If you can build a basic mug shape, you can totally turn it into a little character with a face and a whole mood. These clay mug face ideas are the kinds of designs I love teaching because tiny tweaks to the eyes, nose, and mouth instantly bring your mug to life.
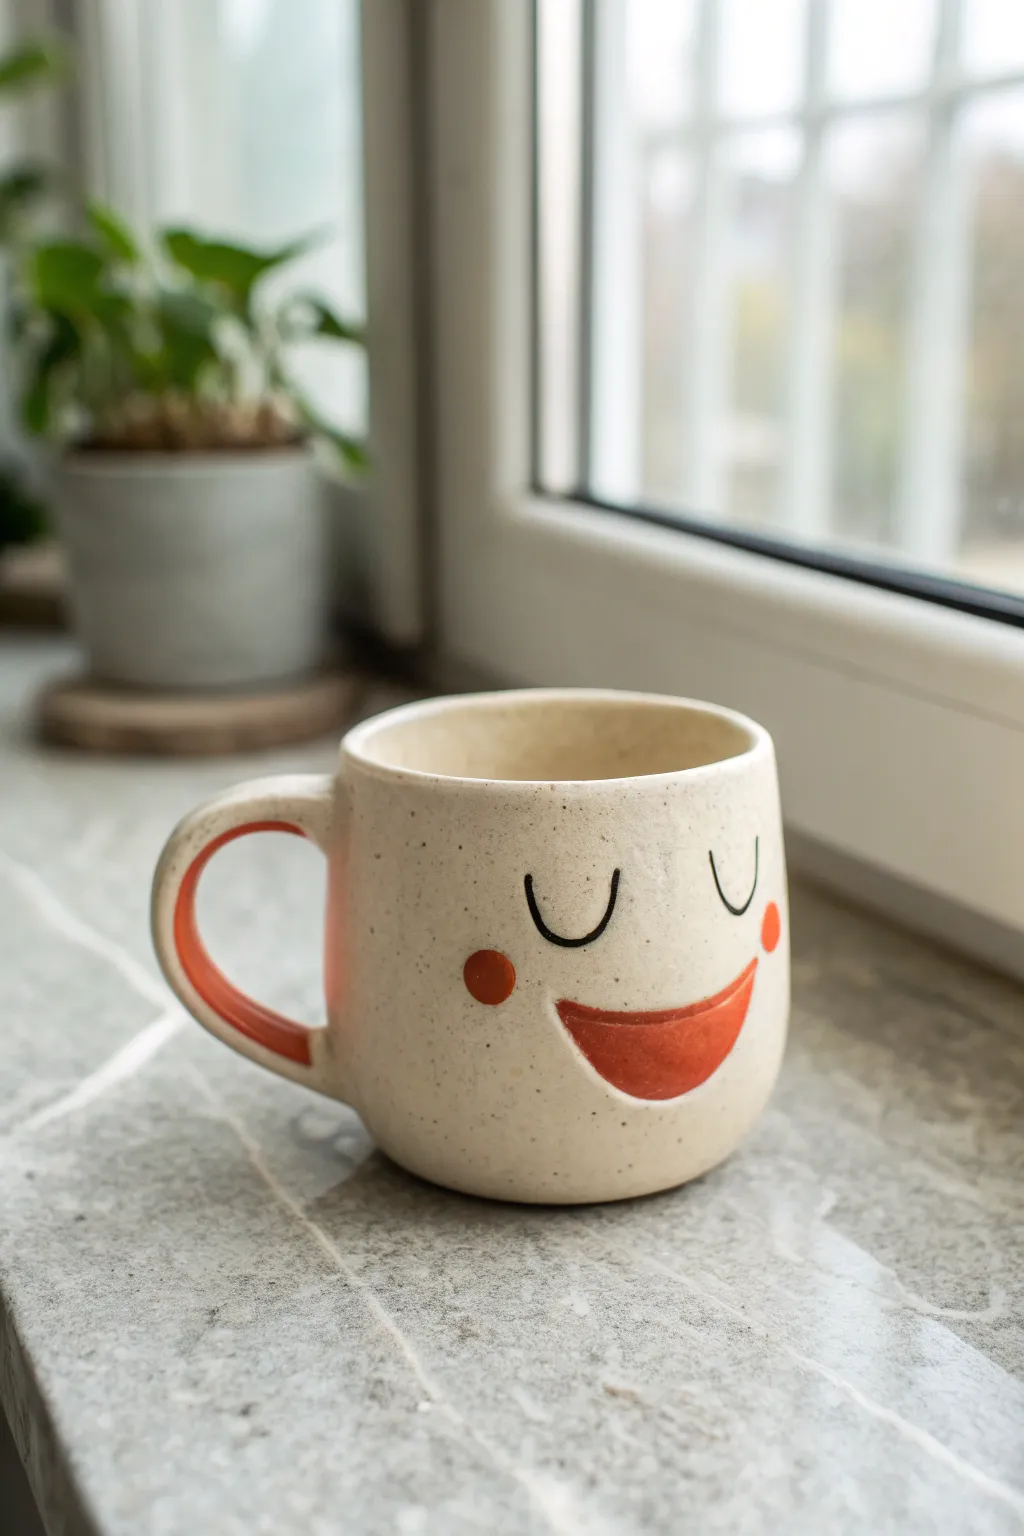
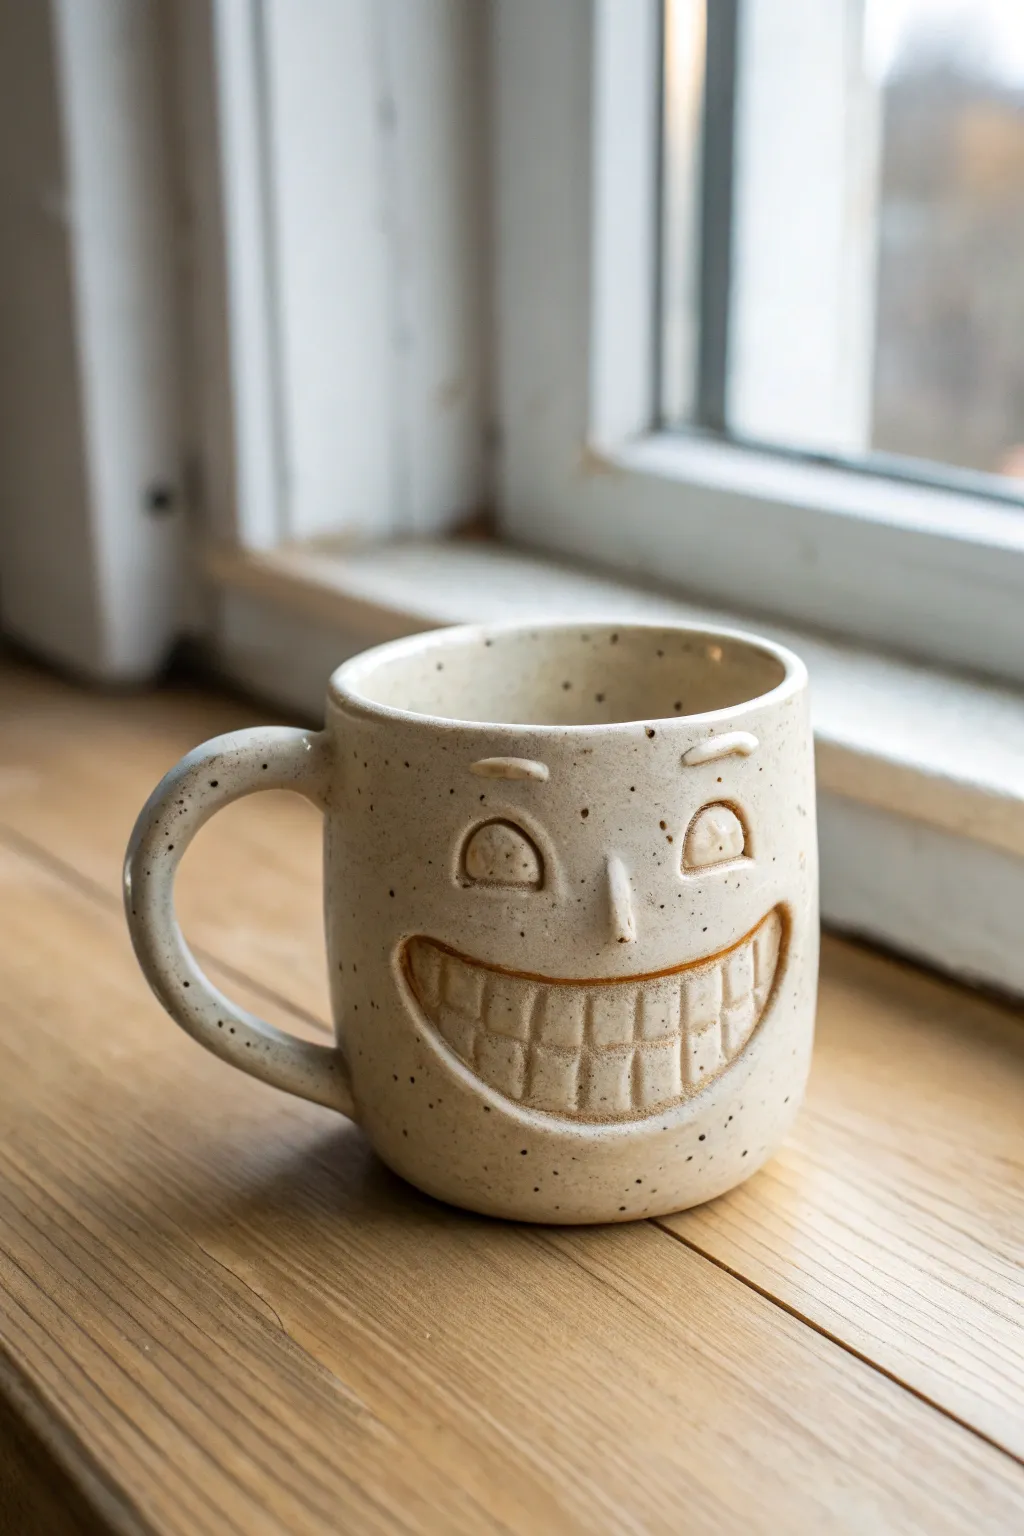
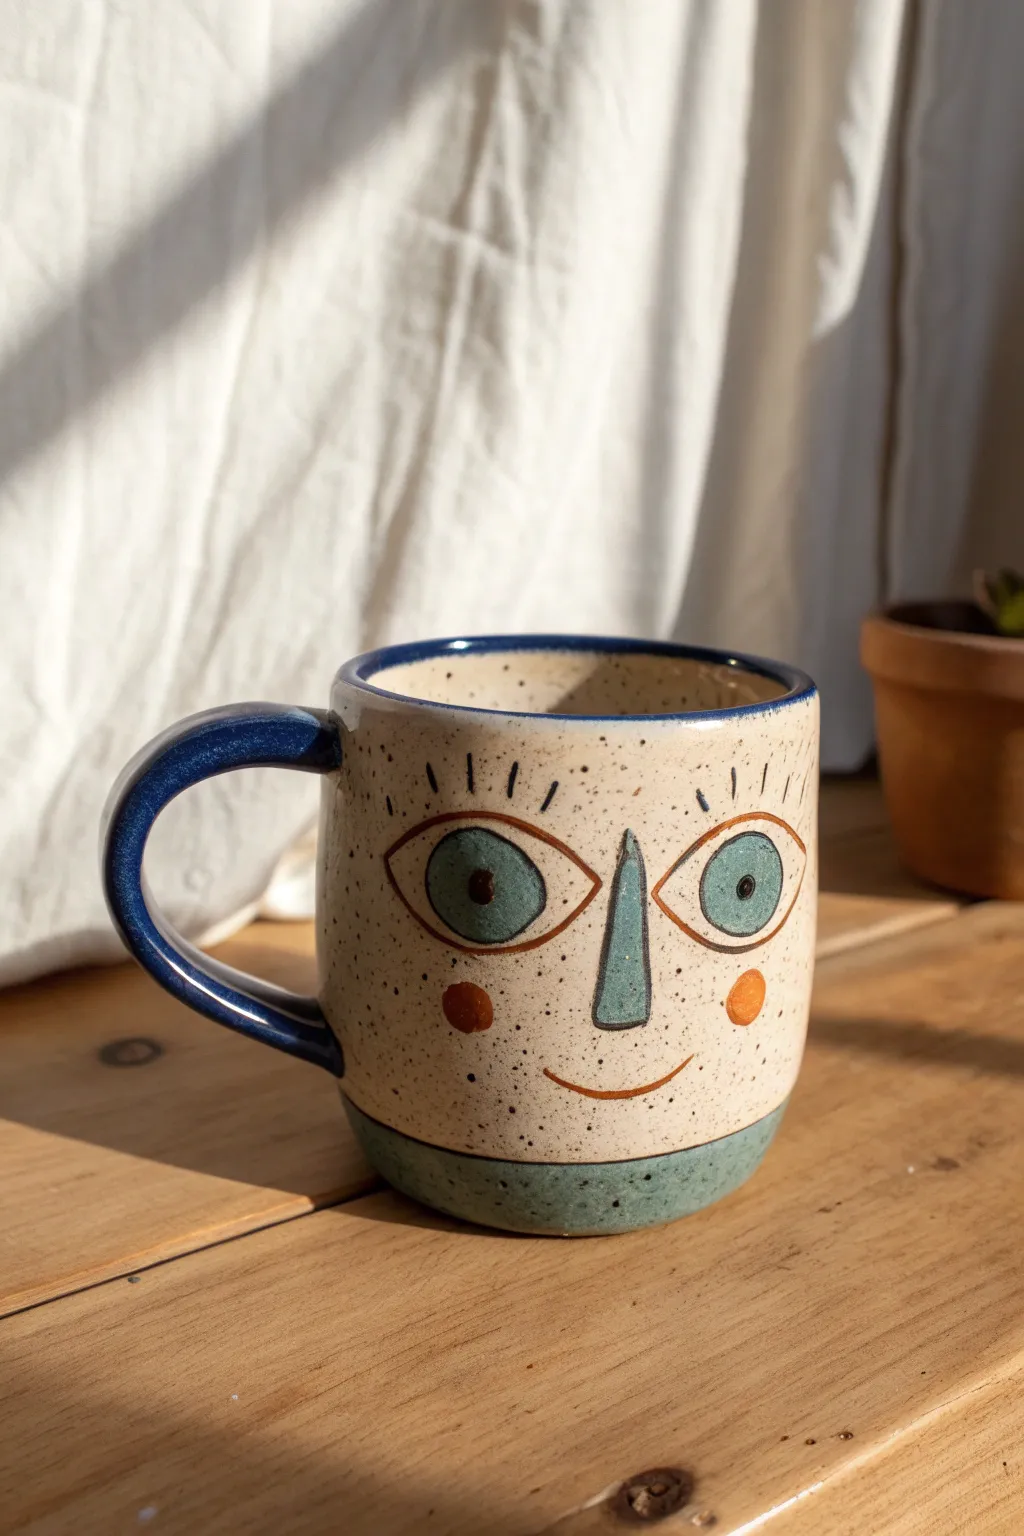
Classic Smiley Face Mug
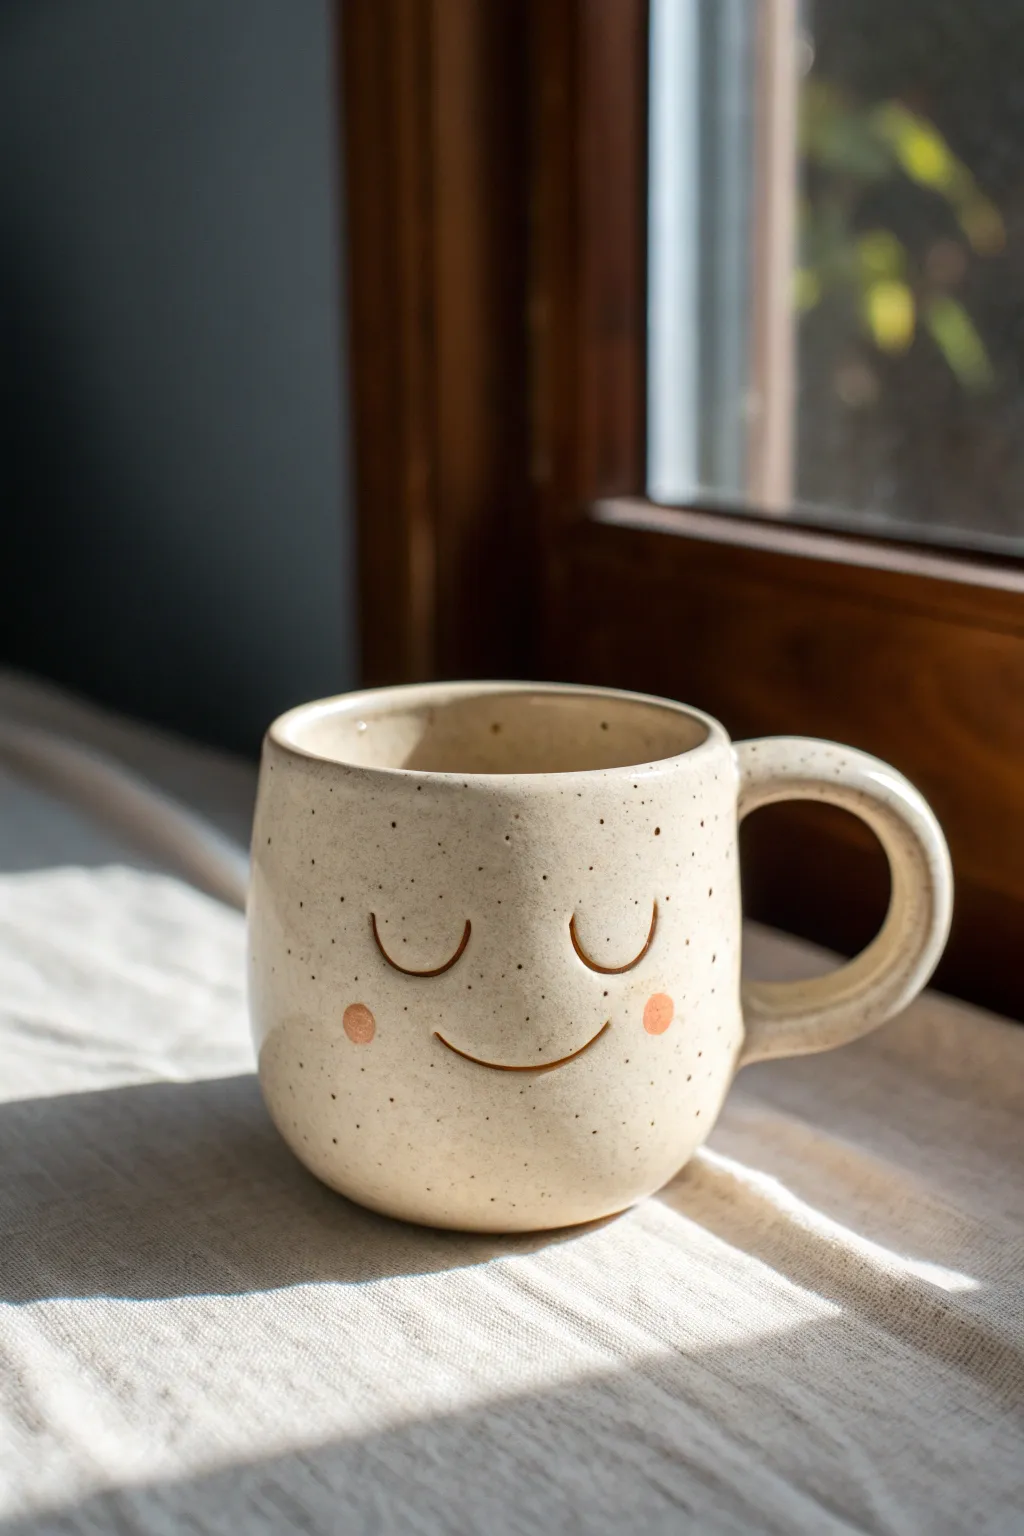
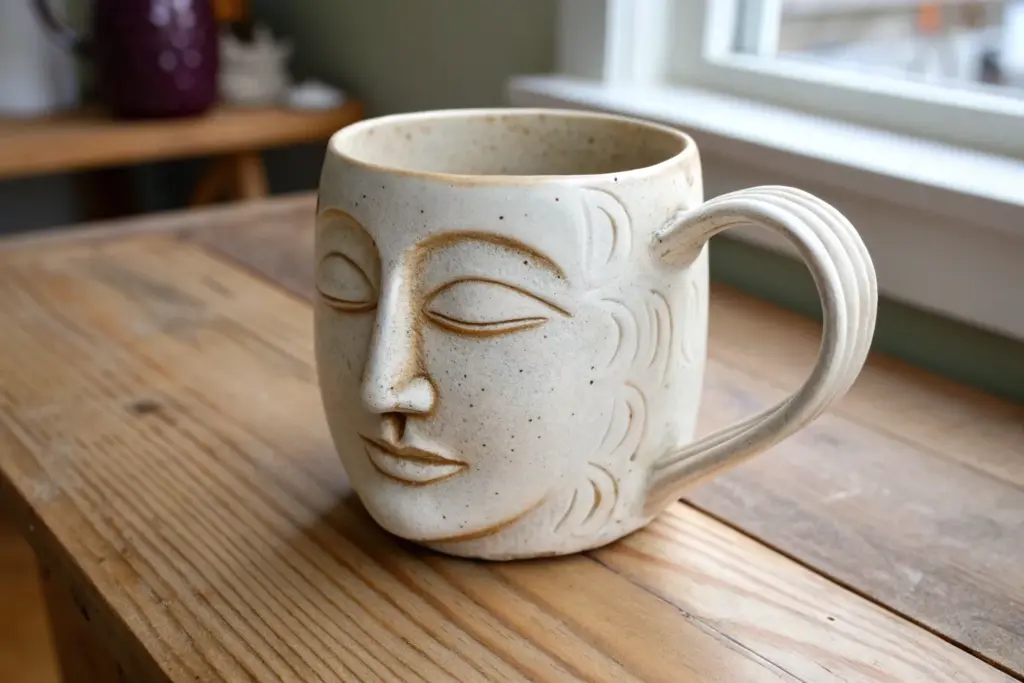
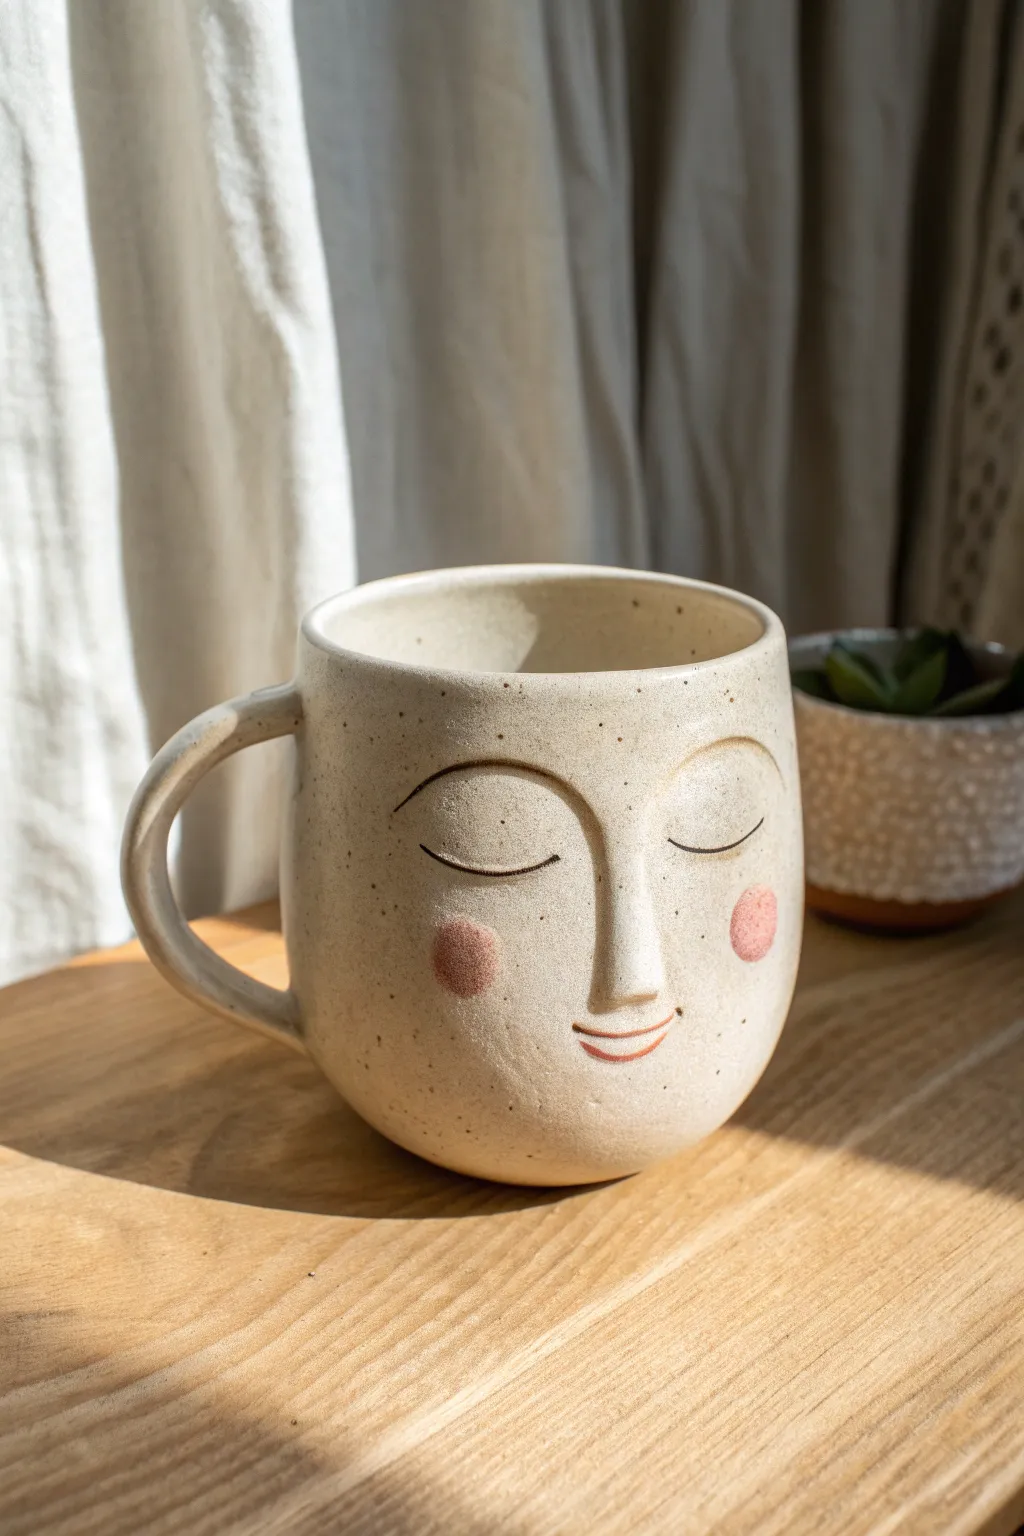
This charming handmade mug features a warm, creamy speckled glaze and a minimalist carved face that radiates pure contentment. Its rounded, huggable shape and simple detailing make it a perfect beginner-friendly pottery project that feels cozy in your hands.
Detailed Instructions
Materials
- Stoneware clay (preferably a speckled buff body)
- Pottery wheel (or slab roller/coil supplies for hand-building)
- Wooden modeling tool
- Pin tool
- Metal kidney rib
- Sponge
- Wire cutter
- Loop tool for trimming
- Underglaze (Soft bright pink or peach)
- Small round detail brush
- Clear or transparent cream glaze (food safe)
- Kiln
Step 1: Forming the Body
-
Prepare the Clay:
Begin by thoroughly wedging about 1 to 1.5 pounds of speckled stoneware clay to remove air bubbles and ensure an even consistency. -
Center and Open:
Throw the clay onto the wheel head and center it. Open the clay to create the floor of your mug, keeping it slightly thicker than a standard cylinder to support the rounded bottom. -
Pull the Walls:
Pull up the walls of the vessel. Instead of a straight cylinder, gently push the clay outward from the inside as you pull to create a bellied, rounded shape. -
Shape the Curve:
Use a metal kidney rib on the outside while supporting the inside with your hand to smooth the surface and refine that gentle, convex curve. It should look like a little pot belly. -
Refine the Rim:
Compress the rim with a piece of chamois or your sponge to make it smooth and pleasant to drink from. -
Dry to Leather Hard:
Cut the mug from the wheel and let it dry slowly under plastic until it reaches a leather-hard state. It should be firm enough to handle but not chalky.
Iron Speckles Pro-Tip
If you don’t have speckled clay, mix 2-3% granular ilmenite or manganese into plain white clay. Wedge thoroughly to disperse the speckles evenly.
Step 2: Adding Handle and Face
-
Trim the Base:
Place the mug back on the wheel (or use a banding wheel) to trim away excess weight from the bottom, creating a neat foot ring. -
Pull a Handle:
Pull a strap of clay for the handle. For this comforting design, a medium-thickness handle with a ‘C’ curve works best. Let it stiffen slightly. -
Attach the Handle:
Score and slip the attachment points on the mug and handle. Press the handle firmly onto the side, smoothing the seams with a wooden tool and a damp sponge. -
Mark the Face Placement:
Before carving, I always lightly sketch the face with a dull pencil or tool to check the symmetry. Place the eyes about halfway down the cup. -
Carve the Eyes:
Using a fine loop tool or a semi-sharp wooden tool, gently press in to create two U-shaped curves for the closed, sleeping eyes. -
Carve the Smile:
Carve a larger U-shape centered below the eyes for the smile. Keep the lines shallow and soft; you want an impression, not a deep gash. -
Smooth the Lines:
Use a damp paintbrush or the tip of your finger to smooth any jagged burrs created during the carving process.
Fixing Sharp Edges
If your carved lines feel sharper than intended after the bisque fire, lightly sand them with 400-grit sandpaper before glazing to soften the expression.
Step 3: Color and Glazing
-
Add Cheeks:
Dip a small round brush into pink or peach underglaze. Dab two circular spots at the ends of the smile line to create the rosy cheeks. -
Bisque Fire:
Once bone dry, fire the mug in the kiln to a bisque temperature (usually Cone 04 or 06, depending on your clay). -
Wax Resist:
Apply wax resist to the foot ring and over the pink underglaze cheeks if you want them to remain matte/raw, though usually, we glaze over them. -
Apply Glaze:
Dip the mug into a transparent cream or clear glaze. Because you used speckled clay, the iron spots will burn through the glaze, creating the texture seen in the photo. -
Final Fire:
Fire the mug to maturity (Cone 5, 6, or 10 depending on clay body). Ensure the kiln has good ventilation for the glazes to brighten.
Fill your new creation with hot coffee or tea and enjoy the serene vibes of your handmade mug


Winky Face With a Lifted Lid

This charming ceramic piece features a playful, minimalist face design on a warm, speckled cream clay body. The simple line work combined with the subtle texture creates a cozy, artisanal feel perfect for your morning coffee.
How-To Guide
Materials
- Speckled stoneware clay (cream or buff firing)
- Pottery wheel (or rolling pin for hand-building)
- Rib tool
- Wire cutter
- Needle tool
- Sponge
- Underglaze pencil or fine brush
- Dark brown underglaze
- Mustard yellow underglaze
- Orange/terracotta underglaze
- Clear transparent glaze (food safe)
- Kiln
Step 1: Forming the Mug Body
-
Prepare the Clay:
Wedge your speckled stoneware clay thoroughly to remove air bubbles and align the particles. You’ll want about 1 pound of clay for a standard-sized mug. -
Throw the Cylinder:
Center the clay on the wheel and open it up. Pull the walls up into a cylinder shape with a slightly wider base that tapers gently inward toward the rim. Aim for a height of about 3.5 to 4 inches. -
Refine the Shape:
Using a rib tool, smooth the exterior walls to remove throwing lines if you want a cleaner canvas for the face, though leaving slight ridges adds character. Compress the rim with a piece of chamois or your finger for a drinking-friendly edge. -
Trim the Base:
Use your wire cutter to slice the mug from the bat. allow it to dry to a leather-hard state. Once firm, trim the bottom to create a neat foot ring, revealing the raw clay texture at the very base.
Smudged Lines?
If your underglaze lines smudge during glazing, try dabbing the clear glaze over the design first with a sponge before dipping the whole piece.
Step 2: Handle and Assembly
-
Pull a Handle:
Pull a strap of clay for the handle. For this design, aim for a classic ‘C’ shape that is comfortable to grip. It should be proportional to the mug body. -
Attach the Handle:
Score the mug body and the attachment points of the handle. Apply slip and press the handle firmly onto the mug. Smoothing the connection points is crucial here; use a damp sponge or modeling tool to blend the seams seamlessly. -
Slow Drying:
Cover the mug loosely with plastic to let the moisture content equalize between the handle and the body. This prevents cracking.
Step 3: Painting the Face Design
-
Outline the Eye:
Once the mug is bone dry or leather hard (depending on your underglaze preference), visualize the face placement. Using a fine liner brush and dark brown underglaze, paint an almond-shaped eye on the right side. -
Add Eye Details:
Fill a circle inside the almond shape for the iris, leaving the center unpainted or highlighted later. Add radiating lashes above and below the eye with quick, short strokes. -
Draw the Wink and Nose:
On the left side, paint a curved arch for the winking eye, adding downward-facing lashes. Connect this arch into a long, L-shaped line that extends down to form the nose profile. -
Paint the Lips:
Below the nose line, paint a simple mouth shape. Outline the upper and lower lips with the dark brown, keeping the center open. -
Add Cheek Accents:
Dip a small round brush or the back of a tool into the orange underglaze and place a dot on the left cheek. Repeat with mustard yellow on the right cheek, slightly lower than the eye. -
Bisque Fire:
Load the mug into the kiln for a bisque firing (typically Cone 04). This hardens the clay and prepares it for glazing.
Make It 3D
Add a tiny ball of clay for the nose or carve the eye shape slightly into the leather-hard clay before painting for subtle relief texture.
Step 4: Glazing and Finishing
-
Clean the Bisque:
Wipe the bisqued mug with a damp sponge to remove any kiln dust or oils from handling. This ensures the glaze adheres properly. -
Apply Clear Glaze:
Dip the entire mug into a clear, gloss glaze. I prefer to hold it by the foot and submerge quickly to get an even coat without streaks. Shake off the excess gently. -
Wipe the Foot:
Using a wet sponge, meticulously wipe the glaze off the bottom foot ring. Any glaze left here will fuse the mug to the kiln shelf. -
Final Firing:
Fire the mug to maturity (typically Cone 5 or 6 for stoneware). This brings out the speckles in the clay and makes the clear glaze glossy and food-safe.
Enjoy sipping from your new, personality-filled handmade mug


Sleepy Face With Heavy Eyelids
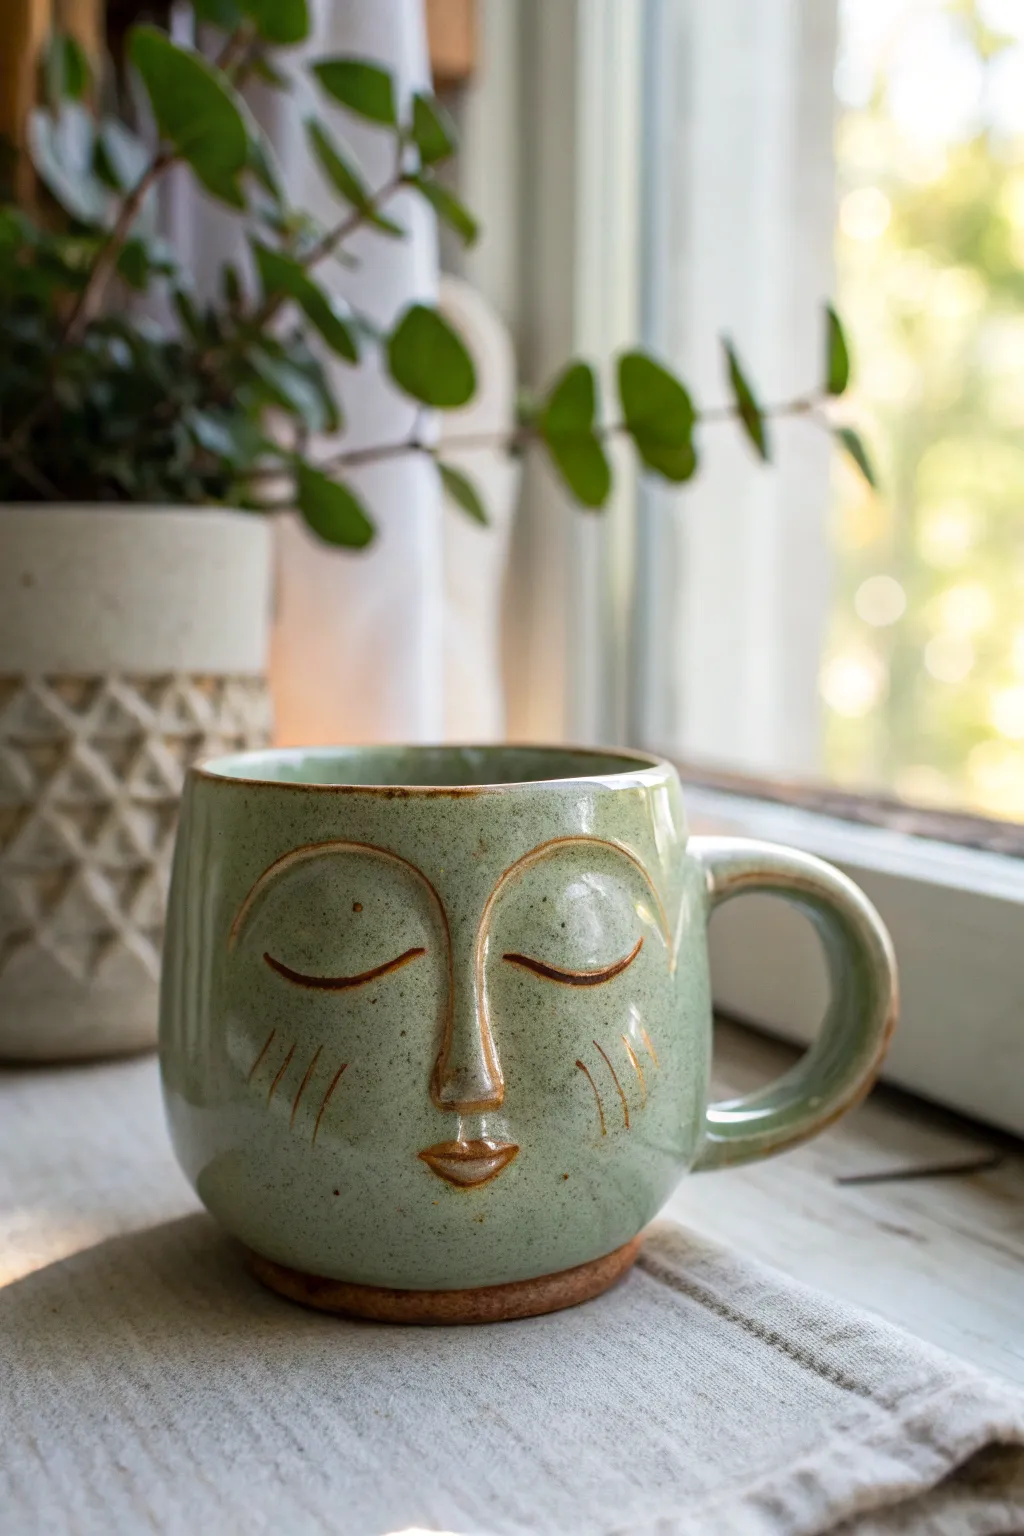
Capture the feeling of a lazy Sunday morning with this tranquil ceramic project. This wheel-thrown mug features a softly sculpted face with heavy, peaceful eyelids and a speckled sage green glaze that breaks beautifully over the textured details.
Step-by-Step
Materials
- Stoneware clay (speckled or buff)
- Pottery wheel
- Throwing tools (sponge, wire, rib)
- Trimming tools
- Needle tool
- Small loop tool
- Soft styling brush or water for smoothing
- Iron oxide wash or dark brown underglaze
- Semi-transparent sage green glaze (cone 5/6 suggested)
- Kiln
Step 1: Forming the Base
-
Throw the Cylinder:
Begin by throwing a standard cylinder on the wheel. Aim for a slightly rounded bottom and straight sides to provide a good canvas for the face. Keep the walls medium-thick (about 1/4 inch) to allow flexibility for altering the shape without puncturing through. -
Belly Out the Form:
Using a rib tool on the inside, gently push the belly of the mug outward to create a rounded, comforting curve. This spherical shape naturally complements the organic facial features we will add later. -
Trim the Foot:
Once leather hard, flip the pot and trim a clean foot ring. Define a clear stopping point for your glaze near the bottom. -
Add a Handle:
Pull a sturdy C-shaped handle and attach it securely to the side opposite where the face will go. Smooth the connection points seamlessly.
Step 2: Sculpting the Features
-
Map the Face:
Lightly sketch the placement of the nose and eyes with a needle tool. Ensure the nose bridge aligns vertically with the center of the mug’s curve. -
Build the Nose Bridge:
Roll a small coil of clay. Score and slip it vertically down the center to form the nose bridge. Blend the clay smoothly onto the mug surface, keeping the bridge distinct and prominent. -
Form the Brow Bone:
Roll two curved coils for the eyebrows/eyelids. These should arc high and connect directly into the top of the nose bridge like a ‘T’. Attach these securely, ensuring the curve mimics a sleeping eye. -
Refine the Eyelids:
Using a modeling tool or your thumb, smooth the top edge of the eyebrow coil to blend it into the forehead. Leave the bottom edge of the coil distinct and slightly undercut to create the shadow of a heavy eyelid. -
Add the Lips:
Attach a small, oval sphere of clay below the nose. Press a horizontal line into the center to separate the upper and lower lip, creating a slight pout. -
Carve the Whisker Lines:
Using a needle tool or small styling tool, incise three diagonal lines on each cheek. These shouldn’t be too deep, just enough to catch the glaze later. -
Smooth Everything:
I like to take a soft, damp brush at this stage to go over every added feature. Remove any sharp tool marks and ensure the transitions between the added clay and the mug body are fluid.
Pro Tip: Breaking Glazes
Choose a glaze labeled ‘breaking’ or ‘floating.’ These thin out over raised edges (showing the clay body) and pool in recesses, highlighting the face perfectly.
Step 3: Glazing and Finishing
-
Bisque Fire:
Fire the mug to bisque temperature (usually cone 04) to prepare it for glazing. -
Apply Oxide Wash:
Paint a diluted iron oxide wash or dark brown underglaze into all the detailed areas: the creases of the eyes, the sides of the nose, the lip line, and the cheek whiskers. -
Wipe Back:
Using a clean, damp sponge, wipe away the excess oxide from the raised surfaces. You want the dark color to remain only in the deepest recesses to accentuate the sculpting. -
Dip in Glaze:
Dip the entire mug into a semi-transparent sage green glaze. Avoid opaque glazes, as they will hide the subtle sculpting and the oxide details. -
Clean the Foot:
Wipe the foot ring completely clean of glaze to prevent it from sticking to the kiln shelf. -
Final Firing:
Glaze fire the piece to the maturity temperature of your clay and glaze (typically cone 5 or 6). Let the kiln cool completely before unloading.
Troubleshooting: Cracking Features
If added features crack off during drying, your mug was likely too dry when you attached them. Use vinegar in your slip next time for a stronger bond.
Now you have a charming, peaceful companion for your morning coffee routines


Big Laugh With an Open Mouth
This charming mug brings instant joy with its simple yet expressive face featuring closed happy eyes and a wide, open-mouthed grin. The design uses the natural speckled clay body as a canvas, adding a pop of warm red-orange glaze for a friendly touch.
Detailed Instructions
Materials
- Speckled stoneware clay
- Pottery wheel (or rolling pin for hand-building)
- Rib tool
- Sponge
- Trimming tools
- Needle tool
- Slip and scoring tool
- Black underglaze pencil or fine brush
- Red-orange ceramic underglaze
- Small round paintbrush
- Clear transparent glaze
- Kiln
Step 1: Forming the Mug Body
-
Prepare your clay:
Begin by wedging your speckled stoneware clay thoroughly to remove air bubbles. A pound of clay is usually sufficient for a standard mug size. -
Center and open:
Throw the clay on the wheel, centering it perfectly before opening up the interior. If you are hand-building, roll out a consistent slab instead. -
Pull the walls:
Pull the walls up to create a cylinder. Aim for a slightly rounded bottom that tapers just a tiny bit towards the rim, giving it a cozy, cupped feel. -
Smooth the surface:
Use a rib tool on the outside while the wheel is spinning slowly to compress the clay and create a smooth canvas for the face later. -
Refine the rim:
Use a chamois or a wet sponge to round off the rim so it will be comfortable to drink from. Cut the mug from the bat with a wire tool.
Step 2: Adding the Handle
-
Dry to leather hard:
Allow the cylinder to dry until it reaches a leather-hard state. I like to handle the pot at this stage to ensure it’s firm enough to not warp. -
Pull a handle strap:
Pull a strip of clay for the handle, tapering it slightly. Curve it into an ear shape and let it stiffen up on a board for about 20-30 minutes. -
Attach the handle:
Score the mug body and the attachment points of the handle. Apply slip and firmly press the handle onto the mug, smoothing the joints with your thumb or a modeling tool.
Smudged Lines?
If your black lines look fuzzy, your underglaze might be too watery. Thicken it slightly or switch to an underglaze pencil for crisper lines.
Step 3: Painting the Face
-
Draft the face:
Lightly sketch the position of the eyes and mouth with a pencil. The graphite will burn off in the kiln, so don’t worry about mistakes. -
Paint the handle interior:
Using the red-orange underglaze, paint the inside curve of the handle. This adds a hidden pop of color that ties in with the face. -
Outline the mouth:
Dip your small brush into the red-orange underglaze. Paint the wide, curved ‘U’ shape for the mouth first to anchor the face’s expression. -
Fill the smile:
Fill in the mouth shape completely with the red-orange underglaze. You may need 2-3 coats for solid opacity. -
Add rosy cheeks:
Paint a small, solid circle on either side of the smile using the same red-orange color to create blushing cheeks. -
Draw the eyes:
Using a black underglaze pencil or a very fine liner brush with black underglaze, draw two simple ‘U’ shapes above the cheeks for the closed eyes. -
Add eye details:
Carefully draw three tiny vertical lashes on the outer edge of each eye curve for extra character.
Make It a Set
Create a whole family of mugs by slightly varying the mouth shapes—try a small ‘o’ surprised mouth or a zig-zag nervous grin on the next one.
Step 4: Glazing and Firing
-
Bisque fire:
Once bone dry, load the mug into the kiln for a bisque firing (usually Cone 04) to harden the clay and set the underglaze. -
Apply clear glaze:
Dip the entire mug into a clear transparent glaze. Ensure the glaze is compatible with your clay body to avoid crazing. -
Check the foot:
Wipe the bottom of the mug and a few millimeters up the side with a damp sponge to remove any glaze so it won’t stick to the kiln shelf. -
Glaze fire:
Fire the mug again to the maturation temperature of your clay and glaze (often Cone 5 or 6 for stoneware). This will melt the clear coat and reveal the speckles.
Enjoy your morning coffee with a mug that is always happy to see you

The Complete Guide to Pottery Troubleshooting
Uncover the most common ceramic mistakes—from cracking clay to failed glazes—and learn how to fix them fast.
Wide-Eyed Surprise Expression
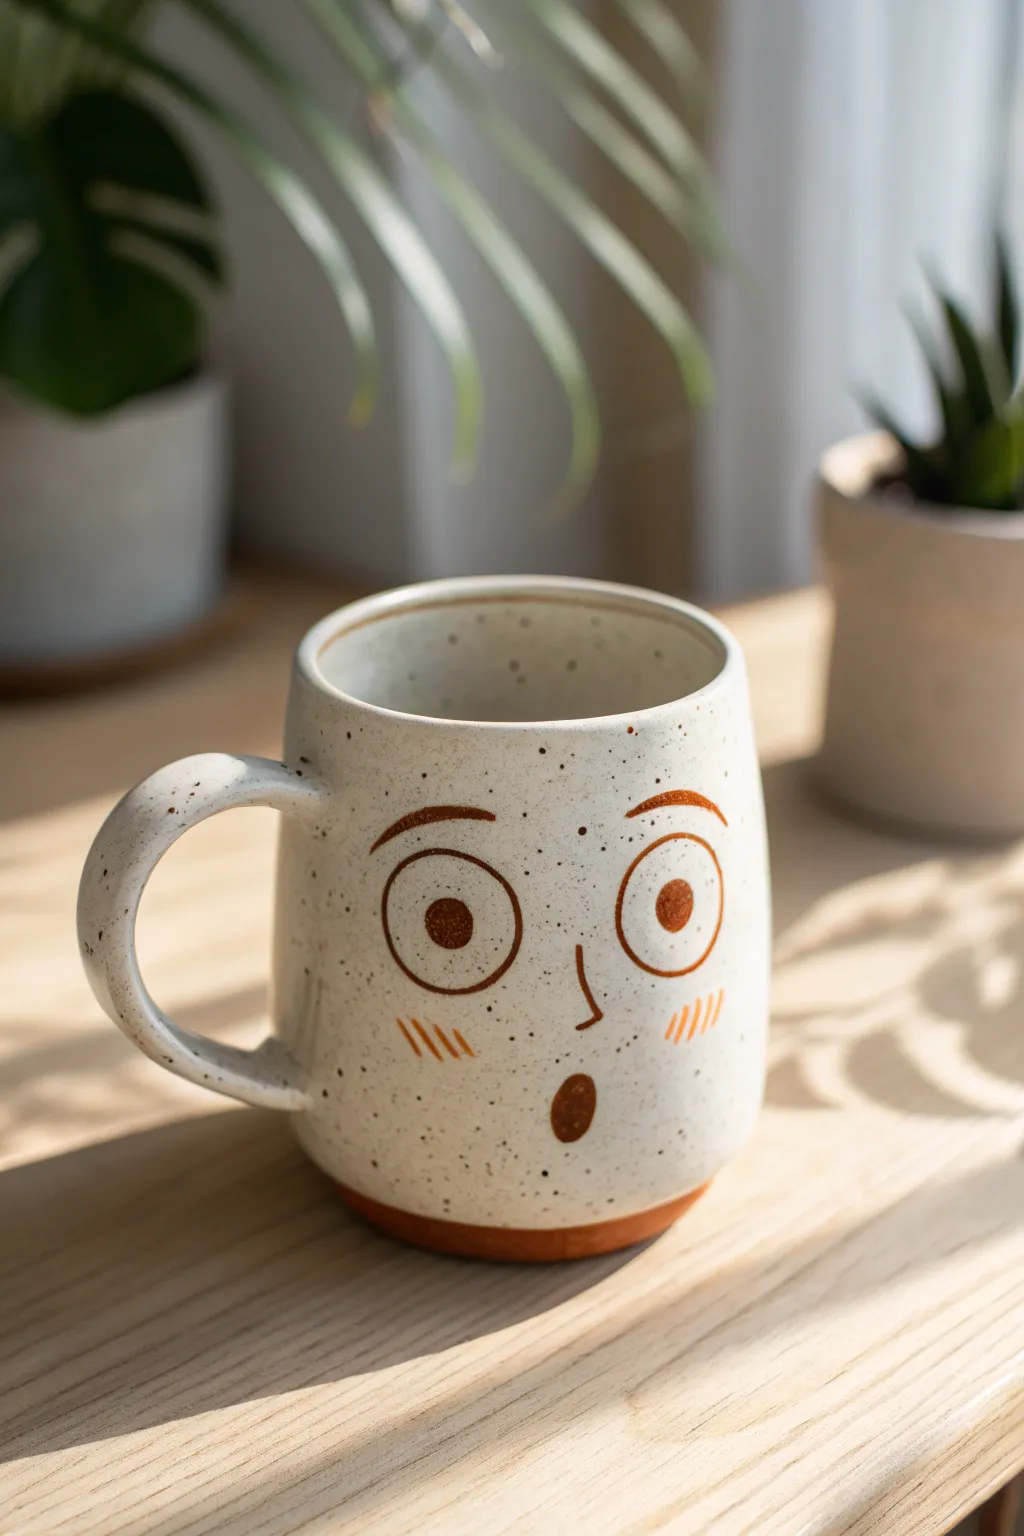
Capture a moment of pure astonishment with this charming ceramic project featuring wide eyes and a speckled finish. The contrast between the creamy oat glaze and the rich brown underglaze creates a warm, rustic look that makes every sip of coffee feel friendly.
Step-by-Step Guide
Materials
- Stone-colored stoneware clay body
- Pottery wheel (or slab roller/rolling pin for hand-building)
- Throwing tools: sponge, rib, wire cutter
- Trimming tools
- Needle tool
- Dark brown underglaze
- Fine detail brush (liner brush)
- Small round brush
- Satin matte cream or ‘oatmeal’ speckle glaze
- Wax resist
- Kiln
- Sponge
Step 1: Forming the Body
-
Prepare the Clay:
Begin by wedging about 1 to 1.5 pounds of stoneware clay to remove air bubbles. Ensure the consistency is even and workable. -
Throw the Cylinder:
Center your clay on the wheel and open it up. Pull the walls to create a straight-sided cylinder, slightly tapering inward at the very top rim to create a cozy shape. -
Refine the Shape:
Use a rib tool on the outside while supporting the inside with your hand to smooth the walls and remove throwing rings. Aim for a smooth canvas for your face design. -
Create the Handle:
Pull a handle from a separate piece of clay. Let it set up slightly until it can hold an arch shape without sagging. -
Attach the Handle:
Score and slip the contact points on both the mug body and handle. Attach the handle securely, blending the clay where they meet for a seamless join. -
Initial Drying:
Allow the mug to dry to a leather-hard state. This is crucial for clean trimming and painting.
Smudged Underglaze?
If you smudge the underglaze while painting, wait for it to dry completely. Then, gently scrape the mistake away with an X-Acto knife rather than wiping, which spreads pigment.
Step 2: Trimming and Face Design
-
Trim the Foot:
Place the mug upside down on the wheel. Trim the bottom to create a defined foot ring, leaving a small exposed band of raw clay at the very base for that dipped look. -
Sketch the Face:
Using a very light touch with a pencil or needle tool, sketch the outlines of the large circular eyes, eyebrows, nose, mouth, and blush lines directly onto the leather-hard clay. -
Paint the Outlines:
Load a fine liner brush with dark brown underglaze. Carefully trace the large outer circles of the eyes. Keep your hand steady to maintain even line thickness. -
Add the Pupils:
Switch to a small round brush. Fill in the pupils with solid brown underglaze. I find placing them slightly cross-eyed or varying the size adds extra character. -
Facial Features:
Paint the curved eyebrows high above the eyes for maximum surprise. Add a simple ‘L’ shape for the nose and a small, solid oval for the open mouth. -
Blush Touches:
Add three small diagonal hash marks on each cheek using the fine liner brush to mimic blush. -
Bisque Fire:
Let the mug dry completely to a bone-dry state, then fire it in the kiln to cone 04 (or your clay’s bisque temperature).
Step 3: Glazing and Finishing
-
Clean the Bisque:
Wipe the fired mug with a damp sponge to remove any kiln dust, which helps the glaze adhere properly. -
Wax Resist Application:
Apply wax resist over the painted brown underglaze features (eyes, mouth, blush) and the exposed clay foot ring. This will prevent the cream glaze from obscuring your design. -
Dip Glazing:
Stir your cream speckled glaze thoroughly. Dip the mug into the glaze, holding it by the foot. Ensure the inside is fully coated and the outside is coated down to the foot ring. -
Clean Up:
Use a damp sponge to wipe any stray beads of glaze off the waxed areas. The wax resists the glaze, but a quick wipe ensures crisp lines. -
Internal Glazing Check:
Double-check that the interior glaze is smooth and even. If you poured glaze inside rather than dipping, ensure no drips run down the outside. -
Final Fire:
Load the mug into the kiln for the final glaze firing, typically to cone 5 or 6 depending on your specific clay and glaze combination.
Add Texture
Before the clay dries, use a needle tool to gently scratch the ‘blush’ lines into the clay surface. When glazed, the glaze will pool slightly in the grooves for depth.
Once cooled, your mug is ready to greet you every morning with its delightfully shocked expression
Grumpy Brows and Pouty Lips
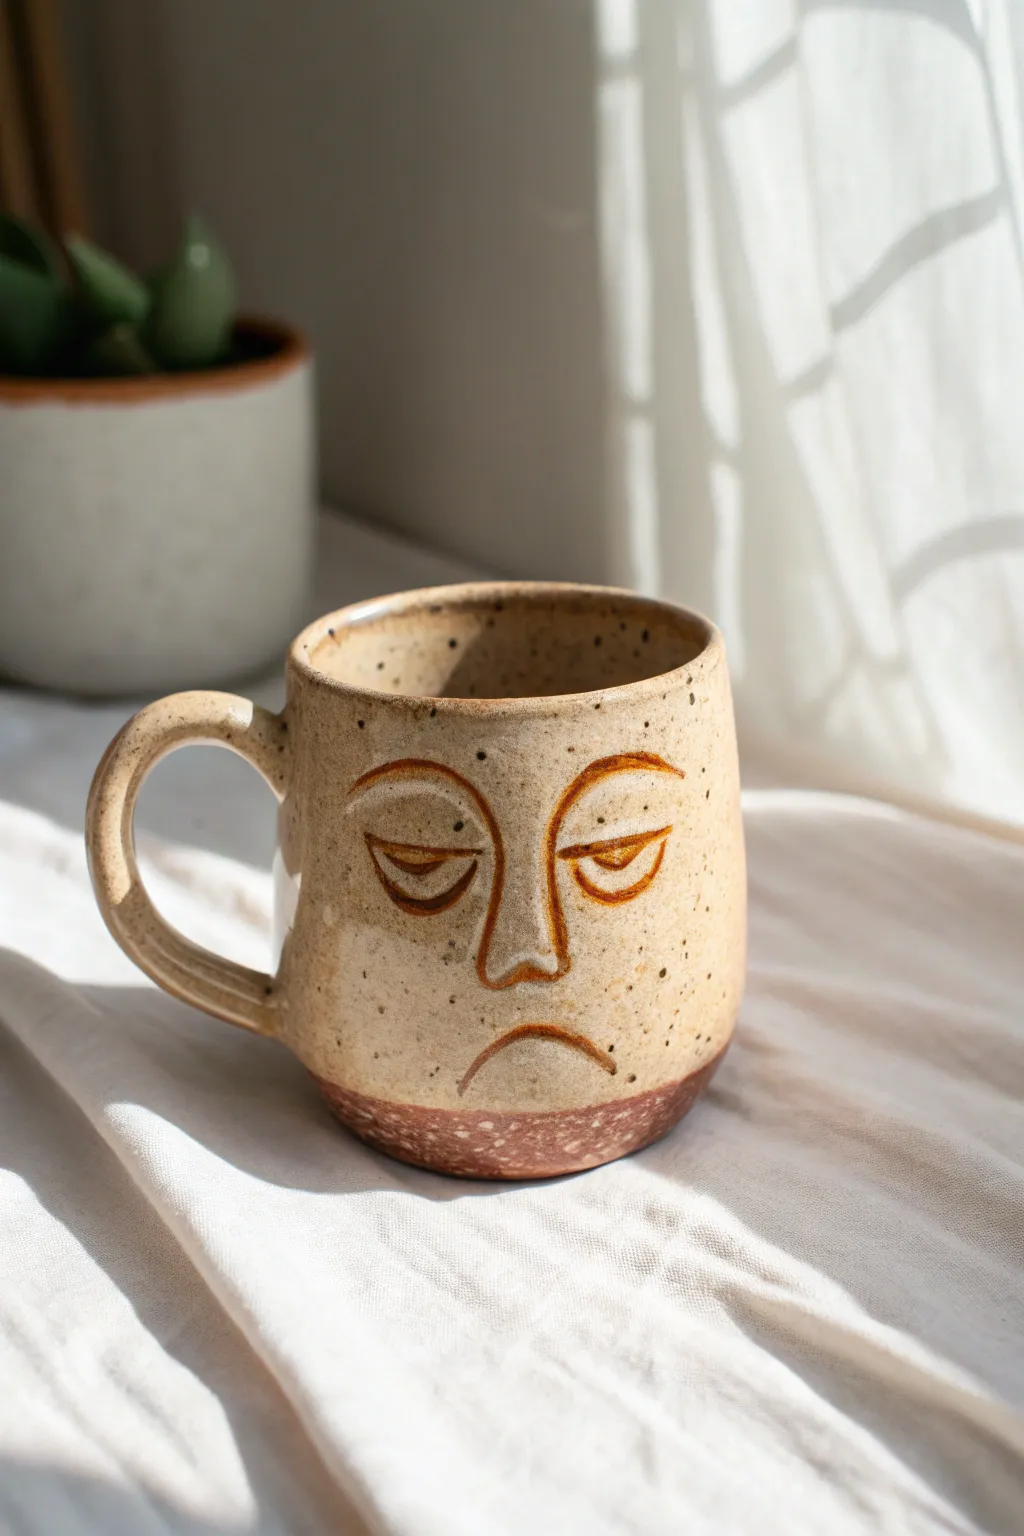
Embrace the beauty of the pre-coffee mood with this delightful stoneware mug featuring a playfully grumpy face. The speckled cream glaze contrasts beautifully with the raw, reddish clay body, while the simple line work captures a relatable expression of bleary-eyed weariness.
Detailed Instructions
Materials
- Stoneware clay (speckled or light brown)
- Pottery wheel (or slab roller for hand-building)
- Rib tool
- Wire cutter
- Sponge
- Carving tool or needle tool
- Slip trailer (optional, for raised lines)
- Red iron oxide wash or underglaze pencil
- Speckled cream/oatmeal glaze
- Wax resist
- Paintbrush
Step 1: Forming the Vessel
-
Throw the Cylinder:
Begin by centering your stoneware clay on the wheel. Open the ball and pull up the walls to form a cylinder about 4-5 inches tall. Aim for a slightly rounded bottom edge rather than a sharp corner. -
Shape the Belly:
Apply gentle pressure from the inside to belly out the form slightly, giving the mug a comfortable, holdable curve that narrows just slightly at the rim. -
Smooth the Surface:
While the wheel is spinning slowly, run a rib tool up the exterior to remove throwing lines and create a smooth canvas for your face design. I find this smoothness helps the facial features stand out later. -
Trim the Base:
Once the mug is leather hard, trim the bottom to create a defined foot. Leave the bottom half-inch of the clay wall somewhat thick to support the carving or trailing later. -
Pull and Attach Handle:
Pull a classic loop handle from a separate piece of clay. Score and slip the attachment points on the mug body, then firmly attach the handle, blending the seams until invisible.
Step 2: Creating the Grumpy Expression
-
Sketch the Face:
Lightly sketch your design onto the leather-hard clay with a needle tool. Place the nose centrally, flanked by two large, half-circle eyes. -
Define the Eyes:
Draw the eyelids heavy and low. Instead of open circles, create semicircles with a horizontal line cutting across the top third to give that sleepy, unimpressed look. -
Add the Brows:
Above the eyes, carve or trail two arched eyebrows. Keep the inner corners slightly lower than the outer arch to emphasize the furrow. -
Shape the Pout:
Well below the nose, create a distinct downward curve for the mouth. Make it wide enough to match the width of the nose bridge for balance. -
Deepen the Lines:
Go back over your sketched lines. You can carve them out for a recessed look (sgraffito style) or use a slip trailer with thick slip to pipe the lines onto the surface for a raised relief effect.
Smeared Lines?
If your oxide wash smears too much when sponging back, let it dry for 5-10 minutes first. Use a firm, slightly damp (not wet) sponge and wipe in one direction only.
Step 3: Glazing and Finishing
-
Bisque Fire:
Allow the mug to dry completely, then bisque fire it to the appropriate cone temperature (usually Cone 04 or 06) for your clay body. -
Highlight the Lines:
Mix red iron oxide with a little water or use a brown underglaze. Brush this into the carved lines of the face. If you used raised slip lines, paint carefully on top of the ridges. -
Wipe Back Excess:
Take a damp sponge and gently wipe the surface of the face. This removes the oxide from the high points but leaves it stained in the crevices (or on the slip lines), defining the expression. -
Wax the Base:
Apply wax resist to the bottom inch of the mug. This creates the two-tone look where the raw reddish clay peeks out from beneath the glaze. -
Apply Main Glaze:
Dip the mug into a speckled oatmeal or matte cream glaze. The wax will prevent the glaze from sticking to the bottom section. -
Final Clean Up:
Clean any stray drips of glaze off the waxed bottom with a sponge to ensure it doesn’t stick to the kiln shelf. -
Glaze Fire:
Fire the mug a final time to the glaze’s maturity temperature (often Cone 5 or 6). This will melt the glaze and fuse the face design permanently.
Texture Twist
Before attaching the handle, gently paddle the sides of the mug to make it slightly square or irregular. This adds to the organic, handmade feel of the grumpy character.
Fill your new creation with hot tea or coffee and enjoy a quiet moment with a mug that understands exactly how you feel


What Really Happens Inside the Kiln
Learn how time and temperature work together inside the kiln to transform clay into durable ceramic.
Rosy Cheeks With Dimples
Capture a moment of total tranquility with this wheel-thrown mug featuring a gently sculpted face. The design combines a speckled clay body with subtle rosy underglaze accents to create a comforting, peaceful companion for your morning coffee.
Step-by-Step Tutorial
Materials
- Speckled stoneware clay (approx. 1 lb)
- Pottery wheel
- Throwing tools (sponge, rib, wire cutter)
- Needle tool
- Small loop trimming tool
- Wooden modeling tool (rounded tip)
- Pink or coral underglaze
- Small, soft paintbrush
- Clear or transparent matte glaze
- Sponge and water bucket
- Fine grit sandpaper (for bisque stage)
Step 1: Throwing and Shaping the Base
-
Center and throw:
Begin with about 1 pound of well-wedged speckled stoneware clay. Center it firmly on the wheel and open the clay to form the floor of your mug. -
Pull the walls:
Pull the walls up to an even thickness, aiming for a height of about 4-5 inches. Keep the rim slightly thickened for comfortable drinking later. -
Belly the form:
Using a rib tool on the inside, gently push outward to create a rounded, bulbous belly at the bottom half of the mug. This curve mimics the shape of a face. -
Refine the rim:
Compress the rim using a chamois or your sponge to ensure it is smooth and pleasant against the lips. Cut the mug from the bat and let it dry to leather-hard.
Dimple Detailing
For deeper dimples, press the rounded end of a paintbrush handle gently into the clay at the corners of the mouth before the clay gets too dry.
Step 2: Sculpting the Features
-
Add the nose:
Roll a small, elongated teardrop of clay. Score and slip the center of the mug’s ‘face’ area and attach the nose, blending the edges seamlessly into the mug wall with a wooden tool until no seam remains. -
Define the nose bridge:
Use your thumb or a modeling tool to smooth the top of the nose bridge so it flows naturally into the forehead area, rather than looking stuck on. -
Carve the eyebrows:
Using a needle tool or a fine loop tool, carve two shallow, arched lines extending outward from the top of the nose bridge to create the eyebrows. -
Create the closed eyes:
Beneath the brow arches, carve two simple U-shaped curves to represent sleeping eyelids. The lines should be clean and deliberate. -
Sculpt the mouth:
Carve a gentle upward curve for the smile. To add dimension, lightly press the lower lip area outward from the inside of the mug, or carefully carve a tiny bit of clay away below the line to create a shadow.
Don’t Smudge the Blush
If your underglaze feels powdery after drying, apply a thin coat of wax resist over the blush spots before dipping in the clear glaze to prevent smearing.
Step 3: Handle and Finishing Touches
-
Pull a handle:
Pull a simple strap handle from a lump of clay. Let it set up until it holds its arch without collapsing. -
Attach the handle:
Score and slip the attachment points on the side of the mug (opposite the face or to the side, depending on preference). Press the handle on firmly and smooth the joints. -
Clean up the surface:
Use a damp sponge to wipe away any sharp burrs or clay crumbs from your carving work. Run your finger over the features to ensure everything is smooth. -
Apply the blush:
Dip a small, soft brush into pink or coral underglaze. Gently dab a circular ‘cheek’ onto the raw clay on either side of the nose. I like to keep this wash slightly translucent so the speckles show through. -
Tint the lips:
Apply a very thin line of the same underglaze into the carved smile line to emphasize the mouth. -
Bisque fire:
Allow the mug to dry completely—slowly is better to prevent handle cracks—then bisque fire to cone 04. -
Glaze and final fire:
Dip the entire mug into a clear or transparent matte glaze. This will seal the clay while letting the speckles and underglaze details shine. Fire to the maturity temperature of your clay (usually cone 6 or 10).
Now you have a charming, handmade mug perfect for cozy mornings and warm drinks
Freckles and a Button Nose
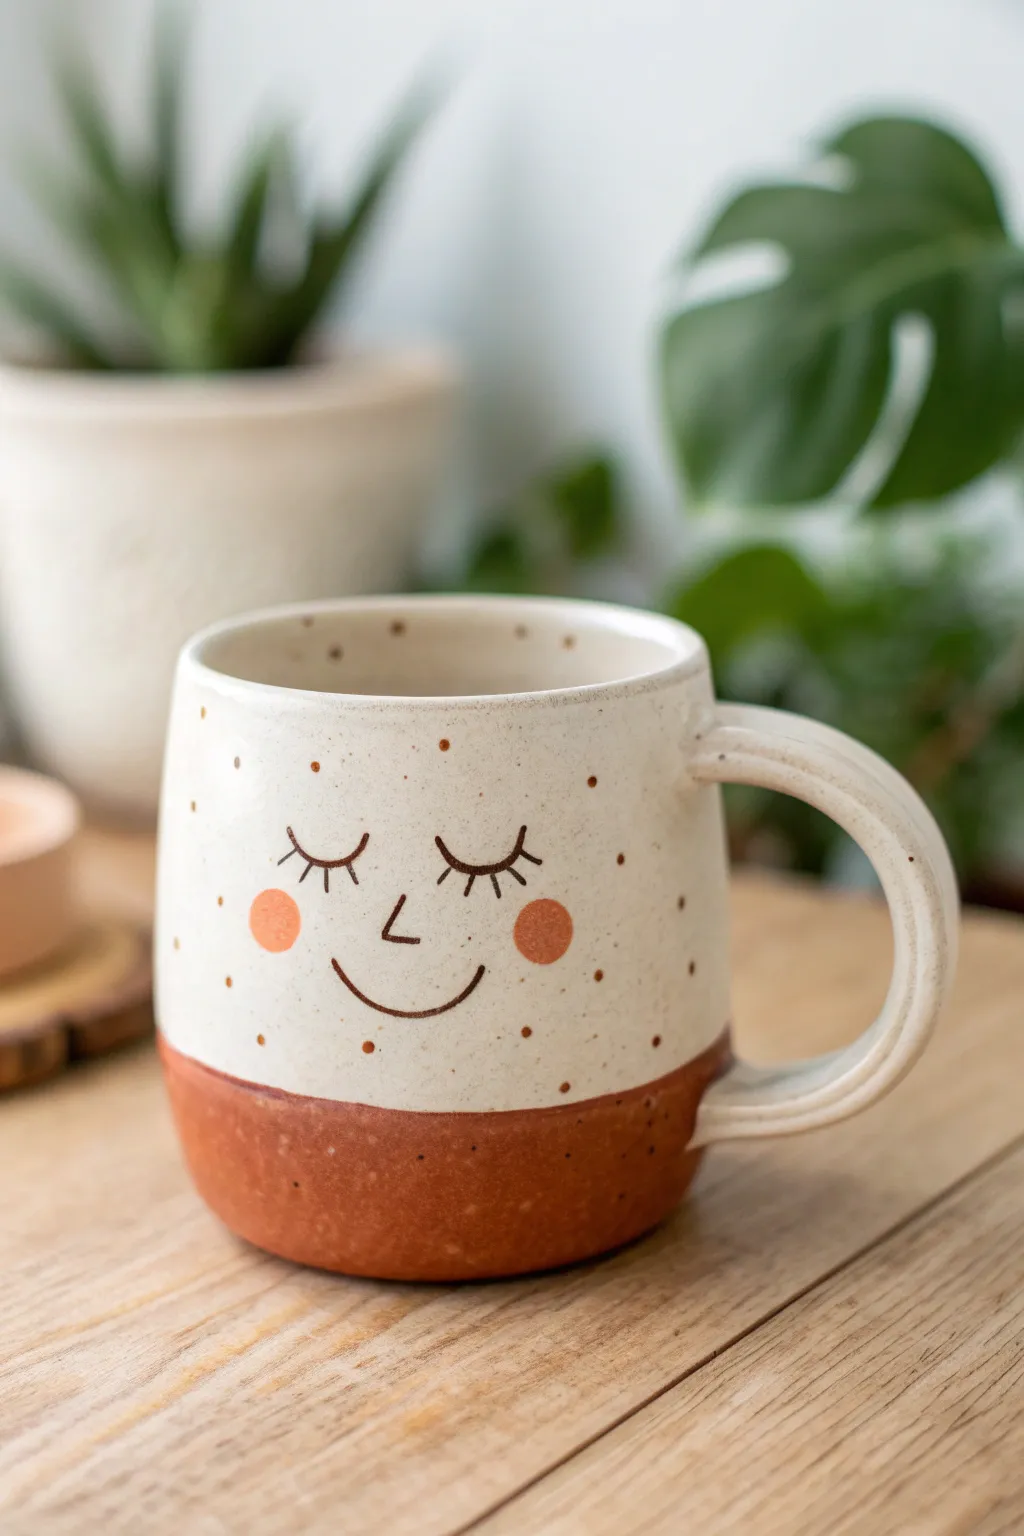
Capture a moment of quiet serenity with this charming ceramic design, featuring sleepy eyelashes and a warm, speckled finish. The two-tone glaze effect adds a wonderful tactile quality, blending a smooth creamy upper with a raw or matte terra-cotta base for a cozy, handmade feel.
How-To Guide
Materials
- Bisque-fired ceramic mug (wheel-thrown or hand-built)
- Creamy white speckled glaze (gloss or satin)
- Iron oxide wash or brown underglaze (for the face)
- Coral or peach underglaze (for the cheeks)
- Wax resist
- Fine detail brush (liner brush)
- Small round brush
- Sponge
- Clean water
- Fan brush (optional, for extra speckling)
- Kiln access (cone 5/6 or per clay body)
Step 1: Planning and Prep
-
Clean surface:
Begin by wiping down your bisque-fired mug with a damp sponge. This removes any dust that might prevent the glaze or underglaze from adhering properly to the surface. -
Map the face:
Looking at the front of the mug, visualize where the face will sit. The eyes should be roughly in the middle vertical section of the cup. You can lightly sketch the placement with a pencil; the graphite will burn off in the kiln.
Uneven Glaze Line?
If the line between the glaze and raw clay looks jagged, clean it up with a damp sponge while the glaze is wet, or use an X-Acto knife to gently scrape the dry glaze edge for a crisp finish.
Step 2: Painting the Features
-
Mix the liner color:
Prepare your brown underglaze or iron oxide wash. If it’s too thick, thin it slightly with water until it has an ink-like consistency that flows smoothly off your brush. -
Draw the lashes:
Using your finest liner brush, paint two downward-curving arcs for the closed eyes. Add three or four small, upturned ticks on the outer edges and center of each arc to create the eyelashes. -
Add the nose:
In the center, slightly below the eye line, paint a small ‘L’ shape or an acute angle for the nose. Keep the lines thin and delicate to maintain the sweet expression. -
Create the smile:
Paint a gentle, wide U-shape curve below the nose. Ensure the smile is centered relative to the nose and eyes for a balanced look. -
Paint the cheeks:
Switch to a small round brush and the coral underglaze. Paint two solid circles on either side of the smile. You may need two coats here to ensure the color remains vibrant after firing. -
Add faux speckles:
If your final glaze doesn’t have speckles built-in, use a toothbrush or stiff brush to flick tiny dots of brown underglaze across the face area. This mimics the organic look of speckled clay.
Pro Tip: Cheek Depth
For deeper, more dimensional cheeks, sponge the coral underglaze on lightly rather than painting a solid circle. This creates a softer, airbrushed blush effect that looks sweet.
Step 3: Glazing the Mug
-
Apply wax resist:
Once the underglaze face design is bone dry, carefully paint wax resist over the eyes, nose, mouth, and cheeks. This technique, called wax resist inlay, protects your design during glazing. -
Wax the bottom:
Decide where you want the two-tone division. Apply wax resist to the bottom third of the mug (the terra-cotta area) and the entire bottom foot. This keeps the raw clay exposed. -
Prepare the main glaze:
Stir your creamy white speckled glaze thoroughly. If the speckles settle at the bottom, the final effect won’t be uniform. -
Dip the interior:
Pour glaze inside the mug, roll it around to coat the entire inner surface, and pour the excess back out. Wipe the rim immediately with a sponge if any drips occurred. -
Dip the exterior:
Hold the mug by the foot (or use glazing tongs) and dip the top two-thirds into the cream glaze. The wax resist on the bottom will repel the glaze, creating a clean line. -
Clean the face:
Gently wipe the waxed face area with a damp sponge or fingertip. The glaze should bead up on the wax, but wiping ensures no stray droplets obscure your painted lines. -
Clean the foot:
Double-check the bottom waxed section. Any stray glaze beads here need to be wiped away cleanly so the bottom remains raw and earthy.
Step 4: Firing and Finishing
-
Bone dry:
Let the mug dry completely overnight. Glaze that is still damp can cause issues during the firing process. -
Load the kiln:
Place the mug in the kiln, ensuring it doesn’t touch other pieces. Since the bottom is unglazed, it can sit directly on the shelf, but I always check twice just to be safe. -
Fire:
Fire the kiln to the specific temperature required for your clay and glaze combination (usually Cone 5 or 6 for stoneware). -
Cool and sanding:
Once the kiln has cooled, remove the mug. Use wet sandpaper to gently smooth the unglazed bottom section if the raw clay feels too rough against the skin.
Now you have a cozy, custom mug perfect for warming up your mornings.

TRACK YOUR CERAMIC JOURNEY
Capture glaze tests, firing details, and creative progress—all in one simple printable. Make your projects easier to repeat and improve.
Oversized Nose Caricature Face
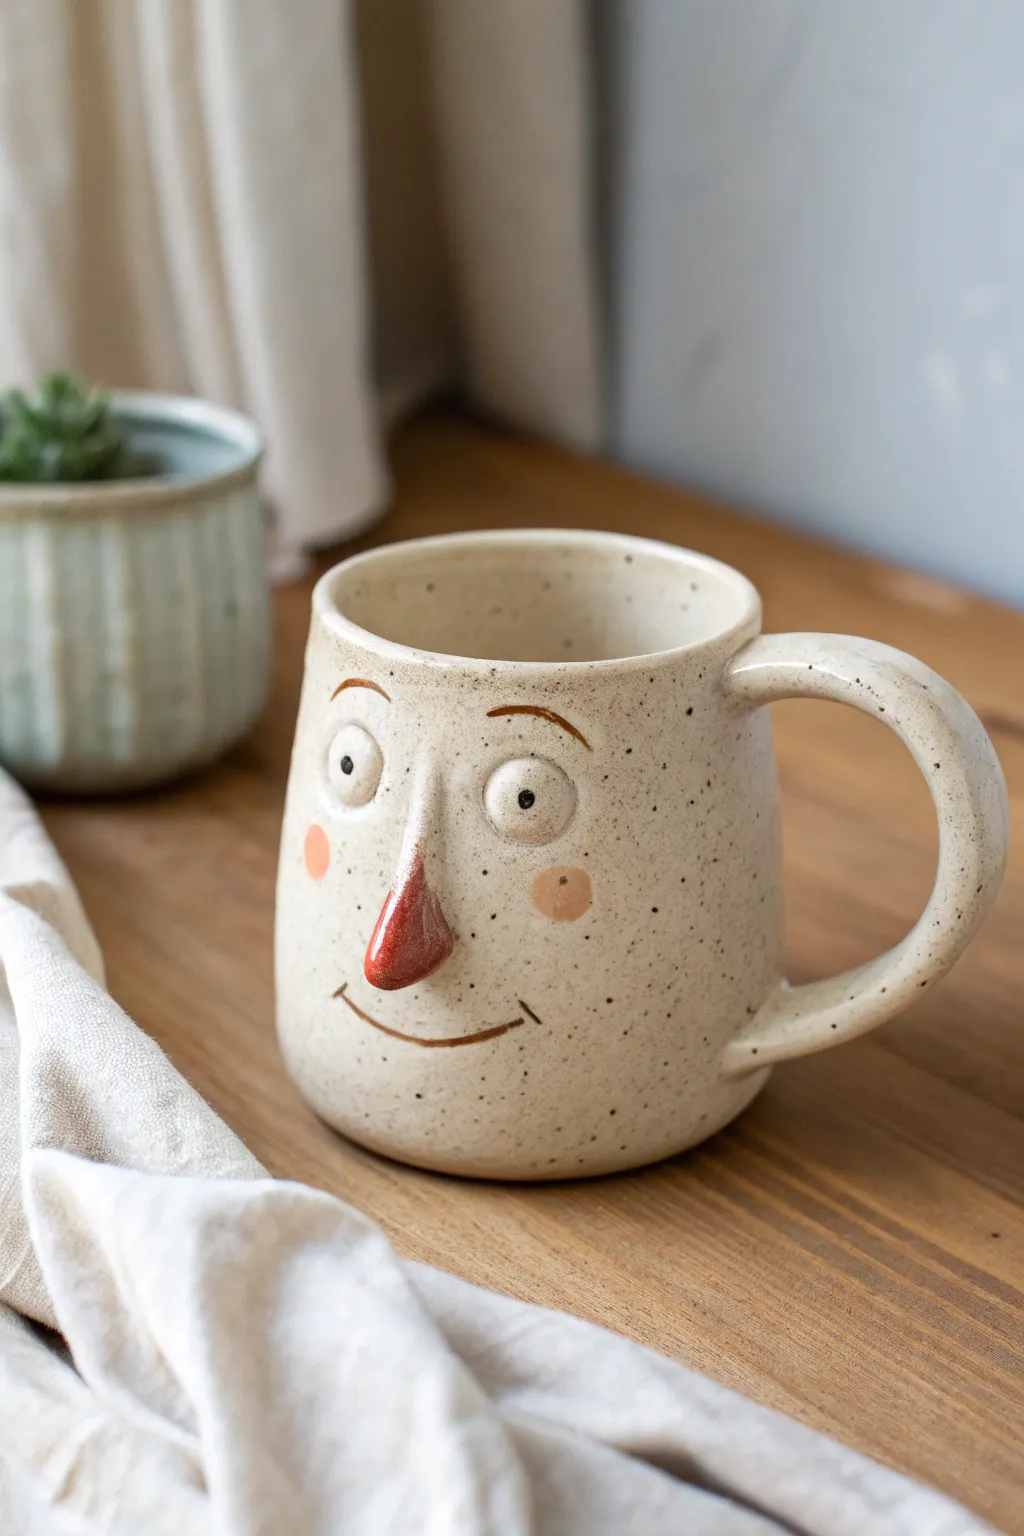
This charming ceramic piece features a speckled clay body that adds warmth and character even before you begin sculpting. The star of the show is undoubtedly the prominent, three-dimensional nose, which pairs with simple painted features to create a friendly, approachable expression.
Step-by-Step Tutorial
Materials
- Speckled buff stoneware clay
- Pottery wheel (or slab roller for hand-building)
- Needle tool
- Scoring tool (serrated rib)
- Small sponge
- Slip (clay slurry)
- Loop tool for trimming
- Underglazes: Red/Terracotta, Black, Blush Pink
- Fine detail paintbrush
- Clear transparent glaze
- Kiln
Step 1: Forming the Body
-
Throw the cylinder:
Begin by throwing a standard cylinder on the pottery wheel using speckled buff clay. Aim for a slightly bottom-heavy shape that tapers gently inward toward the rim to frame the face. -
Shape the walls:
Use a rib tool to smooth the exterior walls while the wheel is spinning, removing throwing lines to create a clean canvas for the facial features. -
Trim the foot:
Once leather hard, trim a neat foot ring at the base using a loop tool. This lifts the mug and gives it a professional finish. -
Pull the handle:
Pull a classic strap handle from a lug of clay. Let it set up slightly until it holds a curve without drooping. -
Attach the handle:
Score and slip the contact points on both the handle and the mug body. Press the handle firmly into place, smoothing the seams with your thumb or a damp sponge.
Step 2: Sculpting the Features
-
Shape the nose:
Roll a small coil of clay into a teardrop shape. Flatten the back side where it will attach to the mug. The nose should be long and taper slightly downward. -
Attach the nose:
Score the center of the mug face and the back of your clay nose. Apply slip and press the nose onto the mug, positioning it centrally but lower down to leave room for the eyes. -
Blend the seams:
Using a small modeling tool or your finger, blend the clay from the nose onto the mug body so it looks like it grew out of the surface rather than just being stuck on. -
Create the brow ridge:
I prefer to gently press my thumb into the clay on either side of the nose bridge to create shallow indentations for the eye sockets, adding subtle depth.
Nose Attachment Tip
Score the nose attachment area deeper than usual. Since the nose protrudes, it gets bumped easily. A deep score ensures a lifelong bond.
Step 3: Painting and Finishing
-
Bisque fire:
Let the mug dry slowly to the bone-dry stage, then bisque fire it in your kiln to cone 04 (or your clay’s specific bisque temperature). -
Glaze the nose:
Using a terracotta or deep red underglaze, carefully paint the sculpted nose. The darker nose creates a cute focal point. -
Paint the eyes:
With white underglaze, paint two circles above the nose. Once dry, add small black dots for pupils. Making the pupils small gives that surprised, alert look. -
Add expressive details:
Use a very fine liner brush and black underglaze to paint thin, arched eyebrows high on the forehead and a simple curved line for the smile. -
Apply rosy cheeks:
Dab two soft circles of blush pink underglaze on the cheeks. You can water the underglaze down slightly for a more translucent, watercolor effect. -
Apply clear glaze:
Dip or brush the entire mug with a clear, glossy glaze. This will seal the clay and make the speckles pop through. -
Final firing:
Glaze fire the mug to the maturity temperature of your clay body (typically cone 5 or 6 for stoneware).
Glaze Crawling?
If the clear glaze crawls away from the painted features, wash your bisque ware first to remove dust and let the underglaze dry fully before glazing.
Now you have a friendly face to greet you with every morning coffee
Goofy Grin With a Tooth Gap
Start your morning with a smile that’s as wide as your coffee cup. This wheel-thrown mug features a hand-sculpted face with a charmingly goofy expression, complete with a broad, toothy grin and speckled stoneware finish.
Step-by-Step Guide
Materials
- Speckled stoneware clay (approx 1 lb)
- Pottery wheel
- Throwing tools (sponge, rib, wire cutter)
- Needle tool
- Scoring tool (serrated rib or specialized tool)
- Slip (liquid clay)
- Small loop tool or carving tool
- Wooden modeling tool
- Opaque white/cream glaze (glossy or satin)
- Paintbrush for glazing
- Kiln
Step 1: Throwing the Base Form
-
Prepare the Clay:
Begin by wedging your speckled stoneware clay thoroughly to remove air bubbles and ensure consistency. Form it into a rough ball shape. -
Center and Open:
Center the clay on your wheel head. Once secure, open the center, creating a floor about 1/4 inch thick. Compress the floor with your sponge or a wooden rib to prevent cracking later. -
Pull the Cylinder:
Pull the walls up into a standard cylinder shape. Aim for straight, even walls, perhaps slightly tapering inward at the rim to keep the shape cozy. The walls should be sturdy enough to handle sculpting later—don’t make them paper-thin. -
Refine the Shape:
Use a rib tool on the outside to smooth the surface and define the profile. Cut the mug off the wheel with a wire tool and set it aside until it reaches ‘leather hard’ consistency.
Cracking Up?
If facial features pop off during drying, you didn’t score deeply enough. Use vinegar instead of water when making slip for a stronger bond on crucial join points.
Step 2: Sculpting the Face
-
Trimming and Handle Prep:
Once leather hard, trim the foot of the mug on the wheel. Pull a simple strap handle from a separate piece of clay, curve it into an ear shape, and let it firm up slightly. -
Attach the Handle:
Score the side of the mug and the attachment points of the handle. Apply slip and press the handle firmly onto the mug body, smoothing the joints with your thumb or a modeling tool. -
Map the Face:
Use a needle tool to faintly sketch the placement of the features on the side opposite the handle. Mark a large semi-circle for the mouth, two spots for eyes, and a central spot for the nose. -
Form the Mouth Shape:
Roll a small coil of clay. Score and slip the sketched mouth line, then attach the coil to create the outline of that giant grin. Blend the outer edge of the coil smoothly into the mug wall so it looks seamless, not stuck-on. -
Create the Eyeballs:
Roll two small balls of clay and flatten them slightly into ovals. Score and slip eye positions, then press these onto the mug. Roll tiny ‘snakes’ of clay for eyebrows and attach them just above the eyes. -
Add the Nose:
Form a small, triangular wedge of clay for the nose. Score and slip the center of the face and attach it, blending the edges downward. -
Adding Details:
Using a small loop tool or needle tool, gently carve out the pupils in the eyes. I find doing this while the added clay is still slightly soft gives a cleaner line. -
Carving the Teeth:
Inside the mouth outline, flatten a slab of clay to fill the gap if needed, or simply work on the existing wall. Use a knife or needle tool to carve deep vertical lines to separate the teeth, followed by a horizontal line across the middle to separate top from bottom teeth. -
Refining Features:
Use a damp sponge or soft brush to smooth any sharp burrs of clay around the sculpted features. The teeth should look rounded, not sharp.
Step 3: Glazing and Firing
-
Bisque Fire:
Once bone dry, load the mug into the kiln for a bisque firing (usually Cone 04). This hardens the clay and prepares it for glazing. -
Apply Glaze:
Dip the mug into your white or cream speckled glaze, or brush it on evenly. Make sure the glaze gets into the carved lines of the teeth and eyes to accentuate the depth. -
Check the Bottom:
Wipe the foot of the mug completely clean with a damp sponge. Any glaze left on the bottom will fuse your masterpiece to the kiln shelf. -
Final Fire:
Fire the mug to maturity (Cone 6 or 10, depending on your clay body). The heat will interact with the iron speckles in the clay, causing them to bleed through the white glaze for that classic speckled look.
Make It Yours
Try leaving the teeth unglazed (bare clay) and applying a dark wash or underglaze into the crevices before glazing clear to make the grin really pop.
Fill your new goofy friend with coffee and enjoy the cheerful company
Mustache Face With Smile Lines
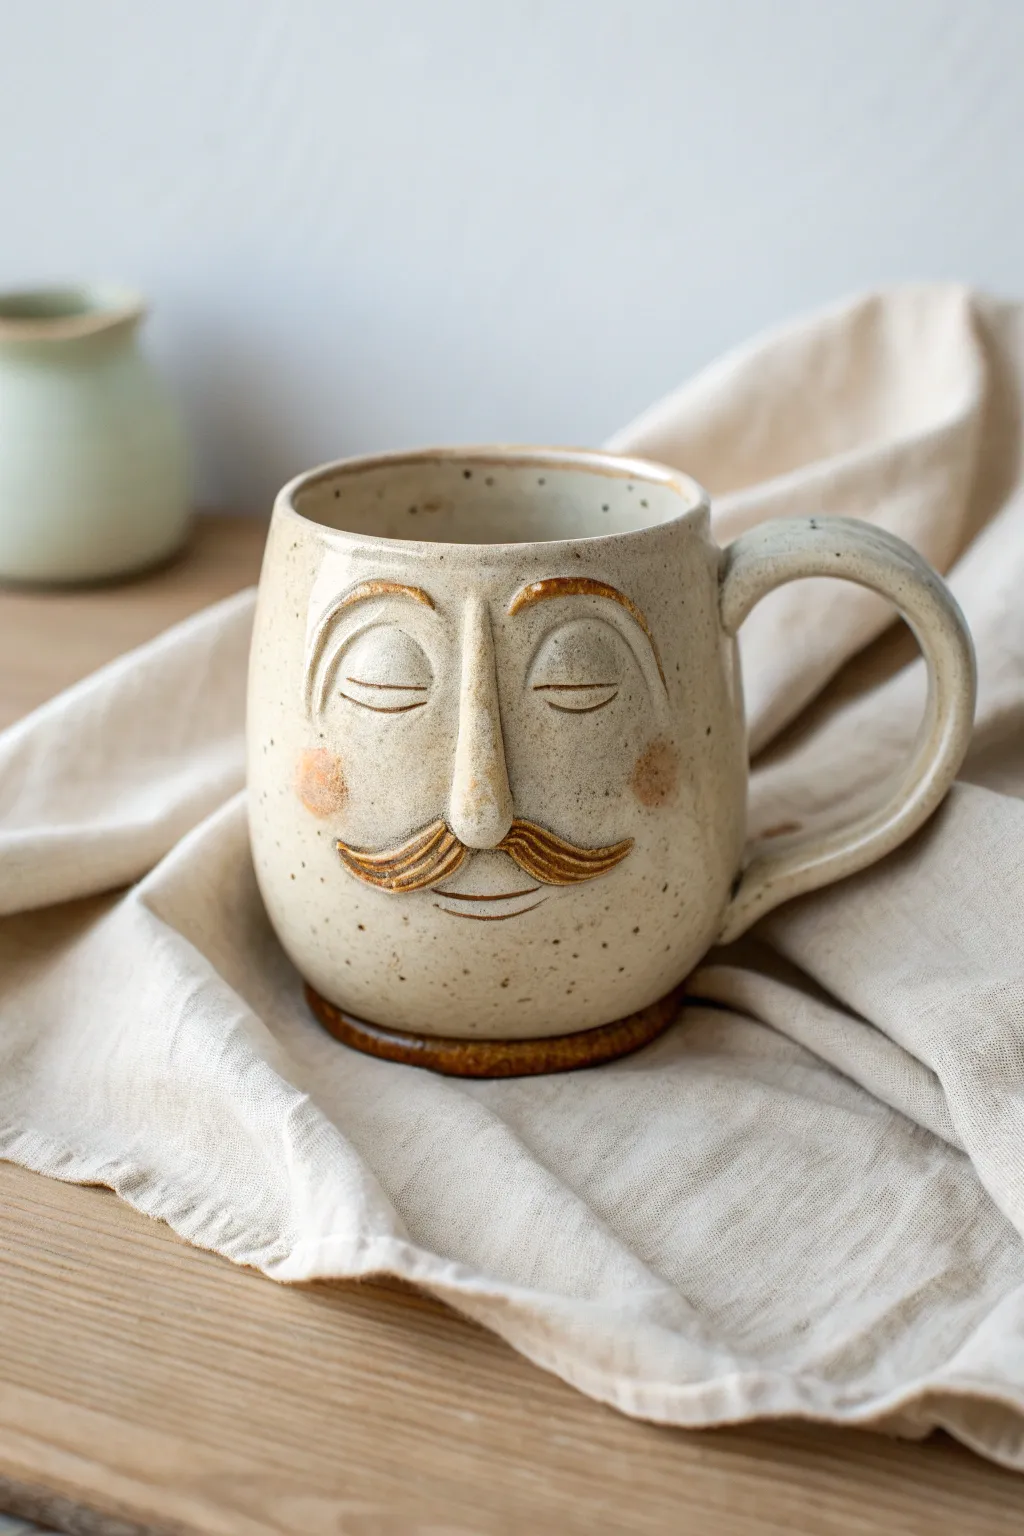
Capture a sense of calm sophistication with this charming, face-sculpted mug featuring a prominent mustache and serene, closed eyes. The speckled clay body and warm, earthy accents give this piece a timeless and cozy feel, perfect for slow mornings.
How-To Guide
Materials
- Stoneware clay (speckled or sand-coloured)
- Pottery wheel (or slab roller/rolling pin for hand-building)
- Needle tool
- Loop tool for trimming
- Small carving tools or kemper tool
- Slip and scoring tool (serrated rib)
- Sponge
- Clear glaze
- Iron oxide wash or dark brown underglaze
- Soft paintbrush
Step 1: Forming the Base
-
Throw or build the body:
Start with about 1-1.5 lbs of clay. Throw a cylinder on the wheel with a rounded bottom, slightly tapering in at the top to create a cozy, hugging shape. If hand-building, roll a slab and form a cylinder, smoothing the seam completely. -
Trim and refine:
Once leather hard, trim the bottom to create a defined foot ring. This lifts the mug slightly and adds to the professional finish visible in the original piece. -
Add the handle:
Pull or roll a coil for the handle. Attach it opposite where the face will go using the score and slip method. Ensure the curve is comfortable for gripping and smooth the transitions into the mug body.
Air Pocket Prevention
When attaching the nose, ensure you score aggressively and use enough slip. Trapped air behind added features can cause them to pop off in the kiln.
Step 2: Sculpting the Features
-
Position the nose:
Roll a small, elongated tear-drop shape of clay for the nose. Score the center of the mug face area and slip the back of the nose piece. -
Blend the nose:
Press the nose onto the mug. Using a modeling tool or your finger, blend the edges of the clay into the mug body seamlessly, leaving the bridge and tip prominent. -
Shape the mustache:
Create two small tapered coils of clay that curve upwards at the ends. Attach these directly under the nose, pressing firming to adhere them. -
Texturize the mustache:
Use a needle tool or a fine wire tool to carve deep, flowing lines into the mustache clay. Follow the curve of the clay to mimic hair strands. -
Define the eyes:
Visualize two arches for eyebrows and two inverted arches for the closed eyelids. I find it helpful to lightly embrace the mug to steady my hand while carving. -
Carve the relief lines:
Use a small loop tool to carve out the negative space for the eye sockets. You want to leave a raised ‘lid’ area and a raised brow ridge. This is subtler than adding clay; it’s about removing clay to create shadows. -
Incise the details:
With a needle tool, draw the single curved line for the closed eye slit and a parallel curved line above it for the eyelid crease. -
Add cheek rosiness:
Slightly roughen two circular areas on the cheeks if you plan to use a textural stain, or leave smooth for a painted effect later. -
Carve the mouth:
Just below the mustache, carve a simple, gentle curve for the mouth. Add a tiny line below the center to suggest the lower lip.
Step 3: Glazing and Finishing
-
Bisque fire:
Let the mug dry slowly to prevent cracking, especially around the added nose and handle. Bisque fire to your clay body’s specifications (usually Cone 04). -
Apply oxide wash:
Mix iron oxide with water or use a dark brown underglaze. Paint this carefully onto the mustache, the eyebrows, and the base foot ring. -
Wipe back excess:
Using a slightly damp sponge, wipe the oxide off the high points of the mustache. This leaves the dark color in the crevices, highlighting the texture. -
Add cheek color:
Dab a small circle of diluted red iron oxide or a pink/peach underglaze onto the cheek area for a soft flush. -
Glaze application:
Dip the entire mug into a clear or transparent matte glaze. This will seal the clay and allow the speckles and the oxide details to show through clearly. -
Clean the foot:
Wipe the glaze off the bottom foot ring completely so it doesn’t stick to the kiln shelf. -
Final firing:
Glaze fire the piece to the appropriate temperature for your clay and glaze combination (often Cone 5 or 6 for stoneware).
Make it a Pair
Make a matching ‘awake’ mug! Instead of the downward curved sleeping eyes, paint or carve open eyes with pupils looking sideways for a playful companion piece.
Once cooled, your distinguished mug is ready to add a touch of personality to your coffee routine.
Minimal Line-Drawn Face Look
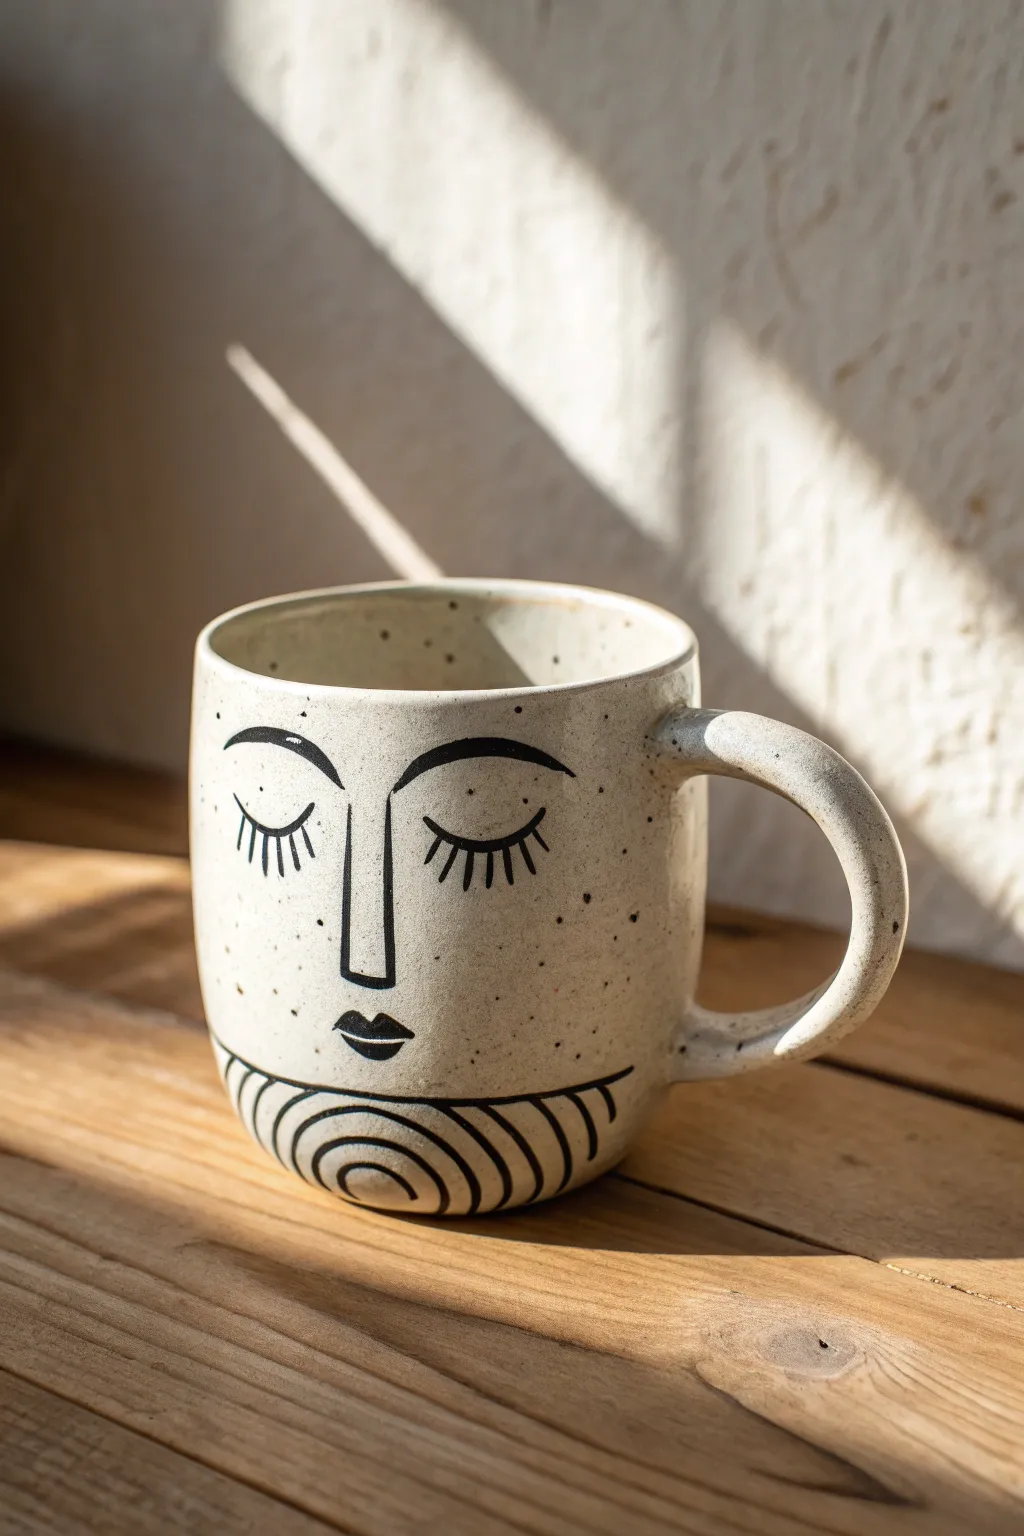
This serene project combines the rustic charm of speckled clay with modern, minimalist line art. The result is a soothing, sleepy-faced mug that brings a sense of calm to your morning coffee routine.
Step-by-Step Guide
Materials
- Speckled stoneware clay (white or buff)
- Pottery wheel (or slab roller/rolling pin for hand-building)
- Black underglaze
- Fine-tip detail brush (size 0 or 00)
- Loop trimming tool
- Rib tool
- Sponge
- Clear matte or satin glaze
- Kiln
Step 1: Forming the Mug Body
-
wedge the clay:
Start by thoroughly wedging about 1 lb (450g) of your speckled stoneware clay to remove air bubbles and ensure consistency. -
throw the cylinder:
Center your clay on the wheel and open it up. Pull the walls to create a straight-sided cylinder, approximately 3.5 to 4 inches tall. Aim for an even thickness throughout the walls. -
shape the profile:
Use a rib tool to smooth the outside and define the shape. For this specific look, keep the sides relatively straight or just slightly tapered at the bottom, rather than rounding it into a bowl shape. -
finish the rim:
Compress the rim using a chamois or your sponge to ensure it is smooth and pleasant to drink from. -
dry to leather hard:
Remove the cylinder from the wheel and let it dry slowly until it reaches a leather-hard state. It should be firm enough to handle without warping but still cool to the touch. -
trim the foot:
Invert the mug on the wheel and use a loop tool to trim the bottom. Create a subtle curve at the base where the mug meets the table, mirroring the rounded bottom in the reference image.
Drawing Tip
Steady your painting hand by resting your pinky finger against the mug surface as an anchor while working with the fine brush
Step 2: Attaching the Handle
-
pull the handle:
Pull a strap of clay for the handle. For this modern look, try to keep the handle somewhat thick and round in cross-section rather than flat and wide. -
shape the curve:
Looking at the image, form the handle into a ‘C’ shape that extends generously from the mug body. -
score and slip:
Score the attachment points on both the mug body and the handle tips. Apply slip generously. -
attach and smooth:
Press the handle firmly onto the mug. Use a modeling tool or your finger to smooth the seams completely so the handle looks like it grew out of the mug.
Underglaze smudging?
If the black lines smudge when you apply the clear glaze, sponge the bisque ware lightly first, or brush the clear glaze on rather than dipping
Step 3: Painting the Face Design
-
sketch lightly:
Before committing with underglaze, lightly sketch the face design onto the leather-hard clay using a very dull pencil. This won’t leave graphite marks after firing, just a faint indentation guide. -
paint the nose:
Using black underglaze and your fine-tip brush, paint the nose first to center the face. Draw a long, vertical ‘U’ shape that is open at the top. -
add the eyebrows:
Directly above the nose bridge, paint two mirrored arches for eyebrows. I find it helps to start from the center and sweep outward. -
detail the closed eyes:
Below the eyebrows, paint two downward-curving arcs for the eyelids. Add 5-6 vertical dashes extending downward from each arc to represent eyelashes. -
paint the mouth:
Paint the lips as a simple, small shape beneath the nose. A small, filled-in black oval with a slight point at the top and bottom works perfectly. -
add the chin pattern:
At the very base of the mug, paint a series of concentric, curved lines resembling a rainbow or ripples. This grounds the design and fills the negative space at the bottom.
Step 4: Glazing and Firing
-
bisque fire:
Once the mug is bone dry, load it into the kiln for a bisque firing (usually cone 04 or 06, depending on your clay). -
apply clear glaze:
After the bisque fire, dip the entire mug into a clear matte or satin glaze. Ensure the glaze isn’t too thick, or it might cloud the black lines. -
final firing:
Fire the mug to maturity (likely cone 5 or 6 for stoneware). The heat will bring out the natural speckles in the clay body.
Enjoy your morning brew in a piece of art that invites a moment of quiet reflection
Wraparound Side Profile Face
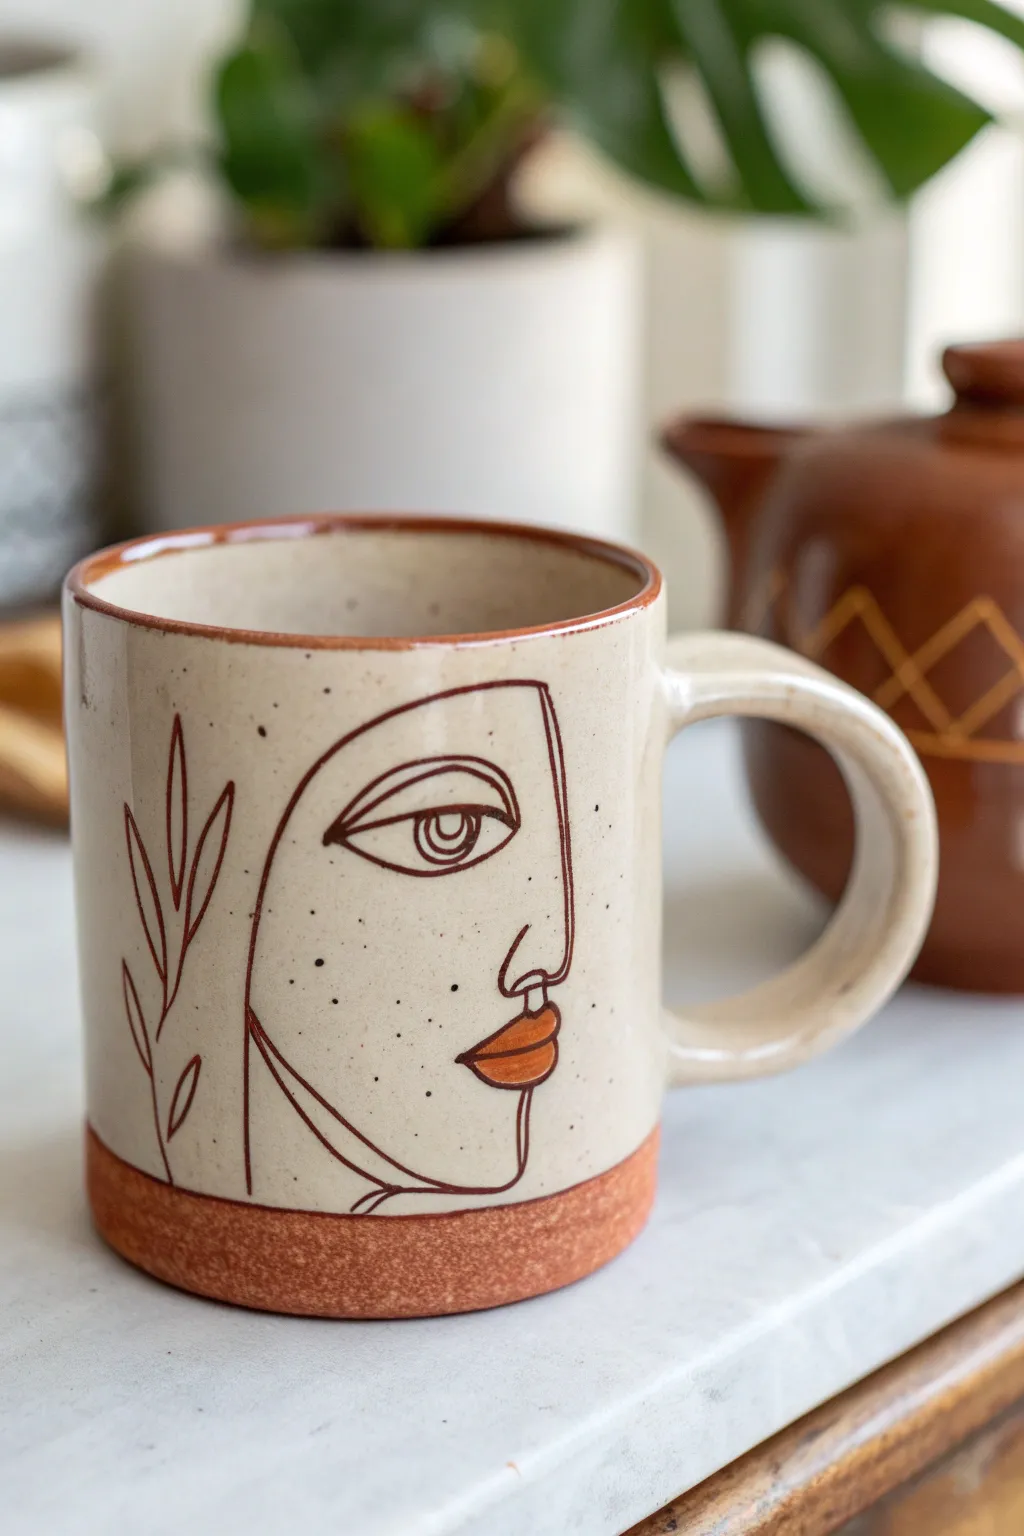
This elegant ceramic project features a continuous line-style side profile sketch on a speckled cream background, framed by raw clay accents. The design creates a striking contrast between the smooth glaze and the textural, earthy base.
Detailed Instructions
Materials
- Stoneware clay body (red or terra cotta)
- Pottery wheel or slab roller
- Creamy speckled matte glaze
- Iron oxide wash or underglaze pencil (dark brown/black)
- Red-orange underglaze (for lips)
- Fine liner brush
- Wax resist
- Sponge
- Rib tool
- Needle tool
Step 1: Forming the Mug
-
Prepare your clay:
Begin by wedging your red stoneware clay thoroughly to remove air bubbles. You’ll need about 1 pound of clay for a standard mug size. -
Throw the cylinder:
Center your clay on the wheel and pull up a uniform cylinder with straight walls. Aim for a height of about 4-5 inches. -
Shape the rim:
Compress the rim well with a chamois or sponge. Slightly taper the walls inward near the top to create a classic shape. -
Refine the surface:
Use a rib tool to smooth the exterior walls, removing any throwing lines to create a perfect canvas for your illustration. -
Attach the handle:
Pull a strap handle and attach it once the cylinder is leather hard. Ensure the handle curve mimics the ear shape of your eventual design for harmony.
Step 2: Designing the Face
-
Draft the design:
Once the mug is bone dry, lightly sketch your profile outline using a graphite pencil. The graphite will burn off in the kiln, serving only as a guide. -
Apply wax resist:
Before glazing, apply a band of wax resist to the bottom half-inch of the mug. This preserves the raw red clay look at the base. -
Bisque fire:
Load your greenware mug into the kiln and fire to cone 04 (or your clay’s specific bisque temperature).
Fixing Smudged Lines
If your oxide line runs or smudges on the powdery glaze, don’t wipe it! Let it dry completely, then gently scrape the mistake off with an X-Acto knife.
Step 3: Glazing and Decoration
-
Apply the base glaze:
Dip the bisqued mug into a cream speckled matte glaze. Hold it by the foot and ensure an even coat. Wipe any drips immediately. -
Clean the base:
Use a damp sponge to wipe back any glaze that touched the waxed area at the bottom, ensuring a crisp line where the glaze meets the raw clay. -
Clean the rim:
Gently sponge off a thin line of glaze from the very top rim to expose the red clay body, matching the base. -
Prepare the oxide:
Mix a small amount of iron oxide wash or dark underglaze. It should have an inky consistency suitable for fine line work. -
Paint the profile outline:
Using a fine liner brush on top of the unfired glaze, carefully trace the profile of the face, starting with the forehead and nose line. -
Add facial details:
Paint the eye with a distinct almond shape and pupil. Add a few vertical leafy stems behind the head for botanical balance. -
Color the lips:
Using a small detail brush, fill in the lips with a red-orange underglaze. I find that applying two thin coats gives the best opacity. -
Final inspection:
Check for any unwanted smudges. You can gently scratch away small mistakes in the oxide with a needle tool. -
Glaze fire:
Fire the mug to maturity (typically Cone 5 or 6 for stoneware). The glaze will melt, sealing the design permanently into the surface.
Add Dimension
Use a technique called Mishima: carve the lines into the leather-hard clay first, fill with slip, and scrape back for an inlaid look under a clear glaze.
Now you have a stunning, cafe-quality mug ready for your morning brew
Mismatched Eyes Quirky Character
Capture a whimsical spirit with this handcrafted ceramic mug featuring a charmingly startled face. The combination of speckled clay, bold blue glazes, and simple line work creates a functional piece of art that feels both rustic and modern.
Step-by-Step Guide
Materials
- Speckled stoneware clay body
- Pottery wheel (or slab roller for hand-building)
- Needle tool
- Trimming tools
- Rib tool (kidney)
- Sponge
- Underglaze pencil or fine brush (black/dark brown)
- Underglaze (teal/light blue, orange/terracotta)
- Deep glossy blue glaze
- Clear transparent glaze (cone 5/6 compatible)
- Kiln
- Score and slip tool
Step 1: Forming the Vessel
-
Throw the cylinder:
Begin by centering about 1-1.5 lbs of speckled clay on your wheel. Pull the walls up to form a straight-sided cylinder, aiming for a height of about 4 inches. -
Shape the belly:
Gently push the walls outward from the inside to create a slight curve, giving the mug a subtle belly while keeping the rim straight. -
Refine the rim:
Compress the rim with a piece of chamois or your sponge to ensure it’s smooth and pleasant to drink from. -
Trim the foot:
Once leather hard, flip the mug and trim a clean foot ring. Define a clear line near the bottom where the glaze will eventually stop. -
Pull the handle:
Pull a strap of clay for the handle. I like to make mine thick enough to be comfortable but tapered slightly towards the bottom attachment point. -
Attach the handle:
Score and slip both the handle ends and the attachment points on the mug body. Press the handle firmly on, blending the seams until invisible.
Smudged Lines?
If your black underglaze lines smudge during glazing, try lightly dabbing the clear glaze over the design with a sponge rather than brushing, which can drag the pigment.
Step 2: Adding the Character
-
Sketch the face:
While the clay is still leather hard, lightly sketch the facial features using a needle tool. Draw two large almond-shaped eyes, a long triangular nose, and a simple curved smile. -
Inlay the outlines:
Go over your sketch using a black underglaze pencil or a very fine brush with black underglaze. Keep the lines deliberate and relatively thin. -
Add the lashes:
Paint three simple vertical dashes above each eye for the eyelashes. -
Fill the nose:
Using a teal or light blue underglaze, fill in the long triangle of the nose. Apply two to three coats for opacity. -
Paint the irises:
Paint large circles inside the eye outlines using the same teal underglaze. Leave the surrounding area as raw clay. -
Add details:
Once the teal is dry, add a black dot in the center of each iris for the pupil. Paint two rosy cheeks using an orange or rust-colored underglaze. -
Bisque fire:
Let the mug dry completely (bone dry) and fire it to bisque temperature (usually Cone 04) to set the shape and underglazes.
Step 3: Glazing and Finishing
-
Wax resist:
Apply wax resist to the foot ring and the bottom of the mug to prevent glaze adhesion. -
Glaze the interior:
Pour a clear glaze inside the mug, roll it around to coat the entire interior, and pour out the excess. -
Dip the handle:
Carefully dip just the handle into a deep glossy blue glaze. You can use a brush to clean up the connection points where the handle meets the mug for a crisp line. -
Deep dip the rim:
Hold the mug by the base and dip the rim about a half-inch deep into the same glossy blue glaze used on the handle. -
Glaze the base:
Dip the bottom inch of the mug into a celadon or light teal glaze that complements the nose color. This creates the colored ‘pant leg’ effect at the bottom. -
Clear coat the face:
Brush or dip a clear transparent glaze over the central face area. This seals the raw clay and makes the speckles pop. -
Final fire:
Load the kiln carefully and glaze fire to your clay’s maturity temperature (likely Cone 5 or 6).
Make it a Set
Create a family of mugs by slightly altering the nose shapes (round vs. triangle) and eye directions (looking left, right, or cross-eyed) for each one.
Enjoy your morning coffee with a quirky companion that smiles back at you
Kissy Lips With Puckered Mouth

This charming ceramic mug features a serene, sleeping face with sweet puckered lips, combining modern minimalism with playful patterns. The design uses a dual-tone glaze effect with a speckled cream upper and a soft, dusty pink base dotted with cream accents, perfect for a cozy morning coffee.
Step-by-Step
Materials
- Bisque-fired stoneware mug (wheel-thrown or hand-built)
- Cream or off-white glaze (speckled finish recommended)
- Dusty rose or mauve underglaze
- Dark brown or black underglaze pencil or fine brush
- Pink underglaze (slightly brighter shade for cheeks)
- Clear transparent glaze
- Wax resist
- Band styling wheel (optional but helpful)
- Small round paintbrush
- Design tool or fine stylus
Step 1: Preparation & Base Color
-
Clean surface:
Begin by wiping down your bisque-fired mug with a slightly damp sponge to remove any kiln dust or oils from handling. This ensures the glazes will adhere properly without crawling. -
Mark the horizon line:
Place your mug on a banding wheel. While spinning it slowly, use a graphite pencil to lightly mark a straight line around the circumference, positioned about one-third of the way up from the bottom. This separates the pink base from the cream face. -
Apply the pink base:
Using a soft brush, apply three even coats of the dusty rose underglaze to the bottom section below your pencil line. Allow each coat to become touch-dry before adding the next to ensure solid coverage.
Step 2: Adding the Face Details
-
Sketch the features:
Lightly sketch the face design onto the raw bisque area using a graphite pencil. The pencil marks will burn off in the kiln, so don’t worry about mistakes. Center the nose simple ‘L’ curve first to anchor the face. -
Draw the eyes:
Draw two downward-curving arcs for the closed eyelids. Add 5-6 short, straight lines radiating downward from each arc to create the eyelashes. Keep them symmetrical for a peaceful expression. -
Create the puckered mouth:
Draw the mouth as a small, rounded shape, resembling a sideways ‘D’ or a small bean, with a horizontal line through the middle to separate the lips. -
Line work:
Go over your pencil sketch with a dark brown underglaze using a very fine liner brush. I find that thinning the underglaze slightly with a drop of water helps the lines flow more smoothly. -
Add rosy cheeks:
Dip a round sponge dabber or a medium round brush into the brighter pink underglaze. Apply two circles on either side of the face, just below the outer corners of the eyes.
Smudge Prevention
If facial lines smudge when applying clear glaze, try dabbing the glaze over the lines first rather than brushing across them, or verify your underglaze is fully dry.
Step 3: Polka Dots & Resist
-
Apply wax resist patterns:
To create the cream polka dots on the pink base, dip the handle end of a paintbrush into wax resist. Dot the wax randomly over the pink underglaze section. -
Protect the face design:
Carefully paint wax resist over the dark lines of the eyes, nose, mouth, and the pink circles of the cheeks. This step is crucial so your cream glaze doesn’t obscure the drawing. -
Drying time:
Let the wax resist dry completely. It usually takes about 15-20 minutes depending on humidity; wait until it is no longer tacky to the touch.
Texture Twist
Instead of painted polka dots, use a small carving tool to gently scratch small circles into the pink underglaze before the first firing to reveal the raw clay texture.
Step 4: Glazing & Firing
-
Apply the main glaze:
Dip the entire mug into your bucket of speckled cream glaze. Alternatively, if brushing, apply 2-3 coats over the entire exterior. -
Wipe back the wax:
Immediately after dipping, use a damp sponge to gently wipe any beads of cream glaze off the waxed areas (the face details and the polka dots). The wax resists the glaze, revealing the underglaze colors beneath. -
Clean the foot:
Thoroughly wipe the bottom (foot ring) of the mug with a clean sponge to remove all glaze, preventing it from fusing to the kiln shelf. -
Final check:
Inspect the rim to ensure the glaze is smooth. You can gently rub out any drips with your finger once the glaze is powdery dry. -
Fire:
Load the mug into the kiln and fire to the temperature appropriate for your clay and glaze body (typically Cone 5 or 6 for stoneware).
Once cooled, your charming mug is ready to hold your favorite warm beverage and brighten your kitchen shelf
Handle as an Ear Face Design
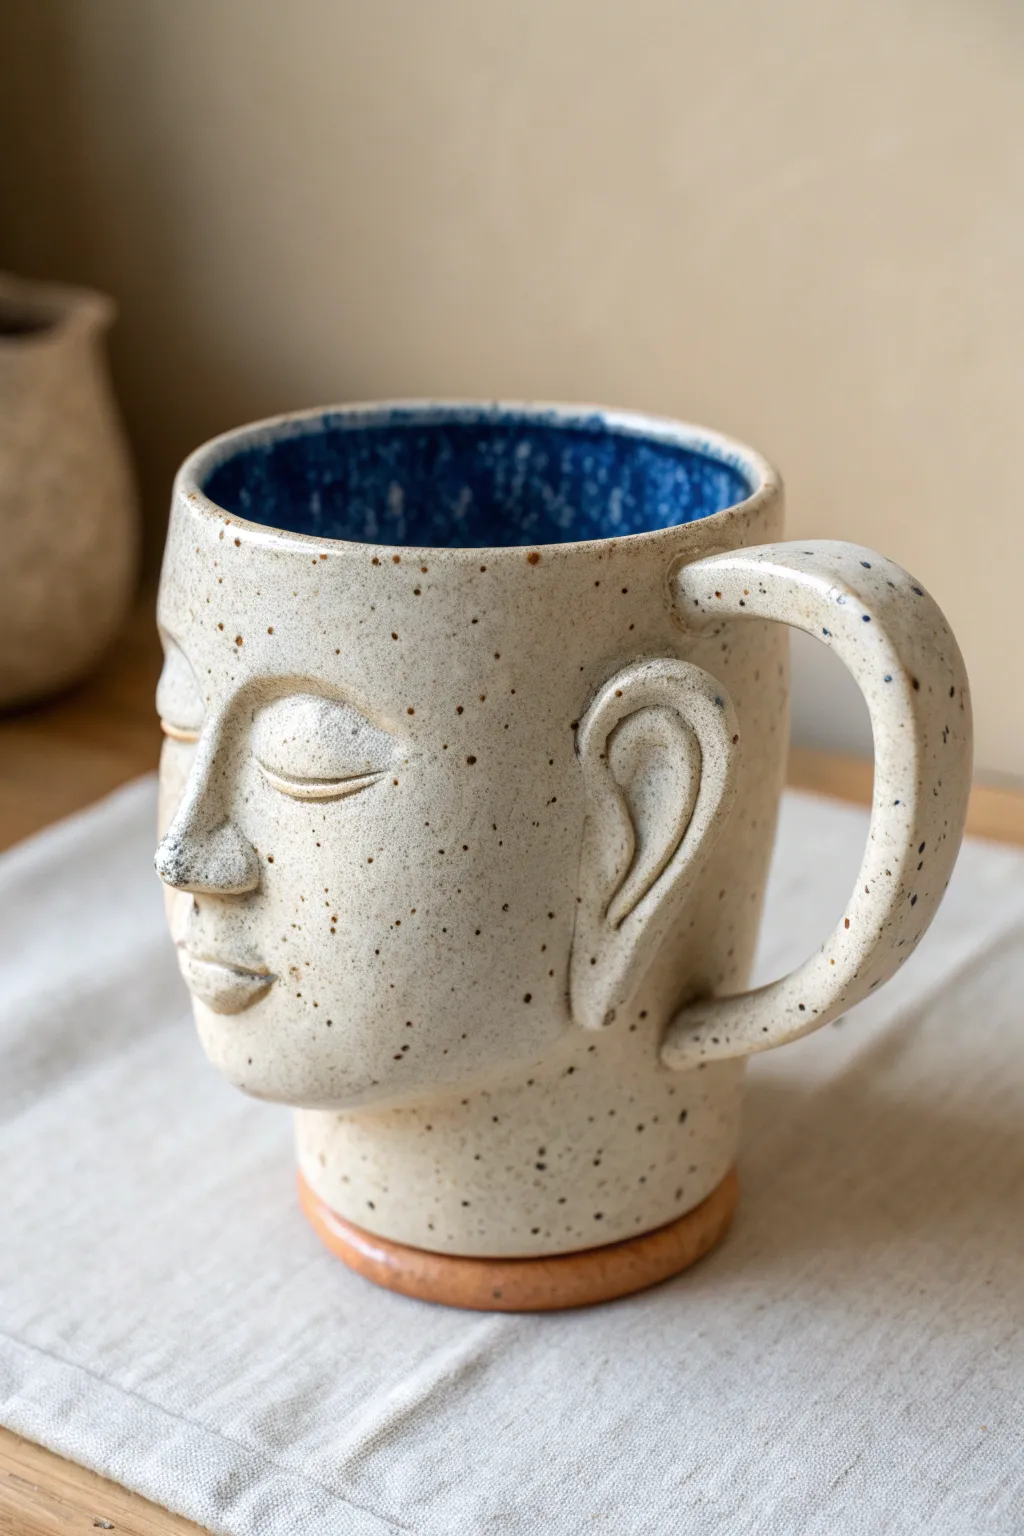
This project transforms a standard vessel into a serene, sculptural piece featuring a peaceful face and a clever ear-shaped handle. Using speckled stoneware clay and a vibrant blue interior glaze creates a stunning contrast that elevates your morning coffee ritual.
Detailed Instructions
Materials
- Speckled buff stoneware clay
- Pottery wheel (or slab roller/rolling pin for hand-building)
- Needle tool
- Loop tools (smalls and medium)
- Rib tool (metal and rubber)
- Scoring tool or serrated kidney
- Slip (clay and water mixture)
- Sponge
- Wooden modeling tools
- Deep blue gloss glaze
- Clear matte or satin glaze (optional for exterior)
- Kiln
Step 1: Forming the Base Vessel
-
Throwing the cylinder:
Begin by throwing a tall, uniform cylinder on the wheel using about 1.5 to 2 lbs of speckled clay. Aim for a shape that is slightly wider at the top than the bottom, but relatively straight-walled. -
Defining the neck:
About one-third of the way up from the bottom, gently collar the clay in to create a distinct ‘neck’ area. This separates the head from the base. -
Shaping the head:
From the neck restriction, pull and swell the clay outwards slightly to create the volume of a head, keeping the rim thick enough to support sculpting later. -
Trimming:
Once leather hard, trim the bottom to create a neat foot ring. This visual separation at the base adds elegance to the bust shape.
Fixing Cracks
If hairline cracks appear around the nose or ear joins during drying, score the crack, add a tiny bit of vinegar or magic water, and compress the clay with a rib tool to seal it.
Step 2: Sculpting the Face
-
Mapping features:
Lightly sketch the placement of the eyes and nose on the cylinder surface using a needle tool. The nose should be centered, with eyes spaced evenly on either side. -
Adding volume:
Score the nose area and attach a small vertical coil of clay. Blend the edges thoroughly into the mug wall to build up the bridge and tip of the nose. -
Shaping the nose:
Use your wooden modeling tool to refine the nose shape, carving out nostrils and smoothing the transition into the cheeks. -
Creating eyelids:
Instead of carving eyes *in*, add small almond-shaped pads of clay for the eyelids. Score and slip them onto your marked eye spots. -
Refining the eyes:
Use a small loop tool or modeling tool to carve a slit across the clay pads, defining the closed eyelid line. Smooth the clay around them to form the brow bone and under-eye area. -
Forming the mouth:
Add a very small amount of clay for the lips below the nose. Use a tool to press a center line and gentle dimples at the corners to create a soft, resting expression.
Make It Glossy
For a smoother feel against the lips and easier cleaning, apply a clear satin or matte glaze over the exterior. It protects the speckles while keeping the natural look.
Step 3: The Ear Handle
-
Pulling the handle:
Pull a standard strap handle, but keep it shorter and slightly thicker than usual. Let it set up until it holds a curve without flopping. -
Attaching the ear:
Score the side of the mug deeply where the ear should be (aligned roughly with the eyes and nose). Attach the top and bottom of the handle securely. -
Sculpting the ear shape:
Add a C-shaped coil of clay to the attachment point at the top of the handle to mimic the helix (outer rim) of an ear. Blend this seamlessly into the handle strap. -
Detailing the cartilage:
Add a small tear-drop shape of clay inside the ‘ear’ curve to represent the tragus. Carve gentle depressions into the handle top to suggest the inner ear structure without over-complicating it. -
Smoothing:
Use a slightly damp sponge to smooth all join marks on the face and ear. I find this step crucial for making the added features look like they grew organically from the mug.
Step 4: Glazing and Finishing
-
Bisque firing:
Allow the piece to dry slowly and completely to avoid cracking at the thick sculpting points. Fire to bisque temperature (usually Cone 04). -
Waxing the exterior:
Apply wax resist to the entire exterior of the mug, including the face and handle. We want the raw speckled clay to remain unglazed on the outside. -
Glazing the interior:
Pour a deep, saturated blue glaze into the interior. Swirl it to coat evenly and pour out the excess. Wipe any drips off the waxed exterior immediately. -
Final wipe down:
Use a clean, damp sponge to wipe the exterior clay body one last time to ensure no glaze residue remains on the features, which could obscure the sculpting. -
Glaze firing:
Fire the mug to maturity (likely Cone 5 or 6 depending on your clay). The heat will bring out the natural iron speckles in the clay body.
Now you have a serene, functional sculpture ready for your favorite beverage
Clay Glasses Accessory Face
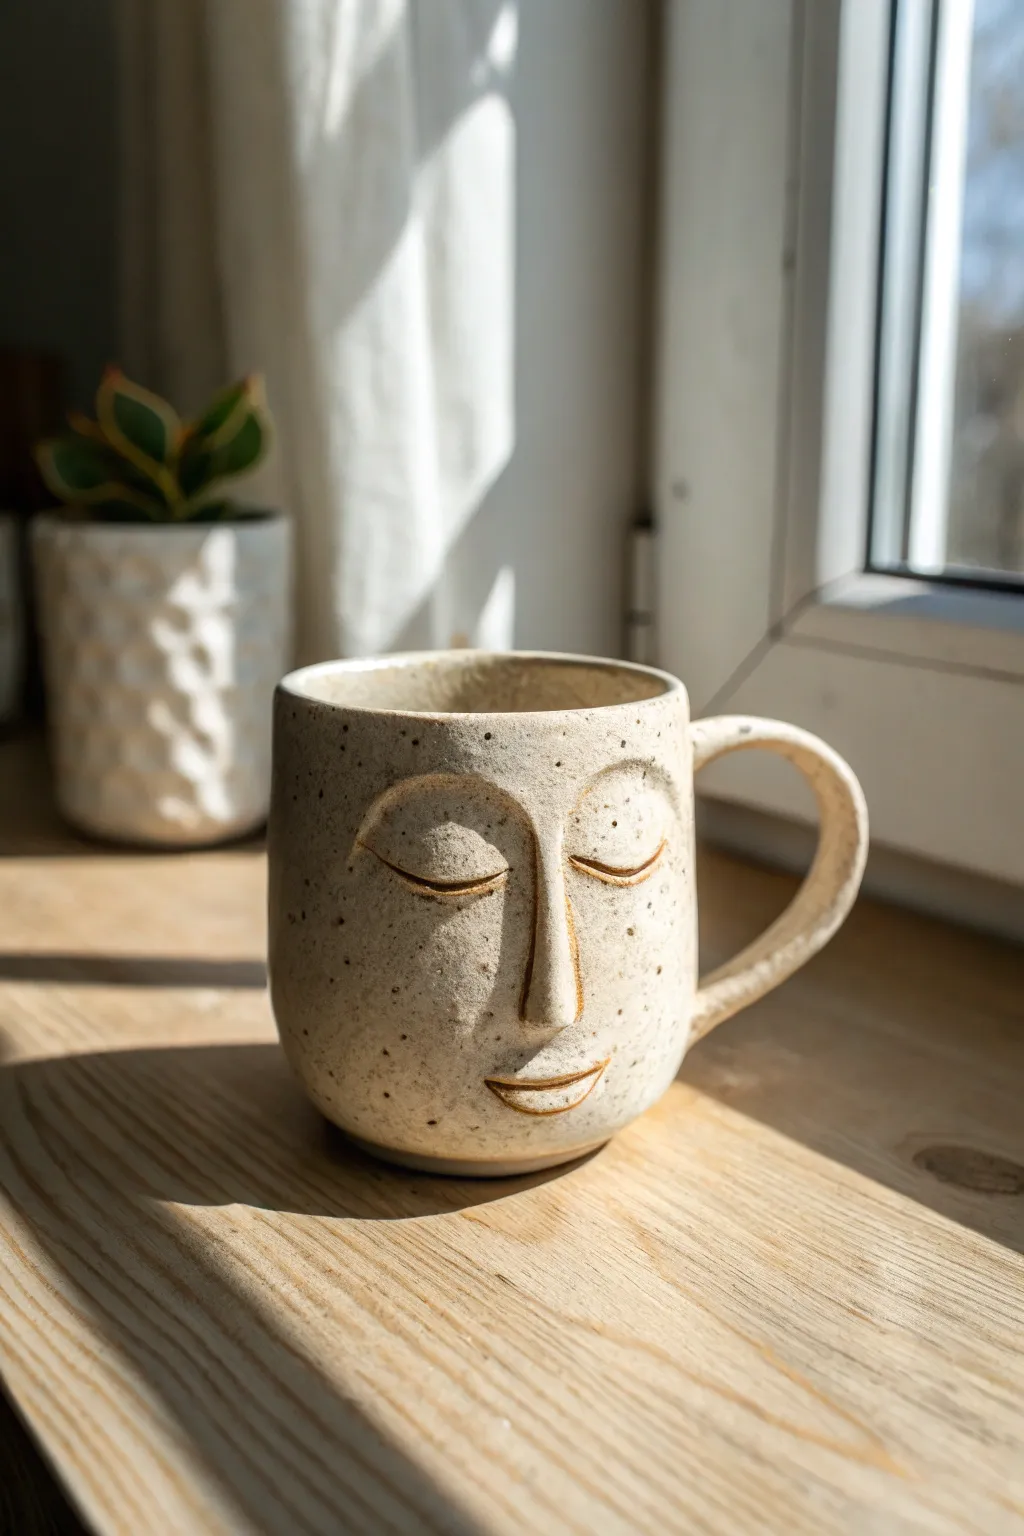
Capture a moment of zen with this hand-sculpted stoneware mug featuring a peaceful, sleeping face. The speckled clay body and minimal relief features create a tactile and calming vessel perfect for your morning coffee.
Step-by-Step Tutorial
Materials
- Speckled buff stoneware clay
- Pottery wheel (or rolling pin for slab building)
- Needle tool
- Small loop tool or carving tool
- Wooden modeling tool
- Sponge
- Scoring tool (or fork)
- Slip (clay and water mixture)
- Clear matte glaze
- Kiln
Step 1: Forming the Vessel
-
Prepare the clay:
Begin by wedging about 1.5 lbs of speckled buff clay to remove air bubbles. This specific clay body gives the final piece its lovely spotted texture without needing complex glazes. -
Throw the cylinder:
Center your clay on the wheel and open it up. Pull the walls to create a straight-sided cylinder, slightly wider at the bottom and tapering just a tiny bit toward the rim. Aim for a height of about 4-5 inches. -
Shape the rim:
Use a chamois or a wet sponge to compress and round the rim. A comfortable lip is essential for a good drinking experience. -
Trim the piece:
Once the clay is leather hard, trim the bottom to create a clean foot ring. Smooth out any throwing lines on the exterior surface with a metal rib so you have a blank canvas for the face.
Seamless Blending
When attaching the nose and eyelids, blend the clay until you can’t see the seam. If a line remains, it may crack during firing.
Step 2: Sculpting the Face
-
Map out features:
Before adding clay, lightly sketch the placement of the eyes, nose, and mouth directly onto the leather-hard mug using a needle tool. Keep the design symmetrical and centered opposite where the handle will go. -
Form the nose coil:
Roll a small coil of clay for the nose. It should be thicker at the bottom and taper thinly toward the top where it meets the brow. -
Attach the nose:
Score the area where the nose will sit and apply a dab of slip. Press the coil onto the mug. Use a wooden tool to blend the edges of the clay seamlessly into the mug wall, maintaining a raised ridge down the center. -
Shape the nose profile:
Refine the nose shape so it is straight and prominent. I find using a slightly damp sponge helps smooth the transition areas without washing away the definition. -
Create the eyes:
Trace deeply curved semi-circles for the closed eyelids. Instead of just scratching lines, you want to create relief. Use a small carving tool to gently pressing the clay inward below the lash line. -
Define the eyelids:
Roll two very thin, tiny coils. Score and slip them along the upper curve of your eye markings to create protruding eyelids. Blend the top edge of these coils into the forehead, leaving the bottom edge sharp and distinct. -
Carve the mouth:
Similar to the eyes, carve a simple, gentle upward curve for the smile. Be careful not to cut all the way through the wall. -
Add lip volume:
Add a tiny, flattened piece of clay below the mouth line to suggest a bottom lip. Blend it downwards into the chin area.
Step 3: Handle and Finishing
-
Pull a handle:
Pull a strap handle from a separate lug of clay. Let it set up until it can hold an arch shape without collapsing. -
Attach the handle:
Score and slip the attachment points on the back of the mug. Press the handle firmly into place, smoothing the joins with your thumb or a modeling tool. -
Final smoothing:
Go over the entire face with a damp sponge to soften any sharp carving marks. The goal is a soft, organic look, not rigid geometry. -
Drying:
Cover the mug loosely with plastic to let it dry slowly. This prevents the handle or the added facial features from cracking away from the body. -
Bisque fire:
Once bone dry, fire the piece to cone 04 (or your clay’s specific bisque temperature). -
Glazing:
Dip the entire mug into a clear matte glaze. A glossy glaze can sometimes cause glare that hides the subtle sculpting, so matte is best. -
Final firing:
Fire to cone 6 (stoneware temperature) to vitrify the clay and bring out those beautiful dark speckles.
Blush Effect
Before the final glaze, dab a tiny amount of diluted pink underglaze on the cheeks for a sweet, rosy-cheeked effect.
Enjoy the comforting weight of your new handmade mug as you sip your favorite warm beverage
Two-Tone Split Face With Bold Shapes
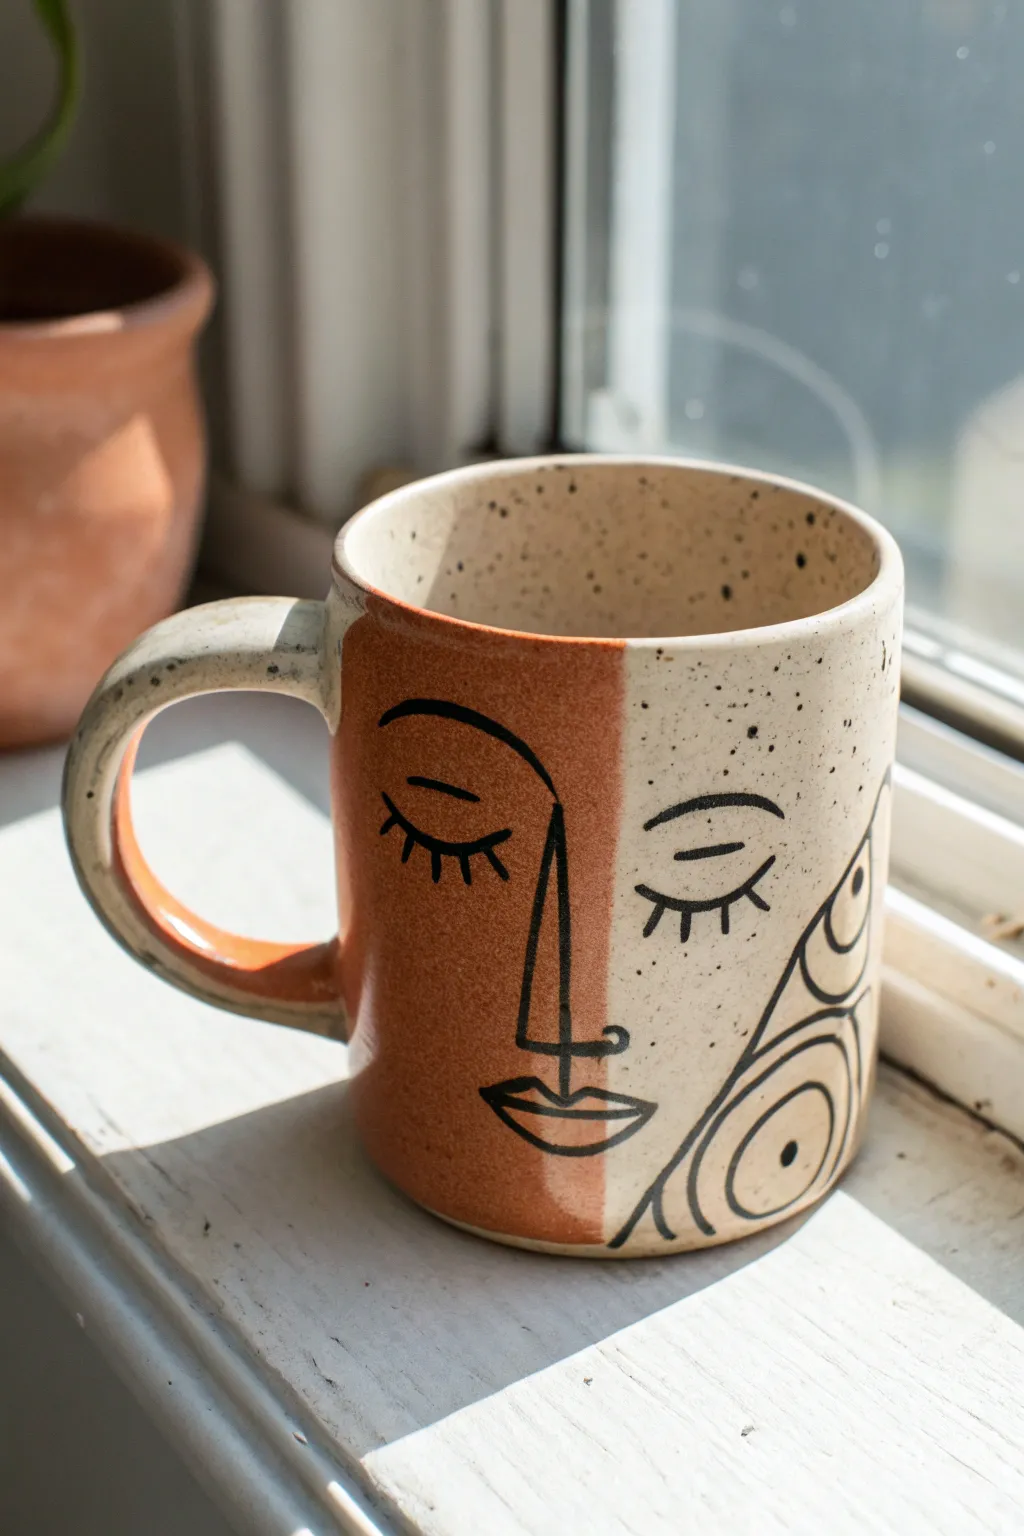
Embrace the beauty of duality with this striking ceramic project that combines earthy terracotta tones with a modern, speckled cream finish. The continuous line art face bridges the two distinct glaze zones, creating a cohesive and artistic statement piece perfect for your morning brew.
Step-by-Step Guide
Materials
- Bisque-fired ceramic mug (wheel-thrown or hand-built)
- Glaze tape or wax resist
- Terracotta-colored underglaze or glaze
- Speckled cream or ‘oatmeal’ glaze
- Black underglaze pencil or fine-tip underglaze applicator bottle
- Clear transparent glaze (if using underglazes)
- Soft fan brush
- Detail brush
- Pencil (standard graphite)
Step 1: Preparation and Zoning
-
Clean the bisque:
Start by wiping down your bisque-fired mug with a damp sponge. This removes any kiln dust or oils from your hands that might prevent the glaze from adhering properly. -
Mark the center line:
Using a standard pencil, lightly draw a vertical line straight down the center of the mug’s face, opposite the handle. Don’t worry, the graphite will burn off in the kiln. -
Apply the mask:
Apply a strip of glaze tape or carefully paint a line of wax resist exactly along your pencil mark. Cover the right side of the mug (the side that will be cream) if you are messy with a brush, or simply trust your steady hand for the next step.
Step 2: Applying Base Colors
-
Glaze the left side:
Using a soft fan brush, apply your terracotta or burnt orange glaze to the left side of the specific line. Ensure you coat the inside of the handle if you want the color to wrap around partway. -
Layering for opacity:
Apply 2-3 coats of the terracotta glaze, letting each layer dry until it’s no longer shiny before applying the next. This ensures a solid, rich color. -
Remove the mask:
If you used tape, peel it off gently now while the glaze is semi-dry to keep a crisp edge. If you used wax, you can leave it, as it will burn off. -
Glaze the right side:
Now, apply the speckled cream glaze to the unpainted right side. Be very careful where the two colors meet; a slight overlap is okay, but a clean line looks best. -
Build up the cream:
Apply 2-3 coats of the speckled cream glaze. I find that speckled glazes often need that third coat to really show off their depth after firing. -
Glaze the interior:
Don’t forget the inside! Pour the speckled cream glaze into the mug, swirl it around to coat the entire interior, and pour out the excess. Wipe the rim clean with a sponge.
Fixing a Wobbly Line
If your center line isn’t straight, re-wet the glaze with a damp brush to soften it, then use a fettling knife to gently scrape the edge back into a straight vertical line.
Step 3: The Line Art Design
-
Sketch the face:
Once the base glazes are dry to the touch, lightly sketch your face design with a pencil. Draw a nose bridging the color split, sleepy eyes on either side, and lips at the bottom. -
Add side details:
On the cream side, sketch the abstract, concentric organic shapes or ‘fish scale’ patterns near the bottom right, flowing away from the face. -
Prepare the black liner:
Fill a fine-tip applicator bottle with black underglaze. Test the flow on a piece of paper first to ensure there are no air bubbles that could cause splatters. -
Outline the nose:
Start the line work with the nose. Draw a long, vertical triangle shape right over the color seam. Make the lines bold and confident. -
Draw the eyes:
Add the closed, sleepy eyelids. Draw a simple arc for each eye, then add small vertical dashes for the lashes. -
Define the mouth:
Create the lips using an almond shape with a horizontal line through the middle. Position this directly under the nose line. -
Trace the abstract shapes:
Go over your pencil sketches for the side patterns. Use varied line weights here if you can—press a little harder for the outer curves and lighter for the inner dots. -
Clean up mistakes:
If you smudge a black line, let it dry completely, then gently scratch the mistake off with a needle tool or an X-Acto knife.
Try Sgraffito Style
Instead of piping black lines on top, apply black underglaze first, then layer your colors. After drying, carve through the colors to reveal the black lines underneath.
Step 4: Finishing Touches
-
Check the rim:
Ensure the rim glaze is smooth. You can gently dab a final bit of cream glaze on the rim if the pouring step left it thin. -
Apply clear coat (optional):
If your base colors were underglazes rather than gloss glazes, you must now dip the entire mug in a clear transparent glaze to seal it and make it food safe. -
Fire the mug:
Load the kiln and fire to the temperature specific to your clay body and glazes (usually Cone 5 or 6 for stoneware). Allow the kiln to cool completely before opening.
Enjoy the calm, artistic presence of your new favourite mug during your next coffee break