If you’ve ever held a handmade mug and felt those tiny thumb-print details, you know clay mugs are basically comfort you can drink from. Here are my favorite clay mug ideas—from classic shapes to playful surface tricks—so you can pick one that fits your vibe and actually feels doable.
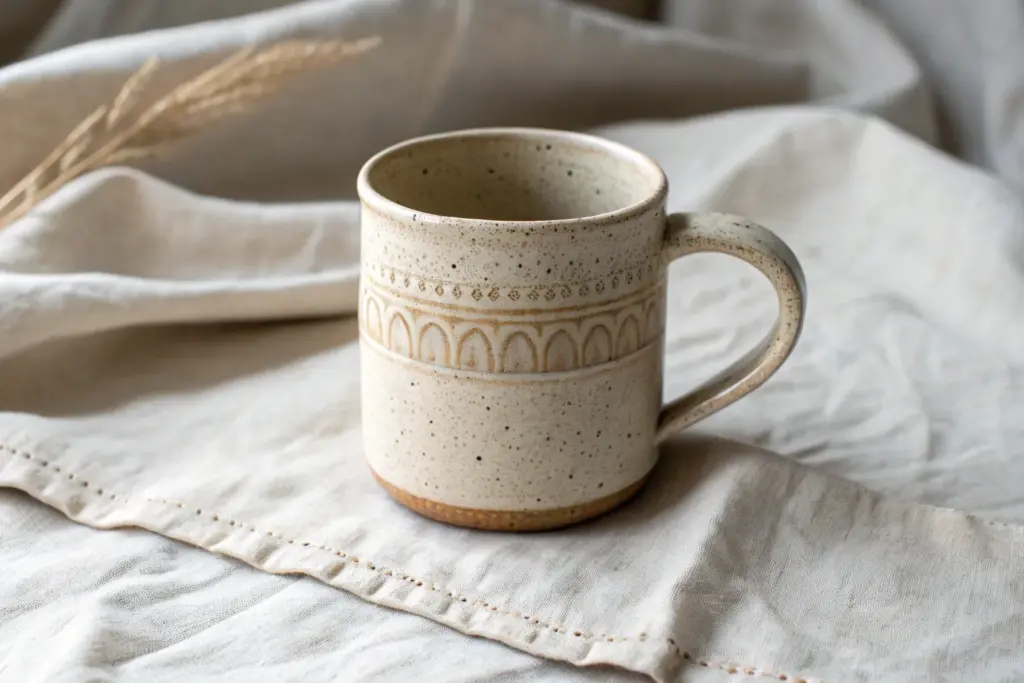
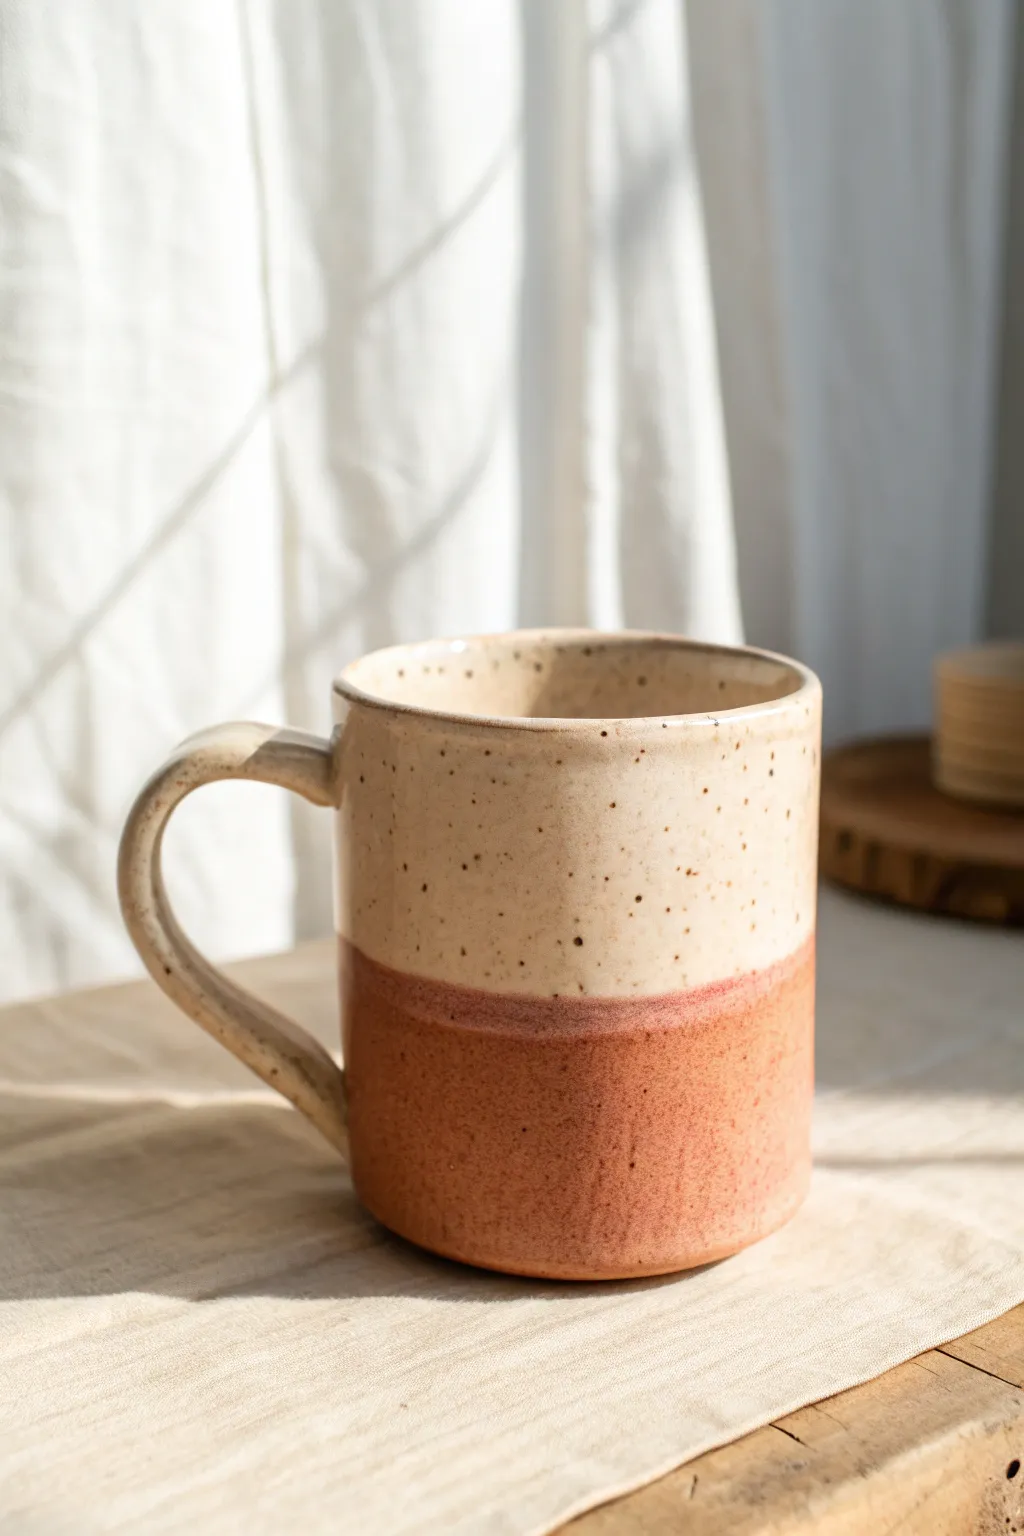
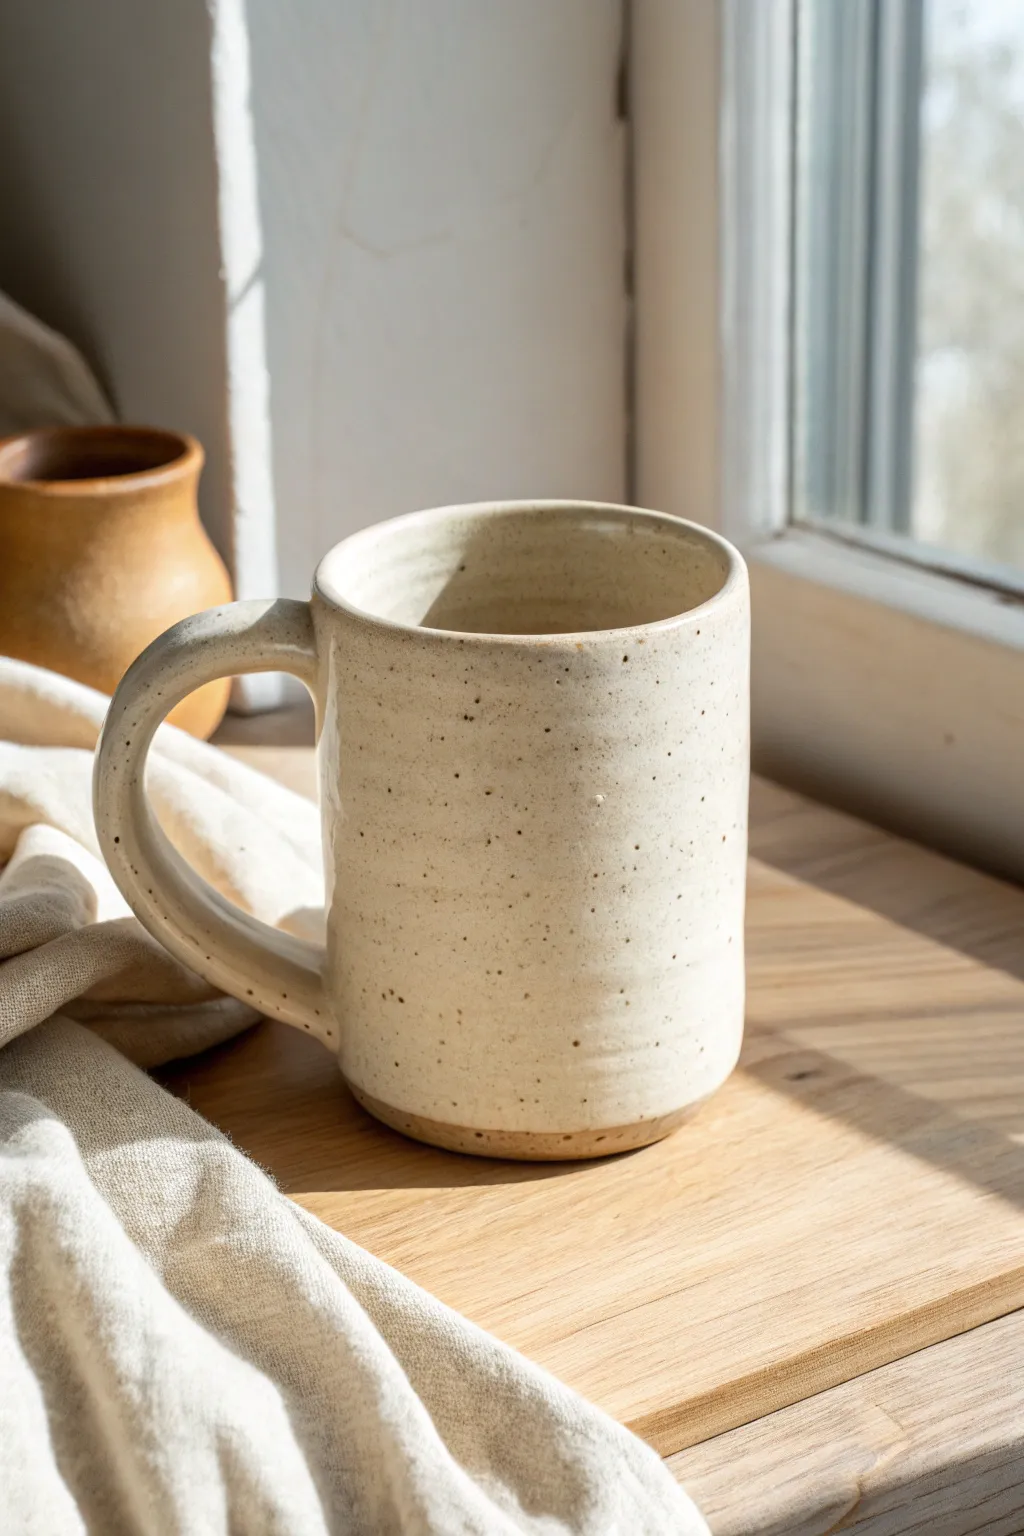
The Classic Slab-Built Cylinder Mug
This project captures the essence of minimalist pottery with a perfectly cylindrical form and a warm, speckled cream finish. The exposed raw clay at the base adds a tactile, earthy contrast that grounds the piece beautifully.
Detailed Instructions
Materials
- Stoneware clay (speckled or buff)
- Rolling pin
- Canvas or fabric work surface
- Wooden guide strips (approx. 1/4 inch thick)
- Ruler
- Fettling knife or needle tool
- Scoring tool (serrated rib or fork)
- Slip (clay and water slurry)
- Cylindrical form for template (PVC pipe or similar)
- Sponge
- Modeling tool or wooden spoon
- Speckled vanilla/cream ceramic glaze
Step 1: Prepping the Slab
-
Wedge and roll:
Begin by thoroughly wedging your stoneware clay to remove air bubbles. Place the clay between two wooden guide strips on your canvas and roll it out until it is perfectly even and smooth. -
Compress the clay:
Take a rubber rib tool and firmly compress both sides of the slab. This aligns the clay particles, preventing warping during the firing process, and creates a smooth canvas for that creamy glaze later. -
Cut the rectangle:
Using a ruler and your fettling knife, measure and cut a long rectangle. A standard size is roughly 10-11 inches long and 4-5 inches tall, depending on how large you want your coffee vessel. -
Bevel the edges:
On the short ends of your rectangle, cut 45-degree angles in opposite directions. This allows the seam to overlap cleanly without creating a thick lump in the wall of your mug.
Smooth Seams
Use a wooden paddle to gently tap the seam area after joining. It helps compress the join and restore the perfect curve of the cylinder if it got flattened.
Step 2: Assembling the Cylinder
-
Score and slip:
Rough up the beveled edges with your scoring tool and apply a generous amount of slip. This acts as the glue that bonds the clay together. -
Form the wall:
Gently curve the slab around your cylindrical template or simply form a circle by hand. Press the scored beveled edges together firmly to create the cylinder. -
Seam blending:
Use a wooden tool or your thumb to blend the seam completely, both inside and outside. I like to smooth it until it’s invisible, ensuring the mug looks seamless. -
Create the base:
Roll out a small separate piece of slab for the floor. Place your cylinder on top of it, trace around the base lightly, score and slip the bottom edge of the cylinder and the slab, then attach them. -
Trim the excess:
Once attached, trim away the excess clay from the base slab so it is flush with the cylinder walls. Use a modeling tool to compress this bottom join for a watertight seal.
Step 3: Handle and Finishing
-
Pull a strap:
Roll a small coil or cut a thin strip from your leftover slab provided it’s still pliable. Smooth the edges with a damp sponge so they feel comfortable to hold. -
Shape the C-curve:
Curve the strap into a classic ‘C’ shape or an inverted ear shape, depending on your preference. Hold it up to the cylinder to check proportions. -
Attach the handle:
Score and slip the attachment points on both the mug body and the handle ends. Press the handle firmly onto the mug, blending the clay at the joints for strength. -
Clean the distinct rim:
Run a damp chamois or sponge over the top rim to make it perfectly smooth for drinking. Ensure the lip is slightly rounded, not sharp. -
Dry slowly:
Cover the mug loosely with plastic to let it dry slowly. This ensures the handle and body shrink at the same rate, preventing cracks.
Make It Yours
Try pressing dried leaves or lace into the slab before cutting your rectangle to create a subtle texture that the glaze will break over interestingly.
Step 4: Glazing
-
Wax the base:
After your bisque fire, apply wax resist to the bottom half-inch or inch of the mug exterior. This reserves that beautiful raw clay band shown in the photo. -
Dip or pour:
Dip the mug into a speckled cream or vanilla glaze. If the glaze is semi-translucent, the natural speckles of the clay body will shine through even more. -
Cleanup:
Wipe away any stray glaze beads from the waxed bottom area with a damp sponge before loading it into the kiln for the final glaze firing.
Now you have a timeless, handcrafted mug ready for your morning coffee rituals


A Simple Band of Carved Lines for Texture
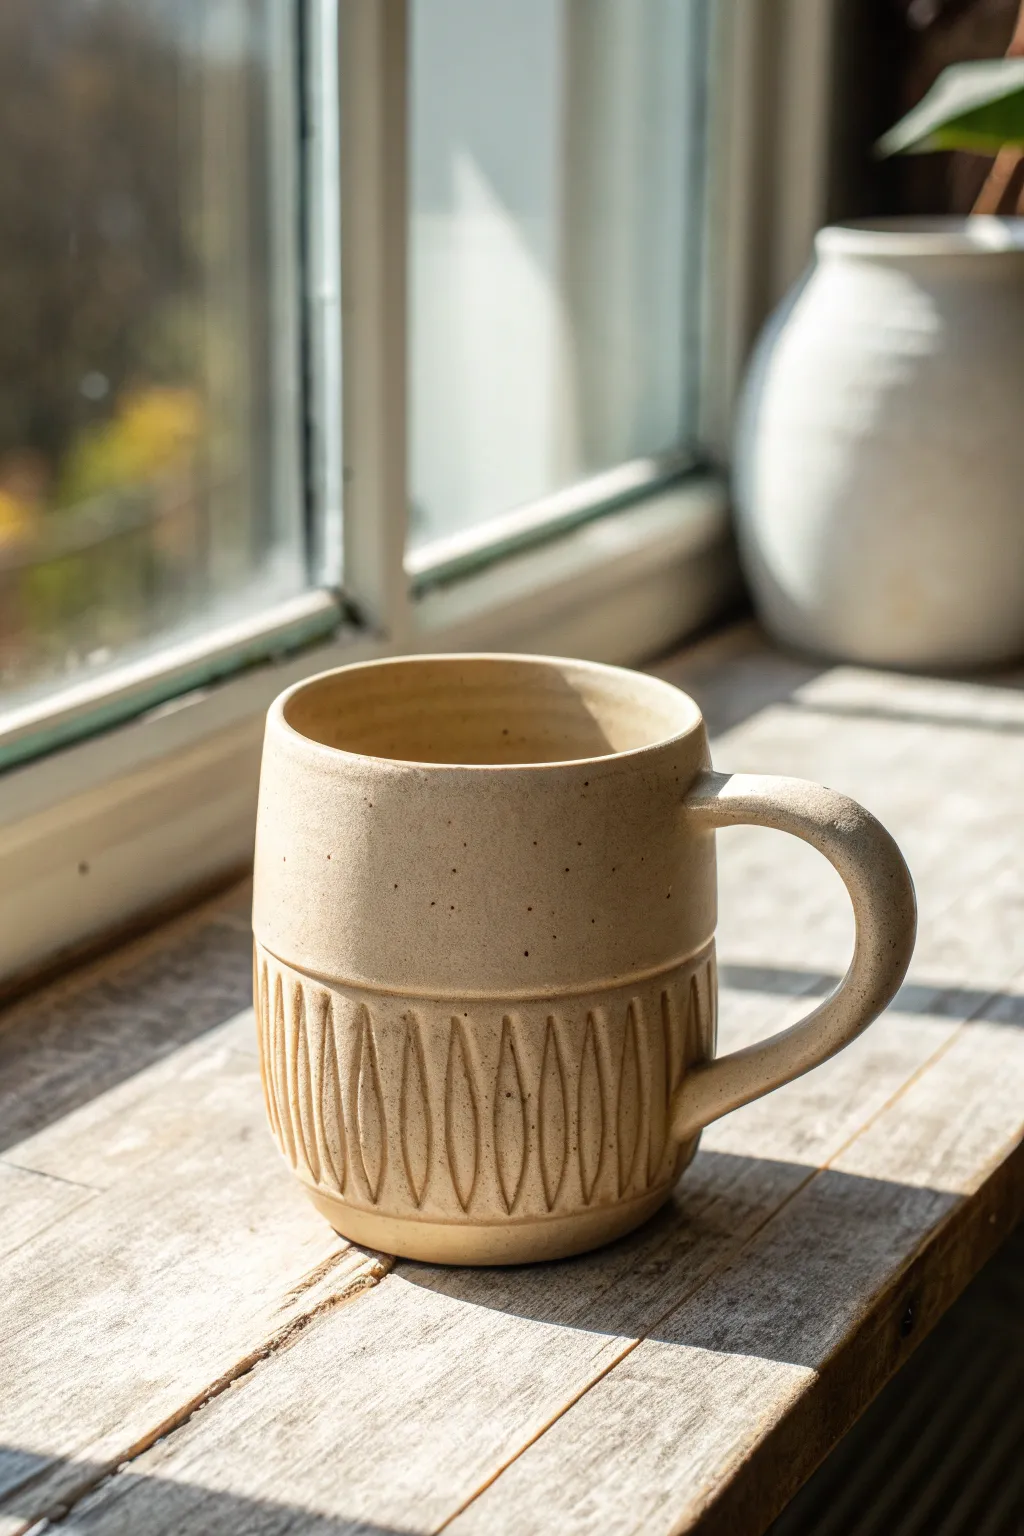
This project focuses on creating a harmonious balance between smooth, unglazed clay and tactile carving. It features a warm, speckled stoneware base with a distinctive band of repetitive vertical leaf-shapes carved into the lower half, offering a rustic yet modern aesthetic.
Detailed Instructions
Materials
- Speckled stoneware clay (buff or light tan firing)
- Pottery wheel
- Throwing tools (sponge, rib, wire cutter)
- Small loop tool or carving stylus with an oval tip
- Trimming tools
- Sponge
- Clear matte glaze (optional, for inside only) or liner glaze
- Kiln
Step 1: Throwing the Cylinder
-
Prepare the Clay:
Begin by wedging about 1 to 1.5 lbs of speckled stoneware clay. The speckles are crucial for this specific look, so choose a clay body with iron pyrite or manganese flecks. -
Center and Open:
Center the clay on your wheel head. Open the center to create a flat floor, leaving about 1/4 inch thickness for the base. -
Pull the Walls:
Pull the walls up into a straight cylinder. Aim for a medium height—this isn’t a tall tumbler but a cozy coffee mug shape. Keep the walls even, roughly 1/4 inch thick throughout. -
Define the Belly:
Gently shape the cylinder so it has a slight inward taper at the top, but keep the sides relatively vertical. Use a metal rib to compress and smooth the outside, removing throwing lines. -
Create the Texture Zone:
This step is subtle but important. Visually divide the mug in half horizontally. The bottom half will be carved, so ensure the wall thickness there can handle removing some material later. -
Refine the Rim:
Use a chamois or a piece of plastic to compress the rim, making it smooth and rounded for comfortable drinking. Cut the pot from the wheel but leave it on the batt to firm up slightly before moving.
Uneven Carving?
If your vertical lines are drifting diagonally, keep your elbow tucked tight against your body for stability and rotate the banding wheel, not your arm.
Step 2: Trimming and Handle
-
Leather Hard Stage:
Wait until the mug is leather hard—firm enough to hold its shape but soft enough to carve. Place it back on the wheel (or a Giffin Grip) upside down to trim. -
Trim the Foot:
Trim a defined foot ring. Because the carving stops before the very bottom, creating a slight undercut or shadow line at the foot helps lift the visual weight of the texture. -
Pull a Handle:
Pull a handle from the same clay. Aim for a simple ‘C’ shape or a slightly squared ear shape, as seen in the reference. It should accommodate two or three fingers. -
Attach the Handle:
Score and slip the attachment points. Place the top attachment just below the rim and the bottom attachment right at the midway point where the carving will eventually stop. Smooth the connections with a damp sponge.
Step 3: Carving the Texture
-
Mark Guidelines:
Lightly scribe a horizontal line around the circumference of the mug where the smooth top meets the textured bottom. This ensures your carving stays level. -
Prepare the Tool:
Select a loop tool with a narrow, oval shape. I find perfectly round loops remove too much clay; an oval shape creates that tapered ‘almond’ or leaf look. -
First Carve:
Start just below your guideline line. Press the tool in gently, drag it downward, and lift out as you near the bottom. The cut should be deepest in the middle and shallow at both ends. -
Establish Rhythm:
Repeat this vertical stroke right next to the first one. Leave a small ridge of raised clay between each cut to define the pattern. Try to keep the spacing consistent. -
Detailing the Carves:
If you look closely at the image, there is sometimes a secondary, thinner line inside the oval carves. Use a needle tool or stylus to gently impress a vertical line inside each carved oval for extra depth. -
Clean Up:
Once carved, let the mug dry a bit more. Then, use a stiff brush or a slightly damp sponge to soften the sharp burrs left by the carving tool without erasing the texture.
Depth Perception
Vary your pressure while carving. Press harder in the middle of the stroke and lighter at the ends to get that tapered almond shape.
Step 4: Glazing and Firing
-
Bisque Fire:
Fire the mug to bisque temperature (usually cone 04 or 06). Sand lightly if there are any sharp bits remaining. -
Glaze Interior:
Pour a clear or white liner glaze inside the mug. Pour it out quickly to ensure an even coat. -
Exterior Treatment:
For the look in the photo, the exterior is left largely unglazed to show off the raw, speckled clay body. You can apply a very thin wash of matte clear glaze to seal it, or leave it bare if your clay vitrifies fully and becomes non-porous. -
Final Fire:
Fire to the maturity temperature of your clay (likely Cone 5/6 or Cone 10 for stoneware).
Now you have a beautifully tactile mug that highlights the natural beauty of the clay itself.


Stamped Patterns That Look Like Fabric Impressions
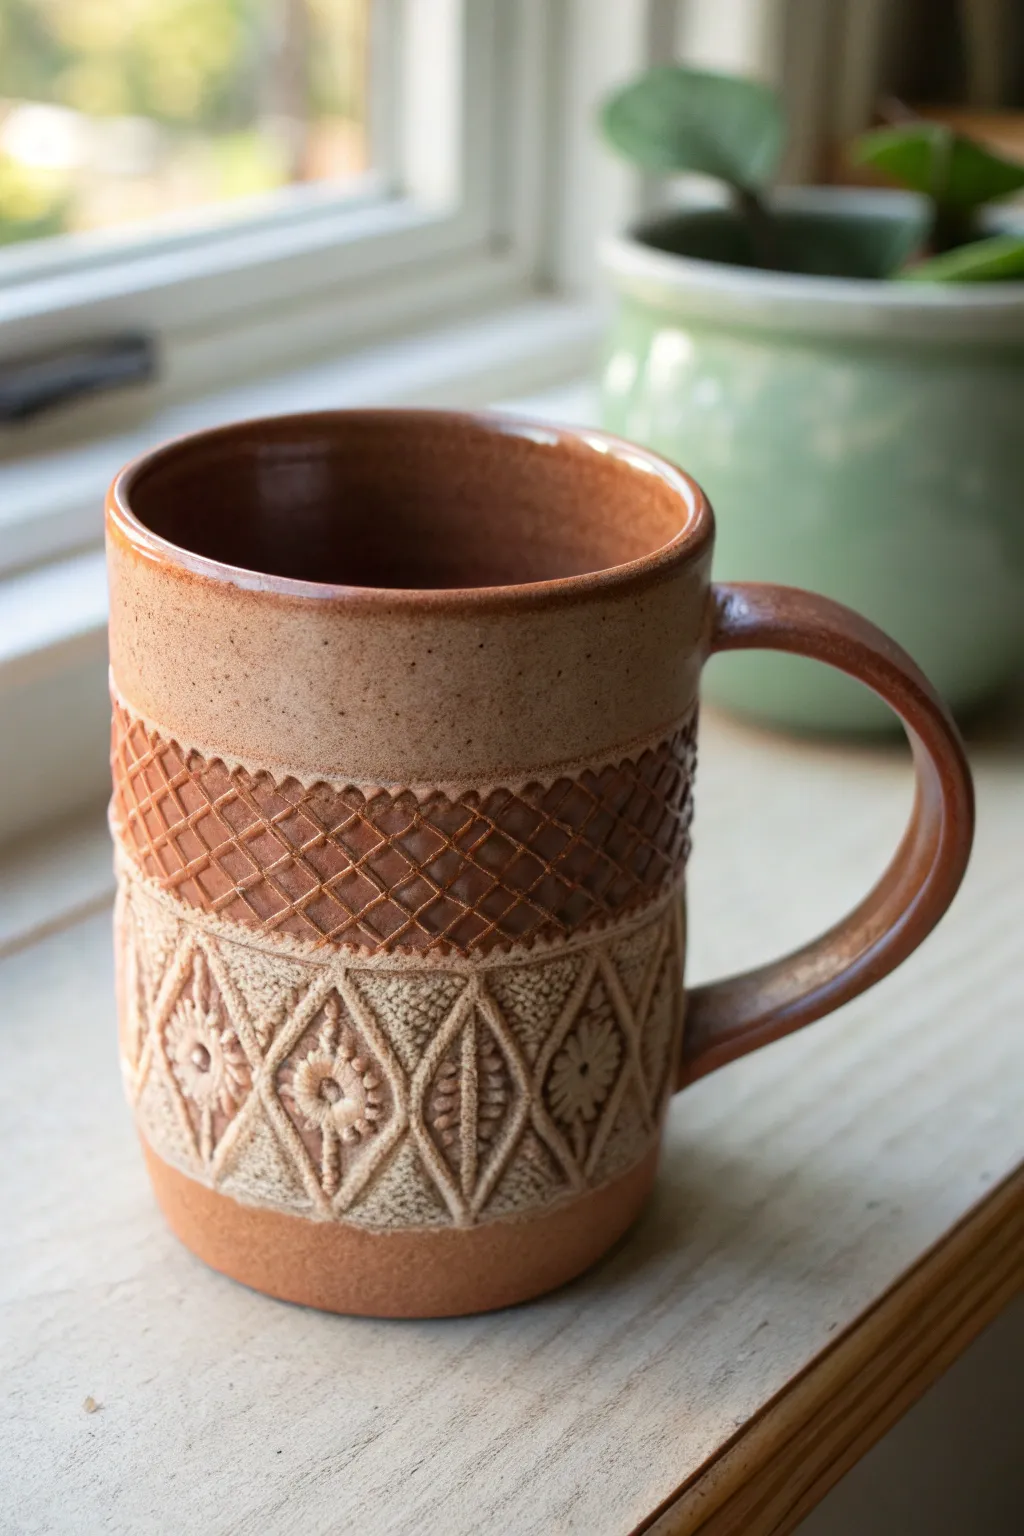
This rustic, cozy mug combines the tactile appeal of fabric impressions with the durability of stoneware. By layering two distinct pattern bands—a waffle lattice and a geometric floral diamond—you create a rich surface that feels as good in your hand as it looks on your shelf.
Step-by-Step Guide
Materials
- Stoneware clay body (speckled or warm brown)
- Rolling pin and canvas mat
- Slab roller (optional)
- Pottery wheel (if throwing the cylinder) or slab tools (if handbuilding)
- Textured rolling pin or stamp (waffle/lattice pattern)
- Geometric floral diamond stamp or textured mat
- Fettling knife
- Scoring tool and slip
- Sponge
- White decorative slip or underglaze
- Clear or transparent glossy glaze
- Wax resist
Step 1: Forming the Mug Body
-
Prepare the Clay:
Begin by wedging your stoneware clay thoroughly to remove air pockets. If you are throwing on the wheel, center about 1 to 1.5 lbs of clay. If handbuilding, roll out a consistent slab about 1/4 inch thick. -
Create the Cylinder:
Throw a tall, straight-walled cylinder on the wheel, leaving the walls slightly thicker than usual to accommodate later stamping. Alternatively, cut your slab into a rectangle and join the ends to form a tube. -
Define the Rim:
Smooth the rim with a chamois or sponge. Leave the top 1.5 inches of the mug completely smooth; this negative space will contrast beautifully with the busy textures below. -
Dry to Leather Hard:
Allow the cylinder to dry slowly until it reaches a firm leather-hard stage. It needs to be soft enough to accept an impression but sturdy enough not to collapse when you press against it.
Step 2: Applying the Textures
-
Map the Zones:
Lightly mark two horizontal lines around the mug to guide your stamping. You want a middle band about an inch wide, and a lower band covering the bottom portion. -
Impress the Lattice Band:
Support the inside of the wall with one hand. With the other, gently roll your lattice or waffle-texture tool around the middle band. Use firm, even pressure to ensure the diagonal grid is crisp. -
Stamp the Lower Pattern:
For the bottom section, align your geometric diamond stamps. Press them side-by-side to create a continuous ‘fabric’ wrap. I find that slightly overlapping the edges helps hide the seams between stamps. -
Add the Handle:
Pull or extrude a simple strap handle. Attach it securely using the score-and-slip method, placing the top attachment on the smooth upper rim and the bottom attachment near the base of the textured area. -
Slow Drying:
Cover the mug loosely with plastic to equalize the moisture content, especially around the handle joints. Let it dry completely to bone dry.
Stamp Support
When stamping the walls, hold a firm sponge or dense foam against the INSIDE wall opposite your stamp. This prevents the cylinder from warping out of round.
Step 3: Surface Decoration & Glazing
-
Bisque Fire:
Load the bone-dry mug into the kiln for a bisque firing (typically Cone 04 or 06). -
Apply White Slip Inlay:
Once bisqued, brush a white slip or underglaze heavily over the lower diamond-patterned section. Work it deep into the crevices of the texture. -
Wipe Back the Surface:
Using a clean, slightly damp sponge, wipe away the excess slip from the raised areas. This leaves the white material only in the recessed lines, highlighting the ‘stitched’ look. -
Glaze the Lattice Band:
Apply a transparent amber or light brown celadon glaze specifically to the middle lattice band. This will pool in the grid, darkening the recesses and emphasizing the waffle texture. -
Wax the Bottom:
Apply wax resist to the foot of the mug and slightly up the bottom edge to prevent glaze from running onto the kiln shelf. -
Dip or Pour Clear Glaze:
Dip the entire mug (or pour over the exterior) in a clear or semi-matte transparent glaze. This seals the clay and the white inlay while letting the natural clay body color show through. -
Final Fire:
Fire the mug to maturity (Cone 5, 6, or 10 depending on your clay body). Allow the kiln to cool naturally before unloading.
Vintage Lace Trick
Don’t have a stamp? Press actual heavy-lace or crocheted doilies into the clay while it’s soft. It creates an incredibly realistic fabric impression instantly.
Enjoy your morning coffee knowing the intricate patterns were crafted by your own hands


Two-Tone Color Blocking With a Crisp Divide
Embrace the beauty of contrast with this two-tone ceramic mug that features a grounding terracotta base and a creamy, speckled upper half. The distinct horizon line created by the glazing technique adds a modern, yet rustic touch to your morning coffee routine.
Step-by-Step Tutorial
Materials
- Stoneware clay body (speckled buff recommended)
- Pottery wheel (or rolling pin for hand-building)
- Pottery tools (wire cutter, rib, needle tool, trimming tools)
- Sponge
- Water bucket
- Scoring tool
- Slip
- Wax resist (liquid)
- Small paintbrush for wax
- Cream or white speckled glaze (glossy or satin)
- Terracotta or rust-colored glaze
- Kiln
Step 1: Throwing and Shaping
-
Prepare your clay:
Begin by wedging about 1 to 1.5 pounds of speckled stoneware clay to remove any air bubbles and ensure a uniform consistency. -
Center on the wheel:
slam your clay onto the wheel bat and use water and pressure to center it perfectly before opening. -
Pull the walls:
Or pull the walls up into a cylinder shape. Aim for straight, vertical sides similar to the mug in the photo, keeping the thickness consistent from bottom to top. -
Refine the rim:
Compress the rim with a chamois or your sponge to make it smooth and pleasant for drinking, ensuring it’s slightly rounded. -
Dry to leather hard:
Cut the cylinder from the bat with a wire tool and set it aside until it reaches the leather-hard stage.
Step 2: Trimming and Handle Attachment
-
Trim the foot:
Invert the mug onto the wheel and trim the bottom to create a neat foot ring, removing any excess weight from the base. -
Pull a handle:
Pull a strap of clay for the handle. Aim for a comfortable thickness that complements the mug’s size, curving it into an ear shape. -
Attach the handle:
Score the attachment points on both the mug and the handle. Apply slip generously and press the handle firmly onto the mug body, smoothing the seams so they disappear. -
Bisque fire:
Allow the mug to dry completely, typically for a few days to a week, before loading it into the kiln for a bisque firing (usually Cone 04 or 06).
Clean Lines
If the glaze line looks messy after dipping, use a stiff, damp brush or a fettling knife to gently scrape away excess glaze while it’s powdery dry to sharpen the edge.
Step 3: Glazing the Two-Tone Effect
-
Clean the bisque:
Wipe the bisque-fired mug with a damp sponge to remove any dust that might interfere with glaze adhesion. -
Mark the divide:
Using a pencil, lightly mark a line around the circumference of the mug where you want the color color break to happen—about one-third up from the bottom. -
Apply wax resist:
Brush liquid wax resist carefully over the bottom section and the foot of the mug, right up to your pencil line. I find a steady hand here makes all the difference for that crisp look. -
Glaze the interior:
Pour your cream speckled glaze inside the mug, roll it around to coat the entire interior surface, and pour out the excess. -
Dip the top half:
Holding the mug by the foot (which is waxed), dip the entire smooth outer surface into the cream glaze. The wax will repel the glaze from the bottom third. -
Clean the wax line:
Use a damp sponge to wipe any stray droplets of cream glaze off the waxed bottom section to ensure a clean surface for the next step. -
Dry briefly:
Let the top glaze dry to the touch so you don’t smudge it during the second dip. -
Glaze the bottom:
For the bottom color, you can either carefully brush the terracotta glaze onto the waxed area (if your glaze adheres to wax, which some special ones do) or, more traditionally, remove the wax (if possible) or simply dip the bottom third into the terracotta glaze *before* washing the foot, overlapping slightly if desired. Alternatively, for the crispest line shown, dip the bottom third in terracotta *first*, wax over it, then dip the top. -
Correction: The Dip Method:
Actually, the sharpest line is achieved by dipping the bottom third into the rust glaze first. Let it dry perfectly. -
Wax the bottom glaze:
Apply wax over the dried rust glaze up to the color line. -
Final dip:
Dip the top two-thirds (and interior if not done) into the cream speckled glaze. The wax over the rust glaze will protect it, creating that sharp meet-point. -
Wipe the foot:
Ensure the very bottom foot ring is completely free of glaze so it doesn’t fuse to the kiln shelf. -
Glaze fire:
Load the mug into the kiln for the final glaze firing according to your clay and glaze specifications (e.g., Cone 6 or 10).
Make it yours
Try leaving the bottom third completely unglazed instead of using rust glaze. The raw fired clay often provides a beautiful textural contrast against the smooth top glaze.
Once the kiln cools, you’ll have a stunning piece of functional art ready for your favorite hot beverage

The Complete Guide to Pottery Troubleshooting
Uncover the most common ceramic mistakes—from cracking clay to failed glazes—and learn how to fix them fast.
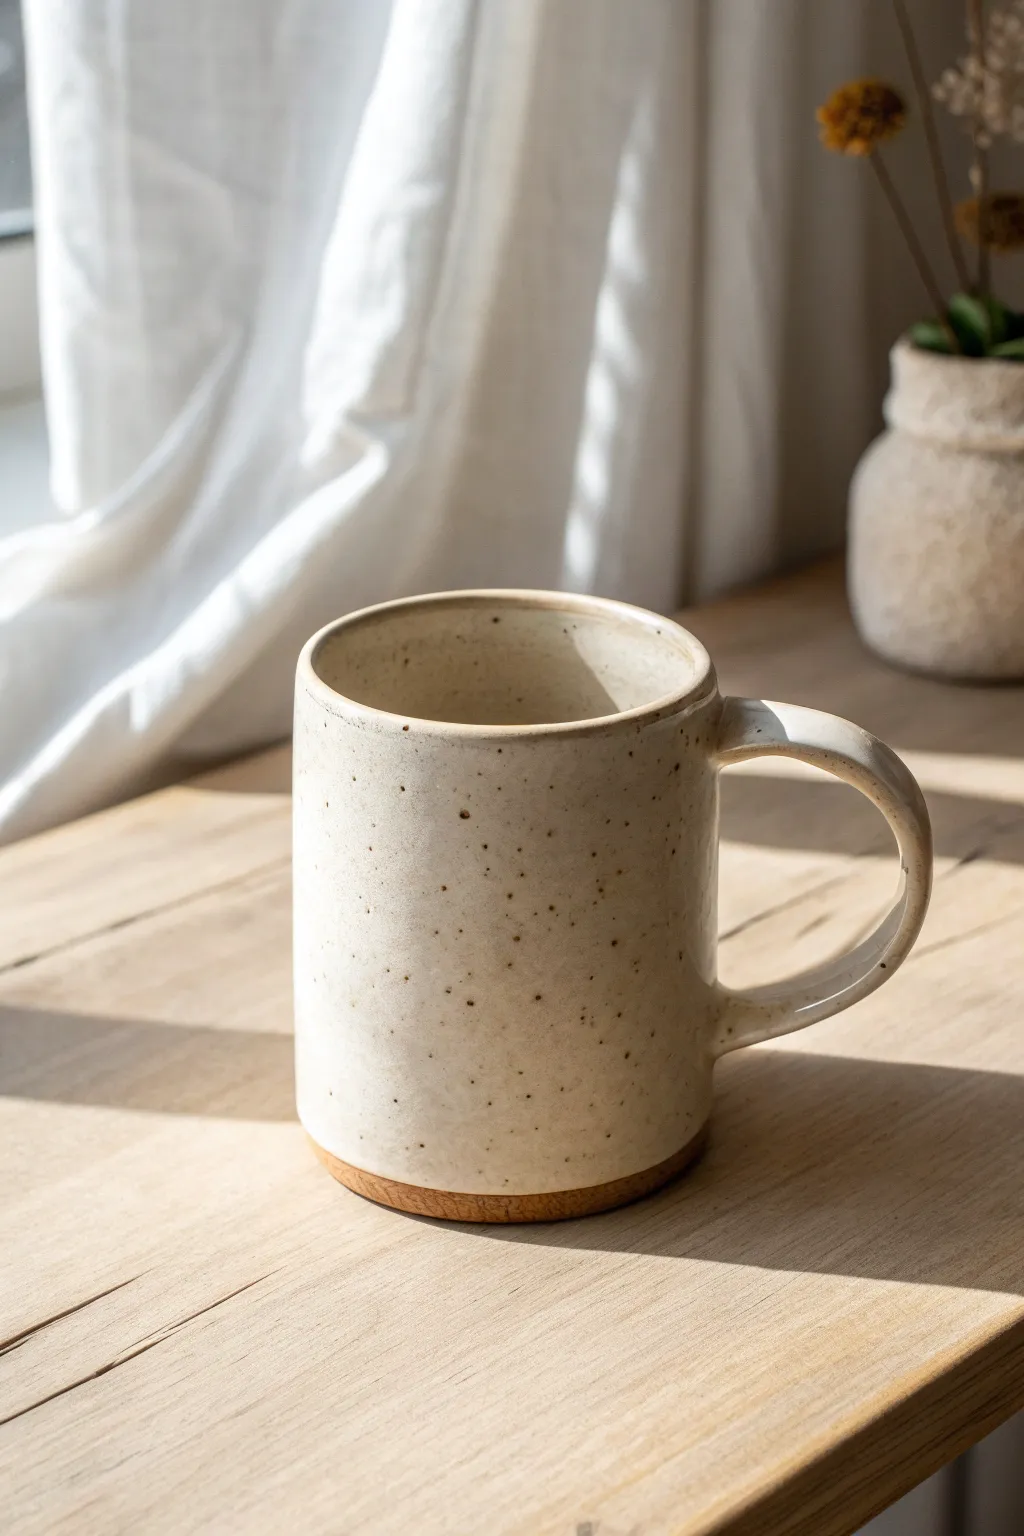
Speckled Minimal Mug for an Earthy Look

Capture the essence of natural pottery with this tall, cylindrical mug featuring a warm oatmeal glaze and deliberate brown speckling. The simple form, combined with the organic texture and subtle rim detail, creates a comforting vessel perfect for your morning brew.
How-To Guide
Materials
- Speckled Stoneware Clay (or Buff clay with added grog/manganese speckles)
- Pottery wheel
- Throwing tools (sponge, needle tool, rib, wire cutter)
- Trimming tools
- Water bucket
- Serrated rib or scoring tool
- Slip (liquid clay)
- Oatmeal or Satin White glaze (translucent enough to show speckles)
- Iron Oxide wash (optional, for rim)
- Small paintbrush
- Kiln
Step 1: Throwing the Cylinder
-
Center and Open:
Begin with about 1.5 lbs of speckled stoneware clay. Center it firmly on the wheel head, then open the center down to leave about a 1/4 inch floor. -
Pull the Walls:
Pull the walls upward into a tall, consistent cylinder. Aim for a height that feels substantial—this mug is taller and narrower than a standard coffee cup. Keep the walls even from bottom to top. -
Refine the Shape:
Use a straight wooden or metal rib on the exterior to remove throwing lines and create that sleek, minimal straight-sided profile shown in the image. -
Compress the Rim:
Gently compress the rim with your chamois or sponge. It should remain slightly squared off but smooth to the touch. -
Wire Off:
Run your wire cutter under the base and carefully set the cylinder aside on a ware board to firm up until leather hard.
Handle Cracking?
If hairline cracks appear where the handle meets the mug, dry the piece more slowly under plastic next time. Uneven drying causes tension at the joints.
Step 2: Creating the Handle
-
Pull a Strap:
While the body dries, pull a medium-width strap handle from a lug of clay. I find pulling handles directly from a larger lump of clay gives them a nicer taper. -
Form the Curve:
Allow the pulled strap to stiffen slightly, then curve it into a ‘C’ shape that complements the tall body. The handle should be generous enough for three or four fingers. -
Trim to Fit:
Cut the attachment points of the handle at an angle to match the curve of the mug wall.
Step 3: Trimming and Assembly
-
Trim the Base:
Once leather hard, center the mug upside down on the wheel. Trim away excess weight from the bottom, creating a clean, flat foot ring or a slight undercut. -
Score and Slip:
Hold the handle up to the mug to check placement. Score the attachment points on both the mug and the handle aggressively, then apply a generous amount of slip. -
Attach the Handle:
Press the handle firmly onto the mug body. Use a small wooden tool or your finger to smooth the seams completely, blending the clay so it looks like it grew out of the mug. -
Clean Up:
Wipe away any excess slip with a damp sponge. Run a smooth rib over the handle curve to ensure it feels comfortable in the hand. -
Bisque Fire:
Let the mug dry slowly to prevent cracking, especially at the handle join. Load it into the kiln for a bisque fire (usually cone 04 or 06).
Thumb Rest Trick
Add a small clay button or indentation at the top of the handle curve. This provides a perfect resting spot for your thumb and improves grip stability.
Step 4: Glazing and Finishing
-
Wax the Foot:
Apply wax resist to the bottom of the mug and up the side about 1/8th of an inch to prevent glaze from running onto the shelf. -
Apply Base Glaze:
Dip the entire mug into a satin white or oatmeal glazes. The glaze needs to be somewhat translucent; if it’s too opaque, you’ll lose the natural clay speckles. -
Accent the Rim:
Dip a small brush into iron oxide wash or a darker brown glaze. Carefully paint a thin line around the very top edge of the rim. This creates that defined, rustic border. -
Enhance Speckles (Optional):
If your clay isn’t naturally speckled enough, you can flick a stiff toothbrush dipped in iron oxide wash lightly over the surface now. -
Glaze Fire:
Load the mug into the kiln for the final glaze firing (often Cone 5/6 or Cone 10, depending on your clay and glaze choice). -
Sand the Bottom:
After firing, use wet sanding paper or a diamond pad to smooth the unglazed foot ring so it doesn’t scratch your table.
Enjoy the warmth of your handmade speckled mug with your favorite beverage
Hand-Painted Wildflowers Around the Belly
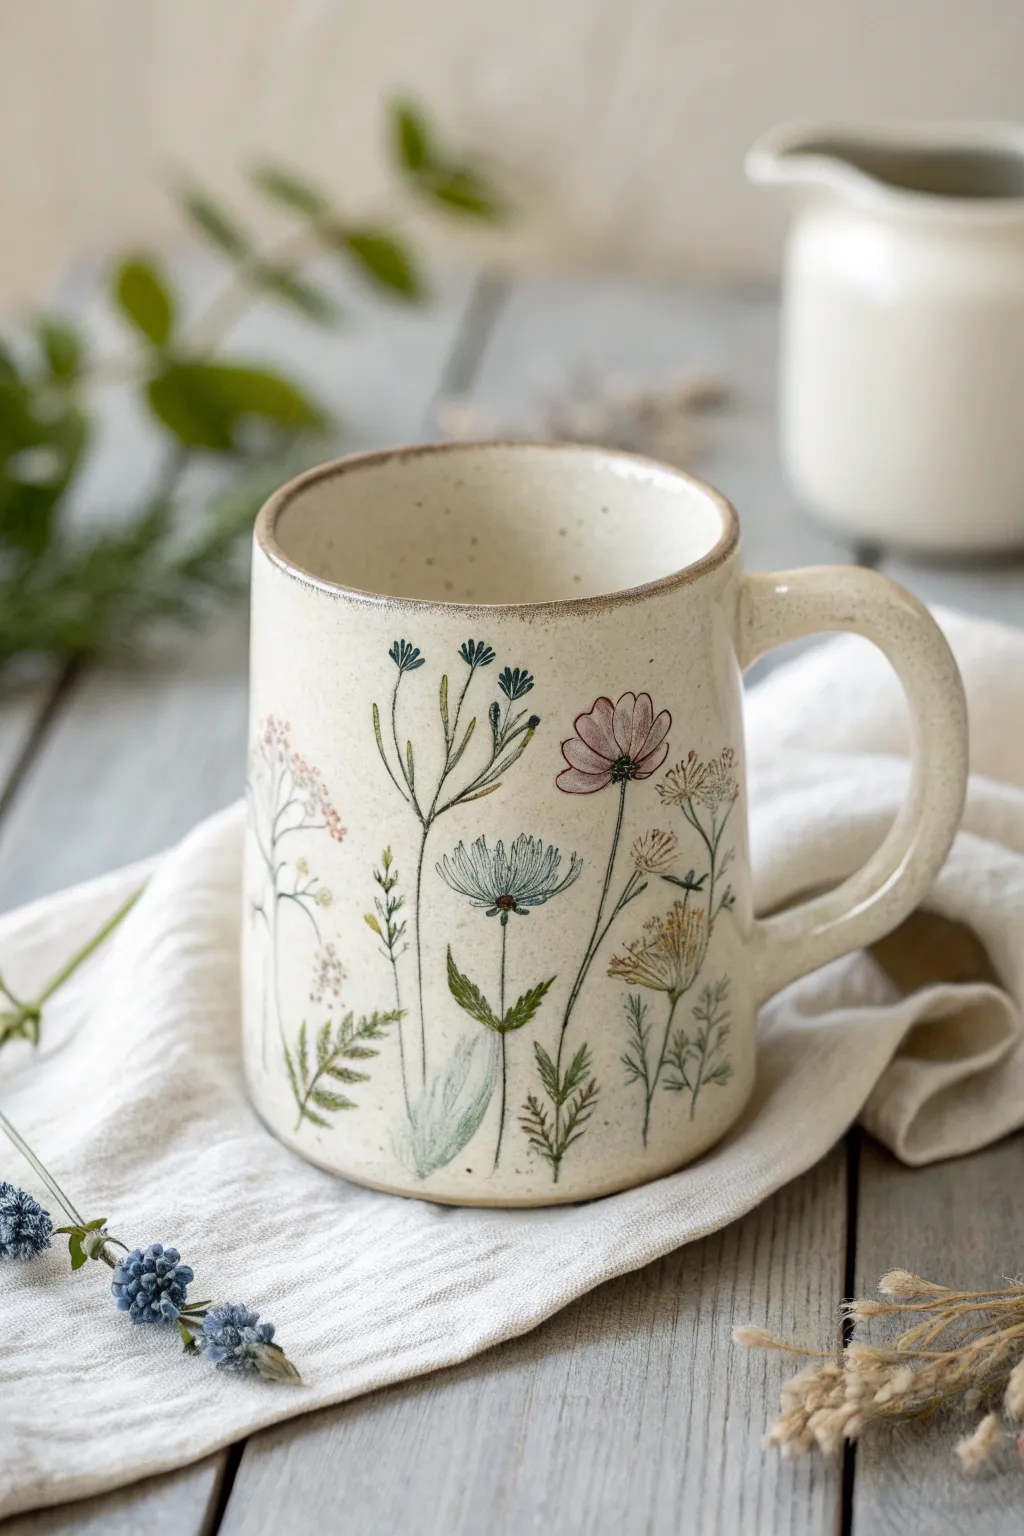
Bring the serene beauty of a wildflower meadow into your morning routine with this hand-painted ceramic mug project. Featuring slender stems of cosmos, fennel, and wild grasses on a speckled cream clay body, this design balances rustic charm with botanical precision.
Step-by-Step Guide
Materials
- Bisque-fired ceramic mug (wheel-thrown or hand-built)
- Underglazes (Sage Green, Forest Green, Dusty Pink, Cornflower Blue, Mustard Yellow, Soft White)
- Clear dipping glaze or brushing glaze
- Fine liner brush (size 0 or 00)
- Small round brush (size 2)
- Pencil (for sketching)
- Palette or ceramic tile
- Water cup and sponge
Step 1: Planning and Base Work
-
Prepare the surface:
Begin with your bisque-fired mug. Wipe it down swiftly with a damp sponge to remove any kiln dust or oils from your hands, ensuring a clean surface for the underglaze to adhere to. -
Sketch the layout:
Using a regular graphite pencil, lightly sketch the vertical lines where your stems will grow. Vary the heights to create a natural, organic rhythm around the belly of the mug. Don’t worry about the graphite marks; they will burn off completely in the kiln. -
Map out floral heads:
Mark small circles or ovals at the top of your stem lines to indicate where the main flowers will sit. This helps visualize the spacing so your design doesn’t feel cluttered on one side.
Water Consistency
Add a drop of water to your underglaze until it feels like heavy cream. Too thick acts like paste; too thin and the color vanishes.
Step 2: Painting the stems and Greenery
-
Mix your greens:
On your palette, put out your Sage Green and Forest Green. I like to mix a tiny bit of brown or mustard into the Forest Green to make it look more earthy and less artificial. -
Paint the main stems:
Load your fine liner brush with the diluted Sage Green mixture. Paint thin, confident lines following your pencil sketches. Keep the pressure light to maintain a delicate line weight. -
Add leafy details:
Using the same liner brush, add the fern-like leaves at the base. Use short, quick strokes that start at the stem and flick outward to mimic the texture of yarrow or wild ferns. -
Introduce variance:
Switch to the darker Forest Green mix for the stems of the cosmos and cornflowers. This subtle contrast prevents the ‘meadow’ from looking flat. -
Detail the grasses:
For the feathery grass elements, dampen your brush slightly more so the underglaze flows like ink. Create wispy, upward strokes that overlap the main stems slightly.
Step 3: Adding the Blooms
-
Paint the Cosmos petals:
Using the size 2 round brush and Dusty Pink underglaze, press gently to form the tear-drop shapes of the cosmos petals. Leave a tiny bit of negative space in the center. -
Add the blue accents:
For the cornflowers, switch back to your fine liner brush. Use Cornflower Blue to make small, jagged strokes radiating from a point, creating that characteristic thistle-like shape. -
Create the white umbels:
For the Queen Anne’s Lace or fennel flowers, use the tip of your brush to dot Soft White underglaze in umbrella-shaped clusters at the top of the tallest stems. -
Layer the colors:
Once the pink petals are dry to the touch, add very fine lines of darker magenta or red near the center of the bloom to give the flower depth and dimension. -
Final floral details:
Add tiny dots of Mustard Yellow to the centers of the blue cornflowers and the larger white clusters to act as pollen.
Prevent Smudging
If you smudge a stem while painting, don’t wipe it! Let it dry, then scratch the mistake off gently with an X-Acto knife or needle tool.
Step 4: Glazing and Finishing
-
Check the rim:
This style features a lovely toasted rim. If your clay body is speckled but light, simple leave the rim unpainted. If you want to enhance it, sponge a very sheer wash of iron oxide or brown underglaze on the lip. -
Bisque fire (Optional):
If you are worried about smudging your design during glazing, you can bisque fire the piece again to set the underglaze. However, most potters skip straight to glazing. -
Apply clear glaze:
Dip the entire mug into a clear, gloss glaze. Ensure you shake off excess drips gently. If brushing, apply three even coats, letting each dry fully in between. -
Wait for setting:
Allow the glaze to dry completely before handling the mug too much to avoid leaving fingerprints in the powdery surface. -
Fire the mug:
Load the mug into the kiln and fire to the maturity temperature of your clay and glaze (typically Cone 5 or 6 for stoneware). -
Sand the bottom:
Once the kiln is cool and unloaded, check the bottom of the mug. Use sandpaper or a diamond pad to smooth any rough grit on the foot ring.
Now you have a stunning, functional piece of art that perfectly captures the gentle wildness of a summer field.


What Really Happens Inside the Kiln
Learn how time and temperature work together inside the kiln to transform clay into durable ceramic.
Sgraffito Line Art for a Clean, Graphic Mug
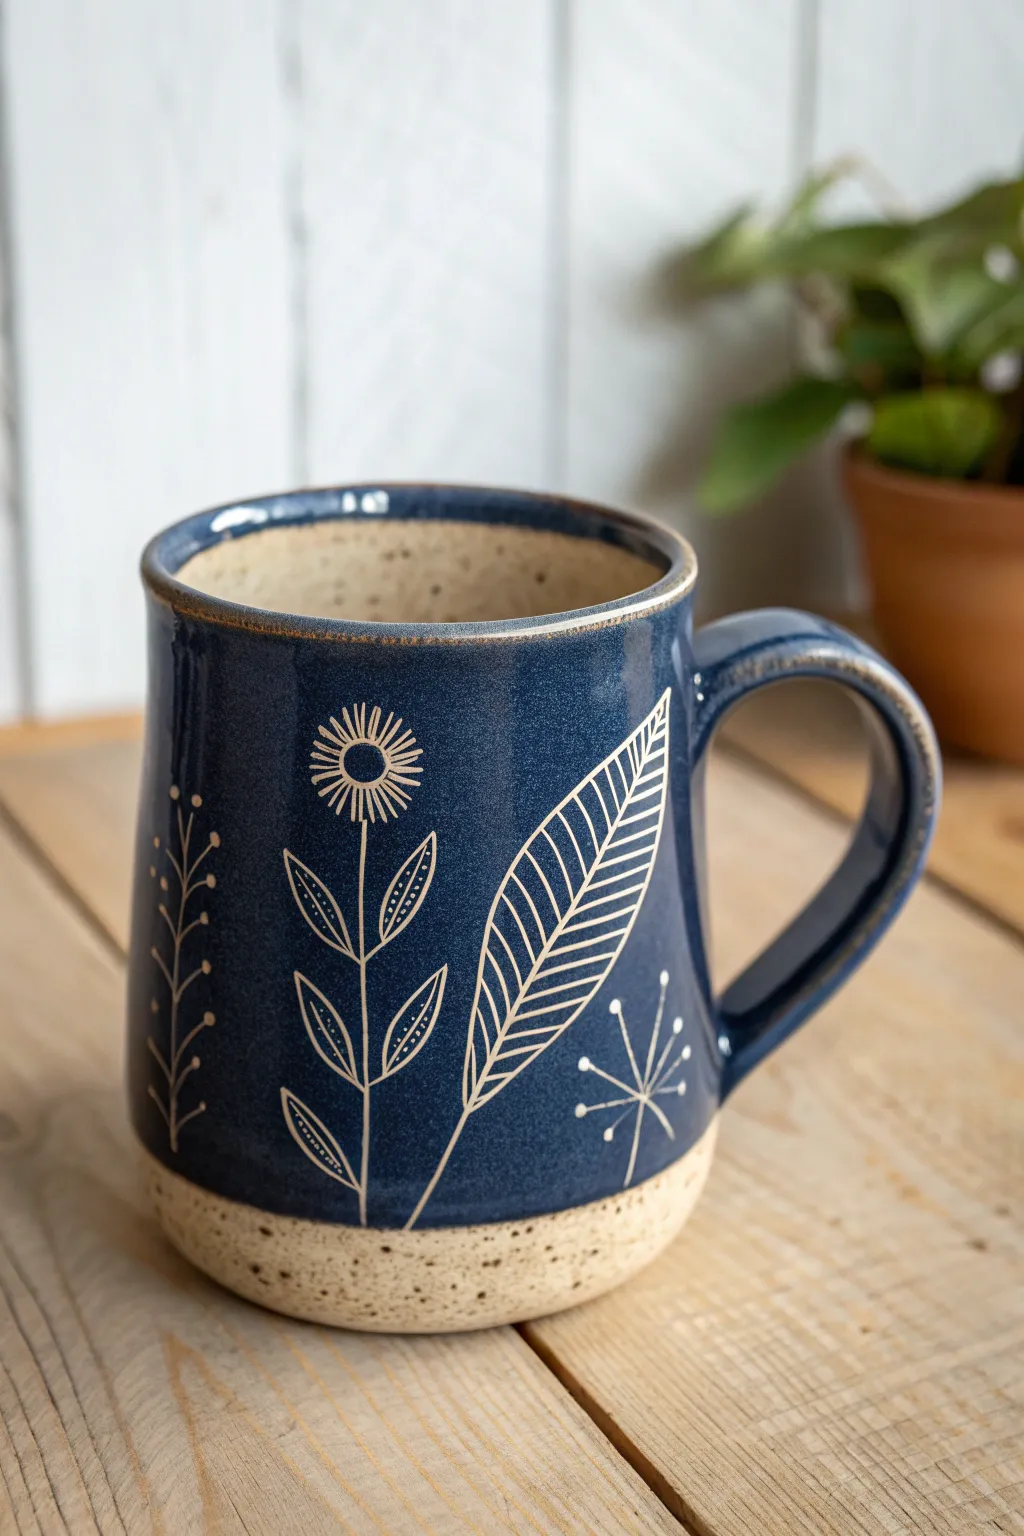
This project combines the rustic charm of speckled stoneware with crisp, modern line art technique called sgraffito. By carving through a layer of deep navy underglaze, you’ll reveal the raw clay body underneath to create delicate botanical motifs.
Detailed Instructions
Materials
- Speckled stoneware clay
- Navy blue underglaze
- Clear glossy glaze
- Pottery wheel (or slab roller/hand-building tools)
- Small loop carving tool (sgraffito tool)
- Needle tool
- Synthetic soft fan brush
- Sponge
- Wire cutter
- Rib tool
- Kiln
Step 1: Shaping the Form
-
Wedge and Center:
Begin by thoroughly wedging about 1 to 1.5 lbs of speckled stoneware clay to remove air bubbles. Center the clay on your pottery wheel, ensuring a stable base. -
Throw the Cylinder:
Pull the walls up to create a tall, straight cylinder. Aim for a slightly narrower rim compared to the base to give it that cozy mug silhouette visible in the example. -
Refine the Profile:
Using a rib tool, smooth the exterior walls and gently gently bow out the form slightly if you prefer a rounded body, though a straighter profile works best for this specific botanical layout. -
Form the Rim:
Compress the rim well with a sponge. The example shows a slightly rounded, substantial lip, so don’t make it too thin. -
Trim and Add Handle:
Once the mug is leather-hard, trim the bottom to create a neat foot. Pull a simple strap handle and attach it securely, smoothing the joins so they are invisible.
Clean Lines Tip
Carve when the underglaze is leather-hard, not bone dry. If it chips or flakes while carving, the piece is too dry—mist it lightly and wait.
Step 2: Applying Color
-
Determine Glaze Line:
Decide where your blue background will stop. Looking at the photo, the blue ends about an inch from the bottom, leaving a raw clay band at the base. -
Map the Exterior:
I find it helpful to lightly mark a horizontal line around the base with a needle tool to ensure your underglaze application stays straight. -
Apply Underglaze:
Using a soft fan brush, apply 2-3 even coats of navy blue underglaze to the exterior, stopping at your marked line. Let each coat dry until it loses its sheen before applying the next. -
Monitor Drying:
Allow the underglaze to dry to a leather-hard state. It should be firm to the touch but not dusty or bone dry, as carving requires a bit of moisture.
Add Dimension
Leave the rim unglazed (raw clay) like the base, or dip just the rim in a contrasting rusty orange glaze for a vintage look.
Step 3: Carving the Sgraffito Design
-
Sketch the Layout:
Before committing to deep cuts, lightly scratch your design onto the blue surface with a dull pencil. The graphite will burn off later, but it gives you a guide for the flowers. -
Carve the Stems:
Using your sharpest small loop tool or stylus, carve clean, long vertical lines for the plant stems. Use confident, steady strokes to slice through the blue layer and reveal the white clay. -
Detail the Leaves:
For the large leaf, carve the outline first, then add the internal veins. Notice how the veins are simple parallel lines; keep your pressure consistent. -
Create the Flora:
Carve the sunflower shape with a central circle and radiating petals. For the dandelion-style puff, use simple straight lines radiating from a point. -
Add Texture Accents:
Add the smaller details like the tiny dots on the leaf veins and the small vertical vine patterns to fill empty negative space. -
Clean Up Crumbs:
As you carve, clay burrs will accumulate. Do not brush them away with your hand, or you might smear the blue. Use a large, soft, dry brush to gently sweep the crumbs away.
Step 4: Firing and Glazing
-
Bisque Fire:
Once the mug is completely bone dry, load it into the kiln for a bisque fire (usually Cone 04 or 06). This sets the shape and underglaze. -
Wax the Foot:
Apply wax resist to the bottom of the mug and up the side, covering that exposed raw clay band at the bottom so no clear glaze sticks there. -
Clear Glaze Application:
Dip the entire mug (or pour) into a clear glossy glaze. This will seal the interior for food safety and make the exterior carving pop. -
Final Fire:
Fire the mug to maturity (Cone 5 or 6 for most stoneware). The clear glaze will become transparent, highlighting the contrast between the navy and the speckled clay. -
Sand the Base:
After firing, use a sanding block or diamond pad to smooth the unglazed raw clay at the bottom so it doesn’t scratch your table.
Enjoy your morning coffee knowing you crafted this botanical beauty with your own hands
Mishima-Style Inlay for a Crisp Pattern

Achieve clean, graphic lines on a rustic speckled surface using the Mishima inlay technique. This project combines a classic cylinder form with a satisfying geometric grid that reveals the raw clay body beneath.
Step-by-Step
Materials
- Speckled buff stoneware clay
- Throwing wheel and bats
- Needle tool
- Carving tool (small loop or sgraffito tool)
- White underglaze or slip
- Wax resist
- Metal kidney rib
- Sponge
- Clear glaze (matte or satin)
- Ruler or straight edge
- Soft brush
Step 1: Throwing and Trimming
-
Throw the cylinder:
Begin with about 1 lb of speckled buff clay. Center it on the wheel and pull a cylinder with straight, vertical walls. Aim for a height of about 4-5 inches, keeping the rim slightly tapered for comfortable drinking. -
Refine the shape:
Use a rib to smooth the walls and remove throwing lines. The smoother the surface now, the easier the carving will be later. Let the mug dry to a firm leather-hard stage. -
Trim the foot:
Place the leather-hard mug back on the wheel. Trim the bottom to create a neat foot ring. I like to leave a slightly taller unglazed area at the base to define where the handle will end. -
Pull and attach handle:
Pull a classic C-shaped handle from a lug of clay. Score and slip the touch points on both the handle and the mug body, then attach it firmly. Smooth the seams with a damp sponge.
Clean Lines Pro Tip
Apply the wax resist *before* carving. This prevents the white slip from staining the surrounding clay, ensuring your grid lines look incredibly crisp and saving you hours of cleanup time.
Step 2: Creating the Mishima Grid
-
Wax the surface:
Apply a thin coat of wax resist over the entire exterior surface where you plan to carve. This protects the negative space from staining during the inlay process. -
Mark your grid:
Once the wax is dry to the touch, gently sketch your grid guide lines lightly with a needle tool. Don’t carve deep yet; just layout your spacing to ensure the squares are relatively even. -
Carve the main grid:
Using a fine loop tool or a sharp carving tool, carve through the wax and into the clay body along your vertical and horizontal lines. Create a groove deep enough to hold slip but not so deep it weakens the wall. -
Detail the base:
For the bottom 1/4 inch of the mug (the border section), carve a dense cross-hatch or diamond pattern. These lines can be slightly finer than the main grid. -
Clean up burrs:
Run a finger gently over the carved lines to knock off any large clay crumbs, but don’t worry about being perfect yet.
Level Up: Color Pop
Instead of white slip, try using a dark cobalt blue or black underglaze for the inlay. The high contrast against the speckled buff clay creates a bold, modern farmhouse aesthetic.
Step 3: Inlay and Finishing
-
Apply the inlay:
Generously paint white underglaze or slip over all the carved areas. Make sure the liquid gets all the way into the grooves. Because of the wax, it will bead up on the uncarved surfaces. -
Let it firm up:
Wait until the underglaze loses its sheen and is stiff but not bone dry. This usually takes 15-20 minutes. -
Scrape the excess:
Using a metal rib or a specialized scraping tool, gently scrape the surface of the mug. The wax helps the excess underglaze peel right off, leaving crisp white lines inside the clay grooves. -
Final wipe:
Use a barely damp sponge to wipe away any lingering haze on the waxed areas, ensuring the clay body color shows clearly between the white grid lines. -
Bisque fire:
Let the mug dry slowly to prevent handle cracking, then bisque fire to cone 04. -
Glaze application:
Dip the interior and the exterior grid section in a clear matte or satin glaze. Leave the detailed cross-hatch border at the bottom unglazed to highlight the raw clay texture. -
Final firing:
Fire to cone 6 (or your clay body’s maturation temperature) in an electric kiln. The heat will fuse the inlay and reveal the speckles in the beige clay.
Fill your new mug with coffee and enjoy the tactile feel of the inlaid texture

TRACK YOUR CERAMIC JOURNEY
Capture glaze tests, firing details, and creative progress—all in one simple printable. Make your projects easier to repeat and improve.
Botanical Sprigs and Relief Leaves You Can Feel
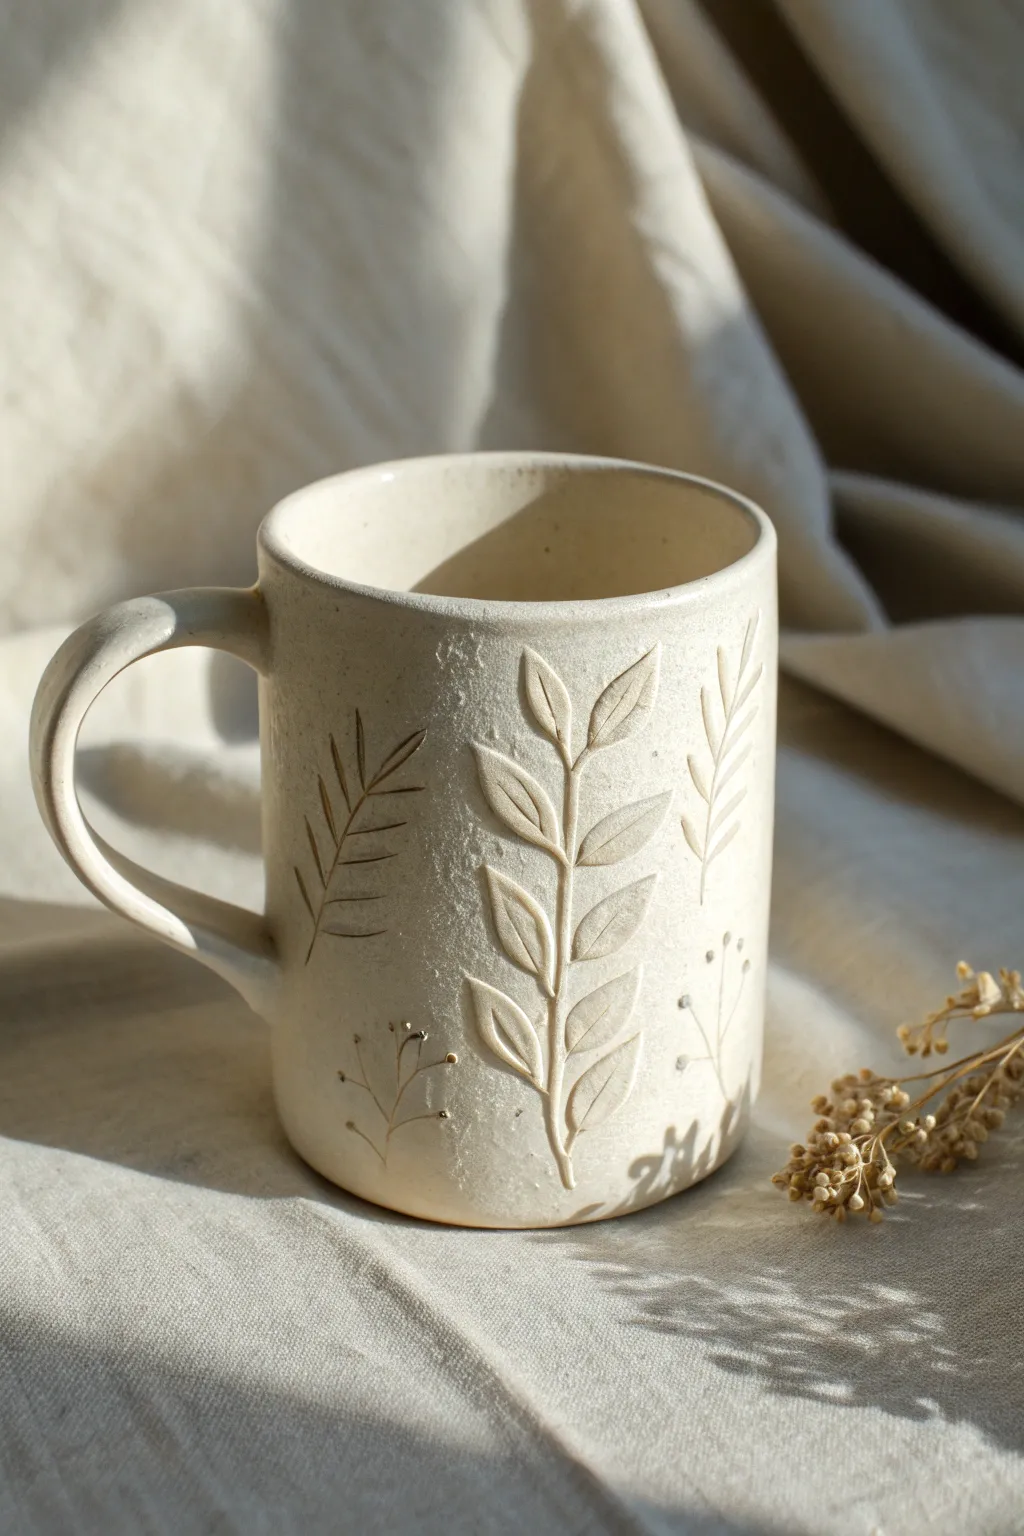
Capture the delicate beauty of nature directly in your hands with this textured botanical mug. By using relief carving techniques on leather-hard clay, you’ll create a tactile surface where fern-like sprigs and leaves seem to grow right out of the vessel.
Step-by-Step Guide
Materials
- Light-colored stoneware clay (smooth or slightly grogged)
- Pottery wheel (or slab roller/rolling pin for hand-building)
- Needle tool
- Wire loop trimming tools (various sizes)
- Ribs (metal and wood)
- Sponge
- Clear or matte transparent glaze
- Kiln
- Slip (liquid clay)
- Scoring tool or serrated rib
Step 1: Forming the Base Vessel
-
Prepare the clay:
Begin by wedging about 1 to 1.5 lbs of clay thoroughly to remove air bubbles. This ensures a smooth throwing experience and a uniform surface for your future carving. -
Throw the cylinder:
Center your clay on the wheel and open it up. distinctively, this mug has a straight-sided profile with a very subtle curve at the bottom, so aim for a classic cylinder shape about 4-5 inches tall. Keep the walls even, perhaps slightly thicker than usual (about 1/4 inch) to allow depth for carving later. -
Refine the rim:
Use a chamois or a piece of plastic to compress and round the rim. A comfortable rim is crucial for a mug you’ll use daily. -
Dry to leather hard:
Cut the cylinder from the bat and let it dry slowly. You want it to reach a ‘leather hard’ state—firm enough to handle without deforming, but soft enough to carve into easily. -
Trim the foot:
Once leather hard, flip the mug over and trim the bottom. Create a clean, flat foot ring or a simple flat bottom, smoothing away any rough tool marks.
Uneven Carving Depths?
If you carve too deep and hit a thin spot, don’t panic. Backfill with a tiny bit of soft clay slip, smooth it over, let it dry, and gently re-carve the area.
Step 2: Handling and Carving
-
Pull the handle:
Pull a strap handle from a lump of fresh clay. Aim for a comfortable C-shape that mimics the curve seen in the image. Allow this to stiffen up slightly until it matches the moisture content of your mug body. -
Attach the handle:
Score and slip the attachment points on both the mug and the handle. Press firm to secure the join, then smooth the seams with a small tool or your finger to make it look seamless. -
Sketch the design:
Using a very light touch with a needle tool, sketch the outlines of your botanical sprigs directly onto the mug surface. Plan for a mix of large, central leaf stems and smaller, delicate sprigs off to the sides. -
Carve the relief:
This step requires patience. Use a small wire loop tool to carve away the ‘negative space’ around your drawn leaves. You aren’t cutting the leaves out; you are lowering the background clay *around* them, which makes the leaves stand out in relief. -
Detail the veins:
Switch back to your needle tool or a fine stylus. Gently press a central vein line down the middle of each raised leaf. For the smaller fern-like sprigs, you can simply incise lines rather than carving away the background to create variety in texture. -
Refine the edges:
I like to take a slightly damp brush or sponge and gently wipe over the carved areas. This softens any sharp crumbs of clay left by the carving tools and makes the leaves feel smooth to the touch. -
Add delicate accents:
Check the image for the tiny dash-like details near the smaller sprigs. Use the very tip of your tool to press these small divots into the clay, adding whimsical movement to the composition.
Step 3: Finishing and Firing
-
Slow drying:
Loosely cover the mug with plastic to ensure the handle and body dry at the same rate. This prevents cracking at the attachment points. Once fully dry (bone dry), it is ready for the first firing. -
Bisque fire:
Load the mug into the kiln for a bisque fire (usually Cone 04 or 06). This hardens the clay and prepares it for glazing. -
Clear glaze application:
To maintain the natural look of the clay and the visibility of your carving, dip the mug into a clear or transparent matte glaze. Shake off any excess drip. -
Clean the foot:
Wipe the bottom of the mug clean with a wet sponge to ensure no glaze touches the kiln shelf. -
Glaze fire:
Fire the mug to the maturity temperature of your specific clay body (e.g., Cone 5 or 6 for stoneware). Allow the kiln to cool completely before unloading.
Highlight the Leaves
For more contrast, brush a dark oxide wash (like iron oxide) over the carving, then wipe it away with a sponge. The dark color will stay in the recesses.
Pour your favorite warm beverage into your new mug and enjoy the feeling of those textured leaves under your fingers.
Whimsical Appliqué: Mushrooms, Clouds, or Tiny Stars
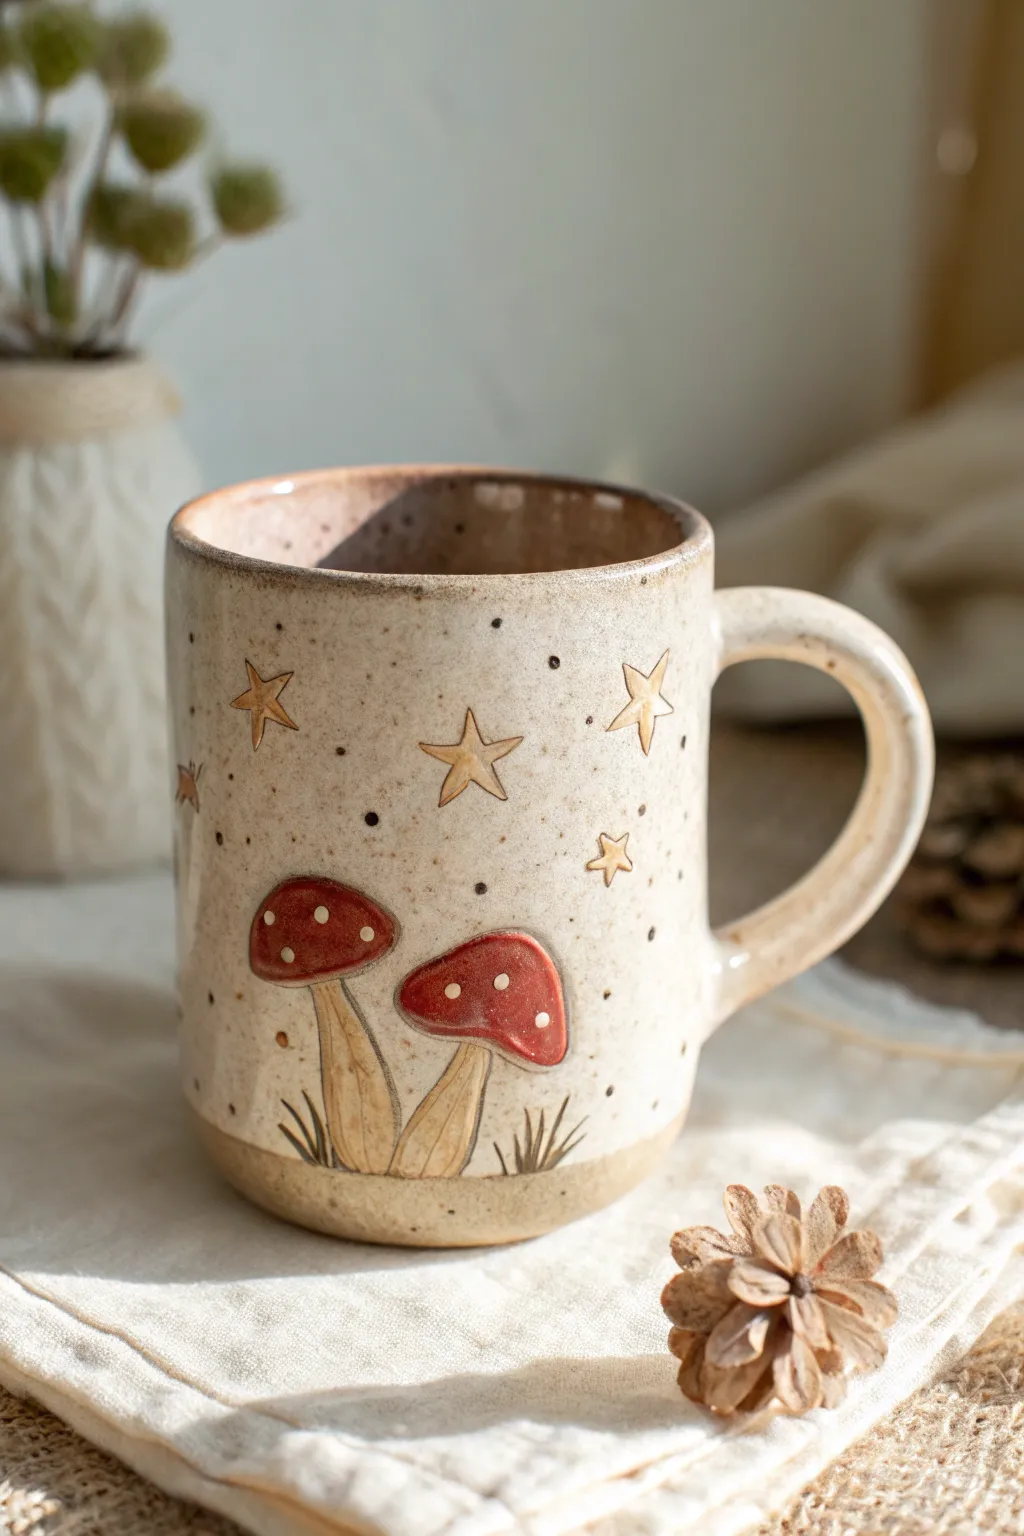
Bring a touch of cottagecore charm to your morning coffee with this speckled stoneware mug featuring hand-carved mushroom details and celestial accents. The combination of raw clay texture and glossy red caps creates a delightful tactile experience perfect for cozy days.
How-To Guide
Materials
- Speckled buff stoneware clay
- Pottery wheel (or slab roller for handbuilding)
- Rib tools (metal and wood)
- Needle tool
- Small loop tool or carving tool
- Red underglaze (for mushroom caps)
- Black underglaze pencil or fine liner brush
- Clear glossy glaze
- Detailed paintbrush
- Wax resist
- Sponge
Step 1: Forming the Mug
-
Throw the cylinder:
Begin by centering about 1-1.5 lbs of speckled stoneware clay on your wheel. Pull the walls to create a straight-sided cylinder with a slightly thicker floor to account for eventual trimming. -
Refine the shape:
Use a rib tool to smooth the outside and create a gentle curve at the bottom if desired, distinct from the straight walls. Ensure the rim is rounded and comfortable for drinking. -
Pull and attach the handle:
Pull a strap of clay for the handle. Once the clay is leather hard, score and slip the attachment points on the mug body and the handle ends. Press firmly to attach, creating a classic C-shape loop.
Clean Lines Pro Tip
If using underglaze pencil for the stars, spray pieces lightly with hairspray before glazing. This sets the powder and prevents smearing when dipping in clear glaze.
Step 2: Adding the Whimsical Details
-
Sketch the layout:
Once the mug is leather hard, lightly scratch the outline of two mushrooms near the base using a needle tool. Add a few star shapes scattered above them in the ‘sky’ area. -
Carve the relief:
Using a small loop tool, gently carve away the background clay *around* your mushroom outlines. You want the mushrooms to be slightly raised (bas-relief). Smooth the edges of the raised shapes with a damp finger. -
Incise the stems:
Use a needle tool or very fine carving point to scratch vertical texture lines into the mushroom stems. At the base, scratch in small upward strokes to represent grass. -
Detailed outlining:
For the stars and tiny dots, you can either incise them directly or use a black underglaze pencil to draw them on. If incising the stars, press gently to create a recessed shape.
Level Up: Gold Luster
After the final glaze firing, apply a gold luster overglaze to the stars and the dots on the mushroom caps. Fire one last time to cone 018 for real sparkle.
Step 3: Glazing and Finishing
-
Bisque fire:
Allow the mug to dry completely, checking that the handle dries at the same rate as the body. Fire to cone 04 (or your clay’s specific bisque temperature). -
Paint the mushrooms:
On the bisque-fired ware, apply 2-3 coats of bright red underglaze to the mushroom caps. Keep the layers even to ensure a solid color. -
Add fine details:
Using a very fine liner brush and black underglaze (or a specialized underglaze pencil), outline the stars and add the tiny dots on the mushroom caps. I find a steady hand and very little water works best here. -
Wax resist the base:
Apply wax resist to the bottom of the mug and up the side about a quarter-inch to leave a raw clay band at the foot. -
Apply clear glaze:
Dip the entire mug (except the waxed foot) into a clear glossy glaze. This will seal the clay and make the red underglaze pop while showing off the speckles. -
Final smooth:
Check for any drips or pinholes in the glaze. Rub out any finger marks from holding the mug during dipping. -
Glaze fire:
Fire the mug to your clay body’s maturity temperature (typically cone 5 or 6 for stoneware). Let it cool slowly in the kiln.
Now you have a charming woodland mug ready for your favorite warm beverage
Soft Ombre Wash That Fades From Rim to Base
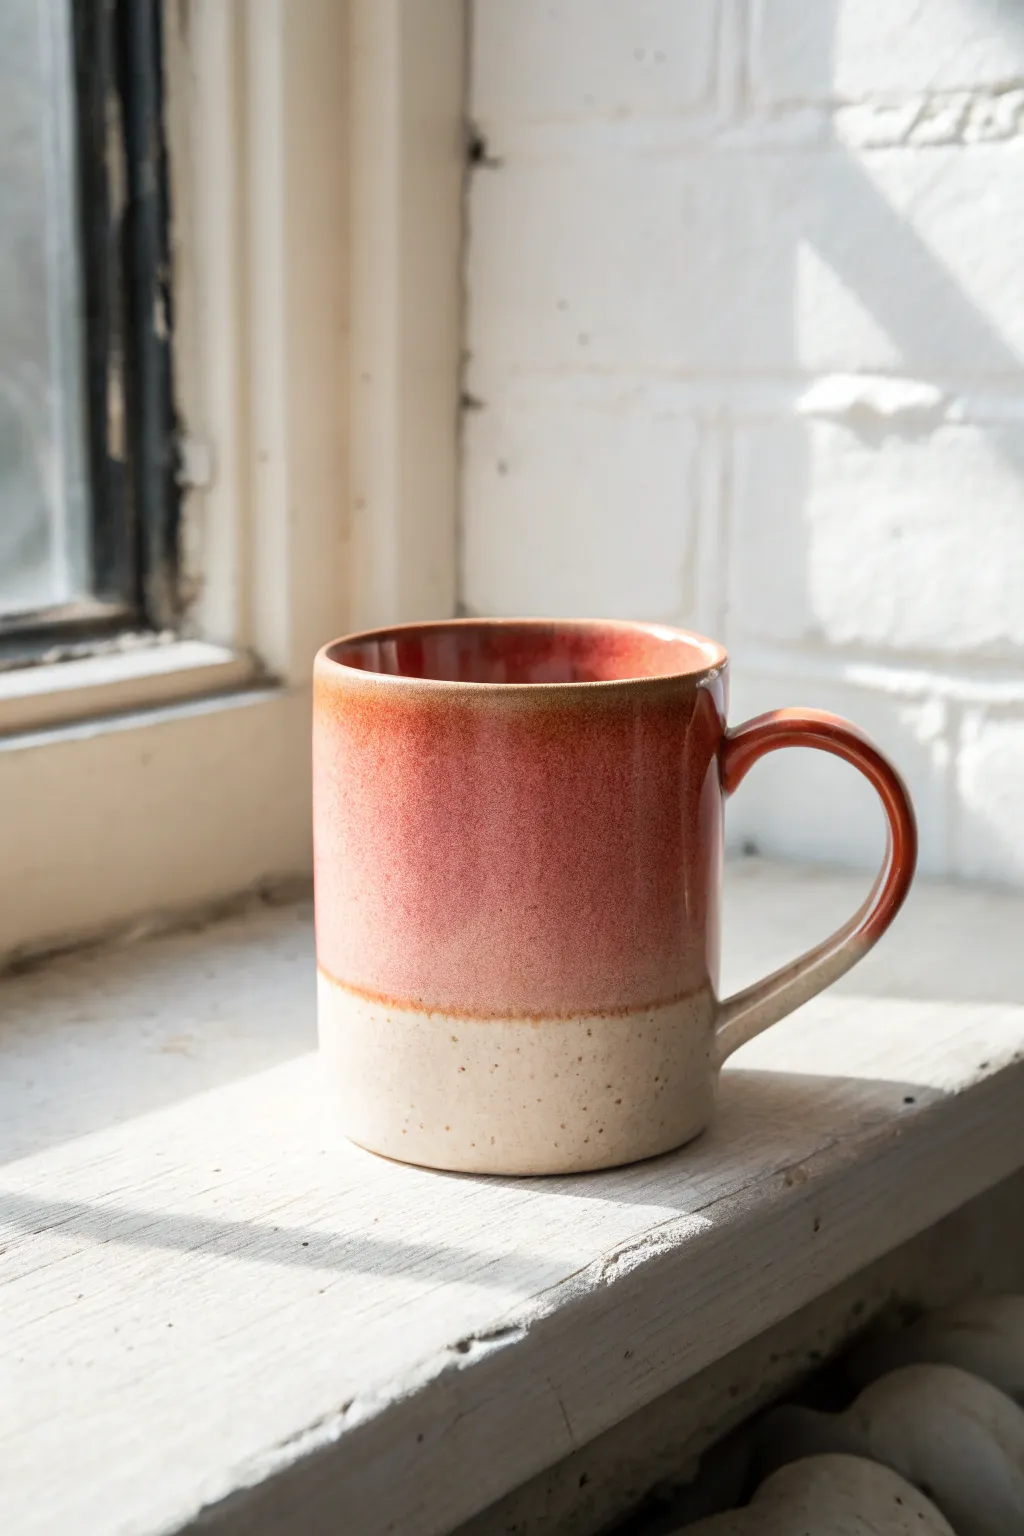
Capture the warmth of a setting sun with this cozy wheel-thrown mug project. The result is a beautifully tactile piece featuring a soft, reddish-pink glaze that gently transitions into a natural, speckled clay body.
Detailed Instructions
Materials
- Speckled stoneware clay (approx. 1 lb)
- Pottery wheel
- Throwing tools (sponge, rib, wire cutter)
- Trimming tools
- Needle tool
- Scoring tool or fork
- Slip (clay slurry)
- Small sponge for smoothing
- Wax resist
- Reactive reddish-pink or terracotta glaze (dipping consistency)
- Kiln (bisque and glaze firing capability)
Step 1: Throwing the Cylinder
-
Center the clay:
Begin with about a pound of wedged speckled stoneware. Center it firmly on the wheel head, ensuring there is no wobble before you open the mound. -
Open and pull:
Open the clay to create a flat internal floor. Compress the floor with your fingers or a flat tool to prevent future cracking. Begin pulling the walls up into a cylinder shape, keeping a consistent thickness. -
Shape the belly:
Once you have height, gently push from the inside while supporting the outside to create a subtle outward curve or ‘belly’ for the mug, keeping the rim upright and substantial. -
Smooth the exterior:
Use a metal or wooden rib to smooth the outside walls, removing throwing lines if you prefer the clean look shown in the image. I find a soft rib really helps compress the surface here. -
Finish the rim:
Use a chamois or a wet fingertip to round the rim perfectly. A smooth rim is crucial for a comfortable drinking experience. -
Wire off:
Run your wire cutter under the base and set the cylinder aside on a ware board to dry to leather-hard.
Uneven Glaze Line?
If your glaze line looks messy after dipping, don’t wipe it all off. Let it dry, then use a damp sponge to carefully clean up the edge, pushing the glaze back up to a straight line.
Step 2: Trimming and Handling
-
Trim the foot:
Once leather-hard, center the mug upside down on the wheel. Trim away excess clay from the bottom third, defining a clean, flat bottom or a slight foot ring. This lower area will remain unglazed, so make sure the surface texture is pleasing. -
Pull a handle:
Take a small nugget of clay and pull a strap for the handle. Aim for a D-shaped profile that feels good in the hand. Let it stiffen slightly into a curve. -
Attach the handle:
Score the mug wall and the attachment points of the handle. Apply slip generously. Press the handle firmly onto the mug, ensuring a straight alignment. -
Clean connections:
Wipe away excess slip around the joints with a damp sponge. Run a wet finger down the handle to smooth it one last time. -
Bisque fire:
Allow the mug to dry completely (bone dry). Load it into the kiln for a bisque firing to roughly Cone 04.
Glaze Fit Check
For this specific look, choose a glaze labeled ‘semi-transparent’ or ‘breaking.’ These thin out over rims and texture, highlighting the speckles in the clay underneath.
Step 3: Glazing the Ombre Effect
-
Wax the bottom:
Apply wax resist to the bottom of the mug and up the side walls about one-third of the way. This reserves the raw speckled clay look for the base. -
Clean the lines:
If your wax line is shaky, use a fettling knife to gently scrape it into a straight, clean horizon line around the mug. -
Prepare the glaze:
Mix your reddish-pink glaze thoroughly. It should be the consistency of heavy cream to ensure an opaque but fluid coat. -
Dip the top:
Holding the mug by the foot (where the wax is), dip the mug rim-down into the glaze. Submerge it until the glaze meets the wax line, then pull it out quickly. -
Shake off excess:
Give the mug a gentle shake as you pull it out to remove drips. Just before the glaze dries, I like to rub the transition line gently with a finger to soften the edge slightly. -
Clean the foot:
Even with wax, small beads of glaze can stick. Use a damp sponge to wipe the waxed area perfectly clean to protect your kiln shelves. -
Glaze fire:
Fire the mug to the maturity temperature of your clay and glaze (likely Cone 5 or 6). This final firing melts the glaze, creating that beautiful semi-gloss finish.
Enjoy your morning coffee in a mug that feels as warm and grounded as the earth it came from
Faceted Mug With Simple Cut Planes
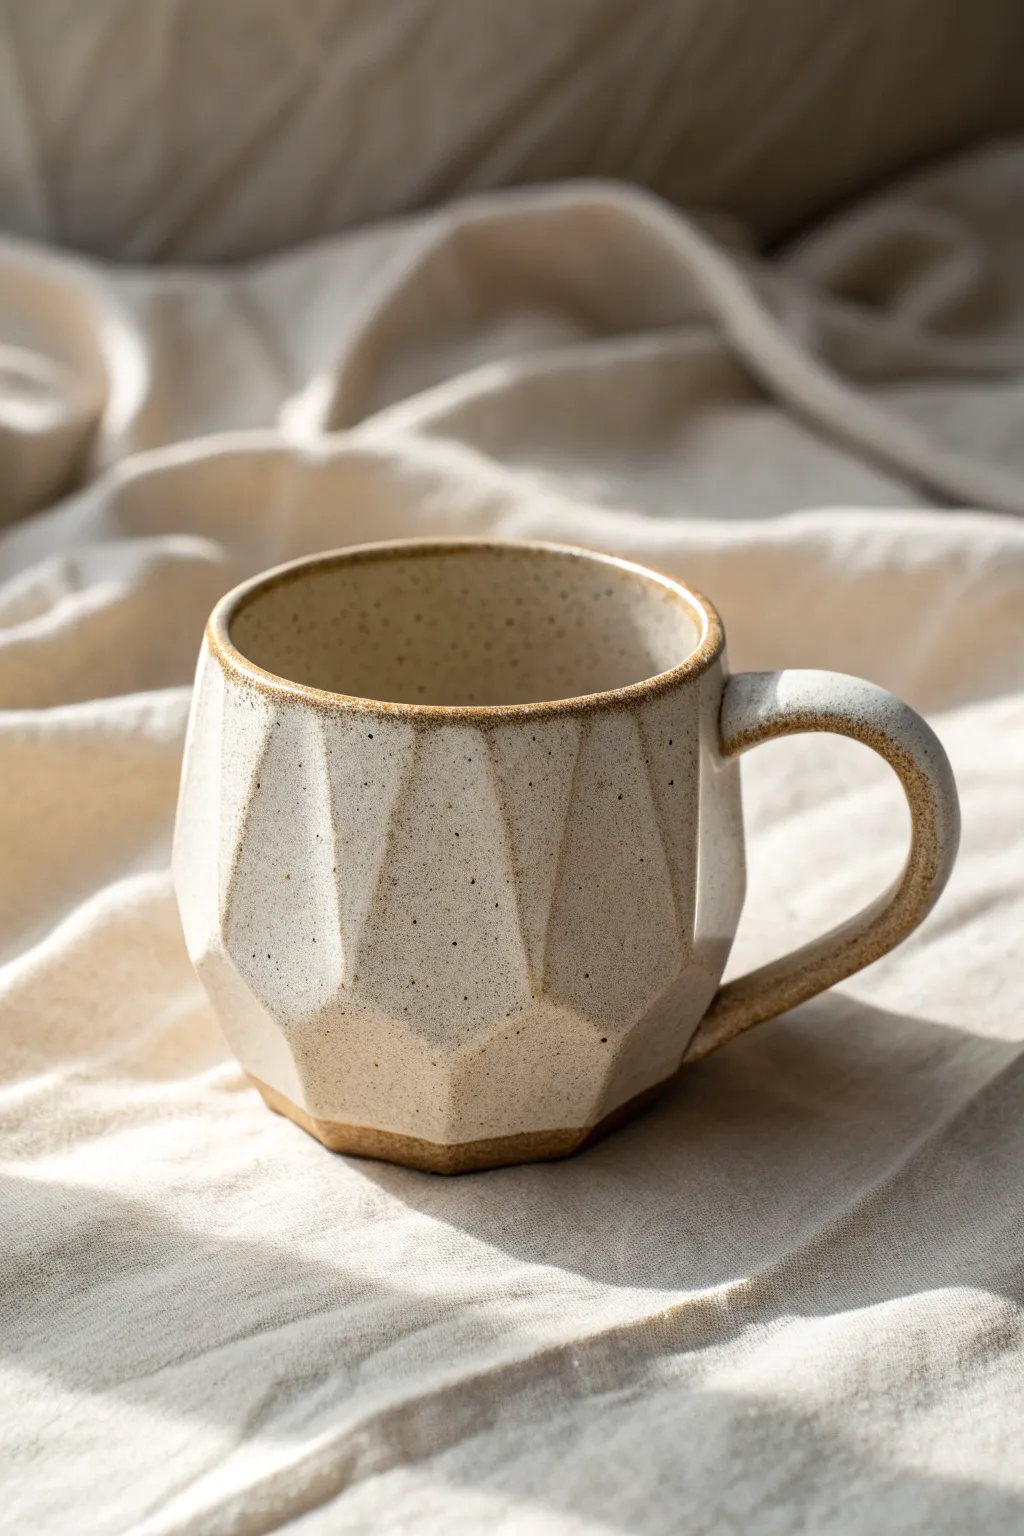
This project combines the organic warmth of speckled clay with modern, structural geometry. By slicing away panels of clay from a simple thrown cylinder, you reveal a stunning architectural form that fits perfectly in the hand.
Step-by-Step Tutorial
Materials
- Speckled stoneware clay (mid-fire)
- Pottery wheel
- Throwing tools (sponge, ribs, wooden knife)
- Wire clay cutter
- Cheese cutter or sharp fettling knife for faceting
- Trimming tools
- Scoring tool and slip
- Satin cream/white glaze
- Wax resist (optional)
Step 1: Throwing the Cylinder
-
Center the Clay:
Begin with a ball of well-wedged speckled stoneware clay. Center it firmly on the wheel head, ensuring there is no wobble before you open it. -
Open and Pull Walls:
Open the clay and pull the walls up. Aim for a cylinder that is thicker than your usual mug—around 3/8 to 1/2 inch thick everywhere. You need this extra thickness to carve the facets later. -
Shape the Belly:
Introduce a gentle outward curve to the cylinder, creating a subtle belly while keeping the rim slightly tapered in. Don’t make it too bulbous, as you need relatively vertical surfaces for the cuts. -
Define the Rim:
Compress the rim well with a chamois or your sponge. Give it a distinct, rounded profile now, as it will be harder to fix after the clay dries slightly.
Uneven Facets?
If your cuts aren’t perfectly symmetrical, don’t worry. The beauty of this style is in the hand-carved, wabi-sabi look. Just ensure the wall thickness remains safe.
Step 2: Faceting the Form
-
Wait for Leather Hard:
Allow the cylinder to dry to a firm leather-hard stage. It should be stiff enough to handle without warping, but soft enough to slice cleanly. -
Plan Your Cuts:
Visualize where your facets will go. You want two rows of cuts: one angling downward from the top, and one angling upward from the bottom, meeting in a zigzag pattern around the middle. -
Execute the Top Cuts:
Using a sharp wire cheese cutter or a fettling knife, slice a plane of clay off the top half of the mug, starting just below the rim and angling outward. Repeat this around the circumference. -
Execute the Bottom Cuts:
Make a second row of cuts starting near the base and angling upward to meet the ridges created by the top row. The goal is to create diamond or kite-like shapes where the planes intersect. -
Smooth the Edges:
Once the cuts are made, gently run a damp sponge or a soft rib over the sharp ridges to soften them slightly without losing the geometric definition.
Use a Cheese Cutter
A wire cheese slicer with a roller creates smoother, more consistent planes than a knife. The roller acts as a depth gauge for even cuts.
Step 3: Handle and Trimming
-
Trim the Foot:
Turn the mug over and trim the base. Keep the foot ring simple and distinct, leaving a raw clay edge that matches the aesthetic of the rim. -
Pull a Handle:
Pull a strap of clay for the handle. For this mug, a simple C-curve works best to balance the busy texture of the facets. -
Attach the Handle:
Score and slip the contact points on both the mug and the handle. Attach the handle firmly, blending the clay at the join points. I prefer to attach the top of the handle near the rim, above where the faceting begins. -
Dry Slowly:
Cover the mug loosely with plastic to let it dry slowly. This ensures the handle and body dry at the same rate, preventing cracks.
Step 4: Glazing and Finishing
-
Bisque Fire:
Fire the mug to bisque temperature (usually cone 04 or 06) to prepare it for glazing. -
Wax the Accents:
Apply wax resist to the very bottom foot ring and the very top rim of the mug. This exposes the beautiful warm clay body, creating a frame for the glazed section. -
Dip in Glaze:
Dip the mug into a satin cream or soft white glaze. The semi-opaque nature of the glaze will break beautifully over the sharp edges of the facets, highlighting the geometry. -
Clean and Fire:
Use a sponge to wipe away any glaze beads on the waxed areas. Fire the mug to the maturity temperature of your clay (likely cone 5 or 6) and let it cool completely.
Enjoy your morning coffee with the tactile satisfaction of gripping those crisp geometric planes
A Wavy Rim That Feels Like a Handmade Signature
Capture the cozy essence of a lazy morning with this rustic, hand-thrown style mug featuring a beautifully imperfect wavy rim. The combination of speckled clay and a warm, milky white glaze creates a timeless piece that feels personal and distinctly handmade.
Step-by-Step
Materials
- Speckled stoneware clay (approx. 1 lb)
- Pottery wheel (or can be adapted for hand-building)
- Sponge
- Wire cutter
- Rib tool
- Needle tool
- Loop tool for trimming
- Soft white or translucent matte glaze
- Kiln access
Step 1: Throwing the Form
-
Prepare the Clay:
Begin by thoroughly wedging about one pound of speckled stoneware clay to remove any air bubbles. Form it into a smooth, round ball before slamming it onto the center of your wheel head. -
Center and Open:
With the wheel spinning at a moderate speed, use wet hands to center the clay. Once centered, press your thumbs into the middle to open the well, leaving about a half-inch of thickness at the bottom for trimming later. -
Pull the Walls:
Slow the wheel down slightly. Using a pincer grip or your preferred pulling method, gently pull the clay walls upward. Aim for a slightly tapered cylinder shape that is wider at the bottom and gently narrows towards the middle. -
Shape the Curve:
Apply gentle outward pressure from the inside of the mug to belly it out slightly, creating that soft, curvaceous profile seen in the image. Be careful not to make the walls too thin. -
Create the Signature Rim:
Instead of compressing the rim perfectly flat, use your index finger to gently depress slight irregularities along the edge as the wheel turns slowly. This creates the subtle, organic ‘wavy’ look that gives the mug its character.
Pro Tip: Spotting Speckles
If you don’t have speckled clay, mix 2-3% granular ilmenite or manganese into plain stoneware. This hack mimics the iron spots perfectly.
Step 2: Handle and Trimming
-
Dry to Leather Hard:
Allow the cylinder to dry until it is leather hard—stiff enough to hold its shape but soft enough to carve. This usually takes a day or two depending on humidity. -
Trim the Foot:
Place the mug upside down on the wheel and center it. Use a loop tool to trim away excess clay from the bottom, creating a clean foot ring. I like to leave the bottom texture a bit rough to enhance the rustic feel. -
Pull the Handle:
Take a separate small lump of clay and pull a strap handle using water and smooth, downward strokes. The handle should be thick enough to be comfortable but proportionate to the mug. -
Shape the Handle Curve:
Bend the pulled strap into a generous ‘C’ shape or ‘ear’ shape. Let it stiffen slightly on a board for about 20 minutes so it doesn’t flop when attached. -
Attach the Handle:
Score the attachment points on both the mug body and the handle ends. Apply slip (clay slurry) and press the handle firmly onto the mug. Smooth the seams with your thumb or a small tool for a seamless connection.
Step 3: Glazing and Firing
-
Bisque Fire:
Once the mug is bone dry, load it into the kiln for a bisque firing (usually cone 04 or 06). This prepares the clay to accept glaze. -
Wax the Foot:
Apply wax resist to the bottom half-inch of the mug and the underside. This is crucial for achieving that distinct line where the glaze stops and the raw clay begins. -
Glaze Application:
Dip the mug into a soft white or translucent matte glaze. Hold it upside down by the foot and submerge up to the wax line. The wax will repel the glaze, but you may need to wipe any stray drips with a sponge. -
Check the Rim:
Inspect the rim to ensure the glaze has coated the wavy edge nicely. If the glaze is too thin, the breaks visually won’t be as soft; if too thick, it might run. -
Glaze Fire:
Fire the mug again to the maturation temperature of your clay and glaze (often cone 5 or 6 for stoneware). This final firing melts the glaze and reveals the beautiful speckles in the clay. -
Final Polish:
After the kiln cools, remove your mug. Use a sanding block or diamond pad to smooth the unglazed bottom foot so it won’t scratch your table surface.
Level Up: Thumb Rest
Add a small, flattened button of clay to the top of the handle before attaching. It creates a comfortable spot for your thumb to rest while drinking.
Now pour yourself a hot drink and enjoy the tactile comfort of your new favorite mug
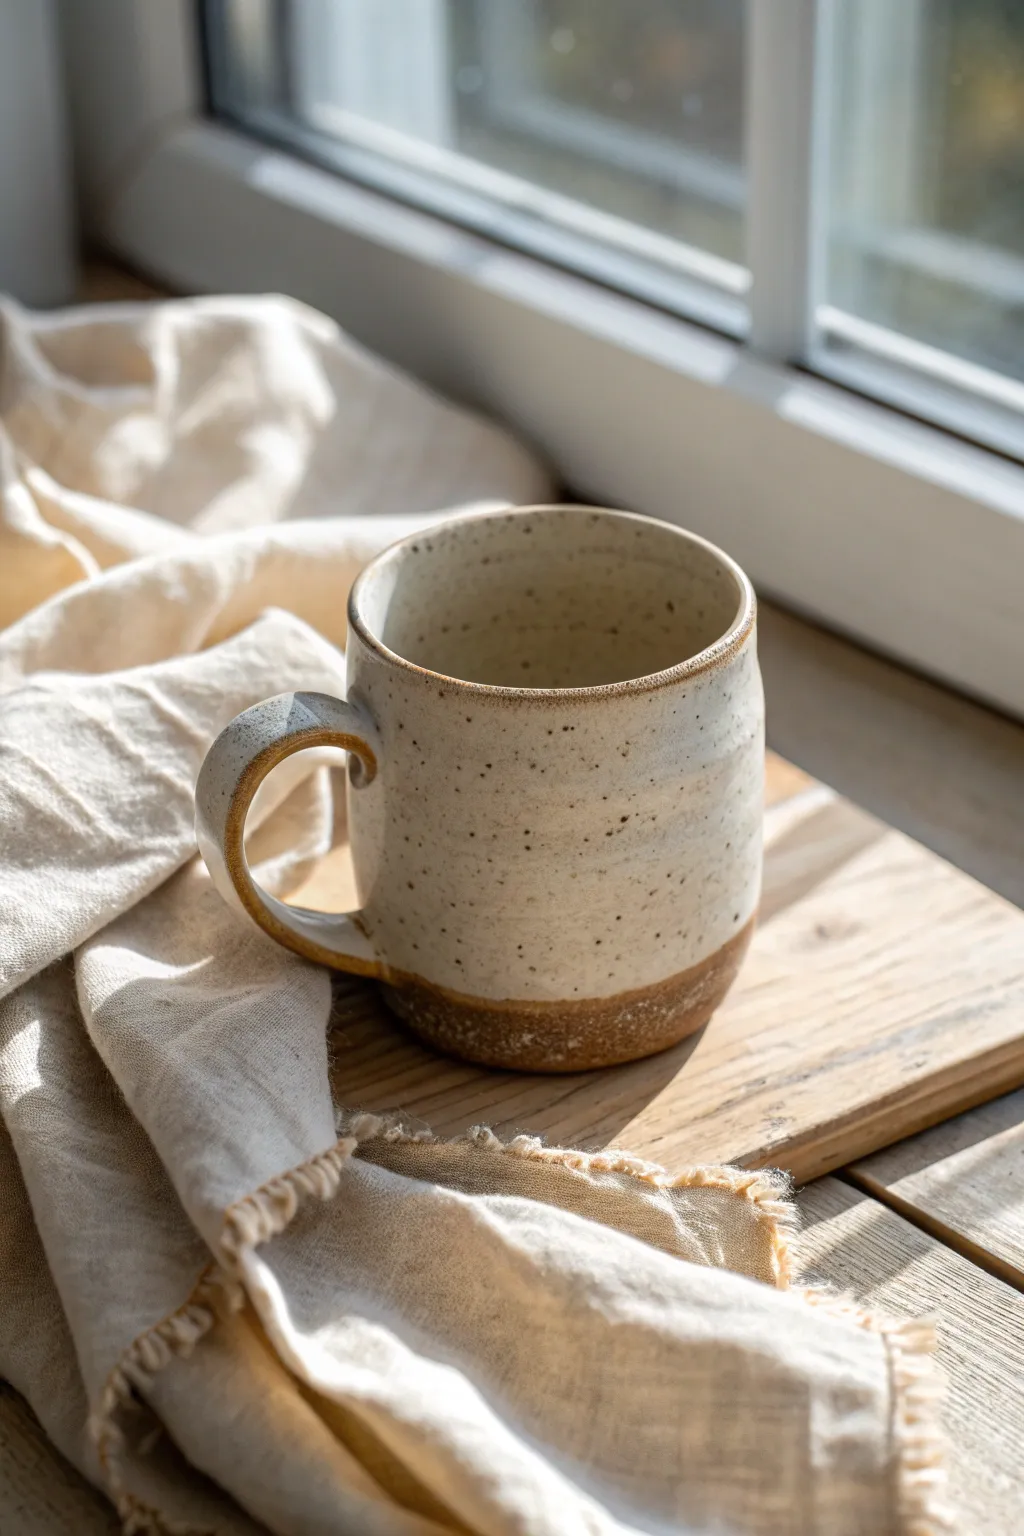
An Oversized Loop Handle for Extra Comfort
Embrace the cozy imperfection of handmade ceramics with this comforting, speckled stoneware mug featuring a generous loop handle. The natural clay body shows through a milky glaze, offering a warm, tactile experience perfect for slow mornings.
Detailed Instructions
Materials
- Speckled stoneware clay (approx. 1 lb)
- Potter’s wheel (or slab roller for hand-building)
- Wooden modeling tool
- Pin tool
- Rib tool (metal and rubber)
- Wire clay cutter
- Sponge
- Scoring tool (or serrated rib)
- Slip (clay mixed with water)
- White or cream translucent glaze
- Kiln
Step 1: Throwing the Body
-
Prepare the Clay:
Begin by thoroughly wedging your speckled stoneware clay to remove any air bubbles and ensure an even consistency. Center a ball of clay roughly the size of a large orange on your wheel head. -
Establish the cylinder:
Open the centered clay and pull up the walls to form a cylinder. Aim for a height of about 4-5 inches, keeping the walls relatively straight but allowing for a slight, natural outward curve. -
Refine the walls:
Use a rib tool on the exterior while supporting the interior with your other hand to smooth out throwing lines. This compresses the clay and gives the surface a clean, modern finish. -
Finish the lip:
Gently chamois or sponge the rim to ensure it is rounded and smooth for comfortable drinking. I like to make the rim slightly thinner than the body for a delicate mouthfeel. -
Undercut and trim:
Use a wooden tool to create a slight undercut at the base, separating the mug visually from the bat. Wire cut the mug from the wheel and set it aside until it reaches leather-hard consistency.
Clean Wipe Trick
Use a wax resist solely on the bottom 1/4 inch of the mug before glazing. This ensures a crisp, straight line where the glaze meets the raw clay foot without messy sponge marks.
Step 2: Creating the Oversized Loop
-
Pull the handle blank:
While the body firms up, pull a thick strap of clay for the handle. For this oversized look, keep the strap wide and generous, about 1 inch in width, tapering slightly. -
Form the curve:
Gently curve the pulled strap into a large ‘C’ shape. Lay it on its side on a ware board to stiffen slightly so it holds its arch without collapsing. -
Trimming the body:
Once the mug body is leather-hard, center it upside down on the wheel. Trim the bottom to create a neat foot ring, leaving a bit of unglazed clay visible at the base as shown in the image.
Step 3: Assembly and Finishing
-
Mark attachment points:
Hold your handle against the mug to visualize the placement. The top attachment should be near the rim, and the bottom should sweep down near the base. Lightly mark these spots. -
Score and slip:
Aggressively score the attachment points on both the mug and the handle ends. Apply a generous amount of slip to these roughened areas. -
Attach the handle:
Press the handle firmly onto the mug body. Wiggle it slightly to ensuring a solid bond between the clay surfaces. -
Smooth the seams:
Use a small damp sponge or a wooden tool and your thumb to wipe away excess slip. Smooth the transition so the handle looks like it grows naturally out of the mug wall. -
Check alignment:
Look at the mug from multiple angles to ensure the handle is vertically straight and the loop is symmetrical. -
Slow drying:
Cover the mug loosely with plastic to allow the handle and body to dry at the same rate. Uneven drying is the main cause of handle cracks. -
Bisque fire:
Once bone dry, load the mug into the kiln for a bisque firing (usually Cone 04 or 06, depending on your clay). -
Glazing technique:
Dip the bisque-fired mug into a semi-translucent white or cream glaze. Shake off excess glaze and wipe the foot ring clean with a damp sponge to expose the raw speckled clay at the bottom. -
Final firing:
Fire the mug to maturity (often Cone 5 or 6 for stoneware). The heat will interact with the iron speckles in the clay, causing them to bleed through the milky glaze for that signature rustic look.
Comfort Grip
Flatten the top of the handle slightly where your thumb will rest. It acts as a subtle thumb-stop, making a heavy mug feel much lighter and more secure in the hand.
Now you have a beautifully handcrafted vessel ready for your favorite warm beverage
A Footed Mug That Feels Like a Little Goblet
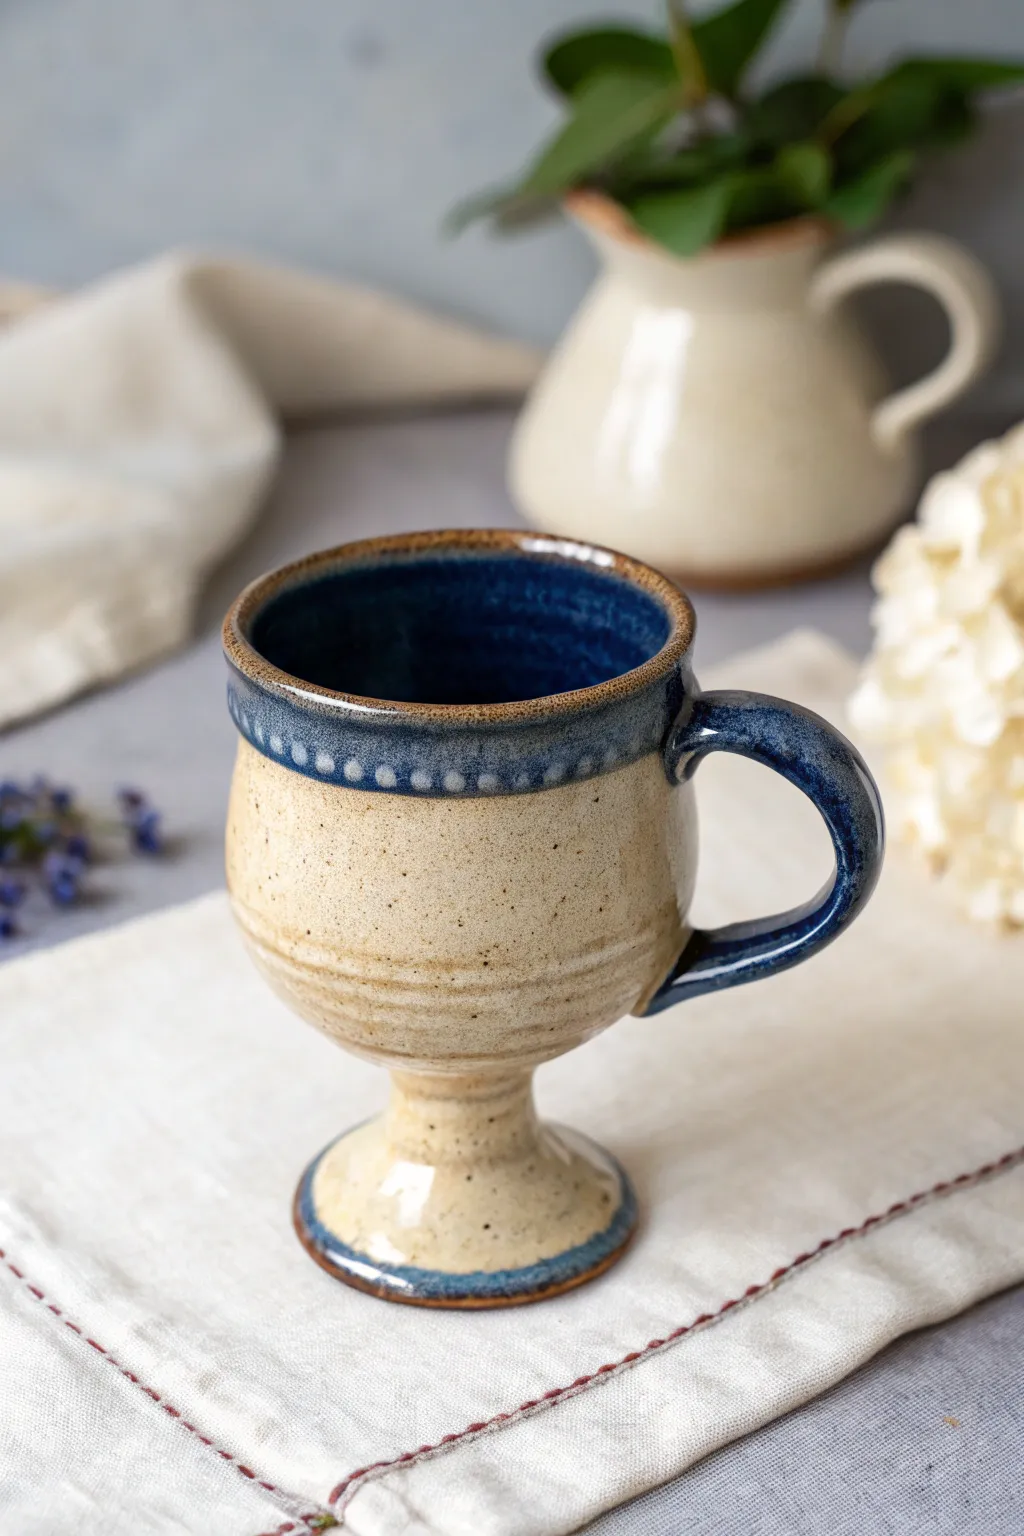
Elevate your morning coffee with this charming mug that takes cues from medieval goblets but keeps things grounded with earthy, speckled clay. The footed base adds elegance, while the beaded rim and deep blue glaze offer a beautiful contrast against the creamy stone finish.
How-To Guide
Materials
- Speckled stoneware clay (mid-fire)
- Pottery wheel
- Throwing tools (sponge, wire cutter, ribs)
- Trimming tools
- Needle tool or small round carving tool
- Sponge for smoothing
- Scoring tool
- Slip
- Deep cobalt blue glaze
- Creamy matte or satin speckled glaze
- Kiln
Step 1: Throwing the Body & Foot
-
Center the clay:
Begin with about 1.5 lbs of speckled clay. Center it firmly on the wheel head, ensuring a stable base for the throwing process. -
Open and pull:
Open the clay, leaving a slightly thicker floor than usual (about 1/2 inch) to allow for trimming the foot later. Pull the walls into a cylinder first, keeping the top rim compressed. -
Shape the belly:
Gently push the clay outward from the inside to create a rounded belly shape, similar to a wine glass bowl. I like to taper the rim inward slightly to hold heat better. -
Refine the stem area:
Use your fingers or a rib to choke in the clay at the very bottom, creating a distinct narrow ‘waist’ before the clay meets the wheel head. This pre-defines the stem. -
Create the decorative band:
While the wheel is spinning slowly, leave a slightly thicker band of clay about an inch down from the rim. Smooth this area with a rib. -
Add the beaded texture:
Stop the wheel. Using the rounded end of a small tool or a dull pencil, gently press a row of evenly spaced indentations into that thickened band near the rim to create the ‘pearl’ effect. -
Cut and dry:
Wire the pot off the bat and let it dry to leather-hard consistency.
Step 2: Trimming & Handle
-
Set up for trimming:
Once leather hard, invert the mug onto the wheel head. Center it and secure it with lugs of clay. -
Carve the foot:
Using a sharp trimming tool, carve away excess clay from the bottom to define the pedestal foot. Aim for a flared shape that mirrors the curve of the rim. -
Detail the stem:
Carve deep grooves or rings into the stem area to accentuate the transition between the cup body and the foot. -
Pull a handle:
Pull a strap of clay for the handle. For this shape, a handle with a bit of a curve or ‘ear’ looks fantastic. Let it stiffen slightly. -
Attach the handle:
Score and slip the attachment points on both the mug and handle. Press firmly to join, starting near the beaded rim and looping down to the lower belly. -
Clean up:
Smooth the connection points with a damp sponge and ensure the handle is straight. Let the piece dry slowly under plastic to prevent cracking.
Wobble Worries?
If the foot makes the mug top-heavy during throwing, leave the base wider than final. You can trim away the excess weight later once the clay is leather hard.
Step 3: Glazing & Firing
-
Bisque fire:
Fire the bone-dry mug to cone 04 (or your clay’s specific bisque temperature). -
Wax resist:
Apply wax resist to the very bottom of the foot to prevent glaze from sticking to the kiln shelf. -
Glaze the interior:
Pour the deep cobalt blue glaze inside the mug, swirl to coat, and pour out. Wipe any drips off the exterior. -
Glaze the rim:
Dip just the top rim—covering the beaded texture—into the blue glaze. Let this dry completely. -
Apply the exterior glaze:
Dip the exterior of the mug (up to the blue rim line) into the creamy speckled glaze. Be careful not to overlap too heavily on the beads to keep the definition sharp. -
Dip the foot:
I prefer to dip just the edge of the foot ring into the blue glaze for a cohesive look that bookends the design. -
Final fire:
Fire to cone 6 (or maturity). The blue glaze should break beautifully over the texture of the beads and the dark clay body.
Glaze Tip: The Break
Choose a ‘breaking’ glaze for the rim. These glazes thin out over high points (the beads), revealing the clay color underneath, which makes the texture pop.
Enjoy sipping from your new chalice-style mug that brings a touch of history to your daily routine
A Wraparound Story Mug With a Tiny Landscape Scene
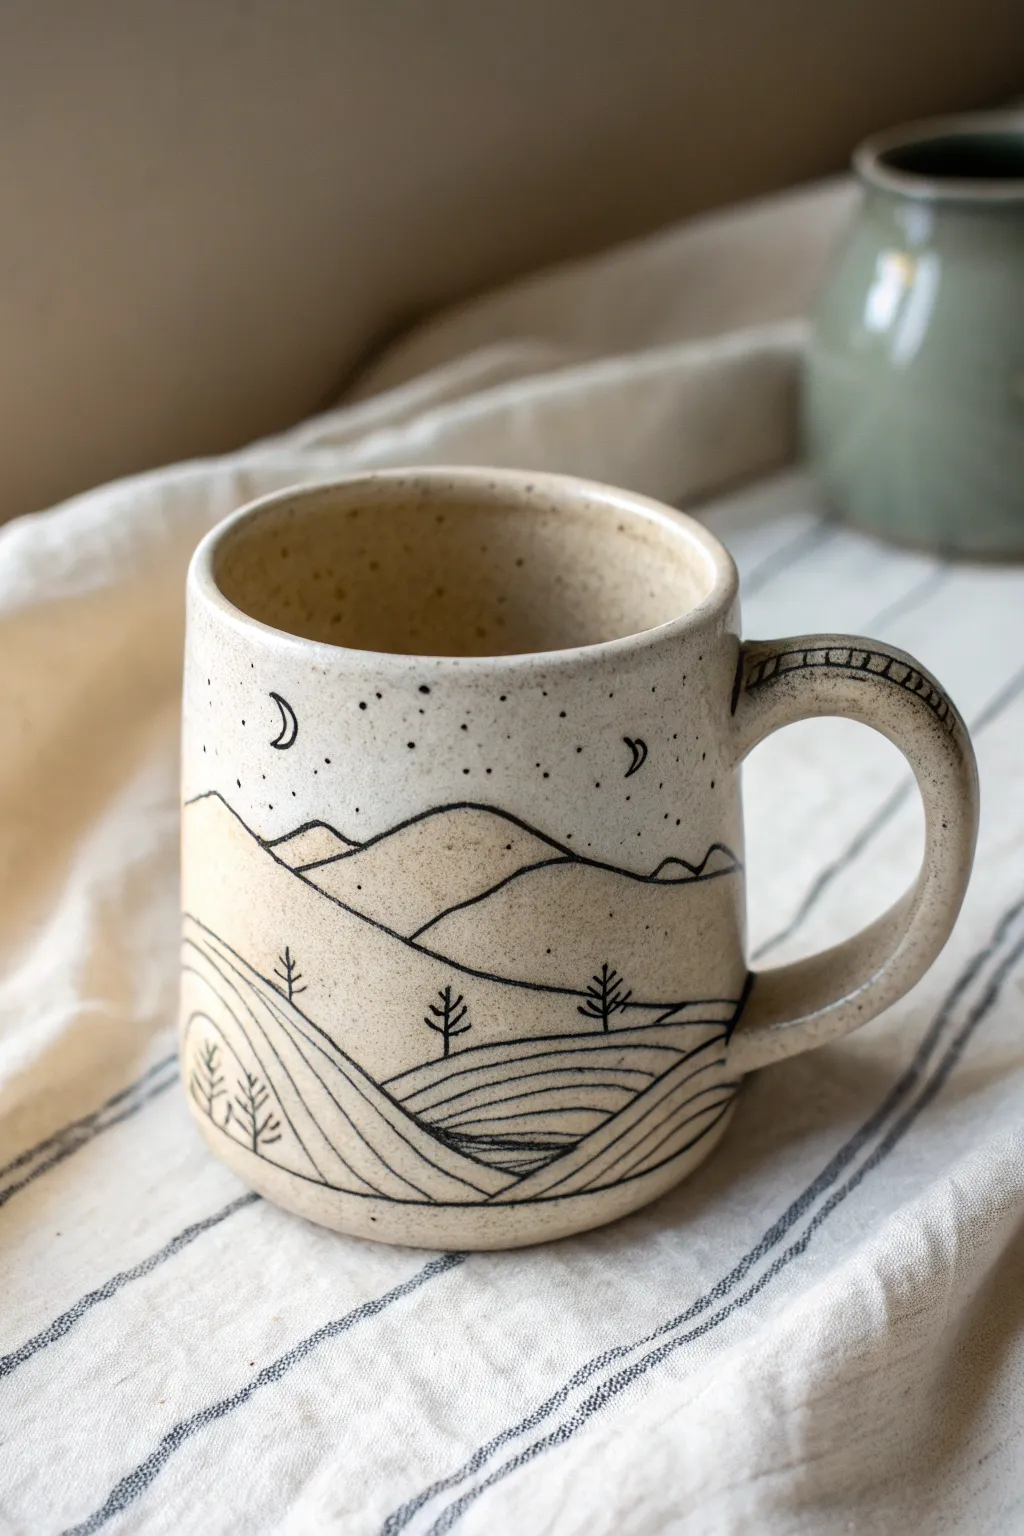
Bring the calming silence of a starry night to your morning coffee with this hand-built or wheel-thrown stoneware mug. The design features a continuous line-art landscape etched into the surface, creating a tactile and visual story that wraps completely around the vessel.
Step-by-Step Tutorial
Materials
- Speckled buff stoneware clay (approx. 1.5 lbs)
- Pottery wheel (optional, can be hand-built)
- Sponge and bucket of water
- Rib tool (wooden or metal)
- Needle tool
- Loop trimming tools
- Fine-point underglaze pencil or very fine slip trailer (black)
- Clear matte or satin glaze
- Kiln for bisque and glaze firing
- Wire cutter
- Scoring tool or fork
- Slip (clay slurry)
- Fine paintbrush (for touch-ups)
Step 1: Forming the Vessel
-
Prepare the clay:
Begin by wedging your speckled stoneware clay thoroughly to remove air bubbles and ensure consistency. If you want that lovely warm background tone seen in the image, ensure you are using a buff or oatmeal-colored clay body that speckles when fired. -
Shape the cylinder:
Throw a cylinder on the wheel, aiming for straight, vertical walls with a flat bottom. Alternatively, you can slab-build this form by rolling a consistent slab and joining the seams. Aim for a wall thickness of about 1/4 inch. -
Smooth the surface:
While the clay is still plastic but firm, use a rib tool to compress the walls and create a silky-smooth canvas. Is is crucial to remove any throwing rings if you used a wheel, as these will interfere with your delicate line drawing later. -
Pull and attach the handle:
Pull a strap handle that is slightly wider at the attachment points. Attach it securely using the score-and-slip method when the mug creates a ‘leather hard’ state. Ensure the loop is large enough for comfortably fitting two or three fingers. -
Refine the handle shape:
Once attached, smooth the connection points so they look seamless. Gently shape the handle into a comfortable ‘ear’ curve that mirrors the roundness of the mug body. -
Detail the handle:
Using your needle tool or a dull pencil, gently impress the ‘ladder’ pattern on the top curve of the handle. Draw two parallel lines following the curve, then connect them with small perpendicular hatches.
Smudged Lines?
If your black underglaze smears during the sponge-back phase, your sponge is too wet. Squeeze it out thoroughly—it should be barely damp—and wipe in single, short strokes, rinsing often.
Step 2: Illustrating the Landscape
-
Sketch the horizon lines:
Wait until the mug is leather hard—tacky but not squishy. lightly sketch the rolling hills and mountain peaks using a dull pencil. I find it helps to plan the ‘wraparound’ so the end of the landscape meets the beginning seamlessly. -
Carve the main contours:
Using a needle tool or an underglaze applicator with a very fine black tip, define your mountain ranges. If carving, keep the incision shallow; if using underglaze, keep the line steady and consistent. -
Add foreground fields:
Create the rolling fields in the foreground by drawing long, sweeping curved lines that echo the bottom curve of the mug. Vary the spacing slightly to create perspective. -
Plant the trees:
Draw simple, stylized pine trees. Start with a vertical trunk line, then add horizontal or slightly angled branches. Place them strategically: a larger couple in the foreground and potentially smaller ones on the distant hills. -
Create the night sky:
In the negative space above the mountains, draw a crescent moon. Add stippling dots clustered around the moon and scattered towards the sides to represent stars and the Milky Way. -
Inlay the design (mishima method):
If you carved your lines, paint black underglaze over the entire drawing, pushing the pigment into the grooves. Let it stiffen slightly. -
Clean the surface:
If you used the inlay/mishima method, wipe the surface gently with a damp sponge. This removes the excess black underglaze from the high points, leaving distinct black lines trapped inside your carved grooves.
Step 3: Firing and Finishing
-
Bisque fire:
Allow the mug to bone dry completely, which is the most fragile stage. Load it into the kiln and bisque fire it to the appropriate cone (usually Cone 04 or 06) to harden the clay. -
Apply clear glaze:
Dip the entire mug into a clear matte or satin glaze. A glossy glaze can sometimes cause the thin black lines to bleed or blur, while a matte finish preserves the illustrative quality of the drawing. -
Check the foot:
Wipe the foot ring of the mug completely clean of glaze with a damp sponge to prevent it from sticking to the kiln shelf. -
Final firing:
Fire the mug to maturity (Cone 5, 6, or 10 depending on your specific clay body). Let the kiln cool naturally before opening to prevent thermal shock.
Pro Tip: Line Weight
Vary your pressure. Press slightly harder for the foreground hills and lighter for the distant mountains. This subtle change in line thickness adds surprising depth to a simple 2D drawing.
Enjoy the quiet beauty of your new landscape mug with your favorite warm drink