I love how easy clay mugs can look totally charming even when they’re a little wonky. These ideas stick to hand-building tricks you can do at a table, so you can make a mug that feels personal without needing fancy gear.
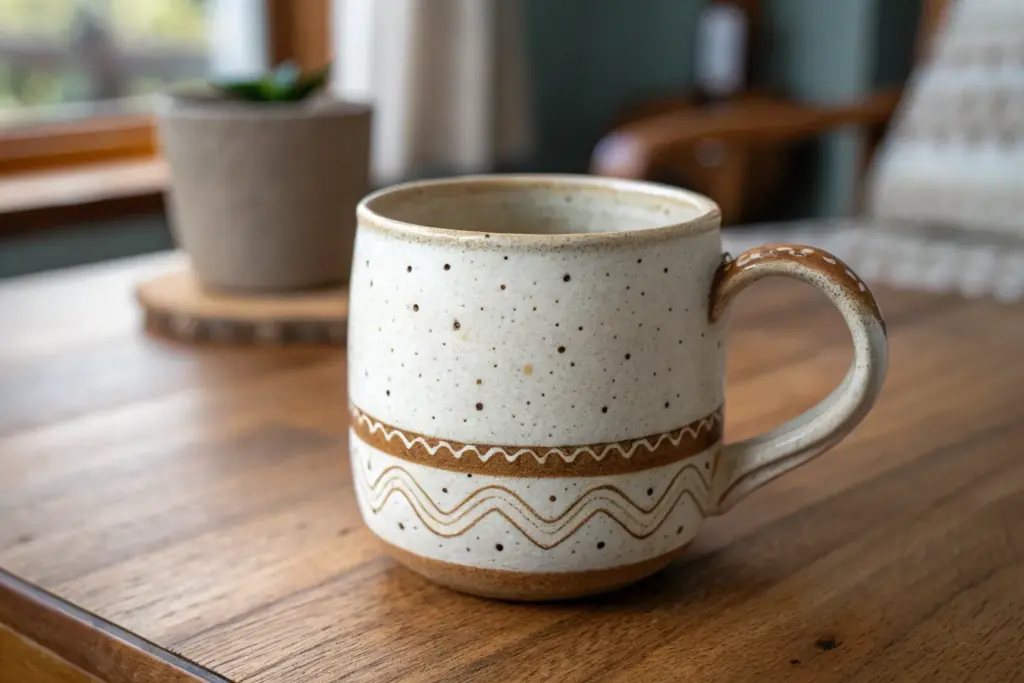
Slab-Built Straight-Sided Mug
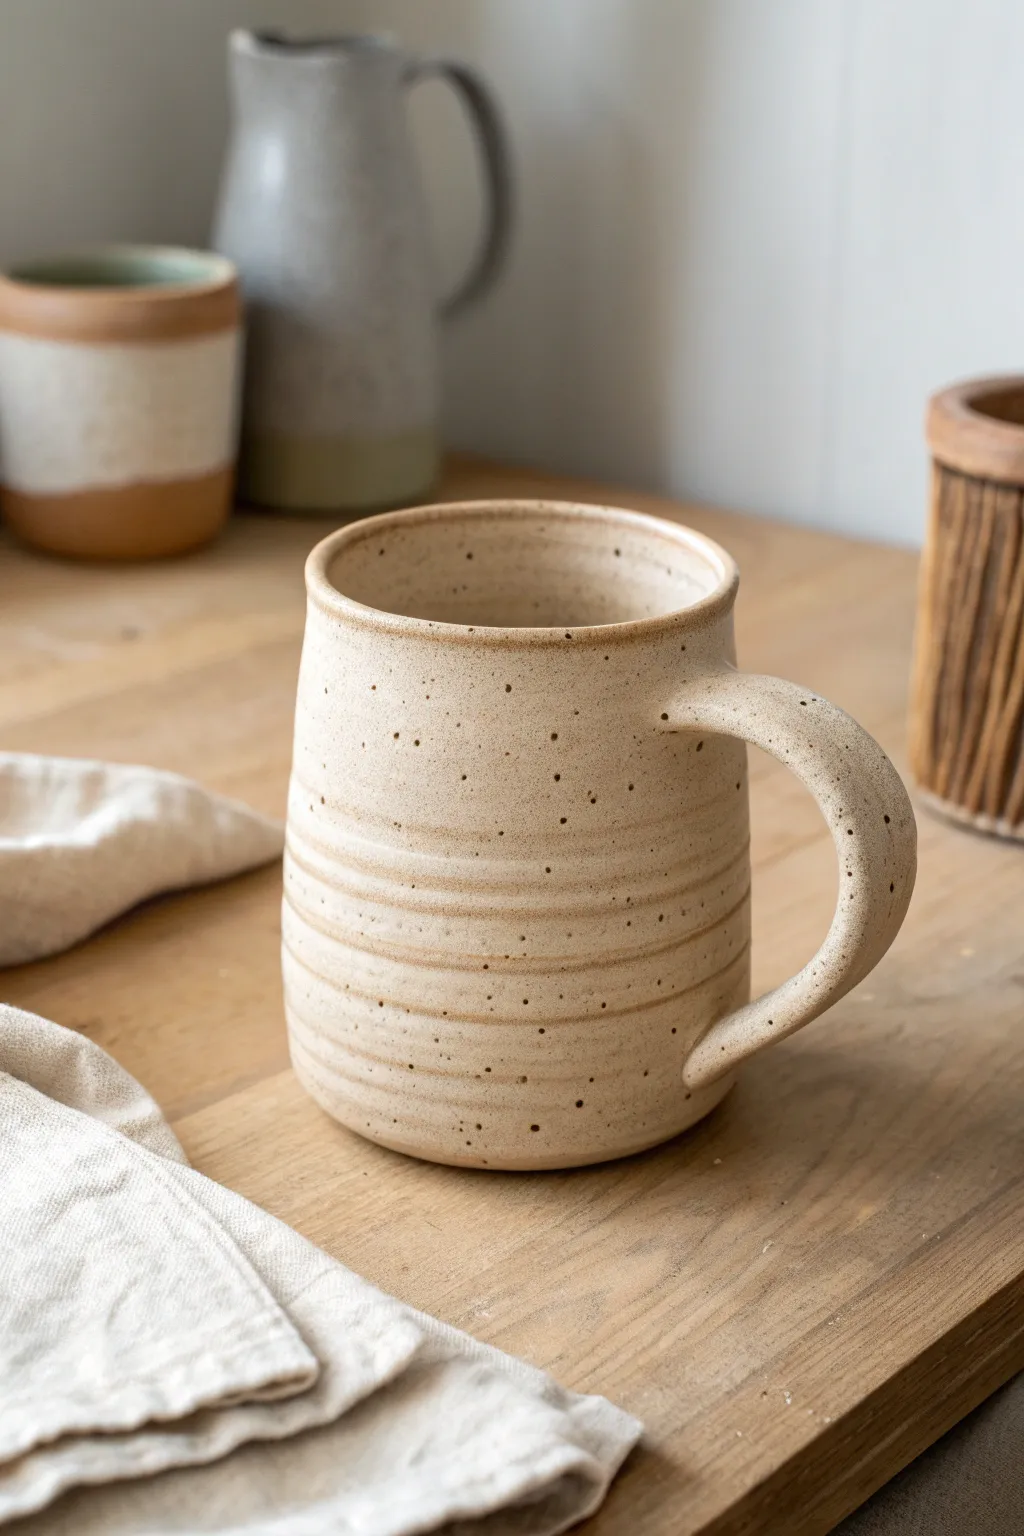
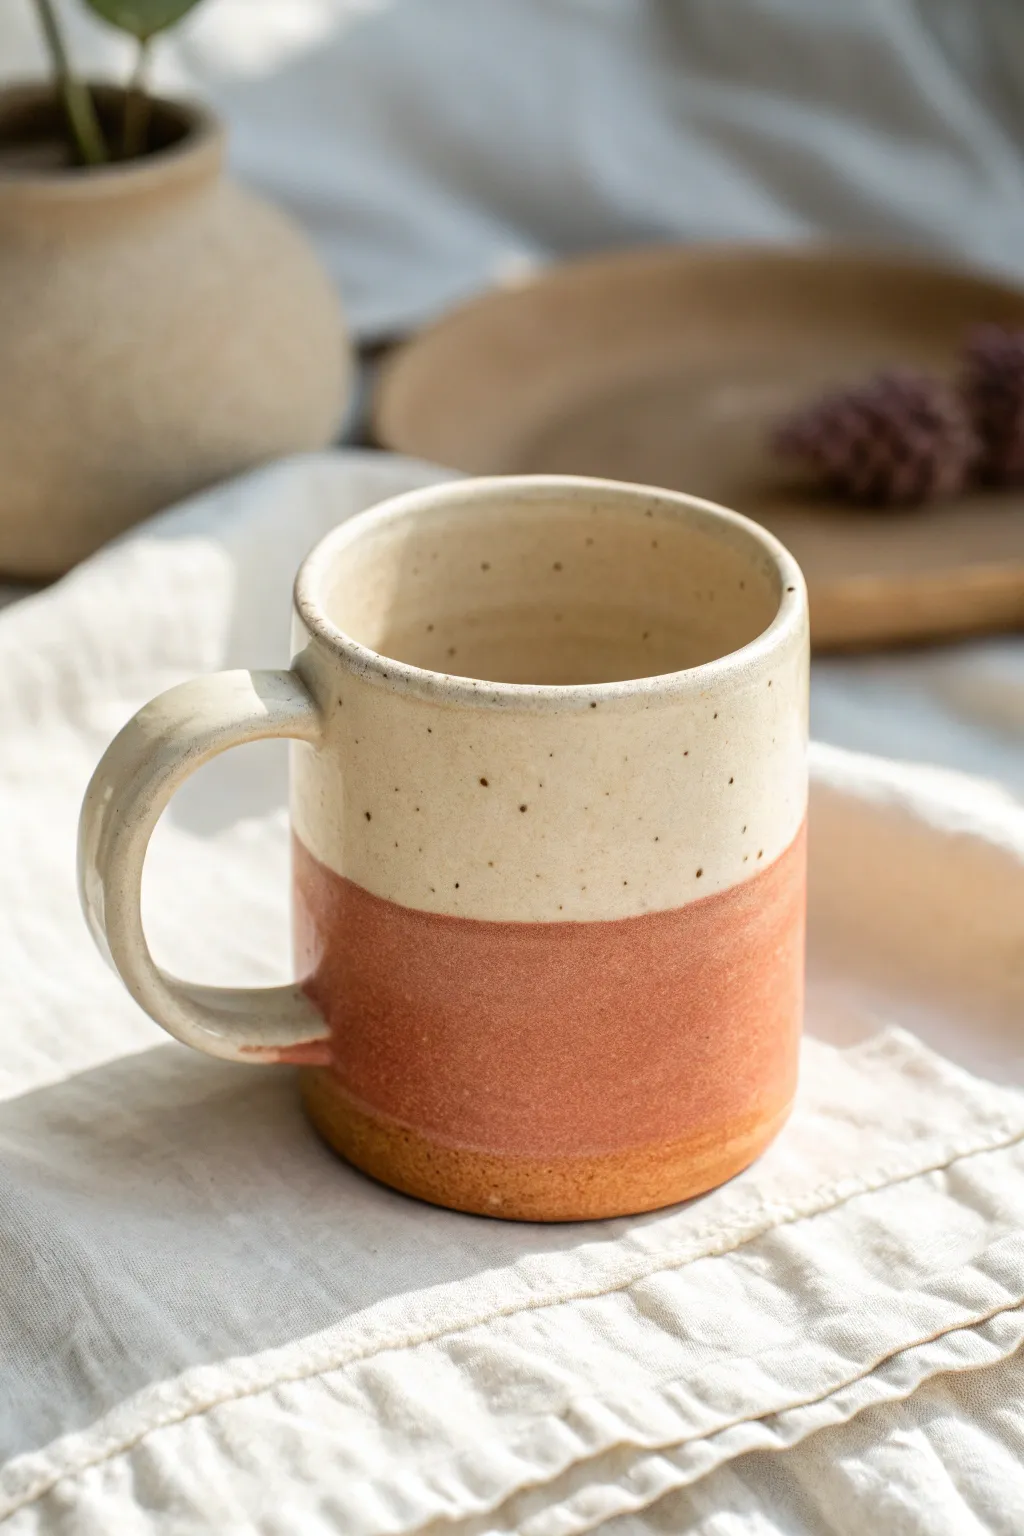
Capture the essence of modern farmhouse style with this understated yet beautiful slab-built mug. The design uses a speckled cream glaze to let the natural texture shine, while leaving an unglazed strip at the base for a warm, earthy contrast.
Step-by-Step
Materials
- Speckled buff stoneware clay (or white clay with speckles added)
- Rolling pin
- Wooden guide strips (1/4 inch thick) or slab roller
- Fettling knife or needle tool
- Mug template (rectangular paper strip approx. 12″ x 4″)
- Scoring tool (serrated rib or needle tool)
- Slip (clay mixed with water)
- Wooden modeling tool or blending tool
- Sponge
- Clear or Cream Speckled Glaze (cone 5/6 compatible)
Step 1: Preparing the Slab
-
Roll out the clay:
Begin by wedging your speckled buff clay to remove air bubbles. Place it on a canvas board between your two wooden guide strips. Roll the clay out until the rolling pin rests flat against the guides, ensuring an even thickness of about 1/4 inch across the entire slab. -
Compress the slab:
Take a soft rib tool and drag it firmly across the surface of the clay in multiple directions. This compression aligns the clay particles, reducing the chance of warping later, and smooths out the canvas texture. -
Cut the cylinder body:
Lay your paper template onto the slab. Using your fettling knife, cut precisely around the rectangle. For a standard mug, a 12-inch by 4-inch rectangle works well, but adjust based on your desired size. -
Prepare the edges:
On the short ends of your rectangle, bevel the edges at a 45-degree angle. Bevel one end facing up and the opposite end facing down; this creates a seamless overlap joint when you roll the cylinder.
Step 2: Assembling the Form
-
Form the cylinder:
Carefully lift the slab and curl it into a cylinder shape. Bring the beveled edges together to check the fit. -
Score and slip:
Rough up both beveled surfaces with your scoring tool and apply a generous amount of slip. Press the edges firmly together to create the bond. -
Reinforce the seam:
Support the inside wall with one hand while using a wooden modeling tool to smooth the seam on the outside. Repeat this process on the interior seam to ensure it is completely invisible. -
Create the base:
Roll out a small piece of leftover clay to the same thickness. Place your cylinder on top of this small slab and trace lightly around the bottom. -
Attach the bottom:
Score and slip both the bottom edge of the cylinder and the designated circle on the slab. Press the cylinder onto the base firmly. I like to use a small coil of clay on the interior seam here to make sure it’s watertight. -
Trim the excess:
Cut away the excess clay from the base slab, flush with the cylinder wall. Use a damp sponge to smooth the connection point so it looks like one solid piece.
Clean Bevels
When cutting your 45-degree bevels for the seam, keep your hand steady and cut quickly. A hesitant, slow cut often leads to jagged edges that are harder to blend invisibly.
Step 3: Handle and Finishing
-
Pull or cut a handle:
You can pull a strap handle or cut a strip from your remaining slab. Shape it into a ‘C’ or an ear shape that fits 2-3 fingers comfortably. Let it stiffen slightly until it holds its curve. -
Attach the handle:
Score and slip the attachment points on the mug body and the handle ends. Press the handle firmly onto the mug, ensuring it is straight. Smooth out the connections with a small blending tool. -
Refine the rim:
Go over the drinking rim with a damp sponge or a piece of chamois leather. A rounded, smooth rim provides a much better functional experience than a sharp or square edge. -
Bisque fire:
Allow the mug to dry slowly under plastic for 1-2 days, then uncover until bone dry. Fire it in the kiln to bisque temperature (usually Cone 04). -
Wax resist application:
To get that specific bottom detail, apply wax resist to the bottom 1/4 inch of the exterior wall and the entire underside of the mug. -
Glazing:
Dip the mug into your cream speckled glaze. The wax will repel the glaze at the bottom, creating that clean line where the raw clay shows through. Clean up any random drips with a sponge. -
Final firing:
Load the mug into the kiln for the glaze firing (likely Cone 5 or 6, depending on your clay body). Ensure no glaze touches the kiln shelf.
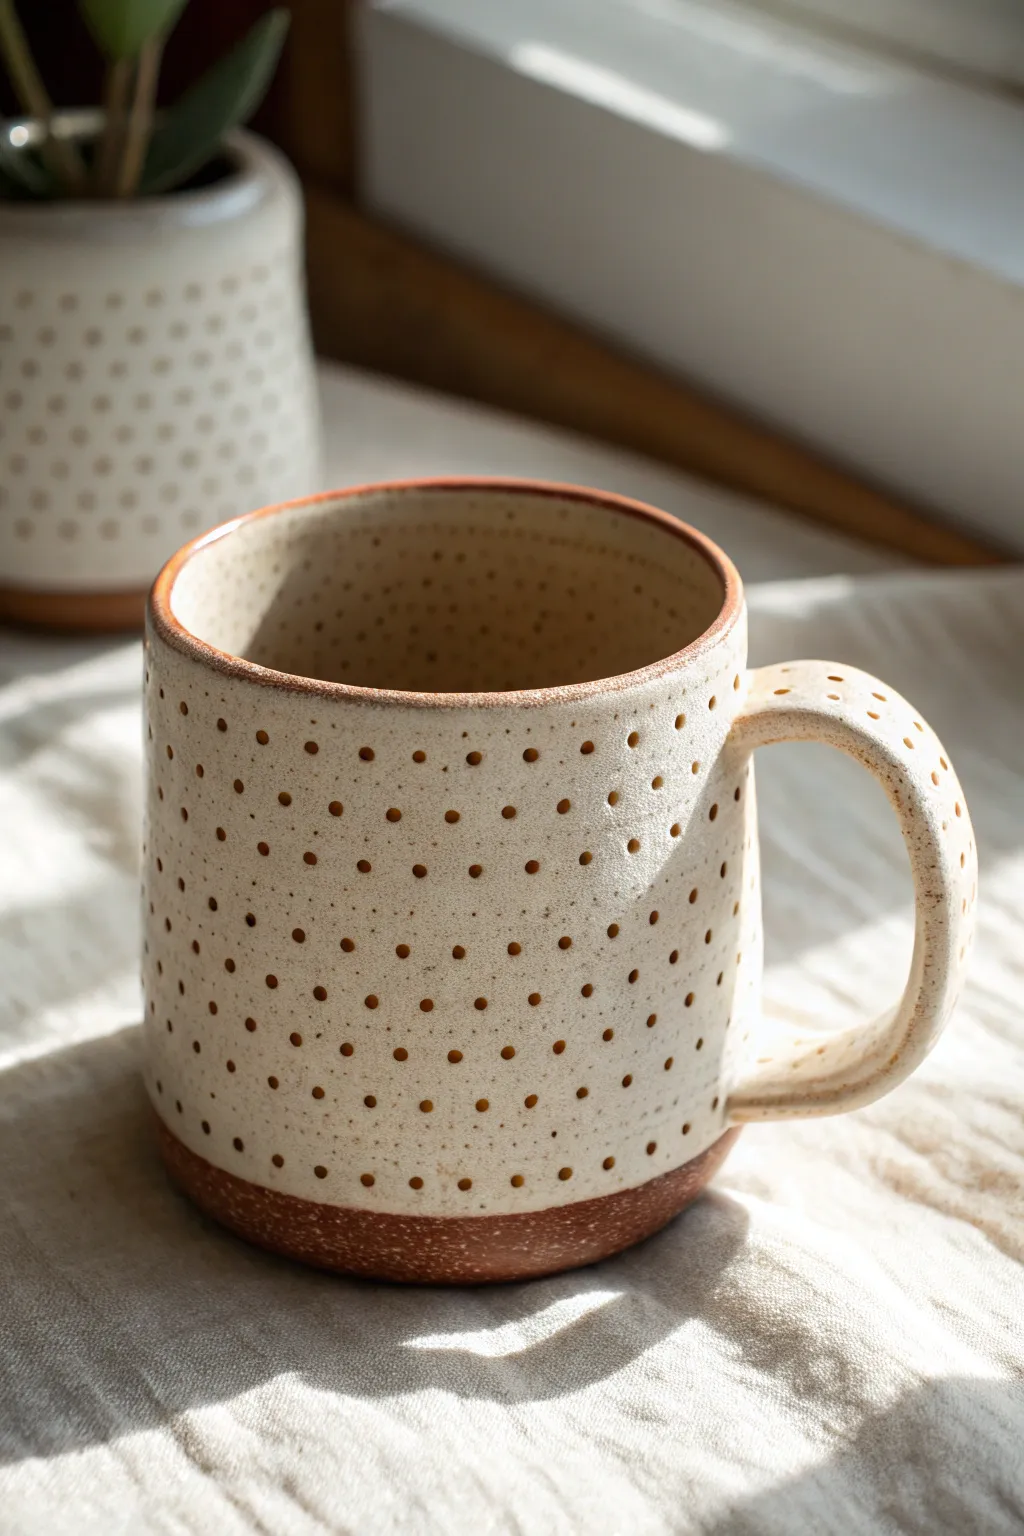
Create Texture
Before rolling the slab into a cylinder, gently press a piece of coarse linen fabric into the surface. The glaze will break beautifully over this subtle texture.
Once cooled, your mug is ready for a freshly brewed coffee and a cozy morning moment


Pinch-Pot Mug With a Flattened Base
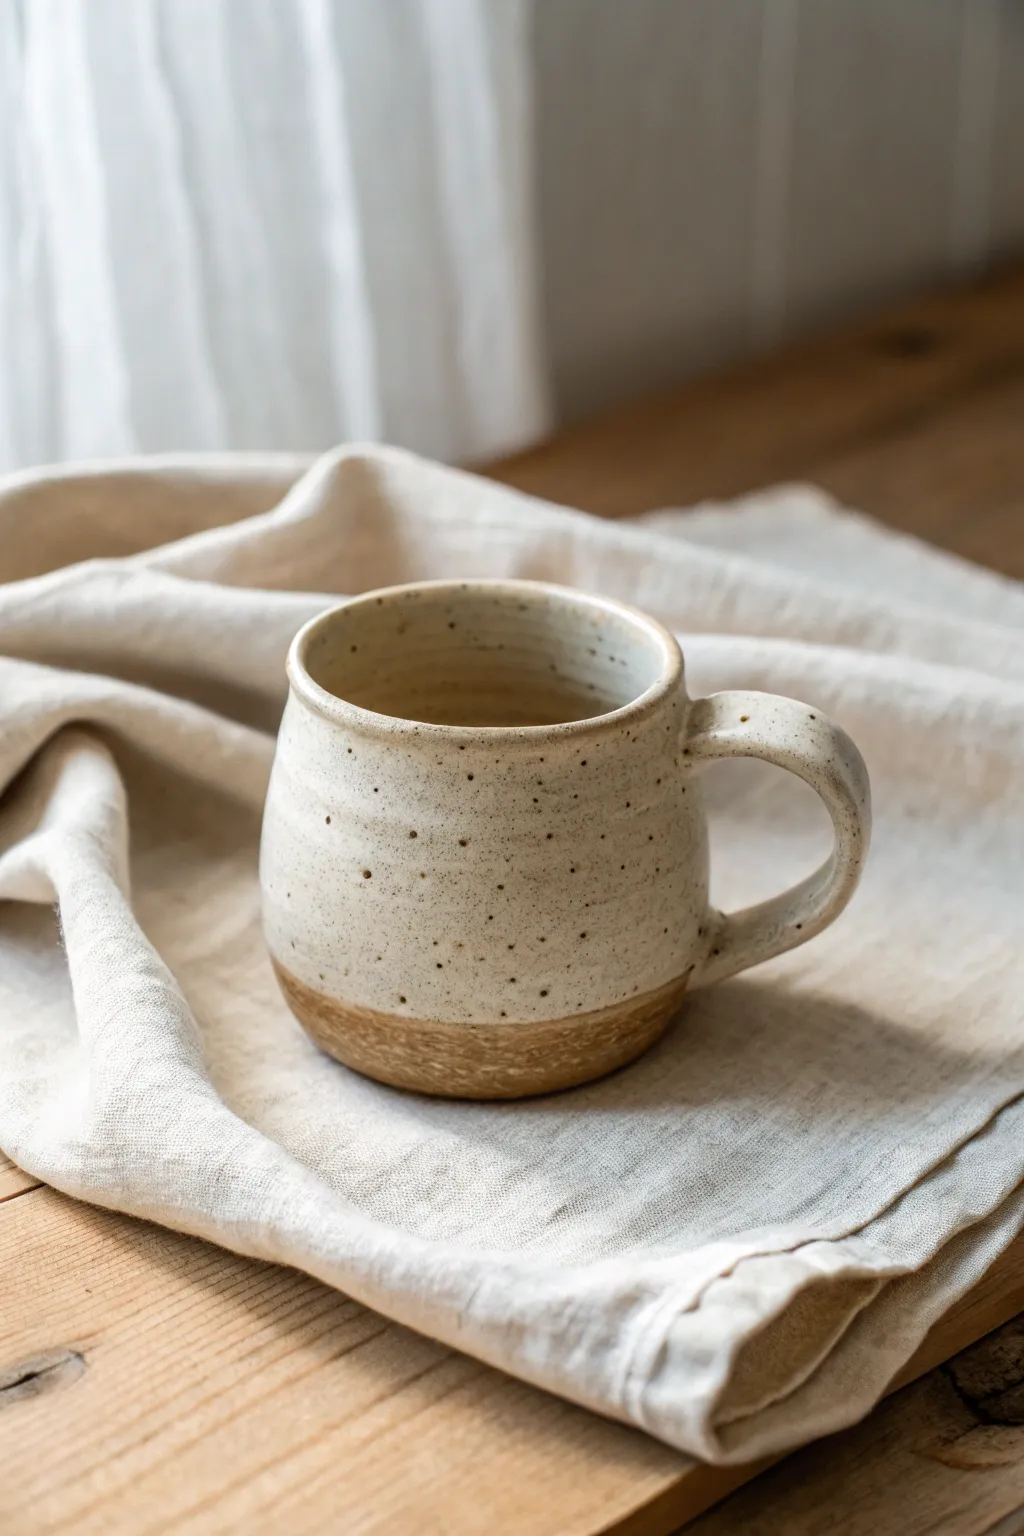
This rustic, speckled mug features a satisfyingly wide belly and a narrowed rim that keeps your coffee warm. Using simple pinch pot techniques and a raw clay base, it creates a cozy, artisanal piece perfect for slow mornings.
Step-by-Step Tutorial
Materials
- Stoneware clay (preferably speckled)
- Needle tool
- Loop tool (for trimming)
- Serrated rib or kidney tool
- Sponge
- Scoring tool (or fork)
- Slip (clay mixed with water)
- Creamy white glaze (speckled if your clay isn’t)
- Rolling pin (optional)
- Wooden paddle
Step 1: Forming the Mug Body
-
Create a Clay Ball:
Start by taking a lump of clay roughly the size of a large orange. Pat it firmly between your hands to create a smooth, dense sphere. -
Open the Pot:
Hold the sphere in one hand and press your thumb into the center, stopping about a half-inch from the bottom to leave enough thickness for the base. -
Pinch the Walls:
Begin rotating the ball while gently pinching evenly from the bottom up. Aim for consistent wall thickness, but allow the middle section to balloon slightly outward to create that rounded ‘belly’ shape. -
Flatten the Base:
Once you have your basic shape, tap the pot gently on your work surface to create a flat, stable bottom. I like to do this early so the pot doesn’t rock while I work. -
Smooth the Interior:
Use your thumb or a slightly damp sponge to compress the interior floor and smooth out any deep finger marks. -
Refine the Rim:
Gently collar the rim inward by encircling it with your hands and pressing lightly. This creates the tapered opening shown in the photo, which is distinct from the wider body. -
Paddle for Shape:
If the exterior is too bumpy, gently pat the outside with a wooden paddle while supporting the inside with your hand to encourage a smooth, round curve.
Rim Comfort Tip
Use a damp chamois cloth or a strip of soft plastic to compress the rim while spinning the pot slowly. This ensures the drinking edge is perfectly smooth for your lips.
Step 2: Adding the Handle
-
Pull or Roll a Coil:
Roll a thick coil of clay for the handle. Taper one end slightly if you prefer a thinner attachment point at the bottom. -
Shape the Curve:
Bend the coil into a ‘C’ shape or ear shape that feels comfortable for your fingers. Hold it up to the mug to check proportions. -
Score the Surfaces:
Mark the attachment points on both the mug body and the handle ends using a scoring tool or fork. The texture should be rough like velcro. -
Apply Slip and Attach:
Dab a generous amount of slip onto the scored areas. Press the handle firmly onto the mug body, wiggling slightly to create a suction bond. -
Blend the Seams:
Use a small wooden tool or your finger to smooth the clay from the handle onto the mug body until the seam disappears completely.
Step 3: Finishing and Glazing
-
Dry to Leather Hard:
Let the mug dry slowly under plastic until it is leather hard—firm enough to handle without deforming. -
Create the Trim Line:
Decide where you want the glaze to stop. Use a needle tool to lightly mark a horizontal line around the base, leaving the bottom inch or so raw. -
Bisque Fire:
Once bone dry, fire the piece in a kiln to bisque temperature according to your clay type specifications. -
Wax the Base:
Before glazing, apply liquid wax resist to the bottom section (below your marked line) and the underside of the foot to keep the raw clay exposed. -
Dip and Clean:
Dip the mug into a creamy white glaze. After the glaze dries, wipe away any stray droplets on the waxed area with a sponge to ensure that clean, crisp line. -
Final Firing:
Fire the mug a final time to the glaze maturity temperature.
Add Thumb Rest
Before the handle dries, press a small, organic indentation at the very top of the handle curve. It creates a perfect resting spot for your thumb.
Enjoy the warmth of your handmade pottery with your favorite hot beverage.


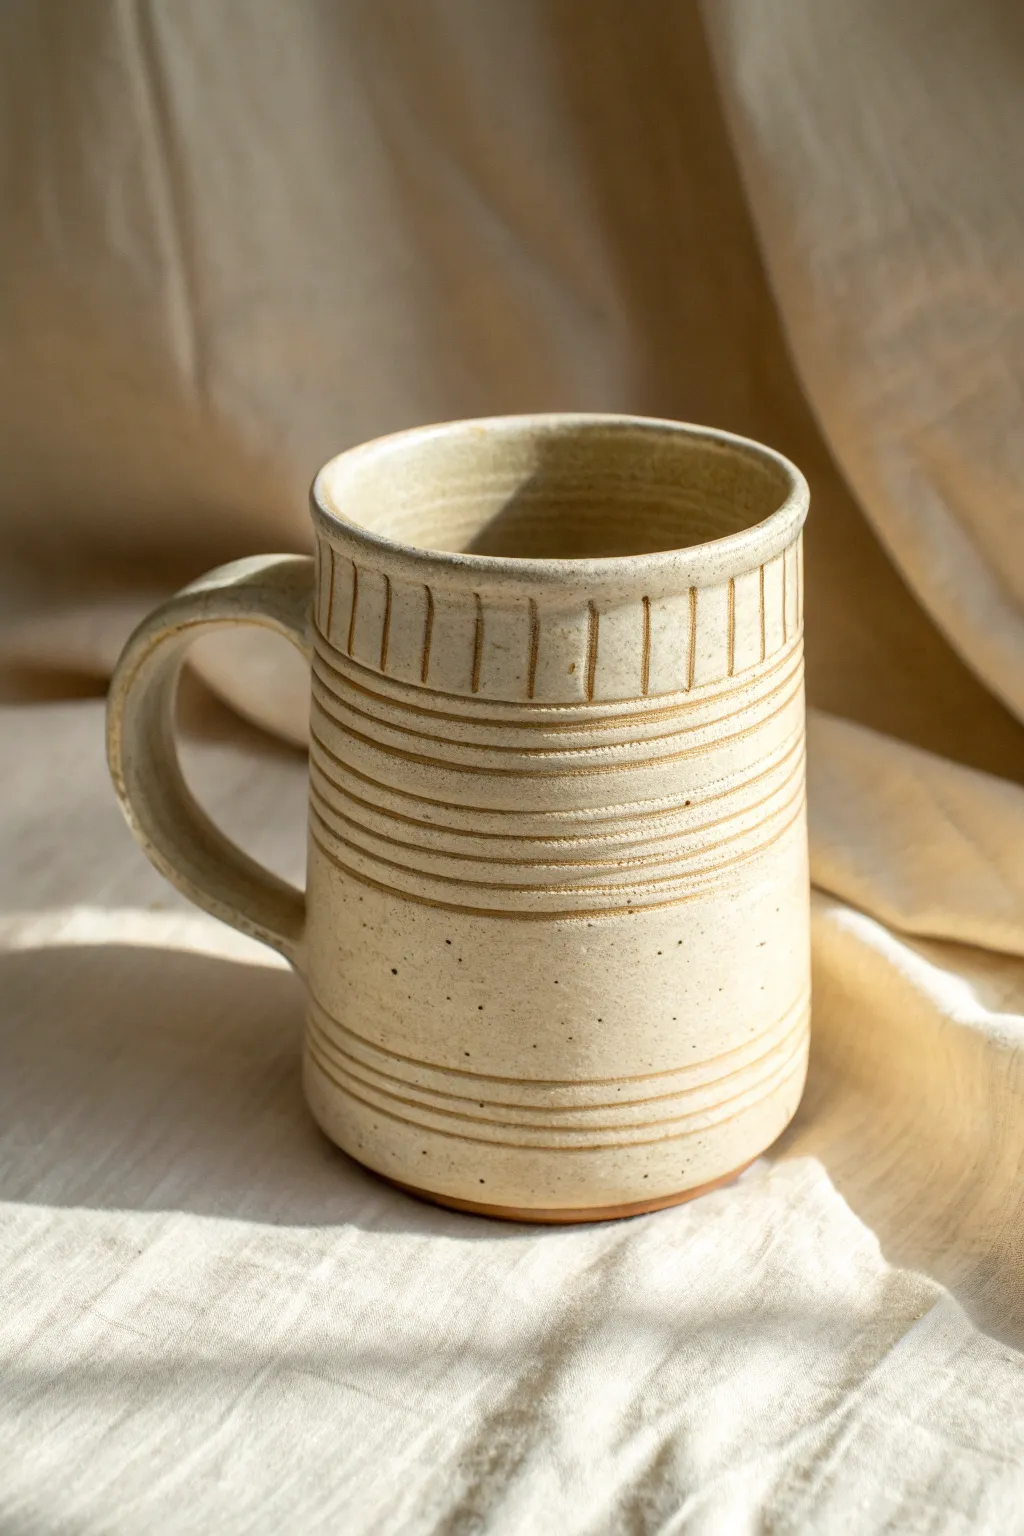
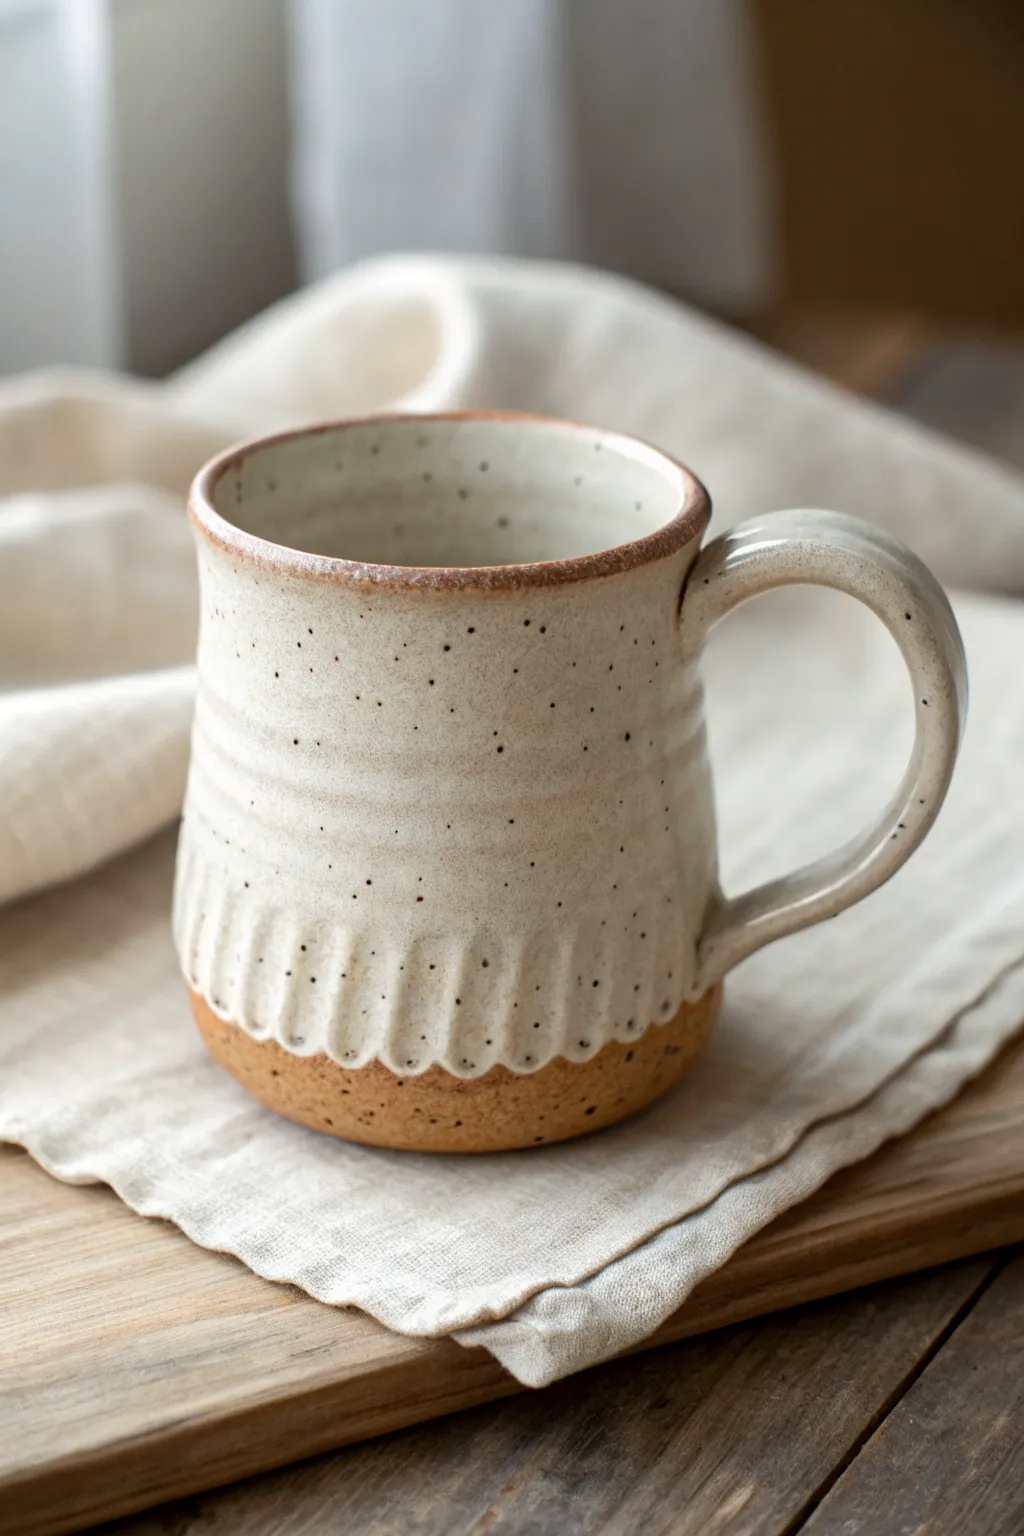
Coil-Built Mug With a Chunky Handle
Embrace the tactile nature of hand-building with this beautifully textured coil mug. The visible horizontal ridges and speckled cream clay give it an earthy, rustic charm that feels cozy in your hands.
How-To Guide
Materials
- Speckled stoneware clay (approx. 1.5 lbs)
- Scoring tool (needle tool or serrated rib)
- Slip (creamy mixture of clay and water)
- Wooden modeling tool
- Sponge
- Fettling knife
- Clear or translucent satin glaze
- Kiln available for firing
Step 1: Building the Base
-
Roll the slab:
Start by rolling out a small slab of your clay to about 1/4 inch thickness. This will be the floor of your mug. -
Cut the circle:
Use a round cookie cutter or trace a circle (about 3.5 inches in diameter) with your needle tool and cut it out to form the base. -
Score the edge:
Rough up the outer top edge of this circle base using your scoring tool and apply a generous dab of slip.
Uneven Walls?
If your coils are bulging unevenly, use a flat wooden paddle to gently tap the outside of the mug while supporting the inside with your hand to true up the shape.
Step 2: Coiling the Walls
-
Roll your coils:
Roll out several long, even snakes of clay on your table. Aim for a thickness similar to your pinky finger. -
Attach the first coil:
Place the first coil directly onto the scored edge of the base. Gently press it down to ensure contact. -
Blend the inside:
Use your thumb or a wooden tool to smear the clay from the coil downward onto the base on the *inside* of the mug only. This seals the seam. -
Continue stacking:
Score the top of your attached coil, add slip, and stack the next coil on top. Repeat this process until the mug reaches your desired height, usually about 4 to 5 inches. -
Smooth the interior:
As you build upward, continue smoothing the coils together on the inside to create a water-tight, flat interior surface. -
Refine the exterior ridges:
On the outside, use a damp sponge or your finger to gently soften the coil lines without erasing them completely. I like to leave the ridges distinct to highlight the construction method. -
Shape the rim:
Once built, gently pinch and smooth the top rim of the mug with a chamois or damp sponge to make sure it’s comfortable for drinking.
Step 3: Adding the Handle
-
Form a lug handle:
Roll a thicker, short coil for the handle. Gently flatten it slightly into an oval cross-section rather than a perfect circle. -
Shape the curve:
Bend the clay into a ear-shape or ‘C’ curve. Hold it up to the mug body to check the proportion. -
Score and slip attachment points:
Mark where the handle will attach on the mug body. Thoroughly score both the mug surface and the handle ends, then apply slip. -
Attach firmly:
Press the handle onto the mug with firm pressure. Use a small wooden tool to blend the clay at the connection points, ensuring no air is trapped. -
Smooth the joints:
Wipe away any excess slip that squeezed out with a damp sponge for a clean transition.
Highlight the Texture
Instead of a clear glaze, try a breaking glaze (like a honey amber) that pools in the coil crevices to emphasize the horizontal ridges even more.
Step 4: Finishing
-
Slow drying:
Loosely cover the mug with plastic to let it dry slowly to the leather-hard stage, then uncover to bone dry. -
Bisque fire:
Fire the piece in the kiln to bisque temperature (usually cone 04). -
Glaze application:
Dip or brush a clear satin or semi-matte glaze over the entire piece. This allows the natural speckles of the clay body to shine through. -
Final firing:
Glaze fire the mug to the maturity temperature of your clay (likely cone 5 or 6).
Now perfectly fired, your speckled mug is ready to hold your morning coffee or tea


Easy Strap Handle That Fits Your Fingers
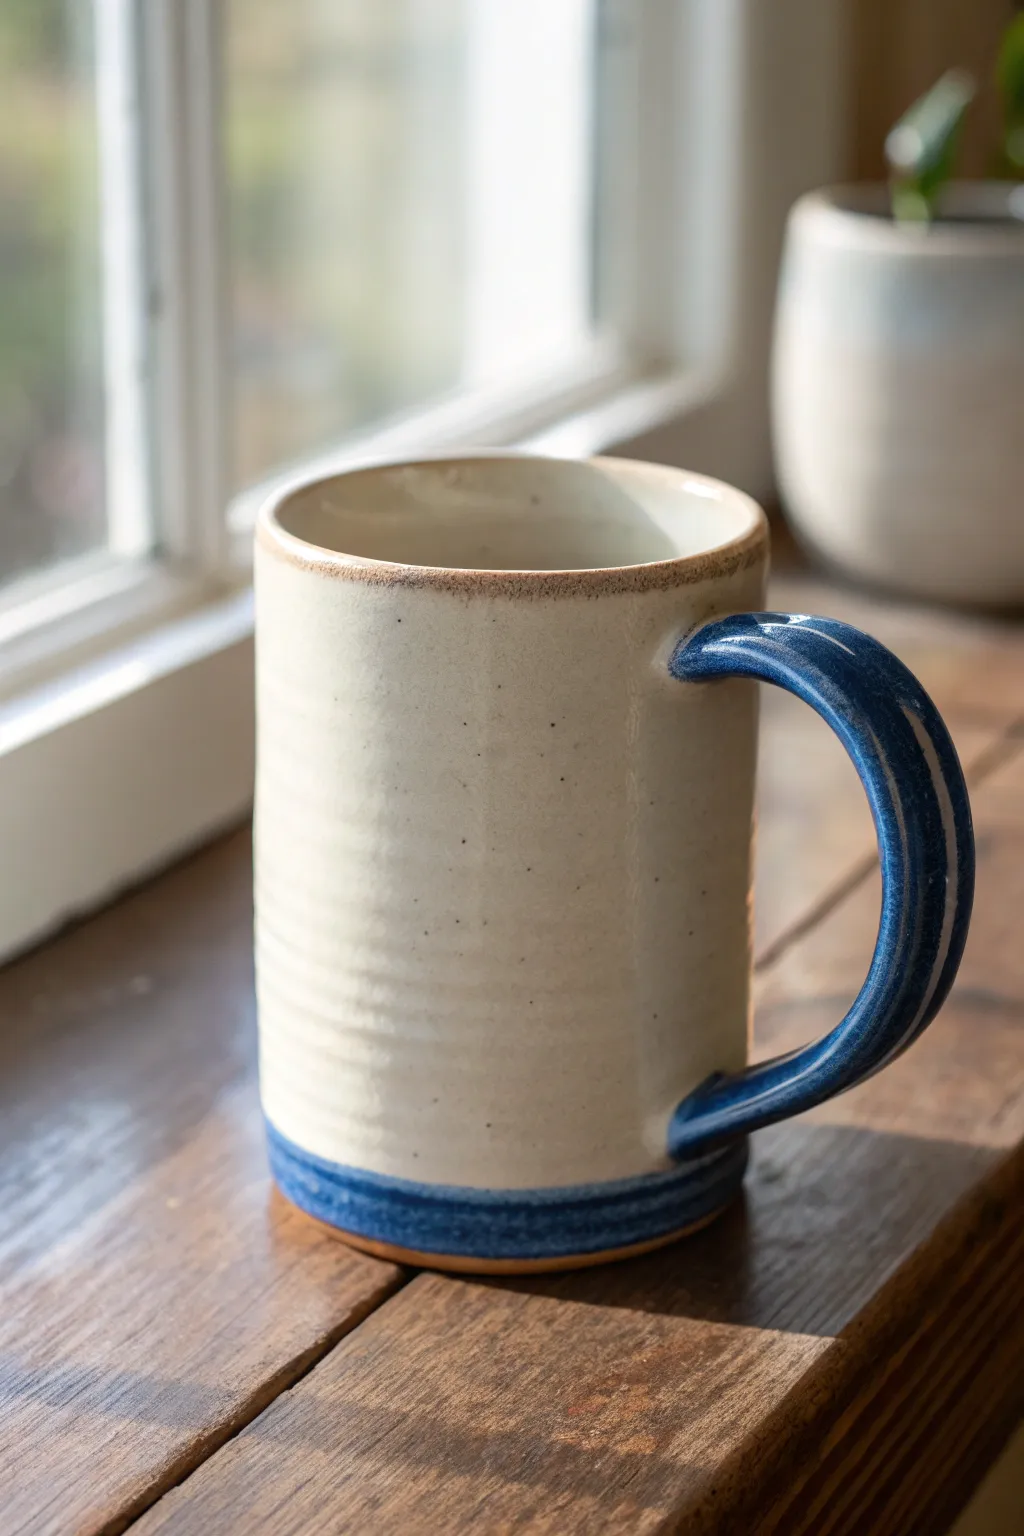
Create a timeless sturdy mug featuring a comfortable strap handle and striking cobalt blue accents. This project focuses on building a simple, clean cylinder form and mastering the art of an attached handle that fits perfectly in your hand.
Step-by-Step
Materials
- Stoneware clay body (speckled or buff)
- Pottery wheel (or slab roller/rolling pin for hand-building)
- Needle tool
- Rib tool (wooden or metal)
- Wire cutter
- Sponge
- Water bucket
- Serrated rib or scoring tool
- Slip
- Cobalt blue underglaze or glaze
- Clear or creamy white glaze (translucent enough to show speckles)
- Soft fan brush
Step 1: Throwing the Cylinder Body
-
Center the clay:
Start with about 1 to 1.5 lbs of clay. Throw it onto the wheel head and center it firmly using steady pressure and water for lubrication. -
Open the form:
Press your thumbs into the center to open the clay, leaving about a quarter-inch of thickness for the floor. Compress the floor with your fingers or a flat tool to prevent S-cracks later. -
Pull the walls:
Pull the clay upward into a tall cylinder. Keep a consistent speed and pressure to ensure even walls. Aim for a straight-sided profile rather than a rounded bowl shape. -
Refine the surface:
Use a rib tool on the outside while supporting the inside with your hand to remove throwing lines and create that smooth, modern finish seen in the photo. -
Trim the rim:
Use a needle tool to trim the top rim if it’s uneven, then use a damp sponge or chamois to round it off smoothly so it will be comfortable to drink from. -
Cut and dry:
Run your wire cutter under the base to release it. Set the cylinder aside until it reaches a soft leather-hard stage.
Fixing Handle Cracks
If hairline cracks appear at the handle join while drying, compress immediately with a damp sponge. Wrap the handle in plastic to slow drying and let the moisture even out.
Step 2: Creating and Attaching the Strap Handle
-
Pull a strap:
Take a separate nugget of clay and pull a long, flat strap using plenty of water. You want it about an inch wide and fairly thick to match the mug’s visual weight. -
Shape the curve:
Section off the best part of your pulled strap. Let it stiffen slightly in a curved arch shape on a board so it holds its form when you pick it up. -
Score the attachment points:
Identify where you want the handle on the leather-hard mug. Score the mug surface and the ends of the handle thoroughly with a serrated rib. -
Apply slip:
Dab a generous amount of slip onto the scored areas. This acts as the glue that bonds the pieces together. -
Attach the handle:
Press the top of the handle firmly against the mug wall just below the rim. Check the vertical alignment, then press the bottom attachment point near the base. -
Smooth the seams:
Use a small amount of water or a damp sponge to smooth the connection points, blending the clay so it looks like it grew out of the mug.
Step 3: Glazing and Finishing
-
Bisque fire:
Once the mug is bone dry, fire it in the kiln to bisque temperature (usually cone 04 or 06). -
Wax the foot:
Apply wax resist to the very bottom of the mug and a few millimeters up the side if you want a clean unglazed foot ring. -
Apply the base glaze:
Dip the entire mug into your creamy white or clear glaze. Shake off excess drips and let it dry to the touch. -
Paint the blue accents:
Using a steady hand and a soft brush, paint a thick band of cobalt blue glaze around the bottom edge of the mug. -
Highlight the handle:
Paint the outer surface of your handle with the same blue glaze. I find it helpful to leave the underside unpainted for a nice contrast. -
Final firing:
Load the kiln for the final glaze firing according to your clay and glaze specifications (typically cone 5/6 or cone 10).
Textured Grip
Before attaching the handle, press a textured fabric or stamp into the strap while it’s flat. The glaze will break beautifully over the pattern.
Enjoy your morning coffee in a vessel that feels as good as it looks

The Complete Guide to Pottery Troubleshooting
Uncover the most common ceramic mistakes—from cracking clay to failed glazes—and learn how to fix them fast.
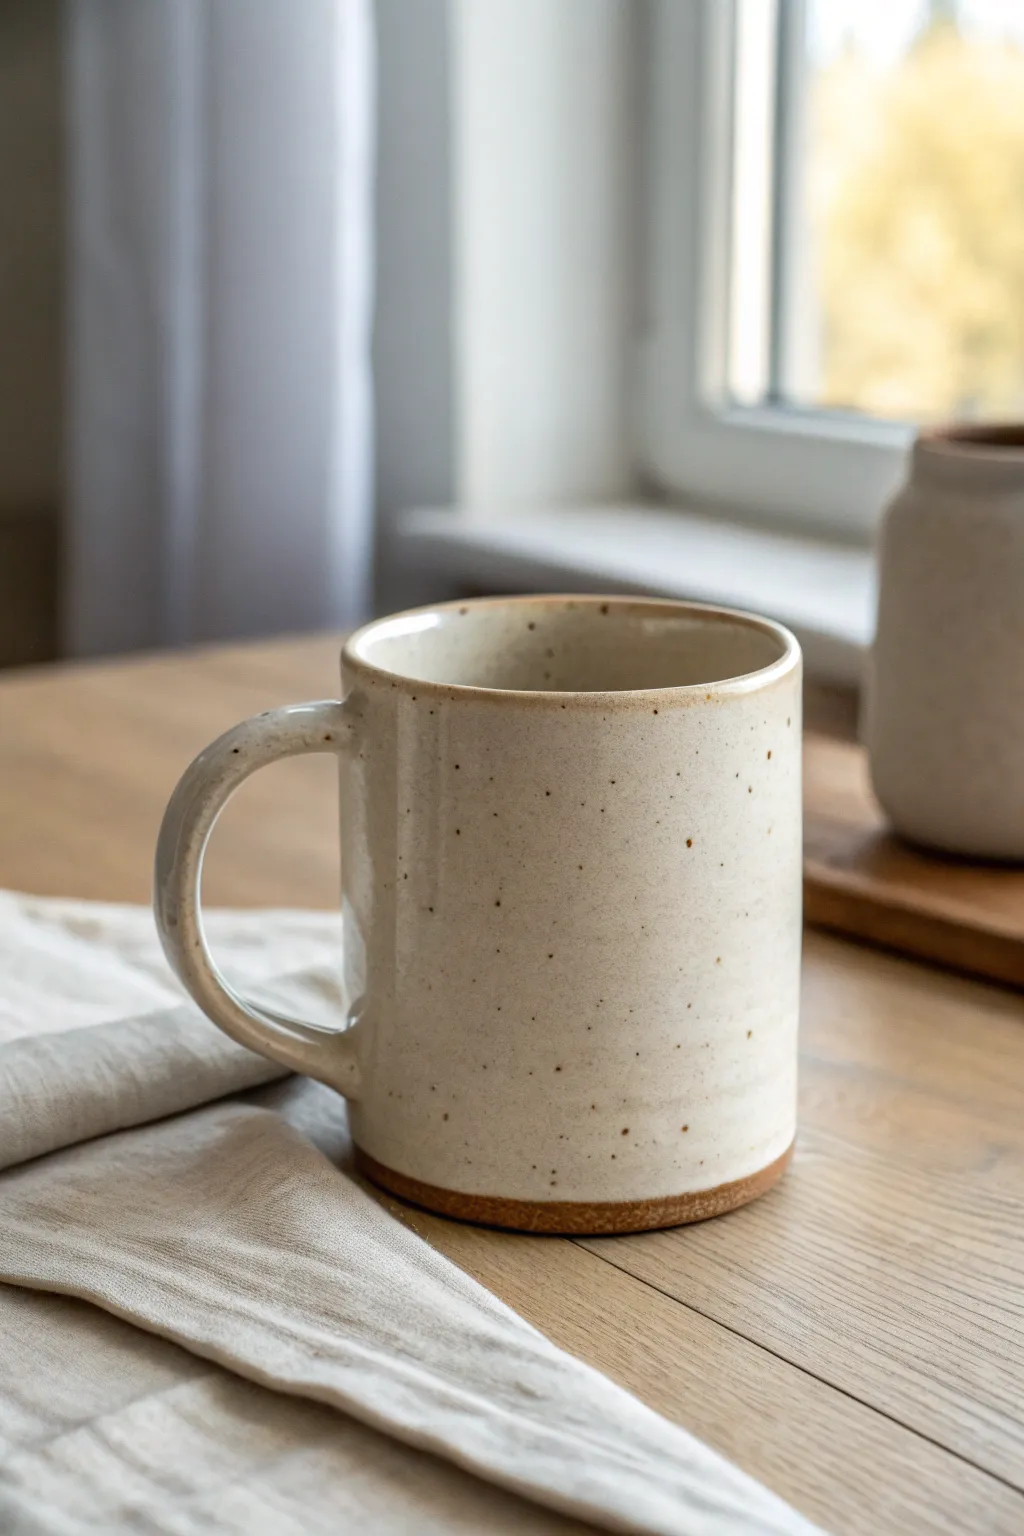
Soft Rounded Rim for a Comfy Sip
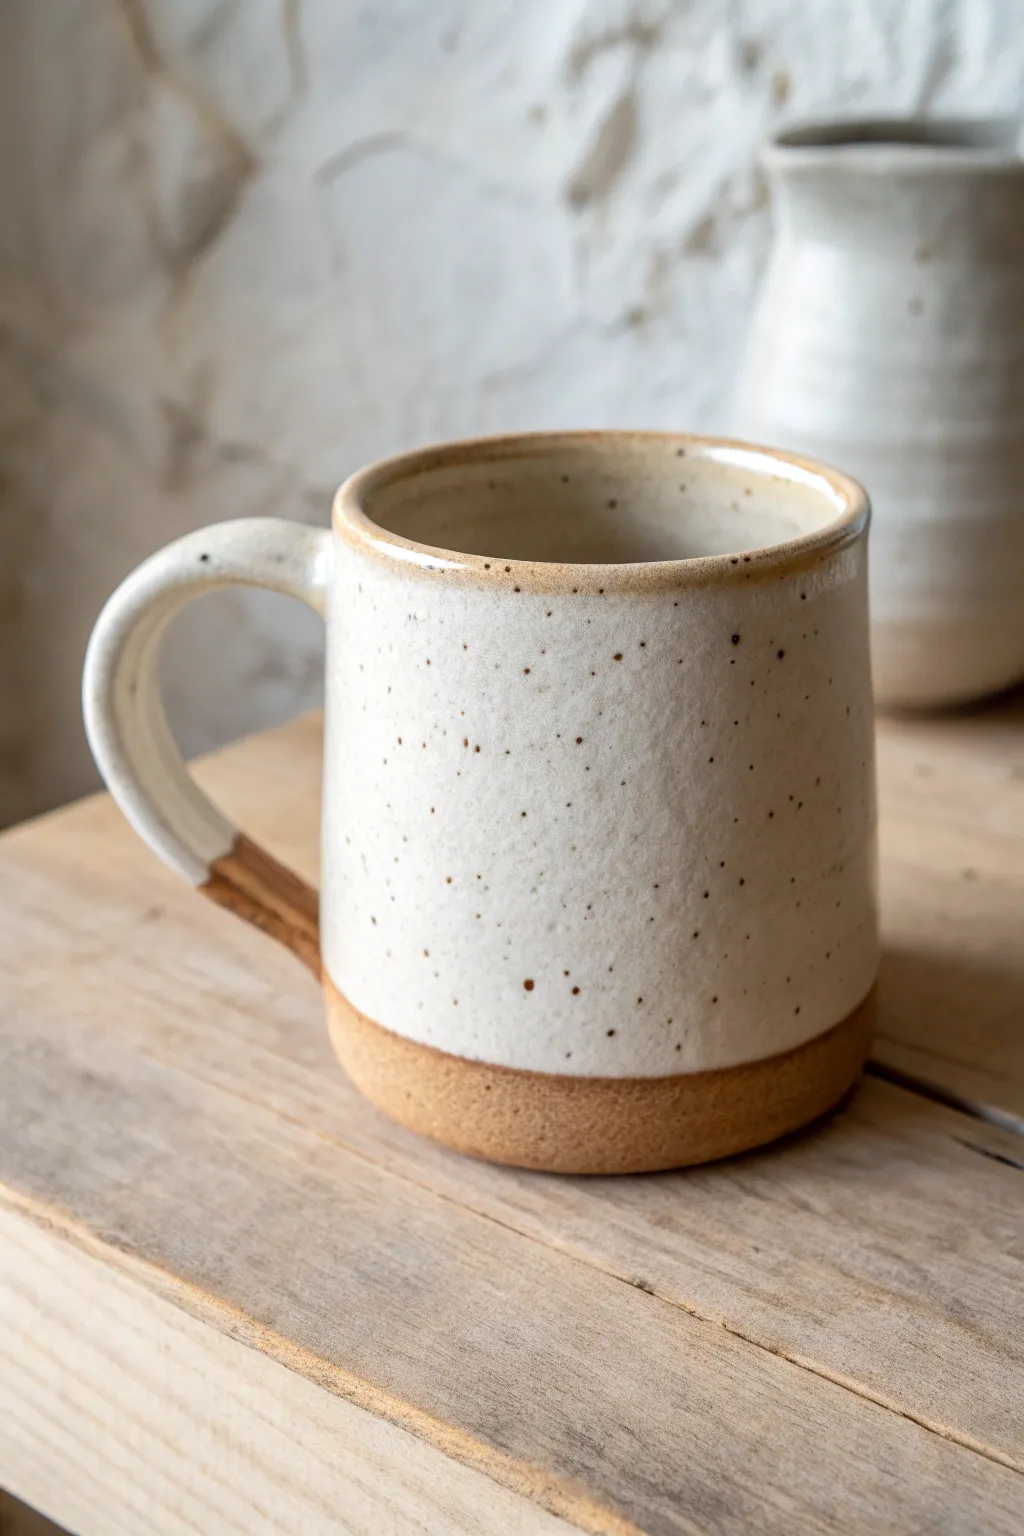
This handmade ceramic mug features a cozy, wide-bottomed shape with a comforting, creamy white glaze that lets natural iron speckles shine through. The distinctively exposed raw clay base and lower handle attachment add warmth and texture to every sip.
How-To Guide
Materials
- Stoneware clay (speckled or iron-rich)
- Pottery wheel
- Throwing tools (sponge, wire cutter, rib tools)
- Loop tool for trimming
- Needle tool
- Serrated rib or scoring tool
- Slip (clay mixed with water)
- Satin matte white glaze
- Kiln for bisque and glaze firing
Step 1: Throwing the Body
-
Center the clay:
Begin with about 1 – 1.5 lbs of speckled stoneware wedged into a ball. Smack it onto the center of your wheel head and use water and steady pressure to center the mound perfectly. -
Open the form:
Push your thumbs into the center to create the floor, leaving it about a half-inch thick to allow for trimming later. Pull the clay outward to establish a flat, wide internal base. -
Pull the walls:
Slowly pull the walls upward. Unlike a perfect cylinder, allow the base to remain slightly wider than the rim, giving it that grounded, stable shape seen in the photo. -
Shape the profile:
Use a rib tool on the inside and your hand on the outside to gently belly the walls out slightly, creating a soft curve while keeping the overall vertical heavy-bottomed silhouette. -
Refine the rim:
Compress the rim with a chamois or sponge. I like to focus here on making it rounded and smooth, as this is the key feature for a comfortable sipping experience. -
Cut off:
Run a wire cutter underneath the base and set the cylinder aside on a ware board to dry to a leather-hard state.
Rim Comfort
Use a piece of plastic wrap over the rim while smoothing it with your fingers during the throwing stage to get an exceptionally soft, rounded edge.
Step 2: Trimming and Handling
-
Trim the foot:
Once leather hard, center the mug upside down on the wheel. Trim excess clay from the bottom to create a defined foot, leaving a strip of raw clay texture visible near the base. -
Pull a handle:
Pull a thick strap of clay for the handle. For this specific look, aim for a substantial, sturdy handle that isn’t too delicate. -
Shape the handle curve:
Curve the pulled strap into a large ‘C’ shape. Allow it to stiffen slightly until it can hold its shape without slumping. -
Prepare attachment points:
Hold the handle up to the mug. Mark where the top connects near the rim and the bottom connects near the lower third. Score these areas thoroughly with a serrated rib and add slip. -
Attach the handle:
Press the handle firmly onto the scored spots. Smooth the top joint seamlessly into the rim. For the bottom joint, blend it well but leave the very end slightly prominent if you want that rustic touch. -
Dry slowly:
Cover the mug loosely with plastic to ensure the handle and body dry at the same rate, preventing cracks at the joints. Once bone dry, bisque fire the piece.
Step 3: Glazing and Finishing
-
Wax the resist areas:
Apply wax resist to the bottom foot ring and specifically to the lower inch of the mug’s exterior wall. Also carefully wax the bottom attachment point of the handle to keep it raw. -
Prepare the glaze:
Mix your satin matte white glaze well. If your clay body doesn’t have speckles, you can add granular ilmenite or iron oxide to the glaze itself. -
Dip the mug:
Hold the mug by the foot and dip it rim-first into the glaze bucket. Submerge it until the glaze reaches your wax line, then pull it out quickly to avoid a too-thick application. -
Clean up:
Wipe away any stray drips of glaze that might have settled on the waxed raw clay areas with a damp sponge. -
Smooth the transition:
Check the line where glaze meets raw clay. If it’s jagged, smooth it slightly with your finger for a clean, intentional finish. -
Final fire:
Load the mug into the kiln for the glaze firing (typically Cone 5 or 6 for stoneware). The heat will melt the glaze and draw out the iron speckles from the clay.
Change the Tone
Try a dark chocolate brown clay body with the same white glaze. The contrast will be much sharper, and the speckling will appear warmer and deeper.
Enjoy your morning coffee in a mug that feels as grounded and natural as the earth it came from
Minimal Banding Lines for Instant Style
This project combines the rustic charm of speckled clay with clean, graphic line work for a mug that feels both modern and timeless. By layering carved horizontal bands with vertical notches, you create a tactile surface that catches the glaze beautifully.
Detailed Instructions
Materials
- Speckled stoneware clay (mid-fire)
- Pottery wheel
- Throwing tools (sponge, wire, rib)
- Pin tool or needle tool
- Loop trimming tool
- Carving tool (small U-gouge)
- Matte white or cream dipping glaze
Step 1: Throwing and Shaping
-
Center the clay:
Begin by centering about 1-1.5 lbs of speckled stoneware clay on your wheel head. Ensure it’s perfectly centered to make the carving steps easier later on. -
Open and pull:
Open the clay and pull up a cylinder. Aim for straight, vertical walls rather than a curved belly, as a straight profile works best for this linear design. -
Define the rim:
Compress the rim with a shammy or sponge, creating a slightly thickened, rounded lip for comfortable drinking. -
refine the surface:
Run a metal rib up the outside of the form to remove throwing rings and create a smooth canvas for your texture. Remove the cylinder from the wheel with a wire tool.
Uneven Lines?
If your horizontal bands wobble, your wheel speed might be too slow. Increase speed slightly and brace your elbows firmly against your body for better stability.
Step 2: Trimming and Texture
-
Wait for leather hard:
Allow the mug to dry to a leather-hard state where it’s firm enough to handle without warping but soft enough to carve smoothly. -
Initial trimming:
Place the mug upside down on the wheel, center it, and trim the bottom foot ring using a loop tool. -
Section the design:
With the mug spinning slowly on the wheel, use a needle tool to lightly mark horizontal guides: one section near the rim, a large middle section, and a section at the base. -
Carve the rim notches:
Stop the wheel. Using your small carving tool, press vertical indentations around the top one-inch band of the mug. Space them evenly, about a quarter-inch apart. -
Create the middle bands:
Spin the wheel slowly again. Using the corner of a loop tool or a specialized carving tool, press gently into the clay to create continuous horizontal grooves. -
Vary the depth:
I like to vary the pressure slightly as I carve these bands to give them a hand-drawn feel, rather than making them mechanically perfect. -
Add base details:
Carve two or three accent lines near the very bottom of the mug to balance the visual weight of the design.
Step 3: Handle and Finish
-
Pull a handle:
Pull a simple, sturdy strap handle from a lug of fresh clay. Let it set up until it holds a curve but is still flexible. -
Attach the handle:
Score and slip the attachment points on both the handle and the mug. Press firmly to join, smoothing the clay to ensure a seamless connection. -
Clean up burrs:
Once the mug is bone dry, gently rub the carved areas with a green scouring pad or your finger to remove any sharp clay burrs. -
Bisque fire:
Fire the piece to cone 04 (or your clay body’s bisque temperature). -
Glaze application:
Dip the entire mug into a matte cream or white glaze. Hold it upside down for a few seconds to let excess glaze drip off the rim. -
Check the grooves:
Ensure the glaze doesn’t pool too thickly in your carved lines; the texture should remain visible. If it looks too thick, gently rub the grooves with a finger while the glaze is powdery. -
Final wipe:
Wipe the foot ring clean with a damp sponge. -
Final firing:
Glaze fire the mug to cone 5 or 6, depending on your clay and glaze specifications.
Highlight Texture
For more contrast, wipe away the glaze from the high points of the carved ridges with a damp sponge before firing to reveal the raw clay speckles underneath.
Enjoy using your new favorite mug or gift it to someone special who appreciates handmade texture


What Really Happens Inside the Kiln
Learn how time and temperature work together inside the kiln to transform clay into durable ceramic.
Pressed Lace or Fabric Texture Mug
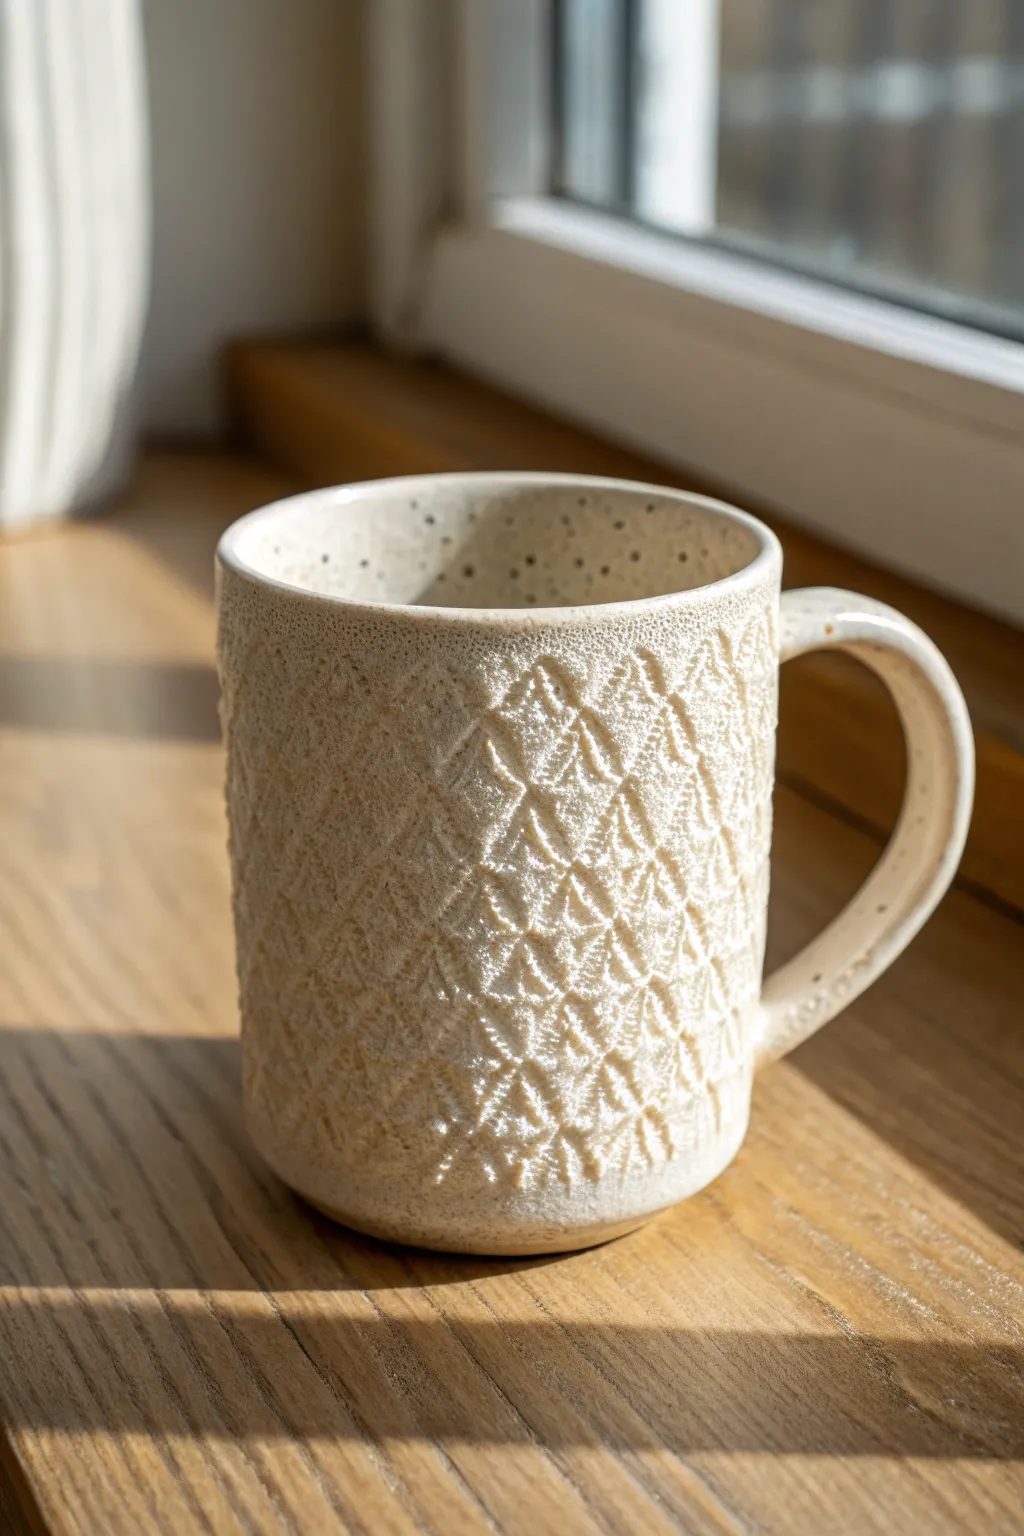
Transform a simple slab of clay into a cozy, textured mug that looks like it’s wearing a favorite sweater. This project uses the impression of lace or fabric to create a stunning raised diamond pattern, finished with a warm speckled glaze for that perfect rustic touch.
Step-by-Step
Materials
- Mid-fire stoneware clay (speckled or white)
- Textured fabric, lace, or a fondant impression mat (diamond knit pattern)
- Rolling pin
- Canvas or slab mat
- Fettling knife or needle tool
- Mug template (paper or craft foam)
- Serrated rib or scoring tool
- Slip (clay mixed with water)
- Smooth wooden rib
- Sponge
- Cream/White speckled glaze
- Kiln
Step 1: Preparing the Slab
-
Roll the Clay:
Begin by rolling out a smooth slab of your stoneware clay on a piece of canvas. Aim for a thickness of about 1/4 inch, ensuring it is even throughout to prevent warping during drying. -
Apply the Texture:
Lay your textured fabric, heavy lace, or impression mat over the clay slab. If you want the specific look in the photo, search for a ‘diamond knit’ or ‘cable knit’ texture mat. -
Press the Pattern:
Roll over the fabric or mat firmly with your rolling pin directly on top of the clay. Press hard enough to leave a deep, clear impression, but be careful not to make the clay too thin. -
Reveal the Design:
Carefully peel back the fabric or mat to reveal the embossed pattern. I always take a moment here to check for any shallow spots and re-press them if necessary before cutting.
Clean Seam Tip
To hide the vertical seam on the outside, gently press the texture mat or fabric back over the joined area. This blends the disruption back into the pattern.
Step 2: Building the Mug
-
Cut the Body:
Place your rectangular mug template over the textured slab. Use a fettling knife to cut around the template. Be gentle so you don’t smudge the beautiful texture you just created. -
Bevel the Edges:
On the two short ends of the rectangle, use your knife to cut a 45-degree angle (bevel). Cut one side facing up and the other facing down so they will overlap seamlessly. -
Score the Seams:
Rough up the beveled edges with a serrated rib or scoring tool. This texture is universally crucial for a strong bond. -
Apply Slip and Join:
Brush a generous amount of slip onto the scored areas. Bring the two ends together to form a cylinder, overlapping the beveled edges to create the wall of the mug. -
Secure the Seam:
Reach inside the cylinder and smooth the seam completely with a wooden rib or your finger. On the outside, press the seam gently to join it without erasing the pattern. -
Cut the Base:
Roll out a small piece of plain clay (untextured) for the floor. Place your cylinder on top of it and trace around the base with a needle tool, then cut it out. -
Attach the Base:
Score and slip both the bottom edge of the cylinder and the outer edge of the round base. Press them firmly together. -
Smooth the Connection:
Use a small wooden tool to smudge the clay from the base up onto the wall to seal the joint. Smooth this area with a damp sponge for a clean finish.
Step 3: Handle and Finish
-
Pull a Handle:
Pull a simple, smooth strap handle from a lug of clay. It should be wide enough to support the mug but sleek enough to contrast with the textured body. -
Shape the Handle:
Curve the handle into a ‘C’ or ear shape and let it stiffen slightly on a board until it holds its form without flopping. -
Attach Handle:
Score and slip the attachment points on both the mug body and the handle ends. Press the handle firmly onto the mug, checking the alignment. -
Rim Smoothing:
Run a damp sponge or a piece of soft plastic/chamois over the top rim of the mug. A smooth rim is essential for comfortable drinking. -
Bisque Fire:
Allow the mug to dry slowly under loose plastic to prevent the handle from cracking. Once bone dry, bisque fire the mug to cone 04. -
Glaze Application:
Dip or brush your mug with a cream-colored, speckled glaze. The glaze should be thick enough to be opaque but thin enough that it doesn’t pool too heavily in the texture. -
Wipe the Foot:
Clean the bottom of the mug with a wet sponge to remove all glaze from the foot ring, preventing it from sticking to the kiln shelf. -
Glaze Fire:
Fire the mug to the temperature recommended for your clay and glaze (likely cone 5 or 6). This final firing melts the glaze and vitrifies the clay.
Creative Twist
Try rubbing a dark oxide wash (like iron oxide) into the texture and wiping it back before glazing. This will make the ‘knit’ pattern pop with deeper contrast.
Enjoy your morning coffee in a mug that feels as cozy as it looks
Cookie-Cutter Appliqué Shapes on a Mug
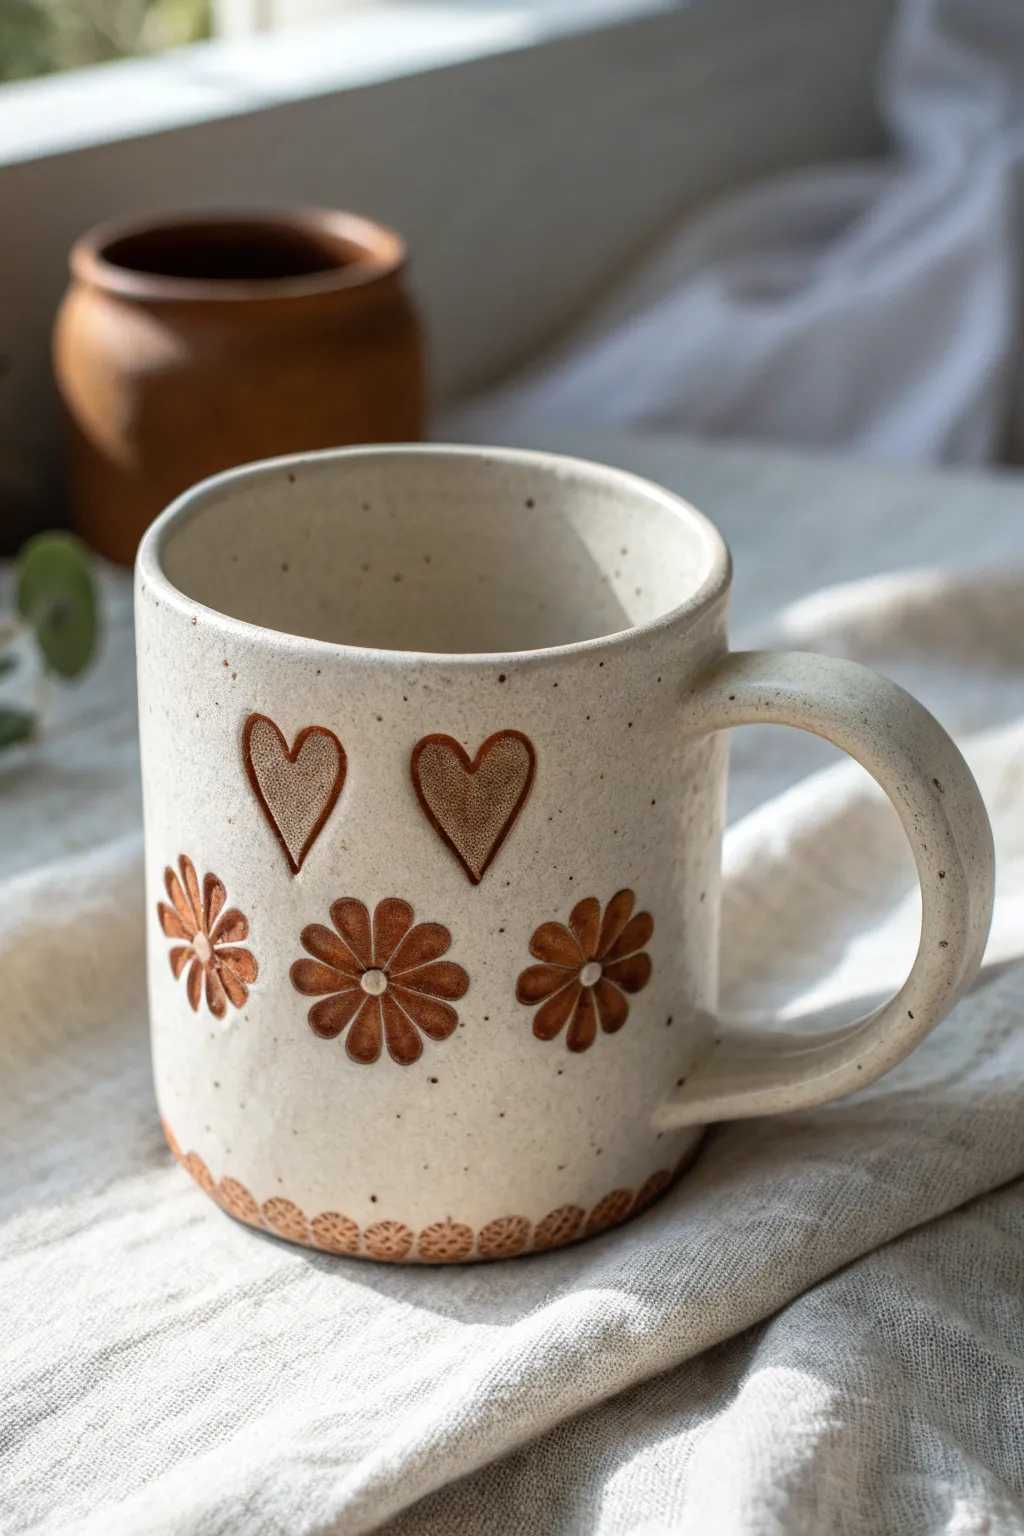
This charming handmade mug features a warm, speckled clay body adorned with rust-colored heart and flower appliqués. The design has a wonderfully tactile quality, combining stamped or cut-out shapes with a smooth, glazed finish.
Step-by-Step Guide
Materials
- Speckled stoneware clay (e.g., Cone 5/6)
- Rolling pin and guide sticks (about 1/4 inch thickness)
- Small heart and flower cookie cutters (or fondant cutters)
- Serrated rib tool
- Pottery needle tool
- Slip (clay mixed with water)
- Scoring tool or old toothbrush
- Underglaze (warm brown or rust color)
- Clear glaze (food safe)
- Small paintbrush
- Sponge
Step 1: Forming the Mug Body
-
Roll the slab:
Begin by rolling out your speckled stoneware clay into an even slab. Use guide sticks to ensure a consistent thickness of roughly 1/4 inch, which provides a sturdy but not overly heavy wall for your mug. -
Cut the rectangle:
Measure and cut a rectangular strip from your slab. A standard size is approximately 12 inches long by 4 inches high, but you can adjust this based on how large you want your finished vessel to be. -
Score and slip:
Use your serrated rib or needle tool to scratch up the short ends of the rectangle. Apply a generous amount of slip to these scored areas to act as glue. -
Create the cylinder:
Gently bend the slab into a cylinder, overlapping the scored ends. Press them firmly together, supporting the wall from the inside with one hand while smoothing the seam on the outside with the other. -
Add the base:
Roll a small piece of clay for the base. Place your cylinder on top, trace around it with a needle tool, and cut out the circle. Score and slip both the bottom of the cylinder and the edge of the base circle before attaching them firmly.
Compression is Key
When rolling your slab, compress the clay on both sides with a rib tool. This aligns the clay particles, preventing warping and cracking during the drying and firing stages.
Step 2: Adding the Handle & Appliqués
-
Pull the handle:
To make the handle, pull a small strap of clay or roll a coil, flattening it slightly. Shape it into a ‘C’ curve and let it stiffen for about 20 minutes until it holds its shape. -
Attach the handle:
Score and slip the attachment points on both the mug body and the handle ends. Press the handle onto the mug, smoothing the joints with a wooden modeling tool or your thumb. -
Cut out shapes:
Roll a very thin scrap piece of clay (thinner than the mug body). Use your small cookie cutters to punch out two hearts and three flower shapes. If you don’t have cutters, you can freehand these with a needle tool. -
Arrange the pattern:
Plan your layout before attaching. Place the two hearts near the top rim and the flowers in a row beneath them. -
Attach the appliqués:
Score the back of each cutout shape and the spot on the mug where it will go. Apply slip and press the shape onto the surface gently. I like to use a rib to gently compress the appliqué so it bonds fully without losing its definition. -
Create the bottom border:
For the texture at the very bottom edge, use a small, round modeling tool or the end of a paintbrush handle. Press small indentations continuously around the base to create a scalloped or beaded effect.
Step 3: Finishing and Glazing
-
Bisque fire:
Allow your mug to dry slowly and completely, usually for a few days. Once bone dry, fire it in the kiln to the bisque temperature appropriate for your clay body. -
Apply underglaze:
Once the mug is bisque fired, use a small brush to carefully paint the hearts, flowers, and the bottom recessed border with a rust or warm brown underglaze. Wipe away any stray marks with a damp sponge. -
Wax resist (optional):
If you want the appliqués to remain matte, you can apply wax resist over the painted shapes. Otherwise, painting clear glaze over them will make the colors pop more vividly. -
Dip in clear glaze:
Dip the entire mug into a clear, food-safe glaze. This will seal the speckled clay body and make the mug functional and easy to clean. -
Wipe the foot:
Use a damp sponge to meticulously wipe all glaze off the very bottom of the mug (the foot ring) so it doesn’t stick to the kiln shelf. -
Final fire:
Fire the mug again to the final glaze temperature (e.g., Cone 5 or 6). This melts the glaze into a smooth, glassy surface.
Appliqués Falling Off?
If your hearts or flowers pop off as they dry, you didn’t score enough. The surface needs to be rough, like Velcro, on both pieces before adding slip and pressing them together.
Now you have a cozy, custom mug ready for your morning coffee or tea

TRACK YOUR CERAMIC JOURNEY
Capture glaze tests, firing details, and creative progress—all in one simple printable. Make your projects easier to repeat and improve.
Easy Stamped Botanical Pattern Mug
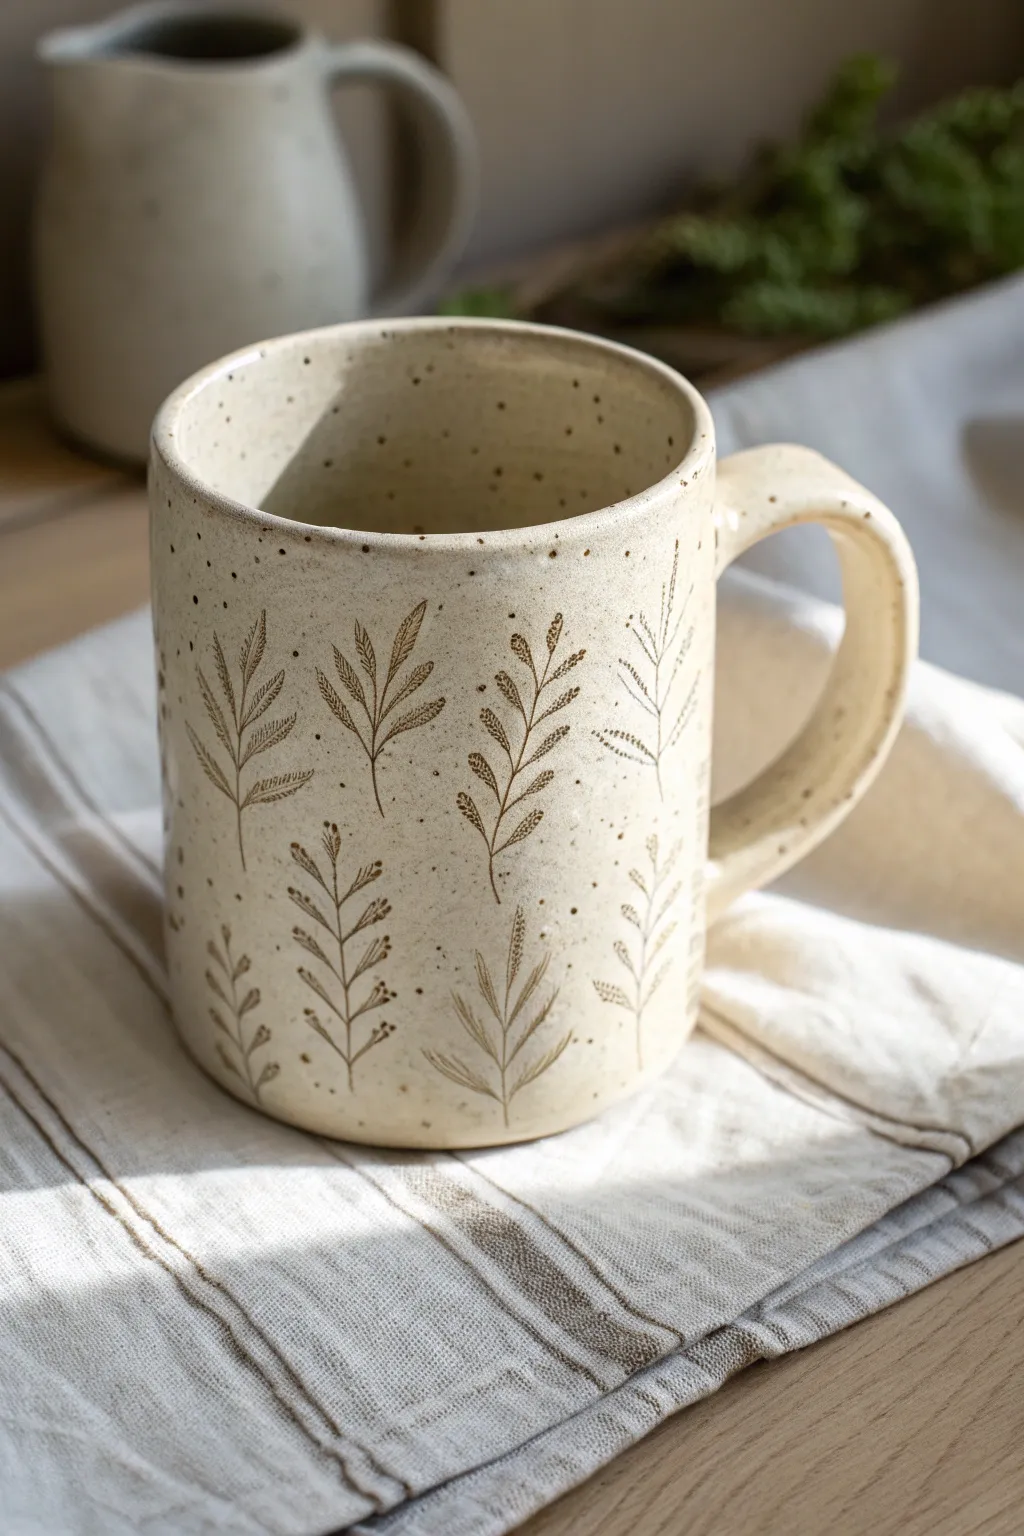
This project combines the rustic charm of speckled clay with delicate, minimalist botanical illustrations. The end result is a cozy, nature-inspired vessel that feels as lovely in the hand as it looks on the shelf, perfect for your morning brew.
Step-by-Step Tutorial
Materials
- Speckled stoneware clay (mid-fire)
- Rubber and wooden ribs
- Fettling knife
- Rolling pin and guide sticks (1/4 inch)
- Small botanical stamps (various leaf/fern patterns)
- Dark brown or black liquid underglaze
- Small stiff-bristled brush
- Sponge
- Clear matte glaze
- Scoring tool
- Slip
- Ware board
Step 1: Forming the Body
-
Roll the Slabs:
Begin by rolling out your speckled stoneware clay into a smooth slab. Use 1/4 inch guide sticks on either side of your rolling pin to ensure an even thickness throughout the entire piece. -
Smooth the Texture:
Before cutting, take a soft rubber rib and compress the clay slab on both sides. This removes any canvas texture from the rolling process and brings the beautiful speckles to the surface. -
Cut the Rectangle:
Using a ruler and fettling knife, cut a clean rectangle. For a standard mug, 11 inches by 4 inches is a solid starting size, but adjust based on your desired height and circumference. -
Bevel the Edges:
Identify the two short ends of your rectangle. Cut a 45-degree bevel on opposite sides (one facing up, one facing down) to create a strong, invisible overlap seam. -
Join the Cylinder:
Score the beveled edges thoroughly and apply slip. Bring the ends together to form a cylinder, pressing the beveled seams firmly against each other. -
Refine the Seam:
Support the inside of the mug with one hand while using a wooden tool or thumb to smooth the exterior seam until it disappears completely. -
Attach the Base:
Roll a small piece of excess clay for the base. Place your cylinder on top, trace around it with a needle tool, score and slip both contact points, and press them firmly together.
Step 2: Handle and Detailing
-
Pull the Handle:
Pull a strap of clay for the handle, tapering it slightly so it feels comfortable to hold. Bend it into a ‘C’ or ‘ear’ shape and let it stiffen up until it holds its form without sagging. -
Attach the Handle:
Score and slip the attachment points on both the mug body and handle. Press firmly to attach, then blend the clay at the joints for a seamless connection. -
Stamp the Design:
Once the mug is leather hard, gently press your botanical stamps into the surface. Arrange them in a repetitive but slightly organic vertical pattern, leaving negative space between each column of plants.
Smudged Images?
If you wipe away too much underglaze, let the piece dry fully, re-apply the color into the grooves, and use a dryer sponge with a lighter touch.
Step 3: Inlaying and Glazing
-
Clean the Bisque:
After the mug has been bisque fired, wipe it down with a damp sponge to remove any kiln dust. -
Apply Underglaze:
Using a small brush, paint dark brown underglaze directly into the stamped botanical impressions. Don’t worry about being neat; just ensure the recessed lines are filled. -
Wipe Back:
Take a clean, slightly damp sponge and wipe across the surface of the mug. This removes the underglaze from the high points but leaves it trapped inside the stamped lines, revealing the design. -
Clear Glaze:
Dip the entire mug into a clear matte glaze. I find matte glazes pair best with the rustic speckles, enhancing the natural look without creating distracting reflections. -
Check the Foot:
Carefully wipe any glaze off the bottom of the mug and up the side about 1/4 inch to prevent it from fusing to the kiln shelf during the final firing. -
Final Fire:
Fire the mug to the temperature appropriate for your clay and glaze combination (usually Cone 5 or 6 for mid-fire stoneware).
Custom Stamp Idea
Make your own stamps by pressing real leaves or twigs into small balls of scrap clay, then bisque firing them to create custom texture tools.
Enjoy using your new favorite mug for a quiet moment of reflection.
Thumbprint Dimple Mug for Extra Grip
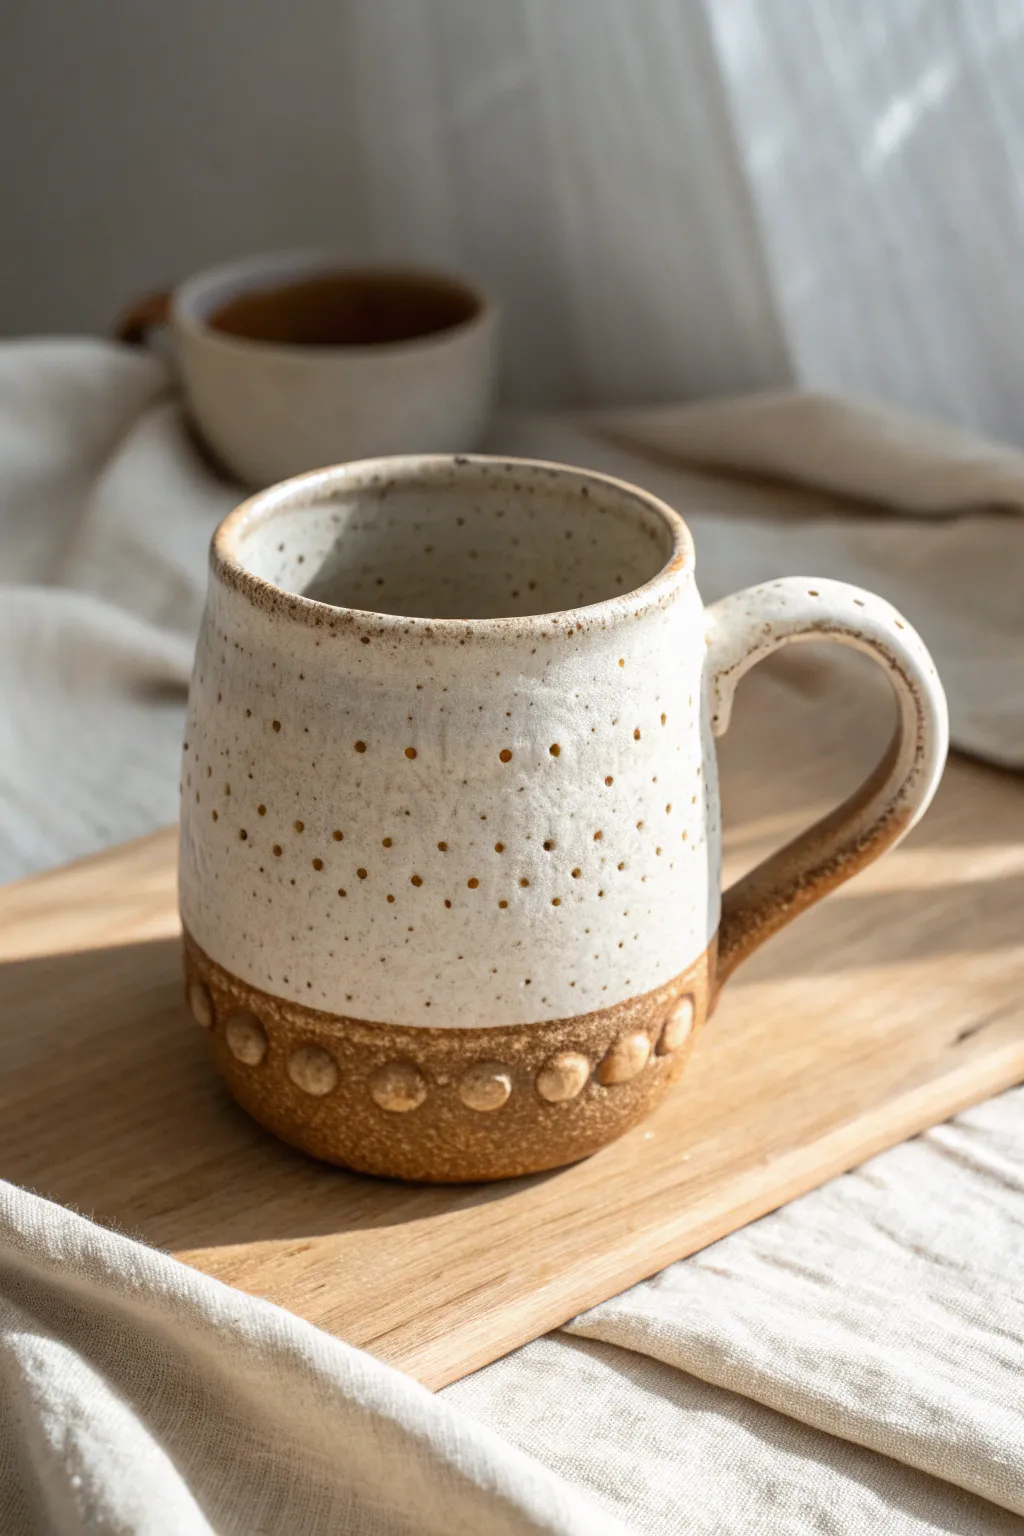
This charming handmade mug combines texture and warmth with its exposed speckled clay base and creamy white glaze. The distinctive row of raised buttons along the bottom not only adds tactile interest but creates a cozy, rustic aesthetic perfect for your morning brew.
Step-by-Step Guide
Materials
- Stoneware clay (speckled or buff)
- Pottery wheel (or rolling pin/slab roller for hand-building)
- Ware board
- Wire cutter
- Rib tool (wooden and metal)
- Needle tool
- Trimming tools
- Sponge
- Small round delicate tool (or dull pencil) for dots
- Creamy white dipping glaze
- Kiln
Step 1: Forming the Body
-
Prepare the Clay:
Begin by wedging about 1 to 1.5 lbs of speckled stoneware clay to remove air bubbles. Ensure the consistency is uniform. -
Center and Open:
Secure the clay on the wheel head and center it. Open the clay up, establishing a flat floor for the inside of the mug. -
Pull the Walls:
Pull the walls up into a cylinder. Aim for a slightly tapered shape that is wider at the bottom and gently narrows toward the rim to keep beverages warm. -
Refine the Shape:
Use a rib tool to smooth the outside and remove throwing lines. Belly out the form just slightly in the middle for a comfortable hand-feel. -
Create the Button Ridge:
Leave the bottom quarter-inch of the wall slightly thicker or define a clear visual separation where the glaze line will stop. Smooth the rim with a chamois or sponge. -
Initial Drying:
Wire cut the mug from the bat and let it dry to a soft leather-hard stage.
Clean Lines
Use masking tape to create a perfectly straight line above the buttons before glazing. Peel it off immediately after dipping for a crisp edge.
Step 2: Adding Texture & Handle
-
Trimming the Foot:
Once leather hard, center the mug upside down and trim the foot ring. Clean up the bottom area where your texture will go. -
Making the Buttons:
Roll tiny, pea-sized balls of soft clay. You will need enough to circle the entire base of the mug. -
Attaching the Buttons:
Score and slip a ring around the base of the mug. Press each small clay ball onto this ring, spacing them evenly. Flatten them slightly with your thumb to secure them. -
Pulling a Handle:
Pull a strap of clay for the handle. Allow it to stiffen slightly into a curve on a work surface before attaching. -
Attach the Handle:
Score and slip the attachment points on the mug body. Press the handle on firmly, smoothing the joins so they look seamless. -
Creating the Pinhole Texture:
Using a small, blunt tool (like a dull pencil tip or a dedicated texture tool), gently press random, shallow indents all around the upper body of the mug. Vary the spacing for an organic look. -
Bisque Fire:
Allow the mug to dry completely (bone dry) before loading it into the kiln for a bisque firing (usually Cone 04 or 06).
Go Darker
Try using a dark chocolate or black clay body. The contrast between dark buttons and a white upper glaze is strikingly modern.
Step 3: Glazing & Finishing
-
Wax Resist:
Apply wax resist to the bottom foot ring and specifically over the row of button textures. This keeps the raw clay exposed. -
Inside Glazing:
Pour a creamy white glaze inside the mug, roll it around to coat the interior, and pour out the excess. -
Dipping the Outside:
Holding the foot, dip the exterior of the mug into the white glaze. Stop the dip just above the row of buttons. -
Cleanup:
Use a damp sponge to wipe away any glaze drips that may have run onto the raw clay section or the buttons. -
Final Fire:
Load the mug into the kiln for the glaze firing (typically Cone 5 or 6 depending on your clay body). The heat will interact with the specks in the clay, often showing through the white glaze.
Enjoy the wonderfully tactile experience of your new favorite morning mug
Simple Polka Dot Texture With a Dowel Press
This charming handmade mug features a tactile, rhythmic pattern created by simply pressing a tool into the clay surface. The combination of the raw, speckled clay body, the indented texture, and a creamy white glaze creates a beautiful interplay of light and shadow perfect for your morning coffee.
Step-by-Step Tutorial
Materials
- Speckled buff stoneware clay
- Rolling pin with guide sticks (approx. 1/4 inch thick)
- Small wooden dowel or drill bit shank (approx. 3-4mm diameter)
- Fettling knife or needle tool
- Serrated rib and scoring tool
- Clay slip or vinegar
- Sponge
- Creamy matte white glaze
- Bisque and glaze kiln access
Step 1: Forming the Mug Body
-
Roll the Slab:
Start by rolling out a slab of speckled buff clay. Use guide sticks on either side of your rolling pin to ensure an even thickness of about 1/4 inch. If you want a more organic feel, you can skip the guides, but try to keep it consistent. -
Cut the Rectangle:
Measure and cut a rectangle from your slab. A standard mug size is usually around 12 inches long by 4.5 inches tall, but you can adjust this based on how large you want your final vessel to be. -
Bevel the Edges:
To make a seamless join, cut 45-degree bevels on the two short ends of your rectangle. Remember to cut them in opposite directions so they overlap perfectly when you curve the clay into a cylinder. -
Create the Cylinder:
Score the beveled edges thoroughly and apply a generous amount of slip. Bring the ends together to form a cylinder, pressing the seam firmly. Use your fingers or a wooden rib to smooth the seam inside and out until it disappears. -
Add the Base:
Place your cylinder on a fresh piece of slab. Trace around the bottom, remove the cylinder, score and slip the contact areas, and reattach. Trim away the excess clay with a knife and smooth the join so the transition from wall to floor is seamless.
Depth Control
Wrap a small rubber band around your dowel tool to act as a depth stop. This ensures every single dot is pressed to the exact same depth.
Step 2: Texturing and Handle
-
Plan the Pattern:
Before you start pressing, visually plan your grid. You can lightly mark vertical lines as guides, or freehand it for a more rustic look. I usually prefer to eyeball it to keep that handmade charm. -
Press the Dots:
Take your small wooden dowel or the back end of a drill bit. Firmly press into the clay to create the indentations. Support the wall from the inside with your other hand to prevent the cylinder from warping as you push. -
Continue the Texture:
Work your way around the mug in rows. Stagger the dots slightly (like a brick pattern) or keep them in strict columns depending on your preference. Leave the top rim and the very bottom inch smooth for contrast. -
Pull a Handle:
Pull a strap of clay for the handle, or roll a coil and flatten it slightly. While the clay is still soft, use your dowel to continue the dot pattern onto the handle itself. -
Attach the Handle:
Wait until the handle creates a soft arch without collapsing (leather hard). Score and slip the attachment points on the mug and handle, then press them together firmly. Smooth the seams with a small tool or your finger.
Warped Walls?
If the mug loses its round shape while you are pressing the dots, wait for the clay to firm up to a ‘soft leather hard’ stage before texturing.
Step 3: Firing and Glazing
-
Dry Slowly:
Cover the mug loosely with plastic to let it dry slowly. This ensures the handle and body dry at the same rate, preventing cracks. Once bone dry, bisque fire it to cone 04. -
Wax the Bottom:
Apply wax resist to the bottom of the mug and up the side about half an inch. This creates that distinct line of raw clay at the base shown in the photo. -
Mouth Rim Waxing (Optional):
If you want the rim exposed like the reference photo, carefully sponge off any glaze that lands there, or apply a thin line of wax resist to the rim before dipping. -
Glaze Application:
Dip the mug into a creamy matte white glaze. Hold it in the glaze for about 3 seconds to get good coverage inside the dots. -
Check the Dots:
Inspect the indentations. If the glaze is too thick and filling the holes completely, gently blow on them while the glaze is wet or use a pin to pop air bubbles to reveal the texture. -
Final Fire:
Clean up any glaze drips on the waxed bottom. Fire the mug to the temperature appropriate for your clay and glaze combination (likely cone 5 or 6 for stoneware).
Once cooled, your mug is ready to add a touch of texture to your daily routine
Two-Tone Color-Block Mug With a Slip Band
This project combines the rustic charm of speckled clay with a clean, modern aesthetic through a distinct two-tone design. The smooth transition from the creamy speckled top to the warm, terra-cotta colored base creates a timeless piece perfect for your morning routine.
How-To Guide
Materials
- Speckled stoneware clay (mid-fire)
- Pottery wheel
- Throwing tools (sponge, needle tool, rib)
- Wire cutter
- Trimming tools
- Bucket of water
- Clear matte glaze
- Warm coral or terra-cotta colored dip glaze
- Wax resist
- Kiln
Step 1: Throwing and Shaping
-
Prepare the Clay:
Begin by thoroughly wedging about 1 to 1.5 pounds of speckled stoneware clay. Wedging removes air bubbles and ensures the clay particles are aligned, which is crucial for preventing cracks later. -
Center on the Wheel:
Slam the clay onto the center of the wheel head. Using moistened hands and steady pressure, cone the clay up and down until it spins perfectly smooth and centered without any wobble. -
Open the Form:
Press your thumbs into the center of the spinning clay to open it, leaving about a quarter-inch of thickness at the bottom for the floor. Gently pull this opening outward to establish the interior width of your mug. -
Pull the Walls:
Using a wet sponge in one hand and your fingertips in the other, compress the clay and pull the walls upward. Maintain a consistent speed. Aim for a simple cylinder shape initially, keeping the walls even from bottom to top. -
Refine the Shape:
Once you have height, use a rib tool on the exterior while supporting the interior with your hand. Gently smooth the sides, creating a strictly vertical cylinder with a very subtle outward curve near the rim for drinking comfort. -
Compress the Rim:
Use a piece of chamois leather or a soft sponge to gently compress the rim. This not only makes it smooth for lips but helps prevent cracking during the drying process. -
Wire Off:
Run a wire cutter underneath the base of the mug to separate it from the wheel head. Carefully lift it off and place it on a ware board to firm up until it reaches leather-hard consistency.
Drip Prevention
If the second glaze layer seems too thick at the overlap line, lightly sand it down with a finger once dry. This prevents the bottom color from running down during firing.
Step 2: Trimming and Handling
-
Trim the Base:
Once the clay is leather-hard—firm but still carveable—center the mug upside down on the wheel. Use trimming tools to refine the bottom, carving out a slight foot ring. This adds a professional finish and reduces overall weight. -
Pull a Strap Handle:
With a fresh lump of clay, pull a strip of clay using water and downward pulling motions until it forms a comfortable strap shape. I prefer to curve it into a ‘C’ shape and let it stiffen slightly on a board before attaching. -
Score and Slip:
Score the mug body where the handle will attach and do the same to the handle ends. Apply a dab of clay slip to both areas. -
Attach the Handle:
Firmly press the handle onto the mug, ensuring a strong bond. Use a modeling tool or your finger to smooth the seam where the clay meets, blending it so it looks like it grew out of the mug body. -
Bisque Fire:
Allow the mug to dry completely slowly to avoid warping. Once bone dry, fire the piece in the kiln to bisque temperature (usually cone 04 or 06).
Clean Lines
For a razor-sharp transition line instead of a soft overlap, apply masking tape around the middle of the bisque mug before dipping the bottom half. Peel it off immediately after dipping.
Step 3: Glazing the Two-Tone Design
-
Wax the Foot:
Apply wax resist to the very bottom foot of the mug. This prevents glaze from sticking to the bottom and ruining your kiln shelves. -
Glaze the Interior:
Pour a clear matte glaze into the inside of the mug, swirl it around to coat the entire interior surface, and pour out the excess. Wipe any drips off the exterior immediately. -
Dip the Top Half:
Hold the mug by the foot and dip the entire cup into a bucket of clear matte glaze (or a milky white speckled glaze). Let it dry until it is powdery to the touch. -
Prepare the Color Dip:
Stir your warm coral or terra-cotta colored glaze thoroughly. You want a consistent texture to ensure the bottom band is solid and opaque. -
Create the Color Block:
Hold the mug upside down by the rim (or use tongs). Dip the mug straight down into the coral glaze, stopping exactly halfway up the wall. Hold it there for 3-4 seconds to build a good layer. -
Reveal the Raw Base:
Immediately after dipping the color, take a damp sponge and wipe away a thin strip of glaze at the very bottom edge, or leave the bottom-most 1/4 inch unglazed if you prefer the raw clay texture shown in some styles. -
Check the Overlap:
Inspect the line where the coral glaze meets the clear/white top glaze. If the line is uneven, you can very gently tidy it with a clean, damp brush, but the natural dip line usually looks best. -
Final Fire:
Load the mug into the kiln for the final glaze firing (usually cone 5 or 6 depending on your clay body). The heat will fuse the glazes and bring out the speckles in the upper section.
Once cooled, your mug is ready to hold your favorite warm beverage with handmade style
Speckled Confetti Inlay for a Playful Look

Bring a burst of joy to your morning routine with this playful speckled mug, featuring a creamy base dotted with colorful, jewel-like clay fragments. This terrazzo-style technique creates a smooth, inlaid surface that feels as good in the hand as it looks on your shelf.
Step-by-Step
Materials
- White or cream stoneware clay body
- Colored clay or underglaze-stained clay scraps (pink, red, teal, orange)
- Slab roller or rolling pin
- Canvas work surface
- Mug template (paper or craft foam)
- Fettling knife
- Scoring tool or serrated rib
- Slip (made from your main clay)
- Rolling pin (small pony roller is helpful)
- Sponge
- Clear or speckled semi-matte glaze
- Kiln
Step 1: Preparing the Confetti
-
Mix your colors:
If you don’t have pre-colored colored clay, create your own by kneading mason stains or underglaze into small balls of your white clay body until the color is uniform. -
Make the chips:
Roll your colored clay balls out very thinly—about 1/8th of an inch thick. Let these slabs dry until they are leather hard. -
Create the terrazzo:
Once stiff, tear or cut the colored slabs into irregular, small geometric shapes. Aim for variety in size, from tiny specks to pea-sized chunks. -
Hydrate the chips:
Keep these chips under a damp paper towel so they don’t get bone dry; they need to be slightly flexible to bond with the mug wall.
Clean Confetti Tip
If the colored chips look smeared after rolling, lightly scrape the slab surface with a metal rib. This cleans off the top layer of white clay to reveal crisp colors.
Step 2: Building the Mug Body
-
Roll the main slab:
Roll out your main white clay body to a uniform thickness, roughly 1/4 inch. Smooth the surface with a rib to remove any canvas texture. -
Apply the confetti:
Scatter your colored clay chips randomly across the surface of the slab. Don’t overthink the placement; spaces between the colors look nice. -
Inlay the colors:
Using your rolling pin, gently roll over the chips to press them flush into the main slab. Roll in multiple directions to ensure everything is flat and integrated. -
Cut the shape:
Place your rectangular mug template onto the patterned slab and cut around it using a fettling knife. -
Bevel the edges:
Cut 45-degree bevels on the short ends of your rectangle so they will overlap seamlessly when formed into a cylinder. -
Form the cylinder:
Lift the slab and curve it into a cylinder. Score and slip the beveled edges, then press them firmly together to create the wall of your mug. -
Attach the base:
Roll a small circle for the base. Score and slip the bottom edge of your cylinder and the edge of the base, then join them, smoothing the seam with a modeling tool.
Step 3: Handle & Finishing
-
Shape the handle:
Pull or roll a coil of clay for the handle. I like to flatten it slightly to match the modern feel of the terrazzo body. -
Attach the handle:
Wait until the handle and mug body are both leather hard. Score and slip the attachment points, press the handle on firmly, and clean up excess slip with a damp brush. -
Additional speckling:
For that extra speckled look seen in the photo, you can flick a stiff toothbrush loaded with iron oxide wash or brown underglaze lightly over the exterior. -
Bisque fire:
Let the mug dry slowly under loose plastic to prevent warping, then bisque fire it according to your clay’s specifications. -
Glazing:
Dip or brush the mug with a clear or semi-transparent speckled white glaze. A matte finish works beautifully to preserve the stone-like aesthetic. -
Final fire:
Glaze fire the piece to the appropriate cone temperature for your clay and glaze combination.
Cracking Issues?
If chips pop out during drying, they were likely too dry when rolled in. Ensure both the slab and chips have similar moisture content before pressing them.
Now you have a charming, modern mug perfect for cozy mornings with your favorite hot drink
Faceted Mug Made From a Folded Slab
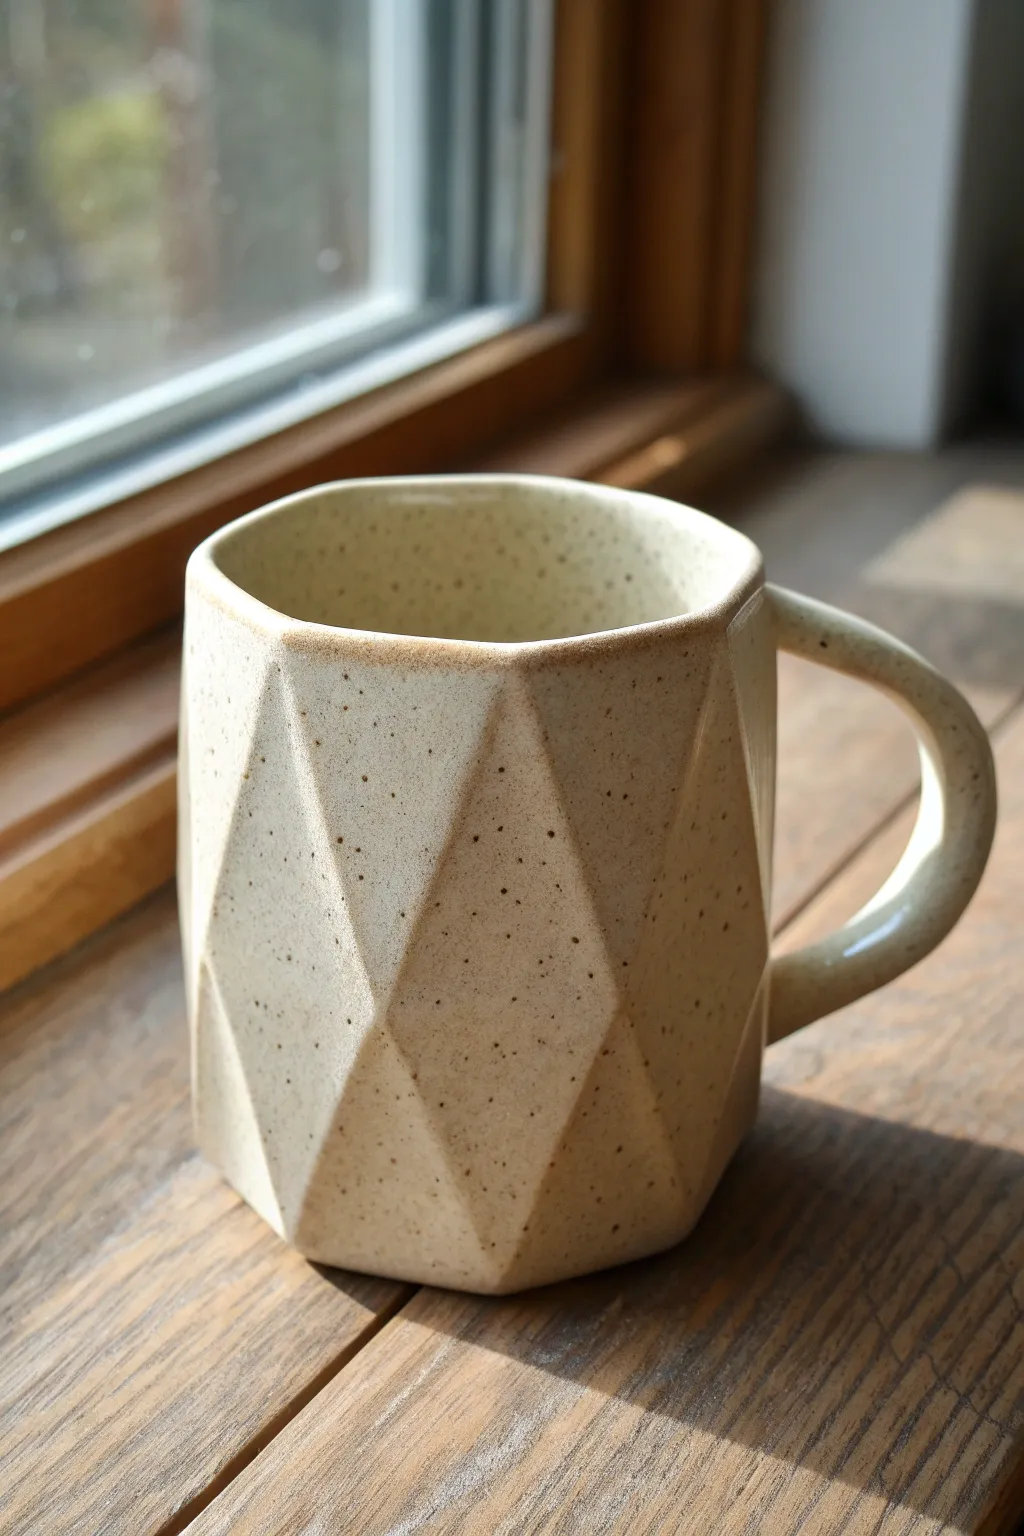
This project transforms a flat sheet of clay into a sophisticated, modern mug with sharp geometric facets. The finished piece features a creamy, speckled glaze that breaks beautifully over the angled edges, highlighting the unique structure.
How-To Guide
Materials
- Speckled cone 6 stoneware clay
- Rolling pin
- Guide sticks (1/4 inch thick)
- Fettling knife or X-Acto blade
- Ruler
- Scoring tool or serrated rib
- Slip (clay and water mixture)
- Pony roller or small brayer
- Sponge
- Creamy matte white glaze
Step 1: Prepping the Slab
-
Roll the clay:
Begin by rolling out your speckled stoneware clay into a smooth slab. Use 1/4 inch guide sticks on either side to ensure an even thickness throughout the entire sheet. -
Compress the surface:
Run a rubber rib firmly over both sides of the slab to compress the clay structure. This helps prevent warping later and smooths out the canvas texture from your rolling mat. -
Cut the template:
Measure and cut a rectangular strip approximately 12 inches long and 4.5 inches high. This will form the body of your mug. -
Create the folding guides:
Using a ruler, lightly mark vertical lines every 2 inches along the length of your slab. Don’t cut through; just make a visual reference. -
Mark the diagonals:
Connect your vertical marks with diagonal lines to create a repeating diamond or zig-zag pattern. These lines will become your fold creases.
Cracks on the Folds?
If clay cracks at the crease while folding, it was likely too dry. Mist your slab lightly and let it sit under plastic for 10 minutes before trying again.
Step 2: Folding and Shaping
-
Score the interior fold lines:
Gently press a dull tool or the back of your knife along the diagonal lines to indent them slightly. This encourages the clay to fold cleanly exactly where you want it. -
Form the cylinder:
Lift the slab and curve it into a cylinder. Be careful not to smudge your geometric lines. Overlap the ends slightly or butt them together, depending on your preferred join method. -
Join the seam:
Score and slip the edges where the cylinder connects. Press them firmly together. I like to reinforce this seam with a tiny coil of clay on the inside to ensure it doesn’t split. -
Push out the facets:
From the inside of the cylinder, gently push outward against the diamond shapes while supporting the creases from the outside. This pressure creates the 3D faceted effect. -
Sharpen the edges:
Once the general form is pushed out, use a flat wooden tool or your fingers to pinch and sharpen the exterior ridges, defining the geometric planes clearly.
Step 3: Base and Handle
-
Attach the base:
Place your faceted cylinder onto a fresh piece of slab. Trace around the bottom, cut out the base, and attach it securely by scoring and slipping. Smooth the connection so it’s seamless. -
Pull a handle:
Pull a thick strap of clay for the handle. Keep it simple and round to contrast with the angular body, or flatten it slightly to match. -
Shape the handle curve:
Curve the handle into a C-shape and let it stiffen slightly until it can hold its own weight without drooping. -
Attach the handle:
Score and slip the attachment points on both the mug body and the handle. Press the handle on firmly. Use a damp brush to clean up any excess slip around the joints. -
Final smoothing:
Check the rim of the mug. It should be comfortable for drinking, so use a chamois or wet sponge to round it off slightly, softening any sharp angles at the very top.
Hexagonal Top
Instead of smoothing the rim back to a circle, shape the top edge to match the geometry of the facets for a striking hexagonal opening.
Step 4: Finishing
-
Bisque fire:
Allow the mug to dry slowly to avoid cracking at the folds. Once bone dry, bisque fire it to cone 04. -
Glaze application:
Dip the mug into a creamy, semi-opaque white glaze. A glaze that ‘breaks’ over edges is ideal here, as the thinner application on the ridges will reveal the speckled clay body underneath. -
Glaze firing:
Fire the mug to cone 6 (or the temperature appropriate for your specific clay and glaze). The heat will interact with the iron specks to create that lovely spotted texture.
Enjoy your morning coffee in a vessel that feels modern yet comfortably handmade
Scalloped Rim Mug That Feels Fancy

This charming project combines the warmth of terracotta-colored clay with a delicate cream glaze to create a piece that feels both earthy and elegant. The scalloped rim detail adds a fancy touch without requiring complex carving skills, while the speckled finish gives it that cozy, handmade pottery studio vibe.
Step-by-Step Tutorial
Materials
- Terracotta or red stoneware clay body
- Rolling pin
- Canvas work surface
- Clay needle tool or fetling knife
- Circular cookie cutter or jar lid (for base)
- Scoring tool (serrated rib)
- Slip (clay slurry)
- Sponge
- Loop tool (optional)
- Cream or antique white dipping glaze
- Iron oxide wash (for speckles) or Speckled clay body
- Small round paintbrush
- Wax resist
Step 1: Forming the Body
-
Roll your slab:
Begin by wedging your terracotta clay to remove air bubbles, then roll it out into a consistent slab about 1/4 inch thick on your canvas. -
Cut the components:
Using a ruler and needle tool, cut a long rectangle for the mug body (approx. 4 inches high by 10-11 inches long) and use a circular cutter to create the base. -
Prepare the join:
Score the short ends of your rectangle heavily with a serrated tool. Apply a generous amount of slip to the scored areas. -
Create the cylinder:
Curve the rectangle into a cylinder, overlapping the scored ends slightly. Press them together firmly, supporting the wall from the inside. -
Attach the base:
Score the bottom edge of your cylinder and the outer edge of your circular base. Apply slip and press the cylinder onto the base. -
Blend the seams:
Use a wooden modeling tool or your finger to smooth the join where the wall meets the base, both inside and out, ensuring a watertight seal.
Step 2: Adding Details & Handle
-
Shape the rim:
Smooth the lip of the mug with a damp sponge or a piece of chamois leather so it’s comfortable to drink from. -
Pull or roll a handle:
Roll a coil of clay or pull a strap for the handle. Shape it into a ‘C’ curve that fits comfortably in your hand. -
Attach the handle:
Score and slip the attachment points on both the mug body and handle ends. Press firmly to attach, then wipe away excess slip with a damp sponge. -
Bisque fire:
Allow the mug to dry slowly under plastic for a day, then uncovered until bone dry. Fire it in a kiln to bisque temperature (usually cone 04).
Smooth Scallops
Sketch your scalloped line lightly with a pencil on the bisque ware before applying wax. The graphite burns off in the kiln, leaving you with a perfectly guided glaze line.
Step 3: Glazing the Design
-
Wax the design:
This is the crucial step for the scalloped look. Paint liquid wax resist onto the bisque ware below where you want the white glaze to stop. Create a wavy, scalloped line with the wax. -
Add bottom details:
I like to use a small dotting tool or brush tip to apply small dots of wax near the bottom edge if you want the clay body to show through as dots later. -
Dip the rim:
Once the wax is dry, dip the top portion of the mug upside down into a cream or antique white glaze. The wax will repel the glaze, leaving a crisp scalloped edge. -
Clean up:
Immediately wipe away any glaze beads that stick to the waxed areas using a damp sponge. -
Add speckles (optional):
If your glaze or clay isn’t naturally speckled, flick a toothbrush loaded with watered-down iron oxide or dark glaze over the surface. -
Final wipe:
Ensure the very bottom of the foot is completely free of glaze so it doesn’t stick to the kiln shelf. -
Glaze fire:
Fire the mug again to the maturation temperature of your specific clay and glaze (typically cone 5 or 6). Allow it to cool completely in the kiln.
Glaze Running?
If your scallops look blurry after firing, the glaze was likely too thick or the wax line wasn’t solid. Keep the wax coat even and don’t apply glaze too heavily near the resist line.
Once cooled, fill your new handmade mug with your favorite warm beverage and enjoy the cozy aesthetic you’ve created
Wonky Wavy Mug for Handmade Charm
Embrace the beauty of imperfection with this charmingly rustic mug, featuring a speckled glaze and tactile fluted base. The exposed raw clay bottom adds warmth and texture, making your morning coffee ritual feel extra grounded and cozy.
How-To Guide
Materials
- Speckled stoneware clay body (cone 5/6 recommended)
- Pottery wheel
- Throwing tools (sponge, wire cutter, rib)
- Loop tool or trimming tool (medium size)
- Needle tool
- Creamy white dipping glaze (semi-opaque)
- Wax resist
- Brush for wax resist
- Kiln
Step 1: Throwing and Shaping
-
Center the clay:
Start with about 1 to 1.5 lbs of speckled stoneware on your wheel. Center it firmly, ensuring a strong connection to the bat. -
Open and pull:
Open the clay and begin pulling up your walls. Aim for a cylinder that is slightly wider at the bottom than the top, creating a gentle taper. -
Form the ridges:
As you do your final pull, use your fingertip or the corner of a soft rib to intentionally leave slight horizontal spiral grooves on the upper half of the mug. This adds that subtle ‘thrown’ texture seen in the photo. -
Create the rim:
Compress the rim with a chamois or your sponge. For the ‘wonky’ look, you don’t need it perfectly level; a slight undulation adds character. Flare it slightly outward for comfortable sipping. -
The waiting game:
Using a wire tool, cut the mug from the bat but leave it in place. Let the piece dry until it reaches a leather-hard state. It should be firm enough to handle without deforming.
Fixing Sharp Flutes
If your carved flutes feel too sharp after the bisque fire, lightly sand them with 200-grit sandpaper under running water (wet sanding) to smooth them out before glazing.
Step 2: Trimming and Carving
-
Trim the foot:
Center your leather-hard mug upside down on the wheel. Trim the bottom to create a defined foot ring, removing excess weight from the base. -
Mark your carving zone:
While it’s still spinning, lightly mark a line about an inch up from the bottom where your carving will stop. -
Carve the flutes:
Using a medium loop tool, carve vertical scoops around the base of the mug. Start from your marked line and drag the tool downward toward the foot. -
Vary the pressure:
I prefer to press harder at the start of the stroke and lift up gently as I reach the bottom edge to create a tapered scallop shape. -
Smooth the edges:
Once all flutes are carved, run a damp fingertip over the sharp ridges created by the loop tool to soften them slightly.
Step 3: Handling and Firing
-
Pull a handle:
Pull a strap of clay for your handle. Aim for a medium thickness that balances well with the mug’s visual weight. -
Attach firmly:
Score and slip both the handle and the mug body. Attach the top of the handle near the rim and the bottom just above the carved fluted section. -
Biscuit fire:
Allow the mug to dry completely to the bone-dry stage. Load it into the kiln for a bisque fire (usually cone 04).
Level Up: Thumb Rest
Add a small clay ‘button’ or flatten the top curve of the handle slightly while wet. This creates a dedicated spot for your thumb to rest, making the mug extra ergonomic.
Step 4: Glazing
-
Clean the bisque:
Wipe the bisqued mug with a damp sponge to remove any kiln dust ensuring the glaze adheres properly. -
Wax the base:
Apply wax resist to the bottom foot and up the side, covering the bottom 1/4 inch of the carved flutes. This creates the beautiful transition from glaze to raw clay. -
Dip and clean:
Dip the mug into your creamy white glaze. Hold it for about 3 seconds. Shake off excess glaze gently as you pull it out. -
Rim reveal:
Immediately after dipping, use a damp sponge to gently wipe a tiny bit of glaze off the very edge of the rim if you want the brown clay to peek through like the original image. -
Final fire:
Let the glaze dry before loading into the kiln. Fire to your clay body’s maturity temperature (likely cone 5 or 6).
Enjoy the warmth of your homemade vessel, perfect for slow mornings and hot tea
Simple Slab Mug-and-Saucer Set
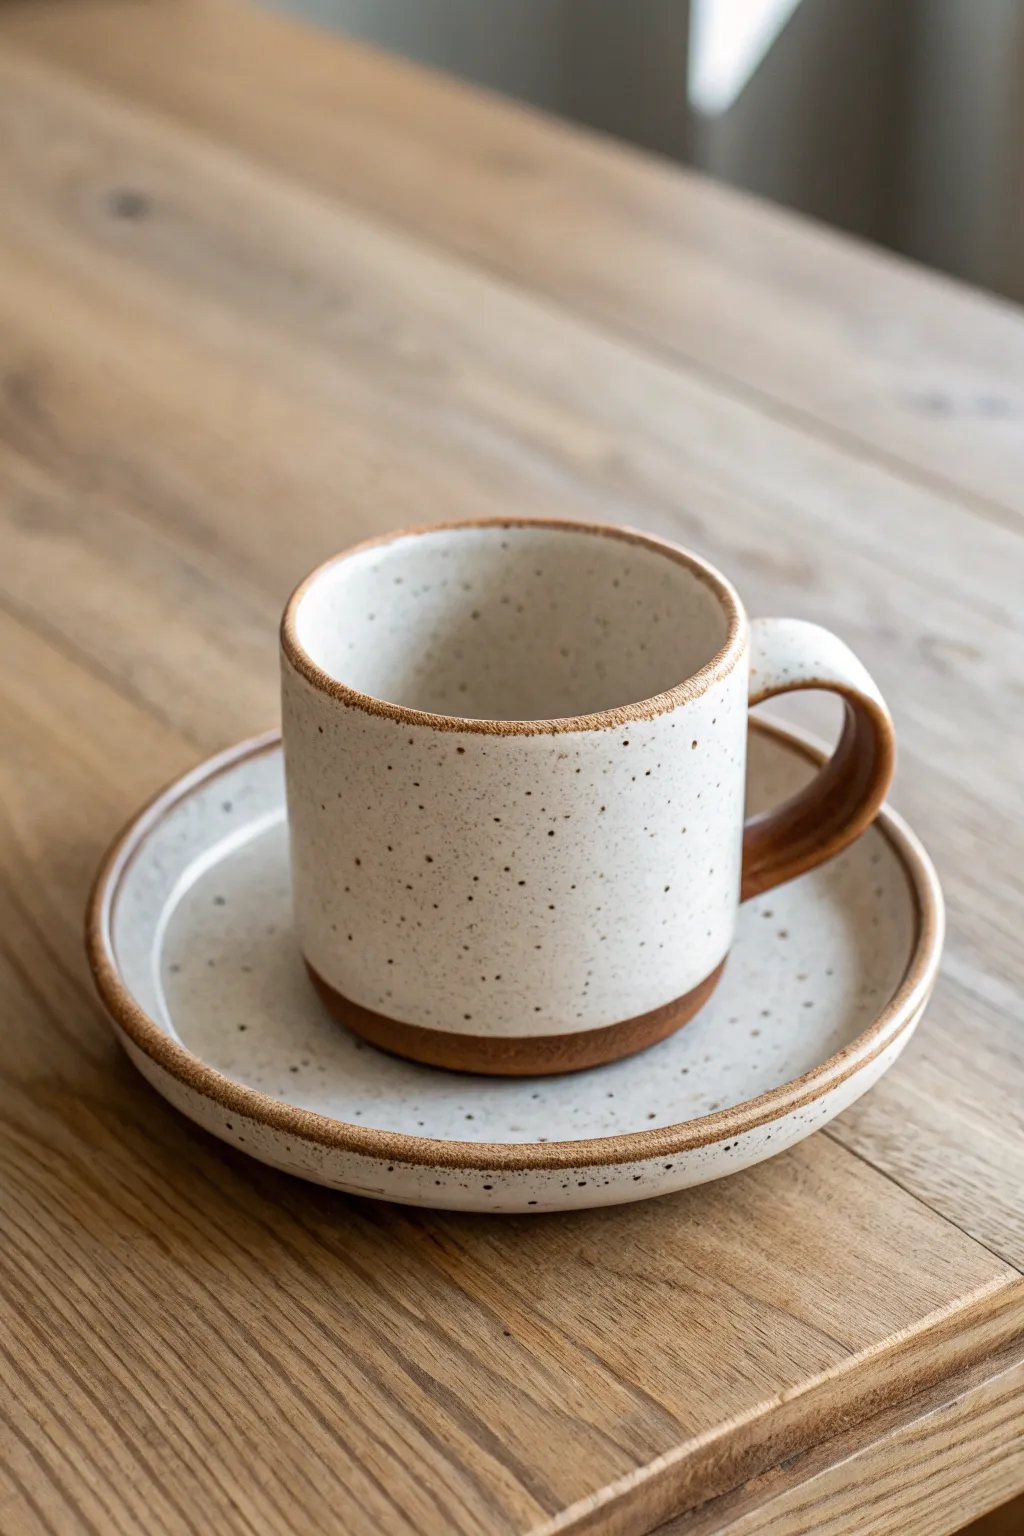
Embrace the beauty of simplicity with this handmade mug and saucer duo, featuring a charming speckled finish and exposed clay accents. The clean cylindrical form and subtle earth tones make this set a timeless addition to your morning coffee ritual.
Step-by-Step Guide
Materials
- Speckled stoneware clay (mid-fire)
- Rolling pin
- Canvas working surface
- Clay knife or fettling knife
- Flexible metal rib
- Serrated rib or scoring tool
- Slip (clay mixed with water)
- Wooden modeling tool
- Sponge
- White matte or satin glaze
- Wax resist
- Kiln
Step 1: Preparing the Slabs
-
Roll out the clay:
Begin by rolling out your speckled stoneware clay on a canvas surface until it is an even ¼-inch thick slab. I verify the thickness is consistent by checking from multiple angles to avoid weak spots. -
Compress the slab:
Take a flexible metal rib and gently drag it across the surface of the clay in multiple directions. This compression aligns the clay particles, preventing future warping and creating a smooth texture. -
Cut the components:
Using a ruler and a fettling knife, cut a rectangular strip for the mug body (approx. 4 inches high by 10 inches long) and use a circular cutter or template to cut two circles: one roughly 3.5 inches for the mug base and a larger 6-inch circle for the saucer.
Clean Seams
When joining slab seams, use a thin coil of soft clay along the interior joint. Smear it smooth to reinforce the connection and prevent cracks during drying.
Step 2: Building the Mug
-
Bevel the edges:
On the rectangular strip, cut 45-degree angles on the short vertical ends. This beveling allows the ends to overlap seamlessly without creating a thick lump at the seam. -
Score and slip the seam:
Rough up the beveled edges with your serrated rib or scoring tool and apply a generous amount of slip. Bring the ends capture to form a cylinder. -
Join the cylinder:
Press the seam firmly together. Support the inside wall with one hand while smoothing the outside seam with a wooden tool or rib. Repeat for the interior seam to ensure a strong bond. -
Attach the base:
Score and slip the bottom edge of your cylinder and the outer edge of the small 3.5-inch circle. flipp the cylinder onto the base, press down firmly, and smooth the clay from the outside wall down onto the base to seal it. -
Refine the rim:
Use a damp sponge or a piece of soft plastic/chamois to gently round the top rim of the mug. This makes it comfortable to drink from later.
Warping Rims?
If your mug or saucer rims warp during firing, it likely means the clay slabs weren’t compressed enough. Always rib both sides of your slab before cutting shapes.
Step 3: Creating the Handle
-
Pull or cut a strap:
Create a clay strap about ¾-inch wide. You can pull a handle for a more organic feel or cut a strip from your remaining slab for a uniform look matching the cylinder. -
Shape the handle:
Curve the strap into a ‘C’ shape and let it stiffen slightly until it holds its form but is still pliable. -
Attach the handle:
Score and slip the attachment points on both the mug body and the handle ends. Press the handle firmly onto the mug, blending the clay where it meets the body for a clean transition.
Step 4: Forming the Saucer
-
Shape the rim:
Take your 6-inch clay circle and gently curve the edges upward to create a shallow lip. You can use a shallow bowl as a mold or shape it by hand on a banding wheel. -
Create the foot ring:
Roll a thin coil of clay and attach it to the bottom of the saucer to create a slight lift. This matches the professional look of the mug. -
Smooth the surfaces:
Go over the entire saucer with a damp sponge to remove fingerprints and sharp edges, paying special attention to the rim.
Step 5: Glazing and Finishing
-
Bisque fire:
Allow your pieces to dry slowly and completely before loading them into the kiln for a bisque fire (usually cone 04). -
Apply wax resist:
Once fired, apply wax resist to the bottom of the mug, the foot of the saucer, and crucially, paint a thin line of wax along the rim of the mug and the outer edge of the saucer to leave the raw clay exposed. -
Dip in glaze:
Dip the mug and saucer into a white matte or satin glaze. The wax on the rims will repel the glaze, creating that beautiful toasted clay contrast and revealing the speckles clearly. -
Final firing:
Clean any stray glaze drips from the waxed areas with a sponge, then fire the pieces to the maturity temperature of your clay (typically cone 5 or 6).
Enjoy your morning coffee in a set that perfectly balances rustic charm with modern design.