Whenever I’m stuck on what to make next, I reach for a necklace project because clay jewelry lets you play with color, texture, and shape in the most satisfying way. Here are my favorite clay necklace ideas—from classic pendants you can finish in an afternoon to bolder statement pieces that feel like wearable art.
Simple Round Pendant Necklace
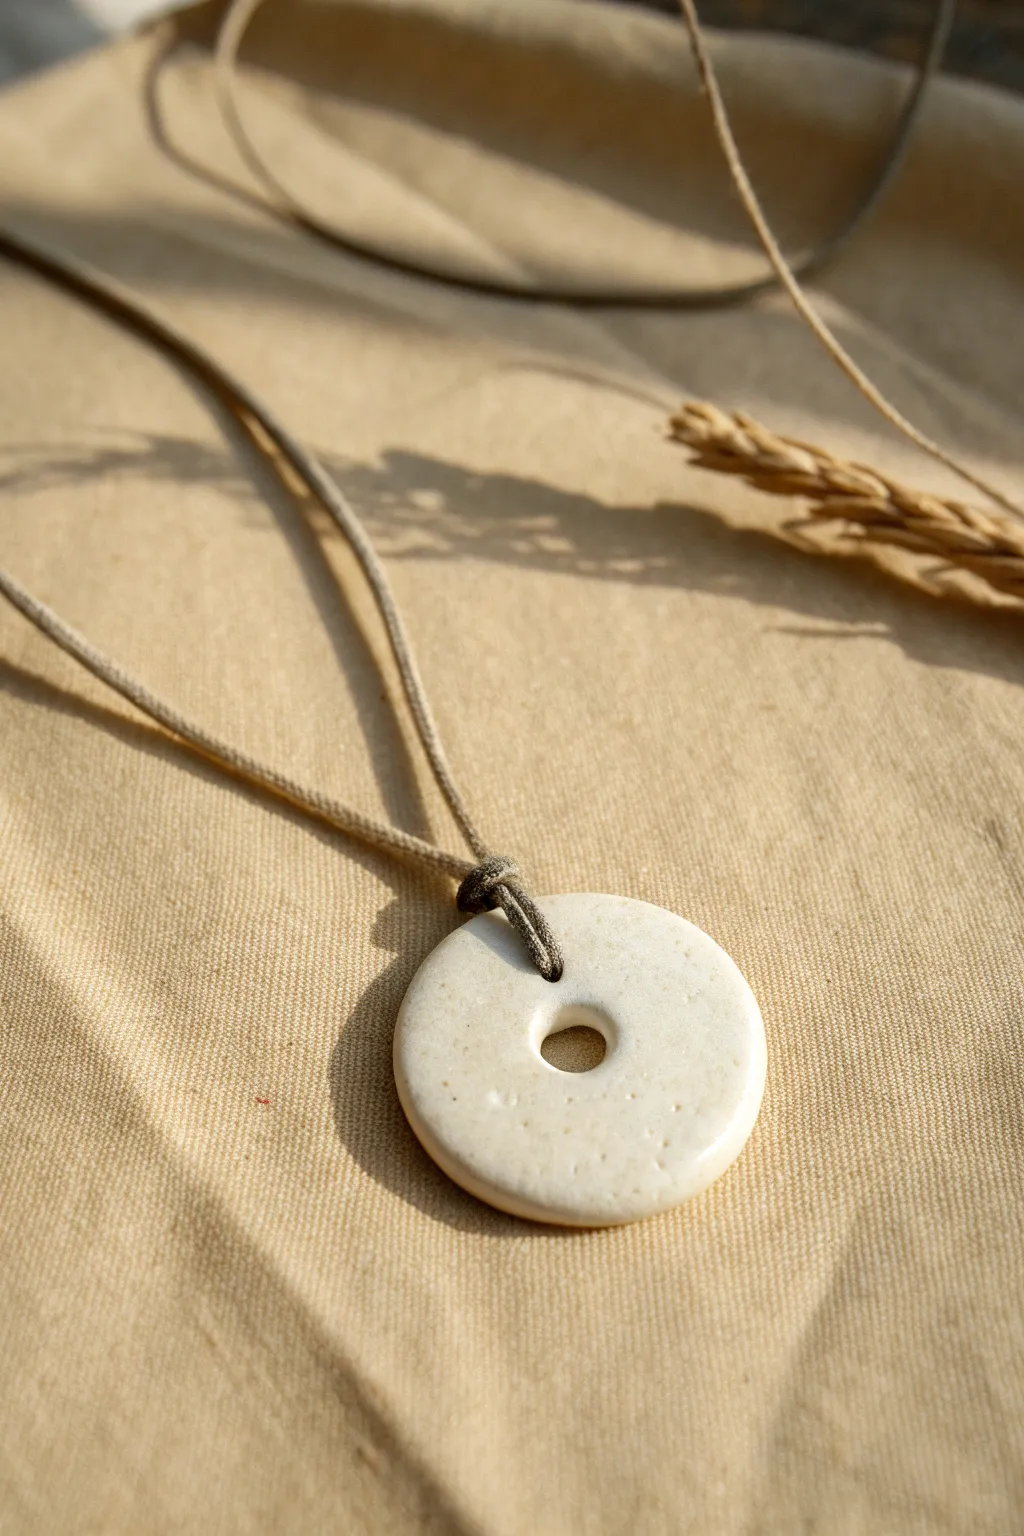
Embrace the beauty of simplicity with this organic, donut-shaped clay pendant. Its textured white surface and rustic cord create a timeless, earth-inspired accessory that pairs perfectly with casual linen or knitwear.
Detailed Instructions
Materials
- White air-dry clay or polymer clay
- Rolling pin or smooth glass jar
- Round cookie cutter (approx. 1.5 – 2 inches)
- Small round cutter or straw (for the center hole)
- Fine-grit sandpaper (400-600 grit)
- Texturing tool (old toothbrush or crumpled foil)
- Hemp, waxed cotton, or suede cord (beige/taupe)
- Gloss or satin varnish (optional, for finish)
Step 1: Shaping the Clay
-
Condition the Clay:
Start by taking a golf-ball-sized amount of white clay. Knead it thoroughly in your hands until it becomes warm, pliable, and free of any internal air bubbles. -
Roll Out the Slab:
Place the clay on a smooth work surface. Use your rolling pin to flatten it into an even slab. Aim for a thickness of about 1/4 inch (6mm) to ensure the pendant feels substantial but not too heavy. -
Cut the Main Circle:
Press your larger round cookie cutter firmly into the clay slab. Give it a tiny wiggle to ensure it cuts all the way through, then lift away the excess clay from the outside. -
Create the Texture:
Before cutting the center hole, add a subtle organic texture. Gently tap the surface with an old toothbrush or a ball of crumpled aluminum foil. You want faint, scattered pockmarks, not deep indentations. -
Cut the Center Hole:
Position your small cutter or a drinking straw exactly in the center of the clay circle. Press down straight to cut the hole. If using a straw, twist it slightly as you pull it out to remove the core cleanly. -
Soften the Edges:
Dip your finger in a little water (for air-dry clay) or baby oil (for polymer clay). Gently run it around the outer and inner rims to smooth out any sharp angles left by the cutters, creating a soft, rounded profile.
Uneven Drying?
If your air-dry clay curls while drying, it’s losing moisture too fast on one side. Gently place a light book on top of it (with parchment paper in between) once it’s semi-dry to flatten it out
Step 2: Refining and Finishing
-
Drying or Baking:
If using air-dry clay, verify it dries flat by turning it over every few hours for 24-48 hours. For polymer clay, bake according to the manufacturer’s package instructions on a parchment-lined tray. -
Initial Sanding:
Once fully cured or dry, assess the surface. Use fine-grit sandpaper to gently buff away any fingerprints or unintentional bumps, focusing on the outer rim to make it perfectly circular. -
Adding the Finish:
To mimic the slight sheen seen in the image, apply a thin coat of satin or gloss varnish. I find that a single thin layer preserves the stone-like look better than a thick, glassy coat. -
Let the Sealant Cure:
Allow the varnish to dry completely in a dust-free area. This usually takes about an hour, depending on your chosen product.
Speckled Stone Look
Knead in a pinch of dried coffee grounds or black pepper into the white clay before rolling. This creates a realistic, speckled faux-stone effect that adds depth without painting
Step 3: Assembly
-
Prepare the Cord:
Cut a length of your beige cord, approximately 24 to 30 inches long, depending on how low you want the necklace to hang. -
Create the Loop:
Fold the cord in half. Push the folded loop end through the center hole of the pendant from back to front. -
Secure the Lark’s Head Knot:
Take the loose ends of the cord and pass them through the loop you just pushed through the hole. Pull tight so the cord cinches securely around the top of the clay donut. -
Knotting the Top:
For extra detail similar to the photo, tie a simple overhand knot with both cord strands together, positioning it right above the lark’s head knot to lock everything in place. -
Final Adjustments:
Trim the ends of your cord to your desired length and tie them off with a simple knot at the back of the neck.
Now wearing your piece, you carry a little bit of earthy calm with you wherever you go


Textured Disc Pendant With Imprints
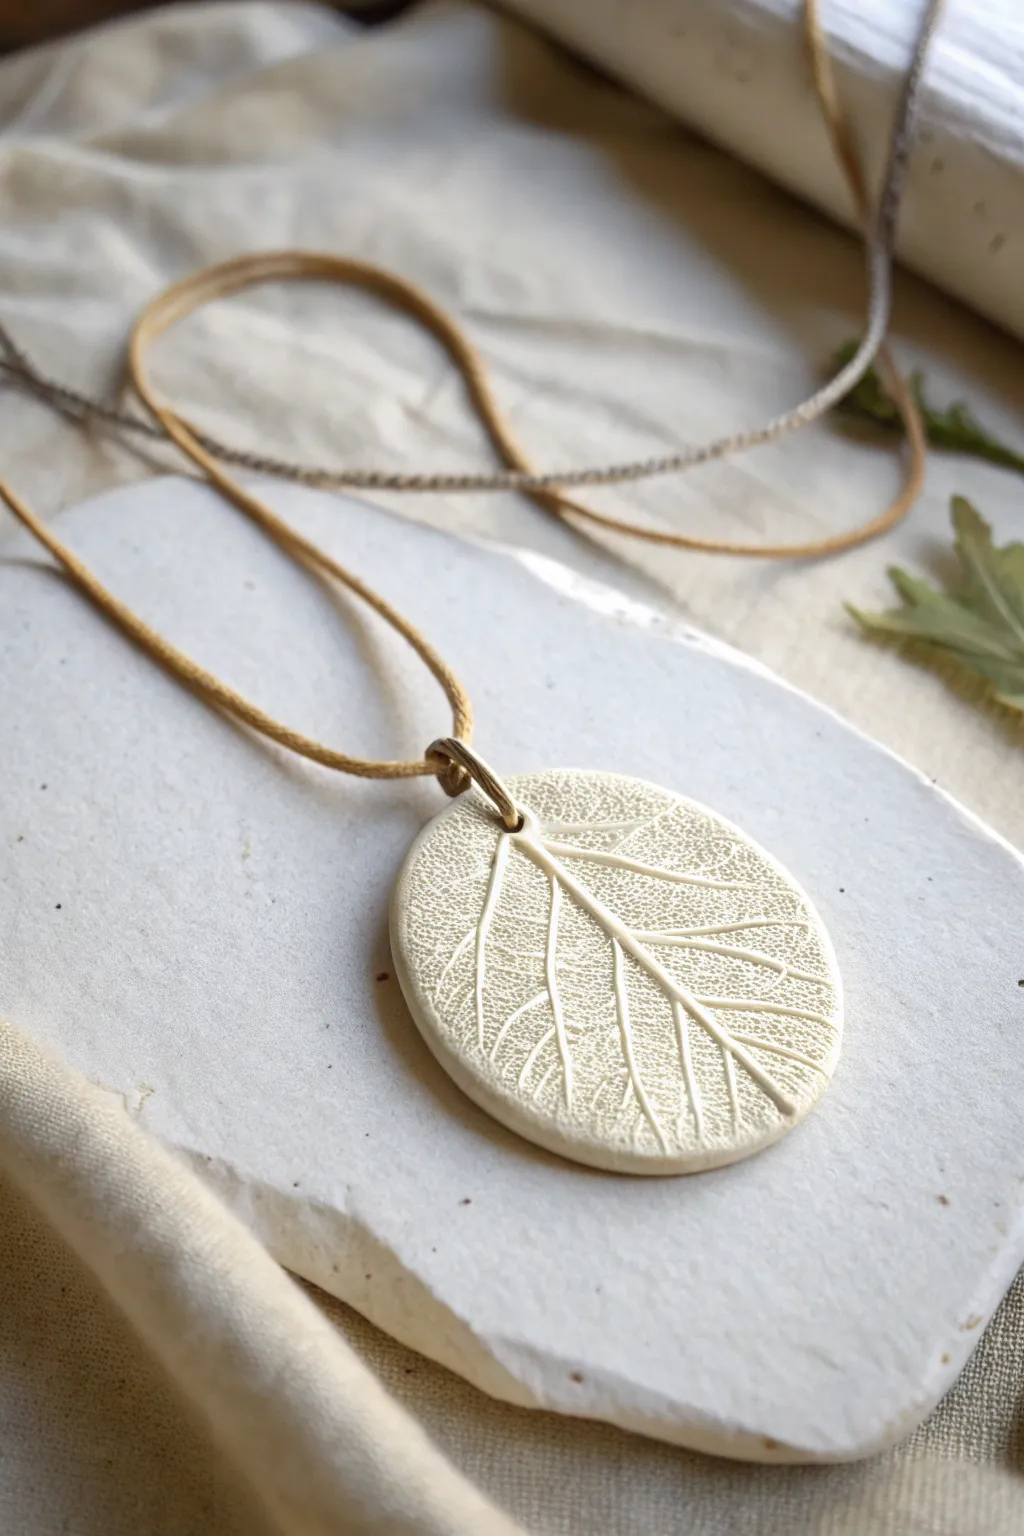
Capture the delicate beauty of nature with this organic clay pendant featuring an intricate leaf skeleton imprint. The result is an elegant, fossil-like piece with a soft matte finish that perfectly highlights the subtle vein details.
Step-by-Step Tutorial
Materials
- White air-dry clay or polymer clay (white/translucent blend)
- Fresh leaf with prominent veins (e.g., sage, mint, or a skeleton leaf)
- Rolling pin or acrylic roller
- Oval cookie cutter or craft knife
- Sanding sponge (fine grit)
- Small straw or cocktail stick for hole making
- Faux suede cord or leather cord
- Jump ring (optional)
- Gloss or matte varnish (optional)
Step 1: Preparation & Condition
-
Select your botanical:
Begin by venturing outside or looking through your houseplants to find a leaf with strong, raised veins on the underside. Leaves like sage, hydrangea, or rose work beautifully because their structure is distinct enough to leave a deep impression. -
Condition the clay:
Take a small ball of your white clay—about the size of a walnut—and knead it in your hands until it is warm, pliable, and free of air bubbles. If using polymer clay, this conditioning step is crucial to prevent cracking later. -
Roll the slab:
Place the clay on a smooth, non-stick surface or piece of parchment paper. Roll it out evenly to a thickness of approximately 4mm or 1/4 inch. You don’t want it too thin, or it might be fragile after drying.
Sticky Leaf Situations
If the leaf sticks to the clay and won’t peel off cleanly, lightly dust the clay surface with cornstarch or baby powder before placing the leaf down to act as a release agent.
Step 2: Texturing & Cutting
-
Position the leaf:
Place your chosen leaf face down onto the clay slab so that the veiny underside is in direct contact with the clay surface. Press it gently with your fingertips to tack it in place. -
Imprint the texture:
Using your roller, roll firmly over the leaf once. Apply steady, even pressure to push the veins deep into the clay without thinning the slab too much. I find rolling in one direction from stem to tip works best to avoid shifting. -
Reveal the design:
Carefully find the stem or edge of the leaf and peel it back slowly to reveal the intricate impression left behind. -
Cut the shape:
Position your oval cutter over the most interesting part of the texture. Press down firmly to cut the shape. Alternatively, use a craft knife to freehand a slightly organic oval for a more rustic look. -
Smooth the edges:
Dip your finger in a tiny bit of water (for air-dry clay) or baby oil (for polymer clay) and gently run it around the cut edge to soften any sharpness left by the cutter. -
Create the suspension hole:
Using a small straw or a tool, pierce a hole near the top of the oval. Make sure the hole is large enough for your cord to pass through but not so close to the edge that it weakens the clay.
Step 3: Finishing Touches
-
Dry or Bake:
If using air-dry clay, set the piece aside on a drying rack for 24-48 hours until fully hardened. If using polymer clay, bake it according to the manufacturer’s temperature instructions, usually on a tile or parchment-lined tray. -
Refine the surface:
Once fully cured or dry, inspect the edges. Use a fine-grit sanding sponge to gently buff away any remaining roughness on the sides, being careful not to sand over your beautiful texture. -
Enhance shading (Optional):
To make the veins pop, you can brush a diluted wash of acrylic brown or grey paint over the surface and immediately wipe the high points clean with a damp cloth, leaving pigment only in the crevices. -
Seal the piece:
Apply a thin coat of matte varnish to protect the surface while maintaining that raw, natural stone look seen in the photo. -
Attach the cord:
Thread a simple faux suede cord directly through the hole. For a more polished finish, open a jump ring, insert it through the clay hole, and thread the cord through the ring instead. -
Final adjustment:
Tie the ends of the cord at your desired length, and your botanical fossil pendant is ready to wear.
Depth Perception
For deeper textures, choose leaves that are slightly dried rather than fresh. Fresh leaves can be too soft, flattening under the roller instead of pushing into the clay.
Now you have a timeless piece of botanical jewelry that captures a fleeting moment in nature forever


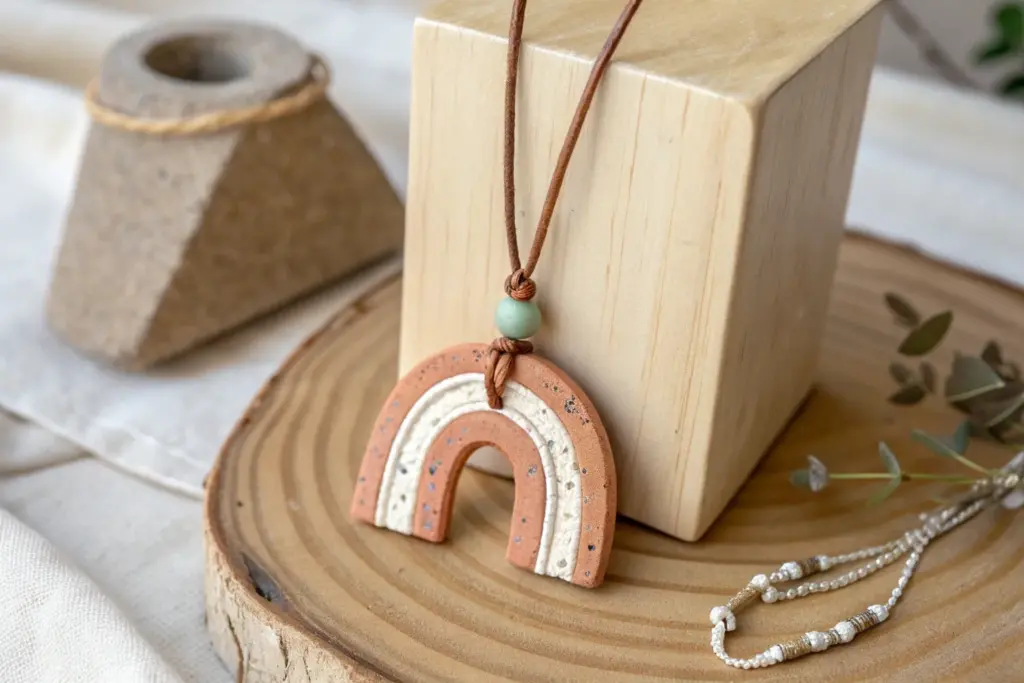
Geometric Arch Pendant Necklace
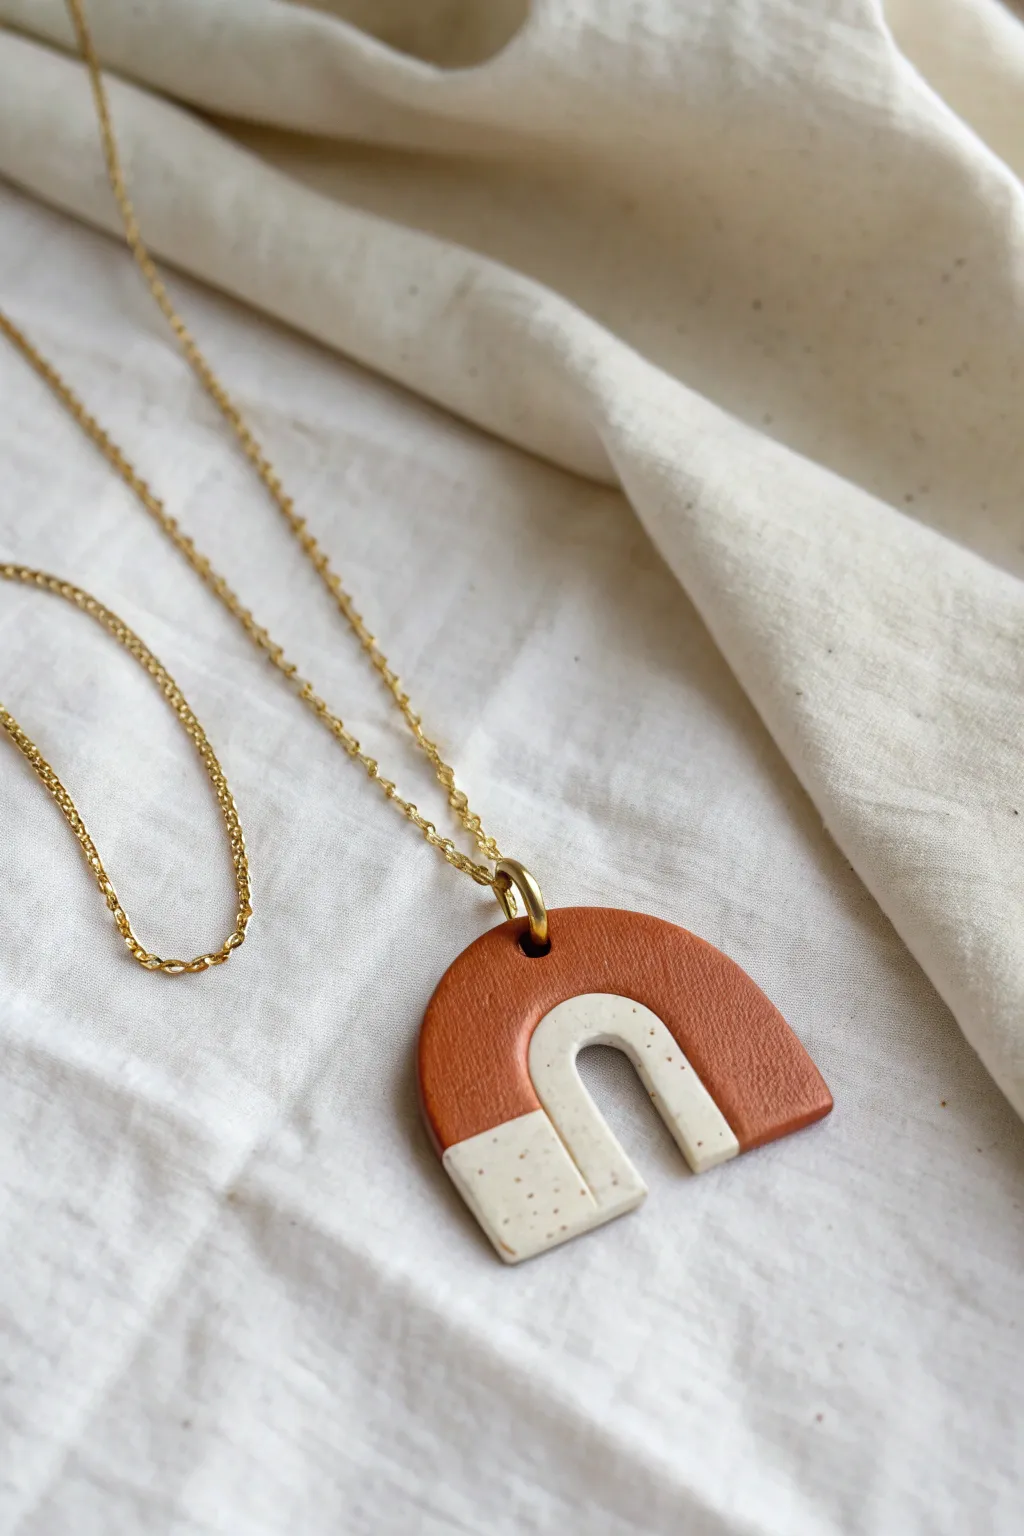
This modern geometric pendant combines warm terracotta tones with a stylish speckled cream finish for a distinct retro-minimalist vibe. The clean arch shape and subtle gold hardware make it an everyday staple that feels both earthy and sophisticated.
Step-by-Step Guide
Materials
- Polymer clay (Terracotta/Rust color)
- Polymer clay (White or Translucent)
- Black pepper or black crushed craft sand (for speckling)
- Acrylic roller or pasta machine
- Sharp clay blade or X-Acto knife
- Small oval or arch-shaped cookie cutter (approx 1.5 inch)
- Even smaller arch or circle cutter (for the negative space)
- Parchment paper
- Oven for baking
- Hand drill or pin vibe
- Large gold jump ring (6-8mm)
- Gold chain necklace with clasp
- Jewelry pliers (flat nose and round nose)
- Fine grit sandpaper (400-1000 grit) – optional
- Matte clay varnish – optional
Step 1: Prepping Your Clay
-
Condition the base color:
Start by taking a chunk of your terracotta-colored polymer clay. Knead it in your hands until it is warm, soft, and pliable. This conditioning step is crucial to prevent cracking later. -
Create the speckled mix:
For the contrasting section, take your white clay and flatten it slightly. Sprinkle a tiny pinch of ground black pepper or coarse black craft sand onto it. I find that pepper gives a really natural, organic pottery look. -
Blend the speckles:
Fold the white clay over the speckles and knead thoroughly until the particles are evenly distributed throughout the dough. If you want a warmer cream tone, mix in a tiny dot of the terracotta clay. -
Roll out the sheets:
Using your acrylic roller or pasta machine, roll both the terracotta and the speckled cream clay into separate slabs. Aim for a thickness of about 3mm to 4mm—thick enough to be sturdy but not heavy.
Step 2: Cutting and Assembling
-
Cut the main arch shape:
Place the terracotta sheet on parchment paper. Use your main arch-shaped cutter to punch out the primary shape. If you don’t have a cutter, print an arch template on paper, lay it on the clay, and trace around it with your knife. -
Cut the inner void:
Use a smaller arch cutter or a small circle cutter to remove the center of the terracotta arch to create the ‘n’ shape. Keep the cutout piece; you can reuse it for earrings later. -
Slice the two-tone section:
With your blade, make a clean horizontal cut across the bottom third of the terracotta arch leg on the left side (or right, if you prefer). Remove the bottom piece. -
Prepare the speckled insert:
Now, take your speckled cream slab. Place the piece of terracotta you just removed on top of it as a guide, and cut a matching piece of speckle clay. Or, cut a fresh arch from the speckled clay and slice off the corresponding section. -
Join the seams:
Fit the speckled piece into the gap you created on the terracotta arch. Gently push the edges together. On the back side, use your finger or a sculpting tool to smooth the seam so the bond is strong. -
Create the smaller inner arch:
The example image features a second, smaller inner arch made of speckled clay. Cut a small U-shape from your speckled slab that nests perfectly inside the terracotta arch’s negative space. -
Assemble the final shape:
Ideally, cut one large base slab (thin) and layer these pieces on top, or press the edges of the inner speckled arch against the inner terracotta walls until they fuse. Ensure the surface is level by lightly rolling over the entire assembled piece with your acrylic roller.
Seamless Smoothness
To erase fingerprints before baking, brush a tiny amount of rubbing alcohol or acetone over the raw clay. It melts the top layer just enough to self-smooth.
Step 3: Finishing Touches
-
Drill the hole:
Use a small straw or a tool to poke a hole at the very top center of the terracotta arch. Make sure the hole is big enough for your jump ring but not so close to the edge that it breaks. -
Smooth the edges:
Dip your finger in a little baby oil or water and gently run it along all raw edges to remove fingerprints and sharp cutting lines before baking. -
Bake the pendant:
Place the parchment paper with your pendant on a baking sheet. Bake according to your clay manufacturer’s instructions (usually 275°F/135°C for 15-30 minutes). Let it cool completely. -
Sand and buff:
Once cool, inspect the edges. If there are any rough spots, wet sand them gently with fine-grit sandpaper for a professional finish. -
Add the hardware:
Using two pairs of pliers, twist your large gold jump ring open (twist sideways, don’t pull apart). Thread it through the hole in the clay. -
Attach the chain:
Before closing the jump ring, slip your gold chain through it. Twist the jump ring closed securely so the ends meet perfectly flush.
Texture Twist
Before baking, press a piece of rough linen or sandpaper onto the terracotta section only. This gives it a realistic ‘stone’ texture contrasting the smooth white.
Now you have a stunning, architectural piece of jewelry ready to wear or gift.


Minimal Bar Pendant Necklace
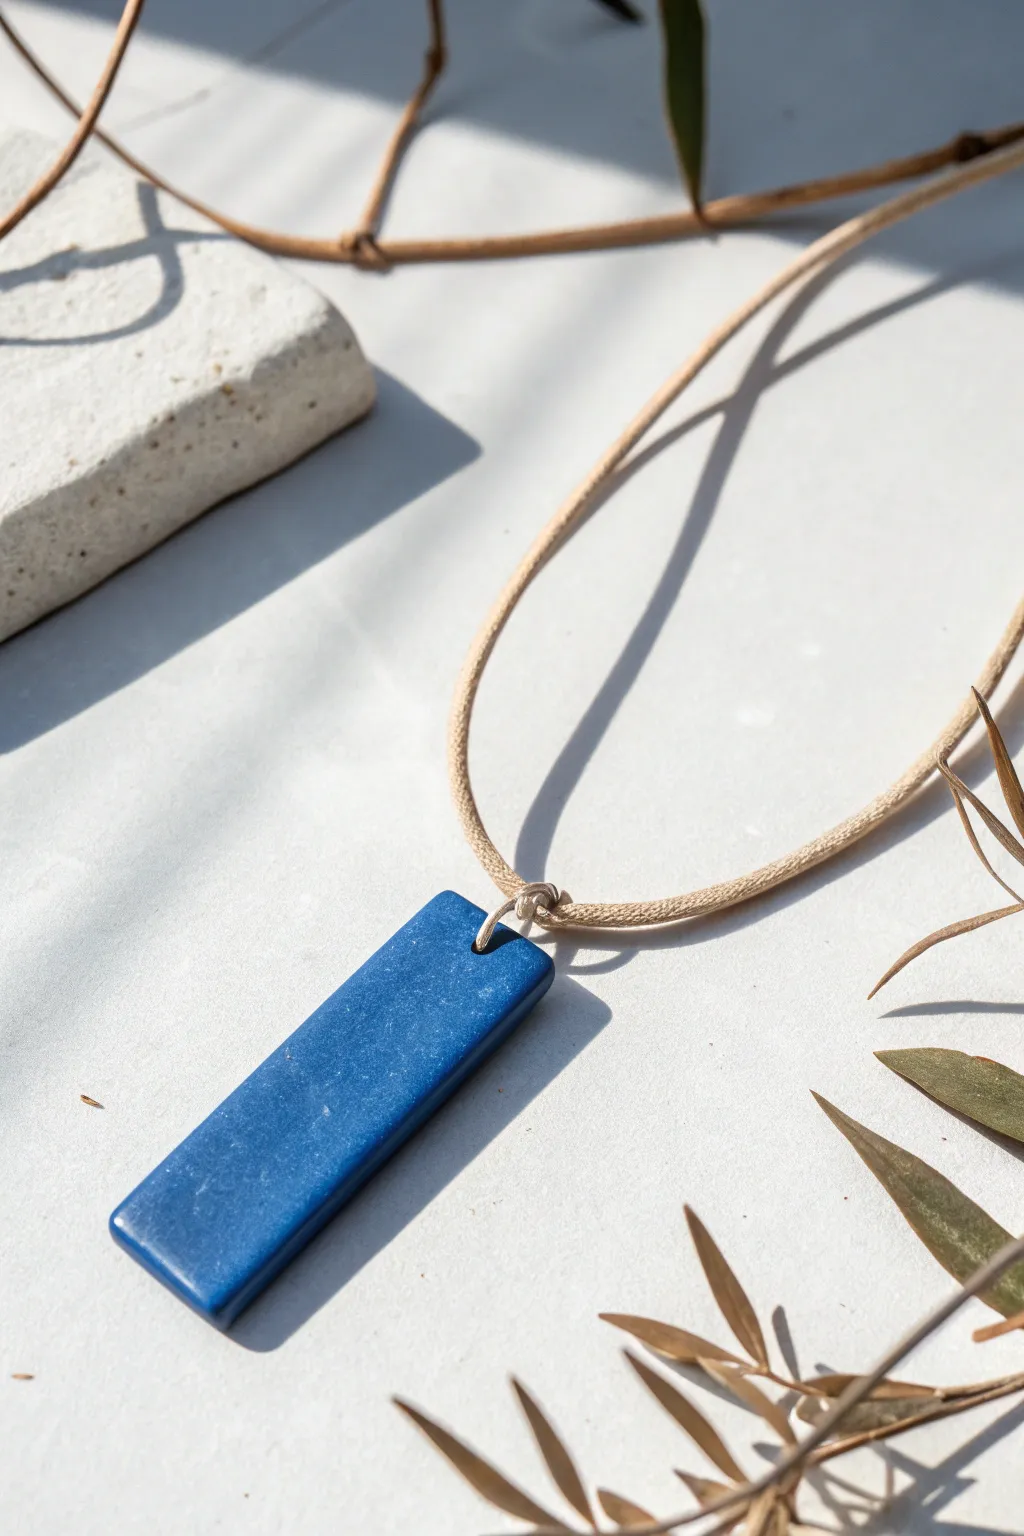
Embrace clean lines and striking color with this deep blue bar pendant, a piece that proves simplicity is often the most sophisticated choice. The smooth, satin finish and rectangular form create a modern versatile accessory perfect for everyday wear.
How-To Guide
Materials
- Polymer clay (deep royal blue or navy)
- Acrylic rolling pin or pasta machine
- Tissue blade or sharp clay knife
- Small round punch or toothpick
- Fine-grit sandpaper (400, 600, and 1000 grit)
- Buffing cloth or denim scrap
- Beige waxed cotton cord or hemp cord (approx. 1mm thickness)
- Ruler
- Oven for baking
Step 1: Shaping the Bar
-
Condition the Clay:
Begin by thoroughly conditioning your blue polymer clay. Knead it in your hands until it is soft, pliable, and free of any air bubbles or crumbly texture. -
Roll out a Sheet:
Using your acrylic roller or a pasta machine on a medium-thick setting, roll the clay into a smooth, even sheet. Aim for a thickness of about 4-5mm (roughly 3/16 inch) to give the pendant a substantial feel without being too heavy. -
Cut the Rectangle:
Place your clay sheet on a clean work surface. Use a ruler to guide your tissue blade and cut a clean, long rectangle. For the look in the image, measure approximately 1 inch wide by 2.5 inches long. -
Refine the Edges:
Gently tap the cut edges with your finger to soften them slightly so they aren’t razor-sharp. You want the geometry to remain crisp, but comfortable to wear. -
Create the Hanging Hole:
Using a small round cutter or a toothpick, punch a hole centered near the top edge of the rectangle. Ensure the hole is large enough for your chosen cord to pass through comfortably, about 3-4mm from the top edge. -
Inspect the Surface:
Before baking, check the surface for any fingerprints or lint. I like to lightly smooth over the surface with a drop of baby oil on my finger to remove any imperfections.
Uneven Edges?
If your rectangular cut warped during transfer to the baking sheet, bake it on the surface you cut it on (like a ceramic tile) to preserve the perfect shape.
Step 2: Baking and Finishing
-
Bake the Pendant:
Place your clay piece on a ceramic tile or baking sheet lined with parchment paper. Bake according to the manufacturer’s instructions for your specific brand of clay, typically around 275°F (130°C) for 30 minutes. -
Cool Completely:
Once baked, remove the pendant from the oven and let it cool completely. Do not attempt to sand it while it is still warm, as the clay is softer. -
Wet Sanding:
Dip your 400-grit sandpaper in water and gently sand the edges and surface of the pendant. Sanding underwater or rinsing frequently prevents dust and keeps the paper clean. -
Refining the Finish:
Move up to 600-grit and then 1000-grit sandpaper, continuing the wet sanding process. This progression removes scratches and creates a silky smooth texture. -
Buff to a Sheen:
Dry the pendant thoroughly. Using a piece of denim or a soft buffing cloth, rub the clay vigorously. The friction will generate heat and bring out a natural, subtle sheen similar to the reference photo.
Stone Effect
Mix a tiny pinch of translucent clay or black pepper into your blue clay before rolling. This mimics the look of Lapis Lazuli or natural stone.
Step 3: Assembly
-
Prepare the Cord:
Cut a length of beige waxed cotton cord or hemp cord to your desired necklace length, usually around 24-30 inches so it can slip over the head. -
Thread the Pendant:
Fold the cord in half to find the center loop. Push this folded loop through the hole in your pendant from back to front. -
Secure with a Knot:
Pass the two loose ends of the cord through the loop you just pushed through the hole. Pull tight to create a lark’s head knot that secures the pendant firmly. -
Knot the Ends:
Bring the two loose ends of the necklace together and tie a simple overhand knot or a sliding knot to finish the necklace.
Now you have a sleek, modern accessory ready to complement any outfit

The Complete Guide to Pottery Troubleshooting
Uncover the most common ceramic mistakes—from cracking clay to failed glazes—and learn how to fix them fast.
Classic Clay Bead Strand Necklace
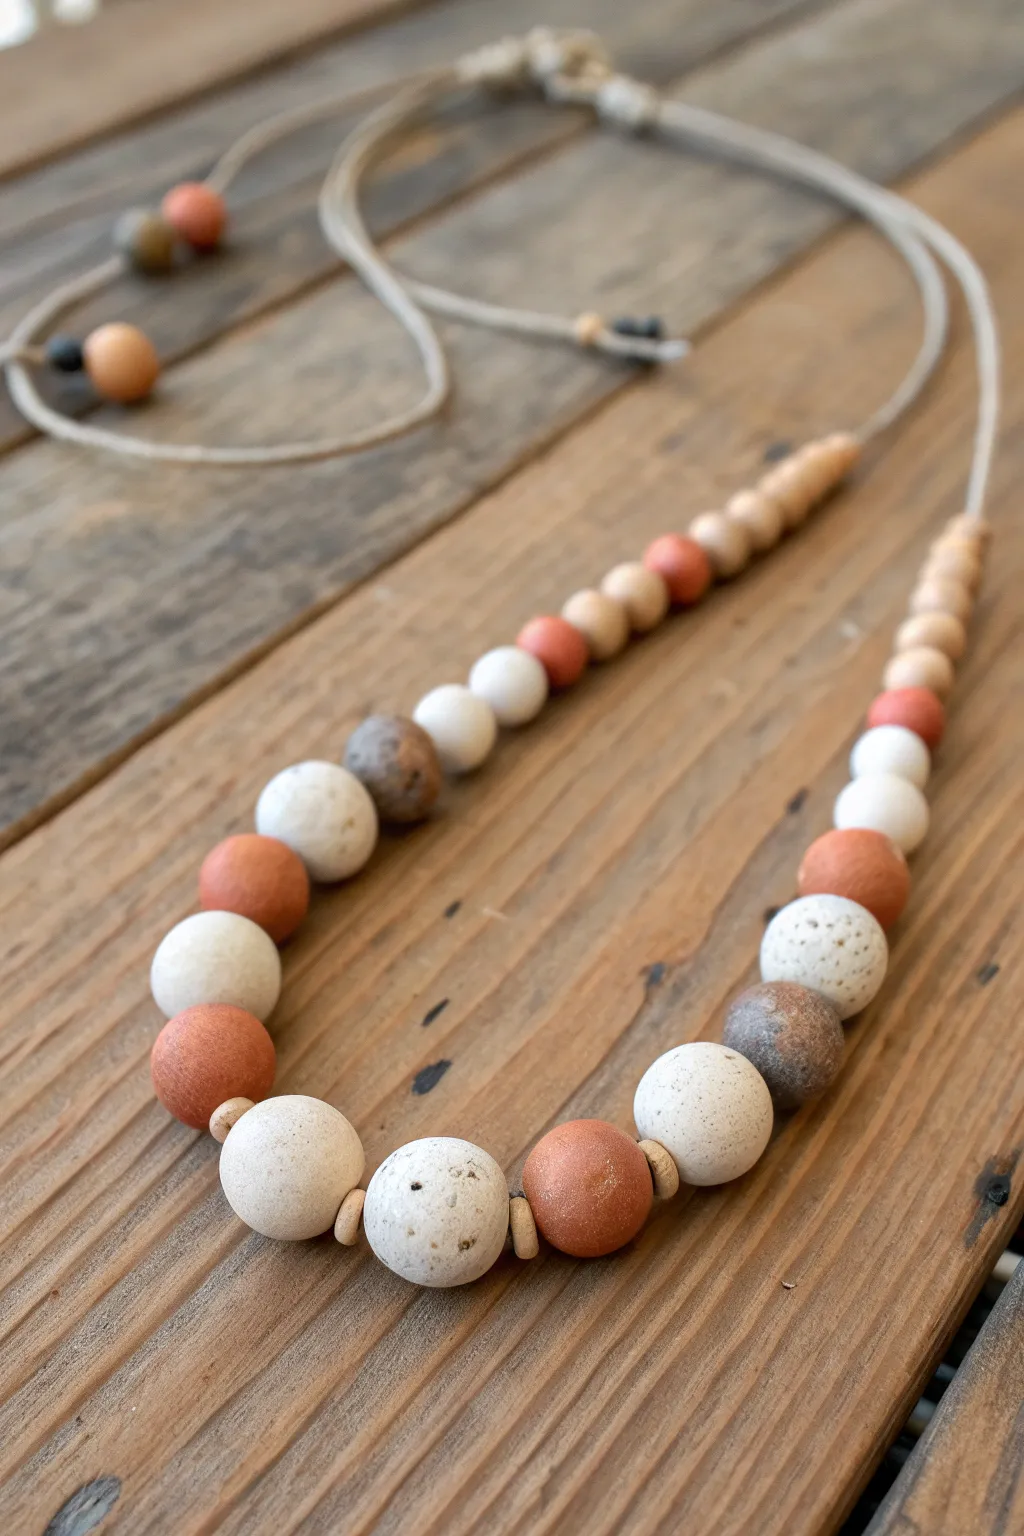
This project combines the rustic charm of unglazed clay with a modern, asymmetrical design. By mixing terracotta, speckled cream, and dark stone colors, you’ll create a versatile accessory that feels both grounded and stylish.
Step-by-Step
Materials
- Polymer clay (terracotta, white, black, beige)
- Ground black pepper or sand (for speckling)
- Small round wooden spacer beads
- Natural hemp or waxed cotton cord (1.5mm – 2mm)
- Clay roller or pasta machine
- Circle cutters (various small sizes)
- Needle tool or toothpick
- Oven for baking
- Sandpaper (fine grit)
- Bead reamer (optional)
Step 1: Preparing the Clay
-
Mix the Speckled Cream:
Start by conditioning your white polymer clay until it is soft. To get that natural stone look, mix in a very small amount of beige clay. Then, knead in a pinch of ground black pepper or clean sand. This adds the realistic texture seen in the photo. -
Create the Terracotta Tone:
If you don’t have a pre-mixed terracotta color, blend orange, brown, and a tiny bit of red clay. Aim for a rich, warm rust color rather than a bright orange. -
Mix the Dark Stone Shade:
For the dark accent beads, mix brown and black clay together. Leave it slightly marbled if you want more depth, or blend fully for a solid dark stone hue.
Hole Distortion?
If your beads squash when piercing, let the raw clay sit in the fridge for 15 minutes first. The firmer clay holds its shape better against the needle tool pressure.
Step 2: Forming the Beads
-
Portion the Clay:
Roll your clay into thick logs. Cut segments of varying sizes to ensure you have a mix of large focal beads and smaller taper beads. You will need about 5-7 large beads, 10-12 medium beads, and 14-16 small taper beads. -
Roll the Spheres:
Roll each segment between your palms to create smooth spheres. I find that cupping my hands slightly helps get them perfectly round without flat spots. -
Add Texture (Optional):
For the speckled white and dark stone beads, you can gently tap them with a stiff toothbrush or roll them lightly over sandpaper before baking to enhance the matte, stony texture. -
Pierce the Holes:
Using a needle tool or toothpick, carefully poke a hole through the center of each bead. Twist the tool as you push to avoid squishing the bead. Make sure the hole is wide enough for your thick hemp cord.
Step 3: Baking and Finishing
-
Bake the Beads:
Arrange your beads on a baking sheet or tile. Bake according to the manufacturer’s instructions for your specific brand of polymer clay (usually around 275°F/135°C for 15-30 minutes). -
Cool Down:
Let the beads cool completely in the oven before handling them. This strengthens the clay. -
Sand and Buff:
Once cool, lightly sand any fingerprints or rough edges with fine-grit sandpaper. Do not apply glaze; the beauty of this piece lies in its matte, natural finish.
Go Geometric
Instead of perfect spheres, try faceting the beads. Once rolled round, use a sharp blade to slice off small random edges for a modern, gemstone-like finish before baking.
Step 4: Assembly
-
Cut the Cord:
Cut a length of hemp or waxed cotton cord about 36 inches long. This gives you plenty of room for knotting and adjustability. -
Lay Out the Design:
Organize your beads on a flat surface. Start with the largest speckled and terracotta beads in the center. Place the small wooden spacer beads between the five largest central beads. -
Continue the Pattern:
Work outwards from the center, transitioning to medium-sized beads, then tapering down to the smallest beads at the ends. Mix the colors randomly but keep the size graduation consistent. -
String the Beads:
Thread the beads onto the cord following your layout. If the cord end frays, wrap a tiny piece of tape around it to create a stiff needle. -
Create the Slider Knot:
Bring the two ends of the cord together. Overlap them by about 3 inches. You will use a separate piece of cord (about 8 inches) to tie a sliding macramé square knot over the overlapped section. -
Tie End Knots:
Tie a simple overhand knot at the very end of each cord tail to prevent them from slipping through the slider mechanism. Add a small leftover clay bead to each tail for a decorative touch. -
Final Adjustments:
Trim any excess cord from the knotting process and ensure the beads slide freely but sit nicely when worn.
Now you have a stunning, organic statement piece ready to wear.
Terrazzo Speckled Pendant Necklace
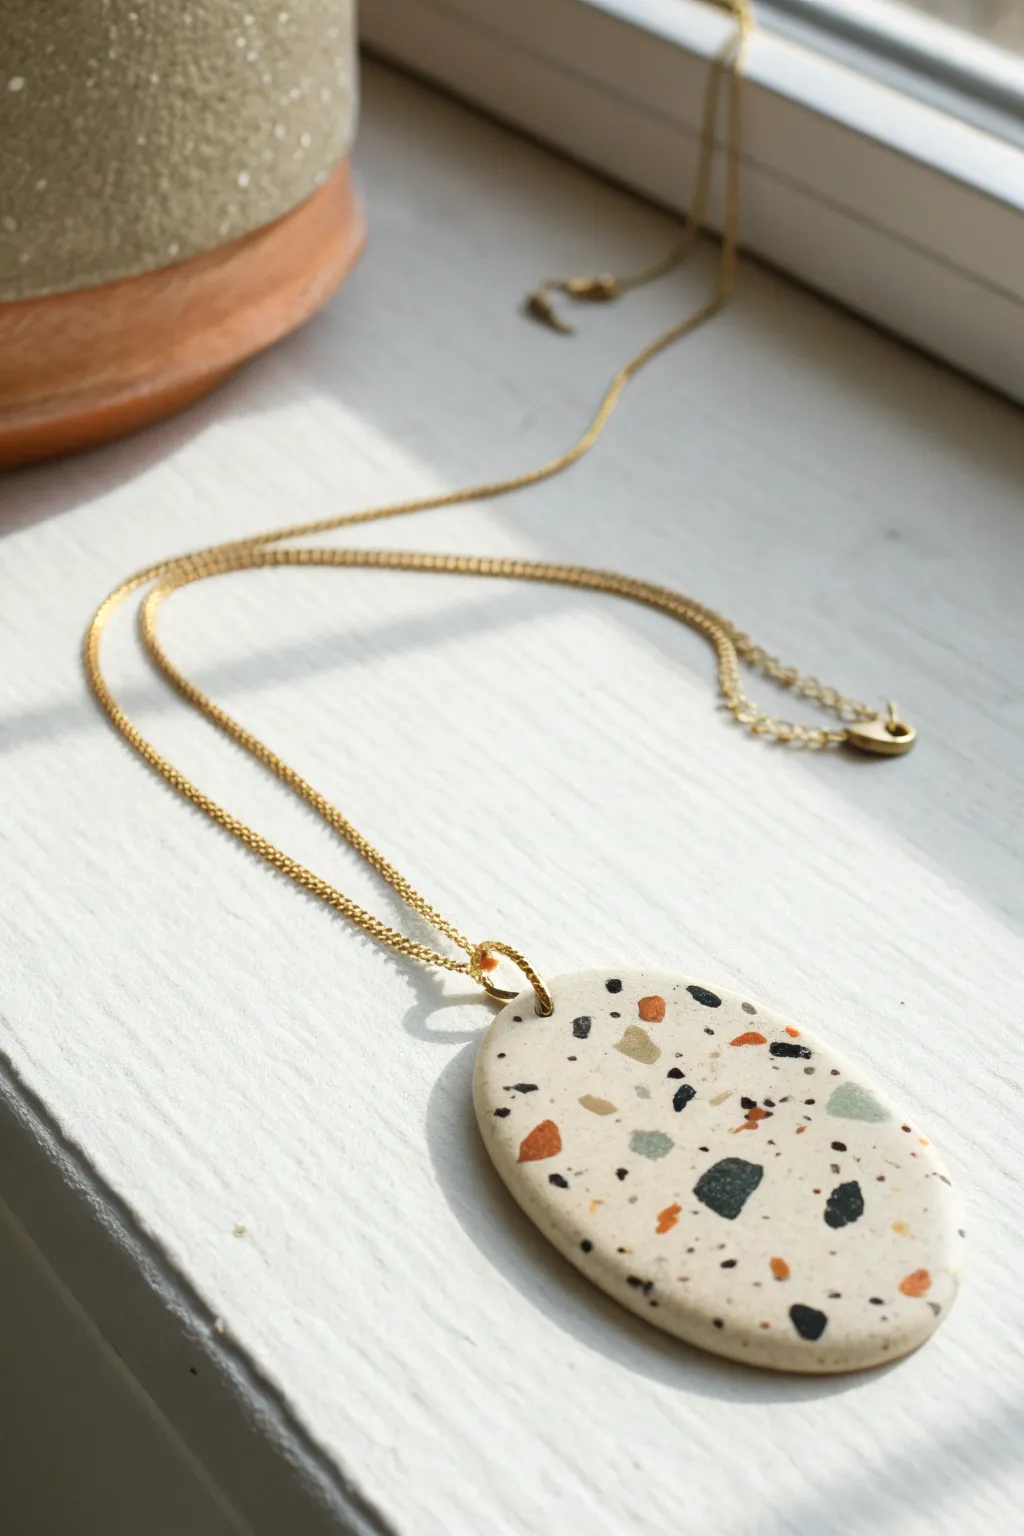
Embrace the timeless beauty of terrazzo with this chic, handcrafted pendant that brings a modern artistic touch to any outfit. The creamy base dotted with organic fragments of rust, charcoal, and grey creates a sophisticated yet playful accessory that looks effortlessly high-end.
How-To Guide
Materials
- Polymer clay (white or translucent white for base)
- Polymer clay scraps (rust orange, black, grey-green, beige)
- Acrylic rolling pin
- Tissue blade or sharp craft knife
- Oval shape cutter (approx. 2 inches long)
- Sandpaper (varying grits: 400, 600, 1000)
- Hand drill or small clay hole punch
- Jump ring (gold)
- Necklace chain (gold)
- Pliers
- Parchment paper and baking sheet
Step 1: Prepping the ‘Chips’
-
Condition the colors:
Begin by conditioning small amounts of your contrast colors—black, rust orange, grey-green, and beige—until they are soft and pliable. -
Create thin sheets:
Roll each colored piece into a very thin sheet. You want these paper-thin so they integrate well without creating huge bumps. -
Chop into fragments:
Use your tissue blade to chop these thin sheets into random, jagged confetti-like pieces. Vary the sizes, keeping most quite small. -
Separate the colors:
Keep the little piles of chopped clay separate for now so you can control the distribution later.
Smudged Chips?
If colors smear during sanding, the clay wasn’t baked long enough. Ensure a full cure, and always use water when sanding to keep debris from clogging the grit.
Step 2: Forming the Terrazzo Slab
-
Prepare the base:
Condition your white (or off-white) base clay thoroughly. Roll it out into a slab that is roughly 3-4mm thick. -
Scatter the chips:
Gently sprinkle your colored clay chips onto the white slab. Aim for a random, organic pattern, ensuring some areas are denser than others. -
Embed the design:
Place a piece of parchment paper over the slab to prevent sticking. Use your acrylic roller to firmly roll over the chips, pressing them flush into the base clay. -
Roll smooth:
Continue rolling until the surface is completely smooth and level. The slab might spread out and become thinner; aim for a final thickness of roughly 3mm.
Add Some Shine
Mix a tiny pinch of gold leaf into your terrazzo confetti pile. When rolled flat, the metallic flecks will add an elegant shimmer alongside the matte colors.
Step 3: Cutting and Baking
-
Cut the shape:
Position your oval cutter over the most pleasing section of your terrazzo pattern. Press down firmly to cut out your pendant shape. -
Drill the hole:
Use a small clay hole punch or a toothpick to create a hole at the very top center of the oval. Make sure it’s large enough for your jump ring. -
Refine edges:
Gently smooth the sides of the oval with your finger to remove any sharp edges from the cutter. -
Bake:
Transfer the pendant to a parchment-lined baking sheet. Bake according to your specific clay manufacturer’s instructions (usually 275°F/135°C for 30 minutes). -
Cool down:
Allow the piece to cool completely before handling. I like to let it sit in the oven as it cools to prevent cracking from thermal shock.
Step 4: Finishing Touches
-
Sand the surface:
Wet sand the surface of the pendant, starting with 400 grit and moving up to 1000 grit. This reveals the crisp edges of the terrazzo chips and creates a silky matte finish. -
Buff:
Rub the pendant briskly with a piece of denim or a soft cloth to give it a gentle sheen. -
Attach hardware:
Use two pairs of pliers to twist open a gold jump ring. Thread it through the hole in the pendant and attach it to your chain. -
Secure closure:
Twist the jump ring closed carefully, ensuring the ends meet perfectly flush.
Wear your new terrazzo masterpiece with pride or gift it to a friend who loves modern design


What Really Happens Inside the Kiln
Learn how time and temperature work together inside the kiln to transform clay into durable ceramic.
Marbled Swirl Statement Pendant
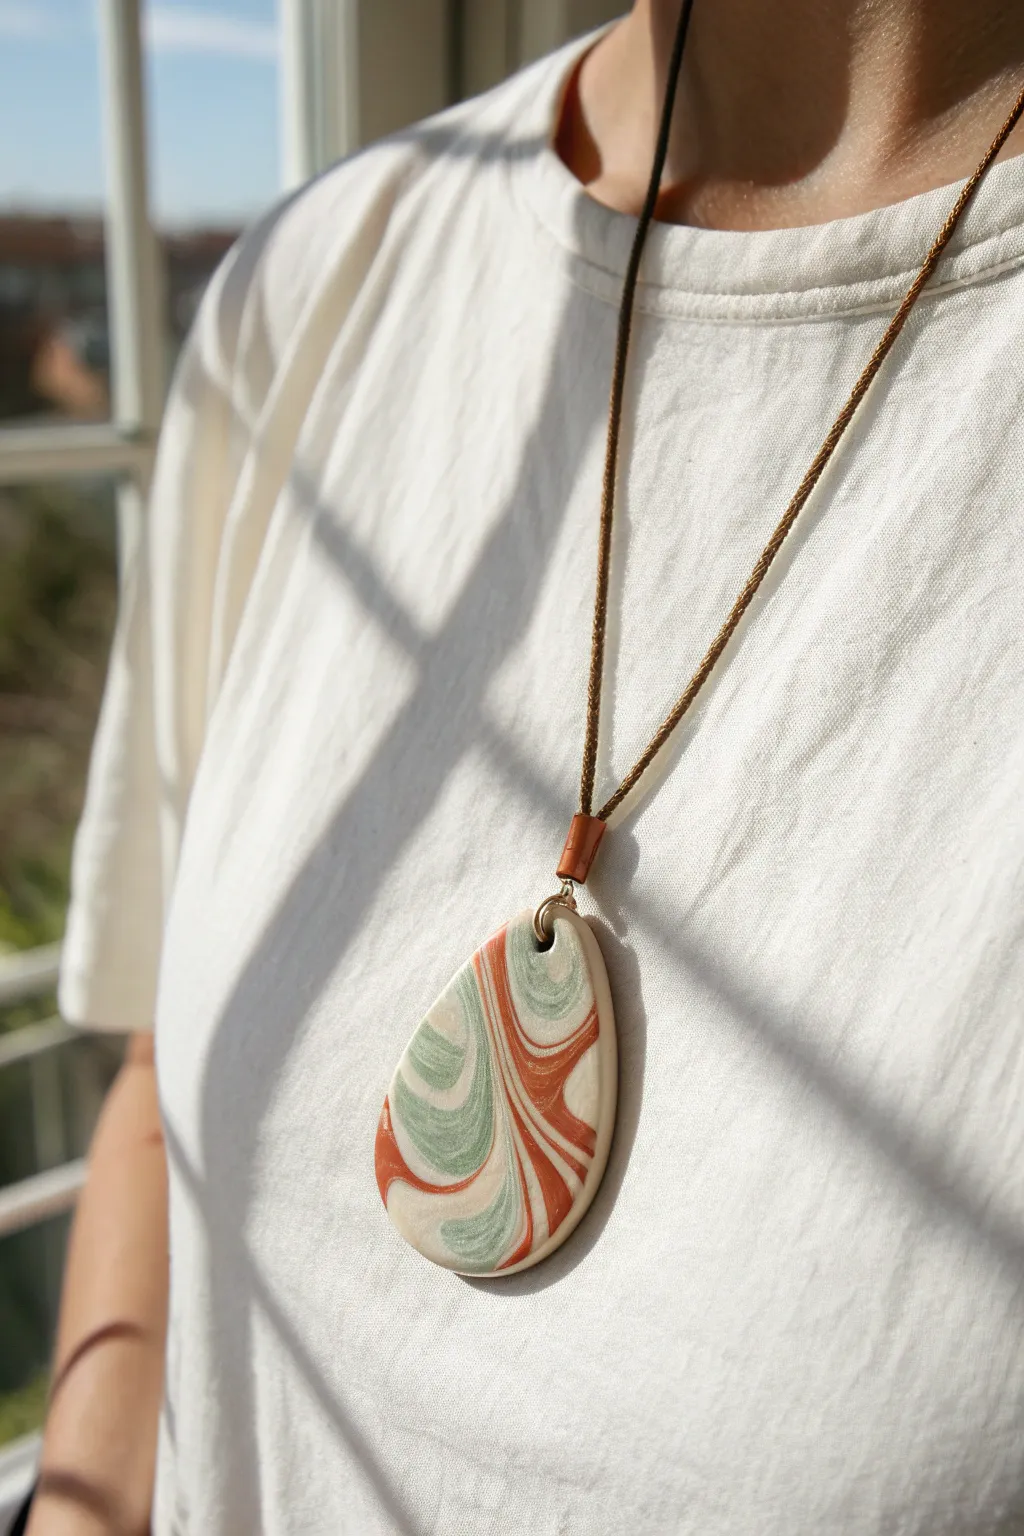
Embrace organic shapes and fluid patterns with this striking polymer clay pendant. The teardrop silhouette showcases a mesmerizing swirl of cream, sage green, and earthy terracotta that mimics naturally geological strata.
Detailed Instructions
Materials
- Polymer clay in cream/white
- Polymer clay in sage green
- Polymer clay in terracotta/burnt sienna
- Rolling pin or clay machine
- Teardrop-shaped clay cutter (large)
- Small circle cutter or straw (for the hole)
- Craft knife or tissue blade
- Fine-grit sandpaper (wet/dry)
- Matte or satin polymer clay glaze (optional)
- Soft brush
- Brown waxed cotton cord or leather cord
- Small strip of brown leather or matching clay for the bail
- Jump ring (gold or brass tone)
- Jewelry pliers
- Super glue (gel type recommended)
Step 1: Creating the Marble Slab
-
Condition the Clay:
Start by warming up your clay blocks. Knead the cream, sage, and terracotta clays separately until they are soft and pliable. You’ll want about 50% cream, 25% sage, and 25% terracotta for this specific balance. -
Roll Snakes:
Roll each color into several long, thin snakes. Varying the thickness slightly will create a more natural, less uniform pattern later on. -
Combine the Colors:
Gather your snakes together into one large bundle, twisting them gently from top to bottom like a candy cane. Fold the twisted log in half and twist again. -
Roll and Fold:
Roll the twisted clay into a cohesive ball, then flatten it slightly. Pass it through your clay machine or use a rolling pin to create a rough sheet. -
Disrupt the Pattern:
I like to tear the sheet in half and stack the pieces on top of each other, then roll it out again. This ‘tear and stack’ method creates those beautiful, complex wavy lines rather than simple stripes. -
Final Sheet Thickness:
Roll your marbled slab to your final desired thickness, aiming for about 4mm to 5mm. It needs to be sturdy since it’s a larger pendant.
Clean Cuts Matter
Before cutting your teardrop shape, place a piece of plastic wrap over the clay. Press the cutter through the plastic for instantly rounded, professional edges.
Step 2: Shaping and Curing
-
Cut the Shape:
Position your large teardrop cutter over the area of the slab with the most pleasing swirl pattern. Press down firmly to cut. If you don’t have a cutter, trace a paper template with a craft knife. -
Smooth the Edges:
Gently run your finger along the cut edges to soften any sharp corners left by the cutter. This reduces sanding time later. -
Create the Hanging Hole:
Use a small circle cutter or a straw to punch a hole at the very tip of the teardrop. Make sure it’s centered and not too close to the edge to prevent breakage. -
Bake the Piece:
Place the pendant on a ceramic tile or parchment-lined baking sheet. Bake according to your specific clay brand’s instructions (usually 275°F/135°C for 15-30 minutes per 1/4 inch of thickness). -
Cool Down:
Allow the piece to cool completely in the oven or on a wire rack before handling. Polymer clay is fragile while hot.
Level Up: Texture
Before baking, gently press a piece of coarse sandpaper or a texture sponge into the clay surface. This removes fingerprints and mimics real stone texture.
Step 3: Finishing and Assembly
-
Sand and Buff:
Once cool, use wet/dry sandpaper starting at 400 grit and moving to 800 grit. Sand the edges and surface under slightly running water to achieve a smooth, stone-like matte finish. -
Seal (Optional):
If you prefer a darker, more vibrant color, apply a very thin layer of satin or matte glaze. If you love the raw ceramic look shown in the photo, skip this step. -
Attach the Jump Ring:
Use your pliers to open the jump ring, slide it through the hole in the pendant, and close it securely. -
Create the Cord Bail:
Cut a small rectangle of brown leather (or use a cured strip of leftover clay). Wrap this tightly around the base of your cord to create a visual ‘stopper’ or decorative element just above where the pendant sits. -
Secure the Bail:
Glue the overlapped ends of the leather strip together with a tiny drop of gel super glue, ensuring it grips the cord tightly. -
String the Pendant:
If your cord loop is large enough, thread the pendant’s jump ring onto the cord below your leather bail. Otherwise, attach the jump ring to the cord first, then add the leather bail above it. -
Final Adjustments:
Tie the ends of your cord at your desired length using a simple overhand knot or sliding knots for adjustability.
Wear your new statement piece with a simple linen top to let natural patterns intricate take center stage
Botanical Leaf-Imprint Charm Necklace
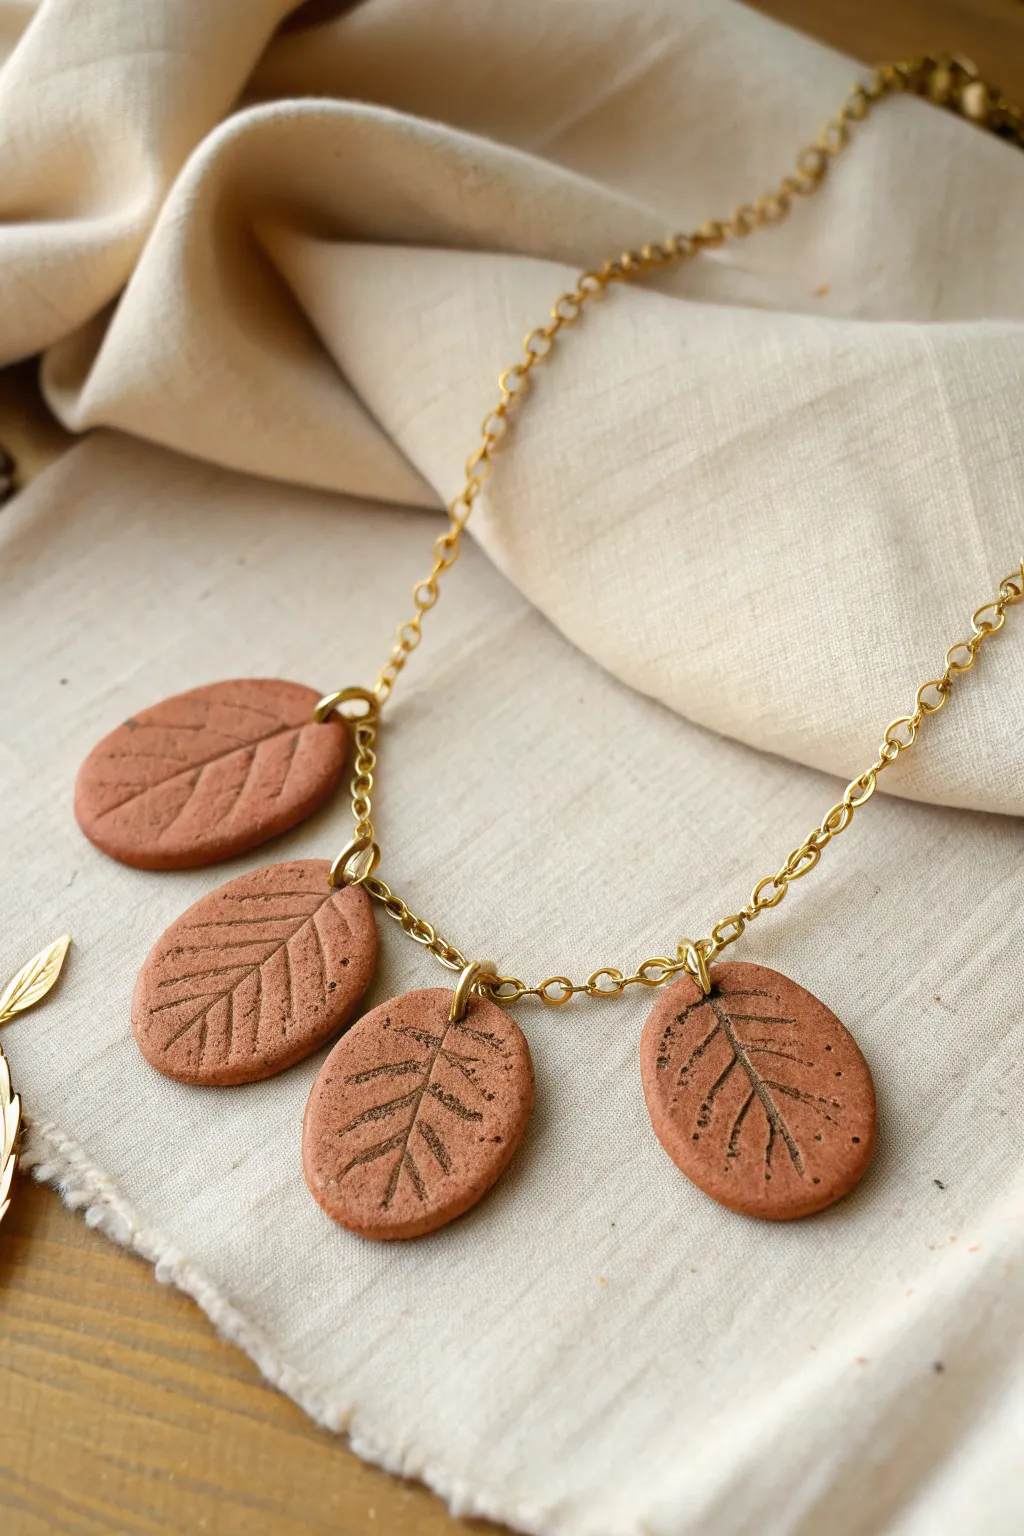
Capture the delicate details of nature with this warm, earthy necklace featuring oval-shaped clay pendants. The simple leaf impressions and terracotta tones create a rustic yet elegant piece perfect for everyday wear.
How-To Guide
Materials
- Terracotta-colored polymer clay (or air-dry clay)
- Small oval clay cutter (approx. 1 inch)
- Fresh, veiny leaves (small size)
- Acrylic rolling pin
- Parchment paper or ceramic tile
- Needle tool or toothpick
- Dark brown acrylic paint
- Paper towel or wet wipe
- 4 Gold jump rings (6mm)
- Gold chain necklace with clasp
- Jewelry pliers (flat nose and round nose)
- Oven (if using polymer clay)
Step 1: Shaping the Clay
-
Condition the Clay:
Start by warming a small block of terracotta polymer clay in your hands. Knead it thoroughly until it creates a pliable, smooth consistency without any cracks or air bubbles. -
Roll the Sheet:
Place the clay on a sheet of parchment paper or a smooth ceramic tile. Using your acrylic rolling pin, roll the clay out evenly to a thickness of about 3mm to 4mm—thick enough to be sturdy but light enough for a necklace. -
Impressing the Botanicals:
Select your small leaves. Place them vein-side down onto the clay surface, spacing them out enough for your cutter. Gently roll over the leaves with the rolling pin once to press the veins deep into the clay surface. -
Remove the Foliage:
Carefully peel the leaves away by the stem to reveal the detailed imprint underneath. If a leaf sticks, use fine tweezers to lift the edge. -
Cut the Shapes:
Position your oval cutter over each imprint, centering the leaf design pleasingly within the frame. Press down firmly to cut out four identical oval charms. -
Create Hanging Holes:
While the clay is still raw, use a needle tool or toothpick to pierce a small hole at the very top of each oval. Ensure the hole is large enough for your jump rings but not so close to the edge that it tears.
Step 2: Baking and Antiquing
-
Bake the Pendants:
Preheat your oven according to the manufacturer’s instructions on your specific package of clay. Bake the pieces on a parchment-lined tray—usually around 275°F (135°C) for 15-30 minutes. -
Cool Completely:
Once baked, remove the tray from the oven and let the clay charms cool completely. They must be room temperature before you apply any paint. -
Apply the Wash:
Mix a tiny drop of water with dark brown acrylic paint. Brush this wash liberally over the textured surface of the charms, ensuring the paint gets deep into the imprinted leaf veins. -
Wipe Away Excess:
Immediately use a damp paper towel or wet wipe to gently remove the paint from the surface. The dark color should remain only in the recessed veins, highlighting the botanical details. -
Seal (Optional):
If you want extra durability or a specific finish, apply a thin layer of matte varnish at this stage, though raw clay has a lovely natural texture on its own.
Paint sticking too much?
If the acrylic paint dries too fast on the surface while antiquing, lightly sand perfectly flat areas with fine-grit sandpaper to reveal the clean terracotta color again.
Step 3: Assembly
-
Prepare the Chain:
Lay your gold chain flat on your workspace. Determine the center point of the necklace so your charms hang symmetrically. -
Open Jump Rings:
Using two pairs of pliers, twist your gold jump rings open sideways (never pull them apart). This maintains the circle’s tension. -
Attach the Charms:
Slide a charm onto an open jump ring, then loop the ring through a link in the chain. Start with the two central charms, spacing them about an inch apart. -
Add Outer Charms:
Add the remaining two charms on either side of the center pair, maintaining equal spacing between all four pieces. -
Final Check:
Close all jump rings securely with your pliers, ensuring there are no gaps where the chain could slip out. Hold the necklace up to check that the leaves all face forward.
Level Up: Metal Accents
Before baking, lightly brush gold mica powder into the leaf veins instead of using dark paint later. This gives a subtle, shimmering effect that catches the light.
Now you have a stunning, nature-inspired accessory ready to complement any earthy outfit

TRACK YOUR CERAMIC JOURNEY
Capture glaze tests, firing details, and creative progress—all in one simple printable. Make your projects easier to repeat and improve.
Painted Mini Landscape Pendant
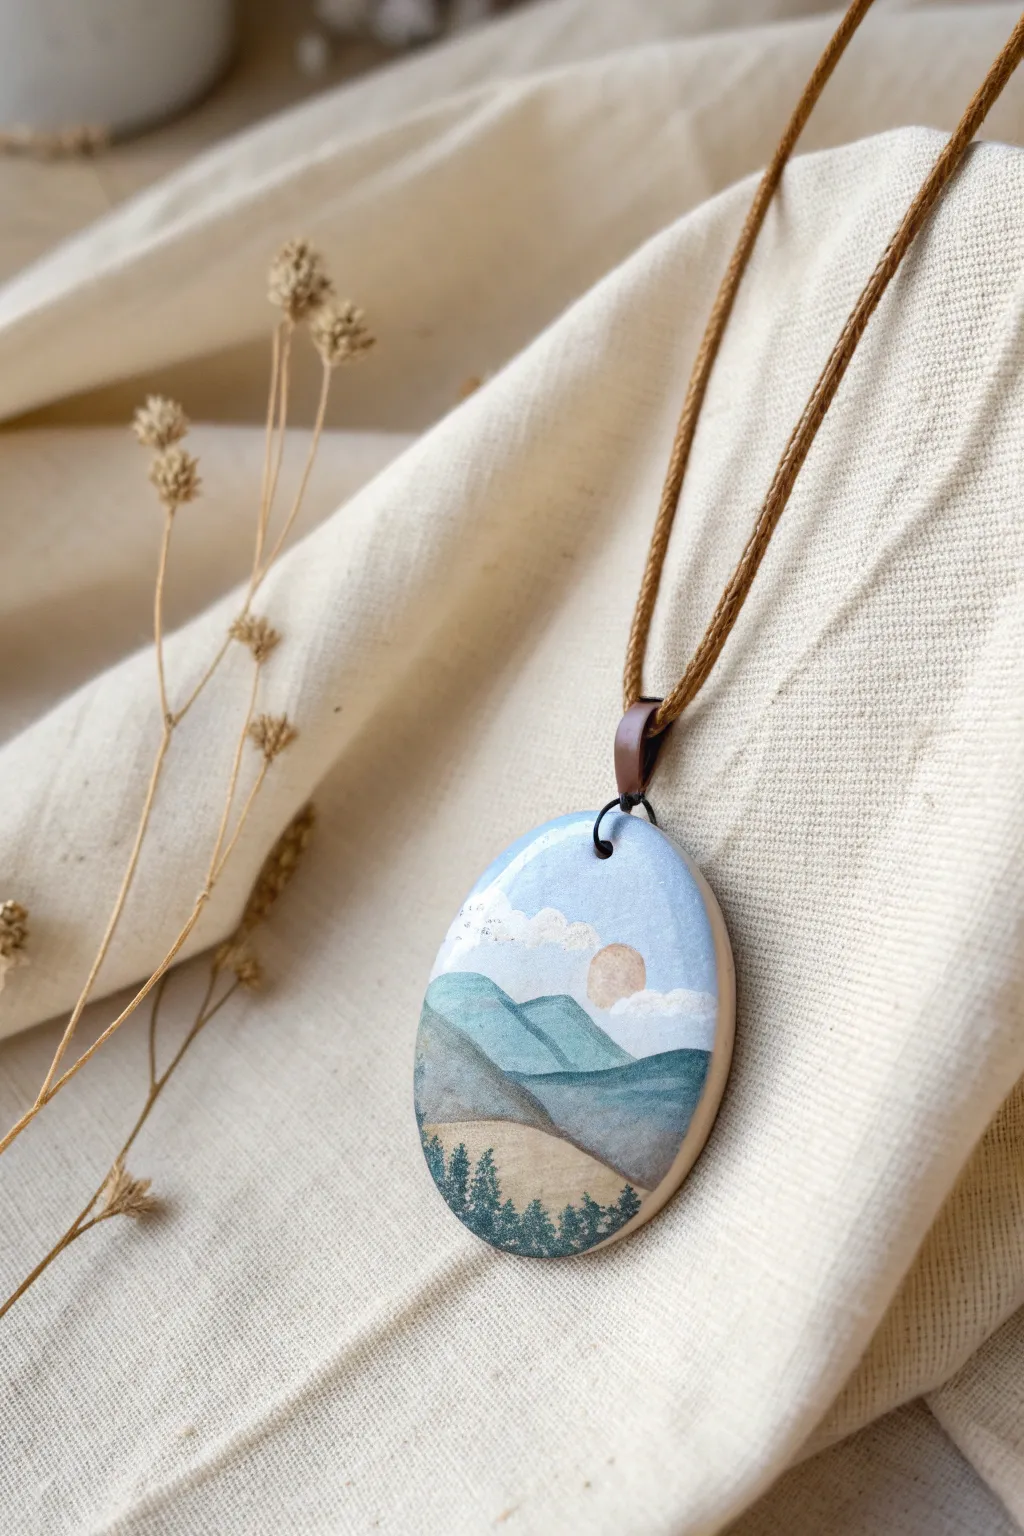
Capture the tranquility of nature with this hand-painted clay pendant, featuring rolling teal mountains and a soft sun against a pale sky. This wearable art piece combines simple landscape stratification with delicate brushwork to create a soothing miniature world.
Step-by-Step
Materials
- White polymer clay (or air-dry clay)
- Oval clay cutter (approx. 2 inches)
- Acrylic paints (Titanium White, Phthalo Blue, Burnt Sienna, Yellow Ochre, Deep Green)
- Fine detail brushes (size 00 and 000)
- Flat shader brush (small)
- Gloss or matte varnish (water-based)
- Rolling pin
- Jump ring (large, black)
- Brown cord necklace
- Sandpaper (400 and 800 grit)
- Palette for mixing
Step 1: Shaping the Canvas
-
Condition the clay:
Begin by kneading your white polymer clay until it is soft and pliable. Ensure your hands and work surface are clean to avoid trapping dust in the white clay. -
Roll out the slab:
Roll the clay into a smooth slab about 1/4 inch thick. Aim for an even thickness so the pendant hangs correctly. -
Cut the shape:
Use your oval cutter to stamp out the pendant shape. If edges are rough, gently smooth them with your finger. -
Create the hole:
Use a specialized tool or a straw to punch a hole near the top edge for the jump ring. Make sure it isn’t too close to the edge to prevent tearing. -
Bake or dry:
Bake the clay according to the manufacturer’s instructions on the package. If using air-dry clay, let it sit for at least 24 hours until fully hardened. -
Sand for smoothness:
Once cool and hard, sand the surface lightly with 400 grit and then 800 grit sandpaper. This creates a tooth for the paint but keeps the finish smooth.
Step 2: Painting the Landscape
-
Base coat the sky:
Mix a large amount of Titanium White with a tiny dot of Phthalo Blue. Paint the upper two-thirds of the pendant with this pale blue. Let it dry completely. -
Paint the background mountain:
Mix Phthalo Blue with a touch of Deep Green and a lot of white to create a dusty teal. Paint the furthest mountain range with soft, rolling peaks just below the sky area. -
Add the sun:
Mix White with a tiny amount of Yellow Ochre and Burnt Sienna to get a soft peach color. Carefully paint a small circle resting just above or slightly behind your first mountain layer. -
Paint the middle mountains:
Darken your teal mixture slightly by adding less white. Paint a second range of mountains below the first, overlapping them to create depth. -
Add the foreground hill:
Create a darker blue-grey by mixing your blue and green with a touch of brown. Paint the closest hill shape at the bottom, curving upwards. -
Paint the valley floor:
Fill the bottom area with a beige tone made from White, Yellow Ochre, and a speck of brown. This acts as the grassy field at the foot of the mountains. -
Detail the clouds:
Use a dry brush technique with pure white paint to dab jaggedy, fluffy clouds across the sky and over the sun slightly. -
Add tiny trees:
Using your smallest 000 brush and deep green paint (mixed with a tiny bit of black or blue for darkness), paint tiny vertical strokes along the bottom edge to simulate a pine forest.
Paint Peeling?
If acrylics peel off the clay after drying, you likely skipped sanding. Lightly sand the cured clay surface to give the paint ‘tooth’ to grip onto.
Step 3: Finishing Touches
-
Seal the artwork:
Allow the paint to cure fully, preferably overnight. Apply two thin coats of varnish to protect your painting from scratches. -
Assemble the necklace:
Open the large black jump ring with pliers and thread it through the hole in the pendant. Close it securely. -
Attach the cord:
Thread your brown cord through the jump ring. I find a simple lark’s head knot or just looping it through works perfectly for this rustic look.
Pro Tip: Atmospheric Perspective
Make distant mountains paler and bluer than foreground ones. This mimics how the atmosphere obscures far-off objects, adding instant 3D depth.
Wear your miniature masterpiece with pride or gift it to a nature-loving friend
Crackle-Texture Pendant Necklace
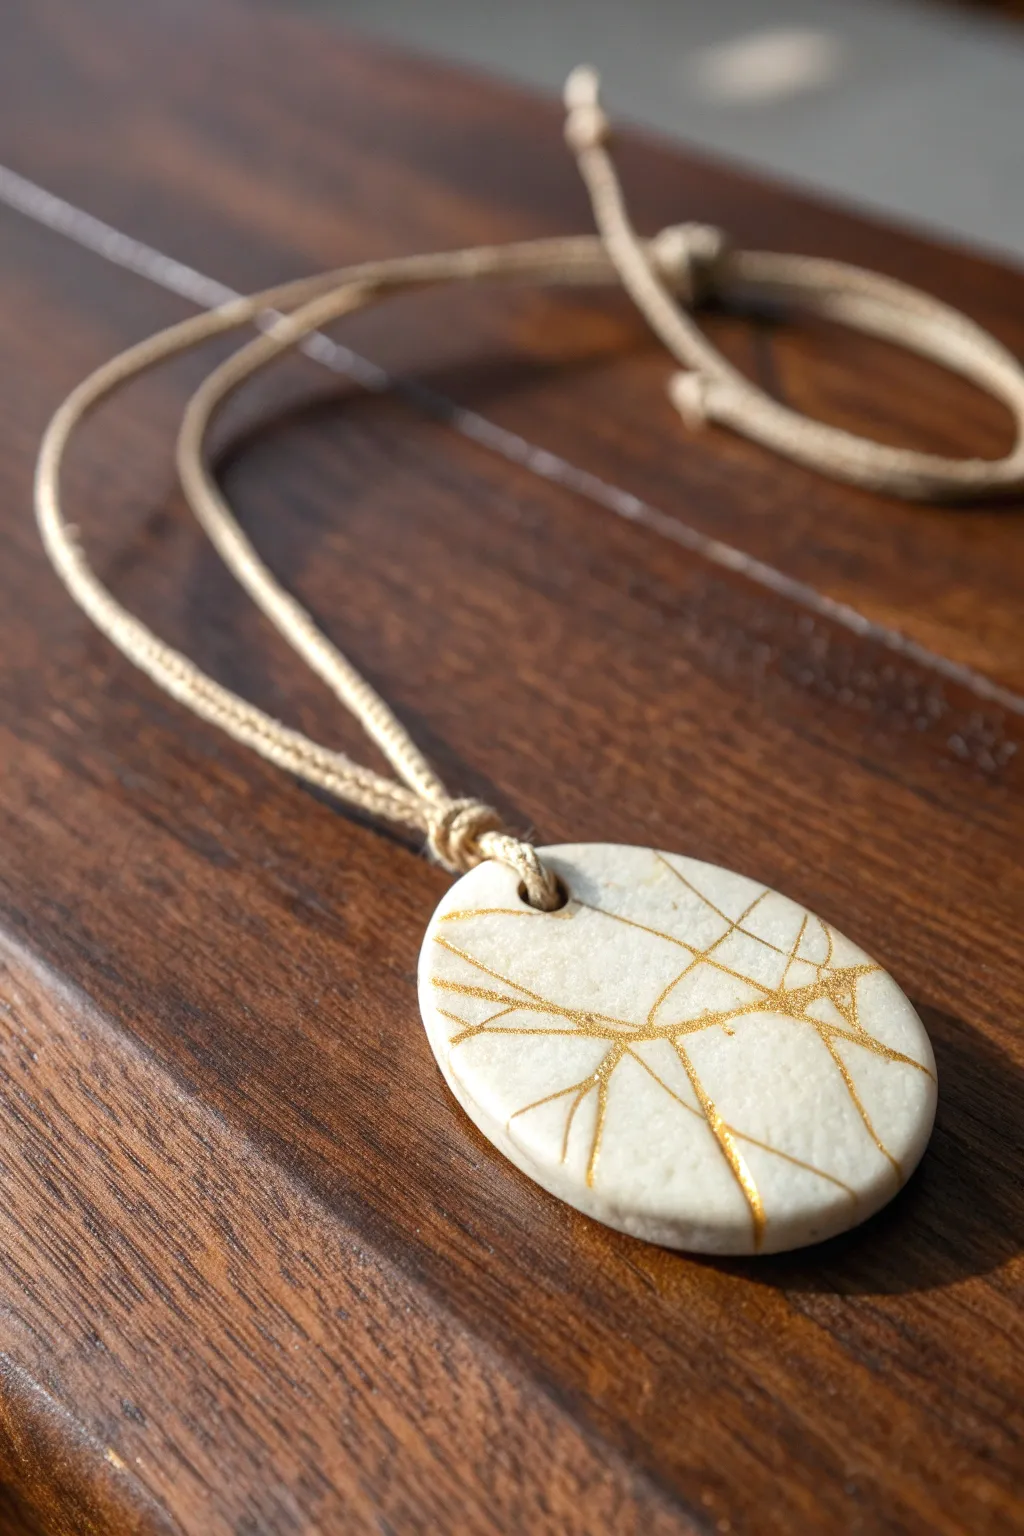
Embrace the beauty of imperfection with this elegant pendant inspired by the Japanese art of Kintsugi. Using polymer clay and gold accents, you will create a faux-ceramic piece that looks like it has been broken and lovingly repaired with pure gold.
How-To Guide
Materials
- White or cream polymer clay (e.g., Fimo or Sculpey)
- Gold leaf sheets or metallic gold mica powder
- Liquid polymer clay or strong craft glue
- Acrylic roller or pasta machine
- Oval clay cutter (approx. 1.5 – 2 inches)
- X-Acto knife or sharp blade
- Toothpick or small drill bit
- Fine grit sandpaper (400 – 800 grit)
- Gloss or satin polyurethane varnish
- Small paintbrush
- Hemp cord or leather string for the necklace
Step 1: Shaping the Base
-
Condition the clay:
Start by kneading your white or cream polymer clay in your hands until it becomes soft, pliable, and warm. This prevents unwanted air bubbles later. -
Roll out a slab:
Using your acrylic roller or a pasta machine, flatten the clay into a slab that is approximately 1/4 inch thick. You want it substantial enough to hold the ‘cracks’ but not too heavy. -
Cut the shape:
Press your oval cutter firmly into the clay slab. Wiggle it slightly to ensure a clean cut, then remove the excess clay from around the shape. -
Smooth the edges:
Gently rub your finger along the cut edges of the oval to round them off slightly. This gives the piece a more organic, stone-like feel rather than a sharp, manufactured look. -
Create the hole:
Use a toothpick or a small straw to pierce a hole near the top of the oval about 1/4 inch from the edge. Make sure the hole is large enough for your chosen cord to pass through.
Step 2: Creating the Gold Veins
-
Score the surface:
Taking your sharp blade, gently score shallow, random lines across the surface of the pendant. I like to make these intersect and branch out like lightning or tree roots to mimic natural fractures. -
Deepen the cuts:
Go back over your initial score lines and widen them slightly into V-shaped channels. Don’t cut all the way through the clay; you just want grooves for the gold to sit in. -
Prepare the gold fill:
If using mica powder, mix a small amount with a drop of liquid clay to form a thick gold paste. If using gold leaf, ensure your channels are slightly tacky or apply a tiny amount of liquid clay into the grooves as an adhesive. -
Fill the cracks:
Carefully paint the gold paste into the grooves using a fine brush. Alternatively, press gold leaf into the cracks effectively. Don’t worry about being too neat; having some gold spill over creates a stunning effect. -
Clean up (Optional):
If you prefer cleaner lines, you can gently wipe the surface with a baby wipe to remove excess gold from the high points of the clay, leaving it only in the deep cracks.
Clean Lines Tip
Use a baby wipe wrapped tight around your finger to clean up gold smudges before baking. This keeps the white clay stark and the gold lines sharp.
Step 3: Baking and Finishing
-
Bake the piece:
Place your pendant on a ceramic tile or parchment-lined baking sheet. Bake according to your clay manufacturer’s instructions—usually around 275°F (130°C) for 30 minutes. -
Cool down:
Allow the clay to cool completely inside the oven or on a dedicated heat-safe surface. The clay hardens fully as it cools. -
Sand for texture:
Once cool, lightly sand the surfaces and edges with fine-grit sandpaper under running water. This mimics the slightly matte texture of stone and ensures the shape is perfectly smooth. -
Seal the piece:
Apply a thin layer of satin or gloss varnish to protect the gold details and give the faux stone a finished sheen. Let this dry completely according to the bottle directions. -
Cut the cord:
Cut a length of hemp or leather cord to your desired necklace length, usually around 24 inches for a piece that sits mid-chest. -
Attach the pendant:
Thread the cord through the hole in the pendant. Center the pendant on the cord. -
Tie the knots:
Tie a secure overhand knot about an inch above the pendant to keep it in place if desired, or let it slide freely. Finish the necklace by tying adjustable sliding knots at the ends for versatility.
Try This Variation
Mix black pepper or used coffee grounds into the white clay before rolling it out. This creates a speckled ‘granite’ look that pairs beautifully with gold.
Now you have a stunning, artful pendant that turns broken lines into a bold fashion statement.
Faux Stone Cabochon Necklace
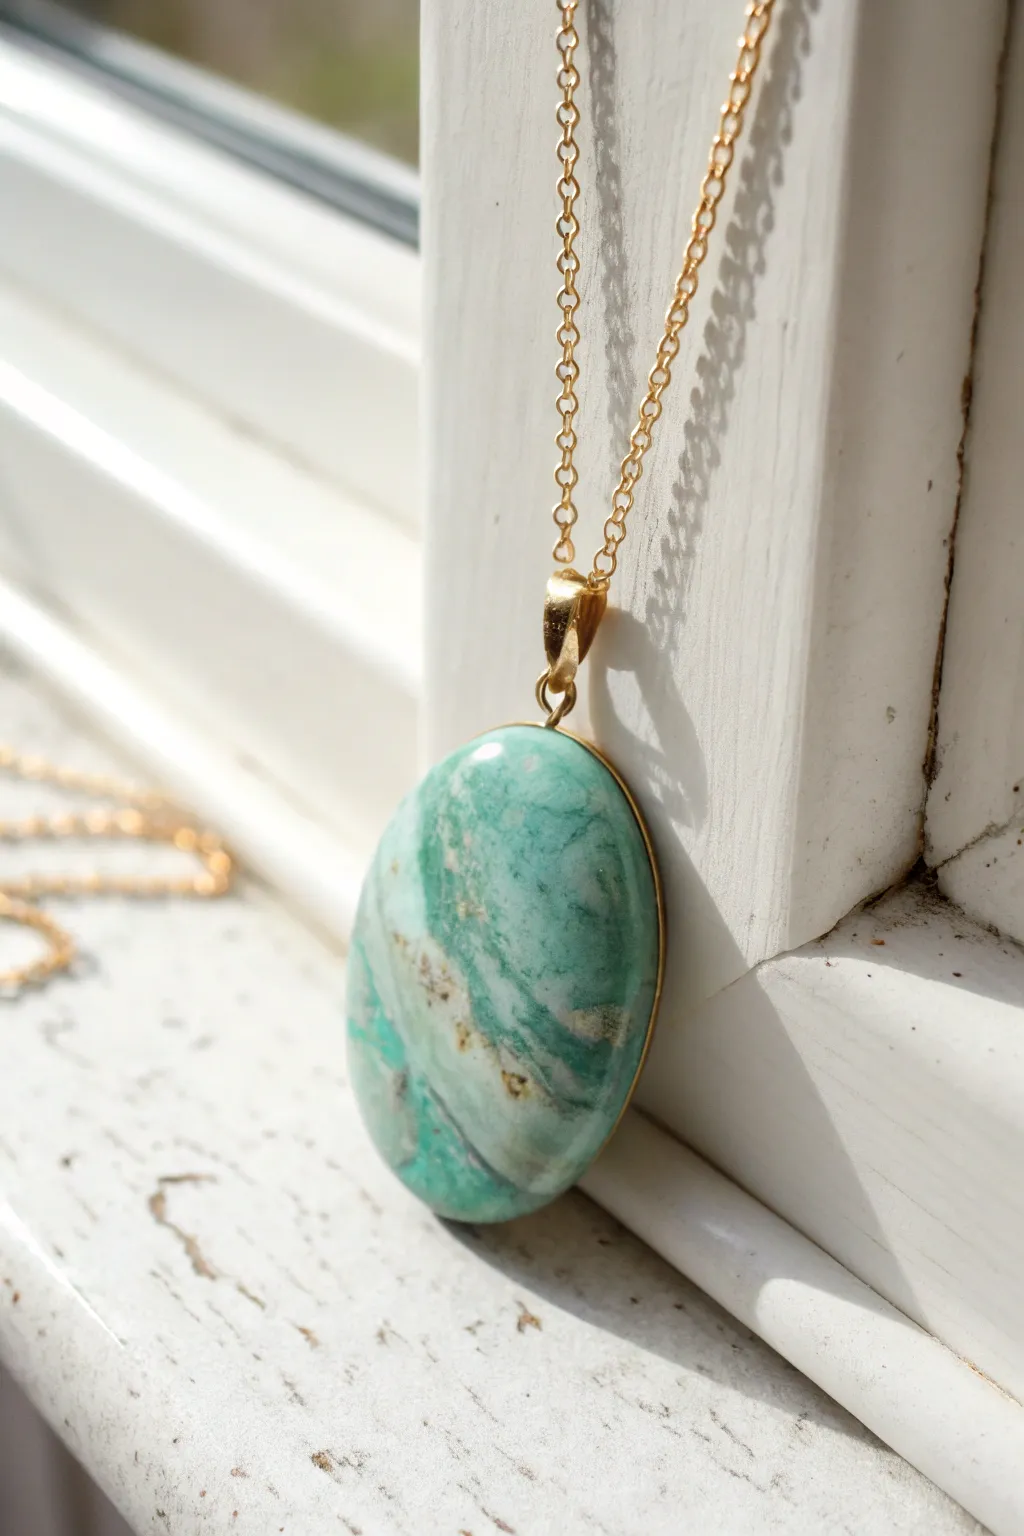
Capture the organic beauty of genuine gemstones without the price tag by creating this stunning faux turquoise cabochon. Swirls of teal, seafoam, and metallic gold veins come together in polymer clay to create a unique, high-end jewelry piece that looks freshly mined.
Detailed Instructions
Materials
- Polymer clay (Teal, White, Translucent, Gold/Bronze)
- Acrylic paint (Burnt Umber or Dark Brown)
- Glossy polyurethane varnish or UV resin
- Oval clay cutter
- Rolling pin or pasta machine
- Gold pendant bail
- Gold jewelry chain
- Super glue or E6000
- Tissue blade
- Heavy grit sandpaper or stiff brush
- Oven for baking
Step 1: Creating the Faux Stone Block
-
Condition the Clay:
Start by thoroughly conditioning your teal, white, and translucent polymer clay blocks separately until they are soft and pliable. I like to add a tiny bit of white to the teal to soften the hue slightly. -
Chop and Mix:
Chop the conditioned clays into irregular, small chunks using your tissue blade. You want a mix of sizes to simulate natural stone formations. -
Add Metallic Accents:
Take a very small amount of gold or bronze clay and tear it into tiny flakes, scattering them among your teal and white chunks. -
Form the Log:
Gather all the chopped bits into a pile and squeeze them firmly together into a rough log shape. Do not knead smooth; you want to preserve the distinct chunks. -
Apply the Matrix:
Roll the log in a very thin layer of brown acrylic paint or brown metallic mica powder if you prefer a subtle look. This creates the ‘veins’ between the clay chunks. -
Twist and Compress:
Gently twist the log like a candy cane to distort the lines, then compact it back into a rectangular block shape.
Natural Veining Tip
Let the brown acrylic paint dry slightly on the raw clay log before twisting. Wet paint smears into mud; tacky paint cracks beautifully.
Step 2: Shaping the Cabochon
-
Slice the Pattern:
Use your tissue blade to slice thin layers (veneers) off your clay block lengthwise. This reveals the beautiful internal marbling and veining pattern. -
Prepare the Base:
Roll out a sheet of scrap clay or plain teal clay to a medium thickness (about 3-4mm) to serve as the sturdy base for your pendant. -
Apply the Veneer:
Carefully lay your favorite slice of the faux stone pattern onto the base sheet. Use an acrylic roller to gently smooth them together so no air bubbles remain. -
Cut the Shape:
Position your oval cutter over the most attractive section of the pattern and press down firmly to cut out your cabochon shape. -
Refine the Edges:
Gently smooth the cut edges with your fingertip to round them off slightly, removing any sharp angles from the cutter. -
Dome the Surface:
To mimic a real cut stone, gently press and smooth the edges downward to create a slight domed effect on top.
Step 3: Finishing Touches
-
Bake the Clay:
Bake the piece according to your clay manufacturer’s specific instructions (usually around 275°F/135°C depending on brand). Let it cool completely. -
Sand for Smoothness:
Once cool, wet sand the surface starting with 400 grit and working up to 1000 grit sandpaper for a silky smooth stone feel. -
Seal and Shine:
Apply a thin, even coat of glossy polyurethane varnish or UV resin to the surface. This makes the colors pop and gives it that polished gemstone shine. -
Attach the Hardware:
Apply a strong dab of E6000 or super glue to the flat back of a gold pendant bail and press it firmly onto the back of your cabochon near the top edge. -
Final Assembly:
Allow the glue to cure fully (wait 24 hours for maximum strength), then thread your gold chain through the bail to complete your necklace.
Add Real Depth
Mix crushed dried black pepper or actual sand into the translucent clay layer for gritty, realistic mineral inclusions.
Wear your new faux stone necklace with pride, knowing no two pieces will ever be exactly alike
Geode Slice Pendant Necklace
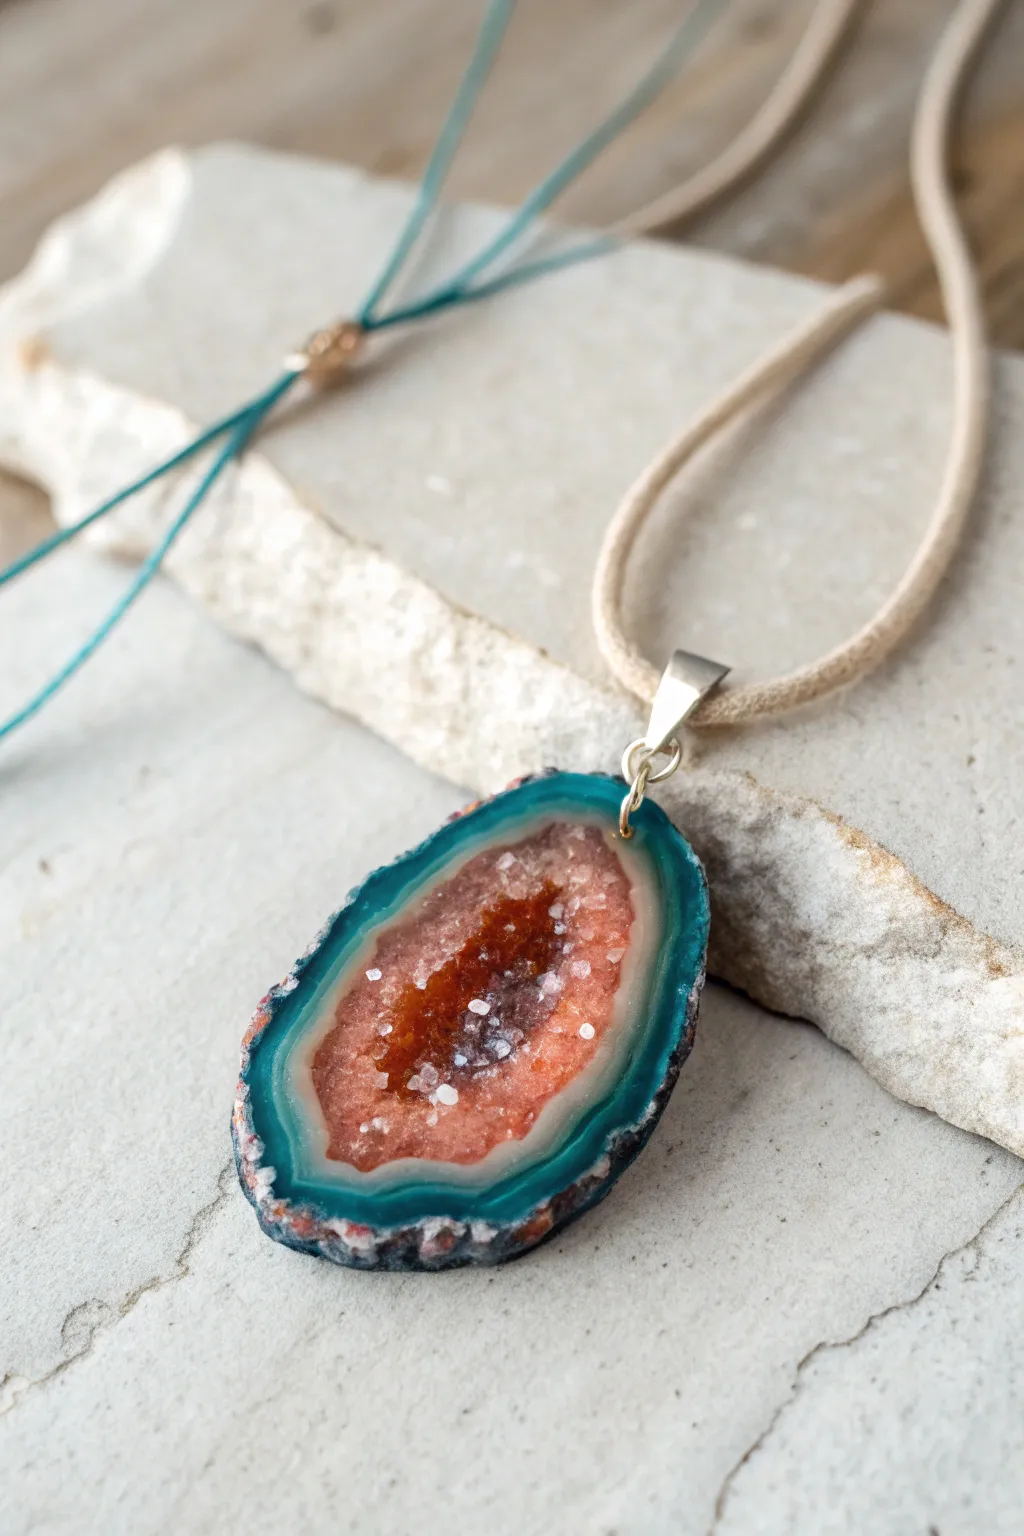
Transform ordinary polymer clay into a stunning, translucent gemstone replica that looks freshly mined from the earth. This intricate geode slice pendant captures the organic beauty of agate with layered rings of teal and a crystallized pink center.
How-To Guide
Materials
- Translucent polymer clay (white or colorless base)
- Opaque polymer clay (Black, Teal/Turquoise, White)
- Alcohol inks (Pink/Red, Orange, dark Brown)
- Liquid polymer clay (translucent)
- Coarse sea salt or crushed glass glitter (for crystal texture)
- UV resin or gloss glaze
- Silver pendant bail
- Faux suede cord (beige)
- Silver wire or jump ring
- Clay roller or pasta machine
- X-acto knife or tissue blade
- Needle tool
- Fine sandpaper (wet/dry)
Step 1: Preparing the Geode Center
-
Tint the translucent clay:
Begin by conditioning a block of translucent polymer clay until it is soft and pliable. Divide it into two small portions. Mix a tiny drop of pink alcohol ink into one portion to create a soft rose quartz color. Leave the other portion plain or tint it very slightly white. -
Create the crystalline core:
Take your pinkish translucent clay and tear it into small, jagged little bits rather than rolling it smooth. Pack these jagged pieces loosely together into an irregular oval shape to form the center ‘crystal’ cave. -
Add inner texture:
Press coarse sea salt or crushed glass glitter firmly into the center of your clay oval. This will mimic the rough, druzy texture found inside real geodes. -
Darken the heart:
Apply a tiny amount of dark orange or reddish-brown alcohol ink right in the very center of the texture to create depth, as if the crystal is denser in the middle.
Salt Texture Pro-Tip
If using salt for pits, use large grain sea salt for the center and fine table salt crystals near the edges to mimic natural crystal growth sizes.
Step 2: Building the Agate Layers
-
Form the first translucent ring:
Roll a thin snake of the plain translucent clay you prepared earlier. Wrap this snake around your textured pink center, smoothing the seam so it blends organically. -
Add a white defining line:
Roll out a very thin sheet or snake of opaque white clay. Wrap a thin band of this around the translucent layer. This stark line is characteristic of real agate slices. -
Create the main color band:
Condition your teal or turquoise clay. Roll it into a sheet about 2-3mm thick. Wrap a substantial band of this color around the current stack. Don’t worry about making it perfectly circular; varying thick and thin spots makes it look more natural. -
Apply the outer crust:
Mix black clay with a little bit of scrap clay to get a dark, stone-like grey-black. Roll it into a thin sheet and apply the final outer wrap to the geode. This represents the rough rock exterior. -
Texture the exterior:
Use a crumpled ball of aluminum foil or a toothbrush to texture the black outer ring heavily. You want it to look like rough, unpolished rock.
Step 3: Shaping and Refining
-
Compress the cane:
Gently squeeze the entire assembly from the outside in, ensuring all layers are adhered well. Shape it into an organic, slightly irregular oval. -
Slice the pendant:
Using a very sharp tissue blade, slice a slab off your cane about 4-5mm thick. This slice is your pendant base. -
Enhance the translucency:
If the slice looks smudged, gently wipe the surface with a baby wipe or a little rubbing alcohol to clean up the distinct color bands. -
Insert hardware attachment:
Carefully poke a hole near the top edge for a jump ring, or embed a small wire loop directly into the clay if you prefer a cleaner look. I find embedding a wire loop is sturdier for heavier pendants. -
Bake the piece:
Bake according to your polymer clay manufacturer’s instructions (usually 275°F/130°C for 30 minutes). If you used salt for texture, wash the piece in warm water after baking to dissolve the salt, leaving behind realistic pitting.
Gilded Edge Upgrade
Paint the rough outer black edge with liquid gold leaf or metallic gold paint after baking to turn your rustic geode into a chic, high-end jewelry piece.
Step 4: Finishing Touches
-
Seal and shine:
Once cool and dry, apply a coat of UV resin or glossy glaze, focusing specifically on the center ‘crystal’ area and the colored rings to make them look wet and glass-like. -
Add druzy sparkle:
While the resin or glaze is wet, sprinkle a pinch of extra fine glitter or crushed glass into the center depression if you want extra sparkle that won’t dissolve away. -
Cure the finish:
Cure under a UV lamp or let the glaze dry completely until hard and glassy. -
Assemble the necklace:
Attached a silver bail to your wire loop or jump ring. Thread a beige faux suede cord through the bail to complete the earthy boho look.
Wear your faux stone slice with pride, knowing you created a geological wonder without waiting a million years!
Mokume-Inspired Layered Pendant
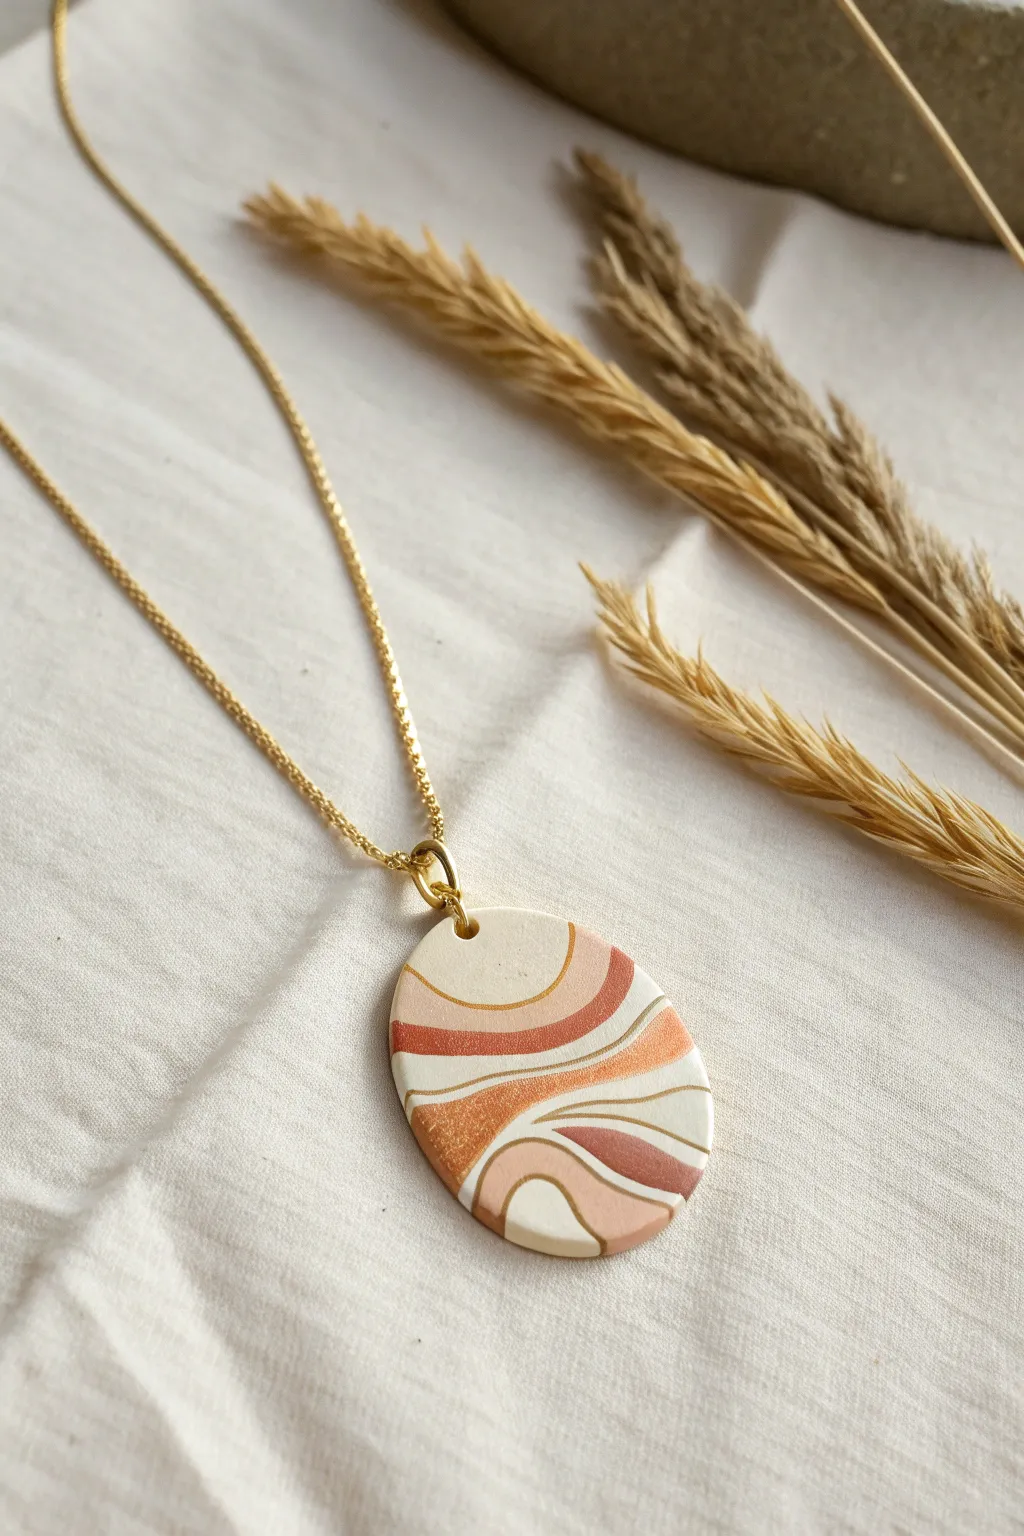
Capture the organic flow of desert sands with this elegant mokume-gane style pendant. Overlapping waves of terracotta, peach, and cream are separated by delicate veins of gold leaf for a sophisticated, modern finish.
Step-by-Step Guide
Materials
- Polymer clay (colors: white/cream, peach, terracotta/rust, metallic bronze)
- Gold leaf sheets or metallic gold polymer clay
- Tissue blade or very sharp craft knife
- Acrylic roller or pasta machine
- Oval clay cutter (approx. 1.5 inches)
- Small jump ring (gold)
- Gold chain
- Hand drill or needle tool
- Sandpaper (various grits from 400 to 1000)
- Jewelry pliers
Step 1: Creating the Mokume Stack
-
Condition the Clay:
Start by thoroughly conditioning your three main clay colors: cream, peach, and terracotta. Warm them in your hands until they are soft and pliable, ensuring no air bubbles remain. -
Create Sheets:
Roll each color into a sheet of equal thickness, roughly 2-3mm thick. If you have a pasta machine, use a medium setting; otherwise, use your acrylic roller and guide rails. -
Apply Gold Leaf:
Carefully place a single sheet of gold leaf over the top of each colored clay sheet. Or, for a sturdier line, roll a very thin layer of gold metallic clay and sandwich it between the colors. -
Stack the Colors:
Place the sheets on top of one another to form a block. The order doesn’t matter strictly, but alternating light and dark creates the best contrast. -
Compress the Block:
Gently gently roll over the stack with your acrylic roller to ensure the layers fuse together without distorting them too much.
Clean Cuts Matter
For the sharpest gold lines, put your clay stack in the fridge for 20 minutes before slicing. Cold clay resists dragging and smearing.
Step 2: Manipulating the Pattern
-
Distort the Layers:
Push the handle of a paintbrush or a rounded tool up from the bottom of the stack to create bumps, or press down from the top to create depressions. This creates the ‘wave’ internals. -
Slice the Slab:
Using your flexible tissue blade, carefully slice off the top bumps of your distorted stack horizontally. This reveals the hidden concentric rings and wave patterns inside. -
Flatten the Veneer:
Once you have thinly sliced pieces revealing the pattern, arrange them side-by-side on a fresh sheet of waste clay (or a solid cream backing sheet) to create a flat, patterned veneer. -
Smooth the Surface:
Lay a piece of parchment paper over your patterned slab and burnish it with your finger or a roller. This smoothes the seams between slices so the surface feels like one solid piece.
Resin Finish
For a glass-like 3D effect, apply a thin layer of UV resin to the front after sanding. This makes the metallic gold detail pop.
Step 3: Shaping and Finishing
-
Cut the Shape:
Position your oval cutter over the most pleasing section of your patterned slab. Press down firmly to cut your pendant shape. -
Pierce the Hole:
Before baking, use a needle tool to create a small hole at the very top of the oval for the jump ring. Ensure it goes straight through. -
Bake:
Bake the pendant according to your clay manufacturer’s instructions (usually 275°F/130°C for 30 minutes). I often tent foil over the tray to prevent scorching the white clay. -
Cool Down:
Allow the piece to cool completely before handling. It will be slightly soft when hot but hardens as it cools. -
Sand and Buff:
Wet sand the edges and surface starting with 400 grit sandpaper and working up to 1000 grit. This reveals the crispness of the pattern and makes the surface buttery smooth. -
Buffing (Optional):
Rub the piece vigorously with a denim scrap or soft cloth to give it a natural sheen without using glaze. -
Assembly:
Use two pairs of jewelry pliers to twist open a gold jump ring. Thread it through the hole in the pendant. -
Attach Chain:
Slip your gold chain through the jump ring before closing the ring securely. Ensure the closure is tight so the chain doesn’t slip out.
Wear your golden wave pendant with pride, knowing you’ve created a completely unique piece of wearable art
Shimmery Mica-Style Frill Necklace
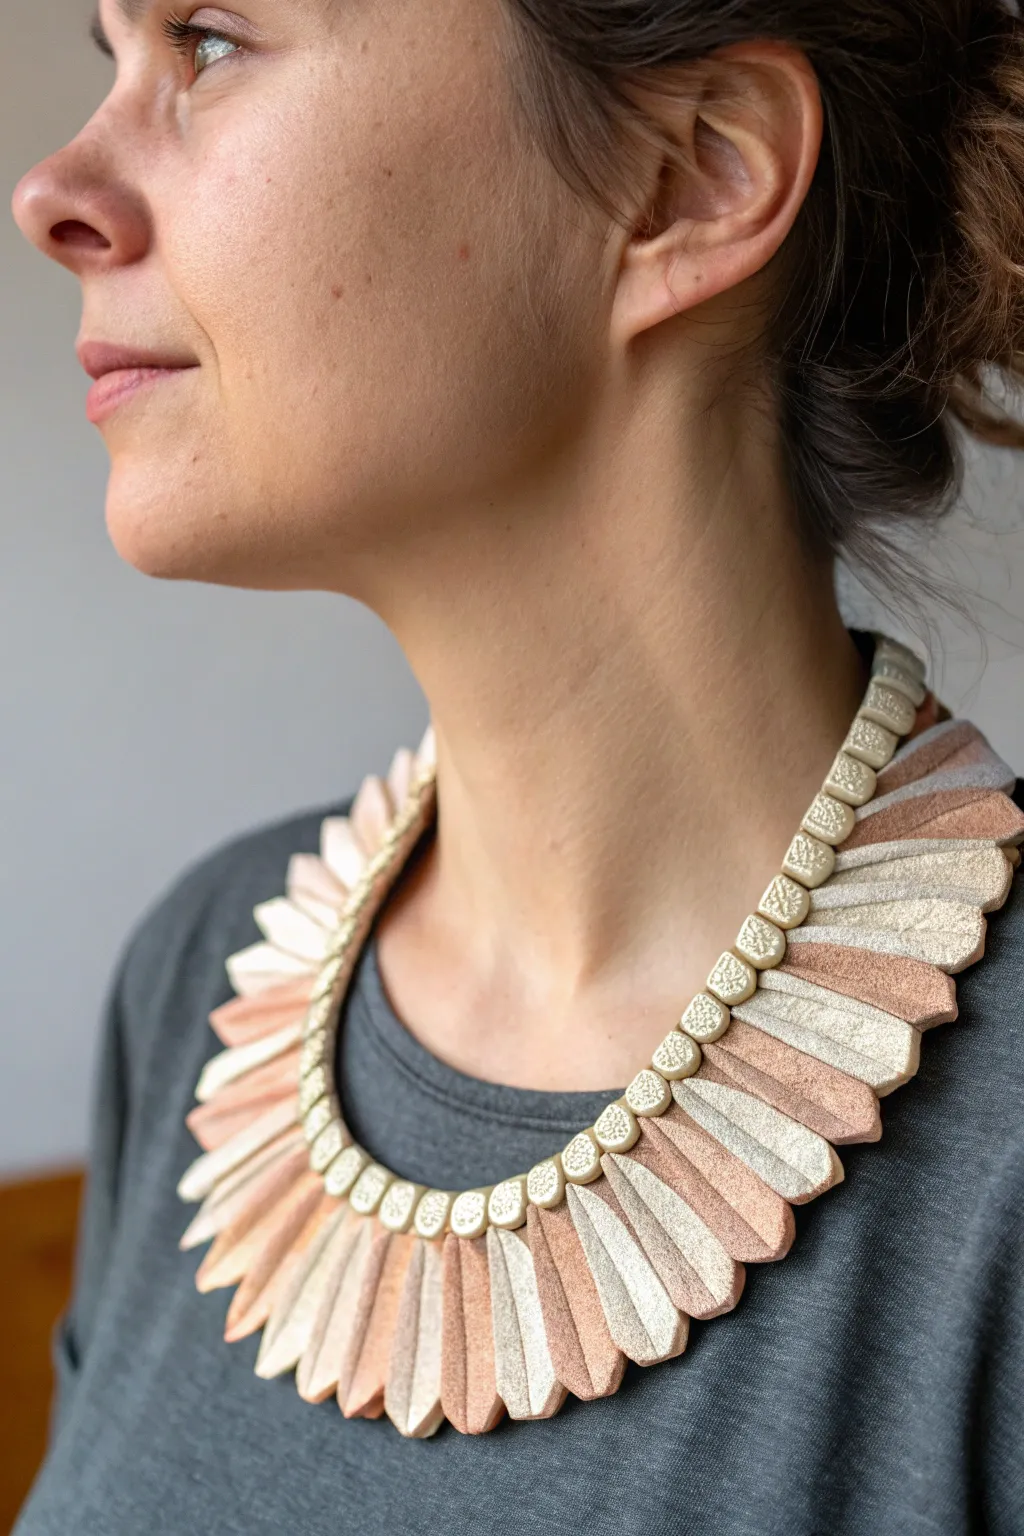
This stunning statement piece mimics the elegance of a heavily pleated collar using shimmering polymer clay. With its alternating matte and metallic finishes in soft rose gold and champagne tones, it creates a sophisticated, light-catching effect that elevates simple outfits.
Detailed Instructions
Materials
- Polymer clay in three complementary colors: pearl/white, champagne/beige, and metallic rose gold/copper
- Mica powder (gold or pearl)
- Acrylic rolling pin or pasta machine
- Rigid tissue blade for slicing
- Small square cutter (approx. 1cm)
- Needle tool or bead piercing pins
- Beading wire (flexible nylon-coated usually works best)
- Clasp and crimp beads
- Baking tile or parchment-lined baking sheet
- Wet/dry sandpaper (400-800 grit)
- Optional: Clay extruder (for consistent thickness)
Step 1: Creating the Frill Petals
-
Condition and Mix:
Begin by conditioning your three blocks of clay separately until they are soft and pliable. If your metallic rose gold color is too dark, I like to mix in a bit of pearl clay to soften the hue and increase the shimmer. -
Roll Out Sheets:
Roll each color into a thick slab, approximately 4mm to 5mm thick. Since these pieces need to be sturdy but not heavy, this thickness provides a good balance. -
Cut Base Rectangles:
Using your tissue blade, cut long strips from each color slab that are about 1.5 inches wide. Then, slice these strips into uniform rectangles approximately 0.5 inches wide. -
Shape the Points:
Take one rectangle and gently pinch one end to create a tapered point. Lay it flat and use your finger to smooth the top surface so it resembles an elongated gemstone or petal shape. Repeat for all rectangles. -
Refine the Top Edge:
The top of each petal needs to be flat to sit flush against the beads. Use your tissue blade to trim the top edge of each petal straight across. -
Drill Holes:
Carefully pierce a hole horizontally through the top part of each petal using a needle tool. Ensure the hole is large enough for your beading wire to pass through twice if necessary. -
Texture Option:
For the subtle texture seen in the photo, gently press a piece of coarse sandpaper or a texture sponge onto the surface of the rose gold and darker beige pieces.
Pro Tip: Mica Magic
Brush raw metallic clay with extra mica powder before baking. This intensifies the shine significantly more than the clay alone provides.
Step 2: Making the Spacer Beads
-
Create a Cane:
Roll a snake of pearl or light champagne clay to about 1cm in diameter. Alternatively, shape it into a square log for sharper edges. -
Apply Gold Detail:
Dust the outside of the log heavily with gold mica powder. Or, for a textured look like the image, roll the log over a textured surface first, then highlight the raised areas with mica. -
Slice the Beads:
Use your tissue blade to slice the log into consistent small square beads, about 4mm thick. These will act as the connectors between the larger frill pieces. -
Pierce the Spacer Beads:
Poke a hole through the center of each square bead. Make sure the hole direction matches how you want them to sit on the wire.
Troubleshooting: Wonky Holes
If your holes deform while piercing raw clay, refrigerate the pieces for 15 minutes first. The firmer clay resists squishing while you drill.
Step 3: Baking and Assembly
-
Bake the Components:
Arrange all petals and beads on your baking tile. Bake according to the manufacturer’s instructions for your specific brand of clay—usually around 275°F (135°C) for 30-45 minutes. -
Cool and Sand:
Allow the pieces to cool completely in the oven to prevent cracking. Once cool, lightly sand the edges of the petals if there are any sharp burrs or fingerprints. -
Layout the Design:
Lay out your petals on a table in the alternating color pattern shown: light pearl, champagne, rose gold. Determine the center point of your necklace. -
Stringing:
Cut a long length of beading wire. Start stringing by alternating one large petal and one small square spacer bead. Ensure the spacer beads sit horizontally, acting as a hinge between the vertical petals. -
Checking the Curve:
Periodically lift the strand to see how it hangs. The spacer beads should allow the petals to fan out nicely against the neckline. -
Finish the Ends:
Once you have achieved the desired length of the ‘frill’ section, you can continue stringing just the square beads for the back of the neck, or switch to a chain. Attach crimp beads and your clasp to secure the ends.
Enjoy styling your new shimmering collar, letting the warm metallic tones bring a glow to your neckline
Matte “Lava Rock” Bead Necklace
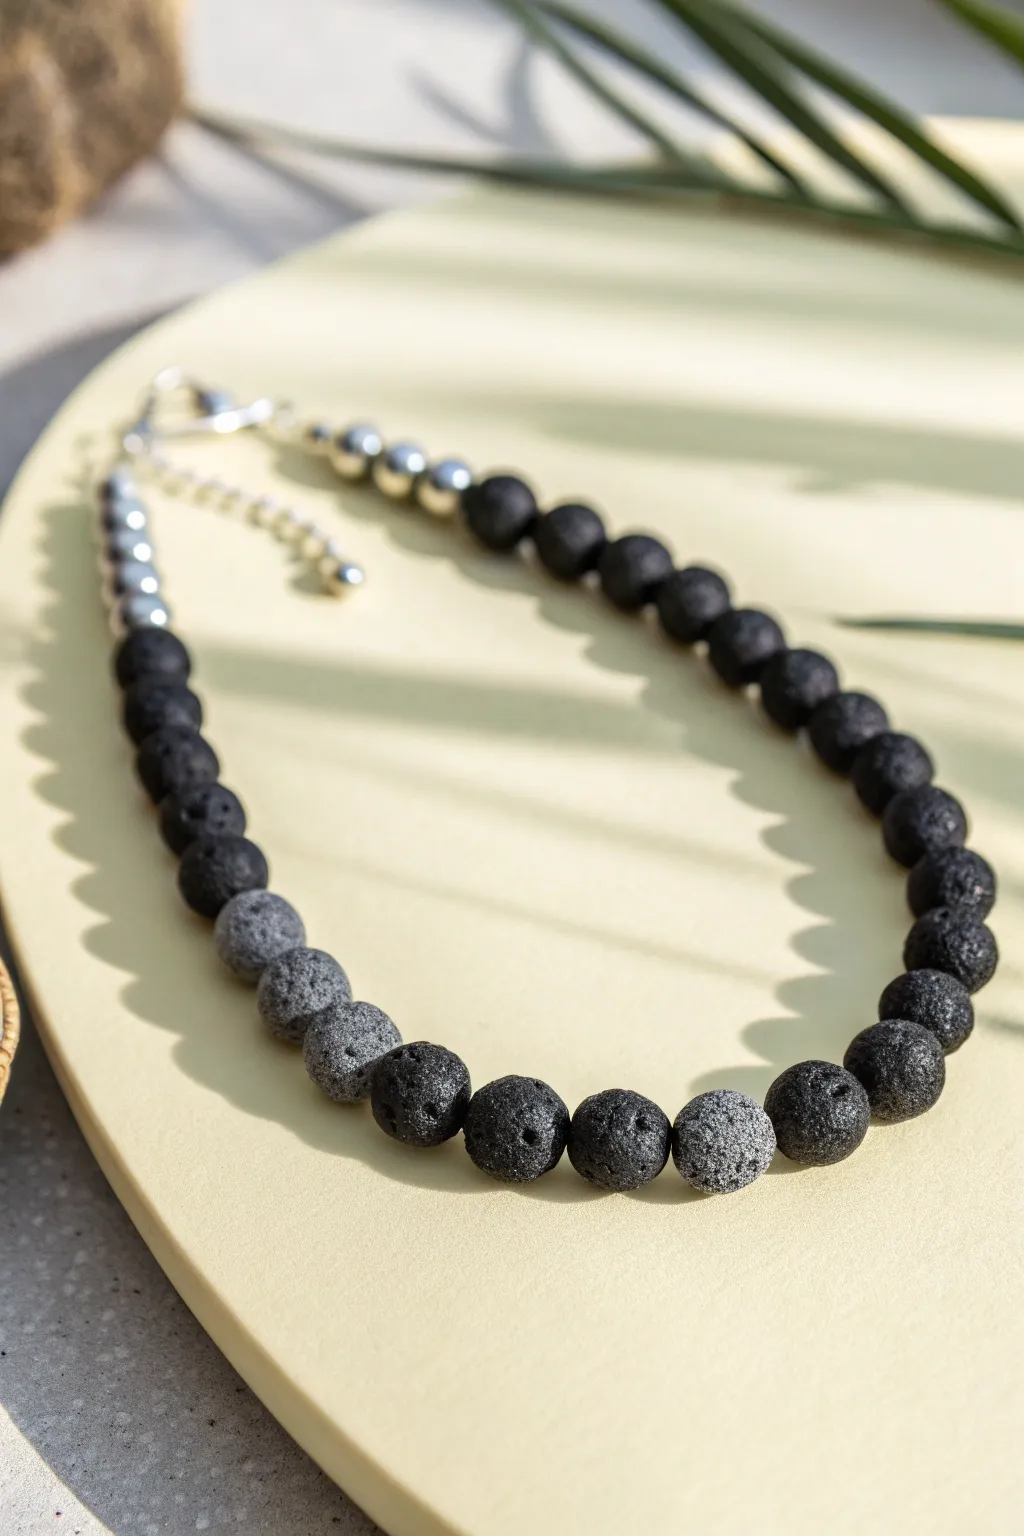
Capture the rugged, organic beauty of volcanic stone with this matte bead necklace project. By using a clever texturing technique and specific clay mixes, you’ll create lightweight, realistic lava beads accented with sleek silver for a modern contrast.
Step-by-Step Guide
Materials
- Black polymer clay (e.g., Premo or Fimo)
- White or translucent polymer clay (small amount for mixing)
- Coarse sea salt or kosher salt
- Silver metallic spacer beads (approx. 4mm – 6mm)
- Beading wire (nylon coated flex wire)
- Crimp beads and crimp covers
- Lobster claw clasp and jump rings
- Chain extender (optional)
- Needle tool or thick toothpick
- Water bowl
- Wire cutters and crimping pliers
Step 1: Creating the Lava Texture
-
Condition the black clay:
Start by thoroughly kneading your black polymer clay until it is soft and pliable. This project relies on the clay accepting texture easily, so ensure it isn’t crumbly. -
Form the base beads:
Roll the black clay into a uniform log. Slice it into equal portions to ensure your beads are consistent in size. Roll each slice into a smooth, round ball between your palms. -
Create the grey mix:
To make the lighter, speckled accent beads shown in the center, mix a small amount of white clay into a portion of black clay. Don’t mix it completely uniform; leave it slightly marbled or speckled to mimic natural stone variation. -
Apply the salt texture:
Pour coarse sea salt onto your work surface. Take a raw clay bead and roll it firmly into the salt, pressing so the crystals embed deep into the clay surface. The bead should be fully coated. -
Refine the shape:
After coating in salt, roll the bead gently between your hands again to re-round it, as the pressing action may have distorted the sphere. Ensure the salt is pushed in, not just sitting on top. -
Pierce the beads:
Using your needle tool or a thick toothpick, poke a hole through the center of each salt-crusted bead. Give the tool a little twist as you exit to ensure a clean opening.
Salt Won’t Dissolve?
If salt remains stuck in the crater, the clay might have baked around it too tightly. Soak longer in hot water and use a stiff denture brush to dislodge stubborn crystals.
Step 2: Baking and Revealing
-
Bake the beads:
Arrange your beads on a baking sheet or tile. Bake according to the manufacturer’s instructions for your specific brand of clay (usually around 275°F/130°C for 30 minutes). -
Cool completely:
Allow the beads to cool fully before handling. They are fragile when hot. -
Dissolve the salt:
Place the cooled beads into a bowl of warm water. Let them soak for about 10–15 minutes. The water will dissolve the salt crystals, leaving behind the characteristic pitting and craters of lava rock. -
Scrub and dry:
Rinse the beads under running water. I find using an old toothbrush helps scrub away any stubborn salt residue inside the deep crevices. Pat them completely dry.
Aromatherapy Shift
Since these faux lava beads have deep texture pores, you can actually place a drop of essential oil on them. They will act as a subtle diffuser necklace throughout the day.
Step 3: Assembly
-
Cut the wire:
Cut a length of beading wire about 4 inches longer than your desired necklace length to allow for finishing. -
Secure one end:
String a crimp bead and one half of your clasp onto the wire. Thread the wire back through the crimp bead and use your pliers to flatten it securely. Cover with a crimp cover if desired. -
Start with silver:
Begin stringing by adding about 5-6 silver metallic beads. This creates the sleek transition area near the clasp seen in the photo. -
String the black lava beads:
Thread on your black textured beads. Continue until you reach the center section of the necklace. -
Add the focal section:
In the center, intersperse or switch to your grey/speckled lava beads to create a focal point, then return to the solid black beads for the other side. -
Finish with silver:
End the beading pattern with another set of 5-6 silver metallic beads to mirror the start. -
Attach the final clasp:
String a crimp bead and the jump ring (or chain extender). Loop the wire back through the crimp and a few adjacent beads. Pull everything snug—but not stiff—and crimp the bead shut.
Enjoy wearing your handcrafted necklace that perfectly balances rugged texture with elegant design
Scrap-Clay Patchwork Pendant Necklace
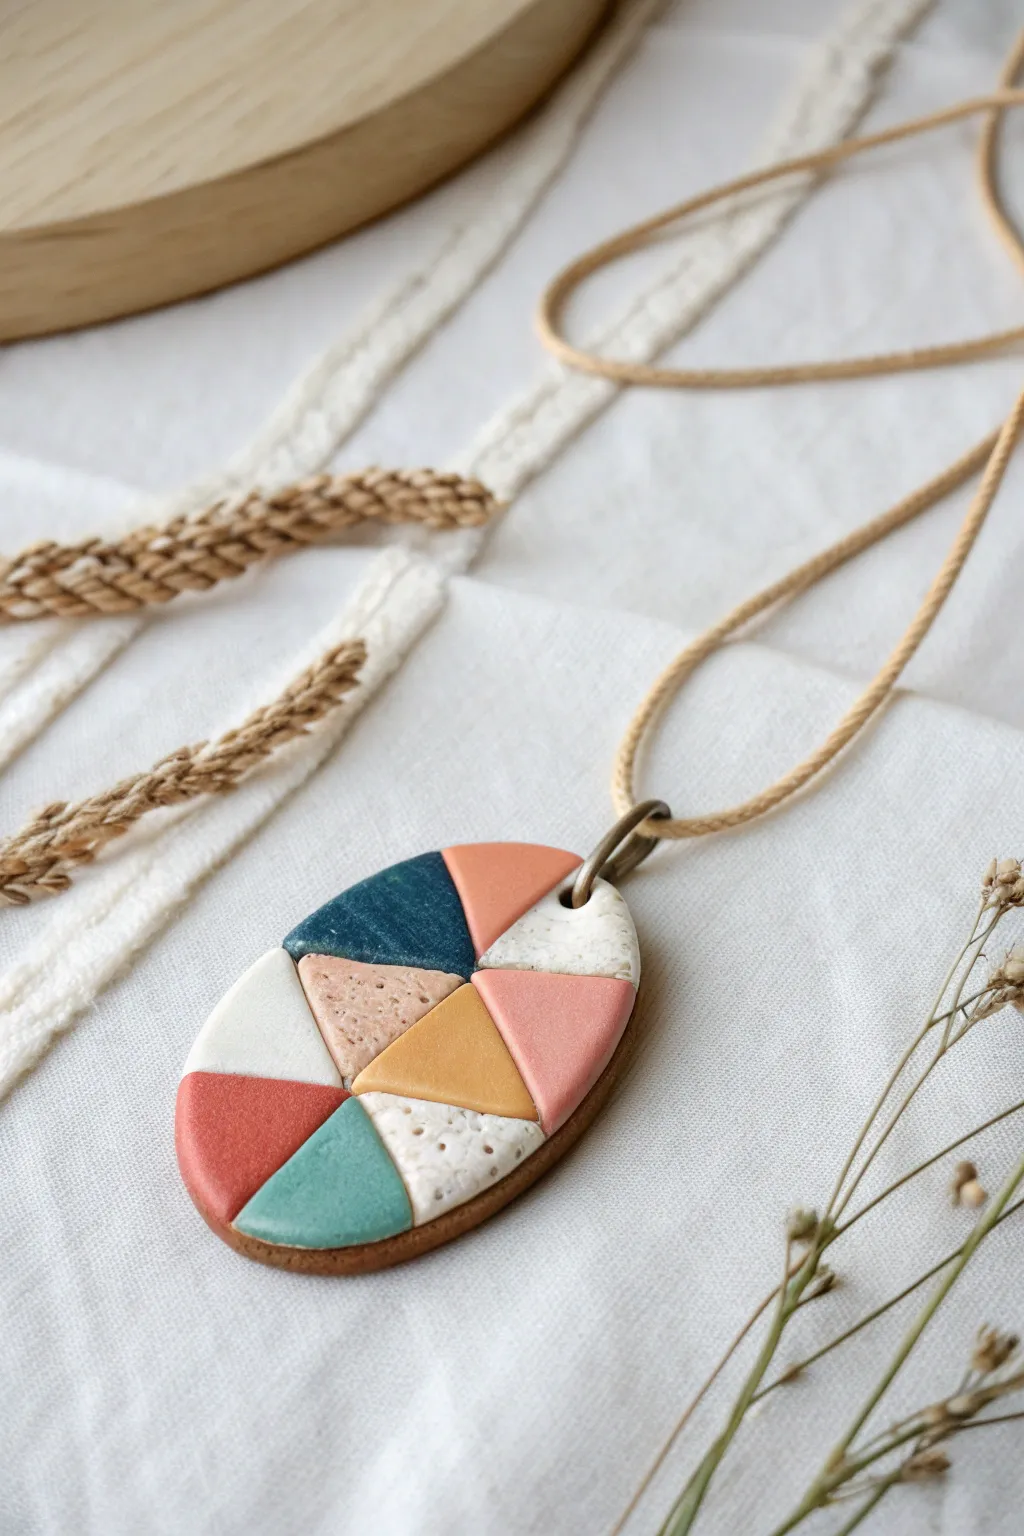
Utilize your leftover polymer clay bits to craft this stunning, earthy pendant composed of colorful geometric triangles. The design features a pleasing mosaic of matte solids and speckled stone effects, all framed on a sturdy textured backing.
Step-by-Step
Materials
- Polymer clay (scraps in teal, coral, peach, yellow, mint, white, speckled beige)
- Fimo leather-effect clay or brown clay for backing
- Rolling pin or clay machine
- Sharp tissue blade or X-Acto knife
- Oval clay cutter (medium size)
- Jump ring (antique brass finish)
- Small drill bit or needle tool
- Suede or waxed cotton cord (beige)
- Super glue or liquid polymer clay (optional)
- Sandpaper (fine grit)
Step 1: Preparing the Clay Palette
-
Condition your scraps:
Gather your polymer clay scraps in the desired color palette. You will need a mix of solid earthy tones like teal, coral, and ochre, along with some textured or speckled whites and beiges. -
Sheet the colors:
Roll each color out into a thin sheet. Aim for a consistent thickness, roughly 2mm, so all your puzzle pieces will sit flush with one another. -
Texture the speckled clay:
For the beige and white sections, I like to create a faux-stone look by mixing in black pepper or using pre-mixed granite effect clay before rolling it out.
Fixing Gaps
If tiny gaps appear between triangles after rolling, fill them with tiny slivers of matching clay or liquid clay before baking to ensure a smooth finish.
Step 2: Assembling the Mosaic
-
Cut triangular shapes:
Using your sharp blade, cut various sizes of triangles from each color sheet. They don’t need to be identical; a mix of isosceles and right-angle triangles adds visual interest. -
Create a base sheet:
Roll out a thin sheet of scrap clay to act as a temporary canvas. This won’t be seen, so the color doesn’t matter. -
Fit the puzzle pieces:
Start placing your colored triangles onto the base sheet. Fit them together tightly like a puzzle, ensuring there are no gaps between the edges. -
Consolidate the slab:
Once you have an area large enough for your pendant, gently roll over the top with an acrylic roller. This fuses the seams together and creates a unified surface. -
Cut the oval shape:
Position your oval cutter over the most pleasing part of your geometric pattern and press down firmly to cut out the pendant shape.
Go Textured
Before cutting the final oval, gently press a piece of coarse sandpaper or a toothbrush onto specific color triangles to give them different surface textures.
Step 3: Backing and Baking
-
Prepare the backing clay:
Roll out a sheet of brown or leather-effect clay slightly thicker than your mosaic layer. This will frame the piece. -
Attach the mosaic:
Apply a very thin layer of liquid clay to the brown backing, then gently place your cut oval mosaic on top. -
Trim the excess:
Using your blade, carefully trim the brown backing clay, leaving a very small rim visible if desired, or cut flush depending on your preference. The example shows a flush cut with a brown edge visible. -
Pierce the hole:
Before baking, use a needle tool or small straw to create a hole at the top of the oval for the jump ring. -
Smooth the edges:
Run your finger lightly with a little cornstarch or water around the perimeter to soften any sharp cutting lines. -
Bake the pendant:
Place the pendant on a ceramic tile or baking sheet. Bake according to the manufacturer’s instructions, typically at 275°F (130°C) for 30-45 minutes.
Step 4: Finishing Touches
-
Sand and buff:
Once completely cool, lightly sand the edges and surface with high-grit sandpaper if needed to remove fingerprints. Buff with a soft cloth for a matte sheen. -
Drill verification:
If your hole closed up slightly during baking, use a small hand drill to clear it out. -
Add hardware:
Open a sturdy antique brass jump ring using two pliers. Thread it through the hole in the clay. -
String the necklace:
Thread your beige suede or cotton cord through the jump ring. Tie the ends of the cord with a sliding knot or attach cord ends and a clasp. -
Final inspection:
Check that the jump ring is closed tightly so the cord doesn’t slip out.
Now you have a stylish, geometric accessory that turns simple scraps into wearable art