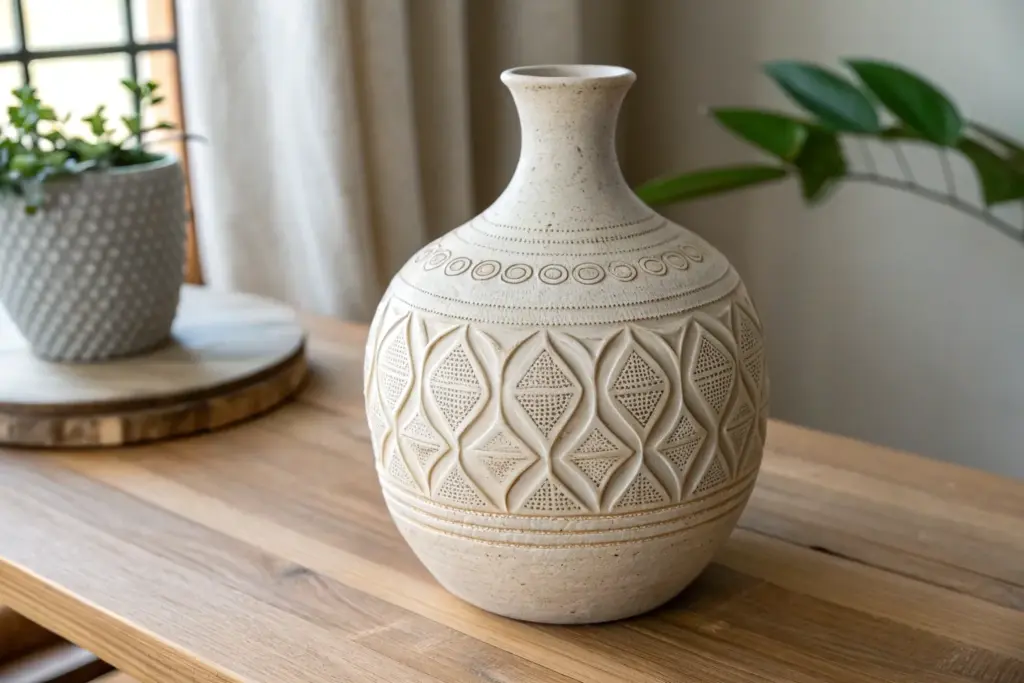
Whenever I’m stuck on what to make, I start with clay patterns—because a simple shape gets instantly exciting once you add surface texture or a bold motif. Here are my go-to clay pattern ideas that work beautifully on polymer clay and air-dry clay, from classic repeats to the fun, weird stuff that always gets the best reactions.
Botanical Leaf Imprints
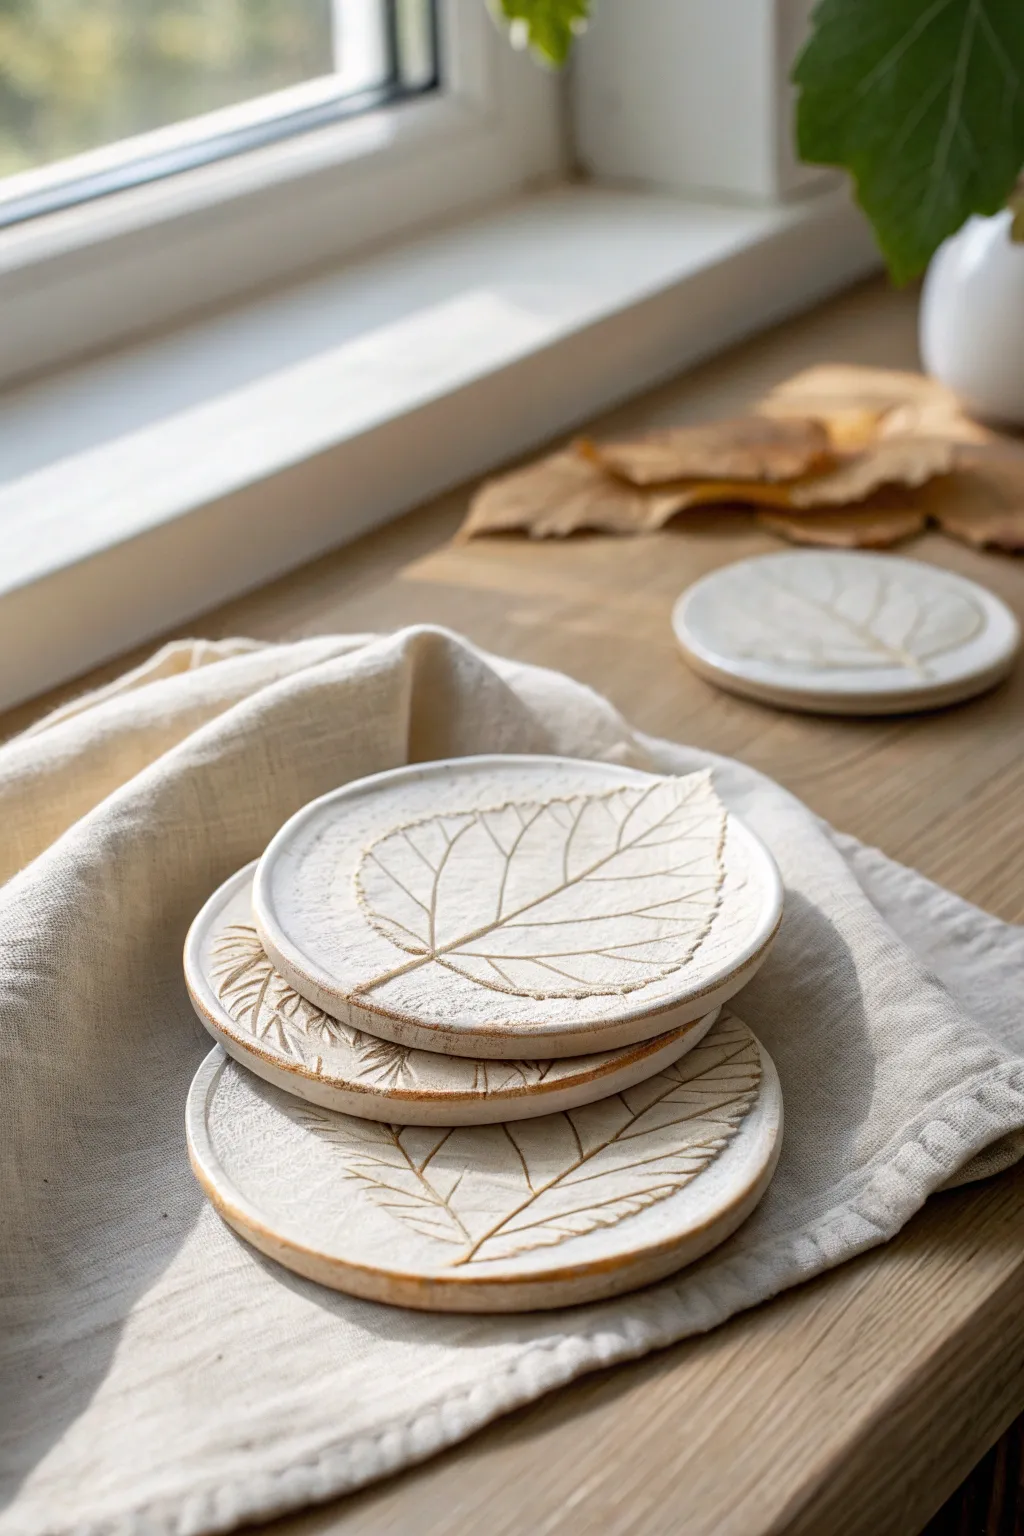
Capture the delicate details of nature with these elegant, leaf-imprinted clay coasters. The subtle contrast between the creamy white surface and the raw clay rim gives them a sophisticated, organic feel perfect for any seasonal table setting.
Step-by-Step Tutorial
Materials
- White stoneware or polymer clay (oven-bake)
- Fresh leaves with prominent veins (e.g., hydrangea, sage, or birch)
- Rolling pin
- Circular cookie cutter (approx. 4 inches)
- Canvas mat or parchment paper
- Small rolling pin or brayer
- Needle tool or fettling knife
- Smooth sponge
- Clear matte glaze or sealant
- Optional: Brown oxide wash or thinned acrylic paint (for antiquing)
Step 1: Preparing the Clay Canvas
-
Wedge the clay:
Begin by thoroughly wedging your clay to remove any air bubbles, ensuring a smooth and consistent texture that won’t crack during firing or baking. -
Roll out the slab:
Place your clay on a canvas mat or parchment paper. Use a rolling pin to flatten the clay into a slab that is approximately 1/4 inch thick. Try to keep the thickness uniform so your coasters sit flat. -
Smooth the surface:
Take a slightly damp sponge or a clay rib and gently smooth the surface of the slab. I like to do this before cutting to ensure the canvas texture on the back doesn’t transfer to the front.
Step 2: Creating the Imprint
-
Select and place leaves:
Choose a fresh leaf with strong, raised veins on the underside. Place the leaf vein-side down onto your smoothed clay slab. -
Roll the impression:
Using a small brayer or a rolling pin, gently but firmly roll over the leaf. Press hard enough to embed the veins into the clay, but not so hard that you distort the slab’s thickness. -
Remove the leaf:
Find the stem edge and carefully peel the leaf away from the clay. Do this slowly to reveal the intricate network of veins left behind. -
Cut the shape:
Position your circular cutter over the best part of the leaf imprint. Press down firmly to cut the coaster shape, then lift away the excess clay. -
Refine the edges:
Once the circle is cut, use your finger or a damp sponge to soften the sharp top edge of the rim. This prevents chipping later and gives the piece a professional finish. -
Dry or bake:
If using stoneware, let the coasters dry slowly under plastic to prevent warping, then bisque fire. If using polymer clay, bake according to the package instructions.
Leaves sticking?
If the leaf tears when peeling it off, it might be too dry. Use fresh leaves, and lightly dust the underside with cornstarch before rolling to act as a release agent.
Step 3: Finishing and glazing
-
Clean the bisque:
After the first firing (or baking), wipe the coaster down with a damp sponge to remove any dust. -
Apply wash (optional):
To highlight the veins like the example, brush a diluted brown oxide or thinned acrylic paint into the crevices, then immediately wipe the surface clean with a sponge, leaving darkness only in the deep veins. -
Expose the rim:
If glazing, apply a white matte glaze to the top surface. Then, carefully wipe the rim with a damp sponge to expose the raw clay body, creating that rustic halo effect. -
Final fire or seal:
Fire the glazed pieces in the kiln. For polymer clay, apply a matte varnish to seal the surface and protect the imprint from moisture. -
Sand the bottom:
Once finished, check the bottom of the coaster. Briefly sand it if it feels rough to ensure it won’t scratch your table.
Level Up: Color Wash
Try rubbing a little cinnamon or diluted brown acrylic into the veins before sealing polymer clay to make the leafy details pop without needing a kiln.
Now you have a set of handcrafted botanicals that bring a permanent touch of autumn to your home


Classic Geometric Stamp Repeat
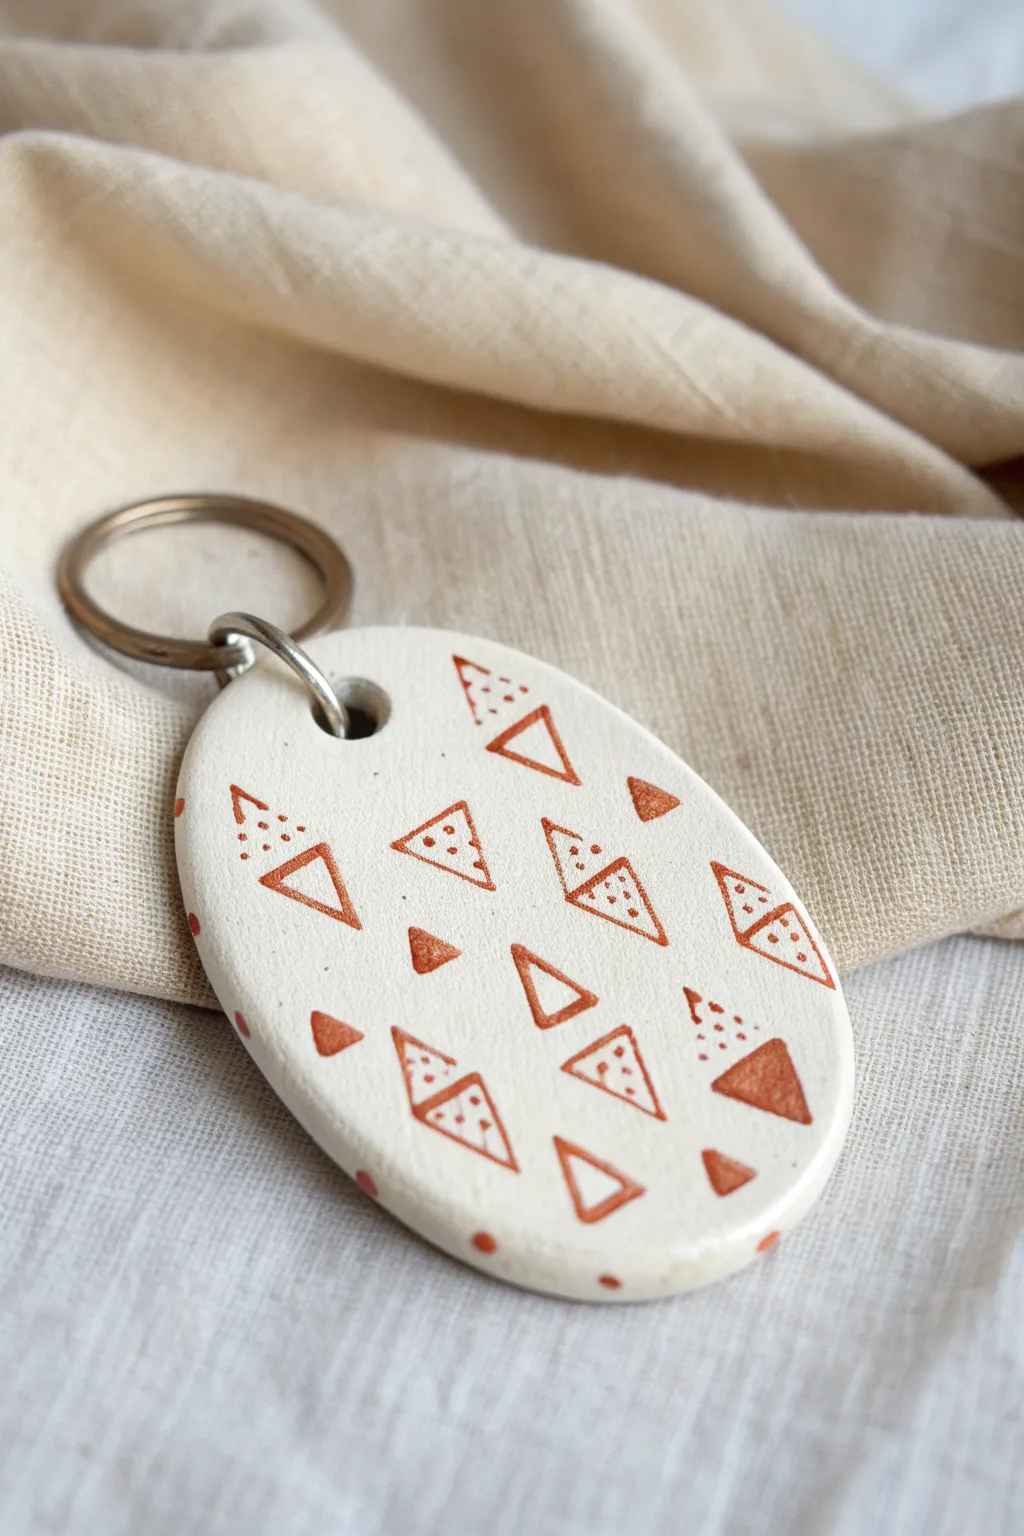
This charming keychain combines the organic feel of white clay with the warmth of a classic terracotta geometric pattern. The design relies on a satisfying repetition of triangles and dots for a modern, boho-chic accessory.
Step-by-Step Tutorial
Materials
- White polymer clay or air-dry clay
- Rolling pin or pasta machine
- Oval clay cutter (approx. 2-3 inches)
- Small circle cutter or straw (for the hole)
- Sandpaper (fine grit)
- Reddish-brown acrylic paint (terracotta or burnt sienna)
- Fine detail paintbrush (size 0 or 00)
- Matte varnish or glaze
- Jump ring (large)
- Keyring hardware
- Pliers
Step 1: Shaping the Clay Base
-
Condition and Roll:
Begin by conditioning your white clay until it is soft and pliable. Roll it out into an even slab, aiming for a thickness of about 1/4 inch (6mm) to ensure the keychain is sturdy enough for daily use. -
Cut the Shape:
Press your oval cutter firmly into the clay slab. Use your fingers to gently smooth the edges of the cut shape right away to minimize sanding later. -
Create the Hole:
Use a small circle cutter or a straw to punch a hole near the top of the oval. Make sure you leave at least 3-4mm of clay between the hole and the top edge so it doesn’t break easily. -
Bake or Dry:
If using polymer clay, bake according to the manufacturer’s instructions on the package. If using air-dry clay, let it sit in a dry place for 24-48 hours, flipping it occasionally to prevent warping. -
Sand for smoothness:
Once fully cured and cooled, take fine-grit sandpaper and gently buff the edges and surface. You want a perfectly smooth canvas for your painted design.
Fixing Wobbly Lines
If a painted line goes astray, quickly use a damp toothpick or a cotton swab dipped in rubbing alcohol to gently wipe away the mistake before it dries.
Step 2: Painting the Geometric Pattern
-
Prepare your paint:
Squeeze a small amount of terracotta-colored acrylic paint onto your palette. It should be creamy but not too watery, as you want crisp lines. -
Paint outline triangles:
Using your finest brush, start painting small, open triangles scattered randomly across the surface. Varing their orientation keeps the pattern dynamic. -
Add filled triangles:
Paint a few solid, filled-in triangles interspersed among the open ones. These anchor the design and add visual weight. -
Create diamond motifs:
For a bit of complexity, paint two triangles base-to-base to form a diamond shape. I usually split these diamonds in half with a small line of negative space. -
Dot the details:
Inside some of the open triangles or diamond halves, add three tiny dots arranged in a smaller triangle formation. -
Edge detailing:
Carefully paint single dots along the side edge of the clay oval. Space them out evenly to frame the piece. -
Let it cure:
Allow the paint to dry completely. Acrylics dry fast, but give it 20 minutes to be safe before sealing.
Make It a Stamp
Carve a small eraser into a triangle shape to stamp the base pattern instead of painting it. It creates a rustic, uniform texture instantly.
Step 3: Assembly and Finishing
-
Seal the piece:
Apply a thin coat of matte varnish over the entire clay piece. This protects the paint from scratching off inside a pocket or bag. -
Open the jump ring:
Using two pairs of pliers, twist your large jump ring open (twist ends away from each other, don’t pull apart). -
Attach hardware:
Slide the jump ring through the hole in the clay, then thread the split keyring onto the jump ring. -
Close the loop:
Twist the jump ring closed again with your pliers, ensuring the ends meet perfectly flush so nothing slips off.
Your stylish new keychain is now ready to organize your keys or add focus to a plain bag


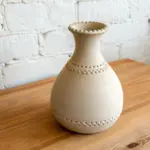
Polka Dots With Simple Tools

Create a warm, rustic piece for your home with this simple terracotta bowl tutorial. The cheerful white polka dots add a playful touch to the rich, earthy clay, making it a perfect beginner-friendly project that looks effortlessly handmade.
Step-by-Step Guide
Materials
- Terracotta air-dry clay or kiln-fire clay
- Rolling pin
- Small bowl (to use as a mold)
- Plastic wrap or cling film
- White acrylic paint or underglaze (depending on clay type)
- Sponge
- Sandpaper (fine grit)
- Round foam pouncer, Q-tip, or pencil eraser
- Clear sealant or glaze
- Small bowl of water
Step 1: Shaping the Bowl
-
Prepare your workspace:
Lay down a canvas cloth or non-stick mat to prevent the clay from sticking to your table. Take a handful of terracotta clay and knead it until it’s pliable and warm. -
Roll out the clay:
Use your rolling pin to flatten the clay into a circle. Aim for an even thickness of about 1/4 inch. If you see any air bubbles, pop them gently and smooth over. -
Prepare the mold:
Take a small kitchen bowl that has the shape you want to mimic. Cover the outside of the bowl tightly with plastic wrap; this ensures your clay won’t get stuck later. -
Form the shape:
Drape your rolled clay slab over the plastic-covered bottom of the bowl. Gently press the clay down with your palms to shape it against the form. -
Trim the edges:
Using a knife or a clay tool, trim away the excess clay at the rim to create an even, circular edge. I like to smooth this cut edge with a damp fingertip immediately. -
Initial smoothing:
Dip a small sponge in water (squeeze it out well!) and gently run it over the clay surface to remove any fingerprints or canvas textures. -
Let it firm up:
Allow the clay to dry on the mold for a few hours until it is leather-hard—firm enough to hold its shape but not fully dry.
Step 2: Refining and Decorating
-
Remove the mold:
Carefully lift the clay bowl off the mold and peel away the plastic wrap. Set the bowl right-side up on your work surface. -
Smooth the interior:
The inside might be a bit rough from the plastic wrap. Use a barely damp sponge to smooth out the interior walls and base. -
Dry completely:
Let the bowl dry completely. Depending on your climate and clay type, this could take 24 to 48 hours. The clay will lighten in color when fully dry. -
Sand for perfection:
Once bone dry, take fine-grit sandpaper and gently sand the rim and any rough spots on the body. Wipe away the dust with a dry cloth. -
Prepare the paint tool:
Pour a small amount of white acrylic paint (or underglaze) onto a palette. Choose a round tool like a foam pouncer, the flat end of a pencil, or a Q-tip for your dots. -
Dot the exterior:
Dip your tool into the white paint and press it onto the outside of the bowl. Space the dots randomly but evenly for that charming, organic look. -
Dot the interior:
Repeat the process on the inside of the bowl. Don’t worry about perfect circles; slight variations add character. -
Seal or glaze:
If using air-dry clay, apply a coat of clear acrylic sealant to protect the finish. If using kiln clay, apply a clear glaze and fire it according to the clay manufacturer’s instructions.
Cracked edges?
If the rim cracks while drying, mix a tiny bit of fresh clay with water to make a paste (slip) and fill in the cracks, then smooth over.
Perfect Polka Placement
Work in a triangle pattern when placing dots. Place one dot, then two below it, to keep the spacing feeling natural but consistent.
Now you have a delightful little vessel ready to hold trinkets or simply brighten up a shelf


Hand-Painted Stripe Patterns
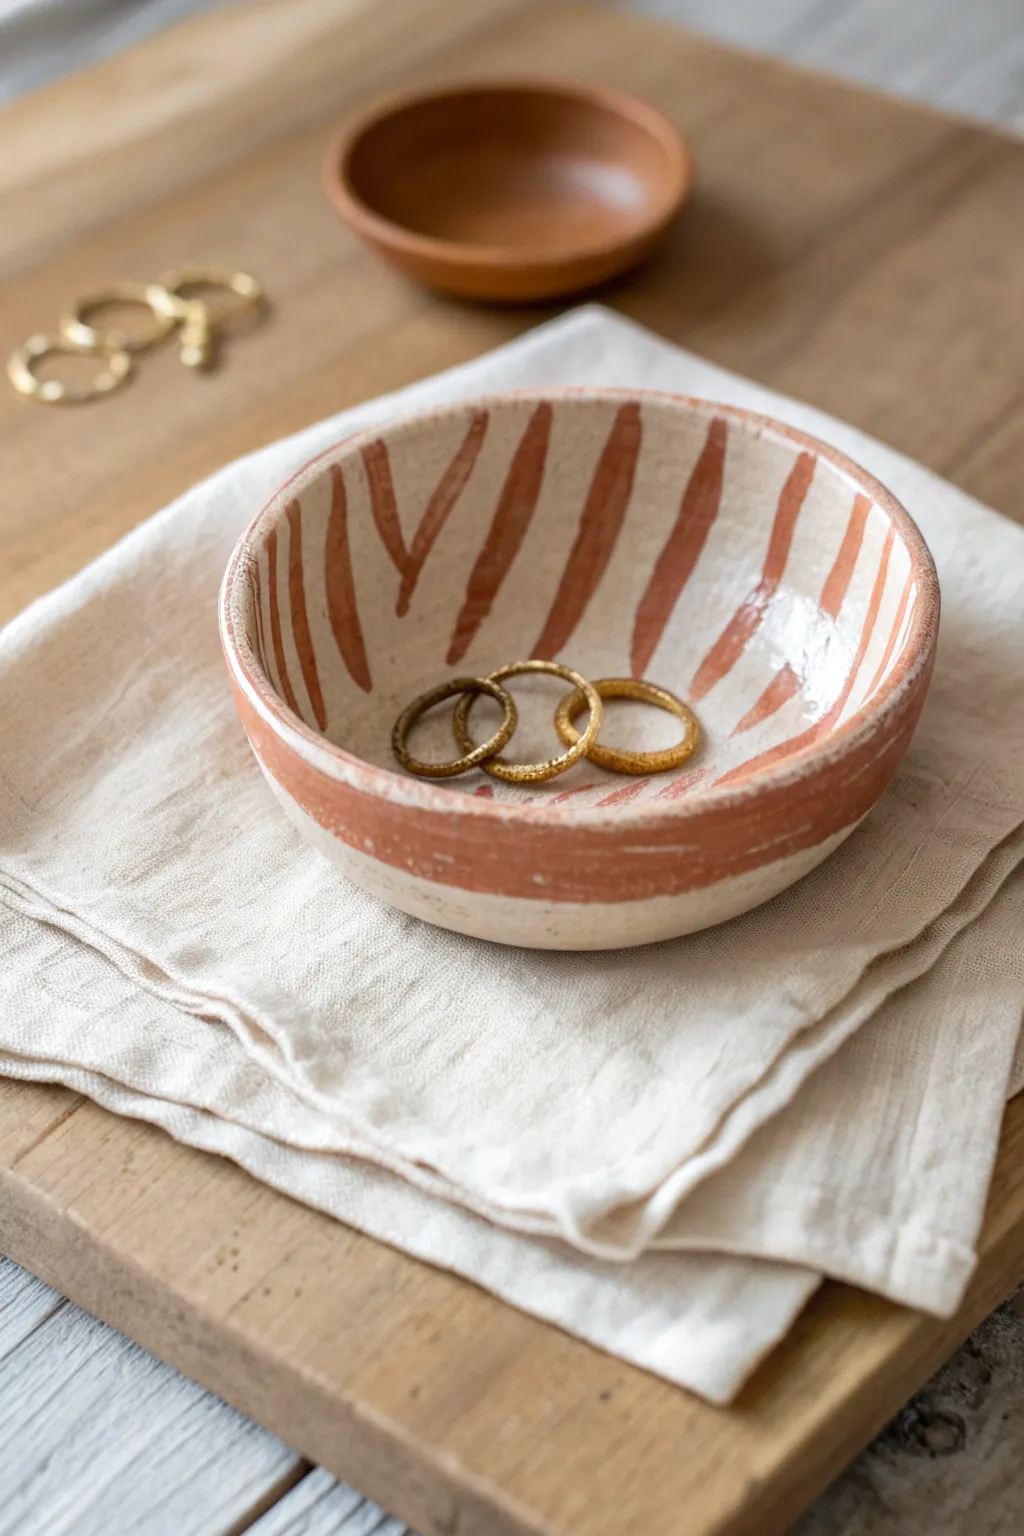
Capture the organic beauty of unfinished clay with this charming trinket dish featuring freehand stripes. The contrast between the creamy speckled stoneware and the earthy terracotta-toned underglaze creates a warm, artisanal feel perfect for holding your favorite rings.
Detailed Instructions
Materials
- Speckled cream stoneware clay (e.g., buff stoneware with iron specks)
- Reddish-brown underglaze (terracotta or rust color)
- Clear glossy glaze (food safe)
- Small rolling pin
- Bisque mold or small bowl (for shaping)
- Round cookie cutter (approx. 4-5 inches)
- Small flat synthetic paintbrush
- Sponge
- Rib tool
- Canvas work surface
Step 1: Forming the Bowl
-
Roll the slab:
Begin by wedging a small ball of speckled stoneware clay to remove air bubbles. Roll it out on your canvas surface until it is an even slab, approximately 1/4 inch thick. -
Cut the shape:
Use your round cookie cutter to punch out a perfect circle from the slab. If you don’t have a cutter, trace a small bowl and cut carefully with a needle tool. -
Smooth the edges:
Dip your finger in a little water and gently run it along the cut rim of the clay circle. This softens the sharp angle left by the cutter and prevents future chipping. -
Shape the curve:
Place your clay circle into a bisque mold or drape it inside a small bowel lined with plastic wrap. Gently press the clay down to take the shape of the mold. -
Refine the form:
Use a damp sponge or a soft rib tool to smooth the inside of the bowl while it is in the mold, ensuring the curve is continuous and removing any fingerprints. -
Let it firm up:
Allow the clay to dry to a leather-hard state. I always wait until the rim holds its shape without warping before removing it from the mold.
Step 2: Painting the Design
-
Prepare the surface:
Once leather-hard, wipe the bowl gently with a barely damp sponge to remove any dust. The surface needs to be clean for the underglaze to adhere properly. -
Mix the underglaze:
Shake your reddish-brown underglaze well. You want a consistency similar to heavy cream so it flows smoothly but remains opaque. -
Paint the rim border:
Load a flat brush and paint a solid band around the exterior rim of the bowl. Don’t worry about making it perfectly straight; a wavy, organic edge adds character. -
Start the interior stripes:
Beginning at the rim border you just painted, pull the brush downwards toward the center of the bowl to create your first stripe. -
Vary the line weight:
Continue painting stripes around the interior. Apply slightly different pressure for each stroke—some should be thick, others tapering to a thin point. -
Create the V-shape:
Notice in the reference image how some stripes join together. Occasionally paint two diagonal strokes that meet at the bottom to form a ‘V’ or ‘Y’ shape for visual interest. -
Embrace imperfections:
Leave varying gaps of the raw cream clay showing between the red stripes. The goal is a loose, hand-painted look, not geometric precision. -
Bisque fire:
Let the bowl dry completely (bone dry) before firing it in the kiln to a bisque temperature (usually cone 04).
Brush Technique Tip
Use a bamboo sumi brush or a dagger striper brush. These hold more pigment and naturally create that tapered ‘calligraphy’ stroke seen in the stripes.
Step 3: Glazing and Finishing
-
Clean the bisque:
After the bisque firing, wipe the piece down with a wet sponge to remove any kiln dust that could cause pinholing in the glaze. -
Apply clear glaze:
Dip the entire bowl into a clear glossy glaze. Alternatively, you can brush on three even coats, letting each coat dry before applying the next. -
Wipe the foot:
Using a sponge, thoroughly wipe the glaze off the bottom (foot) of the bowl so it doesn’t fuse to the kiln shelf during firing. I like to leave just a tiny bit of the raw clay exposed at the very bottom edge. -
Final fire:
Fire the piece again to the maturity temperature of your clay body (usually cone 5 or 6 for stoneware). The clear glaze will seal the underglaze and make the colors pop.
Level Up: Exposed Clay
For a texture contrast, apply wax resist over the painted stripes before glazing. The raw matte stripes will stand out against the glossy cream background.
Once cooled, your custom bowl is ready to display your treasures or be gifted as a handmade gem

The Complete Guide to Pottery Troubleshooting
Uncover the most common ceramic mistakes—from cracking clay to failed glazes—and learn how to fix them fast.
Zigzag and Chevron Carved Lines
This minimalist project features a soothing oval shape adorned with precise repeating chevron lines, creating a beautiful tactile rhythm. The raw, matte finish emphasizes the delicate carving work, making it perfect for a natural wall hanging, ornament, or statement jewelry piece.
Step-by-Step Tutorial
Materials
- White polymer clay (or air-dry clay)
- Rolling pin
- Oval cookie cutter (or paper template and craft knife)
- Needle tool or sharp carving point
- Small straw or hole punching tool
- Fine-grit sandpaper (400 to 600 grit)
- Parchment paper or ceramic tile (work surface)
- Smooth sponge (optional)
Step 1: Shaping the Base
-
Condition the clay:
Begin by warming the clay in your hands, kneading it until it is soft, pliable, and free of cracks. This ensures a smooth surface for your carving later. -
Roll out the slab:
Place the clay on a sheet of parchment paper or a ceramic tile. Use your rolling pin to flatten it into an even slab, aiming for a thickness of about 1/4 inch (6mm) to ensure durability. -
Cut the oval shape:
Press your oval cutter firmly into the clay slab. If you don’t have a cutter, lay a paper template on top and carefully trace around it with a craft knife. -
Smooth the edges:
Gently run your finger dipped in a little water (or baby oil for polymer clay) around the cut rim to soften any sharp edges left by the cutter. -
Create the hanging hole:
Use a small drinking straw or a dedicated hole punch tool to create the suspension hole near the top center of the oval. Twist the tool gently as you pull it out to keep the hole clean.
Clean Lines Tip
Chill your clay slab in the fridge for 10 minutes before carving. Firm clay resists dragging and yields much sharper, cleaner cuts.
Step 2: Carving the Pattern
-
Plan your center line:
Before carving deep, use your needle tool to very faintly mark a vertical guide down the center. This helps keep your chevrons symmetrical. -
Mark vertical guides:
Create parallel vertical lines (about four or five total across the width) by lightly dragging the tool. These will serve as ‘lanes’ for your zigzags. -
Start the first zigzag:
Beginning at the bottom left section, press your carving tool into the clay and drag diagonally up to the next vertical guide line. -
Complete the ‘V’ shape:
From that point, drag diagonally down to the subsequent vertical line. Repeat this up-and-down motion across the width of the oval to form your first complete zigzag row. -
Establish the rhythm:
Move up slightly and crave a second parallel zigzag line above the first one. I find it helpful to rotate the piece as I work to maintain a comfortable hand angle. -
Fill the surface:
Continue carving rows of zigzags from bottom to top. It’s okay if they aren’t machine-perfect; the hand-carved look adds character. -
Clean up burrs:
Carving often leaves little crumbs of clay. Use a soft, dry brush to gently sweep these away without smooshing the fresh lines.
Step 3: Finishing
-
Bake or dry:
If using polymer clay, bake according to the package instructions (usually 275°F/135°C for 15-30 minutes). If using air-dry clay, let it sit in a cool, dry place for 24-48 hours. -
Initial sanding:
Once fully cured or dry, take your fine-grit sandpaper and lightly buff the edges to make them perfectly smooth. -
Surface sanding:
Lay the sandpaper flat on your table and gently run the face of the oval over it in a circular motion. This will flatten the raised areas while leaving the carved lines deep and crisp. -
Final wipe down:
Wipe the piece with a damp cloth to remove any sanding dust, revealing the stark contrast between the smooth surface and the textured carving.
Add an Antiqued Wipe
Dilute brown acrylic paint with water, brush it into the grooves, and immediately wipe the surface clean. The dark paint will stay in the lines.
String a leather cord or ribbon through the top loop and enjoy the modern, geometric charm of your handmade piece
Scallop and Fish-Scale Texture
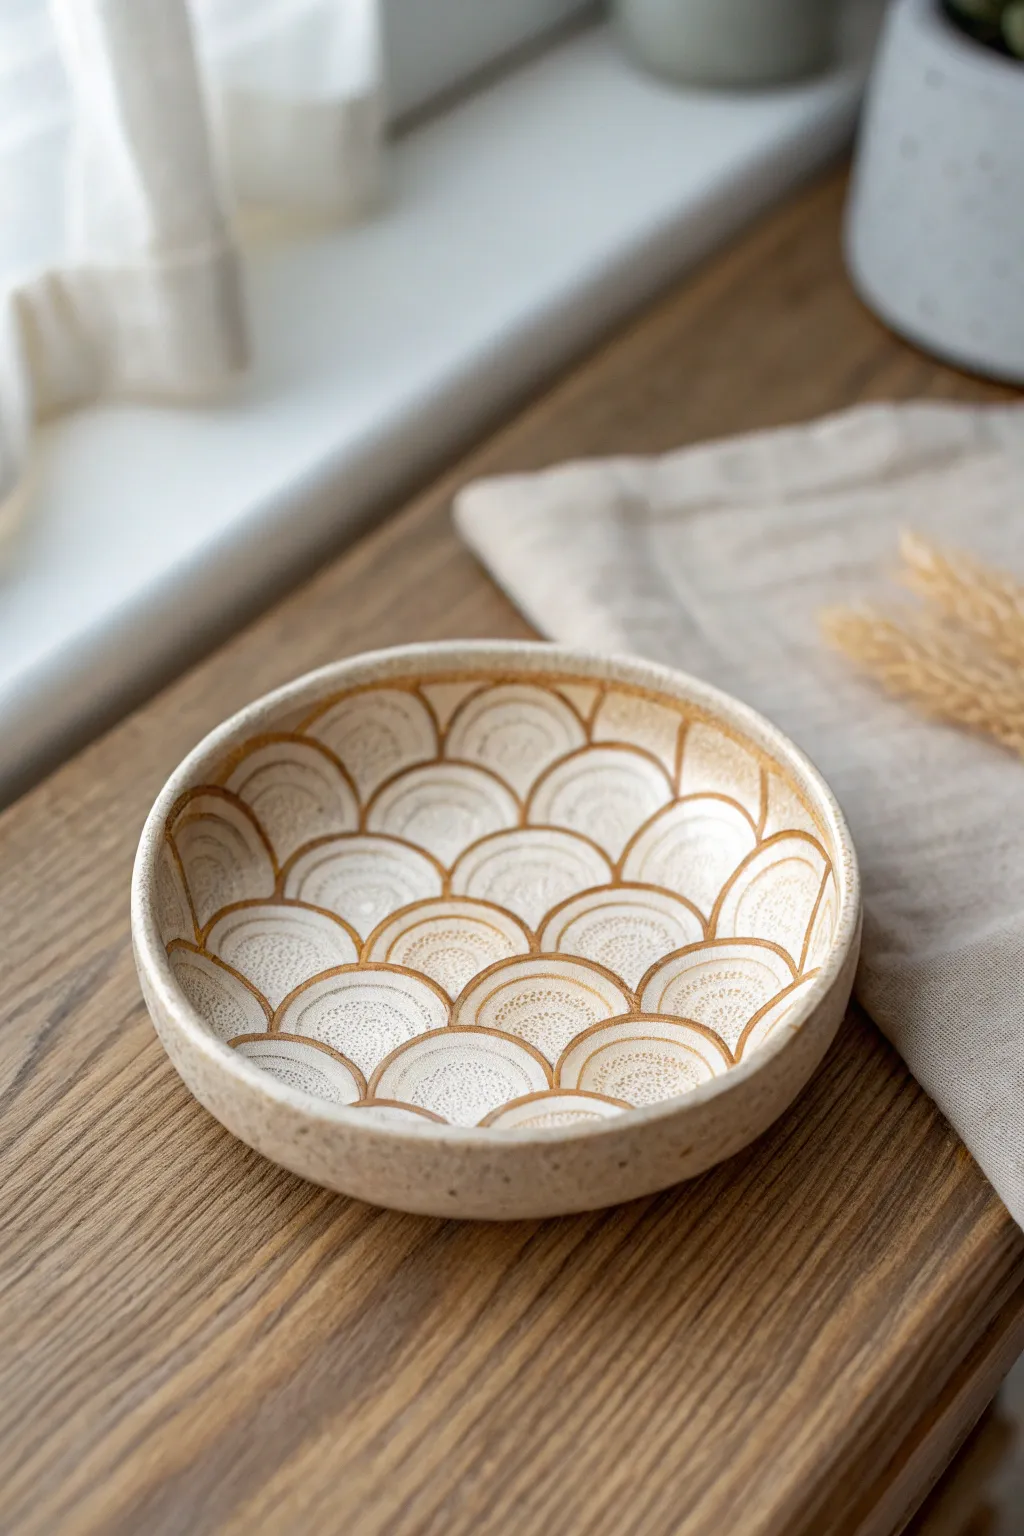
Embrace the rhythm of repetition with this stunning stoneware bowl, featuring a hand-carved fish-scale pattern that highlights the natural beauty of speckled clay. The sgraffito-like technique reveals the raw clay body beneath, creating a lovely contrast with the gentle ivory glaze.
How-To Guide
Materials
- Speckled buff stoneware clay
- Rolling pin and guide sticks (approx. 1/4 inch)
- Bowl mold or slump mold (plaster or bisque)
- Needle tool
- Loop tool (small, rounded profile)
- Rib tool (kidney shaped, soft rubber)
- Soft sponge
- Wax resist (optional but helpful)
- Clear or translucent satin glaze (ivory/creamy tint)
- Kiln
Step 1: Forming the Bowl
-
Roll the slab:
Begin by rolling out your speckled buff clay into a smooth, even slab. Use guide sticks to ensure a consistent thickness of about 1/4 inch, which provides enough depth for carving later without making the bowl too heavy. -
Compress the clay:
Take your soft rubber rib and firmly compress the surface of the slab in all directions. This aligns the clay particles which prevents warping and creates a silky smooth canvas for your pattern. -
Drape the mold:
Carefully lift your slab and drape it over your chosen slump mold. Gently press the clay down to conform to the shape, starting from the center and working outward to avoid trapping air bubbles. -
Trim the rim:
Once the clay has stiffened slightly to soft leather-hard, use your needle tool to trim the excess clay around the base of the mold to create a clean, circular rim. Smooth the edge with a damp sponge.
Step 2: Mapping the Pattern
-
Define the center:
Wait until the bowl is leather-hard—firm enough to hold its shape but soft enough to carve. Locate the center bottom of the interior. -
Mark the first circle:
Using a very light touch with a needle tool, sketch a small circle at the very bottom center. This will be your anchor point. -
Draft the scallops:
Lightly sketch the arched tops of your scallop rows. Arrange them in concentric circles radiating outward from the center, staggering the peaks of one row with the valleys of the row beneath it, just like fish scales.
Sticky Situation?
If your loop tool drags and pulls up grog, the clay is too wet. Let it stiffen for 30 more minutes. If it’s chipping, it’s too dry—spritz lightly with water and wrap in plastic.
Step 3: Carving the Texture
-
Outline the arches:
Select a small loop tool. Deepen the outlines of your arched scales first. Press firmly enough to create a distinct border, but be careful not to puncture the bowl wall. -
Scoop the interior:
Inside each arched outline, use the loop tool to gently shave away a thin layer of clay. I find it works best to pull the tool from the top of the arch down toward the base of the scale. -
Texture the scales:
For the interior texture shown in the image, instead of smoothing the scooped area, use the loop tool to make small, concentric scratching motions or tiny gouges. This roughness will catch the glaze beautifully. -
Refine the ridges:
Go back over the borders between the scales. You want the ‘grout lines’—the raised ridges between the scales—to remain smooth and uniform, contrasting with the textured interiors. -
Clean up burrs:
Once the carving is complete, let the bowl dry until bone dry. Then, gently brush away any distinct clay crumbs or sharp burrs with a stiff brush, but don’t over-smooth it or you’ll lose the crispness.
Pro Tip: Depth Control
Use a sewing measuring tape to mark concentric rings lightly before sketching scallops. This keeps your rows even as the bowl’s circumference expands outward.
Step 4: Glazing and Firing
-
Bisque fire:
Load the bone-dry bowl into the kiln and fire to bisque temperature (usually barely Cone 04) to prepare it for glazing. -
Wax the pattern (optional):
If you want the ridges to remain looking like raw clay as shown in the picture, carefully apply wax resist to the raised lines between the scales. This is tedious but creates that sharp definition. -
Apply the glaze:
Dip or brush a translucent, creamy satin glaze over the interior. The glaze should pool slightly in the textured recesses of the scales but break (go thin) over the ridges. -
Wipe back:
If you didn’t use wax, take a damp sponge and gently wipe the glaze off the raised ridges. You want the clay body to show through on the high points while the glaze remains in the textured scoops. -
Final fire:
Fire the piece to the maturity temperature of your clay body (likely Cone 5 or 6 for stoneware). Allow the kiln to cool naturally before unloading.
Enjoy using your beautifully textured bowl for jewelry or serving dry snacks


What Really Happens Inside the Kiln
Learn how time and temperature work together inside the kiln to transform clay into durable ceramic.
Checkerboard Color Blocks
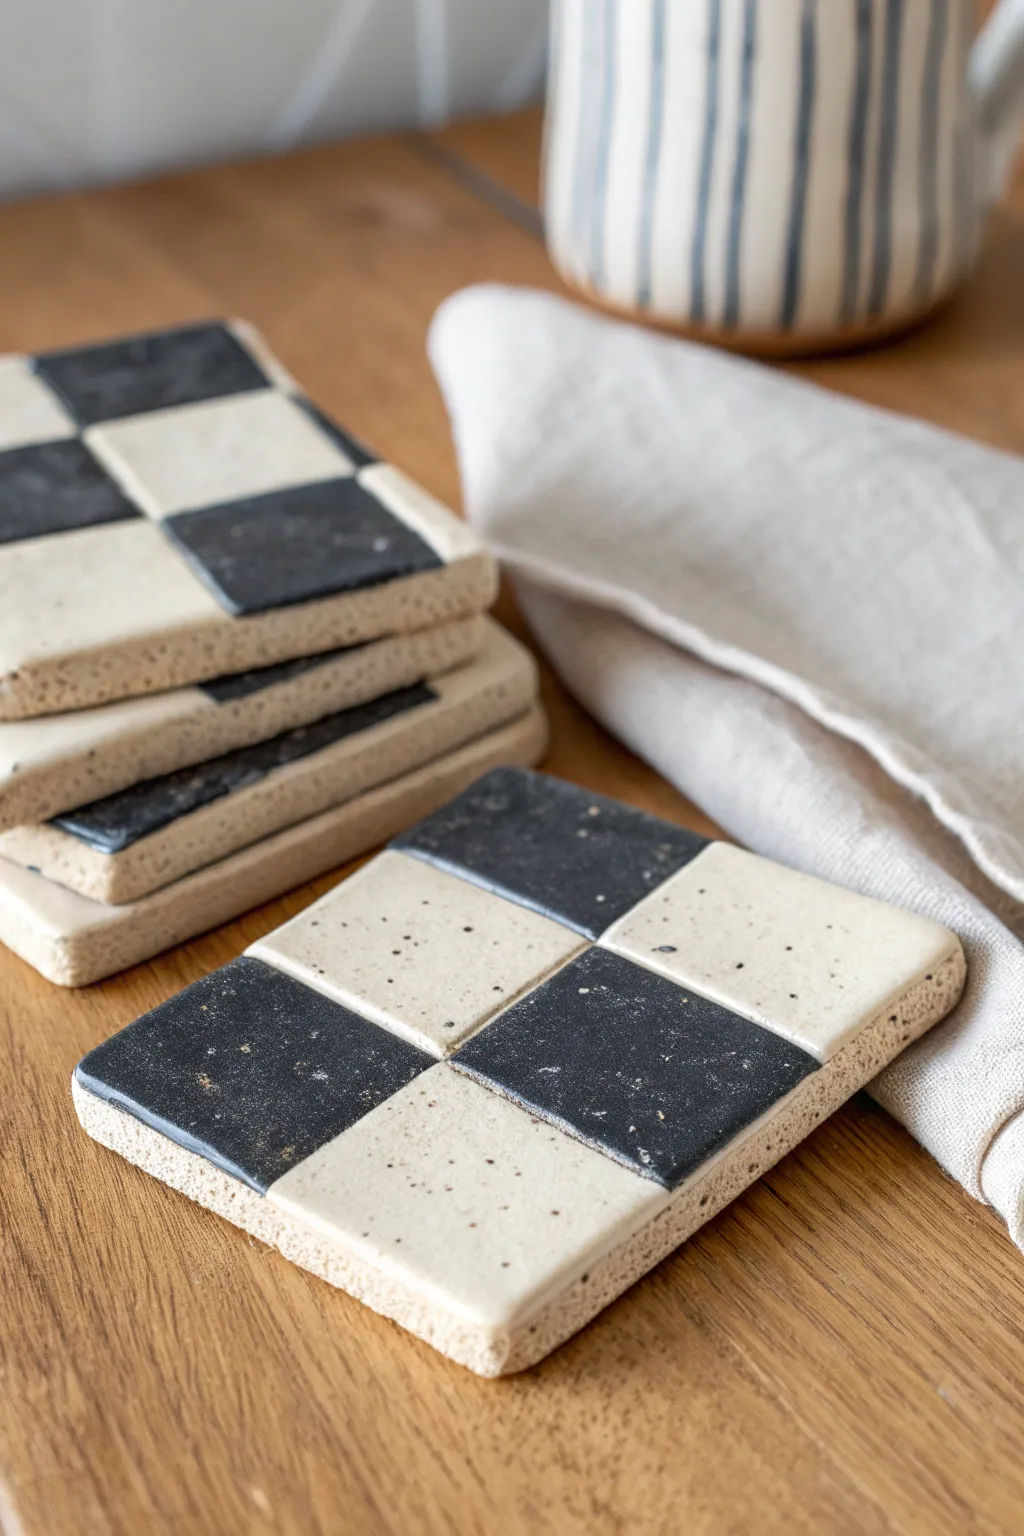
Embrace the timeless appeal of geometric design with these speckled checkerboard coasters. The contrast between satin black and natural cream glazes creates a modern, sophisticated look that adds texture to any table setting.
Step-by-Step Guide
Materials
- Stoneware clay (speckled or buff)
- Black underglaze or slip
- Cream or white underglaze (optional, or use raw clay body)
- Clear matte glaze
- Rolling pin
- Guide strips (1/4 inch thick)
- Square cookie cutter (approx. 4×4 inches) or ruler and knife
- Needle tool or scoring tool
- Small flat paintbrush
- Masking tape (1/4 inch width)
- Sponge
Step 1: Prepping the Canvas
-
Roll the Slab:
Begin by wedging your stoneware clay thoroughly to remove air bubbles. Flatten it onto a canvas work surface and use a rolling pin with 1/4 inch guide strips to create a perfectly even slab. -
Cut the Squares:
Using a square cookie cutter or a ruler and sharp fetling knife, cut out your coaster shapes. Aim for about 4 inches square to accommodate for shrinkage during firing. -
Smooth the Edges:
Dip a sponge in water and wring it out almost completely. Gently run it along the cut edges of your squares to soften any sharp angles and compress the clay particles, which helps prevent cracking. -
Dry to Leather Hard:
Place your clay squares between two boards or pieces of drywall to dry slowly. Wait until they reach leather-hard stage—firm enough to handle without bending, but still cool to the touch.
Warped Corners?
Flat slabs love to warp. Dry them very slowly under plastic or sandwiched between weighted drywall boards to keep them perfectly flat.
Step 2: Creating the Grid
-
Measure the Center:
Using a ruler, lightly mark the exact center point on each side of the square coaster with a needle tool. You only need tiny reference pricks. -
Score the Lines:
Connect your reference marks by lightly scoring a cross into the clay surface. Don’t cut deep; just make a visible guideline that divides the coaster into four equal quadrants. -
Deepen the Groove:
Go back over your scored lines with a slightly blunter tool or the back of a knife to create a shallow channel. This physical groove helps separate the glaze colors later for a crisp finish.
Step 3: Applying Color
-
Tape Off (Optional):
If you have a shaky hand, you can apply thin masking tape over the dividing lines. However, for that organic look shown in the photo, I prefer to freehand paint within the grooves. -
Paint the Black Squares:
Load a flat brush with black underglaze. Fill in the top-left and bottom-right quadrants. Apply 2-3 coats, letting each layer dry until matte before adding the next to ensure solid opacity. -
Paint the Cream Squares:
If your clay isn’t naturally cream-colored, use a white or cream underglaze for the remaining two quadrants. Apply 2-3 coats here as well. -
Clean the Grooves:
Once the underglaze is dry, use a clean, slightly damp needle tool to gently scrape out any paint that spilled into the separating grooves, re-establishing that crisp grid line.
Make it a Set
Create a matching trivet by cutting a larger 8×8 inch slab and following the same steps, simply increasing the size of the checkerboard grid.
Step 4: Firing and Finishing
-
Bisque Fire:
Load the bone-dry coasters into the kiln for a bisque fire (usually Cone 04). This sets the shape and makes the pottery porous for glazing. -
Wax the Bottom:
Apply a coat of wax resist to the bottom of each coaster and slightly up the side edge to prevent them from sticking to the kiln shelf. -
Apply Clear Glaze:
Dip the entire coaster into a clear matte glaze. A matte finish is key to achieving the soft, stone-like texture seen in the reference image rather than a high-gloss look. -
Final Fire:
Fire the coasters to the maturity temperature of your clay body (typically Cone 5 or 6 for stoneware). Let the kiln cool completely before unloading. -
Sand the Base:
Once cool, check the bottoms. If there are any rough patches of bare clay, use sandpaper or a sanding block to smooth them out so they won’t scratch your furniture.
Enjoy using your stylish new coasters for your morning coffee or evening tea
Swirled Marble Veins
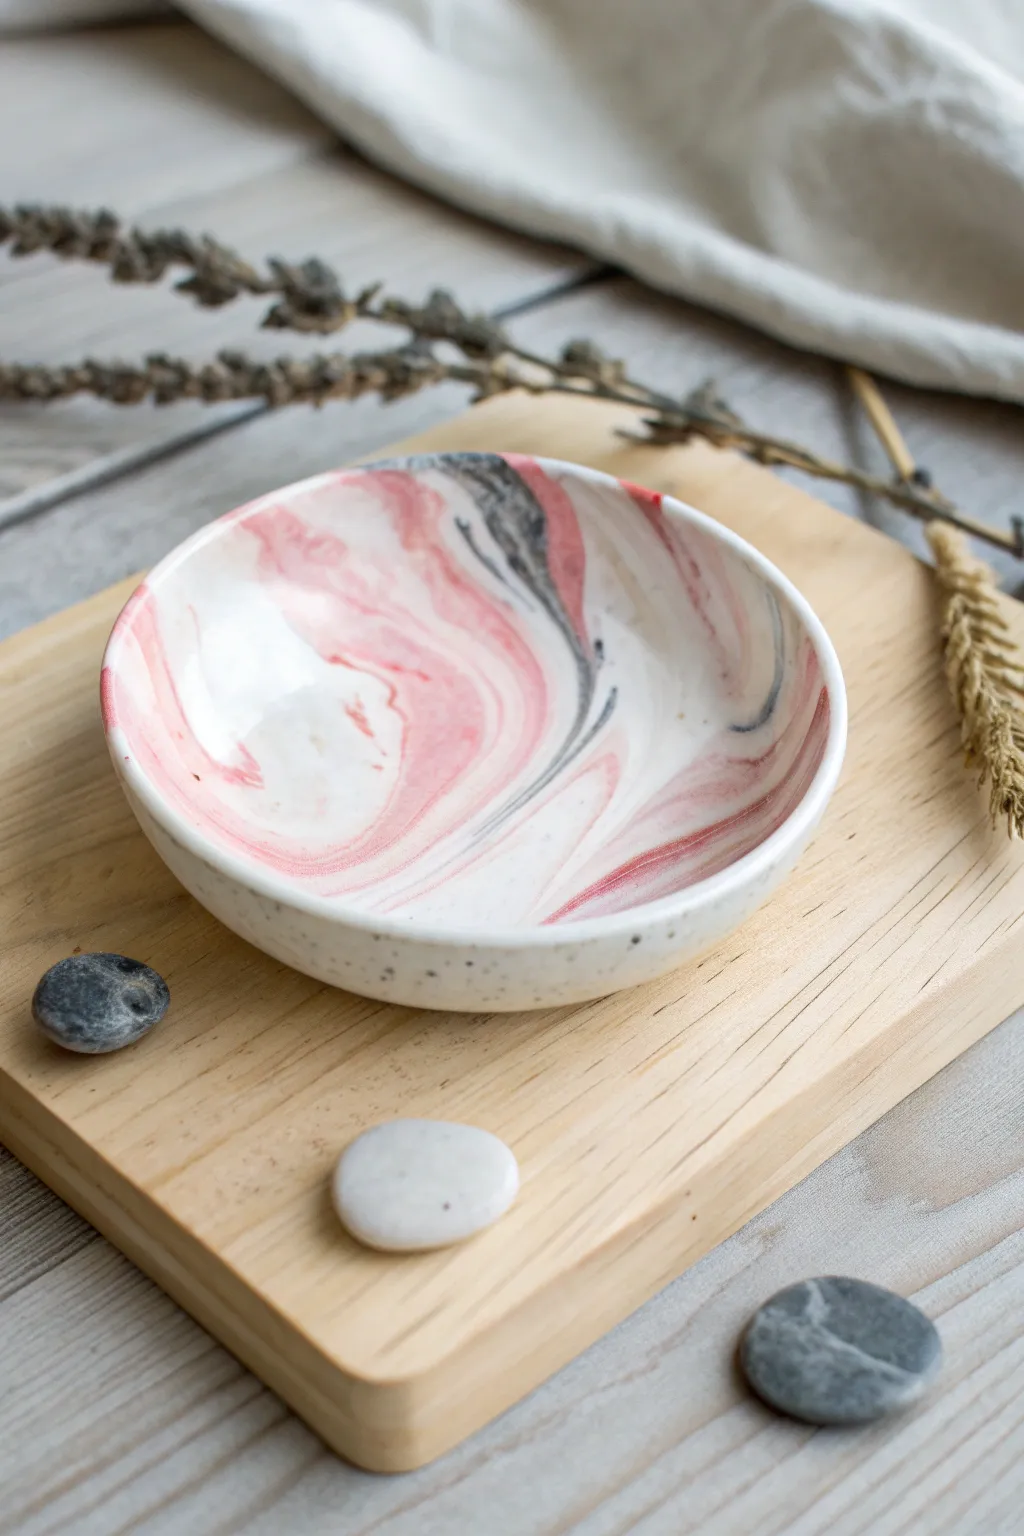
Capture the elegance of natural stone with this swirl-patterned ring dish that looks complex but is surprisingly simple to make. The combination of soft pinks, stark blacks, and speckled whites creates a modern, organic piece perfect for holding your daily treasures.
How-To Guide
Materials
- White polymer clay (approx. 2 oz)
- Pink or salmon polymer clay (small amount)
- Black polymer clay (very small amount)
- Grey polymer clay (optional, or mix black and white)
- Rolling pin or acrylic roller
- Circle cutter or a rimmed bowl (approx. 4-5 inches)
- Oven-safe glass bowl (for shaping)
- X-acto knife or clay blade
- Sandpaper (fine grit)
- Gloss glaze or varnish (optional)
Step 1: Preparing the Colors
-
Condition the Base:
Start by conditioning your white clay until it is soft and pliable. This will act as the primary canvas for your marbling. -
Create the Speckle Effect:
To achieve the speckled look seen on the exterior, take a tiny pinch of black clay—truly, a crumb size is plenty—and chop it into microscopic bits. Mix these thoroughly into your white clay ball. -
Prepare Accent Colors:
Condition small balls of pink, grey, and solid black clay. Roll these individual colors into thin, snake-like ropes.
Clean Marbling Tip
Use significantly more white clay than colored clay (a 5:1 ratio). Too much color will darken the whole piece and you’ll lose that elegant, high-contrast marble vein look.
Step 2: Marbling Technique
-
Twist and Roll:
Lay the colored ropes onto your larger log of speckled white clay. Twist the entire bundle together like a candy cane. -
Fold and Compress:
Fold the twisted log in half, roll it into a smooth ball, and then roll it back out into a log. Repeat this motion. -
Check the Pattern:
Stop twisting before the colors become muddy. You want distinct veins of color, not a uniform purple-grey mix. -
Flatten the Slab:
Roll the clay into a ball one last time. Using your acrylic roller, flatten it into a slab about 1/4 inch thick. I find rolling in different directions helps keep the circle shape. -
Inspect Veins:
Look at both sides of your slab. The marbling will look different on each side, so choose the one with the most pleasing swirl pattern for the inside of the bowl.
Step 3: Shaping and Baking
-
Cut the Circle:
Place your circle cutter or an inverted bowl onto the clay slab to select your area. Press down firmly or trace around it with a blade to cut out a clean circle. -
Smooth the Edges:
Gently run your finger along the cut edge of the clay circle to soften any sharp corners created by the cutter. -
Form the Curve:
Drape your clay circle inside an oven-safe glass bowl to give it a curved shape. Gently press it down so it takes the form of the bowl. -
Bake:
Bake the clay according to the manufacturer’s instructions on the package (usually 275°F/135°C for 15-30 minutes). Keep the clay inside the glass bowl while baking. -
Cool Down:
Allow the piece to cool completely before attempting to remove it from the glass form. The clay hardens fully as it cools.
Luxurious Rim
After baking and cooling, use a small brush to paint the very top rim of the bowl with gold leaf paint. This adds a chic, metallic border that pops against the pink swirls.
Step 4: Finishing Touches
-
Sand Imperfections:
Once cool, use a fine-grit sandpaper to smooth out any rough spots on the rim or the underside. -
Clean Up:
Wipe the bowl with a slightly damp cloth to remove any sanding dust. -
Optional Glaze:
For a glossy, ceramic-like finish resembling the photo, apply a thin coat of polymer clay gloss varnish. Let it dry completely.
Place your finished dish on a vanity or side table for a chic spot to drop your earrings

TRACK YOUR CERAMIC JOURNEY
Capture glaze tests, firing details, and creative progress—all in one simple printable. Make your projects easier to repeat and improve.
Raised Slip-Trail Doodles
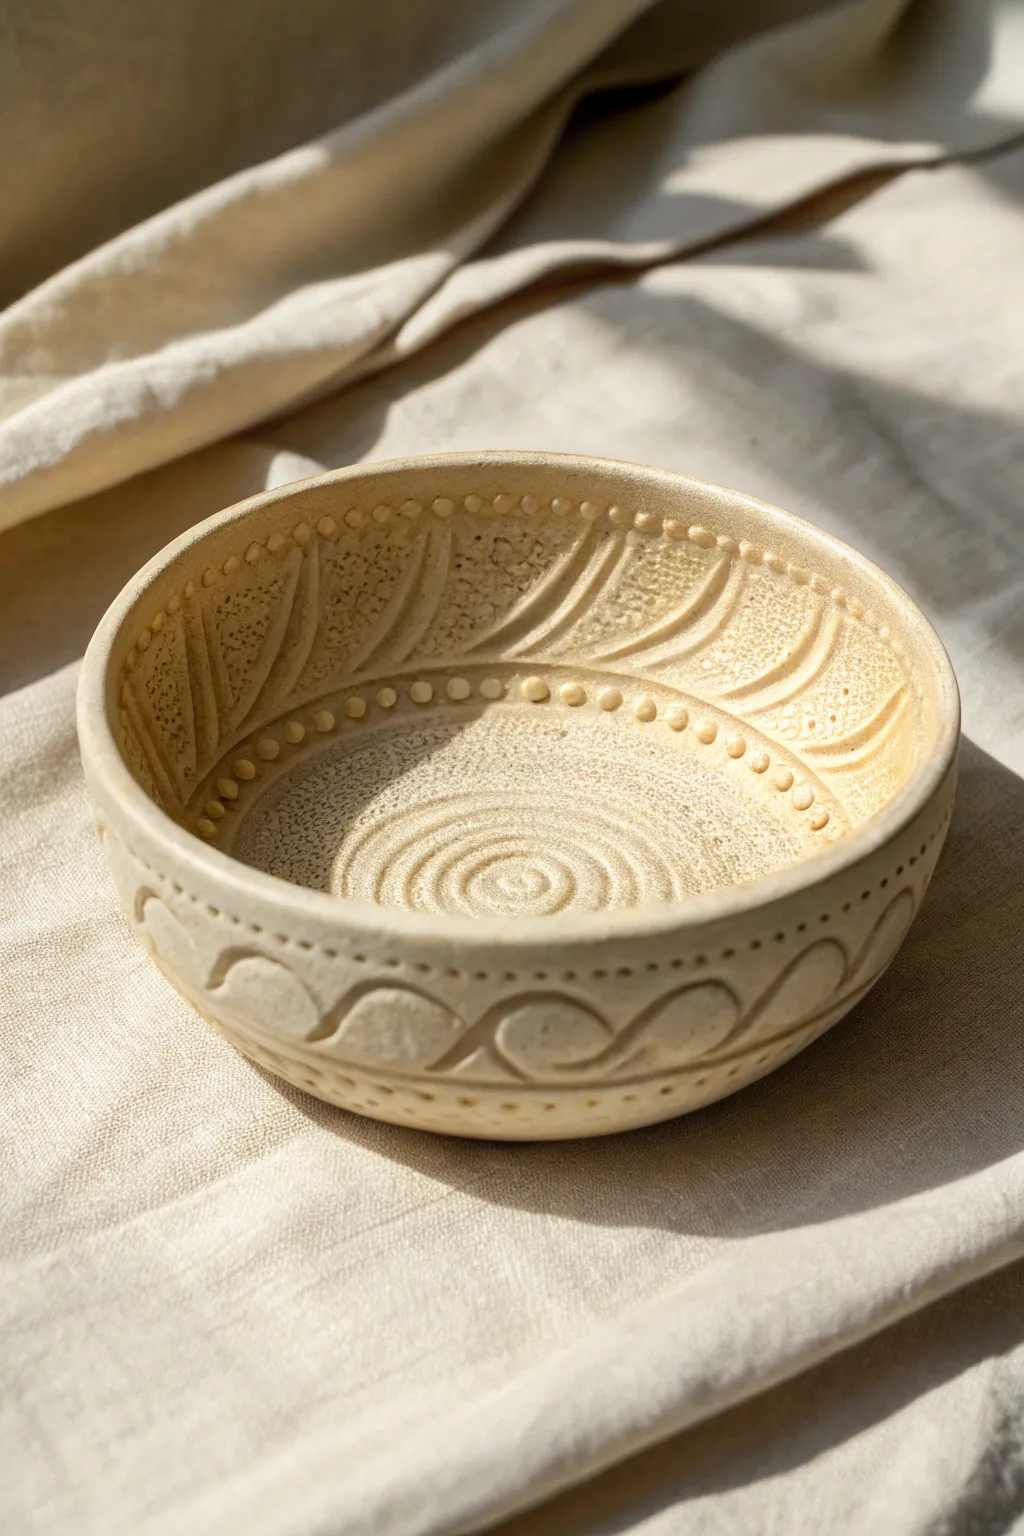
This project combines the delicate precision of slip-trailing with robust carving techniques to create a bowl that feels as interesting as it looks. The interplay of raised dots and carved waves gives the piece a rhythmic, sandy quality reminiscent of a beach landscape.
Step-by-Step Guide
Materials
- Speckled stoneware clay (buff or cream)
- Pottery wheel (or slab roller/molds for hand-building)
- Slip trailer bottle with fine nozzle
- Thick slip (made from the same clay body)
- Loop carving tool
- Pin tool or needle tool
- Sponge
- Matte cream or transparent glaze
Step 1: Forming the Base
-
Throw the bowl form:
Begin by centering your speckled stoneware clay on the wheel. Throw a basic medium-sized bowl with a gentle, continuous curve from the foot to the rim. Aim for a wall thickness of about 1/4 inch to allow depth for carving later. -
Refine the rim:
Smooth and compress the rim with a chamois or your sponge. A slightly rounded rim complements the soft textures we will add later. -
Create the interior spiral:
While the wheel is spinning slowly, use your finger or a rounded wooden rib to create a defined spiral groove in the very bottom center of the bowl. This acts as the focal point. -
Dry to leather hard:
Allow the piece to dry slowly until it reaches a sturdy leather-hard stage. It needs to be firm enough to handle carving without warping, but soft enough to accept slip. -
Trim the foot:
Flip the bowl over and trim a clean foot ring. Smooth out any trimming marks with a damp sponge.
Step 2: Carving the Patterns
-
Mark your guidelines:
Lightly sketch two horizontal bands around the exterior of the bowl using a needle tool. One band should be near the rim, and another lower down, creating a central zone for the main wave pattern. -
Carve exterior waves:
Using a loop tool, carve a repeating wave or scallop pattern in the central band on the outside. Dig in slightly to create relief, letting the clay curl away. -
Carve interior curves:
Move to the inside of the bowl. Carve long, sweeping curved lines extending from the bottom spiral upward toward the rim. Leave space between these lines for texture. -
Add stone texture:
In the negative spaces between your interior carved lines, gently dab a stiff-bristled brush or a coarse sponge to create a pitted, sandy texture.
Clogged Trailer?
If your slip trailer keeps spluttering, strain your slip through a fine mesh sieve or old pantyhose to remove grit before filling the bottle.
Step 3: Slip Trailing Details
-
Prepare the slip:
Fill your slip trailer with thick throwing slip. I find it works best if the consistency is similar to cake frosting—stiff enough to hold a peak. -
Dot the interior rim:
Apply a row of evenly spaced, raised dots just below the interior rim. Try to keep your pressure consistent so the dots remain uniform in size. -
Outline the interior waves:
Follow the edge of your carved interior lines with a line of smaller, delicate dots. This highlights the separation between the smooth carved area and the textured sections. -
Detail the exterior:
On the outside, use the slip trailer to create lines of dots bordering your carved wave patterns. You can add a single dot inside each wave peak for extra detail. -
Smooth the peaks:
Let the slip set for about 10-15 minutes. Once the glossy sheen disappears, gently tap any sharp peaks on the dots with a clean fingertip to round them off nicely.
Dual-Tone Effect
For more contrast, use a white porcelain slip on darker stoneware clay. The bright white dots will pop dramatically against the toasted brown background.
Step 4: Finishing
-
Bisque fire:
Once the bowl is bone dry, bisque fire it to cone 04 (or your clay’s specific bisque temperature). -
Glaze application:
Dip or spray the bowl with a matte cream glaze or a simple transparent glaze. A glaze that breaks (thins) over edges is ideal here, as it will darken the texture and highlight the white slip dots. -
Final wipe:
Wipe the foot ring clean with a damp sponge to prevent it from sticking to the kiln shelf. -
Glaze fire:
Fire the piece to the final maturity temperature for your clay body (likely cone 5 or 6).
The finished bowl offers a wonderful tactile experience where your fingers can trace the journey of every dot and wave
Color Inlay Linework
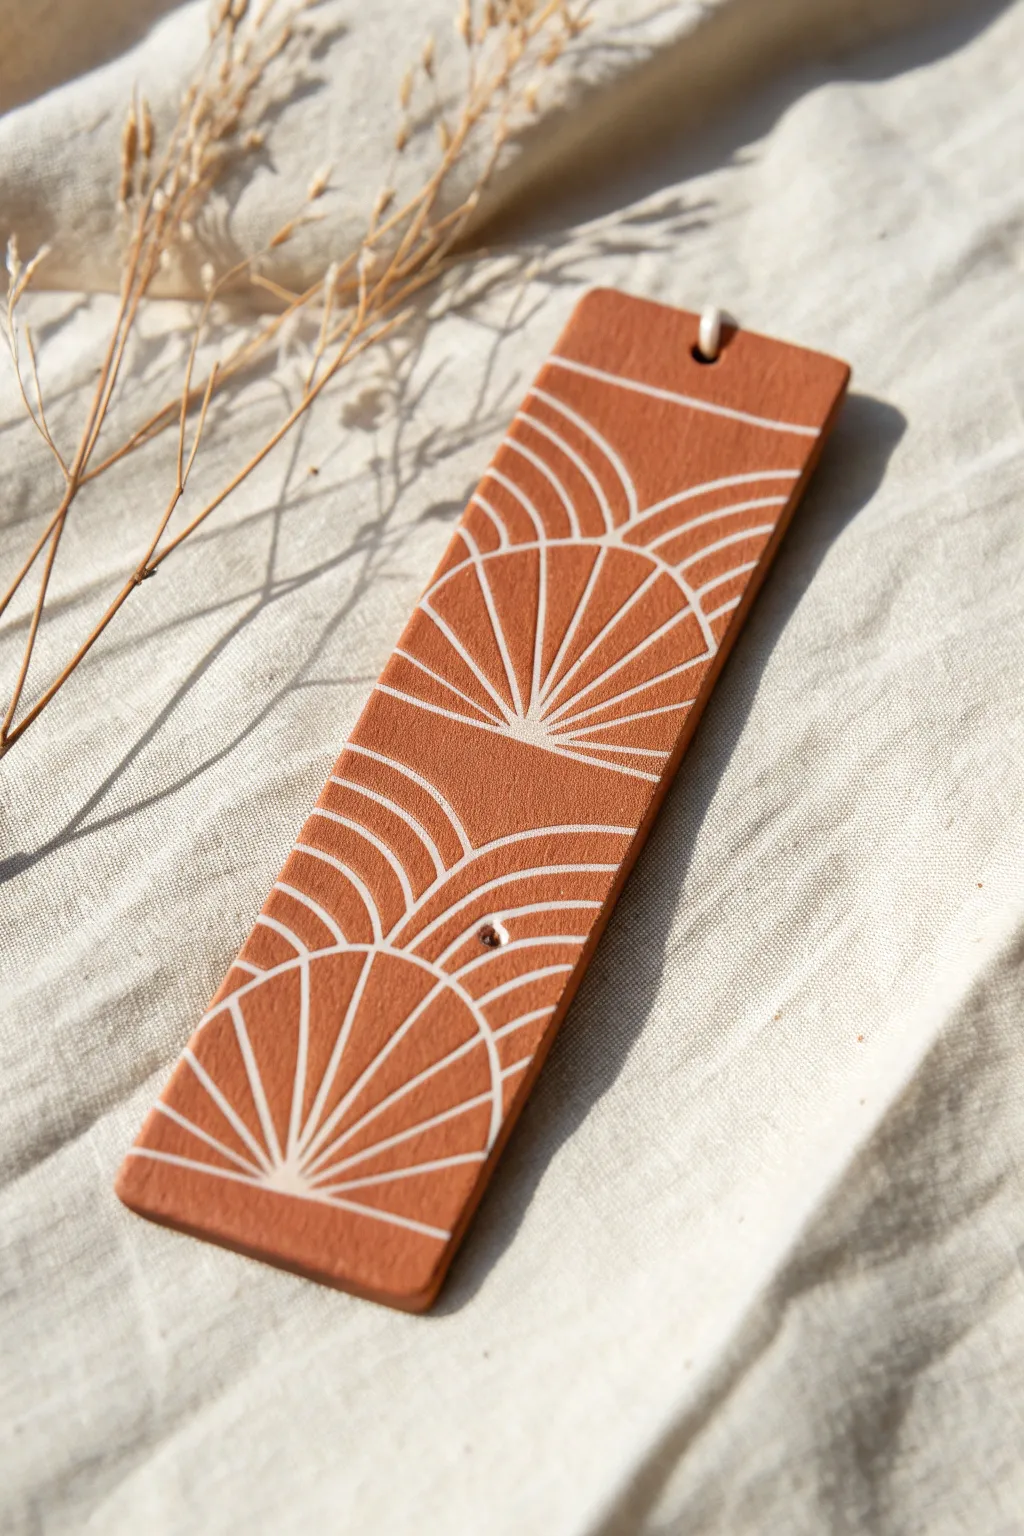
This elegant bookmark combines the warmth of terracotta-colored clay with crisp white linework for a modern bohemian aesthetic. The technique essentially creates an inlay effect, where paint settles into carved grooves to reveal a striking geometric fan design.
How-To Guide
Materials
- Terracotta colored polymer clay
- Rolling pin or pasta machine
- Sharp crafting scalpel or X-Acto knife
- Ruler
- Circle cutter (optional, for guidelines) or a steady hand
- Small stylus or needle tool for etching
- White acrylic paint
- Paper towels or baby wipes
- Sandpaper (various grits from 400 to 1000)
- Oven for baking
- Small drill bit (optional, if hole isn’t pre-punched)
Step 1: Preparation & Shaping
-
Condition the clay:
Begin by thoroughly kneading your terracotta polymer clay until it is soft and malleable. Warm hands help this process significantly. -
Roll out a slab:
Roll the clay flat to a consistent thickness of about 3mm. Using a pasta machine on a medium setting ensures the most even result, but a rolling pin works too. -
Cut the rectangle:
Using your ruler and a sharp blade, cut a clean rectangle approximately 2 inches wide by 6 inches long. Smooth the cut edges gently with your finger to remove any sharpness. -
Create the hanging hole:
Use a small straw or a circular cutter to punch a hole near the top center of the rectangle. This is where a tassel or ribbon can eventually go.
Step 2: Carving the Pattern
-
Draft the arches:
Lightly sketch the repeating fan shapes onto the raw clay using a needle tool. Don’t press deep yet; just create faint guidelines. The pattern consists of alternating semi-circles stacked on top of each other. -
Deepen the main arcs:
Once happy with the placement, go over your main semi-circle lines with the needle tool or a small stylus, pressing firmly to create a distinct groove. The depth needs to be enough to hold paint later. -
Add radiating lines:
Draw the straight lines radiating from the center base of each fan to the outer edge. Space them evenly to mimic rays of light or shell ridges. -
Clean up burrs:
Carving often lifts tiny bits of clay (burrs) along the edges of the lines. Gently smooth these down with a fingertip or carefully slice them off, so the surface remains flat. -
Bake the clay:
Place your carved bookmark on a ceramic tile or baking sheet. Bake according to your specific brand’s package instructions—usually around 275°F (135°C) for 30 minutes. -
Cool completely:
Allow the piece to cool fully before moving to the next step. Painting warm clay can cause the acrylics to dry too fast and become gummy.
Messy Lines?
If wiping removes too much paint from the grooves, your carving was too shallow. Re-carve slightly and re-paint. If paint streaks remain on top, use rubbing alcohol on a Q-tip.
Step 3: The Inlay Process
-
Apply the paint:
Squeeze a generous amount of white acrylic paint onto the surface. Don’t be shy here; you want to work the paint deep into every carved groove you created. -
Let it sit briefly:
I like to let this dry briefly—just for a minute or two—so the paint adheres to the textured grooves, but isn’t fully cured on the surface. -
Wipe the surface:
Take a slightly damp paper towel or baby wipe and wipe across the surface. The goal is to remove the paint from the flat top layer while leaving the white paint trapped inside the lines. -
Repeat if necessary:
If the white lines look faint, apply a second coat of paint and repeat the wipe-off process to build opacity.
Go Metallic
Swap the white acrylic paint for gold or copper leaf paint. The metallic inlay against the matte terracotta creates a stunning, high-end architectural look.
Step 4: Finishing Touches
-
Let dry fully:
Allow the acrylic paint to dry completely inside the grooves. -
Sand for clarity:
For the crispest lines, wet-sand the surface lightly with fine-grit sandpaper (start at 400, finish with 1000). This removes any stubborn paint film from the terracotta areas. -
Buff (Optional):
Rub the bookmark vigorously with a piece of denim or a soft cotton cloth to give the clay a smooth, professional sheen. -
Add a cord:
Thread a leather cord or ribbon through the top hole to complete your bookmark.
Enjoy using your new handcrafted marker for your next reading adventure
Faux Knit and Sweater Stamps
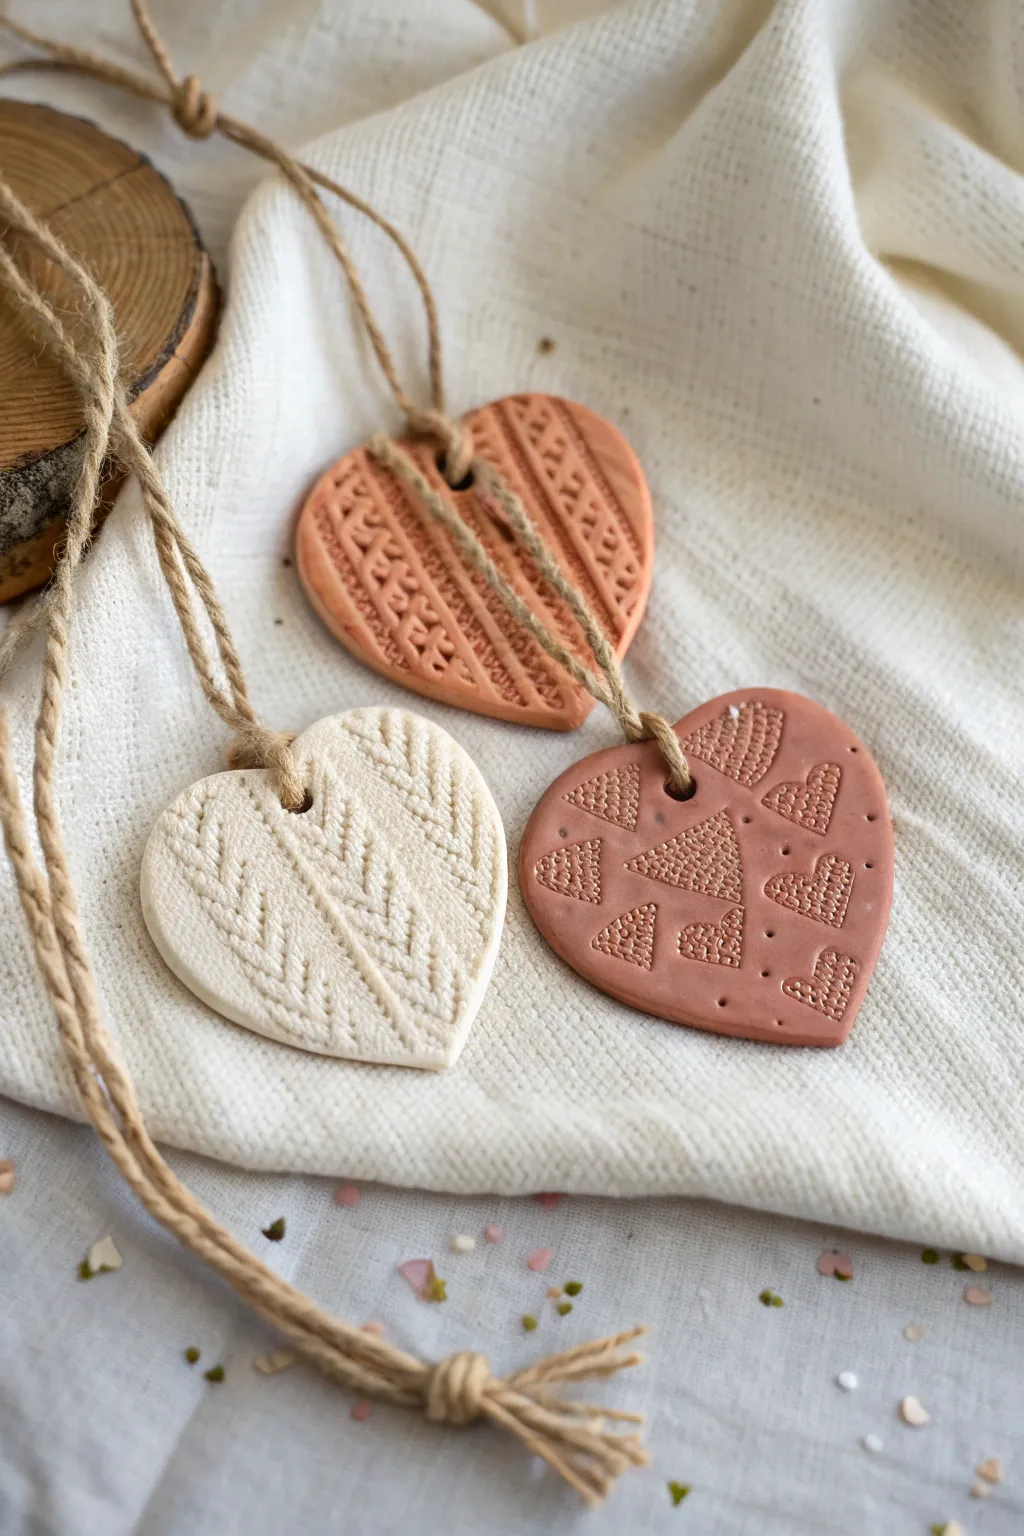
Capture the warmth of a favorite winter sweater in these charming clay ornaments. Using simple stamping techniques, you will create textured hearts that feature faux-knit patterns and delicate geometric imprints.
Step-by-Step
Materials
- Air-dry clay (white and terracotta colors)
- Heart-shaped cookie cutters
- Rolling pin
- Parchment paper or craft mat
- Knit texture stamp or an old piece of coarse sweater/fabric
- Geometric pattern stamps or textured tools
- Drinking straw or skewer (for the hole)
- Jute twine or rustic string
- Fine-grit sandpaper
- Clear matte varnish (optional)
Step 1: Preparation & Rolling
-
Prepare your clay:
Start by kneading your white or terracotta clay until it is soft, pliable, and free of cracks. If you are using two colors like in the example, keep them separate to avoid mixing. -
Set up your workspace:
Lay down parchment paper or a non-stick craft mat to protect your table and prevent the clay from sticking. -
Roll out the slab:
Use a rolling pin to flatten the clay into an even slab, aiming for a thickness of about 1/4 inch (6mm). This thickness ensures the ornament is sturdy but not too heavy.
Step 2: Texturing the Faux Knit
-
Position your texture:
To create the white ‘cable knit’ heart, take your knitting texture stamp or a scrap of actual coarse knit fabric and place it gently over the rolled clay. -
Impress the pattern:
Roll your rolling pin firmly over the stamp or fabric. Apply even pressure so the ‘yarn’ details transfer clearly without making the clay too thin. -
Check the impression:
Carefully peel back the texture tool to reveal the faux knit design. If the impression is too light, you can try re-aligning and pressing harder, though it’s easiest to re-roll the clay and start fresh. -
Create geometric accents:
For the terracotta hearts, press individual geometric or patterned stamps into the smooth clay slab instead of an all-over texture. Vary the pressure to create depth. -
Add detail dots:
Use a small, blunt tool or the end of a paintbrush to poke tiny decorative holes or dots around your stamped shapes for added visual interest.
Use Cornstarch
Dust your stamps or fabric lightly with cornstarch before pressing into the clay. This acts as a release agent and prevents the clay from getting stuck in the intricate texture grooves.
Step 3: Cutting & Finishing
-
Cut the shapes:
Position your heart-shaped cookie cutter over the most interesting part of your textured clay. Press down firmly to cut the shape. -
Release the shape:
Give the cutter a little wiggle on the surface to ensure the edges are clean, then lift the clay heart away from the excess scrap material. -
Smooth the edges:
Dip your finger in a tiny bit of water and gently run it along the cut edges of the heart to smooth out any roughness or loose bits of clay. -
Create the hanging hole:
Use a drinking straw to punch a clean, circular hole near the top center of the heart. The straw removes the clay plug neatly. -
Begin drying:
Transfer the hearts to a clean, flat surface to dry. I prefer to place them on a wire rack after a few hours to let air circulate underneath. -
Flip occasionally:
During the 24-48 hour drying period, flip the hearts over carefully once or twice. This helps prevent them from warping as the moisture evaporates. -
Sand for perfection:
Once fully dry and hard, use fine-grit sandpaper to gently buff away any sharp flashing on the edges. -
Seal (Optional):
For longevity, brush on a coat of clear matte varnish. This will protect the clay without ruining the natural, matte aesthetic.
Add a Wash
Make the texture pop by applying a diluted dark acrylic paint wash over the dry clay. Quickly wipe it off the surface, leaving paint only in the deep crevices for an antique look.
Step 4: Assembly
-
Cut the twine:
Cut a length of jute twine or rustic string, roughly 8 to 10 inches long, depending on how low you want the ornament to hang. -
Loop and knot:
Fold the twine in half and push the loop through the hole from front to back. Pull the tails through the loop to create a lark’s head knot, or simply tie it securely at the top.
Now you have a set of cozy, textured hearts ready to hang or gift to a friend
Pattern Sampler Tiles Library
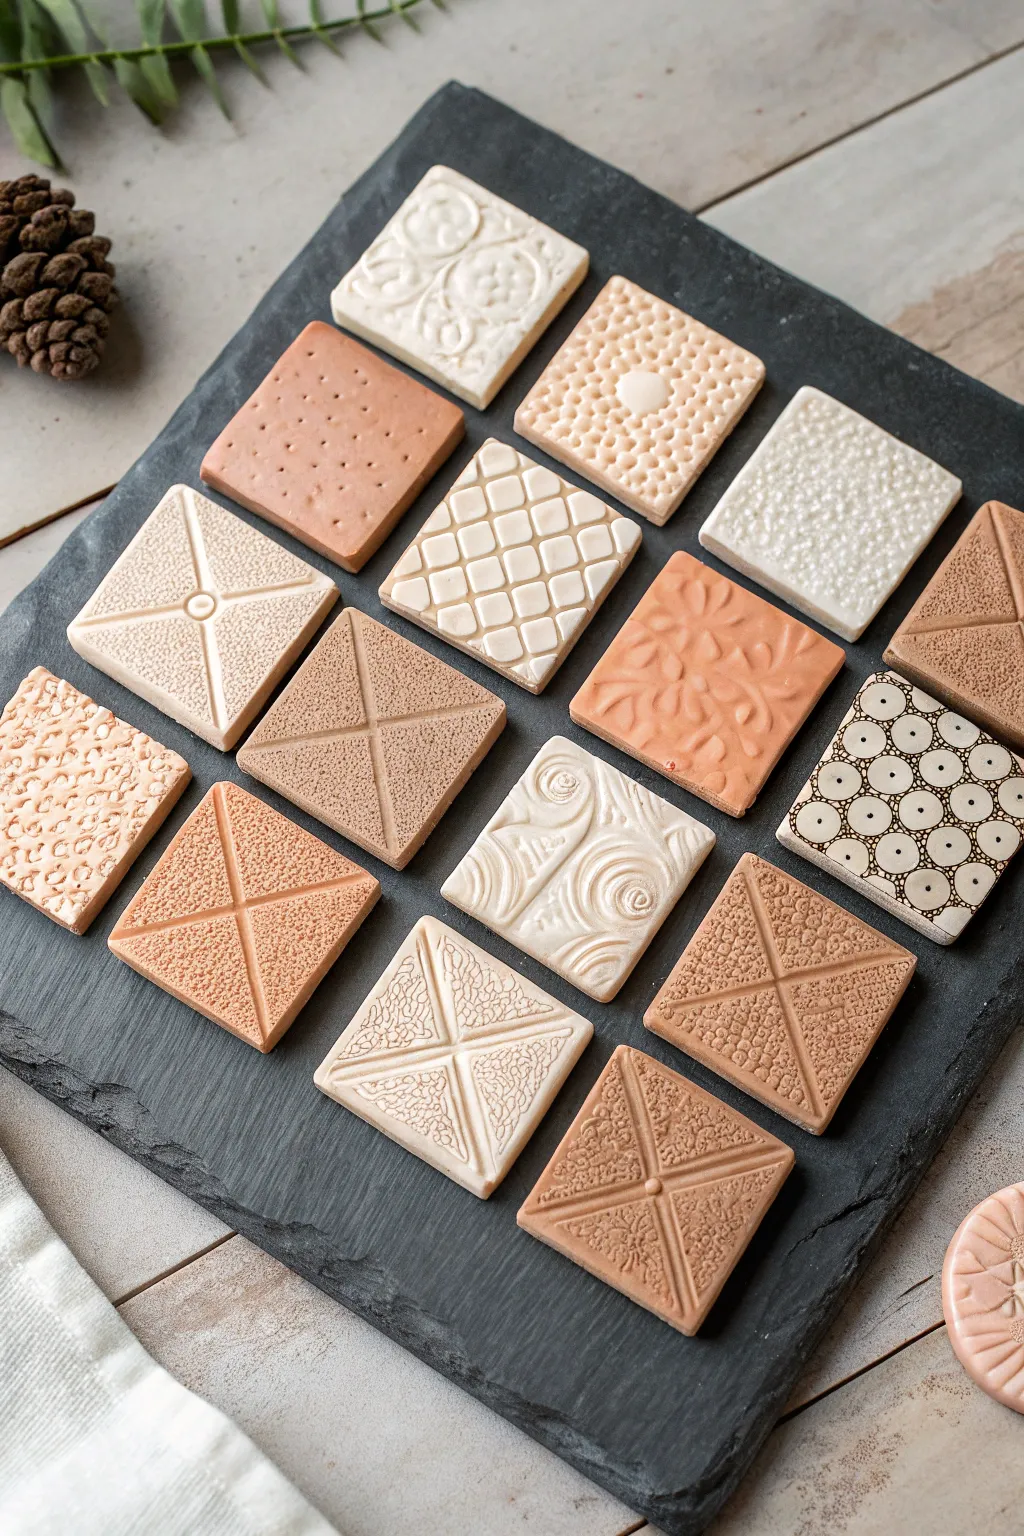
Discover the endless possibilities of surface design with this elegant library of clay pattern tiles. Displayed on a slate board, these monochromatic squares showcase techniques ranging from simple stamping to detailed geometric carving.
Detailed Instructions
Materials
- Polymer clay or air-dry clay (in cream, tan, and terracotta colors)
- Clay roller or pasta machine
- Square cookie cutter (approx. 1.5 – 2 inches)
- Needle tool
- Texture sheets or patterned rollers
- Found objects for stamping (lace, buttons, burlap)
- Small circle cutters or straw tips
- Ball stylus tool
- Black acrylic paint (for the intricate circle pattern)
- Fine-grit sandpaper
- Slate cheese board or similar display surface
Step 1: Base Preparation
-
Condition the Clay:
Begin by conditioning your clay until it is soft and pliable. Mix colors if desired to create a range of natural tones from white to deep terracotta. -
Roll Uniform Sheets:
Roll out your clay into even sheets. I find that a thickness of about 1/4 inch (6mm) works best to prevent warping while allowing enough depth for texture. -
Cut the Squares:
Using your square cutter, punch out 15 identical tiles. Clean up any rough edges with your finger or a smoothing tool before texturing.
Step 2: Creating the Textures
-
Geometric Grids:
For the quilt-like patterns, use a ruler and a dull knife or needle tool to gently score diagonal grid lines. Press deeply enough to see the shadow, but not through the clay. -
Floral Relief:
Create the raised floral tile by pressing a detailed rubber stamp or a piece of textured lace firmly into a cream-colored square. -
Dot Work:
Take a needle tool or small ball stylus to poke repeating holes. For the tile in the top left row, make random, shallow pokes to mimic a porous stone texture. -
Linear Divisions:
Several tiles feature an ‘X’ or cross division. Use a long blade to impress these straight lines, dividing the square into four triangular quadrants. -
Dual Textures:
On the divided tiles, leave two quadrants smooth and texture the opposing two. Press a piece of sandpaper or a rough sponge into the clay to create the grainy contrast seen in the tan squares. -
Swirl Impressions:
For the white swirl tile, use a small coil of wire or a dedicated swirl stamp. Press into the clay at different angles to create an overlapping, organic flow. -
Bubble Texture:
Use the end of a drinking straw or a tiny circle cutter to press rows of circles into a tan tile, creating a honeycomb or bubble wrap effect. -
Detailed Carving:
For the elaborate black-and-white tile, press a complex geometric stamp into the clay. If drawing by hand, use a fine needle tool to etch circles and dots.
Sticky Stamps?
If your stamps are sticking to the clay, dust them lightly with cornstarch (for polymer) or water (for ceramic) before pressing down.
Step 3: Finishing and Display
-
Baking or Drying:
Follow the manufacturer’s instructions for your specific clay. If baking polymer clay, tent it with foil to prevent scorching the lighter colors. -
Highlighting the Pattern:
Once cool or dry, tackle the geometric circle tile. Brush a wash of diluted black acrylic paint into the grooves, then immediately wipe the surface with a damp cloth to leave dark lines. -
Sanding Edges:
Gently sand the sides of each tile with fine-grit sandpaper to ensure they are perfectly square and professional-looking. -
Final Arrangement:
Arrange the finished tiles on a dark slate board. Mix the colors and textures in a pleasing grid, alternating between light and dark tones for visual balance.
Make it Magnetic
Glue small circular magnets to the back of each finished tile to turn your texture sampler into a distinctive refrigerator set.
Enjoy arranging your miniature gallery of textures