I never get tired of seeing a crisp paw impression appear in soft clay—it’s such a tiny, perfect snapshot of your pet. These clay paw print ideas are my go-to ways to personalize, decorate, and display that print so it feels truly special.
Classic Round Paw Print Plaque
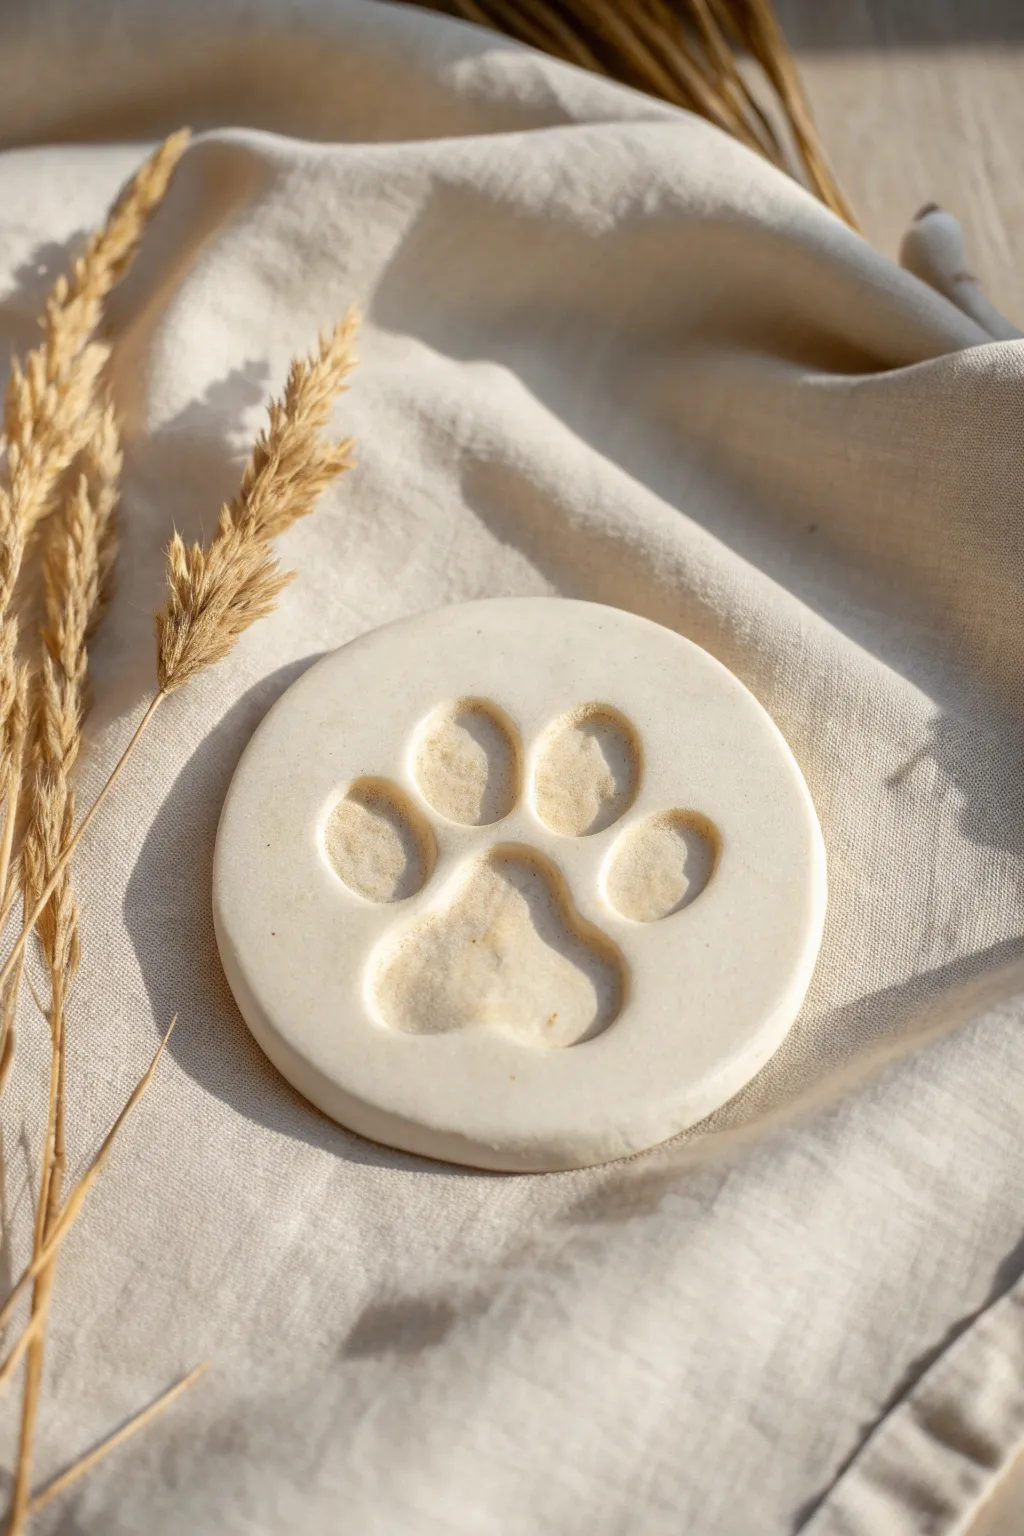
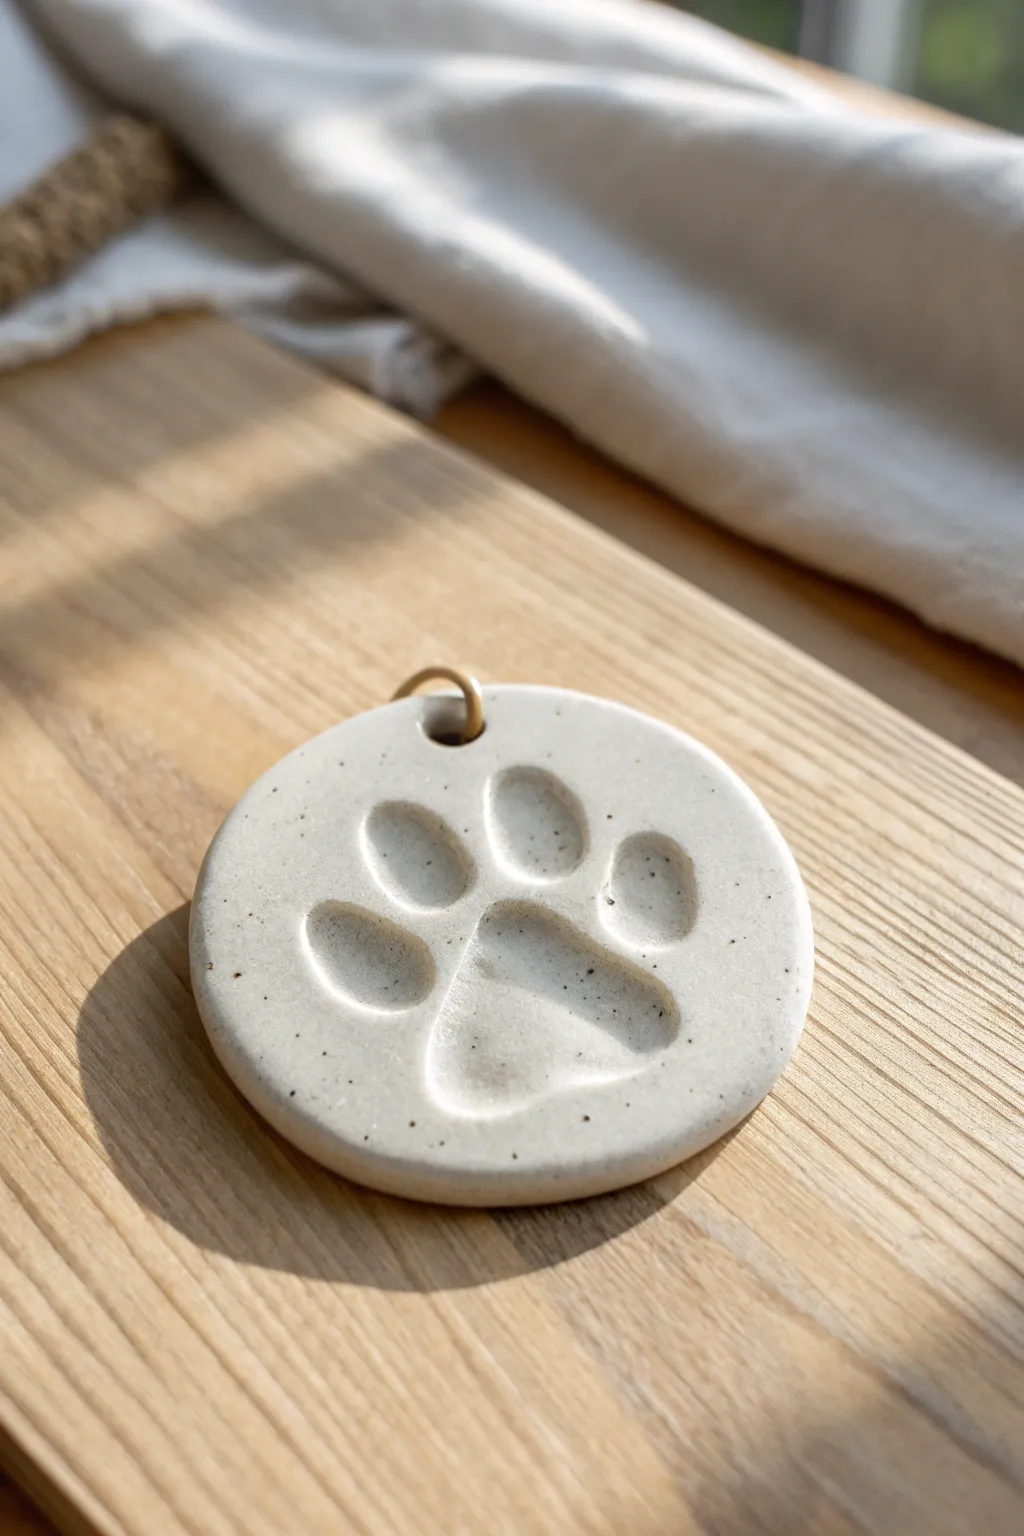
Capture a moment in time with this minimalist and elegant round paw print plaque. The design relies on the clean simplicity of white air-dry clay and a deep, crisp impression to create a stunning, natural-looking memento.
Step-by-Step Guide
Materials
- White polymer clay or premium air-dry clay (smooth texture)
- Circular cookie cutter or jar lid (approx. 4-5 inches)
- Rolling pin or smooth glass bottle
- Parchment paper or non-stick craft mat
- Fine-grit sandpaper (400-600 grit)
- Small bowl of water
- Clear matte varnish (optional)
- Soft cloth
Step 1: Preparation and Rolling
-
Condition the Clay:
Begin by working a handful of white clay in your hands. Knead it thoroughly until it is warm, pliable, and free of any air pockets or cracks. -
Set Up Surface:
Lay down your parchment paper or non-stick craft mat on a flat, stable table. This prevents sticking and ensures you can move the clay later without distortion. -
Initial flattening:
Form the clay into a smooth ball in your palms, then place it centrally on your mat. Gently press it down with your palm to create an initial puck shape. -
Roll to Thickness:
Using your rolling pin, roll the clay out evenly. Aim for a thickness of about 1/4 to 1/2 inch. You want it substantial enough to take a deep impression without cracking the bottom. -
Smooth the Surface:
Dip your finger lightly in water and run it over the surface of the rolled clay to remove any rolling lines or fingerprints. A flawless surface is key for this classic look.
Step 2: Shaping and Impression
-
Cut the Circle:
Place your circular cutter or jar lid onto the clay. Press down firmly and evenly to cut a clean shape. Remove the excess clay from around the outside before lifting the cutter. -
Soften Edges:
The cutter can leave a sharp edge. Gently run a slightly damp finger around the rim of your circle to round it off slightly for a softer, more finished appearance like the one in the photo. -
Position the Paw:
Bring your pet over to the workstation. If using a dog, ensure their paw pads are clean and dry. Center their paw hovering over the clay disc to check spacing. -
Press Firmly:
Support the paw and press it firmly into the clay. Apply pressure specifically to each toe pad and the main palm pad to ensure a uniform depth. Don’t worry if it’s not perfect on the first try; you can re-roll the clay if needed. -
Clean Removal:
Lift the paw straight up quickly to avoid dragging the clay. Wipe any clay residue off your pet’s paw immediately. -
Inspect and Refine:
Look closely at the impression. If there are tiny nail marks you don’t want, you can smooth them over gently with a modeling tool or your finger, keeping just the pads for a graphic look.
Paw Prep Pro-Tip
Trim the hair between your pet’s toe pads before printing. Excess fur can create textured marks in the clay that detract from the clean, distinct shape seen in the example image.
Step 3: Finishing Touches
-
Slow Drying:
Place the clay on a flat surface in a cool, dry area away from direct sunlight. Let it dry for at least 24-48 hours. I find flipping it over halfway through helps it dry evenly and prevents curling. -
Sanding:
Once fully cured and hard, take your fine-grit sandpaper and very gently buff the edges and surface. This removes any tiny burrs and gives it that professional, stone-like texture. -
Final Wipe:
Use a soft, dry cloth to wipe away all sanding dust. Ensure the crevices of the paw print are free of dust. -
Seal (Optional):
If you want to protect the keepsake from dirt over time, apply a very thin layer of matte varnish. This preserves the natural ‘raw clay’ look while adding durability.
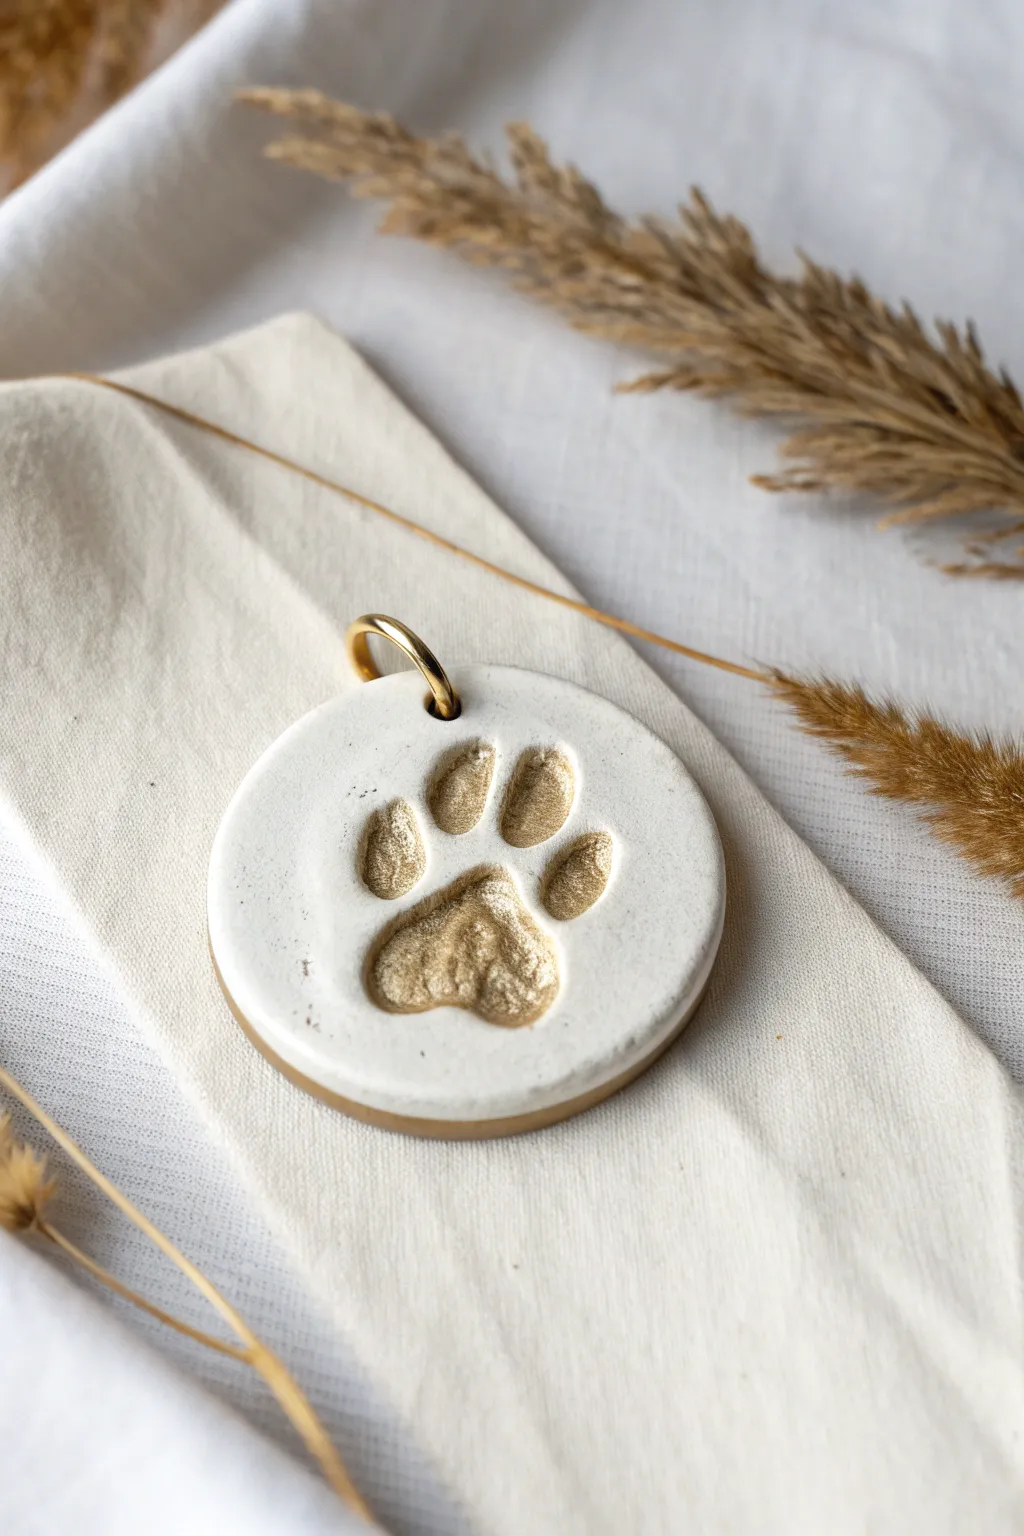
Gilded Upgrade
Once the clay is fully dry, use a small detail brush to paint the inside of the paw impression with gold liquid leaf paint. The metallic shine against the white matte clay looks incredibly chic.
Place your beautiful plaque on a shelf or mantlepiece to cherish as a permanent reminder of your furry friend


Name and Date Stamped Under the Print
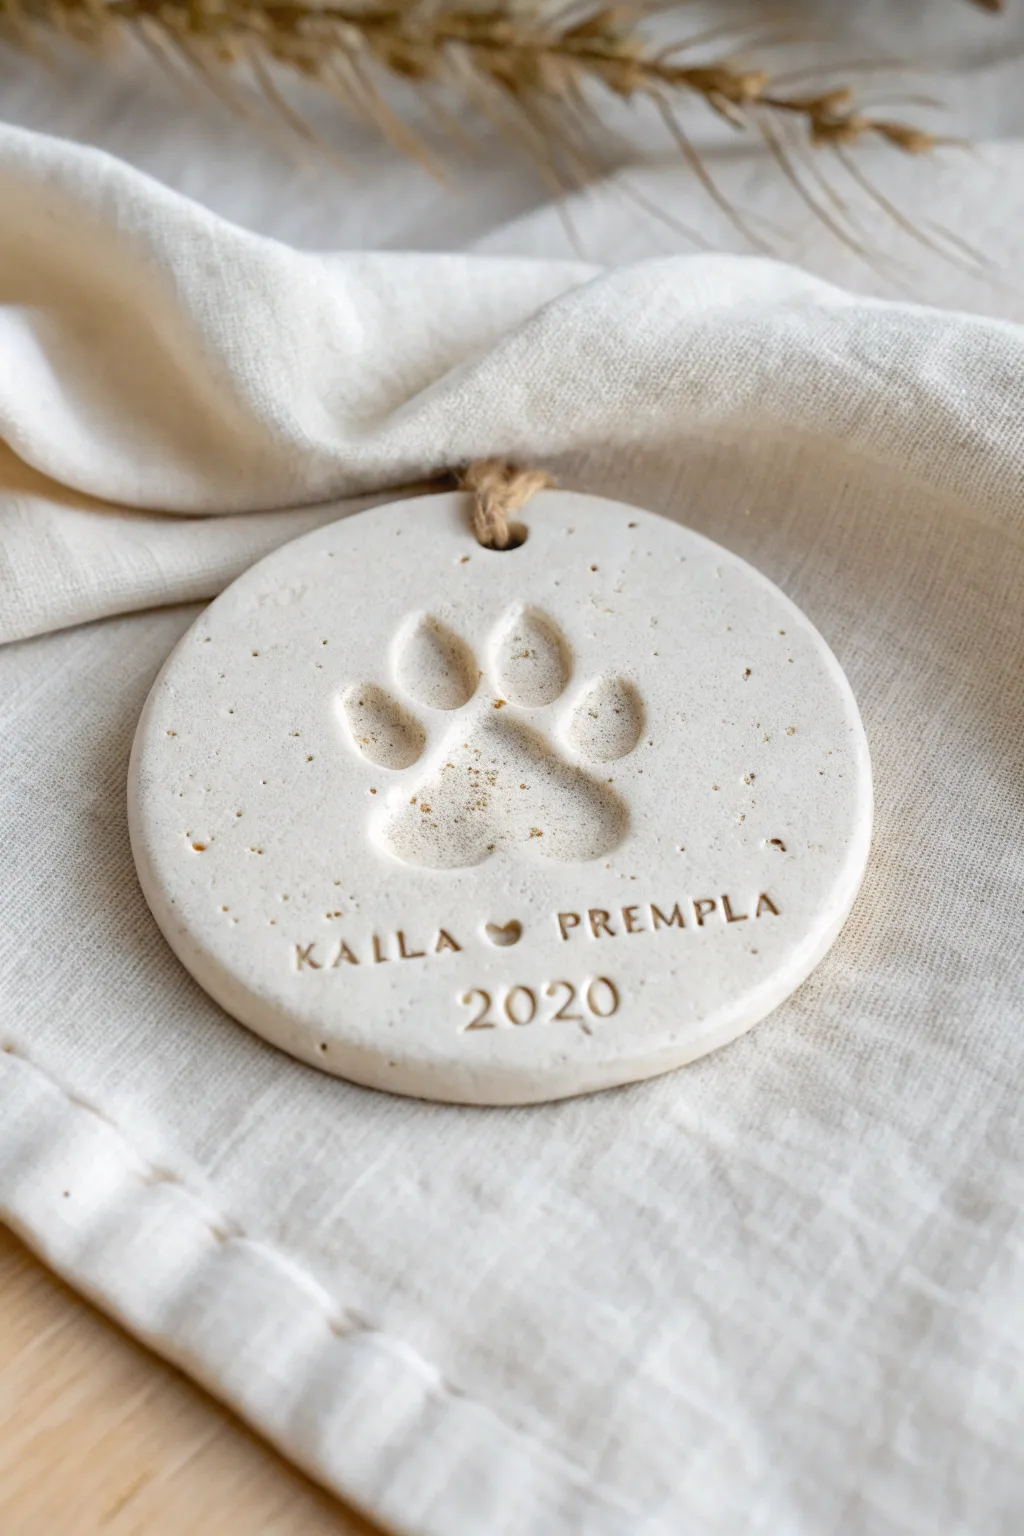
Create a cherished keepsake that captures your pet’s memory forever with this elegant clay ornament. The speckled, natural finish and personalized stamping give it a sophisticated, heirloom quality perfect for display year-round.
Detailed Instructions
Materials
- Air-dry clay (white or stone effect)
- Rolling pin
- Round cookie cutter (approx. 3-4 inches)
- Small alphabet stamp set
- Small heart stamp
- Number stamp set
- Drinking straw or skewer
- Fine-grit sandpaper
- Jute twine
- Parchment paper
- Bowl of water
- Sponge
Step 1: Preparation & Impression
-
Prepare your workspace:
Lay down a sheet of parchment paper on a flat, stable surface. Take a ball of air-dry clay roughly the size of a tennis ball and knead it briefly to warm it up. -
Roll the clay:
Use your rolling pin to flatten the clay to an even thickness of about 1/4 inch. If you want that natural stone look shown in the photo, you can mix a pinch of coffee grounds or sand into the clay before rolling. -
Cut the shape:
Press your round cookie cutter firmly into the rolled clay. Lift the excess clay away from the outside of the cutter before removing the cutter itself to keep the circle perfect. -
smooth the edges:
Dip your finger in a little water and gently run it along the cut edge of the circle to smooth out any sharpness or burrs left by the cutter. -
Capture the print:
Gently but firmly press your pet’s clean paw into the center of the clay disc. Apply even pressure to each toe pad and the main pad to ensure a deep, clear impression. -
Refine the print:
If the impression edges look a bit rough, use a slightly damp finger or the back of a small spoon to smooth the interior of the paw print indentations.
Clean Lines
To keep the stamped letters crisp, coat the stamp faces lightly with cornstarch before pressing them into the clay. This prevents sticking and dragging.
Step 2: Stamping & Finishing
-
Check spacing:
Before stamping, lightly arrange your letter stamps on the table to measure how much space the names will take up to ensure they are centered. -
Stamp the names:
Press the small alphabet stamps into the clay below the paw print in a gentle curve or straight line. Use the heart stamp as a spacer between names if desired. -
Add the date:
Align your number stamps underneath the names and press them in to record the year. I find it helpful to start with the middle numbers to keep everything symmetrical. -
Create the hanging hole:
Use a drinking straw or a skewer to punch a hole near the top edge of the ornament. Twist the straw as you pull it out to remove the clay core cleanly. -
Initial drying:
Leave the ornament on the parchment paper in a cool, dry place. Flip it over gently after about 12 hours so the bottom can breathe and dry evenly. -
Full cure:
Allow the clay to dry completely for 24 to 48 hours. It will turn a lighter matte white color when fully dry. -
Sand the surface:
Once fully hard, take a piece of fine-grit sandpaper and very lightly buff the surface and edges to remove any fingerprints or imperfections. -
String it up:
Thread a length of jute twine through the top hole. Tie a knot at the base of the loop to secure it, leaving enough length to hang it easily.
Gilded Touch
Once dry, use a small detail brush to paint liquid gold leaf into the recesses of the paw print or the stamped letters for a luxurious, shimmering highlight.
Hang your beautiful new keepsake where it can be admired as a lasting tribute to your furry friend


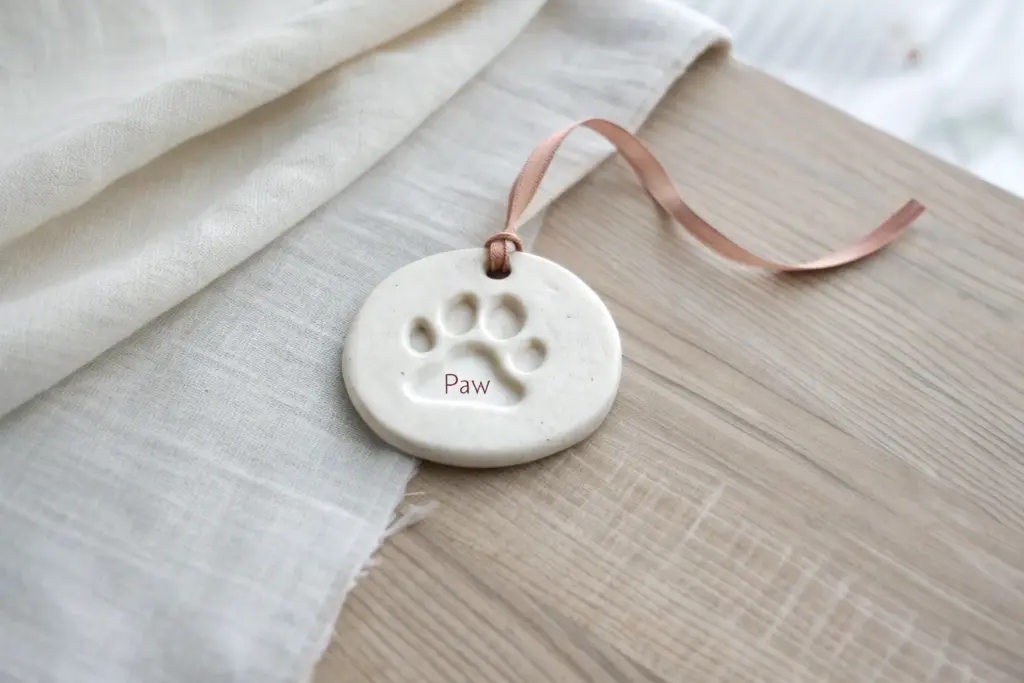
Hanging Ornament With a Clean Ribbon Hole
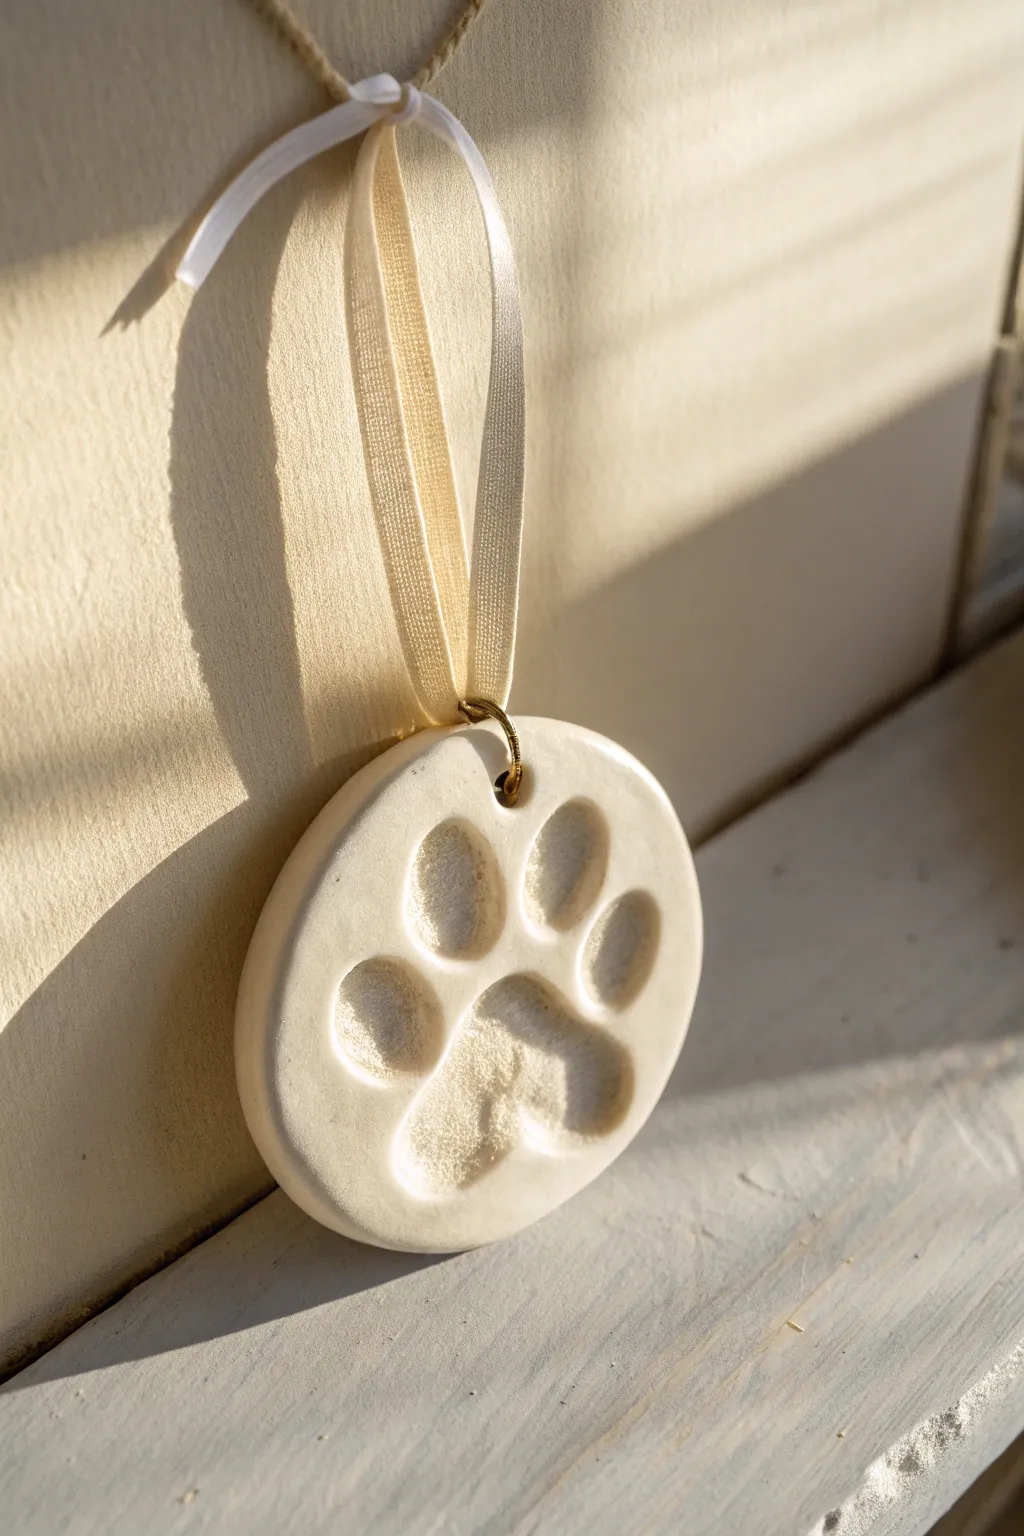
Immortalize your furry friend’s footprint with this elegant and minimalist keepsake that hangs beautifully in any home. The simple, clean design features a smooth clay disc with a distinct impression, finished with a classic ribbon for a professional look.
Step-by-Step Tutorial
Materials
- White polymer clay or air-dry clay (smooth texture)
- Small rolling pin
- Circle cookie cutter (approx. 3-4 inches)
- Parchment paper or non-stick craft mat
- Small metal jump ring (gold or silver)
- Needle tool or toothpick
- Grossgrain or satin ribbon (cream or white)
- Fine-grit sandpaper (400-600 grit)
- Matte or satin clay varnish (optional)
- Soft brush
- Your pet’s paw (clean and dry)
Step 1: Preparing the Clay Base
-
Condition the Clay:
Begin by taking a handful of your white clay and kneading it in your hands. Warm it up until it is pliable and free of any cracks. -
Roll it Out:
Place the clay onto a sheet of parchment paper. Use your rolling pin to flatten the clay to an even thickness, aiming for about 1/4 inch thick to ensure durability. -
Smooth the Surface:
Run your finger or a very slightly damp sponge lightly over the surface of the clay to remove any rolling pin marks or fingerprints before making the impression. -
Cut the Shape:
Press your circle cookie cutter firmly into the clay. Lift the cutter away and carefully peel off the excess clay from around the circle, leaving the disc on the parchment paper.
Step 2: Impressing and Refining
-
Prepare the Paw:
Ensure your pet’s paw is clean and dry. If using a very sticky clay, you can lightly dust the paw with a tiny bit of cornstarch to prevent sticking. -
Make the Impression:
Gently but firmly press the paw into the center of the clay disc. Apply even pressure to each toe pad and the main pad to get a deep, clear print. -
Lift and Inspect:
Lift the paw straight up to avoid smudging the edges. Check the print for clarity; if it’s too faint, you can squeeze the clay back into a ball and start over. -
Create the Hanging Hole:
Use a needle tool or toothpick to pierce a small hole near the top edge of the disc. Make sure it is centered above the print and leave enough clay margin (about 1/4 inch) so it doesn’t tear later. -
Smooth the Edges:
Dip your finger in water (for air-dry clay) or baby oil (for polymer) and gently run it around the cut edge of the circle to soften any sharp angles.
Clean Edges Pro-Tip
To fix hairline cracks or rough spots on air-dry clay pieces after they dry, make a thick paste with a bit of clay and water, apply it to the crack, let dry, and sand smooth.
Step 3: Finishing Touches
-
Dry or Bake:
Follow the manufacturer’s instructions for your specific clay. If baking polymer clay, use an oven thermometer to prevent scorching. If air-drying, let it sit for 24-48 hours, flipping halfway through. -
Sand for Perfection:
Once fully hardened, take your fine-grit sandpaper and gently buff the edges and surface. I find this step crucial for getting that porcelain-like finish shown in the photo. -
Clean the Dust:
Wipe the ornament down with a barely damp cloth to remove any sanding dust from the crevices of the paw print. -
Apply Varnish (Optional):
If you want a slight sheen or extra protection, apply a thin layer of matte or satin varnish using a soft brush and let it dry completely. -
Attach the Jump Ring:
Open the small metal jump ring with pliers, loop it through the hole you created earlier, and close it securely. This prevents the ribbon from rubbing against the clay potentially causing wear. -
Thread the Ribbon:
Cut a length of cream ribbon. Fold it in half to create a loop, pass the folded end through the jump ring, and pull the tails through the loop to secure it, or simply tie a classic knot.
Add a Golden Touch
Before sealing, use a small detail brush to paint inside the paw impression with liquid gold leaf or metallic acrylic paint for a luxurious, high-end finish.
Hang this lovely memento where it catches the light, reminding you always of your pet’s loyal steps


Freestanding Tile on a Small Stand
Create a timeless keepsake of your furry friend with this freestanding clay tile, featuring a deeply impressed paw print in a natural, speckled finish. This project combines simple hand-building techniques with a modern aesthetic, perfect for displaying on a shelf or desk.
Detailed Instructions
Materials
- Air-dry clay (white or cream)
- Small rolling pin
- Square cookie cutter or knife
- Ruler
- Sandpaper (fine grit)
- Dried coffee grounds or fine sand (for speckling)
- Small wooden easel stand
- Bowl of water
- Parchment paper
Step 1: Preparing the Clay
-
Condition the clay:
Start by kneading a handful of air-dry clay until it is soft and pliable. If you want to achieve the speckled look shown in the photo, sprinkle in a teaspoon of dried coffee grounds or fine sand while kneading to distribute the texture evenly. -
Roll out the slab:
Place your clay ball onto a sheet of parchment paper to prevent sticking. Use your rolling pin to flatten the clay into an even slab. Aim for a thickness of about 1/2 inch to ensure the tile is sturdy enough to stand upright. -
Cut the shape:
Use a large square cookie cutter to stamp out your tile shape. Alternatively, measure a perfect square with a ruler and cut along the lines using a sharp craft knife. Remove the excess clay around the edges. -
Smooth the edges:
Dip your finger in a little bit of water and run it along the cut edges of the square to soften any sharp corners or roughness. A smooth, rounded edge gives the piece a more professional, finished look.
Cracking Edges?
If edges crack while drying, mix a tiny bit of clay with water to make a paste (slip) and fill in the cracks. Smooth it over with a wet finger and let dry again.
Step 2: Making the Impression
-
Position the paw:
Make sure your pet’s paw is clean and dry. Center their paw gently over the clay square. If your pet is hesitant, you can gently guide their paw or do this while they are resting. -
Press firmly:
Press down firmly but evenly on the paw pads. Ensure you press on each individual toe pad and the main metacarpal pad to get a deep, clear impression. Don’t press so hard that you go through the clay, but firmly enough to create distinct shadows. -
Lift carefully:
Lift the paw straight up to avoid smudging the print. If the print isn’t clear or is off-center, simply ball up the clay, re-roll it, and try again until you are happy with the placement. -
Refine the print:
Sometimes pressing the paw can distort the square shape slightly. Use your ruler to gently push the sides back into a perfect square if needed.
Level Up: Color Wash
Mix acrylic paint with lots of water to create a wash. Brush it into the paw impression and wipe the surface clean, leaving color only in the deep grooves.
Step 3: Finishing Touches
-
Let it dry:
Leave the tile on the parchment paper to air dry. I usually flip the tile over carefully after 24 hours to let the bottom dry evenly. Total drying time can take 48-72 hours depending on humidity. -
Sand the surface:
Once the clay is completely bone dry and hard, take a piece of fine-grit sandpaper and lightly buff the surface and edges. This removes any fingerprints or uneven texture from the initial rolling. -
Seal (Optional):
For longevity, you can apply a matte varnish or sealant. This will protect the clay from moisture and dust without altering the natural stone-like appearance. -
Display:
Place your finished tile onto the small wooden easel stand. Ensure the stand is stable and holds the weight of the tile securely.
Now you have a chic, modern tribute to your pet that blends seamlessly with your home decor

The Complete Guide to Pottery Troubleshooting
Uncover the most common ceramic mistakes—from cracking clay to failed glazes—and learn how to fix them fast.
Paint Infill Just Inside the Paw Impression
This minimalist keepsake highlights the unique texture of your pet’s paw print by infilling the impression with a warm, contrasting cognac color. The result is a clean, modern ornament that looks beautiful hanging in any home.
Step-by-Step Tutorial
Materials
- White air-dry clay or salt dough
- Circle cookie cutter (approx. 3-4 inches)
- Small rolling pin
- Parchment paper
- Straw or skewer (for hole punching)
- Hemp or jute Twine
- Fine-grit sandpaper
- Acrylic paint (Light brown/Cognac shade)
- Small fine-point paintbrush
- Matte clear sealant spray (optional)
Step 1: Shaping the Clay
-
Prepare the workspace:
Lay down a sheet of parchment paper on a flat, sturdy surface to prevent the clay from sticking. -
Roll out the clay:
Take a ball of white air-dry clay and roll it out with your small pin until it is about 1/4 inch thick. Aim for an even thickness so it dries without cracking. -
Cut the shape:
Press your circle cookie cutter firmly into the clay. Before lifting the cutter, give it a tiny shimmy to ensure clean edges, then remove the excess clay from around the circle. -
Smooth the edges:
Dip your finger in a tiny bit of water and run it gently along the cut edge of the circle to smooth out any roughness or loose bits of clay.
Paint Bleeding?
If paint bleeds into the clay pores, use a slightly thicker paint consistency. If mistakes happen, let the paint dry completely, then gently sand the top surface to remove the stray marks.
Step 2: Creating the Impression
-
Position the paw:
Gently guide your pet’s paw to the center of the clay circle. Ensure their pads are clean and dry before pressing. -
Press firmly:
Press down firmly on the large main pad and each toe pad individually to get a deep, clear impression. I find it helps to hold their leg steady while doing this to prevent sliding. -
Create the hanging hole:
Use a drinking straw or a skewer to punch a small hole near the top edge of the circle. Make sure it’s not too close to the edge, or the clay might break later. -
Allow to dry:
Set the ornament aside in a safe, dry place. Let it air dry for 24-48 hours, flipping it over halfway through to prevent curling.
Step 3: Finishing Touches
-
Sand for smoothness:
Once fully dry and hard, use a piece of fine-grit sandpaper to lightly buff the surface and edges. This removes any fingerprints or stray imperfections. -
Dust off debris:
Wipe the ornament with a dry cloth or use a soft brush to remove all the sanding dust from the crevices. -
Load your brush:
Squeeze a small amount of cognac or light brown acrylic paint onto a palette. Use a very fine-point brush, as accuracy is key here. -
Paint the infill:
Carefully paint only the inside of the impressed paw print. The goal is to color the ‘floor’ of the print while keeping the top surface plain white. -
Clean up edges:
If any paint gets onto the top surface, quickly wipe it away with a damp paper towel or wait for it to dry and gently sand it off. -
Seal the piece:
To protect the paint and clay from humidity, give the entire ornament a light coat of matte clear sealant spray and let it dry. -
Add the hanger:
Cut a length of hemp or jute twine. Thread it through the hole you made earlier and tie a secure knot to complete the rustic look.
Add a Glossy Pop
Make the paw print look wet and realistic by adding a layer of dimensional glaze or glossy varnish strictly inside the painted paw area after the matte sealer dries.
Hang your new ornament on a tree or wall hook to cherish that sweet little paw print for years to come
Dark Wash to Bring Out Fine Paw Details
This project creates a beautiful, rustic keepsake by highlighting the unique texture of a pet’s paw print using a simple dark wash technique. The contrast between the smooth, pale clay and the gritty, darkened recesses brings every little detail to life.
Step-by-Step Guide
Materials
- Air-dry clay (white or cream)
- Small rolling pin
- Round cookie cutter (large enough for the paw)
- Fine-grit sandpaper
- Brown acrylic paint (burnt umber or similar earthy tone)
- Water
- Small bowl for mixing
- Soft paintbrush
- Paper towels or a soft rag
- Matte sealant spray or Mod Podge (optional)
Step 1: Creating the Base Impression
-
Prepare the Clay:
Knead a ball of air-dry clay until it is soft, pliable, and free of cracks. If it feels too dry, you can wet your hands slightly while working it. -
Roll Smooth:
Roll the clay out onto a smooth surface to a thickness of about 1/2 to 3/4 of an inch. Ensure the surface is perfectly flat for a clean look. -
Cut the Shape:
Using your large round cookie cutter, press firmly into the clay to create a perfect circle. Remove the excess clay from around the edges before lifting the cutter. -
Capture the Print:
Gently but firmly press the pet’s clean paw into the center of the clay disk. Apply even pressure to each toe pad and the main metacarpal pad to ensure a deep impression. -
Initial Cleanup:
Check the edges of the circle. If the pressure of the paw distorted the round shape, gently nudge the edges back into place or smooth them with a wet finger. -
Dry Completely:
Allow the clay to dry fully according to the package instructions. This usually takes 24-48 hours. I like to flip it over halfway through to ensure the bottom dries evenly.
Uneven Drying?
If the clay starts curling up at the edges while drying, place a lightweight book on top of it (with paper in between) once the surface is firm to the touch to keep it flat.
Step 2: Refining and Sealing
-
Sand the Surface:
Once bone dry, take fine-grit sandpaper and very gently sand the top surface and edges. The goal is to make the raised areas smooth while leaving the texture inside the print rough. -
Dust Off:
Wipe the disk with a dry cloth or soft brush to remove all the clay dust from the sanding process.
Step 3: Applying the Dark Wash
-
Mix the Wash:
In your small bowl, mix a pea-sized amount of brown acrylic paint with a tablespoon of water. You want a very watery, ink-like consistency, not thick paint. -
Apply to Recesses:
Dip your brush into the wash and flood the inside of the paw print. Don’t worry about being neat; make sure the liquid gets into every crevice of the toe pads. -
Let it Settle:
Allow the watery paint to sit in the impression for about 10-15 seconds. This gives the pigment time to settle into the tiny textures of the clay. -
Wipe the Surface:
Take a slightly damp paper towel and wipe across the top surface of the clay. This removes the paint from the high points but leaves it trapped in the deep paw crevices. -
Evaluate the Contrast:
Inspect the print. If the darkness isn’t deep enough, let it dry briefly and repeat the wash process. If you got too much paint on the surface, wipe harder with a clean, damp cloth. -
Create Texture:
For the specific gritty look in the photo, allow small pools of the wash to dry naturally in the deepest parts of the print rather than soaking it all up. This creates that sediment-like effect. -
Final Surface Clean:
Do one last very light sanding on just the topmost surface area surrounding the print to brighten the white clay back up, creating a sharp contrast against the dark wash. -
Seal (Optional):
If you want to protect the finish, lightly spray with a matte sealant. Avoid glossy sprays, as they will diminish the stone-like aesthetic.
Add Subtle Metallics
For a magical touch, mix a tiny bit of gold mica powder into your dark wash. It will settle into the crevices and sparkle only when the light hits it just right.
Now you have a timeless, stone-like record of your furry friend’s paw that highlights every unique detail


What Really Happens Inside the Kiln
Learn how time and temperature work together inside the kiln to transform clay into durable ceramic.
Metallic-Look Medallion Finish
Transform a simple clay impression into an elegant keepsake with this metallic-look medallion finish. The contrast between the matte white clay and the shimmering gold inlay creates a sophisticated, jewelry-like quality perfect for hanging or display.
Step-by-Step Tutorial
Materials
- Air-dry clay (white) or polymer clay
- Rolling pin
- Round cookie cutter (approx. 3-4 inches)
- Fine-grit sandpaper (400-600 grit)
- Liquid gold leaf or high-quality metallic acrylic paint
- Small fine-point paintbrush
- Medium flat paintbrush
- Clear sealant (matte or satin)
- Gold jump ring (large)
- Drill with small bit or a straw (for creating the hole)
- Pet’s paw (for the impression)
Step 1: Shaping the Base
-
Prepare the Clay:
Take a handful of white clay and knead it until it is smooth and pliable. This warms up the material and helps prevent internal air bubbles. -
Roll it Out:
Flatten the clay on a clean, non-stick surface using a rolling pin. Aim for an even thickness of about 1/4 inch to ensure the medallion is sturdy but not too heavy. -
Cut the Shape:
Press your round cookie cutter firmly into the rolled clay to create a perfect circle. Remove the excess clay from around the cutter before lifting the cutter itself. -
Smooth the Edges:
Dip your finger in a little water and gently run it around the cut edge of the circle to smooth out any sharpness or roughness left by the cutter.
Clean Lines Hack
If you accidentally get gold paint on the white surface, let it dry completely, then gently scrape it off with an exacto knife or sand it away lightly.
Step 2: Creating the Impression
-
Position the Paw:
Check your pet’s paw to ensure it is clean and dry. Center the paw over the clay disc, making sure the toes and main pad will fit comfortably within the circle. -
Press Firmly:
Gently but firmly press the paw into the clay. Apply even pressure to each toe pad and the main metacarpal pad to get a deep, clear definition. -
Create the Hanging Hole:
Use a straw or a tool to poke a hole near the top edge of the circle. Make sure it is centered above the print and not too close to the very edge to prevent cracking. -
Allow to Dry:
Place the clay piece in a safe spot to dry completely. If using air-dry clay, I typically let this sit for 24 to 48 hours, flipping it halfway through to prevent curling.
Add a Ribbon
Instead of a jump ring, thread a velvet or silk ribbon through the hole for a softer, organic look perfect for hanging on a wall or hook.
Step 3: Refining and Gilding
-
Sand the Rough Spots:
Once fully cured, use fine-grit sandpaper to gently buff the surface and edges. Focus on smoothing out any fingerprints or uneven textures on the flat white areas. -
Dust Off:
Wipe the medallion with a clean, dry cloth or a soft brush to remove all fine sanding dust. A clean surface is crucial for the paint to adhere smoothly. -
Paint the Impression:
Dip a fine-point brush into your liquid gold leaf or metallic paint. Carefully fill in the recessed areas of the paw print, letting the paint pool slightly for rich coverage. -
Clean Up Lines:
Keep a steady hand and ensure the gold paint stays strictly within the indented print. If you make a mistake, quickly wipe it away with a damp Q-tip before it sets. -
Gild the Edge:
Switch to a flat brush or use the side of your round brush. Paint the entire outer rim of the circle gold to create a finished, framed look. -
Add a Second Coat:
If the gold looks a bit translucent after the first layer dries, apply a second thin coat to the print and the rim for maximum opacity and shine. -
Seal the Piece:
Apply a thin layer of clear matte or satin sealant over the entire white surface to protect the clay from dirt and moisture, avoiding the gold areas if you want to keep their high shine. -
Attach Hardware:
Open a large gold jump ring with pliers. Thread it through the pre-made hole at the top of the medallion and pinch it closed securely.
Hang your finished medallion in a shadow box or on a holiday tree to cherish that precious print for years to come
Marbled Background With a Crisp Paw Print
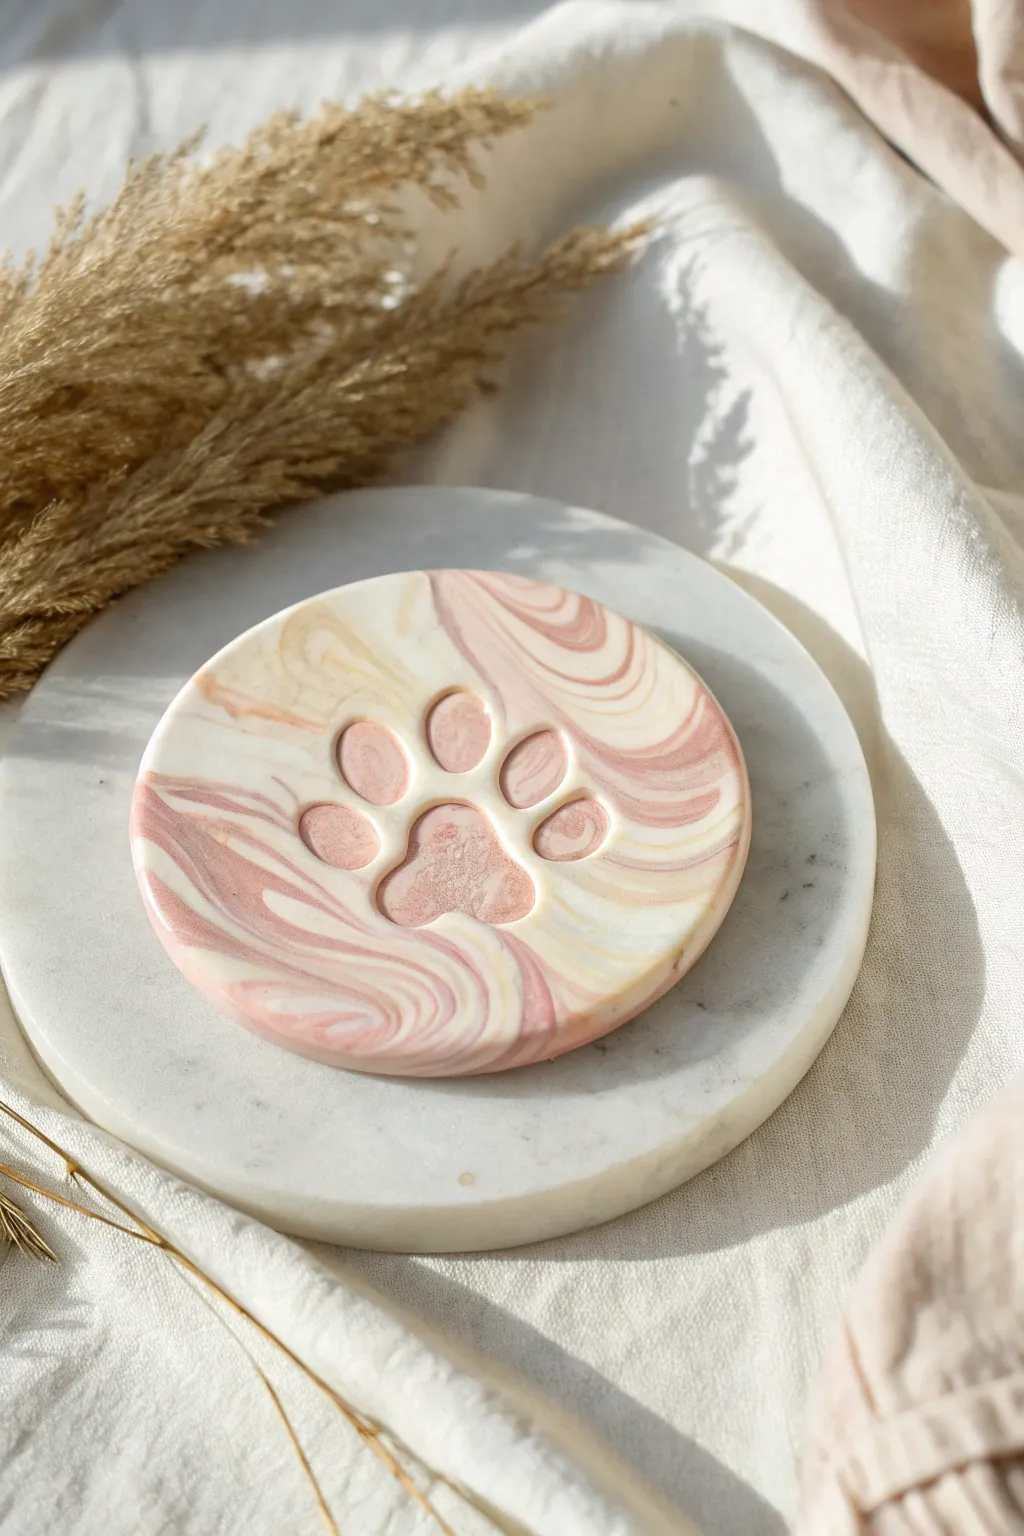
This elegant keepsake combines soft swirls of pink, cream, and white clay to create a sophisticated marbled effect. The result is a smooth, polished disc featuring a crisp paw impression that perfectly captures your pet’s memory.
Step-by-Step Guide
Materials
- Polymer clay (white, pearl, dusty rose, and light beige)
- Acrylic roller or pasta machine
- Round cookie cutter or clay cutter (approx. 4-inch diameter)
- Small paw print stamp or tool (alternatively, your pet’s actual paw if clean)
- Ceramic tile or glass work surface
- Cornstarch or baby powder (release agent)
- Glossy clay varnish or resin (optional)
- Fine-grit sandpaper (400-1000 grit)
- Oven (for baking) and baking sheet
- Parchment paper
Step 1: Marbling the Clay
-
Condition the clay:
Start by kneading each color of polymer clay separately until they are soft and pliable. You will need more white and pearl than the colored clays to keep the look light and airy. -
Form snakes:
Roll each color into long, thin snakes. Aim for the white snakes to be slightly thicker than the colored ones to maintain dominance in the palette. -
Twist together:
Gather your snakes into one bundle and twist them together tightly like a candy cane. This initiates the mixing process without blending the colors completely into a single muddy hue. -
Fold and roll:
Fold the twisted rope in half and roll it out again into a long snake. Repeat this folding and twisting process 2-3 times. Stop as soon as you see fine streaks appearing; overworking it will destroy the distinct marbling. -
Create a ball:
Roll the marbled snake into a tight ball. Ensure there are no air bubbles trapped inside by compressing it firmly between your palms.
Step 2: Shaping and Stamping
-
Flatten the base:
Place the ball on your work surface and gently press it down with your palm. Use your acrylic roller to flatten it into a sheet about 1/4 inch thick. I find rolling in different directions helps keep the pattern random. -
Check the pattern:
Examine both sides of your clay sheet. Often, the underside has a more interesting swirl pattern, so flip it over and choose your favorite side to be the face. -
Cut the circle:
Press your round cutter firmly into the clay sheet. Give it a tiny wiggle to separate the shape, then lift the cutter and peel away the excess clay scrap. -
Smooth the edges:
Dip your finger in a tiny bit of water or baby oil and gently run it along the cut edge of the circle to smooth out any harsh lines or burrs left by the cutter. -
Prepare the stamp:
Lightly dust your paw print stamp or tool with cornstarch. This prevents the tool from sticking to the polymer clay and ensures a clean release. -
Impress the paw:
Position the stamp in the center of the disc. Press down firmly and evenly, ensuring you go deep enough to leave a distinct impression but not so deep that you distort the round shape. -
Clean up edges:
If the stamping process pushed up any clay ridges around the toes, gently pat them down with a silicone tool or your finger to soften the transition.
Clean Cuts Pro Tip
Place a sheet of plastic wrap over the clay before using your round cutter. This creates a soft, domed pillow edge rather than a sharp, flat cut.
Step 3: Baking and Finishing
-
Prepare for baking:
Transfer the clay disc onto a baking sheet lined with parchment paper. To prevent shiny spots on the back, you can bake it on a piece of plain copy paper instead. -
Bake the clay:
Bake according to your polymer clay manufacturer’s instructions (usually around 275°F or 135°C) for about 30 minutes. Let it cool completely in the oven to prevent cracking. -
Sand the surface:
Once fully cooled, wet sand the edges and surface lightly with fine-grit sandpaper (start with 400, finish with 1000) under running water to achieve a buttery smooth finish. -
Buff or glaze:
Dry the piece thoroughly. You can vigorously buff it with a denim cloth for a natural sheen, or apply a thin layer of satin or gloss varnish for a sealed, ceramic-like look.
Add a Little Sparkle
Mix a tiny amount of gold leaf flakes into the translucent or white clay during the kneading phase for subtle metallic veins running through the marble.
Display this beautiful disc on a small easel or use it as a sophisticated ring dish for your vanity

TRACK YOUR CERAMIC JOURNEY
Capture glaze tests, firing details, and creative progress—all in one simple printable. Make your projects easier to repeat and improve.
Soft Color-Dipped Edge Around the Print
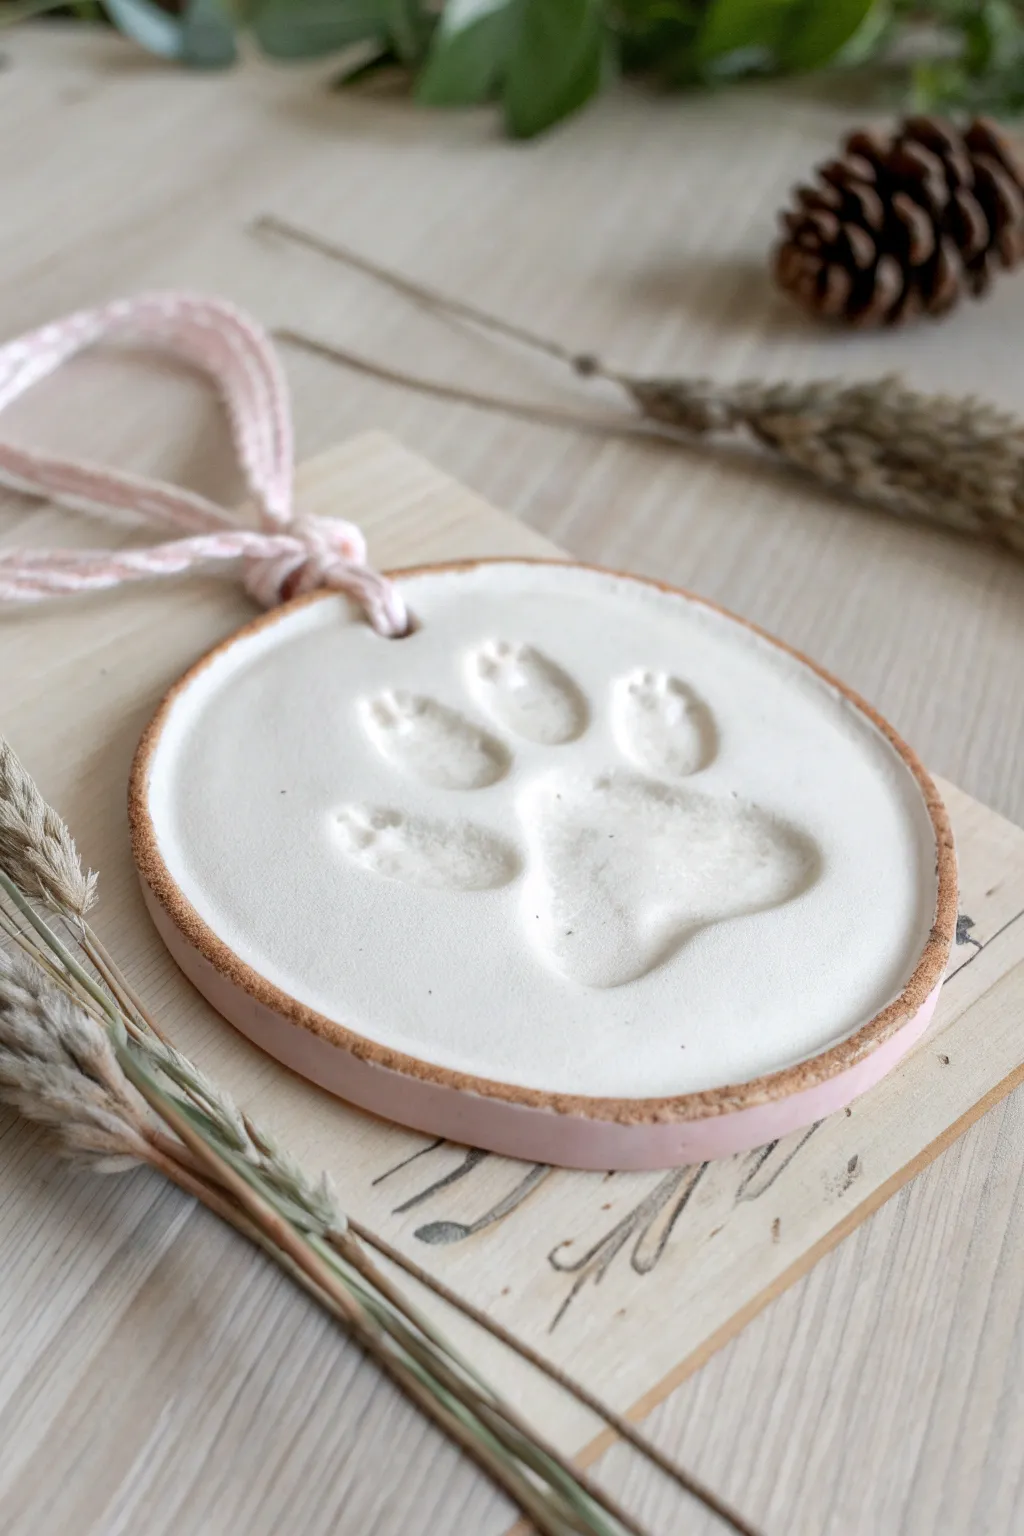
Capture a sweet memory with this elegant paw print ornament featuring a soft, dipped-style edge. The simple white clay highlights the texture of the print, while the painted rim adds a delicate pop of color that frames the impression beautifully.
Step-by-Step Tutorial
Materials
- White air-dry clay or polymer clay
- Rolling pin
- Round cookie cutter (approx. 4 inches)
- Parchment paper or silicone mat
- Sandpaper (fine grit)
- Soft pink acrylic paint
- Metallic bronze or gold acrylic paint (optional for detailing)
- Small flat paintbrush
- Foam sponge brush
- Drinking straw or skewer (for the hole)
- Pink cotton twine or ribbon
- Clear matte sealant spray
Step 1: Preparing the Clay Base
-
Condition the clay:
Begin by taking a handful of white clay and kneading it in your hands until it becomes soft, pliable, and free of cracks. If you are using air-dry clay, keep your hands slightly moist to prevent drying. -
Roll it out:
Place the clay on a sheet of parchment paper. Use a rolling pin to flatten it into an even disk, aiming for a thickness of about 1/4 to 1/2 inch. You want it thick enough to take a deep impression without tearing. -
Cut the shape:
Press your round cookie cutter firmly into the clay to create a perfect circle. Remove the excess clay from around the edges before lifting the cutter to keep the shape distorted. -
Smooth the surface:
Dip your finger in a tiny bit of water and gently run it over the surface and edges of the circle to smooth out any fingerprints or rough textures.
Smooth Operator
To get a flawlessly smooth surface before printing, roll the clay out between two sheets of parchment paper. This prevents the rolling pin from leaving texture marks.
Step 2: Capturing the Print
-
Position the paw:
Gently guide your pet’s paw onto the center of the clay circle. Ensure the pads are clean and dry before pressing. -
Press firmly:
Press down firmly on each toe pad and the main pad to ensure a deep, clear capture. If the print is too faint, simply roll the clay into a ball and start the rolling process again. -
Create the hanging hole:
Use a drinking straw or a skewer to punch a hole near the top edge of the ornament. Make sure it’s not too close to the edge to prevent cracking later. -
Allow to dry:
Let the clay dry completely according to the package instructions. For air-dry clay, this usually takes 24-48 hours. Turn it over halfway through to ensure even drying.
Step 3: Decorating the Edge
-
Sand for perfection:
Once fully dry, take a piece of fine-grit sandpaper and gently sand the outer rim of the circle to remove any sharp ridges left by the cookie cutter. -
Mix your paint:
Pour a small amount of soft pink acrylic paint onto a palette. I sometimes like to mix in a tiny drop of white to get that perfect pastel shade. -
Paint the rim:
Using a flat paintbrush, carefully paint the outer vertical edge of the disk. Rotate the ornament slowly as you go to maintain an even coat. -
Create the dipped effect:
To mimic the dipped look on the front face, use the flat brush to bring the pink paint just slightly over the top edge onto the face of the ornament, creating a thin, consistent border about 2-3mm wide. -
Add a metallic touch:
For the subtle bronze accent seen in the image, lightly dab a foam sponge into metallic bronze paint. Blot almost all the paint off on paper, then gently graze it over the very edge of the pink rim to add warmth.
Cracked Clay Rescue
If small hairline cracks appear as the clay dries, mix a tiny bit of fresh wet clay with water to make a paste and fill them in with your finger.
Step 4: Finishing Touches
-
Seal the piece:
In a well-ventilated area, spray the entire ornament with a clear matte sealant. This protects the clay from moisture and preserves the paint colors. -
Cut the twine:
Cut a length of pink cotton twine, roughly 12 inches long, to serve as the hanger. -
Thread the loop:
Fold the twine in half and push the looped end through the hole from the front to the back. -
Secure the hanger:
Thread the loose ends of the twine through the loop and pull tight to create a lark’s head knot against the clay. -
Tie it off:
Tie the loose ends together in a simple knot at the top to complete the loop.
Hang this sweet memento on your tree or wall to keep a part of your furry friend close by
Botanical Wreath Border Framing the Paw
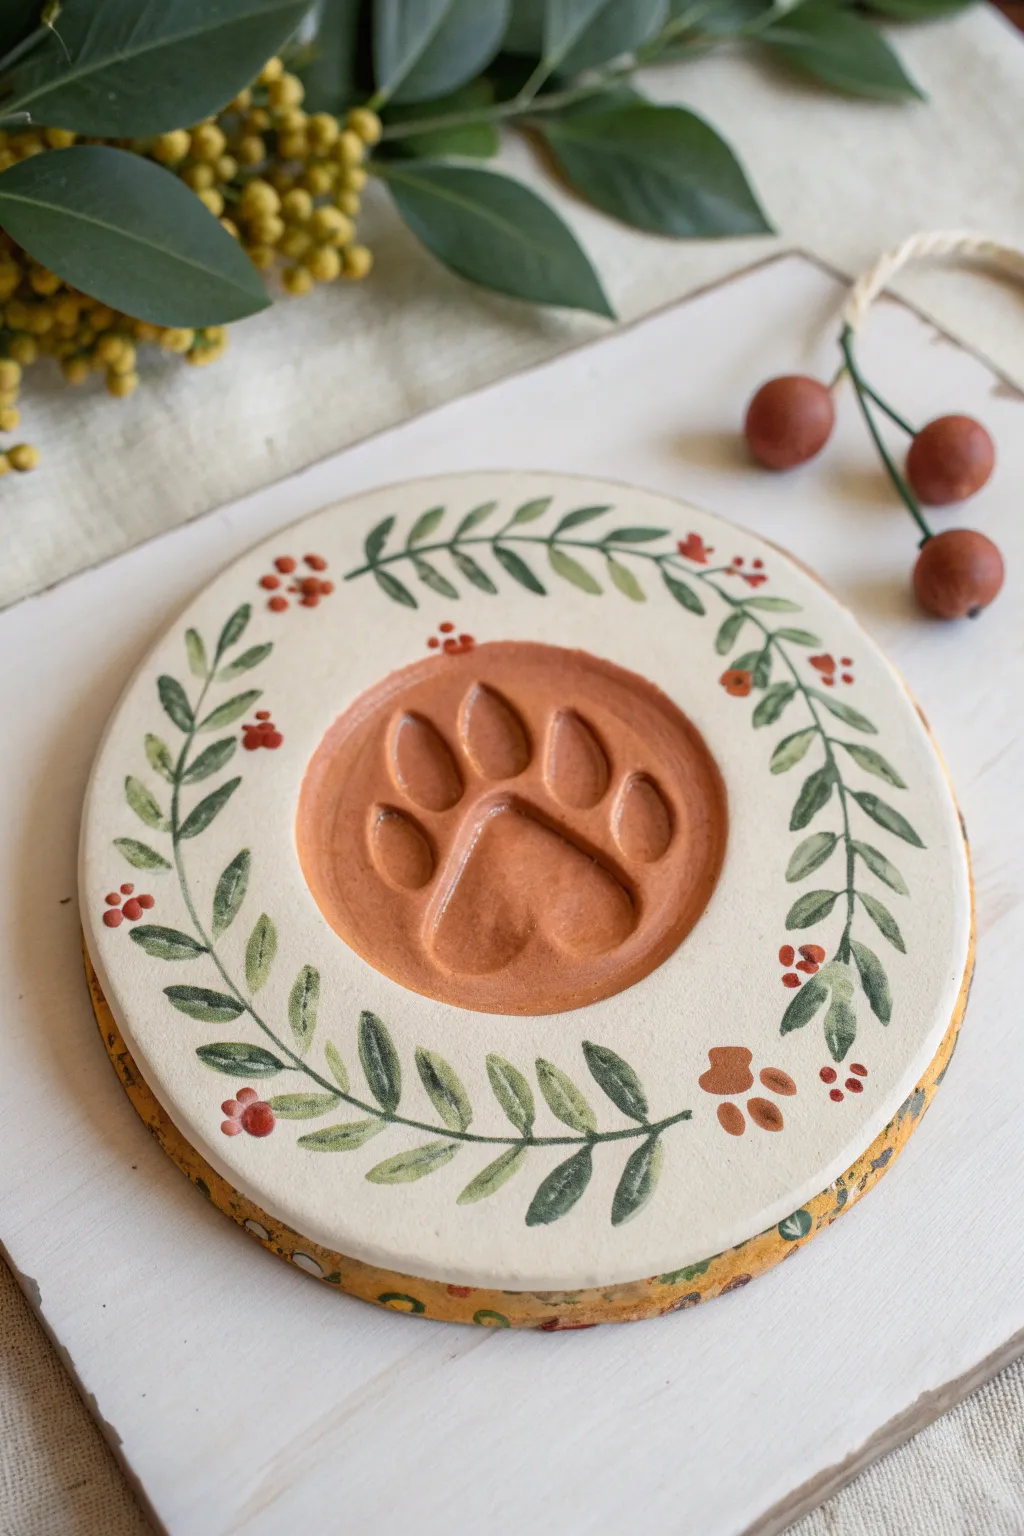
Immortalize your furry friend’s paw print in a charming, handcrafted clay disk adorned with a delicate watercolor-style laurel wreath. This project combines the tactile memory of an impression with the soft beauty of painted greenery for a timeless decoration.
Step-by-Step Tutorial
Materials
- Air-dry clay (white) or polymer clay
- Rolling pin
- Round cookie cutter or bowl (approx. 5-6 inches diameter)
- Fine-grit sandpaper
- Acrylic paints (olive green, forest green, muted red/berry, terracotta/burnt sienna)
- Fine detail paintbrushes (size 0 and 00)
- Clear matte sealant or varnish
- Small sponge or foam pouncer
- Cup of water and paper towels
Step 1: Shaping the Base
-
Prepare the Clay:
Start by kneading your white clay until it is soft, pliable, and free of air bubbles. Roll it out on a smooth surface to an even thickness of about 1/4 to 1/2 inch. -
Cut the Circle:
Use your large round cutter or trace around a bowl with a craft knife to create a perfect circle. Smoothing the edges now with a slightly damp finger will save you sanding time later. -
Center the Impression:
Gently but firmly press the paw of your pet into the exact center of the clay circle. Ensure you get a deep enough impression to capture the pads distinctively without pushing all the way through the clay.
Cracked Clay Fix
If small hairline cracks appear while drying, don’t panic. Mix a tiny amount of fresh clay with water to make a paste and fill the cracks, then sand smooth when dry.
Step 2: Refining and Coloring
-
Smooth the Print:
Once the impression is made, check the edges of the paw print. If there are jagged clay bits, smooth them down gently with a wet brush or finger. -
Drying Phase:
Let the clay dry completely according to the package instructions. For air-dry clay, flipping it occasionally helps it dry flat. Once bone dry, lightly sand any rough edges. -
Base Color for the Paw:
Mix a warm terracotta or burnt sienna shade. Using a small sponge or soft brush, paint only inside the indented paw print area, giving it a rich, earthen contrast against the white background.
Step 3: Painting the Botanical Border
-
Planning the Vine:
Visualize a circle roughly an inch from the edge. Lightly trace a guiding line with a pencil if you need help keeping it symmetrical. -
Painting the Stems:
Using your finest brush and a mix of olive and forest green, paint thin, curving vine lines that encircle the paw print. Leave small gaps at the top, bottom, and sides for a natural look. -
Adding Leaves:
Along the vine stems, paint small, simple almond-shaped leaves. Vary the angles, having them point outwards and slightly forward in the direction of the vine’s curve. -
Varying the Greenery:
To create depth, mix a slightly lighter green and add a second layer of leaves over or near the first set, giving the wreath a fuller, more organic appearance. -
Berry Accents:
Dip the tip of a small brush or a toothpick into the muted red paint. Dot clusters of three small berries periodically along the vine, particularly near leaf junctions.
Crisp Print Tip
Before pressing the paw into the clay, lightly dust the pads with cornstarch. This prevents sticking and ensures the paw lifts away cleanly without dragging
Step 4: Final Details
-
Tiny Paw Accent:
Between two sections of the vine (like at the bottom right), paint a tiny, stylized paw print using the same terracotta color to echo the center impression. -
Seal and Protect:
Once all paint is thoroughly dry, apply a coat of clear matte sealant. This protects the clay from moisture and keeps the paint colors vibrant without adding an artificial gloss.
Now you have a beautifully framed memory that captures a moment in time with artistic flair
Collar Tag-Inspired Paw Print Shape
Achieve the high-end look of kiln-fired stoneware without the need for a pottery studio using this simple polymer clay technique. This project results in a sleek, minimalist round tag featuring a deep, clean paw impression and a charming speckled finish that mimics raw ceramic.
Step-by-Step Guide
Materials
- White polymer clay (matte finish preferred)
- Black pepper or finely ground dried coffee (for speckling)
- Circle clay cutter (approx. 2-3 inches diameter)
- Acrylic roller or pasta machine
- Clean pet paw (or a paw-shaped stamp)
- Straw or small circle cutter (for the hanging hole)
- Fine grit sandpaper (400-600 grit)
- Gold jump ring
- Gloss or matte varnish (optional)
- Parchment paper
Step 1: Preparing the Clay Base
-
Condition the clay:
Begin by warming the white polymer clay in your hands. Knead it thoroughly until it is soft, pliable, and free of any hard lumps. -
Create the speckles:
To mimic that organic stoneware look, I like to sprinkle a very small pinch of black pepper or finely ground coffee grounds onto the flattened clay. Fold the clay over and knead it again until the specks are evenly distributed throughout the block. -
Roll out the slab:
Place the clay on a sheet of parchment paper. Using your acrylic roller, flatten the clay into a slab that is roughly 1/4 inch (6mm) thick. You want it substantial enough to take a deep impression without cracking. -
Cut the circle:
Press your circle cutter firmly into the clay slab. Give it a slight wiggle before lifting to ensure a clean cut. -
Smooth the edges:
Gently run your finger around the perimeter of the cut circle to soften any sharp ridges created by the cutter. The goal is a rounded, stone-like edge.
Step 2: Impressing and Detailing
-
Prepare the surface:
Ensure the clay circle is lying perfectly flat on your work surface. If your pet’s paw has long fur, you might want to place a very thin sheet of plastic wrap over the clay to prevent hair from sticking. -
Make the impression:
Gently press your pet’s paw (or your stamp) into the center of the disc. Press down firmly on the main pad and each toe pad individually to get a consistent depth. -
Refine the print:
Lift the paw carefully. Inspect the impression; if the edges are messy, use a ball stylus or your rounded fingertip to smooth out the inside of the indentations. -
Add the hardware hole:
Use a straw or a small micro-cutter to punch a hole near the top edge of the circle. Make sure there is at least 3-4mm of clay between the hole and the edge for strength.
Cracked Edges?
If the edges crack while pressing the paw, your clay is too dry. Mix in a drop of clay softener or baby oil, re-knead thoroughly, and roll it out again.
Step 3: Baking and Finishing
-
Bake the clay:
Transfer the parchment paper with the clay tag to a baking sheet. Bake according to your brand’s specific package instructions (usually 275°F/130°C for 15-30 minutes). -
Cool down:
Allow the piece to cool completely in the oven with the door slightly ajar. This gradual cooling helps prevent cracks. -
Sand for smoothness:
Once cool, take a piece of fine-grit sandpaper and wet-sand the edges and surface lightly under running water. This removes fingerprints and creates that ultra-smooth, professional finish. -
Seal (optional):
If you want extra protection, apply a thin layer of matte varnish. However, the raw, sanded clay often looks best for this natural style. -
Attach hardware:
Open a sturdy gold jump ring using two pairs of pliers (twist sideways, don’t pull apart). Thread it through the hole. -
Close the ring:
Twist the jump ring back into a closed position, ensuring the ends meet perfectly flush.
Make it an Ornament
Instead of a jump ring, thread a velvet ribbon or raw leather cord through the hole for a rustic holiday ornament or wall hanging.
Now you have a timeless, minimalist keepsake that captures your pet’s print forever
Double Paw Print Side-by-Side Layout
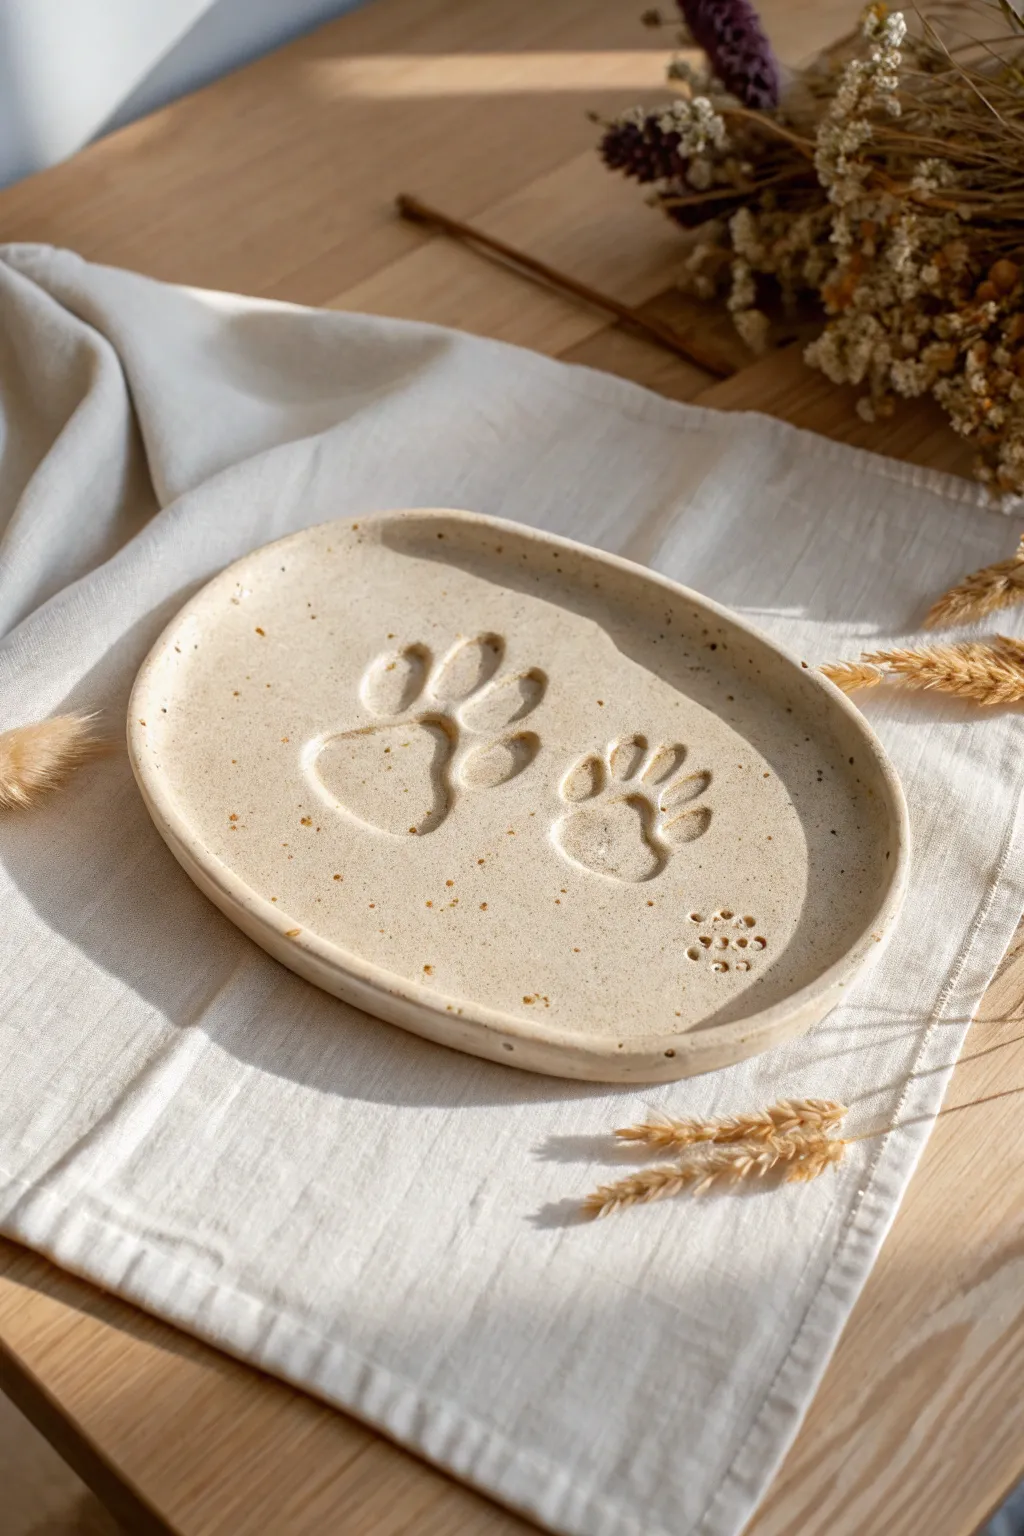
This elegant keepsake features two paw prints side-by-side on a rustic, speckled clay dish. The natural, unglazed finish highlights the simple beauty of the impressions, creating a timeless piece of decor or a functional trinket tray.
Step-by-Step Tutorial
Materials
- Speckled stoneware clay (beige or sand color)
- Rolling pin
- Canvas or heavy fabric workspace
- Oval template (paper or flexible plastic)
- Fettling knife or needle tool
- Small bowl relative to dish size (for shaping)
- Potter’s sponge
- Small wooden circle tool or marker cap (for paw pads)
- Tiny alphabet or symbol stamps (optional)
- Clear matte glaze (optional)
- Kiln (if using stoneware) or air-dry clay sealant
Step 1: Preparing the Base
-
Condition the Clay:
Begin by wedging your speckled clay thoroughly to remove air bubbles. This ensures the clay is pliable and prevents cracking during the drying process. -
Roll the Slab:
Roll your clay out onto a canvas cloth until it is an even slab, approximately 1/4 inch thick. Aim for a consistent thickness so the dish dries and fires evenly. -
Cut the Shape:
Place your oval template onto the clay slab. Using a needle tool or fettling knife, carefully trace around the template to cut out your base shape. -
Smooth the Edges:
Dip your finger or a sponge lightly in water and run it along the cut rim. This rounds off the sharp edges left by the knife for a softer, more finished look.
Cracking Up?
If small cracks appear near the paw edges while drying, smooth them immediately with a vinegar-water mix (known as ‘magic water’) to bond the clay back together.
Step 2: Creating Impressions
-
Plan the Placement:
Before pressing, gently lay the paws (or your stamping tools) over the slab to visualize the layout. The larger print should sit slightly left of center, with the smaller print to its right. -
Firm Press:
Press the larger paw firmly into the clay. If using a live pet, support the back of the slab with your hand. If sculpting manually, use your thumb to create the main pad depression. -
Refine the Toes:
Ensure each toe pad is distinct. I find using a rounded sculpting tool helps deepen these impressions if the initial press was too light. -
Add the Second Print:
Repeat the process for the smaller paw print on the right side. Angle it slightly differently to give the composition a natural, walking feel. -
Clean Up Edges:
Tiny ridges often form around the edges of the pressed clay. Smooth these down gently with a damp sponge or your fingertip to keep the surface streamlined. -
Add Small Details:
In the bottom right corner, use a small circular tool or a customized stamp to press a tiny decorative element, like the dotted flower or mini-paw shown in the image.
Make It Hangable
Before the clay dries, use a straw to punch a small clean hole near the top edge. After firing, thread a ribbon through to turn this tray into a wall ornament.
Step 3: Shaping and Finishing
-
Lift the Rim:
Gently lift the edges of the oval slab upwards with your fingers. You aren’t creating a steep wall, just a shallow, curved lip to give the piece dimension. -
Curve the Form:
To hold this shape while drying, place the slab onto a piece of foam or drape it into a shallow, paper-lined bowl that matches the curve you want. -
Initial Drying:
Let the clay dry slowly to the leather-hard stage. Cover it loosely with plastic if your environment is very dry to prevent warping. -
Sponge Finish:
Once leather hard, take a slightly damp sponge over the entire surface one last time to reveal the natural speckles in the clay body. -
Bone Dry:
Allow the piece to dry completely until it is bone dry. It should feel room temperature to the touch and be a lighter color. -
Bisque Fire:
Fire the piece in a kiln to cone 04 (or according to your clay manufacturer’s instructions) to harden it into bisque ware. -
Optional Glazing:
For the look in the photo, leave the piece unglazed to show off the raw clay texture. Alternatively, apply a clear matte glaze if you want it to be food safe. -
Final Fire:
If you applied glaze, fire the piece again to the appropriate temperature for your specific clay body (usually cone 5 or 6 for stoneware).
Place your finished dish on a bedside table to hold rings or keep it on a shelf as a minimalist tribute to your furry friends
Multi-Pet Print Set With Matching Style
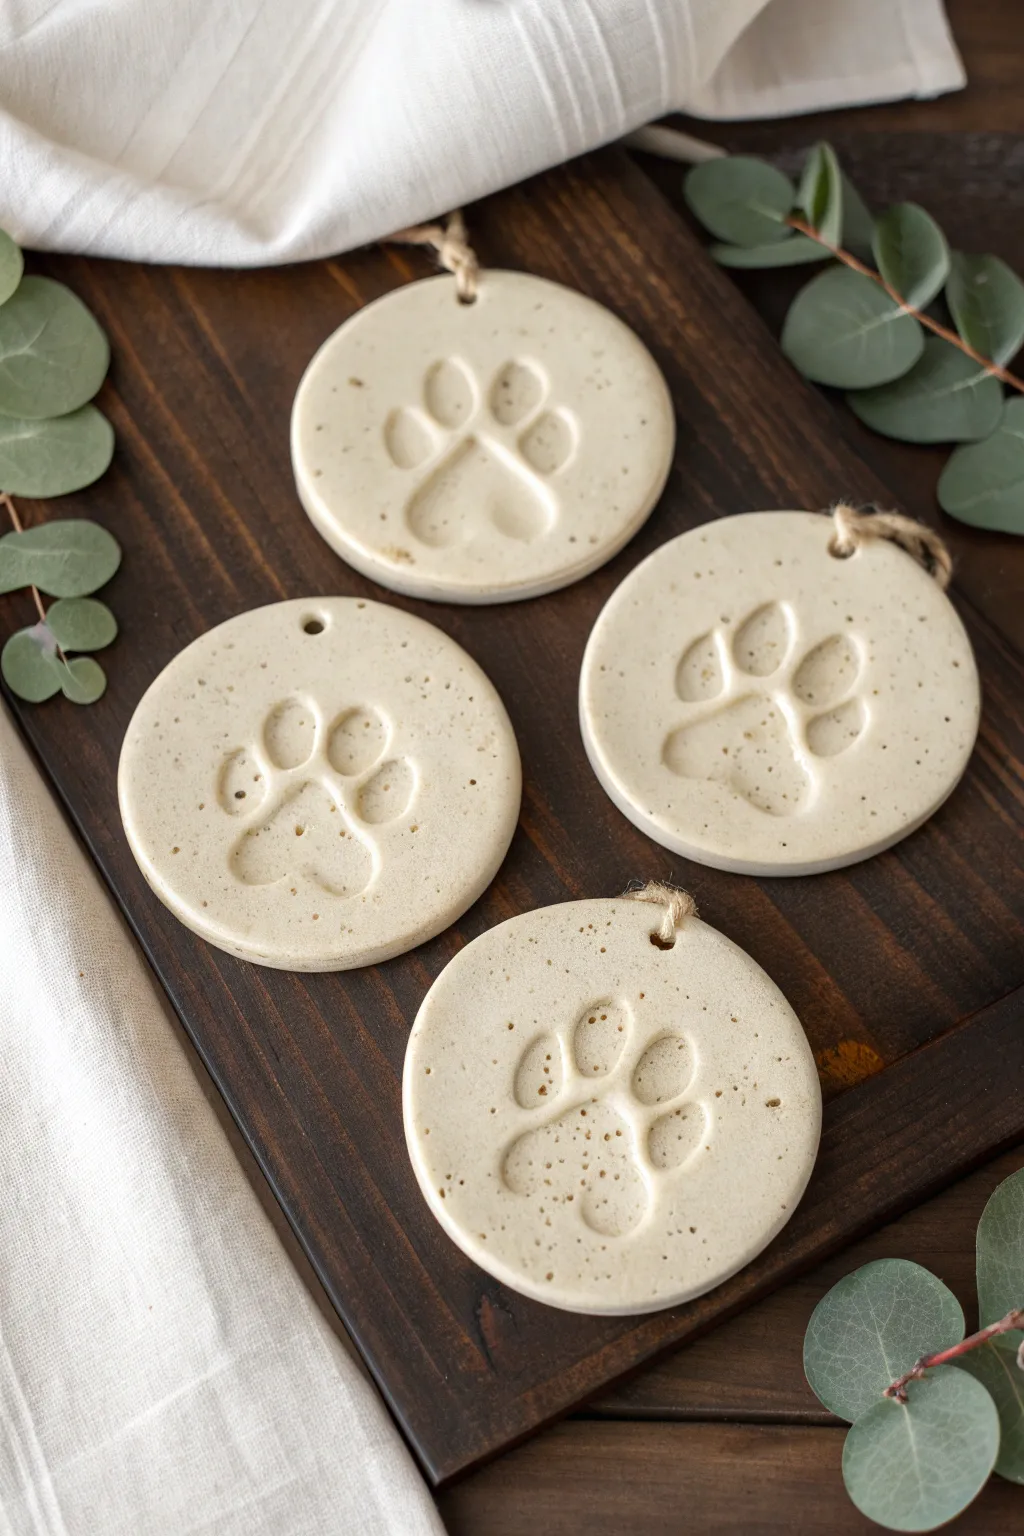
Capture the distinct personality of every furry friend in your home with this coordinated set of circular ornaments. The cream-colored clay features a charming, natural speckled texture and deep, satisfying imprints that turn simple paw prints into modern rustic décor.
How-To Guide
Materials
- White air-dry clay or polymer clay (oven-bake)
- Used coffee grounds or fine black pepper (for speckling)
- Rolling pin
- Large circular cookie cutter (approx. 3-4 inches)
- Straw or skewer
- Fine-grit sandpaper
- Jute twine
- Clear matte varnish (optional)
- Baking sheet and parchment paper (if using oven-bake clay)
Step 1: Preparing the Clay
-
Condition the clay:
Begin by taking a large chunk of your white clay and kneading it in your hands to warm it up. This makes it pliable and prevents cracks from forming later. -
Add the speckles:
To achieve that organic, stoneware look without a kiln, sprinkle a small amount of dried used coffee grounds or fine black pepper into the clay. Knead thoroughly until the specks are evenly distributed throughout the white base. -
Roll it out:
Place the clay on a smooth, clean surface or a silicone mat. Use your rolling pin to flatten the clay to a uniform thickness of about 1/4 inch. I find that going too thin makes them fragile, so keep them substantial.
Cracking Issues?
If air-dry clay cracks while drying, mix a tiny bit of fresh clay with water to make a paste (slip) and fill in the cracks. Smooth it over and let it dry again.
Step 2: Creating the Imprints
-
Cut the circles:
Using your large circular cookie cutter, punch out as many discs as you need for your pets. Remove the excess clay from around the circles carefully so you don’t distort their shape. -
Smooth the edges:
Dip your finger in a little water and gently run it around the raw edge of each clay circle to smooth out any roughness or sharp cuts left by the cutter. -
Press the paw:
This step requires your pet’s cooperation. Place the clay disc on a sturdy surface (or a small board you can bring to the pet). Gently but firmly press your pet’s clean paw into the center of the circle. Rock the paw slightly to ensure the toe beans make a deep impression. -
Touch up the print:
Sometimes the claws make unintended marks. If this happens, simply use a damp finger or a clay smoothing tool to gently rub out the scratch marks, leaving only the pad impressions. -
Create the hanging hole:
While the clay is still wet, use a plastic straw to punch a clean hole near the top edge of the ornament. A straw removes the clay plug cleanly, whereas a skewer just pushes it aside.
Pro Tip: Clean Prints
Trim the fur between your pet’s paw pads before pressing. Excess fur can create rough textures in the clay that obscure the clean shape of the toe beans.
Step 3: Finishing Touches
-
Dry or bake:
If using air-dry clay, move the discs to a wire rack and let them dry for 24-48 hours, flipping halfway through. If using polymer clay, bake according to the package instructions on a parchment-lined sheet. -
Sand for perfection:
Once fully cured and cooled, use fine-grit sandpaper to gently buff the edges and surface. This removes any fingerprints you might have left and gives the ornament a professional matte finish. -
Seal the surface:
For longevity, apply a thin coat of clear matte varnish. This seals the porous material and protects the ‘speckles’ (especially if you used coffee) from molding or staining over time. -
Add the hanging loop:
Cut a length of jute twine, about 6 inches long. Thread it through the hole you made earlier. -
Secure the twine:
Tie a secure knot at the base of the twine loop, close to the clay edge, or tie it at the very top for a different hanging style. Trim any excess fraying.
Hang these textured tokens on your tree or arrange them on a wall hook for a year-round display of affection
Mini Paw Print Magnets for the Fridge

Transform a simple lump of clay into a charming set of paw print magnets that bring a personal touch to your kitchen. These textured medallions, ranging from soft blush to deep slate blue, are perfect for holding up photos or grocery lists with pet-loving flair.
Step-by-Step Guide
Materials
- Polymer clay (in beige, terracotta, mustard yellow, and slate blue)
- Clean rolling pin or acrylic roller
- Round cookie cutters (various sizes: 2-3 inches and smaller 1-1.5 inches)
- Paw print stamp or sculpting tools (ball stylus)
- Parchment paper or baking mat
- Coarse sandpaper or a stiff bristle brush (for texture)
- Strong craft glue (E6000 or similar)
- Round ceramic or ferrite magnets
- Oven for baking
Step 1: Shaping the Clay Base
-
Condition the clay:
Start by warming the polymer clay in your hands. Knead your chosen colors—like that soft beige or the terracotta tone—until they are pliable and free of cracks. -
Roll it out:
Place the conditioned clay on a sheet of parchment paper. Use a rolling pin to flatten it into a sheet about 1/4 inch thick. You want it sturdy enough to hold the magnet but not too heavy. -
Cut the circles:
Press your round cookie cutters into the clay sheet. Cut out a few different sizes to create a playful variety, just like the mix of large and small magnets seen in the photo. -
Smooth the edges:
Gently run your finger around the perimeter of each clay circle to soften any sharp ridges left by the cutter, giving the medallion a polished, finish-ready look. -
Add surface texture:
Before stamping the paw, create a stone-like texture. Lightly tap a stiff bristle brush or press a piece of coarse sandpaper onto the surface of the clay circles to remove that plastic shine.
Magnet Sliding Down?
If your magnet slides down the fridge, the clay medallion is likely too thick. Roll your next batch slightly thinner or use stronger rare-earth (neodymium) magnets.
Step 2: Creating the Impressions
-
Position the main pad:
If you are using a sculpting tool instead of a pre-made stamp, start with the large central pad of the paw. Press a large ball stylus into the lower center of the circle, rocking it slightly to create a rounded triangular shape. -
Refine the shape:
Use a smaller tool or your fingertip to slightly flatten the bottom of that central impression, making it look more like a heart or a kidney bean shape characteristic of a paw pad. -
Add the toes:
Using a smaller ball stylus, press four oval indentations in an arc above the main pad. Ideally, the two middle toes should sit slightly higher than the outer two. -
Deepen the texture:
I like to go back into the recessed areas of the print with a textured sponge or the tip of a stiff brush. This emphasizes the roughness inside the print versus the smoother surface of the medallion. -
Clean up details:
Inspect the edges of your impressions. If the clay has raised up too much around the toes, gently tap it back down with a flat tool so the surface remains level.
Step 3: Baking and Assembly
-
Prepare for baking:
Transfer the parchment paper with your clay medallions onto a baking sheet. Ensure they aren’t touching each other. -
Bake the clay:
Bake according to your polymer clay package instructions. This is typically around 275°F (135°C) for 15-30 minutes, depending on thickness. -
Cool completely:
Remove the tray from the oven and let the pieces cool down completely. Trying to glue magnets to warm clay often results in a weak bond. -
Sand the back:
Once cool, lightly sand the center of the back of each clay piece. This creates a rough surface that helps the glue grip better. -
Apply adhesive:
Squeeze a small dot of strong craft glue, like E6000, onto the sanded spot on the back of the clay. -
Attach the magnet:
Press a round magnet firmly into the glue. Give it a little twist to spread the adhesive evenly between the magnet and the clay. -
Final cure:
Lay the magnets face down and allow the glue to cure fully for at least 24 hours before sticking them to your fridge.
Adding Contrast
To make the paw print pop, dilute some brown acrylic paint with water and brush it into the recesses. Wipe the surface clean immediately to leave color only in the grooves.
Once the glue has fully set, your collection of custom paw prints is ready to hang up your favorite memories
Paw Print Coasters With a Sealed Surface
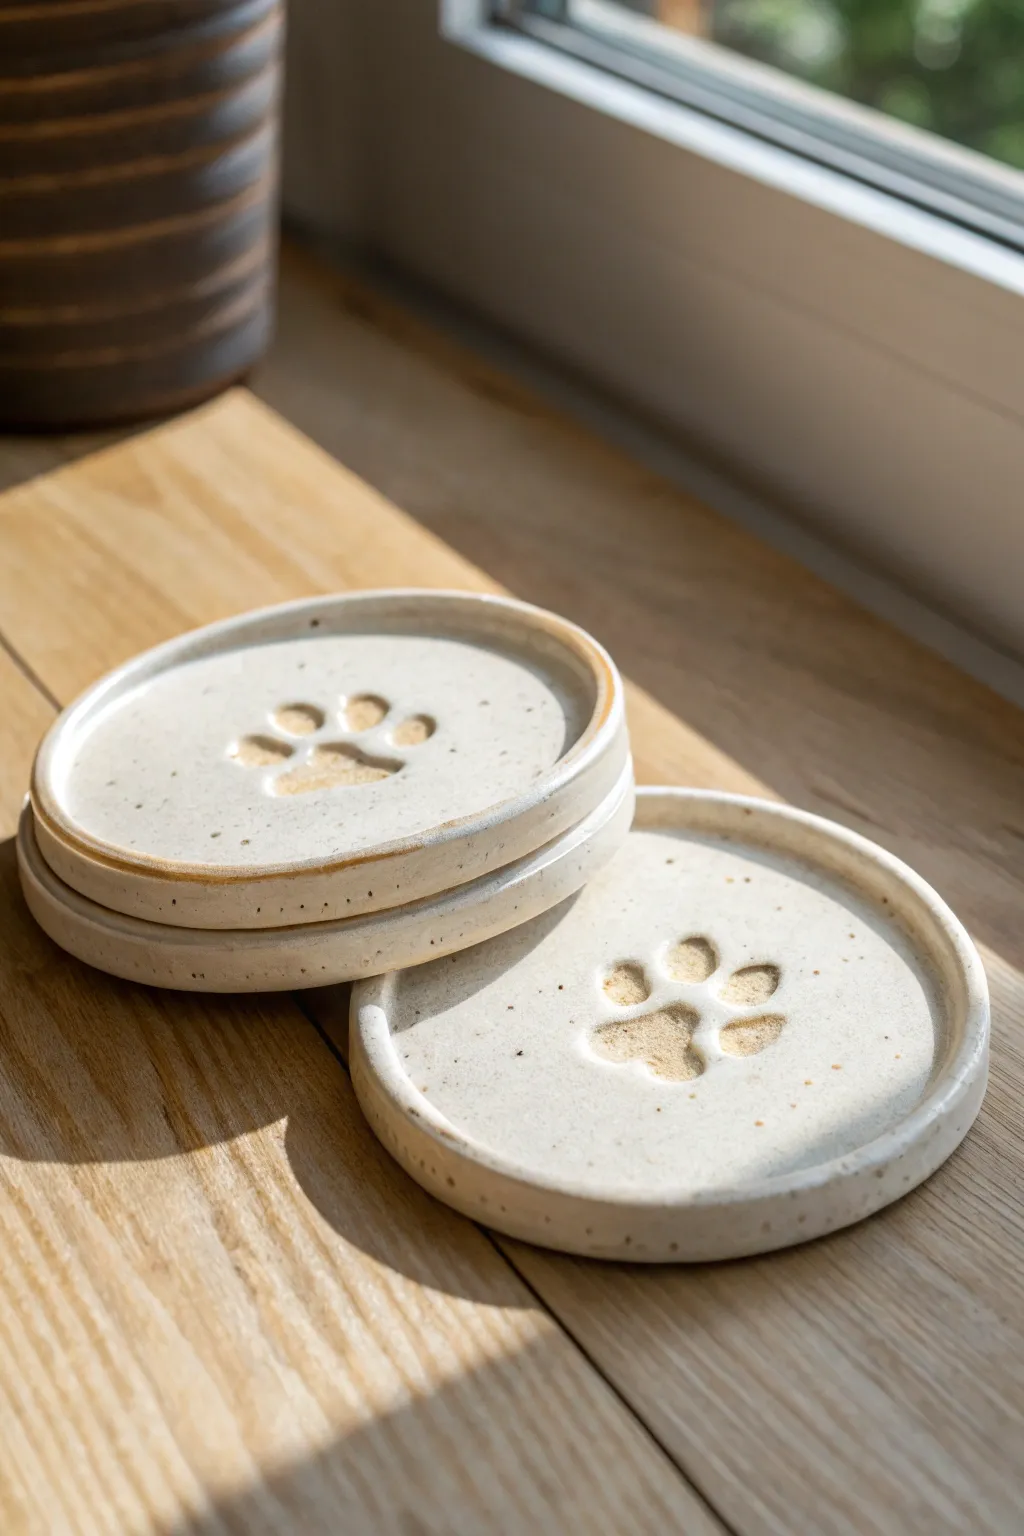
Create a lasting tribute to your furry friend with these minimalist, speckled ceramic coasters. Featuring a gentle rim to catch drips and a central paw impression, they offer a functional yet deeply personal touch to your coffee table decor.
Detailed Instructions
Materials
- Speckled buff stoneware clay (or polymer clay with speckles)
- Rolling pin
- Circle cutter (approx. 4 inches) or a bowl to trace
- Smooth sponge
- Pottery wheel (optional, for trimming) or a rasp tool
- Clean pet paw (or a stamp tool)
- Clear glossy glaze or food-safe sealant
- Kiln (if using stoneware) or oven (if using polymer clay)
Step 1: Prepping and Shaping
-
Prepare the Clay:
Start by wedging your speckled buff stoneware clay thoroughly to remove any air bubbles. If you are using polymer clay, condition it by kneading until it is soft and pliable. -
Roll the Slab:
Roll out the clay on a canvas board or non-stick surface to a consistent thickness of about 1/4 inch. Using guide sticks on either side of your rolling pin ensures an even surface. -
Cut the Circles:
Using a large circular cutter or by tracing around a bowl with a needle tool, cut out your coaster shapes. Aim for a diameter slightly larger than your final desired size to account for shrinkage. -
Smooth the Edges:
Take a slightly damp sponge and run it gently around the cut edge of each circle. This removes the sharp ‘burr’ left by cutting and rounds off the edge for a professional finish. -
Create the Rim:
To create the raised rim seen in the photo, gently press your thumb or a modeling tool around the inner perimeter, about half an inch from the edge. I like to rotate the clay on a banding wheel while doing this to keep the depression uniform.
Clean Impressions
Place a thin sheet of plastic wrap over the clay before pressing the paw down. This prevents fur from sticking and creates a softer, rounded edge to the imprint.
Step 2: Making the Impression
-
Clean the Paw:
Ensure your pet’s paw is clean and dry. If their fur is long around the pads, you might want to trim it slightly to get a crisp impression without hair marks. -
Press the Paw:
Place the clay circle on a firm surface. Gently but firmly press your pet’s paw into the center of the coaster. Apply even pressure to the toe beans and the main pad. -
Refine the Print:
Lift the paw straight up. If there are minor distortions or nail marks you don’t like, smooth them out gently with a rubber rib or your fingertip. -
Slow Drying:
Sandwich the coasters between two pieces of drywall or cover them loosely with plastic. Let them dry slowly over several days to the ‘bone dry’ stage to prevent warping. -
Bisque Fire:
Once fully dry, fire the pieces in a kiln to cone 04 (bisque fire). If using polymer clay, bake according to the package instructions instead.
Add Subtle Color
Before glazing, rub a small amount of iron oxide wash into the paw print and sponge it off. This deepens the recess color like the example image.
Step 3: Glazing and Finishing
-
Wax the Bottom:
Apply a wax resist to the very bottom of the coaster to prevent glaze from sticking to the kiln shelf. You can also wax the paw print impression if you want that area to remain raw and matte against the glossy surface. -
Apply Glaze:
Dip the coaster into a clear or white semi-transparent glaze. A transparent glaze is crucial here to let natural speckles of the clay body show through. -
Wipe the Rim (Optional):
For the slight browning effect on the rim seen in the image, gently wipe a little glaze off the high point of the rim with a sponge, thinning it out so the clay breaks color during firing. -
Clean Up:
Wipe away any drips from the bottom or edges where the wax was applied. Any stray glaze here can cause the coaster to fuse to the shelf. -
Glaze Fire:
Fire the coasters again in the kiln to the maturity temperature of your clay (usually cone 5 or 6 for stoneware). This melts the glaze into that durable, glass-like finish. -
Final Polish:
Once cooled, check the bottom for any rough patches. Sand the bottom lightly with wet sandpaper to ensure it won’t scratch your wooden furniture.
Stack your finished coasters on the table and enjoy a piece of functional art that celebrates your companion every day
Garden Memorial Stone With Paw Impression

Capture your furry friends’ essence forever with this durable garden memorial stone. This project creates a smooth, naturally weathered-looking stone featuring both a large and small paw impression, perfect for outdoor display among gravel or greenery.
Step-by-Step Guide
Materials
- White Portland cement or fine concrete mix
- Sand (clean play sand works best)
- Water
- Large plastic mixing bowl or bucket
- Sturdy mixing spoon or trowel
- Round plastic mold (like a planter saucer or cut-off bucket bottom, approx. 10-12 inches)
- Cooking spray or petroleum jelly (release agent)
- Sandpaper (medium and fine grit)
- Matte outdoor sealant (optional)
- Your pets (for the impressions)
Step 1: Preparation & Mixing
-
Prepare the mold:
Clean your chosen round mold thoroughly to ensure the surface of your stone will be smooth. A plastic plant saucer works wonderfully for this shape. -
Apply release agent:
Grease the inside of your mold generously with cooking spray or a thin layer of petroleum jelly. This ensures the hardened stone pops out easily later without cracking. -
Measure the mix:
In your mixing container, combine 1 part white Portland cement with 2 parts sand. Using white cement matches the light, creamy color seen in the example photo perfectly. -
Dry mix first:
Stir the dry ingredients together until they are completely blended. Getting an even distribution now prevents weak spots in the final stone. -
Add water gradually:
Slowly pour in water while mixing constantly. You are looking for a ‘cookie dough’ consistency—moldable and stiff, not runny or soupy. -
Fill the mold:
Scoop the mixture into your greased mold. Fill it to a depth of about 1.5 to 2 inches to ensure it is thick enough to survive outdoors.
Cracked Prints?
If small cracks appear near the prints as you press, the mix is too dry. Dab a little water on the crack and smooth it with your finger immediately to fuse it back together.
Step 2: Creating the Impressions
-
Smooth the surface:
Tap the sides of the mold repeatedly to release trapped air bubbles. Use a trowel or a flat ruler to smooth the top surface until it looks like cream. -
Let it firm up slightly:
Wait about 15-30 minutes. The mix needs to be firm enough to hold a shape but soft enough to press into. I usually test edges with my finger to see if it holds. -
Clean the paws:
While waiting, wipe your pets’ paws clean to prevent dirt from discoloring the white cement. -
Apply a barrier:
Rub a tiny bit of olive oil or petroleum jelly onto the paw pads. This acts as a barrier so the cement doesn’t stick to their fur or skin. -
Make the large impression:
Gently guide the larger dog’s paw onto the left side of the stone. Press down firmly on the center pad and each toe to get a deep, clear relief. -
Make the small impression:
Immediately repeat the process with the smaller pet on the lower right side. If you don’t have a second pet, you can use a smaller decorating tool to stamp a heart or date. -
Wash paws immediately:
Wash your pets’ paws right away with warm soapy water to remove any cement residue before it dries on their skin.
Add Subtle Color
To make the prints pop, mix a drop of brown acrylic paint with water and wash it over the indentations, then wipe the surface clean. The color will stay only in the recesses.
Step 3: Curing & Finishing
-
Initial cure:
Cover the mold with a plastic sheet to keep moisture in, which helps concrete cure stronger. Let it sit indisturbed for at least 24 to 48 hours. -
Demold the stone:
Turn the mold upside down and gently tap or flex it until the stone releases. It should slide out easily thanks to the grease. -
Sand the edges:
Use medium-grit sandpaper to soften the sharp top edge of the stone, creating that rounded, river-rock look. Sand away any rough patches on the surface. -
Refine the surface:
Switch to fine-grit sandpaper to give the top surface a silky finish. Be careful around the paw prints so you don’t erode the detail. -
Final cure:
Let the stone sit in a dry, shaded area for another week to fully cure and harden before placing it in the garden. -
Optional sealing:
For extra longevity against moss or staining, apply a coat of matte masonry sealer. This is invisible but protects your keepsake from the elements.
Place your stone in a quiet corner of the garden and enjoy this permanent reminder of your faithful companions