There’s something extra satisfying about turning a plain little lump of clay into a tiny person with a whole personality. Here are my favorite clay people ideas—starting with the classic beginner-friendly ones and drifting into the delightfully weird (in the best way).
Simple Peg People With Sweet Faces
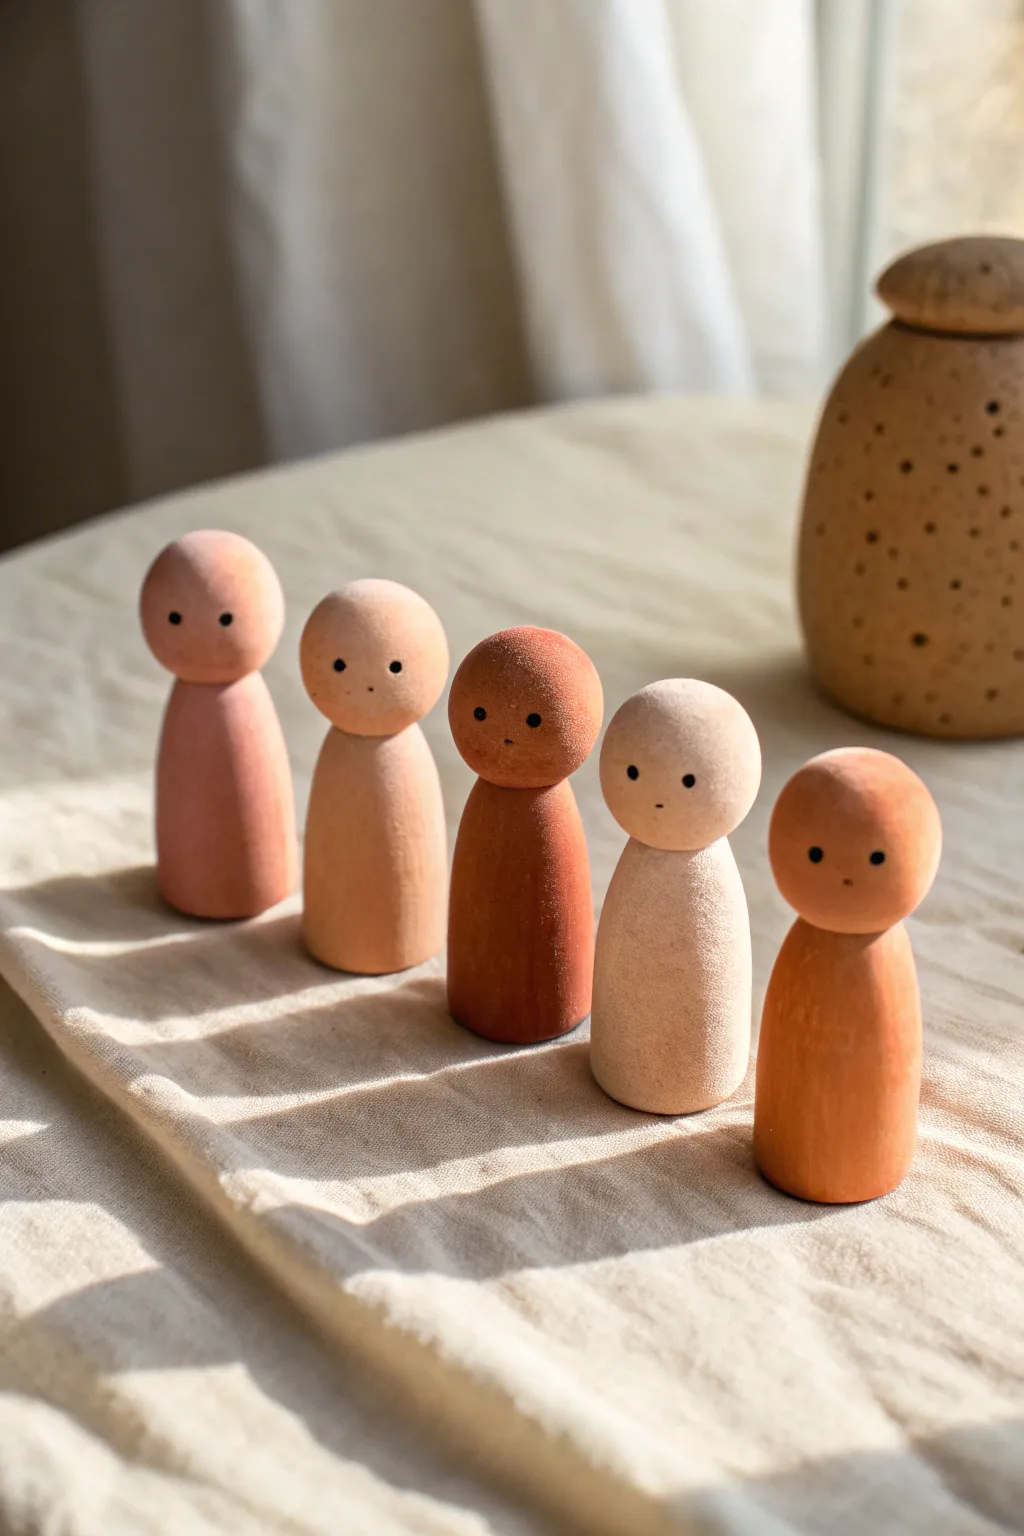
These charming wooden figures celebrate the beauty of simplicity and diversity with their soft range of natural skin tones. With their minimalist faces and smooth finish, they make wonderful open-ended toys or understated decor pieces.
Detailed Instructions
Materials
- Unfinished wooden peg dolls (2-3 inches tall)
- Fine-grit sandpaper (320 or 400 grit)
- Acrylic paints (white, burnt sienna, yellow ochre, raw umber, burnt umber)
- Mixing palette or plate
- Soft flat paintbrushes (medium size)
- Fine detail paintbrush or dotting tool
- Water cup and paper towels
- Matte spray varnish or beeswax polish
Step 1: Preparation & Color Mixing
-
Smooth the surface:
Begin by lightly sanding each wooden peg doll with fine-grit sandpaper. Focus on the head and base to remove any rough patches or splinters, ensuring a perfect canvas for your paint. -
Wipe clean:
Use a slightly damp cloth or tack cloth to remove all sanding dust from the wood. Even tiny dust particles can create texture under the paint, so take your time here. -
Create a base palette:
Squeeze out small amounts of your acrylic paints onto the palette. You will primarily be working with whites and browns to create the various skin tones. -
Mix the lightest tone:
Start by mixing a large amount of white with a tiny dot of yellow ochre and a speck of burnt sienna. This creates a pale, sandy beige tone similar to the doll second from the right. -
Mix medium tones:
For the next shade, take some of your lightest mix and add more burnt sienna. This will warm it up into a rosy-tan color like the doll on the far left. -
Mix deeper tones:
Continue creating separate puddles of paint for darker shades by incorporating burnt umber and raw umber. Aim for a gradient of roughly five distinct shades ranging from pale beige to deep espresso.
Step 2: Painting the Bodies
-
Apply the first coat:
Pick up a doll and your chosen color. Using a soft flat brush, paint the entire figure from the top of the head to the bottom base. Painting with the grain of the wood helps hide brushstrokes. -
Manage the hold:
I usually like to hold the doll by the very bottom edge while painting the head and body, then set it down carefully to paint the top of the head last. -
Paint the remaining dolls:
Repeat the process for each doll, giving every figure a unique skin tone from your mixed palette. Assigning a specific color to each doll before starting ensures a balanced collection. -
Let them dry:
Allow the first coat to dry completely. This usually takes about 15-20 minutes depending on the thickness of your paint. -
Sand between coats:
Once dry, very lightly run your fine sandpaper over the painted surface. This knocks down any raised wood grain and creates that professional, velvety finish. -
Apply the second coat:
Paint a second layer of the same colors over each doll. This layer should be opaque and smooth, completely covering the wood grain pattern underneath.
Keep It Smooth
If your acrylic paint feels too thick or leaves ridges, mix in a drop or two of water or flow medium. Thin layers allow the wood’s warmth to remain subtle while providing solid color.
Step 3: Details & Finishing
-
Prepare for details:
Ensure the base coats are bone dry. Pour a tiny drop of black acrylic paint onto your palette for the facial features. -
Practice the placement:
Visualize where the eyes should go. Placing them slightly lower on the round head often makes the figures look cuter and more childlike. -
Dot the eyes:
Dip the very tip of a fine detail brush (or the non-brush end of a paintbrush handle) into the black paint. Gently press two small dots onto the face. -
Add the nose/mouth:
Using an even lighter touch or a smaller tool (like a toothpick), place a tiny dot centered below the eyes. This minimalist mark serves as a suggestion of a nose or mouth. -
Seal the work:
Once the faces are fully dry, protect your work. A spray matte varnish works best to keep the natural loom, or rub on a little beeswax polish for a soft, organic sheen that feels great in hand.
Add Subtle Blush
Before sealing, dry brush a tiny amount of pink chalk pastel dust onto the cheeks using a soft makeup brush. It adds a sweet, rosy glow without looking like heavy paint.
Now you have a beautiful set of diverse figures ready for play or display.


Chibi-Style Big Head Mini Figures
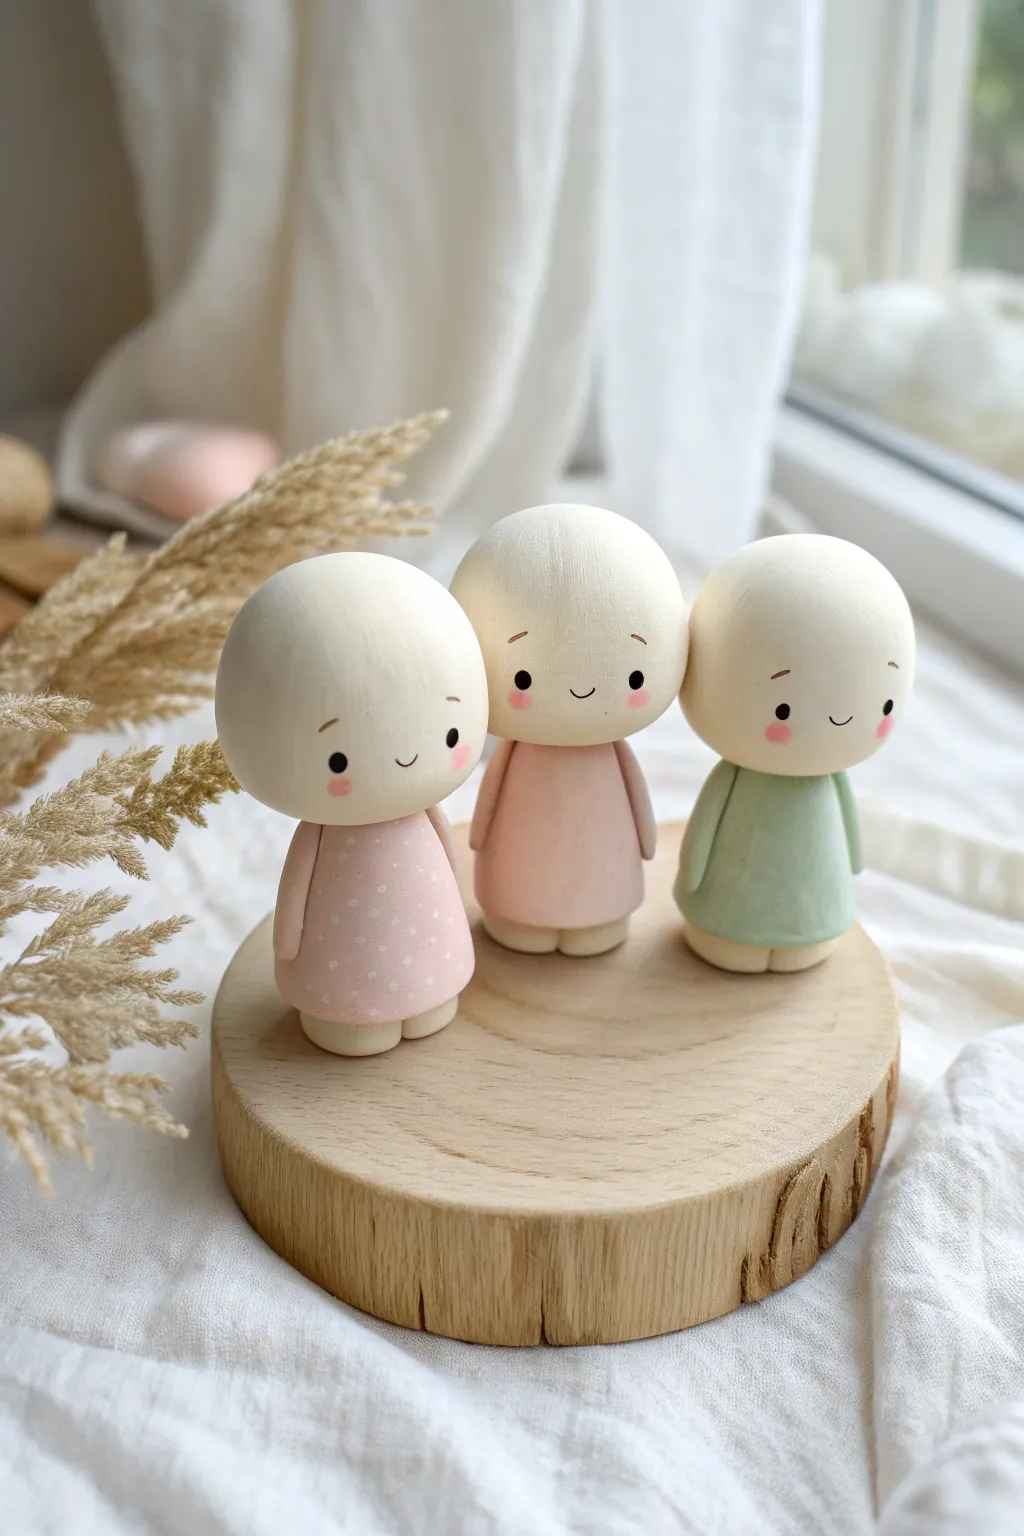
These adorable figurines capture the essence of chibi style with oversized, polished heads and simple, elegant bodies. The soft pastel color palette and minimalist facial features make them a charming addition to any desk or shelf.
Step-by-Step Guide
Materials
- Polymer clay (white, pastel pink, sage green)
- Small rolling pin
- Sculpting tools (needle tool, ball tool)
- Black acrylic paint or extra-fine liner pen
- Pink chalk pastel or blush powder
- Soft paintbrush
- Aluminum foil
- Liquid clay or bake and bond
- Matte finish varnish (optional)
- Oven
Step 1: Sculpting the Base Forms
-
Prepare the foil armature:
To keep the heads lightweight, crunch up three balls of aluminum foil, each roughly 1 inch in diameter. This saves clay and ensures even baking. -
Cover the heads:
Condition your white clay until soft, then roll it into flat sheets. Wrap a sheet around each foil ball, smoothing out all seams until you have perfectly round, unblemished spheres. -
Shape the bodies:
Take a portion of pink, sage, and dotted pink clay (you can mix white dots into pink clay manually if needed) and roll them into cone shapes with flattened tops. These cones should be about half the height of the heads to achieve that cute chibi ratio. -
Create the legs:
For each figure, roll two tiny balls of white clay and slightly flatten them against the bottom of the colored cones to act as simple feet. -
Construct the arms:
Roll thin, tapered sausage shapes from the body-colored clay for arms. Attach them flush against the sides of the cone so they hang straight down.
Step 2: Assembly and Detailing
-
Attach heads to bodies:
Apply a small drop of liquid clay or bake and bond to the top of each body cone. Press the large white head firmly onto the body, ensuring it is centered. -
Smooth the connection:
Use a sculpting tool to gently blend the clay slightly at the neck area if you want a seamless look, though simply pressing them together works for this segmented toy aesthetic. -
Pre-bake prep:
double-check that the figurines stand independently. If they wobble, gently tap the feet on your work surface to flatten the base. -
Baking:
Bake the figures according to your clay manufacturer’s instructions (usually 275°F/135°C for 15-30 minutes). Let them cool completely before painting.
Fingerprint Fix
Can’t get a smooth finish on the heads? Before baking, lightly brush the raw clay with a little baby oil or cornstarch to buffer your fingerprints while smoothing.
Step 3: Painting the Face
-
Mark eye placement:
Using a needle tool, make two very light, tiny indentations where the eyes will go. The authentic chibi look relies on wide-set eyes placed slightly lower on the face. -
Paint the eyes:
Dip a fine-point tool or toothpick into black acrylic paint and dot it into the indentations. Alternatively, use an extra-fine micron pen. -
Paint the mouth:
With an extremely steady hand and the finest brush or pen, draw a tiny ‘u’ shape between the eyes. -
Add eyebrows:
Paint short, floating curved lines high above the eyes to give them an innocent expression. -
Apply blush:
I like to scrape a little pink chalk pastel into a powder. Use a dry, soft brush to gently dust this powder onto the cheeks for a rosy glow. -
Finish with varnish:
Once the paint is fully dry, apply a thin coat of matte varnish to protect the surface and the blush, keeping the finish soft rather than glossy.
Make it Modular
Create tiny clay hats, flower crowns, or holding accessories like balloons that can be glued on post-bake to give each triplet a unique personality.
Set your finished trio on a wooden slice or windowsill to bring a touch of gentle whimsy to your room


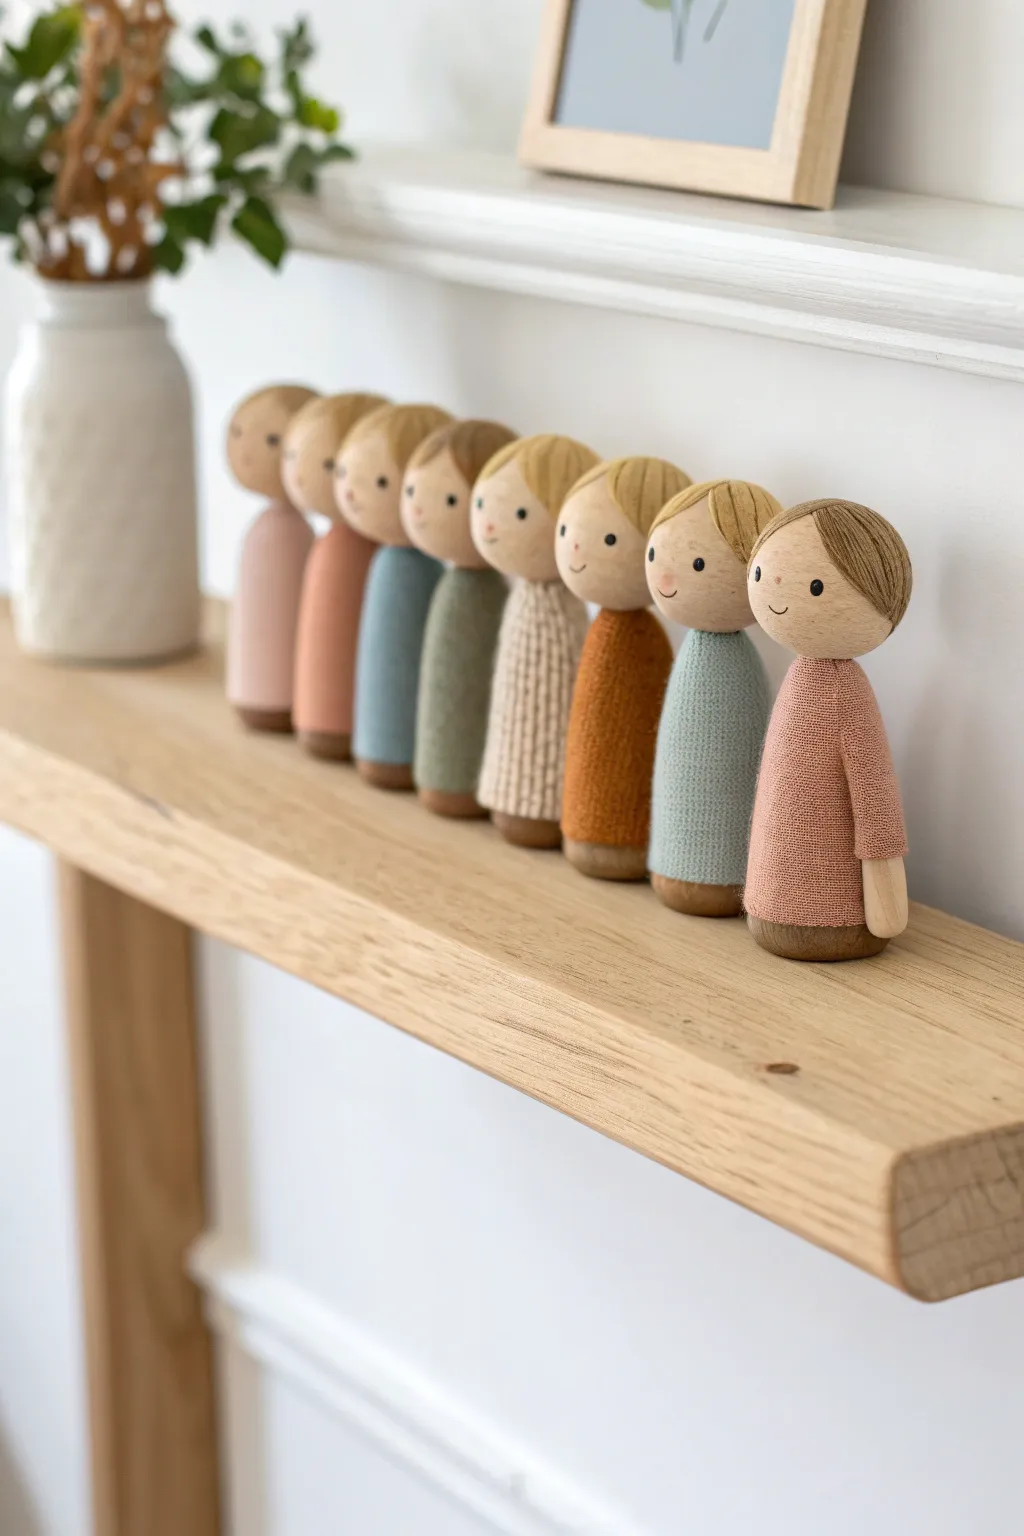
Little Family Portrait Lineup
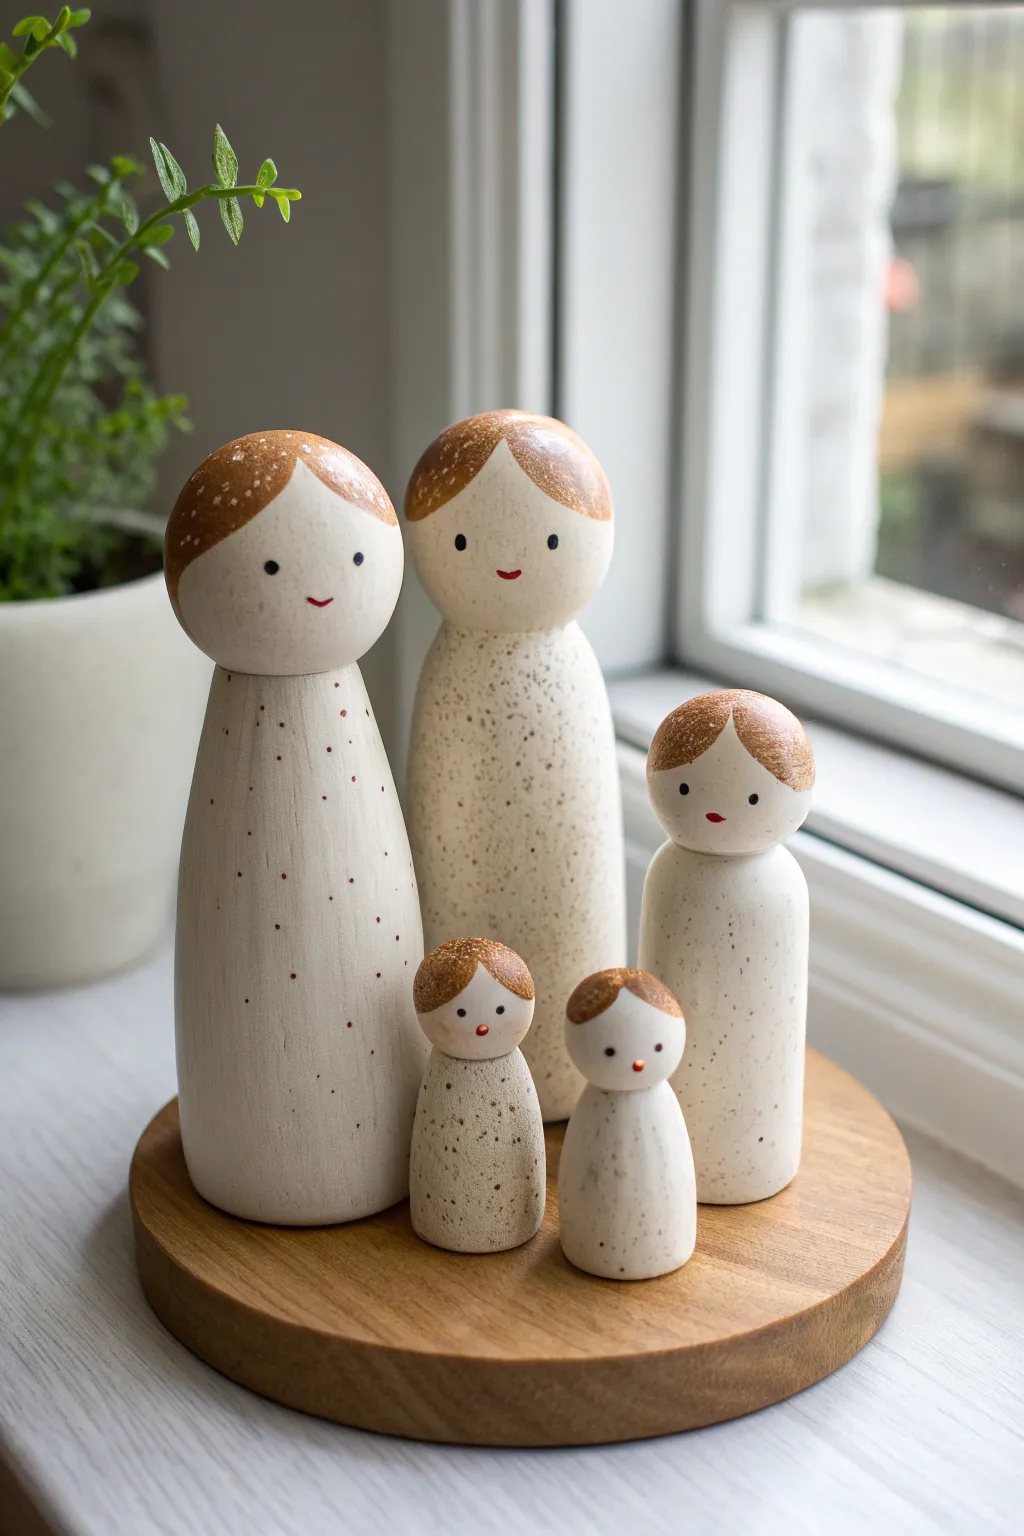
These charming, peg-style figures offer a modern, minimalist take on a family portrait using air-dry or polymer clay. Their simple cylindrical shapes, speckled finish, and sweet painted faces make for a timeless keepsake perfect for a windowsill display.
How-To Guide
Materials
- White polymer clay or air-dry clay
- Rolling pin
- Aluminum foil (for armatures)
- Acrylic paint (warm brown for hair, beige/white for body, black, red)
- Old toothbrush or stiff bristle brush
- Fine detail paintbrushes
- Fine sandpaper
- Matte varnish or sealant
- Round wooden coaster or clay base
Step 1: Shaping the Figures
-
Core construction:
Begin by tightly bunching aluminum foil into cylindrical shapes for the taller adult figures to save on clay and reduce weight. aim for a tapered cylinder shape, slightly wider at the base. -
Encasing the body:
Roll out a slab of white clay to about 1/4 inch thickness. Wrap this around your foil core, smoothing the seam completely at the back so it disappears. -
Forming the heads:
Roll solid balls of clay for the heads—two larger ones for the adults and smaller ones for the children. Carefully press these onto the tops of the bodies. -
Blending the join:
Use a modeling tool or your thumb to blend the clay from the head onto the neck area of the body, creating a smooth, seamless transition rather than a wobbly head balancing on a stick. -
Sizing the children:
For the smaller figures, you can likely skip the foil core and sculpt them from solid clay. Create varying heights to represent different ages, keeping the simplistic, armless peg-doll shape. -
Refining the silhouette:
Before curing or drying, gently roll each figure on your work surface to ensure they are perfectly round and stand stable without wobbling. -
Curing or drying:
Bake your polymer clay according to package instructions or let your air-dry clay set for 24-48 hours until completely hard.
Clean Lines
For a super crisp hairline, apply a strip of washi tape or painter’s tape across the forehead before painting the hair section.
Step 2: Painting and Finishing
-
Base sanding:
Once fully cured, use fine sandpaper to gently smooth out any fingerprints or bumps, paying special attention to the head-body connection. -
Creating the speckled effect:
Mix a small amount of beige or light brown paint with water to thin it. Dip an old toothbrush into this mixture. -
Splattering:
Hold the toothbrush near the figures and run your thumb along the bristles to flick tiny specks of paint onto the bodies. I prefer doing this inside a cardboard box to contain the mess. -
Painting the hair:
Using a warm, metallic brown or bronze paint, carefully paint the hair ‘caps’ on the top of each head. create a simple curved hairline on the forehead—some center-parted, some side-swept. -
Adding the faces:
Using your smallest detail brush or a toothpick, dot two wide-set black eyes on the face area. -
The smiles:
With a tiny amount of red paint, add a very small, simple curved line for the smile directly between the eyes. -
Protective coat:
Allow the paint to dry completely, then apply a coat of matte varnish to seal the clay and protect the paintwork without making it too glossy. -
Preparing the base:
If you are making the wooden display stand, sand a round wooden coaster and stain it a warm oak tone. -
Final arrangement:
Arrange your little clay family on the stand to see how they look best together, securing them with a dab of glue if you want a permanent display.
Wobbly Figures?
If a figure won’t stand straight after baking, simply rub the bottom against coarse sandpaper in a circular motion until the base is perfectly flat.
Place your little family lineup in a bright spot where their cheerful faces can be seen every day


Couple Hug Keepsake Figurines
Create a heartwarming keepsake with these adorable clay figurines wrapped in textured, sweater-like embraces. This beginner-friendly project uses polymer clay to mimic the cozy look of knitted fabric, perfect for a wedding topper or anniversary gift.
Step-by-Step Tutorial
Materials
- Polymer clay (Teal, Rust Orange, Light Skin Tone)
- White polymer clay (for the base)
- Aluminum foil (for armature core)
- Texturing tools (or a real piece of coarse fabric/knitting)
- Detailing needle or toothpick
- Acrylic paints (black, pink)
- Fine detail paintbrush
- Small dotting tool
- Oven
- Baking sheet
- Rolling pin
Step 1: Forming the Bodies
-
Create the foil cores:
Crumple two small pieces of aluminum foil into rough cylinders. This saves clay and keeps the figures lightweight. Aim for a height of about 2-3 inches for each figure. -
Preparing the clay:
Condition your teal and rust-orange clay by kneading it until soft and pliable. Roll each color out into a sheet about 1/4 inch thick. -
Applying the texture:
To get that knitted sweater look, press a texture sheet, a piece of burlap, or even a real coarse-knit sweater fragment firmly into your clay sheets. Alternatively, carefully etch ‘V’ shapes repeatedly with a needle tool to mimic stitches. -
Wrap the bodies:
Cut the textured clay to size and wrap one sheet around each foil core. Smooth the seam at the back, blending it gently so the texture isn’t ruined.
Step 2: Sculpting Heads and Features
-
Shape the heads:
Roll two smooth balls of skin-tone clay. Ensure they are proportional to the bodies. I like to flatten the bottom of the spheres slightly so they sit securely on the neck area. -
Add the hair/hats:
For the teal figure, flatten a small piece of brown clay and mold it over the top of the head for hair. For the orange figure, create a textured ‘beanie’ using the same rust clay and texture technique used for the body. -
Attach heads to bodies:
Insert a toothpick or small piece of wire into the top of each body, leaving half exposed. Push the heads onto these supports to secure them firmly. -
Create the scarves/collars:
Roll small snakes of teal and rust clay. Flatten them slightly, add texture, and wrap them around the necks to create cozy cowls that hide the join between head and body.
Fixing Cracks
If tiny cracks appear after baking, fill them with a mix of liquid clay and the matching color clay, then rebake for 10 minutes.
Step 3: Creating the Embrace
-
Shape the arms:
Roll two log shapes from the teal clay for the hugging figure’s arms. Apply your sweater texture to these as well. -
Position the hug:
Place the two figures side-by-side, touching. Attach the teal arms so they wrap around the orange figure. One arm should go high across the shoulder, and the other lower around the waist. -
Add hands:
Form tiny, simple mittens or hands from skin-tone clay and attach them to the ends of the sleeves, resting gently on the orange figure.
Personalize It
Add tiny glasses made of wire, paint freckles, or incorporate a tiny clay pet sitting at their feet to match the recipients.
Step 4: Finishing Touches
-
Make the base:
Roll a disk of white clay, roughly 1/2 inch thick and wider than both figures combined. You can texture the edges slightly for a rustic look. -
Assemble and bake:
Press the hugging couple firmly onto the white base. Check the package instructions for your specific brand of clay and bake the entire piece. -
Cool down:
Let the sculpture cool completely in the oven with the door slightly ajar to prevent cracking. -
Paint facial features:
Using a very fine brush or dotting tool, paint two small U-shapes for closed eyes and a tiny dot for the mouth on each face. -
Add blush:
Dry brush a tiny amount of pink paint or pastel dust onto the cheeks for a sweet, rosy glow.
Display your charming couple on a shelf or gift it to a loved one to cherish forever

The Complete Guide to Pottery Troubleshooting
Uncover the most common ceramic mistakes—from cracking clay to failed glazes—and learn how to fix them fast.
Baby Swaddle Add-On Character
Create a serene and whimsical nursery decoration with this polymer clay project featuring a peaceful sleeping baby wrapped in a textured swaddle. The smooth, minimalistic finish combined with delicate painted details gives this piece a high-end, boutique feel perfect for gifting or display.
Step-by-Step
Materials
- Polymer clay (flesh tone of choice)
- Polymer clay (cream or off-white for swaddle)
- Polymer clay (pale yellow for hair)
- Aluminum foil
- Rolling pin or pasta machine
- Needle tool and ball stylus tool
- Soft pastel chalks (blush pink)
- Small fluffy brush
- Acrylic paint (black, white, gold)
- Fine detail paintbrush (00 or 000)
- Matte varnish or sealant
Step 1: Sculpting the Core
-
Create the armature:
Crumple aluminum foil into a tight egg shape. This will be the core of the baby’s body, helping it stand upright and saving clay. The shape should be wider at the bottom and slightly tapered at the top. -
Cover with clay:
Condition your cream-colored clay until pliable. Roll it into a sheet about 1/4 inch thick. Wrap this sheet completely around your foil egg, smoothing the seams until you have a perfect, seamless egg shape.
Clay Too Stick?
If your white clay is getting fingerprints or attracting dust, wipe it gently with a baby wipe or a Q-tip dipped in rubbing alcohol before baking to smooth it perfectly.
Step 2: Creating the Face
-
Shape the head:
Form a ball of flesh-toned clay roughly 1.5 inches in diameter for the head. Flatten the back slightly so it will sit flush against the swaddle later. -
Position the face:
Gently press this ball onto the top portion of your egg base. Blend the clay at the neck area just enough to secure it, though most will be covered by the swaddle. -
Sculpt the nose:
Add a tiny, rice-sized piece of clay to the center of the face. Blend the edges outward seamlessly to create a cute button nose. -
Refine facial contours:
Use a large ball tool or your thumb to gently press indentations for the eye sockets. Keep the cheeks full and round.
Step 3: Wrapping comfort
-
Prepare the swaddle fabric:
Roll out a long, thin strip of the cream clay. I like to use a textured rolling pin here if available, or texture it lightly with a toothbrush for a fabric effect. -
Create the hood:
Cut a semi-circle from your sheet. Place it over the top of the head, framing the face. Allow it to drape naturally, folding slightly at the sides. -
First wrap layer:
Take a wide strip of clay and drape it diagonally across the body, starting from the left shoulder and tucking under the right side. -
Second wrap layer:
add a second strip crossing from the right shoulder over the first layer. Create gentle folds and creases where the ‘fabric’ meets to mimic soft cloth. -
The final cocoon:
Wrap a large sheet around the bottom half of the egg, smoothing it upward to meet the crossed layers. This creates the seamless bottom of the swaddle sack. -
Add texture details:
Use a needle tool to poke shallow, random dots across the outer layer of the swaddle for a decorative, starry pattern.
Make It Personalized
Instead of painted dots, try pressing actual dried flower petals or small beads into the clay swaddle before baking for a mixed-media botanical texture.
Step 4: Finishing Details
-
Add hair:
Roll a very thin sheet of pale yellow clay. Cut a curved piece for bangs and gently press it onto the forehead, just peeking out from under the hood. Add texture lines with a needle tool. -
Apply blush:
Before baking, scrape some pink pastel chalk into dust. Use a soft brush to gently apply rosette cheeks to the raw clay. This embeds the color for a natural look. -
Bake the piece:
Bake according to your clay manufacturer’s instructions (usually 275°F/130°C for 15-30 minutes per 1/4 inch thickness). Let it cool completely inside the oven to prevent cracking. -
Paint the eyes:
Once cool, use your finest brush and black acrylic paint to draw two fragile, downward-curving arcs for the closed eyes. Add tiny lashes if desired. -
Highlight the dots:
Dip a toothpick or dotting tool into gold or grey paint and carefully fill the indented dots on the swaddle. -
Seal the work:
Apply a thin coat of matte varnish to the entire piece to protect the paint and give the clay a unified, porcelain-like finish.
Place your little sleeping creation on a shelf or bedside table to add a touch of calm to your space
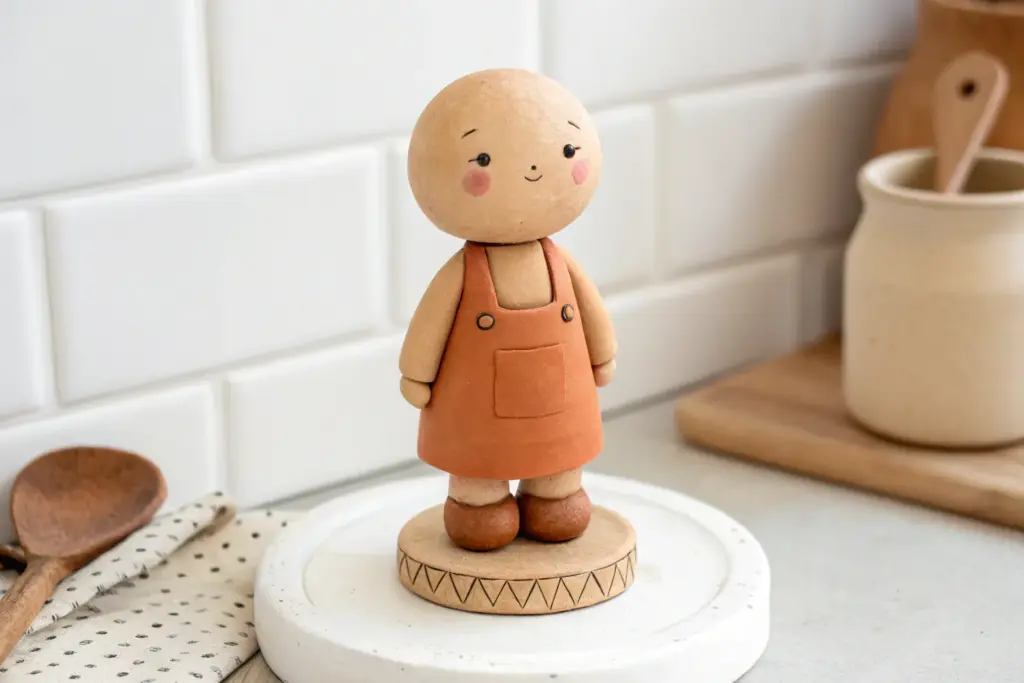
Occupational Clay People With Mini Props
These charming little occupational figures blend the simplicity of wooden peg dolls with the versatility of polymer clay detailing. With their sweet, minimalist faces and textured clay clothing, they make perfect keepsakes or playful décor for a kitchen shelf.
How-To Guide
Materials
- Wooden peg doll bases (approx. 2-3 inches tall)
- White polymer clay
- Light blue polymer clay
- Grey polymer clay
- Caramel or brown polymer clay (for shoes/hair)
- Acrylic paints (black, blush pink, optional white)
- Fine detail paintbrush or dotting tool
- Needle tool or toothpick
- Clay rolling pin
- Craft knife
- Matte varnish (optional)
Step 1: Prepping the Base Figures
-
Sand and clean:
Begin by lightly sanding your wooden peg dolls to remove any roughness. Wipe them down with a damp cloth to ensure the clay adheres properly to the wood surface. -
Form the pants (Left & Right Figures):
Roll out white clay (for the baker) and grey clay (for the worker) into thin sheets. Wrap a strip around the lower half of the peg doll to create pants, smoothing the seam at the back. -
Define the legs:
Use a craft knife or needle tool to gently score a vertical line up the center of the pants to suggest two separate legs. Don’t cut all the way through; just create a deep groove. -
Add the skirt (Center Figure):
For the center figure, wrap a sheet of white clay around the lower body to form an apron-like skirt. You can leave the very bottom wood exposed or cover it entirely depending on the look you prefer.
Step 2: Dressing the Dolls
-
Sculpt the baker’s bib:
Roll a small rectangle of white clay. Place it on the baker’s chest and use your needle tool to prick tiny stitch marks along the top edge. Add two tiny flattened balls of yellow or gold clay for buttons. -
Create the worker’s overalls:
For the grey figure, cut a square bib piece and two thin straps from your grey clay sheet. Attach the bib to the chest and run straps over the shoulders to the back, blending the clay gently where they meet. -
Add silver details:
Roll tiny balls of metallic or grey clay to mimic metal fasteners on the overall straps. Press them flat with your fingertip to secure them. -
Dress the center figure:
Apply a thin layer of light blue clay to the torso for a shirt. Over this, lay a white clay bib shape for the apron. I find using a small rolling tool helps smooth these layers without leaving fingerprints. -
Add texture:
Use your needle tool to create a ‘stitched’ texture pattern along the waistline of the baker and the center figure’s apron. Small, evenly spaced indentations add a lovely handmade fabric feel.
Fixing Smudges
If you smudge paint on the raw wood face, lightly sand it away with fine-grit sandpaper instead of trying to wipe it, which pushes pigment deeper into the grain.
Step 3: Heads, Hats, and Baking
-
Form the shoes:
Roll small balls of caramel or brown clay. Flatten them slightly and press them onto the bottom of the wooden base to act as sturdy shoes. -
Baker’s hat:
Form a white ball of clay and flatten the bottom. Score vertical lines around the sides to create that classic puffed chef’s hat look, then press it onto the wooden head. -
Bonnet and cap:
Shapes the center figure’s bonnet using white clay molded around the back of the head. For the worker, form a flat, grey driving cap with a small brim peaking over the forehead. -
Bake the clay:
Follow your polymer clay package instructions for baking temperatures and times—usually around 275°F (135°C) for 15-30 minutes. Let them cool completely before painting.
Make Them Personal
Create a custom family set by swapping the occupational clothes for outfits that match your family’s actual hobbies, like gardening gear or sports jerseys.
Step 4: Painting the Faces
-
Dot the eyes:
Dip a dotting tool or the non-brush end of a paintbrush into black acrylic paint. Carefully place two small, widely spaced dots for eyes on each face. -
Add pink cheeks:
Dilute a tiny amount of pink paint with water or use a dry-brush technique to gently dab rosy cheeks under the eyes. -
Tiny details:
Using your finest brush, add minuscule eyebrows or a tiny dash of hair peeking out from under the hats if desired. Keep it minimal to match the style. -
Protect the work:
Once the paint is fully dry, you may choose to coat the clay portions with a matte varnish to protect pieces from dust and fingerprints.
Arranging your finished trio on a wooden slice creates an instant, heartwarming vignette for any room.


What Really Happens Inside the Kiln
Learn how time and temperature work together inside the kiln to transform clay into durable ceramic.
Hobby-Themed Clay People Characters
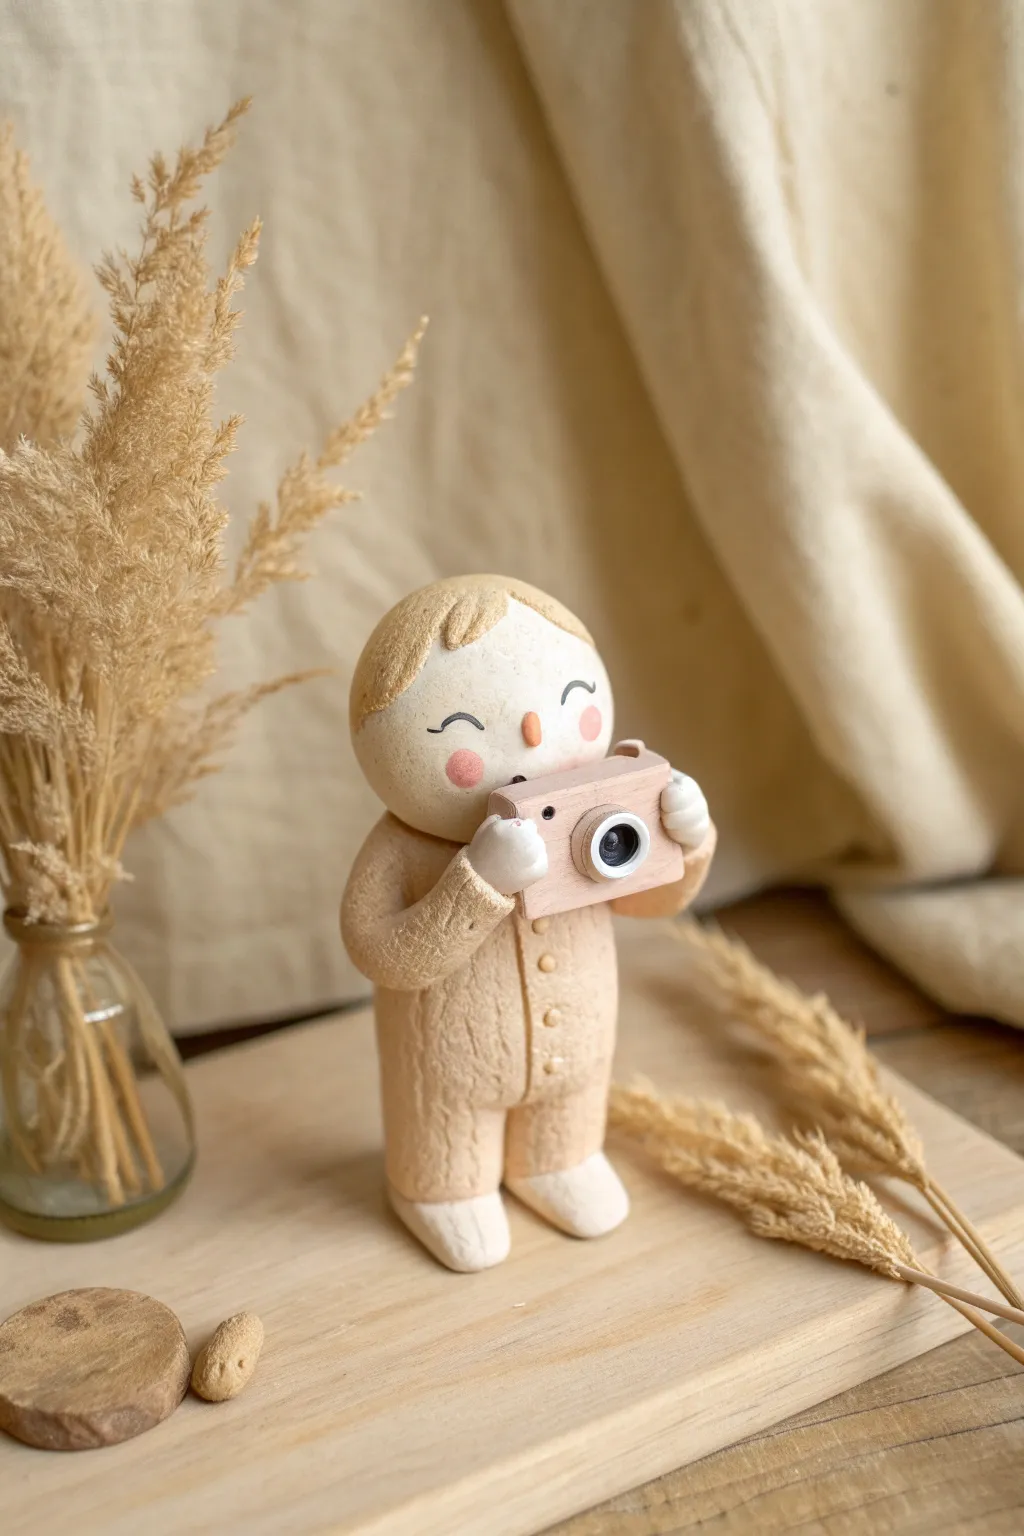
Capture the charm of photography with this adorable clay figure dressed in a cozy textured jumpsuit. This project focuses on simple shapes and surface textures to bring a sweet, hobby-themed character to life.
Step-by-Step Tutorial
Materials
- Polymer clay (beige/flesh tone, light brown for hair, pale pink for camera)
- Texture tools (knitting texture mat, needle tool, old toothbrush)
- Acrylic paints (black, pink, orange)
- Small detail paintbrush
- Ball stylus tool
- Rolling pin
- Craft knife
- Wire armature or toothpicks
- Baking sheet and foil
- Matte varnish (optional)
Step 1: Sculpting the Head and Body
-
Form the head:
Start by rolling a ball of beige clay, slightly larger than a marble, into a smooth, flattened sphere for the head. Press gently to shape the chin area so it’s slightly wider at the bottom. -
Create the body core:
Roll a cylinder of beige clay for the body. It should be slightly shorter and wider than the head to give that cute, chubby proportion. -
Texture the jumpsuit:
Roll out a thin sheet of the same beige clay. Press a knitting texture mat or a piece of actual coarse fabric into the clay to create a sweater-like woven pattern. -
Dress the figure:
Cut pieces from your textured sheet to wrap around the body cylinder. Smooth the seams at the back carefully so you don’t crush the texture on the front. -
Add the legs:
Create two short, thick sausage shapes from the textured clay. Attach them to the bottom of the body, blending the clay upwards to secure them. -
Make the shoes:
Form two small, smooth white oval shapes for shoes. Press the textured legs onto these shoes, ensuring the figure can stand balanced on its own. I like to tap the feet on the table to flatten the bottoms perfectly.
Texture Trick
Don’t have a texture mat? Roll a piece of aluminum foil into a tight ball and roll it gently over the clay surface to create a cozy, fleecy fabric look.
Step 2: Adding Details and Features
-
Add the button placket:
Roll a very thin snake of smooth beige clay. Flatten it slightly and press it vertically down the center of the textured jumpsuit. -
Add tiny buttons:
Roll three miniscule balls of clay and press them onto the placket you just made. Use a needle tool to poke two tiny holes in each button for realism. -
Sculpt the hair:
Flatten a disk of light brown clay. Drape it over the top of the head like a cap. Use a craft knife or needle tool to carve short, sweeping lines to mimic hair strands and cut a fringe across the forehead. -
Attach the head:
Insert a toothpick or short wire into the neck area of the body and press the head onto it. This adds stability so the head doesn’t droop during baking.
Step 3: Crafting the Camera and Hands
-
Shape the camera body:
Cut a small rectangle from pale pink or light wood-colored clay. Smooth the edges so it looks like a block. -
Add the lens:
Roll a small white cylinder and attach a black circle to the front of it. Press this lens assembly onto the center of the camera block. -
Position the camera:
Place the camera against the figure’s chest, just below the chin. It should look like they are looking through the viewfinder. -
Add the hands:
Form two small white mitten-shapes for hands. Attach them to the sides of the camera body, looking as if they are gripping the camera. -
Connect the arms:
Roll two textured sausages for arms. Attach one end to the shoulder area and the other to the white hands, bending them at the elbows.
Fixing Fingerprints
If you accidentally squash the texture while assembling, gently brush a little baby oil or clay softener over the area and re-stamp lightly with your texture tool.
Step 4: Finishing Touches
-
Bake the figure:
Bake your clay creation according to the package instructions (usually 275°F/130°C for 15-30 minutes). Let it cool completely. -
Paint the face:
Using a fine detail brush, paint two curved upward arches for happy eyes. Add a tiny vertical oval for the nose. -
Add the blush:
Mix a tiny amount of pink paint with water to make a glaze, or use dry pastel chalk. Dab it gently onto the cheeks for a rosy glow. -
Varnish:
Brush a coat of matte varnish over the figure to protect the paint and give the clay a unified, professional finish.
Place your little photographer on a shelf to remind you to snap happy memories every day
Standing Clay People That Actually Balance
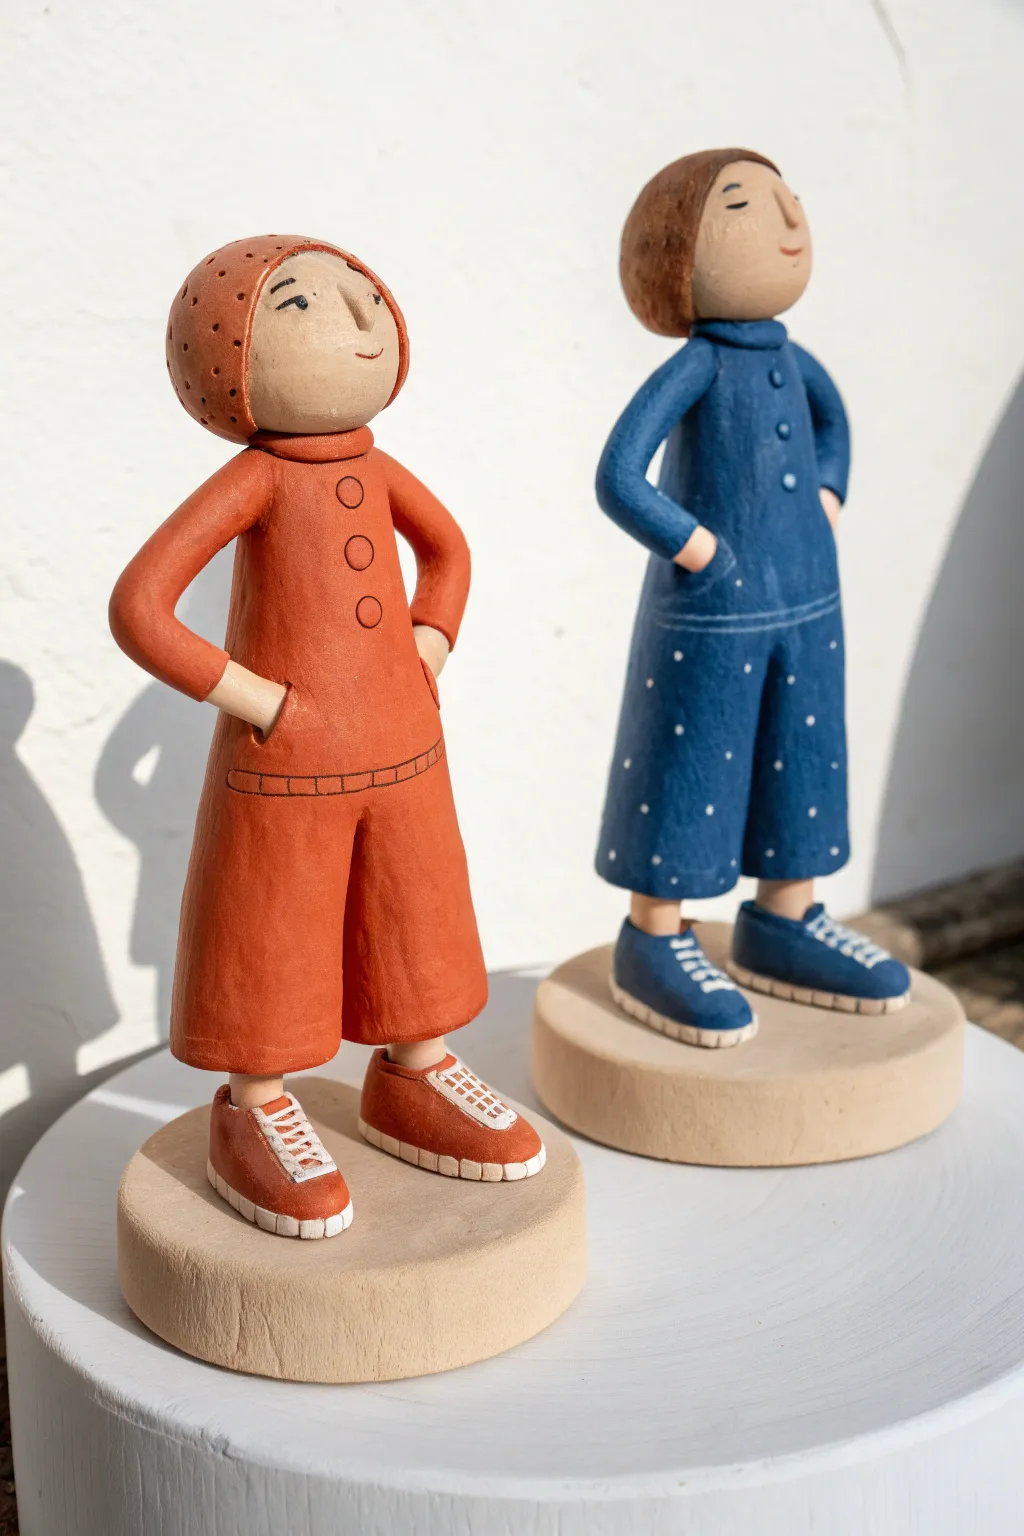
These two charming figures bring a touch of folk-art storytelling to any shelf with their expressive postures and earthy textures. They feature sturdy circular bases and cleverly balanced poses, making them perfect for practicing stability in standing clay forms.
How-To Guide
Materials
- Earthenware or stoneware clay (white or buff)
- Clay tools (needle tool, modeling tool, scoring tool)
- Slip (clay mixed with water)
- Underglazes (terracotta orange, deep denim blue, white, black, flesh tone)
- Clear matte or satin glaze
- Rolling pin
- Small geometric cutters (optional, for bases)
- Fine detail brushes
- Sponge
Step 1: Establishing the Base and Body
-
Create the podiums:
Roll out a slab of clay to about 1/2 inch thick and cut out two consistent circles, roughly 3 inches in diameter. Smooth the edges with a damp sponge. -
Form the pants:
For each figure, roll two equal coils of clay for legs. Because we want ‘wide-leg’ trousers, keep these thick and slightly flattened. Join them at the top to create the hip area. -
Attach to base:
Score and slip the bottom of the legs and the center of your bases firmly. Press the legs down to ensure a strong bond; this is crucial for the figure’s balance. -
Build the torso:
Create a solid oval of clay for the torso. Score and slip it onto the hip section. Blend the clay seams completely smooth so the body looks like one continuous piece of fabric. -
Add the arms:
Roll two thinner coils for arms. Attach them at the shoulders, bending the elbows so the hands (which can just be rounded nubs at this stage) rest against the hips or thighs.
Step 2: Sculptural Details
-
Pocket integration:
To create the ‘hands in pockets’ look, add small curved strips of clay over the hand area on the thighs. Smooth the edges of these strips into the pants, leaving the top edge open to simulate a pocket lip. -
Head and neck:
Roll a sphere for the head and a small cylinder for the neck. Attach the neck to the body, then the head to the neck, using aggressive scoring and slipping to prevent detachment. -
Hair and hoods:
For the blue figure, flatten a piece of clay and drape it over the head for hair. For the orange figure, mold a hood shape directly around the face, adding small indented dots for texture if desired. -
Facial features:
Keep the faces simple. Use a tiny pinch of clay for the nose and blend it onto the face. I prefer to leave the eyes and mouth to be painted later rather than sculpting them, to keep the surface smooth. -
Clothing details:
Add tiny flattened discs down the front of the orange figure’s chest for buttons. For the blue figure, scribe a horizontal waistline. -
Shoe sculpting:
Model small shoe shapes around the bottom of the ankles. Add a distinct sole by flattening a thin strip of clay and wrapping it around the base of the shoe.
Air Escape Vent
Since the torsos are thick, poke a tiny, hidden hole (perhaps under the arm or inside a pocket) to let air escape during firing.
Step 3: Firing and Decoration
-
Bisque firing:
Allow your figures to dry slowly and completely (at least a week) before bisque firing them to cone 04. -
Base hues:
Apply three coats of terracotta orange underglaze to the first figure’s outfit and shoes. Apply deep denim blue to the second figure’s outfit. -
Skin tones:
Paint the faces and necks with a flesh-tone underglaze. Don’t forget the tiny sliver of ‘ankle’ visible above the shoes. -
Fine details:
Use a fine liner brush with black underglaze to paint simple curved eyes and eyebrows. Use a reddish wash for the cheeks. -
Pattern work:
Using a tiny brush or a needle tool dipped in white underglaze, dot the pants of the blue figure. Paint the laces on the shoes white as well. -
Finishing touches:
Outline the pockets, buttons, and waistbands with a very thin wash of dark oxide or black underglaze to make the details pop. -
Final glazing:
Does the underglaze look dry? Good. Now apply a clear matte or satin glaze over the entire piece and fire it to the clay body’s maturation temperature.
Accessories
Give them personalities! Add a tiny clay handbag, a scarf, or a pet dog sitting on the base beside them.
Once cooled, your clay duo will be ready to stand guard on your mantle with quiet confidence

TRACK YOUR CERAMIC JOURNEY
Capture glaze tests, firing details, and creative progress—all in one simple printable. Make your projects easier to repeat and improve.
Seated Shelf-Sitter Clay People
Create a charming lineup of minimalist figures that blend smoothness of polymer clay with the cozy texture of fabric. These simple shelf-sitters feature sweet, understated faces and unique yarn hairstyles, making them perfect as nursery decor or gentle storytelling props.
Step-by-Step Guide
Materials
- Polymer clay (white or beige for the core, skin tones for the head)
- Wooden peg doll bodies (optional, as armature) or aluminum foil
- Soft knit fabric scraps (jersey or fine sweater knit) in muted earth tones
- Yarn (various shades of blonde, brown, and ginger)
- Fine-point black permanent marker or acrylic paint pen
- Tacky glue or strong craft adhesive
- Fabric scissors
- Sculpting tools (needle tool, smoothing tool)
- Sandpaper (fine grit)
- Matte varnish (optional)
Step 1: Forming the Base Body
-
Creature the core:
Start by forming a simple cylinder shape for the body. You can use a tightly crumpled core of aluminum foil to save clay, or start with a pre-made wooden peg doll base if you want extra stability. -
Wrap vertically:
Roll out a sheet of neutral-colored polymer clay to about 1/4 inch thickness. Wrap this around your foil or wooden core to create a smooth, elongated cone shape that tapers slightly toward the neck. -
Shape the head:
Roll a perfect sphere of skin-tone clay for the head. It should be slightly wider than the neck of the body. -
Attach the head:
Press the head firmly onto the neck of the body. You can insert a small piece of toothpick or wire between the head and body to act as a supportive spine before baking. -
Smooth the seams:
Use your fingers or a smoothing tool to blend the clay at the neck slightly, though this area will largely be covered by the ‘clothing’ later. Ensure the base is flat so the figure stands upright without wobbling. -
Bake the figures:
Place your clay figures on a baking sheet lined with parchment paper. Bake according to your brand of polymer clay instructions (usually 275°F/135°C for 15-30 minutes). Let them cool completely.
Smooth Operator
Before baking, wipe your raw clay with a little baby oil or rubbing alcohol on your finger. This removes distinct fingerprints and dust for a professional porcelain finish.
Step 2: Dressing the Figures
-
Select fabric:
Choose knit fabrics with a visible weave or texture, like jersey or ribbed material. Cut a rectangular strip that is long enough to wrap around the body and slightly taller than the shoulder-to-base height. -
Apply adhesive:
Brush a thin, even layer of tacky glue over the clay body, starting from below the neck down to the bottom edge. -
Wrap the fabric:
Carefully wrap the fabric strip around the body. Pull it snug so the texture of the fabric highlights the rounded form. Create a clean seam at the back where the fabric edges meet. -
Trim excess:
Trim any excess fabric at the bottom flush with the base. For the neck, tuck the raw edge slightly under itself or trim it very close to the clay neck for a neat collar line. -
Add arm details:
While many stick to a solid shape, you can add subtle arm definitions by gluing small tubes of matching fabric to the sides, or simply letting the main wrap imply a cloak-like silhouette.
Step 3: Adding Personality
-
Prepare the hair:
Cut several short lengths of yarn for the hair. For a side-swept look, you will glue strands horizontally across the forehead. -
Glue the hair base:
Apply a dab of craft glue to the top and back of the wooden head. Begin laying yarn strands starting from the crown and working down the back to cover the ‘scalp’. -
Style the fringe:
For the bangs, glue strands across the forehead, swooping them to one side. I find it helpful to use a toothpick to guide the yarn strands into a tidy curve without getting glue on my fingers. -
Trim the haircut:
Once the glue is fully dry, give the yarn hair a trim. You can create a bob, a pixie cut, or leave it long, ensuring the ends are neat. -
Mark the eyes:
Using a very fine-point black marker or a dotting tool with black paint, place two small dots wide apart on the face. Keep them low on the face for a cuter, more youthful look. -
Add a smile:
Draw a tiny, shallow ‘u’ shape between the eyes for a nose or simple smile. Keep the lines incredibly thin and delicate. -
Blush the cheeks:
Take a dry paintbrush with a tiny amount of pink chalk pastel or blush powder. Gently dab visible pink circles on the cheeks to bring the character to life. -
Finishing touches:
If desired, seal the face paint with a very light coat of matte varnish to prevent the marker from smudging over time.
Texture Play
Instead of fabric, try rolling the raw clay body over a piece of lace or burlap before baking. This imprints a realistic textile pattern directly into the hard surface.
Line up your finished family on a wooden shelf to enjoy their quiet, minimalist charm
Minimalist No-Arms “Blob People”
These charming, armless figures rely on simple geometric forms and raw textures to convey a sense of family and warmth. Their minimalist design makes them an accessible project for beginners, focusing on smooth shaping and subtle facial expressions.
How-To Guide
Materials
- Air-dry clay (smooth, light-tone)
- Small cup of water
- Fine-grit sandpaper (400 grit)
- Black fine-point pigment liner or acrylic paint pen
- Soft cloth or sponge
- Terracotta or light brown acrylic paint (optional for tinting)
- Matte spray varnish
Step 1: Shaping the Family
-
Prepare the clay:
Begin by kneading a fist-sized amount of air-dry clay to warm it up and remove air bubbles, ensuring it is pliable and smooth. -
Portion the sizes:
Divide your clay into five distinctly sized lumps: one large piece for the tallest figure, two medium pieces, one small piece, and one tiny round piece for the smallest member. -
Roll the tallest figure:
Take the largest lump and roll it into a smooth cylinder between your palms, tapering it slightly towards the top so it resembles a tall, rounded cone. -
Round the ends:
Gently tap the bottom of the cone against your work surface to flatten it so it stands upright, then use your thumb to smooth the top into a perfect dome. -
Form the segmented figures:
For the medium and small figures (the ones that look like little pawns), roll a cylinder for the body first and flatten the top surface slightly. -
Create the heads:
Roll separate, smaller spheres for the heads of these segmented figures. I like to make the head slightly wider than the neck area for a cute, toy-like proportion. -
Join the pieces:
Score the top of the body and the bottom of the head with a tool or fingernail, apply a dab of water (slip), and press them firmly together, smoothing the seam just slightly to ensure a bond. -
Shape the baby blob:
For the smallest figure, simply roll a perfect sphere. Flatten one tiny spot on the bottom just enough so it doesn’t roll away. -
Smooth the surfaces:
Dip your finger in water and gently rub over all the figures to remove fingerprints and bumps. The goal is a matte, stone-like finish.
Step 2: Refining and Decorating
-
Allow to dry:
Let the figures dry completely for 24 to 48 hours. They should feel room temperature to the touch, not cool. -
Sand for perfection:
Once bone dry, use the fine-grit sandpaper to buff away any remaining imperfections or sharp edges, wiping away the dust with a dry cloth. -
Add color variations:
If you want the terracotta tones seen in the image, water down some acrylic paint into a ‘wash’ and brush it onto selected figures, wiping off the excess immediately to create a stained wood effect. -
Plan the faces:
Before drawing, visualize where the face sits; usually, placing the eyes slightly lower on the head or dome creates a cuter, friendlier look. -
Draw the eyes:
Using the fine-point black pen, gently press straight down to make small, solid dots for eyes. Keep them relatively wide apart. -
Add smiles:
Draw the mouths using thin, simple curves. Vary them slightly—make the tall figure’s smile wide and U-shaped, while the smaller figures can have tiny, subtle smiles. -
Detail the buttons:
On the bodies of the figures, add a vertical row of 3-4 dots to represent buttons, keeping the spacing vertical and even. -
Seal the work:
Take the figures to a well-ventilated area and apply a light coat of matte spray varnish to protect the clay and the ink without making them shiny.
Cracks while Drying?
Mix a tiny amount of fresh clay with water to make a paste. Fill the crack, smooth it over with a wet finger, and let it dry again.
Textured Touch
Before drying, gently pres a piece of linen or canvas fabric against the clay surface to imprint a subtle, organic texture.
Arranged together on a windowsill, your new clay family brings a quiet, joyful presence to the room
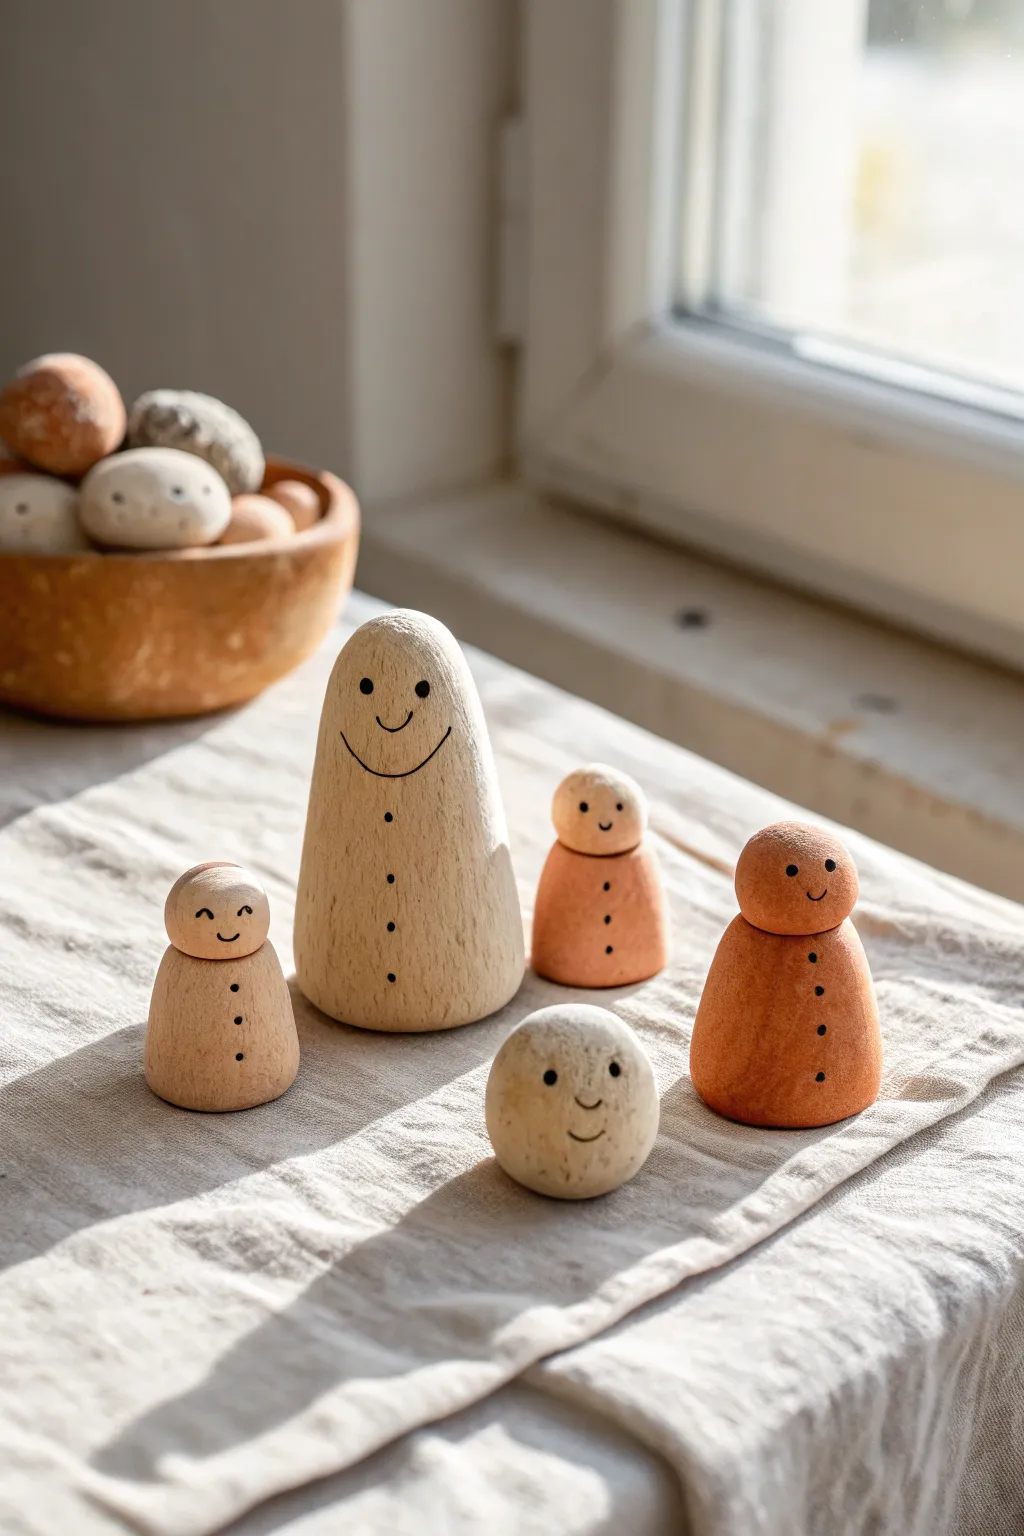
Clay People With Textured Hair Styles

This striking totem sculpture features four stylized heads stacked vertically, each showcasing a unique hair texture and alternating between warm terracotta and soft beige clay tones. The serene, closed-eye expressions create a peaceful centerpiece that celebrates the versatility of clay textures.
Detailed Instructions
Materials
- Terracotta air-dry clay or kiln-fire clay
- Cream or white clay (or slip for coloring)
- Wooden sculpting tools
- Needle tool
- Loop tool
- Rolling pin
- Texture tools (coils, stamps, or found objects)
- Water and sponge
- Slip (clay mixed with water)
- Sturdy metal rod or wooden downtime for internal structure (optional)
Step 1: Forming the Base Heads
-
Prepare the clay:
Begin by conditioning both your terracotta and cream clay until they are pliable and free of air bubbles. You will need enough clay for four distinct heads and a flat circular base. -
Shape the base:
Create the heavy bottom disc first. Roll a thick slab of terracotta clay into a circle about 1 inch thick. Smooth the edges with a damp sponge to create a clean, modern foundation. -
Form the head armatures:
Roll four balls of clay—two in terracotta and two in cream/beige. Shape them into rough ovals, slightly flattened at the top and bottom where they will stack. -
Hollow out the forms:
If firing in a kiln, carefully cut each head in half or use a loop tool from the bottom to hollow them out to ensure even drying. If using air-dry clay, you can keep them solid but may need a longer drying time.
Seamless Blending
When attaching features like noses or distinct hair coils, use a rubber-tipped tool. It blends seams invisible without leaving harsh tool marks.
Step 2: Sculpting the Faces
-
Define the facial plane:
On each of the four oval shapes, flatten the front slightly to create a surface for the face. Use your thumb to gently press indentations for the eye sockets. -
Add the nose:
Score and slip a small wedge of clay into the center of the face. Blend the edges seamlessly into the cheeks and forehead to built up a straight, classic nose profile. -
Sculpt the eyes:
For the serene, closed-eye look, roll tiny crescents of clay and attach them in the eye sockets. Smooth them down so they look like resting eyelids, rather than protruding shapes. -
Shape the mouths:
Add a small amount of clay below the nose for the lips. Use a wooden modeling tool to carve a soft line for the mouth, curving the corners slightly upward for a peaceful expression. I like to keep the lips subtle, barely more than a whisper of a smile.
Preventing Sagging
If the bottom heads start squishing under the weight of the top ones, let the bottom pieces stiffen to ‘leather hard’ before stacking the rest.
Step 3: Creating Textured Hairstyles
-
Bottom head: Swirl texture:
For the bottom terracotta head, roll thin snakes of clay. Coil them into small spirals and attach them all over the scalp area, blending the edges so they look like carved relief curls. -
Second head: Smooth waves:
For the second head (cream), apply a layer of clay over the scalp area. Use a damp modeling tool to carve deep, sweeping grooves that mimic swooping hair strands. -
Third head: Braided texture:
On the third head (cream), create a texture resembling knits or braids. You can achieve this by pressing a textured fabric or a rope tool into the wet clay, or by carving repetitive ‘V’ shapes. -
Top head: Nubby curls:
For the crowning terracotta head, form many small, uniform balls of clay. Attach them closely together all over the head, pressing the center of each with a round tool to create a ‘bantu knot’ or nubby texture.
Step 4: Stacking and Finishing
-
Test the stack:
Before attaching permanently, gently stack your heads to check the balance. If using an internal rod for stability, pierce a vertical hole through the center of each head now. -
Join the pieces:
Score and slip the contact points between each head and the base. Press them firmly together. If your sculpture is heavy, the internal rod is crucial here to prevent tipping. -
Refine the surface:
Use a barely damp sponge to smooth out any fingerprints on the faces, being careful not to erase the hair textures you just created. -
Dry slowly:
Loosely cover the entire totem with plastic to let it dry very slowly over several days. This prevents cracking, especially where the different clay bodies meet. -
Final touches:
Once fully dry (or fired), you can leave the natural matte finish. If you used all one color of clay, you might choose to paint the alternating heads in warm earth tones to match the reference look.
Place your finished totem in a spot with soft lighting to let the shadows play across the varied textures
Tiny Clay People Keychain-Style Charms
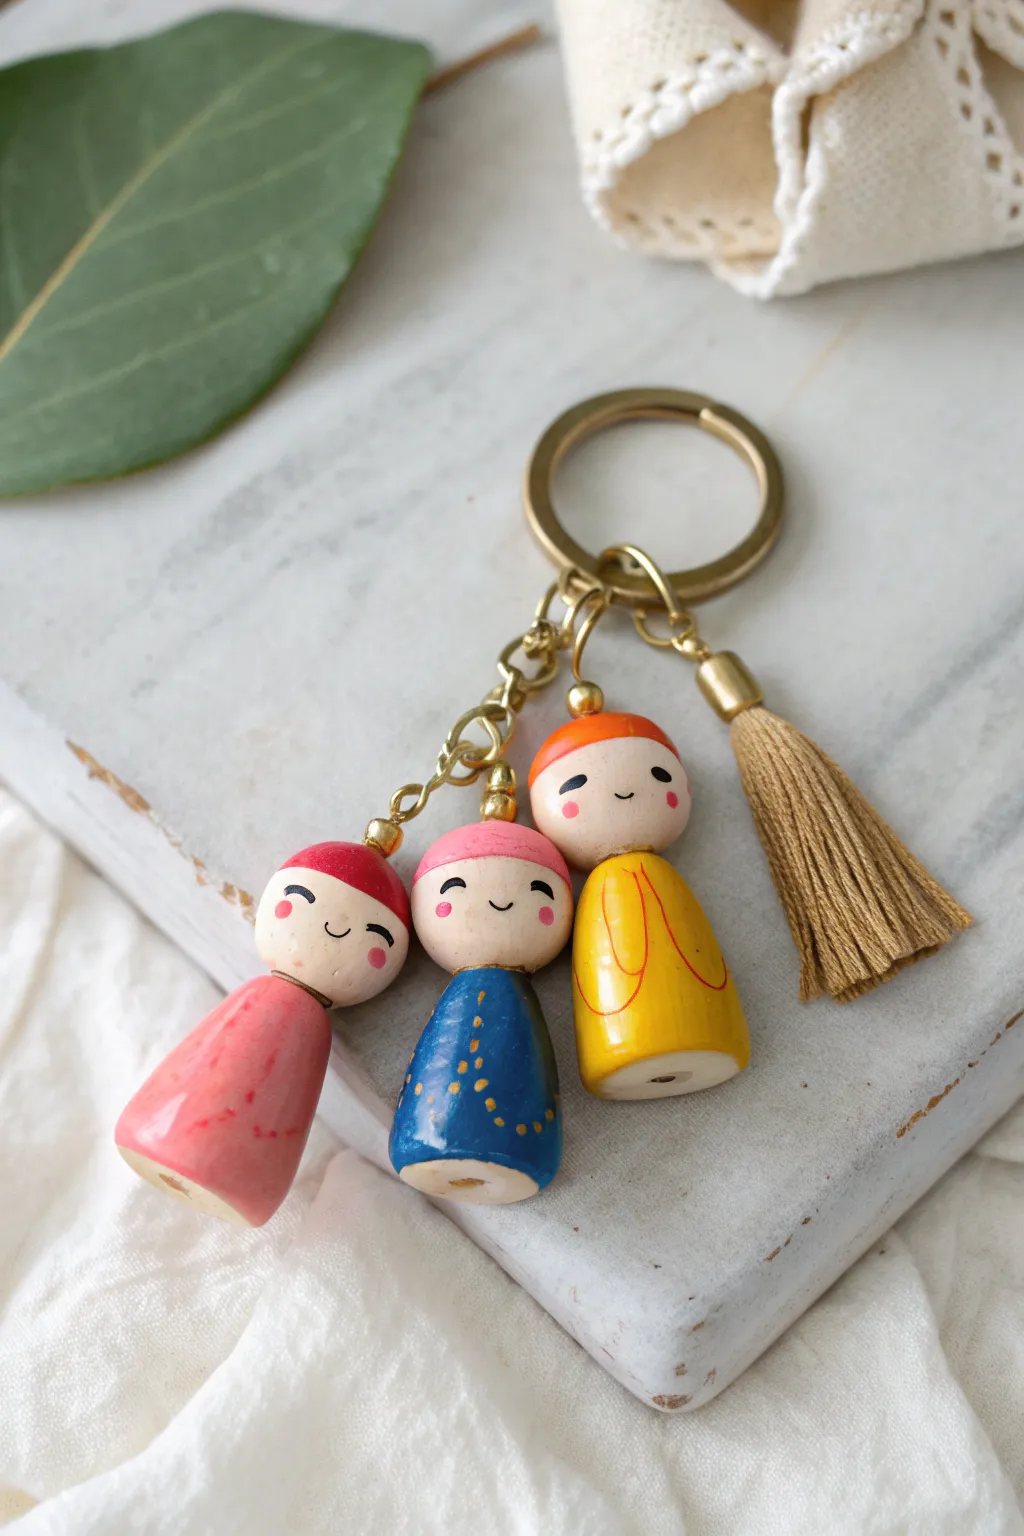
Carry a little happiness with you wherever you go with these adorable hand-painted wooden peg doll charms. Featuring a trio of smiling characters in primary colors, this keychain combines simple painting techniques with sturdy jewelry assembly for a functional piece of art.
Step-by-Step Guide
Materials
- Small wooden peg dolls (approx. 1-1.5 inches tall)
- Acrylic craft paints (Red, Blue, Yellow, Pink, Black, Beige/Skin tone)
- Fine detail paintbrushes (Size 000 and Size 1)
- Gold screw eye pins (small size)
- Gold keychain ring with chain extender
- Jump rings (gold, 4mm-6mm)
- Gold jewelry wire (optional, for connecting)
- Flat nose pliers and round nose pliers
- Clear protective sealant (gloss or matte varnish)
- Beige/Gold embroidery floss or pre-made tassel
- Drill with a tiny bit (slightly smaller than eye screw shank)
Step 1: Painting the Base Layers
-
Prepare the wood:
Ensure your wooden peg dolls are smooth and clean. If there are any rough spots, give them a quick sanding with fine-grit sandpaper and wipe away the dust. -
Sketch the design:
Lightly pencil a horizontal line around the ‘neck’ area of each doll to separate the head from the body. You can also sketch the curve for their hair caps. -
Paint the faces:
Using a beige or skin-tone acrylic paint, carefully fill in the head area below the hair line. You may need two thin coats for opaque coverage. -
Create the hair:
Paint the top of each head with a different color to act as a hat or hair. Use red for the first, pink for the second, and orange for the third, following the curve you sketched earlier. -
Paint the bodies:
Paint the body portion of the first doll in a soft red. For the second doll, use a deep midnight blue. For the third, apply a bright mustard yellow. Let these base coats dry completely before adding patterns.
Step 2: Adding Details & Faces
-
Add rosy cheeks:
Dip the back end of a paintbrush handle into pink paint. Gently dot it onto the face area to create perfectly round, rosy cheeks. -
Draw the facial features:
Using your finest 000 brush or a extra-fine tip black paint pen, carefully draw small u-shaped closed eyes and a tiny smile between the cheeks. -
Detail the red doll:
Mix a slightly darker shade of red or use a very watered-down brown to add subtle texture or splatter effects to the red doll’s dress for a vintage look. -
Detail the blue doll:
Using a gold metallic paint or yellow ochre, dab tiny dots in a vertical line down the center of the blue dress, and add a few scattered dots near the bottom hem. -
Detail the yellow doll:
With a fine red or orange paint, outline a simple collar or robe opening shape on the chest of the yellow doll. -
Seal the dolls:
Once all paint is thoroughly dry, apply a coat of clear varnish over the entire surface. I find a gloss finish makes the colors pop and protects them from keychain wear.
Clean Lines Hack
Use tiny strips of washi tape or artist’s masking tape to create the separation line between the face and clothing. This guarantees a crisp, straight neck line every time.
Step 3: Assembly
-
Drill pilot holes:
Carefully drill a shallow pilot hole into the very top center of each doll’s head. This prevents the wood from splitting when you insert the hardware. -
Insert eye pins:
Twist a gold screw eye pin into the pilot hole of each doll. Use your pliers to grip the eye and turn it firmly until it is flush with the wood. -
Attach jump rings:
Open a jump ring using two pairs of pliers (twist sideways, don’t pull apart). Slide the eye pin of a doll onto the ring, then attach it to the chain links of the main keyring. -
Connect the trio:
Repeat the connection process for all three dolls, attaching them at slightly different lengths on the chain so they cascade rather than clump together. -
Add the tassel:
Attach a beige or gold tassel to the main ring using a separate jump ring or the tassel’s built-in loop to balance out the composition. -
Final check:
Ensure all jump rings are closed tightly so there are no gaps for components to slip through.
Level Up: Custom Characters
Instead of abstract patterns, paint the dolls to look like your family members or best friends by matching hair colors and favorite outfits for a personalized gift.
Clip your new handmade charm onto your keys or bag and enjoy the smiles it brings to your daily routine
Clay People Cake Topper Characters
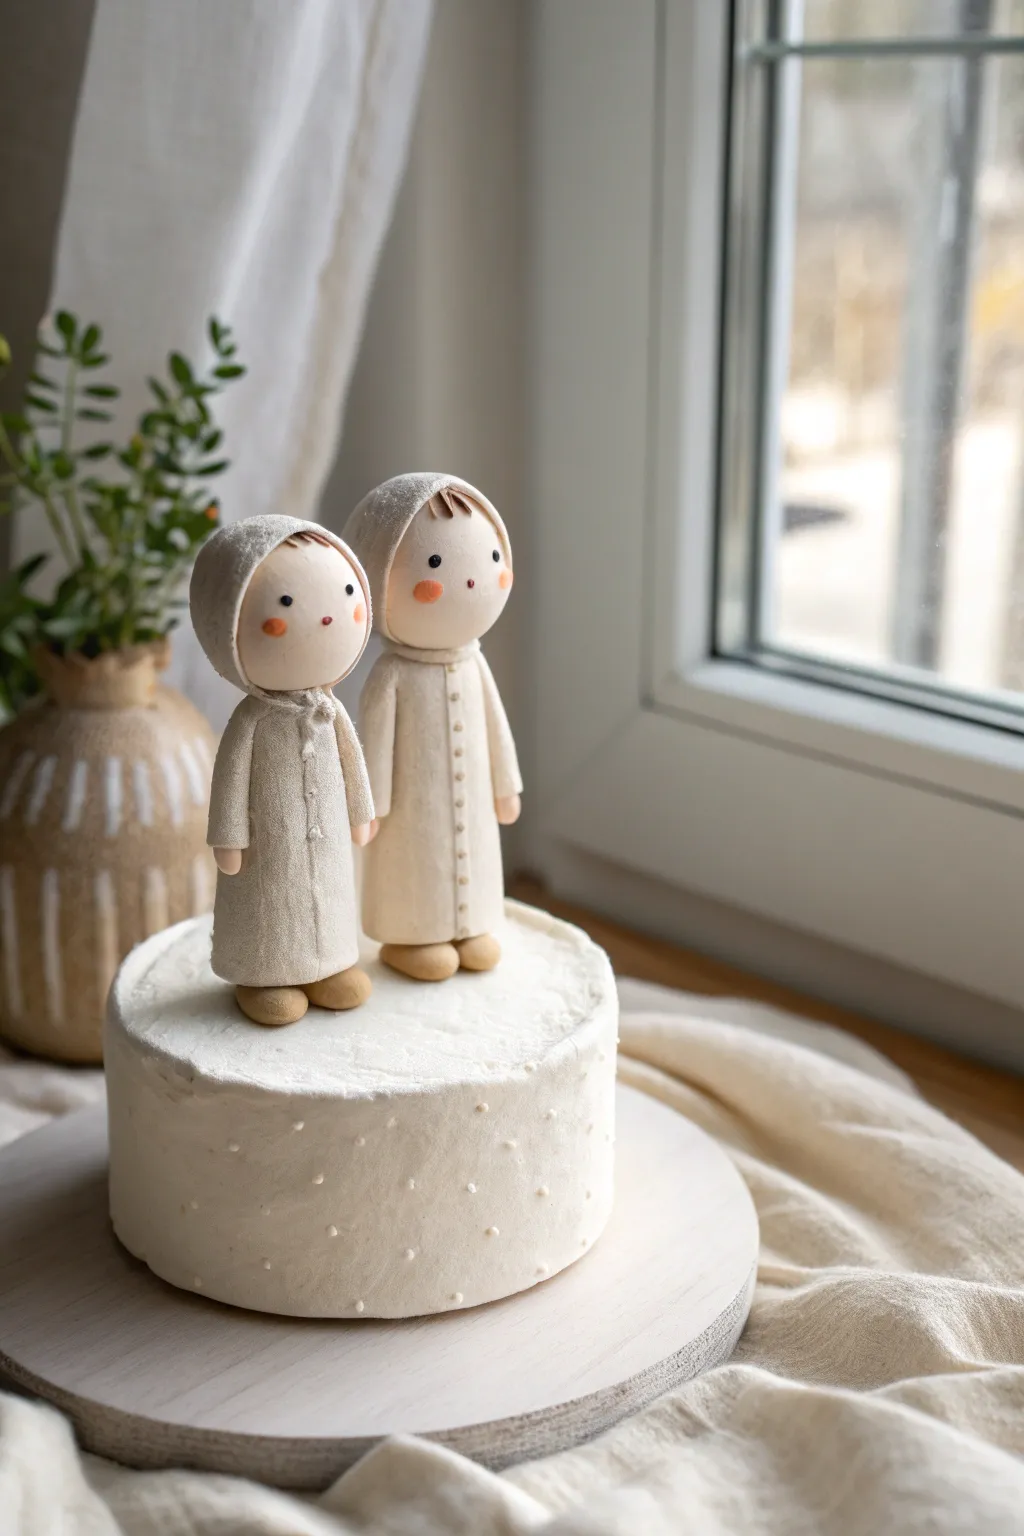
These two serene winter-themed figures bring a touch of minimalist charm to any celebration cake. With their soft beige tones, matte linen-like texture, and simple hoods, they look like treasured wooden heirlooms but are surprisingly simple to sculpt from clay.
How-To Guide
Materials
- Polymer clay or air-dry clay (white and beige/sand)
- Acrylic rolling pin
- Modeling tools (ball tool, needle tool)
- Small piece of textured fabric (linen or canvas) for imprinting
- Acrylic paints (black, pink/blush)
- Fine detail paintbrush or dotting tool
- Wooden dowels or toothpicks (for structural support)
- Clear matte varnish (optional)
- Flexible clay blade
Step 1: Forming the Core Structure
-
Prepare the bodies:
Start by conditioning your beige or sand-colored clay until it’s pliable. Roll two solid cylinders for the bodies, making one slighty taller than the other if you want variation. Taper them gently towards the top where the head will sit. -
Insert supports:
Insert a toothpick or small wooden dowel vertically into the top of each body cylinder. Leave about half an inch protruding; this will secure the heavy heads later so they don’t droop. -
Create the heads:
Roll two smooth spheres of clay for the heads. Make sure they are proportional to the bodies—think ‘cute’ proportions, so slightly larger than realistic heads. -
Shape the shoes:
For the feet, roll four small balls of a slightly darker beige clay. Flatten them slightly into oval shapes. Press the body cylinders firmly onto these feet so the figures stand securely on their own.
Uneven Standing?
If figures wobble, gently tap the base on a flat surface while the clay is still soft to flatten the bottom. For baked figures, sand the feet bottoms lightly with sandpaper.
Step 2: Dressing the Figures
-
Roll the coat fabric:
Roll out a sheet of your main body-colored clay until it is about 2mm thick. Before cutting, gently press a piece of coarse linen or canvas onto the surface to imprint a subtle fabric texture. -
Cut the coats:
Using your flexible blade, cut rectangular pieces that are tall enough to cover the body cylinders from neck to ankles. Wrap a rectangle around each body, joining the seam at the front or back depending on the look you want. -
Refine the front seam:
For the figure on the left, overlap the clay slightly at the front to mimic a buttoned coat. Use a needle tool to poke tiny holes or indentations in a vertical line to represent closure buttons. -
Add arm details:
Roll thin sausages of clay for the arms. Texture them with your fabric scrap, then attach them to the sides of the body. Blend the clay at the shoulder attachment point so it looks seamless. -
Form the hoods:
Roll out another textured sheet of clay. Cut circles or semi-circles large enough to drape over the head spheres. Place the clay over the head, pinching gently under the chin for a snug bonnet look.
Make it Wintery
Before baking, dust the hoods and shoulders with a tiny bit of white embossing powder or ultra-fine glitter to mimic a dusting of fresh snow.
Step 3: Refining and Finishing
-
Assemble the parts:
Carefully push the heads onto the exposed toothpicks on the bodies. Press down gently to ensure the neck connects firmly with the coat collar. -
Smooth the clay:
Check for any fingerprints. I often use a tiny bit of baby oil on my fingertip to smooth out imperfections without erasing the beautiful linen texture we added earlier. -
Bake or dry:
If using polymer clay, bake according to the package instructions (usually around 275°F/130°C). If using air-dry clay, let the figures sit in a dry, room-temperature spot for 24-48 hours. -
Paint the cheeks:
Once dry/cool, dip a dry brush or cotton swab into a tiny amount of pink chalk pastel or diluted acrylic paint. Gently buff pink circles onto the cheeks for a rosy, wintry flush. -
Add facial features:
Using a fine dotting tool or the tip of a toothpick, apply two tiny black dots for the eyes. Add a minuscule dot for the nose if desired, keeping it minimal to match the style. -
Add hair details:
If you want hair peeking out from the hood, use a thin brush to paint simple brown bangs on the forehead area, just under the rim of the hood. -
Seal the work:
To protect your toppers from frosting grease, brush a thin layer of matte varnish over the entire figure, paying special attention to the base.
Now your charming little pair is ready to stand sweetly atop your cake conversation piece
Folk-Art Gnome People With Hats
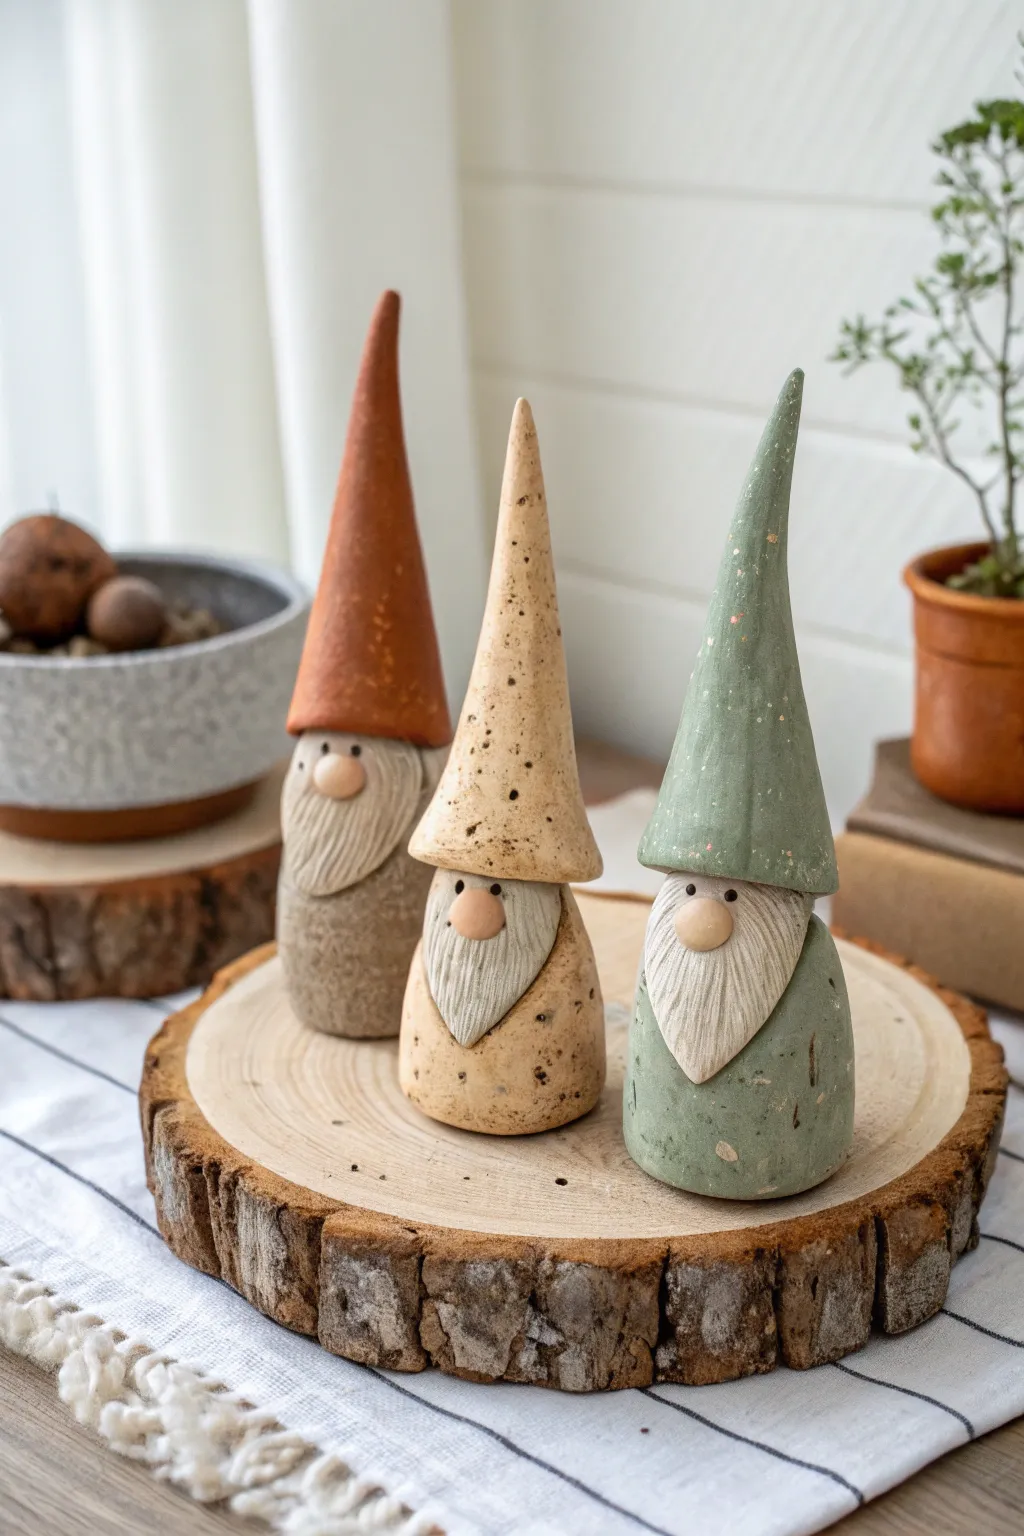
These charming, minimalist gnomes bring a touch of woodland magic to your home decor with their speckled, earthy textures and tall, sweeping hats. The project combines simple geometric forms with subtle textural details to create a timeless folk-art aesthetic that looks beautiful on any mantle.
Step-by-Step Tutorial
Materials
- Polymer clay (terracotta, beige, sage green, and white)
- Speckled clay or fine faux-granite embossing powder
- Aluminum foil (for armature)
- Basic sculpting tools (needle tool, small ball stylus)
- Texture tool (old toothbrush or stiff bristle brush)
- Craft knife
- Acrylic rolling pin
- Baking sheet and parchment paper
- Oven (for baking polymer clay)
- Old toothbrush or stiff bristle brush for texturing
Step 1: Forming the Base Structure
-
Create the core:
Start by crumpling a small piece of aluminum foil into a cone shape. This acts as an armature to reduce the amount of clay needed and ensures the gnome isn’t too heavy. -
Prepare the body clay:
Condition your chosen body color clay (beige, sage, or brown) by kneading it until soft. If you want that lovely speckled look shown in the image, mix in a pinch of faux-granite embossing powder or coarse black pepper. -
Cover the body:
Flatten a portion of the clay and wrap it around the bottom two-thirds of your foil cone. Smooth the seams with your fingers to create a seamless, rounded base that tapers slightly upward. -
Add texture:
Before the clay sets, gently tap the surface of the body with a stiff-bristled brush or an old toothbrush. This creates the stone-like, rustic texture visible in the finished piece.
Clean Cuts
Pop your clay in the fridge for 10 minutes before doing detailed cutting work on the beard. Firmer clay holds fine details better and prevents the beard strands from mushing together.
Step 2: Sculpting the Beard and Face
-
Shape the beard base:
Take a walnut-sized piece of white clay and roll it into a teardrop shape. Flatten it slightly with your thumb. -
Attach the beard:
Press the flattened teardrop onto the front of the body cone, positioning the wider part near the top where the face will be. Smooth the edges down gently so it adheres well. -
Detail the hair:
Using a needle tool or a sharp craft knife, score vertical lines down the length of the white clay to simulate hair strands. Varying the depth and spacing of these lines makes the beard look more natural and organic. -
Form the nose:
Roll a small ball of beige or flesh-toned clay. It should be proportional to the beard—rustic gnomes often look best with slightly oversized noses. -
Place the nose:
Position the nose right at the top center of the beard. Press it on firmly enough to stick, but keep that nice round shape intact. -
Add the eyes:
For the tiny eyes, use a needle tool to make two small indentations just above the nose on the underlying body cone, or prick two tiny holes into the top edge of the beard clay if it sits high. -
Insert eye beads:
Roll two minuscule balls of black clay—truly tiny specks—and press them into the indentations you just made. I typically use the tip of a craft knife to place these precisely.
Step 3: Creating the Signature Hat
-
Roll the cone:
Select a contrasting color for the hat, like terracotta or sage green. Roll a larger piece of clay into a long, smooth tapered cone. -
Hollow the base:
Use your thumb to create an indentation in the wider bottom end of the cone, turning it into a hat shape that can potential fit over the body armature. -
Fit the hat:
Place the hat onto the gnome body. It should sit low, covering the top edge of the beard and resting just above the nose. This creates that shy, cozy gnome appearance. -
Create the curve:
Gently gently bend the very tip of the hat to one side to give it movement and character. A little irregularity adds to the handmade charm. -
Refine the brim:
If the transition between hat and body looks too sharp, gently smooth the clay or add a tiny textured roll of clay as a brim, although the style in the image relies on a clean overlap. -
Final texture check:
Give the hat a light pass with your texturing brush if you want it to match the body, or keep it smooth for contrast. Inspect the whole piece for fingerprints and smooth them away. -
Bake carefully:
Place your gnomes on a parchment-lined baking sheet. Bake according to your polymer clay manufacturer’s specific instructions (usually 275°F/135°C for 15-30 minutes per 1/4 inch thickness). -
Cool and finish:
Let the gnomes cool completely in the oven to prevent cracking. Once cold, they are ready to display.
Mossy Vibes
After baking, dilute some dark green or brown acrylic paint with water. Brush it into the textured crevices and quickly wipe the surface clean to create an aged, weathered stone effect.
Arranging these little characters in groups of three with varying heights creates a wonderful visual balance for your shelf
Fantasy Clay People With Wings and Capes
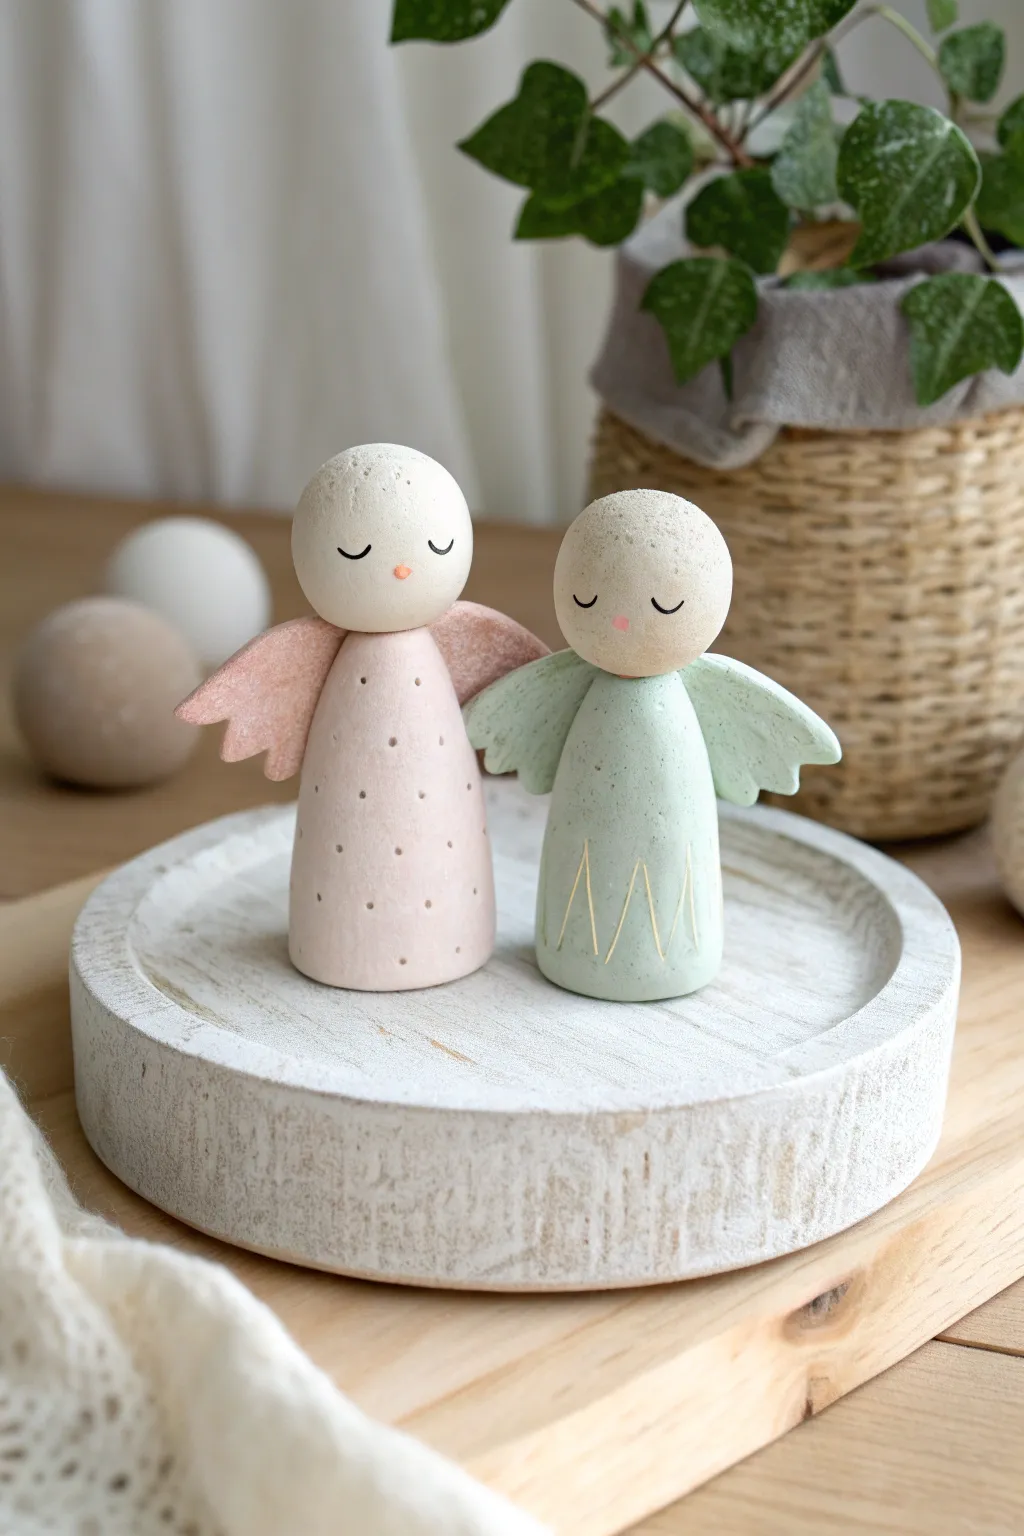
These serene, minimalist angels bring a touch of gentle charm with their pastel hues and simple geometric shapes. Perfect for holiday décor or a sweet nursery shelf, this project focuses on clean lines, soft textures, and delicately painted details.
Detailed Instructions
Materials
- Air-dry clay (white or stone texture)
- Acrylic paints (soft pink, mint green, white, black, orange)
- Fine grit sandpaper
- Small rolling pin
- Detail paintbrush (00 or 000 size)
- Flat shader brush
- Clay sculpting tools (knife, smoothing tool)
- Water cup
- Cardboard or leaf shape template (optional)
- Toothpicks (for structural support)
Step 1: Sculpting the Base Forms
-
Form the bodies:
Start by taking two lumps of clay, roughly the size of a golf ball. Roll them into smooth balls first, then gently roll one side against your surface to create a cone shape. Flatten the bottom so they stand securely. -
Create the heads:
Roll two smaller balls of clay for the heads. These should be proportional to the bodies—slightly oversized gives them a cute look. I like to continuously roll them in my palms to ensure they remain perfectly round. -
Attach head to body:
Insert half a toothpick into the top of the cone body. Push the head onto the exposed toothpick. Use a tiny bit of water or slip (clay mixed with water) at the join to bond the pieces together securely. -
Smooth the surface:
Dip your finger in water and gently smooth out any fingerprints or cracks on the clay. The goal implies a slightly rustic, stone-like texture, so it doesn’t need to be manufactured-perfect, but major bumps should be leveled.
Fixing Cracks
Make a ‘slurry’ paste by mixing dry clay crumbs with water. Fill any drying cracks with this paste, let it dry again, and then sand smooth.
Step 2: Adding Wings & Details
-
Roll out clay for wings:
Roll a small amount of clay flat, about 1/4 inch thick. You need enough material for two pairs of wings. -
Cut the wing shapes:
Use a craft knife or a small leaf-shaped cutter to create the wings. For the pink angel, shape them like rounded bird wings; for the green one, try a more pointed, leaf-like shape. Cut small notches on the edges to suggest feathers. -
Attach the wings:
Score the back of the angel body and the attachment point on the wings (scratch cross-hatch marks). Apply a dab of water and press the wings firmly onto the back. Smooth the seam with a sculpting tool. -
Let it dry completely:
Air-dry clay needs time. Allow your angels to dry for at least 24-48 hours. Turn them occasionally so the bottom dries too. The clay will turn a lighter white color when fully dry. -
Sand for finish:
Once bone dry, use fine-grit sandpaper to buff away any rough patches, especially around the wing connections and the base.
Step 3: Painting & Finishing
-
Mix the base colors:
Mix white with a tiny drop of red to create a pale dusty pink. Mix white with green and a touch of yellow for the mint shade. Keep the colors pastel and muted. -
Paint the bodies:
Paint the conical body of one angel pink and the other mint green. Leave the heads unpainted if you want the natural clay look, or paint them a warm cream. Paint the wings to match their respective body colors. -
Add a wash (optional):
To get that speckled, stone-like texture seen in the photo, you can flick a toothbrush with watered-down brown paint lightly over the dried base coat, or use a speckle-effect spray. -
Paint the faces:
Using your finest detail brush and black paint, carefully paint two small, curved lines for closed sleeping eyes. Add a tiny dot of orange or soft pink for a nose or blush. -
Add body patterns:
For the pink angel, use a toothpick dipped in a darker pink or gray to create small, evenly spaced dots. For the green angel, use a thin brush with gold or cream paint to draw a zig-zag pattern near the hem.
Add a Halo
Twist a small piece of gold artisan wire into a circle and insert it into the top of the head before the clay dries for a shiny halo effect.
Place your duo on a textured tray or shelf to enjoy their peaceful presence
Anthropomorphic Animal People Characters
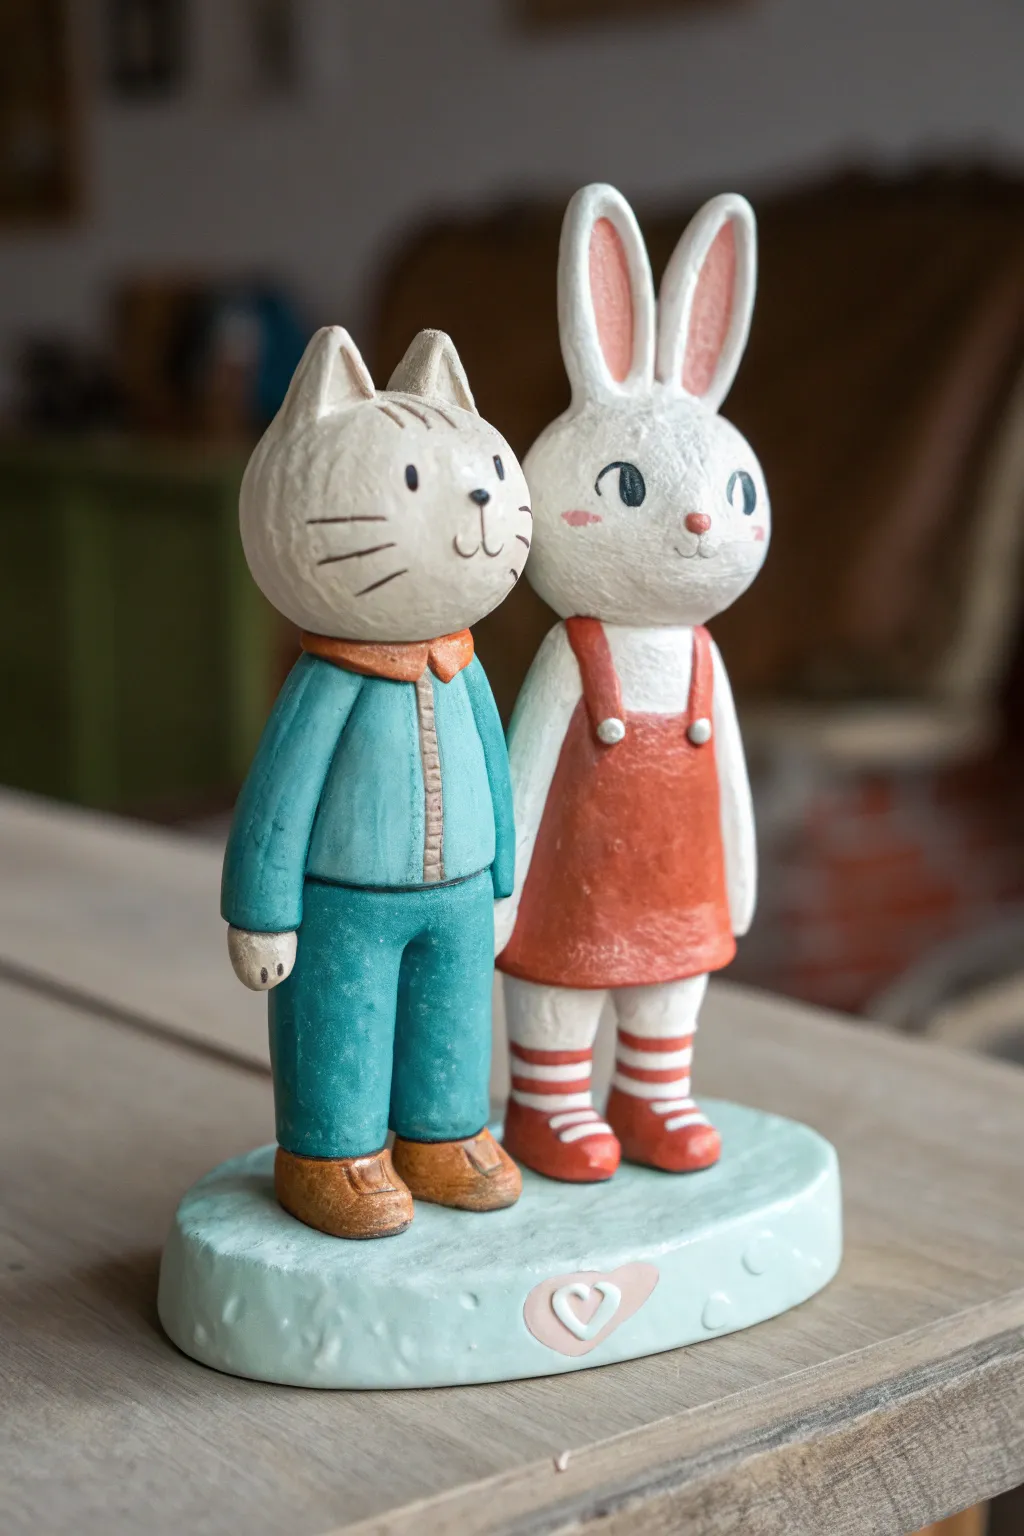
Sculpt a charming pair of anthropomorphic friends with this delightful clay project featuring a dapper cat and a sweet rabbit. The finished piece has a lovely, handmade texture and soft matte finish that gives it the look of a vintage storybook character brought to life.
Step-by-Step Tutorial
Materials
- Air-dry clay or polymer clay (white)
- Wire armature (thin gauge aluminium)
- Ball stylus tools
- Sculpting tools (needle tool, small spatula)
- Acrylic paints (teal, rust-orange, white, beige, brown, black)
- Fine detail paintbrushes (0 and 00 sizes)
- Matte varnish or sealant
- Rolling pin
- Sandpaper (fine grit)
Step 1: Forming the Base & Bodies
-
Create the platform:
Start by rolling out a thick oval of clay about 1/2 inch high. Smooth the edges with a little water on your finger to create a soft, rounded perimeter. This will serve as the shared base for both figures. -
Build the armatures:
Twist two simple loops of wire to act as the core for each figure. Insert these securely into the base, side-by-side but leaving enough room for the heads to not bump into each other. -
Sculpt the cat’s body:
Form a cylinder of clay around the left wire. Slightly taper it at the top for the neck. Using a knife tool, gently impress a vertical line down the center for the jacket opening and carve a horizontal line for the waist where the pants meet the jacket. -
Sculpt the bunny’s body:
Around the right wire, form a slightly more A-line shape to represent a dress. Smooth the surface, then layer two small straps over the shoulders to create the look of a jumper or dungarees.
Step 2: Heads & Details
-
Shape the cat’s head:
Roll a smooth sphere of clay. Pinch the top gently to pull out two triangular ears. Flatten the face area slightly and attach it to the cat’s body, blending the clay at the neck so it feels secure. -
Shape the rabbit’s head:
Roll another sphere, slightly more oval. Form two long, sausage-like shapes for ears and attach them to the top, blending the seams thoroughly so they stand upright. Position the rabbit’s head on the right body. -
Add limbs:
Roll four thin logs for arms. Attach them to the sides of the bodies. For feet, simple oval shapes work best; add shoes by pressing small flattened balls of clay onto the bottom of the legs before smoothing them onto the base. -
Refine facial features:
I find using a needle tool here really helps add personality. Scribe small lines for whiskers on the cat. For the noses, add tiny triangles of clay—an inverted triangle for the cat and a soft oval for the bunny. -
Texture the surface:
Before the clay dries, vigorously tap the surface with a stiff-bristled brush or a balled-up piece of foil. This creates that lovely organic, papier-mâché appearance seen in the photo. -
Add base details:
Press a small heart shape into the front center of the base using a stamp or by sketching it with a needle tool.
Cracks Appearing?
If you see hairline cracks while air-dry clay cures, mix a tiny bit of fresh clay with water to make a paste (slip) and smooth it over the crack.
Step 3: Painting & Finishing
-
Prime the figures:
Once fully dry, paint the entire sculpture with a base coat of white acrylic. This ensures your colors will pop later. -
Paint the cat’s outfit:
Mix a muted teal color and apply it to the jacket and pants. Use a warm beige or light brown for the shoes and a rust-orange for the collar. -
Paint the bunny’s outfit:
Use a warm rust-orange for the jumper dress. Paint the legs white, then carefully add horizontal red stripes for the socks using your finest brush. Paint the shoes to match the dress. -
Detail the faces:
Paint the heads a creamy off-white. Use black for simple dot eyes and whiskers. Add a touch of pink inside the rabbit’s ears and small pink blushes on both sets of cheeks. -
Highlight the base:
Paint the base a very pale minty blue. Fill the impressed heart with a soft pink to tie the color palette together. -
Seal the work:
Finish with a coat of matte varnish. Avoid glossy finishes, as the matte look preserves the rustic, storybook feel of the sculpture.
Pro Tip: Rustic Look
Don’t sand the sculpture perfectly smooth. The small bumps and brush textures add significantly to the vintage, handmade charm.
Now you have a timeless keepsake that celebrates friendship and creativity
Abstract Modern “Mood People” Sculptures
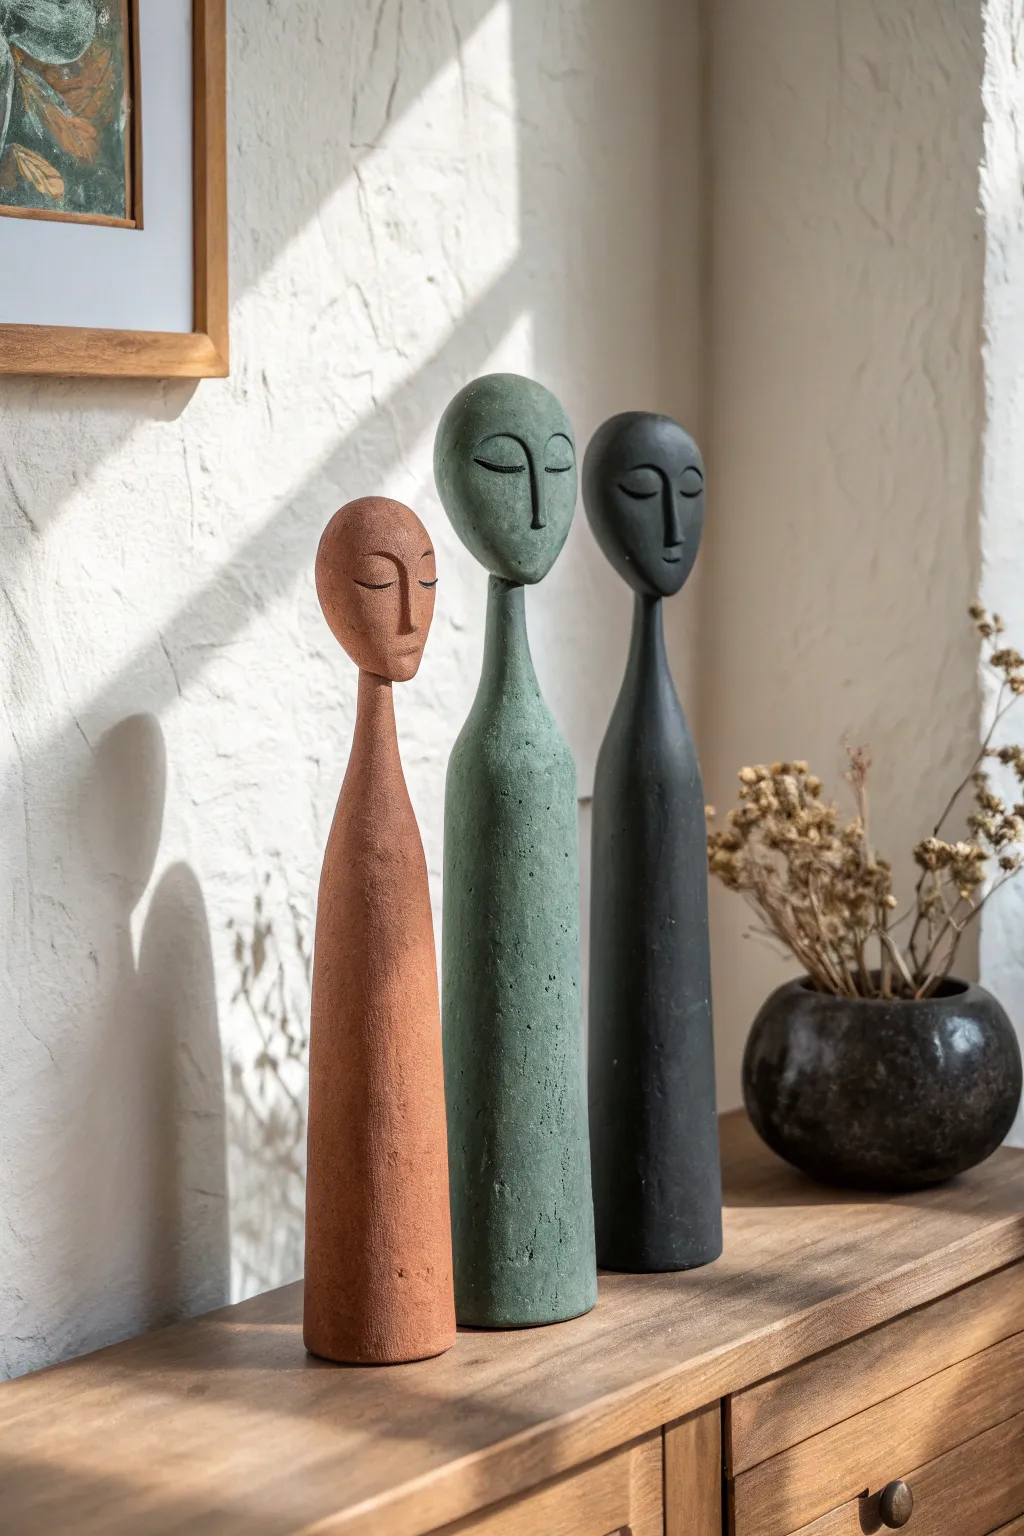
These elegant, elongated figures bring a serene, minimalist presence to any shelf, featuring simplified facial features that evoke a sense of calm contemplation. The project focuses on creating smooth, conical forms and stylized heads, finished with earthy, matte textures that mimic stone or concrete.
Step-by-Step Guide
Materials
- Air-dry clay (or polymer clay)
- Aluminum foil
- Sturdy wire (armature wire or a metal hanger)
- Wire cutters
- Rolling pin
- Clay modeling tools (specifically a needle tool and a smoother)
- Bowl of water (for smoothing)
- Fine-grit sandpaper
- Acrylic paints (terracotta, sage green, charcoal grey)
- Baking soda (optional, for texture)
- Matte spray varnish
Step 1: Building the Armature
-
Form the core structure:
Cut a length of wire roughly 10-12 inches long. Bend the bottom few inches into a wide, flat spiral or loop to act as a stable base, ensuring the sculpture won’t tip over. -
Create the body volume:
Crumple aluminum foil tightly around the wire, building a long, tapered cone shape. Start wider at the bottom (about 2-3 inches) and taper it gradually until it meets the wire near the top. -
Shape the head base:
At the very top of the wire, extend the foil slightly to create a small, flattened oval shape for the head. It should look like an elongated egg resting on the neck. -
Check stability:
Stand your foil armature on a flat surface. Adjust the wire base and foil compression until it stands completely upright without wobbling.
Cracking at the Neck?
The neck is the weakest point. If hairline cracks appear during drying, fill them immediately with a watery clay slurry (slip) and smooth over. Reinforce thin necks with extra clay before painting.
Step 2: Sculpting the Form
-
Prepare the clay:
Roll out a slab of clay to about 1/4 inch thickness. Cut it into manageable strips or sheets that can wrap around your foil core. -
Cover the body:
Wrap the clay sheet around the conical foil body. Use your thumbs to press the seams together firmly, blending the clay until the join lines disappear. -
Smooth the surface:
Dip your fingers or a sponge in a little water and smooth the entire body. You want a sleek, uninterrupted taper from the base up to the neck area. -
Form the head:
Roll a solid ball of clay for the head, slightly flattening it into a smooth oval. Join this securely to the top of the neck, blending the clay downwards so there is no cracking at the neck joint. -
Refine the silhouette:
Step back and look at the figure’s profile. The transition from the wide base to the slender neck needs to be graceful and gradual, so add or remove bits of clay as needed to perfect the flow.
Faux-Stone Finish
After the solid color dries, splatter tiny specks of watered-down white or dark grey paint onto the surface using a toothbrush. This mimics the speckled look of real granite or stoneware.
Step 3: Facial Features & Detailing
-
Carve the nose bridge:
Add a very thin, small snake of clay vertically down the center of the face. Blend the sides of this strip into the face using a modeling tool, leaving a ridge that suggests a long, straight nose. -
Sculpt the brow connections:
At the top of the nose, gently curve the clay outwards to the left and right to suggest the brow line. This T-shape structure anchors the expression. -
Incise the eyes:
Using a needle tool or the edge of a spatula, carefully press two curved, crescent-shaped lines into the clay for the closed eyelids. I find it easiest to mark the center point lightly before committing to the deep cut. -
Add the lashes:
If you want the subtle detail shown in the green figure, use the very tip of your needle tool to etch tiny, vertical lines hanging from the curved eyelid cut to represent eyelashes. -
Final smoothing:
Give the entire piece one last pass with a damp sponge to remove fingerprints, paying special attention to the nose and eye areas so they remain distinct but soft.
Step 4: Finishing
-
Drying or baking:
If using air-dry clay, let the figures stand in a cool, dry place for 24-48 hours. If using polymer clay, bake according to the package instructions based on the thickness. -
Sanding:
Once fully cured, use fine-grit sandpaper to buff away any remaining rough patches or tool marks, creating a stone-like finish. -
Mixing textured paint:
Mix your acrylic paint with a teaspoon of baking soda. This thickens the paint and gives it a gritty, ceramic texture similar to the inspiration image. -
Applying color:
Paint each figure in solid coats of terracotta, sage, or charcoal. Use a dabbing motion rather than long strokes to enhance the textured effect. -
Highlighting the face:
Once the main coat is dry, you can very lightly dry-brush a tiny amount of black paint into the eye crevices to make the features pop, though this is optional. -
Sealing:
Finish with a coat of matte spray varnish to protect the paint without adding an unnatural shine, preserving the earthy aesthetic.
Arrange your trio of serene sculpts together to create a calming focal point in your living space