If you’ve ever wished your phone sounded a little louder while you’re glazing, cleaning up, or just hanging out, a clay phone amplifier is such a satisfying little project. These ideas are all about shaping clay into simple acoustic forms that naturally funnel sound forward—no power, just smart curves and a good phone slot.
U-Shaped Dual-Opening Amplifier
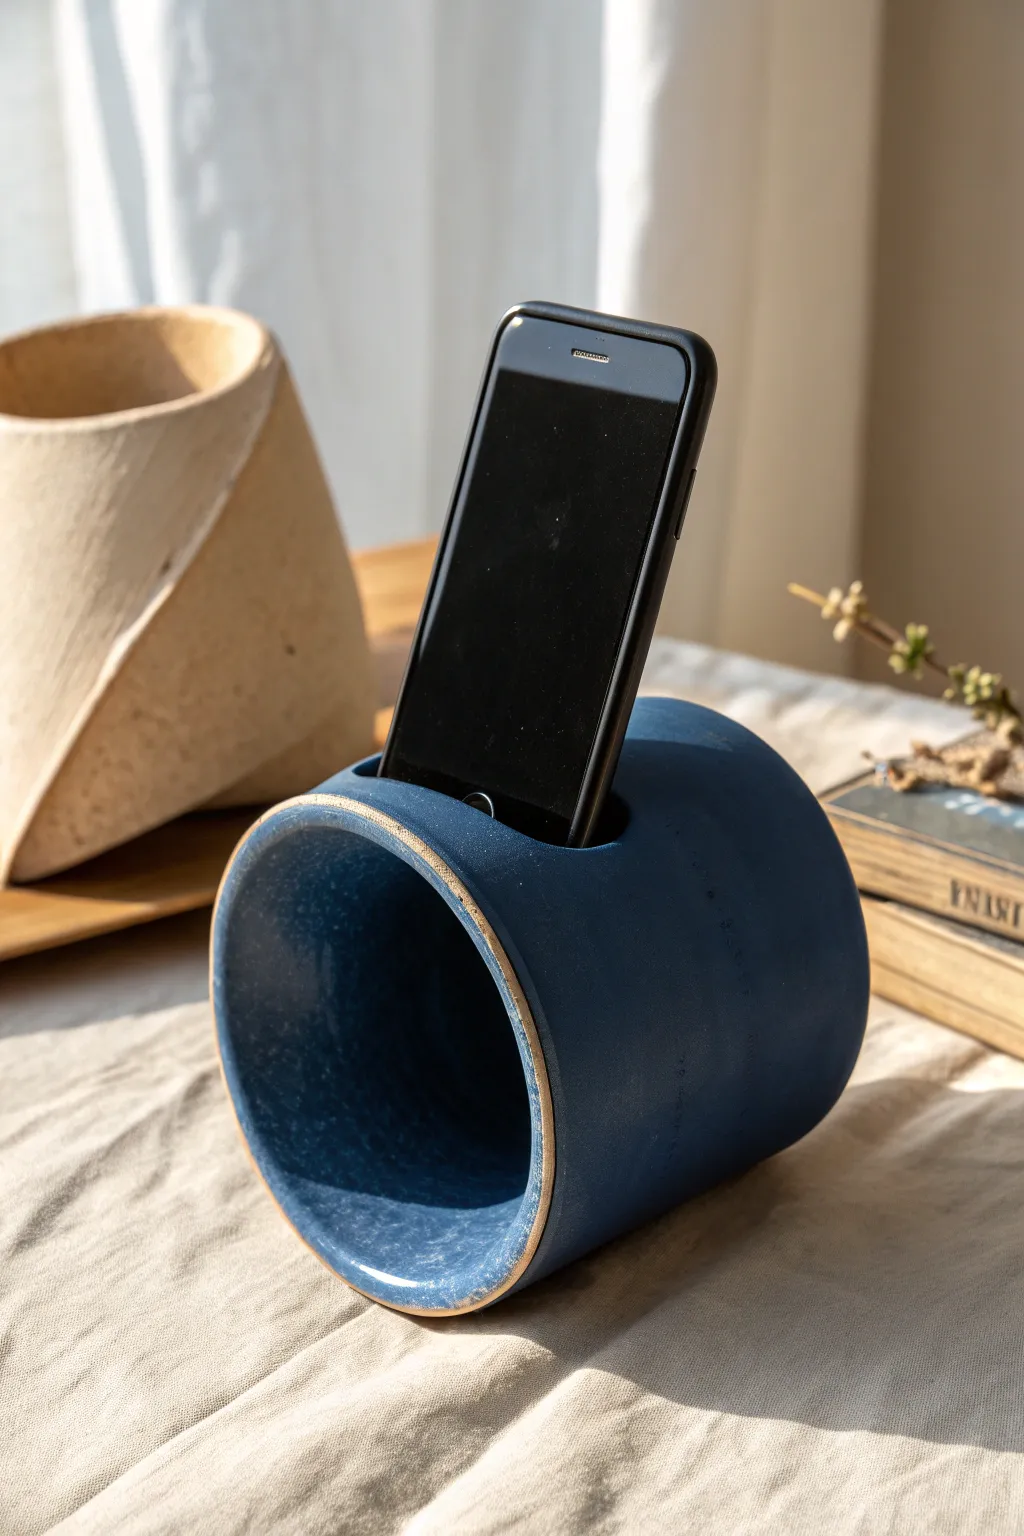
This minimalist passive amplifier combines sleek design with analog functionality, using a hollow cylindrical chamber to naturally boost your phone’s volume. Finished with a stunning matte midnight-blue glaze that contrasts mostly against the raw clay rim, it serves as both a sculptural desk accessory and a practical audio tool.
Step-by-Step Tutorial
Materials
- Stoneware clay (smooth body recommended)
- Rolling pin
- Canvas work surface
- Cardboard mailing tube or PVC pipe (approx. 4-5 inches diameter) for form
- Paper or newspaper
- Needle tool
- Fettling knife
- Serrated rib or scoring tool
- Slip (clay mixed with water)
- Sponge
- Matte dark blue glaze
- Wax resist (optional)
- Small paintbrush
Step 1: Forming the Cylinder
-
Prepare the workspace:
Begin by setting up your canvas work area. Prepare your cylindrical form (the mailing tube or PVC pipe) by wrapping it in a sheet of newspaper or paper; this crucial step prevents the clay from sticking to the form later. -
Roll the slab:
Roll out a slab of stoneware clay to a uniform thickness of about 1/4 to 3/8 inch. Compress the slab on both sides with a rubber rib to align the clay particles, which helps prevent warping during drying. -
Cut to size:
Measure the length needed to wrap around your tube form with a slight overlap. Use a needle tool and a straight edge to cut a clean rectangle from your slab. -
Wrap the form:
Carefully lift the clay slab and wrap it around your paper-covered tube. Bring the two short ends together. -
Join the seam:
Score both edges where they meet using a serrated rib. Apply a generous amount of slip, press the edges firmly together, and smooth the seam inside and out until it is invisible. I find a wooden modeling tool works best for blending the clay here. -
Stiffen the form:
Let the cylinder rest on the tube for about 30–60 minutes until it becomes leather-hard—stiff enough to hold its shape but still workable. Carefully slide the clay cylinder off the form.
Acoustic Boost
Make the cylinder slightly longer than you think you need. A larger internal volume creates deeper resonance and richer sound amplification.
Step 2: Creating the Speaker Slot
-
Measure your phone:
Measure the width and depth of your phone (with its case on, if you use one). Add about 10-15% to these dimensions to account for clay shrinkage during firing. -
Mark the slot:
Locate the center of the cylinder’s length. On what will be the ‘top’ side, lightly mark a rectangular slot shape that corresponds to your measurements. -
Cut the opening:
Using a sharp fettling knife or scalpel, carefully cut out the rectangular slot. Work slowly to keep the corners crisp. -
Smooth the edges:
Use a damp sponge or your finger to gently round over the sharp cut edges of the slot. This prevents scratching your phone later. -
Refine the rim:
Check the two open circular ends of the cylinder. If they distorted during cutting, gently reshape them into perfect circles and smooth the rims with a damp chamois or sponge.
Slumping Cylinder?
If the clay sags when you remove the tube, it’s too wet. Put it back on the form and wait another hour. Leather-hard clay should feel like cheddar cheese.
Step 3: Drying and Glazing
-
Slow drying:
Place the amplifier on a board and cover it loosely with plastic. Allow it to dry slowly over several days to prevent cracking. Once bone dry, bisque fire the piece according to your clay’s specifications. -
Clean the bisque:
After the bisque fire, wipe the piece down with a damp sponge to remove any dust that could interfere with glaze adhesion. -
Wax the rim:
To achieve the look in the photo, brush a line of wax resist carefully along the very edge of the cylinder’s rim. This will keep the raw clay exposed after firing. -
Apply the glaze:
Dip the entire piece into a bucket of matte dark blue glaze, ensuring it coats both the interior and exterior evenly. The wax on the rim should repel the glaze. -
Clean up:
Once the glaze is dry to the touch, use a damp sponge to wipe any stray droplets off the waxed rim or the foot of the piece (where it will sit on the kiln shelf). -
Final Fire:
Fire the piece to the glaze maturity temperature (typically Cone 5 or 6 for stoneware). Let the kiln cool completely before removing your new amplifier.
Place your finished amplifier on your desk and enjoy the natural boost in sound quality without using a single watt of electricity


Wide-Mouth Monster Amplifier
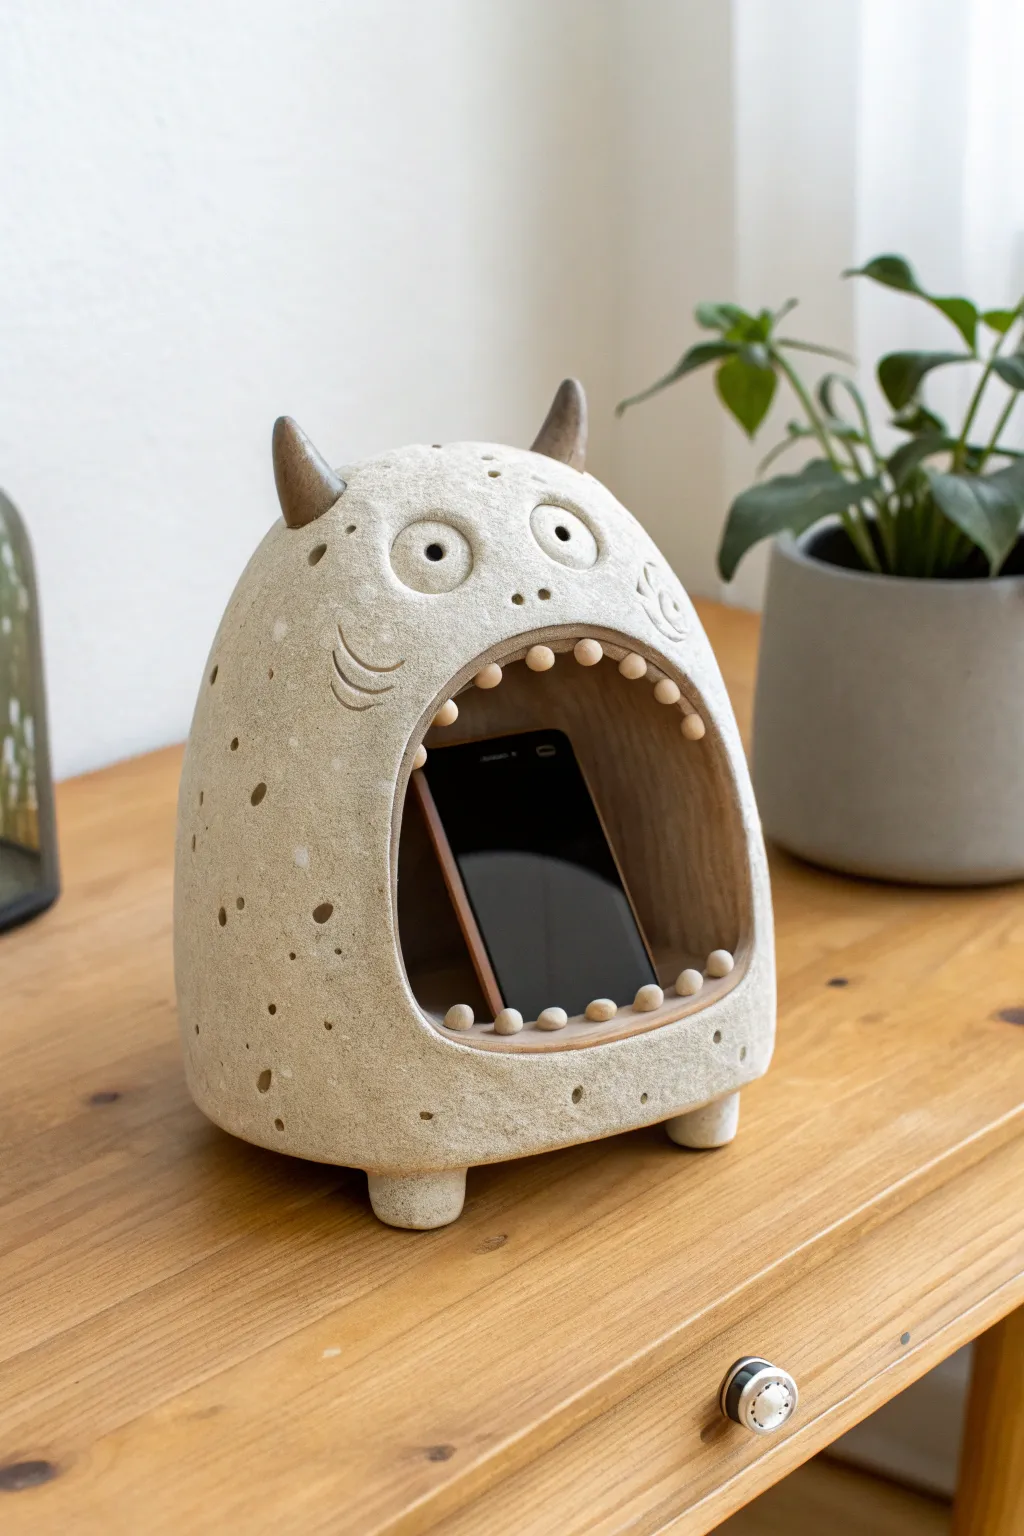
Transform a lump of clay into a charmingly monstrous phone amplifier that boosts your tunes naturally. With its speckled stone-like texture, goofy grin, and prominent horns, this wide-mouthed creature combines whimsical character design with practical acoustic function.
How-To Guide
Materials
- Stoneware clay (preferably with speckles or grog)
- Pottery tools (needle tool, rib tool, loop tool)
- Small wooden balls or extra clay for teeth
- Rolling pin
- Slip (liquid clay)
- Scoring tool or old fork
- Sponge
- Spherical mold (like a balloon or large bowl) or newspaper for armature
- Kiln (or access to a firing service)
Step 1: Forming the Body
-
Prepare the base:
Start by rolling out a thick slab of clay, roughly 1/4 to 1/2 inch thick. Cut out a rounded square or oval shape to serve as the sturdy bottom of your creature. -
Build the dome:
Using the coil building method, begin stacking rings of clay on top of your base to create a hollow, dome-like shape. Alternatively, you can drape a large slab over a paper-stuffed mold to get that rounded, organic silhouette. -
Smooth the surface:
Once the basic dome shape stands about 8-10 inches tall, use a rib tool to smooth the exterior walls. I like to leave a little surface texture to enhance the ‘stone’ look later, but ensure all coil seams are fully blended. -
Carve the mouth:
When the clay is leather-hard (firm but still carvable), cut a very large, arching mouth opening. This needs to be significantly wider than your phone to act as the sound chamber. -
Create the phone slot:
Inside the mouth, near the bottom floor, carefully cut a slot that fits your specific phone. Test the fit gently, making sure the phone can stand continuously at a slight angle.
Step 2: Adding Character Details
-
Sculpt the eyes:
Form two flattened spheres of clay and attach them high on the forehead using the score-and-slip method. Use a small tool to press pupil indentations into the center of each. -
Add the horns:
Roll two small cones of clay for the horns. Score the attachment points on the head and the base of the horns, apply slip, and press them firmly into place, smoothing the transition so they look grown, not stuck on. -
Give it feet:
Flip the monster gently or work on its side. Attach four small, sturdy nub feet to the base to lift the amplifier slightly off the table, which helps with sound resonance. -
Detail the mouth:
Roll a thin coil of clay to create a lip around the large mouth opening. Blend the outer edge into the face but leave the inner edge defined to frame the ‘cavern’. -
Install the teeth:
For the teeth, you can use small pre-made wooden balls glued on after firing, or sculpt small clay spheres now. If using clay, score and slip twelve to fourteen small balls along the upper and lower inner lip.
Acoustic Geometry
Make the interior of the mouth as smooth and rounded as possible. Rough textures absorb sound, while smooth, curved interior walls will reflect and amplify the music best.
Step 3: Texture and Finishing
-
Refine the surface:
Use a damp sponge to smooth out any sharp edges, especially around the phone slot and the mouth opening. Harsh edges can scratch your device, so be thorough here. -
Add decorative texture:
Using a needle tool or small loop tool, carve small, random divots and craters across the body to mimic porous rock. Add curved lines beside the eyes for expression. -
Slow drying:
Cover your monster loosely with plastic to let it dry very slowly over several days. This prevents the large mouth opening from warping as the clay shrinks. -
Bisque fire:
Once bone dry, fire the piece in a kiln to bisque temperature. This hardens the clay and prepares it for glazing or staining. -
Glaze application:
Apply a matte, speckled stone glaze or a light wash to highlight the textures. If you want the horns to look different, brush a darker oxide or glaze onto just those cones. -
Final firing:
Fire the piece again to the appropriate temperature for your clay and glaze. Once cool, if you didn’t use clay teeth, glue small wooden beads along the gum line for a mixed-media touch.
Glow Up
Leave the eyes hollow and cut fully through to the inside. When the phone screen is on inside the mouth, light will shine through the eyes for a spooky effect.
Place your phone in the slot and enjoy the surprisingly robust sound of your primitive new friend


Geometric Faceted Speaker Form

This modern, geometric phone stand uses the acoustic properties of its heavy material to naturally amplify your music. With its sharp, angular facets and a raw, speckled finish that mimics polished concrete, it serves as both a functional desk accessory and a piece of minimalist sculpture.
Step-by-Step Guide
Materials
- Air-dry clay (white or light grey) or polymer clay
- Coarse black pepper or dried used coffee grounds
- Rolling pin
- Sharp craft knife or clay blade
- Cardstock or thick paper (for templates)
- Ruler
- Fine-grit sandpaper (220-400 grit)
- Small bowl of water
- Matte varnish or sealant
Step 1: Preparing the Faux-Concrete Clay
-
Condition the clay:
Begin by kneading a large block of white air-dry clay until it is soft, pliable, and free of cracks. -
Add texture:
To achieve that speckled concrete look without using cement, flatten the clay slightly and sprinkle a generous pinch of coarse black pepper or dry coffee grounds over the surface. -
Integrate the speckles:
Fold the clay over and knead repeatedly until the particles are evenly distributed throughout the entire mass. I find that pepper gives a sharper contrast, while coffee offers a warmer, earthier tone. -
Form the base block:
Shape the prepared clay into a rough cube or heavy sphere, slightly larger than your intended final size to account for carving loss.
Step 2: Carving the Geometric Form
-
Establish the phone slot:
While the clay is still workable, press your phone (wrapped in cling film for protection) deep into the top center to create the slot. Wiggle it slightly to ensure the gap is wide enough for easy insertion. -
Refine the opening:
Remove the phone and use a modeling tool or knife to clean up the edges of the slot, ensuring the internal walls are smooth. -
Wait for leather-hard stage:
Let the clay dry for a few hours until it reaches a ‘leather-hard’ state—firm enough to hold sharp edges but soft enough to slice easily. -
Slice the first facet:
Using a very sharp, long blade, slice off one corner of the block at a steep angle. Try to make this a single, confident cut to keep the surface smooth. -
Create the geometric pattern:
Continue slicing off corners and sides, turning the object constantly. Aim for irregular triangles and polygons that intersect at sharp ridges. -
Shape the acoustic interior:
If possible, carefully carve out a hollow chamber inside the bottom of the form (accessing from below) that connects to the phone slot, which helps reverberate the sound. -
Check stability:
Ensure the bottom facet is flat and wide enough so the amplifier sits steadily on a table without tipping when the phone is inserted. -
Refine the edges:
Dip your finger in water and very lightly run it along the sharp ridges to remove any burrs, but be careful not to round them over too much; the geometric look relies on crisp lines.
Cracks Appearing?
Thick clay blocks can crack while drying. To prevent this, cover the piece loosely with a plastic bag to slow the drying process, and fill any hairline cracks with a clay slip immediately.
Step 3: Finishing and Sealing
-
Full drying:
Allow the piece to dry completely. For a solid block of clay this size, this may take 3-5 days. It must be bone dry before sanding. -
Surface sanding:
Use fine-grit sandpaper to gently buff the flat faces. This will expose the pepper or coffee speckles more clearly and create a stone-like texture. -
Clean dust:
Wipe the entire piece down with a barely damp cloth or a soft brush to remove all white clay dust from the sanding process. -
Apply protection:
Apply a coat of matte varnish. Avoid glossy finishes, as the matte look is essential for mimicking the raw concrete aesthetic shown in the reference.
Add Metallic Flair
For a luxe touch, paint just the inner walls of the phone slot with liquid gold leaf or copper paint. It adds a hidden shimmer that catches the light.
Now you have a stylish, functional sculpture that boosts your volume without any wires


Spiral Shell Sound Chamber
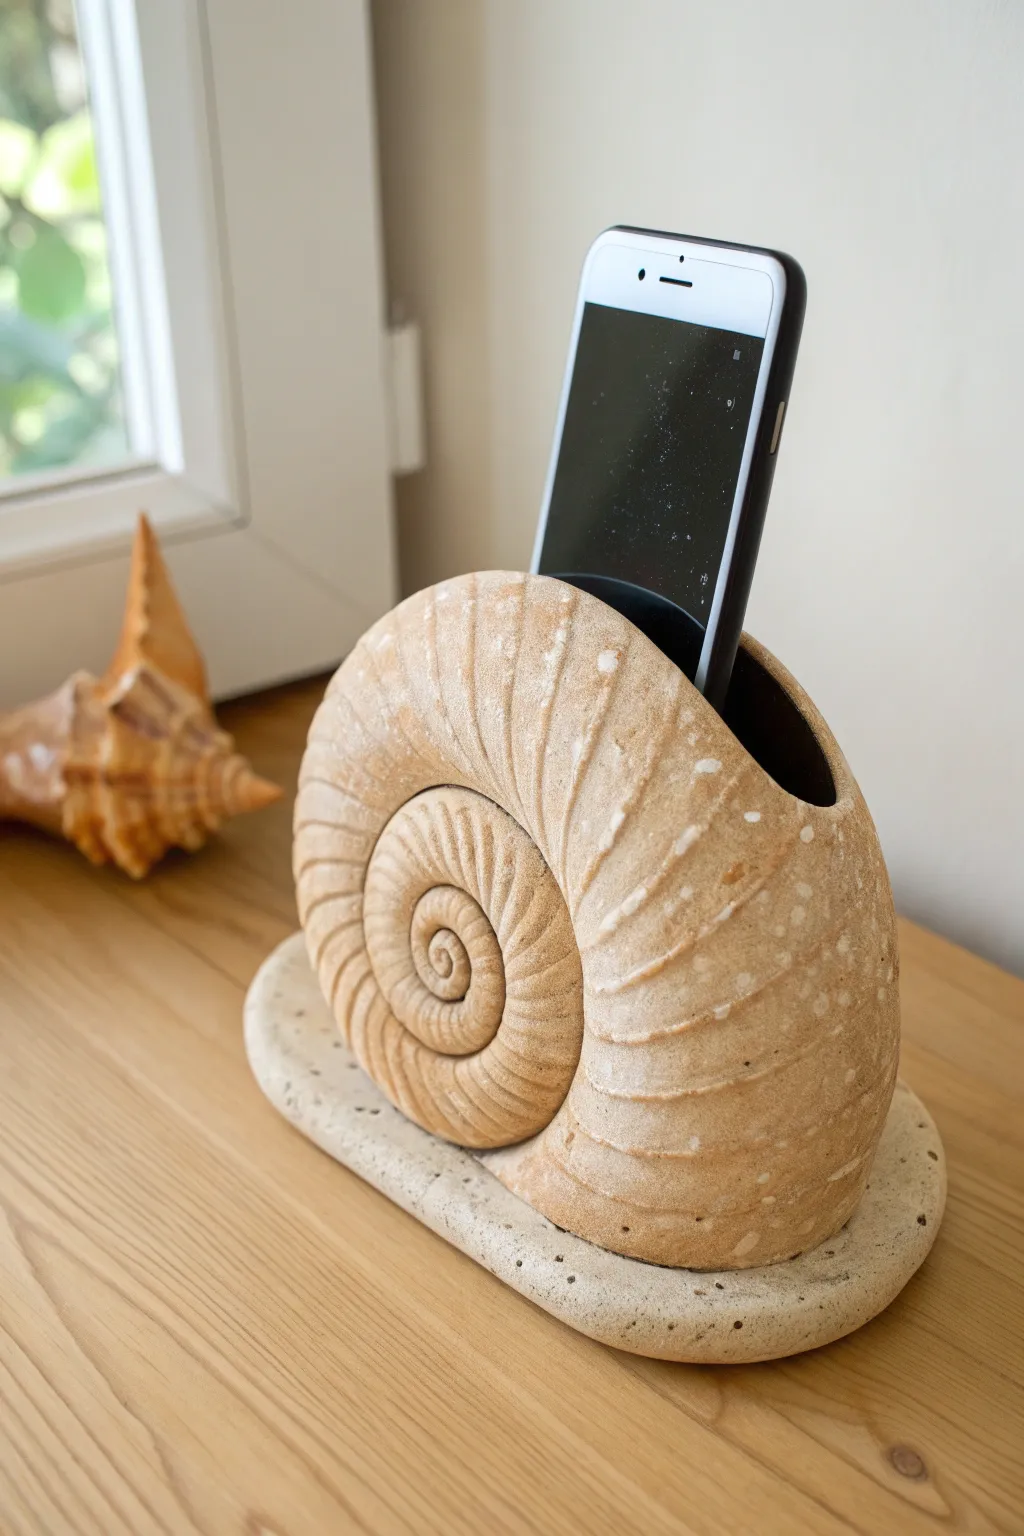
Enhance your phone’s acoustics with a sculptural amplifier inspired by the golden ratio and ancient fossils. This project uses stoneware clay to craft a hollow, spiraling ammonite shape that naturally boosts volume without electricity.
Detailed Instructions
Materials
- Stoneware clay (groggy/speckled beige)
- Pottery wheel (optional, can be hand-built)
- Clay slab roller or rolling pin
- Fettling knife
- Modeling tools (wooden rib, sculpting loops)
- Sponge
- Slip (clay and water slurry)
- Scoring tool
- Newspaper or paper towels
- Matte transparent glaze (optional)
Step 1: Forming the Main Chamber
-
Roll the main slab:
Start by rolling out a medium-thick slab of clay, roughly 1/4 inch thick. This will form the outer walls of the shell. -
Create the interior form:
To ensure the chamber is hollow, lightly crumple newspaper into a tapered, spiraling snake shape. This acts as an armature to hold the clay up while you build. -
Wrap and coil:
Cut a long strip from your slab and wrap it around your paper armature, smoothing the seam where the clay overlaps. You are essentially making a long, hollow clay tube that tapers at one end. -
Coil the spiral:
Gently gently curl this hollow tube into a tight spiral, starting with the thinnest end in the center. Score and slip the contact points where the tube touches itself to bond the spiral together securely. -
Refine the shape:
Use a wooden rib or paddle to gently shape the outer curve, ensuring it looks like a unified shell rather than just a coiled snake. Smooth the seams between the coils on the outside, but leave the spiral definition visible.
Collapsing Walls?
If the hollow tube flattens while coiling, your clay is too soft. Let the slab stiffen to a ‘leather hard’ state before rolling, or stuff the inside more firmly with paper.
Step 2: Detailing and the Base
-
Carve the ridges:
Using a modeling tool, carve the distinct, radiating ridges that follow the curve of the shell. I like to press deeper near the outer edge and fade the line as it spirals inward. -
Cut the phone slot:
Identify the widest part of the opening at the top. Measure your phone’s width and cut a rectangular slot slightly larger than your device. Smooth the cut edges with a damp sponge. -
Create the base:
Roll a second slab, slightly thicker than the first, and cut it into an elongated oval shape. This platform will stabilize the rounded shell. -
Texturize the base:
Tap the oval base with a stiff brush or a rough stone to give it a porous, rock-like texture consistent with the fossil theme. -
Attach the shell:
Score the bottom of the shell and the center of the base aggressively. Apply generous slip and press the shell firmly onto the base. Clean up the connection point with a small coil if needed.
Acoustic Boost
Make the interior hollow cavity as smooth as possible. Rough textures inside dampen sound, while smooth, burnished interior walls reflect sound waves better for louder volume.
Step 3: Finishing and Firing
-
Dry slowly:
Cover the piece loosely with plastic. Because of the variable thickness and trapped air (remember to poke a tiny hidden air vent hole if the paper is fully sealed inside!), slow drying creates fewer cracks. -
Bisque fire:
Once bone dry, fire the piece in a kiln to bisque temperature (usually cone 04/06). -
Apply wash or glaze:
To mimic the sandy look in the photo, wipe a watered-down iron oxide wash or a thin, white engobe over the ridges, then sponge it back so the color remains only in the crevices. -
Final fire:
Fire the piece to maturity (Cone 5/6 for stoneware). If you want the raw stone look shown here, leaving the exterior unglazed is best, provided the clay body is pleasant to touch. -
Sand the bottom:
After firing, attach a piece of sandpaper to a flat surface and rub the bottom of the base against it to ensure it sits perfectly flat on a table.
Place your phone in the slot and enjoy the naturally amplified sound from your fossil creation

The Complete Guide to Pottery Troubleshooting
Uncover the most common ceramic mistakes—from cracking clay to failed glazes—and learn how to fix them fast.
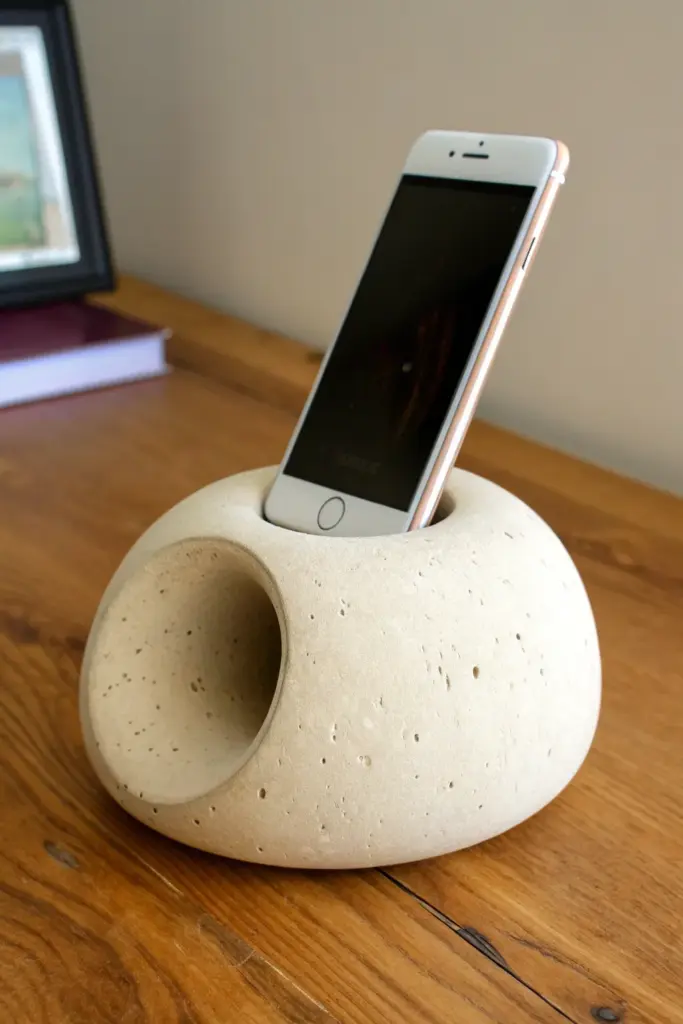
Hidden Internal Labyrinth Tunnel

This sleek passive amplifier combines modern aesthetics with acoustic physics, featuring a smooth, pebble-like shape and a cavernous internal tunnel. The speckled, stone-like finish gives it an organic feel, perfect for magnifying sound without any cords or batteries.
Step-by-Step Tutorial
Materials
- Fine grain concrete mix or casting cement
- Polystyrene foam block (for sculpting the core)
- Sharp carving knife or hot wire cutter
- Sandpaper (various grits: 80, 150, 400)
- Plastic mixing bowl and spoon
- Large rounded plastic bowl (to use as the outer mold)
- Non-stick cooking spray or petroleum jelly
- Painter’s tape
- Dremel tool or round file
- Protective mask and gloves
Step 1: Forming the Labyrinth Core
-
Design the internal void:
Visualize the negative space. You need a shape that looks roughly like a ‘U’ or a curved horn. One end must be the size of the front opening, and the other must be flat and wide enough to support the phone. -
Carve the foam core:
Using your foam block, carve this internal shape. The top part (phone holder) should be a rectangular block slightly wider than your phone. The front part should flare out into a trumpet shape. -
Smooth the foam:
Sand your foam core gently. Any bumps here will become bumps inside your tunnel later, messing with the acoustics. Wrap the foam tightly in smooth packing tape to make removal easier later. -
Prepare the slot:
Glue a dummy phone shape (also made of foam or wood) to the top of your core. This will create the precise slot your device will sit in.
Stuck foam core?
If the foam won’t budge, pour a small amount of pure acetone into the cavity. It dissolves polystyrene almost instantly, leaving a sticky residue you can easily wipe out.
Step 2: Casting the Stone
-
Prep the main mold:
Select a large rounded plastic bowl that is big enough to hold your foam core with about an inch of space all around. Grease the inside thoroughly with cooking spray. -
Position the core:
Place your foam core structure inside the bowl. The trumpet flare needs to press flush against the side of the bowl (this will be the front hole). Use tape or hot glue to temporarily seal it against the bowl wall so concrete doesn’t seep in front of it. -
Suspend the phone slot:
Ensure the top ‘phone slot’ part of the core is suspended correctly. You might need to bridge a piece of wood across the top of the bowl to hang the core in the center. -
Mix the concrete:
Mix your fine grain concrete according to the package. I prefer a consistency similar to pancake batter—pourable but not watery. Tap the mixing bowl to release trapped air bubbles. -
Pour the mixture:
Slowly pour the concrete into the bowl, filling the space around your foam core. Stop when the level reaches the top of what will be the sphere. -
Vibrate the mold:
This is crucial. Gently tap, shake, or vibrate the bowl for several minutes. This brings air bubbles to the surface and ensures the signature pock-marked stone texture forms naturally. -
Curing time:
Cover with plastic wrap to keep moisture in and let it cure undisturbed for at least 48 hours. Patience is key to preventing cracks.
Step 3: Excavation and Finishing
-
Demold the sphere:
Turn the bowl upside down and gently tap to release the concrete sphere. It should slide out easily due to the release agent. -
Remove the core:
Now for the tricky part. Using pliers, a long screwdriver, or acetone (if using uncoated styrofoam), dig out the foam core from inside the tunnel and the phone slot. Take your time to avoid chipping the edges. -
Clean the tunnel:
Use a round file or a Dremel to clean up any concrete flash points inside the tunnel and ensure a smooth path for the sound waves. -
Sand the exterior:
Start with coarse 80-grit sandpaper to shape the sphere if the bottom is uneven. Then, progressively move to 400-grit to polish the surface until it feels like a river stone. -
Refine the slot:
Double-check the phone fit. Wrap sandpaper around a ruler to smooth the inside of the rectangular slot so it won’t scratch your device. -
Optional sealing:
If you want a darker, wet-look finish, apply a concrete sealer. For the natural look shown in the image, leave it raw or apply a light clear matte wax.
Acoustic boost
Make the internal tunnel walls as smooth as possible. Rough walls absorb sound; smooth, hard walls reflect it, giving you significantly louder volume output.
Place your creation on a wooden desk to hear the rich, amplified tones of your hard work