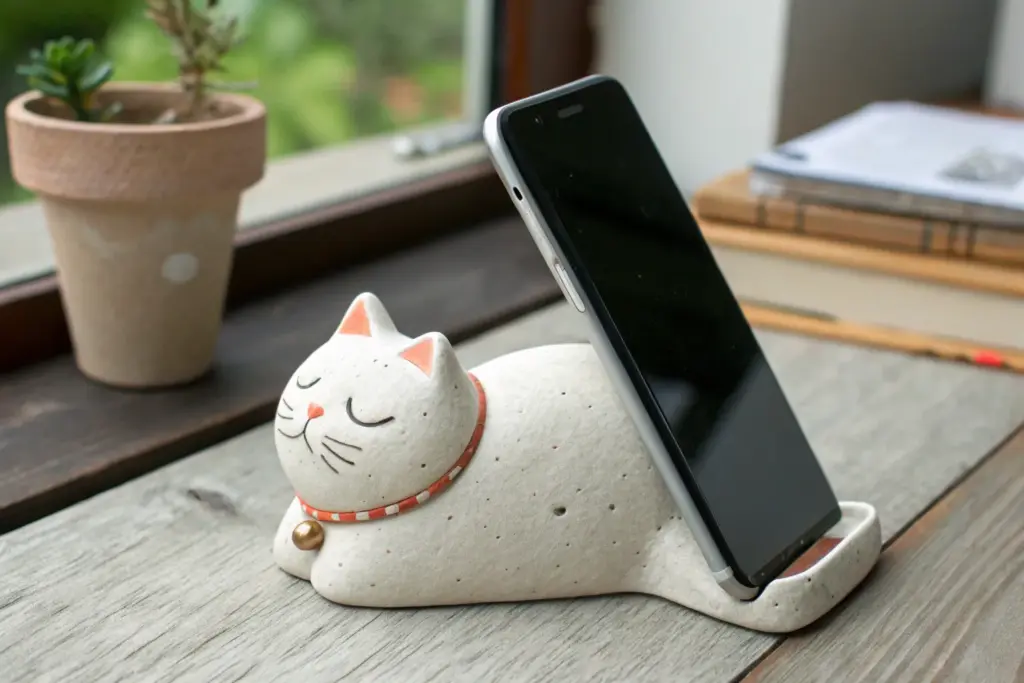
If your phone is always sliding off your desk, a little clay phone holder is the cutest fix you can make in an afternoon. I love how polymer clay and air-dry clay let you go from simple shapes to tiny characters, all while keeping your screen right where you want it.
Classic Slab-and-Notch Stand
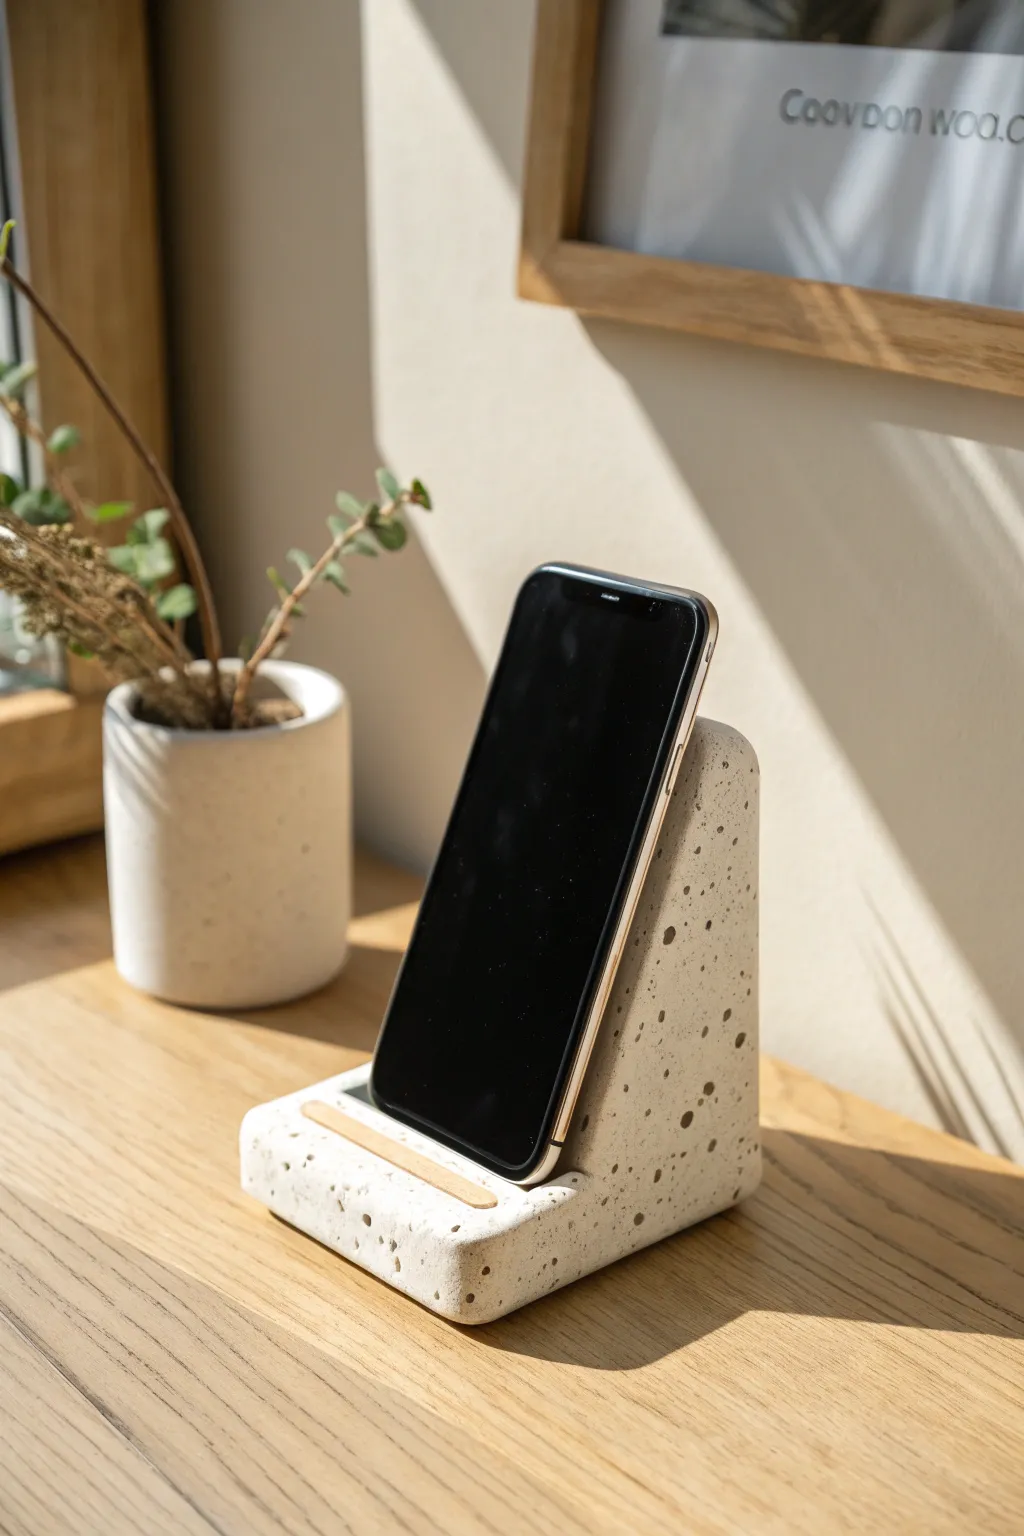
Embrace industrial chic with this sturdy, L-shaped phone stand that mimics the look of raw terrazzo or speckled concrete. Using clay to achieve this effect allows for a lighter weight but identical aesthetic, perfect for a modern desk setup.
Step-by-Step
Materials
- White or cream polymer clay (approx. 1lb)
- Black and grey polymer clay (small amounts for speckling)
- Black pepper or dried coffee grounds (optional for texture)
- Rolling pin or pasta machine
- Sharp craft knife or tissue blade
- Ruler
- Thin wooden strip or balsa wood (for the accent)
- Sandpaper (various grits)
- Matte varnish or sealant
Step 1: Preparing the Faux-Stone Clay
-
Condition the base:
Start by thoroughly conditioning your large block of white or cream clay until it is soft and pliable. -
Create the grit:
Finely chop small amounts of black and grey clay into tiny, irregular crumbs. You want them to look like grains of sand or small pebbles. -
Mix for terrazzo effect:
Sprinkle the colored crumbs and a pinch of black pepper or coffee grounds onto your white clay. -
Incorporate the speckles:
Fold and roll the clay repeatedly just enough to distribute the speckles evenly without blending the colors into a solid grey mud.
Stone Texture Trick
Use a crumpled ball of aluminum foil to gently texture the clay surface before baking. This removes the ‘plastic’ shine and mimics real concrete pores.
Step 2: Forming the L-Shape Structure
-
Form the main block:
Shape your speckled clay into a thick, rectangular block. It needs to be heavy enough to counterbalance a phone, so keep it substantial. -
Roll to thickness:
Roll the clay into a thick slab, approximately 1 inch (2.5 cm) thick. Ensure the surface is level. -
Cut the side profile:
Using your sharp blade, cut out a distinct L-shape. The vertical back should be tall enough to support your phone (about 4-5 inches), and the horizontal base should extend forward about 3-4 inches. -
Refine the curve:
Smooth the inside corner where the vertical and horizontal sections meet. You want a gentle curve rather than a sharp 90-degree angle for better structural integrity. -
Shape the back support:
Trim the back of the vertical section so it tapers slightly towards the top, giving it a sleek wedge profile rather than a boxy look.
Level Up: Tech Ready
Before baking, carve a shallow channel underneath the base and drill a hole through the wood-slot area to feed a charging cable through invisibly.
Step 3: Adding the Notch and Finish
-
Measure the shelf:
On the horizontal base, measure about 0.5 inches from the vertical backrest. This is where your phone will sit. -
Create the wood inlay channel:
Press your thin wooden strip into the clay to create an indentation, or carefully carve out a shallow trough that fits the wood perfectly. Remove the wood for baking. -
Smooth the surfaces:
Rub your finger or a little baby oil over the clay to remove any fingerprints or harsh cut marks. The surface should look like smooth, cast stone. -
Bake the piece:
Bake the clay according to the manufacturer’s instructions. Since the piece is thick, I recommend baking it at a slightly lower temperature for a longer time to prevent cracking. -
Cool down:
Let the piece cool completely in the oven with the door slightly ajar to avoid thermal shock.
Step 4: Final Assembly
-
Sand for stone texture:
Once cool, wet sand the entire surface. This removal of the top layer is crucial as it reveals the sharp details of your internal speckles. -
Glue the accent:
Apply a strong adhesive to the channel you created earlier and press the wooden strip into place. -
Seal the deal:
Apply a coat of matte varnish to protect the surface while maintaining that natural, dry stone appearance.
Now you have a stylish, weighty home for your device that looks like a high-end design store find


Simple Triangle Wedge Holder
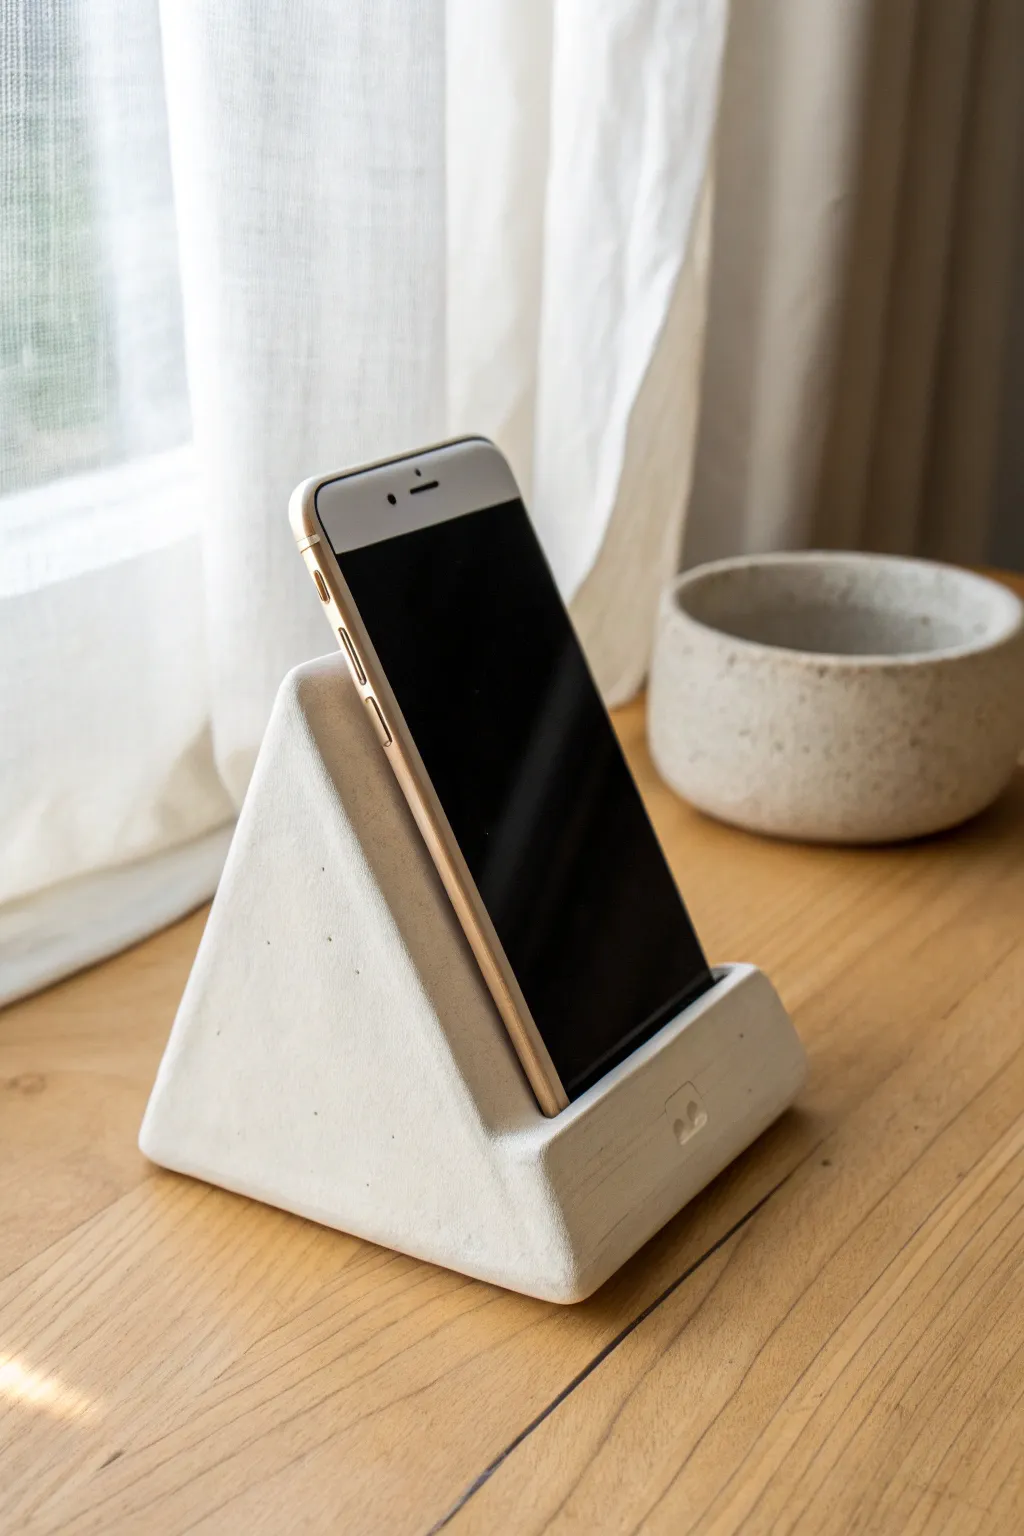
Embrace clean lines and functional simplicity with this minimalist phone stand. Its solid triangular form provides stability, while the raw, unglazed finish offers a modern, industrial-chic aesthetic perfect for any desk setup.
Detailed Instructions
Materials
- Air-dry clay (white or light grey) or polymer clay
- Rolling pin
- Sharp craft knife or clay blade
- Ruler
- Fine-grit sandpaper (220 and 400 grit)
- Small bowl of water
- Sponge
- Acrylic sealant (matte finish)
Step 1: Shaping the Base Form
-
Prepare the clay block:
Start with a substantial block of clay, roughly the size of a grapefruit. Knead it thoroughly to remove air bubbles, which is crucial for preventing cracks later. Form it into a rough rectangular block. -
Create the rough triangle:
Using your hands, press the clay block into a triangular prism shape. Focus on creating a wide base for stability and a sloping front face where the phone will rest. -
Define the angle:
Place your phone against the sloped side to test the viewing angle. If it’s too steep, press the top down slightly; if too flat, squeeze the sides to heighten the peak. -
Flatten the sides:
Use a smooth, flat object—like a hardcover book or a scrap of wood—to tap the sides of the triangle. This helps create sharp, distinctive geometric planes rather than organic, rounded sides. -
Slice for precision:
For the cleanest look, I prefer to use a sharp clay blade or wire tool to slice off thin layers from the sides and back. This reveals a crisp, flat surface that looks more professional than hand-smoothing alone.
Step 2: Adding the Support Lip
-
Form the ledge:
Roll a snake of clay roughly the same width as the bottom of your triangle slope. Flatten it slightly into a rectangular strip about half an inch high. -
Score the connection points:
Using your craft knife, make hash marks (scoring) on the bottom edge of the triangle’s slope and on the back of the strip you just made. -
Apply slip:
Dab a little water or liquid clay (slip) onto the scored areas to act as glue. -
Attach the lip:
Press the strip firmly onto the base of the slope. This creates the ‘stop’ that keeps your phone from sliding off. -
Blend the seams:
Use a modeling tool or your finger to smooth the clay where the lip meets the main body. The transition should be seamless, making it look like one solid piece. -
Refine the edges:
Run a damp sponge lightly over all the sharp edges to soften them just a tiny bit, preventing them from being brittle after drying.
Weight Matters
If using lightweight air-dry clay, embed a heavy stone or metal washer inside the center of the base during forming. This ensures the stand won’t tip over when you tap your phone.
Step 3: Finishing Touches
-
Adding details:
If you want to add a logo or small icon like the one in the photo, gently press a small stamp into the front of the ledge while the clay is still soft. -
Slow drying:
Place the piece in a cool, dry spot away from direct sunlight. Let it dry very slowly for at least 48 to 72 hours. Rushing this step can cause warping. -
Sanding the surface:
Once bone dry, take your 220-grit sandpaper and sand the flat surfaces in circular motions to remove fingerprints. Follow up with 400-grit for a silky smooth finish. -
Dust removal:
Wipe the entire piece down with a barely damp cloth or a dry tack cloth to remove all fine clay dust. -
Sealing:
Apply a thin coat of matte acrylic sealant. This protects the porous clay from dirt and oils from your hands without adding an artificial-looking shine.
Terrazzo Effect
Mix small, colorful chips of dried clay into your white wet clay before shaping. When you sand it later, you’ll reveal a beautiful, speckled terrazzo pattern.
Now you have a stylish, custom-made accessory to keep your workspace organized


Textured Imprint Scroll Stand
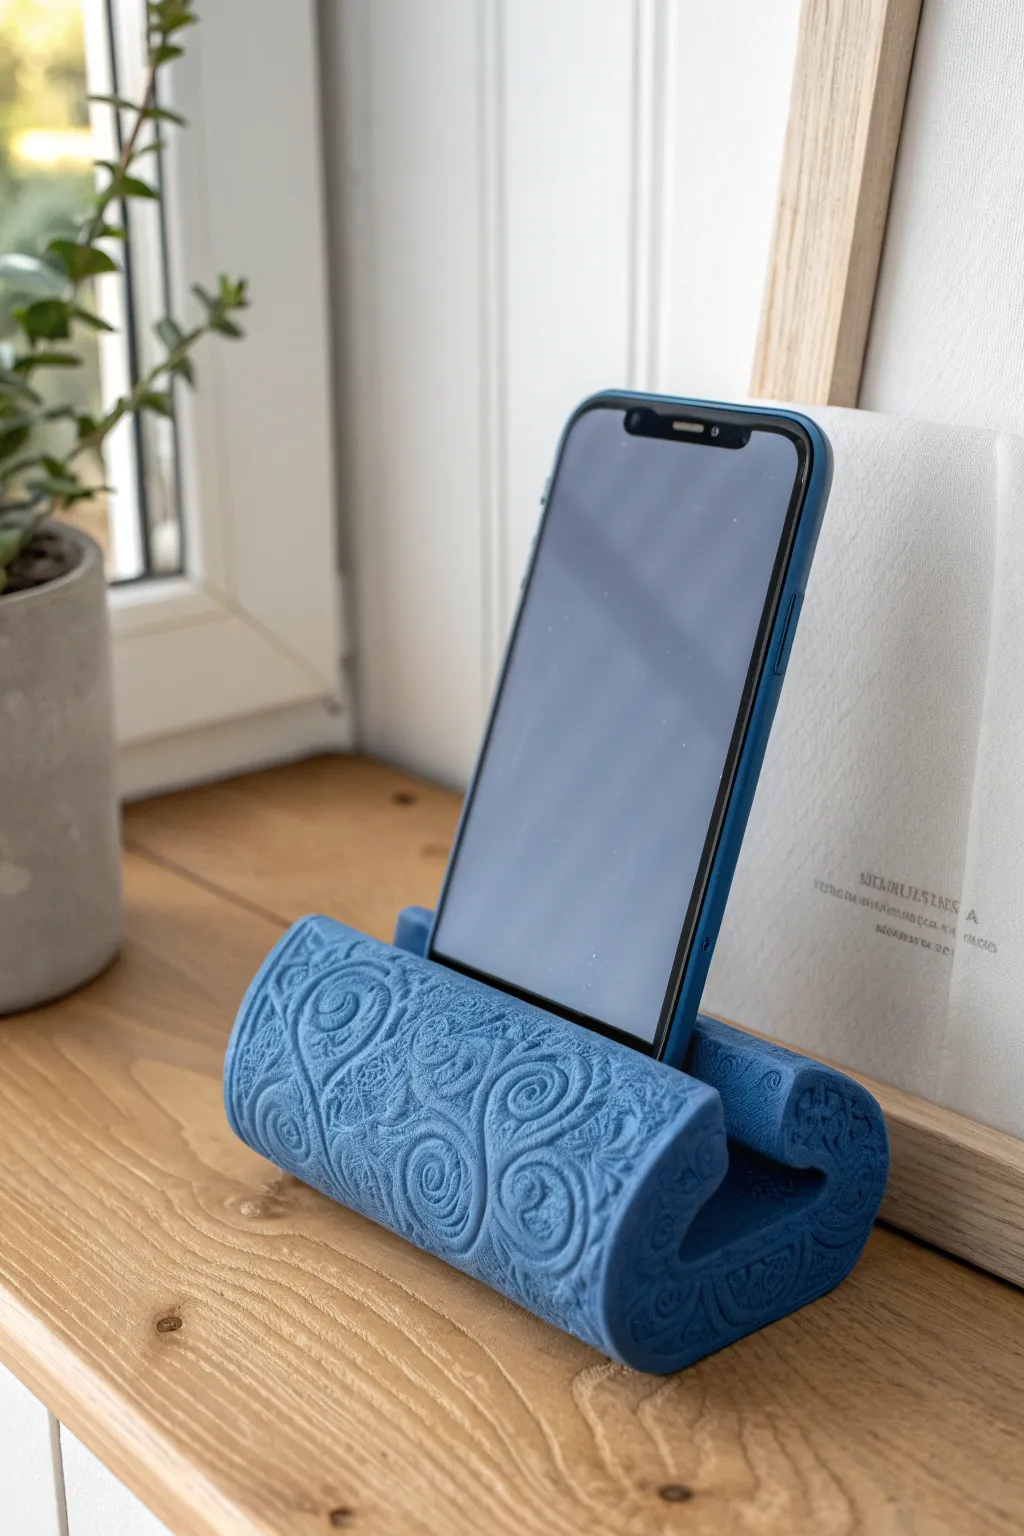
This elegant phone holder features a unique scroll-like cylindrical shape adorned with intricate Swirled patterns. The textured surface is achieved using an imprint roller or stamp, giving the piece a sophisticated, artisanal look while providing a sturdy base for your device.
Detailed Instructions
Materials
- Polymer clay or air-dry clay (approx. 500g, blue or color of choice)
- Acrylic rolling pin
- Texture roller or pattern stamp (scroll/floral design)
- Craft knife or clay blade
- Ruler
- Measuring tape
- Phone (for sizing reference)
- Fine-grit sandpaper
- Matte sealant or varnish
Step 1: Preparing the Base
-
Condition the Clay:
Begin by thoroughly kneading your clay until it is soft, pliable, and free of air bubbles. This step is crucial for preventing cracks later on. -
Roll Out a Slab:
Use your acrylic rolling pin to flatten the clay into a large, even rectangular slab. Aim for a thickness of about 1/4 inch (6mm) to ensure stability. -
Cut to Size:
Using a ruler and craft knife, trim the edges of your clay slab to create a clean rectangle. The width should be slightly wider than your phone (approx. 4-5 inches), and the length needs to be long enough to roll into the scroll shape (approx. 10-12 inches).
Step 2: Adding Texture
-
Apply the Pattern:
Take your texture roller or stamp and press it firmly into the flat clay slab. Roll or stamp continuously across the entire surface to create a deep, consistent imprint. -
Refine the Edges:
After texturing, the clay may have spread slightly. Gently tap the edges with your ruler or re-trim them with your knife to maintain clean, straight lines without distorting the pattern. -
Smooth the Surface:
Check for any unwanted fingerprints or rough spots. Lightly smooth them out with your finger or a soft brush, being careful not to flatten the texture you just created.
Clean Imprints
Dust your texture roller or stamp lightly with cornstarch or baby powder before pressing it into the clay. This prevents sticking and ensures a crisp, clean pattern transfer.
Step 3: Shaping the Scroll
-
Start the Coil:
Gently lift one short end of the textured slab and begin rolling it inward creating a loose spiral. Think of it like rolling a carpet or a scroll. -
Form the Shape:
Continue rolling until you have formed a cylindrical shape that resembles the letter ‘C’ or a wave. The two ends should curl inward towards each other but leave a gap in the center. -
Create the Slot:
Adjust the gap between the two curled ends to fit the thickness of your phone. Test the fit gently with your phone, ensuring it sits securely in the slot at a comfortable viewing angle. -
Flatten the Base:
Once the scroll shape is set, gently press the bottom of the cylinder onto your work surface to create a flat, stable base so the holder won’t wobble. -
Reinforce the Inside:
If the clay feels too soft to hold its shape, you can loosely stuff the hollow parts of the curls with crumpled paper or foil to support the structure while it dries or bakes.
Two-Tone Effect
After baking, lightly brush white or silver acrylic paint over the raised texture, then quickly wipe it off. Ideally, paint stays only in the crevices.
Step 4: Finishing Touches
-
Dry or Bake:
Follow the instructions for your specific clay type. If using polymer clay, bake it in the oven as directed. For air-dry clay, allow it to dry completely in a cool, dry place for 24-48 hours. -
Sand Imperfections:
Once the piece is fully cured and hard, use fine-grit sandpaper to gently smooth any sharp edges or rough spots, particularly around the phone slot and base. -
Clean Dust:
Wipe the creative dust away with a slightly damp cloth or a soft brush to ensure the surface is clean before sealing. -
Seal the Holder:
Apply a coat of matte sealant or varnish to protect the clay and enhance the color. I find a matte finish highlights the texture better than gloss. -
Final Cure:
Let the sealant dry completely according to the manufacturer’s instructions before placing your phone in its new stylish home.
Now you have a functional piece of art that keeps your phone visible and stylishly displayed on your desk


Terrazzo Speckled Desk Stand
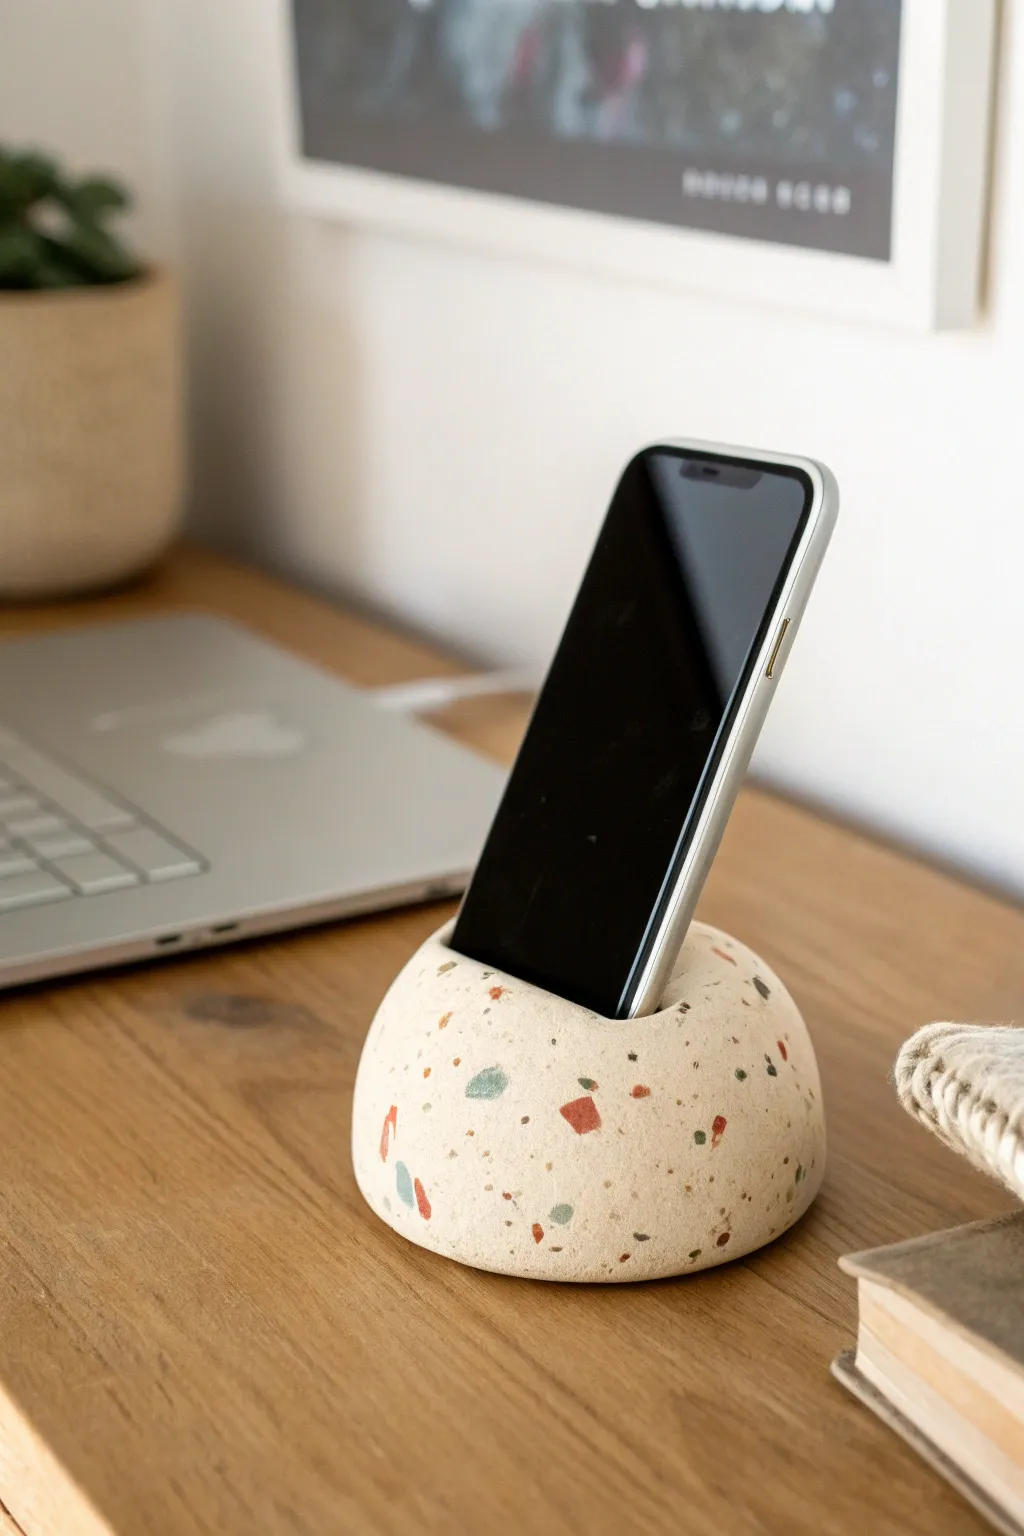
Bring a touch of modern speckled charm to your desk with this minimalist dome-shaped phone holder. This project uses the terrazzo technique to create a sturdy, functional art piece that keeps your device upright and visible.
Step-by-Step
Materials
- White air-dry clay or polymer clay (approx. 500g)
- Small amounts of colored polymer clay (red, teal, green, ochre)
- Rolling pin
- Sharp crafting knife or blade
- Large foam hemisphere mold or a small bowl
- Sanding sponge or fine-grit sandpaper (400-grit)
- Matte varnish or sealant
- Small paintbrush
- Plastic wrap
Step 1: Preparing the Terrazzo Chips
-
Flatten colored clay:
Take your small portions of colored clay (red, teal, green, etc.) and roll them out into very thin sheets, about 1-2mm thick. -
Create the chips:
Using your craft knife, chop these thin sheets into random, jagged bits of varying sizes. Don’t worry about being perfect; irregularity makes the terrazzo look authentic. -
Bake the chips (if polymer):
If you are using polymer clay for the chips, bake them briefly according to the package instructions just to harden them slightly so they don’t smear during the rolling process. If using air-dry clay, simply let them dry out until firm.
Clean Color Pop
Keep a bowl of water or baby wipes nearby to clean your hands between clay colors. This prevents the white base clay from getting muddy or tinted.
Step 2: Forming the Base
-
Condition the main clay:
Take your large block of white clay and knead it until it is soft, pliable, and free of cracks. -
Incorporate the chips:
Sprinkle your hardened colored chips onto the white clay. Fold the clay over and knead gently to distribute the chips throughout the entire mass, not just on the surface. -
Create a smooth ball:
Roll the clay into a smooth, tight ball. I find rolling it between my palms helps remove any trapped air bubbles. -
Shape the dome:
Press the ball onto a flat surface to create a flat bottom. Gently shape the top with your cupped hands to form a perfect semi-circle or dome shape. -
Refine the surface:
Press more chips into the outer surface if it looks too plain. Roll the dome gently on your work surface to embed these new chips flush with the white clay.
Step 3: Creating the Slot
-
Measure your phone:
Check the thickness of your phone (including its case) to ensure the slot will be wide enough. -
Mark the slot position:
Using a ruler, lightly mark a straight line across the center of the dome’s top where you want your phone to sit. -
Cut the groove:
Carefully slice straight down into the clay along your marks using a stiff blade or a flat tool. Create a rectangular channel about 1 inch deep. -
Widen and test:
Gently wiggle the blade to widen the slot slightly. Test the fit carefully with your phone—it should sit securely at a slight angle without tipping over. -
Smooth the edges:
Use a damp finger (for air-dry clay) or baby oil (for polymer) to smooth the rough edges around the opening of the slot so it doesn’t scratch your device.
Cracks while Drying?
If using air-dry clay and small cracks appear, mix a tiny amount of fresh clay with water to make a paste and fill them in before sanding.
Step 4: Finishing Touches
-
Dry or bake:
Allow the project to dry completely (24-48 hours for air-dry clay) or bake it according to the manufacturer’s instructions for polymer clay. -
Sand for exposure:
Once fully cured/dried, sand the entire surface with fine-grit sandpaper. This is the magic step that reveals the crisp edges of the colored chips hidden just beneath the surface. -
Wipe clean:
Wipe away all the white dust with a slightly damp cloth to reveal the bright colors of the speckles. -
Seal:
Apply a thin coat of matte varnish to protect the surface and give it a finished, professional ceramic look.
Enjoy the organized elegance this simple handmade stand adds to your workspace

The Complete Guide to Pottery Troubleshooting
Uncover the most common ceramic mistakes—from cracking clay to failed glazes—and learn how to fix them fast.
Double-Groove Holder for Two Angles
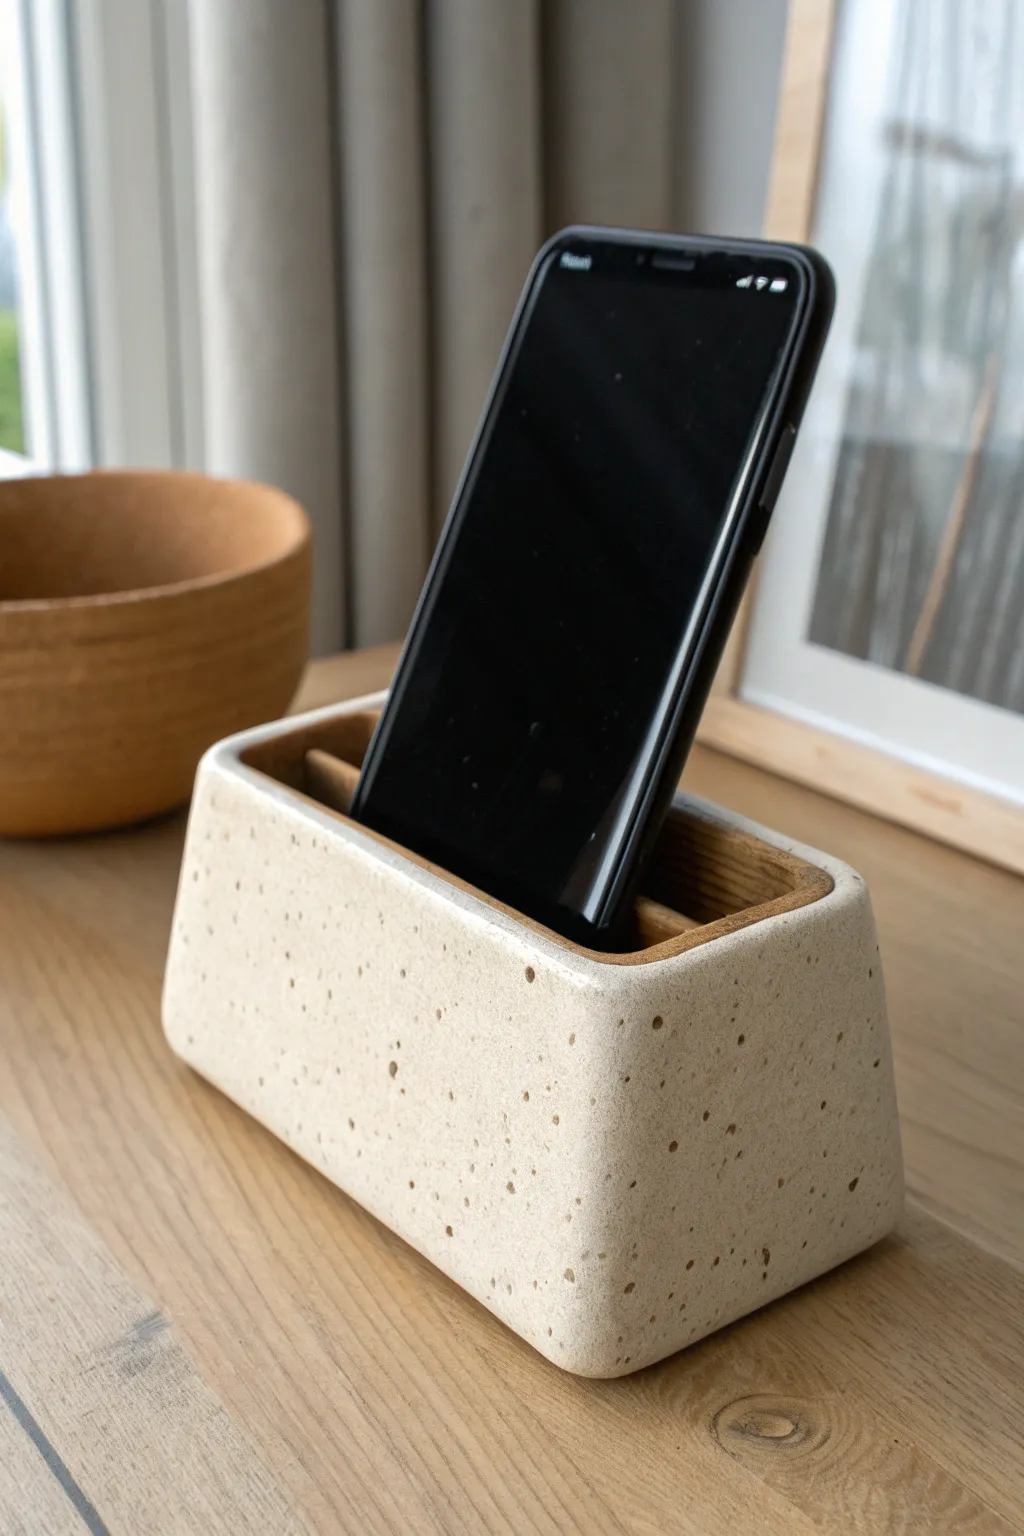
This minimalist phone stand combines the speckled charm of natural stoneware with a clever, functional design. Its wide, tapered base provides stability, while the deep internal groove securely cradles your device for easy viewing.
Step-by-Step Tutorial
Materials
- Speckled stoneware clay (mid-fire)
- Rolling pin
- Two wooden guide slats (approx. 1/4 inch thick)
- Fettling knife or X-Acto blade
- Ruler
- Scoring tool (or serrated rib)
- Slip (clay and water mixture)
- Wooden modeling tool
- Rectangular sponge
- Sandpaper (for post-firing)
Step 1: Prepping the Slab
-
Roll the clay:
Begin by wedging your speckled stoneware clay to remove air bubbles. Place it between your two wooden guide slats and roll it out into a consistent slab. The guides ensure an even thickness, which is crucial for structural integrity. -
Compress the slab:
Use a rib tool to compress the clay on both sides. This aligns the clay particles and helps prevent warping during the drying process, ensuring your box edges stay straight. -
Measure the components:
You will need to cut a base rectangle, two long side walls, and two shorter end walls. To achieve the tapered look shown in the image, cut the side walls as trapezoids: wider at the bottom edge and slightly narrower at the top.
Warping Walls?
If your long walls start to bow inward while working, cut a piece of foam or stiff cardboard to the exact interior width and place it inside as a temporary brace until the clay stiffens.
Step 2: Constructing the Box
-
Score the edges:
Take your base piece and score the perimeter where the walls will attach. Do the same for the bottom edges of your four wall pieces. Scoring creates a rough texture for the slip to grab onto. -
Apply slip and assemble:
Brush a generous amount of slip onto the scored areas. I like to attach the two longer side walls first, pressing them firmly onto the base. Then, add the shorter end walls. -
Reinforce the seams:
Roll a very thin coil of clay and press it into the interior corners where the walls meet the base and each other. Smooth this coil out with a wooden modeling tool to seal the joints completely. -
Refine the shape:
Once assembled, use a paddle or a flat board to gently tap the exterior walls. This sharpens the corners and emphasizes the tapered angle while ensuring the walls are straight.
Step 3: Creating the Groove
-
Measure the insert:
Cut a rectangular strip of clay that fits the exact length inside your box. This will be the insert that holds the phone. It should be slightly shorter than the exterior walls so it sits recessed. -
Install the divider:
Score and slip the sides and bottom of this insert piece. Place it inside the box, positioning it off-center to create a specific width for your phone. Ensure it is parallel to the long walls. -
Bevel the top edges:
Once the clay is leather-hard, use a damp sponge or your finger to gently round over the sharp top edges of the box walls and the inner divider. This softens the look and makes it pleasant to touch. -
Smooth the surface:
Take a slightly damp sponge and wipe down the exterior surfaces. This step exposes the beautiful speckles in the clay body and removes any fingerprints or harsh tool marks.
Texture Play
Before rolling your slab, sprinkle coarse sand or organic material like coffee grounds onto your work surface. Rolling the clay over this adds a unique, earthy texture to the exterior.
Step 4: Finishing
-
Slow drying:
Cover the piece loosely with plastic to let it dry slowly. Uneven drying can cause the box to warp or crack at the seams. -
Bisque fire:
Once bone dry, bisque fire the piece according to your clay body’s specifications (usually Cone 06 or 04). -
Glaze application:
For the look in the photo, apply a clear matte glaze or leave the exterior unglazed if the clay body is fully vitrified at high temperatures. If glazing the interior, carefully pour glaze inside and pour it out. -
Final firing:
Fire the piece to the final temperature required by your clay and glaze (likely Cone 5 or 6 for stoneware). Ensure the bottom is wiped clean of any glaze before firing.
Place your phone in its new home and enjoy the modern, handcrafted aesthetic on your desk
Rainbow Arch Bridge Stand
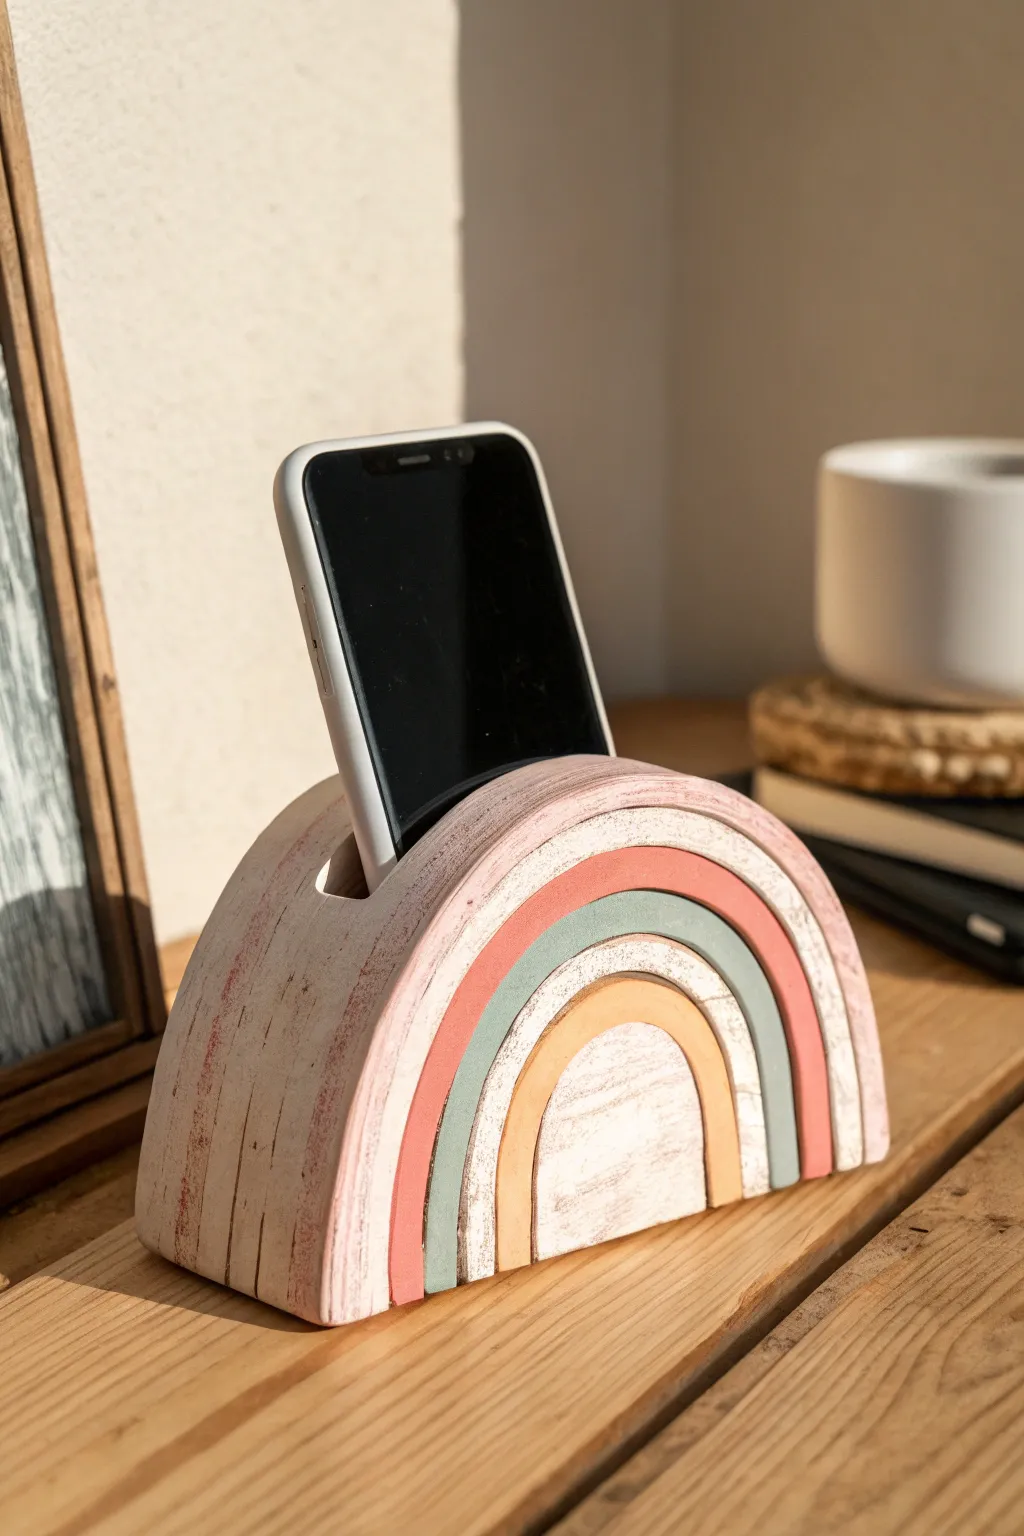
Bring a touch of playful bohemian charm to your desk with this chunky rainbow phone holder. Its sturdy arch design not only cradles your device securely but also doubles as a piece of sculptural decor with its distressed, chalky finish.
Step-by-Step Tutorial
Materials
- Air-dry clay (white or terracotta)
- Rolling pin
- sharp knife or craft blade
- Measuring tape or ruler
- Sandpaper (medium and fine grit)
- Acrylic paints (Vintage white, muted pink, sage green, mustard yellow, warm brown)
- Small flat paintbrushes
- Water cup
- White extra-fine paint marker (optional, for distressing)
- Matte sealant or varnish
Step 1: Shaping the Base Block
-
Prepare the Clay:
Start by conditioning a large block of air-dry clay. Knead it thoroughly until it is warm and pliable to prevent cracking later on. -
Form the Main Arch:
Shape the clay into a thick, semi-circle block. You want it to be substantial—about 5-6 inches wide and 2 inches thick—to support the weight of a phone without tipping. -
Refine the Shape:
Stand the semi-circle on its flat edge. Use your hands or a flat tool to smooth the front and back faces, ensuring the curve is symmetrical and the base is perfectly flat for stability. -
Carve the Slot:
Using your phone as a width guide (add a few millimeters directly for wiggle room), verify where the slot should go. Use your knife or a modeling tool to carve a rectangular groove across the top of the arch. It should be about an inch deep and angled slightly backward for the best viewing angle. -
Dry the Base:
Let this main block dry completely. Because it is thick, this might take 48-72 hours. Rotate it occasionally so the bottom dries evenly.
Cracks while Drying?
If you see cracks forming as the thick block dries, mix a little clay with water to make a paste and fill them in immediately, then smooth over with a damp finger.
Step 2: Creating the Rainbow Layers
-
Roll Out Sheets:
Roll out a fresh slab of clay to about 1/4 inch thickness. This will be used to make the raised rainbow arches on the front face. -
Cut the Strips:
Cut curved strips or concentric arches that match the curve of your dried base block. You will need four distinct sections: a small central semi-circle and three surrounding arch bands. -
Attach the Layers:
Score the front of your dried base and the back of your new clay strips. Apply a slip (clay and water mixture) to act as glue. Press the smallest semi-circle at the bottom center, then layer the arches above it, leaving a small gap between each segment to define the bands. -
Texturize Edges:
While the new clay is wet, use a tool or your finger to slightly round off the edges of the strips so they aren’t sharp. I find this gives the finished piece a much softer, handcrafted look. -
Final Drying:
Allow the added layers to dry completely, typically another 24 hours.
Step 3: Painting and Distressing
-
Sand for Texture:
Once fully bone dry, use sandpaper to smooth out any unwanted bumps. Don’t worry about being too perfect; a little roughness adds to the rustic aesthetic. -
Base Coat:
Paint the entire piece, including the back and slot, with a coat of vintage white mixed with a tiny drop of brown for a creamy, aged look. -
Paint the Bands:
Paint the raised rainbow arches. Use mustard yellow for the center semi-circle, followed by sage green, then muted pink for the outer band. Leave the base block showing between the bands as a white outline. -
Add the Distress Effect:
Once the colors are dry, take a rough, dry brush with a tiny amount of white paint. Lightly drag it horizontally across the colored bands to simulate a wood-grain or weathered texture. -
Detail the Sides:
For extra dimension, use a fine brush or paint marker to add faint, vertical scratches or ‘wood grain’ lines in a darker brown on the side of the main block. -
Seal the Piece:
Finish with a clear matte varnish to protect the paint from chipping and to guard against moisture.
Level Up: Weighted Base
For extra stability with heavy phones, embed a few clean, flat rocks or metal washers into the bottom center of the wet clay base before it dries.
Pop your phone into its new home and enjoy the cozy, artisan vibe it brings to your workspace


What Really Happens Inside the Kiln
Learn how time and temperature work together inside the kiln to transform clay into durable ceramic.
Ring-Shaped Minimal Phone Rest
Embrace minimalism with this chunky, ring-shaped phone holder that mimics the look of natural white stone. Its low profile and heavy base keep your device secure while adding a sculptural element to your desk or bedside table.
How-To Guide
Materials
- Air-dry clay (white or cream)
- Rolling pin
- Small bowl of water
- Sponge
- Sandpaper (medium and fine grit)
- Matte white acrylic paint (optional)
- Matte spray varnish
- Sculpting tool or old credit card
- Ruler
Step 1: Forming the Ring Base
-
Condition the Clay:
Begin with a fist-sized ball of white air-dry clay. Knead it thoroughly in your hands until it feels warm and pliable, eliminating any dry pockets or cracks. -
Create a Thick Log:
Roll the ball on your work surface to create a thick, uniform log. Aim for a log that is approximately 1.5 to 2 inches thick and about 8-10 inches long. -
Form the Circle:
Gently bend the log into a circle, bringing the two ends together. The inner diameter needs to be wide enough to hold your phone but tight enough to support it, usually around 2.5 to 3 inches. -
Blend the Seams:
Where the ends meet, drag clay from one side over to the other using your thumb or a sculpting tool. Do this on the top, bottom, outside, and inside surfaces until the seam disappears completely. -
Shape the Profile:
Pat the ring gently against the table to flatten the bottom slightly—this ensures stability. Then, use your palms to round over the top and sides, creating a soft, donut-like shape.
Cracks Appearing?
If hairline cracks form while drying, mix a tiny bit of fresh clay with water to make a paste (slip). Fill the cracks, smooth it over, and let it dry again.
Step 2: Refining and Drying
-
Smoothing the Surface:
Dip your finger or a small sponge into water and run it over the entire piece. This smooths out fingerprints and minor lumps. Don’t use too much water, or the clay will become mushy. -
Checking the Fit:
Before the clay sets, carefully test the size by placing your phone inside. It should lean back comfortably. If the angle is too steep, gently press the inner ring wall outward to create a better slope. -
Initial Drying:
Place the ring on a wire rack or a clean piece of paper. Let it air dry for at least 24-48 hours. I find flipping it over halfway through helps the bottom dry evenly. -
Sanding for Texture:
Once bone dry, use medium-grit sandpaper to remove any major bumps. Switch to fine-grit sandpaper to create a smooth, stone-like finish. Don’t sand it perfectly smooth; leave little imperfections for character. -
Adding Pits (Optional):
To recreate the specific texture in the photo, take a needle tool or an old toothbrush and gently poke a few tiny, random holes or pits into the surface to mimic porous stone.
Step 3: Finishing Touches
-
Dusting Off:
Wipe the entire piece down with a slightly damp cloth or a dry paintbrush to remove all the clay dust from sanding. -
Painting (Optional):
If you want a brighter white or a specific cream tone, apply a thin layer of matte acrylic paint. If you like the natural clay color, you can skip this step. -
Speckling Effect:
For that subtle faux-stone look, dip a stiff paintbrush into watered-down brown or grey paint. Run your thumb across the bristles to flick tiny speckles onto the holder. -
Weighting the Base (Pro Step):
If the holder feels too light, you can glue a circle of felt or cork to the bottom. This adds grip and protects your table surface. -
Sealing:
Take the holder to a well-ventilated area and apply a coat of matte spray varnish. This protects the clay from moisture and stains without adding an unnatural shine.
Natural Stone Look
Mix coffee grounds or sand into your clay while kneading. This adds weight and creates a genuine granular texture that looks like sandstone once dry.
Now you have a stylish, functional piece of decor that keeps your phone visible and your space organized
Marbleized Faux Stone Holder
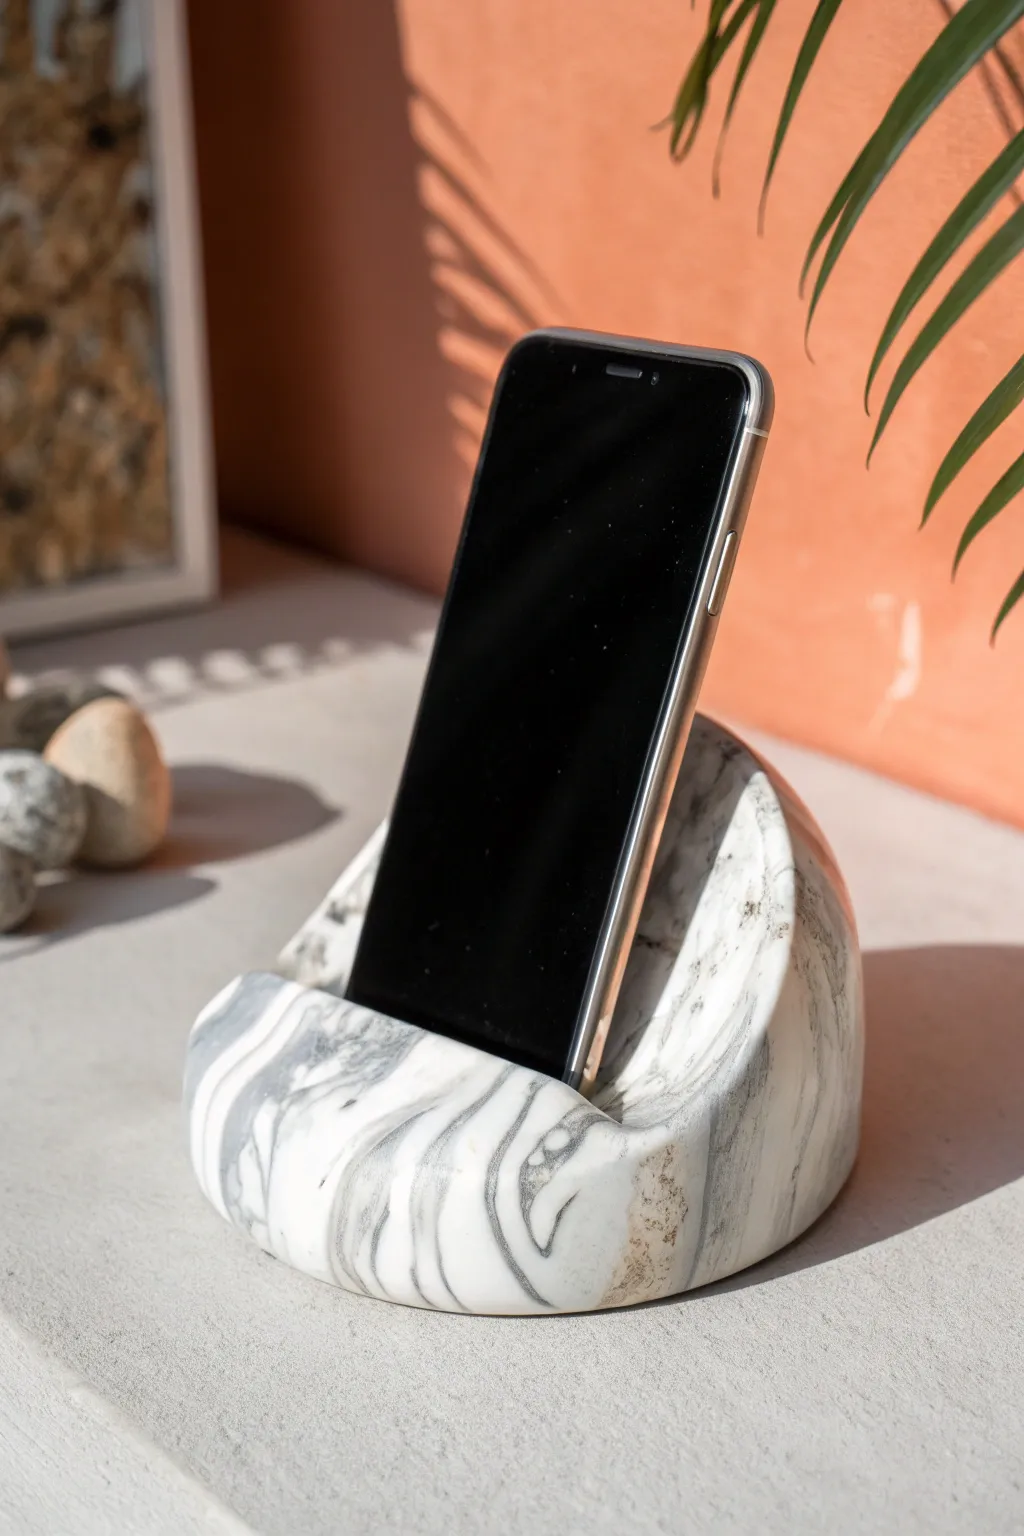
Bring a touch of high-end luxury to your desk or nightstand without the heavy price tag of real stone. By mixing polymer clays, you can mimic the organic veins and swirls of Carrera marble in a functional, minimalist phone stand.
Step-by-Step Guide
Materials
- White polymer clay (approx. 4oz)
- Black polymer clay (small amount)
- Translucent polymer clay (optional, for depth)
- Brown/Beige polymer clay (tiny amount for earthy veins)
- Acrylic rolling pin or glass jar
- Tissue blade or sharp craft knife
- Phone for sizing (or a piece of cardboard of similar thickness)
- Gloss glaze or polyurethane varnish
- Fine-grit sandpaper (400, 800, 1000 grit)
- Oven
Step 1: Marbling the Clay
-
Condition the white clay:
Begin by thoroughly kneading the white polymer clay until it is soft, pliable, and free of cracks. This will be the bulk of your project, so ensure it’s warmed up well. -
Prepare the vein colors:
Roll very small snakes of black and brown clay. You want them extremely thin—like rounded toothpicks or spaghetti strands. -
Combine the clays:
Form the white clay into a rough log shape. Lay the thin black and brown strands randomly along the length of the white log. If you are using translucent clay, add thin strips of that now as well to add visual depth. -
Twist and fold:
Twist the log like a candy cane to begin swirling the colors. Fold the log in half, roll it back into a log, and twist again. Repeat this process until you see the colors streaking but not blending into grey. -
Check the pattern:
Slice the log in half with your tissue blade to check the cross-section. If the marbling looks too chunky, push the halves back together and twist a few more times.
Step 2: Shaping the Holder
-
Form the base sphere:
Once happy with the marble pattern, roll the entire lump of clay into a smooth, tight ball. Inspect the surface for any air bubbles and smooth them out with your thumb. -
Create the base:
Gently tap the ball onto your work surface to flatten the bottom. You want a stable base that won’t rock, so press down firmly until you have a flat circle at the bottom. -
Shape the hemisphere:
Refine the overall shape into a smooth dome or hemisphere. It should look like half a ball resting on the table. -
Mark the slot:
Determine the angle you want your phone to sit at. Gently press the edge of your phone (or a cardboard stand-in) into the top of the clay to mark the width and position of the groove. -
Carve the channel:
Using your tissue blade or knife, carefully cut out a wedge or channel where you marked. It’s better to cut a little less at first and widen it gradually. -
Test the fit:
Gently insert your phone to test the fit. The slot should be wide enough to hold the device without pinching, but deep enough to keep it stable. -
Smoothing the cut:
I usually use a bit of baby oil on my finger to smooth the raw edges of the cut clay channel, ensuring no rough cutting marks remain visible.
Muddy colors?
If your grey veins look blurry instead of sharp, you over-mixed the clay. Stop twisting sooner next time. The veins should remain distinct distinct streaks.
Step 3: Baking and Finishing
-
Preheat the oven:
Set your oven to the temperature recommended on your specific brand of polymer clay packaging (usually around 275°F or 130°C). -
Bake the piece:
Place the holder on a baking sheet lined with parchment paper. Bake for approximately 30-45 minutes depending on the thickness. Since this is a thick block, a longer low-temp bake is safer. -
Cool down:
Turn the oven off and let the piece cool down inside slowly to prevent thermal shock cracks. -
Wet sanding:
Once fully cool, take your sandpaper and a bowl of water. Start with the lower grit and work up to the high grit, sanding the surface under water to achieve a silky smooth texture. -
Apply glaze:
Wipe the piece dry and apply a thin coat of gloss varnish to enhance the contrast between the white clay and the dark veins, mimicking polished stone.
Realistic Veins
Vary the pressure when twisting the clay log to create veins of different thicknesses—some hairline thin, others bold and chunky—for a natural look.
Pop your phone in its new home and enjoy the chic, organizational upgrade to your workspace

TRACK YOUR CERAMIC JOURNEY
Capture glaze tests, firing details, and creative progress—all in one simple printable. Make your projects easier to repeat and improve.
Whale Tail Support Phone Stand
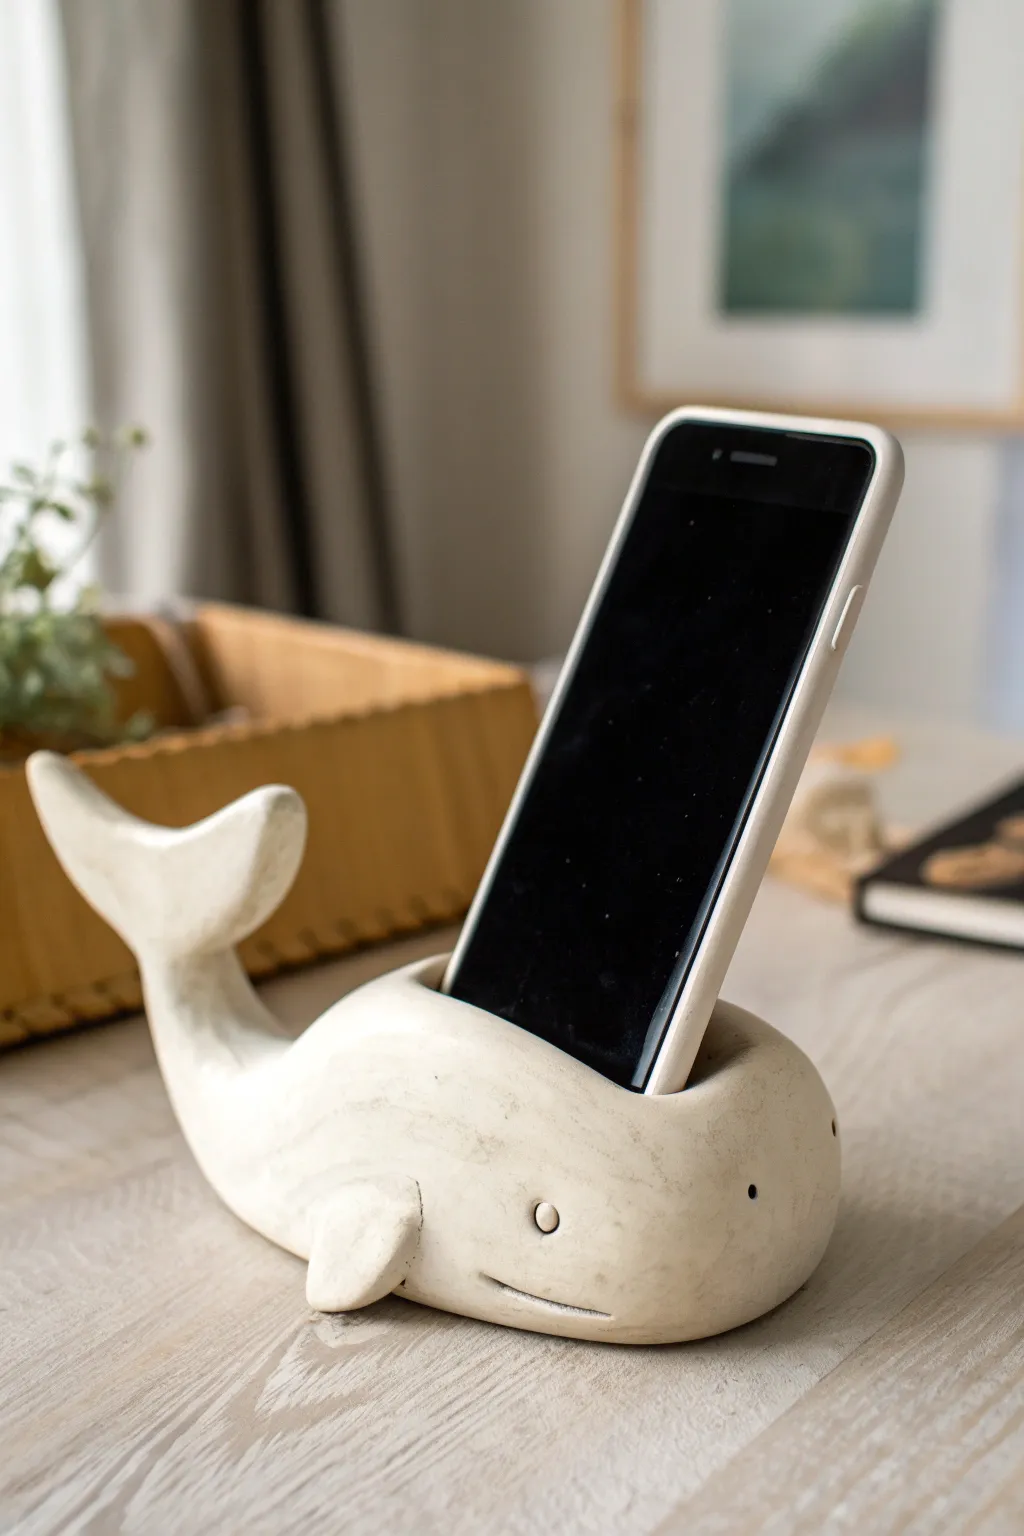
This charming desk accessory combines functionality with minimal nautical style, featuring a smooth, creamy white finish and a simplified whale form. The clever design utilizes the whale’s body to cradle your device while the upturned tail adds balance and whimsy.
Step-by-Step Tutorial
Materials
- White air-dry clay (stone clay or hearty clay work best)
- Small rolling pin
- Sculpting tools (needle tool, small loop tool)
- Water and sponge for smoothing
- Fine-grit sandpaper (220 and 400 grit)
- Acrylic sealant (matte finish)
- Your phone (for measuring)
- Plastic wrap
Step 1: Forming the Base Body
-
Condition the clay:
Begin with a large ball of white air-dry clay, roughly the size of a grapefruit. Knead it thoroughly until it’s pliable and free of air bubbles. -
Shape the oblong form:
Roll the ball into a thick, elongated oval or potato shape. One end should be slightly blunter for the head, tapering gently towards the back for the tail section. -
Flatten the base:
Gently tap the bottom of your oval against your work surface to create a flat, stable belly. The whale needs to sit significantly heavy and low so the phone doesn’t tip it over. -
Pull the tail:
Pinch the tapered end and gently curve it upward. Use your thumb and forefinger to pull the clay out and flatten it horizontally to form the flukes of the tail. -
Refine the flukes:
Shape the tail into a ‘Y’ or crescent moon shape. Smooth the edges so they are rounded and organic, ensuring the connection to the body is thick enough to not crack later.
Balance Check
If the phone tips the whale backward, hollow out a bit of clay from the underside of the tail (unseen) or stick a heavy washer into the belly clay while wet.
Step 2: Creating the Phone Slot
-
Measure your device:
Wrap the bottom half of your phone in plastic wrap to protect it. Press it gently into the top center of the whale’s back to mark the width and slightly indented angle needed. -
Excavate the slot:
Remove the phone. Using a loop tool or a knife, carefully carve out a rectangular slot where you made your marks. Dig deep enough to hold the phone securely, but leave at least half an inch of clay at the bottom. -
Test the fit:
Re-insert your plastic-wrapped phone to ensure it stands at your desired viewing angle. The clay should hug the device comfortably without being too tight. -
Smooth the interior:
Use a wet finger or a damp paintbrush to smooth the inside walls of the slot. Rough edges here could scratch your phone later, so take your time making this area silky smooth.
Step 3: Adding Details and Finishing
-
Attach the fins:
Form two small, flattened tear-drop shapes for the pectoral fins. Score (scratch) the side of the body and the back of the fin, add a dab of water, and press them firmly onto the lower sides of the whale. -
Blend the seams:
I always use a rubber sculpting tool or just my thumb to drag clay from the fin onto the body, making the attachment invisible and seamless. -
Adding facial features:
Use a needle tool or small awl to poke two small holes for the eyes. Use a knife tool to carve a simple, horizontal curved line for the mouth near the bottom of the face. -
Initial Smoothing:
Wipe the entire sculpture with a slightly damp sponge to remove fingerprints. Check the overall silhouette to ensure it looks soft and rounded. -
Slow drying:
Let the whale dry slowly away from direct heat or sunlight. This usually takes 2-4 days depending on thickness. If you dry it too fast, the heavy body might crack. -
Sanding:
Once bone dry, sand the piece. Start with 220 grit to remove bumps, then finish with 400 grit for a stone-like polish. -
Scuffing for texture:
For the antique look in the image, you can gently scuff the surface with a coarse brush or sandpaper in random directions to mimic carved wood or worn stone. -
Seal the piece:
Apply a thin coat of matte acrylic varnish or sealant to protect the clay from moisture and dirt without making it look glossy or plastic.
Stone Effect
Mix a tiny pinch of dried tea leaves or black pepper into your white clay before sculpting to create natural speckles that mimic real stone.
Now you have a sturdy little ocean friend to hold your device while you work or watch videos
Shark Mouth Slot Phone Holder
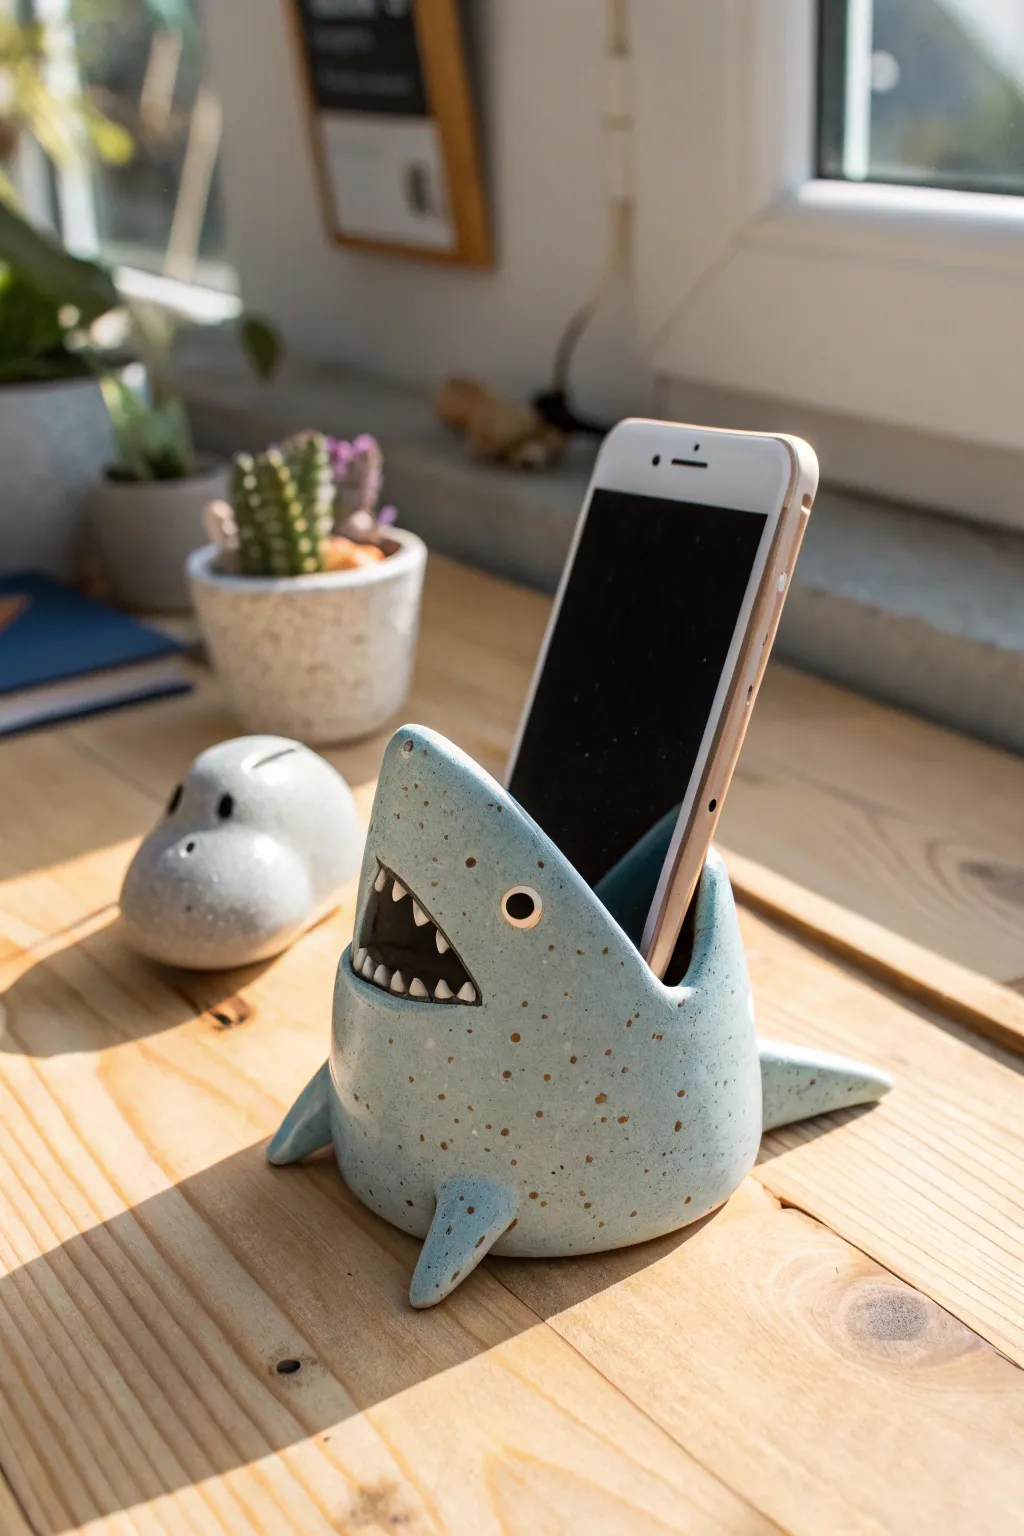
This charming ceramic shark swallows your phone while appearing to emerge from your desk like a friendly sea monster. With its speckled blue glaze and comical wide-open mouth, this holder combines practical utility with whimsical sculptural design.
Step-by-Step
Materials
- Light colored stoneware clay (smooth)
- Speckled blue glaze (or clear glaze with speckled underglaze)
- White underglaze (for teeth)
- Black underglaze (for mouth interior)
- Pottery tools (needle tool, rib tool, sponge)
- Slip and scoring tool
- Rolling pin and guide sticks
- Small paintbrush
Step 1: Forming the Body
-
Prepare the base:
Start by wedging a softball-sized amount of clay to remove air bubbles. Shape it into a rough cone or gumdrop shape, ensuring the base is wide and flat for stability. -
Hollow out the form:
Using a pinch pot method, press your thumb into the bottom of the cone and gently pinch outwardly while rotating. You want a hollow dome shape with walls about 1/4 inch thick. Keep the top rounded. -
Refine the surface:
Turn the dome right-side up and use a flexible rib tool to smooth the exterior. I like to gently tap the bottom on the table to flatten it perfectly so it won’t wobble later. -
Cut the phone slot:
Measure the width of your phone. On the top center of the shark’s head, use a needle tool to cut a rectangular slot slightly wider and thicker than your device. Test fit gently, remembering clay shrinks. -
Create the mouth:
Below the phone slot, cut a wide, crescent-shaped wedge out of the front for the mouth. Be careful not to cut too deep into the internal cavity; you are just creating the opening.
Shark Tipping Over?
If the phone makes the shark tip backward, add a hidden weight. Before closing the bottom or drying, press a small flat stone or extra clay into the inside front floor of the shark.
Step 2: Sculpting Details
-
Attach the fins:
Fashion three triangles from scrap clay: two smaller ones for the pectoral fins and one for the dorsal fin (if desired) or tail. Score and slip the sides of the body near the base, then firmly press the side fins on. -
Add a tail:
Form a flattened, curved cone shape to act as the tail. Attach this to the back of the shark at the base level to act as a counterweight against the phone’s tilt. -
Make the teeth:
Roll tiny, rice-sized cones of clay. Score the upper and lower ridges of the mouth opening, apply a dot of slip, and carefully attach the teeth one by one, merging the back of each tooth into the gum line. -
Sculpt the eyes:
Roll two small spheres of clay. Attach them to the sides of the head using slip. Use a small loop tool or the back of a paintbrush to create a slight indentation in the center of each eye for the pupil. -
Dry slowly:
Allow the piece to dry slowly under plastic for a day, then uncover to bone dry. This prevents the fins from cracking at the joints.
Step 3: Glazing and Firing
-
Bisque fire:
Fire the piece to cone 04 (or your clay’s specific bisque temperature). -
Paint the mouth interior:
Using a small brush, carefully paint the inside of the mouth cavity with black underglaze. Avoid getting black heavily on the teeth. -
Detail the teeth and eyes:
Paint the teeth with white underglaze. For the eyes, paint the outer ring white and the center pupil black or gold. -
Wax resist:
Apply wax resist to the teeth and the eyes to protect your detailed underglaze work from the main body glaze. -
Apply body glaze:
Dip or brush the entire shark (except the bottom) in a speckled light blue glaze. If brushing, apply 2-3 even coats, letting them dry in between. -
Clean the bottom:
Wipe the bottom of the shark thoroughly with a damp sponge to remove any glaze, preventing it from fusing to the kiln shelf. -
Glaze fire:
Fire the piece to the maturity temperature of your glaze and clay body (typically Cone 5 or 6 for stoneware).
Smoother Cuts
When cutting the mouth or phone slot, let the clay firm up to ‘leather hard’ first. Cutting when too wet drags the clay and warps the shape.
Enjoy your fierce new desk companion that keeps your device safe and upright
Puppy Paws Cradle Phone Holder
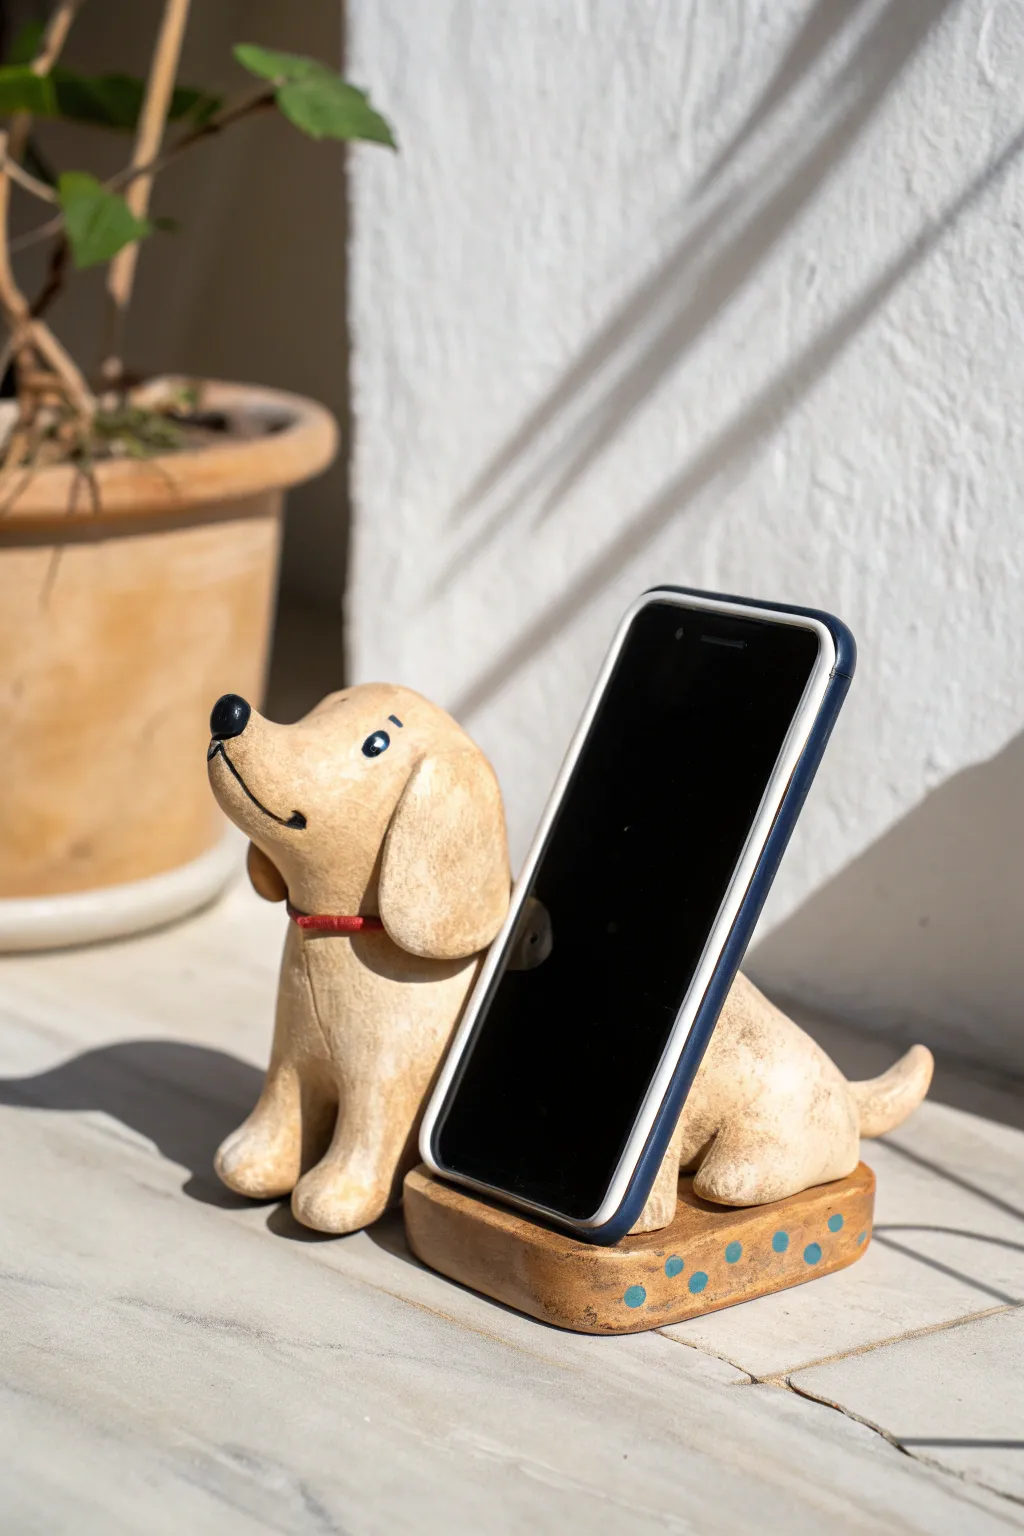
This adorable dog-themed phone holder combines charm and utility, featuring a friendly pup that props up your device on his back. With its faux-wood finish and sweet expression, it brings a warm, handmade touch to any desk or nightstand.
Step-by-Step
Materials
- Air-dry clay or polymer clay (approx. 500g)
- Clay sculpting tools (knife tool, ball stylus)
- Rolling pin
- Aluminum foil (for armature)
- Water and slip (for joining air-dry clay)
- Acrylic paints (sand/beige, dark brown, black, red, turquoise)
- Clear matte varnish
- Sandpaper (fine grit)
Step 1: Sculpting the Base
-
Form the base slab:
Start by rolling out a thick slab of clay roughly the size of a coaster, about 3/4 inch thick. Shape it into a rounded rectangle or oval to serve as the sturdy platform for your phone. -
Add a ridge:
Create a small, raised ridge or lip near the front edge of the base. This little stopper is crucial as it prevents the phone from sliding forward. -
Texture the sides:
Smooth the top surface, but leave the edges slightly organic or rounded to mimic a carved wooden or stone look.
Step 2: Building the Puppy Body
-
Create the core armature:
Crumple a piece of aluminum foil into a vague L-shape to represent the dog’s seated body and head. This saves clay and reduces drying time. -
Cover with clay:
Roll out a sheet of clay and wrap it entirely around your foil armature. Smooth the seams until you have a solid, elongated teardrop shape for the body sitting upright. -
Shape the legs:
Roll two thick sausage shapes for the front legs. Attach them to the front of the body, blending the clay upwards into the chest, and flatten the bottoms into paws. -
Add the hind legs and tail:
Form two haunch shapes for the back legs and attach them to the sides of the base body. Add a small, pointed tail curling off the back end. -
Attach to base:
Score the bottom of the dog and the top of your base slab. Apply a little water or slip, then press the dog firmly onto the base, ensuring it sits far enough back to leave room for the phone.
Weight Distribution
Ensure the dog’s back is angled slightly backward. If it’s too vertical, the phone might tip forward. Test often!
Step 3: Detailing the Head
-
Sculpt the head:
If your armature didn’t include the full head, form a rounded ball of clay and attach it to the neck. Pull the clay forward gently to create a distinct muzzle. -
Add floppy ears:
Shape two teardrop pieces of clay. Flatten them slightly and attach one to each side of the head, letting them drape down naturally like a spaniel or retriever’s ears. -
Check the angle:
Before the clay sets, place your phone (or a dummy piece of cardboard) against the dog’s back to ensure the angle is comfortable for viewing. The dog’s back should offer solid support. -
Dry partially:
Let the sculpture dry until it’s leather-hard so you can add fine details without deforming the main shape.
Custom Breed
Customize the ears and tail! Pointy ears for a terrier or a fluffy tail for a husky make this uniquely yours.
Step 4: Finishing Touches
-
Refine the surface:
Once fully dry, lightly sand any rough fingerprints or bumps. You want a smooth, slightly weathered texture. -
Paint the base coat:
Paint the entire sculpture in a warm sand or beige color. I sometimes mix a tiny drop of brown into white to get that natural bone or light wood tone. -
Add the sponge effect:
Dip a dry sponge into a slightly darker brown paint and dab it off on paper. Lightly stipple this over the dog’s back and the base to create a textured, organic look. -
Paint facial features:
Use a fine brush to paint a black nose on the tip of the muzzle. Add two simple eyes with eyebrows, and a thin black line for the smiling mouth. -
Paint the collar:
Paint a thin red line around the neck for a collar. This pop of color really brings the character to life. -
Decorate the platform:
Using a small dotting tool or the back of a paintbrush, add a row of turquoise dots along the side edge of the base slab for a playful decorative border. -
Seal the work:
Protect your creation with a coat of clear matte varnish. This will prevent paint from chipping when you slide your phone in and out.
Enjoy your charming new desk companion as he faithfully holds your phone
Vine-Wrapped Floral Phone Stand
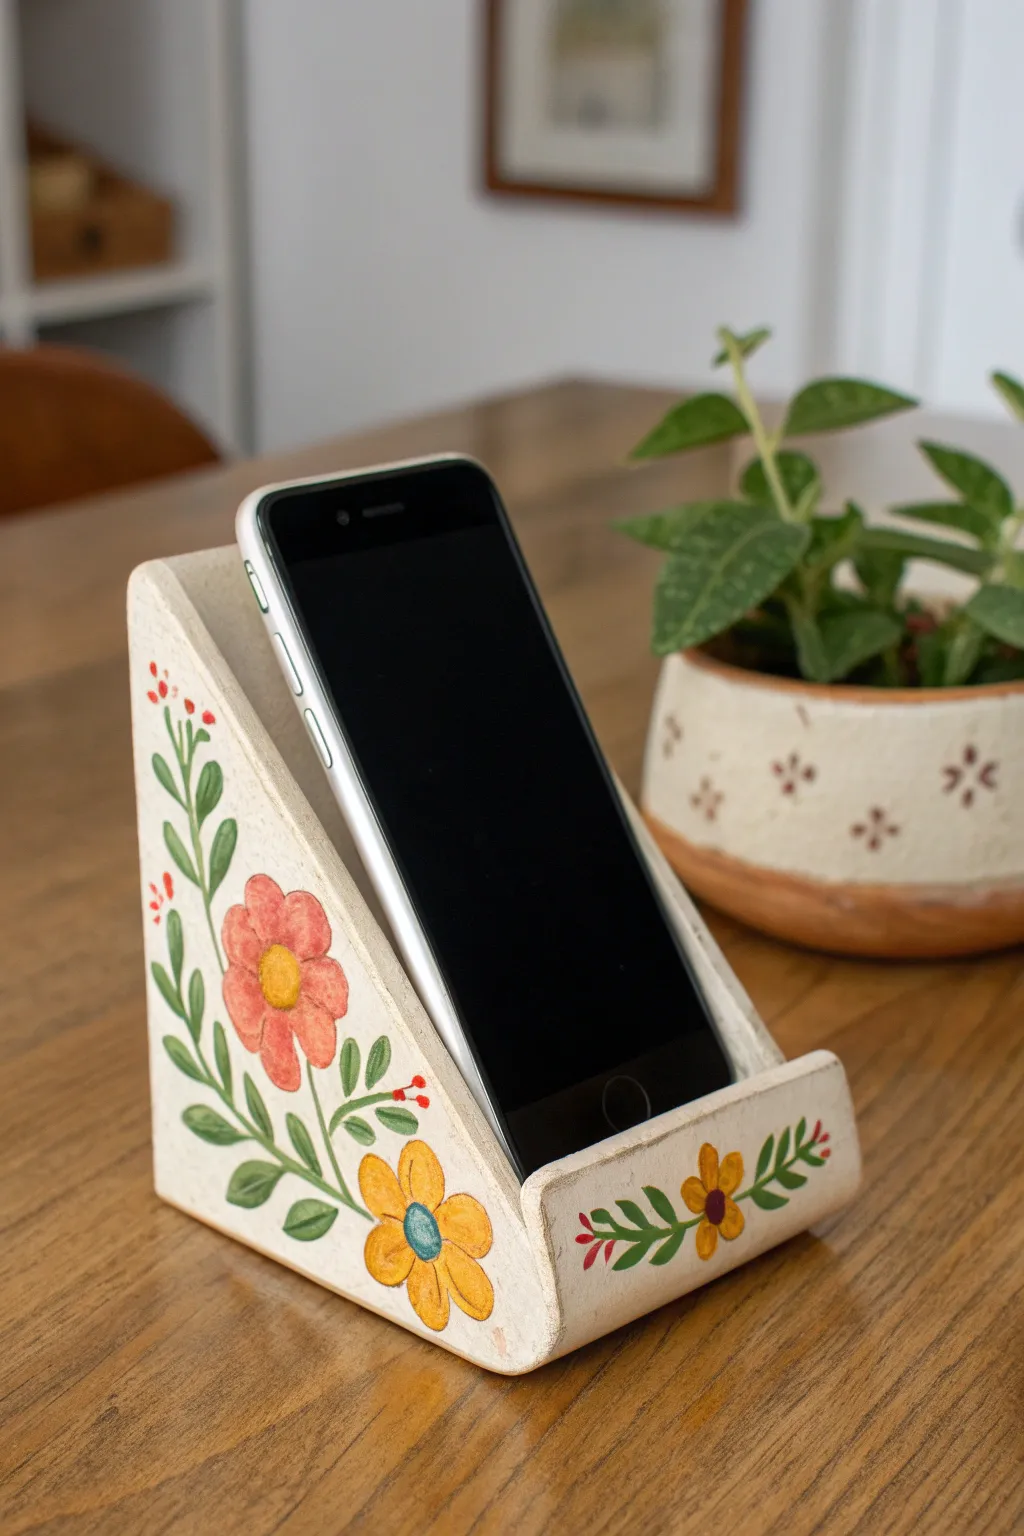
This charming, handmade accessory combines functionality with a touch of cottagecore aesthetic. Featuring a sturdy triangular base and hand-painted floral motifs on a creamy white background, it’s perfect for propping up your device while reading recipes or watching videos.
Step-by-Step Guide
Materials
- Air-dry clay or polymer clay (approx. 500g)
- Rolling pin
- Sharp crafting knife or clay slicer
- Ruler
- Water and a small bowl
- Sandpaper (fine grit)
- Acrylic paints (Cream/Off-white, Salmon Red, Mustard Yellow, Deep Green, Teal)
- Fine detail paintbrushes (Sizes 0 and 2)
- Gloss or matte varnish for sealing
- Cardboard for creating templates
Step 1: Shaping the Structure
-
Create the templates:
Before touching the clay, cut three cardboard rectangles. You’ll need a base (approx. 3×4 inches), a back slope (approx. 5×4 inches), and a front lip (approx. 0.5×4 inches). Tape them together briefly to check the angle; the phone needs to lean back comfortably. -
Roll the clay slab:
Condition your clay until it is soft and pliable. Roll it out into a large, even slab about 1/4 to 1/2 inch thick. Uniform thickness is crucial for stability. -
Cut the components:
Place your cardboard templates onto the clay. Using your craft knife, carefully cut out the rectangular base, the tall back sloping piece, the front lip, and two triangular side panels that will connect everything. -
Assemble the base:
Score the edges where the pieces will join by making small hatch marks with your knife. Apply a little water (slip) to these scored areas to act as glue. Press the back slope onto the base rectangle. -
Add the sides and lip:
Attach the two triangular side pieces to support the back slope. Finally, attach the small front lip piece. Smooth all seams together with your finger or a clay tool until the joints are invisible and the structure feels solid. -
Dry completely:
Let the stand dry thoroughly. For air-dry clay, this might take 24-48 hours. Flip it occasionally so the bottom dries too. Polymer clay should be baked according to package instructions. -
Smooth the surface:
Once hardened, use fine-grit sandpaper to smooth out any bumps, fingerprints, or sharp corners. Wipe away the dust with a damp cloth.
Step 2: Painting the Design
-
Apply the base coat:
Paint the entire stand with the cream or off-white acrylic paint. You may need two or three thin coats to get an opaque, solid finish. Let this dry completely before starting the details. -
Sketch the flowers:
Lightly sketch your vine and flower placement with a pencil. Aim for a large, central bloom on the triangular side panel and a smaller vine motif running across the front lip. -
Paint the main blooms:
Using the salmon red paint, fill in the large flower petals on the side. Use mustard yellow for the smaller flower near the bottom corner. Don’t worry about shading yet; just block in the color. -
Add the centers:
Once the petals dry, dab a contrasting center into each flower. I like to use a yellow center for the red flower and a teal center for the yellow flower to make it pop. -
Paint the greenery:
With your smallest brush and deep green paint, carefully draw the stems connecting the flowers. Add leaves branching off the stems, varying the size for a natural look. -
Add floral details:
Paint small red dots or tiny buds at the ends of the vines for extra texture. On the front lip, paint a small yellow flower flanked by green leaves to mirror the main design. -
Seal the piece:
Once your painting is fully dry, apply a coat of varnish. This protects the paint from scratches and gives the holder a finished, professional look.
Uneven Seams?
If gaps appear at your joints while drying air-dry clay, fill them with a “paste” made of fresh clay and water, then sand smooth once dry.
Weight it Down
Before the clay dries, test the balance with your phone. If it tips, add a small roll of clay inside the base for undetectable counterweight.
Your workspace now has a lovely custom accent that keeps your phone visible and secure