If you’ve got a stack of little prints you actually want to see (instead of hiding in a drawer), a handmade clay photo holder is the easiest upgrade. I’m sharing my favorite ideas that are cute, sturdy, and totally doable with polymer clay or air-dry clay.
Simple Slit Block Stand

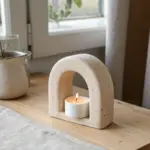
Embrace clean lines and subtle textures with this understated photo display block. Its soft, rounded rectangle shape and speckled off-white finish offer a modern home for your favorite printed memories.
How-To Guide
Materials
- White air-dry clay or polymer clay (approx. 500g)
- Speckled clay additive (e.g., ground pepper or faux granite inclusions) if clay isn’t pre-speckled
- Rolling pin
- Sharp craft knife or clay blade
- Ruler
- Fine-grit sandpaper (200-400 grit)
- Bowl of water
- Cardboard or stiff plastic card (credit card thickness)
- Clean work surface or silicone mat
Step 1: Prepping the Clay
-
Condition the material:
Begin by working the clay in your hands to warm it up and make it pliable. If you are using standard white clay and want the speckled look shown in the photo, knead in a pinch of ground black pepper or specialized granite inclusions until evenly distributed. -
Shape the initial block:
Form the clay into a rough thick log shape. This doesn’t need to be perfect yet, but it helps set the volume for the next steps. -
Flatten the sides:
Place the log on your work surface and gently press it down to create a flat bottom. Using a flat object or your hands, press against the long sides to square them off. -
Refine the rectangle:
Use your rolling pin gently on the top surface to ensure it is perfectly level. You want a solid block approximately 4-5 inches long, 1.5 inches wide, and 1.5 inches tall.
Step 2: Sculpting the Form
-
Trim for precision:
To get those clean vertical lines, use your sharp craft knife and ruler to slice off the potentially uneven ends of the block, creating crisp, flat faces on the short sides. -
Soften the edges:
The charm of this piece lies in its lack of sharp corners. Dip your finger in a little water and run it along every hard edge to round it over gently. -
Smooth the surfaces:
Check for any fingerprints or dents. I like to use a barely damp sponge or just a wet finger to buff the flat surfaces until they look matte and uniform. -
Check stability:
Set the block down on a flat surface to ensure it doesn’t wobble. If it rocks, gently press the block down firmly to re-flatten the base.
Clean Cuts Only
To prevent the clay from dragging or deforming when you slice the block ends, lay a piece of plastic wrap over the clay before cutting through it with your blade.
Step 3: Creating the Mechanism
-
Mark the center:
Using your ruler, lightly mark a centerline along the top face of the block where the photo will sit. -
Cut the slit:
Take your rigid card or a thick piece of cardboard. Press it steadily and vertically into the clay along your marked line. Go about 0.5 inches deep. -
Widen the gap:
Wiggle the card ever so slightly front-to-back to ensure the opening is wide enough to hold a photo without bending it, but tight enough to keep it upright. -
Clean the opening:
Depending on the clay type, the edges of the slit might have raised up. Smooth these back down gently with a tool or finger without closing the gap.
Slit Closed Up?
If the photo slot shrinks while drying, carefully run a folded piece of sandpaper back and forth inside the groove to widen it post-drying.
Step 4: Finishing Touches
-
Allow to dry:
Let the block air dry completely. For a block this thick, this may take 48-72 hours. Rotate it occasionally so the bottom gets airflow. -
Sand for perfection:
Once fully cured, use fine-grit sandpaper to buff away any remaining imperfections or rough texture, paying special attention to the rounded corners. -
Dust off:
Wipe the piece with a slightly damp cloth to remove any sanding dust. The natural matte finish is part of the aesthetic, so no varnish is needed unless you want a shine. -
Insert photo:
Slide your favorite polaroid or printed card into the slot to complete the display.
Now you have a serene, custom-made display that lets your favorite moments take center stage
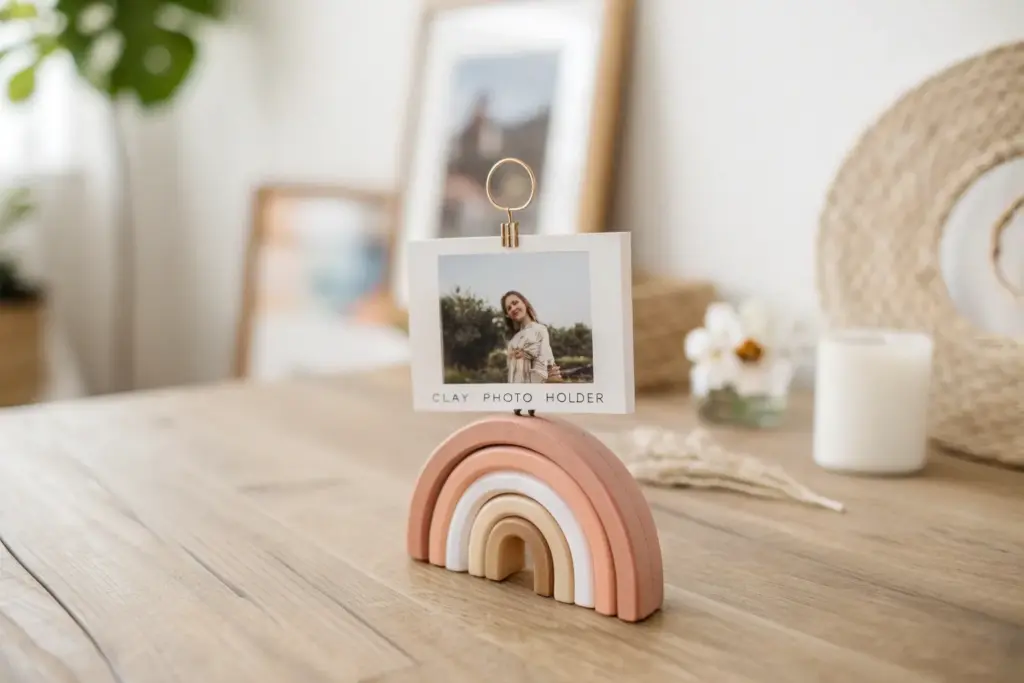
Coiled Wire Clip in a Clay Base

This charming photo holder mimics the organic shape of a river stone, offering a grounded and earthy base for your favorite memories. The simple coiled wire clip adds a touch of industrial elegance without distracting from the beauty of the display.
Detailed Instructions
Materials
- Air-dry clay (terracotta or pink granite color)
- Craft wire (16-18 gauge aluminum or silver-plated)
- Needle nose pliers
- Wire cutters
- Fine-grit sandpaper (optional)
- Round object (like a marker or dowel) for shaping wire
- Small botanical print or photo
Step 1: Shaping the Clay Base
-
Condition the clay:
Begin by taking a chunk of air-dry clay roughly the size of a tangerine or a golf ball. Knead it in your hands for a minute until it is soft, pliable, and free of cracks. -
Form a sphere:
Roll the clay between your palms using a circular motion to create a smooth, tight ball. Aim for a unified surface with minimal seams. -
Flatten the shape:
Place the ball on your work surface and press down gently with your palm. You aren’t making a pancake, but rather a flattened pebble shape about an inch thick. -
Smooth the edges:
Use a little bit of water on your finger to smooth out the circumference of the pebble. Rub gently to erase any fingerprints or small cracks that appeared during flattening. -
Create the texture:
For that natural stone look, gently tap the surface with a toothbrush or a crumpled piece of aluminum foil to add subtle pitting, though leaving it smooth works too.
Wire Shaping Hack
To avoid plier marks on your soft craft wire, wrap the tips of your needle nose pliers with a layer of painter’s tape or masking tape before bending.
Step 2: Creating the Wire Clip
-
Cut the wire:
Cutting a length of wire about 10-12 inches long ensures you have plenty to work with for both the coil and the stem. -
Start the coil:
Grab the very tip of the wire with your needle nose pliers and create a tiny, tight loop. This will be the center of your spiral. -
Wind the spiral:
Holding the center loop flat, manually wind the wire around itself to create a flat spiral shape. Aim for 3 to 4 complete rotations so the clip is sturdy enough to hold paper. -
Adjust the spacing:
Ensure the gaps between the wire loops are consistent but very close together; tight coils exert better pressure for holding thin photos. -
Bend the stem:
Once your spiral head is the desired size, use your pliers to bend the remaining straight wire downward at a 90-degree angle. This tail creates the stem. -
Straighten the stem:
Run your fingers down the stem to straighten it out completely, ensuring the spiral sits upright like a flower head. -
Create an anchor:
At the very bottom of the stem (about 1.5 inches down), make a small zig-zag or ‘L’ bend. This acts as a hook inside the clay so the wire won’t spin loosely later. -
Trim excess length:
If the stem feels too long for your pebble size, trim the bottom before making your anchor bend.
Step 3: Assembly and Finish
-
Insert the wire:
While the clay is still wet, carefully push the anchored end of the wire stem into the center of your clay pebble. Push it down until the spiral hovers about an inch above the surface. -
Seal the entry point:
The clay might mound up slightly where the wire entered. Gently smooth this clay back down against the stem to secure it tight. -
Initial drying:
Let the piece sit undisturbed for 24-48 hours. I like to rotate it occasionally so the bottom gets air exposure and dries evenly. -
Sanding:
Once fully cured and hard, use fine-grit sandpaper to buff away any rough spots on the clay, focusing on the bottom edge for stability. -
Display:
Slide your favorite photo or a small art print between the coils of the wire. The tension will hold it securely in place.
Clay Cracking?
If small cracks appear as the clay dries, mix a tiny bit of fresh clay with water to make a paste perfectly suited for filling in gaps.
Now you have a stylish, minimalist display piece ready for your desk or shelf


Marbled Cube Photo Holder
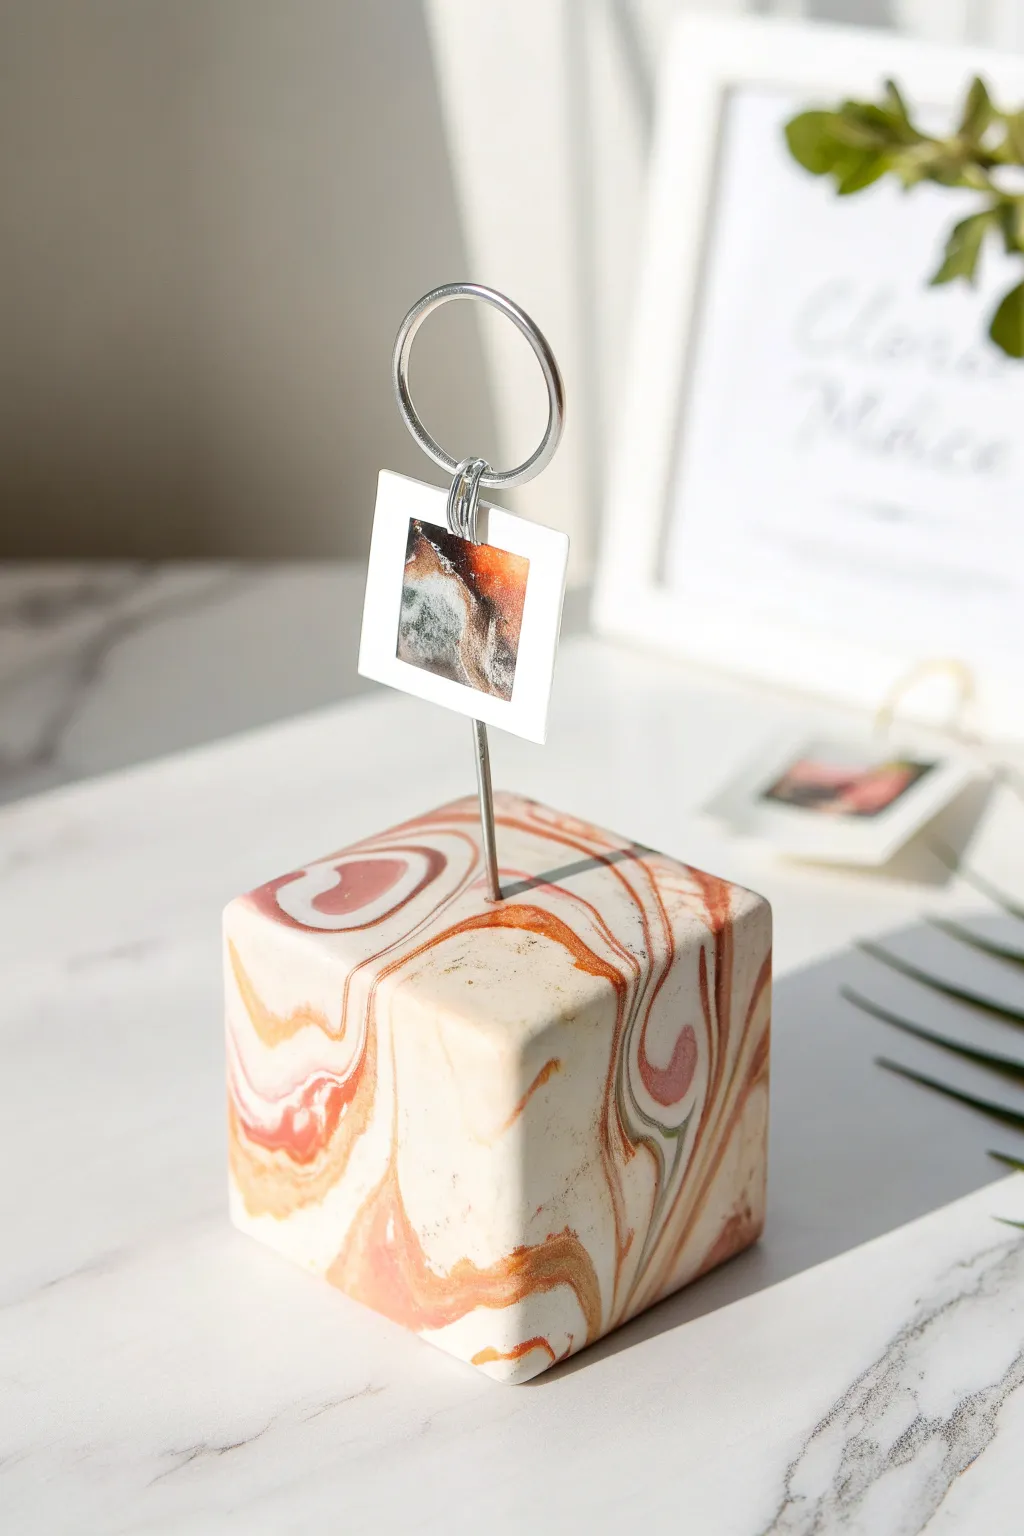
Bring a touch of modern elegance to your desk with this marbled cube photo holder, featuring swirling veins of terracotta, peach, and white. Its crisp geometric shape contrasts beautifully with the organic, fluid patterns of the clay, making it a perfect functional art piece.
How-To Guide
Materials
- White polymer clay (large block)
- Terracotta or rust-colored polymer clay
- Peach or light pink polymer clay
- Sage green or grey polymer clay (optional accent)
- Clay blade or sharp craft knife
- Acrylic rolling pin
- Silver heavy-gauge crafting wire
- Wire cutters
- Needle-nose pliers
- Smooth work surface (ceramic tile or glass)
- Fine-grit sandpaper (400, 600, 800 grit)
- Oven
Step 1: Preparing the Clay
-
Condition the white clay:
Begin by conditioning the white clay, kneading it in your hands until it becomes soft and pliable. This will form the bulk of your cube, so create a ball roughly the size of a golf ball. -
Prepare colored accents:
Condition the terracotta, peach, and optional sage green clays separately. Roll each color into thin snakes or ropes, varying the thickness slightly for a more natural look. -
Combine the clays:
Lay the colored ropes randomly across the white ball of clay. Twist the ball gently to start incorporating the colors, but don’t over-mix just yet.
Muddy Colors?
If your colors are blending into a single brown hue rather than distinct veins, stop twisting immediately. You likely over-mixed the clay. Fewer folds preserve the stark contrast of veins.
Step 2: Creating the Marbling
-
Twist and roll:
Roll the clay into a thick log shape on your work surface. Twist the log like a candy cane to stretch and distort the colored lines. -
Fold and repeat:
Fold the twisted log in half and roll it out again. I usually repeat this twisting and rolling process 2-3 times until the veins look organic and fluid. -
Form a smooth ball:
Once you are happy with the marbling pattern, roll the clay back into a tight, smooth ball, ensuring there are no air bubbles trapped inside.
Gold Vein Glamour
Incorporate small flakes of gold leaf into the clay while rolling the initial ball. The gold will stretch and crackle along with the colors, adding a chic metallic vein to the faux marble.
Step 3: Shaping the Cube
-
Square the sides:
Place the ball on your work surface and gently press down to flatten the bottom. Use your acrylic roller or a flat object to gently press the sides, slowly coaxing the round shape into a square. -
Sharpen the edges:
Use your clay blade to slice off thin layers from each of the six sides. This reveals the beautiful internal marbling pattern and creates sharp, crisp edges for that perfect geometric look. -
Smooth the surface:
With your finger, very lightly smooth any harsh cutting marks, being careful not to round over the sharp corners you just created.
Step 4: Adding the Hardware
-
Cut the wire:
Cut a piece of sliver wire to your desired height, typically about 4 to 5 inches long. -
Form the ring:
Using a cylindrical object like a marker or glue stick, wrap the top end of the wire around twice to create a double-loop ring. This split-ring style will hold the photo securely. -
Insert the stem:
Push the straight end of the wire vertically into the center of your raw clay cube. Insert it deep enough to differ stability, at least halfway through the block. -
Remove for baking:
Carefully pull the wire back out. Using the pilot hole ensures you can easily glue it in later without distorting the baked clay.
Step 5: Finishing Touches
-
Bake the clay:
Place the clay cube on a baking tile and bake according to the package instructions (usually 275°F/135°C for 30 minutes per 1/4 inch of thickness). -
Cool and sand:
Allow the cube to cool completely. Wet sand the surfaces under running water, starting with 400 grit and moving to 800 grit for a silky smooth, stone-like finish. -
Secure the wire:
Place a dab of strong super glue or E6000 onto the end of your wire stem and insert it firmly back into the pre-made hole. -
Buff (optional):
For a slight sheen, buff the cube vigorously with a soft denim cloth or a buffing wheel.
Slide your favorite polaroid or note into the clip and enjoy your custom desk accessory


Terrazzo Speckled Wedge Stand
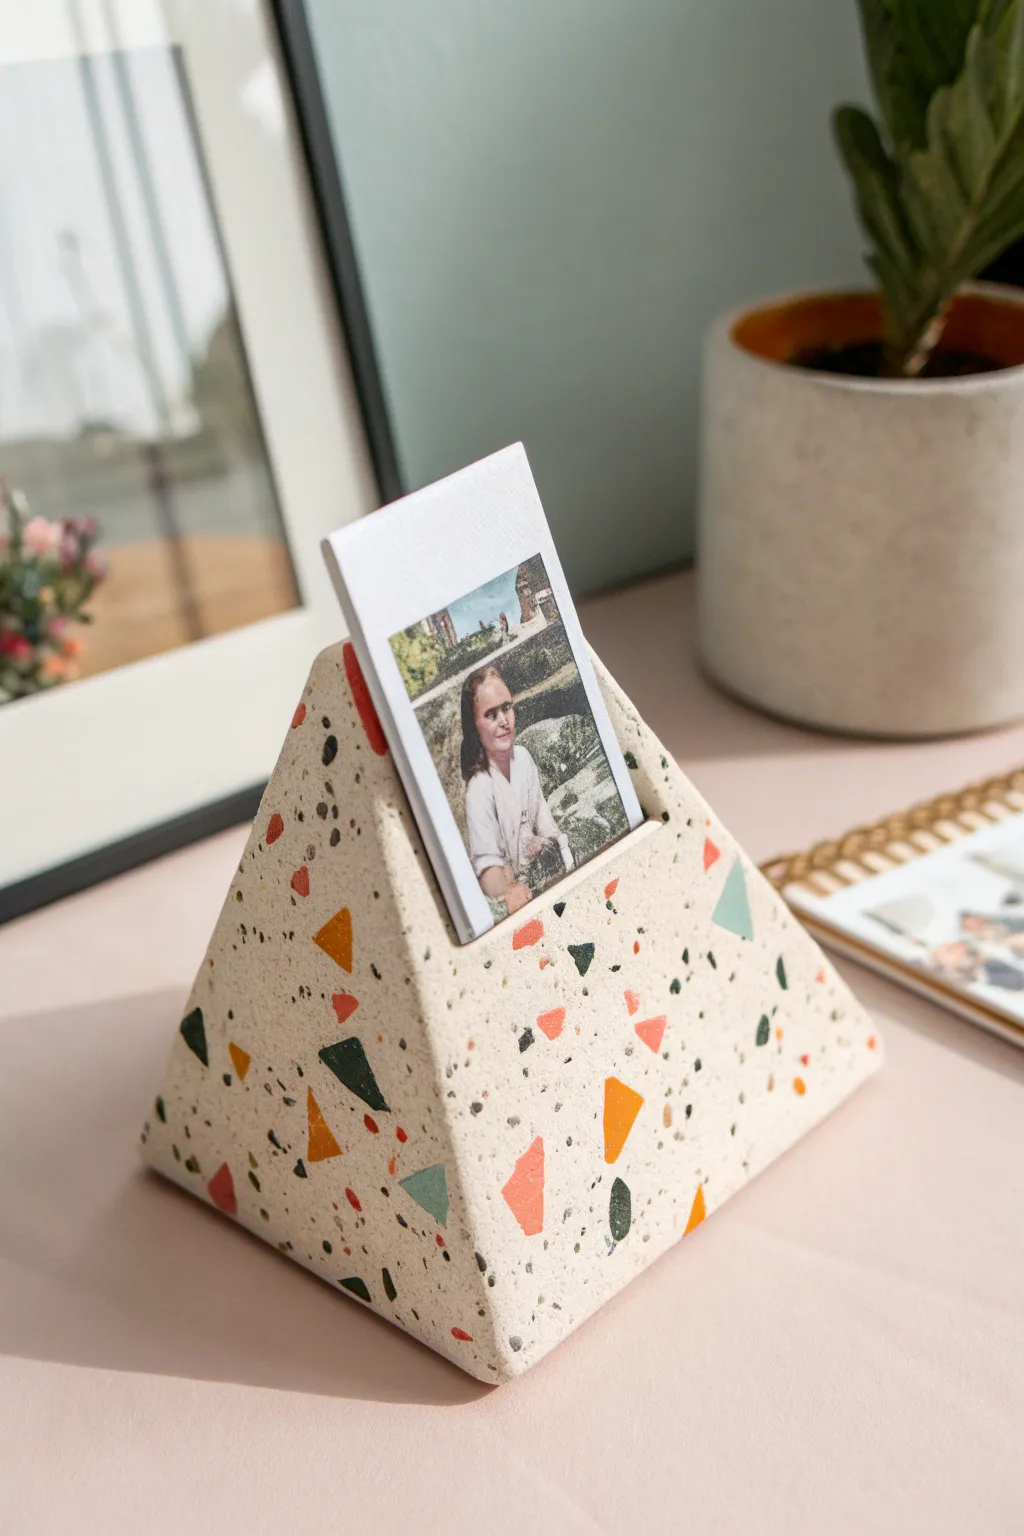
This modern, geometric photo holder features a playful terrazzo pattern that adds a pop of color to any desk or shelf. Its sturdy wedge shape perfectly displays your favorite instant photos or postcards with a sophisticated stone-like finish.
Step-by-Step
Materials
- Polymer clay (white or beige for the base)
- Polymer clay (various colors like orange, teal, green, black)
- Acrylic rolling pin
- sharp clay blade or craft knife
- Ruler
- Baking sheet
- Parchment paper
- Oven
- Fine-grit sandpaper (optional)
- Matte varnish (optional)
Step 1: Preparing the Terrazzo Chips
-
Condition the colored clay:
Start by softening your small amounts of colored clay (orange, teal, green, and black) by kneading them in your hands until they are pliable. -
Roll thin sheets:
Roll out each colored piece of clay as thinly as possible. You want them very flat so they incorporate easily into the base later. -
Cut the chips:
Use your clay blade to chop these thin sheets into tiny, irregular angular pieces. Aim for a mix of triangles and shards in varying sizes. -
Separate the pieces:
Gently scatter the pieces on your work surface so they aren’t sticking together in clumps.
Step 2: Creating the Base
-
Condition the base clay:
Take a large block of your beige or white clay and condition it thoroughly until it is soft and warm. -
Initial rolling:
Roll the base clay into a thick slab, approximately 1/4 inch thick. -
Apply the chips:
Sprinkle your colored clay chips randomly over the surface of the beige slab. Don’t overthink the placement; randomness looks best here. -
Embed the pattern:
Use your acrylic roller to press the chips into the base clay. Roll over the slab until the surface is completely flat and the chips are flush with the beige clay.
Smudged Terrazzo?
If your colored chips are smearing during the rolling phase, let the clay cool in the fridge for 10 minutes before rolling again. Harder clay smears less.
Step 3: Shaping the Wedge
-
Form a block:
Cut your terrazzo slab into sections and stack them, or fold the clay, then reshaping it into a solid 3D triangular prism shape. I usually smooth the seams with my fingers to make it look like a solid block of stone. -
Refine the angles:
Use your blade to slice off the sides to create clean, sharp, flat planes for the pyramid/wedge shape. -
Check the stability:
Set the wedge on the table to ensure the bottom is perfectly flat and the holder sits securely without wobbling. -
Cut the slot:
Using the ruler as a guide, carefully press your blade deep into the top ridge of the wedge to create a slit for the photo. Wiggle the blade slightly to widen the gap just enough for a thick card.
Add Real Texture
Mix actual sand or black pepper into your beige base clay before adding the colored chips. This adds a gritty, realistic stone texture to the final piece.
Step 4: Finishing Touches
-
Smooth the surface:
Gently rub the surface with your finger to remove any fingerprints, but be careful not to distort the sharp geometric edges you just cut. -
Bake:
Place the wedge on a parchment-lined baking sheet and bake according to your clay manufacturer’s specific time and temperature instructions. -
Cool down:
Let the piece cool completely in the oven with the door slightly ajar to prevent cracking. -
Sand (optional):
If the surface feels rough, lightly wet-sand the cured piece with fine-grit sandpaper to reveal the terrazzo pattern more clearly. -
Seal (optional):
Apply a thin coat of matte varnish if you want to protect the surface and give it a finished, professional look.
Place your favorite instant photo in the slot to see how the geometric colors complement your memory

The Complete Guide to Pottery Troubleshooting
Uncover the most common ceramic mistakes—from cracking clay to failed glazes—and learn how to fix them fast.
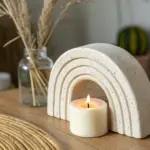
Mountain Ridge Photo Stand
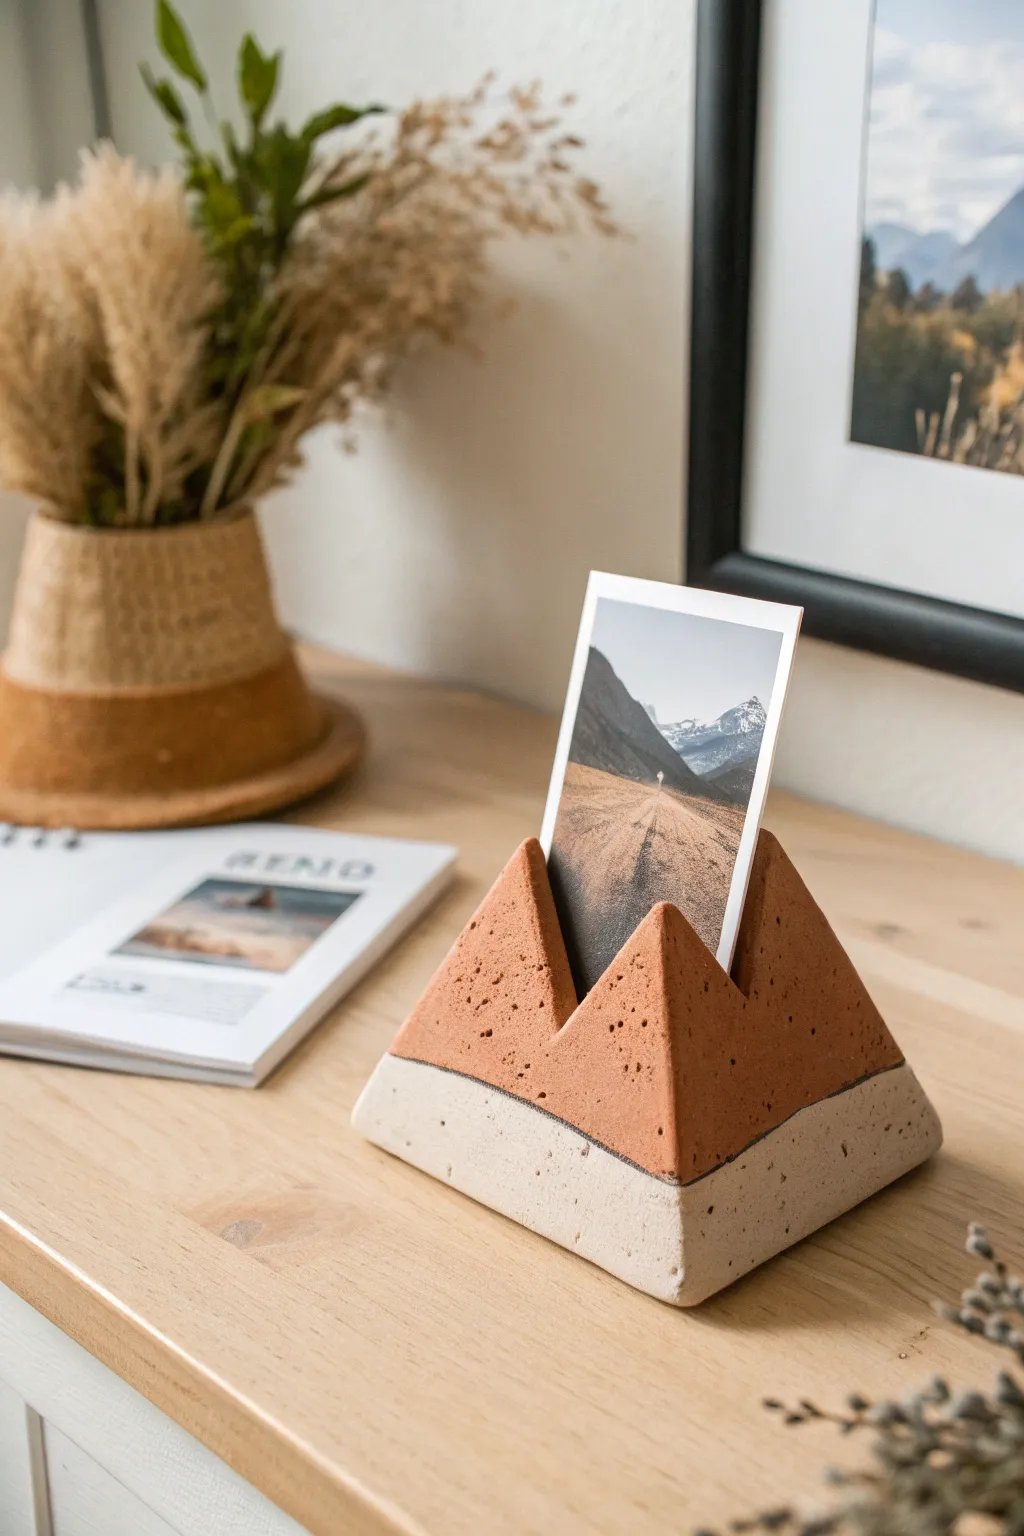
Bring the grandeur of the outdoors to your desktop with this stylized mountain photo holder. Crafted from clay to resemble natural earth tones, its dual-color design features snowy white peaks resting on a terracotta-colored ridge.
Detailed Instructions
Materials
- Polymer clay (white/granite)
- Polymer clay (terracotta)
- Acrylic rolling pin
- sharp clay blade or craft knife
- Ruler
- Sandpaper (fine grit)
- Oven and baking tray
- Parchment paper
- Old toothbrush or stiff bristle brush
Step 1: Shaping the Base
-
Condition the white clay:
Begin by taking a block of white or granite-flecked polymer clay. Knead it thoroughly in your hands until it becomes soft, warm, and pliable to prevent cracking later. -
Form the base block:
Shape the conditioned white clay into a thick rectangular block. Aim for a thickness of about 1 inch and a length of about 3-4 inches depending on your desired final size. -
Bevel the sides:
Using your clay blade or knife, carefully slice the four sides of the rectangle at an angle to create a pyramid-like base shape, leaving the top flat. -
Create texture:
Take an old toothbrush or a ball of aluminum foil and press it gently all over the exterior of the white base to give it a stone-like, pocked texture.
Natural Texture Hack
Mix black pepper or dried tea leaves into your white clay before shaping. This creates realistic faux-granite speckles without needing special effect clay.
Step 2: Creating the Peaks
-
Prepare the terracotta clay:
Condition the reddish-brown terracotta clay just as you did the white clay until it is smooth and workable. -
Shape the mountain tops:
Form this clay into two distinct triangular peaks. One should be slightly taller than the other to create an organic, craggy look. -
Join the peaks:
Press the bottoms of the two triangles together and smooth them into a single unit that matches the footprint of your white base’s top surface. -
Texturize the peaks:
Apply the same stippled texture to the terracotta section using your toothbrush, paying special attention to the tips of the mountains. -
Combine the layers:
Place the terracotta mountain unit directly onto the flat top of the white base. Press down firmly but gently to adhere them without distorting the shapes.
Snow-Capped Peaks
After baking, drizzle white acrylic paint or liquid clay over the very tips of the terracotta mountains for a realistic snow-capped effect.
Step 3: Refining and Baking
-
Carve the photo slot:
This is the most crucial step. Use your clay blade or a thick piece of cardstock to press a deep groove between the two peaks. -
Check the width:
Ensure the groove is wide enough for a photograph or card, but tight enough to hold it upright. I usually wiggle the tool slightly to create just enough clearance. -
Clean up the edges:
Smooth out any fingerprints or sharp edges created during the joining process. You can use a fingertip dipped in a tiny bit of baby oil for a flawless finish. -
Prepare for baking:
Place the assembled mountain on a baking sheet lined with parchment paper. -
Bake the project:
Bake according to the specific temperature and time instructions on your package of polymer clay. Do not overbake. -
Cool down:
Allow the piece to cool completely in the oven with the door slightly ajar. This gradual cooling helps prevent cracks. -
Sand the bottom:
Once fully cool and hard, rub the bottom of the stand against a piece of fine-grit sandpaper on a flat surface to ensure it sits perfectly level.
Place your favorite memory in the slot and enjoy the rugged charm this little sculpture adds to your space
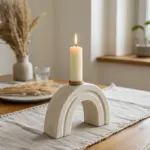
Heart-Shaped Photo Holder
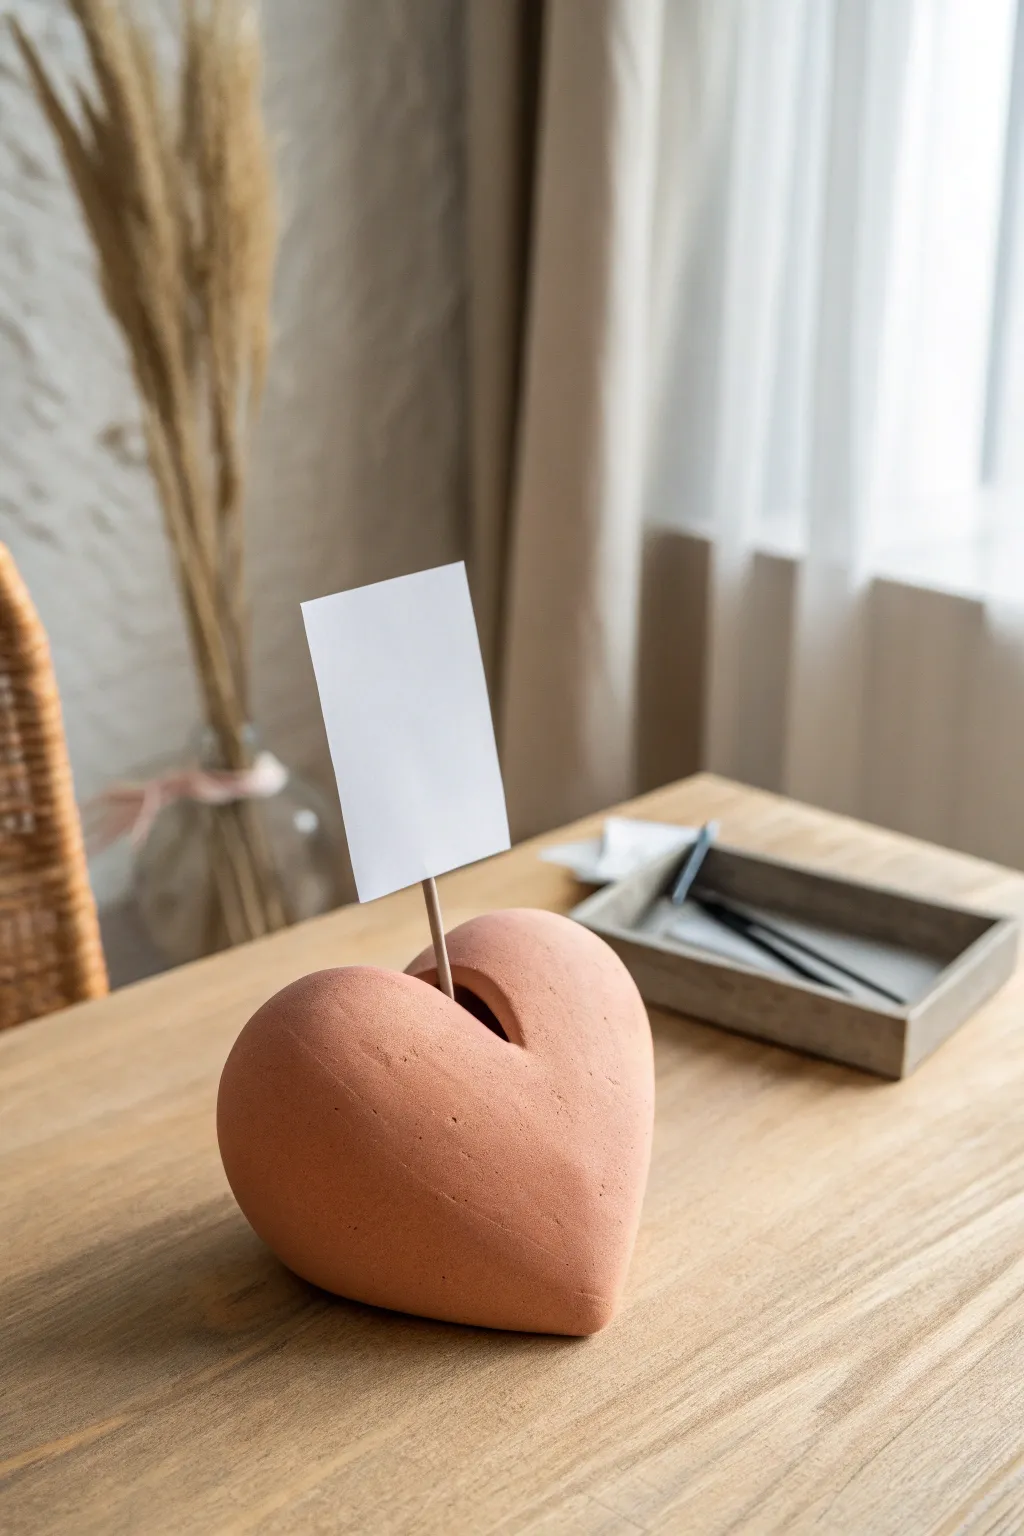
This minimalist heart-shaped holder brings a touch of earthy warmth to your desk or mantel with its soft terracotta tone and smooth, rounded form. It serves as a sturdy base for displaying beloved photos, table numbers, or sweet little notes.
How-To Guide
Materials
- Air-dry clay (terracotta color or white)
- Acrylic paint (terracotta or burnt orange, if using white clay)
- Wooden dowel or strong wire
- Rolling pin
- Small bowl of water
- Modeling tool or butter knife
- Fine-grit sandpaper
- Matte sealant spray or matte Mod Podge
- Cardstock for the photo backing
Step 1: Shaping the Base
-
Prepare the Clay:
Start with a generous handful of air-dry clay, about the size of a grapefruit. Knead it thoroughly in your hands until it becomes warm, pliable, and free of cracks. -
Form a Sphere:
Roll the clay between your palms or on your work surface to create a smooth, solid ball. This ensures the internal structure is dense, which gives the holder its necessary weight. -
Flatten Slightly:
Place the ball on your table and gently press down with your palm until it becomes a thick, rounded disc, roughly 2-3 inches thick. -
Create the V-Indentation:
Using the side of your hand or a modeling tool, press into the top center of the disc to create a deep indentation. This forms the cleavage of the heart shape. -
Taper the Bottom:
Cup your hands around the lower half of the form and gently squeeze to taper it down into a point. You want a soft, rounded point rather than a sharp one to keep it stable. -
Refine the Curves:
Dip your fingers in a little water and smooth out the ‘shoulders’ of the heart. The goal is a chubby, organic shape rather than a flat, cookie-cutter look.
Step 2: Adding the Mechanics
-
Make the Slot:
At the very center of the V-indentation, press a modeling tool or the handle of a spoon straight down to create a small vertical hole or slot. This is where your dowel will sit. -
Insert the Dowel:
Take your wooden dowel and push it about an inch deep into the hole you just made. Twist it slightly to ensure the hole is wide enough to accommodate the stick without cracking as it dries. -
Secure the Fit:
If I notice the hole is too loose, I pinch the clay gently back around the base of the dowel. Remove the dowel carefully for the drying phase so it doesn’t get stuck permanently yet.
Cracks appeared?
Mix a tiny bit of fresh wet clay with water to create a paste (slip). Fill the cracks with this paste, smooth over with a finger, and let dry again.
Step 3: Finishing Touches
-
Initial Smoothing:
Before leaving it to dry, run a damp sponge over the entire surface to remove fingerprints and ensure a stone-like texture. -
Slow Drying:
Let the heart dry for 24-48 hours. Turn it over occasionally so the bottom receives air circulation; this prevents warping and uneven drying. -
Sanding:
Once fully cured and hard, use fine-grit sandpaper to buff away any rough patches or sharp edges, focusing on that nice matte finish. -
Create the Card Split:
Take your wooden dowel. Using a small saw or sharp craft knife, carefully cut a slit into the top end of the wood, going down about half an inch. This split will grip your photo. -
Assembly:
Place a dab of strong craft glue into the hole in the clay heart and insert the non-slit end of the dowel firmly. -
Painting (Optional):
If you didn’t use terracotta clay, mix burnt orange and a touch of white acrylic paint. Apply two thin coats for that earthy ceramic look. -
Sealing:
Finish with a matte spray sealant to protect the clay from moisture without making it shiny.
Make it Luxe
Mix gold leaf flakes into the clay before shaping, or paint the very tip of the wooden dowel gold for a chic, modern contrast.
Slide your favorite memory into the unexpected slot and enjoy the heartwarming display on your table


What Really Happens Inside the Kiln
Learn how time and temperature work together inside the kiln to transform clay into durable ceramic.
Swirled Clay Coil Groove Stand

Create a mesmerizing, ripple-effect photo holder that mimics the look of a tranquil pool. This sturdy clay piece features deep, concentric grooves perfect for displaying thick cardstock or cherished polaroids with artistic flair.
Step-by-Step Tutorial
Materials
- Stoneware or earthenware clay (approx. 1 lb)
- Pottery wheel (optional, can be hand-built)
- Needle tool
- Loop trimming tool
- Rib tool (wood or rubber)
- Sponge
- Wire cutter
- Turquoise or teal reactive glaze
- Kiln for firing
Step 1: Forming the Base
-
Center the clay:
Start by throwing a small mound of clay onto the wheel head. Center it firmly, ensuring there are no wobbles, as symmetry is key for the spiral effect. -
Open the form:
Press your thumbs into the center to open the clay, but keep the floor relatively thick—about half an inch to three-quarters of an inch—to accommodate the deep grooves later. -
Establish the width:
Pull the clay out to a diameter of roughly 4-5 inches. You want a low, wide puck shape rather than a tall bowl. -
Raise the outer wall:
Pull up a short, vertical outer wall, about one inch high. Keep the rim slightly rounded and smooth using a chamois or your sponge.
Step 2: Carving the Spiral
-
Plan the grooves:
Looking at the thick floor you created, visualize a spiral starting from the center. You will be carving deep channels into this floor. -
Define the center coil:
Using a loop tool or your fingers while the wheel spins slowly, press into the exact center to create the innermost button or small coil. -
Create the first channel:
Move outwards slightly and press down firmly to create a deep valley between the center point and the next ring of clay. -
Form the middle ridge:
Leave a raised ring of clay, then press down again to create the second, larger outer channel. You are essentially sculpting concentric rings (or a continuous spiral) out of the thick floor. -
Refine the edges:
Use a damp sponge or a soft rib to smooth the tops of the ridges. They should look organic and slightly weathered, not razor-sharp. -
Check groove depth:
Ensure the channels are deep enough to hold a card securely, but not so deep that you cut through the bottom of the pot. -
Wire off and dry:
Run a wire cutter under the base to release it. Set the piece aside until it reaches a leather-hard state.
Groove Smoothness
Run a wet finger inside the grooves before drying. Rough spots inside the channels can scratch your photos or make cards sit unevenly.
Step 3: Trimming and Glazing
-
Trim the foot:
Once leather-hard, flip the piece over and center it on the wheel. Trim away excess weight from the bottom and carve a neat foot ring for stability. -
Bisque fire:
Allow the clay to dry completely (bone dry) before loading it into the kiln for the first bisque firing. -
Clean the surface:
After the kiln cools, wipe the bisque-ware with a damp sponge to remove any dust that might prevent the glaze from adhering. -
Apply the glaze:
Choose a turquoise or deep teal glaze with reactive properties. Pour the glaze inside to ensure it gets deep into the spiral grooves, then pour out the excess. -
Glaze the exterior:
Dip or brush the exterior walls with the same glaze. I like to let the glaze pool slightly in the bottom of the grooves to create darker color variations. -
Wipe the foot:
Carefully wipe any glaze off the bottom foot ring with a sponge so it doesn’t fuse to the kiln shelf. -
Glaze fire:
Load the piece for the final glaze firing according to your clay and glaze temperature specifications (usually Cone 5 or 6 for stoneware).
Melted Glass Effect
Place a few small chips of clear or blue glass in the bottom of the grooves before the final firing for a stunning, crystalline pool effect.
Once cooled, your glossy ceramic swirl is ready to cradle your favorite memories on any desk or shelf
Minimal Circle Ring Photo Holder
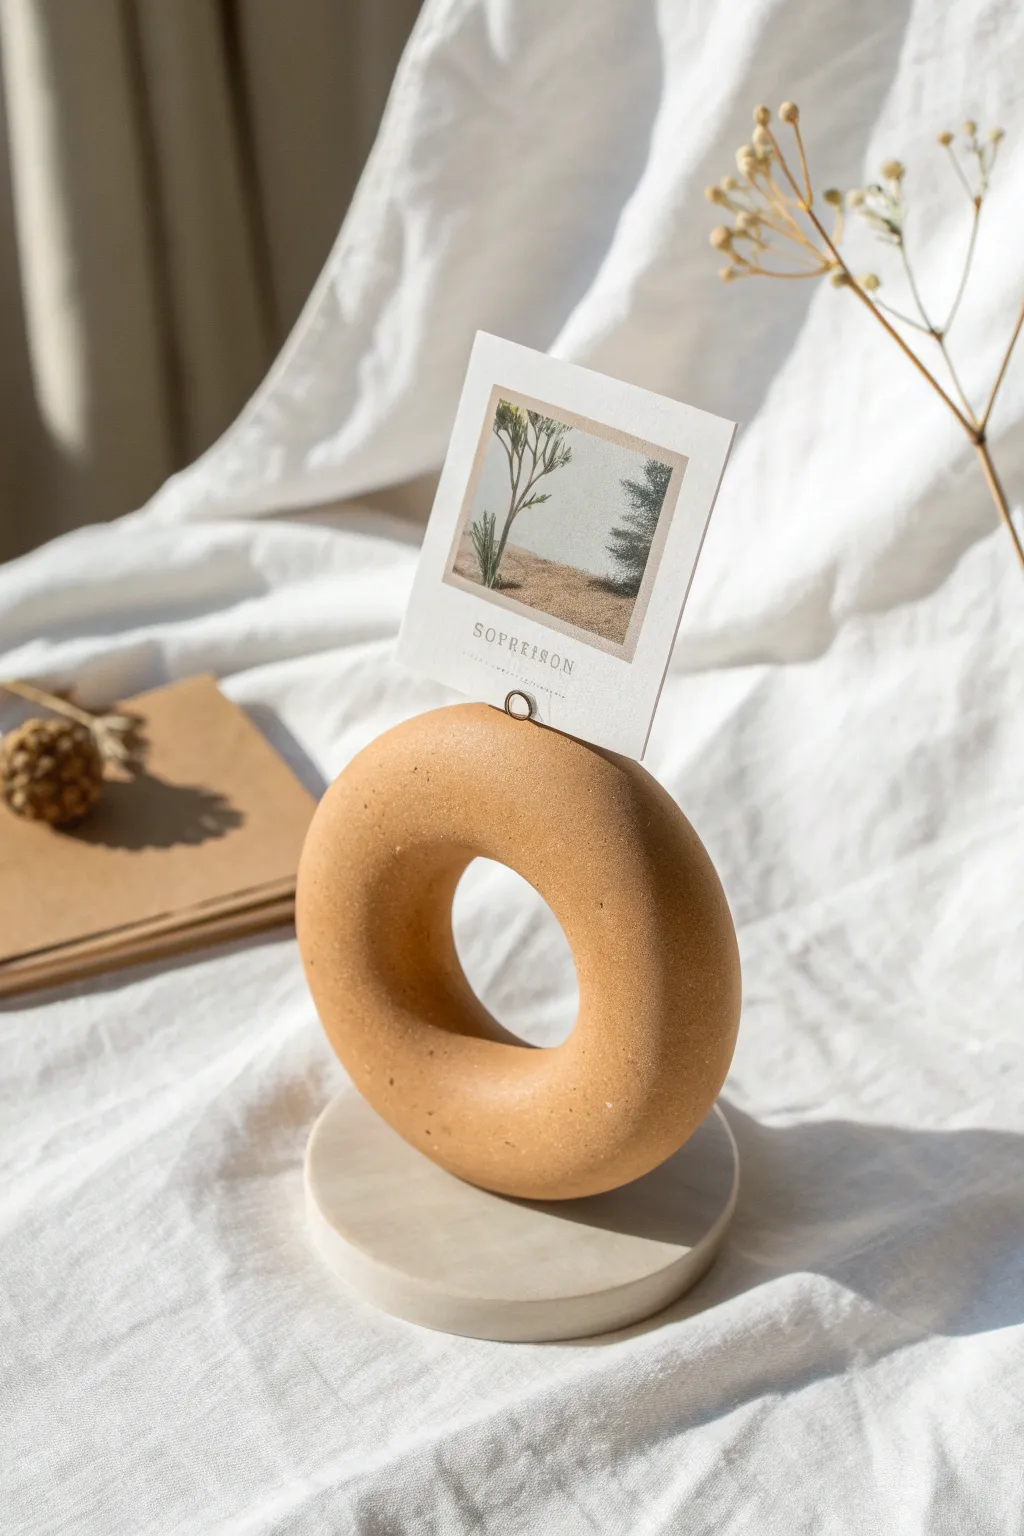
Bring a touch of modern sculpture to your desk with this elegant, two-toned photo display. By combining warm, textured clay with a sleek base, you create a perfect balance of organic and refined styles to showcase your favorite memories.
Detailed Instructions
Materials
- Polymer clay (terracotta or tan color)
- White or marble-effect polymer clay
- Circle cutters (one large approx. 3-4 inches, one small approx. 1 inch)
- Small metal wire loop or photo clip wire
- Rolling pin or pasta machine
- Strong craft glue (E6000 or similar)
- Sandpaper (fine grit)
- Baking sheet and parchment paper
- Texture sponge (optional)
- Clay knife or blade
- Oven
Step 1: Shaping the Donut Ring
-
Condition the terra cotta clay:
Begin by kneading your tan or terra cotta colored polymer clay until it is soft, pliable, and easy to work with. Warm hands make this process much faster. -
Form a thick log:
Roll the conditioned clay into a thick, uniform cylinder. Aim for a thickness of about 1 inch to give the holder substantial weight. -
Create the circle:
Curve the cylinder into a circle, joining the two ends together. Focus on making the seam invisible by smoothing the clay with your thumb until it looks like a continuous ring. -
Smooth and refine:
Roll the ring gently on your work surface to ensure it is perfectly round. Check that the thickness is consistent all the way around the loop. -
Add texture (optional):
For that earthy, stone-like finish seen in the photo, gently dab a coarse sponge over the surface of the clay ring. This removes fingerprints and adds a natural grit. -
Insert the wire holder:
Take your metal photo clip or a small loop of wire. Carefully push the stem into the top center of the clay ring. Ensure it goes deep enough to be secure. -
Flatten the contact point:
Gently press the bottom of the ring against your table to create a very slight flat spot. This increases the surface area for gluing later.
Wobbly Ring?
If your ring won’t stand straight while gluing, create a temporary jig using two heavy books or blocks to sandwich the ring upright until the glue fully hardens.
Step 2: Creating the Marble Base
-
Prepare the white clay:
Condition your white clay thoroughly. If you want a marble effect, mix in tiny slivers of grey or translucent clay, twisting them together slightly without over-blending. -
Roll out the slab:
Roll the white clay out into a flat sheet, approximately 1/4 inch thick. A pasta machine is great here for getting an even thickness, but a rolling pin with guide rings works too. -
Cut the base:
Use your large circle cutter to punch out a perfect disc. This will serve as the heavy base to keep the sculpture stable. -
Smooth the edges:
Run your finger lightly around the cut edge of the white disc to soften any sharp corners left by the cutter.
Level Up: Paint Speckles
For a terrazzo look, flick a toothbrush loaded with thinned brown or black acrylic paint onto the baked ring before assembly to create tiny, organic speckles.
Step 3: Baking and Assembly
-
Bake the pieces:
Place both the ring (with the wire inserted) and the flat base on a parchment-lined baking sheet. Bake according to your specific clay brand’s instructions (usually 275°F for 15-30 minutes). -
Cool completely:
Let the pieces cool down inside the oven with the door cracked open. This gradual cooling prevents cracking. -
Sand for perfection:
Once cool, inspect your pieces. Use fine-grit sandpaper to buff away any uneven spots on the bottom of the ring or the edges of the base. -
Test the fit:
Place the ring on top of the base to find the perfect center point. You can mark this lightly with a pencil if needed. -
Glue the components:
Apply a dab of strong adhesive (like E6000) to the flat spot on the bottom of the ring. Press it firmly onto the center of the white base. -
Let it cure:
Support the ring if necessary so it stays upright while the glue dries. I usually prop it up against a mug or book to ensure it doesn’t tilt while curing.
Once the glue is fully set, slide your favorite photo into the clip and admire your modern art piece

TRACK YOUR CERAMIC JOURNEY
Capture glaze tests, firing details, and creative progress—all in one simple printable. Make your projects easier to repeat and improve.
Stacked Bead Tower Clip Stand
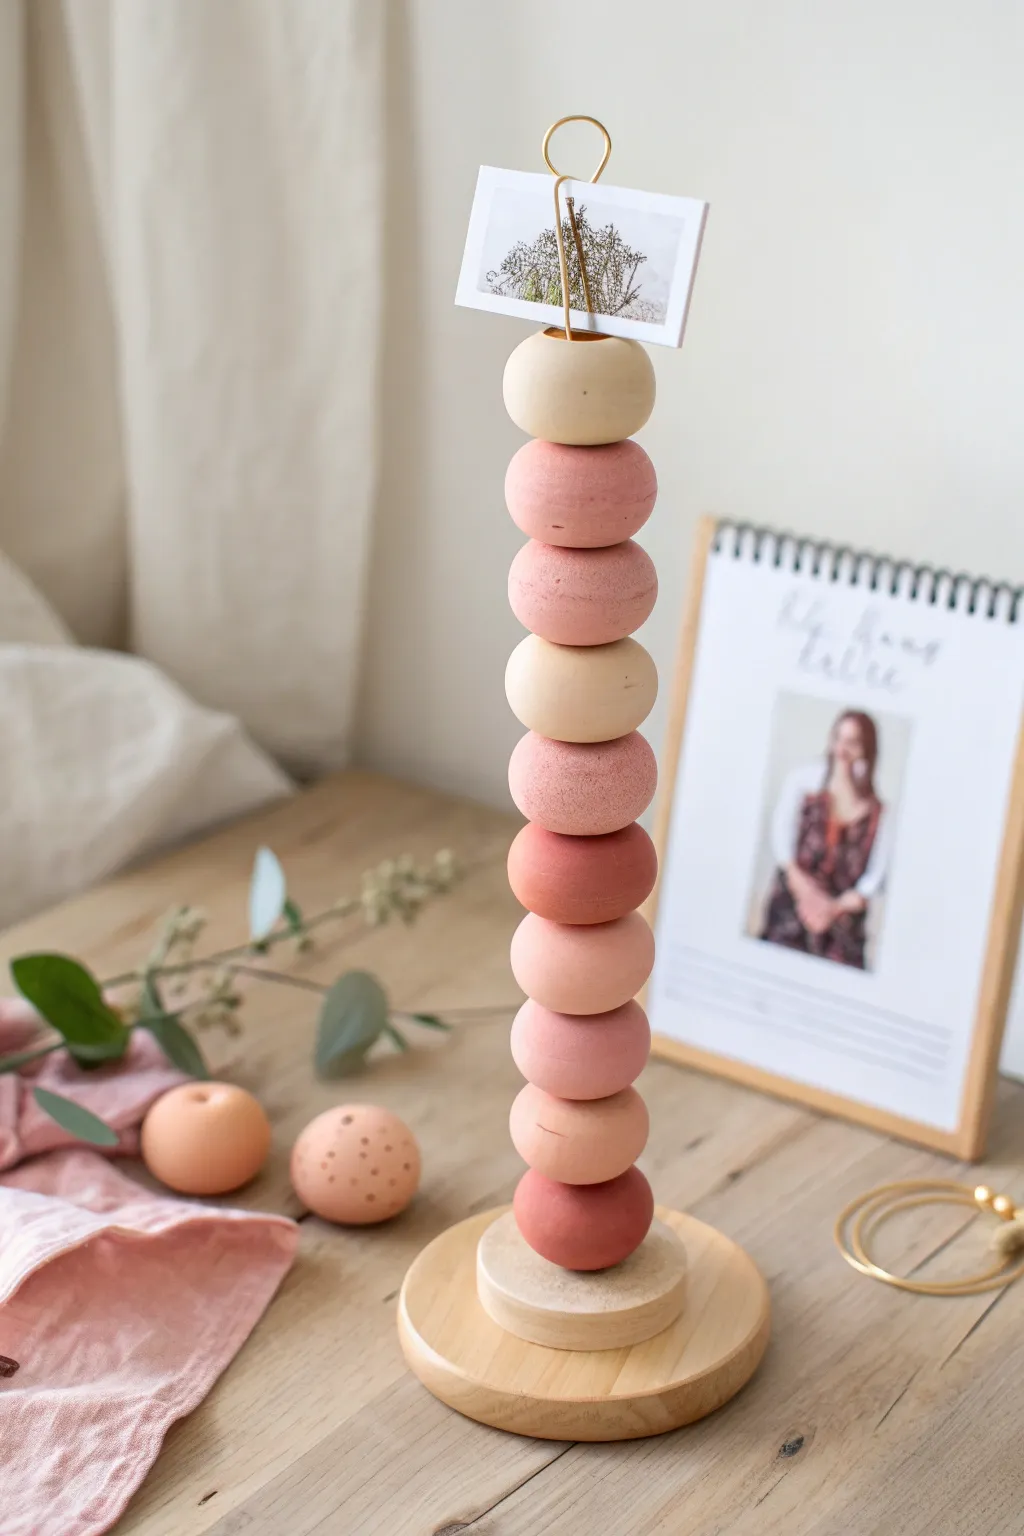
Elevate your favorite memories with this chic, vertical photo display that combines the warmth of natural wood with custom-colored clay beads. The soft gradient of pinks and creams creates a soothing, modern aesthetic perfect for desks or mantels.
Step-by-Step Guide
Materials
- Polymer clay (white, beige, terracotta, and soft pink)
- Wooden dowel rod (approx. 1/4 inch diameter)
- Round wooden base (plaque or coaster size)
- Gold crafting wire (16-18 gauge)
- Wire cutters
- Needle nose pliers
- Hand drill or pin vise
- Strong craft glue (E6000 or wood glue)
- Baking sheet and parchment paper
- Sandpaper (fine grit)
- Acrylic paint (optional, for the base)
- Matte varnish (optional)
Step 1: Creating the Clay Stone Beads
-
Mix your palette:
Begin by conditioning your polymer clay blocks. To achieve the beautiful gradient look, mix white clay with varying small amounts of terracotta and pink to create 5-6 distinct shades ranging from pale cream to deep clay red. -
Form the spheres:
Roll the mixed clay into large, smooth balls. You will need about 9-10 beads for a tower of this height. Aim for them to be roughly 1 to 1.5 inches in diameter. -
Flatten slightly:
Gently press each ball against your work surface to create a slightly flattened ‘bun’ shape rather than a perfect sphere. This helps them stack more securely. -
Create the center holes:
Using a tool slightly larger than your wooden dowel, poke a hole vertically through the center of each bead. Twist the tool gently as you push through to keep the shape intact. -
Texture the surface:
For that organic, stone-like texture visible in the photo, lightly roll the beads over a piece of sandpaper or gently dab them with a stiff toothbrush. -
Bake the beads:
Arrange your beads on a parchment-lined baking sheet. Bake according to your clay package instructions (usually 275°F for 15-30 minutes). Let them cool completely before handling.
Step 2: Preparing the Base Structure
-
Prepare the wooden base:
Take your round wooden base and sand any rough edges. If you’re using a raw wood plaque, you might want to seal it with a clear matte varnish to match the natural aesthetic. -
Drill the anchor hole:
Find the exact center of your wooden base. Drill a hole about half the depth of the wood, sized snugly for your dowel rod. -
Measure and cut the dowel:
Stack your cooled clay beads next to the dowel to determine the height. Mark the dowel just below the top of the final bead and cut it there. -
Secure the dowel:
Apply a dab of strong glue into the hole in the wooden base. Insert the dowel firmly and ensure it stands perfectly straight while the glue sets.
Wobbly Tower?
If the beads spin or wobble too much on the dowel, wrap a small piece of masking tape around the dowel at the level of each bead to create a snug friction fit.
Step 3: Assembly and finishing
-
Form the wire clip:
Cut a 6-inch distinct piece of gold wire. Using round nose pliers, create a double loop or a spiral at one end to hold the photo. The other end needs to be straight. -
Prepare the top bead:
The top-most bead needs a way to hold the wire. If your central hole is too large for the wire, you may need to fill it with a bit of scrap clay or glue, or drill a tiny secondary hole specifically for the wire. -
Begin stacking:
Slide your beads onto the dowel one by one. I like to arrange them in a random, organic color pattern rather than a perfect ombre for a more relaxed look. -
Secure the stack:
If the beads fit loosely, you can add a small dot of glue between each one for stability, though leaving them loose allows you to re-arrange later. -
Install the photo clip:
Insert the straight end of your gold wire clip into the top bead. Secure it with a strong adhesive like E6000 to ensure it doesn’t wobble when holding a picture. -
Final touches:
Once all glue is dry, slide your favorite photo between the gold wire loops.
Texture Pro Tip
Mix black pepper or dried used coffee grounds into your clay before baking. This mimics the speckled look of real ceramic or stone incredibly well.
Now you have a stunning, sculptural piece ready to showcase your fondest moments on any surface
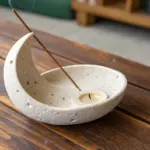
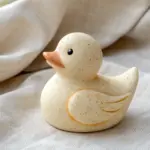
Pinch Bowl Photo Holder
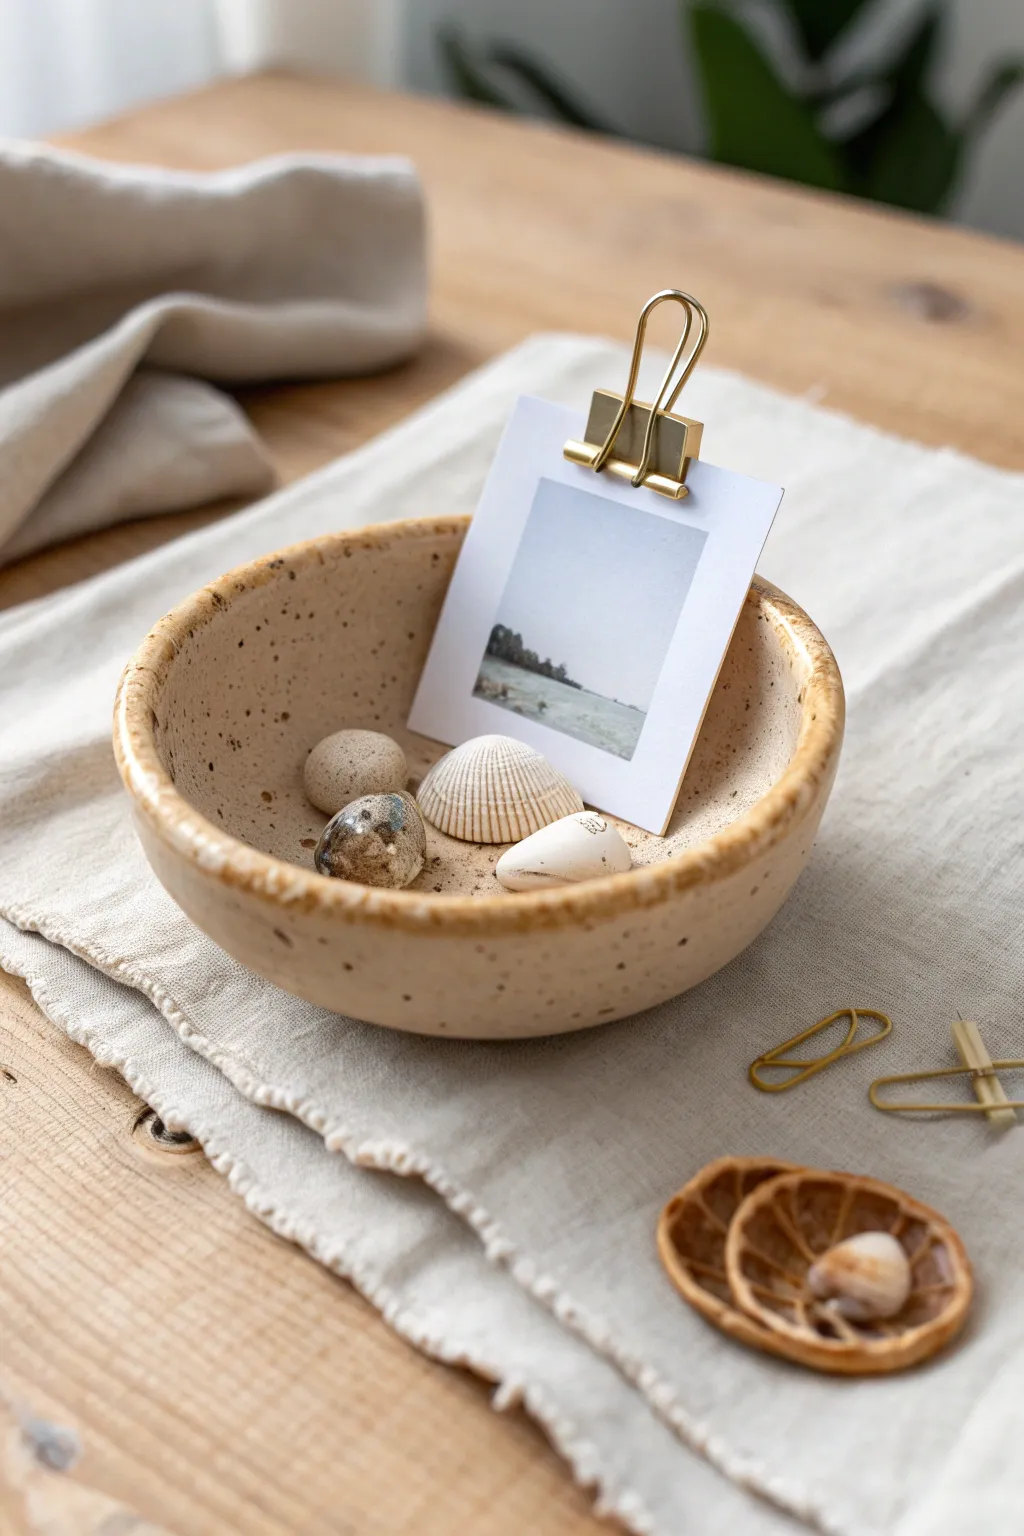
This charming project combines the rustic simplicity of a hand-formed clay bowl with the sleek functionality of a gold binder clip to display your favorite memories. The finished piece features a lovely speckled cream glaze and serves as both a catch-all dish for tiny treasures and a sturdy stand for Polaroid-style prints.
How-To Guide
Materials
- Air-dry clay or polymer clay (white or light beige)
- Speckled cream or beige acrylic paint (or glaze if using kiln clay)
- Clear gloss varnish or sealant
- Gold wire binder clip (skeleton style)
- Sandpaper (fine grit)
- Small bowl of water
- Sponge or soft brush
- Paintbrush
- Decorative filler (small sea shells, pebbles)
Step 1: Forming the Bowl
-
Prepare the clay:
Start with a ball of clay roughly the size of a large orange. Knead it in your hands for a minute to warm it up and ensure it is pliable and free of air bubbles. -
Begin the pinch base:
Hold the clay ball in your non-dominant hand. Press your thumb into the center of the ball, stopping about a half-inch from the bottom to create the base thickness. -
Pinch the walls:
Gently pinch the clay between your thumb (on the inside) and fingers (on the outside). Rotate the ball as you pinch, working your way from the bottom up to the rim. -
Shape the vessel:
Continue pinching and turning until you have an even wall thickness of about 1/4 inch. Aim for a wide, shallow bowl shape rather than a tall cup. -
Smooth the surfaces:
Dip your finger in a little water and run it over any cracks or uneven spots. I like to spend extra time here to ensure the rim is rounded and organic looking. -
Flatten the bottom:
Gently tap the bowl on your work surface to create a flat, stable base so it won’t wobble when holding a photo. -
Dry the clay:
Allow the clay to dry completely according to the package instructions. This usually takes 24-48 hours for air-dry clay. Turn it over halfway through to help the bottom dry.
Glaze Hack
Mix a tiny amount of baking soda into your acrylic paint. This gives it a textured, matte finish that looks remarkably like real ceramic instead of plastic-looking paint.
Step 2: Finishing and Assembly
-
Sand for imperfections:
Once bone dry, use fine-grit sandpaper to gently smooth out any sharp ridges on the rim or rough patches on the exterior. -
Apply the base color:
Paint the entire bowl, inside and out, with a cream or light beige acrylic paint. You may need two coats for full opacity. -
Create the speckled effect:
Dilute a small amount of dark brown paint with water. Dip a stiff brush (or toothbrush) into the mixture and run your thumb across the bristles to flick tiny specks onto the bowl. -
Seal the piece:
After the paint is fully dry, apply a coat of clear gloss varnish. This mimics the look of fired ceramic glaze and protects the surface. -
Prepare the clip:
Take your gold binder clip and ensure the wire arms are flipped up in the clamping position. -
Anchor the photo holder:
You can adhere the clip to the bottom of the bowl with strong glue, or simply nestle it into the filler material if you want it removable. -
Add filler material:
Fill the bottom of the bowl with small pebbles, sea shells, or sand. This adds weight for stability and helps prop up the clip if you chose not to glue it. -
Display your memory:
Clamp your favorite photo into the gold clip and arrange the shells around the base to complete the beachy aesthetic.
Seasonal Switch
Keep the filler loose! Swap shells for dried moss in autumn or glass beads in winter to change the vibe without making a new bowl.
Now you have a serene little display piece ready to showcase your favorite moments
Mini “Book” Folded Base Stand
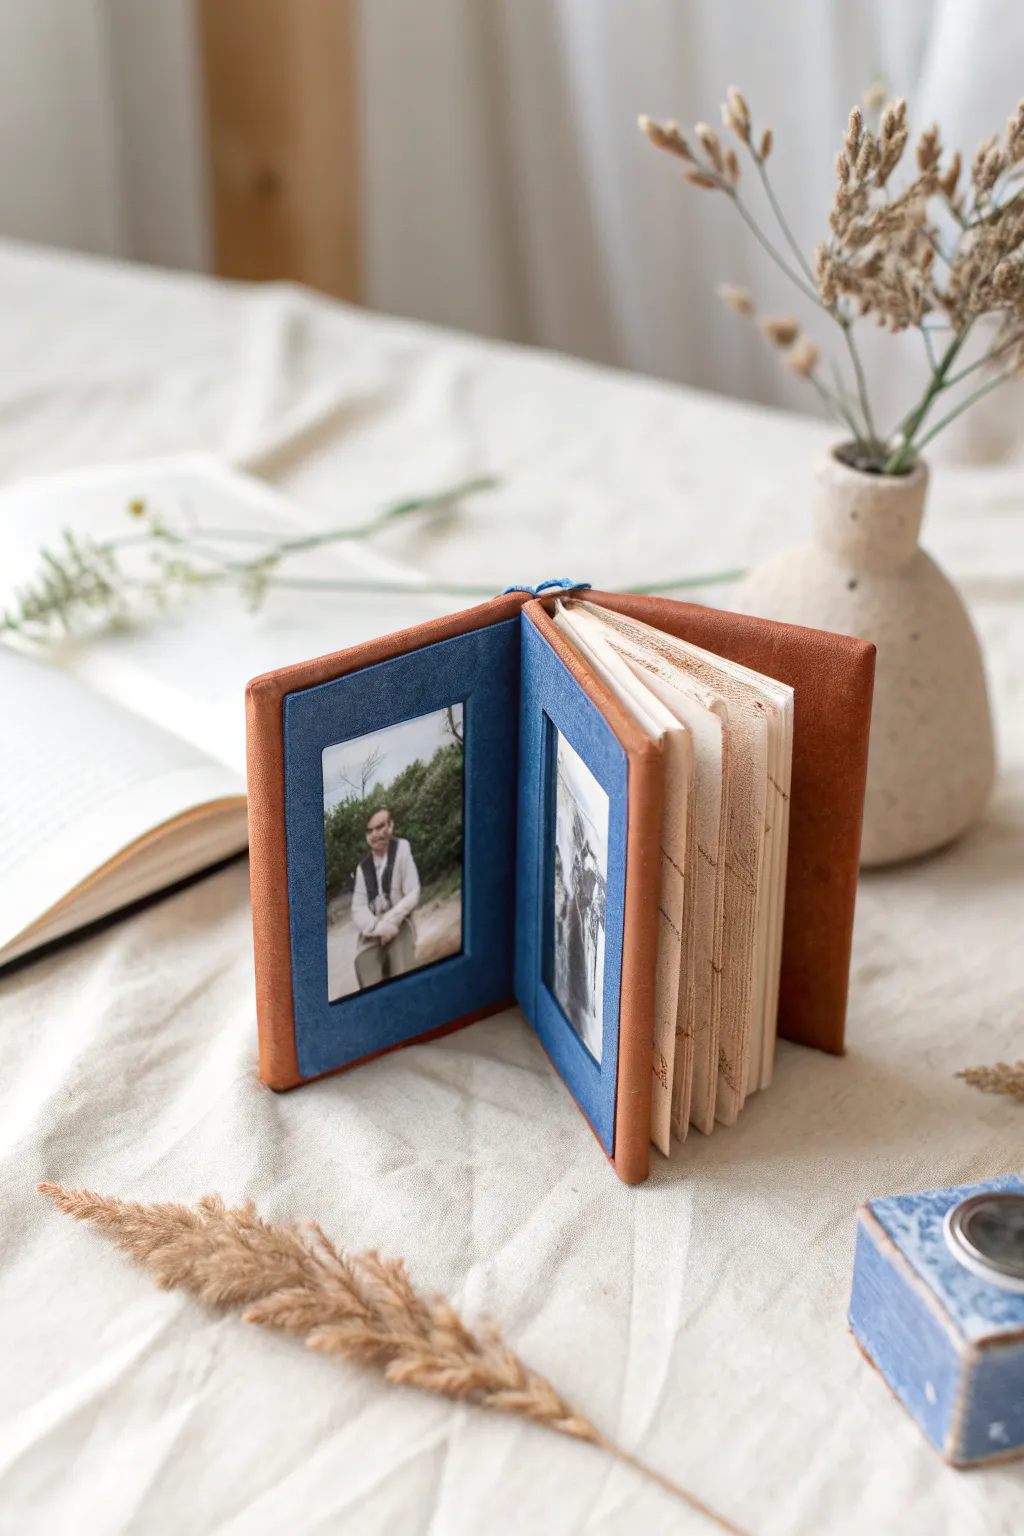
This charming project combines the sturdy weight of polymer clay with the classic elegance of leather binding to create a free-standing mini photo book. It features a clever folded structure that allows it to display two favorite memories while holding extra pages for notes inside.
Step-by-Step
Materials
- Polymer clay (terracotta or brown color)
- Faux leather or thin genuine leather sheet
- Cardstock (blue for mats, cream/white for pages)
- Craft knife and ruler
- Rolling pin or clay machine
- Heavy-duty craft glue or epoxy
- Bone folder
- Parchment paper
- Oven (for baking clay)
- Needle and embroidery floss (blue)
- Awl or pushpin
- Small printed photos (approx. 2×3 inches)
Step 1: Creating the Clay Core
-
Condition the clay:
Start by kneading your polymer clay until it is soft and pliable. I find that warming it in my hands for a few minutes makes rolling it out much smoother. -
Roll the slabs:
Roll the clay into two flat, even rectangular slabs, approximately 3 inches wide by 4 inches tall and 1/4 inch thick. These will form the rigid covers. -
Cut to size:
Using your craft knife and ruler, trim the edges to ensure perfect rectangles. Smooth any rough edges with your finger. -
Bake the clay:
Place the clay slabs on parchment paper and bake according to the manufacturer’s instructions. Let them cool completely on a flat surface to prevent warping.
Clean Edges
When cutting the leather flush to the clay, use a brand-new blade. A dull blade will drag and pucker the leather instead of slicing cleanly.
Step 2: Leather Binding & Frame
-
Cut the outer leather:
Measure a strip of leather that is slightly taller than your clay slabs (about 4.25 inches) and long enough to wrap around both slabs plus a spin width (approx. 7-8 inches total). -
Glue the covers:
Apply strong craft glue to one side of each baked clay slab. Adhere them to the leather strip, leaving about a 3/4-inch gap between them for the spine. -
Trim the leather:
Once dry, trim the leather flush with the clay edges using your craft knife for a clean, modern look. -
Create the photo mats:
Cut two rectangles from blue cardstock slightly smaller than your cover size. Cut a rectangular window in the center of each that fits your photos. -
Attach the mats:
Glue these blue frames onto the *inside* faces of your clay covers. Leave the top edge unglued if you want to be able to swap photos later, or glue the photo in place first for permanence.
Clay Warping?
If your clay slabs come out of the oven slightly curved, place a heavy book on top of them while they are still warm (but not hot) to flatten them as they cool.
Step 3: The Inner Paper Book
-
Prepare the pages:
Cut 4-6 sheets of cream paper to double the width of a single cover. Fold them in half to create a signature (a booklet). -
Punch binding holes:
Open the paper booklet and the leather cover. Use an awl to poke three distinct holes through the spine crease of the paper and the leather spine gap. -
Stitch the binding:
Thread a needle with blue embroidery floss. Sew through the center hole from the inside out, back in through the top hole, out through the bottom, and back in through the center. -
Secure the knot:
Tie the two thread ends securely on the inside of the booklet and trim any excess. I like to dab a tiny drop of glue on the knot to ensure it never slips. -
Weather the pages:
For that vintage look seen in the photo, gently run scissors along the paper edges to roughen them up.
Step 4: Assembly
-
Insert photos:
Slide your photos behind the blue cardstock frames on the inside covers. -
Stand and display:
Open the book to a 90-degree angle. The weight of the clay covers allows the album to stand upright securely on its own.
Now you have a sturdy, personalized keepsake that displays your memories beautifully on any shelf or desk
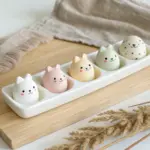
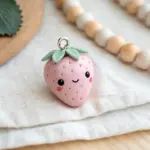
Cute Blob Character Photo Holder
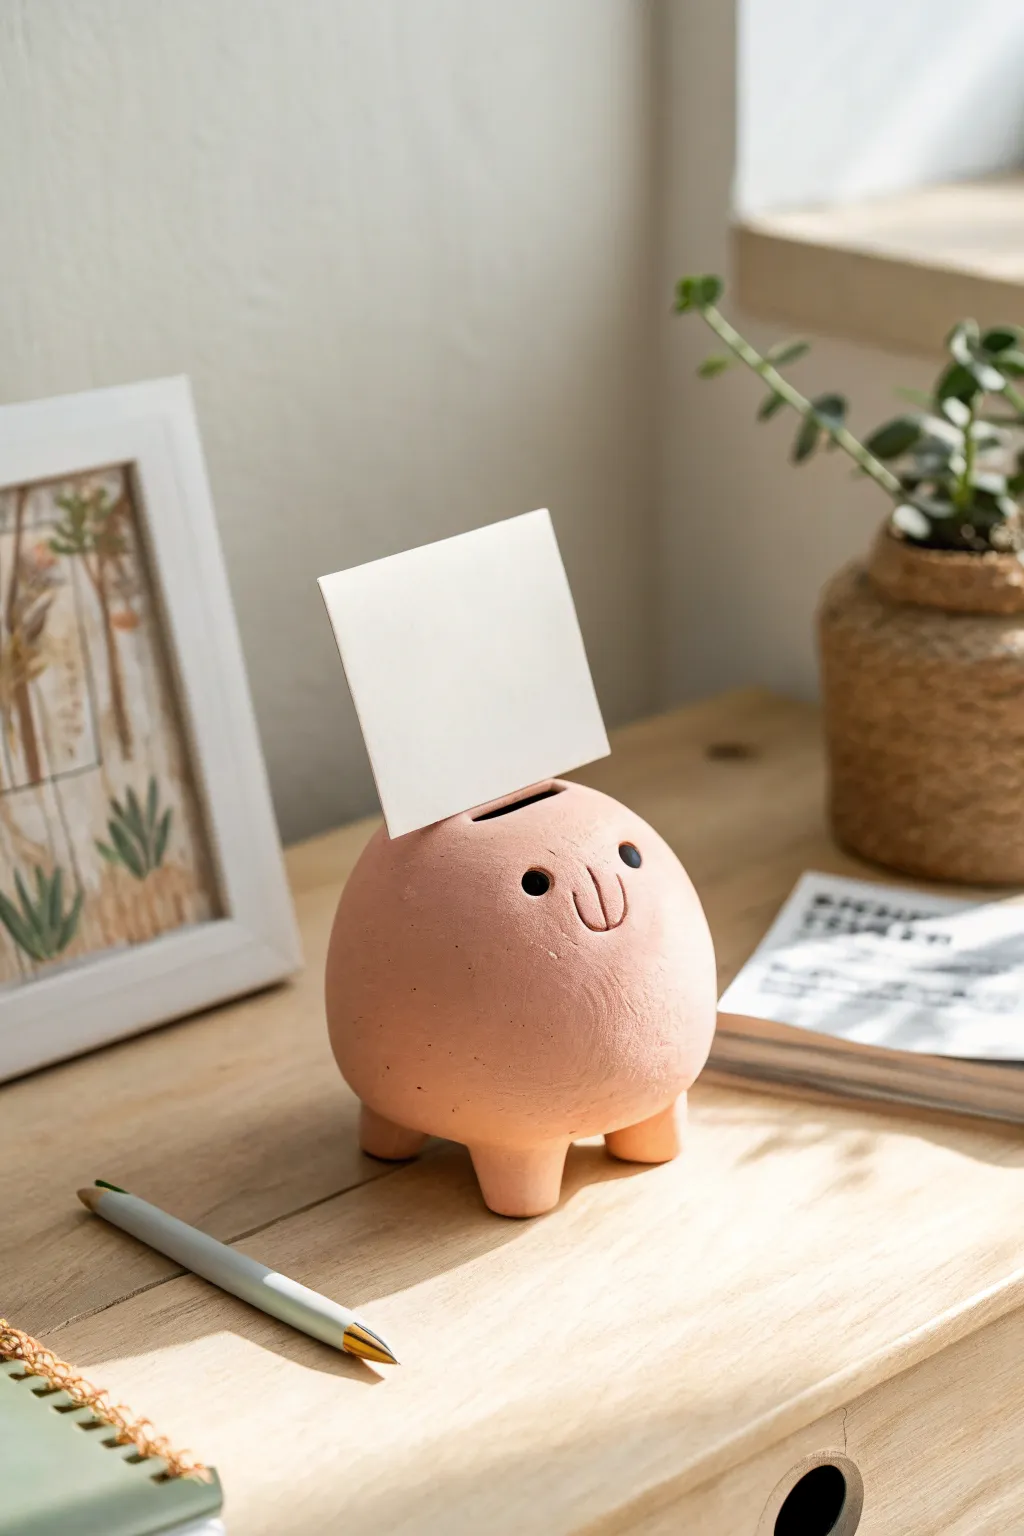
Add a touch of whimsy to your desk with this adorable blob-shaped photo holder, crafted from air-dry or polymer clay. Its simple, round form and cheerful, minimalist face make it the perfect little companion to display your favorite memories or important reminders.
How-To Guide
Materials
- Pink or terracotta air-dry clay (or polymer clay)
- Clay modeling tools (or a butter knife)
- Small round tool (like the end of a paintbrush)
- Cup of water (for smoothing)
- Sandpaper (fine grit)
- Matte sealant or varnish
- Cardstock or photo to display
Step 1: Shaping the Body
-
Prepare the Clay:
Start by taking a generous handful of your clay. Knead it thoroughly in your hands until it becomes warm, pliable, and free of any air bubbles. This conditioning step is crucial to prevent cracks later on. -
Form the Sphere:
Roll the clay between your palms to create a smooth, solid ball. Aim for a size slightly larger than a tennis ball, or adjust based on how much desk space you want it to occupy. -
Pinch the Legs:
Turn the ball upside down. Gently pinch three equal sections of clay from the bottom to form short, stubby legs. You want a tripod arrangement so the character sits consistently stable. -
Refine the Stance:
Flip the character right-side up and press it gently onto your work surface. Give it a tiny wiggle to flatten the bottoms of the feet and ensure it doesn’t wobble. -
Smooth the Surface:
Dip your finger in a little bit of water and rub it over the entire surface of the clay. This will erase your fingerprints and smooth out the transition between the body and the legs.
Cracks Appearing?
If you see hairline cracks while air-drying, mix a tiny bit of fresh clay with water to make a paste (slip). Fill the cracks, smooth it out, and let it dry again.
Step 2: Adding Details
-
Create the Card Slot:
Use a flat modeling tool or a fettling knife to cut a straight slot across the very top of the head. Cut deep enough to hold a card securely—about half an inch—but be careful not to distort the round shape. -
Widen the Slot:
Gently wiggle your tool back and forth inside the cut to widen it just slightly. Test with a piece of scrap cardstock to ensure it fits easily without bending. -
Mark Eye Position:
Identify where you want the face to be. Use a needle tool to make two tiny guide dots for the eyes, keeping them relatively wide apart for extra cuteness. -
Punch the Eyes:
Use the back end of a paintbrush or a small ball stylus to press into your guide marks, creating two clean, circular indentations for the eyes. Go gently to avoid flattening the face. -
Carve the Mouth:
With a needle tool or a small sculpting blade, carve a simple ‘W’ or ‘U’ shape between and slightly below the eyes. I find a shallow, soft line looks friendlier than a deep gouge. -
Final Smoothing:
Do one last inspection. Use a damp finger or a soft, damp sponge to smooth away any tiny burrs of clay around the eyes, mouth, and top slot.
Step 3: Finishing Touches
-
Drying Time:
Place your blob in a cool, dry place away from direct sunlight. Let it dry completely for 24-48 hours. If using polymer clay, bake according to the package instructions instead. -
Sand for Texture:
Once fully dry (and cool, if baked), use fine-grit sandpaper to gently buff the surface. This removes minor imperfections and gives it a nice, stone-like texture. -
Dust Clean:
Wipe the sculpture down with a slightly damp cloth or a dry paintbrush to remove all the sanding dust. -
Seal the piece:
Apply a coat of matte varnish or sealant to protect the clay from moisture and dirt. A matte finish preserves that natural, earthy look seen in the photo.
Make It Blush
Before sealing, use a soft makeup brush to dust a tiny amount of pink chalk pastel or real blush onto the cheeks for a rosy, kawaii effect.
Pop your favorite snapshot or postcard into the slot and enjoy your new desk buddy
Ghost Figure Slot Photo Stand
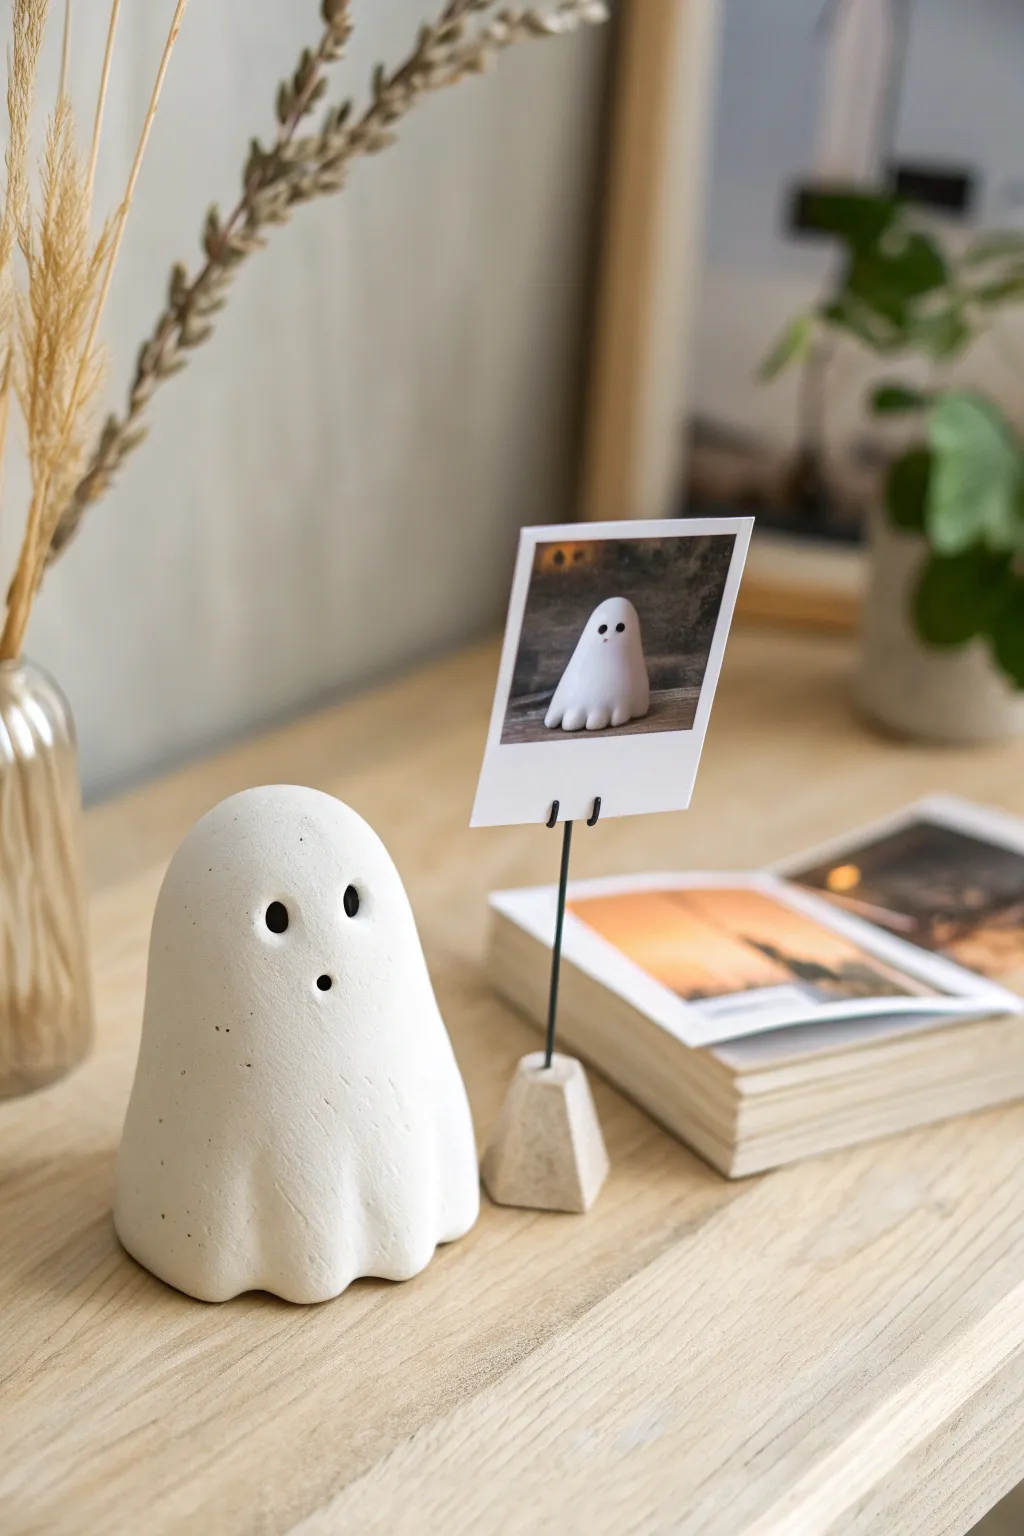
Add a touch of playful haunting to your desk with this adorable ghost photo stand, perfect for displaying favorite polaroids or notes. The matte white finish and simple, rounded shape give it a modern, minimalist charm that works well beyond Halloween.
Step-by-Step Tutorial
Materials
- White air-dry clay (or polymer clay)
- Black wire (18 or 20 gauge)
- Wire cutters
- Needle nose pliers
- Small rolling pin
- Modeling tools or a toothpick
- Black acrylic paint
- Fine detail paintbrush
- Fine-grit sandpaper
- Small geometric clay mold (optional, for the base)
Step 1: Sculpting the Ghost
-
Condition the clay:
Start by taking a handful of white clay and kneading it thoroughly in your hands until it’s warm, soft, and pliable, which helps prevent cracks later on. -
Form the main shape:
Roll the clay into a smooth ball about the size of a tangerine, then gently elongate it into a thick, rounded cylinder with a domed top. -
Create the base:
Tap the bottom of your cylinder firmly against your work surface to flatten it, ensuring the ghost will stand up straight and stable. -
Shape the folds:
Using your fingers, gently pull and curve the bottom edges of the clay outward to mimic the draping fabric of a sheet. -
Define the hem:
Press a modeling tool or the handle of a paintbrush vertically into the bottom edge to create indents, enhancing the wavy, ruffled look of the ghost’s hem. -
Insert the wire hole:
Note: The image shows a separate wire stand, but if you want the ghost itself to hold the photo, use a needle tool to poke a small hole in the very top of the head. -
Revisiting the image structure:
Looking closely at the photo, this set actually features two pieces: a standing ghost figurine and a separate geometric base holding the wire clip. Let’s make both. -
Sculpting the wire base:
Take a smaller piece of clay and press it into a small geometric mold or shape it by hand into a faceted rock shape, about 1 inch wide.
Cracked Clay?
If small cracks appear while drying, don’t restart. Mix a tiny bit of fresh clay with water to make a paste and fill the cracks, then sand smooth once dry.
Step 2: Creating the Photo Clip
-
Cut the wire:
Cut a length of black wire approximately 4-6 inches long using your wire cutters. -
Form the clip:
Using needle nose pliers, bend one end of the wire into a double loop or spiral shape—this is where the photo will slide in. -
Bend the photo grips:
Alternatively, bend the wire into two U-shapes standing next to each other, like a simplified pitchfork, to hold the photo as seen in the reference image. -
Insert into base:
Push the straight end of the wire into the center of your geometric clay base while the clay is still wet.
Glow Up
Mix glow-in-the-dark powder into your white paint or use glow-in-the-dark polymer clay for a ghost that actually illuminates at night.
Step 3: Finishing Touches
-
Add facial details:
Return to your ghost figure. Use the end of a paintbrush handle or a large dotting tool to press three deep indentations into the face area for the eyes and mouth. -
Refine the surface:
Dip your finger in a little water and smooth over any fingerprints or rough textures on both the ghost and the geometric base. -
Dry completely:
Let both clay pieces dry for 24-48 hours. I stick them in a cool, dry spot away from direct sunlight to prevent cracking. -
Paint the features:
Once dry, use a fine detail brush and black acrylic paint to carefully fill in the indented eyes and mouth of the ghost. -
Add texture (optional):
To mimic the speckled stone look in the photo, dilute a tiny drop of grey or black paint and flick it off an old toothbrush lightly over the white surface.
Now you have a charming little spooky companion to hold your fondest memories throughout the season
Mushroom Cap Clip Holder
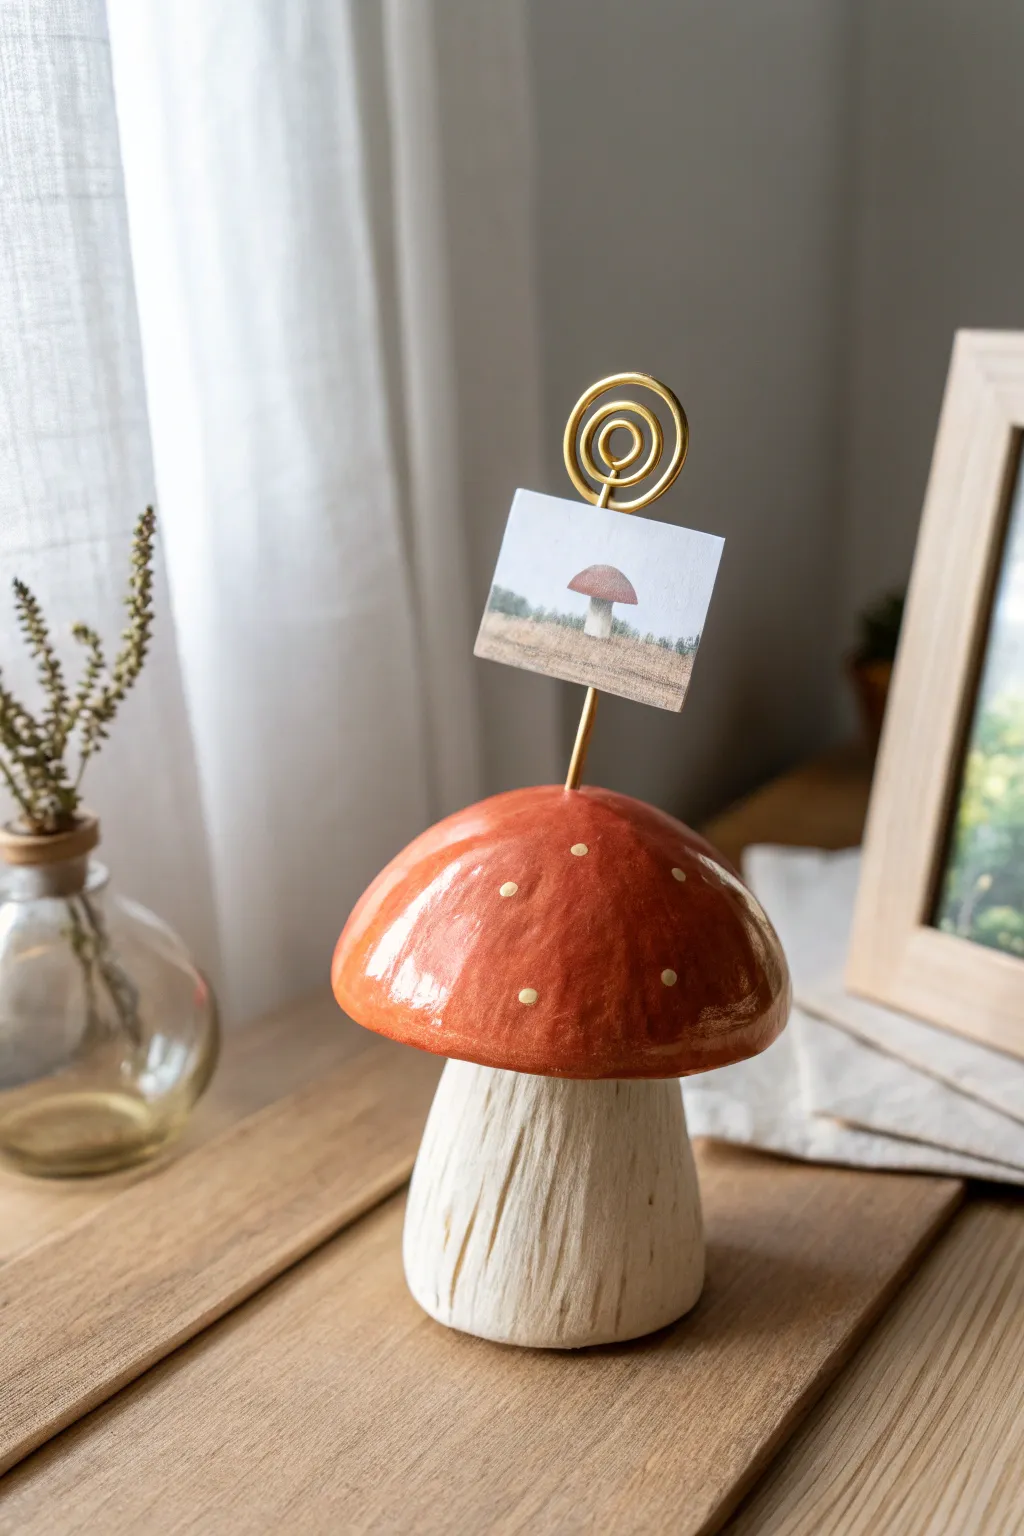
Bring a touch of the forest floor to your desk with this charming clay mushroom photo holder. Featuring a textured white stalk and a glossy, speckled red cap, it’s the perfect way to display your favorite nature snapshots or tiny notes.
Detailed Instructions
Materials
- Air-dry clay (white)
- Aluminum foil
- Gold crafting wire (16-18 gauge)
- Wire cutters
- Round nose pliers
- Sculpting tools (needle tool and serrated tool)
- Acrylic paints (bright orange-red, warm white)
- Paintbrushes (flat shader and fine detail)
- Gloss varnish or glaze
- Water cup
- Rolling pin
Step 1: Forming the Core Structure
-
Create the foil armature:
Start by scrunching a piece of aluminum foil into a thick, cylindrical shape for the stem. Create a second, flattened dome shape for the mushroom cap. This saves clay and keeps the piece lightweight. -
Prepare the wire holder:
Cut a 6-inch length of gold wire. Using round nose pliers, gently curl one end into a tight spiral, making about three concentric circles to form the clip mechanism. -
Insert the wire:
Push the straight end of the wire down through the center of your foil cap armature. If it feels loose, add a dab of glue where the wire enters the foil.
Wobbly Wire?
If the wire spins freely after the clay dries, remove it, add a drop of superglue to the hole, and reinsert it. Hold for 30 seconds to bond.
Step 2: Sculpting the Mushroom
-
Wrap the stem:
Roll out a slab of white air-dry clay to about 1/4 inch thickness. Wrap this around your cylindrical foil stem, smoothing the seam with a little water until it disappears. -
Add texture to the stem:
Using a needle tool or a serrated sculpting tool, drag vertical lines down the length of the stem. Vary the depth and spacing to mimic the fibrous texture of a real mushroom stalk. -
Cover the cap:
Roll a circular slab of clay and drape it over the foil cap armature (and around the protruding wire). Gently mold the clay to the shape, curling the edges under slightly. -
Connect the parts:
Score the top of the stem and the underside of the cap with a needle tool. Apply a little water or slip (clay mixed with water) and press the cap firmly onto the stem. -
Smooth the transition:
Use a modeling tool or your finger to blend the clay where the cap meets the stem on the underside, ensuring a strong bond. I find a slightly damp finger works best for smoothing out any fingerprints on the top of the cap. -
Refining the shape:
Make sure the base is flat by gently tapping the mushroom on your table. Check that the wire is standing straight up. -
Drying:
Set the mushroom aside to dry completely. This usually takes 24-48 hours depending on humidity; turn it occasionally to ensure even airflow.
Level Up: Mossy Base
Glue small bits of dried preserved moss or faux grass around the very bottom edge of the stem to make it look like it was just plucked from the ground.
Step 3: Painting and Finishing
-
Paint the cap base:
Once dry, paint the entire top of the cap with a bright orange-red acrylic paint. You may need two coats for full opacity, letting the first coat dry before adding the second. -
Add the stem detail:
For the stem, you can leave the natural white clay or give it a light wash of warm white paint to unify the color while letting the texture shadow remain visible. -
Dot the cap:
Using a fine detail brush or the back end of a paintbrush, dip into warm white or pale yellow paint. Add small, scattered dots across the red cap. -
Seal with gloss:
Apply a thick coat of high-gloss varnish or glaze over the painted red cap. This gives it that wet, fresh-from-the-forest look visible in the photo. -
Seal the stem:
Apply a matte varnish to the stem to keep it looking natural and earthy compared into the shiny cap. -
Final assembly:
Once the varnish is fully cured, slide your favorite photo or memo between the coils of the gold wire.
Enjoy displaying your forest find on a shelf or gifting it to a nature-loving friend
Citrus Slice Photo Holder
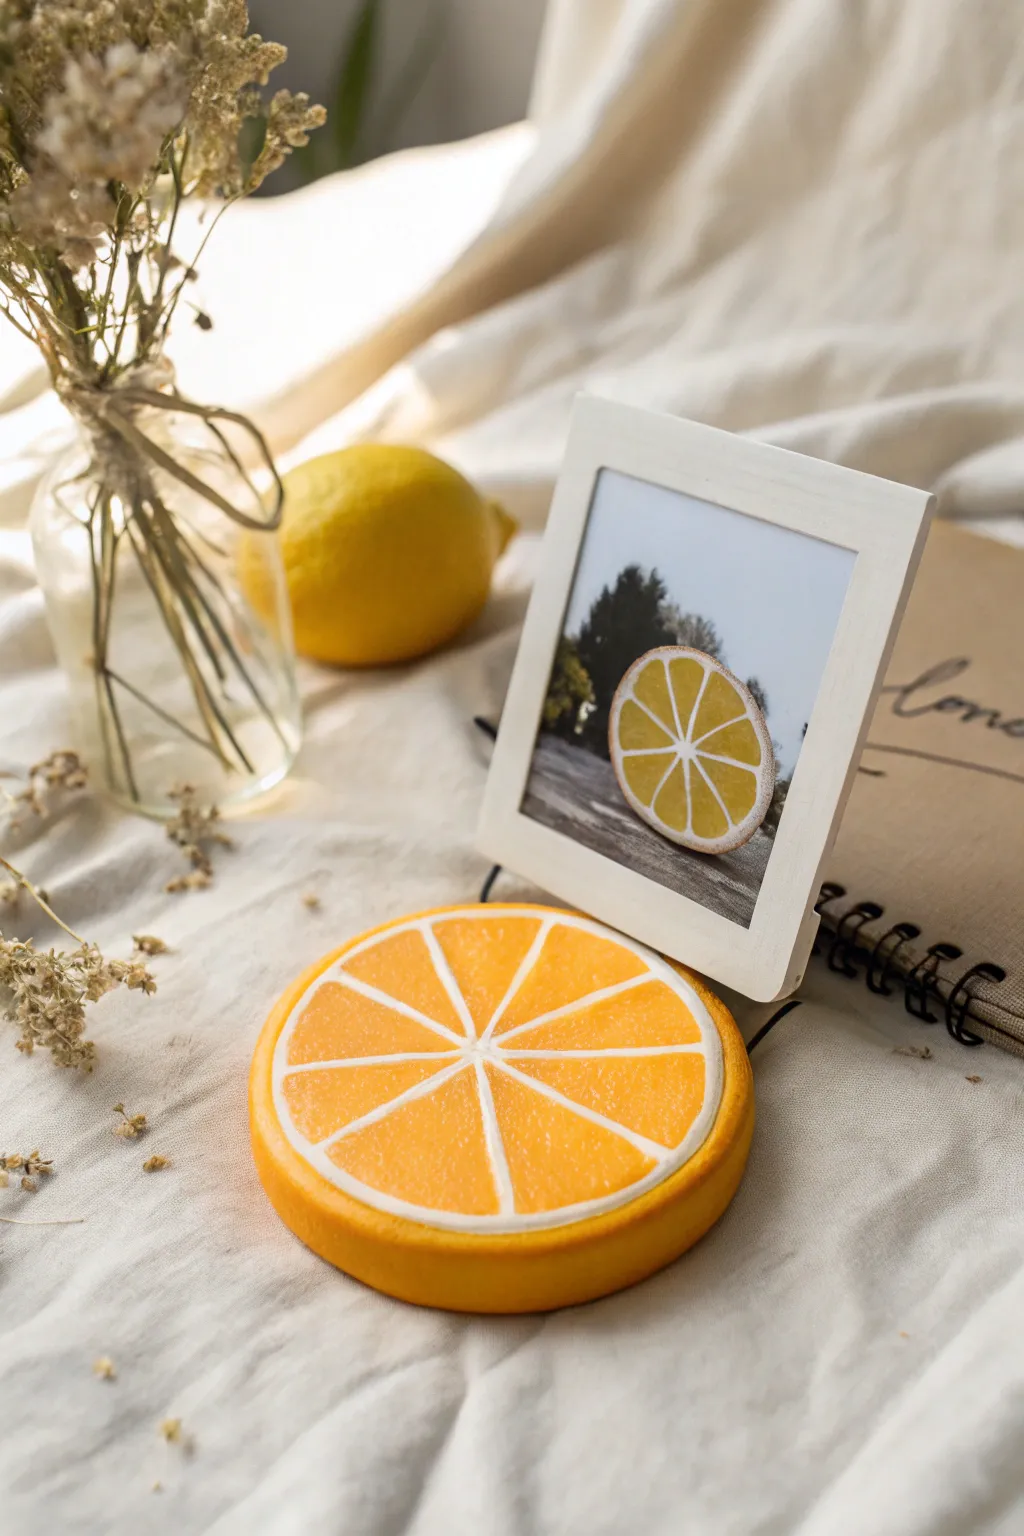
Bring a squeeze of summer into your decor with this refreshingly simple clay photo holder. Modeled to look like a thick slice of lemon or orange, its realistic texture and vibrant color make it the perfect stand for your favorite mini Polaroids or notes.
Step-by-Step
Materials
- Air-dry clay (white)
- Acrylic paints (bright yellow, orange, white)
- Round cookie cutter (approx. 3-4 inches diameter)
- Rolling pin
- Sculpting needle tool or toothpick
- Old toothbrush or stiff bristle brush
- Fine grit sandpaper
- Sharp craft knife
- Palette and water cup
- Matte varnish or sealant
Step 1: Shaping the Slice
-
Condition the clay:
Start by taking a generous handful of white air-dry clay. Knead it thoroughly in your hands until it is warm, pliable, and free of any cracks. -
Roll it out:
Roll the clay onto a smooth surface until it’s a thick slab, approximately 3/4 to 1 inch thick. You need this thickness to ensure the holder is stable enough to support a photo frame. -
Cut the circle:
Press your round cookie cutter firmly into the clay slab to create a perfect circle. If you don’t have a cutter, trace a jar lid and carefully cut around it with a craft knife. -
Smooth the edges:
Dip your finger in a little water and run it around the circumference of the clay circle to smooth out any rough edges or drag marks left by the cutter. -
Create the photo slot:
Using a ruler or a steady hand, gently press a straight line into the top center of the slice with a knife or stiff card stock. Rock it slightly to widen the gap just enough for a photo frame edge to sit securely inside. Don’t cut all the way through.
Fixing a Wobbly Slice
If the bottom isn’t flat after drying and the holder rocks, glue a circle of felt to the base. It cushions the unevenness and protects your table surface.
Step 2: Texturing the Fruit
-
Mark the segments:
Lightly sketch the internal structure of the citrus slice onto the top surface using a needle tool. Draw a small circle in the center, leave a rim around the edge for the pith, and divide the remaining space into 8 triangular segments. -
Texture the flesh:
This is the secret to realism. Take an old toothbrush or a stiff bristle brush and firmly tap it into the clay within the triangular segments. Do not texture the dividing lines or the outer rim. -
Refine the pith lines:
Go back over your dividing lines with your needle tool or a small sculpting tool. Gently press them down to make the textured segments appear raised and juicy. -
Dry completely:
Set your clay slice aside in a warm, dry place. Because the piece is thick, I recommend letting it dry for at least 48 to 72 hours, flipping it occasionally to prevent warping. -
Sand for smoothness:
Once fully cured, use fine-grit sandpaper to smooth the outer rind and the bottom surface, ensuring it sits perfectly flat.
Step 3: Painting and Finishing
-
Base coat the rind:
Mix a vibrant orange-yellow hue. Paint the outer vertical edge of the disk completely. You can bring this color slightly up onto the very edge of the top face. -
Paint the segments:
Using a slightly lighter, more yellow tone, paint the textured triangular segments. Use a dabbing motion to get paint into all the little crevices created by the toothbrush. -
Detail the pith:
With a fine detail brush and white acrylic paint, carefully fill in the dividing lines, the center circle, and the rim between the segments and the rind. -
Add highlights:
To make the fruit look juicy, dry brush a tiny bit of white or very pale yellow across the top of the textured segments. This catches the high points of the texture. -
Seal the piece:
Protect your paint job with a coat of matte varnish. This will prevent chipping and give the piece a finished, professional look without making it look plastic.
Make it a Lime!
Switch up the color palette! Use deep forest green for the rind and a vibrant lime green for the flesh segments to create a zesty lime version.
Slide your favorite memory into the slot and enjoy the fresh pop of color on your desk
Multi-Photo Bouquet Wire Stand
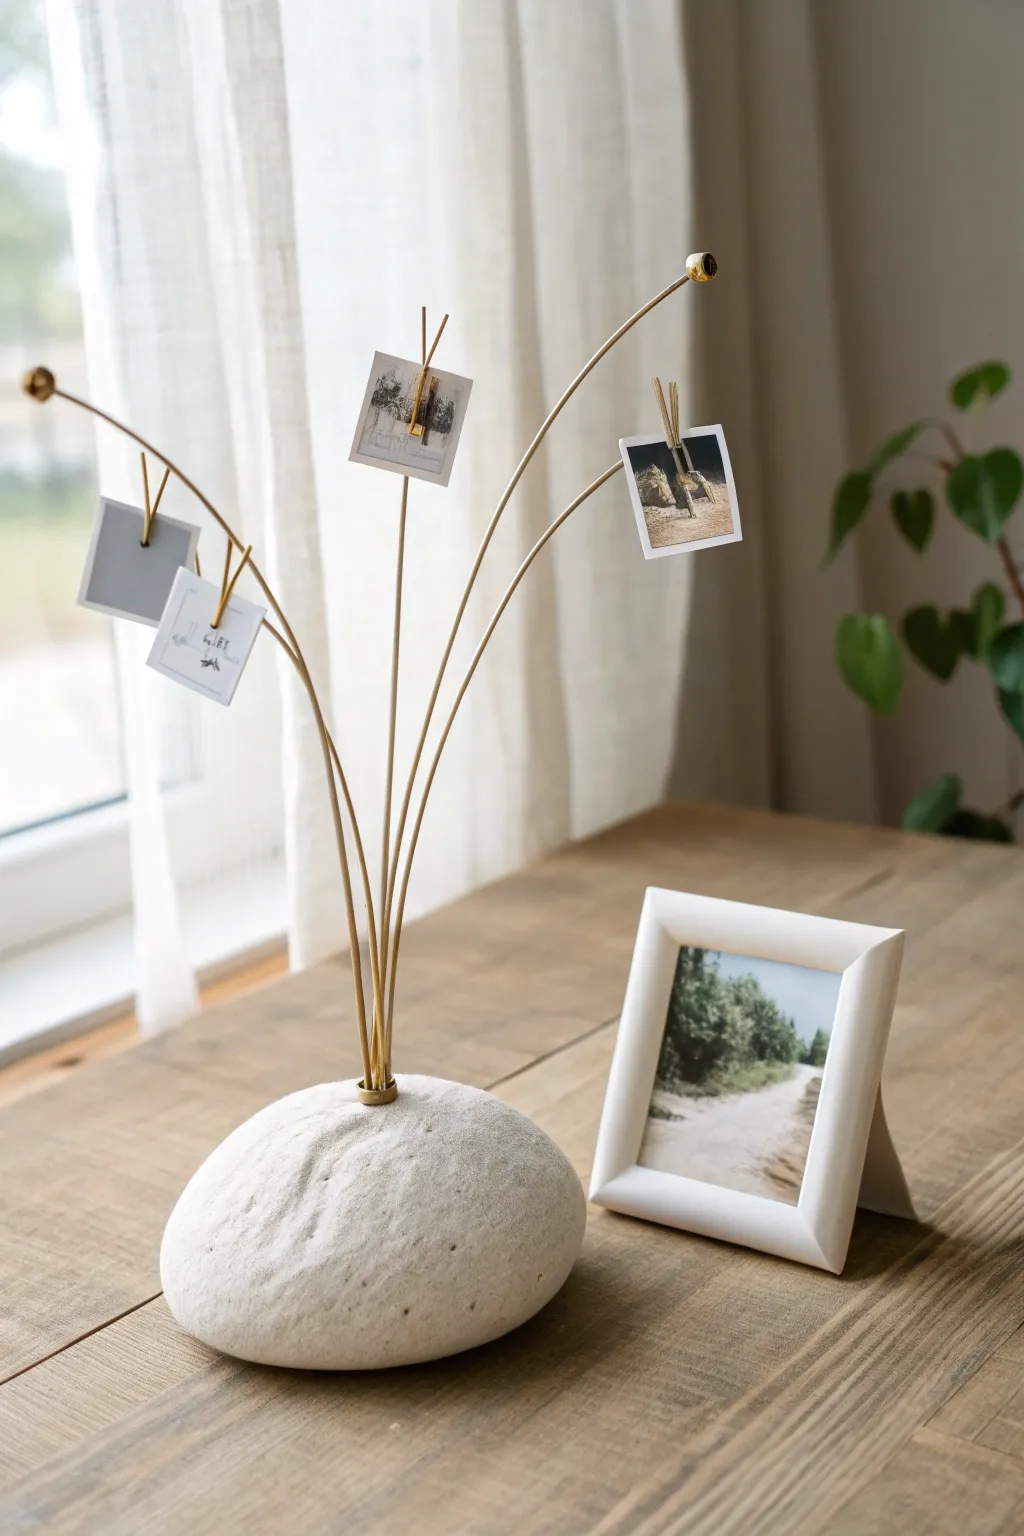
Transform a simple lump of clay into this serene, nature-inspired photo display that mimics the look of a smooth river stone sprouting delicate brass stems. This minimalist piece serves as a functional sculpture, perfect for elevating a collection of polaroids or small prints with an airy, floating effect.
Step-by-Step Guide
Materials
- White or speckled air-dry clay (approx. 1 kg)
- Brass craft wire (12 gauge or similar thickness for stability)
- Brass craft wire (20 gauge for wrapping clips)
- Wire cutters
- Pliers (needle-nose and round-nose)
- Small brass beads or end caps (optional)
- Sandpaper (fine grit)
- Matte spray varnish or sealant
- Water and sponge for smoothing
- Ruler
Step 1: Shaping the Stone Base
-
Condition the clay:
Begin by kneading your air-dry clay thoroughly to remove air bubbles and warm it up, making it more pliable and less prone to cracking. -
Form the organic shape:
Roll the clay into a large, smooth ball, then gently flatten it into an oval, stone-like mound. Aim for a shape that is slightly irregular to mimic a natural river rock, keeping the bottom flat for stability. -
Refine the surface:
Dip your fingers or a small sponge in water and run them over the surface to smooth out any fingerprints or creases. The smoother you get it now, the less sanding you’ll need later. -
Texture the surface (optional):
If you want the speckled, porous look seen in the image, lightly press a coarse sponge or a crumpled ball of foil against the wet clay to create subtle pitting.
Loose Wires?
If the wires feel wobbly after the clay dries, remove them, add a drop of superglue or strong craft adhesive into the holes, and re-insert the wires for a permanent hold.
Step 2: Creating the Wire Stems
-
Cut the main stems:
Using wire cutters, cut 3 to 5 lengths of the thicker (12 gauge) brass wire. Vary the lengths between 8 and 14 inches to create a staggered, bouquet-like arrangement. -
Bend the curves:
Gently bend each wire length into a soft, organic curve. Avoid sharp angles; you want them to look like swaying grass or flower stems. -
Create the photo clips:
For the top of each stem, cut a short piece of wire (about 2 inches) and fold it in half to create a tight ‘V’ shape. This will act as the pincer to hold the photo. -
Attach the clips:
Use the finer gauge wire to tightly wrap the base of the ‘V’ clip to the top of your main stem. Ensure the wrap is secure so the clip doesn’t slide down. -
Add decorative ends (optional):
For a polished look like the inspiration image, glue a small brass bead or cap to the tip of any wires that extend past the clip, or simply curl the wire end into a tiny loop.
Step 3: Assembly and Finishing
-
Insert the wires:
While the clay is still wet, insert the bottom ends of your wire stems into the center of the mound. Group them closely together at the base so they fan out as they rise. -
Secure the grouping:
Gently press the clay around the insertion point to close any gaps around the wires. You can add a small brass ring or washer around the bundle at the base for a decorative touch. -
Allow to dry:
Let the project dry completely in a cool, dry place. This usually takes 24-48 hours depending on the thickness of the clay. Don’t rush this, or cracks may form. -
Sand imperfections:
Once fully dry and hard, use fine-grit sandpaper to buff away any rough spots or remaining fingerprints, focusing on the edges near the bottom. -
Seal the piece:
Spray the clay base with a matte varnish or sealant. This protects the clay from moisture and gives it a finished, professional appearance without making it too shiny. -
Display your photos:
Slip your mini prints, polaroids, or notes into the wire clips. Adjust the bends of the wires slightly if needed to ensure the photos don’t touch each other.
Weighted Base Trick
To prevent tipping, embed a heavy seamless washer or a flat stone inside the bottom of your clay mound while shaping it to lower the center of gravity.
Place your finished sculpture near a window to let the light play off the brass wires and showcase your favorite memories
Stamped Message Plaque Slot Holder
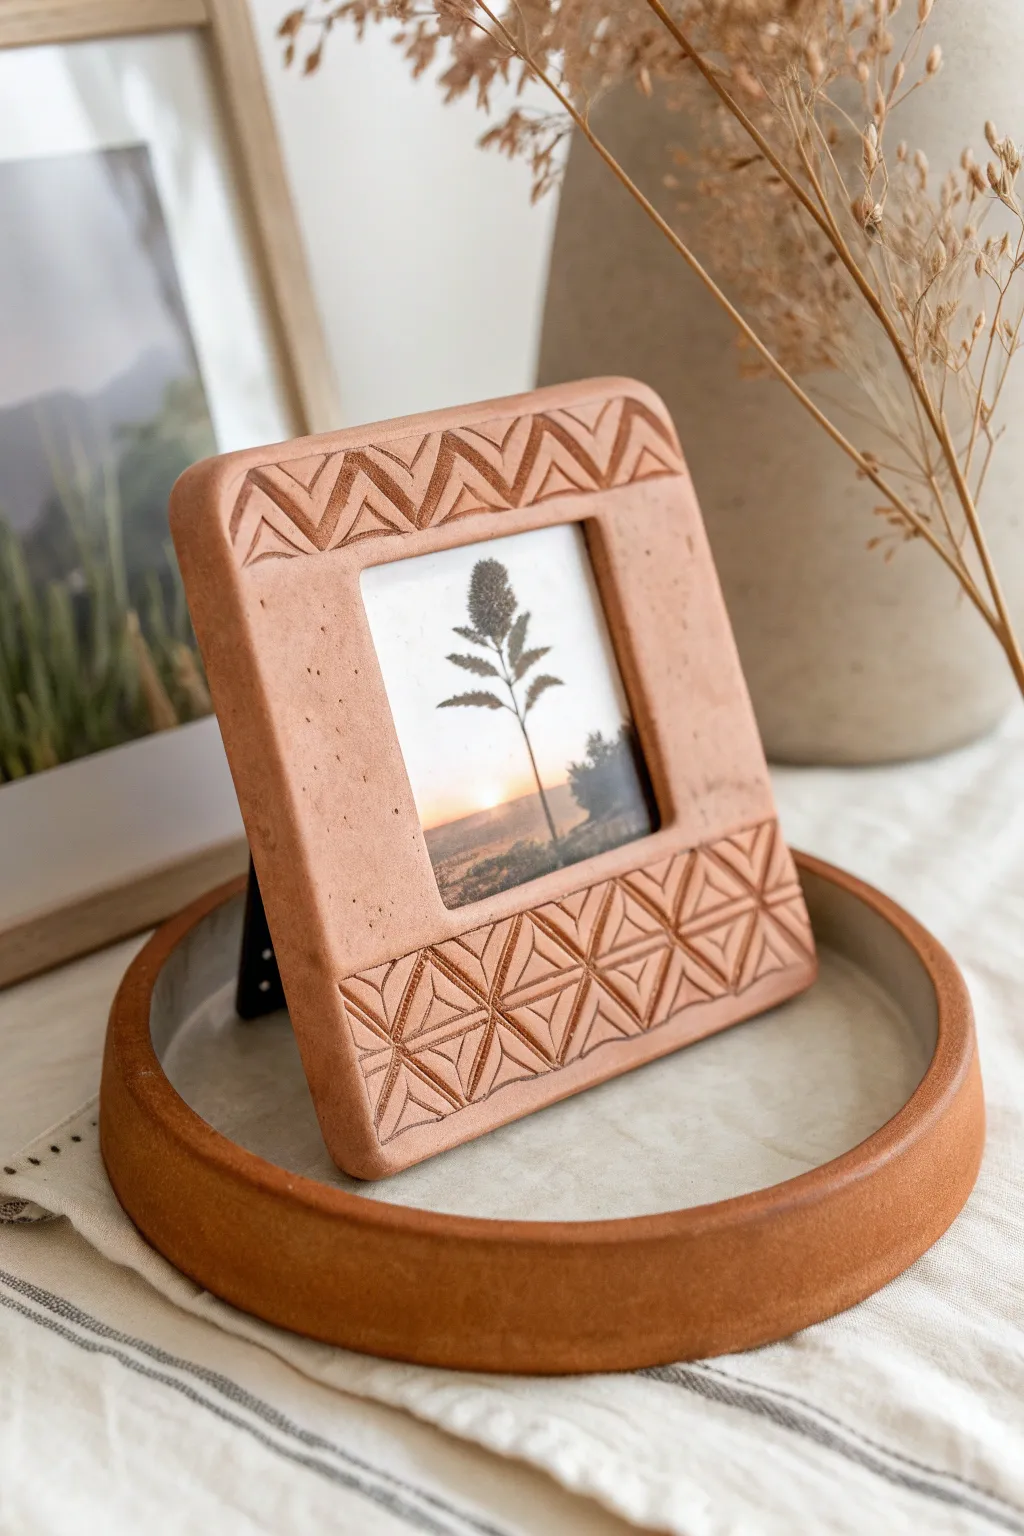
Embrace earthy warmth with this square photo frame crafted from terracotta-colored polymer clay. Featuring intricate stamped geometric patterns on the top and bottom borders, it offers a beautifully textured home for your favorite nature prints.
Detailed Instructions
Materials
- Terracotta-colored polymer clay (approx. 2-3 blocks)
- Square clay cutter (large)
- Square clay cutter (small, for the inner window)
- Acrylic rolling pin
- Depth guides (3mm and 5mm)
- Geometric texture stamps or carving tools (zig-zag and triangle motifs)
- Craft knife or scalpel
- Smoothing tools or cornstarch
- Cardboard or stiff cardstock (for backing)
- Strong craft glue (e.g., E6000)
- Small easel back stand (optional metal or cardboard)
- Baking sheet and parchment paper
- Sandpaper (fine grit)
Step 1: Preparation & Rolling
-
Condition the clay:
Begin by thoroughly kneading your terracotta polymer clay. Warmth from your hands will make it pliable and easier to work with, preventing cracks later on. -
Roll the slab:
Place your conditioned clay between two 5mm depth guides. Roll it out using the acrylic rolling pin to create a smooth, even slab that is thick enough to be sturdy. -
Smooth the surface:
Before cutting, gently wipe the surface with a tiny bit of cornstarch on your finger or a soft brush to remove any fingerprints or dust specks.
Stamp Stuck?
If your carving tool or stamp pulls up the clay, dust the clay surface lightly with cornstarch or dip the tool in water before pressing down.
Step 2: Cutting & Shaping
-
Cut the outer shape:
Press your large square cutter firmly into the clay slab. If you don’t have a cutter the right size, create a paper template and cut around it with your craft knife. -
Create the window:
Center the smaller square cutter inside the larger square. Measure the sides to ensure the borders are even, specifically leaving slightly more space at the top and bottom for the designs. -
Remove the center:
Press the cutter down to remove the central square. Lift the excess clay away carefully so you don’t distort the frame’s outer edges. -
Refine the edges:
Use your finger or a rubber shaping tool to gently smooth the sharp cut edges of both the outer perimeter and the inner window.
Step 3: Patterning & Texturing
-
Plan the top design:
For the top border, you will create a zig-zag pattern. Lightly mark where your pattern will go to ensure it stays centered. -
Carve the zig-zags:
Using a V-gouge carving tool or a dedicated stamp, carefully press a continuous zig-zag line across the top border. Add a second parallel zig-zag just below it for depth. -
Detail the triangles:
Inside the triangular spaces created by your zig-zags, add small vertical line impressions to create texture within the shapes. -
Create the bottom grid:
For the wider bottom section, lightly score a grid of squares or diamonds as a guide for your stamp placement. -
Stamp the geometric motif:
Press a triangular or diamond geometric stamp into the bottom section. I like to rotate the stamp slightly with each impression to create the complexity seen in the reference image. -
Add texture marks:
Use a needle tool to add tiny random dots or pockmarks on the side panels of the frame to give it an aged, stone-like appearance.
Faux Stone Finish
After baking, wipe a diluted wash of white acrylic paint over the texture and wipe it back immediately to highlight the carved grooves.
Step 4: Baking & Assembly
-
Bake the frame:
Transfer the clay frame to a parchment-lined baking sheet. Bake according to your brand’s specific instructions (usually 275°F/135°C for 30 minutes per 1/4 inch of thickness). -
Cool and sand:
Let the frame cool completely inside the oven to prevent thermal shock. Once cool, lightly sand the back to make it flat and ready for glue. -
Prepare the backing:
Cut a piece of stiff cardstock slightly smaller than the outer dimensions of your frame. -
Create the photo slot:
Glue the cardstock to the back of the clay frame along three sides (left, right, and bottom), leaving the top open so you can slide your photo in. -
Attach the stand:
Secure a small easel back or a folded piece of heavy cardstock to the back center of the frame to allow it to stand upright. -
Finish the look:
Once the glue is dry, slide in your favorite photo or artwork to complete your custom display.
This textured frame adds a lovely handcrafted touch to any shelf or desk setup