When you’ve got a little clay in front of you, it’s honestly the best feeling—like you can turn a blank lump into a tiny world. Here are some clay pieces ideas I teach and make all the time, starting with the classics and drifting into the extra-fun, more unexpected stuff.
Pinch Pot Trinket Dishes
Embrace the beauty of imperfection with this lovely, hand-formed trinket dish. Featuring a raw, speckled interior and a soft terracotta-hued band, this bowl offers a perfect home for your everyday jewelry or small keepsakes.
How-To Guide
Materials
- Air-dry clay (white or cream)
- Acrylic paint (terracotta or dusty pink)
- Small sponge
- Water cup
- Fine-grit sandpaper
- Matte sealant or varnish
- Rolling pin (optional)
- Canvas or cloth mat for working
Step 1: Forming the Bowl
-
Prepare the Clay:
Start by taking a handful of air-dry clay, roughly the size of a tennis ball. Knead it in your hands for a minute to warm it up and ensure it’s pliable and free of air bubbles. -
Create a Sphere:
Roll the clay between your palms or on your work surface until you have a smooth, round ball. -
Begin the Pinch:
Hold the clay ball in your non-dominant hand. Gently push your thumb into the center of the ball, stopping about a half-inch from the bottom to create the base thickness. -
Shape the Walls:
Using a pinching motion with your thumb on the inside and fingers on the outside, slowly rotate the ball while pressing. Work from the bottom up to thin out the walls evenly. -
Refine the Form:
Continue pinching until the walls are about ¼ inch thick. Don’t worry about making it perfectly symmetrical; the charm of this piece lies in its slightly organic, wavy rim. -
Flatten the Base:
Gently tap the bottom of the bowl against your table to create a flat, stable surface so it won’t wobble. -
Smooth Imperfections:
Dip your finger in a tiny bit of water and run it over any large cracks. However, leave the smaller surface textures and finger marks alone to maintain that rustic look.
Step 2: Finishing and Coloring
-
Let it Dry:
Place your bowl in a safe spot away from direct heat. Let it dry completely for 24-48 hours until the clay turns distinctive chalky white. -
Sand the Edges:
Once bone dry, take fine-grit sandpaper and very gently smooth just the rim of the bowl to remove any sharp bits, keeping the rest of the texture intact. -
Mix Your Paint:
Prepare a dilute wash of terracotta or dusty pink acrylic paint. I like to add a drop of water to make it semi-transparent so the clay texture shows through. -
Apply the Color Band:
Using a small sponge or a wide brush, apply the paint around the middle exterior of the bowl. Create a strip about an inch wide. -
Blend the Edges:
Before the paint dries, feather the edges slightly so you get a soft transition rather than a hard line. You can leave the bottom and top rim unpainted. -
Add Speckles (Optional):
To mimic the speckled stoneware look in the photo, flick a toothbrush dipped in diluted black or brown paint inside the bowl. -
Seal the Piece:
Once the paint is fully dry, apply a coat of matte sealant over the entire dish to protect the clay and give it a finished feel.
Cracks Appearing?
If small cracks form while drying, mix a tiny bit of fresh clay with water to make a paste (slip) and fill them in before painting.
Make it Shine
For a more contrasted look, use a high-gloss varnish only on the painted stripe, leaving the raw clay matte for a play on textures.
Now you have a serene little vessel ready to hold your favorite rings and things


Cute Animal Mini Figurines
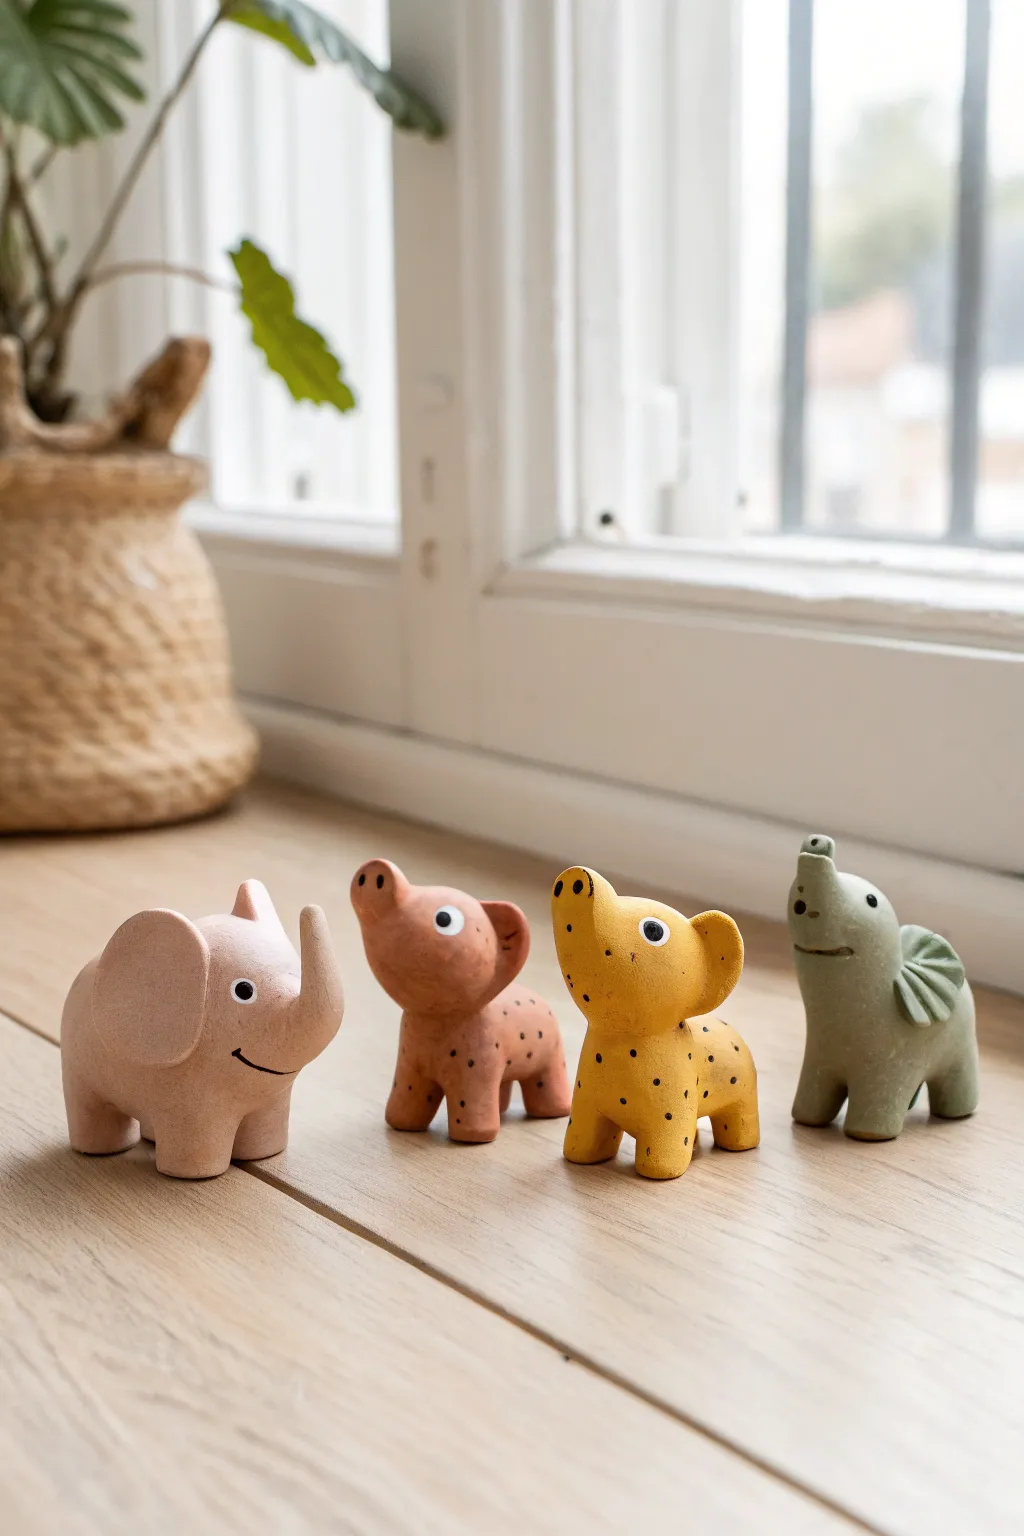
These charming, palm-sized figurines bring a touch of playful character to any windowsill with their stylized shapes and soft, matte finish. Perfect for beginners, this project focuses on simple geometric forms and minimal painting to create an adorable abstract menagerie.
Step-by-Step
Materials
- Air-dry clay (white or terra cotta)
- Acrylic paints (pastel pink, terra cotta, mustard yellow, sage green, black, white)
- Fine-grit sandpaper
- Small bowl of water
- Rolling pin
- Modeling tools or a toothpick
- Fine-point paintbrush
- Matte sealant or varnish
Step 1: Shaping the Bodies
-
Condition the clay:
Start by taking a handful of clay for each animal. Knead it in your hands until it’s warm, pliable, and free of cracks. -
Form the main torso:
Roll four spheres of roughly equal size. Gently flatten the bottom of each sphere against your work surface to create a stable base, then elongate them slightly into rounded oblong shapes for the bodies. -
Pull out the legs:
Instead of attaching separate legs, try to pinch and pull the clay directly from the bottom of the torso to form four sturdy, stump-like legs. Smooth the transition area with a wet finger so there are no seams. -
Refine the stance:
Press the figure down gently onto the table again to ensure all four legs touch the ground evenly. The animals should look grounded and heavy.
Cracks appeared?
If you see cracks as the clay dries, mix a tiny amount of fresh clay with water to make a paste (slip) and fill in the cracks. Smooth over and let dry again.
Step 2: Adding Animal Features
-
Sculpt the elephant trunk:
For the elephant, pull clay from the front of the face area upwards and outwards to form a trunk. Curl it upwards slightly for a cheerful expression. -
Create the ears:
Roll small balls of clay and flatten them into discs. Attach these to the sides of the head. For the dogs or bears, keep them small; for the elephant, make them large and rounded. -
Blend the seams:
Use a modeling tool or your thumb to blend the edges of the ears into the head. I find using a tiny bit of water here acts like glue and helps secure the attachment. -
Add tails:
Roll a very tiny snake of clay for tails. Attach them to the rear, blending the clay thoroughly so they don’t snap off later. -
Smooth the surface:
Dip your finger in water and run it over the entire sculpture to remove fingerprints. Let the figures dry completely for 24-48 hours away from direct heat.
Step 3: Sanding and Painting
-
Sand for smoothness:
Once fully dry, use fine-grit sandpaper to gently buff away any rough bumps or unevenness, paying special attention to the feet and ears. -
Apply base coats:
Paint each animal in a solid, matte color. Use dusty pink for the first elephant, terracotta for the second animal, mustard yellow for the third, and sage green for the last elephant. -
Add a second coat:
Depending on your paint opacity, you may need a second layer to get that rich, solid finish seen in the photo. Let the paint dry fully between coats. -
Paint the eyes:
Using a very fine brush or a dotting tool, dab a white circle for the eye. Once dry, add a smaller black dot in the center for the pupil. -
Detail the faces:
Add tiny black dots for nostrils on the snouts. For the pink elephant, paint a simple curved black line for a smile. -
Add body patterns:
For the terracotta and yellow animals, use the tip of your brush to add scattered black speckles across their bodies for a textured, stone-like look. -
Seal the work:
Finish with a coat of matte varnish. This protects the paint and gives the animals that finished, ceramic quality without being too glossy.
Make it hangable
Before the clay dries, insert a small eye-hook screw into the top of the animal’s back. Once dry, you can thread a ribbon through it to turn these into ornaments.
Arrange your little clay family on a shelf where they can bring a smile to your face every day


Coil Bowls With a Wavy Rim
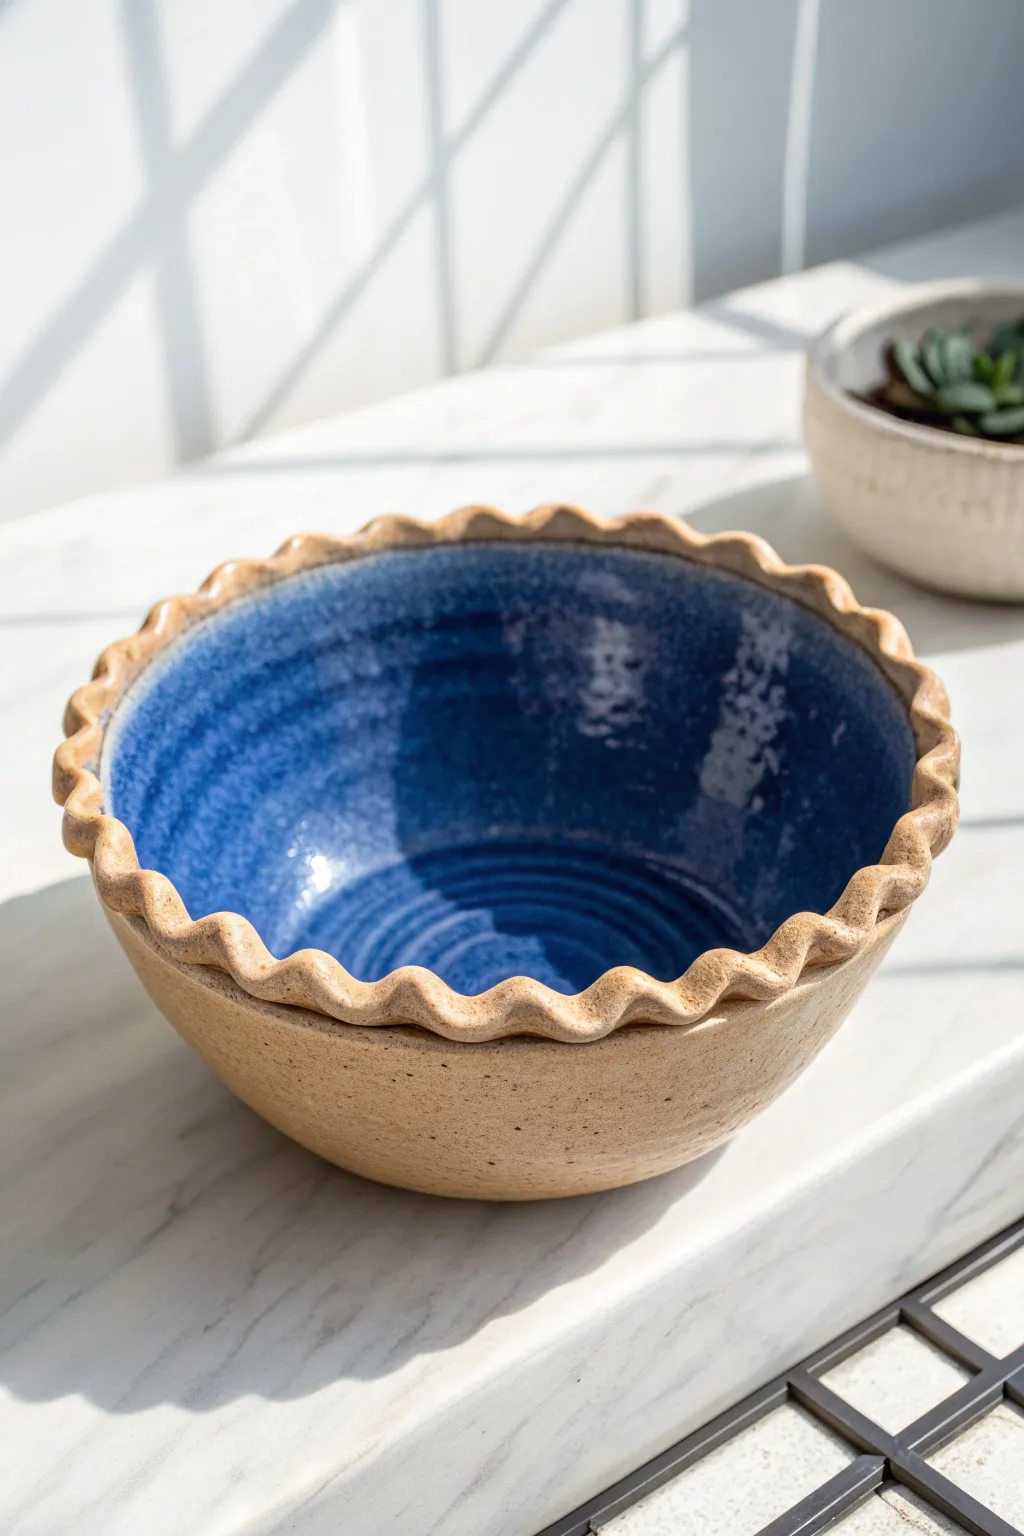
This charming ceramic bowl features a classic fluted edge reminiscent of a freshly baked pie crust, contrasted with a deep, glossy blue interior. The speckled buff clay body adds rustic warmth to the exterior, making it a perfect functional centerpiece for your kitchen.
Step-by-Step Guide
Materials
- Speckled buff stoneware clay (approx. 3-4 lbs)
- Pottery wheel (or rolling pin and slump mold for hand-building)
- High-gloss cobalt blue glaze
- Clear matte or satin glaze (optional for exterior)
- Throwing sponge
- Rib tool (wooden or metal)
- Wire cutter
- Loop trimming tool
- Needle tool
- Soft fan brush or glaze tongs
Step 1: Forming the Bowl Base
-
Prepare your clay:
Begin by thoroughly wedging about 3 to 4 pounds of speckled buff clay. Ensure there are no air bubbles, as this ensures the structural integrity of your bowl. -
Center and open:
Secure the clay to the wheel head and center it. Open the clay to form a flat floor, leaving about a half-inch thickness for trimming later. -
Pull the walls:
Pull the walls up and outward into a gentle, open curve. Aim for a wide, u-shaped profile rather than a tall cylinder. Keep the rim slightly thicker than usual to accommodate the scalloping. -
Refine the curve:
Use a kidney-shaped rib on the inside of the bowl to compress the clay and create a smooth, continuous interior curve. I find this step crucial for getting that seamless look where the glaze will eventually flow.
Uneven Waves?
If your rim waves look inconsistent, don’t overwork the wet clay. Wait until it’s slightly stiffer (soft leather hard) to refine the shape with a damp sponge.
Step 2: Sculpting the Wavy Rim
-
Flatten the rim:
With the wheel spinning slowly or stopped, use your thumb or a wooden tool to flatten the top edge of the rim slightly, creating a small horizontal shelf. -
Mark spacing:
Lightly mark even intervals around the rim with a needle tool to guide your scallops. Even spacing is key to a professional finish. -
Flute the edges:
Using your index finger from one hand on the inside and two fingers from the other hand on the outside, gently push the clay rim outward and inward to create the undulating wave pattern. -
Clean the scallops:
Smooth the edges of each wave with a damp sponge or chamois cloth to prevent any sharp burrs from forming during firing.
Level Up: Texture Pop
Before bisque firing, gently press a textured paddle or fabric against the exterior clay. The speckles combined with subtle texture add amazing tactile depth.
Step 3: Trimming and Drying
-
Wire off:
Run your wire tool under the base to release it from the bat, then set the piece aside to dry to a leather-hard state. -
Trim the foot:
Once leather hard, center the bowl upside down on the wheel. Use a loop tool to trim the excess weight from the base and carve a neat foot ring. -
Smooth the exterior:
Use a rib or damp sponge to smooth out any trimming marks, revealing the natural texture of the speckled clay body. -
Bisque fire:
Allow the bowl to dry completely (bone dry) before loading it into the kiln for a bisque firing to roughly Cone 04.
Step 4: Glazing and Finishing
-
Wax resist:
Apply wax resist to the foot ring and the bottom of the bowl to prevent glaze from sticking to the kiln shelf. -
Pour the interior:
Pour a generous amount of high-gloss cobalt blue glaze into the center of the bowl. Quickly swirl it around to coat the entire interior up to the wavy rim, then pour out the excess. -
Clean the rim:
Immediately wipe any glaze drips off the very top edge of the rim with a damp sponge. This creates a clean break between the blue interior and the raw clay exterior. -
Exterior finish:
Leave the exterior unglazed to showcase the speckled clay, or apply a very thin coat of clear matte glaze if you prefer a sealed surface. -
Glaze fire:
Load the piece into the kiln for the final glaze firing, typically to Cone 5 or 6 depending on your clay and glaze specifications.
Now you have a stunning, functional bowl ready to hold fruit or serve side dishes at your next gathering


Slab-Built Soap Dishes
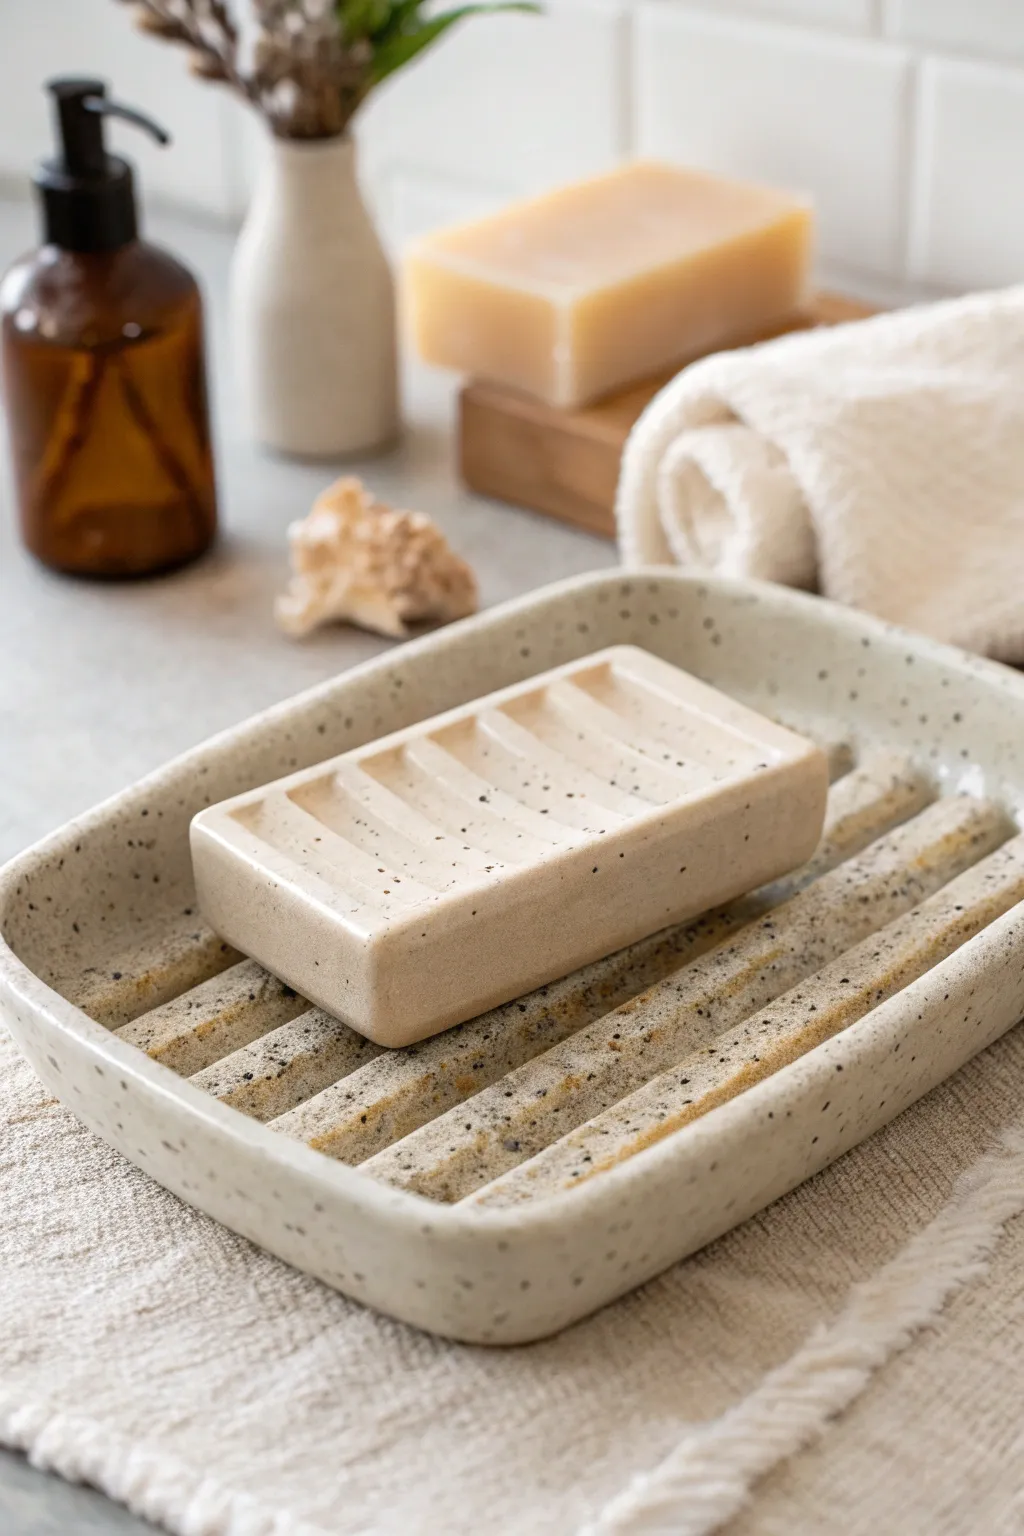
This charming, functional soap dish features a subtle speckle pattern and deep drainage ridges to keep your favorite bars dry. The slab-built design offers a modern, earthy aesthetic that complements any bathroom vanity or kitchen sink.
Step-by-Step Tutorial
Materials
- Speckled stoneware clay (white or light beige)
- Rolling pin
- Canvas board or mat
- Needle tool or fettling knife
- Ruler
- Wooden modeling tool (rounded edge)
- Sponge
- Slip (clay and water slurry)
- Scoring tool or fork
- Small rectangular mold or wooden block (optional for shaping)
- Clear or matte transparent glaze
Step 1: Preparing the Slab
-
Roll the clay:
Start by wedging your speckled stoneware clay to remove air bubbles. Roll it out into an even slab, approximately 1/4 to 3/8 inch thick. Using guide sticks on either side of your rolling pin helps maintain a consistent thickness. -
Smooth the surface:
Run a rubber rib or a damp sponge lightly over the surface of the slab to compress the clay particles and remove any canvas texture. This makes for a cleaner final look. -
Measure and cut:
Using your ruler and needle tool, cut a rectangle for the base. A size around 4×6 inches works well, but you can adjust based on the size of soap bars you typically use. -
Create the walls:
From the remaining slab, cut long strips for the walls. These should be about 3/4 inch tall. I prefer to cut them slightly longer than the perimeter of the base so I can trim them to an exact fit later.
Clean Channels
Use the back of a drill bit or a round chopstick to run through the valleys between ridges. This creates perfectly uniform spacing and depth.
Step 2: Forming the Ridges
-
Mark ridge positions:
Visualize the drainage channels. Lightly use your needle tool to mark parallel lines lengthwise across the base slab where the ridges will go, spacing them about half an inch apart. -
Make clay coils:
Roll out several thin coils of clay, slightly thinner than a pencil. Ensure they are uniform in thickness so your soap sits level. -
Attach the coils:
Score the lines you marked on the base and apply a small amount of slip. Place the coils onto the scored lines. -
Shape the ridges:
Using your wooden modeling tool or just your finger, gently press down and blend the edges of the coils into the base slab. You want to create smooth, rounded humps rather than distinct snakes of clay. -
Refine the channels:
Run a damp finger or a rounded tool between the ridges to smooth out the valleys. This ensures water won’t get trapped in tiny crevices during use.
Step 3: Assembly and Finishing
-
Score the perimeter:
Score the outer edge of the base slab where the walls will attach. Do the same to the bottom edge of your wall strips. -
Attach the walls:
Apply slip and firmly press the walls onto the base. If you are using multiple strips, score and slip the ends where they meet to form corners. -
Reinforce the seam:
Roll a very tiny, thin coil of clay and press it into the interior seam where the wall meets the floor. Blend this coil smoothly upwards into the wall and downwards into the floor to strengthen the joint. -
Smooth the exterior:
On the outside, use a rib or wooden tool to blend the seam between the wall and base so it disappears completely. The outside should look like one continuous piece of clay. -
Round the rim:
Use a damp sponge to soften the top rim of the dish. A rounded edge is more durable and less likely to chip than a sharp square edge. -
Final smooth:
Give the entire piece a once-over with a slightly damp sponge to remove any fingerprints or sharp burrs.
Drainage Hole Option
Poke two small holes in the valleys between the ridges before the clay dries. This lets water drip through if the dish sits on a draining rack.
Step 4: Drying and Glazing
-
Slow drying:
Loosely cover the dish with plastic to let it dry slowly for the first day. This helps prevent warping, especially since the floor has added thickness from the ridges. -
Bisque fire:
Once bone dry, fire the piece to bisque temperature (usually cone 04) based on your clay body’s specifications. -
Glaze application:
Apply a clear or semi-transparent glaze. This highlights the natural speckles in the clay while making the surface non-porous and easy to clean. -
Surface wipe:
Before firing, wipe the bottom of the dish clean of any glaze to prevent it from sticking to the kiln shelf. -
Glaze fire:
Fire for a final time to the maturity temperature of your clay and glaze (often cone 6 for stoneware).
Place your favorite artisan soap on your new creation and enjoy the spa-like vibe it brings to your home

The Complete Guide to Pottery Troubleshooting
Uncover the most common ceramic mistakes—from cracking clay to failed glazes—and learn how to fix them fast.
Marbled Clay Catchall Tray
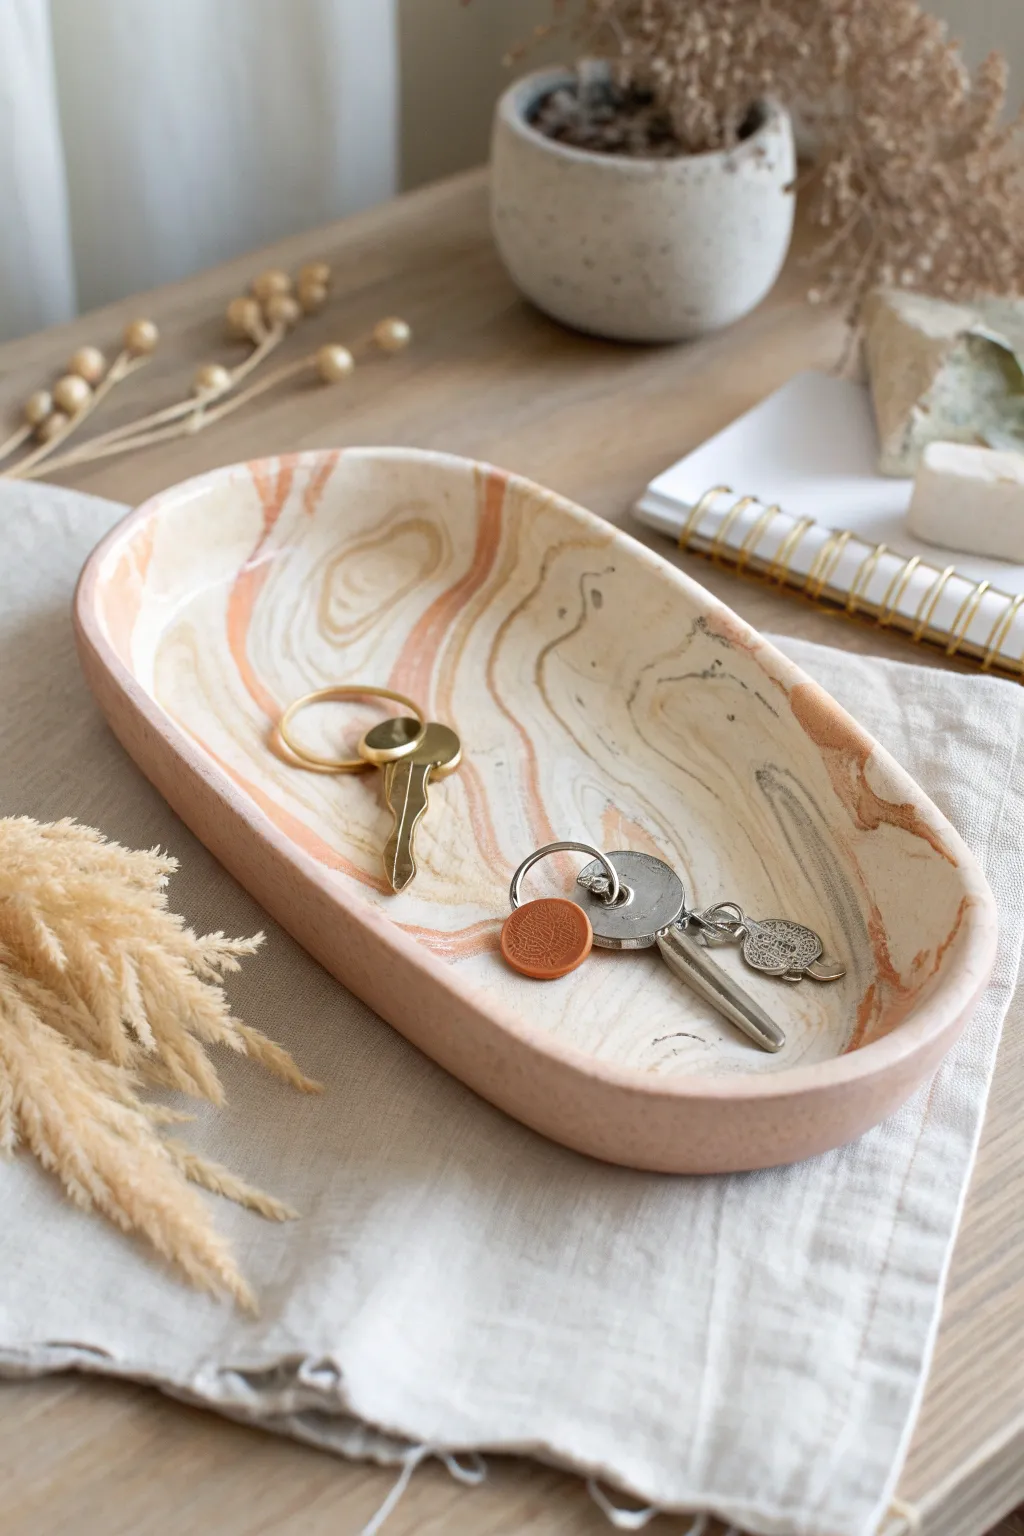
This elegant oval tray features a sophisticated swirl of peach and cream tones, creating a natural stone effect that looks beautiful on any entryway table. It’s the perfect stylish spot to drop your keys and small essentials when you walk through the door.
Detailed Instructions
Materials
- Polymer clay (white)
- Polymer clay (peach or terra cotta)
- Polymer clay (translucent – optional but recommended for depth)
- Acrylic rolling pin or pasta machine
- Oval cutter or paper template with craft knife
- Sandpaper (various grits from 400 to 1000)
- Matte glaze or polyurethane varnish (optional)
- Oven and baking sheet
- Parchment paper
Step 1: Prepping the Clay
-
Condition the clay:
Start by warming up your blocks of clay in your hands. Knead the white and peach clays separately until they are soft, pliable, and easy to work with. If the clay feels too stiff, keep working it to avoid cracks later. -
Create logs:
Roll each color into a long, snake-like log. For this particular look, you’ll want about two parts white clay to one part peach clay to keep the design light and airy. -
Twist them together:
Lay the logs side by side and twist them around each other like a candy cane. This is the beginning of your marbled pattern. -
Fold and roll:
Fold the twisted log in half and roll it out again into a snake. Repeat this process of twisting, folding, and rolling a few times. -
Ball it up:
Once you see the colors starting to mingle but distinct lines remain, roll the entire snake into a smooth ball. Be careful not to over-mix, or the colors will blend into a solid, muddy orange.
Step 2: Shaping the Tray
-
Roll out the slab:
Place your marbled ball on a sheet of parchment paper or a silicone mat. Using your acrylic roller, flatten the ball into an oval sheet about 1/4 inch thick. Work from the center outward to ensure even thickness. -
Cut the oval shape:
Place your oval cutter or paper template onto the clay slab. If using a template, carefully trace around it with a sharp craft knife to cut out your base shape. -
Smooth the edges:
Run your finger dipped in a little cornstarch or water along the cut edge to soften any sharpness left by the knife. I find this step saves a lot of sanding time later. -
Create the rim:
Gently lift the edges of the oval slab upwards with your fingertips to create a raised rim. You want a gradual curve rather than a sharp 90-degree angle. -
Refine the form:
Smooth out any fingerprints on the inside and outside of the rim. You can use a damp sponge to get a perfectly smooth surface before baking.
Air Bubble Troubles?
If you see a bubble while rolling, pierce it gently with a needle tool or pin, then smooth the air out with your finger and roll over it again.
Step 3: Baking and Finishing
-
Prepare for baking:
Transfer the formed tray (still on its parchment paper) to a baking sheet. To help it hold its curved shape, you can lightly prop up the sides with crumpled foil or bake it inside an oven-safe oval dish. -
Bake the clay:
Bake according to the manufacturer’s instructions on your clay package. This is usually around 275°F (135°C) for 15-30 minutes, depending on thickness. -
Cool down completely:
Let the tray cool completely in the oven with the door slightly ajar. Removing it while hot can cause warping or cracking. -
Sand the edges:
Once cool, take your sandpaper and wet-sand the rim and any rough spots. Start with a lower grit to shape and finish with a high grit for a polished feel. -
Seal (Optional):
If you want extra durability or a different sheen, apply a thin coat of matte glaze. The piece in the photo has a natural matte look, so you can also leave it raw if thoroughly sanded.
Pro Tip: Translucency
Mix a small amount of translucent clay into your white clay before marbling. It adds a realistic, stone-like depth that mimics real quartz.
Place your new tray in the hallway or on a dresser to add a touch of handmade warmth to your daily routine
Stamped Texture Coasters
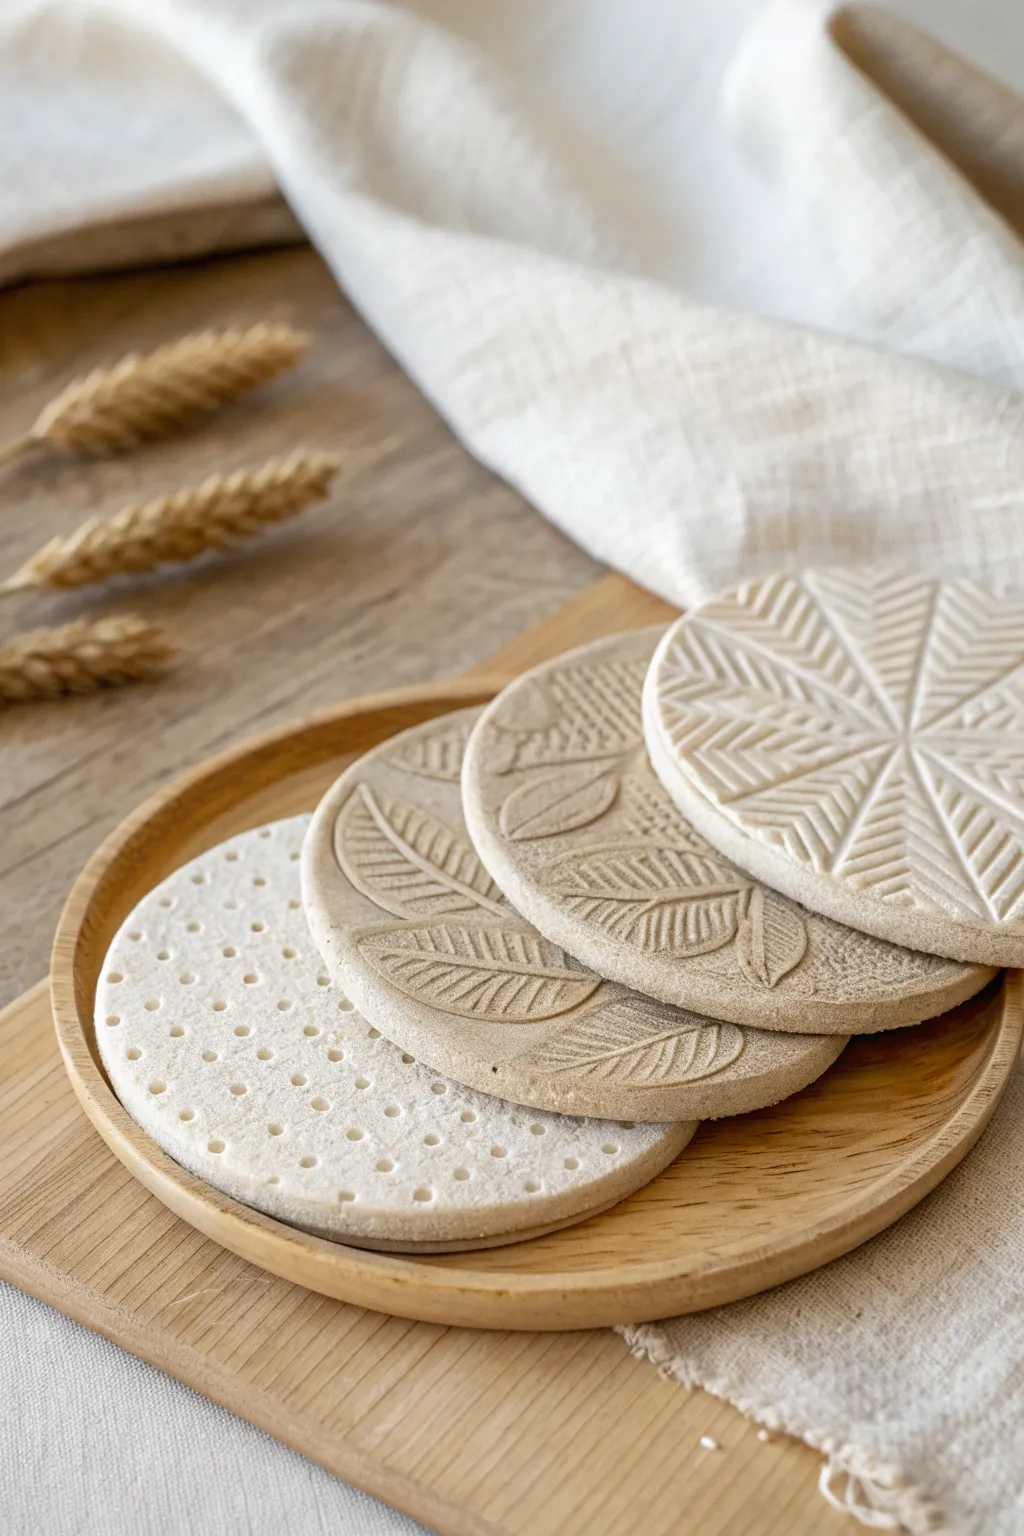
These elegant, minimalist coasters bring a touch of nature to your table with their subtle, embossed textures and neutral palette. By using simple tools found around the house or specialized clay stamps, you can create a set that looks professionally crafted and effortlessly chic.
Step-by-Step Tutorial
Materials
- Light-colored air-dry clay or polymer clay (white or beige)
- Round cookie cutter (approx. 4 inches diameter)
- Rolling pin
- Parchment paper or non-stick silicone mat
- Texture stamps (botanical/leaf designs and geometric)
- Small round tool (like a toothpick or dull pencil point)
- Fine-grit sandpaper
- Matte sealant or varnish (optional)
Step 1: Preparing the Base
-
Condition the clay:
Begin by working your chosen clay in your hands to warm it up. Knead it thoroughly until it is soft, pliable, and free of any cracks or air bubbles. -
Roll out the slab:
Place the clay on your parchment paper or silicone mat. Using the rolling pin, roll the clay out into a large, even slab. Aim for a thickness of about 1/4 inch to ensure the coasters are sturdy. -
Smooth the surface:
Before texturing, inspect the surface for any imperfections. Lightly run a damp finger (if using air-dry clay) or a smooth tool over the clay to erase fingerprints or small bumps. -
Cut the shapes:
Press your round cookie cutter firmly into the clay slab to create four distinct circles. Do not remove the excess clay yet; keeping it in place supports the edges while you stamp.
Step 2: Adding Textures
-
Create the dotted design:
For the first coaster, take your small round tool. Starting from one side, gently press focused indentations into the clay in a grid pattern. Try to keep the spacing consistent, but slight variations add handmade charm. -
Impress the botanical design:
Select a large leaf stamp. I prefer to position this slightly off-center for a more artistic composition. Press the stamp firmly and evenly into the second circle, rocking it slightly to catch all edges. -
Repeat with variation:
For the third coaster, use the same leaf pattern or a complementary botanical stamp. Rotate the angle so the leaves flow in a different direction compared to the previous coaster. -
Stamp the geometric pattern:
For the final coaster, center a large geometric or radial stamp directly over the circle. Press down hard, ensuring the deep grooves of the pattern transfer clearly into the clay.
Sticking Stamps?
If your stamp pulls the clay up, lightly dust the clay surface with cornstarch (for polymer) or a tiny bit of water (textile stamps on air-dry) before pressing down.
Step 3: Refining and Finishing
-
Clean the edges:
Carefully peel away the excess clay from around your cut circles. If the edges of the coasters look rough, gently smooth them with your finger. -
Initial drying:
Let the coasters sit undisturbed. If using air-dry clay, allow them to dry for 24-48 hours. Turn them over halfway through the drying process to prevent warping. -
Baking (Polymer only):
If you used polymer clay, transfer the parchment paper to a baking sheet and bake according to the manufacturer’s temperature instructions, usually around 275°F (135°C) for 15-30 minutes. -
Sanding imperfections:
Once fully dry or cooled, take a piece of fine-grit sandpaper and lightly buff the edges. You can also lightly sand the surface if you want a more weathered, stone-like texture. -
Clean off dust:
Wipe the coasters down with a slightly damp cloth or a dry brush to remove any sanding dust trapped in the textured crevices. -
Sealing the surface:
To protect against moisture from cups, apply a thin coat of matte varnish or sealant. This step is crucial for air-dry clay but optional for polymer clay.
Use Depth Guides
To get perfectly even thickness across all coasters, place wooden craft sticks or stacks of playing cards on either side of your clay while rolling to guide the pin.
Arrange your beautiful new set on a coffee table and enjoy the organic warmth they add to your space


What Really Happens Inside the Kiln
Learn how time and temperature work together inside the kiln to transform clay into durable ceramic.
Incense Holders With Clean Lines
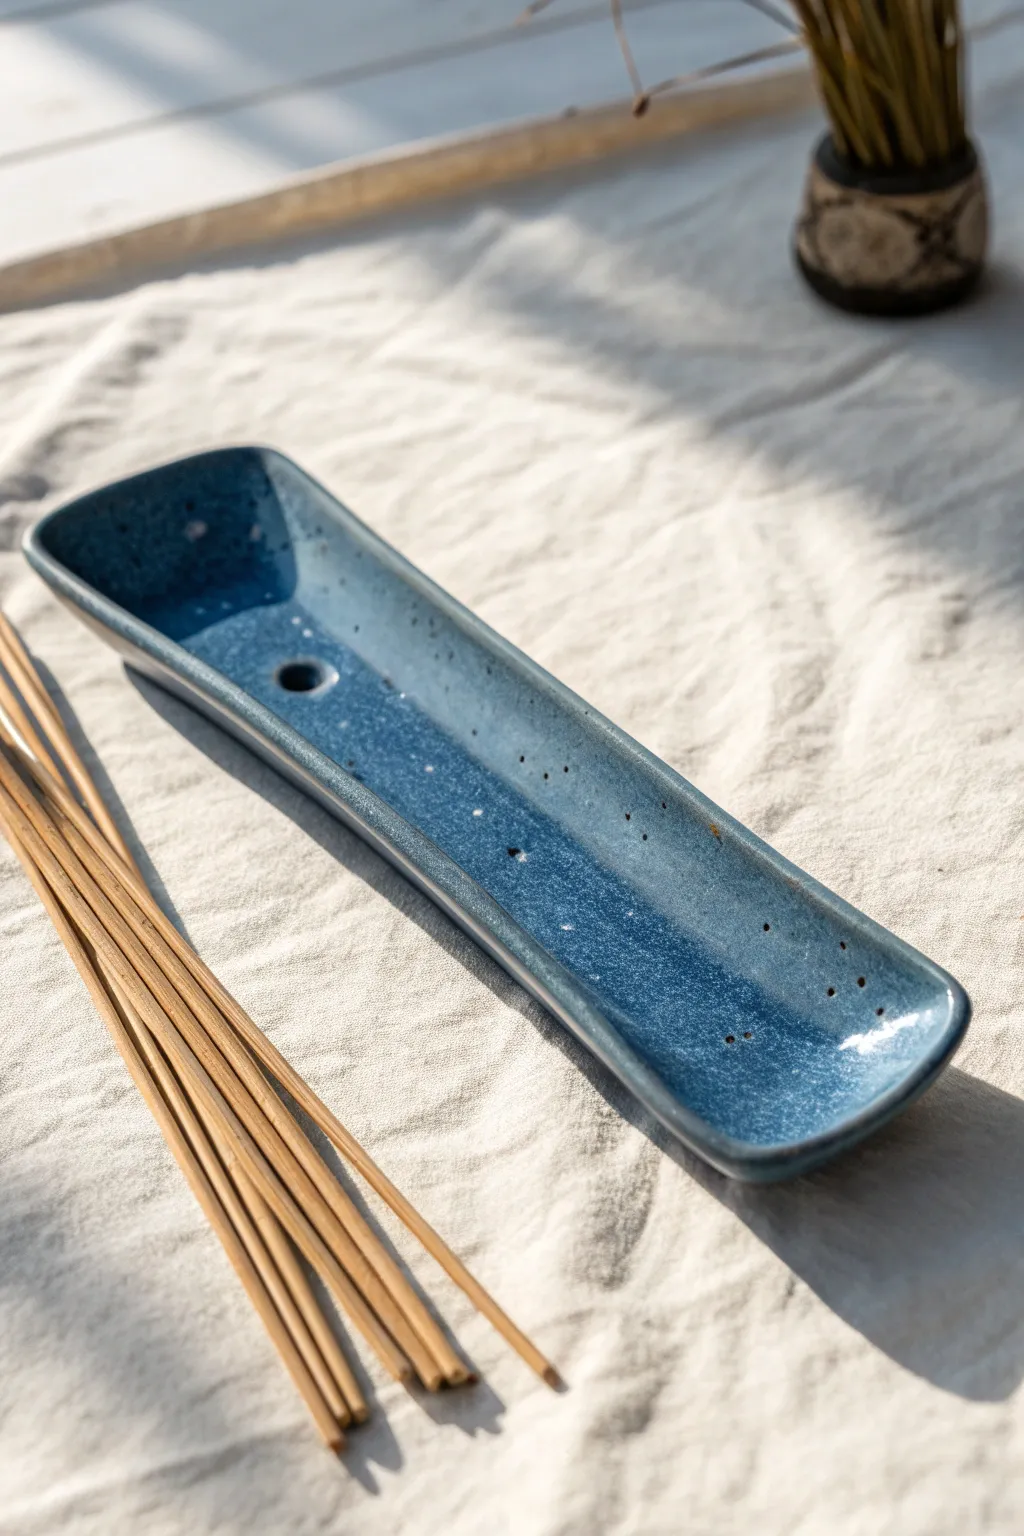
This sleek, boat-shaped incense holder combines modern minimalism with organic texture, featuring a deep blue speckled glaze that evocative of a starry night sky. Its simple form is designed to catch falling ash effortlessly while bringing a calm, sculptural element to your space.
Step-by-Step
Materials
- Stoneware clay (smooth or lightly grogged)
- Rolling pin
- Two wooden guide slats (approx. 5mm thick)
- Fettling knife or needle tool
- Kidney rib (rubber or metal)
- Sponge
- Straw or small hole cutter (approx. 3-4mm)
- Wooden modeling tool or spoon
- Deep blue speckled stoneware glaze
- Kiln
Step 1: Forming the Base
-
Prepare the slab:
Begin by wedging your stoneware clay thoroughly to remove air bubbles. Place the clay between two wooden guide slats on a canvas board and roll it out until it is a uniform thickness of about 5mm. -
Cut the rectangle:
Using a ruler and a needle tool or fettling knife, cut a long, narrow rectangle. A good size for this project is approximately 9 inches long by 2.5 inches wide, which accounts for shrinkage during firing. -
Smooth the surface:
Take a damp sponge or a soft rubber kidney rib and gently run it over the surface of the clay slab. This compresses the particles to prevent cracking and creates a smooth canvas for your glaze later. -
Soften the edges:
Run a damp finger along the sharp cut edges of the rectangle to round them slightly. This ensures the finished piece feels nice to hold and doesn’t have sharp, chip-prone corners.
Step 2: Shaping the Curve
-
Create the boat shape:
Carefully lift the long edges of the rectangle, curling them upwards. You want to create a gentle ‘U’ shape or trench down the length of the piece without folding the clay sharply. -
Lift the ends:
Gently push up the two short ends of the rectangle as well so they are slightly elevated. This creates a contained vessel shape that will keep the ash from spilling off the ends. -
Refine the walls:
Place the piece on your work surface. Use your fingers to pinch and smooth the walls of the holder, ensuring they stand up at an angle of roughly 45 to 60 degrees. I find checking the profile periodically helps keep the symmetry. -
Smooth the interior:
Use a wooden modeling tool or the back of a small spoon to smooth the interior curve where the floor meets the walls, guaranteeing a seamless transition without visible seams or fingerprints.
Clean Lines Tip
To get that perfectly uniform curve, try drying the slab over a section of PVC pipe or a rolling pin covered in newspaper. It acts as a mold for the curve.
Step 3: Detailing and Drying
-
Position the hole:
Decide which end will hold the incense. About 1.5 to 2 inches from one short edge, mark a spot in the center of the ‘floor’ of the holder. -
Punch the holder hole:
Using a hole cutter or a simple plastic straw, punch a clean hole through the clay at your mark. Twist the tool gently as you remove it to keep the edges crisp. -
Angle check:
Inspect the hole to ensure it is vertical or angled slightly toward the long end of the tray, so the incense stick will lean securely over the catch area. -
Slow drying:
Loosely cover the piece with plastic to let it dry slowly for a day or two. This prevents the lifted edges from warping as they lose moisture. -
Bisque fire:
Once bone dry, fire the piece to bisque temperature (usually roughly Cone 04, depending on your clay body).
Hole Size Help
Remember clay shrinks! Make the incense hole about 10-15% larger than your incense sticks. If it’s too tight after firing, use a small diamond file to widen it.
Step 4: Glazing and Finishing
-
Clean the bisque:
Wipe the bisque-fired piece with a damp sponge to remove any kiln dust. This helps the glaze adhere properly without pinholing. -
Apply the glaze:
Pour a deep blue speckled glaze into the interior of the holder, tilting it to coat the inside thoroughly, then pour out the excess. Alternatively, simply dip the entire piece if you have a large enough bucket. -
Check the rim:
If the glaze looks too thick on the rim, gently wipe a little away with a sponge to let the clay body color peek through, highlighting the form’s clean lines. -
Clear the hole:
Double-check that the incense hole isn’t clogged with glaze. Use a needle tool to clear it out if necessary, or the stick won’t fit later. -
Wipe the foot:
Using a wax resist or a wet sponge, completely clean the bottom of the holder so it doesn’t fuse to the kiln shelf. -
Final fire:
Fire the piece to the maturity temperature of your clay and glaze (often Cone 5 or 6 for stoneware). Allow the kiln to cool completely before removing your new incense holder.
Once cooled, place a stick of your favorite scent in the holder and watch the ash collect neatly in your beautiful new creation
Mini Bud Vases for Tiny Flowers
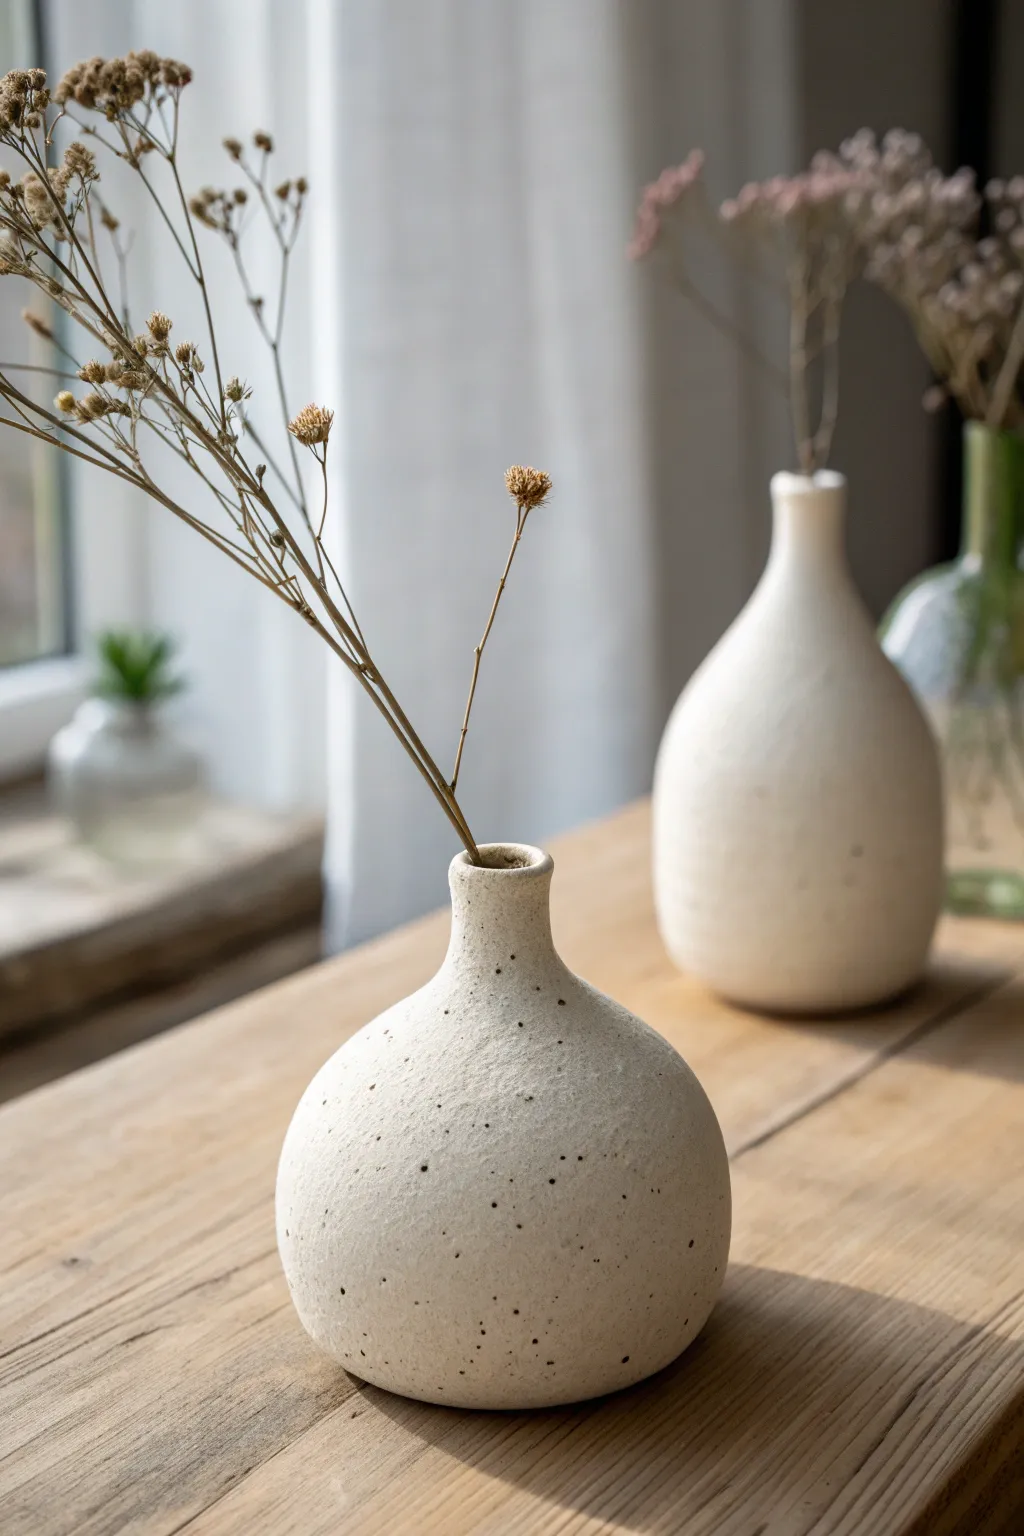
These charming mini bud vases feature a soothing organic shape and a delightful speckled texture that mimics natural stone. They are the perfect minimal vessel for displaying dried stems or tiny wildflowers on a windowsill.
How-To Guide
Materials
- White polymer clay or air-dry clay (approx. 200g per vase)
- Black pepper or dried coffee grounds (for speckling)
- Pottery sponge
- Rolling pin
- Wooden sculpting tool or chopstick
- Fine-grit sandpaper (400-600 grit)
- Cup of water
- Matte spray varnish or sealant
Step 1: Preparation & Mixing
-
Condition the clay:
Begin by warming up your white clay in your hands. Knead it thoroughly until it becomes soft, pliable, and free of cracks. This conditioning step is crucial for preventing breakage later. -
Add texture:
Flatten the clay slightly into a pancake shape. Sprinkle a generous pinch of coarse black pepper or dried coffee grounds into the center. Evenly distributing this organic material is the secret to that speckled stoneware look. -
Integrate the specks:
Fold the clay over the darker particles and knead repeatedly. Continue folding and pressing until the specks are dispersed relatively evenly throughout the entire ball of clay.
Step 2: Shaping the Vessel
-
Form the base:
Roll your conditioned, speckled clay into a smooth, tight sphere. Ensure there are no major air pockets or seams visible on the surface. -
Create the opening:
Hold the sphere in one palm. With your other thumb, gently press down into the center of the ball to create a well, stopping about a half-inch from the bottom. Do not pinch the walls too thin yet. -
Pinch the body:
Using a classic pinch-pot technique, gently squeeze the clay walls between your thumb and fingers, rotating the ball as you go. Focus on widening the belly of the vase while keeping the opening somewhat gathered. -
Close the neck:
As you move upward, change your pressure to guide the clay inward. Gently collar the clay—squeezing from the outside in—to narrow the top section into a bottleneck shape. -
Refine the lip:
Once the neck is narrow, use your finger or a wooden styling tool to smooth the very rim. It should be slightly uneven for that wabi-sabi aesthetic, but free of sharp cracks. -
Check stability:
Gently tap the filled-out base of the vase on your table to create a small flat spot. This ensures the round bottle won’t roll away once it’s finished.
Faux Stone Hack
Don’t have pepper handy? You can also mix in actual fine sand or dried tea leaves. Different materials create varied colors and textural depths for a unique finish.
Step 3: Surface & Finishing
-
Initial smoothing:
Dip your finger in a little water and run it over the exterior clay. This blends any fingerprint marks and helps bring the speckles to the surface. -
Create stone texture:
Take a slightly damp pottery sponge (rough side) or even a crumpled ball of aluminum foil. Gently pat the entire surface of the vase. This removes the ‘plastic’ shine and gives it a matte, earthen feel. -
Drying:
Set the vase aside to dry. If using air-dry clay, let it sit for 24-48 hours away from direct heat. If using polymer clay, bake according to the package instructions (usually 275°F for 15-30 minutes). -
Sanding:
Once fully cured or dried, use fine-grit sandpaper to lightly buff any rough spots on the rim or base. Be gentle so you don’t remove the texture you created. -
Highlighting specks:
I like to wipe the surface with a slightly damp cloth one last time after sanding; this cleans off dust and makes the pepper or coffee specks pop against the white clay. -
Sealing:
Finish by applying a matte spray varnish. This protects the porous surface and the organic speckles from humidity without adding an artificial glossy shine.
Cracking Issues?
If you see tiny cracks forming while shaping the neck, dip your finger in water (or clay softener oil) and smooth them immediately. Keep walls even thickness.
Place a single dried branch or flower stem inside to complete your beautiful miniature display

TRACK YOUR CERAMIC JOURNEY
Capture glaze tests, firing details, and creative progress—all in one simple printable. Make your projects easier to repeat and improve.
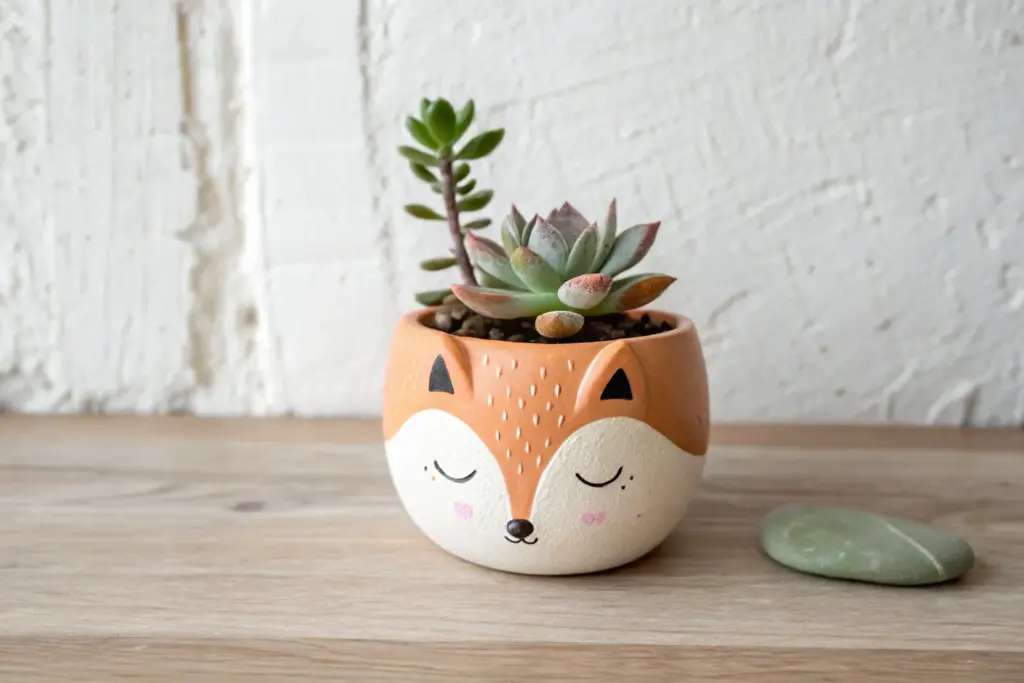
Face Planters and Pencil Cups

Sculpt a moment of calm with this charming multifunctional vessel that serves as either a planter for small vines or a cozy home for your sketching pencils. The piece features a textured, speckled clay body with a simple, peaceful face emerging in gentle relief.
Step-by-Step Guide
Materials
- Speckled stoneware clay (or polymer clay with faux granite effect)
- Pencil or needle tool
- Small loop tool
- Rubber kidney rib
- Sponge
- Rolling pin
- Slip and scoring tool (if using ceramic clay)
- Clear matte glaze (for ceramic) or matte varnish (for polymer)
- Circle cutter or template (approx. 4 inches diameter for base)
- Ruler
Step 1: Forming the Cylinder
-
Prepare the Clay Slab:
Begin by rolling out your speckled clay into a consistent slab, approximately 1/4 inch thick. Aim for a long rectangle that measures about 4 inches high and 10 inches long. -
Cut the Components:
Using a ruler and knife, cut the rectangle to your exact dimensions to ensure clean straight edges. Use your circle cutter to create a separate round base for the pot. -
Texture the Surface:
Before assembling, I like to gently dab the surface with a coarse sponge or a crumpled ball of foil to enhance the natural stone texture, though speckled clay often does the work for you. -
Join the Cylinder:
Score the two short ends of your rectangle and apply slip. Curve the clay into a tube, pressing the scored ends together firmly. Smooth the seam inside and out until it is invisible. -
Attach the Base:
Score and slip the bottom edge of your cylinder and the outer edge of your circular base. Press the cylinder onto the base, using a tool to blend the clay upwards to seal the join completely.
Step 2: Sculpting the Face
-
Position Features:
Identify the ‘front’ of your pot opposite the vertical seam. Lightly mark a central vertical line to guide where the nose will go. -
Add Clay for the Nose:
Roll a small coil of clay, flattening one side. Attach this vertically to the center of the face using slip, blending the edges smoothly into the cylinder so the nose appears to rise naturally from the surface. -
Refine the Bridge:
Use a modeling tool to smooth the bridge of the nose upwards, letting it fade into the forehead area rather than having a hard stop. -
Define the Eyebrows:
Instead of adding clay, use a small loop tool or your thumb to gently press indentations on either side of the upper nose. This creates the shadow of the brow bone and eye socket. -
Carve the Eyes:
Using a needle tool, draw two simple, downward-curving arcs for closed eyelids. Keep them symmetrical on either side of the nose bridge. -
Add Eyelashes:
Just below the eyelid arcs, make several tiny, vertical dash marks for lashes. Keep these delicate and light. -
Shape the Mouth:
Below the nose, carve a small, gentle upward curve for a smile. You can add a tiny secondary curve underneath to suggest the lower lip.
Clean Lines
When carving the eyes and mouth, wait until the clay is ‘leather hard.’ If the clay is too wet, the needle tool will create messy burrs that are hard to clean up.
Step 3: Finishing Touches
-
Smooth and Refine:
Go over the entire piece with a slightly damp sponge or rubber rib to soften any sharp carving lines. The features should look soft and dreamy, not jagged. -
Dry Slowly:
Loosely cover the pot with plastic to let it dry slowly over a few days. This prevents the seam from cracking or the base from warping. -
Bisque Fire:
Once bone dry, fire the piece to bisque temperature according to your clay body’s specifications. -
Glazing:
Apply a clear matte glaze to the exterior to showcase the speckles without adding shine. If it’s a planter, you may want to glaze the interior for water resistance. -
Final Firing:
Fire the piece a final time to mature the clay and glaze. Once cool, it’s ready for your pencils or a little creeping plant.
Hair Play
Instead of a smooth rim, cut the top edge in a wavy or jagged pattern to mimic a hairline, or add small clay coils around the rim for ‘curls’ before firing.
Fill your finished pot with a trailing succulent to give your sculpted face a growing, green hairstyle
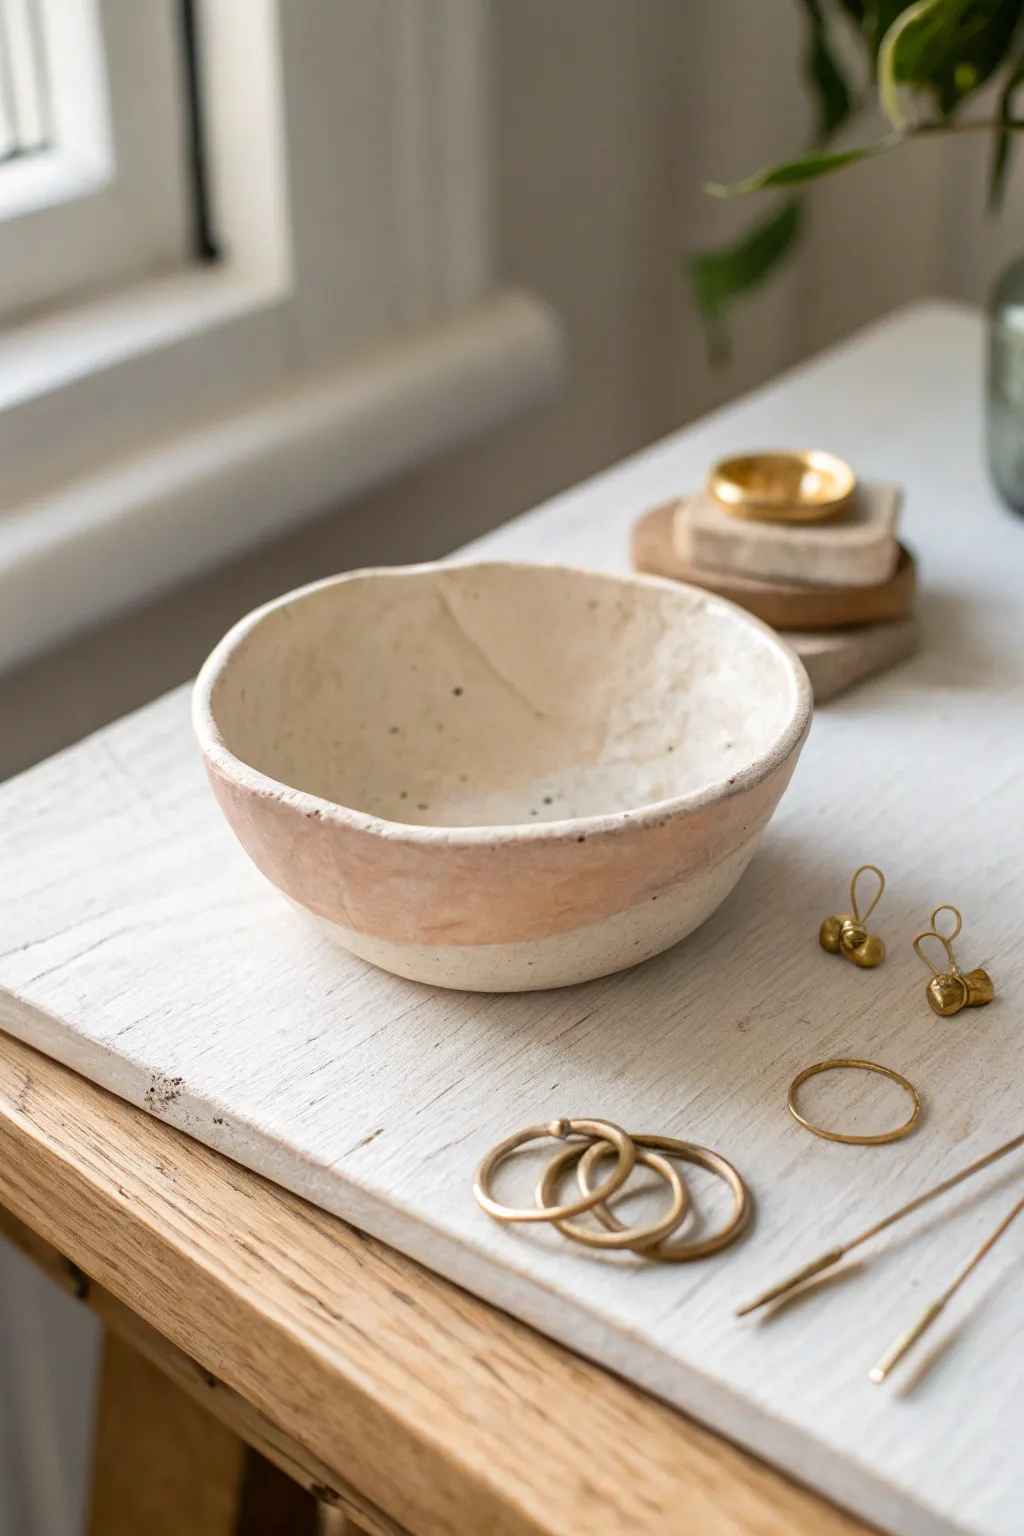
Beaded Edge Jewelry Dishes

This elegant little dish combines a classic minimalist form with a tactile, whimsical edge of hand-rolled beads. Its speckled, creamy finish makes it the perfect resting spot for delicate gold rings or everyday stud earrings.
Step-by-Step Tutorial
Materials
- White air-dry clay or polymer clay (speckled variety optional)
- Small rolling pin
- Circle cutter (approx. 4-5 inches diameter)
- Small bowl (for shaping)
- Clay knife or craft blade
- Slip (a mix of water and clay) or liquid polymer clay
- Fine grit sandpaper
- Matte sealant or varnish
- Small sponge
- Rolling mat or parchment paper
Step 1: Forming the Base
-
Prepare the clay:
Begin by wedging your clay to remove any air bubbles. If you are using standard white clay but want the look in the photo, knead in a tiny pinch of black pepper or craft sand to create a faux-stone speckled effect. -
Roll out the slab:
Roll your clay out on a mat or piece of parchment paper until it is an even slab, approximately 1/4 inch thick. Aim for a consistent thickness to ensure even drying later. -
Cut the circle:
Place your circle cutter or a round template onto the slab and press down firmly to cut out your base shape. -
Smooth the edges:
Dip your finger in a little water and run it along the cut edge of your circle to smooth down any sharpness or burrs left by the cutter. -
Initial shaping:
Gently lift the clay circle and place it into your shaping bowl. Press it lightly so it takes on a shallow curve; you don’t need deep sides, just a gentle, concave dip.
Step 2: Creating the Beaded Rim
-
Roll a coil:
Take a fresh piece of clay and roll it into a long, thin rope (snake). Try to keep the thickness uniform, about the width of a pencil. -
Cut equal segments:
Using your blade, slice the coil into small, equal-sized nuggets. These will become your beads, so ensure they are consistent in volume. -
Shape the beads:
Roll each small nugget between your palms or fingers until it forms a perfect sphere. Make enough to circle the entire perimeter of your dish. -
Prepare the rim:
If using air-dry clay, score the rim of your bowl (scratch it up slightly) and brush on a layer of slip. For polymer clay, apply a thin line of liquid clay adhesive. -
Attach the first beads:
Press the clay beads onto the rim one by one. I find it helpful to gently push them down slightly so they attach firmly to the rim, rather than just resting on top. -
Complete the circle:
Continue placing beads all the way around. If you reach the end and the gap is too small or large, adjust the spacing of the last few beads slightly to make it fit seamlessly. -
Blend firmly:
Flip the bowl over gently (or support it from underneath) and use a sculpting tool or your thumb to smear the *bottom* of each bead into the bowl’s rim. This ensures they won’t pop off later but keeps the top looking round.
Clean Bead Hack
To get perfectly identical beads, use a small fondant cutter or the end of a straw to punch out equal volumes of clay from a flat slab before rolling them.
Step 3: Refining and Finish
-
Sponge smooth:
Use a slightly damp sponge to wipe over the entire piece, smoothing out fingerprints and softening the transition between the beads and the bowl. -
Dry completely:
Let the dish dry in the shaping bowl for 24-48 hours if using air-dry clay. If using polymer, bake according to the manufacturer’s instructions. -
Sand imperfections:
Once fully cured or dry, use fine-grit sandpaper to buff away any rough spots, paying special attention to the underside of the rim. -
Seal the piece:
Brush on a coat of matte varnish or sealant to protect the surface. This gives it that finished, ceramic-studio look and protects it from scratches.
Cracking Issues?
Air-dry clay cracks if it dries too fast. Drape a lightweight plastic bag loosely over the dish while it dries to slow the process down.
Now you have a chic, handmade vessel ready to display your favorite treasures
Wall Tiles With Carved Patterns
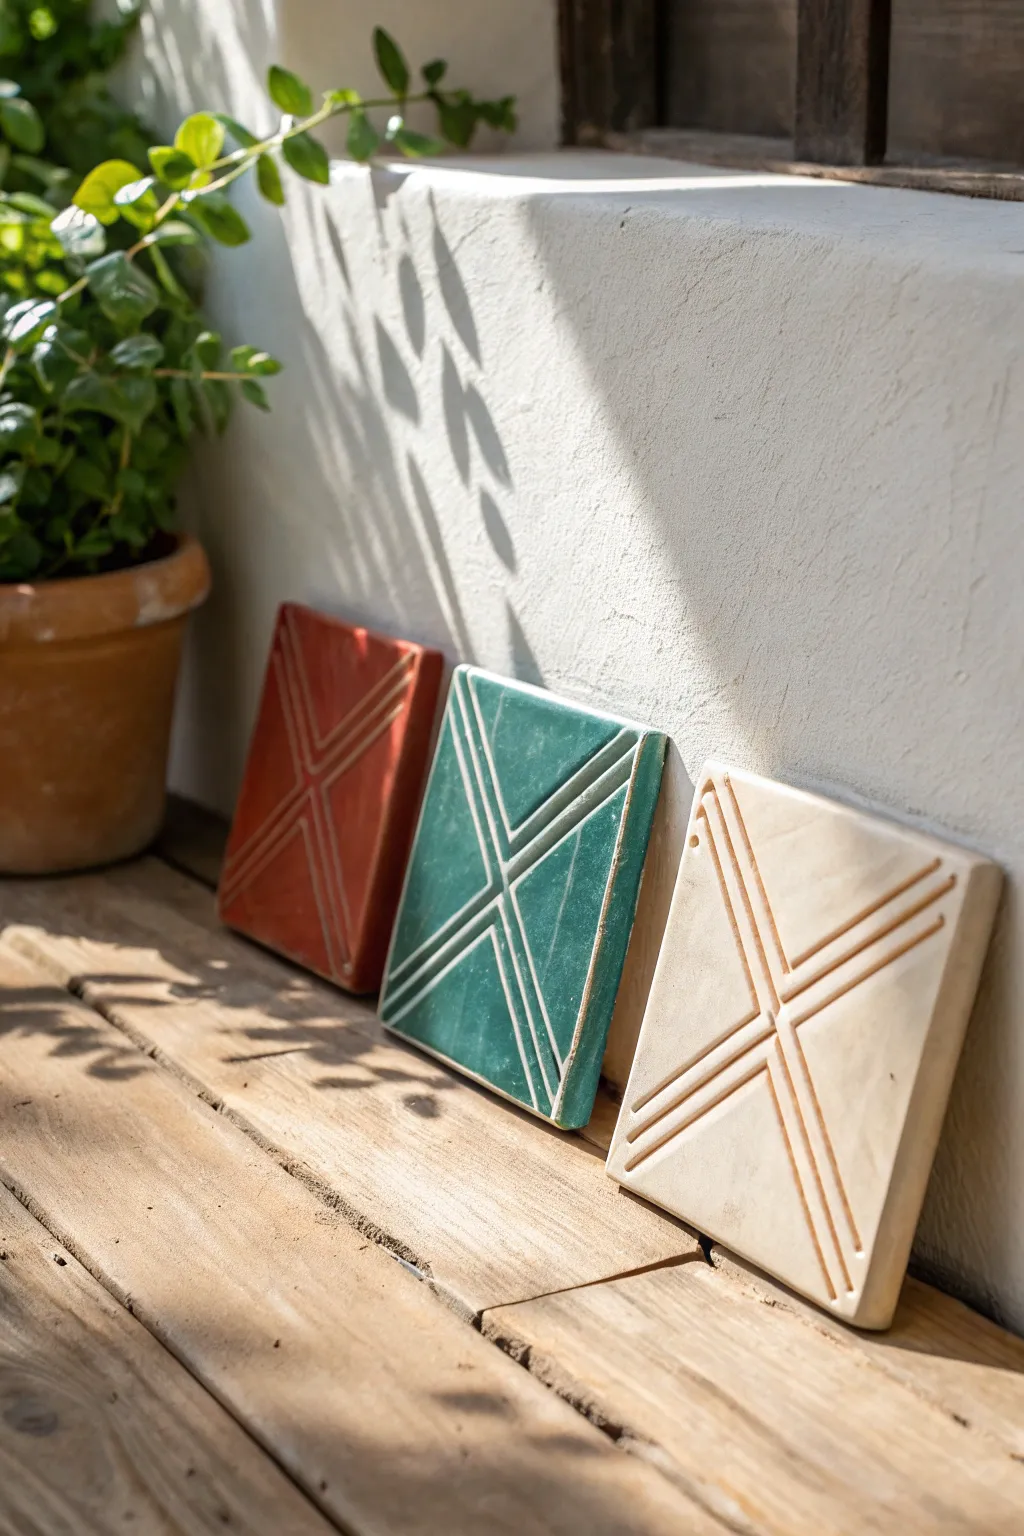
These striking square tiles feature a clean, modernist aesthetic with deep diagonal grooves forming a central ‘X’ motif. The trio of earthy burnished orange, teal, and cream glazes creates a harmonious palette perfect for adding texture to any wall or shelf.
How-To Guide
Materials
- Stoneware clay or air-dry clay (smooth body preferred)
- Square template (cardboard or plastic) or square cutter
- Rolling pin
- Two 1/4-inch wooden guide strips (slats)
- Canvas mat or slab mat
- Needle tool
- Ruler (metal preferred)
- Small carving loop tool or ribbon tool (U-shaped tip)
- Sponge
- Fettling knife
- Clear or tinted glazes (Rust/Orange, Teal, Cream)
- Kiln (if using stoneware)
Step 1: Prepping and Shaping the Base
-
Prepare your workspace:
Set up your canvas mat to prevent the clay from sticking. Place your two wooden guide strips parallel to each other, slightly wider than the width of your desired tiles. -
Roll the slab:
Take a generous wedge of clay and pound it slightly flat with your hand. Place it between the guide strips and roll it out with a rolling pin until the pin rests on the wood, ensuring an even thickness across the entire slab. -
Compress the clay:
Use a rubber rib or a damp sponge to smooth the surface of the clay slab. This compression step aligns the clay particles and helps prevent warping during the drying process. -
Cut the squares:
Place your square template onto the clay. Using a Fettling knife or needle tool held vertically, cut around the template. For this project, you will need three matching squares. -
Smooth the edges:
Once cut, gently run your finger or a slightly damp sponge along the sharp edges of the squares to round them off just a little, removing any loose crumbs of clay.
Warping Worries
Tiles warping? Dry them extremely slowly. Flip them over every day during the drying process, and consider drying them on a wire rack to allow even airflow to the bottom.
Step 2: Carving the Design
-
Mark the center:
Use a ruler to lightly find the exact center of the tile. You don’t need to make a deep hole, just a tiny prick or faint impression with a needle tool to guide your lines. -
Draft the ‘X’ lines:
Lay your ruler diagonally from corner to corner. Lightly score a guide line connecting opposite corners. Repeat for the other diagonal so you have a large ‘X’ lightly drawn on the surface. -
Mark the parallel guides:
For the geometric effect, you need two parallel lines flanking the central diagonal. Measure about 1/4 inch away from your center line on both sides and lightly mark these parallel paths. -
Begin the primary carve:
Select a ribbon tool with a U-shaped tip. Place the tool at one corner and drag it steadily towards the center, following your central guide line. Do not cross the center point yet; stop right at the middle. -
Complete the central cross:
Carve from the opposite corner towards the center to meet your first cut. Repeat this for all four arms of the ‘X’ until the main cross is deeply established. -
Carve the parallel details:
Using the same consistent pressure, carve the parallel lines on either side of the main cross arms. I find it helps to hold my breath slightly while gliding the tool to verify the line stays straight. -
Clean up the debris:
Wait until the clay is leather-hard before cleaning up the crumbs. Once firm, use a stiff brush to sweep away the little clay burrs created by the carving tool. -
Create a hanging hole (Optional):
If you plan to hang these on a wall, poke a hole in the back or create a specialized angled notch on the reverse side while the clay is still leather-hard.
Step 3: Finishing and Glazing
-
Slow drying:
Sandwich your tiles between two pieces of drywall or cover them loosely with plastic to ensure slow, even drying. This is critical for flat tiles to prevent curling at the corners. -
Bisque fire:
Once bone dry, load the tiles into the kiln for a bisque firing (usually Cone 04). Ensure they are flat on the kiln shelf. -
Clean bisque ware:
Wipe the fired tiles with a damp sponge to remove any dust, which can prevent glaze from adhering properly. -
Apply glaze:
Brush or dip your tiles. Use a reddish-orange for the first, a teal green for the second, and a cream or clear matte for the third. Be careful not to let the glaze pool too thickly in the carved grooves. -
Final fire:
Fire the tiles again to the maturation temperature of your specific clay and glaze combination (e.g., Cone 5 or 6).
Inlay Effect
Before the final firing, wipe the glaze off the raised surfaces with a sponge, leaving color only deep in the carved grooves. This creates a stunning raw clay contrast.
Arranged together, these carved tiles bring a sophisticated touch of artisanal craftsmanship to your living space.
Hanging Moons, Stars, and Rainbows
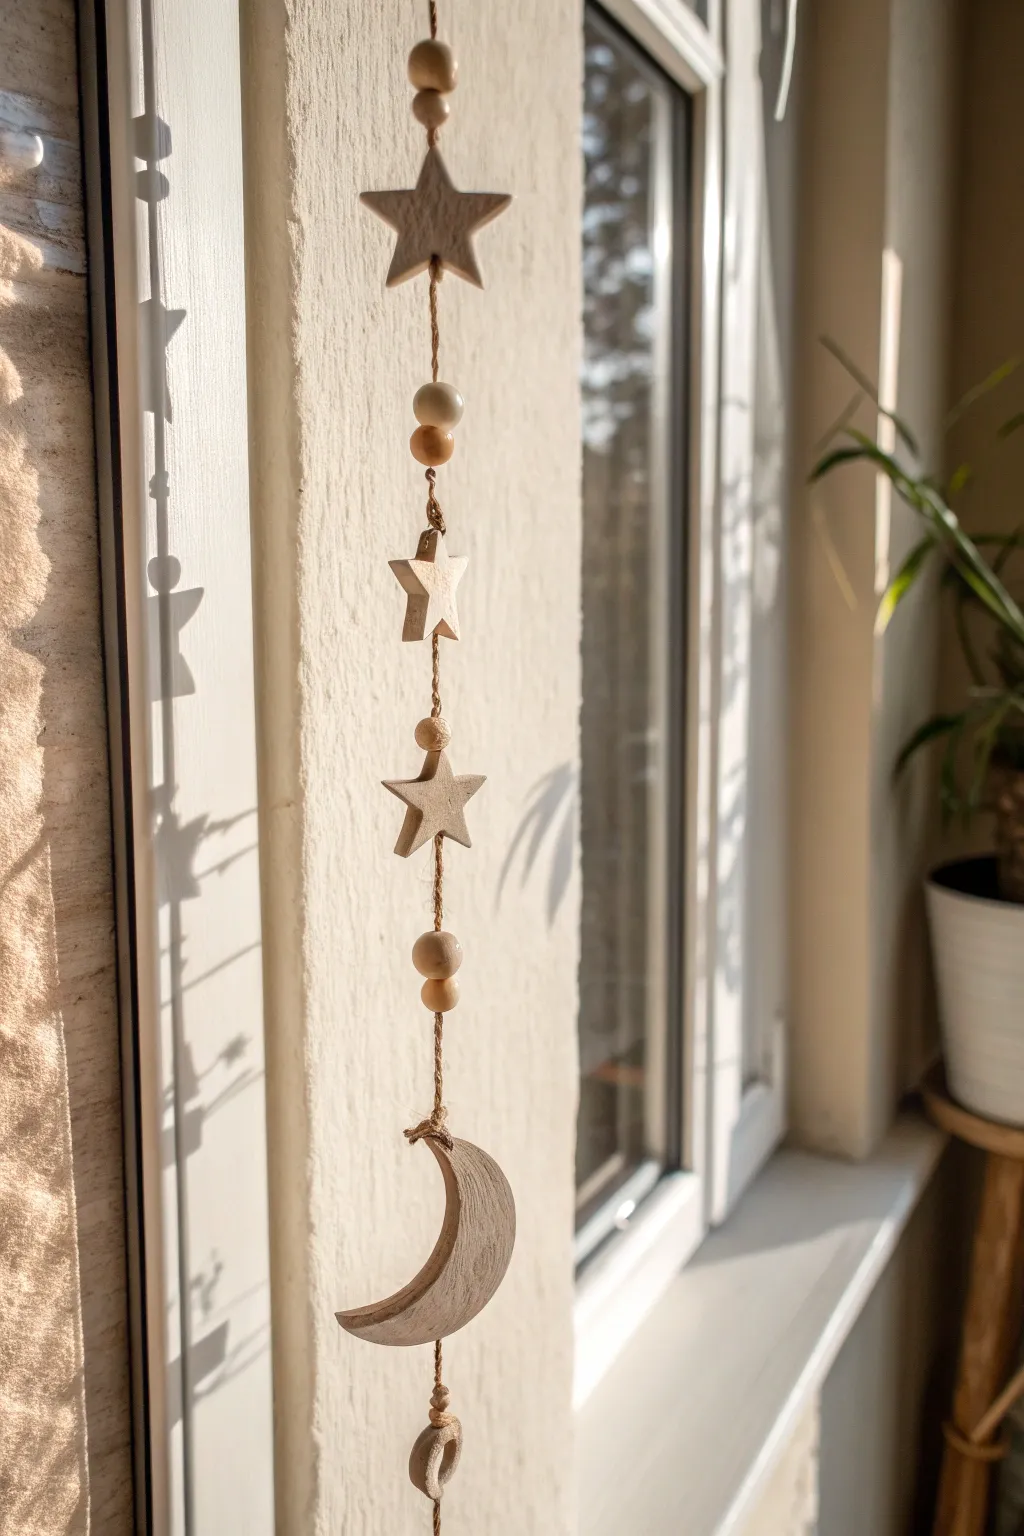
Bring a touch of the cosmos into your home with this serene, nature-inspired mobile. Featuring handcrafted clay stars and a crescent moon strung on rustic jute, it casts beautiful shadows when hung near a sunlit window.
Step-by-Step Tutorial
Materials
- Air-dry clay (white or natural stone color)
- Rolling pin
- Star-shaped cookie cutters (two sizes)
- Round cookie cutter (or a drinking glass)
- Knife or clay tool
- Wooden skewer or toothpick
- Jute twine or hemp cord
- Wooden beads (natural finish, various sizes)
- Fine-grit sandpaper
- Scissors
Step 1: Shaping the Elements
-
Prepare the clay:
Begin by kneading a good chunk of air-dry clay in your hands to warm it up and make it pliable. This helps prevent cracks later on. -
Roll it out:
On a smooth, clean surface, roll the clay out to an even thickness of about 1/4 inch. If you want a more rustic texture like the original, you don’t need to make it perfectly smooth. -
Cut the stars:
Use your cookie cutters to cut out one large star and two medium-sized stars. Gently push the clay out of the cutter to keep the points sharp. -
Create the crescent moon:
Cut a circle using your round cutter. Then, offset the cutter slightly over the same circle and cut again to slice off a crescent moon shape. Discard (or reuse) the remaining oval piece. -
Make the bottom loop:
Roll a small snake of clay and form it into a loose ring or irregular circular shape for the bottom weight. This piece adds a nice visual anchor to the design. -
Smooth the edges:
Dip your finger in a little bit of water and run it along the cut edges of all your shapes to smooth out any roughness or loose clay bits. -
Add holes for stringing:
Using your skewer, poke a hole vertically through the center of every star. For the moon, poke a hole near the top tip. For the bottom ring, poke a hole through the top arc. -
Let them dry:
Place all pieces on a drying rack or a sheet of parchment paper. I prefer to let them dry for at least 24-48 hours, flipping them halfway through to ensure even drying.
Smooth Surface Trick
To remove fingerprints before drying, lightly brush the wet clay with a tiny bit of water or baby oil. This creates that professional, porcelain-like finish.
Step 2: Finishing and Assembly
-
Sand for perfection:
Once fully dry and hard, use fine-grit sandpaper to gently buff away any sharp edges or uneven spots on the clay pieces. -
Prepare the cord:
Cut a long piece of jute twine, roughly 3 to 4 feet long. Fold it in half to create a loop at the top for hanging, and tie a knot about an inch down to secure the loop. -
Thread the top beads:
Thread two wooden beads onto the double strand of twine beneath your knot. Push them up snugly against the top knot. -
Attach the large star:
Thread the twine through the hole in the large star. To keep it in place, tie a knot in the twine immediately underneath the star. -
Add spacing beads:
Leave a few inches of space, then tie a knot. Thread two mixed-size wooden beads onto the twine and rest them on this new knot. This creates the spacing between elements. -
Attach the middle star:
Tie another knot a short distance below the beads. Thread your first medium star onto the twine, letting it rest on the knot. -
Repeat the pattern:
Leave another gap of string, tie a knot, add a single wooden bead, then tie another knot below it to hold the second medium star. -
Hang the moon:
Add two more wooden beads with a gap between them. Tie the twine securely through the hole in the crescent moon. -
Attach bottom anchor:
Drop down a few more inches below the moon, adding a final small bead if desired, and tie the irregular clay ring to the very bottom. -
Secure and trim:
Double-knot the very end of the twine securely. Trim any excess tail close to the knot for a clean finish.
Add Natural Scent
Mix a few drops of essential oil like lavender or cedarwood into the clay while kneading. Your mobile will release a gentle, calming scent as it hangs.
Hang your new creation in a bright spot and enjoy the peaceful vibe it brings to the room
Body-Inspired Mini Vases
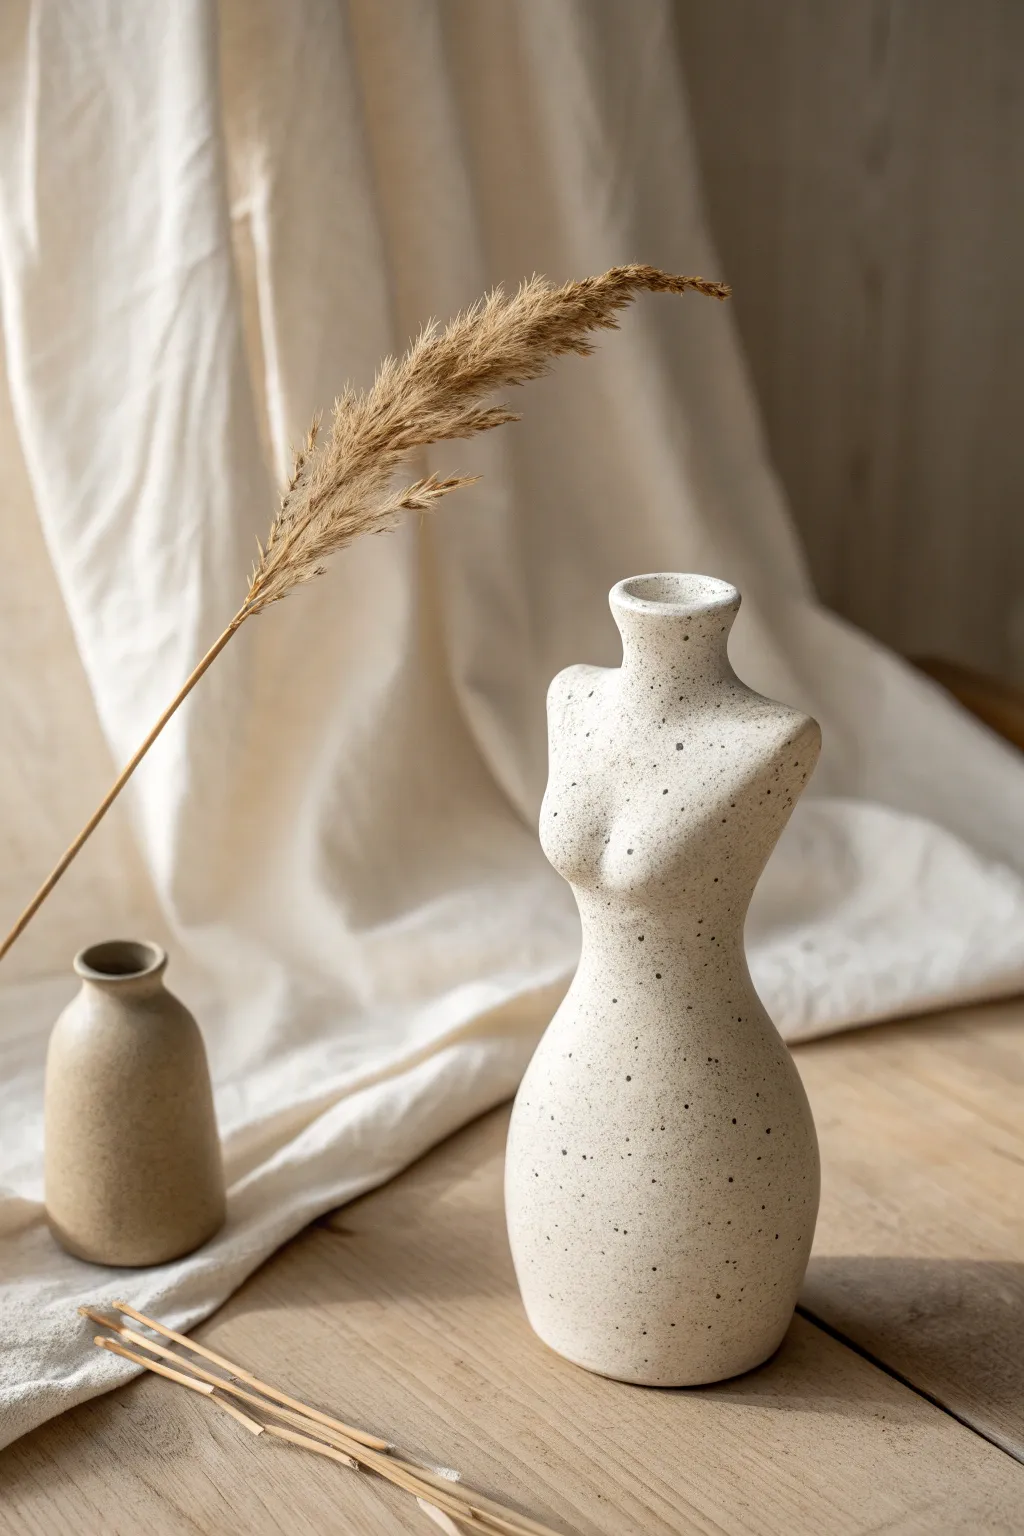
Capture the elegance of the human form with this minimalist body-inspired vase. Featuring a soft, speckled stoneware finish and graceful curves, this piece is perfect for holding a single dried bloom or standing alone as a sculptural accent.
Step-by-Step Guide
Materials
- Speckled stoneware clay (or white clay mixed with grog/black sand)
- Pottery wheel (optional, can be hand-built)
- Wooden modeling tools
- Metal rib kidney
- Needle tool
- Sponge
- Pottery wire
- Clear matte glaze (optional)
- Kiln
Step 1: Forming the Base Structure
-
Prepare the clay:
Begin with a ball of speckled stoneware clay about the size of a large orange. Wedge it thoroughly to remove air bubbles, ensuring the speckles are evenly distributed. -
Throw a cylinder:
Center your clay on the wheel and open it up, pulling the walls into a tall, narrow cylinder. Aim for a height of about 7-8 inches and a width of roughly 2.5 inches. Alternatively, build this cylinder using the coil method if you are hand-building. -
Shape the waist:
Using gentle pressure with your fingers or a rib tool, collar the clay inward at the midpoint of the cylinder to define the narrow waistline of the figure. -
Bulb out the hips:
From the inside of the cylinder, push the clay outward at the bottom section to create the rounded, voluminous shape of hips. Be careful not to make the walls too thin here. -
Form the chest area:
Above the waistline, push the clay outward slightly again to create the chest cavity, gently bringing the neck in tighter at the very top. -
Finish the rim:
Smooth and compress the rim of the vase. It should be slightly flared but mostly vertical, resembling a neck.
Step 2: Sculpting the Details
-
Dry to leather hard:
Allow the piece to dry until it is leather hard. This is crucial; the clay needs to be firm enough to handle sculpting without collapsing. -
Flatten the torso:
Gently gently press the front and back of the ‘chest’ area to flatten it slightly, moving away from a perfect cylinder into a more anatomical oval cross-section. -
Add volume for the bust:
Take two small, equal balls of soft clay. Score and slip the chest area, then attach these spheres to form the breasts. -
Blend the attachments:
Using a wooden modeling tool, blend the edges of the added clay seamlessly into the main body. I find using my thumb here helps create the most natural transition. -
Refine the shoulders:
Carve away slight amounts of clay or gently shape the top corners to suggest the slope of shoulders leading into the neck. -
Define the collarbone:
Use a small loop tool or a modeling stick to press subtle indentations near the base of the neck, suggesting the clavicle structure.
Anatomy Check
Step back often! Looking at your vase from a distance helps ensure the shoulders and hips are symmetrical before the clay hardens.
Step 3: Finishing Touches
-
Smooth the surface:
Use a damp sponge to smooth over all joining marks and fingerprints. The goal is a seamless, matte skin-like finish. -
Enhance speckles:
If using a grogged clay, wipe the surface firmly with a sponge to expose the texture and speckles, removing the fine clay slurry from the top layer. -
Dry completely:
Set the vase aside to dry slowly. Cover it loosely with plastic for the first day to ensure even drying between the thicker and thinner sections. -
Bisque fire:
Fire the piece in the kiln to a bisque temperature (usually Cone 04). -
Glaze application:
If you want the raw clay texture shown in the photo, skip a colored glaze. You can leave the outside unglazed for a matte look, or apply a very thin clear matte glaze to seal it. -
Glaze the interior:
Pour a clear liner glaze inside the vase, swirl it to coat, and pour out the excess. This ensures the vase is watertight for fresh flowers. -
Final firing:
Fire the kiln again to the final maturation temperature of your specific clay body (e.g., Cone 6 or Cone 10).
Uneven Drying?
If the neck dries faster than the thicker hips, wrap just the neck in a damp paper towel and plastic to slow it down and prevent cracking.
Now you have a stunning, sculptural vessel ready to display your favorite dried botanicals
Tiny Room Diorama Pieces
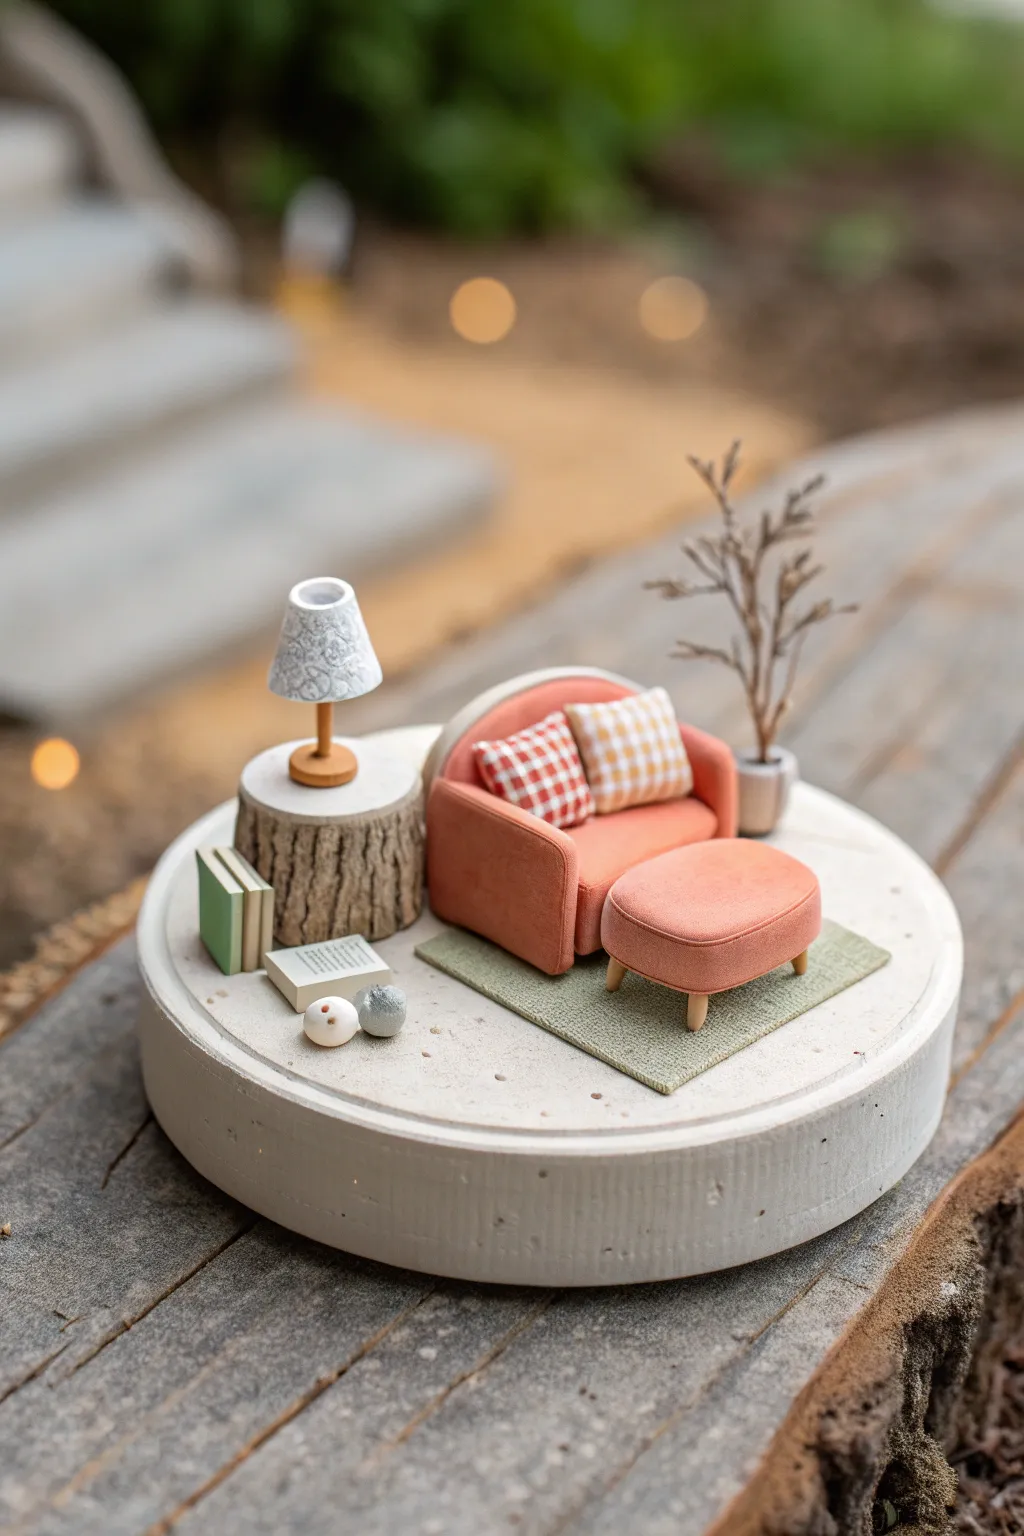
Create a cozy, pocket-sized sanctuary with this detailed clay diorama tutorial. This project combines polymer clay sculpting with mixed textures to craft a charming miniature living room scene complete with tiny furniture and décor.
Step-by-Step
Materials
- Polymer clay (terracotta/coral, white, brown, beige, green, grey, black)
- Air-dry clay or plaster (for the base)
- Circular mold or cookie cutter (approx. 4-5 inches)
- Texture tools (needle tool, toothbrush, sandpaper)
- Acrylic paints (fine detail brushes)
- Tacky glue or super glue
- Small piece of textured fabric or felt (green)
- Wire armature (for the tree)
- Rolling pin
- Dotting tool
Step 1: Setting the Foundation
-
Base Creation:
Start by pressing air-dry clay or plaster into your circular mold to create the thick platform. Smooth the top surface perfectly flat with a scraper. While the clay is still slightly damp, poke tiny random holes with a needle tool to mimic the porous texture of concrete, then let it dry completely—this usually takes 24 hours. -
Rug Preparation:
Cut a small rectangle from your textured green fabric or thin felt. If you don’t have fabric, you can roll out a very thin sheet of green polymer clay and texture it by pressing sandpaper onto the surface. Set this aside to size your furniture against later.
Step 2: Sculpting the Furniture
-
Armchair Base:
Mix coral or terracotta polymer clay to get that warm orange hue. Form a thick, rounded rectangular block for the seat cushion and a taller, curved piece for the backrest. -
Armchair Arms:
Roll two equal log shapes for the armrests. Flatten the sides slightly and attach them to the seat base, blending the seams with a clay tool so it looks like one upholstered piece. -
Chair Details:
Gently press a piece of sandpaper or a toothbrush against the clay surface to give it a fabric texture. This subtle step removes the ‘plastic’ look of the clay. -
The Ottoman:
Create an oval shape from the same coral clay for the footrest. For the legs, shape four tiny tapered cones from light wood-colored clay and gently press them into the bottom of the ottoman. If needed, insert tiny wire bits for stability. -
Textured Pillows:
Form two small squares of white/beige clay. Use a needle tool to score a grid pattern on one (for gingham) and lines on the other. You can paint the colored checks after baking, or use the cane technique if you are advanced.
Uneven Legs?
If your furniture wobbles, gently sand down the longer legs with an emery board or nail file after baking until the piece sits perfectly flat.
Step 3: Crafting Accessories
-
Stump Side Table:
Roll a cylinder of brown clay. Use a needle tool to drag deep, jagged vertical lines down the sides to simulate bark. Flatten the top and add concentric circle swirls for the wood grain. -
Tiny Books:
Roll out a thin sheet of white clay for pages and stack small rectangles. Wrap three sides with a thin layer of green or blue clay to create the hardcover binding. I find using a razor blade helps get sharp, crisp corners here. -
The Lamp:
Shape a cone for the lampshade using white clay—texture it with a lace imprint or stamps. Create a small wooden-style post and base for the stand, and attach the shade to the top. -
Decorative Plant:
Twist thin brown wire to create a small branching tree structure. Coat the wire lightly with brown clay or paint it. Set it into a tiny grey clay pot filled with ‘soil’ (textured brown clay).
Level Up: Lighting
Hide a tiny LED wire light inside the lampshade before baking (if the LED is heat safe) or drill a hole through the stump and base to feed a wire through for a working lamp.
Step 4: Assembly and Finishing
-
Baking:
Arrange all your polymer clay pieces (chair, ottoman, pillows, stump, lamp, books, plant pot) on a tile and bake according to package instructions. Let them cool completely. -
Painting Details:
Once cool, use acrylic paint to add the red checks to the pillows and a wash of dark brown over the tree stump to highlight the bark texture. Paint the book cover details and the lamp pattern if you didn’t texture it earlier. -
Final Arrangement:
Glue the green rug onto your concrete base first. Then, secure the armchair and ottoman on top of the rug. -
Placing Decor:
Glue the stump table next to the chair, place the lamp on top, and stack the books on the floor. Finish by adhering the potted tree behind the chair to balance the composition.
Place your miniature scene on a bookshelf or window ledge to enjoy a tiny moment of calm
Whimsical Mushroom House Sculptures
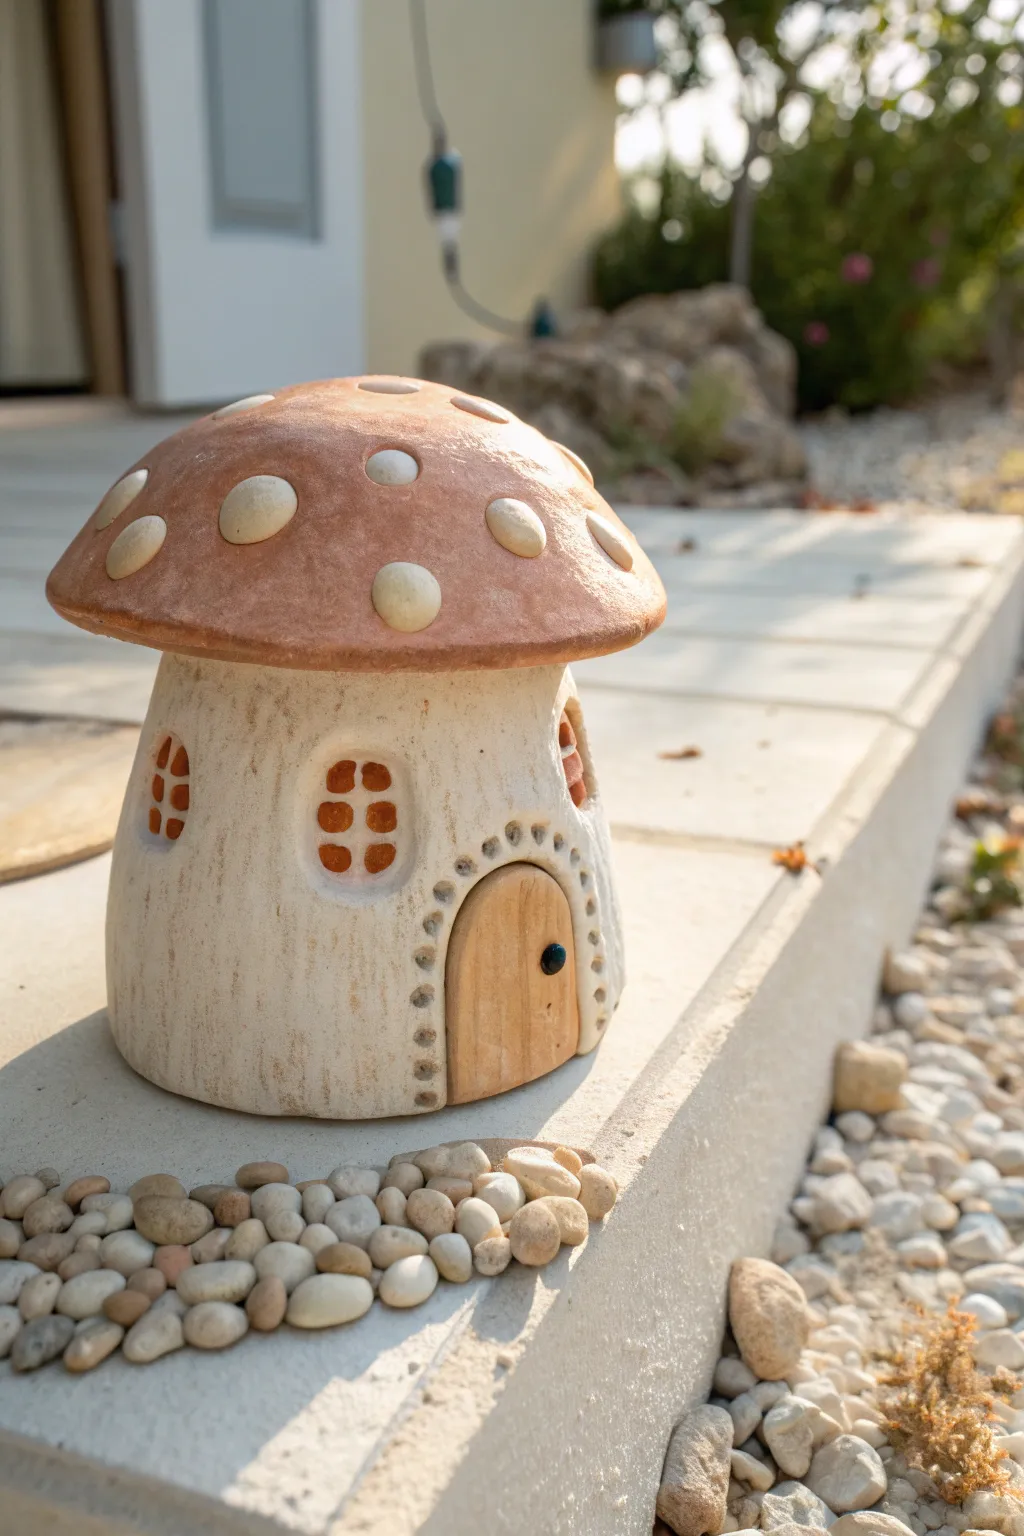
This enchanting little abode brings a touch of fairy-tale magic to any garden or shelf with its speckled toadstool roof and rustic, organic textures. The project combines hand-building techniques with careful surface detailing to create a charming, weathered mushroom house complete with tiny windows and a welcoming wooden door.
Step-by-Step Tutorial
Materials
- White or speckled stoneware clay body
- Rolling pin and guide sticks
- Pottery knife or fettling knife
- Needle tool
- Small round cutter or different sized caps
- Underglazes (terracotta/red-brown, dark brown)
- Small sponge
- Clear matte glaze
- Scoring tool or serrated rib
- Slip
- Small carving loop tool
- Black underglaze or glaze pencil
Step 1: Forming the Cottage Base
-
Roll the clay slab:
Begin by rolling out a medium-thick slab of your white clay, aiming for about 1/4 inch thickness. Ensure the surface is smooth but retain some of the clay’s natural grain for that rustic look. -
Cut the walls:
Cut a long rectangle from your slab. The height of the rectangle will determine the height of your house walls, and the length will determine the circumference. -
Create the cylinder:
Curve the rectangle into a wide, slightly tapered cylinder. Overlap the edges, score both sides thoroughly, apply clay slip, and press them firmly together to create a seamless join. -
Shape the form:
Gently paddle or shape the cylinder so it is slightly wider at the bottom and tapers inward toward the top, mimicking a natural mushroom stem stalk. -
Texture the walls:
Drag a serrated rib or a stiff brush vertically up the sides of the cylinder to create subtle striation marks, giving the impression of organic growth and age.
Clean Spot Edges
For crisp mushroom spots, paint the roof color first, let it dry, then scratch away any paint that got on the spot areas before attaching the white clay discs.
Step 2: Building the Mushroom Roof
-
Form a pinch pot:
Take a large ball of clay and create a wide, shallow pinch pot. This will serve as the mushroom cap. Smooth the interior, but keep the walls fairly thick to support the overhang. -
Refine the curve:
Turn the pinch pot upside down and gently paddle it into a smooth, domed shape. The edges should curve downward slightly to protect the house below. -
Add the spots:
Roll out several small, irregular balls of clay and flatten them into discs. Score and slip these onto the roof dome in a random layout, pressing them down so they adhere seamlessly but remain raised. -
Attach the roof:
Score the top rim of your wall cylinder and the corresponding underside of the roof. Apply slip and press the roof firmly onto the base. Blend the clay on the inside seam if your hand fits, or use a tool to ensure a strong connection.
Sagging Roof?
If the roof is heavy and sagging during construction, ball up some newspaper or paper towels and stuff them inside the house to support the dome until it stiffens.
Step 3: Carving Details and Finishing
-
Carve the windows:
Use a small loop tool or needle tool to carve out arched window shapes. Leave a cross-bar of clay in the center like a mullion, or carve the openings completely and add tiny clay coils for the frames later. -
Sculpt the door frame:
Roll a very thin coil of clay. Score a door shape at the base of the house and attach the coil to create a defined archway. Use a needle tool to add small indentations around the arch to simulate stonework or rivets. -
Create the door:
Shape a small slab of clay to fit inside your door frame. Use a tool to draw vertical lines simulating wood grain. Roll a tiny ball of clay and attach it as a doorknob, painting it black later. -
Apply roof color:
Once the clay is leather hard, apply a terracotta or red-brown underglaze to the roof cap, carefully painting around the raised white spots. I find a smaller brush helps keep the edges of the spots clean. -
Antique the walls:
Water down a dark brown underglaze and wash it over the walls and door. Immediately wipe it back with a damp sponge so the color remains only in the recessed textures and window frames. -
Final drying:
Allow the entire piece to dry slowly under loose plastic to prevent the heavy roof from causing cracks at the seam. -
Bisque fire:
Fire the piece to bisque temperature (usually Cone 04) once fully bone dry. -
Glaze and final fire:
Apply a clear matte glaze to the entire piece to seal it without making it too shiny. Fire to the final temperature appropriate for your clay body.
Place your finished cottage among some potted plants or pebbles to complete the charming look