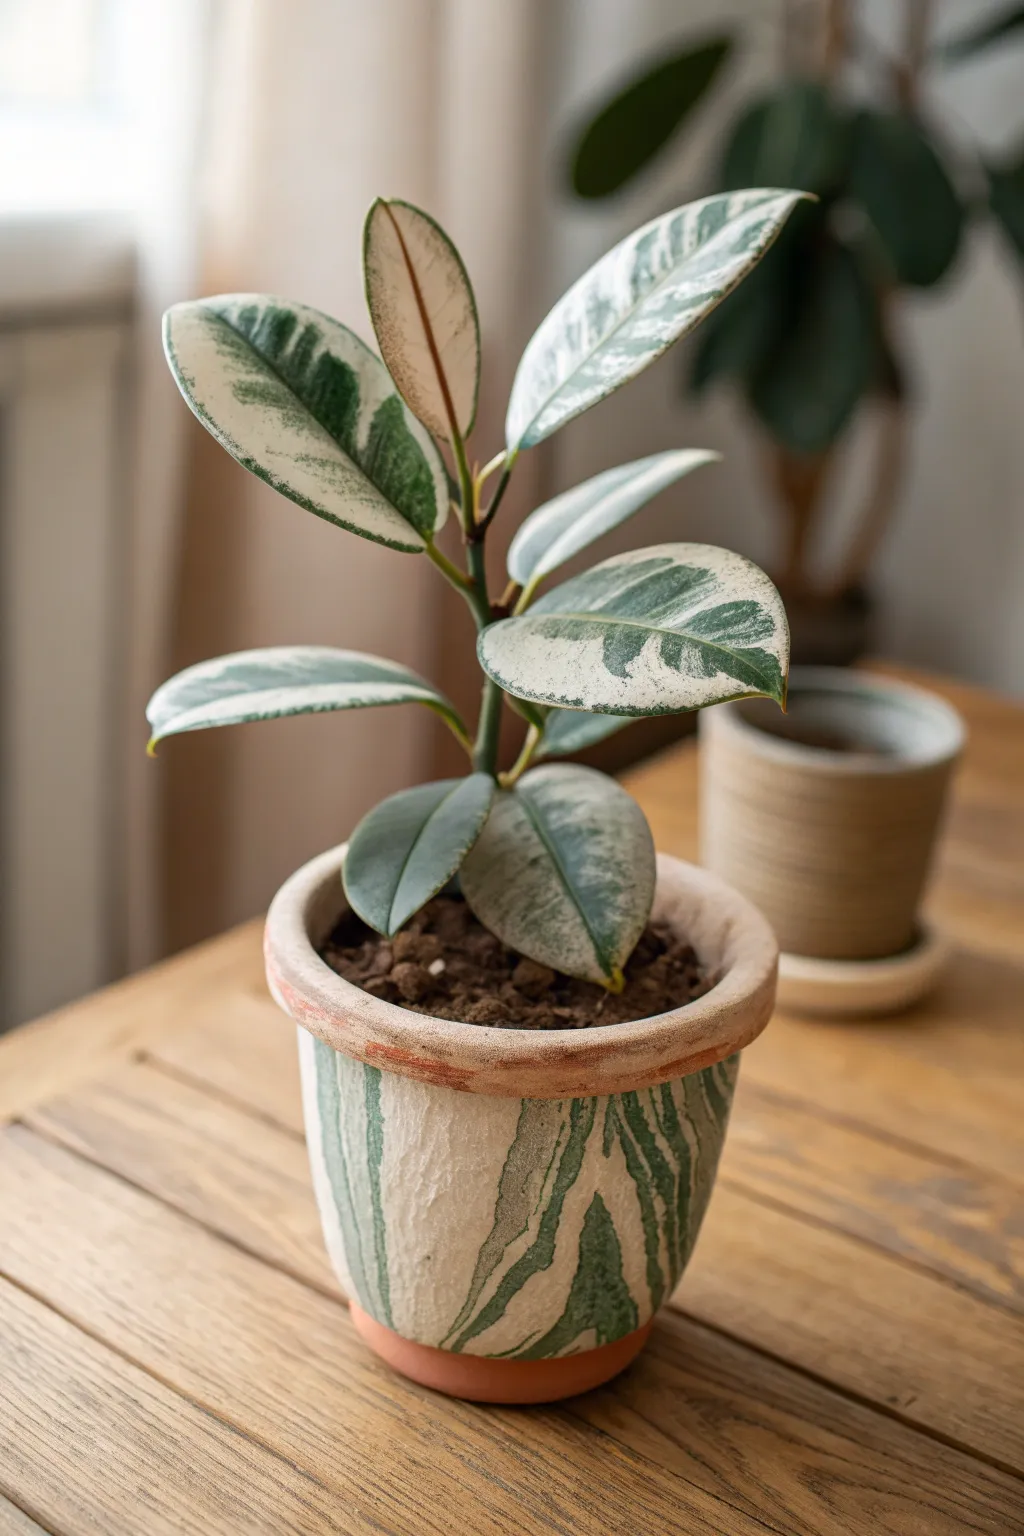
If you’re craving a little greenery that never needs watering, these clay plant ideas are about to become your favorite studio obsession. I’m talking mini succulents, tiny cacti, and sweet little potted plants you can make with polymer clay or air-dry clay.
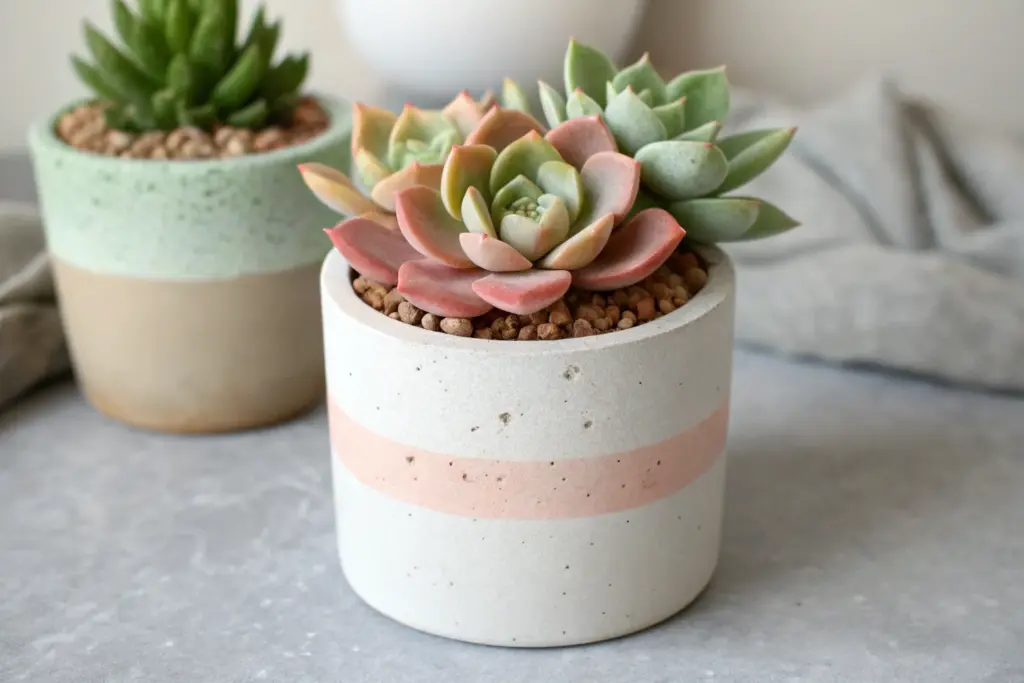
Mini Succulent Rosettes in Tiny Pots
Create your own evergreen garden with these ultra-realistic succulent rosettes sculpted from polymer clay. Nestled in miniature terracotta pots, these tiny beauties capture the soft, matte finish and subtle ombre coloring of real desert plants without any of the watering requirements.
How-To Guide
Materials
- Light green polymer clay (translucent and opaque)
- White polymer clay
- Soft pastel chalks (pink, purple, dark green)
- Small paintbrush (for applying chalk)
- Needle tool or toothpick
- Ball stylus tool
- Miniature terracotta pots (1.5 – 2 inch)
- Brown polymer clay or dried coffee grounds (for ‘soil’)
- Liquid polymer clay or craft glue
- Gloss varnish (optional, for center leaves)
- Oven for baking
Step 1: Preparing the Clay and Base
-
Mix your base color:
Start by conditioning your light green polymer clay. To get that realistic, slightly milky succulent look, I prefer to mix one part translucent clay with three parts opaque light green, adding a pinch of white to soften the hue. -
Prepare the pots:
Fill your miniature terracotta pots with a ball of scrap clay or brown clay to act as a base. Press it down so it sits just below the rim. -
Create the soil texture:
Texture the brown clay surface with a stiff brush or a ball of aluminum foil. Alternatively, brush a layer of liquid clay on top and sprinkle dried coffee grounds for an ultra-realistic dirt effect.
Pro Tip: Fingerprints
Dust your fingertips with cornstarch before handling the leaves. This prevents visible fingerprints on the clay and gives the finished succulent a natural, powdery matte texture.
Step 2: Sculpting the Leaves
-
Form leaflike teardrops:
Roll your green clay mixture into a thin log. Slice off varied sizes of clay bits—small for the center, medium for the middle layers, and larger for the outer leaves. Roll each bit into a teardrop shape. -
Flatten and shape:
Place a teardrop on your palm and flatten it gently with your thumb or a ball tool. Press the wider end thinner than the pointed end to create a delicate leaf edge. -
Curve the leaves:
Use your finger to gently curve the leaf so it cups slightly upwards, mimicking the natural turgidity of a succulent leaf. Repeat this process until you have about 20-30 leaves per plant. -
Pinch the tips:
For the pointed varieties like Echeveria, gently pinch the very tip of each leaf to create a sharp, defined point.
Troubleshooting: Drooping
If leaves droop during assembly, the clay is too warm. Pop the leaves in the fridge for 5 minutes to firm them up before attaching them to the main rosette body.
Step 3: Adding Color Depth
-
Prepare the pastels:
Scrape your soft pastel chalks into fine powder using a craft knife. You’ll want a soft pink, a dusty purple, and a darker green. -
Apply shading:
Before assembling, use a soft brush to dust the tips of your leaves with the pink or purple powder. This creates that sun-stressed look common in succulents. -
Darken the base:
Dust the very bottom (narrow end) of the leaves with a tiny bit of dark green powder to suggest shadow where they connect to the stem.
Step 4: Assembly and Baking
-
Start the center:
Take three of your tiniest leaves and press them together at the base to form a tight bud. This will be the center of your rosette. -
Add the first layer:
Attach the next size of leaves around the bud in a spiraling pattern. Ensure each new leaf covers the seam between two leaves from the previous row. -
Build outward:
Continue adding larger leaves as you move outward, slightly opening the angle of the leaves so the rosette looks like it is blooming. -
Plant the rosette:
Once the rosette is the desired size to fit your pot, press it firmly onto the prepared ‘soil’ base in your terracotta pot. Use a drop of liquid clay to secure it if necessary. -
Create variety:
Make a few variations. For the spikier plant in the back, roll longer, thinner teardrops and assemble them more vertically. -
Bake the project:
Place the pots on a baking sheet. Bake according to your polymer clay manufacturer’s instructions—usually around 275°F (135°C) for 15-30 minutes. -
Cool and finish:
Let the pots cool completely inside the oven to prevent cracking. Once cool, you can lightly brush the very center of the rosettes with a semi-gloss varnish to mimic new, waxy growth.
Arranging these little clay masterpieces on a windowsill creates a serene vignette that stays perfectly green year-round


Chunky Mini Cactus Trio With Spines

These adorable faux succulents bring the charm of desert greenery to your windowsill without the need for watering or prickles. Using polymer or air-dry clay, you’ll sculpt three distinct chunky cacti with soft, textured spines and clean white pots.
Step-by-Step Guide
Materials
- Polymer clay (Sage Green, Olive Green, White, and Terracotta or Beige)
- Small rolling pin or acrylic roller
- Essential sculpting tools (needle tool, ball stylus, rubber shaper)
- Liquid clay (like Bake & Bond) or PVA glue for air-dry clay
- Texture sponge or toothbrush
- Foil (for armatures)
- Fine grit sandpaper
- Acrylic paint (optional, for shading)
- Matte spray varnish
Step 1: Sculpting the Pots
-
Form the base:
Start by conditioning a large ball of white clay. Divide it into three equal portions. Roll each portion into a smooth cylinder, about 1.5 to 2 inches wide. -
Add the rim:
Roll out a separate long snake of white clay. Flatten it slightly with your roller to create a consistent strip. -
Attach the rim:
Wrap this flattened strip around the top edge of your cylinder to create the distinct rim of the pot. Smooth the seam well with a rubber shaper so it looks seamless. -
Create the soil:
Press a small disk of terracotta or beige clay inside the top of the pot to act as the “soil” surface. Texture this roughly using a stiff toothbrush to simulate grainy earth.
Drooping Cactus?
If your tall cactus starts to lean while working, insert a piece of raw spaghetti or a toothpick through the specific column into the pot base for internal support during baking.
Step 2: The Round Ribbed Cactus (Left)
-
Shape the body:
Roll a ball of olive green clay, slightly smaller than the pot diameter. Press a small dent into the bottom so it sits securely on the soil surface. -
Mark the ribs:
Using the side of a knitting needle or a modeling tool, press vertical indentations from the top center down to the base to create deep lobes or ribs. -
Add spine clusters:
Roll extremely tiny balls of white clay. Press these gently along the ridges of the ribs in even rows. Use a needle tool to dimple the center of each white dot.
Make It Realistic
Before baking, use soft pastel chalk shavings and a fluffy brush to dust the crevices of the green cacti with a darker green or brown for instant depth and shadow.
Step 3: The Tall Columnar Cactus (Right)
-
Create the armatures:
For taller pieces, I like to create a small core of crumpled foil first. Cover two foil cylinders (one taller, one shorter) with a sheet of sage green clay. -
Join the columns:
Attach the shorter column to the side of the taller one. Use liquid clay or slip to ensure a strong bond between them. -
Texture the ridges:
Instead of deep lobes, use a needle tool to score shallow vertical lines all around the columns. -
Apply the vertical spines:
Roll very thin strings of white clay. Lay them vertically along the scored lines you just made. Gently press them down so they adhere but remain raised. -
Detail the spines:
Use a heavy needle tool to press periodic distinct notches into those white vertical strips, giving them a segmented, spine-like appearance.
Step 4: The Petite White Cactus (Front)
-
Form the pale body:
Mix a tiny amount of beige into white clay to get an off-white, creamy color. Roll this into a small, squat sphere. -
Create raised ribs:
Instead of carving in, we will add on. Roll thin snakes of the same creamy clay and lay them vertically over the sphere, spacing them evenly. -
Texture the ribs:
Use a fast, stippling motion with a needle tool along the spine of the added ribs to create a fuzzy, highly textured look. -
Assemble and Bake:
Place all cactus bodies onto their respective pots. If using polymer clay, bake according to the package instructions (usually 275°F for 15-30 minutes). -
Finishing touches:
Once cool, inspect your pieces. A quick dusting of matte varnish will seal the clay and remove any shiny fingerprints, leaving a realistic matte finish.
Enjoy arranging your new low-maintenance garden on your desk or bookshelf for a permanent touch of nature


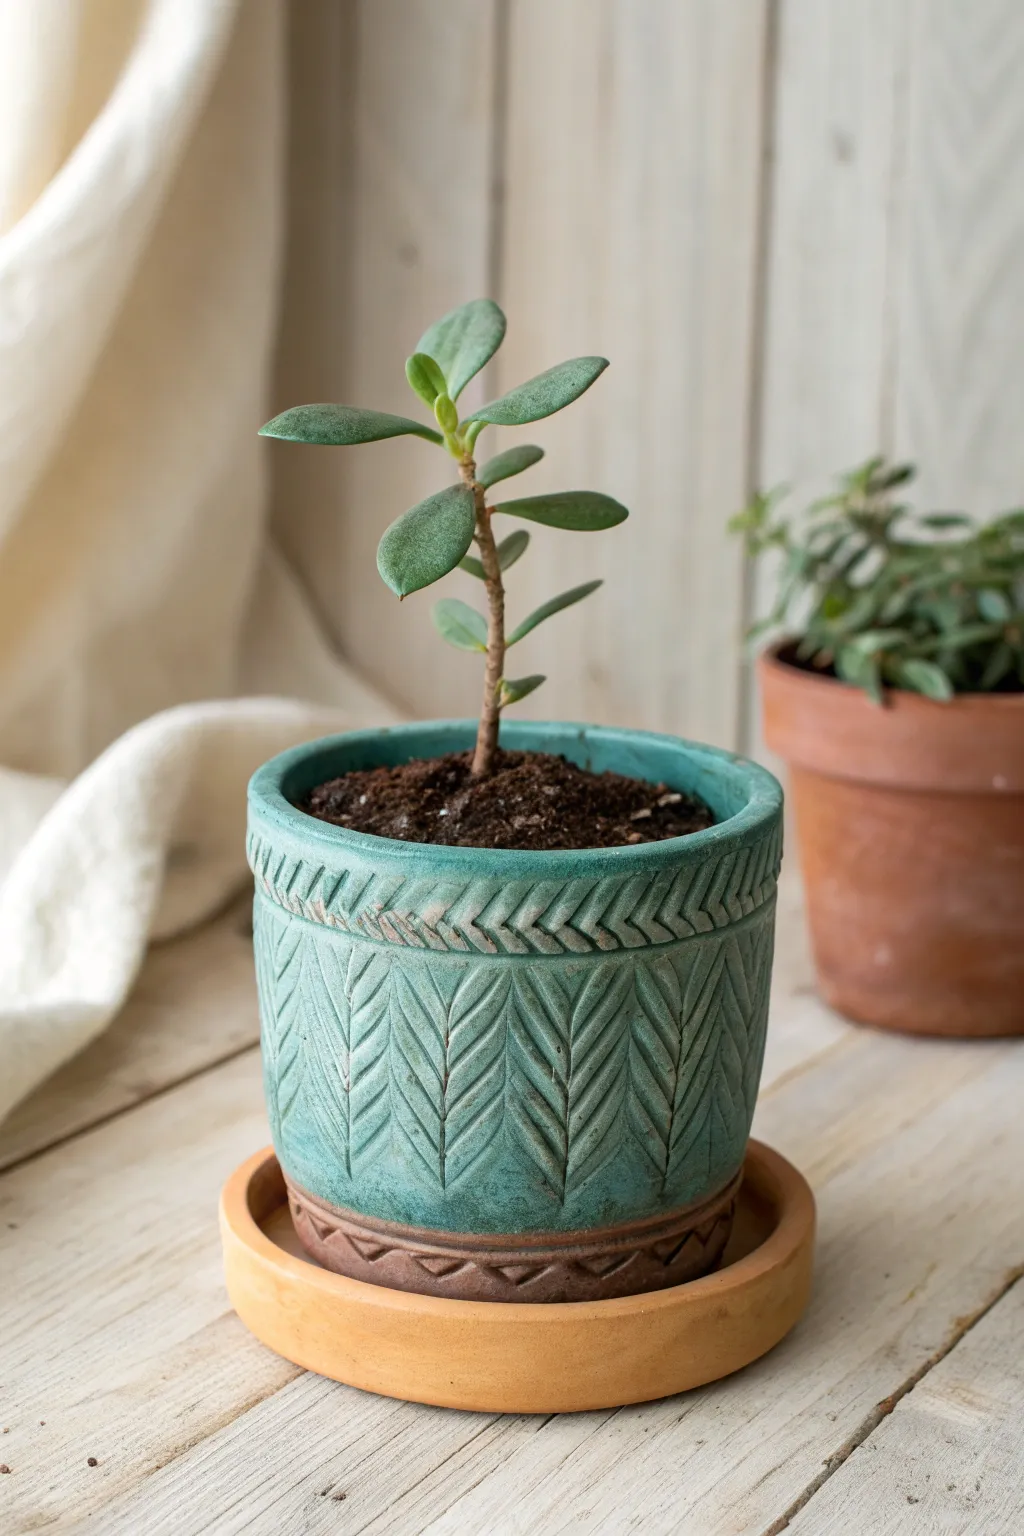
Aloe and Snake Plant Spikes for Height
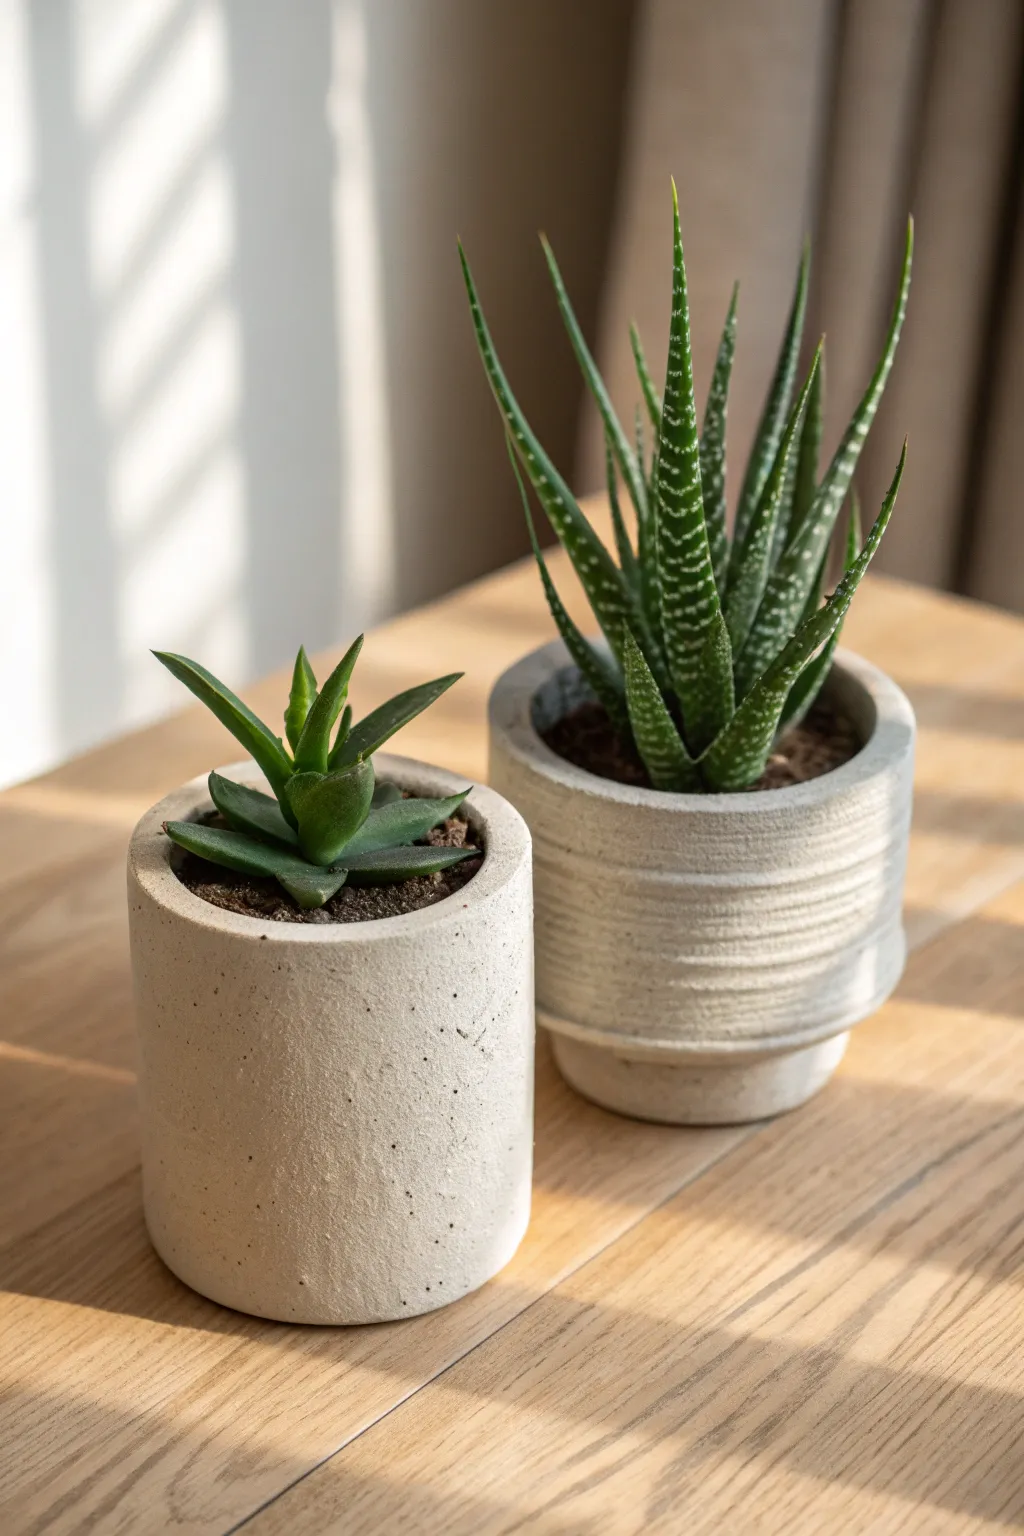
These charming, minimalist planters mimic the heavy, industrial look of concrete but are surprisingly lightweight and easy to craft. Using air-dry clay and clever texturing techniques, you can build custom homes for your favorite prickly succulents that fit perfectly on any sun-drenched windowsill.
How-To Guide
Materials
- Stone-gray air-dry clay (or white clay mixed with gray acrylic)
- Small rolling pin
- Craft knife or clay cutter
- Circular cookie cutters (or a glass) for base templates
- Coarse sandpaper (80 grit)
- Old toothbrush or stippling sponge
- Acrylic paints: black, white, and raw umber
- Matte spray sealant
- Water in a spray bottle
- Small plastic cups (to use as forms/molds)
- Succulent potting soil
Step 1: Forming the Smooth Cylinder Pot
-
Prep the clay:
Begin by conditioning a generous handful of stone-gray clay. Knead it until it is warm and pliable, ensuring there are no air bubbles trapped inside. -
Roll the slab:
Roll the clay out into a long, rectangular slab about 1/4 inch thick. Aim for a consistent thickness to mimic the walls of a cast concrete pot. -
Cut the base:
Using a circular cutter or a glass as a guide, cut out a circle for the base of your pot. -
Measure the walls:
Measure the circumference of your base circle. Cut a rectangular strip from your slab that matches this length, plus a tiny bit of overlap for joining. -
Assemble the cylinder:
Wrap the rectangular strip around the circular base. Carefully stand it up, joining the two ends of the strip together. -
Blend the seams:
Using a little water on your fingertip, smooth the vertical seam where the wall connects. Then, blend the clay downwards to seal the wall to the base circle, ensuring it’s watertight. -
Refine the shape:
Place a small plastic cup inside the pot to help it hold a perfect circular shape while you work on the exterior.
Concrete Consistency
Mix a pinch of real sand or dried coffee grounds directly into your clay before rolling it. This adds internal texture that looks incredibly authentic when dry.
Step 2: Creating the Textured Banded Pot
-
Build the base shape:
Repeat the process for the second pot, but this time, create a slightly taller cylinder. You can flare the bottom slightly inward to create that subtle pedestal look seen in the taller aloe pot. -
Add texture bands:
Using a sculpting tool or the back of a knife, gently score horizontal lines around the pot. Do not cut all the way through; just create grooves to simulate a stacked or turned concrete effect. -
Roughen the surface:
To get that gritty, realistic cement look, tap the exterior of both pots firmly with an old toothbrush or a ball of coarse sandpaper. This removes the tell-tale smoothness of the clay.
Step 3: Concrete Finish & Planting
-
Dry completely:
Allow both pots to dry for at least 24 to 48 hours. I find that turning them upside down halfway through helps the bases dry evenly. -
Create the speckle:
Mix a very watery wash of black acrylic paint. Load an old toothbrush with the paint and flick the bristles with your thumb to spray fine black specks over the dried clay. -
Add dimension:
Do a second pass of speckling with white paint to add depth to the faux stone texture. -
Seal the deal:
Once the paint is dry, coat the inside and outside with two layers of matte spray sealant. This is crucial to protect the clay from moisture during watering. -
Plant:
Fill your new pots with succulent-specific soil and nestle your aloe or spiky succulents in place, pressing the soil down firmly around the roots.
Pedestal Pop
Make a matching saucer! Cut a clay circle just larger than the pot base, add a small rim, and paint it to match for a cohesive, high-end nursery look.
Place these on a sunlit table to enjoy the contrast between the soft green leaves and the sturdy industrial pots


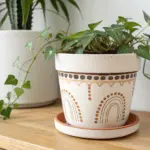
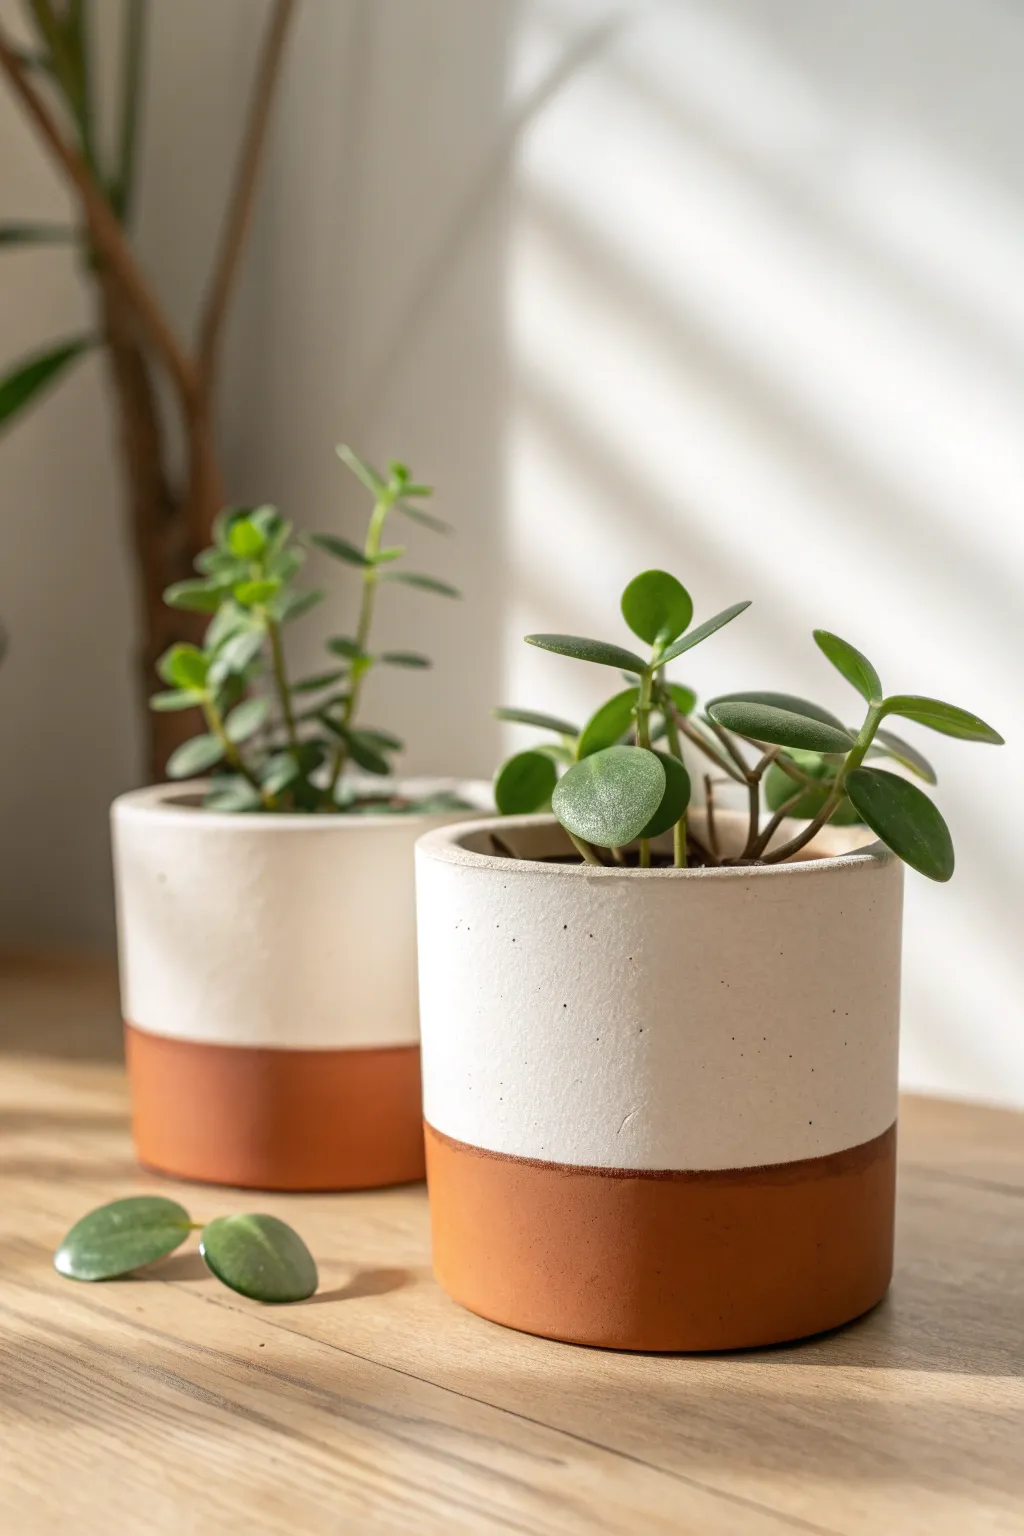
Mixed Mini Clay Plant Shelf Set
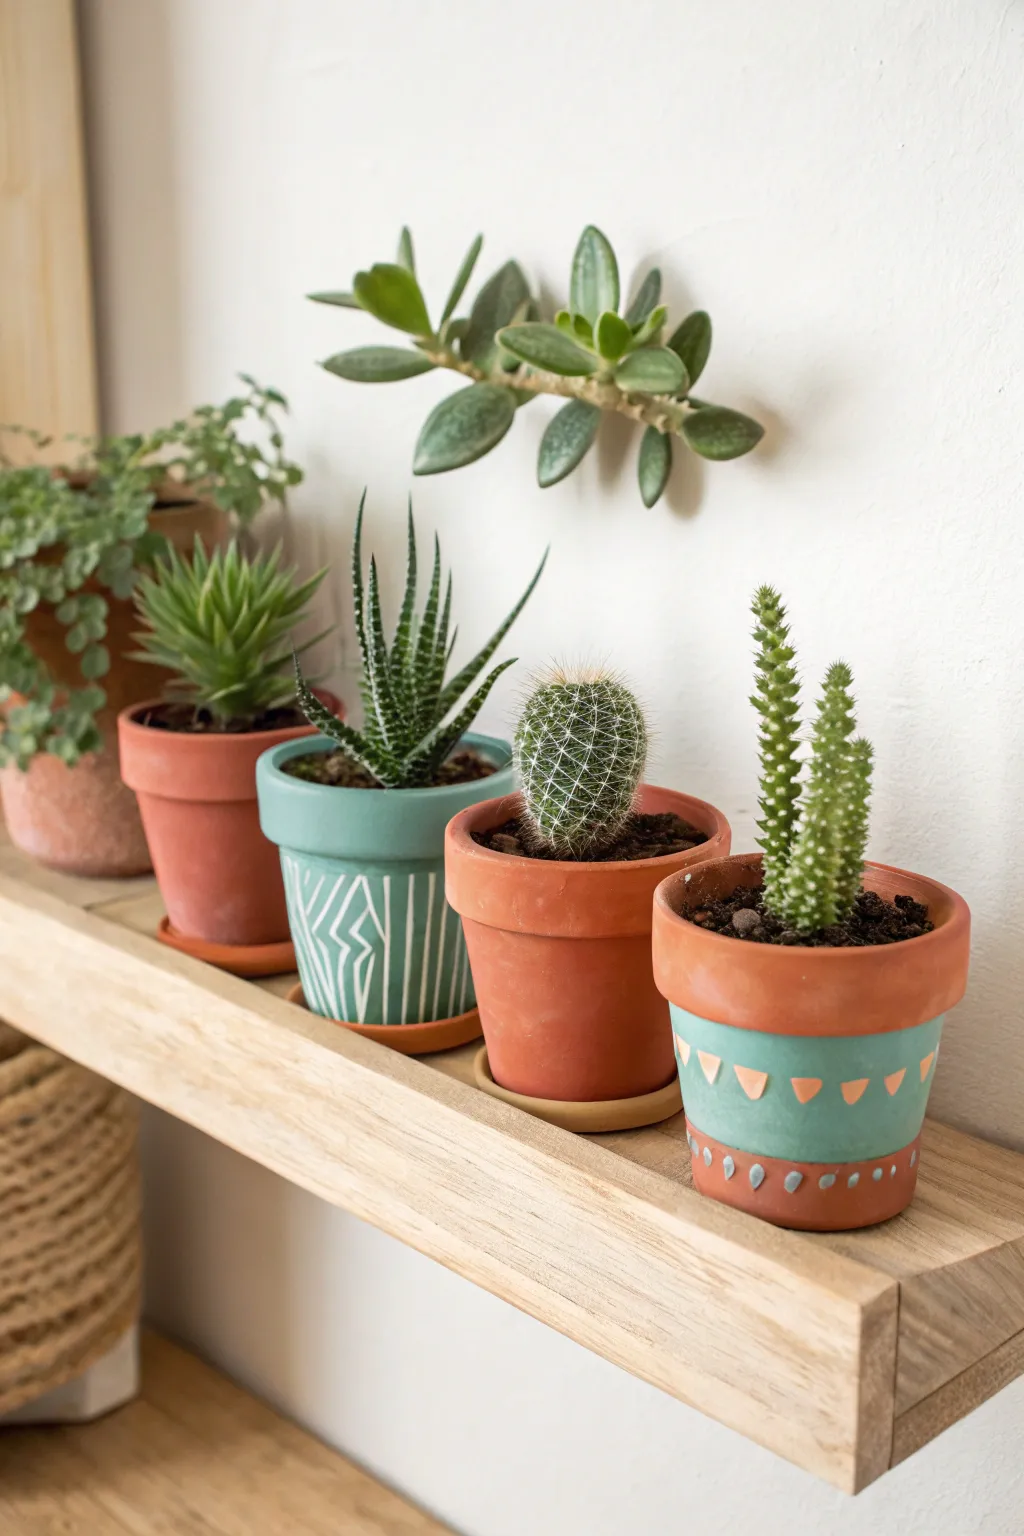
Transform ordinary terracotta pots into a stylish vignette with just a splash of paint and some simple geometric patterns. This set combines earthy clay tones with refreshing teal and white accents for a modern, desert-inspired look.
Step-by-Step
Materials
- 3 small terracotta pots (approx. 3-4 inches)
- 3 matching terracotta saucers
- Acrylic craft paint (teal, white, peach/terracotta)
- Flat paintbrush (medium width)
- Fine detail paintbrush (round)
- Painter’s tape or washi tape (optional)
- Pencil
- Water cup and paper towels
- Clear matte sealer spray
Step 1: Preparation & Base Coats
-
Clean the surface:
Before painting, wipe down your terracotta pots with a damp cloth to remove any dust or manufacturing residue. Let them dry completely, as terracotta is porous and holds moisture. -
Paint the first pot teal:
Take your first pot and paint the entire exterior with the teal acrylic paint, leaving the top rim natural if you prefer a bordered look. Apply two coats for solid, opaque coverage. -
Paint the second pot teal:
For the third pot in the arrangement (the one on the far right), paint a wide band of teal around the middle section. Leave the top rim and the very bottom base exposed as raw terracotta. -
Create a wash look (optional):
For the middle pot, which appears more natural, you can either leave it bare or mix a tiny drop of white paint with water to create a very subtle whitewash, softening the orange hue. -
Let everything dry:
Allow all base coats to dry fully. I usually give them about 20-30 minutes to ensure the paint doesn’t lift when we add details.
Clean Lines Hack
For the color-blocked pot on the right, wrap a rubber band or painter’s tape around the pot to get a perfectly straight line for the teal section.
Step 2: Geometric Details
-
Sketch the ‘Lightning’ pattern:
On the fully painted teal pot, use a pencil to lightly sketch vertical lines and zigzag geometric shapes around the body of the pot. Don’t press too hard. -
Paint the white lines:
Using your fine detail brush and white acrylic paint, trace over your pencil lines. Keep your hand steady and reload the brush often to get crisp, solid lines. -
Add vertical stripes:
Fill in the rest of that pot’s design with simple vertical white stripes. Varying the spacing slightly adds to the hand-drawn charm. -
Start the triangle pattern:
Moving to the partially painted pot (the one on the right), dip your small brush into peach or terracotta-colored paint. Paint a row of small, inverted triangles along the top edge of the teal band. -
Add the dot details:
Using the back end of your paintbrush handle dipped in grey or light blue paint, stamp small dots along the bottom edge of the teal band on that same pot. -
Clean up edges:
If any paint went astray, use a damp Q-tip to wipe it off the raw terracotta areas, or use your base color to touch up mistakes.
Step 3: Finishing Touches
-
Seal the pots:
Once all designs are completely dry (give it at least an hour), take the pots to a well-ventilated area and spray them with a clear matte sealer. This protects the paint from water damage when you water your plants. -
Prepare the saucers:
You can leave the saucers natural, or paint the rim of one teal to tie the set together visually. -
Final assembly:
Place your pots on their saucers and they are ready for planting.
Level Up: Texture
Mix a teaspoon of baking soda into your acrylic paint before applying the base coat. This creates a trendy, ceramic-like matte texture on the pot.
Arrange your trio on a sunny shelf and enjoy your custom mini garden

The Complete Guide to Pottery Troubleshooting
Uncover the most common ceramic mistakes—from cracking clay to failed glazes—and learn how to fix them fast.
Faux Soil Tops With Pebbles and Crumbs
Transform a simple clay potted plant into a botanical masterpiece with a hyper-realistic soil texture. Using a clever mix of dried clay crumbs and strategically placed pebbles, you can achieve a grounded, earthy look that rivals the real thing.
Detailed Instructions
Materials
- Air-dry clay or polymer clay (terracotta color)
- Dried coffee grounds or dried tea leaves
- Texture paste or brown acrylic paint
- Small pebbles or coarse sand
- White or tacky craft glue
- Old toothbrush or stiff bristle brush
- Small palette knife or spatula
- Matte varnish or sealant
- Previously made clay plant stem and leaves
- Small clay pot (pre-made or store-bought)
Step 1: Preparing the Base
-
Fill the foundation:
Begin by filling your terracotta pot with a base of scrap clay or crumpled foil, leaving about half an inch of space from the rim. This saves on your good materials and keeps the project lightweight. -
Create the soil mound:
Roll a ball of dark brown clay that fits snugly into the pot opening. Gently press it down onto your base, shaping it into a slight dome in the center to mimic how potting mix naturally settles around a plant stem. -
Insert the plant:
While the clay mound is still soft, use a needle tool to poke a pilot hole in the center. Insert your pre-made clay plant stem securely. You can add a drop of super glue here if you need extra stability.
Loose crumbs everywhere?
If your soil keeps shedding after drying, apply a mix of 50/50 water and matte mod podge over the top with a dropper. It will soak in and harden invisibly.
Step 2: Creating the Soil Texture
-
Prepare the adhesive layer:
Mix a generous amount of tacky glue with a small dab of dark brown acrylic paint. This creates a mud-colored adhesive that won’t show white spots if your soil coverage isn’t perfect. -
Apply the mixture:
Using an old brush you don’t mind ruining, coat the top of your clay mound with the glue mixture. Be careful to get right up to the stem without painting the plant itself. -
Make clay crumbs:
Take a piece of dried brown clay and grate it against a sieve or use a craft knife to chop it into fine dust and larger chunks. I like to mix this with actual dried coffee grounds for a truly convincing, organic texture. -
Dust the surface:
Sprinkle your clay crumb and coffee ground mixture over the wet glue. Press it down very gently with your finger or a flat tool to ensure good contact. -
Clear the excess:
Turn the pot upside down and give it a gentle tap to dislodge any loose particles that didn’t stick.
Add mossy vibes
Mix finely chopped green flocking powder with your soil crumbs before gluing. This adds subtle green specks that look like inevitable moss growth.
Step 3: Adding Detail and Dimension
-
Place focal pebbles:
Select 3-4 distinctively shaped small pebbles. Dip the bottom of each into your glue and press them firmly into the faux soil. Try to nestle them slightly so they look buried, not just floating on top. -
Simulate moisture:
Mix a tiny amount of water with black acrylic wash. Dab this randomly onto the soil surface to create darker patches, simulating where the soil would be damp from watering. -
Dry brushing:
Once the previous layers are dry, take a clean, dry brush with a tiny amount of light tan paint. lightly whisk it over the highest points of the clay crumbs to highlight the texture. -
Weathering the pot:
If your terracotta pot looks too new, dab a sponge with diluted white paint and gently blot the rim and sides. This mimics mineral buildup found on aged planters. -
Clean the stem:
Check the base of your green plant stem. If any soil crumbs are stuck too high up the stalk, gently scrape them away with a toothpick for a tidy finish. -
Scatter loose debris:
For added realism, glue a few loose clay crumbs or a tiny pebble near the base of the pot on the table surface where you display it, suggesting a moment of gardening. -
Final seal:
Spray the entire soil area (masking off the leaves if necessary) with a matte varnish to lock everything in place and prevent the coffee grounds or crumbs from shedding over time.
Now your miniature botanicals have a professional, grounded appearance ready for display
Classic Terracotta-Style Pinch-Pot Planters
Embrace the warmth of natural earthenware with these handcrafted pinch pots that mimic classic terracotta styles. The main project focuses on creating a charming bowl-shaped planter detailed with a simple yet striking incised wavy pattern.
How-To Guide
Materials
- Terracotta air-dry clay or polymer clay (oven-bake)
- Clay sculpting tools (specifically a needle tool or toothpick)
- Small bowl of water (for smoothing)
- Sponge
- Rolling pin (optional)
- Canvas mat or parchment paper
- Potting soil and small succulents
Step 1: Forming the Base
-
Prepare the Clay:
Start with a ball of terracotta-colored clay about the size of a tangerine. Knead it thoroughly in your hands until it feels warm and pliable, which prevents cracking later on. -
Open the Pinch Pot:
Hold the clay ball in one hand and push your thumb into the center, stopping just before you poke through the bottom. This indentation establishes the interior depth of your planter. -
Pinch the Walls:
Gently pinch the clay between your thumb and fingers, rotating the ball as you go. Work your way from the bottom up to the rim, aiming for an even wall thickness of about 1/4 inch. -
Shape the Profile:
As you pinch, guide the shape into a rounded bowl form leading up to a slightly wider rim. Taper the bottom slightly so it resembles the classic silhouette seen in the photo. -
Flatten the Bottom:
Tap the pot gently against your work surface to create a flat, stable base so it won’t wobble when holding your plant.
Step 2: Refining and detailing
-
Smooth the Surface:
Dip your finger or a small sponge into a little water and run it over the exterior walls to erase fingerprints. I find this helps achieve that wheel-thrown look even though it’s hand-built. -
Build the Rim:
Roll a small coil of clay, roughly the thickness of a pencil. Attach this coil to the outer top edge of your pot by scoring the clay (scratching crisscross marks) and adding a dot of water (slip). -
Blend the Coil:
Use your thumb to blend the bottom edge of the coil downward into the main body of the pot, but leave the top edge distinct to create a decorative band. -
Level the Top:
Invert the pot onto the table and press down gently to ensure the mouth of the planter is perfectly level.
Keep it Even
To check wall thickness, close your eyes and feel the walls. Your fingers are more sensitive to variations than your eyes are.
Step 3: Carving the Pattern
-
Draft the Design:
Using a needle tool, lightly sketch two parallel horizontal lines around the decorative band you just added. These will serve as the boundaries for your pattern. -
Incise the Wavy Line:
Carefully drag your needle tool between the parallel lines in a continuous zigzag or wavy motion. Try to keep the peaks and valleys consistent as you rotate the pot. -
Add Texture:
Once the main wave is carved, use the point of your tool or a toothpick to press small dots or dashes into the spaces above and below the wave for added texture. -
Clean Up Burrs:
Allow the clay to dry slightly until it’s ‘leather hard.’ Then, gently rub a dry finger or soft brush over the carved areas to remove any little crumbs of clay created during carving.
Cracks Appearing?
If you see hairline cracks while drying, smooth a tiny bit of wet clay (slurry) into the crack immediately to bond it back together.
Step 4: Finishing Up
-
Create Drainage:
If you plan to plant directly into the pot, use a straw or tool to poke a drainage hole in the center of the bottom. -
Dry or Bake:
Follow the specific instructions for your clay type. Air-dry clay typically needs 24-48 hours, while polymer clay will require baking in an oven at a low temperature. -
Planting:
Once fully cured or dry, fill your new miniature planter with cactus soil and nestle a small succulent inside. Add a top dressing of small pebbles for a polished look.
Your windowsill is going to look lovely with these handmade touches of greenery


What Really Happens Inside the Kiln
Learn how time and temperature work together inside the kiln to transform clay into durable ceramic.
Minimal Two-Tone Modern Pots With Greenery
Bring a fresh, minimalist aesthetic to your indoor jungle with these stylish two-tone planters. By combining raw earthenware warmth with a crisp, matte white finish, you create a sophisticated vessel that lets your greenery truly shine.
Step-by-Step Tutorial
Materials
- Two cylindrical terracotta pots (straight-sided)
- White matte acrylic paint or chalk paint
- Painter’s tape (high quality)
- Flat paintbrush (1-inch width)
- Fine-grit sandpaper (220 grit)
- Clear matte sealant spray
- Ruler or measuring tape
- Pencil
- Damp cloth
- Small houseplants (Peperomia or Jade work well)
- Potting soil
Step 1: Preparation & Masking
-
Clean the Surface:
Begin by wiping down your terracotta pots with a damp cloth to remove any dust or manufacturing residue. If the pots are old, give them a good scrub and let them dry completely overnight, as trapped moisture can bubble the paint later. -
Sand for Texture:
Lightly swirl the fine-grit sandpaper over the area you intend to paint. You don’t need to be aggressive; just scuff the slick surface enough to help the paint adhere better to the clay. -
Measure the Line:
Decide on your paint line. For the look in the image, aim for the top two-thirds of the pot. Use your ruler to measure about 1.5 to 2 inches up from the bottom edge and make small pencil tick marks around the circumference. -
Apply Tape:
Carefully apply the painter’s tape, connecting your pencil marks. Keep the tape taut as you wrap it around to ensure a perfectly straight horizontal line. -
Seal the Edge:
Once the tape is on, run your fingernail or a credit card firmly along the top edge of the tape. This crucial step prevents paint from bleeding underneath and ensures that crisp, professional line we’re aiming for.
Bleeding Lines?
If paint bleeds under the tape, wait for it to dry fully. Then, gently scratch the excess paint off the raw terracotta using a craft knife or a fine-grit sanding block for a clean edge.
Step 2: Painting
-
First Coat:
Load your flat brush with matte white paint. Start painting from the tape line upward toward the rim. Brush vertically to minimize stroke marks. -
Paint the Rim:
Don’t forget the top rim and the first inch of the inner pot. Painting slightly inside the pot gives it a finished look even when the soil level settles slightly. -
Dry and Assess:
Let the first coat dry completely—usually about 20 to 30 minutes for acrylics. Terracotta is porous and will soak up this first layer quickly. -
Second Coat:
Apply a second layer of white paint. If you are using standard acrylic, you might need a third thin coat to get that solid, opaque finish where no orange clay shows through. -
Speckling (Optional):
If you look closely at the inspiration, there is a very subtle texture. You can achieve a similar effect by flicking a tiny bit of grey or beige paint from a toothbrush onto the white section, though a solid white looks equally clean. -
Reveal the Line:
I prefer to peel the tape while the final coat is still slightly tacky, not bone dry. Pull the tape slowly at a 45-degree angle away from the paint to avoid chipping the fresh edge. -
Clean Up:
If any paint managed to creep under the tape onto the raw clay, gently scrape it away with a craft knife or use a damp Q-tip to wipe it off immediately.
Step 3: Finishing & Planting
-
Seal the Pot:
Take the pots to a well-ventilated area and spray the entire exterior with a clear matte sealant. This protects the white paint from water stains when you water your plants and keeps the raw clay from aging too quickly. -
Let Cure:
Allow the sealant to cure for at least 24 hours before introducing any moisture or soil. -
Add Drainage Layer:
If your cylinder pots don’t have drainage holes, place a layer of small pebbles at the bottom. However, drilling a hole is always best for plant health. -
Pot the Plants:
Fill the bottom portion with fresh potting mix. Gently remove your plants from their nursery pots, loosen the roots, and place them into your new vessels. -
Top Up Soil:
Fill the remaining space with soil, leaving about half an inch of space from the rim so water doesn’t overflow over your nice white paint. -
Final Clean:
Brush off any loose soil crumbs from the white painted surface with a dry soft brush to complete the look.
Make it Speckled
Mix a tiny pinch of sand or baking soda into your white paint before applying. This creates a concrete-like, stone texture that adds tactile depth to the smooth cylinder.
Place these on a wooden shelf or windowsill to enjoy the soothing contrast between stark white and natural clay
Textured Leaf-Stamped Pots With Simple Sprigs
Transform plain terracotta or air-dry clay into an artisanal masterpiece with simple carving techniques and a two-tone glaze effect. This planter features a repeating chevron or leaf-like pattern that mimics organic textures, finished with a weathered turquoise patina that highlights every groove.
How-To Guide
Materials
- Terracotta clay or air-dry clay (terra cotta color)
- Clay carving tools (needle tool, small loop tool, or a dull knife)
- Rolling pin (if building from scratch)
- Cylinder mold or existing terracotta pot (to use as a base form)
- Acrylic paints: Turquoise/Teal, Dark Brown/Burnt Umber, White
- Matte clear sealant or varnish
- Sponge or paper towels
- Paintbrushes (medium flat brush and small detail brush)
- Water cup
- Sandpaper (fine grit)
Step 1: Shaping the Vessel
-
Prepare the Clay Base:
If you are using store-bought terracotta clay, wedge it well to remove air bubbles. Roll out a slab approximately 1/4 inch thick. Alternatively, if you are upgrading a pre-made terracotta pot, clean the surface thoroughly and skip to the texturing phase. -
Form the Cylinder:
Cut a rectangular strip from your slab that is tall enough for your desired pot height. Wrap this strip around a cylindrical form (like a sturdy can or jar wrapped in paper) to create the basic shape. Join the seams by scoring and slipping the edges together. -
Add the Rim:
Roll a small coil of clay and attach it to the top edge of your cylinder to create a slightly thickened rim. Smooth the transition with your thumb on the inside, but define the bottom edge of the rim using a modeling tool on the outside. -
Attach the Base:
Cut a circle for the bottom and attach it securely. If using a pre-made pot, you’re all set. Ensure the pot is ‘leather hard’ (firm but still carveable) before proceeding to the decoration.
Step 2: Carving the Texture
-
Mark Vertical Guidelines:
Using a needle tool, very lightly sketch vertical lines around the pot’s circumference. Spacing them about 1.5 inches apart works well to define the width of your leaf columns. -
Carve the Central Spines:
Carve a vertical line down the center of each column. This acts as the ‘stem’ or spine for the herringbone leaf pattern. -
Create the Herringbone Pattern:
Use a small loop tool or a dull knife to press diagonal marks extending upward and outward from the central spine. Repeat this all the way down each column to mimic leaf veins. -
Texture the Rim:
On the thickened rim band, carve a slanted hatch pattern. These small diagonals should all angle in the same direction, creating a rope-like or woven border effect. -
Define the Footer:
Leave the bottom 1/2 inch of the pot untextured to create a contrasting base, similar to the footer shown in the image. I sometimes add a simple horizontal line to mark where the texture ends. -
Dry and Bisque Fire:
Allow the clay to dry completely. If using real pottery clay, fire it in a kiln. If using air-dry clay, let it cure for 24-48 hours until rock hard.
Uneven Carving Lines
Don’t stress over perfect symmetry. If a line goes astray, smooth it with a drop of water and retry. The organic, hand-carved look adds to the charm.
Step 3: Applying the Finish
-
Apply Base Color:
Paint the entire textured area with a vibrant turquoise or teal acrylic paint. You want full coverage, so work the paint deep into the carved crevices. -
Create the Washer Layer:
Mix a watery wash using dark brown paint and a drop of black. Brush this over the turquoise while it is still slightly tacky to dirty it up. -
Wipe Back for Distinction:
Immediately use a damp sponge or paper towel to wipe across the surface. This removes paint from the raised areas but leaves the dark wash and turquoise in the carved recesses, emphasizing the texture. -
Dry Brush Highlights:
Take a very small amount of white or light mint paint on a dry brush. Lightly sweep it over the highest points of the texture to make the pattern pop. -
Detail the Rim and Base:
Paint the untextured footer and the topmost edge of the rim with a reddish-brown or raw terracotta color to simulate exposed clay, giving it that rustic, dipped look. -
Seal the Pot:
Once fully dry, apply a coat of matte sealant. This protects the paint and makes the pot water-resistant suitable for holding soil.
Use a Real Leaf Stamp
For a variation, press actual fern fronds or sturdy herbs directly into the wet clay instead of carving by hand to get realistic botanical impressions.
Now you have a stunning, textured vessel ready to cradle your favorite houseplant

TRACK YOUR CERAMIC JOURNEY
Capture glaze tests, firing details, and creative progress—all in one simple printable. Make your projects easier to repeat and improve.
Cute Face Pots With Blushing Succulents
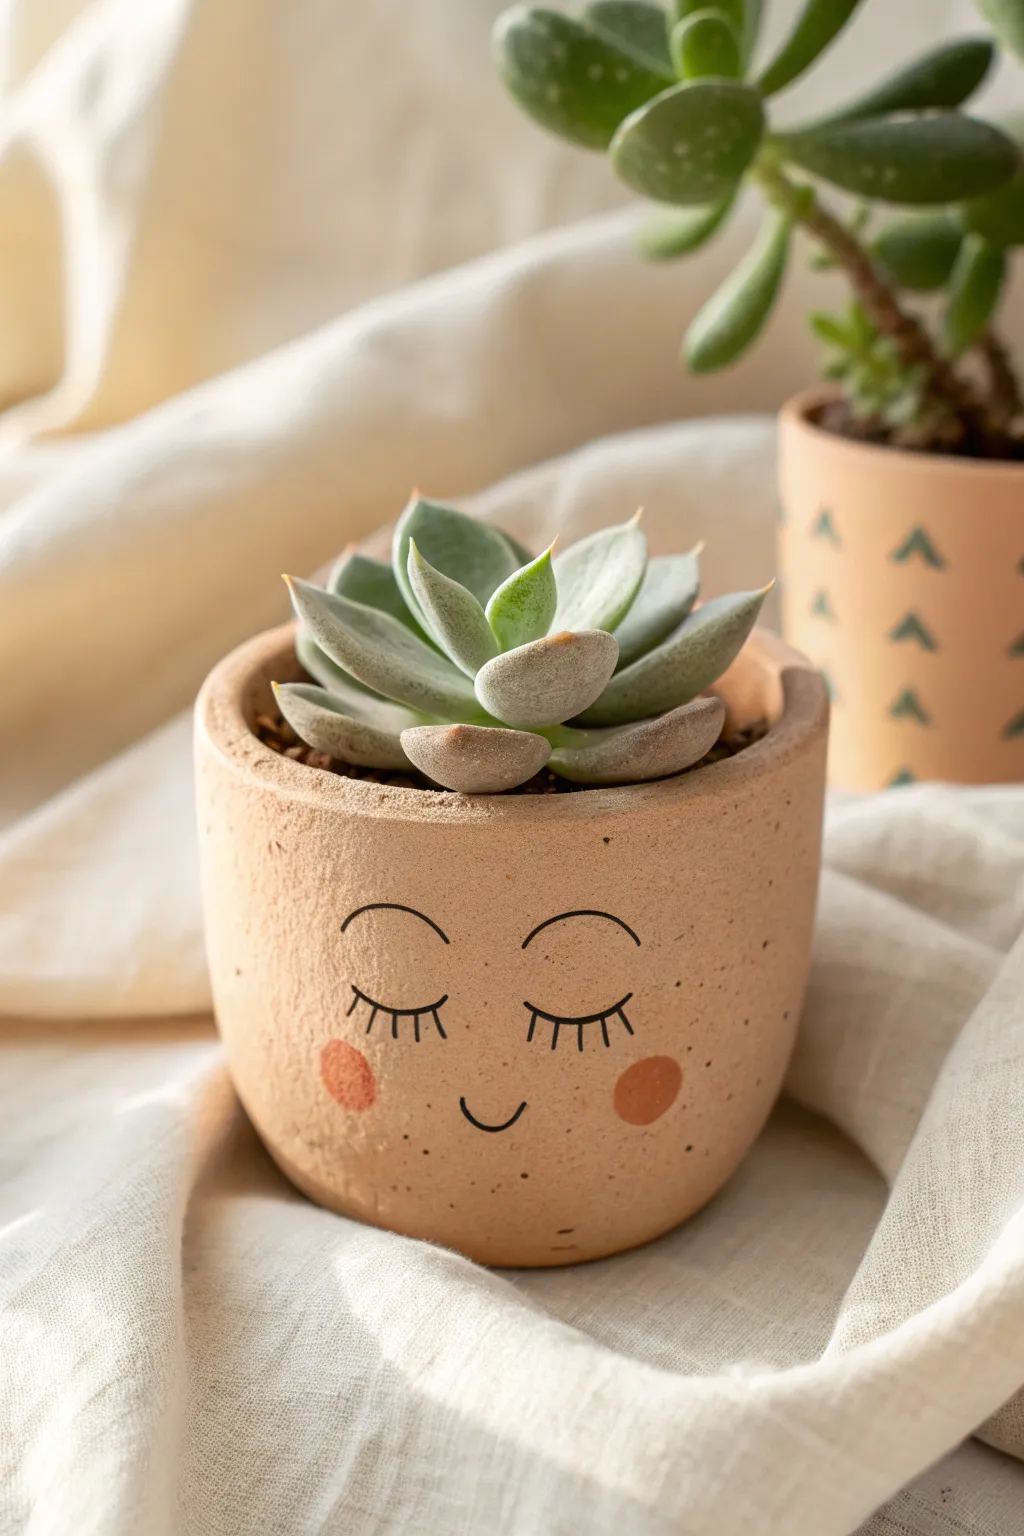
Transform a plain clay pot into a charming character with just a few simple strokes and a touch of color. This sweet, sleeping face design adds a whimsical personality to your succulent collection while keeping a minimalist, earthy aesthetic.
Detailed Instructions
Materials
- Small terracotta pot (3-4 inch diameter)
- Beige or light peach acrylic paint (matte)
- Black acrylic paint or extra-fine paint marker
- Coral or light terracotta acrylic paint
- Old toothbrush or stiff bristle brush
- Small round paintbrush
- Detail liner brush
- Brown paint (watered down)
- Matter sealer spray
- Small succulent plant
- Cactus potting mix
Step 1: Prepping the Base
-
Clean surface:
Begin by wiping down your terracotta pot with a damp cloth to remove any pottery dust or oils. Let it dry completely. -
Mix base color:
Mix a warm beige or light peach acrylic paint. We want a color that looks like lighter clay, offering a soft canvas for the face. -
Apply base coat:
Paint the exterior of the pot with your mixed base color. Don’t worry about perfect opacity; a slightly uneven coat adds to the organic, handmade look. -
Dry and repeat:
Allow the first coat to dry for about 20 minutes. Apply a second coat if you want fuller coverage, smoothing out any uneven drips.
Paint Smudges?
If you make a mistake with the black lines, wait for it to dry completely, then paint over the error with your beige base color before trying again.
Step 2: Creating Texture
-
Prepare splatter mix:
Dilute a small amount of dark brown paint with water until it has an inky consistency. -
Speckle technique:
Dip an old toothbrush or stiff bristle brush into the watery brown paint. Run your thumb across the bristles to flick tiny speckles onto the pot. -
Control the spray:
Aim for a random distribution. I like to test the spray on a piece of paper first to ensure the droplets aren’t too large. -
Let it set:
Allow the speckles to dry completely so they don’t smear during the face painting phase.
Add Dimension
Mix a tiny bit of baking soda into your base beige paint. This creates a rough, gritty texture that mimics stone or ceramic stoneware perfectly.
Step 3: Painting the Face
-
Map the face:
Lightly sketch the placement of the eyes and mouth with a pencil. Position the eyes about halfway down the pot for a cute proportion. -
Paint the eyelids:
Using a fine liner brush and black paint (or a paint pen), draw two downward-curving arcs for the closed eyelids. -
Add lashes:
Carefully paint 4-5 small vertical lines extending downward from the center of each eyelid arc to create the eyelashes. -
Draw the brows:
Paint smaller, slightly flatter arcs floating above the eyes for the eyebrows. Keep them thin and expressive. -
Create the smile:
Paint a very small, subtle ‘U’ shape centered below the eyes for the mouth. Keep it petite for that sweet, shy look. -
Mix blush color:
Dip a small round brush into the coral or terracotta paint. You want a color slightly darker than the pot base. -
Apply cheeks:
Press the round brush gently onto the pot on either side of the smile to create perfect circular cheeks. -
Protect the art:
Once all paint is fully dry (give it at least an hour), spray the entire pot with a matte sealer to protect the design from water damage.
Step 4: Planting
-
Add soil:
Fill the bottom third of the pot with cactus potting mix. -
Position plant:
Gently remove your succulent from its nursery container and place it into the new pot. -
Fill gaps:
Spoon more soil around the edges, pressing down lightly to secure the plant without compacting the soil too much.
Place your new sleeping beauty on a sunny windowsill where the light can catch those sweet painted details
Hanging Mini Planters With Trailing Vines
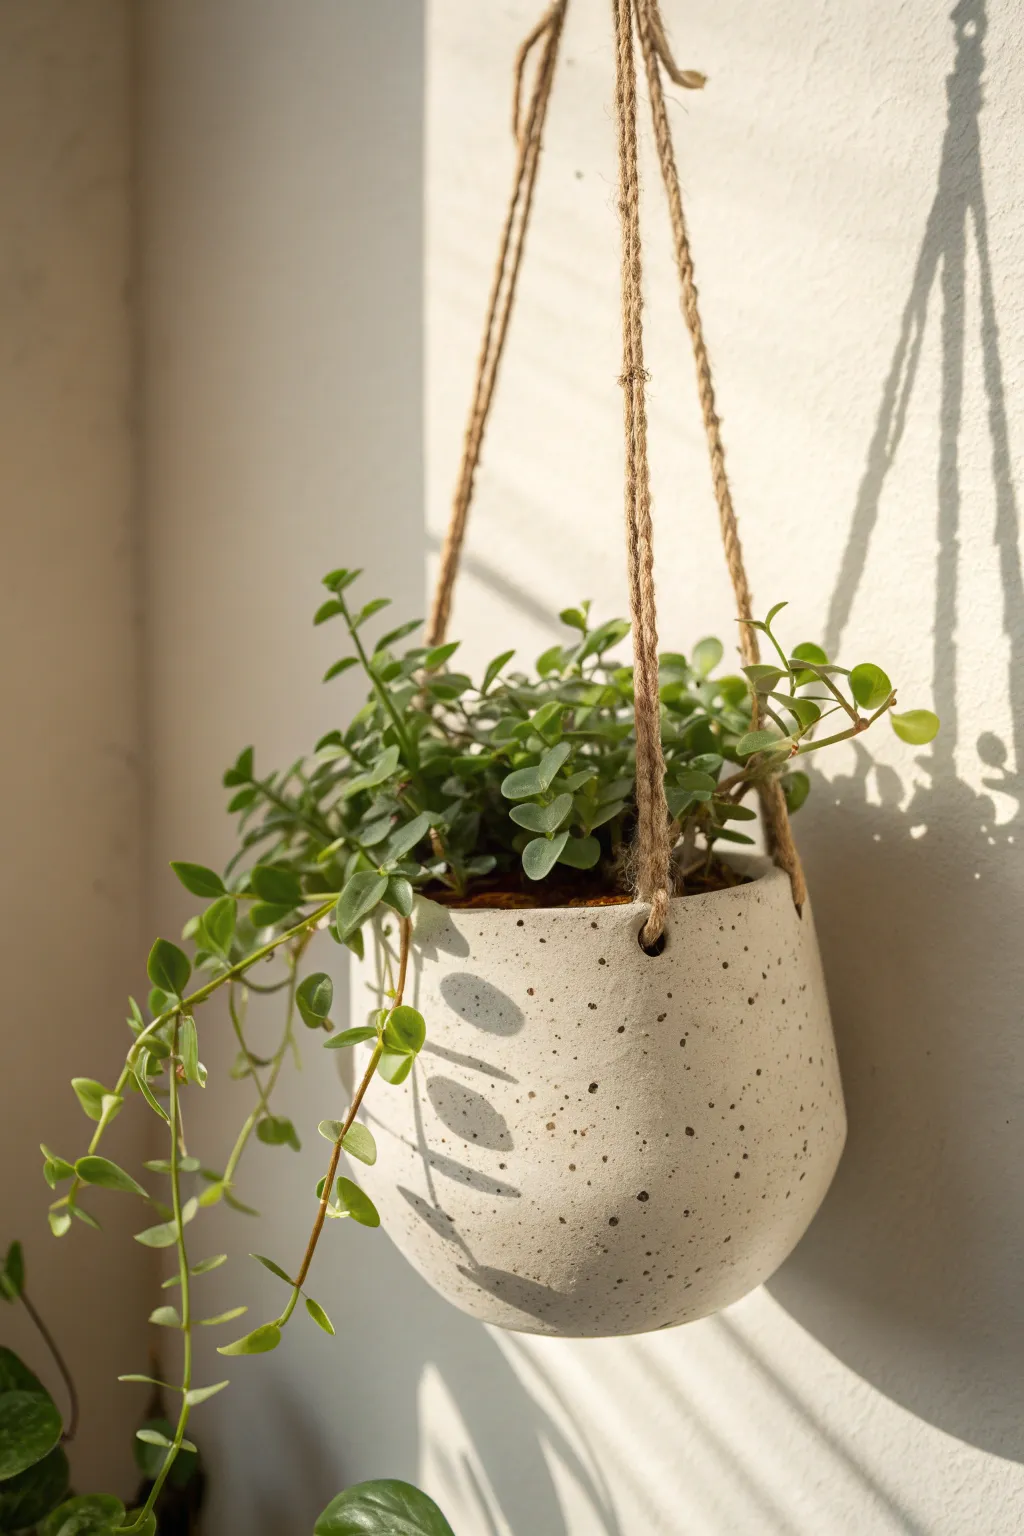
Create a modern, organic home for your trailing vines with this delightful hanging planter project. By using speckled clay and simple jute twine, you can achieve a textured, natural aesthetic that looks beautiful swinging in the sunlight.
How-To Guide
Materials
- White polymer clay or air-dry clay (approx. 500g)
- Black pepper or dried coffee grounds (for speckles)
- Small bowl or balloon (to use as a mold)
- Rolling pin
- Craft knife or clay tool
- Drinking straw or small circular cutter
- Sandpaper (fine grit)
- Matte varnish or sealant
- Jute twine or hemp cord
- Scissors
Step 1: Preparing the Clay Body
-
Condition the clay:
Begin by warming up your white clay in your hands. Knead it thoroughly until it is soft, pliable, and free of any cracks. -
Create the texture:
Flatten the clay slightly and sprinkle a generous pinch of coarse black pepper or dried coffee grounds onto the surface. Fold the clay over itself to trap the particles inside. -
Mix for consistency:
Continue kneading the clay to distribute the ‘speckles’ evenly throughout the batch. I like to stop when the distribution looks random but balanced, mimicking natural stone. -
Roll it out:
Use your rolling pin to flatten the clay into a slab about 1/4 inch thick. Aim for an even thickness to ensure the pot dries or bakes uniformly.
Uneven Hanging?
If the pot tilts, the strings aren’t equal. Untie the top knot, hang the pot from a doorknob to level it manually, then retie tight.
Step 2: Shaping the Planter
-
Prepare your mold:
Take your small bowl or inflate a balloon to the desired size of your pot. If using a bowl, cover the outside specifically with plastic wrap to prevent sticking. -
Drape the clay:
Gently lift your clay slab and drape it over the bottom of your bowl or the top of your balloon. Smooth the clay down the sides with your palms. -
Trim the excess:
Using a craft knife, carefully trim away the uneven edges around the ‘rim’ of your pot to create a clean, straight line. You can make it perfectly level or leave a slight organic wave. -
Smooth the surface:
Dip your finger in a little water (for air-dry clay) or baby oil (for polymer) and gently rub the exterior to smooth out fingerprints and imperfections. -
Create hanging holes:
Use a drinking straw to punch three evenly spaced holes about half an inch below the rim. Twist the straw as you push through for a clean cut.
Step 3: Finishing and Assembly
-
Cure or dry:
If using polymer clay, bake according to the package instructions. For air-dry clay, leave it in a cool, dry place for 24-48 hours until fully hardened. -
Remove the mold:
Once fully cured and cooled, carefully separate the clay form from your bowl or pop the balloon. -
Sand for smoothness:
Take your fine-grit sandpaper and gently sand the rim and any rough spots on the exterior. This step gives it that professional, high-end stone finish. -
Seal the refined pot:
Apply a coat of matte varnish to the inside and outside. This protects the finish and makes the pot more water-resistant. -
Cut the suspension cords:
Cut three equal lengths of jute twine, each about 3 feet long (adjust depending on how low you want it to hang). -
Thread the supports:
Thread one end of a twine piece through a hole from the outside in. Tie a sturdy double knot on the inside of the pot so the twine can’t pull back through. -
Repeat for all holes:
Do the same for the remaining two holes, ensuring all knots are secure and roughly the same size. -
Gather and hang:
Gather all three strings at the top, ensuring the pot hangs level. Tie them together in a large overhand knot to create the top loop for hanging.
Add Color Accents
Dip the bottom third of the finished pot into diluted acrylic paint for a chic ‘dipped’ look that contrasts with the speckles.
Now you have a charming, stone-look planter ready to cradle your favorite creeping greens
Variegated Leaves With Marbled Clay Effects
Echo the stunning variegation of your favorite houseplants with this clever planter that brings the leaf patterns down to the pot itself. Using a simple marbling technique on a standard terracotta base, you’ll create a sophisticated, organic vessel that looks remarkably like glazed ceramic.
Step-by-Step
Materials
- Clean terracotta pot (6-inch)
- White chalk paint or matte acrylic paint
- Sage or forest green acrylic paint
- Clear acrylic glazing medium
- Sea sponge
- Small fine-tip brush
- Wide flat brush
- Matte clear sealer spray
- Paper plate or palette
- Water cup
- Pencil
Step 1: Base Preparation
-
Clean surface:
Begin by wiping down your terracotta pot with a damp cloth to remove any dust or oils, ensuring a clean surface for painting. -
Prime coat:
Using the wide flat brush, apply a solid coat of white chalk paint to the entire exterior of the pot, stopping just below the top rim. -
Rim detailing:
Leave the top rounded rim and the very bottom edge unpainted to maintain that classic exposed clay look, which adds rustic warmth. -
Second coat:
Once the first layer is dry to the touch, apply a second coat of white paint to ensure full, opaque coverage without streaks.
Step 2: Creating the Marble Effect
-
Mix the glaze:
On your palette, mix roughly one part green acrylic paint with two parts glazing medium. This translucency is key for a realistic watercolor-style marble. -
Map the pattern:
Lightly sketch wavy, vertical organic lines on the white surface with a pencil. Think about the way flames or zebra stripes move upward. -
Initial greenery:
Dip your fine-tip brush into the green glaze mixture and trace your pencil lines, varying the pressure to create lines that go from thin to thick. -
Softening edges:
While the green paint is still wet, take a damp (not soaking) sea sponge and gently dab the edges of your painted lines. -
Feathering technique:
Drag the sponge slightly downwards in select areas to ‘pull’ the color, creating that feathered, variegated look. -
Adding depth:
I like to go back in with a tiny amount of undiluted green paint on the fine brush and darken the very center of the thickest stripes for contrast.
Uneven Streaks?
If your marble lines look too harsh, immediately mist the area with water and blot with a paper towel to lift pigment and restart.
Step 3: Adding Texture and Protectant
-
Dry brushing:
Once the green marbling is dry, dip a dry brush into a tiny amount of white paint, wipe almost all of it off, and lightly whisk it over the green areas to create a chalky texture. -
Distressing the rim:
Dip a rag in watered-down white paint and rub it messily over the exposed terracotta rim to give it an aged, salt-stained clay appearance. -
Drying time:
Allow the entire pot to cure for at least 2-3 hours. The paint needs to be fully set before sealing. -
Sealing:
Spray the pot with a matte clear sealer. Work in light bursts to avoid drips. -
Final cure:
Let the sealer dry overnight before planting your favorite foliage inside.
Metallic Touch
Mix a drop of gold leaf paint into your glazing medium for veins that catch the sunlight.
Place your variegated plant inside to see how the pot’s new pattern perfectly complements nature’s artwork
Fruit-Shaped Pots Holding Succulent Babies
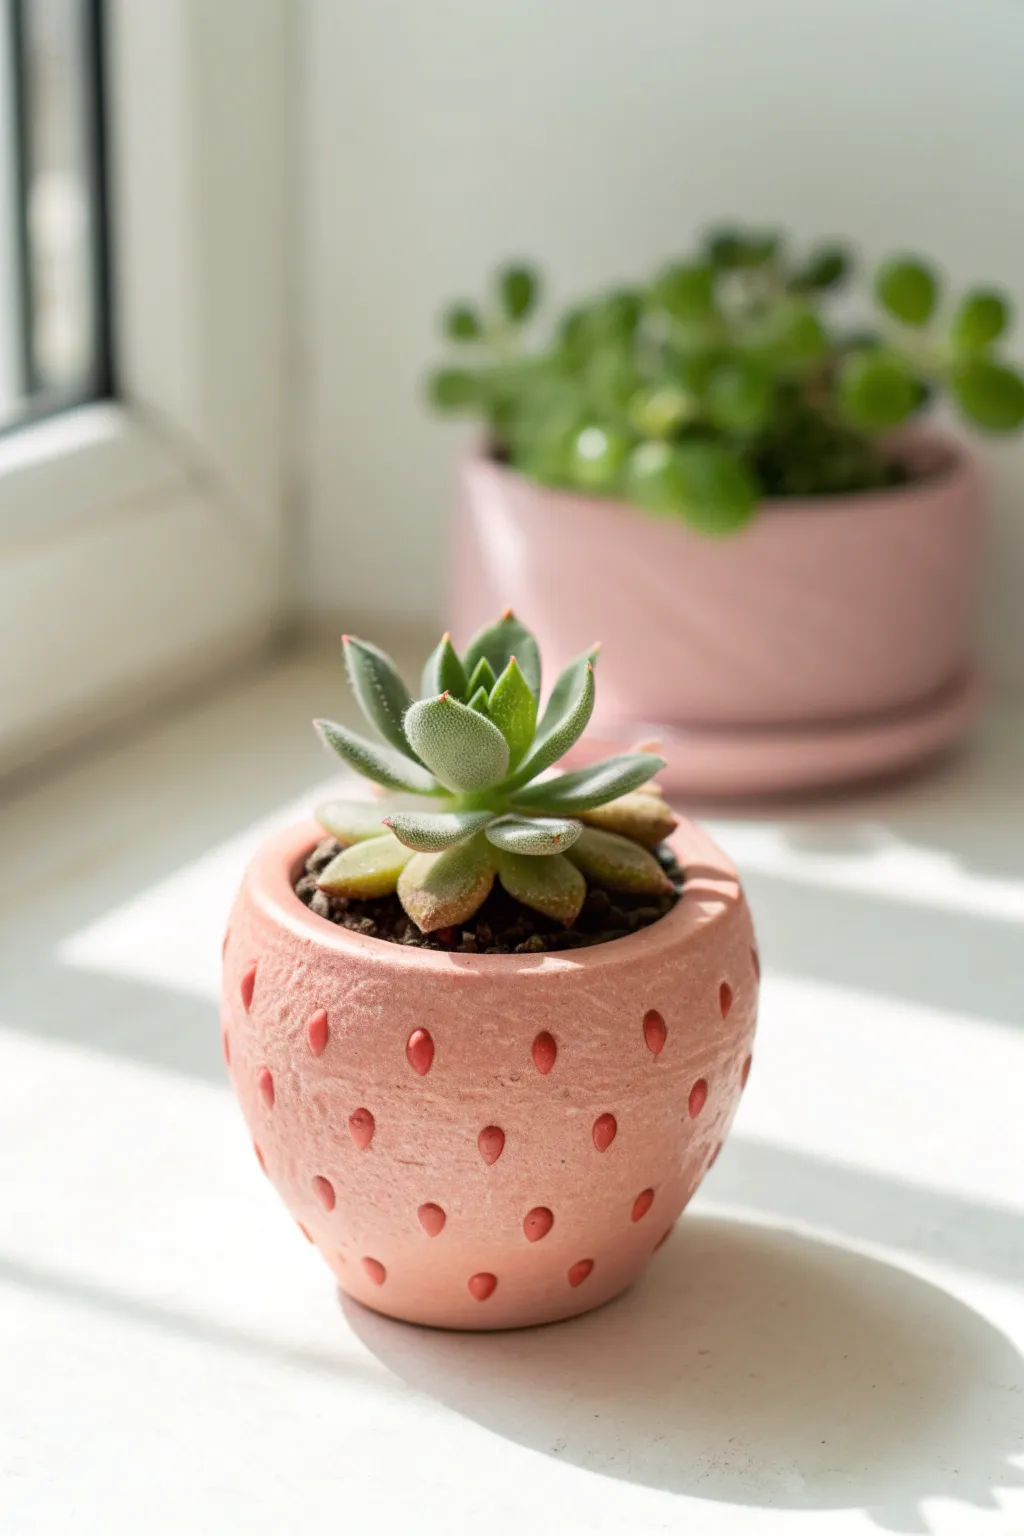
Transform a simple pinch pot into a sweet, fruit-inspired home for your tiniest succulents. This strawberry planter features a textured, soft pink surface with dainty red seed details that add a pop of whimsical charm to any windowsill.
Detailed Instructions
Materials
- Air-dry clay or polymer clay (white or terracotta)
- Acrylic paints (pastel pink, bright red, dark brown)
- Glossy varnish or sealant (waterproof)
- Basic sculpting tools (or a toothpick)
- Small paintbrush
- Water and sponge (for smoothing)
- Sandpaper (fine grit)
- Small succulent plant
Step 1: Shaping the Berry
-
Start with a sphere:
Begin by rolling a fist-sized amount of clay into a smooth, even ball. Ensure there are no cracks; if you see any, smooth them out with a little bit of water on your finger. -
Create the opening:
Push your thumb gently into the center of the sphere to create a well. Rotate the ball in your hand while pressing outwards with your thumb to widen the opening, forming the classic pinch pot shape. -
Refine the strawberry shape:
Instead of leaving it perfectly round, gently tap the bottom on your work surface to create a flat base so it stands upright. Then, subtly taper the bottom half of the pot so it narrows slightly, mimicking the shape of a strawberry. -
Smooth the surface:
Use a damp sponge or your finger to smooth out the exterior walls. Aim for a slightly organic, rounded look rather than perfect symmetry. -
Drainage hole check:
If you plan to plant directly into the pot, use a straw or tool to punch a small drainage hole in the very center of the bottom.
Seed Spacing Trick
Visualize a diamond grid pattern when placing your seeds. This prevents them from looking cluttered and mimics real fruit.
Step 2: Adding Texture and Seeds
-
Mark seed placement:
Using a toothpick or a small dotting tool, lightly mark where you want your seeds to go. Distribute them evenly around the pot in a staggered pattern. -
Create seed indentations:
Instead of just poking holes, use a teardrop-shaped sculpting tool or press the side of a small tool into the clay at an angle. This creates small, shallow divots that look like embedded seeds. -
Refine the rim:
Check the top rim of the pot. Smooth it down one last time so it’s comfortable to touch and looks finished. -
Dry the form:
Allow the clay to dry completely according to the package instructions. Air-dry clay often takes 24-48 hours; turn it occasionally to ensure airflow to the bottom.
Step 3: Painting and Finishing
-
Sand for smoothness:
Once fully dry, lightly sand any rough patches or fingerprints with fine-grit sandpaper. Wipe away the dust with a slightly damp cloth. -
Base coat application:
Paint the entire exterior and the inner rim with a soft pastel pink acrylic paint. This might need two coats for full opacity. -
Paint the seeds:
Using a very fine detail brush, carefully fill each indented seed divot with bright red paint. I find it helps to brace my pinky finger against the table for stability here. -
Add depth (optional):
To make the texture pop, you can mix a tiny drop of brown into your red paint and add a minuscule dot to the bottom of each seed impression for a shadow effect. -
Seal the interior:
Apply a waterproof sealer or heavy-duty varnish to the inside of the pot to protect the clay from moisture needed for the plant. -
Seal the exterior:
Finish by coating the outside with a matte or satin varnish. This protects your paint job and gives the ‘fruit’ a nice sheen. -
Planting time:
Once everything is dry and cured, fill with cactus soil and nestle your small succulent into its new home.
Make It a Pair
Create a shorter, wider pot using the same pink tone but without seeds to act as a sleek companion planter for a cohesive set.
Now you have a charming little strawberry pot ready to brighten up your plant collection
Tiny Clay Plant Magnets for Small Spaces
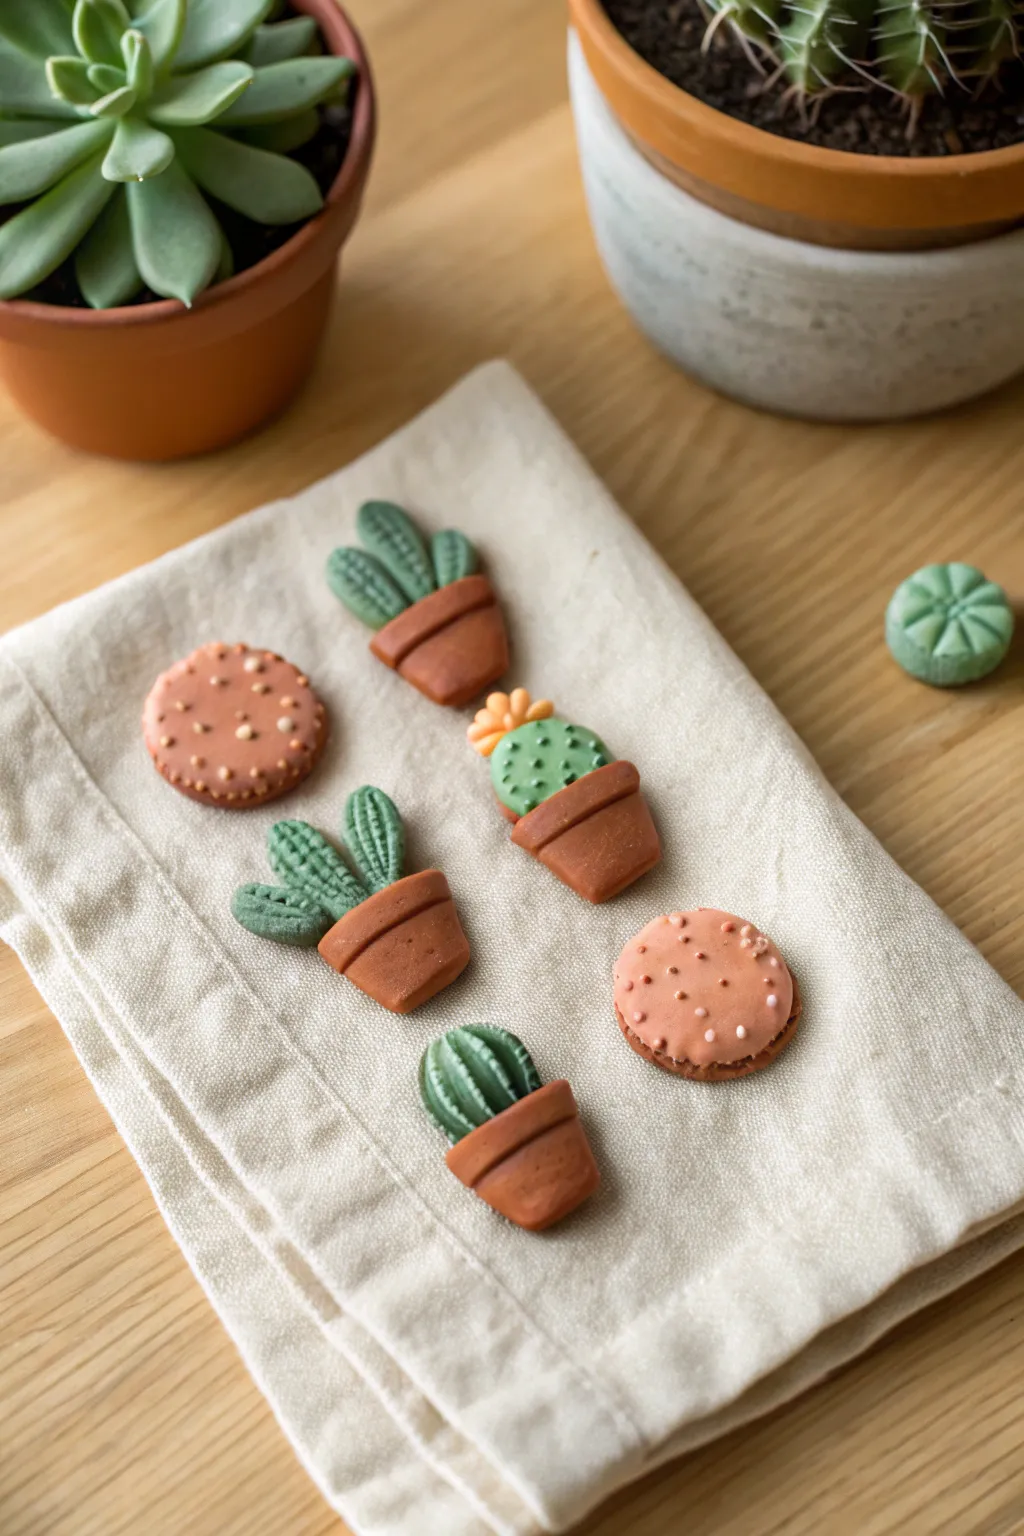
Bring a touch of greenery to your fridge or magnetic board with these adorable, zero-maintenance succulents. This project uses polymer clay to sculpt tiny potted cacti and prickly pear pads with charmingly simple details.
Detailed Instructions
Materials
- Polymer clay (terracotta, sage green, dark forest green, light pink/peach)
- Small round magnets (6mm or 8mm)
- Super glue or E6000 adhesive
- Sculpting tool with a needle point
- Plastic knife or clay blade
- Baking sheet
- Parchment paper
- Sculpting tool with a small ball tip (optional)
- Oven
Step 1: Shaping the Terracotta Pots
-
Prepare the clay:
Begin by conditioning the terracotta-colored polymer clay until it is soft and malleable. Roll it into a small log about half an inch thick. -
Cut pot sections:
Use your clay blade to slice off small segments from the log. You’ll need one segment for each plant you intend to make. These slices will become the base of the pots. -
Form the base shape:
Take a slice and flatten it slightly into a trapezoid shape, wider at the top and narrower at the bottom, mimicking a classic flower pot silhouette. -
Add the rim:
Roll a very thin snake of terracotta clay. Wrap a small section of this around the top edge of your trapezoid base to create the pot’s rim. Press it gently to adhere, smoothing the seam on the back. -
Refine the edges:
Tap the sides of the pot gently against your work surface to square off the edges and ensure the rim looks distinct from the base.
Keep it Clean!
Polymer clay picks up dust easily. Keep baby wipes or rubbing alcohol nearby to clean your hands and tools often, especially when switching between the terracotta and lighter green colors.
Step 2: Sculpting the Cacti Variations
-
Make the tall cactus:
For the taller columnar cactus, roll sage green clay into three small, elongated teardrops of varying lengths. -
Texture the cactus:
Using a needle tool or the back of a knife, press vertical lines into each green teardrop to create the ribbed texture of a cactus. -
Assemble the tall plant:
Press the three green sections together at their bases, then attach them firmly to the top of a prepared terracotta pot base. -
Create the prickly pear:
To make the ‘bunny ear’ style cactus, flatten two small balls of green clay into oval pads. Use the needle tool to press tiny dots or dashes all over the surface to represent spines. -
Attach the pads:
Place the distinctive pads into a pot base, pressing the clay together so they stand upright. -
Form the round barrel cactus:
Roll a single ball of lighter green clay. Flatten the bottom slightly so it sits flush on the pot rim. -
Detail the barrel:
Use a needle tool to create recessed dots all over the surface. I like to add a tiny orange or yellow clay flower on top for a pop of color.
Loose Parts?
If a cactus piece falls off the pot after baking, don’t worry. A tiny dab of super glue will fix the break invisibly. The clay bonds very well with cyanoacrylate glues.
Step 3: Crafting the Pink Succulents
-
Shape the round biscuit:
Condition the light pink or peach clay. Roll it into a ball and flatten it into a thick disc, resembling a macaron or a round aesthetic succulent. -
Add texture:
Using a small ball tool or a dull toothpick, create shallow indentations scattered across the surface. -
Create the raised bumps:
Roll incredibly tiny balls of a slightly lighter pink clay. Press these gently into the indentations you made, or simply onto the surface, to give the piece a ‘bumpy’ organic texture.
Step 4: Baking and Assembly
-
Final check:
Smooth out any fingerprints on your pieces with a light touch. Ensure all plant parts are securely attached to their pots. -
Bake the clay:
Place your creations on a baking sheet lined with parchment paper. Bake according to your polymer clay package instructions (usually around 275°F or 135°C for 15-30 minutes depending on thickness). -
Cool down:
Allow the clay pieces to cool completely on the baking sheet. They adhere best when fully hardened and cool. -
Attach the magnets:
Flip the plants over. Apply a strong dot of super glue or E6000 to the back of each pot/plant and press a magnet firmly into place. -
Dry time:
Let the glue cure fully (usually 24 hours for E6000) before placing them on your fridge to ensure the magnets don’t pop off.
Now you have a permanent garden displayed on your fridge that never needs watering
Micro Clay Plant Charms and Studs

These incredibly tiny clay creations capture the charm of a desert garden in micro-scale. From spiky cacti to blooming rosettes, these clay pieces make adorable stud earrings or delicate charms for jewelry.
Step-by-Step Tutorial
Materials
- Polymer clay (terracotta/rust, dark green, sage green, yellow)
- Needle tool or toothpick
- Ball stylus tool (small)
- Gloss or matte glaze (optional)
- Oven
- Baking sheet or ceramic tile
- Earring posts and backs (optional)
- Strong craft glue (e.g., E6000)
Step 1: Basic Pot Base
-
Shape the pots:
Begin by rolling tiny balls of terracotta or rust-colored clay, about the size of a small pea. Gently flatten the top and bottom to create a cylinder shape that sits flat. -
Add texture:
Use a needle tool or toothpick to press vertical indentations around the sides of the cylinder. This mimics the fluted look of a classic ceramic planter. -
Create a hollow:
Press the small end of a ball stylus into the top center of each pot to create a slight depression where your ‘plant’ will sit.
Step 2: Succulent Variations
-
Minty rosettes:
For the pale green succulent, roll tiny spheres of sage green clay. Press them gently into the pot, starting with a ring of larger spheres and filling the center with smaller ones. -
Detailing the leaves:
Use your needle tool to create a tiny crease or indentation in the center of each leaf sphere to make them look plump and realistic. -
Spiky cactus balls:
For the darker cactus pots, roll a single ball of dark green clay that fits snugly into the pot base. Texture the entire surface by repeatedly poking it with a needle tool to create a prickly look. -
Adding blooms:
If you like, add a microscopic ball of yellow clay to the top of the spiky cactus. Texture this yellow dot with a needle tool to resemble a flowering bud.
Sticky Situation
If the clay gets too soft and sticky to detail, pop it in the fridge for 10 minutes. This firms it up, making those tiny needle textures much crisper.
Step 3: Blooming Rosettes
-
Center formation:
For the rust-colored flower shapes, start by rolling a very thin snake of clay. Flatten it slightly and coil it tight to form the central bud. -
Adding petals:
Form tiny teardrop shapes of clay and flatten them. Press these around the central coil, overlapping them slightly as you work outward. -
Final shaping:
Gently curl the edges of the outer petals downward to open up the bloom. These can be glued into pots later or left as standalone charms.
Color Depth
Before baking, lightly brush the textured parts with dry chalk pastel dust in a slightly darker shade to accentuate the grooves and add realism.
Step 4: Standard Cacti
-
Elongated arms:
Roll thin logs of green clay. Create a ‘U’ shape for the classic saguaro look, or a single tall column. Gently flatten them so they aren’t fully round. -
Ribbing texture:
Carefully draw vertical lines down the length of the cactus arms using a needle tool to simulate ribs. -
Flowering tips:
Add tiny balls of yellow clay to the tips of the cactus arms or base. Use a needle tool to stipple the yellow clay for a pollen-like texture.
Step 5: Finishing
-
Baking:
Arrange all your pieces on a ceramic tile or baking sheet. Bake according to your polymer clay manufacturer’s instructions (usually 275°F/135°C for 15-30 minutes). -
Cooling:
Allow the pieces to cool completely before determining if you want to add a finish. I prefer leaving these matte for a natural look, but a satin glaze adds durability. -
Assembly:
Once cool, use strong craft glue to attach earring posts to the backs of the flat pieces or the bottoms of the pots.
Now you have a tiny botanical collection ready to wear or gift.