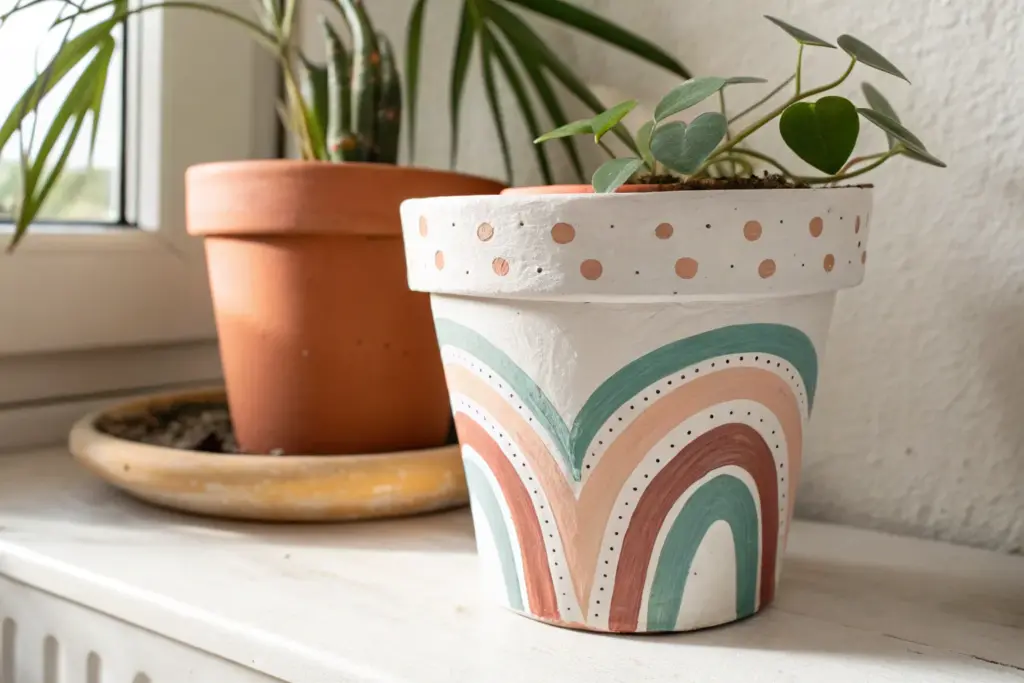
Plain terracotta is cute, but a little color can turn a humble clay pot into a whole mood. Here are my go-to clay pot color ideas—from classic, easy wins to artsy, unexpected finishes you can totally pull off at home.
Classic Solid Color Wrap
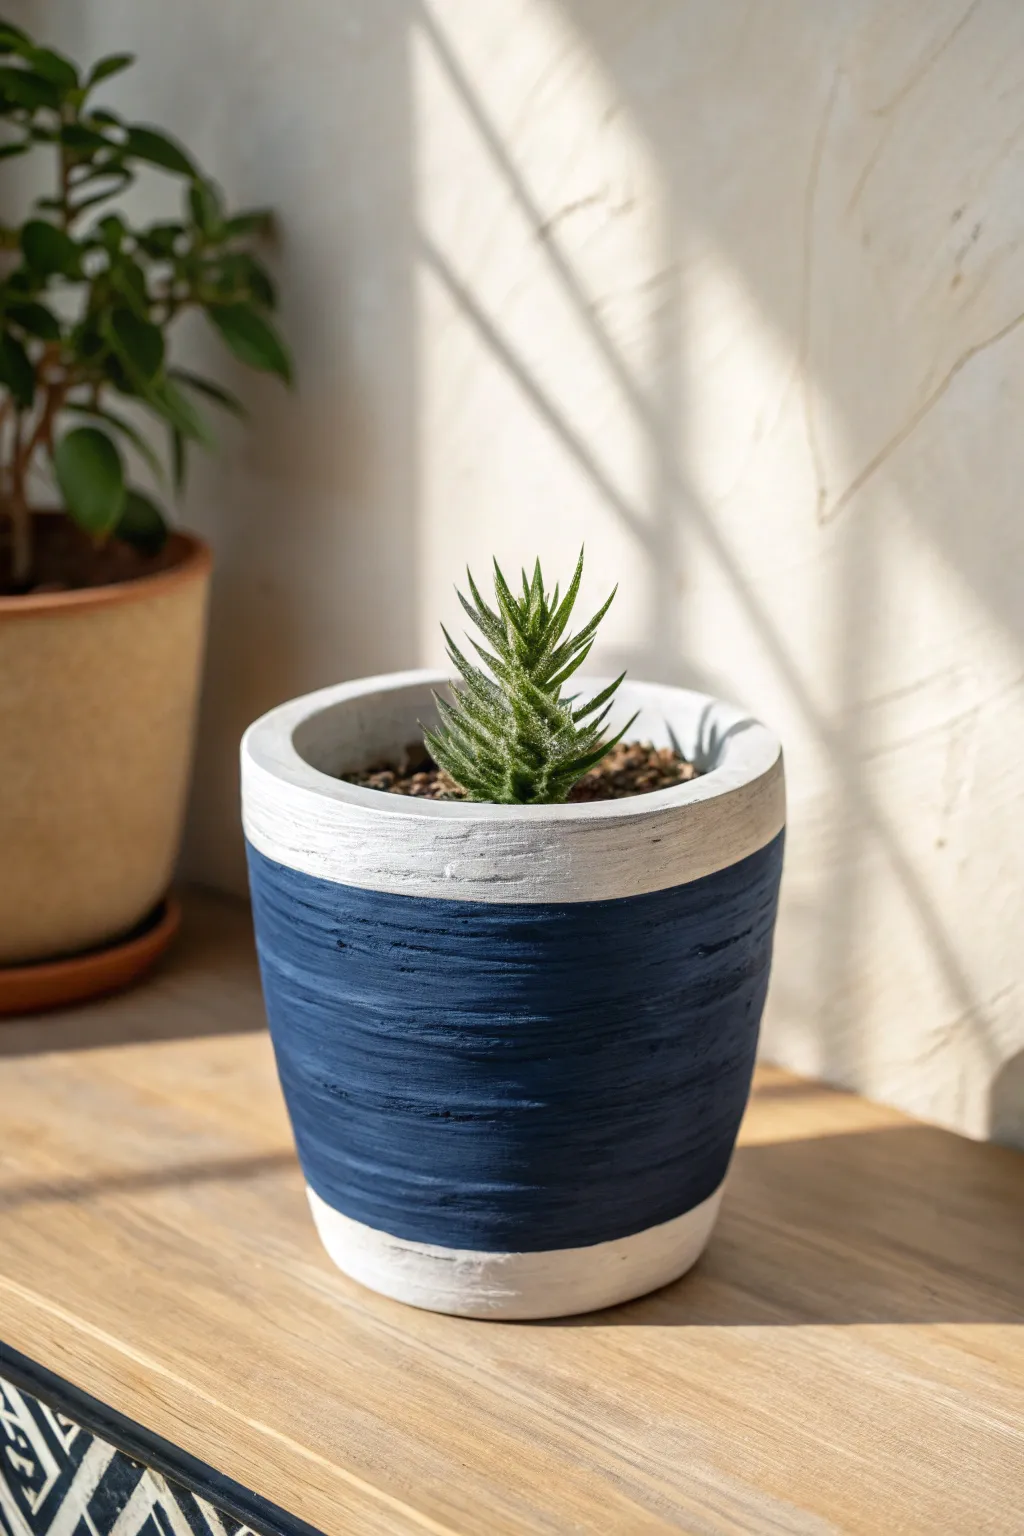
Give your plain terracotta pots a modern, coastal update with this striking color-blocked design. The heavy texture of the midnight blue center contrasts beautifully with the crisp white borders, creating a sophisticated look that mimics handmade stoneware.
Step-by-Step
Materials
- Terracotta pot (cleaned and dried)
- White acrylic craft paint (matte finish)
- Navy blue acrylic craft paint (chalky finish preferred for texture)
- Flat paintbrush (medium size, 1-inch)
- Flat stiff-bristle brush (for texture)
- Masking tape or painter’s tape
- Paper plate or palette
- Clear matte sealer spray
Step 1: Base Coat Prep
-
Clean surface:
Begin by ensuring your terracotta pot is completely free of dust or dirt. Wipe it down with a damp cloth and let it dry fully, as trapped moisture can cause bubbling later. -
Paint interior edge:
Use your flat paintbrush to apply a coat of white acrylic paint to the inside rim of the pot. Go down about two inches deep so the soil line won’t show the raw clay. -
Apply base white:
Paint the entire exterior of the pot with the white acrylic paint. This acts as a primer and ensures your white top and bottom borders are bright. -
Second coat:
Once the first layer is dry to the touch, apply a second coat of white for full opacity. I like to let this dry for at least an hour to ensure the tape won’t peel it off.
Bleeding Lines?
If paint bleeds under the tape, wait for it to dry completely. Then, scrape the excess away gently with a craft knife or paint over it with the base color.
Step 2: Creating the Navy Band
-
Tape top border:
Apply a strip of painter’s tape horizontally around the top of the pot. Leave about an inch of white exposed at the rim. -
Tape bottom border:
Apply a second strip of tape around the bottom of the pot, leaving about an inch of white base exposed. Press the edges of the tape down firmly to prevent bleeding. -
Prepare textured paint:
Squeeze a generous amount of navy blue paint onto your palette. If your paint is very thin, let it sit for a few minutes to thicken up slightly, or mix in a tiny pinch of baking soda for grit. -
Apply thick layer:
Load your brush heavily with the navy paint. Apply it to the space between the tape lines. Don’t smooth it out too much; you want a thick, generous layer. -
Add horizontal texture:
While the blue paint is still wet, take your stiff-bristle brush and drag it horizontally around the pot. This creates those distinctive striated grooves seen in the image. -
Enhance the grooves:
Go back over any areas that look too smooth. The goal is to see physical ridges in the paint that mimic wheel-thrown pottery. -
Remove tape immediately:
Carefully peel off the painter’s tape while the blue paint is still wet. This is crucial for getting a clean line without chipping the thick paint.
Texture Pro Tip
For deeper ridges in the blue section, mix a 1:1 ratio of baking soda to acrylic paint. This creates a fluffy, plaster-like consistency that holds brushstrokes perfectly.
Step 3: Finishing Touches
-
Clean up edges:
If any blue paint seeped under the tape, use a small detail brush with white paint to touch up the lines once the blue is dry. -
Dry completely:
Allow the pot to cure for 24 hours. Because the blue layer is thick and textured, it needs extra time to harden fully. -
Seal the work:
Spray the entire pot with a clear matte sealer. This protects the paint from water damage when you water your plants and preserves that beautiful chalky finish.
Enjoy the sophisticated, nautical charm this transformed vessel brings to your windowsill display


Half-Dipped Two-Tone
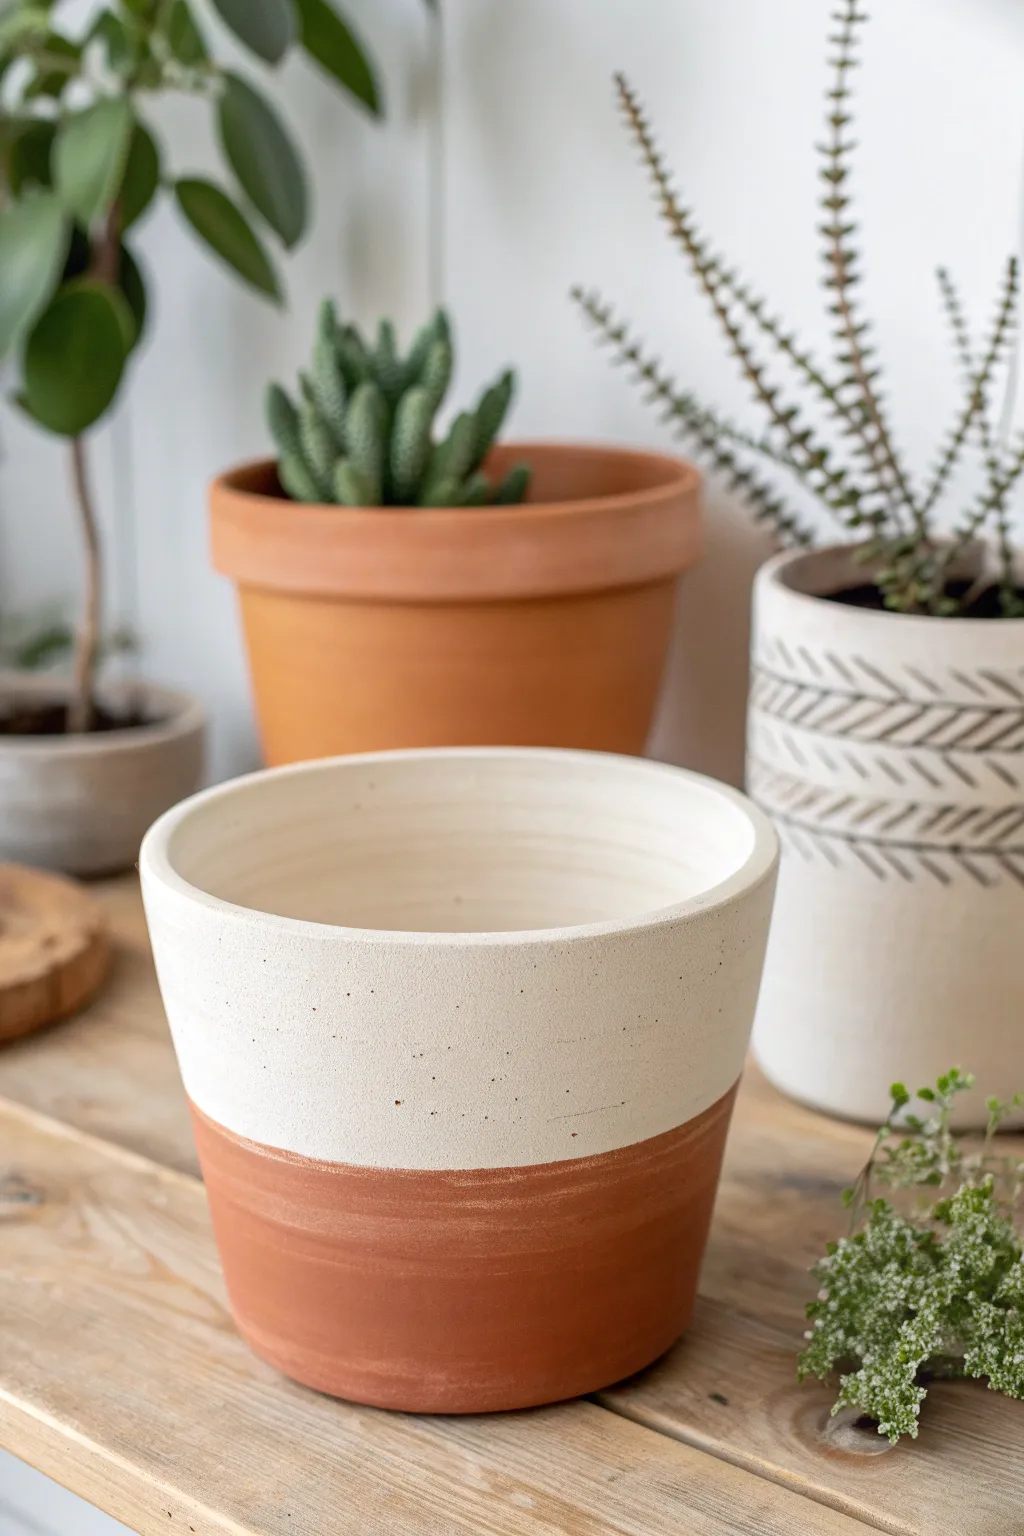
Give your classic terracotta pots a sleek, modern update with this simple half-dipped effect. The contrast between the matte cream glaze and the raw clay creates a sophisticated, earthy look that elevates any houseplant.
How-To Guide
Materials
- Terracotta pot (clean and dry)
- Matte cream or off-white acrylic paint
- Painter’s tape or masking tape (optional)
- Medium-grit sandpaper
- Fine-grit sandpaper
- Flat paintbrush (1-2 inches wide)
- Clear matte sealer spray
- A disposable container for paint
- Damp cloth
- Water
Step 1: Preparation
-
Clean surface:
Begin by thoroughly wiping down your terracotta pot with a damp cloth to remove any dust or debris. If the pot is old, scrub it well and let it dry completely overnight. -
Smooth the texture:
Using medium-grit sandpaper, lightly sand the entire pot to knock down any large bumps or imperfections in the clay surface. -
Refine the surface:
Follow up with fine-grit sandpaper to create a very smooth base, which helps the paint lay flat and mimics a ceramic glaze finish. -
Wipe clean:
Use a damp cloth or tack cloth to remove all sanding dust. This step is crucial for a smooth paint application.
Step 2: Creating the Design
-
Mark the line:
Decide where you want your color line to be. For the look in the photo, aim for the bottom third of the pot. You can eyeball this for an organic feel or use a pencil to lightly mark the height around the circumference. -
Tape guide (optional):
If you want a razor-sharp edge, apply painter’s tape firmly around your marked line. However, for the slightly softer, hand-dipped look seen in the image, skipping the tape and painting freehand works best. -
Mix the paint:
Squeeze your cream acrylic paint into a container. I like to add just a few drops of water to thin it slightly, which helps eliminate brush strokes and creates a dipped appearance. -
Paint the rim:
Start by painting the inside rim of the pot down to the soil line. This ensures the terracotta color doesn’t show at the top when your plant is potted. -
Apply the first coat:
Using a flat brush, apply the paint from the top rim down to your designated line. Keep your strokes horizontal near the line for a clean edge. -
Smooth the edge:
If painting freehand, rotate the pot on a lazy susan or a towel while holding the brush steady against the pot to create a consistent line around the bottom. -
Let it dry:
Allow the first coat to dry completely for about 20-30 minutes. Terracotta is porous and will soak up the first layer quickly. -
Second coat:
Apply a second coat of paint to ensure solid, opaque coverage. The cream color should be rich enough that no orange clay shows through the painted section. -
Inspect coverage:
Check for any streaks or thin spots. A third light coat might be necessary depending on the quality of your paint.
Pro Tip: Speckled Effect
To mimic ceramic clay, flick a toothbrush loaded with diluted brown paint over the cream section before sealing.
Step 3: Finishing Touches
-
Remove tape:
If you used painter’s tape, peel it away carefully while the final coat of paint is still slightly tacky to prevent chipping. -
Clean up the line:
If your paint bled or the freehand line is messy, use a damp Q-tip or a piece of fine sandpaper to gently tidy up the edge where the paint meets the raw clay. -
Seal the pot:
Take the pot outside or to a well-ventilated area. Spray the entire exterior (painted and unpainted sections) with a clear matte sealer. -
Second seal:
Apply a second light coat of sealer. This protects the paint from water damage when you water your plants and prevents the clay from wicking moisture too aggressively. -
Final cure:
Let the pot cure for at least 24 hours before adding soil and your favorite plant.
Troubleshooting: Peeling Paint
Terracotta absorbs water. Always seal the INSIDE of the pot with a waterproof sealer to stop moisture from pushing the outer paint off.
Now you have a custom, high-end looking planter ready for your favorite greenery


Soft Ombre Fade
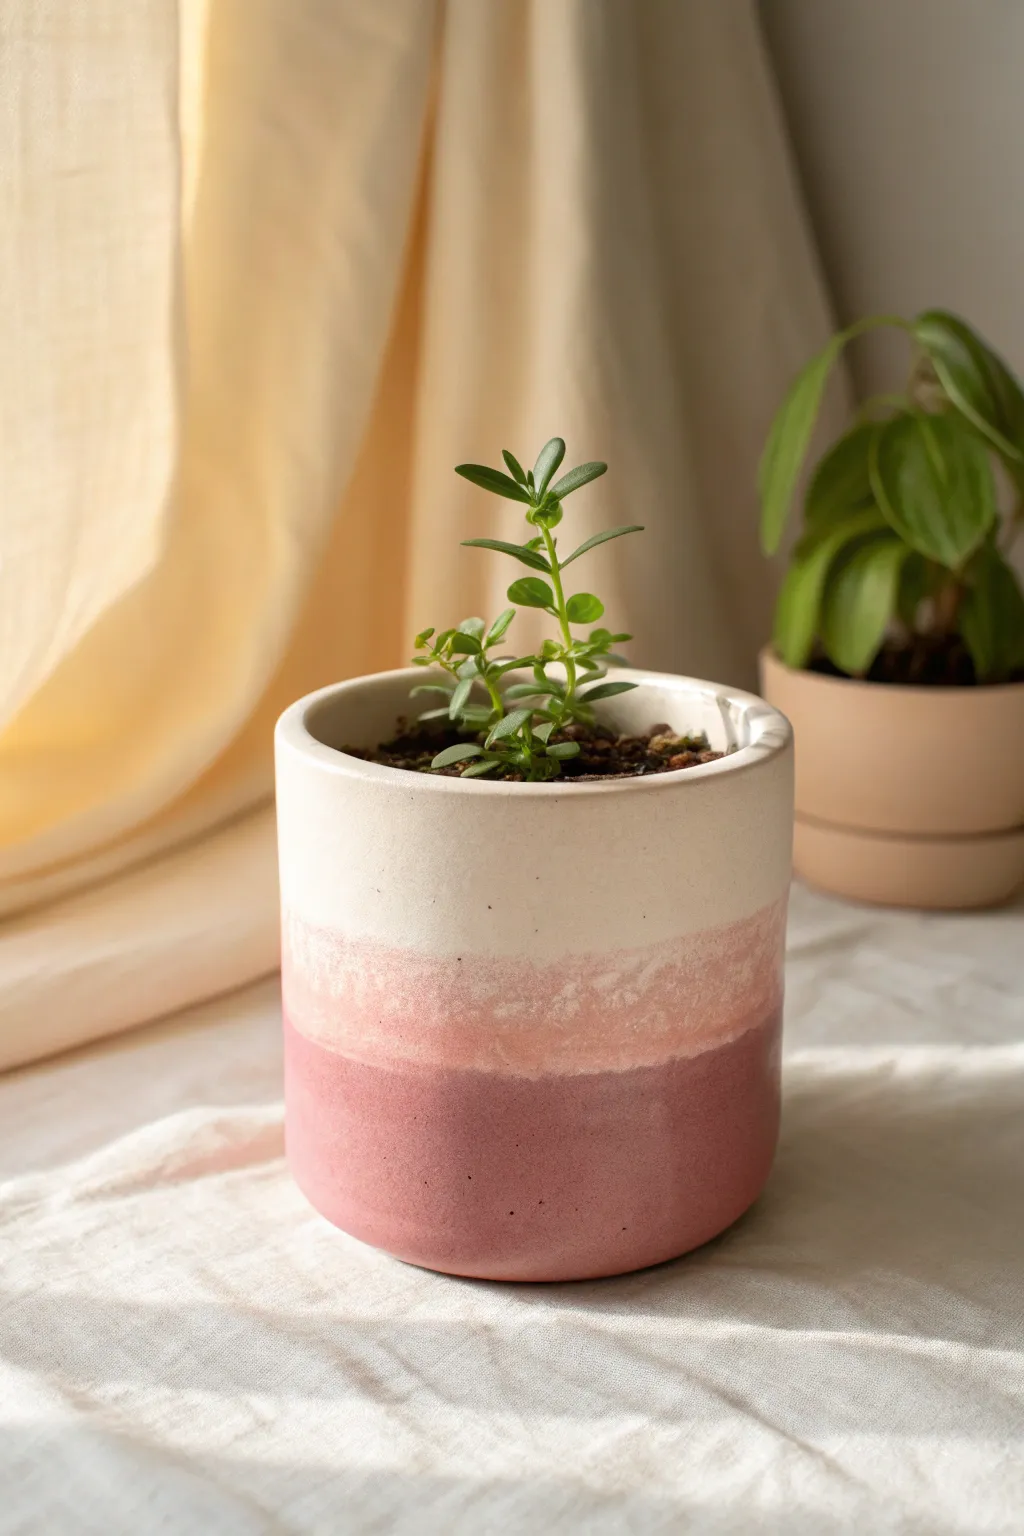
Capture the gentle gradient of a sunrise with this dipped-effect ombre planter. By blending heavy body acrylics or chalk paints from deep mauve to creamy white, you’ll create a soft, textured fade that looks effortlessly handmade.
Detailed Instructions
Materials
- Small cylindrical ceramic or terracotta pot (glazed or unglazed)
- White primer (if pot is porous)
- Matte acrylic paints: Deep Dusty Rose (dark pink)
- Matte acrylic paints: Soft Blush (light pink)
- Matte acrylic paints: Warm Cream or Off-White
- Medium flat synthetic brush
- Makeup wedge sponge or dabber sponge
- Paper palette or painter’s tray
- Clear matte sealant spray
Step 1: Preparation and Base
-
Clean surface:
Begin by wiping down your ceramic pot with a damp cloth to remove any dust or oils. Let it dry completely. -
Prime the pot:
If you are using raw terracotta, apply a coat of white primer first to stop the clay from soaking up all your paint. For already glazed ceramic pots, you can skip this step or give it a light sanding for better adhesion. -
Paint the top section:
Load your flat brush with the Warm Cream paint. Paint the top third of the pot (including the rim) with a solid, even coat. Don’t worry about a perfect bottom edge for this section. -
Paint the bottom section:
Rinse your brush thoroughly. Now, paint the bottom third of the pot with your darkest color, the Deep Dusty Rose. Ensure the paint covers the very bottom edge for a clean look.
Paint drying too fast?
If acrylics dry before you can blend, mix a drop of ‘acrylic retarder’ or ‘slow-dry medium’ into your paints. This keeps them wet and workable longer.
Step 2: Creating the Ombre Fade
-
Fill the middle gap:
Mix a little of your Deep Dusty Rose with the Warm Cream on your palette to create a mid-tone blush color. Apply this to the empty middle band of the pot. -
Start the lower blend:
While the paint is still wet (this is crucial), take your damp sponge. Lightly dab along the line where the dark rose meets the mid-tone blush. -
Soften the lower transition:
Use an up-and-down tapping motion with the sponge to blur the hard line, pulling a tiny bit of the dark color up and the medium color down. -
Start the upper blend:
Clean your sponge or use a fresh side. Now move to the line where the mid-tone blush meets the creamy white top. -
Create the texture:
Dab vigorously here to create that specific textured, ‘cloudy’ look seen in the photo. I find that a slightly dry sponge actually creates better texture here than a wet one. -
Add highlights:
To enhance the fade, dip just the corner of your sponge into the darkest pink and gently tap it into the middle section to deepen the gradient. -
Add lowlights:
Similarly, take a tiny amount of the cream paint on a clean sponge area and dab it downwards into the middle pink section to soften the transition further. -
Refine the rim:
Check the top rim of the pot. If any pink paint accidentally smudged onto the pure white area, touch it up now with a small brush and fresh cream paint.
Add a speckled effect
For more texture, load a toothbrush with watered-down white paint and flick the bristles to spray tiny droplets over the dried ombre fade.
Step 3: Finishing Touches
-
Dry completely:
Allow the pot to sit undisturbed for several hours. The thick, textured dabbing technique takes a little longer to dry than flat brushstrokes. -
Seal the work:
Take the pot to a well-ventilated area. Apply a light coat of clear matte sealant spray to protect the paint from water damage when you water your plant. -
Pot your plant:
Once the sealer creates a hard shell (usually 24 hours), gently pot your succulent or houseplant using appropriate soil.
Place your new planter near a window where the natural light can highlight the gentle color transition


Sunset Gradient Palette
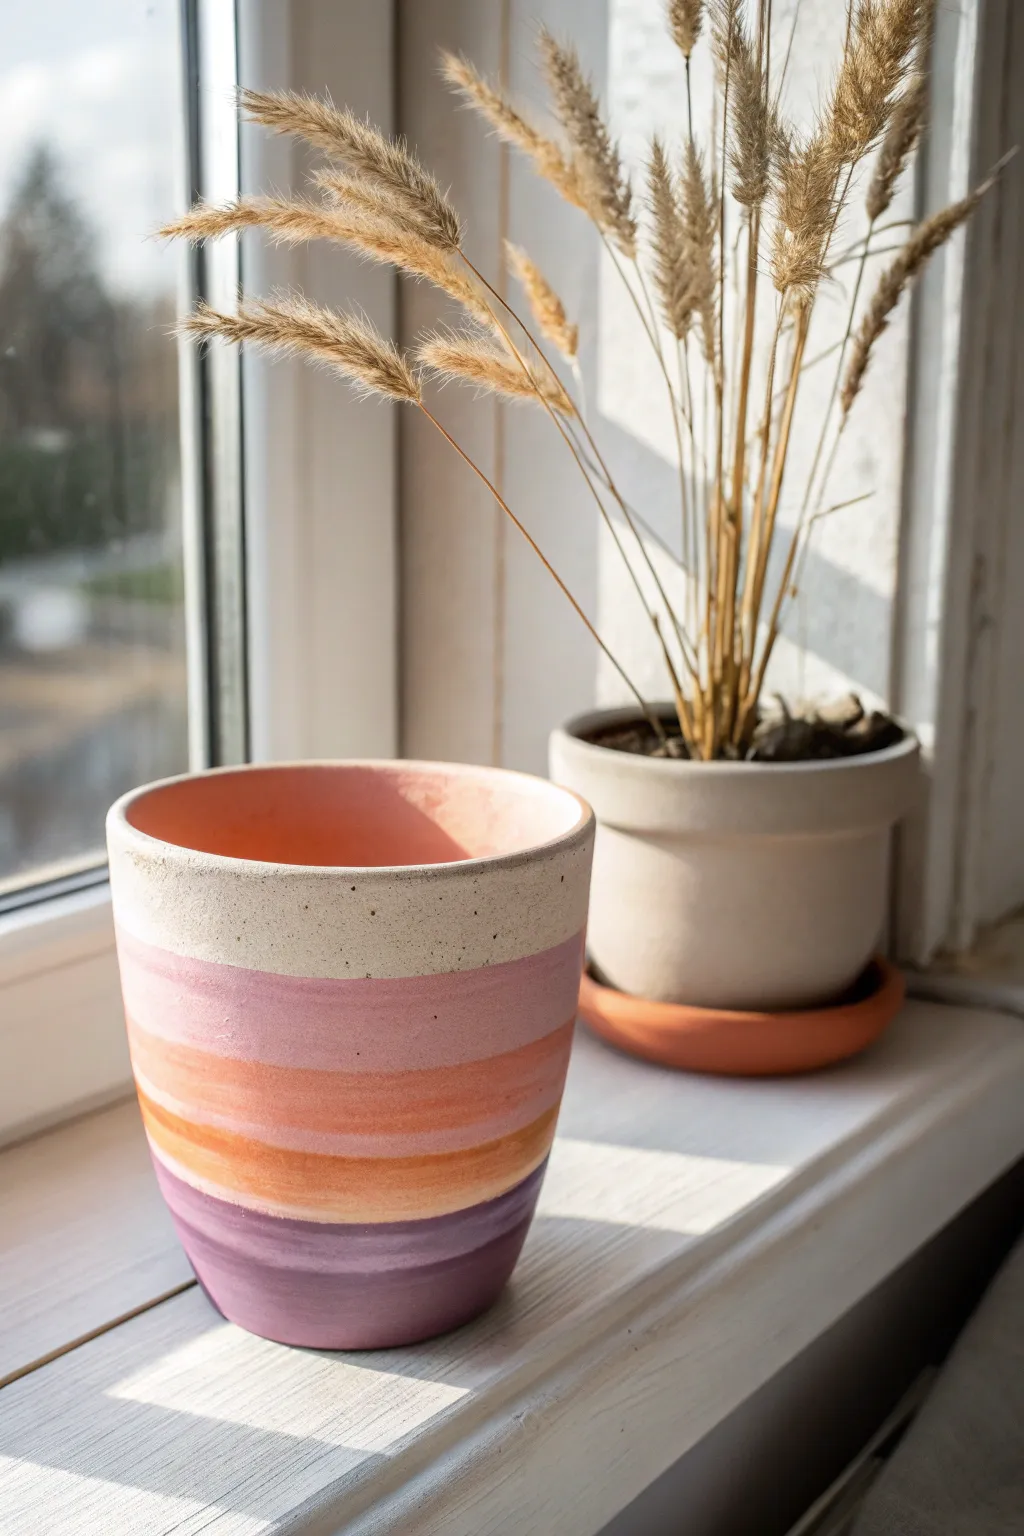
Capture the fleeting beauty of dusk with this soothing gradient design. By layering bands of warm cream, soft pink, vivid orange, and deep purple, you’ll transform a plain ceramic vessel into a piece of functional art that radiates calm energy.
Step-by-Step Tutorial
Materials
- Terra cotta or ceramic pot (clean and dry)
- White primer or gesso
- Acrylic paints: Cream/Off-white, Dust Pink, Coral/Orange, Lavender, Deep Plum
- Flat paintbrush (medium width)
- Small round brush (for touch-ups)
- Painter’s tape or masking tape (optional, primarily for the rim)
- Palette or paper plate
- Matte spray sealer
- Water cup and paper towels
Step 1: Preparation & Base Coat
-
Clean the Surface:
Begin by ensuring your pot is completely free of dust or oils. Wipe it down with a damp cloth and let it dry fully, as any moisture trapped inside can cause the paint to bubble later. -
Prime the Pot:
Apply a coat of white primer or gesso over the entire exterior of the pot. This is specifically important for the top section where the cream color will go, ensuring the speckled clay texture doesn’t darken your light tones. -
Tape the Rim:
If you want a crisp line specifically at the very top edge, apply a strip of painter’s tape around the inner rim. Alternatively, you can paint freehand for a more organic, handcrafted feel. -
Paint the Interior:
Notice the inside of the pot in the image is a warm pink hue. Paint the visible interior rim and down about two inches inside with a mix of your pink and coral paint.
Pro Tip: Soft Horizons
To get that “watercolor” look between stripes without mixing mud, use a dry brush technique. Wipe most paint off your brush and lightly drag it over the seam of dry colors.
Step 2: Painting the Gradient Bands
-
Mix Your Cream:
On your palette, prepare your cream color. If you only have stark white, mix in a tiny drop of yellow oxide or brown to warm it up so it looks earthy rather than clinical. -
Apply the Top Band:
Using your flat brush, paint a wide band of the cream color around the top third of the pot. I like to keep the bottom edge of this band slightly uneven initially so blending is easier later. -
Create the Speckled Effect:
While the cream paint is still wet, dip an old toothbrush or stiff brush into slightly diluted brown paint and flick tiny specks onto the cream section to mimic natural stoneware pottery. -
Paint the Upper Pink Band:
Load your brush with the dusty pink shade. Paint a band directly below the cream section, slightly overlapping the wet edge of the cream to create a soft transition rather than a hard line. -
Add the Coral Strip:
Below the pink, paint a thinner band of the coral or muted orange color. This represents the last bright moments of the sun setting. Keep your brush touches horizontal to maintain the banded look. -
Blend the Transition:
With a slightly damp (clean) brush, gently feather the area where the pink meets the coral. The goal isn’t a perfect airbrushed fade, but a gentle softening of the border. -
Introduce the Lavender:
Move to the lower section with your lavender paint. Apply this band below the coral, encompassing the curve where the pot starts to taper inward. -
Anchor with Plum:
Paint the very bottom base of the pot with your deepest plum or violet shade. This darker color at the bottom gives the design visual weight and stability. -
Define the Stripes:
Once the base layers are down, look at the reference image. The stripes are distinct but not taped off perfectly straight. Go back with a smaller brush and reinforce any colors that look too sheer, intentionally leaving the lines slightly wavy for an organic touch.
Step 3: Finishing Touches
-
Dry Completely:
Let the pot sit for at least an hour until the paint is dry to the touch. Acrylics dry quickly, but thick layers need extra time. -
Inspect Boundaries:
Check the meeting points of your colors. If you lost too much definition during blending, paint a very thin, deliberate line of the original color back over the transition area to re-establish the bands. -
Protect the Work:
Take the pot to a well-ventilated area. Hold the can regarding 8-10 inches away and apply a light mist of matte spray sealer. This locks in the colors and protects the paint from water damage during watering. -
Remove Tape:
If you taped the rim, peel it off carefully at a 45-degree angle now that the sealer is tacky but not fully cured, ensuring a clean edge. -
Final Cure:
Allow the sealer to cure fully (usually 24 hours) before potting any plants or arranging dried flowers inside.
Trouble with Streaks?
If your acrylic paint looks streaky or translucent, don’t keep brushing wet paint. Let the first layer dry completely, then apply a second thin coat for solid coverage.
Enjoy the warmth of your permanent sunset on your windowsill every day

The Complete Guide to Pottery Troubleshooting
Uncover the most common ceramic mistakes—from cracking clay to failed glazes—and learn how to fix them fast.
Modern Color Blocking
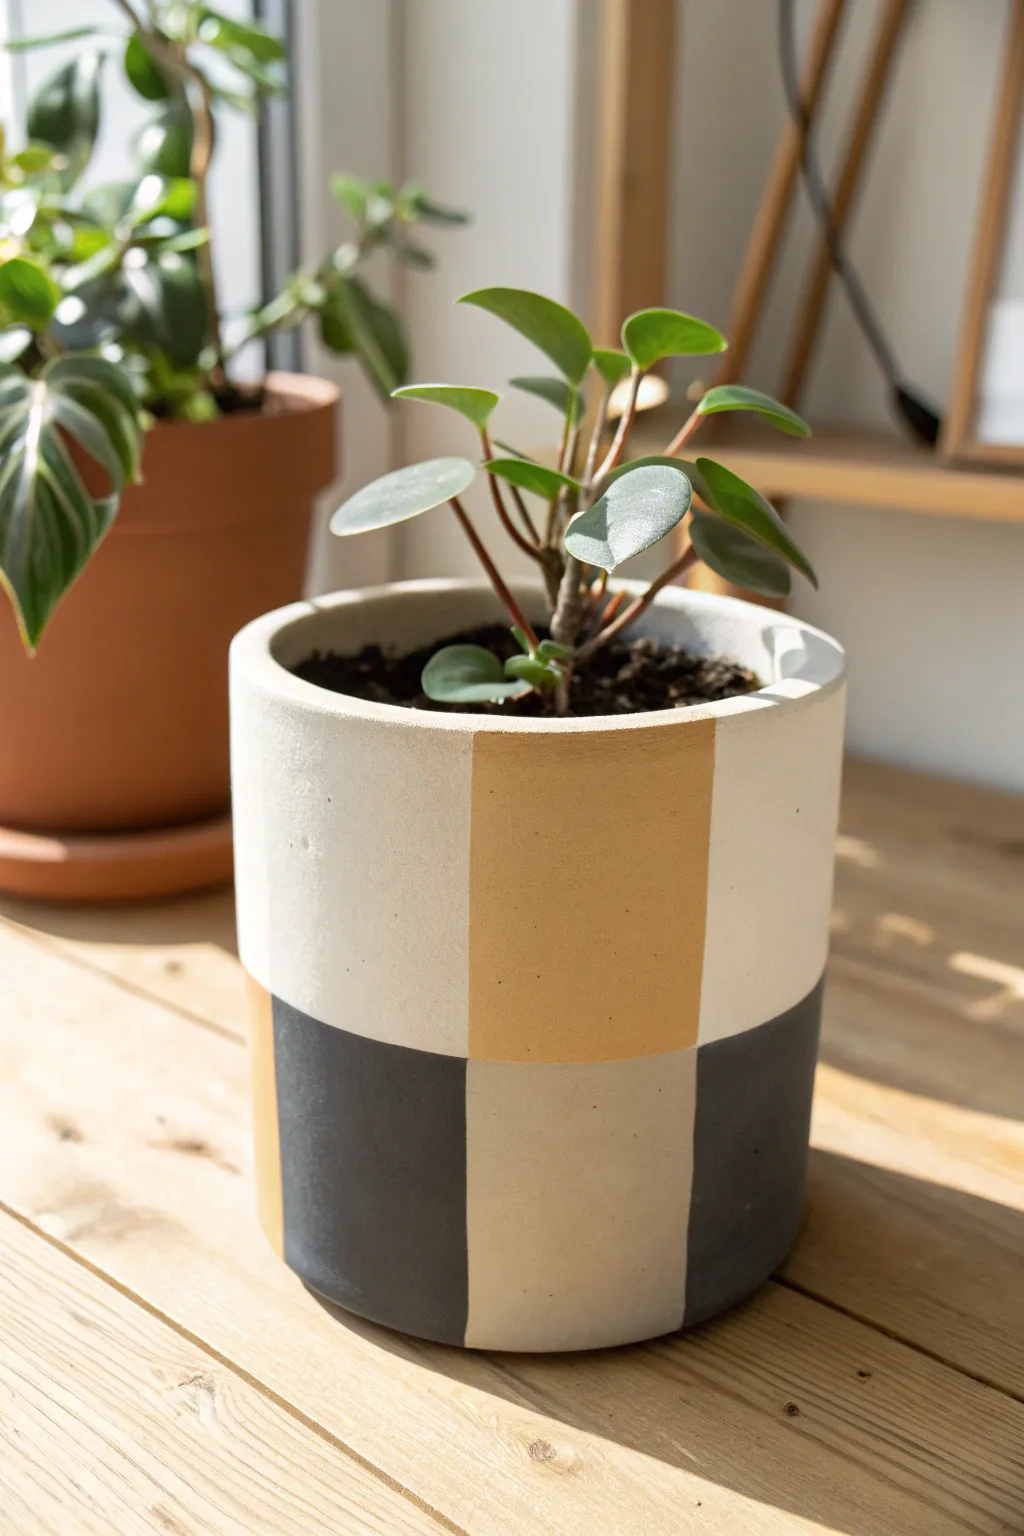
Transform a standard cylinder planter into a piece of modern art with this crisp, color-blocked design. The interplay of mustard yellow, charcoal grey, and creamy off-white creates a sophisticated matte finish that looks high-end but is simple to achieve.
Step-by-Step
Materials
- Cylinder clay or ceramic pot (smooth sided)
- Acrylic craft paints (Mustard Yellow, Charcoal Grey, Cream/Off-White)
- Painter’s tape (various widths, preferably 1-inch)
- Flat paintbrushes (medium width)
- Small angled detail brush
- Pencil
- Ruler or measuring tape
- Matte clear sealant spray
Step 1: Preparation and Base Coat
-
Clean surface:
Begin by thoroughly wiping down your pot with a damp cloth to remove any dust or oils. If the pot is unglazed terracotta, let it dry completely before painting. -
Apply base color:
Paint the entire exterior of the pot with your Cream/Off-White acrylic paint. This will serve as the lightest color in your block pattern and ensures the other colors pop. -
Let it dry:
Allow the first coat to dry fully for about 20-30 minutes. Apply a second coat if the clay color is showing through, then let it cure for at least an hour to ensure the tape won’t peel it off later.
Step 2: Drafting the Grid
-
Measure the height:
Measure the total height of the pot. Divide this number by two to find your horizontal center line. -
Mark the horizon:
Using a pencil, make small tick marks around the circumference of the pot at that center height. Lightly connect these marks to create a faint horizontal guide around the middle. -
Calculate vertical sections:
Measure the circumference. Decide how many column blocks you want; the example image uses wide blocks, likely dividing the pot into quarters or thirds. Mark these vertical divisions. -
Draw the grid:
Use your ruler to draw straight vertical lines connecting the top rim to the bottom edge at your marked intervals. You should now have a grid of large rectangles drawn lightly on the pot.
Bleeding Lines?
If paint bleeds under the tape, wait for it to dry fully. Then, gently scrape the excess away with a craft knife or use a small brush to patch over it.
Step 3: Painting the Blocks
-
Tape first set of blocks:
Apply painter’s tape along the outlines of the sections you want to paint Mustard Yellow. I prefer to tape ‘outside’ the lines so the pencil mark gets painted over. -
Seal edges:
Press the tape edges down firmly with your fingernail or a credit card to prevent paint bleed. -
Paint yellow sections:
Fill in the designated rectangles with Mustard Yellow paint. Use smooth, horizontal strokes. -
Second coat:
Once the yellow is touch-dry, apply a second coat for opacity. Remove the tape immediately while the second coat is still slightly wet to get the cleanest line. -
Dry time:
Let these yellow sections dry completely before moving on. This is crucial so you don’t smudge your work. -
Tape grey sections:
The pattern alternates, so tape off the sections intended for Charcoal Grey. You will likely be taping over the dry edge of the Cream or Yellow sections. -
Paint grey sections:
Fill in the masked areas with Charcoal Grey acrylic paint. Darker colors cover well, but two thin coats are always better than one thick, gloopy coat. -
Remove tape:
Peel back the tape carefully at a 45-degree angle to reveal your alternating checkerboard pattern.
Texture Twist
Mix baking soda into your acrylic paint before applying the colored blocks. This creates a trendy, grainy ceramic texture that mimics rough stoneware.
Step 4: Finishing Touches
-
Touch ups:
Inspect your lines. If any paint bled under the tape, use a very small angled brush and the appropriate background color to carefully tidy up the edges. -
Erase guides:
If any pencil marks are still visible in the unpainted cream sections, gently erase them now. -
Seal the deal:
Take the pot to a well-ventilated area and spray it with a matte clear sealant. This protects the paint from water damage when you water your plant.
Now you have a stylish, custom planter ready to showcase your favorite greenery
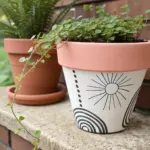
Crisp Geometric Tape Patterns
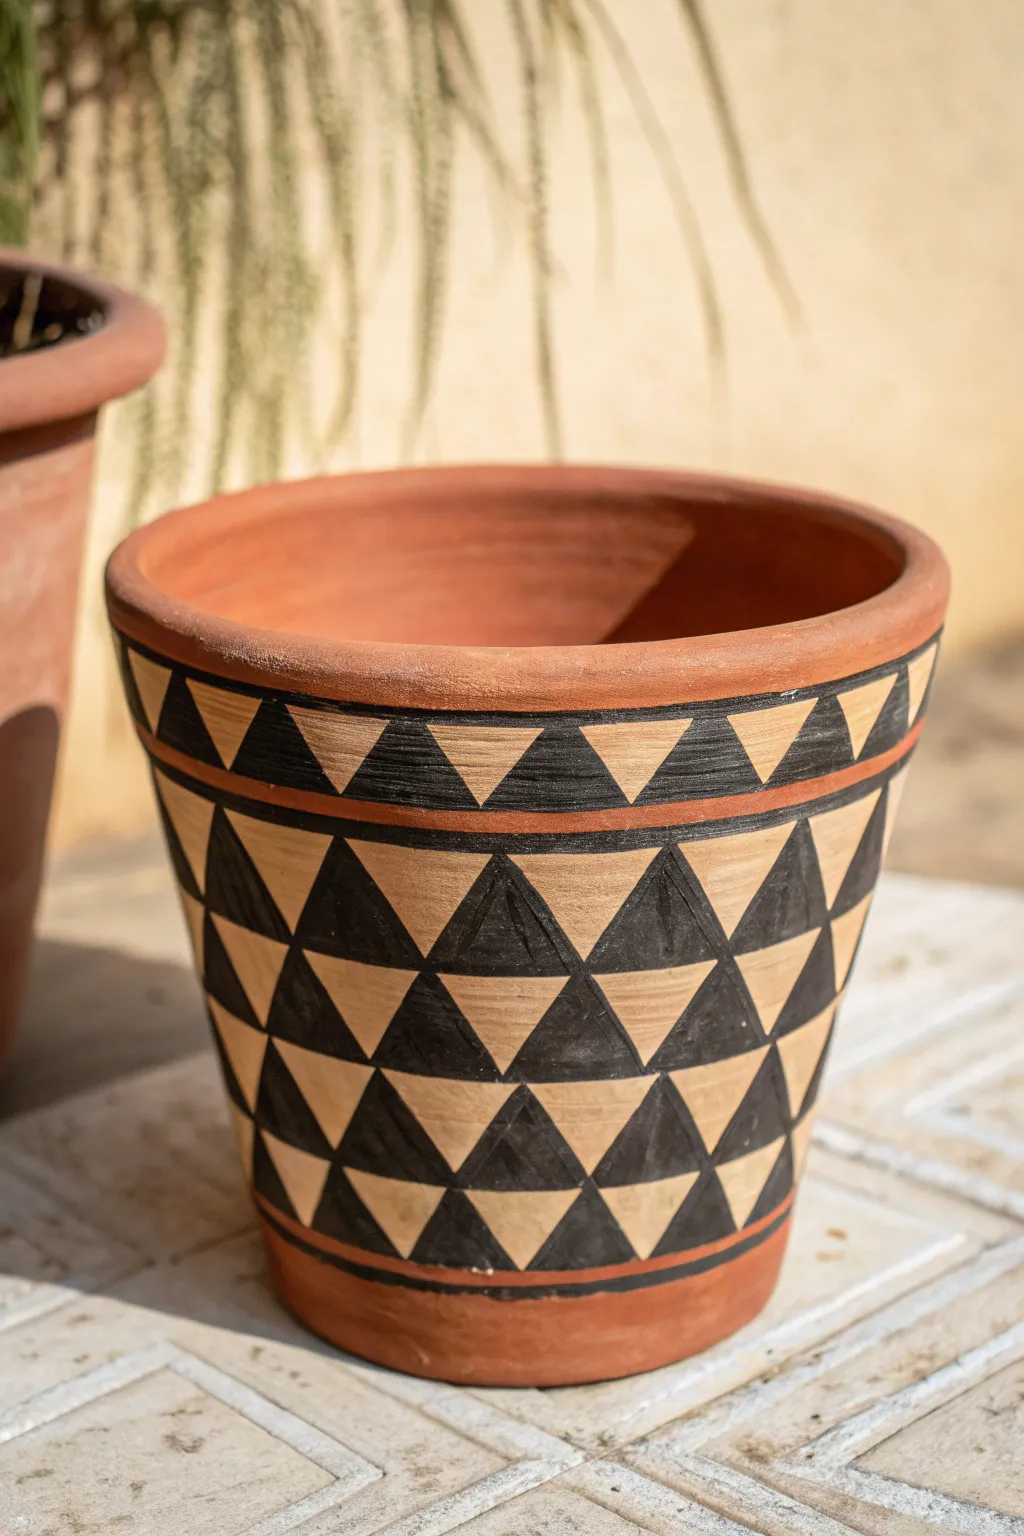
Transform a plain terracotta pot into a striking piece of decor with this crisp, high-contrast geometric design. By utilizing masking tape and careful painting, you’ll achieve a modern tribal look that perfectly balances black, tan, and natural clay tones.
Step-by-Step Tutorial
Materials
- Terracotta pot (medium to large size)
- Black acrylic craft paint (outdoor or multi-surface formula recommended)
- Tan or beige acrylic craft paint
- Painter’s tape or masking tape (1/4 inch and 1 inch widths)
- Small flat paintbrush
- Medium flat paintbrush
- Utility knife or craft knife
- Pencil
- Ruler or measuring tape
- Clear matte acrylic sealer spray
Step 1: Preparation and Base Layer
-
Clean the surface:
Before you begin, wipe down your terracotta pot with a damp cloth to remove any dust or warehouse grit. Let it dry completely so the paint adheres properly. -
Mark the rim and base:
Using your pencil and ruler, lightly mark a line about 1 inch down from the top rim and 1 inch up from the bottom edge. These areas will remain unpainted to show the natural terracotta. -
Apply the tan base coat:
Paint the entire middle section of the pot—between your pencil lines—with the tan or beige acrylic paint. Use your medium flat brush for this. -
Build opacity:
Allow the first coat of tan paint to dry fully, which usually takes about 20 minutes. Apply a second or even third coat until you have a solid, opaque background without streaks.
Step 2: Creating the Upper Texture Band
-
Define the upper band:
Once the tan paint is bone dry, apply a strip of painter’s tape horizontally around the pot, positioned about 1.5 inches below the top rim line you marked earlier. -
Add the separation line:
Place a very thin strip of tape (or cut a standard piece lengthwise) just above that first tape line, leaving a tiny gap. This gap will be painted later to create the thin terracotta-colored stripe. -
Sketch the small triangles:
In the band created above your tape, lightly pencil in a row of alternating triangles pointing up and down. -
Paint the upper triangles:
Using the small flat brush and black paint, carefully fill in every other triangle. I find it easiest to outline the shape first and then fill the center. -
Add texture:
While the black paint is still wet, you can lightly drag a dry brush through it to give it that scratched, rustic texture seen in the photo.
Tape Removal Trick
Pull tape away from the paint at a 45-degree angle. This slicing motion cuts the paint film cleanly, leaving a much sharper edge than pulling straight up.
Step 3: Designing the Main Geometric Pattern
-
Draft the grid:
For the main body of the pot, use a ruler to lightly draw a grid of diamonds or large triangles. This ensures your pattern stays symmetrical as you go around the curve. -
Tape off the main shapes:
Use your painter’s tape to mask off the large triangular sections. Creating sharp points where tapes meet is crucial here; press the edges down firmly with your fingernail. -
Cut for precision:
If the tape overlaps too much at the corners, create a clean vertex by gently slicing the excess tape away with a craft knife. -
Seal the tape edges:
To prevent bleeding, lightly brush a tiny amount of the tan base paint over the tape edges. This fills any microscopic gaps before you apply the black. -
Paint the black triangles:
Fill in the unmasked triangular sections with black paint. Apply two coats if necessary to get a deep, rich charcoal color. -
Create the scratched effect:
Similar to the top band, before the final coat of black dries completely, use a slightly stiff bristle brush to create vertical or diagonal texture lines in the black areas. -
Remove the tape:
Peel off the tape while the paint is still slightly tacky—not soaking wet, but not fully cured. This helps ensure the crispest lines without pulling up dried paint chunks.
Bleeding Lines?
If paint bleeds under the tape, wait for it to dry fully. Then, place a piece of tape over the black part and repaint the edge with the tan base color to clean it up.
Step 4: Finishing Touches
-
Touch up lines:
Use a detail brush and your tan paint to fix any areas where the black might have bled or where the lines aren’t perfectly straight. -
Paint the dividing stripe:
Remember that thin gap we left below the top band? Paint a line of rust or mix a little orange into your tan paint to mimic the terracotta color there, creating a defined border. -
Clear coat sealant:
Take the pot to a well-ventilated area and spray it with a clear matte acrylic sealer. This protects the design from water damage and UV fading.
Now you have a stunning, hand-painted vessel ready to showcase your favorite indoor plant


What Really Happens Inside the Kiln
Learn how time and temperature work together inside the kiln to transform clay into durable ceramic.
Minimalist Raw Clay With Painted Rim
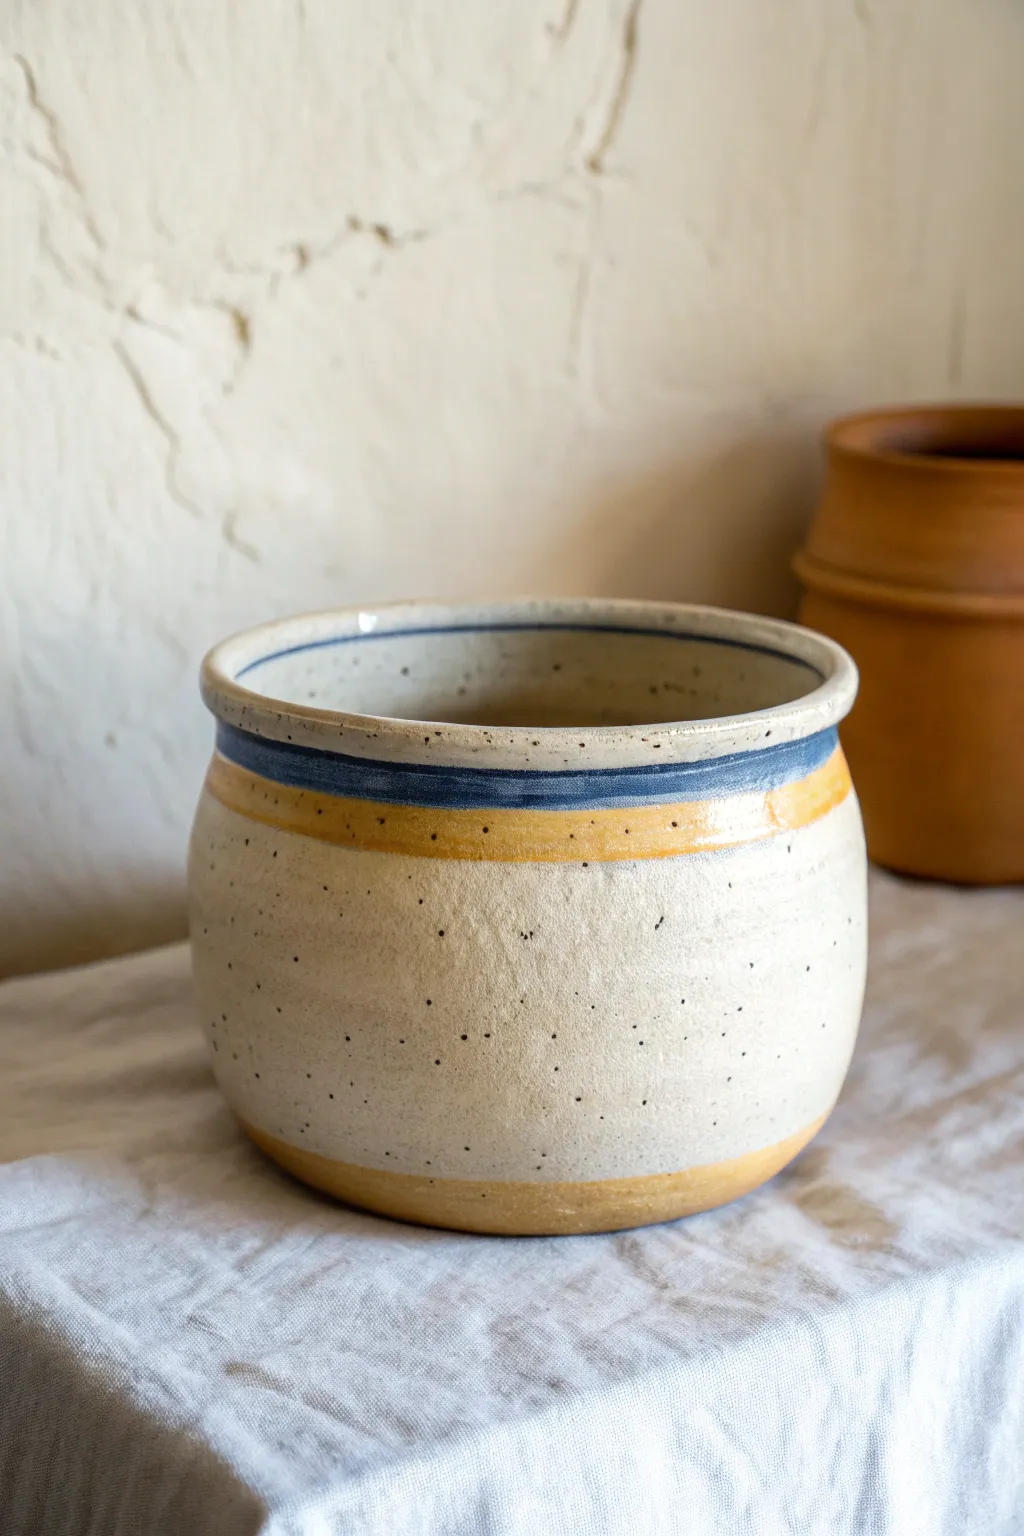
This project transforms a simple clay vessel into a charming, rustic piece featuring a creamy speckled base and subtle seaside-inspired banding using underglazes. It balances the raw, earthy feel of stoneware with clean lines of maritime blue and warm ochre.
Detailed Instructions
Materials
- Bisque-fired ceramic pot (white or light stoneware)
- Speckled Cream or White glaze (cone 5/6 compatible)
- Navy Blue underglaze
- Mustard Yellow or Ochre underglaze
- Banding wheel
- Soft fan brush (for glaze)
- Medium detail brush (size 4 or 6 round)
- Fine detail brush (size 0 or linear)
- Clean sponge and water
- Wax resist (optional)
Step 1: Preparation & Base Glaze
-
Clean surface:
Begin by wiping down your bisque-fired pot with a damp sponge. This removes any kiln dust or oils from your hands that might prevent the glaze from adhering properly. -
Wax the foot:
Apply a coat of wax resist to the bottom foot ring of the pot and about 1/8 inch up the side. This saves you from having to wipe glaze off later and ensures a clean base. -
Stir the glaze:
Thoroughly mix your speckled cream glaze. The speckles often settle at the bottom, so ensure a consistent suspension before applying. -
Apply first coat:
Place your pot on a banding wheel. While slowly spinning the wheel, use a soft fan brush to apply a smooth, even coat of the speckled cream glaze to the entire exterior and interior. -
Dry and repeat:
Allow the first coat to dry until it is no longer shiny and feels cool to the touch. Apply a second coat to ensure full coverage, but avoid it getting too thick or it may run. -
Rim check:
Double-check the rim. I like to dab a little extra glaze here if it looks thin, as gravity tends to pull glaze downward during firing.
Wobbly Lines?
If your hand shakes while painting lines, rest your pinky finger on the pot for stability or use a tall object (like a jar) as an armrest next to the wheel.
Step 2: Painting the Stripes
-
Prepare the blue:
Pour a small amount of Navy Blue underglaze onto a palette. You want a consistency similar to heavy cream for opaque coverage. -
Paint the rim stripe:
Center the pot on the banding wheel again. Spin the wheel at a steady, medium pace. Hold your medium brush loaded with blue underglaze steady against the pot, just below the rim, to create a consistent horizontal band. -
Add interior detail:
Using the same technique, add a thin blue line on the *inside* of the rim for a professional finished look. -
Prepare the yellow:
Clean your brush or switch to a fresh one. Load it with the Mustard Yellow or Ochre underglaze. -
Paint the upper yellow band:
While spinning the banding wheel, apply the yellow band directly underneath the blue one. Let the brush bristle naturally create a slightly softer, organic edge rather than a hard line. -
Paint the lower yellow band:
Move your brush down to the very bottom of the pot, just above the foot. Create a matching yellow band here to frame the speckled cream section in the middle. -
Layering the color:
Underglaze can be translucent. Once the first stripes are dry to the touch, apply a second layer of blue and yellow directly over the first lines to ensure solid, vibrant color.
Add Texture
Before the bisquing stage, lightly carve into the clay where the yellow bands will go. The glaze will break beautifully over the texture.
Step 3: Finishing Touches
-
Clean up:
If any underglaze dripped onto the plain cream section, gently scratch it off with a needle tool or wipe it with a barely-damp cotton bud. -
Final inspection:
Check the foot ring one last time. If any glaze adhering to the wax, wipe it off cleanly so the pot doesn’t stick to the kiln shelf. -
Fire the kiln:
Load the kiln and fire to the temperature specified by your clay and glaze manufacturer (typically Cone 5 or 6 for stoneware). Allow the kiln to cool completely before opening.
Once cooled, your pot is ready to hold a fresh plant or stand alone as a piece of minimal decor
Terracotta Wash Tint
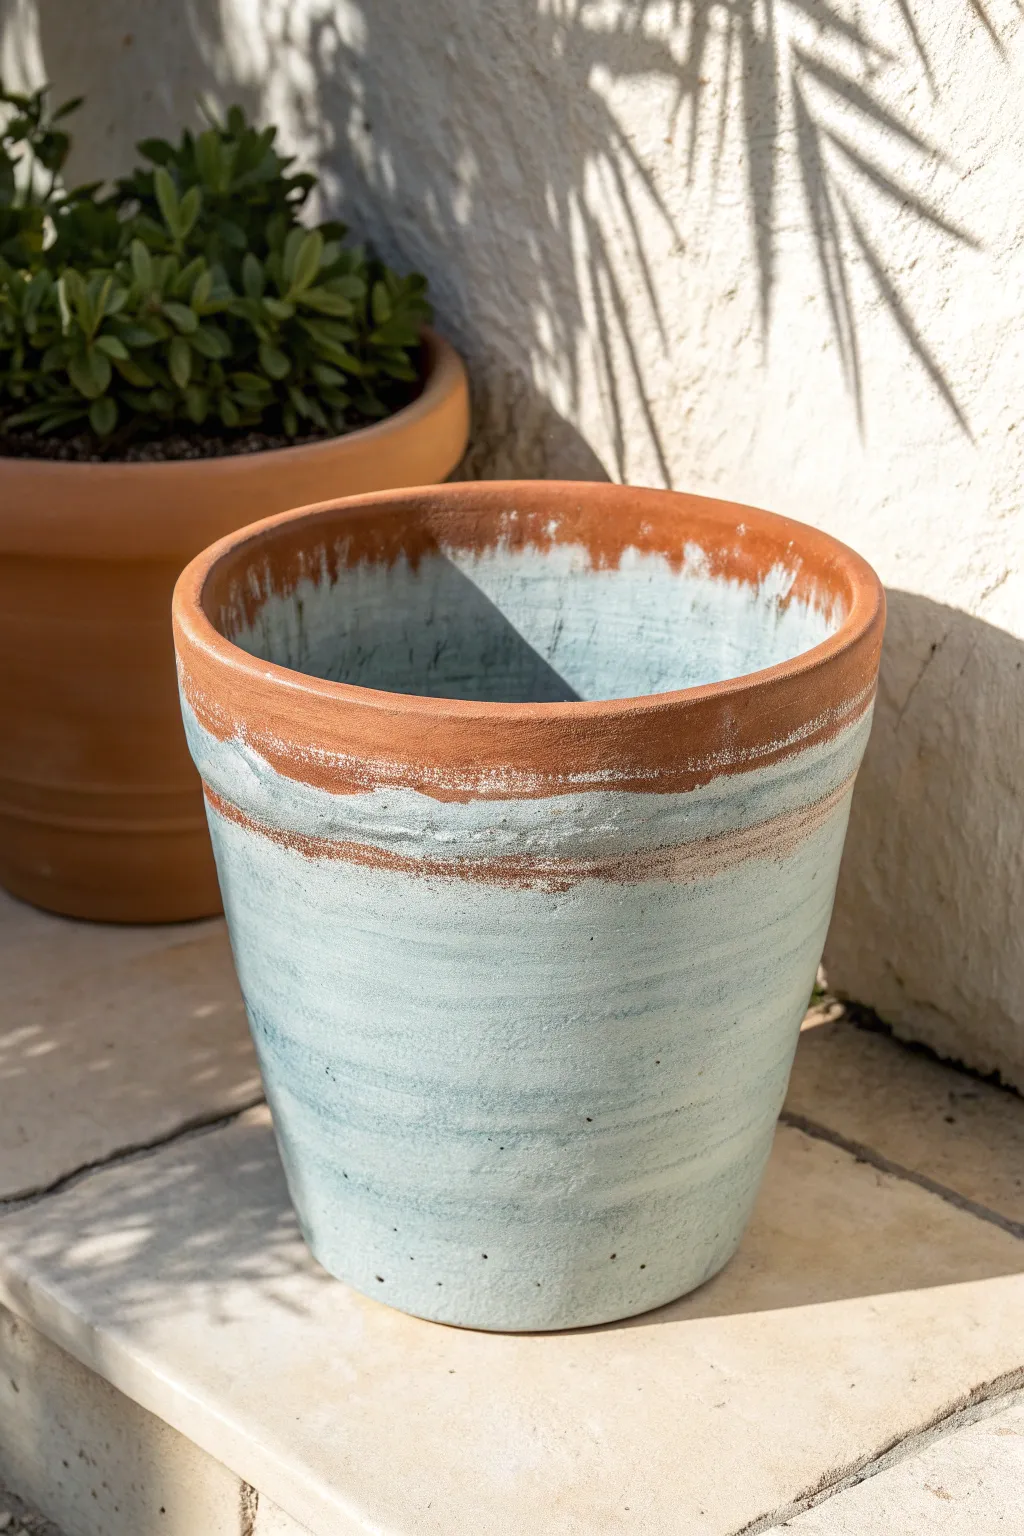
Give your plain terracotta pots an instant dose of Mediterranean charm with this textured wash technique. By layering paint and water, you create a gorgeous, aged patina that looks like it has been baking in the sun for years.
Step-by-Step
Materials
- Standard terracotta pot (clean and dry)
- White acrylic paint (chalk paint works best)
- Teal or sage green acrylic paint
- Small plastic container for mixing
- Water
- 2-inch chip brush or stiff bristle brush
- Paper towels or a rag
- Fine-grit sandpaper (optional)
- Matte spray sealer (optional)
Step 1: Preparation and Mixing
-
Clean surface:
Ensure your terracotta pot is free of dust and stickers. If intended for outdoor use, you may want to seal the inside first, but only work on the outside for this cosmetic finish. -
Create the base tint:
In your mixing container, combine about 1 part teal/sage paint with 2 parts white paint. We want a very pale, muted blue-green tone. -
Dilute the paint:
Add water to your paint mixture. You aren’t looking for a solid coat; aim for a consistency thinner than heavy cream but thicker than milk. It should be faint and translucent.
Step 2: Applying the Wash
-
Initial application:
Dip your chip brush into the watery mix. Starting about an inch or two below the rim, drag the brush horizontally around the pot. -
Create the rough edge:
Don’t try to make a perfect line near the rim. Instead, let the bristles skip and drag, leaving patches of raw terracotta showing through for that weathered look. -
Fill the body:
Continue brushing the wash down the rest of the pot. Use horizontal strokes to mimic the direction the pot was thrown on the wheel. -
Build textured layers:
While the first layer is still tacky, dab your brush into slightly thicker (less watered down) white paint. I like to dry-brush this randomly over the middle section to add depth. -
Ragging off:
Take a crumpled paper towel and blot areas that look too uniform or heavy. This lifts the paint to reveal the orange clay beneath, simulating aging. -
Rim detail:
Use a nearly dry brush with a tiny amount of the whitewash mix to feather just the very bottom edge of the rim, softening the transition between the painted body and the raw top.
Paint Too Opaque?
If the color is covering too much clay, wipe it back immediately with a damp sponge. Work in sections so the paint doesn’t dry before you can distress it.
Step 3: Interior and Finishing
-
Inner rim technique:
To make the aging look authentic, apply the wash to the inside of the pot too. Paint from the top rim down about two inches. -
Create artistic drips:
Allow the watery paint on the inside to naturally drip down casually. This mimics mineral deposits from watering. -
Add rim highlights:
Dip just the tips of your brush in pure white paint. Lightly whisk it over the very top edge of the pot rim to highlight the texture. -
Dry completely:
Let the pot sit in a warm, dry area for at least an hour. The clay will absorb the moisture quickly. -
Distress (Optional):
Once bone dry, take fine-grit sandpaper and lightly scuff the painted areas, focusing on any raised rings or ridges on the pot. -
Seal (Optional):
If this pot will live outdoors, spray a light coat of matte sealer over the painted area to preserve the wash without adding shine.
Add Mossy Texture
Dab a tiny bit of watered-down dark green or brown paint into the crevices and under the rim for a dirty, moss-grown garden antique effect.
Now you have a beautifully aged vessel ready for your favorite fern or succulent

TRACK YOUR CERAMIC JOURNEY
Capture glaze tests, firing details, and creative progress—all in one simple printable. Make your projects easier to repeat and improve.
Speckled Confetti Dots
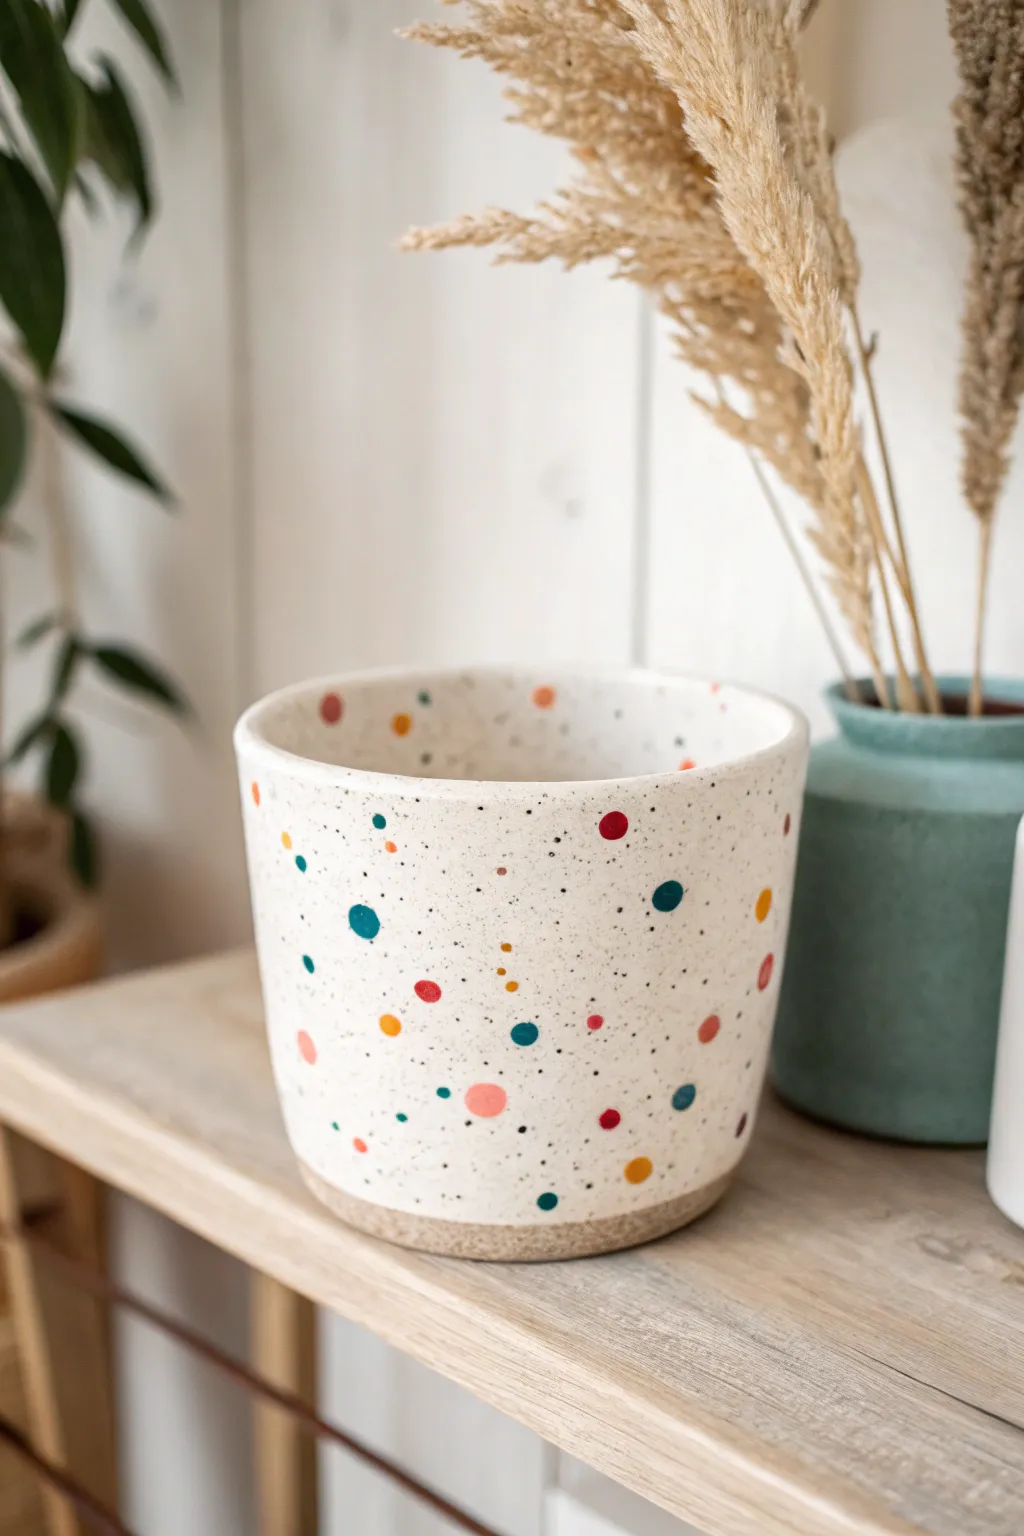
Transform a plain terracotta or ceramic vessel into a trendy, modern piece that mimics high-end speckled stoneware. This playful design features a creamy white base scattered with festive, multi-colored dots and tiny faux-stone flecks.
Detailed Instructions
Materials
- Terracotta or bisque ceramic pot
- Acryic paint (Cream/Off-White base)
- Acrylic paints (Teal, Mustard Yellow, Red, Pink, Navy Blue)
- Black acrylic paint
- Water
- Medium flat paintbrush
- Small round paintbrush (size 2 or 4)
- Old toothbrush
- Matte spray sealer or varnish
- Q-tips (optional)
- Paper plate or palette
- Cardboard box (for splatter containment)
Step 1: Base Coat Application
-
Prep the surface:
Begin by wiping down your pot with a damp cloth to remove any dust or oils that might prevent the paint from adhering properly. Let it dry completely. -
Mix your base color:
On your palette, squeeze out a generous amount of cream or off-white acrylic paint. If you only have bright white, add the tiniest drop of yellow or brown to warm it up. -
Apply the first layer:
Using your medium flat brush, paint the entire exterior of the pot. Don’t worry if it looks streaky; terracotta absorbs moisture quickly. -
Paint the rim:
Extend the base color just over the top rim and a half-inch down the inside for a finished look. -
Dry and repeat:
Allow the first coat to dry for about 20 minutes. It should feel dry to the touch before adding a second coat for full opacity. -
Create the raw bottom look:
If you want to mimic the pot in the photo, leave the bottom half-inch unpainted to show the raw ‘clay’ texture, or use a damp rag to wipe the paint away from the bottom edge before it cures.
Smear Control
If you accidentally smear a wet dot, wait for it to dry completely, paint over it with a dab of your cream base color, and then re-apply the dot.
Step 2: Speckling Technique
-
Prepare the splatter station:
I highly recommend placing your pot inside a cardboard box for this step to contain the mess. -
Dilute the black paint:
Mix a small dab of black paint with water until it reaches an ink-like consistency. It needs to be fluid enough to fly off bristles easily. -
Load the tool:
Dip an old toothbrush into this watery mix, tapping off any large drips on your paper towel. -
Flick the specks:
Hold the toothbrush near the pot and run your thumb across the bristles to flick tiny specks onto the surface. Rotate the pot as you go. -
Assess the coverage:
Aim for an uneven, organic distribution. Some areas can have more specks than others to look like natural stone. -
Dry the speckles:
Wait at least 15-20 minutes for the tiny black dots to dry completely so they don’t smear during the next phase.
Step 3: Adding Confetti Dots
-
Select your palette:
Choose 4-5 distinct colors for your confetti. The original uses teal, mustard, red, pink, and navy. Squeeze small amounts onto your palette. -
Start with the largest dots:
Load your small round brush or the back end of a paintbrush handle with your first color (e.g., teal) and press gentle circles onto the pot. -
Vary the sizing:
Ensure your dots vary slightly in size. You can achieve this by pressing harder for larger dots or using just the tip for smaller ones. -
Introduce the second color:
Wipe your brush and switch to a contrasting color like red. Place these dots randomly in the empty spaces, keeping them spaced out. -
Layer the remaining colors:
Continue adding your remaining colors (mustard, pink, navy) one by one. Step back occasionally to ensure the distribution feels balanced but not rigid. -
Add tiny accents:
For the smallest dots, dip a toothpick or the very tip of a fine brush into the paint and fill in any large gaps. -
Seal the deal:
Once all paint is bone dry (give it a few hours), spray the entire pot with a matte clear coat to protect your work and unify the sheen.
Textured Touch
Mix a pinch of baking soda into your cream base paint before applying it. This creates a grainy, stoneware-like texture that feels more authentic.
Fill your new confetti pot with a vibrant green plant and enjoy the pop of color on your shelf
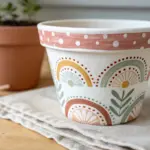
Polka Dots in a Tight Palette
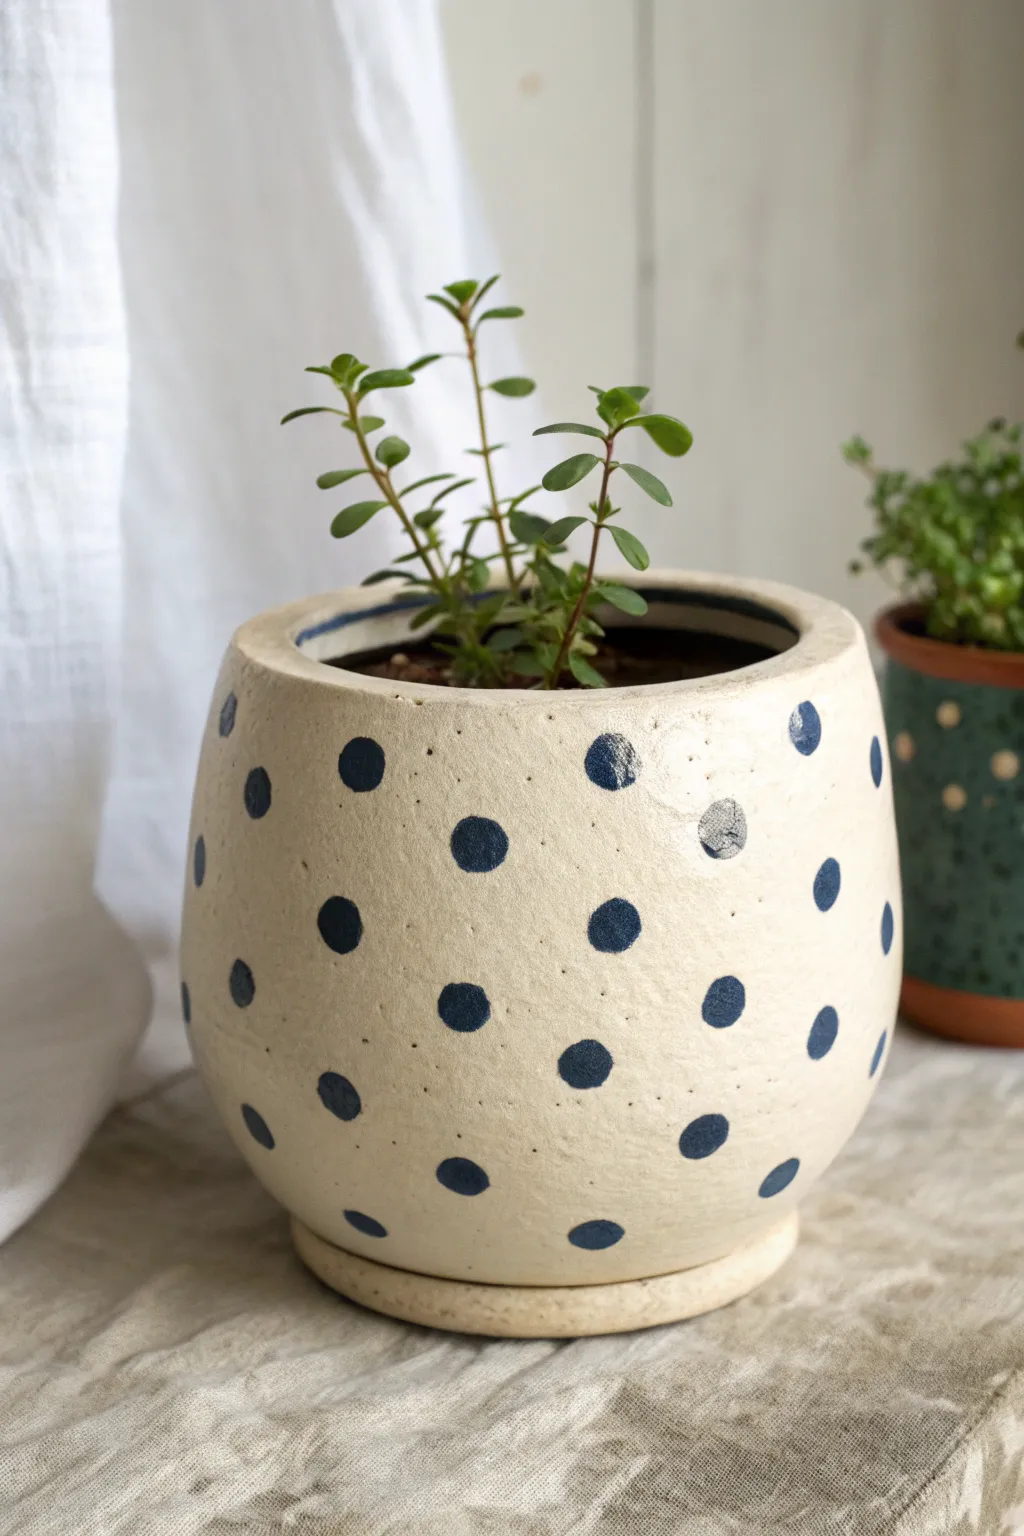
Embrace simplicity with this charming planter project that features a creamy off-white base scattered with playful navy polka dots. The finish mimics the look of high-end speckled stoneware, giving your humble terra cotta a chic, artisanal makeover.
Step-by-Step Guide
Materials
- Terra cotta pot (rounded/bulbous shape preferred)
- Matching terra cotta saucer
- Gesso or white primer
- Cream or off-white acrylic paint (matte finish)
- Navy blue acrylic paint
- Medium flat brush (for base coat)
- Small round paintbrush or sponge pouncer (approx 1/2 inch) or fingertips
- Old toothbrush (for speckling)
- Water cup and paper towels
- Matte spray sealer
- Newspaper or drop cloth
Step 1: Base Preparation
-
Clean the Surface:
Begin by wiping down your terra cotta pot and saucer with a damp cloth to remove any dust or retail stickers. Let it dry completely. -
Prime the Clay:
Apply a coat of gesso or white primer to the exterior of the pot and the saucer. This step is crucial because terra cotta is porous and will soak up your acrylics otherwise. -
Apply the Cream Layer:
Once primed, use your flat brush to apply the creamy off-white acrylic paint. Cover the entire outer surface and the top inch of the inner rim. -
Add a Second Coat:
Let the first layer dry for about 20 minutes. If the coverage looks streaky or thin, apply a second coat of cream paint for a solid, opaque finish. -
Create the Speckles:
To mimic stoneware, create a speckle effect. Dilute a tiny drop of brown or black paint with water until it’s very runny. -
Flick the Texture:
Dip an old toothbrush into the watery paint, point it at the pot, and run your thumb across the bristles to flick tiny specks onto the cream surface. Go lightly; you want subtle texture, not big blobs. -
Dry Completely:
Allow the base and speckles to dry thoroughly—wait at least an hour—before moving on to the pattern.
Uneven Dots?
If your hand-painted circles look wobbly, don’t worry. A slightly organic shape adds to the handmade pottery aesthetic. It looks more authentic than a perfect stencil.
Step 2: Dot Design
-
Load the Navy Paint:
Pour a small amount of navy blue acrylic paint onto your palette. It shouldn’t be too thick, or the dots will have raised ridges. -
Test Your Tool:
I like to test my dotting tool on a piece of scrap paper first. Whether using a sponge pouncer, a round brush, or your fingertip, practice getting a consistent circle size. -
Start the Patterns:
Begin placing dots randomly around the pot. Start with the ‘hero’ dots in the center viewing area to establish spacing. -
Spacing Strategy:
Keep the spacing loose and organic rather than a rigid grid. Aim for roughly 1 to 1.5 inches of space between each blue circle. -
Paint Individual Dots:
Press your brush or pouncer gently against the curved surface. If using a brush, rotate it slightly to create a clean circular edge. -
Handle the Edges:
Don’t forget to paint partial dots near the top rim and bottom curve. This makes the pattern feel continuous, like printed fabric wrapping around the form. -
Refine the Shapes:
If any dots look uneven, use a small detail brush to carefully round out the edges while the paint is still wet. -
Paint the Saucer:
While the pot dries, paint the rim of the saucer cream to match. You can leave the dots off the saucer for a cleaner look, or add a few for continuity.
Textured Finish
Mix a teaspoon of baking soda into your cream base paint. This creates a grainy, ceramic-like texture that makes the cheap terra cotta feel like heavy stone.
Step 3: Finishing Touches
-
Paint the Inner Rim:
For a polished look, paint a thin navy blue line on the inside rim of the pot or simply ensure your cream paint extends far enough down so raw clay doesn’t show above the dirt line. -
Seal the Work:
Once all paint is perfectly dry (give it a few hours), take the pot outside and spray it with a clear matte sealer. This protects the design from water damage when you water your plant. -
Final Cure:
Let the sealer cure for 24 hours before filling the pot with soil and your favorite plant.
Place your newly painted pot on a sunny windowsill and enjoy the handcrafted vibe it brings to your room
Loose Brushstroke Stripes
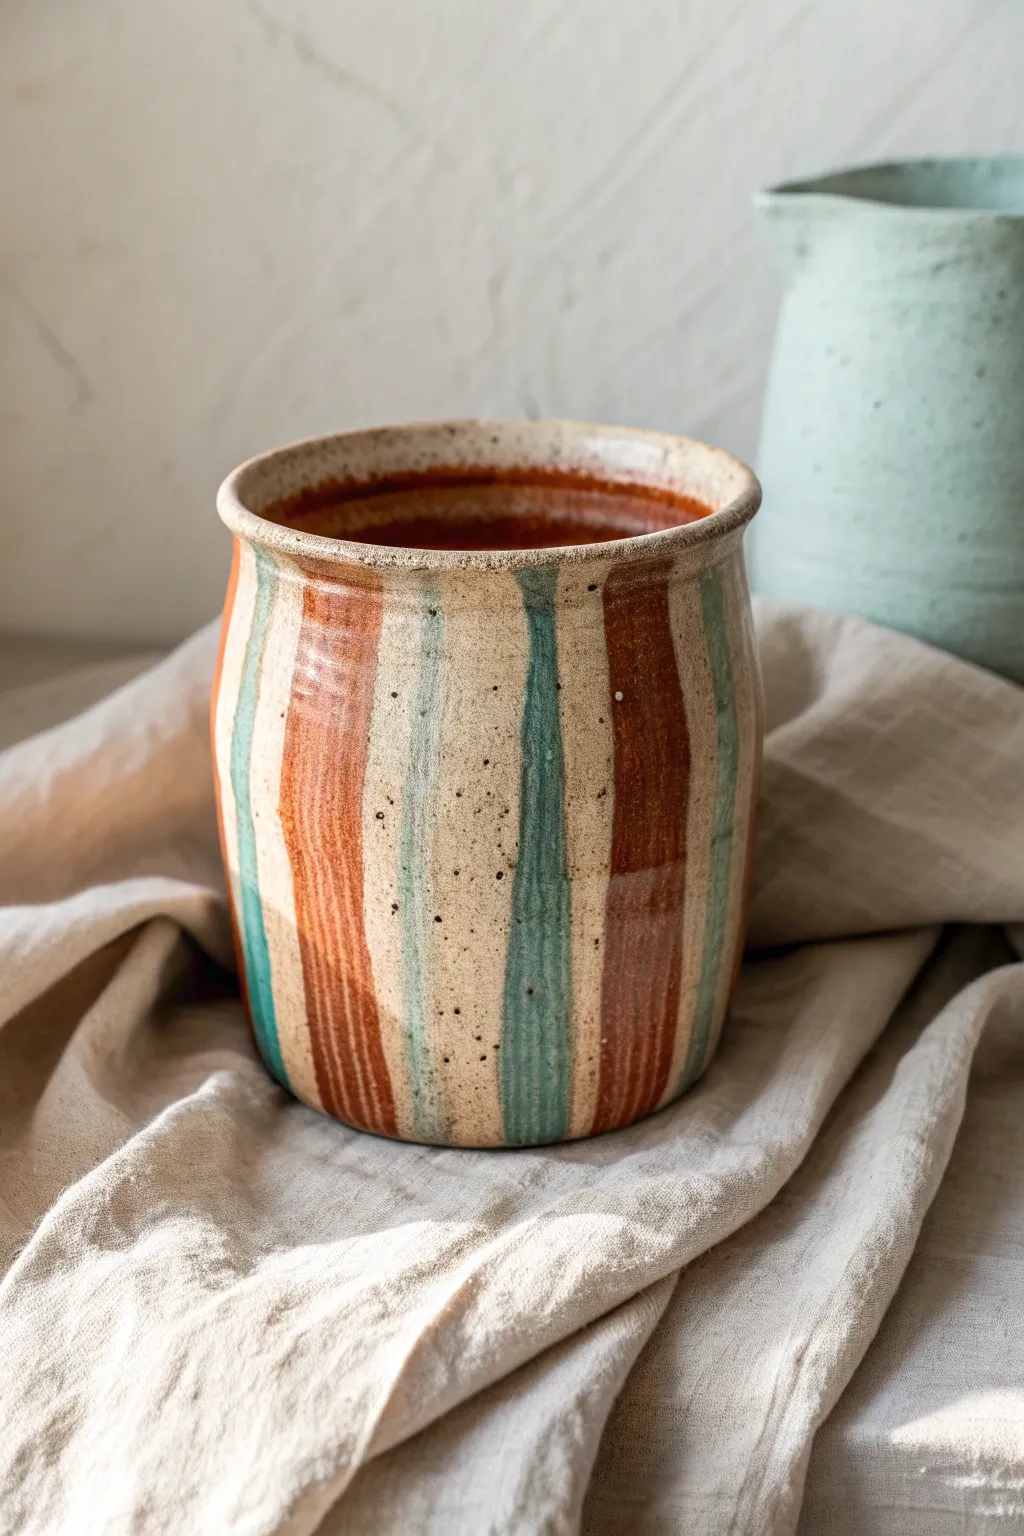
Embrace the beauty of imperfection with this loosely striped clay pot design. Combining rusty terracotta tones with muted teal against a speckled cream background creates a cozy, rustic aesthetic perfect for housing your favorite kitchen herbs or succulents.
Detailed Instructions
Materials
- Bisque-fired ceramic pot or terracotta pot (primed)
- Speckled clay stoneware glaze (cream or oatmeal)
- Underglaze or acrylic paint (Rust/Terracotta)
- Underglaze or acrylic paint (Muted Teal/Sage)
- Clear glaze (if firing) or matte spray sealant (if painting)
- Flat shader brush (size 8 or 10)
- Wide gentle fan brush
- Water container and palette
- Sponge
Step 1: Preparation and Base Coat
-
Clean surface:
Begin by wiping down your pot with a damp sponge to remove any dust or oils that might prevent adhesion. -
Apply base color:
Using a wide fan brush, apply your cream or oatmeal base color. If you are using a speckled glaze, ensure you mix the jar thoroughly to distribute the specks. -
Layering the base:
Apply two to three even coats of the base color, allowing them to dry until they are touch-dry between layers. You want a solid, opaque background. -
Optional texture:
If your base paint isn’t naturally speckled, you can flick a toothbrush loaded with watered-down brown paint lightly over the surface to mimic the clay texture shown in the image.
Wobbly Stripes?
Don’t panic! If a line goes crooked, use a slightly damp stiff brush to gently “erase” or push the wet paint back into line before it dries.
Step 2: Painting the Stripes
-
Load the brush:
Load your flat shader brush generously with the rust-colored paint or underglaze. You want enough pigment to make a long stroke, but not so much that it drips. -
First stripe anchor:
Place your brush at the top rim of the pot and pull straight down to the bottom in one fluid motion. Don’t worry if the edges waver slightly; that’s part of the charm. -
Spacing methodology:
Visualize the pot divided into equal sections. Paint your rust stripes first, leaving a gap slightly wider than a brush width between each one for the teal stripes later. -
Varying pressure:
As you pull the brush down, I like to vary the pressure slightly—pressing harder in some spots and lighter in others—to create that organic, translucent look where the background peeks through. -
Dry the first color:
Allow the rust stripes to dry completely before introducing the second color to prevent muddying the edges. -
Preparing the teal:
Clean your brush thoroughly or switch to a fresh flat shader brush. Load it with the muted teal or sage green pigment. -
Filling the gaps:
Paint the teal stripes in the spaces between the rust lines. Aim for a central placement within the gap, allowing a sliver of the cream background to remain visible between the colors. -
Rim detail:
Take a smaller brush with a bit of the rust color and run it lazily along the very top rim of the pot to frame the vertical lines.
Step 3: Finishing Touches
-
Assess opacity:
Step back and look at your stripes. If any look too faint, carefully layer a second coat over just those specific areas, keeping the edges loose. -
Inside the pot:
For a cohesive look like the example, paint the interior of the pot. A dark terracotta or deep rust color inside adds depth and contrasts beautifully with the lighter exterior. -
Dry time:
Let the entire project dry completely. If using ceramic glazes, this needs to be bone dry before firing on a kiln. -
Sealing:
If you used acrylics on a terracotta pot, take the piece outside and spray it with a matte clear sealant. This protects the paint from water damage. -
Glaze firing:
For ceramicists, apply a clear transparent glaze over the underglaze stripes if you want a glossy finish, then fire according to your clay body’s temperature requirements.
Mix it Up
Try varying the width of your brush for different stripe thicknesses, or use a dry-brush technique for a more weathered, vintage texture.
Now your pot is ready to bring a touch of earthy warmth to any corner of your home
Drippy Paint Melt Effect
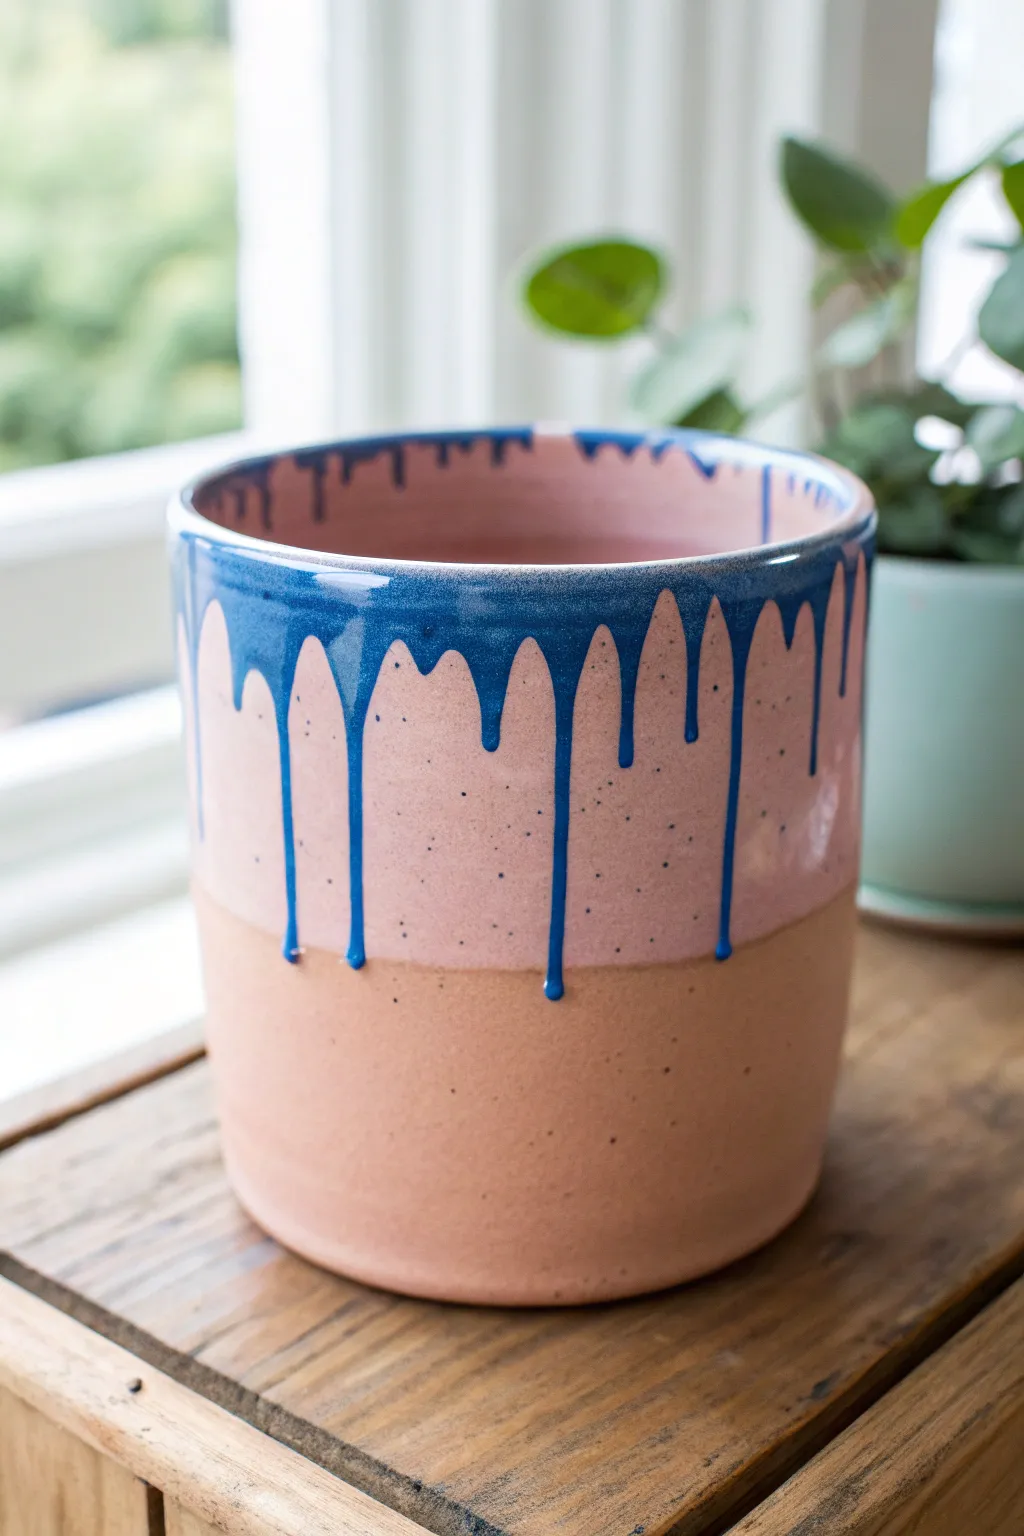
Capture the beauty of fluid motion with this stunning ceramic glazing technique that pairs raw clay warmth with cool, glossy color. This project uses deliberate glaze application to create a controlled drip effect, resulting in a modern, artistic planter that looks professionally crafted.
Step-by-Step Guide
Materials
- Bisque-fired ceramic cylinder pot (wheel-thrown or hand-built)
- Pink speckled ceramic glaze (glossy finish)
- Deep cobalt blue ceramic glaze (glossy finish)
- Wax resist emulsion
- Medium soft fan brush
- Small liner brush or bulb syringe applicator
- Sponge
- Bucket of water
- Kiln (or access to a pottery studio firing service)
Step 1: Preparation & Masking
-
Clean the bisque ware:
Begin by wiping down your bisque-fired pot with a slightly damp sponge. This removes any dust from sanding or shelf storage that could prevent the glaze from adhering properly. -
Plan your glaze line:
Visualize where you want the raw clay to end. On the pot shown, the bottom third is left unglazed. You can lightly mark this line with a pencil if you need a guide; the graphite will burn off in the kiln. -
Apply wax resist:
Dip your brush into the wax resist and carefully paint the bottom third of the pot’s exterior, as well as the entire bottom base. I find that being generous with the wax ensures nice, clean lines later. -
Let the wax dry:
Allow the wax resist to dry completely. It usually takes about 15-20 minutes. It should feel dry to the touch and might darken slightly.
Glaze Running Too Far?
If your blue drips ran onto the shelf during firing, the glaze was likely applied too thick or too low. Next time, stop the drips higher up on the pot or use a stiffer glaze recipe.
Step 2: Base Glazing
-
Mix the pink glaze:
Stir your pink speckled glaze thoroughly. Ensure all the sediment at the bottom is incorporated so the speckles distribute potentially. -
Apply the interior glaze:
Pour a generous amount of pink glaze inside the pot. Rotate the pot in your hands to coat the entire interior surface, then pour the excess back into your glaze bucket. -
Glaze the exterior pink section:
Using a soft fan brush, apply the first coat of pink glaze to the upper two-thirds of the exterior. Brush right over the edge of the wax resist; the wax will repel the glaze. -
Add layers:
Wait for the first coat to lose its sheen (become matte), then apply a second and third coat of pink. Usually, three brush coats or one dip coat provides opaque coverage. -
Clean the wax line:
Use a damp sponge to gently wipe any beads of pink glaze sitting on top of the waxed bottom section. This ensures a crisp transition between the pink glaze and the raw clay.
Step 3: Creating the Drips
-
Prepare the blue glaze:
Select a deep cobalt blue glaze. For the drip effect to work well, this glaze needs to be slightly fluid but not runny. Stir it well. -
Apply the rim band:
Paint a thick band of blue glaze, about 1 inch wide, all around the very top rim of the pot, overlapping the pink glaze. -
Load your applicator:
Load a liner brush heavily with blue glaze, or fill a small bulb syringe. You need a tool that holds a significant volume of liquid. -
Create the drips:
Press the loaded brush or squeeze the bulb gently just below the blue rim band. Allow gravity to pull a bead of glaze down the side. Repeat this around the circumference at varying intervals. -
Vary the lengths:
Use more glaze for long drips and less for short ones to create an organic, natural rhythm. Don’t let the drips run all the way to the wax line. -
Glaze the inner rim:
Apply a small stripe of the blue glaze just inside the top rim of the pot as well. This creates a cohesive look and subtle interior drips. -
Clean the foot:
Double-check the bottom of the pot one last time. Any glaze on the very bottom will fuse your pot to the kiln shelf, so wipe it clean with a sponge.
Pro Tip: Testing Flow
Before committing to a big pot, test your blue glaze on a vertical tile. This tells you exactly how much that specific glaze moves when fired, preventing messy kiln accidents.
Step 4: Firing
-
Let it dry:
Allow the pot to dry completely for at least 24 hours. The thick drips take longer to dry than standard brushing. -
Load the kiln:
Place the pot in the kiln. If you are worried about the drips running too far, place a ‘cookie’ (a flat piece of scrap clay with kiln wash) underneath the pot to catch potential run-off. -
Fire to temperature:
Fire the kiln to the cone temperature specified by your clay and glaze manufacturer (typically Cone 5 or 6 for stoneware). The heat will cause the thick blue glaze to melt and flow further down.
Once cooled, fill with your favorite houseplant and enjoy the dynamic contrast of the glossy drips against the matte finish
Marbled Stone Look

Transform a plain planter into a sophisticated piece of decor with this faux Carrara marble technique. Using simple acrylics and a feathering method, you can achieve the elegant, veined look of high-end stone without the heavy price tag.
Step-by-Step Tutorial
Materials
- Straight-sided terracotta or ceramic pot
- Primer (white)
- White acrylic paint (matte)
- Light grey acrylic paint
- Dark charcoal grey acrylic paint
- Glazing medium or water (for thinning)
- Sea sponge
- Small round brush
- Feather or fan brush
- Soft blending brush
- Matte clear sealant spray
Step 1: Base Preparation
-
Clean surface:
Begin by wiping down your pot with a damp cloth to remove any dust or oils. Let it dry completely. -
Prime the pot:
Apply a coat of primer to seal the porous surface. This ensures your final marble effect sits on top rather than soaking in. -
Apply base color:
Paint the entire pot with matte white acrylic paint. Use broad strokes for even coverage. -
Second coat:
Once the first layer is dry to the touch, apply a second coat of white to ensure a solid, opaque background. Let this dry fully.
Feather Touch
Use an actual bird feather dipped in paint to drag veins. The natural barbs create unpredictable, realistic organic lines.
Step 2: Creating the Marble Haze
-
Mix a glaze:
Mix a small amount of light grey paint with glazing medium (or water) until it is very translucent and runny. -
Sponge application:
Dip a dampened sea sponge into the grey glaze and dab off most of the excess on a paper towel. -
Create texture:
Lightly sponge random, cloudy patches of grey across the white surface. Keep this very subtle; you want a shadowy depth, not distinct spots. -
Soften the edges:
While the glaze is still wet, use a clean, dry blending brush to sweep over the sponged areas, softening them into the white background.
Step 3: Veining Technique
-
Prepare vein paint:
Mix your dark charcoal grey with a little glazing medium. You want a consistency that flows easily like ink but isn’t watery. -
Drafting main veins:
Using a small round brush or a feather, drag shaky, irregular lines diagonally across the pot. I suggest rolling the brush slightly in your fingers to prevent straight, unnatural lines. -
Feathering technique:
Immediately use a dry fan brush or blending brush to tickle the paint while it’s wet, blurring one side of the vein while keeping the other side sharper. -
Adding secondary veins:
Mix a mid-tone grey and add thinner, branching veins that connect to your main dark veins. These should look like lightning bolts or tree branches. -
Mist for effect:
Lightly mist the wet veins with water from a spray bottle if you want them to bleed slightly for a more organic, aged stone look. -
Intensify details:
Go back in with undiluted charcoal paint and a very fine liner brush to accentuate just the deepest crevices of your main veins.
Gold Dust
Trace a few very thin lines of metallic gold paint alongside the darkest grey veins for a luxurious, modern Kintsugi feel.
Step 4: Finishing Touches
-
Review and refine:
Step back and look at the pot from a distance. If an area looks too white, add a faint grey wash. If a vein looks too harsh, dry brush some white over it to push it back. -
Paint the rim:
Don’t forget to carry your pattern over the top rim and a few inches down the inside of the pot for a realistic finish. -
Dry time:
Allow the pot to cure for at least 24 hours to ensure all layers of paint and glaze are completely dry. -
Seal the work:
Spray the pot with a matte clear acrylic sealer. Apply two thin coats to protect your paint job from moisture and scratches.
Your new pot now has the timeless elegance of Italian stone and is ready to host your favorite greenery
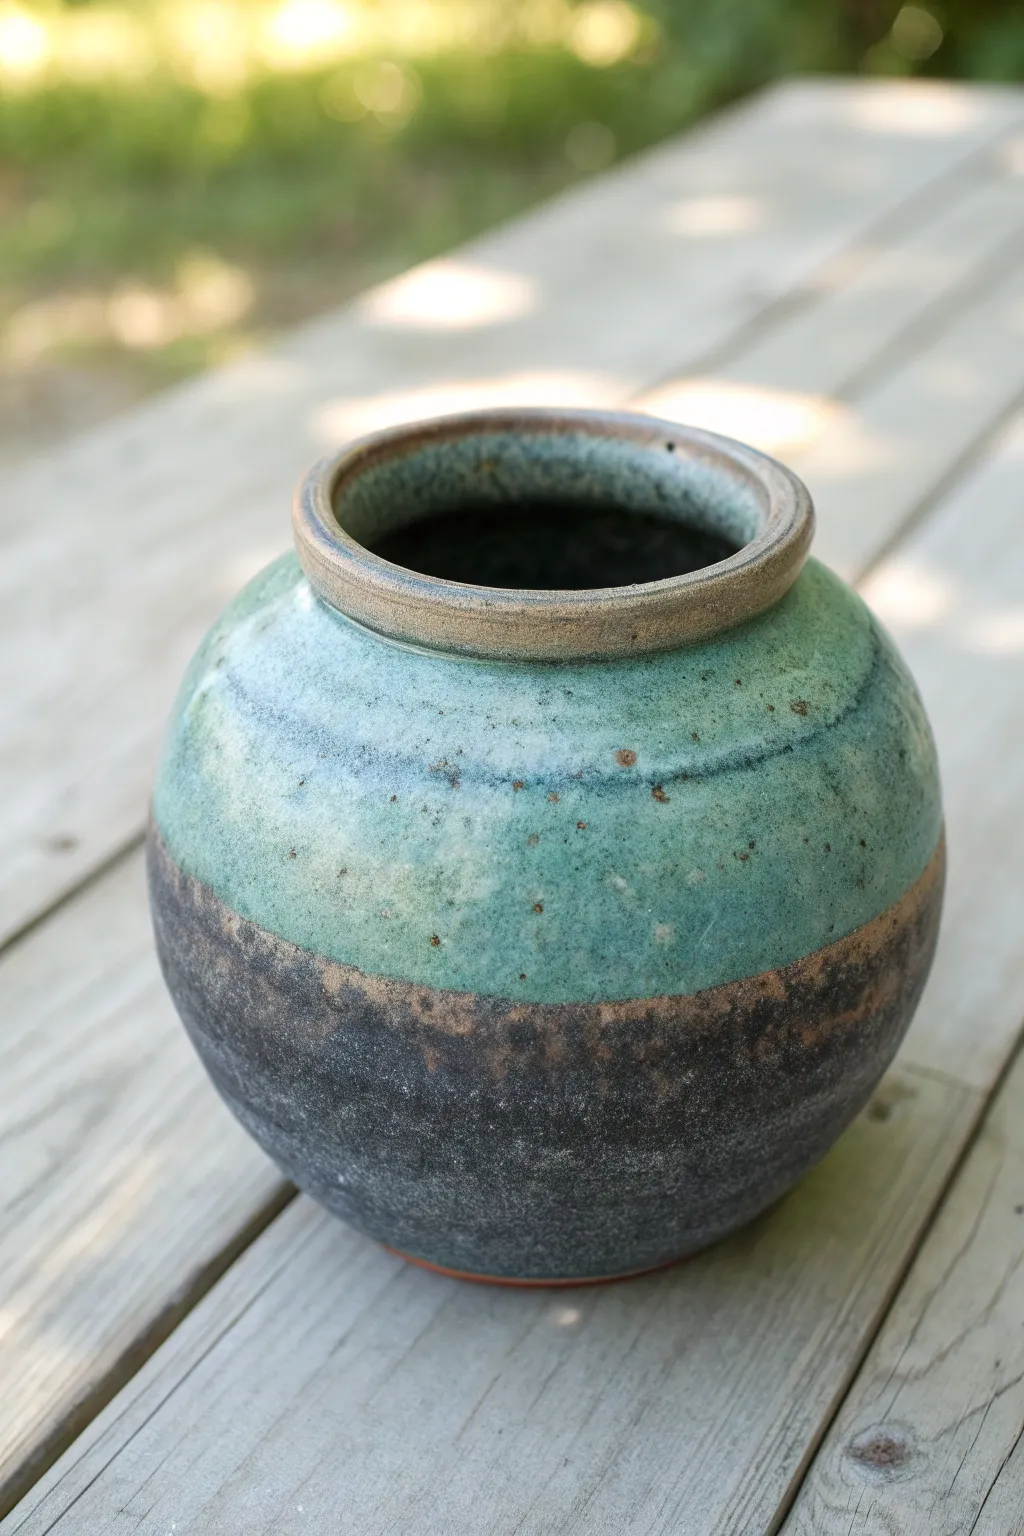
Faux Aged Patina Greens
Capture the essence of earthy studio pottery with this faux aged patina project, turning a standard terracotta pot into a piece that looks like it was fired in a wood kiln. By layering textured metallic paints under a soft sea-glass green, you achieve a stunning contrast and depth.
Step-by-Step Guide
Materials
- Round bisqueware or terracotta pot
- Medium grit sandpaper
- Primer (spray or brush-on)
- Black acrylic paint
- Metallic bronze or dark copper acrylic paint
- Matte teal or seafoam green acrylic paint
- Glaze medium or extender
- Sea sponge
- Medium flat synthetic brush
- Small round brush
- Water spray bottle
- Matte spray sealer
Step 1: Preparation & Base Coat
-
Sand the surface:
Begin by lightly sanding your pot to remove any rough casting seams or price sticker residue. Wipe it down with a damp cloth to remove all dust, ensuring a clean slate for your paint. -
Apply primer:
Cover the entire exterior of the pot with a coat of primer. This prevents the porous clay from absorbing too much paint too quickly and helps the subsequent layers adhere evenly. Let this dry completely. -
Create the dark base:
Mix black acrylic paint with a small amount of metallic bronze. You want a color that looks like dark, iron-rich earth, not just flat black. Paint the entire pot with this mixture, covering it thoroughly. -
Add texture:
While the dark base is still slightly tacky, dab a sea sponge over the bottom half to create a slightly uneven, pitted texture characteristic of stoneware. Allow the base coat to dry for at least one hour.
Paint sliding off?
If the green wash beads up too much on the dark base, your base coat might be too glossy. Lightly scuff the base with fine sandpaper to give the next layer some tooth to grab onto.
Step 2: The Patina Zone
-
Mix the glaze color:
Create a wash by mixing your teal or seafoam green paint with glaze medium (about a 50/50 ratio). This transparency is crucial for letting the dark ‘clay’ underneath peek through. -
Apply the top color:
Starting from just below the rim, brush the green glaze mixture down to the visual equator of the pot. Don’t worry about a perfectly straight line; a slightly organic, waving line looks more authentic. -
Feather the edge:
Where the green paint meets the dark bottom section, use a clean, dry brush to gently feather the edge. I like to blur this transition just enough so it doesn’t look like a taped-off line. -
Create the mottled effect:
While the green paint is wet, spritz it lightly with water from a distance. The water droplets will push the pigment aside, creating tiny craters that reveal the dark base coat beneath. -
Blotting technique:
Gently blot the wet green area with a crumpled paper towel or dry sponge. This lifts off excess paint in random patches, mimicking the look of reactive glaze breaking over texture. -
Refining the top:
If you removed too much green, lightly stipple a bit more glaze back on with the sponge, focusing on the upper shoulder of the pot where glaze would naturally pool.
Add a drip effect
Mix a thicker batch of the teal glaze and use a small brush to create physical drips running down past the halfway mark, mimicking thick kiln-fired glaze runs.
Step 3: Details & Finish
-
The rim detail:
For the rim, mix a sandy beige or light tan color. Carefully paint the very top edge of the rim to mimic the look of unglazed raw clay often seen on studio pottery. -
Wash the rim:
Water down a tiny bit of brown paint and brush it quickly over the beige rim, then wipe it back immediately. This settles into crevices and creates an aged appearance. -
Add speckling:
Dip an old toothbrush into thinned black or brown paint. Run your thumb over the bristles to flick tiny specks onto the green section. This replicates iron spots often found in ceramic glazes. -
Dry thoroughly:
Allow the pot to dry completely, ideally overnight, to ensure all moisture has evaporated from the layers. -
Seal the work:
Finish with a matte spray sealer. Avoid glossy finishes, as this faux effect relies on the matte texture to look like stoneware clay.
Place your new vessel on a sunny shelf and enjoy the illusion of hand-thrown pottery without the kiln time
Metallic Rim or Base Accent
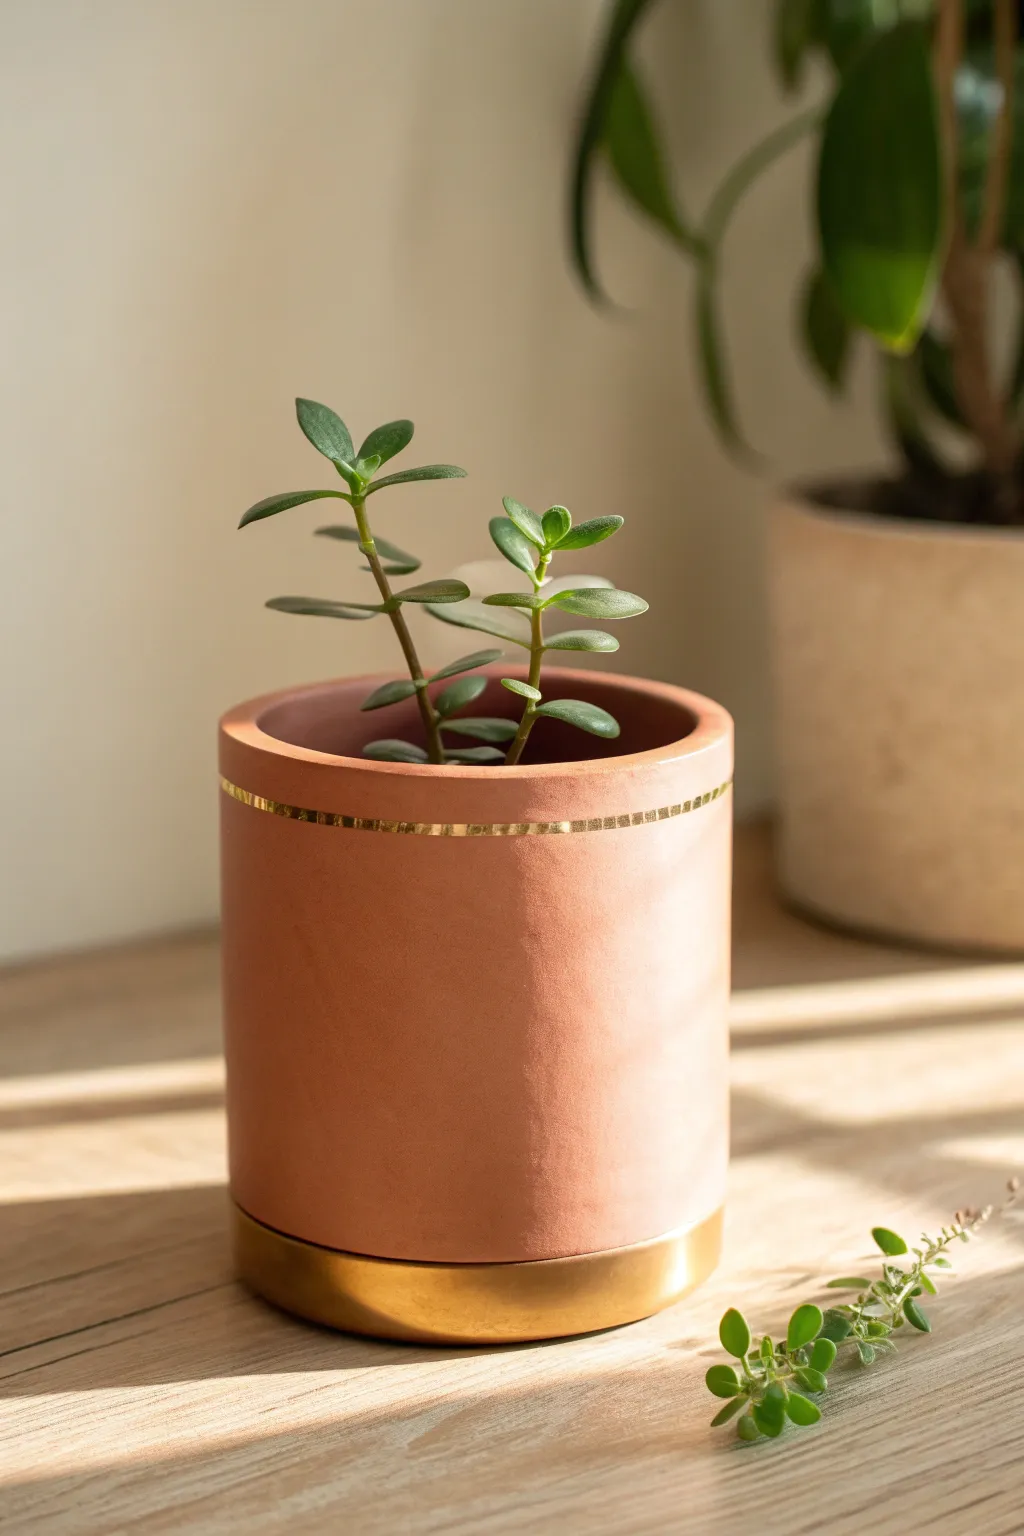
Elevate a simple, cylindrical terracotta pot into a chic statement piece with just a touch of metallic flair. This project balances the earthy warmth of natural clay with the sharp, clean lines of a gold-dipped base and delicate rim detailing.
Detailed Instructions
Materials
- Cylindrical terracotta pot (clean and dry)
- Painter’s tape (high quality)
- Metallic gold spray paint
- Gold paint pen (fine tip)
- Clear matte sealer spray
- Drop cloth or cardboard
- Alcohol wipes or damp cloth
- Ruler or measuring tape
- Pencil
Step 1: Preparation
-
Clean surface:
Begin by thoroughly wiping down your terracotta pot with alcohol wipes or a damp cloth to remove any dust or oils. This ensures your paint adheres perfectly. -
Dry completely:
Allow the pot to dry completely before applying any tape or paint; trapped moisture can cause bubbling later. -
Measure the base:
Decide on the height of your gold base accent. For the look in the photo, measure about 1 to 1.5 inches up from the bottom edge. -
Mark the line:
Using your ruler, make small, light pencil marks horizontally around the pot at your chosen height to guide your taping. -
Apply tape:
Apply the painter’s tape carefully along your pencil marks, encircling the pot. Press the edge of the tape down firmly with your fingernail or a credit card to prevent paint bleed. -
Protect the top:
Cover the rest of the pot (above the tape line) with paper or plastic, taping it down securely so no stray spray paint lands on the terra cotta.
Bleed-Proof Lines
Before spraying gold, paint a thin layer of clear matte sealer over the tape edge. This seals the gap, ensuring any seep-through is clear, not gold.
Step 2: Painting the Base
-
Setup:
Place your pot upside down on a drop cloth or piece of cardboard in a well-ventilated area. -
Shake paint:
Shake your metallic gold spray paint can vigorously for at least one minute to ensure the metallic flakes are evenly distributed. -
First coat:
Spray a light, even coat of gold paint around the exposed base. Keep the can moving to avoid drips. -
Dry and repeat:
Let this first coat dry for about 15-20 minutes. I usually take this time to prep my next materials. Apply a second coat for full opaque coverage. -
Third coat (optional):
If the terracotta color is still peeking through, add a third light coat. -
Remove tape:
Carefully peel off the painter’s tape while the paint is still slightly tacky—this helps render a crisp, clean line. -
Cure:
Let the gold base cure fully according to the spray paint can’s instructions, typically at least an hour.
Step 3: Adding the Rim Detail
-
Position the rim:
Once the base is dry enough to handle, turn the pot right-side up. Using a ruler, measure about 3/4 of an inch down from the top rim. -
Draw the accent:
Take your fine-tip gold paint pen. Instead of a solid line, create a “dashed” or “stitched” look. Draw small vertical dashes horizontally around the circumference. -
Maintain spacing:
Try to keep the spacing between your gold dashes consistent for a professional finish. You can use a scrap piece of paper as a spacer guide if needed. -
Let ink dry:
Allow the paint pen marks to dry completely, which should only take a few minutes.
Geometric Twist
Instead of a straight horizontal line, tape off a diagonal angle or triangle shape for the gold dip to add a dynamic, modern asymmetry to your collection.
Step 4: Finishing Touches
-
Seal (Optional):
To protect your design, lightly mist the entire exterior with a clear matte sealer. This locks in the gold and protects the clay from water stains. -
Planting:
Once fully cured (wait 24 hours for best results), pot your favorite succulent or jade plant directly into your new stylish container.
Place your newly adorned pot near a sunny window where the light can catch the golden accents
Celestial Night Sky Stars
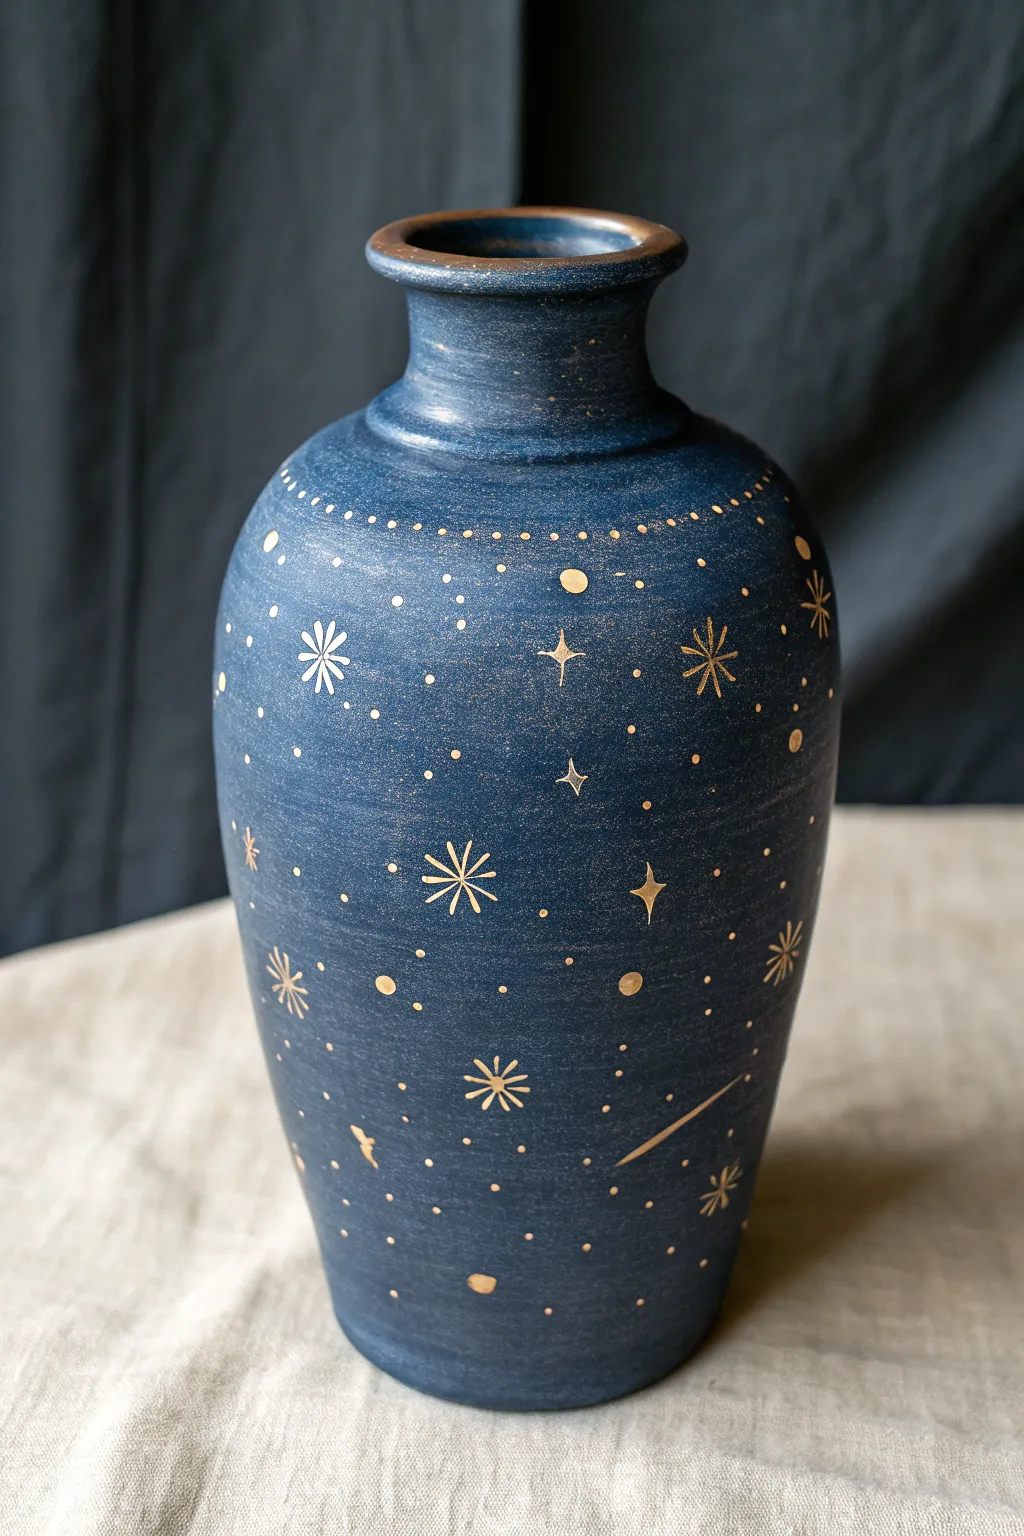
Transform a plain clay vessel into a piece of the night sky with this deep blue, textured finish. The scattered gold constellations and delicate stardust details create a magical, sophisticated look that feels both ancient and modern.
Step-by-Step
Materials
- Bisque-fired clay vase or terracotta pot
- Deep midnight blue matte acrylic paint (or chalky finish paint)
- Metallic gold paint pen (fine point)
- Metallic gold paint pen (extra fine point)
- Metallic gold acrylic paint (small pot)
- Wide flat paintbrush
- Small round detail brush
- Spray sealant (matte finish)
- Sea sponge or textured cloth (optional)
Step 1: Setting the Atmosphere
-
Prepare the surface:
Wipe down your clay pot with a slightly damp cloth to remove any dust or oils. Let it dry completely before starting to ensure the paint adheres properly. -
Apply the base coat:
Using a wide flat brush, apply your deep midnight blue paint. Aim for full coverage. This dark background represents the depth of space. -
Add texture:
While the first coat is tacky but not wet, I like to stipple a second coat using a sea sponge or a dry brush technique. This gives the surface that slightly rough, stone-like texture seen in the photo rather than a perfectly smooth plastic look. -
Let it cure:
Allow the blue base to dry thoroughly. Since we will be drawing fine lines on top, the base must be bone dry to prevent the paint pens from snagging.
Paint Pen Skip?
If your gold pen stops flowing over the textured paint, press the tip onto a scrap piece of cardboard to re-saturate the nib before returning to the vase.
Step 2: Mapping the Constellations
-
Create the heavy specks:
Start with the small round detail brush and the pot of liquid gold paint. Dot random clusters of slightly larger ‘stars’ or planets around the upper and middle sections. -
Add the rim detail:
Using the same brush, gently paint the very top rim of the vase gold to frame the artwork. -
Draw the main stars:
Switch to your fine point gold paint pen. Draw several eight-pointed stars by making a simple cross (+) and then a smaller diagonal cross (x) over it. -
Add variety with four-pointed stars:
In the spaces between the large stars, add four-pointed stars. Draw these deeply elongated, like a diamond or a kite shape that has been stretched thin. -
Draw the shooting star:
Near the bottom or middle, add a dynamic element by drawing a diagonal line with a slightly thicker head to represent a shooting star or comet.
Real Constellations
Look up a star map and faithfully recreate actual constellations like Orion or Cassiopeia for a knowledgeable touch that astronomy lovers will appreciate.
Step 3: Dusting the Galaxy
-
Create the decorative ring:
Visualize a ring around the neck of the vase. Use your paint pen to create a consistent line of dots encircling the shoulder of the pot. -
Fill the void:
This is the most important step for density. Use the extra-fine paint pen to fill every empty blue space with tiny dots. -
Vary dot density:
Try to clump some dots closer together and leave other areas sparse to mimic the natural irregularity of the milky way. -
Seal the work:
Once all metallic ink is completely dry, spray the entire vase with a matte sealant to protect the design without making it too shiny.
Place your finished celestial vase near a window where the light can catch the metallic gold details
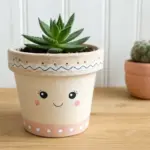
Whimsical Character Color Themes
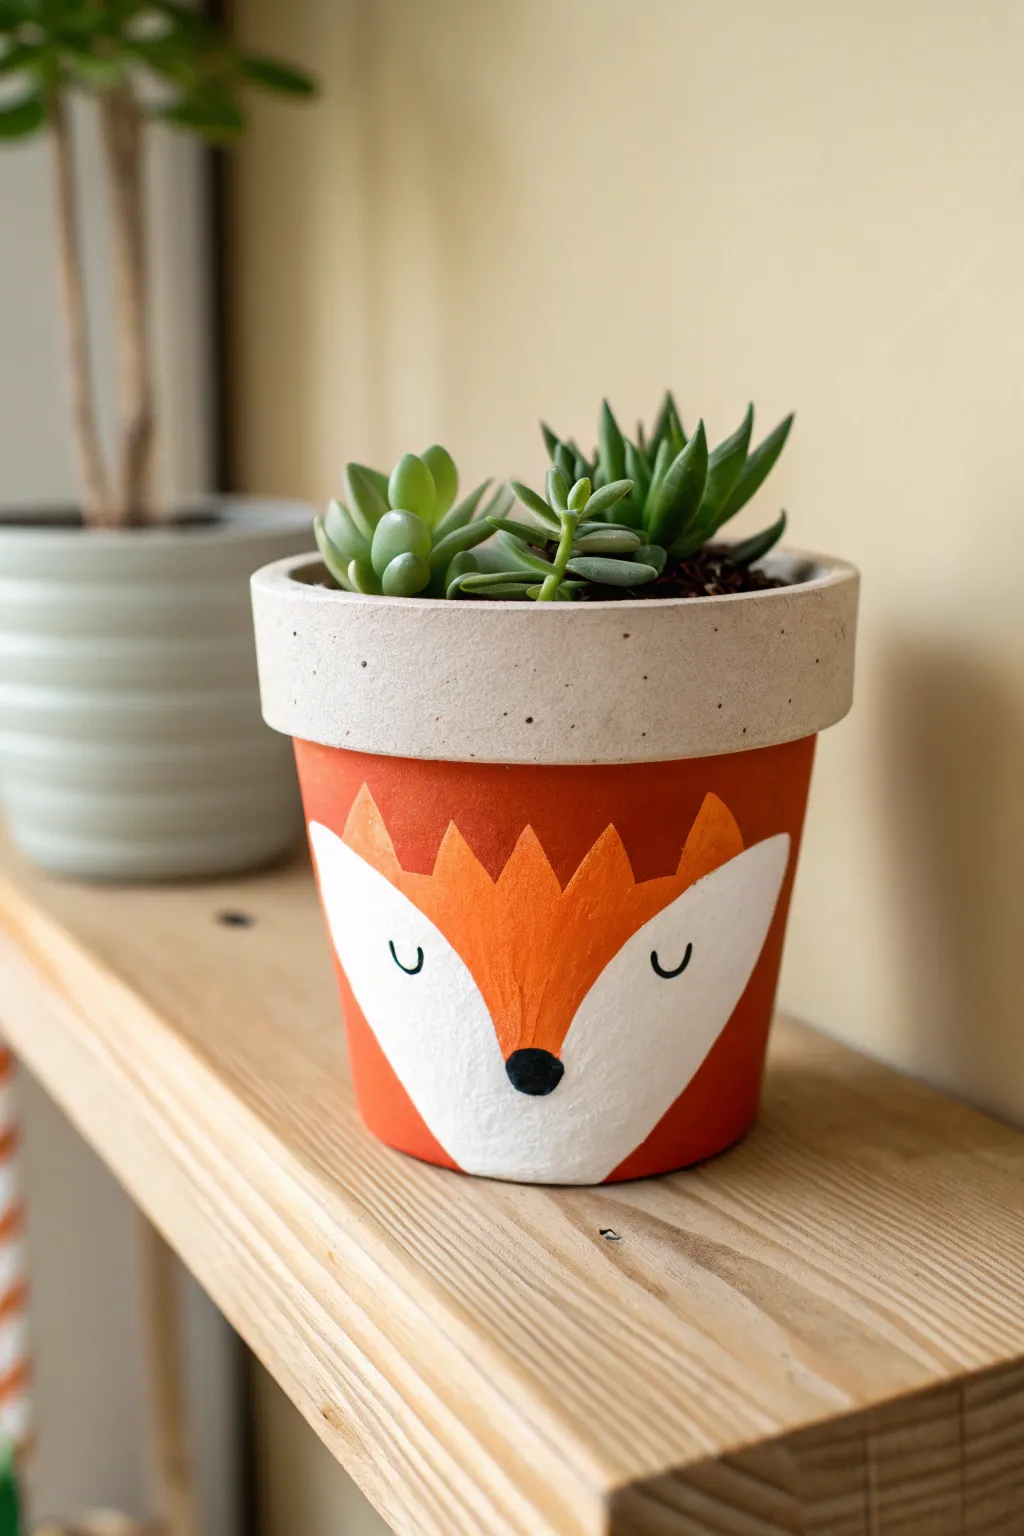
Transform a plain terracotta vessel into this charming sleeping fox planter that adds a touch of whimsy to any succulent collection. With its minimalist face and speckled stone-effect rim, this project perfectly balances rustic texture with sweet character details.
Step-by-Step Guide
Materials
- Terracotta pot (4-inch recommended)
- White acrylic paint
- Rust orange acrylic paint
- Black acrylic paint
- Light beige/stone colored acrylic paint
- Flat paintbrush (medium width)
- Small round detail brush
- Pencil
- Old toothbrush (optional)
- Matte sealer or varnish
Step 1: Base Preparation
-
Clean the surface:
Before starting, ensure your terracotta pot is clean, dry, and free of dust or sticker residue. Wipe it down with a damp cloth and let it dry completely. -
Prime the base:
Apply a base coat of white acrylic paint to the main body of the pot, below the rim. This helps the orange pop later, especially on porous clay. -
Base coat the rim:
Paint the entire upper rim of the pot with a light beige or stone-colored acrylic paint. Create a solid, opaque layer.
Stone Effect Secret
Mix a pinch of baking soda into your beige rim paint before applying. This adds a gritty, realistic stone texture that looks amazing under the speckles.
Step 2: Creating the Rim Texture
-
Speckle effect setup:
To achieve that stony look on the rim, mix a tiny amount of water into black acrylic paint to make it fluid. -
Splatter the specs:
Dip an old toothbrush into the fluid black paint. Run your thumb over the bristles to gently flick tiny specks onto the beige rim. Practice on paper first to control the spray. -
Alternate specking (optional):
If you don’t have a toothbrush, I find using the tip of a stiff paintbrush to dab irregular tiny dots works just as well for a controlled pattern. -
Dry the rim:
Let the rim dry completely before handling the pot further to avoid smudging your stone effect.
Step 3: Painting the Fox
-
Sketch the outline:
Using a pencil very lightly, draw the fox’s hairline. This should be a wide ‘V’ shape or heart-top shape that starts low in the center and sweeps up towards the ears. -
Define the ears:
Sketch two triangular shapes peaking up from the orange section you just outlined. The tips of the triangles should almost touch the bottom of the rim. -
Paint the orange fur:
Fill in the space above your pencil line with the rust orange paint. Cover the back of the pot in this orange as well, leaving only the face area white. -
Refine the edges:
Use a smaller flat brush to neaten the line where the orange meets the white face area. You want sharp, clean curves here. -
Layer the color:
Apply a second coat of orange once the first is dry to ensure no streaks remain and the color is rich. -
Paint inner ears:
Inside the orange ear triangles you painted, add slightly lighter orange or use the white background to define the inner ear shapes. -
Add detail tufts:
At the top of the white face section, between the ears, paint three small jagged ‘tufts’ using the orange paint to mimic fur texture.
Make it a Family
Create a woodland set by painting different animals on different sized pots. A grey raccoon or brown bear use the same simple face-shape technique.
Step 4: Facial Features
-
Draw the face:
Lightly pencil in the location for the nose and eyes. Centering is key here. -
Paint the nose:
Using black paint and a small round brush, paint a small, rounded inverted triangle or oval at the bottom point of the white face area. -
Paint the eyes:
Paint two small ‘U’ shapes for the sleeping eyes. Keep them symmetrical and centered between the nose and the ears. -
Clean up:
If any orange paint strayed onto the white face, touch it up now with fresh white paint for a crisp look.
Step 5: Protection
-
Seal the work:
Once all paint is completely dry (give it at least an hour), apply a coat of matte spray sealer or varnish. -
Plant:
Fill with succulent potting mix and add your favorite green friends to give the fox a fun hairdo.
Place your little fox on a sunny shelf and enjoy the cozy atmosphere it brings to your room