A plain terracotta pot is basically a blank canvas, and I love how fast it can turn into home decor you actually want to show off. Here are my go-to clay pot decoration ideas—starting with the classics and ending with the kind of playful projects that make people ask, “Wait, you made that?”
Clean Color Block With a Crisp Rim
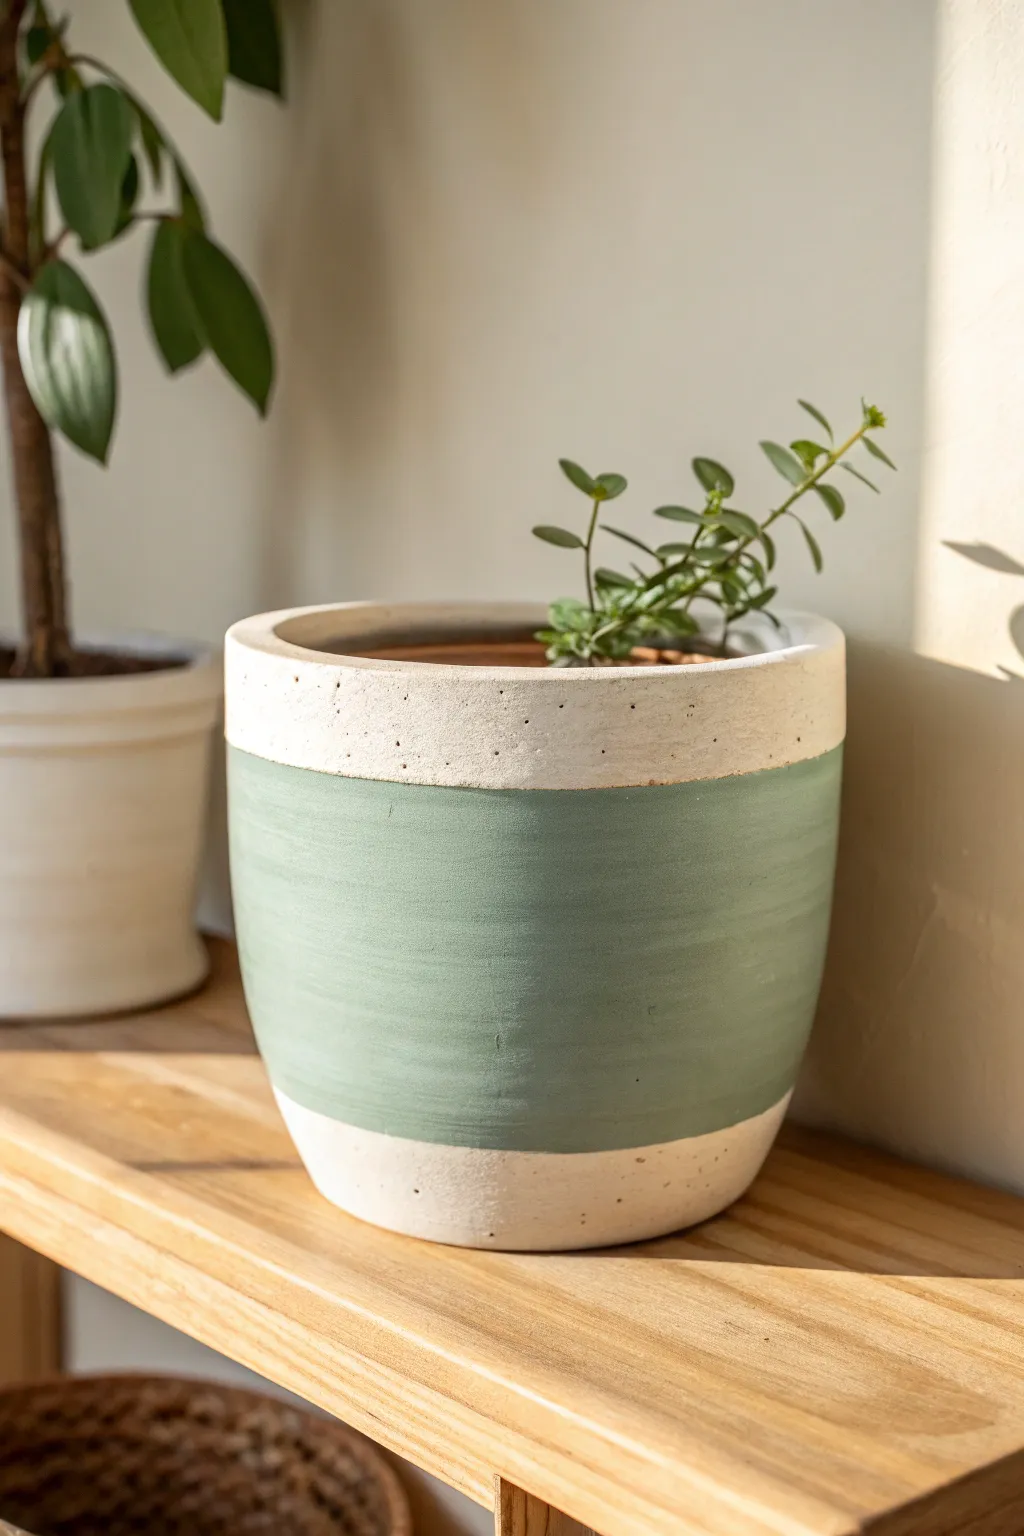
This project embraces a serene, earthy palette by combining a textured cream stone finish with a calming band of sage green. The clean, crisp lines offer a modern aesthetic that still feels organic and grounded on any shelf.
Step-by-Step Guide
Materials
- Terracotta pot (size of choice)
- White or cream acrylic paint (matte finish)
- Baking soda or fine sand
- Sage or sea-green acrylic paint
- Painter’s tape (1-inch width works well)
- Wide flat paintbrush
- Medium flat paintbrush
- Paper cup or mixing dish
- Sealant spray (matte)
Step 1: Prepping the Base Texture
-
Clean surface:
Begin by wiping down your terracotta pot with a damp cloth to remove any dust or oils, ensuring the paint adheres properly. -
Mix textured paint:
In your mixing dish, combine your white or cream acrylic paint with a tablespoon of baking soda. This creates that lovely faux-stone, sandy texture visible on the rim and base. -
Apply base coat:
Using a wide flat brush, paint the entire exterior of the pot with your textured mixture. Don’t worry about being perfectly smooth; the brushstrokes add character. -
Paint inside rim:
Extend the textured paint about two inches down into the inside of the pot for a finished look when filled with soil. -
Add second coat:
Once the first layer is dry to the touch, apply a second coat of the textured cream mix to ensure full opacity and build up that ceramic feel. -
Dry completely:
Allow the base to dry fully, preferably overnight or for several hours, as the baking soda mixture can take longer to set than standard paint.
Step 2: Creating the Color Block
-
Tape top line:
Position your painter’s tape horizontally around the top of the pot, leaving about 1.5 to 2 inches of the cream rim exposed. -
Tape bottom line:
Run a second strip of tape around the bottom section, leaving a similar amount of cream base exposed at the foot of the pot. -
Press edges:
Firmly run your fingernail or a credit card along the edges of the tape to seal them tight against the textured surface. -
Seal the tape:
I like to lightly brush a tiny amount of the cream base paint over the tape edges first. This seals any gaps and ensures the green line will be razor-sharp. -
Mix green hue:
Prepare your sage green paint. If it’s too bright, mix in a tiny drop of grey or white to achieve that muted, dusty tone from the photo. -
Paint color band:
Using the medium flat brush, apply the green paint in the space between the two tape lines. -
Horizontal strokes:
Keep your brushstrokes horizontal, moving around the circumference of the pot to mimic the look of wheel-thrown pottery glazing. -
Layering color:
Apply two to three thin coats of green rather than one thick one, allowing brief drying time in between for the smoothest finish. -
Remove tape:
Peel off the tape carefully while the final coat of green is still slightly tacky to prevent the paint from chipping.
Tape Bleeding?
Due to the texture, tape can sometimes lift. Use a hair dryer on low heat while pressing the tape down securely right before painting your color block layer.
Step 3: Finishing Touches
-
Touch up:
If any green paint bled through, use a small detail brush and your leftover cream texture mix to cover the imperfection. -
Seal project:
Spray the entire pot with a clear matte sealant to protect the textured finish from water damage and wear.
Make it Speckled
For extra dimension, try splattering tiny dots of diluted brown or black paint onto the cream sections using an old toothbrush for a faux-ceramic speckle.
Pop in your favorite trailing plant and enjoy the modern simplicity of your new pot


Easy Stenciled Motifs for Instant Pattern
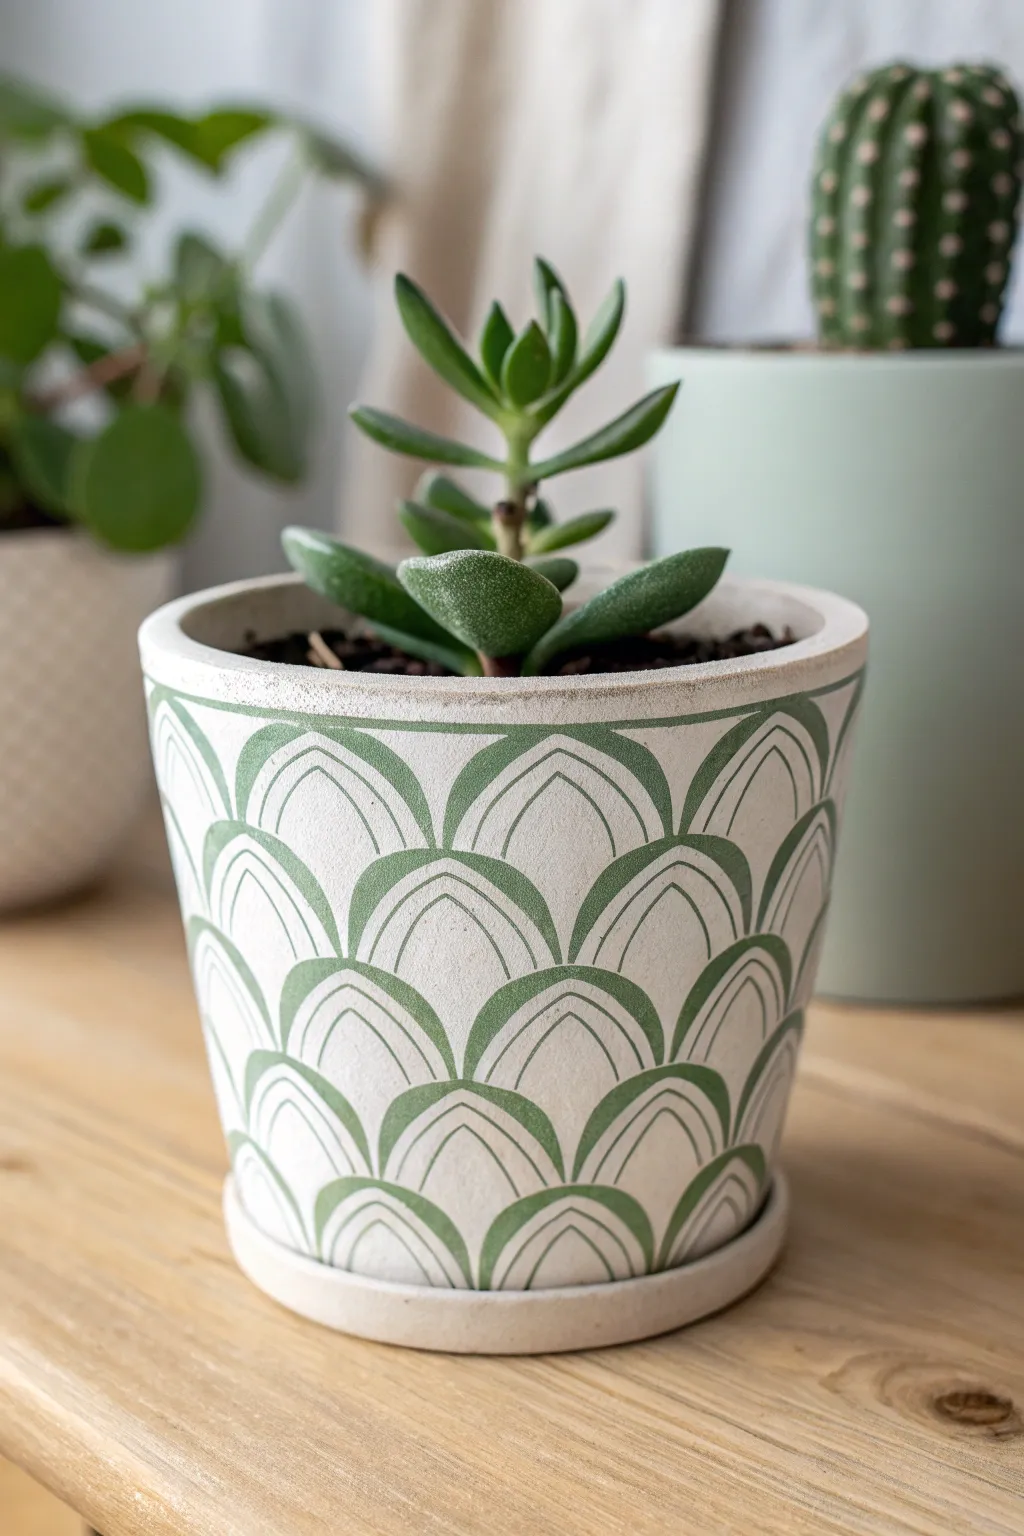
Transform a standard terracotta pot into a chic, patterned focal point with this easy stenciling project. The repeating green scallop design against a fresh white background adds a modern, organic touch perfect for housing succulents or small indoor plants.
Step-by-Step
Materials
- Clean terracotta pot (cleaned and dried)
- White matte acrylic paint or chalk paint
- Sage green acrylic paint
- Scallop or fish scale pattern stencil (flexible adhesive stencils work best)
- Foam pouncer or stencil brush
- Wide flat paintbrush
- Painter’s tape or masking tape
- Paper plate or palette
- Matte clear sealant spray
Step 1: Base Preparation
-
Clean surface:
Ensure your terracotta pot is completely clean and dry. If reusing an old pot, scrub away any mineral deposits or dirt, as paint won’t adhere well to a dusty surface. -
Apply base coat:
Using the wide flat paintbrush, apply a generous coat of white matte acrylic paint to the entire exterior of the pot. Don’t forget to paint the top rim and a few inches down the inside for a finished look. -
Let dry and repeat:
Allow the first coat to dry completely, which usually takes about 20-30 minutes. Apply a second coat to ensure opaque, solid coverage where no terracotta orange peeks through. Let this cure fully—ideally for an hour—before moving on to stenciling.
Sticky Situation
Use a specialized adhesive spray on the back of non-adhesive stencils. It makes them temporarily tacky, helping them hug the curve of the pot much better than tape alone.
Step 2: Applying the Stencil
-
Position the stencil:
Select your scalloped stencil. Starting near the top rim is often easiest. Align the top edge of your stencil pattern just below the pot’s lip so the design hangs down elegantly. -
Secure the stencil:
Adhere the stencil to the pot. If using an adhesive stencil, press it down firmly, smoothing out bubbles. If using a standard stencil, use painter’s tape generously to hold it tight against the curved surface. -
Prepare the paint:
Squeeze a small amount of sage green paint onto your paper plate. I like to keep the amount small because stenciling requires very little pigment. -
Load the brush:
Dip your foam pouncer or stencil brush into the green paint, then offload most of the paint onto a clean part of the plate. Your brush should feel almost dry to the touch to prevent bleeding. -
Apply the pattern:
Gently tap or pounce the paint over the stencil openings using an up-and-down motion. Avoid brushing or sweeping side-to-side, as this pushes paint under the stencil edges. -
Check coverage:
Lift a corner carefully to check your color density. For this design, a slightly textured, uneven application adds character, but you can build up a second layer if you want a bolder solid green.
Step 3: Continuing the Pattern
-
Align the next section:
Peel off the stencil carefully. Reposition it immediately next to your painted section, using the registration marks or the edge of the previous design to ensure proper spacing and alignment. -
Work around the pot:
Continue stenciling around the circumference of the pot. Terracotta pots are tapered, so you may need to cheat the alignment slightly as you go around; slight imperfections in the gap spacing are rarely noticeable in the final product. -
Start the lower row:
Once the top row is dry to the touch, align your stencil for the row below. Typically, scallop patterns look best when offset, meaning the peak of the bottom scallop sits directly under the valley of the top ones. -
Complete the design:
Continue this process until you reach the bottom. Don’t worry if the pattern cuts off abruptly at the base; a partial scallop pattern at the bottom edge looks quite natural. -
Paint the saucer:
While the pot dries, paint the matching saucer with the white base coat. You can leave it solid white as shown in the image, or add a single ring of scallops if you’re feeling adventurous.
Bleeding Lines?
If paint seeps under the stencil, your brush was too wet. Reload with much less paint and offload it firmly on paper towel before touching the pot. Dry brushing is key.
Step 4: Finishing Touches
-
Touch up:
Inspect your design for any major paint bleeds. Use a tiny detail brush with white paint to carefully cover up any green smudges or uneven edges. -
Seal the work:
Once everything is bone dry (give it a few hours), take the pot outside and spray it with a matte clear sealant. This protects the design from water damage when you water your plant.
Now you have a freshly patterned planter ready for its new green inhabitant


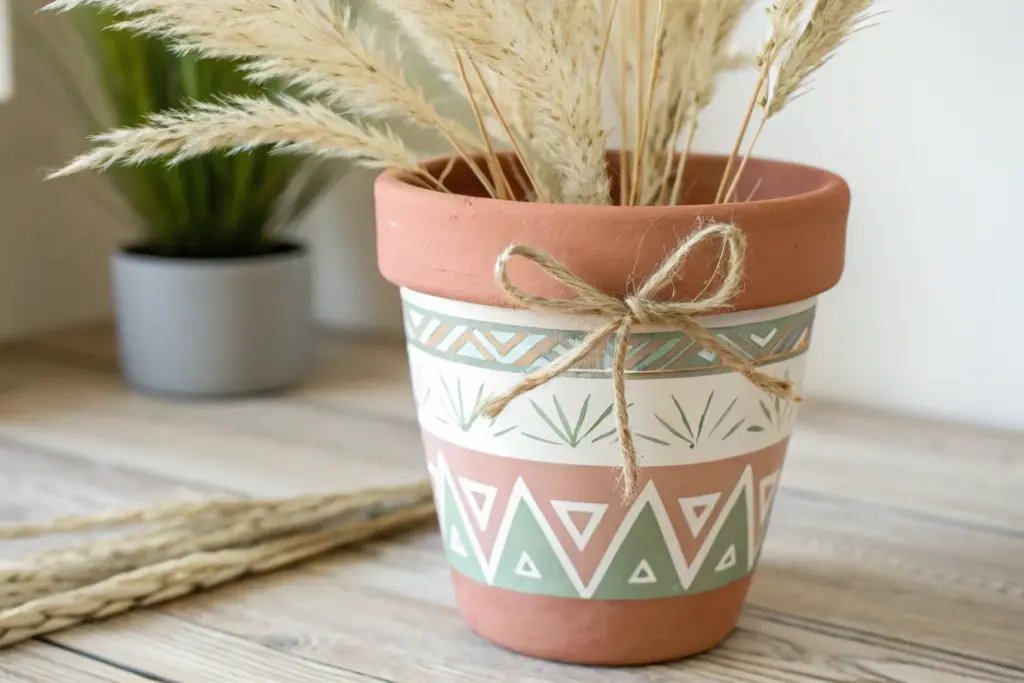
Tape-Resist Geometric Stripes and Angles
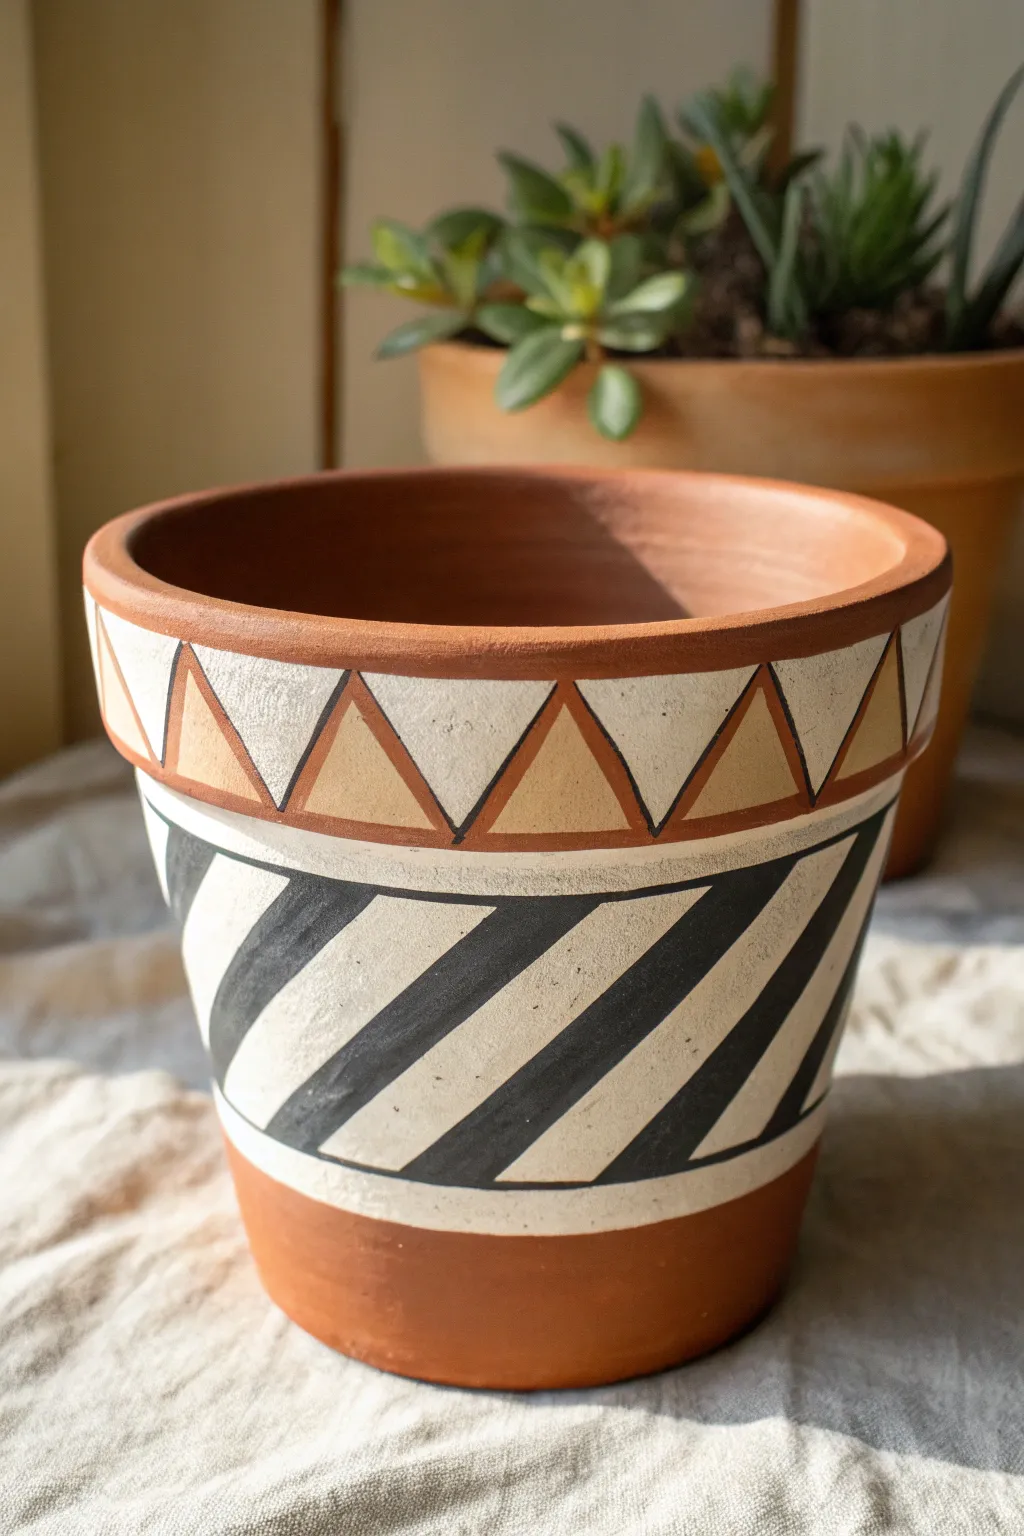
Transform a plain garden staple into a stylish statement piece with this high-contrast geometric design. Combining broad diagonal stripes with a detailed tribal-inspired rim creates a balanced, modern look that perfectly complements green succulents.
Detailed Instructions
Materials
- Terracotta pot (clean and dry)
- White acrylic craft paint (matte)
- Black acrylic craft paint
- Tan/caramel color acrylic craft paint
- Painter’s tape or masking tape (various widths)
- Flat paintbrush (medium)
- Round detail brush (small)
- Black fine-tip paint marker or permanent marker
- Pencil
- Sealer (optional, matte spray)
Step 1: Base Preparation
-
Clean the surface:
Ensure your terracotta pot is thoroughly clean and completely dry. Any moisture trapped inside can cause the paint to peel later. -
Mark the sections:
Using a pencil, lightly mark horizontal rings around the pot to define your design zones. You’ll need a top band just under the rim (about 1.5 inches wide) and a larger middle section for the stripes, leaving the bottom third natural. -
Apply the white base:
Paint the entire top two-thirds of the pot white, following your pencil guides. Use a flat brush for this. -
Layer up:
Let the first coat dry completely, then apply a second or third coat of white until the terracotta color no longer shows through. I find three thin coats usually provide the best solid finish.
Bleeding Lines?
If paint bleeds under your tape, wait for it to dry fully. Then, use a flat-edged brush or a paint pen in the background color (white) to carefully paint over and ‘erase’ the jagged edge.
Step 2: Creating the Striped Section
-
Tape the boundaries:
Once the white paint is bone dry (wait at least an hour), place a horizontal strip of painter’s tape to define the bottom edge of the white section. This keeps the line between paint and raw clay crisp. -
Create diagonal guides:
Place strips of painter’s tape diagonally across the middle white section. The space you leave between the tape strips will become your black lines. -
Seal the tape edges:
Run your finger firmly along the edges of the tape to ensure a tight seal. For extra crisp lines, create a ‘seal’ by lightly painting white over the tape edges first to block any potential bleed-under. -
Paint the black stripes:
Paint the exposed diagonal spaces with black acrylic paint. Be careful not to paint into the top band area reserved for the triangles. -
Remove the tape:
Carefully peel off the tape while the black paint is still slightly wet. This prevents the paint from bonding to the tape and pulling up chunks when dry.
Tape Removal Trick
Pull your tape away at a 45-degree angle slowly. If the paint feels rubbery or stretchy, score the edge gently with a craft knife before peeling to ensure a razor-sharp line.
Step 3: Detailing the Rim
-
Outline the band:
Using a fine-tip black paint marker or a steady hand with a small brush, draw a horizontal line separating the diagonal stripe section from the top white band. -
Sketch triangles:
Lightly pencil in a row of triangles along that top white band. The points should face upward. -
Fill with color:
Use your small detail brush and the tan/caramel paint to fill in every other triangle (or all of them, depending on your preference), creating a warm contrast against the white. -
Outline the shapes:
Once the tan paint is dry, outline each triangle with the black paint marker. This sharpens the geometry and hides any slightly uneven paint edges. -
Finish the rim:
Paint the very top lip of the pot with the tan paint to tie the color scheme together.
Step 4: Finishing Touches
-
Touch ups:
Check closely for any smudges or uneven lines. Use a tiny brush with white paint to clean up any black errors, or black to sharpen the stripes. -
Seal the work:
If this pot will live outdoors or hold a real plant requiring water, spray the painted areas with a matte clear acrylic sealer to protect your detailed work from moisture damage.
Place your favorite succulent inside and enjoy the modern, artisanal vibe this planter brings to your space


Playful Polka Dots and Confetti Speckles
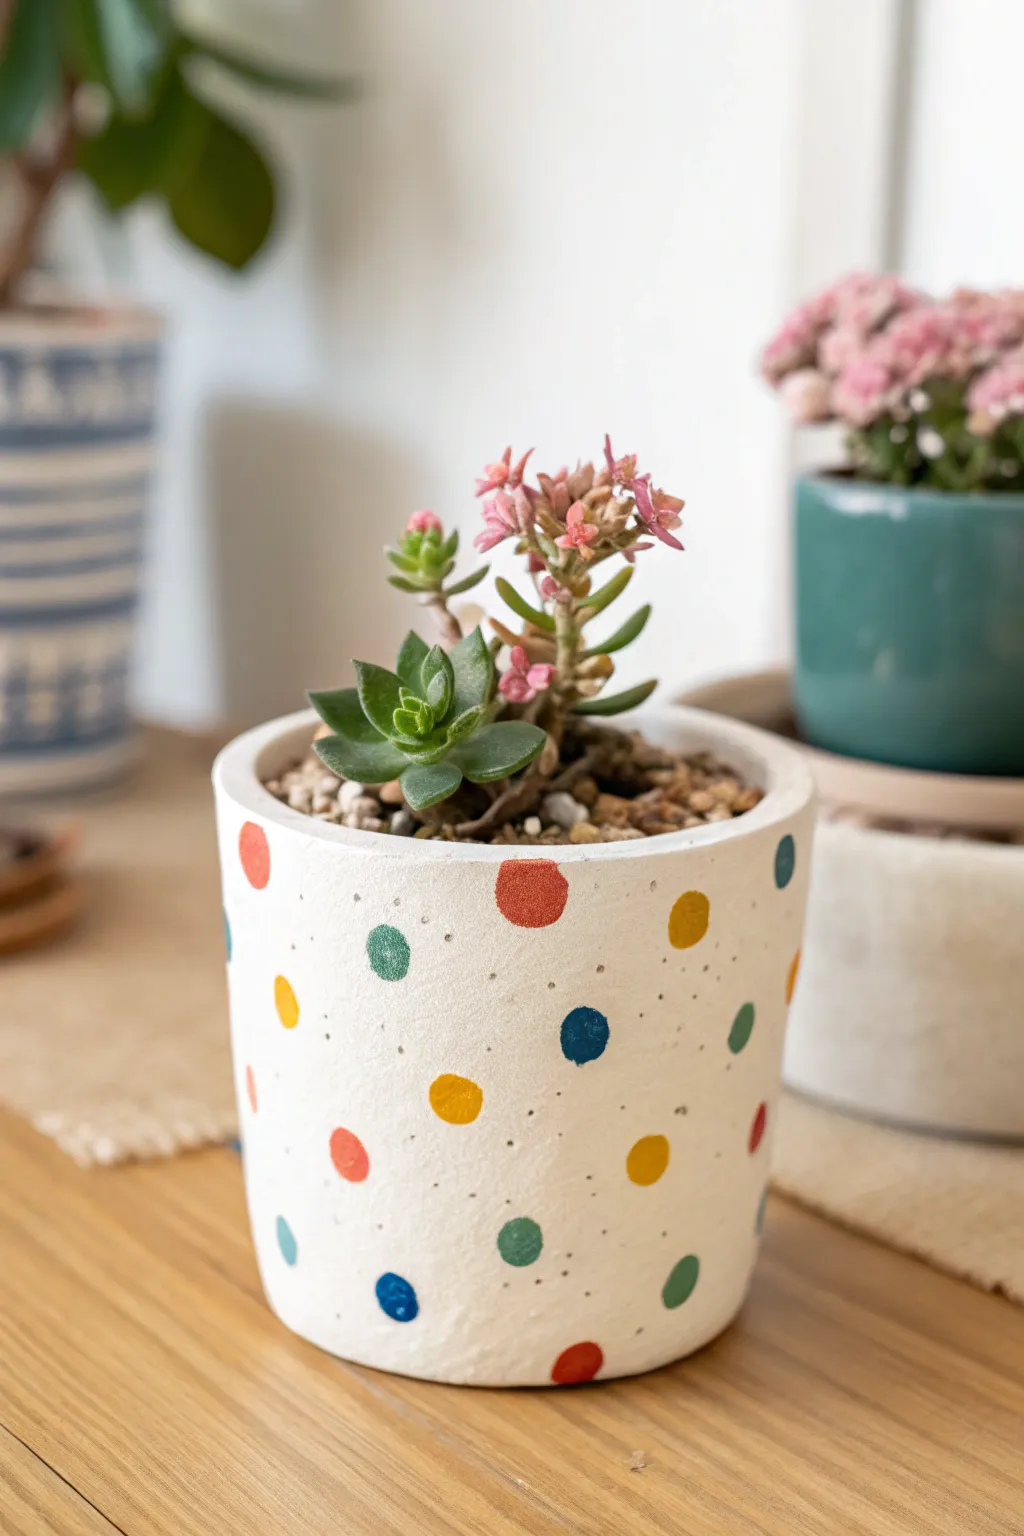
Transform a plain terracotta vessel into a cheerful home for your succulents with this lively design featuring bold, colorful circles and delicate speckled accents. The bright white background makes the primary colors pop, creating a playful, modern look perfect for a windowsill or desk.
Step-by-Step Tutorial
Materials
- Small terracotta pot (cleaned and dried)
- White acrylic craft paint (matte finish suggested)
- Red, yellow, teal/green, and deep blue acrylic craft paints
- Light grey or black acrylic paint (watered down)
- Medium flat paintbrush
- Small round detail brush
- Foam pouncer or eraser end of a pencil
- Old toothbrush
- Paper plate or palette
- Clear matte acrylic sealer spray
Step 1: Base Coat Prep
-
Clean the surface:
Before you begin painting, ensure your terracotta pot is completely free of dust and dirt. Wipe it down with a damp cloth and let it dry fully so the paint adheres properly. -
Apply the first layer:
Using a medium flat paintbrush, apply a coat of white acrylic paint to the exterior of the pot. Don’t worry if it looks streaky at first; terracotta is porous and soaks up paint quickly. -
Paint the rim:
Make sure to bring the white paint over the top rim and slightly down the inside lip of the pot for a finished look, as this area will be visible once the soil is added. -
Add opaque layers:
Let the first coat dry for about 20 minutes, then apply a second and possibly third coat until you have a solid, opaque white background without any orange clay showing through.
Stamp Master Tip
For perfectly round dots without special tools, use the flat end of a drill bit or a round chopstick dipped in paint.
Step 2: Creating the Polka Dots
-
Prepare your palette:
Squeeze dime-sized amounts of your red, yellow, teal, and blue paints onto a paper plate. Space them out so the colors don’t mix accidentally. -
Stamp the first color:
Using a small foam pouncer or the eraser end of a pencil for uniformity, dip into the red paint. Carefully stamp a few random dots around the surface of the pot. -
Add yellow accents:
Clean your tool or switch to a fresh one, then add yellow dots in the open spaces. Aim for a scattered pattern rather than perfect rows. -
Incorporate cool tones:
Continue the process with your teal and blue paints. I find it helpful to rotate the pot constantly to ensure the spacing looks balanced from all angles. -
Touching up:
If the dots look slightly translucent, use a small round detail brush to dab a little extra paint directly on top of the circles to make the colors bold and solid. -
Address the rim:
Don’t forget to place a few partial dots near the top rim or the bottom edge to create the illusion that the pattern wraps naturally around the form.
Uneven Coverage?
If the white base coat keeps soaking in and looking patchy, prime the terracotta with a clear spray sealer first to stop absorption.
Step 3: The Confetti Speckle Effect
-
Mix the speckle wash:
Take a tiny amount of grey or black paint and dilute it with water until it has an inky consistency. It should be fluid enough to flick easily. -
Load the tool:
Dip the bristles of an old toothbrush into this watery mixture. Test it on a piece of scrap paper first to control the spray. -
Apply the speckles:
Hold the toothbrush a few inches away from the pot and run your thumb across the bristles to flick tiny droplets of paint onto the surface. Rotate the pot as you go. -
Refine the texture:
Add a second pass of speckles if you want a denser texture, but keep the spray light so it doesn’t overpower your colorful polka dots.
Step 4: Sealing and Planting
-
Final drying time:
Allow the entire pot to dry completely, preferably overnight, to ensure the thick dots and speckles are fully set. -
Apply protection:
Spray the pot with a clear matte acrylic sealer. This protects your artwork from water damage when you water your plants later. -
Ready for soil:
Once the sealer is dry and no longer smells of fumes, you can fill the pot with succulent soil and your favorite small plant.
Enjoy the bright splash of color your new custom planter adds to your space

The Complete Guide to Pottery Troubleshooting
Uncover the most common ceramic mistakes—from cracking clay to failed glazes—and learn how to fix them fast.
Soft Ombre Fade From Dark to Light
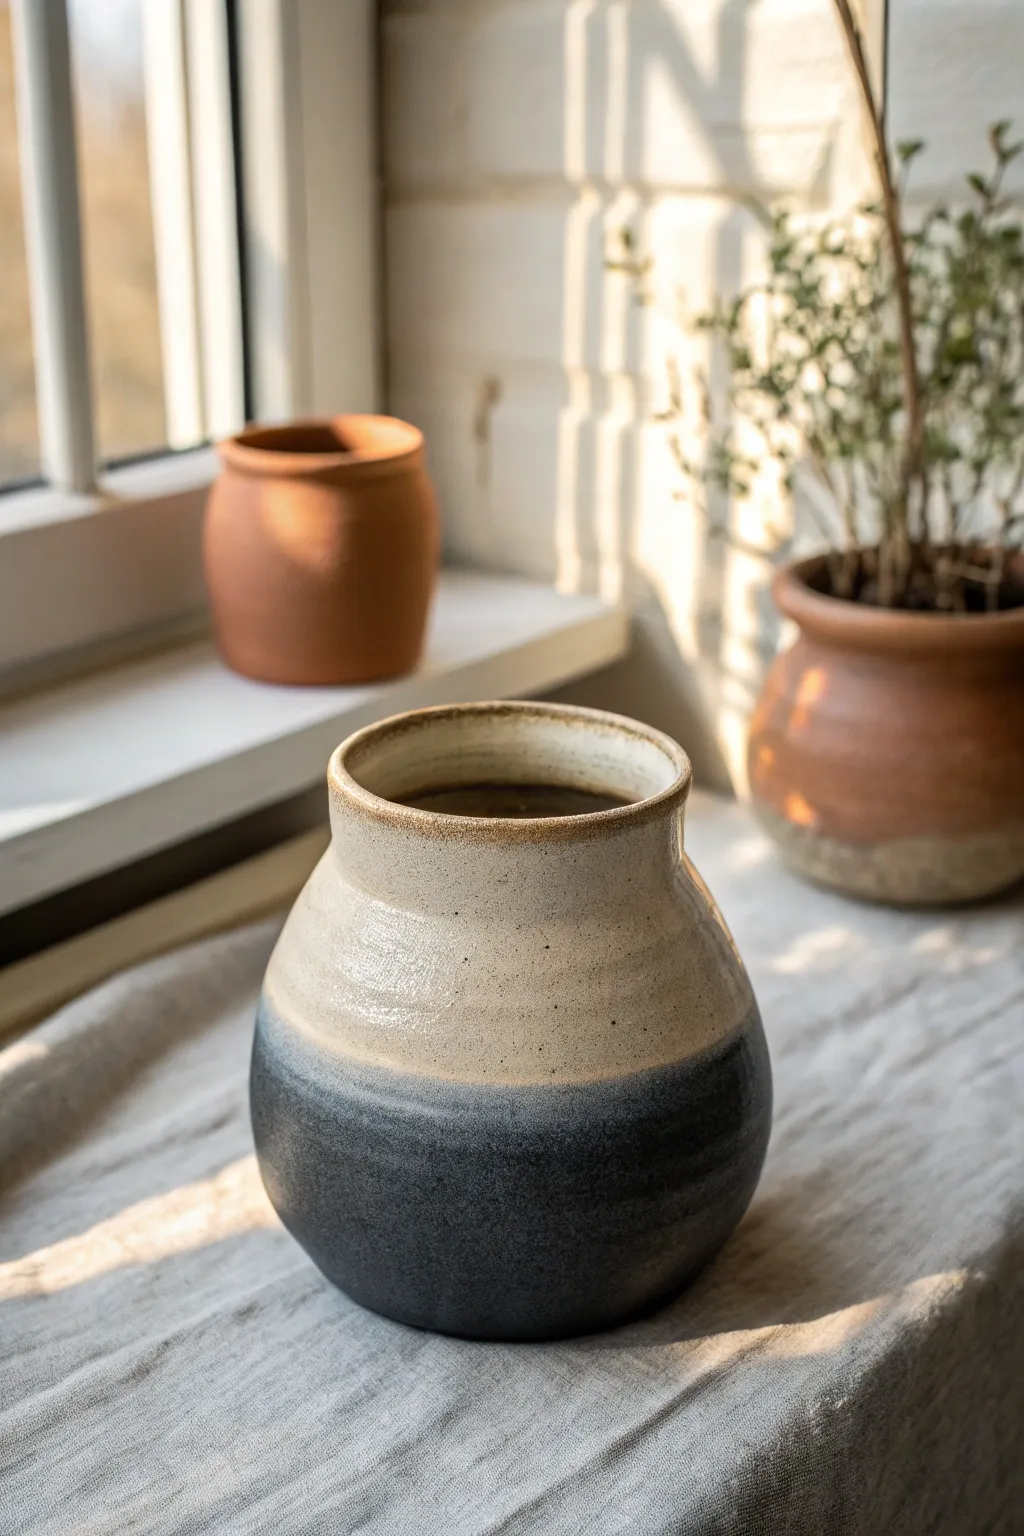
Achieve a sophisticated, studio-pottery look without a kiln by mimicking high-fire glazes using paints and texture mediums. This project features a striking contrast between a rough, speckled sandy texture on top and a smooth, moody midnight blue on the bottom.
Detailed Instructions
Materials
- Terracotta or ceramic vase (round belly shape)
- Sand texture medium or fine crafting sand
- Cream or beige matte acrylic paint
- Deep midnight blue or charcoal chalkboard paint
- Paintbrushes (flat shader and medium round)
- Sponge dabber or old cosmetic sponge
- Brown acrylic paint (diluted)
- Clear matte sealant spray
- Old toothbrush
- Paper plate or palette
- Painter’s tape (optional)
Step 1: Base Texture Layer
-
Prepare your surface:
Begin by wiping down your vase with a damp cloth to remove any dust or oils. Let it dry completely to ensure strong paint adhesion. -
Mix the texture base:
On your palette, mix your cream or beige acrylic paint with a generous amount of sand texture medium. Aim for a ratio that feels gritty but still spreadable, like thin porridge. -
Apply the first coat:
Using a flat brush, apply this textured beige mixture over the entire top half of the vase, extending slightly past the midline where the colors will eventually meet. -
Refine the rim:
Don’t forget to paint the inside of the rim and the lip of the vase. The texture here is crucial for that authentic, hand-thrown pottery aesthetic. -
Add depth and speckle:
While I wait for the base to dry, I like to create a watery wash of brown acrylic paint. Once the base is dry, lightly spatter this brown wash using an old toothbrush to simulate clay speckles. -
Highlight the rim:
Dip a small brush into undiluted brown paint and gently run it along the very edge of the rim to create that toasted, iron-oxide look often found on fired ceramics.
Paint Peeling Off?
If acrylics peel off a glazed ceramic surface, sand the original vase lightly with 120-grit sandpaper before painting to give the primer something to grip.
Step 2: Creating the Ombre Dip
-
Mark the transition line:
Decide where you want your dark dip to start—usually the bottom third or half looks best. You can use painter’s tape for a hard line, or go freehand for a softer, organic feel. -
Paint the bottom section:
Apply your deep midnight blue or charcoal paint to the bottom section. I find chalkboard paint works beautifully here because it dries to a powdery, matte finish that resembles unglazed clay. -
Build the opacity:
The dark color needs to be opaque. Apply a second or third coat as necessary, allowing roughly 20 minutes of drying time between layers. -
Create the fade transition:
To get that soft, hazy transition seen in the photo, dampen a sponge dabber slightly. Dip it into the dark paint and blot most of it off on a paper towel. -
Blend the meeting point:
Gently stipple the sponge along the line where the cream meets the blue. You want a soft dusting of dark color drifting up into the light section, not a solid band. -
Soften harsh edges:
If the transition looks too stark, lightly sponge a tiny bit of the original cream paint back downwards over the blue edge to marry the two tones together.
Texture Pro Tip
Mix baking soda into your paint instead of sand for a fluffier, more velvety texture that mimics unglazed bisque ware perfectly.
Step 3: Finishing Touches
-
Add subtle sheen (optional):
The top section in the image has a slight satin sheen compared to the matte bottom. You can dry-brush a tiny amount of satin varnish just onto the cream section to replicate this glaze difference. -
Inspect for gaps:
Check the very bottom edge and underneath the pot to ensure no original surface is showing through. -
Seal the artwork:
Take the vase to a well-ventilated area and spray the entire piece with a clear matte sealant. This protects the textured paint from chipping.
Place your new artisan-style vessel on a sunny sill and enjoy the warmth it brings to your space
Hand-Lettered Words and Simple Quotes
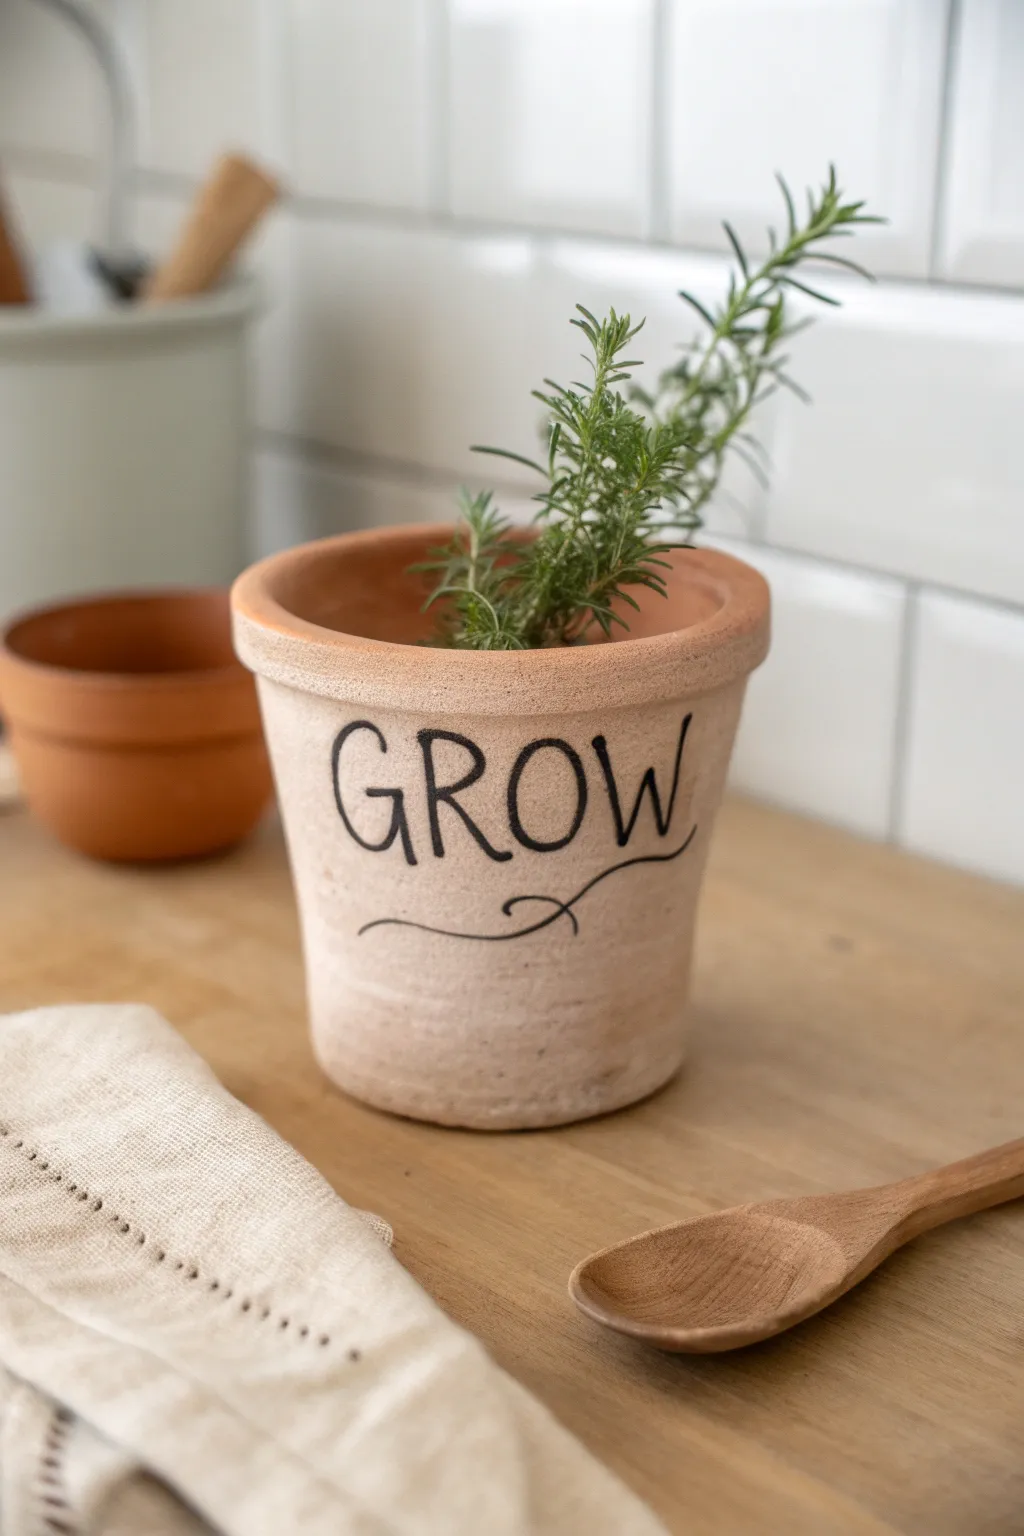
Embrace the rustic charm of the garden with this elegantly simple clay pot project that features bold, serif lettering. The slight whitewashed finish provides the perfect neutral backdrop for the word “GROW,” making your herbs standard out beautifully on any kitchen sill.
Step-by-Step
Materials
- Unsealed terracotta pot (4-6 inch diameter)
- White acrylic paint
- Water
- Paper towel or rag
- Small mixing bowl
- Black acrylic paint or waterproof paint marker (fine point)
- Pencil
- Eraser
- Thin round paintbrush (size 0 or 1)
- Clear matte sealer spray (optional)
Step 1: Preparing the Surface
-
Clean the pot:
Before you begin, ensure your terracotta pot is free from dust and sticker residue. Wipe it down with a damp cloth and let it dry completely. If it’s an old pot, scrub it well to remove any mineral deposits. -
Mix the whitewash:
In your small mixing bowl, create a whitewash mixture. Combine roughly one part white acrylic paint with two parts water. The consistency should be thin and milky, not opaque like regular paint. -
Apply the wash:
Dip your paper towel or rag into the watery paint mixture. Rub it onto the exterior of the pot in a circular motion. You aren’t trying to paint it solid white; you want the orange clay to show through for that aged, textured look. -
Layer and distress:
If the first layer is too subtle, let it dry for five minutes and apply a second light coat. I prefer to wipe away excess immediately with a dry corner of the rag to keep the finish uneven and vintage-looking. -
Dry thoroughly:
Set the pot aside until it is bone dry to the touch. The surface must be completely dry before you try to pencil in your design, or the graphite will smudge into the damp clay.
Uneven Whitewash?
If your whitewash looks too streaky, dampen a sponge and lightly dab the wet paint instead of wiping. This creates a softer, more clouded texture on the clay.
Step 2: Drafting the Design
-
Sketch the letters:
Using a pencil, lightly sketch the word “GROW” across the center of the pot. Aim for a slightly condensed serif font where the letters are tall and narrow. -
Refine the O:
Draw the ‘O’ slightly smaller than the other letters or perfectly centered to balance the word. Keep the lines thin at first; you will thicken them later with paint. -
Add the flourish:
Underneath the word, sketch a long, flowing curved line. Start from the left, dip down slightly, loop up in the center under the ‘O’, and trail off to the right. This underline anchors the text. -
Check spacing:
Step back and look at your pencil marks. Ensure the word is centered relative to the pot’s rim. Use your eraser gently to adjust any spacing issues now before committing to paint.
Step 3: The Lettering Process
-
Prepare black paint:
Put a small dime-sized amount of black acrylic paint on your palette. If it feels too thick, add a singular drop of water to help it flow smoothly off your brush. -
Outline the G:
Using your small round brush (size 0 or 1), carefully trace over your pencil lines for the ‘G’. Apply gentle pressure for thin lines and slightly more pressure for the thicker vertical strokes. -
Complete the word:
Continue painting the remaining letters ‘R’, ‘O’, and ‘W’. Take your time. If you are using a paint marker instead of a brush, shake it well and test the flow on a scrap paper first. -
Add serif details:
Once the main strokes are down, go back to the top and bottom of each vertical line and add small horizontal ‘feet’ (serifs). This gives the lettering that classic, typographical look shown in the example. -
Paint the flourish:
Paint the decorative squiggle underneath the text in a single, confident stroke if possible. If you need to stop, try to lift the brush at a natural curve point to hide the connection. -
Refine edges:
Inspect your letters for any shaky edges. You can carefully smooth them out with just a tiny bit more black paint, but don’t overwork it—hand-painted imperfections add character.
Pro Tip: Practice Placement
Before painting the final pot, write your word on a piece of paper tape and stick it to the pot. This helps you visualize exactly where the center point should be.
Step 4: Finishing Touches
-
Erase guidelines:
Wait at least one full hour for the black paint to cure completely. Once dry, gently erase any visible pencil marks that weren’t covered by paint. -
Seal the work:
To protect your artwork from watering accidents, spray the exterior with a light coat of clear matte sealer. This will keep the whitewash from wearing off over time. -
Add greenery:
Your pot is essentially done. Fill it with potting soil and your favorite herb, like the rosemary shown here, to complete the organic aesthetic.
Now you have a charming, custom planter ready to bring a little life to your kitchen.


What Really Happens Inside the Kiln
Learn how time and temperature work together inside the kiln to transform clay into durable ceramic.
Dot-Painted Mandalas for a Calm Boho Feel
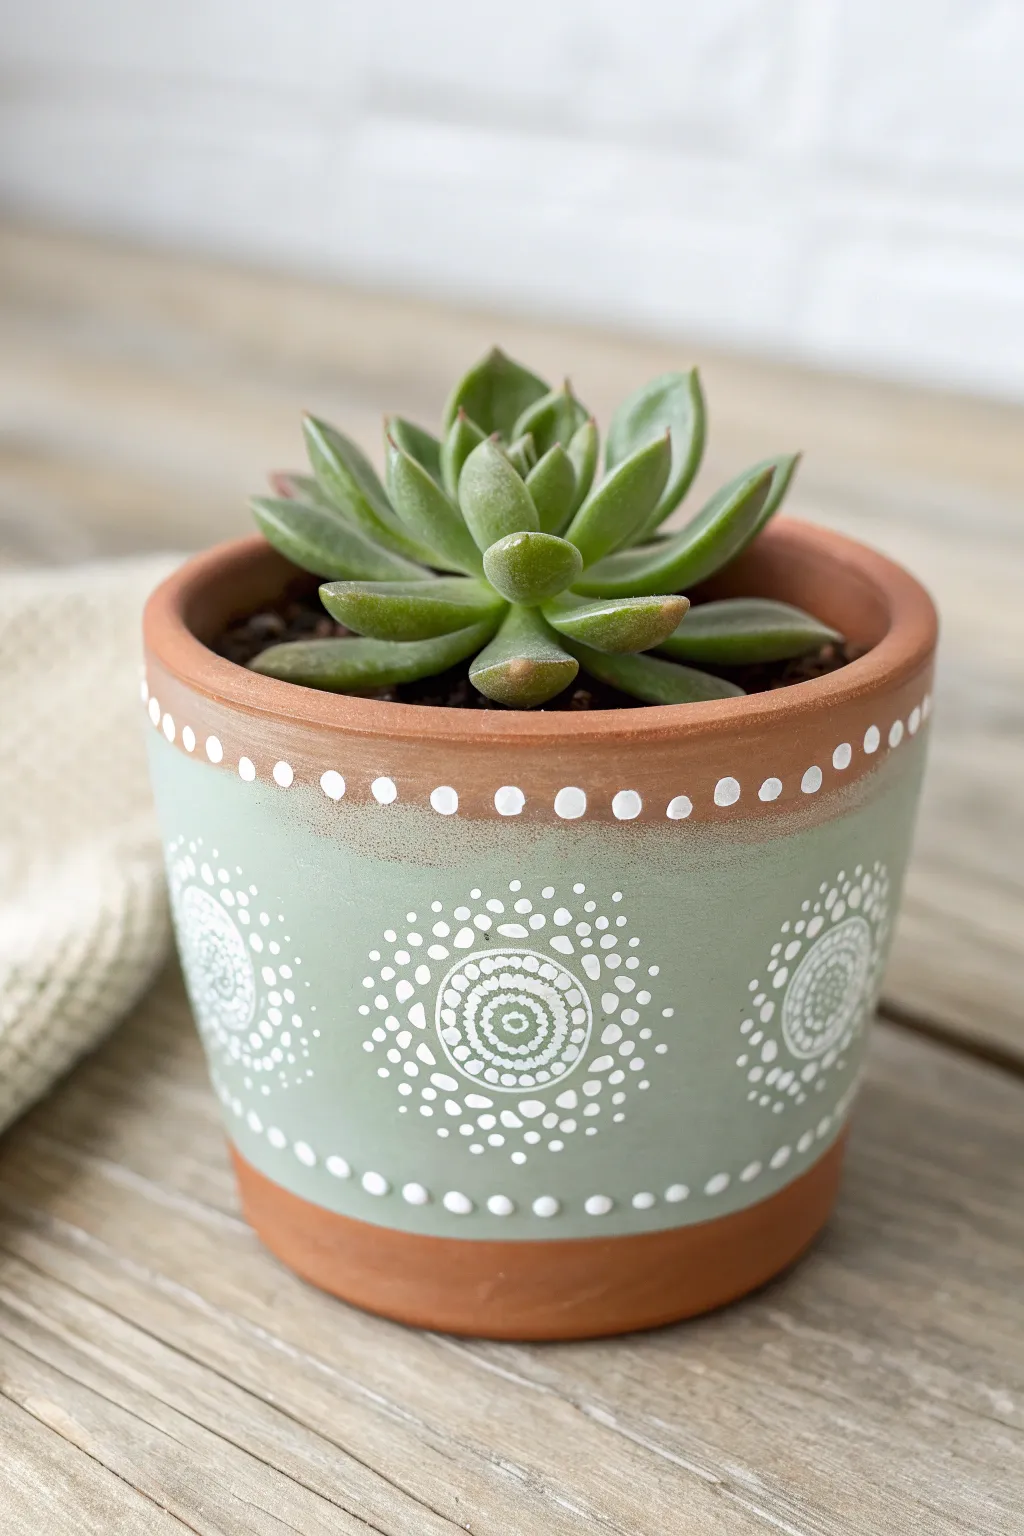
Bring a touch of Zen to your plant collection with this soothing dot-painted design. The soft sage green background paired with crisp white mandala patterns creates a modern bohemian look that perfectly complements succulent greenery.
Step-by-Step Guide
Materials
- Small terracotta pot (approx. 4-6 inches)
- Sage green matte acrylic paint
- White acrylic paint (high opacity)
- Dotting tools (various sizes) or distinct household items (pencil eraser, brush end, toothpick)
- Small flat paintbrush
- Painter’s tape
- Clear matte sealant spray
- Paper plate or palette
- Damp rag for mistakes
Step 1: Base Preparation
-
Tape the Rim:
Begin by applying painter’s tape around the top rim of the terracotta pot. Place it just below the lip to keep the natural clay exposed at the top, creating that nice two-tone contrast. -
Tape the Base:
Similarly, apply a strip of tape around the bottom edge of the pot. Leave about an inch of the natural terracotta exposed at the base. -
Apply the Base Coat:
Using your flat paintbrush, apply the sage green acrylic paint to the area between the tape strips. Brush horizontally to minimize texture. -
Layering Up:
Allow the first coat to dry for about 15-20 minutes. Apply a second coat of sage green to ensure full, opaque coverage where no terracotta shows through. -
Reveal the Lines:
Once the paint is tacky but almost dry, carefully peel away the painter’s tape. Pulling it off before the paint fully hardens helps prevent clean lines from chipping.
Step 2: Dotting the Details
-
Start the Top Border:
Dip a medium-sized dotting tool into your white paint. Create a ring of evenly spaced dots immediately above the green painted section, right on the raw terracotta rim. -
Create the Bottom Border:
Repeat this process just below the green section on the bottom raw terracotta strip. Try to align these dots vertically with the top ones if possible, but don’t stress over perfection. -
Center the Mandalas:
Visualize three or four main focal points around the green band. Use your largest dotting tool to place a single large white dot in the center of the green field at each point. -
First Ring:
Switch to a very fine dotting tool or toothpick. Surround the large center dot with a tight ring of tiny dots. -
Second Ring:
Using a slightly larger tool, create a second ring of dots outside the first one. -
Third Ring:
Move up one tool size again. Create a third concentric circle of dots. -
Outer Ring Variation:
For the outermost ring of the mandala, use a medium tool. Space the dots out slightly more than the previous rings to give the design an airy feeling. -
Adding Filler Dots:
Between your main mandalas, add small clusters of three or four random-sized dots to fill the negative space without overcrowding it. -
Top Detail Band:
Go back to the top edge of the green paint. Using a small tool, dot a line of white dots directly on the green paint, mirroring the ones you placed on the terracotta rim earlier. -
Bottom Detail Band:
Repeat this on the bottom edge of the green paint, creating a ‘double border’ effect with the dots on the raw clay below.
Oops, Smudged It?
If a dot smears or looks wonky, wait for it to dry completely. Then, use a small detail brush to paint a tiny patch of sage green over the error. Re-dot once that patch is dry.
Step 3: Finishing
-
Potting:
Wait at least 24 hours for the thick dots of paint to cure completely. Once dry, pot your succulent using cactus soil. -
Sealing:
Take the pot outside and spray it with a light coat of clear matte sealant. This protects the water-based acrylic paint from moisture when you water your plant.
Add Some Shine
For a subtle glam look, mix a tiny drop of metallic gold paint into your white acrylic before dotting. It adds a warm shimmer that looks amazing against terracotta.
Place your new pot on a sunny windowsill and enjoy the calm vibes it brings to your space
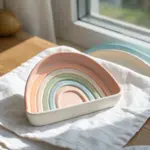
Loose Watercolor-Style Washes for an Airy Look

Transform a plain ceramic vessel into a dreamy landscape using a loose, layered painting technique that mimics the soft transparency of watercolors. This project captures an airy, ethereal aesthetic with gentle washes of pink, teal, and slate blue, perfect for adding a touch of calm to any windowsill.
Step-by-Step
Materials
- Bisque-fired ceramic vase or smooth terracotta pot (primed white)
- Acrylic paints (Soft Pink, Teal/Seafoam, Slate Blue, Lavender, Cream/White)
- Glaze medium or fabric medium/water (to thin paints)
- Wide, soft synthetic brushes (filbert or round shapes)
- Small piece of natural sponge or paper towel
- Clear gloss acrylic sealer or varnish
- Palette or mixing plate
- Water cup
Step 1: Preparation and Base
-
Clean surface:
Begin by wiping down your ceramic pot or vase with a damp cloth to remove any dust or oils. If you are using a raw terracotta pot, apply two coats of white gesso or primer first to create a blank canvas similar to the white clay shown. -
Mix your washes:
Prepare your palette by placing dime-sized amounts of your acrylic colors. To achieve that translucent, watercolor look, mix each color with a generous amount of glaze medium or water—aim for a ratio of about 1 part paint to 3 parts medium. -
Test opacity:
Swipe a test stroke on a piece of paper or the bottom of the pot. The paint should be fluid and semi-transparent, allowing light to pass through, rather than thick and opaque.
Oops! Colors Muddy?
If blending wet-on-wet gets too brown or messy, let each color layer dry 100% before adding the next. This creates clean, optical color mixing instead of physical mixing.
Step 2: Painting the Pink Layers
-
First wash:
Dip a medium-sized soft brush into your diluted Soft Pink. Start near the upper-middle section of the vase, painting a wavy, undulating line that mimics rolling hills or clouds. -
Soften the edge:
While the paint is still wet, quickly dip your brush in clean water and drag the bottom edge of the pink shape downward, fading it out into the white background so there isn’t a hard line at the bottom. -
Create variation:
Add a second, slightly more saturated layer of pink just at the top crests of the waves to create depth and shadow. -
Allow to dry:
Let this pink layer dry completely. Since the washes are thin, this should only take about 10–15 minutes.
Step 3: Building the Landscape
-
Add the middle tones:
Using your Teal or Seafoam wash, paint a new wavy section below the pink area. It’s okay—and actually encouraged—to let the top of the teal slightly overlap the faded bottom of the pink layer. -
Blend naturally:
Where the wet teal meets the dry pink, the colors might create a subtle third tone. Embrace this; it adds to the organic watercolor feel. -
Introduce lavender:
Paint a swooping section of the Lavender wash below or adjacent to the teal. Keep your wrist loose to create natural, non-uniform curves. -
Deepen with slate:
At the very bottom of the composition, anchor the design with a swipe of the darker Slate Blue. This visual weight keeps the airy design grounded.
Make it Metallic
For a luxe touch, trace the very top edge of one ‘wave’ layer with a thin line of liquid gold leaf or metallic gold paint after the main colors have dried.
Step 4: Adding Details and Finishing
-
Top rim accent:
Using a slightly smaller brush and the Slate Blue tone (less diluted this time), paint a loose collar around the neck of the vase. Use short, downward strokes to create a fringed or icicle-like effect. -
Refine the shapes:
Step back and look at your vase. If any areas look too flat, I sometimes go back in with a barely-damp sponge to lift a little pigment, revealing the light ceramic underneath for highlights. -
Dry thoroughly:
Allow the entire piece to dry for at least 24 hours. The layers need to be fully set before sealing. -
Seal the artwork:
Apply a clear high-gloss acrylic varnish or spray sealer over the painted area. This mimics the look of a fired ceramic glaze and protects your delicate washes from moisture.
Place your beautiful new vessel near a sunlit window to let those translucent layers truly shine

TRACK YOUR CERAMIC JOURNEY
Capture glaze tests, firing details, and creative progress—all in one simple printable. Make your projects easier to repeat and improve.
Distressed Vintage Finish With Layered Paint

Transform a plain terracotta pot into a weathered piece of history with this layered paint technique. The finish mimics the natural salt deposits and calcification found on antique garden pottery, adding instant character to your doorstep.
How-To Guide
Materials
- Standard terracotta pot (clean and dry)
- White acrylic paint (matte finish) or chalk paint
- Cream or off-white acrylic paint
- Baking soda or plaster powder (for texture)
- Medium-grit sandpaper (100-150 grit)
- Coarse-grit sandpaper (60-80 grit)
- Chip brush or old stiff-bristled brush
- Paper towels or cotton rag
- Matte clear sealer spray
- Plastic cup for mixing
Step 1: Creating the Texture Base
-
Prepare the mixture:
Begin by creating your texture paste. In a plastic cup, mix approximately two parts white matte paint with one part baking soda. The consistency should feel gritty and slightly thick, like pancake batter. -
First coat application:
Dip your chip brush into the mixture and apply a thick, uneven layer to the entire pot. Focus heavily on covering the rim and the bottom third, as these areas naturally accumulate the most weathering. -
Stipple for effect:
While the paint is still wet, use the tip of your brush to stipple (jab repeatedly) the surface. This creates small peaks and valleys that will catch future paint layers and sanding. -
Let it dry completely:
Allow this base layer to dry fully. Since it is thick, give it at least an hour or two. It should be hard to the touch before moving on.
Too much white?
If you covered too much orange clay, use a damp sanding sponge to scrub the wet paint away. It removes layers faster than dry sanding.
Step 2: Layering and Distressing
-
Dry brush the mid-section:
Using a dry brush with very little off-white or cream paint, lightly drag horizontal strokes across the middle band of the pot. You want this area to remain somewhat translucent. -
Highlight the rim:
Apply a second, solid coat of your texture mixture specifically to the rim. I like to let this drip slightly over the edge to mimic heavy calcium buildup. -
Initial rough sanding:
Once everything is bone dry, take your coarse-grit sandpaper to the middle band of the pot. Sand aggressively in horizontal motions to reveal the orange terracotta beneath. -
Targeted weathering:
Switch to medium-grit sandpaper and smooth out the rim and bottom edge, but leave some of the thick texture intact. -
Create the drag marks:
Use the coarse sandpaper to create deep horizontal scratches around the circumference, cutting through the white paint to make it look like the pot has been spun or scraped over time.
Mossy Patinaz
Dab diluted sap green or moss green paint into the crevices of the rim and base before sealing for an organic, garden-grown look.
Step 3: The Wash and Finish
-
Mix a whitewash:
Dilute a small dollop of white paint with water until it is very runny, roughly a 1:1 ratio. -
Apply the wash:
Brush this watery mixture over the entire pot, including the areas you just sanded. This helps blend the harsh sanding lines into the rest of the finish. -
Wipe back immediately:
Before the wash dries, use a crumpled paper towel or rag to wipe away the excess. Rub harder on the middle band to keep that terra cotta color visible. -
Add final texture spots:
If any area looks too uniform, dab a tiny bit of undiluted white paint on your finger and smudge it onto the pot. This creates localized ‘salt’ deposits. -
Final dry time:
Let the pot sit for 30 minutes to ensure all moisture has evaporated from the porous clay. -
Seal the deal:
Spray the entire exterior with a matte clear sealer. This is crucial if the pot will live outdoors, as it prevents rain from washing away your hard work.
Enjoy the timeless, rustic beauty your new ancient-looking vessel brings to the garden space
Drip-Paint Edges That Look Effortlessly Artsy

Capture the organic beauty of messy studio pottery without the kiln by recreating this stunning drip-edge look. This project transforms a basic vessel into an artsy, speckled masterpiece that balances modern whites with earthy, warm terracotta tones.
Step-by-Step Tutorial
Materials
- Simple terracotta or ceramic pot (clean and dry)
- White chalk paint or matte acrylic paint
- Terracotta-colored acrylic paint or glaze medium
- Gloss varnish or clear glaze topcoat
- Black acrylic paint (for speckles)
- Stiff bristle brush or old toothbrush
- Medium flat paintbrush
- Squeeze bottle or spoon
- Water
- Sandpaper (fine grit)
- Painter’s tape (optional)
Step 1: Base Preparation
-
Clean the Surface:
Begin by wiping down your chosen pot with a damp cloth to remove any dust or oils. If usng a terracotta pot, ensure it is bone dry before starting so the paint adheres properly. -
Apply the Base Coat:
Paint the entire exterior of the pot with your white chalk paint. I prefer using chalk paint here because it gives that lovely matte, ceramic-like texture. -
Dry and Repeat:
Let the first coat dry completely. Apply a second or third coat until the original pot color is fully concealed and you have a solid, opaque white surface. -
Create the Speckles:
Dilute a small amount of black acrylic paint with water until it is runny. Dip a stiff brush (or toothbrush) into the mixture. -
Flick the Texture:
Hold the brush near the pot and run your thumb across the bristles to flick tiny specks of black paint onto the white surface. Rotate the pot to ensure even, random coverage. -
Seal the Base:
Once the speckles are completely dry, apply a layer of matte varnish to seal the white background. This prevents the next dripping step from staining the white areas you want to keep clean.
Gravity Assist
If the paint isn’t dripping naturally, gently tap the bottom of the pot against your table. The vibration encourages the paint to slide down creating organic lines.
Step 2: The Drip Effect
-
Mix the Drip Medium:
Mix your terracotta-colored acrylic paint with a pouring medium or a little water. You want a consistency similar to heavy cream—thick enough to hold color, but fluid enough to run. -
Test the Flow:
Test the consistency on a piece of cardboard first. If it drips too fast, add more paint; if it clumps, add tiny drops of water. -
Paint the Rim:
Using a flat brush, paint a thick band of the terracotta mixture around the very top rim of the pot, extending about half an inch down the outside. -
Initiate the Drips:
Load a squeeze bottle or a spoon with your mixture. Gently deposit extra paint at the top edge of the painted rim, allowing gravity to pull streams of paint down the side. -
Control the Flow:
For longer drips, add more paint in one spot. For the uneven look shown in the image, vary the amount of paint you release at different intervals around the circumference. -
Refine the Look:
If a drip stops too short, you can gently encourage it downward with the tip of a toothpick, but try to let gravity do most of the work for the most natural shape.
Step 3: Finishing Touches
-
Allow to Cure:
Place the pot on a raised surface (like a can) so the drips don’t pool at the bottom if they run too far. Let this dry undisturbed for at least 24 hours. -
Add Gloss to the Drips:
To mimic the look of glazed ceramic, carefully paint a high-gloss varnish ONLY over the terracotta drips and the rim. Keep the white speckled area matte for contrast. -
Final Inspection:
Check for any unwanted smudges on the white base and touch them up with a tiny bit of white paint if necessary. Once fully cured, your pot is ready for planting.
Metallic Twist
Swap the terracotta paint for liquid gold leaf or copper paint. The metallic drip against the matte speckled white creates a luxe, high-end modern aesthetic.
Enjoy the unique character this faux-glaze technique brings to your indoor garden collection
Marbled Swirls for a Quick “Wow” Moment
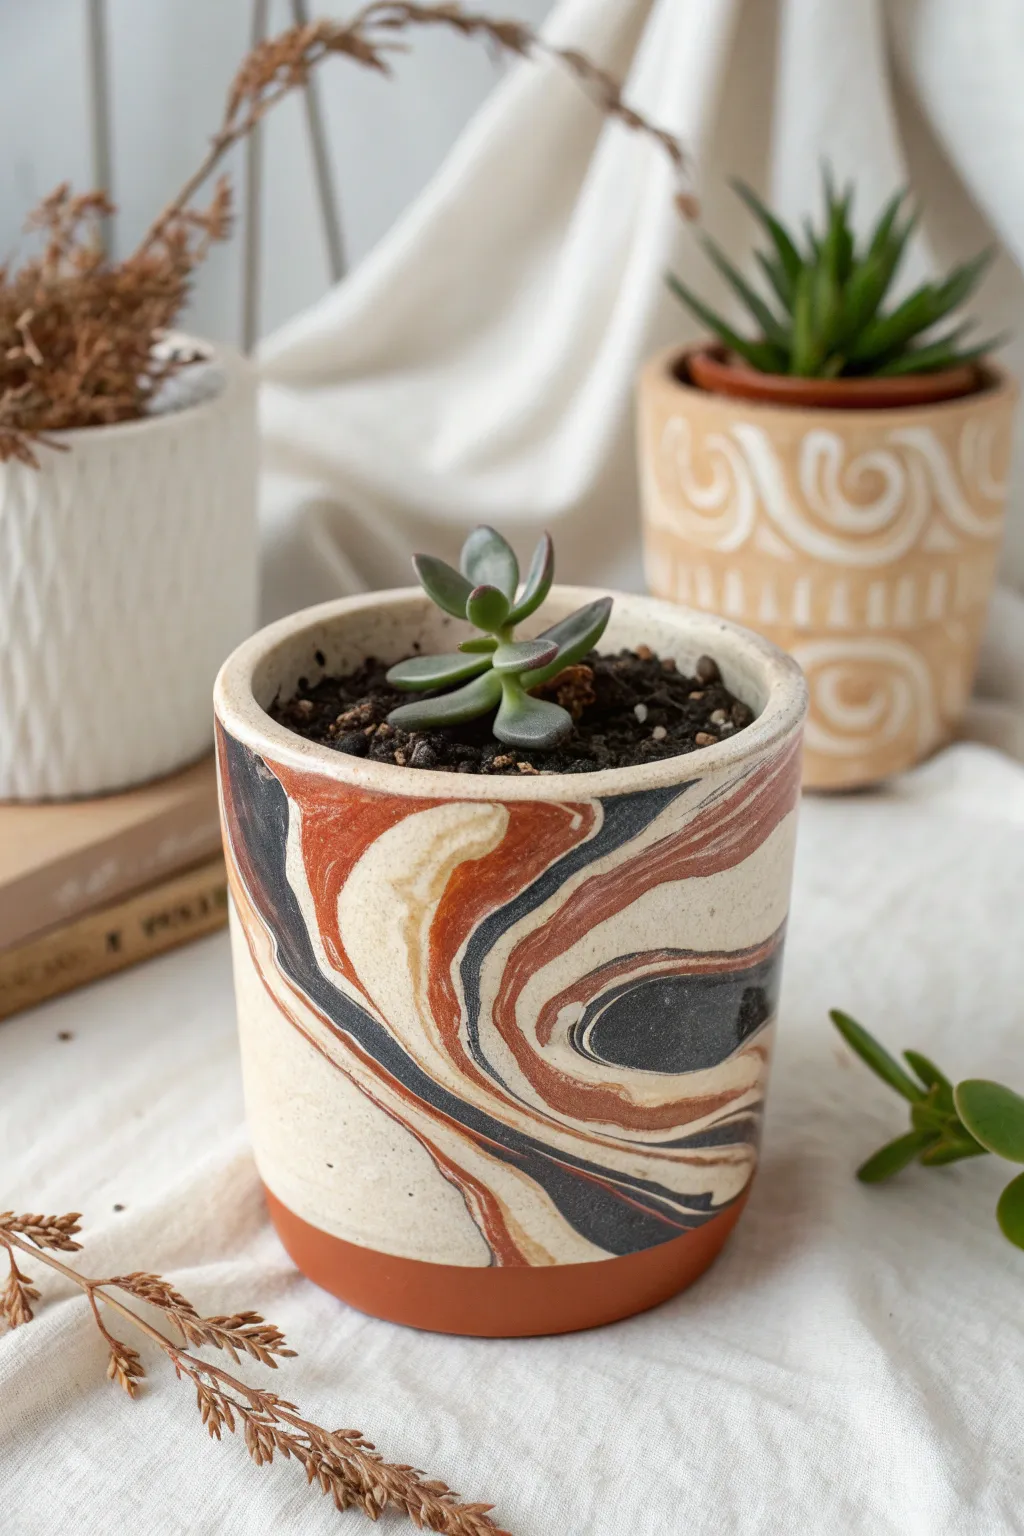
Transform a simple terracotta pot into a swirling masterpiece of modern art with this simple marbling technique. The organic ripples of black, rust, and cream create a sophisticated, high-end ceramic look without the need for a kiln.
How-To Guide
Materials
- Small terracotta pot (clean and dry)
- White or cream acrylic paint (base coat)
- Black acrylic paint
- Rust/burnt sienna acrylic paint
- Pouring medium
- 2 small plastic cups for mixing
- Large plastic bin or deep disposable tray
- Water
- Stirring sticks or toothpicks
- Protective gloves
- Clear matte sealant spray
- Painter’s tape
Step 1: Preparation & Base Coat
-
Clean the surface:
Wipe down your terracotta pot with a damp cloth to remove any dust or oils. This ensures the paint adheres properly. -
Tape the base:
If you want to keep the bottom rim natural terracotta like the example, apply a strip of painter’s tape around the bottom edge of the pot, pressing firmly to seal it. -
Apply the base color:
Paint the entire exterior of the pot (above the tape line) with your cream or off-white acrylic paint. You may need two coats for full coverage. -
Dry completely:
Allow the base coat to dry fully before moving on. This is crucial so the marbling doesn’t muddy the underlying color. -
Mix paint with medium:
In separate cups, mix your black and rust paints with a pouring medium. A 1:1 ratio usually works well to get a fluid, honey-like consistency. -
Prepare the cream mix:
Prepare a cup of the cream paint mixed with pouring medium as well; you will need this to create negative space in the dip.
Temperature Tip
Use lukewarm water for your dip. Cold water can verify the paint skin too quickly, making it clumpy instead of smooth.
Step 2: Creating the Swirls
-
Fill the dipping container:
Fill your large bin with enough water to submerge the pot up to the tape line. Room temperature water works best. -
Add the first color:
Gently drip your cream paint mixture onto the surface of the water. It should float rather than sink. -
Layer the accents:
Drip the rust and black paint mixtures onto the water’s surface, aiming for random spots within the cream pool. -
Swirl the pattern:
Use a toothpick or skewer to very gently drag through the floating paint. Don’t overmix; you want distinct ribbons of color. -
Check the density:
Ensure there is enough paint on the surface to cover the circumference of your pot. Add a few more drops of rust if the design looks too sparse.
Go Metallic
Add a touch of luxury by using a metallic gold or copper paint as a third accent color in your swirl mix.
Step 3: The Dip & Finish
-
Position the pot:
Hold the pot by the rim (or place your hand inside/wear a glove) and position it over a section of the paint swirl you like best. -
Roll and dip:
Slowly dip the pot into the water at an angle, rotating it as you submerge to wrap the paint film around the surface. -
Submerge fully:
Pus the pot down until the water line reaches just above your tape mark to ensure full coverage. -
Clear the surface:
While the pot is underwater, blow on the surface to disperse the remaining paint skin, then pull the pot out through the clear water. -
Drip dry:
Hold the pot upside down for a moment to let excess water drip off, then set it on a raised surface (like a cup) to dry. -
Remove the tape:
Once the paint is tacky but not fully hard (about 30 minutes), carefully peel off the painter’s tape to reveal the clean terracotta line. -
Seal the deal:
After drying for 24 hours, apply a clear matte sealant spray to protect your design from water damage when you water your plants.
Now you have a stunning, gallery-worthy planter ready to house your favorite succulent
Floral Paper Decoupage for a Printed Look
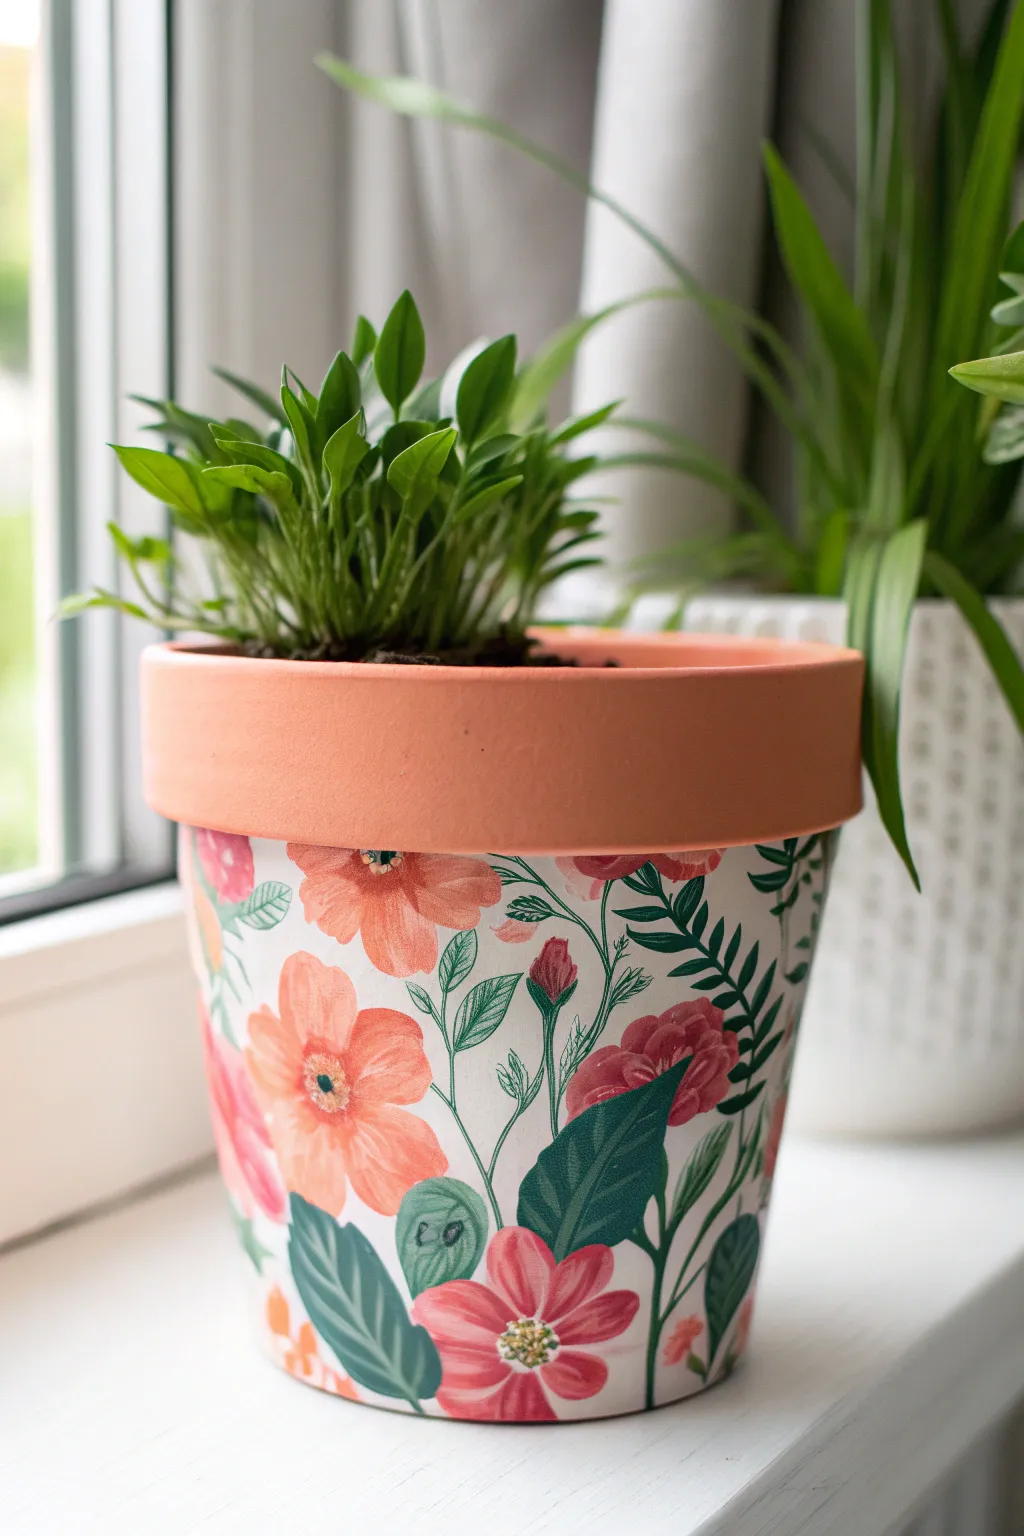
Transform a plain terracotta pot into a botanical beauty with the art of decoupage. By layering vibrant floral paper cutouts over a crisp white base, you’ll achieve a stunning, hand-painted look that brightens any windowsill.
Step-by-Step Guide
Materials
- Standard terracotta pot (cleaned)
- White acrylic paint or chalk paint
- Floral paper napkins or decoupage paper
- Mod Podge (Matte or Satin finish)
- Small sharp scissors
- Flat paintbrush (medium width)
- Small detail brush
- Foam sponge brush (optional)
- Clear acrylic sealer spray (matte)
- Painters tape
Step 1: Preparing the Canvas
-
Clean the Surface:
Begin by wiping down your terracotta pot with a damp cloth to remove any dust or debris. Let it dry completely to ensure the paint adheres perfectly. -
Tape the Rim:
To keep that classic terracotta rim clean as seen in the photo, apply a strip of painter’s tape just below the lip of the pot. Press the edges down firmly to prevent paint seepage. -
Prime with White:
Using a flat paintbrush or foam sponge, apply a base coat of white acrylic paint to the body of the pot below the tape. This bright background makes the floral colors pop. -
Second Coat Application:
Allow the first coat to dry for about 20-30 minutes. Apply a second coat if the terracotta color is still showing through, ensuring a solid, opaque white finish. -
Remove Tape:
While the second coat is still slightly tacky (but mostly dry), carefully peel away the painter’s tape to reveal a crisp line. Let the white paint cure fully for at least an hour.
Pro Tip: Wrinkle Free
Use the ‘cling wrap method’: place plastic wrap over the wet cutout and smooth with your thumb. It glides over the delicate paper without tearing it.
Step 2: Designing the Garden
-
Select Floral Patterns:
Examine your floral napkins or decoupage paper. Look for designs featuring peach and red flowers with deep green foliage that mimics the reference image. -
Separate Napkin Layers:
If you are using paper napkins, this is crucial: gently peel away the unprinted white backing layers until you are left with only the single, thin printed sheet. -
Fussy Cutting:
Using small, sharp scissors, carefully cut out individual flowers and leaf clusters. Get as close to the printed edge as possible to minimize any white border. -
Plan the Layout:
Before gluing, lay your cutouts on a table or temporarily place them against the dry pot to plan your arrangement. Aim for a mix of large blooms and smaller filler leaves.
Step 3: Decoupage Application
-
Apply Base Medium:
Working on one small section at a time, brush a thin layer of Mod Podge onto the white painted surface of the pot where your first flower will go. -
Position the Flower:
Gently place your cut-out flower onto the wet Mod Podge. Start from the center of the cutout and lightly tap it down outward to avoid trapping air. -
Smooth the Edges:
Dip your finger in a tiny bit of water or Mod Podge and very gently smooth out wrinkles. Be delicate, as wet napkin paper tears easily. I find a light touch works best here. -
Seal the Cutout:
Immediately brush another thin layer of Mod Podge over the top of the adhered flower to seal it in place. Ensure the edges are fully saturated. -
Continue the Pattern:
Repeat the process, rotating the pot and overlapping leaves or stems slightly to create a seamless, organic garden effect wrapping around the vessel. -
Fill the Gaps:
Use smaller leaf cutouts or tiny buds to fill any large white spaces, balancing the design so it looks full and lush from every angle.
Level Up: Painted Details
After sealing, use a tiny brush and gold acrylic paint to add small dots to the center of the flowers for an extra touch of dimension and sparkle.
Step 4: Final Touches
-
Dry Time:
Allow the entire decoupage layer to dry completely, preferably overnight. The milky look of the Mod Podge will clear as it dries. -
Clean Up the Rim:
If any paint or glue accidentally got onto the terracotta rim, gently sand it off with fine-grit sandpaper for a flawless finish. -
Protective Sealer:
Take the pot to a well-ventilated area and spray it with a clear matte acrylic sealer. This waterproofs the outside, protecting your art from splashes when watering plants.
Now your pot is ready to be the stylish new home for your favorite houseplant
Fabric-Wrapped Pots for Cozy Texture and Color
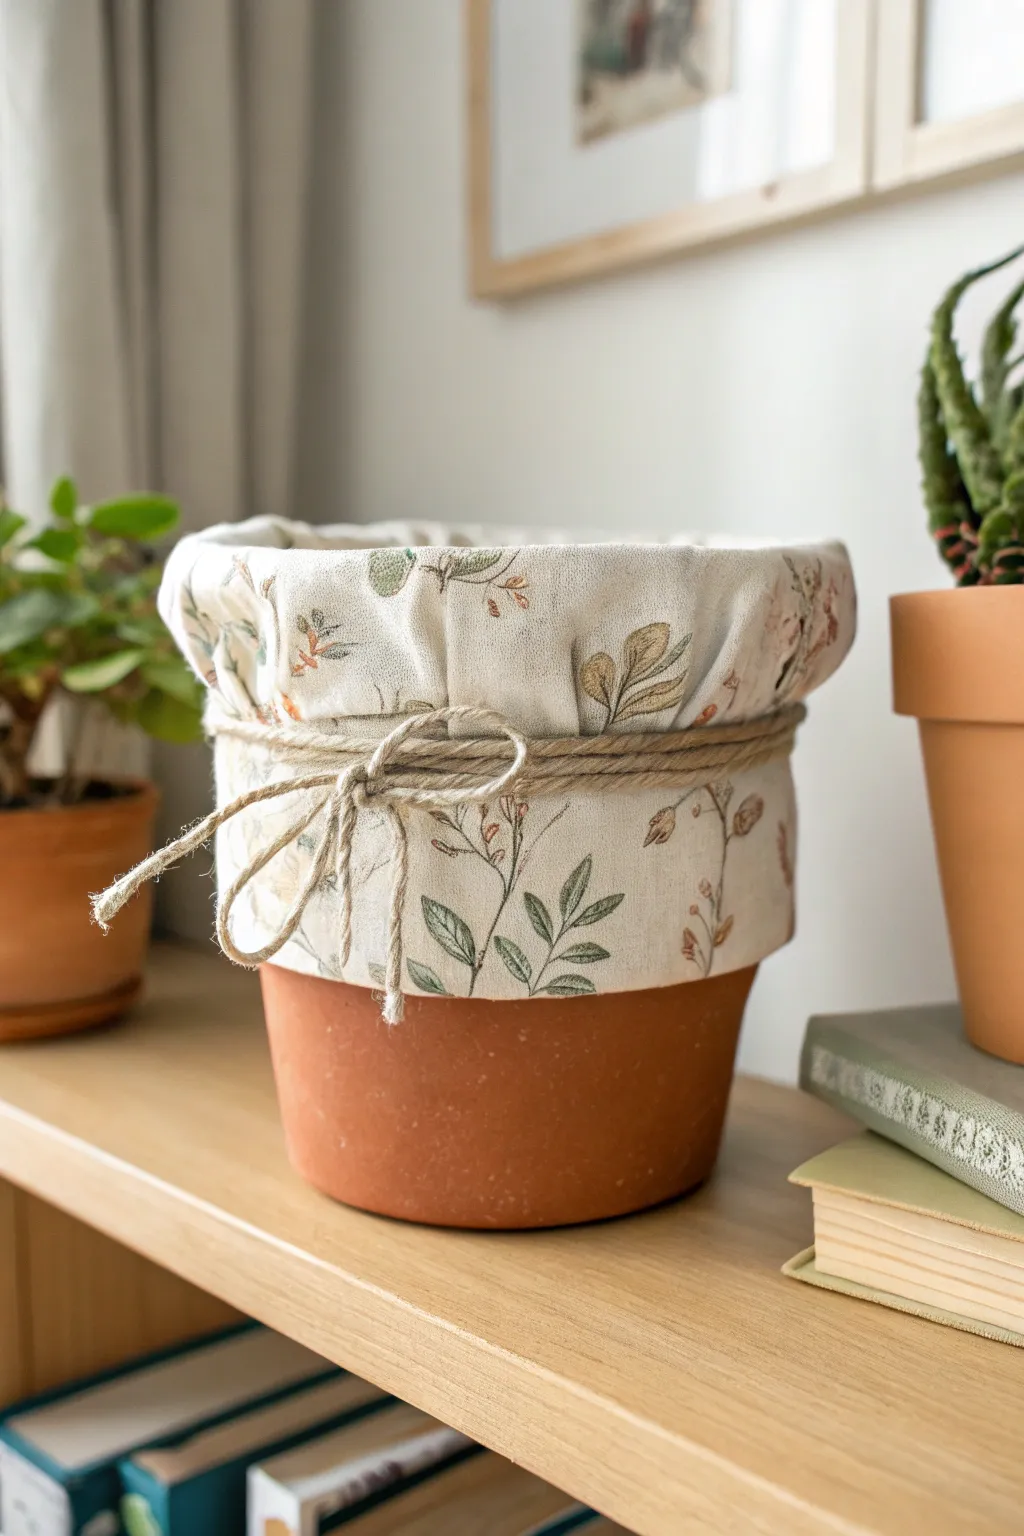
Transform a simple terracotta pot into a charming, farmhouse-style accent using remnant fabric and rustic twine. The folded cuff design adds visible layers and softness, making your plants feel extra cozy while highlighting delicate botanical prints.
Step-by-Step
Materials
- Standard terracotta pot (clean and dry)
- Cotton or linen fabric with a botanical print
- Jute twine or hemp cord
- Fabric scissors
- Measuring tape
- Hot glue gun and glue sticks
- Iron and ironing board
- Optional: Fabric stiffener spray
Step 1: Preparing the Fabric Sleeve
-
Measure pot circumference:
Wrap your measuring tape around the widest part of the pot’s rim. Add approximately 2 inches to this measurement to account for the seam allowance and some gathered slack. -
Determine the height:
Measure the height of the pot from the base to the rim. Double this measurement and add 3 inches. This extra length creates the double-sided fabric look and the distinct folded-over cuff. -
Cut the fabric rectangle:
Using your calculated circumference and height measurements, cut a large rectangle from your botanical print fabric. -
Create a tube:
Fold the fabric rectangle in half width-wise with the patterned sides facing each other (right sides together). Pin along the short edge to hold it in place. -
Sew or glue the seam:
Stitch a straight line down the pinned edge to create a tube. If you aren’t sewing, run a thin bead of hot glue along the edge and press firmly, but be careful of the bulk. -
Press the seam:
Turn the fabric tube right-side out. Use your iron to press the seam flat so the cylinder looks neat and professional.
Slipping Fabric?
If the fabric slides up while wrapping the twine, place double-sided tape or a tiny dab of hot glue under the fabric fold directly on the clay to hold it steady.
Step 2: Attaching to the Pot
-
Insert the “liner” layer:
Place the fabric tube inside the pot. Adjust it so the bottom edge of the fabric touches the inside bottom of the pot, creating a lining. -
Fold over the rim:
Take the excess fabric length sticking out of the pot and fold it down over the exterior rim. Pull it down until it covers about two-thirds of the pot’s exterior. -
Adjust the gathers:
Since the fabric is wider than the pot’s base, you will naturally have some loose areas. Evenly distribute these soft folds around the rim to create a relaxed, gathered look. -
Create the cuff fold:
Now, take the bottom edge of the exterior fabric and fold it upward about 2-3 inches to create a cuff. This mimics the look of a rolled-up sleeve or pant leg. -
Secure with glue:
Lift the fabric cuff slightly at the back of the pot (where the seam is) and apply a small dot of hot glue to anchor the fabric to the terracotta, preventing it from slipping off.
Step 3: Finishing Touches
-
Position the twine:
Cut a long length of jute twine—about four times the circumference of the pot. Wrap it around the fabric, right in the designated groove where the fabric is folded up. -
Wrap tightly:
Wind the twine around the pot 3 or 4 times. Keep the strands close together to create a solid band of texture. -
Tie the bow:
Bring the ends of the twine to the front of the pot. Tie a simple shoelace bow, adjusting the loops so they are even and drape nicely. -
Trim the ends:
Snip the tails of the twine at an angle. I usually like leaving them slightly long for a more relaxed, rustic appearance. -
Final fluffing:
Use your fingers to poof out the fabric above the twine tie, ensuring the cuff looks voluminous and not too flattened against the clay.
Waterproof It
Use a plastic nursery pot inside the terracotta one as a liner. This prevents water from seeping through the clay and staining your beautiful fabric over time.
Now you have a softly textured planter that perfectly bridges the gap between garden utility and home decor
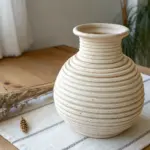
Twine and Rope Bands for Rustic Charm
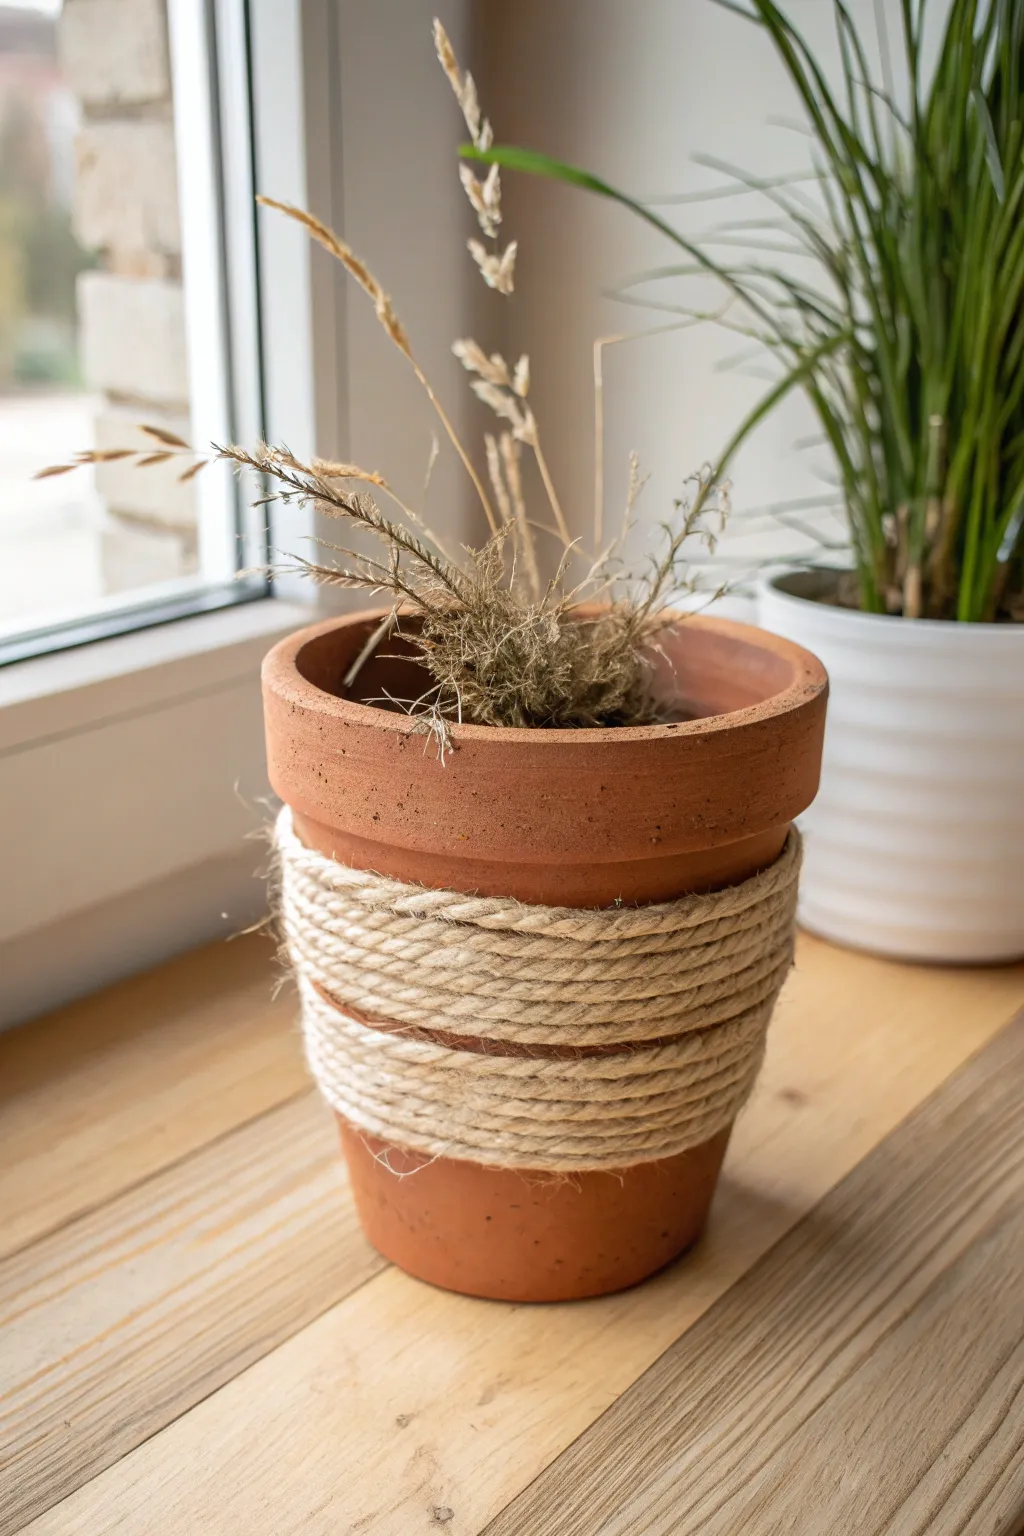
Transform a simple terracotta pot into a textured, farmhouse-style accent piece using nothing but sturdy rope and a bit of glue. This minimalist project highlights the natural warmth of the clay while adding a tactile, nautical touch.
How-To Guide
Materials
- Standard terracotta pot (approx. 6-8 inch diameter)
- Thick jute rope or twisted sisal twine (approx. 1/4 inch thickness)
- Hot glue gun with clear glue sticks
- Scissors
- Dried ornamental grass or faux stems (optional, for filling)
- Damp cloth (for cleaning)
Step 1: Preparation
-
Clean surface:
Begin by wiping down the exterior of your terracotta pot with a damp cloth to remove any dust or retail stickers. -
Dry thoroughly:
Allow the pot to dry completely before applying any glue, as moisture can prevent the adhesive from bonding properly with the porous clay. -
Plan spacing:
Visualize where your rope bands will sit. Notice in the original design that the rope covers the middle section, leaving the very top rim and the bottom base exposed for contrast.
Loose Rope Fix
If a row slips or gaps appear as the glue cools, gently push the rope back into place while resizing the gap, then inject a tiny drop of superglue for an extra strong, invisible hold.
Step 2: Wrapping the First Band
-
Anchor the start:
Apply a dab of hot glue about 1.5 inches below the bottom of the pot’s rim lip. Press the raw end of your rope firmly into the glue. -
Begin wrapping:
Wrap the rope horizontally around the pot, keeping the line straight. Add small dots of glue every few inches to keep the tension tight. -
Stacking rows:
Continue wrapping the rope around, stacking the new row directly beneath the previous one. Push the rows snugly against each other so no clay shows through between the strands. -
Create the first section:
Wrap approximately 5-6 full rotations to create the top band of texture. This should cover the upper-middle portion of the pot body. -
Cut and secure:
Cut the rope at the back of the pot (aligning with your starting point) and secure the end with a generous dab of glue.
Add Color Contrast
Before wrapping, paint the area that will be exposed in the ‘gap’ with white or slate grey acrylic paint. This creates a modern, graphic pop behind the rustic rope texture.
Step 3: Creating the Negative Space
-
Measure the gap:
Leave a gap of approximately 1/2 to 3/4 of an inch of exposed clay below your first rope band. This negative space is crucial for the specific striped look. -
Start the second band:
Apply a new anchor dot of glue below the gap, aligning it vertically with your previous start/stop points to keep the back tidy. -
Wrap the lower section:
Begin wrapping the second band just like the first, ensuring the rope stays parallel to the upper band. -
Maintain tension:
Keep pulling the rope taut as you wrap. The pot tapers slightly, so you may need to adjust the angle slightly to keep the rows flush. -
Matching thickness:
Make this second band slightly narrower than the top one—about 4-5 rotations looks best—to follow the pot’s natural taper. -
Finish the wrap:
Cut the rope and glue the end down firmly. I like to smooth the hot glue with a scrap piece of cardboard to prevent bumps.
Step 4: Finishing Touches
-
Tuck the ends:
Inspect your start and cut points. If the raw ends of the rope look frayed, dab a tiny bit of glue on them and tuck the fibers inward. -
Clean up glue:
Pull away any visible spiderweb strands of hot glue that might have drifted onto the exposed clay parts. -
Style the pot:
Fill the pot with dried grasses, wheat stems, or weeds to mimic the rustic, autumnal vibe of the original image.
Place your new textured pot on a sunny windowsill and enjoy the cozy, handcrafted atmosphere it brings to the room
Mini Mosaic Tiles for Sparkle and Dimension
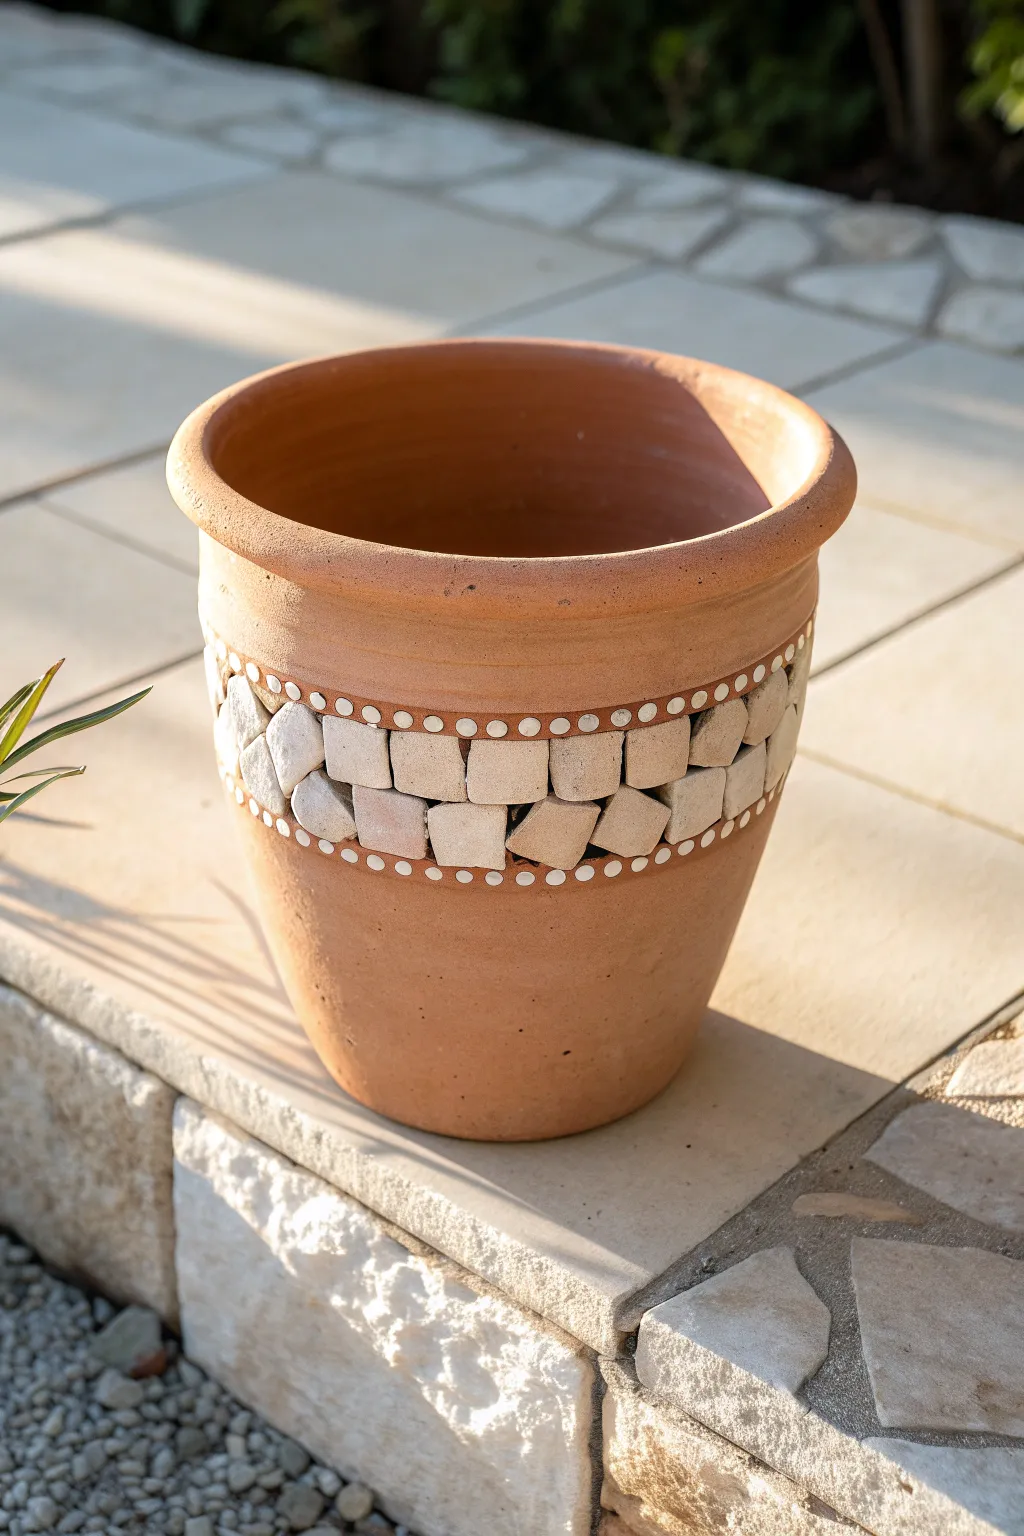
Transform a plain terracotta planter into a Mediterranean-inspired piece with this tactile stone mosaic project. By combining natural stone textures with crisp painted details, you’ll create a dimensional band that adds instant character to any patio garden.
Detailed Instructions
Materials
- Standard terracotta pot (approx. 8-10 inches)
- Small tumbled stone tiles or mosaic tesserae (cream/beige, approx. 1-inch squares)
- Strong craft adhesive (e.g., E6000 or landscape adhesive)
- White acrylic paint or paint pen
- Small round sponge dobber or q-tip
- Pencil
- Ruler or measuring tape
- Sandpaper (medium grit)
- Cloth or rag
- Clear matte sealant spray (optional)
Step 1: Preparing the Surface
-
Clean the pot:
Before starting, ensure your terracotta pot is completely clean and dry. If it’s an old pot, scrub away any dirt or algae; for a new pot, simply wipe it down with a damp cloth to remove dust. -
Sand for adhesion:
Lightly sand the area around the middle of the pot where you plan to place your stone band. This roughs up the surface slightly and helps the heavy adhesive grip the clay better. -
Mark the center:
Using a ruler, measure down from the rim to find the vertical center of your pot’s main body. Make a small mark with your pencil. -
Draw guide lines:
Rotate the pot carefully and draw two parallel horizontal lines around the entire circumference. The space between these lines should be just tall enough to fit two rows of your stone tiles comfortably—usually about 2 to 2.5 inches.
Stones Sliding Down?
If the heavy stones keep sliding while the glue dries, wrap a large rubber band or a piece of painter’s tape around the circumference to hold them tightly in place while curing.
Step 2: Creating the Stone Mosaic
-
Dry fit the stones:
Before gluing, lay out your stone tiles on a flat surface to test the spacing. Look for pieces that fit nicely together, alternating slightly different shapes if your stones are tumbled or natural. -
Apply adhesive to the first stone:
Apply a generous dab of strong craft adhesive to the back of your first stone tile. I find that a thick gel adhesive works best here so the heavy stones don’t slide down immediately. -
Place the top row:
Press the stone firmly against the pot, aligning its top edge just below the upper pencil guide line you drew earlier. Hold it for a few seconds until it grabs. -
Continue the top row:
Continue gluing stones around the entire circumference for the top row. Leave a very small gap (about 1/8 inch) between each stone to accommodate the curve of the pot. -
Begin the bottom row:
Once the top row is secure, start the second row directly beneath it. Ideally, you want to stagger the joints, placing the center of the bottom stone directly below the gap between two top stones, like bricks in a wall. -
Adjust and align:
As you work around the bottom row, gently nudge any stones that look crooked. The beauty of this design lies in its organic, rustic feel, so perfect geometric precision isn’t necessary. -
Let the adhesive cure:
This is a crucial patience step. Let the pot sit undisturbed for several hours (or overnight) to ensure the heavy stones are permanently bonded before you add the painted details.
Step 3: Adding Painted Details
-
Prepare the paint:
Shake your white acrylic paint bottle or prime your white paint pen. Pour a small amount of paint onto a palette or paper plate if using a dobber. -
Create the top border:
Using a small round sponge dobber, the back of a paintbrush handle, or a Q-tip, dip into the white paint and gently press a dot just above the top row of stones. -
Continue the dotted line:
Continue creating these dots all the way around the rim, keeping them evenly spaced. Try to align each dot roughly with the vertical center of the stone below it. -
Paint the bottom border:
Repeat the process underneath the bottom row of stones. Create a matching line of white dots that mirrors the top border. -
Clean up edges:
If any paint dripped or a dot became smeared, use a damp Q-tip to quickly wipe away the mistake before it dries. -
Seal the project:
Once the paint is fully dry, take the pot to a well-ventilated area and spray a light coat of clear matte sealant over the painted areas and stones. This protects the artwork from rain and sun damage.
Pro Tip: Texture Variety
For a truly rustic look, don’t worry about finding perfectly square tiles. Tumbled marble or uneven limestone pieces add fantastic shadows and dimension that flat ceramic tiles can’t match.
Now your charming new planter is ready to be filled with soil and your favorite greenery
Raised Texture With Simple Clay Appliqués
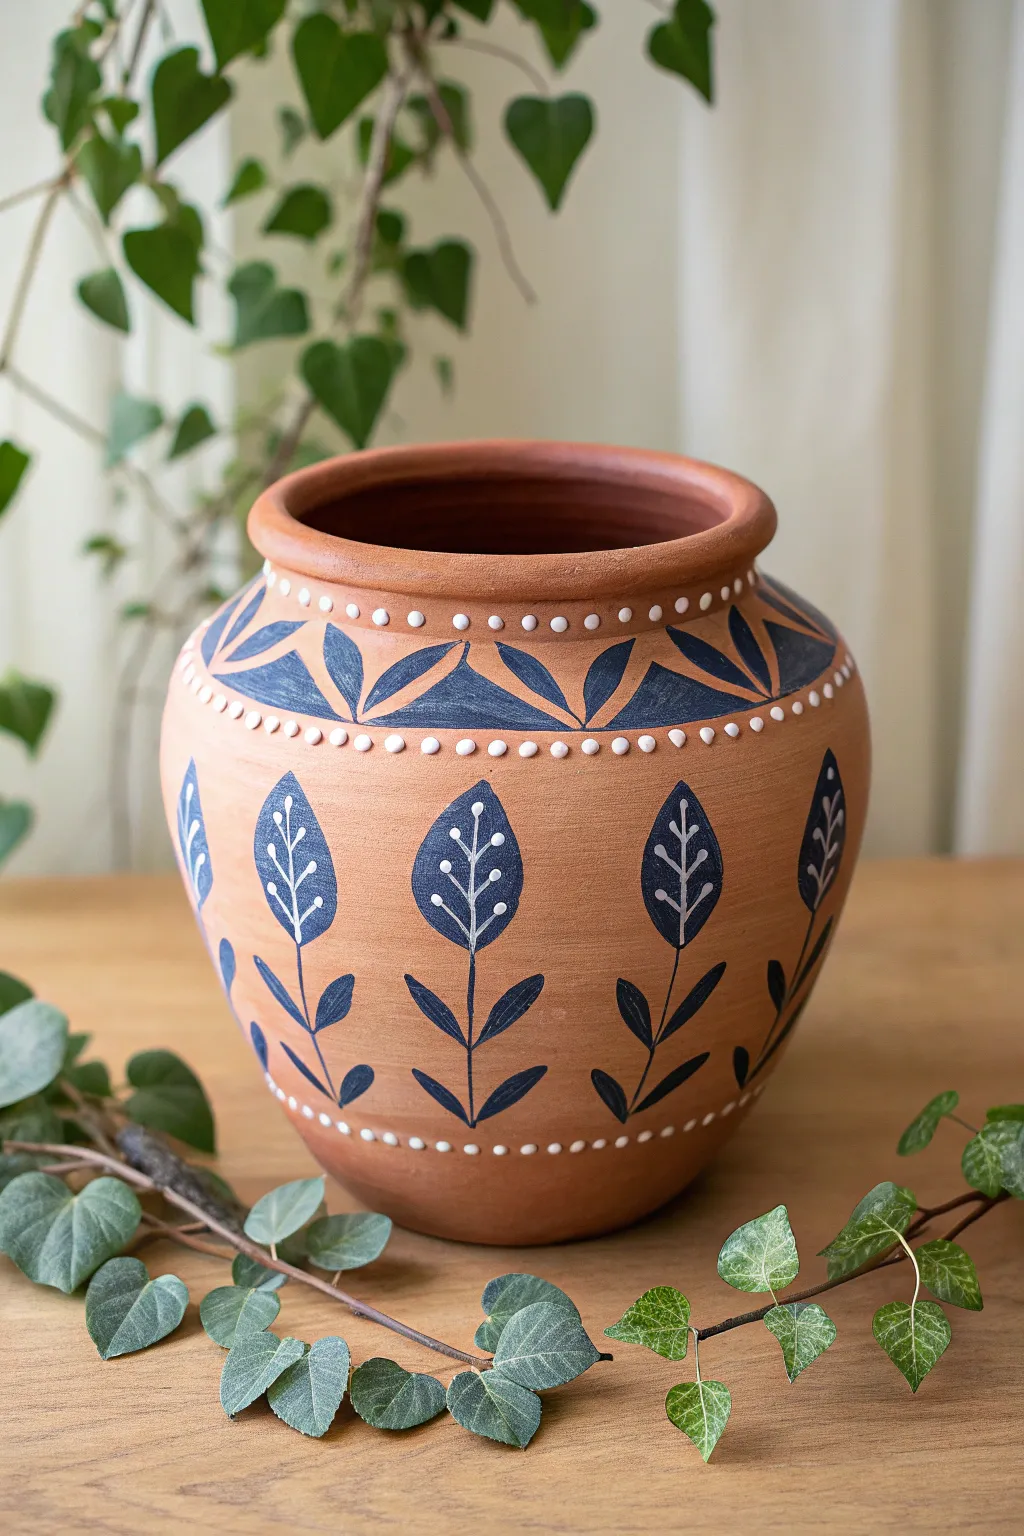
Transform a plain terracotta pot into a striking piece of home decor with this folk-inspired design. Featuring deep navy botanical motifs and charming raised white dots, this project combines simple painting techniques with tactile 3D elements.
Step-by-Step Guide
Materials
- Medium-sized terracotta pot (cleaned and dried)
- Dark navy blue acrylic paint
- Puffy paint or 3D fabric paint (white)
- Small flat paintbrush
- Fine liner paintbrush
- Pencil
- Eraser
- Matte spray sealer (optional)
Step 1: Preparation and Mapping
-
Clean surface:
Ensure your terracotta pot is free from dust and completely dry before starting; wipe it down with a damp cloth if needed and let it air dry. -
Mark the bands:
Using a pencil, lightly sketch a horizontal line around the neck of the pot where the shoulder begins to curve. -
Create the lower border:
Sketch a second horizontal line around the lower belly of the pot to define the bottom boundary of your main design area.
Dot Perfection
Hold the puffy paint bottle vertically and lift straight up after squeezing to avoid dragging the peak of the dot.
Step 2: Painting the Neck Pattern
-
Sketch neck leaves:
In the band around the neck, lightly pencil in a zig-zag or chevron pattern. Instead of straight lines, curve the sides slightly to resemble leaves meeting at points. -
Fill the leaves:
Using your small flat brush and navy blue acrylic paint, carefully fill in these leaf shapes. I like to use the edge of the brush to get crisp points. -
Add detail:
Once dry, you can paint a thin straight line connecting the valleys of the leaves if you want a more solid band, or leave them as floating leaf shapes as shown.
Step 3: Painting the Main Botanical Motifs
-
Space the stems:
Lightly mark vertical lines around the main body of the pot where each flower stem will go, ensuring equal spacing between them. -
Draw leaf shapes:
At the top of each stem line, sketch a large, pointed oval leaf shape for the flower head. Below that, sketch two smaller leaves branching out from the base of the stem. -
Paint the stems:
With the fine liner brush and navy paint, trace over your vertical stem lines and the small branches at the bottom. -
Fill the main leaves:
Switch to a slightly larger brush if needed to fill in the large flower head ovals and the lower leaves with solid navy blue paint. -
Add inner details:
Allow the navy paint to dry completely. Then, using white paint and a very fine brush (or a white paint pen), draw a central vein and small side veins inside each large navy flower head. -
Final leaf touches:
Add small white dots at the tips of the inner veins inside the blue leaves for extra detail.
Color Swap
Try a matte black background with metallic gold paint for the leaves and dots for a luxurious modern look.
Step 4: Adding the Raised Texture
-
Test the flow:
Squeeze a small amount of white puffy paint onto a scrap piece of paper to ensure the nozzle is clear and the flow is smooth. -
Dot the top border:
Apply a row of small, evenly spaced dots along the top rim edge of the pot using the puffy paint. -
Frame the neck band:
Create two rows of dots bordering the navy neck pattern—one row just above the blue leaves and one row just below them. -
Dot the bottom border:
Finish the design by applying a final row of dots along the pencil line you drew near the bottom of the pot. -
Dry completely:
Let the pot sit undisturbed for at least 4-6 hours (or overnight) to allow the puffy paint to harden fully. -
Seal (optional):
If this pot will be used outdoors, spray a light coat of matte clear sealer over the entire exterior to protect your work.
Now you have a beautifully custom vessel ready to showcase your favorite indoor plant.
Animal Face Planters That Feel Like Little Pets
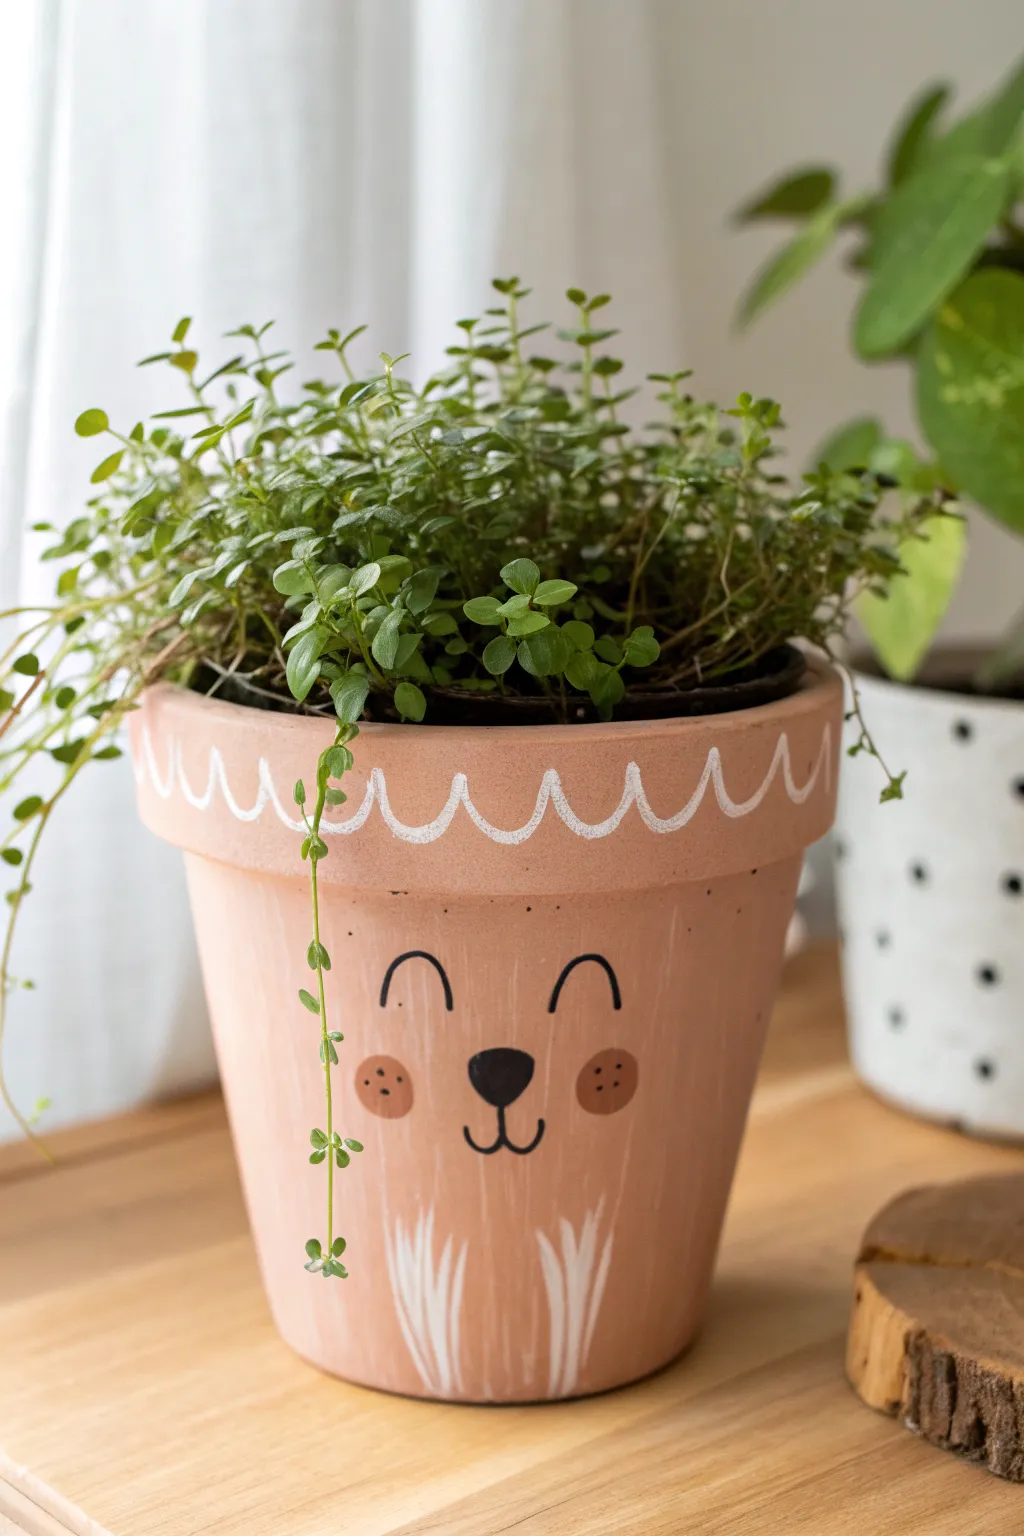
Transform a standard terracotta planter into an adorable animal companion with a soft peach base and simple painted details. This project turns a simple vessel into a sweet, sleeping character that adds warmth and whimsy to any shelf.
Step-by-Step Tutorial
Materials
- Terracotta pot (cleaned and dried)
- Acrylic paint (peach/light pink, white, black, brown)
- Flat paintbrush (medium size)
- Small round paintbrush (size 1-2)
- Fine detail brush or black paint marker
- Palette or small dish for mixing
- Water cup and paper towels
- Clear matte sealant spray (optional)
Step 1: Base Coat
-
Prepare the surface:
Before dipping your brush, ensure your terracotta pot is completely clean and dry. Wipe away any dust with a damp cloth and let it air dry so the paint adheres properly. -
Mix your base color:
Create a soft peach hue by mixing white acrylic paint with a very small amount of orange and a tiny touch of brown to tone it down. Aim for a warm, pastel shade rather than a bright fruit color. -
Apply the first coat:
Using the flat paintbrush, apply the peach paint over the entire exterior of the pot, including the rim. Don’t worry if it looks streaky; the first layer acts as a primer. -
Let it dry completely:
Wait about 15-20 minutes for the first layer to dry. Terracotta absorbs moisture quickly, so this shouldn’t take long. -
Apply the second coat:
Paint a second layer of your peach mixture to achieve full, opaque coverage. Brush vertically from the rim to the base for a smooth finish and let dry.
Paint Slipping?
If the paint soaks in too fast or looks patchy, the terracotta is too porous. Apply a coat of Mod Podge or watered-down white glue as a primer first to seal the clay before painting.
Step 2: Face Details
-
Outline the features:
Visualize where the face will sit in the center of the pot. You can lightly pencil in the eyes and nose first if you’re nervous about freehanding. -
Paint the eyes:
Using your fine detail brush and black paint (or a black paint marker for easier control), draw two small inverted ‘U’ shapes for the sleeping eyes. Make them slightly curved for a happy expression. -
Add the nose:
In the center below the eyes, paint a small, rounded triangular nose in black. It should resemble an inverted guitar pick shape. -
Draw the mouth:
Connect a simple anchor shape to the bottom of the nose. Draw a small vertical line down, splitting into two curves to the left and right to form the smile. -
Create rosy cheeks:
Mix a slightly darker, more brownish-pink shade than your base. Dip the round brush or a fingertip into the paint and dab two circles on either side of the smile. -
Add freckles:
Once the cheek circles are dry, use the tip of your smallest brush to add three tiny black dots inside each cheek patch for texture.
Level Up: 3D Ears
Before painting, sculpt two small triangles from air-dry clay and glue them to the inner rim. Paint them to match the pot for realistic protruding ears.
Step 3: White Accents
-
Paint the rim detail:
Load a small round brush with pure white paint. Along the rim of the pot, paint a continuous scalloped or wavy line that loops up and down all the way around. -
Add chest fur:
At the very bottom center of the pot, paint rough, upward strokes in white to mimic fur tufts. I usually make the center strokes slightly longer than the side ones. -
Refine the fur:
Add a second layer of white to the fur strokes if the peach color is showing through too much. Keep the edges feather-like and loose. -
Final touches:
Check your black lines. If any look faded, trace over them one last time for a crisp, illustrative look. -
Seal the work:
Once fully dry (give it at least an hour), spray the pot with a clear matte sealant. This protects your artwork from water drips when you eventually water your plant.
Pop in a trailing plant like thyme or creeping jenny to give your new friend a wild, green hairstyle
Whimsical Mushroom and Mini House Pots for Fairy-Garden Magic
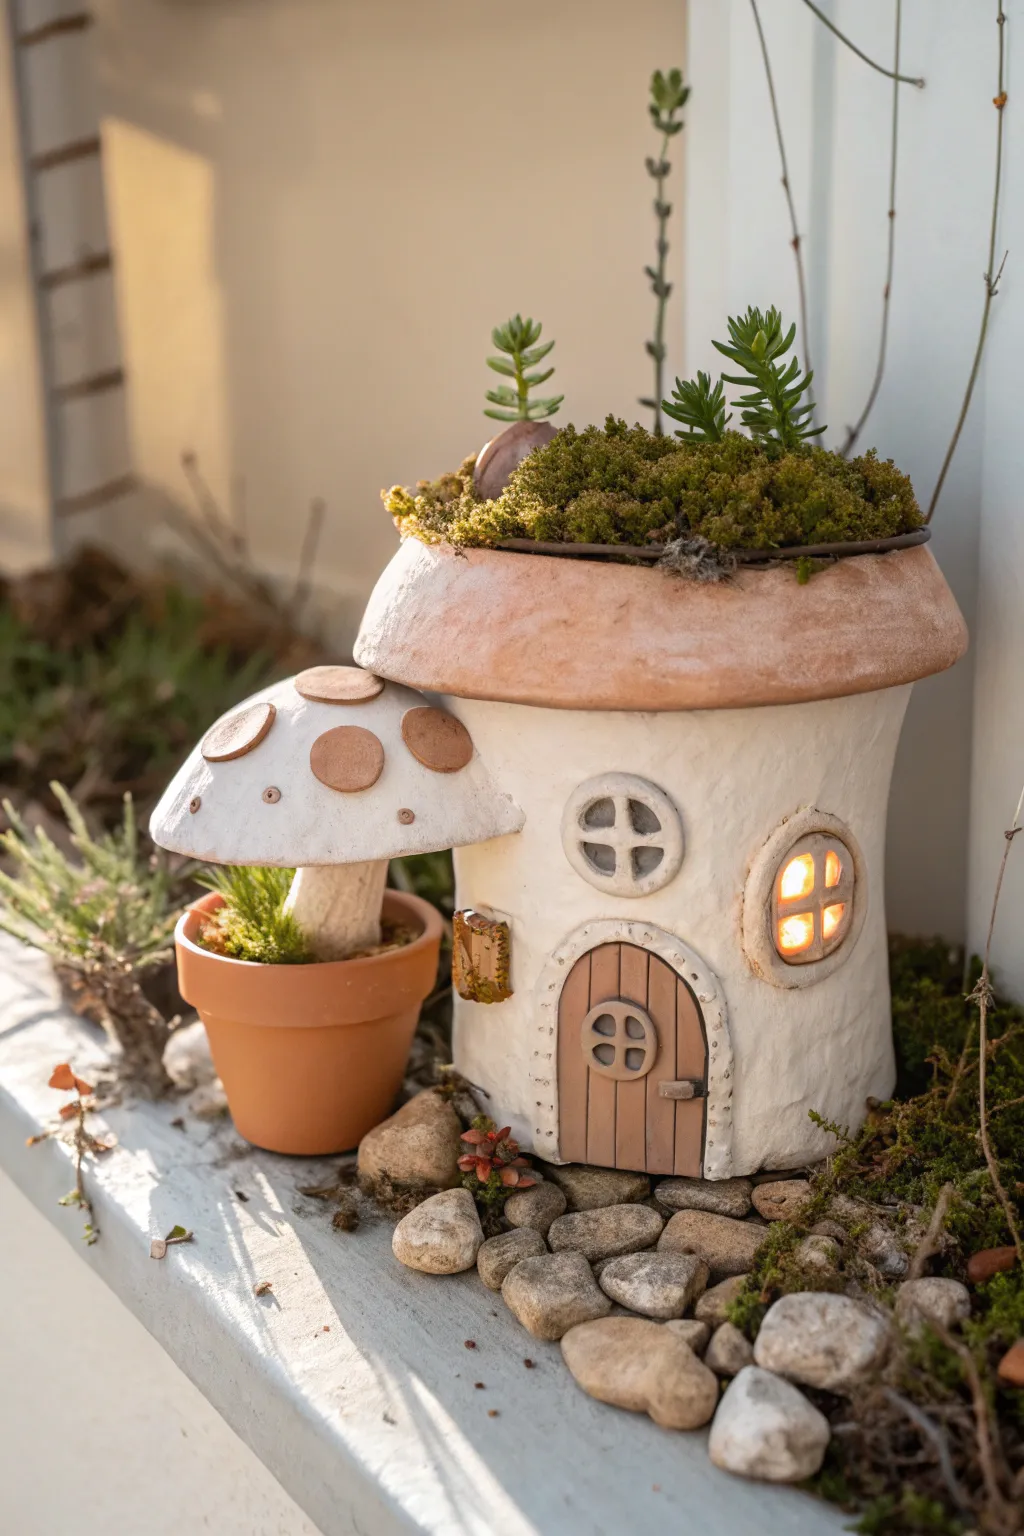
Transform ordinary terracotta into an enchanted dwelling with this delightful mushroom house project. Featuring a cozy lighted cottage base and a companion mushroom sprouting from a mini pot, this set brings instant fairy-tale charm to any windowsill.
How-To Guide
Materials
- One medium terracotta pot (standard shape)
- One large terracotta saucer (slightly wider than the pot’s rim)
- One miniature terracotta pot (2-3 inches)
- Air-dry clay or polymer clay (white/neutral)
- Acrylic paints (white, terracotta/burnt orange, brown, grey)
- Paintbrushes (flat wash brush, fine detail brush)
- Strong craft glue (E6000) or hot glue gun
- Sculpting tools or a toothpick
- Small battery-operated tea light
- Moss (sheet moss and loose bits)
- Small succulents (real or faux)
- Small pebbles and rocks for landscaping
Step 1: Constructing the Cottage Base
-
Prepare the main structure:
Turn the medium terracotta pot upside down. This will serve as the walls of your cottage. Wipe it clean to ensure the clay adheres properly. -
Texture the walls:
Apply a thin, uneven layer of air-dry clay all over the outside of the overturned pot. Use your fingers or a sponge to dab the wet clay, creating a stucco-like, rustic plaster texture. -
Carve the openings:
While the clay is still pliable, press a small circle cutter or bottle cap into the clay to mark the round window frames. You don’t need to cut through the pot; we will paint the ‘glass’ or leave it open if your pot has a drainage hole there (though painting is easier). -
Sculpt the door and windows:
Roll thin snakes of clay to form the window grilles (cross shapes) and the rounded door frame. Press a flat oval of clay onto the base for the door itself, scratching vertical lines into it to mimic wooden planks. -
Add charming details:
Fashion a tiny rectangle for a porch light or mailbox near the door. Roll tiny balls of clay to create rivets or stones around the door frame for extra character.
Clay Adhesion Trick
Score the surface of the terracotta pot with coarse sandpaper before applying air-dry clay. This rough texture gives the clay ‘teeth’ to grip onto.
Step 2: Creating the Mushroom Roof
-
Prepare the saucer:
Take the large terracotta saucer and turn it upside down. This creates the cap of the mushroom house. -
Add the mushroom texture:
Smear a layer of clay over the top curve of the saucer. Smooth it out but leave the edges slightly organic and undulating so it doesn’t look manufactured. -
Form the side mushroom:
To make the companion mushroom shown on the left, sculpt a separate cap shape from a solid ball of clay (flattened on the bottom) and a thick stalk. Texture the stalk with vertical striations. -
Dry everything thoroughly:
Allow all clay components to dry completely. I find this usually takes about 24 hours, depending on humidity and clay thickness.
Magical Glow Up
Paint the inside of the window panes with yellow or orange paint, then glaze with a high-gloss varnish. It mimics light even when the battery candle is off.
Step 3: Painting & Assembly
-
Base coat the walls:
Paint the textured ‘plaster’ walls of the main pot in a creamy off-white or very light beige. Let some of the darker clay or pot color peek through if you want an aged look. -
Paint the woodwork:
Use a warm brown acrylic for the door and window frames. Mix a slightly darker brown to paint inside the wood grain grooves on the door for depth. -
Color the mushroom caps:
Sponge a soft terracotta or dusty orange paint onto the saucer roof and the smaller side mushroom cap. Keep the color slightly mottled for realism. -
Detail the spots:
Paint large, circular spots on the smaller mushroom cap in a lighter beige or white. For the main roof, you can dust it with a little brown paint to look like dirt or moss stains. -
Attach the roof:
Once dry, glue the saucer (right side up, so it acts like a bowl) onto the bottom of the overturned main pot. However, the image shows the saucer acts as a planter, so ensure the saucer is sitting securely on the flat bottom of the inverted pot.
Step 4: Landscaping the Scene
-
Plant the roof:
Fill the saucer ‘roof’ with soil and plant a dense layer of moss and a few tall succulents to act as chimneys or rooftop vegetation. -
Assemble the side planter:
Place the small clay mushroom into the miniature terracotta pot. Tuck fresh moss around the base of the stalk to hold it in place. -
Create the pathway:
Arrange the finished house and the mini pot on your display surface. Lay down a path of smooth river stones leading to the front door. -
Light it up:
If you left a window opening or have space underneath, tuck a small battery-operated tea light inside the main pot to make the windows glow warmly.
Now you have a cozy little habitat ready to welcome garden sprites to your home