If you’ve got a stack of terracotta pots sitting around, you’re basically holding a whole garden art supply closet. I love how a few flips, stacks, and paint tricks can turn plain clay pots into playful, sculptural garden features that feel totally you.
Hand-Painted Terracotta Statement Pots
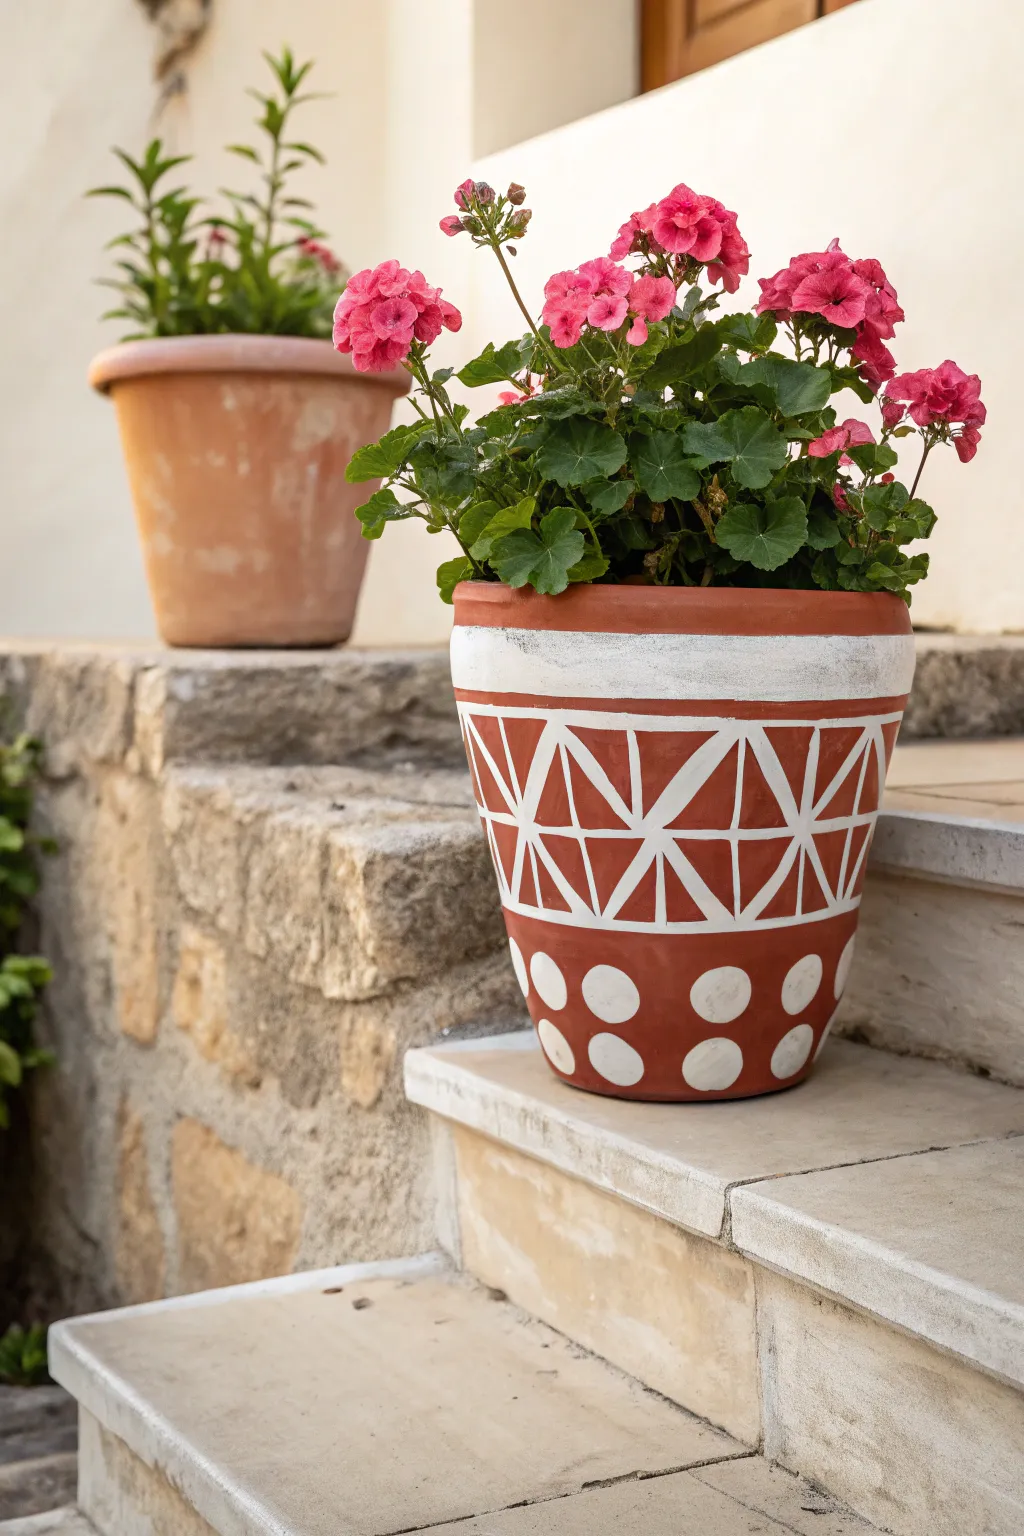
Transform a standard terracotta planter into a striking patio feature with this dynamic, hand-painted design. Combining crisp white geometric linework with bold polka dots against the natural clay backdrop creates a playful yet sophisticated piece perfect for vibrant geraniums.
Detailed Instructions
Materials
- Standard terracotta pot (approx. 10-12 inch diameter)
- White outdoor-grade acrylic paint
- Painter’s tape or masking tape
- Wide flat paintbrush (1-inch width)
- Small flat brush (1/4-inch width)
- Round detail brush (size 2 or 3)
- Pencil and eraser
- Ruler or soft tape measure
- Round foam pouncer (medium size) or round stencil
- Clear acrylic outdoor sealer (matte or satin finish)
- Paper plate or palette
- Water cup and paper towels
Step 1: Preparation and Base Lines
-
Clean surface:
Begin by thoroughly wiping down your terracotta pot with a damp cloth to remove any dust or manufacturing residue. Let it dry completely before starting, as moisture will prevent paint adhesion. -
Seal (Optional):
If you plan to plant directly inside the pot, I usually coat the inside with a sealer first to prevent moisture from seeping through and bubbling your exterior paint later. -
Paint top rim:
Using your wide flat brush, paint a solid white band around the uppermost rim of the pot. Don’t worry about being perfectly straight at the bottom edge of this stripe yet, as we will refine it. -
Mark horizontal guides:
Measure about 1.5 inches down from the rim and lightly mark a ring around the pot with your pencil. Measure another 3-4 inches down from that line and mark a second ring. These will define the central geometric band. -
Paint horizontal borders:
Using the small flat brush, paint a thick white line over your top pencil mark and your bottom pencil mark. These two lines create the ‘frame’ for the triangle pattern.
Pro Tip: Steady Hands
Place the pot on a lazy Susan or turntable while painting. Spinning the pot instead of moving your body helps keep horizontal lines straighter and reduces hand fatigue.
Step 2: Painting the Geometric Center
-
Create triangle grid:
Inside the two horizontal bands you just painted, use your pencil and ruler to mark a zigzag pattern that touches the top and bottom lines. Try to keep the spacing consistent. -
Draw vertical dividers:
From the points of your zigzags (both top and bottom peaks), draw straight vertical lines connecting to the opposite border. This turns your zigzag into a set of subdivided triangles and geometric shapes. -
Paint the main zigzags:
With your round detail brush loaded with white paint, carefully trace over your main zigzag pencil lines. Keep your hand steady and use your pinky finger against the pot for balance. -
Paint vertical details:
Go back and paint the vertical divider lines you drew. The result should look like a series of triangles that have been split down the middle or grouped into diamonds. -
Thicken lines:
Once the initial guide lines are dry, go over them a second time to thicken the lines uniformly. This makes the white pop against the terracotta background. -
Clean up edges:
If any lines look shaky, use a damp Q-tip to gently wipe away mistakes while the paint is wet, or touch up with a tiny bit of watered-down terracotta-colored paint if necessary.
Troubleshooting: Bleeding Tape
If you used tape and paint seeped under, wait for it to dry fully. Then, gently scrape the excess paint away with a craft knife or paint over it with a custom mix of orange and brown.
Step 3: Adding the Polka Dot Base
-
Position the dots:
For the bottom section of the pot, visualize where your dots will go. You want a single row of large, evenly spaced circles wrapping around the base. -
Apply dots:
Dip your round foam pouncer into white paint, offloading a little excess on your palette first. Press firmly onto the pot to create the circles. Alternatively, trace a bottle cap lightly and fill it in with a brush. -
Refine opacity:
Terracotta is porous and likes to absorb the first layer of paint. You will likely need to paint a second coat over your dots once the first is dry to get that bright, solid white coverage.
Step 4: Finishing Touches
-
Final inspection:
Look over the entire pot. Check the top rim stripe and touch up the bottom edge to make it crisp. Ensure all pencil marks are erased or covered. -
Apply Sealer:
Once all paint is fully cured (give it a few hours), apply a coat of outdoor clear acrylic sealer over the painted areas. This protects your hard work from sun fading and watering mishaps.
Fill your new masterpiece with bright pink flowers for a stunning contrast that livens up any doorstep

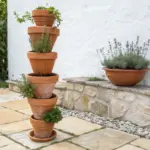

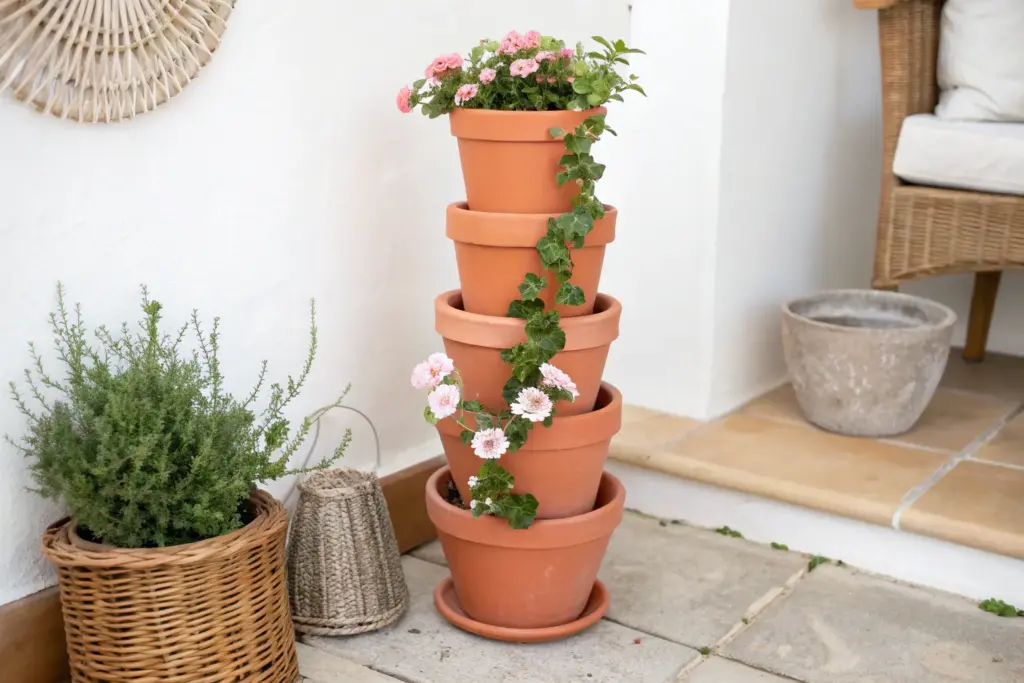
Topsy-Turvy Stacked Pot Planter
Elevate your indoor greenery with this charming, vertical garden display featuring stacked terracotta pots. This space-saving design creates a cascading tower of lush foliage that adds instant height and visual interest to any sunny corner.
Step-by-Step
Materials
- 3 Terracotta pots (graduated sizes, e.g., 8-inch, 6-inch, and 4-inch)
- 1 Terracotta saucer (sized for the largest pot)
- Potting soil mix suitable for indoor plants
- English Ivy or similar trailing vines
- Small decorative gravel or drainage rocks
- Wooden bead garland
- Fabric pink peonies or roses (optional prop)
- Metal rebar or wooden dowel (optional for stability)
Step 1: Base Preparation
-
Select the base:
Start with your largest terracotta pot and its matching saucer. Ensure the saucer is clean and place it exactly where you intend the planter to live, as moving the fully stacked tower later can be tricky. -
Add drainage:
Pour a thin layer of drainage rocks or small gravel into the bottom of the largest pot. This prevents the soil from compacting too much at the drainage hole. -
Fill the first layer:
Fill the large pot with potting soil, stopping about 2 inches from the rim. Pat the soil down gently but don’t pack it too thighly, as you need to nest the next pot inside.
Step 2: Stacking the Tower
-
Nest the second pot:
Take the medium-sized pot and press it firmly into the center of the soil in the large base pot. Wiggle it slightly until it feels stable and seated. -
Secure the layer:
Pack a bit more soil around the base of the medium pot where it meets the soil of the large pot to lock it in place. -
Fill the second tier:
Fill this medium pot with soil, again leaving a couple of inches of space at the top. -
Place the top tier:
Press the smallest pot into the center of the medium pot’s soil. Ensure the stack looks vertically aligned; you can tilt them slightly for a ‘topsy-turvy’ look, but straight stacking is more stable for indoor surfaces. -
Fill the top:
Fill the top small pot with soil, leaving just enough room for your final plant’s root ball. -
Optional stability rod:
For extra security, especially if you have pets, I like to run a thin dowel or rebar rod through the drainage holes of all three pots before adding soil, anchoring it in the bottom pot.
Watering Wisdom
Water from the top down slowly. The excess water will trickle down to lower tiers, ensuring deep hydration without waterlogging the roots.
Step 3: Planting and Styling
-
Prepare the plants:
Gently remove your ivy and trailing plants from their nursery containers. Loosen the root balls slightly with your fingers. -
Plant the top:
Plant a generous cluster of ivy in the very top pot. This will be the ‘fountain’ head where the longest vines will drape down. -
Plant the pockets:
In the small rings of exposed soil in the bottom and middle tiers, tuck in smaller plugs of trailing plants. You might need a spoon to help dig these narrow spaces. -
Direct the vines:
Gently arrange the long tendrils of the top plant so they cascade down the sides, intermingling with the plants in the lower tiers. -
Clean up:
Brush off any loose soil from the terracotta rims using a soft, dry paintbrush to keep that clean, classic clay look. -
Add the garland:
Drape a simple wooden bead garland around the base of the saucer. The natural wood tones complement the terracotta beautifuly. -
Final flourish:
Place two large fabric flower heads near the base of the arrangement to soften the earthy color palette and add a pop of pastoral charm.
Herb Garden Twist
Swap the ivy for kitchen herbs! Plant rosemary on top, thyme in the middle, and creeping oregano on the bottom for a functional kitchen sculpture.
Step back and admire how this simple vertical structure transforms basic pots into a living sculpture for your home


Broken Pot Fairy Garden Terraces
Transform accidental breakage or carefully cracked terra cotta into this enchanting multi-tiered fairy garden tower. With its winding stone staircases, tiny wooden door, and pockets of lush greenery, this project turns a basic planter into a magical hillside dwelling.
Step-by-Step Guide
Materials
- 1 large terra cotta pot (approx. 10-12 inches)
- 1 terra cotta saucer (slightly larger than the big pot’s base)
- 1 medium terra cotta pot (approx. 6-8 inches)
- Small terra cotta pot sherds/broken pieces
- 1 very small terra cotta pot (2-3 inches)
- 2 tiny separate terra cotta pots for side decoration
- Potting soil (succulent mix recommended)
- Small pebbles or white aquarium gravel
- Flat stones or slate pieces for steps
- Miniature wooden door accessory
- Small succulents (e.g., Echeveria, Sedum)
- Sheet moss or preserved moss
- Hammer and towel (for breaking pots)
- Gardening trowel
- Spray bottle with water
Step 1: Preparation & Structure
-
Prepare the Break:
If your large pot isn’t already broken, wrap it in an old towel and tap the front gently with a hammer. You want to remove a curved section from the front rim extending about halfway down the pot. -
Shape the Sherds:
Save the removed piece! Break this large sherd further into smaller, usable curved fragments which will act as retaining walls for the upper levels. -
Set the Base Layer:
Place the large, shallow terra cotta saucer on your workspace. Fill it with a foundational layer of soil, packing it down slightly so it’s stable. -
Position the Main Pot:
Nestle the large broken pot into the saucer, tilting it slightly backward if needed for balance. Fill the bottom of this main pot with soil until it reaches the level of the break.
Clean Breaks
Score the pot with a file or craft knife before hammering. This guides the crack for a cleaner, more deliberate break rather than a shatter.
Step 2: Building the Tiers
-
Create the Second Level:
Take your medium-sized broken pot (or a large curved sherd) and insert it into the soil inside the main pot. Position it off-center to leave room for the staircase. -
Top Turret Installation:
Place the very small, unbroken terra cotta pot at the absolute summit, nesting it into the soil behind the second level wall. This crowns your tower. -
Secure the Soil:
Pack soil firmly behind each inserted shard and pot. Stability is key here, so I like to dampen the soil slightly with a spray bottle to help it hold its shape as I build upward. -
Install the Door:
Tuck the miniature wooden door against the side of the main pot’s interior wall, near the base of the broken section. Ensure it sits flat against the soil surface.
Step 3: Staircase & Hardscaping
-
Lower Stairs Construction:
Using small flat stones or slate chips, build a staircase starting from the saucer base up to the first soil level. Stack them carefully, using a bit of wet soil as ‘mortar’ between steps. -
Upper Stairs Construction:
Continue the staircase from the wooden door level up to the top tier. Keep the steps small and tight to maintain the scale of the miniature world. -
Gravel Pathways:
Spread white aquarium gravel or small pebbles on the flat exposed soil areas, creating a path leading to the door and around the base. This adds brightness and contrast.
Soil Sliding?
If dirt keeps sliding out the front, mix a little clay into your soil or use larger curved pot shards as retaining walls hidden beneath the visible moss.
Step 4: Planting & Detailing
-
Plant the Summit:
Plant a small, spiky succulent directly into the top crowning pot. This gives height and a finished look to the peak. -
Add Greenery Pockets:
Tuck small succulents into the soil pockets on the middle tier and around the base in the saucer. Varied textures—like rosettes mixed with trailing sedum—look best. -
Moss Application:
Press pieces of sheet moss into any exposed soil between plants and stones. This hides the dirt and instantly makes the garden look established and lush. -
Side Pot Accents:
Take the two tiny separate pots, fill them with soil and a single rosette succulent each. Place them on the saucer or nearby surface to expand the scene. -
Final Cleanup:
Use a soft brush to sweep any stray soil off the rim of the pots, the wooden door, and the stone steps. Give the whole arrangement a gentle misting.
Place your new miniature world in a sunny spot and watch your tiny landscape thrive


Clay Pot Lighthouse Garden Sculpture
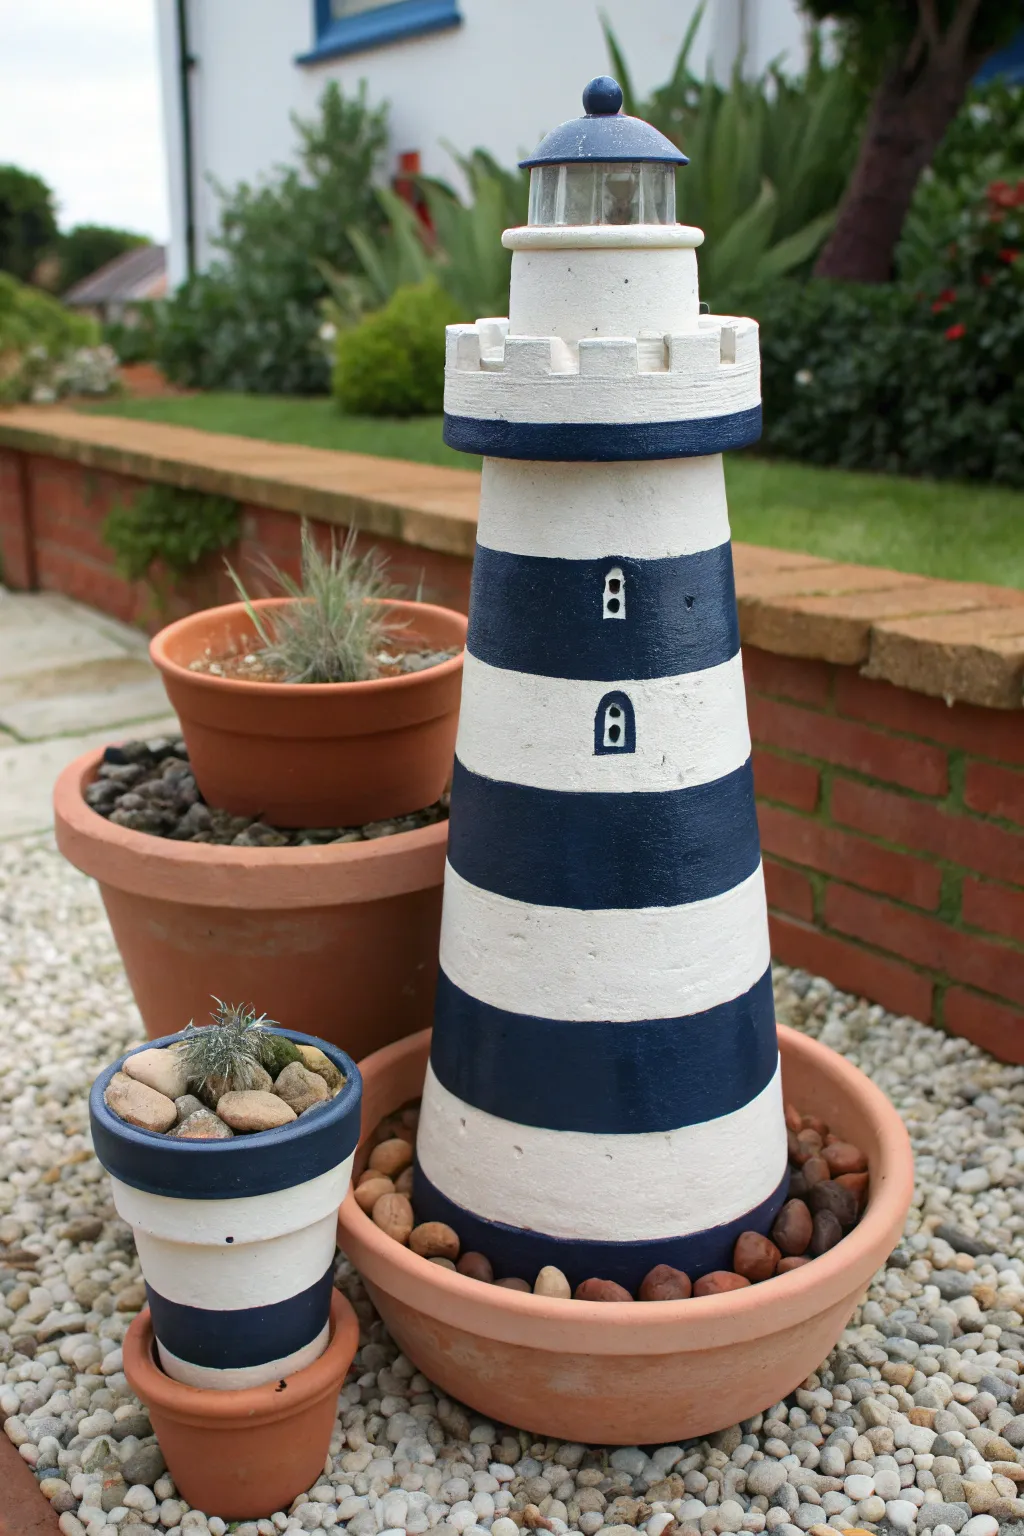
Bring the seaside to your backyard with this charming lighthouse sculpture crafted from ordinary terracotta pots. Painted in classic navy and white stripes and topped with a solar light lantern, it serves as both a whimsical garden feature and a beacon of creativity.
Step-by-Step
Materials
- 4 terracotta pots of graduated sizes (e.g., 8″, 6″, 4″, 2″)
- 2 terracotta saucers (one large enough for the base, one small for the top)
- Outdoor acrylic craft paint (Navy Blue, White, Black)
- Strong outdoor adhesive (e.g., E6000 or construction adhesive)
- Solar path light (stake removed)
- Bland/flat foam brushes
- Small detail paintbrush
- Painter’s tape or masking tape (optional)
- River rocks or decorative pebbles
- Clear outdoor sealant spray (matte or satin finish)
Step 1: Base Painting
-
Clean the pots:
Before starting, ensure all your terracotta pots and saucers are completely clean and dry to help the paint adhere properly. Remove any price stickers and wipe away dust. -
Prime with white:
Paint the exterior of all four pots and the smaller saucer with a base coat of white outdoor acrylic paint. You don’t need to paint the inside, but bring the color just over the rim. -
Apply second coat:
Terracotta is porous and soaks up paint, so I usually apply a second or even third coat of white until the finish is opaque and solid. Let this dry completely between layers. -
Mark the rims:
Identify the rims of your pots. The rims will naturally form the navy blue stripes of the lighthouse structure when stacked upside down. Painting these structural rings is the easiest way to get clean lines. -
Paint the blue bands:
Using a flat brush, carefully paint the thick rim of each pot in Navy Blue. If you don’t have a steady hand, you can use painter’s tape to mark off the edge below the rim. -
Add detail stripes:
For the largest pot at the bottom, paint an additional wide navy stripe around the middle of the body to break up the white space. -
Paint the balcony:
Take the small saucer that will serve as the lantern platform. Paint the entire underside (which will be visible) and the rim in Navy Blue.
Paint Like a Pro
If your white paint looks streaky over the dark clay, apply a coat of grey primer first. It neutralizes the terracotta color and makes the final white coats pop.
Step 2: Assembly and Decoration
-
Dry fit the stack:
Once the paint is fully cured, stack your pots upside down from largest to smallest to ensure they fit together nicely without wobbling. -
Glue the base:
Apply a generous ring of strong outdoor adhesive to the bottom (now the top) of the largest pot. Center the second-largest pot upside down on top of it and press firmly. -
Build the tower:
Continue this process, gluing the third largest pot onto the second, and finally the smallest pot on top. Wipe away any excess glue that squeezes out immediately. -
Add the balcony saucer:
Glue the small painted saucer right-side up onto the very top of your smallest pot. This creates the platform for your light. -
Sketch the windows and door:
Using a pencil, lightly sketch small arched windows on the middle sections of the lighthouse tower. You can also sketch a larger door at the base if desired. -
Paint the details:
Use a fine detail brush and black paint to fill in the window shapes. Outline them in navy blue to create a frame effect, mimicking the look in the photo. -
Create the top railing:
If you want the castle-like railing shown in the image, you can paint small vertical white rectangles along the rim of the top saucer, or use small wooden craft cubes glued around the edge and painted white. -
Seal the project:
Once all paint and glue is dry, spray the entire tower with a clear outdoor sealant. This protects the color from fading in the sun and rain.
Level Up: Rotating Light
Instead of a standard path light, search for a ‘solar lighthouse beacon’ replacement top online. Some models actually rotate to mimic a real lighthouse beam!
Step 3: Final Installation
-
Prepare the large saucer base:
Take your largest unpainted saucer. You can leave it natural terracotta or paint the rim to match. Place the lighthouse tower in the center of this saucer. -
Add stone ballast:
Fill the space around the base of the lighthouse inside the saucer with river rocks. This looks decorative but also provides crucial weight to keep the tower from tipping over in the wind. -
Install the beacon:
Take the top portion of a solar path light (discarding the stake) and glue it firmly into the center of the top saucer balcony. -
Create a companion pot:
For the finishing touch, paint a tiny separate pot with matching blue and white stripes to sit alongside your lighthouse, perhaps holding a small succulent.
Place your new nautical creation in a sunny spot so the beacon charges up to guide you through the garden at night

The Complete Guide to Pottery Troubleshooting
Uncover the most common ceramic mistakes—from cracking clay to failed glazes—and learn how to fix them fast.
Clay Pot Mushroom Cluster
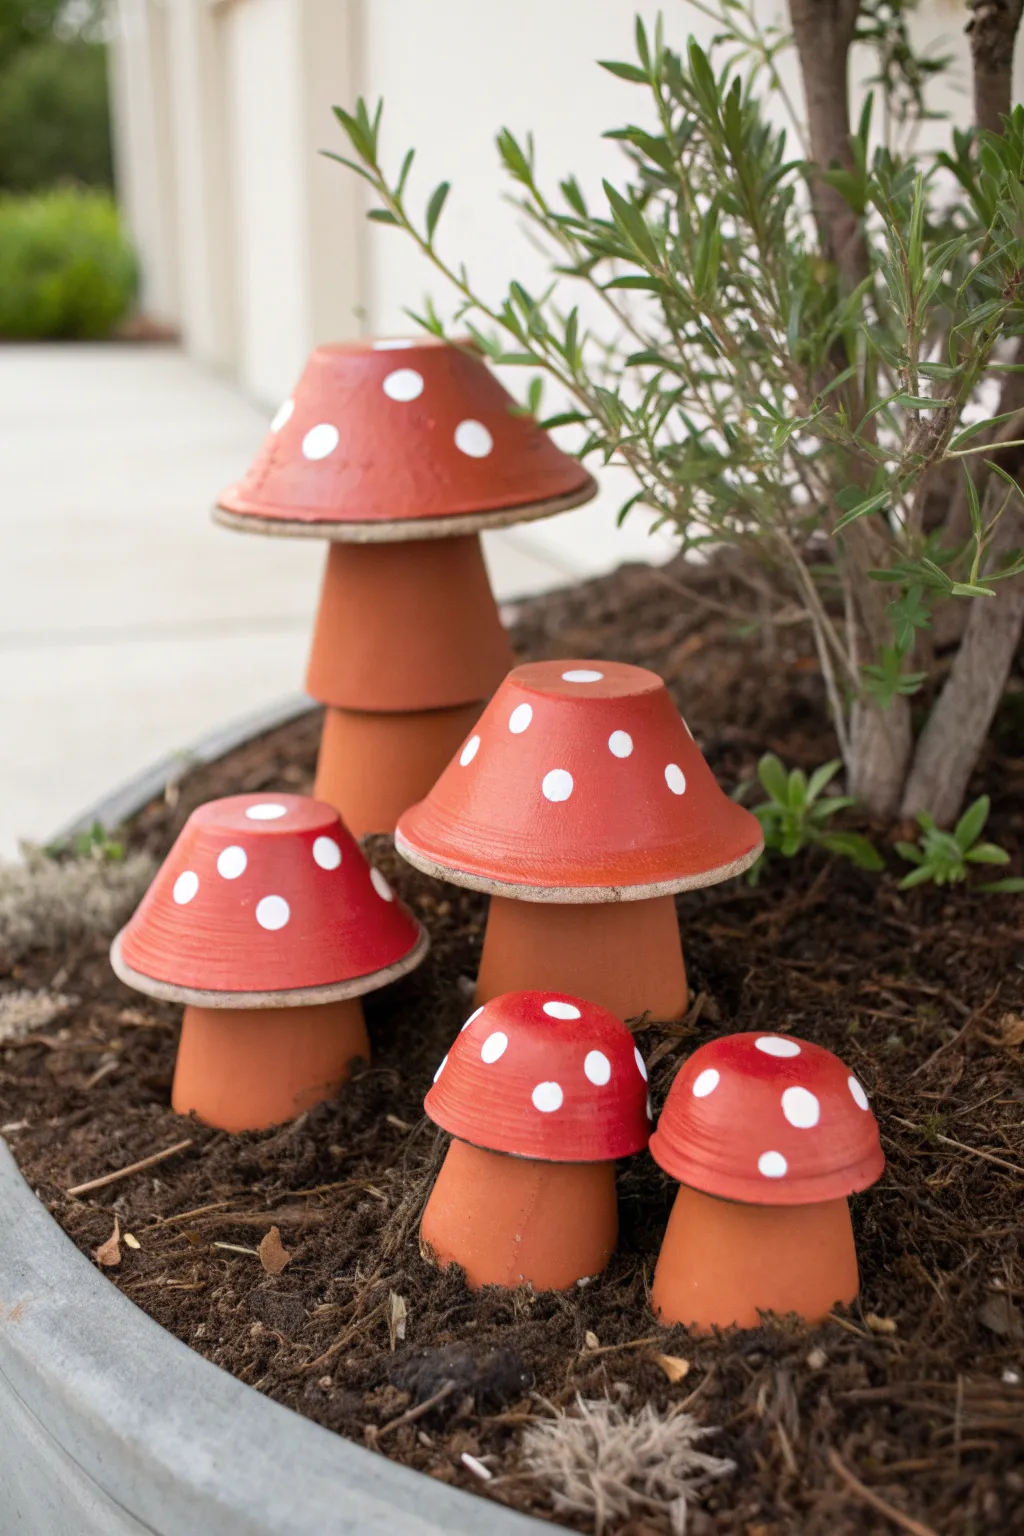
Transform ordinary garden staples into an enchanting woodland scene with these adorable clay pot mushrooms. This cheerful cluster features bright red caps speckled with white dots, sitting atop natural terracotta stems for a rustic yet playful garden accent.
How-To Guide
Materials
- Small terracotta pots (varying sizes, e.g., 2-inch and 3-inch)
- Terracotta saucers (sized slightly larger than chosen pots)
- Outdoor acrylic craft paint (Bright Red)
- Outdoor acrylic craft paint (White)
- Strong outdoor adhesive (e.g., E6000 or landscape glue)
- Wide flat paintbrush
- Small round paintbrush or foam pouncer
- Paper plate or palette
- Damp cloth
- Clear outdoor sealant spray (matte or satin finish)
Step 1: Preparing the Bases
-
Clean the terracotta:
Begin by wiping down all your terracotta pots and saucers with a damp cloth. Remove any loose dust, price stickers, or residue to ensure the paint and glue adhere properly. -
Dry thoroughly:
Let the pottery dry completely. Terracotta is porous and holds moisture, so give it an hour or so in the sun if you washed them heavily. -
Arrange your cluster:
Before gluing or painting, test stack your pots and saucers to decide on the sizes. For the tallest mushroom shown, plan to stack two small pots rim-to-rim to create a longer stem.
Step 2: Painting the Caps
-
Base coat application:
Turn the terracotta saucers upside down. Using your wide flat brush, paint the entire top surface and the side rim with the bright red outdoor acrylic paint. -
Painting the underside edge:
Carefully paint just the very bottom edge of the rim so no bare clay shows when looking at the mushroom from a low angle. You can leave the center of the underside unpainted since it will be glued later. -
Let it dry:
Allow the first coat of red to dry for about 20-30 minutes. Terracotta soaks up paint quickly, so the first layer might look uneven. -
Apply a second coat:
Add a second layer of red paint to get that rich, opaque color. Smooth out your brushstrokes so they run in the direction of the saucer’s curve. -
Create the polka dots:
Once the red paint is fully dry to the touch, pour a small amount of white paint onto your palette. -
Dotting technique:
Dip a small round brush or a foam pouncer into the white paint. Press gently onto the red saucer to create circular dots. I like to vary the placement randomly rather than making a perfect grid for a more natural look. -
Dry the details:
Let the white polka dots dry completely. If the white isn’t opaque enough against the red, carefully dab a second layer over the existing dots.
Perfect Circles Tip
Don’t have a round sponge? Dip the eraser end of a pencil or the flat end of a drill bit into the paint to stamp perfectly uniform white dots.
Step 3: Assembly and Finishing
-
Prepare the single stems:
For the standard mushrooms, simply turn a terracotta pot upside down. The bottom of the pot (now facing up) will be the gluing surface. -
Construct the tall stem:
For the tallest mushroom, take two pots of the same size. Apply a ring of strong adhesive to the rim of one pot and press it against the rim of the second pot. You now have a taller, hourglass-shaped stem. -
Apply adhesive to stems:
Squeeze a generous amount of outdoor adhesive onto the flat bottom of each upside-down pot stem. -
Attach the caps:
Center your dry, painted saucers on top of the glue-covered stems. Press down firmly to ensure good contact between the saucer and the pot. -
Curing time:
Leave the assembled mushrooms undisturbed for at least 24 hours (or per your glue’s instructions) to ensure a waterproof bond. -
Sealing the project:
To protect your paint from sun and rain, take the mushrooms to a well-ventilated area and spray them with a clear outdoor sealant. -
Final placement:
Nestle the finished mushrooms into the soil of a large planter or garden bed, burying the bottom edge slightly for stability.
Level Up: Fairy Door
Paint a tiny arched door and windows on the base of the largest stem before sealing to turn your mushroom cluster into a hidden fairy house.
Enjoy the pop of color these merry mushrooms bring to your greenery all season long
Vertical Herb Tower With Nested Pots
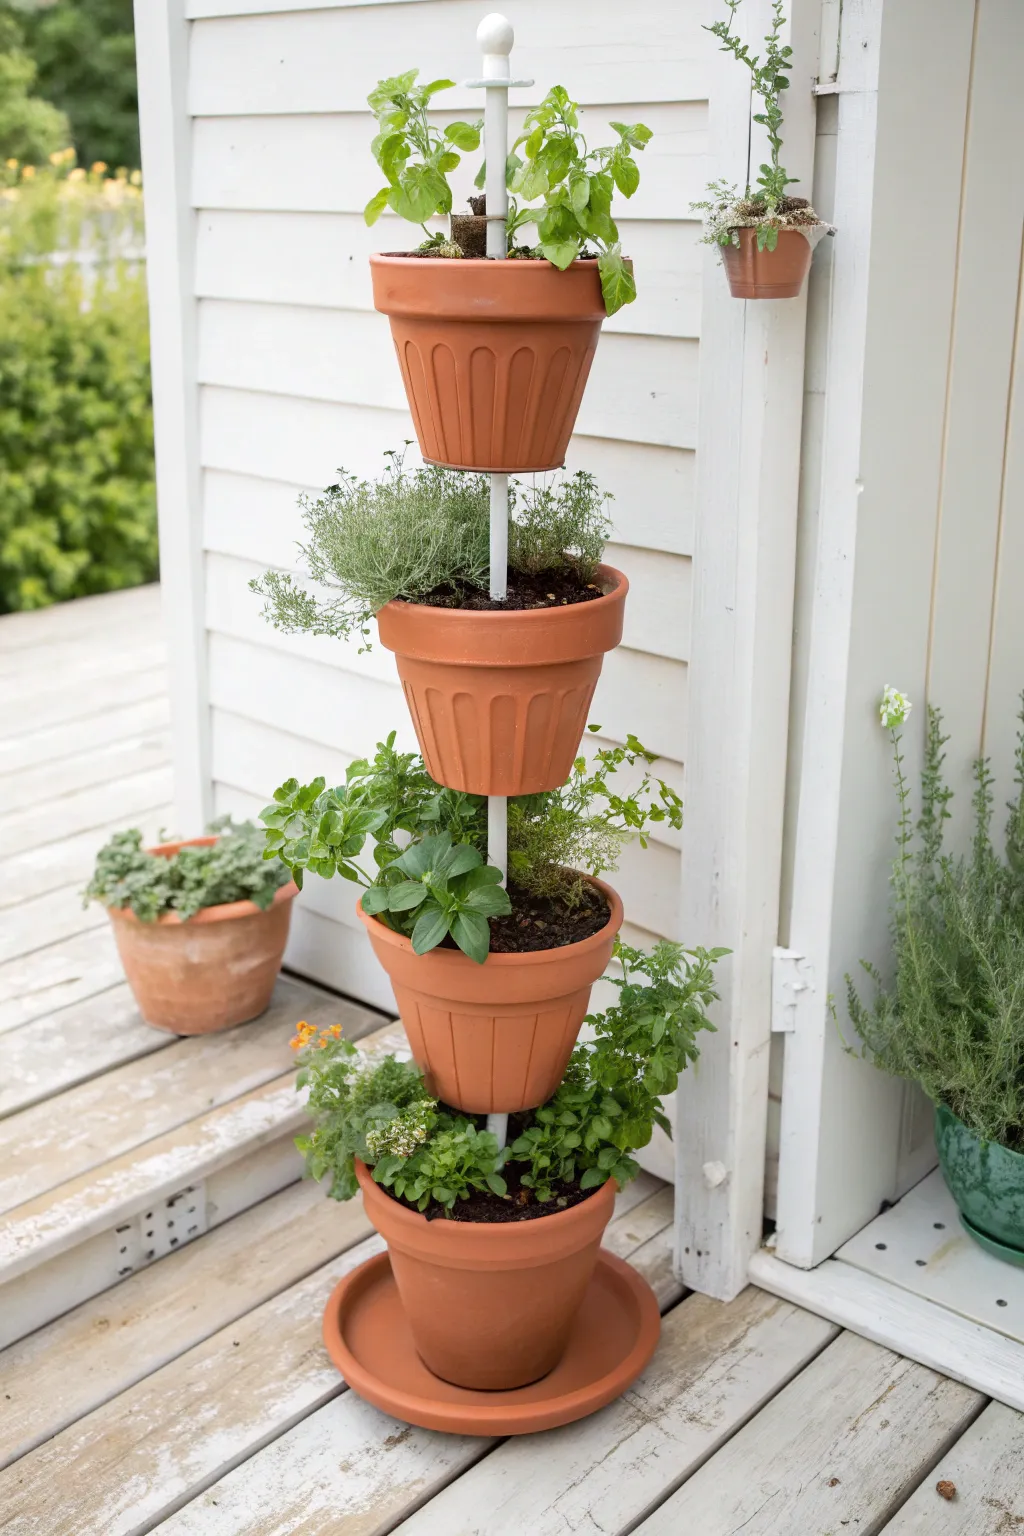
Maximize your growing space with this clever vertical planter that turns four terracotta pots into a lush, towering herb garden. This tiered design uses a central support rod to create a sturdy, space-saving display that looks beautiful on any deck or patio.
Step-by-Step
Materials
- 4 terracotta pots (approx. 10\”-12\” diameter, identical size)
- 1 large terracotta saucer (compatible with the pots)
- 1 threaded metal rod or rebar (3-4 feet long)
- 2 hex nuts (sized to fit the rod)
- 2 wide metal washers
- Potting soil (high-quality, well-draining mix)
- Assorted herb seedlings (basil, thyme, cilantro, parsley)
- Small gravel or pottery shards (optional for drainage)
- Measuring tape
- Drill (if pots lack drainage holes or need widening)
- Decorative ceramic finial or rod cap
Step 1: Base Assembly
-
Prepare the foundation:
Begin by selecting the location for your tower. Once filled with soil, this planter becomes quite heavy and difficult to move, so it is best to build it right where it will live. -
Check the drainage holes:
Inspect your four terracotta pots. The central drainage hole needs to be large enough to accommodate your metal rod comfortably. If the holes are too tight, carefully widen them using a drill with a masonry bit. -
Set the rod anchor:
Take your threaded rod and thread one nut onto the bottom end, followed by a wide washer. This will act as the anchor that holds the entire stack together from underneath. -
Position the saucer:
Thread the rod through the center hole of your large terracotta saucer. The washer and nut should sit flush against the underside of the saucer, with the long part of the rod pointing straight up. -
Secure the first pot:
Slide the first terracotta pot down the rod until it rests firmly inside the saucer. Check for wobbling; the pot should sit flat and stable. -
Add a stabilizing layer:
I like to add a thin layer of small gravel or pottery shards at the very bottom of this first pot carefully around the rod. This helps keep the drainage hole clear and adds a bit of stabilizing weight.
Lean Prevention
If your tower leans, your soil density is uneven. Repack the soil in the lower pot firmly under where the next pot sits to level it out instantly.
Step 2: Stacking the Tower
-
Fill the base pot:
Fill the bottom pot with high-quality potting mix. Pack it down firmly but not too tightly. Leave about 1.5 inches of space from the rim. The soil itself provides the shelf for the next pot to sit on. -
Level the soil surface:
Smooth the soil surface to ensure it is perfectly flat. This is crucial because the next pot needs a level foundation to prevent the tower from leaning. -
Place the second tier:
Slide the second pot down the metal rod. Nestle it into the soil of the first pot. Press down gently until it feels secure; the bottom of this pot effectively ‘floats’ on the soil of the one below it. -
Fill and repeat:
Fill this second pot with soil, just as you did the first, leaving room at the top. Smooth the surface again to prepare for the subsequent layer. -
The third tier:
Add the third pot onto the rod, settling it into the second pot’s soil. Check your vertical alignment by stepping back to ensure the tower looks straight from a distance. -
The final tier:
Place the fourth and final pot on top. Fill it with soil, leaving a standard rim for watering space. -
Cap the rod:
If you have extra rod sticking out simply cap it with a decorative finial. Alternatively, if your rod is threaded, you can add a washer and nut inside the top pot before filling it with soil to mechanically lock the stack, though gravity usually does the trick fine. -
Top decoration:
Place a decorative ceramic cap or finial on the exposed tip of the rod. This protects you from sharp edges and adds a polished look to the spire.
Step 3: Planting the Greenery
-
Select your plants:
Choose smaller herbs for the upper tiers (like thyme or cilantro) and trailing or bushier varieties (like basil or creeping oregano) for the lower levels where they have more room to spill over. -
Plant the pockets:
Carefully plant your herbs in the exposed ring of soil in each of the lower pots. You will have a narrow planting space, so handle the root balls gently. -
Plant the crown:
Fill the top pot with your remaining herbs. This is the sunniest spot, so reserve it for sun-loving varieties like basil or rosemary. -
Initial watering:
Water the tower slowly from the top down. Use a gentle stream to avoid washing soil out of the tiers. The water will trickle down through the layers, hydrating the whole system.
Pro Tip: Moisture Control
Terracotta dries out fast! Soak your clay pots in a bucket of water for an hour before building. This prevents them from wicking moisture away from your new soil.
Enjoy your beautiful, space-efficient garden and fresh herbs all season long


What Really Happens Inside the Kiln
Learn how time and temperature work together inside the kiln to transform clay into durable ceramic.
Fence-Mounted Pot Pocket Wall
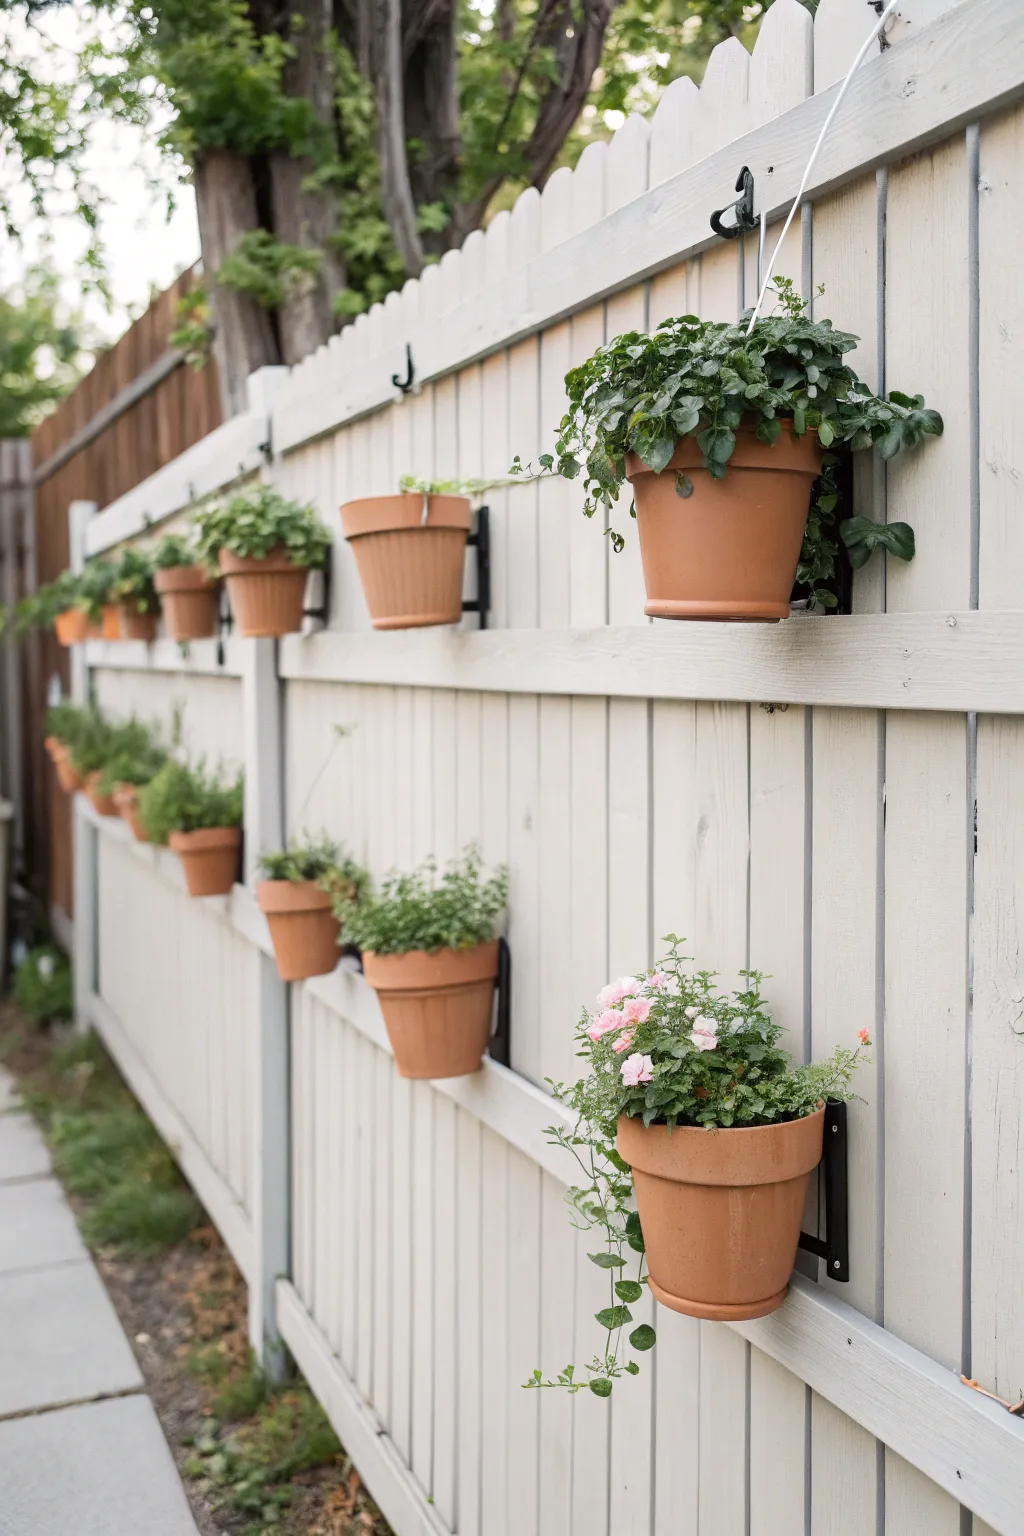
Transform a plain white fence into a living wall of greenery with this simple mounting project. By attaching classic terracotta pots directly to the fence rails, you create a tiered display perfect for herbs and trailing blooms.
How-To Guide
Materials
- Standard terracotta pots (6-inch and 8-inch sizes)
- Black metal pot ring holders (wall-mounted style)
- Exterior wood screws (rust-resistant)
- Power drill with drill bits
- Bubble level
- Tape measure
- Pencil
- Potting soil
- Assorted plants (ivy, herbs, geraniums)
- Coffee filters or mesh screen scraps
Step 1: Planning and Layout
-
Assess the Fence Rails:
Examine your fence’s horizontal rails. This project works best on fences with sturdy top and bottom support rails that can hold weight. Ensure the wood is solid and not rotting. -
Determine Spacing:
Measure the total length of the fence section you intend to cover. I like to leave about 12 to 18 inches of space between each pot to allow the plants to bush out without crowding. -
Mark Vertical Positions:
Decide on a staggered or aligned look. In the example, pots are placed on both the upper and lower/middle horizontal rails. Use a pencil to mark the center point for each bracket on these rails. -
Check for Level:
Hold your first metal pot ring against the fence at your mark. Place a small bubble level on the mounting plate of the bracket to ensure it is perfectly vertical before marking your screw holes.
Step 2: Mounting the Hardware
-
Drill Pilot Holes:
Once your screw locations are marked, drill small pilot holes into the wood. This prevents the fence rail from splitting when you drive in the larger screws. -
Attach the First Bracket:
Line up the metal ring bracket with the pilot holes. secure it tightly using exterior-grade wood screws. These screws resist rust and won’t streak down your white fence over time. -
Verify Stability:
Give the mounted bracket a firm wiggle. It should feel completely rigid against the wood. If it moves, tighten the screws slightly or use a slightly larger screw if the hole is stripped. -
Install Remaining Brackets:
Repeat the drilling and mounting process for all marked locations along the fence line. Step back occasionally to ensure the visual alignment looks correct.
Uneven Pots?
If a pot slips through or sits crooked, the ring might be too large. Wrap a strip of burlap or rubber grip tape just under the pot’s rim to create a thicker wedge for a tighter fit.
Step 3: Preparing the Planters
-
Line the Pots:
Place a coffee filter or a small piece of mesh screen over the drainage hole inside each terracotta pot. This keeps the soil inside while still allowing excess water to drain freely. -
Add Base Soil:
Fill the bottom third of each pot with a high-quality potting mix. Lightly pat it down to create a base for your plants. -
Planting:
Remove your plants from their nursery containers. Gently tease the roots outward if they are bound. Place one plant per pot, filling in the sides with more soil until it reaches just below the rim. -
Watering In:
Water each pot thoroughly until water begins to drip from the bottom. Let them drain on the ground for a few minutes before hanging to avoid making a muddy mess on the fence immediately.
Moisture barrier
To protect the wood fence from constant moisture, paint a small square of clear outdoor sealer behind where each pot hangs, or stick small rubber bumpers on the back of the pot rim.
Step 4: Final Assembly
-
Hang the Pots:
Slip each planted terracotta pot into a mounted metal ring. The rim of the pot should catch securely on the ring, holding it suspended. -
Adjust Orientation:
Rotate the pots slightly so the plants’ “best side” is facing outward toward the viewer. -
Clean Up:
If any soil spilled onto the white fence during installation, brush it off or wipe it down with a damp cloth immediately to prevent staining.
Now you have a stunning floating garden that adds depth and life to your backyard boundary
Mosaic-Tile Pot Makeover
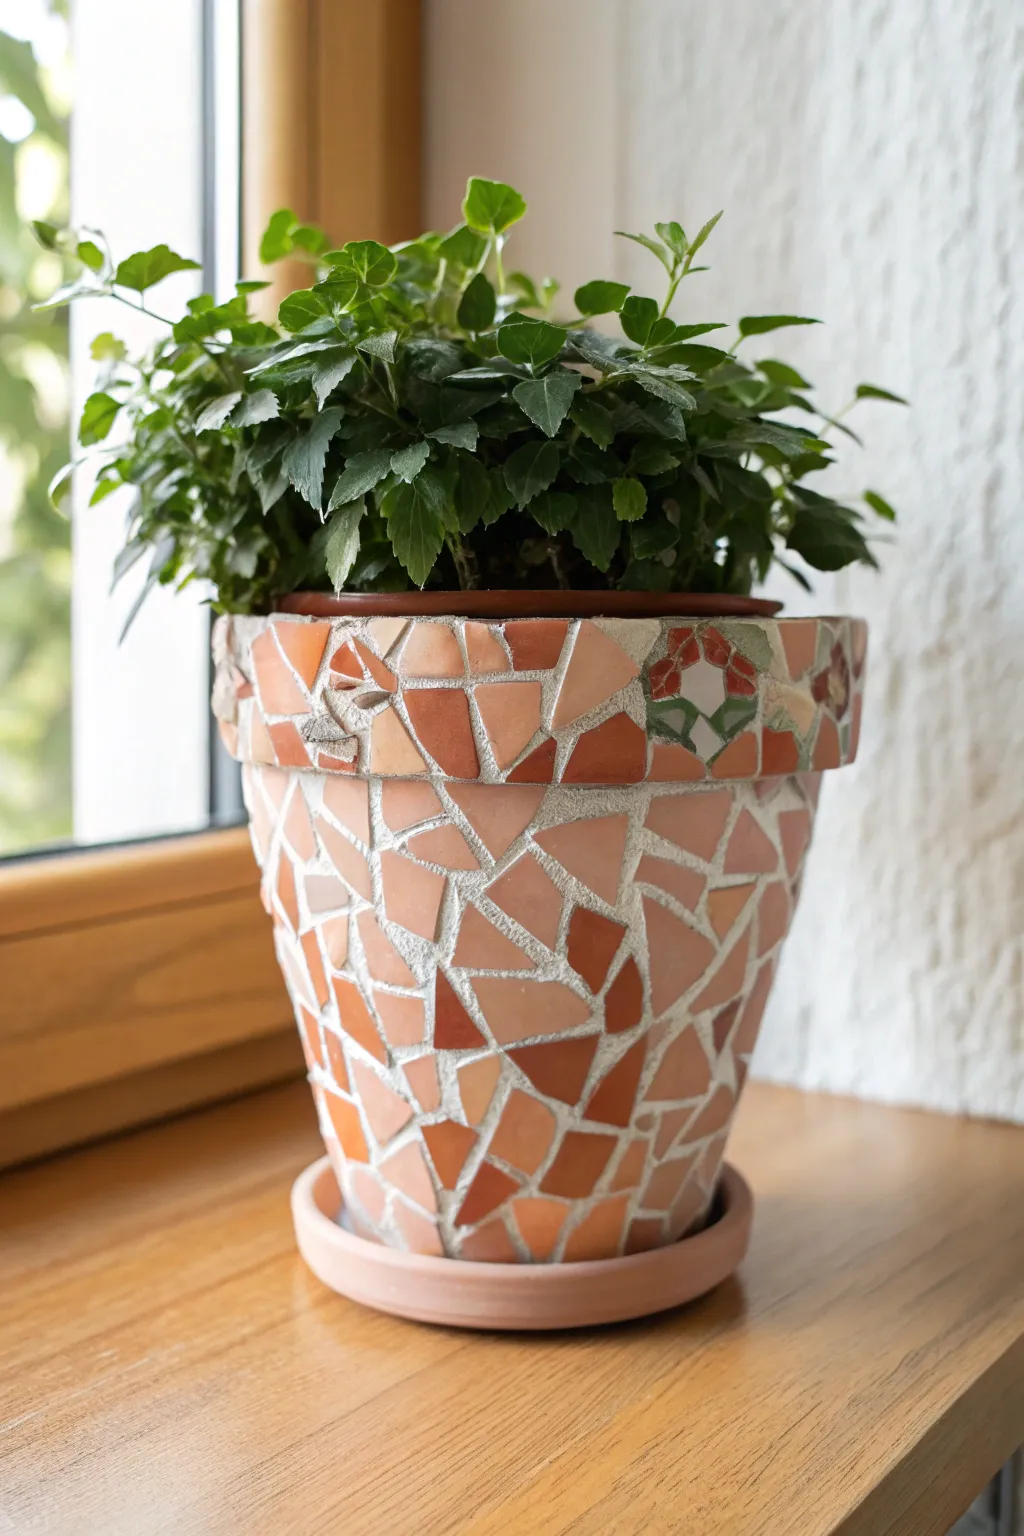
Transform a plain clay pot into a textured masterpiece using the timeless art of mosaic. This project features broken ceramic shards in warm, earthy tones to create a uniform yet puzzle-like surface that catches the light beautifully.
Step-by-Step Guide
Materials
- Standard terra cotta pot (approx. 6-8 inch)
- Matching terra cotta saucer
- Ceramic tiles or plates (in shades of terra cotta, peach, light brown, plus red and green for detail)
- Tile nippers or wheeled glass cutters
- Hammer and heavy cloth (for initial breaking)
- Tile adhesive or clear silicone glue
- Pre-mixed sanded grout (off-white or light gray)
- Sponge and bucket of water
- Rubber gloves
- Plastic spatula or craft stick
- Safety glasses
Step 1: Preparation & Breaking
-
Safety check:
Before you begin breaking anything, put on your safety glasses. Ceramic shards can fly unexpectedly, and eye protection is non-negotiable. -
Create the base shards:
Wrap your main tiles or old plates in a heavy cloth (like denim or canvas). Strike them firmly with a hammer to create large chunks. Aim for variety, but don’t pulverize them into dust. -
Refine the shapes:
Using your tile nippers, trim the jagged edges of the larger chunks. You want irregular polygons—triangles, trapezoids, and random shapes—mostly ranging from 1 to 2 inches in size. -
Sort by color:
Separate your shards into piles. Keep the main earthy tones (terra cotta, peach, tan) in one large group, and set aside the red and green pieces for the floral detail. -
Clean the pot:
Briefly wipe down your terra cotta pot with a damp cloth to remove any dust or nursery grime, then let it dry completely so the adhesive bonds well.
Step 2: Adhering the Mosaic
-
Dry fitting the rim:
Before gluing, pick out a specific set of flat-edged pieces for the top rim of the pot. Laying these out first ensures a nice, straight edge at the top. -
Spread the adhesive:
Using a craft stick, apply a moderate layer of tile adhesive to the back of a shard—just enough to coat it, behaving like thick frosting. -
Establish the rim:
Press your rim pieces into place first. Leave a small gap (about 1/8 to 1/4 inch) between each piece for the grout later. -
Create the floral accent:
Select a spot near the rim for your flower. Glue a few red shards in a petal arrangement and place green shards below them to mimic leaves. I like to do this early so I can build the background around it. -
Fill the body:
Work your way down the pot with the earthy-toned shards. Treat it like a puzzle where the pieces don’t quite touch. Rotate pieces to find the best fit for the curves. -
Check spacing:
As you work, ensure your gaps are relatively consistent. If a gap is too wide, find a tiny sliver of tile to fill it, or leave it for a grout feature. -
Cure time:
Once the pot is fully covered, let the adhesive dry completely. This usually takes 24 hours depending on your glue type; don’t rush this or tiles will slide during grouting.
Curve Control
For curved surfaces like pots, use smaller shards. Large tiles stick out rigidly, creating sharp edges and requiring way more grout to fill the gaps underneath.
Step 3: Grouting & Finishing
-
Mix the grout:
Prepare your sanded grout according to the package instructions until it reaches the consistency of peanut butter. Wear your rubber gloves for this stage. -
Apply the grout:
Scoop a generous amount of grout onto the pot. Smear it over the entire surface, pressing firmly to force the mixture deep into the crevices between the tiles. -
Reveal the tiles:
Once the gaps are filled, use your gloved hand or a spatula to scrape off the excess grout sitting on top of the tile faces. -
Wait for the haze:
Let the grout set for about 15-20 minutes. You will see a hazy film appear on the tiles as they dry. -
Sponge cleaning:
Dampen a sponge (wring it out well so it’s not dripping) and gently wipe across the surface to clean the haze off the tiles. Rinse the sponge frequently. -
Final polish:
Allow the pot to dry for another hour, then take a soft, dry cloth and buff the tiles to a high shine. -
Seal the grout:
After the grout has fully cured (usually 2-3 days), apply a grout sealer to protect the surface from water and dirt, especially if the pot will be outdoors.
Color Contrast
Use dark gray or charcoal grout instead of white to make the lighter peach and terra cotta tile colors pop dramatically for a more modern look.
Now you have a durable, custom planter that adds rustic charm to any windowsill.

TRACK YOUR CERAMIC JOURNEY
Capture glaze tests, firing details, and creative progress—all in one simple printable. Make your projects easier to repeat and improve.
Clay Pot People Planter Family
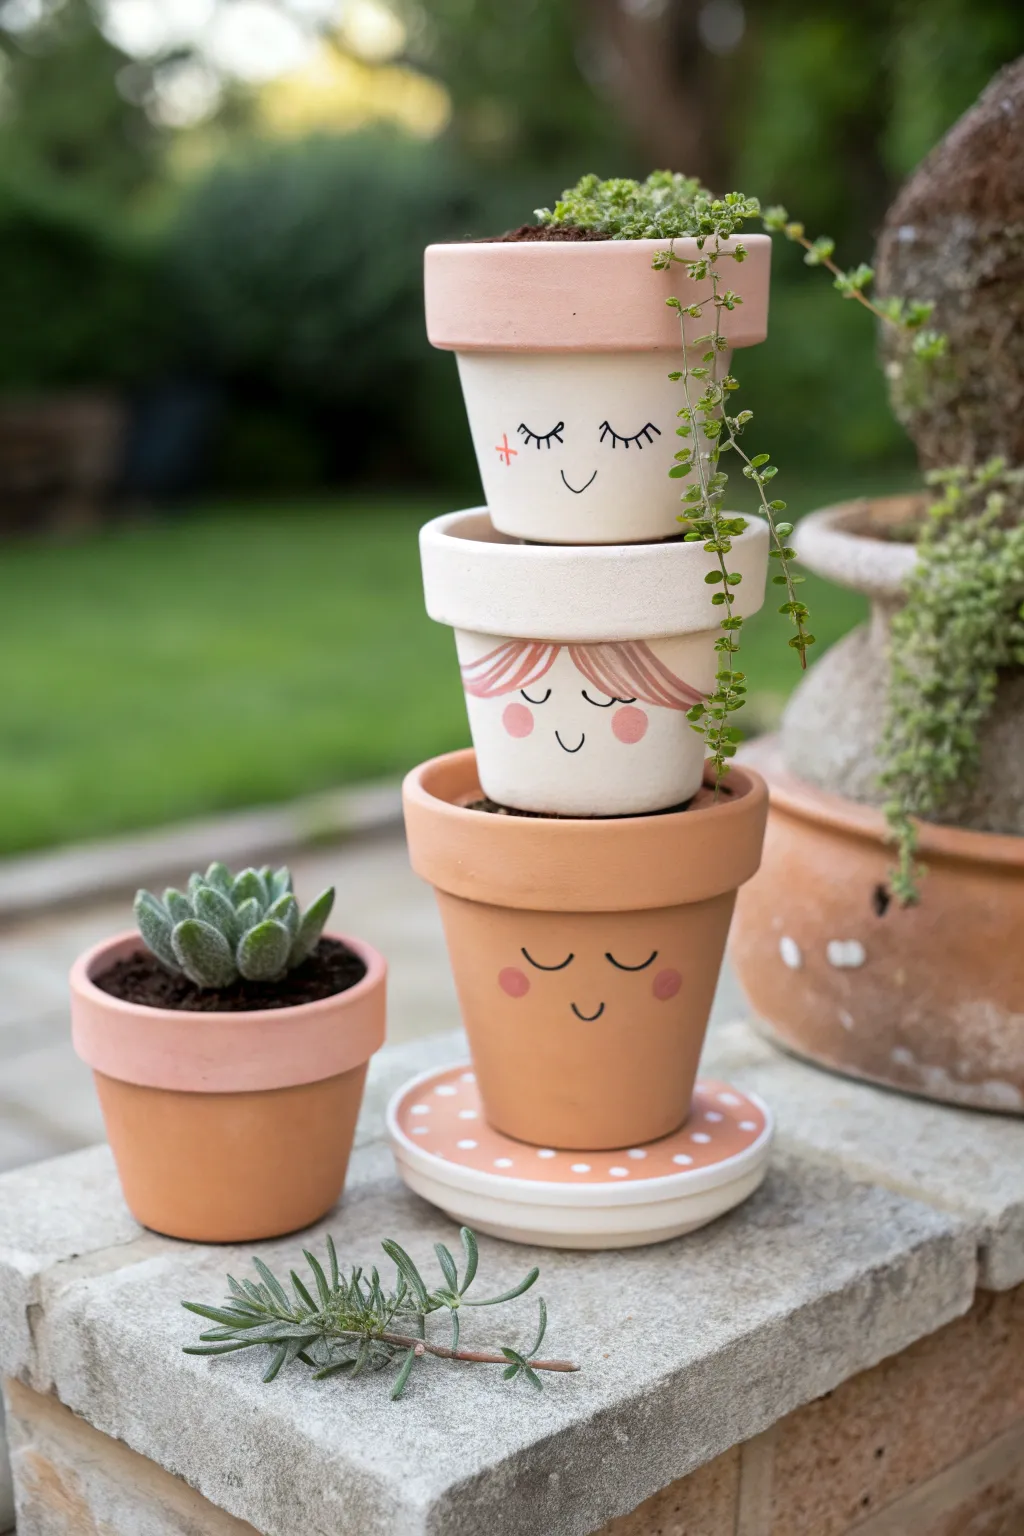
Bring whimsical charm to your garden with this stacked planter project featuring three distinct personalities. Using simple terracotta pots and a bit of paint, you’ll create an adorable tiered display that is perfect for trailing plants and small succulents.
Step-by-Step Guide
Materials
- 3 terracotta pots (small, medium, large sizes for stacking)
- 1 terracotta saucer (to fit the largest pot)
- 1 small terracotta pot (separate individual planter)
- White acrylic craft paint (outdoor rated)
- Light pink acrylic craft paint
- Peach acrylic craft paint
- Black fine-point paint pen or permanent marker
- Pink or coral paint pen (for cheeks)
- Foam brushes and small detail brushes
- Potting soil and succulents/trailing plants
- Clear matte sealer spray
Step 1: Base Painting
-
Clean the terracotta:
Before starting, ensure all your terracotta pots and the saucer are clean and completely dry. Wipe away any loose dust with a damp cloth and let them air dry for at least an hour to ensure paint adhesion. -
Paint the top pot:
Take the smallest of the three stacking pots. Use a foam brush to paint the main body creamy white, leaving the rim natural for now. You may need two to three coats for solid coverage, letting each coat dry for about 15 minutes in between. -
Add rim color:
Once the white body is dry, paint the rim of this smallest pot with a soft, muted pink. Keep a steady hand to create a clean line where the rim meets the white body. -
Paint the middle pot:
For the medium-sized pot, paint the entire exterior—including the rim—with the creamy white paint. Apply coats until opaque. -
Prepare the bottom pot:
The largest bottom pot stays mostly natural terracotta. However, you need to prepare the saucer. Paint the top surface of the saucer (where the pot sits) with a solid coat of peach or light terracotta paint if you want a uniform look, or leave it natural.
Uneven Coverage?
Terracotta is very porous and drinks paint. If your white looks streaky, apply a coat of white primer or gesso first to seal the clay before adding your top color.
Step 2: Face Details
-
Sketch the faces:
Lightly sketch the sleeping faces onto the dry pots with a pencil. Position them centrally: simple curved lines for closed eyes and a small ‘u’ shape for the smile. -
Draw the main features:
Go over your pencil sketches with a black fine-point paint pen. For the top pot, draw eyelashes pointing down. For the middle and bottom pots, simple curved arches work best for the closed eyes. -
Add rosy cheeks:
Dip a round sponge dauber or use your fingertip with pink paint to gently stamp circular cheeks on the middle and bottom pots. For the top pot, draw a small cross or ‘plus’ sign on one cheek for a quirky detail. -
Paint hair details:
On the middle pot, paint sweeping bangs coming down from the rim using a light mauve or dusty pink color. I find using a thin liner brush helps create the individual strands of hair. -
Detail the saucer:
Using a small round brush or the handle end of a paintbrush, dot white spots around the rim of the painted saucer to create a polka-dot pattern.
Step 3: Assembly & Planting
-
Seal the artwork:
Take all pieces outside and spray them with a clear matte sealer. This is crucial for protecting your water-based acrylics from moisture and soil. -
Fill the bottom pot:
Place the largest face pot onto the polka-dotted saucer. Fill it with potting soil, packing it firmly almost to the top. -
Stack the middle pot:
Nestle the middle (white) pot directly into the soil of the bottom pot. Push it down slightly so it feels stable. Fill this second pot with soil. -
Stack the top pot:
Place the smallest pot into the soil of the middle pot. Ensure the ‘faces’ are aligned vertically or slightly offset for a playful look. -
Plant the greenery:
Plant a trailing succulent, like string of pearls or creeping jenny, in the very top pot so it cascades down like green hair. Fill the gaps in the lower tiers with smaller succulents if space allows. -
Create the sidekick:
Paint the rim of your separate small pot pink to match the top stacker, leaving the base natural. Plant a rosette succulent inside to complete the family.
Make It Taller
To add height without wasting soil, place an inverted plastic nursery pot inside the bottom tier as a riser for the next pot to sit on.
Now you have a charming family of pot people ready to brighten up your patio or windowsill
Terracotta Shard Garden Edging
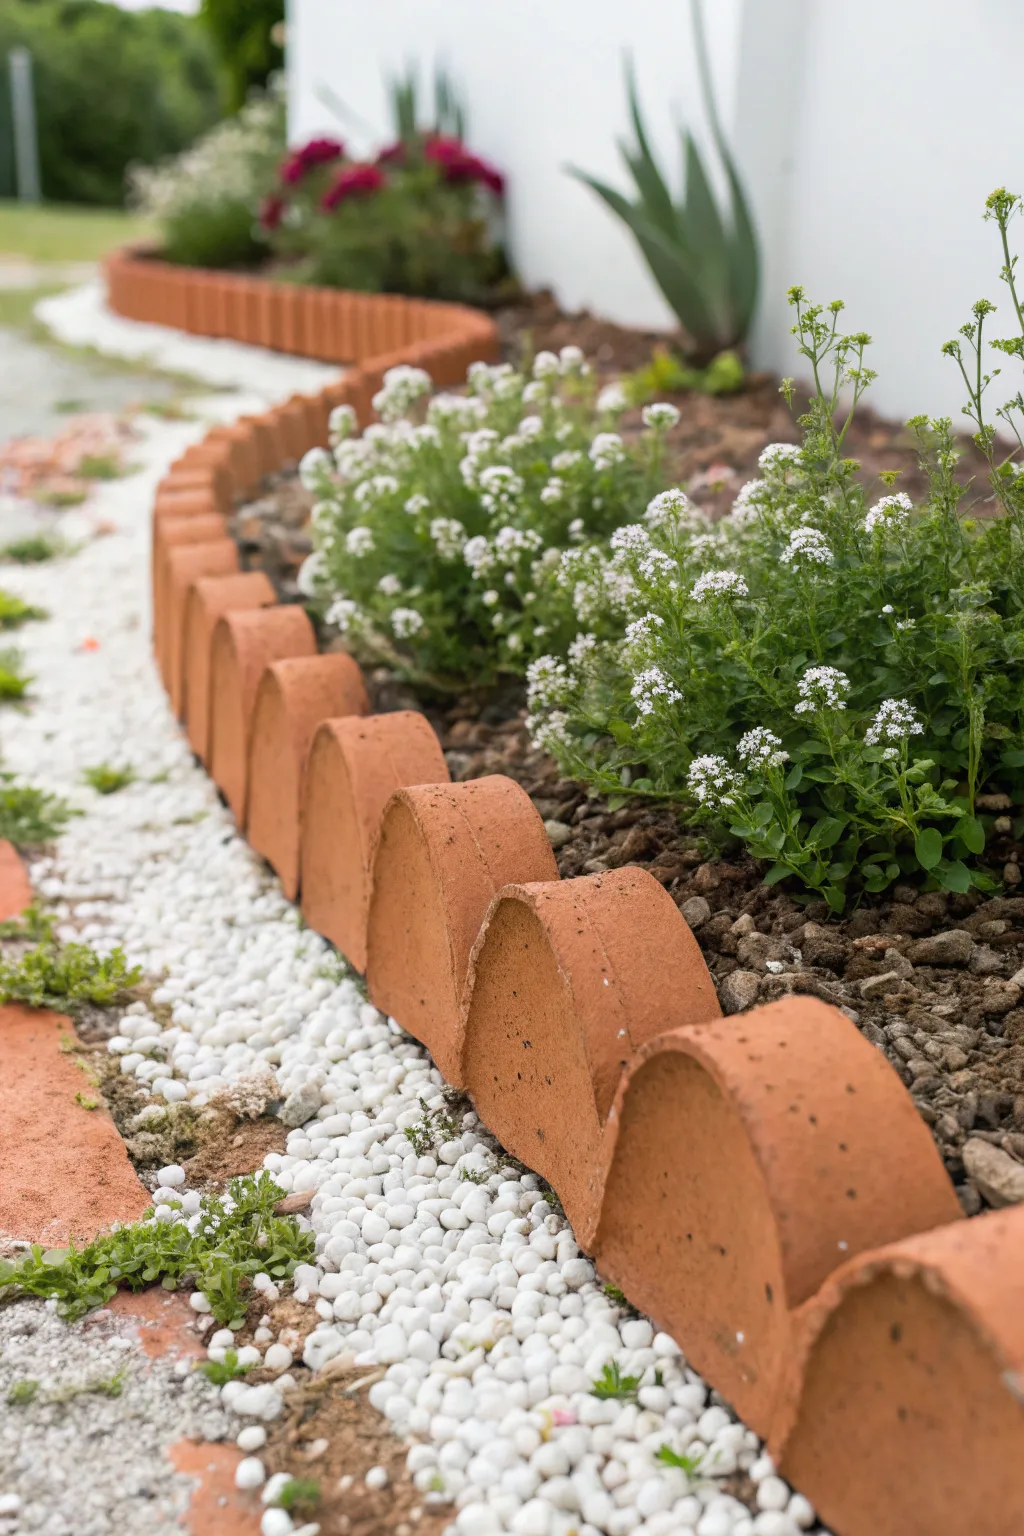
Transform broken or repurposed curved terracotta roof tiles into a charming, scalloped garden border that guides the eye. The warm clay tones provide a beautiful rustic contrast against white pebbles and lush greenery, creating a structured yet organic edge for your flower beds.
How-To Guide
Materials
- Curved terracotta roof tiles or large broken pot shards (uniform size)
- Garden spade or edging tool
- Hand trowel
- Rubber mallet
- String line and two stakes
- Sand (for leveling)
- White garden pebbles
- Landscaping fabric (optional)
Step 1: Preparation and Layout
-
Define the curve:
Visualize the gentle curve of your planned border. If you want a precise line, set up a string line using stakes to mark the desired path, or use a garden hose to lay out organic, flowing curves. -
Dig the trench:
Using a spade or edging tool, dig a narrow trench along your marked line. The trench should be about half the height of your terracotta tiles to ensure they sit securely in the ground. -
Clear debris:
Remove any large rocks, roots, or clumps of hard soil from the trench. A clean gathered space makes it much easier to level the tiles later. -
Add a sand base:
Pour a thin layer of sand (about 1 inch) into the bottom of your trench. This acts as a leveling agent and helps with drainage, preventing the terracotta from shifting too much during heavy rains.
Consistent Curves
Use a consistent overlapping distance (e.g., 2 inches) for every tile. This rhythm makes the finished border look professional rather than jagged.
Step 2: Installing the Edging
-
Position the first tile:
Place your first curved tile vertically into the trench. Ensure the convex side (the outer curve) is facing the path, as shown in the inspiration photo. -
Create the overlap:
Nest the second tile slightly behind the first one, overlapping the edges by an inch or two. This interlocking method closes gaps so soil doesn’t spill through. -
Check the height:
Step back to check that the top of the second tile aligns with the first. I find it helpful to keep a long spirit level handy to place across the tops periodically. -
Continue the chain:
Repeat the placement process, nesting each subsequent tile behind the previous one. Follow the curve of your trench carefully. -
Secure with soil:
Once a section involves 4-5 tiles, backfill the garden side (the concave side) with soil to hold them upright. Pack it down firmly with your hand trowel. -
Tap for stability:
Use a rubber mallet to gently tap the tops of the tiles if they need to settle deeper into the sand. Be very gentle to avoid cracking the dry clay.
Step 3: Finishing Touches
-
Backfill the front:
On the path side of the border, fill the trench gap with soil, packing it tightly against the base of the tiles to lock them in place. -
Lay landscape fabric:
If you are creating a pebble path alongside the border, lay a strip of landscaping fabric on the path side to prevent weeds from growing through your stones. -
Pour the pebbles:
Pour white garden pebbles along the front of the border. Fill it enough to cover the soil line where the tiles meet the ground, creating a clean, high-contrast finish. -
Clean the clay:
Brush off any loose dirt from the faces of the terracotta tiles using a stiff brush or a damp rag to let that orange color pop. -
Plant along the edge:
To complete the look, plant low-growing white flowers, like alyssum, directly behind the border so they peek over the terracotta edge.
Mosaic Variation
For a quirkier look, alternate concave and convex placements, or mix in pieces of broken patterned pots for an eclectic, shabby-chic vibe.
Your classic terracotta border now brings a warm, Mediterranean structure to the garden path