A plain terracotta clay pot is basically a blank canvas, and a little paint can turn it into the kind of decor that makes your whole room (or patio) feel more like you. These clay pot painting ideas are all beginner-friendly, but they still look thoughtful and special when you line a few up together.
Classic Solid Color With a Clean Rim
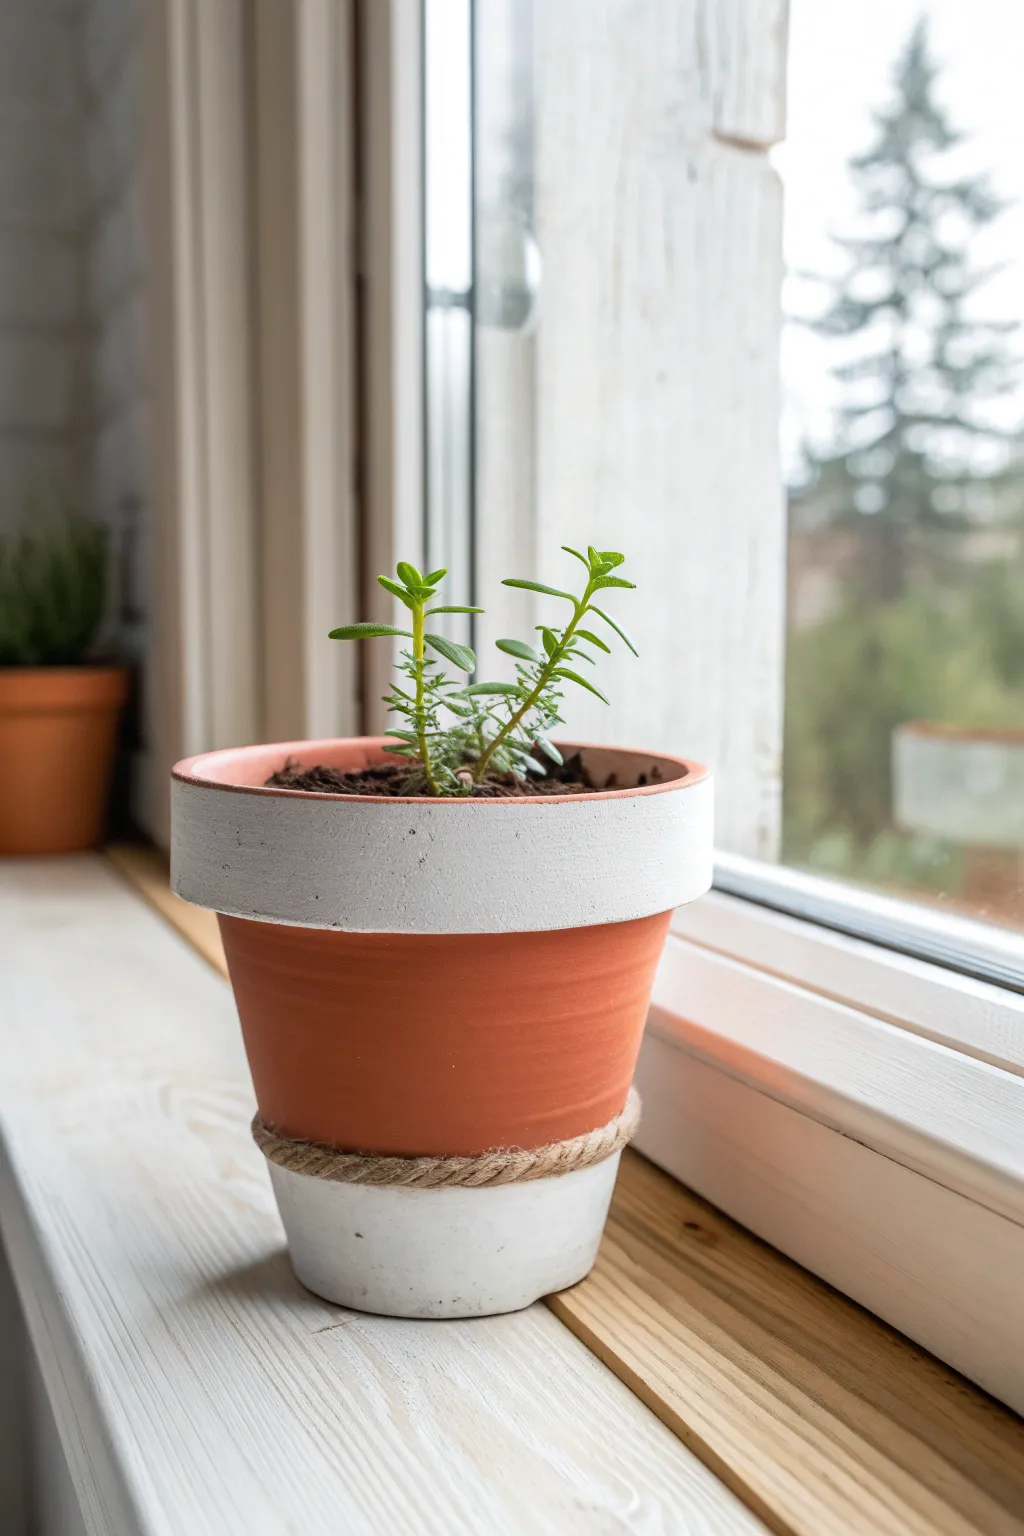
Embrace the natural beauty of terracotta while adding a modern farmhouse touch with this simple color-blocking technique. The crisp white sections contrast beautifully with the warm clay and rustic twine accent, creating a charming home for your favorite small plants.
Step-by-Step Guide
Materials
- Small terracotta pot (clean and dry)
- White acrylic craft paint or chalk paint
- Medium flat paintbrush
- Painter’s tape or masking tape
- Natural jute twine or thin rope
- Hot glue gun and glue sticks
- Clear acrylic sealer (spray or brush-on)
- Scissors
Step 1: Preparation & Top Rim
-
Clean surface:
Begin by wiping down your terracotta pot with a damp cloth to remove any dust or debris. Let it dry completely so the paint adheres properly. -
Protect the inside:
If you plan to fill the pot with soil directly, tape off the top inside edge about an inch down. This keeps the inside clean, though it’s optional if you’ll use a plastic nursery pot inside. -
Define the rim:
Most terracotta pots have a defined lip or rim at the top. You can use this natural structural line as your guide, so no taping is strictly necessary here unless you have a very unsteady hand. -
Paint the rim:
Load your flat brush with white paint. Apply an even coat horizontally around the entire top rim. Be careful to maintain a clean edge where the rim meets the main body of the pot. -
Add a second coat:
Allow the first coat to dry for about 15-20 minutes. Apply a second coat to ensure opaque, solid coverage. I find that dabbing the paint slightly on the second coat gives it a nice, textured finish that looks less like plastic.
Step 2: Bottom Section
-
Tape the bottom line:
Decide how large you want your bottom white section to be. A good rule of thumb is to make it visually similar in height to the top rim. Apply a strip of painter’s tape around the pot’s circumference at this height. -
Seal the tape edge:
Press down firmly on the tape edge with your fingernail or a credit card to prevent paint bleed. -
Paint the base:
Paint the area below the tape white, including the very bottom edge of the pot. Brush downwards, away from the tape line, to further minimize bleeding. -
Second coat:
Let dry, then apply a second coat for full opacity. Wait until the paint is tacky but not fully dry before carefully peeling off the tape to reveal a crisp line. -
Seal the paint:
Once all white paint is completely dry (wait at least an hour), apply a clear matte sealer over the painted areas to protect them from water damage.
Clean Lines Pro Tip
For a razor-sharp paint line on porous terracotta, paint a thin layer of clear sealer or white glue over your tape edge first. This seals the gap so white paint can’t bleed under.
Step 3: Twine Accent
-
Prepare the twine:
Unspool a length of jute twine. You won’t need to cut it yet; it’s easier to work directly from the spool. -
Start the wrap:
Apply a small dot of hot glue exactly on the paint line where the white base meets the raw terracotta. Press the end of your twine into the glue. -
Wrap tightly:
Wrap the twine around the pot, following the seam between the paint and the clay. Pull it taut as you go. -
Double the thickness:
For the look in the photo, wrap the twine around a second or third time, stacking it neatly just above the first strand so it sits slightly on the terracotta section. -
Secure the end:
Cut the twine and secure the end with another tiny dab of hot glue, ideally on the ‘back’ side of the pot so the seam is hidden.
Level Up: Texture
Mix a small amount of baking soda into your white acrylic paint before applying. This creates a gritty, ceramic-like texture that mimics expensive artisan pottery.
Now you have a stylish, custom planter ready to showcase your favorite succulent or herb on a sunny windowsill


Two-Tone Dip-Dyed Clay Pot
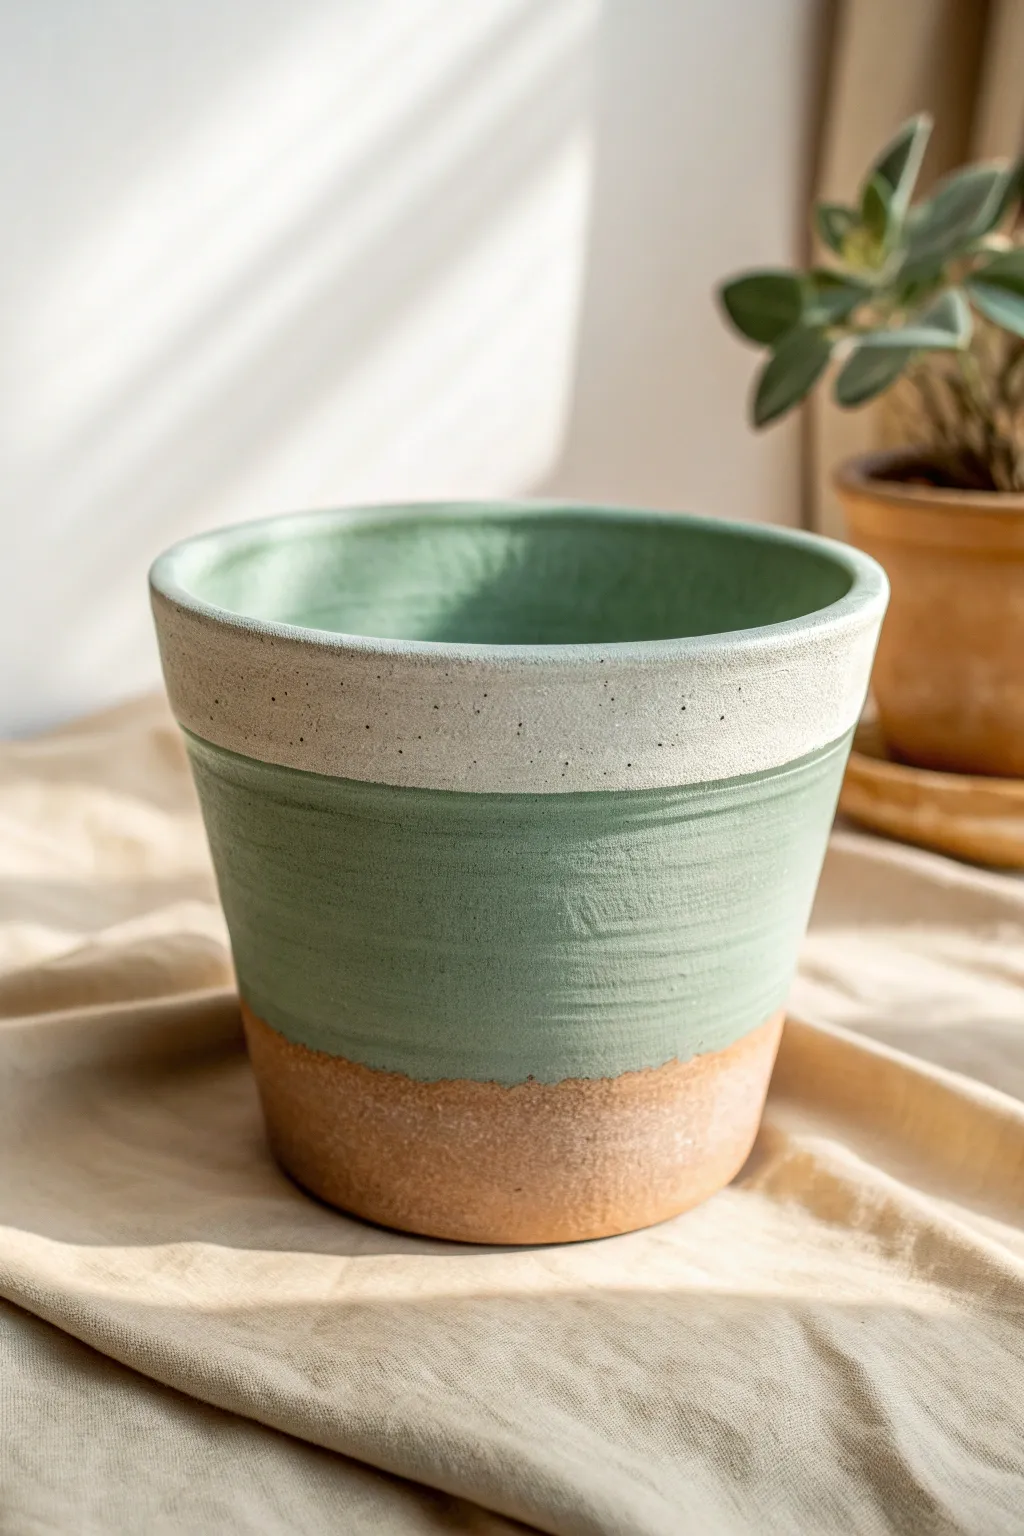
Transform a standard terra cotta pot into a modern, serene home for your plants with this faux-dipped painting technique. By layering sage green and speckled stone-effect paint, you’ll create a sophisticated, textured look that mimics high-end artisanal ceramics.
Step-by-Step Tutorial
Materials
- Terra cotta pot (clean and dry)
- Sage green acrylic paint (matte finish)
- Off-white or cream acrylic paint
- Gray or black acrylic paint (for speckling)
- Wide flat paintbrush (synthetic bristles)
- Old toothbrush
- Painter’s tape or masking tape
- Palette or paper plate
- Water cup and paper towels
- Clear matte sealant spray (optional)
Step 1: Preparation & Base Coat
-
Clean surface:
Begin by ensuring your terra cotta pot is completely clean and free of dust or price tag residue. Wipe it down with a damp cloth and let it dry fully before painting. -
Section off the bottom:
Decide how much of the raw terra cotta you want to leave exposed at the base. Place a strip of painter’s tape horizontally around the lower third of the pot. Press the edges down firmly to prevent paint bleed. -
Mix the green:
If you don’t have a premixed sage green, mix a standard green with a bit of white and a tiny drop of brown or gray to desaturate it. You want a soft, earthy tone rather than a bright primary green. -
Apply the green layer:
Using your wide flat brush, paint the area above the tape with your sage green paint. Don’t worry about the very top rim yet; focus on covering the main body of the pot up to the rim’s lower edge. -
Create texture:
While painting, use horizontal strokes. I like to leave the brushstrokes slightly visible to give it that handmade, ceramic glaze appearance. -
Second coat:
Allow the first coat of green to dry for about 15-20 minutes. Apply a second coat to ensure solid, opaque coverage over the orange clay underneath.
Pro Tip: Texture Trick
Mix a teaspoon of baking soda into your cream paint before applying it to the rim. This creates a grainy, true stone-like texture that feels rough to the touch.
Step 2: The Stone Rim
-
Tape the boundary:
Once the green paint is fully dry to the touch, apply a new line of painter’s tape right over the top edge of your green paint, leaving the thick top rim of the pot exposed. -
Paint the rim:
Load your brush with the off-white or cream paint. Cover the entire top rim of the pot, extending slightly over the top edge and into the inner lip about an inch down. -
Build opacity:
Cream paint often requires more layers to hide the dark terra cotta. Let each layer dry before adding the next; you might need 3-4 thin coats for a solid finish. -
Prepare speckle mix:
Dilute a very small amount of black or dark gray paint with water on your palette until it has an inky consistency. -
Splatter technique:
Dip an old toothbrush into this watery mix. Hold it near the painted rim and run your thumb across the bristles to flick tiny speckles onto the cream paint. -
Control the speckles:
Aim carefully to keep the speckles mostly on the white rim. If some land on the green, simply wipe them away gently with a damp paper towel before they dry. -
Dry time:
Let the speckled rim dry completely. This ensures you won’t smudge your stone effect when removing the tape.
Level Up: Ombre Effect
Instead of a sharp line between the green and raw clay, use a dry brush to feather the bottom edge of the green paint downward for a soft, fading gradient.
Step 3: Finishing Touches
-
Remove tape:
Carefully peel away all painter’s tape. Pull the tape away at a 45-degree angle to keep the paint lines crisp and prevent chipping. -
Clean up lines:
If any paint bled under the tape onto the raw terra cotta or between sections, use a small detail brush or a damp Q-tip to tidy up the edges. -
Seal the interior:
If you plan to plant directly into the pot, seal the inside with a waterproof sealant to prevent moisture from bubbling your exterior paint. -
Seal the exterior:
Apply a coat of clear matte sealant spray over the entire exterior. This protects the paint from scratches and water damage while maintaining that flat, earthy look. -
Final cure:
Allow the sealant to cure for at least 24 hours before adding soil and your favorite plant.
Enjoy the calming vibes your new custom planter brings to your space


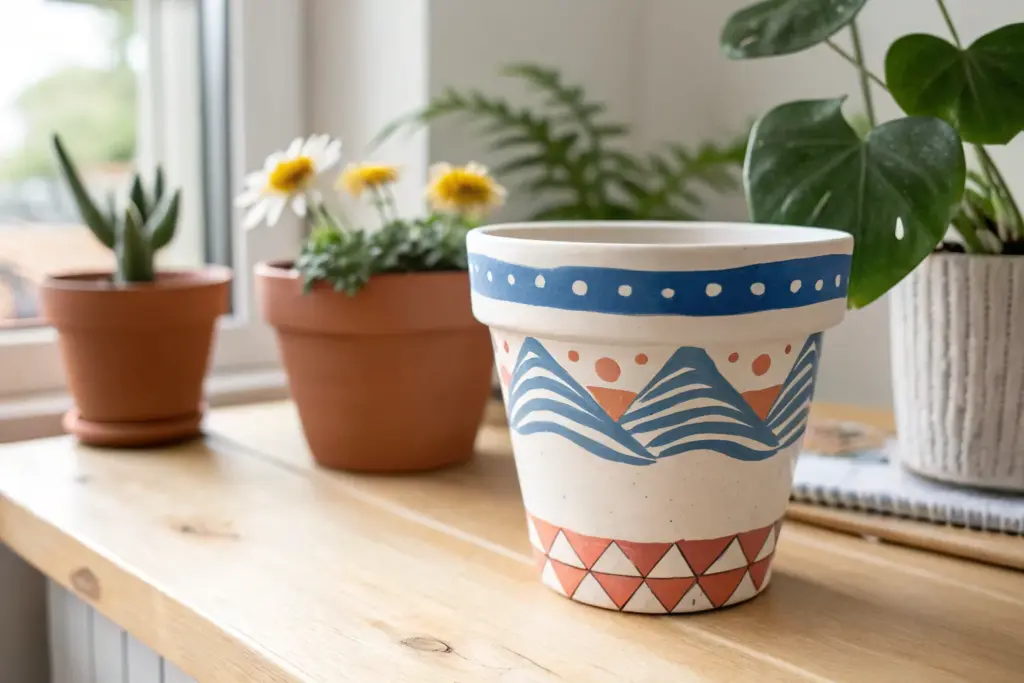
Crisp Tape Stripes and Zigzags
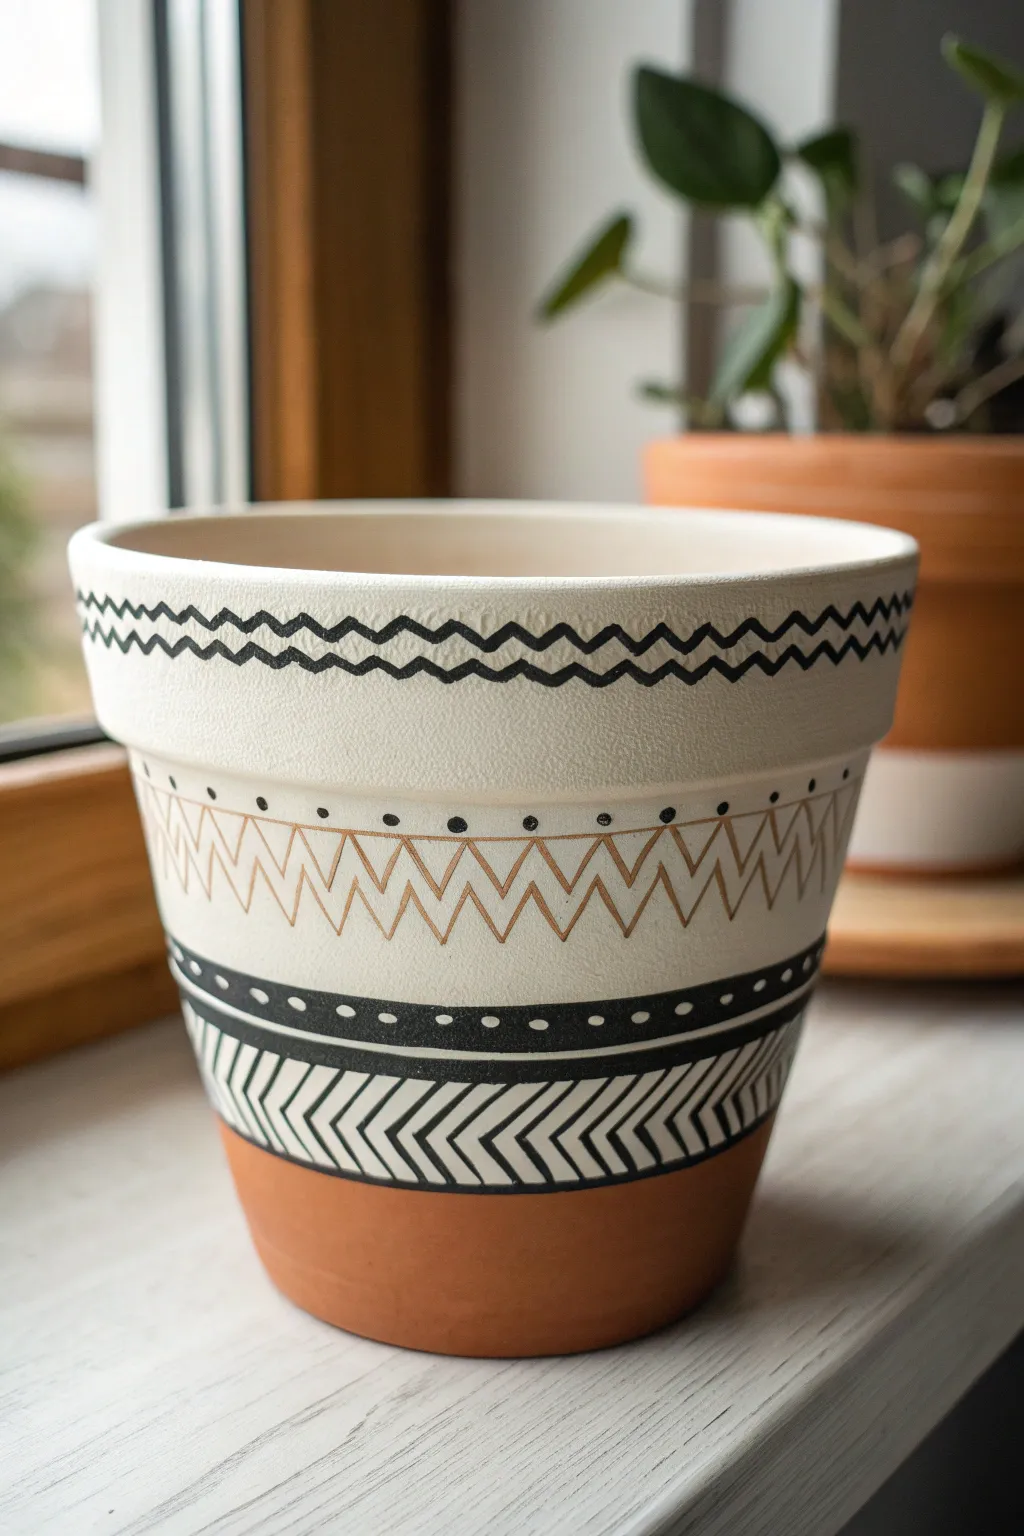
Transform a plain terracotta pot into a modern bohemian statement piece using crisp lines and geometric flair. This design combines raw clay warmth with creamy white paint and intricate black and gold detailing for a sophisticated finish.
Step-by-Step Guide
Materials
- Terracotta pot (cleaned and dried)
- Cream or off-white acrylic craft paint
- Black acrylic craft paint or black paint marker (fine tip)
- Gold metallic paint marker
- Painter’s tape or masking tape (various widths)
- Flat paintbrush (1-inch width)
- Small round detail brush (optional)
- Pencil and eraser
- Ruler or flexible measuring tape
- Matte or satin clear sealant spray
Step 1: Base Preparation
-
Deep clean the surface:
Before starting, ensure your terracotta pot is completely free of dust and stickers. Scrub it gently with warm water and let it dry overnight to prevent moisture from trapping under the paint. -
Tape off the base:
Decide how much of the raw terracotta you want to tackle. For this look, apply a strip of painter’s tape around the lower circumference of the pot, leaving about the bottom quarter exposed. -
Seal the tape edge:
Run your thumbnail or a credit card firmly along the edge of the tape to ensure a tight seal. This is crucial for crisp lines later. -
Apply the base coat:
Using a wide flat brush, paint the entire area above the tape with your cream acrylic paint. Don’t worry about the inside rim yet. -
Layer for opacity:
Terracotta is porous and drinks up paint, so I usually apply 2-3 coats. Let each layer dry completely to the touch before adding the next to avoid streaks. -
Remove the tape:
Ideally, peel off the tape while the final coat of cream paint is still slightly tacky. This helps prevent the paint from chipping at the line.
Clean Lines Secret
Apply a thin layer of the base color over your tape edge first. This seals the gap, ensuring the next color doesn’t bleed underneath.
Step 2: Detailed Patterning
-
Pencil the guidelines:
Once the base is bone dry, lightly sketch horizontal guide rings around the pot with a pencil. You’ll need guidelines for the rim zigzags, the middle gold section, and the lower band. -
Paint the top zigzags:
At the very top rim, use a fine-tip black paint marker to draw two parallel zigzag lines. Try to keep your hand steady and connect your peaks and valleys consistently. -
Create the dot row:
Just below the rim of the pot, draft a horizontal line. Along this line, place evenly spaced black dots using the tip of your marker or the back end of a small paintbrush dipped in black paint. -
Draft the central geometric band:
In the middle section, draw a larger zigzag pattern in pencil first. This will be the gold feature area. -
Apply gold accents:
Trace over your pencil zigzag with a gold metallic paint marker. To add depth, draw vertical lines dropping down from each upper point of the zigzag, creating a series of connected triangles. -
Define the lower black band:
Paint a solid black band about half an inch thick below the gold section. Use painter’s tape again here if you want perfectly straight edges, or freehand it for an organic look. -
Add detailing to the black band:
Once the black band is dry, take a white paint marker or a tiny brush with cream paint and add small white dots along the center of the black stripe. -
create the herringbone base:
Below the solid black band, draw two parallel horizontal lines. Fill the space between them with a herringbone or chevron pattern using your black marker. -
Detail the chevron:
For the specific look in the photo, draw angled lines that meet in the center, resembling arrows pointing to the right. Keep the spacing tight for a dense, graphic effect.
Step 3: Finishing Touches
-
Clean up sketch lines:
Gently erase any visible pencil marks that weren’t covered by paint. Be sure the paint is fully cured before rubbing an eraser over it. -
Seal the artwork:
To protect your design from water damage when watering your plant, finish by spraying the entire pot (inside and out) with a matte clear acrylic sealer.
Creative Twist
Swap the gold marker for a bright neon color like hot pink or electric blue for a modern, pop-art version of this earthy design.
Place your favorite succulent or leafy plant inside to complete this stylish, handcrafted display


Playful Polka Dots in Mixed Sizes
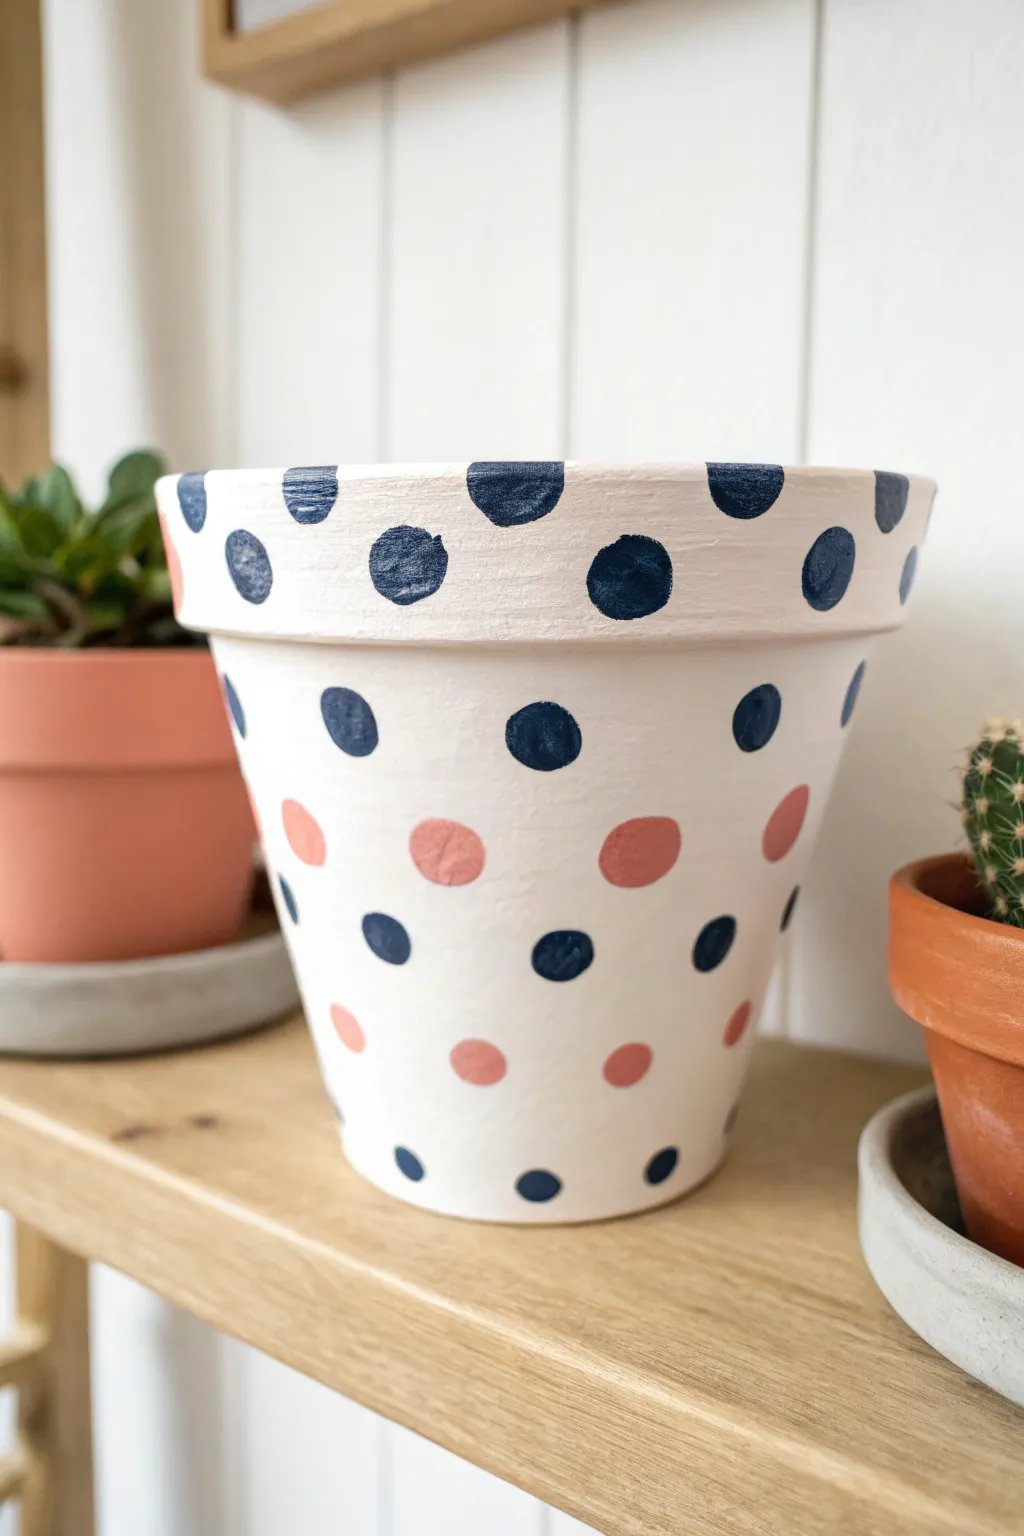
Transform a plain terracotta pot into a modern statement piece with this crisp polka dot design. The contrasting navy and soft coral dots on a creamy white background create a playful yet sophisticated look perfect for succulent gardens.
Step-by-Step
Materials
- Terracotta pot (standard size)
- Acrylic craft paint (Cream/Off-White)
- Acrylic craft paint (Navy Blue)
- Acrylic craft paint (Coral/Salmon Pink)
- Foam sponge pouncers (varying sizes: small and medium)
- Flat paintbrush (1-inch width)
- Small detail brush (optional for touch-ups)
- Painter’s palette or paper plate
- Water cup and paper towels
- Clear matte acrylic sealer (spray or brush-on)
Step 1: Base Coat Preparation
-
Clean the surface:
Before you begin painting, wipe down your terracotta pot with a damp cloth to remove any dust or loose clay particles. Let it dry completely so the paint adheres properly. -
Apply the first base layer:
Using your flat paintbrush, apply a generous coat of the cream or off-white acrylic paint. Cover the entire exterior of the pot, including the top rim and just inside the upper lip where soil won’t reach. -
Let it dry:
Allow the first coat to dry for about 15-20 minutes. Terracotta sucks up moisture quickly, so the first layer often looks streaky or translucent. -
Add a second coat:
Apply a second, even layer of the cream paint. I always like to brush in the opposite direction of the first coat—usually vertically—to help eliminate brushstrokes and ensure solid opacity. -
Check for coverage:
Inspect the pot for any spots where the orange clay is peeking through. If necessary, dab on a third light coat for a perfectly smooth, white canvas.
Step 2: Stamping the Rim
-
Prepare the blue paint:
Squeeze a dollop of navy blue acrylic paint onto your palette. It shouldn’t be too thick; if it is, mix in a tiny drop of water to improve flow. -
Load the sponge pouncer:
Take a medium-sized foam pouncer and dip the flat face into the navy paint. Dab it onto a clean part of the palette a few times to evenly distribute the paint and remove excess globs. -
Stamp the rim pattern:
Press the foam pouncer firmly onto the rim of the pot to create your first dot. Continue stamping dots around the entire circumference of the rim, spacing them about an inch apart. -
Wrap the dots:
Notice how the dots on the rim in the image wrap over the edge. Don’t be afraid to let your pouncer hang off the top or bottom edge of the rim slightly for a dynamic, printed fabric look.
Uneven Circles?
If your sponge slips and smudges a circle, don’t wipe it wet! Let it dry fully, sand the smudge lightly, paint over it with the base cream color, and re-stamp.
Step 3: Creating the Body Pattern
-
Start the first body row:
Switch to a slightly smaller pouncer if you have one, or stick with the same size. Using the navy blue paint, stamp a row of dots just under the rim. Position these dots in the spaces *between* the dots on the rim above to start a staggered pattern. -
Introduce the coral color:
Clean off your pouncer or grab a fresh one. Load it with the coral/salmon pink paint, dabbing off excess just like before. -
Stamp the middle row:
Create the next horizontal row of dots using the coral paint. Again, stagger the placement so each pink dot sits roughly centered below the gap between the two blue dots above it. -
Return to navy blue:
Load up your navy blue pouncer again. Stamp a third row of dots below the pink row, maintaining that alternating brick-lay pattern. -
Finish the bottom row:
Depending on the height of your pot, add a final row of dots near the base. In the example, this row reverts to coral pink, but you can finish with whichever color fits your spacing best. -
Touch up edges:
Sometimes foam pouncers leave small bubbles or translucent centers. Use a small detail brush dipped in the appropriate color to fill in the centers of the dots for a solid, opaque finish. -
Clean up stray marks:
If any paint smudged onto the white background, wait for it to dry completely, then use a tiny brush with white paint to carefully cover the mistake.
Make it Metallic
Swap the coral paint for metallic gold or copper. The shimmer adds a glamorous touch that contrasts beautifully with the matte navy and white background.
Step 4: Sealing and Finishing
-
Dry completely:
Let the polka dots dry for at least an hour. Thick dots from pouncers can take longer to cure than thin brush layers. -
Apply sealer:
To protect your design from water damage when watering plants, apply a coat of clear matte acrylic sealer over the entire painted surface. -
Final cure:
Allow the sealer to cure fully according to the bottle instructions (usually 24 hours) before potting your plant.
Now your stylish new pot is ready to give your favorite houseplant a happy home

The Complete Guide to Pottery Troubleshooting
Uncover the most common ceramic mistakes—from cracking clay to failed glazes—and learn how to fix them fast.
Easy Daisy and Wildflower Petals
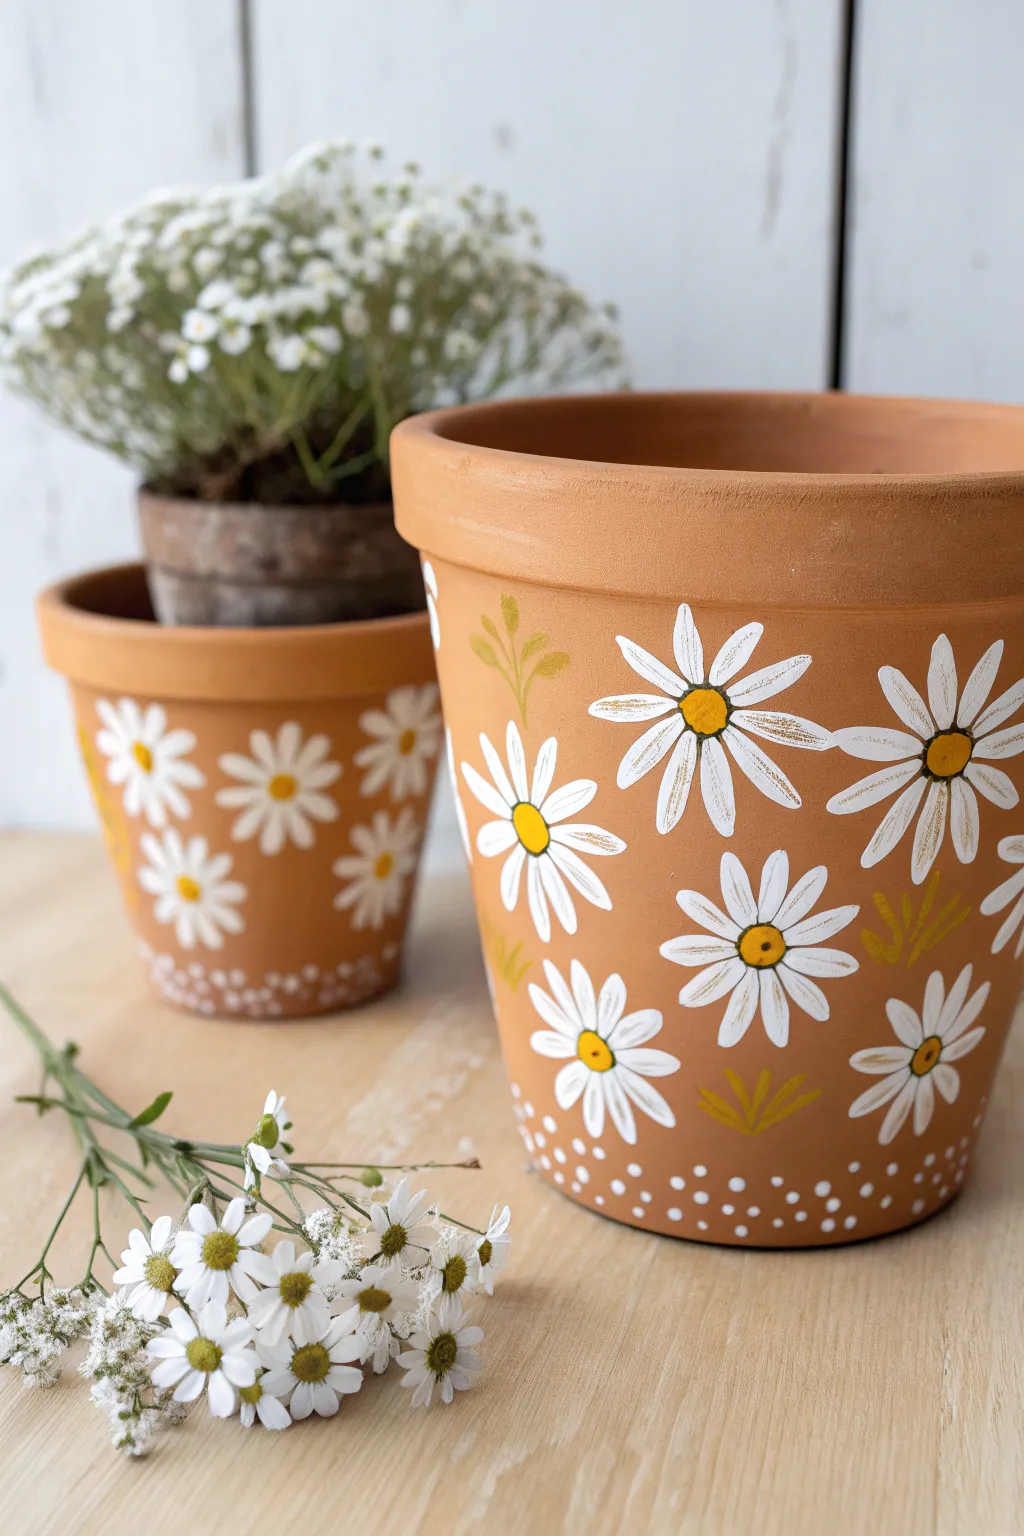
Brighten up your indoor garden with these charming hand-painted terracotta pots featuring a cheerful field of daisies. The design combines crisp white petals with sunny yellow centers and subtle foliage accents for a look that is both rustic and refined.
Step-by-Step Guide
Materials
- Terracotta pots (various sizes)
- White acrylic paint (high opacity)
- Yellow ochre or golden yellow acrylic paint
- Olive green acrylic paint
- Round tip paintbrushes (sizes 2 and 4 for petals)
- Fine detail brush (size 0 or 00 for outlines)
- Dotting tool or toothpick
- Palette or paper plate
- Water cup and paper towels
- Matte sealant spray (optional)
Step 1: Preparing the Canvas
-
Clean the surface:
Begin by wiping down your terracotta pots with a damp cloth to remove any dust or manufacturing residue. Let them dry completely, as moisture will prevent the acrylics from adhering properly. -
Plan the layout:
Visualize where your main flower heads will go. You don’t need to sketch them, but imagine a random, staggered pattern so the flowers aren’t perfectly aligned in rows.
Pro Tip: Opacity Hack
If your white paint looks streaky on the clay, paint the petal shapes in a light grey or cream first. Once dry, layer the bright white on top for solid coverage.
Step 2: Painting the Blooms
-
Load the brush:
Load a size 4 round brush with a generous amount of white acrylic paint. You want the paint to be fluid but opaque. -
Paint the first petal:
Starting near the imaginary center of a flower, press the brush down and pull outward, lifting pressure as you reach the tip to create a tapered petal shape. -
Complete the flower head:
Continue painting petals in a radial pattern around the center point. Aim for 10-14 petals per flower to get that full daisy look shown in the photo. -
Add variety:
Paint some flowers fully open and others slightly tilted by shortening the petals on one side. Vary the sizes of the flowers as you move around the pot. -
Second coat:
Terracotta is porous and absorbs paint. Once the first layer is dry to the touch, apply a second coat of white to the petals to ensure they pop against the clay background. -
Create the centers:
Dip a smaller round brush into your yellow ochre paint. Dab a solid circle into the center of each white flower, covering the convergence point of the petals. -
Add dimension:
For a little extra depth, you can mix a tiny bit of white into your yellow and add a small highlight dot to the top right of each yellow center.
Troubleshooting: Shaky Lines?
If struggling with the fine outlines, try using an extra-fine tip black paint pen or permanent marker instead of a brush. It offers much more control.
Step 3: Details & Foliage
-
Paint delicate leaves:
Using your olive green paint and a fine detail brush or the tip of your size 2 brush, paint small, simple sprigs of leaves in the empty brown spaces between flowers. -
Leaf shape technique:
Use a single stroke for each leaf: press down at the base and flick upward quickly. Keep these accents sparse so they don’t overpower the daisies. -
Outline the petals:
This step is crucial for the illustrative style. Take your finest detail brush (size 00) and very slightly watered-down black or dark grey paint. Carefully outline the white petals and the yellow centers to define the edges. -
Keep outlines loose:
Don’t worry about perfect continuous lines; broken or sketchy lines actually add to the hand-painted charm. -
Detail the centers:
Add tiny black dots or small ‘C’ curves inside the yellow centers to simulate the texture of pollen.
Step 4: Finishing Touches
-
Create the bottom border:
Dip a dotting tool or the handle end of a paintbrush into white paint to create the decorative border. -
Dot the rim:
Stamp a row of small dots around the very bottom edge of the pot. I like to vary the spacing slightly to keep it organic. -
Add randomized dots:
Add a few more dots scattered just above the bottom row, fading upward into the main design area like falling snow. -
Seal the work:
If you plan to use these outdoors or with real plants that require watering, spray the entire pot with a clear matte sealant once the paint is fully cured.
Fill your new pots with fresh herbs or wildflowers to complete this lovely spring display
Botanical Leaves in a Wraparound Border
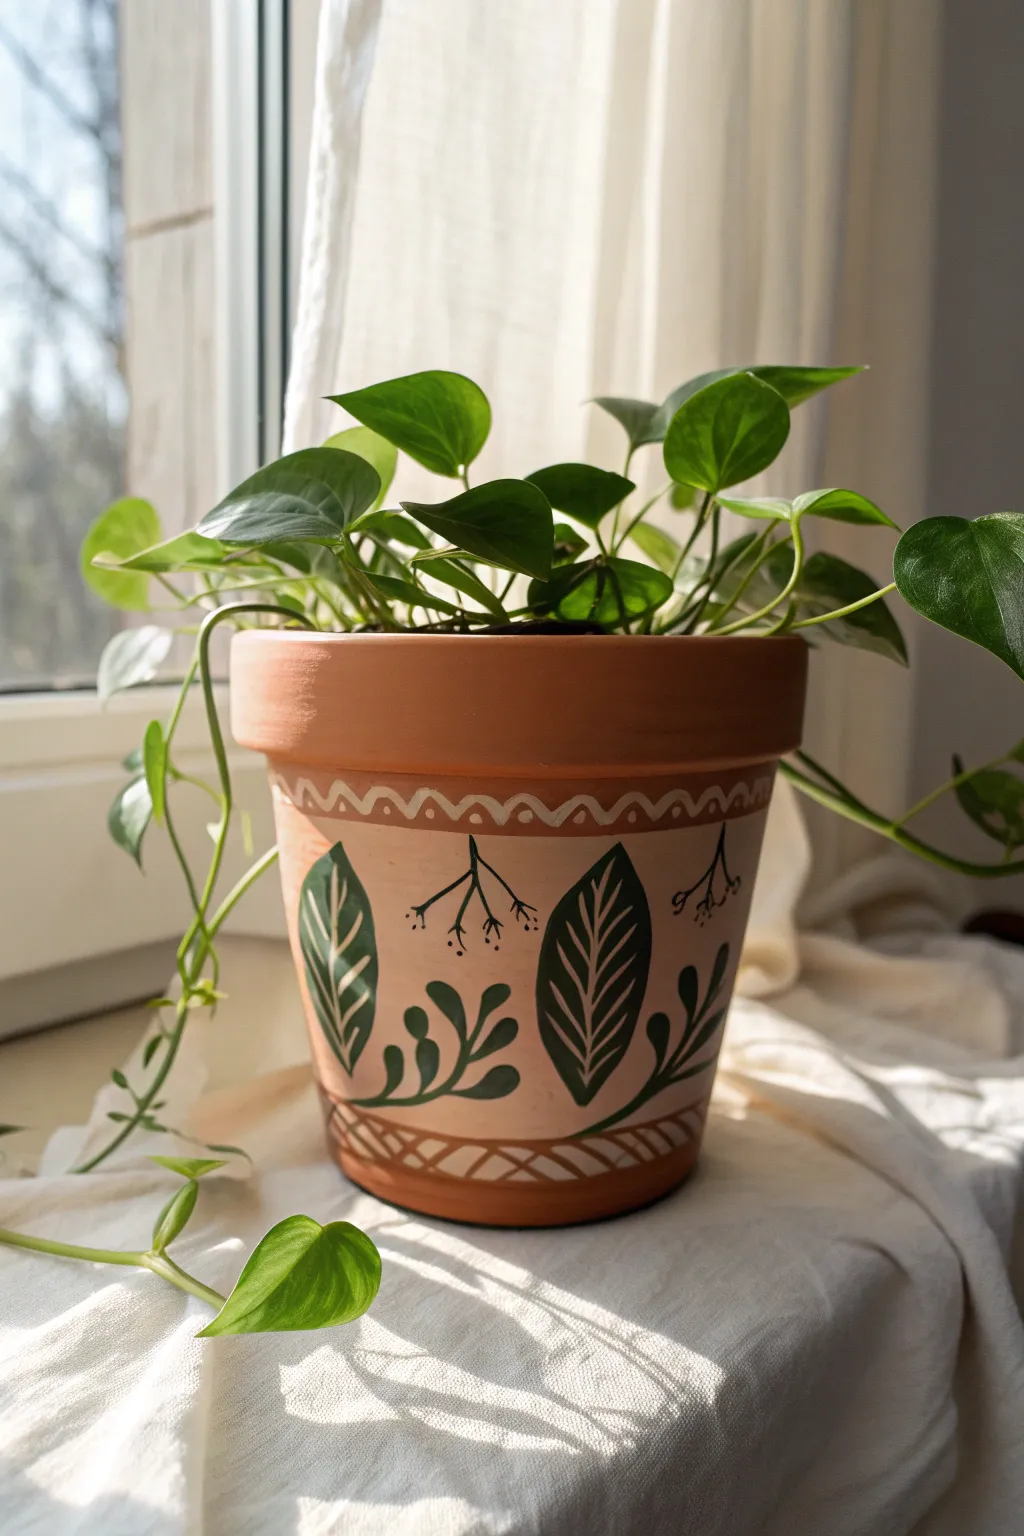
Transform a plain terracotta vessel into a stylish home for your greenery with this elegant leaf motif. The design features bold green leaves and delicate linework set against a soft peach background, creating a warm, organic look that complements any houseplant.
Step-by-Step
Materials
- Terracotta pot (standard size)
- Flesh-tone or soft peach acrylic paint
- Dark forest green acrylic paint
- White or cream acrylic paint
- Black acrylic paint or fine tip paint pen
- Flat paintbrush (medium width)
- Round detail brushes (small and fine liner)
- Pencil for sketching
- Matte spray sealer (optional)
Step 1: Base Preparation
-
Clean and dry:
Before you begin, ensure your terracotta pot is completely clean and dry. Wipe away any dust with a damp cloth and let it air dry so the paint adheres properly. -
Paint the background band:
Using a flat medium brush, apply the flesh-tone or soft peach acrylic paint to the main body of the pot. Leave the heavy rim and the very bottom edge unpainted to show the natural terracotta clay. -
Build opacity:
Apply a second or third coat of the peach paint as needed to get a solid, opaque finish. Allow the paint to dry completely between coats to prevent streaking.
Step 2: Sketching the Design
-
Mark the layout:
Once the base coat is bone dry, lightly use a pencil to mark where your large leaves will go. Space them evenly around the circumference of the pot. -
Sketch the wave border:
Just under the pot’s rim, lightly sketch a continuous wavy line. This will act as a guide for your white decorative border later. -
Outline the cross-hatch base:
Near the bottom edge of the painted section, pencil in two parallel horizontal lines about a half-inch apart to define the bottom border area.
Pro Tip: Smooth Curves
For the scallop border, turn the pot slowly with one hand while holding your brush hand steady in one spot. This creates smoother lines than moving your hand.
Step 3: Painting the Greenery
-
Block in the main leaves:
Load a small round brush with dark forest green paint. Carefully fill in the large, almond-shaped leaf outlines you sketched earlier. Keep the edges crisp and smooth. -
Add the vine details:
Between the large standing leaves, paint smaller, curving vines with rounded leaflets. These should look like they are sprouting from the bottom border, creating a rhythmic pattern. -
Detail the large leaves:
Once the green leaves are dry, use a very fine liner brush with the peach base color (or white) to paint the veins inside the large leaves. A simple central line with diagonal veins works perfectly. -
Paint thin black stems:
Using a fine liner brush with black paint (or a paint pen), add delicate, twig-like structures sticking up between the foliage. Top these thin lines with tiny dots to resemble berries or buds.
Troubleshooting: Streaky Paint
If your peach base looks streaky, don’t keep brushing wet paint. Let it dry completely, then add another thin layer. Several thin coats are better than one thick one.
Step 4: Adding Borders
-
Paint the top scallop:
With a steady hand and a small round brush, paint over your pencil wave line near the rim using white or cream paint. Make the line thick enough to stand out. -
Add circle accents:
Inside each dip of the white wave, add a small white dot. Above each peak of the wave, add a small white circle outline to complete the intricate top border. -
Create the bottom border:
Paint the two parallel lines at the bottom in white. I like to use my pinky finger against the table to stabilize my hand while rotating the pot for straight lines. -
Fill the cross-hatching:
Paint diagonal white lines inside the bottom parallel bands to create a lattice or cross-hatch effect. This grounds the design beautifully.
Step 5: Finishing Touches
-
Clean up edges:
Check the edges where the painted section meets the raw terracotta rim and base. Use a small brush with the appropriate color to touch up any messy lines. -
Erase pencil marks:
Gently erase any visible pencil lines that weren’t covered by paint, making sure the paint is totally cured first so you don’t smudge it. -
Seal the pot:
To protect your artwork from water damage during watering, apply a coat of matte spray sealer over the entire outside of the pot.
Place your favorite trailing plant inside and enjoy the handmade charm this pot adds to your windowsill


What Really Happens Inside the Kiln
Learn how time and temperature work together inside the kiln to transform clay into durable ceramic.
Modern Color-Block Shapes

Transform a plain terracotta pot into a modern statement piece with this warm, geometric design. By combining soft blush tones with crisp white angles and earthy orange accents, you’ll create a lively vessel that perfectly complementing your favorite houseplants.
How-To Guide
Materials
- Terracotta pot (clean and dry)
- Acrylic craft paints: White or Cream, Light Blush/Peach, Terracotta/Coral, Burnt Orange
- Painter’s tape (various widths)
- Flat paint brushes (small and medium)
- Small fine-detail round brush
- Pencil
- Ruler or measuring tape
- Water cup and paper towels
- Clear matte sealer spray
Step 1: Base Preparation
-
Clean the surface:
Before laying down any color, ensure your terracotta pot is free of dust and debris. Wipe it down with a damp cloth and let it dry completely so the paint adheres properly. -
Map out the sections:
Using a pencil and ruler, lightly mark horizontal lines around the pot to divide it into three main zones: a top rim section, a wide middle band for the triangles, and a bottom band.
Step 2: Applying Background Colors
-
Paint the top band:
Start by painting the very top rim of the pot with your creamy white paint. Extend this color slightly down into the top of the middle section to ensure coverage. -
Paint the bottom section:
Apply the coral or terracotta-colored paint to the bottom third of the pot. Use smooth, horizontal strokes to create a solid foundation. -
Let it dry:
Allow these base layers to dry fully. Acrylics on terracotta dry quickly, but give it at least 20 minutes to prevent smudging.
Uneven Lines?
If your straight lines look shaky, use painter’s tape or washi tape to mask them off. Press the edges down firmly to prevent bleed-under for a crisp finish.
Step 3: Creating the Triangles
-
Draft the triangle grid:
Within the wide middle band, use your pencil to mark lighter zig-zag lines. You want to create a row of alternating triangles—some pointing up, some pointing down. -
Paint the downward triangles:
Fill in the triangles that point downward with the light blush or peach paint. Use a flat brush to get crisp edges along your pencil lines. -
Paint the upward triangles:
Next, fill the upward-pointing triangles with the creamy white paint. Be careful where the two colors meet; a steady hand or a strip of painter’s tape can help keep the lines straight. -
Refine the edges:
Go over the edges where the blush and white meet to ensure solid opacity. I prefer a second coat here to make the white really pop against the clay.
Mix It Up
Change the palette for different vibes. Try navy, teal, and gold for a luxe look, or sage green and forest green for an organic, monochromatic style.
Step 4: Adding the Semi-Circles
-
Outline the arches:
At the base of each white upward-pointing triangle, sketch a semi-circle shape. This will look like a setting sun resting on the bottom band line. -
Fill the arches:
Using the burnt orange paint and a small round brush, carefully fill in these semi-circles. Take your time on the curved upper edge to keep it smooth. -
Clean up the bottom line:
If painting the semi-circles made the bottom line messy, use a fine detail brush with white paint to draw a thin, crisp horizontal stripe separating the triangle section from the bottom coral band.
Step 5: Finishing Touches
-
Check for imperfections:
Rotate the pot and look for any spots where the terracotta shows through unintentionally or where lines are wobbling. Touch up with the appropriate color using your smallest brush. -
Create the splatter effect (optional):
For that textured, ceramic look seen in the photo, dip an old toothbrush or stiff brush into brown paint, flick the bristles with your thumb to create tiny speckles over the white and blush areas. -
Final dry time:
Let the entire pot cure for at least an hour to ensure all layers are hardened. -
Seal the deal:
Take the pot to a well-ventilated area and specific a coat of clear matte sealer. This protects your hard work from water damage and fading.
Once filled with soil and greenery, your new pot will bring a sunny, artistic touch to any corner of your home
Speckled Terrazzo-Inspired Paint Finish
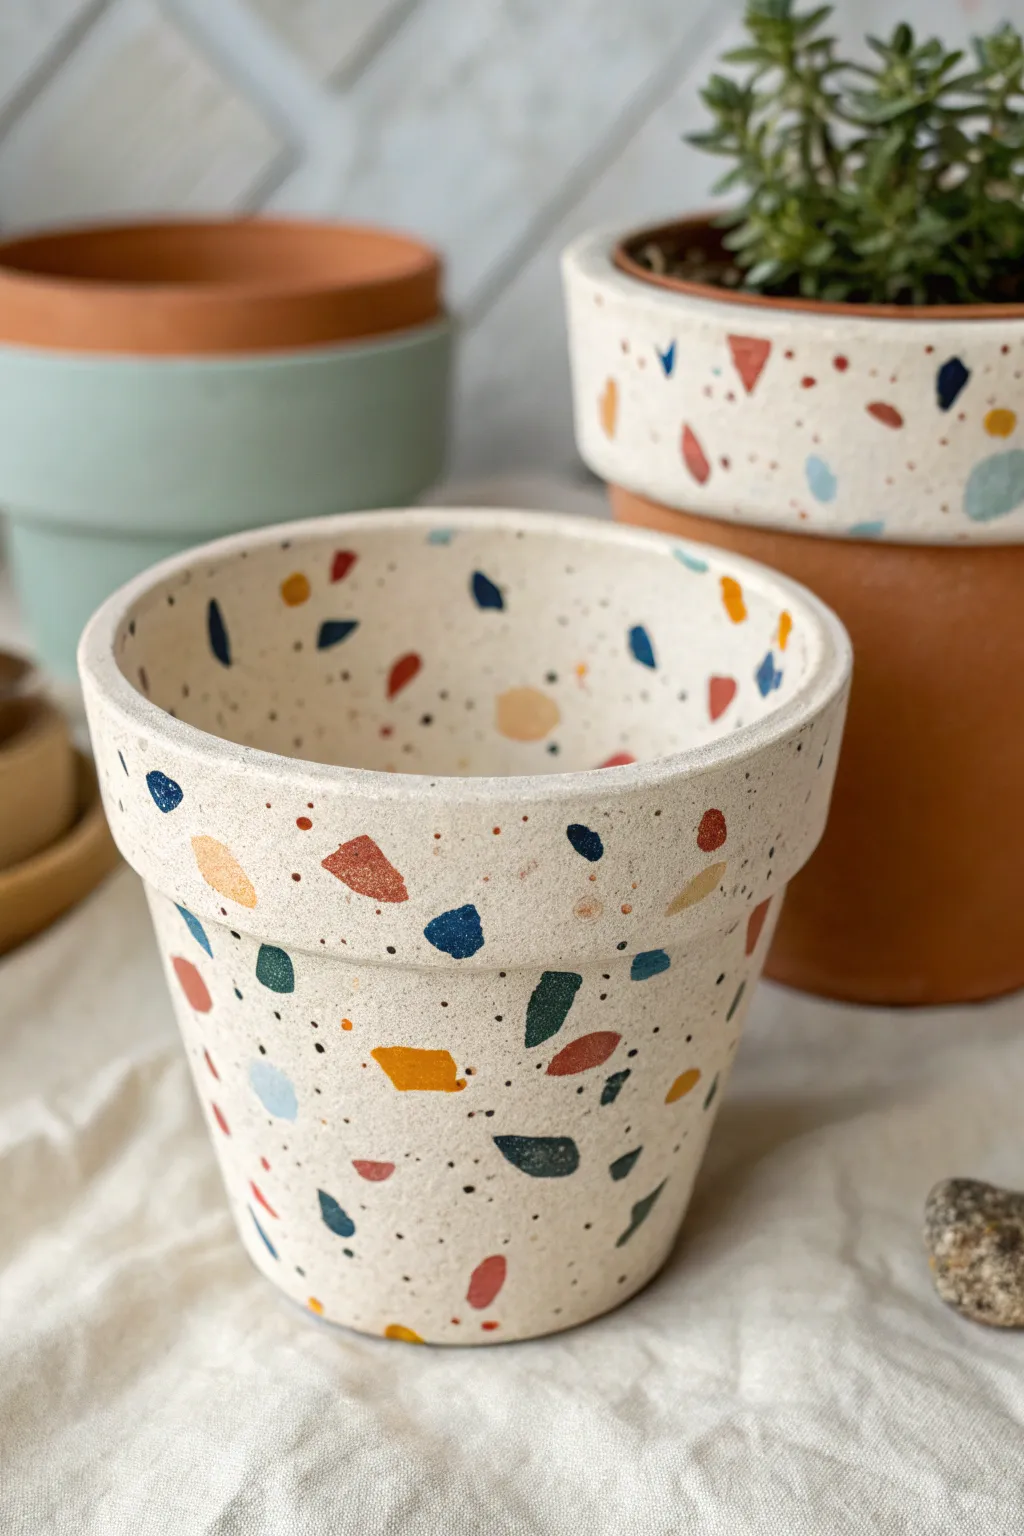
Bring the high-end look of terrazzo to a humble terracotta pot using nothing but paint. This project layers creamy neutrals with irregular, colorful geometric shapes and fine speckles to create a textured finish that looks convincingly like real stone.
Step-by-Step Guide
Materials
- Terracotta pot
- Primer spray or white acrylic paint
- Cream or off-white acrylic paint (base color)
- Acrylic paints in accent colors (mustard yellow, navy blue, terracotta red, teal, rust)
- Small flat brush (size 2 or 4)
- Old toothbrush
- Palette or paper plate
- Water cup
- Matte spray sealer
Step 1: Base Coat Preparation
-
Clean the surface:
Before you begin, ensure your terracotta pot is completely clean and dry. Wipe away any dust with a damp cloth and let it air dry for a few minutes to ensure the paint adheres properly. -
Priming the pot:
Apply a coat of primer or white acrylic paint to the exterior of the pot and the inner rim. This neutralizing layer prevents the orange clay color from altering your lighter base shades later on. -
Applying the cream base:
Once the primer is dry, paint the entire exterior with your chosen cream or off-white acrylic paint. You want a nice, opaque finish, so plan on applying two to three thin coats rather than one thick, gloopy one. -
Check for coverage:
Inspect the pot for any streaks or transparent spots. Since terrazzo is meant to look like a solid composite material, a consistent background color is key to the illusion. Touch up as needed.
Step 2: Creating the Terrazzo Chips
-
Plan your palette:
Squeeze dime-sized amounts of your accent colors onto your palette. For this specific look, aim for a mix of warm tones like mustard and rust, balanced with cool tones like teal and navy. -
Painting the first shapes:
Dip your small flat brush into your first color—perhaps the navy blue. Paint random, irregular geometric shapes around the pot. Think triangles with clipped corners, uneven trapezoids, or shards. Avoid perfect circles or squares. -
Rotational painting:
Rotate the pot frequently as you work. This prevents you from concentrating one color too heavily in a single area. Space these shapes out generously, leaving plenty of cream background visible. -
Adding the second color:
Clean your brush thoroughly and switch to the terracotta red or rust shade. Paint similar shard-like shapes, placing some near the blue ones but never touching them. Vary the sizes; some chips should be large, others tiny. -
Incorporating lighter tones:
Introduce your lighter accent colors, such as mustard yellow or pale teal. I find that layering these lighter colors near darker ones creates a nice sense of depth and contrast. -
Painting the rim:
Don’t forget to carry your pattern over the top lip and into the inner rim of the pot. This makes the material look solid all the way through, rather than just painted on the outside. -
Review and refine:
Step back and look at the overall distribution. If there are large empty spaces, fill them with smaller chips of whatever color seems underrepresented. The pattern should feel random but balanced.
Natural Stone Look
Keep your painted ‘chips’ angular and sharp-edged. Soft, round shapes look like polka dots, while jagged, straight edges mimic crushed stone aggregate much better.
Step 3: Adding Texture and Sealing
-
Preparing the splatter:
To mimic the sandy grit found in real terrazzo, mix a very dark grey or black paint with a few drops of water to create an inky consistency. -
The toothbrush technique:
Dip the bristles of an old toothbrush into this watered-down mixture. Test the splatter on a piece of scrap paper first by running your thumb over the bristles. -
Applying the speckles:
Hold the toothbrush about 6 inches from the pot and flick the bristles to spray fine mist and tiny dots over the entire surface. This ties all the colorful shapes together. -
Adding a secondary splatter:
For extra dimension, repeat the splatter process with a second color, perhaps a watered-down version of your rust or mustard paint. This adds subtlety to the texture. -
Final drying time:
Allow the pot to sit undisturbed until every layer of paint is completely bone dry. This usually takes at least an hour, especially if the splatter was heavy. -
Sealing the work:
Finish by spraying the pot with a clear matte sealer. A glossy finish tends to look plastic, whereas matte preserves the natural, stone-like aesthetic we are aiming for.
Level Up: Texture
Mix a small pinch of baking soda into your cream base coat paint. This creates a gritty, physical texture that feels like real stone when you run your hand over the finished pot.
Now you have a stylish, modern planter that looks like it came from a boutique shop for a fraction of the price

TRACK YOUR CERAMIC JOURNEY
Capture glaze tests, firing details, and creative progress—all in one simple printable. Make your projects easier to repeat and improve.
Abstract Squiggles and Doodles With Paint Pens
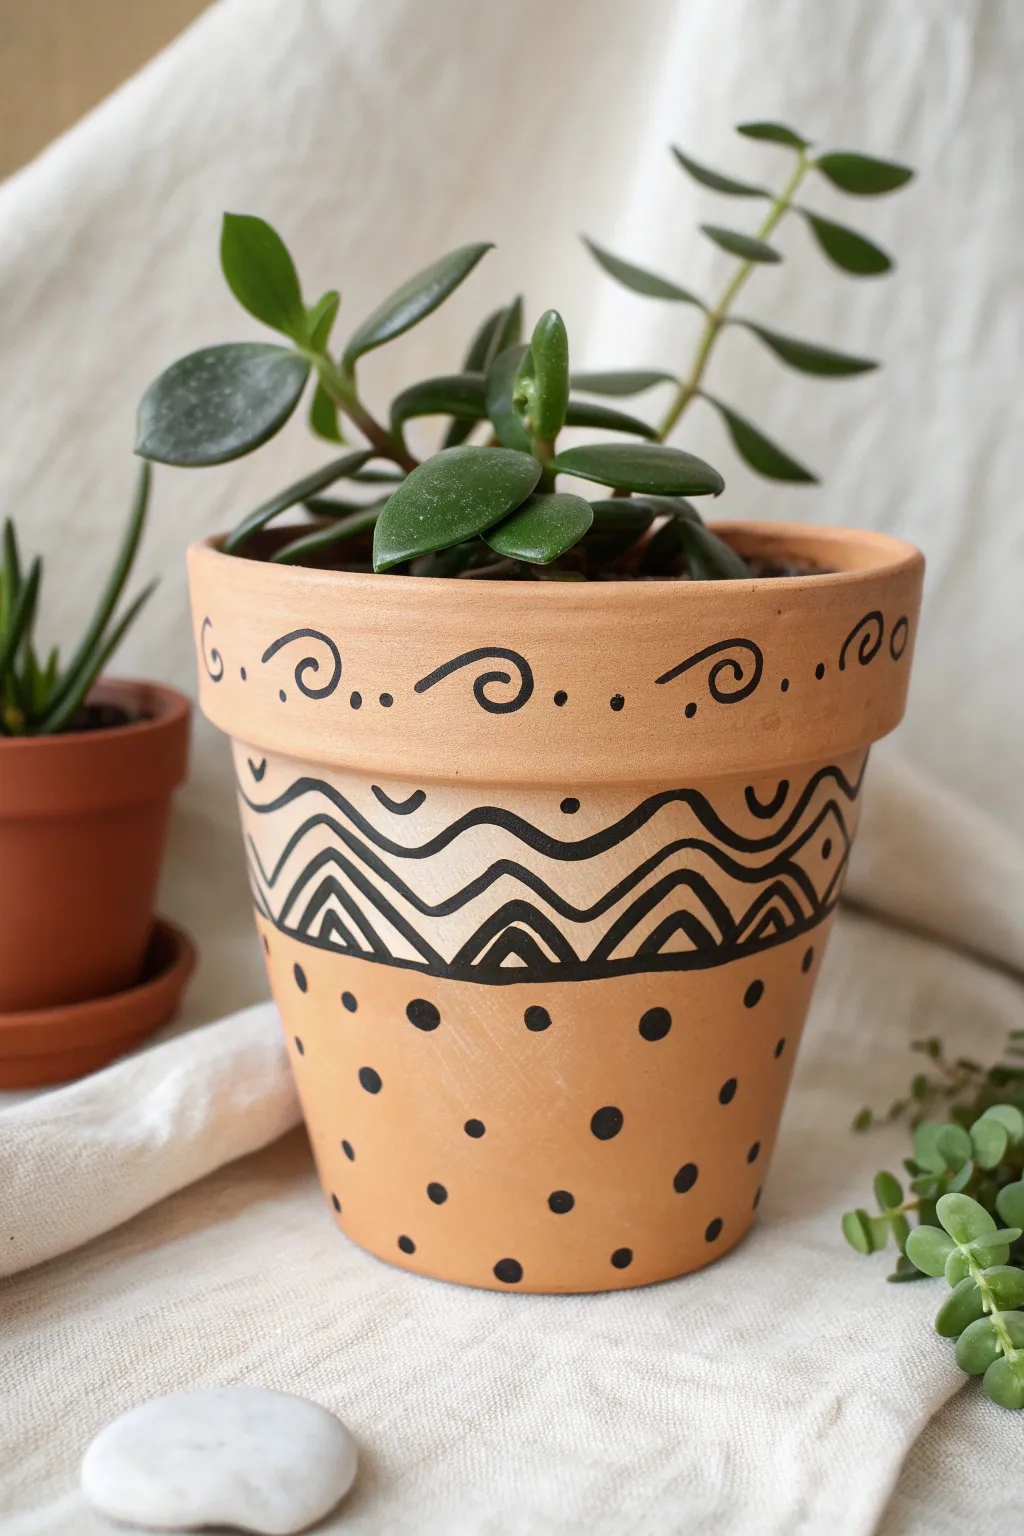
Transform a plain terracotta planner into a stylish, bohemian-inspired piece using simple geometric patterns and high-contrast details. This project combines waves, zigzags, and playful polka dots for a look that feels both modern and hand-crafted.
How-To Guide
Materials
- Clean terracotta pot (standard rimmed shape)
- Black acrylic paint pen (medium tip)
- Black acrylic paint pen (fine tip, optional)
- Pencil
- Eraser
- Paper towel or rag
- Sealant spray (matte or satin finish)
Step 1: Preparation
-
Clean the surface:
Ensure your terracotta pot is completely clean and dry before starting. Wipe away any dust or loose clay particles with a slightly damp paper towel, then let it air dry for at least 15 minutes. -
Pattern planning (optional):
If you are nervous about freehanding, lightly sketch your main dividing lines with a pencil. Mark a horizontal line just under the rim and another about two inches down the body of the pot to create the central band.
Uneven Ink Flow?
If the paint pen starts skipping on the rough clay, press the tip down on a scrap piece of cardboard a few times to re-saturate the nib before continuing on the pot.
Step 2: Painting the Rim
-
Draw the rim spirals:
Using your medium-tip black paint pen, start on the flat vertical surface of the rim. Draw a series of loose, horizontal spirals that curl inward. Aim for consistent spacing, leaving about an inch between each spiral. -
Connect with dots:
In the spaces between each spiral, add two simple black dots. These should sit horizontally aligned with the spirals to create a continuous visual flow around the top. -
Add rim accents:
Place a single small dot inside the center of every spiral loop you just drew, giving the design a finished, purposeful look.
Steadier Hands
Rest your painting hand’s pinky finger on the pot surface as you draw. It acts as an anchor and pivot point, giving you much smoother control over curved lines.
Step 3: Creating the Central Band
-
Define the borders:
Move down to the main body of the pot. Draw a wavy line horizontally around the pot, just under the rim’s shadow. Draw a matching second wavy line about an inch and a half below the first one. -
Double the lines:
Go back over your two wavy border lines and thicken them significantly, or draw a parallel line right next to them and fill in the gap so they are bold and distinct. -
Draw the central wave:
Exactly halfway between your top and bottom thick wavy borders, draw a thinner, single wavy line that mirrors the flow of the borders. -
Fill with zigzags:
In the space below the central thin wave, draw a sharp zigzag pattern. The peaks of the triangles should almost touch the central wave. -
Add inner triangles:
Inside each triangle created by your zigzag line, draw a smaller, floating triangle. This creates a geometric nesting doll effect. -
Decorate the upper section:
In the space *above* the central thin wave, draw small semi-circles or ‘U’ shapes that cup the dips of the wave. -
Upper section dots:
Place a single dot inside each of the ‘U’ shapes you just created in the upper band section.
Step 4: Finishing Touches
-
Start the lower polka dots:
For the bottom half of the pot, you’ll create a random but balanced polka dot pattern. I find it easiest to start with a row of dots just under the main design band. -
Fill the remaining space:
Continue adding medium-sized black dots down to the base. Try to stagger them so they don’t form perfect vertical columns, creating a more organic, scattered appearance. -
Check for consistency:
Rotate the pot and look for any dots that seem too faint. Go over them with a second coat of the paint pen if the terracotta is showing through too much. -
Erase pencil marks:
Allow the paint to dry completely (at least 30 minutes). Once dry, gently run an eraser over the pot to remove any visible pencil guidelines. -
Seal the artwork:
To protect your design from water damage when watering plants, spray the entire exterior with a clear matte or satin sealant in a well-ventilated area.
Pop in your favorite succulent or leafy plant to complete this charming display
Mandala Rim Detail for a Boutique Look
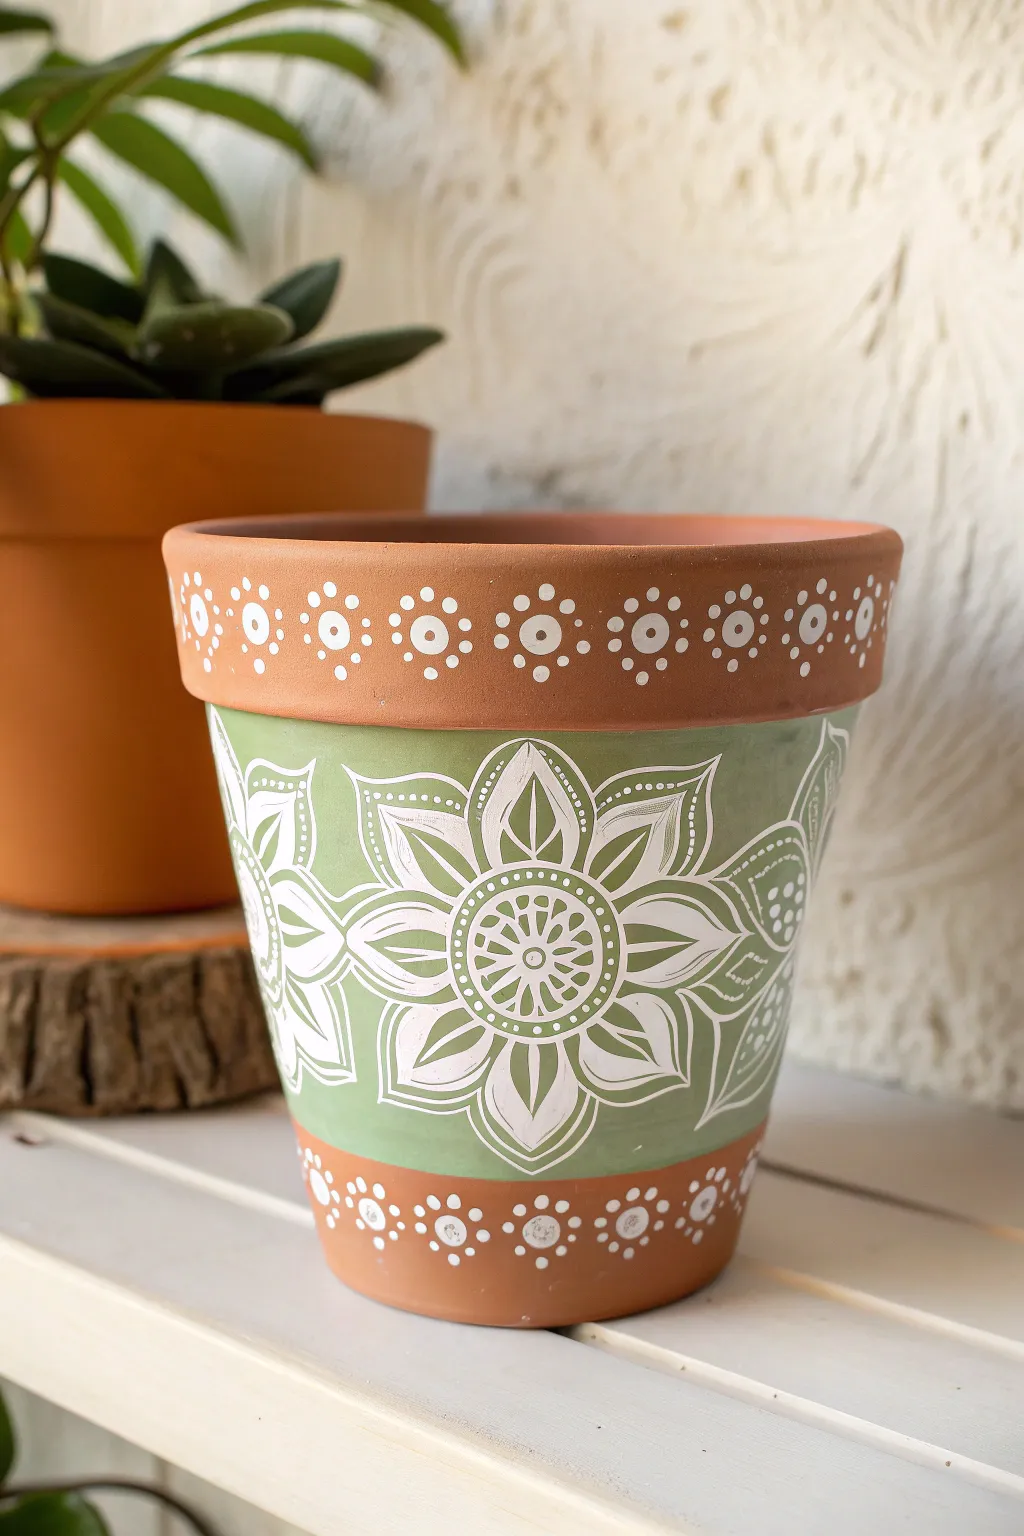
Transform a plain terracotta vessel into a boutique-worthy piece with this elegant design featuring soft sage green and intricate white line work. The combination of delicate floral mandalas and precise dot detailing creates a stunning contrast against the natural clay warmth.
Step-by-Step Guide
Materials
- Standard terracotta pot (4-6 inch diameter)
- Sage or olive green acrylic paint (matte finish)
- White acrylic paint or a white oil-based paint pen (fine tip)
- Flat paintbrush (1-inch width)
- Dotting tools (various sizes) or the end of a paintbrush/pencil
- Pencil and eraser
- Painter’s tape or masking tape
- Clear acrylic sealer (spray or brush-on, matte finish)
- Paper plate or palette
- Paper towels and water cup
Step 1: Preparation & Base Coat
-
Clean the surface:
Before starting, wipe your terracotta pot down with a damp cloth to remove any dust or loose clay particles. Let it dry completely to ensure the paint adheres properly. -
Mark the sections:
Decide how wide you want your green band to be. This design leaves the top rim and a small section at the very bottom as natural terracotta. Use a pencil to lightly mark where the rim ends. -
Video tape the boundaries:
Apply painter’s tape just under the rim lip and around the base, leaving the middle section exposed. Press the tape edges down firmly so paint doesn’t bleed underneath. -
paint the middle band:
Using your flat paintbrush, apply the sage green acrylic paint to the middle section of the pot. Brush horizontally for a smooth finish. -
Apply a second coat:
Terracotta is porous and soaks up paint quickly. Once the first layer is dry to the touch, apply a second coat of green to get a solid, opaque color. -
Remove the tape:
Carefully peel off the painter’s tape while the paint is still slightly tacky to achieve the crispest lines. Let the green band cure fully for at least an hour.
Clean Dots Trick
If your white paint is too thick, dots will leave “peaks” as you lift the tool. Mix in a single drop of water or acrylic medium to get perfect, smooth domes.
Step 2: Mandala Floral Design
-
Draft the center:
Lightly sketch a circle in the center of the green band with your pencil. This will serve as the core of your main flower. -
Add first petal layer:
Sketch small, rounded petals radiating directly from that center circle. Keep them evenly spaced. -
Draw outer petals:
Draw larger, pointed petals extending outward from the first layer. These should reach almost to the top and bottom edges of the green band. -
Trace with white:
Using a fine round brush with thinned white paint, or a white paint pen for better control, trace over your pencil lines. Start with the center circle and work outward. -
Add inner details:
Inside the large pointed petals, draw a smaller, varied shape—like a teardrop or a split leaf vein—to add complexity to the mandala. -
Create the center grid:
Paint vertical and horizontal lines through your center circle to create a grid or wheel-spoke pattern like the example. -
Fill the gaps:
If there is empty green space on the sides of your main flower, sketch and paint partial leaves or geometric triangles to wrap the design around the pot.
Step 3: Rim & Base Detailing
-
Prepare dotting paint:
Squeeze a dollop of white acrylic paint onto your palette. It should be thick enough to hold a shape but fluid enough to create a round dot. -
Dot the main circles:
Dip a medium-sized dotting tool into the white paint. On the unpainted terracotta rim, press gently to create a row of evenly spaced dots around the circumference. -
Create the halo effect:
Switch to a much smaller tool or a toothpick. Place tiny dots in a circle around each of the main medium dots you just created, making mini sunbursts. -
Repeat on the base:
Recreate this same dotted pattern on the bottom strip of unpainted terracotta to frame the design perfectly. -
Clean up sketch lines:
Once the white paint is completely dry (give it plenty of time so you don’t smudge), gently erase any visible pencil marks. -
Seal the artwork:
Apply a coat of clear matte sealer over the entire outside of the pot to protect your work from water damage and fading.
Reverse Colors
For a dramatic night-garden look, swap the sage green background for a deep navy blue or charcoal, but keep the bright white line work for high contrast.
Now your custom-painted pot is ready to house a succulent or cactus with style
Smiley Faces and Character Expressions
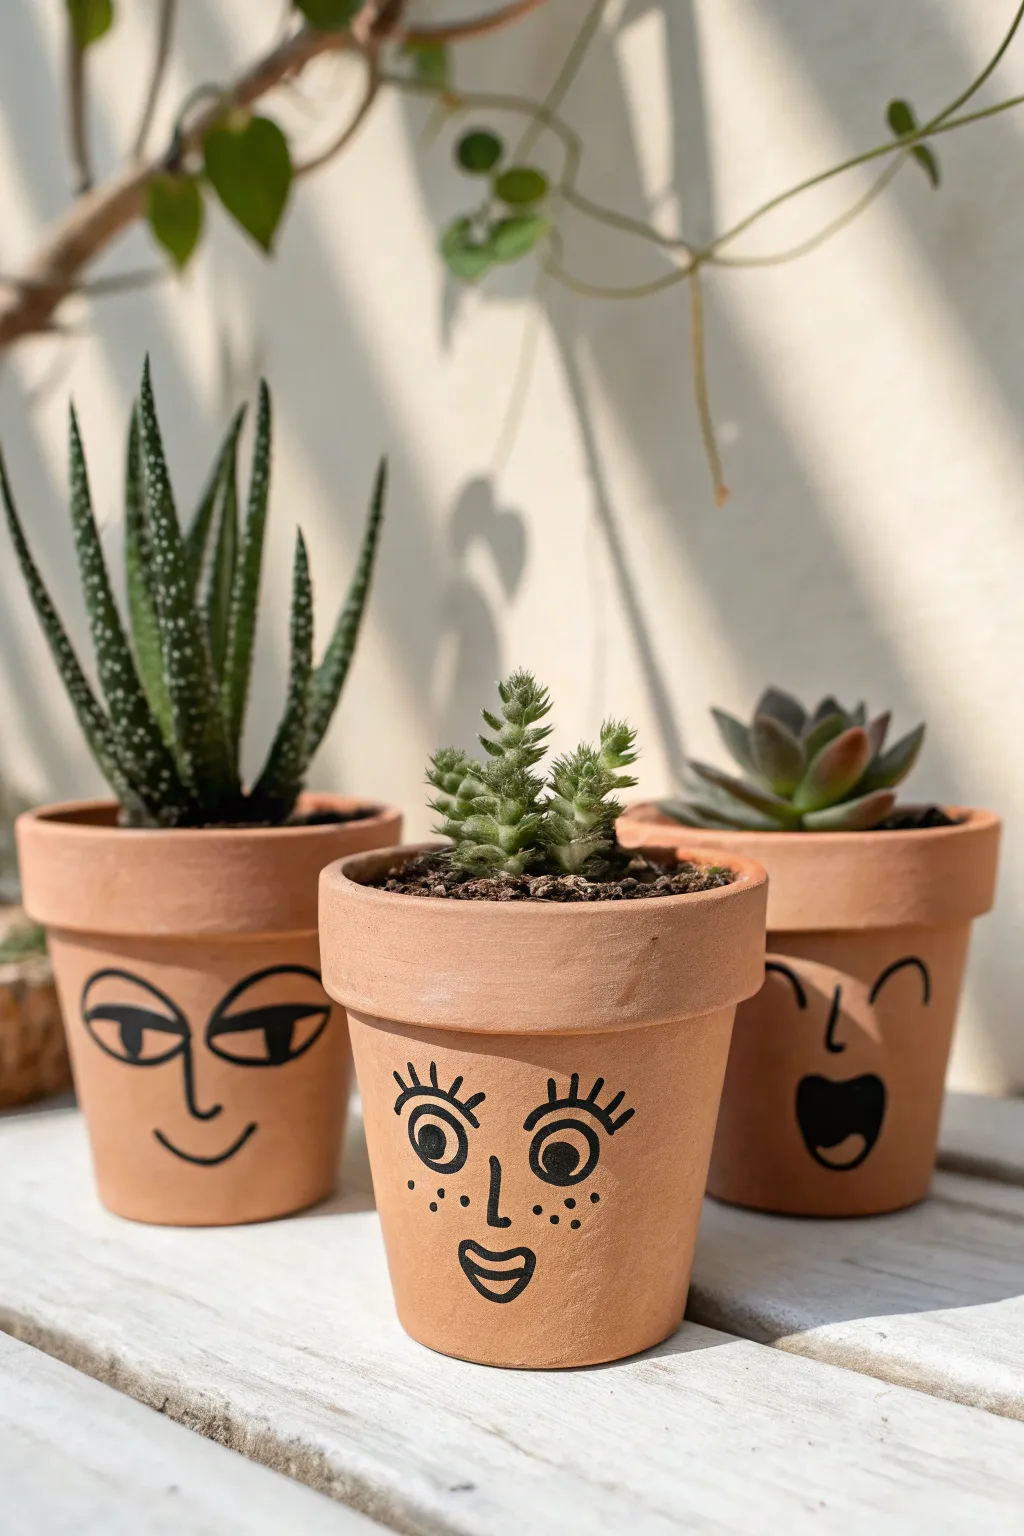
Brighten up your windowsill with this charming set of terracotta pots, each boasting its own distinct personality drawn in bold black lines. The minimalist design emphasizes simple shapes and playful expressions, making it a perfect quick craft for adding character to your plant collection.
Step-by-Step
Materials
- 3 Small terracotta pots (approx. 2-3 inches diameter)
- Black oil-based paint marker (medium tip) or black acrylic paint with fine liner brush
- Pencil (HB or lighter)
- Eraser
- Succulent potting soil
- 3 Small succulent plants (e.g., Haworthia, Cactus, Echeveria)
- Small pebbles or gravel (optional for drainage)
Step 1: Preparation & Planning
-
Clean the surface:
Before starting, ensure your terracotta pots are completely free of dust or price sticker residue. Wipe them down with a slightly damp cloth and let them air dry fully, as any moisture will prevent the marker from adhering properly. -
Sketch the relaxed face:
On the first pot, use your pencil to lightly sketch the ‘relaxed’ expression. Draw two wide, almond-shaped eyes in the upper third of the pot. Instead of pupils, draw a horizontal line across the middle of each eye to suggest heavy lids. -
Add relaxed details:
Below the eyes, sketch a simple ‘L’ shape or a gentle curve for the nose. Finish this face with a shallow ‘U’ shape for a calm, subtle smile near the bottom. -
Sketch the cheerful face:
For the second pot (center), sketch two large circles for eyes. Add excitement by drawing distinct eyelashes—about three or four lines radiating from the top of each circle. -
Detail the cheerful features:
Draw pupils inside the circles looking slightly sideways or centered. Add freckles by dotting three small marks under each eye. Draw a small, simple nose line and an open-mouthed smile showing teeth or just an joyful ‘D’ shape on its side. -
Sketch the laughing face:
On the third pot, create a laughing or singing expression. Draw two curved lines like rainbows for closed, happy eyes. Place them fairly high up on the pot. -
Complete the laughing look:
Add a small nose line, and then draw a large, open oval or rounded triangle mouth at the bottom to represent a big laugh or a singing note.
Step 2: Inking the Designs
-
Test your marker:
Shake your black paint marker well and press the nib down on a piece of scrap paper until the ink flows smoothly. You want a consistent, opaque black line. -
Trace the relaxed face:
Carefully trace over your pencil lines on the first pot. I like to start with the eyes to anchor the face. Fill in the heavy eyelids if your design calls for it, or keep them as outlines. -
Bold outlines:
Go over the lines a second time if the terracotta absorbs too much ink, ensuring the black stands out clearly against the orange clay. -
Ink the cheerful face:
Move to the second pot. Carefully outline the circular eyes and fill in the pupils, leaving a tiny dot of unpainted clay if you want a ‘highlight’ in the eye. Draw the lashes with quick, confident flicks. -
Add freckles and mouth:
Dot the freckles gently so the tip doesn’t bleed. Outline and fill the mouth, focusing on crisp edges. -
Ink the laughing face:
For the third pot, trace the curved eye lines. When filling in the large open mouth, work in strokes from one side to the other tailored to the curve of the pot to get solid coverage. -
Clean up:
Allow the ink to dry for at least 30 minutes. Once fully dry, gently erase any visible pencil marks with your eraser.
Pro Tip: Hairdos
Match the plant shape to the face! Spiky aloe looks like punk hair for an edgy face, while trailing vines look like long locks for a sweet face.
Step 3: Planting
-
Prepare drainage:
Place a small layer of gravel or a pottery shard over the drainage hole at the bottom of each pot to prevent soil from washing out. -
Add soil base:
Fill the pots about halfway with succulent-specific potting soil, which drains faster than regular dirt. -
Position plants:
Gently remove your succulents from their nursery containers. Place the tall Haworthia in the ‘relaxed’ pot, the fuzzy succulent in the ‘cheerful’ pot, and the rosette Echeveria in the ‘laughing’ pot to mimic ‘hair’ styles. -
Final potting:
Fill the remaining space around the roots with soil, pressing down gently with your thumbs to secure the plants. Brush off any loose soil from the painted faces.
Troubleshooting: Ink Bleeding
If the marker ink bleeds into the clay grain, the clay is too porous. Seal the area first with a clear matte varnish, let dry, then draw on top.
Now you have a trio of conversational planters ready to brighten any corner of your home
Garden Bug Designs Like Ladybugs and Bees
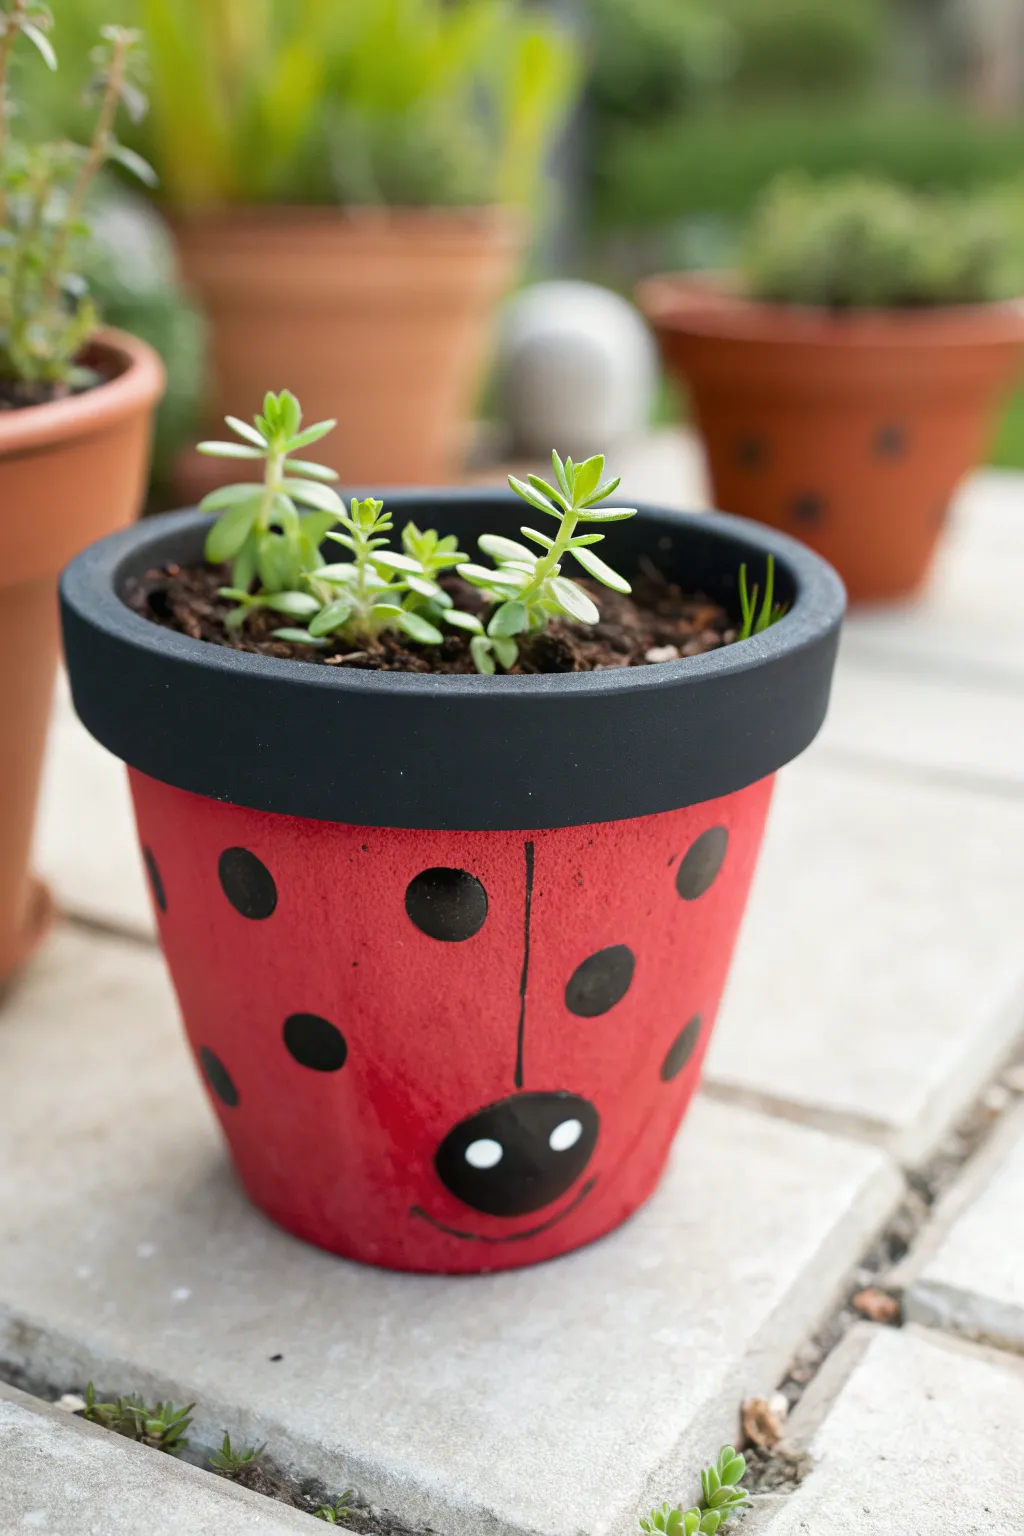
Transform a standard terracotta pot into a cheerful garden friend with this adorable ladybug design. This simple painting project features a bright red body, bold black spots, and a sweet smiling face that instantly adds character to your patio or windowsill.
Step-by-Step Guide
Materials
- Terracotta pot (cleaned and dried)
- Red acrylic craft paint (outdoor/multi-surface preferred)
- Black acrylic craft paint
- White acrylic craft paint
- Flat paintbrush (medium size)
- Small round detail brush
- Round sponge applicator or stencil dabber (for spots)
- Pencil
- Clear acrylic sealer spray (matte or gloss)
- Paper plate or palette
- Water cup and paper towels
Step 1: Base Coating
-
Prep the pot:
Ensure your terracotta pot is thoroughly clean and completely dry before starting. Wipe away any dust with a damp cloth and let it air dry. -
Paint the rim:
Using your flat paintbrush and black acrylic paint, cover the entire outer rim of the pot. You may need to paint just over the top lip to ensure the terracotta color doesn’t show when planted. -
Paint the interior rim:
Paint the inside of the rim black as well, going down about an inch or two. This gives the finished planter a professional look even if the soil level settles slightly. -
Paint the body:
Switching to a clean brush, paint the entire body of the pot below the rim with bright red paint. Make sure to get right up to the underside of the black rim for a crisp line. -
Apply a second coat:
Terracotta is porous and soaks up paint quickly. Once the first layer is dry to the touch, apply a second coat of red to get a solid, opaque coverage without streaks.
Uneven Dots?
If your sponge dots look patchy or transparent, don’t press harder. Let the first layer dry, then carefully stamp the exact same spot a second time for solid coverage.
Step 2: Adding Details
-
Sketch guidelines:
Once the red base is fully dry, lightly use a pencil to mark the center front of the pot. Draw a faint vertical line from just under the rim down to where the nose will be. -
Paint the dividing line:
Using a small detail brush and black paint, carefully trace over your pencil line to create the division between the ladybug’s wings. Stop about an inch or two from the bottom. -
Create the spots:
Dip a round sponge applicator or stencil dabber into black paint. Press it gently onto the red surface to create perfectly round polka dots. I find twisting the sponge slightly as you lift helps keep the edges clean. -
Space the spots:
Continue adding spots randomly around the pot, making sure not to clutter the front area where the face will go. Let the dots dry completely.
Cleanup Trick
Make a mistake with the black paint on the red background? Don’t wipe it! Let it dry completely, then paint over the error with your red base color to erase it.
Step 3: Creating the Face
-
Paint the nose:
At the bottom of your center dividing line, use black paint to create a solid oval or circle for the nose. This anchors the face design. -
Add the smile:
With your finest detail brush, paint a thin, curved black line underneath the nose to create a simple, happy mouth. -
Add the eyes (optional):
If you want eyes, paint two white circles above the nose area, or keep the design simple as shown here with just the nose detail taking focus. -
Highlight the nose:
Dip the handle end of a small paintbrush into white paint. Dot two small highlights onto the black nose area—one slightly larger than the other—to make it look shiny and cute.
Step 4: Finishing Up
-
Let it cure:
Allow the pot to sit undisturbed for at least 24 hours to ensure all layers of paint have fully cured and bonded to the clay. -
Seal the pot:
Take the pot to a well-ventilated area and spray it with a clear acrylic sealer. This protects your artwork from water damage and fading, especially if it will live outdoors. -
Plant:
Once the sealer is dry, fill your new ladybug planter with potting soil and your favorite plants. Succulents or small flowering plants work beautifully to create green ‘hair’ for your bug.
Now you have a charming little garden guardian ready to brighten up any corner of your home
Night-Sky Galaxy With Splatter Stars
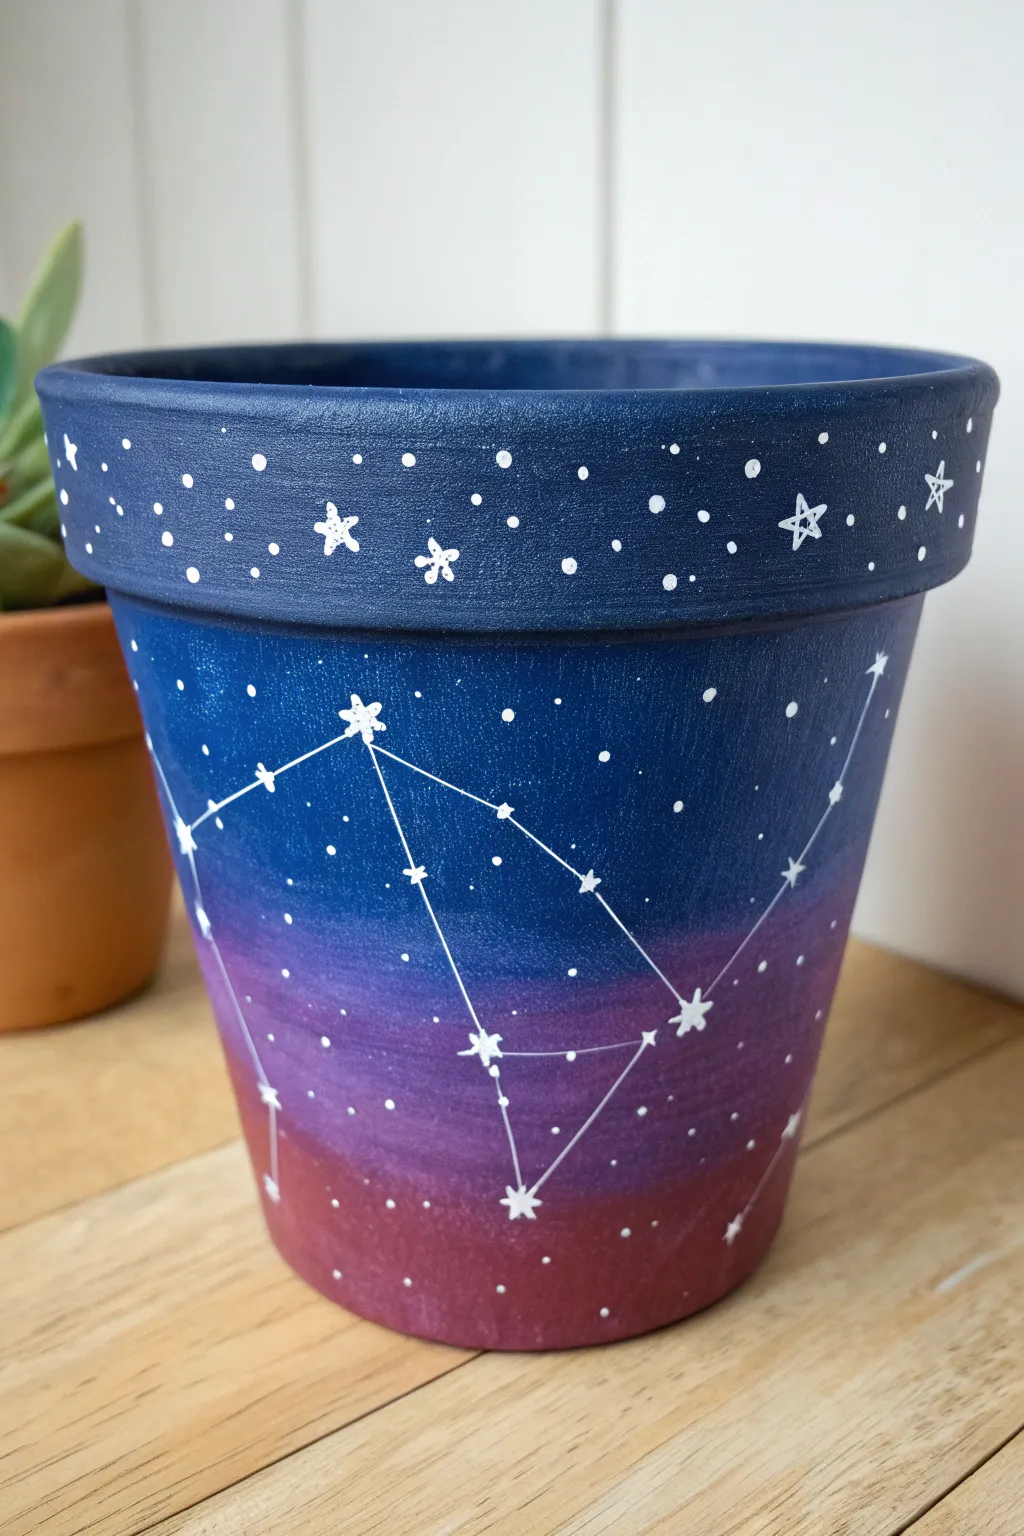
Transform a plain terra cotta pot into a celestial masterpiece featuring a deep blue to dusty rose gradient. This night-sky design is topped with delicate hand-painted constellations and a scattering of stardust.
Detailed Instructions
Materials
- Terra cotta clay pot (cleaned and dried)
- Acrylic paints: Navy blue, Royal blue, Purple, and Deep Rose/Burgundy
- White acrylic paint (or paint pen)
- Sponge applicators or cosmetic wedges
- Small round detail brush
- Flat paintbrush (medium size)
- Water cup and paper towels
- Clear spray sealant (matte or gloss)
- Pallet or paper plate
Step 1: Creating the Galaxy Base
-
Clean the surface:
Ensure your terra cotta pot is free of dust and stickers. Wipe it with a slightly damp cloth and let it dry completely before starting. -
Paint the rim:
Using your flat paintbrush, apply a solid coat of navy blue acrylic paint to the entire rim of the pot. Extend this color just slightly below the rim’s ridge onto the main body. -
Apply the top gradient color:
For the body of the pot, start at the top (right under the rim). Paint a band of royal blue using a sponge applicator. The sponge helps create a textured, blended look rather than harsh brush strokes. -
Add the middle gradient color:
While the blue is still slightly wet, dab a band of purple paint directly below it. Use the sponge to gently tap over the line where the blue and purple meet to blend them instantly. -
Finish the bottom gradient:
Apply your deep rose or burgundy paint to the bottom section of the pot. Just like before, sponge the area where it meets the purple to create a seamless transition from dark sky to horizon. -
Touch up the blend:
If I notice the transition lines are too stark, I like to take a clean sponge and lightly dab over the gradients to soften them further. Let the entire base coat dry for 20-30 minutes.
Sponge Genius
Use a slightly damp sponge for blending the gradient. A dry sponge absorbs too much paint, while a wet one makes the paint runny and hard to blend.
Step 2: Painting the Stars
-
Create the splatter stars:
Dip a stiff brush or an old toothbrush into watered-down white acrylic paint. Run your thumb across the bristles to flick tiny specks of ‘stardust’ across the rim and body of the pot. -
Clean up large splatters:
If any paint splatters are too large for your liking, quickly dab them away with a damp paper towel before they dry. -
Paint the rim stars:
Using a very fine detail brush or a white paint pen, add larger stars to the navy blue rim. Draw some as simple dots and others as five-pointed outline stars. -
Add asterisk stars:
Mix in a few asterisk-shaped stars (three intersecting lines) on the rim to add variety to your galaxy pattern.
Glow in the Dark
Mix glow-in-the-dark powder or use glow paint for the white stars. Your pot will charge in the sunlight and reveal a glowing galaxy at night.
Step 3: Mapping the Constellations
-
Plan the constellation:
Visualize where you want your main constellation to go on the body of the pot. You can pencil it in lightly first if you are unsure of the spacing. -
Mark the major stars:
Using your detail brush or paint pen, place bold white dots or small 5-point stars where the key points of your constellation will be. -
Draw the connecting lines:
Carefully draw thin, straight lines connecting your star points used in the previous step. A ruler isn’t necessary; a slightly hand-drawn look adds character. -
Add secondary stars:
Scatter a few medium-sized dots and tiny crisscross stars around the main constellation lines to fill any empty visual space. -
Detail the main stars:
Go back to your main constellation points and create a slightly larger ‘glow’ by thickening the centers of the stars.
Step 4: Finishing Touches
-
Dry completely:
Allow all the white paint details to dry fully. This usually takes about 15 minutes depending on how thick your paint application was. -
Seal the artwork:
Take the pot to a well-ventilated area and apply a clear spray sealant. This protects the paint from water damage when you water your plants.
Place your favorite succulent or leafy plant inside to complete your personalized piece of the universe