A plain clay pot is basically a blank canvas, and I never get tired of how many personalities it can take on. Here are my favorite clay pot planter ideas, starting with the classics and building up to the quirky, studio-table conversation starters.
Painted Color-Block Terracotta Planters
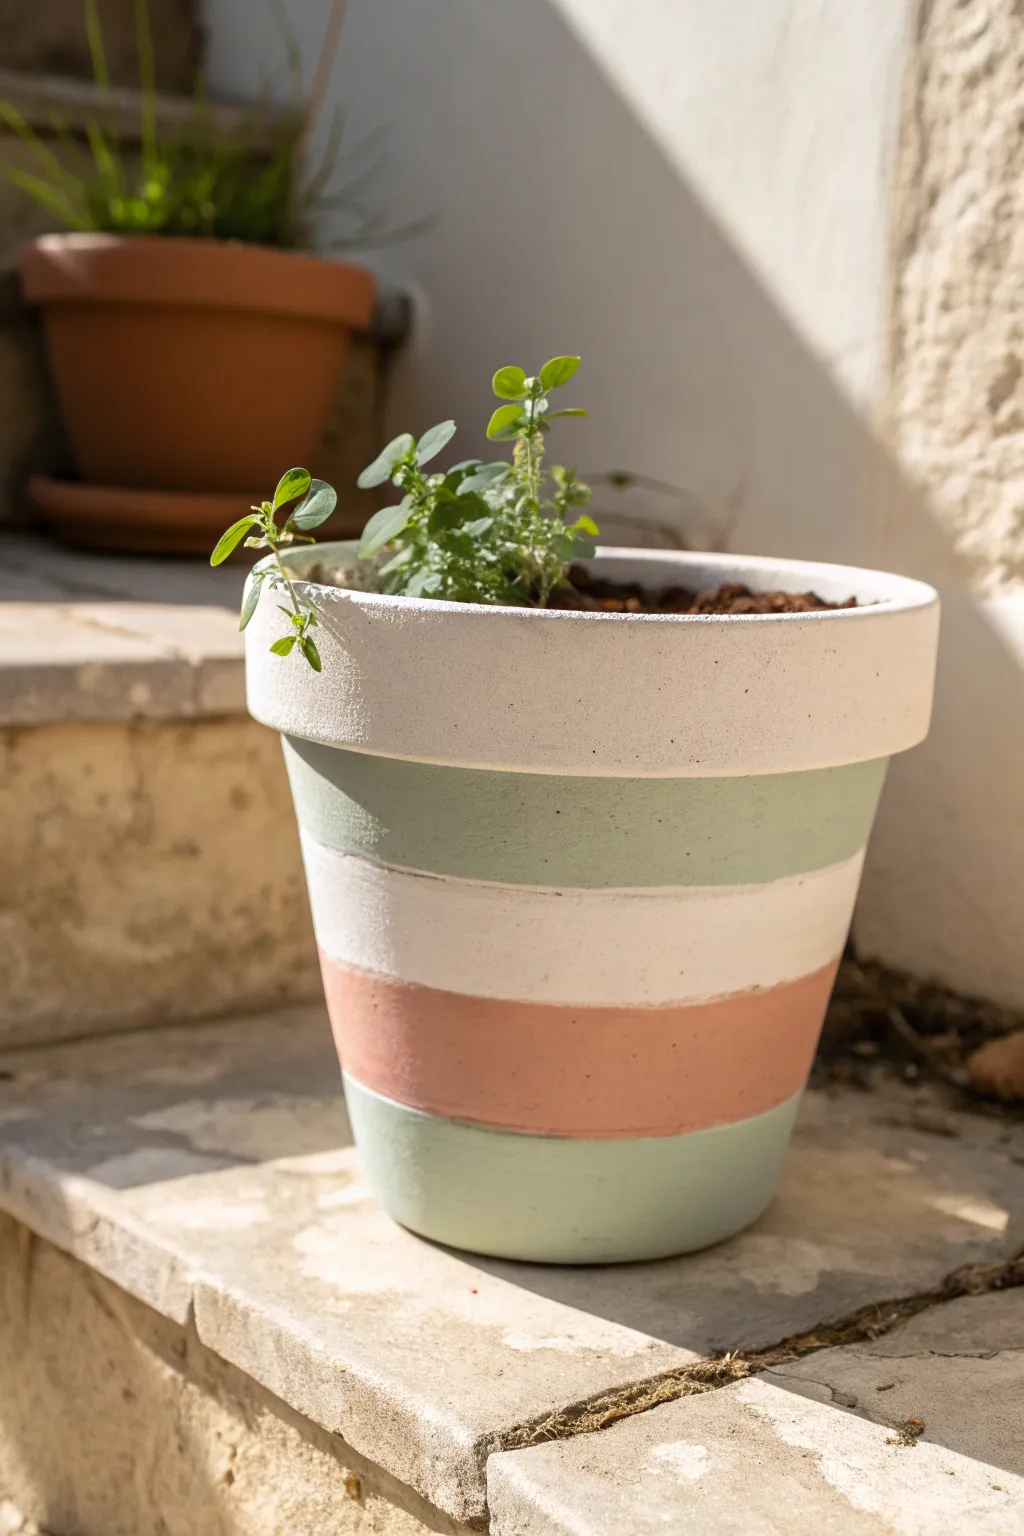
Transform a plain clay planter into a modern decor piece with soft horizontal stripes of mint, coral, and white. This color-blocked design adds a gentle pop of pastel elegance to any staircase or shelf.
Step-by-Step
Materials
- Standard terracotta pot (approx. 6-8 inch diameter)
- Acrylic craft paints (White, Mint Green, Coral/Salmon)
- Flat paintbrush (1-inch width)
- Painter’s tape or masking tape (approx. 1 inch wide)
- Sealant spray (clear matte or satin)
- Damp cloth
- Newspaper or drop cloth
Step 1: Preparation and Base
-
Clean the surface:
Begin by wiping down your terracotta pot with a damp cloth to remove any dust or manufacturing residue. Let it dry completely for about 15 minutes. -
Paint the top rim:
Dip your flat brush into the white acrylic paint. Paint the entire outer rim of the pot, extending the color slightly over the top edge and inside the rim just a bit for a clean look. -
Add a second coat:
Terracotta is very porous and soaks up paint quickly. Once the first coat is dry to the touch, apply a second coat of white to the rim to ensure solid, opaque coverage.
Step 2: Blocking the Green Section
-
Mark the first green band:
Decide on the width of your top colored band. You can eyeball this or use a pencil to lightly mark a line about 1.5 inches below the rim. -
Tape firmly:
Apply a strip of painter’s tape horizontally around the pot to mask off the area below where your green stripe will go. Press the edges of the tape down firmly with your fingernail to prevent paint bleed. -
Apply mint green paint:
Paint the section directly below the white rim with your mint green paint. Paint carefully up to the rim’s edge; if you have a steady hand, you can skip taping the rim itself, but feel free to tape the white rim if needed. -
Dry and remove tape:
Allow the green paint to dry until it’s no longer tacky. I prefer to carefully peel off the tape while the paint is still slightly damp to get the crispest line possible.
Clean Lines Secret
Before painting your color, brush a tiny amount of the *base* color (or white) along the tape edge. This seals the tape so any bleed is invisible.
Step 3: Creating the White Stripe
-
Define the middle band:
You now need a white stripe below the green one. Since the raw terracotta is orange, you can’t just leave it bare; you must paint it white. -
Mask the green section:
Once the green paint is fully cured (give it at least 20 minutes), place a strip of painter’s tape over the bottom edge of the green paint to protect it. -
Paint the middle white:
Apply white acrylic paint below the tape line. This band looks best if it’s roughly the same width as the green band above it. -
Double check opacity:
Because you are painting white over dark clay, this specific stripe usually needs three thin coats rather than one thick one. Let each layer dry before adding the next.
Make it Waterproof
Coat the *inside* of the pot with a brush-on waterproof sealer or liquid rubber. This stops moisture from seeping through the clay and bubbling your exterior paint.
Step 4: Adding Coral and Bottom Green
-
Prep for coral paint:
Mask off the bottom edge of your dry white stripe with fresh tape. This ensures your next color doesn’t ruin the bright white band. -
Apply the coral band:
Paint the next section with your coral or salmon paint. This warm tone bridges the gap between the cool mint and bright white perfectly. -
Tape the final section:
After the coral section dries, apply one final ring of tape over the bottom edge of the coral stripe. -
Paint the base:
Paint the very bottom section of the pot with the same mint green used at the top. This creates a cohesive, balanced look to the design.
Step 5: Finishing Touches
-
Remove all tape:
Gently peel away any remaining tape. If you notice any jagged edges or bleed-through, use a tiny detailed brush with the appropriate color to touch up those spots. -
Seal the pot:
To protect your paint from water damage when you water your plants, spray the entire exterior with a clear matte sealant. Two light coats work best. -
Dry and plant:
Let the sealant cure for 24 hours before filling the pot with soil and adding your favorite herbs or succulents.
Now you have a beautifully custom planter ready to showcase your greenery on the patio


Soft Ombre Wash Clay Pots

Transform a standard garden center staple into an ethereal, artful vessel with this soft whitewash technique. The finished look features organic drips and a swirling, sandy ombre effect that feels perfectly aged and effortlessly chic.
How-To Guide
Materials
- Standard terracotta pot with saucer
- White acrylic paint (matte finish)
- Wide flat paintbrush (1-2 inch)
- Plastic cup or bowl for water
- Paper towels or old rag
- Spray bottle with water
- Clear matte sealer spray (optional)
Step 1: Preparation & Base Wash
-
Clean surface:
Begin by wiping down your terracotta pot with a damp cloth to remove any dust or sticker residue. The clay needs to be porous but clean for the paint to adhere properly. -
Create the wash:
In your mixing container, dilute the white acrylic paint with water. You are aiming for a ratio of about 1 part paint to 2 parts water—it should be very milky and translucent, not opaque. -
Define the boundary:
Decide where you want your raw rim to end. You can tape this off if you want a sharp line, but for this organic look, simply freehand your painting line just below the pot’s collar. -
Apply the first wash:
Using your wide brush, apply the watery white mixture to the main body of the pot. Work quickly, brushing vertically to cover the surface. The terracotta color should still show through significantly. -
Paint the saucer:
While the pot dries slightly, paint the entire outer rim and sides of the saucer with a slightly thicker mixture (1:1 paint to water) to give it a more solid white grounded look.
Step 2: Creating the Drips
-
Load the brush:
Dip your brush into the watery paint mixture again, this time ensuring it is heavily saturated and dripping wet. -
Press and release:
Press the loaded brush firmly against the top of the painted section (just under the raw rim). Allow the excess liquid to naturally pool and run down the sides of the pot. -
Encourage gravity:
If the drips are sticking, give the area a quick, light mist with your spray bottle to encourage the paint to travel further down the textured clay surface. -
Vary the spacing:
Repeat this drip process around the circumference of the pot, leaving random gaps between drips to keep the look natural rather than uniform.
Paint vanished?
Terracotta is thirsty! If the pot absorbs too much paint and the white disappears, simply apply a second layer of wash once the first is dry.
Step 3: Adding the Swirls
-
Mix a thicker white:
Add a small dollop of fresh white paint to your palette, keeping it undiluted or very slightly dampened. -
Apply horizontal strokes:
Near the bottom third of the pot, use horizontal, sweeping strokes to apply the thicker white paint. Don’t cover everything; leave negative space. -
Wipe away:
Immediately take a damp paper towel or rag and wipe across the wet paint in a horizontal swirling motion. This removes some white pigment and reveals the clay, creating that marbling effect. -
Blend the transition:
I like to use a clean, slightly damp brush to feather the edges where the bottom swirls meet the upper washed section, ensuring there are no harsh stop-and-start lines.
Texture Trick
Add a pinch of baking soda to your paint mixture for the bottom swirls. It creates a gritty, stone-like texture that mimics aged pottery.
Step 4: Finishing Touches
-
Check the interior:
Paint the top inch of the inside of the pot with your white wash so the soil line looks finished, leaving the rest of the interior raw for drainage health. -
Refine the rim:
If any white paint accidentally splashed onto the upper raw collar, use a damp sanding sponge or rough cloth to scrub it off while it’s semi-dry. -
Dry completely:
Let the pot sit for at least an hour. Terracotta holds moisture, so the paint may look darker while wet and lighten as it dries fully. -
Seal (Optional):
If you plan to keep this outdoors, apply a clear matte spray sealer over the painted areas to protect your design from the elements.
Style your new planter with a trailing succulent or string of pearls to complement the vertical drips


Marbled Drip-Paint Clay Pot Planters
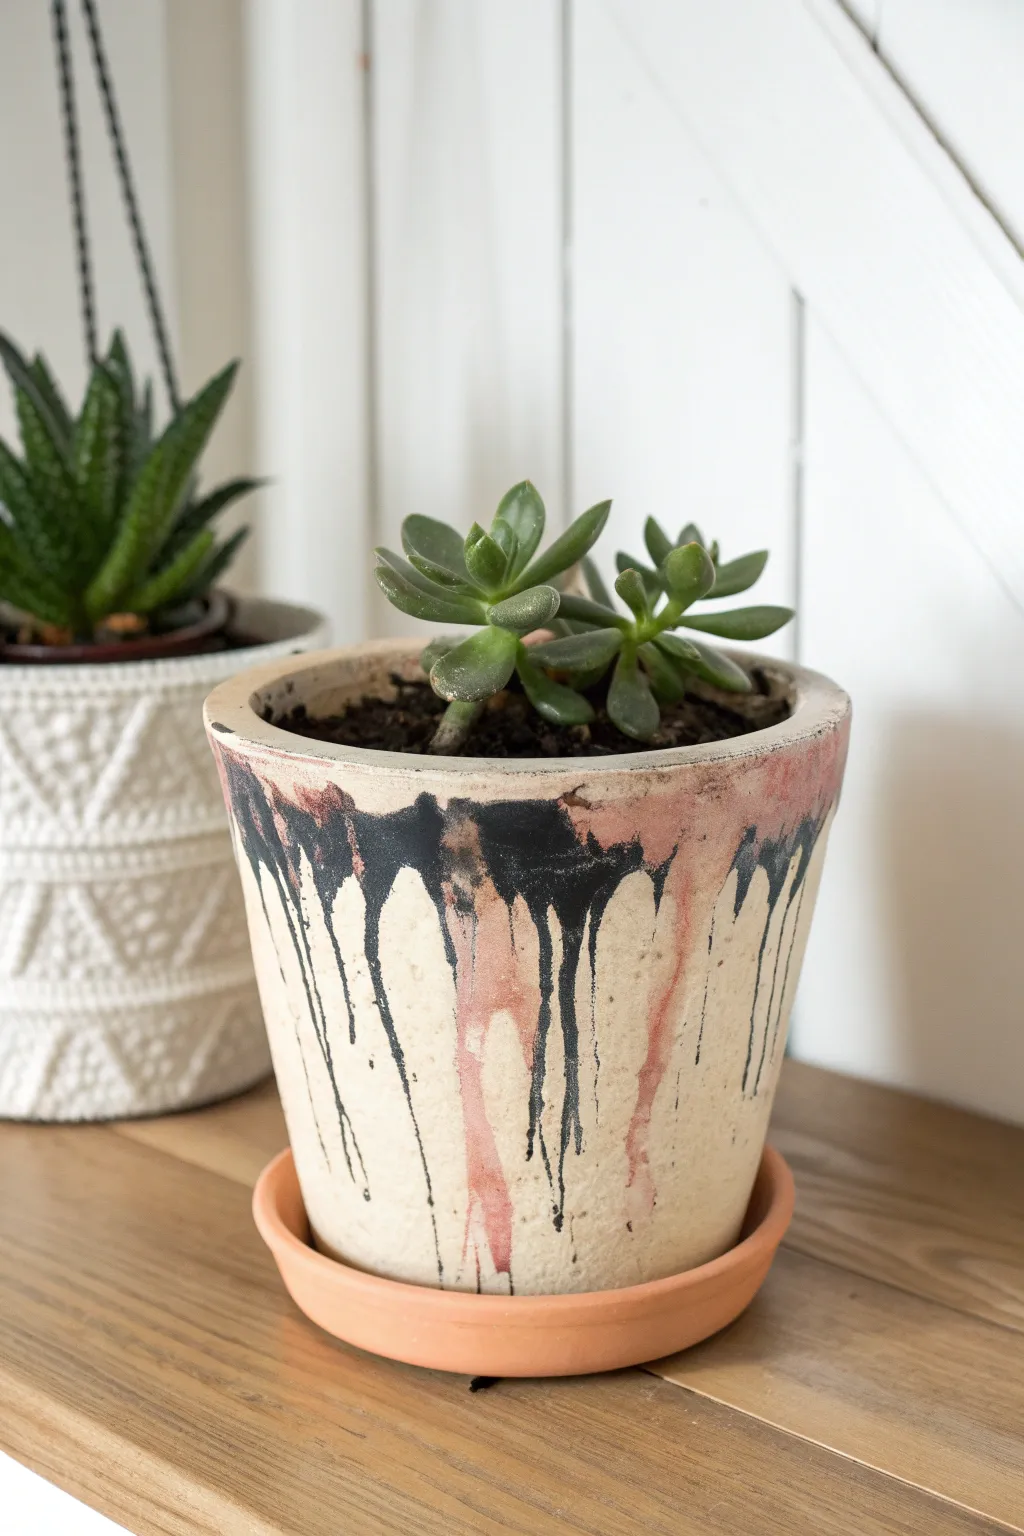
Transform a plain terracotta pot into a modern art piece with this striking drip-paint technique. The contrasting black and metallic rose gold drips against a creamy distressed base create an edgy yet sophisticated look for your favorite succulents.
Step-by-Step Guide
Materials
- Terracotta pot and matching saucer
- Off-white or cream acrylic paint (matte finish)
- Black acrylic paint (fluid or high-flow works best)
- Metallic rose gold or copper acrylic paint
- Foam brush or wide flat bristle brush
- Small round paintbrush or pipette (medicine dropper)
- Water cup for diluting paint
- Paper towels or rag
- Sandpaper (medium grit, optional)
- Cardboard or drop cloth
- Sealant spray (matte or satin)
Step 1: Base Preparation
-
Clean surface:
Begin by wiping down your terracotta pot with a damp cloth to remove any dust or oils. This ensures the base coat adheres properly to the clay. -
Apply base coat:
Using a foam brush, apply a generous layer of off-white or cream acrylic paint all over the exterior of the pot. Don’t worry about perfect coverage; a slightly uneven application adds character. -
Distress the texture:
While the paint is still tacky, use a dry paper towel to dab and wipe away small patches of paint. This creates a weathered, textural look that mimics aged ceramic. -
Dry completely:
Allow this base layer to dry fully. If you want an even rougher texture, lightly sand the dried paint in random spots to reveal hints of the terracotta underneath.
Control the Drip
Test your paint consistency on a spare piece of cardboard first. If it’s too watery, the colors will be transparent; too thick, and they won’t drip naturally.
Step 2: Creating the Drips
-
Prepare drip paint:
In separate small containers, mix a small amount of black paint and metallic rose gold paint with water. You want a consistency similar to heavy cream—fluid enough to run, but thick enough to hold color. -
Upside down setup:
Place your pot upside down on a piece of cardboard or a drop cloth. This prevents the paint from pooling inside the rim and allows gravity to do the work for you. -
Apply the first color:
Starting with the black mixture, load a small round brush or pipette heavily with paint. Press it against the bottom edge (which is currently at the top) of the pot. -
Let it run:
Allow the paint to naturally drip down the sides. I like to vary the pressure—let some drips run all the way to the rim, while stopping others halfway down for variety. -
Add the metallic accent:
While the black is still wet or slightly tacky, repeat the process with the metallic rose gold paint. Place these drips in the gaps between the black lines or overlay them slightly for a layered effect. -
Control the flow:
If a drip is moving too fast or looking too thick, quickly dab it with a dry paper towel to arrest the flow or alter the texture. -
Rim detailing:
If you want the rim itself to have color, use your brush to gently dab some of the metallic paint along the edge, blending it slightly into the top of the drips.
Metallic Magic
Swap the rose gold for deep emerald green or navy blue drips to create a moodier, darker aesthetic suitable for low-light corners.
Step 3: Finishing Touches
-
Extended drying time:
Leave the pot in its upside-down position until the drip layers are completely dry to the touch. This prevents the thickest parts of the drips from smudging. -
Flip and inspect:
Turn the pot right side up. Check the bottom edge (the rim). If paint pooled too heavily there, you can lightly sand it down for a cleaner look. -
Address the saucer:
For the saucer, you can either leave it natural terracotta for contrast or paint it with the solid cream base color to match the pot. -
Seal the artwork:
Take the pot outside and spray it with a clear matte or satin sealant. This protects your paint job from water damage during future waterings. -
Plant:
add potting soil and your chosen succulent, ensuring the green tones complement your new color scheme.
Your unique, artisan-style planter is now ready to add a splash of modern texture to your shelf


Stamped Pattern Clay Pot Planters
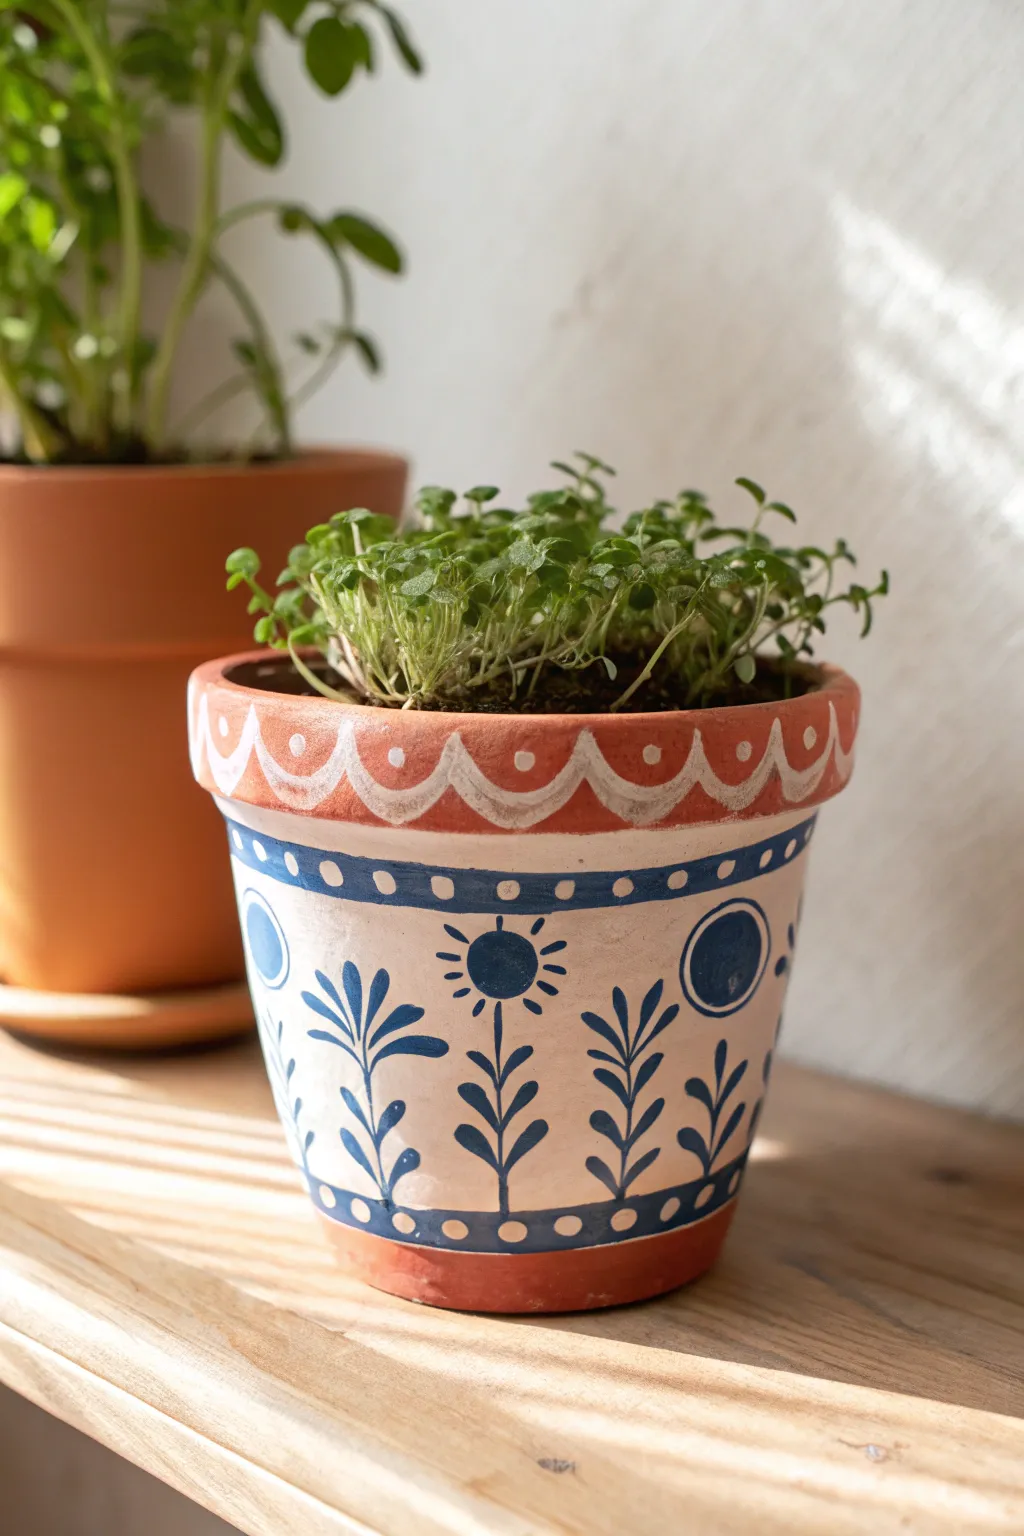
Transform a plain terracotta vessel into a charming, hand-painted planter featuring a delicate botanical motif. This design combines soft blush tones with contrasting deep blue stamps for an elegant, eclectic look that brightens any windowsill.
Step-by-Step Tutorial
Materials
- Standard terracotta pot (4-6 inch)
- Acrylic craft paint (Soft Blush/Pale Pink)
- Acrylic craft paint (Deep Navy Blue)
- Acrylic craft paint (White)
- Foam stamps (leaf sprig, sunburst/circle designs)
- Detail brush (fine liner)
- Flat paintbrush (medium width)
- Small round paintbrush
- Pencil
- Matte spray sealer
Step 1: Base Coat
-
Prep the surface:
Wipe down your terracotta pot with a damp cloth to remove any dust or debris, then let it dry completely to ensure the paint adheres. -
Apply the background color:
Using the flat paintbrush, paint the entire exterior of the pot, below the rim, with the soft blush acrylic paint. I like to bring the color just slightly inside the top edge for a clean finish. -
Add a second coat:
Let the first layer dry for about 15-20 minutes. If the terracotta is still showing through, apply a second coat for solid, opaque coverage. -
Paint the rim base:
Paint the top rim of the pot with a separate base coat if desired, or leave it natural terracotta like in the example image to provide a rustic contrast.
Stamp Master Tip
Practice your stamp on a scrap piece of paper first. This helps gauge how hard to press and ensures you don’t have too much paint on the foam.
Step 2: Adding the Rim Details
-
Sketch the scallop:
Lightly sketch a scalloped (wavy) line around the center of the terracotta rim using a pencil to act as your guide. -
Paint the white wave:
With a small round brush and white paint, follow your pencil guide to create a thick, wavy line that encircles the rim. -
Double-check opacity:
White paint can be translucent on dark clay, so you may need to retrace this line once the first pass is dry to make it pop. -
Add rim dots:
Dip the handle end of a paintbrush into the white paint and stamp a dot inside the peak of each terracotta wave for a uniform polka-dot effect.
Step 3: Stamping the Pattern
-
Create the upper border:
Mix a small amount of navy blue paint. Using a medium brush, paint a solid horizontal band just below the rim of the pot, approximately 1/4 inch thick. -
Detail the blue band:
Once the blue band is dry, use your small round brush and white paint to add evenly spaced dots along the center of the stripe. -
Prepare your stamps:
Pour a small amount of navy blue paint onto a palette or paper plate. Dab your floral or leaf-sprig foam stamp into the paint, ensuring even coverage without overloading it. -
Stamp the foliage:
Press the leaf stamp firmly onto the blush-colored body of the pot. Repeat this around the circumference, spacing them out to leave room for the alternate design. -
Stamp the sunbursts:
Using a sunburst or circle stamp, apply navy paint and stamp these designs in the gaps between your leaf sprigs. If you don’t have a stamp this specific shape, these simple geometric forms are easy to freehand with a small brush. -
Refine the shapes:
Sometimes foam stamps leave a textured or incomplete impression. Use your fine liner brush and navy paint to fill in any gaps or sharpen the edges of your stamped leaves and suns.
Make It 3D
Instead of painted white dots on the rim, glue on small white seed beads or faux pearls using strong craft glue for a fun textured element.
Step 4: Final Touches
-
Paint the bottom border:
Create a matching border at the bottom of the pot. Paint a navy blue band around the base, mirroring the thickness of the top band. -
Add bottom details:
Just like the top band, add a series of white dots along this bottom blue stripe using the brush-handle technique or a dotting tool. -
Seal the artwork:
Allow the pot to dry for at least 24 hours. Take it to a well-ventilated area and apply a clear matte spray sealer to protect your design from moisture and soil.
Once the sealer is dry, pot your favorite fresh herbs or succulents to complete this charming display

The Complete Guide to Pottery Troubleshooting
Uncover the most common ceramic mistakes—from cracking clay to failed glazes—and learn how to fix them fast.
Minimal Line-Art Clay Pot Planters
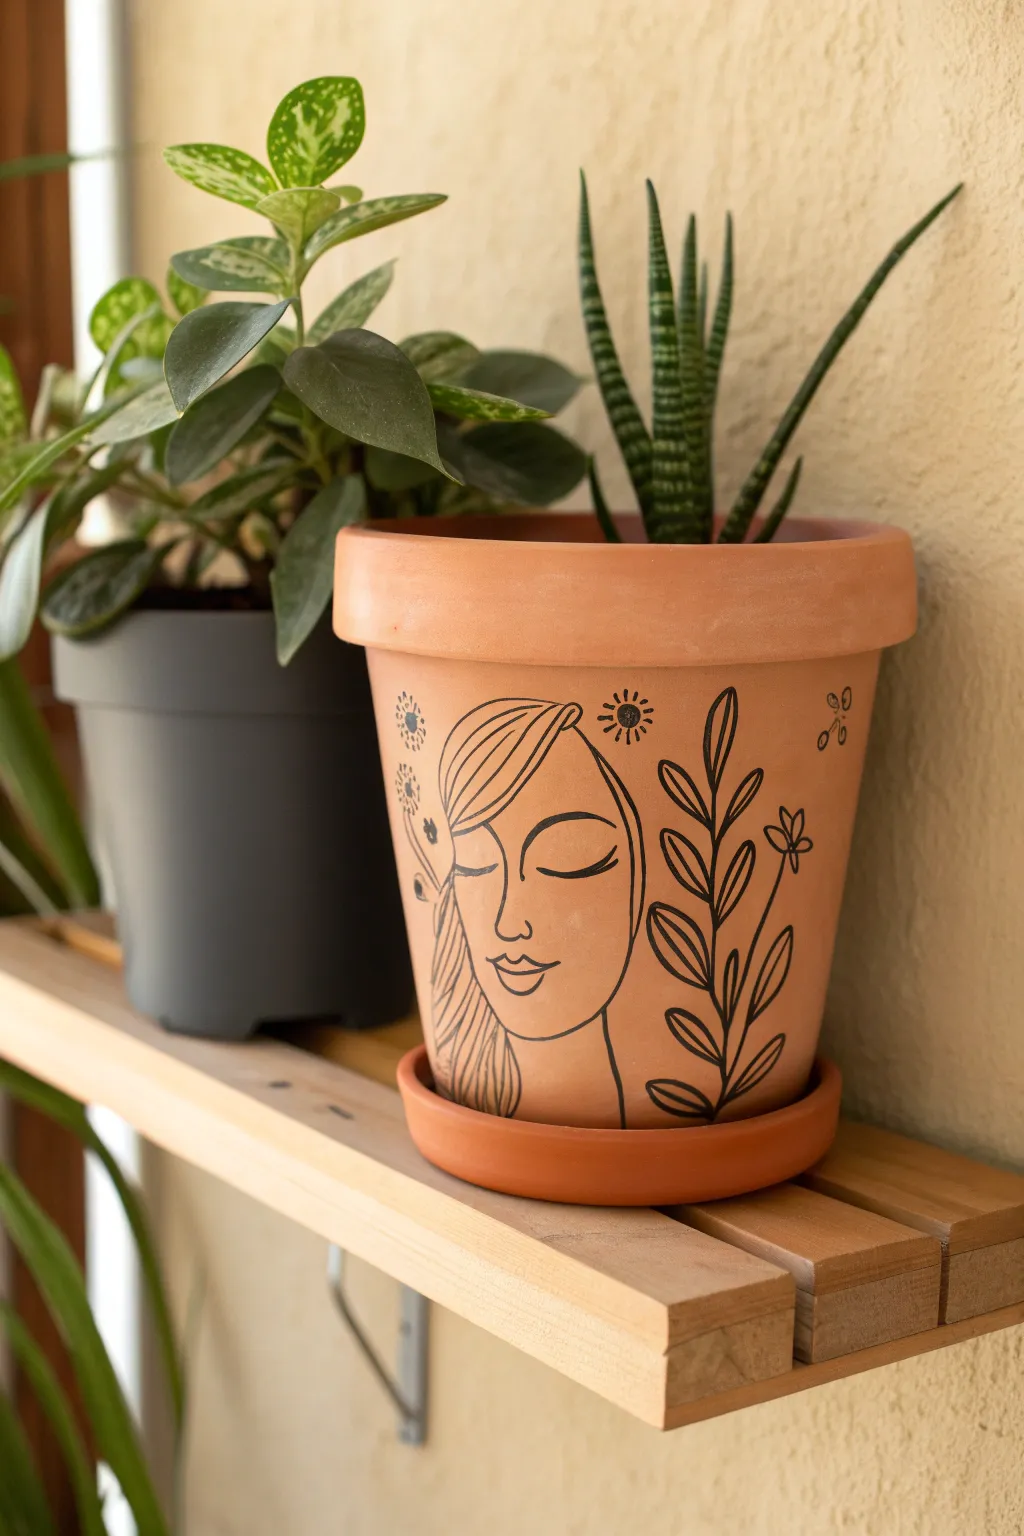
Transform a standard terracotta planter into a piece of modern bohemian decor with this minimalist line art design. The contrast of crisp black ink against the warm clay creates a calming, earthy aesthetic perfect for your favorite succulents.
Detailed Instructions
Materials
- Terracotta pot (6-8 inch diameter) with saucer
- Pencil (HB or lighter)
- Eraser
- Black oil-based paint marker (fine point)
- Black oil-based paint marker (medium point)
- Matte clear sealant spray
- Damp cloth
- Paper towels
Step 1: Preparing the Surface
-
Clean the Pot:
Before you begin, ensure your terracotta pot is completely clean and dry. Wipe it down with a damp cloth to remove any clay dust or barcode sticker residue, as these will interfere with the marker adhesion. -
Dry Thoroughly:
Terracotta is porous and holds moisture. Let the pot sit in a dry, warm spot for at least an hour to ensure no internal moisture remains, which could cause the ink to bleed later.
Ink Flow Tip
If using a paint pen, store it horizontally when not in use. If the ink stops flowing while drawing on the vertical surface, press the tip on a flat scrap paper to recharge it.
Step 2: Sketching the Design
-
Map the Face:
Using a pencil with a light touch, sketch the basic oval shape for the face in the center of the pot. Keep the lines faint so they are easy to erase later if needed. -
Draft the Features:
Draw the closed eyelids first to center the expression. Add the eyebrows slightly above, following the curve of the lids. Sketch a simple, angled line for the nose and a small, peaceful smile for the mouth. -
Outline the Hair:
Sweep a curved line across the forehead to create a side-swept bang look. Continue the hair lines down the left side of the face, letting them drape naturally like strands of hair. -
Add Botanical Elements:
To the right of the face, sketch a tall, leafy stem. Draw a central line stemming from the bottom, adding pairs of simple oval leaves climbing upward. -
Fill the Negative Space:
Add small whimsical details around the main subjects. I like to sketch a small sun with rays near the forehead, a few scattered flower blooms on the left, and maybe a tiny butterfly or two on the far right.
Step 3: Inking the Design
-
Test Your Marker:
Shake your black oil-based paint marker well and press the nib on a scrap piece of paper until the ink flows smoothly. This prevents sudden globs of paint on your pot. -
Trace Main Lines:
Using the medium point marker, begin tracing over your pencil lines for the primary facial features (eyes, nose, mouth) and the main outline of the face. Use confident, continuous strokes for a smoother look. -
Define the Hair:
Switch to a fine point marker if you want more delicate hair strands, or stick with the medium for a bold look. carefully trace the sweeping hair lines. -
Ink the Botanicals:
Trace the leafy stem on the right. For the leaves, you can fill them in slightly at the base of the vein to give them a bit of visual weight, just like in the photo. -
Add Fine Details:
Use the fine point marker for the smaller elements: the sun rays, the tiny flowers on the left, and the delicate butterfly wings. Precision is key here. -
Let Ink Cure:
Allow the paint marker to dry completely. Oil-based markers can take a bit longer on clay, so give it at least 20-30 minutes to become touch-dry.
Make It Pop
For a subtle pop of color without losing the minimal vibe, add a single dot of blush pink paint to the cheeks or paint the lips a muted terracotta red.
Step 4: Finishing Touches
-
Erase Pencil Marks:
Once you are absolutely certain the ink is dry, gently erase any visible pencil sketch lines. trace lightly so you don’t smudge the black ink. -
Seal the Artwork:
Take the pot to a well-ventilated area. Hold your matte clear sealant spray about 10-12 inches away and apply a light, even coat over the entire exterior. This protects the design from water damage when you water your plants. -
Dry and Plant:
Let the sealant cure for the time recommended on the can (usually 24 hours) before adding soil and your plant.
Now you have a unique, gallery-worthy planter ready to house your favorite greenery
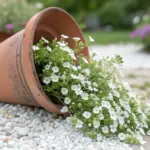
Decoupage Leaf-Print Clay Pots
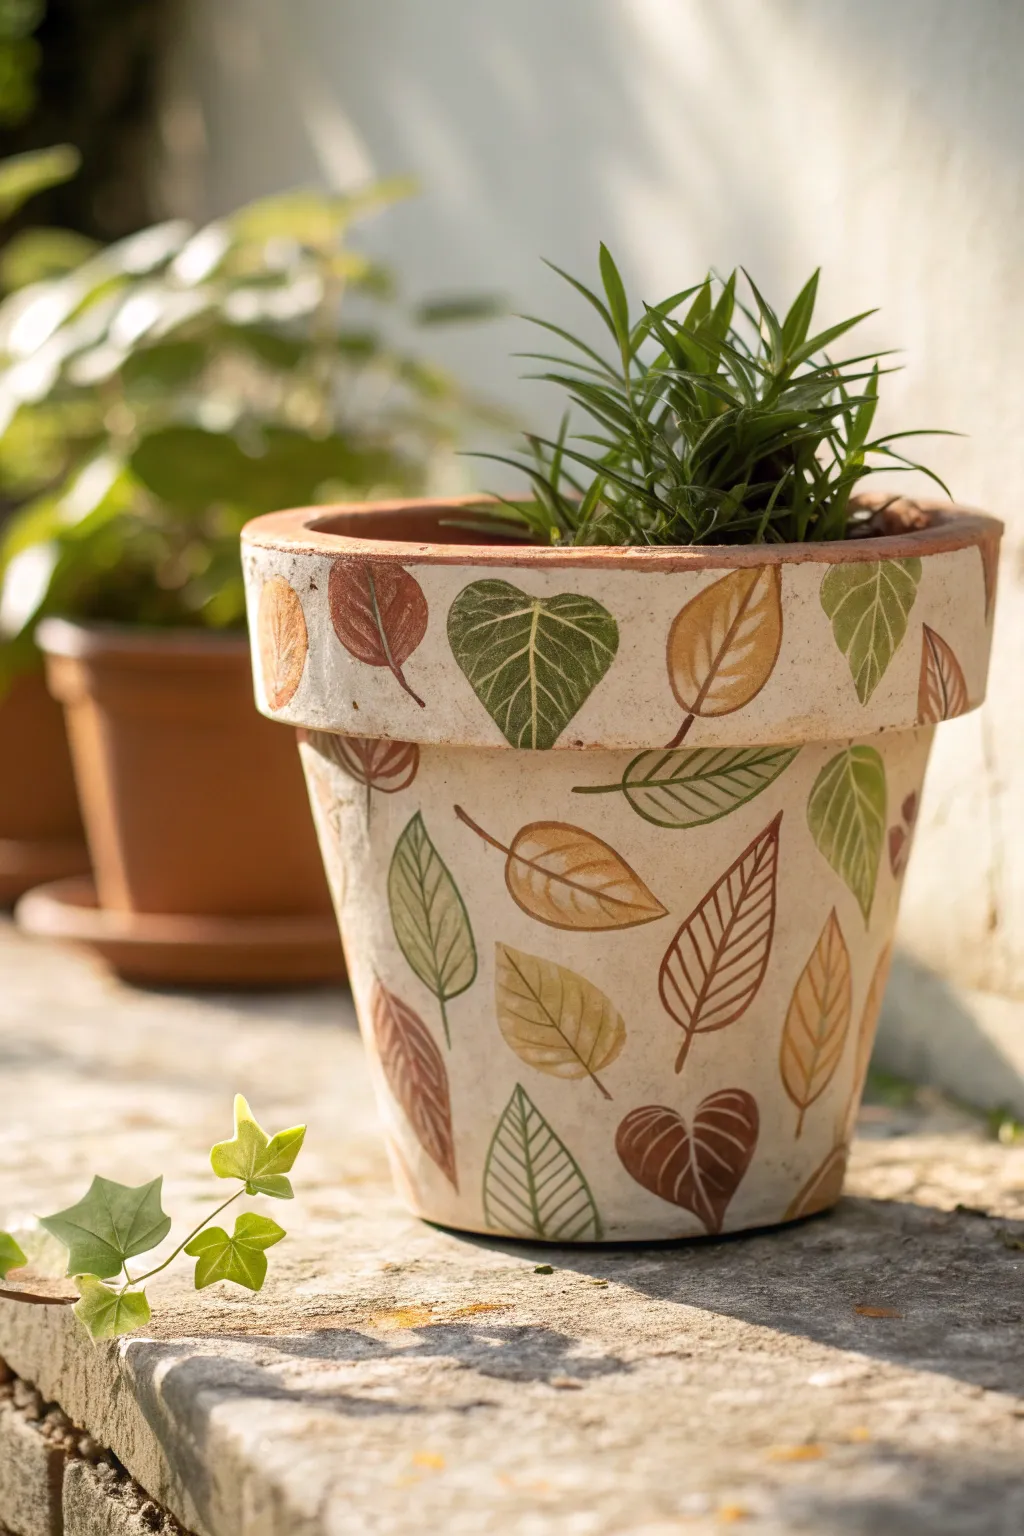
Transform a standard terracotta pot into a nature-inspired masterpiece with this decoupage leaf project. The design features an array of stylized leaves in earthy greens, browns, and ochres, creating a warm, organic border that perfectly complements indoor greenery.
Step-by-Step
Materials
- Standard terracotta pot (cleaned and dried)
- White or cream acrylic chalk paint
- Leaf-patterned decoupage paper, napkins, or thin wrapping paper
- Fine-detail scissors
- Mod Podge (matte finish)
- Flat paintbrush (medium size)
- Fine-point detail brush (size 0 or 1)
- Brown and green acrylic paints (for touch-ups or hand-painted details)
- Foam brush
- Clear acrylic sealer spray (matte)
Step 1: Base Preparation
-
Clean the Surface:
Begin by thoroughly wiping down your terracotta pot with a damp cloth to remove any dust or oils. Let it dry completely, as trapped moisture can cause the paint to bubble later. -
Apply Base Coat:
Using a wide foam brush, paint the entire exterior of the pot, including the rim, with white or cream chalk paint. Chalk paint adheres wonderfully to clay without needing primer. -
Dry and Repeat:
Allow the first coat to dry for roughly 20-30 minutes. Apply a second coat to ensure opaque, solid coverage where the terracotta orange doesn’t peek through. -
Smooth the Texture:
Once the paint is bone dry, run your hand over the surface. If there are distinct brush strokes or rough patches, give it a very light sanding with fine-grit sandpaper for a smooth decoupage base.
Step 2: Preparing the Leaves
-
Select Your Motifs:
Examine your paper and choose a variety of leaf shapes—broad spades, elongated ovals, and heart shapes—in varying fall colors like olive green, yellow ochre, and rust. -
Fuzzy Cutting:
Carefully cut out the leaves using small detail scissors. Cut as close to the design edge as possible to minimize the halo of white paper, which makes the final look much cleaner. -
Separate Polish Layers:
If you are using paper napkins, this step is critical: gently peel away the bottom white plies until you are left with only the single, whisper-thin printed top layer. -
Plan the Layout:
Before gluing, lay your cutouts on a table to simulate the pot surface. I like to arrange them so the stems point in different directions—some up, some down, some sideways—to create movement.
Wrinkle Rescue
If a leaf bubbles or wrinkles badly while wet, don’t panic. Dip your finger in water and gently smooth it out. If it tears, simply overlay another small leaf piece on top to hide the mistake.
Step 3: Decoupage Application
-
Apply Adhesive:
Paint a thin layer of Mod Podge onto the pot exactly where you want your first leaf to go. Don’t coat the whole pot at once, or the glue will dry before you get there. -
Place the Leaf:
Gently press the paper leaf onto the wet area. Start from the center of the leaf and lightly tap outward to push out air bubbles without tearing the delicate paper. -
Seal the Edge:
Immediately dip your brush in a little more Mod Podge and gently sweep it over the top of the leaf to seal it down. Work from the center outward to smooth wrinkles. -
Build the Pattern:
Continue adding leaves around the pot body and the rim. Space them out nicely, allowing the cream background to breathe between the designs. -
Rim Details:
Pay special attention to the rim. You can wrap leaves slightly over the edge or place smaller foliage horizontally along this band for a defined border.
Vintage Vibe
To age your pot instantly, mix a tiny drop of brown paint into your topcoat of Mod Podge. This creates an ‘antique glaze’ that settles into the texture for an old-world pottery look.
Step 4: Artistic Details & Finishing
-
Enhance Veins:
Once the glue is dry, some leaf details might look washed out. Use your fine-point brush and diluted brown or white paint to carefully re-trace the veins on the leaves for a hand-painted look. -
Add Stems:
If your paper cutouts lost their stems during cutting, simply paint small, thin brown stems extending from the leaf base directly onto the pot. -
Final Sealing:
Apply a final, full coat of Mod Podge over the entire pot to unify the texture. Let this cure for at least 24 hours. -
Weatherproofing:
To protect your hard work from water drips, finish the project with a coat of clear matte acrylic spray sealer outdoors.
Now you have a charming, botanically inspired home for your favorite indoor tropical plant


What Really Happens Inside the Kiln
Learn how time and temperature work together inside the kiln to transform clay into durable ceramic.
Twine-Wrapped Rustic Clay Pot Planters
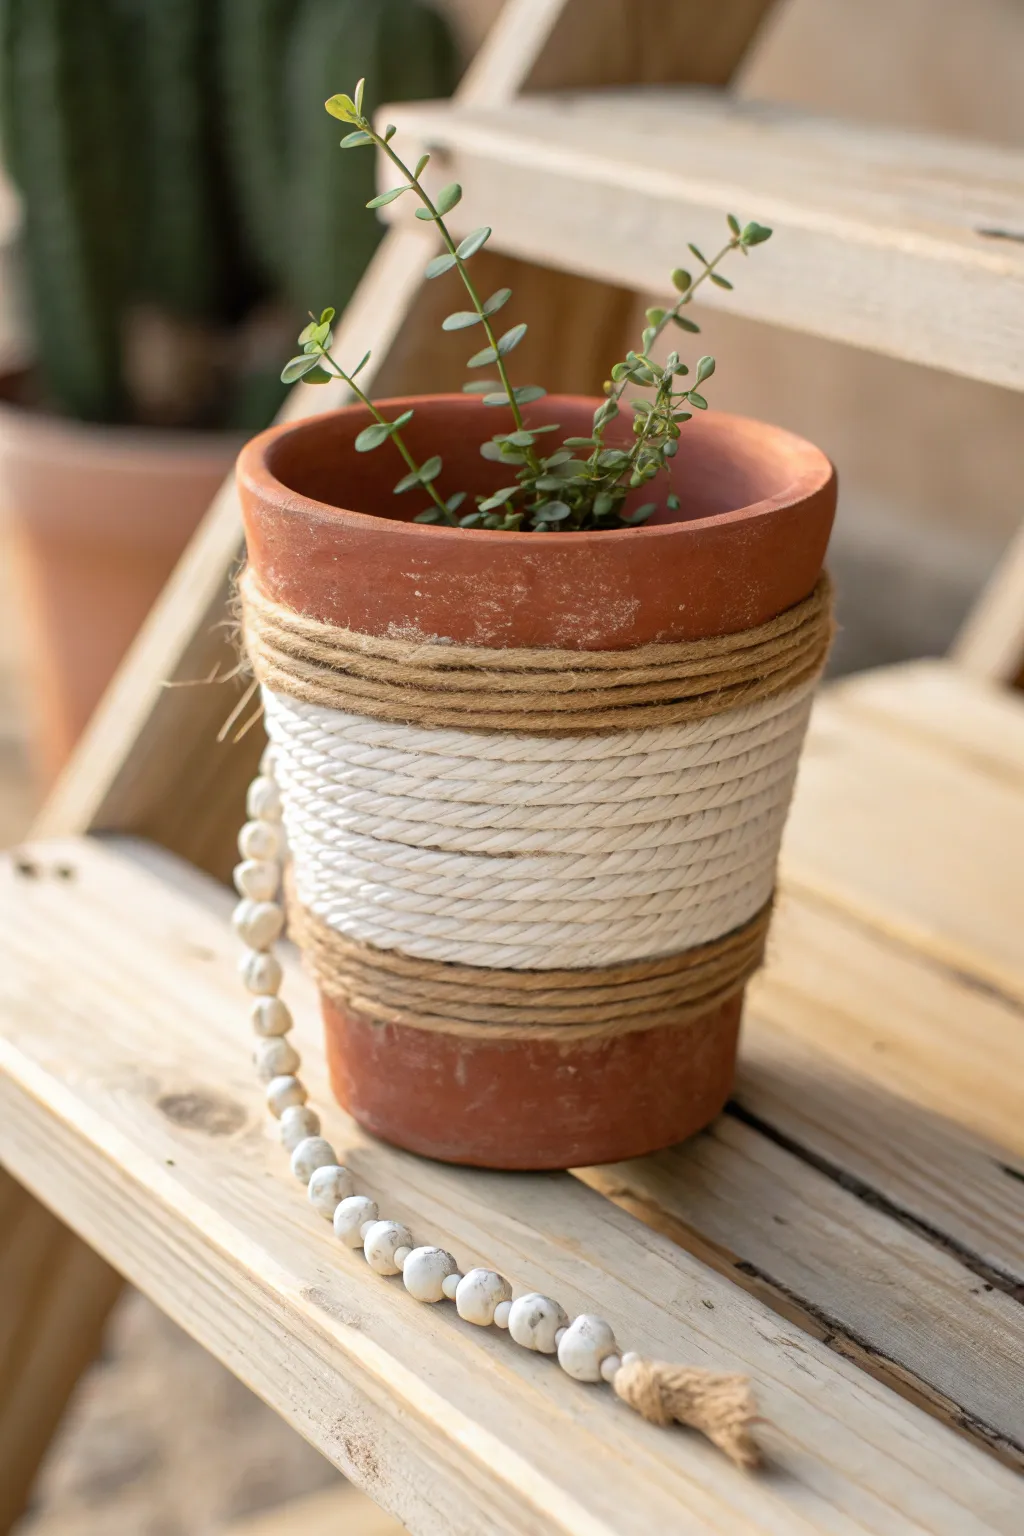
Transform a standard terracotta pot into a textural, coastal-inspired décor piece using just a few simple materials. This project combines the rustic warmth of jute with the crisp cleanness of white cotton rope for a two-toned look that feels effortlessly stylish.
How-To Guide
Materials
- Standard terracotta pot (4-6 inch diameter)
- Thick white cotton rope (approx. 5-7mm thickness)
- Natural jute twine (medium thickness)
- Hot glue gun and clear glue sticks
- Scissors
- Small potted plant (like a succulent or creeping fig)
- Wooden craft beads (optional, for garland accessory)
- Clear matte sealer (optional)
Step 1: Preparing the Pot
-
Clean the surface:
Begin by wiping down your terracotta pot with a damp cloth to remove any dust or sticker residue. Let it dry completely so the glue adheres properly. -
Seal the pot (optional):
If you plan to plant directly into the pot, I recommend spraying the inside with a clear sealer to prevent water from seeping through and potentially loosening the glue over time.
Clean Seams
Always start and stop your rope cuts in vertical alignment on one side. This creates a dedicated ‘back’ of the pot, keeping the front view seamless and professional.
Step 2: Applying the Top Jute Band
-
Start the jute line:
Apply a small dot of hot glue about an inch and a half down from the top rim of the pot. Press the end of your natural jute twine firmly into the glue. -
Wrap the first layer:
Begin wrapping the twine horizontally around the pot working upwards toward the rim. Keep the tension tight. -
Glue as you go:
Every few inches, add a tiny dab of hot glue to the terracotta to keep the jute from slipping down, especially since the pot is tapered. -
Create the band:
Continue wrapping until you have created a band approximately 1 inch wide. This will sit just below the rim. -
Secure the end:
Cut the twine and glue the end down securely on the same side where you started, keeping all your seams aligned in what will be the ‘back’ of the pot.
Sliding Rope?
If the tapered shape causes the rope to slide upward, apply vertical strips of double-sided tape or a thin layer of craft glue to the pot before wrapping for extra grip.
Step 3: Adding the White Rope Center
-
Anchor the white rope:
Right below your finished jute band, apply a generous line of hot glue. Press the end of your thick white cotton rope into it, butting it right up against the jute. -
Wrap downwards:
Wrap the white rope around the pot, moving downwards this time. Because this rope is thicker, you’ll need slightly more glue to hold its weight. -
Check consistency:
Ensure each coil touches the previous one tightly so no terracotta orange peeks through the white section. -
Build the block:
Continue wrapping until the white section is about 2 to 2.5 inches wide, covering the main body of the pot. -
Finish the white section:
Cut the white rope at the back seam line. Glue the end down firmly, tucking it slightly if needed to prevent fraying.
Step 4: The Bottom Jute Band & Finishing Touches
-
Start the bottom band:
Switch back to the natural jute twine. Glue the starting end right below the white rope band. -
Wrap to the base:
Wrap the jute around the remaining bottom portion of the pot. You want this bottom band to mirror the width of the top band for balance. -
Secure the final end:
Once you reach near the bottom edge, cut the twine and glue the final end down securely at the back seam. -
Tidy up:
Inspect the pot for any stray hot glue strings (often called ‘spider webs’) and pull them off. Press down any loose sections of rope. -
Create the bead garland accessory:
As a final styling touch seen in the photo, thread wooden beads onto a spare piece of jute twine to create a decorative loop. -
Add a tassel:
Tie a simple jute tassel to the end of your bead string for extra rustic flair. -
Style and plant:
Place your plant inside the pot and drape the bead garland loosely over the side for that perfect finished look.
This textured beauty is now ready to add a warm, organic touch to your favorite sunny corner
Mosaic Tile Clay Pot Planters
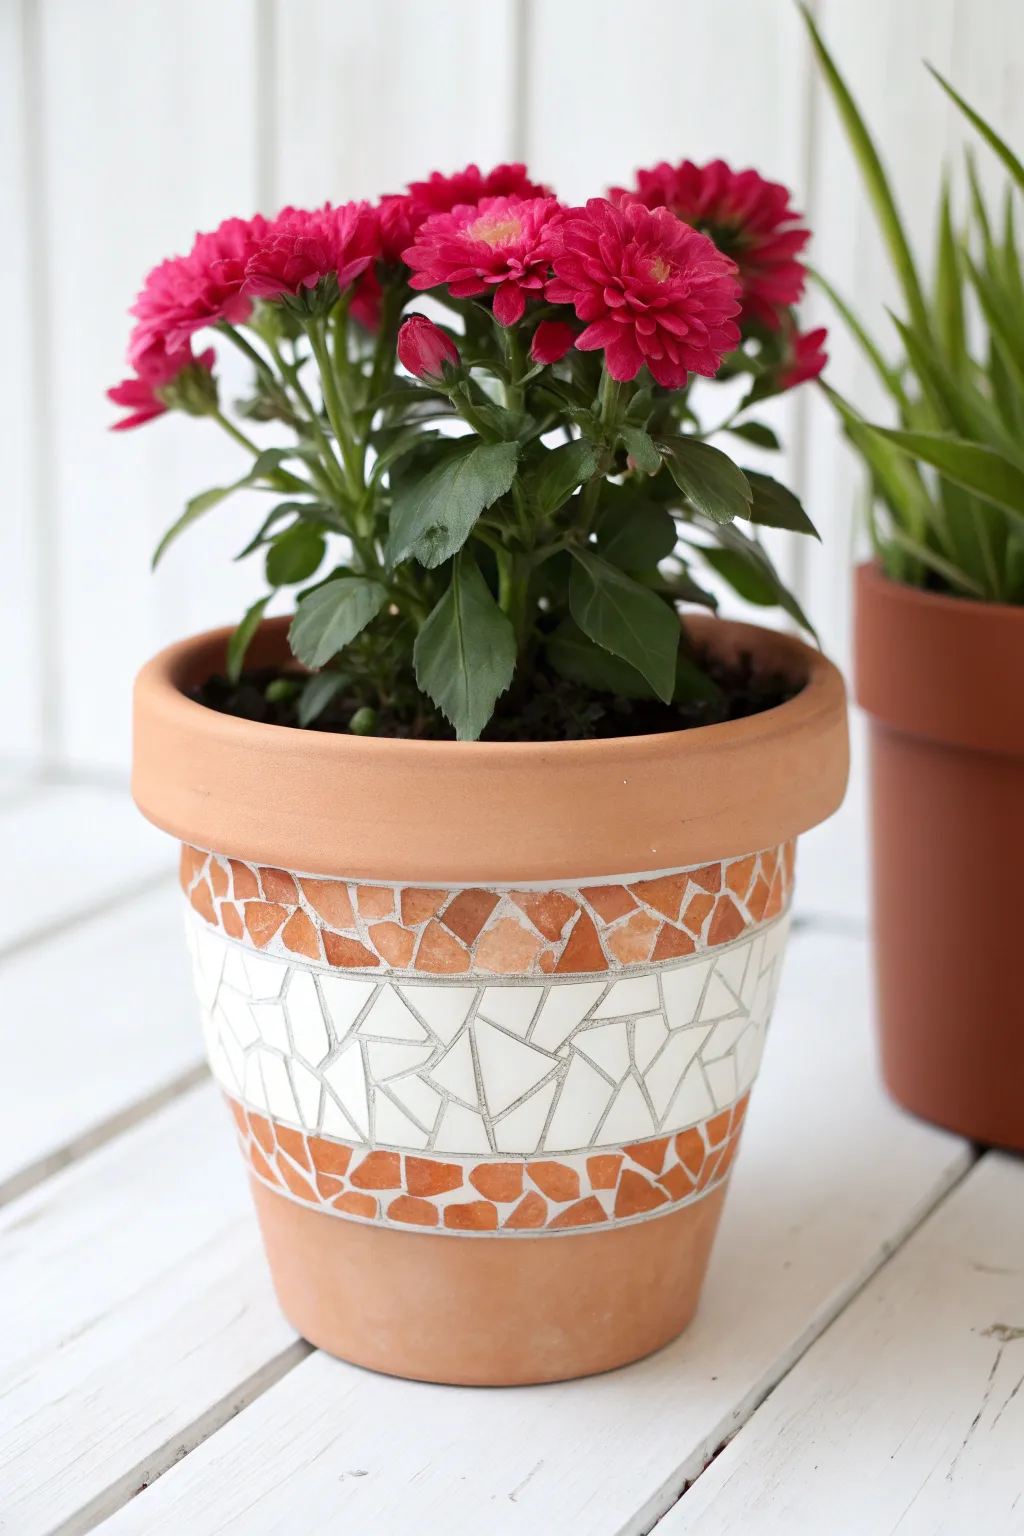
Elevate a standard garden staple by adding textured bands of mosaic tile that mimic the pot’s natural warmth. This design features a crisp white center stripe bordered by rugged terra cotta fragments for a rustic yet modern look.
Step-by-Step
Materials
- Standard terra cotta pot (approx. 6-8 inch)
- Terra cotta colored ceramic tiles or broken pot shards
- White ceramic tiles or mosaic glass pieces
- Tile adhesive or thin-set mortar
- White grout (pre-mixed or powder)
- Tile nippers
- Palette knife or plastic spreaders
- Sponge and water
- Soft cloth
- Protective eyewear
- Masking tape or painter’s tape
- Pencil
Step 1: Preparation & Design
-
Clean surface:
Begin by wiping down your terra cotta pot with a damp cloth to remove any dust or loose clay particles. Let it dry completely. -
Mark boundaries:
Using a pencil, draw two horizontal rings around the pot to define your central white band. I find that measuring about 2 inches from the top rim and 2 inches from the bottom gives a balanced look, adjusting based on your pot’s height. -
Apply tape guide:
Stick masking tape just inside the rim and near the bottom edge if you want to keep the very top lip and base completely clay-free. This acts as a visual guide and protects areas you don’t want tiled. -
Prepare tiles:
Put on your safety glasses. Using tile nippers, cut your white tiles into irregular shapes—triangles, trapezoids, and shards working roughly around 1-inch sizes. -
Create orange shards:
Repeat the nipping process for the terra cotta colored tiles. Keep these pieces slightly smaller than the white ones to create a nice textural contrast.
Step 2: Applying the Mosaic
-
Start the center:
Apply a generous layer of tile adhesive to a small section of the central band area using your palette knife. -
Place white tiles:
Press the white shards into the adhesive. Leave small, consistent gaps (about 1/8 inch) between pieces for the grout lines. -
Fill the band:
Continue working your way around the pot, buttering small sections with adhesive and placing white tiles until the center ring is complete. -
Start the borders:
Apply adhesive to the upper band section, directly above your white tiles. -
Apply top border:
Place the orange/terra cotta shards in this upper section. Try to align the flat edges of the shards with your pencil line for a neat transition. -
Apply bottom border:
Repeat the process for the lower band, filling the space below the white section with the remaining orange shards. -
Dry time:
Allow the adhesive to cure fully according to the package instructions, usually overnight or for at least 24 hours.
Adhesion Helper
For better grip on the slippery curved surface, scuff the exterior of the terra cotta pot with medium-grit sandpaper before applying any adhesive.
Step 3: Grouting & Finishing
-
Mix grout:
Prepare your white grout. If using powder, mix it with water until it reaches a consistency similar to peanut butter. -
Apply grout:
Scoop a generous amount of grout onto the mosaic surface. Using a plastic spreader or your gloved fingers, press it firmly into all the crevices between tiles. -
Make it smooth:
Ensure all gaps are filled and the grout is level with the tile surface. Don’t worry about the mess on top of the tiles yet. -
Initial clean:
Let the grout set for about 15-20 minutes until it feels slightly firm. Take a damp (not soaking) sponge and gently wipe across the surface to remove excess grout. -
Refine the look:
Rinse your sponge frequently and continue wiping until the tiles are clean and the grout lines look smooth. -
Final buffing:
Once a hazy film appears on the dry tiles (usually after another hour), take a soft, dry cloth and buff the tiles to a high shine. -
Remove tape:
Carefully peel away any masking tape you applied earlier. -
Seal (optional):
If keeping outdoors, apply a tile and grout sealer to protect your work from moisture.
Creative Twist
Swap the terra cotta shards for mirrored glass pieces in the top and bottom bands. The reflection will make the white center pop and add sparkle to your garden.
Place your favorite mums or greenery inside and enjoy the handmade charm on your patio

TRACK YOUR CERAMIC JOURNEY
Capture glaze tests, firing details, and creative progress—all in one simple printable. Make your projects easier to repeat and improve.
Hanging Wall Pocket Clay Pot Planters
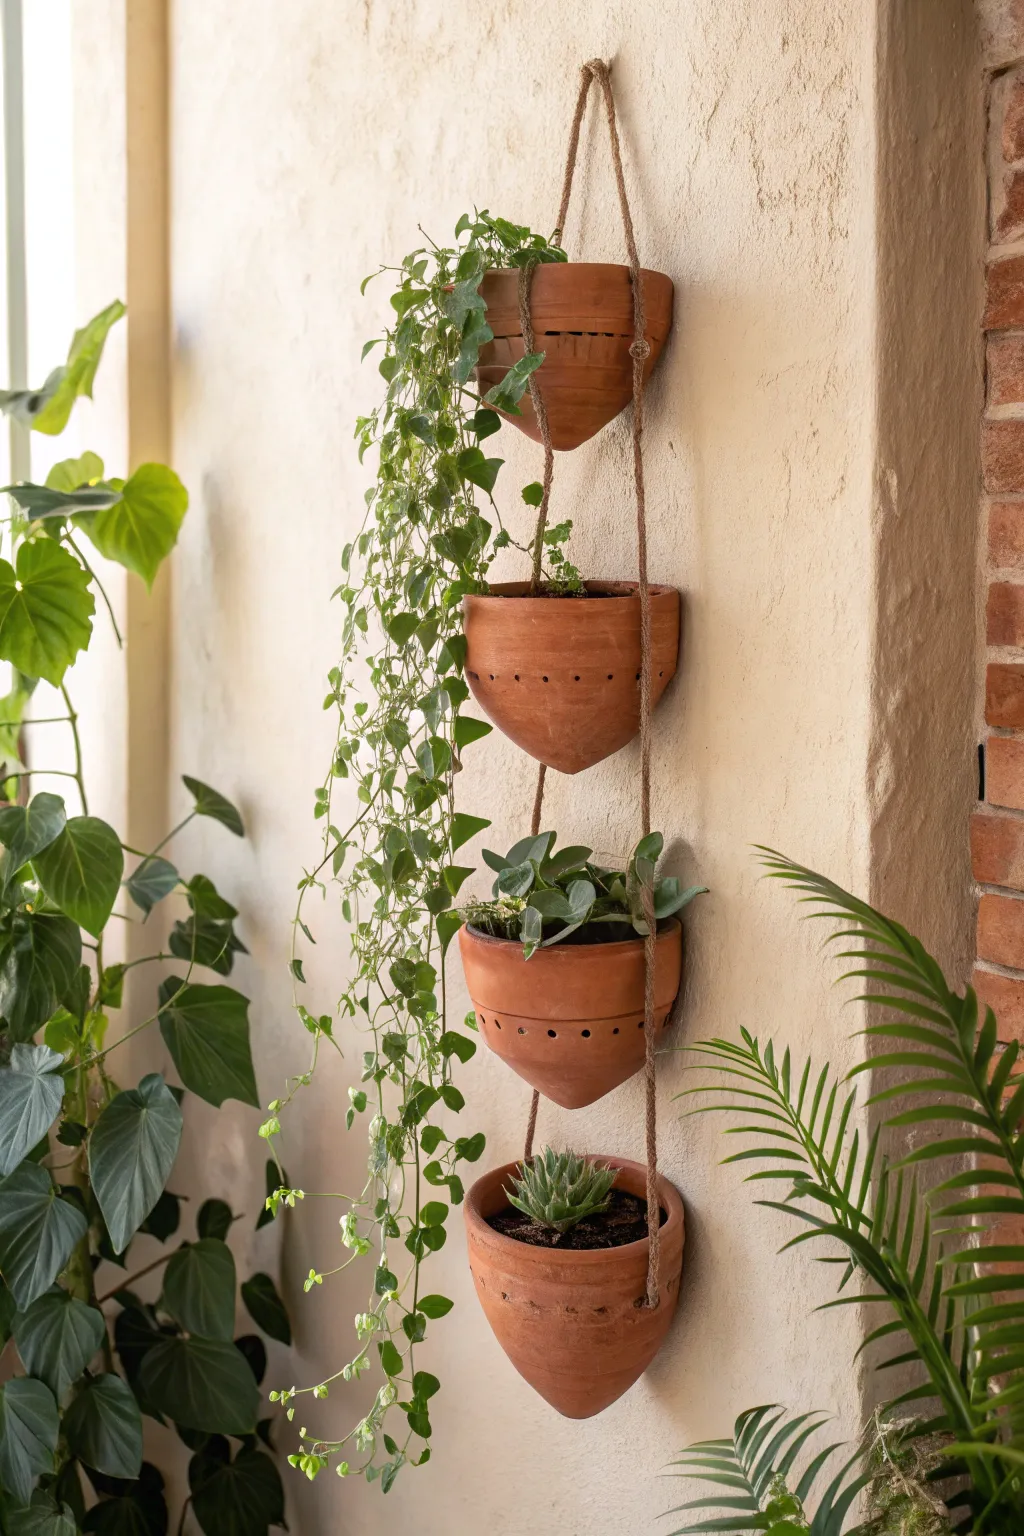
Bring earthy charm to your vertical spaces with this cascading set of hanging clay pockets. This four-tier planter uses natural terracotta and sturdy jute rope to create a rustic, space-saving display for your favorite trailing vines and succulents.
Step-by-Step Guide
Materials
- 4 terracotta wall planter pockets (half-cone shape)
- Thick jute rope (approx. 1/2 inch diameter)
- Power drill with masonry bit (if pots lack holes)
- Heavy-duty S-hook or wall anchor
- Measuring tape
- Pencil for marking
- Scissors
- Potting soil
- Assorted plants (ivy, succulents)
Step 1: Preparing the Pots
-
Select your pots:
Choose four identical terracotta wall pockets. These are distinct from standard round pots because they have a flat back to rest flush against the wall. -
Check for suspension holes:
Inspect the sides of each pot near the top rim. You need a hole on the left and right side of every pot for the rope to pass through. -
Drill if necessary:
If your pots don’t have side holes, place a piece of masking tape where you want the hole to prevent cracking. Using a masonry bit appropriately sized for your rope, carefully drill horizontally through the side walls. -
Clean the terracotta:
Wipe down the pots with a damp cloth to remove any dust or debris from drilling. I like to let them dry completely in the sun before moving on to assembly.
Knot Security
Add a dab of clear superglue inside the core of each structural knot before tightening it. This prevents the heavy pots from slowly slipping down over time.
Step 2: Rigging the Suspension
-
Measure the rope:
Cut two long lengths of jute rope. Each piece needs to be roughly 1.5 times the total desired height of your planter to account for knots and slack. -
Start at the top:
Take both pieces of rope and find their centers. Create a loop at the very top by tying the two ropes together with an overhand knot—this loop will hang on your wall hook. -
Thread the first pot:
Working with the top-most pot, thread one rope end through the left hole and the other through the right hole, entering from the inside of the pot outward. -
Secure the first tier:
Tie a sturdy knot in the rope immediately after it exits the hole on each side. Ensure the knots are tight against the terracotta so the pot sits level. -
Determine spacing:
Decide how much vertical space you want between tiers. A gap of about 8-10 inches usually allows enough room for plants to grow without being crowded. -
Prepare the second tier:
Mark the rope with a pencil where the next set of knots should sit to keep everything symmetrical. -
Thread and knot:
Thread the ropes through the second pot’s holes, again from inside to outside. Slide the pot up until it hits your measured marks, then tie knots underneath the holes to lock it in place. -
Repeat for remaining tiers:
Continue this process for the third and fourth pots. Check periodically by holding the planter up to ensure the pots hang straight and evenly spaced. -
Finish the bottom:
After securing the final bottom pot, tie a decorative double knot or wrap the ends with twine to prevent fraying, then trim any excess rope.
Step 3: Planting and Hanging
-
Install the hardware:
Drill a hole into your chosen wall location and install a heavy-duty wall anchor and hook capable of supporting substantial weight (wet soil and terracotta are heavy!). -
Layer the soil:
Add a small layer of gravel or broken pottery shards at the bottom of each pocket for drainage, then fill about halfway with potting soil. -
Add the greenery:
Place your plants into the pockets. Put trailing plants like ivy in the top tiers so they can cascade down, and upright succulents in the lower tiers for visual balance. -
Top up and water:
Fill the rest of the space with soil, pressing gently around the roots. Water lightly—terracotta is porous, so careful watering is key to prevent dripping on your wall. -
Hang it up:
Lift the entire assembly by the top loop and place it securely onto your wall hook. Step back and adjust the pots slightly if they need leveling.
Ombré Effect
Dip-dye the bottom half of each terracotta pot in white or pastel paint before assembly for a modern, two-tone look that adds artistic flair.
Enjoy the fresh, vertical garden vibe this beautiful handmade planter brings to your room
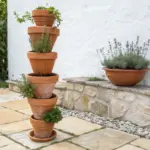
Stacked Tiered Clay Pot Planter Tower
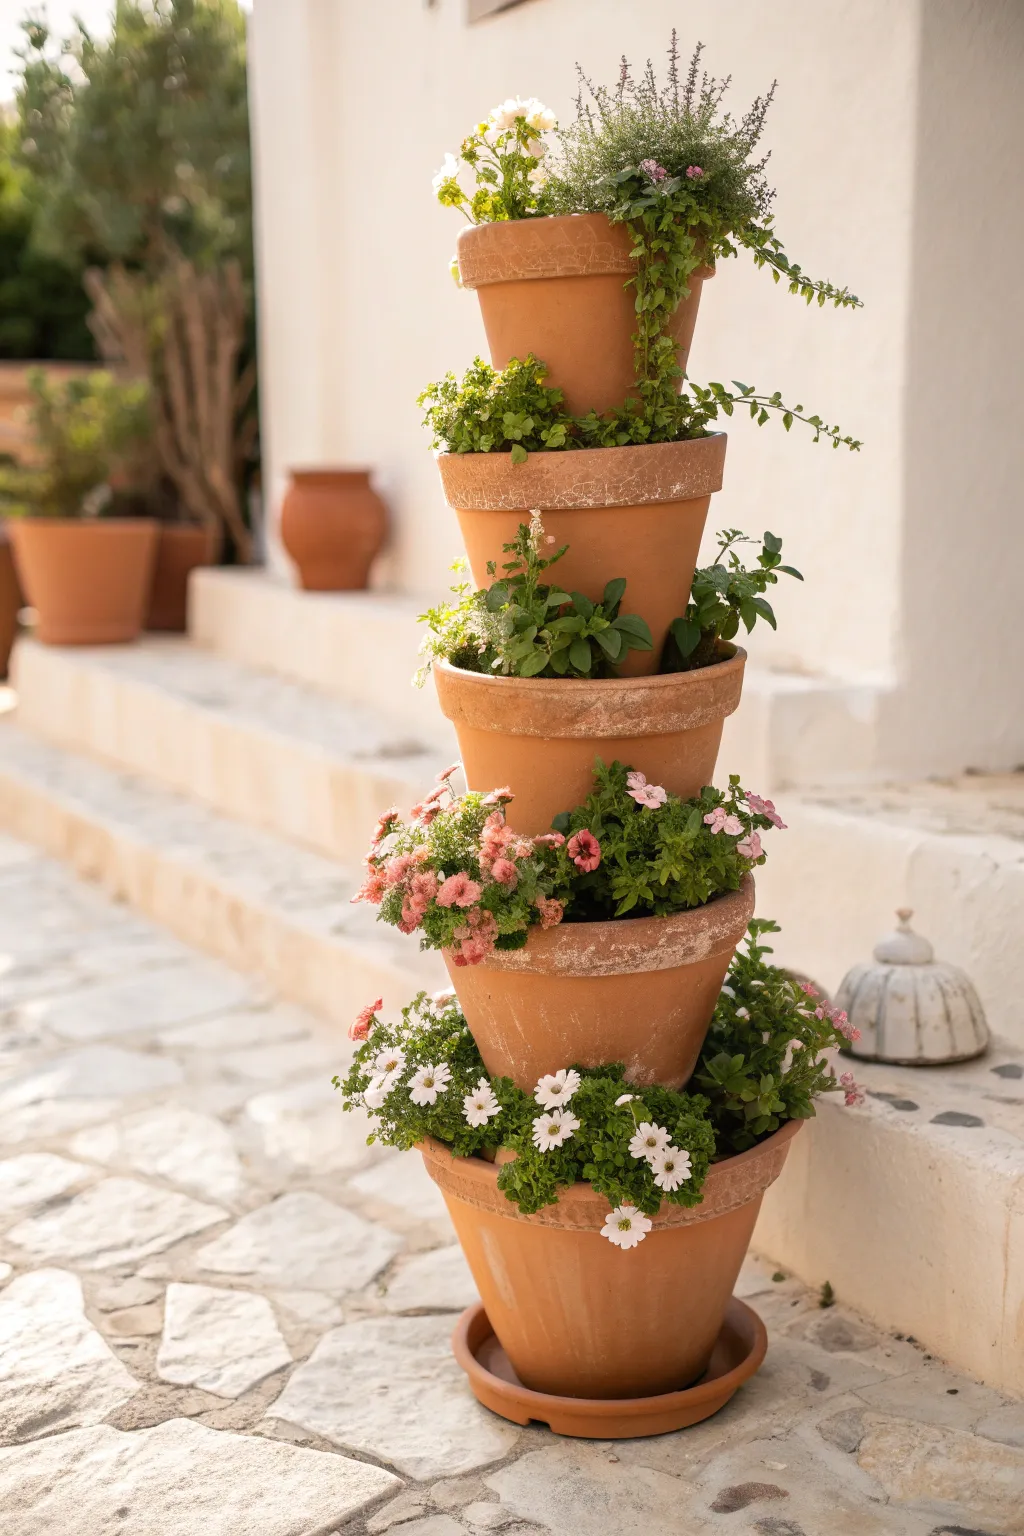
Transform a simple collection of terracotta pots into a stunning vertical garden with this tiered planter tower. The finished project features five stacked pots brimming with a vibrant mix of trailing ivy, herbs, and cheerful white flowers, creating a whimsical focal point for any patio.
Detailed Instructions
Materials
- 1 Large terracotta pot (approx. 12-14 inch diameter)
- 4 Medium to Small terracotta pots (graduated sizes, e.g., 10, 8, 6, and 4 inch)
- 1 Large terracotta saucer (to fit the largest pot)
- 1 sturdy 4-5 foot rebar or metal planting stake
- Potting soil (high quality, potting mix)
- Assorted plants (trailing vines, creeping herbs, petunias, daisies)
- Gravel or packing peanuts (for drainage)
- Mallet or Hammer
- Watering can
Step 1: Base Construction
-
Prepare the Location:
Choose the final resting spot for your planter carefully, as it will be very heavy once filled. A flat, paved area or a sturdy corner of your deck works best. -
Position the Foundation:
Place your large terracotta saucer on the ground. Set the largest pot directly into the saucer, ensuring it sits level and stable. -
Drive the Center Rod:
Insert the rebar or metal stake through the drainage hole of the bottom pot. Using a mallet, drive it a few inches into the ground beneath the saucer for stability. If you are on concrete, simply hold it upright; the weight of the soil will eventually secure it. -
Add Drainage Layer:
Fill the bottom of the large pot with about 2 inches of gravel or packing peanuts to ensure the roots don’t sit in water. -
Anchor the Stake:
Fill the base pot with potting soil around the rod, packing it down firmly as you go until you are about 2 inches from the rim. The rod should now stand straight on its own.
Wobbly Tower?
If pots slip from their tilted angles, use broken terracotta shards or small stones buried in the soil underneath the low side of the pot to act as invisible shims.
Step 2: Stacking the Tower
-
Thread the Second Pot:
Take your second-largest pot and thread it down over the metal rod through its drainage hole. -
Create the Tilt:
Slide the pot down until it rests on the soil of the base pot. Tilt it purposefully to the left so the rim rests on the soil surface of the pot below. -
Secure with Soil:
Fill this second pot with potting soil. I like to pack extra soil on the ‘low’ side of the tilt to act as a wedge and keep the angle securely locked in place. -
Thread the Third Pot:
Slide the third pot down the rod. When it touches the soil of the second pot, tilt it in the opposite direction (to the right). -
Repeat the Process:
Continue threading remaining pots, alternating the direction of the tilt (left, right, left) for each tier. This creates a balanced, zig-zag visual effect. -
Top the Tower:
Place the smallest, final pot straight up or slightly tilted on the very top of the rod. Fill it with soil to conceal the remaining tip of the metal stake.
Pro Tip: Moisture Control
Terracotta dries out quickly. Mix water-retaining crystals into your soil before filling the pots to keep your vertical garden hydrated longer on hot days.
Step 3: Planting and Styling
-
Start at the Bottom:
Begin planting in the exposed crescent-shaped soil areas of the bottom pot. This is a great spot for spill-over plants like white daisies or petunias that will drape over the edge. -
Plant the Middle Tiers:
Work your way up, tucking smaller plants like herbs or compact flowers into the soil pockets created by the tilted pots. Ensure you dig deep enough to cover the root balls completely. -
Crown the Top:
Plant your ‘thriller’ in the very top pot. A taller herb or a trailing vine that can cascade down the sides works beautifully here to soften the terracotta edges. -
Fill in Gaps:
Check for any exposed soil patches. Add more potting mix where needed or tuck in small succulents or moss to create a lush, overflowing look. -
Water In:
Gently water each tier, starting from the top and letting the water trickle down. Be careful not to wash away fresh soil; a slow, gentle stream is best. -
Clean Up:
Wipe away any mud splashes or soil dust from the terracotta rims with a damp cloth to make the distinctive orange clay pop.
Step back and admire how this vertical arrangement adds instant charm and height to your garden space
Strawberry-Inspired Painted Clay Pot Planters
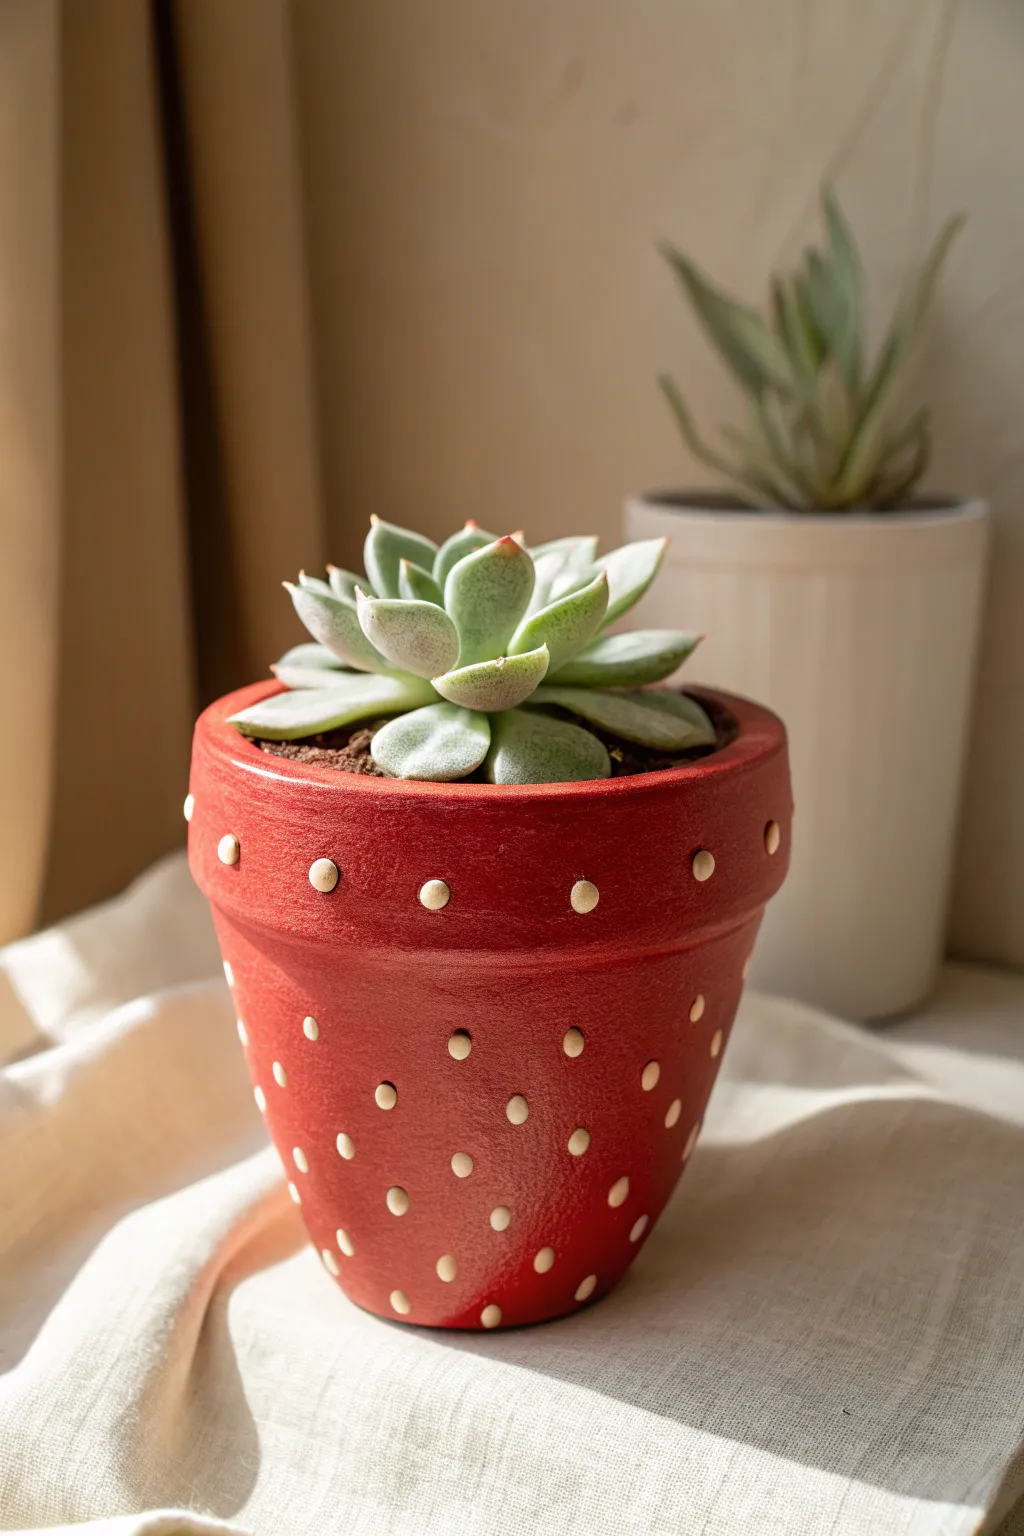
Transform a plain terracotta pot into a charming garden accent that mimics the look of a ripe strawberry. The warm red base and delicate seed details create a playful yet modern aesthetic perfect for housing your favorite rosette succulents.
Step-by-Step Guide
Materials
- Small terracotta pot (approx. 4-6 inches)
- Acrylic craft paint (bright cardinal red)
- Acrylic craft paint (cream or pale yellow)
- Outdoor matte varnish or sealer
- Medium flat paintbrush
- Small round detail brush or dotting tool
- Cardboard or palette for mixing
- Succulent potting soil
- Rosette-style succulent (like Echeveria)
Step 1: Base Preparation
-
Clean the surface:
Begin by thoroughly wiping down your terracotta pot with a damp cloth to remove any warehouse dust or oils. This ensures your paint adheres properly and doesn’t peel later. -
Dry completely:
Allow the clay to dry fully before you start painting; if the terracotta is damp, it can trap moisture under the acrylic and cause bubbling. -
Seal the inside (optional):
If you plan to plant directly into the pot, apply a quick coat of water-based sealer to the interior walls. This prevents moisture from seeping through the porous clay and bubbling your exterior paint job.
Step 2: Painting the Fruit Layer
-
First coat of red:
Using your medium flat brush, apply a coat of cardinal red paint to the exterior of the pot, including the rim. Don’t worry if it looks streaky at first; terracotta absorbs the first layer quickly. -
Paint the rim:
Ensure you paint the top lip of the pot and just about an inch down the inside interact, so the raw clay doesn’t show when the soil is added. -
Allow to dry:
Let the first coat dry for about 15-20 minutes until it is no longer tacky to the touch. -
Second coat of red:
Apply a second, slightly thicker coat of red paint to achieve a solid, opaque finish. I like to brush horizontally around the pot for this layer to create a smooth, seamless texture. -
Inspect coverage:
Check for any bald spots where the orange clay is peeking through and touch them up as needed. -
Full dry time:
Let the red base coat dry completely for at least an hour. The base must be perfectly dry before adding details to prevent colors from muddying.
Seed Spacing Trick
Use a small piece of painter’s tape to measure spacing between dots. Place it, paint a dot, move the tape, and repeat for perfect uniformity.
Step 3: Creating the Seed Pattern
-
Prepare the seed color:
Pour a small amount of cream or pale yellow paint onto your palette. It should be thick enough to hold a shape, not watery. -
Start the rim pattern:
Using a small detail brush or the handle end of a paintbrush, create a row of dots along the thick upper rim of the pot. Space them evenly, about 3/4 of an inch apart. -
Begin the body pattern:
Move to the main body of the pot. Instead of a grid, place your seeds in a staggered, diamond-like pattern, positioning each new dot in the space between the two dots in the row above it. -
Refine the shape:
Rather than perfect circles, try to make the seeds slightly teardrop-shaped or oval. You can do this by pressing the brush down and gently pulling up as you lift it. -
Vary the size subtly:
Keep the dots relatively uniform, but don’t stress over perfection; slight variations make the strawberry look more organic and natural. -
Dry the details:
Allow the cream seeds to dry fully. Since these dots are often thicker than the base paint, give them extra time—usually about 30 minutes.
Uneven Dots?
If a paint dot looks messy or smudged, let it dry completely, paint over it with a dab of the red base color, and try again once dry.
Step 4: Finishing Touches
-
Apply sealer:
Coat the entire painted exterior with an outdoor matte varnish. This protects your artwork from water damage and UV fading. -
Add soil:
Once the sealer is cured, fill the pot with specialized succulent potting mix, leaving room for the root ball. -
Plant the ‘stem’:
Place your rosette succulent (like an Echeveria) in the center. The leafy green rosette acts as the strawberry’s stem or calyx, completing the visual illusion.
Now you have a delightful, fruity planter ready to brighten up your windowsill
Pineapple-Inspired Clay Pot Planters
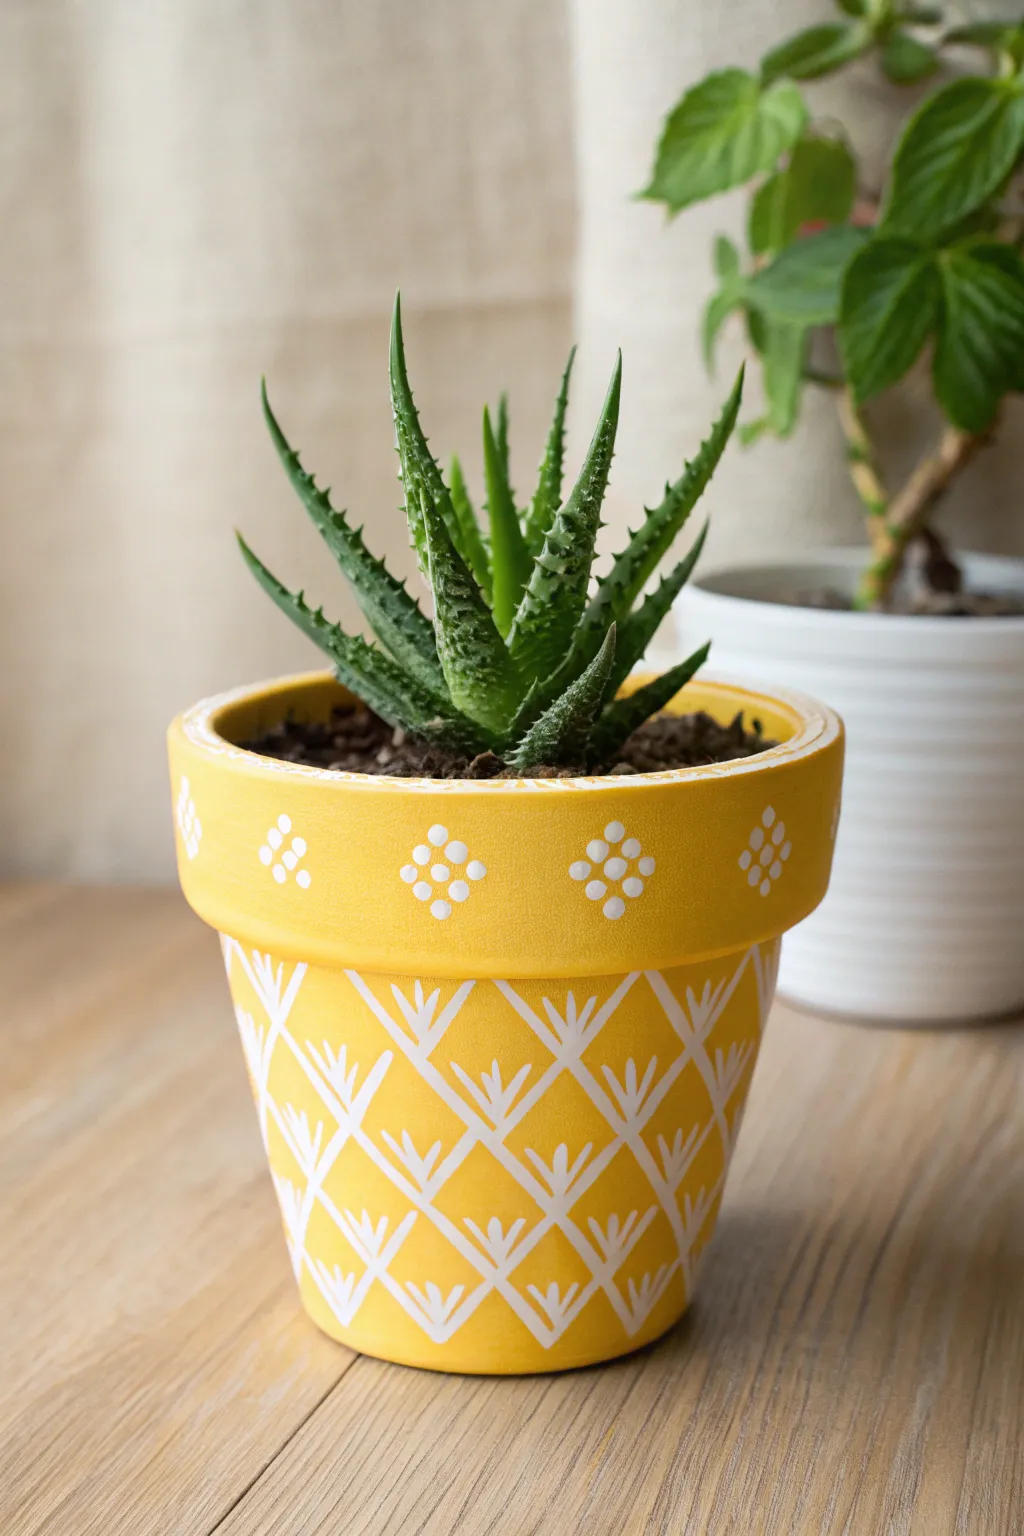
Bring a splash of summer into your home year-round with this cheerful pineapple-inspired planter. By combining a bright yellow base with a geometric white pattern, you can transform a standard terracotta pot into a piece of fruity decor that pairs perfectly with spiky succulents.
Detailed Instructions
Materials
- Terracotta pot (standard shape with rim)
- White acrylic craft paint
- Yellow acrylic craft paint (bright, sunny shade)
- Wide flat paintbrush
- Small fine-tip liner brush (size 0 or 1)
- Small round detail brush
- Pencil
- Ruler or measuring tape
- Paper plate or palette
- Cup of water and paper towels
- Clear acrylic sealer spray (matte or gloss)
- Aloe or Haworthia plant (optional, for the crown)
Step 1: Base Preparation
-
Clean the surface:
Begin by thoroughly wiping down your terracotta pot with a damp cloth to remove any dust or manufacturing residue. Let it dry completely before you start painting. -
Apply the first yellow coat:
Squeeze a generous amount of sunny yellow acrylic paint onto your palette. Using the wide flat brush, apply a smooth, even base coat over the entire exterior of the pot, including the rim. -
Paint the inner rim:
Extend the yellow paint about an inch down the inside of the pot. Since soil will cover the rest, you don’t need to paint the entire interior, but painting the top edge ensures no bare clay shows. -
Layer up the color:
Allow the first coat to dry for roughly 20 minutes. Apply a second—and possibly third—coat of yellow until the color is solid and opaque, with none of the original terracotta orange showing through. -
Let it cure:
Set the pot aside to dry fully for at least an hour. The base needs to be completely dry to touch so the pattern lines don’t smudge the yellow layer.
Grid Guide
Use a flexible sewing tape measure rather than a stiff ruler to measure the pot’s circumference. It wraps around the curves easily for spacing your diamonds.
Step 2: Patterning the Body
-
Mark vertical guides:
Using a pencil and a ruler, lightly mark even intervals around the top edge of the pot’s body (just under the rim). These marks will help you start your grid. -
Draft the diamond grid:
Lightly sketch diagonal lines connecting your marks to create a diamond lattice pattern all around the pot body. Don’t worry if it’s not mathematically perfect; the handmade look adds charm. -
Paint the grid lines:
Dip your fine-tip liner brush into the white acrylic paint. Carefully trace over your pencil lines to create the white diamond grid. Keep a steady hand and reload your brush often for crisp lines. -
Add vertical accents:
Inside each diamond shape, paint a small vertical line starting from the bottom corner and reaching about halfway up the diamond. -
Create the V-shapes:
Paint a small ‘V’ shape coming off the top of that vertical line you just made. This creates a little three-pronged abstract flower or leaf shape inside every diamond, mimicking the texture of pineapple skin. -
Refine the lines:
Go back over any white lines that look a bit faint. I find that a second pass makes the white pop beautifully against the bright yellow background.
Step 3: Finishing Touches
-
Start the rim pattern:
Switch to your small round detail brush. Visualize a diamond shape for your dot clusters on the rim to match the geometry below. -
Paint the central dots:
Paint single white dots spaced evenly around the center line of the rim. Use the grid lines on the body below as a guide to center them above the diamonds. -
Complete the dot clusters:
Add four smaller dots around each central dot—top, bottom, left, and right—to form a small cross or diamond cluster. Repeat this pattern around the entire circumference. -
Clean up details:
Check for any stray yellow spots or uneven white lines. Use a tiny bit of yellow paint to ‘erase’ mistakes if necessary. -
Seal the artwork:
Once all paint is completely dry (underside and top), take the pot outside and spray it with a clear acrylic sealer. This protects the paint from water damage when you water your plant. -
Plant the crown:
For the full pineapple effect, pot a spiky succulent like an Aloe or Haworthia inside. The green leaves act as the pineapple’s crown, completing the visual pun.
Go Geometric
Instead of the small floral/leaf shapes inside the diamonds, try painting the top half of each diamond solid white for a modern, bold harlequin look.
Place your new sunny creation on a windowsill to enjoy a little slice of the tropics every day
Whimsical Mushroom Clay Pot Planters
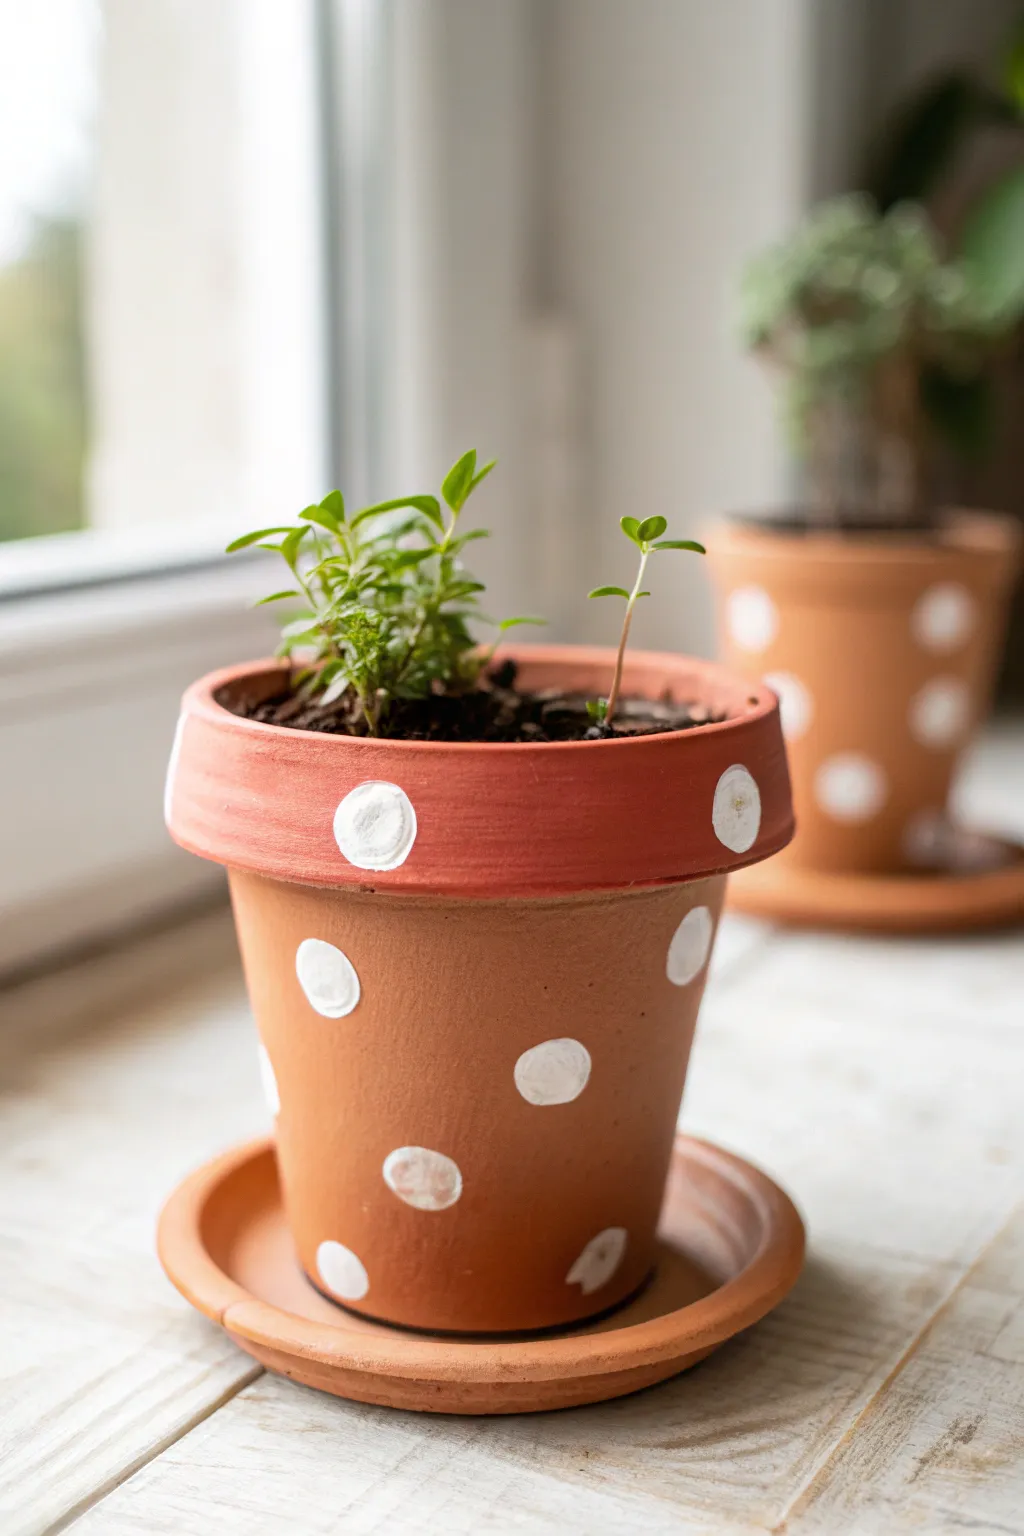
Transform a plain clay pot into a charming, playful home for your seedlings with this simple painting project. The bright white dots against the classic terracotta orange create a whimsical, toadstool-inspired look perfect for any windowsill garden.
Step-by-Step Guide
Materials
- Small terracotta pot with matching saucer
- White acrylic paint (matte or satin finish)
- Round foam pouncer (small size, approx. 1/2 inch) or a round bristle brush
- Small paintbrush (for touch-ups)
- Paper plate or palette
- Paper towels
- Clear acrylic sealer spray (optional)
- Damp cloth
Step 1: Preparation
-
Clean the surface:
Before you begin, wipe down your terracotta pot and saucer with a damp cloth to remove any dust or loose clay particles. Let the pot dry completely, as moisture can prevent the acrylic paint from adhering properly. -
Prepare your palette:
Squeeze a small amount of white acrylic paint onto your paper plate or palette. Using a small puddle helps ensure you can load your tool evenly without getting too much excess paint on the sides.
Clean Stamp Tip
Twist your foam pouncer slightly as you lift it away from the surface. This little twist helps break the suction and leaves a crisper edge on your dot.
Step 2: Painting the Dots
-
Practice your technique:
If you are new to dot painting, do a test stamp on a piece of scrap paper first. Dip your round foam pouncer or brush into the white paint and practice the pressure needed to get a solid, opaque circle. -
Start on the rim:
Begin by adding dots to the rim of the pot first. Place your first dot in a prominent spot, gently pressing the pouncer against the clay surface. Lift it straight off to keep the edges as clean as possible. -
Space out the rim dots:
Continue adding dots around the circumference of the rim. Aim to leave about an inch or two between each dot, depending on the size of your pot. Don’t worry about measuring perfectly; spacing them by eye adds to the organic, whimsical charm. -
Begin the body dots:
Move down to the main body of the pot. Place your first dot just below the rim, positioning it roughly in the empty space between two dots on the rim above. This staggered pattern mimics the natural look of a mushroom cap. -
Create a pattern:
Continue adding dots around the body of the pot in a loose, staggered arrangement. I like to rotate the pot as I go to ensure the distribution looks balanced from all angles. -
Vary the opacity:
You might notice some dots are more opaque than others. This rustic texture is lovely, but if you want solid white circles, wait for the first layer to dry and carefully stamp a second layer of paint directly over the first. -
Don’t forget the bottom edge:
Add a few dots near the very bottom edge of the pot. Sometimes a half-dot painted right at the curve where the base meets the table looks very natural and grounded. -
Check for gaps:
Take a step back and look at your pot. If there are any large empty spaces that feel unbalanced, add a small dot to fill the void.
Step 3: Finishing Touches
-
Touch up edges:
If any of your dots have messy edges or didn’t transfer cleanly, use a small, fine paintbrush dipped in bit of white paint to smooth out the perimeters. -
Clean up drips:
Check for any accidental smudges or drips of white paint on the terracotta. If the paint is still wet, a damp paper towel usually wipes it right off. If dry, you can sometimes gently scrape it away with a fingernail. -
Decorate the saucer (optional):
For a cohesive look, you can add a few dots to the outer rim of the saucer as well, though leaving it plain often helps frame the busy pattern on the pot itself. -
Let it dry fully:
Allow the paint to dry completely for at least an hour. Terracotta is porous, so the paint usually dries fairly quickly, but thick dots might take a little longer. -
Seal the pot:
To protect your design from water damage when watering your plants, take the pot outside and spray it with a clear acrylic sealer. A matte sealer keeps the natural clay look, while gloss adds a shiny finish. -
Plant prep:
Once the sealer is dry and no longer smells of fumes, your pot is ready for soil and plants. This design looks especially cute with small leafy herbs or succulents.
Reverse the Colors
For a dramatic twist on this mushroom look, paint the entire pot white first, let it dry, and then add red or terracotta-colored dots on top.
Now your adorable spotted planter is ready to add a burst of cheer to your indoor garden
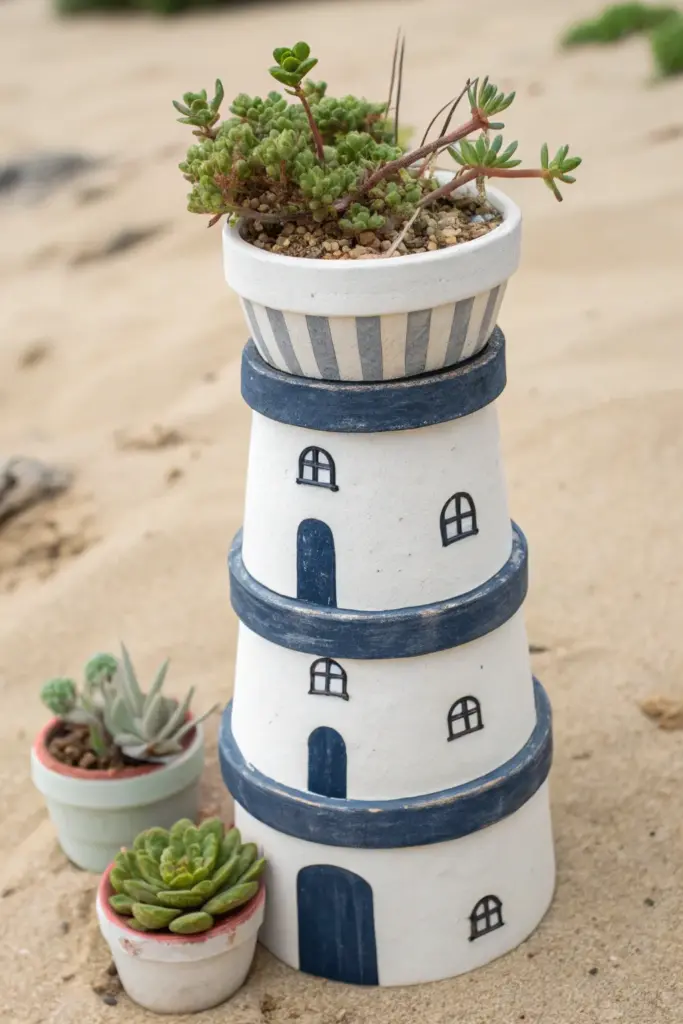
Clay Pot Lighthouse Planter Stack

Transform ordinary terracotta pots into a charming seaside beacon that doubles as a unique home for your succulents. This vertical planter adds height and whimsy to your garden, mimicking the classic white-washed lighthouses found along sandy coastlines.
Step-by-Step Tutorial
Materials
- 3 terracotta pots of graduating sizes (large, medium, small)
- 1 terracotta saucer (to fit the largest pot base)
- Small terracotta saucer (optional, for top)
- Strong outdoor adhesive (E6000 or similar)
- White acrylic outdoor craft paint
- Navy blue acrylic outdoor craft paint
- Grey acrylic outdoor craft paint
- Clear outdoor sealant spray (matte finish)
- Paintbrushes (flat brush and fine detail brush)
- Succulents and potting soil
- Small pebbles or gravel
Step 1: Base Preparation
-
Clean everything:
Start by thoroughly cleaning all your terracotta pots and saucers to remove dust or stickers. Let them dry completely, as moisture will trap underneath the paint and cause peeling later. -
Base coat application:
Paint the exterior of all three pots white using a flat brush. Depending on the coverage of your paint, you may need two or three coats to get a solid, opaque look that hides the orange clay. -
Rim painting:
While the white is drying, paint the heavy rims of the two larger pots with navy blue paint. This creates the distinct architectural separation seen in real lighthouses. -
The top lantern room:
For the smallest pot (which will sit at the very top), paint vertical grey stripes along the rim instead of a solid blue band. I find using a piece of painter’s tape helps keep these lines crisp if you don’t have a steady hand.
Tip: Dry Brushing
To get that weathered rim look, wipe most of the paint off your brush onto a paper towel before lightly dragging it across the texture of the rim.
Step 2: Assembly
-
Stacking the tower:
Invert the largest pot so it sits upside down on your workspace. Apply a strong ring of adhesive around the bottom edge (now facing up). -
Adding the middle section:
Place the medium-sized pot upside down onto the adhesive ring of the large pot. Press firmly and ensure it is centered perfectly. -
Completing the structure:
Repeat the gluing process by placing the smallest pot right-side up on top of the medium pot. This top pot acts as the actual planter, unlike the structural ones below. -
Drying time:
Allow the adhesive to cure fully according to the package instructions—usually overnight is best to ensure stability.
Step 3: Detailing & Planting
-
Adding doors:
Using the navy blue paint and a flat brush, paint an arched door shape at the bottom center of the large pot and another identical one on the medium pot. -
Painting window frames:
Switch to your fine detail brush. Paint small, black or dark blue arched window outlines above the doors on both tower sections. -
Window panes:
carefully paint a cross shape inside the window arches to create the look of panes. This tiny detail really brings the character to life. -
Weathering effects:
If you want a rustic look like the photo, lightly dry-brush some of the blue paint on the edges of the rims to make it look weathered by sea salt. -
Seal protection:
Spray the entire structure with a clear matte outdoor sealant. This is crucial to protect your paint job from watering and outdoor elements. -
Preparing the planter:
Fill the top open pot with succulent soil mix. Because the pots below are glued shut, ensure you don’t overwater, or drill a drainage hole through the stack before assembly if needed. -
Planting:
Nestle a trailing succulent or sedum into the top pot. Add a layer of small pebbles around the base of the plant to finish the look.
Level Up: Solar Cap
Replace the top plant with a small solar path light. Glue it into the top opening for a functional lighthouse that glows at night.
Place your new nautical creation near a sandy spot or rock garden to complete the beachy scene