If you’re just getting into clay pottery and want quick wins, I’ve got you—these are the kinds of projects I teach when someone wants that first “I made this!” moment. Each idea is beginner-friendly, small-scale, and totally doable with simple handbuilding (no wheel needed).
Pinch Pot Trinket Bowl
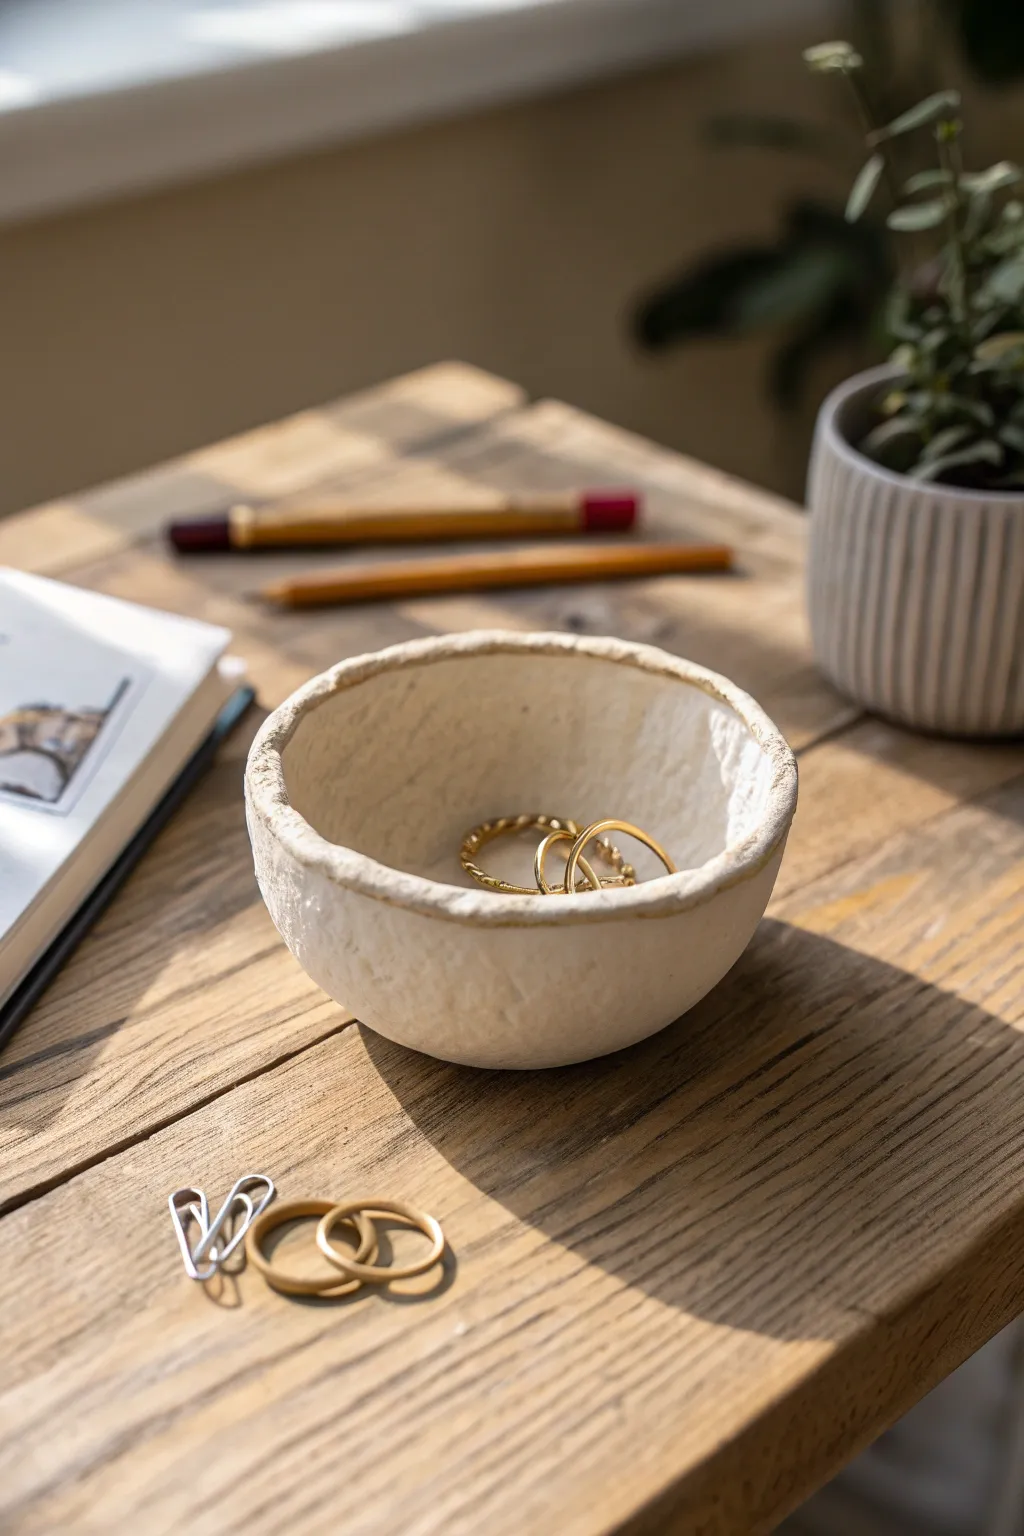
This charming, rustic trinket bowl features a tactile, stone-like texture and an organic, unglazed finish that celebrates the beauty of raw clay. The warm, metallic-hued rim adds a touch of elegance, making it the perfect catch-all for your everyday jewelry.
Detailed Instructions
Materials
- Air-dry clay (white or cream)
- Small bowl of water
- Sponge
- Texturing tool (stiff bristle brush or scrunched sandpaper)
- Pottery wire or dental floss
- Rolling pin (optional)
- Loop tool or sharp knife
- Brown acrylic paint or oxide stain
- Fine detail paintbrush
- Matte sealant/varnish
Step 1: Forming the Base
-
Prepare the Clay:
Cut off a chunk of air-dry clay roughly the size of a tennis ball. Knead it in your hands for a minute to warm it up and ensure it’s pliable and free of air bubbles. -
Create a Sphere:
Roll the clay between your palms or against a clean work surface until you have a smooth, round ball. -
Start the Pinch:
Hold the ball in your non-dominant palm. Press your dominant thumb into the center of the ball, pushing down about three-quarters of the way through, leaving enough thickness for the base. -
Open the Walls:
With your thumb still inside, begin pinching the clay between your thumb and fingers. Rotate the ball slowly in your palm as you pinch, applying even pressure to thin the walls uniformly. -
Shape the Curve:
Continue pinching upward and outward to create a gentle bowl shape. Aim for a wall thickness of about a quarter-inch, keeping it relatively consistent from bottom to top. -
Flatten the Bottom:
Gently tap the bottom of the bowl against your table to create a flat, stable base so it doesn’t wobble.
Cracking Up?
If small cracks appear while the clay dries, don’t panic. Mix a tiny bit of fresh clay with water to make a paste (slip) and fill in the cracks, then smooth over.
Step 2: Refining and Texturing
-
Create the Texture:
Instead of smoothing the outside perfectly, use a stiff bristle brush or a piece of scrunched-up coarse sandpaper to dab against the exterior walls. I find this creates that lovely stone-like effect seen in the photo. -
Shape the Rim:
Use your fingers to gently uneven the rim. You want an organic, slightly waving edge rather than a perfect circle. Press down slightly in some areas to enhance the handmade look. -
Smooth the Interior:
Dip your finger in a tiny bit of water and run it along the inside of the bowl to smooth out any deep fingerprints or cracks, ensuring a safe surface for delicate jewelry. -
Refine the Lip:
Run a slightly damp sponge along the very top edge to soften any sharp bits, but be careful not to erase the organic undulations you created. -
Initial Drying:
Let the bowl sit for 24-48 hours until it is bone dry. It should turn a lighter shade of white and feel room temperature to the touch, not cool.
Step 3: Finishing Touches
-
Inspect the Surface:
Once fully dry, check for any unintended sharp spikes in the clay texture. You can gently sand these down with fine-grit sandpaper if needed. -
Mix the Rim Color:
Squeeze a small dot of brown acrylic paint onto a palette. Determine if you want a wash or a solid line; for the look in the image, use the paint mostly undiluted. -
Paint the Edge:
Using a fine detail brush, carefully paint the very top edge of the rim. Allow the brush to skip slightly over the texture to keep it looking natural and rustic. -
Wait for Paint to Dry:
Allow the painted rim to dry completely, which should only take about 15-20 minutes. -
Seal the piece:
Apply a coat of matte varnish or sealant over the entire bowl, inside and out. This protects the air-dry clay from moisture and gives it a finished feel.
Go for Gold
For a more glamorous look, swap the brown paint for liquid gold leaf or metallic gold acrylic. It catches the light beautifully against the matte white clay.
Now you have a unique, handcrafted piece ready to hold your favorite rings and trinkets


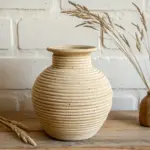
Simple Coil Pot Planter
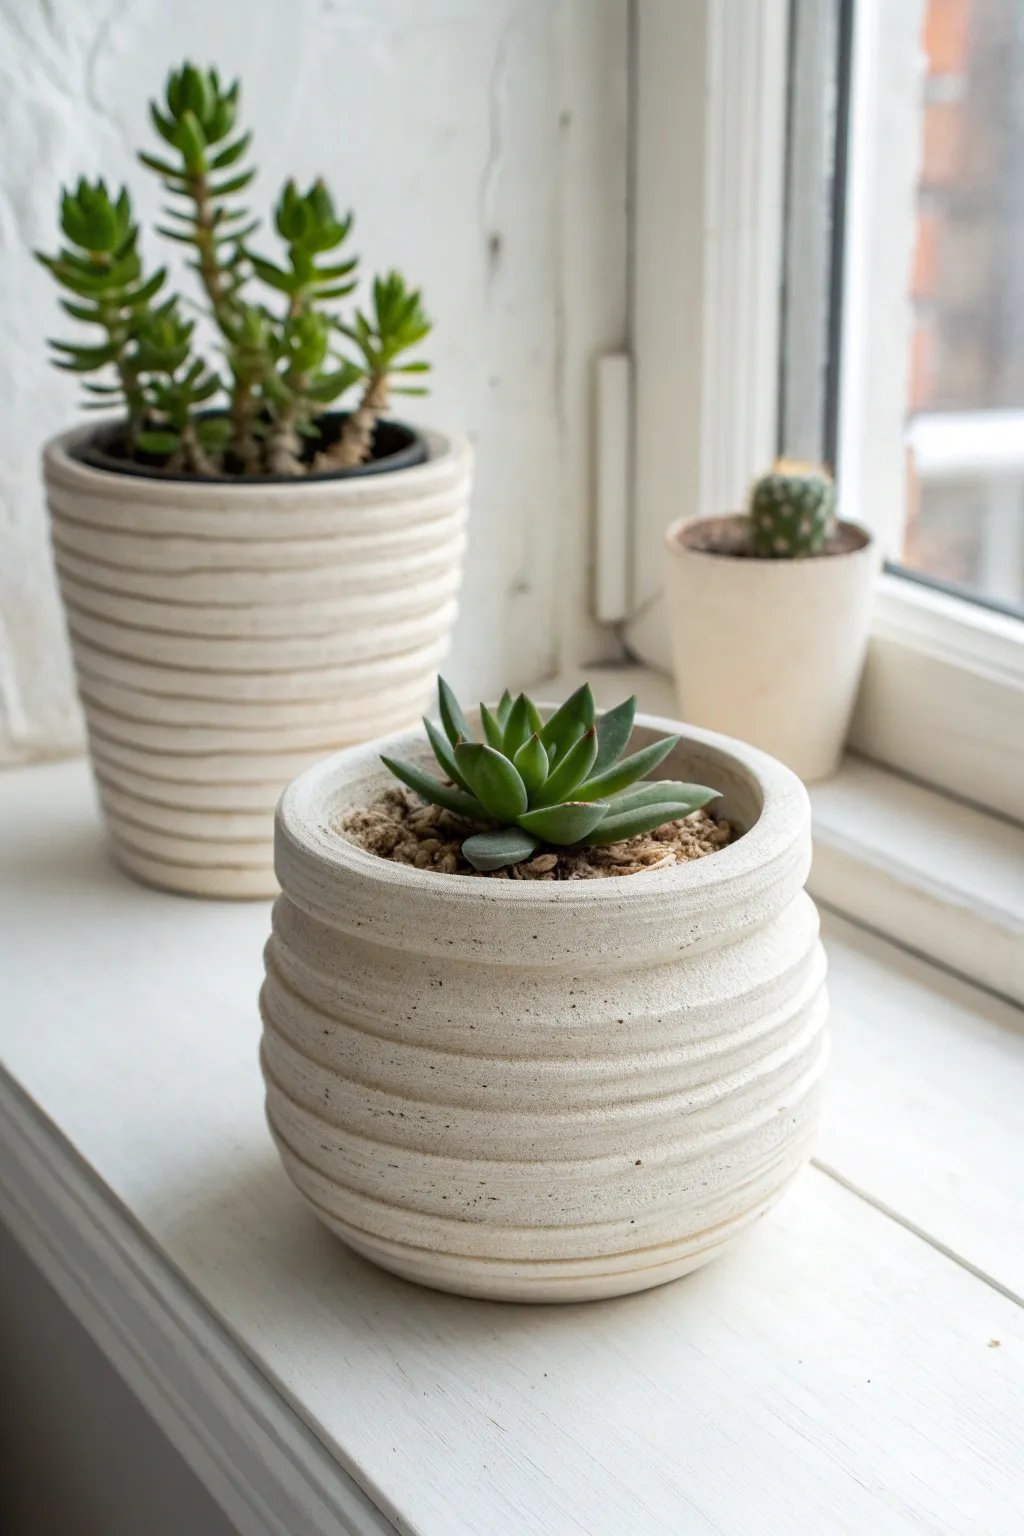
This charming, round planter features deep horizontal ridges that give it a cozy, organic feel perfect for small succulents. The natural off-white glaze and hand-built texture create a minimalist yet warm aesthetic that sits beautifully on any windowsill.
How-To Guide
Materials
- White stoneware or porcelain clay body
- Rolling pin or slab roller (optional)
- Canvas mat or wooden board
- Fettling knife
- Scoring tool or serrated rib
- Slip (clay and water mixture)
- Small sponge
- Wooden modeling tool
- Matte white or transparent glaze
- Kiln access
Step 1: Forming the Base
-
Prepare the Clay:
Start by wedging your clay thoroughly to remove air bubbles, aiming for a smooth consistency. Take a small portion, about the size of a tangerine, and pat it into a ball. -
Flatten the Bottom:
Press the ball flat onto your canvas mat or board. You can use your palm or gently use a rolling pin to create a circular slab about 1/4 inch thick. This will be the floor of your pot. -
Trim to Size:
Place a round object (like a cookie cutter or jar lid) on the slab as a template, or freehand a circle about 3-4 inches in diameter. Cut around it with your fettling knife for a crisp edge. -
Score the Edge:
Using your scoring tool or a serrated rib, scratch up the outer perimeter of your base circle. Apply a generous dab of slip to these scratches to act as glue.
Even Rolling Trick
To get perfectly even coils, move your hands from the center of the clay rope outwards while rolling. If the clay gets flat, twist it like a candycane and keep rolling.
Step 2: Building the Coils
-
Roll Your Coils:
Take a hunk of clay and roll it out on the table using long, smooth motions with your palms. Aim for a consistent ‘snake’ that is roughly the thickness of your pinky finger. -
Attach the First Ring:
Lay the first coil directly on top of the scored edge of the base. Cut the ends at an angle where they meet to ensure a seamless join, then gently press it down. -
Blend the Interior:
To make the pot strong, you need to blend the clay on the *inside* only. Use your thumb or a wooden tool to smear the clay from the coil down onto the base until the seam disappears. -
Build Upwards:
Score the top of your previous coil and add a layer of slip. Place the next coil on top. I prefer to offset the start/stop points of the coils so they don’t all line up in one vertical seam. -
Create the Curve:
To get that round belly shape seen in the photo, place each new coil slightly further outward than the one below it for the first few layers. Blend the inside seams smooth as you go. -
Taper the Top:
Once you reach the widest point of the belly, start placing the coils slightly further *mward* to narrow the opening. Continue blending only the interior to keep the exterior ridges visible.
Step 3: Refining and Finishing
-
Smooth the Rim:
Once you reach the desired height, add one final coil for the rim. Instead of leaving it round, use a damp sponge to gently flatten and smooth the top lip so it feels finished. -
Accentuate the Grooves:
The charm of this pot is the visible coil texture. Use a rounded wooden tool or your finger to gently deepen the horizontal grooves on the outside, cleaning up any messy crumbs of clay. -
Dry Slowly:
Wrap the pot loosely in plastic for the first day to let the moisture equalize, then uncover it to dry completely to the bone-dry stage. This helps prevent cracks. -
Bisque Fire:
Fire the piece in a kiln to cone 04 (or your clay’s specific bisque temperature). This turns the fragile dry clay into durable ceramic ready for glazing. -
Glaze Application:
Dip the pot into a matte white or off-white glaze. If you want the grooves to stand out more, you can wipe the exterior gently with a sponge immediately after dipping to thin the glaze on the high points. -
Final Firing:
Loading the kiln for the final glaze firing according to the clay and glaze manufacturer’s cone instructions. Ensure the bottom is wiped clean of glaze so it doesn’t stick to the shelf.
Sagging Walls?
If your pot starts wobbling or sagging while building, the clay is too wet. Stop building, cover the rim with plastic, and let the base stiffen up for an hour before continuing.
Now you have a beautifully textured vessel ready to become a home for your favorite succulent


Slab-Built Ring Dish
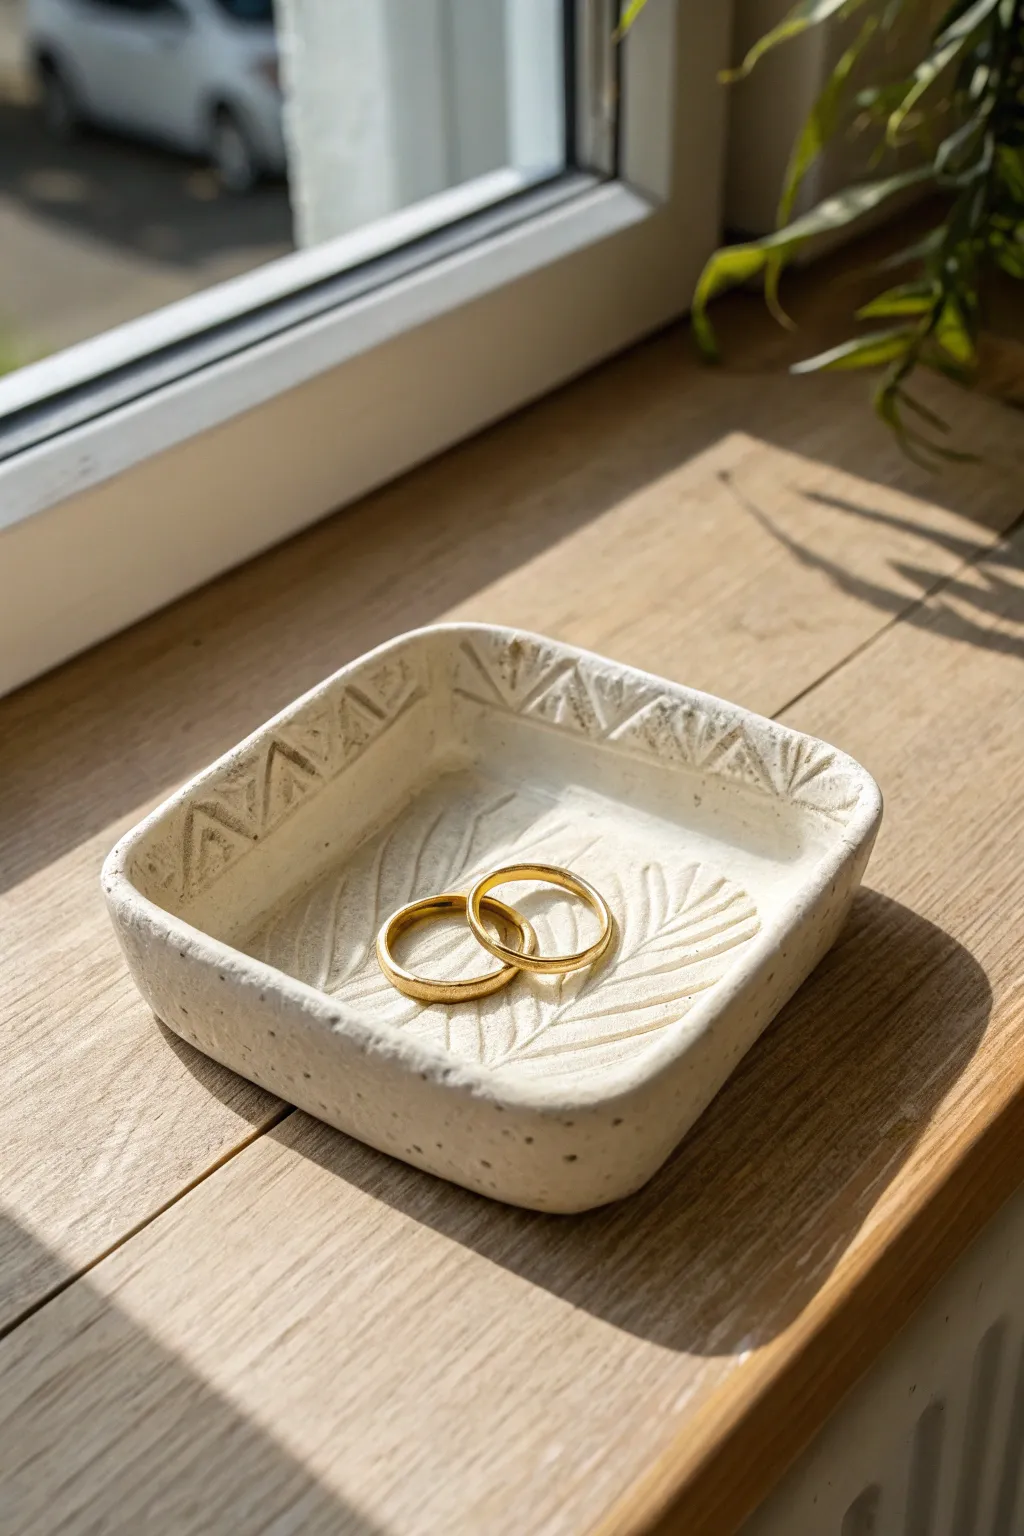
This rustic, square ring dish combines simple slab-building techniques with delicate surface patterns to create a functional piece of art. The creamy white glaze and imprinted fern and geometric details give it a charming, handmade quality that highlights your favorite jewelry.
Detailed Instructions
Materials
- White or speckled stoneware clay
- Rolling pin
- Two guide sticks (approx. 1/4 inch thick)
- Square template (paper or cardstock, approx. 4×4 inches)
- Fettling knife or craft knife
- Small fern leaf or similar botanical for texture
- Pottery carving tool or small loop tool
- Small sponge
- Bowl of water
- Matte white glaze
- Kiln (or air-dry clay sealant if using non-fired clay)
Step 1: Preparing the Slab
-
Roll the clay:
Begin by wedging a ball of white stoneware clay to remove air bubbles. Place it on your canvas or work surface. -
Flatten evenly:
Set your guide sticks on either side of the clay ball. Use the rolling pin to flatten the clay until the rolling pin rests on the sticks, ensuring a perfectly even 1/4 inch thickness. -
Cut the shape:
Place your square paper template onto the smooth slab gently. Using your fettling knife held vertically, carefully trace around the template to cut out your square base. -
Smooth the edges:
Remove the excess clay. Dip your finger in a little water and run it along the cut edges to soften them, removing any sharp corners or clay burrs.
Cracking Corners?
If the corners crack while lifting the sides, your clay might be too dry. Dab a tiny amount of vinegar on the crack and compress it with a rib tool to heal it.
Step 2: Adding Texture & Shape
-
Imprint the botanical:
Lay your fern leaf or botanical element onto the center of the square slab. Gently roll over it once with your rolling pin to press the veins and details into the clay surface. -
Remove the leaf:
Carefully peel the leaf away to reveal the impression. If any bits stick, use tweezers to remove them without marring the clay. -
Carve the border:
Using your carving tool, scratch a geometric pattern along the top edge of what will be the rim. Small triangles or zig-zags work perfectly to frame the organic center. -
Lift the sides:
Place the square slab onto a piece of foam or a small slump mold. Gently lift and press the corners upward to create the dish shape. You want the sides to slope up gradually, forming a shallow bowl. -
Refine the form:
I like to pinch the corners slightly to define the square shape while keeping the walls curved and organic. Smooth the rim with a damp sponge.
Oxide Definition
To make the pattern pop, brush a dark oxide wash into the textures and wipe it back with a sponge before applying a transparent glaze.
Step 3: Finishing & Glazing
-
Dry slowly:
Cover the dish loosely with plastic and let it dry slowly to the leather-hard stage, then uncover to let it become bone dry. This prevents warping. -
Bisque fire:
Fire the bone-dry piece in a kiln to bisque temperature (usually cone 04) to prepare it for glazing. -
Clean the surface:
Once cool, wipe the bisque ware with a damp sponge to remove any dust that might resist the glaze. -
Apply glaze:
Dip the dish into a matte white glaze, or brush on three even coats. Ensure the glaze settles into the leaf impression but doesn’t obscure the fine details. -
Wipe the foot:
Use a sponge to wipe any glaze off the very bottom of the dish so it doesn’t stick to the kiln shelf. -
Final fire:
Fire the piece again to the glaze temperature recommended for your specific clay and glaze combination.
Place this lovely little dish on a windowsill to catch the light and hold your treasures safely


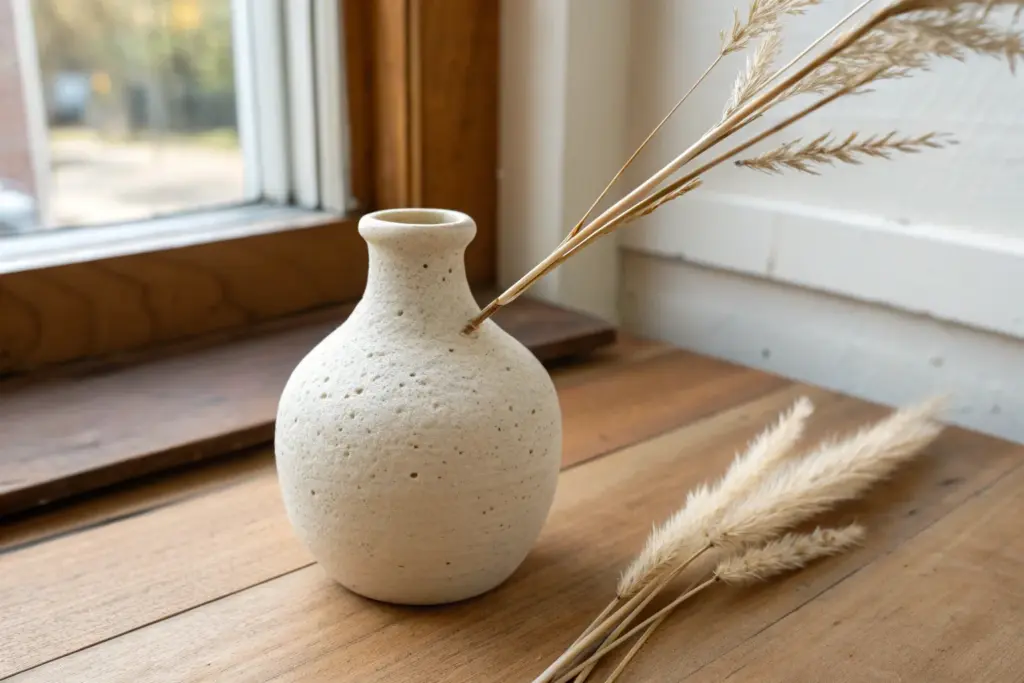
Mini Bud Vase Trio
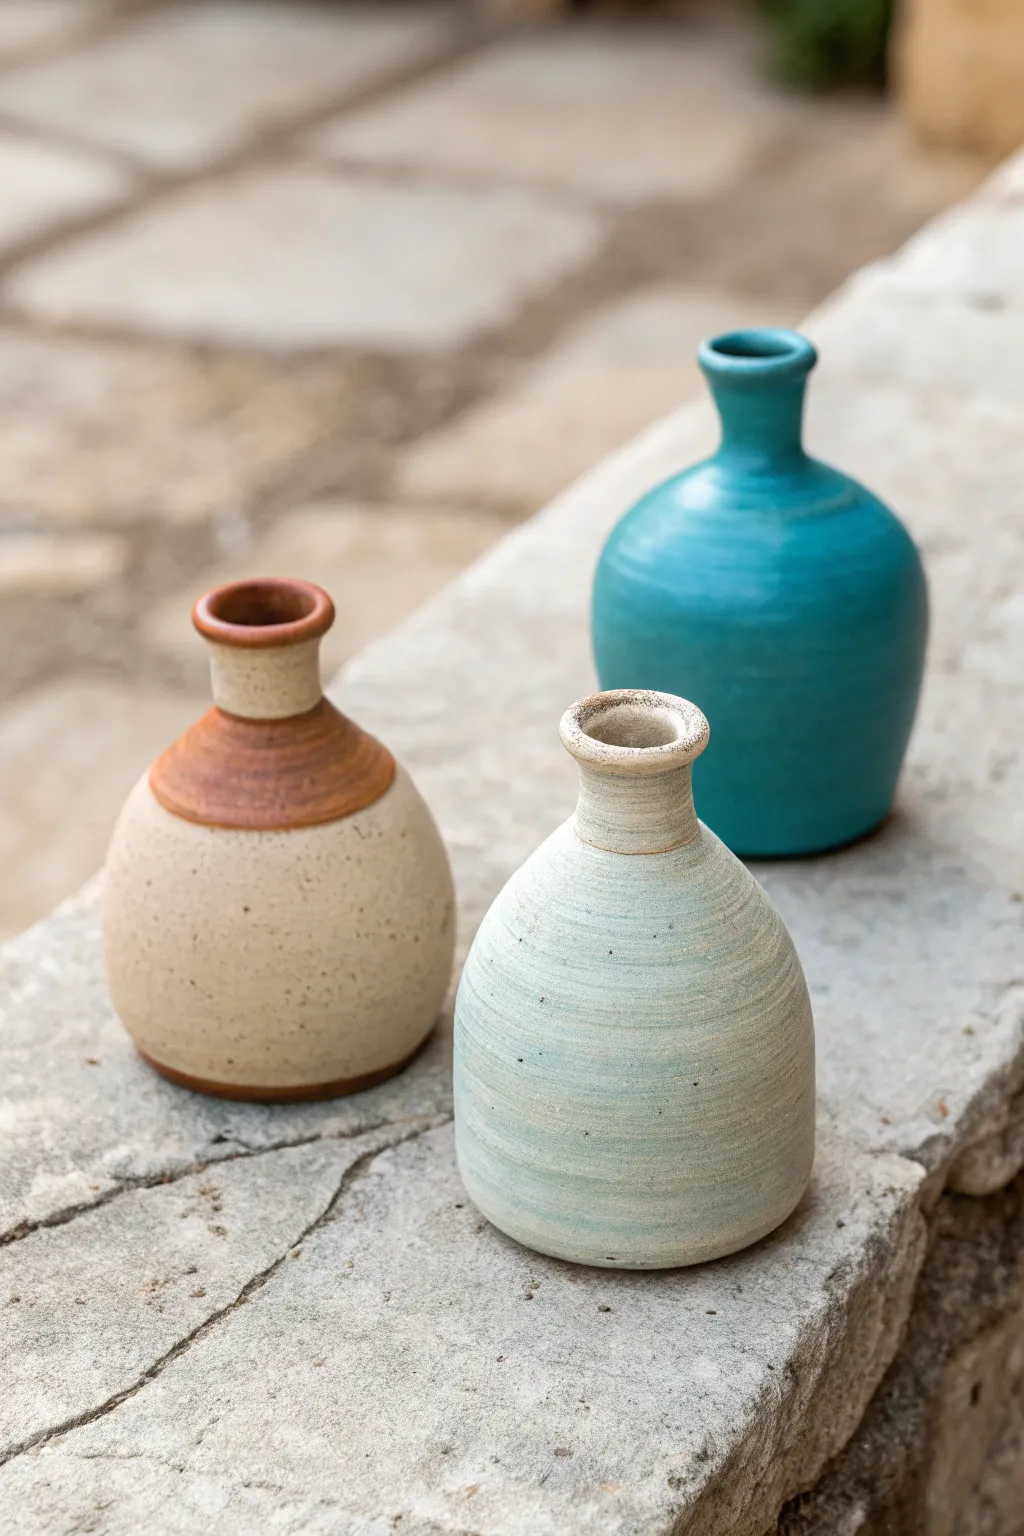
These charming miniature vessels are perfect for holding a single stem or simply decorating a shelf with their organic, earthy textures. By centering small amounts of clay, you can practice throwing consistent shapes while exploring three distinct glazing effects.
Step-by-Step Guide
Materials
- Speckled stoneware clay (approx. 1 lb per vase)
- Pottery wheel
- Small bucket of water
- Potter’s sponge
- Pin tool
- Wooden rib tool
- Wire cutting tool
- Loop turning tools (for trimming)
- Turquoise gloss glaze
- Matte white or clear glaze
- Iron oxide wash or terracotta slip (for the brown accents)
- Small paintbrush
Step 1: Throwing the Forms
-
Wedge and Center:
Start with a small ball of clay, roughly the size of a tennis ball (about 1 lb). Wedge it thoroughly to remove air bubbles, then slam it onto the center of your wheel head. Use wet hands to cone the clay up and down until it is perfectly centered. -
Open the Clay:
Press your thumbs into the center of the mound, opening it up but leaving about half an inch of clay at the bottom for the foot. Create a narrow floor, as these are small bud vases. -
Pull the Walls:
Using your thumb on the inside and fingers on the outside, gently squeeze and pull the clay upward. Keep the cylinder relatively narrow. Aim for a height of about 4-5 inches, maintaining even wall thickness. -
Belly Out the Form:
To create the rounded bottom, gently apply pressure from the inside of the cylinder with your fingertips, pushing outward while supporting the outside. I like to use a flexible rib here to smooth the exterior curve as it expands. -
Collar the Neck:
Place both hands around the top third of the vessel. Gently squeeze inward while the wheel spins to narrow the opening. Do this gradually to avoid buckling the clay. This creates the ‘bottle’ shape. -
Refine the Rim:
Use a chamois or your sponge to smooth the very top edge. For the turquoise vase, gently flair the rim outward slightly. For the others, create a rolled or thickened rim for a sturdy look. -
Cut and Dry:
Run your wire tool under the base to release it from the wheel. Repeat the process to make all three vases, varying the belly shapes slightly. Let them dry to a leather-hard state.
Step 2: Trimming
-
Center and Secure:
Place a leather-hard vase upside down on the wheel. Center it perfectly and use small coils of soft clay to secure it in place. -
Define the Foot:
Using a sharp loop tool, shave away excess clay from the bottom to create a neat foot ring. This lifts the visual weight of the vase and gives it a professional finish. -
Smooth the Surface:
If you want the textured spiral look seen on the front vase, leave slight finger ridges or use a tool to carve subtle spiral lines. Otherwise, smooth the surface with a damp sponge. -
Bisque Fire:
Allow the pots to dry completely until they are bone dry. Load them into the kiln for a bisque firing (usually to Cone 04 or 06).
Wobbly Necks?
If the neck twists while collaring, you are squeezing too hard or the clay is too dry. Use plenty of water (slip) and collar in multiple slow passes rather than one big squeeze.
Step 3: Glazing and Finishing
-
Wax the Bottoms:
Apply wax resist to the foot ring and the very bottom of each vase to prevent glaze from sticking to the kiln shelf. -
Glaze the Turquoise Vase:
Pour turquoise gloss glaze inside the tall vase, swirl, and pour out. Then, either dip the entire exterior or use a brush to apply three even coats of the turquoise glaze. -
Glaze the Speckled Vase:
For the front vase, use a matte white or semi-transparent glaze. Dip the vase quickly—if the glaze is thin enough, the natural speckles of the clay body will show through nicely. The spiral texture will catch the glaze beautifully. -
Decorate the Two-Tone Vase:
For the left vase, start by dipping the whole piece in a clear or light beige matte glaze. Let it dry to the touch. -
Apply the Oxide Accent:
Mix iron oxide with a little water or use a terracotta slip. Carefully paint this onto the neck and shoulder area of the beige vase. Use a steady hand to create a clean line where the brown meets the beige. -
Final Clean Up:
Wipe away any stray glaze droplets on the foot rings with a damp sponge. -
Glaze Fire:
Load the kiln for the final glaze firing (often Cone 5 or 6 for stoneware). Ensure the vases aren’t touching each other.
Creative Texture
Before the clay dries, gently press a piece of lace or a textured fabric against the belly of the pot to create an intricate, embossed pattern that glaze will break over.
Once cooled, arrange your trio on a windowsill to catch the light and show off the variety of finishes.

The Complete Guide to Pottery Troubleshooting
Uncover the most common ceramic mistakes—from cracking clay to failed glazes—and learn how to fix them fast.
Easy Slab Mug With Handle
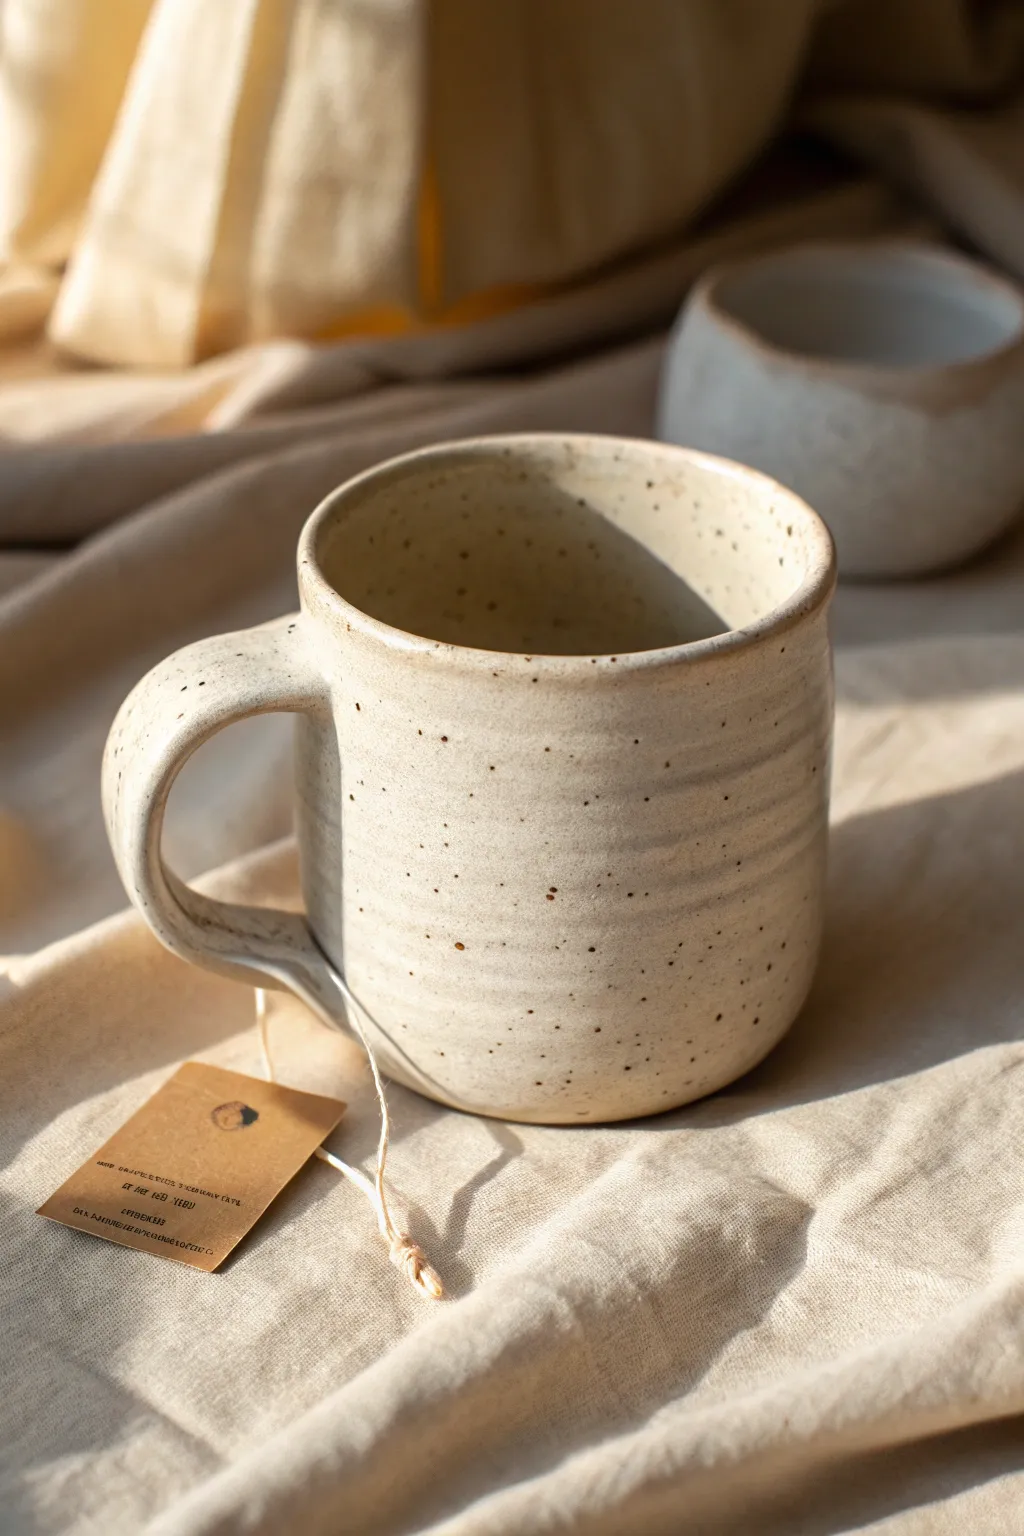
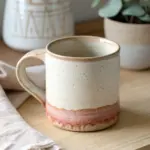
This charming, rustic mug features a warm, speckled cream glaze and gentle throwing lines that give it a distinctive handmade character. Perfect for beginners, this slab-built project combines simple construction with a professional-looking finish.
Step-by-Step Tutorial
Materials
- Speckled stoneware clay (pyrite or iron speckles)
- Rolling pin
- Canvas mat or cloth
- Clay knife or needle tool
- Fettling knife
- Serrated rib or fork (for scoring)
- Slip (clay mixed with water)
- Wooden modeling tool
- Sponge
- Cream or oatmeal matte glaze
- Template (paper rectangle approx. 12×5 inches)
Step 1: Creating the Slab Body
-
Roll the slab:
Begin by wedging your speckled clay to remove air bubbles. Lay it on your canvas mat and roll it out into a smooth, even slab about 1/4 inch thick. I find turning the clay over frequently helps keep the thickness consistent. -
Add texture:
To mimic the subtle horizontal ridges seen in the reference, gently drag a serrated rib or a heavily textured fabric horizontally across your slab while it is still flat. Don’t press too hard; just create surface interest. -
Cut the body:
Place your paper template onto the clay slab. Using your fettling knife, cut around the rectangle cleanly. Save the excess clay for the base and handle. -
Score and slip:
Take the two short ends of your rectangle. Score (scratch) the edges thoroughly and apply a generous amount of slip to both sides. -
Form the cylinder:
Curved the slab into a cylinder, overlapping the scored ends slightly. Press them together firmly, supporting the wall from the inside with your other hand to seal the seam. -
Smooth the seam:
Use a wooden modeling tool to blend the clay across the seam line until it disappears. You can re-apply the horizontal texture over the seam area so it matches the rest of the mug.
Step 2: Attaching the Base and Handle
-
Cut the base:
Roll a small piece of excess clay to the same thickness as your walls. Place your cylinder on top of this slab and trace around it with a needle tool, cutting slightly wider than the cylinder itself. -
Attach base to body:
Score the bottom edge of your cylinder and the outer edge of your base circle. Apply slip, press the cylinder onto the base, and use your modeling tool to drag clay from the base up onto the wall to seal it tight. -
Pull a strap handle:
Cut a strip of clay about 1 inch wide and 5 inches long. Smooth the edges with a wet finger to round them off, creating a comfortable C-shape curve. -
Attach the handle:
Score the attachment points on both the mug body and the handle ends. Firmly press the handle onto the mug, blending the clay at the joints for a seamless connection. -
Refine the form:
Once the mug is assembled, use a damp sponge to soften the rim. Run your finger along the rim to ensure it is smooth and pleasant for drinking.
Seam Splitting?
If the seam cracks during drying, score the crack deeply, add vinegar-heavy slip, and compress with a rib. Dry very slowly.
Step 3: Glazing and Firing
-
Bisque fire:
Allow your mug to dry slowly under plastic for a day, then uncover until bone dry. Fire it to your clay body’s bisque temperature (usually cone 04). -
Prepare the glaze:
Stir your cream or oatmeal glaze thoroughly. If your clay doesn’t have natural speckles, mix a small amount of granular ilmenite into the glaze to achieve the spotted effect. -
Apply glaze:
Pour glaze inside the mug, swirl to coat, and pour out. Then, dip the outside of the mug into the bucket, stopping just before the bottom to leave a clear rim. -
Wipe the foot:
Use a wet sponge to wipe away any glaze that may have dripped onto the very bottom of the mug so it doesn’t stick to the kiln shelf. -
Final firing:
Fire the mug a second time to the maturation temperature of your glaze and clay (typically cone 5 or 6 for stoneware) to bring out the warm, milky finish.
Smooth Sip
Use a piece of plastic wrap over the rim while smoothing with your finger; it creates a perfectly rounded, professional edge.
Enjoy your morning coffee in a mug that feels as cozy and handmade as it looks
Soap Dish With Drainage Holes

This rustic soap dish brings a spa-like serenity to your bathroom with its warm terracotta hue and functional drainage design. The wide, shallow bowl shape is perfect for holding artisan soaps, ensuring they stay dry and last longer.
Step-by-Step Guide
Materials
- Terracotta or earthenware clay
- Rolling pin
- Canvas mat or wooden board (to work on)
- Circular template (small bowl or cookie cutter approx. 4-5 inches)
- Needle tool or toothpick
- Small circular hole cutter (or a straw)
- Sponge
- Bowl of water
- Pottery rib (smooth, soft)
Step 1: Forming the Base
-
Prepare the Clay:
Start with a ball of terracotta clay roughly the size of a large orange. Wedge it well to remove any air bubbles, as trapped air can cause cracks later. -
Flatten the Slab:
Place your clay on the canvas mat. Using the palm of your hand, press the ball down into a thick puck shape to get it started. -
Roll it Out:
Use your rolling pin to roll the clay into an even slab. You are aiming for a thickness of about 1/4 to 3/8 of an inch—thick enough to be sturdy but not clunky. -
Cut the Circle:
Lay your circular template over the rolled slab. Use your needle tool to trace and cut around the template deeply to create a perfect circle. -
Smooth the Edges:
Typically, freshly cut edges are sharp. Dip your finger in a little water and run it gently along the cut rim to round it off slightly.
Clean Hole Trick
When punching drainage holes, twist the straw or cutter as you push through. This slicing motion creates a cleaner exit than pushing straight down.
Step 2: Shaping the Bowl
-
Lift the Rim:
Ideally, place the clay circle on a piece of foam or cup it in your hand. Gently pinch and lift the edges upward to create a shallow wall. -
Create the Curve:
Work your way around the circle multiple times, pressing your thumb into the center while your fingers support the outside, encouraging a gentle, concave bowl shape. -
Refine the Wall:
Make sure the rim is standing up about an inch high. I find it helpful here to use a soft rib tool on the inside curve to compress the clay and make the surface seamless. -
Level the Top:
Inspect the rim height. If one side is taller, gently press it down or trim slightly with your needle tool so the top edge is level.
Step 3: Adding Details
-
Mark the Center:
Find the approximate center of your dish. You can make a tiny, faint mark with your needle tool to guide your pattern placement. -
Cut the Central Hole:
Using your small hole cutter or a sturdy straw, punch a clean hole directly in the center for the primary drain. -
Create the Pattern:
Punch five or six additional holes in a circle surrounding the center hole. Try to keep them evenly spaced to create a flower-like geometric design. -
Clean Up Burrs:
Flipping the dish over, you will likely see ragged bits of clay where the cutter exited. Smooth these ‘burrs’ away with a slightly damp sponge so the bottom is totally flat.
Raised Feet
Add three small balls of clay to the bottom as feet. Score and slip them on—this lifts the dish, allowing water to drain away more freely.
Step 4: Finishing Touches
-
Final Smoothing:
Take a slightly damp sponge and wipe the entire surface of the dish to remove fingerprints and unify the texture. -
Rim Definition:
Run your wet finger around the top rim one last time to ensure it is fully rounded and comfortable to the touch. -
Slow Drying:
Place the dish on a board to dry. Cover it loosely with plastic for the first day to let the moisture even out, then uncover to dry completely. -
Fire the Piece:
Once bone dry (lighter in color and warm to the touch), fire the piece in a kiln according to your clay body’s specifications.
Once fired, this simple yet elegant dish is ready to be the centerpiece of your bathroom sink


What Really Happens Inside the Kiln
Learn how time and temperature work together inside the kiln to transform clay into durable ceramic.
Spoon Rest With a Notch
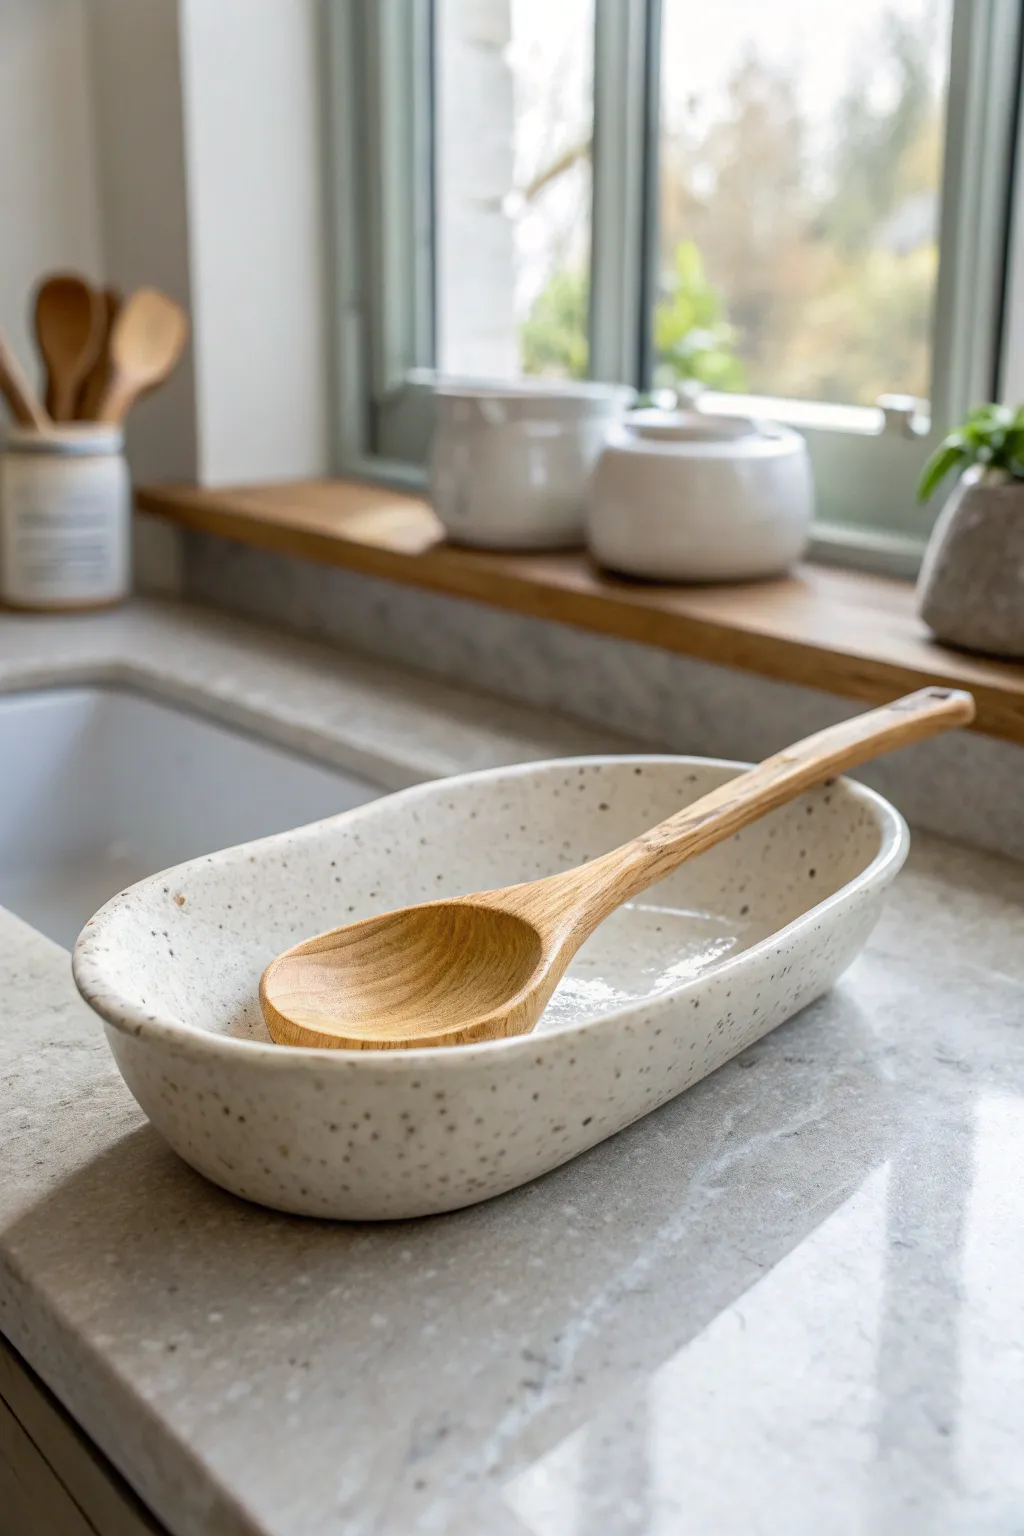
This charming, oblong spoon rest features a simple, modern design with a subtle speckled glaze that adds character to any kitchen counter. Its gentle curves and functional notch make it the perfect resting spot for your favorite wooden serving utensils.
How-To Guide
Materials
- Light colored stoneware clay (e.g., Laguna B-Mix or slightly grogged white clay)
- Speckled white glaze (cone 5/6)
- Rolling pin
- Guide strips or canvas
- Needle tool
- Potter’s knife or fettling knife
- Rib tool (flexible metal or rubber)
- Sponge
- Small oval template (paper or flexible plastic)
- Circular carving tool or small loop tool for the notch
Step 1: Forming the Base
-
Prepare the Clay:
Begin by wedging a ball of light-colored stoneware clay to remove air bubbles and ensure consistency. You’ll need about 1-1.5 pounds of clay for a generous spoon rest like this. -
Roll out a Slab:
Using a rolling pin and guide strips (about 1/4 to 3/8 inch thick), roll the clay into an even slab. Smooth out any canvas texture with a rib tool immediately. -
Cut the Shape:
Place your oval template onto the slab. Trace around it with a needle tool to cut out the base shape. Don’t discard the excess clay yet; you will need it for the walls. -
Prepare Wall Strips:
From the remaining slab, cut a long strip of clay approximately 1.5 inches wide. This will become the vertical wall of the spoon rest. -
Score the Edges:
Using your needle tool or a serrated rib, deeply score the entire outer edge of your oval base and one long edge of your wall strip.
Step 2: Assembling the Form
-
Apply Slip:
Dab a generous amount of slip (or vinegar) onto the scored areas of the base to create a strong adhesive bond. -
Attach the Wall:
Carefully place the wall strip onto the base, matching the scored edges. Work your way around the oval, pressing firmly to secure it. -
Join the Ends:
Where the strip ends meet, cut them at a 45-degree angle for a cleaner seam. Score, slip, and press these ends together firmly. -
Reinforce the Seam:
rolled a very thin coil of clay and press it into the interior corner where the floor meets the wall. Smooth this coil out completely to reinforce the join and create a curved transition. -
Smooth the Connection:
I like to use a wooden modeling tool or your thumb to drag clay from the wall down to the floor on the inside, and from the floor up to the wall on the outside, ensuring a seamless piece.
Uneven Walls?
If your slab walls are wobbling, let the clay firm up to a stiffness just shy of leather-hard before assembly. Floppy clay is hard to build vertical walls with.
Step 3: Refining and Glazing
-
Create the Notch:
Decide where you want your spoon handle to rest—usually on one of the narrow ends of the oval. Use a loop tool or simply your thumb to gently press or carve a shallow u-shaped dip into the rim. -
Smooth the Rim:
Use a damp sponge (not soaking wet) to round over the top lip of the wall. It should feel smooth to the touch with no sharp edges. -
Slow Drying:
Loosely cover the piece with plastic to let it dry slowly to the leather-hard stage. This prevents the floor from warping or cracking away from the walls. -
Bisque Fire:
Once bone dry, fire the piece in a kiln to bisque temperature (usually cone 04). -
Dipping the Glaze:
Stir your speckled white glaze thoroughly to suspend the heavy speckles. Dip the entire piece using tongs, or pour glaze inside and then dip the exterior. -
Wipe the Foot:
Use a wax resist on the bottom beforehand, or meticulously wipe the bottom of the spoon rest clean with a sponge to prevent it from sticking to the kiln shelf. -
Glaze Fire:
Fire the piece to the glaze’s maturity temperature (typically cone 5 or 6 for stoneware) to reveal the beautiful speckled finish.
Add Texture
Before assembling, press lace or leaves into the outer wall slab. The glaze will break over the texture, adding depth to the simple form.
Place this beside your stove and enjoy the clean, functional beauty of your handmade pottery
Tea Light Candle Holder
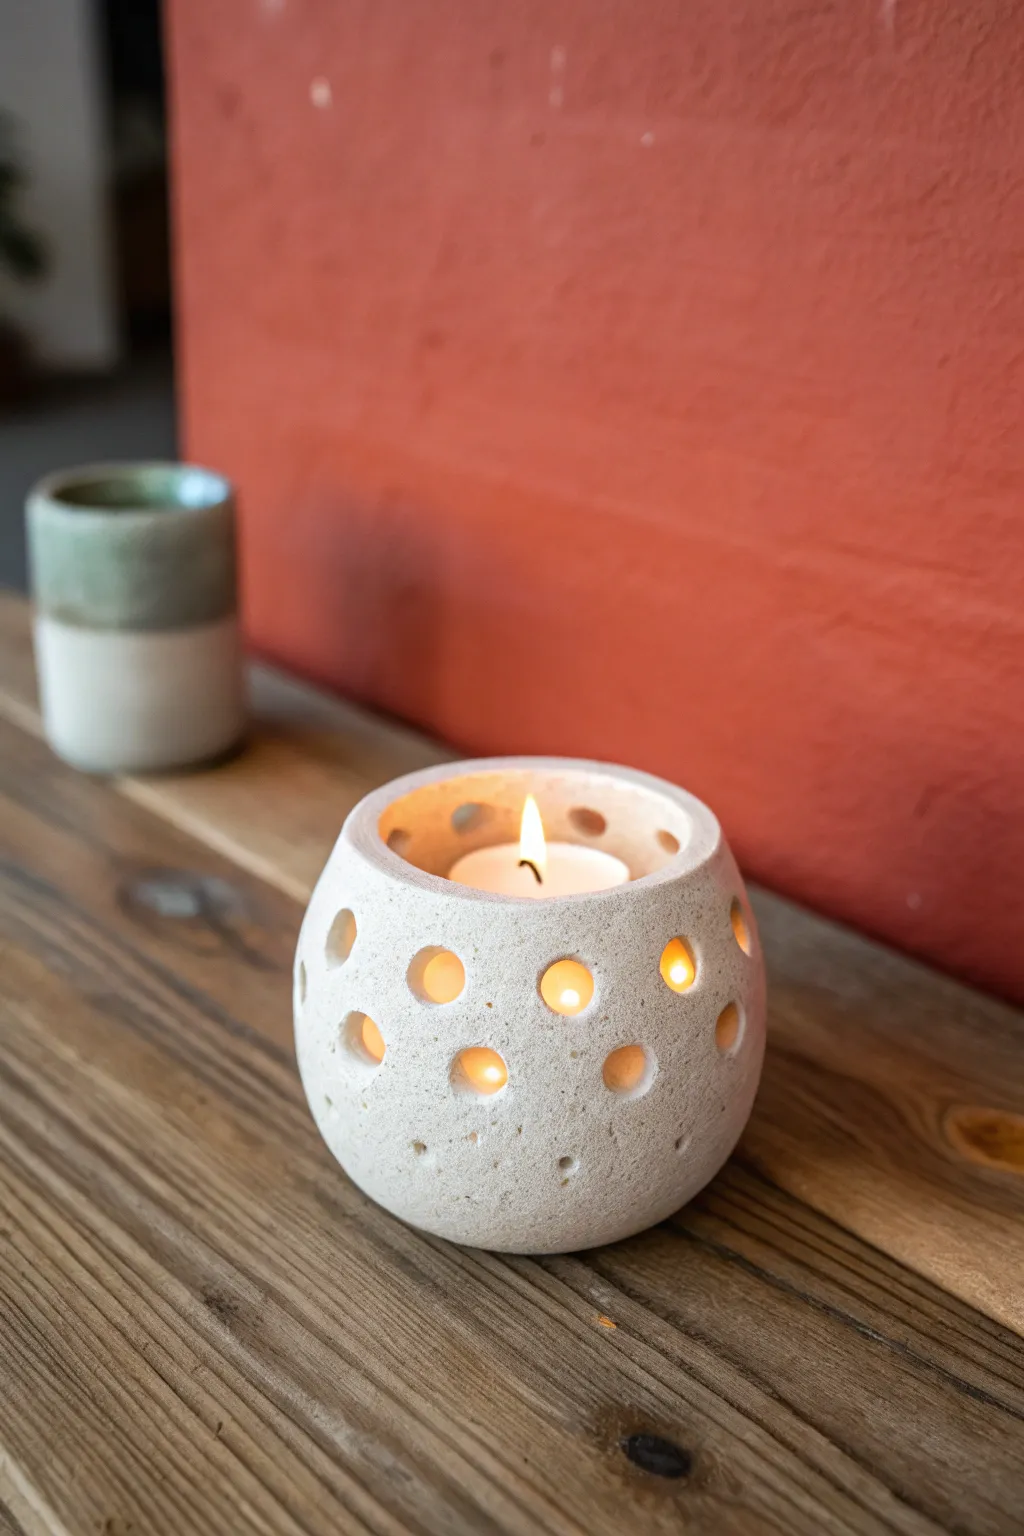
This charming tea light holder combines a rustic, stone-like texture with playful illumination. The spherical form feels organic in the hand, while the random pattern of holes casts a magical, speckled light across your space.
Step-by-Step
Materials
- White or speckled stoneware clay (groggy texture preferred)
- Small balloon or round plaster mold (for support)
- Rolling pin
- Wooden paddle
- Circle cutters or hole punch tools (various small sizes)
- Needle tool
- Sponge
- Rib tool (metal or rubber)
- Fettling knife
- Sandpaper (for post-firing)
Step 1: Forming the Sphere
-
Prepare the slab:
Start by wedging your clay to remove air bubbles, then roll out a slab to an even thickness of about 1/4 inch. If you want that stone-like texture, don’t smooth the surface too perfectly. -
Create pinch pots:
Alternatively, instead of a slab, form two equal-sized pinch pots. Gently curvature the walls with your thumbs until you have two hemispheres that match in diameter. -
Join the halves:
Score the rims of both hemispheres thoroughly and apply slip. Press them together firmly to create a sealed hollow sphere. Trap air inside; this internal pressure helps the shape hold up while you work. -
Refine the shape:
Using a wooden paddle, gently tap the exterior of your joined sphere. This not only secures the seam but also helps round out any lumpy areas. -
Smooth the seam:
Take a rubber rib or your thumb and blend the clay across the join line until it disappears completely. The surface should look continuous. -
Create the heavy base:
Gently tap the bottom of the sphere against your table to create a flat spot. This balances the holder so it won’t roll away. -
Open the top:
Use a needle tool or circular cutter to cut a large opening at the very top. I find it helpful to measure a tea light first to ensure the opening is at least wide enough for a candle to drop in easily. -
Refine the rim:
Smooth the cut edge of the top opening with a damp sponge or a strip of plastic wrap to remove sharpness.
Uneven Drying?
If holes crack while drying, you likely cut them when the clay was too wet. Wait until the sphere is ‘leather hard’—firm to the touch but not dry—before punching holes.
Step 2: Adding Texture and Light
-
Plan the holes:
Before cutting, you can lightly mark where you want your light holes to go. A random, scattered pattern often looks more organic and pleasing than a perfect grid. -
Punch the holes:
Using varied sizes of hole punch tools or the back of a paintbrush, press through the clay wall to create the circular windows. Support the inside wall with a finger if possible to prevent collapsing. -
Create variety:
Mix up the sizes. Use a larger cutter for the main glowing spots and a smaller tool or needle for tiny accent pinholes. -
Clean the edges:
As the clay stiffens slightly to leather hard, go back and clean up the ‘burrs’ or messy bits of clay around each hole using a damp sponge or detailed trimming tool. -
Add surface texture:
To mimic the stone look in the photo, gently press a coarse sanding sponge or a real rock against the exterior surface to imprint a natural, pitted texture. -
Final drying check:
Ensure the bottom is flat and the rim feels smooth. Let the piece dry slowly under plastic to prevent the holes from cracking as it shrinks. -
Bisque fire:
Fire the piece to cone 04 (or your clay’s bisque temperature). -
Glazing strategy:
For the raw stone look shown, leave the exterior unglazed or wash it with a very thin oxide (like iron oxide) to highlight the texture. Only glaze the inside if you want more light reflection. -
Final wipe:
Wipe away any glaze that dripped into the holes to keep them perfectly round and unobstructed. -
Final firing:
Fire the piece to the final maturity temperature of your clay body.
Stone Texture Trick
Mix a small amount of sand or grog directly into your clay body before forming. When you sponge it down later, the gritty particles will reveal a beautiful, weathered surface.
Place a tea light inside and enjoy the warm, speckled glow of your new creation

TRACK YOUR CERAMIC JOURNEY
Capture glaze tests, firing details, and creative progress—all in one simple printable. Make your projects easier to repeat and improve.
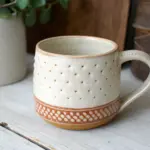
Beginner-Friendly Side Plate
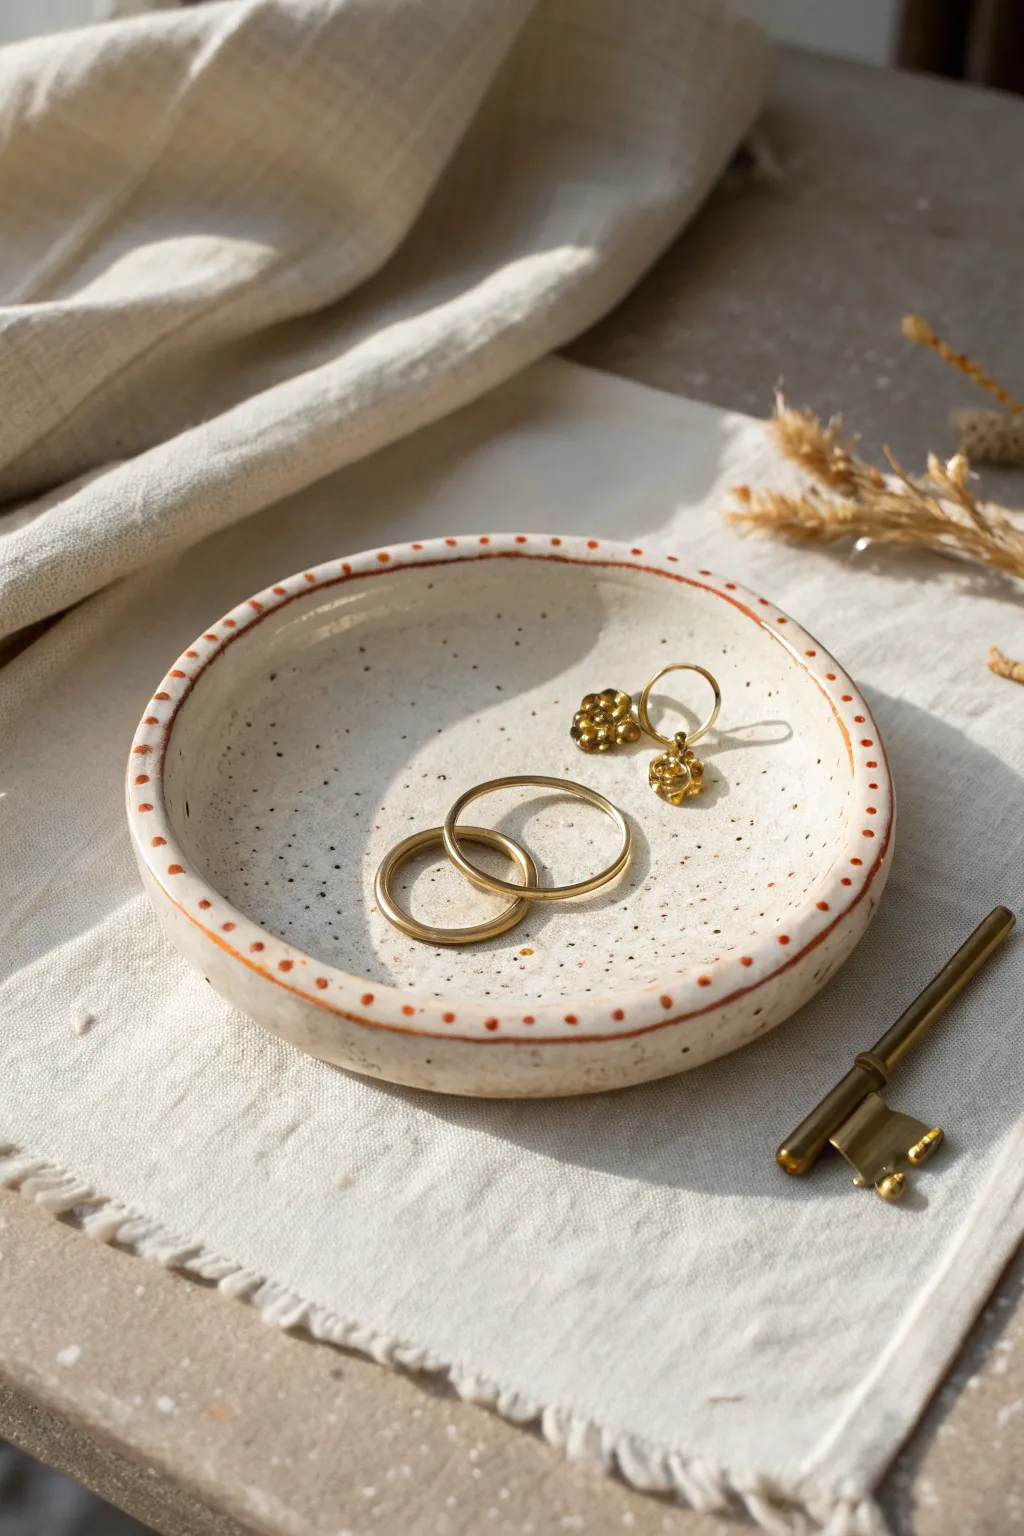
This charming little side plate works perfectly as a jewelry catch-all or a rustic saucer. Its beauty lies in the simple, hand-pinched form and the delicate rust-colored dotted rim against a speckled cream glaze.
Step-by-Step Guide
Materials
- White or buff stoneware clay (speckled clay body recommended for best results)
- Pottery wheel (optional) or rolling pin and flat surface
- Circle template or bowl (approx. 4-5 inches diameter)
- Needle tool
- Sponge
- Rib tool (wooden or silicone)
- Creamy white glaze (glossy or satin)
- Underglaze (Rust Orange/Terracotta)
- Fine detail brush
- Kiln
Step 1: Forming the Plate
-
Prepare the Clay:
Start with a ball of clay roughly the size of a tennis ball. Wedge it thoroughly to remove air bubbles, which is crucial to prevent cracking during firing. -
Create a Slab:
Flatten the clay ball onto your work surface. Use a rolling pin to roll it out into an even slab, aiming for a thickness of about 1/4 inch. If you are throwing on the wheel, throw a small, low plate and trim the foot before moving to the rim decoration. -
Cut the Shape:
Place your circular template or an overturned bowl onto the slab. Trace around it using your needle tool to cut out a perfect circle. -
Smooth the Edges:
Dip your sponge in a little water and run it along the cut edge of the circle. This softens the sharp angle left by the needle tool and compresses the clay particles. -
Lift the Rim:
Gently lift the edges of the clay circle upwards to create a shallow curve. You can do this by cupping the clay in your palm or pinching gently around the perimeter to give it that organic lip. -
Define the Edge:
Use your thumb and index finger to slightly thin and define the very top rim. I prefer to leave it slightly irregular to maintain the handmade charm. -
Refine the Surface:
Take a damp sponge or a soft rib tool and smooth the interior surface of the dish, erasing any canvas textures or fingerprints. -
Slow Dry:
Cover the dish loosely with plastic and let it dry slowly until it reaches a leather-hard state. This usually takes about one day.
Warped Rim?
If the rim is drying unevenly, place a small weighted bag of sand or rice in the center while it dries to leather-hard to keep the base flat.
Step 2: Decorating and Glazing
-
Bisque Fire:
Once the piece is bone dry, fire it in the kiln to a bisque temperature (usually Cone 04 or 06). This prepares the clay for glazing. -
Apply the Base Glaze:
Dip the bisqued dish into a creamy white glaze. If your clay body isn’t naturally speckled, choose a glaze that includes speckles such as ‘Speckled Buff’ or ‘Vanilla Spice’. -
Clean the Foot:
Wipe away any glaze from the bottom of the dish with a damp sponge so it doesn’t stick to the kiln shelf. -
Paint the Rim Line:
Using a fine detail brush and your rust-colored underglaze, carefully paint a thin line along the very top edge of the rim. A shaky hand actually adds character here. -
Add the Dots:
Reload your brush with the rust underglaze. Just below the rim line on the inside, gently dab small dots spaced evenly apart. Aim for consistent spacing but don’t worry about perfect symmetry. -
Glaze Fire:
Place the decorated dish back into the kiln for the final glaze firing (temperature depends on your specific clay and glaze, often Cone 5 or 6). -
Cool and Inspect:
Allow the kiln to cool completely before opening. Remove your dish and check the rim to ensure the underglaze has fused beautifully with the glossy white base.
Make it a Set
Create three dishes in graduating sizes. Nesting them together creates a stunning visual display for selling or gifting.
Now you have a delicate, speckled dish ready to hold your favorite rings or serve a small treat
Ceramic Paint Palette
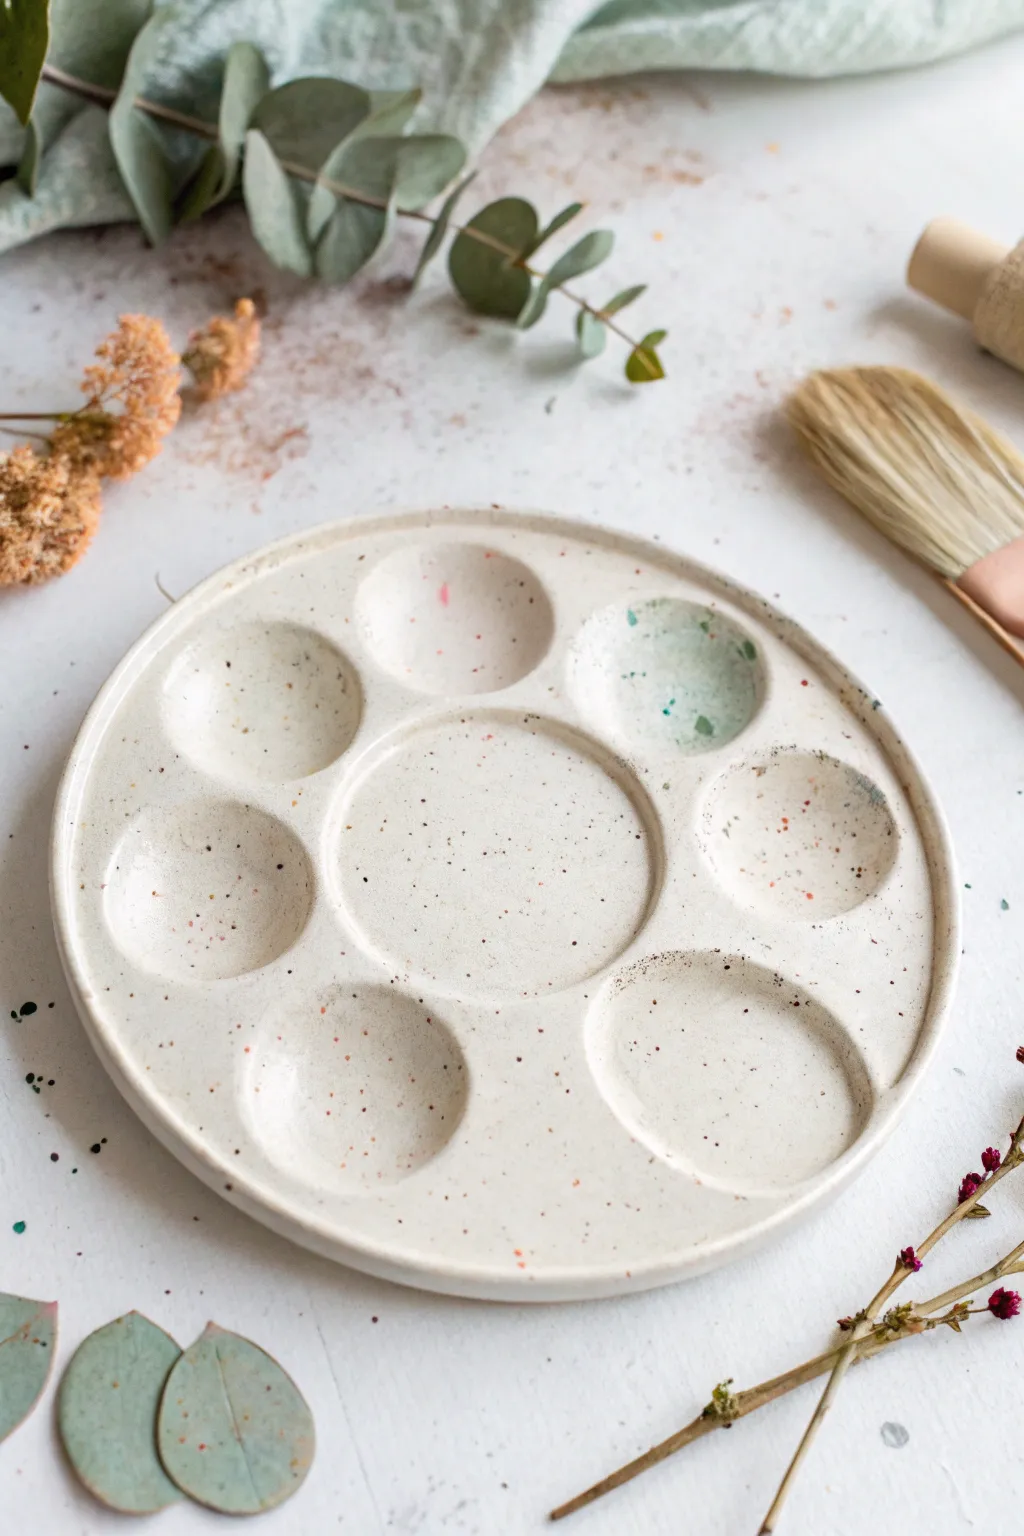
This elegant ceramic paint palette features a classic circular design with seven mixing wells surrounding a larger central reservoir. Crafted from white speckled clay and finished with a clear glossy glaze, it’s both a functional tool for artists and a beautiful object in its own right.
Step-by-Step Tutorial
Materials
- White speckled stoneware clay (approx. 1-1.5 lbs)
- Pottery wheel
- Wooden sponge
- Wire cutter
- Needle tool
- Loop trimming tool (small and round)
- Rib tool (metal or rubber)
- Bat for the wheel
- Clear glossy glaze
- Kiln access
Step 1: Throwing the Base
-
Prepare the Clay:
Begin by thoroughly wedging about 1.5 pounds of speckled white stoneware clay to remove air bubbles and ensure consistency. -
Center and Open:
slam the ball of clay onto the center of your wheel bat. With the wheel spinning at a moderate speed, use wet hands to center the clay. Open the clay wide and flat rather than tall, aiming for a thick pancake shape about 8 inches in diameter. -
Flatten the Form:
Compress the base repeatedly with a rib tool or sponge to prevent S-cracks. You want a flat, thick slab—about 3/4 inch thick—secured to the bat. Do not pull walls up; keep it as a solid disc. -
Define the Rim:
Use your fingers or a rib to gently lift the very outer edge, creating a shallow rim that will contain any spills. Smooth this rim with a chamois for a professional finish. -
Cut from Wheel:
Run your wire cutter under the base to separate it from the bat, but leave it on the bat to dry until it reaches a leather-hard state. This ensures it stays perfectly flat.
Step 2: Carving the Wells
-
Map Out the Design:
Once leather-hard, lightly trace your design onto the surface with a needle tool. Draw a large circle in the center and seven smaller circles evenly spaced around it. -
Begin Carving Center:
Using a sharp loop tool, start carving out the central reservoir first. Keep your tool movements smooth and shallow, gradually removing clay to create a concave dip. -
Carve Outer Wells:
Move to the smaller outer circles. Carve each one carefully, aiming for a consistent depth of about 1/4 to 1/2 inch. I like to rotate the piece frequently to check symmetry. -
Smooth the Transitions:
Use a damp sponge or your finger to smooth the sharp edges created by the carving tool. The wells should have soft, rounded transitions rather than harsh cliffs. -
Refine the Surface:
check the surface for any burrs or rough spots of clay. Gently compress the bottom of each well with a rounded tool or thumb to make them perfect for mixing paint.
Warp Watch
Flat slabs love to warp. Dry it very slowly under plastic, flipped upside down on a piece of drywall board if possible, to draw moisture evenly from both sides.
Step 3: Finishing and Firing
-
Slow Drying:
Cover the palette loosely with plastic to let it dry very slowly. Flat pieces are prone to warping, so even drying is crucial. Once bone dry, it’s ready for the bisque fire. -
Bisque Fire:
Fire the piece to cone 04 (or your clay’s specified bisque temperature). This hardens the clay and prepares it for glazing. -
Apply Clear Glaze:
Wipe the bisque-fired palette with a damp sponge to remove dust. Dip the entire piece into a clear glossy glaze, or brush on three even coats if using brush-on glaze. -
Wipe the Foot:
Flip the palette over and meticulously wipe all glaze off the bottom foot ring with a wax resist or a damp sponge so it doesn’t fuse to the kiln shelf. -
Glaze Fire:
Load the palette into the kiln for the final glaze firing (typically cone 5 or 6 for stoneware). Ensure it sits completely flat on the shelf. -
Cool and Inspect:
Allow the kiln to cool naturally before removing your palette. The clear glaze should now reveal the beautiful natural speckles of the clay body beneath.
Brush Rest Notch
Before the clay dries, use a round tool to press a small indentation into the rim between two wells. This creates a clever resting spot for your paintbrush.
Now you have a durable custom tool that will make your painting sessions even more enjoyable
Textured Clay Coasters
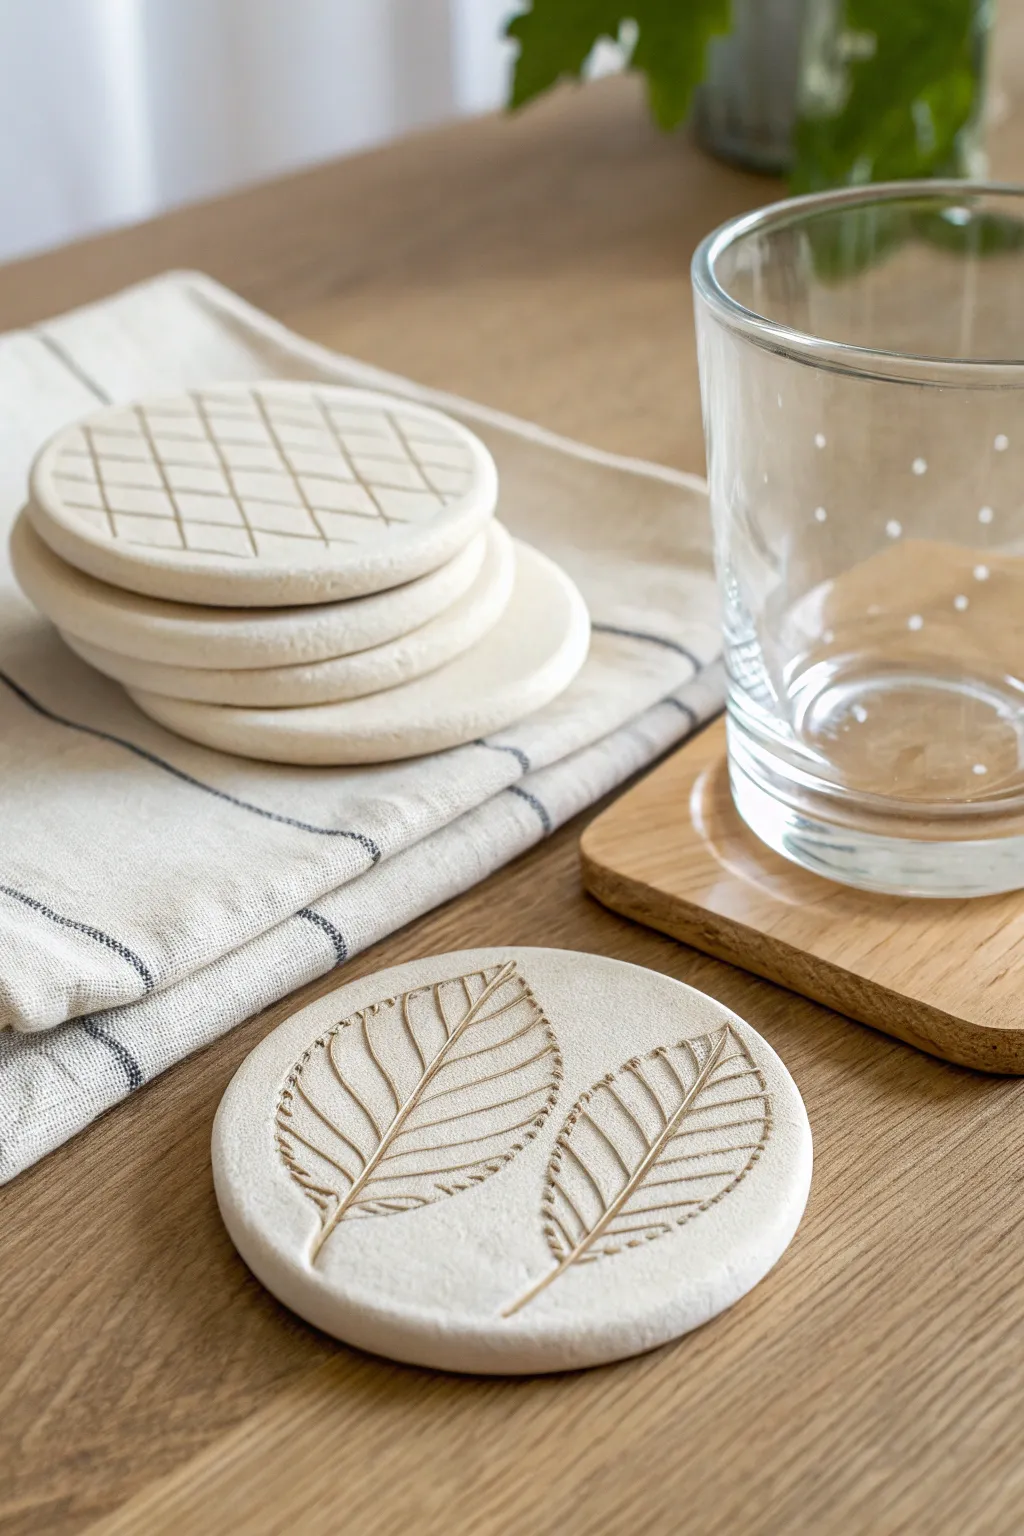
These charming clay coasters bring a touch of the outdoors inside with their organic leaf imprints and classic grid patterns. The matte white finish highlights the delicate textures, making them a functional yet artistic addition to any coffee table.
Step-by-Step Guide
Materials
- White coloring air-dry clay or polymer clay
- Rolling pin
- Circle cookie cutter (approx. 3.5 – 4 inches)
- Fresh leaves with prominent veins (e.g., beech or elm)
- Ruler or straight edge
- Clay knife or butter knife
- Fine-grit sandpaper
- Parchment paper or non-stick mat
- Water in a small cup
- Sponge or soft brush
- Matte clear acrylic sealer (waterproof)
Step 1: Preparation & Rolling
-
Prepare your workspace:
Lay down your parchment paper or work on a non-stick mat. This prevents the clay from sticking and picking up unwanted textures from your table. -
Condition the clay:
Take a handful of clay and knead it in your hands until it becomes soft, pliable, and free of cracks. Warmth from your hands helps this process significantly. -
Roll the slab:
Place the clay ball on your surface and use the rolling pin to flatten it. Aim for an even thickness of about 1/4 inch (6mm) to ensure durability. -
Ensure smoothness:
Before cutting or stamping, run the rolling pin lightly over the surface one last time to remove any fingerprints or dents.
Clean Lines Tip
To stop the clay from sticking to your cutter and warping the circle shape, dip the cutting edge into cornstarch or flour before pressing it into the slab.
Step 2: Creating Textures
-
Method 1: Leaf impressions:
Select fresh leaves with strong, raised veins on the back. Place two leaves vein-side down onto the clay surface, arranging them at slightly different angles. -
Press the design:
Gently roll your rolling pin over the leaves once or twice with firm, even pressure to embed the veins into the clay. Don’t press so hard that the leaves tear. -
Reveal the pattern:
Use a needle tool or just your fingernail to carefully lift the stem and peel the leaves away, revealing the intricate imprint. -
Method 2: Grid texture:
For the geometric design seen in the stack, lightly press the long edge of a ruler into the clay to create parallel lines. Rotate the clay slightly to create intersecting diagonal lines for a diamond effect. -
Cut the shapes:
Position your circle cutter over the textured area. Press down firmly to cut out the coaster shape. If creating the leaf design, center the leaves nicely within the circle.
Step 3: Refining & Drying
-
Remove excess clay:
Peel away the scrap clay from around the circle first, then carefully lift the coaster. If it’s stuck, slide a piece of dental floss underneath to release it. -
Smooth the edges:
Dip your finger in a little water and run it around the cut edge of the coaster to smooth out any harsh lines or burrs left by the cutter. -
Initial drying phase:
Place the coasters on a flat surface to dry. I prefer to place a light book on top of them (with parchment in between) after an hour to keep them perfectly flat as they cure. -
Flip and finish drying:
Allow air-dry clay to cure for 24-48 hours. Flip them halfway through the drying time to ensure the bottom dries evenly.
Add Color Depth
After drying, rub a small amount of diluted brown or green acrylic paint into the leaf veins, then wipe the surface clean to make the texture pop.
Step 4: Finishing Touches
-
Sand for perfection:
Once fully hard, inspect the edges. Use fine-grit sandpaper to gently buff away any remaining roughness on the rim. -
Clean dust:
Wipe the coaster with a slightly damp sponge or cloth to remove sanding dust before sealing. -
Seal the surface:
Apply a coat of matte clear acrylic sealer. This is crucial for coasters, as it protects the clay from moisture/condensation from cups. -
Apply second coat:
Let the first coat dry completely, then apply a second layer for extra durability, paying attention to the indented textures.
Enjoy styling your table with these beautiful, handcrafted pieces that capture a permanent moment of nature.
Tiny Clay Magnets
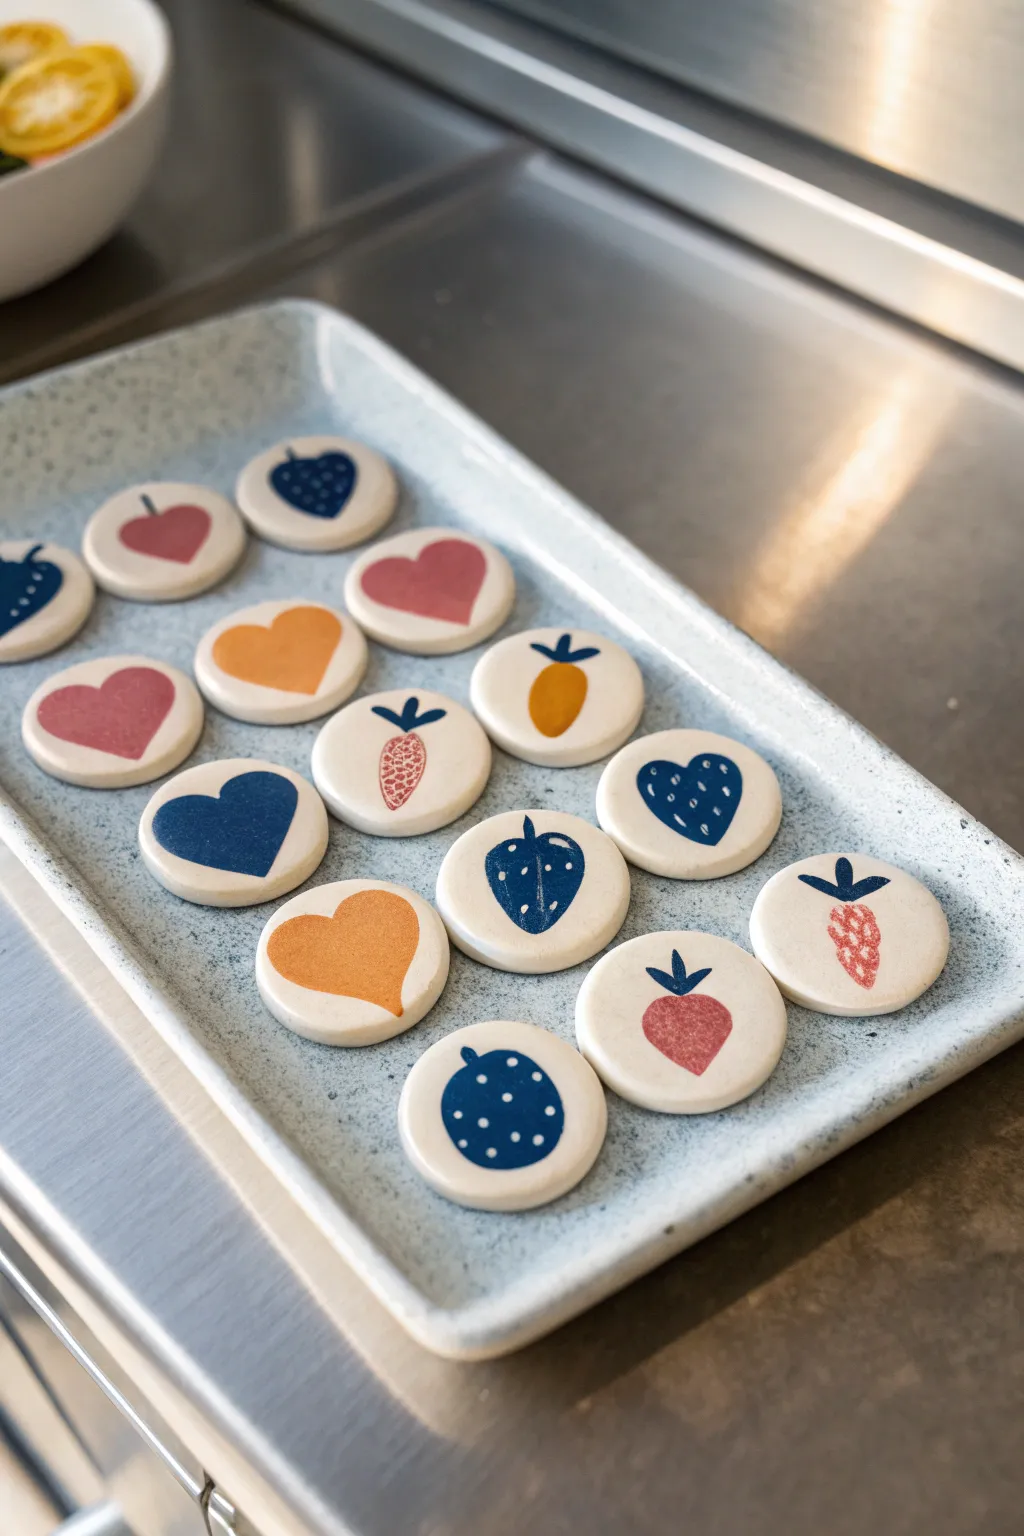
These charming little magnets bring a sweet, rustic touch to your kitchen with their stamped fruit and heart motifs. The clean white clay provides the perfect canvas for simple, colorful designs like strawberries, carrots, and hearts.
Step-by-Step
Materials
- White air-dry clay or polymer clay
- Rolling pin
- Small round cookie cutter (approx. 1.5 inch)
- Sandpaper (fine grit)
- Small magnets (neodymium recommended)
- Super glue or E6000
- Small rubber stamps (fruit/heart shapes)
- Acrylic paints (red, blue, orange, yellow, green)
- Foam pouncers or small paintbrushes
- Matte spray sealant or Mod Podge
Step 1: Shaping the Discs
-
Condition the Clay:
Begin by kneading your white clay until it is soft, pliable, and free of air bubbles. If using polymer clay, warm it in your hands first. -
Roll it Out:
Roll the clay onto a clean, smooth surface until it is an even slab, approximately 1/4 inch thick. I find using depth guide rings on the rolling pin helps keep the thickness perfectly consistent. -
Cut the Shapes:
Use your small round cookie cutter to punch out as many circles as you can fit on the slab. -
Smooth the Edges:
Dip your finger in a little water (for air-dry clay) or baby oil (for polymer clay) and gently run it around the cut edge of each circle to soften any sharpness. -
Initial Drying/Baking:
If using air-dry clay, let the discs dry on a wire rack for 24-48 hours, flipping them occasionally to prevent warping. If using polymer clay, bake according to the package instructions.
Uneven Stamping?
If your stamped images look splotchy, your paint is likely too thick. Thin it slightly with water and test on scrap paper first.
Step 2: Stamping and Designing
-
Sand for Smoothness:
Once fully cured and hard, gently sand the tops and edges of the discs with fine-grit sandpaper to create a silky smooth surface for painting. -
Prepare the Stamps:
Select your rubber stamps. For this look, choose simple silhouettes like hearts, strawberries, carrots, or blueberries. Clean the rubber surface to ensure no dust interferes with the paint transfer. -
Apply Paint to Stamps:
Squeeze a small amount of acrylic paint onto a palette. Use a foam pouncer to lightly dab paint onto the raised design of the stamp. Don’t overload it, or the image will smudge. -
Stamp the Design:
Press the stamp firmly onto the center of a clay disc. Lift it straight up to avoid smearing. Repeat for all discs, alternating colors like deep blue for hearts and bright orange for carrots. -
Add Details:
Once the main stamped image is dry, use a very fine detail brush to add stems or seeds. For the strawberries, little white dots work perfectly as seeds; for the carrots, add simple green tops.
Step 3: Assembly and Finishing
-
Seal the Surface:
After the paint is completely dry, coat the top and sides of each magnet with a matte sealant or Mod Podge to protect the design from kitchen grease or fading. -
Attach the Magnet:
Flip the discs over. Apply a strong dot of super glue or E6000 directly to the center of the back. -
Press and Hold:
Press a small magnet into the glue. Hold it in place for 30 seconds to ensure it grabs the surface securely. -
Final Cure:
Allow the glue to cure fully—usually overnight—before placing them on your refrigerator.
Textured Impressions
Instead of painting the stamp, press the clean stamp into raw clay to create an indented texture, then fill the groove with paint after baking.
Now you have a whole set of cheerful, custom magnets to brighten up your fridge door
Stamp-Pressed Ornament Tags
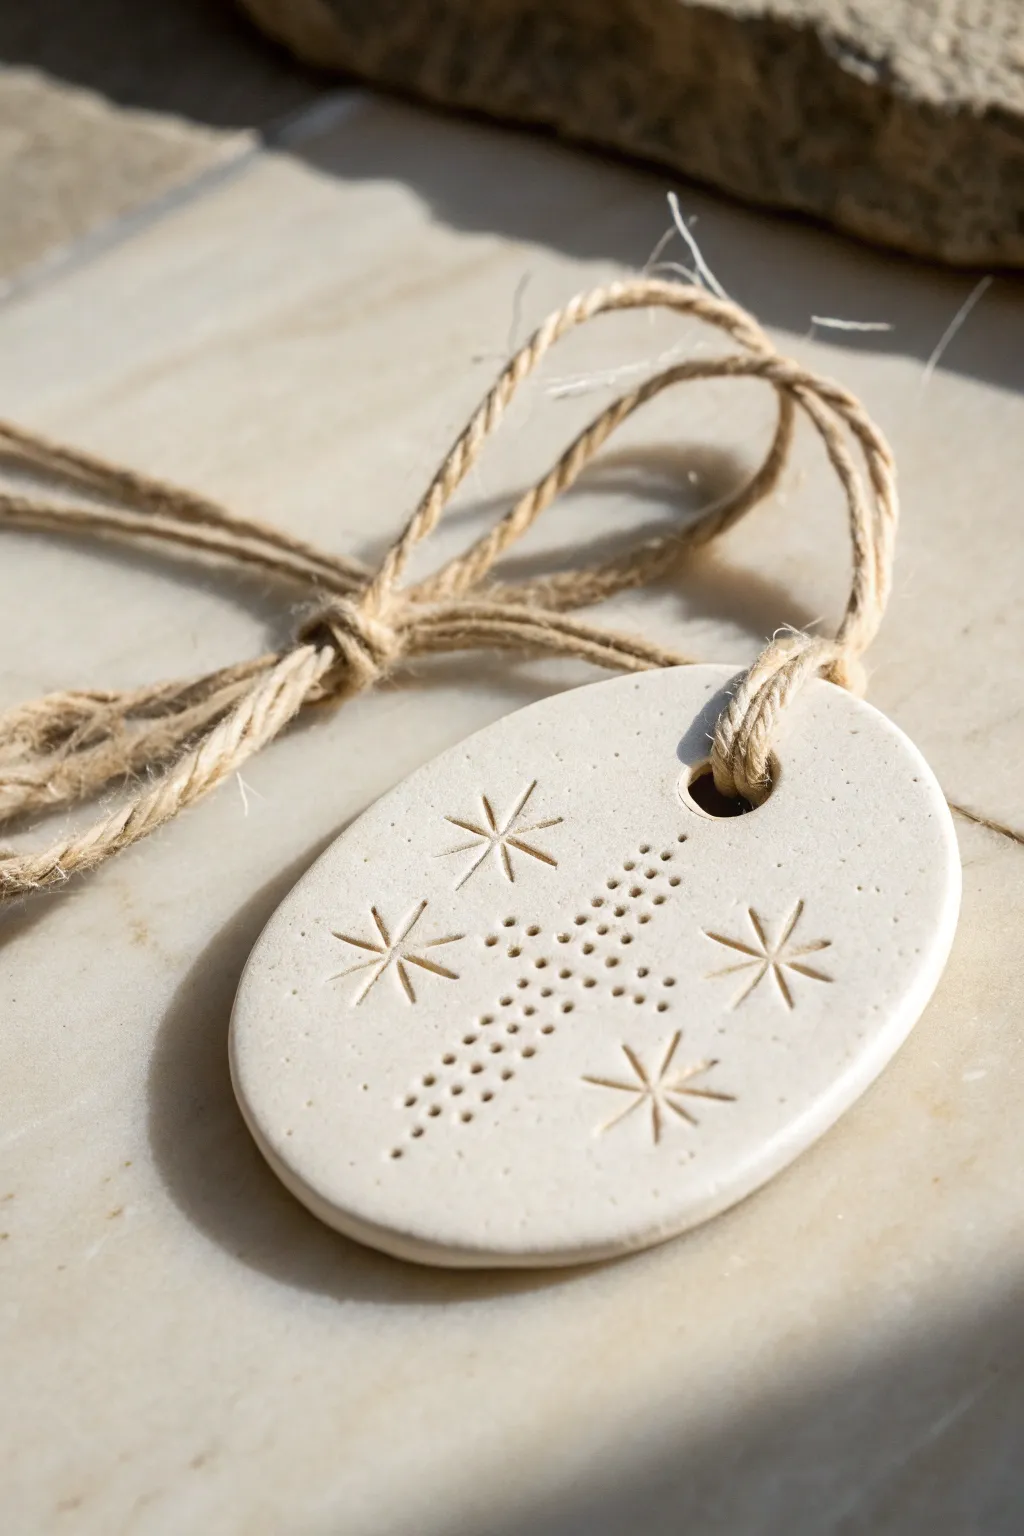
Create a rustic yet elegant clay tag featuring a delicate dotted cross and scattered starbursts. This beginner-friendly project uses simple impression techniques to achieve a texture that feels both ancient and modern, perfect for gift wrapping or holiday decor.
How-To Guide
Materials
- White air-dry clay or polymer clay
- Rolling pin
- Oval cookie cutter (approx. 2-3 inches)
- Small star/asterisk stamp tool (or carving tool)
- Small metal stylus or blunt toothpick
- Straw or small circular cutter (for the hole)
- Fine-grit sandpaper
- Natural jute twine
- Wax paper or canvas mat
Step 1: Preparation & Shaping
-
Condition the clay:
Begin by kneading a small ball of white clay in your hands until it becomes warm, soft, and pliable. This prevents cracks from forming later. -
Roll the slab:
Place the clay on a piece of wax paper or a canvas mat. Use your rolling pin to flatten it into an even slab, aiming for a thickness of about 1/4 inch. -
Check surface quality:
Inspect the surface for any air bubbles or lint. Smooth them out gently with your fingertip or the back of a spoon if needed. -
Cut the shape:
Press your oval cookie cutter firmly into the clay. Give it a tiny wiggle to ensure a clean separation, then lift the cutter away. -
Smooth the edges:
Dip your finger in a little water (if using air-dry clay) and run it gently around the rim of the oval to soften the sharp cut edges. -
Create the hanging hole:
Use a drinking straw or a small circular cutter to punch a hole near the top of the oval. Make sure it’s centered and not too close to the edge.
Clean Impressions
Dip your stylus or stamp into a tiny bit of cornstarch or oil before pressing into the clay. This acts as a release agent and keeps your dots and stars crisp without sticking.
Step 2: Pattern & Design
-
Mark the center:
Lightly touch the center of the oval with your stylus to give yourself a visual guide for the cross pattern, but don’t press deep yet. -
Stamp the central dots:
Using a blunt stylus or toothpick, press a series of small, deep dots to form a vertical line down the center of the oval. -
Complete the cross:
Intersect the vertical line with a horizontal row of dots to create a simple cross shape. Try to keep the spacing between dots consistent for a tidy look. -
Add texture to the cross:
To match the reference, add a second, shorter row of dots right next to your main cross lines, creating a slightly thicker, textured cross effect. -
Stamp the stars:
Take your star-shaped stamp tool and press firmly into the four open quadrants around the cross. If you don’t have a stamp, carefully carve six intersecting lines to mimic a snowflake or starburst. -
Refine the impressions:
Check your stamped areas. If the clay has raised up around the edges of your marks, gently pat them down with a finger to keep the surface flat.
Step 3: Finishing Touches
-
Dry the piece:
Set the ornament aside on a flat surface to dry. For air-dry clay, this usually takes 24-48 hours. Using a wire rack from the kitchen helps air circulate underneath. -
Sand edges:
Once fully cured and hard, take a piece of fine-grit sandpaper and lightly buff the edges and the back to remove any roughness. -
Dust off residue:
Wipe the tag with a slightly damp cloth or a dry brush to remove the sanding dust from the indentations. -
Attach the twine:
Cut a length of natural jute twine, about 8 inches long. Fold it in half to create a loop. -
Secure the knot:
Thread the folded loop through the hole from front to back, then pass the loose ends through the loop and pull tight to secure it.
Vintage Wash Effect
After drying, rub a diluted brown acrylic paint over the surface and immediately wipe it off. The dark paint will stay in the stamped recesses, highlighting the pattern.
Your finished tag now has a timeless, handcrafted charm ready to adorn a special gift or hang in your home
Cute Animal Pinch Pot Planter
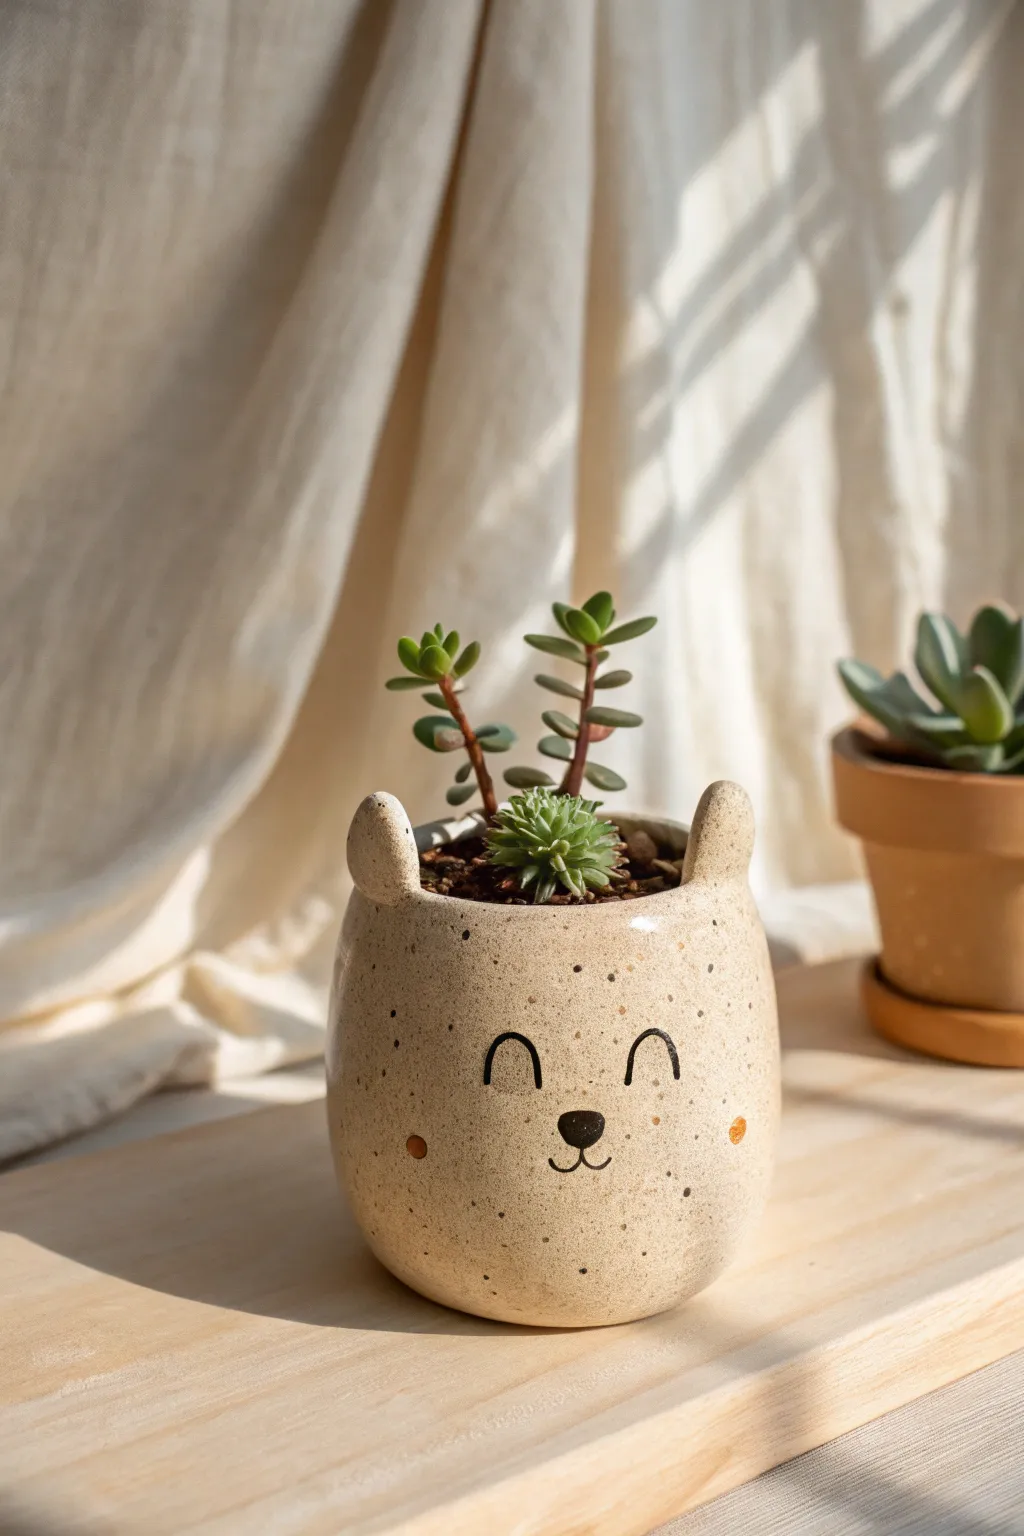
This adorable little bear planter exudes personality with just a few simple lines and charming ears. The speckled clay body gives it a warm, natural texture that pairs perfectly with small succulents, creating a truly beginner-friendly project that looks professionally made.
Detailed Instructions
Materials
- Speckled stoneware clay (or regular clay with grog)
- Small sponge
- Pin tool or needle tool
- Pottery rib (smooth)
- Slip (clay mixed with water)
- Black underglaze
- Orange or terracotta underglaze
- Fine detail paintbrush
- Clear transparent glaze
- Kiln (or access to a firing service)
Step 1: Forming the Body
-
Wedge the clay:
Begin with a ball of clay roughly the size of a tennis ball. Wedge it thoroughly to remove air bubbles, ensuring the clay is consistent and workable. -
Start the pinch pot:
Hold the clay ball in one hand and push your thumb into the center, stopping about a half-inch from the bottom. This thickness is crucial for the base stability. -
Pinch the walls:
Using your thumb on the inside and fingers on the outside, gently pinch and rotate the clay. Work your way from the bottom up in a spiral motion. -
Shape the curve:
As you pinch upward, encourage the walls to curve slightly inward toward the top. This creates that lovely, rounded ‘egg’ shape rather than a straight-sided cup. -
Smooth the surfaces:
Once the general shape is established, use a slightly damp sponge to smooth out finger marks. Follow up with a flexible rib tool to refine the exterior curve. -
Flatten the base:
Gently tap the pot on your work surface to create a flat bottom so it sits securely without rocking.
Use Speckled Clay
To get the look in the photo without painting fake dots, buy ‘Speckled Buff’ or similar stoneware. The speckles appear automatically during the final firing.
Step 2: Adding Details
-
Create the ears:
Roll two small, marble-sized balls of clay. Flatten them slightly into rounded triangular shapes to resemble bear ears. -
Score the attachment points:
Use your pin tool to scratch cross-hatched lines (scoring) on the bottom of the ears and on the top rim of the pot where they will sit. -
Attach the ears:
Apply a dab of slip to the scored areas. Press the ears firmly onto the rim. I like to use a small wooden tool to smooth the seam completely so the ears look like they grew out of the pot. -
Verify symmetry:
Step back and look at the pot from eye level. Adjust the ears gently ensuring they are level and spaced equally apart. -
Add drainage (optional):
If you plan to plant directly into the pot, use a hole cutter tool to remove a small plug of clay from the center of the bottom. -
Dry to leather hard:
Let the piece sit uncovered until it is leather hard—stiff enough to hold its shape well but still cool to the touch.
Make a Family
Don’t stop at bears. Change the ear shapes to make cats (triangles), bunnies (long ovals), or frogs (semicircles) for a complete animal set.
Step 3: Decorating & Firing
-
Draft the face:
Using a very light touch with a pencil, sketch the sleeping eyes, nose, and mouth directly onto the clay. The graphite will burn off in the kiln. -
Paint the features:
Dip a fine detail brush into black underglaze. Carefully trace over your pencil lines to create the sleeping arches for eyes and the curve of the mouth. -
Fill the nose:
Paint a small, solid oval for the nose right at the center point between the cheeks. -
Add rosy cheeks:
Clean your brush and switch to the orange underglaze. Dab two small dots on either side of the face for a flushed, happy look. -
Bisque fire:
Once the underglaze is dry and the pot is bone dry, load it into the kiln for the first firing (bisque fire). -
Apply clear glaze:
After the bisque firing, dip the entire pot into a clear transparent glaze. This seals the clay and makes the speckled texture pop. -
Final firing:
Fire the piece again to the maturation temperature of your specific clay body and glaze.
Once it creates a home for your favorite succulent, this cheerful pot will brighten up any windowsill
Small Lidded Pinch Jar
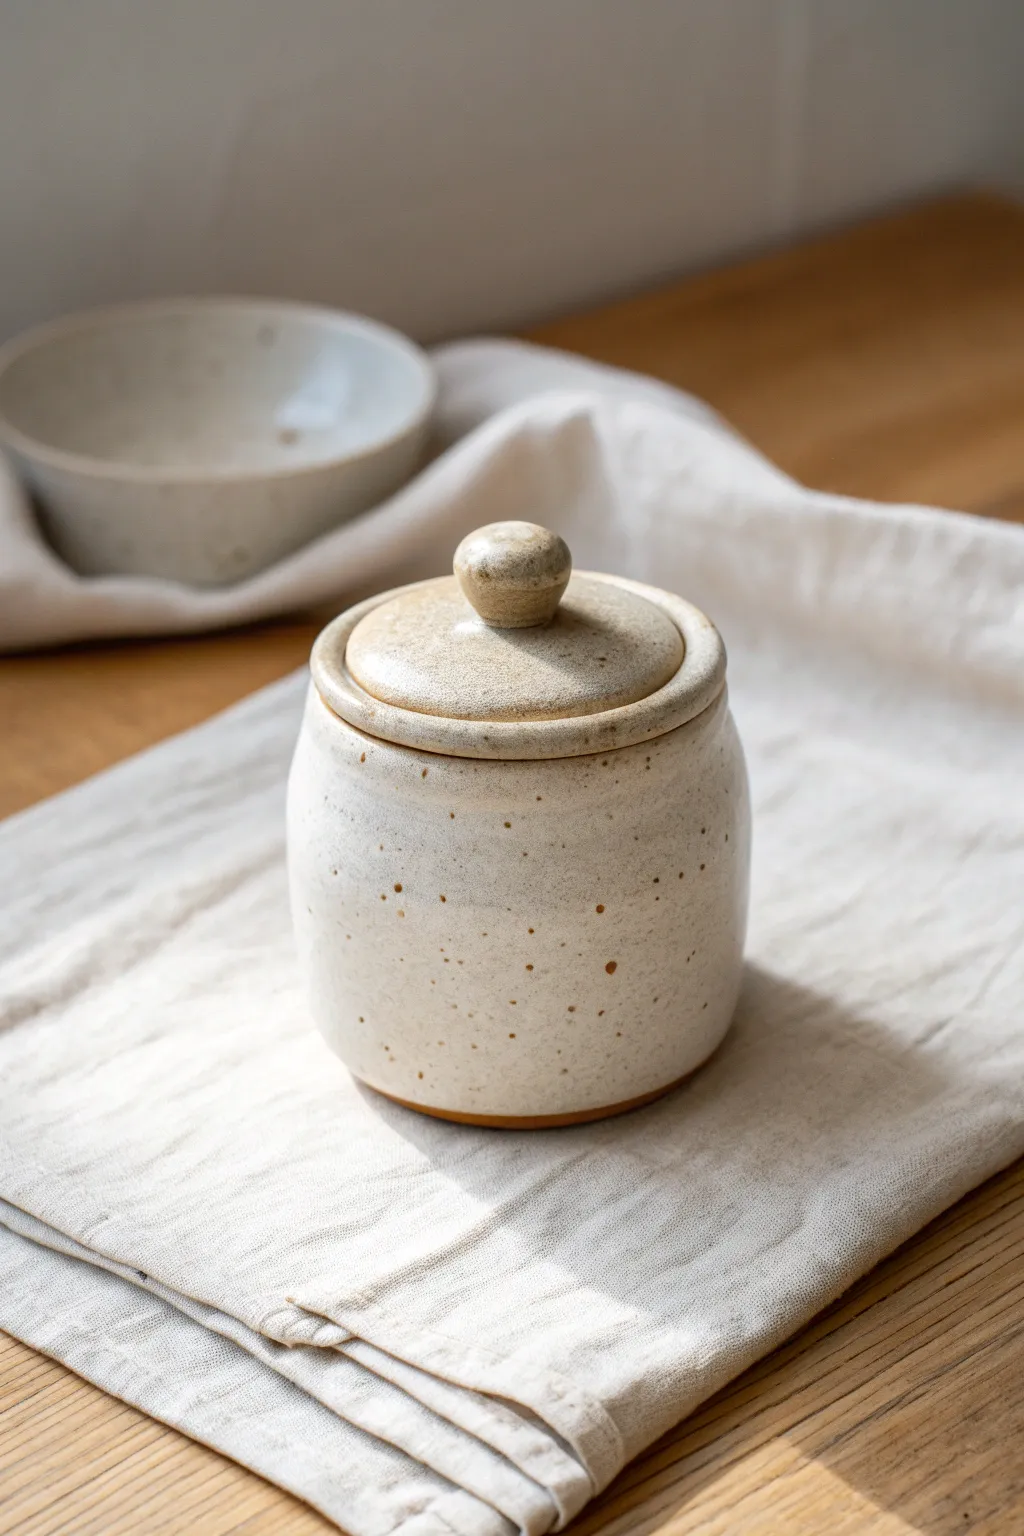
This charming, rustic jar features a warm, earthy clay body peeking through a speckled cream glaze, perfect for holding sea salt or sugar. Its gentle curves and simple knobbed lid make it an achievable yet sophisticated project for beginners learning the pinch method.
Step-by-Step Guide
Materials
- Stoneware clay (preferably speckled or buff)
- Pottery wire cutter
- Loop tool (small)
- Wooden modeling tool
- Serrated rib tool or fork
- Rubber kidney tool
- Bowl of water and sponge
- Needle tool
- Cream or oatmeal speckled glaze
Step 1: Forming the Base
-
Prepare Clay Ball:
Start with a ball of clay roughly the size of a large orange. Pat it into a smooth sphere, ensuring there are no trapped air bubbles. -
Open the Pot:
Hold the ball in one hand and press your thumb into the center, stopping about a half-inch from the bottom to leave enough thickness for the foot. -
Pinch the Walls:
Gently pinch the clay between your thumb and fingers, rotating the ball as you go. Work from the bottom upward, aiming for an even wall thickness of about a quarter-inch. -
Shape the Belly:
As you pinch, gently push the walls outward from the inside to create a rounded, barrel-like shape rather than a straight cylinder. -
Refine the Rim:
Once you have the desired height, use your fingers or a moist sponge to compress and smooth the rim. It should be level and slightly thick to support the lid. -
Smooth the Surface:
I like to use a rubber kidney tool here to gently smooth the outside walls, removing fingerprints while maintaining that organic, hand-built feel.
Smooth Seating
Rotate the lid on the pot while the clay is still leather-hard. This gentle grinding action helps create a perfect, custom fit between the lid and the rim.
Step 2: Creating the Lid
-
Measure the Opening:
Use calipers or a ruler to measure the inner diameter of your jar’s opening. This measurement is crucial for a snug fit. -
Form a Clay Slab:
Take a smaller piece of clay and flatten it into a thick pancake or slab, slightly wider than your jar’s outer rim. -
Create the Flange:
On the underside of your lid slab, score a circle that matches the jar’s *inner* diameter. Add a small coil of clay along this line and blend it downwards to create a flange that will sit inside the jar. -
Test the Fit:
Gently place the lid on the leather-hard base. Trim or smooth the flange until it sits securely without wiggling. -
Shape the Lid Curve:
With the lid right-side up, gently press the edges downward to create a slight dome shape that mimics the curve of the jar’s shoulder.
Step 3: Adding Details and Glazing
-
Make the Knob:
Roll a small ball of clay for the handle. Taper the bottom slightly so it looks like a mushroom stem. -
Attach the Knob:
Score and slip the center of the lid and the bottom of the knob. Press them together firmly and blend the clay at the seam with a wooden tool for a seamless connection. -
Trim the Foot:
Once the base is leather-hard, turn it over and use a loop tool to carve a shallow ring into the bottom. This creates a professional-looking foot ring. -
Bisque Fire:
Allow your piece to dry completely (bone dry) before firing it in the kiln for the bisque firing. -
Apply Wax Resist:
Paint a layer of wax resist on the bottom foot ring and the rim of the jar where the lid touches to prevent the lid from fusing shut during firing. -
Glaze Application:
Dip the jar and lid into a cream or oatmeal speckled glaze. Check to ensure the glaze isn’t too thick on the flange. -
Clean Up:
Use a damp sponge to wipe any stray glaze off the foot ring and the contact points (the gallery and flange). -
Final Fire:
Fire the piece again to the temperature recommended for your specific clay and glaze combination.
Dual-Tone Effect
Leave the bottom quarter-inch of the jar unglazed. This exposes the raw toasted clay body, creating beautiful contrast with the creamy speckled glaze.
Now you have a timeless, functional vessel that brings a touch of handmade warmth to your kitchen counter
Wall-Hanging Texture Tiles

This rustic yet elegant wall hanging combines the organic beauty of leaf impressions with structured geometric patterns to create a stunning piece of home decor. You’ll explore varied texturing techniques, from impressing real foliage to using lace and tools, resulting in a tactile artwork perfect for any nature-lover’s wall.
Step-by-Step Tutorial
Materials
- White stoneware or earthenware clay slab (approx. 1/4 inch thick)
- Rectangular template or ruler
- Fettling knife or needle tool
- Fresh leaves with prominent veins (e.g., beech, ash)
- Wooden dowel or small round tool (for dot texture)
- Cobalt blue underglaze
- Fine-tipped liner brush
- Carving tool or sgraffito loop tool
- Rope or thick twisted cord (for impression)
- Texture roller or piece of stiff lace
- Hole punch or straw
- Jute twine
- Rolling pin and canvas scraps
Step 1: Shaping and Plant Impressions
-
Prepare the slab:
Roll out your clay on a piece of canvas until it is an even slab, approximately 1/4 inch thick. Use a rib tool to smooth the surface, removing any canvas texture or imperfections. -
Cut the rectangle:
Using a ruler and your needle tool or fettling knife, cut a clean rectangular shape. Smooth the sharp cut edges gently with a damp sponge or your finger to prevent chipping later. -
Position the leaves:
Select fresh leaves with strong, raised veins on the back. Arrange them vein-side down on the upper half of your clay tile. I find pressing the leaf gently first helps check the placement before committing. -
Impress the foliage:
Place a scrap of newsprint or thin paper over the leaves to prevent sticking. Roll over them firmly with a rolling pin or brayer to embed the veins deep into the clay. -
Reveal the design:
Carefully lift the paper and peel the leaves away from the clay using a needle tool or tweezers. If any leaf debris remains, wait until the clay is bone dry to flick it off. -
Create hanging holes:
Use a straw or a round hole cutter to punch two holes in the top corners. Ensure they are not too close to the edge to prevent the clay from cracking under the weight of the tile.
Warping Woes?
Flat tiles warp easily. Dry yours slowly under plastic and between two pieces of drywall or wooden boards to keep it perfectly flat.
Step 2: Adding Texture Bands
-
Add the beaded line:
Just below the leaf impressions, press a small round tool or the end of a wooden dowel into the clay repeatedly to create a horizontal row of evenly spaced dots. -
Carve the chevron guide:
Leave a smooth band about an inch wide below the dots. This area will be painted later. You can lightly sketch the horizontal boundaries of this band with a needle tool. -
Impress the rope texture:
Take a piece of twisted rope or cord. Press it firmly into the clay horizontally below the smooth band to create a diagonal rope-like texture. -
Create the floral base:
For the bottom section, press a piece of textured lace or a floral texture roller into the clay. Apply uneven pressure if you want a more organic, faded look.
Clean Lines Pro-Tip
When carving the sgraffito chevrons, wait until the underglaze is fully dry but the clay is still leather hard for the crispest lines.
Step 3: Decoration and Finishing
-
Dry to leather hard:
Allow the tile to dry slowly between two boards or under plastic until it reaches a leather-hard state. This stage is perfect for painting and carving. -
Paint the blue band:
Apply 2-3 coats of cobalt blue underglaze to the smooth horizontal band you reserved earlier. Let the underglaze dry to the touch. -
Carve the chevron pattern:
Using a sgraffito tool or sharp carving loop, carve through the blue underglaze to reveal the white clay body underneath. Create a repeating pattern of arrowheads pointing left. -
Final drying and bisque fire:
Let the piece dry completely to bone dry. Fire it in the kiln to bisque temperature (usually Cone 04). -
Glazing:
Apply a clear glaze over the entire piece to seal the clay and intensify the blue color. Alternatively, leave the raw clay unglazed for a matte finish, or wipe a dark stain into the textures to highlight them. -
Glaze fire:
Fire the piece again to the maturation temperature of your specific clay and glaze. -
Attach the twine:
Once cool, cut a length of jute twine. Thread the ends through the holes from front to back and knot them securely on the front side to mimic the rustic style shown in the photo.
Hang your finished textured tile in a spot with good natural light to let the shadows emphasize all the beautiful details you created
Squiggle-Relief Statement Vase
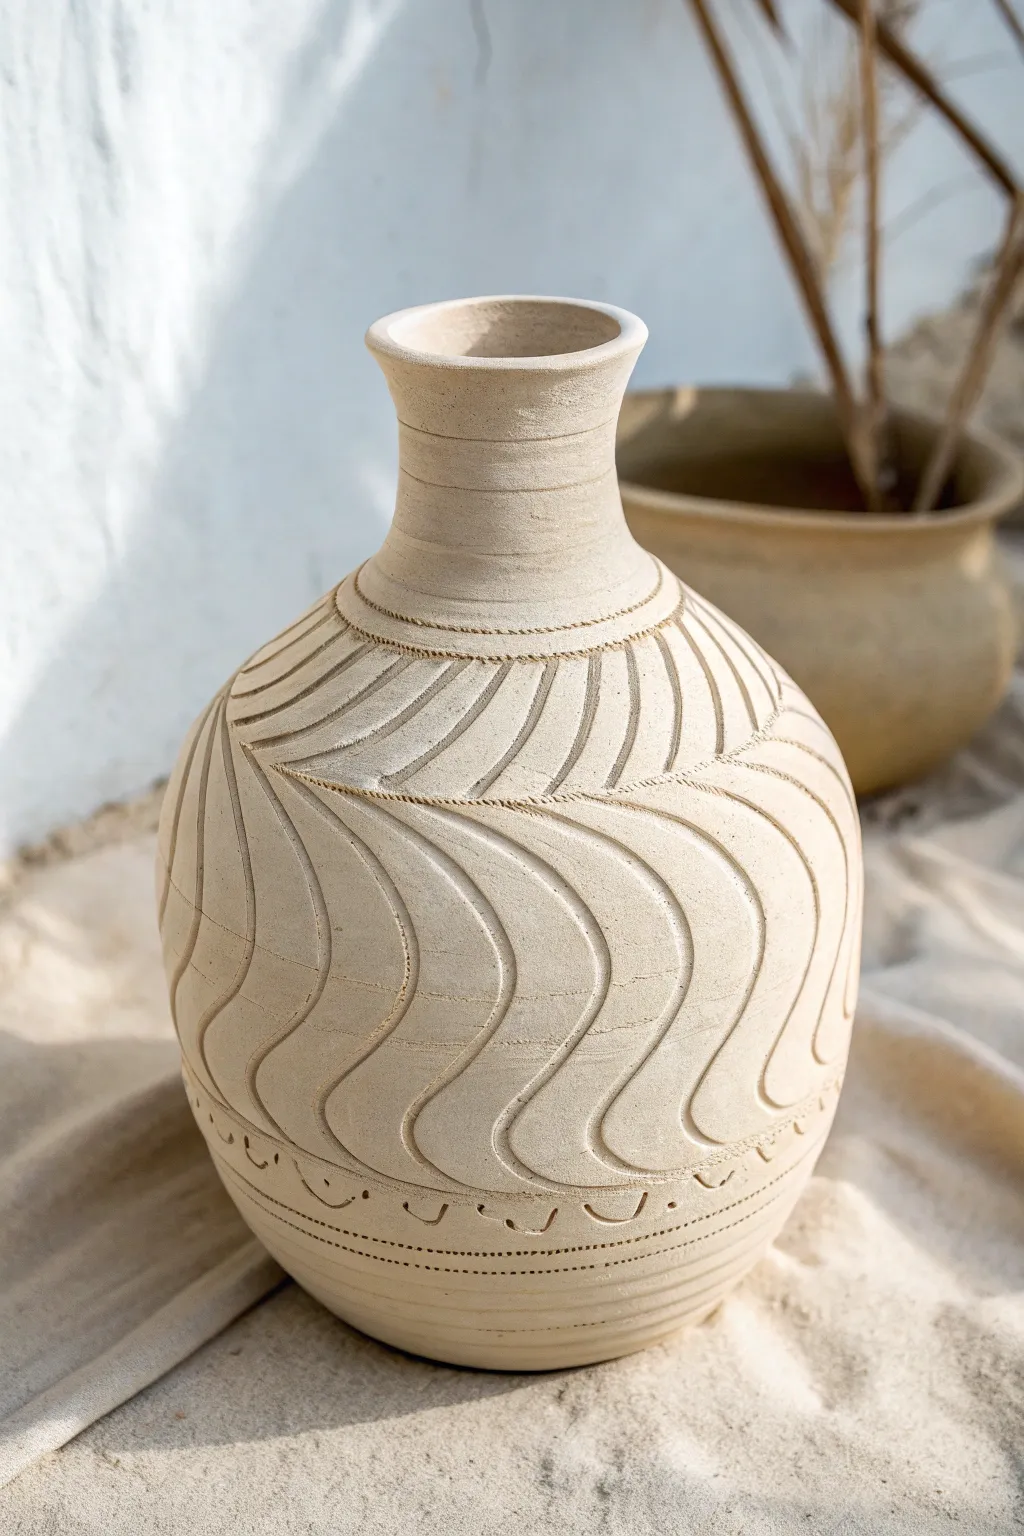
This project transforms a classic bottle shape into a tactile masterpiece using deep carving techniques. The repeating wave pattern catches the light beautifully, giving the unglazed clay a dynamic, organic feel.
Detailed Instructions
Materials
- Light-colored stoneware clay (smooth or fine grog)
- Pottery wheel
- Wire cutter
- Loop tool (medium round profile)
- Needle tool
- Metal rib
- Wooden modeling tool
- Sponge
- Calipers (optional)
Step 1: Throwing the Form
-
Center and open:
Start with a generous ball of clay (about 3-4 lbs). Center it firmly on the wheel head and open it up, keeping the floor relatively narrow to support a bulbous shape. -
Pull the cylinder:
Begin pulling the walls upward. Aim for a tall, thick cylinder initially. You need slightly thicker walls than usual (about 1/3 inch) to allow for the deep carving later without piercing through. -
Belly the form:
Using a rib on the inside and gentle pressure on the outside, push the clay outward to create a rounded belly section. Keep the movement fluid to avoid weak spots. -
Collar the neck:
Slowly choke or ‘collar’ the top third of the clay inward to form a narrow neck. Use plenty of water or slip to prevent friction from twisting the clay. -
Refine the rim:
Flare the very top of the neck slightly outwards for a classic vase silhouette. Compress the rim with a chamois or sponge to ensure it is smooth and strong. -
Smooth the exterior:
Before stopping the wheel, run a metal rib up the exterior to remove throwing lines and create a perfectly smooth canvas for your carving. Let the piece dry to a distinct leather-hard state.
Clean Lines
Carve when the clay is a ‘stiff’ leather hard. If it’s too soft, the loop tool will drag and tear the clay rather than slicing it cleanly.
Step 2: Carving the Texture
-
Mark horizontal guides:
Place the leather-hard pot back on the wheel (or a banding wheel). Using a needle tool while the wheel spins slowly, lightly incise guide lines: one circle at the base of the neck, and one just below the turning point of the belly. -
Detail the neck:
At the neck transition, carve two parallel horizontal lines about a centimeter apart. Inside this band, impress a row of small dots or dashes using a dull wooden tool. -
Map the waves:
Lightly sketch your wave pattern with a needle tool first. Start from the top guide line and swoop down and to the right, creating a repeating ‘S’ curve around the belly. -
Carve the relief:
Using a loop tool, carve out the negative space between your sketched lines. I prefer to carve along the curve in one confident stroke to keep the channel clean. -
Deepen the contrast:
Go back over the carved channels. Angle your tool slightly to create a sharper ridge on the top edge of each wave, making the relief pop. -
Adding texture inside the waves:
For extra detail, use a smaller loop tool to carve fine, parallel striations inside each large wave section, following the directional flow of the main curve.
Oxide Wash
After bisque firing, brush on a diluted iron oxide wash and wipe it back with a sponge. The dark color will stay in the deep grooves, emphasizing the pattern.
Step 3: Finishing Details
-
Decorate the base:
Near the foot of the vase, carve a horizontal band similar to the neck. Add a simple repeating pattern, such as half-circles or scallops, resting on a final incised line. -
Clean up burrs:
Once the carving is complete, let the pot dry just a bit more. Use a stiff brush or a damp sponge to gently soften any sharp jagged clay crumbs or ‘burrs’ left by the tools. -
Slow drying:
Cover the vase loosely with plastic to ensure slow, even drying. This is crucial for thick-walled pieces to prevent cracking. -
Bisque fire and sand:
Fire the piece to bisque temperature. Afterwards, lightly sand the exterior if you plan to leave it unglazed to ensure it feels pleasant to the touch. -
Final firing:
Fire to the maturity of your clay body. This design looks stunning unglazed to highlight the raw clay, or with a very transparent matte glaze.
Place your finished vase in a spot with side lighting to really show off the dramatic shadows of your carving