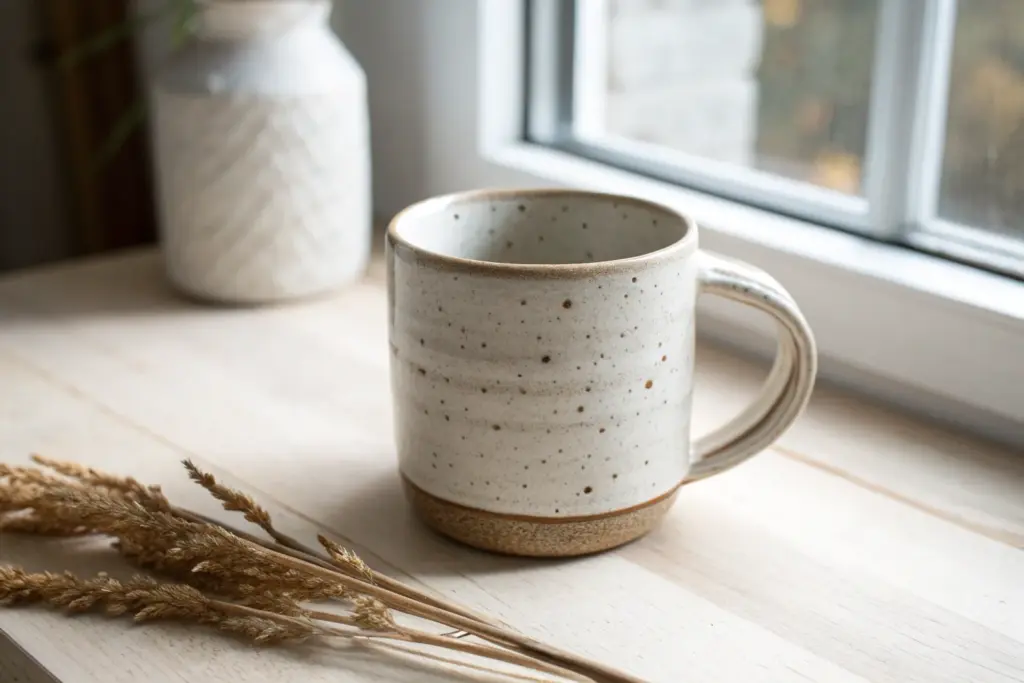
Whenever I’m feeling creatively stuck, I grab a lump of clay and let my hands do the brainstorming. Here are my favorite clay project ideas—from quick, satisfying makes to pieces you’ll actually use and show off around your home.
Pinch Pot Trinket Bowls
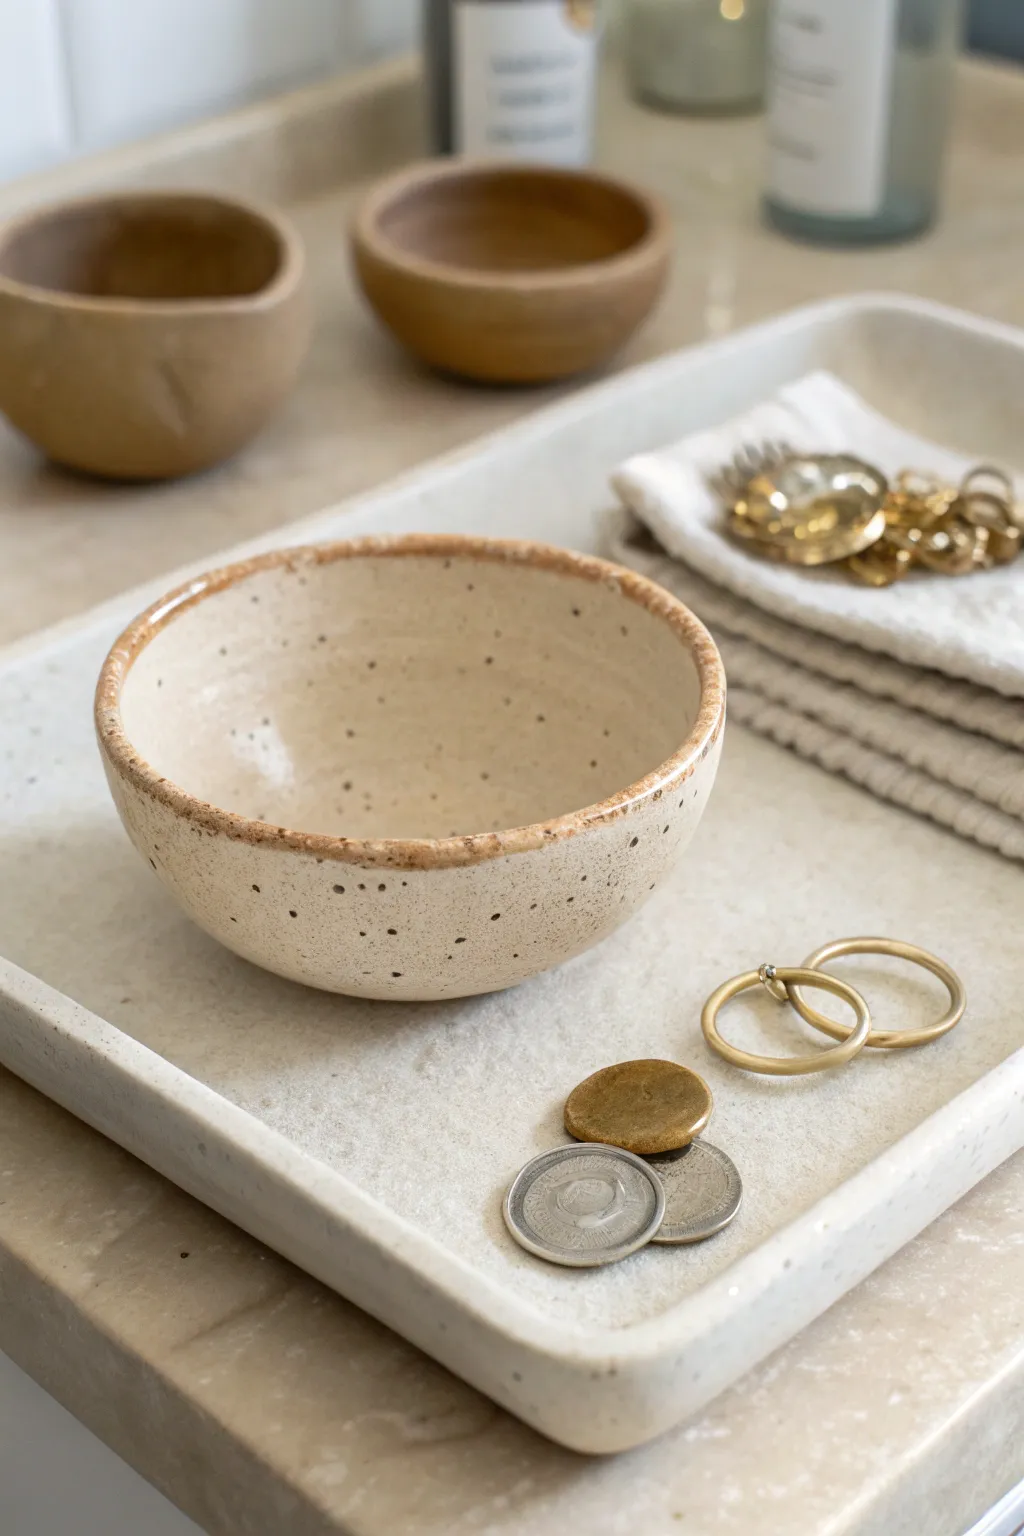
This charming little trinket bowl showcases the organic beauty of speckle-clay pottery with a warm, rustic feel. Its perfectly imperfect shape and iron-washed rim make it an ideal catch-all for your everyday jewelry or loose change.
Step-by-Step Tutorial
Materials
- Speckled clay body (stoneware or earthenware)
- Sponge
- Water
- Potter’s needle or fettling knife
- Soft rib tool (silicone or rubber)
- Small paintbrush
- Iron oxide wash (or a dark brown underglaze)
- Clear or transparent cream glaze
- Kiln (or access to a firing service)
Step 1: Forming the Bowl
-
Prepare the Clay:
Start with a ball of speckled clay about the size of a tennis ball. Wedge it thoroughly to remove any air bubbles and ensure the consistency is even throughout. -
Create the Opening:
Hold the clay ball in one palm. With your other thumb, press gently but firmly into the center of the ball, stopping about a half-inch from the bottom. -
Pinch the Walls:
Begin rotating the ball in your hand while rhythmically pinching the clay between your thumb (inside) and fingers (outside). I find it helps to keep my movements slow to maintain an even thickness. -
Shape the Curve:
Continue pinching upward and outward to create a gentle bowl shape. Aim for walls that are roughly 1/4 inch thick, tapering slightly thinner near the rim. -
Refine the Bottom:
Gently tap the base of the pot against your work surface to create a small, flat foot so the bowl sits stably without rocking. -
Smooth the Surface:
Use a damp sponge to wipe away fingerprints and smooth out any deep ridges. Don’t use too much water, or the clay will become weak. -
Rib the Interior:
Take a soft rib tool and drag it gently up the inside curve of the bowl. This compresses the clay and creates that satisfying, smooth interior curve seen in the photo.
Cracking Up?
If you see small cracks on the rim while pinching, your clay is likely too dry. Score the crack, add a tiny drop of slip, and compress the area immediately.
Step 2: Detailing and Drying
-
Level the Rim:
Look at the rim from the side. If it’s very uneven, use a needle tool or fettling knife to trim it slightly, though keeping a bit of wave adds character. -
Soften the Edge:
Run a damp sponge or your finger over the cut rim to round it off. It should look soft and folded, not sharp. -
Slow Dry:
Cover the bowl loosely with plastic and let it dry slowly to the leather-hard stage. This prevents warping. -
Bisque Fire:
Once fully bone dry, fire the piece in a kiln to bisque temperature (usually Cone 04 or 06, depending on your clay).
Go Bigger
Try making a matching rectangular tray like the one in the photo using a slab-building technique to create a complete vanity set.
Step 3: Glazing and Finishing
-
Clean the Bisque:
Wipe the bisque-fired bowl with a damp sponge to remove any kiln dust, which can prevent the glaze from adhering properly. -
Apply the Rim Stain:
Dip a small brush into iron oxide wash or dark brown underglaze. Carefully paint a thin line along the very edge of the rim. -
Create the Wash Effect:
Using a cleaner, water-dampened brush, gently dab and blur the bottom edge of that brown line so it bleeds slightly down into the bowl, creating a rustic gradient. -
Glaze the Piece:
Pour a transparent cream or clear glaze inside the bowl, swirl to coat, and pour out the excess. Dip the exterior or brush the glaze on. -
Wipe the Foot:
Ensure the bottom flat area is completely free of glaze using a sponge or wax resist before glazing, so it doesn’t stick to the kiln shelf. -
Glaze Fire:
Fire the bowl a final time to the maturity temperature of your clay and glaze (often Cone 5 or 6 for stoneware).
Now you have a timeless, functional piece of pottery ready to hold your daily treasures


Three-Technique Handbuilt Bowl Trio (Pinch, Coil, Slab)
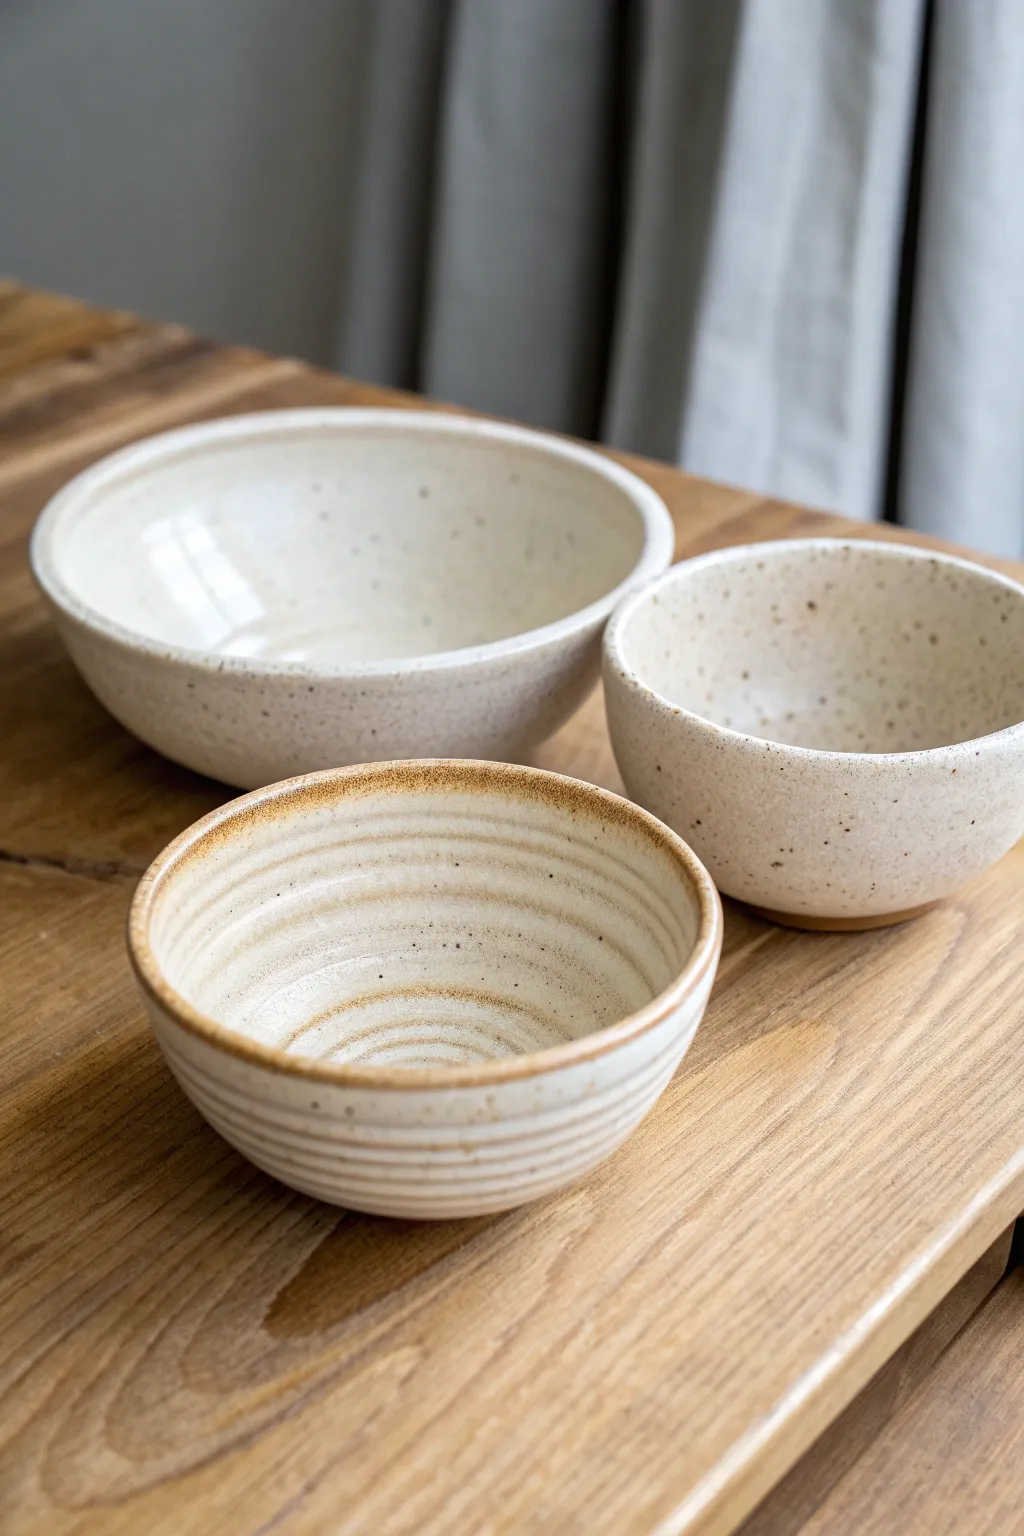
Master three fundamental hand-building techniques by creating this charming set of nesting bowls. Featuring a unified speckled cream glaze, each piece showcases a unique texture and form that celebrates the versatility of clay.
How-To Guide
Materials
- Speckled buff stoneware clay (approx. 3-4 lbs)
- Rolling pin
- Canvas mat or cloth
- Wooden guide strips (1/4 inch thick)
- Pottery rib (metal or rubber)
- Fettling knife or needle tool
- Scoring tool (or serrated rib)
- Slip (clay + water slurry)
- Bowl for a slump mold (lined with plastic)
- Sponge
- Speckled cream or white matte glaze
Step 1: Bowl 1: The Organic Pinch Pot
-
Prepare the clay ball:
Start with a ball of clay roughly the size of a large orange. Pat it into a smooth sphere, ensuring there are no trapped air bubbles. -
Open the form:
Cradle the ball in one hand and push your thumb into the center, stopping about a half-inch from the bottom base. -
Pinch the walls:
Using your thumb on the inside and fingers on the outside, gently pinch and rotate the clay. Work in a spiral from the bottom up to thin the walls evenly. -
Refine the shape:
Aim for a small, deep bowl shape like the one on the right in the photo. Smooth the interior with your thumb or a damp sponge to remove deep fingerprints while keeping some organic texture.
Smooth Operator
Use a flexible rubber rib on the inside of the pinch and slab bowls while the clay is soft to erase fingerprints and compress the surface.
Step 2: Bowl 2: The Textured Coil Bowl
-
Roll the base:
For the medium-sized bowl, roll out a small slab about 1/4 inch thick and cut a 3-inch circle for the floor. -
Create coils:
Roll out several long ropes of clay, aiming for the thickness of your pinky finger. Keep them consistent. -
Stack and score:
Score and slip the edge of your base. Place the first coil on top. Continue stacking coils, scoring and slipping between each layer to build height. -
Blend the interior:
To ensure structural integrity, firmly smudge the coils together on the *inside* of the bowl only. This creates a smooth inner surface for food. -
Define exterior ridges:
On the outside, use a rounded wooden tool or your finger to gently smooth the coil connections just enough to seal them, but leave the horizontal ridges visible to mimic the textured bowl in the foreground. -
Shape the rim:
Finish the rim with a final coil or by smoothing the top edge, slightly flaring it outward.
Rim Contrast
Wipe a damp sponge gently over the rim (and coil ridges) immediately after glazing. This things the glaze, allowing the brown clay body to show through.
Step 3: Bowl 3: The Smooth Slab Bowl
-
Roll a large slab:
Using guide strips, roll a large slab of clay to a uniform 1/4 inch thickness on your canvas. -
Prepare the mold:
Find a kitchen bowl that matches the desired curve of the largest bowl. Drape a piece of thin plastic or cheesecloth inside it to prevent sticking. -
Slump the clay:
Cut a large circle from your slab and gently lift it into the mold. Press it softly against the mold’s interior to take its shape. -
Compress the rim:
Trim any excess clay peeking over the edge. Use a damp sponge to compress and round the rim so it is smooth and resistant to chipping. -
Dry to leather hard:
Let the clay sit in the mold until it is leather hard and holds its shape, then remove it carefully.
Step 4: Finishing and Glazing
-
Bisque fire:
Once all three bowls are bone dry, fire them in a kiln to cone 04 (or your clay’s specified bisque temperature). -
Apply glaze:
Dip or brush a speckled cream glaze onto the bowls. I find dipping gives that perfectly even coat seen in the reference photo. -
Highlight the rim:
For the coil bowl, the glaze will naturally break over the ridges, highlighting the texture with a darker tone, just like the image shows. -
Glaze fire:
Fire the pieces a final time to the glaze’s maturation temperature (likely cone 5 or 6 for stoneware).
Stack your finished trio to admire how the different techniques create a cohesive yet distinct family of forms


Textured Ring Dish With Stamp Patterns
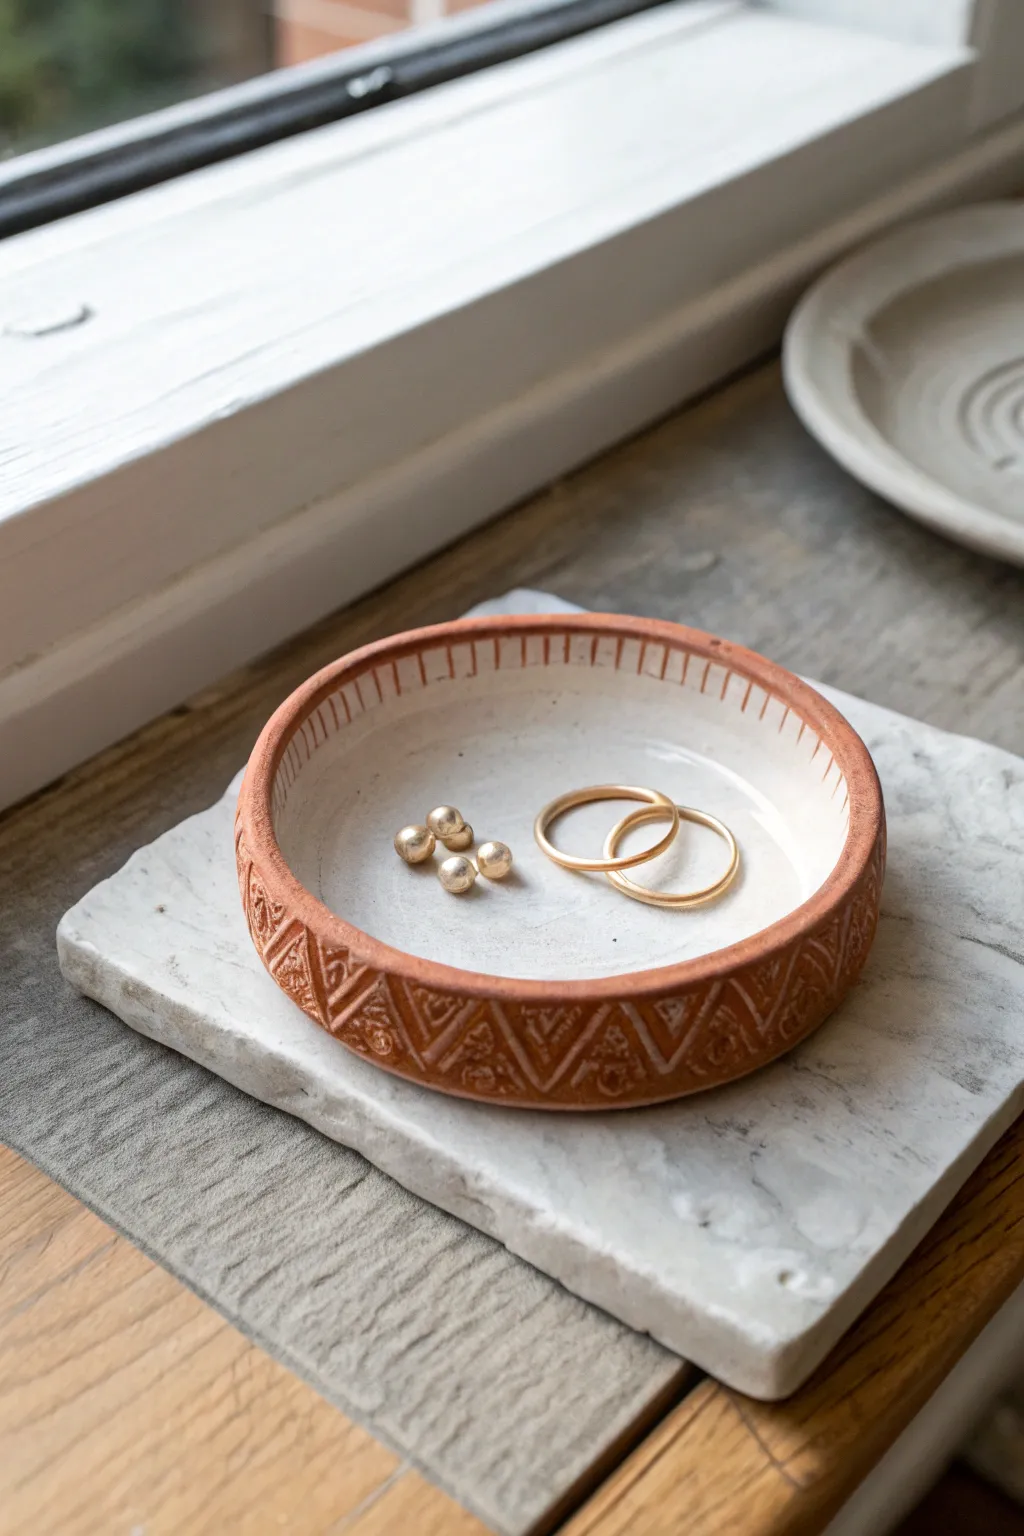
This charming, petite dish combines the warmth of terracotta with crisp white glaze, creating a perfect home for your everyday jewelry. The intricate stamped border and hand-carved details give it an artisanal feel that looks straight from a boutique pottery studio.
Detailed Instructions
Materials
- Terracotta clay (low fire)
- Small circular cookie cutter (approx. 3-4 inches)
- Rolling pin
- Canvas mat or cloth (to prevent sticking)
- Needle tool or X-Acto knife
- Small wooden pottery stamps (geometric/arrow pattern)
- Small sponge
- White low-fire glaze (opaque)
- Fine-grit sandpaper (optional)
- Small paintbrush
Step 1: Shaping the Base
-
Prepare the Clay:
Start by kneading a small ball of terracotta clay to remove air bubbles. This conditioning step is crucial for preventing cracks later on. -
Roll the Slab:
Place the clay on your canvas mat and roll it out into an even slab, aiming for about 1/4 inch or slightly less in thickness. -
Cut the Circle:
Press your circular cookie cutter firmly into the slab to create the base. If you don’t have a cutter, you can trace around a jar lid with a needle tool. -
Create a Coil:
Roll out a separate long, thin snake of clay. This coil should be roughly the same thickness as your base slab and long enough to wrap around the circumference. -
Score and Slip:
Use your needle tool to scratch up (score) the outer upward edge of the base circle and one side of the coil. Dab a little water or slip onto thescored areas. -
Attach the Wall:
Place the coil onto the edge of the base to form the wall. I find it helpful to press down gently as I go to ensure a tight seal without squishing the height. -
Blend the Seams:
On the inside of the dish, use your finger or a modeling tool to smooth the clay downward, blending the coil seamlessly into the base so no crack remains. -
Refine the Rim:
Use a damp sponge to smooth the top rim of the dish, making it level and uniform.
Step 2: Adding Texture & Pattern
-
Stamp the Exterior:
While the clay is leather-hard (firm but still impressionable), press your geometric stamps into the outer wall. Create a repeating triangular or arrow pattern all the way around. -
Carve the Rim Details:
Using a needle tool or small carving tool, carefully etch vertical tick marks along the inner sloping edge of the rim, spacing them evenly. -
Dry the Piece:
Let the dish dry completely. This usually takes 24-48 hours depending on humidity. It must be bone dry before the first firing. -
Bisque Fire:
Fire the piece in a kiln to cone 04 (or according to your clay’s instructions) to harden it into bisque ware.
Uneven Drying?
If your rim warped while drying, place a light plastic sheet loosely over the dish for the first 24 hours. Slowing the drying process helps maintain the perfect circular shape.
Step 3: Glazing & Finishing
-
Clean the Bisque:
Wipe the fired piece with a damp sponge to remove any kiln dust that might interfere with glaze adhesion. -
Apply Interior Glaze:
Paint 2-3 coats of opaque white glaze on the *interior* of the dish only. Let each coat dry before applying the next. -
Detail the Rim:
Carefully apply the white glaze to the inner rim area where you carved the tick marks, but stop right at the top edge so the terracotta exterior remains exposed. -
Clean Up Edges:
If any glaze dripped onto the textured exterior or the stamp work, wipe it away immediately with a damp sponge or q-tip. -
Glaze Fire:
Place the dish back in the kiln for a glaze firing, typically to cone 05 or 06, to melt the white glaze into a glossy finish. -
Final Polish:
Once cool, check the bottom for any rough spots and sand them lightly if needed to protect your furniture.
Try a Wax Resist
Apply liquid wax resist over your stamped exterior pattern before glazing. This ensures absolutely clean lines and prevents accidental glaze drips on your raw clay texture.
Place your favorite rings inside and enjoy the beautiful contrast between the rustic clay and the smooth, bright interior


Speckled Terrazzo Coasters You Can Customize
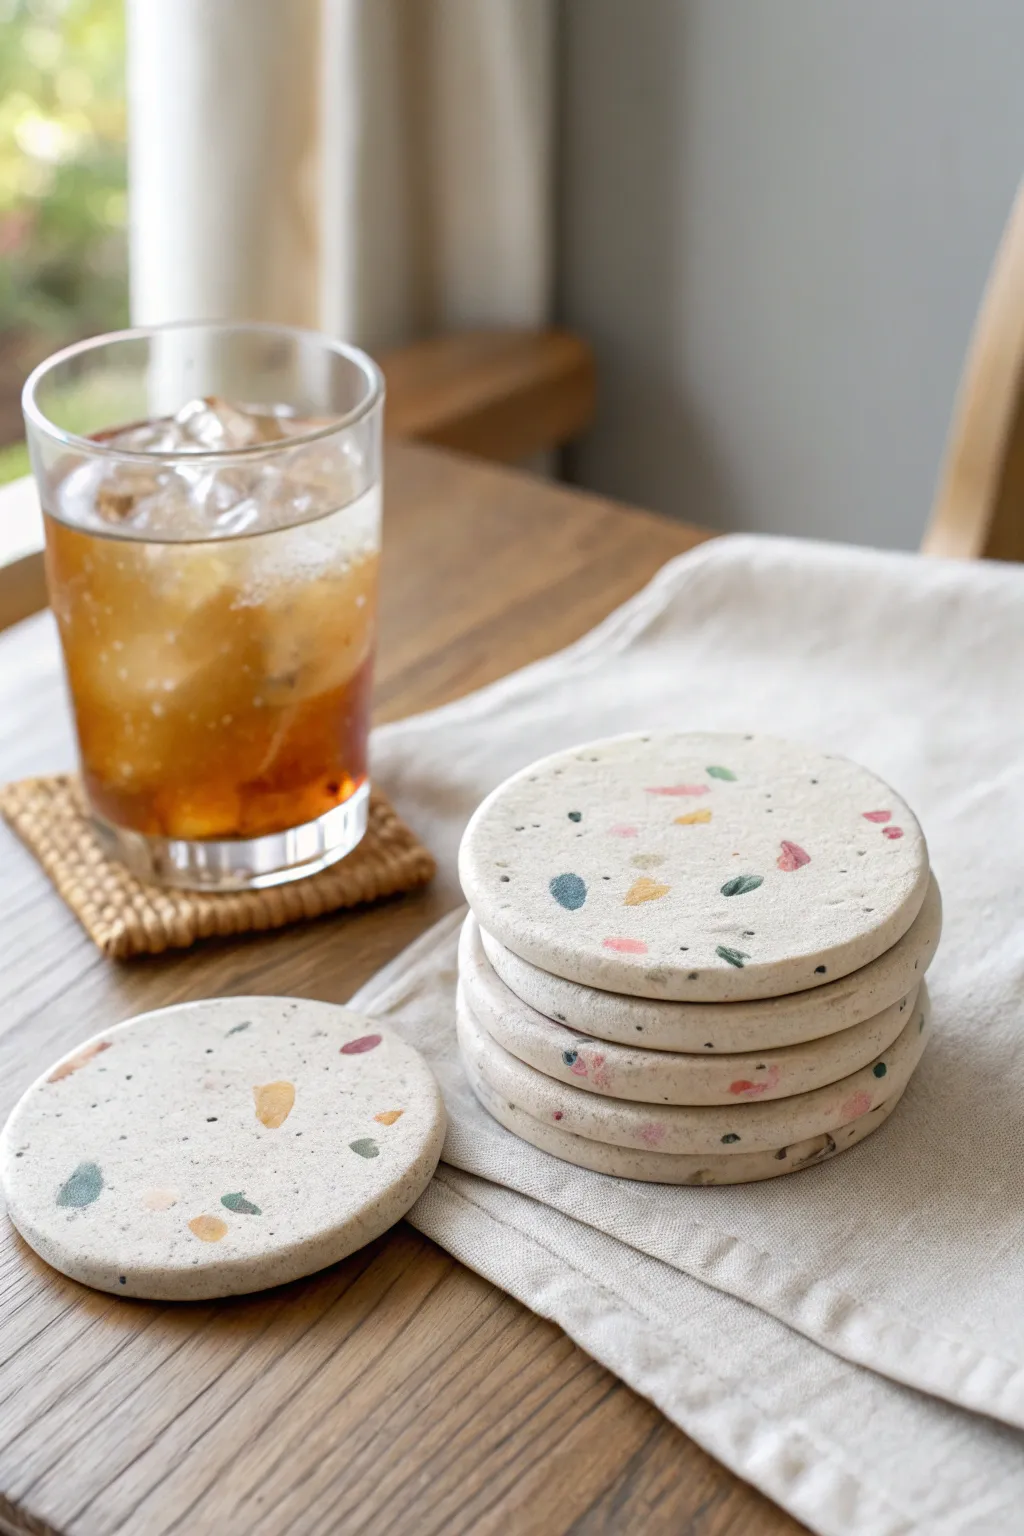
Bring a trendy, modern touch to your coffee table with these charming speckled coasters made from polymer or air-dry clay. The terrazzo effect is achieved by embedding colorful clay chips into a neutral base, creating a polished, stone-like finish that looks surprisingly high-end.
Step-by-Step Tutorial
Materials
- Polymer clay (white or beige for the base)
- Polymer clay (various colors like teal, mustard, pink, and terra cotta)
- Rolling pin or acrylic roller
- Round cookie cutter (approx. 3.5 – 4 inches)
- Parchment paper or baking mat
- Craft knife or tissue blade
- Sandpaper (various grits: 400, 600, 1000)
- Glossy varnish or resin (optional for waterproofing)
- Oven (if using polymer clay)
Step 1: Preparing the Terrazzo Chips
-
Condition the colored clay:
Start by taking your small amounts of colored clay—teal, mustard yellow, soft pink, and rust red work beautifully together. Knead each color separately until soft and pliable. -
Roll thin sheets:
Roll each color out into a very thin, distinct sheet. The thinner you make these, the more delicate your terrazzo flecks will appear later. -
Create the chips:
Use your craft knife or tissue blade to chop the colored sheets into tiny, irregular shards. Aim for a mix of sizes, from tiny specks to slightly larger chunks, to mimic natural stone aggregates. -
Set aside:
Keep your piles of colored chips separate or mix them together in a small bowl depending on how random you want the final distribution to be.
Uneven Chips?
If your chips smear rather than looking like sharp stones during rolling, your clay was likely too warm or soft. Pop the chipped slab in the fridge for 10 minutes before the final roll.
Step 2: Forming the Base
-
Condition the base clay:
Take a large block of your white or beige clay and condition it thoroughly. This neutral tone will act as the ‘cement’ holding your colorful stones. -
Initial rolling:
Roll the neutral clay into a slab that is slightly thicker than your desired final coaster thickness, perhaps around 1/4 inch. -
Apply the chips:
Scatter your colored clay chips generously over the top surface of the white slab. Don’t be afraid to overlap them slightly or leave some open white space. -
Embed the chips:
Place a piece of parchment paper over the spotted clay to prevent sticking. -
Flatten and merge:
Use your roller to firmly maximize pressure over the parchment paper. You want to press the chips completely flush into the white base, creating a single, smooth surface.
Adding Contrast
Add a pinch of black pepper or dried used coffee grounds into your white base clay before rolling. This adds tiny, realistic black specks that make the faux stone look much more authentic.
Step 3: Cutting and Baking
-
Cut the shapes:
Remove the parchment paper and place your round cookie cutter onto the clay slab. Press down firmly to cut out your circles. If you don’t have a cutter, you can trace a wide mug and cut carefully with a knife. -
Smooth the edges:
Gently lift the circles and run your finger along the rim to soften any sharp edges created by the cutter. -
Bake:
Place your clay rounds on a parchment-lined baking sheet. Bake according to your specific clay manufacturer’s instructions (usually 275°F for 15-30 minutes for polymer clay). -
Cool down:
Allow the coasters to cool completely on a flat surface. I usually place a heavy book on top of them while they cool to ensure they stay perfectly flat.
Step 4: Finishing Touches
-
Wet sanding:
Once cool, dip your 400-grit sandpaper in water and sand the surface of the coaster in circular motions. This reveals the crisp edges of the chips and removes any fingerprints. -
Refine the finish:
Progress to the 600 and then 1000 grit sandpaper, keeping the paper wet. This polishing process is crucial for getting that professional, smooth stone look. -
Seal (Optional):
If you want extra protection against drink condensation, apply a thin layer of matte varnish or resin to seal the surface.
Now you have a durable, stylish set of coasters ready to protect your tabletops.

The Complete Guide to Pottery Troubleshooting
Uncover the most common ceramic mistakes—from cracking clay to failed glazes—and learn how to fix them fast.
Wavy-Edge Jewelry Dish With Painted Stripes

Embrace the beauty of imperfection with this charming, hand-built jewelry dish featuring a distinctive fluted rim. The organic shape and earthy terracotta and navy stripes give it a cozy, artisanal feel perfect for holding your favorite rings and beads.
Step-by-Step Guide
Materials
- White or speckled air-dry clay (or polymer clay)
- Rolling pin
- Circle template or a bowl (approx. 5-6 inches diameter)
- Craft knife or clay needle tool
- Small bowl (for forming the shape)
- Acrylic paints (terracotta/burnt orange and navy/dark grey)
- Fine round paintbrush
- Sponge or fine sandpaper
- Gloss or matte varnish (optional)
Step 1: Shaping the Base
-
Condition the clay:
Start by taking a handful of your clay and kneading it in your hands until it becomes warm, soft, and pliable. If you are using air-dry clay, keep your hands slightly moist to prevent cracking. -
Roll out the slab:
Place the clay on a clean, flat surface. Using a rolling pin, roll it out evenly until you have a slab that is roughly 1/4 inch thick. Try to keep the thickness consistent across the entire piece for even drying. -
Cut the circle:
Place your circle template or an existing bowl upside down onto the clay slab. Use your craft knife or needle tool to trace and cut out a perfect circle. -
Softening the edges:
Dip your finger in a little water and run it gently along the cut edge of the clay circle to smooth out any sharpness or crumbles from the cutting process.
Step 2: Forming the Waves
-
Create the curve:
Gently lift your clay circle and drape it inside your forming bowl. Press it lightly so the bottom flattens slightly, but don’t squish it down too hard. -
Pinch the rim:
To create the signature wavy edge, use your thumb and forefinger to gently pinch the rim at regular intervals. Push inward with one finger while supporting the clay on either side to create a scallop. -
Refine the flutes:
Go around the rim a second time to ensure the waves are distinct. I like to make them slightly irregular to enhance that handmade, organic aesthetic shown in the photo. -
Smooth the interior:
Check the inside of the bowl for any fingerprints or dents created while pinching the rim. Use a damp sponge to smooth the interior surface perfectly flat again. -
Let it dry:
Leave the clay inside the forming bowl until it is leather-hard (partially dry), then carefully remove it and let it finish drying completely on a wire rack. This usually takes 24-48 hours depending on humidity.
Faux Speckles
If using plain white clay, you can mimic the speckled stoneware look by flicking a toothbrush loaded with diluted brown paint over the dish before painting the stripes.
Step 3: Painting and Finishing
-
Sand imperfections:
Once fully dry, inspect the edges. If there are any sharp points or rough spots, gently sand them down with fine-grit sandpaper or a dry sanding sponge. -
Mix your palette:
Prepare your acrylic paints. You’ll need a warm, earthy burnt orange and a deep, muted navy or charcoal grey. Thin the paint slightly with a drop of water for smoother fluid lines. -
Paint the first stripe color:
Using a fine round brush, paint freehand stripes starting from one side of the bowl. Don’t worry about using a ruler; the charm lies in the wavering, painterly lines. -
Add the second color:
Once the first color is dry to the touch, paint alternating stripes with your second color. Leave some of the raw clay background visible between the painted lines. -
Create the broken pattern:
Notice how the stripes in the example aren’t all continuous. Break some lines halfway or vary their thickness to mimic the loose, artistic style of the original piece. -
Seal the piece:
After the paint has cured completely, apply a coat of varnish. A matte finish keeps the earthy look, while a gloss finish will make the ceramic colors pop.
Gold Rim Upgrade
For a touch of luxury, paint just the very edge of the wavy rim with liquid gold leaf or metallic gold paint after your main design has dried.
Place your finished dish on your bedside table or vanity to add a beautiful handmade touch to your daily routine
Tiny Magnet Bud Vases for Found Flowers
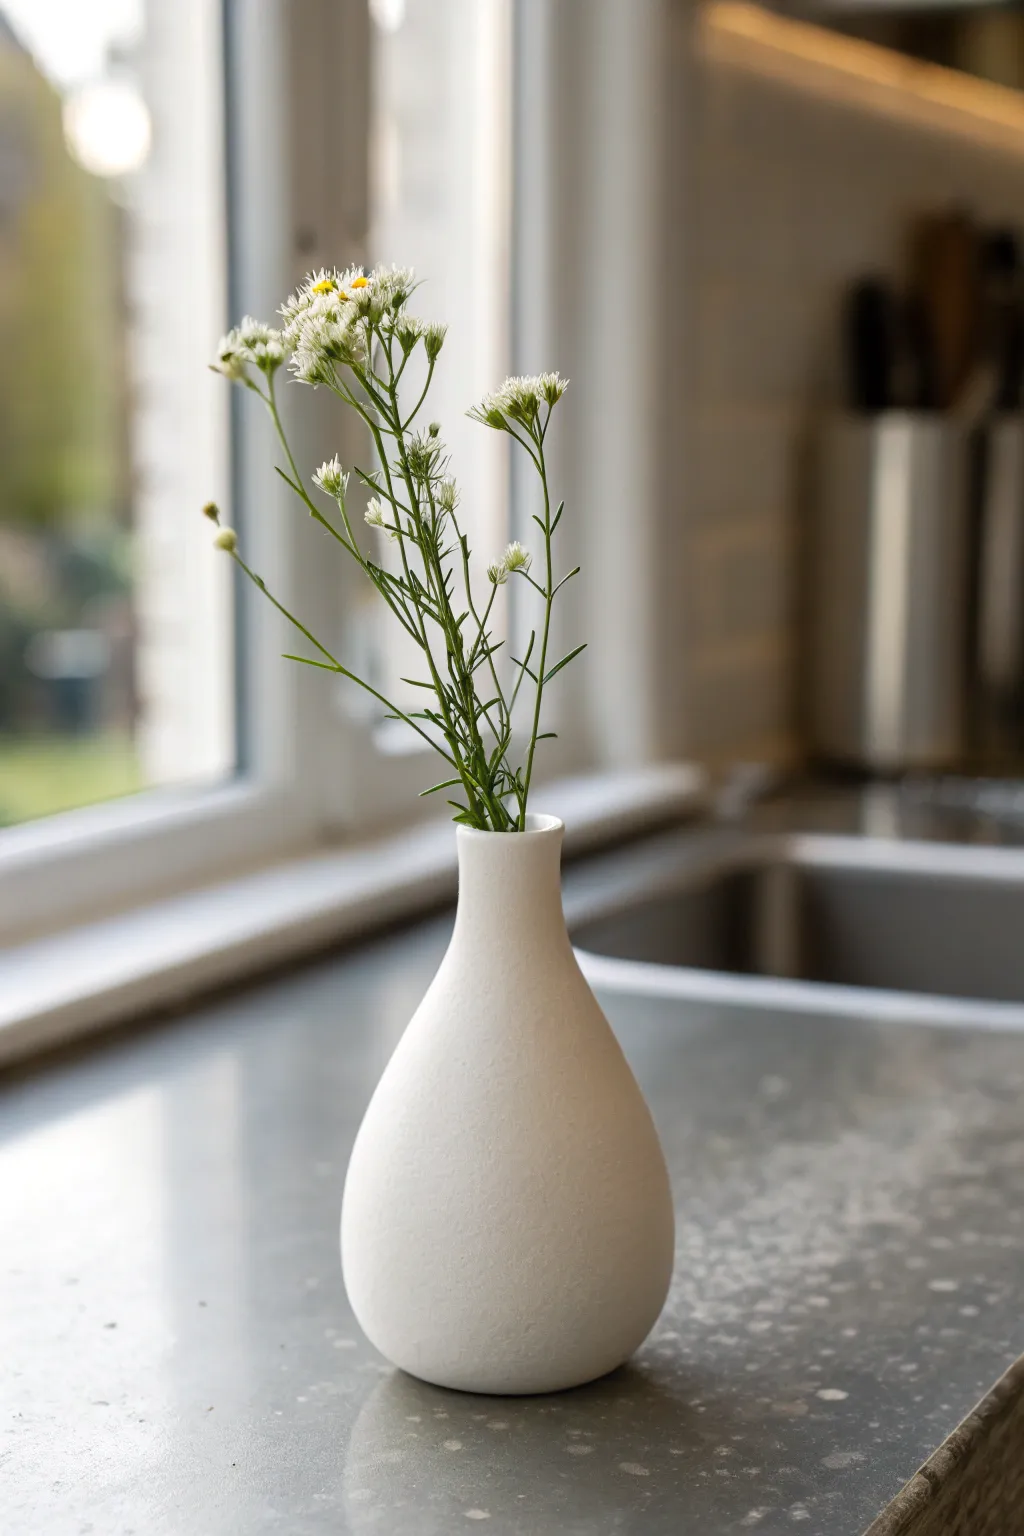
Transform a small lump of clay into this serene, teardrop-shaped bud vase that brings a touch of nature right to your fridge or magnetic board. The matte white finish and organic curves make it the perfect vessel for tiny wildflowers or dried stems.
Step-by-Step Tutorial
Materials
- White air-dry clay or polymer clay
- Strong neodymium disc magnets (approx. 10mm)
- Small rolling pin
- Clay sculpting tools or a smooth butter knife
- Sandpaper (fine grit)
- Small sponge and water
- Strong craft adhesive (like E6000)
- Matte white acrylic paint (optional)
- Matte spray sealant
Step 1: Shaping the Base
-
Prepare your clay:
Start by taking a chunk of white clay roughly the size of a golf ball. Knead it in your hands until it’s soft, pliable, and free of cracks. -
Form the initial shape:
Roll the clay into a smooth ball between your palms, then begin to gently taper one end to create a pear or teardrop shape. -
Refine the teardrop:
Continue rolling the tapered end back and forth on your work surface to elongate the neck while keeping the bottom bulbous and round. -
Flatten the back:
Since this will be a magnet, gently press one side of the bulbous part against your table to create a flat surface. This ensures it sits flush against your fridge. -
Check stability:
Stand the shape up or lay it flat to ensure the flattened back is wide enough to support the weight of the vase and flowers.
Magnet Hack
Use two magnets stacked vertically on the back instead of one. This prevents the vase from spinning upside down if you put a slightly heavy flower in it.
Step 2: Creating the Opening
-
Make the hole:
Use a small, round sculpting tool or the handle of a thin paintbrush to carefully bore a hole into the center of the narrow neck. -
Deepen the well:
gently swirl the tool to widen the opening slightly and go deep enough to hold a stem (about 1.5 to 2 inches), being careful not to poke through the walls. -
Smooth the rim:
With a slightly damp finger, smooth out any rough edges around the opening you just created for a clean, professional look. -
Refine the exterior:
Look over the vase for any fingerprints. Dip your finger in water and gently buff them away, ensuring the curve from neck to base is seamless.
Texture Play
Before the clay dries, gently press a piece of linen fabric or a dried leaf into the surface to leave a subtle, fossil-like imprint for added organic character.
Step 3: Finishing Touches
-
Embed the magnet (Method A):
If your clay is still soft, you can press your magnet slightly into the flat back to create an indentation, then remove it to let the clay dry. This helps it sit flush later. -
Allow to dry:
Set the vase aside to dry completely. For air-dry clay, this usually takes 24-48 hours depending on thickness. Rotate it occasionally for even drying. -
Sand for smoothness:
Once fully cured, use fine-grit sandpaper to gently buff the surface. Focus on removing any remaining bumps or unevenness to achieve that stone-like texture. -
Painting (Optional):
If you want a pristine white look, apply a coat or two of matte white acrylic paint. I find this helps hide any grayness from the raw clay. -
Seal the project:
Spray the entire vase with a matte sealant. This is crucial for air-dry clay to protect it from any moisture the flower stems might carry. -
Attach the magnet:
Apply a dab of strong adhesive to your magnet and press it firmly onto the flat spot on the back (or into the indentation you made earlier). -
Final cure:
Let the glue set for the time recommended on the package before sticking it to a metal surface.
Now you have a charming little vessel ready to showcase your daily garden finds


What Really Happens Inside the Kiln
Learn how time and temperature work together inside the kiln to transform clay into durable ceramic.
Modern Planter With Simple Face Sculpting
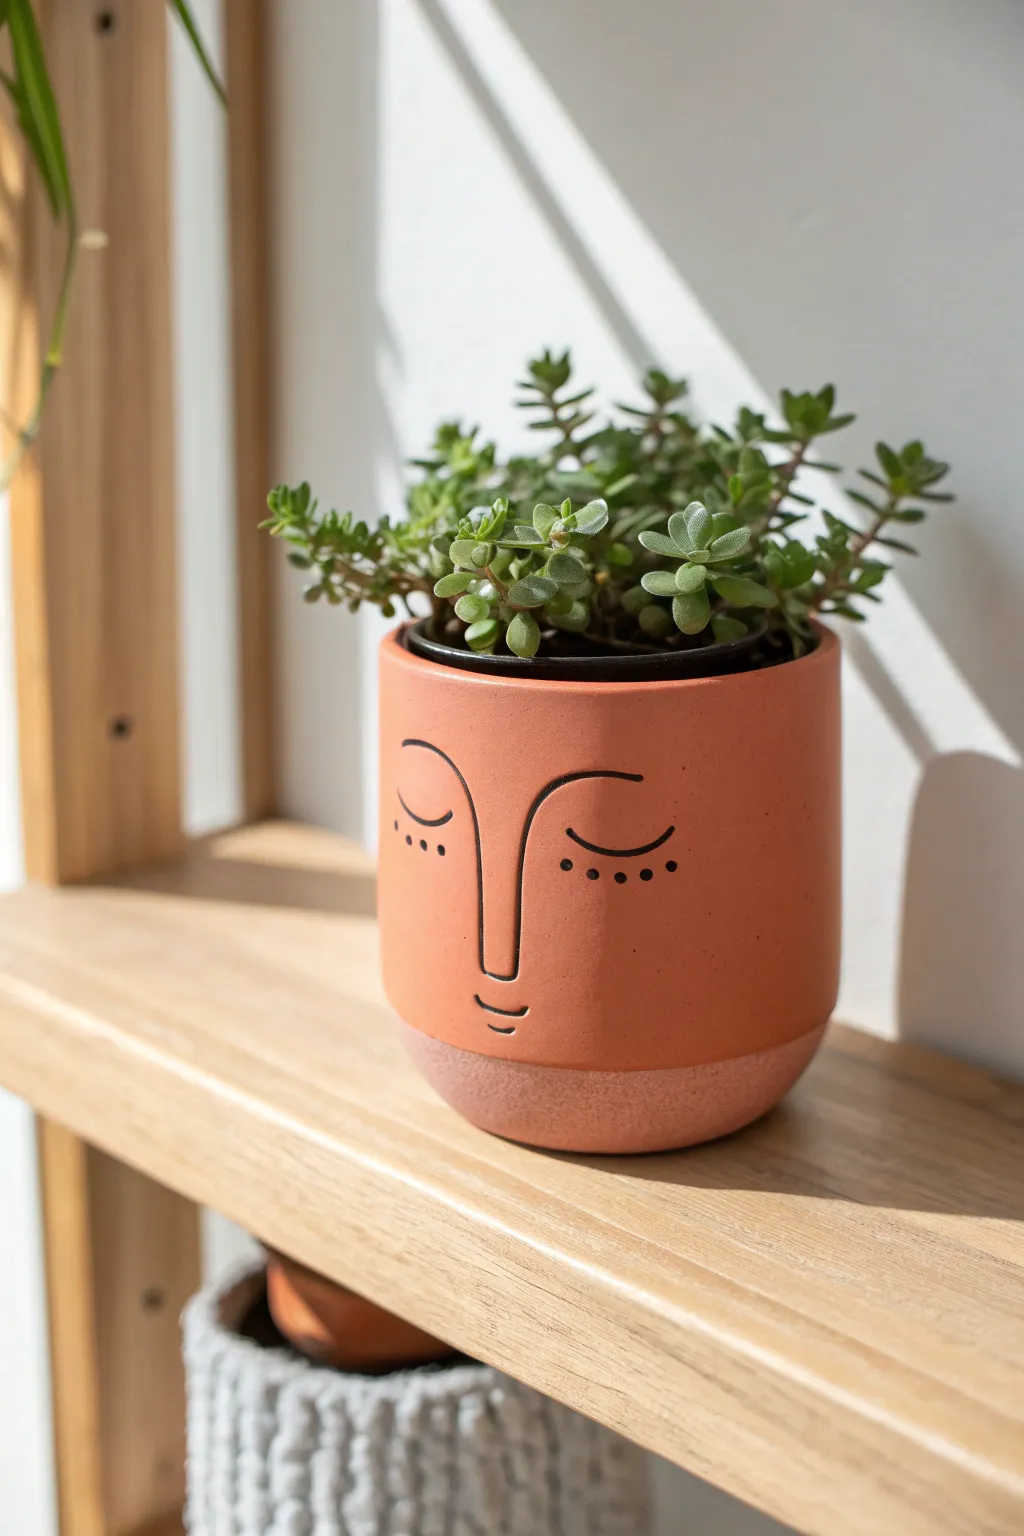
Bring a sense of calm to your indoor garden with this minimalist terracotta-style planter featuring a gently sculpted, sleeping face. The warm, earthy tones and simple line art create a modern yet organic feel perfect for succulents or trailing vines.
Step-by-Step Guide
Materials
- Air-dry clay (terra cotta color) or polymer clay
- Rolling pin
- Cylindrical mold (like a large can or jar)
- Clay knife or fettling knife
- Slip (clay mixed with water) or scoring tool
- Fine-grit sandpaper
- Black acrylic paint or paint pen
- Fine-point paintbrush
- Water-based matte sealant
- Small succulent plant
Step 1: Forming the Base Structure
-
Prepare the clay:
Begin by conditioning your terra cotta colored clay until it is soft and pliable. If you are using air-dry clay, knead it briefly to remove air bubbles. -
Roll out the slab:
Roll the clay out into a long, even rectangular slab about 1/4 inch thick. Aim for a length that can wrap fully around your chosen cylindrical mold with a slight overlap. -
Cut the rectangle:
Using your knife and a ruler, trim the rough edges to create a clean, straight rectangle. This will form the walls of your pot. -
Create the base:
Roll a separate, smaller piece of clay and cut out a circle that matches the diameter of your mold. This will be the floor of the pot. -
Wrap the cylinder:
Carefully wrap the rectangular slab around your mold. Where the two ends meet, score the edges (scratch them up) and add a little water or slip, then press them firmly together to create a seam. -
Attach the base:
Score and slip the bottom edge of the cylinder wall and the outer edge of your circular base. Press the walls onto the base and smooth the clay together on both the inside and outside so the seam disappears. -
Smooth the surface:
Use a little water on your fingers or a sponge to smooth out the vertical seam and any fingerprints on the main body of the pot.
Uneven Seams?
If the back seam where you joined the clay is visible or bumpy, wet your finger and rub in a circular motion to redistribute the clay particles until the line vanishes.
Step 2: Sculpting and Detailing
-
Roll the nose coil:
Take a very small amount of clay and roll it into a thin coil or ‘snake.’ This will become the raised nose bridge. -
Shape the nose:
Position the coil vertically in the center of the pot’s face. Gently blend the edges of the coil into the pot surface, leaving the center ridge raised to define the nose profile. -
Refine the brow connection:
At the top of the nose bridge, curve the clay slightly outward to hint at the brow bone, ensuring the transition is smooth and subtle. -
Dry the pot:
Allow the pot to dry completely according to the clay manufacturer’s instructions. I usually rotate the pot occasionally during drying for even airflow. -
Sand for smoothness:
Once fully dry (and hardened), lightly sand the exterior with fine-grit sandpaper to remove any rough bumps, focusing on the rim and the blended nose area.
Pro Tip: Drawing Helper
Before using permanent paint, sketch the face lightly with a soft pencil directly on the dry clay. This lets you adjust symmetry without committing to the black ink.
Step 3: Painting and Finishing
-
Clean dust:
Wipe the pot down with a barely damp cloth to remove all sanding dust before painting. -
Outline the features:
Using a fine paint pen or a thin brush with black acrylic paint, carefully draw the closed eyelids. They should be simple, downward-curving semicircles placed symmetrically on either side of the nose bridge. -
Add lashes and details:
Add small dots beneath the eyes for lashes or cheeks, and draw a tiny, curved line near the bottom of the nose for a mouth. Keep the lines minimal and clean. -
Create the two-tone effect:
Leave the bottom quarter of the pot unsealed or lightly sanded to maintain a rougher texture, mimicking the raw clay dip shown in the inspiration image. -
Seal the artwork:
Apply a coat of matte water-based sealant over the painted face area and user rim to protect the paint and clay from moisture. -
Final assembly:
Once the sealant is dry, place a plastic nursery pot inside your new planter to protect the clay from water damage, and add your favorite succulent.
Now you have a tranquil, handmade piece of art ready to brighten your shelf
Rustic Pencil Cup With Carved Lines
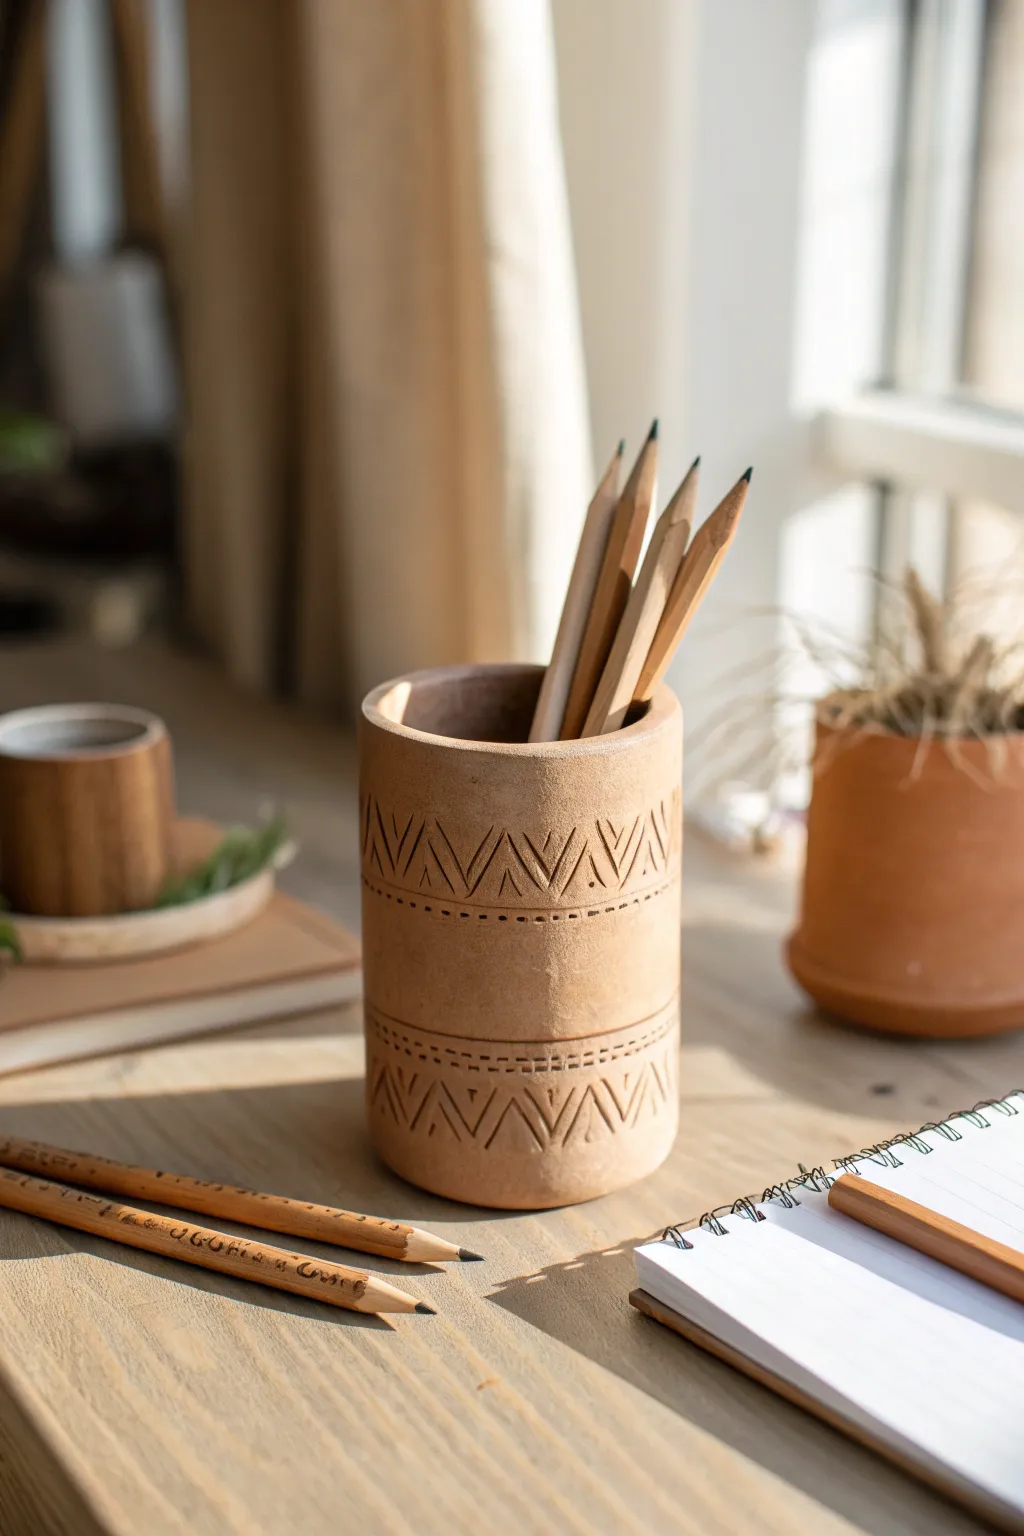
Bring warmth to your workspace with this hand-built clay cup, featuring a simple cylindrical form and charming geometric carvings. The natural, unglazed finish highlights the texture of the clay, giving it a timeless, earthy appeal that looks great on any desk.
Step-by-Step
Materials
- Terracotta or brown stoneware clay (approx. 1 lb)
- Rolling pin
- Canvas mat or wooden board (for rolling)
- Clay knife or fettling knife
- Ruler
- Slip (clay mixed with water)
- Scoring tool or fork
- Loop tool or carving needle
- Sponge
- Circular template (cookie cutter or jar lid, approx. 3 inches)
- Sandpaper (fine grit, optional)
Step 1: Forming the Cylinder
-
Prepare the slab:
Begin by wedging your clay to remove air bubbles, then roll it out into an even slab using your rolling pin. Aim for a thickness of about 1/4 inch so the walls are sturdy but not too heavy. -
Cut the base:
Place your circular template on the slab and cut around it with your clay knife to create the base of the cup. Set this circle aside on your workspace. -
Measure and cut walls:
Measure the circumference of your base circle. Cut a rectangular strip from the remaining slab that is slightly longer than that circumference and about 4 to 5 inches tall. -
bevel the edges (optional):
For a cleaner seam, you can cut the short ends of your rectangular strip at a 45-degree angle. This helps them overlap smoothly when forming the cylinder, though a straight butt joint works fine too. -
Score and slip:
Use your scoring tool to scratch rough hatch marks along the short ends of the rectangle and around the top edge of your circular base. Apply a generous amount of slip to these scored areas. -
Assemble the cylinder:
Carefully lift the rectangular strip and wrap it around the circular base. Press the ends together firmly to close the cylinder, then press the wall down onto the base. -
Smooth the seams:
Use your thumb or a modeling tool to smudge the clay across the vertical seam and the bottom connection point until the join is invisible. I find supporting the inside of the cup with my other hand helps prevent warping during this step.
Step 2: Carving the Design
-
Refine the surface:
Use a slightly damp sponge to smooth out any fingerprints or rough textures on the exterior. Let the cup dry to a ‘leather hard’ state—firm to the touch but still cold. -
Mark your guidelines:
Lightly trace two horizontal bands around the cup using a needle tool or the edge of your ruler. Place one band about an inch from the top rim and another about an inch from the bottom. -
Etch the horizontal lines:
Go over your traced lines with a V-shaped loop tool or carving needle to deepen them. Create a double line effect by carving a dotted or dashed line right next to the solid band. -
Carve the triangles:
Above the top band and below the bottom band, carve a repeating zigzag pattern to create a row of triangles. Focus on keeping the peaks and valleys relatively consistent in size. -
Add inner details:
Inside each large V-shape of your zigzag, carve a smaller, parallel V-shape. This nesting effect gives the design that distinct tribal or rustic look shown in the inspiration piece. -
Smooth the carvings:
Depending on your clay, carving might leave little ‘burrs’ or crumbs. Brush these away gently with a soft dry brush, or smooth sharp edges lightly with your finger. -
Dry slowly:
Place the finished cup loosely under plastic to let it dry slowly over a few days. This prevents the bottom from cracking as it shrinks. -
Bisque fire:
Once bone dry, fire the piece in a kiln to cone 04 (or according to your clay’s instructions). Since the look is raw terracotta, you can leave it unglazed or apply a clear matte sealant after firing.
Clean Lines Secret
Wait for ‘leather hard’ clay! If the clay is too wet, your carving tool will drag and pull chunks. If it shreds, let it dry 30 more mins.
Level Up: Color Wash
After bisque firing, rub a diluted black or dark brown acrylic paint into the carved lines and wipe away the excess for an antique look.
Now you have a functional piece of art ready to organize your creative tools

TRACK YOUR CERAMIC JOURNEY
Capture glaze tests, firing details, and creative progress—all in one simple printable. Make your projects easier to repeat and improve.
Mixed-Height Candle Holders in a Matching Set
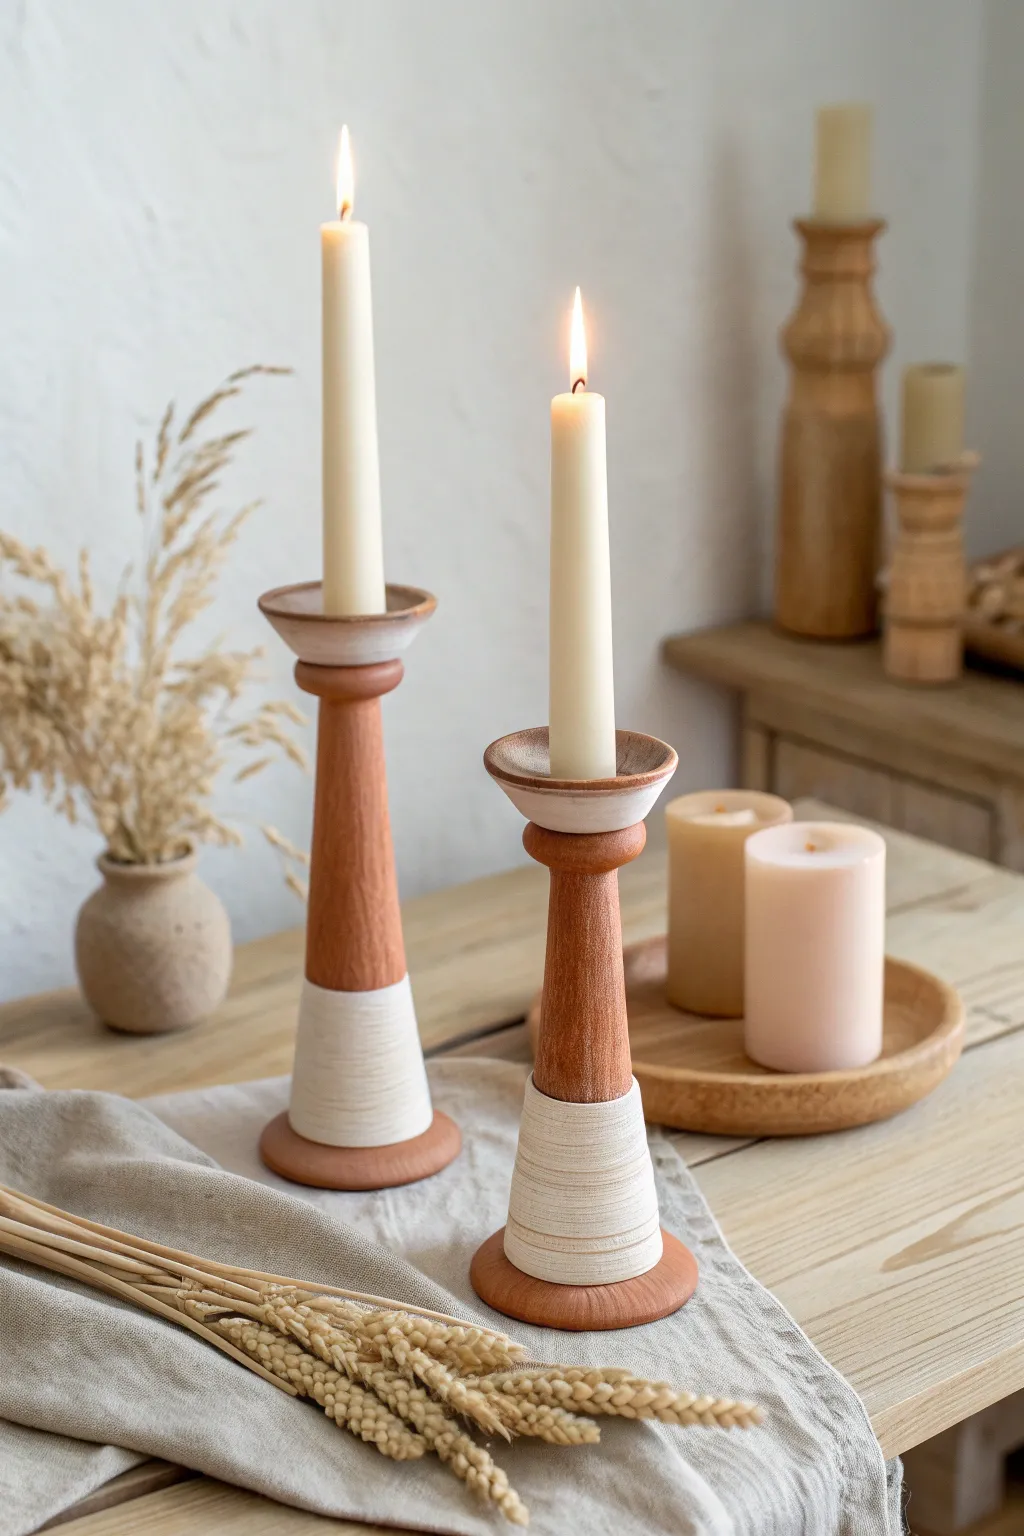
These elegant candle holders combine the warmth of exposed terracotta with a modern, textured white accent for a striking two-toned effect. By varying the heights of the stems, you’ll create a cohesive set that looks sophisticated on any mantel or dining table.
Step-by-Step Tutorial
Materials
- Red earthenware or terracotta clay
- White clay slip (or white underglaze)
- Wooden dowel (approx. 1 inch diameter)
- Clay rolling pin
- fettling knife or needle tool
- Wire cutter
- Scoring tool (serrated rib)
- Small sponge
- Stiff bristle brush (for texture)
- Clear matte glaze (optional)
- Ruler
Step 1: Forming the Base Components
-
Roll the base slabs:
Start by rolling out a medium slab of terracotta clay to about 1/4 inch thickness. Using a circular cutter or a template, cut out two circles for the bases: one approximately 3.5 inches in diameter and another slightly smaller one if you want variation. -
Cut the stem slabs:
Roll out another slab of clay for the main stems. You will need two rectangles. The width should be enough to wrap around your wooden dowel (about 3.5 inches). The lengths determine the height difference; cut one around 6 inches tall and the second around 8 inches tall. -
Create the candle cups:
From the remaining slab, cut two smaller circles (about 2.5 inches wide) for the flared candle cups. Gently pinch the edges of these small circles upward to form a shallow bowl shape that can catch wax drips.
Wobbly Candlestick?
If the base isn’t sitting flat after assembly, tap the whole piece firmly (but carefully) onto your table while the clay is soft to level the bottom disc.
Step 2: Assembling the Stems
-
Wrap the stems:
Wrap your rectangular clay slabs around the wooden dowel to create a perfect cylinder. I find it easiest to use a piece of paper between the wood and clay so it slides off easily later. -
Score and slip the seam:
Score the meeting edges of the cylinder thoroughly and apply a dab of water or slip. Press the seam firmly together. -
Refine the cylinder:
Gently roll the clay-wrapped dowel on your work surface to smooth out the seam until it is invisible. Slide the clay cylinder off the dowel carefully. -
Attach to the base:
Score the center of your base discs and the bottom rim of your cylinders. Apply slip and press the cylinder firmly onto the base. Use a small coil of clay around the inside or outside joint to reinforce the connection, smoothing it out completely.
Step 3: Adding the Distinctive Details
-
Form the decorative collar:
Roll a thick coil of clay and flatten it slightly. Attach this ring around the top of the cylinder stem to create the rounded ‘neck’ piece seen beneath the cup. -
Attach the candle cup:
Score the top of that collar and the bottom of your pinched bowl shapes. Join them together, ensuring the bowl is level. This is crucial so your candles will stand straight. -
Make the candle insert:
Inside the cup, add a small ring of clay sized perfectly to fit a standard taper candle (usually 7/8 inch). Test the fit gently with a candle if the clay isn’t too soft.
Pro Tip: Weighted Base
Make the bottom disc thicker than the rest of the project. A heavier base adds necessary stability to tall, slender forms and prevents tipping.
Step 4: Decoration and Finishing
-
Apply the white band:
Once the clay is leather hard, mask off the top section of the stem with tape or just use a steady hand. Apply thick white slip to the bottom third of the stem and the decorative cup rim. -
Texturize the white slip:
While the white slip is still wet, take a stiff bristle brush or a serrated tool and drag it horizontally around the white sections. This creates that beautiful brushed, linear texture. -
Smooth the terracotta:
Use a damp sponge to wipe down the exposed red clay sections, revealing the ‘grog’ or texture of the terracotta and removing any stray white slip marks. -
Dry slowly:
Loosely cover the candlesticks with plastic to let them dry slowly. Because they are tall and thin, fast drying can cause warping or cracking at the seems. -
Bisque fire:
Fire the pieces to cone 04 (or according to your clay body’s instructions). -
Glaze and final fire:
Apply a clear matte glaze to the inside of the candle cup for easy wax removal later, or leave the exterior raw for a rustic look. Fire to final temperature.
Now you have a stunning, handcrafted centerpiece ready to light up your next dinner party
Peg-Style Earring Holder Stand
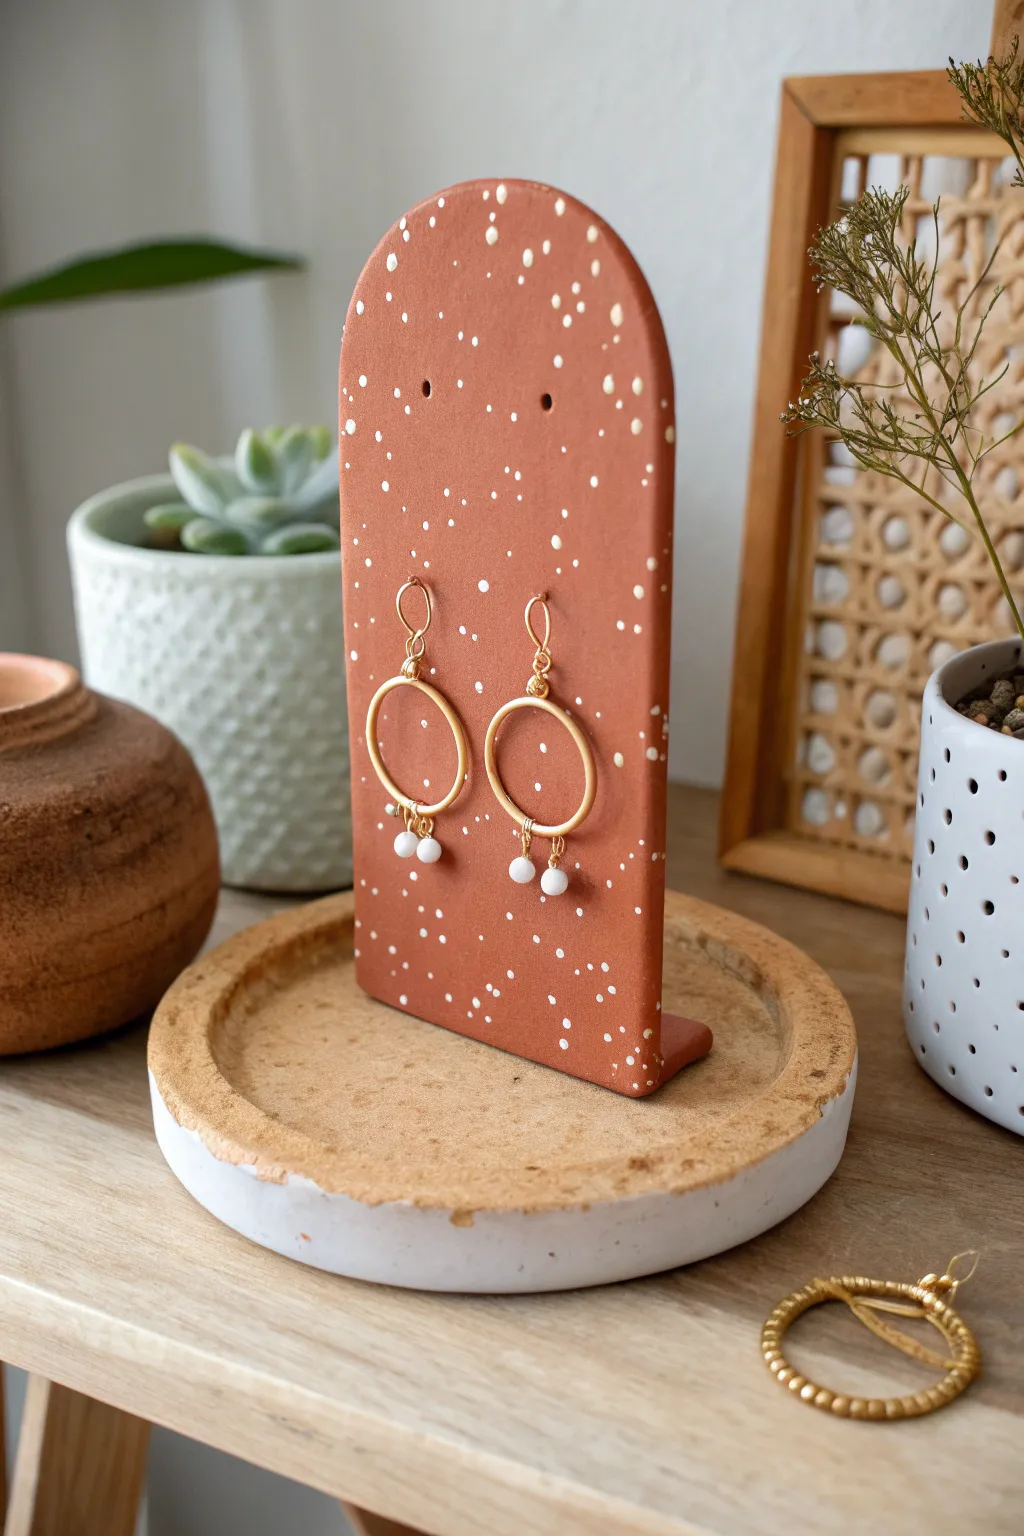
Elevate your jewelry organization with this chic, two-tone clay stand featuring a terracotta arch and a natural stone-look base. The playful splattered finish adds a modern ceramic feel without requiring a kiln, making it a perfect weekend project.
Step-by-Step Guide
Materials
- Air-dry clay (terracotta color)
- Air-dry clay (white or cream color)
- Rolling pin
- Sharp craft knife or clay slicer
- Round cookie cutter (approx 4-5 inches diameter)
- Arch template (paper or flexible plastic)
- Small wooden skewer or toothpick
- White acrylic paint
- Old toothbrush or stiff bristle brush
- Coarse sandpaper or sanding sponge
- Strong craft glue (e.g., E6000) or heavy body gel medium
- Clear matte varnish or sealant
- Water in a spray bottle
Step 1: Shaping the Components
-
Prepare the terracotta slab:
Begin by conditioning a handful of terracotta air-dry clay. Knead it until soft and pliable, then roll it out to a consistent thickness of about 1/4 inch. If the clay feels dry, I like to spritz a tiny bit of water on it while rolling. -
Cut the arch shape:
Place your arch template onto the rolled terracotta slab. Using a sharp craft knife, trace around the template with a steady hand to cut out the main display piece. Smooth the cut edges with a damp finger to remove any jagged bits. -
Add earring holes:
Measure evenly from the top of the arch to determine where you want your earrings to hang. Use a wooden skewer to poke two holes through the clay. Wiggle the skewer slightly to ensure the holes are large enough for earring hooks once the clay shrinks during drying. -
Create the base slab:
Condition the white or cream clay and roll it out slightly thicker than the arch, perhaps 1/3 inch, for stability. Use a large round cookie cutter or trace a bowl to cut a perfect circle. -
Form the rim:
To create the lipped tray effect seen in the photo, roll a long, thin snake of white clay. Score the outer edge of your circle base and apply a little water as slip. -
Attach the rim:
Press the clay snake onto the scored edge, blending the seam on the inside of the tray using a modeling tool or your thumb for a smooth transition. Leave the outside edge slightly rougher for a rustic look.
Step 2: Finishing and Assembly
-
Drying time:
Place both pieces on a flat surface lined with parchment paper. Let them dry completely for 24-48 hours, flipping them occasionally to ensure even drying and prevent warping. -
Create the speckled effect:
Once dry, lay the terracotta arch on a protected surface. Dilute a small amount of white acrylic paint with water until it’s runny. Dip an old toothbrush into the paint and flick the bristles with your thumb to splatter fine white dots across the surface. -
Sand the base:
Take your dried white base and use coarse sandpaper to roughen the rim and the exterior. This exposes the texture and gives it that stone-like, aged appearance shown in the image. -
Antique the base rim:
For the browned rim effect, lightly sponge a tiny amount of diluted brown or terracotta paint onto the rough, sanded edge of the white base. -
Seal the pieces:
Apply a coat of clear matte varnish to both pieces. This protects the splatter paint and seals the clay against moisture. -
Mark placement:
Decide where the arch will sit on the base—usually centered is best for balance. Mark the spot lightly with a pencil. -
Glue components:
Apply a strong adhesive like E6000 to the bottom edge of the terracotta arch. Press it firmly onto the marked spot on the base. -
Support while curing:
Prop the arch up with small heavy objects (like spice jars) on either side to keep it perfectly vertical while the glue cures completely, usually overnight.
Wobbly Arch?
If the arch bottom isn’t perfectly flat, sand it gently in a figure-8 motion on sandpaper before gluing. A flat mating surface is key for a strong bond.
Make it Modular
Skip the glue! Instead, cut a rectangular slot in the center of the white base while wet. Once dry, you can slot the arch in and out for easy packing.
Now you have a stylish, boutique-worthy display ready to showcase your favorite earrings
Easy Clay Charms for Necklaces and Keychains
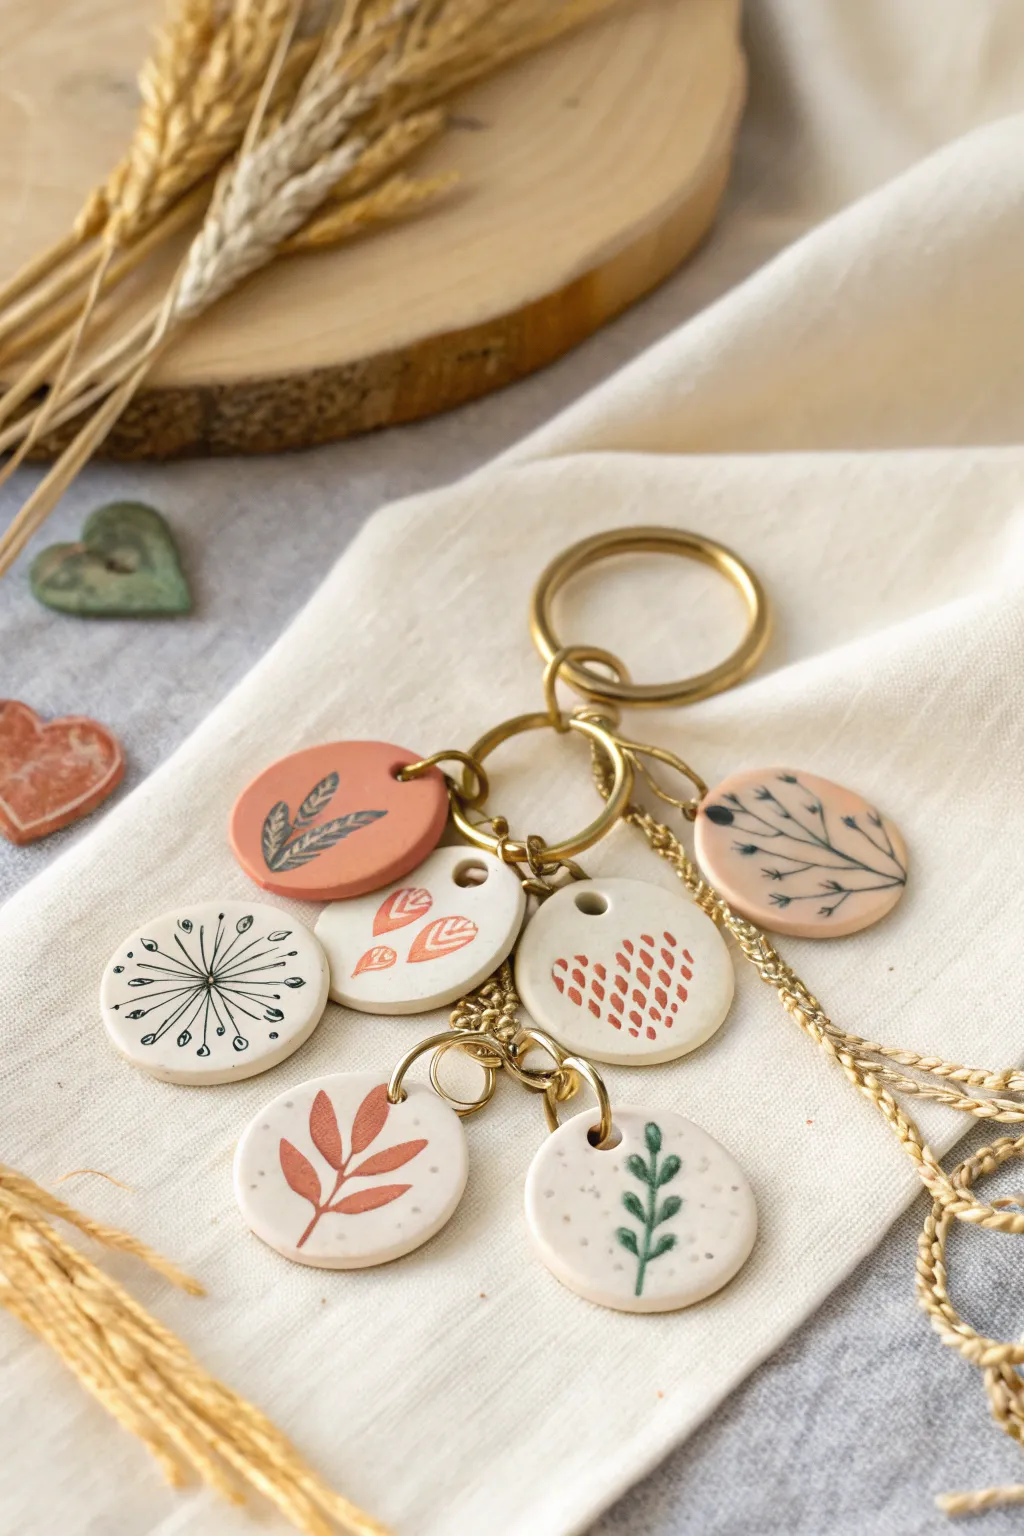
Create a rustic and charming keychain accessory using simple clay discs adorned with hand-painted botanical motifs. These earthy, warm-toned charms feature delicate leaves, hearts, and sunbursts that add a personalized touch to your daily essentials.
Step-by-Step
Materials
- Polymer clay (white and terracotta/orange)
- Small round cutter (approx. 1 inch)
- Rolling pin or clay machine
- Baking paper and baking sheet
- Acrylic paints (black, sage green, burnt orange, white)
- Fine detail paintbrush (size 00 or 000)
- Toothpick or small coffee straw
- Gold keychain ring
- Gold jump rings (6-7 pieces)
- Pliers (flat nose)
- Gloss or matte varnish (optional)
Step 1: Shaping the Clay Bases
-
Condition the clay:
Begin by kneading your polymer clay until it is soft and pliable. You’ll want primarily white clay, but mix a small amount of terracotta color for that warm, earthy disc seen in the cluster. -
Roll it out:
Roll the clay out on a smooth surface to an even thickness of about 3-4mm. If you don’t have a rolling pin, a smooth glass jar works well in a pinch. -
Cut the shapes:
Using your small round cutter, punch out 6 or 7 circles. Lift them carefully to avoid distorting the circle shape. -
Smooth the edges:
Dip your finger in a little water (or cornstarch for polymer clay) and gently run it around the cut edges of each disc to soften any sharp ridges left by the cutter. -
Create hanging holes:
Before baking, use a toothpick or a small coffee straw to punch a hole near the top edge of each circle. Ensure the hole is large enough for your jump rings to fit through later, and wiggle the tool slightly to ensure a clean opening. -
Bake the pieces:
Place your charms on a parchment-lined baking sheet. Bake according to your specific clay package instructions—typically around 275°F (130°C) for 15-30 minutes. Let them cool completely before handling.
Smooth Surfaces
Before baking, lightly wipe your unbaked clay with a baby wipe or a q-tip dipped in rubbing alcohol. This removes fingerprints and dust for a professional finish.
Step 2: Painting the Designs
-
Prepare the palette:
Squeeze out tiny amounts of your acrylic paints. You’ll need a sage green for stems, a burnt orange for leaves and hearts, and black for fine line work. -
The Leafy Sprig:
On a white disc, use the sage green to paint a central vertical line. Add small, paired leaves branching off the stem. Keep the strokes short and slightly teardrop-shaped. -
The Dotted Heart:
For the heart charm, don’t outline the shape. Instead, use burnt orange paint to create small dashes or ‘v’ shapes that cluster together to form the suggestion of a heart. -
The Sunburst:
Using black paint and your finest brush, draw a small center dot. Radiate thin lines outward like spokes on a wheel. Add tiny dots or leaf shapes at the end of some lines for an organic sunburst feel. -
Contrasting Designs:
On the terracotta-colored disc, use black or dark grey paint to create contrast. Simple fern-like leaves work beautifully against the darker background. -
Speckled Texture:
To mimic the ceramic look in the photo, dip an old toothbrush or stiff brush into diluted grey or brown paint. Flick the bristles to spatter tiny speckles across the white charms. I find this really ties the rustic look together. -
Seal the work:
Once the paint is fully dry, apply a thin coat of matte or satin varnish to protect your designs from scratches.
Step 3: Assembly
-
Open the jump rings:
Using two pairs of pliers (or pliers and your thumb), twist the jump rings open sideways—never pull them apart outward, as this weakens the metal. -
Attach the charms:
Loop an open jump ring through the hole in a clay charm. -
Connect to the keychain:
While the jump ring is still open, hook it onto the main gold keychain ring or a secondary smaller ring attached to it. -
Secure the closure:
Twist the jump ring back into a closed position, ensuring the ends meet perfectly flush so the charm doesn’t slip off. -
Cluster arrangement:
Repeat for all charms. Varying the length of the jump rings or linking two rings together can help the charms cascade nicely rather than bunching up.
Add Some Texture
Before baking, use a piece of lace, a textured rolling pin, or even a crumpled ball of foil to press a subtle texture into the raw clay surface for more depth.
Now you have a jingle of personalized art to carry with you wherever you go
Minimal Photo Holder Clips for Your Desk or Shelf
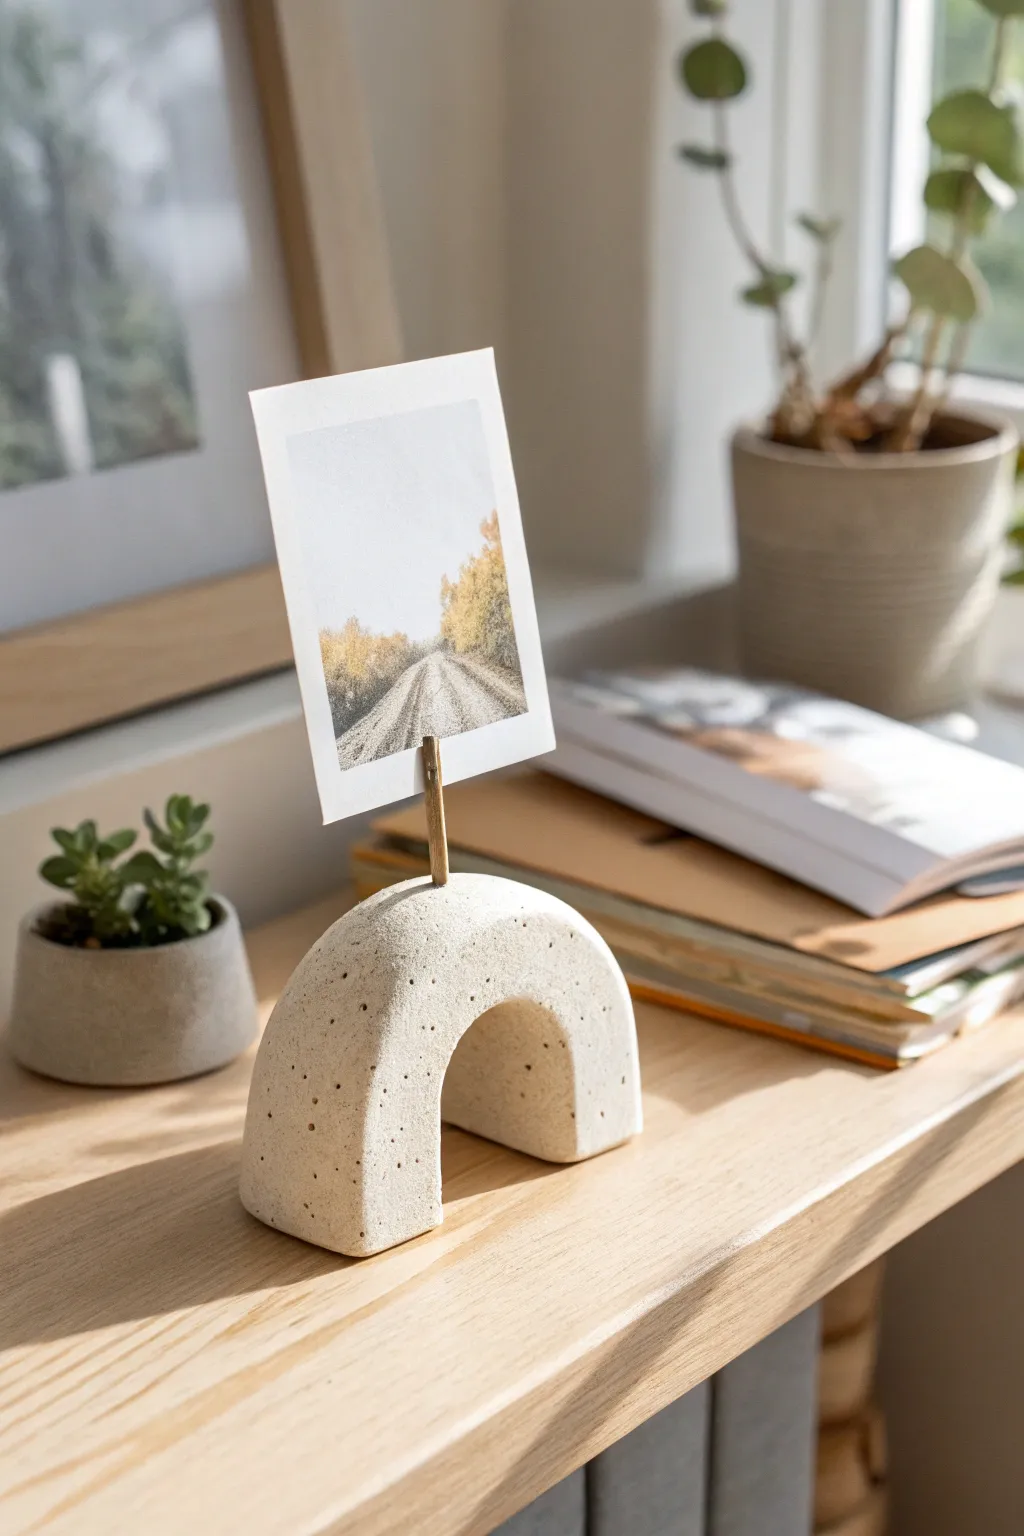
Embrace the beauty of modern simplicity with this minimalist photo holder, perfect for displaying your favorite polaroids or postcards. Its clean arched shape and natural speckled texture bring a calm, organic warmth to any workspace.
Step-by-Step Tutorial
Materials
- Air-dry clay (white or light beige)
- Speckle material (dried coffee grounds, black pepper, or black sand)
- Brass or gold-colored wire (16-18 gauge)
- Wire cutters
- Rolling pin
- Craft knife
- Small bowl or sandpaper block (to shape the arch)
- Clean sponge and water
- Fine-grit sandpaper
Step 1: Preparing the Speckled Clay
-
Mix texturizers:
Begin with a fist-sized ball of white air-dry clay. To achieve that stony, speckled look, knead in a small amount of your chosen speckle material. Dried coffee grounds work beautifully for a warm, earthy tone, while cracked pepper gives a sharper contrast. Start with a pinch and add more until you’re happy with the density. -
Condition the clay:
Knead the clay thoroughly for several minutes. This ensures the speckles are evenly distributed and warms up the clay, making it pliable and preventing cracks later on. -
Roll it out:
Using your rolling pin, flatten the clay into a thick slab. You want substantial thickness here for stability—aim for roughly 1 inch (2.5 cm) thick. It needs to be heavy enough to not tip over.
Step 2: Shaping the Arch
-
Cut the strip:
Use your craft knife to cut a long, clean rectangular strip from your slab. The width of the strip determines the depth of your arch (front to back), so keep it consistent, about 1.5 to 2 inches wide. -
Form the curve:
Gently pick up the clay strip and drape it over a cylindrical form to create the arch shape. A small jar, rolling pin, or even a toilet paper roll covered in parchment paper works well. If the clay is firm enough, you can simply bend it by hand into a ‘U’ shape and set it upright. -
Trim the base:
Once you have your arch shape, check that the ‘feet’ sit flush on the table. Use your craft knife to slice the bottom edges flat so the holder stands perfectly vertical without rocking. -
Smooth the surface:
Dip your finger or a sponge in a little water and gently run it over the clay. Smooth out any fingerprints, cracks, or sharp edges created by the knife. Pay special attention to the inner curve.
Clean Cuts Pro-Tip
When cutting thick clay slabs, wipe your craft knife with a bit of vegetable oil or lotion first. This helps the blade glide through without dragging or distorting the shape of your slab.
Step 3: Adding the Clip Mechanism
-
Cut the wire:
Cut a piece of brass wire approximately 3-4 inches long using your wire cutters. -
Create the coil:
To make the holder part, wrap one end of the wire tightly around a pencil or a thin paintbrush handle twice to create a double loop. This coil will pinch the photo to hold it in place. -
Insert the wire:
While the clay is still wet, carefully push the straight end of the wire into the absolute center of the top of the arch. Push it down at least an inch deep for stability. -
Secure the post:
Gently press the clay around the entry point of the wire to ensure it seals tight against the metal. This prevents the wire from becoming loose once the clay shrinks during drying.
Level Up: Terrazzo Style
Instead of coffee grounds, mix in colorful dried clay chips from previous projects. Knead lightly so the chips stay chunky, then sand heavily after drying to reveal a vibrant terrazzo pattern.
Step 4: Finishing Touches
-
Let it dry:
Place your creation in a cool, dry spot away from direct sunlight. Let it air dry completely. For a piece this thick, it may take 48 to 72 hours. I prefer to rotate it gently every 12 hours so all sides get airflow. -
Sand for smoothness:
Once fully dry and hard, take your fine-grit sandpaper and lightly sand the surface. This removes any final bumps and exposes your speckles a little more clearly. -
Dust off:
Wipe away the sanding dust with a slightly damp cloth or a dry paintbrush. -
Seal (Optional):
If you want to protect the finish, apply a coat of matte spray varnish. This keeps the natural look but prevents stains.
Slide your favorite memory into the wire coil and enjoy the artisanal touch this piece adds to your desk
Chunky Bookends With Color-Blocked Clay
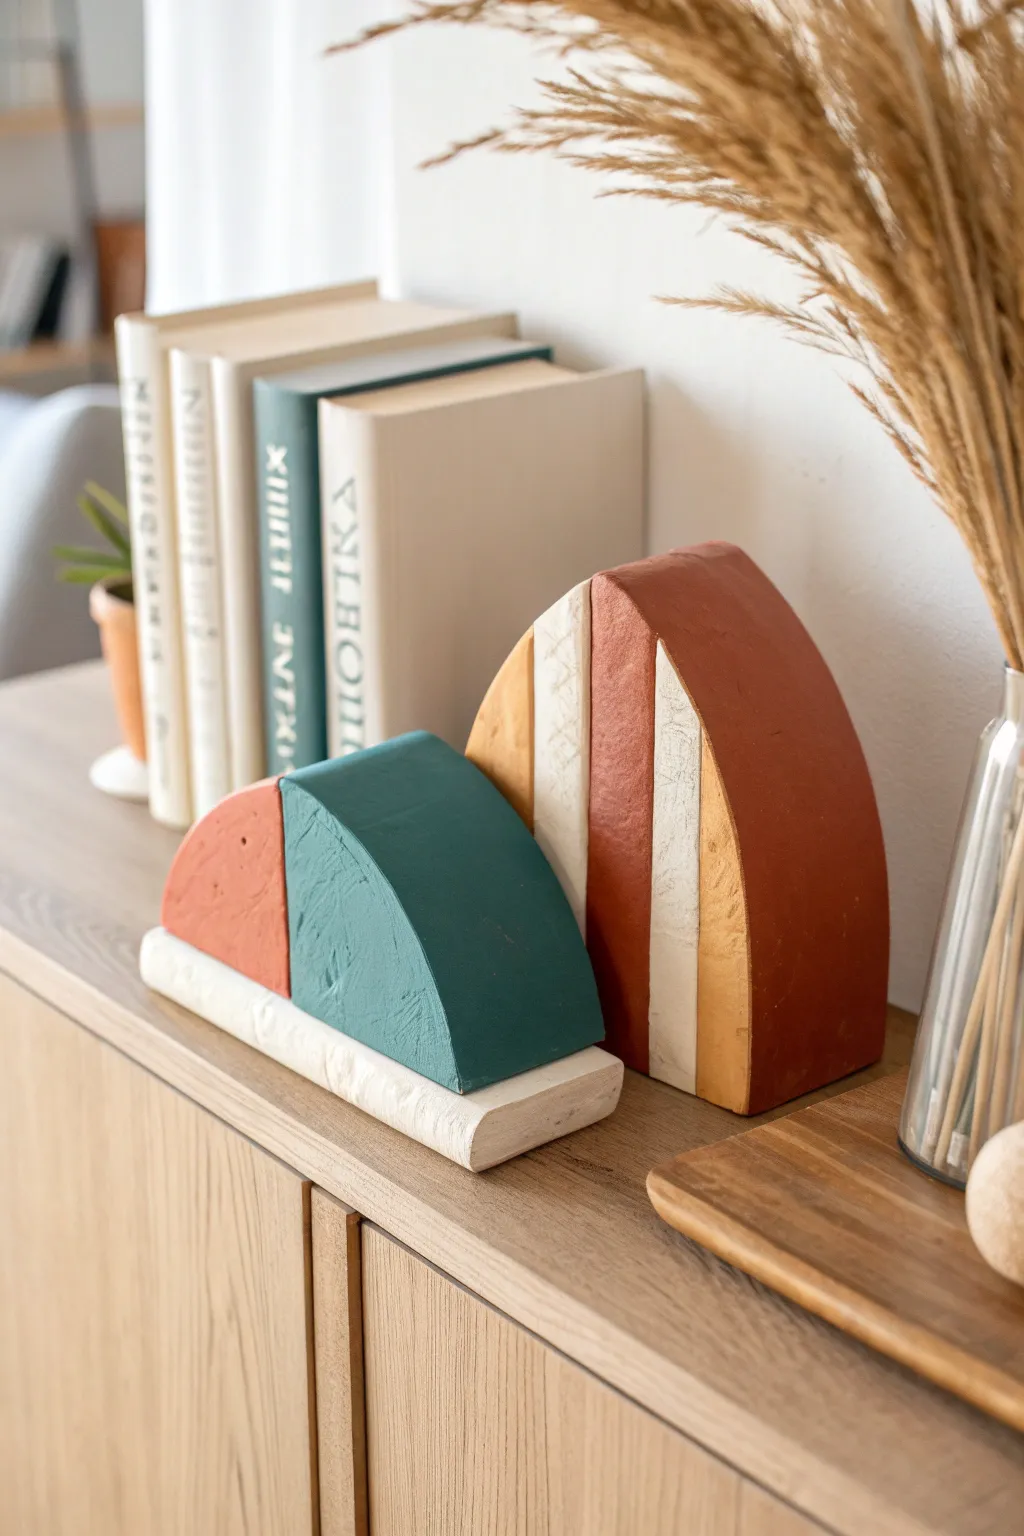
These chunky, architectural bookends bring a touch of warm, modern design to any shelf. By slicing and assembling thick slabs of clay into geometric arches, you’ll create functional decor that feels substantial and looks effortlessly chic.
Detailed Instructions
Materials
- Air-dry clay (white or terracotta)
- Acrylic paints (terracotta, teal, ochre, cream)
- Heavy rolling pin
- Two 1/2-inch thick wooden slats (for depth guides)
- Clay knife or retractable craft blade
- Ruler or straight edge
- Small bowl of water
- Fine-grit sandpaper (220 grit)
- Matte clear sealant or varnish
- Paintbrushes (flat and detail)
- Cardstock (for templates)
Step 1: Planning and Shaping the Base Slabs
-
Create your templates:
Sketch two arch shapes on cardstock. One should be taller and steeper (about 6-7 inches high), and the other shorter and wider (about 4 inches high). Cut these out to use as cutting guides. -
Condition the clay:
Begin by kneading a large block of air-dry clay. Work it until it’s smooth, pliable, and free of air bubbles, which helps prevent cracking later. -
Set up your workspace:
Place your two wooden slats on either side of your workspace. These will act as rails for your rolling pin to ensure every slab is a uniform, chunky thickness. -
Roll the main slabs:
Roll your clay out between the guides. You want a very thick slab—at least half an inch to an inch thick—to give the bookends the necessary weight and stability. -
Cut the primary shapes:
Place your cardstock templates onto the clay. Using a sharp clay knife, cut out one tall arch and one semi-circle shape. Slice straight down to keep the edges crisp.
Weight It Down
Bookends need heft! Embed heavy washers or fishing weights inside the wet clay base before drying to ensure they can hold up heavy hardcover books.
Step 2: Creating the Color-Blocked Segments
-
Slice the arches:
Decide on your geometric pattern. For the tall arch, cut it vertically into strips of varying widths. For the shorter semi-circle, you might make a vertical cut and a horizontal cut to create quadrants. -
Make the base platform:
Roll out a separate long rectangular slab, slightly wider than your bookends. Cut two rectangles that will serve as the heavy footing for each bookend. -
Smooth the edges:
Dip your finger in a little water and run it along every cut edge of your clay pieces. Smooth out any roughness or dragging marks from the knife. -
Initial drying phase:
Lay all the individual components flat on a wire rack or a piece of cardboard. Let them dry for about 24-48 hours. I find flipping them halfway through prevents warping.
Terrazzo Twist
Mix small chips of dried, colored clay into your wet white clay slab before rolling. When you sand the finished piece, a cool colorful terrazzo pattern will appear.
Step 3: Assembly and Finishing
-
Sand for perfection:
Once fully dry, lightly sand the sides and faces of each piece with fine-grit sandpaper to remove any fingerprints or texture irregularities. -
Paint the components:
Paint each segment individually before gluing. Use terracotta for the large arch, cream and ochre for the vertical stripes, and a deep teal for the semi-circle section. Apply 2-3 coats for opaque coverage. -
Paint the bases:
Paint the rectangular base pieces a neutral cream or off-white to contrast with the colorful arches. -
Reassemble the arches:
Arrange the painted arch segments back into their original shapes. Use a strong craft glue or epoxy to bond the vertical strips of the tall arch together. -
Construct the short bookend:
Glue the segments of the shorter semi-circle bookend together, ensuring the front face is flush. -
Attach to bases:
Glue the assembled tall arch and the short semi-circle onto their respective rectangular bases. Press firmly and wipe away any excess glue immediately. -
Seal the work:
Finish by applying a coat of matte clear varnish. This protects the paint from chipping and gives the clay a professional, finished look.
Now you have a set of custom, architectural bookends ready to organize your favorite reads.
Hanging Clay Suncatcher With Cutout Shapes
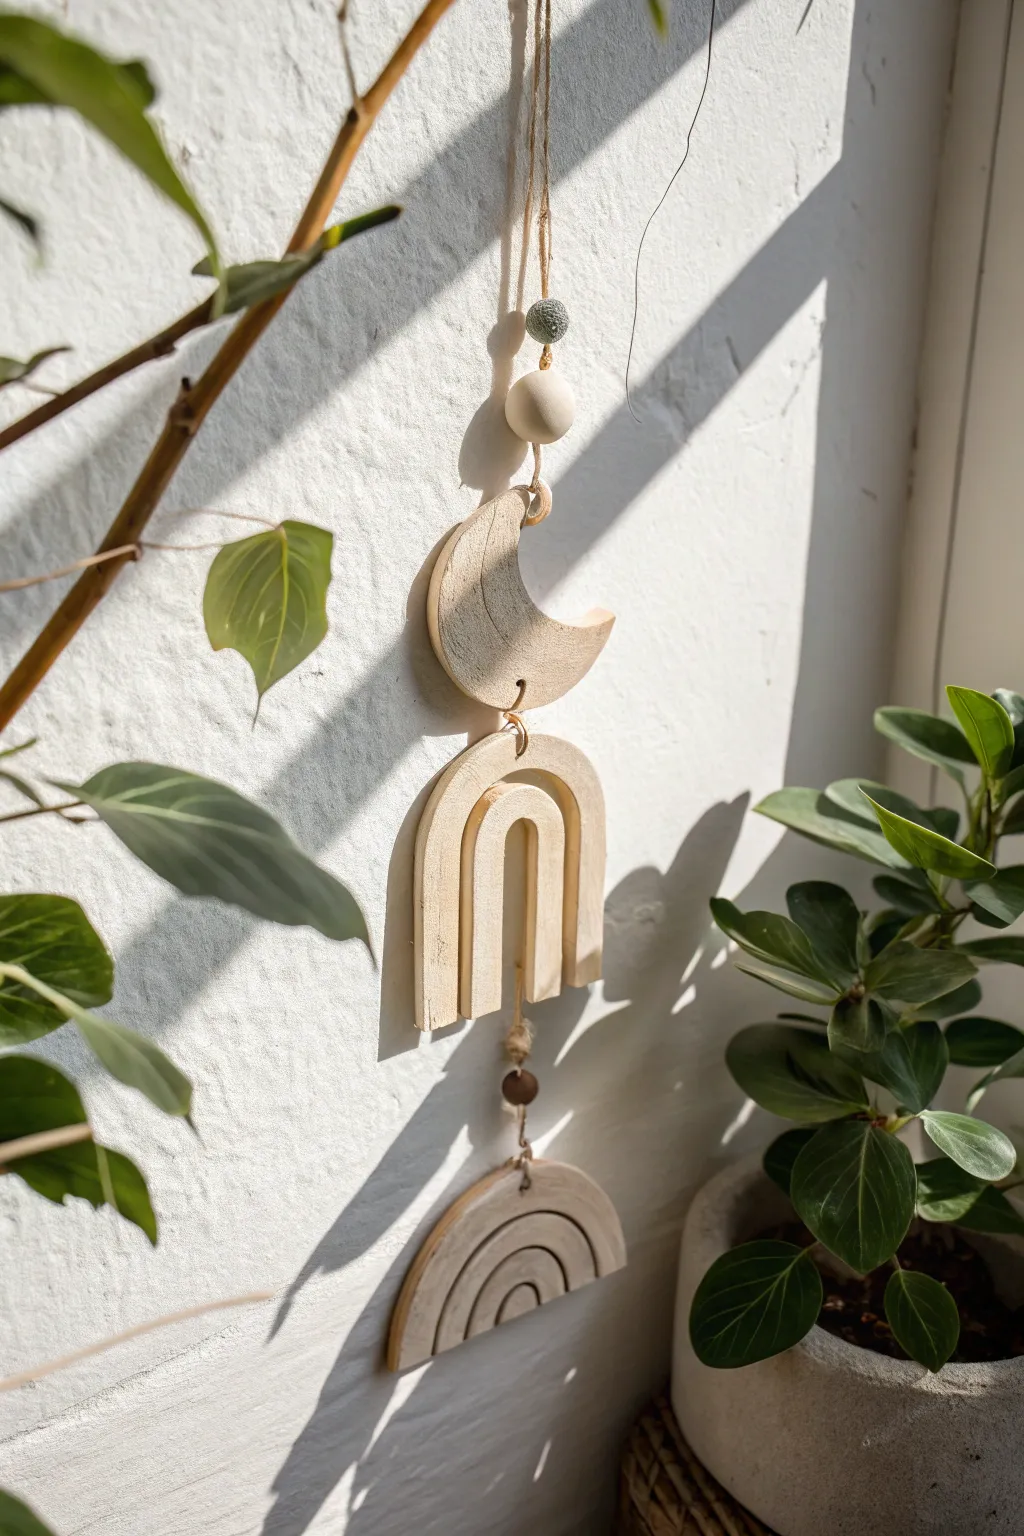
Capture the magic of celestial shapes with this earthy, minimalist clay wall hanging. Featuring a crescent moon, a structural arch, and a rainbow motif, this piece brings a calm, natural aesthetic to any sunlit corner of your home.
Step-by-Step
Materials
- Air-dry clay (white or natural stone color)
- Rolling pin
- Clay knife or X-Acto blade
- Parchment paper or canvas mat
- Jute twine or hemp cord
- Wooden beads (varying sizes)
- Textured bead (optional, for top accent)
- Sandpaper (fine grit)
- Needle tool, toothpick, or skewer
- Water and sponge for smoothing
- Ruler
Step 1: Preparation & Cutting
-
Roll the slab:
Begin by conditioning a chunk of air-dry clay in your hands until it’s pliable. Roll out a consistent slab on your parchment paper, aiming for a thickness of about 1/4 inch. If the clay is too thin, the hanging pieces may be fragile. -
Cut the crescent moon:
Use a needle tool to lightly sketch a crescent moon shape onto the clay. Once satisfied with the curve, cut it out cleanly using your clay knife. Smooth the edges with a damp finger to remove any sharp angles. -
Create the middle arch:
For the center piece, cut a classic U-shape arch. To create the negative space, cut a smaller, identical U-shape out of the center, leaving a border of about 1/2 inch width. This open structure gives the mobile a light, airy feel. -
Form the bottom rainbow:
Cut a semi-circle shape for the bottom tier. Using your needle tool, gently carve two or three concentric arch lines into the surface of the clay. Press deeply enough to see the lines but be careful not to slice all the way through. -
Make the attachment holes:
This is crucial: while the clay is wet, punch holes for the twine. The moon needs one hole at the top (for hanging) and one at the bottom tip. The middle arch needs a hole at the top center and bottom center. The bottom rainbow needs one hole at the top center.
Smooth Moves
Use a slightly damp sponge to wipe the surface of the clay right after cutting. This seals the clay pores and creates a surface that looks like tumbled stone when dry.
Step 2: Refining & Assembly
-
Dry completely:
Lay your pieces flat on a clean surface to dry. I find that flipping them over carefully after about 12 hours helps them dry evenly without warping. Allow 24-48 hours total drying time depending on humidity. -
Sand for perfection:
Once fully dry, take your fine-grit sandpaper and gently gently buff the edges. You want to remove any roughness from the cutting process, giving the shapes a professional, smooth finish. -
Prepare the top loop:
Cut a long length of jute twine. Fold it in half to create a loop at the top for hanging, and tie a knot. Thread your specialty textured bead and a smooth wooden bead onto the double strand. -
Attach the moon:
Tie the twine through the top hole of the crescent moon. Ensure the knot is secure on the back or hidden inside the hole if large enough. -
Connect the middle section:
Cut a fresh piece of twine (about 6 inches). Tie it to the bottom of the moon, thread a small wooden bead or knot it for visual interest, and tie the other end to the top of the open arch piece. -
Add the final tier:
Cut another short piece of twine. Secure it to the bottom of the open arch. Thread a dark brown or contrasting wooden bead onto the string before tying the final end to the top of the carved rainbow piece. -
Secure knots:
For extra security, you can place a tiny dab of clear craft glue on the knots at the back of the clay pieces to prevent them from slipping over time. -
Final adjustment:
Hold the mobile up by the top loop to check the balance. If one piece tilts, adjust the knots slightly or verify that the holes were centered. Hang in a sunny spot and enjoy the shadows it casts.
Add a Scent
Before the clay dries, add a few drops of essential oil to the wooden beads. Your wall hanging will act as a passive diffuser, releasing a subtle aroma as it sways.
You now have a serene, handcrafted accent piece that brings a touch of earthly calm to your space