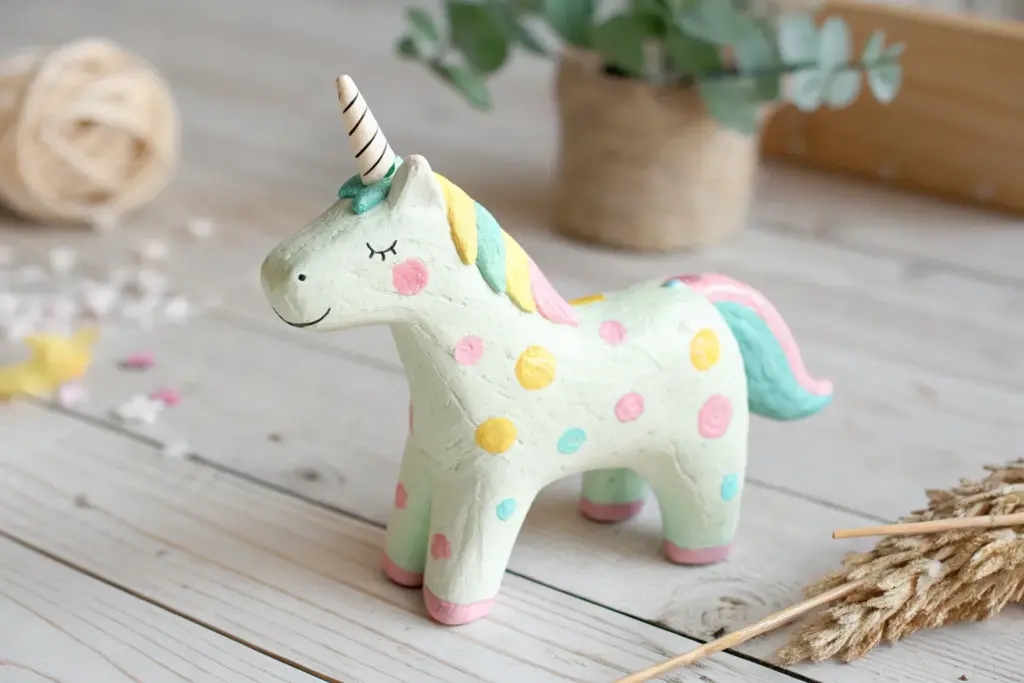
Kids + clay is one of my favorite combos because it’s playful, forgiving, and instantly hands-on. These clay project ideas for kids are all about simple shapes, bright color, and that satisfying “I made this!” moment.
Pinch Pot Critter Bowls
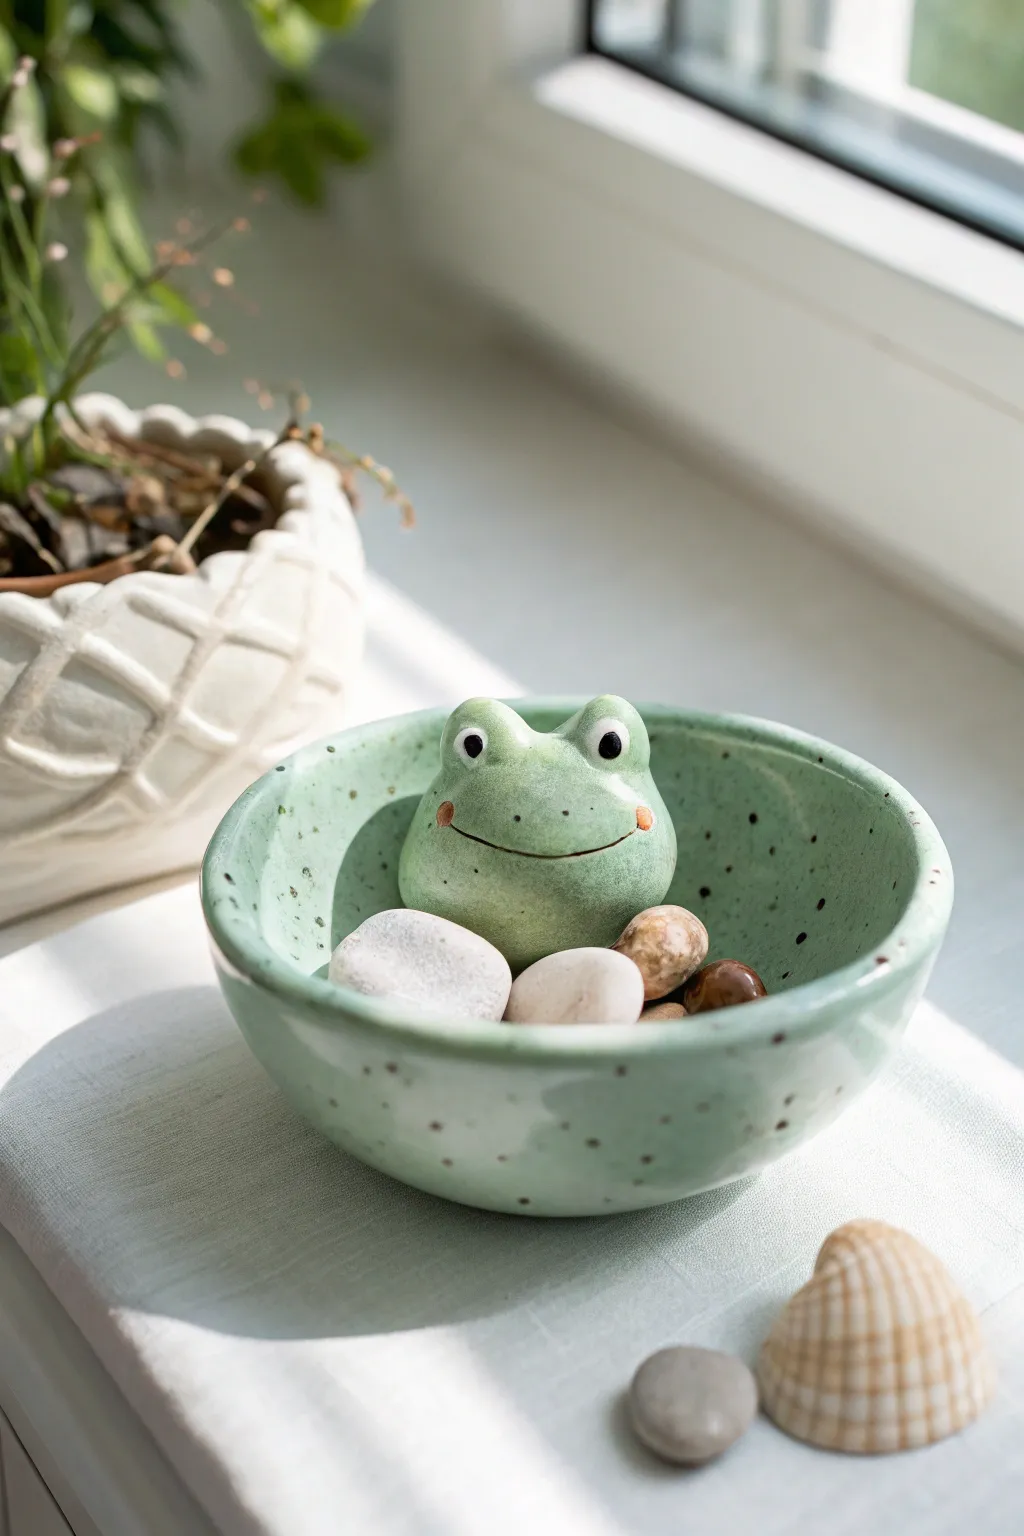
This adorable light green bowl features a friendly frog who seems to be peeking right out at you from the rim. Perfect for holding small treasures like sea glass or stones, this speckled ceramic dish is a charming introduction to creating animal-themed pinch pots.
Step-by-Step Guide
Materials
- Light-colored stoneware or earthenware clay
- Pottery tools (needle tool, rib, sponge)
- Slip (clay mixed with water)
- Underglaze (light green, black, pink/coral)
- Clear transparent glaze
- Paintbrushes (small detail brush, larger soft brush)
- Kiln for firing (or oven if using polymer clay alternative)
Step 1: Forming the Bowl Base
-
Preparing the clay:
Start with a ball of clay about the size of a large orange. Wedge it well to remove air bubbles, then pat it into a smooth sphere in your hands. -
Opening the pot:
Hold the clay sphere in one hand. Press your thumb into the center, stopping about a half-inch from the bottom. This creates the start of your bowl. -
Pinching the walls:
Gently pinch the clay between your thumb (inside) and fingers (outside). Rotate the ball as you pinch, working your way up from the bottom to thin out the walls evenly. -
Shaping the curve:
Aim for a wide, open bowl shape rather than a tall cup. Use a damp sponge to smooth the rim so it is rounded and not sharp. -
Smoothing the surface:
Use a flexible rib tool or your thumb to smooth the exterior and interior surfaces. You want the bowl to look organic but clean.
Eye Height Trick
Make the eye mounds slightly taller than you think they need to be. The glaze can pool around them, so extra height ensures they stay distinct and pop.
Step 2: Sculpting the Frog
-
Creating the body mound:
Form a small, semi-circle mound of clay separate from the bowl. This will be the frog’s head and body that sits inside. -
Attaching the frog:
Score the inside wall of the bowl where you want the frog to sit. Score the back and bottom of your frog mound. Apply slip to both areas and press the frog firmly into the curve of the bowl so it looks like he is emerging from the side. -
Blending the seams:
Use a modeling tool or your finger to blend the clay of the frog’s body into the bowl wall so they become one solid piece. I like to smooth this transition carefully to prevent cracking later. -
Adding eyes:
Roll two tiny spheres of clay for the eyes. Score and slip the top of the frog’s head, then attach the spheres. Gently press down so they adhere well but stay raised. -
Drying slowly:
Cover the pot loosely with plastic and let it dry slowly to the leather-hard stage, then fully dry to bone dry before the first firing (bisque fire).
Hidden Surprise
Instead of just painting specks, use a ‘speckled clay body’ from the start. The natural iron spots will show through the glaze for an authentic stone look.
Step 3: Painting and Glazing
-
Bisque firing:
Fire the bone-dry piece in the kiln to bisque temperature. -
Applying base color:
Once cooled, apply 2-3 coats of a light sage green underglaze to the entire bowl and the frog. Let each coat dry slightly before adding the next so the color is opaque. -
Adding speckles:
To get the speckled egg look, dilute a tiny bit of brown or dark green underglaze with water on a toothbrush. Run your thumb over the bristles to flick tiny specks across the entire surface. -
Painting the face details:
Using a very fine brush, paint two black dots for pupils inside the raised eye mounds. Paint a simple, thin curved line for the smile. -
Adding rosy cheeks:
Dab two small spots of pink or soft coral underglaze at the corners of the smile for rosy cheeks. This gives the frog a sweet expression. -
Clear glazing:
Dip the entire piece into a transparent clear glaze. This will make the green glossy and seal the clay so it can hold water. -
Final firing:
Fire the piece a final time (glaze fire) according to your clay and glaze specifications. Allow it to cool completely before handling.
Fill your new amphibian friend with smooth river stones or keep it empty to show off that smiling face


Rainbow Coil Snail Pots
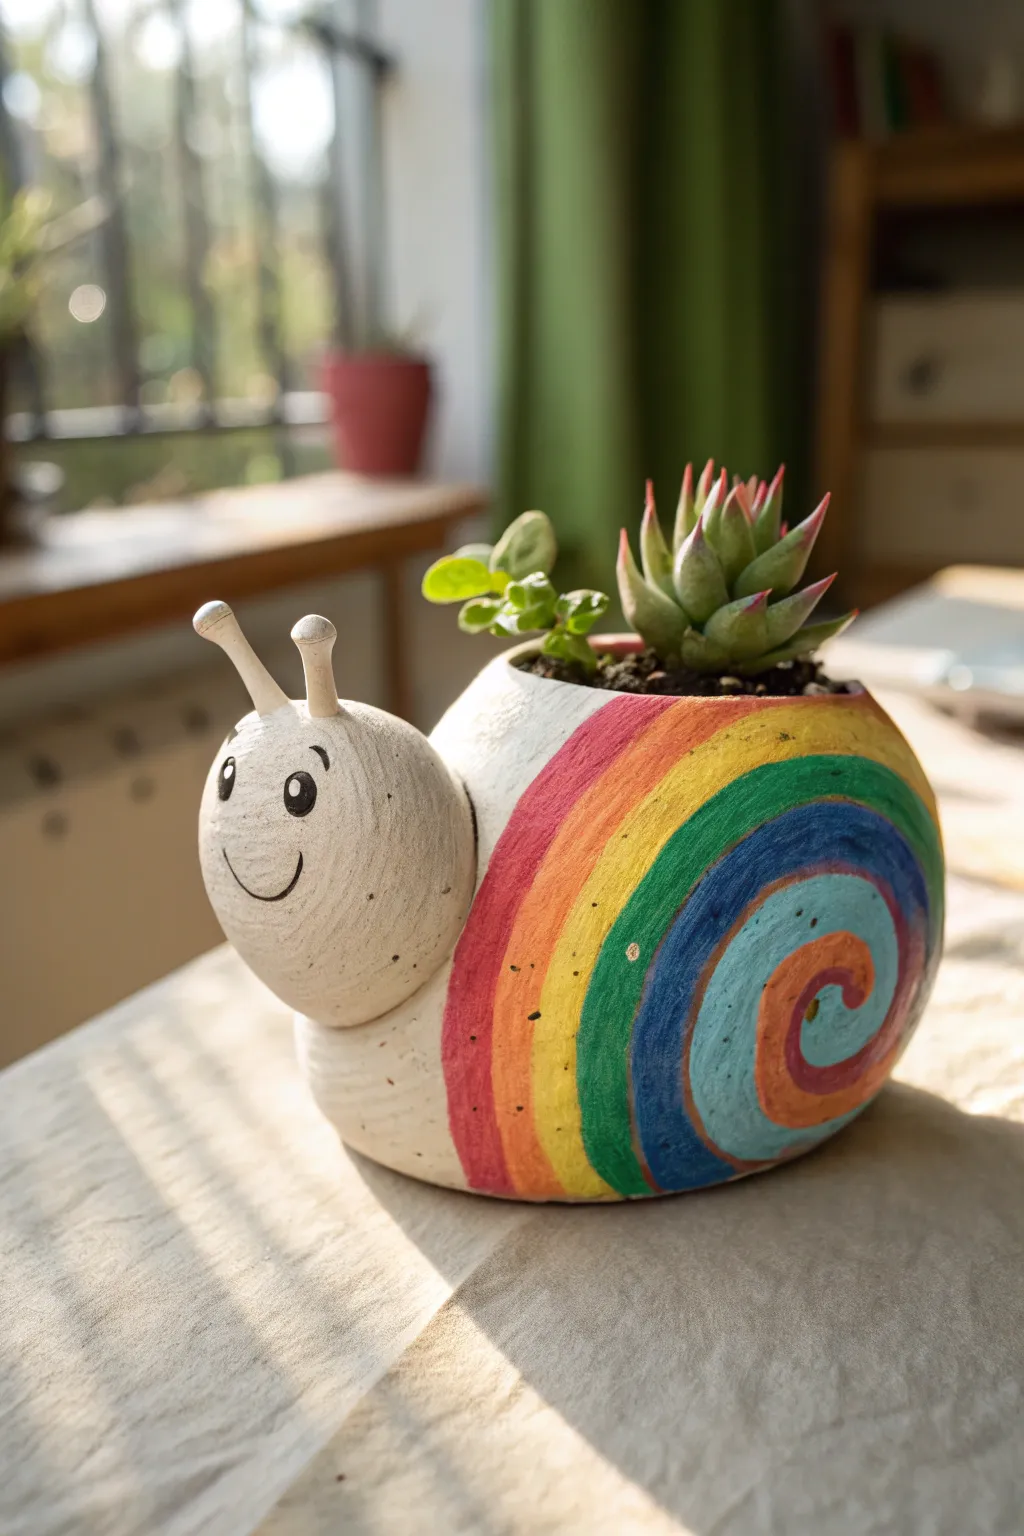
Brighten up any windowsill with this adorable, hand-painted snail planter made from air-dry clay. Its cheerful face and vibrant rainbow shell provide the perfect cozy home for small succulents.
Step-by-Step Tutorial
Materials
- White polymer clay or air-dry clay (approx. 500g)
- Small bowl or sphere for molding shape (optional)
- Clay sculpting tools (including a needle tool)
- Acrylic paints (Red, Orange, Yellow, Green, Blue, Light Blue)
- Black fine-point permanent marker or fine detail brush
- Paintbrushes (flat shader and small round)
- Clear waterproof sealant or varnish
- Water and sponge (for smoothing)
- Small succulent plants and potting soil
Step 1: Sculpting the Body
-
Form the shell base:
Start with a large ball of clay about the size of a grapefruit. Gently press your thumb into the center and pinch the sides to create a hollow pot shape. Aim for walls about 1/4 inch thick so it’s sturdy. -
Shape the opening:
Since this is the snail’s shell, slightly angle the opening towards the top-back rather than straight up. Smooth the rim with a little water on your finger to remove cracks. -
Roll the head:
Takes a second piece of clay and roll it into a sphere slightly smaller than a tennis ball. This will be the snail’s head. -
Attach the head:
Score (scratch) the back of the head and the front of the shell pot where they will meet. Add a dab of water or clay slip, then press them firmly together. Use a modeling tool to blend the clay at the seam so it is seamless and strong. -
Create the base:
Flatten the bottom of both the shell and the head slightly against your table. This ensures your planter won’t roll away once it’s finished. -
Make the antennae:
Roll two small, thin snake-like coils of clay. Flatten one end of each slightly to make a small cap shape. I usually insert a small piece of toothpick or wire inside these for extra support before attaching them. -
Attach antennae:
Score and slip the top of the head, then press your antennae into place. Smooth the connection points carefully. -
Dry the sculpture:
Let your snail dry completely according to your clay package instructions. For air-dry clay, this might take 24-48 hours. It needs to be bone dry before painting.
Step 2: Painting the Rainbow
-
Base coat:
Once dry, verify the surface is smooth. If you used colored clay, you can skip this, but for white clay, you might want to do a quick sanding if there are bumps. -
Draft the spiral:
Using a pencil very lightly, draw a large spiral shape on the side of the shell. Start from the center and spiral outward to creating lanes for your rainbow colors. -
Start with the center:
Begin painting the innermost part of the spiral. In our example, we start with an orange/red center swirl, then move outward. -
Paint the bands:
Work your way out, painting thick curved stripes following your pencil lines. The order here is light blue, dark blue, green, yellow, orange, and red. Let each color dry slightly before painting the neighbor to keep lines crisp. -
Add texture details:
The example has a slightly rustic, dry-brush look. Don’t worry about perfect solid coverage; letting some texture show through adds character. -
Paint the face:
Using your black marker or a very fine brush with black paint, draw oval eyes. Leave a tiny white dot in each pupil for a ‘sparkle’. Add a simple curved line for a happy smile. -
Waterproofing:
This step is critical if you are planting real plants. Coat the entire inside and outside with a waterproof varnish or sealant. Apply 2-3 coats, letting them dry in between. -
Planting:
Add a small amount of gravel at the bottom for drainage (since there is no drainage hole), top with soil, and tuck your succulents in.
Keep it clean
Use a damp sponge to constantly smooth your clay while working. Cracks formed now will only get bigger when the clay dries, so smooth them out early.
Level Up: Texture
Before the clay dries, gently press a textured sponge or fabric against the ‘skin’ parts of the snail (head and neck) to give it a realistic, bumpy texture.
Place your happy snail in a sunny spot and watch your garden grow


Clay Bead Bracelets and Necklaces
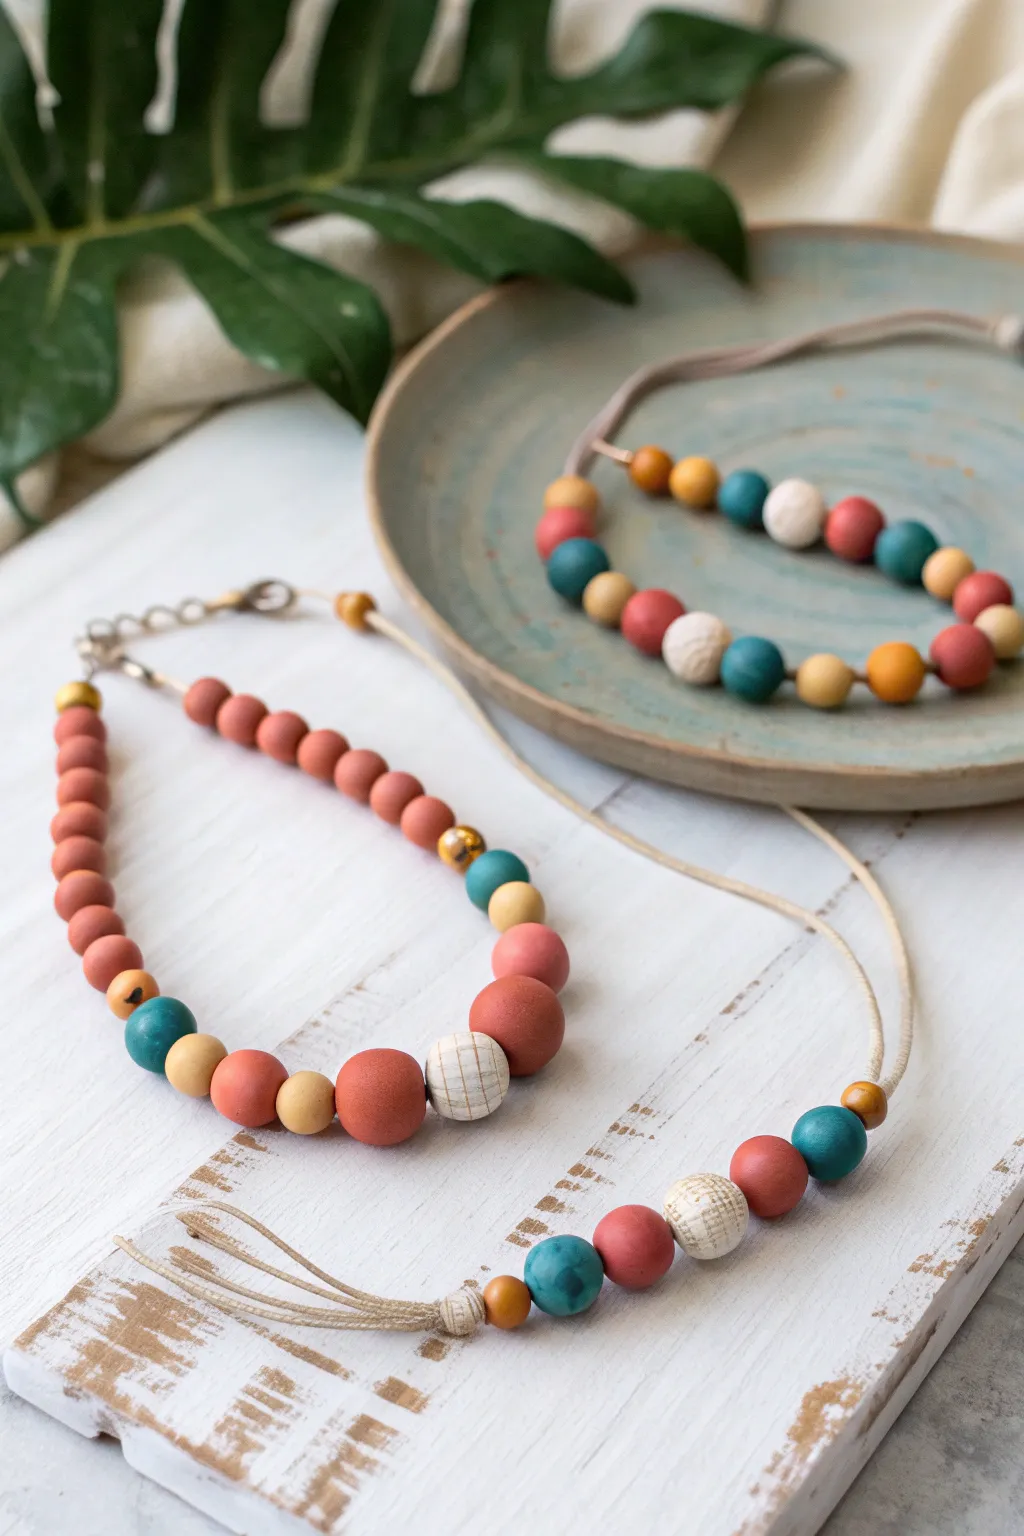
These stylish necklaces feature handcrafted polymer clay beads in warm earthy tones like terracotta, teal, and mustard. With a mix of smooth, textured, and gold-accented beads strung on natural cord, this project perfectly bridges the gap between kid-friendly crafting and trendy jewelry design.
How-To Guide
Materials
- Polymer clay in terracotta, deep teal, mustard yellow, and white
- Gold acrylic paint or metallic gold wax
- Gold spacer beads (optional)
- Small round paintbrush
- Toothpicks or a bead piercing tool
- Waxed cotton cord or thin leather cord (beige/natural)
- Jewelry findings: clasp and jump rings (for the short necklace)
- Texture tools (like a needle tool or textured fabric)
- Baking sheet and parchment paper
- Oven
Step 1: Prepping and Shaping Beads
-
Condition the clay:
Start by warming up your polymer clay in your hands. Knead each color separately until it is soft, pliable, and free of cracks. -
Roll spheres:
Pinch off small pieces of clay and roll them between your palms to create smooth spheres. Aim for variety in size; the largest focal beads should be about 3/4 inch wide, tapering down to smaller pea-sized beads for the ends. -
Create a color mix:
For a variegated look, try marbling a little white clay with the terracotta to create a lighter, softer coral tone for a few of the beads. -
Pierce the beads:
Gently insert a toothpick or bead piercing tool through the center of each sphere. Use a twisting motion to avoid squashing the bead’s round shape. If the hole closes up slightly, verify it’s open on both sides. -
Add texture:
Select a few of the white or cream beads to be your textured accents. Using a needle tool, lightly score a grid pattern or cross-hatching onto the surface while the clay is still raw.
Step 2: Baking and Painting
-
Bake carefully:
Arrange your beads on a baking sheet lined with parchment paper. Bake according to the manufacturer’s instructions on your specific package of clay—usually around 275°F (135°C) for 15-30 minutes. -
Cool down:
Let the beads cool completely on the tray before handling them. They harden fully as they cool. -
Texture staining:
For the white grid-textured beads, brush a tiny amount of brown paint into the grooves and immediately wipe the surface with a damp paper towel. This leaves the dark color in the cracks for an antique look. -
Gold accents:
I like to add a touch of glamour here by painting small, organic dots or blotches of gold acrylic paint onto a few of the mustard or teal beads. Let the paint dry completely.
Fingerprint Fix
If your raw clay beads have fingerprints, lightly brush them with a little baby oil or cornstarch before baking to smooth them out perfectly.
Step 3: Stringing and Assembly
-
Measure the cord:
Cut your leather or cotton cord. For the shorter necklace, measure about 18 inches. For the longer pendant style, cut about 30 inches. -
Design the layout:
Lay your finished beads out on a table to find a pleasing pattern. Start with the largest bead in the center and work symmetrically outward, mixing colors and sizes. -
String the beads:
Thread the cord through your beads. If you are using gold spacer beads, slip them in between the clay beads periodically to add shine and separation. -
Finish the short necklace:
For the shorter style, tie the cord ends to jump rings using a secure knot, add a dab of glue for security, and attach the metal clasp. -
Create the pendant style:
For the longer necklace shown, string the beads onto one end of the cord. Bring the two cord ends together to form a loop. -
The tassel knot:
Tie the two ends of the cord together right above the last bead to close the loop. Leave the excess cord dangling to act as a tassel. -
Wrap the tassel:
Take a separate, short piece of cord and wrap it tightly around the base of the joining knot to create a neat binding. Tuck the ends under the wrap and trim any excess length from the tassel fringe.
Geometric Twist
Instead of rolling perfect spheres, try using a craft knife to slice the sides of the clay balls, creating faceted, geometric gem shapes.
You now have a stunning set of custom accessories ready to wear or gift to a friend


Leaf and Flower Imprint Ornaments
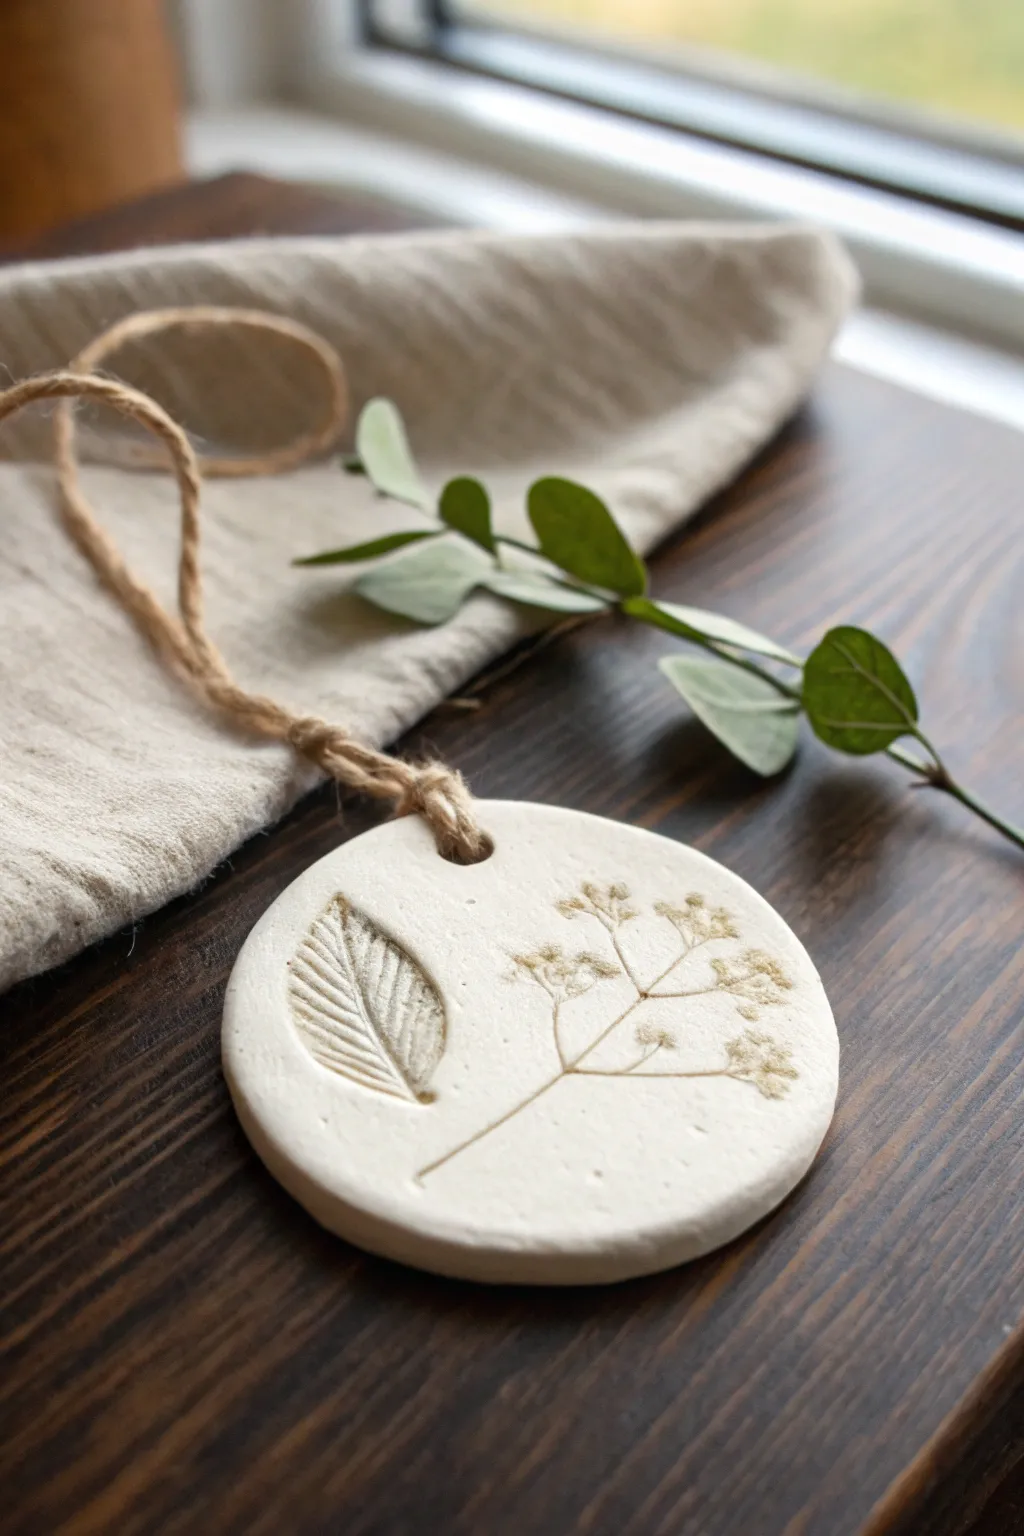
Capture the delicate details of your favorite garden finds with these simple, elegant clay keepsakes. The soft white finish highlights the textures of pressed leaves and flowers, creating a rustic decoration perfect for hanging.
Step-by-Step Guide
Materials
- Air-dry clay (white)
- Small rolling pin
- Round cookie cutter or drinking glass
- Fresh or dried botanical specimens (small leaves, baby’s breath, or wildflowers)
- Straw or skewer (for creating the hole)
- Jute twine or ribbon
- Wax paper or parchment map
- Fine-grit sandpaper (optional)
- Water
Step 1: Preparing the Clay Base
-
Work surface prep:
Lay down a sheet of wax paper or parchment paper to prevent sticking. This makes it much easier to move your ornament later without distorting its shape. -
Roll out the clay:
Take a handful of air-dry clay and knead it briefly until it is pliable. Use your rolling pin to flatten it into an even sheet, aiming for about 1/4 inch thickness. If it’s too thin, it might crack; too thick, and it takes too long to dry. -
Smooth the surface:
Dip your finger in a tiny bit of water and gently rub it over the surface of the clay to smooth out any wrinkles or fingerprints. -
Cut the shape:
Press your round cookie cutter or the rim of a glass firmly into the clay. Give it a little wiggle to ensure a clean cut, then lift the cutter away. -
Clean the edges:
Peel away the excess clay from around the circle. If the edges are rough, gently smooth them with a moist fingertip.
Pro Tip: Highlight Details
To make the veins pop, gently rub a tiny amount of brown acrylic paint or diluted coffee into the grooves, then wipe the surface clean with a damp cloth.
Step 2: Creating the Impressions
-
Select your botanicals:
Choose your leaves and flowers. For this look, I like to use one medium-sized, veined leaf and a delicate sprig of something like baby’s breath or seeding grass. -
Arrangement:
Place your chosen botanicals gently onto the clay circle to test the layout. Ensure they don’t overlap too much unless that is the specific look you want. -
Pressing:
Once you are happy with the placement, use the rolling pin to gently roll over the plants once. Apply firm, even pressure to push them into the clay without flattening the ornament too much. -
Check the depth:
If a stem feels like it didn’t sink in, use your finger to press it down gently. You want a distinct impression. -
Reveal the design:
Carefully find the edge of the leaf or stem. Use a needle tool or the tip of a knife to lift the edge, then peel the plant matter slowly out of the clay. This is the most satisfying part. -
Make the hanging hole:
Use a drinking straw to punch a hole near the top edge of the ornament. A straw creates a cleaner hole than a skewer, removing the little plug of clay neatly.
Step 3: Finishing Touches
-
Drying time:
Move the parchment paper with the ornament to a safe, dry place. Let it air dry for 24 to 48 hours. Flip it over halfway through so the bottom dries evenly. -
Sanding:
Once fully hard and white, use a piece of fine-grit sandpaper to lightly buff the edges or any rough spots on the surface. Be gentle around the delicate plant imprints. -
Sealing (optional):
Typically, you can leave the clay raw for a matte look. If you want protection, brush on a thin layer of matte varnish or diluted white glue. -
Adding the twine:
Cut a length of jute twine, about 8 inches long. -
Threading:
Fold the twine in half and push the folded loop through the hole from front to back. -
Securing the loop:
Pass the loose ends of the twine through the loop and pull tight to create a lark’s head knot at the top of the ornament.
Troubleshooting: Curling Clay
If the edges curl up while drying, gently weigh the ornament down with a heavy book once it is semi-dry (leather hard) but not yet brittle.
Hang your beautiful nature-inspired ornament in a window or use it as a special gift tag for someone you love

The Complete Guide to Pottery Troubleshooting
Uncover the most common ceramic mistakes—from cracking clay to failed glazes—and learn how to fix them fast.
Mini Animal Magnets
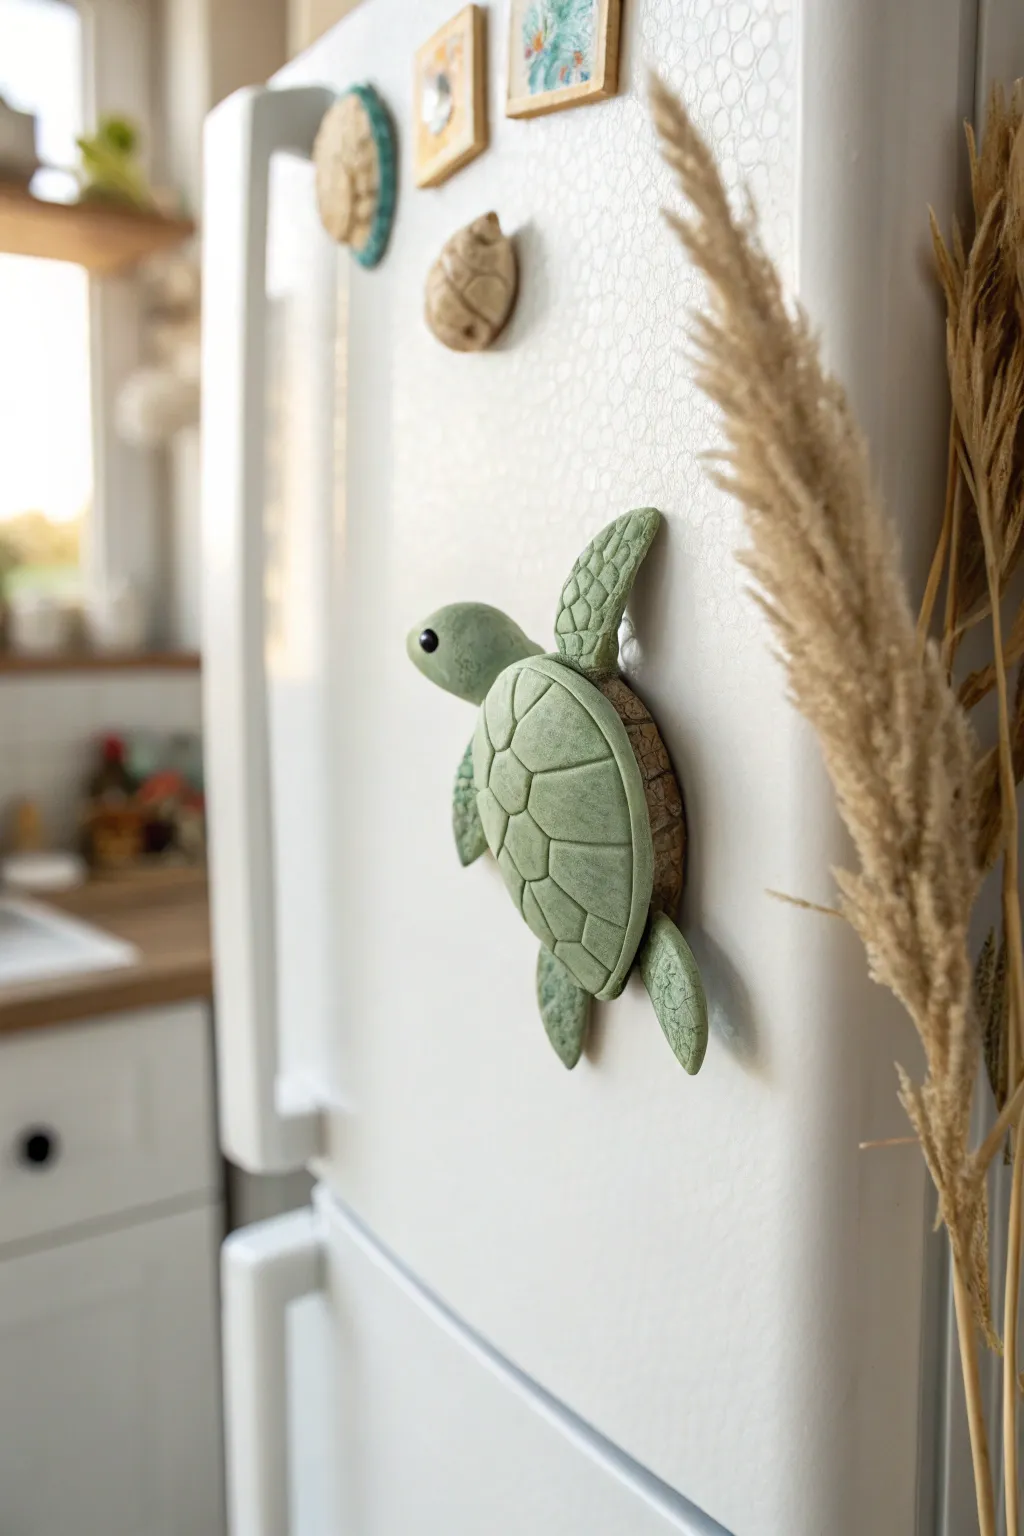
Bring the ocean into your kitchen with this serene, stone-textured sea turtle magnet. Using simple carving techniques and a gentle pastel green hue, you’ll create a durable little friend that looks like it was sculpted from sea glass or soft sandstone.
Step-by-Step Guide
Materials
- Polymer clay (pale sage green or white mixed with a touch of green)
- Small round magnet (neodymium is best)
- Clay sculpting tools (needle tool, small ball stylus)
- Texture sponge or coarse sandpaper
- Small black bead or black clay for the eye
- Strong craft glue (E6000 or similar)
- Gloss glaze (optional for a wet look)
Step 1: Sculpting the Body
-
Base Shape:
Start by conditioning your clay until it is soft and pliable. Roll a medium-sized ball of sage green clay, about the size of a walnut, to serve as the main body. Gently flatten it into a dome shape against your work surface. -
Adding Texture:
Before adding details, gently press a coarse sponge or a piece of crumpled aluminum foil over the entire surface of the dome. I like to do this early so the finish looks natural and uniform like worn stone. -
Create the Shell Rim:
Roll a thin snake of the same green clay. Wrap this coil around the bottom edge of your dome to create the distinct rim of the turtle’s shell, blending the underside smoothly with your finger or a smoothing tool. -
Marking the Scutes:
Using a needle tool or a dull knife, lightly sketch the pattern of the shell. Draw a central hexagon first, then surround it with slightly curved trapezoids extending toward the rim. Go over these lines a second time to deepen the grooves.
Loose Parts?
If a flipper falls off after baking, don’t worry. A tiny drop of superglue works wonders to reattach baked clay pieces invisibly.
Step 2: Adding Extremities
-
Forming the Fippers:
Roll four small tear-drop shapes for the flippers—two larger ones for the front and two smaller ones for the back. Flatten them slightly with your thumb. -
Texturing Flippers:
Use a small ball stylus or the tip of a toothpick to press an irregular, pebbled pattern onto the top surface of each flipper to mimic scales. -
Attaching Fins:
Press the wide end of each flipper underneath the shell rim. You may need to lift the shell slightly to slide them under. Press firmly to ensure a strong bond. -
Head Shape:
Roll a smooth, oval piece of clay for the head. It should be slightly smaller than the front flippers. Gently curve it upward so the turtle looks like it’s swimming. -
Attaching the Head:
Attach the head to the front of the shell, blending clay from the neck underneath the rim to secure it. -
The Eye:
Use a ball tool to make a small indentation on the side of the head. Press a tiny black bead or a speck of black clay into the socket for the eye.
Step 3: Finishing Up
-
Refining Texture:
Check your work for any fingerprints. If you find any, lightly tap over them with your texture sponge to blend them back into the stone-like finish. -
Baking:
Bake the clay according to the manufacturer’s instructions on the package. Usually, this is around 275°F (135°C) for 15-30 minutes depending on thickness. -
Cooling:
Allow the turtle to cool completely on the baking tray. The clay is fragile when hot and hardens as it cools. -
Adding the Magnet:
Once cool, flip the turtle over. Apply a dab of strong craft glue to the flat underside. -
Securing:
Press your round magnet into the glue and let it cure fully (usually 24 hours for maximum hold) before placing it on your fridge.
Stone Effect
Mix a tiny pinch of black pepper or craft sand into your green clay before sculpting. This creates a speckled, realistic granite look.
Now your little sea traveler is ready to hold up your most important notes and photos
Texture Stamp Tiles
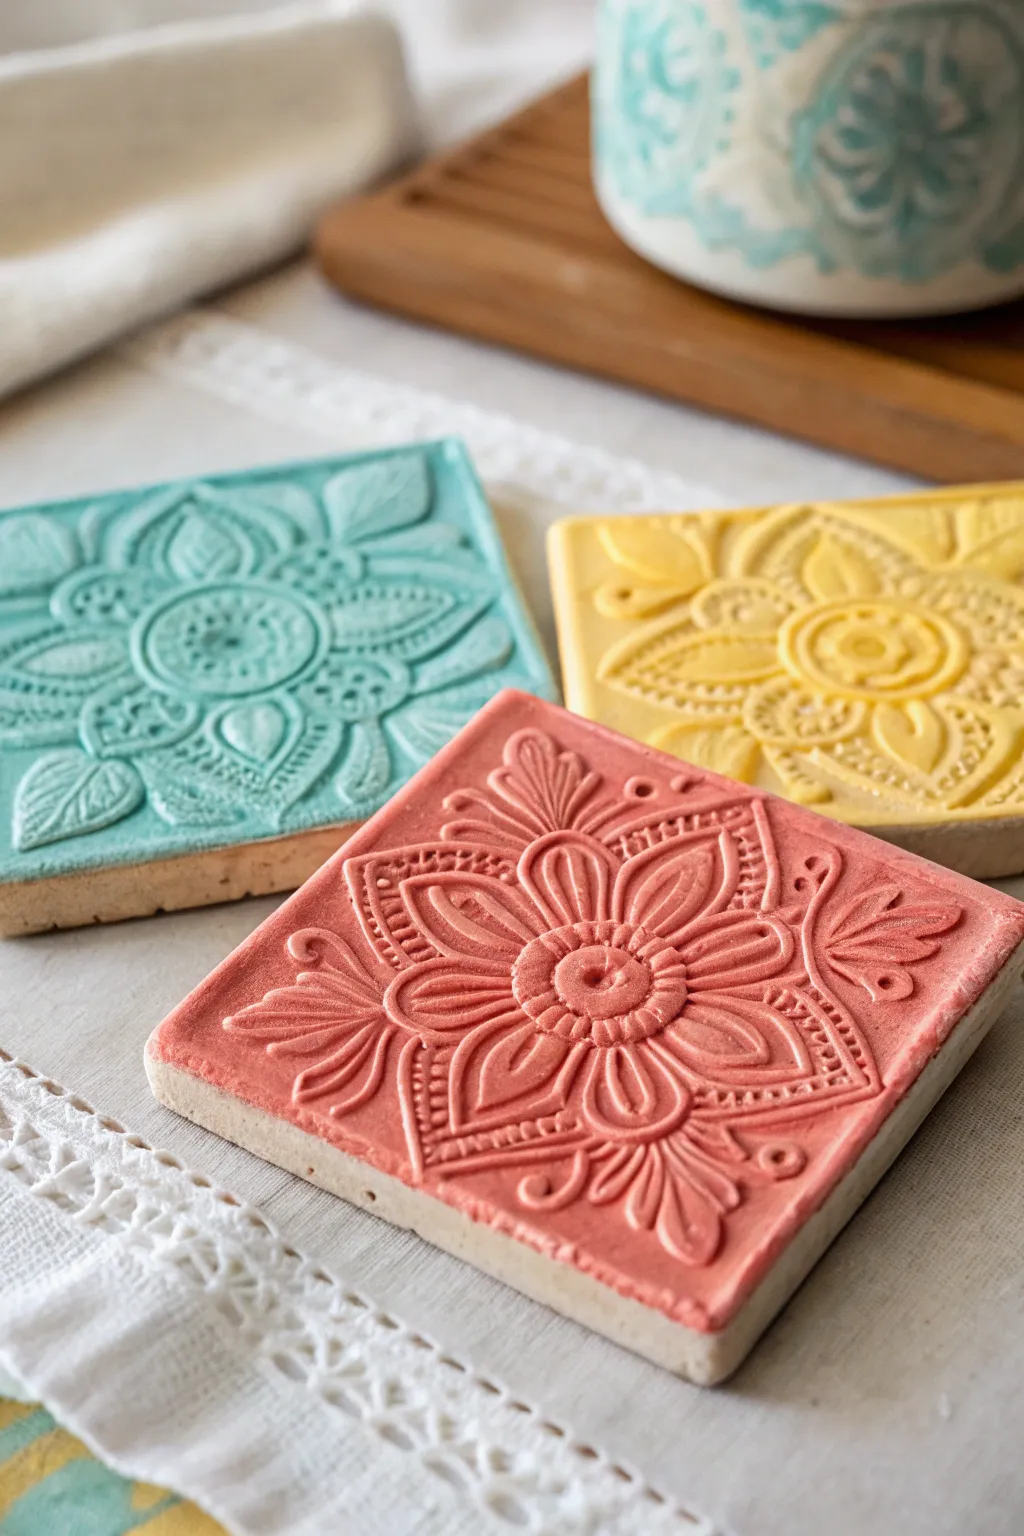
These beautifully detailed tiles introduce young artists to the magic of relief textures. By pressing intricate stamps into soft clay slabs, you can reveal stunning raised patterns that look lovely painted in soft pastels like teal, coral, and yellow.
Step-by-Step Tutorial
Materials
- Air-dry clay (white or light beige)
- Rolling pin
- Two wood guide strips (approx. 1/4 inch thick) or a slab roller
- Square cookie cutter (approx. 4×4 inches) or ruler and knife
- Large floral or mandala rubber stamps (deeply etched works best)
- Acrylic paints (teal, coral, yellow, white)
- Soft flat paintbrushes
- Fine-grit sandpaper
- Clear matte varnish (optional)
- Canvas mat or parchment paper
Step 1: Preparing the Clay Slab
-
Prepare your workspace:
Lay down a piece of canvas or parchment paper to prevent the clay from sticking to your table. If you are using air-dry clay, take a handful and knead it briefly to warm it up and remove any large air bubbles. -
Roll the slab:
Place your clay ball between the two wooden guide strips. Roll the clay out with your rolling pin until the pin rests on the strips; this ensures an even thickness perfectly suited for tiles. -
Smooth the surface:
Take a slightly damp sponge or your finger and gently smooth out any cracks or rough texture on the top of the clay slab. You want a pristine surface for stamping.
Clean Release
If your stamp is sticking to the clay, lightly dust the surface of the clay with cornstarch or baby powder before stamping. It acts as a release agent.
Step 2: Stamping and Cutting
-
Position the stamp:
Check your stamp to ensure it is clean. Position the mandala or floral rubber stamp directly over the center of the area you plan to cut. -
Press for texture:
Press the stamp firmly and evenly into the clay. Don’t push all the way through, but apply enough pressure to get a deep, crisp impression. Wiggle it ever so slightly—just a hair—to help release the suction before lifting it straight up. -
Cut the shape:
Place your square cookie cutter over the stamped design, framing it nicely so the pattern is centered or offset artistically. Press down firmly to cut the tile. -
Release the tile:
Remove the excess clay from around the cutter first, then gently lift the cutter away. If the clay sticks, push it out very gently from the back. -
Soften the edges:
Run a wet finger along the cut edges of the square to smooth out any sharp corners or burrs creating a more professional finish. -
Repeat the process:
Gather your scraps, re-roll the clay, and repeat steps to create a set of three or four tiles.
Step 3: Drying and Refining
-
Slow drying:
Place the tiles on a wire rack or a piece of cardboard covered with a paper towel. Let them dry slowly away from direct heat sources to prevent warping. This usually takes 24 to 48 hours depending on humidity. -
Flip occasionally:
I like to gently flip the tiles over halfway through the drying process so both sides expose to air evenly, keeping them perfectly flat. -
Sand imperfections:
Once fully dry and hard, use fine-grit sandpaper to lightly sand the edges or any rough spots on the surface. Wipe away the dust with a dry cloth.
Make Touches
Before drying, use a straw to poke a hole in the top corner of each tile. After painting, thread twine through for instant hanging wall ornaments.
Step 4: Adding Color
-
Mix pastel shades:
Mix a little white acrylic paint into your teal, coral, and yellow paints to soften the hues and obtain that chalky, matte finish seen in the example. -
The dry brush technique:
Load a flat brush with a small amount of paint and offload most of it onto a paper towel. The brush should be almost dry. -
Hightlight the relief:
Gently sweep the brush over the top surface of the tile. -
Build color gradually:
The goal is to catch the raised textured areas with color while leaving the deeper crevices and the sides of the tile the natural clay color. Apply multiple light coats until the color pops. -
Seal the work:
If these will be used as coasters, apply a coat of clear matte varnish to protect the paint from moisture.
Display your set of textured tiles together on a shelf or use them as unique handmade coasters for your next gathering


What Really Happens Inside the Kiln
Learn how time and temperature work together inside the kiln to transform clay into durable ceramic.
Painted Treasure Trinket Dishes
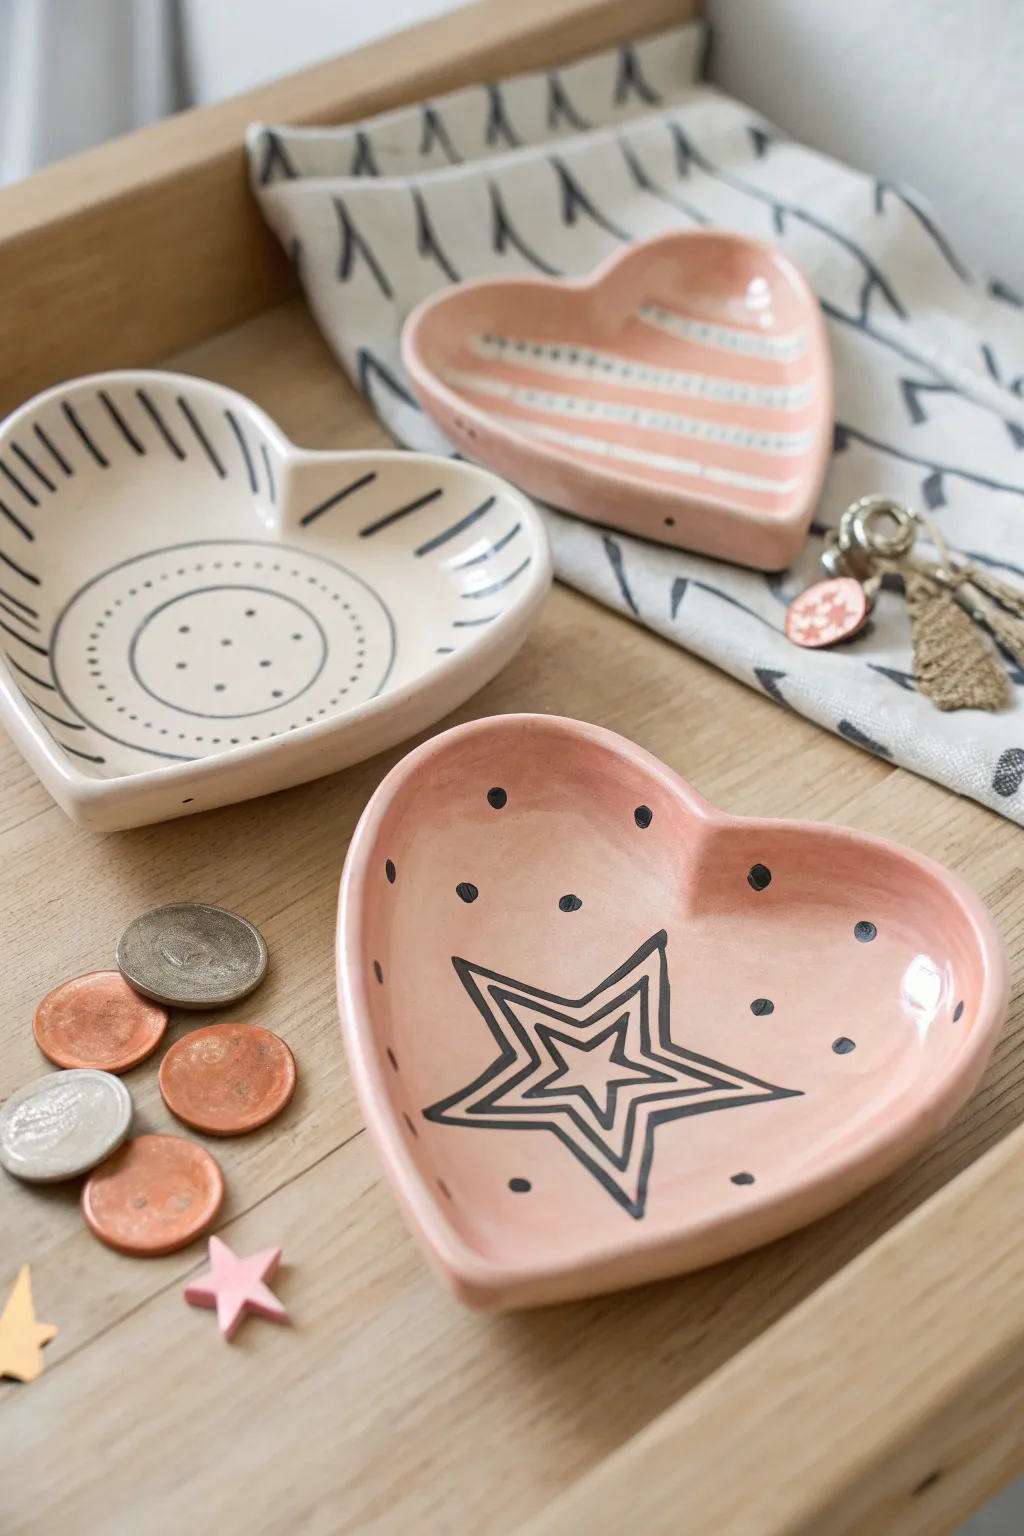
These darling little heart-shaped bowls are the perfect beginner ceramics project, offering a sweet spot to gather tiny treasures like coins or jewelry. With their soft pink and cream glazes mixed with simple geometric line work, they have a modern yet handmade charm that looks professional but is surprisingly easy to achieve.
How-To Guide
Materials
- Air-dry clay (white) or polymer clay
- Rolling pin
- Heart-shaped cookie cutter (large) or paper template
- Pottery sponge
- Small bowel of water
- Acrylic paints (pale pink, cream, black)
- Fine detail paintbrush (round size 0 or 1)
- Medium flat paintbrush
- Glossy varnish or sealant (Mod Podge or spray acrylic)
- Fine-grit sandpaper (optional)
- Wax paper or canvas mat
Step 1: Shaping the Clay
-
Condition the Clay:
Start by taking a handful of your air-dry or polymer clay and kneading it in your hands until it feels soft, warm, and pliable. This prevents cracks later on. -
Roll it Out:
Place the clay on a sheet of wax paper or a canvas mat. Use the rolling pin to flatten it into a smooth slab that is roughly 1/4 inch thick. Try to keep the thickness even across the whole piece. -
Cut the Shape:
Press your large heart-shaped cookie cutter firmly into the clay. If you don’t have a cutter, you can trace around a paper heart template with a plastic knife. -
Soften the Edges:
Dip your finger into a little water and gently run it along the cut edges of the heart to smooth out any roughness or loose bits of clay. -
Create the Dish Form:
Gently lift the clay heart and curve the edges upward to create a shallow bowl shape. You can use your thumbs to press the center down slightly while pinching the sides up. -
Refine the Rim:
Once curved, check the rim again. I like to use a damp sponge to glide over the top edge, ensuring it’s perfectly round and smooth to the touch. -
Let it Dry:
Set your dishes aside in a safe, dry place. Air-dry clay typically needs 24-48 hours to fully harden; flip them over halfway through so the bottom dries evenly.
Cracked Clay?
If small cracks appear as the clay dries, mix a tiny bit of fresh clay with water to make a paste (slip) and fill the crack. Smooth it over with a finger.
Step 2: Painting and Decorating
-
Sand for Smoothness:
Once completely dry, check for any rough spots. A quick pass with fine-grit sandpaper will make the surface feel like professional ceramic ware. -
Base Coat Application:
Using the medium flat brush, paint the entire inside and outside of the dish. For the ‘star’ and ‘stripe’ dishes, use a soft pale pink. For the other design, use a creamy off-white. Let this dry completely. -
Second Coat:
Apply a second layer of your base color to ensure opaque, solid coverage where no clay texture shows through. -
Design the Star Outline:
For the star dish, switch to your fine detail brush and black paint. Carefully paint a five-pointed star in the center of the pink heart. -
Add Star Details:
Paint a second, smaller star inside the first one, and a third smaller one inside that. This creates a cool, concentric graphic effect. -
Create the Polka Dots:
Dip the handle end of your paintbrush into the black paint. Dot it onto the clay around the star to create perfect, uniform circles without needing brush control. -
Draw the Stripes (Alternate Design):
For the striped dish, use the fine brush to paint horizontal black lines across the pink base. Don’t worry if they snake a little; the hand-painted look adds character to the piece. -
Paint the Rim Detail:
For the cream-colored dish, paint short black hash marks along the upper rim at messy, regular intervals. -
Final Sealing:
Once all paint is bone dry, apply a coat of glossy varnish or sealant. This gives the dishes that shiny, kiln-fired look and protects your paint from chipping.
Pro Tip: Drying Trick
To keep the curved shape while drying, rest the wet clay heart inside a small slightly larger bowl lined with plastic wrap so it doesn’t slump flat.
Now these charming little dishes are ready to safeguard your favorite coins and jewelry on your dresser
Fairy Garden Houses
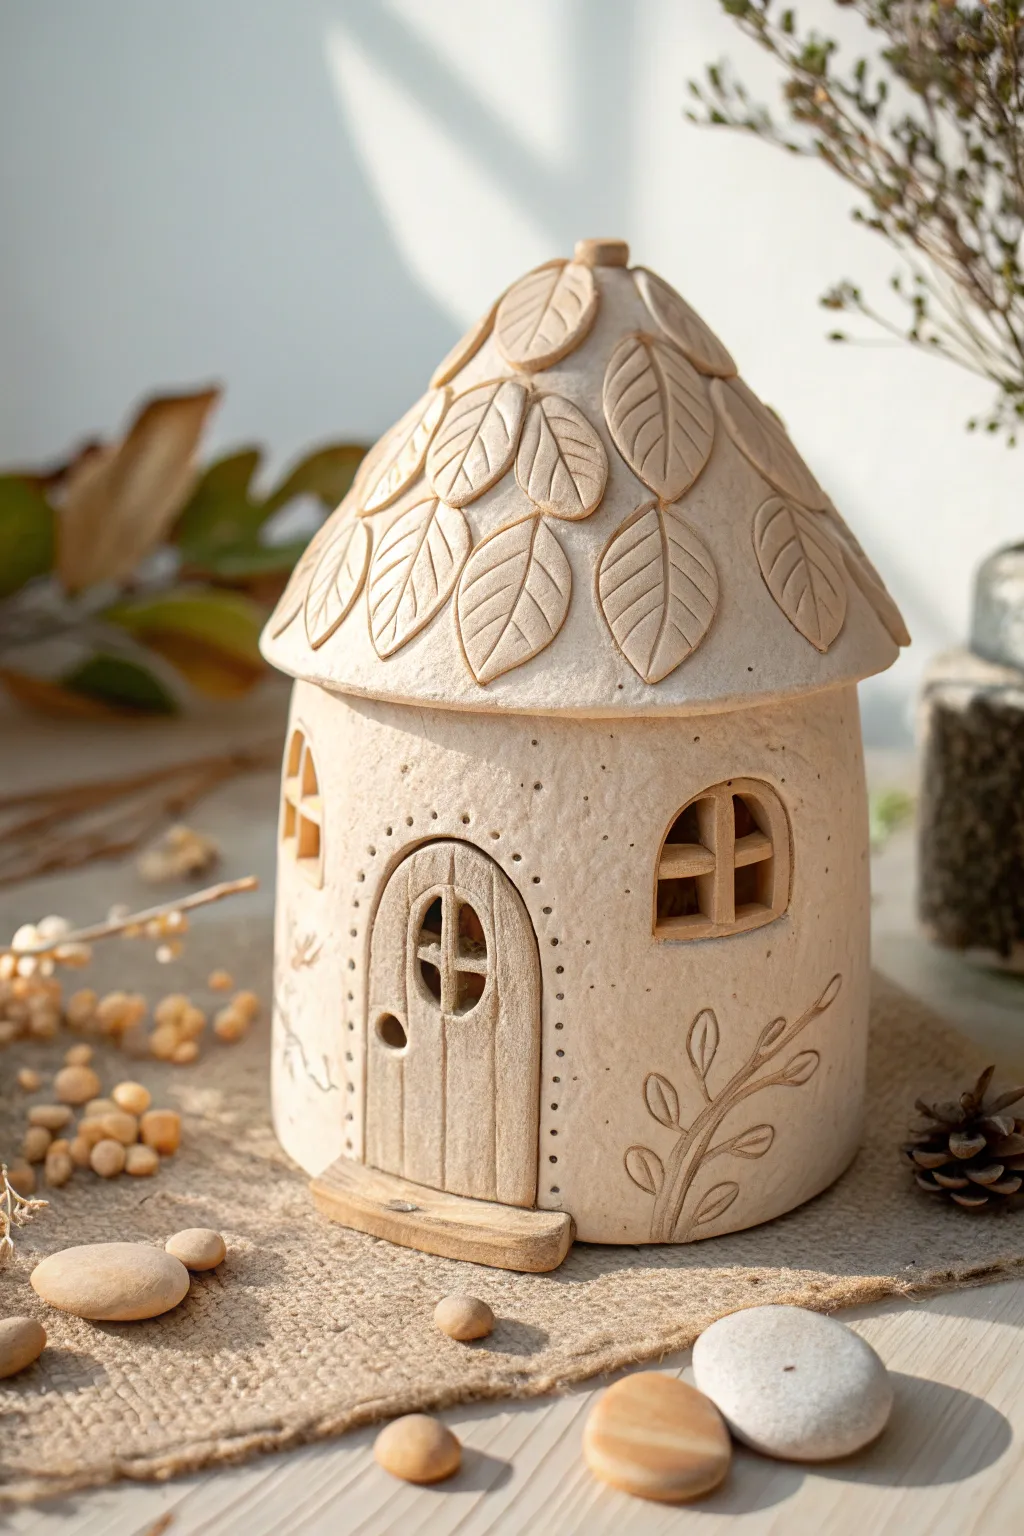
Create an enchanting abode for your garden fairies with this charming clay house, featuring a textured roof of overlapping leaves and rustic wood details. The natural, unpainted finish highlights the beauty of the clay’s texture and form.
Step-by-Step Guide
Materials
- Light-colored air-dry clay or polymer clay (cream/beige)
- Small rolling pin
- Clay knife or craft knife
- Needle tool or toothpick
- Small leaf cutter (teardrop shape) or scissors
- Texture tools (or a crumpled ball of foil)
- Small bowl or cup (for structural support)
- Water slip (for joining air-dry clay) or liquid clay (for polymer)
- Measuring spoon or small round cutter
Step 1: Forming the Base Structure
-
Roll the main slab:
Begin by rolling out a medium-sized slab of clay to about 1/4 inch thickness. This will become the walls of your cottage. -
Cut the wall rectangle:
Cut a clean rectangle from your slab. Measure the circumference of your support bowl or cup to ensure the clay will wrap around it comfortably with a slight overlap. -
Create the cylinder:
Wrap the rectangular slab around your support form to create a cylinder. Join the seam by scoring the edges, applying a little slip or water, and smoothing the clay together until the line disappears. -
Add surface texture:
Take a crumpled ball of aluminum foil or a stiff-bristled brush and gently tap it all over the walls. This gives the cottage that lovely, rustic stucco appearance seen in the photo. -
Cut the openings:
Use your knife to carefully cut out an arched doorway at the front and two arched windows on the sides. Save the clay piece from the door cutout; you will need it later.
Step 2: Crafting the Leaf Roof
-
Shape the roof cone:
Roll a cone shape from a ball of clay that fits atop your cylinder walls. Hollow it out slightly from underneath to reduce weight, or drape a slab over a cone-shaped form. -
Prepare the leaves:
Roll out a thinner slab of clay. Use a tear-drop cutter or your knife to cut out 20-30 small leaf shapes. They should be uniform in size. -
detail the veins:
Using a needle tool, gently press a central vein line down the middle of each leaf, followed by diagonal veins branching out. Don’t cut all the way through. -
Layer the roof:
Starting at the bottom rim of the roof cone, attach the leaves using slip or liquid clay. Overlap them slightly as you work your way up in rows, ensuring the tips point downward. -
Finish the peak:
At the very top, you might need smaller leaves. Cap off the peak with a tiny ball of clay or a single leaf wrapped around the point to hide the final seams.
Sagging Roof?
If the roof starts to slump while you work, prop it up from the inside with a ball of crumpled paper or foil until the clay begins to firm up.
Step 3: Adding Details and Assembly
-
Detail the door:
Take the reserved door piece and use your needle tool to etch vertical lines, simulating wood planks. Add a small window hole near the top. -
Install the door:
Place the door back into the archway, pressing it slightly recessed so it looks inset. Add a tiny ball of clay for a doorknob and a small flattened strip for the threshold step. -
Decorative archway:
Using a needle tool, poke a row of evenly spaced tiny holes around the arch of the door frame for a decorative dotted border. -
Window frames:
Roll tiny snakes of clay to create cross-bars for the windows. Carefully press them inside the window openings. -
Vine carving:
On the side of the house, use a needle tool to lightly carve a simple vine pattern. Scrape away the clay to create the outline of a stem and leaves rising from the base. -
Final assembly:
Attach the roof to the base walls. Score both contact surfaces, add slip, and press firmly. Smooth the inside seam if your hand fits, or just ensure a tight exterior seal.
Glow Up
Cut a hole in the bottom of the house before it dries. Once finished, place an electric tea light underneath to make the windows glow warm and bright.
Let your clay dry completely according to package instructions before placing it in your fairy garden scene

TRACK YOUR CERAMIC JOURNEY
Capture glaze tests, firing details, and creative progress—all in one simple printable. Make your projects easier to repeat and improve.
Monster Pinch Pots With Big Mouths

Transform a simple ball of clay into a hilarious, wide-grinned monster pot that’s perfect for small succulents. This project features a distinctive recessed mouth filled with pointy teeth and goofy, oversized eyes that give it loads of personality.
Step-by-Step
Materials
- Air-dry clay (terracotta color)
- White acrylic paint
- Black acrylic paint
- Small detail paintbrush
- Rolling pin
- Clay knife or plastic modeling tool
- Water in a small cup
- Sponge or smoothing tool
- Clear matte sealant spray (optional)
Step 1: Forming the Base
-
Create a sphere:
Start with a grapefruit-sized chunk of terracotta air-dry clay. Roll it firmly between your palms or on your work surface until you have a smooth, round ball without major cracks. -
Begin the pinch pot:
Push your thumb deep into the center of the ball, stopping about half an inch from the bottom. This establishes the interior depth for your plant. -
Pinch the walls:
Using your thumb on the inside and fingers on the outside, gently pinch and rotate the clay. Work your way from the bottom up to thin out the walls evenly, aiming for about a quarter-inch thickness. -
Flatten the bottom:
Gently tap the pot on your table to create a flat base so it stands up straight without wobbling. I find giving it a little twist while pressing down helps stability. -
Smooth the surface:
Dip your finger in a little water and run it over the exterior to smooth out any fingerprints or cracks. The smoother the surface now, the cleaner the final monster face will look.
Cracked Clay?
If small cracks appear while the clay dries, mix a tiny bit of fresh clay with water to make a paste and fill them in like spackle.
Step 2: Sculpting the Face
-
Carve the mouth outline:
Use your clay knife to lightly trace a wide, U-shaped mouth across the lower half of the pot. Make it stretch almost from side to side for that goofy grin effect. -
Recess the mouth area:
Carefully scrape away a thin layer of clay inside your traced mouth line. You want this area to be slightly sunken compared to the rest of the face, creating a lip or rim above it. -
Shape the eyes:
Roll two small balls of clay, roughly the size of large marbles. Flatten them slightly into thick discs. -
Attach the eyes:
Score the back of the eyes and the spot on the pot where they will go (scratch cross-hatch marks). Add a dab of water (slip) and press the eyes firmly onto the upper face. -
Add a nose:
Roll a tiny, pea-sized ball of clay and attach it right between and slightly below the eyes for a cute button nose. -
Form the teeth:
Roll out a small snake of clay and cut it into tiny triangles. You will need about 6-8 triangles for the bottom row and maybe a couple for the corners. -
Install the teeth:
Score and slip the bottom edge of your recessed mouth area. Press the triangular teeth onto this ridge so they stick up. -
Add texture:
Use a toothbrush or a stiff bristle brush to gently tap the ‘skin’ of the monster (avoiding the eyes and teeth). This gives it a fun, organic texture similar to the photo.
Step 3: Finishing Touches
-
Let it dry:
Place your monster in a safe, dry spot away from direct sunlight. Allow it to air dry for 24-48 hours until it turns a lighter, chalky color. -
Paint the eyes:
Using white acrylic paint, carefully fill in the raised eye discs. You may need two coats to get a bright, solid white. -
Paint the teeth:
Use a small detail brush to paint the triangular teeth white. Take your time here to keep the terracotta color visible in the background of the mouth. -
Add pupils:
Once the white paint is fully dry, paint a solid black circle in the center of each eye. Try making one slightly larger than the other for a sillier expression. -
Seal the pot:
If you plan to put a real plant inside, coat the interior and exterior with a clear matte sealant to protect the clay from moisture.
Go Mult-eyed!
Instead of two eyes, create a cyclops or a spider-monster by adding three or more eyes of different sizes across the top rim.
Now your monster is ready to guard your favorite succulents with a friendly smile
Tiny Clay Diorama “Small Worlds”
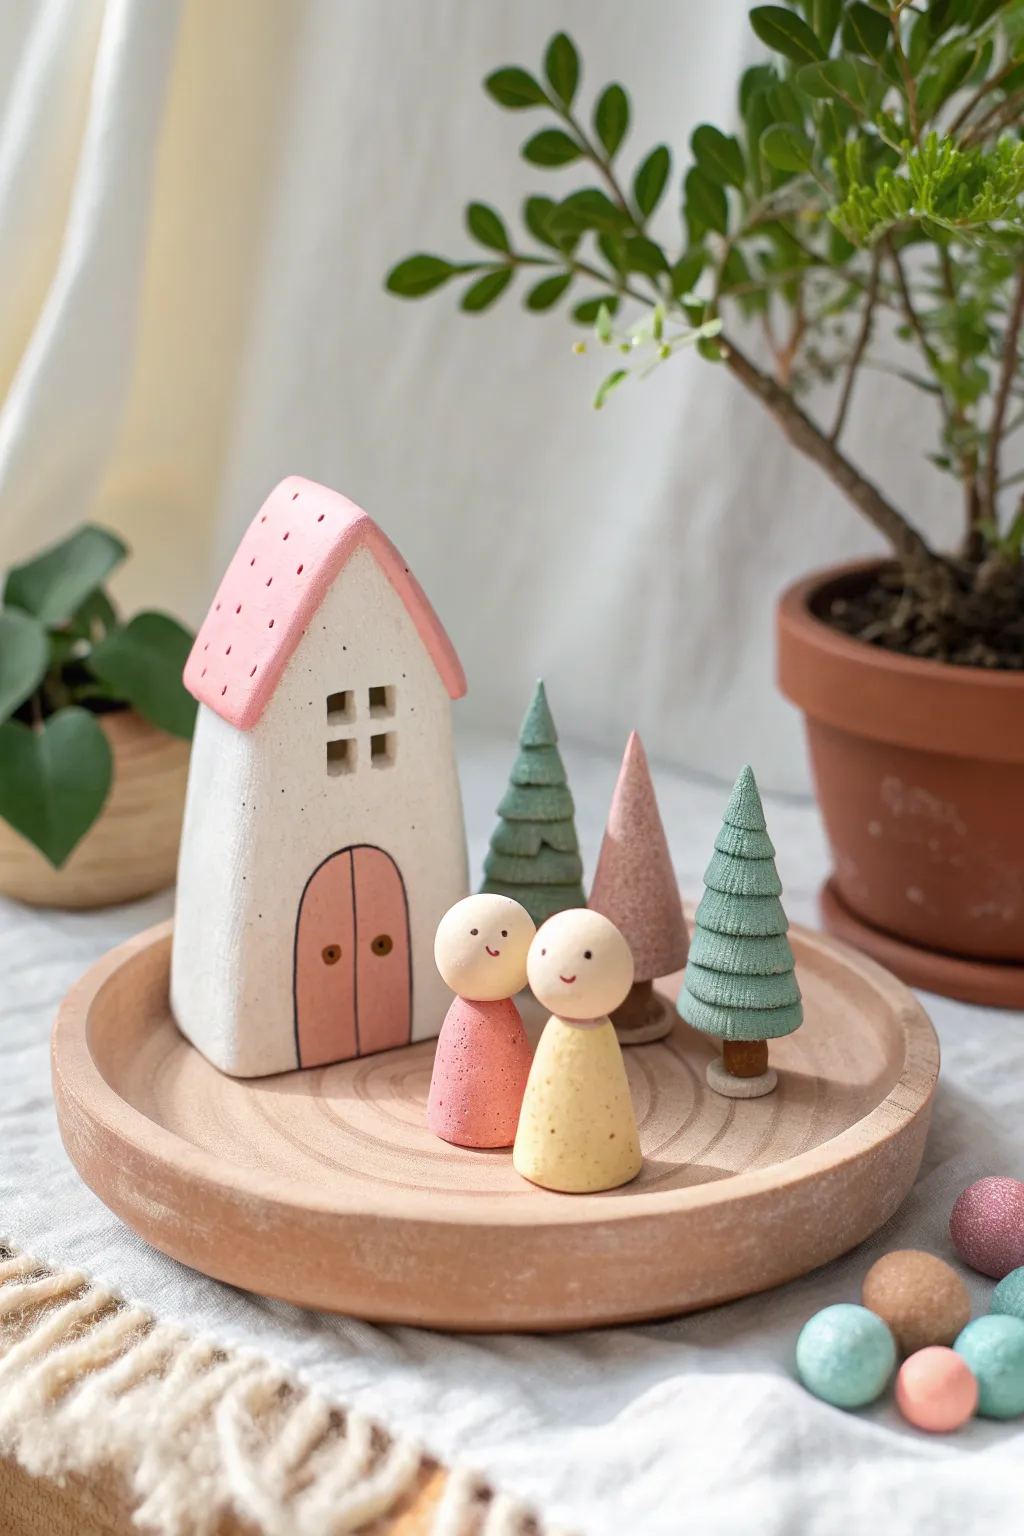
Create a charming miniature world centered around a cozy white cottage with a textured pink roof. This project combines simple geometric sculpting with gentle pastel painting to build a peaceful scene perfect for imaginative play or sweet shelf decor.
Detailed Instructions
Materials
- Air-dry clay (white or terracotta)
- Acrylic paints (pastel pink, soft yellow, sage green, pine green, white, brown)
- Small fine-point paintbrushes
- Rolling pin
- Clay knife or craft knife
- Water cup and sponge
- Fine-grit sandpaper
- Toothpick or needle tool
- Matte varnish (optional)
Step 1: Sculpting the Base and House
-
Form the tray base:
Start by rolling out a ball of clay into a flat circle, about 5-6 inches in diameter. Build up a low rim around the edge by rolling a snake of clay, attaching it to the perimeter with a little water, and smoothing the seam completely. -
Add texture to the tray:
Before the tray dries, use a blending tool or your finger to lightly press faint concentric circles into the floor of the tray to mimic wood grain or ripples. -
Shape the house body:
Take a block of clay and shape it into a rectangular prism with a square base. Keep the walls relatively thick for stability, roughly 2-3 inches tall. -
Attach the roof:
Flatten a separate piece of clay into a rectangle. Bend it in the center to form a ‘V’ shape and attach it to the top of your house block, blending the clay where they meet underneath for a seamless join. -
Detail the house:
Using a craft knife, carve out a four-pane window near the peak of the house. For the door, gently press an arched outline into the front without cutting all the way through. -
Texture the roof:
Use a needle tool or toothpick to poke small, random holes across the entire roof surface to create a whimsical, porous texture.
Smooth Seams
dip your finger in water and run it over any clay joins (like where the head meets the body) to make the two pieces look like one solid object.
Step 2: Creating Figures and Foliage
-
Roll the figures:
Create two cone shapes for the bodies—one slightly shorter than the other. Roll two small spheres for heads and attach them firmly to the tops of the cones using a dab of water or slip. -
Form the trees:
Roll three cones of varying heights for the trees. Using a clay knife, press horizontal rings around the cones, slightly indenting the clay to create distinct tiered sections that mimic evergreen branches. -
Make the trunks:
Form tiny cylindrical stumps for the trees and press them onto the bottom of your cones. Ensure they are flat on the bottom so the trees stand upright. -
Create accessory beads:
With leftover clay, roll several small spheres in varying sizes to serve as decorative ‘boulders’ or play elements. -
Dry completely:
Allow all pieces to air dry for at least 24-48 hours. I find flipping the flat tray over halfway through helps prevent the bottom from curling. -
Sand imperfections:
Once bone dry, use fine-grit sandpaper to gently smooth out any rough fingerprints on the figures and house walls.
Step 3: Painting and Finishing
-
Base coat the house:
Paint the walls of the house a creamy white. You may need two coats for opaque coverage. Let this dry before moving to the roof to avoid color bleeding. -
Paint the roof and door:
Mix a soft pastel pink and carefully paint the roof and the arched door. Use a fine liner brush to paint the window interior and door outline in dark brown. -
Decorate the figures:
Paint the body of one figure pink and the other yellow. Leave the heads unpainted for a natural clay look, or paint them a pale flesh tone. Add two tiny dots for eyes and a small curve for a smile using your finest brush tip. -
Paint the trees:
Paint two trees in varying shades of sage and pine green, and the third in a dusty rose pink. Paint the trunks a warm brown. -
Finish the tray:
Apply a watered-down wash of brown paint over the tray to highlight the concentric texture rings, then wipe away the excess with a paper towel for a stained wood effect. -
Seal:
Protect your small world with a coat of matte varnish to prevent the paint from chipping during play.
Add a Chimney
Before drying, add a tiny rectangle of clay to the roof slope. Paint it white or brick-red later to give your cottage an extra cozy detail.
Arrange your figures on the tray and enjoy the charming miniature village you have built