If you’re teaching (or just crafting with) middle school kids, clay is the sweet spot where skill-building and pure imagination finally meet. These clay project ideas keep things doable for ages 11–14, while still leaving tons of room for personality, humor, and creative choices.
Handbuilding Bowl Trio
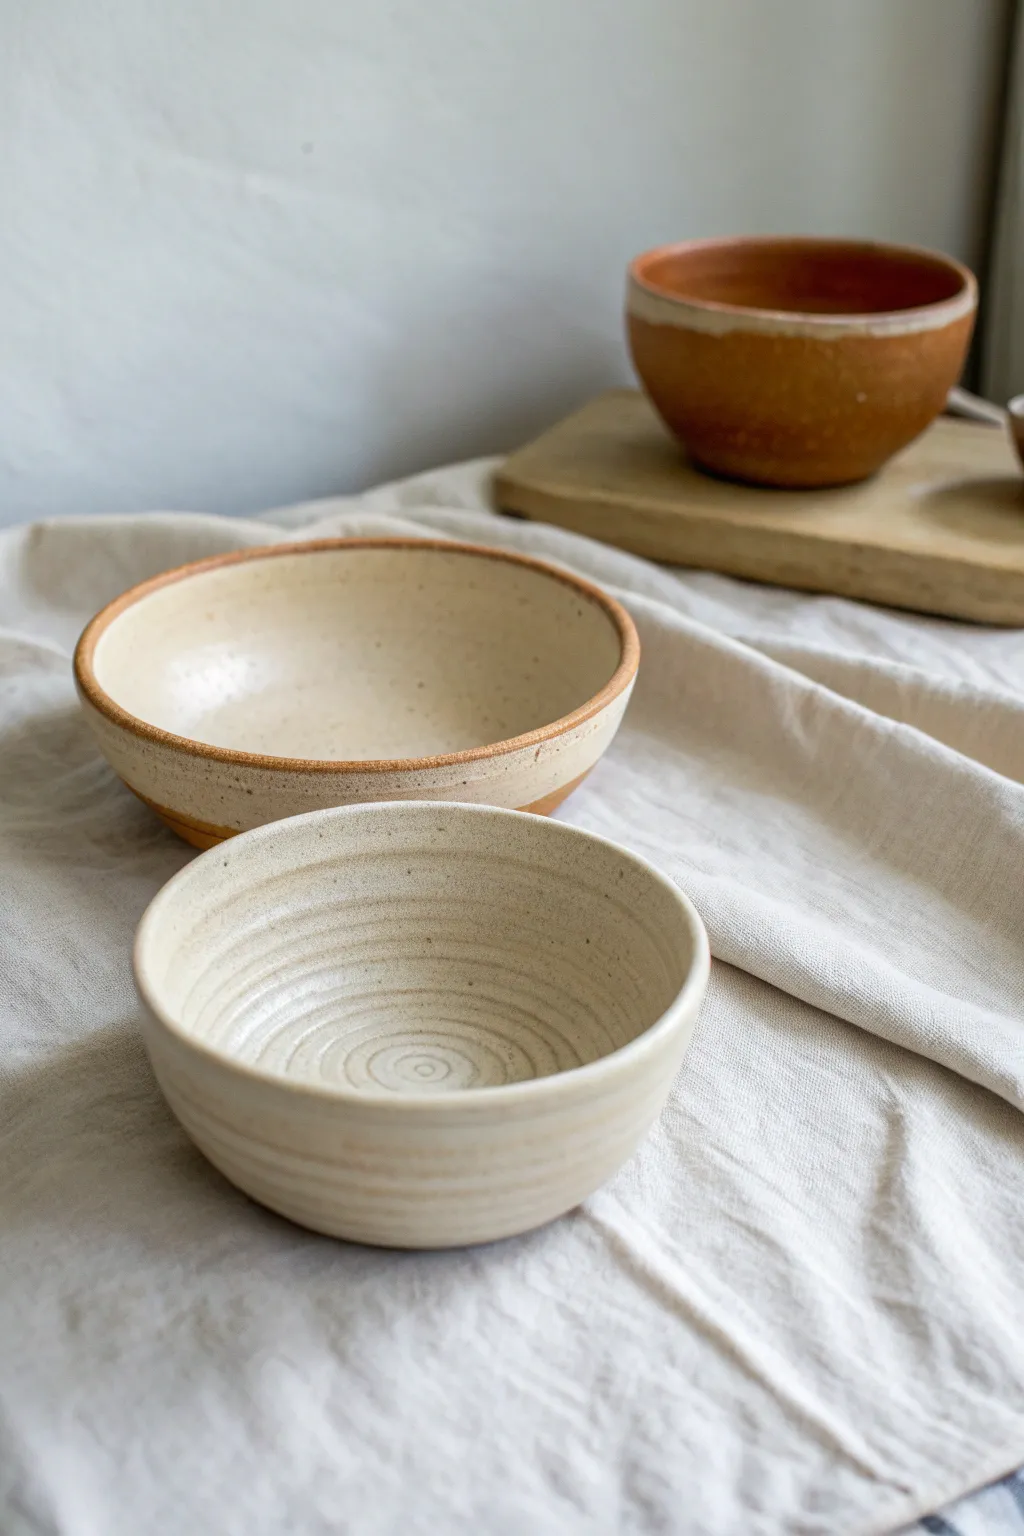
These simple yet elegant bowls rely on two fundamental handbuilding techniques to create distinctly different forms. The result is a charming set featuring a smooth, wide serving bowl alongside a deeply textured, ribbed vessel perfect for dips or snacks.
Detailed Instructions
Materials
- Stoneware clay (speckled or light buff)
- Pottery wheel (optional, can be handbuilt)
- Rib tool (wooden or silicone)
- Needle tool
- Sponge
- Cutting wire
- Glaze (transparent or white matte)
- Kiln
Step 1: Forming the Textured Bowl
-
Prepare the Base:
Start with a ball of clay roughly the size of a tennis ball. Flatten it slightly into a thick puck to establish the floor of your smaller bowl. -
Open the Form:
Using your thumbs, press into the center of the puck and gently pinch outward to raise the initial walls. Keep the walls thick at this stage, about half an inch. -
Create Texture:
If throwing on a wheel, pull the walls up slowly and leave your finger trails deep and visible to create the spiral effect. If handbuilding, roll long snakes of clay. -
Stacking Coils:
For the handbuilding method, score and slip the edge of your base. Lay a coil on top, blending the clay downwards on the outside only, leaving the coil rings visible on the inside. -
Refine the Shape:
Continue stacking coils to build height. As you stack, slightly taper the diameter inwards to create a rounded, cupped shape rather than a straight cylinder. -
Smooth the Exterior:
Use a damp sponge or a soft rib to gently smooth the outside of the bowl while supporting the inside with your hand. The goal is a clean exterior that contrasts with the ribbed interior.
Step 2: Building the Wide Bowl
-
Start Larger:
For the wider bowl in the background, start with a slightly larger amount of clay, perhaps the size of a grapefruit. -
Pinch and Pull:
Pinch the clay into a wide, shallow curve. Focus on expanding the width rather than the height. I find it helpful to turn the bowl constantly in my hand to keep the thickness even. -
Rim Definition:
Use a damp chamois or sponge to compress the rim. Instead of leaving it perfectly flat, allow a slightly undulating, organic edge that highlights the handmade nature. -
Refining the Surface:
Use a metal rib tool to scrape away any fingerprints or loose bits of clay from the interior, aiming for a much smoother finish than the first bowl.
Cracking at the Base?
If S-cracks appear on the bottom, you likely didn’t compress the floor enough. During creation, press down firmly with your fingers or a sponge to align clay particles.
Step 3: Finishing and Glazing
-
Bisque Fire:
Let both bowls dry slowly and completely before bisque firing them according to your clay body’s specifications. -
Wax Resist:
Apply a band of wax resist to the bottom half of the exterior of both bowls. This will leave the raw, speckled clay exposed after firing. -
Dip Glazing:
Dip the top half and the entire interior of the wide bowl into a white or cream matte glaze. Shake gently to remove drips. -
Pouring Glaze:
For the textured bowl, pour the glaze inside, swirl it to coat the spiral ridges, and pour it out. Dip the exterior rim just slightly to create a clean line. -
Final Fire:
Fire the bowls a second time to the glaze maturity temperature.
Level Up Designs
Try using a darker clay body like chocolate stoneware. The contrast between the dark, raw exterior and a creamy white interior glaze looks incredibly modern.
Once cooled, these vessels are ready to hold everything from morning cereal to loose change


Coil Bowl With Exposed Texture

This rustic ceramic bowl balances a smooth, glazed interior with a raw, earthy exterior featuring unique pierced details. The contrasting textures of the iron-rich clay body and the creamy glaze create a stunning, functional piece perfect for intermediate potters.
Step-by-Step
Materials
- Red stoneware or terracotta clay (groggy clay works best)
- Clay scoring tool or fork
- Slip (clay mixed with water)
- Rolling pin
- Canvas mat or cloth
- Wooden ribs (round and straight)
- Sponge
- Needle tool or small drill bit tool
- White or cream dipping glaze
- Wax resist
- Kiln
Step 1: Building the Form
-
Prepare the Base:
Start by rolling out a slab of clay about 1/4 inch thick. Use a circular template or a small bowl to cut out a perfect circle, which will serve as the floor of your bowl. -
Roll Your Coils:
Roll out several long, even snakes of clay, aiming for a thickness of about half an inch. Keep them consistent so your walls build up evenly. -
Score and Slip:
Vigorously score the outer edge of your base and the bottom of your first coil. Apply a generous amount of slip to the scored areas to act as glue. -
Layering Up:
Attach the first coil to the base. Gently pinch it down to secure it, then repeat the scoring and slipping process for the next coil, stacking them directly on top of each other to create vertical walls. -
Smoothing the Interior:
While supporting the outside with one hand, use your fingers or a rounded wooden rib to smooth the coils together on the *inside* only. The goal is a seamless, smooth interior surface. -
Refining the Exterior Profile:
On the outside, you want to keep the coil definition but ensure they are joined. Lightly smudge the coils downward just enough to bond them, then use a flat rib to scrape the surface smooth, removing the bumpy coil texture to create a flat, banded canvas for your design.
Smooth Seams
When smoothing the inside coils, hold a kidney rib flexible tool at a 45-degree angle. This compresses the clay wall, making it stronger and preventing cracks during drying.
Step 2: Adding Texture & Detail
-
Define the Bands:
Using a modeling tool or the edge of a wooden rib, gently carve or compress horizontal lines around the bowl to re-establish where the clay body changes or to create faux banding lines, mimicking the look in the photo. -
Create the Pierced Texture:
Focus on the lower band of the bowl. Take a needle tool or a small circular hole cutter and press a series of random, small dots or shallow holes into the clay. Do not poke all the way through; these are decorative divots. -
Refine the Rim:
Use a damp sponge (not soaking wet) to round off the top rim of the bowl. A smooth rim is crucial for a bowl intended for eating or drinking. -
Slow Drying:
Cover the bowl loosely with plastic to let it dry slowly to the leather-hard stage. This prevents warping.
Step 3: Glazing & Finishing
-
Bisque Fire:
Once the bowl is bone dry, fire it in the kiln to the appropriate bisque temperature for your specific clay body (usually Cone 04 or 06). -
Clean the Bisqueware:
Wipe the fired bowl with a damp sponge to remove any kiln dust, which can prevent glaze from sticking properly. -
Wax Resist Application:
Carefully paint wax resist on the bottom of the bowl and up the sides, covering the textured area with the dots and the band of raw clay above it. You want to preserve that beautiful terracotta color. -
Interior Glazing:
Pour a creamy white glaze inside the bowl. Swirl it around quickly to coat the entire interior and pour out the excess. I usually hold it upside down for a few seconds to let the last drops fall. -
Exterior Dipping:
Dip the rim of the bowl into the white glaze, letting it cover the inside and just the top inch of the outside. The wax resist will stop the glaze from adhering to the lower section, but double-check and wipe stray drips with a sponge. -
Glaze Fire:
Load the bowl into the kiln for the final glaze firing (often Cone 5 or 6 for stoneware). Ensure the unglazed bottom doesn’t touch other pots.
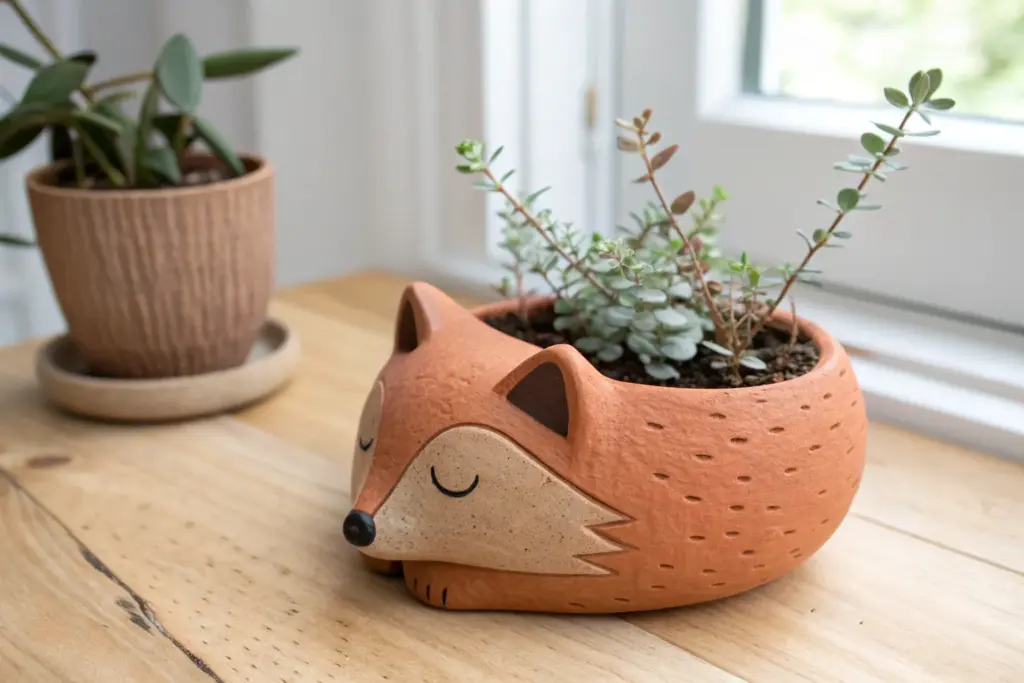
Make It a Planter
Want to use this specifically for succulents? Poke three holes all the way through the bottom during the leather-hard stage for essential drainage.
Now you have a stunning vessel that highlights the natural beauty of the clay itself


Slab Mug With Stamped Patterns
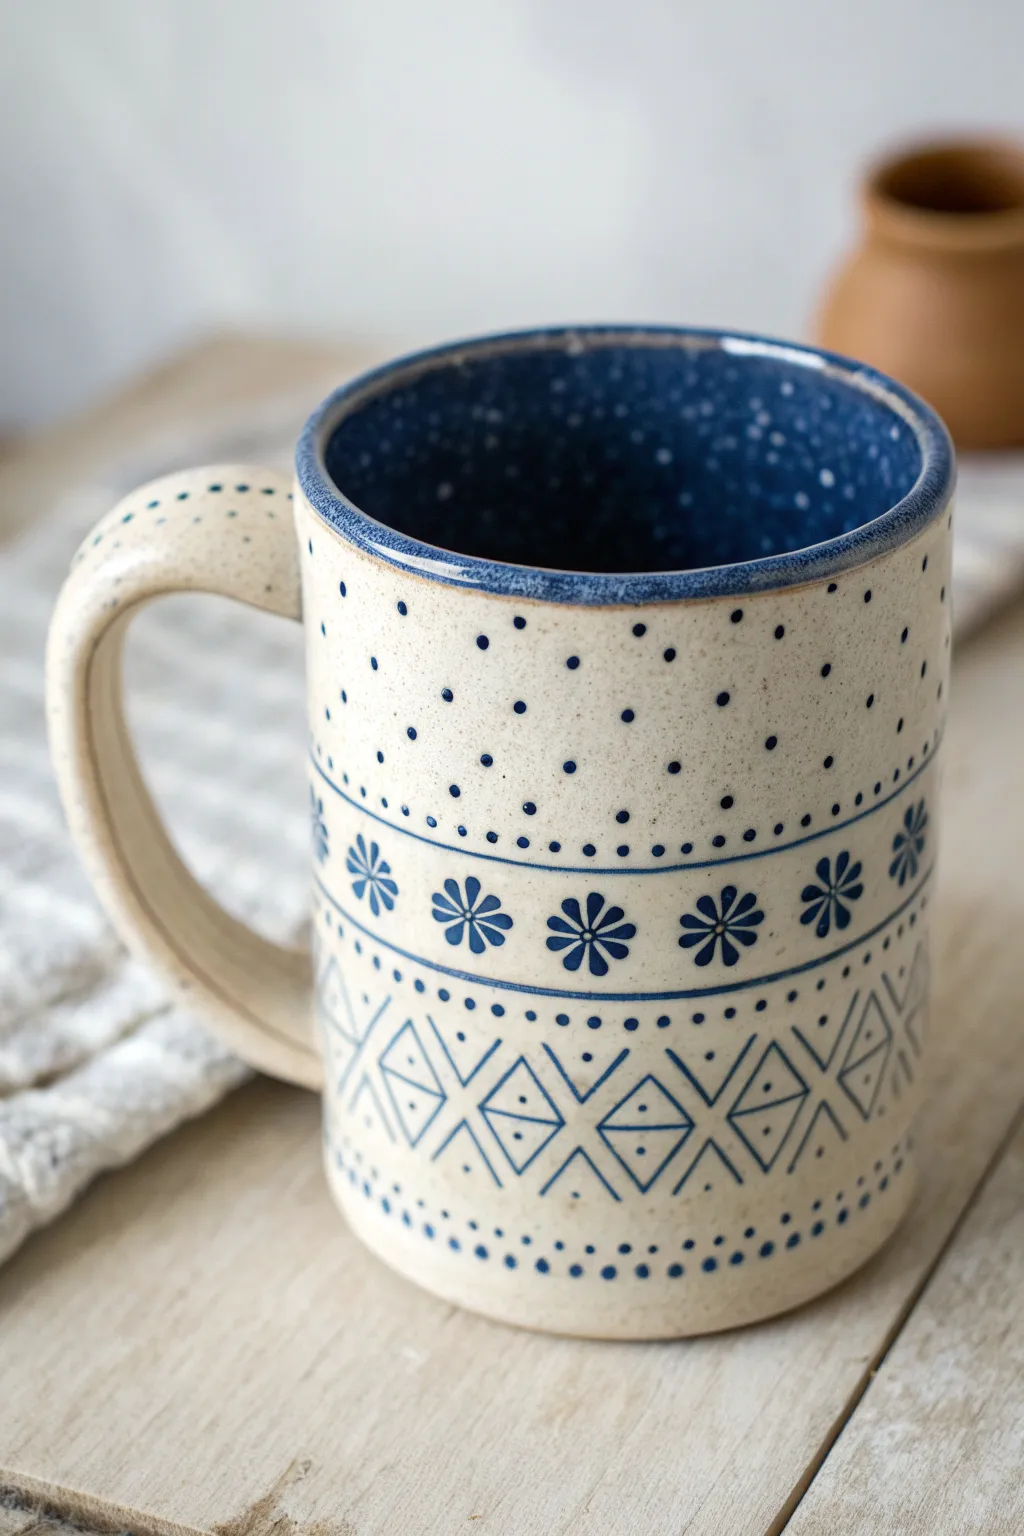
This project combines precise slab construction with decorative stamping to create a mug that looks professionally thrown but is completely handbuilt. The creamy, speckled clay body contrasts beautifully with crisp blue geometric patterns and a deep blue interior.
Detailed Instructions
Materials
- Stoneware clay (speckled or buff)
- Rolling pin and wooden guide strips/slats (approx. 1/4 inch thick)
- Fettling knife or needle tool
- Ruler and paper for template
- Serrated rib or scoring tool
- Slip (clay mixed with water)
- Various stamps (flower, circle/dot, straight edge)
- Sponge
- Cobalt blue underglaze
- Dark blue glaze (for interior)
- Clear glaze (for exterior)
- Small paintbrush
Step 1: Designing and Construction
-
Create your template:
Cut a rectangle from paper that measures approximately 10-12 inches long and 4-5 inches tall. Wrap it into a cylinder to check the size, making sure to account for a slight overlap for the seam. -
Roll out the slab:
Using wooden guide strips on either side of your clay, roll out a consistent slab about 1/4 inch thick. This ensures the walls of your mug are even. -
Cut the forms:
Lay your paper template on the slab and cut around it cleanly with a fettling knife. You will also need to cut a circle for the base (use a circular cookie cutter or trace a lid) and a strip for the handle. -
Texture the slab:
Before assembling, lay the rectangular wall slab flat on your work surface. This is the easiest time to apply your main stamped designs without distorting the cup shape. -
Establish the pattern grid:
Using a ruler and a dull tool, lightly scribe horizontal lines across the slab to create zones for your patterns. Create a central band for the flowers and lower bands for the geometric diamonds. -
Stamp the designs:
Press your chosen stamps into the clay. Use a flower stamp for the middle band and a straight-edge tool to impress the diamond/triangle geometric pattern near the bottom. Don’t add the dots yet; we will paint those later. -
Bevel the edges:
Cut the short vertical ends of your rectangular slab at a 45-degree angle (beveling) so they will overlap seamlessly when rolled into a cylinder. -
Score and slip:
Rough up the beveled edges and the outer edge of your circular base. Apply slip generously to these scored areas. -
Assemble the cylinder:
Stand the rectangle up and curve it around the base. Press the beveled side seam together firmly, smoothing it inside and out so the join disappears. Join the wall to the floor base, blending the clay downward.
Clean Lines Pro Tip
When painting underglaze into stamped areas, don’t worry about being messy. Let it dry, then wipe the surface with a damp sponge. The color stays in the grooves but wipes off the top.
Step 2: Handle and Decoration
-
Form the handle:
Take your clay strip and smooth the edges with a damp sponge. Curve it into a ‘C’ or ear shape, allowing it to stiffen slightly on the table for 10-15 minutes so it holds its arch. -
Attach the handle:
Score and slip the attachment points on both the mug body and the handle ends. Press the handle firmly onto the mug, smoothing the connection points with a small coil of clay for reinforcement. -
Bisque fire:
Once the mug is bone dry, fire it in the kiln to bisque temperature (usually Cone 04) to prepare it for glazing. -
Apply underglaze decoration:
Using a fine brush and cobalt blue underglaze, carefully paint into the stamped impressions (the flowers and diamonds). This is where I like to add the small painted dots using the back end of a paintbrush dipped in underglaze. -
Glaze the interior:
Pour a dark blue glaze into the inside of the mug, swirl it around to coat the entire interior surface, and pour out the excess. Wipe the rim clean with a sponge. -
Glaze the exterior:
Dip or brush a clear transparent glaze over the entire outside of the mug. This will seal the clay and make the blue underglaze pop without hiding the speckled clay body. -
Final firing:
Fire the mug a second time to the glaze maturity temperature (typically Cone 5 or 6 for stoneware).
Troubleshooting: Warping
If your cylinder slumps or ovalizes while working, the slab was likely too wet. Let the slab firm up to ‘leather hard’ (stiff but flexible) before standing it up.
Now you have a durable, custom-designed mug ready for hot cocoa or tea


Leaf-Imprint Trinket Dish
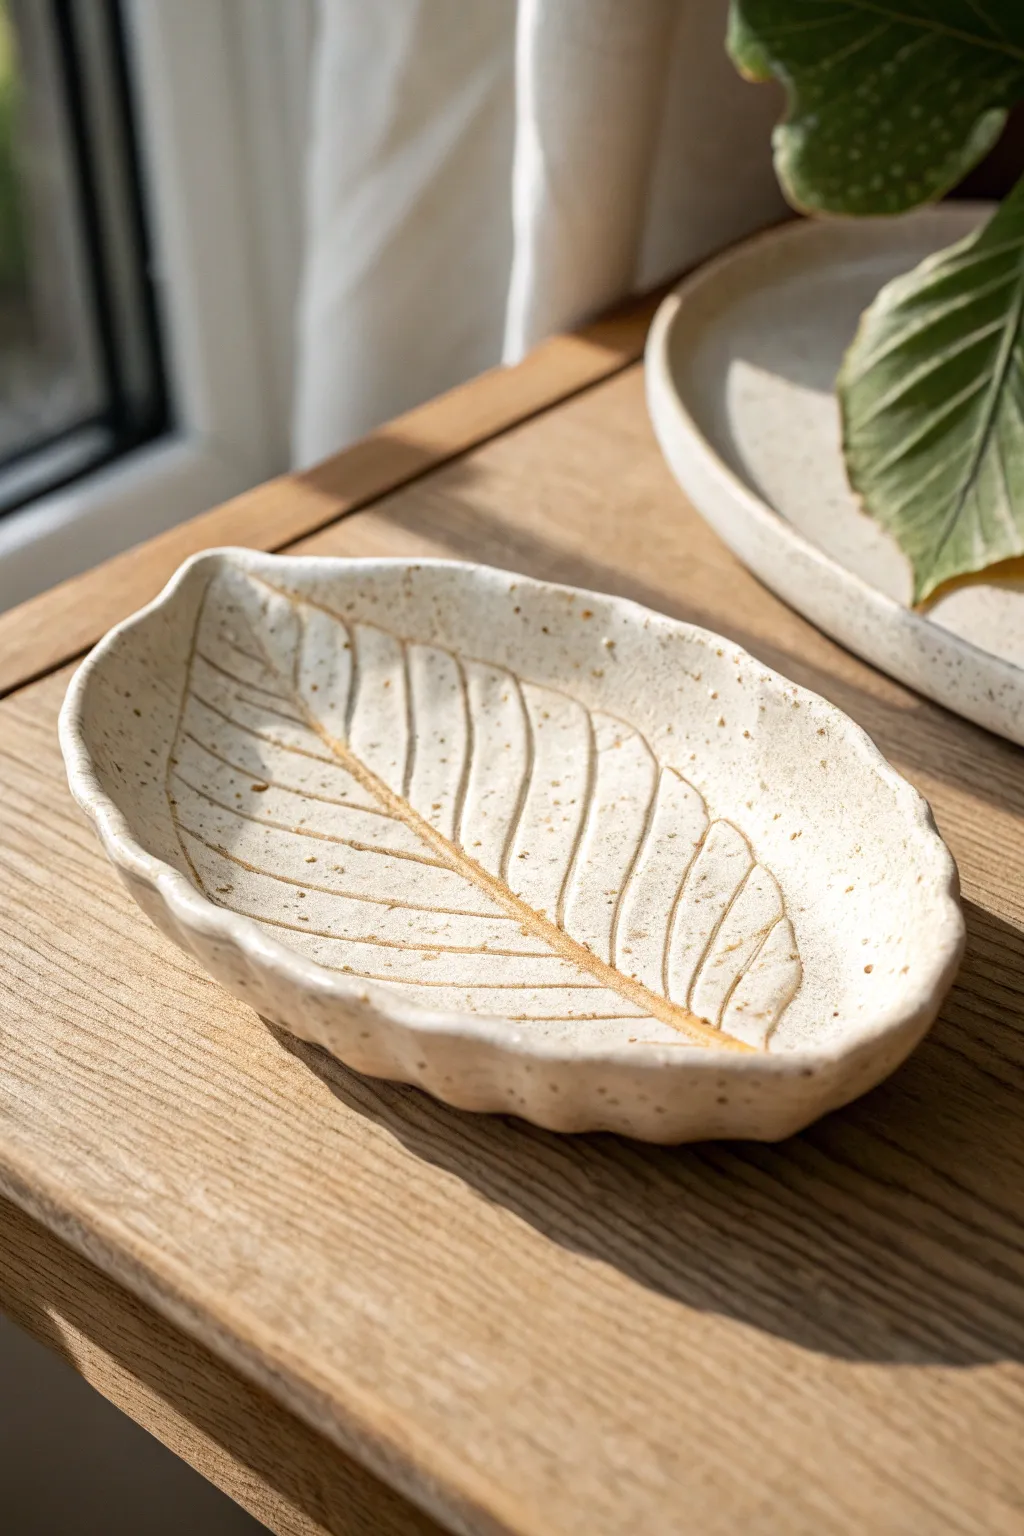
Learn to capture the intricate details of nature with this elegant clay trinket dish. Using a real or faux leaf as a stamp, you will create a beautifully textured piece that highlights the delicate veins and organic shape, perfect for holding jewelry or keys.
Step-by-Step Guide
Materials
- Air-dry clay or low-fire earthenware clay (white or cream)
- A large, deeply veined leaf (fresh or artificial)
- Rolling pin
- Canvas mat or cloth (to prevent sticking)
- Needle tool or plastic knife
- Small sponge
- Small bowl of water
- Shallow bowl (for shaping)
- Acrylic paint (thinned brown or ochre) or underglaze
- Clear varnish or matte glaze
- Sandpaper (fine grit)
Step 1: Preparation & Rolling
-
Prepare your workspace:
Lay down your canvas mat or cloth on a flat surface. This texture helps keep the clay from sticking to the table. -
Select your clay:
Grab a handful of clay about the size of a tennis ball. Knead it in your hands for a minute to warm it up and remove any air bubbles. -
Roll out a slab:
Place the clay on your mat and use the rolling pin to flatten it. Aim for an even thickness of about 1/4 inch; too thin and it might crack, too thick and it will take forever to dry. -
Smooth the surface:
Before adding texture, take a slightly damp sponge and gently wipe the surface of the clay slab to remove any canvas marks or cracks.
Step 2: Creating the Leaf Impression
-
Position the leaf:
Place your chosen leaf vein-side down onto the clay. The underside of the leaf usually has the most prominent veins, which gives the best impression. -
Embed the leaf:
Gently roll your rolling pin over the leaf. Apply firm, steady pressure so the leaf presses fully into the clay without making the slab too thin. -
Check the impression:
Carefully lift one edge of the leaf to peek. If the veins aren’t deep enough, lay it back down and press harder with your fingers or the roller. -
Remove the leaf:
Slowly peel the leaf away from the clay to reveal the pattern. I always find this moment so satisfying as the hidden details appear.
Sticky Situation?
If the clay sticks to your rolling pin, lay a piece of parchment paper or thin fabric between the clay and the roller.
Step 3: Cutting & Shaping
-
Cut out the shape:
Using a needle tool or a plastic knife, trace around the outline of the leaf impression. Leave a small border (about 1/8 inch) around the edge of the print. -
Refine the edges:
Dip your finger in a little water and run it along the cut edges of the clay. This smooths out any sharp bits or crumbles left by the knife. -
Curve the form:
To give it a dish shape, gently lift the clay leaf and place it inside a shallow bowl. Let the clay slump naturally into the curve. -
Adjustment:
While it’s in the bowl, gently curl the very tips of the leaf upward or pinch the edges slightly to mimic the wavy edge seen in the reference photo. -
Drying:
Allow the clay to dry completely in the bowl. For air-dry clay, this usually takes 24-48 hours. If using kiln-fire clay, follow your specific firing instructions.
Natural Upgrade
Try layering multiple small leaves overlapping each other instead of one large leaf for a collage-style texture.
Step 4: Finishing Touches
-
Sanding:
Once bone dry (and fired, if ceramic), use fine-grit sandpaper to gently smooth any rough spots on the rim. Wipe away the dust with a barely damp sponge. -
Highlight the veins:
Mix a small amount of brown or ochre acrylic paint with water to make a thin wash. Brush this over the entire textured surface. -
Wipe back technique:
Immediately use a clean, slightly damp paper towel or sponge to wipe the paint off the raised surface. The dark color will stay trapped in the deep veins, making the texture pop. -
Speckle effect:
To get the speckled look from the photo, dip an old toothbrush in thinned brown paint. Run your thumb across the bristles to flick tiny splatters lightly over the dish. -
Sealing:
Finish your piece with a coat of clear matte varnish or glaze to protect the surface and give it a finished, professional sheen.
Place your finished dish on a bedside table or shelf to bring a permanent touch of autumn beauty into your room

The Complete Guide to Pottery Troubleshooting
Uncover the most common ceramic mistakes—from cracking clay to failed glazes—and learn how to fix them fast.
Mushroom Forest Relief Tile
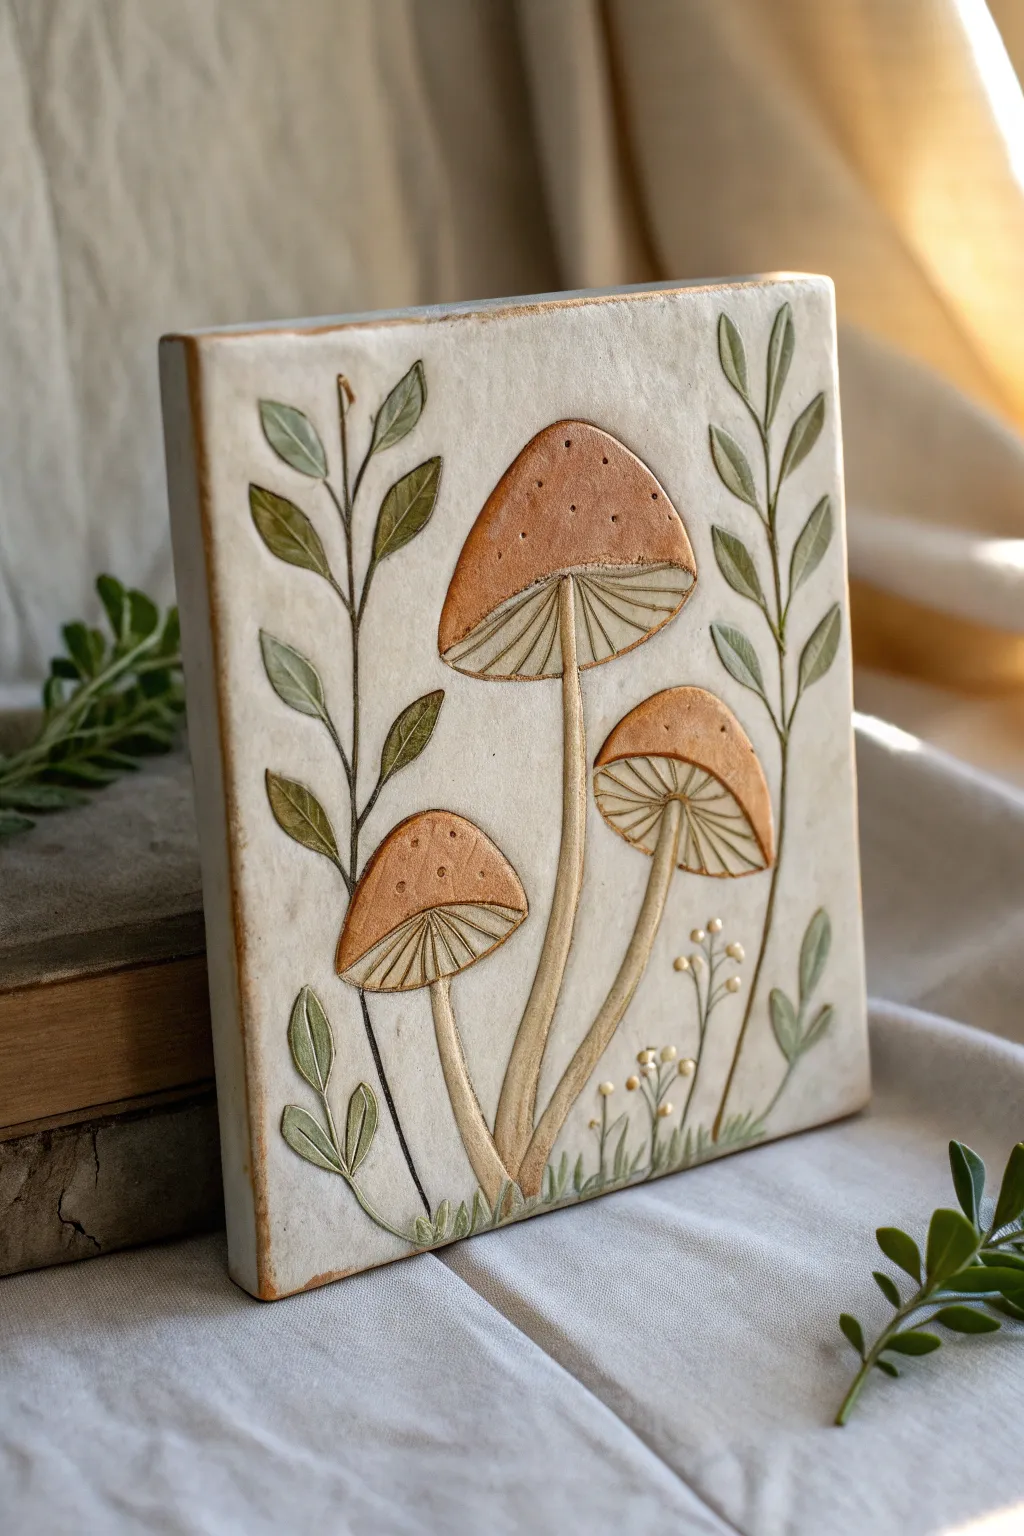
Capture the whimsical beauty of the forest floor with this detailed relief tile project. Using basic slab building and carving techniques, you’ll create a trio of mushrooms surrounded by gentle foliage, finished with a rustic, antique look.
How-To Guide
Materials
- White or speckled stoneware clay
- Rolling pin
- Two wooden guide strips (approx. 1/2 inch thick)
- Needle tool or fettling knife
- Loop carving tools (small and medium)
- Modeling tool (spoon-ended)
- Underglazes (terracotta/brown, sage green, dark brown/black)
- Clear matte glaze
- Sponge and water
- Small stiff paintbrush
- Ruler
Step 1: Slab Preparation
-
Roll the slab:
Begin by wedging your clay to remove air bubbles. Place the clay between your two wooden guide strips on a canvas mat and roll it out until it is perfectly even and smooth. -
Cut the tile shape:
Using a ruler and a needle tool or fettling knife, cut a clean rectangle from your slab. A size of about 6×8 inches works well for this design. Smooth the cut edges with a damp sponge or your finger to remove sharpness. -
Initial drying:
Let the slab sit until it reaches a soft leather-hard stage. It should be firm enough to handle without bending easily, but soft enough to carve into. I find this usually takes 2-4 hours depending on room humidity.
Warped Corners?
If corners curl up while drying, flip the tile over onto a smooth board and gently weight the corners down with small sandbags during the leather-hard stage to flatten them.
Step 2: Sketching and Carving
-
Lightly sketch the design:
Using your needle tool, very lightly scratch the outline of the three mushrooms and the climbing vines onto the clay surface. Don’t dig deep yet; just map out your composition. -
Carve the negative space:
Use a medium loop tool to carve away the background clay around the mushrooms and leaves. You want to lower the background by about 1/8th of an inch, leaving your design elements raised. -
Refine the edges:
Go back in with a smaller tool or a knife to clean up the edges of the stems and caps, making sure they stand out sharply against the recessed background. -
Detail the mushroom caps:
Gently curve the tops of the mushroom caps using a modeling tool or your thumb to give them a rounded, convex 3D appearance. -
Carve the gills:
Under the mushroom caps, use a needle tool or a very fine loop tool to carve the radiating lines for the gills. These should fan out from the top of the stem to the edge of the cap. -
Create leaf veins:
Use a sharp tool to incise a central vein down the middle of each leaf. For extra detail, add tiny side veins branching off. -
Texture the grass:
At the very bottom of the tile, use quick, upward strokes with a needle tool to create the tufts of grass that anchor the scene. -
Smooth the surfaces:
Use a barely damp sponge or a soft brush to smooth away any rough clay crumbs (burrs) created during carving. Be gentle so you don’t erase your fine details. -
Dry slowly:
Place the tile between two pieces of drywall or cover loosely with plastic to dry very slowly. This prevents the corners from warping or curling up as the clay shrinks.
Add Dimension
Make the mushroom caps pop by adding a small coil of clay to the cap area before smoothing it down. This adds extra height and relief beyond just carving away the background.
Step 3: Glazing and Finishing
-
Bisque fire:
Once bone dry, fire the tile in the kiln to cone 04 (or your clay’s specific bisque temperature). -
Apply mushroom color:
Paint a terracotta-colored underglaze onto the mushroom caps. You can apply it slightly unevenly or sponge some off to give it a natural, organic weathered look. -
Paint the foliage:
Use a sage or olive green underglaze for the leaves and stems. Use a small detail brush to stay within the raised lines. -
Antique the details:
Mix a very watered-down dark brown or black underglaze (a wash). Brush this over the entire piece, getting into the carved crevices, and then immediately wipe the high points clean with a damp sponge. This highlights the carved textures. -
Add dots:
With a tiny brush or a matchstick, add small dots of white or cream underglaze to the mushroom caps and the tiny flower buds near the grass. -
Clear glaze:
Apply a thin coat of clear matte glaze over the entire face of the tile to seal it and deepen the colors without making it too shiny. -
Final firing:
Fire the tile a final time to the temperature recommended for your glaze and clay body.
Display your finished tile on a small easel or mount it in a frame to bring a touch of woodland magic to your room
Coil Picture Frame
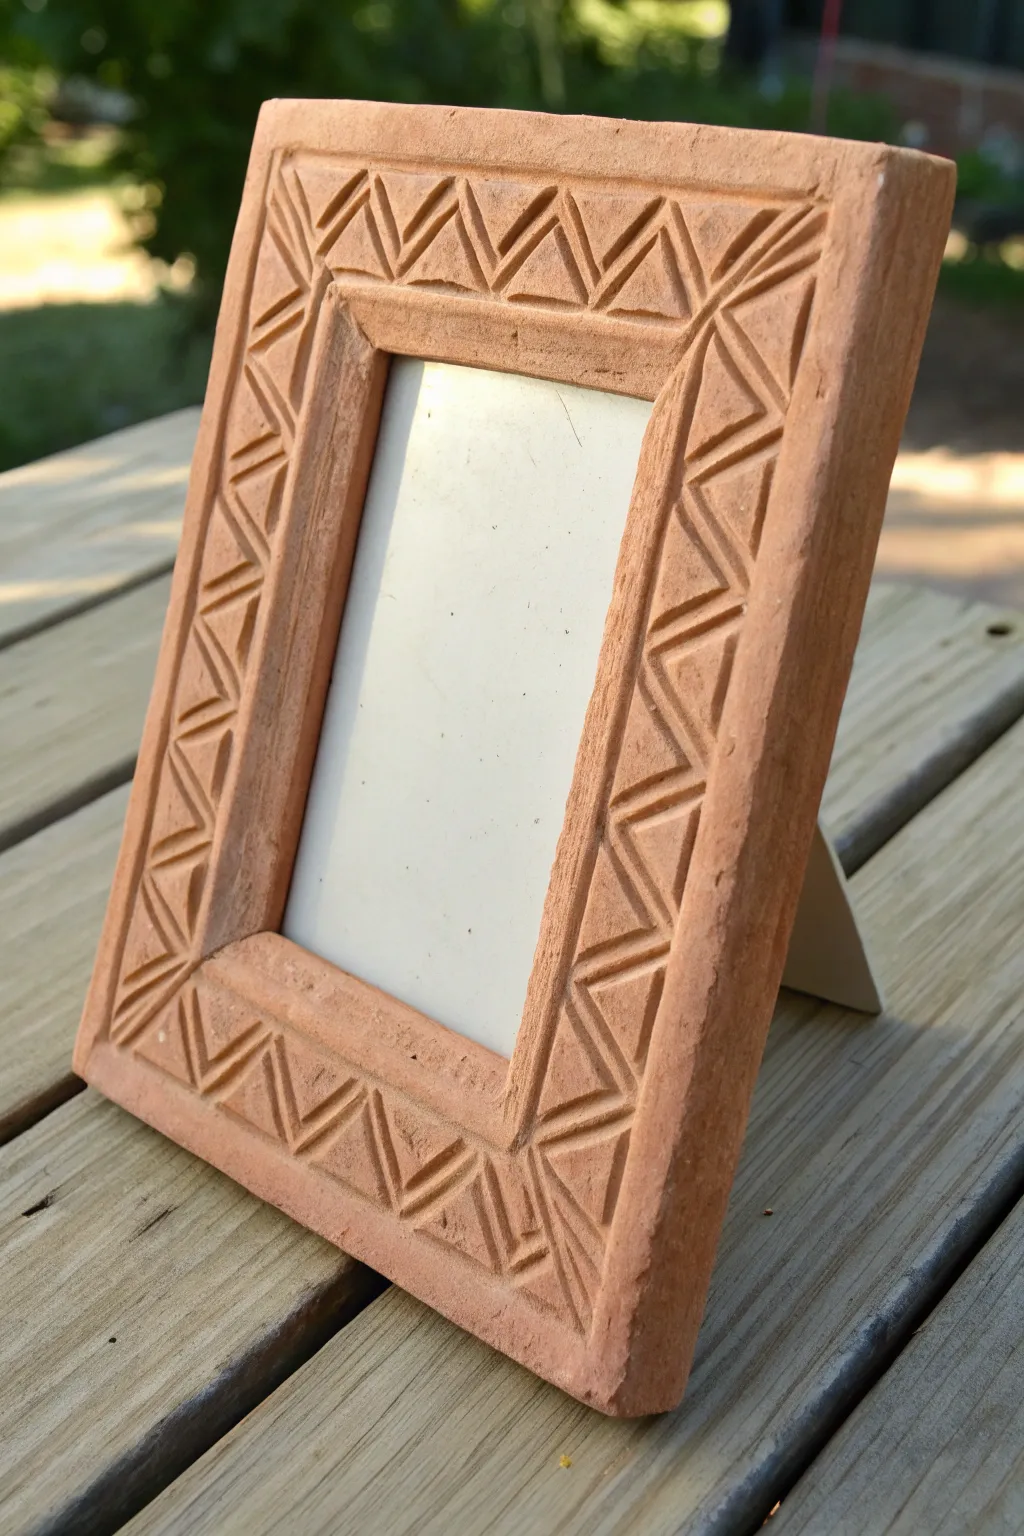
This rustic picture frame mimics the warmth of natural terracotta with a distinctive, deeply etched geometric pattern. It’s a perfect project for learning precise slab construction and subtractive carving techniques, resulting in a timeless piece of home decor.
Step-by-Step Tutorial
Materials
- Terracotta-colored air-dry clay or kiln-fire clay
- Rolling pin
- Two wooden guide strips (approx. 1/4 inch thick)
- Fettling knife or X-Acto knife
- Ruler
- Needle tool or sharp carving tool
- Triangle carving loop tool (optional but helpful)
- Small cup of water
- Score and slip tool (or toothbrush)
- Cardboard (for template)
- Sandpaper (fine grit)
Step 1: Slab Preparation
-
Rolling the slab:
Begin by wedging your clay to remove air bubbles, then place it between two wooden guide strips. Roll the clay out into a large, even slab about 1/4 inch thick; the guides ensure the thickness is perfectly uniform. -
Creating the template:
Cut a rectangular template out of cardboard. For a standard frame like this, a 5×7 inch rectangle with a 3×5 inch opening in the center works well, leaving a sturdy border. -
Cutting the base:
Lay your cardboard template over the smooth clay slab. Using your fettling knife or X-Acto blade, cut straight down around the outer and inner edges to create the frame shape. -
Defining the bevel:
With the blade held at a slight angle, gently trim the inner edge of the frame opening. This creates a subtle bevel that draws the eye toward the picture. -
Smoothing edges:
Dip your finger in a little water and run it along all cut edges to soften any sharpness or burrs left by the knife.
Step 2: Carving the Design
-
Marking the border:
Use your ruler and a needle tool to lightly scribe a straight line around the entire face of the frame, about 1/4 inch from the inner opening. This creates a smooth inner border. -
Marking the outer border:
Repeat the previous step on the outer edge, scribing a light line about 1/8 inch from the outside perimeter to frame your carving area. -
Planning the zig-zags:
Lightly scratch a continuous zig-zag pattern between your two border lines. Try to keep the peaks and valleys evenly spaced, though minor variations add character. -
Carving the main channels:
Using a triangle loop tool or a sharp carving tool, carve out the V-shaped lines you just drew. Press firmly enough to create deep, distinct grooves. -
Adding internal details:
Inside each large triangle created by your zig-zag, curve smaller V-shapes or nested triangles. Carve these lines parallel to the main zig-zag to create the repeating geometric motif seen in the photo. -
Cleaning the grooves:
As you carve, small crumbs of clay will accumulate. Use a soft, dry brush to sweep these out of the grooves rather than mashing them back in.
Sharp Lines Secret
Wait until the clay is ‘leather hard’ (stiff but cold) before carving. Wet clay drags and clumps, but leather hard clay carves cleanly like soft wood.
Step 3: Finishing and Assembly
-
Creating the back support:
Roll a small coil or cut a thin strip of clay to create a stopper on the back. Score and slip this onto the bottom back edge so the glass and photo won’t slide out. -
Making the stand (optional):
If you want a self-standing frame, cut a trapezoid shape from the remaining slab. Let it dry separately; it will be glued onto the backing board later, or you can attach a store-bought easel back. -
Slow drying:
Place the frame on a flat board and cover it loosely with plastic. Let it dry slowly over 2-3 days to prevent the corners from curling up. -
Sanding:
Once bone dry, take fine-grit sandpaper and gently sand the flat surface of the frame. This sharpens the contrast between the smooth top surface and the carved recesses. -
Firing or sealing:
If using kiln clay, fire it to bisque temperature. If using air-dry clay, apply a matte sealant to protect the finish without making it too shiny. -
Adding the backing:
Cut a piece of thick cardboard or mat board slightly smaller than the frame. Glue this to the back on three sides (left, right, bottom), leaving the top open to slide in your photo and protective acetate.
Uneven Texture?
If your carving tool leaves rough or jagged groove bottoms, dampen a thin paintbrush and run it through the channels to smooth them out without losing detail.
Your finished frame will have a wonderful tactile quality that makes any photo look special


What Really Happens Inside the Kiln
Learn how time and temperature work together inside the kiln to transform clay into durable ceramic.
Clay Tic-Tac-Toe Game Set
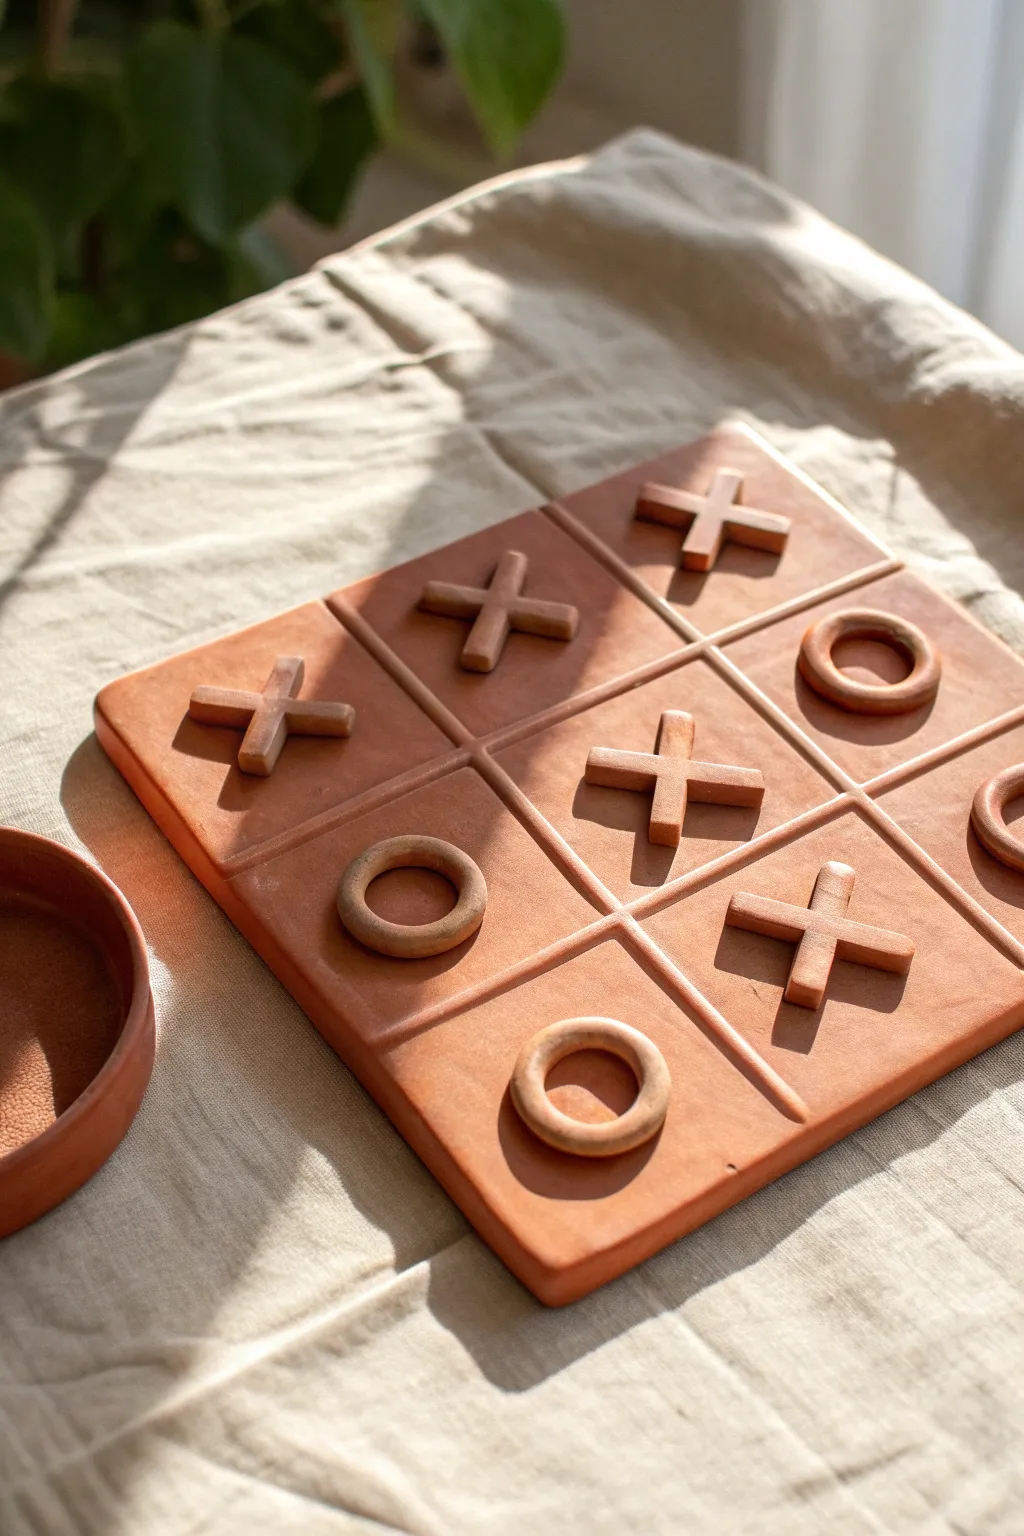
This earthy, handcrafted game set transforms a simple childhood pastime into a beautiful piece of functional decor. Using warm terracotta-colored clay, you’ll sculpt a sturdy grid board along with chunky, tactile X and O playing pieces.
Detailed Instructions
Materials
- Terracotta-colored air-dry clay or self-hardening clay
- Rolling pin
- Two wooden rulers or guide strips (approx. 1/4 inch thick)
- Ruler or straight edge
- Clay carving tool or butter knife
- Needle tool or toothpick
- Circular cookie cutter (approx. 1 inch diameter)
- Small cup of water
- Sponge or smoothing brush
- Canvas mat or parchment paper
Step 1: Creating the Board
-
Prepare the workspace:
Lay down your canvas mat or parchment paper to prevent sticking. Place your two wooden guide strips parallel to each other, about 8 inches apart. -
Roll the slab:
Take a large handful of clay and knead it briefly to remove air bubbles. Place it between the guide strips and roll it out until the rolling pin rests on the guides, ensuring a perfectly even thickness. -
Cut the square:
Measure and cut a 6×6 inch square from your rolled slab. Use a ruler and a knife for sharp, clean edges, keeping the excess clay for the game pieces. -
Smooth the edges:
Dip your finger or a small sponge in water and gently run it along the cut edges of the square to soften any sharpness and refine the shape. -
Mark the grid:
Using a ruler, lightly mark points at 2-inch intervals along all four sides of the square. Creating these guide marks first helps ensure your grid is perfectly centered. -
Engrave the lines:
Press a long straight edge or the back of your carving tool firmly into the clay connecting your marks. Create two vertical and two horizontal channels to form the classic nine-square grid. -
Refine the channels:
Go back over your grid lines with a slightly dampened finger or round tool to smooth out the bottom of the grooves, making them look intentional and finished.
Warping Woes?
If the board corners start curling up while drying, weigh them down gently with small bean bags or heavy washers placed on parchment paper.
Step 2: Sculpting the Pieces
-
Roll coils for Xs:
Roll out a few long, even snakes of clay, about the thickness of a pencil. Cut them into 1-inch segments. -
Assemble the Xs:
Take two segments and cross them. Use the ‘score and slip’ method—scratching the contact points and adding a drop of water—to join them securely in the center. -
Make the Os:
Roll out a fresh slab of clay to the same thickness as your board. Use your small circular cookie cutter to punch out five circles. -
Hollow the centers:
Use a smaller cutter or freehand with a knife to remove the centers of your circles, creating thick rings. Alternatively, you can form rings by joining the ends of short clay coils. -
Shape check:
I like to place an ‘X’ and an ‘O’ onto the damp board briefly to ensure they fit comfortably inside the grid squares without overcrowding. Adjust size if necessary. -
Smooth the pieces:
Spend time smoothing the edges of every game piece with a wet brush. Removes any crumbles or sharp angles for a professional feel.
Step 3: Finishing Up
-
Final drying setup:
Place the board and all ten pieces (5 Xs, 5 Os) on a flat, dry surface. To prevent warping, place a piece of parchment paper and a light book on the board once the surface is touch-dry. -
Rotation:
Flip the board and pieces gently every few hours during the drying process to encourage even airflow and prevent curling. -
Optional sanding:
Once fully cured (24-48 hours depending on clay), use fine-grit sandpaper to buff away any remaining rough spots.
Make It Yours
Instead of Xs and Os, sculpt themes like stars and moons, hearts and diamonds, or even tiny cats and dogs for a personalized twist.
Once dry, you will have a timeless, durable game set ready for strategy sessions on the coffee table
Pinch Pot Creature Whistle
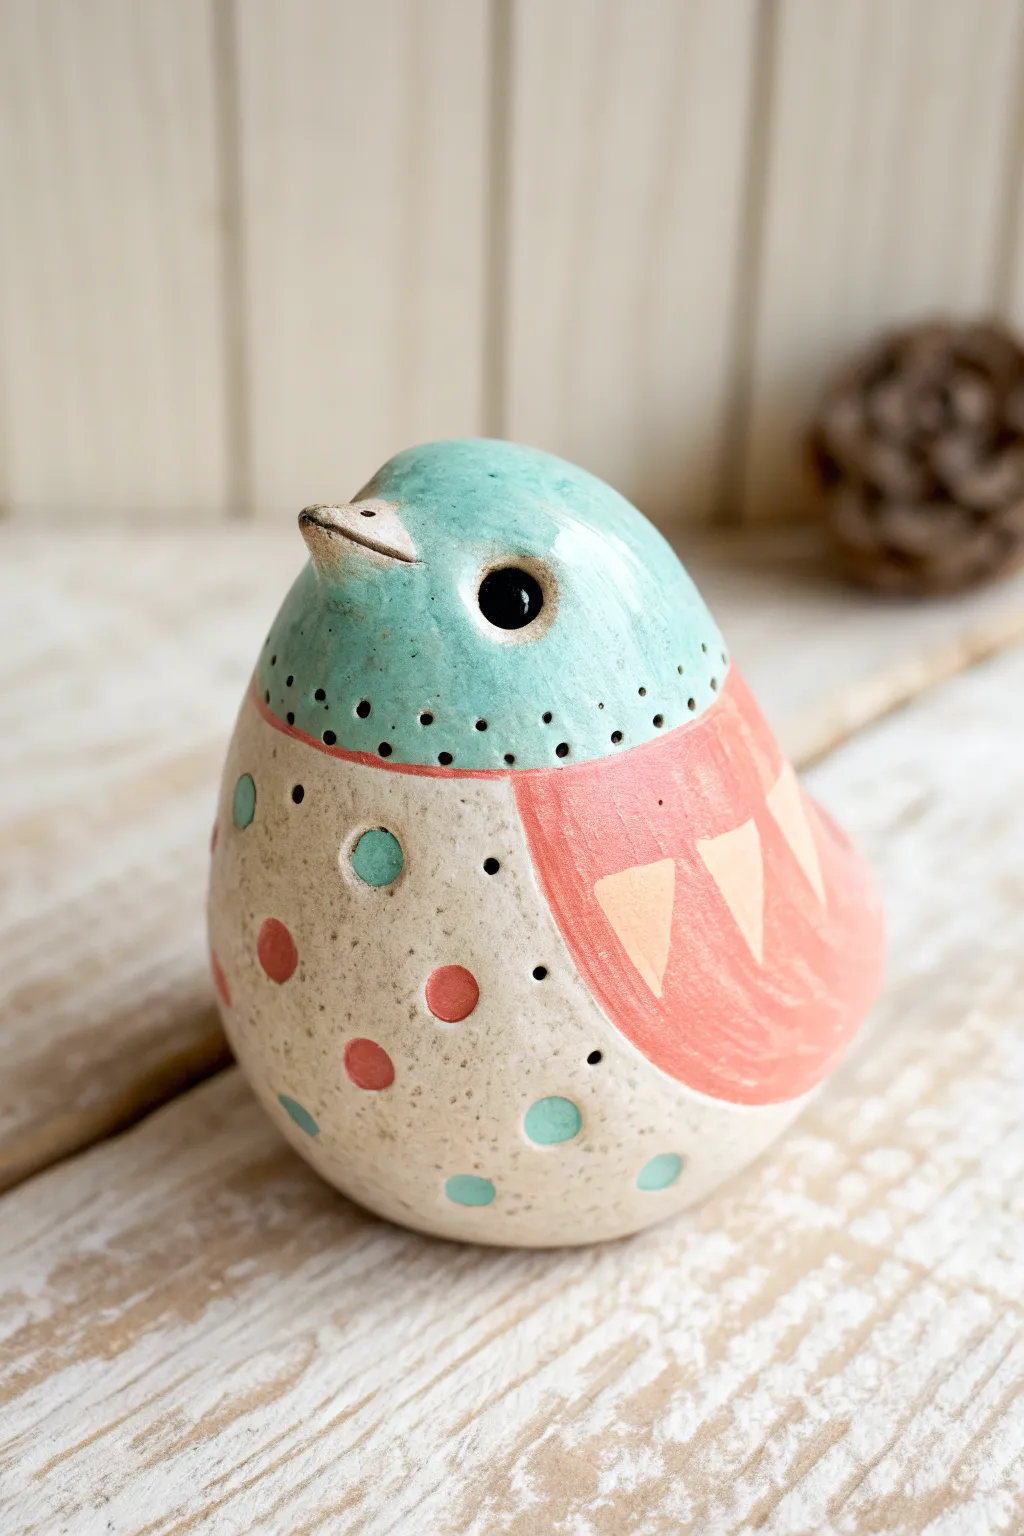
Transform a simple pinch pot into a charming, musical creature with this ceramic bird whistle project. Featuring a soft pastel palette of teal, cream, and coral, this glossy friend combines decorative surface patterns with the functional fun of a working clay whistle.
How-To Guide
Materials
- White earthenware or stoneware clay
- Wooden modeling tool (flat edge)
- Popsicle stick or fettling knife
- Needle tool
- Small sponge
- Underglazes (teal, cream/white, coral/salmon, red)
- Small round paintbrush
- Clear transparent glaze
- Water cup
- Whistle tool (optional, or shaped popsicle stick)
Step 1: Forming the Body
-
Pinch the base:
Start with a ball of clay roughly the size of a tangerine. Insert your thumb and pinch while rotating to create a classic pinch pot shape, keeping the walls even—about ¼ inch thick. -
Close the form:
Unlike a bowl, you want to close this pinch pot. Gently collar the rim inward, smoothing the clay over the hollow center until you have a fully enclosed, hollow egg shape. -
Shape the bird:
Hold the egg shape in your palm. Smooth out the surface with a rib tool or your finger. Gently pull one end to create a small, pointed tail and pat the bottom on the table so it sits flat.
Step 2: Creating the Whistle
-
Make the mouthpiece:
Flatten the tail slightly. Insert a popsicle stick or whistle tool horizontally into the end of the tail to create the air channel. Do not pierce all the way into the hollow cavity yet. -
Cut the sound hole:
On the underside of the bird, near the base of the tail, cut a small rectangular window. Use a bevel tool or knife to cut the side of the window closest to the mouthpiece at a sharp 45-degree angle (the blade). This sharp edge splits the air. -
Connect the airway:
Re-insert your stick into the mouthpiece channel. Adjust it until you see the stick lining up perfectly with the sharp 45-degree blade edge you just cut. This alignment is critical for sound. -
Test the sound:
Once the airway is clear, blow gently through the mouthpiece. If it hisses, adjust the angle of the blade edge or clear any clay crumbs. It should produce a clear tone.
Silent Bird?
If the whistle won’t sound, the air isn’t hitting the sharp edge (‘blade’) correctly. Re-insert the stick and carefully adjust the blade angle up or down until it splits the airstream cleanly.
Step 3: Adding Details
-
Sculpt the beak:
Pinch a tiny amount of clay at the front of the ‘egg’ to form a small beak. Use a knife or needle tool to slice a horizontal line for the mouth opening. -
Add eyes:
Using the back of a paintbrush or a small round tool, press indentations where the eyes should go. Roll tiny balls of clay, place them in the sockets, and pierce the center with a needle tool for pupils. -
Refine the surface:
Smooth away any fingerprints with a slightly damp sponge. I find it helpful to let the clay stiffen to leather-hard before doing the final smoothing.
Level Up: Note Change
Before the clay dries, poke a hole on the side of the hollow belly. By covering and uncovering this hole with a finger while blowing, you can create a two-note instrument.
Step 4: Decoration & Glazing
-
Base coat the head:
Apply two to three coats of a teal or light blue underglaze to the top third of the bird, curving the line downwards to mimic a hood. -
Paint the body:
Paint the lower portion of the bird with a cream or white underglaze. Make sure this layer is opaque to hide the clay body color. -
Wing design:
Paint a curved wing shape on the side using a coral or salmon color. Inside the wing, use a lighter cream color to paint alternating triangles for feathers. -
Polka dot details:
Using the handle end of a paintbrush, dip into red and teal underglazes to stamp perfect circles onto the cream belly area. -
Texture dots:
Use a needle tool or very fine drill bit to gently poke a line of small black holes along the border where the blue head meets the cream body for added texture. -
Bisque fire:
Let the bird dry slowly and completely (at least 2-3 days). Fire the piece to cone 04 (or according to your clay specs) for the bisque firing. -
Clear glaze:
Dip or brush a clear gloss glaze over the entire bird. Be very careful not to let glaze clog the whistle airway or sound hole. -
Final firing:
Fire the piece a second time to the temperature required by your clear glaze (usually cone 05/06) to seal the surface and make the colors pop.
Now you have a cheerful little avian friend ready to perch on your shelf or sing a tune.

TRACK YOUR CERAMIC JOURNEY
Capture glaze tests, firing details, and creative progress—all in one simple printable. Make your projects easier to repeat and improve.
Clay Bell Wind Chime
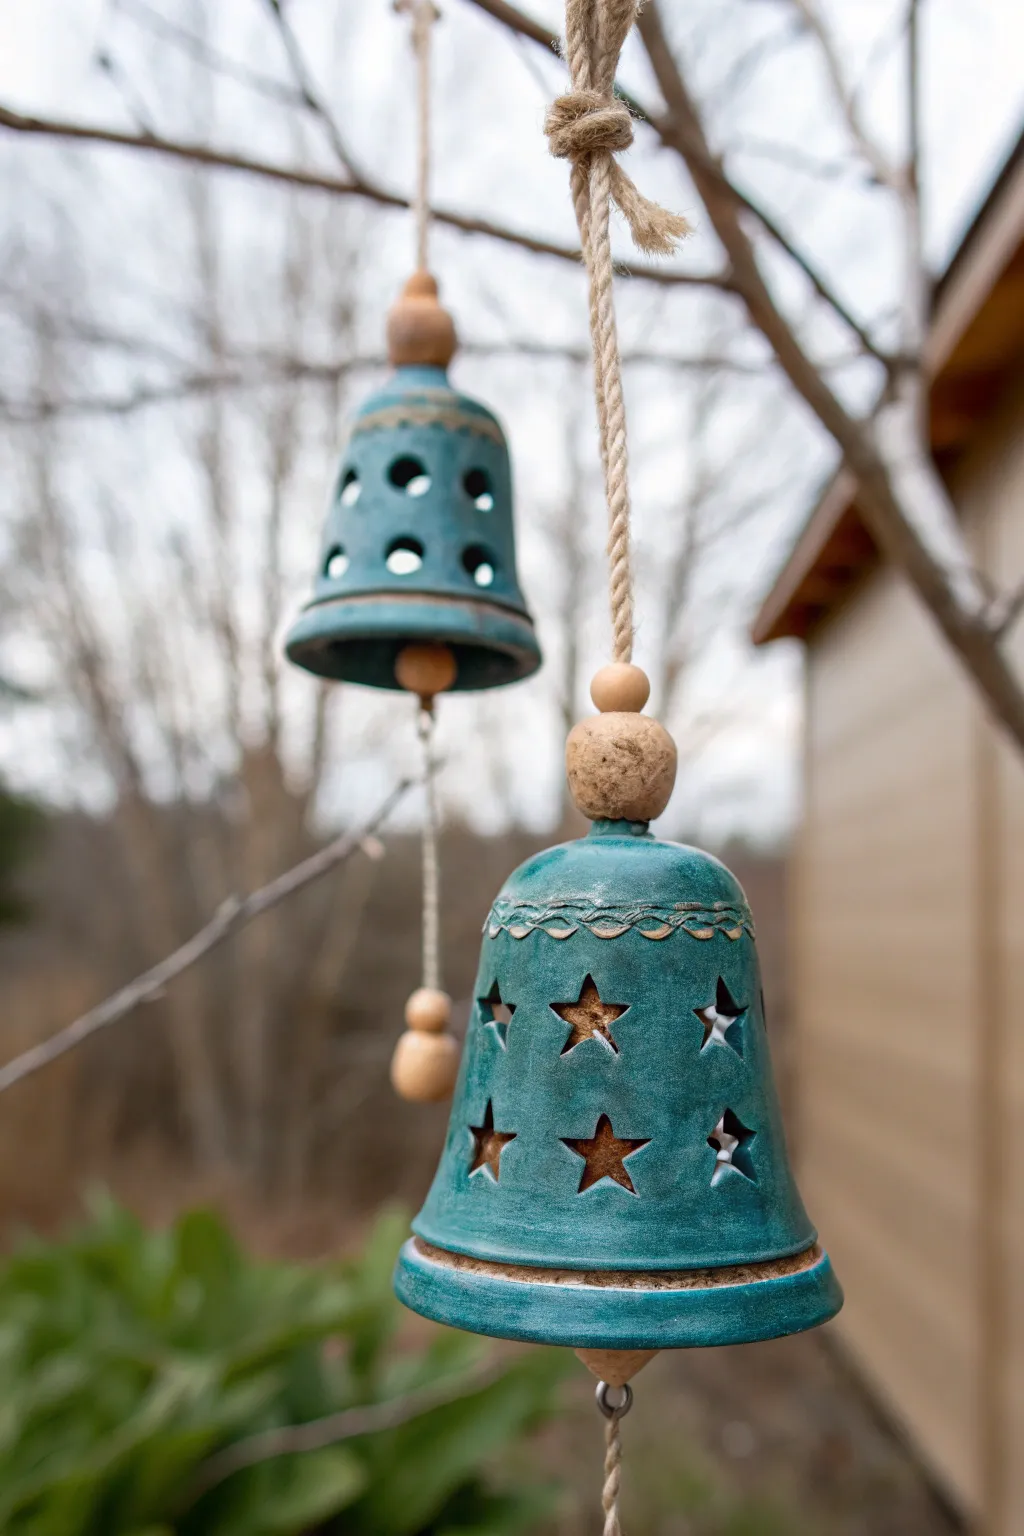
These enchanting bells feature a rustic teal glaze and cutout designs that catch the light as they sway. The project combines hand-building techniques with decorative carving, making it a perfect introduction to functional clay art for students.
Step-by-Step Guide
Materials
- Low-fire white earthenware clay
- Rolling pin and canvas mat
- Plastic cup or yogurt container (for forming)
- Small cookie cutters (stars and circles)
- Fettling knife or clay needle tool
- Loop tool for texture (optional)
- Sponge and water
- Teal or turquoise ceramic glaze (semi-opaque)
- Wooden beads (unpainted)
- Jute twine or hemp cord
- Clear matte varnish (optional for beads)
Step 1: Forming the Bell Body
-
Roll the slab:
Begin by rolling out a slab of clay to an even thickness of about 1/4 inch on your canvas mat. -
Cut the shape:
Create a paper template that forms a cone shape when rolled, or simply cut a large semi-circle from your clay slab using a needle tool. -
Form the cone:
If you enjoy using molds, drape the clay over a plastic cup covered in newsprint to prevent sticking, or hand-form the clay into a cone shape, overlapping the straight edges. -
Join the seam:
Score and slip the overlapping edges thoroughly, then press them together firmly to create a seal that won’t crack during firing. -
Refine the shape:
Stand the bell up and gently tap the bottom on the table to level it. Smooth out the seam with a damp finger or a rib tool so it blends seamlessly into the rest of the surface.
Slumping Issues?
If your clay cone sags while working, stuff the inside with crumpled newspaper or dry paper towels to support the shape while it stiffens to leather-hard.
Step 2: Adding Detail and Texture
-
Create cutouts:
When the clay is leather-hard (firm but still cool), use small star or circle cutters to punch holes through the walls of the bell. Remove the clay plugs carefully. -
Clean the edges:
Use a slightly damp sponge to smooth any sharp burrs or rough spots around your cutout designs. -
Add surface texture:
Use a needle tool or small loop tool to carve a decorative band near the top of the bell. You can make wavy lines or a braided pattern like the one shown. -
Create the hanger:
Roll a small ball of clay, flatten it slightly, and attach it to the very top of the bell using the score and slip method. -
Make the hole:
Pierce a hole through this top attachment that is large enough for your twine to pass through after the clay shrinks during firing. -
Dry and fire:
Allow the bells to dry slowly under loose plastic to prevent warping, then bisque fire them in the kiln according to your clay’s instructions.
Make it Chime
Create your own clay clappers and beads instead of using wood. Glaze them to match for a fully ceramic sound that is slightly higher pitched.
Step 3: Glazing and Assembly
-
Apply glaze:
Brush 2-3 coats of teal glaze onto the bisque-fired bell. For a rustic look, you can wipe a little glaze off the textured areas with a damp sponge before firing. -
Glaze fire:
Fire the bells a second time to mature the glaze. Make sure the bottom rim is wiped clean of glaze so it doesn’t stick to the kiln shelf. -
Prepare the clapper:
Cut a long length of jute twine. Tie a large knot at one end and thread a wooden bead onto it to serve as the clapper that makes the sound. -
Assemble the bell:
Thread the twine up through the inside of the bell and out the top hole. Tie a knot just above the bell handle to secure the clapper at the right height. -
Add finishing touches:
String a second decorative bead above the bell on the outside, knotting the twine again to hold it in place. -
Create a hanging loop:
Tie a loop at the top of the remaining twine so your new artwork is ready to hang on a branch or hook.
Listen for the gentle clinking sound as the wind catches your beautiful new creation
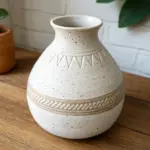
Scratch-Drawn Pattern Vessel

This striking ceramic project introduces students to the ancient technique of sgraffito, where designs are scratched through a layer of slip to reveal the clay body underneath. The result is a high-contrast, professional-looking vessel featuring a celestial theme with stars, waves, and geometric motifs.
How-To Guide
Materials
- Stoneware clay (buff or white)
- Black underglaze or decorative slip
- Rolling pin
- Canvas mat or cloth
- Clay knife or fettling knife
- Scoring tool (or fork)
- Slip (slurry)
- Loop carving tool (small)
- Needle tool
- Synthetic soft brush (for underglaze)
- Ruler
- Sponge
Step 1: Building the Cylinder
-
Roll the Slab:
Begin by wedging your clay to remove air bubbles, then roll out a smooth, even slab about 1/4 inch thick. Use guide sticks if you have them to ensure consistent thickness across the entire piece. -
Measure and Cut:
Using a ruler, cut a rectangular strip for the walls of your cup; a good size for a tumbler is about 10-12 inches long and 4-5 inches tall. I like to cut the top edge completely straight but leave the others rough until I check the fit. -
Bevel the Edges:
To create a seamless join, cut the short ends of your rectangle at a 45-degree angle (beveling) in opposite directions so they overlap perfectly when rolled into a cylinder. -
Score and Slip:
Rough up the beveled edges with your scoring tool and apply a liberal amount of clay slip. This glue is essential for a join that won’t crack during firing. -
Form the Cylinder:
Gently curve the slab into a cylinder shape, pressing the scored ends together firmly. support the inside wall with one hand while smoothing the seam on the outside with the other. -
Add the Base:
Place your cylinder on a scrap piece of clay slab and trace around the bottom with a needle tool. Cut this circle out, score and slip the contact points, and attach it to the bottom of the cylinder. -
Refine the Form:
Smooth out the rim with a damp sponge or a strip of chamois leather. Ensure the walls are straight and the joins are invisible.
Smudged Lines?
If you accidentally smear black underglaze onto your white carved lines, wait for it to dry completely. Then, gently scrape the smudge off with your loop tool to re-expose the clean clay.
Step 2: Applying the Surface Design
-
Leather Hard Stage:
Allow the vessel to dry slowly until it reaches the leather-hard stage. It should feel cool and firm, like a block of cheddar cheese—no longer squishy, but not dry. -
Apply Underglaze:
Paint 2-3 even coats of black underglaze over the exterior of the cup. Let each coat dry until it’s matte before applying the next to ensure solid, opaque coverage. -
Map the Sections:
Once the black surface is dry to the touch, lightly scratch three horizontal bands around the vessel using a needle tool to divide your design space. These will separate the stars, waves, and bottom triangles. -
Carve the Top Stars:
In the top section, use a small loop tool or sgraffito tool to carve out 6-pointed and 8-pointed stars. Remove the black layer gently to reveal the raw clay underneath. Don’t worry about making them identical; variety adds charm. -
Add the Dots:
Poke small circular dots between the stars using the tip of a loop tool or a dull pencil point to create a starry night effect. -
Carve the Wave Pattern:
In the middle band, carve parallel wavy lines. Try to keep your hand steady and flow around the curve of the mug. The lines should mirror each other horizontally. -
Create the Base Triangles:
In the bottom section, carve a series of triangles pointing upward. You can alternate their fillings: leave some solid black with a simple outline, and fill others with horizontal stripes. -
Clean Up Crumbs:
As you carve, little crumbs of clay and underglaze will accumulate. Do not wipe them with your hand, or you might smear the black. Instead, use a large, soft, dry makeup brush to gently sweep them away. -
Final Polish:
Once finished carving, check the rim again. If any underglaze got on the lip where you drink, sponge it back to the raw clay for a clean, finished look. -
Drying and Firing:
Let the piece dry completely to the bone-dry stage. Bisque fire first, apply a clear glaze over the entire piece (or just the interior if you prefer a matte exterior), and then glaze fire to the clay’s specified temperature.
Add Texture
Make the design tactile by variable carving depths. Carve the stars deeper than the waves so the user can feel the different patterns when holding the mug.
Enjoy using your custom celestial vessel for your morning juice or display it as a standalone art piece
Ocean Life Mobile Charms
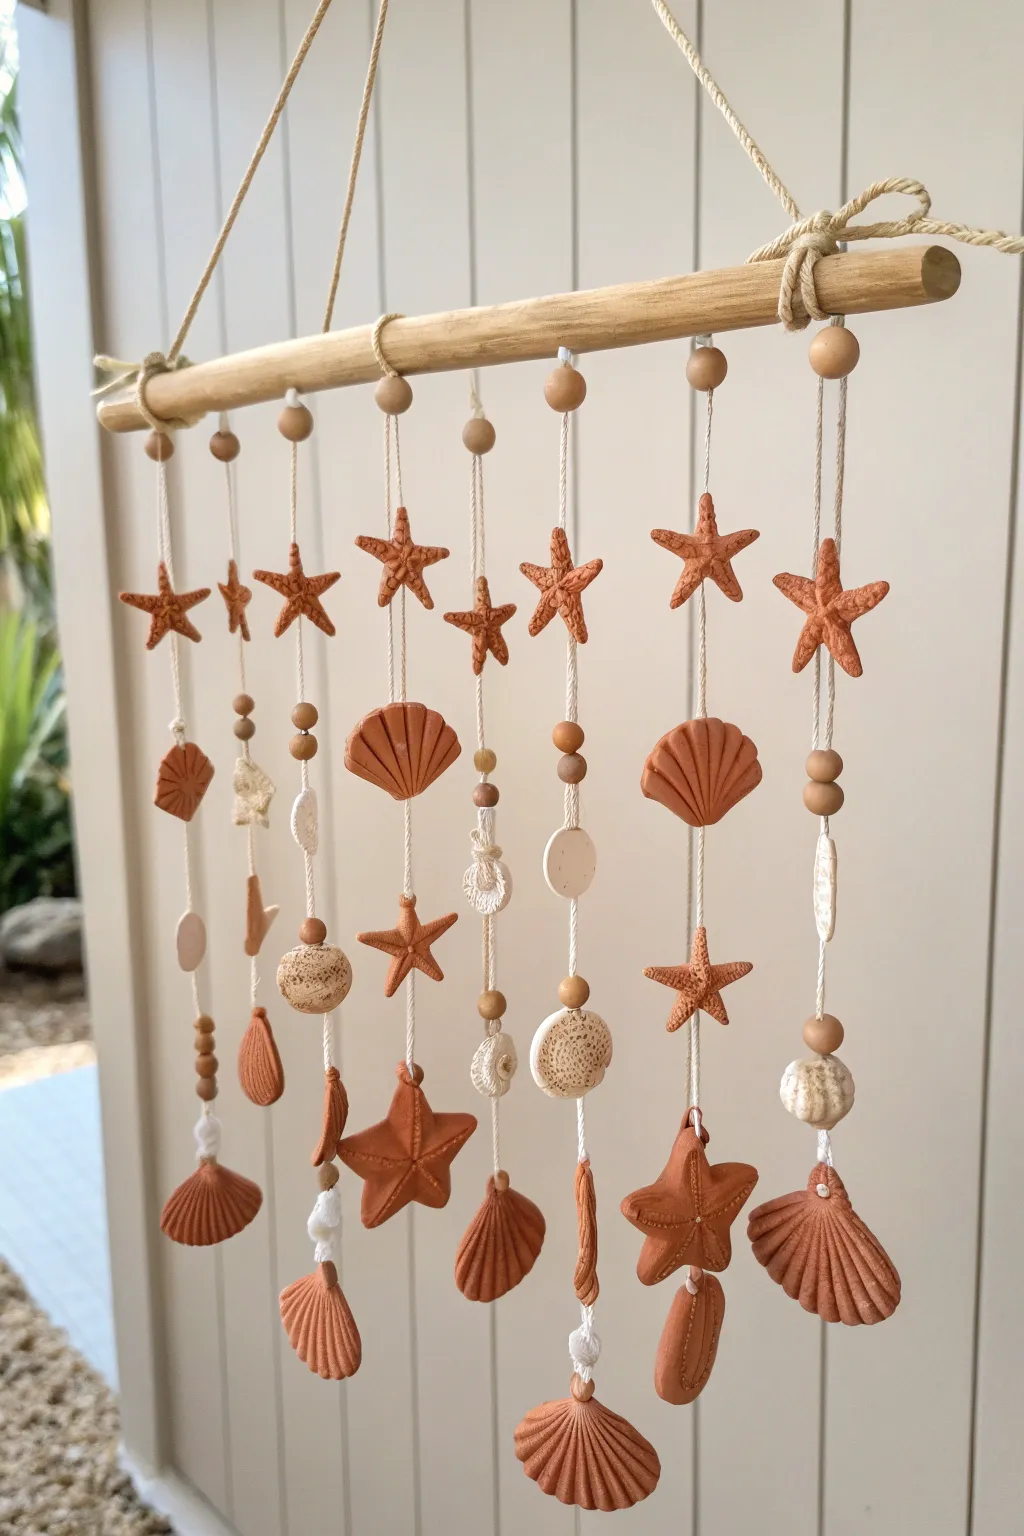
Bring the calming vibes of the coast indoors with this earthy, bohemian-style mobile. Using warm terracotta clay and natural wood elements, you’ll sculpt delicate sea stars and shells that dance gently in the breeze.
Detailed Instructions
Materials
- Terracotta-colored polymer clay (or air-dry clay)
- White or cream polymer clay
- Texturing tools (needle tool, toothpick, toothbrush)
- Wooden dowel (approx. 12-14 inches)
- Natural jute twine or hemp cord
- Wooden beads (assorted sizes)
- Small circle cutter (optional for spacing)
- Rolling pin
- Baking sheet and parchment paper
- Craft glue or clear sealant (optional)
Step 1: Sculpting the Sea Life
-
Prepare your clay:
Condition the terracotta clay by kneading it in your hands until it’s soft and pliable. This prevents cracks while you work. -
Shape the larger starfish:
Pinch off walnut-sized balls of clay. Flatten them slightly and pull out five points to form star shapes. For this mobile, you’ll need about 3 or 4 larger starfish for the bottom tier. -
Texture the starfish surface:
Use a needle tool or an old toothbrush to stipple the surface of the stars, giving them a realistic, organic texture. I like to gently press a toothpick down the center of each arm to create a subtle ridge. -
Create the smaller stars:
Repeat the process with smaller, marble-sized pieces of clay to create the upper row of tiny starfish. You’ll need roughly 8-10 of these. -
Form the scallop shells:
Roll balls of terracotta clay and flatten them into fan shapes. Use a needle tool to press deep grooves radiating from the bottom point to the top edge to mimic shell ridges. -
Sculpt spiral shells:
Roll a small snake of clay that tapers at one end. Coil it around itself to create cone-shaped snail shells. Ensure they are thick enough to be pierced later. -
Make the white accents:
Using the white clay, create small textured discs, irregular pebble shapes, or tiny spiral shells to act as separators between the terra cotta pieces. Texture these heavily with a toothbrush to look like weathered coral. -
Add hanging holes:
Before the clay hardens, use a toothpick or needle tool to poke a clean hole through the top (and bottom, if hanging pieces below it) of every single clay charm. Make the holes slightly larger than your twine.
Keep it Clean
Terracotta pigment can stain hands. Wipe your hands with a baby wipe before handling the white clay accents to keep them bright and prevent color transfer.
Step 2: Assembly and Hanging
-
Bake or dry:
Place all your clay pieces on a parchment-lined baking sheet. Bake according to your polymer clay package instructions (typically 275°F for 15-30 mins) or let air-dry clay set for 24-48 hours. -
Prepare the dowel:
Cut a long piece of twine (about 3 feet) and tie it to both ends of your wooden dowel to create the main hanger. Secure the knots with a dab of glue if needed. -
Cut suspension cords:
Cut 7 or 8 lengths of twine, each about 24 inches long. These will hold your vertical strands of charms. -
Attach cords to dowel:
Tie each suspension cord onto the dowel using a lark’s head knot or a simple double knot. Space them out evenly across the width of the wood. -
String the top beads:
Thread a wooden bead onto each string right below the dowel. A small knot below the bead will keep it in place at the top. -
Assemble the strands:
Begin threading your clay pieces. Start with a small starfish near the top, followed by beads or white clay spacers. Tie knots underneath each charm to hold it at your desired height. -
Vary the patterns:
Don’t make every strand identical. Alternate the order of shells, starfish, and beads to create visual interest. For instance, place a large scallop shell in the middle of one strand and a spiral shell on the next. -
Anchor the bottom:
Finish each strand with a larger, heavier clay piece (like a large starfish or big shell) at the very bottom. This weight helps the strings hang straight. -
Trim excess twine:
Once all knots are secure, trim any tail ends of the twine close to the knots for a clean look.
Driftwood Upgrade
Instead of a standard wooden dowel, scavenge for a piece of real sun-bleached driftwood. It breaks up the uniformity and adds authentic beach character.
Hang your new mobile near a sunny window and enjoy the coastal atmosphere it creates
Shelf Sitter Character Scene
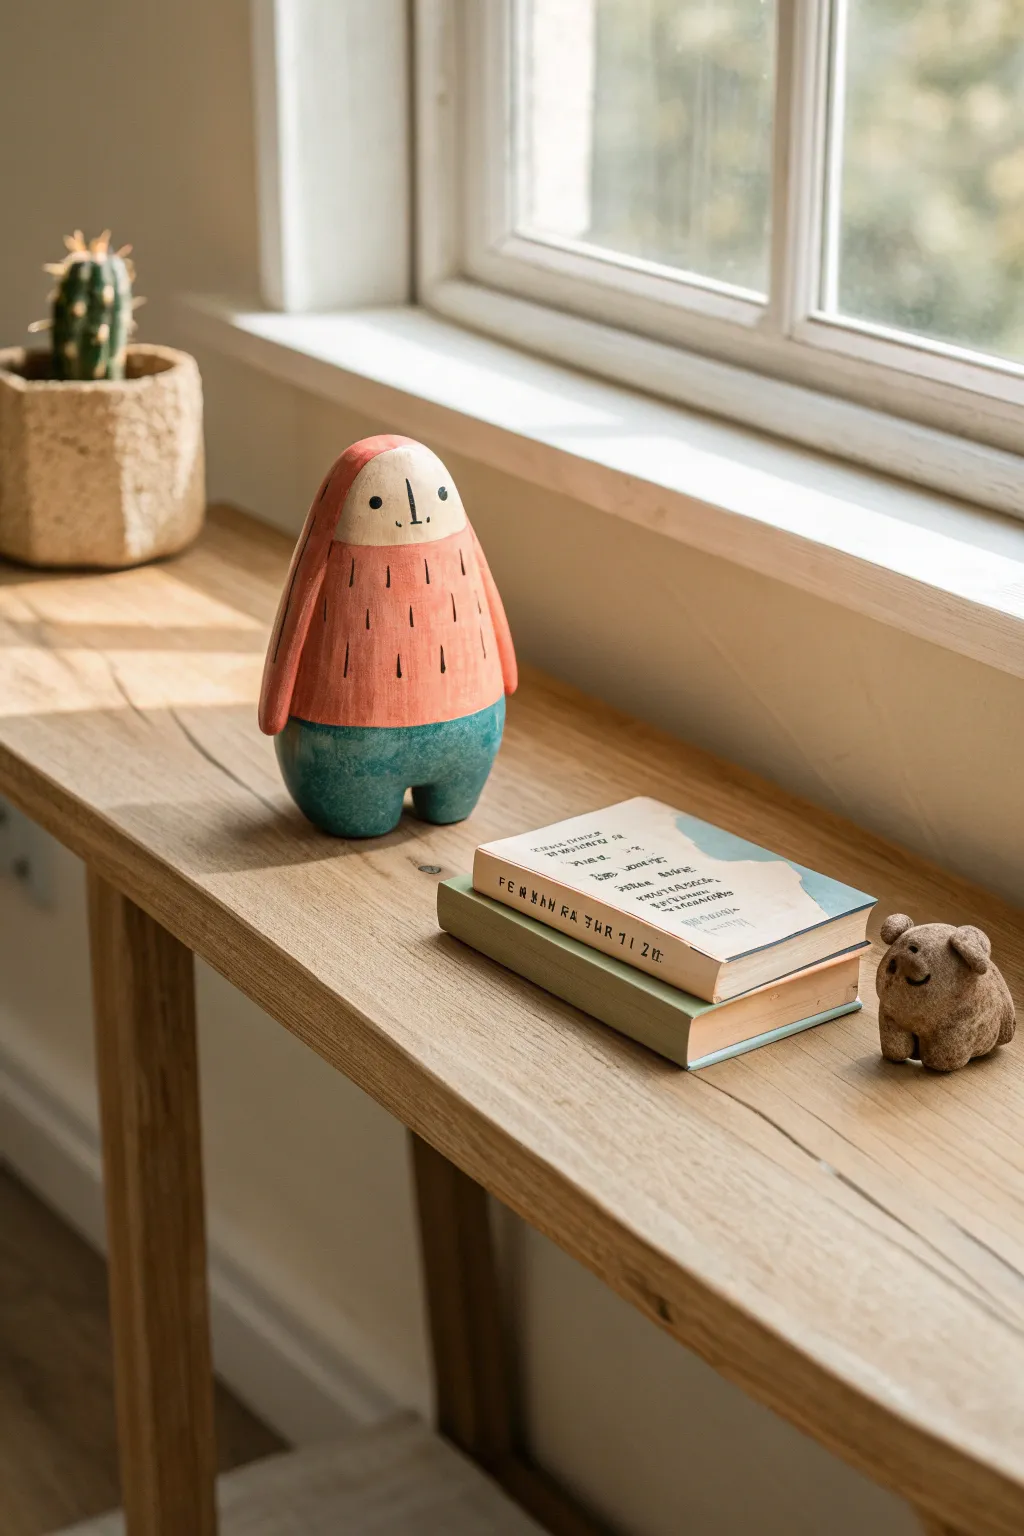
This charming little character brings a touch of quiet curiosity to any bookshelf or windowsill. Sculpted with simple, soft curves and finished with a distinct two-tone painted design, this shelf sitter feels like a friendly spirit from a storybook.
Detailed Instructions
Materials
- Air-dry clay or polymer clay (white)
- Acrylic paints (salmon pink, teal green, dark brown/black, cream/beige)
- Small flat paintbrush
- Fine detail paintbrush
- Aluminum foil (for armature)
- Sculpting tools (smooth rib, needle tool)
- Cup of water
- Fine-grit sandpaper
- Matte varnish or sealant
Step 1: Forming the Core
-
Create a foil armature:
Begin by crumpling aluminum foil into a tight, elongated pear shape. This saves clay and keeps the figure lightweight. Aim for a shape that is slightly wider at the bottom and tapered at the top. -
Cover with clay:
Roll out a slab of clay creating a thickness of about 1/4 inch. I like to wrap this sheet entirely around your foil core, pressing the seams together firmly. -
Smooth the surface:
Using a little water on your fingers or a smooth rib tool, blend the seams until they disappear. Working the clay until the surface is completely uniform is key for that minimalist look. -
Define the base:
Gently tap the bottom of the figure on your work surface to flatten it slightly. This ensures your character sits steadily without wobbling. -
Sculpt the legs:
Using a modeling tool or your thumbs, press into the bottom center of the form to create a separation, forming two stubby, rounded legs. Smooth the clay around this indentation.
Step 2: Adding Details & Drying
-
Add the arms:
Roll two small sausage shapes of clay that taper slightly at one end. Attach these to the sides of the body using the score and slip method (scratch both surfaces and add water/slip). -
Blend the attachments:
Smooth the clay where the arms meet the body so they look seamless, draping down naturally along the sides. -
Refine the face area:
Identify the front of the sculpture and ensure the ‘face’ area near the top is smooth and slightly rounded. No nose or mouth sculpting is needed, as these will be painted. -
Final smooth:
Give the entire piece one last check for fingerprints or lumps. Use a damp sponge for a final polish. -
Let it dry:
Allow the clay to dry completely according to the manufacturer’s instructions. For air-dry clay, this usually takes 24-48 hours. Rotate it occasionally for even drying. -
Sand imperfections:
Once fully dry (and hardened if baking polymer), lightly sand any rough spots with fine-grit sandpaper to get a porcelain-like finish.
Cracks happen!
If small cracks appear as the clay dries, don’t panic. Mix a small amount of fresh clay with water to make a paste (slip) and fill the cracks, then smooth it over.
Step 3: Painting the Character
-
Base coat the face:
Paint a small, arched area near the top center using a cream or beige color. This defines the face area. -
Paint the pants:
Using teal green paint, cover the bottom third of the figure, including the legs. Create a clean, slightly curved line where the pants meet the upper body. -
Paint the upper body:
Fill in the rest of the body (and arms) with salmon pink paint, carefully painting around the cream face area. You might need two coats for opaque coverage. -
Add texture marks:
With the dark brown or black paint and a very fine brush, paint small vertical dashes randomly across the pink upper body area to resemble fur or rain marks. -
Paint facial features:
Using the same dark paint, add two small dots for eyes and a simple vertical line for the nose. Keep the features small and centered for a cute expression. -
Seal the work:
Protect your paint job with a coat of matte varnish. This removes the chalky feel of air-dry clay and keeps the colors vibrant.
Make it a set
Make a trio of characters in varying heights and color palettes. Try mustard yellow or slate grey for the bodies to create a cohesive modern art family.
Place your new friend on a shelf near a window to catch the afternoon light