If you’re craving a cozy, hands-on fall project, clay pumpkins are one of my favorite ways to scratch that creative itch. I’m sharing a mix of classic and unexpected clay pumpkin ideas you can make in an afternoon and style all season long.
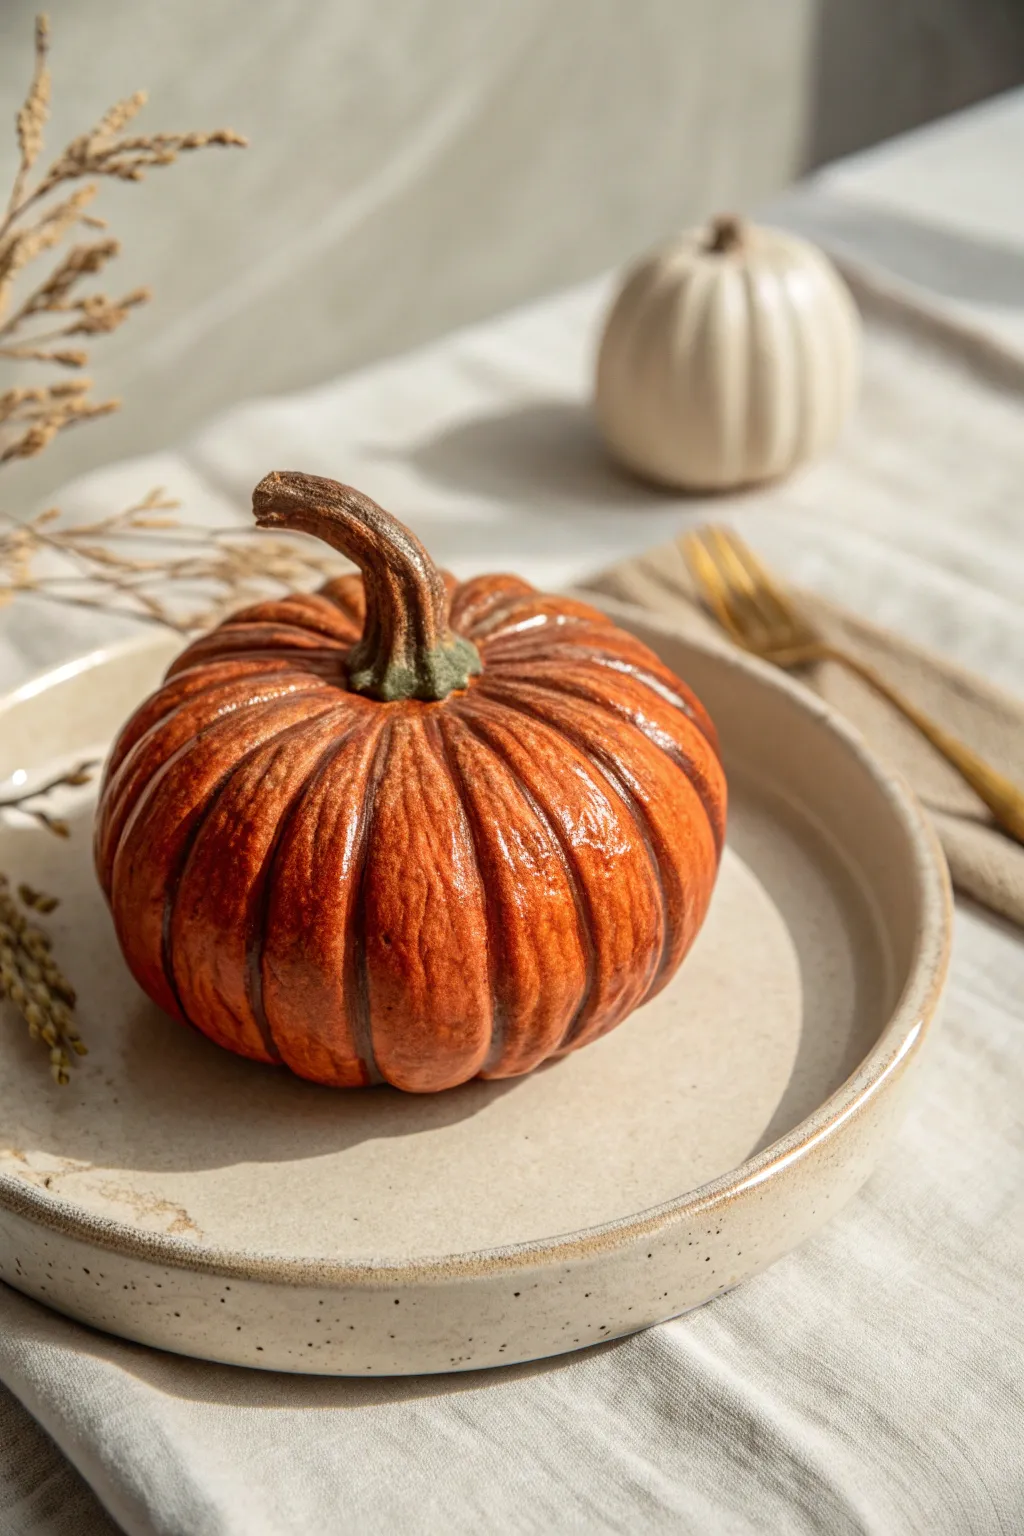
Classic Mini Clay Pumpkins With Ribbed Grooves
Capture the essence of autumn with this incredibly lifelike clay pumpkin featuring deep, satisfying ribbed grooves and a natural-looking stem. The matte finish and subtle shading give it an organic feel that fits perfectly into any modern farmhouse decor.
Step-by-Step
Materials
- Terracotta or orange polymer clay
- Dark brown or espresso polymer clay
- Sculpting tool set (needle tool, ball stylus)
- Small piece of aluminum foil
- Soft pastel chalks (dark orange, brown, dark green)
- Soft paintbrush for pastels
- Toothbrush or texturing sponge
- Liquid polymer clay (optional)
- Acrylic rolling pin
- Oven for baking
Step 1: Forming the Base
-
Prepare the core:
Begin by crumpling a small piece of aluminum foil into a tight ball, roughly half the size of your desired finished pumpkin. This saves clay and ensures the pumpkin isn’t too heavy. -
Condition the clay:
Take your orange polymer clay and knead it thoroughly in your hands until it becomes warm and pliable. This conditioning prevents cracking later. -
Cover the core:
Flatten the conditioned orange clay into a pancake shape and wrap it completely around the foil ball. Roll it smoother between your palms until you have a perfect sphere with no visible seams. -
Flatten the shape:
Place the sphere on your work surface and press down gently with your palm to flatten the top and bottom slightly, giving it that classic squat pumpkin silhouette. -
Mark the center:
Use a ball stylus or the back of a paintbrush to create a small indentation in the very center of the top where the stem will eventually sit.
Step 2: Sculpting the Ribs
-
Mark the quadrants:
Using a dull knife tool or the side of a needle tool, gently impress a line from the top center to the bottom center. Repeat on the opposite side to divide the pumpkin in half, then again to create quarters. -
Subdivide sections:
Divide each of those four sections in half again. Depending on the size of your pumpkin, you might want to divide them once more to create narrow, realistic ribs. -
Deepen the grooves:
Go back over your initial marked lines with a modeling tool, pressing deeper to create distinct, rounded lobes. Smooth the edges of the grooves with your finger so they look organic, not sharp. -
Soften the shape:
Gently press the top near the stem indentation inward slightly more to create that dipped look where the stem attaches. -
Add surface texture:
Lightly tap a clean toothbrush or a texturing sponge over the entire surface of the orange clay. This removes fingerprints and mimics the skin of a real vegetable.
Fixing Flat Spots
If the bottom flattens too much while sculpting, gently cup the pumpkin in your hand while working instead of leaving it on the table. You can also rest it on a rounded bed of cornstarch.
Step 3: Stem and Shading
-
Shape the stem:
Take a small log of dark brown clay. Twist it slightly to create a gnarled look, making one end wider (the base) and the other slightly tapered. -
Texture the wood:
Use a needle tool to scratch veritcal, irregular lines up and down the stem to simulate dried wood grain. I find twisting the stem again after texturing adds even more realism. -
Attach the stem:
Press the wide base of the stem firmly into the indentation on top of the pumpkin. If needed, blend the edges of the brown clay slightly into the orange with a small tool, or use a drop of liquid clay for a stronger bond. -
Shade with pastels:
Before baking, use a soft brush to dust dark orange or reddish-brown chalk pastel powder deep into the ribbed crevices. This accentuates the shadows. -
Add greenery hints:
Dust a tiny amount of dark green or brown pastel right around the base of the stem and the very bottom of the pumpkin to simulate where it grew on the vine. -
Final check:
Do a final inspection for lint or accidental nail marks, smoothing them out gently with a finger or silicone tool. -
Bake carefully:
Bake the pumpkin according to your clay manufacturer’s instructions, typically around 275°F (135°C) for 30 minutes per quarter-inch of thickness. Let it cool completely before handling.
Pro Tip: Matte Finish
Real pumpkins aren’t shiny. If your clay cures with a sheen, buff it lightly with super-fine steel wool or apply a matte varnish to achieve that velvety, garden-fresh look.
Arranging a few of these in different sizes creates a charming centerpiece that lasts year after year


Tiny Pumpkin Patch Display for a Shelf or Table
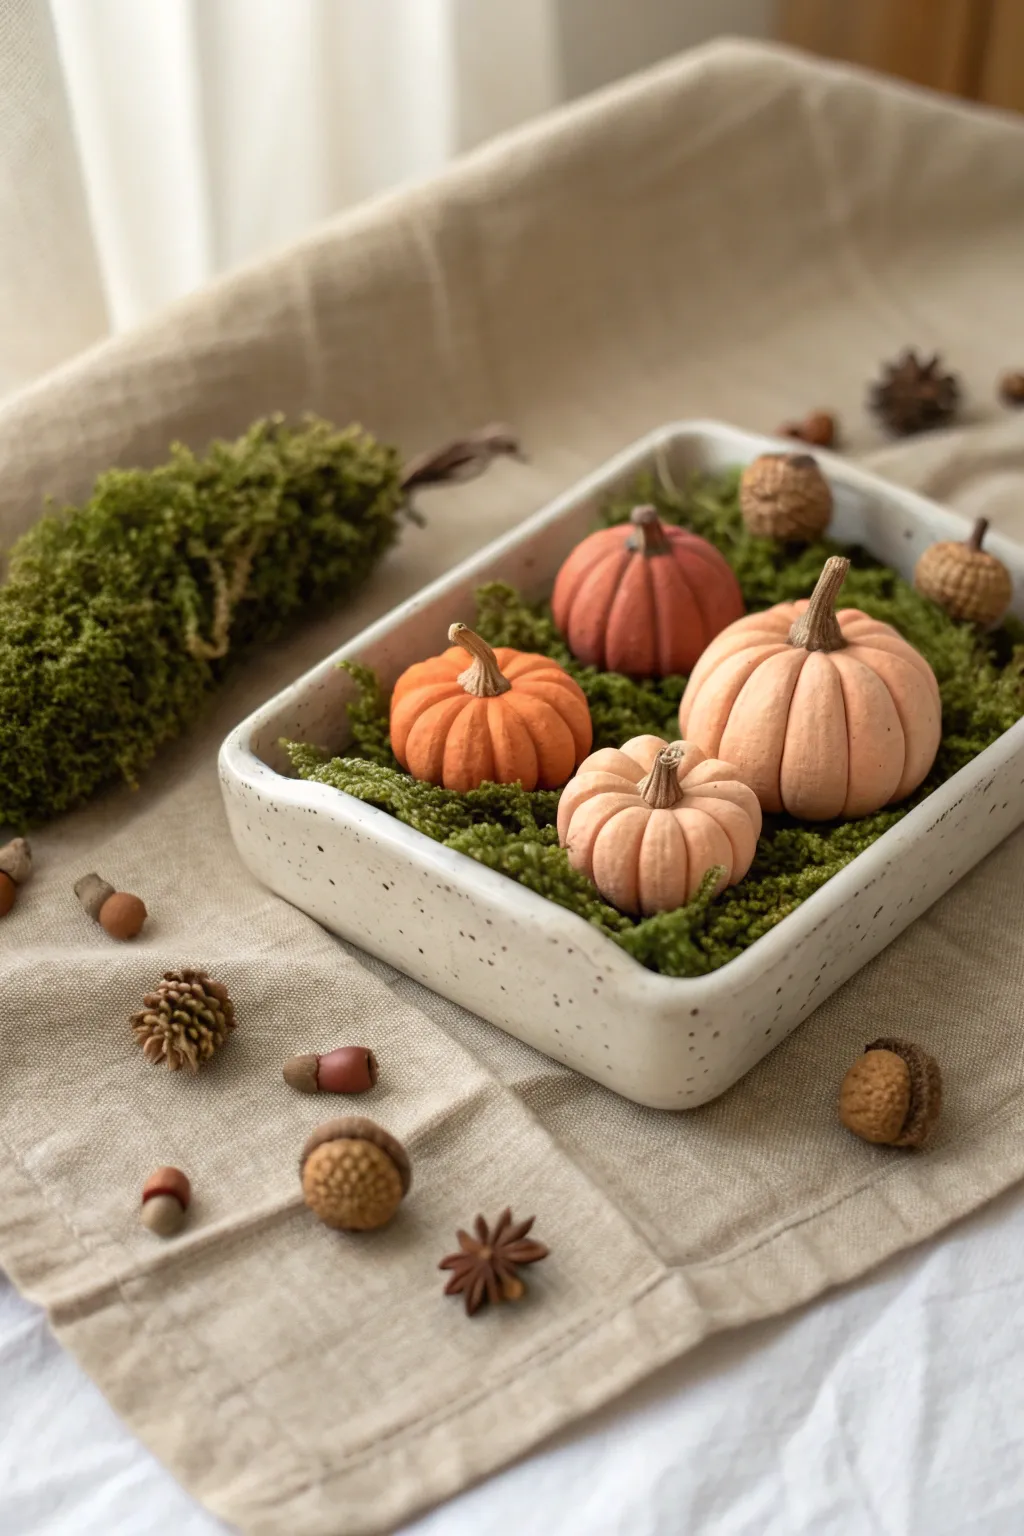
Bring the autumnal spirit indoors with this charming display of handmade clay pumpkins nestled in living moss. This project combines simple sculpting techniques with natural textures to create a cozy, petite centerpiece perfect for any shelf or table.
How-To Guide
Materials
- Air-dry clay or polymer clay (terracotta and white/neutral)
- Acrylic paints (burnt orange, peach, cream, antique white)
- Sculpting tools (needle tool, ball stylus)
- Real twigs or clove stems (for pumpkin stalks)
- Rectangular ceramic baking dish (white speckled or plain)
- Preserved reindeer moss or sheet moss
- Small paintbrush
- Matte varnish or sealant (optional)
- Liquid glue
Step 1: Sculpting the Pumpkins
-
Mix your clay:
Start by conditioning your clay. Create different shades by mixing terracotta clay with varying amounts of white clay to achieve a gradient of colors—dark orange, medium peach, and pale cream. -
Form the base shapes:
Roll four balls of clay in slightly different sizes, ranging from a large walnut to a small apricot. Flatten them just slightly on the top and bottom so they sit stable. -
Create the segments:
Using a needle tool or the side of a toothpick, press vertical lines into the side of each ball, running from the center top to the center bottom. Space these lines evenly around the sphere. -
Soften the edges:
Gently rub your finger over the indented lines to soften the harsh edges, giving the pumpkin segments a plump, natural look. -
Make the stem indentation:
Press a small indentation into the very top center of each pumpkin using a ball stylus or the end of a paintbrush handle. -
Insert the stems:
Choose small, dried twigs or even whole cloves for the stems. Cut them to size—about half an inch long—and press them firmly into the indentation you just made. If using air-dry clay, remove them before drying; for polymer, bake them in place. -
Dry or bake:
Follow the instructions for your specific clay type. If using air-dry clay, let them sit for 24-48 hours. If using polymer, bake according to the package directions.
Step 2: Painting and Finishing
-
Apply base coats:
Once dry, paint your pumpkins. For a realistic look, I like to use matte acrylics. Paint the darkest pumpkin a rich burnt orange and the lighter ones in soft peach and cream tones. -
Add subtle shading:
Mix a tiny amount of brown paint with water to create a wash. Brush this into the crevices of the segments and wipe away the excess with a paper towel to enhance the depth. -
Dry brushing:
Lightly dry brush a very pale cream or white over the tops of the pumpkin curves. This highlights the texture and gives them that soft, velvety skin appearance seen in the photo. -
Glue the stems:
If you removed the stems earlier, apply a dab of strong glue to the indentation and reinsert your twig pieces. -
Seal the work:
Apply a coat of ultra-matte varnish if you want to protect the paint without adding unnatural shine.
Cracks in the Clay?
If air-dry clay cracks while drying, mix a tiny bit of fresh clay with water to make a paste (slip) and fill in the cracks, then smooth over with a finger.
Step 3: Assembling the Patch
-
Prepare the vessel:
Clean your ceramic rectangular dish. A speckled finish adds a nice rustic touch that complements the clay. -
Layer the foundation:
Fill the bottom of the dish with a layer of preserved moss. Pull the moss apart slightly to fluff it up and ensure it covers the bottom completely. -
Arrangement strategy:
Nestle your pumpkins into the moss. Place the largest, lightest pumpkin towards the back right, and the medium burnt orange one near the back left. -
Balancing the composition:
Set the brighter orange pumpkin in the front left and the smallest pale pumpkin in the front center. Press them down gently so they look like they are growing out of the moss, not just floating on top. -
Final styling:
To complete the scene as shown in the image, scatter a few dried acorns, small pinecones, and star anise pods loosely around the dish on your table surface.
Add Realistic texture
Before baking or drying, gently tap the surface of the clay pumpkins with a clean toothbrush or piece of sandpaper to mimic organic pumpkin skin texture.
You now have a wonderfully tactile autumn display ready to warm up your home decor


Realistic Pumpkin Color Blends and Shading
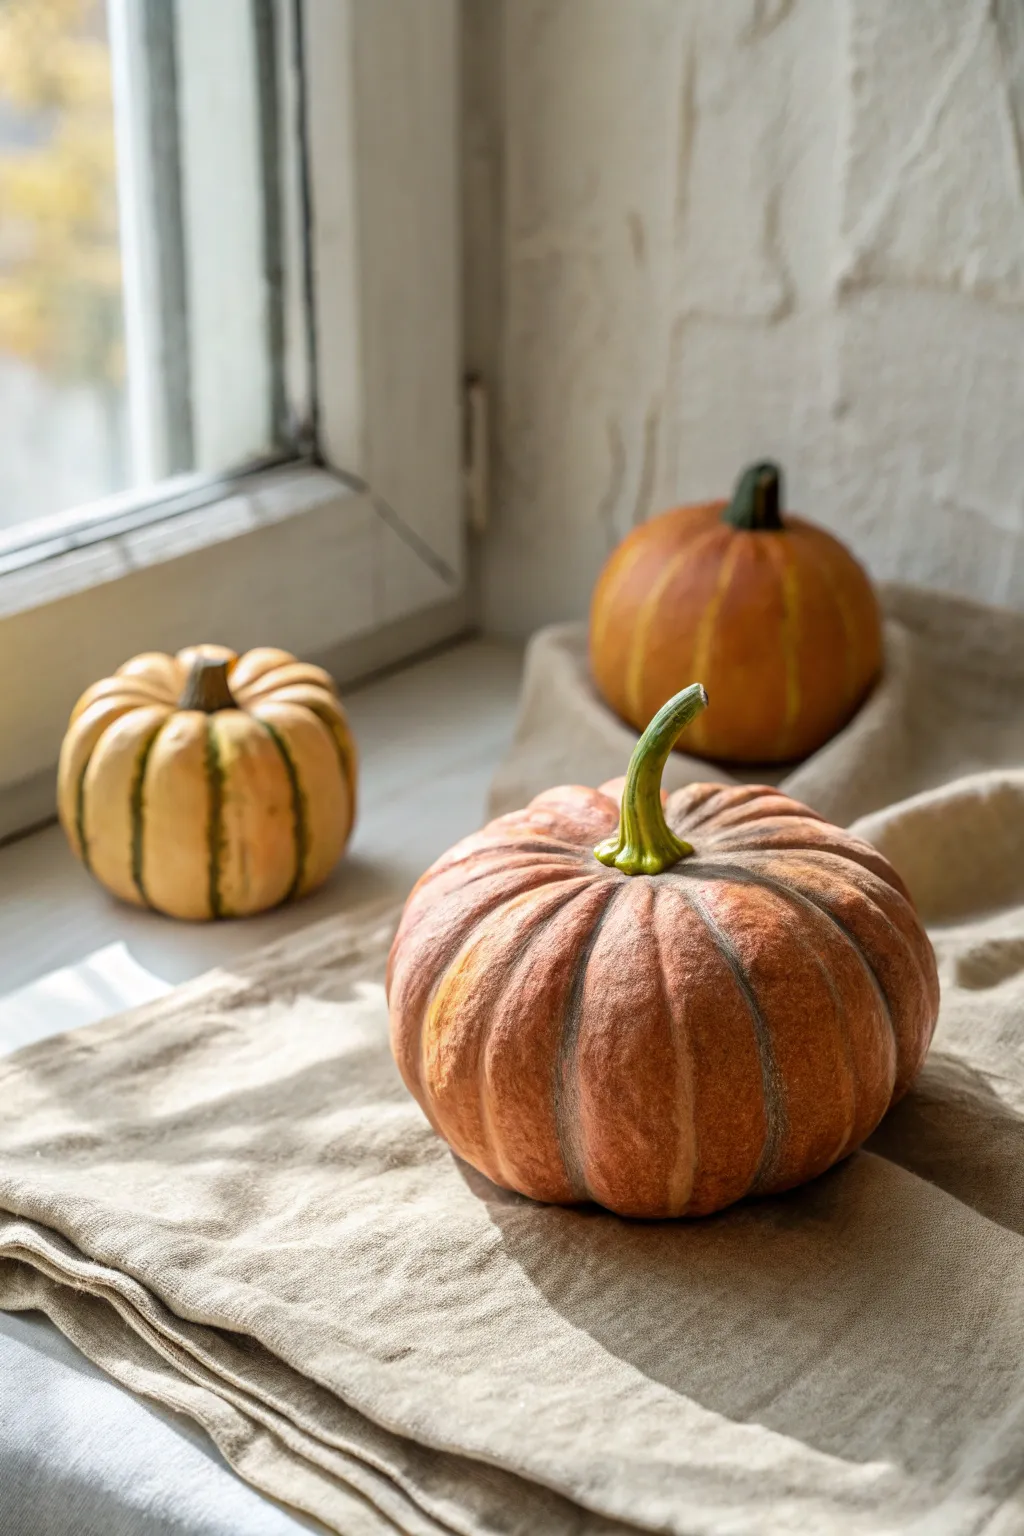
These handcrafted clay pumpkins capture the essence of autumn with their hyper-realistic shading and organic textures. By layering washes of acrylics and pastels, you can transform simple clay forms into heirloom-quality decor that looks plucked straight from the vine.
Step-by-Step
Materials
- Air-dry clay or polymer clay (white or light beige)
- Sculpting tools (needle tool, ball stylus)
- Acrylic paints (Burnt Orange, Yellow Ochre, Raw Umber, deep Green)
- Soft pastels (chalk style) in rust, brown, and cream
- Matte varnish or sealant
- Various paintbrushes (soft fluffy brush, fine liner)
- Aluminum foil (for armature)
- Sponge or paper towel
- Water spray bottle
Step 1: Sculpting the Base Form
-
Prepare the core:
Ball up a piece of aluminum foil into a flattened sphere shape. This reduces the amount of clay needed and keeps the pumpkin lightweight. -
Cover with clay:
Roll out a slab of clay about 1/4 inch thick and wrap it completely around your foil core, smoothing out any seams with a bit of water. -
Shape the ribs:
Use the side of a sculpting tool or a dull knife to press vertical indentations from the top center to the bottom, creating the pumpkin’s characteristic ribs. -
Refine the surface:
Soften the edges of each rib with your fingers or a damp sponge to make them look organic rather than sharp and mechanical. -
Add the stem:
Roll a small snake of clay for the stem, twisting it slightly for a natural look. Attach it firmly to the top center, blending the clay at the base. -
Texturize:
Gently stipple the surface with a coarse brush or a ball of tin foil to remove fingerprints and add a skin-like texture. -
Dry completely:
Allow the clay to dry fully according to package instructions. I find waiting an extra day ensures the core is dry before painting.
Natural Speckling
Flick a toothbrush dipped in diluted brown paint lightly over the finished pumpkin. These tiny specks mimic the natural imperfections found on real gourds.
Step 2: Painting and Shading
-
Apply base coat:
Paint the entire pumpkin with a mix of Yellow Ochre and a touch of white. Aim for a pale, creamy yellow base rather than bright orange. -
Layer the orange:
Mix a watery glaze of Burnt Orange acrylic. Apply it comfortably over the ribs, wiping it back with a paper towel so the yellow still glows through the high points. -
Deepen the creases:
Using a thin brush, paint Raw Umber or diluted brown paint into the deep crevices between the ribs to exaggerate the shadows. -
Dry brush highlights:
With a very dry brush and cream-colored paint, lightly whisk over the tops of the ribs to create a sun-kissed highlight effect. -
Add pastel softness:
For that matte, velvety look seen in the photo, shave some rust and brown soft pastels into a powder. Dust this powder into the grooves and transitional areas with a fluffy brush. -
Detail the variegation:
For the stripped pumpkin look, paint thin, broken vertical lines of deep green or dark orange along the crevices. Keep the lines irregular. -
Paint the stem:
Base coat the stem in a dusty green. While wet, brush a little brown near the tip and the very base where it meets the fruit. -
Final shading pass:
Evaluate the realism. If it looks too clean, create a wash of watery brown paint and dab it sporadically on the bottom for an ‘earthy’ feel. -
Seal the work:
Finish with a matte varnish spray. It is crucial to use matte rather than glossy to maintain the realistic, organic gourd texture.
Clay Cracking?
If cracks appear while drying, mix a small amount of fresh clay with water to make a ‘slip’ paste and fill the cracks. Smooth over and let dry again.
Place your trio of pumpkins near a window to let the natural light show off your realistic texturing


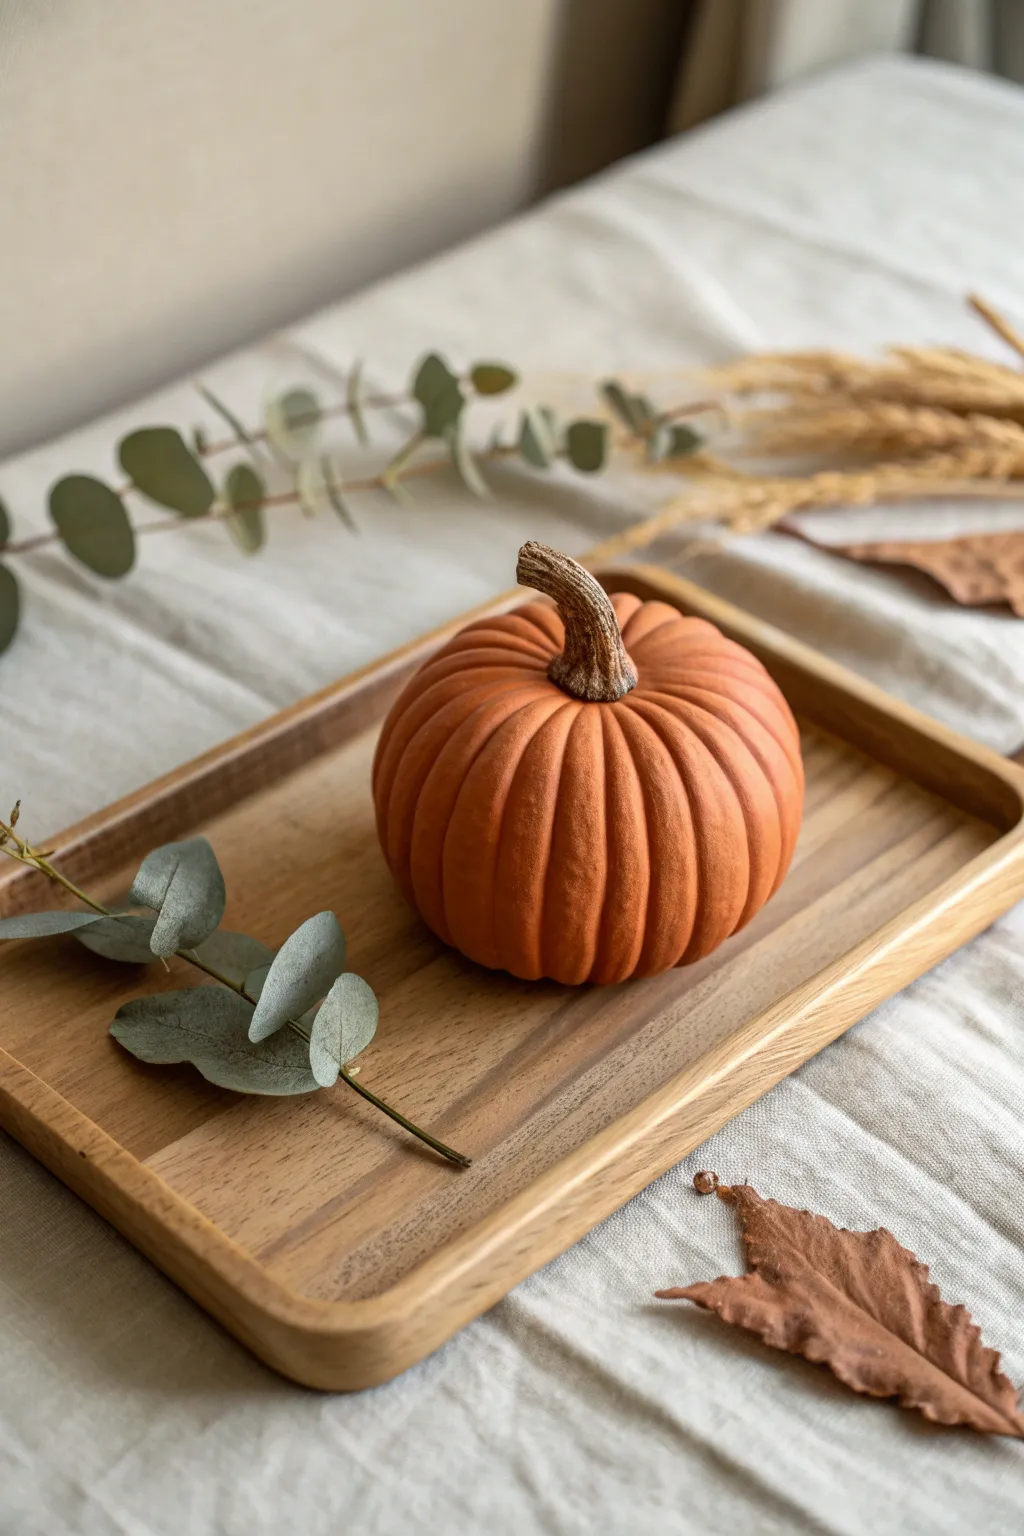
Heirloom Pumpkin Shapes With Deep Ridges
This project captures the rustic elegance of an heirloom ‘Cinderella’ pumpkin, featuring distinct, deep ribs and a rich, glazed finish. By sculpting exaggerated curves and layering translucent washes of color, you can transform simple clay into a convincing ceramic-style autumn centerpiece.
Step-by-Step Tutorial
Materials
- White or terracotta air-dry clay (or polymer clay)
- Sculpting tools (needle tool, rib tool, loop tool)
- Acrylic paints: Burnt Orange, Raw Sienna, Dark Brown, Cream
- Glazing medium or gloss varnish
- Soft synthetic brushes
- A small piece of foil (for the core shape)
- Water spray bottle
- Sponge
Step 1: Sculpting the Base Form
-
Form the core:
Begin by crumpling aluminum foil into a tight, flattened sphere shape, roughly the size of a large orange. This saves clay and keeps the pumpkin lightweight. -
Cover with clay:
Roll out a slab of clay about 1/4 inch thick. Wrap this entirely around your foil core, pressing seams together firmly and smoothing them out with a damp sponge or finger. -
Mark the ridges:
Using a needle tool, lightly draw lines from the top center to the bottom center, dividing the pumpkin into 8 to 10 sections. These lines will guide your deep indentations. -
Deepen the ribs:
Use the side of a paintbrush handle or a thick modeling tool to press firmly along your guide lines. Don’t be afraid to go deep; heirloom pumpkins are defined by these valley-like crevices. -
Round the lobes:
With your thumb or a smoothing tool, round off the sections between the indentations so they look puffy and full. I like to smooth outwards from the center of each lobe to enhance the curve. -
Detail the texture:
Take a rough sponge or a crumpled ball of foil and gently press it over the entire surface. This removes fingerprints and adds a realistic, organic skin texture.
Step 2: Adding the Stem
-
Create the stem base:
Press a small indentation into the top center of the pumpkin where all the ribs meet. -
Sculpt the stem:
Roll a small coil of clay. Attach it to the indentation, blending the clay downwards into the pumpkin shoulders for a seamless connection. -
Twist and texture:
Gently twist the stem and curve it slightly to one side. Use a needle tool to scratch deep vertical lines into the stem, mimicking fibrous wood texture. -
Dry partially:
Allow the clay to dry until it is leather-hard. This prevents you from squishing your details during the refinement stage.
Crack Control
If you see hairline cracks while air-dry clay is curing, patch them immediately with a ‘slip’ mixture (water + clay) and smooth over with a finger.
Step 3: Painting and Glazing
-
Base coat application:
Once fully dry, paint the entire pumpkin (except the stem) with a mix of Burnt Orange and a touch of Cream. Let this base layer dry completely. -
Shadowing the crevices:
Mix Dark Brown paint with a little water to create a wash. Paint this strictly into the deep crevices between the ribs. -
Wiping back:
Before the brown wash dries fully, gently wipe the raised areas with a damp paper towel or sponge. This leaves the shadow in the grooves while revealing the orange highlight on the lobes. -
Dry brushing:
Dip a dry brush into a tiny amount of Cream or light yellow paint. Lightly whisk it over the very tops of the pumpkin ribs to create a sun-kissed highlight. -
Painting the stem:
Paint the stem with a dark brown, blending a little green at the very base where it meets the orange pumpkin skin. -
Final glaze:
Apply two coats of high-gloss varnish or glazing medium. This is crucial for mimicking the shiny, hard look of fired ceramic visible in the inspiration photo.
Speckled Finish
For extra realism, flick a toothbrush loaded with watered-down brown paint over the finished piece to create tiny, organic speckles.
Place your gleaming new heirloom on a neutral plate to let those rich colors really pop

The Complete Guide to Pottery Troubleshooting
Uncover the most common ceramic mistakes—from cracking clay to failed glazes—and learn how to fix them fast.
White Pumpkin Decor With Subtle Texture
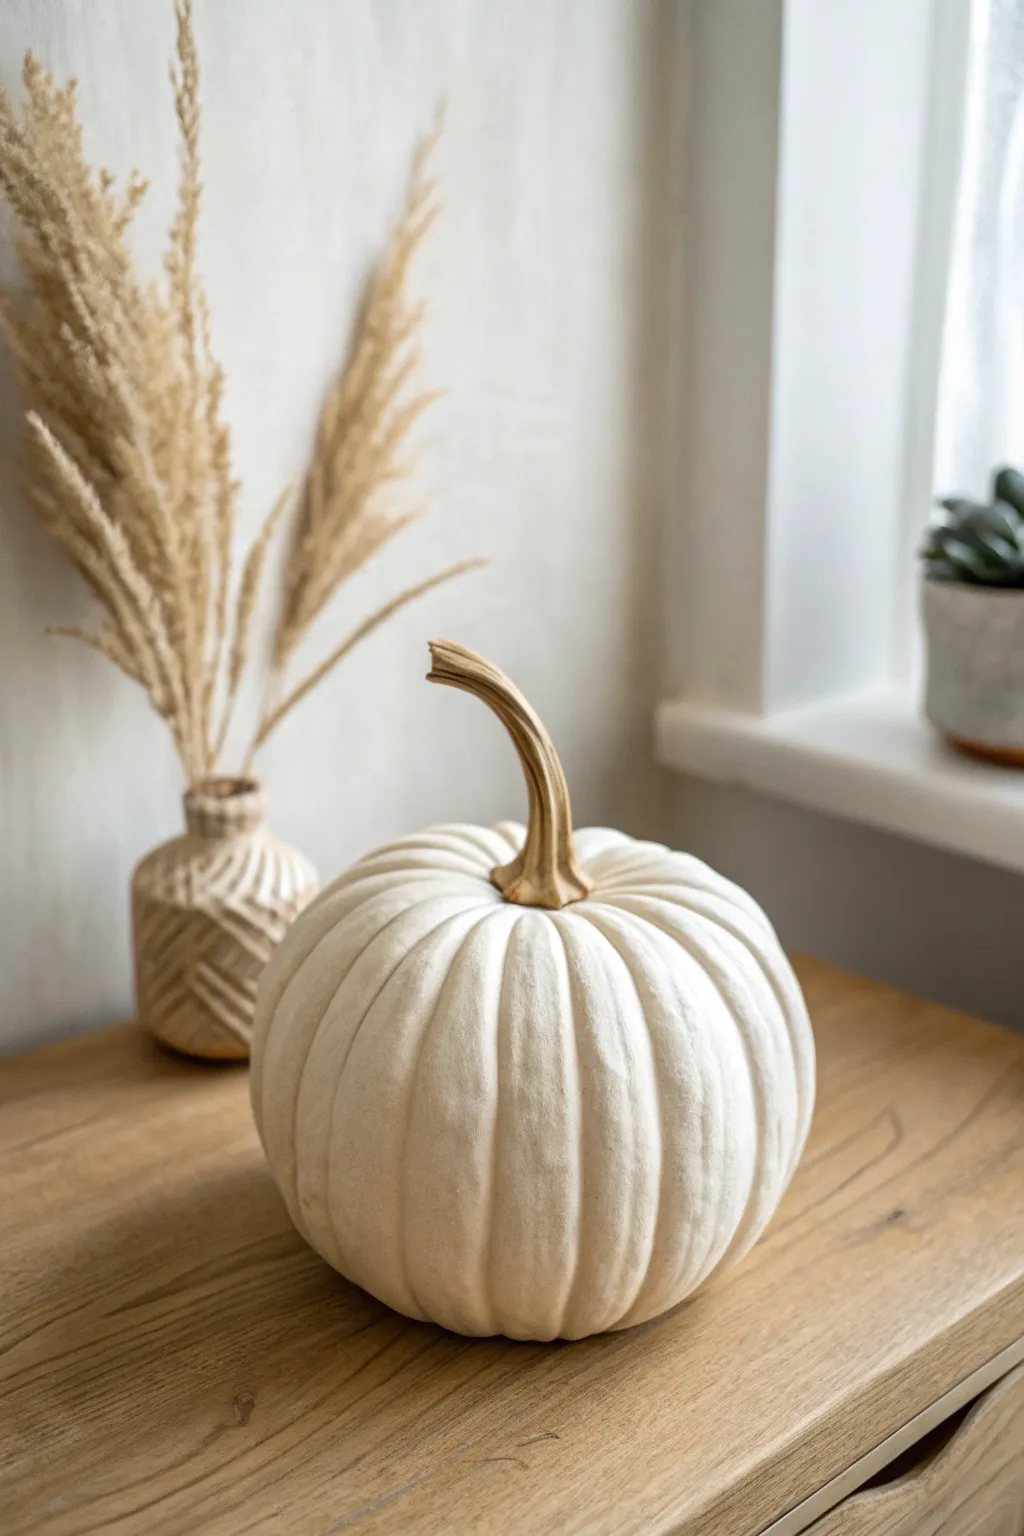
Embrace the understated beauty of autumn with this minimalist white clay pumpkin. Its realistic ridges and soft, matte finish make it a sophisticated addition to any seasonal display, proving that pumpkin decor doesn’t always need to be orange.
Step-by-Step Guide
Materials
- Air-dry clay (white)
- Aluminum foil
- Water in a small bowl
- Sculpting tools (needle tool, rib tool)
- Soft paintbrush
- Acrylic paint (warm white, light brown, dark brown)
- Matte sealant spray
- Sponge or textured cloth
Step 1: Forming the Core
-
Create the armature:
Start by crunching a large amount of aluminum foil into a tight ball. This saves clay and keeps the pumpkin lightweight. Aim for a sphere slightly smaller than your desired finished size. -
Flatten the shape:
Press the foil ball gently against a table to create a flat bottom so your pumpkin will sit stable without rolling away. -
Prepare the clay slab:
Roll out your white air-dry clay to a thickness of about 1/4 inch. It should be large enough to completely wrap around your foil core. -
Cover the armature:
Drape the clay sheet over the foil ball. Work the clay down the sides, smoothing out any major seams or overlaps underneath the base. -
Smooth the surface:
Dip your fingers slightly in water and rub them over the clay sphere to eliminate fingerprints and cracks, creating a uniform canvas.
Step 2: Sculpting the Ribs
-
Mark the center:
Use a needle tool to make a small indentation at the very top center of the sphere where the stem will eventually go. -
Define the sections:
Using a modeling tool or the back of a butter knife, draw light vertical lines from the top center to the bottom base, dividing the pumpkin into equal sections (usually 8 to 10). -
Deepen the grooves:
Go back over your vertical lines, pressing deeper to create distinct lobes. Use your thumb to round out the clay between the grooves, giving them that plump, organic look. -
Soften the ridges:
Use a damp sponge or a soft brush with water to smooth the edges of your grooves. Real pumpkins rarely have sharp lines, so softening these transitions adds realism. -
Add surface texture:
Take a textured cloth or a dry sponge and gently press it all over the surface of the clay. This eliminates the ‘perfectly smooth’ artificial look and mimics the skin of a real pumpkin.
Smooth Seams Secret
If you struggle to smooth out cracks, a tiny drop of vinegar on your finger works better than water to break down the surface clay for blending.
Step 3: Adding the Stem
-
Roll the stem coil:
Roll a snake of clay that is thicker at the bottom and tapers toward the top. I find twisting it slightly as I roll adds natural-looking torque. -
Score and slip:
Scratch the texture into the bottom of the stem and the top indentation of the pumpkin. Add a drop of water (slip) to join them securely. -
Blend the connection:
Use a sculpting tool to drag clay from the base of the stem onto the pumpkin shoulders, blending the seam until it disappears completely. -
Sculpt stem details:
Use your needle tool to carve deeper vertical lines into the stem, twisting them to follow the curve of the clay. -
Create the curve:
Gently bend the top of the stem to one side. A slight curve gives the pumpkin character and makes it look less rigid. -
Dry thoroughly:
Allow the pumpkin to dry completely. This usually takes 24-48 hours depending on humidity and thickness.
Level Up: Realism
Before the paint dries on the stem, dust it with a pinch of real cinnamon powder. It adds incredible rustic texture and a subtle scent.
Step 4: Painting and Finishing
-
Apply base coat:
Paint the entire body of the pumpkin with a warm white acrylic paint. Avoid bright titanium white; an off-white or cream looks more natural. -
Add subtle depth:
Mix a tiny amount of beige or light grey into your white paint. Dry brush this excessively lightly into the deep grooves to enhance the shadows subtly. -
Paint the stem:
Paint the stem with a light brown base. While wet, streak in darker brown lines following the grooves you carved earlier. -
Seal the piece:
Once all paint is dry, spray the entire piece with a matte sealant to protect the clay and remove any unwanted acrylic shine.
Place your finished pumpkin near a window to let the natural light highlight those lovely handmade textures
Textured Stem Details That Look Woody
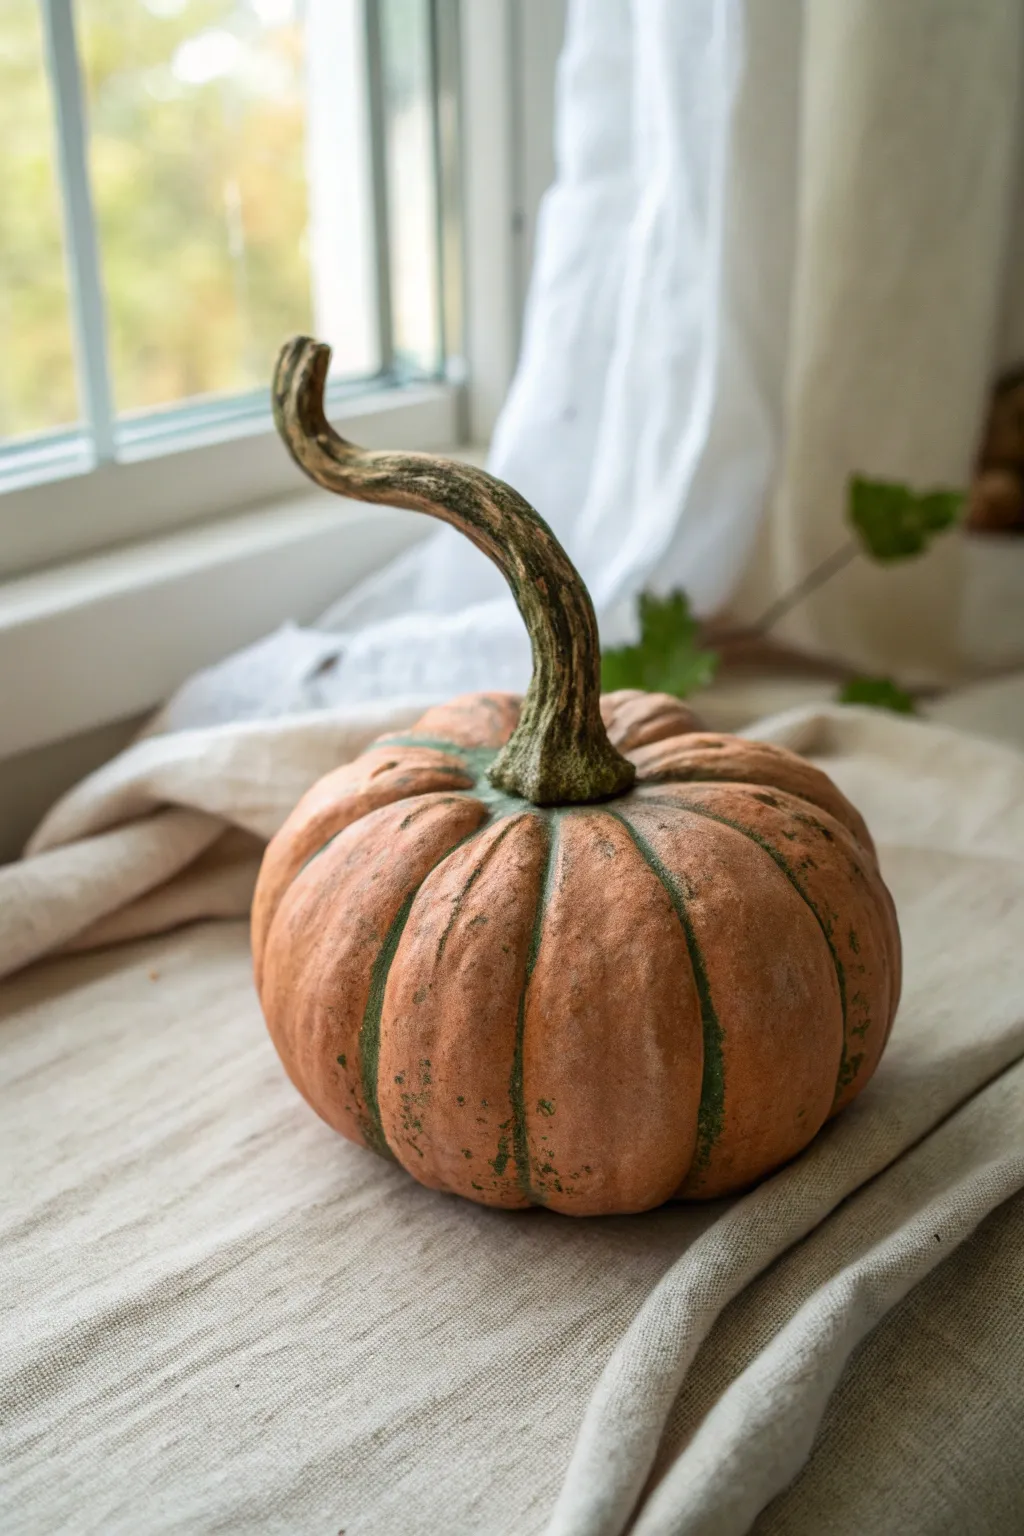
Create a stunningly lifelike faux pumpkin that captures the essence of an heirloom variety using air-dry clay. The focus of this project is sculpting a dramatically curved, wood-textured stem and achieving a mottled, organic finish that brings the piece to life.
Step-by-Step Tutorial
Materials
- Air-dry clay (stone or terracotta color preferred)
- Aluminum foil
- Polystyrene ball or old plastic bag (for core)
- Masking tape
- Sculpting tools (needle tool, loop tool)
- Small stiff-bristled brush (like a toothbrush or stipple brush)
- Acrylic paints: Burnt Umber, Raw Sienna, Olive Green, Moss Green, Muted Orange, Cream
- Matte varnish or sealant
- Water spray bottle
- Sponge
Step 1: Forming the Base
-
Create the Core:
Begin by crumpling aluminum foil into a large ball to form the armature. If you want to save foil, wrap a smaller layer of foil around a crumpled plastic bag or Styrofoam ball. Shape it into a slightly flattened sphere, typical of a squat pumpkin shape. -
Define the Ribs:
Wrap bright masking tape or more foil strips around the ball vertically to create the initial deep indentations of the pumpkin’s ribs. Imagine dividing a pie; create at least 8 sections. -
Cover with Clay:
Roll out a slab of air-dry clay to about 1/4 inch thickness. Drape this over your foil armature. Use your thumbs to press the clay firmly into the indentations you created with the tape, ensuring the clay adheres to the core. -
Smooth the Surface:
Dip your fingers in water and smooth out the clay surface. Don’t aim for perfection—heirloom pumpkins are naturally bumpy. Ensure there are no trapped air pockets between the foil and clay.
Stem Cracking?
If the stem cracks while drying, fill the fissures with a ‘slip’ made of clay dissolved in water, then smooth over. This doubles as extra texture.
Step 2: Sculpting the Stem
-
Form the Stem Armature:
Twist a piece of aluminum foil into a long, tapered snake shape. Bend it into a dramatic S-curve or hook shape to mimic the dried stem in the reference image. Press the base of this foil snake into top center of your pumpkin. -
Apply Clay to Stem:
Wrap a thinner layer of clay around the foil stem. Blend the clay downwards onto the shoulders of the pumpkin so the stem looks like it grew out of the fruit, not just stuck on top. Smooth the connection point thoroughly. -
Add Deep Grooves:
Using a needle tool or the edge of a sculpting spatula, drag deep, vertical lines down the length of the stem. Twist the lines slightly as they go up the curve to emphasize the dried, twisted look of real wood. -
Texture the Connection:
Where the stem meets the pumpkin body, use your tool to create rougher, stippled textures. I find that pricking the clay here creates that convincing ‘cork-like’ transition found on real squash. -
Dry Completely:
Allow the sculpture to dry fully. This is crucial for air-dry clay to prevent cracking during painting. It may take 24-48 hours depending on thickness and humidity.
Add Realism
Glue a real dried pumpkin tendril (the curly corkscrew part) near the base of your clay stem for a mixed-media touch that fools the eye.
Step 3: Painting the Details
-
Base Coat:
Paint the entire pumpkin, including the stem, with a mix of Muted Orange and a touch of Cream. You want a soft, dusty orange rather than a bright Halloween orange. -
Apply a Wash:
Dilute Burnt Umber paint heavily with water. Brush this wash over the entire pumpkin and immediately wipe most of it off with a damp sponge or rag. The dark paint will remain in the crevices and stem grooves, defining the texture. -
Shadowing the Grooves:
Mix a dark Olive Green with a little brown. Using a dry brush technique, gently paint inside the deep vertical ribs of the pumpkin body. Feather the color outwards slightly so there are no harsh lines. -
Mottling the Skin:
Dip a stiff brush or old toothbrush into Moss Green paint. Dab off the excess on a paper towel, then stipple (tap repeatedly) small green spots randomly over the orange skin, concentrating near the stem and the bottom. -
Highlighting the Stem:
Paint the stem with a mix of Burnt Umber and Olive Green. Once dry, dry-brush a light Cream or pale Green color over the raised ridges of the stem to make the woody texture pop. -
Final Green Accents:
Run a thin line of watered-down Moss Green right where the stem meets the fruit, letting it bleed slightly into the orange for a natural ripened gradient. -
Seal the Work:
Since air-dry clay is porous, finish with a matte spray varnish to protect the paint job and give the pumpkin a soft, realistic sheen.
Place your finished pumpkin near a window to let the natural light highlight those beautiful organic textures you’ve created


What Really Happens Inside the Kiln
Learn how time and temperature work together inside the kiln to transform clay into durable ceramic.
Pumpkin Magnets for Fridge-Friendly Fall Decor
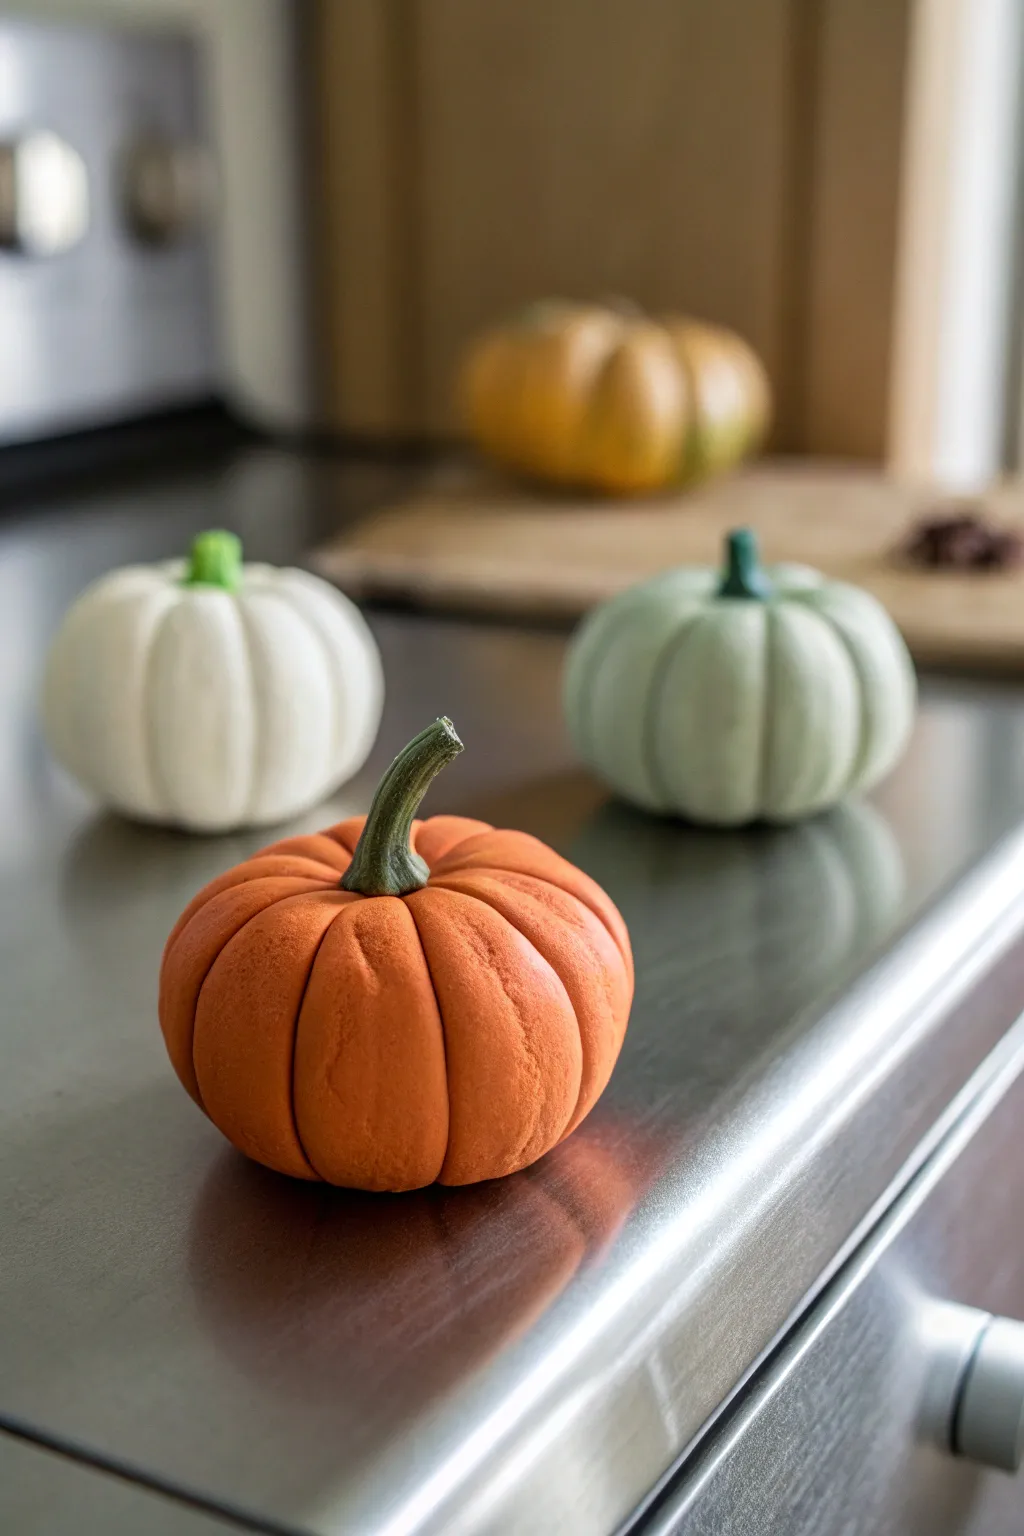
Bring the pumpkin patch right into your kitchen with these realistic, matte-finish clay pumpkin magnets. These charming accents are perfect for holding up autumn recipes or photos while adding a subtle pop of seasonal color to your stainless steel appliances.
Step-by-Step Tutorial
Materials
- Polymer clay (Orange, White, Sage Green, and Dark Green)
- Strong neodymium disc magnets (approx. 0.5 inch diameter)
- Sculpting tool set (needle tool, ball stylus)
- Soft pastel chalks (orange, brown, yellow)
- Paintbrush for chalk application
- Liquid clay or bake-and-bond
- Super glue (gel formula recommended)
- Baking sheet and parchment paper
- Soft texture sponge or toothbrush
Step 1: Shaping the Base
-
Prepare the Clay:
Begin by conditioning your orange polymer clay until it is soft and pliable. Roll a piece into a smooth ball about the size of a walnut, roughly 1.5 to 2 inches in diameter. -
Flatten for Magnet:
Gently press the ball onto a flat surface to create a slightly flattened bottom. This ensures the pumpkin will sit flush against the fridge without wobbling. -
Create the Indent:
On the top center of your sphere, use a ball stylus tool to press a deep indentation. This is where the stem will eventually sit. -
Mark the Segments:
Using a needle tool or the back of a knife, lightly score lines running from the top indentation down to the bottom center. Imagine dividing the pumpkin into 8 even wedges.
Magnet Won’t Stick?
If the magnet pulls off the clay, the surface was likely too smooth. Scrape the clay back and the magnet face with sandpaper to roughen them up, then re-glue for a stronger grip.
Step 2: Sculpting Details
-
Deepen the Ribs:
Go back over your scored lines with a rounded modeling tool. Press firmly to deepen these grooves, which creates the distinctive ‘ribbed’ look of a pumpkin. -
Round the Lobes:
Use your fingertip to gently smooth and round out the clay between the grooves. You want each section to look plump and puffy, not sharp or angular. -
Texture the Skin:
To simulate a realistic skin texture rather than a shiny plastic look, lightly tap the entire surface of the pumpkin with a soft texture sponge or a clean toothbrush. I find this really helps break up the smoothness of the polymer.
Varied Patch
Make a few pumpkins in ‘heirloom’ shapes! Try flattening one into a disc shape (like a Cinderella pumpkin) or making one tall and oblong to vary the silhouette of your collection.
Step 3: Stem and Shading
-
Form the Stem:
Take a small amount of dark green clay and roll it into a cone shape. Twist it slightly and bend the tip to give it an organic, withered appearance. -
Texture the Stem:
Use a needle tool to scratch vertical lines up and down the green stem, imitating fibrous plant material. -
Attach the Stem:
Add a tiny drop of liquid clay into the top indentation of the orange pumpkin. Press the base of the green stem firmly into the hole. -
Adding Depth with Chalk:
Scrape a little brown and dark orange soft pastel chalk into a powder. Using a dry brush, dust this powder into the deep crevices between the ribs and around the base of the stem to add realistic shading.
Step 4: Baking and Assembly
-
Bake the Pieces:
Place your pumpkins on a parchment-lined baking sheet. Follow the temperature and time instructions specific to your brand of polymer clay (usually around 275°F for 15-30 minutes). -
Cool Down:
Allow the pumpkins to cool completely on the baking sheet. Do not handle them while hot, as the clay is still fragile. -
Embed the Magnet:
If you want the magnet hidden, you can carve a hole before baking. Otherwise, simply apply a dot of strong gel super glue to the flat back of the cooled pumpkin. -
Final Attachment:
Press the neodymium magnet firmly into the glue. Let it cure undisturbed for at least an hour to ensure a permanent bond before sticking it to your fridge.
Now you have a durable, custom set of seasonal decor that looks straight from a high-end home store
Pumpkin Tea Light Holders With Cutout Faces

Brighten up your spooky decor with these charming, handcrafted clay pumpkin tea light holders. Featuring a classic carved grin and a warm, textured orange finish, they cast a cozy glow perfect for autumn evenings.
Detailed Instructions
Materials
- Air-dry clay (white or terracotta)
- Acrylic paint (burnt orange, black, and a lighter orange for highlights)
- Tea light candle (real or LED)
- Clay sculpting tools (needle tool, small knife)
- Water and a small sponge
- Rolling pin
- Aluminum foil
- Fine-grit sandpaper
- Matte varnish or sealant
Step 1: Shaping the Base
-
Prepare the foil core:
Crumple a piece of aluminum foil into a tight ball slightly smaller than your desired pumpkin size. This saves clay and keeps the holder lightweight. -
Create a candle recess:
Press your tea light candle firmly into the top of the foil ball to create a flat indentation where the candle will eventually sit. Remove the candle. -
Cover with clay:
Roll out a slab of clay to about 1/4 inch thickness. Drape it over the foil ball, smoothing it down the sides to cover the foil completely, leaving the top indentation open. -
Smooth the surface:
Dip your fingers in a little water and smooth out any seams or cracks on the clay surface until you have a uniform sphere. -
Define the opening:
Place the tea light back into the top indentation to ensure it fits snugly. Use a knife to trim away excess clay around the rim so the candle sits flush or slightly recessed.
Step 2: Sculpting the Details
-
Add vertical ribs:
Using a blunt sculpting tool or the back of a knife, gently press vertical lines from the top rim down to the base to mimic pumpkin ribs. Space them evenly around the sphere. -
Soften the lines:
Use a damp sponge or your finger to gently soften the edges of the vertical lines, making them look like natural indentations rather than sharp cuts. -
Texture the skin:
For that realistic, slightly pitted look seen in the photo, gently tap the surface of the clay with a stiff bristle brush or a ball of textured foil. -
Carve the face:
Use a needle tool to lightly sketch the triangular eyes, nose, and smiling mouth. Once satisfied with the placement, carve deeper into the clay to define the outlines. -
Detail the mouth:
Carefully carve out the teeth within the mouth shape. You aren’t cutting all the way through the clay here—just creating a deep relief carving for the black paint later.
Cracked Clay Fix
If small cracks appear while drying, don’t panic. Mix a tiny bit of fresh clay with water to make a paste (slip) and fill the cracks, then sand smooth once dry.
Step 3: Finishing and Painting
-
Dry thoroughly:
Allow the pumpkin to dry completely. This can take 24-48 hours depending on the clay thickness. Rotate it occasionally for even drying. -
Sand imperfections:
Once dry, use fine-grit sandpaper to smooth out any rough patches, especially around the top rim and the carved features. -
Base coat:
Paint the entire pumpkin with a coat of burnt orange acrylic paint. I find that two thin coats provide better coverage than one thick one. -
Add dimension:
While the base coat is dry, dry-brush a lighter orange shade over the raised sections of the ribs to highlight the texture. -
Paint the features:
Using a fine brush and black acrylic paint, fill in the carved eyes, nose, and mouth. Be careful to stay inside the carved lines for a crisp look. -
Seal the work:
Protect your paint job with a layer of matte varnish. This also gives the pumpkin a finished, professional ceramic look.
Glow Up
Instead of relief carving, use a small cutter to punch the face features all the way through the clay before the foil step, allowing light to shine through.
Place a tea light inside and enjoy the warm, festive atmosphere your handmade pumpkin creates

TRACK YOUR CERAMIC JOURNEY
Capture glaze tests, firing details, and creative progress—all in one simple printable. Make your projects easier to repeat and improve.
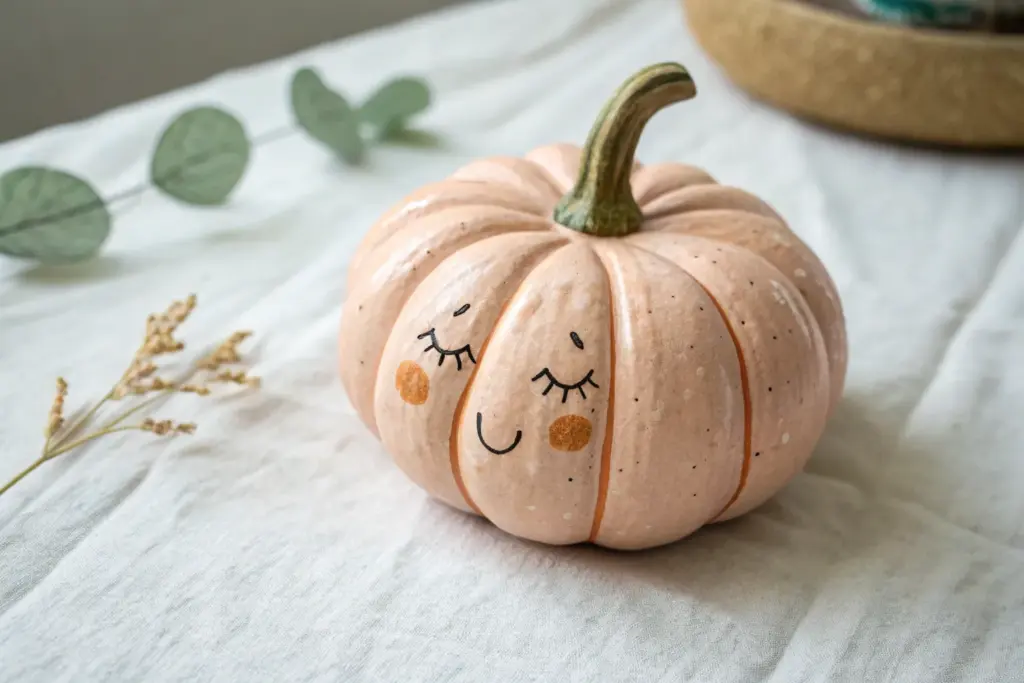
Cute Pumpkin Faces With Simple Expressions
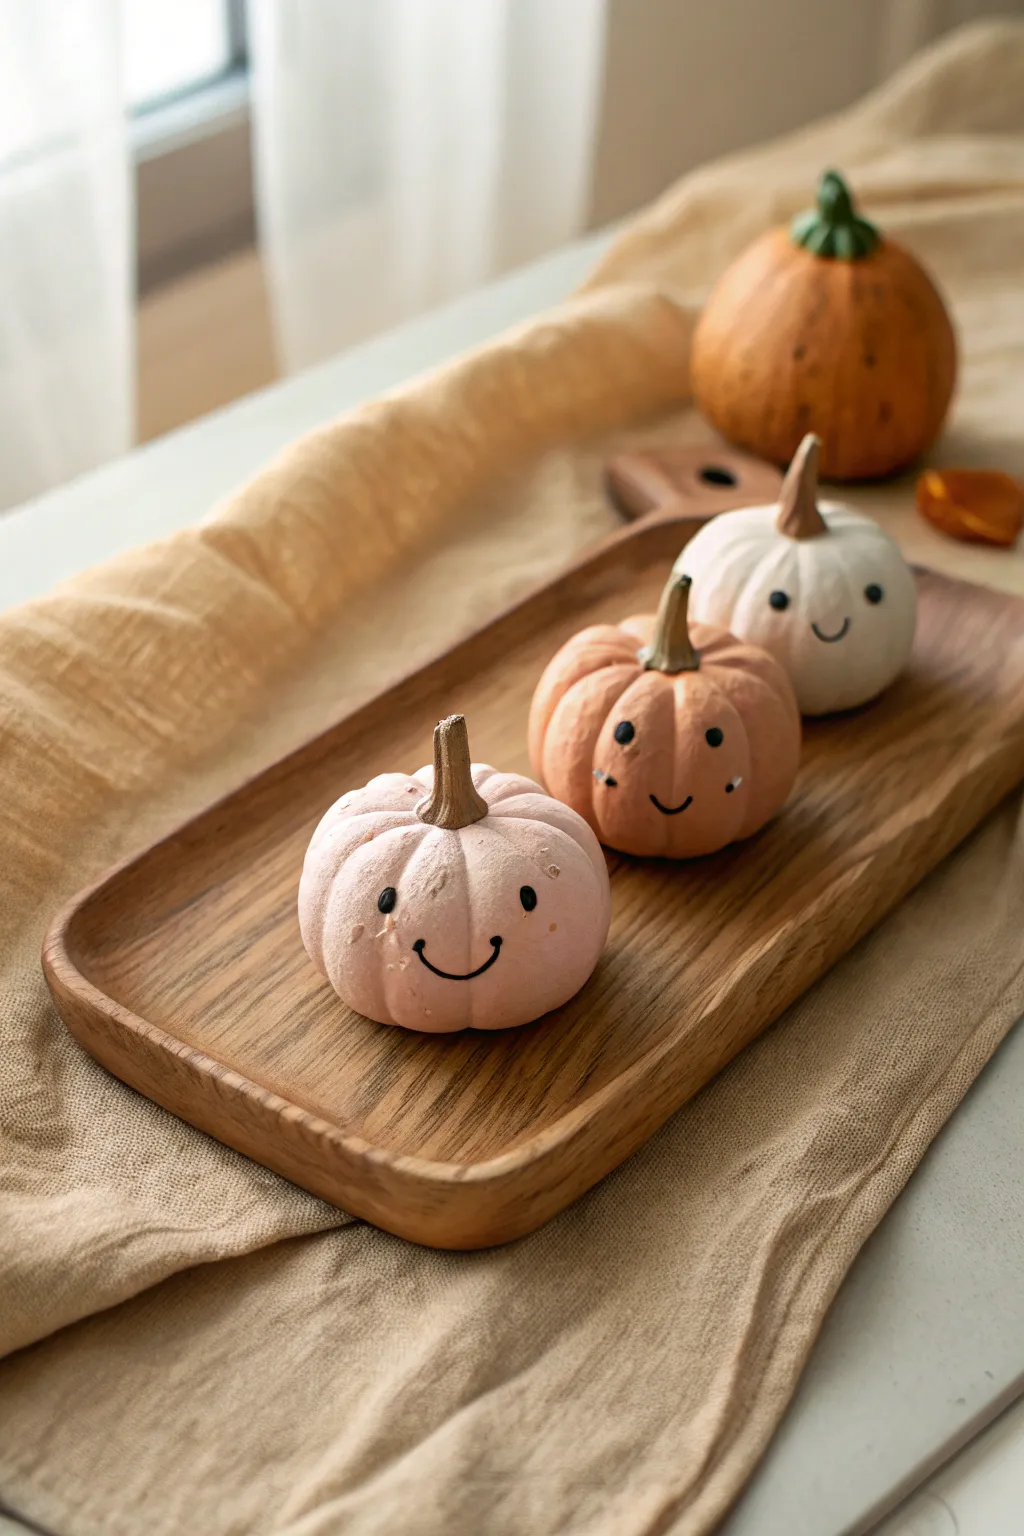
Capture the softer side of autumn with these adorable, palm-sized pumpkins featuring varied pastel hues and minimalist expressions. Their smooth, matte finish and charming little faces make them perfect for a subtle, cheerful seasonal display on a wooden tray or mantel.
Step-by-Step Guide
Materials
- Air-dry clay (white)
- Acrylic paints (pale pink, light peach, white, soft orange, black, gold/bronze)
- Sculpting tools (needle tool or toothpick, ball stylus)
- Small paintbrush (fine liner)
- Medium paintbrush (flat or filbert)
- Water cup
- Paper towels
- Matte sealant spray or varnish
- Fine-grit sandpaper
Step 1: Sculpting the Base Forms
-
Portion the clay:
Start by grabbing three equal portions of white air-dry clay, each roughly the size of a tangerine or small apple. Knead them well until they are pliable and warm. -
Roll spheres:
Roll each portion between your palms to create smooth, tight spheres. If you notice any cracks, dip your finger in a tiny bit of water and smooth them over immediately. -
Flatten slightly:
Place the spheres on your work surface and press down gently on the top to create that squat, pumpkin-like shape. They shouldn’t be perfect balls; a little chubbiness at the bottom adds character. -
Indent the center:
Use your thumb or a ball tool to press a deep indentation into the top center of each sphere where the stem will eventually sit.
Cracks in the Clay?
If cracks appear while drying, mix a tiny amount of fresh clay with water to make a paste. Fill the crack, smooth it over with a wet finger, and let it dry again before sanding.
Step 2: Adding Ribs and Stems
-
Create the ribs:
Using a modeling tool, a knitting needle, or the side of a toothpick, press vertical lines from the top indentation down to the base. Go all the way around the pumpkin. -
Soften the lines:
Use a damp finger to gently rub over the indentations you just made. You want the ribs to look soft and organic, not like harsh cuts. -
Form the stems:
Take three smaller bits of leftover clay and roll them into tapered logs. Shape them so they are slightly thicker at the base and twisted or curved at the top for a natural look. -
Attach the stems:
Score the bottom of the stems and the indentation on the pumpkins (scratch tiny cross-hatch marks). Apply a drop of water or liquid clay (slip) and press the stems firmly into place. -
Dry completely:
Set your trio aside to dry. Depending on humidity and clay thickness, this usually takes 24-48 hours. I find flipping them upside down halfway through helps the bottoms dry evenly.
Placement is Key
For maximum cuteness, place the eyes wider apart than you think they should be and very low on the ‘cheek’ area of the pumpkin. High features make them look more scared!
Step 3: Painting and Finishing
-
Sand imperfections:
Once fully dry, use fine-grit sandpaper to gently buff away any rough fingerprints or sharp edges, leaving a smooth surface for painting. -
Mix pastel base coats:
Prepare your palette with three distinct shades: a very pale muted pink, a warm light peach, and a creamy off-white. You may need to mix white into your oranges and pinks to get that chalky pastel look. -
Apply base color:
Paint the body of each pumpkin in its designated color. You will likely need two coats for opaque, streak-free coverage. Let the paint dry completely between coats. -
Paint the stems:
Use a metallic gold or bronze paint for the stems. This adds a touch of elegance that contrasts beautifully with the matte pastel bodies. -
Draft the faces:
Lightly sketch the position of the eyes and mouth with a pencil. Keep the features low on the pumpkin’s face to enhance the ‘cute’ factor—wide-set eyes are key here. -
Paint the eyes:
Using your finest liner brush or the back of a paintbrush dipped in black paint, dot two small circles for eyes. -
Add the smiles:
With the liner brush and slightly thinned black paint (ink consistency flows better), paint a delicate, thin ‘U’ shape between the eyes for a simple smile. -
Add highlights:
Once the black eyes are dry, add a tiny white dot to the upper corner of each eye to bring the expression to life. -
Seal the project:
Finish by spraying the pumpkins with a matte aesthetic sealant to protect the paint without adding unwanted gloss.
Arrange your trio on a tray or shelf to add a whimsical touch to your fall decor
Spooky Carved Pumpkin Expressions With Teeth
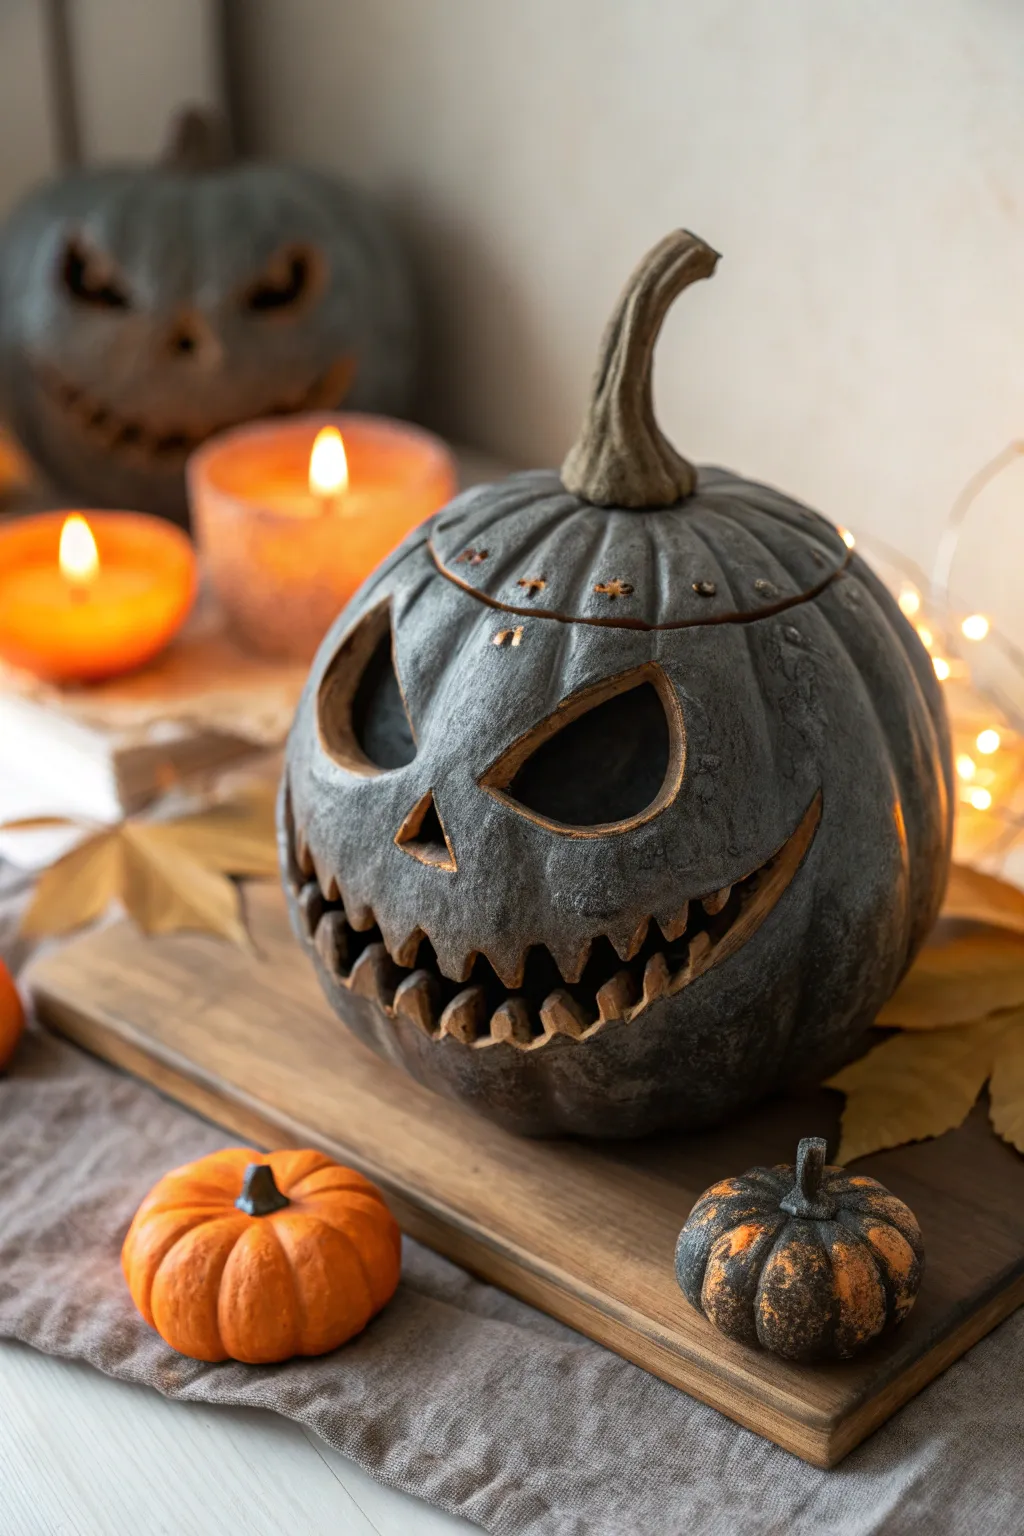
Transform ordinary clay into a menacing masterpiece with this faux-stone pumpkin project. The deep charcoal finish and jagged, exposed teeth give this piece a wonderfully sinister and ancient appearance perfect for elevating your Halloween decor.
Step-by-Step
Materials
- Air-dry clay (approx. 2-3 lbs) or polymer clay
- Aluminum foil
- Clay sculpting tools (specifically a needle tool and loop tool)
- Acrylic paints (black, dark grey, burnt umber, metallic bronze/gold)
- Matte clear sealant spray
- Sponge or textured rock for stamping
- X-acto knife or precision cutter
- Rolling pin
- Water cup and slip (for joining)
- Paintbrushes (medium flat, small detail)
Step 1: Forming the Base
-
Create the armature:
Begin by crumpling aluminum foil into a tight ball shape, roughly the size of a cantaloupe. This saves clay and keeps the sculpture lightweight. -
Roll out the slab:
Roll your clay out into a large, even slab about 1/4 inch thick. Make sure it’s wide enough to fully encase your foil ball. -
Wrap the form:
Drape the clay slab over the foil ball. Gently press and smooth the seams together until the foil is completely hidden and you have a smooth sphere. -
Define the ridges:
Using the side of a wooden tool or just your pinky finger, press vertical indentations from the top center to the bottom to create the classic pumpkin ribs. Make them fairly deep to emphasize the segmented look. -
Shape the stem:
Fashion a thick, slightly twisted stem from a separate coil of clay. Attach it securely to the top center using scoring and slip (scratching both surfaces and adding water/clay mix).
Step 2: Carving the Face
-
Map out the features:
Lightly sketch the triangular eyes and the wide, grinning mouth directly onto the clay with a needle tool. Ensure the mouth stretches wide across the face for that menacing look. -
Cut the lid line:
If you want the top removable (like in the photo), carefully cut a circular lid line around the stem area. If it’s purely decorative, you can skip this, but simulate the cut line for realism. -
Excavate the eyes:
Use an X-acto knife to slice out the eye shapes. Angle your cuts inward slightly so the interior shadow is deep. -
Carve the mouth cavity:
Instead of cutting all the way through for the mouth, carve out a recessed area about 1/4 inch deep. This creates a black background for the teeth. -
Sculpt the teeth:
I find it easier to add teeth separately. Form small, jagged triangles of clay and press them into the top and bottom of the mouth recess. Texture them to look chipped and worn. -
Refine the edges:
Use a damp brush to smooth any harsh burrs of clay, but leave the edges around the eyes and mouth slightly sharp to maintain a carved stone appearance. -
Add surface texture:
Gently press a crumpled ball of foil or a textured rock against the entire surface of the pumpkin. This creates a pitted, stone-like skin. -
Add decorative pips:
Using a small tube or straw, press tiny circular indentations or decorative dots around the rim of the lid cut for extra detail.
Stone Texture Trick
Mix a small amount of baking soda into your base grey paint. This creates a gritty, sandpaper-like texture that feels incredibly realistic when dry.
Step 3: Faux Stone Painting
-
Apply the base coat:
Once the clay is fully dry (24-48 hours), paint the entire pumpkin with a solid coat of matte black acrylic paint. Ensure you get into every crevice, especially the mouth and eyes. -
Heavy dry brushing:
Mix a dark charcoal grey. load your brush, wipe most of it off on a paper towel, and scrub it over the surface. The black base should remain in the textures and deep cuts. -
Highlighting ridges:
Using a lighter grey, gently dry brush just the raised ridges of the pumpkin and the edges of the stem to make the shape pop. -
Detailing the cut edges:
Take a small amount of metallic bronze or burnt umber paint. Carefully paint the exposed edges of the eyes, nose, and teeth. This subtle touch makes it look like the inner material is different from the outer stone skin. -
Final weathering:
Dilute a bit of black paint with water to make a wash. Dab this into the deepest crevices around the teeth and stem base, then wipe away the excess for added grime. -
Seal the work:
Finish with a spray of matte clear sealant to protect the paint job without adding an unrealistic glossy shine.
Inner Light
Paint the very back wall of the mouth recess with a bright yellow or orange gradient to simulate a glowing candle inside, even without a light source.
Place your menacing creation alongside some real gourds for a striking contrast between natural and crafted textures
Bat-Pumpkin Mashup With Wings and Fangs
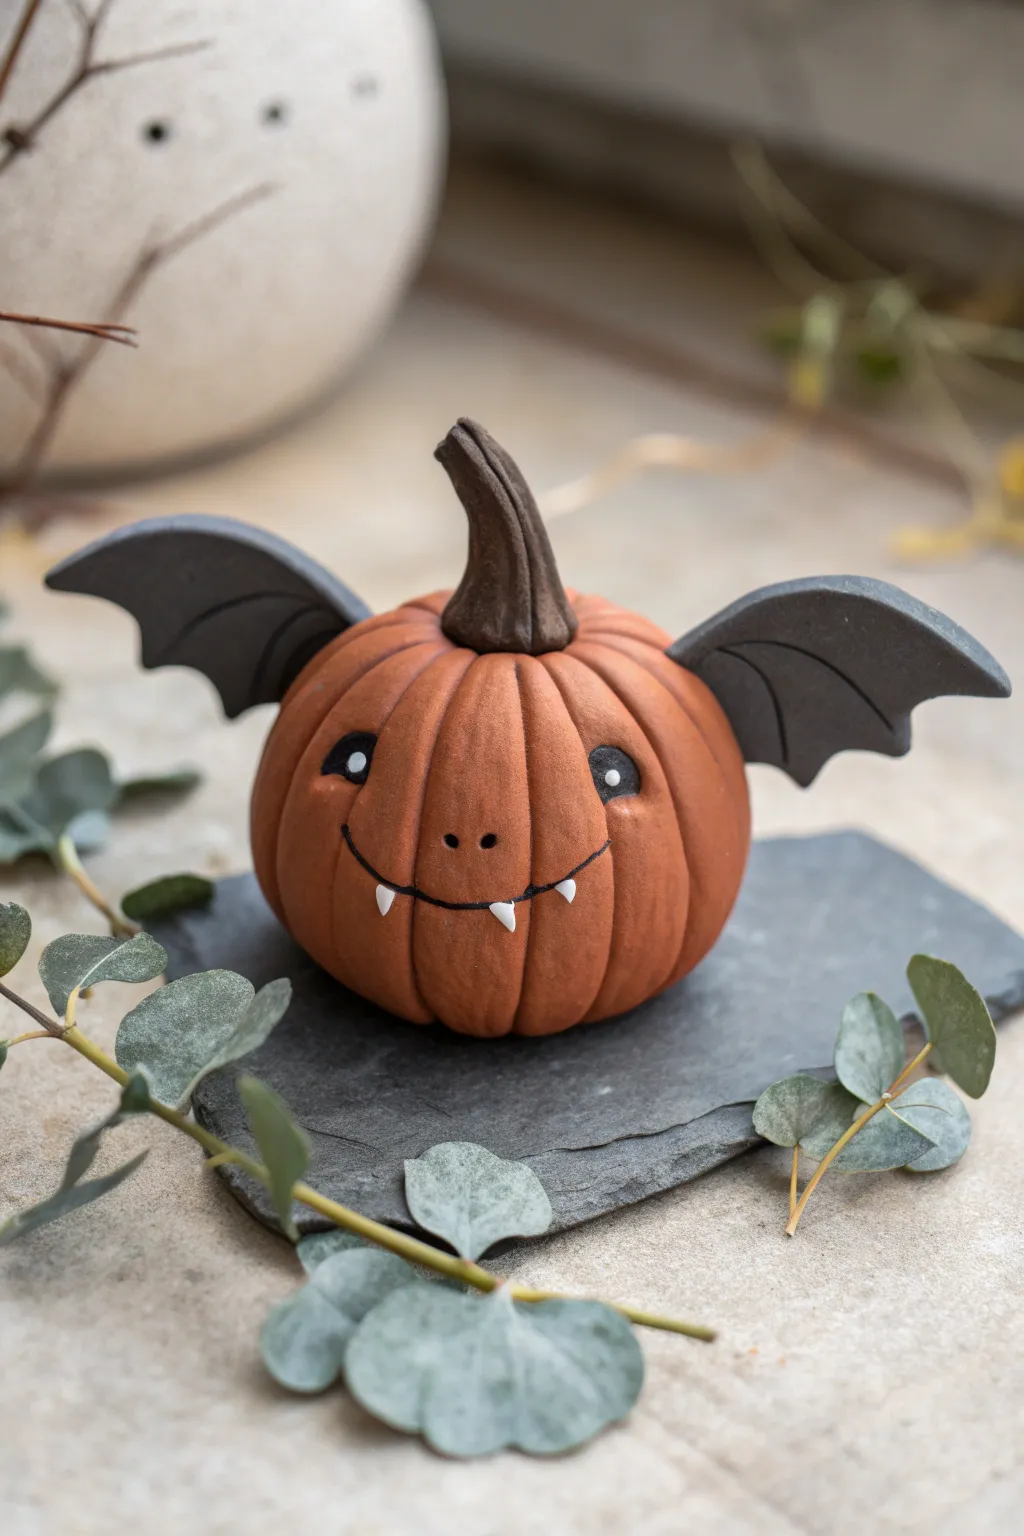
This charming project combines the spookiness of a vampire bat with the classic autumn pumpkin form. The result is an adorably squat character featuring dark gray wings, tiny fangs, and a mischievous smile that is perfect for Halloween decor.
Step-by-Step Tutorial
Materials
- Orange polymer clay
- Dark brown or charcoal gray polymer clay
- White polymer clay
- Black polymer clay
- Clay sculpting tools (needle tool, small ball stylus)
- Small rolling pin
- Scalpel or craft knife
- Liquid clay adhesive (optional)
- Baking sheet and foil
- Oven
Step 1: Sculpting the Pumpkin Base
-
Form the body:
Start by conditioning a generous amount of orange clay and rolling it into a smooth, slightly flattened sphere. This will be the main body of your pumpkin. -
Create the segments:
Using a needle tool or the blunt side of a knife, press vertical lines from the top center down to the bottom center all creating the classic ribbed pumpkin texture. -
Refine the segments:
Use your finger or a smoothing tool to gently round over the edges of each indentation so the segments look plump and natural rather than sharply cut. -
Make the stem:
Take a piece of dark brown clay and roll it into a thick, curved log. Pinch the base slightly so it sits flat against the top of the pumpkin. -
Texture the stem:
Score vertical lines up and down the stem with a needle tool to simulate woody texture, then press it firmly onto the center of your orange sphere.
Making Wings Stick
If wings droop or won’t stick, insert a small piece of wire or a toothpick into the pumpkin side and slide the wing onto it for internal support.
Step 2: Adding the Bat Wings
-
Prepare the wing clay:
Roll out a sheet of dark gray or charcoal clay to about 3mm thickness. It needs to be sturdy enough to stand up on its own. -
Cut the wing shapes:
Use your craft knife to cut two identical bat wing shapes. I find it easiest to make a paper template first to ensure symmetry. -
Detail the wings:
Use a modeling tool to press curved indentations into the wings, radiating from where they will attach to the body, mimicking the bone structure of a bat wing. -
Attach the wings:
Press the wings onto the sides of the pumpkin body. Use a small blending tool to smooth the clay seam where the wing meets the pumpkin for a secure bond.
Avoiding Fingerprints
Keep a small bowl of cornstarch nearby. Dipping your fingers lightly in it while smoothing the clay prevents sticky fingerprints from ruining the finish.
Step 3: Creating the Face
-
Position the eyes:
Use a small ball tool to make two indentations where the eyes will go. Spacing them widely apart gives it a cuter, more innocent look. -
Fill the eyes:
Roll two small balls of black clay and press them into the eye sockets, flattening them slightly. -
Add the sparkle:
Place a teeny-tiny dot of white clay in the upper corner of each black eye to bring the character to life. -
Carve the mouth:
Use a needle tool to gently scribe a wide, shallow ‘U’ shape for the smile connecting the cheek areas. -
Define the smile:
Roll an extremely thin snake of black clay and carefully lay it into the mouth groove you just carved, pressing it down gently. -
Add the nose:
Poke two tiny nostrils right in the center of the face using a needle tool. -
Create the fangs:
Shape two tiny triangles of white clay and attach them pointing downward from the corners of the smile.
Step 4: Finishing Up
-
Smoothing check:
Give the entire piece a once-over to remove any fingerprints. A light brush with baby oil can help smooth imperfections before baking. -
Bake the project:
Place your bat-pumpkin on a foil-lined baking sheet and bake according to your specific clay brand’s instructions (usually 275°F/135°C for 15-30 minutes). -
Cool down:
Let the sculpture cool completely in the oven before handling it to prevent cracks.
Now you have a spooky-sweet companion ready to guard your desk.
Ghost-and-Pumpkin Companion Figurines
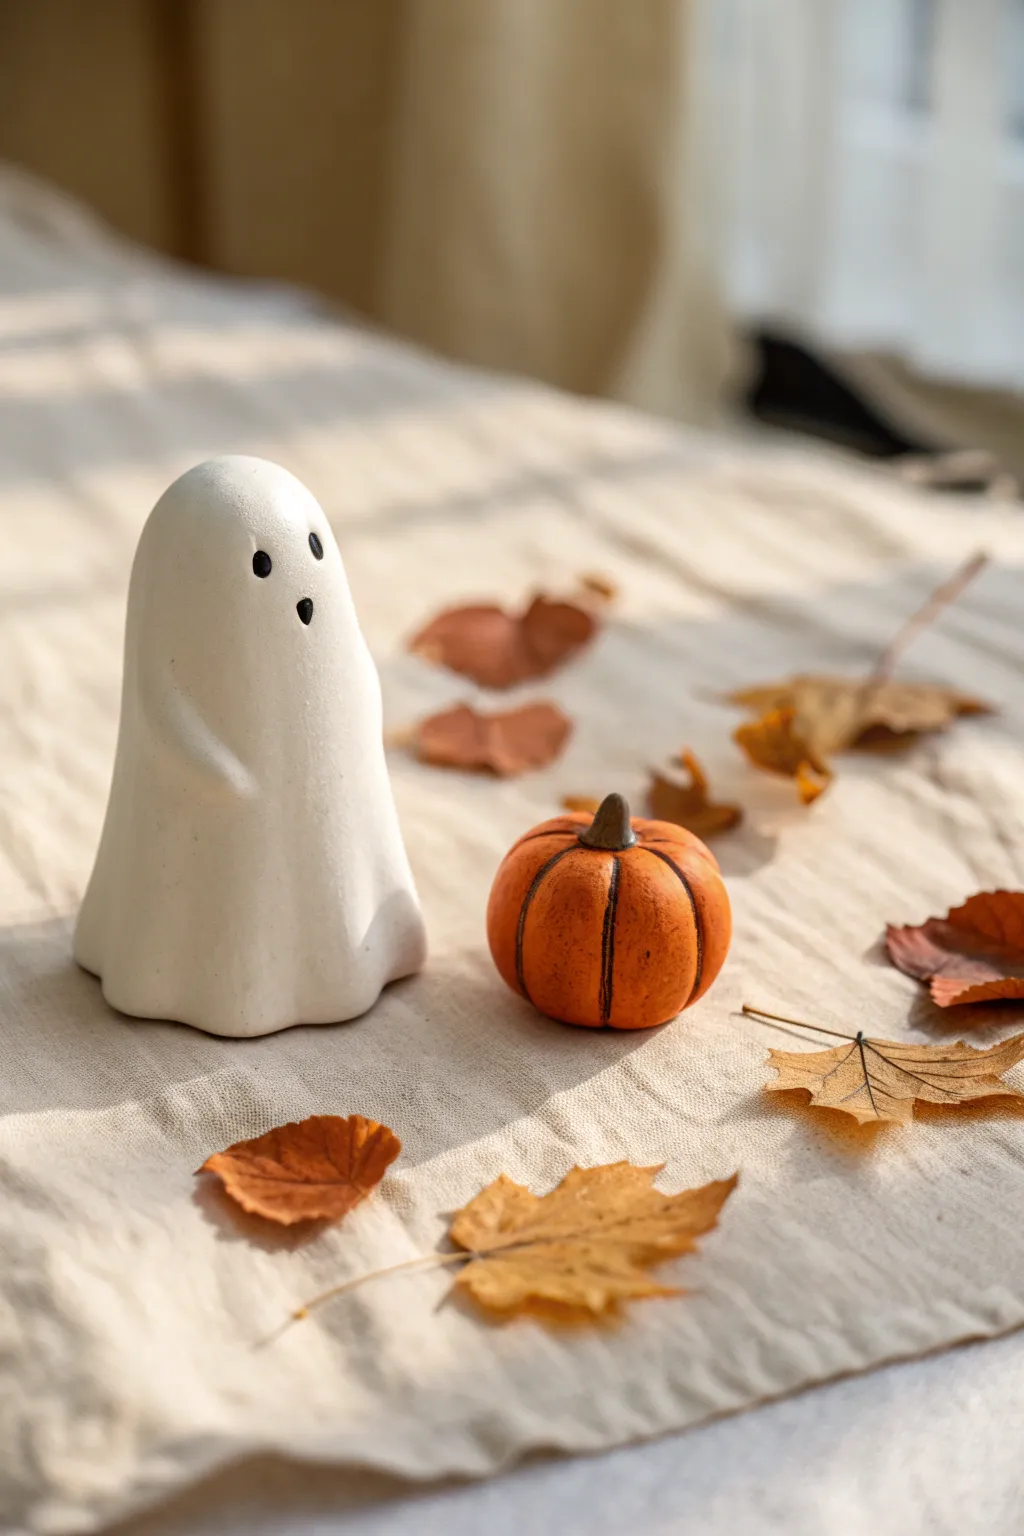
Create a charming, minimalist Halloween vignette with this handmade clay ghost and his tiny pumpkin companion. The soft, rounded forms and simple painted details give these figurines a warm, rustic appeal perfect for shelf styling.
Step-by-Step
Materials
- White air-dry clay or polymer clay
- Orange acrylic paint
- Black acrylic paint
- Brown acrylic paint
- Small fine-point paintbrush
- Sculpting tools (needle tool, blending tool)
- Water cup (for smoothing)
- Aluminum foil (for armature)
- Rolling pin
- Matte spray varnish
Step 1: Sculpting the Ghost
-
Form the armature:
Crumple a small piece of aluminum foil into a tall, slightly conical shape with a rounded top. This saves clay and keeps the ghost lightweight. -
Sheet the clay:
Roll out a slab of white clay until it is approximately 1/4 inch thick. You want it substantial enough to drape without tearing, but not so thick it looks clunky. -
Drape the form:
Gently lay the clay sheet over your foil armature. Use your fingers to smooth it down the sides, allowing the excess to pool slightly at the bottom to create the “sheet” effect. -
Shape the folds:
Using your fingers, gently pinch and wave the bottom edges of the clay to create soft, fabric-like folds where the ghost meets the table. I like to make these asymmetrical for a natural look. -
Create arm nubs:
Push gently from the inside of the clay layer (or pinch from the outside) to create two small, subtle protrusions on the sides for arms. Keep them undefined and rounded. -
Smooth the surface:
Dip your finger in a tiny bit of water and run it over the entire ghost to erase fingerprints and create a silky matte texture.
Pro Tip: Weighted Base
Before the ghost dries, push a large washer or coin into the wet clay at the very bottom center. This adds weight and prevents the tall figure from tipping over easily.
Step 2: Sculpting the Pumpkin
-
Roll the base:
Roll a ball of clay roughly 1/3 the height of your ghost. Gently flatten the top and bottom slightly so it sits stable. -
Mark the segments:
Using a needle tool or the back of a knife, press vertical indentations from the top center down to the bottom center all around the sphere to create the pumpkin’s ribs. -
Soften the grooves:
Use a damp finger or a soft silicone tool to smooth over the indented lines so they look molded and organic, rather than like sharp cuts. -
Form the stem:
Roll a tiny snake of clay, tapering one end. Press it into the center depression at the top of the pumpkin and bend the tip slightly for character. -
Dry both pieces:
Set both figurines aside to dry completely. For air-dry clay, this usually takes 24-48 hours depending on humidity.
Step 3: Painting and Finishing
-
Paint the pumpkin base:
Paint the body of the pumpkin with a coat of orange acrylic. You might need two thin coats for full opacity. -
Add depth to grooves:
Mix a tiny drop of brown into your orange paint. Carefully paint this darker shade into the deep crevices of the pumpkin ribs to accentuate the shape. -
Paint the stem:
Paint the stem a dark, earthy brown. Blend a little of the brown onto the very top of the orange surface where the stem attaches for a realistic transition. -
Paint the ghost features:
Select a very fine-point brush and black paint. Carefully dot two oval eyes and a smaller, slightly lower oval for the mouth. -
Apply a wash (optional):
To mimic the slightly aged look in the reference, you can water down a tiny bit of grey-brown paint and lightly brush it over the sculpture, wiping it off immediately with a paper towel. -
Seal the work:
Once all paint is bone dry, spray both pieces with a matte varnish to protect the finish without making them look glossy or plastic.
Crack Control
If you see hairline cracks forming as the clay dries, mix a tiny bit of fresh clay with water to make a paste (slip) and fill the cracks, then smooth with a wet finger.
Now arrange your little clay friends among some dried leaves for the perfect autumnal display
Stacked Pumpkin Topiary for a Statement Piece
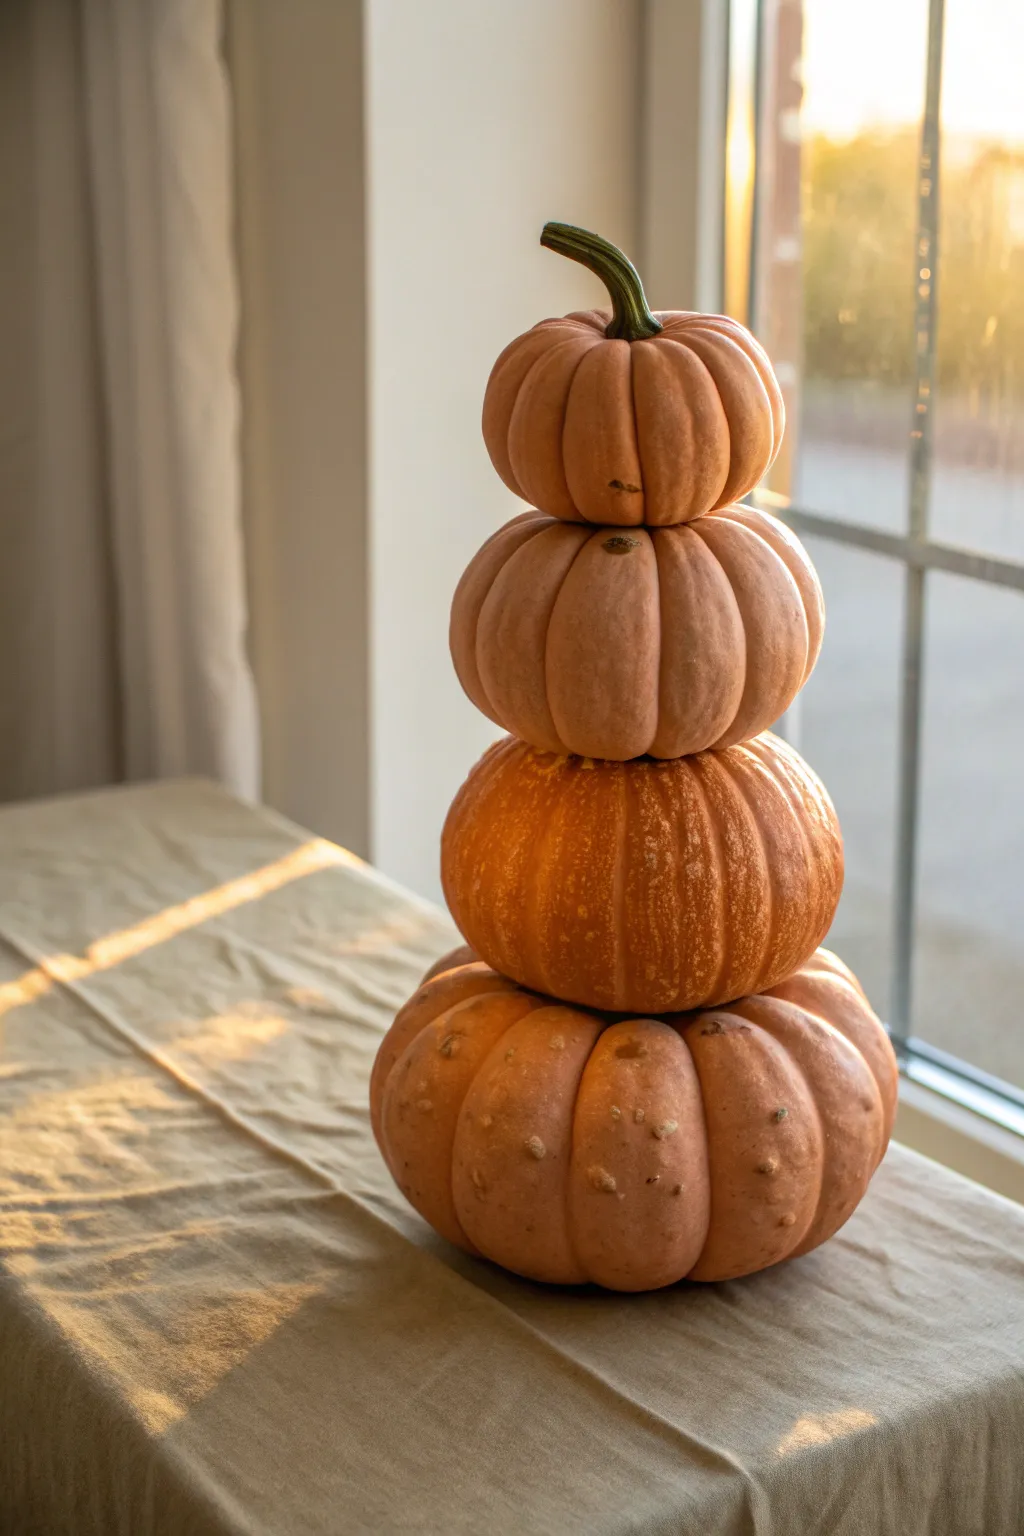
Bring the warmth of autumn indoors with this stunning clay pumpkin topiary, featuring four graduated pumpkins stacked to create an elegant centerpiece. The realistic textures and muted, natural glazes give this sculpture an organic feel that mimics heirloom squash perfectly.
Detailed Instructions
Materials
- Air-dry clay or polymer clay (approx. 4-5 lbs)
- Aluminum foil (for armatures)
- Wooden dowel or metal rod (for structural support)
- Sculpting tools (needle tool, ball stylus, rib tool)
- Texture sponge or old toothbrush
- Acrylic paints (various shades of orange, cream, tan, and soft pink)
- Paintbrushes (soft bristles and detail brushes)
- Gloss or satin varnish
Step 1: Planning and Armature
-
Establish the scale:
Decide on the total height of your topiary first. You will need four distinct sizes, from a large base pumpkin (about 6-7 inches wide) to a small topper (about 3 inches wide). -
Create the base armature:
Crumple aluminum foil into a large, flattened sphere shape for the bottom pumpkin. This saves clay and keeps the sculpture lighter. Poke a hole vertically through the center where your support rod will eventually go. -
Form the upper armatures:
Repeat the foil ball process for the remaining three pumpkins, making each one progressively smaller. Ensure they are shaped somewhat like flattened disks rather than perfect spheres to mimic squat heirloom pumpkins.
Weight Distribution
To prevent tipping, fill the bottom foil armature with a few heavy washers or a stone before wrapping it in clay to anchor the stack.
Step 2: Sculpting the Pumpkins
-
Cover the base:
Roll out a slab of clay about 1/4 inch thick. Wrap it entirely around your largest foil armature, smoothing the seams together with a little water or slip until the foil is completely hidden. -
Define the ribs:
Using the side of a needle tool or a modeling tool, press vertical indentations into the clay to create the pumpkin’s ribs. Start at the top center and draw the line down to the bottom center, repeating this all the way around. -
Round the lobes:
With your thumb or a curved rib tool, smooth the clay between the indented lines to puff out the ‘lobes’ of the pumpkin, giving it that classic plump look. -
Add texture:
Gently dab the surface with a texture sponge or an old toothbrush. Real pumpkins aren’t perfectly smooth, and this subtle stippling adds crucial realism. -
Repeat for middle tiers:
Sculpt the middle two pumpkins using the same method. Vary the depth of the ribs slightly; heirloom pumpkins often have deep, dramatic creases. -
Sculpt the top pumpkin:
For the smallest top pumpkin, cover the armature and sculpt the ribs. Instead of leaving a hole at the top, pull a small amount of clay upward to form the twisted green stem base. -
Refine the stem:
Add a bit more clay to the stem, twisting it and adding fine lines with a needle tool to simulate woody texture. Curve it slightly for a natural appearance.
Step 3: Assembly and Finishing
-
Dry fit the stack:
While the clay is still leather-hard (firm but not dry), carefully stack them on your central dowel rod to ensure they balance correctly. Press them gently together so the contact points flatten slightly for stability. -
Let it cure:
Separate the pumpkins and allow them to dry completely according to your clay’s instructions. This usually takes 24-48 hours for air-dry clay. -
Apply base coat:
Paint all pumpkins with a primer or a base coat of warm cream or pale orange acrylic paint. -
Layer the colors:
I like to use a dry-brushing technique here to build depth. Use slightly darker oranges and terracottas in the crevices of the ribs, and lighter peaches or creams on the raised lobes to catch the light. -
Add realistic details:
Mix a watery wash of brown paint and lightly brush it over the surface, wiping it back immediately with a paper towel. This antiquing effect settles into the textures you created earlier. -
Paint the stem:
Paint the stem of the top pumpkin a dark, earthy green, blending a little brown at the base where it meets the orange skin. -
Final assembly:
Once the paint is dry, thread the pumpkins onto your central rod, securing with strong adhesive between the layers if you want a permanent bond. -
Seal the piece:
Finish with a coat of satin varnish to protect your work and give it a slight, waxy sheen similar to real pumpkin skin.
Level Up: Mottled Skin
Splatter tiny flecks of diluted green or brown paint onto the pumpkins using a stiff brush to mimic biological imperfections found on real heirloom squash.
Place your finished topiary near a window to catch the golden hour light and enjoy your handcrafted autumn display
Marbled Pumpkins for a Modern Twist
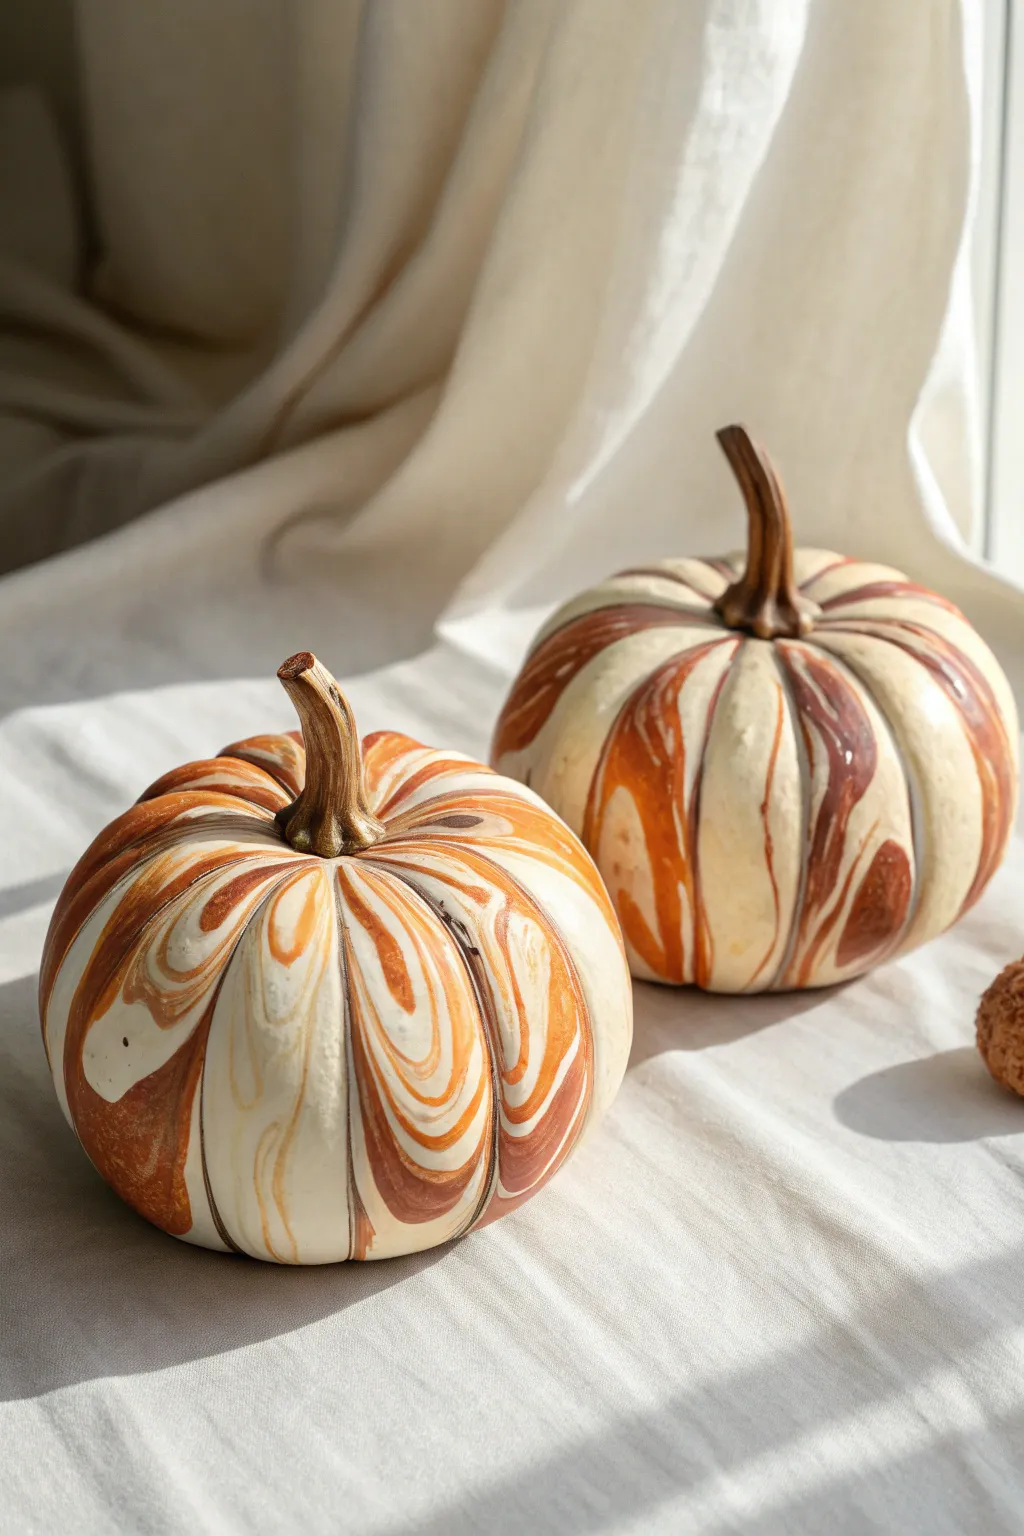
Move beyond traditional orange decor with these sophisticated, cream and caramel swirled pumpkins. The unique marbling technique creates an organic, fluid pattern that ensures no two pieces are exactly alike, adding a modern touch to your autumn display.
Step-by-Step
Materials
- Polymer clay (white or cream)
- Polymer clay (terra cotta or burnt sienna)
- Polymer clay (translucent or light beige)
- Polymer clay (dark brown for the stem)
- Acrylic rolling pin
- Modeling tools (or a toothpick)
- Clay blade or craft knife
- Baking sheet
- Parchment paper
- Oven (for curing)
Step 1: Preparing the Clay
-
Condition the clay:
Start by kneading each color of clay separately until it is soft, pliable, and warm to the touch. This prevents cracking later on. -
Create color ropes:
Roll your white or cream clay into a thick log, about 1 inch in diameter. Roll the terra cotta and translucent beige clays into thinner ropes, roughly half the thickness of the white log. -
Combine the ropes:
Lay the thinner colored ropes alongside the thick white log. Twist them together tightly into one large, spiraled candy-cane shape. -
Fold and twist:
Fold the twisted log in half and twist it again. Only do this 2-3 times—if you over-mix, the colors will blend into a muddy brown rather than distinct swirls. Stop while you can still see bold stripes. -
Form a ball:
Roll the marinated log into a smooth ball between your palms. The surface pattern will begin to stretch and swirl naturally as you round it out.
Step 2: Shaping the Pumpkin
-
Flatten slightly:
Gently press the ball down onto your work surface to create a squat, pumpkin shape rather than a perfect sphere. I prefer to press just enough so it sits vividly flat. -
Mark the segments:
Using a modeling tool or the back of a butter knife, press vertical indentations from the top center to the bottom center. Start with a cross pattern (North, South, East, West) to keep specific sizing even. -
Deepen the ridges:
Add diagonal lines between your first marks until you have 8 distinct sections. Go over the lines again to deepen the grooves, smoothing the edges slightly with your finger to remove harsh tool marks. -
Create the stem indent:
Press your thumb or a rounded tool firmly into the top center of the pumpkin to create a well where the stem will eventually sit.
Don’t Over-Twist
The key to defined marbling is minimal manipulation. Stop twisting the clay ropes as soon as you see a pattern you like; too much handling muddies the colors.
Step 3: Creating the Stem
-
Shape the base stem:
Take a small balls of dark brown clay and roll it into a cone shape. Curve the tip slightly to give it a natural, organic look. -
Texturize the stem:
Use a needle tool or toothpick to scratch vertical lines up and down the stem, mimicking the fibrous texture of dried wood. -
Attach the stem:
Place the stem into the indentation you made earlier. Blend the bottom edge of the stem clay onto the pumpkin body slightly to secure it, or use a dab of liquid clay adhesive for extra strength. -
Refining touches:
Once attached, you might want to twist the very tip of the stem slightly for a whimsical finish.
Gold Leaf Accents
For a luxe upgrade, press small flakes of gold leaf onto the clay surface before baking. The metallic shine pairs beautifully with the caramel tones.
Step 4: Baking and Finishing
-
Preheat oven:
Set your oven to the temperature recommended on your polymer clay package (usually between 265°F and 275°F or 130°C). -
Prepare baking surface:
Line a baking sheet with parchment paper. Place your pumpkins on the paper, ensuring they aren’t touching each other. -
Bake the clay:
Bake according to the manufacturer’s instructions, typically 15-30 minutes per 1/4 inch of thickness. Since these are solid, they may need 45-60 minutes total. -
Cool down:
Turn off the oven and let the pumpkins cool completely inside with the door slightly ajar. Sudden cooling can sometimes cause thermal shock cracks. -
Optional glaze:
If you prefer a glossy finish like the inspiration image, apply a thin coat of polymer clay gloss varnish once the pumpkin is fully cool.
Place your finished marbled pumpkins in a sunny spot where the light can catch the soft swirls of the clay
Textured Pumpkin Skins Using Stamps and Carving
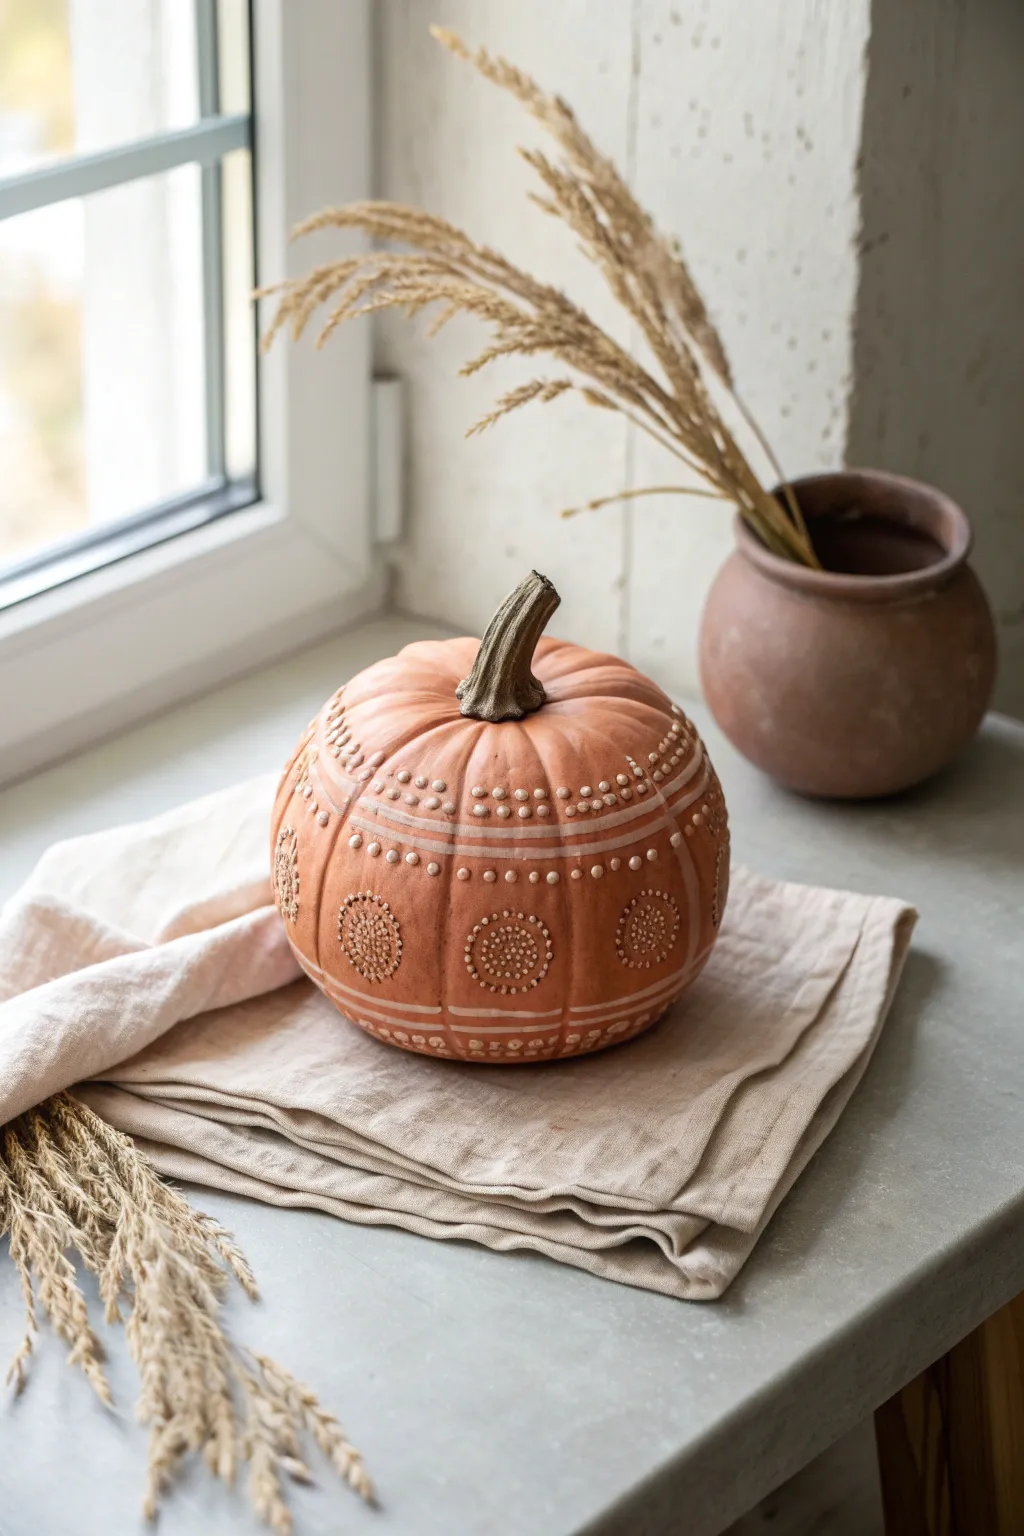
Embrace the warmth of autumn with this stunning terracotta pumpkin project, featuring delicate white slip detailing that mimics embroidery or beadwork. The contrast between the rich, earthy clay and the raised cream patterns creates a sophisticated, bohemian centerpiece perfect for any windowsill.
Step-by-Step Guide
Materials
- Terracotta air-dry clay or kiln-fire clay
- Cream or white clay slip (or heavy body acrylic paint for faux finish)
- Slip trailer bottle with fine nozzle
- Needle tool
- Loop carving tool
- Small sponge
- Plastic bag for slow drying
- Clear matte sealer (optional)
Step 1: Shaping the Base
-
Form the pinch pots:
Start by rolling two equal-sized balls of terracotta clay. Insert your thumb into the center of each and pinch the walls evenly to create two matching bowl shapes. -
Join the halves:
Score the rims of both bowls with your needle tool and apply a little water or slip. Press the rims together firmly to seal the air inside, creating a hollow sphere. -
Smooth the seam:
Using a wooden modeling tool or your thumb, drag clay across the seam to merge the two halves completely. Smooth over the join until the sphere is seamless. -
Define the ribs:
Gently press the side of a pencil or a modeling tool vertically down the sides of the sphere to create the pumpkin’s natural indentations or ‘ribs.’ Start at the top center and curve down to the bottom. -
Refine the shape:
Tap the bottom of the pumpkin gently on your work surface to flatten it slightly so it sits stable. Use a damp sponge to smooth out any fingerprints or rough areas on the skin. -
Create the stem:
Roll a thick coil of clay and twist it slightly to mimic a natural stem texture. Score and slip the attachment point at the top of the pumpkin, then press the stem firmly into place, blending the clay at the base.
Slip Consistency Tip
If your slip trails are flattening out immediately, the mixture is too wet. Leave the open bottle out for an hour to let some water evaporate, then stir and test again.
Step 2: Adding the Detail
-
Plan your patterns:
Before adding the slip, use a needle tool to lightly sketch your horizontal bands and circular motifs directly onto the clay surface. This acts as a guide for your piping. -
Prepare the slip trailer:
Fill your slip trailer bottle with a smooth, white or cream-colored clay slip. Ensure the consistency is like thick yogurt—runny enough to squeeze out but thick enough to hold its shape. -
Pipe the horizontal bands:
Steady your hand and squeeze gentle lines of slip following the horizontal guides you marked earlier. I find it helps to rotate the pumpkin on a banding wheel or piece of paper while I work. -
Add the dots:
Create rows of small, raised dots along the horizontal lines. Vary the spacing to create rhythm; some lines can be solid, while others are entirely made of stippled dots. -
Create the medallions:
In the center of the pumpkin’s vertical sections, pipe circular medallion patterns. Start with a central dot and work outward in concentric circles of tiny dots to create a mandala-like effect. -
Detail the ribs:
Add vertical lines of dots or dashes along the indented ribs of the pumpkin to accentuate its three-dimensional form. -
Let it firm up:
Allow the slip decoration to dry until it is no longer shiny and feels firm to the touch. This prevents smearing during the final drying phase.
Step 3: Finishing
-
Slow drying:
Place your finished pumpkin loosely inside a plastic bag. Let it dry slowly over several days to prevent cracks, especially where the stem attaches. -
Final inspection:
Once bone dry (lighter in color and hard), check for any sharp burrs where the slip might have peaked. You can gently sand these down with fine grit paper if needed. -
Sealing or firing:
If using air-dry clay, apply a coat of matte clear sealer to protect the surface. If using ceramic clay, fire the piece according to your clay manufacturer’s cone rating.
Clogged Nozzle?
Tiny dry clay particles can block the fine tip. Keep a thin sewing needle or a piece of wire handy to clear the nozzle immediately if the flow stops unexpectedly.
Display your handcrafted pumpkin near a window to let the light catch the beautiful texture of the raised details
Mini Pumpkin Jewelry Charms and Keychain Dangles
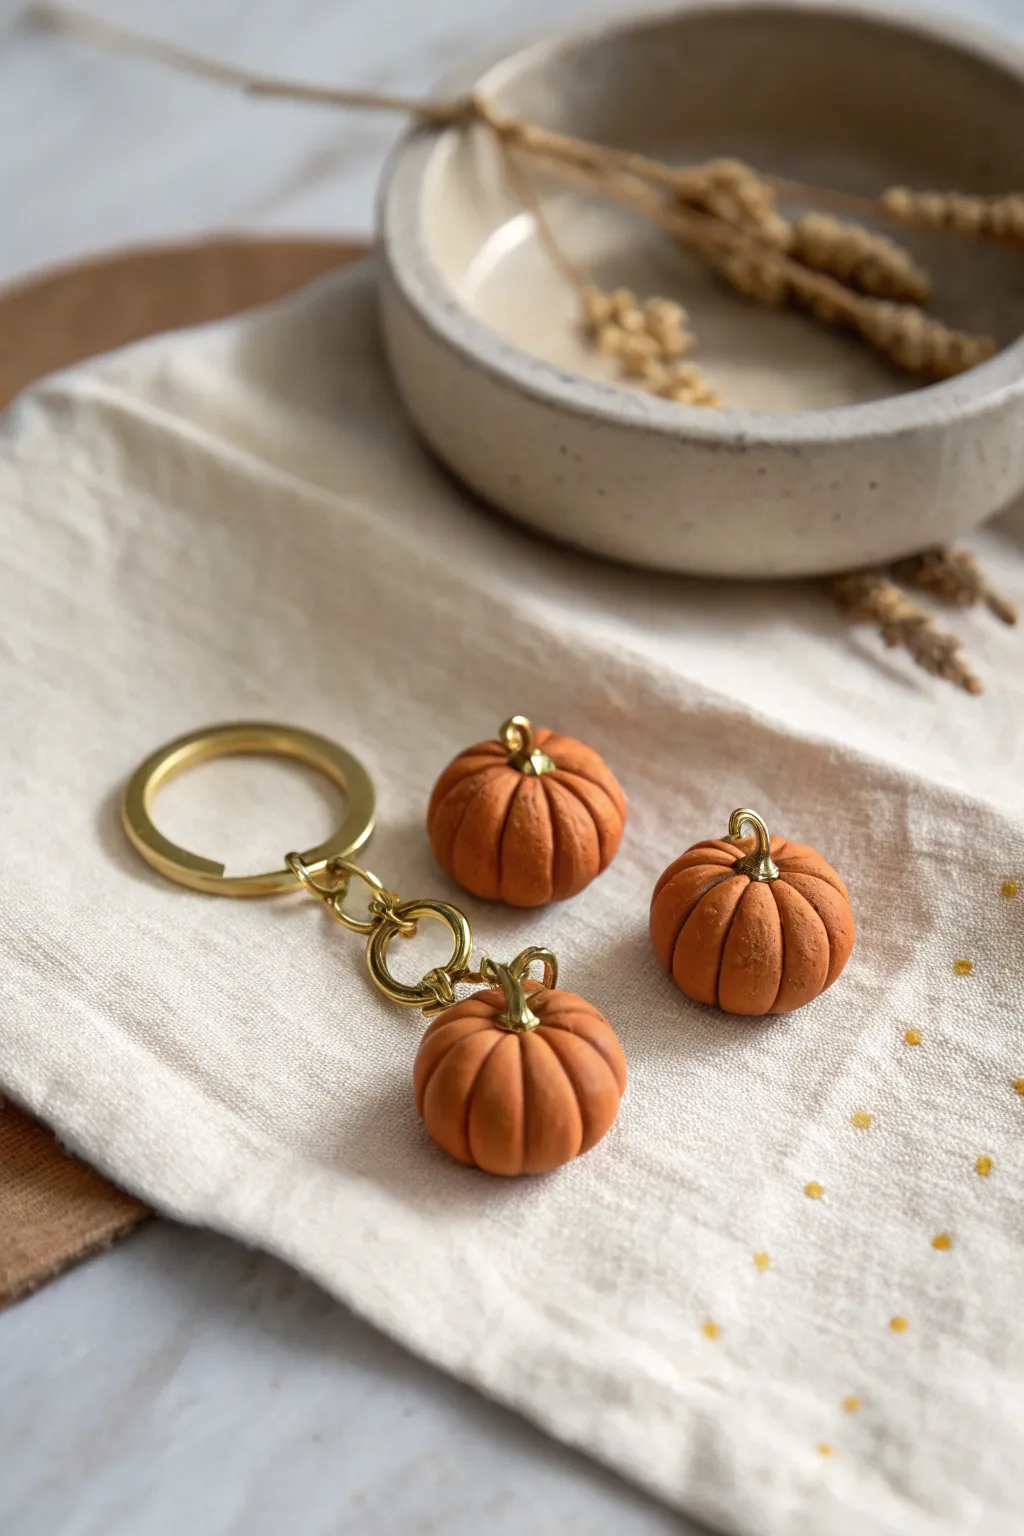
Embrace the harvest season with these dainty pumpkin charms, perfect for adding a touch of autumn to your keys or jewelry. Their realistic matte texture paired with elegant gold stems creates a sophisticated, handmade accessory that looks much more complicated than it actually is.
Detailed Instructions
Materials
- Polymer clay (burnt orange or terracotta color)
- Gold polymer clay or gold acrylic paint
- Gold jewelry headpins or eye screws
- Gold keychain mechanism with chain links
- Pliers (needle-nose and round-nose)
- Needle tool or toothpick
- Soft pastel chalks (dark brown/burnt umber) – optional for shading
- Sculpting tool with a blunt edge
- Soft brush
- Oven
Step 1: Shaping the Base
-
Condition the Clay:
Begin by warming your orange polymer clay in your hands. Knead it thoroughly until it is soft, pliable, and free of any cracks or air bubbles. -
Portion the Clay:
Divide the clay into three equal-sized balls, each roughly the size of a large marble or a small cherry. Roll them between your palms until they are perfectly smooth spheres. -
Flatten Slightly:
Gently press down on the top and bottom of each sphere to create a slightly squat, pumpkin-like shape rather than a perfect ball. -
Create the Center Hole:
Using a needle tool, poke a small guide hole in the direct center of the top of each pumpkin. This marks where the stem will eventually sit.
Clean Start
Before handling the orange clay, wipe your hands and workspace with baby wipes. Lint and dust show up easily on light matte clay.
Step 2: Sculpting the Segments
-
Mark the Quadrants:
With a blunt sculpting tool or the back of a knife, press a vertical line from the top center hole down to the bottom center. Repeat on the opposite side to split the pumpkin in half, then again to split it into quarters. -
Divide Further:
Press additional indents between your first four lines. Aim for roughly 8 sections total, though slight irregularity makes them look more natural. -
Round the Ribs:
Use your finger or a soft silicone tool to gently smooth the sharp edges of your indentations. You want the sections to look like puffy ribs, not sliced wedges. -
Add Texture (Optional):
For a more organic look, gently tap the surface with an old toothbrush or a piece of sandpaper to remove fingerprints and add a subtle skin texture. -
Apply Shading:
I like to scrape a little brown soft pastel into a powder and brush it lightly into the grooves of the pumpkin ribs. This creates depth and realism before baking.
Step 3: Adding the Hardware
-
Insert Hardware:
Take a small gold eye screw or a headpin bent into a loop. Insert it firmly into the center hole you made earlier. Ideally, dip the end in a tiny bit of liquid clay or bake-and-bond for security. -
Form the Stem:
Take a tiny amount of clay to form a collar around the base of your metal loop. This acts as the stem base and secures the hardware visually. -
Refine the Stem:
Sculpt the clay around the metal eyelet so it looks like a cut pumpkin stem. You can use gold metallic clay for this step, or regular clay that you will paint later. -
Bake the Pumpkins:
Place your pumpkins on a ceramic tile or baking sheet. Bake according to your polymer clay manufacturer’s instructions (usually 275°F/135°C for 15-30 minutes per 1/4 inch of thickness). -
Cool Down:
Allow the pieces to cool completely inside the oven or on a wire rack. Polymer clay is fragile when hot.
Make it Sparkle
Mix a tiny pinch of gold mica powder into the orange clay body before sculpting. It adds a subtle shimmer that catches the light beautifully.
Step 4: Finishing and Assembly
-
Paint the Stem:
If you didn’t use gold clay, carefully paint the stem area with metallic gold acrylic paint. Let it dry completely. -
Seal the Surface (Optional):
If you want extra durability, apply a very thin layer of matte varnish to the orange sections, keeping the matte, organic look shown in the photo. -
Prepare Jump Rings:
Using two pairs of pliers, twist open a jump ring. Do not pull it apart outward; twist the ends front-to-back to preserve the circle shape. -
Attach to Chain:
Slide the loop of your pumpkin charm onto the jump ring, then attach the jump ring to the bottom link of your keychain hardware. -
Close the Ring:
Twist the jump ring closed securely with your pliers, ensuring there is no gap for the charm to slip through.
Now you have a charming set of seasonal accessories ready to clip onto your bag or gift to a friend.