If you’ve ever wanted to turn a simple sketch into something you can actually feel, clay relief is the sweetest little magic trick. I love how a flat slab can become a mini world just by layering, carving, and letting texture do the talking.
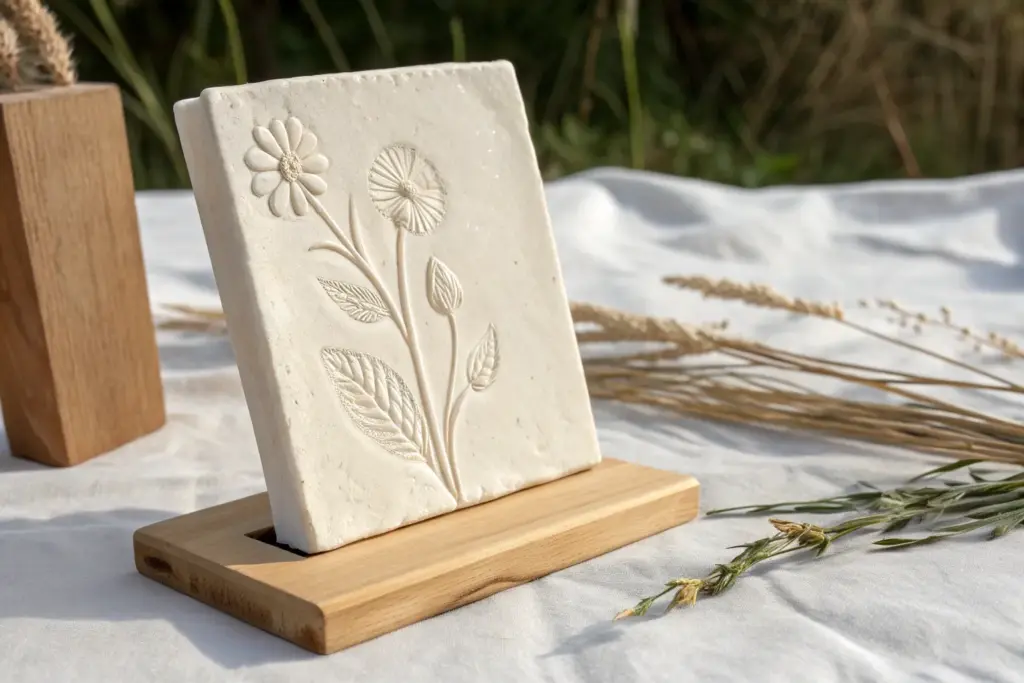
Layered Wildflower Relief Tile

Capture the delicate beauty of a summer meadow with this elegant monochromatic clay relief tile. By carving negative space around simple floral forms, you’ll create a raised, textural design that feels both modern and timelessly organic.
Step-by-Step
Materials
- White or speckled stoneware clay (approx. 1 lb)
- Rolling pin
- Two 1/2-inch thick wooden slats (guide rails)
- Square template (paper or flexible plastic, approx. 6×6 inches)
- Needle tool or sharp pencil
- Loop tool (small size for detailed carving)
- Rubber rib tool
- Small carving gouge or V-tip tool
- Soft brush (for smoothing)
- Clean sponge
- Canvas mat or slab mat
Step 1: Preparing the Slab
-
Roll the base:
Start by wedging your clay thoroughly to remove air bubbles. Place the clay on your canvas mat between the two wooden slats. Roll the clay out until the rolling pin rests on the slats, ensuring a perfectly even 1/2-inch thickness across the entire slab. -
Smooth the surface:
While the clay is fresh, take your rubber rib tool and gently compress the surface. Drag it across the slab in multiple directions to align the clay particles; this makes carving easier and prevents warping later. -
Cut the shape:
Place your square template over the smoothed slab. Holding your needle tool vertically, cut straight down into the clay to trace the square. Remove the excess clay scraps, but keep the tile on the mat to avoid distorting the shape. -
Round the edges:
Dip your finger or a slightly damp sponge in water and gently run it along the sharp cut edges of the square to soften them slightly, mimicking the soft, pillowy look of the finished piece.
Step 2: Drafting the Design
-
Sketch the stems:
Using the needle tool with very light pressure, sketch the central structure. Draw two main curved lines rising from the center-bottom, branching outward. These will be your main flower stems. -
Outline the blooms:
At the top of the left stem, lightly sketch a simple daisy shape. On the right, taller stem, sketch a larger, fan-shaped coneflower profile. Add a small rosette flower in the bottom right corner for balance. -
Add foliage:
Fill the negative space by sketching long, lance-shaped leaves extending from the stems. Ensure the leaves are evenly spaced and angle upwards. Don’t worry about perfection; these are just guidelines for carving.
Pro Tip: Leather Hard is Best
Don’t carve immediately after rolling! Let the slab sit until it’s ‘leather hard’ (firm like cheddar cheese). Your tools will cut cleaner lines without dragging or smearing the clay.
Step 3: Carving the Relief
-
Define the outlines:
Now, commit to your lines. Use a V-tip tool or a small gouge to carve a shallow trench directly over your sketched outlines. This separates the floral elements from the background. -
Lower the background:
Using a loop tool, begin removing clay from the background areas *around* the leaves and flowers. I find it best to shave away thin layers gradually rather than digging deep immediately. You want the background slightly lower than the design. -
Sculpt the leaves:
Within the raised leaf shapes, use a small loop tool to carve a central vein line. Gently slope the clay downward from the center vein toward the edges of the leaf to give it a 3D, convex form. -
Detail the flower heads:
For the left daisy, carve distinct petals radiating from the center. For the right flower, carve vertical grooves to separate the petals of the fan shape. Use the needle tool to stipple small dots into the flower centers for texture. -
Refine the stems:
Go back to the stems and carefully carve away any excess clay on either side, ensuring they look rounded and connect naturally to the leaves. -
Add decorative specks:
To enhance the organic feel, use the point of your needle tool to poke shallow, random holes in the background area (the negative space). This creates a lovely contrast with the smooth raised surfaces.
Troubleshooting: Warping Corners
If corners curl up while drying, flip the tile over onto a piece of drywall or intricate wire rack. You can also lightly weight the corners with small sandbags during the drying phase.
Step 4: Finishing Touches
-
Initial smoothing:
Once the carving is complete, use a soft, dry brush to sweep away all the little clay crumbs (burrs) created during the process. -
Water refining:
Dip a soft brush in a tiny amount of water—barely damp—and brush over the raised leaves and petals. This melts the harsh tool marks into smooth, buttery curves. -
Final border check:
Run your finger along the outer rim of the tile one last time to ensure no sharp edges remain. -
Drying process:
Place a piece of plastic loosely over the tile for the first 24 hours to let it dry slowly. This is crucial for preventing the corners from curling up. Once leather hard, uncover it to dry completely before firing.
Once fired, the light catching the relief will bring your permanent garden to life


Botanical Leaf Overlap Relief

Capture the delicate structure of fall foliage with this sophisticated clay relief project. You’ll create a smooth, rectangular slab featuring a composition of distinct leaf varieties, each rendered with crisp veins and subtle elevation.
How-To Guide
Materials
- High-quality air-dry clay (stone or white)
- Rolling pin
- Two wooden guide slats (approx. 1/2 inch thick)
- Fresh leaves with prominent veins (maple, oak, chestnut)
- Clay carving tools (needle tool, small loop tool)
- Rubber clay shaper or blending tool
- Sponge
- Fine-grit sandpaper
- Craft knife
- Ruler
Step 1: Preparing the Base
-
Condition the Clay:
Begin by wedging your air-dry clay thoroughly to remove air bubbles and ensure a consistent texture. It should feel pliable and smooth, not sticky. -
Create the Slab:
Place your clay between the two wooden guide slats on a canvas or cloth surface. Roll the clay out until the rolling pin rests on the slats, ensuring a perfectly even thickness across the entire piece. -
Cut the Shape:
Using a ruler and a craft knife, trim the ragged edges to create a clean, sharp rectangular block. Save the excess clay; you will need it for the relief work. -
Polish the Surface:
Dip a sponge lightly in water and wring it out almost completely. Gently wipe the surface of the slab to remove any canvas texture or rolling pin marks, creating a pristine canvas.
Fixing Cracks
If hairline cracks appear during drying, mix a small amount of clay with vinegar to create a thick paste. Fill the cracks, smooth over, and let dry again.
Step 2: Building the Relief
-
Roll Thin Sheets:
Take your excess clay and roll it out much thinner than your base, roughly 1/8th of an inch thick. This will be used for the applique method. -
Cut Leaf Silhouettes:
Place your real leaves onto the thin clay sheet or use paper templates to trace the outlines. Uses a needle tool to cut out roughly 5-6 distinct leaf shapes. -
Arrange the Composition:
Lay the clay cutouts onto your main slab to test the arrangement. Aim for a balanced look where leaves angle in from different sides, but do not attach them yet. -
Score and Slip:
Once you are happy with the placement, lift one leaf at a time. Generously score (scratch) the back of the leaf and the spot on the slab where it will sit. Add a dab of water or slip to join them. -
Secure the Edges:
Press the clay leaf firmly onto the slab. Use a rubber shaper to gently bevel the edges downward, blending the very bottom perimeter into the slab just enough so it doesn’t look like a sticker, but retains its raised profile.
Step 3: Detailing and Refining
-
Carve Primary Veins:
Using a needle tool or a fine carving tool, draw the central vein down the middle of each leaf. Press deep enough to create a visible shadow line but don’t cut through the applique. -
Add Secondary Veins:
Radiate smaller veins outward from the center line. I find it helpful to look at real reference photos here to get the V-shapes just right for each specific tree species. -
Sculpt Surface Texture:
Use a small loop tool to gently scrape away tiny amounts of clay between the veins. This concave sculpting makes the veins look raised and creates that realistic, puffy leaf texture. -
Refine the Outlines:
Go back around the perimeter of each leaf with your knife or needle tool to sharpen the points and serrated edges, ensuring they look crisp against the smooth background. -
Smooth the Background:
Check the negative space (the flat background) for any fingerprints or tool marks. Smooth these away carefully with a damp brush or fingertip. -
Final Polish:
Once the clay is leather-hard but not fully dry, run a slightly damp finger over the high points of the leaves to remove any burrs from the carving process.
Tinted Detail
Mix a tiny drop of watercolor into your sealant and apply it only into the carved veins. Wipe the surface immediately to leave dark recesses for high contrast.
Step 4: Finishing
-
Slow Drying:
Place a lightweight plastic sheet loosely over the project to let it dry slowly over 2-3 days. This prevents the corners of the rectangular slab from curling or cracking. -
Sanding:
When bone dry, use fine-grit sandpaper to gently smooth the outer edges of the block and the very tops of the relief if you want a stone-like finish. -
Sealing (Optional):
Apply a matte varnish or sealant to protect the surface while maintaining that raw, natural clay aesthetic.
Display your finished botanical relief on a shelf or mount it in a shadow box to bring a touch of nature indoors


Sunburst and Rays Relief Plaque
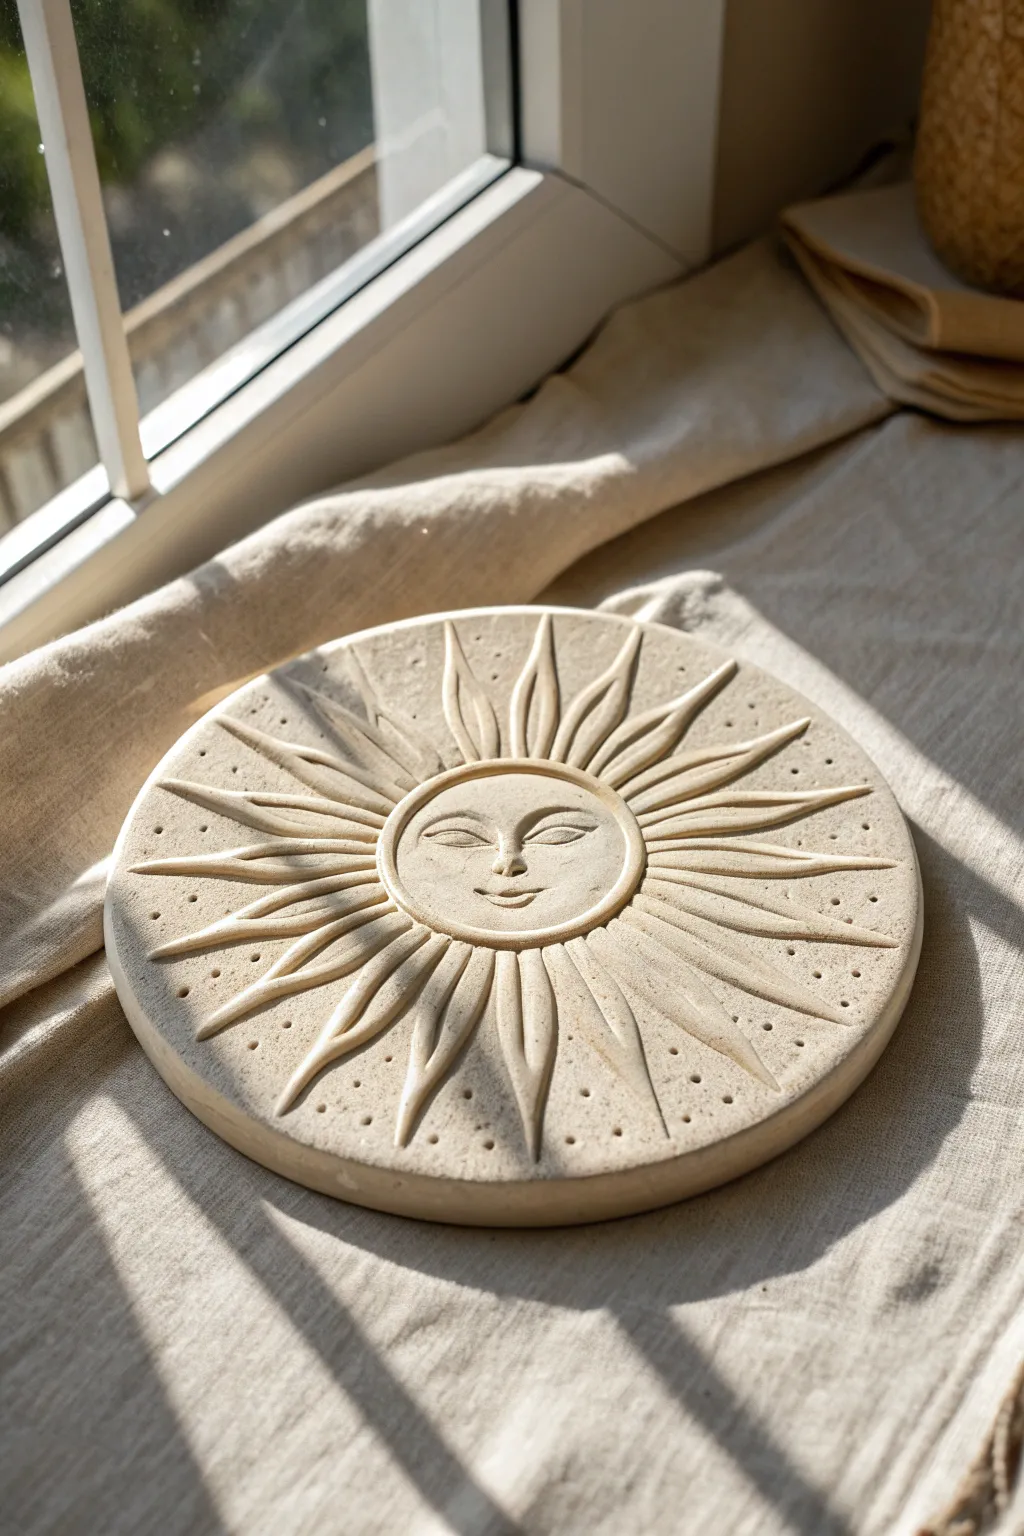
Capture the serene warmth of the sun with this detailed relief carving project. Using air-dry clay or stoneware, you’ll sculpt a stylized face surrounded by gentle, radiating beams to create a timeless piece of wall art or a unique trivet.
Step-by-Step
Materials
- Air-dry clay or white stoneware clay
- Rolling pin
- Two guide slats (approx. 1/2 inch thick)
- Circle cutter or a round bowl (approx. 8-10 inches)
- Needle tool
- Loop carving tools (various sizes)
- Small sponge
- Wooden modeling tool with a curved tip
- Fine-grit sandpaper
- Bowl of water
- Canvas or heavy cloth (for working surface)
Step 1: Base Preparation
-
Prepare your workspace:
Lay down a piece of canvas or heavy cloth on your table. This prevents the clay from sticking and adds a nice subtle texture to the back of your piece. -
Roll out the slab:
Take a large ball of clay and begin flattening it with your hand. Place your 1/2 inch guide slats on either side of the clay and use the rolling pin to create a perfectly even slab. -
Cut the circle:
Place your circle cutter or inverted bowl onto the slab. Press down firmly to cut the shape. Remove the excess clay from the outside and smooth the edges with a damp finger. -
Define the center:
Find the center of your circle. Using a smaller circular object (like a jar lid or cookie cutter), lightly press into the center to mark the boundary for the sun’s face. Do not cut all the way through; just leave a clear impression.
Clean Lines Pro Tip
When carving the recessed background between rays, work from the center pushing outward. This prevents slipping and accidentally gouging the serenity of the sun’s face.
Step 2: Sculpting the Face
-
Build the facial volume:
Score the inside of the central circle with your needle tool and add a thin, flat disk of fresh clay to raise this area slightly above the background. Smooth the edges down so it merges seamlessly. -
Mark features:
Lightly sketch the position of the eyes, nose, and mouth with a needle tool. The eyes should be almond-shaped and widely spaced, with the nose centered and simple. -
Carve the eyes:
Using a small loop tool, carefully carve out the shallow recess for the eyes, leaving the eyelids raised. Refine the shape of the eyelids with a wooden modeling tool. -
Sculpt the nose and mouth:
Add a tiny coil of clay for the nose bridge and nostrils, blending it smoothly. Use a curved wooden tool to press in the smile line, creating a gentle, closed-mouth expression. I find using a light touch here helps keep the expression peaceful. -
Refine the border:
Use a modeling tool to deepen the groove around the face, creating a distinct raised border that separates the sun’s character from the rays.
Step 3: Carving the Rays
-
Map the rays:
Lightly draw the sun rays radiating from the central face to the edge of the plaque. Create a pattern of wavy, flame-like shapes, alternating slightly in width or curve for visual interest. -
Carve the negative space:
Using a medium loop tool, begin carving away the clay *between* the drawn rays. You want the rays to remain raised high while the background is recessed. -
Shape the rays:
Once the areas between are lowered, use a damp sponge or your finger to round over the sharp edges of the raised rays. They should look soft and fluid, not blocky. -
Add texture:
Take a needle tool or a small blunt point and press tiny dots into the recessed background areas between the rays. This stippling effect adds wonderful contrast and hides any uneven carving marks.
Level Up: Color Wash
Mix a small amount of burnt umber acrylic paint with water. Brush it over the relief and wipe it back immediately. The dark pigment will settle in the dots and grooves for instant antique depth.
Step 4: Finishing Touches
-
Smooth the surface:
Go over the entire piece with a slightly damp sponge to remove any clay crumbs or sharp burrs created during carving. Be careful not to wash away the fine details of the face. -
Dry slowly:
Place a loose sheet of plastic over the relief to let it dry slowly over 2-3 days. This prevents the edges from curling up. Flip the piece over occasionally to ensure even drying. -
Sand and dust:
Once bone dry, take fine-grit sandpaper and gently smooth the outer rim and the high points of the sun’s face. Wipe away the dust with a dry brush. -
Seal or fire:
If using air-dry clay, apply a matte acrylic varnish to protect the surface. If using stoneware, fire the piece according to your clay body’s instructions, perhaps adding a clear matte glaze to enhance the natural stone look.
Hang your solar creation near a window to let natural light play across the soothing relief textures you’ve carved


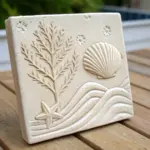
Ocean Waves With Carved Flow Lines
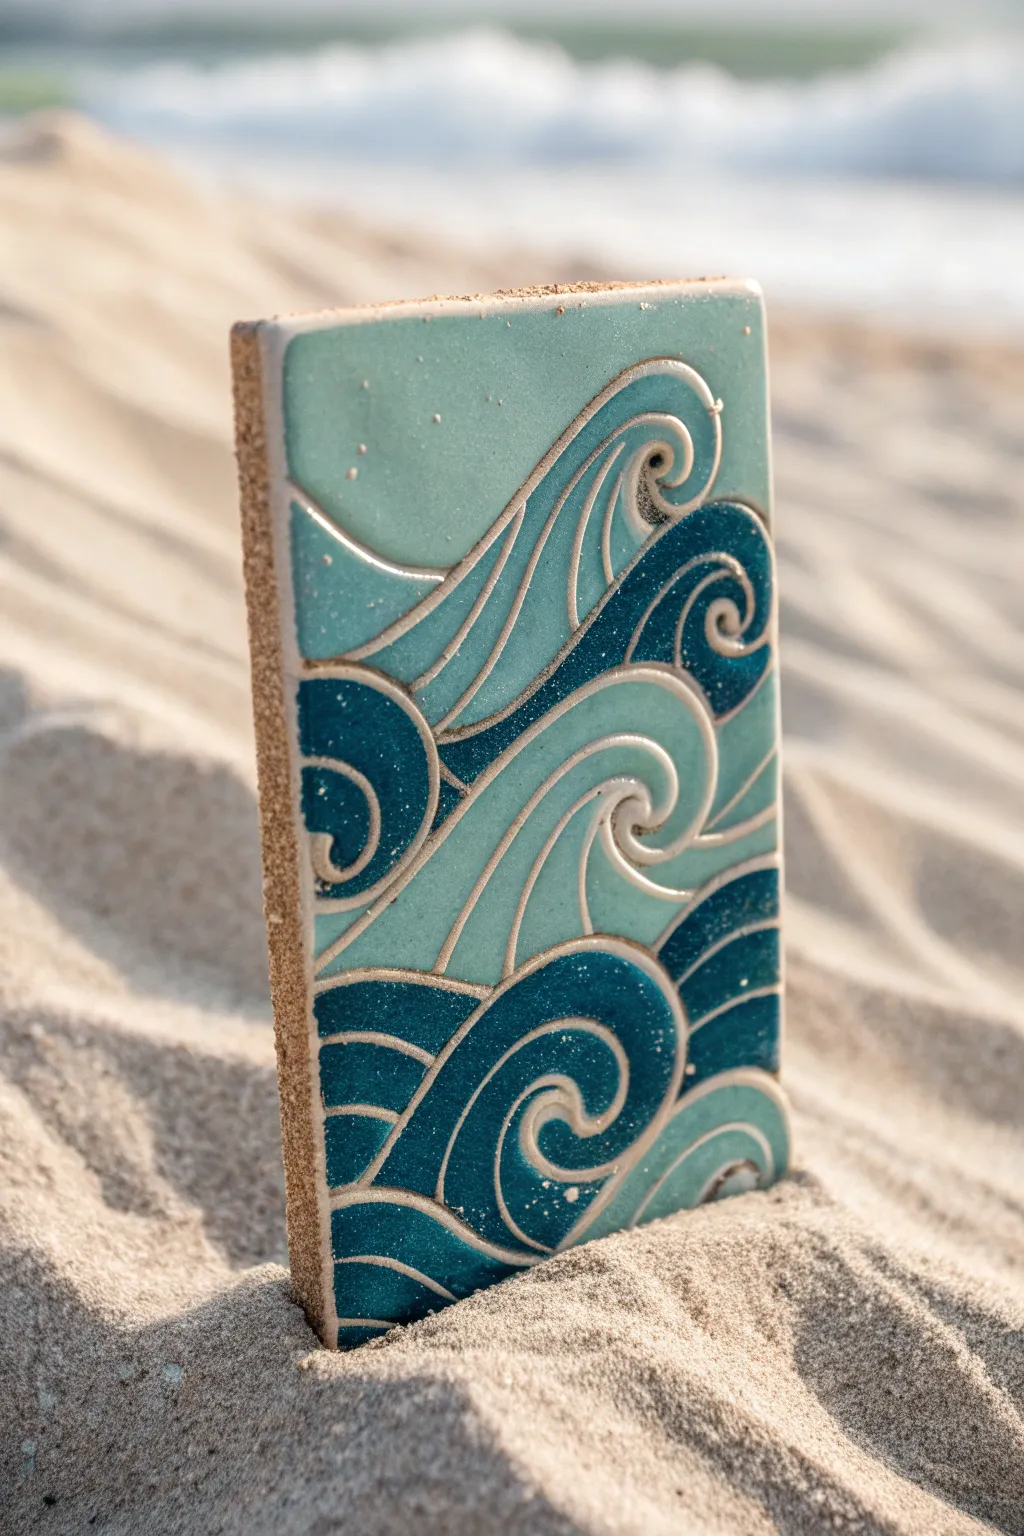
Capture the rhythmic energy of the sea with this stunning ceramic relief tile featuring crashing stylized waves. Using a sgraffito-inspired carving technique and alternating glazes, you’ll create a piece that feels both modern and timelessly oceanic.
Detailed Instructions
Materials
- Stoneware clay slab (approx 1/2 inch thick)
- Rectangular template (approx 4×6 inches)
- Needle tool
- Loop tool or ribbons tool (small)
- Fettling knife
- Soft sponge
- Teal celadon glaze
- Deep glossy blue glaze
- Wax resist (liquid)
- Small liner brushes
- Kiln access
Step 1: Slab Preparation & Design
-
Prepare the slab:
Roll out your stoneware clay to an even thickness of about half an inch. Compress the clay on both sides with a rib tool to align the particles and prevent warping later. -
Cut the shape:
Place your rectangular template onto the slab and cut around it cleanly using a fettling knife. Smooth the sharp edges slightly with a damp sponge. -
Sketch the flow:
Using a needle tool, very lightly scratch your wave design onto the leather-hard clay. Focus on large, sweeping spirals that echo the Art Deco style, creating three distinct tiers of waves. -
Refine the composition:
Ensure your lines flow continuously from edge to edge. I prefer to vary the size of the spirals, making the bottom waves slightly denser than the top splash.
Step 2: Carving the Relief
-
Define the channels:
Use a small loop tool to carve over your sketched lines. You want to remove a consistent strip of clay, creating a deep channel about 1/8th inch wide. -
Bevel the edges:
Gently soften the sharp edges of your carved channels with a damp fingertip or a soft brush. This prevents the glaze from breaking too sharply or crawling away from the lines. -
Clean the debris:
Check the deep recesses for any clay crumbs or burrs. Remove them carefully so your unglazed lines remain crisp and clean after firing. -
Slow drying:
Sandwich your tile between two pieces of drywall or place it under plastic for slow drying. This is crucial for flat tiles to prevent the corners from curling up. -
Bisque fire:
Once bone dry, fire the piece to bisque temperature (usually cone 04) to prepare it for glazing.
Glaze Running Over?
If glaze runs into your carved lines despite the wax, wait for it to dry completely, then use a wooden toothpick to gently scrape the channel clean before firing.
Step 3: Glazing & Finishing
-
Apply wax resist:
Using a very fine brush, carefully paint liquid wax resist into all the carved channels. This will keep the raw clay body visible as the outline, which is the signature look of this project. -
Mix your glazes:
Prepare your teal and deep blue glazes. If they are commercial brushing glazes, give them a good shake to ensure the suspension is even. -
Paint the deep blue:
Identify the ‘shadow’ areas of your waves—typically the underside of the spirals and the bottom-most section. Apply 2-3 coats of the deep glossy blue glaze into these specific shapes. -
Apply the teal:
Fill the remaining upper sections and the crests of the waves with the lighter teal celadon glaze. Overlap slightly onto the wax—it will bead up and can be wiped away. -
Clean the lines:
Once the glaze is dry to the touch, use a damp sponge to gently wipe any stray glaze droplets off the waxed carved lines, ensuring the clay body will show through clearly. -
Final Fire:
Load the tile into the kiln for the final glaze firing (usually cone 5 or 6 depending on your clay and glaze choice). Ensure the tile is flat on the shelf.
Depth Perception
Carve slightly deeper on the bottom wave tier and shallower at the top. This subtle difference in relief height adds physical depth that enhances the visual 3D effect.
Prop your finished tile on a shelf or frame it to bring a permanent ocean breeze into your home

The Complete Guide to Pottery Troubleshooting
Uncover the most common ceramic mistakes—from cracking clay to failed glazes—and learn how to fix them fast.
Sea Turtle Over Ripples Relief
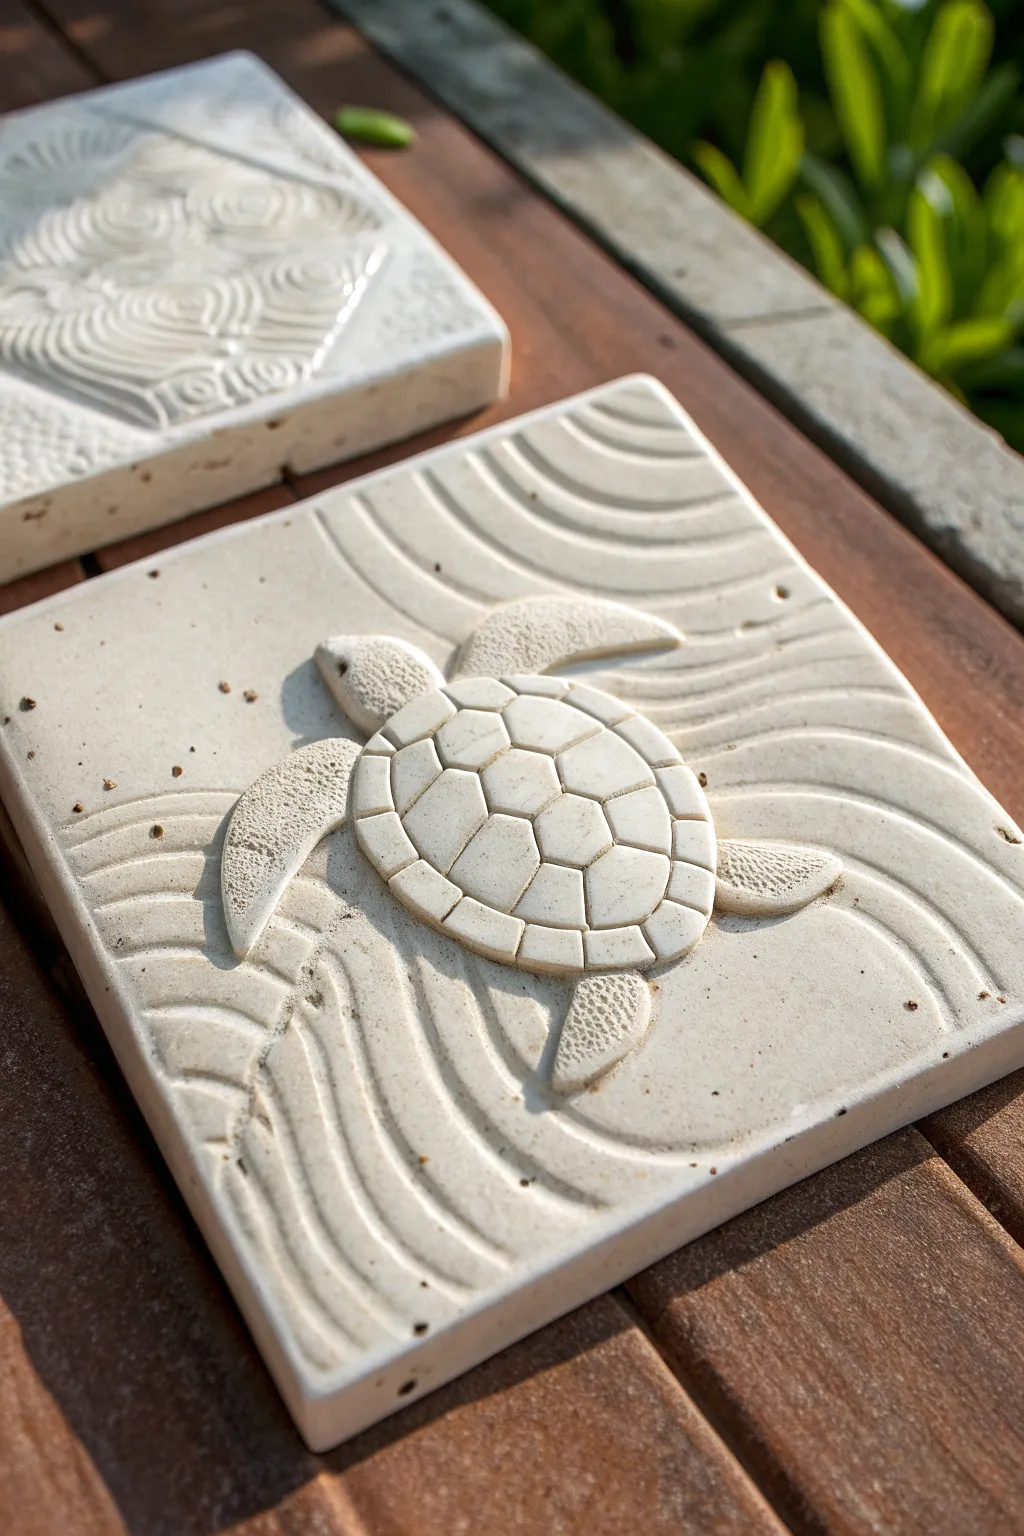
Capture the serene movement of the ocean with this elegant clay relief tile featuring a sea turtle gliding over stylized ripples. The finished piece has a beautiful stone-like matte texture, making it perfect for coaster sets or decorative wall art.
Step-by-Step Tutorial
Materials
- White sculpture clay (or air-dry clay)
- Square tile cutter or ruler and knife
- Rolling pin
- Two wooden guide strips (approx. 1/4 inch thick)
- Needle tool
- Loop tool for carving
- Modelling tools (ball stylus, rubber shaper)
- Sponge and water bowl
- Texturing brush (stiff bristle) or toothbrush
- Slip (clay mixed with water)
Step 1: Preparing the Base
-
Roll the slab:
Begin by wedging your clay to remove air bubbles. Place your clay between two wooden guide strips on a canvas surface and roll it out with a rolling pin. This ensures an even thickness of about 1/4 inch across the entire slab. -
Cut the square:
Using a square tile cutter or a ruler and fettling knife, cut a clean 4×4 or 6×6 inch square from your slab. Smooth the cut edges gently with a damp sponge to remove any sharp burs.
Clean Cuts Pro Tip
When cutting the initial square, place a sheet of paper or plastic wrap under the clay slab. This allows you to rotate the work without deforming the square shape.
Step 2: Creating the Background Ripples
-
Sketch the flow:
Lightly trace sweeping, curved lines across the face of the tile using a needle tool. These lines should curve gently around where the turtle will be placed, suggesting water displacement. -
Carve the channels:
Use a small loop tool to carve out shallow channels following your traced lines. Vary the depth slightly—deeper near the center and shallower towards the edges—to create a dynamic sense of movement. -
Smooth the ridges:
Dip your finger in a little water and run it along the carved channels to soften the sharp ridges. You want soft, rolling waveforms rather than sharp, mechanical grooves.
Warping Fix
If your tile corners start to lift while drying, gently weigh them down with small sandbags or even books placed on top of a board to keep the tile flat.
Step 3: Sculpting the Turtle
-
Form the shell body:
Roll a ball of clay and flatten it slightly into an oval dome for the shell. Score the back of the shell and the center of your tile, apply a dab of slip, and press the shell firmly onto the base. -
Add the head:
Shape a smaller tear-drop piece of clay for the head. Attach it to the top of the shell using the score-and-slip method, blending the neck seam smoothly so it looks connected to the body. -
Attach the flippers:
Create four flattened teardrop shapes—two large for the front flippers and two smaller ones for the back. Attach them so they appear to be swimming, with the front flippers sweeping backward. -
Define the shell pattern:
Using a needle tool, lightly sketch the hexagonal pattern of the scutes on the shell. Start with a row down the center spine and fill in the sides with varied polygon shapes. -
Deepen the shell lines:
Once satisfied with the pattern, go over the lines again with a slightly blunter tool to deepen the grooves without cutting all the way through the clay.
Step 4: Refining Details and Texture
-
Shape the scutes:
Gently press down on the center of each shell scute with a modeling tool to make them appear slightly domed and three-dimensional, rather than flat. -
Texture the skin:
I find that using a stiff-bristled brush or an old toothbrush works wonders here. Gently tap the brush onto the head and flippers to create a pitted, leathery skin texture distinct from the smooth shell. -
Refine the edges:
Use a rubber shaper tool to clean up the outline of the turtle where it meets the water. Ensure there is a clean separation so the turtle pops from the background. -
Add final speckles:
For added realism, you can press small sand grains or tiny clay crumbs into the tile surface randomly to simulate seabed sediment, as seen in the reference.
Step 5: Finishing
-
Slow drying:
Place a loose sheet of plastic over the tile to let it dry slowly over a few days. This prevents the corners from curling up as the clay shrinks. -
Bisque fire or seal:
If using ceramic clay, bisque fire it to cone 04. If using air-dry clay, wait until bone dry and then seal with a matte varnish to protect the surface while maintaining the natural stone look.
Display your relief proudly on a stand or use it as a striking centerpiece for a mosaic table
Simple Mountain Landscape Relief
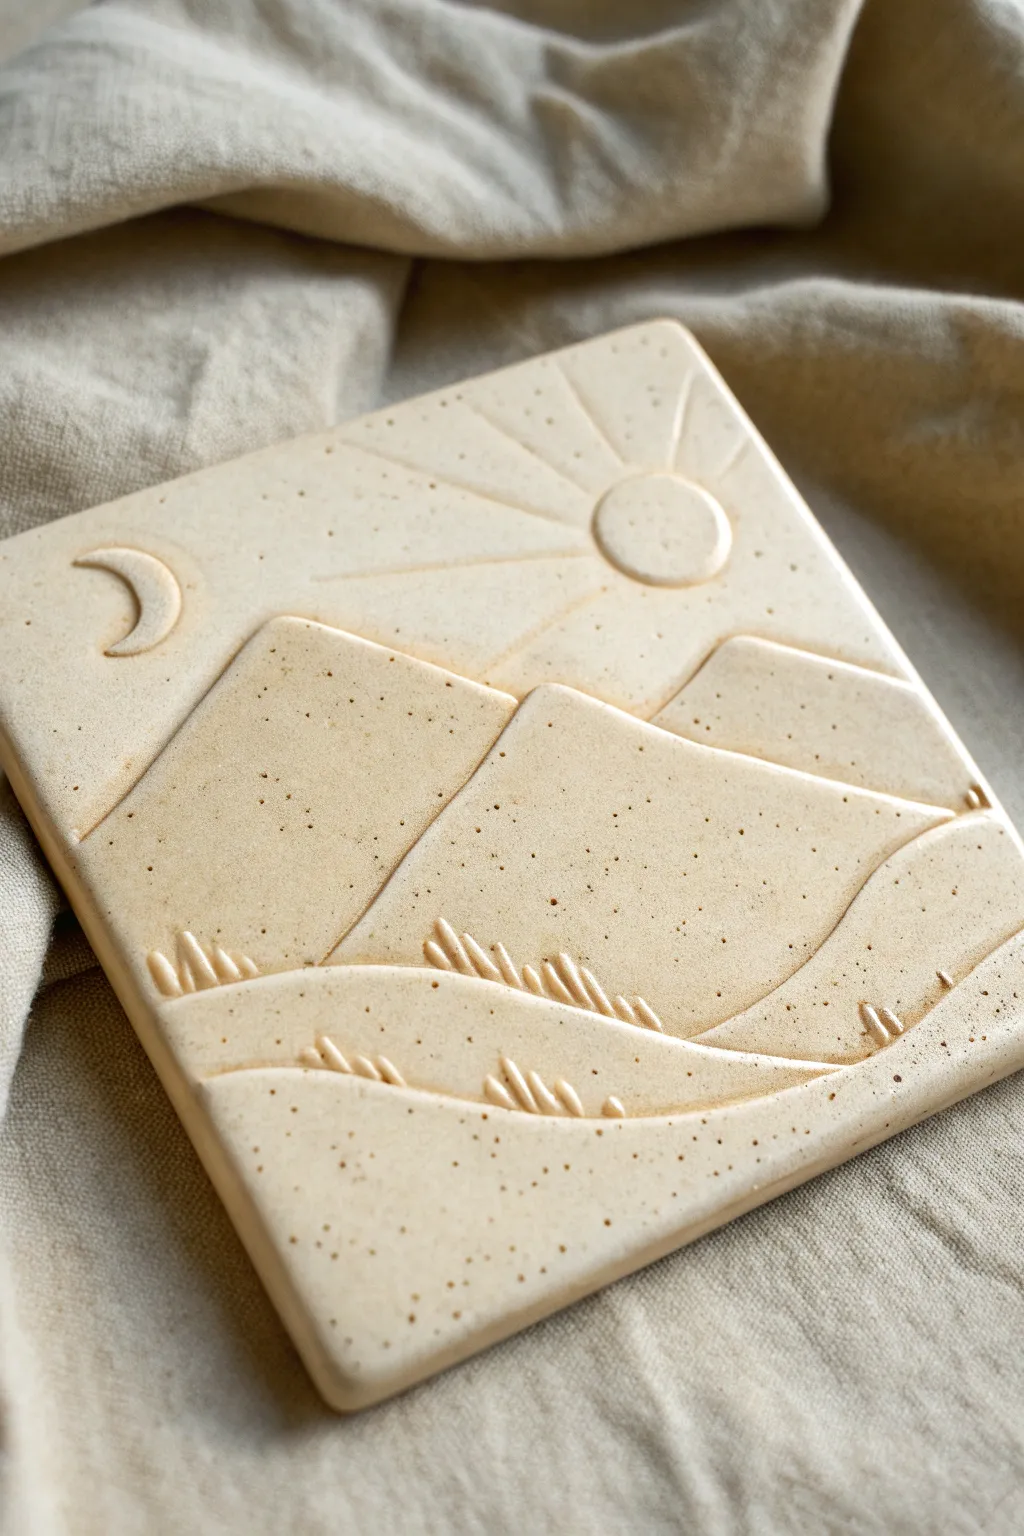
Capture the serene balance of day and night with this charming relief tile featuring overlapping mountain peaks. The speckled clay body adds a gorgeous organic texture that enhances the simple line work and earthy subject matter.
Step-by-Step Guide
Materials
- Speckled buff stoneware clay (or polymer clay with speckles)
- Square cookie cutter (approx. 4-5 inches) or a ruler and craft knife
- Rolling pin
- Guide sticks (1/4 inch thick)
- Needle tool or X-Acto knife
- Small ball stylus tool
- Carving tool (small loop or straight edge)
- Sponge and water
- Canvas or heavy fabric working surface
Step 1: Preparation & Base
-
Prepare the Clay:
Begin by wedging your speckled clay to remove air bubbles. Flatten it slightly with your palms on a canvas surface to prevent sticking. -
Roll the Slab:
Place your guide sticks on either side of the clay. Roll the clay out into a smooth, even slab that is about 1/4 inch thick, ensuring the rolling pin rests on the guides for uniformity. -
Cut the Square:
Using a large square cookie cutter or a ruler and knife, cut out a perfect square tile. Remove the excess clay and smooth the cut edges gently with a damp fingertip.
Smooth Moves
To get those perfectly rounded grooves without flaking, lay a piece of thin cling film over the clay before drawing your lines with a stylus. It creates a soft, polished channel instantly.
Step 2: Carving the Landscape
-
Outline the Mountains:
Lightly sketch your design onto the clay surface using a needle tool. Draw two large, overlapping geometric mountain peaks in the center, and rolling hills in the foreground. -
Define the Rolling Hills:
Use a carving tool or the edge of a dull knife to incise the lines for the foreground hills. Press firm enough to create a groove but not so deep that you cut through the slab. -
Carve the Mountain Peaks:
deepen the lines defining the two main mountain triangles. I like to bevel the cut slightly on the ‘outer’ side of the line to make the mountains appear raised. -
Add the Sun:
In the upper right corner, lightly impress a small circle (a bottle cap works well) or freehand a circle for the sun. -
Create Sun Rays:
radiating from the sun, carve straight lines of varying lengths outward. Allow them to stop just short of the mountain peaks. -
Sculpt the Moon:
In the upper left corner, carefully carve a crescent moon shape. You can either incise the outline or gently scoop out a shallow layer of clay around it to make it pop.
Make it a Coaster
Before drying, glue a layer of cork to the bottom or add small felt feet after firing. This turns your art piece into a functional, absorbent coaster for your coffee table.
Step 3: Adding Texture & Detail
-
Soften the Edges:
Take a slightly damp sponge (wrung out thoroughly) and gently wipe over your carved lines. This removes the sharp ‘burrs’ of clay created during carving. -
Add Grass Details:
Using a small loop tool or even the side of a needle tool, press small, repetitive indentations along the tops of the rolling hills to simulate tufts of grass. -
Refine the Grooves:
Go back over your main structural lines with a ball stylus to compress the clay and make the grooves smooth and consistent width. -
Smoothing Surface:
Check the flat surfaces of the mountains and sky; if you see fingerprints, lightly buff them away with the softest side of your damp sponge. -
Drying:
Place the tile between two pieces of drywall or heavy wood boards to dry slowly. This prevents the corners of the square from curling up as the moisture leaves the clay. -
Bisque Fire:
Once bone dry, fire the piece to bisque temperature (usually Cone 04) if using stoneware. If using polymer clay, bake according to package instructions. -
Finishing:
Since the beauty here is the raw clay body, apply a clear matte glaze to seal it, or leave the raw stoneware unglazed on the outside for a rustic texture, only glazing the incised lines if desired.
Display your finished tile on a small easel or mount it on the wall to enjoy the minimalist beauty of your landscape


What Really Happens Inside the Kiln
Learn how time and temperature work together inside the kiln to transform clay into durable ceramic.
Bird on a Branch Relief Scene
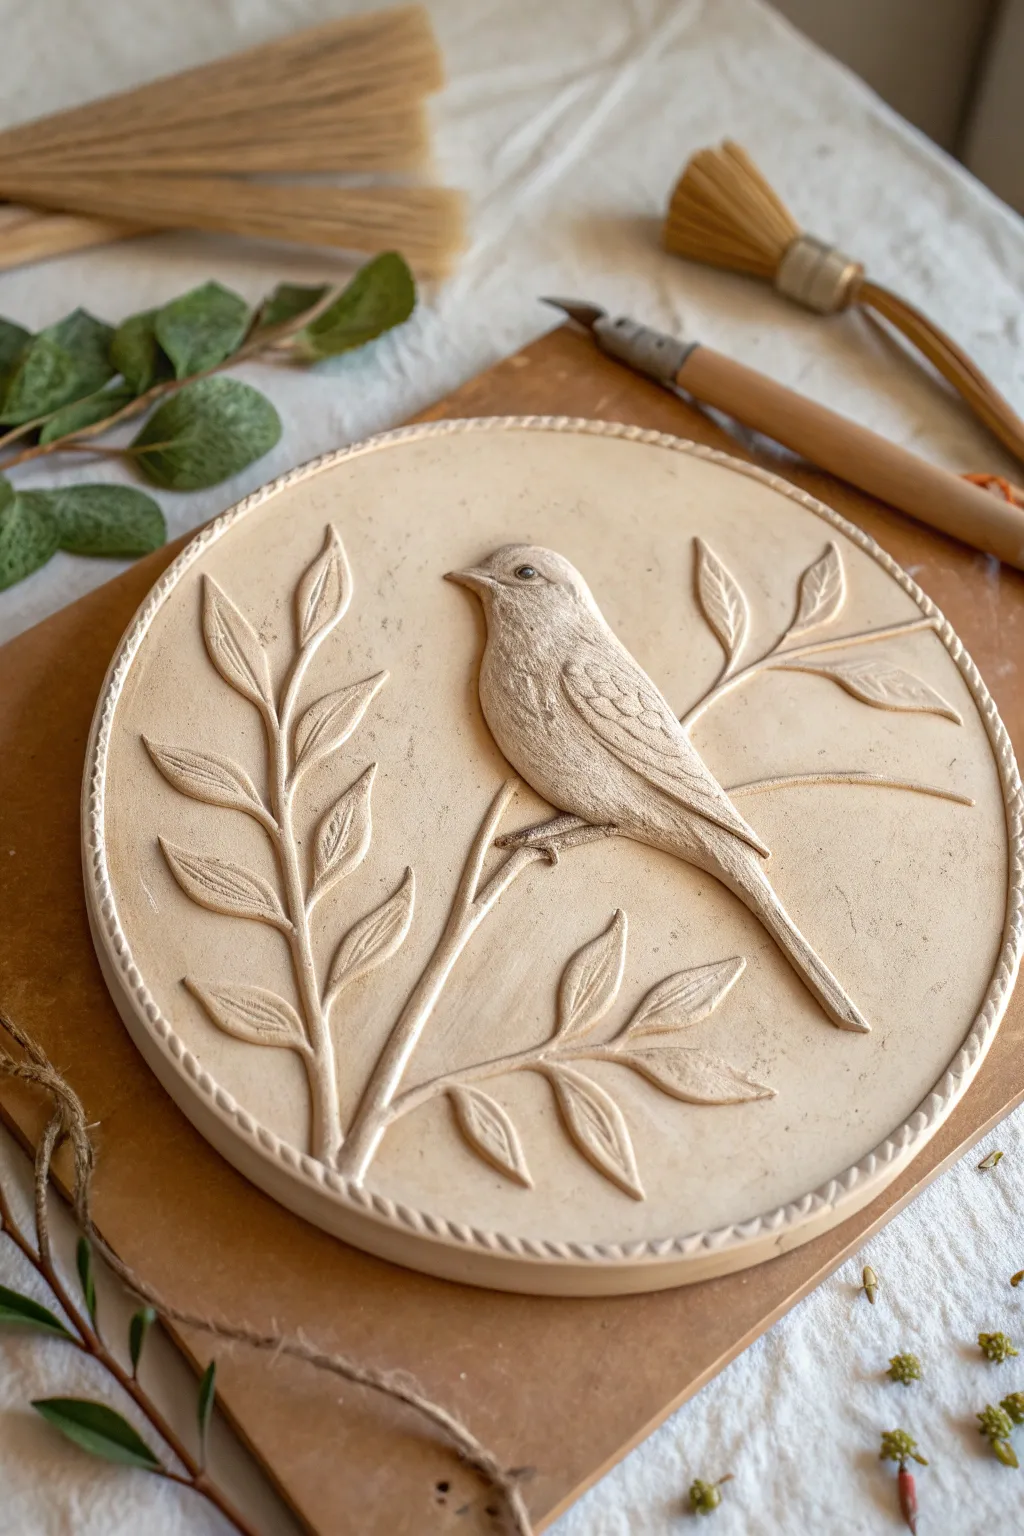
Capture the delicate beauty of nature with this elegant clay bas-relief featuring a songbird perched amongst leaves. The design relies on subtle depth and texture, created through layering and carving, resulting in a timeless piece that mimics the look of carved stone or plaster.
Detailed Instructions
Materials
- Air-dry clay or polymer clay (beigey-white or stone color)
- Round cookie cutter or circular template (approx. 6-8 inches)
- Rolling pin
- Modeling tools (needle tool, small ball stylus, knife tool)
- Small carving gouge or clay loop tool
- Slip (clay mixed with water) or liquid polymer clay for joining
- Fine-grit sandpaper
- Wooden board or ware board for working surface
- Texture sponge or stiff brush
Step 1: Preparing the Base
-
Roll the foundation:
Begin by rolling out a smooth slab of clay to a consistent thickness of about 1/4 inch. Ensure your work surface is clean to avoid picking up unwanted dust. -
Cut the circle:
Use your large circular cutter or a template with a knife to cut out the perfect round base. Smooth the edges with a slightly damp finger to remove any sharpness. -
Create the twisted border:
Roll two very thin snakes of clay of equal length. Gently twist them together to form a rope. Carefully attach this rope around the very perimeter of your circle using a little slip or water to adhere it securely.
Step 2: Building the Composition
-
Sketch the layout:
Lightly trace the outline of your branch, leaves, and bird directly onto the wet clay base using a needle tool. Keep the lines faint; they are just guides for placement. -
Form the main branch:
Roll a thin coil of clay and taper it at the ends. lay it over your traced branch line, pressing it gently onto the base. Flatten it slightly so it looks integrated rather than just sitting on top. -
Shape individual leaves:
For each leaf, form a small tear-drop shape of clay. Flatten it between your fingers, then press it onto the branch stems. I find it helpful to vary the sizes slightly for a natural look. -
Sculpt the bird’s body:
Form a larger teardrop shape for the bird’s body and a smaller round shape for the head. Flatten them slightly (relief works in layers, not full 3D) and attach them to the branch, smoothing the clay where the neck joins the body. -
Add the wing:
Create a distinct, flattened oval shape for the wing. Attach it to the side of the bird’s body, ensuring the back edge sweeps downward towards the tail. -
Extend the tail feathers:
Add a long, tapered strip of clay extending from beneath the wing and body to form the tail, crossing over the branch line for visual depth.
Clean Cuts Matter
For crisp leaf edges, let the clay firm up slightly (about 15-20 min) before carving the final vein details. Soft clay tends to drag and create crumbs.
Step 3: Refining Details
-
Define the veins:
Using a knife tool or needle, carefully score a central vein down each leaf. Add smaller diagonal veins branching off the center, pressing firmly enough to create a shadow but not cutting through. -
Carve the bird’s eye:
Press a small ball stylus into the bird’s head to create the eye socket. Place a tiny bead of clay inside for the eyeball, then use a needle tool to define the eyelids. -
Texture the feathers:
Use a small loop tool or gouge to carve short, shallow curves into the wing to simulate layered feathers. For the body, gently scratch fine lines to suggest soft down. -
Refine the beak:
Pinch the clay at the front of the head to sharpen the beak. Use a knife tool to create the horizontal line separating the upper and lower beak. -
Blend connections:
Go back over the points where the stems meet the main branch. Use a modeling tool to smooth the clay together so the plant looks organic and continuous. -
Final surface smoothing:
Check the empty background space. If you see fingerprints, gently buff them away with a barely damp sponge or brush to achieve that matte, stone-like finish. -
Dry or bake:
Follow the instructions for your specific clay. If air drying, cover loosely with plastic first to prevent curling. If baking, ensure the piece is supported flat.
Preventing Cracks
If the clay starts separating from the base while you work, your base is likely too dry. Score both surfaces and add a generous dab of slip or liquid clay.
Once fully cured, you can display this peaceful relief on a small easel or mount it to a wooden backing for a rustic wall hanging
Mushroom Cluster Woodland Relief
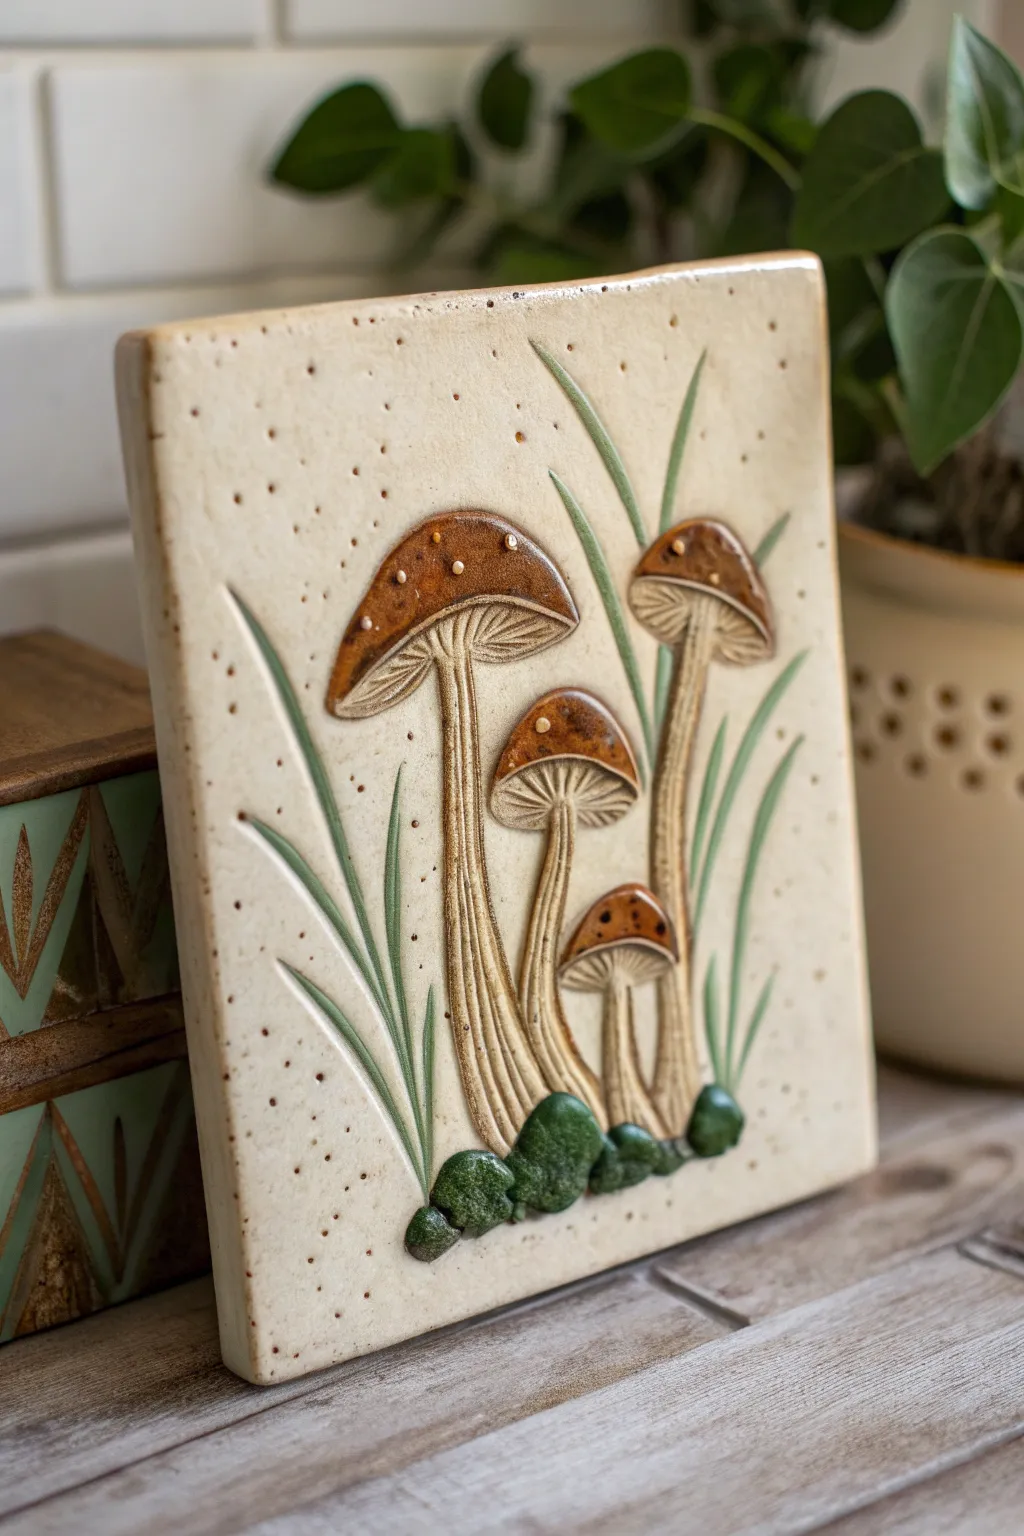
Bring the quiet charm of the forest floor into your home with this textured clay relief tile. This project captures rustic beauty through warm, earthy glazes, delicate carving, and an organic arrangement of mushrooms and moss.
Step-by-Step Tutorial
Materials
- Light-colored stoneware clay or earthenware (low-grog)
- Rolling pin and guide sticks (approx. 1/4 inch thick)
- Fettling knife or X-Acto blade
- Loop tools and needle tools
- Modeling tools (wooden or rubber ribs)
- Underglazes (Warm Brown, Dark Green, Light Green, Cream/White)
- Small sponges and paintbrushes (detail and broad)
- Clear matte or satin glaze
- Kiln (or access to firing services)
Step 1: Preparing the Canvas
-
Roll out the slab:
Begin by rolling out a generous slab of your clay to an even thickness using your guide sticks. Aim for about 1/4 to 3/8 inch thick to ensure durability without excessive weight. -
Cut the tile shape:
Using a ruler and a fettling knife, cut a clean rectangle or square. The example here is a slight vertical rectangle. Smooth the cut edges with a damp sponge or your finger to prevent sharp burrs later. -
Create the background texture:
Before sculpting, address the surface. You can leave it smooth, but gently pressing a sponge or a piece of textured fabric onto the clay creates a subtle organic tooth that catches glaze beautifully.
Step 2: Sculpting the Mushrooms
-
Outline the composition:
Lightly trace the positions of your four mushrooms with a needle tool. Place the largest one on the left, a tall thin one on the right, and two smaller ones tucked in the center. -
Add clay for the caps:
Score and slip the areas where the mushroom caps will go. Form small, flattened domes of fresh clay and press them firmly onto the scored areas. Smooth the edges down so they blend seamlessly into the background tile. -
Build the stems:
Roll coils of clay varying in thickness. Score and slip the stem areas, then attach the coils. Flatten them slightly, merging the top of the stem into the underside of the cap. -
Refine the forms:
Use a modeling tool to shape the caps, giving them a slight curve. For the stems, ensure they flare slightly at the bottom where they meet the ‘ground.’ -
Carve the gills:
Using a fine needle tool or a very small loop tool, carefully carve the gills underneath the caps. These should radiate outward from the stem to the edge of the cap. -
Texture the stems:
Drag a serrated rib or a needle tool vertically down the stems to create disjointed, bark-like ridges. This mimics the fibrous texture of mushroom stalks.
Warping Woes
Tiles love to warp. Dry very slowly by loosely covering with plastic for several days. Place a drywall board on top to gently weigh it down while it dries evenly.
Step 3: Adding Flora and Details
-
Sculpt grass blades:
Roll very thin, tapered coils of clay. Attach these in long, sweeping curves behind and around the mushrooms to represent tall grass. Press them flat against the tile so they become a low relief element. -
Create the moss base:
Form small, irregular lumps of clay and attach them at the very bottom of the stems. Texture these lumps by stippling them with a stiff-bristled brush or a balled-up piece of foil to look like mossy stones. -
Initial drying:
Allow the piece to dry slowly to the leather-hard stage. This is crucial to prevent warping. -
Bisque fire:
Once fully bone dry, fire the piece to bisque temperature (usually Cone 04) to prepare it for glazing.
Depth Perception
Make the mushroom caps the thickest relief point (highest elevation) and the grass the thinnest. This varying depth creates realistic shadows and dimension.
Step 4: Glazing and Finishing
-
Wax resist (optional):
Check your bisque piece for any dust and wipe with a damp sponge. If you want pristine unglazed lines, you can apply wax resist, but for this rustic look, we will paint freely. -
Paint the caps:
Apply a warm, amber-brown underglaze to the mushroom caps. Be careful near the edges. I find adding a second, slightly darker coat near the center adds lovely dimension. -
Highlight the gills and stems:
Wash a very diluted light brown or cream underglaze over the stems and gills. Use a damp sponge to wipe back the high points, leaving color in the carved recesses to accentuate the texture. -
Glaze the greenery:
Paint the grass blades with a soft sage green underglaze. For the mossy stones at the base, use a darker, deeper forest green to weigh down the composition. -
Splatter texture:
Dip a stiff toothbrush into brown iron oxide wash or underglaze. Flick the bristles to spray fine speckles across the entire background and mushrooms, mimicking natural imperfections and soil. -
Apply clear glaze:
Once the underglazes are dry, brush or dip the entire face of the tile in a clear matte or satin glaze. Avoid glossy glaze if possible, as it can obscure the fine texture. -
Final firing:
Fire the piece to the maturation temperature of your clay and glaze (likely Cone 5 or 6). Let the kiln cool completely before retrieving your woodland treasure.
Display your finished relief on a small easel or frame it to add a touch of handcrafted nature to your wall

TRACK YOUR CERAMIC JOURNEY
Capture glaze tests, firing details, and creative progress—all in one simple printable. Make your projects easier to repeat and improve.
Dragonfly and Lily Pad Relief
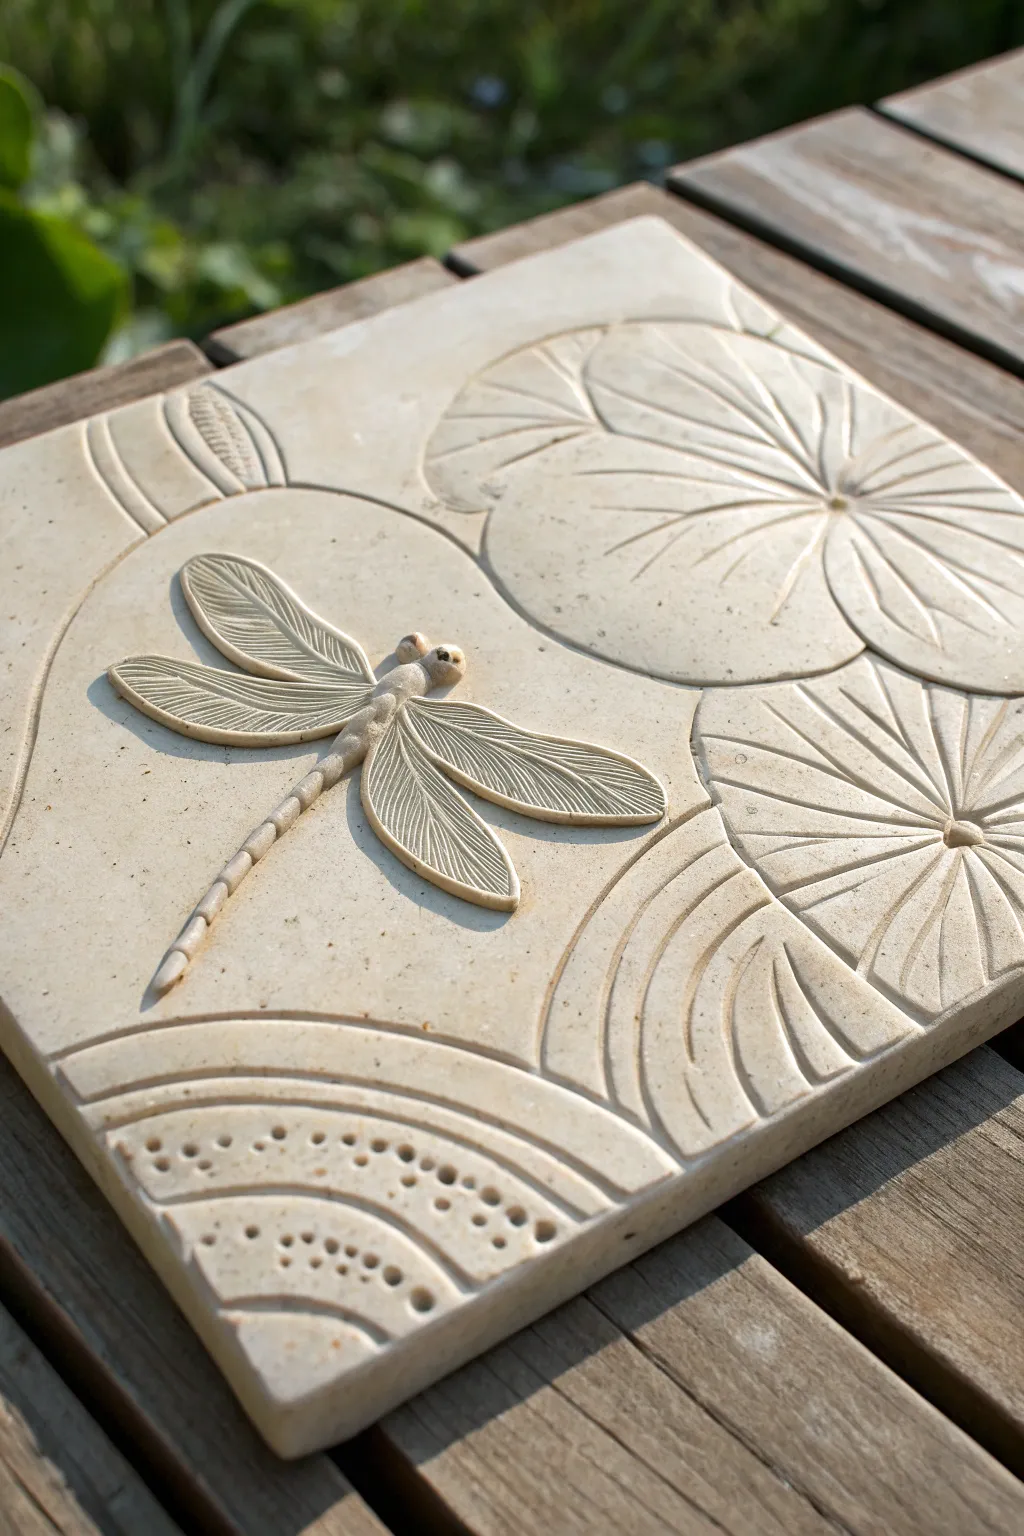
This elegant relief tile captures the delicate beauty of a dragonfly resting near lotus leaves, rendered in a soothing, monochromatic stone finish. The project combines smooth surfaces with intricate textures, making it a perfect exercise for mastering depth and carving techniques.
Detailed Instructions
Materials
- White or speckled stoneware clay (or high-quality air-dry clay)
- Rolling pin
- Two 1/2-inch thickness guide strips
- Needle tool
- Wire loop tool (small and medium)
- Rib tool (rubber or metal)
- Small carving gouges or a linoleum cutter
- Ball stylus tool
- Sponge
- Clay knife or fettling knife
- Slip and scoring tool
Step 1: Preparing the Base
-
Roll out the slab:
Begin by wedging your clay thoroughly to remove air bubbles. Place your clay between the two 1/2-inch guide strips and roll it out into a smooth, even slab. This thickness is crucial to prevent warping later. -
Cut the square:
Measure and cut a perfect square, approximately 8×8 inches, using a ruler and a fettling knife. Clean up the edges with a damp sponge. -
Transfer the design:
Lightly sketch your design onto the clay surface using a needle tool. Draw two large circular lily pads on the right side and curved water ripples at the bottom, leaving the center open for the dragonfly.
Cracking Wings?
If the thin wings start cracking while you work, lightly mist them with water or cover them with plastic wrap. Do not let thin parts dry out before attaching.
Step 2: Sculpting the Lily Pads and Ripples
-
Carve the outlines:
Using a small wire loop tool, gently carve away the clay around the lily pads to lower the background level slightly. This makes the leaves maximize the relief effect. -
Define the veins:
Use a needle tool or small gouge to carve the radiating veins into the lily pads. Start from the center point and pull the tool outward toward the edges, varying the pressure to create natural-looking lines. -
Add water ripples:
For the bottom left corner, carve concentric curved lines to represent ripples. Use a wider loop tool to scoop out shallow channels between the raised lines. -
Create texture details:
Using a small ball stylus, press divots into specific sections of the ripple bands to create a dotted texture, mimicking bubbles or foam.
Color Wash
Apply a diluted iron oxide wash after bisque firing and wipe it back with a sponge. The dark color will remain in the carved veins, making the details pop.
Step 3: Modeling the Dragonfly
-
Shape the body:
Roll a small coil of clay for the dragonfly’s tail (abdomen) and a slightly thicker oval for the thorax. Score and slip the area where the dragonfly will rest, then attach these pieces. -
Add the head:
Form a small sphere for the head and attach it to the top of the thorax. Use a tiny tool to define the eyes. -
Detail the tail:
Press faint horizontal indentations along the length of the tail coil to create the segmented look typical of insect bodies. -
Cut the wings:
Roll out a separate, very thin sheet of clay (about 1/8 inch). Cut four long, wing shapes using a needle tool or craft knife. -
Carve wing veins:
Before attaching, use a very fine needle or stylus to draw the intricate network of veins onto each wing. Deeper lines for the main veins and lighter scratches for the webbing work best. -
Attach the wings:
Score the sides of the thorax and the base of each wing. Apply a dab of slip and press the wings into place. I like to angle the upper wings slightly forward and the lower wings slightly back for a dynamic pose. -
Reinforce connections:
Use a small blending tool to smooth the clay where the wings meet the body, ensuring they are securely attached and won’t pop off during drying.
Step 4: Refining and Finishing
-
Smoothing:
Take a slightly damp sponge or soft brush and gently go over any rough carved edges to soften them, being careful not to erase your fine details. -
Clean the background:
Use a rubber rib or flat tool to smooth out the negative space around the dragonfly and leaves, ensuring the background is flat and uniform. -
Slow drying:
Place a plastic sheet loosely over the tile to let it dry very slowly. This helps prevent the corners from curling up. -
Bisque fire:
Once bone dry, fire the piece to bisque temperature (usually Cone 04) if using ceramic clay. -
Final finish:
Leave the piece unglazed for a raw stone look, or apply a matte clear glaze or a light oxide wash to highlight the textures before the final firing.
Once fired or fully cured, display your dragonfly tile on a small easel or mount it on a wall to bring a touch of nature’s calm into your home
Succulent Rosette Relief Medallion
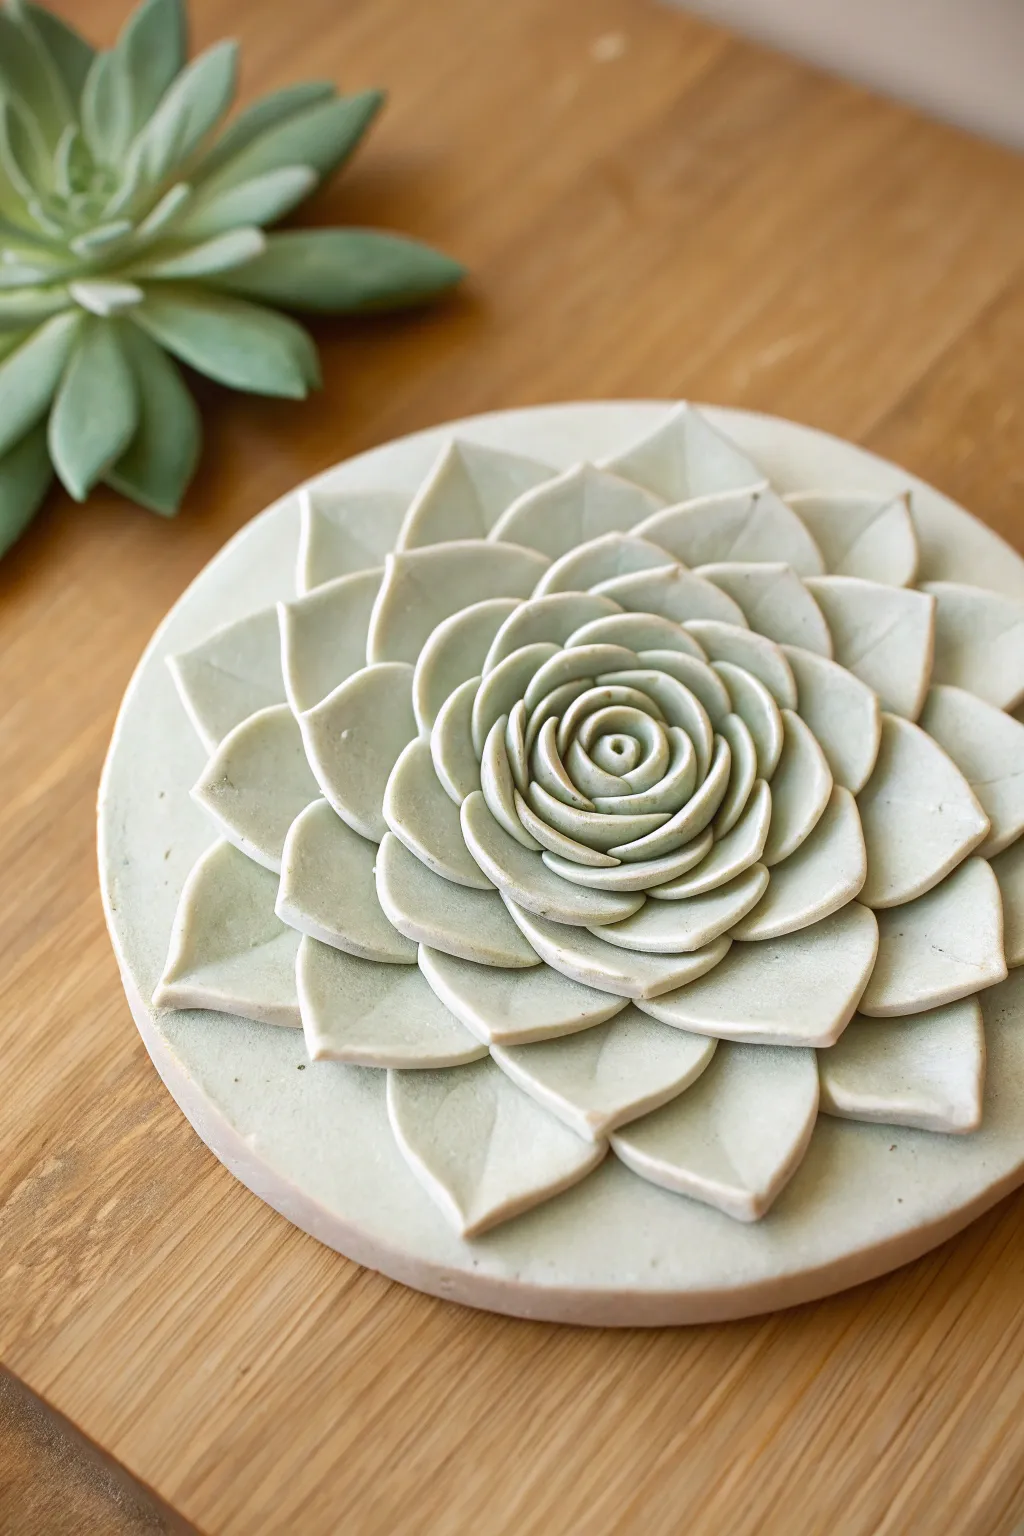
Capture the geometric beauty of nature with this elegant clay relief medallion. This project guides you through sculpting a realistic Echeveria rosette, focusing on layering individual petals to build a dimensional, monochromatic centerpiece.
Step-by-Step Tutorial
Materials
- Light-colored stoneware clay or air-dry clay (smooth texture)
- Rolling pin
- Circle cutter or bowl (approx. 6 inches diameter)
- Needle tool or X-Acto knife
- Small sponge
- Slip (liquid clay)
- Scoring tool or old toothbrush
- Small wooden modeling tool or spoon
- Paintbrush for smoothing
Step 1: Base Preparation
-
Roll the Slab:
Begin by rolling out a smooth slab of clay to a consistent thickness of about 1/4 to 3/8 inch. You want it sturdy enough to support the relief but not overly heavy. -
Cut the Circle:
Use your circle cutter or a bowl as a template to cut out a perfect circle. Smooth the edges of the disc with a damp sponge to remove any sharp burrs or roughness. -
Establish the Center:
Lightly mark the exact center of your clay disc with a needle tool. This tiny dot will be your guide to ensure the rosette stays symmetrical as you build outward.
Cracking Leaves?
If leaves crack while shaping, your clay is too dry. Keep unused clay under plastic and mist your working pile with water. Smooth small cracks immediately with a damp brush.
Step 2: Sculpting the Outer Leaves
-
Roll a Thin Sheet:
Roll out a separate, thinner sheet of clay (about 1/8 inch thick). This will be used to cut out all your succulent leaves. -
Cut Leaf Shapes:
Cut out 8-10 large, spade-shaped leaves for the bottom layer. They should be pointed at the top and slightly wider at the base. -
Shape the Leaves:
Pick up a leaf and gently pinch the tip to sharpen it. Use your thumb to press a slight indentation down the center of the leaf, giving it a subtle curve rather than laying it flat. -
Attach the First Layer:
Score the outer edge of your base medallion and apply a dab of slip. Arrange the largest leaves in a circle, pointing outward, leaving the center empty. Press them down firmly at their bases.
Step 3: Building the Middle Layers
-
Create Medium Leaves:
Cut a second set of slightly smaller leaves from your thin clay sheet. I usually make these about 15% smaller than the first batch. -
Shape for Volume:
Curve these leaves slightly more than the first layer. You want them to start lifting upwards to create volume. -
Layering:
Attach this second row of leaves in the gaps between the first layer’s leaves (offsetting them). Score and slip the contact points to ensure a strong bond. -
Repeat and Reduce:
Continue this process with a third row of even smaller leaves. As you move inward, increase the angle so the leaves stand more upright, cupping towards the center.
Tint the Clay
Knead a small amount of green pigment or acrylic paint into your air-dry clay before sculpting. This creates a soft, consistent pastel tone without needing to paint it later.
Step 4: Forming the Center Bud
-
Cut Tiny Petals:
Cut 6-8 very small, teardrop-shaped petals for the innermost section. These need to be delicate. -
Create the Core:
Roll a tiny ball of clay and place it in the very center. Take your smallest petals and wrap them tightly around this core, overlapping them to look like a tight bud. -
Blend and Secure:
Use a small modeling tool to carefully blend the bases of this central bud into the medallion below, ensuring it doesn’t pop off during drying. -
Refine the Edges:
Once all layers are assembled, use a soft, slightly damp paintbrush to brush over the leaves. This removes fingerprints and softens any harsh cut marks.
Step 5: Finishing Touches
-
Check Perspective:
Rotate your medallion and look at it from the side. Gently lift any drooping leaves with a tool to ensure the rosette looks perky and open. -
Drying:
Dry the piece slowly under loose plastic. If the outer leaves curl up too much as they dry, place small supports (like crumpled paper) under them. -
Firing or Sealing:
If using ceramic clay, bisque fire and then glaze with a matte pale green or white glaze. If using air-dry clay, seal with a matte varnish once fully dry.
Display your botanical relief on a wall or as a stunning table centerpiece to bring a permanent touch of greenery to your home
Pond Scene With Fish Silhouettes Relief
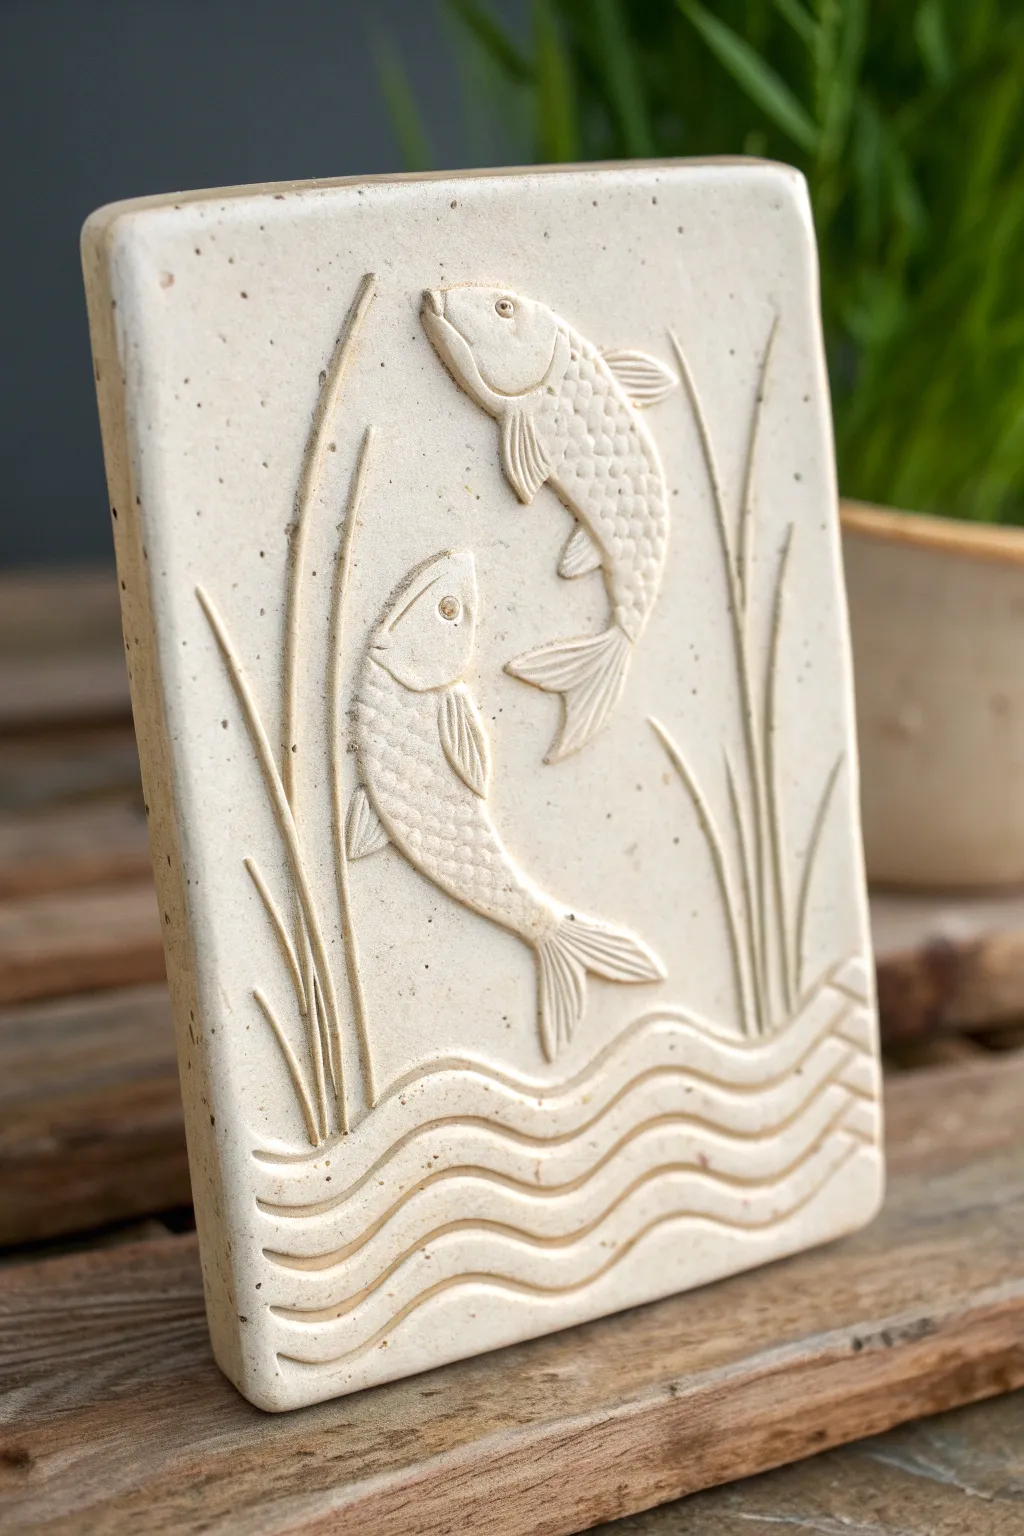
Capture the fluid motion of fish in a calm pond with this elegant stoneware relief tile. The design relies on subtle carving and speckled clay body to create a natural, organic look without the need for colorful glazes.
Step-by-Step
Materials
- Speckled stoneware clay (approx. 1 lb)
- Wooden rolling pin
- Two 1/2 inch thick wooden guide slats
- Needle tool
- Loop tool or carving tool set
- Rubber kidney rib
- Small sponge
- Rectangle template (paper or cardstock)
- Slip (clay mixed with water)
- Scoring tool (or fork)
Step 1: Preparing the Slab
-
Roll the clay:
Begin by wedging your speckled stoneware clay to remove air bubbles. Place the clay between two 1/2-inch wooden guide slats and roll it out into a smooth, even slab. The slats ensure the tile has a uniform thickness. -
Cut the shape:
Place your rectangular paper template onto the slab. Using a needle tool held vertically, cut around the template to create the base tile shape. Remove the excess clay. -
Smooth the surface:
Wipe a damp sponge or a rubber kidney rib gently over the surface to erase any canvas texture or rolling marks, creating a pristine canvas for your carving. -
Round the edges:
Use your fingers or the damp sponge to gently soften the sharp 90-degree corners and edges of the rectangle, giving it a soft, finished look similar to the reference image.
Warping Woes?
If your tile corners curl up while drying, flip the tile over every few hours or dry it sandwiched between two absorbent plaster or wooden boards to keep it perfectly flat.
Step 2: Sketching the Design
-
Light outline:
Using the needle tool with very light pressure, sketch the wavy water lines at the bottom third of the tile. Keep the lines parallel and undulating. -
Position the fish:
Lightly sketch the outlines of the two fish—one higher and angled down, the other lower and angled up, creating a circular flow. -
Add vegetation:
Sketch long, vertical lines on the left and right sides to represent reeds or marsh grass. Allow them to overlap the fish area slightly for depth.
Step 3: Carving the Relief
-
Define the fish bodies:
Using a small loop tool, carefully carve away the clay *around* the fish outlines. You want the fish to remain raised while the background recedes slightly. I like to only go down about 1-2mm to keep it subtle. -
Detail the fins:
Use a needle tool or a fine stylus to press in lines for the dorsal and tail fins, giving them a ribbed texture. -
Scale texture:
Press a small, semi-circular tool or the tip of a loop tool repeatedly into the fish bodies to create a pattern of scales. Work from the tail toward the head for a natural overlap. -
Carve the eye:
Press a small hollow tube or use the needle tool to circle the eye, adding a tiny dot in the center for the pupil.
Level Up: Oxide Wash
Apply a diluted iron oxide wash over the carving and wipe it back with a wet sponge. The dark color will stay in the deep grooves, making the fish scales pop.
Step 4: Creating the Environment
-
Carve the water:
Use a U-shaped loop tool to carve out the channels between your sketched water waves. This creates deep grooves that catch light and shadow. -
Refine the reeds:
Carve along the sides of your weed outlines. For some reeds, you can incise deep lines rather than carving away background, creating varied line weights. -
Clean up crumbs:
Wait until the clay is leather hard (stiff but cool to the touch). Use a stiff brush to sweep away any clay crumbs or burrs created during carving. -
Final smooth:
Dip your finger in water and run it over the highest points of the relief gently to ensure they are smooth and comfortable to touch. -
Drying:
Place the tile between two pieces of drywall or under loose plastic to dry slowly. This prevents the corners from curling up. -
Bisque fire:
Fire the piece to cone 04 (or your clay’s specific bisque temperature). -
Finishing:
For the look in the image, leave the raw clay unglazed and fire to maturity (Cone 5/6 typically), or apply a clear matte glaze to enhance the speckles.
Once fired, display your relief on a shelf or mount it to a wooden backing for a serene wall decoration
Desert Cactus Relief With Sand Texture
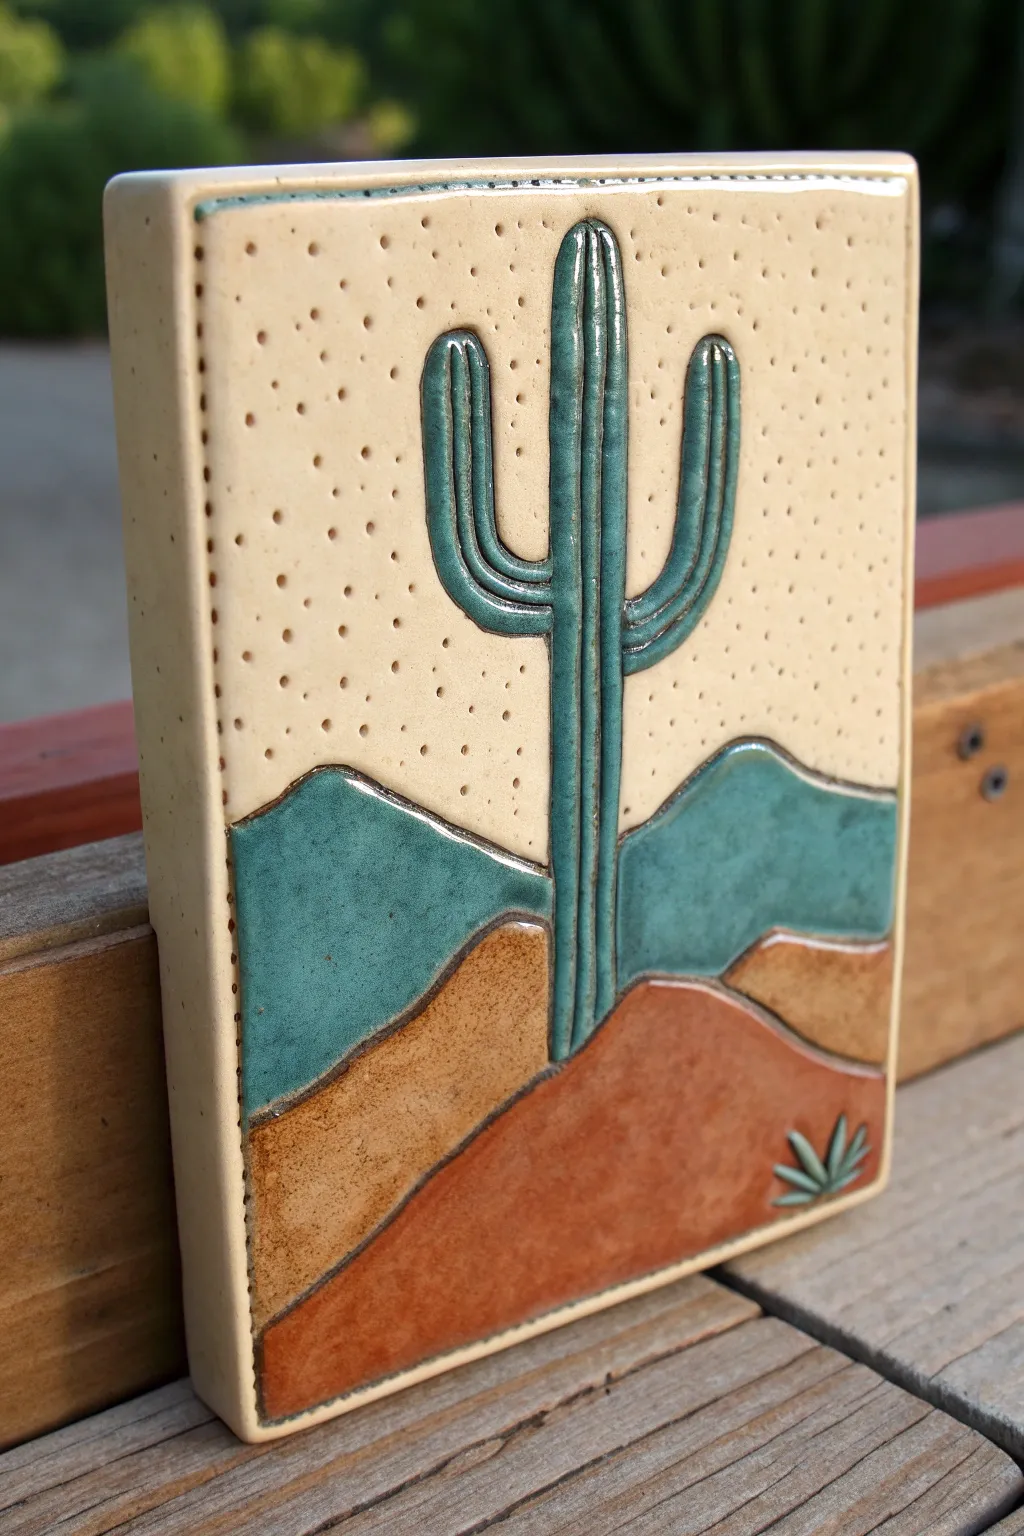
Capture the serene beauty of the Southwest with this textured ceramic relief tile featuring a classic saguaro cactus. Using simple slab techniques and glaze trailing, you’ll build dimension and create a tactile, sandy finish that brings the desert landscape to life.
Detailed Instructions
Materials
- Light-colored stoneware clay (smooth body)
- Rolling pin and guide strips (3/8 inch thickness)
- Needle tool or X-Acto knife
- Modeling tool (rounded tip)
- Slip trailer bottles with fine tips
- Glazes: Turquoise/Teal, Tan/Sand, Reddish-Brown, Dark Green
- Small stiff-bristled brush or toothbrush
- Sponge and water
- Ceramic kiln (or access to a firing service)
Step 1: Creating the Base Tile
-
Roll the Slab:
Begin by rolling out your clay on a canvas board or cloth. Use your guide strips to ensure an even thickness of about 3/8 of an inch, creating a solid foundation that won’t warp easily. -
Cut to Size:
Using a ruler and a needle tool, cut a clean rectangle, roughly 4×6 inches or your desired dimension. Smooth the cut edges with a damp sponge or your finger to remove any sharp burrs. -
Build the Box Form:
To create the deep box-like profile seen in the image, roll a long strip of clay (about 1 inch wide). Score and slip the back edge of your main tile and attach this strip perpendicular to the back to create a hollow box construction, or simply work on a very thick slab if you prefer a solid block.
Step 2: Sculpting the Design
-
Outline the Landscape:
Lightly sketch your design onto the leather-hard clay using a needle tool. Draw two rolling hill horizons and position a large saguaro cactus centrally, extending from the middle ground to near the top. -
Carve the relief lines:
Use a modeling tool to deepen the lines separating the hills. You aren’t cutting all the way through, but rather pressing down to create distinct reservoirs that will eventually hold the glaze. -
Add the Cactus:
Roll thin coils of clay for the cactus body and arms. Score and slip the area where the cactus will sit, then press the coils onto the tile. Flatten them slightly so they are raised but integrated. -
Detail the Cactus:
Using a needle tool, gently drag vertical lines down the length of the cactus body and arms to mimic the ribs of the plant. A steady hand helps here, but organic wobbles look natural. -
Create the Sand Texture:
This is the signature step. Take a stiff-bristled brush or a needle tool and stipple the entire sky area. Poke hundreds of tiny holes or indentations to create a pitted ‘sand’ texture that contrasts with the smooth hills. -
Add the Agave Detail:
In the bottom right corner, press a small stamp or carve a tiny starburst shape to represent a small agave or desert shrub.
Glaze Running?
If your glaze runs over the carved lines, use a slightly stiffer glaze or deepen your dividing grooves. Firing slightly lower can also reduce movement.
Step 3: Glazing and Finishing
-
Bisque Firing:
Allow your tile to dry slowly and completely. Once bone dry, fire it to bisque temperature (usually Cone 04) to prepare it for glazing. -
Wax Resist (Optional):
If you want crisp separation between colors, apply a thin line of wax resist along the carved grooves separating the hills. -
Trailing the Sky:
For the sky, apply a clear or very light matte glaze. The texture you created earlier will break up the glaze and create visual interest without needing heavy color. -
Glazing the Hills:
Fill a slip trailer with your turquoise glaze and flood the upper hill section. I like to do this fairly thickly so the color pools and creates depth. -
Middle Ground Layer:
Use the Tan/Sand glaze for the middle layer of hills. Apply it carefully using the slip trailer, letting it flow right up to the carved boundary line. -
Foreground and Cactus:
Fill the bottom foreground hill with the Reddish-Brown glaze. Finally, carefully trail a Dark Green or Teal glaze into the raised cactus form, ensuring the glaze settles into the vertical rib grooves. -
Clean and Fire:
Wipe the outer rim of the tile with a damp sponge to leave the raw clay body exposed as a frame. Fire the piece again to the final glaze temperature appropriate for your clay and glazes.
Stippling Trick
To speed up the sky texture, bundle 5-6 toothpicks together with tape. This lets you punch multiple texture holes at once, ensuring an even, random density.
Display your finished relief tile on a shelf or hang it on the wall to add a touch of desert warmth to your home
Cameo-Style Profile Silhouette Relief
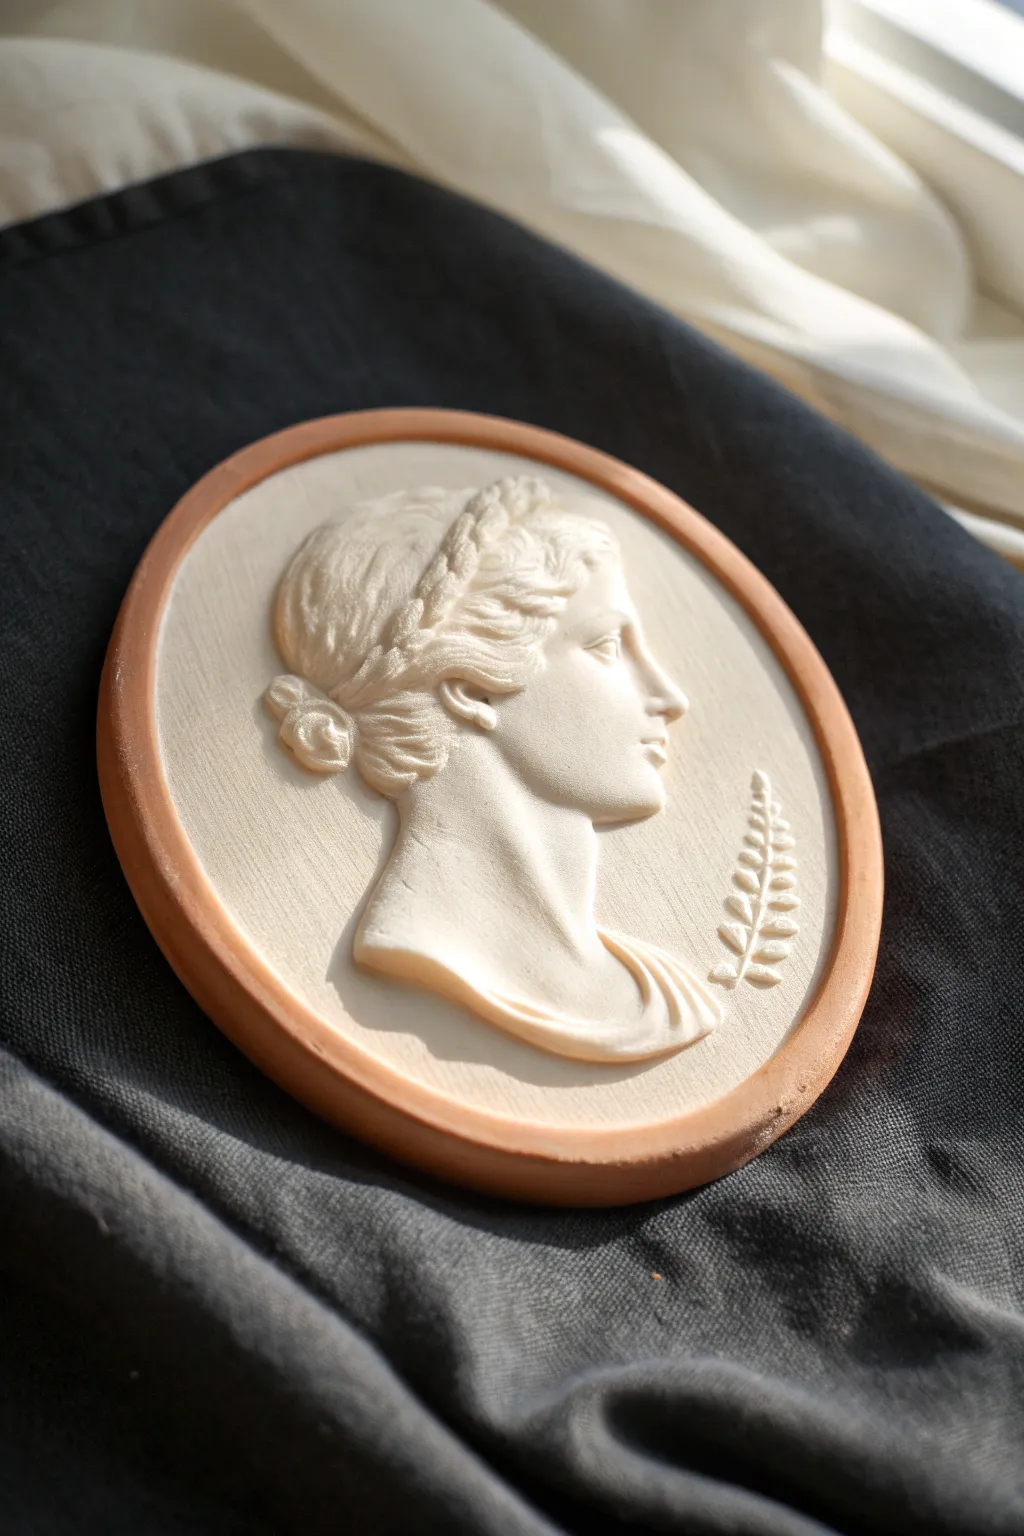
Capture the elegance of antiquity with this sophisticated cameo-style relief project. The finished piece features a delicate, cream-colored profile sculpture set within a warm terracotta frame, perfect for adding a touch of museum-quality art to your home decor.
How-To Guide
Materials
- White or cream-colored polymer clay (approx. 2 oz)
- Terracotta or rust-colored polymer clay (approx. 1 oz)
- Oval template or cookie cutter (approx. 3-4 inches)
- Needle tool or dental pick
- Ball stylus tools (various sizes)
- Small rolling pin or acrylic roller
- Profile reference image (printed to scale)
- Tracing paper and soft pencil (2B or softer)
- Craft knife or scalpel
- Smooth ceramic tile or glass work surface
- Rubbing alcohol and soft brush (optional, for smoothing)
Step 1: Base Preparation
-
Condition the frame clay:
Start by thoroughly conditioning your terracotta-colored polymer clay until it is soft and pliable. Warm clay is much less likely to crack during the rolling process. -
Roll the backing slab:
Roll out the terracotta clay into a sheet approximately 1/4 inch thick. This will form the sturdy backing and the visible rim of your cameo. -
Condition the cameo clay:
Clean your hands and roller thoroughly to avoid color transfer, then condition the white or cream clay. Roll this into a slightly thinner sheet, about 1/8 inch thick. -
Cut the cameo background:
Using your oval cutter or template, cut matching oval shapes from both clay sheets. Carefully layer the white oval directly on top of the terracotta oval, smoothing them together gently to eliminate trapped air bubbles.
Smoothing Secret
Use a scant drop of baby oil on your fingertips while blending the facial features. This prevents the clay from sticking to your skin and ensures a seamless transition between the neck and jawline.
Step 2: Sculpting the Profile
-
Prepare the reference:
Take your printed profile image and trace the major outlines—forehead, nose, lips, chin, neck, and hair shape—onto tracing paper. -
Transfer the outline:
Lay the tracing paper gently onto the white clay surface. Lightly trace over your lines with a stylus or dull pencil to leave a faint impression in the clay without digging too deep. -
Build the volume:
Instead of carving down, we will build up. Add small, flattened tear-drop shapes of white clay to the cheek, neck, and jawline areas within your traced outline. -
Refine facial features:
Use a small ball stylus to carefully merge the added clay pieces together. Gently sculpt the slope of the nose and the curve of the lips, keeping the relief relatively low but defined. -
Detail the eye:
For the closed eye, press a tiny indent for the socket, then smooth a very small, thin snake of clay into it to form the eyelid. Use a needle tool to scratch the faintest line for eyelashes. -
Sculpt the hair:
Add volume to the hair area using larger chunks of clay. I find it helpful to add the hair in sections—the bun first, then the sweeping strands. -
Texture the hair:
Use a needle tool or knife to draw flowing lines through the hair clay to simulate strands. For the braided look near the crown, twist two tiny snakes of clay together and press them into the design. -
Add the laurel sprig:
Roll a very thin snake of white clay for the stem and place it behind the neck. Create tiny teardrops of clay, flatten them slightly, and arrange them along the stem to form leaves. -
Create the toga drape:
Add a flattened strip of clay at the base of the neck. Use a sculpting tool to press deep folds into it, simulating draped fabric.
Antique Wash
After baking, apply a diluted wash of brown acrylic paint into the crevices of the hair and laurel leaves, then wipe it off immediately. It adds instant age and depth to the relief.
Step 3: Finishing Touches
-
Clean the background:
Inspect the white background area around the face. The goal is a texture contrast: the figure should be smooth, and the background can have a slight linen texture if desired, or kept completely matte. -
Reveal the rim:
Carefully trim away the very edge of the white clay layer (about 1/8 inch) all the way around the oval to reveal the terracotta layer underneath, creating a framed effect. -
Smooth imperfections:
Dip a soft brush in diverse rubbing alcohol and gently brush over the face and hair. This melts the top layer slightly, removing fingerprints and tool marks for a porcelain finish. -
Bake the piece:
Bake according to your polymer clay manufacturer’s instructions (usually 275°F for 15-30 minutes). Use an oven thermometer to ensure correct temperature. -
Sand and buff:
Once fully cooled, lightly sand the terracotta rim if there are any sharp edges. You can leave the white cameo matte to resemble plaster or buff it with a soft cloth for a slight sheen.
Now you have a timeless piece of classical art ready to be displayed on a stand or mounted on velvet wall decor
Cozy House Facade Relief Tile
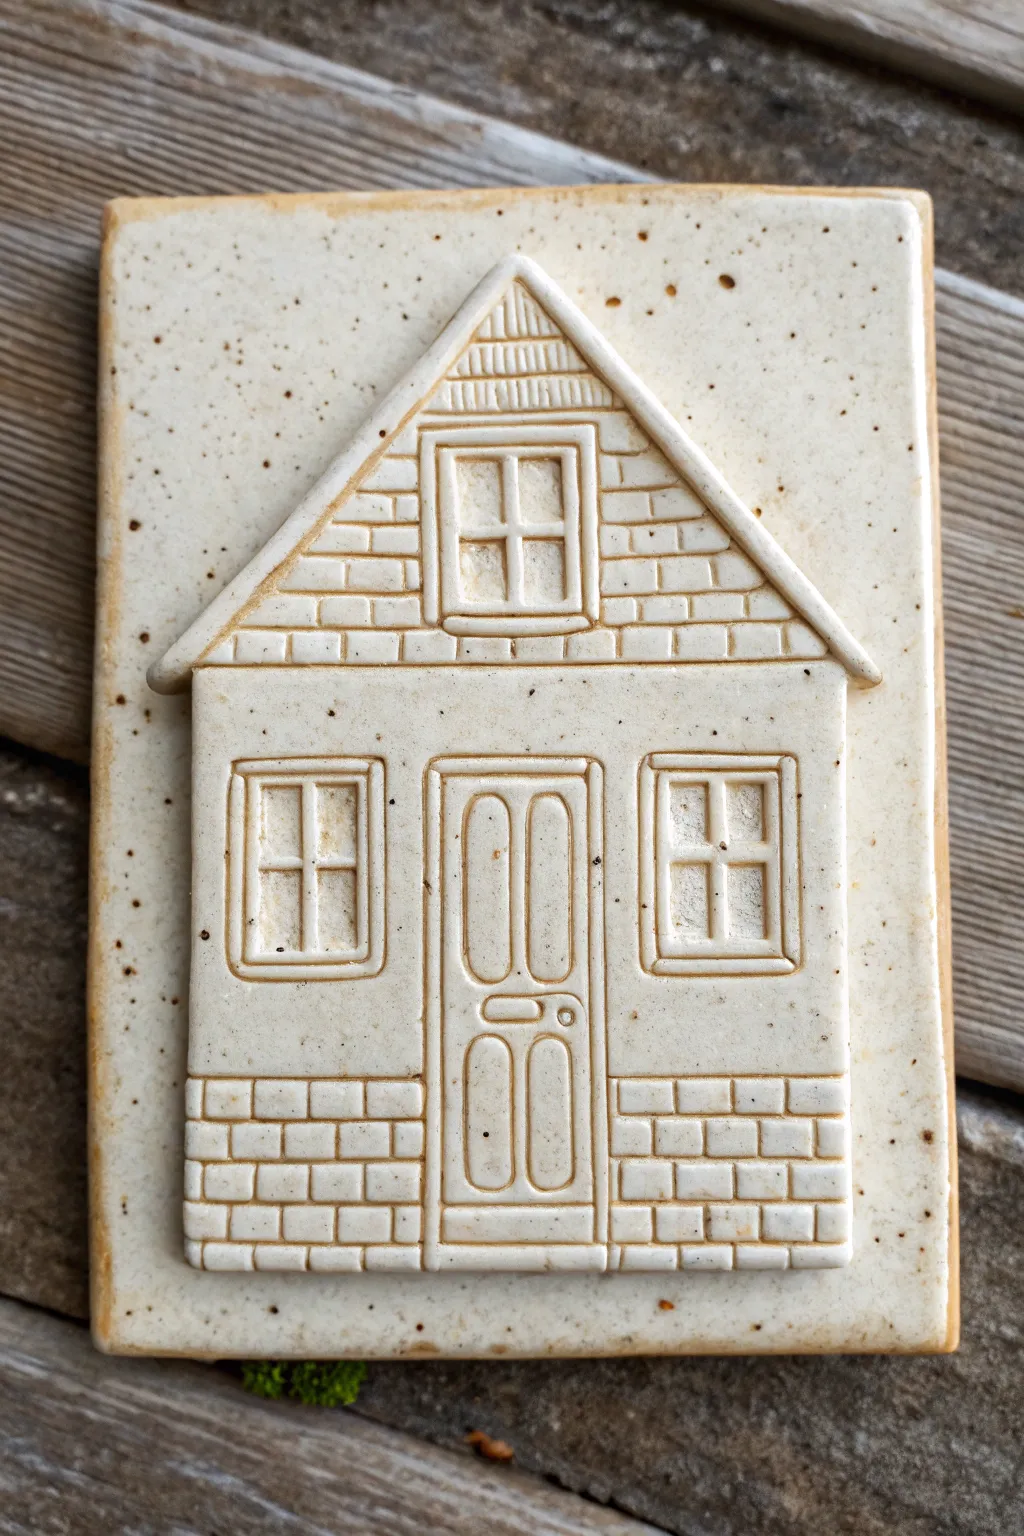
This charming ceramic tile captures the essence of a cozy cottage with raised architectural details and a lovely speckled finish. The relief technique brings depth to the brickwork, windows, and roof shingles, creating a tactile piece perfect for wall art or a trivet.
Step-by-Step
Materials
- Speckled buff stoneware clay
- Rolling pin
- Two 1/4-inch wooden guide strips
- Needle tool
- Small carving loop tool (ribbon tool)
- Fettling knife
- Rubber kidney tool
- Ruler or straight edge
- Small sponge
- White or cream dipping glaze
Step 1: Slab Preparation
-
Roll out the slab:
Begin by wedging your speckled buff clay to remove air bubbles. Place it between your two 1/4-inch wooden guide strips and roll it flat with the rolling pin to ensure an even thickness. -
Cut the base shape:
Using a ruler and fettling knife, cut a clean rectangle from the slab. A size of about 4×6 inches works well for this design, leaving enough border around the house. -
Smooth the surface:
Gently run a rubber kidney tool over the surface to compress the clay particles and remove any canvas texture or rolling marks.
Warping Woes?
Tiles often curl at the corners. Dry it very slowly under plastic, or weigh down the corners with small sandbags during the leather-hard drying phase.
Step 2: Constructing the House Relief
-
Outline the silhouette:
Lightly trace the outline of the house onto the slab using a needle tool. You need a main rectangular body and a triangular roof. Don’t cut through; just mark the surface. -
Roll the appliqué layer:
Roll out a second, thinner piece of clay (about 1/8 inch thick). This will be used to cut out the raised shapes for the house structure. -
Cut house components:
From the thin slab, cut out the main house rectangle and the triangular roof shape to match your traced outline. You’ll also want to cut a tiny strip for the roof overhang. -
Attach the base house:
Score the back of your cutout shapes and the corresponding area on the main tile. Apply slip, press the shapes down firmly, and smooth the edges so they blend seamlessly into the background tile. -
Add window and door pads:
Cut smaller rectangles from the thin slab for the two lower windows, the upper attic window, and the main door frame. Score, slip, and attach these raised pads onto the house facade.
Step 3: Carving Details
-
Define the door:
Using a needle tool, press deeply to outline the inner panels of the door. Carve out slight recesses to create the look of raised panels and add a tiny ball of clay for the doorknob. -
Carve the windows:
Use the needle tool or a small loop tool to carve out the window panes, leaving a raised cross in the center to represent the mullions. Frame the outside with a double line. -
Create the roof shingles:
On the triangular roof section, drag your needle tool horizontally to create rows. Then, make small vertical hash marks in alternating patterns to simulate shingles. -
Texture the attic vent:
Define a triangle near the peak of the roof with vertical lines to suggest a vent or decorative wood siding. -
Sculpt the brickwork:
For the foundation, carve horizontal lines across the bottom portion of the house. Add staggered vertical lines between them to create a running bond brick pattern. -
Add siding texture:
If you want siding on the attic level, gently press horizontal lines flanking the upper window. -
Clean up crumbs:
Use a soft brush to sweep away any clay burrs or crumbs created by the carving process.
Level Up: Seasonal Decor
Make a set of four tiles, changing the details slightly for seasons: add a pumpkin on the steps for autumn or a tiny wreath on the door for winter.
Step 4: Finishing and Glazing
-
Slow drying:
Place the tile between two pieces of drywall or cover loosely with plastic to ensure it dries slowly and evenly to prevent warping. -
Bisque fire:
Once bone dry, fire the piece to cone 04 (or your clay’s specific bisque temperature). -
Apply glaze:
Dip the tile into a white or cream glaze. I like to make sure the glaze isn’t too thick, so it doesn’t obscure the fine brick and shingle details. -
Wipe back:
While the glaze is powdery but dry, gently wipe the raised surfaces with a slightly damp sponge. This reveals the speckled clay body on the high points while leaving white glaze in the recesses. -
Final firing:
Glaze fire the piece to cone 5 or 6 to mature the stoneware and melt the glaze.
Hang your finished tile on a wall or use it as a coaster to bring a touch of architectural warmth to your home
Bold Lettering Quote Relief
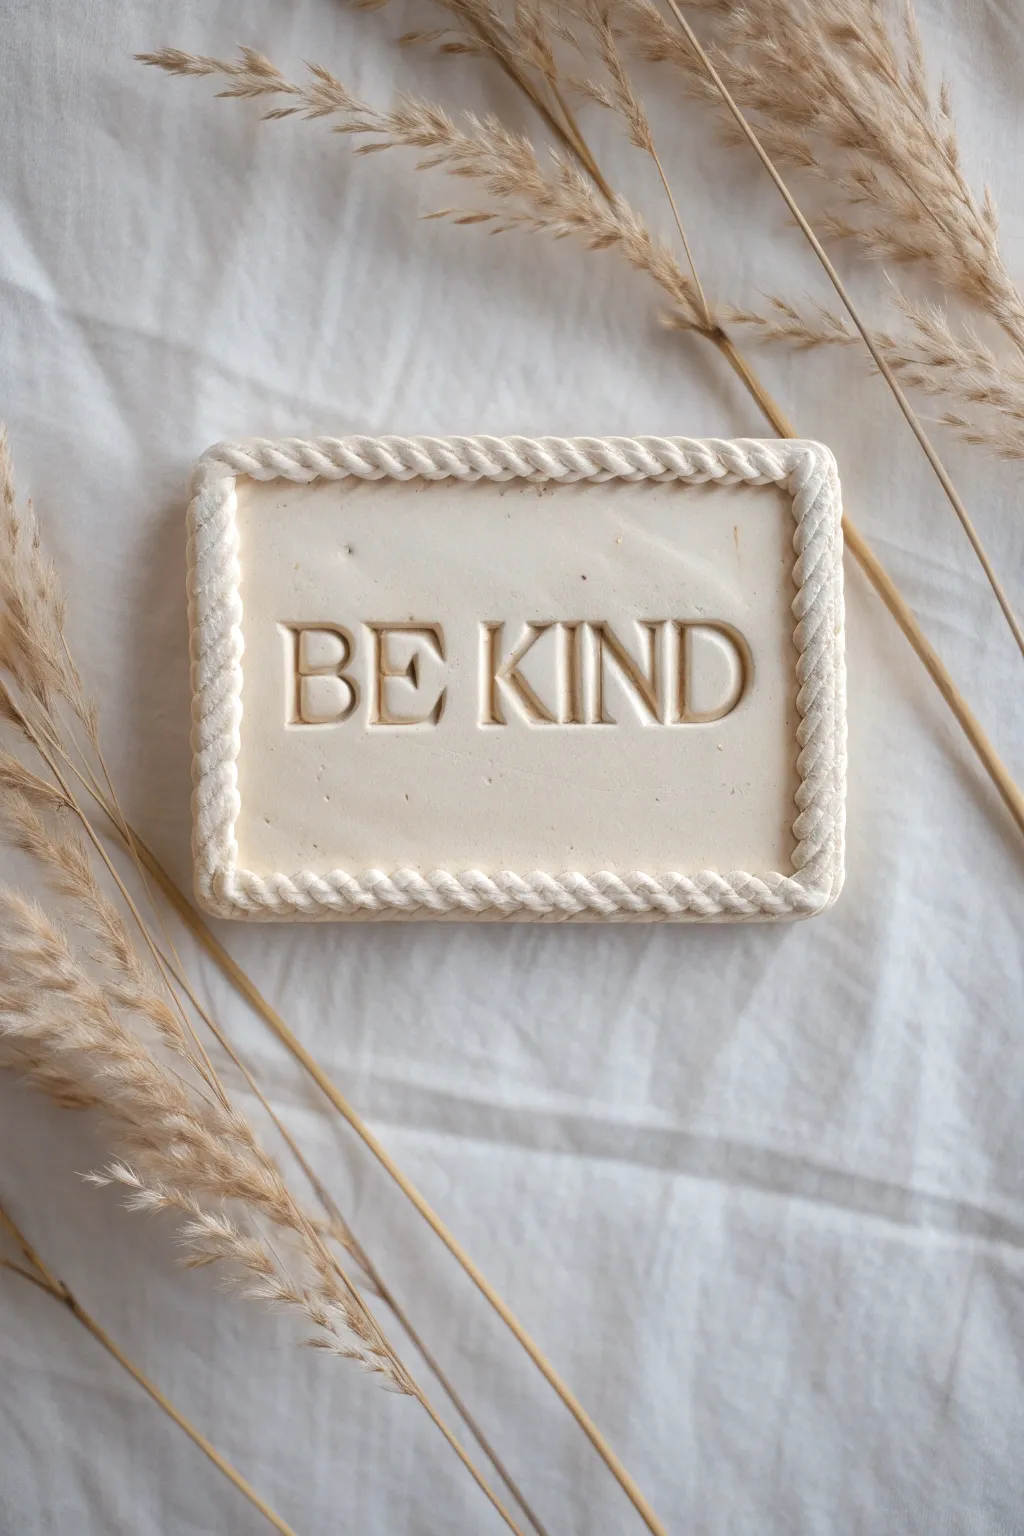
This elegant relief project merges clean lines with tactile warmth, featuring deep letter impressions framed by a classic twisted rope border. The monochromatic cream finish highlights shadows and texture, making it a perfect understated piece for modern decor.
How-To Guide
Materials
- Air-dry clay or polymer clay (white or cream)
- Rolling pin
- Clay knife or craft blade
- Ruler
- Letter stamps (serif font) or sculpting tools for hand-carving
- Slip (water/clay mixture) for joining
- Fine-grit sandpaper
- Matte sealant or varnish
- Canvas or pastry mat for rolling
Step 1: Preparation and Base
-
Condition the clay:
Begin by thoroughly kneading your clay to remove air bubbles and ensure it is pliable. If you are using polymer clay, this might take a few minutes to get the right consistency. -
Roll the slab:
Roll out a smooth, even slab of clay approximately 1/4 to 1/2 inch thick. Use guide sticks on either side of your rolling pin if you struggle to maintain an even thickness. -
Cut the rectangle:
Using a ruler and your clay knife, cut a precise rectangle. The example shown is roughly 4×6 inches, but you can adjust the size to fit your space. Keep the edges clean and vertical. -
Smooth the surface:
Dip your finger in a tiny bit of water (or clay softener) and gently run it over the surface and cut edges to remove any fingerprints or knife marks.
Clean Lettering Trick
Place a thin sheet of plastic wrap over the clay before stamping. This rounds the edges of the impression slightly and prevents the clay from sticking inside deep stamps.
Step 2: Creating the Rope Border
-
Roll coils:
Roll out two long, thin snakes of clay. Try to keep them consistent in diameter—about the thickness of a pencil works well for this scale. -
Twist the rope:
Lay the two coils side-by-side and gently twist them over one another to create a rope effect. Keep the twist tight and uniform as you work down the length. -
Position the border:
Apply a small amount of slip or score the outer edge of your rectangular base where the rope will sit. Gently press the twisted rope onto the perimeter. -
Miter the corners:
When the rope reaches a corner, you can either curve it gently or cut it at a 45-degree angle to create a sharp mitered joint, blending the clay where the ends meet. -
Uniformity check:
Go around the border with a modeling tool or your fingers to ensure the rope is securely attached to the base without flattening the beautifully twisted texture.
Antique Wash
Dilute brown acrylic paint with water and wash over the dry piece. Wipe it back immediately with a cloth; paint stays in the crevices to highlight the rope and text depth.
Step 3: Lettering and Finishing
-
Plan the spacing:
Before pressing into the clay, lightly mark the center of your plaque. Use a ruler to ensure your text will be straight and centered. -
Impress the letters:
Using large serif letter stamps, press the words ‘BE KIND’ firmly into the center. Apply uneven pressure if you want a more organic look, but aim for varying depths to catch the light. -
Clean up edges:
The stamping process often displaces clay slightly. Use a small, flat tool to gently push down any raised ridges around the letters for a crisp finish. -
Add detail holes:
Create the illusion of stitching or binding by poking tiny holes in the valleys of the rope border where it meets the plaque base, though this is optional. -
Dry properly:
Let the piece dry slowly away from direct heat to prevent warping. For air-dry clay, turn it over periodically so both sides dry evenly. -
Sand imperfections:
Once fully cured, use fine-grit sandpaper to smooth any rough edges on the sides or back. Be careful not to sand down the texture of the rope. -
Seal the surface:
Finish with a matte varnish to protect the clay while maintaining that raw, natural stone appearance seen in the photo.
This simple yet poignant piece serves as a beautiful daily reminder on your desk or wall
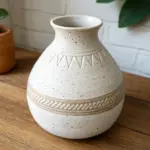
Mandala Pattern Relief With Repeating Layers
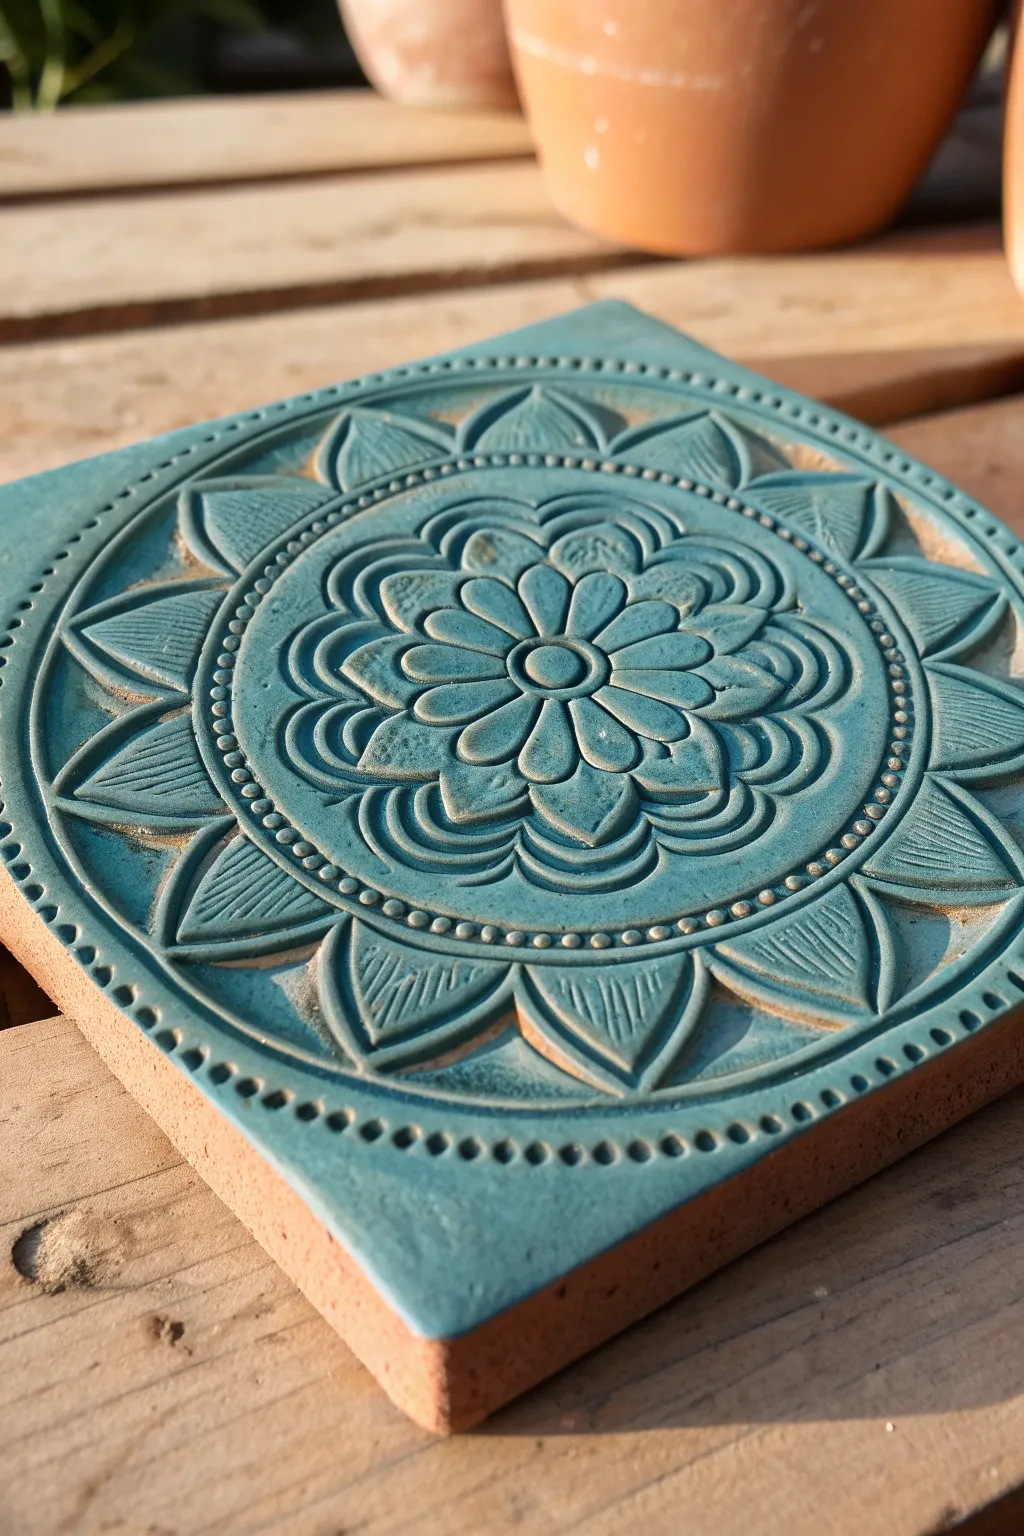
This striking relief project combines the earthy warmth of terracotta with a vibrant, semi-transparent teal glaze. The focal point is a radiating mandala pattern carved or pressed into the clay, creating deep valleys where glaze pools and high ridges that reveal the natural clay body.
Step-by-Step
Materials
- Terracotta clay (grogged for strength)
- Square tile cutter or ruler and knife
- Rolling pin
- Two wooden guide slats (approx. 1 cm thick)
- Mandala stamp or carving tools (loop tools, needle tool)
- Small sponge
- Teal or turquoise ceramic glaze (earthenware)
- Soft fan brush
- Clean cloth
Step 1: Preparation and Shaping
-
Prepare the slab:
Wedge your terracotta clay thoroughly to remove air bubbles. Place the clay between two wooden guide slats on a canvas surface and roll it out until the rolling pin rests on the slats, ensuring a perfectly even thickness. -
Cut the square:
Using a square cookie cutter or a ruler and fettling knife, cut a precise square shape. For the dimensions shown, aim for approximately 15×15 cm (6×6 inches). -
Smooth the edges:
Dip your finger or a small sponge in water and run it gently along the sharp cut edges to round them slightly. This prevents chipping later.
Step 2: Creating the Relief
-
Center the design:
Find the absolute center of your square by lightly marking an ‘X’ from corner to corner, or use a centering ruler. This is crucial for symmetry. -
Form the central rosette:
Using a specialized mandala stamp or by hand-carving with a small loop tool, press or carve the central eight-petal flower shape directly into the middle. -
Add the inner petal layer:
Create the second ring of petals surrounding the center. If carving by hand, outline the petal shapes first with a needle tool, then gently scoop out the interior of each petal to create depth. -
Define the concentric rings:
Carve or press the circular border lines that separate the different floral zones. These ridges act as dams for the glaze later. -
Carve the outer leaves:
Sculpt large, pointed leaf shapes radiating toward the corners and edges. Use a tool with fine grooves to create the vein texture inside these larger leaves. -
Add the beaded border:
Using the blunt end of a small drill bit or a dedicated dotting tool, press a series of small, uniform indentations around the main circular border to create a ‘beaded’ look. -
Refine the texture:
Look closely at the relief. Use a soft brush to sweep away any clay crumbs or ‘burrs’ created during carving. Clean lines result in a cleaner glaze finish. -
Slow drying:
Place the tile on a wire rack or dry plaster bat. Cover it loosely with plastic for the first day to ensure slow, even drying, which prevents the corners from curling up. -
Bisque fire:
Once bone dry, fire the tile in a kiln to the bisque temperature appropriate for your specific terracotta clay (usually cone 04).
Stamp vs. Carve
For this look, you can use a large rubber stamp pressed into soft clay. However, hand-carving allows for deeper relief, which holds more glaze and creates better contrast.
Step 3: Glazing and Finishing
-
Prepare the surface:
Wipe the bisque-fired tile with a damp sponge to remove kiln dust. This helps the glaze adhere properly. -
Apply the glaze:
Using a soft fan brush, apply a generous coat of teal glaze over the entire face of the tile. Ensure the glaze flows into all the deep crevices of the mandala pattern. -
Wipe back technique:
Here I prefer to let the glaze set for just a few minutes until it loses its sheen. Then, take a damp (not dripping) sponge and gently wipe the surface of the tile. -
Reveal the ridges:
Continue wiping gently until the terracotta clay is visible on the high points of the relief—the petal outlines, the dots, and the leaf veins—while the teal glaze remains thick in the recessed areas. -
Clean the edges:
Use a wet sponge to completely clean the sides and bottom of the tile to prevent it from sticking to the kiln shelf. -
Glaze fire:
Fire the tile a second time to the glaze maturity temperature (check your glaze bottle, typically cone 05 or 06 for earthenware).
Make Coasters
Glue a square of cork or felt to the bottom after the final firing. This protects table surfaces and turns your art piece into a functional coaster.
Once cooled, the contrast between the matte orange clay and the glossy blue pools creates a captivating finished piece
Topographic Map Contour Relief
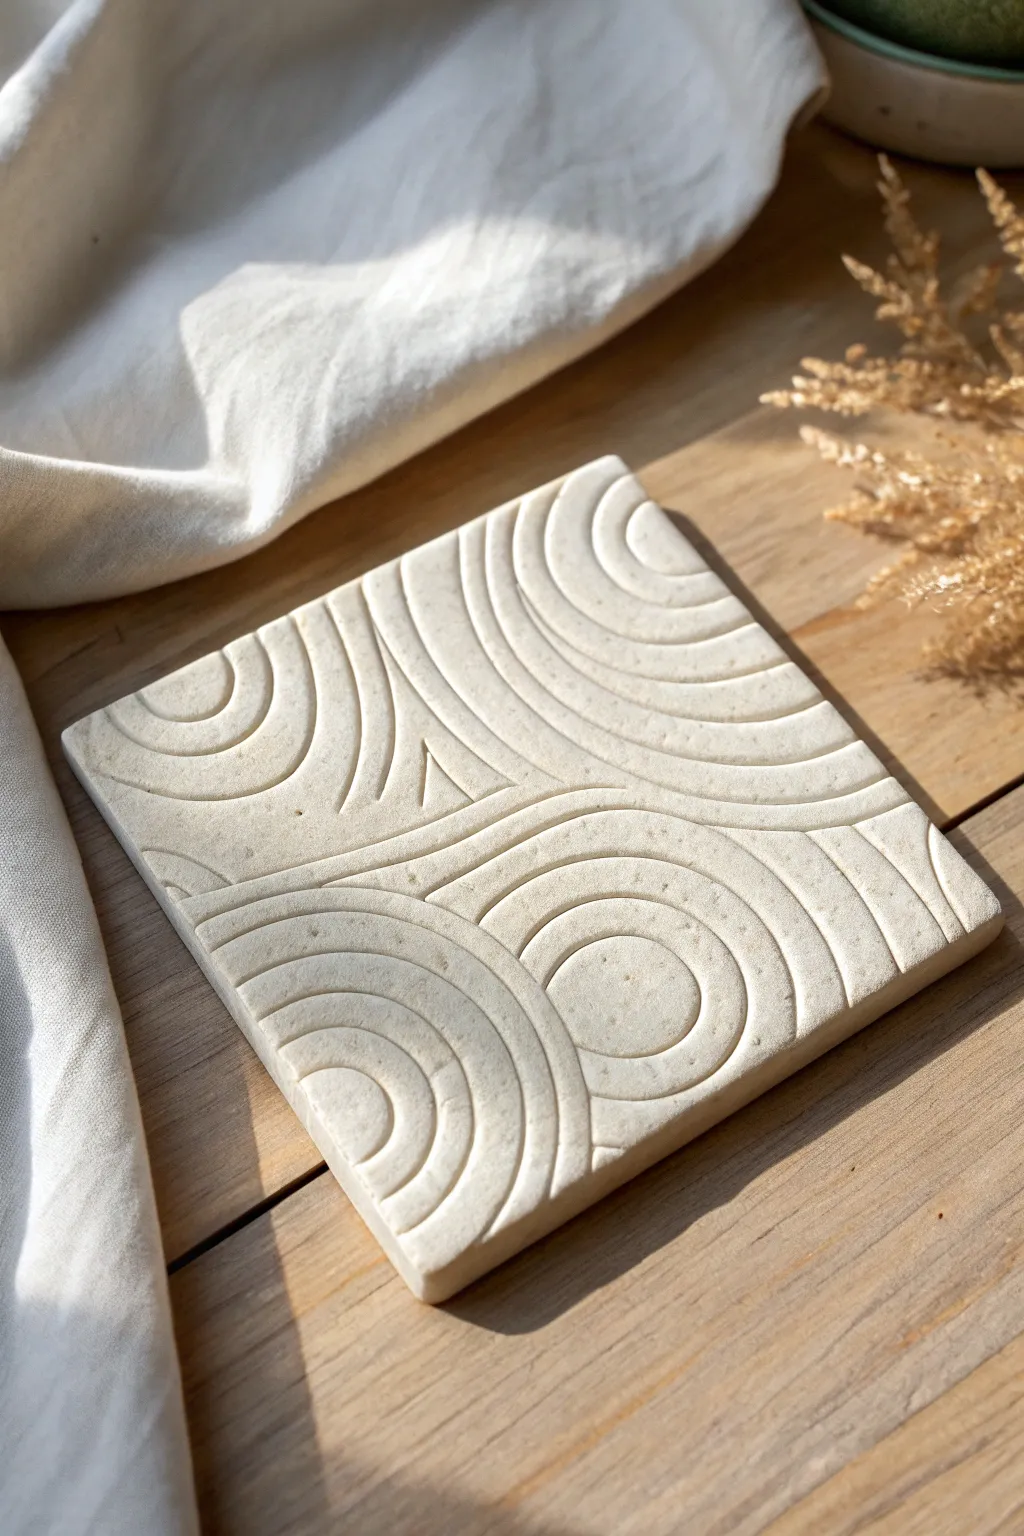
Capture the serene beauty of rolling landscapes with this cream-colored clay relief tile. Using simple carving techniques, you’ll create a soothing, topographical design that plays with light and shadow through elegantly curved lines.
Step-by-Step Guide
Materials
- Air-dry clay or polymer clay (cream/white)
- Rolling pin with guide rings (1/2 inch)
- Square cookie cutter or ruler and craft knife
- Loop tool or carving gouge (U-shaped tip)
- Smoother sponge or paintbrush
- Parchment paper or canvas working surface
- Fine-grit sandpaper
Step 1: Preparation and Base
-
Prepare the workspace:
Lay down your parchment paper or canvas on a flat, sturdy surface to prevent the clay from sticking during the rolling process. -
Condition the clay:
Warm up a generous handful of clay by kneading it thoroughly. This ensures the texture is uniform and free of air bubbles or dry patches. -
Roll out the slab:
Using your rolling pin with guide rings attached, roll the clay into an even slab. Aim for a thickness of about half an inch to allow depth for carving. -
Cut the square:
Press your square cutter firmly into the clay, or measure and cut a perfect square (approx. 4×4 or 6×6 inches) using a ruler and craft knife. -
Smooth the edges:
Gently run a damp finger or a slightly wet sponge along the cut edges to soften any sharp corners left by the cutting tool.
Clean Grooves Tip
If your clay is dragging or tearing while carving, let the slab dry for about 30 minutes until it’s ‘leather hard’ before carving again.
Step 2: Design and Carving
-
Plan the topography:
Lightly sketch your design onto the clay surface using a needle tool. Draw large, sweeping curves that mimic contour lines on a map, perhaps creating two or three focal points. -
Begin the primary cuts:
Take your U-shaped loop tool and carefully carve along the main sketched lines. Apply consistent pressure to maintain an even depth. -
Create parallel echoes:
Carve parallel lines next to your primary cuts. Sometimes I find it helpful to rotate the tile itself rather than my hand to keep the curves smoother. -
Define the focal points:
Work inward towards the centers of your circular patterns. As the circles get smaller, relieve the pressure slightly to avoid digging too deep. -
Smooth the channels:
Inspect your carved lines for any ragged clay bits. Run a damp artist’s paintbrush through the grooves to smooth them out instantly. -
Refine intersection points:
Where two sets of ripples meet, carefully carve triangles or connecting curves to simulate how waves or hills merge naturally.
Add Subtle Color
Before sealing, apply a very watered-down brown acrylic wash into the grooves, then wipe the surface clean to accentuate the depth.
Step 3: Finishing Touches
-
Final surface check:
Look over the flat, uncarved areas. If you’ve left fingerprints, gently buff them out with the flat side of a slightly damp sponge. -
Initial drying:
Let the tile sit undisturbed for at least 24 hours. Placing a light book on the edges (with parchment in between) can help prevent the corners from curling up as it dries. -
Sanding:
Once fully cured and hard, use fine-grit sandpaper to gently go over the top surface. This creates that professional, stone-like matte finish shown in the example. -
Clean up dust:
Wipe the tile with a dry, soft cloth or brush to remove any sanding dust from the deep grooves. -
Seal (optional):
If you plan to use this as a coaster, apply a matte varnish to protect it from moisture.
Place your finished relief on a desk or shelf to add a touch of modern, organic texture to your space
Window Scene Shadowbox-Style Relief
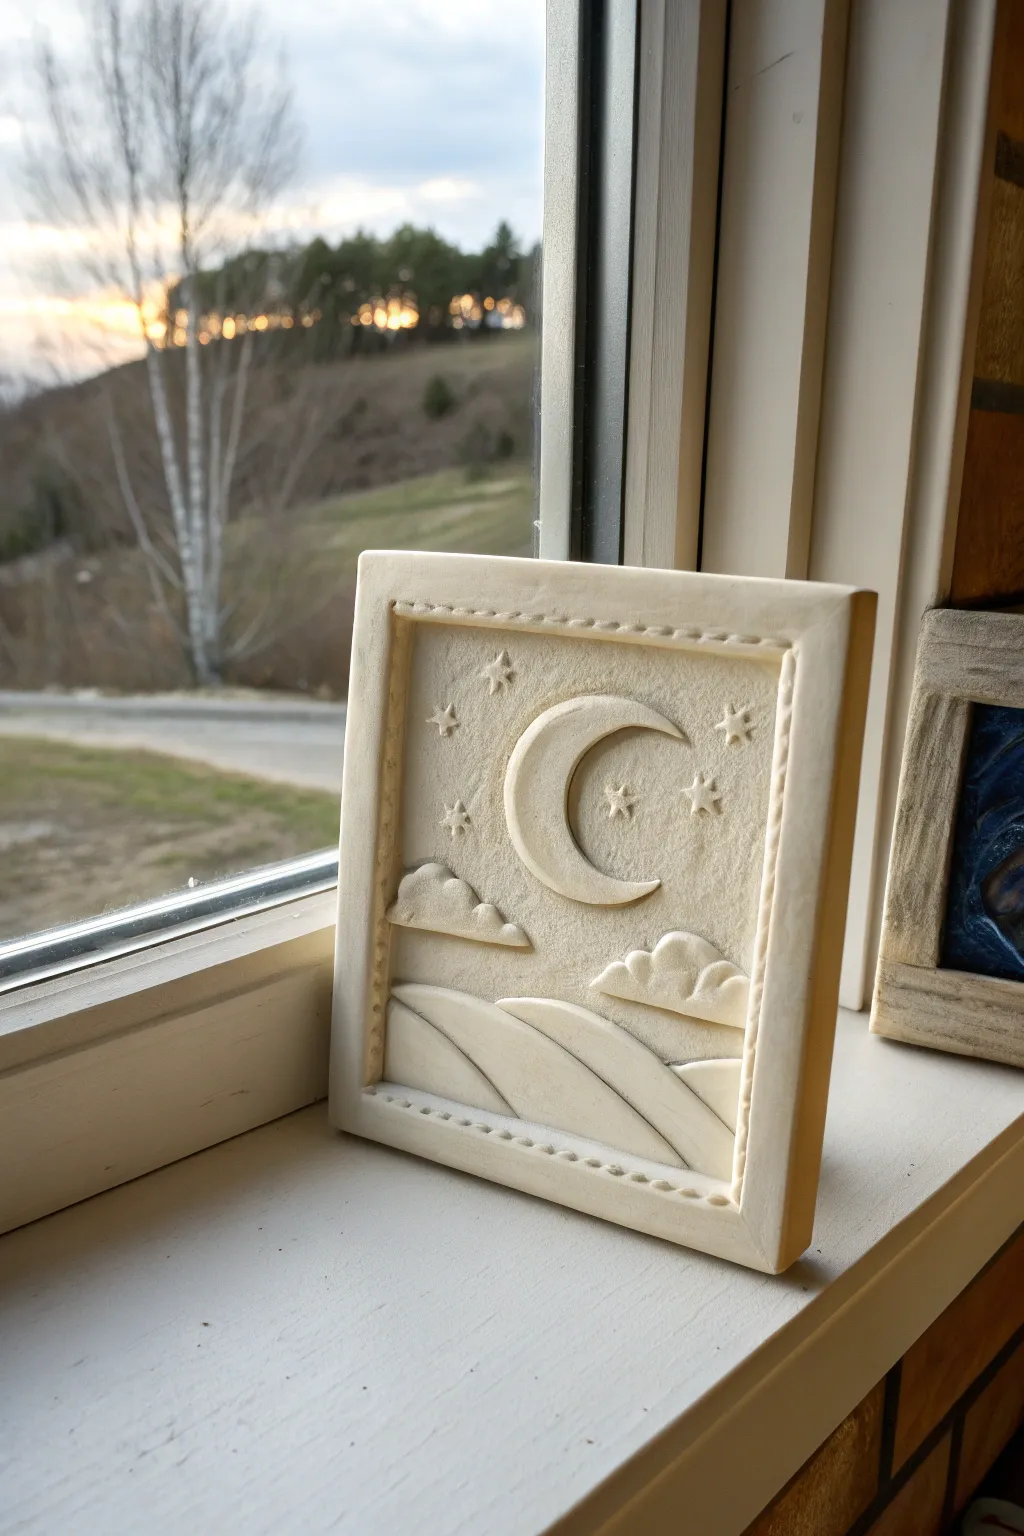
Capture the serenity of a starry night with this charming monochrome relief sculpture. The shadowbox-style frame and layered elements create a lovely depth that looks beautiful resting on a windowsill or shelf.
How-To Guide
Materials
- White or cream air-dry clay (smooth texture)
- Square clay cutter (approx. 4×4 or 5×5 inches)
- Rolling pin with guide rings
- Modeling tools (needle tool, ball stylus, rubber shaper)
- Small round cutter (for the moon)
- Small star plunger cutters (optional, can be hand-cut)
- Slip (clay mixed with water) or joining glue
- Sandpaper (fine grit)
- Ruler
Step 1: Creating the Base and Frame
-
Roll the foundation:
Begin by conditioning your clay until it is soft and pliable. Roll out a slab to about 1/4 inch thickness; this needs to be sturdy enough to support the layers. -
Cut the square:
Using your large square cutter or a ruler and craft knife, cut a precise square base. This will be the canvas for your relief. -
Form the frame sides:
Roll four coils of clay or cut four strips of clay that match the length of your square’s sides. These should be slightly thicker than your base, perhaps 3/8 inch wide. -
Attach the frame:
Score the edges of your base and the underside of your frame strips. Apply a little slip or water and press the strips firmly onto the perimeter of the base to create a raised border. -
Blend the seams:
Use a smooth modeling tool or your finger to blend the outside seams where the frame meets the base so it looks like one solid piece. Keep the inside angle crisp. -
Add the dotted detail:
Using a small, blunt tool like the end of a paintbrush handle or a medium ball stylus, gently press a line of evenly spaced dots along the inner edge of the frame strips to create the decorative border pattern.
Warping Woes?
If the corners start lifting while drying, place a light weight (like a small book) on the corners, or dry the piece sandwiched between two pieces of drywall/wood to keep it perfectly flat.
Step 2: Sculpting the Landscape
-
Create the rolling hills:
Roll a thin sheet of clay (about 1/8 inch). Cut out three or four curved, wave-like shapes. These will be your hills. -
Layer the foreground:
Starting from the bottom, attach the first hill piece. Layer the subsequent hill shapes behind and slightly above the first ones to create perspective. Smooth the edges down gently so they slope naturally. -
Sculpt the clouds:
Form small flattened balls of clay and press them onto the ‘sky’ area above the hills. Use a modeling tool to indent the bottoms flat and scallop the tops, giving them a fluffy, cumulus look. -
Define the cloud edges:
Use a rubber shaper or needle tool to deepen the lines between the cloud bumps, making them look dimensional rather than flat stickers.
Clean Cuts Matter
When cutting out your moon or hills, rub a tiny bit of cornstarch or baby oil on your cutter or knife blade. This prevents drag and dragging clay edges, keeping your shapes crisp.
Step 3: The Night Sky Details
-
Cut the moon:
Roll a small piece of clay flat. Use a round cutter to cut a circle, then offset the cutter and cut again to create a crescent moon shape. -
Bevel the moon:
Before attaching, gently tap the sharp edges of the crescent with your fingertip to soften them. I find this makes the moon look softer and more illustrative. -
Attach the celestial body:
Score and slip the back of the moon, placing it centrally in the upper half of the sky. Press gently to adhere without flattening it completely. -
Make the stars:
If using plunger cutters, punch out several small stars. If working by hand, cut tiny triangles or cross shapes. You can also use a small needle tool to imprint starburst patterns directly into the background clay. -
Arrange the stars:
Place the stars randomly around the moon, varying their sizes slightly for visual interest. Press them down securely.
Step 4: Finishing Touches
-
Check the connections:
Look over the piece from the side to ensure all raised elements—clouds, hills, moon—are fully flush with the background so they won’t pop off when drying. -
Smooth imperfections:
Dip a soft brush in a tiny bit of water and brush over the entire surface to remove fingerprints and smooth out rough textures. -
Dry slowly:
Place the relief on a flat board away from direct heat or drafts. Let it dry for at least 24–48 hours depending on humidity, flipping it occasionally if possible to prevent warping. -
Sand and refine:
Once bone dry, use fine-grit sandpaper to gently smooth the outer edges of the frame or any sharp peaks on the clay.
Now you have a serene little window into a clay world ready to display