When I’m craving something sculptural but still love working on a flat surface, clay relief is my go-to—it’s like drawing, but with shadows. Here are my favorite clay relief sculpture ideas, starting with classic crowd-pleasers and drifting into the more playful, wow-factor stuff.
Botanical Bas-Relief Tile
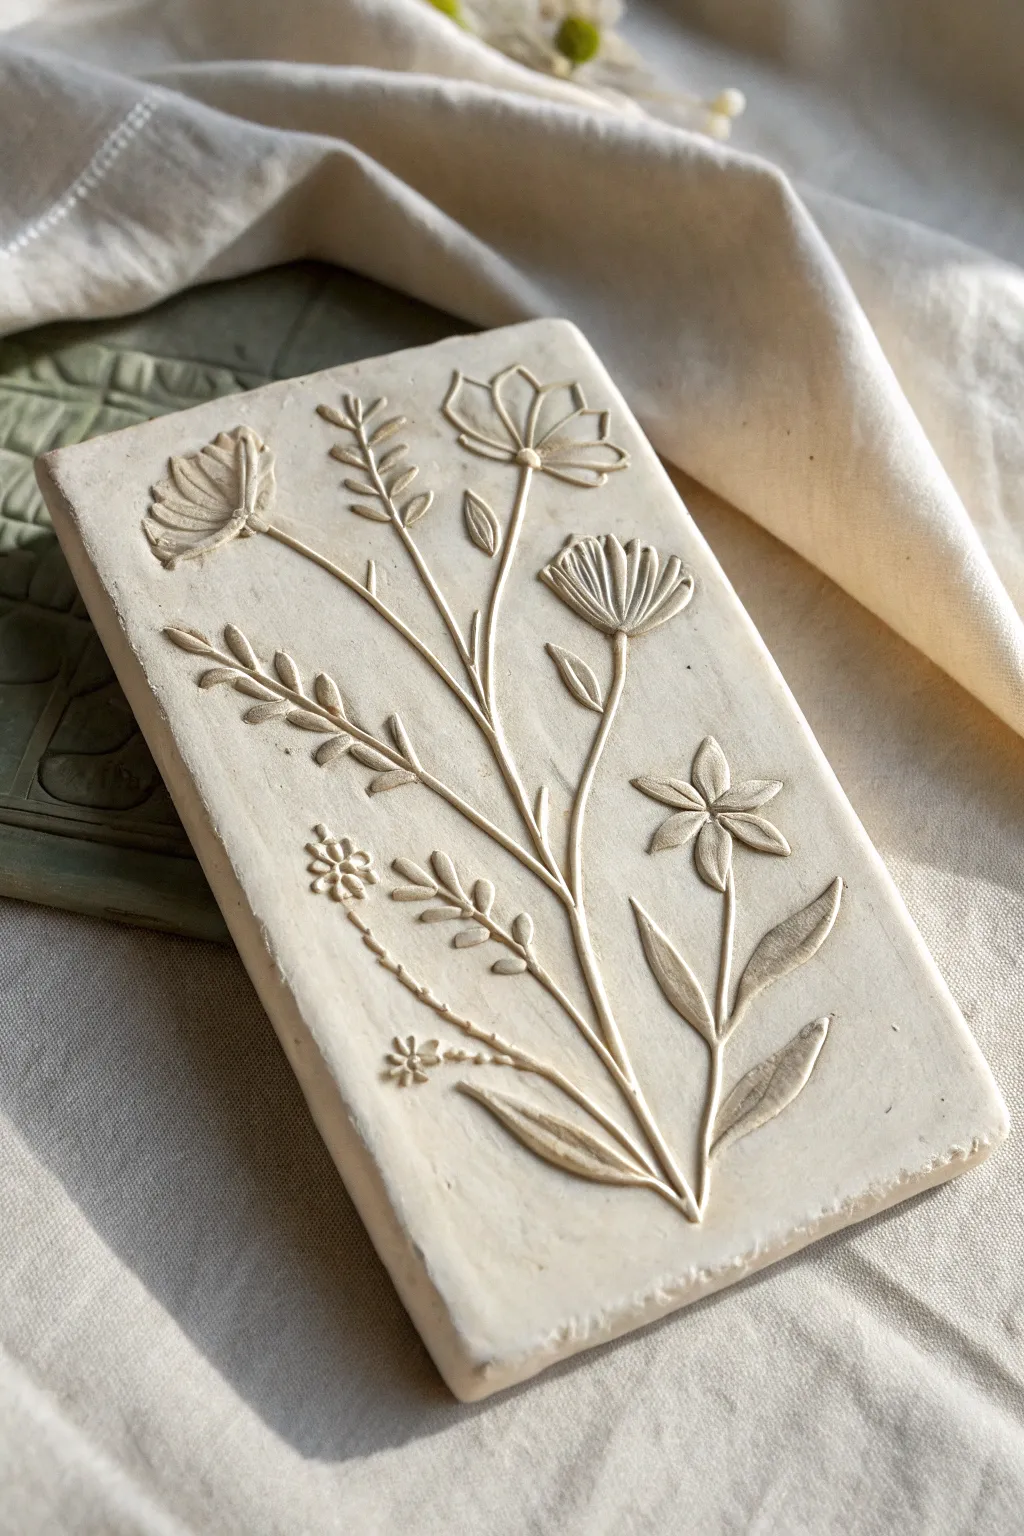
This elegant botanical bas-relief tile captures the delicate beauty of wildflowers in a smooth, creamy clay finish. The raised design creates soft shadows that highlight each petal and leaf, resulting in a sophisticated, minimalist piece of wall art or home decor.
Detailed Instructions
Materials
- Air-dry clay (white or cream) or polymer clay
- Rolling pin
- Two wooden slats or depth guides (approx. 1/4 inch thick)
- Rectangular clay cutter or ruler and knife
- Needle tool or sharp sculpting stylus
- Small loop tool or ribbon tool
- Rubber-tipped sculpting tools (various shapes)
- Sponge and water
- Fine-grit sandpaper (optional)
- Acrylic rolling board or smooth work surface
Step 1: Preparation & Base Creation
-
Condition the clay:
Begin by kneading your clay thoroughly until it is soft, pliable, and free of air bubbles. If using polymer clay, ensure it is warm enough to manipulate easily without cracking. -
Roll out the slab:
Place your clay on a smooth work surface. Use wooden slats on either side of the clay as depth guides for your rolling pin to ensure an even thickness of about 1/4 inch across the entire slab. -
Cut the rectangle:
Using a rectangular cutter or a ruler and craft knife, cut a clean, sharp rectangle from the slab. This will be the canvas for your relief. -
Smooth the surface:
Dip your finger or a sponge lightly in water (for air-dry clay) or use baby oil (for polymer) to smooth out any fingerprints or texture on the flat surface. It needs to be pristine before adding details.
Step 2: Sculpting the Design
-
Lightly sketch the design:
Take a needle tool and very faintly scratch your botanical layout onto the clay. Outline the main stems, the position of the large flowers, and the star-shaped bloom. Keep these lines barely visible. -
Create the main stems:
Roll very thin coils (snakes) of clay. Apply a tiny amount of water or liquid clay (slip/bake and bond) to the sketched lines and press the coils down to form the central stems, branching out from the bottom center. -
Shape the leaves:
For the leaves, form small teardrop shapes of clay. Flatten them slightly and press them onto the stems. Use a specialized rubber-tipped tool or your finger to blend the base of the leaf into the stem so it looks seamless. -
Detail the leaf veins:
Using a needle tool, carefully press a central vein into each leaf. For the smaller fern-like leaves on the left, use tiny sausage shapes pressed flat in a repeating pattern. -
Form the flower petals:
For the open flowers, roll small balls of clay and flatten them into ovals. Arrange them in a fan shape for the side-view blooms. Overlap the petals slightly to create depth. -
Sculpt the star flower:
For the star-shaped flower on the right, create five distinct pointed teardrops. Arrange them radially from a center point. Press a small indentation in the center using the back of a paintbrush or a ball tool. -
Define the petals:
Use a needle tool or knife to gently incise lines into the flower petals. This mimics the natural texture of petals and adds definition to the shapes. -
Add separation:
To make the design pop, use a small tool to undercut the edges of the petals and leaves slightly. This deepens the shadows around the raised elements, enhancing the 3D effect. -
Refine the surface:
Check the background one last time. If you accidentally nicked the flat area while sculpting, smooth it out now with a damp brush or rubber tool.
Slip & Score Secret
When attaching added clay pieces, always scratch (score) the contact points and add a drop of water or slip. This ‘glue’ prevents pieces from popping off as the clay shrinks during drying.
Step 3: Finishing
-
Dry or bake:
Let the piece dry completely (24-48 hours for air-dry clay) or bake it according to the manufacturer’s instructions for polymer clay. Place a light weight on the corners if using air-dry clay to prevent warping. -
Sand edges:
Once fully cured, use fine-grit sandpaper to gently smooth the outer edges of the rectangular tile for a professional, clean look. -
Seal (Optional):
If desired, apply a matte varnish to protect the surface while maintaining the natural, unglazed appearance shown in the reference image.
Antique Wash
To highlight the details, apply a diluted brown or gray acrylic wash over the dried relief, then wipe it off immediately with a damp contour sponge. The color will stay in the crevices.
Display your finished botanical tile on a small easel or frame it in a shadow box to admire the interplay of light and shadow


Sunflower Medallion in High Relief
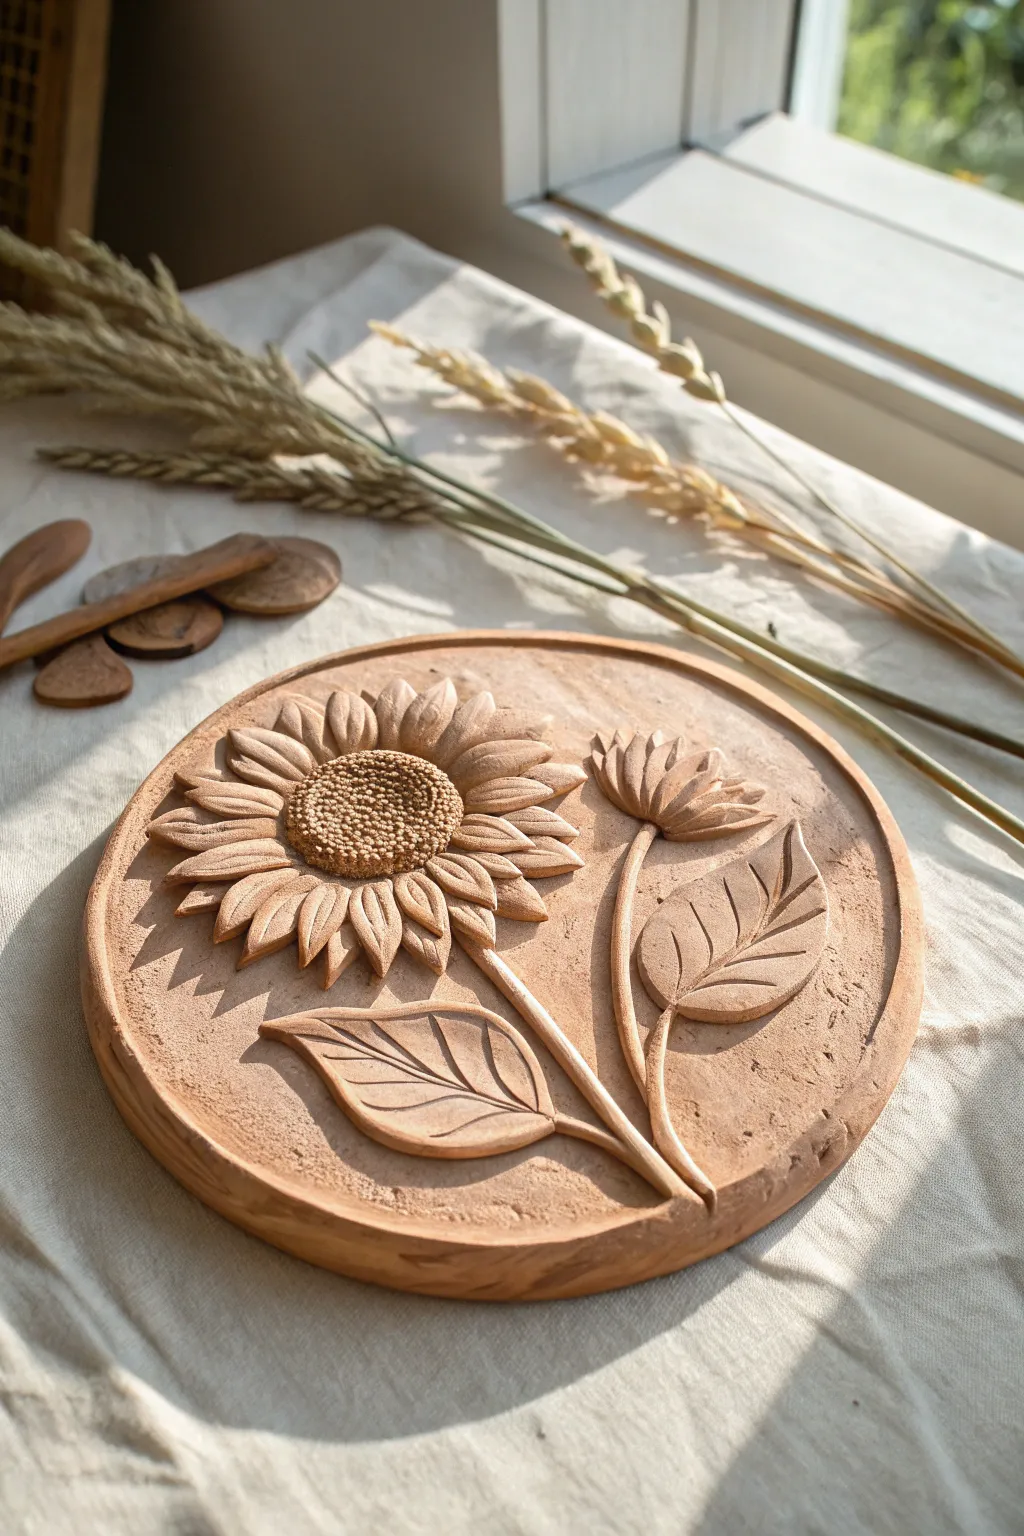
Capture the warmth of late summer with this charming terracotta-style relief plaque. Featuring a prominent sunflower bloom, a delicate bud, and textured leaves, this project teaches excellent layering techniques to achieve convincing depth and dimension without needing a wheel.
Step-by-Step Guide
Materials
- Earthenware or red stoneware clay (smooth)
- Circular bat or wooden board (approx. 10-12 inches)
- Rolling pin and guide sticks (1/2 inch thick)
- Basic clay tool kit (needle tool, modeling tool, loop tool)
- Small sponge
- Slip (clay mixed with water)
- Scoring tool or serrated rib
- Soft paintbrush
- Small texture tool or mesh screen (for sunflower center)
Step 1: Preparing the Base
-
Roll the slab:
Begin by wedging a generous amount of clay to remove air bubbles. Flatten it onto your work surface and roll it out into a slab using guide sticks to ensure an even thickness of about half an inch. -
Cut the circle:
Place a round template or plate onto your slab and cut around it with a needle tool. Smooth the cut edges with a damp sponge to remove any sharpness. -
Create the rim:
Using a modeling tool or your thumb, gently compress the outer edge of the circle downwards slightly to create a subtle raised border effect, framing the composition.
Cracks and Gaps?
If petals pull away during drying, don’t panic. Mix a ‘magic mud’ of vinegar and dry clay dust to fill hairline cracks, then smooth over with a rubber rib.
Step 2: Sculpting the Flowers
-
Layout the stems:
Roll two thin coils of clay for the stems. Score the base slab where the stems will go—curving them slightly to the right for a natural flow—add a dab of slip, and press the coils into place. Flatten them slightly. -
Shape the main sunflower center:
Roll a ball of clay and flatten it into a thick disc for the large sunflower’s center. Score and slip the placement area on the left side of the plaque, then attach the disc securely. -
Texture the seeds:
Use a specialized texture tool, or simply prick the center disc repeatedly with a needle tool or stiff brush bristles to mimic the dense texture of sunflower seeds. I find pressing a piece of coarse mesh screen into the clay works wonders here. -
Form the petals:
Hand-shape numerous teardrop-shaped pieces of clay for the petals. You will need roughly 15-20 petals for the main flower. -
Attach the first layer:
Score the area around the seed center. Attach the first layer of petals, pressing them firmly underneath the edge of the center disc so they appear to be growing from underneath it. -
Add petal definition:
Use a modeling tool to draw a central vein down each petal. Gently curl the tips of a few petals upward or downward to give the flower visual movement. -
Create the bud:
For the smaller flower on the right, create a smaller, half-circle mound of clay. Attach shorter, thicker petals radiating from the top, angling them inward slightly to suggest an opening bud.
Pro Tip: Depth Check
Work in varied heights. Ensure the seed head is the highest point, followed by the leaves, then the background stems, to create realistic 3D perspective.
Step 3: Leaves and Details
-
Cut the leaf shapes:
Roll out a small scrap of clay and cut out two large, pointed oval shapes for the leaves. -
Attach the foliage:
Score and slip the stems where the leaves will join. Press the leaves onto the plaque, allowing the edges to lift slightly off the background for that high-relief effect. -
Veining the leaves:
Using a sharp needle tool or knife, carve a central vein and branching side veins into each leaf. Press deeply enough to catch the light but be careful not to slice through. -
Refine the surface:
Look over the background slab. If you want a rustic look, lightly tap the empty space with a stiff bristle brush to give it a subtle stone-like texture. -
Undercut for shadow:
Take a small modeling tool and gently undercut the edges of the petals and leaves where they meet the background. This increases the shadow contrast and makes the sculpture pop. -
Final smoothing:
Use a barely damp soft paintbrush to go over the petals and leaves, smoothing out any rough fingerprints or jagged clay crumbs. -
Drying:
Cover the medallion loosely with plastic to let it dry very slowly. This prevents the petals from drying faster than the thick slab, which causes cracking.
Once fired, this piece looks stunning with a simple iron oxide wash to highlight the textures you created


Sea Turtle Over Rippling Water Panel
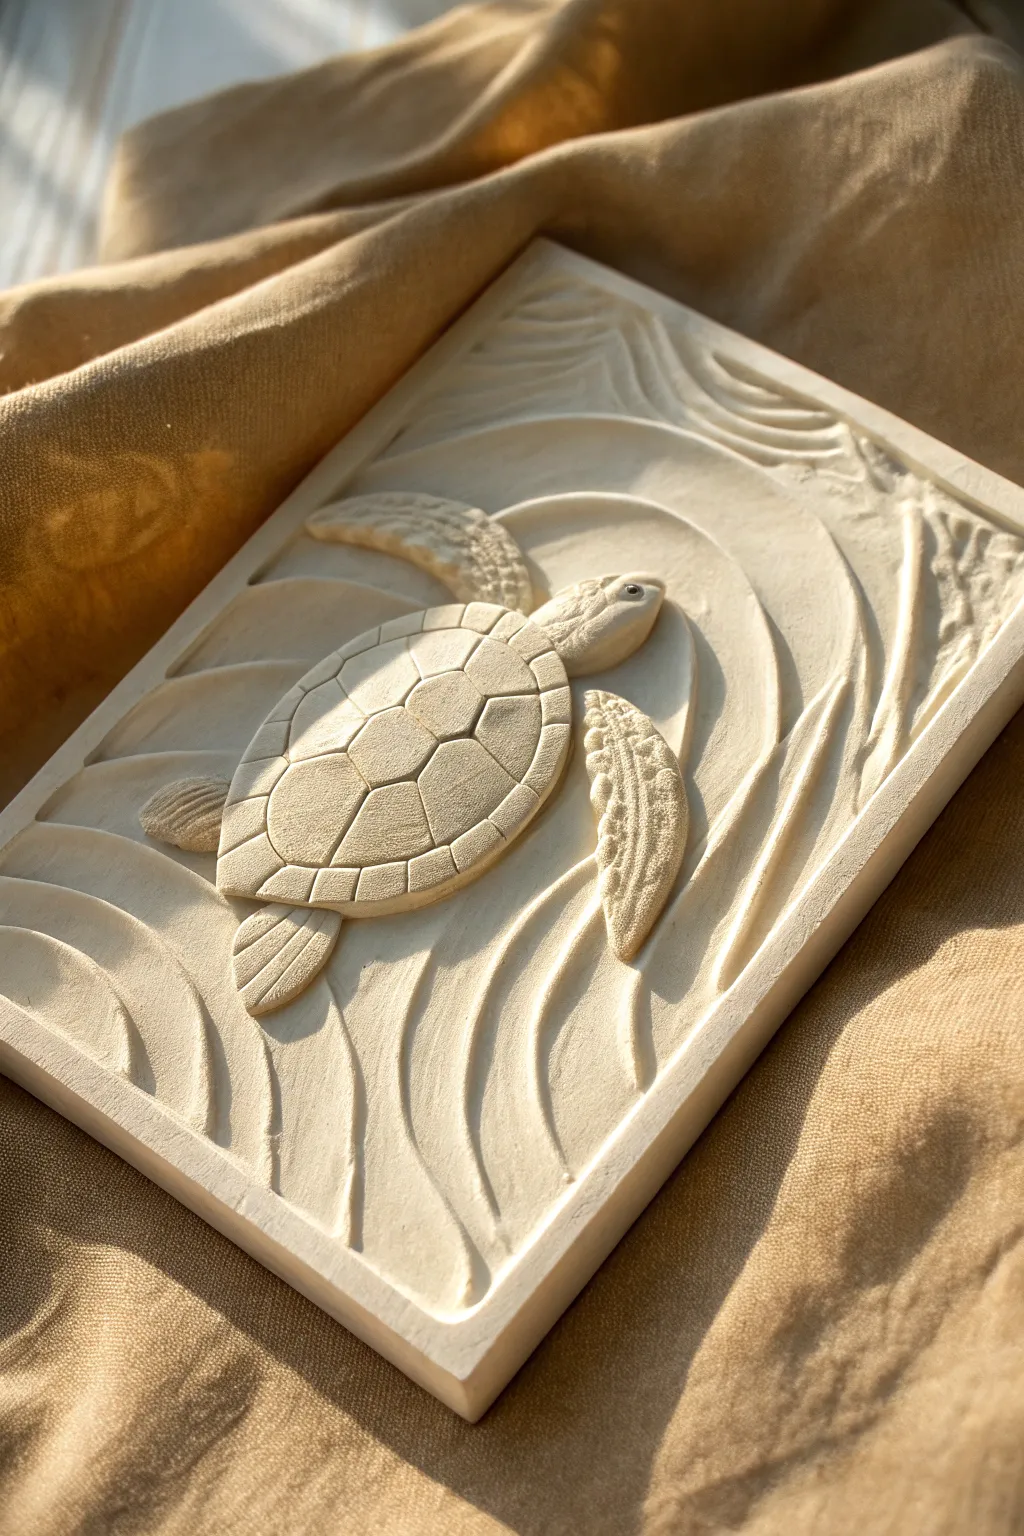
Capture the graceful movement of the ocean with this elegant sea turtle relief sculpture. This project highlights the contrast between the smooth, stylized waves and the intricate, textured details of the turtle’s shell and flippers, all framed within a classic rectangular panel.
Detailed Instructions
Materials
- High-quality air-dry clay or white stoneware clay
- Rolling pin
- Two wooden guide strips (approx. 1/2 inch thick)
- Rectangular template (cardstock or paper)
- Needle tool
- Wire loop tools (large and small)
- Rubber kidney rib
- Modeling tools (wooden or silicone)
- Sponge and water cup
- Wire clay cutter
Step 1: Preparing the Slab Base
-
Roll the clay:
Begin by wedging your clay to remove air bubbles, then place it between two wooden guide strips. Roll out an even slab that is slightly larger than your final desired dimensions. -
Cut the shape:
Place your rectangular template onto the smooth slab. Using a needle tool held vertically, cut around the template to create a clean, sharp rectangle. -
Create the border:
Measure about 1/4 inch inward from the edge on all sides. Lightly score this line to mark the frame, but don’t cut through. This border will remain at the original slab height. -
Establish the background depth:
Using a large wire loop tool, carefully shave away a thin layer of clay from the interior area (inside your marked border). It doesn’t need to be perfectly flat, as this will become water later, but you want a recessed area for the turtle to inhabit.
Clean Lines
Wipe your loop tool clean after every few strokes when carving the water. Clay buildup on the tool creates drag marks that ruin the smooth, liquid effect.
Step 2: Forming the Turtle
-
Block out the body shape:
Form a flattened oval of clay for the main shell (carapace) and attach it to the center of your panel using the score-and-slip method. It should rise significantly higher than the background. -
Add limbs and head:
Shape tapered coils for the front flippers, smaller triangles for the rear flippers, and a rounded, elongated shape for the head. attach these securely to the body, ensuring the front flippers extend gracefully outward. -
Refine the shell shape:
Smooth the shell into a dome. Keep the edges defined but rounded. I like to use a rubber rib here to get the surface perfectly smooth before adding texture. -
Carve the scutes:
Using a needle tool or small modeling tool, lightly sketch the pattern of the shell plates (scutes). Draw a central column of hexagons, flanked by pentagons. Once happy with the spacing, carve these lines deeper to separate the plates. -
Detail the skin:
Use a small, rounded tool to press texture into the flippers and head. For the front flippers, press irregular, scale-like shapes that follow the limb’s curve. Leave the head mostly smooth, but add a small indentation for the eye.
Add Subtle Color
Once dry, apply a very diluted wash of blue-green watercolor or acrylic paint to the deeper recesses of the water to enhance the feeling of depth.
Step 3: Sculpting the Water and Refining
-
Sketch the flow:
Lightly draw curved lines on the background clay to map out the ripples. Imagine the water displacing around the turtle’s movement. -
Carve the ripples:
Use a medium loop tool to carve out channels following your sketched lines. Vary the depth slightly—deeper near the turtle and shallower toward the frame—to create a sense of movement and current. -
Smooth the waves:
Take a damp (not soaking) sponge or a soft brush and smooth the ridges of the water currents. You want soft, fluid transitions rather than sharp jagged cuts. -
Undercutting:
Carefully use a small tool to undercut the edges of the turtle’s shell slightly. This creates a deep shadow that makes the turtle appear to be floating above the background rather than just stuck to it. -
Clean the frame:
Go back to your outer border. Use a flat modeling tool or ruler to ensure the edges are crisp and straight, contrasting with the organic curves of the water. -
Final drying:
Place a piece of plastic wrap loosely over the piece to let it dry common slowly. This prevents the corners of the flat panel from curling upward as the clay shrinks.
Allow the piece to dry fully before displaying your beautiful relief sculpture


Koi and Lily Pad Pond Relief
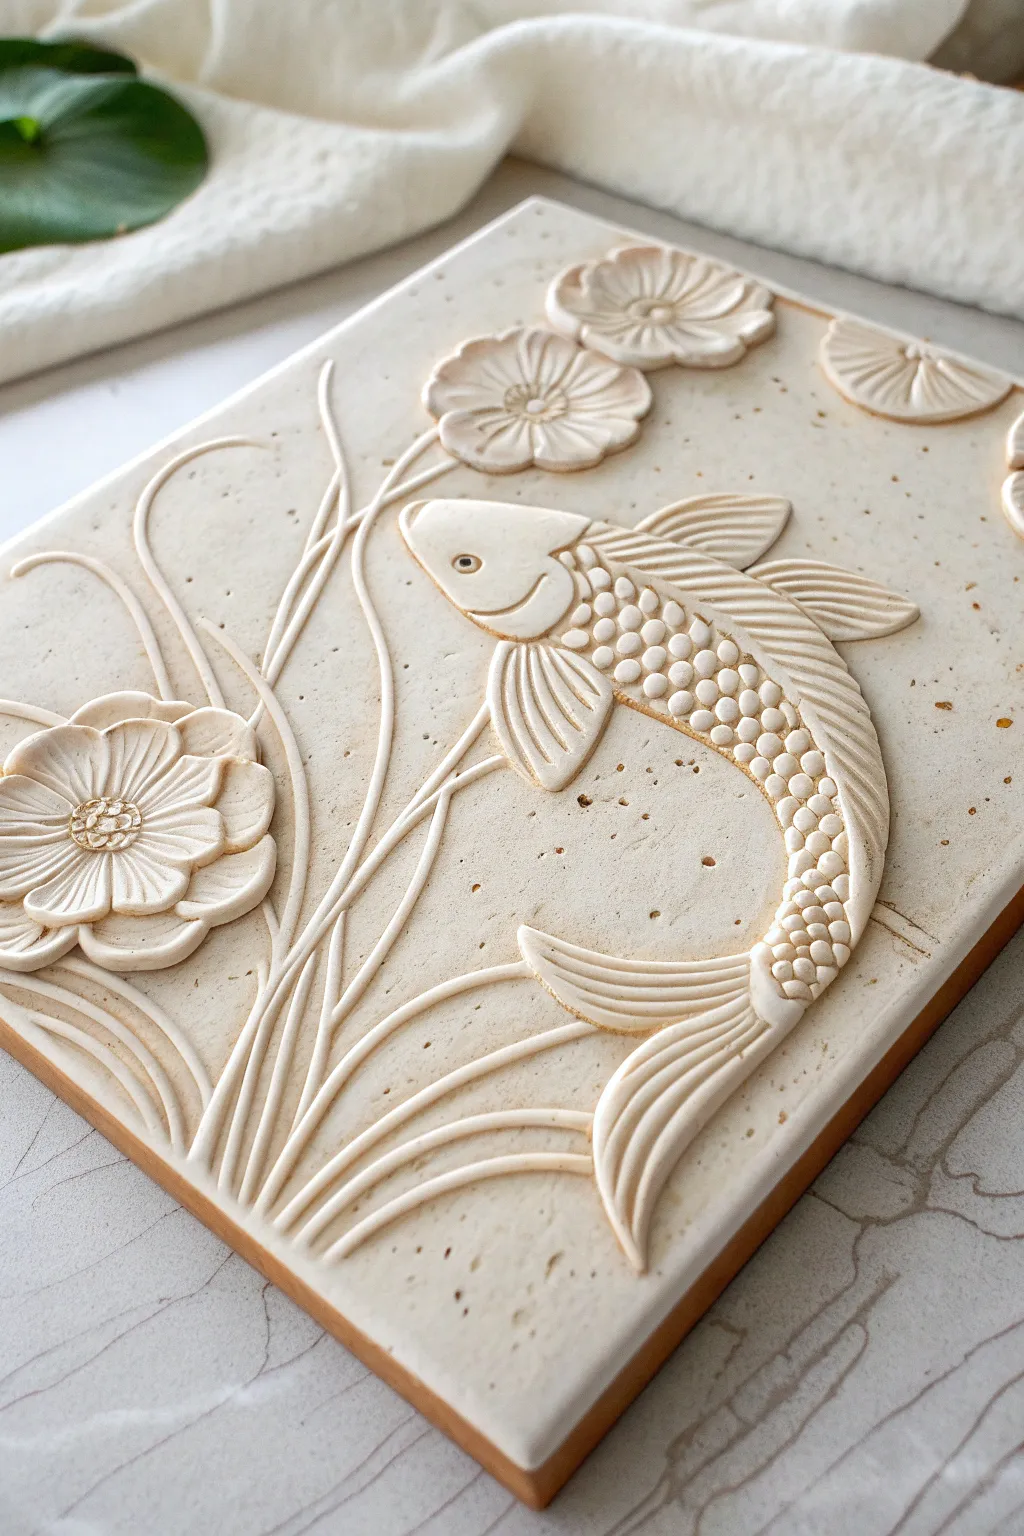
This elegant relief sculpture captures the tranquil movement of a koi fish amidst stylized lotus blooms on a textured slab. The monochromatic cream palette draws attention to the interplay of smooth curves and intricate scales, creating a sophisticated piece of wall art.
Step-by-Step
Materials
- White or cream-colored polymer clay (2 blocks)
- Rolling pin or acrylic roller
- Square or rectangular cookie cutter (or ruler and blade)
- Clay carving tools (needle tool, small loop tool, ball styluses)
- Rubber shaping tools (silicone brushes)
- Texture sponge or stiff bristle brush
- Baking sheet and parchment paper
- Soft pastel chalks in light brown/ochre (optional for shading)
- Gloss varnish (optional)
Step 1: Base Preparation
-
Condition the clay:
Begin by thoroughly kneading your polymer clay until it is soft and pliable. This prevents cracking and makes it easier to blend seams later. -
Create the slab:
Roll out a slab of clay to a uniform thickness of about 1/4 inch (6mm). This needs to be sturdy enough to support the relief work without warping. -
Establish the canvas:
Cut the slab into a clean rectangle. You can use a dedicated cutter or measure with a ruler and slice with a rigid blade for sharp 90-degree corners. -
Add subtle texture:
Before adding details, gently tap the surface with a coarse sponge or a stiff brush. We want a slight, grainy texture that resembles stone or handmade paper, rather than perfectly smooth plastic.
Step 2: Sculpting the Floral Elements
-
Position the main flower:
Roll a medium ball of clay and flatten it slightly. Press it onto the lower left quadrant of your slab. This will be the base for the large open lotus. -
Carve the petals:
Using a needle tool or small knife, divide the circle into petal wedge shapes. Gently press down on the center of each wedge to create a concave, cupped look for the petals. -
Detail the flower center:
Add a small, flattened button of clay to the center. Use a needle tool to stipple it with tiny holes for texture, then add a second ring of slightly larger petals around this core. -
Add floating blooms:
Repeat the process with smaller circles of clay near the top right and top center to create the floating pads or smaller flowers. Keep these flatter to suggest they are drifting on the water’s surface.
Fixing Smudges
Fingerprints ruining the smooth finish? Before baking, lightly brush the clay with a little baby oil or clay softener. It smooths out prints and blends seams instantly.
Step 3: Sculpting the Koi
-
Form the fish body:
Roll a teardrop shape of clay, slightly flattened. Position it on the right side of the slab so the sculpture curves dynamically towards the center. Blend the edges onto the base slab using a silicone tool so it feels integrated. -
Define the head:
Use a modeling tool to press a curved line separating the head from the body. Carve a simple curved mouth and press in a small eye socket. Insert a tiny ball of clay for the eye. -
Create the scales:
This is the most time-consuming part. Roll many tiny, uniform balls of clay. Starting from the tail and moving toward the head, press these onto the body, flattening them slightly to overlap like roof shingles. -
Add fins and tail:
Attach flattened triangles of clay for the dorsal, pectoral, and tail fins. Use a needle tool to score deep, sweeping lines along the length of each fin to mimic the ribbed texture.
Go For Gold
After baking, highlight just the tips of the fish scales and the edges of the flower petals with metallic gold wax or acrylic paint for a luxurious, porcelain-like finish.
Step 4: Refining and Finishing
-
add water currents:
Roll out several very thin, long snakes of clay. Lay them onto the slab in sweeping, S-curve motions that connect the bottom left corner up through the fish and flowers. -
Blend the stems:
I find it helpful to gently flatten these snake lines onto the base, blending just the edges so they look like tall underwater grass or stems rather than spaghetti. -
Connect the elements:
Ensure some stems visually connect to the flowers. Make sure the lines flow ‘behind’ the fish where appropriate to create depth. -
Antique the surface:
Scrape a little bit of light brown pastel chalk into a powder. Dust it lightly into the crevices—around the scales, the flower petals, and the stems—using a dry brush. This subtle shading highlights the 3D relief. -
Bake the piece:
Bake according to your clay manufacturer’s instructions (usually 275°F/130°C for 15-30 minutes). Let it cool completely on the baking sheet to prevent warping.
Once baked and cooled, your serene koi pond relief is ready to be framed or displayed on a stand.

The Complete Guide to Pottery Troubleshooting
Uncover the most common ceramic mistakes—from cracking clay to failed glazes—and learn how to fix them fast.
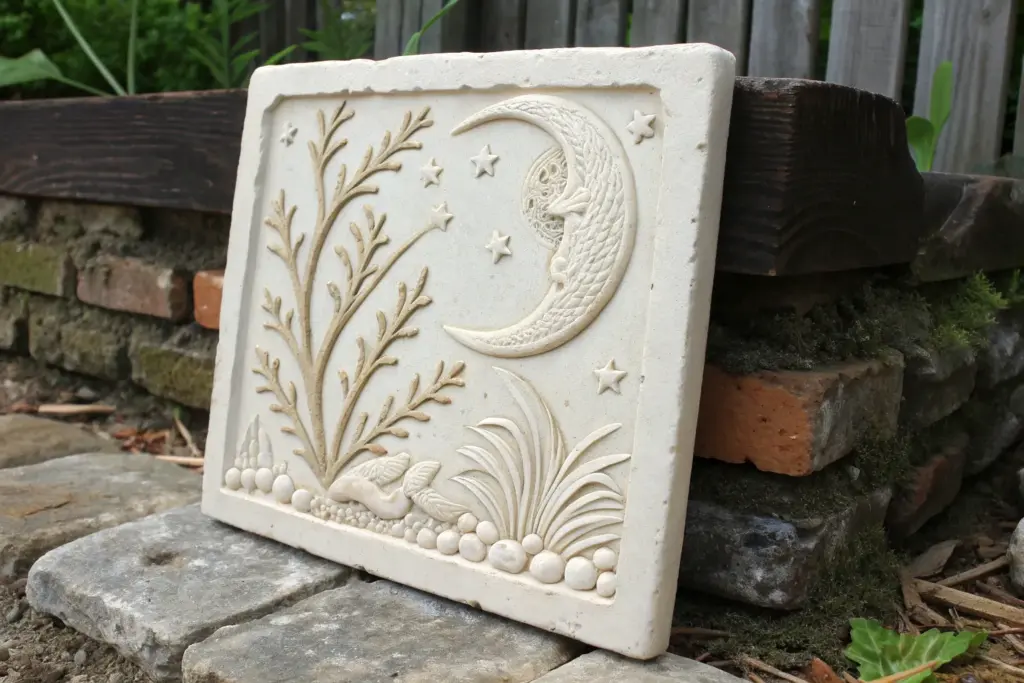
Owl and Crescent Moon Relief
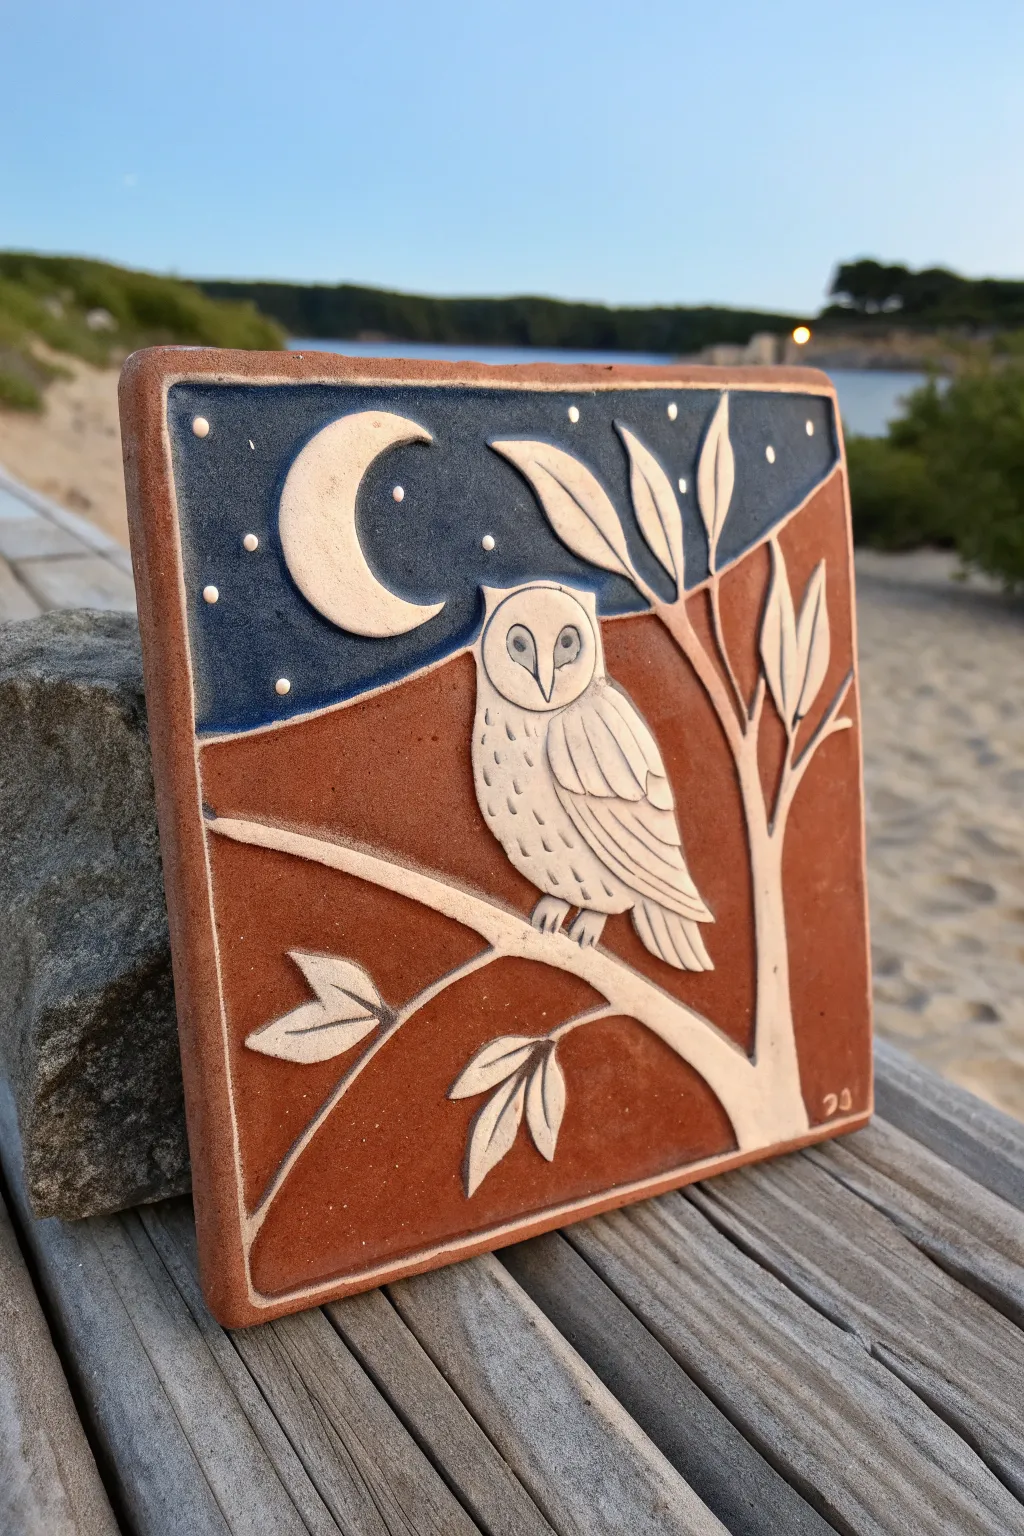
Capture the serene mystery of a clear night with this charming clay relief tile featuring a vigilant barn owl. The contrast between the warm terracotta tones, the deep midnight blue glaze, and the creamy white clay creates a striking piece of wall art perfect for nature lovers.
Detailed Instructions
Materials
- White earthenware or stoneware clay slab (approx. 1/2 inch thick)
- Terracotta-colored underglaze or slip
- Dark blue gloss glaze (mid-fire or low-fire depending on clay)
- Needle tool
- Loop tool or carving tools
- Small fine-point paintbrush
- Medium flat paintbrush
- Rolling pin and guide strips
- Tracing paper and pencil (optional for pattern transfer)
- Sponge and water bucket
- Kiln (or access to a firing service)
Step 1: Slab Preparation & Design Transfer
-
Roll the slab:
Begin by rolling out your white clay on a canvas board to a uniform thickness of about 1/2 inch. Use wooden guide strips on either side of your rolling pin to ensure the surface is perfectly flat and even. -
Cut the tile shape:
Measure and cut a square or slightly rectangular tile shape. For this project, a 6×6 or 8×8 inch square works beautifully. Smooth the cut edges with a damp sponge. -
Define the border:
Use your needle tool to lightly score a border about 1/4 inch from the edge all the way around. Instead of cutting it off, you can gently press down the inner area or add a small coil to build up a raised rim if you prefer more depth. -
Transfer the design:
Lightly sketch your design onto the leather-hard clay using a needle tool. Draw the diagonal horizon line, the main branch structure, the owl’s outline, and the crescent moon in the upper left corner.
Clean Lines Pro-Tip
Apply wax resist to the owl and moon before painting the background. This repels the glaze, keeping your white clay perfectly clean and crisp without meticulous brushing.
Step 2: Carving the Relief
-
Lower the background:
Using a loop tool, carefully carve away the clay around the owl, the branch, and the moon. You want to lower the background by about 1/8 to 1/4 inch, leaving your main subjects raised. -
Refine the branch:
Smooth the edges of the branch and leaves. The branch should look organic, so slight undulations are good. Ensure the connection points where leaves meet the stem are clean. -
Sculpt the owl:
Round off the sharp edges of your owl shape. Gently carve the wing feathers by making overlapping ‘U’ shapes or tiered layers to mimic folded wings. -
Detail the face:
Carve the heart-shaped face characteristic of a barn owl. Indent the eye sockets slightly and add a small beak. I often tackle the eyes last to ensure they are even. -
Add texture:
Use a fine point tool to add small dashes on the owl’s chest for feather texture and detail the veins on the leaves. -
Clean up:
Once your carving is complete, use a slightly damp sponge or soft brush to smooth away any burrs or clay crumbs left from the carving tools.
Step 3: Adding Color & Firing
-
Apply the earth tone:
Paint the bottom section of the background (below the horizon line) with the terracotta-colored underglaze. You want a solid, opaque coat, so apply 2-3 layers, letting each dry briefly in between. -
Bisque fire:
Let the tile dry completely—this can take several days depending on humidity. Once bone dry, bisque fire the piece to the appropriate cone for your clay (usually Cone 04). -
Glaze the sky:
After the bisque firing, apply the dark blue gloss glaze to the upper sky section. Carefully paint around the moon and the leaves. The contrast between the glossy sky and matte owl is crucial. -
Add the stars:
Dip a fine-point brush or the end of a matchstick into white glaze. Dot small stars into the blue sky area while the blue glaze is still wet or just after it dries. -
Clear glaze (optional):
Leave the owl, branch, and terracotta section unglazed for a matte finish, or apply a clear matte glaze over the terracotta, keeping the owl raw clay for texture contrast. -
Final wipe:
Check the rim of the tile. If any blue glaze dripped onto the raised border, wipe it away with a damp sponge to keep that clean clay frame. -
Glaze fire:
Fire the piece a second time to the temperature required by your glaze (typically Cone 5 or 6 for stoneware, or Cone 06 for earthenware).
Warping Prevention
Tiles love to warp as they dry. Dry your tile slowly between two pieces of drywall or heavy wood boards to keep it perfectly flat until it goes into the kiln.
Hang your finished relief on a garden wall or prop it on a shelf to enjoy your handiwork
Butterfly Wing Texture Relief
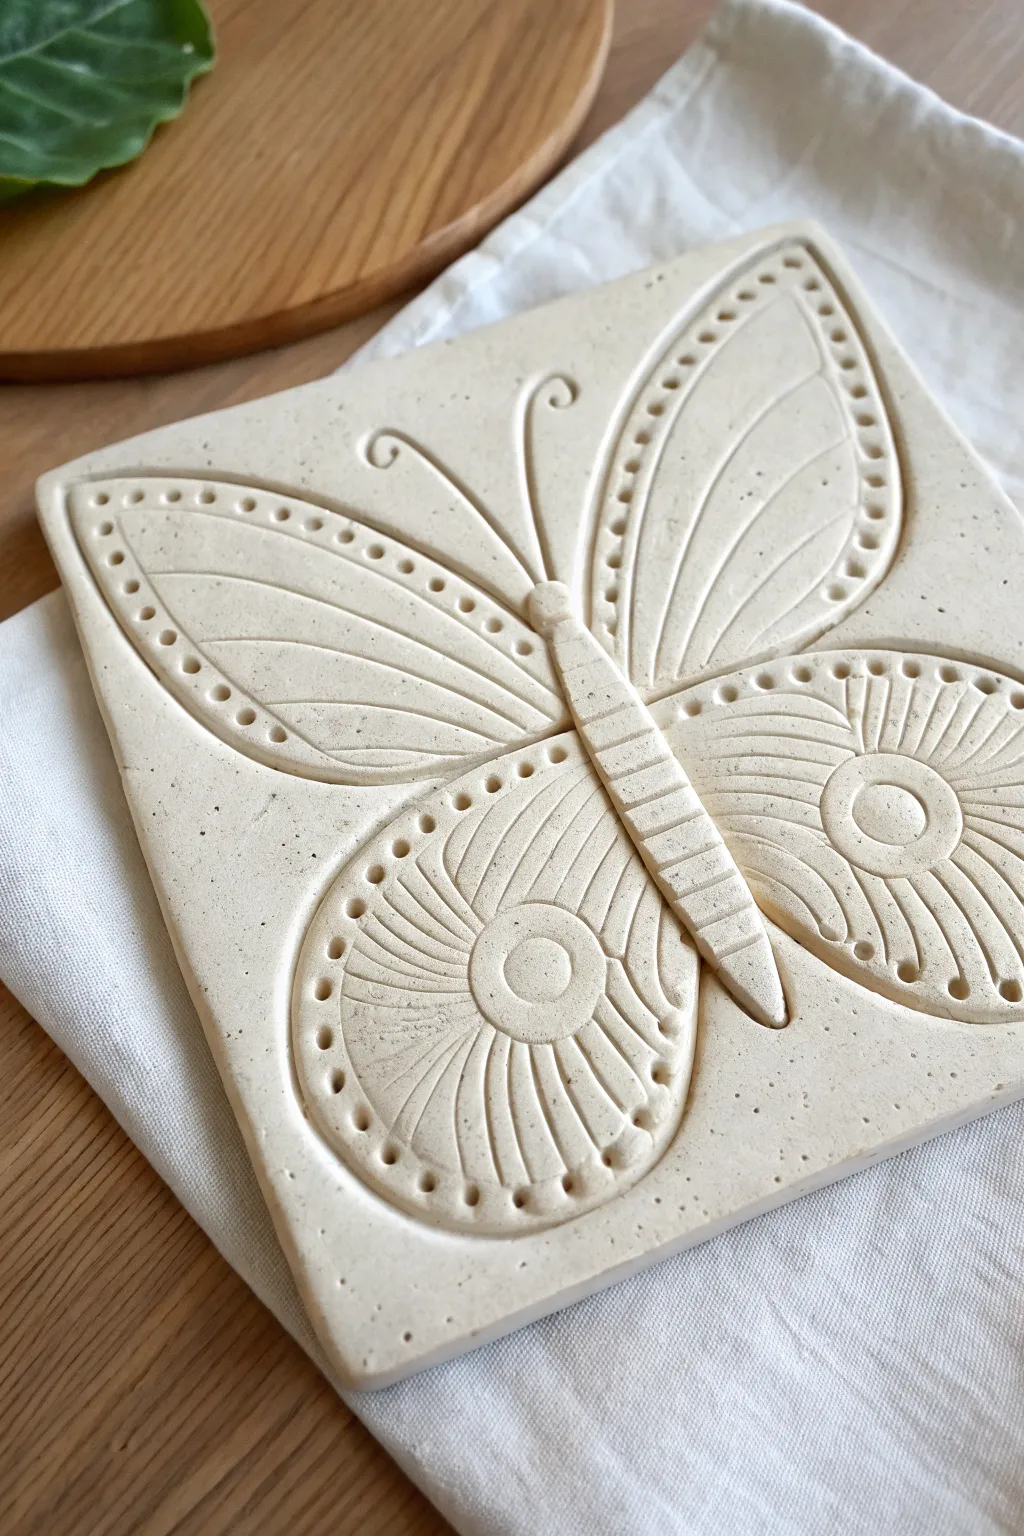
Capture the delicate symmetry of nature with this elegant relief sculpture, featuring a stylized butterfly on a square tile. The design relies on clean lines, repetitive textures, and the natural beauty of speckled stoneware or air-dry clay to create a timeless decorative piece.
Step-by-Step
Materials
- Speckled stoneware clay or light-colored air-dry clay
- Rolling pin
- Two 1/4-inch wooden guide strips (slats)
- Square tile cutter or ruler and knife
- Needle tool or sharp skewer
- Ball stylus tool (small)
- Small loop tool or carving tool
- Rubber kidney rib or smooth sponge
- Canvas or wooden board for working
- Slip (clay slurry) and scoring tool
Step 1: Base Preparation
-
Roll the slab:
Begin by rolling out your clay into an even slab. Place your wooden guide strips on either side of the clay ball to ensure a consistent thickness of about 1/4 inch, which helps prevent warping. -
Cut the square:
Using a ruler and a sharp knife (or a square cookie cutter if you have one large enough), cut a precise square shape. Smooth the outer edges with a damp sponge or your finger to remove any sharp burrs. -
Smooth the surface:
Run a rubber kidney rib gently over the surface of the tile. This compresses the clay particles and creates a pristine canvas for your carving.
Uneven Drying?
If the corners of your tile start lifting as it dries, place a light weight (like a small wooden board) on top of the corners to gently hold them flat.
Step 2: Sculpting the Body
-
Form the butterfly body:
Roll a small, thin coil of clay for the butterfly’s body. It should be slightly tapered at the bottom and create a distinct head at the top. -
Attach the body:
Score the center of your tile vertically and apply a small dab of slip. Press the coil firmly onto the scored area to attach the body. -
Texture the abdomen:
Using the side of a needle tool or a dull knife, gently press horizontal lines across the lower part of the body to mimic the segmented abdomen texture. -
Define the head:
Smooth the top of the coil into a rounded head shape, blending the clay slightly where the neck meets the wings’ future position.
Step 3: Carving the Wings
-
Outline the wings:
With a needle tool held lightly like a pencil, faintly sketch the outline of the four wing sections directly onto the tile surface. Aim for symmetry between the left and right sides. -
Incise the borders:
Once satisfied with the symmetry, go over your sketch lines with deeper incisions. Press firmly enough to create a groove but not so deep that you cut through the tile. -
Carve the relief:
I prefer to use a small loop tool here to gently carve away a tiny amount of clay just outside the wing outlines. This makes the wings appear raised relative to the background. -
Add wing details:
Carve the internal veins of the upper wings using long, sweeping curves with your needle tool. Divide the lower wings into circular sections and radiating lines as shown in the reference.
Go Botanical
Instead of carving distinct lines for the background, try pressing real leaves or dried flowers into the clay surrounding the butterfly for an organic texture.
Step 4: Detailing and Finishing
-
Create the dotted border:
Using a small ball stylus tool, press a series of uniform indentations along the outer edge of the upper wings. Keep the spacing consistent for a polished look. -
Detail the lower wings:
Continue the dotting technique along the bottom edge of the lower wings. Add a central circle motif inside the lower wing whorls using a larger stylus or the back of a paintbrush. -
Add antennae:
Using the needle tool, carefully carve two curved antennae extending from the head, finishing each with a tiny spiral flourish. -
Cleanup:
Wait for the clay to reach a leather-hard state. Then, use a soft, dry brush to sweep away any clay crumbs or ‘bead’ left from the carving process. -
Smooth the edges again:
Do a final pass around the perimeter of the tile with a slightly damp sponge to soften any edges that may have been roughed up during handling. -
Drying:
Place the tile on a wire rack or between two pieces of drywall to dry slowly and evenly. This slow drying is crucial to prevent the corners from curling up.
Once fired or fully cured, display your relief on a plate stand or frame it as a serene wall accent


What Really Happens Inside the Kiln
Learn how time and temperature work together inside the kiln to transform clay into durable ceramic.
Layered Mountain Landscape Relief
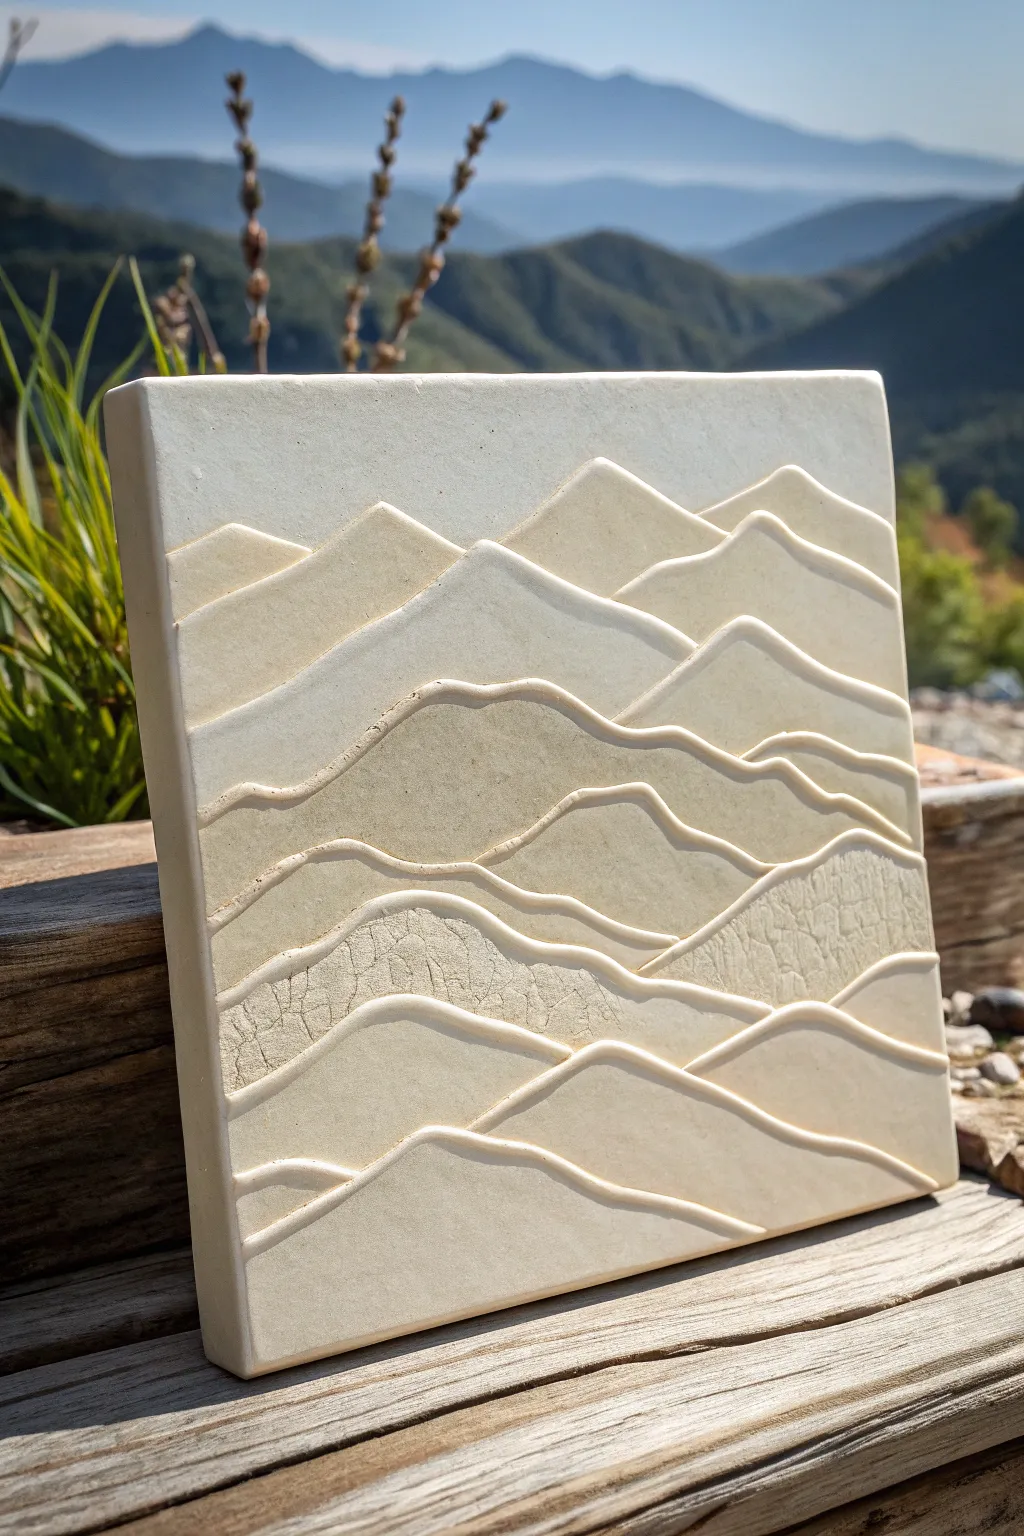
Capture the tranquil beauty of distant mountains with this elegant relief sculpture tile. By layering distinct planes of clay and using subtle texture variations, you’ll create a dimensional landscape that feels both modern and timeless.
Step-by-Step Tutorial
Materials
- Light-colored stoneware clay (smooth body)
- Rolling pin and guide strips (3/8 inch)
- Fettling knife or X-Acto blade
- Wood modeling tool (rounded edge)
- Slip trailer or piping bag with small round nozzle
- White decorative slip (engobe)
- Textured fabric or cracked earth stamp (optional)
- Needle tool
- Sponge and water
- Kiln (or air-dry clay alternative if not firing)
Step 1: Base Preparation
-
Roll the Slab:
Begin by wedging your clay to remove air bubbles. Roll out a consistent slab about 3/8 to 1/2 inch thick using guide strips to ensure an even surface. -
Cut the Tile:
Cut a perfect square from your slab, approximately 6×6 or 8×8 inches. Use a straight edge and a needle tool or fettling knife for clean, sharp 90-degree corners. -
Smooth the Canvas:
Take a slightly damp sponge or a soft rib tool and gently compress the surface of the tile to remove canvas marks or rolling textures. This sky area needs to be pristine.
Warping Worries
If corners lift while drying, flip the tile onto foam and weigh it down gently with a sandbag. Dry slowly away from drafts to keep it perfectly flat.
Step 2: Building Dimensions
-
Sketch the Range:
Lightly trace your mountain outlines onto the wet clay using a needle tool. Design about 5-6 layers, starting from distant peaks at the top to closer hills at the bottom. -
Carve the Recessions:
Instead of adding clay, we will subtract it to create depth. For the topmost mountains (the furthest away), gently shave away a thin layer of clay from the sky area above them to make the peaks stand out slightly. -
Planar Carving:
Work your way down the tile. For each subsequent mountain range closer to the viewer, carve away the clay immediately *above* the ridge line to separate the planes. The lowest hills should remain the thickest part of the slab. -
Refine the Slopes:
Use a modeling tool to smooth the transition between layers. You want distinct “steps” or planes rather than a continuous slope, mimicking the atmospheric perspective of mountain ranges.
Step 3: Texturing and Details
-
Add Subtle Texture:
Select one middle layer to feature a contrasting texture. Gently press a crackle stamp or a piece of crumpled fabric into that specific band of mountains to mimic rocky terrain, leaving the others smooth. -
Prepare the Trailer:
Fill a slip trailer with a thick, smooth white slip (liquid clay). If you are using air-dry clay, you can use a mix of clay paste and water in a piping bag. -
Pipe the Ridges:
Carefully trail a consistent line of slip along the very top edge of every mountain layer. This raised white line highlights the separation between the ranges and adds a graphic quality. -
Pipe Internal Decor:
Add a few sweeping, curved lines across the face of the larger mountain shapes using the slip trailer. These lines suggest contours and flow within the landscape. -
Clean the Lines:
Let the piped slip set until leather hard. If any peaks are too messy, gently smooth them with a slightly damp brush, but try to maintain the raised, rounded profile of the line.
Sun-Kissed Peaks
Add depth by using a gradient of slip colors. Mix a tiny drop of blue stain into the slip for distant peaks and gradually warm up the slip color for foreground hills.
Step 4: Finishing
-
Slow Drying:
Place the tile between two pieces of drywall or loosely cover with plastic. This thick relief needs to dry very slowly to prevent warping at the corners. -
Bisque Fire:
Once bone dry, bisque fire the piece to cone 04 (or according to your clay body specs). This hardens the clay for the final steps. -
Optional Wash:
For an antiqued look, you can apply a very thin wash of iron oxide or a diluted stain and wipe it back, leaving color only in the crevices of the textured layer. -
Final Glaze or Seal:
The example uses a matte finish. Apply a clear matte glaze to seal the piece without adding unwanted shine, then fire to maturity. I personally love how a raw clay surface looks, so a matte sealer works great too.
Display your finished relief on a wooden shelf or plate stand to bring a permanent view of the mountains into your home
Cottage Garden Gate Relief
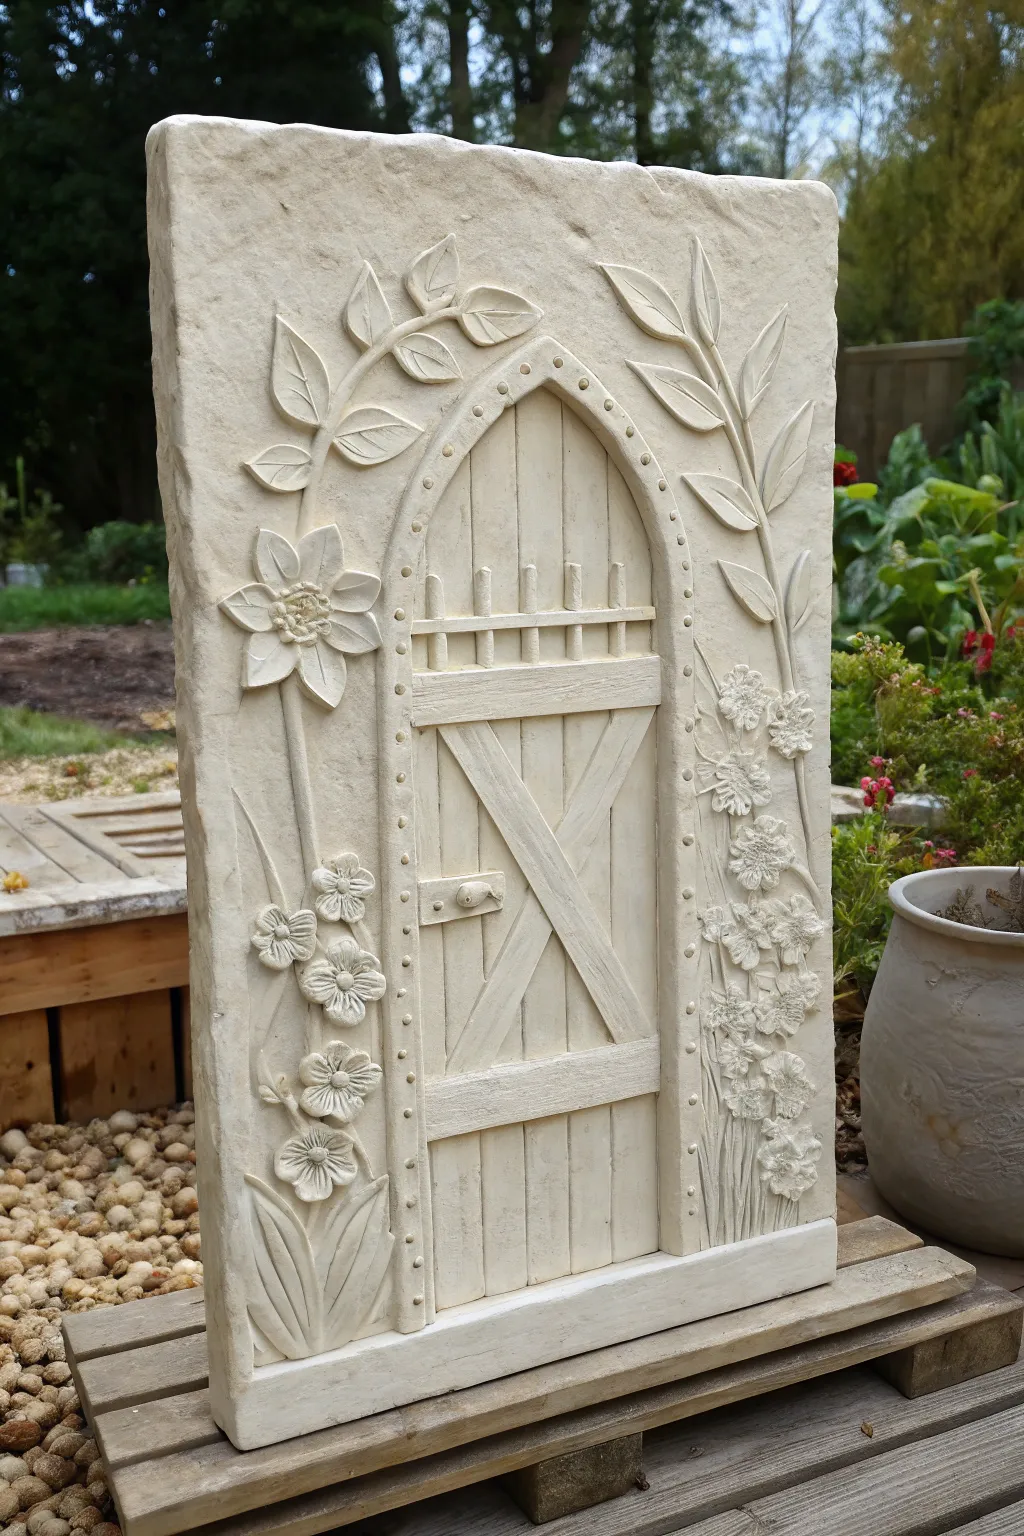
Capture the charm of a hidden cottage entrance with this detailed bas-relief project. Using air-dry or polymer clay, you will sculpt a faux-stone archway surrounded by trailing vines and delicate blooms.
Step-by-Step
Materials
- White or sandstone-colored air-dry clay (or polymer clay)
- Rectangular wooden plaque or heavy cardboard (for base support)
- Clay rolling pin
- Fettling knife or X-Acto knife
- Assorted sculpting tools (needle tool, ball stylus, rubber shaper)
- Ruler
- Texture sponge or stiff brush
- Slip (clay and water mixture) for joining
- Acrylic paints (cream, beige, very diluted brown)
Step 1: Preparing the Slab
-
Roll the base:
Begin by rolling out a thick, even slab of clay, approximately 3/4-inch to 1-inch thick. This needs to be sturdy enough to stand vertically once dry, so don’t go too thin. -
Cut the rectangle:
Using a ruler and your knife, trim the slab into a clean, tall rectangle. Smooth the outer edges with a damp finger to remove any sharpness. -
Texture the surface:
Before adding details, gently press a natural sponge or a crumpled ball of foil over the entire surface. This instant texture mimics the look of hewn limestone.
Clean Cuts Matter
When cutting the main slab, wipe your blade with a damp sponge after every cut. This prevents clay drag and keeps your edges crisp and straight.
Step 2: Constructing the Archway
-
Outline the door:
Use a needle tool or the tip of your knife to lightly sketch the arched doorway in the center of your slab. Leave plenty of room on the sides for foliage. -
Form the door frame:
Roll out a long, consistent snake of clay. Flatten it slightly into a strip and lay it over your sketched arch line. Use slip to adhere it securely to the base. -
Add the rivets:
Roll tiny balls of clay and press them at even intervals along the door frame strip. Use a small ball stylus to indent around them slightly, making them look like embedded iron rivets. -
Scribe the planks:
Inside the arch, use a ruler to press vertical lines into the background clay, creating the illusion of vertical wooden planks. -
Apply the cross-bracing:
Roll out flat strips of clay to create the horizontal and diagonal ‘Z’ bracing on the door. Attach these over the vertical plank lines you just scribbled. -
Install the hinges and latch:
Sculpt small rectangular blocks for the hinges and a small oval for the handle. Attach these to the left side of the door for a realistic functional look.
Step 3: Sculpting the Botanicals
-
Create the main vine:
Roll thin coils of clay and meander them up the left and right sides of the relief. I like to let them touch the arch slightly to integrate the elements. -
Shape the leaves:
Form small teardrop shapes from clay. Flatten them and use a needle tool to press a central vein into each one. Attach these in alternating patterns along your vines. -
Form the large flower:
On the left side, create a focal flower by arranging five pointed petals in a circle. Add a textured button of clay in the center for the pistil. -
Cluster the small blooms:
For the right side, make clusters of tiny balls. Press a star-shaped tool or the end of a small brush into each ball to open them into trumpet flowers. -
Detail the petals:
Go back over your flowers with a sharp tool to add fine lines and texture to the petals, emphasizing a delicate, organic feel. -
Add lower foliage:
At the very bottom, sculpt longer, broad leaves that reach upward, anchoring the design visually.
Make it Mossy
After the final wash, dab tiny spots of diluted green paint into the deep corners of the stone frame and bottom leaves to simulate aged moss growth.
Step 4: Finishing Touches
-
Refine textures:
Check the door specifically—use a wire brush or stiff toothbrush to add a wood-grain texture to the planks and bracing. -
Let it dry completely:
Allow the piece to dry slowly away from direct heat. This thick slab may take 3-5 days to fully cure depending on humidity. -
Apply a subtle wash:
Once dry, mix a tiny drop of brown paint into a cup of water. Brush this wash over the entire piece and immediately wipe it off with a rag. The dark pigment will stay in the crevices, highlighting your details. -
Dry brush highlights:
Finally, use a dry brush with a tiny amount of cream or white paint to lightly dust the highest points of the sculpture.
Place your finished relief on a mantel or garden shelf to enjoy a permanent view into a serene world

TRACK YOUR CERAMIC JOURNEY
Capture glaze tests, firing details, and creative progress—all in one simple printable. Make your projects easier to repeat and improve.
Simple Face Portrait in Low Relief
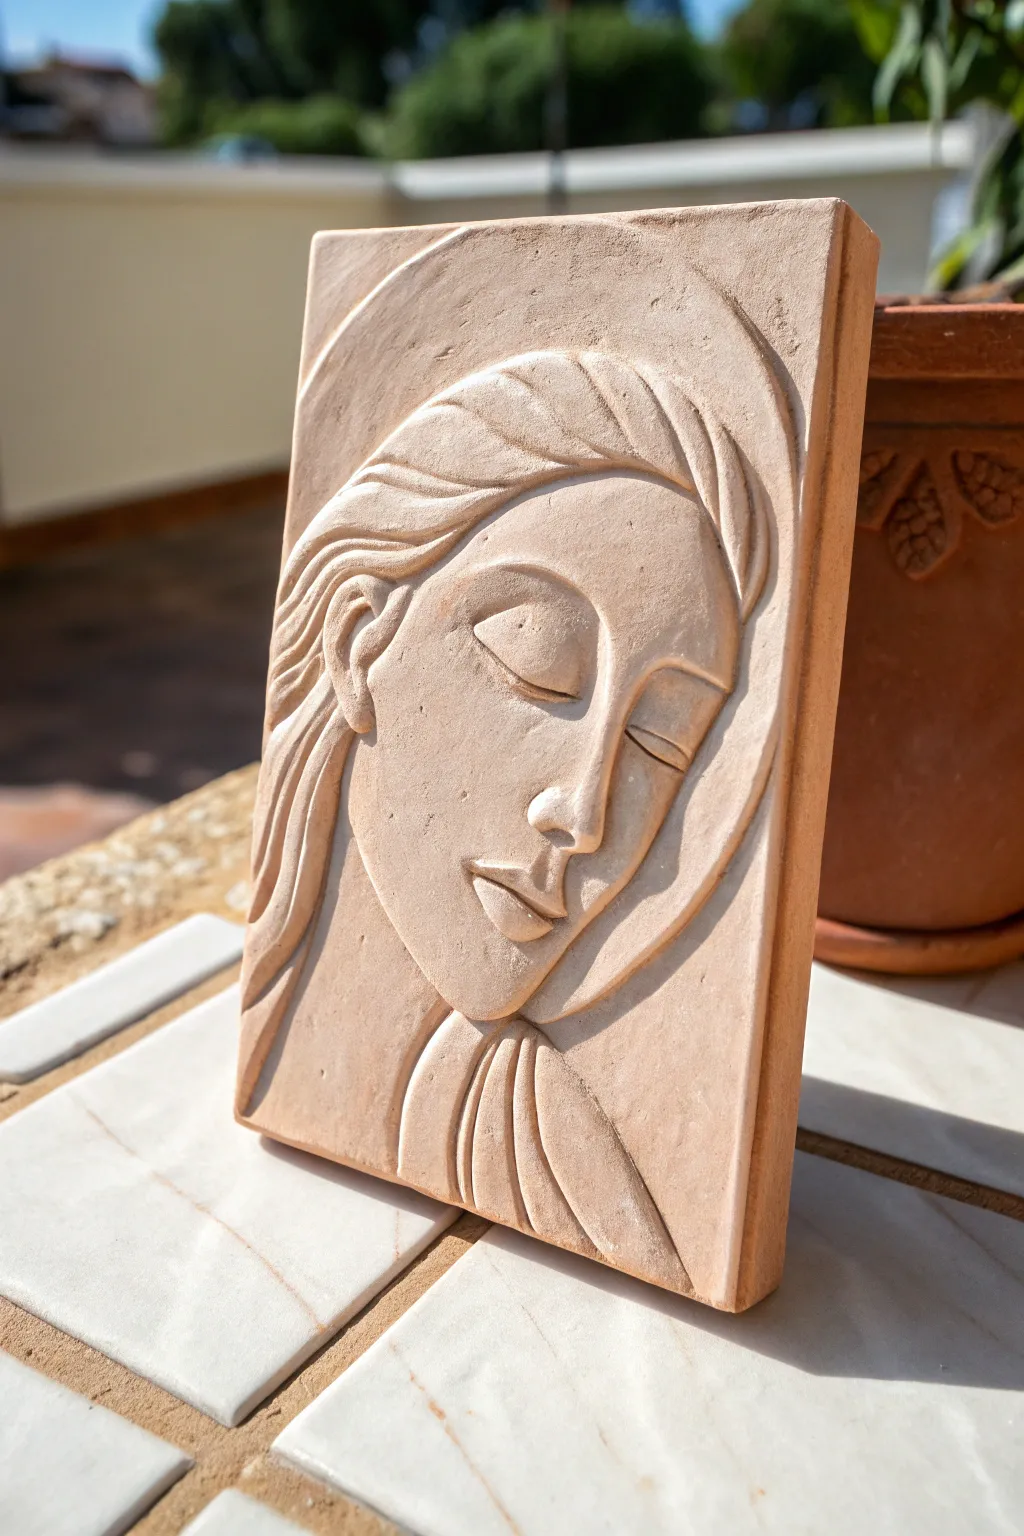
Capture a moment of quiet reflection with this elegant low-relief portrait inspired by classical motifs. The warmth of the clay combined with the stylized, sweeping lines of the hair and face creates a timeless piece perfect for garden decor or indoor display.
Step-by-Step Guide
Materials
- Earthenware or terracotta clay (low-fire)
- Rectangular wooden board or plaster bat (approx. 8×5 inches)
- Rolling pin
- Two wooden guide strips (approx. 1/2 inch thick)
- Needle tool
- Loop tools (various sizes for carving)
- Modeling tool or wooden spatula
- Soft sponge
- Wire clay cutter
- Small paintbrush and water
Step 1: Preparation & Base
-
Prepare the slab:
Begin by wedging your clay thoroughly to remove air bubbles. Place your wooden guide strips on either side of the clay on your work surface. Roll the clay out into a smooth, even slab that matches the height of your guides, roughly half an inch thick. -
Cut the rectangle:
Using a ruler and your needle tool, cut a clean rectangle from the slab. Measure approximately 5 inches wide by 8 inches tall. Save the excess clay; you will need it for building up the relief. -
Sketch the design:
Lightly trace the outline of the face onto the wet slab using the needle tool. Draw elongated, sweeping lines for the hair, the profile of the nose, and the closed eyes. Keep the pressure very light so you don’t gouge the background deeply.
Flattening Warped Slabs
If the corners lift while drying, flip the piece onto a piece of drywall and weigh down the corners gently with small sandbags or heavy books.
Step 2: Building the Form
-
Add volume to the face:
Take small pieces of your scrap clay and flatten them into thin patties. Score and slip the area of the slab where the face will be, then press these patties onto the surface to build up the cheek, forehead, and chin area slightly. -
Define the nose:
Roll a small coil and shape it into a triangular wedge. Attach this firmly to form the bridge and tip of the nose. Use your wooden modeling tool to blend the edges seamlessly into the cheek and forehead so it looks like one continuous piece. -
Sculpt the eyelids:
For the closed eyes, apply very small, flat ovals of clay. Smooth them down onto the face. Use the needle tool or a small spatula to carve the crescent line of the eyelid crease and the eyelash line, creating that peaceful, sleeping expression. -
Shape the lips:
Add a tiny amount of clay for the mouth area. Sculpt the lips by pressing a line across the center, then gently pushing the clay up and down to form the upper and lower lip volume. Keep the relief low; it shouldn’t stick out too far.
Antique Wash Effect
After bisque firing, apply a dark iron oxide wash and wipe it back with a sponge. The dark color stays in the crevices, highlighting your carving work.
Step 3: Carving & Refining
-
Create the hair strands:
I find it helpful to roll several long, thin coils for the hair. Lay them over the forehead and down the sides according to your initial sketch. Flatten them slightly with your thumb to integrate them into the background. -
Carve the negative space:
Using a loop tool, carefully carve away thin channels between the hair strands. This negative space creates shadows that define the flow of the hair without needing to add too much bulk. -
Refine the jawline:
Use a modeling tool to sharpen the edge of the jaw and chin. You want a clear separation between the face and the neck/hair area behind it. A crisp line here adds sophisticated dimension to the relief. -
Deepen the background:
To make the face pop, gently compress the background clay around the silhouette of the head. Use the back of a spoon or a smooth wooden tool to push the background down just a millimeter or two.
Step 4: Finishing Touches
-
Smooth the skin:
Review the face for any tool marks or roughness. Dip your finger or a soft sponge in a tiny bit of water and gently smooth the cheekbones, forehead, and nose. The surface should look matte and soft. -
Detail the ear:
If your composition includes the ear peaking through the hair, define the outer rim (helix) and the inner curve. Keep it stylized and simple to match the rest of the piece. -
Clean the edges:
Run a damp sponge along the outer rectangular edges of the slab to soften any sharp corners created during the initial cutting phase. -
Slow drying:
Loosely cover the relief with plastic sheeting to ensure it dries slowly and evenly, preventing the corners from curling up. Once bone dry, fire it according to your clay body’s instructions.
Once fired, this serene relief sculpture brings a calm, artistic presence to any shelf or garden wall
Flowing Hair Coil Portrait Relief
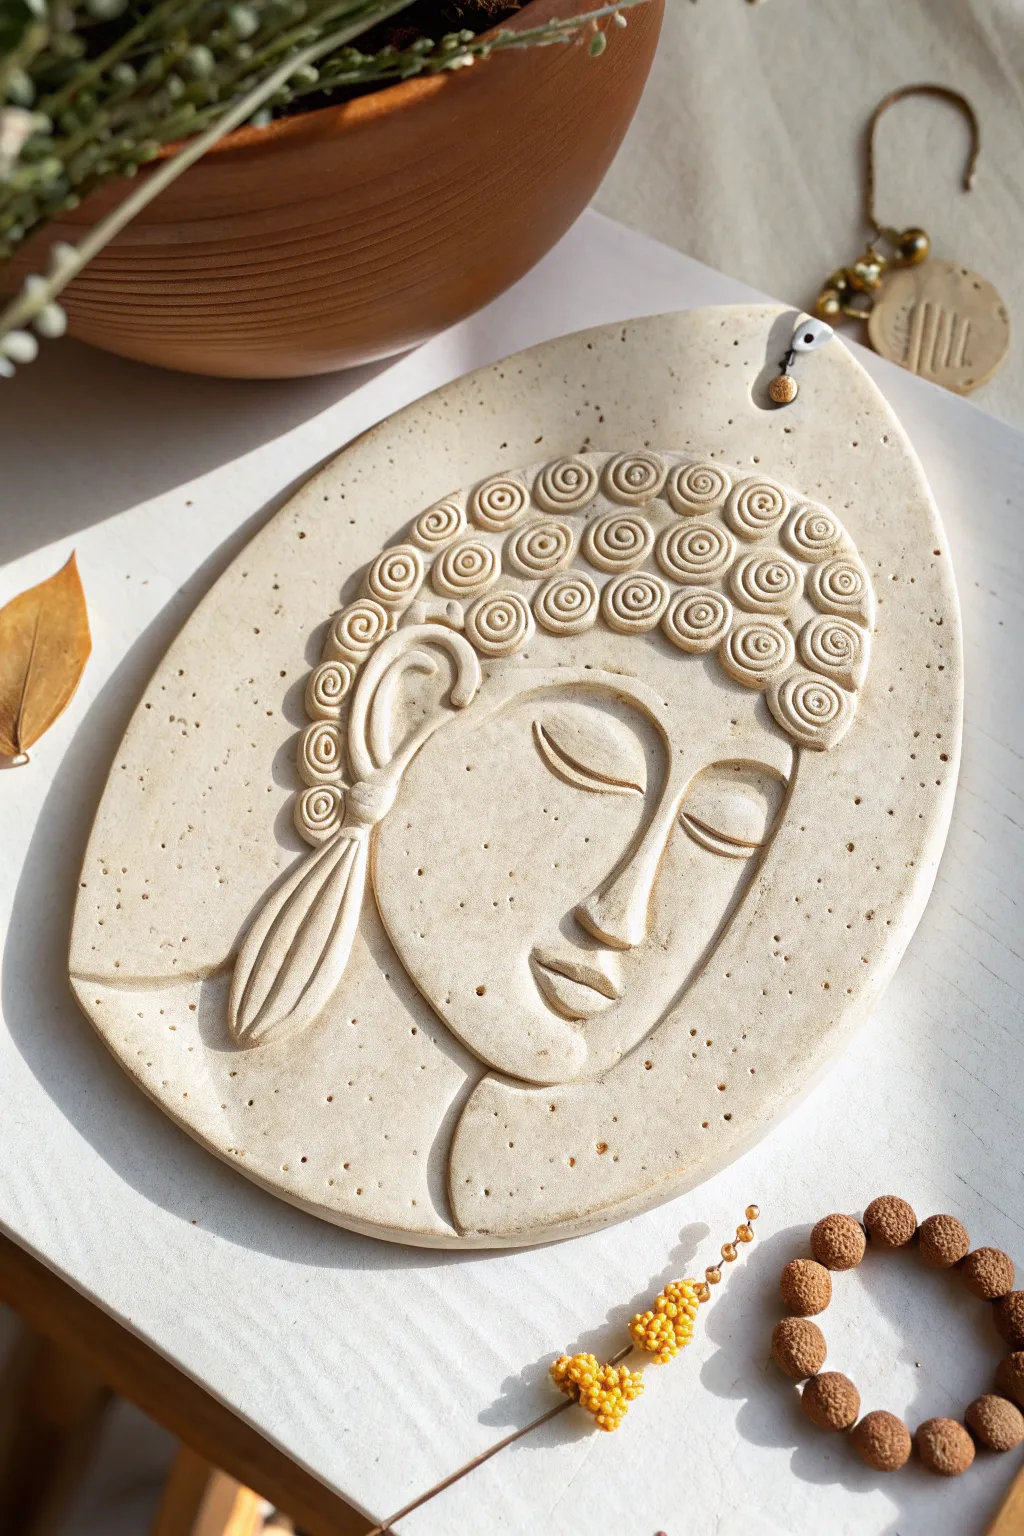
This meditative wall hanging combines the gentle art of relief sculpture with satisfying coil-building techniques. Using speckled stoneware clay, you will create a soothing, Buddha-inspired face characterized by prominent spiral curls and peaceful, closed features.
Step-by-Step
Materials
- Speckled stoneware clay (light beige)
- Rolling pin
- Canvas or slab mat
- Needle tool
- Loop tool (small and medium)
- Rib tool (kidney shaped, wood or rubber)
- Slip and score tool (or fork)
- Sponge
- Small hole cutter or straw
- Sculpting spatula tool
- Water cup
Step 1: Base Preparation
-
Roll the slab:
Begin by wedging your speckled stoneware clay to remove air bubbles. Roll it out into a smooth, even slab approximately 1/4 to 3/8 inch thick. Lift and drop the slab gently a few times to compress the clay particles. -
Cut the shape:
Using a needle tool, cut out a large, organic oval shape. It doesn’t need to be a perfect geometric oval; a slightly tapered ‘egg’ shape works beautifully for this portrait. -
Smooth the edges:
Dip your finger or a small sponge in water and run it along the cut edge of the slab to compress and round off any sharp corners. This prevents cracking later. -
Add the hanging hole:
At the very top, slightly off-center if you prefer the look in the photo, punch a hole using a straw or hole cutter. Ensure it’s large enough to accommodate a cord after the clay shrinks during firing.
Step 2: Sculpting the Face
-
Outline the profile:
Lightly sketch the outline of the face onto the slab with your needle tool. Focus on a 3/4 view: a long jawline, the chin, and the neck area. Don’t carve deep; just mark your guide. -
Build the relief base:
Add small, flat distinct pads of clay to the cheek, chin, and nose areas to build up volume. Score and slip these additions thoroughly so they bond with the base slab. -
Blend the surface:
Use a wood modeling tool or your fingers to smooth these added pieces into a cohesive face shape. The relief doesn’t need to be high; a low, subtle curve is elegant. -
Define the nose:
Roll a small carrot-shaped coil for the nose. Attach it vertically, blending the sides down into the cheek area but keeping the bridge defined. -
Carve the eyes:
Instead of adding clay for eyes, use a small loop tool to gently carve *away* clay to create the recessed eye sockets. Then, shape a small almond of clay for the eyelid, smoothing it so it looks closed and peaceful. -
Shape the mouth:
Add a tiny amount of clay for the lips. Use a sculpting spatula to press a gentle line for the mouth separation, slightly curving the corners up for a serene expression. -
Create the ear:
Form a ‘C’ shape coil for the ear. Attach it to the side of the head, and use a small modeling tool to hollow out the inner ear curves. Extend the earlobe downwards significantly for that stylized, traditional look.
Fixing Cracks
If tiny cracks appear around the coils as they dry, dip a paintbrush in vinegar and dab it into the crack, then smooth with soft clay. Vinegar helps re-bond dry clay.
Step 3: The Coiled Hair
-
Roll mini coils:
Roll out a long, thin snake of clay, roughly the thickness of a pencil lead or slightly thicker. Cut this into many short segments. -
Form the spirals:
Take each segment and roll it tightly into a flat spiral disc. You will need about 20-30 of these, depending on the size of your head sculpture. -
Attach the hair:
Score the top of the head area. Apply slip, then begin pressing the spiral coils onto the head, starting at the forehead hairline and working back. Group them closely together so they touch. -
Refining the hairline:
Ensure the row of coils creates a pleasing, rounded shape around the forehead and down towards the ear. -
The side lock:
For the long hair falling from the ear, roll a tapered coil. Flatten it slightly and use a needle tool to draw deep linear grooves, mimicking strands of hair. Attach this below the earlobe.
Keep it Clean
Wash your hands before rolling the white/beige clay coils. Dirt or colored lint from your clothes can easily get trapped in the light clay and show up after firing.
Step 4: Finishing Touches
-
Define the jawline:
Use a needle tool or a fine modeling tool to incise a clean line separating the face from the neck and the background slab. I like to deepen this line slightly to make the face pop. -
Final smooth:
Gently sponge the entire face to remove any tool marks or burrs. Be careful not to smudge the crisp details of the hair coils. -
Drying:
Place the finished relief between two boards or loosely cover with plastic to ensure slow, even drying. This helps prevent the flat slab from warping.
Once fired, the natural speckles of the clay will emerge, giving your relief a timeless, stone-carved appearance
Hands Holding a Wildflower Relief

Create a serene, monolithic piece of art that mimics the elegance of carved limestone using accessible clay techniques. This substantial relief panel features delicate wildflowers rising from a stylized hand, offering a timeless, architectural aesthetic perfect for garden or interior display.
Step-by-Step Tutorial
Materials
- White or buff stoneware clay (with fine grog)
- Wooden rolling pin
- Two 3/4-inch wooden guide strips (for slab thickness)
- Rectangular template (cardboard or paper)
- Needle tool
- Loop tools (various sizes for carving)
- Rubber kidney tool or smooth sponge
- Modeling tool with a flat, curved edge
- Slip and scoring tool
- Large wooden board or plaster bat (for working and drying)
Step 1: Slab Preparation
-
Roll the base slab:
Begin by wedging your clay thoroughly to remove air pockets. Place the clay between your two wooden guide strips on a canvas-covered board. Roll out a large, uniform slab. The thickness is crucial here; aim for at least 3/4 of an inch to give it that heavy, stone tablet feel. -
Cut the rectangle:
Place your rectangular template over the slab. Using a needle tool held perpendicular to the table, cut the clean outer shape of your tablet. Remove the excess clay. -
Smooth the surface:
Use a rubber kidney or a slightly damp sponge to compress the surface. Smooth out the canvas texture completely until the clay looks like a polished stone block. Don’t forget to square off and smooth the side edges as well.
Warping Worries?
If the corners start to lift while drying, weigh them down gently with small sandbags or beanbags. Dry the piece on a vented board or drywall to ensure even airflow underneath.
Step 2: Drafting the Design
-
Sketch the stem line:
Lightly trace a central vertical line with a needle tool to guide your composition. Draw a long, slightly curved main stem that reaches from the bottom third to near the top. -
Position the flowers:
Sketch two flower heads—one near the top right and a slightly smaller one lower down on the right. Keep the petals simple and radiating from a distinct center. -
Outline the hand:
At the bottom left, lightly sketch the stylized hand gripping the stem. Focus on the thumb and fingers wrapping around the stalk; keep the forms geometric and simplified rather than hyper-realistic.
Step 3: Building the Relief
-
Add clear clay coils:
Roll out thin coils of fresh clay for the stems. Score the sketched line on the slab and apply a little slip. Press the coil firmly onto the slab to raise the stem level. -
Form the flower centers:
Roll small balls of clay for the flower centers. Flatten them slightly, score the back, and attach them at your marked flower positions. -
Add petal volume:
For the petals, you can either add small tapered coils of clay or prefer to carve the negative space away later. For this projecting look, add small teardrop shapes of clay for each petal, blending them carefully onto the background slab. -
Construct the hand:
Add flat pads of clay to build up the volume of the hand and fingers. The hand should be the highest point of relief on the sculpture to create depth.
Level Up: Stone Texture
Before the clay hardens, gently press smooth sandpaper or a real stone onto the flat background areas. This transfers a subtle, authentic grainy texture.
Step 4: Refining and Carving
-
Sharpen the stem edges:
Once the added clay has stiffened slightly (leather hard), use a modeling tool to sharpen the edges of the stem. You want it to look carved, not rolled. -
Detail the petals:
Use a small loop tool to carve grooves between the petals. Define the shape of each petal so they look distinct and stiff, mimicking stone carving techniques. -
Texture the centers:
Take a needle tool or a small textured stamp and stipple the centers of the flowers to create a seeds-like texture. -
Carve the hand details:
Refine the fingers on the hand. Use a tool to carve deep distinct lines separating the fingers and the thumb, ensuring the ‘grip’ looks convincing. -
Clean the background:
Go back over the background negative space. If you’ve marred the surface while working, smooth it down again with a rib to maintain that flat, architectural look. -
Final edge check:
Run a damp finger or sponge along all the raised edges of your relief (petals, stem, hand) to remove any sharp burrs or crumbs of clay.
Step 5: Drying and Finishing
-
Slow drying:
This is a thick slab, so cover it loosely with plastic to let it dry very slowly over several days. This prevents warping. -
Bisque firing:
Fire the piece to bisque temperature once bone dry. -
Optional tinting:
Leave the clay bare for a natural limestone look, or apply a very diluted white underglaze wash and wipe it back to highlight the textures.
Once fired, this piece will have the permanent, quiet beauty of an architectural fragment salvaged from a garden wall
Dragon Coil-and-Scale Relief Panel
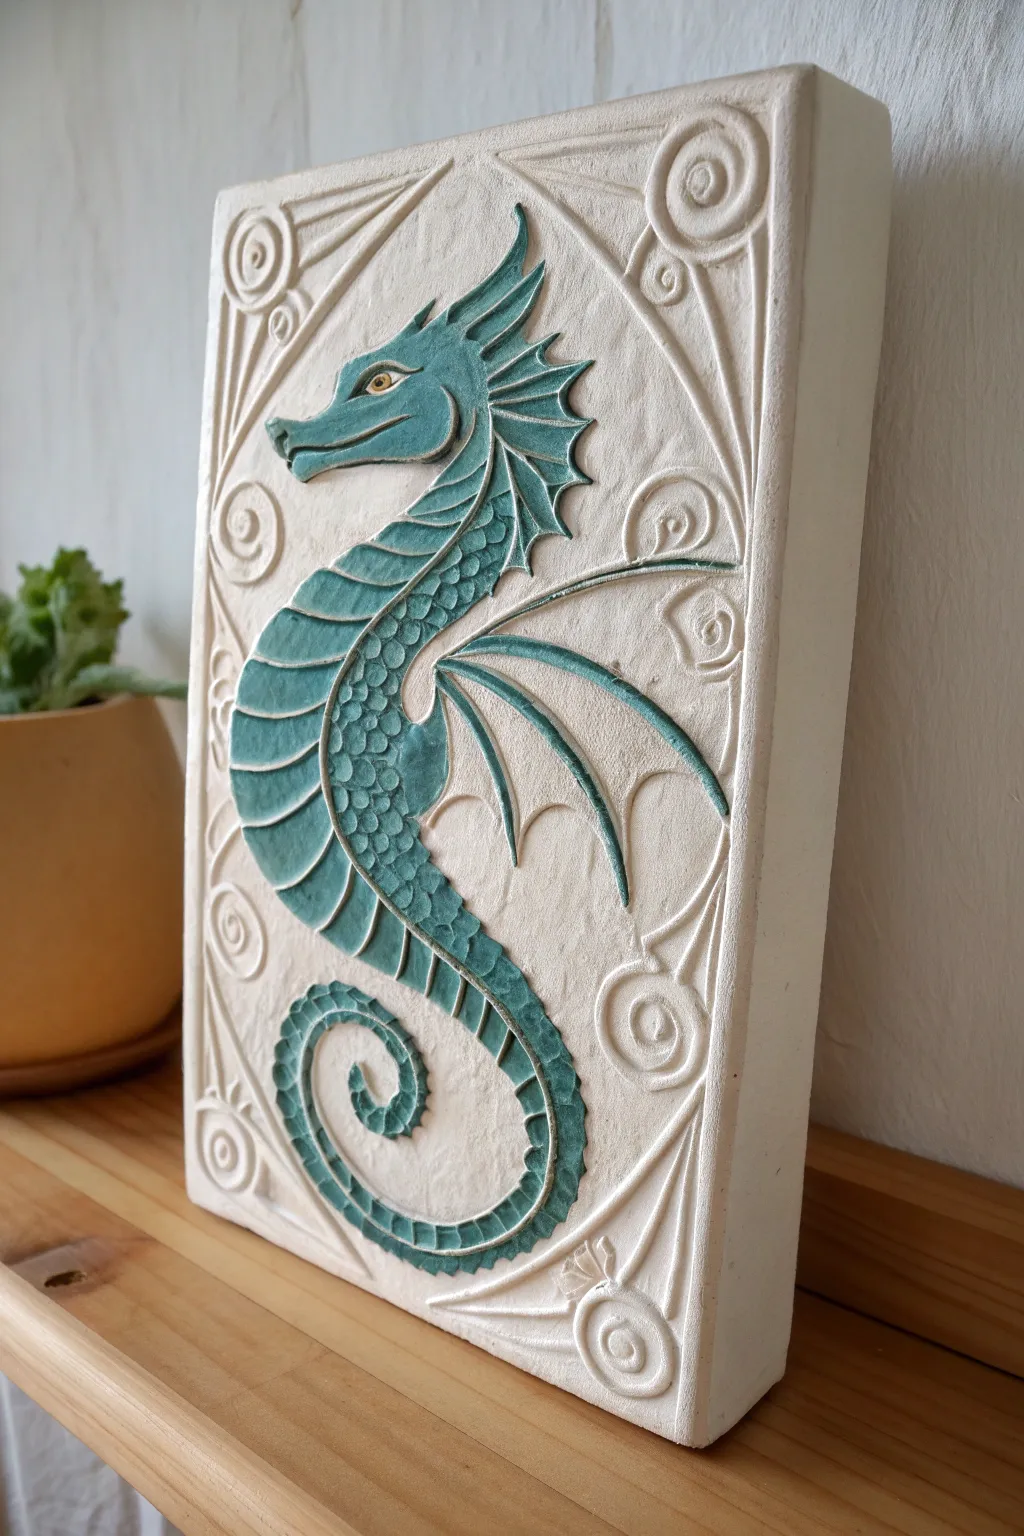
This elegant relief sculpture features a stylized sea dragon with curled wings and geometric scales, set against a creamy white background framed by classic scrolls. The striking contrast between the teal-glazed creature and the matte stone-like base makes for a piece that feels both ancient and refreshingly modern.
Step-by-Step
Materials
- White stoneware or polymer clay (approx. 2 lbs)
- Small wooden rolling pin
- Fettling knife or X-Acto blade
- Loop tools (various sizes)
- Needle tool
- Small ball stylus
- Teal or sea-foam green underglaze (or acrylics if using polymer)
- Clear matte varnish or glaze
- Fine-grit sandpaper
- Rectangular mold box (optional) or ruler and square
Step 1: Base Preparation
-
Prepare the slab:
Roll out a slab of white clay to a uniform thickness of about 3/4 inch. Ensure it is smooth and free of air bubbles by compressing the clay with a rib tool. -
Cut the rectangle:
Using a ruler and a fettling knife, cut a clean rectangle, approximately 6×9 inches. Smooth the cut edges with a damp sponge or finger to remove sharpness. -
Sketch the outline:
Lightly trace the outline of the dragon onto the slab using a needle tool. Start with the S-curve of the body, then add the head profile and the sweeping wing arc.
Cracking Issues?
If your relief slab warps or cracks while drying, weigh it down. Place a piece of drywall or a wooden board on top of the drying clay to ensure it dries flat and evenly
Step 2: Sculpting the Dragon
-
Build the body volume:
Roll a coil of clay that tapers at both ends. Attach it securely to the traced body area using the score-and-slip method (if using ceramic clay) to create the raised S-shape. -
Define the head:
Add a small, angular piece of clay for the head. Shape the snout to be slightly squared off and define the jawline. Use a small ball stylus to press in the eye socket. -
Carve the belly segments:
On the front curve of the body, use a flat modeling tool to press in horizontal indentations, creating the segmented, armor-like belly plates. -
Detail the scales:
For the back and tail, press a small U-shaped loop tool or a specialized scale stamp repeatedly into the clay to create the texture of overlapping scales. -
Form the wing:
Roll thin coils for the wing structure. Attach a long, curved rib for the top of the wing and smaller, curved struts branching down. Flatten the spaces between them slightly to imply webbing. -
Add dorsal fins:
Attach small, triangular bits of clay along the back of the neck and spine. Use your knife to sharpen the tips into spiky fins.
Make it Shine
For a magical touch, use a metallic luster or iridescent acrylic medium on just the wing spines and dorsal fins. It catches the light beautifully when displayed
Step 3: Border and Background
-
Carve the scrollwork:
In the negative space around the dragon, sketch swirling, scroll-like vine patterns. I find it helpful to mirror the curves of the dragon’s body for harmony. -
Relief carving:
Using a small loop tool, carve away the background clay *around* your scroll lines, leaving the swirls slightly raised. Their height should be lower than the dragon but higher than the deepest background level. -
Define the corners:
Pay special attention to the corners, adding concentric circles or spirals to anchor the decorative border. -
Refine the edges:
Go over all cut lines—around the dragon and the scrolls—with a clean, damp brush to smooth out any clay crumbs or jagged edges.
Step 4: Finishing and Color
-
Initial drying:
Allow the piece to dry until leather-hard (for ceramics) or bake according to instructions (for polymer). If ceramic, bisque fire the piece now. -
Painting the dragon:
Carefully apply the teal underglaze or paint only to the dragon’s body. Use a fine liner brush to get into the crevices of the scales and belly plates. -
Wiping back (optional):
If you want to highlight the texture, gently wipe the painted surface with a damp sponge. This leaves pigment in the recesses while revealing the clay on the high points. -
Final eye detail:
Paint a tiny dot of yellow or gold in the eye center, followed by a minuscule black pupil to bring the creature to life. -
Seal:
Once dry, apply a matte varnish or clear glaze over the entire piece to protect the surface and unify the sheen.
Hang your finished relief on a wall near natural light to let the shadows emphasize your carving depth
Moon Goddess Profile Relief
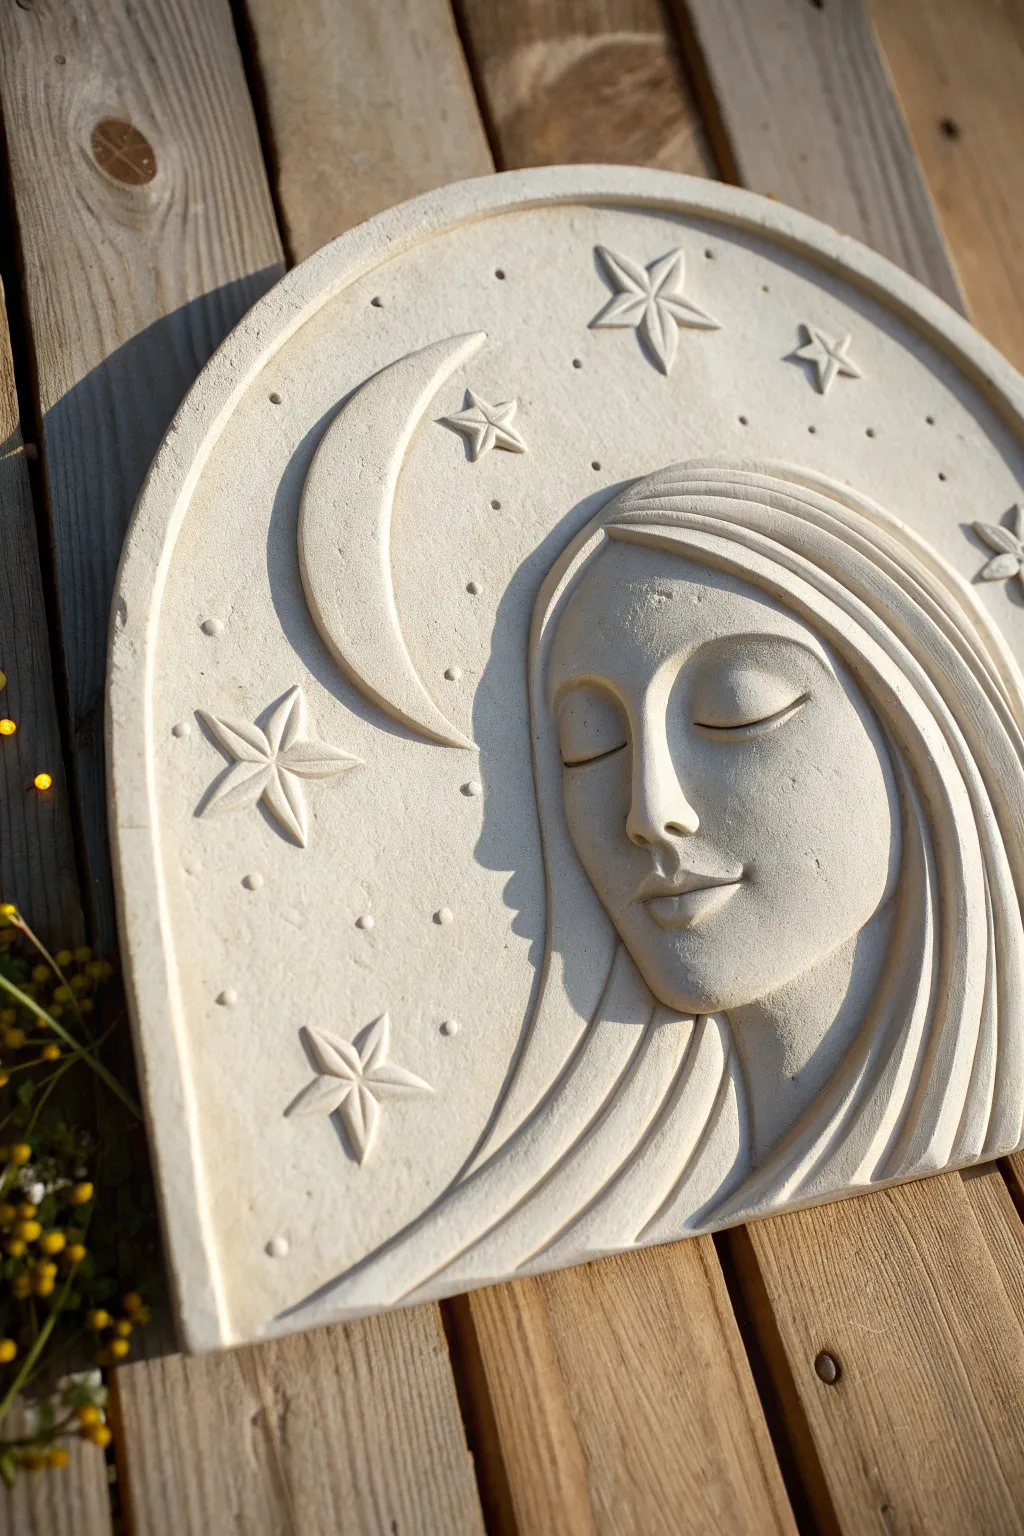
Capture the serene mystery of the night sky with this elegant bas-relief sculpture, featuring a tranquil goddess profile framed by a crescent moon and stars. The smooth, flowing lines of her hair contrast beautifully with the textured, stone-like background to create a timeless piece of wall art.
Detailed Instructions
Materials
- White or light-colored air-dry clay (or polymer clay)
- Clay roller or rolling pin
- Fettling knife or X-Acto knife
- Sculpting tools (needle tool, loop tool, modeling tool)
- Template (paper sketch of the design)
- Texture sponge or toothbrush
- Sandpaper (fine grit)
- Water slip (if using air-dry clay)
- Matte sealant or varnish
Step 1: Base Preparation
-
Roll the Slab:
Begin by conditioning your clay and rolling out a smooth, even slab approximately 1/4 to 1/2 inch thick. Aim for a consistent thickness to prevent warping as it dries. -
Cut the Shape:
Use your knife to cut the slab into the unique arch shape shown in the reference. It has straight sides and a gently curved top, resembling a cathedral window or tombstone shape. -
Smooth the Edges:
Dip your finger in a little water (or clay softener) and run it along the cut edges to smooth out any sharpness or roughness, creating a clean border.
Step 2: Sculpting the Goddess
-
Transfer the Design:
Lightly trace your goddess profile sketch onto the clay slab using a needle tool. Don’t press too hard; you just need a guide for placement. -
Build the Face Volume:
Roll a teardrop-shaped piece of clay and flatten it slightly. Score and slip the back, then attach it to the slab where the face will be. This adds the necessary relief height. -
Refine Facial Planes:
Use a modeling tool to smooth the added clay into the base. Gently press in the eye socket area to define the nose bridge and brow bone. -
Sculpt the Features:
Carve the closed eyelid with a fine loop tool or needle. Add a small snake of clay for the lips and blend it carefully to form a gentle smile. Ensure the nose is straight and elegant. -
Add the Hair Base:
Roll several long, thick coils of clay. Flatten them slightly to create ribbons of hair. -
Layer the Hair Strands:
Attach the hair coils around the face, sweeping them downwards and to the right. Overlap them gracefully to mimic the flow shown in the image, ensuring they blend seamlessly at the scalp line. -
Detail the Hair:
Use a sharp tool to carve deep grooves within the hair sections, emphasizing the individual strands giving the sculpture a linear, graphic quality.
Stone Effect Secret
Mix fine sand or used coffee grounds into your clay body before sculpting. This creates an authentic speckle and rough texture without needing paint.
Step 3: Celestial Elements & Texture
-
Create the Crescent Moon:
Cut a crescent shape from a spare piece of rolled clay. Attach it to the left of the face using the score and slip method, smoothing the edges onto the background. -
Sculpt the Stars:
Form small balls of clay and flatten them into five-pointed stars, or cut them directly from a thin sheet. Place them around the goddess and moon, varying their sizes for visual interest. -
Define Star Details:
Use a knife to press a line down the center of each star point, creating a faceted, 3D effect that catches the light. -
Add Background Texture:
I like to take a coarse sponge or an old toothbrush and gently stipple the background area around the main figures. This creates a sandy, stone-like texture that contrasts with the smooth face. -
create the Border:
Use a modeling tool to press a groove around the inner edge of the arch, creating a subtle frame that contains the composition. -
Add Decorative Dots:
Using the blunt end of a small paintbrush or dotting tool, press tiny indentations into the background to represent distant stars or cosmic dust.
Fixing Cracks
If hairline cracks appear while drying, make a paste of clay and water (slip) and fill them in immediately. Smooth with a damp finger and let dry again.
Step 4: Finishing Touches
-
Final Smoothing:
Do a final pass over the face and moon with a damp brush to erase any fingerprints and ensure the surfaces are perfectly smooth. -
Drying:
Let the piece dry slowly away from direct heat or sunlight. If feasible, place a light weight on the corners or flip it occasionally to prevent curling. -
Sanding:
Once fully cured, use fine-grit sandpaper to gently buff the face and moon, making them ultra-smooth against the textured background. -
Sealing:
Apply a matte varnish or sealant to protect the sculpture while maintaining its natural, stony appearance.
Hang your celestial relief in a spot where the changing light will play across the raised surfaces throughout the day
Triptych Story Relief Tiles
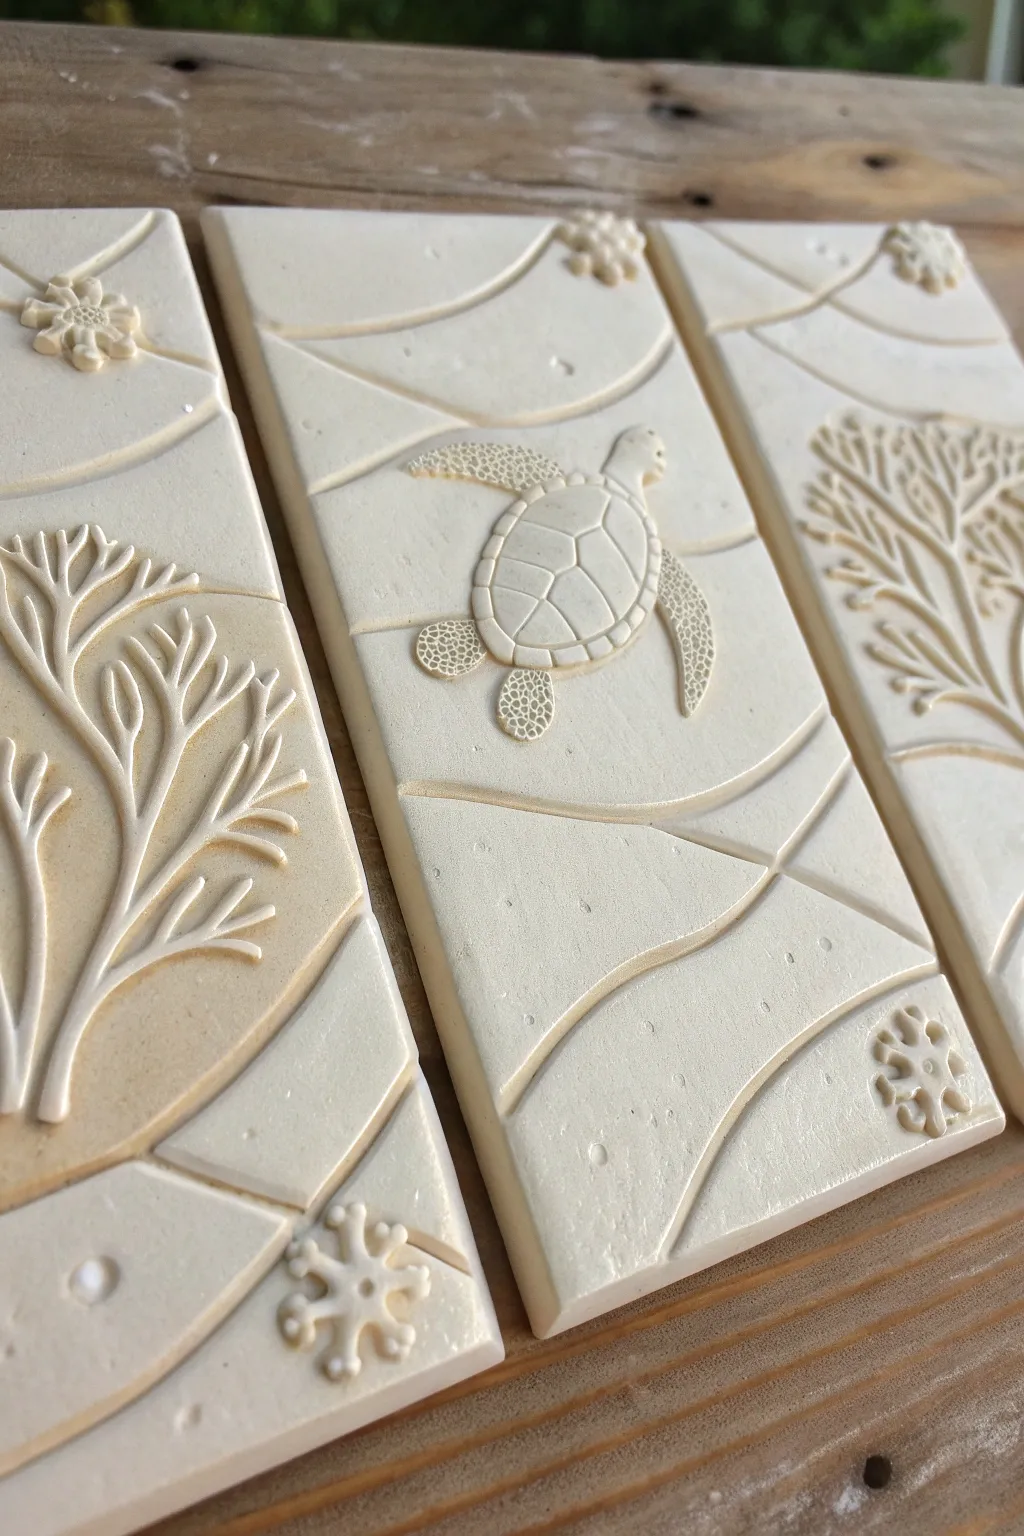
Capture the serene beauty of the ocean floor with this three-panel relief sculpture featuring a gentle sea turtle navigating a coral reef. The consistent wave patterns connect the separate tiles into one cohesive narrative, while the raised details create beautiful shadows and depth.
Step-by-Step Guide
Materials
- White or cream-colored stoneware clay (smooth body)
- Rolling pin with guide strips (approx. 1/4 inch)
- Rectangular clay cutter or ruler and needle tool
- Loop tools for carving
- Modeling tools (ball styluses, rubber shapers)
- Slip and scoring tool (serrated rib)
- Sponge and water
- Plastic wrap
- Canvas work surface
Step 1: Preparing the Base
-
Roll the slabs:
Begin by rolling out your clay on a canvas surface to a consistent thickness of about 1/4 inch using guide strips. You want a smooth, flawless surface, so take your time rolling. -
Cut the tiles:
Measure and cut three identical rectangular tiles. For the look in the photo, a ratio of roughly 1:2.5 works well (e.g., 4 inches wide by 10 inches tall). -
Smooth the edges:
Use a damp sponge or your finger to soften the sharp cut edges of each tile. This prevents chipping later and gives a finished professional look. -
Align the triptych:
Place the three tiles side-by-side with a small gap between each. This setup is crucial because your design needs to flow continuously across the gaps.
Clean Lines
Use a damp paintbrush like a tiny mop to smooth out tight corners inside the coral branches and around the turtle shapes. It cleans up tool marks instantly.
Step 2: Designing the Flow
-
Sketch the wave lines:
Lightly trace sweeping, curved lines across all three tiles using a needle tool. These lines represent water currents and unify the composition. Ensure the lines enter one tile at the exact height they exited the previous one. -
Outline the subjects:
Sketch the silhouette of the sea turtle in the center panel and coral structures extending up from the bottom corners of the side panels. Include small starfish or snowflake-like motifs in the corners as accents. -
Carve the background:
Using a loop tool, gently carve away clay along your wave lines to create recessed channels. This subtractive method makes the uncarved areas appear raised.
Warping Woes
If tile corners start lifting while drying, place small weighted bags (filled with sand or rice) on the corners to gently hold them flat against the board.
Step 3: Sculpting the Relief Details
-
Build the turtle body:
Form a flattened oval of clay for the shell and attach it to the center tile using the scratch-and-slip method. Add the head and flippers, blending the seams down onto the base tile. -
Detail the shell:
Carve the scute pattern (the geometric plates) onto the shell. I like to use a small rubber shaper to press the grooves rather than cutting them, which keeps the edges soft. -
Texture the flippers:
Use a small ball stylus to stipple texture onto the turtle’s flippers and head, mimicking the pebbled skin of a real sea turtle. -
Add coral coils:
Roll very thin coils of clay for the coral branches. Arrange them over your sketched coral outlines on the side panels. -
Blend the coral:
Gently press the coils onto the slab. Use a modeling tool to blend the underside of the coil into the tile so it looks like part of the relief, not just stuck on top. -
Refine the branches:
Use a tool to taper the ends of the coral branches. You want them to look organic and flowing, following the upward direction of the composition. -
Add accent elements:
Create small snowflake or starfish shapes by pressing small balls of clay and carving radiating lines. Attach these in the open negative spaces indicated in your sketch.
Step 4: Refining and Drying
-
Smooth the channels:
Go back over your carved wave lines with a damp brush or finger to remove any clay burrs or crumbs. The contrast between smooth channels and textured subjects is key. -
Check continuity:
Double-check that your wave lines still flow visually across the gaps between the tiles. Make minor adjustments if anything shifted during sculpting. -
Slow drying process:
Cover the tiles loosely with plastic wrap to ensure slow, even drying. This is critical for flat tiles to prevent warping at the corners. -
Final finish:
Once bone dry, you can bisque fire the pieces. The example shows an unglazed, bare clay finish, but a clear matte glaze could also protect the surface.
Display your finished triptych with a little space between each tile to let the design breathe and the continuity shine
Relief Texture Sampler Grid
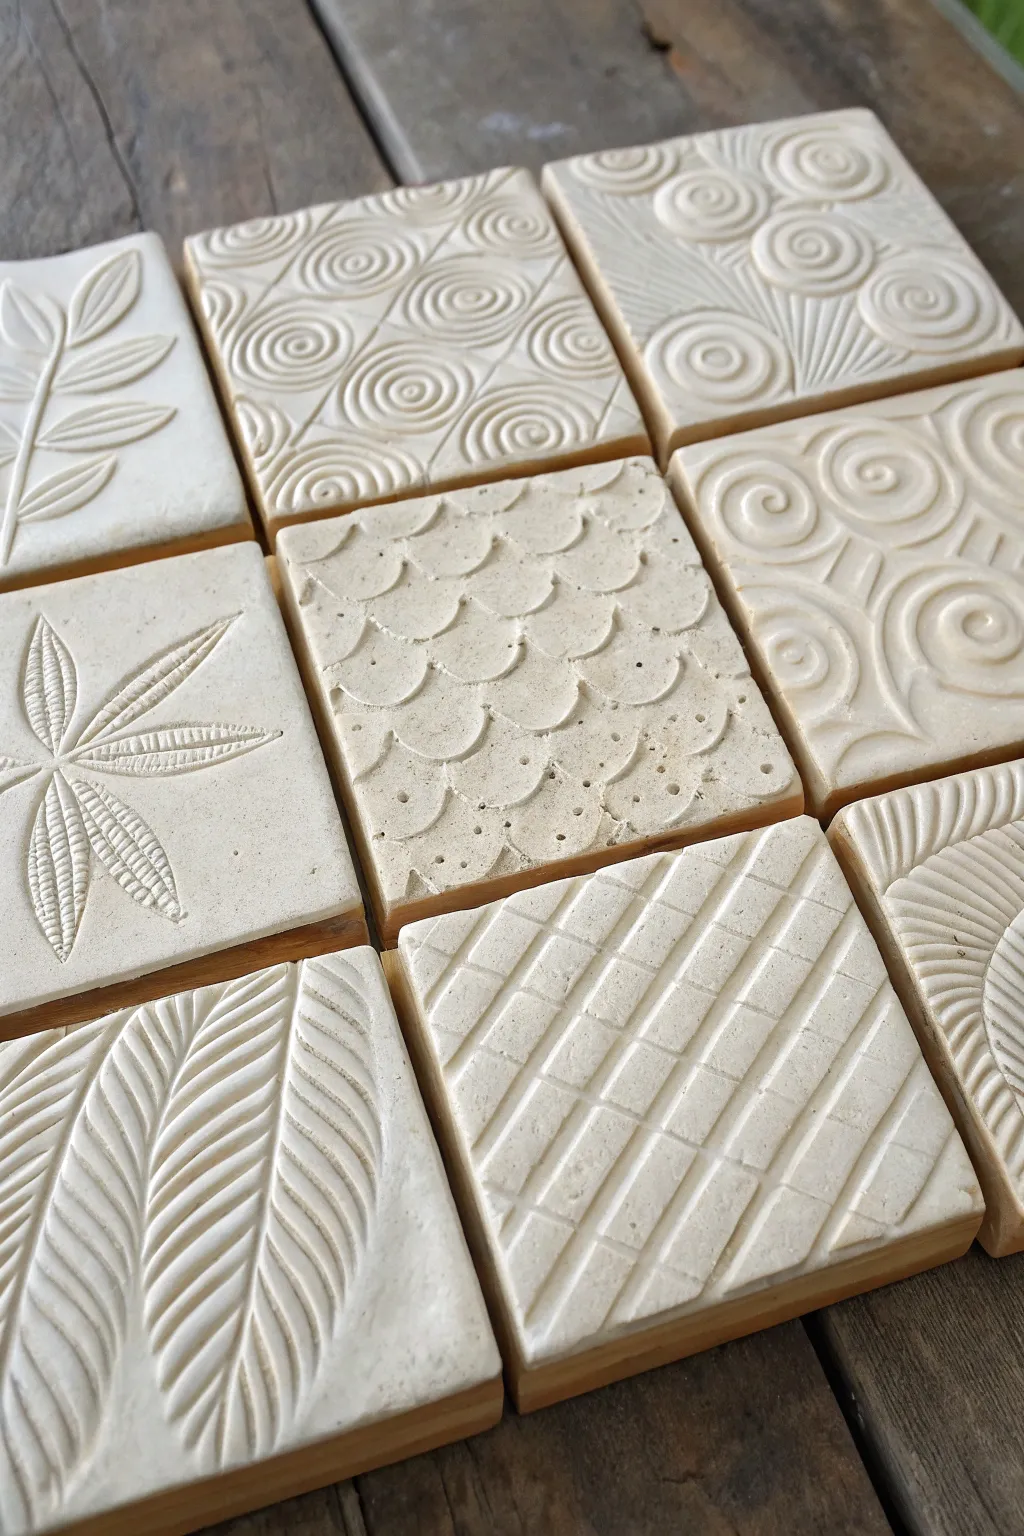
This stunning grid of nine relief tiles serves as a masterclass in surface design, showcasing distinct techniques from botanical carving to geometric stamping. The creamy white finish emphasizes the depth of the shadows, creating a sophisticated and tactile wall piece or trivet collection.
How-To Guide
Materials
- Air-dry clay or polymer clay (white or cream)
- Wooden rolling pin
- Square cookie cutter (approx. 3-4 inches) or ruler and craft knife
- Wooden slats or paint stirrers (as depth guides)
- Needle tool or toothpick
- Loop tool (small)
- Small coffee straw or geometric cap (for circle stamps)
- Rubber stamps or found objects for texture
- Sponge and water
- Sandpaper (fine grit)
- Wooden backing board (optional, for mounting)
- Strong craft glue (E6000 or similar)
Step 1: Preparation & Cutting
-
Roll the clay slabs:
Begin by conditioning your clay until it is smooth and pliable. Place the wooden slats or depth guides on either side of your clay ball to ensure an even thickness (about 1/4 to 3/8 inch) as you use the rolling pin. -
Cut uniform squares:
Using a square cookie cutter or a ruler and craft knife, cut out nine identical squares. If using a knife, wipe the blade clean between cuts to keep the edges sharp. Smooth the outer edges with a slightly damp finger to remove any burrs.
Warped Corners?
Flat clay tiles love to curl up as water evaporates unevenly. Dry them slowly under a plastic sheet, or weigh them down with a board once they are firm enough to hold their shape.
Step 2: Creating the Textures
-
Tile 1: Simplified Leaf:
For the top-left tile, use a needle tool to gently score a vertical central stem. branching off from it, press deeper lines to create leaf veins, tapering the depth as you get to the leaf tips. -
Tile 2: Concentric Circles:
Press a small circular object (like a specialized clay stamp or the cap of a marker) repeatedly into the surface to create rows of tight, concentric spirals. Overlap them slightly or arrange them in a grid pattern. -
Tile 3: Radiating Spirals:
Combine texture tools here. Use the circle stamp for focal points, then drag a needle tool or comb outward from them to create radiating sunburst lines that fill the negative space. -
Tile 4: Botanical Burst:
Carve a central starburst pattern resembling a tropical flower. Use a small carving tool to remove thin slivers of clay from the inside of each ‘petal’ to give them a concave, ribbed texture. -
Tile 5: Scalloped Scales:
Create a fish-scale pattern by pressing a U-shaped tool (a loop tool works perfectly here) into the clay. Start at the bottom and work your way up, overlapping the rows like roofing shingles to build dimension. -
Tile 6: Swirling Scrollwork:
Draw freehand spirals using a stylus with a ball tip. Press firmly to create deep grooves that curve into one another, mimicking classical architectural scrollwork. -
Tile 7: Deep Fern Leaf:
This texture relies on deep, confident carving. Use a ribbon tool or loop tool to carve out substantial curved channels on either side of a central spine, creating a bold fern pattern. -
Tile 8: Geometric Grid:
Lay a ruler diagonally across the tile and lightly impress parallel lines. Turn the ruler 90 degrees and impress a second set of lines to create a cross-hatch or diamond grid. Keep the pressure consistent. -
Tile 9: Fan Texture:
For the final corner, press the edge of a credit card or a specific fan-shaped stamp into the clay edges, radiating inward to create a textured border design.
Step 3: Finishing Touches
-
dry slowly:
Place the tiles on a wire rack or a piece of drywall to dry. To prevent warping—a common issue with flat tiles—lightly place a heavy book on top of them once they are leather hard, or flip them periodically as they dry. -
Sand and smooth:
Once bone dry (or cured, if using polymer), take your fine-grit sandpaper and gently sand the edges and the high points of the surface. This removes any sharp crumbs and gives the piece that professional, stone-like feel. -
Seal or mount:
If these are for display, glue them in a 3×3 grid onto a wooden backing board using strong adhesive. Leave a small, uniform gap between each tile for a gallery-style presentation.
Add an Wash
Apply a diluted acrylic brown or black wash over the dried tiles, then wipe it back with a damp sponge. The dark paint will stay in the crevices, making your texture pop instantly.
Once mounted, see how the changing light throughout the day highlights different patterns in your new relief sculpture grid