If your rings keep disappearing into the void of a drawer, a cute clay ring holder is the kind of tiny upgrade that makes daily life feel more put-together. I love how these projects can be as simple as a little post and dish, or as playful as a mini sculpture that still does its job.
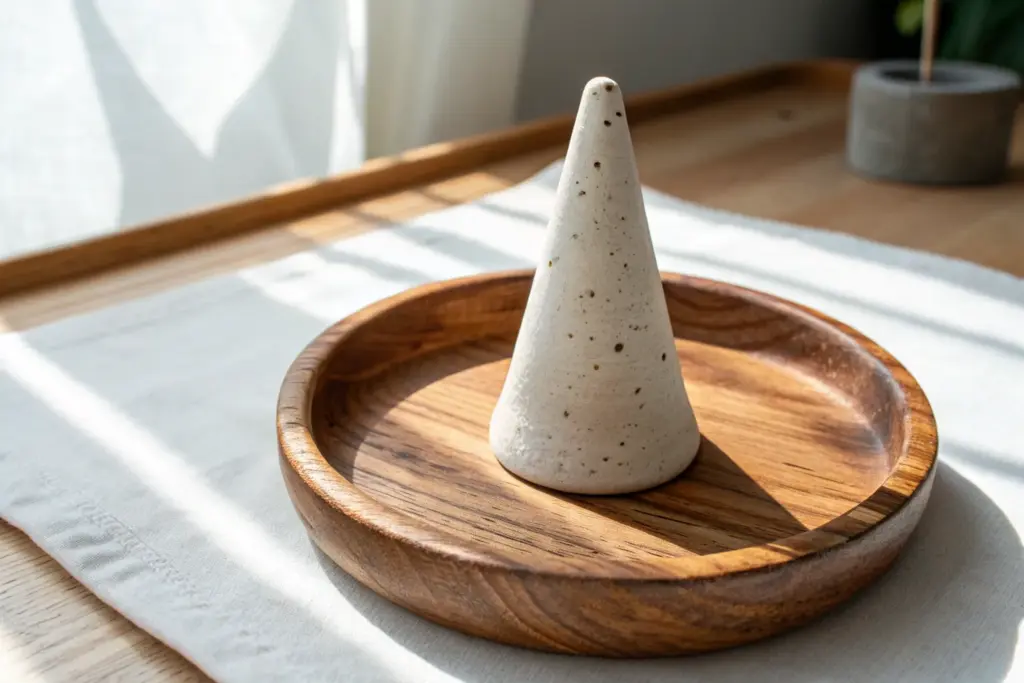
Classic Cone Ring Holder
This elegant ring holder combines a classic cone shape with a shallow trinket dish, offering functionality with a modern, earthy aesthetic. The speckled sandstone finish gives it a sophisticated, store-bought look that belies how simple it is to create at home.
Step-by-Step Tutorial
Materials
- Polymer clay (beige or ‘granite’ color)
- Rolling pin or acrylic roller
- Clay blade or sharp craft knife
- Circle cutter (approx. 3-4 inches diameter)
- Fine-grit sandpaper (400 to 600 grit)
- Ceramic tile or glass sheet (for baking)
- Oven
- Liquid polymer clay (optional, for bonding)
- Sponge or texture tool (optional)
Step 1: Prepping the Base
-
Condition the Clay:
Begin by warming the polymer clay in your hands. Knead it thoroughly until it is soft, pliable, and free of any air bubbles, as conditioning prevents cracks during baking. -
Roll the Slab:
Place your clay on a smooth work surface. Roll it out to an even thickness of about 1/4 inch. If you want a perfectly level surface, use depth guides or playing cards stacked on either side of your roller. -
Cut the Base Circle:
Using your circle cutter or a bowl as a template, press firmly into the clay slab to cut out a clean circle. This will serve as the catch-all dish for smaller earrings or studs. -
Create the Lip:
Gently gently pinch the outer edge of the circle upward to create a slight rim. I find that using my thumb to press the center down while my index finger lifts the edge creates the most organic curve. -
Smooth the Edges:
Run your finger lightly with a tiny bit of water or baby oil along the rim to smooth out any fingerprints or rough cuts.
Step 2: Forming the Cone
-
Shape the Primary Cone:
Take a new ball of conditioned clay, roughly the size of a golf ball. Roll it between your palms, applying more pressure to one side to begin forming a teardrop shape. -
Refine the Taper:
Stand the teardrop on your work surface. Place a flat object or your palm against the side and roll it back and forth, angling your hand to elongate the top into a sharp, smooth point. -
Check Dimensions:
Ideally, the cone should be tall enough to hold multiple rings (about 2.5 to 3 inches) and wide enough at the base to be stable. -
Verify the Fit:
Place the cone temporarily in the center of your dish base to visually check proportions. The cone shouldn’t overwhelm the dish, nor should it look tiny. -
Flatten the Cone Base:
Ensure the bottom of the cone is perfectly flat so it stands upright without leaning. Press it gently onto your glass or tile surface to level it.
Seamless Blending Tip
To invisibly join the cone to the base, roll a very thin ‘snake’ of clay. Wrap it around the seam where the two parts meet and smooth it out with a silicone tool.
Step 3: Assembly and Finishing
-
Score the Surfaces:
Use a needle tool or toothpick to scratch a crosshatch pattern into the center of the dish and the bottom of the cone. This texture helps the clay bond. -
Apply Adhesive:
If you have liquid polymer clay, add a small drop to the scored area on the dish. If not, firmly twisting the cone onto the base works well for mechanical adhesion. -
Join the Pieces:
Press the cone firmly into the center of the dish. Use a modeling tool or your fingertip to seamless blend the clay where the cone meets the dish if you want a unified look, or leave the seam visible for a geometric effect. -
Add Texture (Optional):
To mimic the stone look in the photo, gently dab a dry sponge over the surface to remove glossy fingerprints and add a matte, grainy texture. -
Bake:
Place your creation on a ceramic tile. Bake according to your specific clay package instructions (usually 275°F for 15-30 minutes per 1/4 inch of thickness). -
Cool Down:
Let the piece cool completely in the oven with the door slightly ajar. Sudden temperature changes can sometimes cause cracking. -
Sand and Polish:
Once fully cool, use fine-grit sandpaper under running water to gently buff away any sharp edges or imperfections on the rim or tip of the cone. -
Final Wipe:
Clean off any sanding dust with a damp cloth and let dry. Your ring holder is now ready for use.
Drooping Cone Fix
If your cone is tall and starts leaning while soft, bake the cone separately first. Once hardened, glue it to the raw clay dish base and bake again to set.
Display your new creation on your dresser or nightstand for a functional piece of modern art


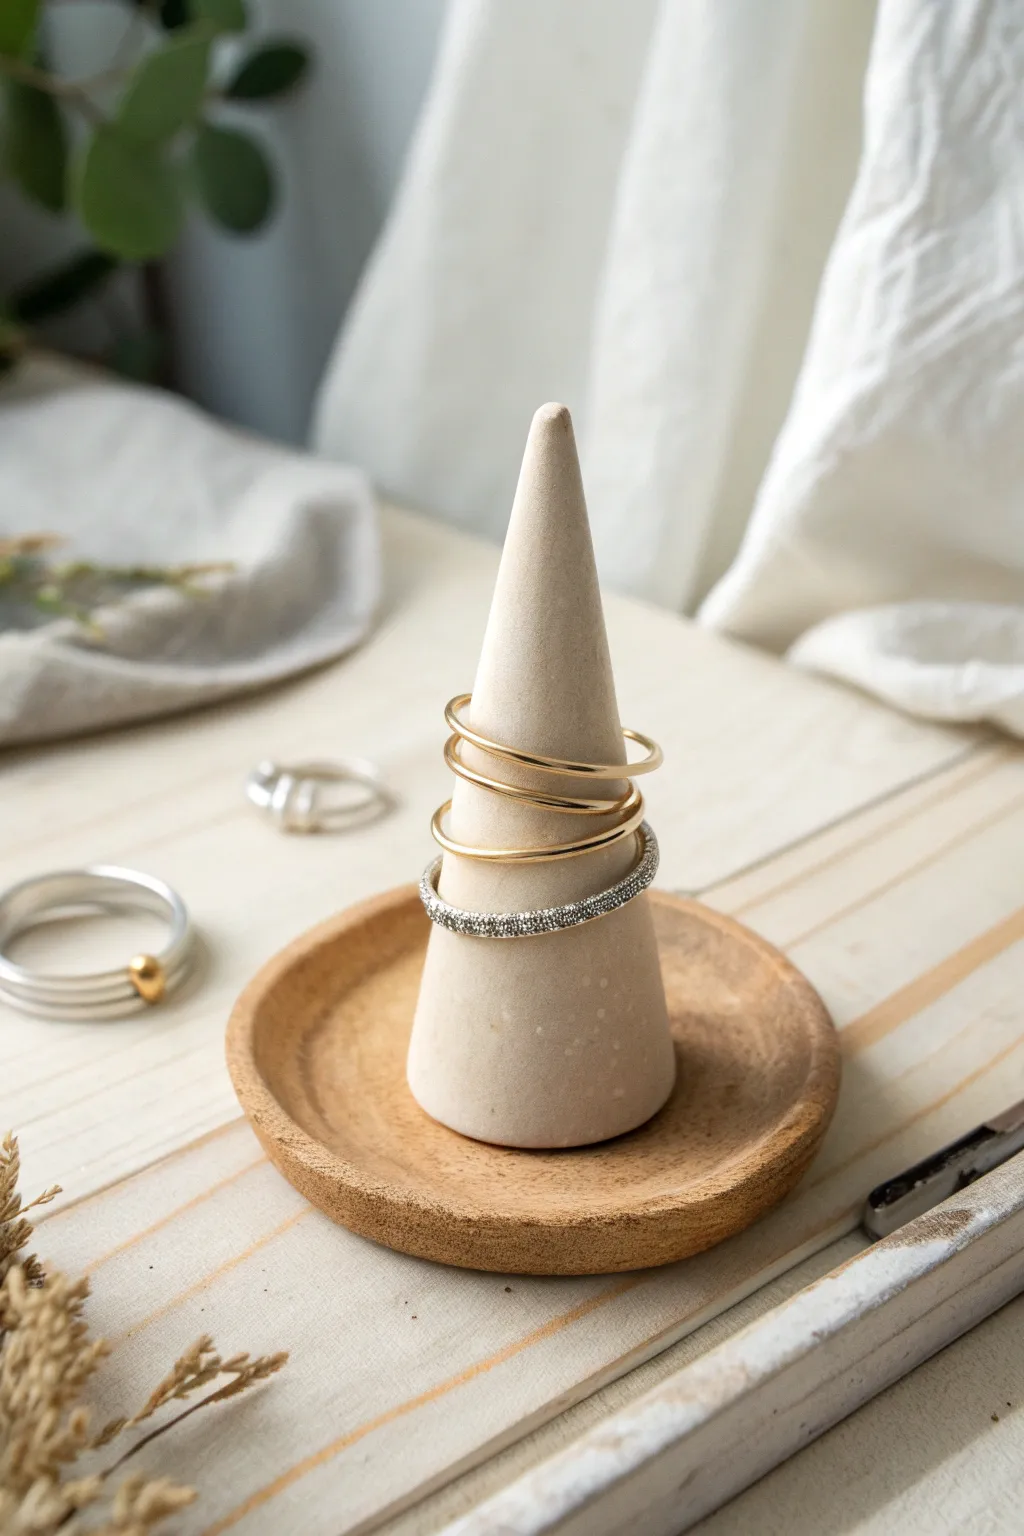
Ring Cone With Trinket Dish Base
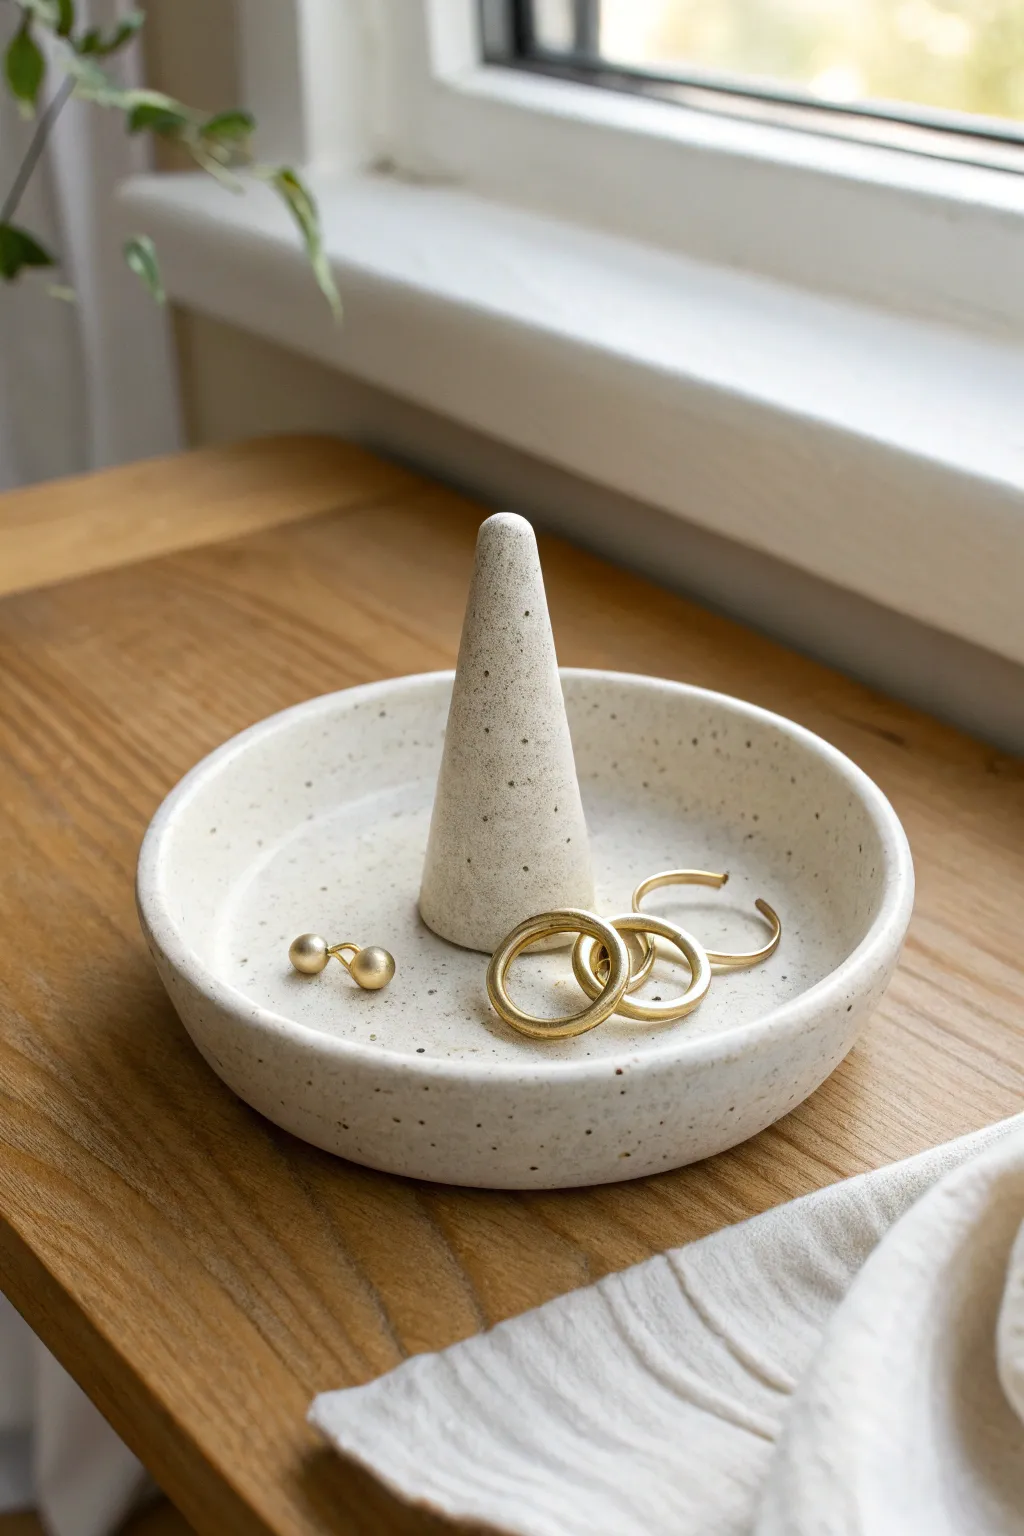
This minimalist jewelry holder features a speckled stone look that feels like modern ceramic art, combining a functional ring cone with a catch-all tray for studs and bands. The organic texture and matte finish give it a high-end feel without needing a kiln or expensive pottery wheel.
How-To Guide
Materials
- Polymer clay (white or cream)
- Black pepper or dried coffee grounds (for speckles)
- Rolling pin or acrylic roller
- Round cookie cutter or bowl (approx 4-5 inches)
- Craft knife or clay blade
- Sandpaper (fine grit)
- Oven
- Baking sheet with parchment paper
- Clear matte sealant (optional)
- Small bowl or curved form (for drying shape)
Step 1: Preparing the Speckled Clay
-
Condition the base:
Start by warming up your white or cream polymer clay in your hands. Knead it thoroughly until it is soft, pliable, and free of any cracks. -
Add the texture:
To achieve that faux-stone speckled look, sprinkle a generous pinch of ground black pepper or dried coffee grounds onto the flattened clay. -
Incorporate the speckles:
Fold the clay over the pepper and knead it repeatedly. Continue folding and rolling until the specks are evenly distributed throughout the entire ball.
Drooping Rim Struggles?
If the dish sides flop down while baking, nest the raw clay circle inside an oven-safe glass bowl. This acts as a mold to support the curved shape until hard.
Step 2: Forming the Trinket Dish
-
Roll out the slab:
Place your speckled clay ball on a smooth work surface. Use your rolling pin to flatten it into a sheet about 1/4 inch thick. Aim for an even thickness so it bakes uniformly. -
Cut the circle:
Press your round cookie cutter or a bowl upside down into the clay to cut a perfect circle. Peel away the excess clay but keep it nearby for the cone. -
Create the rim:
Gently lift the edges of the circle with your fingertips to curve them upwards. I like to smooth the rim with a little water on my finger to erase any sharp cut marks. -
Refine the shape:
If you want a perfectly curved bottom, you can gently rest the clay circle inside a slightly larger, oven-safe bowl to help it hold its cupped shape during baking.
Step 3: Sculpting the Ring Cone
-
Shape the rough cone:
Take the excess speckled clay you set aside and roll it into a ball, then begin rolling it back and forth on one side only to create a carrot shape. -
Perfect the taper:
Stand the clay up and gently tap the base to flatten it. Use your fingers to smooth the sides upward, creating a tall, slender cone with a rounded tip. -
Check proportions:
Place the cone in the center of your unbaked dish to ensure the size looks balanced. The cone should be tall enough to hold rings but not dwarf the dish. -
Attach the pieces:
Score the bottom of the cone and the center of the dish with a craft knife (making little hatch marks). Press the cone firmly into the center of the dish. -
Blend the seam:
Use a modeling tool or your finger to smooth the clay where the cone meets the dish base. You want it to look like one seamless piece, not two parts glued together.
Pro Tip: Seamless Blends
Roll a very thin ‘snake’ of clay and wrap it around the base of the cone where it meets the dish. Smooth this coil into both parts for an invisible, strong bond.
Step 4: Finishing Touches
-
Final smooth:
Do a final check for fingerprints. A tiny bit of baby oil or cornstarch on your finger can help buff these out before the clay hardens. -
Bake carefully:
Place your project on a parchment-lined baking sheet. Bake according to your customized clay package instructions—usually around 275°F (135°C) for 15-30 minutes. -
Cool down:
Let the piece cool completely in the oven with the door cracked open. This gradual cooling helps prevent cracks. -
Sand for stone effect:
Once fully cool, use fine-grit sandpaper to lightly sand the edges and surface. This removes any shine and enhances the matte, stone-like texture. -
Seal (optional):
If you want extra durability, apply a thin coat of matte varnish, though leaving it raw often looks more like the natural stone in the photo.
Place this on your dresser or vanity for an instantly verified chic spot to organize your daily jewelry


Minimal Arch Ring Holder
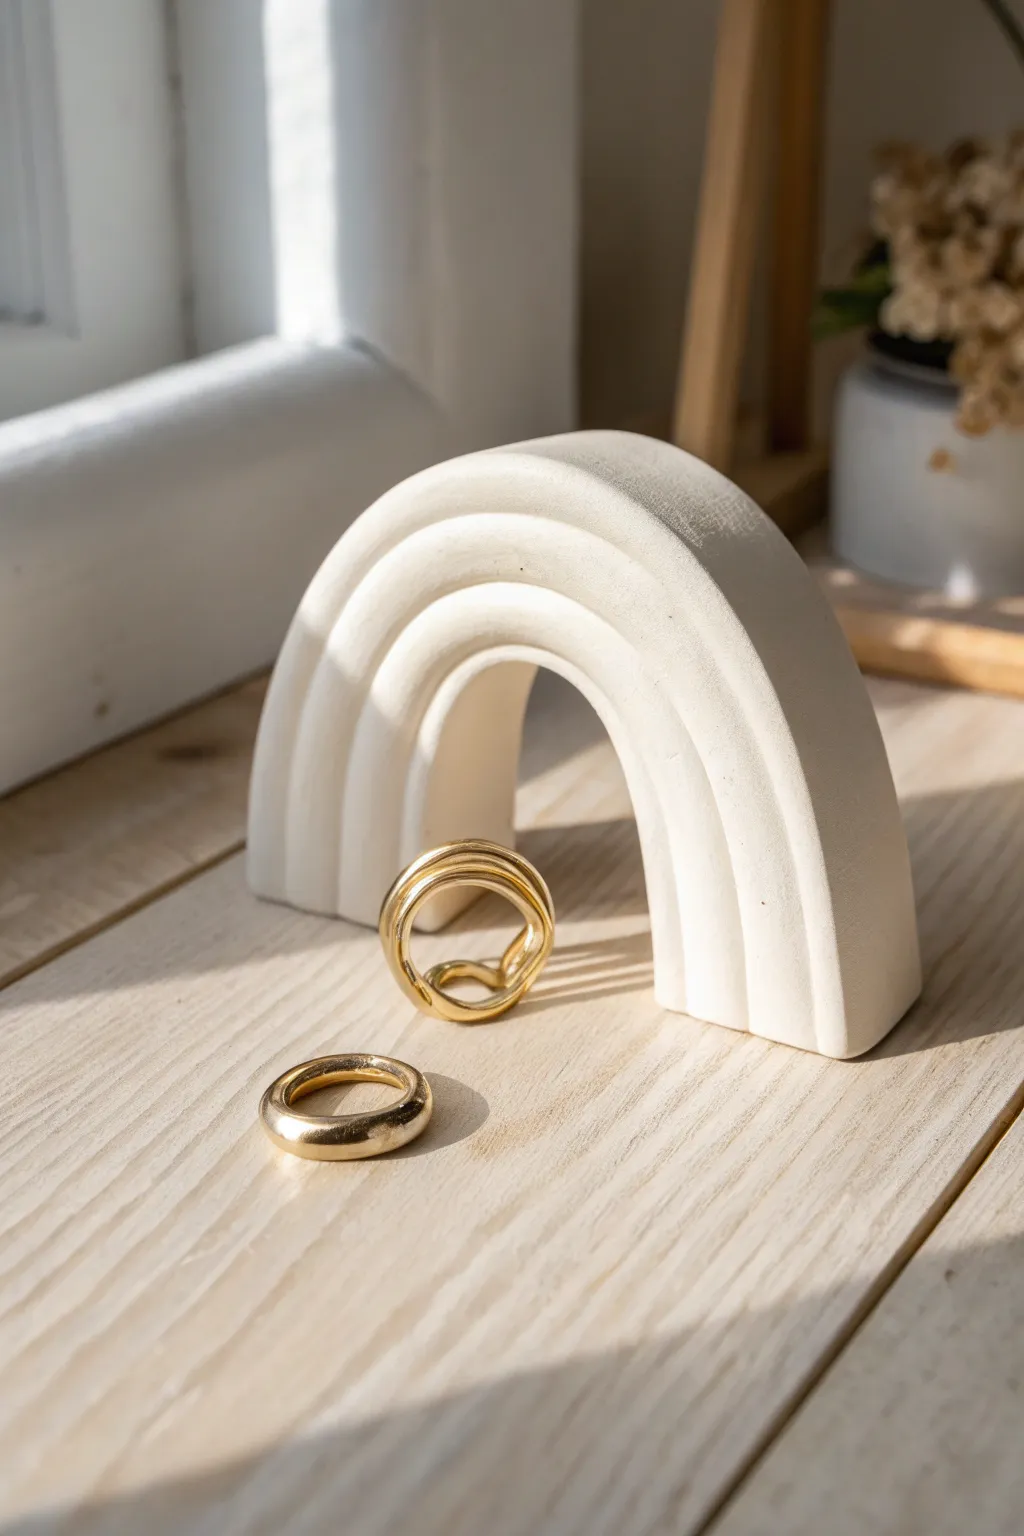
Bring modern simplicity to your vanity with this sleek, arched clay ring holder featuring elegant concentric grooves. Its neutral matte finish provides the perfectly understated backdrop to make your favorite gold bands shine.
Detailed Instructions
Materials
- White air-dry clay or polymer clay (approx. 200g)
- Dough roller or rolling pin
- Sharp clay blade or X-Acto knife
- Two circle cookie cutters (approx. 3-inch and 2-inch diameter)
- Needle sculpting tool or toothpick
- Sandpaper (fine grit, 400-600)
- Water bowl and sponge
- Matte white acrylic paint (optional)
- Small paintbrush (optional)
Step 1: Shaping the Base
-
Condition the clay:
Start by taking a generous amount of your white clay and kneading it thoroughly in your hands until it becomes warm, soft, and pliable without cracks. -
Roll the slab:
Place the clay on a smooth work surface. Use your roller to flatten it into a thick, even slab. Aim for a thickness of about 1 inch (2.5 cm) to ensure the holder is sturdy enough to stand upright. -
Cut the outer curve:
Using the larger circle cutter (or a bowl as a template), press firm half-circles into your clay slab to create the main arch shape. If creating a free-standing arch like this, you can also cut a rectangle and round off the top manually with your blade. -
Refine the thickness:
Once the main arch shape is cut, check ease the edges. If the slab feels too thin, ball it up and re-roll. You want a substantial blocky feel, similar to a book end. -
Create the inner arch:
Use the smaller circle cutter to cut a semi-circle out of the bottom center of your arch. Careful placement is key here to keep the legs symmetrical.
Step 2: Carving the Details
-
Mark specific guide lines:
Before carving deep grooves, lightly trace the concentric rainbow pattern onto the face of the arch using a needle tool. I find lightly sketching first prevents major mistakes later. -
Carve the grooves:
Using a loop tool or the rounded end of a paintbrush, or even pressing a thick wire into the clay, carefully indent the lines you traced. Make these indentations smooth and uniform. -
Soften the groove edges:
The carving process can leave jagged bits of clay. Dip your finger or a small sponge in a tiny bit of water and gently run it along the grooves to smooth out any rough textures. -
Square the sides:
Stand the arch up on its legs. Gently tap the flat sides against your table to ensure the edges remain crisp and the overall thickness is consistent from front to back. -
Check stability:
Ensure the bottom of the ‘legs’ are perfectly flat so the piece stands without wobbling. If it tips, carefully slice a thin layer off the bottom with your blade to level it.
Cracks while drying?
If hairline cracks appear as the clay shrinks, mix a tiny bit of fresh clay with water to make a paste (slip) and fill the cracks, then sand smooth once dry.
Step 3: Finishing Touches
-
Initial drying phase:
Let the piece sit for about 24 to 48 hours depending on humidity. Rotate it occasionally so the bottom legs get air exposure and dry evenly. -
Sanding for smoothness:
Once fully cured and hard, take your fine-grit sandpaper and gently sand the entire surface. Focus on the flat faces and the outer curve to get that ultra-smooth, stone-like finish. -
Detail sanding:
Fold a small piece of sandpaper to get inside the inner arch and gently run it through the carved grooves to remove any remaining grit. -
Dust off:
Wipe the entire piece down with a slightly damp cloth or a dry brush to remove all white clay dust. -
Optional painting:
For a pure, uniform white look, apply a thin coat of matte white acrylic paint. This covers any discoloration from handling the raw clay. -
Final cure:
Allow the paint to dry completely before placing any jewelry on the stand.
Speckled Stone Effect
Mix black pepper or dried tea leaves into the white clay before rolling. When sanded, this creates a beautiful faux-granite or terrazzo texture.
Now you have a chic geometric sculpture that keeps your rings organized and ready to wear


Terrazzo Speckled Ring Stand
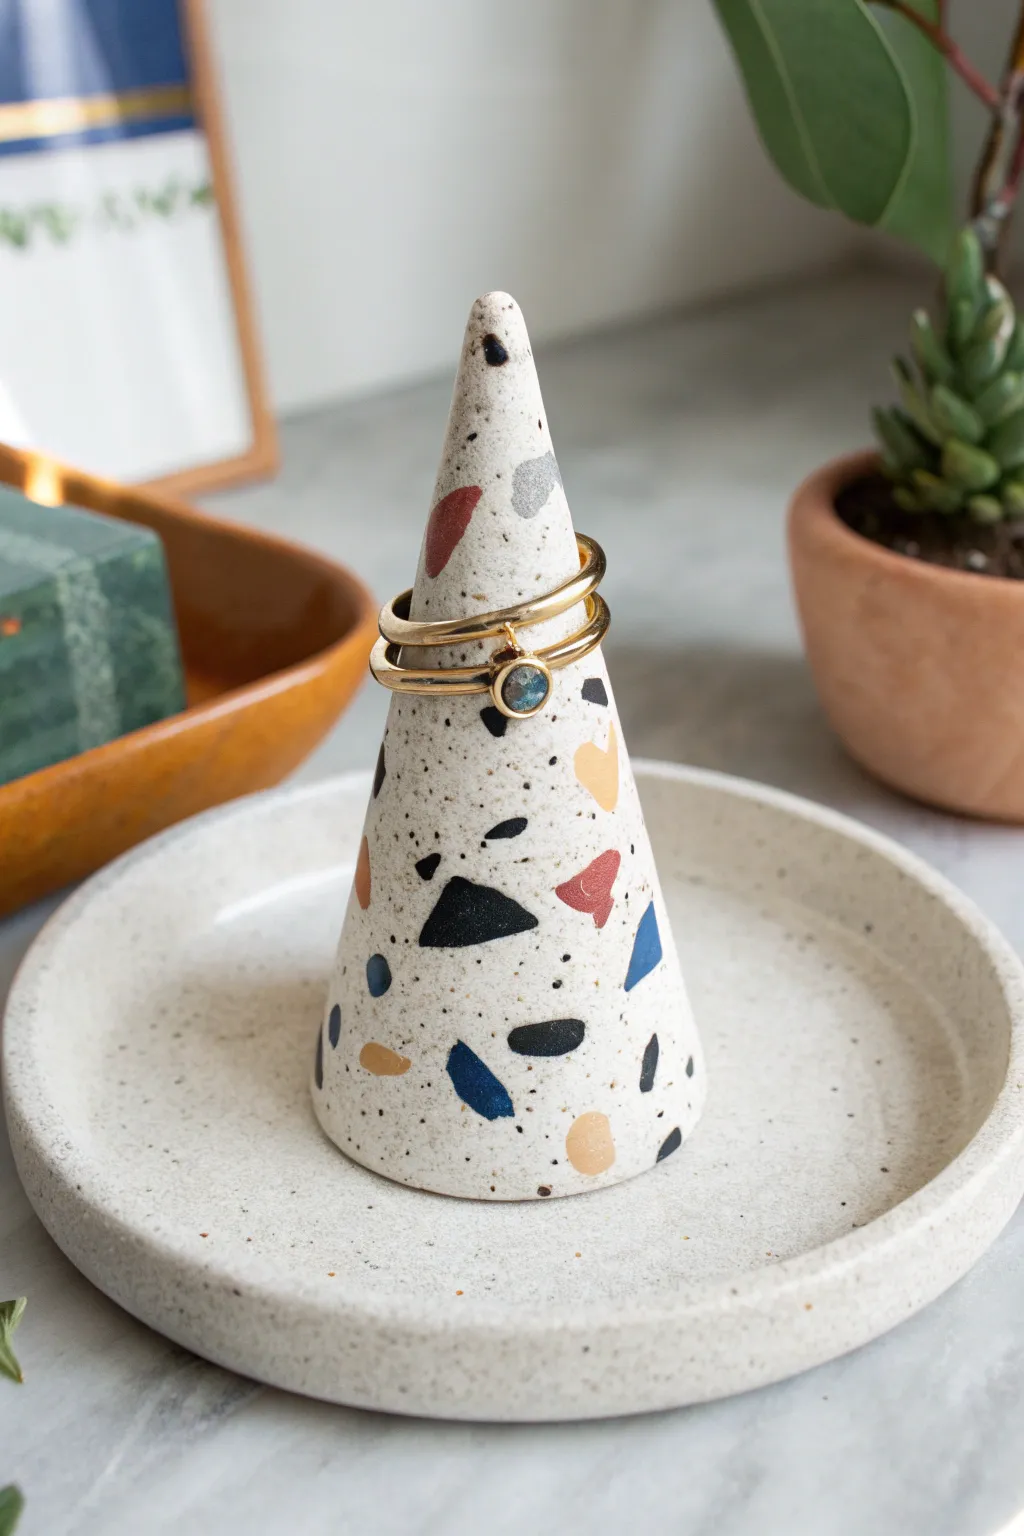
This trendy jewelry organizer combines modern terrazzo patterns with a sleek, minimalist silhouette. The speckled stoneware-effect clay serves as the perfect canvas for the colorful, irregular chips that give this piece its playful character.
Step-by-Step
Materials
- White or beige polymer clay (base)
- Small amounts of colored polymer clay (black, terracotta, navy blue, mustard yellow, grey)
- Speckled clay (or coarse black pepper/sand)
- Acrylic roller
- Tissue blade or sharp craft knife
- Circle cutter (approx. 4-5 inches diameter)
- Cardstock or glossy paper (for cone template)
- Tape
- Sandpaper (various grits from 400 to 1200)
- Gloss or matte varnish (optional)
Step 1: Preparing the Terrazzo Chips
-
Flatten Colors:
Begin by rolling out very thin sheets of your colored clays—black, terracotta, navy, mustard, and grey. The thinner these sheets are, the better they will integrate into your base clay. -
Bake Chips:
For the crispest terrazzo edges, place these thin sheets on a baking tray and bake them for just 10-15 minutes at the manufacturer’s recommended temperature. Let them cool completely. -
Crumble:
Once cool and brittle, crumble the baked sheets into small, irregular shards using your fingers or chop them with your blade. Aim for a variety of shapes and sizes.
Step 2: Creating the Clay Base
-
Mix Base Clay:
Condition your white or beige base clay until soft. To achieve that granite-like speckled look seen in the photo, mix in a small amount of ‘granite’ specialty clay or knead in some coarse black pepper or clean sand. -
Roll Out:
Roll the conditioned base clay into a smooth, even sheet, approximately 1/4 inch thick. This needs to be large enough to cut both your cone and the base dish. -
Apply Chips:
Scatter your prepared baked chips onto the raw clay sheet. Press them down firmly with your fingers so they stick, ensuring a random but balanced distribution of colors. -
embed Chips:
Place a piece of parchment paper over the clay to prevent sticking, then use your acrylic roller to roll over the chips again. Roll in multiple directions until the surface is completely flat and the chips are fully flush with the base clay.
Smudged Colors?
If your colored chips are smearing during the rolling phase, the clay is too warm or soft. Pop the sheet in the fridge for 10 minutes to firm it up before rolling again.
Step 3: Forming the Cone and Dish
-
Make a Template:
Create a cone template using cardstock. Cut a circle, slice a wedge out of it (like a pie slice), and tape the edges together to form a cone shape that is tall and narrow. -
Cut the Clay:
Cut a wedge shape from your terrazzo clay sheet that matches the unrolled template. You will also need to cut a large circle for the dish base using your circle cutter. -
Shape the Cone:
Wrap the wedge-shaped clay around your cardstock cone form. Gently press the seam together where the clay meets, smoothing it with your finger or a clay tool so the line disappears. -
Refine the Point:
Pay special attention to the top tip of the cone, gently pinching and smoothing it so it is rounded but defined, not sharp. -
Form the Dish Rim:
Take your circle base. Roll a long, thin snake of the remaining terrazzo clay and wrap it around the edge of the circle to create a raised rim. Blend the seam between the snake and the base on the inside and outside for a seamless look.
Level Up: Gold Rim
After baking, paint the very tip of the cone and the rim of the dish with liquid gold leaf or metallic acrylic paint to add a luxurious, high-end finish.
Step 4: Finishing Touches
-
Final Bake:
Place the cone (still on its paper form to hold shape) and the dish on your baking tile. Bake according to package directions, usually 30 minutes at 275°F (130°C). -
Cool and Sand:
Allow the pieces to cool fully. Use wet/dry sandpaper under running water, starting with a coarse grit and moving to fine. This creates that professional, smooth stone texture. -
Polishing:
I like to buff the piece with a denim cloth after sanding for a natural sheen. If you prefer a glossy ceramic look, apply a thin coat of glaze instead.
Display your rings on your new modern art piece and enjoy the organized elegance

The Complete Guide to Pottery Troubleshooting
Uncover the most common ceramic mistakes—from cracking clay to failed glazes—and learn how to fix them fast.
Marbled Clay Ring Holder
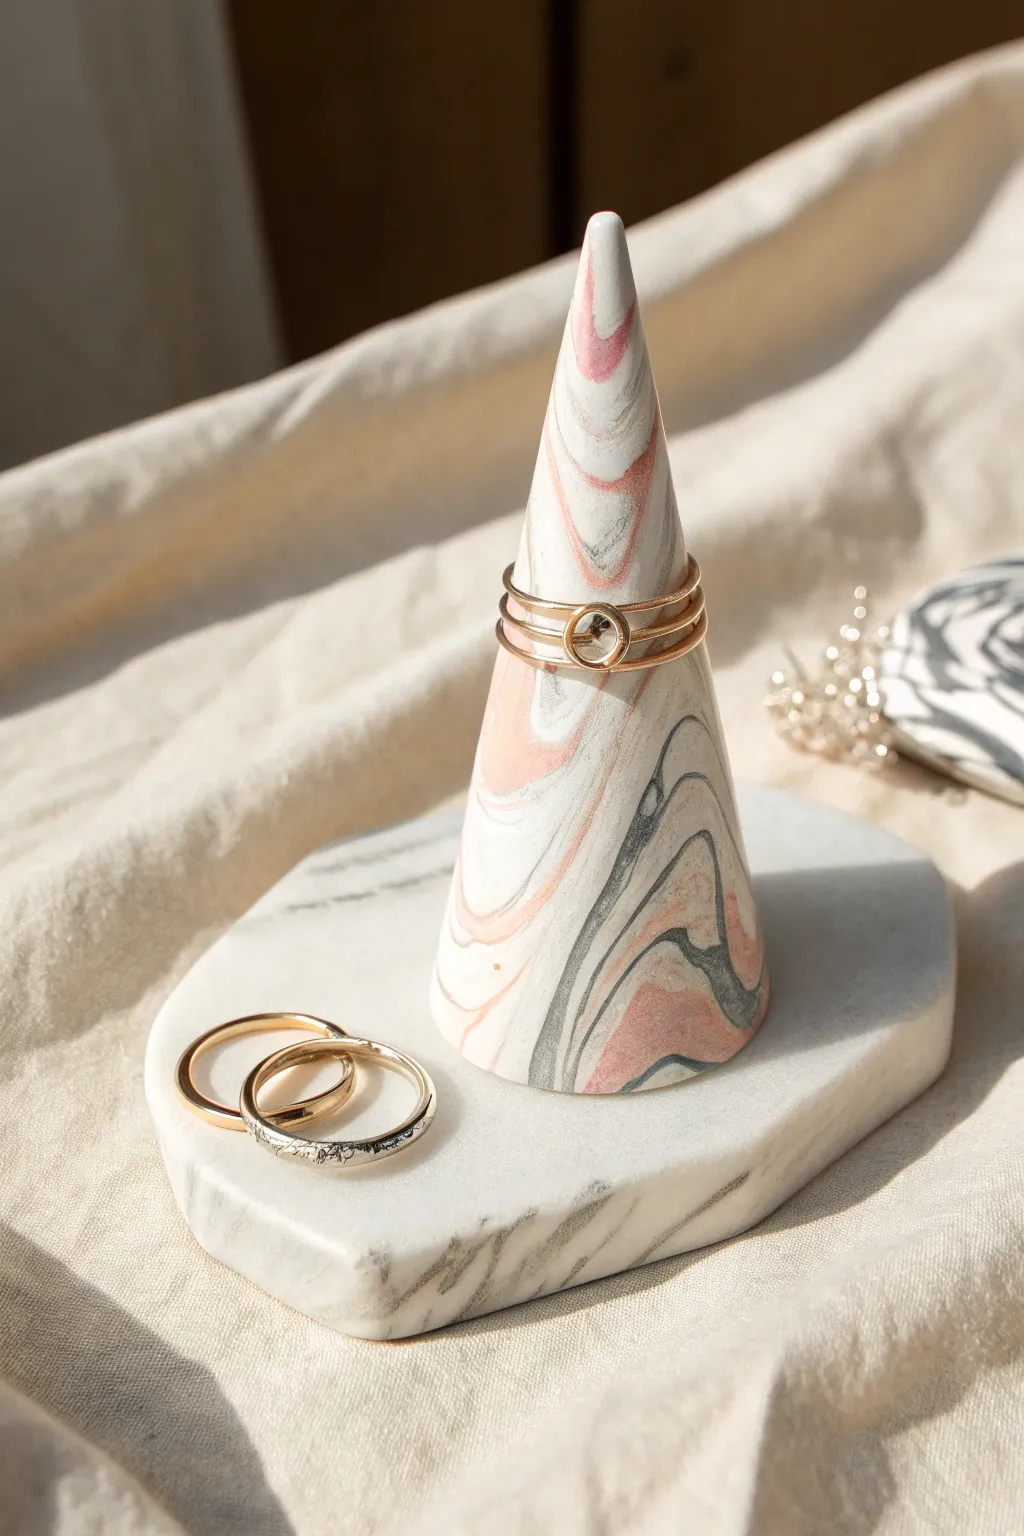
Elevate your jewelry storage with this sophisticated cone ring holder featuring a striking marbled design in soft pinks and greys. This modern piece sits atop a matching hexagonal base, creating a functional yet sculptural display for your favorite rings.
Step-by-Step Tutorial
Materials
- White or translucent polymer clay (primary block)
- Pink or salmon polymer clay
- Grey or slate blue polymer clay
- Taupe or light brown polymer clay
- Acrylic rolling pin
- Clay cutting blade or tissue blade
- Hexagon cookie cutter (approx. 3-4 inches wide)
- Smooth work surface (ceramic tile or glass)
- Oven for baking
- Fine-grit sandpaper (optional)
- Matte or glossy glaze (optional)
Step 1: Preparing the Clay
-
Condition the white clay:
Start by taking a large oscillating chunk of white clay—about 2/3 of your total material—and kneading it in your hands until it is soft, pliable, and warm. -
Roll the base snake:
Roll the conditioned white clay into a thick log or cylinder, approximately 5 inches long and 1 inch thick. -
Prepare accent colors:
Condition small amounts of the pink, grey, and taupe clays. Roll each of these colors into thin snakes, much thinner than your white log.
Muddy Colors?
Stop twisting sooner than you think! Over-mixing the colors will turn the bright pinks and greys into a single brownish blob. Distinct lines are better than a perfect blend.
Step 2: Creating the Marbling
-
Apply color strands:
Lay the thin colored snakes lengthwise along the white log. You can twist them slightly as you lay them down to encourage movement. -
Twist the log:
Grasp both ends of the combined log and twist them in opposite directions. Keep twisting until tight alternating stripes appear, resembling a candy cane. -
Fold and roll:
Fold the twisted log in half and roll it smooth again on your work surface. I like to repeat this twist, fold, and roll process 2-3 times to really intricate swirls. -
Final smooth roll:
Roll the marbled clay into a smooth ball to consolidate all the layers, ensuring there are no air pockets trapped inside.
Pro Tip: Fingerprints
Before baking, lightly brush your finished raw clay shapes with cornstarch or baby powder to help smooth out stubborn fingerprints without distorting the shape.
Step 3: Shaping the Cone
-
Split the clay:
Using your clay blade, cut off about 1/3 of the marbled ball. Set this aside for the base. The remaining 2/3 will be the cone. -
Form the basic cone:
Take the larger piece of clay and begin rolling it between your palms, applying more pressure to the top side to taper it. -
Refine the shape:
Place the cone on your work surface and roll it back and forth gently, smoothing the sides until it reaches a sharp point. -
Flatten the bottom:
Stand the cone upright and press gently to ensure the bottom is perfectly flat and stable. The cone should be about 3-4 inches tall.
Step 4: Making the Hexagon Base
-
Roll the slab:
Take the reserved 1/3 portion of clay and roll it out with your acrylic roller until it is an even slab, about 1/4 inch thick. -
Cut the hexagon:
Press your hexagon cookie cutter firmly into the slab. Remove the excess clay from around the cutter before lifting the shape. -
Smoothing edges:
Gently run your finger along the cut edges of the hexagon to soften any sharpness or cutting artifacts.
Step 5: Finishing Up
-
Final assembly check:
Place the cone in the center of the hexagon to check proportions, but do not press them together permanently yet—it is often easier to bake them separated or just lightly touching. -
Bake the pieces:
Place your clay pieces on a baking tile or parchment-lined sheet. Bake according to your brand of clay’s instructions (usually 275°F for 15-30 minutes). -
Cool down:
Allow the pieces to cool completely in the oven with the door cracked open to prevent cracking from temperature shock. -
Sand and buff:
If desired, use fine-grit sandpaper under running water to polish any fingerprints off the cured clay. -
Attach components:
Use a dab of strong super glue or e6000 to permanently secure the cone to the center of the hexagonal base.
Once the glue sets, you will have a beautiful, modern stand ready to showcase your favorite rings
Gold-Trim Dish and Post
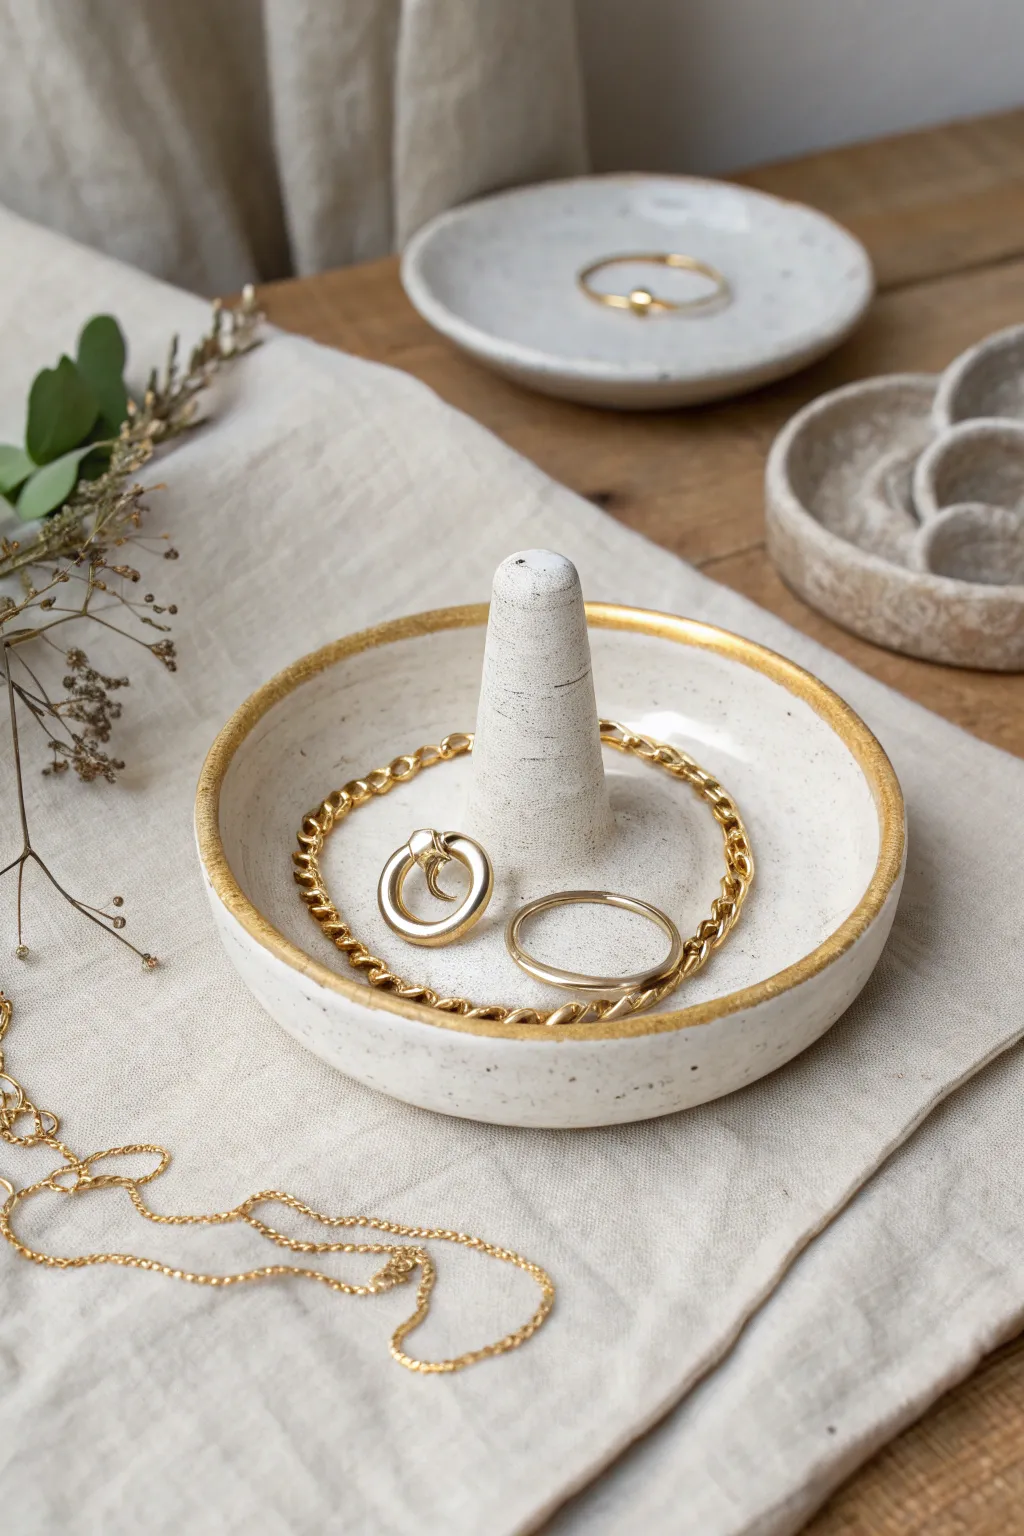
This elegant organizer combines the functionality of a classic ring dish with the structure of a cone holder, perfect for keeping both bands and everyday rings secure. The speckled clay body and delicate gold rim give it a professional, high-end finish that looks lovely on any bedside table.
Step-by-Step
Materials
- Speckled white stoneware clay or polymer clay (oven-bake)
- Small rolling pin
- Rolling slats or playing cards (for even thickness)
- Circle cutter (approx. 4-5 inches)
- Sponge
- Pin tool or needle tool
- Metal rib or old credit card
- Scoring tool (or serrated rib)
- Clay slip (if using ceramic clay) or liquid polymer clay (if using polymer)
- Small paint brush
- Liquid gold leaf or gold glaze luster
- Pottery kiln (for stoneware) or home oven (for polymer)
- Clear glaze (optional)
Step 1: Forming the Dish Base
-
Prepare the clay:
Begin by wedging your speckled clay thoroughly to remove air bubbles. This ensures a strong final piece without cracks. If using polymer clay, condition it in your hands until it becomes pliable and soft. -
Roll out the slab:
Set up your rolling slats on a canvas work surface. Roll the clay out into a smooth slab that is roughly 1/4 inch thick. I like to flip the slab over halfway through rolling to ensure the texture is even on both sides. -
Cut the circle:
Place your circle cutter or a round template onto the clay slab and cut out a perfect circle. Remove the excess clay and set it aside for the cone. -
Smooth the edges:
Use a slightly damp sponge to gently run around the cut edge of the circle. This softens the sharp angle left by the cutter and gives the rim a more finished, handmade look. -
Shape the curvature:
Gently lift the edges of the circle to create a shallow bowl shape. You can do this by cupping it in your hand or pressing it gently into a foam mold. Smooth out any fingerprints with a metal rib.
Step 2: Sculpting and Attaching the Cone
-
Form the starting ball:
Take a walnut-sized piece of the leftover clay and roll it into a smooth ball between your palms. -
Create the taper:
Place the ball on your work surface and roll it back and forth while applying more pressure on one side to create a tapered cone shape. -
Refine the cone:
Stand the cone up and flatten the bottom against the table. Use your fingers to smooth the sides, ensuring the tip is rounded rather than sharp. -
Score the connection points:
Using your needle tool or serrated rib, deeply scratch the center of your dish and the bottom of your cone. This texture is crucial for a strong bond. -
Apply adhesive:
Dab a small amount of slip (for ceramic clay) or liquid clay (for polymer) onto both scored areas. -
Attach the cone:
Press the cone firmly into the center of the dish with a slight twisting motion to lock the pieces together. Check from all angles to ensure it is standing perfectly straight. -
Blend the seam:
Use a modeling tool or the back of a paintbrush to drag a tiny bit of clay from the base of the cone down into the dish, smoothing the seam until it is invisible.
Smooth Seams
Use a small, soft wet brush to reach the tight angle where the cone meets the dish. This cleans up excess slip without gouging the clay.
Step 3: Finishing and Firing
-
Final smooth:
Give the entire piece one last pass with a damp sponge to remove any dust or crumbs. Let the piece dry completely. -
First firing (Bisque):
If using ceramic clay, fire the piece to bisque temperature (usually Cone 04) in a kiln. For polymer clay, bake in your home oven according to package instructions. -
Glazing (Ceramic only):
If you want a glossy finish, dip the piece in clear glaze and fire it again to the maturation temperature of your clay body. If using polymer, you can skip this or apply a gloss varnish. -
Applying the gold trim:
Once the piece is fully fired and cool (or baked and cooled), shake your liquid gold leaf well. Use a fine brush to carefully paint the very top edge of the dish rim. -
Clean up edges:
If the gold drips, quickly wipe it away with a cotton swab before it sets. The goal is an organic drift of gold along the lip. -
Curing the gold:
Let the gold leaf dry completely in a dust-free area for at least 24 hours. If using real gold luster for ceramics, this will require a third, lower-temperature kiln firing.
Textured Touch
Before drying, gently pres raw canvas onto the interior of the dish to give it a subtle woven texture that contrasts beautifully with the gold rim.
Place this newly crafted treasure on your dresser and enjoy the convenient organization it brings.


What Really Happens Inside the Kiln
Learn how time and temperature work together inside the kiln to transform clay into durable ceramic.
Cactus Ring Holder
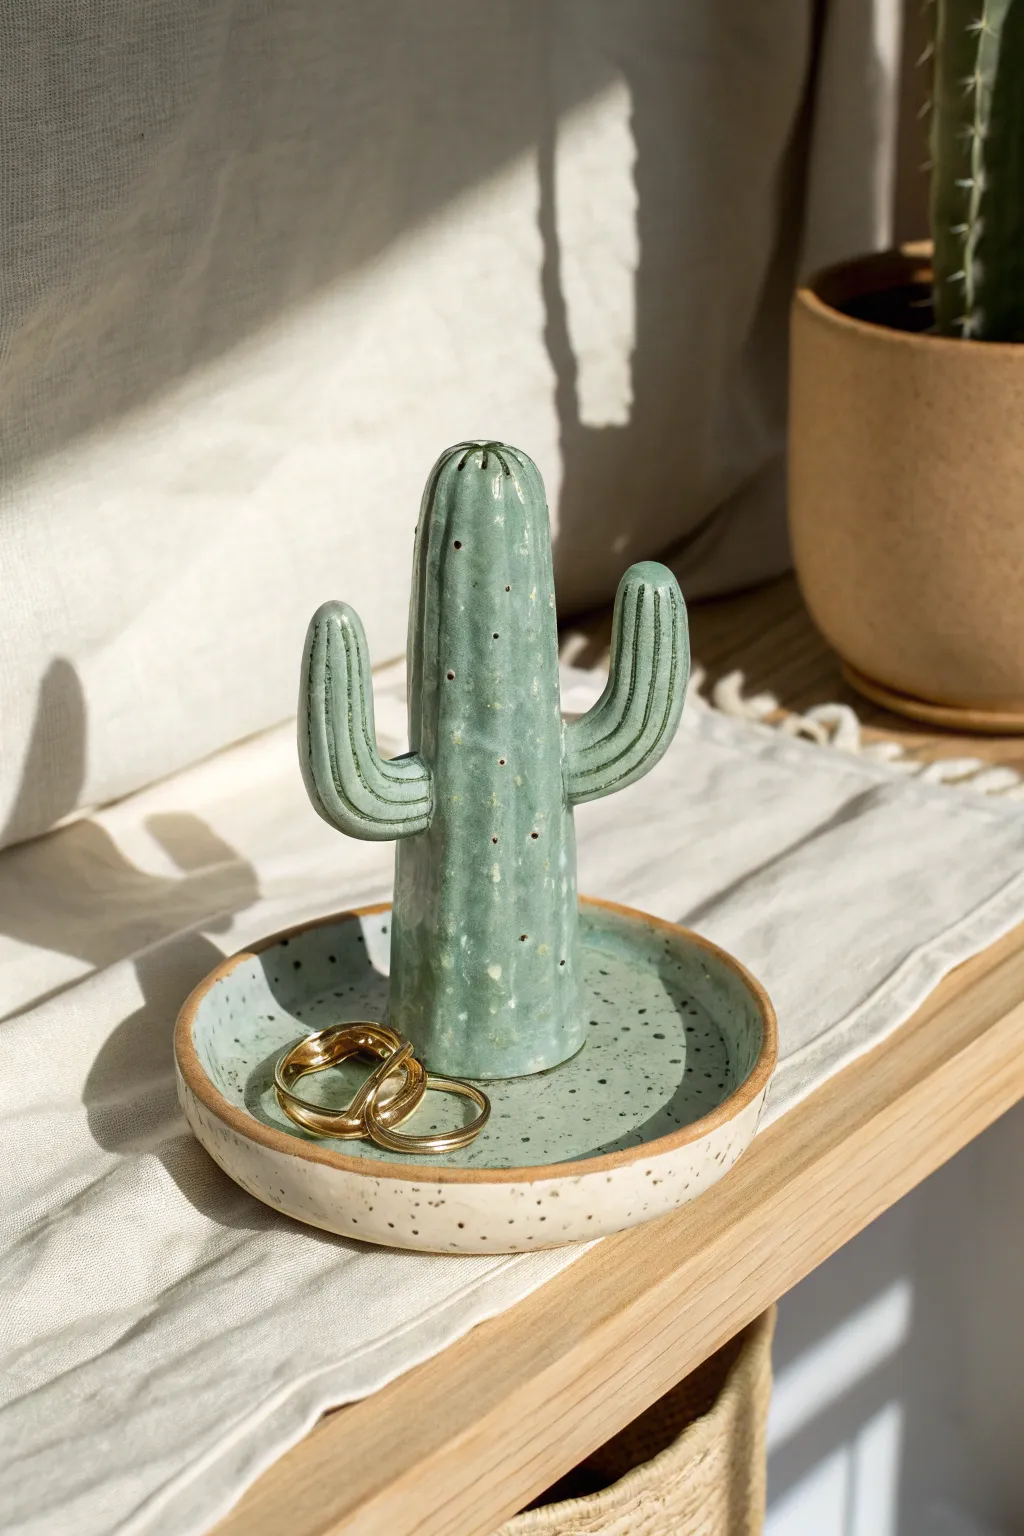
Bring a touch of the southwest to your vanity with this charming cactus ring holder, featuring a speckled green glaze and natural clay textures. This dual-purpose piece serves as a sculpture and a catch-all dish, perfect for keeping your favorite rings safe and organized.
How-To Guide
Materials
- Speckled stoneware clay (white or buff)
- Pottery wheel (optional for dish base)
- Rolling pin and canvas board
- Needle tool
- Scoring tool or serrated rib
- Slip (clay and water mixture)
- Sponge
- Small loop tool or carving tool
- Celadon or translucent green glaze
- Clear glaze (optional)
- Kiln
Step 1: Forming the Base Dish
-
Prepare the clay:
Begin by wedging a baseball-sized ball of speckled stoneware clay to remove air bubbles and ensure consistency. -
Create the slab base:
Roll out a slab of clay to approximately 1/4 inch thickness. Use a circle template or a bowl to cut out a perfect circle, roughly 4-5 inches in diameter. -
Form the rim:
Roll a long, thin coil of clay. Score and slip the outer edge of your circular base, then attach the coil on top to create a raised rim. -
Smooth the transition:
Use your thumb or a modeling tool to blend the coil downward into the base on both the inside and outside, ensuring a seamless connection and a smooth, curved wall. -
Refine the shape:
Use a damp sponge to smooth out any fingerprints on the rim and interior of the dish, giving it a polished look.
Glaze Pooling
Choose a glaze that ‘breaks’ over texture. Carved lines hold more pigment, creating depth naturally.
Step 2: Sculpting the Cactus
-
Roll the main stalk:
Take a new piece of clay and roll it into a thick cylinder, slightly tapered at the top, to form the main body of the cactus. It should be proportional to your dish, about 3-4 inches tall. -
Round the top:
Gently tap the top of the cylinder on your work surface to flatten it slightly, then use your fingers to round off the edges so it looks organic rather than sharp. -
Make the arms:
Roll two smaller cylinders for the cactus arms. Bend them into an ‘L’ shape, curving the corner so it looks natural. -
Attach the arms:
Score the side of the main stalk and the base of an arm. Apply slip, press the arm firmly in place, and smooth the clay at the seam to secure it. Repeat for the second arm on the opposite side, perhaps staggering the height slightly for realism. -
Add texture details:
Using a needle tool or small loop tool, carve vertical lines running from the base of the cactus up to the center top. Do this on the main stalk and follow the curve on the arms. -
Poke the spines:
Use the very tip of your needle tool to poke tiny, shallow indentations randomly along the ridges or between lines to mimic the look of spines or areoles.
Step 3: Assembly and Finishing
-
Join cactus to dish:
Score the center of your dish and the bottom of the cactus heavily. Apply a generous amount of slip. -
Secure the bond:
Press the cactus firmly into the center of the dish. Use a small tool or your finger to smooth the seam where the cactus meets the floor of the dish. -
Create the drying hole:
Flip the entire piece over carefully and poke a small hole in the bottom center (going up into the cactus body) with a needle tool to allow air to escape during firing. -
Bisque fire:
Allow the piece to dry slowly to the bone-dry stage, then bisque fire it in the kiln according to your clay body’s specifications (usually Cone 04). -
Glazing strategy:
Dip or brush a translucent green celadon glaze onto the cactus and the inside floor of the dish. I prefer leaving the outside rim and underside unglazed to show off the raw speckled clay. -
Wipe the details:
If the glaze looks too thick in the carved lines, you can gently wipe the raised areas with a sponge so the glaze pools darker in the recesses, accentuating the texture. -
Final firing:
Glaze fire the piece to the temperature required for your specific glaze and clay (typically Cone 5 or 6 for stoneware).
Wobbly Cactus?
If the cactus leans while wet, prop it up with small sponges or crumpled paper towels until the clay stiffens.
Once cooled, your desert-inspired creation is ready to hold your treasures
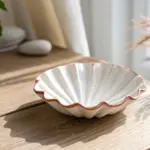
Leaf Dish Ring Holder
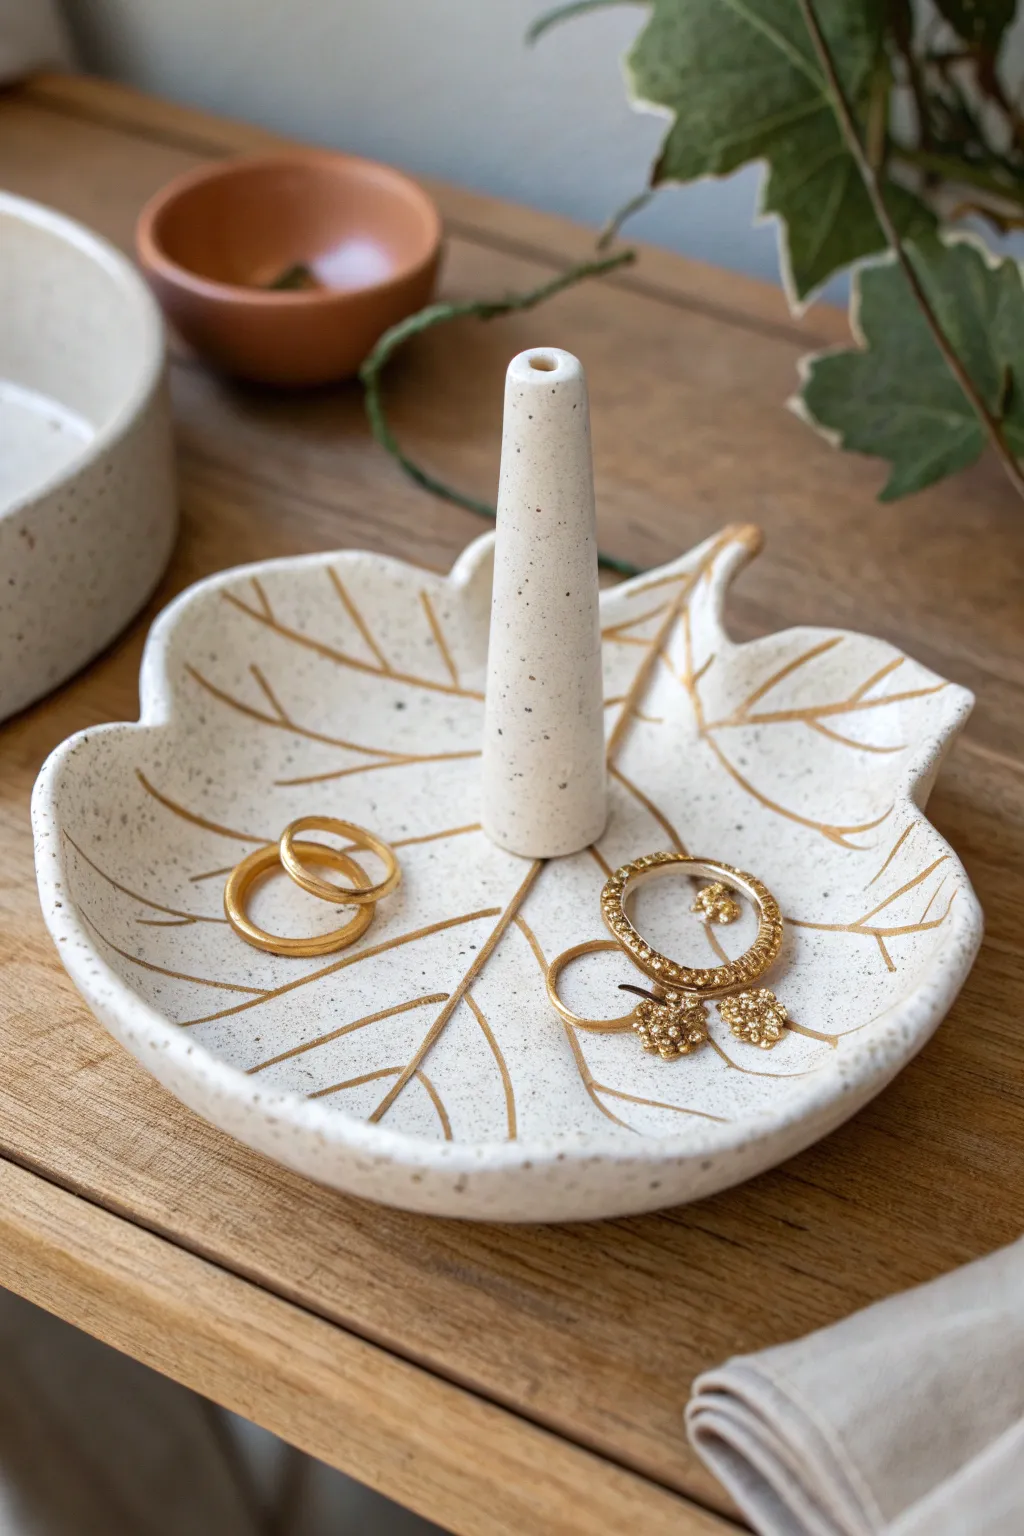
This elegant ring holder combines organic shapes with sophisticated detailing, featuring a creamy speckled clay body and touches of metallic gold. The central cone adds functional height for stacking rings, while the gently curved leaf platter catches smaller treasures.
Step-by-Step Guide
Materials
- Speckled cream polymer clay (or plain white mixed with black pepper/sand)
- Rolling pin
- Real leaf (maple or sycamore work best) or a leaf-shaped cookie cutter
- X-Acto knife or clay cutting tool
- Small bowl (for shaping)
- Liquid gold leaf or gold acrylic paint
- Fine detail paintbrush
- Sandpaper (fine grit)
- Oven (for baking)
- Baking sheet
- Clay adhesive or ‘Bake & Bond’
- Gloss varnish (optional)
Step 1: Shaping the Leaf Base
-
Condition the clay:
Begin by warming the speckled clay in your hands, kneading it until it is soft and pliable. If you don’t have speckled clay, I like to mix a pinch of coarse black pepper or black sand into white clay to achieve that stone-like effect. -
Roll out the slab:
Use your rolling pin to flatten the clay into an even slab, aiming for a thickness of about 1/4 inch so it’s sturdy enough to hold jewelry. -
Create the shape:
Place your real leaf or template onto the clay slab. If using a real leaf, roll over it gently once to imprint the veins. -
Cut the outline:
With an X-Acto knife, carefully trace around the edge of the leaf to cut out your dish shape. Remove the excess clay. -
Refine the edges:
Dip your finger in a little water (or cornstarch) and smooth down any sharp or jagged cut edges to give the piece a finished, professional look. -
Add dimension:
If you didn’t imprint a real leaf, take a needle tool or the back of your knife and gently carve the vein lines into the surface. Start with a central line and branch out. -
Form the curve:
Lift the clay leaf and place it inside a shallow, oven-safe bowl. Gently press it down so it takes on a curved, concave shape that will prevent jewelry from sliding off.
Smooth Operator
Before baking, wipe the raw clay with a baby wipe or a brush dipped in rubbing alcohol. This removes dust and fingerprints effortlessly.
Step 2: Creating the Central Cone
-
Roll a coil:
Take a leftover piece of the conditioned clay and roll it into a thick cylinder. -
Taper the form:
Roll one end of the cylinder with slightly more pressure to create a tapered cone shape. It should be flat on the bottom and rounded at the top. -
Check sizing:
Place the cone in the center of your leaf to ensure the proportions look right. It should be tall enough to hold 3-4 rings. -
Attach the cone:
Score the bottom of the cone and the center of the leaf with a needle tool. Apply a dab of liquid clay or ‘Bake & Bond’ and press the cone firmly into place. -
Blend the seam:
Use a modeling tool or your finger to smooth the clay where the cone meets the leaf, ensuring a seamless transition. -
Add top detail:
Use a small rounded tool to create a tiny indentation at the very tip of the cone, mimicking the hollow stem appearance seen in the image.
Nature’s Stamp
Instead of carving veins by hand, press a real skeletal leaf or a rubber stamp into the clay. The gold paint will settle beautifully into the texture.
Step 3: Baking and Gilding
-
Bake the piece:
Place the bowl containing your clay leaf onto a baking sheet. Bake according to the manufacturer’s instructions for your specific brand of clay. -
Cool down:
Let the piece cool completely in the oven or on a wire rack before handling it. It needs to be fully hardened before decorating. -
Sand imperfections:
Once cool, use fine-grit sandpaper to lightly smooth out any fingerprints or rough spots on the rim. -
Paint the veins:
Dip a fine detail brush into your liquid gold leaf. Carefully paint inside the carved vein lines you created earlier. -
Gild the rim:
Run the side of your brush along the very edge of the leaf dish to add a thin, delicate gold border. -
Seal (Optional):
If you want extra protection, apply a coat of satin or gloss varnish over the clay, avoiding the metallic gold areas to keep them shining bright.
Now you have a stunning, nature-inspired piece ready to organize your favorite accessories

TRACK YOUR CERAMIC JOURNEY
Capture glaze tests, firing details, and creative progress—all in one simple printable. Make your projects easier to repeat and improve.
Hand-Shaped Ring Holder
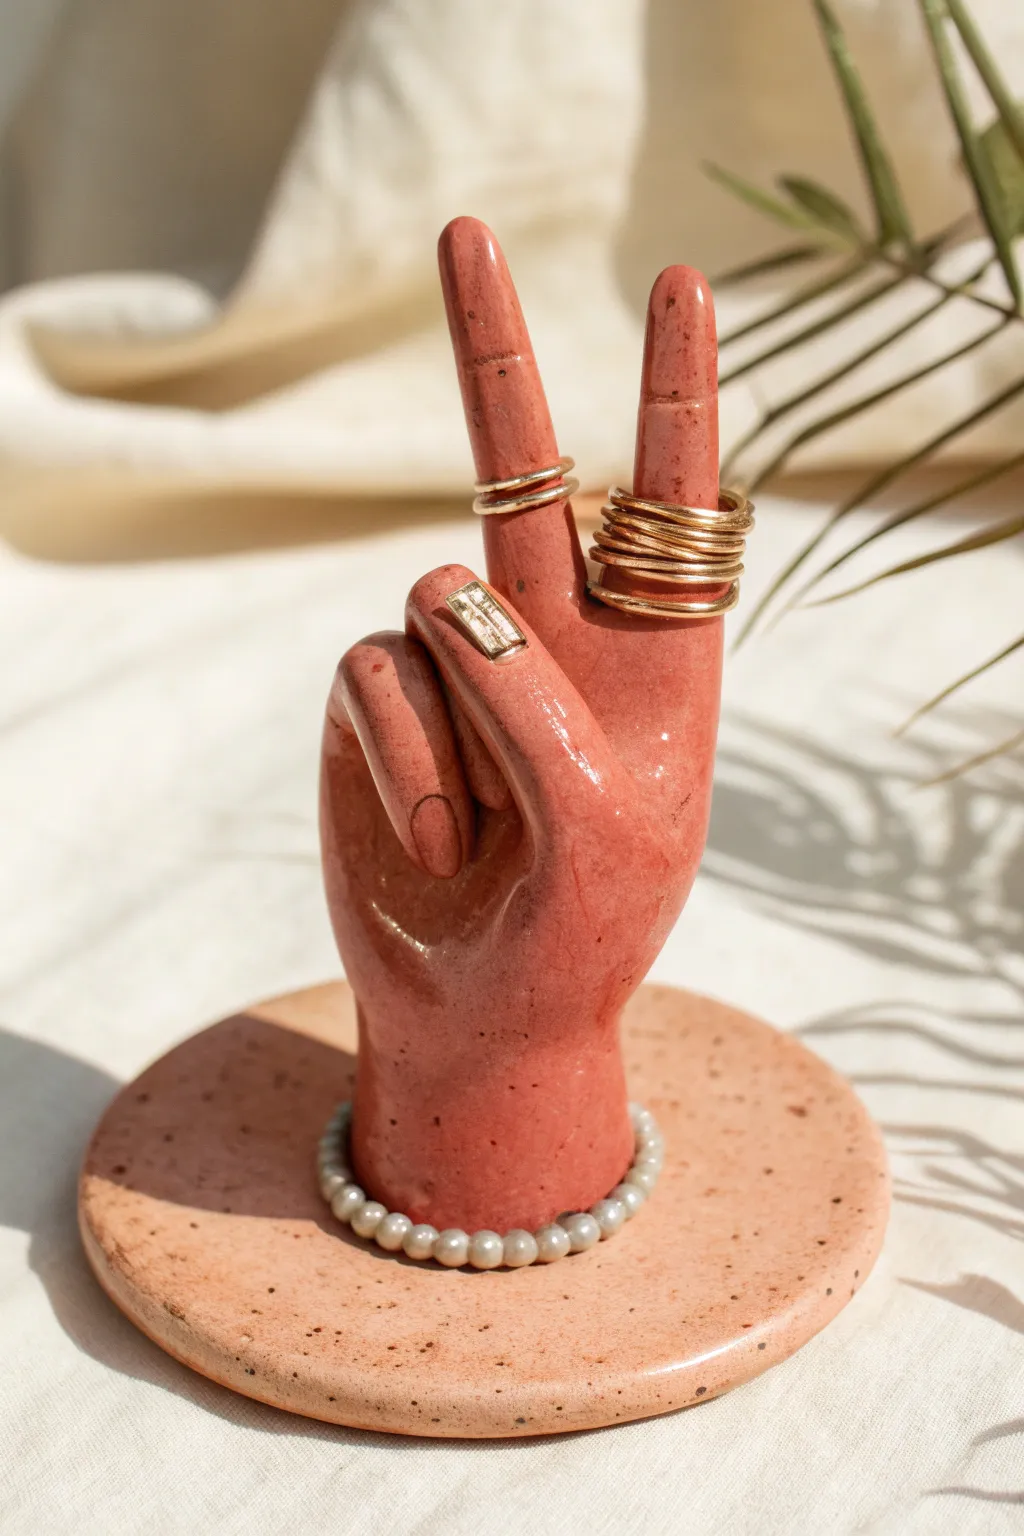
Sculpt a functional statement piece with this terracotta-colored hand measuring out a peace sign. This stylish ring holder features a sturdy speckled base and slender fingers perfect for stacking your favorite bands.
How-To Guide
Materials
- Air-dry clay (terracotta color) or polymer clay
- Rolling pin
- Clay sculpting tools (needle tool, smoothing tool)
- Small bowl or round cookie cutter (approx. 4-5 inches)
- Wire armature or stiff floral wire
- Water and slip (if using air-dry clay)
- Sponge
- Acrylic sealant (matte or satin)
- Optional: Fine grit sandpaper
- Paintbrush
Step 1: Forming the Base
-
Roll the slab:
Start by rolling out a portion of your clay into a flat, even slab about 1/4 inch thick. This will be the foundation for your sculpture. -
Cut the circle:
Use a round cookie cutter or trace around a small bowl to cut a perfect circle from the slab. Smooth the edges with a damp finger or sponge to remove any sharp cuts. -
Texture the base:
If you want that speckled pottery look shown in the photo, you can gently tap the surface with a coarse sponge or fleck it with a stiff toothbrush dipped in slightly darker diluted paint later on. For now, set the base aside to firm up slightly.
Use Your Own Hand
Use your own hand as a live reference model while sculpting. Observing your own knuckle placement and finger length ratios helps keep the anatomy looking believable.
Step 2: Sculpting the Hand
-
Create the arm stump:
Roll a thick cylinder of clay to represent the wrist and palm area. It should be roughly the width of your own wrist but scaled down to your desired size. -
Form the basic palm:
Flatten the top of the cylinder slightly to create the palm area. You want a solid blocky shape that tapers slightly where the wrist connects to the hand. -
Insert armature wires:
Since the fingers are extended, cut two pieces of wire for the index and middle fingers. Insert them deep into the palm section. This structural support is crucial to keep the fingers from drooping while drying. -
Add finger coils:
Roll out two long, thin coils of clay for the extended fingers and two shorter ones for the folded fingers. Gently slide the clay coils over the armature wires for the upright fingers. -
Shape the folded fingers:
Take the clay essential for the ring and pinky fingers and curl them down into the palm. Blend the clay where it meets the palm so they look naturally tucked in. -
Refine the upright fingers:
Smooth the clay on the extended fingers, tapering them slightly at the tips. Use a needle tool to faintly mark where the knuckles would be for a touch of realism. -
Sculpt the thumb:
Add a shorter, thicker coil for the thumb. Position it crossing over the folded ring and pinky fingers, pressing gently to adhere it. -
Smooth the transitions:
I like to use a damp sponge or a clay shaper tool to blur all the seams where the fingers attach to the palm. The goal is a seamless, skin-like transition.
Step 3: Assembly & Finishing
-
Attach hand to base:
Score the bottom of the wrist and the center of your circular base. Apply a bit of water or slip (liquid clay) to both scored areas. -
Secure the bond:
Press the wrist firmly onto the base. Use a modeling tool to drag clay from the wrist down onto the base, smoothing it over to lock the two pieces together. -
Add fingernail details:
Use your needle tool to lightly outline fingernails on the extended fingers and the thumb. This small detail adds a lot of character. -
Refine surface texture:
Go over the entire piece with a barely damp sponge to remove fingerprints and tool marks. If you want the speckled look and didn’t add it earlier, you can gently flick dark brown paint onto the clay now if it’s air-drying, or wait until after baking for polymer. -
Dry or glaze:
Let the piece dry completely according to your clay’s instructions. If using air-dry clay, this may take 24-48 hours. If using polymer, bake as directed. -
Sand imperfections:
Once fully cured or dry, use fine-grit sandpaper to gently buff away any remaining rough spots or bumps. -
Seal the piece:
Apply a coat of satin or gloss varnish. This protects the clay from oils in your jewelry and gives it that finished ceramic sheen.
Fingers Drooping?
If the upright fingers sag despite the wire, prop them up with crumpled aluminum foil or a cardboard brace while the clay dries or bakes to hold the gesture.
Once sealed and dry, your sculptural hand is ready to organize your rings and bracelets in artistic style
Heart Ring Holder Dish
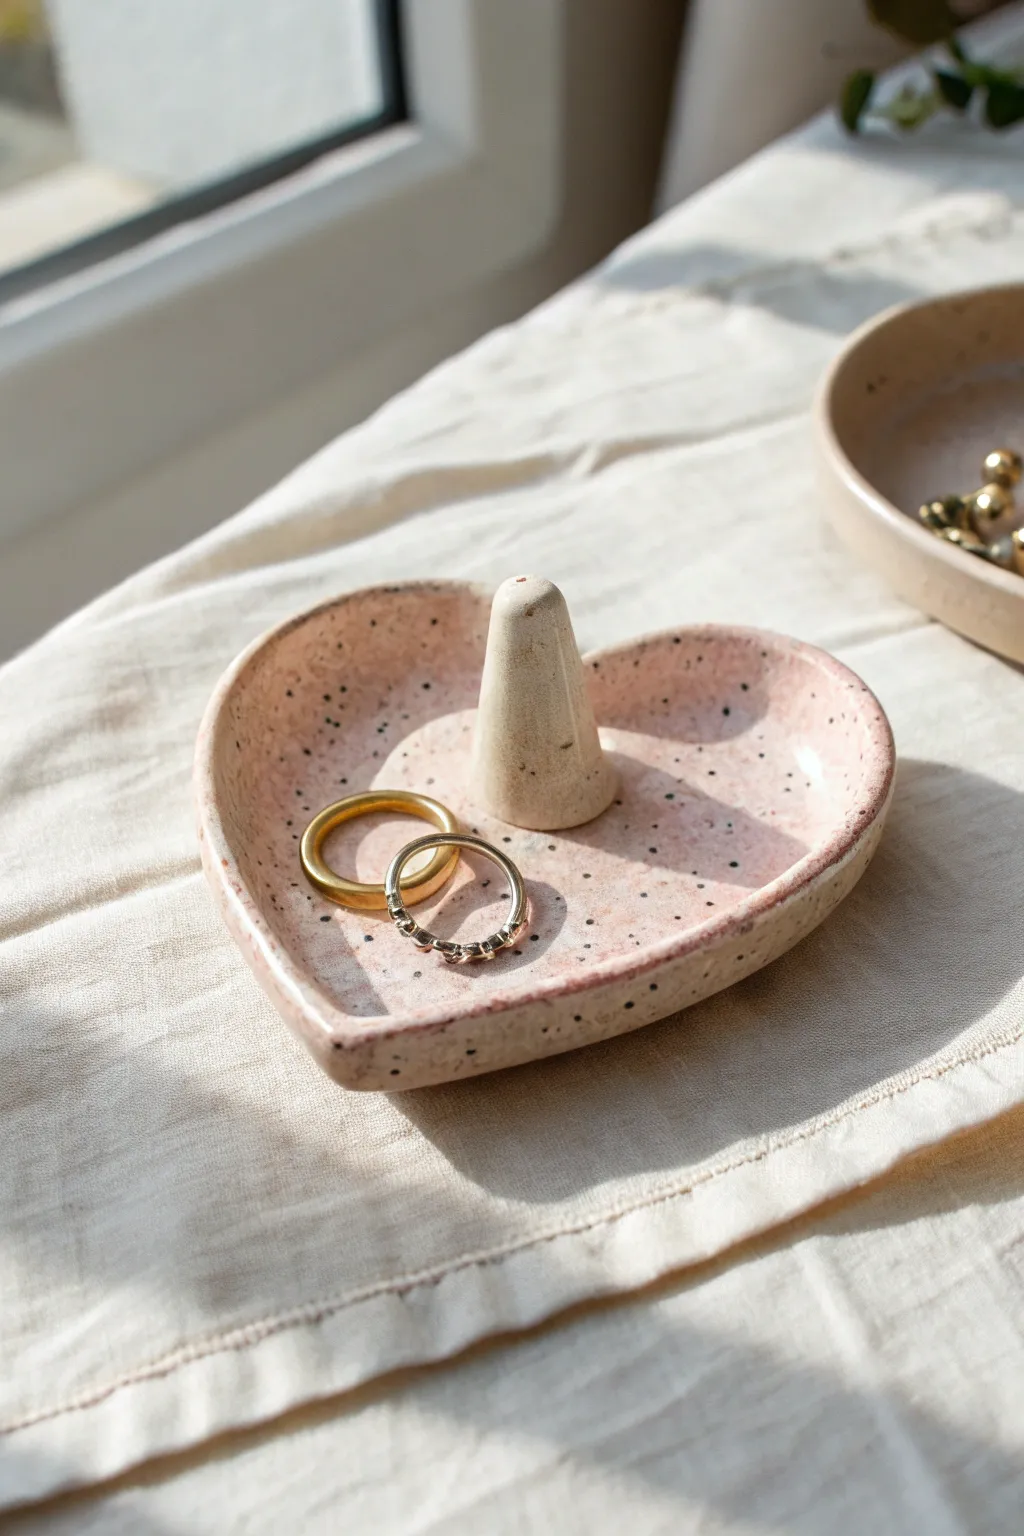
This charming heart-shaped dish features a built-in central cone designed to keep your favorite rings safe and displayed beautifully. The speckled pink finish gives it a trendy, modern ceramic look that feels both handmade and polished.
Step-by-Step Tutorial
Materials
- Polymer clay (white or light beige)
- Fimo effect clay (granite or speckled variety) or coarse black pepper
- Rolling pin
- Heart-shaped cookie cutter (medium size)
- Small circle cutter or craft knife
- Liquid polymer clay (Bake and Bond)
- Sandpaper (various grits)
- Gloss glaze or varnish
- Small paintbrush
- Pink acrylic paint (optional, if tinting white clay)
- Oven baking sheet
Step 1: Prepping the Clay
-
Condition the clay:
Start by warming up your base clay in your hands. Knead it thoroughly until it is soft and pliable to prevent cracking later. -
Create the speckled effect:
If you aren’t using pre-speckled clay, mix a very small amount of black granite clay into your white or pink base. -
Alternative speckling:
For a truly DIY approach essentially identical to the photo, I like to knead in cracked black pepper or dried coffee grounds into the clay body for organic texture. -
Tinting:
If your clay is plain white, mix in a tiny drop of pink acrylic paint or a small amount of red clay to achieve that soft blush tone shown in the image.
Natural Texture Hack
Use a piece of roughly textured fabric or a sponge to lightly pat the clay surface before baking. This mimics the organic, stone-like feel of real fired pottery.
Step 2: Forming the Dish
-
Roll out the slab:
Using your rolling pin, flatten the clay to a uniform thickness of about 1/4 inch. Ensure it is even so the dish sits flat. -
Cut the shape:
Press your heart-shaped cutter firmly into the clay. If you don’t have a cutter, sketch a heart on paper, cut it out, and trace around it with a craft knife. -
Soften the edges:
Dip your finger in a little water (or baby oil for polymer clay) and gently smooth the cut edges of the heart to remove any sharp angles. -
Create the curve:
Gently lift the edges of the heart upwards with your thumbs to create a shallow bowl shape. You want a distinct rim to hold jewelry.
Step 3: Making the Ring Cone
-
Shape the cone:
Take a separate ball of matching clay and roll it into a thick log. Pinch and roll the top end between your fingers to taper it into a smooth cone shape. -
Check the size:
Place a standard ring on your cone to ensure it fits comfortably—not too wide at the base, but tall enough to be functional. -
Flatten the base:
Tap the bottom of the cone firmly on your work surface to ensure it is perfectly flat and will stand upright. -
Attached the cone:
Score the bottom of the cone and the center of your heart dish with a needle tool or toothpick to create texture. -
Bonding:
Apply a drop of liquid polymer clay to the scored area and press the cone firmly into the center of the heart. -
Seamless join:
Use a small modeling tool or your fingertip to smooth the clay where the cone meets the dish, blending them so they look like one continuous piece.
Gold Rim Upgrade
For an elegant touch, paint just the very edge of the heart rim with liquid gold leaf or metallic gold paint after the glaze has fully dried.
Step 4: Finishing Touches
-
Recurve the edges:
Attaching the cone might have flattened your dish. Go back and gently lift the heart edges again to restore the bowl shape. -
Bake:
Place the piece on a baking sheet and bake according to your clay package instructions (usually 230°F – 275°F for 15-30 minutes). -
Cool down:
Let the piece cool completely in the oven or on a wire rack before handling it further to ensure maximum strength. -
Sand:
Once cool, use fine-grit sandpaper to buff away any fingerprints or rough spots on the rim. -
Glaze:
Apply a coat of gloss varnish to the entire piece to protect the speckles and give it that high-shine ceramic finish.
Place this beautiful dish on your nightstand or vanity for a sweet daily reminder to store your jewelry safely
Tiny Animal Tail Ring Holder
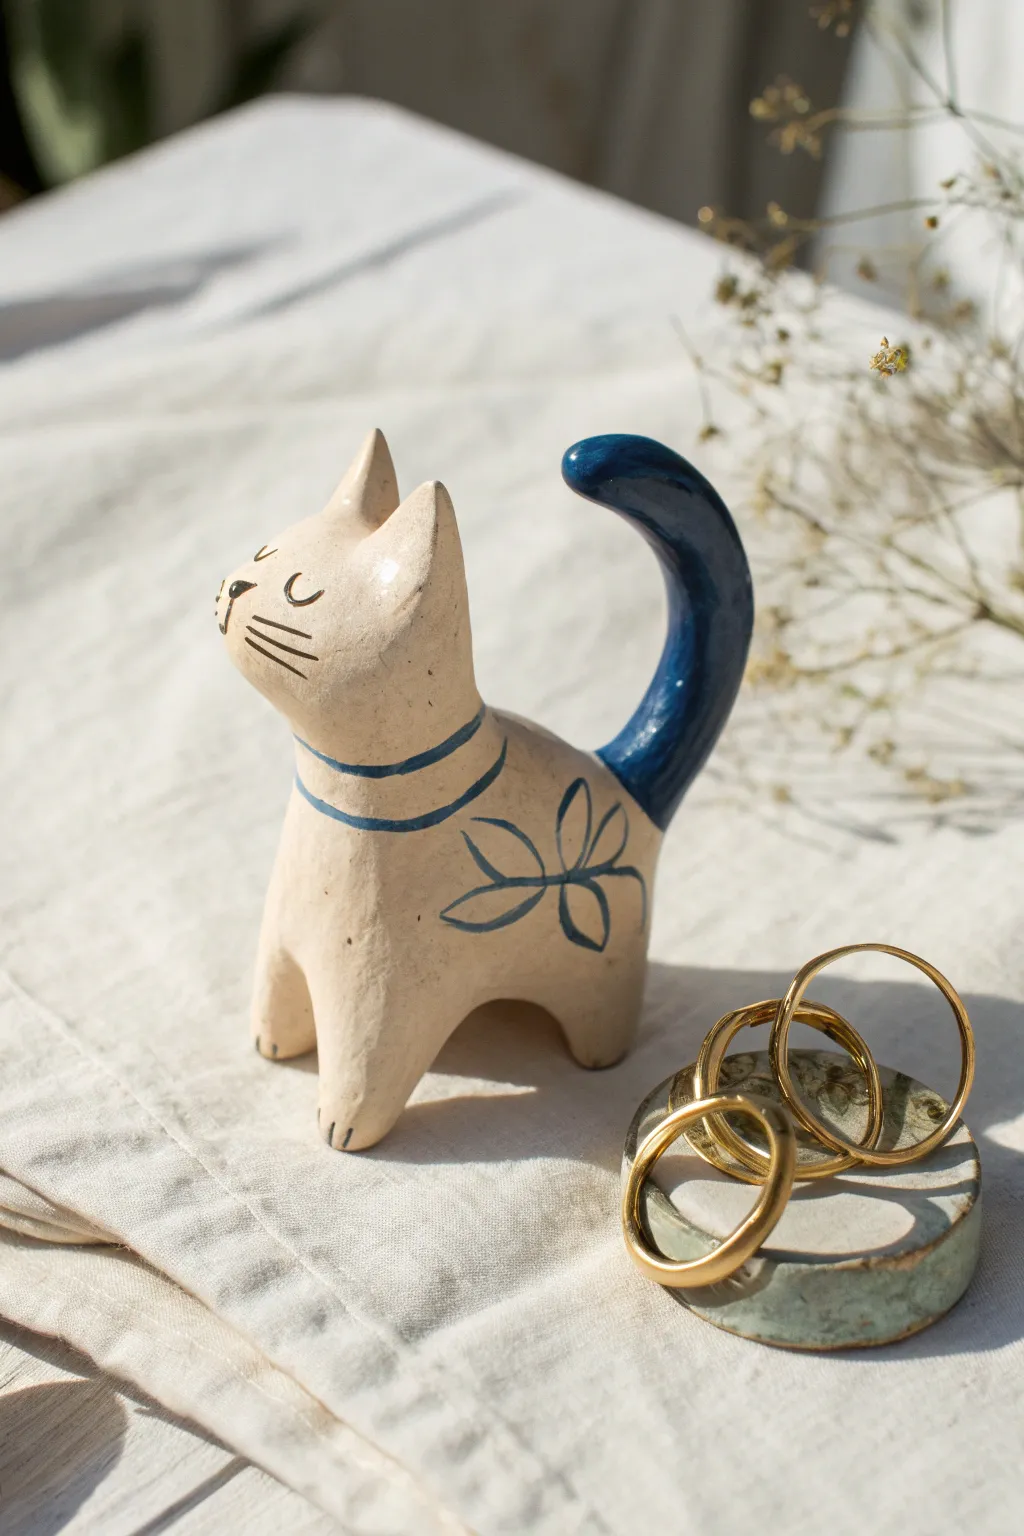
This charming little feline isn’t just a cute shelf decoration; its long, curved tail is perfectly designed to keep your favorite rings safe and organized. With its rustic clay texture and simple blue painted details, this project combines functionality with folk-art whimsy.
Step-by-Step Guide
Materials
- White air-dry clay or polymer clay
- Acrylic paints (Cream/Off-White, Navy Blue, Black)
- Small fine-point paintbrushes
- Clay sculpting tools (or a toothpick and a smooth knife)
- Water cup (for smoothing)
- Gloss varnish or sealant
- Fine grit sandpaper
Step 1: Sculpting the Form
-
Prepare the base body:
Start with a ball of clay about the size of a golf ball. Roll it into a smooth oval shape, slightly flattening the bottom so it stands securely on your work surface. -
Form the legs:
Gently pinch and pull four small nubs from the bottom of your oval to create the legs. Keep them short and sturdy to ensure stability, smoothing the transition from the body with your finger. -
Shape the head:
Pull a section of clay upwards from the front of the body to form the neck and head. Mold this into a rounded shape, blending the neck seamlessly into the chest area. -
Add the ears:
Pinch two small, triangular points at the very top of the head for the ears. Make sure they are firmly attached and smooth out any seams. -
Create the tail:
Roll a separate coil of clay, slightly thicker than a pencil and about 2-3 inches long. Taper it gently towards the tip. -
Attach the tail:
Score (scratch) the back of the cat and the base of the tail, dab a little water or liquid clay on the connection point, and press the tail firmly onto the rear of the body. -
Curve the tail:
Here I like to bend the tail into a gentle ‘S’ or ‘C’ curve upwards. This curve is crucial as it’s what will hold the rings, so ensure it doesn’t tip the figure over.
Step 2: Refining and Drying
-
Smooth the surface:
Dip your finger in a tiny bit of water and rub it over the entire sculpture to remove fingerprints and bumps. Aim for a really smooth, organic finish. -
Initial drying:
Let the sculpture sit in a dry, cool place. Follow the instructions on your specific clay package; air-dry clay usually takes 24-48 hours to fully harden. -
Sand for perfection:
Once fully dry and hard, use fine-grit sandpaper to buff away any remaining rough spots or imperfections, then wipe away the dust with a damp cloth.
Balance Check
Before drying, test the balance by lightly placing a ring on the soft clay tail. If it tips, flatten the feet more or add weight to the base.
Step 3: Painting and Finishing
-
Base coat:
Paint the entire cat with a creamy off-white acrylic paint. You might need two thin coats for opaque coverage. -
Paint the tail:
Using a navy blue paint, carefully color the entire tail. Create a clean line where the tail meets the body. -
Add the collar:
With a fine liner brush and the same navy blue, paint two thin parallel lines around the cat’s neck to resemble a collar. -
Paint the floral detail:
On the cat’s flank (the side of the body), paint a simple flower motif. Start by outlining four or five petal shapes with the blue paint, leaving the inside cream. -
Draw the face:
Using a very fine brush or a black paint pen, draw two curved lines for sleepy eyes, a tiny triangle nose, and whiskers on the cheeks. -
Add paws:
Paint tiny little lines at the bottom of the visible front legs to suggest paws. -
Seal the piece:
Once all paint is completely dry, apply a coat of gloss varnish. This protects the paint from scratching when you slide rings on and off and gives it a finished ceramic look.
Make a Duo
Sculpt a second, slightly smaller cat with its tail curving the opposite direction to create a matching ‘couple’ set for holding different ring types.
Now you have a purr-fectly adorable spot to keep your jewelry safe and display-ready
Geometric Block With Peg Post
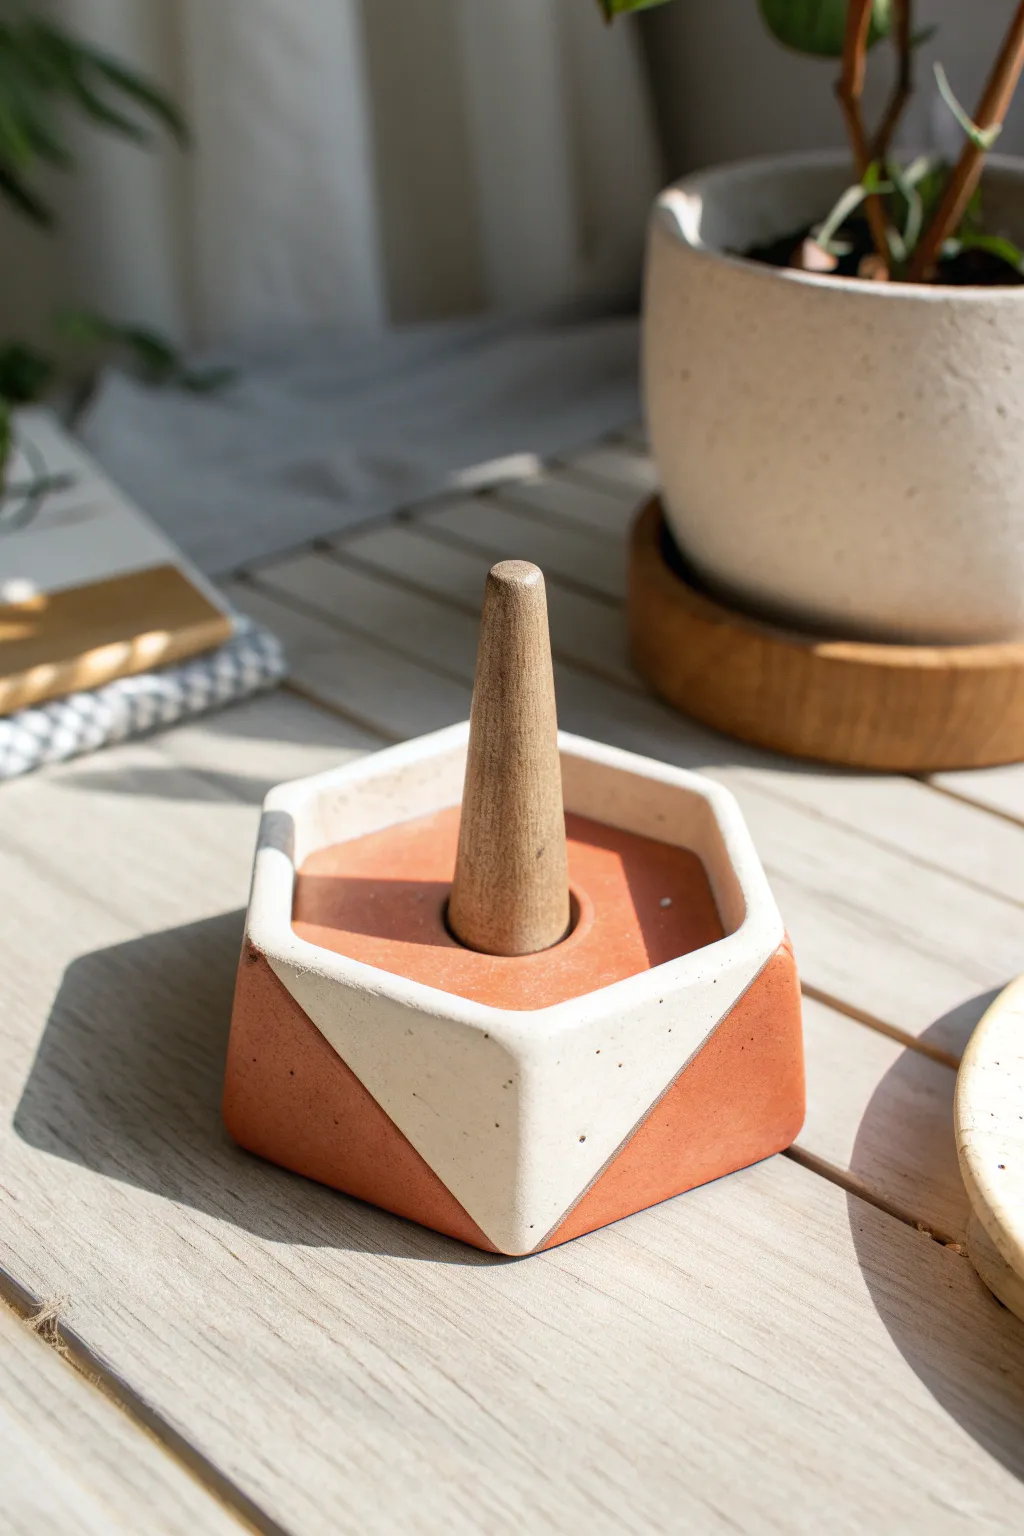
This hexagonal ring holder combines the warmth of terracotta-toned clay with a chic, speckled cream geometric overlay. The central wooden post adds a natural touch while providing the perfect spot to stack your favorite rings.
How-To Guide
Materials
- Terracotta-colored polymer clay
- Speckled granite or cream polymer clay
- Tapered wooden dowel or peg (approx. 2-3 inches)
- Small hexagonal cookie cutter (approx. 3-4 inches wide)
- Acrylic roller or pasta machine
- Sharp craft knife or tissue blade
- Sandpaper (various grits)
- Strong craft glue (like E6000) or bake-and-bond
- Matte varnish (optional)
Step 1: Shape the Base
-
Condition the clay:
Start by warming up your terracotta-colored polymer clay in your hands until it becomes soft and pliable. -
Roll the slab:
Roll out the terracotta clay into a thick, even slab. You want this base to be substantial, so aim for a thickness of at least 3/4 inch to 1 inch. You can stack multiple rolled sheets if needed. -
Cut the hexagon:
Press your hexagonal cutter firmly through the thick slab. If you don’t have a cutter deep enough, use a paper template and carefully slice the straight edges with your tissue blade. -
Smooth the edges:
Gently rub the sides of the hexagon with your finger to soften any sharp ridges created by the cut, ensuring the shape remains crisp. -
Create the center hole:
Take your wooden peg and press it into the exact center of the hexagon to create an indentation. Don’t push all the way through; just deep enough to seat the peg securely later. -
Initial bake:
Place the terracotta base on a parchment-lined tray and bake according to package instructions. Let it cool completely before moving to the next phase.
Loose Fit?
If the hole for the peg shrank during baking, gently widen it using a drill bit twisted by hand or rolled up sandpaper until the wood fits snug.
Step 2: Add the Geometric Overlay
-
Prepare the accent color:
Condition the speckled cream clay. Roll this into a much thinner sheet, about 1/8 inch thick. -
Cut the accent strip:
Cut a long, rectangular strip from the cream clay that is tall enough to cover the sides of your baked base. -
Carve the geometric pattern:
Using your craft knife, cut jagged, triangular peaks and valleys into the top edge of the cream strip. This creates the ‘mountain range’ effect seen on the finished holder. -
Apply the overlay:
Apply a thin layer of liquid clay or bake-and-bond to the sides of your cooled terracotta base. Wrap the cream strip around the perimeter, aligning the straight bottom edge with the base’s bottom. -
Refine the seams:
Where the ends of the cream strip meet, slice through both layers with a sharp blade for a seamless join. Smooth the clay gently with your finger. -
Fold over the rim:
If your design calls for a rim, you can adhere a thin hexagonal frame of cream clay to the top edge, blending the seams where it meets the side overlay. -
Final cure:
Return the piece to the oven for a second bake to set the cream clay. I find tenting it with foil prevents white clay from scorching.
Make it Marble
twist strands of white and grey clay together before rolling your overlay sheet to create a sophisticated faux-marble finish instead of granite.
Step 3: Assembly and Finish
-
Sand for perfection:
Once fully cool, use fine-grit sandpaper under running water to smooth any fingerprints or rough edges on the clay. -
Prepare the wood:
If your wooden peg is unfinished, give it a quick sand. You can stain it if you prefer a darker wood tone, but the natural light wood looks great here. -
Attach the post:
Apply a dab of strong craft glue into the center indentation you made earlier. Press the wooden peg firmly into place. -
Clean up:
Wipe away any excess glue immediately. Allow the adhesive to cure fully based on the manufacturer’s timeframe (usually 24 hours). -
Seal:
To protect the surface from dust, apply a light coat of matte varnish over the clay parts, though leaving it raw works for a more organic feel.
Place this stylish little tower on your dresser and enjoy the organized simplicity