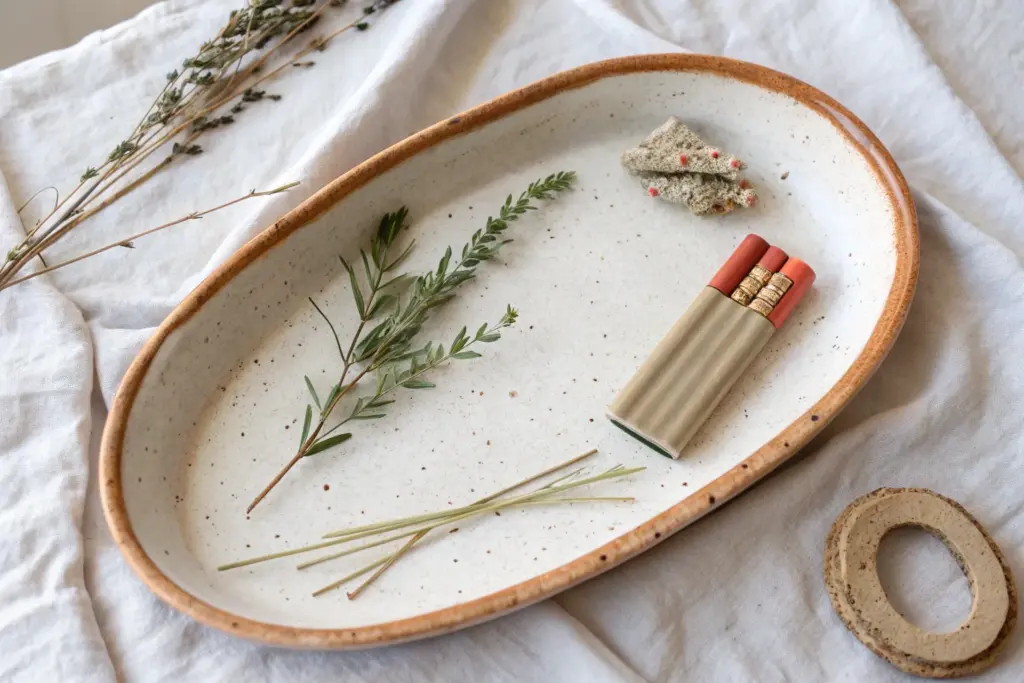
A good clay rolling tray should feel satisfying to use: a smooth center, a raised rim, and little details that make setup easy. Here are my favorite rolling tray ideas that you can personalize from super simple to seriously sculptural.
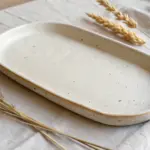
Classic Oval Tray With a Soft Raised Rim
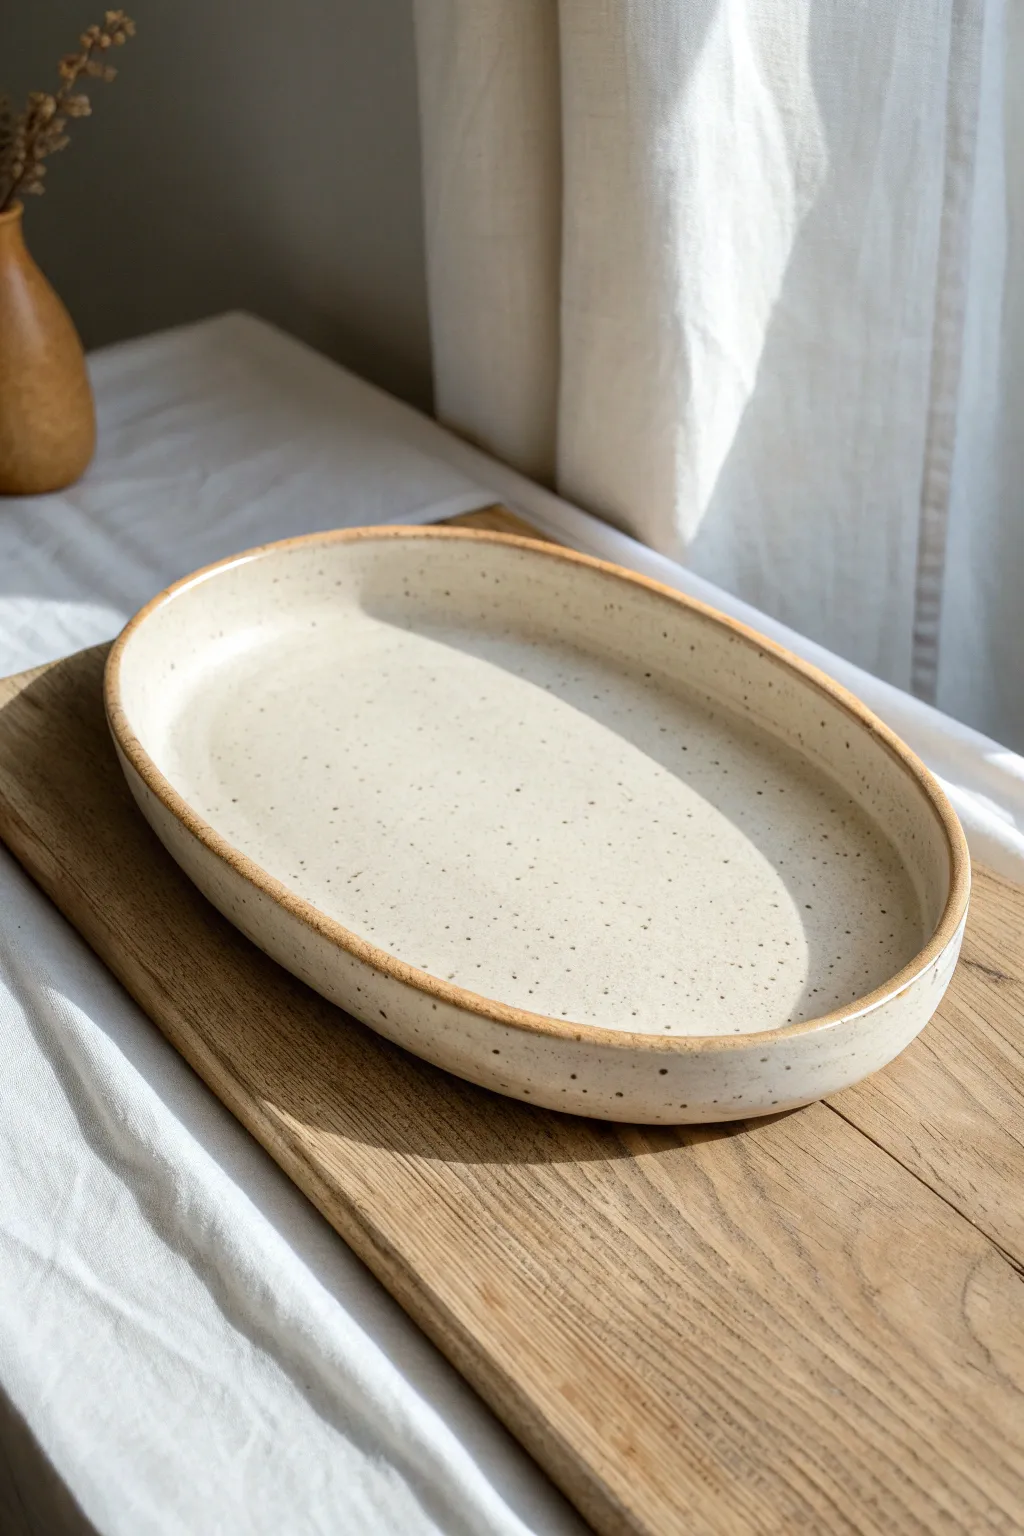
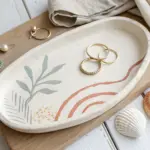
This minimal, organic tray combines functionality with a gentle, rustic aesthetic. Its speckled surface and soft, rounded rim make it a versatile piece for rolling or display, highlighting the natural beauty of the clay itself.
Step-by-Step Guide
Materials
- Speckled Stoneware Clay (e.g., Laguna Speckled Buff)
- Rolling Pin
- Canvas Work Surface
- Oval Template (paper or cardboard)
- Needle Tool or Clay Knife
- Soft Rib (rubber or silicone)
- Sponge
- Bowl of Water
- Potter’s Wheel (optional, but recommended for rim refinement) OR Banding Wheel
- Clear or Satin Matte Glaze (food safe)
Step 1: Preparation and Slab Rolling
-
Wedge the Clay:
Begin by thoroughly wedging a ball of speckled stoneware clay to remove any air bubbles. This step is crucial for preventing cracks during firing. -
Roll the Slab:
On your canvas surface, roll the clay out into an even slab. Aim for a consistent thickness of about 1/4 inch (approx. 6mm). Rotate the slab occasionally to ensure the clay particles are compressed in all directions. -
Smooth the Surface:
Before cutting, take a soft rib and run it firmly over the surface of the slab. This compresses the clay and removes the canvas texture, leaving you with that smooth, professional finish. -
Apply the Template:
Place your oval template onto the smooth slab. If you don’t have a pre-made template, you can sketch a light oval shape directly onto the clay with a needle tool until you are happy with the proportions. -
Cut the Shape:
Holding your needle tool or knife vertical to the table, carefully cut around the template. Remove the excess clay and set it aside for recycling.
Warping Woes?
If your oval isn’t sitting flat after drying, place a small weighted bag (filled with sand or rice) gently in the center while it dries to keep the floor flat.
Step 2: Forming the Tray
-
Soften the Edges:
Run a damp finger or a slightly moist sponge along the sharp cut edge of the slab. This rounds it off nicely before you start lifting the rim. -
Lift the Rim:
Gently slide your fingers under the edge of the oval slab. Slowly lift the edge upwards to create a shallow curve. Don’t pinch it; just encourage the clay to curl upward. -
Support the Lift:
If the clay is too soft and wants to flop back down, prop small wedges of foam or rolled-up clay coils underneath the rim to support the shape while it stiffens slightly. -
Refine the Curve:
Using your thumb on the inside and fingers on the outside, gently smooth the transition from the flat base to the raised rim. The goal is a seamless, soft curve rather than a sharp 90-degree angle.
Rim Definition
For a distinct rim color like the photo, carefully wipe a thin line of glaze off the very edge of the lip, exposing the toasted clay body underneath.
Step 3: Drying and Bisque Fire
-
Slow Dry:
Loosely cover the tray with plastic to allow it to dry slowly. This helps prevent the rim from warping as it shrinks. Once leather hard, remove the plastic and let it dry completely to bone dry. -
Sanding (Optional):
If there are any rough spots on the rim after drying, gently sand them down with a scouring pad. Always wear a mask when sanding dry clay. -
Bisque Fire:
Load the bone-dry tray into the kiln for a bisque firing (usually Cone 04). This sets the shape and prepares the piece for glazing.
Step 4: Glazing and Final Fire
-
Clean the Bisqueware:
Wipe the bisque-fired tray with a damp sponge to remove any dust. This ensures the glaze adheres properly without crawling. -
Apply Glaze:
Coat the interior and rim with a clear or milky white satin glaze. I prefer pouring the glaze into the center and swirling it to coat the bottom, then brushing the rim. -
Expose the Speckles:
Typically, the speckles come from the clay body itself (iron pyrite) bleeding through the glaze. Ensure your glaze application isn’t too thick, or it might mask the beautiful natural flecks. -
Wipe the Foot:
Use a wet sponge to completely wipe away any glaze from the bottom of the tray where it will touch the kiln shelf. -
Glaze Fire:
Fire the tray again to the maturity temperature of your clay (likely Cone 5 or 6 for stoneware). This melts the glaze and vitrifies the clay.
Once the kiln cools, you’ll have a stunning, functional piece of pottery ready for your table


Rectangle Tray With Crisp Corners
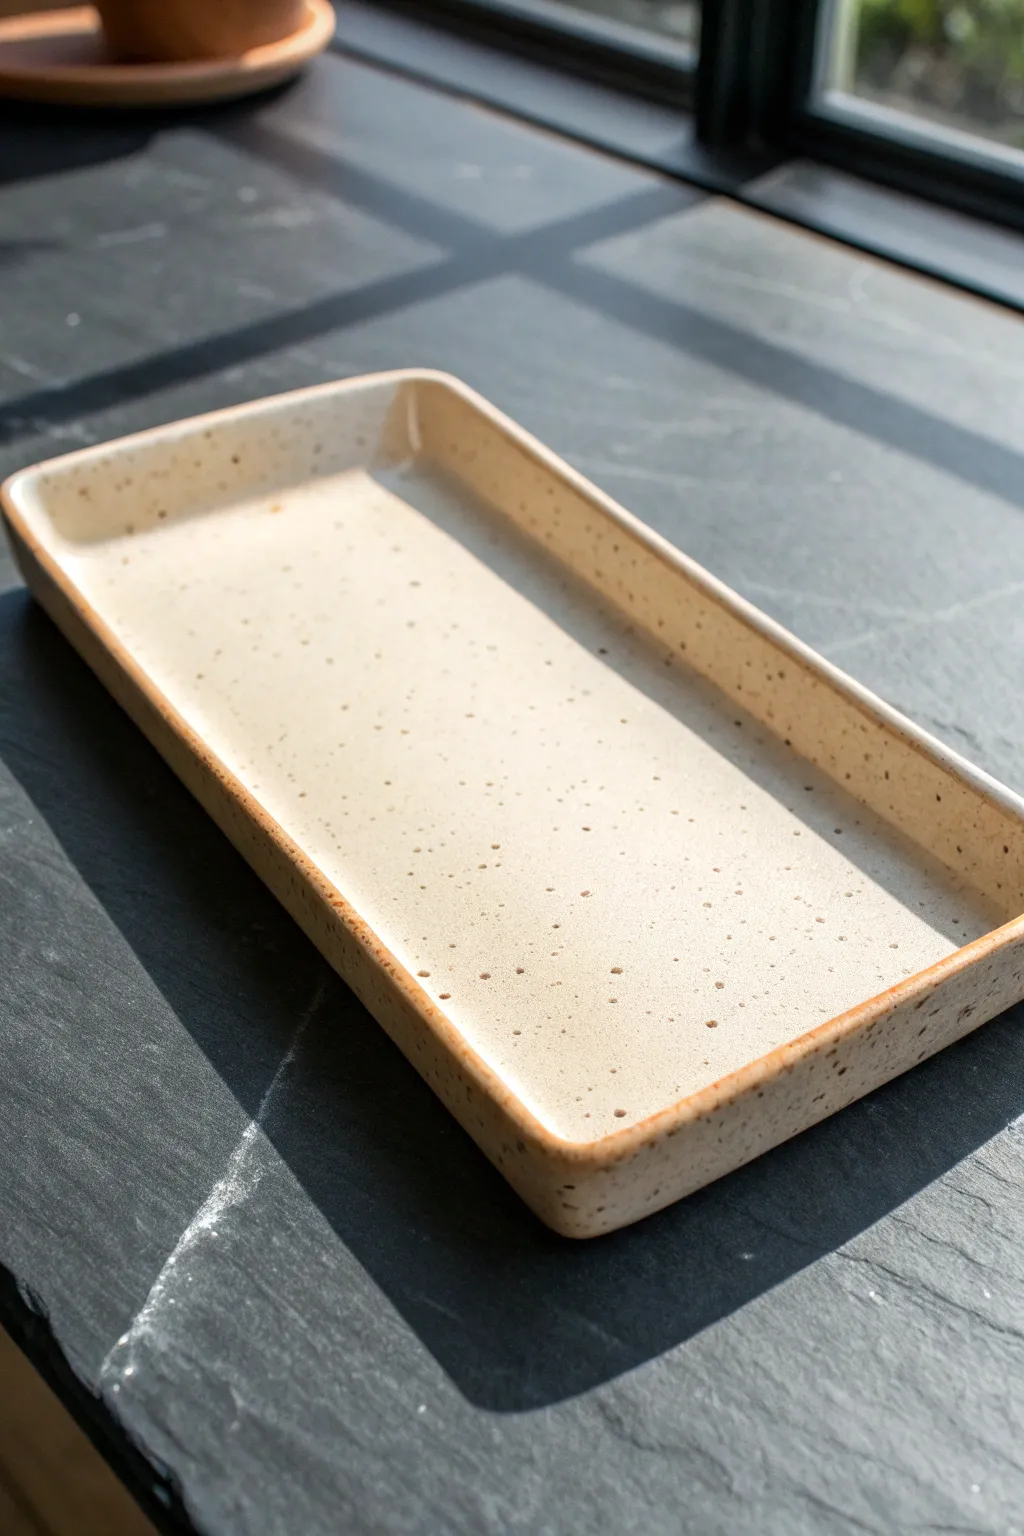
This minimalist rectangular tray showcases the natural beauty of speckled clay with its sharp, crisp lines and smooth, flat bottom. The low-profile walls and glossy finish make it functional while maintaining a sleek, modern aesthetic perfect for any tabletop.
Step-by-Step Tutorial
Materials
- Speckled Stoneware Clay
- Rolling pin
- Two 1/4 inch wooden guide strips
- Rectangular paper template (approx. 5″ x 8″ or desired size)
- Fettling knife or X-Acto blade
- Rib tool (metal or rubber)
- Scoring tool or fork
- Slip (clay and water mixture)
- Sponge
- Clear transparent glaze
- Kiln
Step 1: Slab Preparation
-
Wedge the clay:
Start with a ball of speckled stoneware clay. Wedge it thoroughly to remove air bubbles and ensure particle alignment, which is crucial for preventing warping later. -
Set up guides:
Place your 1/4 inch thick wooden guide strips on either side of your workspace. These will help you roll a perfectly even slab. -
Roll the slab:
Place the clay between the guides. Using the rolling pin, roll the clay out until the pin rests on the guides. Flip and rotate the clay occasionally as you roll to compress it from all directions. -
Smooth the surface:
Take a rib tool and firmly compress the surface of the clay slab. Drag it across vertically and horizontally to align the clay particles and create a silky smooth finish.
Warping Woes?
If the base bows up while drying, place a weighted bag of sand or rice in the center while it dries under plastic. This gentle weight keeps the floor perfectly flat.
Step 2: Cutting and Forming
-
Place the template:
Lay your rectangular paper template onto the smooth slab. I prefer to lightly tap it down so it doesn’t shift while cutting. -
Cut the base:
Using a sharp fettling knife held vertically, cut around the template to create your rectangular base. Remove the excess clay but keep it nearby. -
Cut the strips:
From the remaining rolled slab, cut long strips that are roughly 3/4 of an inch tall. These will become the walls of your tray. -
Miter the wall ends:
Measure the strips against the sides of your base. Cut the ends of the strips at a 45-degree angle where they will meet at the corners for a seamless join.
Step 3: Assembly
-
Score the edges:
Rough up the top outer edge of the base and the bottom edge of your wall strips using a scoring tool or fork. -
Apply slip:
Dab a generous amount of slip onto all the scored areas. -
Attach the walls:
Press the wall strips firmly onto the base. Ensure the 45-degree cuts at the corners align perfectly. -
Reinforce the seams:
Use a modeling tool or the back of a paintbrush to blend the clay from the wall down into the base on both the inside and outside seams. This weld is vital for strength. -
Sharpen the corners:
Pinch the corners lightly to seal the mitered joints, then use a flat tool or wooden paddle to tap the corners straight, establishing those sharp, crisp angles seen in the photo.
Rim Contrast
Before the final glaze firing, wipe the glaze off just the very top rim with a sponge. This leaves a matte, exposed clay line that highlights the tray’s geometry.
Step 4: Finishing
-
Smooth edges:
Run a slightly damp sponge over the rim to soften any sharp cutting marks, but be careful not to round over your crisp corners too much. -
Slow drying:
Cover the tray strictly with plastic to let it dry slowly. Flat objects are prone to warping, so slow, even drying is the secret to keeping it flat. -
Bisque fire:
Once bone dry, fire the piece in the kiln to bisque temperature (usually Cone 04). -
Glaze:
Dip or brush a clear, glossy transparent glaze over the entire piece. This allows the lovely speckles in the clay body to show through clearly. -
Final firing:
Fire the tray again to the maturity temperature of your clay (commonly Cone 5 or 6 for stoneware).
Once cooled, your sleek tray is ready to organize your desk or serve snacks with style


Organic Freeform Tray With Wavy Edges
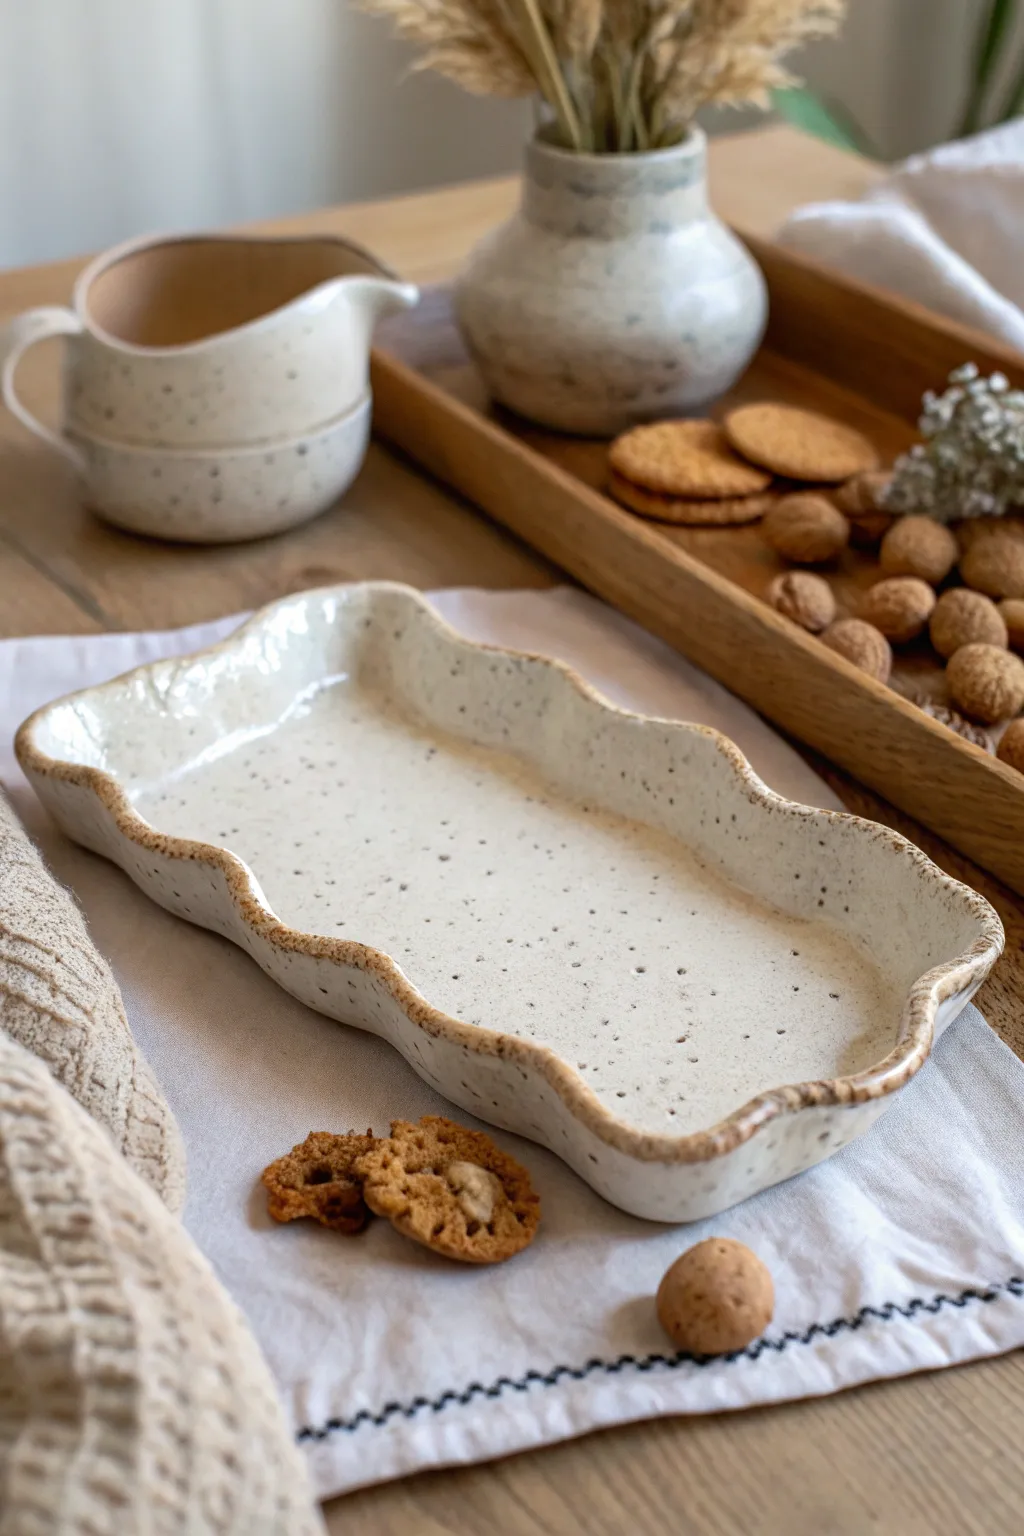
Embrace the beauty of imperfection with this lovely stoneware rolling tray, featuring gentle undulating rims that feel soft and organic in the hand. The creamy, speckled glaze finish paired with toasted edges gives it a cozy farmhouse aesthetic perfect for your tabletop.
Detailed Instructions
Materials
- Speckled stoneware clay (white or light buff)
- Roller or rolling pin
- Canvas mat or slab roller mat
- Wooden guide strips (approx. 1/4 inch thick)
- Needle tool or fettling knife
- Rib tool (clean kidney shape)
- Sponge
- Small bowl of water
- Clear or semi-transparent cone 5/6 glaze (gloss)
- Iron oxide wash (optional, for rim enhancement)
- Kiln access
Step 1: Forming the Slab
-
Prepare the Clay:
Begin by wedging your speckled stoneware clay thoroughly to remove air bubbles. This clay body is essential for achieving those tiny, natural dots seen in the finished piece, so ensure it’s well-mixed. -
Roll the Slab:
Place your clay on a canvas surface. Using wooden guide strips on either side to ensure even thickness, roll the clay out into an elongated oval or rectangle shape, aiming for about 1/4 inch thickness. -
Compress the Surface:
Take your rib tool and firmly drag it across the surface of the clay slab in multiple directions. This compression step is crucial—it aligns the clay particles to prevent warping later and creates that smooth, professional canvas for the glaze.
Control Your Warping
Slabs have memory! Flip your slab over and compress both sides during rolling. Dry the finished piece on drywall or a wooden board, loosely covered, to ensure even moisture loss.
Step 2: Shaping the Organic Form
-
Cut the Base Shape:
Using a needle tool, cut out a freeform rectangle with rounded corners. Don’t worry about perfect straight lines; a slight wobble adds to the organic charm we are aiming for. -
Lift the Edges:
Gently lift the edges of the slab all the way around. Instead of pinching them sharp, use the pads of your fingers or a damp sponge to curve the wall upward, creating a lip about 1 inch high. -
Create the Wave:
This is the signature step. With the wall lifted, use your thumb and forefinger to gently push and pull sections of the rim in alternating directions. Create modest, undulating waves rather than sharp zig-zags. -
Refine the Rim:
Use a damp sponge to smooth over the top edge of the rim. You want to round it off completely so there are no sharp angles, matching the soft aesthetic of the photo. -
Dry Slowly:
Cover the tray Loosely with plastic to let it dry very slowly to the leather-hard stage. Because flat slabs like this love to warp, I usually place a small weight bag in the center during the initial drying phase.
Step 3: Glazing and Finishing
-
Bisque Fire:
Once bone dry, fire the piece in the kiln to a bisque temperature (usually cone 04) to prepare it for glazing. -
Clean and Wax:
Wipe the bisque ware with a damp sponge to remove dust. Apply wax resist to the entire bottom foot of the tray to prevent it sticking to the kiln shelf. -
Apply the Glaze:
Pour a creamy, semi-transparent gloss glaze over the tray or dip it. You want a glaze that breaks nicely over texture. Ensure the coverage is even but not too thick, as we want the clay’s natural speckles to show through. -
Accentuate the Rim:
To recreate that toasted brown edge, wipe the glaze off just the very top rim with a sponge. Alternatively, paint a very thin line of iron oxide wash along the edge. -
Final Fire:
Load the tray into the kiln for the final glaze firing, typically to cone 5 or 6 depending on your clay body specifications.
Add Texture
Before lifting the walls, lightly press a piece of rough linen or lace into the wet clay slab. The glaze will pool in these depressions, adding depth to the surface.
Once cooled, your tray is ready to serve as a stunning, custom catch-all or serving dish


Minimal Round Tray With a Deep Lip

This elegant rolling tray features a mesmerizing deep blue glaze pooled in the center, contrasting beautifully with a speckled stone-colored exterior. Its substantial, high-walled design serves both form and function, preventing spills while offering a modern, minimalist aesthetic.
Step-by-Step
Materials
- Speckled stoneware clay (approx. 2 lbs)
- Rolling pin
- Canvas work surface or slab mat
- Pin tool or needle tool
- Circular template (paper plate or bucket lid, approx. 8-9 inches)
- Ruler or long straight edge
- Scoring tool (serrated rib)
- Slip (clay mixed with water)
- Potter’s knife or fettling knife
- Wooden modeling tool
- Soft sponge
- Deep cobalt blue glossy glaze
- Clear matte or satin glaze (optional for exterior)
- Small paintbrush for wax resist (optional)
Step 1: Creating the Base and Walls
-
Prepare the slab:
Begin by wedging your speckled stoneware clay to remove air bubbles. Roll it out into an even slab about 1/4 inch thick. I find turning the slab frequently helps maintain an even thickness. -
Cut the base:
Place your circular template onto the slab. Using your neeedle tool, trace and cut out a perfect circle. Set the excess clay aside. -
Measure the wall strip:
Gather the remaining clay, re-roll it to the same 1/4 inch thickness, and use a ruler to cut a long, rectangular strip. Width should be roughly 1.5 inches for that deep lip look. -
Check the length:
Ensure the strip is long enough to wrap around the entire circumference of your circle base with a little overlap. It’s better to cut it too long than too short. -
Prepare the connection points:
Score (scratch up) the top edge of your circular base all the way around. Do the same to one long edge of your rectangular strip. -
Apply slip:
Dab a generous amount of slip onto the scored areas of both pieces. This glue acts as the bonding agent for the clay.
Clean Join Trick
When blending the wall to the base, roll a very thin ‘coil’ of clay (like a spaghetti noodle) and press it into the interior corner seam before smoothing. This prevents future cracking.
Step 2: Assembly and Refining
-
Attach the wall:
carefully stand the strip on top of the circle base, matching the scored edges. Curl it around the perimeter until the ends meet. -
Join the seam:
Cut through both overlapping ends at a 45-degree angle to create a clean bevel cut. Score, slip, and press these ends together firmly. -
Blend the interior:
Use a wooden modeling tool to blend the clay from the wall down onto the base on the inside. Smooth strictly downward to create a seamless transition. -
Reinforce the exterior:
Flip the blending motion on the outside: pull clay from the base up onto the wall to ensure a strong structural bond. -
Smooth the lip:
Run a damp sponge along the top rim to round off any sharp edges. The lip should look soft and uniform, mirroring the piece in the photo. -
Dry slowly:
Cover the tray loosely with plastic to let it dry slowly to a leather-hard state. This prevents the base from warping or pulling away from the walls. -
Bisque fire:
Once bone dry, fire the piece in a kiln to cone 04 (or according to your clay body’s instructions).
Warped Bottom?
If the base lifts up in the middle during drying, gently weigh it down with a small sandbag or a bag of rice while it dries to keep it perfectly flat.
Step 3: Glazing
-
Clean surface:
Wipe the bisque-fired tray with a damp sponge to remove any dust that might resist the glaze. -
Interior glaze application:
Pour a glossy, deep cobalt blue glaze into the center of the tray. Swirl it around carefully to coat the bottom and the interior walls evenly. -
Pour out excess:
Quickly pour out the excess glaze and clean any drips off the rim immediately with a sponge. You want the blue to stop exactly at the top interior edge. -
Exterior treatment:
Leave the exterior unglazed to show off the raw, speckled clay texture, or apply a very thin coat of clear matte glaze if you prefer a sealed surface. -
Rim detailing:
Wipe the very top rim of the clay with a damp sponge to expose a thin line of raw clay. This creates the ‘halo’ effect seen in the reference image. -
Final wipe:
Flip the tray over and meticulously clean the bottom so no glaze touches the kiln shelf. -
Glaze fire:
Fire the piece a final time to cone 5/6 (mid-range) to mature the clay and melt the blue glaze into a deep, glassy pool.
Once cooled, your tray is ready to hold trinkets or essentials with sturdy style

The Complete Guide to Pottery Troubleshooting
Uncover the most common ceramic mistakes—from cracking clay to failed glazes—and learn how to fix them fast.
Two-Tone Rim-Dipped Rolling Tray
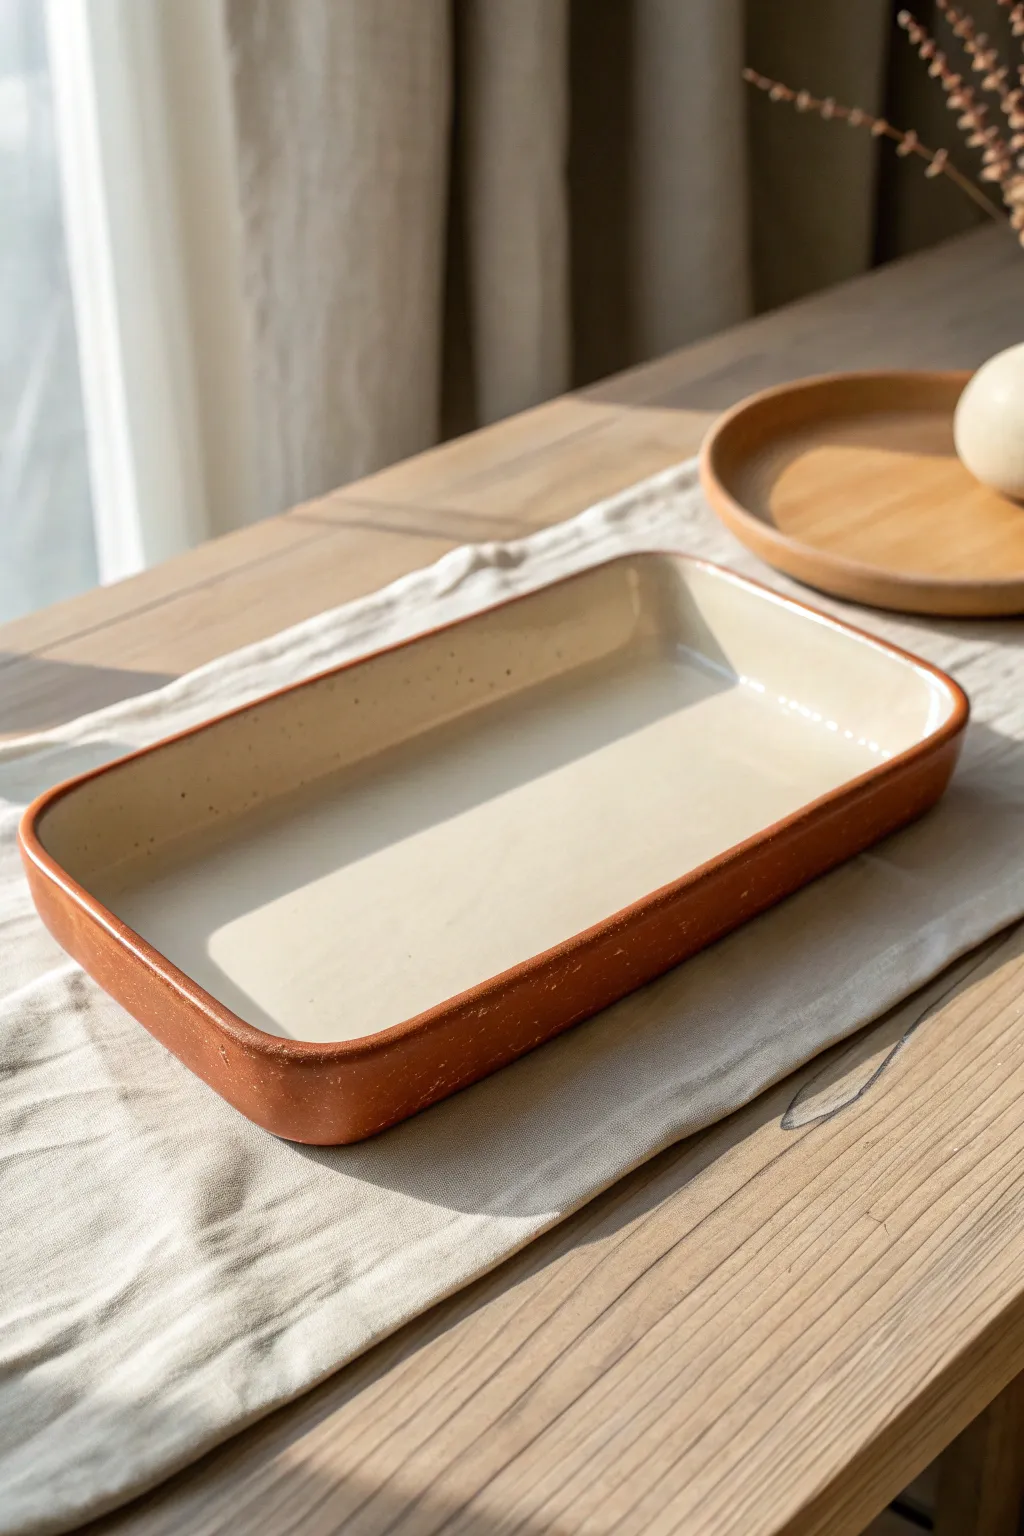
For a sleek, modern update to the classic rolling tray, this project combines raw texture with a smooth finish. The two-tone look mimics high-end ceramics, featuring a rich terracotta exterior that contrasts beautifully with a creamy, glazed-effect interior.
Step-by-Step Tutorial
Materials
- Air-dry clay (terracotta color)
- Rolling pin
- Rolling guides or wooden slats (approx. 5-6mm thick)
- Rectangular template (thick cardstock)
- Sharp craft knife or scalpel
- Small sponge and water
- Fine-grit sandpaper (220 and 400 grit)
- Glossy cream or off-white acrylic paint
- High-gloss varnish or polymer clay glaze
- Flat synthetic paintbrush
- Painter’s tape or liquid mask (optional)
Step 1: Shaping the Base
-
Condition the Clay:
Begin by kneading a large handful of terracotta air-dry clay. Work it in your hands until it becomes pliable and warm, removing any air bubbles that could cause cracks later. -
Roll the Slab:
Place your clay on a smooth work surface or canvas cloth. Use your rolling guides on either side to ensure an even thickness, then roll the clay out into a large, consistent slab about 5-6mm thick. -
Cut the Rectangle:
Lay your cardstock template onto the clay slab. Using a sharp craft knife held vertically, trace around the template to cut out a clean rectangle. Remove the excess clay. -
Gently Curve the Edges:
Instead of adding separate walls, we will lift the edges of the slab itself. Carefully turn up the outer 1.5cm of the rectangle all the way around to create a shallow rim. You want a soft curve, not a sharp 90-degree angle. -
Refine the Corners:
As you lift the sides, the corners will bunch up. Gently pinch and smooth the excess clay at the corners to round them off, blending the clay into a continuous, seamless wall. -
Smooth with Water:
Dip your finger or a small sponge into water—just a tiny amount—and run it over the rim and interior surface to erase fingerprints and smooth out any small imperfections.
Uneven Rim Lines?
If your painted rim looks wobbly, use a very fine-tip brush dipped in a tiny bit of water to clean up the edge while the paint is still wet, or gently scrape dry paint away with an X-Acto knife.
Step 2: Drying and Refining
-
Initial Drying:
Place the tray on a wire rack to allow air circulation. Let it dry for at least 24-48 hours. I find flipping it over halfway through the drying process helps prevent warping. -
Sanding the Edges:
Once bone dry, take your 220-grit sandpaper and gently sand the rim to ensure it is level and uniform in height. -
Smoothing the Interior:
Sand the interior flat surface to ensure it is perfectly smooth for the ‘glaze’ layer. Using circular motions works best here. -
Dust Removal:
Wipe the entire piece down with a slightly damp cloth or a dry tack cloth to remove all sanding dust before painting.
Super Smooth Finish
For a true glass-like finish on the interior ‘glaze,’ apply three very thin coats of gloss varnish rather than one thick one, letting each layer dry completely in between.
Step 3: The Faux-Glaze Finish
-
Masking (Optional):
If you are worried about unsteady hands, apply a strip of painter’s tape just below the outer rim on the exterior so you don’t accidentally paint the raw terracotta sides. -
First Coat of Cream:
Using a flat synthetic brush, apply a layer of glossy cream acrylic paint to the interior bottom and the inner walls. Carry the paint just over the top lip of the rim. -
Refining the Rim Line:
The key to this look is the rim. Carefully paint the very top edge so the cream color is visible from above, stopping exactly where the rim curves down to the exterior wall. -
Building Opacity:
Let the first coat dry completely, then apply a second or third coat until the cream color is fully opaque and rich. -
Applying the Gloss:
Once the paint is cured, apply a thick, even layer of high-gloss varnish or glaze over the painted cream areas only. This mimics the look of fired ceramic glaze. -
Sealing the Exterior:
o protect the raw terracotta look without making it shiny, apply a matte varnish to the unpainted exterior surfaces. -
Final Cure:
Allow the varnish to cure fully according to the bottle instructions before using the tray.
Now you have a sophisticated, minimalist tray that brings an artisan ceramic feel to your space without needing a kiln
Marbled Clay Rolling Tray Surface
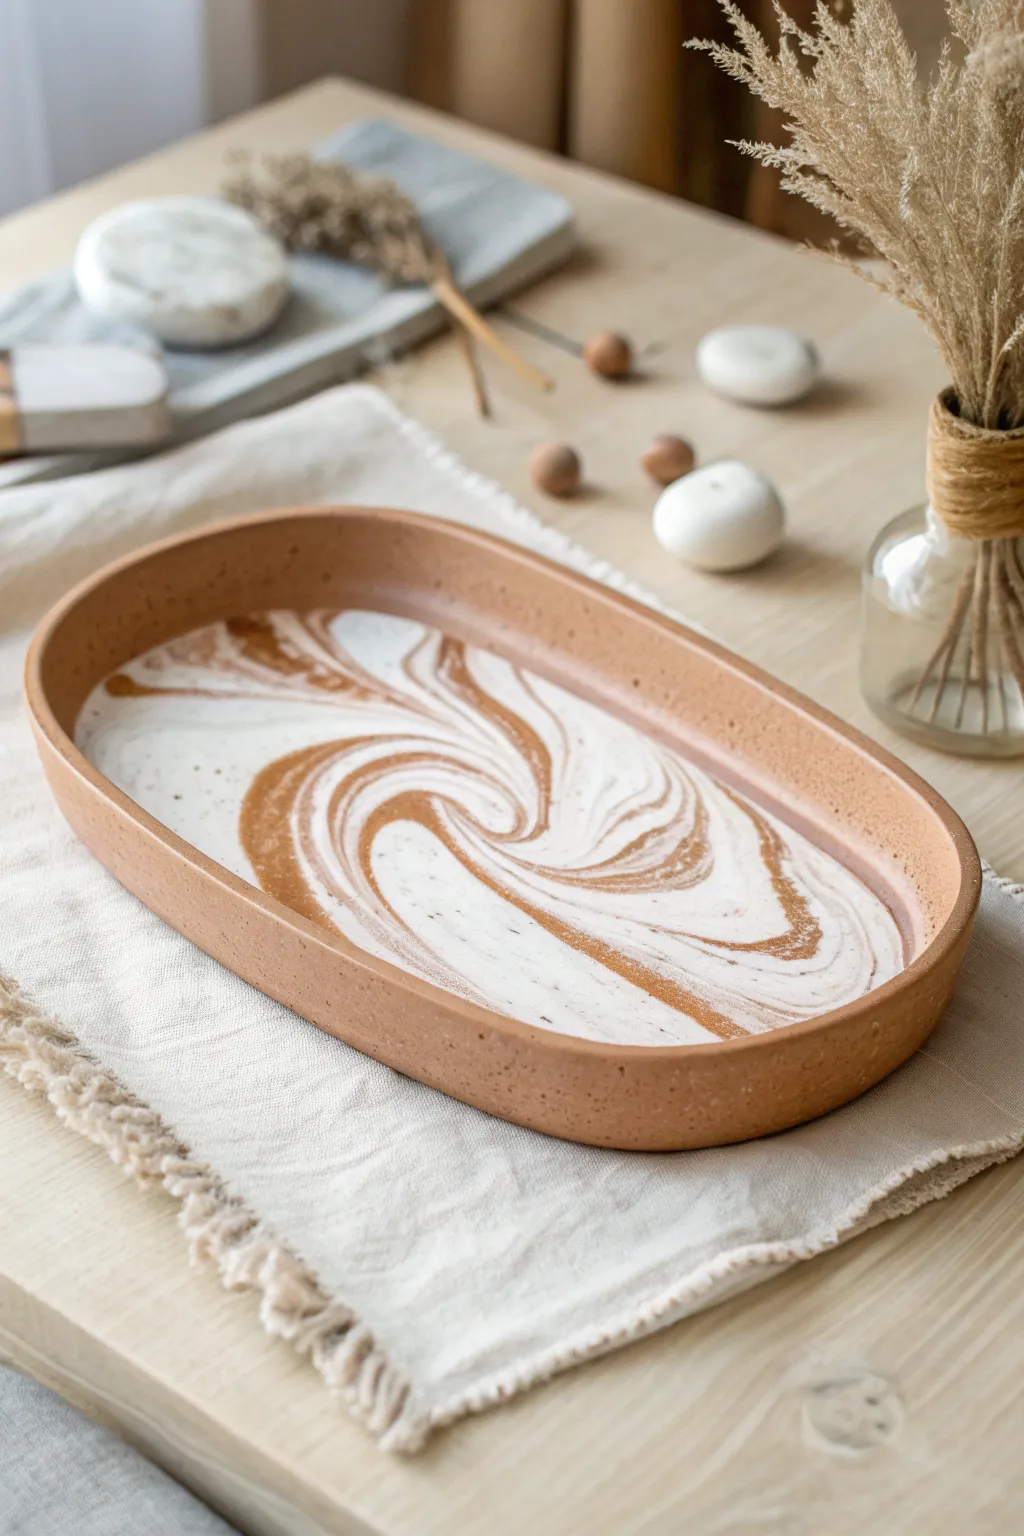
This elegant rolling tray features a warm, earthy aesthetic with a mesmerizing marbled surface that mimics natural stone patterns. The contrast between the solid terracotta rim and the creamy white and brown swirls creates a sophisticated, modern piece for your home.
Step-by-Step Guide
Materials
- Terracotta-colored polymer clay (approx. 4oz)
- White or translucent white polymer clay (approx. 2oz)
- Speckled granite or beige polymer clay (optional, for texture)
- Acrylic rolling pin or glass bottle
- Oval or oblong clay cutter (or a paper template and craft knife)
- Smooth work surface (ceramic tile or glass mat)
- Clay slicer or tissue blade
- Sandpaper (fine grit, 400-1000)
- Matte or satin polyurethane varnish
- Soft bristle brush
Step 1: Preparing the Marbled Base
-
Condition the clay:
Start by warming up your terracotta, white, and optional speckled clay in your hands until they are soft and pliable. This prevents cracking during the rolling process. -
Create clay snakes:
Roll each color into several long, thin ropes or ‘snakes’ of varying thicknesses. Keep the ratio about 60% white and 40% terracotta to achieve a light, airy base. -
Twist and combine:
Gather your clay snakes into a bundle and twist them together firmly. I like to fold the twisted log in half and twist again to increase the complexity of the marbling. -
Roll out the slab:
Using your acrylic rolling pin, flatten the twisted log into a slab about 1/4 inch thick. Roll in different directions to stretch the marble pattern organically. -
Check the pattern:
Examine your slab. If the swirls aren’t defined enough, you can fold it once more and re-roll, but be careful not to over-mix, or the colors will turn muddy. -
Cut the base shape:
Place your oval cutter or paper template onto the nicest part of the marbled slab. Cut out the base shape cleanly with a craft knife or by pressing down the cutter.
Muddy Colors?
If your marbling looks gray or muddy, you’ve over-mixed the colors. Stop rolling sooner next time. The distinct lines between colors need to remain visible before you flatten the slab.
Step 2: Building the Rim
-
Prepare the rim clay:
Condition a large portion of solid terracotta clay. Roll it into a long, uniform snake slightly thicker than your base slab. -
Flatten the strip:
Gently flatten this snake with your roller to create a long, customized ribbon of clay. This strip should be about 3/4 inch tall to form the walls of the tray. -
Attach the wall:
Wrap the terracotta strip around the perimeter of your marbled base. Place it on top of the edge of the base rather than pressing it against the side for a stronger bond. -
Blend the seams:
On the inside of the tray, use a modeling tool or your fingertip to smudge the clay from the wall down into the base, creating a seamless transition. Repeat this on the outside where the wall meets the base. -
Smooth the join:
Where the two ends of the wall strip meet, slice them at a diagonal angle. Press them together and smooth the seam until it is invisible. -
Refine the shape:
check the overall shape of the oval. Gently push outwards from the inside to ensure the walls stand straight or flare slightly outward according to your preference.
Gold Veins
For a luxe upgrade, add thin snakes of gold leaf or metallic gold polymer clay into your initial twist. This creates shimmering metallic veins running through the stone pattern.
Step 3: Finishing Touches
-
Add texture (optional):
If you want that speckled, stone-like look on the rim, you can gently lightly press coarse salt or sand into the surface and brush it off later, or use pre-speckled clay. -
Bake the piece:
Place your tray on a ceramic tile or baking sheet. Bake according to your polymer clay manufacturer’s instructions, usually at 275°F (135°C) for 30 minutes per 1/4 inch of thickness. -
Cool down:
Allow the tray to cool completely in the oven with the door slightly ajar. Sudden temperature changes can sometimes cause brittle clay. -
Wet sand edges:
Once cool, dip your sandpaper in water and gently sand the top rim and any rough edges until they are buttery smooth. -
Seal the surface:
Apply a thin coat of matte or satin polyurethane varnish to the inside and rim. This seals the clay and protects the beautiful marbled pattern from wear.
Now you have a stunning, minimal tray ready to organize your space with style


What Really Happens Inside the Kiln
Learn how time and temperature work together inside the kiln to transform clay into durable ceramic.
Terrazzo-Speckled Rolling Tray Look
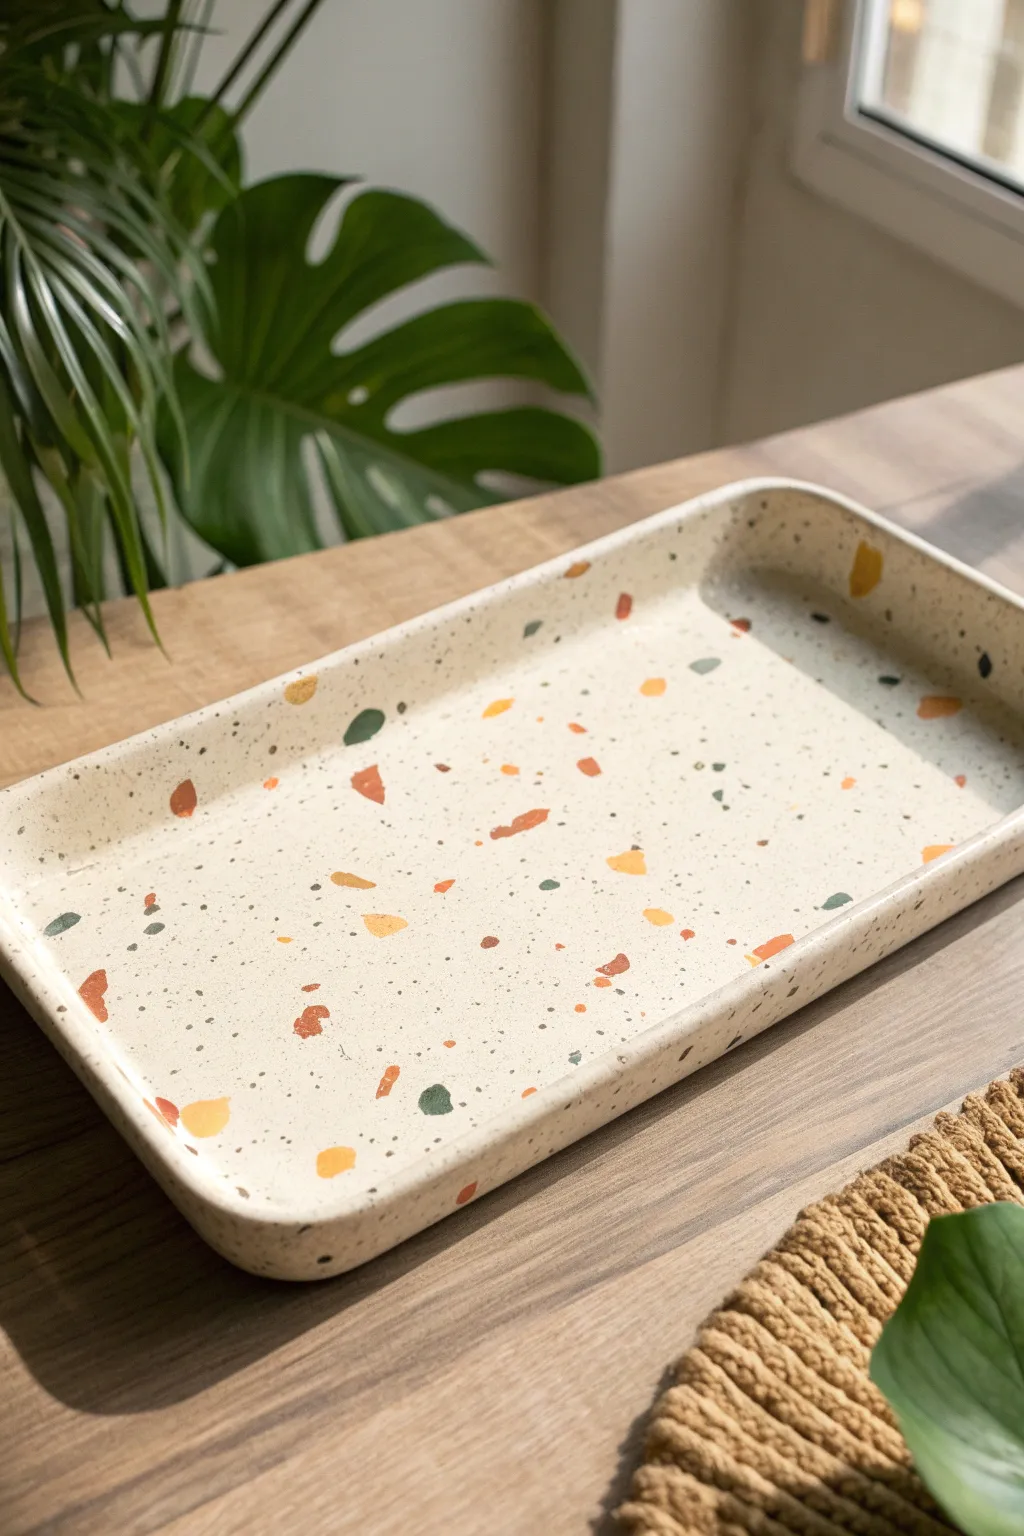
Bring a splash of Mediterranean warmth to your space with this rectangular rolling tray featuring a faux terrazzo finish. The creamy base and scattered confetti chips in terracotta, mustard, and sage green create a modern yet playful aesthetic.
Step-by-Step Tutorial
Materials
- Polymer clay (white or beige for the base)
- Polymer clay (terracotta, mustard yellow, sage green, and dark grey for the chips)
- Acrylic roller
- Tissue blade or sharp craft knife
- Rectangular tray template or ruler
- Baking sheet
- Parchment paper
- Sandpaper (various grits: 400, 600, 1000)
- Matte or satin sealant (polyurethane or clay-specific varnish)
- Soft paintbrush
- Old toothbrush (optional for speckling)
Step 1: Prepping the Chips
-
Condition the colors:
Start by conditioning your colored clay blocks (terracotta, mustard, sage, and dark grey) until they are soft and pliable. -
Roll thin sheets:
Roll each color out into a very thin sheet. The thinner these sheets are, the more natural the terrazzo chips will look later. -
Rough chop:
Using your tissue blade, chop these thin sheets into random, jagged little pieces. Aim for variety in size, from tiny specks to slightly larger chunks. -
Set aside:
Keep your pile of confetti chips separated by color or mixed together, depending on your preferred workflow, and set them aside for a moment.
Clean Rolling
Use parchment paper between your roller and the clay when embedding the chips. This prevents the colors from smearing onto your roller or the white background.
Step 2: Forming the Base
-
Condition base clay:
Take a large amount of your white or beige clay and condition it thoroughly. This project uses quite a bit of clay to ensure the tray is sturdy. -
Roll the slab:
Roll the base clay into a thick, even slab, approximately 1/4 inch thick. Make sure it’s large enough to accommodate your desired rectangular size. -
Scatter the chips:
Take your chopped colored chips and sprinkle them liberally over the white slab. Don’t overthink the placement; random scattering looks best. -
Add fine specks:
For that realistic stone look seen in the photo, take a tiny bit of the dark grey clay, crumble it into dust-like particles, and sprinkle it between the larger chips. -
Embed the pattern:
Place a sheet of parchment paper over the slab and roll over it firmly with your acrylic roller. This presses the chips into the base clay so the surface becomes smooth and level again.
Step 3: Shaping the Tray
-
Cut the rectangle:
Using a ruler and your blade, cut a clean rectangle from your terrazzo slab. Save the scraps for later projects. -
Review the underside:
I like to flip the slab over briefly to ensure no air bubbles are trapped underneath before I start lifting the edges. -
Curve the edges:
Gently lift the edges of the rectangle to create the raised rim. You can prop up the sides with extra bits of clay or rolled foil to hold the shape while baking. -
Smooth the corners:
Use your finger to smooth out the interior corners where the sides rise up, ensuring a seamless, rounded transition rather than a sharp angle. -
Final smooth:
Run your finger along the top rim to soften any sharp edges created by the cutting blade.
Make it Real Stone
Mix a small amount of translucent clay into your colorful chips before chopping them. After baking, this adds depth that mimics real polished stone or glass.
Step 4: Finishing
-
Bake:
Bake the tray according to the instructions on your specific package of polymer clay. Usually, this is around 275°F (135°C) for 30 minutes, but check your brand. -
Cool down:
Allow the tray to cool completely in the oven with the door cracked open to prevent thermal shock. -
Sand for smoothness:
Once cool, wet sand the tray under running water. Start with 400 grit to even out the surface, then move to higher grits to polish the chips so they stand out clearly against the background. -
Seal:
Apply a thin layer of matte or satin varnish to protect the surface and deepen the colors without adding too much shine.
Now you have a stylish, durable tray ready to organize your desk or hold your accessories
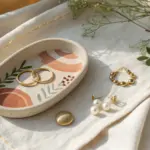
Botanical Imprint Rolling Tray
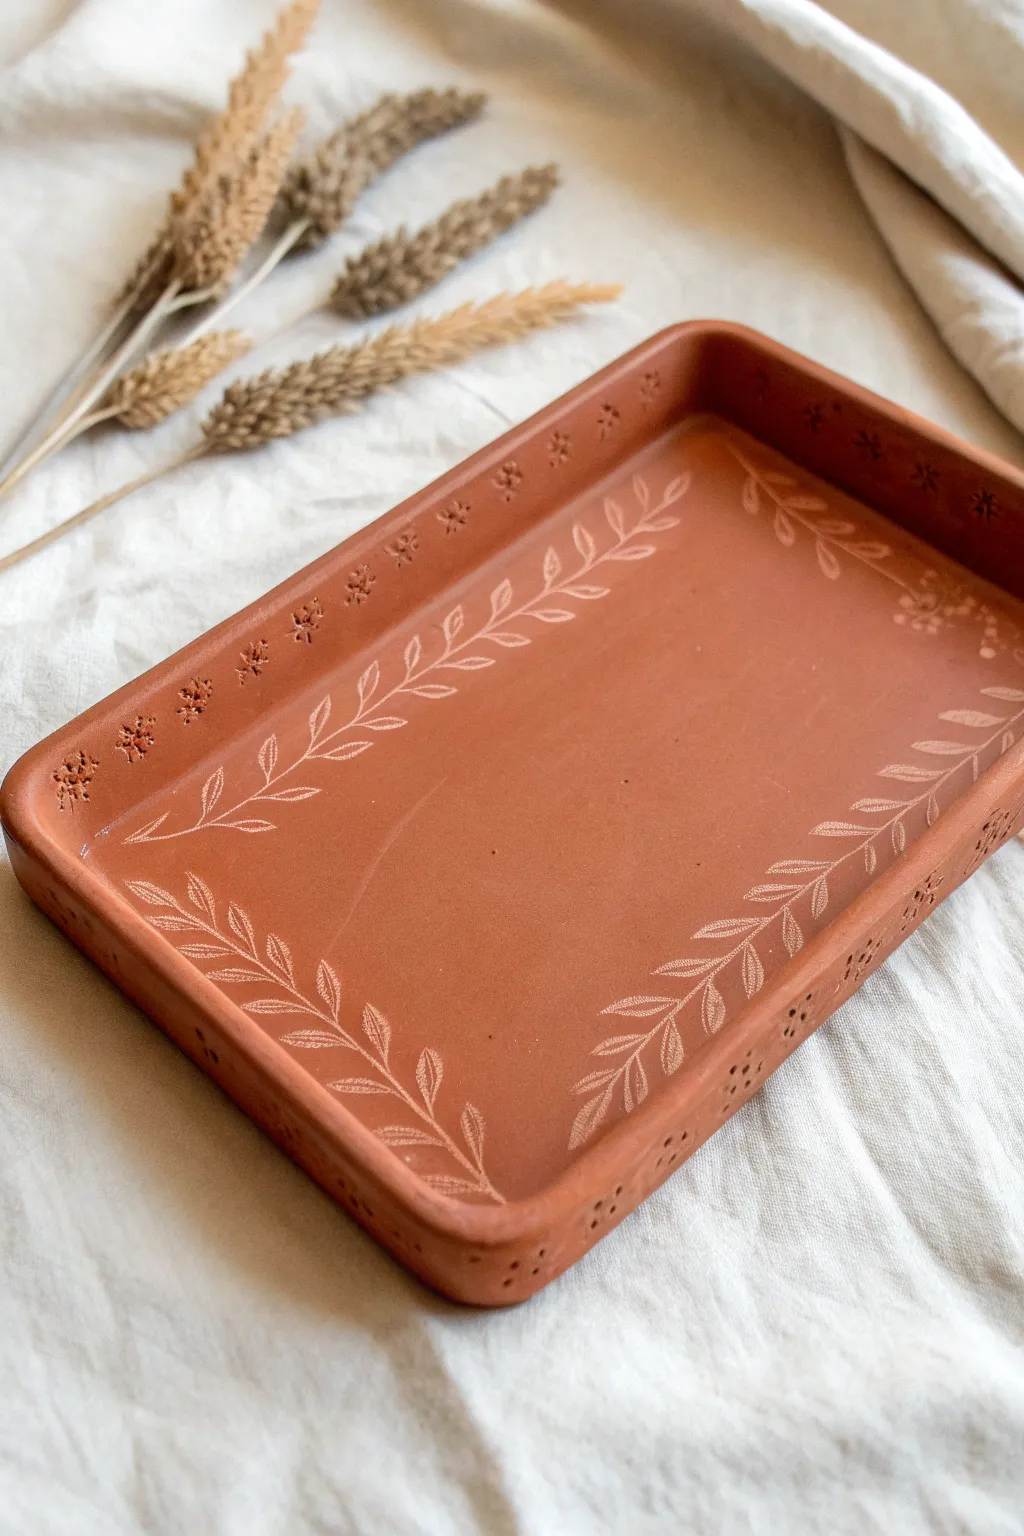
This project combines the rustic warmth of terracotta-colored clay with delicate, white botanical illustrations for a functional piece of art. The finished rolling tray features a raised rim stamped with subtle floral motifs and a hand-painted vine design that frames the center beautifully.
How-To Guide
Materials
- Terracotta-colored polymer clay or air-dry clay
- Rolling pin
- Rectangular clay cutter or ruler and craft knife
- Fine grit sandpaper
- Small floral stamp tool (or found object with texture)
- White fine-tip acrylic paint marker or white acrylic paint with size 000 brush
- Matte or satin sealant (varnish)
- Clay sculpting tools (for smoothing)
- Parchment paper or baking tile (if using polymer)
Step 1: Shaping the Base
-
Condition the Clay:
Begin by kneading your terracotta-colored clay until it is warm, pliable, and free of any air bubbles. If you are using polymer clay, this step is crucial for preventing cracks later. -
Roll Out the Slab:
Place the clay on a smooth surface or parchment paper. Roll it out to an even thickness of about 1/4 inch (6mm). Using depth guides or playing cards stacked on either side of the roller can help keep the thickness consistent. -
Cut the Rectangle:
Use a rectangular cutter or measure a rectangle (approx. 5×7 inches is a good start) with a ruler and slice it cleanly with your craft knife. -
Smooth the Edges:
Dip your clean finger in a tiny bit of water (for air-dry clay) or baby oil (for polymer clay) and gently run it along the cut edges to round them off slightly.
Uneven Clay Surface?
If your tray warped during baking or drying, you can sand the bottom flat with heavy-grit sandpaper. For air-dry clay, placing a light book on top while it dries helps keep it flat.
Step 2: Building the Rim
-
Create Coil Strips:
Roll out long, thin snakes of clay, then flatten them slightly into strips that match the thickness of your base. Alternatively, cut strips from your remaining rolled slab. -
Attach the Walls:
Place the strips on top of the base slab’s edges to create a rim. Score and slip the connection points if using air-dry clay; for polymer, blend the clay seams together firmly using a sculpting tool until the join is invisible. -
Refine the Form:
Smooth the inner corners of the tray curve so they are rounded rather than sharp angles. This makes the tray easier to clean and use later on. -
Add Decorative Stamping:
Using a small floral stamp tool, press a repeating pattern along the top flat edge of the rim. Space them evenly for a tidy look. -
Final Surface Prep:
Check the main interior surface one last time. It must be perfectly smooth for the painting step, so gently buff out any fingerprints. -
Cure the Clay:
Bake the polymer clay according to the package instructions (usually 275°F/135°C for 15-30 mins per 1/4 inch) or let air-dry clay sit for 24-48 hours until fully hardened.
Level Up: Sgraffito
Paint the dried clay white first, let it dry, then carve through the paint to reveal the terracotta color underneath for a stunning inverted ‘sgraffito’ effect.
Step 3: Painting and Finishing
-
Sand for Texture:
Once fully cured and cooled, lightly sand any rough spots or sharp edges on the rim. Wipe away all dust with a damp cloth. -
Sketch the Design:
Lightly sketch your vine placement with a pencil directly on the clay. Aim for two curving vines that mirror each other along the long sides of the tray. -
Paint the Stems:
Using a white paint pen or a fine brush, draw the central curved line for the stem first. Keep your hand steady and use light pressure for a thin, delicate line. -
Add Leaves:
Paint small, almond-shaped leaves branching off the stem. I like to angle them slightly upward towards the tip of the vine to simulate natural growth. -
Detail the Leaves:
For extra realism, add a very fine line down the center of larger leaves, leaving the rest of the leaf shape as an outline rather than filling it in solid. -
Seal the Artwork:
Allow the paint to dry completely (at least 1 hour). Apply two thin coats of matte or satin varnish to protect the surface from scratches and wear.
Now you have a beautifully custom tray ready to hold your trinkets or serve as a unique decorative accent

TRACK YOUR CERAMIC JOURNEY
Capture glaze tests, firing details, and creative progress—all in one simple printable. Make your projects easier to repeat and improve.
Celestial Moon-and-Stars Rolling Tray
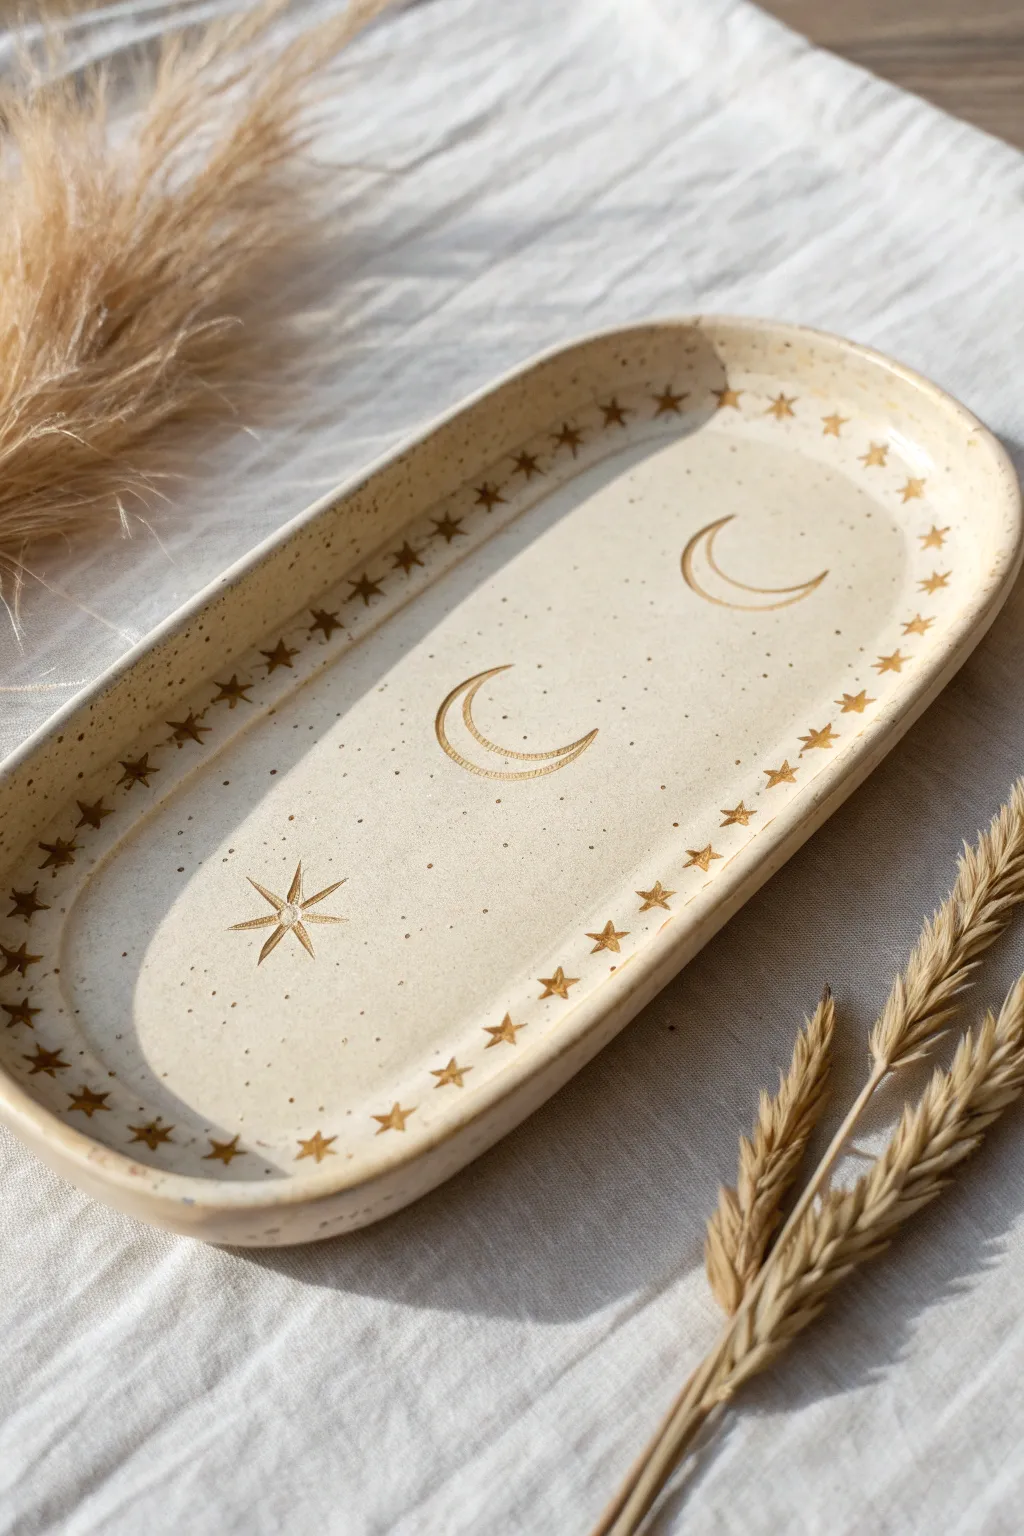
This elegant tray captures the magic of a starry night with its warm, speckled finish and delicate gold inlay. The long, pill-shaped design showcases engraved crescent moons and stars, creating a functional piece of art that feels both modern and mythical.
Step-by-Step
Materials
- Polymer clay (beige or cream with granite/speckle effect)
- Rolling pin or acrylic roller
- Oval or pill-shaped clay cutter (approx. 7-8 inches)
- Small star stamps (5-point)
- Moon and starburst stamps (or sculpting needle tool)
- Gold acrylic paint
- Fine-grit sandpaper (400 and 1000 grit)
- Gloss or satin polyurethane varnish
- Small paintbrush
- Paper towel or baby wipes
- Baking sheet and parchment paper
Step 1: Shaping the Base
-
Prepare the clay:
Begin by conditioning your speckled beige polymer clay until it is soft and malleable. Warm clay is less prone to cracking during the shaping process. -
Roll it out:
Roll the clay into a slab that is approximately 1/4 inch thick. You want it substantial enough to hold the shape of the rim but not too heavy. -
Cut the shape:
Use your large pill-shaped cutter to punch out the main form. If you don’t have a cutter this size, create a paper template and trace around it with a craft knife. -
Create the rim:
Gently lift the edges of the oval slab to create a raised rim. Smooth the transition from the base to the wall with your thumbs, ensuring there are no sharp creases. -
Smooth the edges:
Dip your finger in a little bit of water (or clay softener) and run it along the rim to create a perfectly rounded, organic edge.
Use Liquid Clay
Mix just a drop of liquid polymer clay into your acrylic paint before applying it to the baked piece. It helps the paint bond permanently to the plastic surface.
Step 2: Imprinting the Celestial Design
-
Mark the center:
Lightly visualize where your three main center elements will go. You’ll want the starburst on the left and two crescent moons facing each other towards the right. -
Stamp the border:
Using a small 5-point star stamp, press a border of stars around the inner perimeter of the tray. Space them evenly, about a half-inch apart. -
Create the moons:
If you have moon stamps, press them into the clay firmly but not too deep. If doing this freehand, use a needle tool to drag the outline of the crescent shapes, then press down slightly inside the outline to create a depression. -
Carve the starburst:
Use a needle tool or small knife to carve the eight-pointed star. Start with a simple cross, then add the diagonal rays. I like to press the tool slightly deeper at the center of the star to give it dimension. -
Add texture:
For the subtle sparkly texture seen in the background, gently poke tiny dots randomly around the main shapes using the very tip of a needle tool. -
Bake the tray:
Place the tray on parchment paper and bake according to your clay manufacturer’s instructions (usually 275°F for 15-30 minutes). Let it cool completely.
Step 3: Gilding and Finishing
-
Sand the surface:
Once cool, lightly sand the edges and flat surfaces with 400-grit sandpaper to remove any fingerprints, followed by 1000-grit for a smooth finish. -
Apply the gold wash:
Paint gold acrylic paint into all the stamped areas—the stars, moons, and border. Don’t worry about staying perfectly inside the lines. -
Wipe away excess:
While the paint is still slightly tacky but not wet, take a damp paper towel or baby wipe and wipe across the surface. This removes paint from the high points but leaves the gold trapped in the engraved recesses. -
Clean uph:
If there is stubborn gold haze left on the beige clay, a quick buff with a clean, dry cloth or a tiny sanding with fine grit paper will remove it. -
Seal the piece:
Apply two thin coats of satin or gloss polyurethane varnish to protect the gold paint and give the ceramic-like finish a durable shield.
Fixing Warped Trays
If the tray bows up in the middle while baking, immediately place a heavy book on top of it while it is cooling to press it back into a flat shape.
Once the varnish cures, you have a stunning handmade tray perfect for holding jewelry or trinkets.
Personalized Initials or Date Rolling Tray
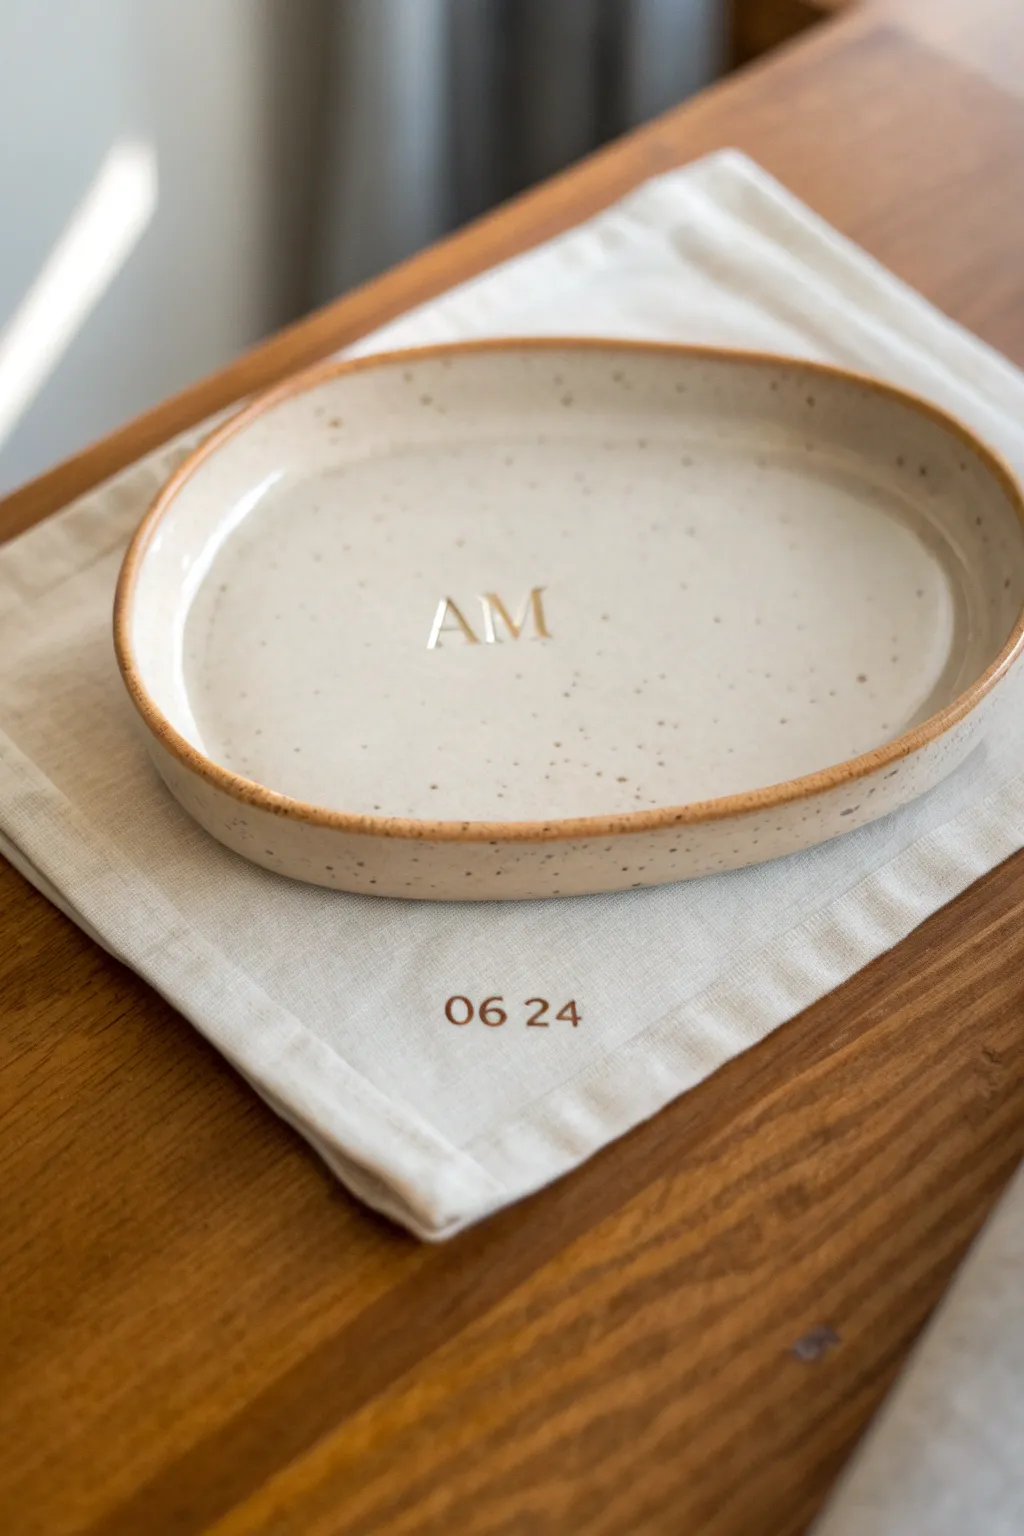
Create a sophisticated, personalized rolling tray that looks like high-end boutique pottery. This project achieves a timeless aesthetic using speckled clay and simple stamping for a personalized touch.
Step-by-Step Tutorial
Materials
- Speckled stoneware clay (white or cream base)
- Wooden rolling pin
- Canvas mat or slab roller
- Oval paper template
- Needle tool or fettling knife
- Small letter stamp set (serif font)
- Sponge
- Pottery rib (smooth kidney)
- Small bowl of water
- Clear or transparent glossy glaze
- Kiln (or access to a firing service)
- Optional: Canvas fabric for styling
Step 1: Shaping the Base
-
Roll the Slab:
Begin by wedging your speckled clay to remove air bubbles. Roll it out on your canvas mat to an even thickness of about 1/4 inch. I like to roll in multiple directions to ensure the clay particles are compressed well. -
Smooth the Surface:
Before cutting, take a rubber rib and gently compress the surface of the slab. This smooths out the canvas texture and aligns the clay platelets to prevent warping later. -
Cut the Oval:
Place your oval paper template onto the smooth slab. Trace around the edge with a needle tool held vertically to get a clean cut, then peel away the excess clay. -
Build the Walls:
Roll a long, thin coil of clay, approximately 3/8 inch thick. Score the outer edge of your oval base and the bottom of the coil using a serrated tool or fork. -
Attach the Coil:
Apply a small amount of slip (watered-down clay) to the scored areas. Gently press the coil onto the rim of the base, joining the ends together seamlessly. -
Blend the Seams:
Use a modeling tool or your thumb to smudge the clay from the coil down onto the base on both the inside and outside. This creates a strong bond.
Stamp Definition
If your stamped letters lose clarity after glazing often, try filling the impressions with a dark iron oxide wash before glazing to make them pop.
Step 2: Refining and Personalizing
-
Smooth the Walls:
Once the coil is attached, use a damp sponge to smooth the transition so the walls look like they were pulled up from the base rather than added on. Pinch the rim gently to get that slightly irregular, handmade organic feel seen in the photo. -
Refine the Rim:
Run a damp chamois or sponge over the top lip of the tray. The goal is a soft, rounded edge, not a sharp one. -
Center the Stamping:
Locate the exact center of your tray. You can lightly mark it with a tool if needed, or eyeball it for a more relaxed look. -
Stamp the Initials:
Press your serif letter stamps into the center of the clay. Apply firm, even pressure, but be careful not to push all the way through the bottom slab. -
Add the Date:
If you are making a matching textile piece or want to date the bottom of the tray, stamp the numerical date near the foot or edge. Clean up any little clay crumbs raised by the stamping with a soft brush. -
Slow Drying:
Loosely cover the tray with plastic and let it dry slowly to leather-hard, then bone dry. This prevents cracking, especially where the wall meets the floor.
Make It a Set
Create a matching linen pouch for storage. Stamp the fabric with fabric ink using the same date stamps for a cohesive gift set.
Step 3: Firing and Glazing
-
Bisque Fire:
Fire the bone-dry piece in a kiln to a bisque temperature (usually cone 04). This hardens the clay and prepares it for glazing. -
Expose the Rim:
For the look in the image, apply wax resist carefully to the very top rim of the tray properly before dipping. This leaves the toasted raw clay visible after the final firing. -
Glaze Application:
Dip the tray into a clear or transparent white glaze. Ensure the glaze doesn’t pool too thickly in the stamped letters, or the definition will be lost. -
Rim Cleanup:
If you didn’t use wax, use a damp sponge to wipe the glaze off the top rim to expose that raw clay contrast. -
Glaze Fire:
Fire the piece again to the maturation temperature of your specific clay body (likely cone 5 or 6 for stoneware). The heat will bring out the natural iron speckles in the clay.
This elegant tray will serve as a timeless keepsake for years to come
Built-In Groove for Papers and Tools
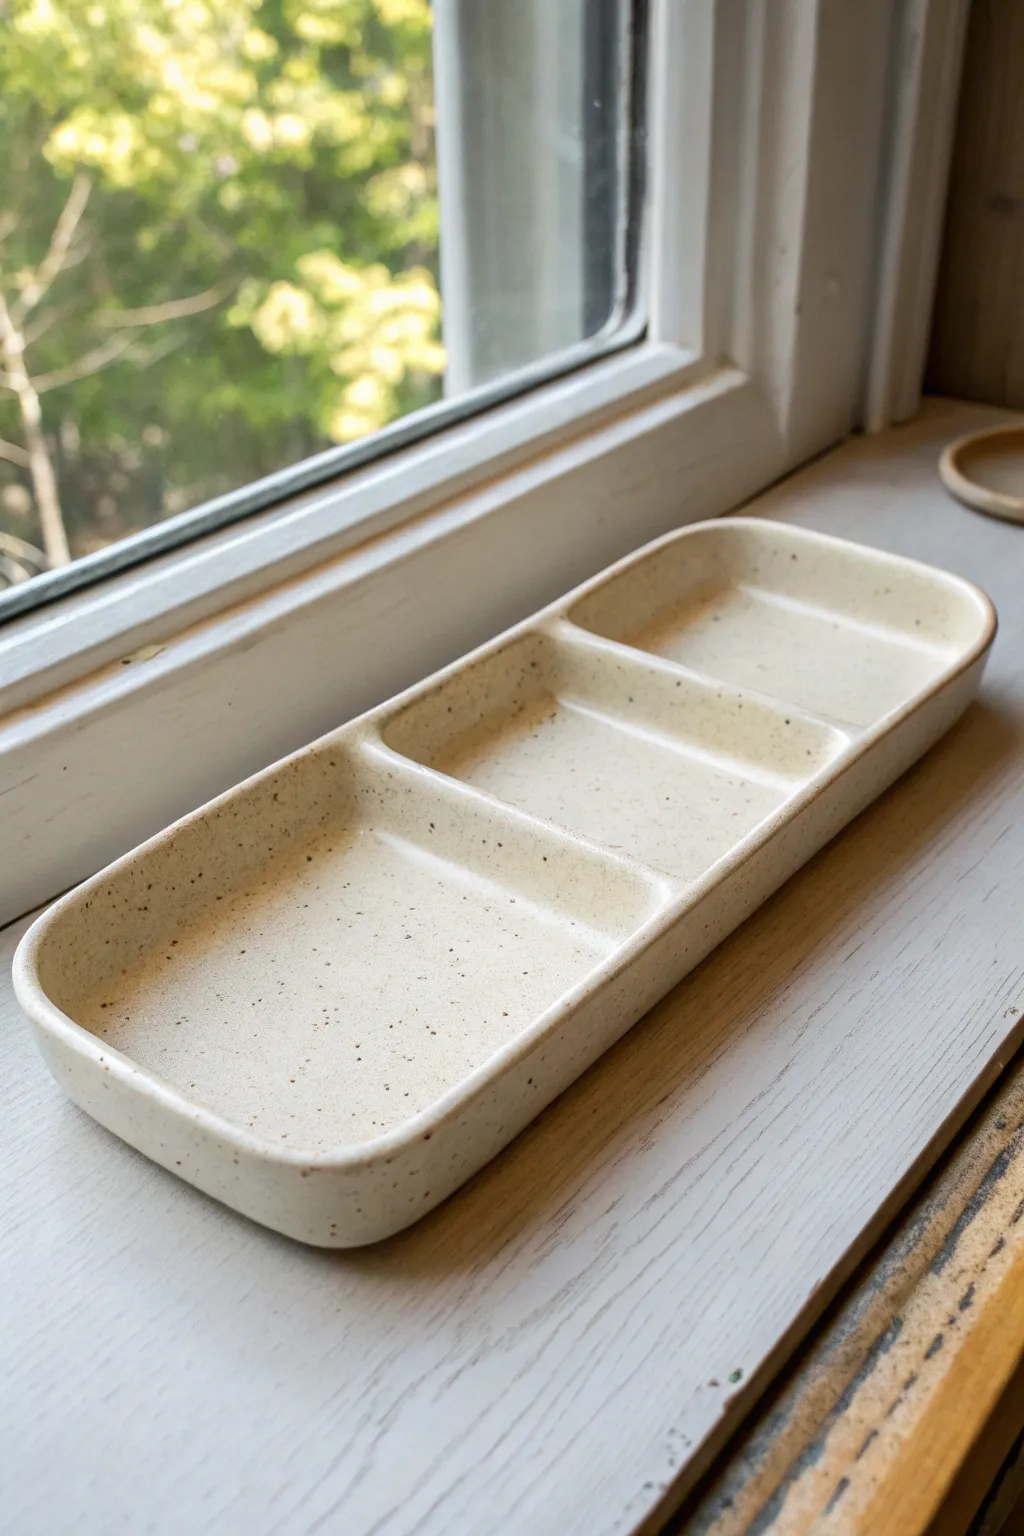
This sleek, low-profile rolling tray features three distinct compartments to keep your papers, tools, and botanicals organized but accessible. The speckled cream finish and soft, rounded corners give it a modern, organic aesthetic that looks beautiful on any windowsill or coffee table.
Step-by-Step Guide
Materials
- Speckled stoneware clay (cream or white)
- Rolling pin
- Two wooden guide strips (approx. 1/4 inch thick)
- Needle tool
- Fettling knife
- Rib tool (wooden or rubber)
- Scoring tool (or serrated rib)
- Slip (clay mixed with water)
- Sponge
- Matte white or clear glaze
Step 1: Forming the Base
-
Prepare the slab:
Begin by wedging your speckled stoneware clay thoroughly to remove air bubbles. Place the clay between two wooden guide strips on a canvas surface and roll it out until it is an even slab, roughly 1/4 inch thick. -
Compress the clay:
Take a rubber or wooden rib and firmly compress the slab on both sides. This smooths the texture and aligns the clay particles, which helps prevent warping during the drying process. -
Cut the rectangle:
Using a ruler and needle tool, cut a rectangle approximately 10 inches by 4 inches. You can adjust these dimensions based on your personal preference, but keep the proportions long and narrow. -
Round the corners:
Instead of leaving sharp 90-degree angles, gently curve the four outer corners of your rectangle. You can trace around a small jar lid or freehand this with your fettling knife for a softer look.
Warping Woes?
If your tray tends to warp while drying, try placing a small weighted bag of sand or rice inside the center compartment while it dries to hold the base flat against the table.
Step 2: Building the Walls
-
Cut wall strips:
From your remaining slab, cut long strips of clay that are about 3/4 inch to 1 inch tall. These will form the outer rim and the inner dividers. -
Score the perimeter:
take your scoring tool and roughen the top edge of your rectangular base where the walls will attach. Do the same to the bottom edge of your clay strips. -
Apply slip:
Dab a generous amount of slip onto the scored areas of the base. This acts as the glue that bonds your clay pieces together. -
Attach the outer rim:
Place the long strips onto the base to form the outer wall. Where two ends of a strip meet, cut them at a 45-degree angle, score and slip the ends, and press them firmly together. -
Blend the seams:
Use a modeling tool or your finger to blend the clay from the wall down onto the base on the inside, and from the base up onto the wall on the outside. Ensure the seam disappears completely.
Pro Tip: Clean Curves
Use a damp piece of chamois leather to run over the top rims right before setting it aside to dry. This creates an incredibly professional, ultra-smooth lip that a sponge can’t quite replicate.
Step 3: Creating the Compartments
-
Measure the dividers:
Cut two smaller strips of clay to fit the width of the tray. Place them inside the tray to visualize the spacing—you want one large section (about half the tray) and two smaller, equal sections. -
Install the dividers:
Score and slip the base and the inner walls where these dividers will sit. Press the dividers into place firmly. -
Smooth the connections:
Just like the outer walls, blend the seams where the dividers meet the floor and the side walls. To get into tight corners, I find a small, rounded wooden tool works best. -
Refine the rims:
Use a damp sponge to gently wipe the top edges of all the walls. You want them to be slightly rounded and smooth to the touch, matching the softness of the image.
Step 4: Finishing and Firing
-
Slow drying:
Loosely cover the tray with plastic and let it dry slowly over several days. Slow drying is crucial for flat pieces like trays to prevent the corners from curling up. -
Bisque fire:
Once bone dry, fire the piece to bisque temperature (usually cone 04) in a kiln. -
Glazing:
Apply a thin layer of matte white or transparent glaze. If you used speckled clay, a transparent glaze will let those beautiful natural flecks show through clearly. -
Final wipe:
Wipe the bottom of the tray clean with a sponge to ensure no glaze touches the kiln shelf, then fire again to your clay’s maturity temperature (often cone 6).
Once fired, you’ll have a wonderfully tactile, custom organizer ready for your daily rituals
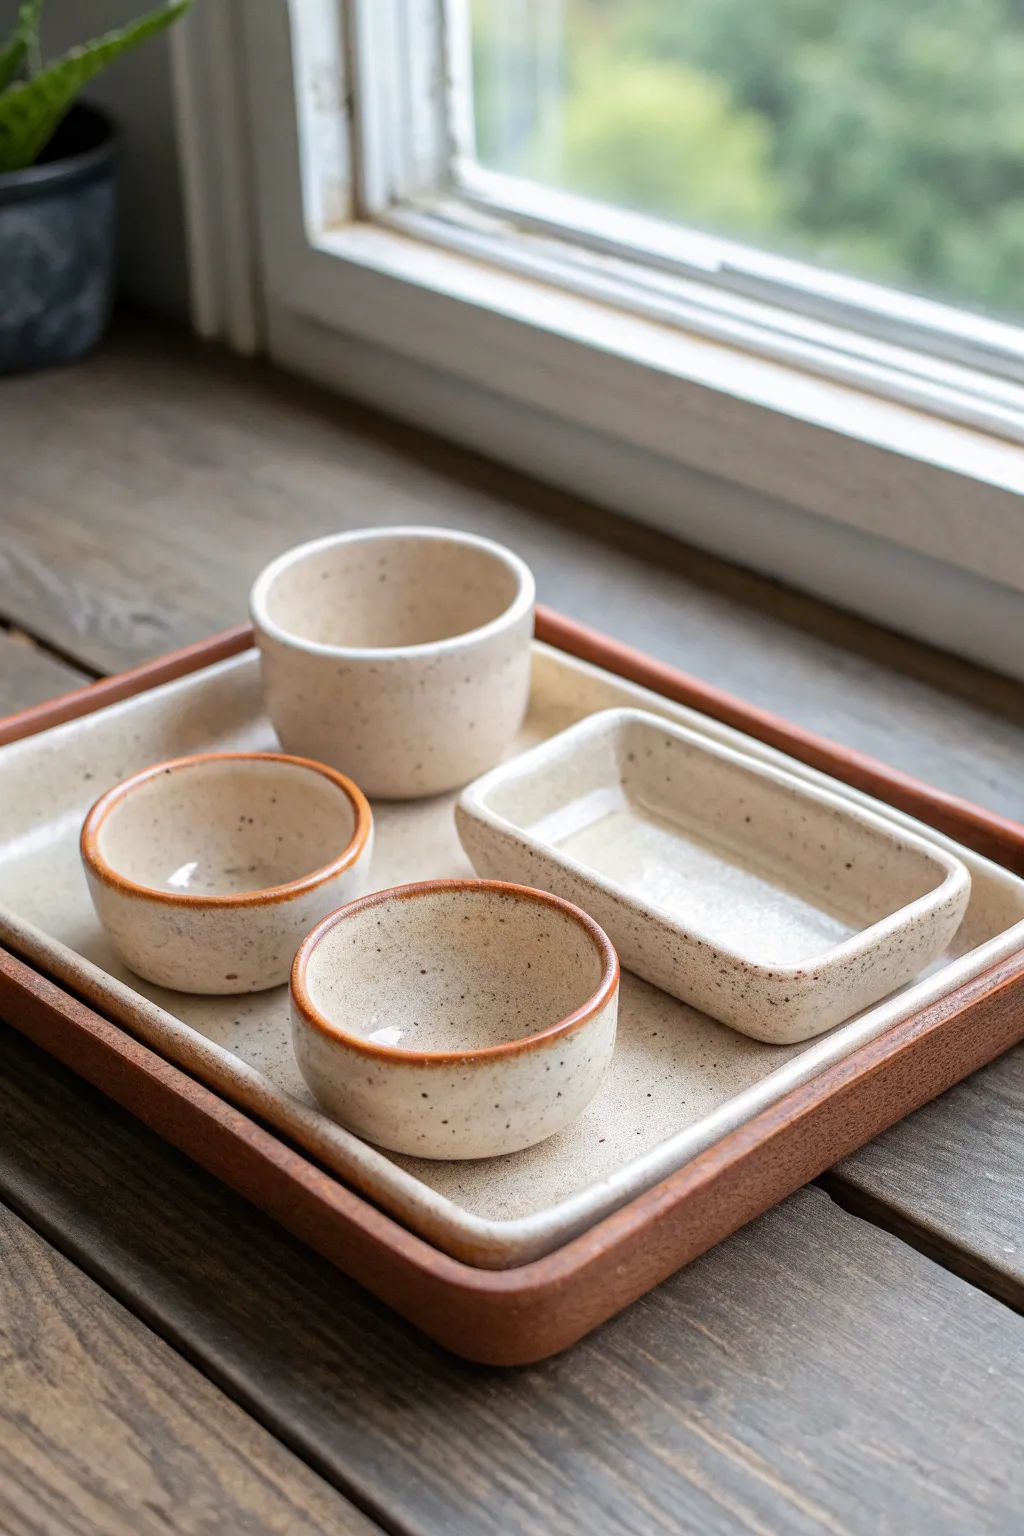
Indented Spot for a Small Jar or Cup
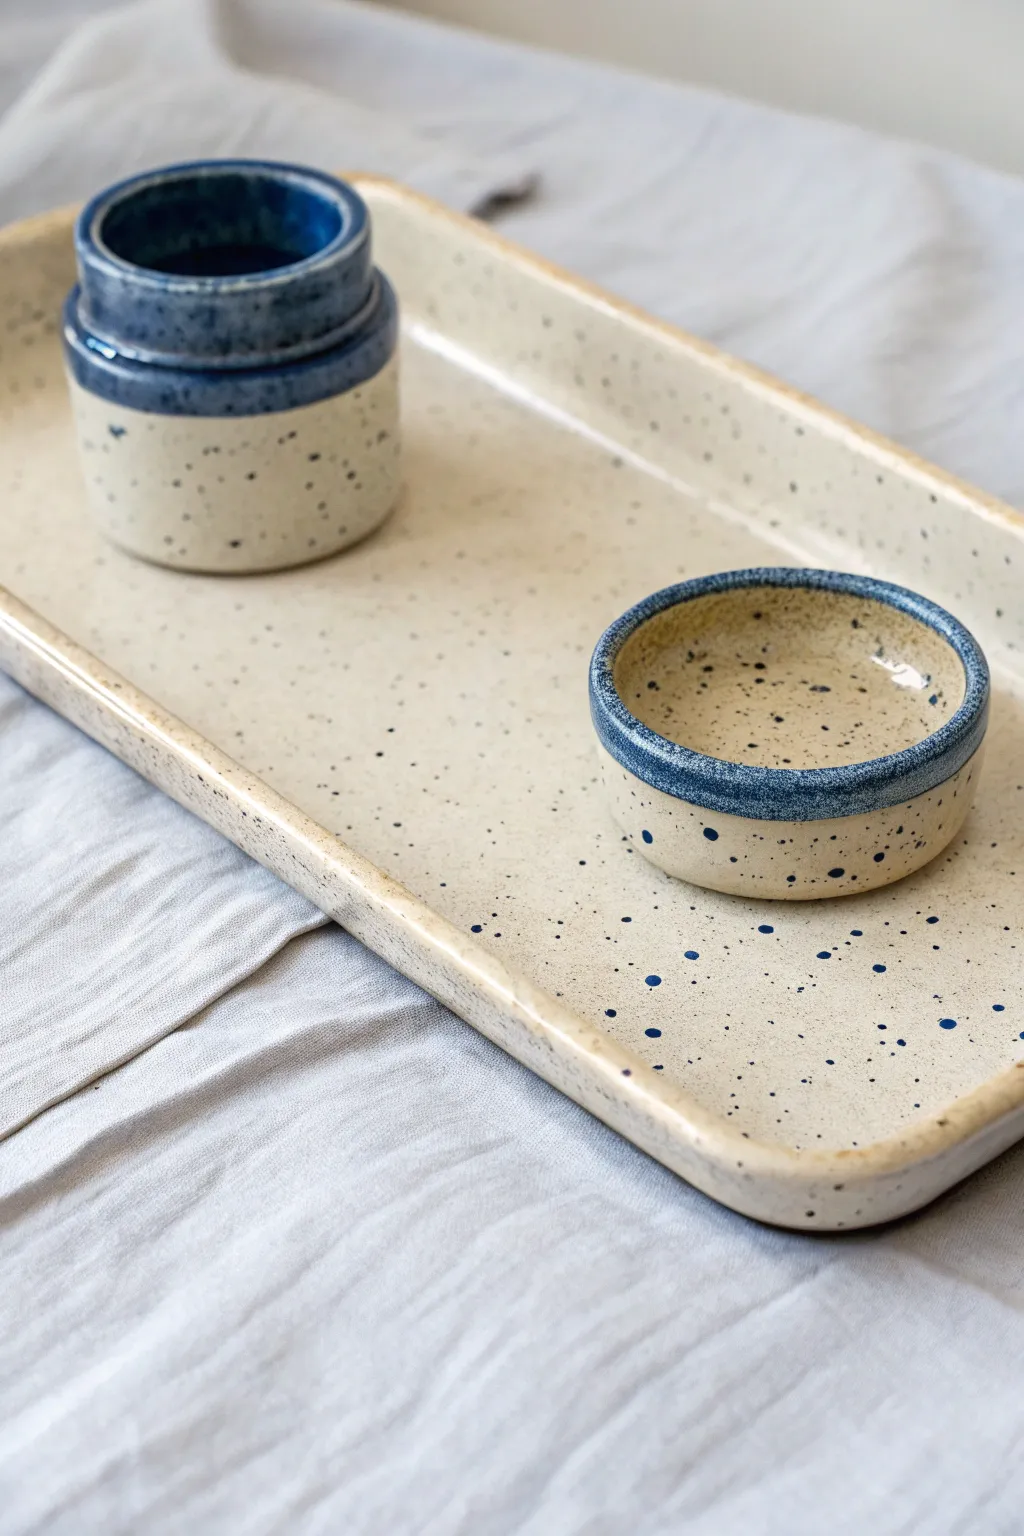
This minimalist stoneware set features a rectangular tray perfectly sized to hold a matching lidded jar and a small pinch bowl. The creamy, speckled clay body contrasts beautifully with the deep cobalt blue rims, creating a modern yet rustic feel.
Detailed Instructions
Materials
- Speckled stoneware clay (mid-fire)
- Rolling pin
- Canvas work surface or slab mat
- Two wooden guide strips (approx. 1/4 inch thick)
- Needle tool or fettling knife
- Rectangular template (cardboard or paper)
- Score and slip tool (or serrated rib)
- Rectangle or large circle cookie cutters (optional)
- Sponge
- Cobalt blue underglaze or glaze
- Clear transparent glaze
- Small paintbrush
- Kiln
Step 1: Forming the Tray Base
-
Roll the slab:
Begin by wedging your speckled stoneware clay to remove air bubbles. Place the clay between two wooden guide strips on your canvas and roll it out into a smooth, even slab about 1/4 inch thick. -
Cut the rectangle:
Place your rectangular template onto the slab. Using a needle tool or fettling knife, cut cleanly around the template to create the base of your tray. -
Create the walls:
Cut long strips of clay from the remaining slab, approximately 3/4 inch tall. These will become the raised walls of the tray. -
Attach the walls:
Score the outer edges of the rectangular base and the bottom edge of your clay strips. Apply slip generously to both scored areas. -
Secure and smooth:
Press the strips firmly onto the base to form the rim. Use your thumb or a modeling tool to blend the clay on the inside and outside seams until they are invisible. -
Refine the edges:
Running a damp sponge along the rim helps soften any sharp angles, giving it that smooth, rounded look seen in the photo.
Warping Worries?
If your tray corners lift during drying, weight them down gently with small bean bags or dry them slowly under plastic to keep the slab flat.
Step 2: Creating the Accessories
-
Form the jar base:
Roll out a small strip of clay and form it into a cylinder, attaching it to a small circular base using the score and slip method. Aim for a diameter of about 2-3 inches. -
Add the gallery:
To make the lid sit securely, attach a smaller coil inside the rim of the jar, or press the rim inward slightly to create a ledge. -
Make the shallow dish:
Pinch a small ball of clay into a low bowl shape, or use a small circular cutter on a slab and attach a very short wall, similar to how you constructed the tray. -
Check the fit:
Before the clay dries, place the wet jar and dish onto the tray to ensure they fit comfortably within the rectangular space.
Make It a Set
Create indentations directly into the wet tray slab where the jar and bowl will sit. This ‘lock-in’ feature keeps pieces sliding around.
Step 3: Glazing and Finishing
-
Bisque fire:
Allow all pieces to dry slowly to the bone-dry stage. Load them into the kiln for a bisque firing. -
Apply the rim color:
Once bisqued, use a small brush to carefully apply cobalt blue underglaze or glaze only to the very top rim of the tray, the jar, and the small dish. I prefer a steady hand here rather than taping it off for a more organic line. -
Dip in clear:
Dip the entire piece (or brush generously) with a clear transparent glaze. This will seal the clay and make those natural speckles pop through. -
Final fire:
Clean the bottoms of all pieces with a wet sponge to prevent sticking, then load them for the final glaze firing according to your clay’s temperature guidelines.
Once cooled, your custom rolling set is ready to organize your space with handmade style
Lighter Slot or Sleeve Built Into the Edge
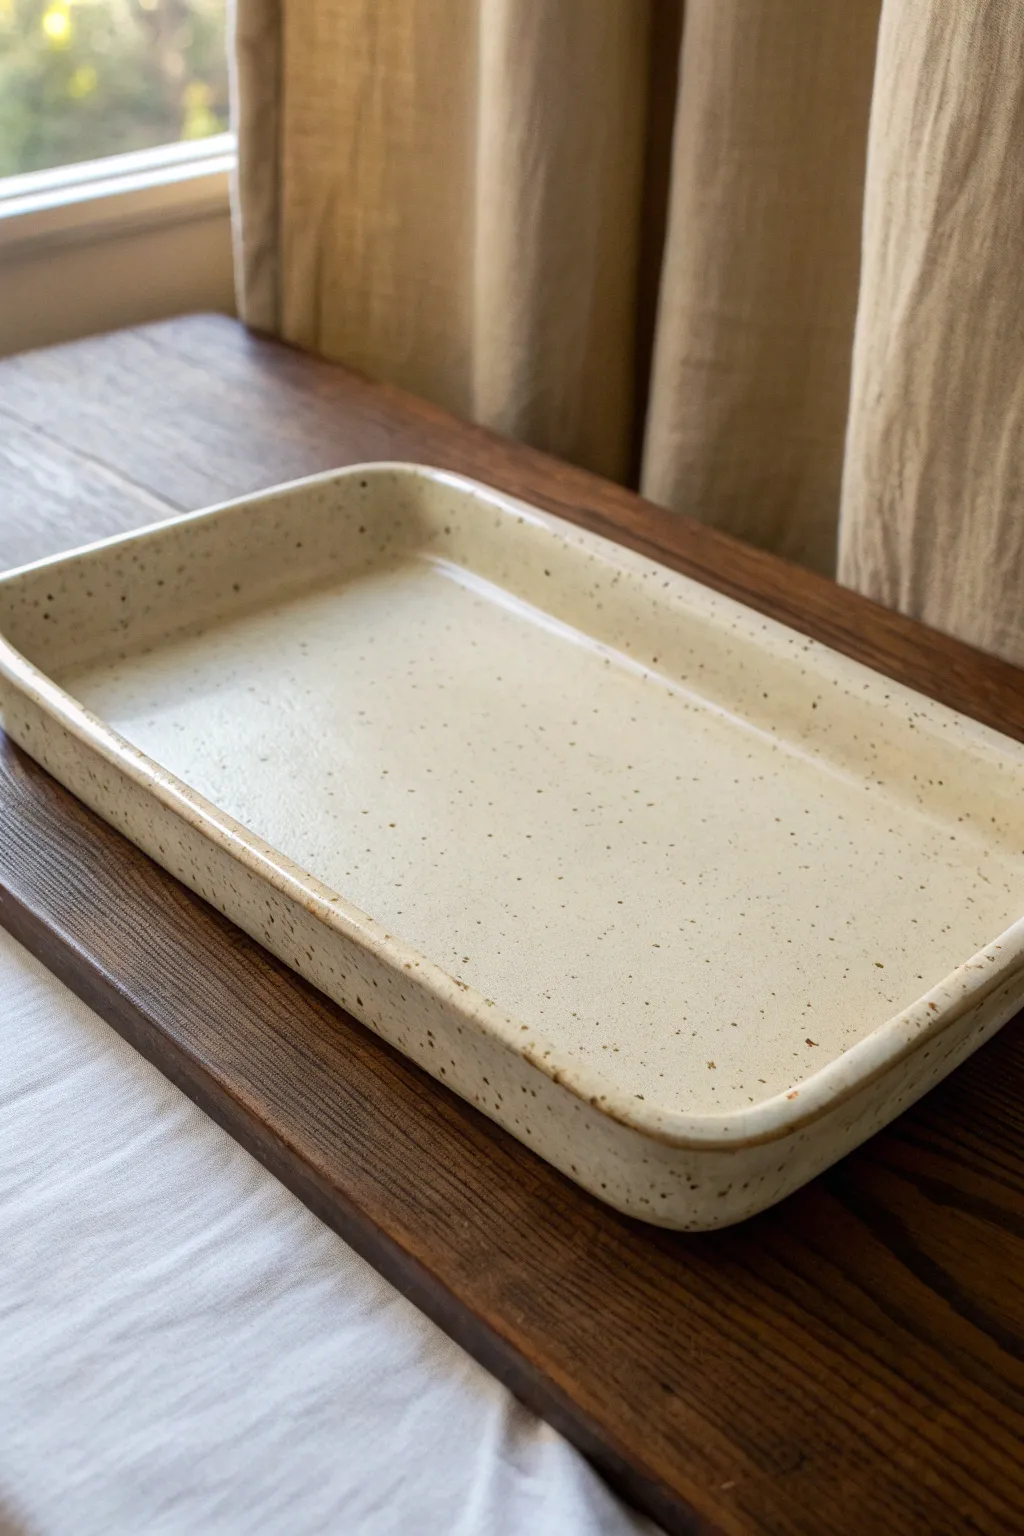
Embrace the beauty of simplicity with this minimalist speckled ceramic rolling tray. Its generous rectangular surface and gently curved rim make it a functional yet stylish addition to any coffee table setup.
How-To Guide
Materials
- Speckled cream stoneware clay (e.g., Laguna Speckled Buff)
- Rolling pin
- Two guide sticks (approx. 1/4 inch thick)
- Canvas mat or slab roller
- Rectangular paper template (approx. 8×12 inches)
- Fettling knife or needle tool
- GR Pottery Form (rectangular with rounded corners) or a simple wooden block form
- Soft rib tool (yellow or red)
- Modeling tool or wooden spoon handle
- Sponge and water
- Wire texturing brush (optional)
- Clear matte glaze
Step 1: Preparing the Slab Base
-
Wedge the clay:
Begin by wedging your speckled stoneware clay thoroughly to remove air bubbles and ensure an even consistency, which prevents warping later. -
Roll the slab:
Sandwich the clay between your two guide sticks on a canvas mat. Roll the clay out until the rolling pin rests flat on the guides, creating a perfectly even thickness. -
Compress the surface:
Run a soft silicone rib over the entire surface of the slab in multiple directions. This aligns the clay particles and creates that super-smooth finished texture. -
Cut the shape:
Place your rectangular paper template over the slab. Using a fettling knife, cut vertically around the template, leaving an extra inch of margin to account for the walls.
Don’t Warp It
To prevent the flat bottom from lifting in the kiln, place a small ‘cookie’ of clay or weighted bag of sand in the center while it dries to leather-hard.
Step 2: Forming the Tray and Edges
-
Set the form:
If using a draping mold or wooden block, place it squarely in the center of your slab. -
Lift the walls:
Instead of cutting and attaching separate walls, we will turn up the edges of the slab itself. Gently lift the inch of margin you left earlier, pressing it against the sides of your form. -
Refine the corners:
The corners will naturally bunch up. Gently pinch or dart the excess clay, pressing it smooth to create a continuous, rounded corner with no sharp seams. -
Create the lighter impression:
Since this section focuses on lighter storage, use the handle of a wooden spoon or a modeling tool to create a shallow, elongated indentation or ‘gully’ along one of the shorter interior walls—perfect for resting a lighter. -
Dry and secure:
Allow the clay to stiffen slightly to leather-hard while still against the form. This memory keeps the walls upright.
Step 3: Finishing and Firing
-
Smooth the rim:
Run a damp sponge along the top edge of the rim. I find that rounding this edge makes the tray much more comfortable to handle later. -
Refining the surface:
Check the interior floor. If any texture was lost during handling, use the rib again to ensure the rolling surface is completely flat and smooth. -
Slow drying:
Cover the piece loosely with plastic to dry slowly. Fast drying often warps flat trays, so patience is key here. -
Bisque fire:
Once bone dry, fire the piece to cone 04 (or your clay body’s bisque temperature) in the kiln. -
Glaze application:
Wipe the bisque ware with a damp sponge to remove dust. Pour a clear matte glaze into the tray, swirl to coat the bottom, and pour out the excess. -
Brush the exterior:
Carefully brush the exterior walls with the same clear glaze, or dip the rim if you have a large enough bucket. -
Final wipe:
Wipe the foot (bottom) of the tray completely clean of glaze to prevent it from sticking to the kiln shelf. -
Glaze fire:
Fire to cone 6 (or your clay’s maturity temperature). The heat will interact with the iron speckles in the clay, causing them to bleed through the clear glaze for that classic spotted look.
Make It a Sleeve
Instead of an indentation, fold a small separate strip of clay over the rim before firing to create a holster-style loop that a lighter can slide into vertically.
Enjoy using your sleek, custom-made tray for all your rolling needs
Modular Rolling Station With Nesting Dishes
Achieve clean lines and functional beauty with this modular rolling station, featuring speckled clay bodies and warm, contrasting rims. This project focuses on precise slab building and nesting forms to create a cohesive organizational system.
Detailed Instructions
Materials
- Speckled buff stoneware clay (or polymer clay with faux speckles)
- Terracotta colored underglaze (or acrylic paint if using polymer)
- Clear matte glaze
- Rolling pin with innovative depth guides
- Sharp clay knife or scalpel
- Rectangle and circle nesting cutter set
- Sponge
- Rib tool
- Slip and scoring tool (if using ceramic clay)
- Soft paintbrush
Step 1: Creating the Main Tray Base
-
Roll the foundation:
Begin by rolling out a medium-sized slab of speckled clay to a uniform 1/4-inch thickness. Compress the slab on both sides using a rib tool to align the clay particles and prevent warping later. -
Cut the rectangle:
Using a ruler or a large rectangular template, cut the base of your main tray. Aim for approximately 8×10 inches, but adjust based on your desired final size. Smooth the cut edges with a damp sponge. -
Form the rim strips:
Roll out a separate, thinner slab (about 3/16-inch) for the walls. Cut long strips that are roughly 3/4-inch high. These will form the shallow lip of the tray. -
Attach walls to base:
Score the outer edge of your rectangular base and the bottom edge of your clay strips. Apply slip generously, then press the strips onto the base. Reinforce the inner seam with a tiny coil of clay. -
Refine the corners:
Where the strips meet at the corners, create a simple butt joint or a 45-degree miter cut. Blend the clay together thoroughly so the seam disappears, using a flat modeling tool to keep the corners crisp.
Step 2: Fabricating the Nesting Modules
-
Plan your pieces:
You’ll need three smaller vessels: one tall cylinder, one medium rectangular dish, and two small shallow bowls. Creating paper templates first helps ensure they fit perfectly inside the main tray. -
Build the tall cylinder:
Cut a circular base and a rectangular wall piece for the cylinder. Wrap the wall around the base, slipping and scoring the connection points. Smooth the vertical seam on the side until it is invisible. -
Form the rectangular dish:
Utilize the same slab-building technique as the main tray. Cut a small rectangular base (approx 3×5 inches) and attach low walls. I like to slightly round the corners of this piece with a sponge for a softer look. -
Create the shallow pinch bowls:
For the two smallest bowls, start with two equal balls of speckled clay. Gently pinch them into shape, rotating constantly to keep the walls even, or use a mold to press the slab into a uniform curve. -
Refine all rims:
Once all pieces are built, wipe down every rim with a damp sponge. The rims should be slightly rounded, not sharp, to mimic the reference item.
Warping Woes?
If your large tray curls up at the corners during drying, try weighting down the center with a sandbag. Dry it very slowly away from drafts to ensure even shrinkage.
Step 3: Finishing and Firing
-
Bisque fire:
Allow all pieces to dry very slowly under plastic to prevent warping, then bisque fire them according to your clay body’s instructions. -
Apply the contrast rim:
Using a steady hand, paint a thin line of terracotta-colored underglaze along the very top rim of every piece. For the main tray, paint the entire exterior wall, not just the rim, to create that solid wood-like frame effect. -
Clean up:
If any underglaze dripped onto the speckled areas, gently scrape it away with a sharp blade or wipe it off with a clean, damp brush. -
Glaze application:
Dip or brush a clear matte glaze over the interior and exterior of the nesting bowls. For the main tray, glaze the interior but leave the terracotta-painted exterior unglazed for a tactile, matte finish. -
Final smooth:
Check the bottoms of all pieces to ensure they are free of glaze (wax resist helps here) so they don’t stick to the kiln shelf. -
Glaze fire:
Fire the kiln to the maturity temperature of your glaze and clay. Once cooled, sand the bottoms if necessary to ensure they don’t scratch the main tray.
Level Up: Texture
Before glazing, lightly sand the raw unglazed exterior of the main tray. This enhances rigidity and makes the painted ‘terracotta’ section feel more like unpolished stone or wood.
Enjoy the deep satisfaction of organizing your space with a custom set made by your own hands
Split-Level Tray With a Raised Back Shelf
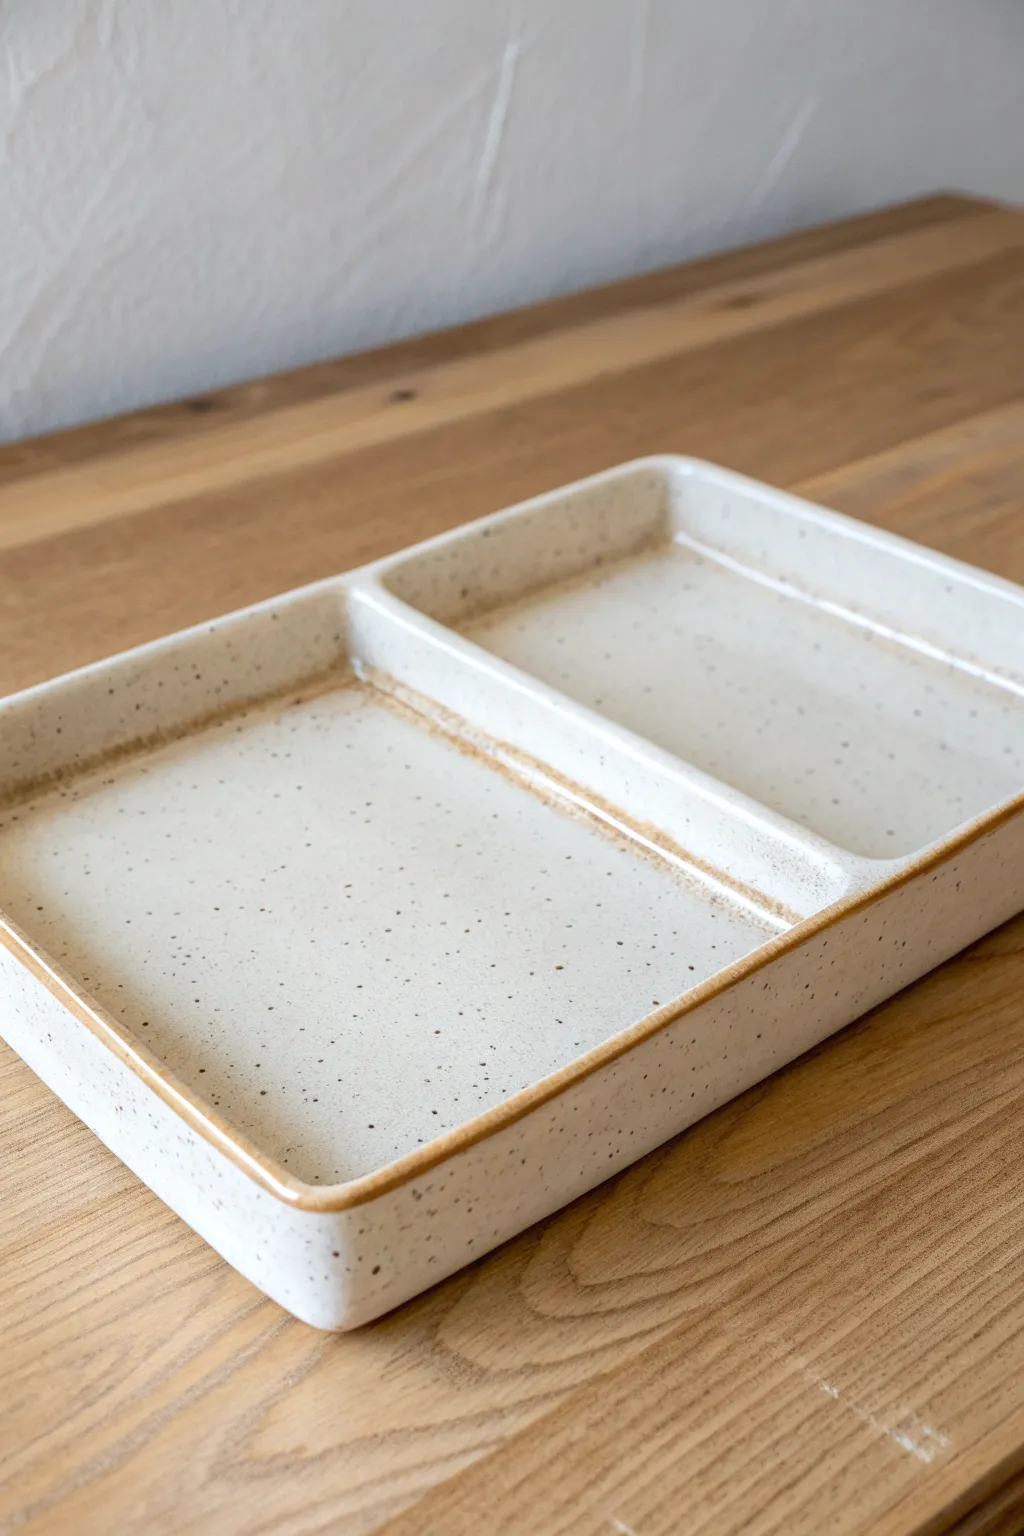
This minimalist, dual-section rolling tray combines functionality with a soft, speckled aesthetic that looks beautiful on any coffee table. The clean lines and gentle cream glaze, accented by a warm toasted rim, make it a perfect beginner-friendly slab building project.
Step-by-Step Guide
Materials
- Speckled Stoneware Clay (2-3 lbs)
- Rolling pin
- Slab rolling guides (1/4 inch thick)
- Fettling knife or needle tool
- Ruler
- Clay rib (rubber or metal)
- Scoring tool and slip
- Sponge
- Wooden modeling tool
- High-gloss cream or clear glaze
- Iron oxide wash (optional, for rim)
Step 1: Preparing the Slab Base
-
Roll the clay:
Begin by wedging your speckled stoneware clay to remove air bubbles. Lay out your thickness guides and roll a smooth slab about 1/4 inch thick, ensuring it’s wide enough for your desired tray dimensions. -
Compress the slab:
Use a rubber rib to compress both sides of the slab. This step is crucial not just for smoothing the texture, but for aligning the clay particles to prevent warping during the drying process later. -
Cut the base template:
Using a ruler and your needle tool or fettling knife, cut a clean rectangle for the base. A size of roughly 6×9 inches works well, but you can adjust this to fit your specific needs. -
Cut the wall strips:
From the remaining slab, cut long strips for the exterior walls and the center divider. These should be cut to the same height (around 1 inch tall) to ensure a uniform profile.
Wall Wobble?
If your walls are slumping inward, your clay might be too wet. Let the slab strips set up to a soft leather-hard stage before attaching them to the base for better structural support.
Step 2: Assembling the Structure
-
Score the perimeter:
Rough up the top outer edge of your base rectangle using a scoring tool or a fork. Apply a generous amount of slip to the scored area. -
Attach the outer walls:
Score the bottom edge of your wall strips and place them onto the base. Gently press them down to adhere. I find it easiest to attach the long sides first, then fit the short ends between them. -
Reinforce the seams:
Use a thin wooden tool to blend the clay from the wall down onto the base on the inside, and from the base up onto the wall on the outside. This creates a strong bond. -
Add a coil reinforcement:
Roll a very thin ‘snake’ or coil of soft clay. Press this into the interior seam where the wall meets the floor to fill any gaps and create a smooth transition. -
Insert the divider:
Measure the halfway point of your tray (or an offset point if you prefer asymmetrical sections). Score and slip the floor and interior walls where the divider will go, then press your divider strip into place.
Clean Corners Pro Tip
Use the back of a spoon to smooth the interior corners where the divider meets the walls. The curved shape of the spoon creates a perfect, easy-to-clean fillet.
Step 3: Refining and Shaping
-
Curve the corners:
While the clay is leather hard but still pliable, use your fingers or a sponge to gently push the exterior corners inward to create that soft, rounded rectangular shape seen in the image. -
Smooth the lip:
Run a damp chamois or a wet sponge along the top rim of the tray walls and the divider. This compresses the rim and ensures it feels smooth to the touch. -
Clean the interior:
Using a slightly damp sponge, wipe the interior floor to ensure it is perfectly flat and free of finger marks. The transition between the floor and walls should be a gentle 90-degree angle. -
Slow drying:
Loosely cover the tray with plastic to let it dry slowly. Because of the divider connection, slow drying helps prevent distinct sections from pulling apart or cracking. -
Bisque fire:
Once fully bone dry, fire the piece to bisque temperature (usually cone 04) according to your clay body’s instructions.
Step 4: Glazing and Finishing
-
Clean the bisque:
Wipe the fired bisque ware with a clean, damp sponge to remove any kiln dust that might interfere with glaze adherence. -
Apply the glaze:
Pour or dip your cream-colored glaze. If using a dipping glaze, dip once for an even coat. If brushing, apply 2-3 even coats, letting each dry in between. -
Accent the rim:
To achieve the toasted edge look, carefully wipe the glaze off just the very top rim of the walls and divider with a sponge. Alternatively, paint a thin line of iron oxide wash over the glaze on the rim. -
Final smooth:
Check the bottom of the tray to ensure no glaze is on the foot. Wipe it clean if necessary to prevent it from sticking to the kiln shelf. -
Glaze fire:
Fire the final piece to the maturity temperature of your clay and glaze (often cone 5 or 6 for stoneware) to let the speckles show through the milky glaze.
Once cooled from the kiln, your sleek new tray is ready to organize your space with handmade style
Sculptural Hand Tray With a Flat Palm Surface
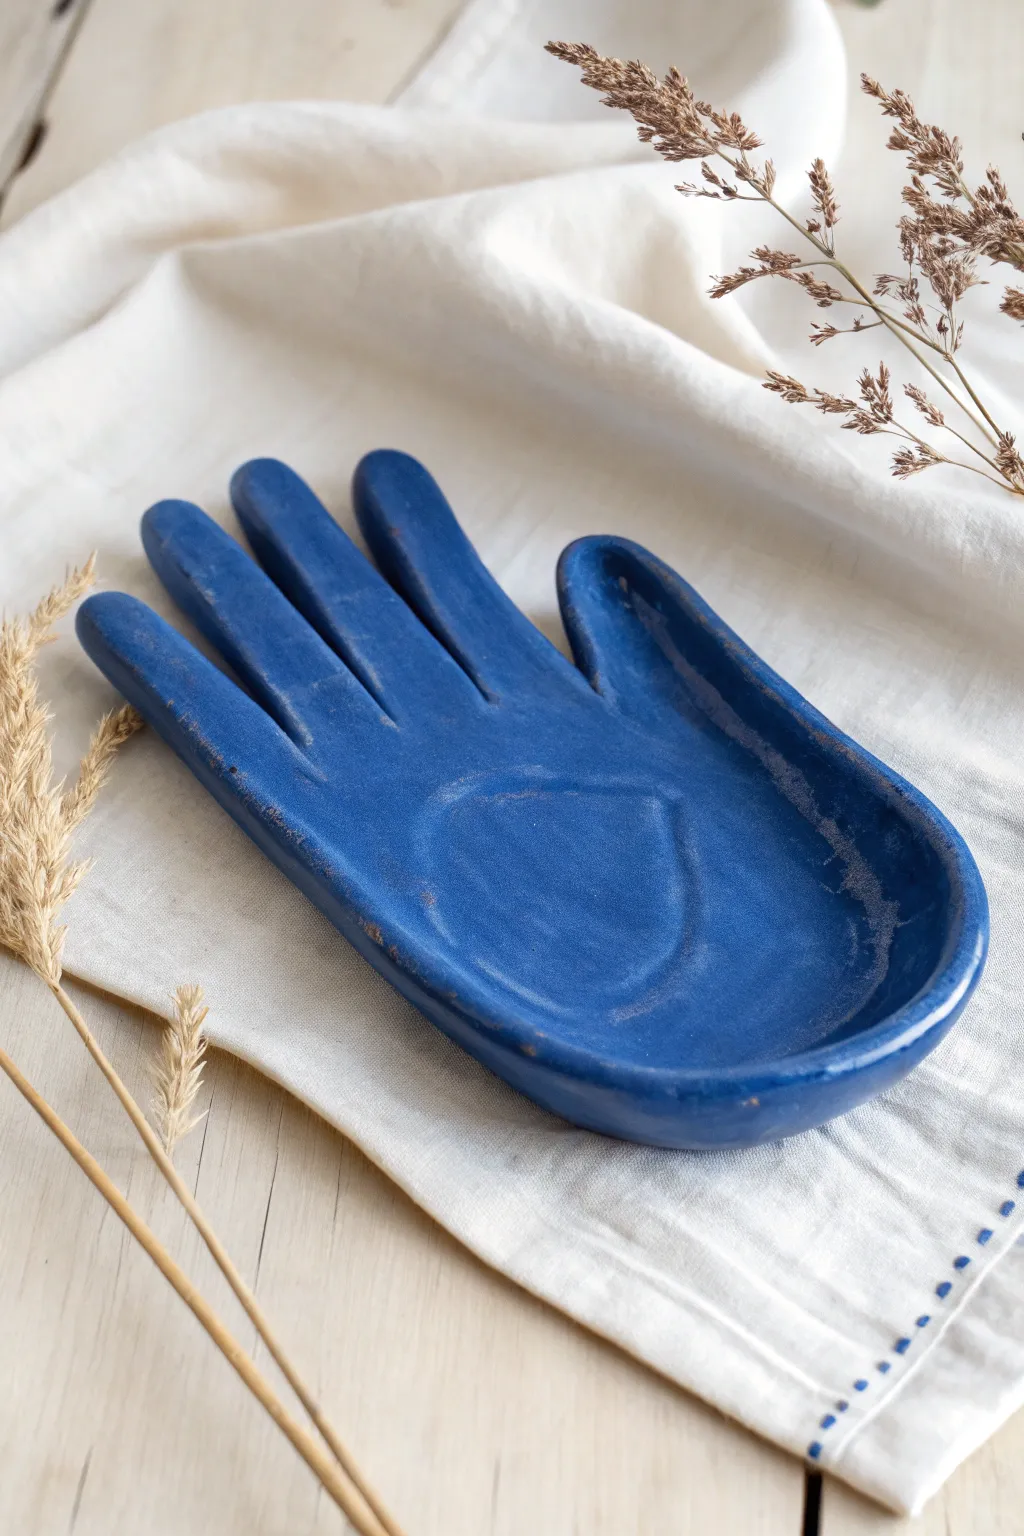
This striking midnight blue rolling tray combines the organic shape of a hand with a functional, flat workspace. The sculpted piece features raised fingers to contain your materials and a subtle heart indentation in the palm for a touch of whimsy.
Detailed Instructions
Materials
- High-quality air-dry clay or earthenware clay (white body)
- Rolling pin
- Canvas mat or non-stick surface
- Needle tool or X-Acto knife
- Paper template of a hand (optional)
- Small sponge
- Slip (clay mixed with water)
- Coil of extra clay
- Modeling tools (rib tool, loop tool)
- Matte blue acrylic paint or ceramic underglaze (if firing)
- Matte varnish (for air-dry) or clear matte glaze (for kiln)
- Fine grit sandpaper
Step 1: Shaping the Foundation
-
Roll the slab:
Begin by wedging your clay to remove air bubbles, then roll it out into an even slab approximately 1/4 inch thick. A consistent thickness is crucial to prevent cracking during the drying process. -
Cut the outline:
Place your hand gently on the clay to trace around it lightly, or use a paper template for better symmetry. Using your needle tool, cut out the hand shape, leaving slightly extra room around the edges since you will be building them up. -
Smooth the edges:
Once the shape is cut, take a damp sponge and gently run it along the cut edges. This softens the sharp angles left by the knife and gives the piece a more finished, ceramic look.
Smooth Moves
Use a damp paintbrush instead of water on your fingers to smooth hard-to-reach spots, like the webbing between the clay fingers.
Step 2: Building the Form
-
Prepare the rim coils:
Roll out thin snakes or coils of clay, about the thickness of a pencil. These will be used to create the raised barrier around the fingers and the heel of the hand. -
Score and slip:
Rough up the outer edges of your hand base with a needle tool (scoring) and apply a dab of water or slip. Do the same to one side of your clay coils. -
Attach the walls:
Press the coils firmly onto the perimeter of the fingers and the outer palm. You want to create a rim that rises up, creating the ‘tray’ depression, rather than just laying a flat hand. -
Blend the seams:
Using a modeling tool or your thumb, drag the clay from the coil down into the base slab on both the inside and outside. I find that smoothing downward ensures a seamless bond that won’t separate. -
Refine the fingers:
Use your fingers to pinch and shape the raised edges of the clay fingers. They should look rounded and organic, not like rigid walls. A damp sponge helps smooth out any fingerprints here.
Make It Functional
Ensure the palm area is perfectly smooth and level before drying. Test it by rolling a pen across it; bumps will annoy you later!
Step 3: Detailing and Surface
-
Create the palm impression:
In the center of the palm, use a loop tool or your thumb to gently depress the clay further, ensuring the rolling surface is perfectly flat and slightly lower than the rim. -
Add the heart motif:
Use a modeling tool to carefully carve or press a faint heart outline into the center of the palm depression. Keep it subtle, just enough to catch the glaze later. -
Slow drying:
Place the tray on a wire rack or a piece of drywall to dry slowly. Cover it loosely with plastic for the first day to prevent warping, especially at the fingertips. Let it dry completely for 24-48 hours. -
Sand for perfection:
Once bone dry, take fine-grit sandpaper and gently buff the entire surface. Focus on the rim and the spaces between fingers to remove any sharp burrs or rough patches.
Step 4: Finishing Touches
-
Apply the base color:
Brush on your deep blue paint or underglaze. For that rich, opaque look in the photo, you will likely need two to three coats. Let each layer dry before adding the next. -
Antique the edges (optional):
To mimic the weathered look in the photo, you can lightly sand the raised edges after painting to reveal a bit of the clay body beneath, or dry brush a slightly lighter blue on the high points. -
Seal the piece:
Finish with a matte varnish or glaze. If using air-dry clay, ensure your sealant is water-resistant so you can wipe the tray clean after use.
Allow the finish to cure fully before putting your new sculptural tray to work
Anatomical Torso Tray With a Hidden Work Zone
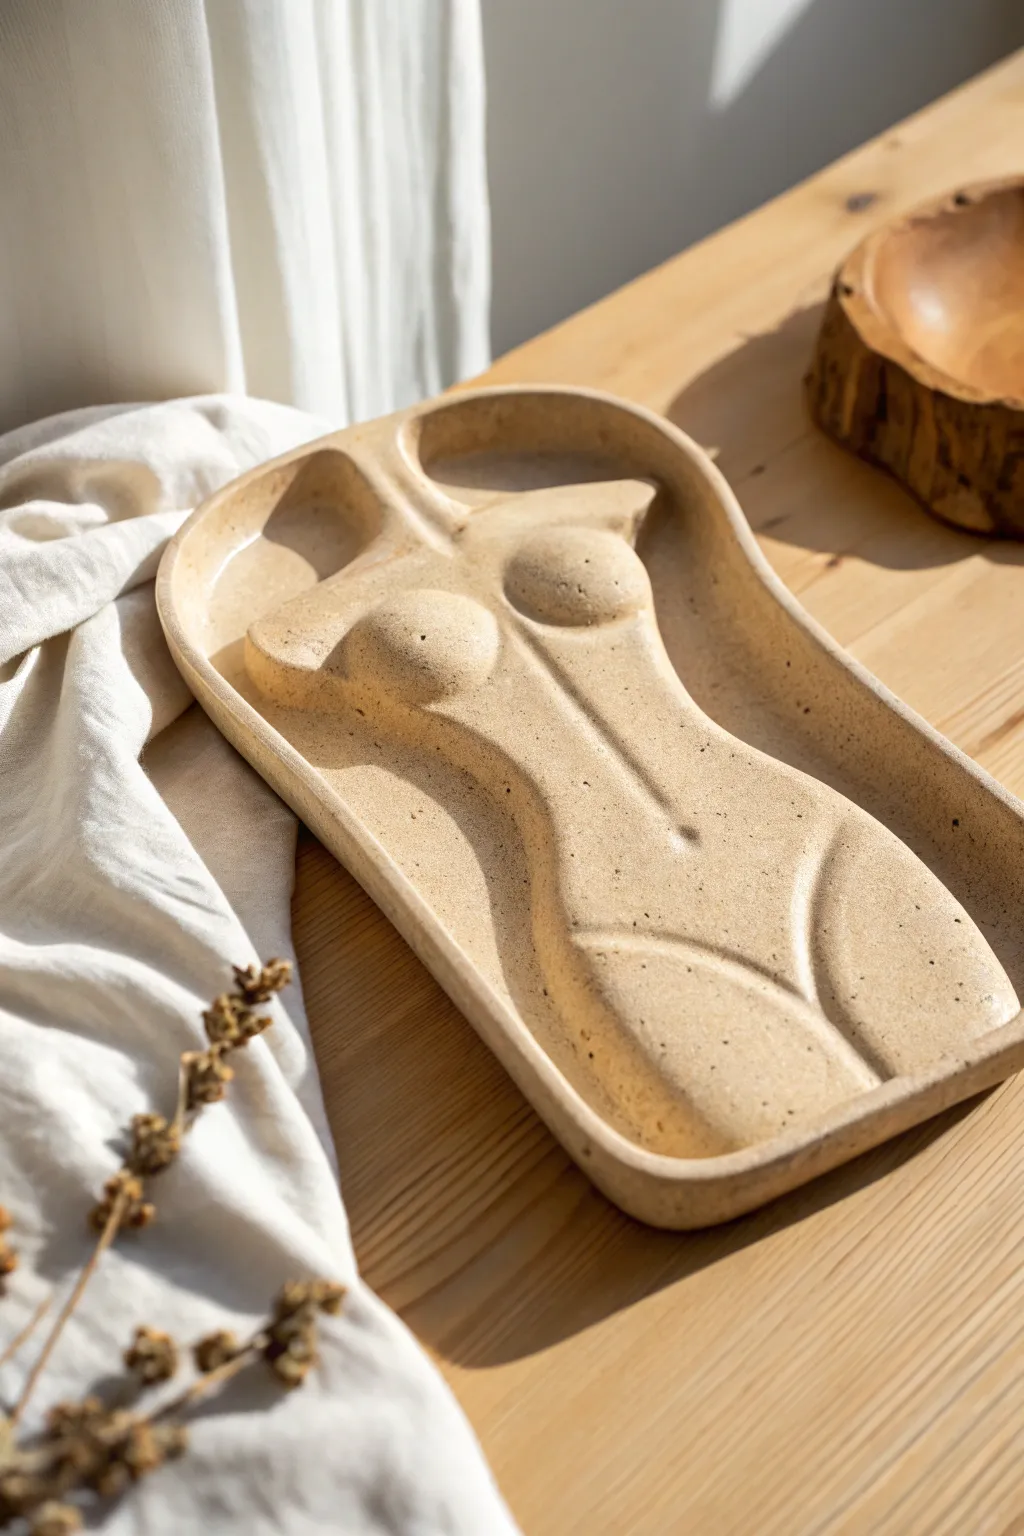
This elegant and functional tray combines natural curves with practical utility, featuring a stylized female torso relief set within a minimalist rectangular form. The sandy-speckled clay body and smooth, matte finish give it an organic feel, perfect for organizing trinkets or acting as a unique rolling surface.
Step-by-Step Tutorial
Materials
- Speckled stoneware clay or polymer clay (color: sandy beige)
- Rolling pin
- Two wooden guide slats (approx. 1/4 inch thick)
- Rectangular tray template or ruler
- Fettling knife or craft blade
- Sculpting tools (loop tool, modeling tool, rubber rib)
- Small sponge
- Slip (clay slurry)
- Clear matte glaze or sealant
Step 1: Base Construction
-
Prepare the slab:
Begin by wedging your speckled clay to remove air bubbles. Flatten it slightly with your palm, then roll it out into a consistent slab using the wooden guide slats on either side to maintain an even thickness of about 1/4 inch. -
Cut the primary shape:
Place your rectangular template (or measure a rectangle roughly 8×5 inches) onto the slab. Cut around the perimeter using your fettling knife, keeping the cut perpendicular to the table for clean edges. -
Form the rim:
Roll a long coil of clay, approximately the thickness of a pencil. Score and slip the outer edge of your rectangular base, then attach the coil to create a raised rim, pinching it gently to seal it to the base. -
Smooth the walls:
Use a modeling tool or your thumb to blend the coil downward into the base on the inside, and upward on the outside, ensuring no seam remains visible. The transition should be seamless and curved, like a skateboard ramp.
Cracking at the curves?
If you see cracks forming where the torso meets the tray floor during drying, compress that seam immediately with a rounded tool and add a tiny bit of soft clay slip to bridge the gap.
Step 2: Sculpting the Anatomy
-
Outline the figure:
Using a needle tool, lightly sketch the outline of the torso directly onto the center of the tray base. Mark the shoulders, the pinch of the waist, and the curve of the hips. -
Build the volume:
Add small, flat pieces of clay within your sketched outline to build up the body’s relief. Focus on adding height to the chest and hip areas first, keeping the silhouette distinct from the background. -
Refine the chest:
Roll two equal balls of clay for the chest area. Score and slip the placement spots, attach the balls, and then smooth the edges into the main body form so they don’t look like separate attachments. -
Carve the details:
Using a modeling tool, gently press in the definition lines. Create the clavicle line at the top, the vertical line of the sternum/abdomen, and the ‘V’ shape for the bikini line or upper thighs. -
Create the negative space:
This is crucial for the usage of the tray. Ensure the area *around* the torso remains flat and functional. I like to use a small loop tool to clean up the junction where the raised figure meets the flat tray floor.
Pro Tip: Texture Trick
To enhance the ‘stone’ look, after basic smoothing, gently tap the surface with an old toothbrush. This adds micropores that catch the glaze beautifully.
Step 3: Refining and Finishing
-
Smoothing the surface:
Rub a slightly damp sponge over the entire piece. Focus on softening hard ridges on the body to make it look organic and skin-like. Pay attention to the rim of the tray to ensure it feels comfortable to the touch. -
Drying slow:
Loosely cover the tray with plastic to let it dry slowly. If the rim dries too fast compared to the thick relief in the center, the piece might warp or crack. -
Bisque fire or bake:
Depending on your clay type, either fire it in a kiln to bisque temperature or bake it in your oven according to polymer clay package instructions. -
Glazing or sealing:
For ceramics, apply a clear matte glaze to protect the speckles without adding shine. If using polymer clay, a wash of water-based matte varnish will seal the surface. -
Final cure:
Perform the final glaze firing or let the varnish fully cure. The result should look like smooth, carved stone.
Now you have a stunning, sculptural piece that serves a practical purpose while showcasing your artistic touch