Whenever I’m stuck for what to make next, I go back to clay sculpture ideas that start simple and still feel magical when they’re finished. Here are my favorite projects to sculpt—ranging from cute classics to artsy, weird-in-the-best-way pieces you’ll want to display right away.
A Textured Turtle With a Patterned Shell
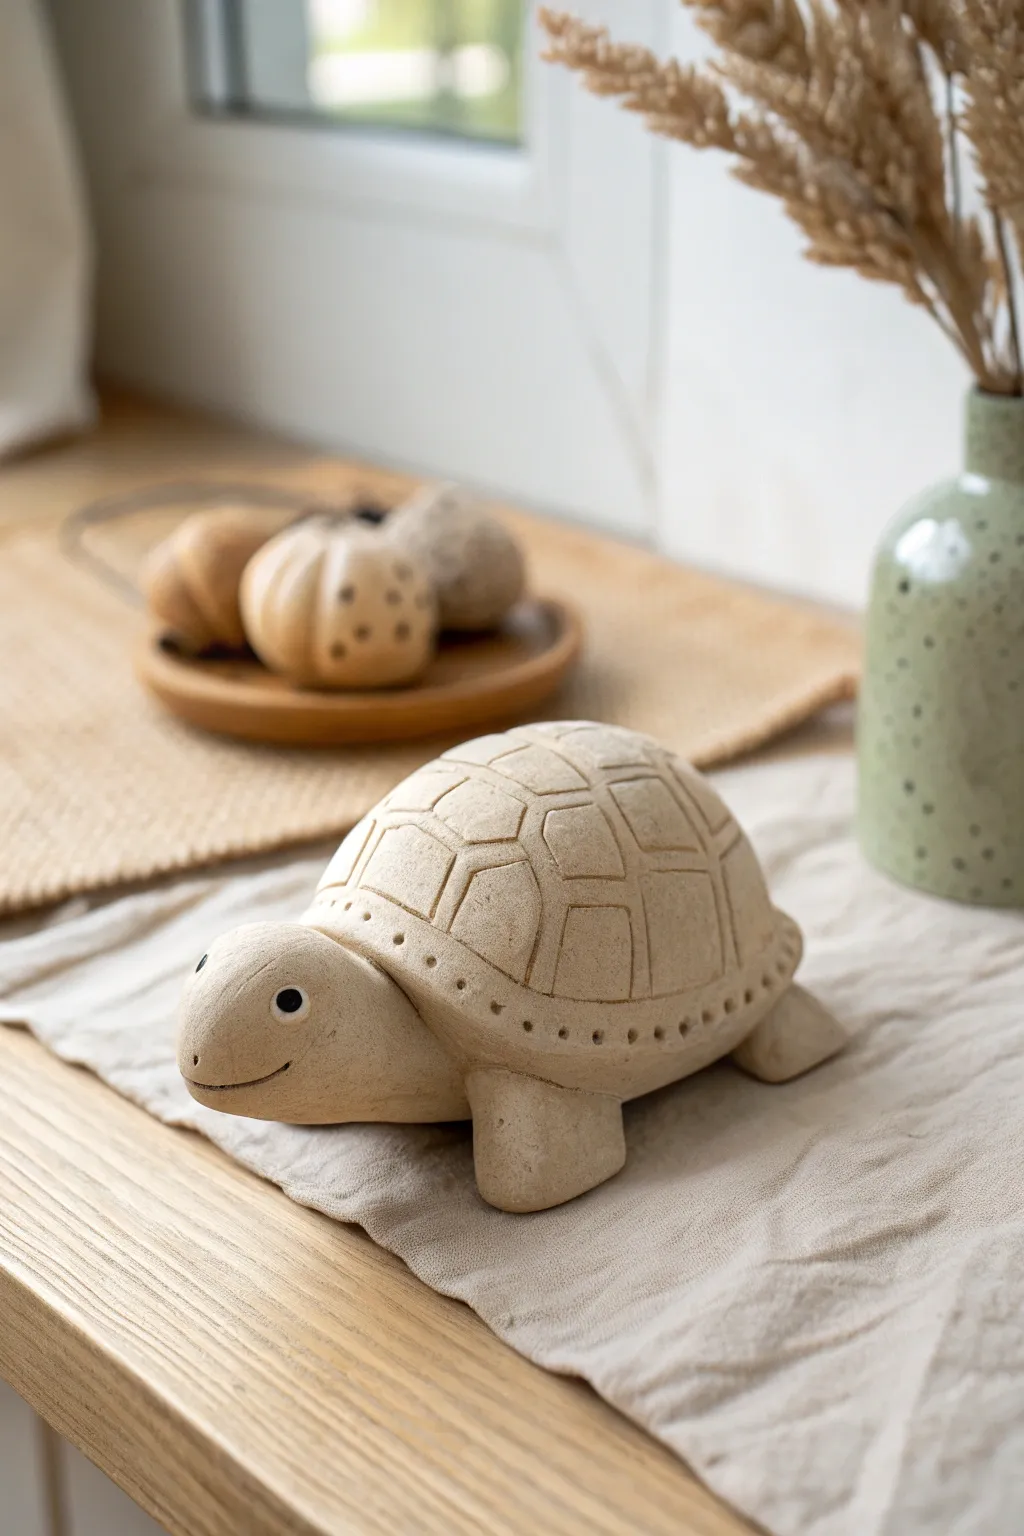
Create a charming, minimalist turtle sculpture that celebrates the natural texture of clay. This project features a satisfyingly rounded shell with deep geometric carvings and a friendly, upturned face.
Detailed Instructions
Materials
- Light-colored stoneware or air-dry clay (buff or sand color)
- Needle tool or toothpick
- Loop tool (small)
- Sponge
- Water cup
- Rolling pin
- Scoring tool or old toothbrush
- Clay knife or fettling knife
- Small round paintbrush
Step 1: Forming the Body Mechanics
-
Shape the main shell:
Start with a large ball of clay about the size of a grapefruit. Gently pat and roll it on your work surface to create a smooth, high-dome hemisphere. I like to keep the bottom slightly flat so it sits stably. -
Create the pinch pot base (Optional):
If you want a lighter sculpture, hollow out the underside of your dome using your thumbs or a loop tool, leaving the walls about 1/2 inch thick. If using solid clay, ensure no air pockets are trapped inside. -
Sculpt the head:
Roll a smaller ball of clay into a thick, elongated teardrop shape for the head. Slightly flatten the wider end to create distinct cheeks and a rounded snout. -
Form the limbs:
Create four stout, rectangular blocks for the legs from equal-sized pieces of clay. Tap them on the table to flatten the bottom surfaces so the turtle will stand level. -
Make the tail:
Roll a tiny cone of clay for the tail. It should be short and pointed, proportional to the rest of the body.
Fixing Cracks
If hairline cracks appear while drying, mix a tiny bit of vinegar with your raw clay to make a paste (slip) and fill the crack. Smooth over it immediately.
Step 2: Assembly & Refinement
-
Score and slip:
Before attaching any parts, roughen the connection points on both the shell and the limbs with a scoring tool. Apply a dab of water or slip (liquid clay) to act as glue. -
Attach the legs:
Press the legs firmly onto the underside of the shell. Smooth the clay from the legs onto the body to create a seamless join, ensuring they support the shell’s weight evenly. -
Attach the head:
Attach the neck portion of the teardrop to the front of the shell, blending the clay thoroughly so the head looks like it’s emerging naturally from the shell. -
Attach the tail:
Secure the small tail to the rear center of the shell, blending the seams completely. -
Smooth the surface:
Use a slightly damp sponge to wipe over the entire form. This removes fingerprints and creates that matte, stone-like finish seen in the photo.
Step 3: Detailing the Shell and Face
-
Define the shell rim:
Using a needle tool, lightly draw a horizontal line all the way around the base of the shell, about half an inch up from the bottom edge. This separates the rim from the scutes. -
Sketch the pattern:
Use the needle tool to lightly sketch a geometric pattern on the shell. Draw a central row of erratic polygons, followed by surrounding rows that interlock like puzzle pieces. -
Carve the grooves:
Once you are happy with the pattern, use a dull pencil or a modeling tool to widen and deepen these lines. The grooves should be distinct but soft-edged. -
Add decorative dots:
Along the bottom rim strip you created earlier, press the tip of a small round tool or the back of a paintbrush into the clay to create a row of evenly spaced divots. -
Sculpt the face:
Use a needle tool or knife to carve a simple, curved mouth line that turns up at the end for a smile. Deepen the corners slightly for expression. -
Add the eyes:
Paint small black circles for eyes directly onto the clay if using air-dry clay. If using ceramic clay, use a small dab of black underglaze. Add a tiny white highlight dot to bring the expression to life. -
Final smooth:
Do one last inspection for sharp burrs of clay created during carving. Gently rub them away with your finger or the damp sponge. -
Let it dry:
Allow your turtle to dry slowly away from direct heat or sunlight to prevent cracking. This usually takes 24-48 hours depending on humidity.
Try a Wash
To highlight the shell carving, paint a diluted brown acrylic or oxide wash over the grooves, then wipe the surface clean with a sponge, leaving dark recesses.
Place your finished turtle on a shelf or near a potted plant to add a wonderfully earthy touch to your decor


A Coil Heart Sculpture With Sweet Imperfections
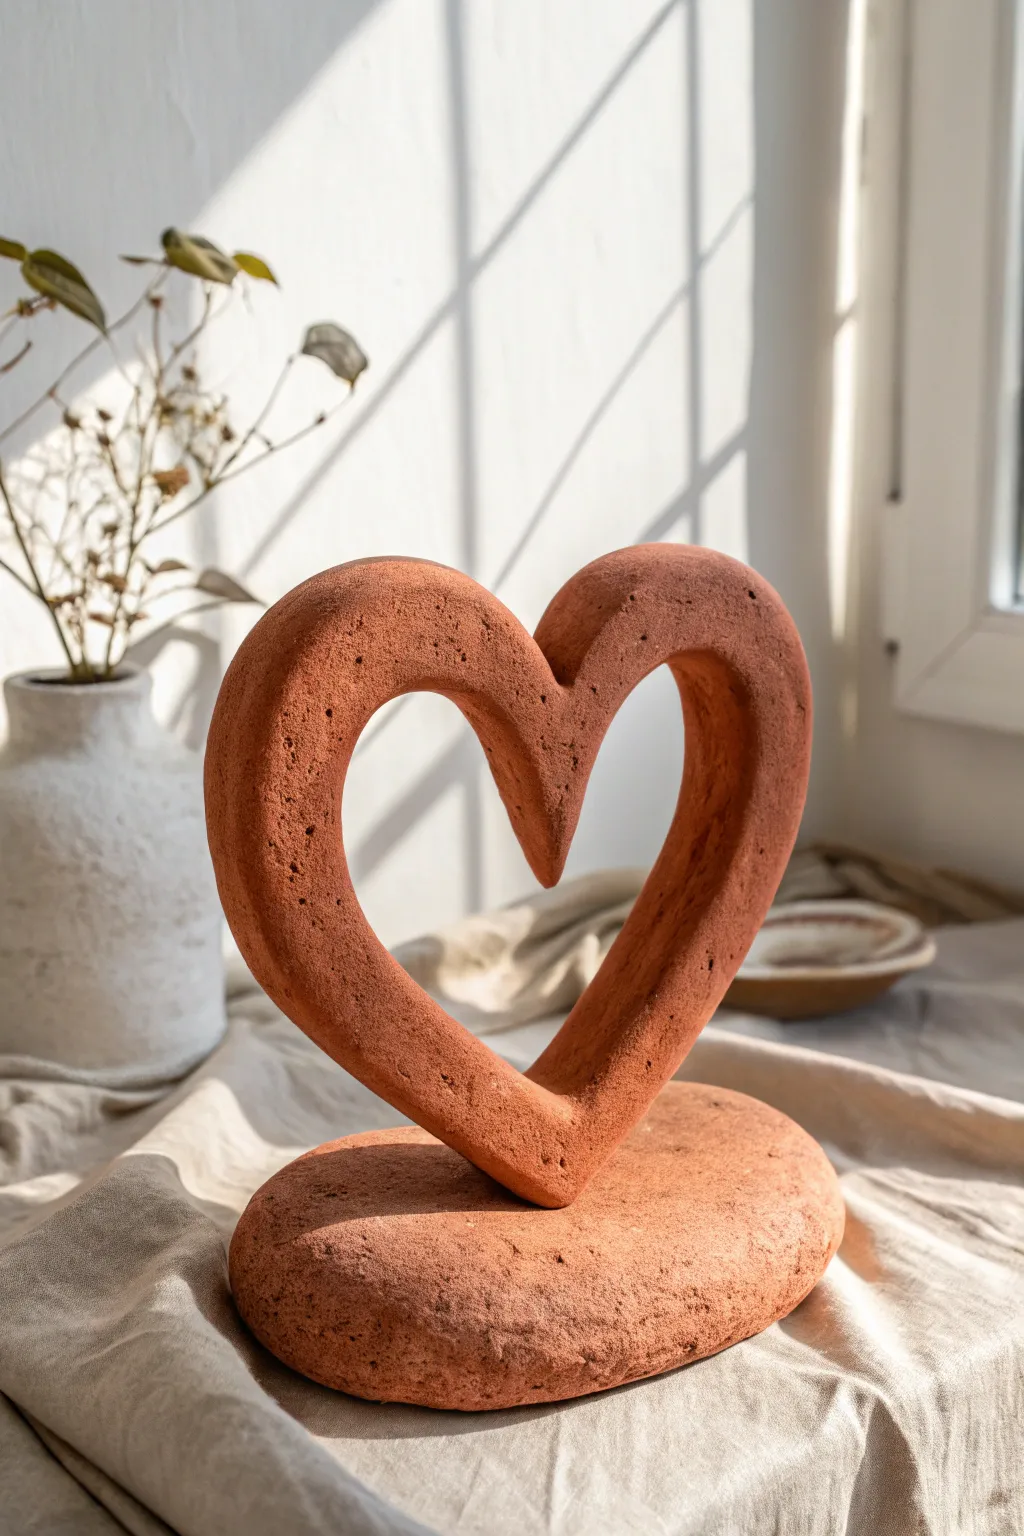
This charming, freestanding sculpture brings a touch of warmth to any shelf with its earthy terracotta tones and sweet, rustic silhouette. By building a sturdy base and using simple coil techniques, you’ll create a heartfelt piece that feels both modern and handmade.
How-To Guide
Materials
- Terracotta-colored air-dry clay (or firing clay)
- Slip (clay mixed with water) or vinegar
- Rib tool or old credit card
- Modelling tools (wooden or plastic)
- Sponge
- Water cup
- Rolling pin
- Needle tool
- Sandpaper (fine grit)
Step 1: Forming the Base
-
Prepare the Clay:
Begin by kneading a large handful of your terracotta clay to remove air bubbles and make it pliable. The clay should feel smooth and uniform before you start shaping. -
Shape the Base:
Form the clay into a large, slightly flattened oval shape, roughly the size of a large mango. Gently pat it against your work surface to create a flat bottom so it sits securely without wobbling. -
Refine the Surface:
smooth out the top and sides of the oval base with a damp thumb or a rib tool. The goal isn’t perfection; the slightly porous, stone-like texture adds character, so don’t polish it too much. -
Score the Attachment Point:
Use your needle tool to rough up (score) the center area of the base where the heart will eventually sit. Add a dab of slip or water to this scored area to prepare it for joining later.
Step 2: Building the Heart
-
Roll the Primary Coil:
Roll out a thick, even coil of clay on your table. It should be approximately 1 inch in diameter and long enough to form the full outline of your heart shape (about 12-14 inches). -
Initial Shaping:
Gently bend the coil into a ‘U’ shape first, then curve the ends inward and downward to meet in the center, forming a classic heart outline. The bottom point of the heart needs to be somewhat thick to support the weight. -
Refine the Dip:
Pinch the center dip of the heart (the top V-shape) to make it distinct. I like to sharpen the inner point slightly to create a nice contrast with the rounded outer curves. -
Flatten the Sides:
Use a flat wooden tool or a small board to gently tap the front and back faces of the heart. You want the coil to become slightly rectangular in cross-section rather than perfectly round, which gives it that modern architectural look. -
Attach to Base:
Score the bottom point of your heart shape. Press it firmly onto the prepared spot on your oval base. Wiggle it slightly to ensure the slip grabs hold and creates a vacuum seal. -
Support the Structure:
While the clay is wet, the heart might want to slump. Place crumpled paper towels or small sponges under the curves of the heart to hold its shape while it stiffens up.
Sagging Heart?
If the heart droops too much, insert a piece of thick crafting wire inside the coil during the rolling phase. This acts as an internal skeleton (armature) to keep the loops upright.
Step 3: Smoothing and Texturing
-
Blend the Seams:
Using a modeling tool, drag clay from the base up onto the bottom of the heart, and from the heart down onto the base. Smooth this blended area with your finger until the seam is invisible and the transition looks seamless. -
Surface Smoothing:
Take a slightly damp sponge and wipe it over the entire sculpture. This removes fingerprints and softens any sharp edges created during the shaping process. -
Add Texture:
To recreate the porous look in the photo, gently tap the surface with a stiff-bristled brush or barely roll a textured stone over the clay. You want tiny divots and imperfections. -
Create the Point:
Check the inner point of the heart (the cupid’s bow area) one last time. Ensure it hangs down sharply and cleanly, as this is a focal point of the design. -
Slow Drying:
Loosely cover the sculpture with a plastic bag for the first 24 hours to let moisture evaporate slowly. This prevents cracking, especially at the join where the heart meets the base. -
Final Sanding:
Once fully dry (which may take 2-3 days depending on thickness), use fine-grit sandpaper to knock off any rough burrs, but leave the main texture intact to maintain that organic feel.
Stone Effect
Mix a small amount of used coffee grounds or sand into your clay body before sculpting. When it dries, these specks create a beautiful, speckled granite-like texture.
Place your finished sculpture near a window where the sunlight can highlight those beautiful handmade textures


Hand Sculpture: A Mini Peace Sign or Open Palm
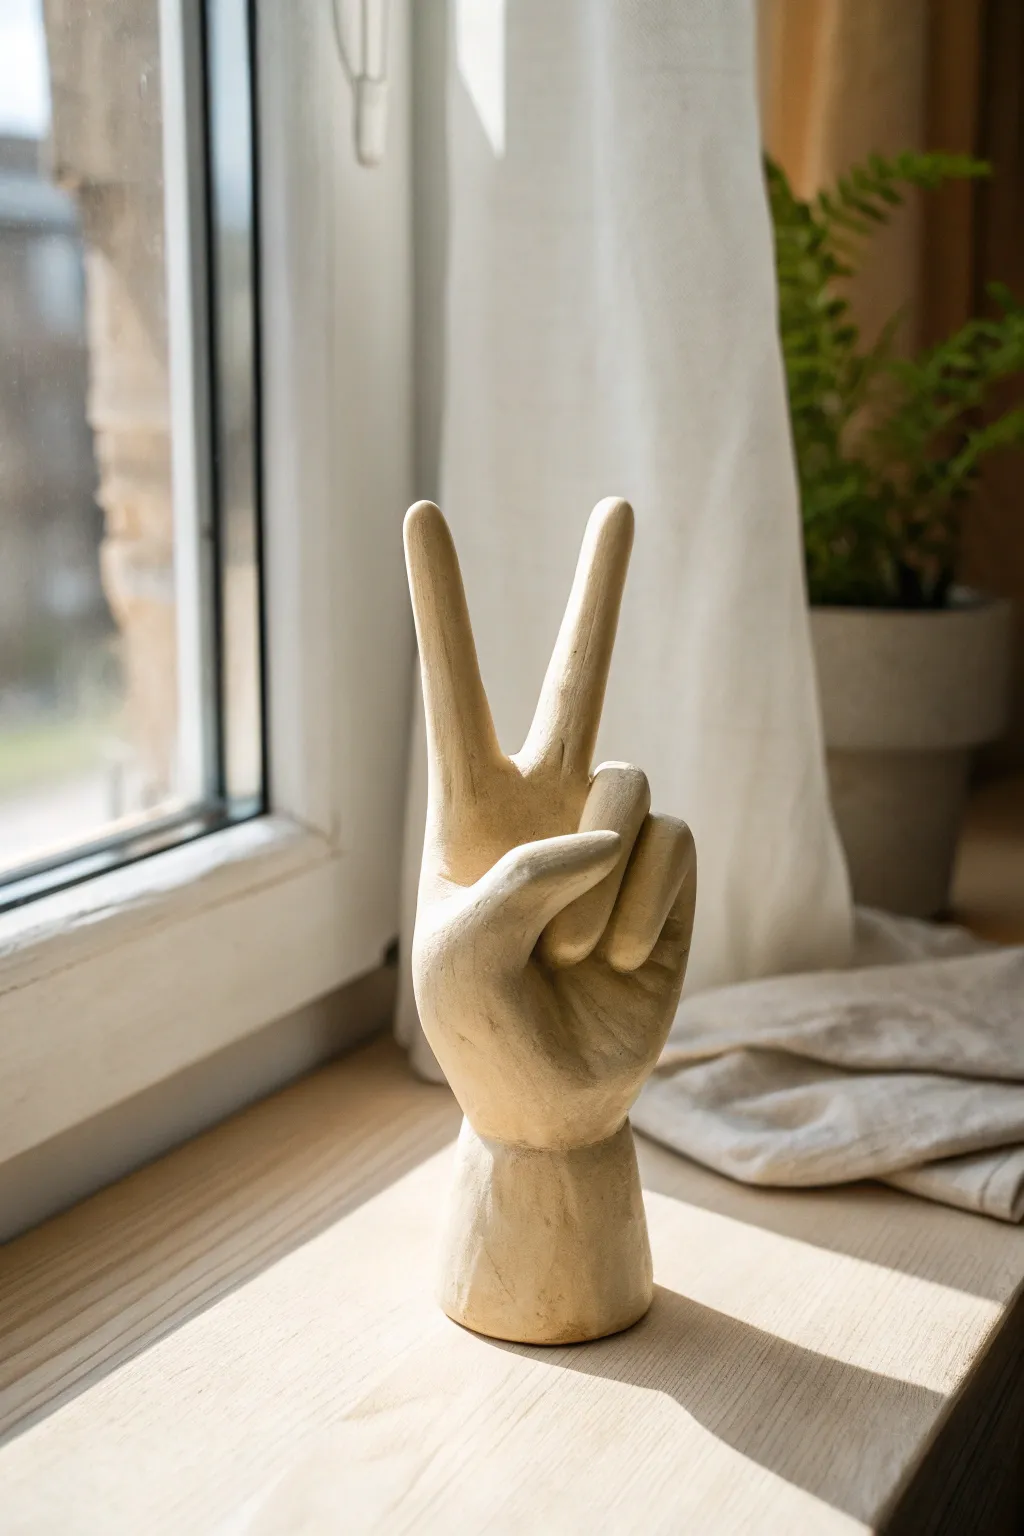
Create a statement piece for your shelf with this stylized hand sculpture forming the classic peace sign. The smooth, matte finish and minimalist cylindrical base give it a modern, gallery-worthy appearance that’s surprisingly achievable at home.
Step-by-Step Tutorial
Materials
- White specialized air-dry clay (like DAS or similar fine-grain clay) or polymer clay
- Rolling pin
- Aluminum foil
- Masking tape
- Sculpting tools (loop tool, needle tool)
- Small cup of water
- Sponge
- Fine-grit sandpaper (220 and 400 grit)
- Acrylic paint (pale beige or cream)
- Matte varnish
Step 1: Building the Armature
-
Form the core:
Crumple aluminum foil into a cylinder shape for the wrist/base and a flattened oval for the palm. This saves clay and keeps the sculpture lighter. -
Wire the fingers:
Cut two lengths of thick wire for the index and middle fingers. Insert them firmly into the foil palm structure where the V-shape will go. -
Add finger bulk:
Wrap foil tighter around these wires to build up the thickness of the fingers, then wrap the entire foil structure in masking tape to create a smooth surface for the clay to grip.
Smooth Seams Pro-Tip
Use a ‘slip’ mixture (clay dissolved in a tiny bit of water) as glue. Apply it generously between joined pieces like the thumb and palm to prevent cracks as it dries.
Step 2: Applying the Clay
-
Prepare the base slab:
Roll out a slab of clay to about 1/4 inch thickness. Wrap this around the cylindrical base of your foil armature, smoothing the seam where the edges meet. -
Cover the palm:
Add sheets of clay over the palm area, blending the clay downward into the wrist section to ensure a seamless transition. -
Form the curled fingers:
Roll two coils of clay for the ring and pinky fingers. Attach them to the palm so they look folded down. Use a sculpting tool to blend the edges into the palm so they don’t look stuck on. -
Sculpt the thumb:
Create a shorter, thicker coil for the thumb. Position it crossing over the curled fingers, pressing it gently into place to mimic the natural fold of a hand. -
Cover the upright fingers:
Roll thin sheets of clay and wrap them around the foil-covered wire fingers. Smooth the seams carefully. -
Detail the joints:
Using a reference photo of your own hand, gently press indentations where the knuckles are to give the straight fingers a subtle, realistic shape rather than looking like sausages.
Level Up: Ring Holder
Make the upright fingers slightly thinner at the top. This turns your sculpture into a functional jewelry stand perfect for stacking rings.
Step 3: Refining and Finishing
-
Smooth the surface:
Dip your finger or a sponge in a little water and run it over the entire sculpture to erase fingerprints and smooth out lumps. I find a damp sponge works wonders for unifying the texture. -
Define the wrist:
Ensure the transition from the wrist to the cylindrical base is clean. You can add a subtle rim of clay at the very bottom for stability if needed. -
Dry thoroughly:
Let the sculpture dry completely. For air-dry clay, this usually takes 24-48 hours. Rotate it occasionally so it dries evenly. -
Sand for perfection:
Once bone dry, sand the piece using 220-grit sandpaper to remove any bumps. Finish with 400-grit for a velvety smooth touch. -
Dust off:
Wipe the sculpture down with a dry cloth or a large soft brush to remove all white sanding dust. -
Painting:
Apply two coats of a pale beige or cream acrylic paint to get that uniform ceramic look. Let the first coat dry completely before adding the second. -
Seal the work:
Apply a final coat of matte varnish. This protects the clay from moisture and gives it a professional, finished sheen without being glossy.
Place your finished sculpture near a window to let the natural light highlight its smooth curves


Easy Face Sculpture With Bold Nose and Brows
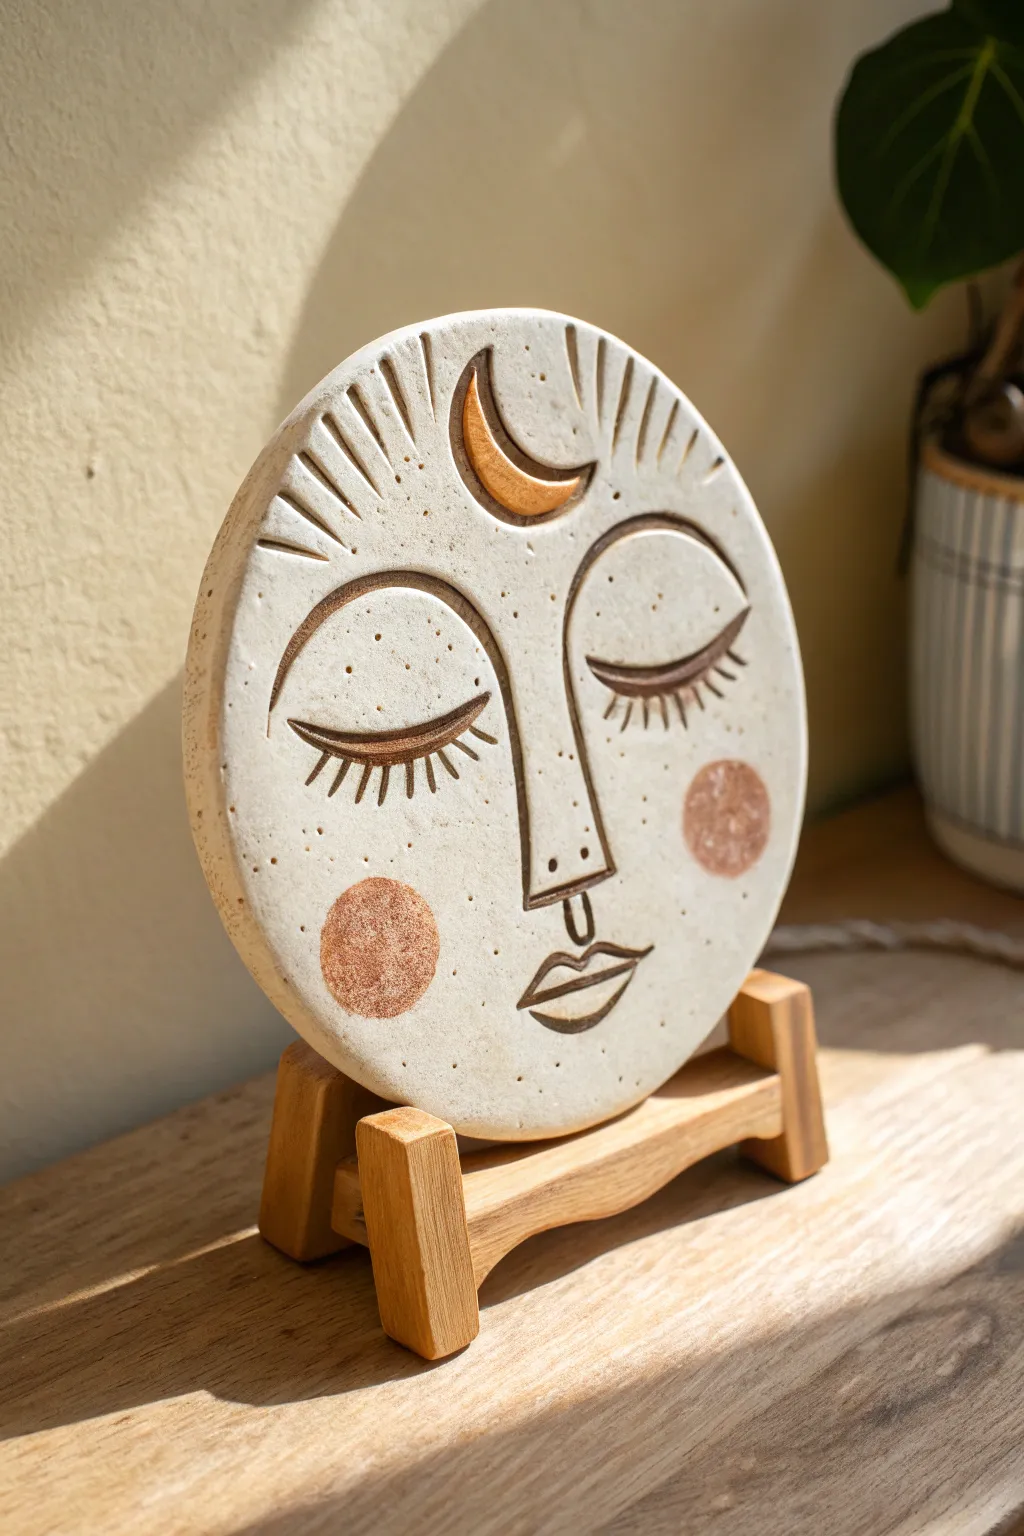
This serene, moon-faced sculpture brings a touch of celestial magic to any shelf or altar space. The project features warm, earthy tones on a speckled cream background, with deep carvings that give the sleeping face a peaceful, meditative quality.
Step-by-Step Guide
Materials
- White or cream speckled clay (air-dry or polymer)
- Rolling pin
- Circle cutter or bowl (approx. 6-8 inches)
- Needle tool or toothpick
- Carving tools (small loop tool and V-gouge)
- Sponge and water
- Acrylic paints (terracotta, gold/bronze, dark brown)
- Small fine-point paintbrushes
- Sealant (matte or satin finish)
- Wooden display stand
Step 1: Shaping the Base
-
Prepare the slab:
Start by conditioning your clay until it is pliable. Roll it out into an even slab, aiming for a thickness of about 1/4 to 1/2 inch. You want it substantial enough to stand up without warping. -
Cut the circle:
Place your circle cutter or a bowl onto the clay and press down firmly to cut a perfect round shape. Peel away the excess clay. -
Smooth the edges:
Dip your finger or a small sponge in water and run it along the cut edge of the circle. This removes any sharp ridges and gives the piece a professional, finished look.
Wobbly Lines?
If your carving tool slips, don’t panic. Dip your finger in a little water (or clay softener/oil for polymer) and gently rub the area in a circular motion to ‘erase’ the mistake before re-carving.
Step 2: Sketching and Carving
-
Map out the features:
Lightly sketch the design onto the clay surface using a needle tool. Draw a long, vertical nose bridge in the center, large semi-circle eyes on either side, and a small crescent moon on the forehead. -
Define the nose:
Using a carving tool or needle, etch deeply along the lines of the long nose. It should connect directly to the eyebrow line on the left side for that continuous-line abstract look. -
Carve the eyes:
Carve deep grooves for the closed eyelids. I find it helpful to go over these lines twice to ensure they are wide enough to hold the dark paint later. -
Add the lashes:
Carefully press or carve short, straight lines radiating downward from the eyelids to create the eyelashes. -
Detail the mouth:
Carve the lips just below the nose. Keep the shape simple and geometric—a triangle on top and a crescent below works perfectly. -
Create the sun rays:
Along the top edge of the circle, carve radiating lines of varying lengths to mimic sun rays. Alternate between short cuts and slightly longer lines. -
Engrave the moon:
Deepen the outline of the crescent moon on the forehead. Scoop out a tiny bit of clay from inside the moon shape so the gold paint will sit slightly recessed.
Step 3: Painting and Finishing
-
Dry the piece:
Allow the clay to dry completely according to the package instructions. If using polymer clay, bake it now. For air-dry clay, wait 24-48 hours until it is bone dry. -
Paint the grooves:
Mix a dark brown acrylic paint with a tiny drop of water to improve flow. Use a fine liner brush to paint inside all the carved lines—the nose, eyes, mouth, and sun rays. -
Add the cheeks:
Dip a round brush or sponge dauber into terracotta or rust-colored paint. Dab two soft circles onto the cheeks. Use a dry-brush technique here to keep the texture visible and soft. -
Gild the moon:
Paint the crescent moon on the forehead with a metallic gold or bronze paint. You might need two coats to get a solid, shiny finish. -
Clean up edges:
If any dark paint spilled out of the grooves, gently wipe it away with a damp cloth or paint over it with a cream color that matches your clay. -
Seal the sculpture:
Once all paint is dry, apply a coat of matte or satin sealant over the entire front surface to protect the paint and give the clay a unified sheen. -
Display:
Place your finished moon face onto a small wooden easel or plate stand to display it upright.
Pro Tip: Faux Speckle
If you can’t find pre-speckled clay, flick a toothbrush loaded with watered-down brown paint over your plain white clay slab before you start carving to get that organic, stone-like texture.
Now you have a tranquil piece of art ready to bring a sense of calm to your home decor

The Complete Guide to Pottery Troubleshooting
Uncover the most common ceramic mistakes—from cracking clay to failed glazes—and learn how to fix them fast.
A Mini Bust Sculpture on a Clean Base
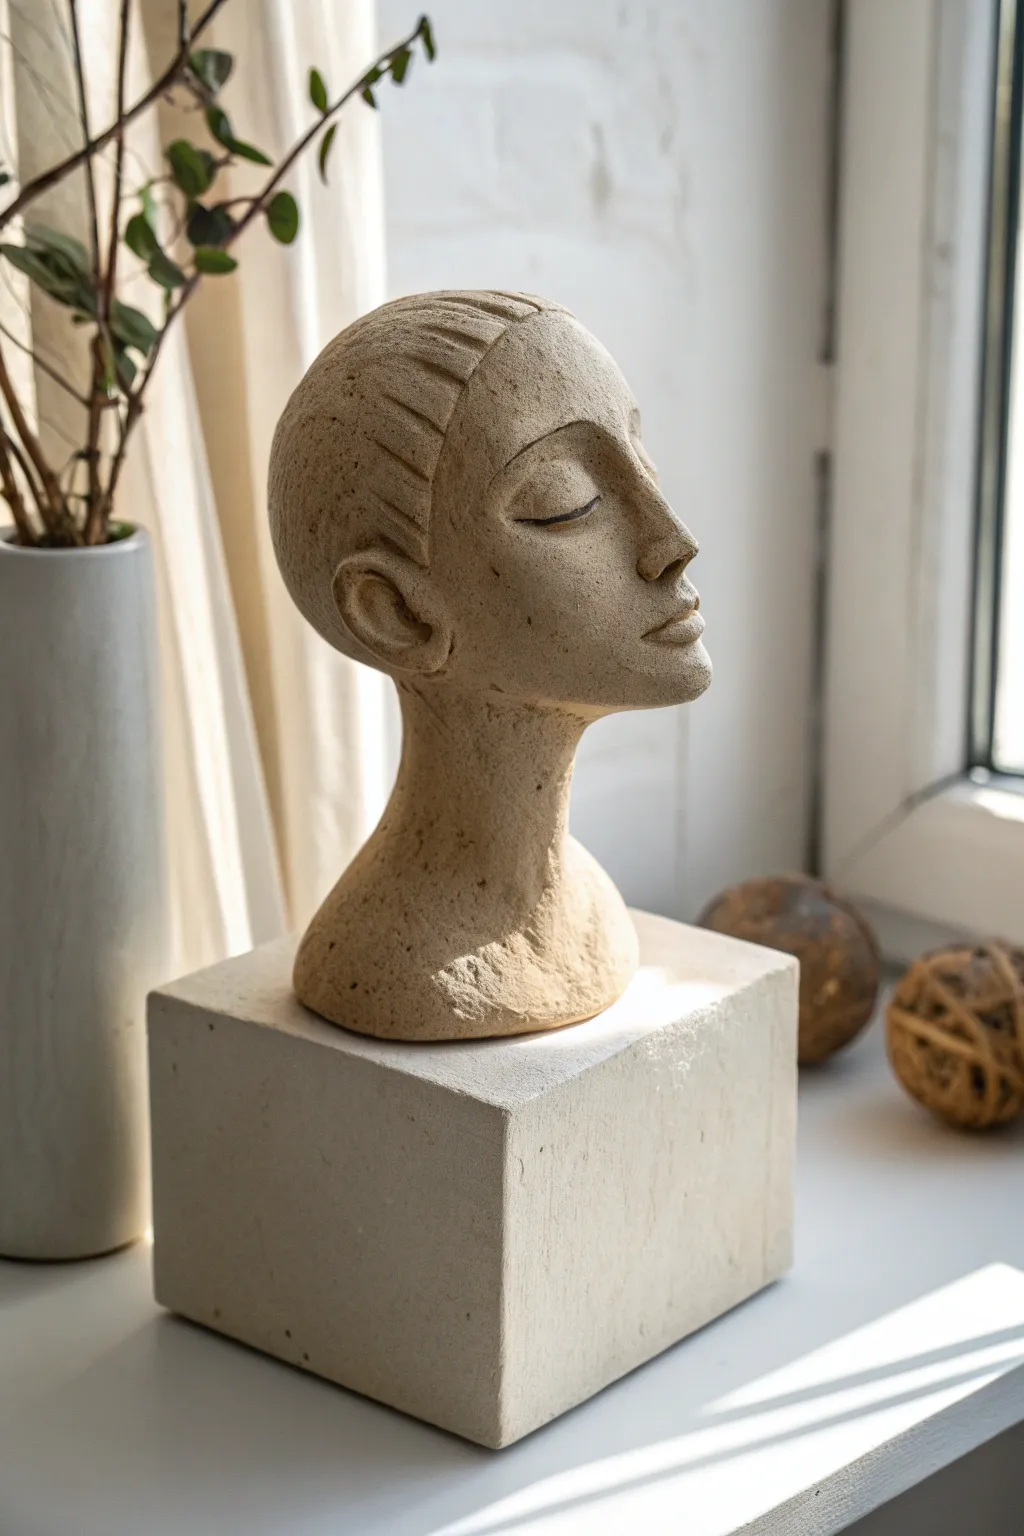
Capture a moment of quiet contemplation with this stylized mini bust. Its elongated features and stone-like texture give it a timeless, museum-quality feel perfect for a modern minimalist shelf.
How-To Guide
Materials
- Stoneware clay or air-dry clay (approx. 2-3 lbs)
- Wooden sculpting tools
- Loop tool
- Needle tool
- Sponge
- Slip (clay and water slurry)
- Coarse sandpaper or texture sponge
- Wire cutter
- Wooden block or pre-made plaster plinth for display
Step 1: Forming the Core Structure
-
Prepare the armature:
Begin by shaping a solid cylinder of clay roughly the thickness of your wrist; this will be the elongated neck. Flare the bottom out slightly to create a stable base that will eventually rest on your plinth. -
Shape the head mass:
Roll a larger ball of clay into an egg shape for the head. It should be proportional but slightly stylized. Score the top of the neck cylinder and the bottom of the head creates, apply slip, and firmly join them together. -
Smooth the transition:
Use your thumb or a wooden modeling tool to drag clay across the seam between the head and neck, blending them until the join is invisible and the transition is graceful.
Ancient Vibes
Mix a small amount of sand or grog into your clay body before sculpting. This gives a natural speckled texture that looks like authentic sandstone once dry.
Step 2: Sculpting the Features
-
Establish facial planes:
Using a flat wooden tool or your thumbs, press into the ‘egg’ to establish the eye sockets. The brow ridge should be prominent and arched, flowing directly into the line of the nose. -
Add volume for the nose:
Add a small wedge of clay to the center of the face for the nose if the basic form doesn’t protrude enough. Blend it seamlessly, keeping the bridge straight and elegant. -
Carve the closed eyes:
Instead of sculpting eyeballs, we are creating a stylized ‘shut’ look. Use a loop tool to gently carve out the curve of the eyelid, then use a needle tool to inscribe a clean, curved slit for the closed lash line. -
Shape the mouth:
Position the mouth closer to the nose than the chin to emphasize the elongated jaw. Roll a tiny coil for the lips, attach with slip, and smooth them into a slight, serene pout.
Step 3: Stylizing the Hair
-
Define the hairline:
Mark a high, rounded hairline with your needle tool. The hair should look like a sleek, fitted cap. -
Create hair texture:
I prefer to use a flat modeling tool here to press rhythmic, parallel grooves into the scalp area. These lines mimic combed hair without needing individual strands. -
Refine the ear shape:
Attach small C-shaped flat discs of clay to the sides of the head. Keep the detailing simple—just an outer rim and a suggestion of the inner ear canal—to match the sleek aesthetic.
Display Drama
Paint your base block with a matte textured spray paint in a contrasting color like charcoal or unbleached titanium to make the sculpture pop.
Step 4: Texturing and Finishing
-
Refine the profile:
Step back and look at the profile view. Use a rib tool to smooth the jawline and ensure the chin has a defined, slightly jutting structure. -
Add surface texture:
To achieve that ancient stone look, do not smooth the clay perfectly. Gently dab the surface with a coarse sponge or a crumpled ball of aluminum foil to create subtle pockmarks and roughness. -
Create the base connection:
Ensure the bottom of the bust is perfectly flat. Slice it with a wire cutter if necessary so it sits flush on your cube base later. -
Dry slowly:
Loosely cover the sculpture with plastic to let it dry very slowly over several days. This prevents cracking, especially at the prone neck area. -
Final sanding:
Once bone dry (if using air dry) or bisque fired (if using ceramic), use sandpaper to scuff up high points, enhancing the eroded, antique effect. -
Mounting:
Place your finished bust on a clean, sharp-edged block (plaster, wood, or concrete) to complete the presentation.
Enjoy the peaceful presence your new sculpture brings to your space
A Reclining Deer With Smooth, Calm Lines
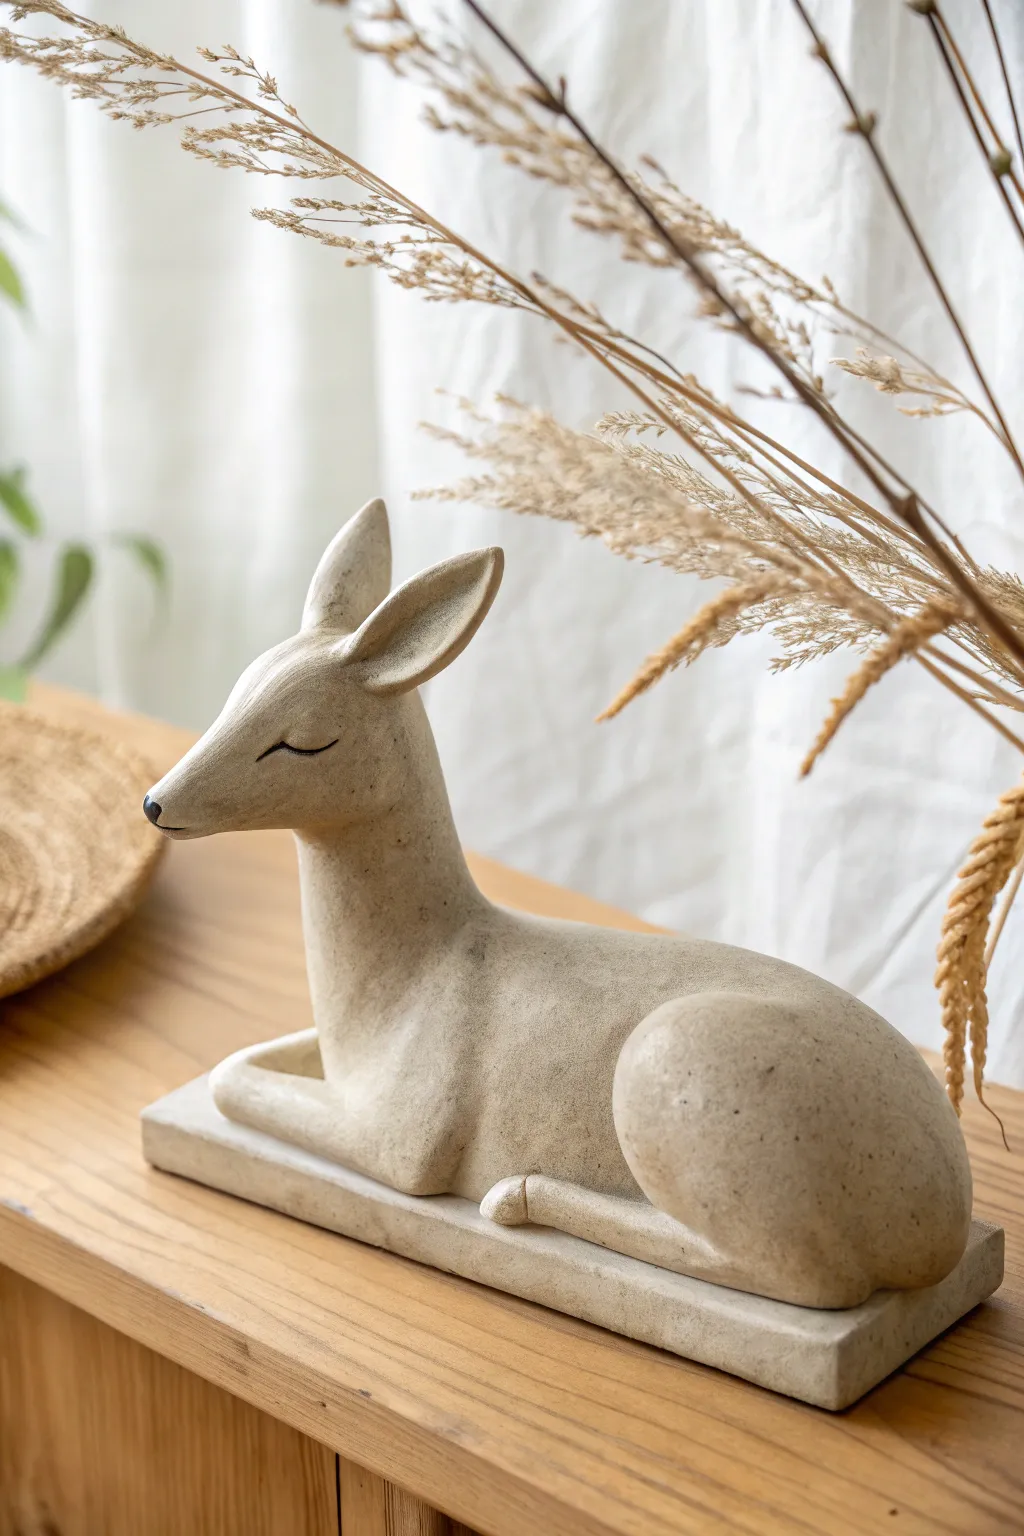
Capture the stillness of nature with this minimalist reclining deer sculpture, characterized by smooth, flowing lines and an elegant posture. The finished piece features a soft, sandstone-like texture that evokes a sense of calm and makes for a timeless decor accent.
Step-by-Step Guide
Materials
- Air-dry clay (stone effect or natural white)
- Rectangular wooden board or clay slab (for the base)
- Sculpting tools (loop tool, needle tool, smoothing rib)
- Water cup and sponge
- Rolling pin
- Acrylic paint (beige, light grey, black)
- Old toothbrush (for speckling)
- Matte varnish
- Fine-grit sandpaper
Step 1: Forming the Base and Body
-
Prepare the Base:
Begin by rolling out a thick slab of clay, roughly 1/2 inch thick. Cut it into a neat rectangle around 6-8 inches long. Smooth the edges with a damp sponge to create a clean, modern foundation. -
Create the Core Shape:
Take a large lump of clay and form a smooth, elongated oval. This will become the deer’s body. Gently flatten the bottom so it sits securely on your rectangular base. -
Attach Body to Base:
Score the top of the base and the bottom of the body, adding a little water or slip (liquid clay) to join them. Press firmly to ensure a strong bond. -
Shape the Hindquarters:
Add extra volume to the back of the oval to form the rounded haunch. Use your thumb to smooth this clay into the main body, creating a seamless, rounded hip shape that tucks underneath.
Seamless Joins
When attaching the head or ears, cross-hatch the clay surfaces (scoring) before adding water. This acts like Velcro, ensuring delicate parts don’t fall off.
Step 2: Sculpting the Neck and Head
-
Build the Neck:
Roll a thick coil of clay and attach it to the front of the body, angling it slightly upwards and backwards. Smooth the clay downwards to integrate it fully with the chest. -
Refine the Head Shape:
At the top of the neck, shape the clay into a tapered, triangular snout. Keep the transition from neck to head fluid and graceful; minimalism is key here. -
Add the Ears:
Form two large, leaf-shaped pieces of clay for the ears. Attach them high on the head, pointing them backwards. The connection point should be seamless, so use a modeling tool to blend the clay. -
Define the Legs:
Roll two smaller coils for the front legs. Attach them so they look tucked under the chest in a resting pose. Only the front knees and hooves need to be distinct; the rest can blend into the body. -
Sculpt the Rear Leg:
Add a small, curved sausage shape along the bottom of the flank to represent the rear leg folded forward, ending in a simple hoof shape resting on the base.
Faux Bronze Look
Swap the stone paint for a dark metallic brown base coat. Once dry, dry-brush a little gold highlight over the curves for a sophisticated cast-metal appearance.
Step 3: Detailing and Surface Texture
-
Smooth the Form:
Dip your fingers or a sponge in water and run them over the entire sculpture. Your goal is to eliminate any fingerprints and emphasize those calm, continuous curves. -
Carve the Face:
Using a needle tool, gently etch two curved lines for the closed eyes. Keep them symmetrical and simple to convey a sleeping or meditating expression. -
Refine the Nose:
Lightly flatten the very tip of the snout to create a nose area, but don’t over-detail nostrils—keep it stylized. -
Drying Time:
Allow the sculpture to dry completely. Depending on the thickness and your climate, this can take 24 to 48 hours. I find that turning it occasionally helps it dry evenly.
Step 4: Finishing Touches
-
Sand Imperfections:
Once bone dry, use fine-grit sandpaper to gently remove any rough bumps or sharp edges, particularly around the ears or base. -
Base Coat Painting:
Paint the entire sculpture with a mixture of beige and light grey acrylics to mimic natural sandstone. -
Stone Texture Effect:
Dilute a darker grey or brown paint slightly. Load an old toothbrush, aim it at the sculpture, and run your thumb over the bristles to flick tiny speckles onto the surface. -
Detail the Face:
Use a very fine brush and black paint to carefully trace the carved eye lines and paint the small nose tip black. -
Seal the Work:
Protect your artwork with a coat of matte varnish to preserve the stone-like finish without adding unnatural shine.
Place your serene deer on a shelf or mantelpiece to bring a quiet moment of calm to your living space


What Really Happens Inside the Kiln
Learn how time and temperature work together inside the kiln to transform clay into durable ceramic.
A Flower Frog Sculpture That’s Actually Useful
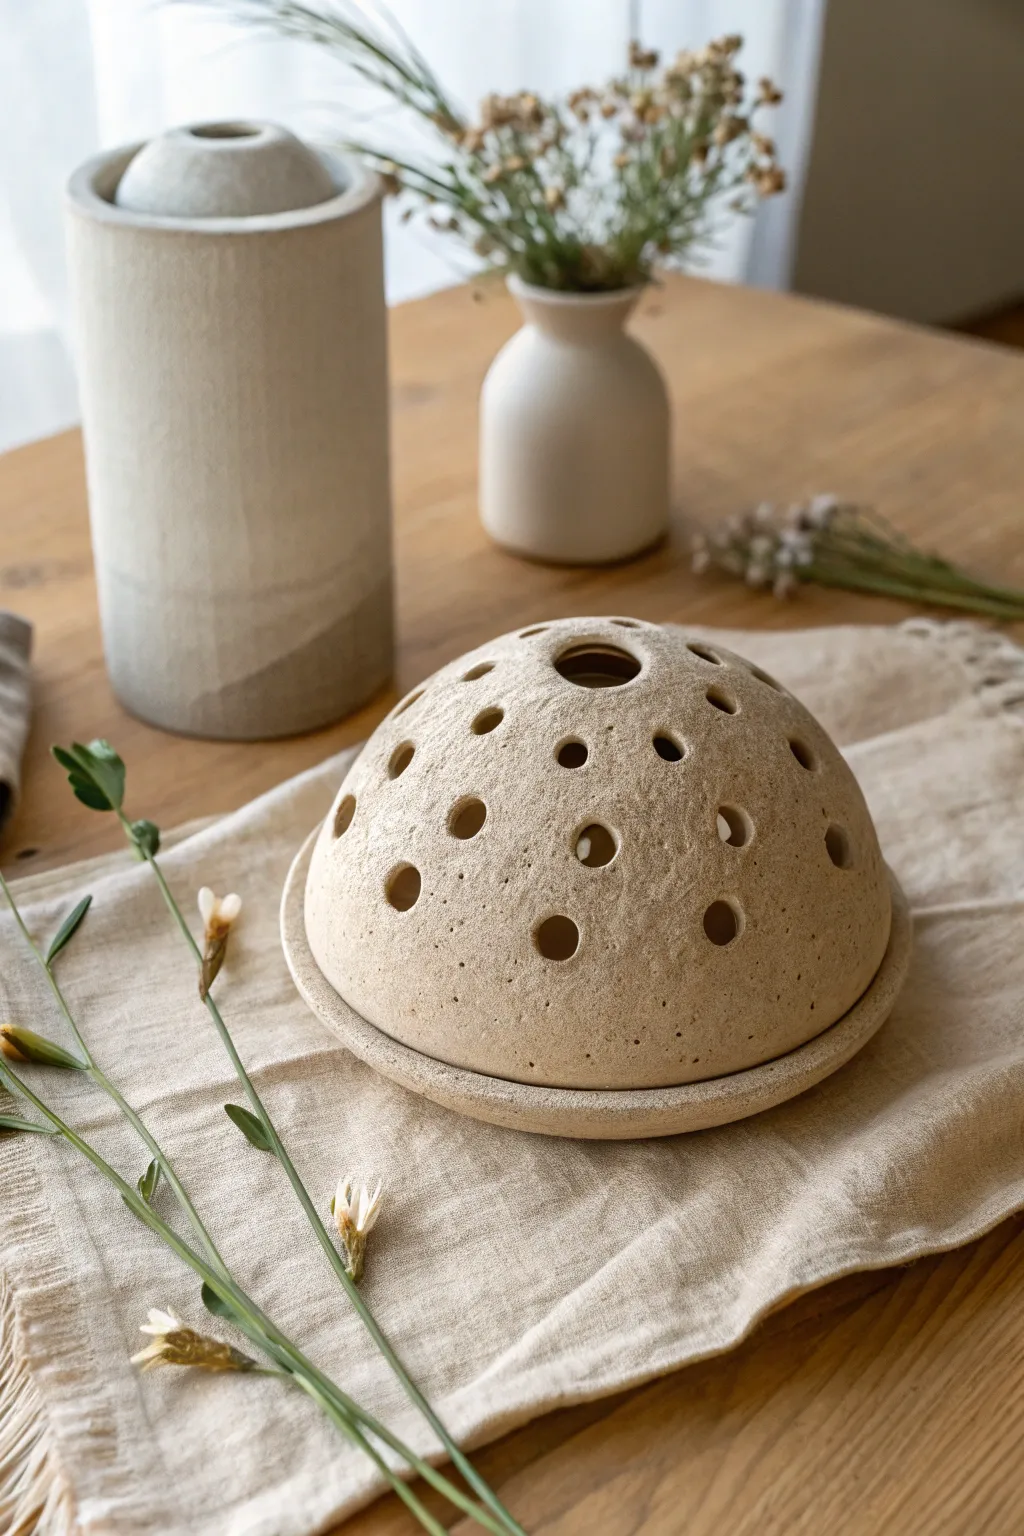
This elegant clay project combines sculptural beauty with practical utility, creating a dual-piece flower frog that looks lovely even without blooms. The textured, sandy finish and perfectly placed apertures turn a simple floral mechanic into a standalone centerpiece.
How-To Guide
Materials
- Stoneware clay (smooth or grogged, beige/sand color)
- Small bowl (for use as a slump mold)
- Canvas mat or cloth
- Rolling pin
- Circle cutter or needle tool
- Hole cutters (variable sizes, 5mm – 15mm)
- Rib tool (flexible metal or rubber)
- Sponge
- Scoring tool (serrated rib)
- Slip (liquid clay)
- Plastic wrap
Step 1: Forming the Base Dish
-
Roll the slab:
Begin by wedging your clay to remove air bubbles, then roll out a slab to an even thickness of approximately 1/4 inch (6mm). Smooth the surface with a rib tool to compress the clay particles. -
Cut the base:
Select a circle template that is slightly larger than your intended dome size. Cut out a perfect circle using your needle tool or a dedicated circle cutter. -
Lift the rim:
Place your clay circle on a banding wheel if you have one. Gently ply up the outer edge with your thumb and forefinger to create a shallow rim, forming a low dish that will catch water. -
Smooth the edge:
Run a damp sponge or chamois over the rim to soften any sharp angles. Set this piece aside on a ware board to firm up to leather-hard.
Clean Cuts Pro-Tip
When punching holes, twist the cutter as you pull it out, rather than just pulling straight back. This shears the clay cleanly and reduces the ragged edges you’ll have to clean up later.
Step 2: Sculpting the Dome
-
Prepare the mold:
Find a small bowl that has the curvature you desire for the dome. Cover the inverted bowl with a layer of plastic wrap or a thin cloth to prevent sticking. -
Drape the clay:
Roll a second slab of clay, slightly thinner than the base. drape it over your prepare mold. Gently press the clay against the form, ensuring it conforms without stretching too thin in spots. -
Trim the excess:
Once the clay has stiffened slightly (soft leather-hard), use your needle tool to trim the bottom edge evenly around the base of the mold so it sits flat. -
Refine the surface:
While still on the mold, use a serrated rib or texturing tool to gently roughen the surface if you want that sandy, stone-like texture shown in the example. Alternatively, leave it smooth.
Level Up: Hidden Wells
Add a small, distinct interior cup to the center of the base dish. This creates a deeper water reservoir specifically for the central flower stem, keeping bulky arrangements hydrated longer.
Step 3: Creating the Apertures
-
Plan the pattern:
Remove the dome from the mold once it can support its own weight. Lightly mark where you want your stem holes to go. I find a random, organic distribution looks more natural than a grid. -
Punch the center:
Start with the largest hole cutter at the very top of the dome. This central opening is great for thicker stems or focal flowers. -
Add variance:
Using smaller variances of hole cutters (or a straw for tiny ones), punch holes around the dome. Angle the cutter slightly towards the center of the imaginary sphere to help stems stand naturally later. -
Clean the cuts:
After punching, let the clay dry a bit more. Then, use a damp sponge or a soft brush to clean up any ‘crumbs’ or sharp burrs around the holes.
Step 4: Finishing and Firing
-
Check the fit:
Place the dome onto the base dish. It should sit comfortably inside the rim with a little wiggle room. If the base has warped, gentle adjustment is easier now before bone dry. -
Final texture check:
Inspect the surface one last time. If you want a speckled look and aren’t using speckled clay, you can flick iron oxide wash onto the surface with a toothbrush. -
Bisque fire:
Allow both pieces to dry slowly under loose plastic for a few days before bisque firing to cone 04 (or your clay’s specification). -
Glaze application:
For the sandy look, leave the exterior unglazed (if the clay is vitrified) or use a matte, stone-texture glaze. Crucially, apply a waterproof clear glaze to the *inside* of the base dish so it holds water. -
Glaze fire:
Fire the pieces separately (do not stack them) to your final glaze temperature.
Once fired, simply fill the bottom dish with water, place the dome on top, and you have a stunning, reusable floral mechanic ready for your table
Abstract Clay Sculpture Built From Balancing Shapes
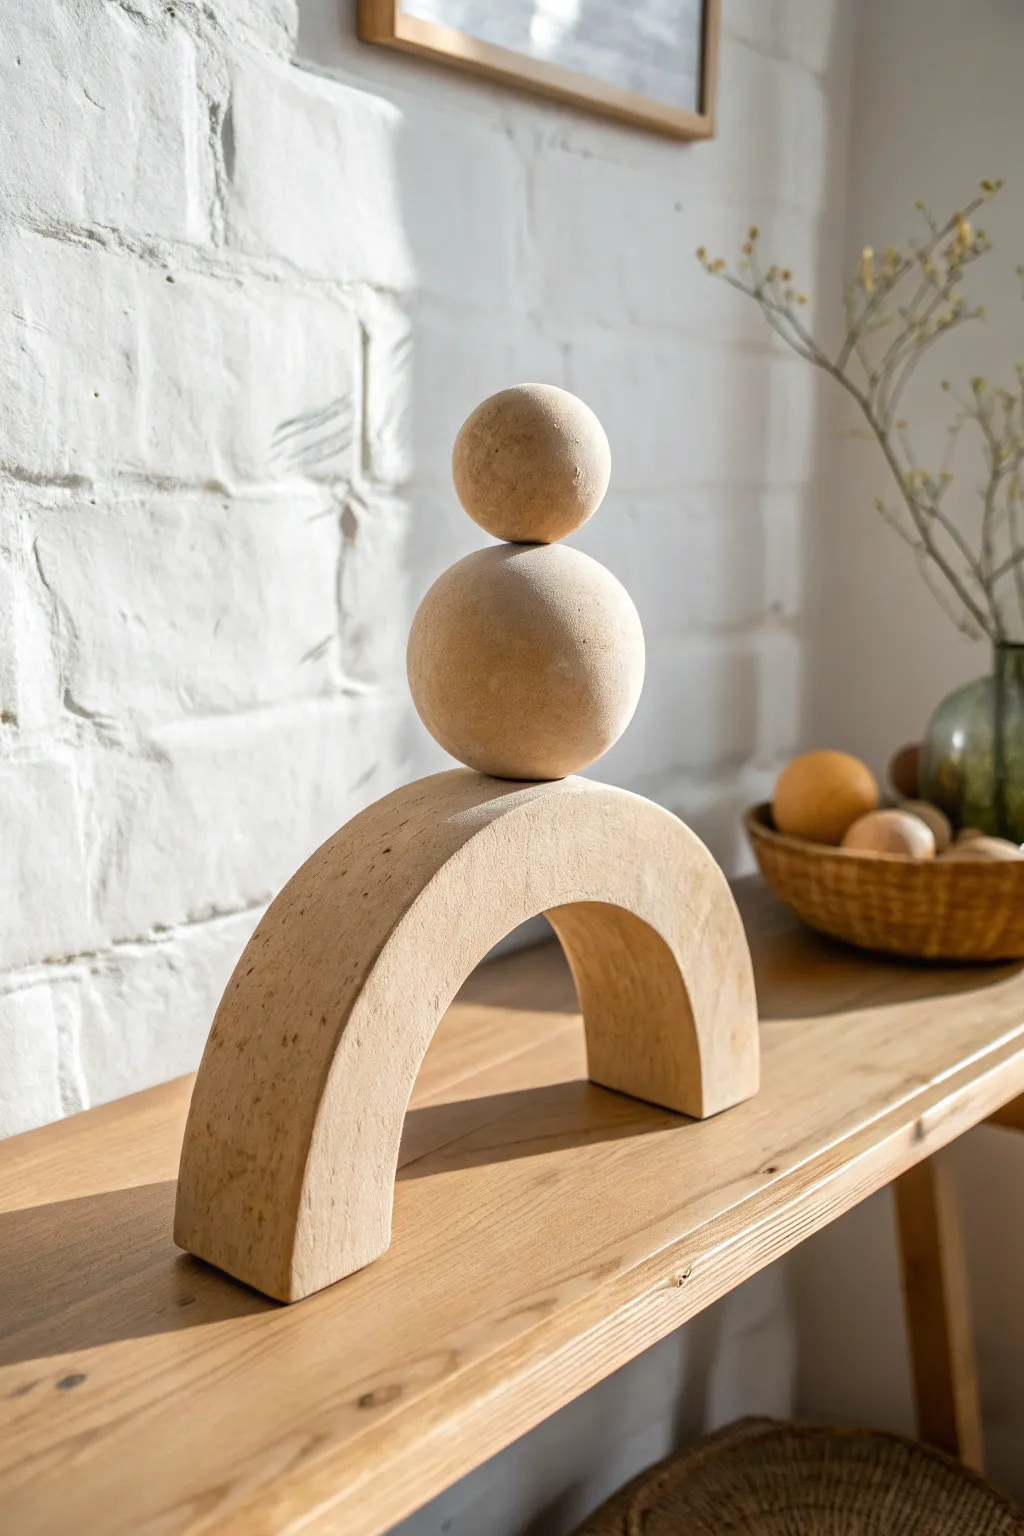
This minimalist sculpture captures the serene beauty of balance with its earthy texture and geometric simplicity. The piece features a sturdy arched base supporting two stacked spheres, all finished with a raw, sandstone-like surface that brings organic warmth to any modern interior.
Step-by-Step Guide
Materials
- Stoneware clay (groggy or sandy variant preferred for texture)
- Clay wire cutter
- Rolling pin
- Two wooden guide strips (approx. 1 inch thick)
- Large circular template (or a bowl approx. 8 inches diameter)
- Small circular template (or a bowl approx. 4 inches diameter)
- Fettling knife
- Serrated metal rib (scoring tool)
- Slip (clay mixed with water)
- Wooden paddle
- Sponge
- Sandpaper (for post-firing)
Step 1: Forming the Arch Base
-
Prepare the slab:
Begin by wedging your clay thoroughly to remove air pockets. Place your wooden guide strips on either side of the clay and use a rolling pin to create a uniform slab about 1 inch thick. This thickness is crucial for the structural integrity of the base. -
Cut the arch strips:
You will need a long rectangular strip to form the arch. Measure and cut a strip approximately 3 inches wide and 12-14 inches long. I find it helpful to cut a second identical strip just in case the first one cracks during bending. -
Curve the clay:
Wait until the clay is leather-hard but still pliable—stiff enough to hold shape, but flexible enough to bend. Gently drape the clay strip over a curved form (like a PVC pipe or a large rolling pin) to create the arch shape. If you don’t have a form, gently bend it by hand and place it upright. -
Refine the edges:
Once the arch is standing, use your wooden paddle to gently tap the sides and top. This flattens the surfaces and keeps the geometric look sharp rather than rounded. -
Level the feet:
Ensure the bottom of the arch ‘feet’ are perfectly flat so the sculpture doesn’t wobble. You can slide a piece of paper under them and gently rub the clay back and forth to level them.
Slumping Arch?
If your arch starts sagging while drying, prop it up with crumpled newspaper or a piece of foam underneath the curve until it becomes bone dry and rigid.
Step 2: Creating the Spheres
-
Portion the clay:
Cut two lumps of clay. One should be significantly larger for the middle sphere, and a smaller amount for the top sphere. -
Form rough spheres:
Roll the lumps of clay between your palms to create rough ball shapes. Don’t worry about perfection yet; just establish the general mass. -
Hollow the large sphere:
If your middle sphere is larger than a tennis ball, cut it in half, hollow out the center slightly to reduce weight and prevent explosion in the kiln, score and slip the edges, and rejoin the halves. This is a critical step for successful firing. -
Paddle into shape:
Use the wooden paddle to gently beat the clay into a perfect sphere. Paddling compresses the clay particles and creates a tighter, more uniform surface than rolling alone. -
Refine the surface:
Smooth out any deep paddle marks with your thumb or a slightly damp sponge, but retain some of that natural, stony texture.
Step 3: Assembly and Finishing
-
Dry fit the pieces:
Once all components are leather-hard, stack them gently to check the balance. Identify the exact contact points where the sphere meets the arch, and where the small sphere meets the large one. -
Score the contact points:
Use your serrated rib to heavily score (scratch) the top of the arch and the bottom of the large sphere. Do the same for the top of the large sphere and bottom of the small one. -
Apply slip:
Generously apply clay slip to the scored areas. This acts as the glue for your sculpture. -
Join the components:
Press the large sphere firmly onto the arch with a slight twisting motion to lock the clay particles together. Repeat this process to attach the top sphere. Wipe away excess slip with a brush for a clean seam. -
Puncture air holes:
Use a needle tool to create a tiny, inconspicuous hole in each sphere (if hollowed) and the arch to allow expanding air to escape during firing. -
Texture the surface:
To achieve the sandstone look shown in the image, gently dab the surface with a coarse sponge or a stiff brush while the clay is still damp. -
Slow drying:
Loosely cover the entire sculpture with plastic to let it dry very slowly over several days. This prevents the joints from cracking as the clay shrinks. -
Bisque fire:
Fire the piece in a kiln to cone 04 (or according to your clay body’s specifications). No glaze is needed to replicate the raw, matte finish of the example.
Level Up: speckled finish
Mix dried coffee grounds or coarse sand into your wet clay before sculpting; once fired, these burn out or melt to create a beautiful, organic speckled texture.
Place your finished sculpture on a mantle or shelf where natural light can highlight its simple, harmonious form

TRACK YOUR CERAMIC JOURNEY
Capture glaze tests, firing details, and creative progress—all in one simple printable. Make your projects easier to repeat and improve.
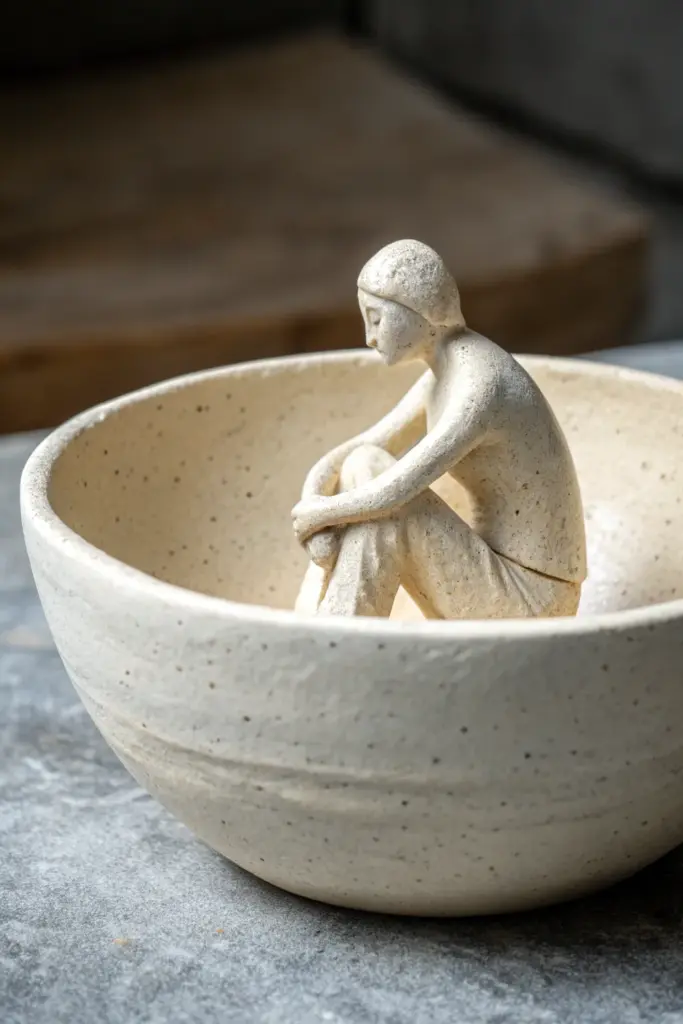
A Surreal Hybrid Sculpture: Figure Meets Vessel
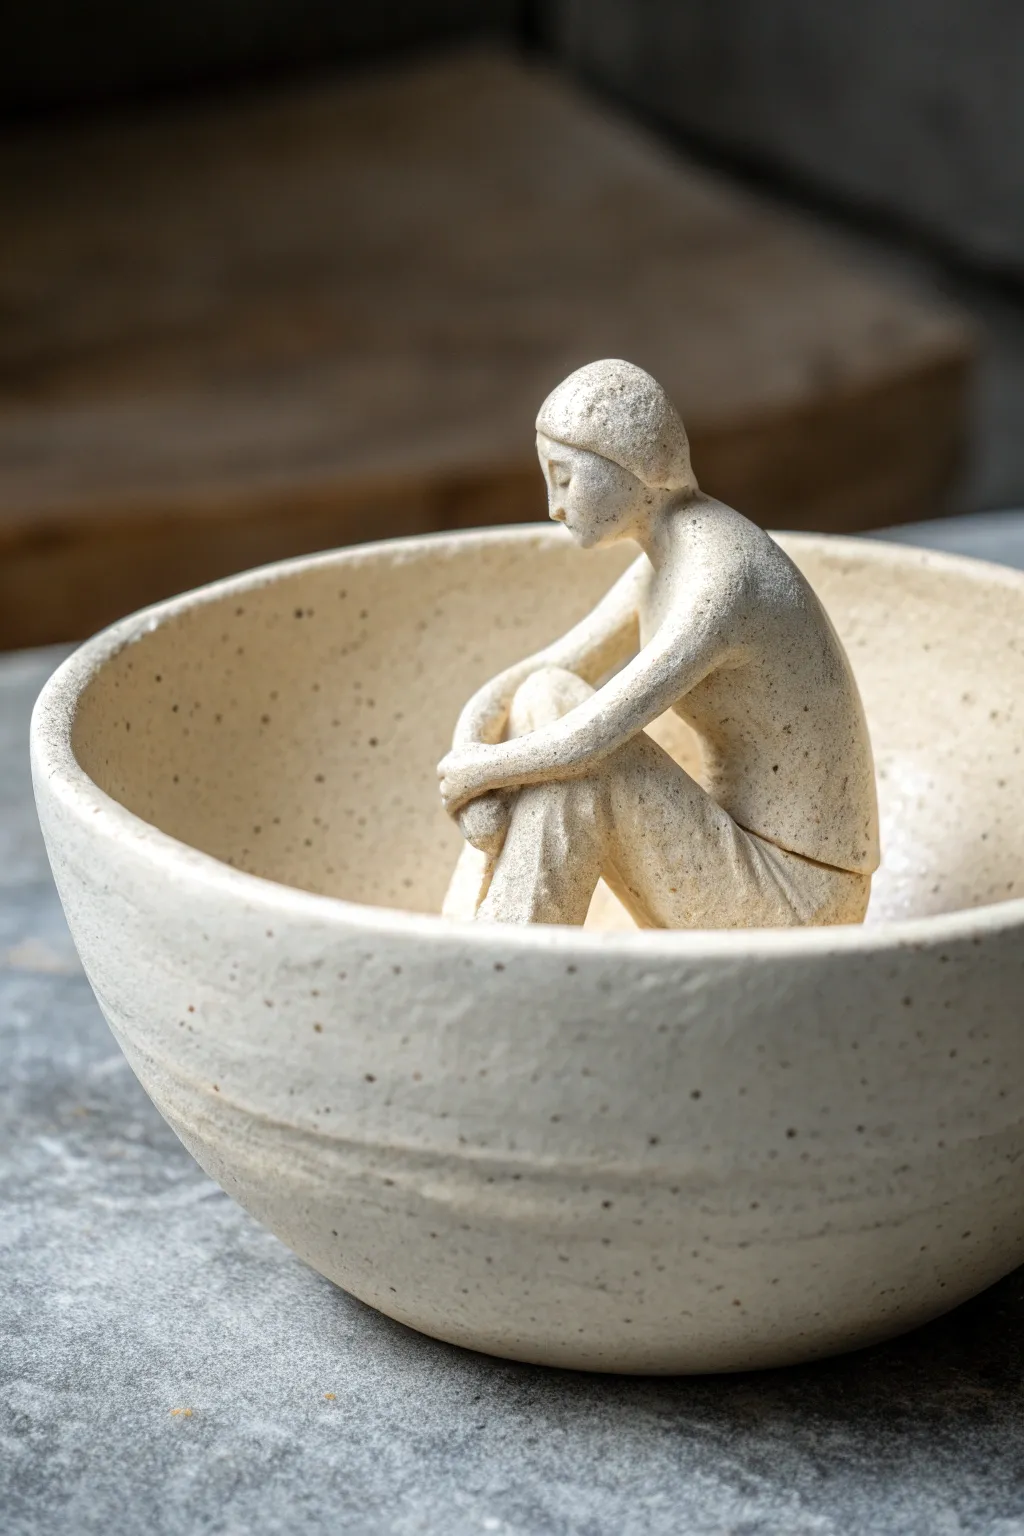
This serene ceramic project merges a functional bowl shape with a stylized human figure, creating a piece that feels both sculptural and intimate. The unglazed, speckled clay body gives it a raw, earthy texture that emphasizes the quiet emotion of the pose.
How-To Guide
Materials
- Speckled buff stoneware clay
- Potter’s wheel (optional, for the bowl)
- Small carving loop tools
- Needle tool
- rib tool (rubber or wood)
- Scoring tool or serrated kidney
- Slip (clay and water slurry)
- Sponge
- Cutting wire
Step 1: Creating the Vessel Base
-
Throw or pinch the bowl:
Begin with about 1-1.5 lbs of clay. You can either throw a simple, curved bowl on the wheel or create a pinch pot by hand. Aim for a gentle, consistent curve inside, as this will act as the ‘chair’ for your figure. -
Refine the rim:
While the clay is still plastic, smooth the rim with a chamois or a damp sponge. The rim should be rounded and soft, matching the organic feel of the sculpture. -
Let it firm up:
Allow the bowl to dry to a sturdy leather-hard stage. It needs to be firm enough to support the weight of the figure without warping, but soft enough to score and slip.
Step 2: Sculpting the Figure
-
Form the torso block:
Take a separate lump of clay and shape a rough, elongated oval for the torso. Curve the back slightly to mimic the spine’s flex. -
Attaching the legs:
Roll two coils for legs. Attach them to the lower torso, bending them sharply to create knees that will be drawn up close to the chest. -
Check the fit:
Before adding detail, place this rough form into your leather-hard bowl. Press gently so the figure’s bottom and feet conform to the curve of the vessel. I find it helpful to leave the figure sitting there for a few minutes to take on the shape. -
Refine the limbs:
Remove the figure carefully. Smooth the seams where legs join the torso. Flatten the sides of the legs slightly for a stylized, geometric look. -
Add the arms:
Roll thinner coils for arms. Attach them at the shoulders, draping them over the bent knees. The hands should cross or rest gently near the ankles. -
Sculpting the head:
Shape a small oval for the head. Keep features minimal—a suggestion of a nose and a smooth cap-like shape for hair is sufficient. The neck should be angled down to convey introspection. -
Attach the head:
Score and slip the neck and shoulders thoroughly. Press the head into place, blending the clay down onto the chest and back so the connection is seamless.
Cracking at the Hips?
If the figure pulls away from the bowl while drying, pack a tiny coil of wet clay into the gap and re-compress. Cover tightly to equalize moisture.
Step 3: Assembly and Finishing
-
Score the seating area:
Identify exactly where the figure touches the bowl. Heavily score (scratch) that area inside the bowl and the corresponding surfaces on the figure. -
Weld the figure in place:
Apply a generous amount of slip. Press the figure firmly into the bowl. Use a small modeling tool to blend the edges of the figure’s contact points into the bowl wall, ensuring a permanent bond. -
Clean up surfaces:
Once attached, go over the entire piece with a slightly damp sponge to smooth out any fingerprints or rough tooling marks. -
Create the texture:
If your clay isn’t naturally speckled, you can flick iron oxide spots onto the surface now, or lightly sand the surface after bisque firing to reveal the grog. -
Dry slowly:
Cover the piece loosely with plastic. Because the figure is thicker than the bowl wall, slow drying is crucial to prevent cracking at the attachment points. -
Bisque fire:
Fire the piece to cone 04 (or your clay’s bisque temperature). -
Final firing:
For the look in the photo, leave the piece unglazed on the outside and figure. You might apply a clear matte glaze only if you want functional waterproofing, otherwise, fire the bare clay to maturity (likely cone 5/6).
Pro Tip: Hollow the Body
To prevent explosions in the kiln, use a needle tool to poke a discrete vent hole underneath the figure, or hollow out the torso if it’s thicker than 1 inch.
Once fired, place this sculpture in a spot with natural light to highlight the gentle shadows of the form