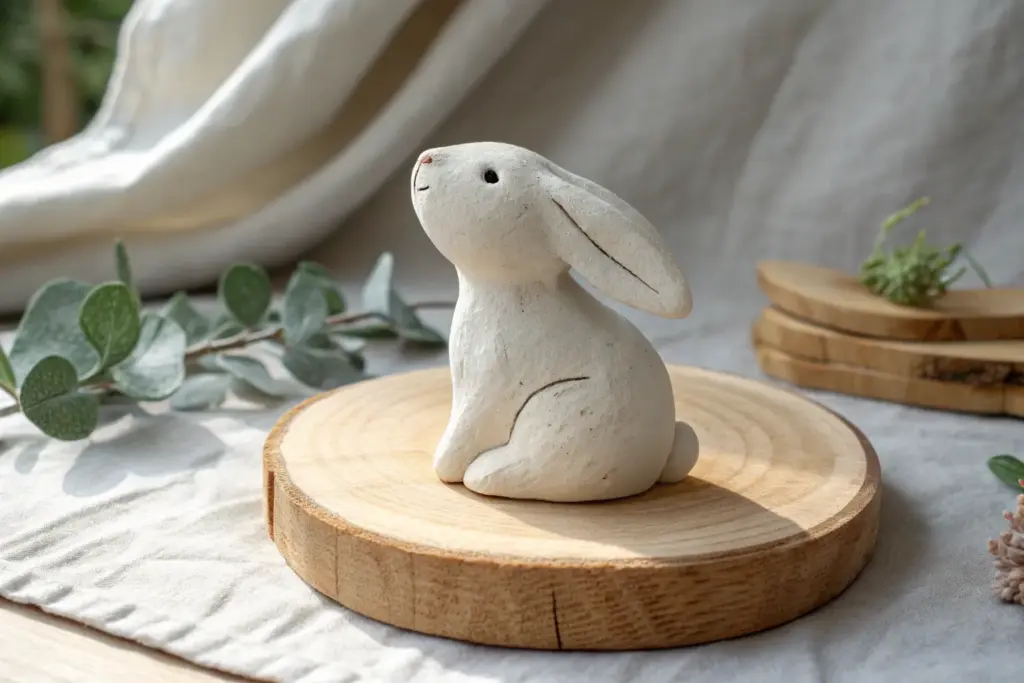
If you’re just getting started, clay sculpture is the sweet spot where simple shapes turn into something seriously charming. These clay sculpture ideas for beginners are the kind of projects I’d set you up with at my studio table—doable, forgiving, and super satisfying to finish.
Cute Turtle With Easy Shell Texture
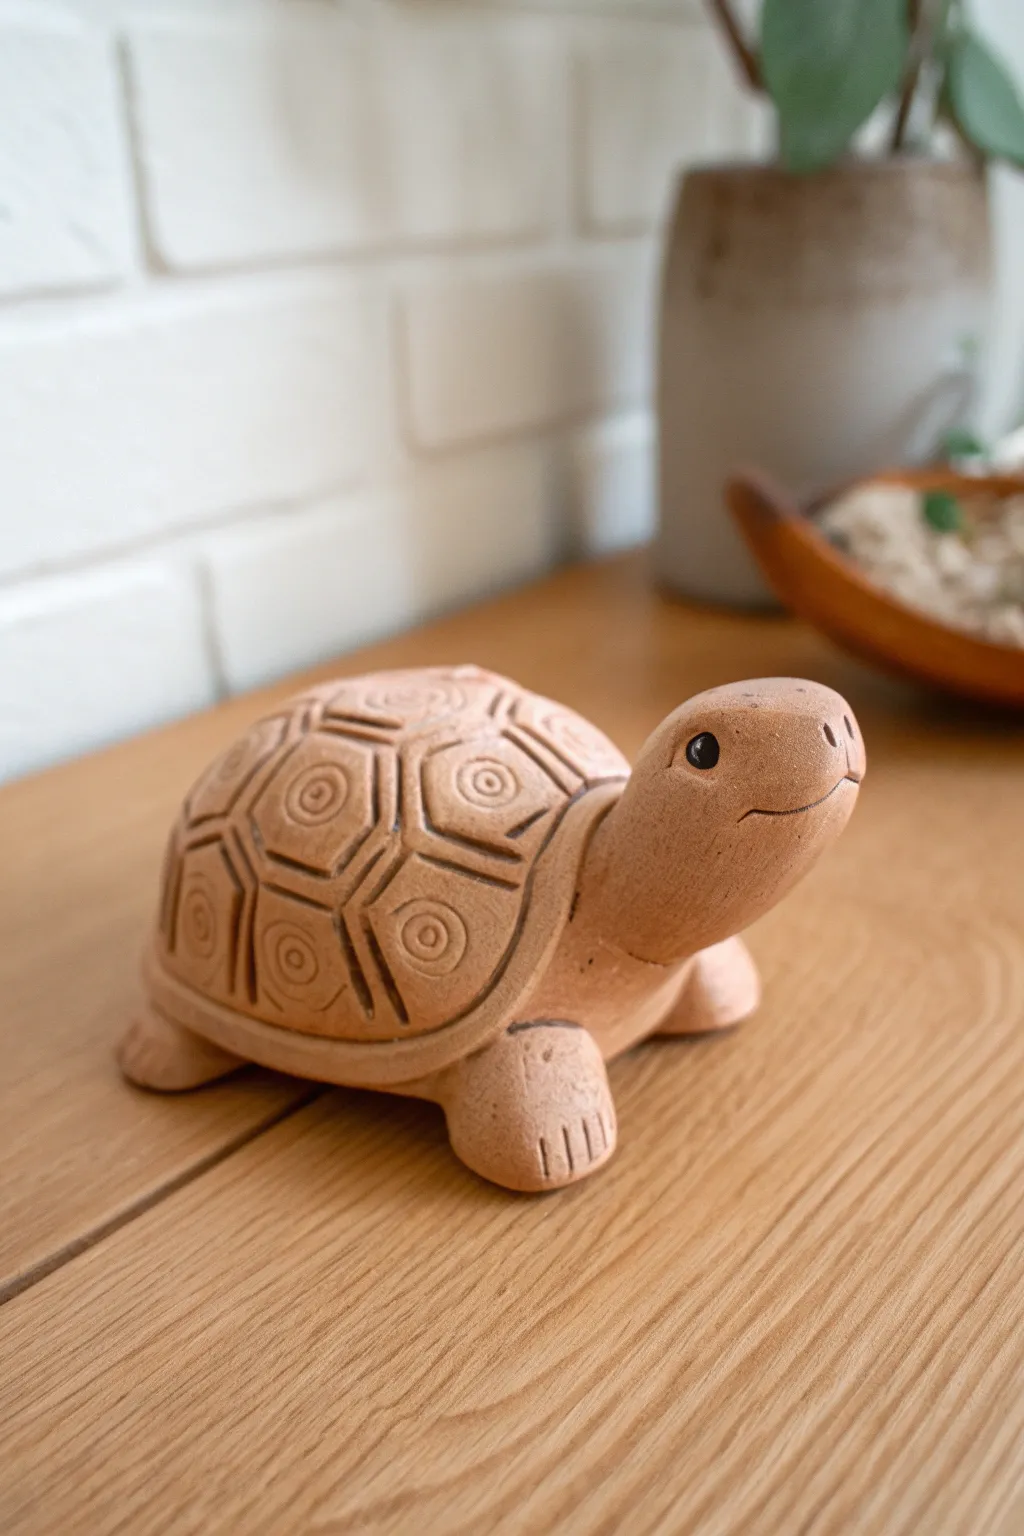
This charming little turtle is a perfect beginner project that introduces simple texture work and joining techniques. The warm, earthy clay gives it a natural feel, while the swirling shell patterns add just the right amount of decorative detail.
Detailed Instructions
Materials
- Terracotta-colored air-dry clay or polymer clay
- Basic sculpting tools (needle tool, modeling tool)
- Small rolling pin
- Water or slip (for joining)
- Acrylic paint (black and white for eyes)
- Fine detail brush
- Smooth work surface
Step 1: Forming the Body
-
Shape the Shell:
Start with a ball of clay roughly the size of a tangerine. Gently press it onto your work surface to flatten the bottom while keeping the top domed and round to create the carapace. -
Create the Head:
Roll a smaller ball of clay into a thick teardrop or pear shape. The rounded end will be the face, and the tapered end will form the neck. -
Sculpt the Limbs:
Roll four equal-sized balls of clay, then flatten them slightly into rounded, stubby cylinders for the legs. Don’t forget a tiny triangular piece for the tail. -
Assemble the Base:
Position the four legs under the shell. Score the attachment points (scratch the surface) and add a dab of water or slip to ensure a strong bond. Press the shell firmly onto the legs so the turtle stands stable. -
Attach the Head:
Attach the tapered end of the head piece to the front of the shell, lifting it slightly upward so the turtle looks like it’s stretching its neck. Smooth the clay where the neck meets the shell using a modeling tool or your finger.
Step 2: Adding Detail & Texture
-
Define the Shell Plates:
Using a needle tool or a dull knife, lightly sketch a hexagon pattern on the top of the shell. I usually start with one central hexagon and draw surrounding shapes from there. -
Deepen the Lines:
Once you are happy with the spacing, go over your sketched lines with a modeling tool to create deeper, distinct grooves separating the scutes (shell plates). -
Add Decorative Swirls:
Take a small, circular tool (like the end of a straw or a small cap) and press a circle into the center of each shell plate. Inside that circle, press a smaller dot or use a needle tool to create a tiny spiral or concentric circle pattern. -
Create the Shell Rim:
Roll a thin snake of clay and flatten it. Attach this strip around the bottom edge of the shell to create a distinct rim, blending the seams on the underside. -
Detail the Feet:
Use a knife tool or the edge of a credit card to press three or four vertical lines into the front of each foot to represent toes. -
Sculpt the Face:
Use a modeling tool to impress a wide, gentle curve for the smile. Use a small ball tool to make indentations where the eyes will go. -
Refine the Surface:
Dip your finger in a little water (or baby oil if using polymer clay) and gently smooth out any fingerprints or rough edges on the skin areas, keeping the shell texture crisp.
Cracking Up?
If you see small cracks forming as air-dry clay dries, mix a tiny bit of fresh clay with water to make a paste and fill them in immediately.
Step 3: Finishing Touches
-
Dry or Bake:
Follow the instructions for your specific clay. If using air-dry clay, let it sit for at least 24-48 hours. If using polymer clay, bake according to the package directions. -
Paint the Eyes:
Once the sculpture is hard and cool, use a fine brush to paint the inside of the eye sockets black. -
Add the Highlights:
To bring the turtle to life, add a tiny white dot in the upper corner of each black eye. This reflection makes the expression look alert and friendly. -
Optional Wash:
For an antique look, you can brush a diluted brown paint over the shell and wipe it off quickly, leaving darker pigment in the deep grooves.
Garden Guardian
Scale this up! Use coarse stoneware clay and make a large version. Once fired, it makes an adorable, weather-resistant ornament for your flower beds.
Place your finished turtle on a shelf near a plant to enjoy its peaceful presence


Frog on a Lily Pad Trinket Sculpture
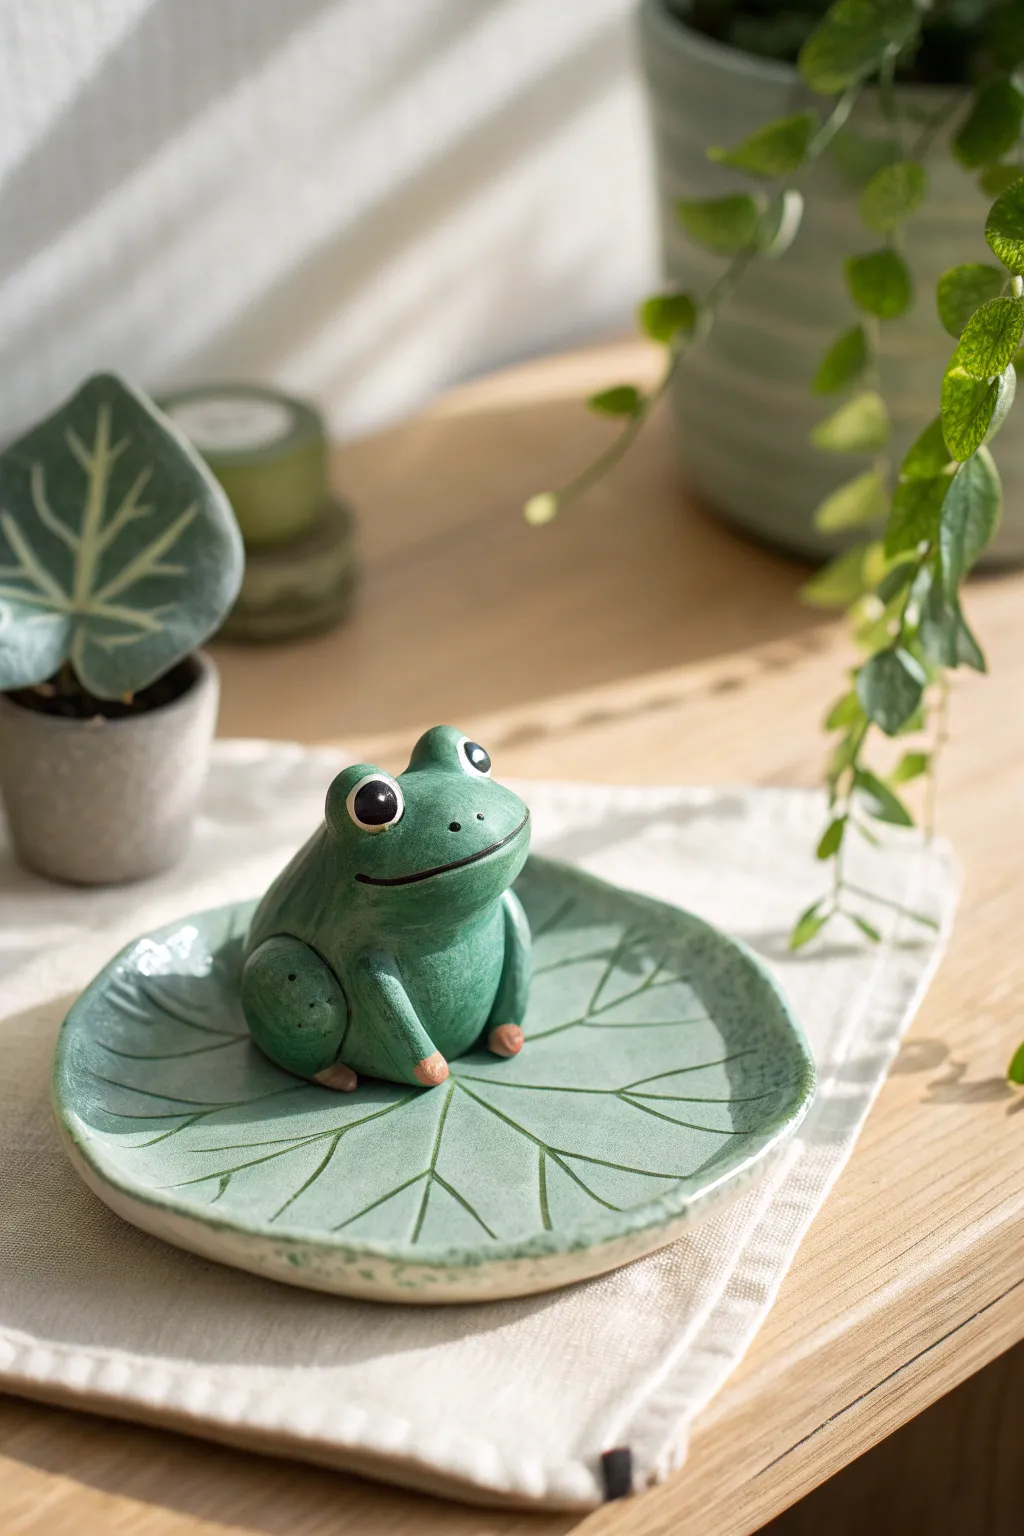
This charming project combines a functional trinket dish with an adorable sculpted character. You’ll create a textured leaf plate to hold jewelry or coins, guarded by a round, friendly frog with wide eyes.
Step-by-Step Guide
Materials
- Air-dry clay or polymer clay (white or green)
- Rolling pin
- Clay carving tools (needle tool, loop tool)
- Bowl of water (for smoothing)
- Acrylic paints (Forest Green, Leaf Green, White, Black, Brown)
- Small paintbrushes (flat and detail round)
- Clear acrylic varnish (glossy or matte)
- Sponge or textured fabric
Step 1: Sculpting the Lily Pad Base
-
Prepare the clay slab:
Start by conditioning a ball of clay about the size of a tennis ball. Roll it out on a flat surface until it’s roughly 1/4 inch thick, keeping the shape generally circular but slightly irregular for a natural look. -
Form the rim:
Gently pinch and lift the edges of your clay circle upwards to create a shallow dish shape. Smooth out any fingerprints with a bit of water. -
Create the texture:
Use a needle tool or a loop tool to carve veins into the surface. Start from a slightly off-center point and draw lines radiating outward to the rim to mimic a lily pad leaf. -
Refine the edges:
Dampen your finger or a small sponge to soften the carved lines and smooth the rim of the dish so it isn’t sharp.
Step 2: Forming the Frog Body
-
Shape the main body:
Take a new piece of clay, roughly the size of a golf ball, and roll it into a smooth, slightly squat teardrop shape. The wider bottom will be the frog’s seat. -
Create the leg shapes:
Roll two smaller sausage shapes for the legs. Bend them into ‘V’ shapes for the hind legs and attach them to the sides of the body, blending the seams with a modelling tool. -
Add front arms:
Roll two smaller cylinders for the front arms. Attach them vertically to the front of the body so they look like they are propping the frog up. -
Sculpt the face:
Press a subtle indentation across the front of the face to define the mouth area. Use a needle tool or the edge of a ruler to press a wide, gentle smile into the clay. -
Add the eyes:
Roll two small spheres of clay and attach them to the top of the head. Press them down gently so they adhere well but remain prominent. -
Position the frog:
Score (scratch) the bottom of the frog and the spot on the lily pad where you want it to sit. Add a dab of water or liquid clay (slip) and press the frog firmly onto the dish.
Smooth Moves
Keep a small piece of slightly damp sponge nearby while working. Wiping the clay periodically removes fingerprints and keeps the surface professional.
Step 3: Painting and Finishing
-
Dry the sculpture:
Allow the clay to dry completely according to the package instructions. I typically wait 24-48 hours for air-dry clay to ensure the thickest parts are solid. -
Base coat the leaf:
Paint the entire dish with a light, sage green color. Let it dry, then dry-brush a slightly darker green over the raised areas to highlight the texture. -
Detail the veins:
Use a thin brush with dark green paint to re-trace the carved vein lines on the lily pad, giving them depth and definition. -
Paint the frog body:
Cover the frog’s body in a rich forest green acrylic. Make sure to get into the crevices between the legs and the body. -
Add frog texture:
While the green paint is still wet, you can dab it slightly with a sponge or dry brush to give the skin a mottled, natural appearance. -
Paint the details:
Paint the eyes pure white with large black pupils. Add tiny white dots as highlights to make the eyes look shiny and alive. -
Highlight the extremities:
Use a soft brown or terra cotta color to paint the tips of the frog’s toes and fingers. -
Seal the piece:
Once all paint is totally dry, apply a coat of clear acrylic varnish. This protects the paint and gives the frog a water-slicked look.
Level Up: Water Droplets
Add UV resin drops on the leaf after sealing to mimic dew. Cure with a UV lamp for a permanent, glossy 3D water effect.
Place your finished sculpture on a windowsill to catch the light and hold your favorite rings


Chubby Cat Figurine Built From Two Shapes
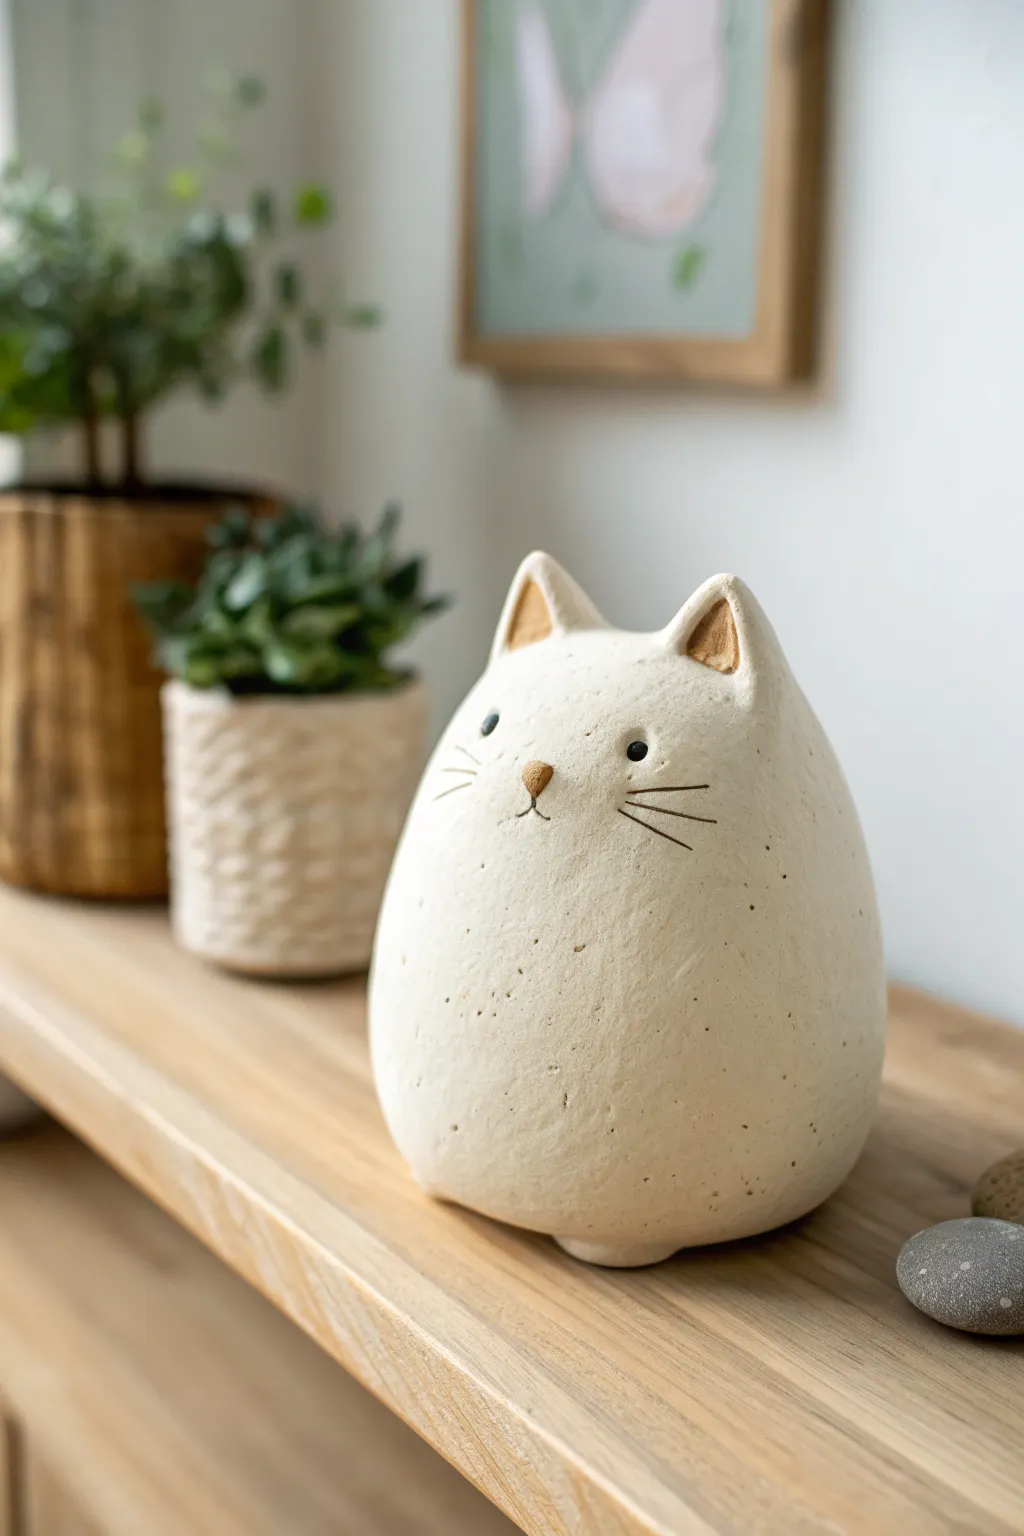
This adorable, egg-shaped cat sculpture captures the essence of feline cuteness with minimal effort. Its smooth, speckled finish and tiny features give it a modern, whimsical charm that looks perfect on any shelf.
Step-by-Step Tutorial
Materials
- Speckled stoneware or air-dry clay (white/cream)
- Small wooden clay paddle
- Pin tool or needle tool
- Designated clay sponge
- Water slip (clay dissolved in water)
- Small loop tool or spoon (for hollowing)
- Black acrylic paint or underglaze
- Brown/Terracotta acrylic paint or underglaze
- Fine detail paintbrush
- Matte sealant or clear matte glaze
Step 1: Forming the Body
-
Shape the base:
Start with a softball-sized lump of clay. Roll it firmly between your palms or on a table surface to create a smooth, tight sphere, ensuring there are no air pockets trapped inside. -
Refine the form:
Gently taper the top third of the sphere to create a slight egg shape. This narrower end will become the head area, though the transition should remain subtle and continuous without a definitive neck. -
Flatten the bottom:
Tap the wider bottom end of your egg shape firmly against your work surface. This creates a stable, flat base so your cat sits upright without wobbling. -
Smooth the surface:
Use a slightly damp sponge to wipe away any fingerprints or lumps. The charm of this piece relies on a very smooth, uninterrupted surface, so take your time here. -
Hollow the form (Optional):
If you plan to fire this in a kiln, carefully hollow out the sculpture from the bottom using a loop tool until the walls are roughly 1/2 inch thick while keeping the exterior shape intact.
Smooth Operator
To get that perfectly smooth texture, rub the surface of the leather-hard clay with the back of a spoon. This burnishing technique compresses the clay particles for a silky sheen.
Step 2: Adding Features
-
Create the ears:
Pinch off two small, marble-sized balls of clay. Flatten them slightly into triangles and curve them to create a concave inner ear shape. -
Attach the ears:
Score (scratch) the top of the head and the bottom of the ears, add a dab of slip, and press the ears firmly into place. Use a wooden modeling tool to blend the seams until they disappear completely into the main body. -
Add the nose:
Roll a tiny, lentil-sized piece of clay into a triangular rounded shape. Score and slip the center of the ‘face’ area and attach this little nose, blending just the back edges so it protrudes slightly. -
Add the feet:
Form two small, flat discs of clay for the paws. Attach these to the very bottom front edge of your sculpture so they just barely peek out, suggesting tiny feet tucked underneath. -
Incise the mouth:
Using your needle tool, very lightly draw a small vertical line coming down from the nose, splitting into a tiny inverted ‘V’ shape to form the mouth.
Step 3: Finishing Touches
-
Final smoothing:
Give the entire piece one last pass with a barely damp sponge or your finger to soften any sharp edges on the ears or incised lines. -
Dry or fire:
If using air-dry clay, let the piece dry for 24-48 hours. If using ceramic clay, dry slowly and fire it to bisque. -
Paint the eyes:
Dip the handle end of a paintbrush into black paint. Dot two small, widely spaced eyes onto the face. Keep them level with the top of the nose for that cute, vacant expression. -
Paint the whiskers:
Using your finest brush and diluted black paint, paint three thin whiskers on each cheek. I like to make the middle whisker slightly longer for a playful look. -
Color accents:
Paint the triangular nose and the inner triangular sections of the ears with a soft terracotta or brown color. -
Seal the work:
Finish with a matte spray sealant or a clear matte glaze to protect the surface while maintaining that natural, stone-like texture.
Make it a Set
Create a whole family of varying sizes. Try making a taller, thinner cylinder cat and a tiny sphere kitten to group together as a trio.
Now you have a serene little companion to keep your houseplants company


Cactus Buddy Planter With a Smiling Face
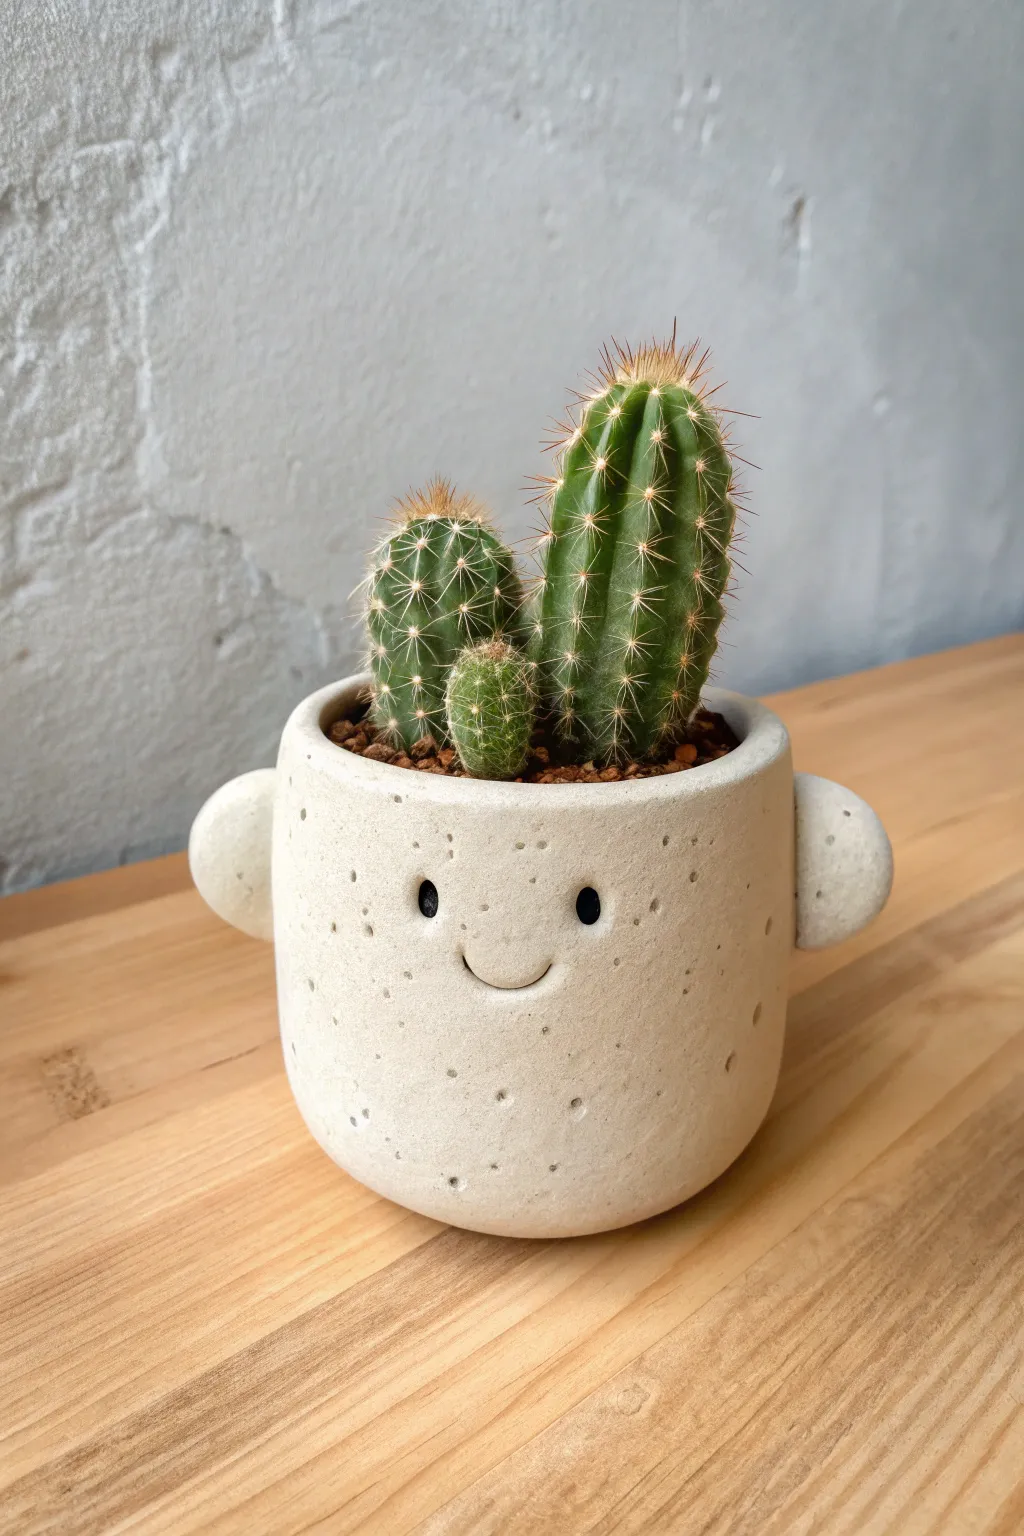
This friendly little vessel combines a classic cylindrical form with playful personality, featuring two small “ears” and a simple, beaming face. The speckled clay body gives it a natural, stone-like texture that perfectly complements the green of the cacti inside.
How-To Guide
Materials
- Speckled stoneware clay (or white air-dry clay)
- Rolling pin
- Canvas mat or work board
- Needle tool
- Fettling knife
- Scoring tool (or serrated rib)
- Slip (clay and water slurry)
- Small circular cutter (approx. 1 inch)
- Sponge
- Black underglaze (or acrylic paint if using air-dry)
- Fine detail brush
- Clear matte glaze
Step 1: Forming the Base Vessel
-
Roll the slab:
Begin by rolling out a medium-sized slab of speckled clay to an even thickness of about 1/4 inch. I find using guide sticks on either side of the rolling pin helps ensure the thickness is perfectly consistent. -
Cut the walls:
Using a ruler and your fettling knife, cut a long rectangular strip. The length will determine the circumference of your pot, and the width determines the height. Aim for roughly 12 inches long by 3.5 inches tall. -
Cut the floor:
Cut a circle from the remaining slab to serve as the base. You can use a circle cutter or trace a round object that is slightly smaller than the cylinder you plan to form. -
Score and slip:
Score (scratch) the short ends of your rectangular strip and the outer edge of your circular base. Apply a generous amount of slip to these roughened areas. -
Assemble the cylinder:
Stand the rectangular strip up and curve it around the circular base. Join the two short ends together first, pressing firmly to seal the seam. -
Attach the base:
Press the cylinder walls down onto the base. Use your finger or a wooden modeling tool to smudge the clay from the wall down onto the base on the outside, and from the base up onto the wall on the inside, ensuring a watertight seal.
Step 2: Sculpting the Features
-
Smooth the form:
Support the inside of the wall with one hand while smoothing the outside seam with a rib tool or damp sponge. Gently round over the top rim so it looks soft and finished, not sharp. -
Create the ears:
Roll two small balls of clay, roughly the size of large grapes. Flatten them slightly against your work surface so they form thick, rounded discs. -
Attach the ears:
Score the side of the pot where the ears will go, positioned exactly opposite each other. Score the flat side of the ears, apply slip, and press them firmly onto the pot. Smooth the seam so they look integrated, not just stuck on. -
Refine the shape:
With the ears attached, gently push the belly of the pot out slightly from the inside to give it a rounder, friendlier volume suitable for a face.
Seam Splitting?
If the vertical seam of your cylinder keeps cracking open, you likely didn’t score it deeply enough. Really scratch up the surface before slipping to create a “zipper” effect with the clay particles.
Step 3: Adding the Face & Finishing
-
Map the face:
Visualize where the eyes and mouth should go. High, wide-set eyes usually create a cuter expression. Use the needle tool to make tiny guide marks if needed. -
Indenting the eyes:
Use the rounded end of a paintbrush handle or a small ball stylus to gently press two indentations into the clay for the eyes. Don’t poke through; just create a recessed looking divot. -
Carve the smile:
Use your needle tool to carve a simple, shallow “U” shape for the smile centered between and slightly below the eyes. Soften the harsh edges of the carved line with a damp brush. -
Dry slowly:
Loosely cover the pot with plastic to let it dry slowly to a leather-hard state, then uncover it to let it become bone dry. This prevents the handles from cracking away. -
Apply color:
Once bisque fired (or fully dry if using air-dry clay), paint the inside of the eye indentations with black underglaze or paint. Keep the paint purely inside the divot for a clean look. -
Glaze and fire:
Dip or brush the entire piece in a clear matte glaze to let the speckles show through. If using kiln-fire clay, fire to the recommended temperature (usually Cone 5/6). If using air-dry, seal with a matte acrylic varnish.
Give it Blush
Before the final clear glaze, dab a tiny amount of watered-down pink underglaze or pastel chalk on the ‘cheeks’ just below the eyes for an extra adorable, rosy-cheeked look.
Once fired and cool, fill your new friend with potting mix and tuck in your favorite prickly cacti

The Complete Guide to Pottery Troubleshooting
Uncover the most common ceramic mistakes—from cracking clay to failed glazes—and learn how to fix them fast.
Textured Peacock Tail Fan Sculpture
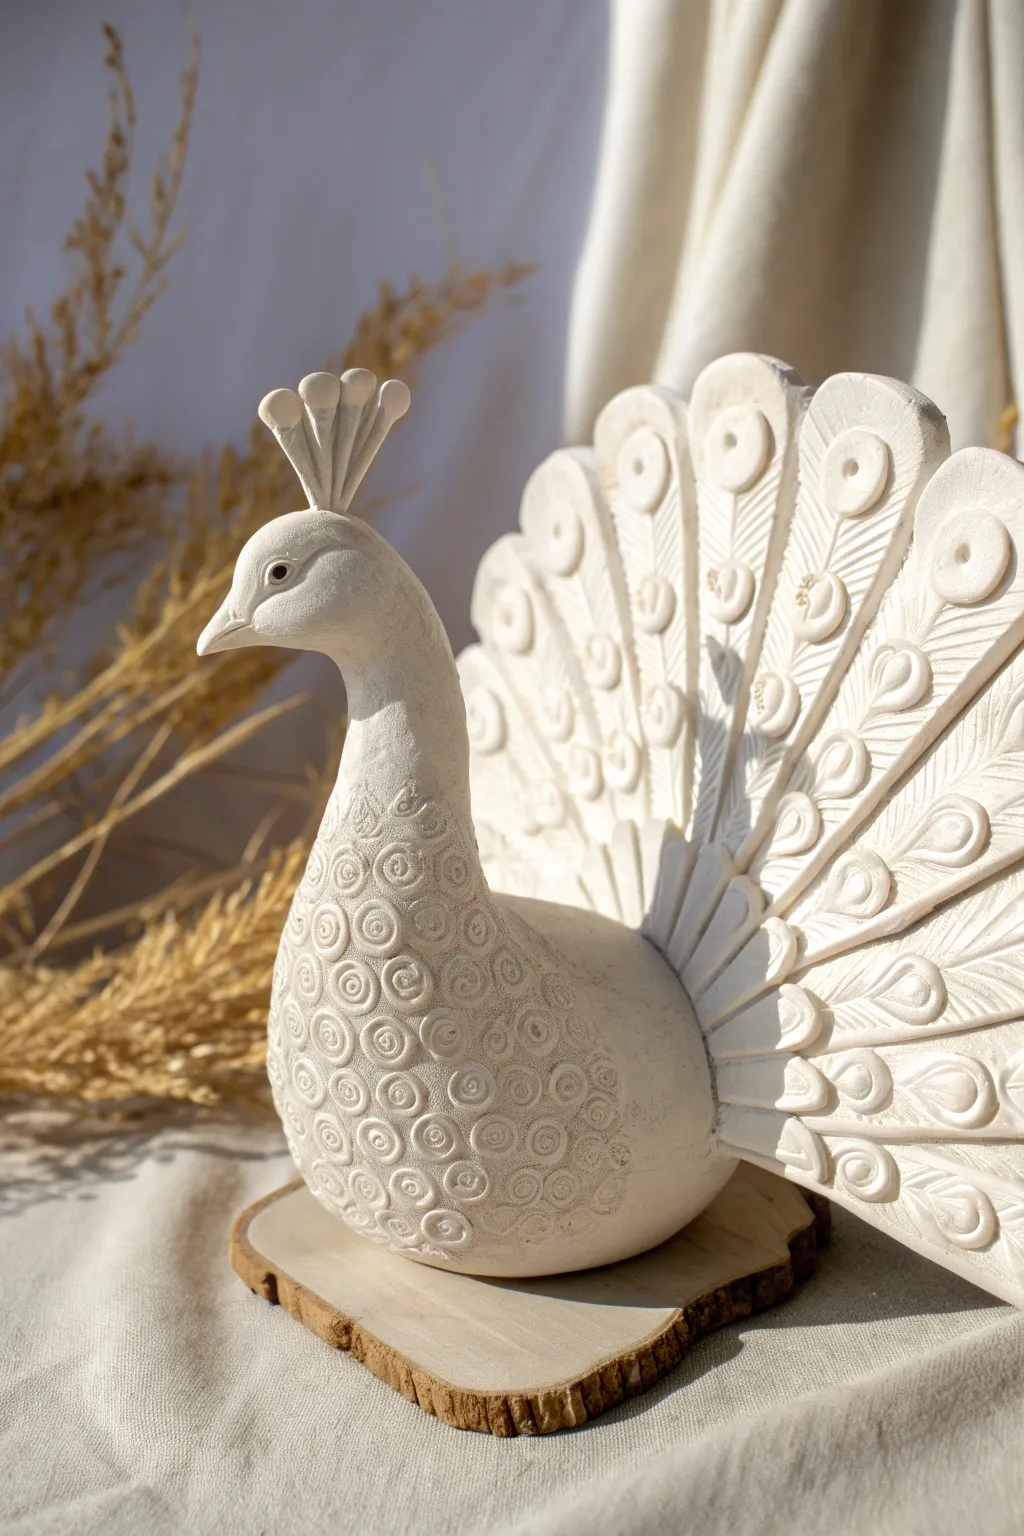
This stunning monochromatic peacock sculpture focuses entirely on texture and form rather than color. By using simple impression tools on air-dry or polymer clay, you can create a sophisticated piece that looks deceptively complex.
Step-by-Step Tutorial
Materials
- White sculpting clay (air-dry or polymer)
- Small wooden slice (for base display)
- Basic sculpting tools (needle tool, blending tool)
- Small circle cutters or straws (various sizes)
- Rolling pin
- Aluminum foil (for armature)
- Water or slip (for joining)
- Fine-grit sandpaper
Step 1: Forming the Body
-
Build the core:
Create a tightly crumped ball of aluminum foil in a teardrop shape to serve as the lightweight core of the peacock’s body. This saves clay and reduces drying time. -
Cover with clay:
Roll out a sheet of white clay about 1/4 inch thick. Wrap this sheet fully around your foil armature, smoothing the seams together until you have a seamless teardrop shape. -
Shape the neck:
Roll a thick snake of solid clay for the neck. Attach it to the rounded top of the body, blending the clay downward so there is no visible seam. -
Create the head:
Refine the top of the neck into a small, rounded head. Pinch the front gently to form a pointed beak shape. -
Add the crest:
Roll three or four tiny sausage shapes and attach them to the top of the head. Flatten the very tips into small discs to mimic the peacock’s crown feathers.
Stamp Selection Tip
Look around your house for texture tools! Pen caps with interesting tops, screw heads, or even lace pressed into the clay can create amazing body textures.
Step 2: Texturing the Body
-
Prepare texture tools:
Find small circular objects to use as stamps—the end of a pen cap, a small straw, or a specialized loop tool work perfectly here. -
Stamp the pattern:
Starting at the base of the neck and working downward, press your circle tool into the clay. Create rows of spiral or circle impressions that cover the entire chest and sides of the bird. -
Detail the eyes:
Use a needle tool to softly outline an almond shape for the eye and add a small pupil indentation.
Step 3: Creating the Tail Fan
-
Roll the slab:
Roll out a larger, flat slab of clay. It needs to be sturdy enough to stand up, so aim for at least 1/4 inch thickness. -
Cut the fan shape:
Cut out a large semi-circle or fan shape. The bottom edge should be curved to nestle against the back of the peacock’s body. -
Sculpt individual feathers:
Use a knife tool to score deep radiating lines from the center bottom to the outer edge, defining the individual wide tail feathers. -
Round the tips:
Trim the top edge of each feather section into a rounded curve to give the fan a scalloped appearance. -
Add eyespots:
Roll small balls of clay and flatten them onto the upper part of each tail feather. Press a smaller circle tool into the center of each to create the ‘eye’ of the feather. -
Add feather barbs:
Using a needle tool or knife, score angled lines (chevrons) pointing upwards on the shaft of each feather to simulate the fine hair-like barbs. -
Support and dry:
If using air-dry clay, allow the tail fan and body to dry separately first. Prop the fan up against a curved surface if you want it slightly cupped.
Gilded Glamour
Once the white clay is dry, use a dry brush to lightly apply gold metallic acrylic paint just to the raised textures of the tail and crest.
Step 4: Assembly
-
Join the parts:
Once stiffened (or before baking if polymer), attach the tail fan to the back of the body. I prefer to score the contact points and use slip or liquid clay to ensure a strong bond. -
Reinforce the join:
Add a small coil of clay at the hidden back seam where the tail meets the body and smoothen it out for extra stability. -
Final smooth:
Check for any fingerprints or rough edges. A little bit of water on your finger helps smooth these out perfectly. -
Finish the piece:
Allow to fully dry or bake according to package instructions. Once done, glue the finished sculpture onto your wood slice for a rustic presentation.
Place your finished peacock near a window where the changing light will highlight all those beautiful textures you created
Minimal Body-Form Vase-Style Sculpture
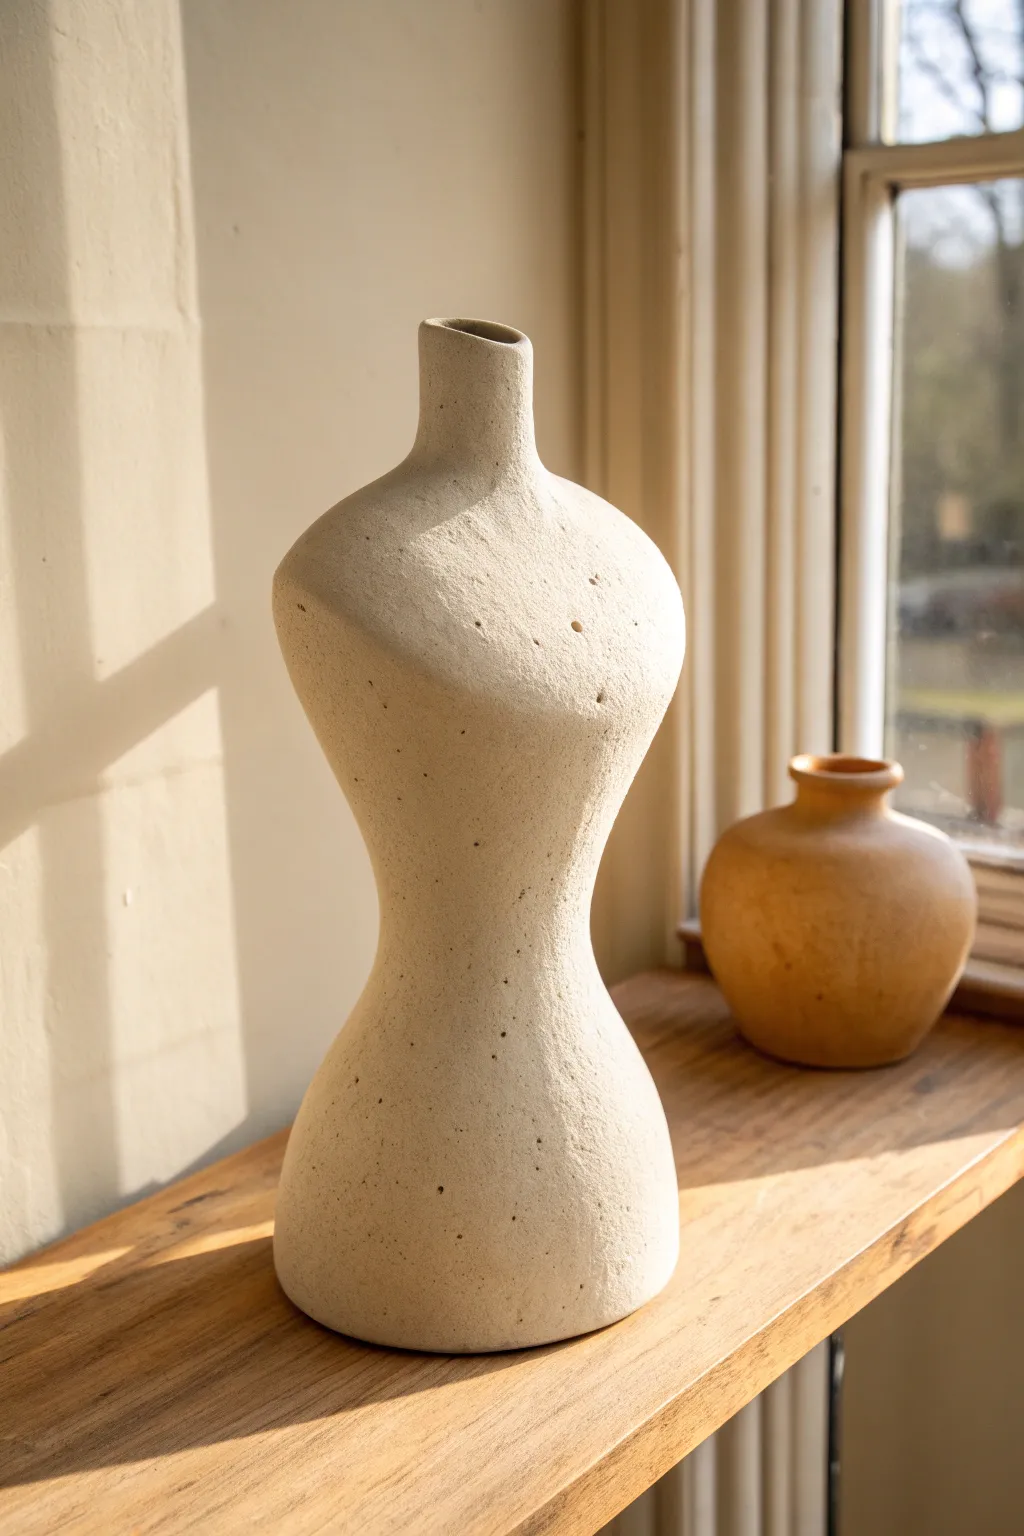
Merging functional pottery with figurative art, this sculpture captures the subtle curves of a human torso in a stylized, modern vase. The textured sandstone finish gives it an ancient, unearthed quality that adds warmth to any shelf.
Step-by-Step Guide
Materials
- Stoneware clay (groggy or speckled clay recommended)
- Fettling knife
- Pin tool
- Rib tool (wooden or rubber)
- Serrated kidney scraper or old fork
- Rolling pin
- Canvas mat or cloth-covered board
- Sponge
- Slip (clay mixed with water)
- Paintbrush for slip
Step 1: Forming the Base Structure
-
Prepare the Clay:
Start by wedging your clay thoroughly to remove air bubbles. This is crucial for structural integrity. I like to divide my clay into two main lumps—one for the base and one for the coil building. -
Roll the Base Slab:
Using a rolling pin, flatten the first lump of clay into a slab about 1/4 inch thick. Use a circular template or freehand a circle about 4-5 inches in diameter and cut it out with your needle tool. -
Create Coils:
Roll out several long, even snakes of clay. Aim for the thickness of your thumb or slightly thinner. Keep them consistent to ensure the walls rise evenly.
Slumping Issues?
If the waist starts to buckle under the weight of the chest, pause. Stuff the bottom half with crumpled newspaper or plastic bags to support the walls, then let it firm up for an hour.
Step 2: Building the Form
-
Start the Wall:
Score the outer edge of your base and apply a little slip. Lay your first coil around the perimeter, pressing it firmly onto the base. -
Blend the Clay:
Using your thumb, smear the clay from the coil down onto the base on the inside. Then, do the same on the outside, ensuring the seam disappears completely. -
Build Upwards:
Continue adding coils, stacking them directly on top of the previous layer to build the straight hip section. Blend each coil thoroughly as you go. -
Taper the Waist:
To create the sculpted hourglass look, begin placing your coils slightly inward toward the center of the vessel. Do this gradually over 3-4 layers to narrow the form. -
Flare the Chest:
Once you’ve reached the narrowest part of the waist, reverse the technique. Place the next few coils slightly outward to widen the form, mimicking the torso’s ribcage area. -
Curve the Shoulders:
As you near the top, bring the coils inward aggressively to form the slope of the shoulders. These layers need to be well-supported, so you might want to let the bottom stiffen slightly before adding this weight.
Step 3: Refining and Neck
-
Add the Neck:
Form a small, vertical cylinder using two small coils centered at the very top of the shoulder slope. Blend this neck seamlessly into the body. -
Shape with Rib tool:
Take a flexible rib tool and run it up the exterior of the sculpture. This will smooth out your coil marks and help define those elegant, sweeping curves. -
Refine the Symmetry:
Step back and look at your vase from all angles. Gently paddle the sides with a wooden spoon or flat board if any area looks lumpy or uneven.
Level Up: Oxide Wash
After bisque firing, apply a diluted iron oxide wash and wipe most of it away with a sponge. The dark color will remain in the tiny texture pits, highlighting the stone effect.
Step 4: Surface Texture
-
Create Roughness:
Don’t over-smooth the surface with a sponge. Instead, lightly drag a serrated kidney tool or even a dry sponge across the leather-hard clay to create a pitted, stone-like texture. -
Add Subtle Pocking:
Using a needle tool or a stiff brush, poke tiny, random holes into the surface. This mimics the natural porosity seen in the reference image. -
Final Rim Polish:
Smooth the very top rim of the neck with your finger and a tiny bit of water so it isn’t sharp, but leave the rest of the body textured. -
Slow Drying:
Cover the piece loosely with plastic. Because of the narrowed waist, you want it to dry slowly to prevent cracking at the stress points. Fire according to your clay body’s instructions.
Place your finished torso vase near a window where the light can catch the beautiful texture you created