When you’re making art in high school ceramics, you want projects that feel legit—like you’re building skills and saying something at the same time. These clay sculpture ideas blend core handbuilding techniques with creative twists that look awesome in a display case or portfolio.
Pinch Pot Face Planter or Desk Cup
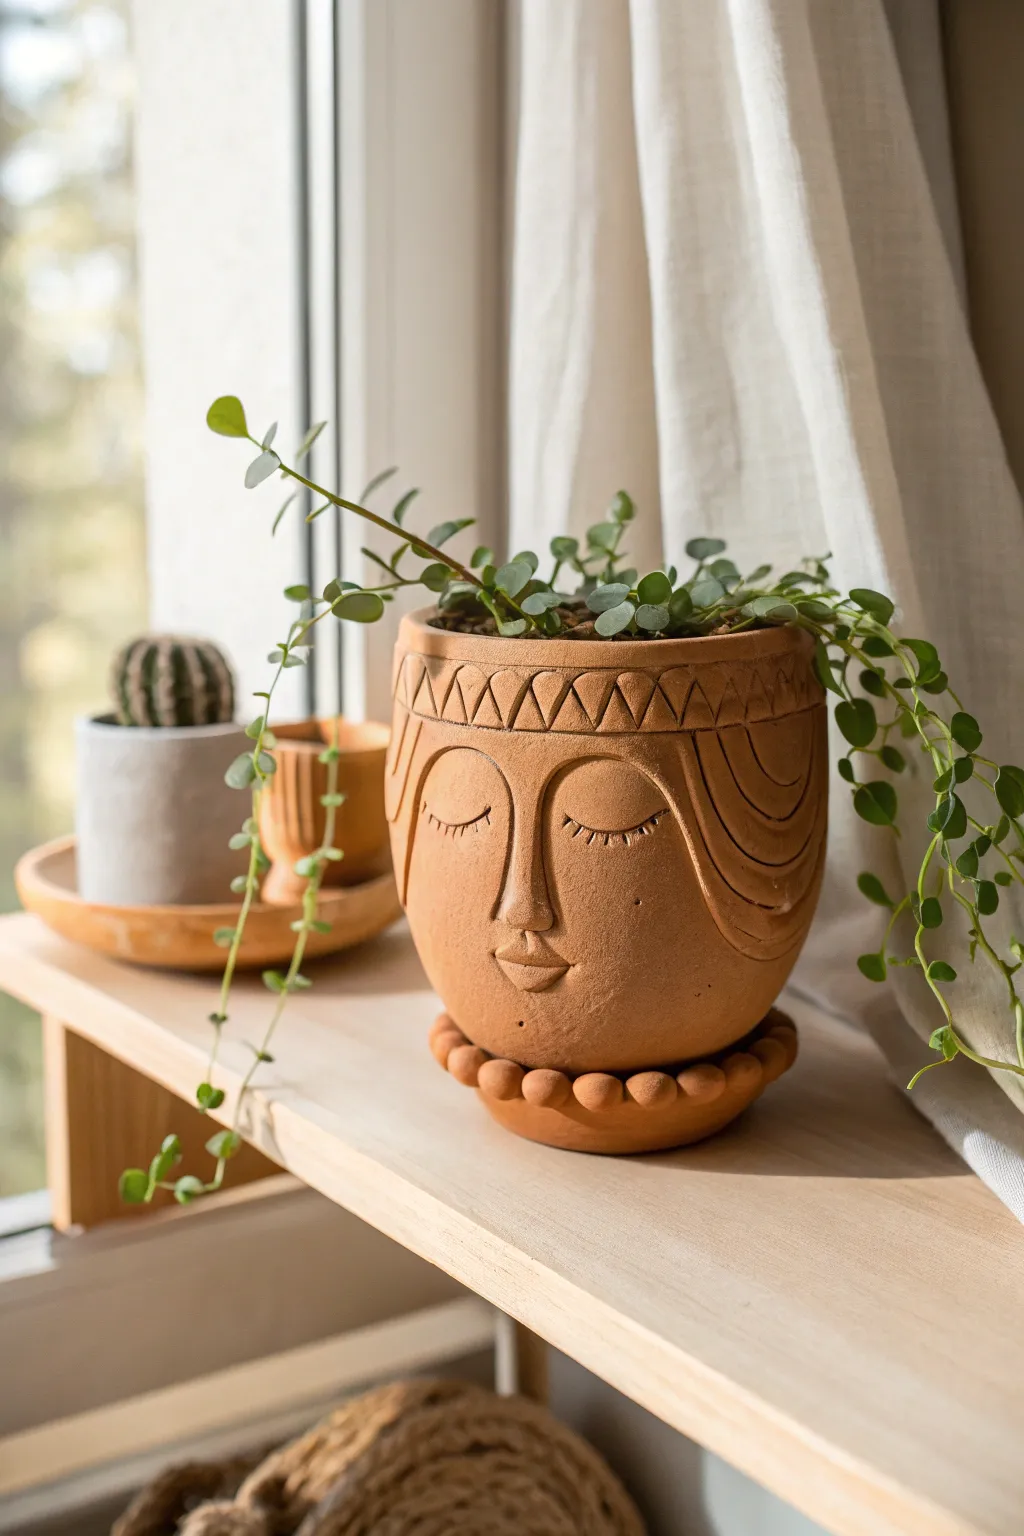
Transform a simple lump of earth into this peaceful personality for your windowsill. This terracotta planter combines basic hand-building techniques with delicate relief carving to create a functional piece of art with a modern, bohemian vibe.
Step-by-Step Tutorial
Materials
- Terracotta or red earthenware clay (low-fire)
- Clay carving tools (needle tool, loop tool)
- Small sponge
- Slip (clay and water mixture)
- Scoring tool or serrated rib
- Rolling pin
- Canvas mat or wooden board
- Small bowl of water
- Kiln for firing (or air-dry clay sealant if using non-fired clay)
Step 1: Forming the Base Structure
-
Start the pinch pot:
Begin with a ball of clay roughly the size of a grapefruit. Push your thumb into the center, stopping about half an inch from the bottom. Gently pinch and rotate the clay to open the walls. -
Build up height:
If the single pinch pot isn’t tall enough to match the image, roll out a thick coil of clay. Score and slip the rim of your pinch pot, add the coil, and smooth it seamlessly downwards to extend the walls. -
Shape the vessel:
Gently paddle the outside or use a rib tool to create a rounded, tapered form. The pot should be wider at the top rim and curve gently inward toward the base, resembling a classic head shape. -
Thicken the rim:
The rim in the photo is quite substantial. Tap the top edge flat with a wooden paddle or your palm to create a distinct, flat upper lip about 1/4 inch thick. -
Create the beaded base:
Roll approximately 15-20 small, pea-sized balls of clay. These will form the necklace-like footer. -
Attach the feet:
Flip your pot upside down. Score the bottom edge heavily. Dip each small ball in slip and press them firmly in a ring around the base, blending just the connecting points so they stay distinct but secure.
Use an abrasive pad
After the clay is bone dry but BEFORE firing, gently rub the surface with a green kitchen scouring pad. It removes tool marks without using water.
Step 2: Sculpting the Features
-
Map the face:
Lightly trace a vertical center line to help with symmetry. Mark horizontal lines where the eyes and nose will sit. I find it helpful to look at the pot from a distance at this stage to check proportions. -
Form the nose:
Roll a small, elongated triangle of clay. Score the center of the face and attach this wedge. Smooth the edges onto the face, blending thoroughly until it looks like it emerges naturally from the surface. -
Define the nostrils:
Use a small loop tool or wooden modeling tool to carve slight indentations on the sides of the nose and define the nostrils underneath. -
Add the lips:
Roll a tiny oval of clay and attach it below the nose. Use a needle tool to slice horizontally through the middle, then press the corners slightly to shape the lips. -
Carve the eyes:
Instead of adding clay, use a needle tool to incise two curved arches for closed eyelids. Add tiny perpendicular dashes along the lower curve to represent eyelashes. -
Sculpt the hair:
Roll two thin coils of clay. Attach them starting near the top rim, curving down around the sides of the face to frame it, creating the ‘hair’ outline shown in the image. -
Detail the hairline:
Carve sweeping, curved lines inside the hair area to suggest waves or strands. Add consistency to the lines to keep the graphic style. -
Carve the headband:
Just under the rim, carve a horizontal band. Inside this band, carve a repeating triangular zigzag pattern using a sharp tool for clean lines.
Step 3: Refining and Finishing
-
Smooth the surface:
Use a barely damp sponge to wipe away any sharp clay crumbs or rough texture from your carving work, softening the features slightly like weathered stone. -
Add drainage (optional):
If this is a real planter, use a hole cutter to remove a plug of clay from the bottom center for drainage. Skip this if making a desk cup. -
Slow drying:
Loosely cover the piece with plastic for the first day to let humidity equalize. Then, uncover and let it dry completely to the bone-dry stage (chalky and light). -
Bisque fire:
Fire the piece in a kiln to cone 04 (or the temperature recommended for your specific clay body). The goal is that warm, matte terracotta finish. -
Final touches:
Leave the raw fired clay unglazed for that earthy look, or apply a clear matte sealer to the interior only if you want it to be watertight without changing the exterior aesthetic.
Make it a family
Vary the heights and widths to create a whole family of planters. Try different hair textures—coils for curls or straight carved lines for bangs.
Once fired and cooled, plant a cascading succulent inside to give your sculpture a vibrant, growing head of hair.


Realistic Hand Sculpture Study

This realistic hand sculpture captures the classic peace sign gesture with a textured, stone-like finish. By building up the form from a sturdy armature, you will learn to model anatomical details like knuckles and fingernails while creating a timeless decorative piece.
Detailed Instructions
Materials
- White or light gray stoneware clay (with grog for texture)
- Wooden dowel (approx. 1 inch diameter)
- Heavy gauge aluminum wire (12-14 gauge)
- Pliers
- Plywood base board
- Newspaper or aluminum foil (for bulking)
- Masking tape
- Sculpting tools (loop tool, wood modeling tool, needle tool)
- Sponge and water bucket
- Fettling knife
- Slip (clay and water slurry)
- Clear matte glaze or sealant (optional)
Step 1: Armature Construction
-
Prepare the base:
Drill a hole into your plywood working board the same size as your wooden dowel. Insert the dowel securely; this will serve as the internal support for the wrist and lower hand. -
Wire the fingers:
Cut two lengths of heavy aluminum wire roughly 8 inches long. Wrap one end of each wire firmly around the top of the wooden dowel, extending the other ends upward to represent the index and middle fingers. -
Bend the gesture:
Using pliers or your hands, bend the two wires slightly apart into a ‘V’ shape. Ensure they are strong enough to support the weight of the clay without sagging. -
Bulk up the form:
Crumple newspaper or aluminum foil around the wire fingers and the top of the dowel to create the basic volume of the palm and fingers. Secure this bulking material tightly with masking tape so it doesn’t shift.
Use Your Own Hand
Don’t just guess at the anatomy! Use your own non-dominant hand as a live model. Observe how the tendons on the back of your hand shift when you make the peace sign.
Step 2: Clay Application and Modeling
-
Build the wrist:
Roll out a slab of clay about 1/2 inch thick. Wrap it around the wooden dowel base to form the wrist cylinder, slipping and scoring the seam where the clay meets to ensure a strong bond. -
Cover the palm:
Add flattened chunks of clay over the taped palm area. Smear the clay downward into the wrist section to create a seamless transition, building up the mass of the hand’s main body. -
Form the extended fingers:
Roll coils of clay and press them onto the wire armatures for the index and middle fingers. I find it helpful to work from the bottom up, ensuring the clay is fully compacted against the wire core. -
Add the folded fingers:
Create three smaller sausage-like shapes for the thumb, ring, and pinky fingers. Position the ring and pinky fingers curled into the palm, and place the thumb crossing over them. -
Refine the anatomy:
Use a wooden modeling tool to define the knuckles and the separation between fingers. Pay attention to the way the skin folds where the fingers bend and where the thumb presses against the others. -
Shape the fingernails:
Gently press a small loop tool or a flat modeling tool into the tips of the extended fingers to outline the nail beds. Smooth the surrounding clay to create the cuticle area.
Step 3: Texturing and Base
-
Create the round base:
Shape a thick disk of clay, roughly 1 inch tall and slightly wider than the wrist, to act as the plinth. Place this directly on your board or working surface. -
Attach the hand:
If your armature allows, slide the wrist clay down to meet the base, or build the base up around the bottom of the dowel. Seal the connection well with slip and a coil of clay. -
Smooth the surface:
Go over the entire sculpture with a slightly damp sponge to remove fingerprints and harsh tool marks, giving the piece a unified, cast-stone appearance. -
Add texture:
To mimic the stone look in the reference photo, gently tap the surface with a stiff bristle brush or a piece of coarse sandpaper. This creates tiny pores and irregularities. -
Hollow out (if firing):
If you are firing this piece in a kiln, wait until leather hard, then carefully cut the piece off the armature. Hollow out the thick palm area and reconnect the parts before drying. -
Dry slowly:
Cover the sculpture loosely with plastic to let it dry very slowly over several days. This prevents cracking, especially around the fingers where the clay is thinner.
Make It a Planter
Instead of a solid wrist, construct the arm as a hollow vessel. The opening at the top can hold dried flowers or pencils, turning your sculpture into functional desk art.
Step 4: Finishing
-
Bisque fire:
Fire the bone-dry clay to bisque temperature according to your clay body’s specifications. -
Apply finish:
To achieve the speckled look, you can leave the raw stoneware if it has grog, or apply a very thin wash of watered-down black acrylic or iron oxide and wipe it back, leaving dark specks in the texture.
Once fired and finished, your hand sculpture will stand as a durable and expressive symbol of peace.


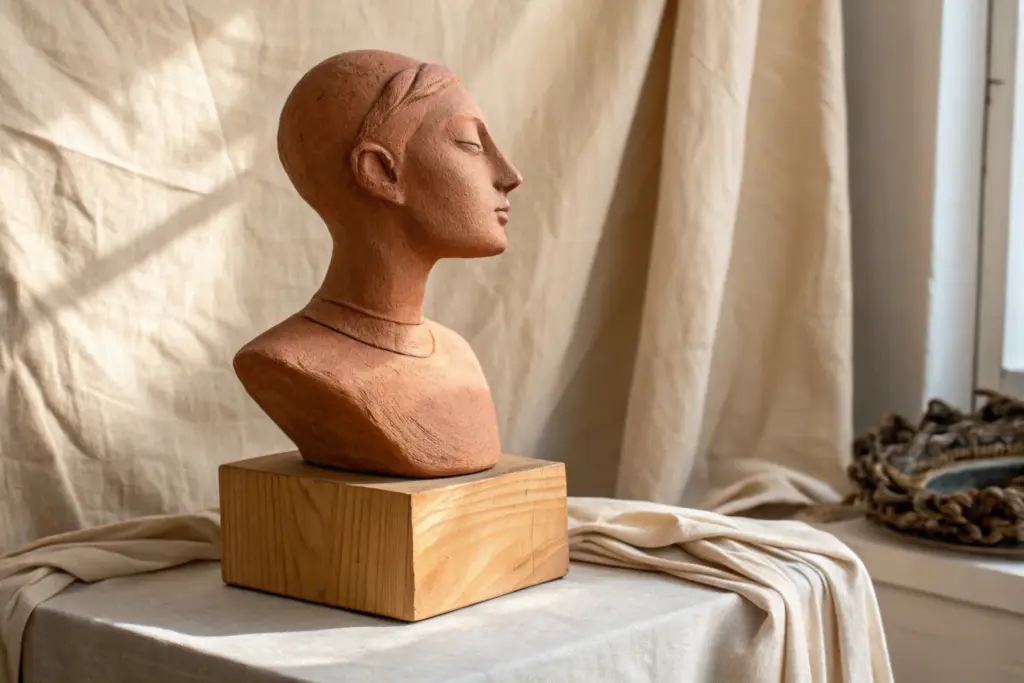
Self-Portrait Bust with Stylized Features
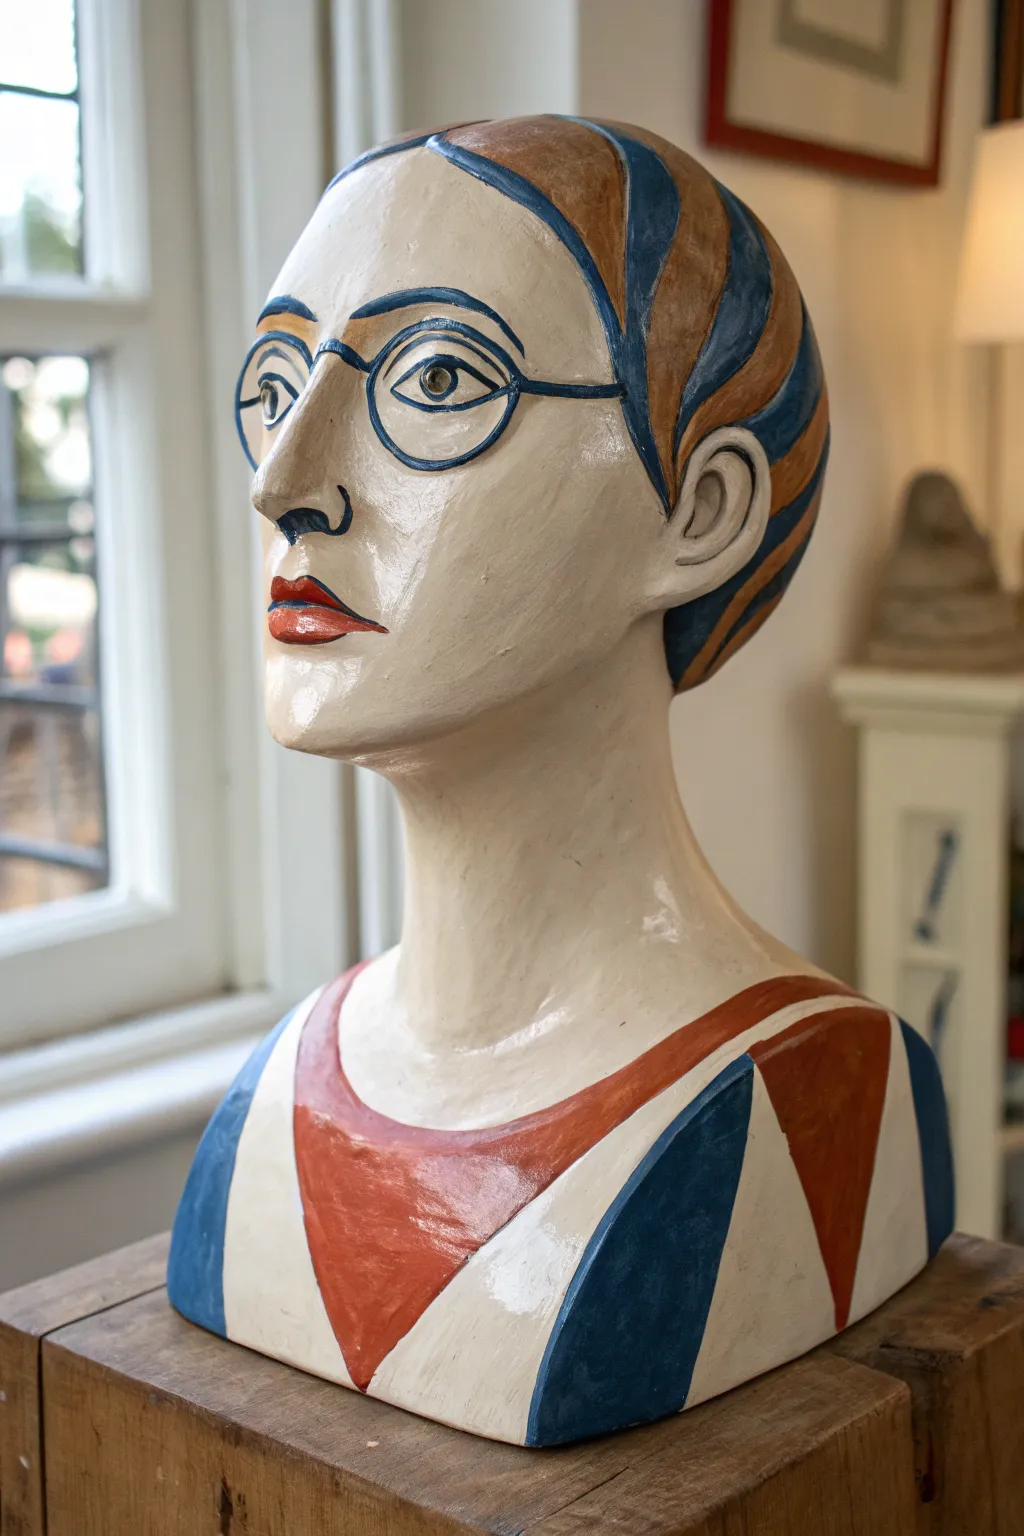
This striking self-portrait project moves beyond realism into the world of stylized forms and bold, geometric decoration. By simplifying facial features and applying a hard-edged, illustrative paint job, you’ll create a sculpture that feels like a 3D painting.
How-To Guide
Materials
- Earthenware or stoneware clay (white or buff body suggested)
- Clay carving tools (needle tool, loop tools, wire cutter)
- Wooden modeling tools
- Sponge and water
- Kiln for firing
- Acrylic paints (White, Red, Navy Blue, Ocher/Brown, Black)
- Set of brushes (including fine liner for outlines)
- High-gloss varnish or polyurethane sealer
- Newspaper or armature wire (for internal support during building)
Step 1: Building the Form
-
Construct the base:
Begin by building a strong, hollow neck and shoulder section using the coil method. Make the shoulders slightly narrower than realistic proportions to emphasize the stylized look, and ensure the neck is long and elegant. -
Form the head:
Create the general egg shape of the head using two pinched bowls joined together or by coiling upward. Attach this securely to the neck, smoothing the clay downward to integrate the seam completely. -
Map the features:
Use a needle tool to lightly sketch where the eyes, nose, and mouth will go. For this style, keep lines sharp and defined rather than overly organic. -
Add volume:
Add small pieces of clay to build up the nose bridge, brow bone, and chin. I find it helpful to keep the nose bridge very straight and angular to match the aesthetic. -
Sculpt the ears and hair:
Attach C-shaped coils for ears. For the hair, don’t sculpt individual strands; instead, carve deep, smooth grooves to represent large waves or sections of hair clinging tightly to the skull. -
Refine and smooth:
Once the primary forms are set, spend significant time smoothing the surface with a damp sponge or a flexible rib tool. The goal is a surface as smooth as porcelain before it dries. -
Hollow out:
If the head is solid or too thick, carefully slice off the top of the skull, hollow out the inside to an even wall thickness (about 1/2 inch), and reattach the top piece using slipping and scoring. -
Dry and fire:
Allow the piece to dry slowly under plastic to prevent cracking, especially at the neck join. Once bone dry, bisque fire the sculpture in the kiln.
Step 2: Painting and Finishing
-
Base coat:
A ply a base coat of off-white or cream acrylic paint to the face, neck, and light sections of the clothing. You may need two coats for full opacity. -
Draft the design:
Using a pencil, lightly draw the glasses, the distinct hair waves, and the geometric triangle pattern on the shirt directly onto the painted surface. -
Block in colors:
Paint the hair sections with alternating stripes of brown and navy blue. Use the same navy blue and a terracotta red to fill in the triangular shapes on the bust’s clothing. -
Detail the face:
Paint the lips a solid red with a black outline. Paint the eyes, keeping them somewhat flat and illustrative rather than realistic. -
Add the glasses:
Carefully paint the rim of the glasses in navy blue. The line work needs to be steady here, so rest your hand on a stable surface while painting. -
Outline for emphasis:
Use a fine liner brush and black or dark blue paint to outline the hair waves, the jawline, and the clothing patterns. This ‘blacklining’ technique gives the sculpture its graphic, comic-book quality. -
Apply varnish:
Once the paint is fully dry, apply a high-gloss varnish over the entire piece. This finish mimics the look of glazed ceramic and protects the acrylic paint.
Fixing Wobbly Lines
If your painted outlines aren’t crisp, wait for them to dry completely, then touch them up with the base cream color before re-lining. A paint marker can also offer more control than a brush for lines.
Level Up: Real Wire
Instead of painting the glasses on, create a pair using thick crafting wire and rest them on the finished nose for a cool mixed-media element.
Place your finished bust near a window or light source to let the glossy finish really shine


Fantasy Character Bust with Texture Focus
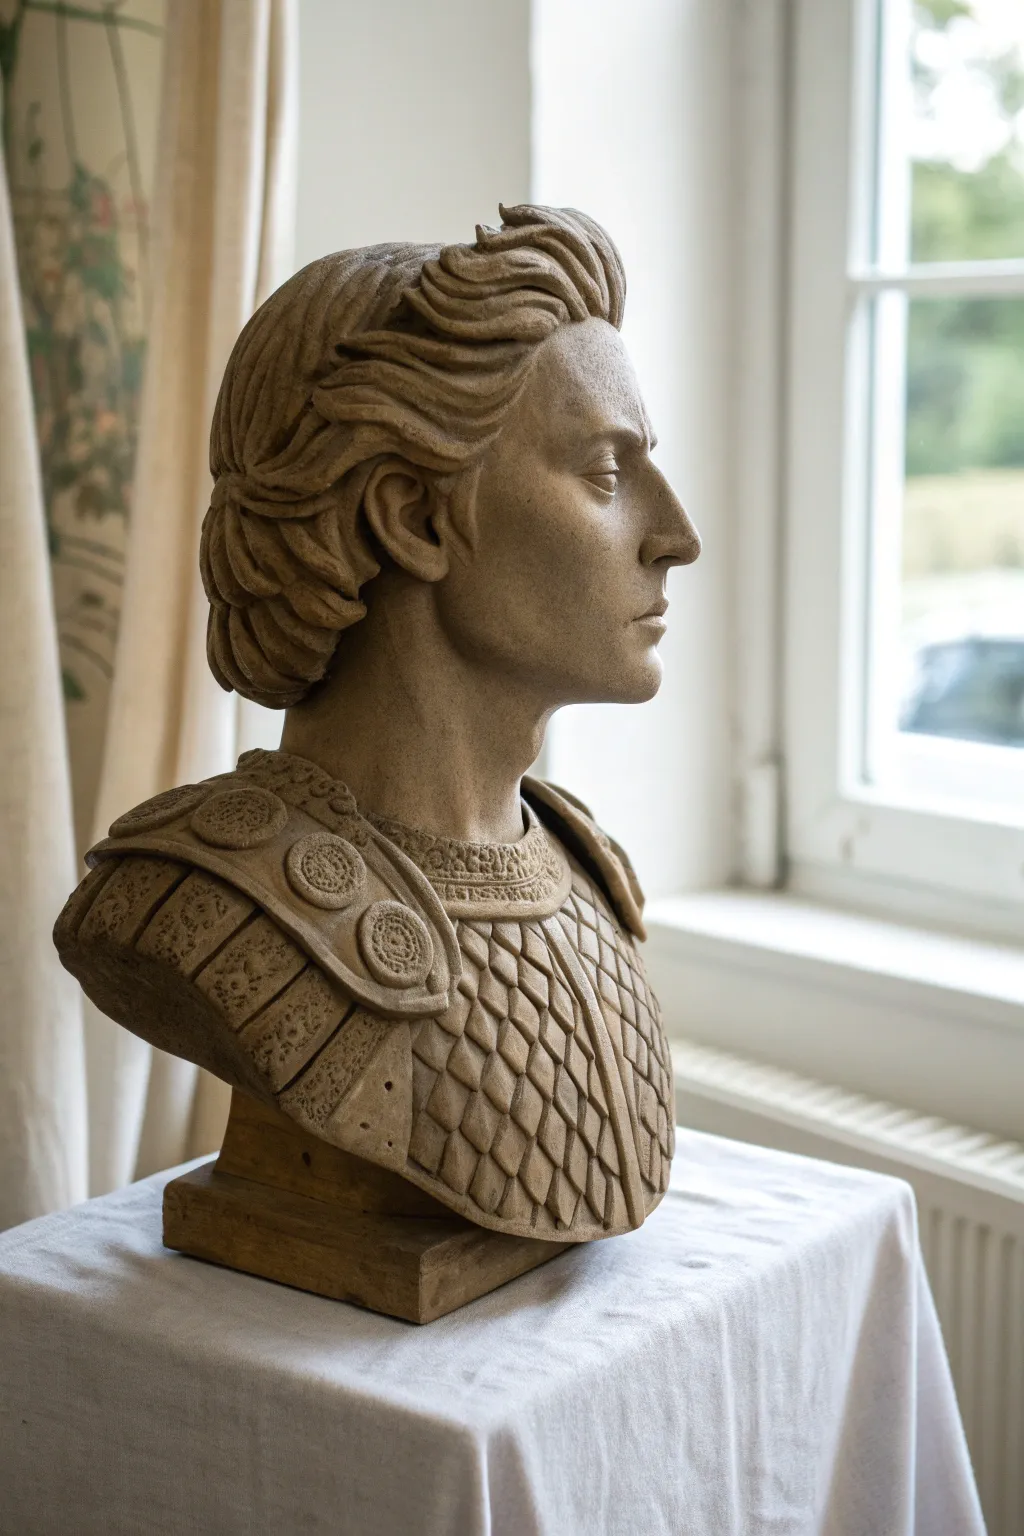
This project challenges you to sculpt a realistic fantasy character bust focusing on varied surface textures, from smooth skin to intricate scale mail armor. Using gritty stoneware clay, you will create a piece that feels ancient and weathered, perfect for mastering the balance between organic and manufactured forms.
Step-by-Step Tutorial
Materials
- Stoneware clay (groggy texture preferred)
- Wooden armature with base
- Bubble wrap and masking tape
- Loop tools (large and small)
- Needle tool
- Wooden modeling tools
- Serrated rib or scoring tool
- Rubber kidney tool
- Sponge
- Wire clay cutter
- Plastic bag (for slow drying)
Step 1: Building the Core Structure
-
Prepare the armature:
Begin by securing a sturdy wooden armature to a base board. Wrap the central post with newspaper or bubble wrap and secure it with masking tape to create volume for the neck and head without using excessive clay. -
Establish the mass:
Pack large chunks of clay around the armature to build the basic shape of the shoulders, neck, and head. Ensure you compress the clay firmly against the core to prevent air pockets. -
Profile blocking:
Using a wooden paddle or your hands, shape the head into a general egg form and establish the angle of the jawline. Since this is a profile piece, pay special attention to the nose projection and chin alignment.
Cracking Up?
If small cracks appear while detailing, the clay is getting too dry. Mist it lightly with water and wrap it in plastic for an hour to rehydrate before continuing.
Step 2: Modeling the Face and Hair
-
Map facial features:
Mark the eye line halfway down the head. Use your thumbs to press in the eye sockets and build up the mass for the nose and cheekbones using small pellets of added clay. -
Refine the profile:
Sculpt the nose bridge, lips, and chin. Keep the forms relatively sharp and angular to convey a noble, heroic character. Smooth the skin areas with a rubber kidney, but don’t over-polish; I like to leave a little tooth to the clay for realism. -
Rough in the hair volume:
Add thick coils or chunks of clay to the top and back of the head to establish the hair’s mass. Don’t worry about individual strands yet; focus on the flow and direction of the locks. -
Detail the hair texture:
Use a large loop tool to carve deep ‘valleys’ into the hair mass, creating distinct, sweeping waves. Follow the natural growth pattern from the crown to the nape of the neck. -
Define the ear:
Sculpt the ear separately and score and slip it onto the side of the head. Ensure the top of the ear aligns roughly with the eye line and refine the inner cartilage curves with a small wooden tool.
Step 3: Armor and Scale Texture
-
Define the tunic neckline:
Roll a thick coil and attach it around the base of the neck to create the collar of the under-tunic. Flatten it slightly and use a needle tool to press in a woven or embroidered pattern. -
Sculpt the pauldron base:
Add slabs of clay to the shoulders to form the heavy shoulder armor (pauldron). Smooth them into curved, rigid plates that sit on top of the shoulder anatomy. -
Create the scale mail:
On the chest area, use a small loop tool or a U-shaped cutter to carve downward-facing scales directly into the clay surface. Alternatively, you can press small, flattened balls of clay in overlapping rows. -
Detail the shoulder armor:
Add decorative elements to the shoulder plates. Roll three small spheres, flatten them into discs, and score and slip them onto the pauldron in a row. -
Texturize the medallions:
Press a textured object (like a button, stamp, or wire mesh) into the center of the three shoulder discs to create intricate filigree details. -
Add battle damage (optional):
For a lived-in look, use a serrated tool to create subtle scratches on the armor plates, or create small nicks on the edges of the scales.
Historical Depth
Research different armor styles (Roman, Medieval, or Samurai) and incorporate specific historical patterns into the collar or scale mail for a unique cultural twist.
Step 4: Finishing Touches
-
Hollow out:
Once leather hard, carefully slice off the top of the head or cut the piece off the armature. Hollow out the thickest parts of the sculpt until the walls are roughly 1/2 to 3/4 inch thick to prevent explosions in the kiln. -
Reassemble and smooth seams:
Score and slip the cut pieces back together. Smooth the join lines meticulously so they disappear completely. -
Final surface check:
Go over the skin areas with a slightly damp sponge to remove fingerprints, but leave the texture in the hair and armor sharp. Let the piece dry very slowly under plastic to ensure even shrinkage.
Once fired, the natural grain of the stoneware will highlight your textures beautifully, leaving you with a timeless artifact

The Complete Guide to Pottery Troubleshooting
Uncover the most common ceramic mistakes—from cracking clay to failed glazes—and learn how to fix them fast.
Bobblehead-Inspired Character Sculpture
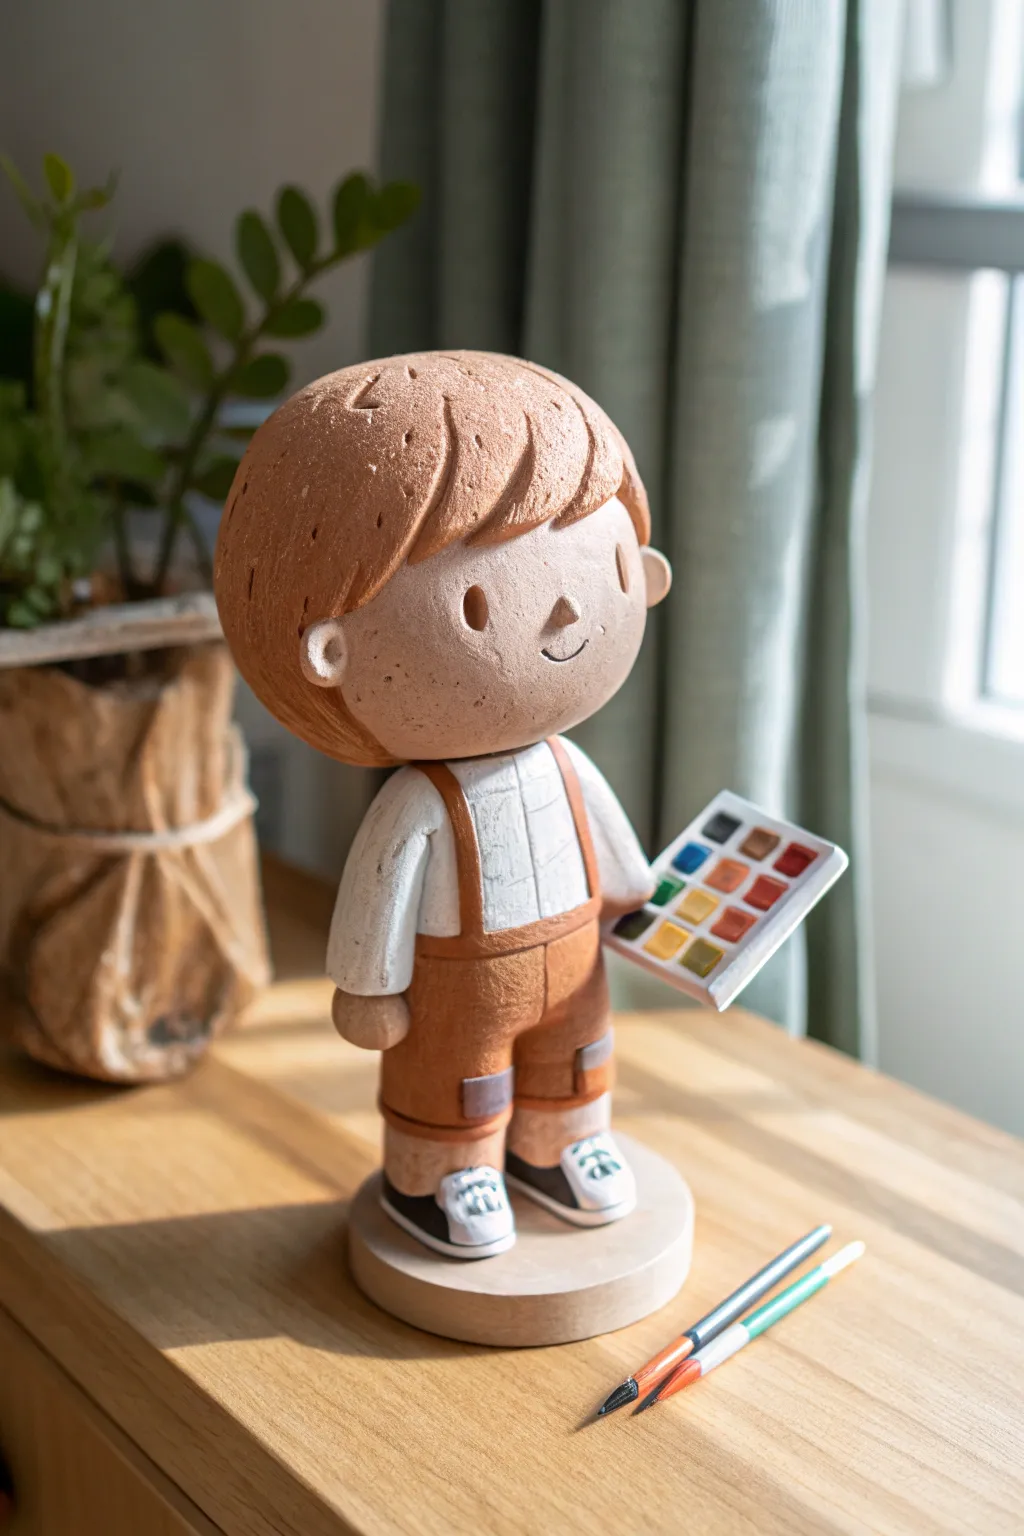
Capture the creative spirit with this charming character sculpture featuring exaggerated proportions and a textured, earthy finish. This project helps you master basic armature building while creating a stylized figure holding a tiny artist’s palette.
Step-by-Step
Materials
- Air-dry clay (terracotta or white color)
- Aluminum foil
- Wire (16-18 gauge) for armature
- Wooden circular base (approx. 4 inches)
- Sculpting tools (ball stylus, needle tool, rubber shapers)
- Acrylic paints (white, orange-brown, blue, black, assorted palette colors)
- Fine grit sandpaper
- Small paintbrushes
- Matte varnish or sealant
- Texture sponge or toothbrush
Step 1: Building the Core
-
Prepare the armature:
Twist two lengths of wire together to form a simple stick figure with legs and a spine. Secure the foot loops onto your wooden base using a strong adhesive or staples if the wood is soft enough. -
Bulk up the body:
Crumple aluminum foil firmly around the wire legs and torso. Create a teardrop shape for the body and two cylinder shapes for the legs, keeping them slightly thinner than the final desired size. -
Form the head core:
Create a distinct, large ball of foil for the head. It should be significantly larger than the body to achieve that cute bobblehead look. Press it onto the top of the neck wire securely.
Texturing Tip
To get that porous, stone-like look, tap the clay with a crumpled ball of aluminum foil before it dries. It creates deeper, sharper divots than a sponge.
Step 2: Sculpting the Figure
-
Cover the structure:
Roll out sheets of clay about 1/4 inch thick. Wrap the foil legs and torso completely, smoothing the seams with a bit of water. -
Sculpt the shorts:
Add a layer of clay around the hip and thigh area to define the shorts. Use a needle tool to lightly scribe a line near the knees to indicate the hem. -
Add the shirt:
Smooth clay over the upper torso. Create two small tubes for the arms and attach them at the shoulders. Position the left arm slightly bent to hold the palette later. -
Detail the clothing:
Roll two thin, flat strips of clay and layer them over the shoulders to create the overall straps. Use a needle tool to scratch vertical lines into the shirt area for a fabric texture. -
Build the head:
Cover the large foil ball with a smooth layer of clay. Blend it seamlessly into the neck, but keep the chin defined. -
Create the hair:
Add a thick ‘cap’ of clay over the top and back of the head. I like to use a loop tool here to curve deeply into the clay, carving out chunky, stylized bangs rather than adding individual strands. -
Form the face:
Add two tiny, flat ears on the sides. While the clay is soft, use a small texture sponge or a toothbrush to gently tap the entire surface of the figure. This gives it that specific rough, stone-like texture shown in the photo. -
Sculpt the accessories:
Fashion two small shoe shapes and attach them to the ankles. Separately, cut a small rectangle of clay for the palette and press small indentations into it for the ‘paint’ wells.
Head Slumping?
If the head is too heavy and slides down the wire, prop it up with a small cardboard box or extra scrunched foil until the clay firms up enough to hold its shape.
Step 3: Painting and Assembly
-
Drying time:
Allow the sculpture and the loose palette accessory to dry completely. This usually takes 24-48 hours depending on humidity. -
Sand and prep:
Lightly sand any harsh ridges, but be careful not to smooth away the stone texture you added earlier. -
Base coating:
Paint the shirt white and the overalls a warm orange-brown. Use a ‘dry brush’ technique—wiping most paint off the brush first—to let the clay’s natural darkness show through in the recessed textures. -
Painting the face:
Keep the face simple. Paint two oval / almond shapes for eyes in dark brown and a small curved line for the smile. Paint the hair a similar shade to the overalls but slightly lighter. -
Finishing the shoes:
Paint the shoes black with white toe caps and messy white laces for a playful look. -
Complete the palette:
Color in the little indentations on the palette with bright squares of yellow, blue, red, and green. Once dry, glue the palette to the figure’s left hand. -
Final touches:
Paint patch details on the knees using grey or light brown. Coat the entire piece with a matte varnish to protect the paint without making it shiny.
Now you have a wonderful little artistic companion to sit on your desk and inspire your next masterpiece
Animal Whistle Sculpture That Actually Works
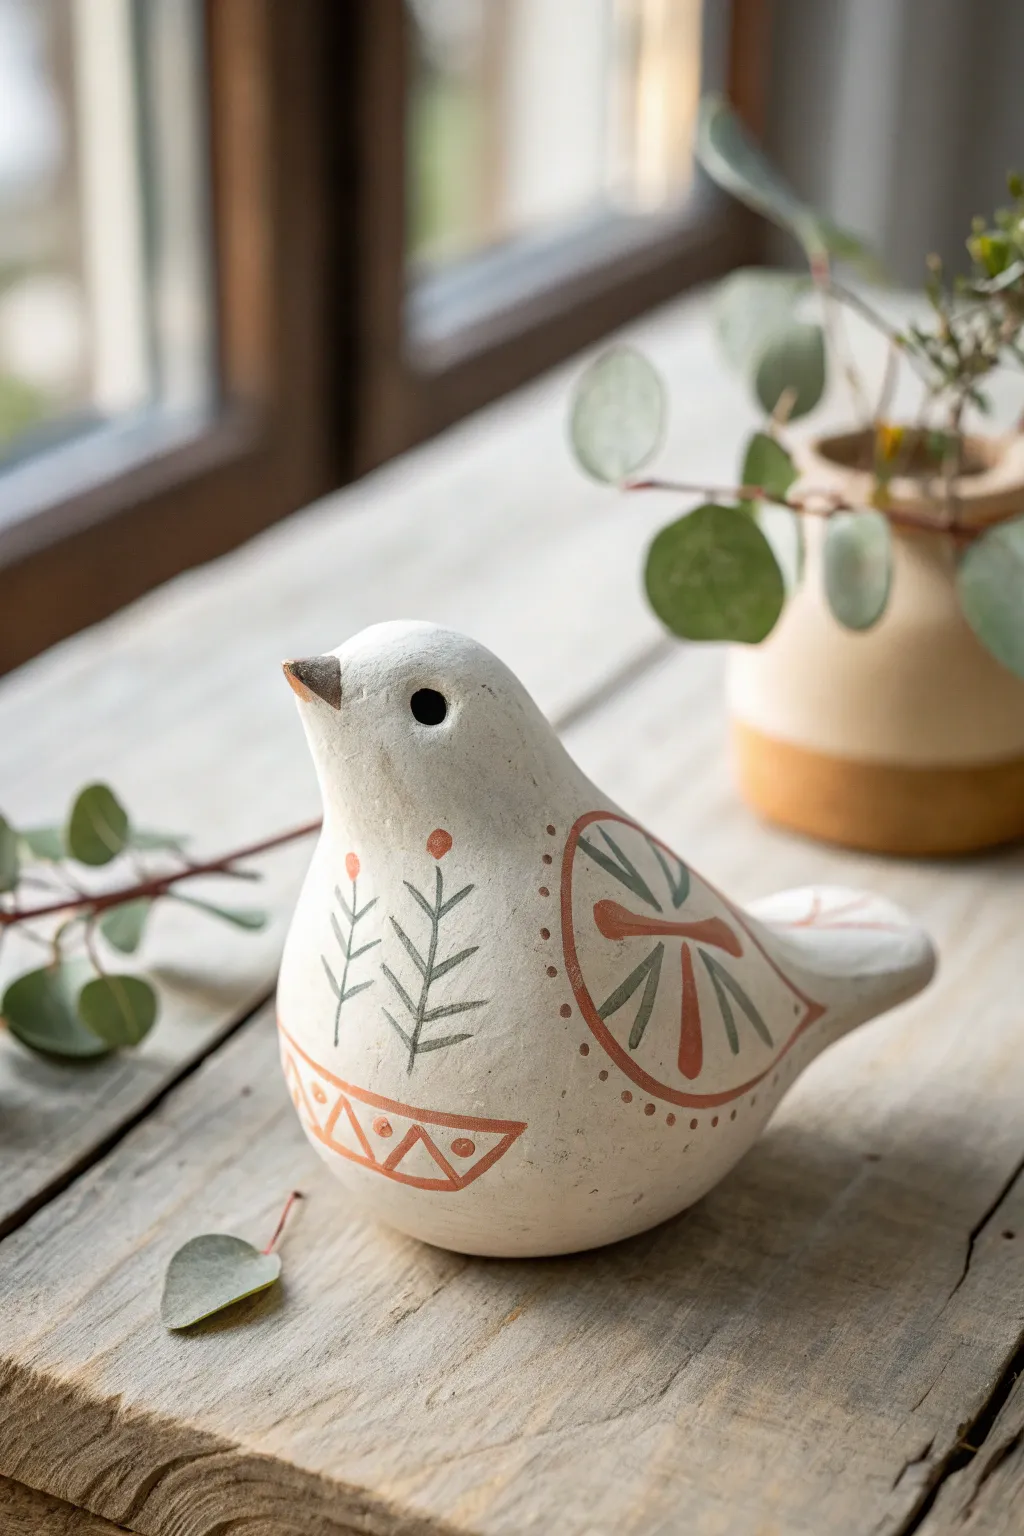
Craft a functional and decorative ocarina-style whistle in the shape of a charming songbird. This project combines basic pinch pot techniques with precise airflow mechanics to create a clay creature that sings as beautifully as it looks.
Detailed Instructions
Materials
- Low-fire white earthenware clay
- Popsicle stick or fettling knife
- Beveled wood modeling tool
- Slip (clay mixed with water)
- Needle tool
- Scoring tool (or fork)
- Small drill bit (optional, for decorative holes)
- Underglazes: terra cotta red, sage green, black
- Fine detail brushes
- Clear matte glaze
Step 1: Forming the Body
-
Create pinch pots:
Start with two balls of white clay, roughly the size of golf balls. Press your thumb into the center of each and pinch the walls evenly to create two matching hemispheres. -
Join the pots:
Score the rims of both pinch pots thoroughly and apply a generous amount of slip. Press the two halves together to form a trapped bubble of air, smoothing the seam completely until invisible. -
Shape the bird:
Gently gently squeeze and paddle the hollow sphere into an egg shape. Pull a small amount of clay from one end to form the head and beak, and pinch the opposite end to create a flat, tapered tail. -
Refine the surface:
Use a metal rib or a damp sponge to smooth the entire surface of the bird. The body should be plump and rounded, sitting flat on its base without rocking.
Step 2: Creating the Whistle Mechanism
-
Cut the mouthpiece:
On the tail end, cut a rectangular slot (the mouthpiece) using a bevel tool or popsicle stick. The angle should be roughly 45 degrees relative to the body. -
Form the fipple:
Flip the bird over. On the underside of the tail, cut a small rectangular window (the fipple) about an inch in from the mouthpiece end. Carve a sharp 45-degree angle on the side of the window closest to the body, creating a splitting edge for the air. -
Clean the airway:
Insert your flat popsicle stick through the mouthpiece hole. It must travel straight through the tail and exit exactly at the sharp edge of the window you just carved. This alignment is critical for sound. -
Test the sound:
Gently blow through the mouthpiece. If you hear a clear whistle, stop immediately. If it sounds airy, adjust rock the angle of the splitting edge slightly until the tone is crisp.
Pro Tip: Stick Trick
Keep the popsicle stick inside the airway while you smooth the exterior of the tail. This prevents you from accidentally collapsing the delicate air channel while handling.
Step 3: Decoration and Firing
-
Bisque fire:
Allow the bird to dry slowly under plastic for a day, then uncovered until bone dry. Fire to cone 04. -
Apply base color:
Since we used white clay, the base is ready. If you used a different clay body, paint the entire bird with white underglaze now. -
Paint the wings:
Mix a terra cotta underglaze. Using a fine liner brush, paint a teardrop shape on the side for the wing. Inside the wing, paint a cross shape, then fill the quadrants with small green dashes. -
Add floral details:
On the bird’s chest, paint two vertical stems with sage green leaves branching outward. Add small terra cotta dots at the top of these stems to represent berries or buds. -
Detail the tail feathers:
Paint a horizontal band near the base of the bird in terra cotta. Inside this band, draw a zig-zag line. Add small circles in the triangular spaces created by the zig-zag. -
Define the face:
Paint the tip of the beak brown mixed with a little black. Use pure black to paint a small, simple round eye. -
Final glaze:
Once the underglaze is completely dry, apply two coats of clear matte glaze. I prefer matte here to keep that earthy, folk-art feel without high gloss distraction. -
Glaze fire:
Fire the piece a final time to cone 05 (or according to your glaze instructions).
Troubleshooting: No Sound?
If it won’t whistle, the splitting edge is likely too blunt or misaligned. Re-sharpen the edge of the window so it is razor-thin and perfectly bisects the air stream.
Display your charming bird on a windowsill where the sunlight can highlight the subtle folk patterns


What Really Happens Inside the Kiln
Learn how time and temperature work together inside the kiln to transform clay into durable ceramic.
Mini Skeletal Dragon or Creature Study
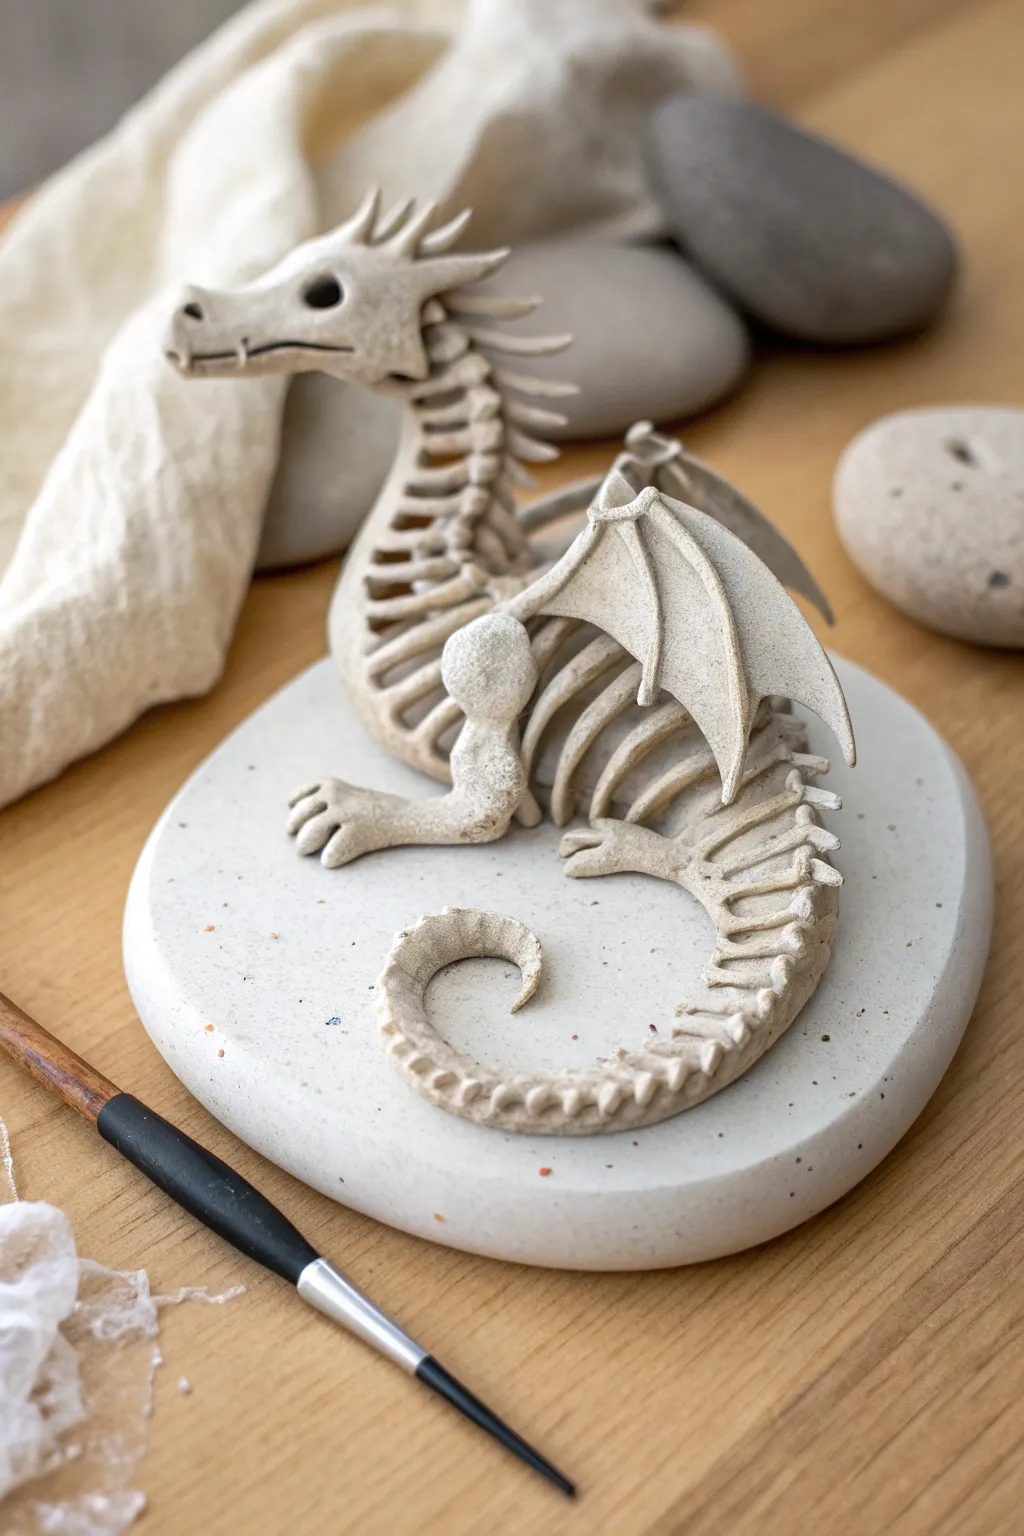
This intricate project challenges you to explore anatomy by sculpting a dragon stripped down to its bare bones. The finished piece features a striking skeletal ribcage, a segmented tail, and delicate wing structures perched on a minimalist round base.
Step-by-Step Guide
Materials
- White or light grey stoneware clay (grogged for strength)
- Round wooden banding wheel or turntable
- Basic clay sculpting tools (needle tool, loop tool, wood modeling tool)
- Slip (clay and water slurry)
- Small paintbrush for slip application
- Wire cutter
- Sponge
Step 1: The Foundation
-
Create the base:
Start by rolling out a thick slab of clay, roughly 1 inch thick. Cut it into a clean oval or circle shape to serve as the mounting platform for your dragon. -
Form the spine anchor:
Roll a sturdy coil of clay that tapers at one end. This will be the main spine and tail. Curve it into an ‘S’ shape and attach it firmly to the base using the score-and-slip method. -
Establish the ribcage:
For the chest area, you don’t want a solid block. Instead, create a small, hollow oval form or use a very small pinch pot as a temporary support that will be mostly hidden or cut away later.
Sagging Ribs?
If the ribs collapse during sculpting, stuff the inside of the chest cavity with crumpled newsprint or paper towels. This supports the clay while it dries and burns out later in the kiln.
Step 2: Skeletal Structure
-
Roll the ribs:
Roll out several thin, even coils of clay. These need to be consistent in thickness, mimicking bone. -
Attach the ribs:
Starting from the spine, attach the rib coils, curving them around the chest area to underneath the belly. Leave space between each rib to create that hollow skeletal look. -
Detail the vertebrae:
Along the spine and tail, adding small, flattened balls of clay between the rib attachments creates the look of segmented vertebrae. Use a modeling tool to square them off slightly. -
Add dorsal spines:
Create small, triangular spikes and attach them in a row along the very top of the neck and down the back of the spine for an aggressive silhouette.
Antique Bone Look
After the piece is bisque fired, apply a wash of iron oxide or a diluted brown stain, then wipe it back with a sponge. This leaves darkness in the crevices, enhancing the skeletal details.
Step 3: Head and Limbs
-
Sculpt the skull:
Model a distinct head shape with an elongated snout. Use a loop tool to hollow out the eye sockets deeply, giving it that skull-like appearance. -
Attach the head:
Score and slip the neck connection point thoroughly before pressing the head onto the spine. I find using a small coil to reinforce the underside of the neck helps keep the head upright. -
Form the arms:
Since this is a partial skeleton, sculpt the visible front arm with a bit of muscle volume rather than just bone. Keep the shoulder joint rounded and attach a hand with three distinct claws resting on the base. -
Create the back legs:
Similarly, sculpt the rear leg and foot. The foot should plant firmly on the base to provide extra structural support for the curved spine.
Step 4: Wings and Texture
-
Build the wing bones:
Roll tapered coils for the main wing arm and the finger-like extensions. Arrange them in a folded position. -
Add the wing membrane:
Roll a very thin slab of clay. Cut triangular sections to fit between the wing bones, pressing them gently onto the ‘bones’ to simulate skin stretched over the frame. -
Attach the wings:
Score the shoulder blade area on the ribcage deeply. Attach the finished wings, ensuring they angle backward. -
Refine the surface:
Use a barely damp sponge to smooth out any fingerprints, but leave the clay’s natural grain to mimic the texture of fossilized bone. -
Final drying check:
Before setting it aside, ensure the ribs haven’t sagged. If they have, prop them up gently with small balls of paper or sponge until the clay is leather hard.
Allow the dragon to dry slowly under loose plastic to prevent the thin ribs from cracking away from the spine