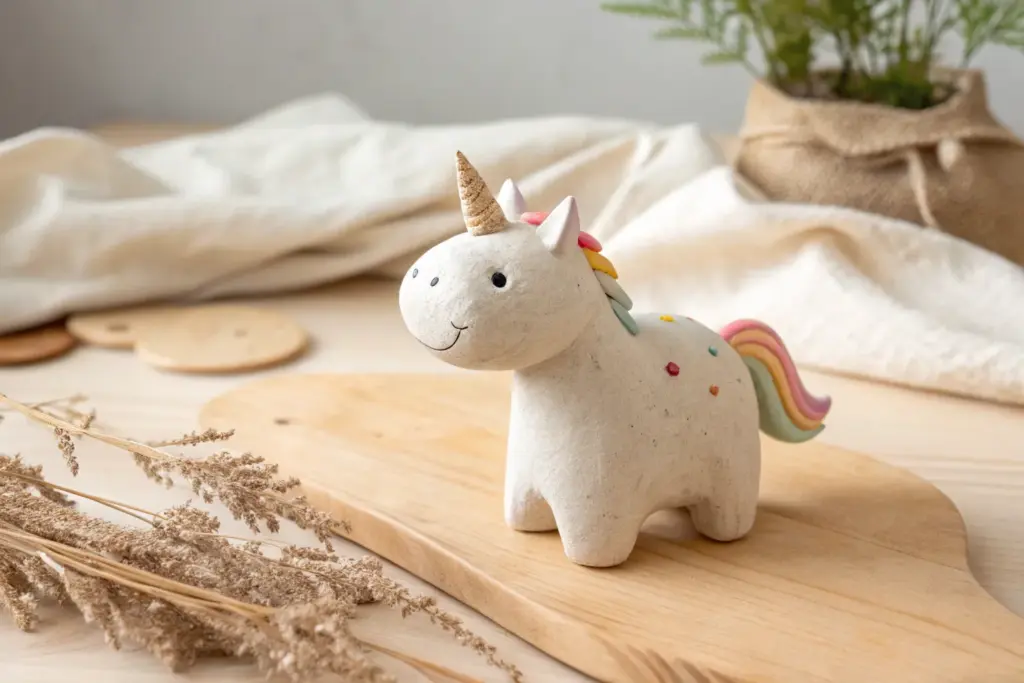
Kids don’t need fancy skills to make clay sculptures they’re proud of—they just need simple shapes, bold colors, and permission to play. These ideas are all about easy clay sculpting that turns into cute, recognizable little creations (with plenty of room for kid-style personality).
Simple Clay Animals Made From Basic Shapes
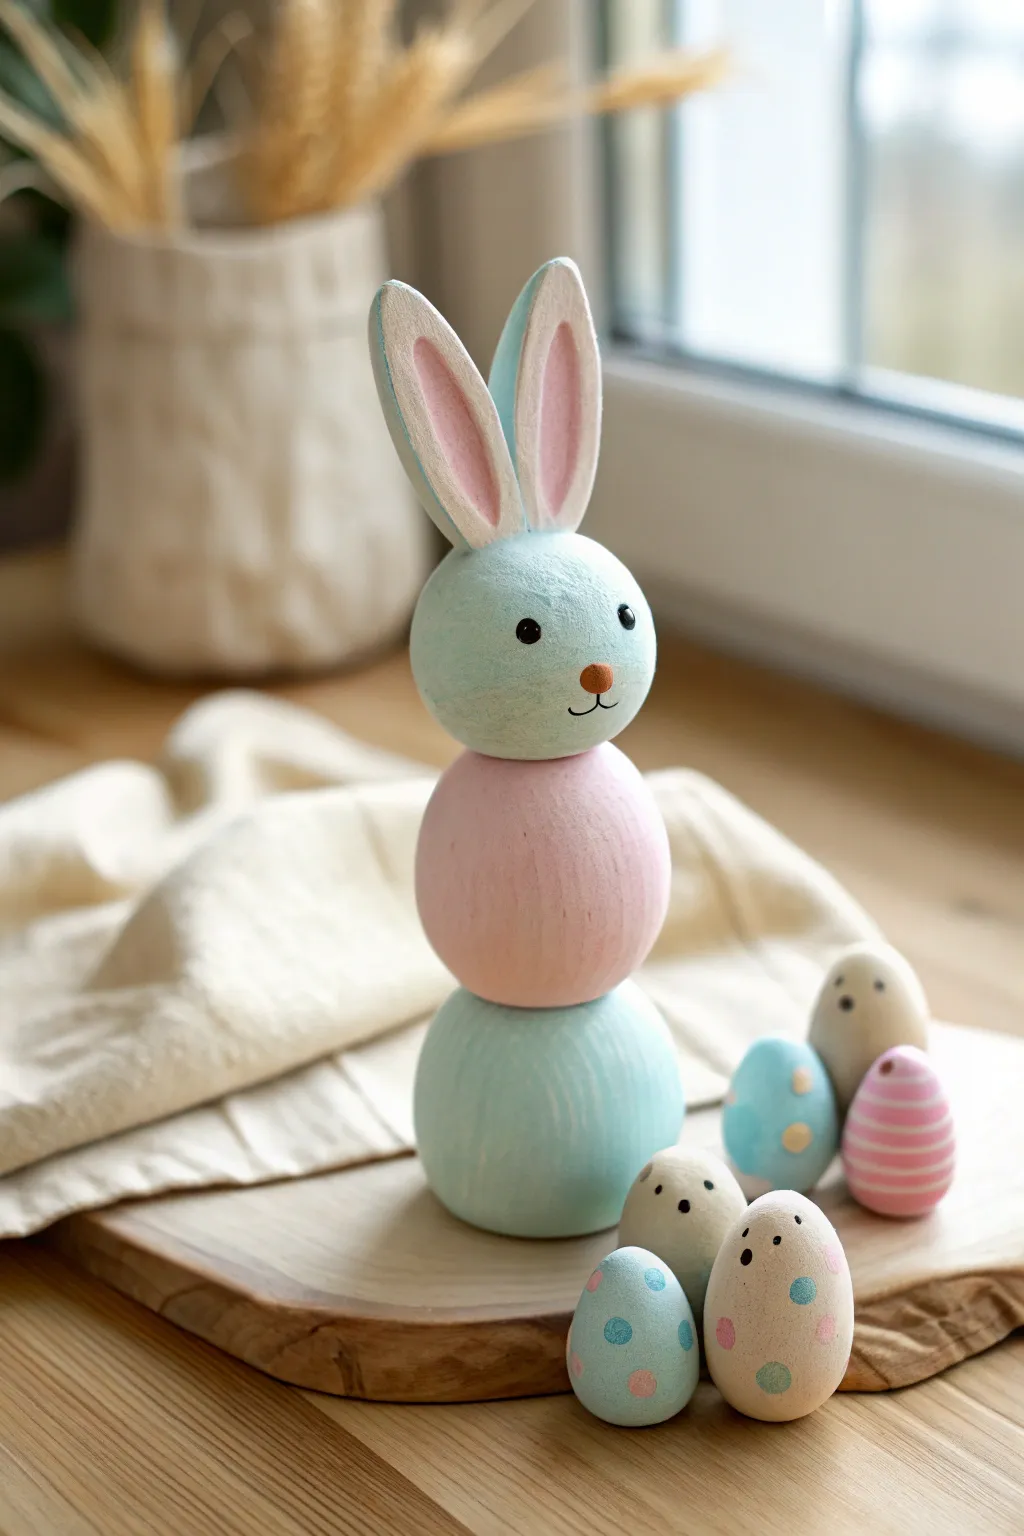
This adorable bunny figurine is built simply by stacking rounded shapes, making it a perfect project for learning structure and balance with clay. With its soft pastel colors and accompanying miniature egg friends, it creates a charming spring display that looks lovely on a windowsill.
Step-by-Step
Materials
- Air-dry clay or polymer clay (white is best)
- Acrylic paints (pale blue, soft pink, white, black, dark brown)
- Wooden skewer or toothpick (for internal structure)
- Fine-grit sandpaper
- Small synthetic paintbrushes (flat and detail round)
- Aluminum foil (optional, for armature)
- Gloss or matte varnish (optional)
Step 1: Shaping the Bunny
-
Form the base:
Start by rolling a large ball of clay, roughly the size of a tangerine. Gently tap it on your work surface to create a flat bottom so it doesn’t roll away. This will form the sturdy base of your bunny. -
Create the torso:
Roll a second ball, just slightly smaller than the first. If you are using heavy clay, you might want to scour the top of the base and the bottom of this new ball to help them stick. -
Add internal support:
Before stacking, I like to insert a wooden toothpick or a trimmed skewer into the center of the base piece. Slide the torso ball onto the protruding skewer to lock it in place vertically. -
Shape the head:
Roll a third ball for the head, making it slightly smaller than the torso. Push this onto the top of the skewer stack, ensuring all three spheres are aligned but distinct. -
Sculpt the ears:
Pinch off two equal pieces of clay for the ears. Roll them into long logs, then flatten them gently with your thumb to create a petal shape that is tapered at both ends. -
Attach the ears:
Score the top of the head slightly where the ears will go. Press the tapered bottom of each ear firmly onto the head so they stand upright. You can smooth the clay connection with a little water or slip. -
Create egg friends:
Use leftover clay to roll several small egg shapes in varying sizes. Tap them on the table so they can stand on their own, just like the main bunny.
Step 2: Smoothing & Refining
-
Check surface texture:
Look over your bunny and eggs for any fingerprints or cracks. Wet your finger slightly and buff these imperfections away to get a smooth, wood-like finish. -
Drying time:
Let your sculpture dry completely. If using air-dry clay, this might take 24-48 hours depending on thickness. Polymer clay should be baked according to package instructions. -
Sanding:
Once fully cured and hard, use fine-grit sandpaper to briefly gently sand the curves. This step is crucial for achieving that professional, smooth painted look.
Keep it Light
If making a large bunny, crunch up a ball of aluminum foil first and wrap your clay around it. This saves clay and makes the sculpture lighter and faster to dry.
Step 3: Painting the Details
-
Paint the base:
Mix a soft pastel blue acrylic paint. Apply this color to the bottom sphere (the base) and the head sphere, covering them completely. -
Paint the torso:
Switch to a pale, dusty pink color. Carefully paint the middle sphere (the torso), using a steady hand where it meets the blue sections. -
Color the ears:
Paint the outer edges and backs of the ears in the pastel blue. Once dry, paint the inner ‘petal’ shape of the ear in pink. -
Add the face:
Using a very fine detail brush, paint two small black circles for eyes. Add a small brown oval nose and a thin line for the mouth just below it. -
Decorate the eggs:
Paint the small eggs in solid base colors like cream, blue, or pink. Once dry, add simple patterns like polka dots or horizontal stripes in contrasting pastel shades. -
Add faces to eggs:
Give a few of the eggs distinct personalities by adding tiny black dot eyes and surprised little mouths. -
Final coat:
Once all paint is dry, apply a layer of matte or satin varnish to protect your work and unify the sheen.
Wobbly Head?
If the head keeps sliding down the skewer or squishing the neck, the clay is too soft. Let the body parts stiffen up for 30 minutes before doing the final assembly.
Display your stacked bunny and its little egg companions together for a whimsical handcrafted scene


Chubby Clay Penguins With Big Eyes
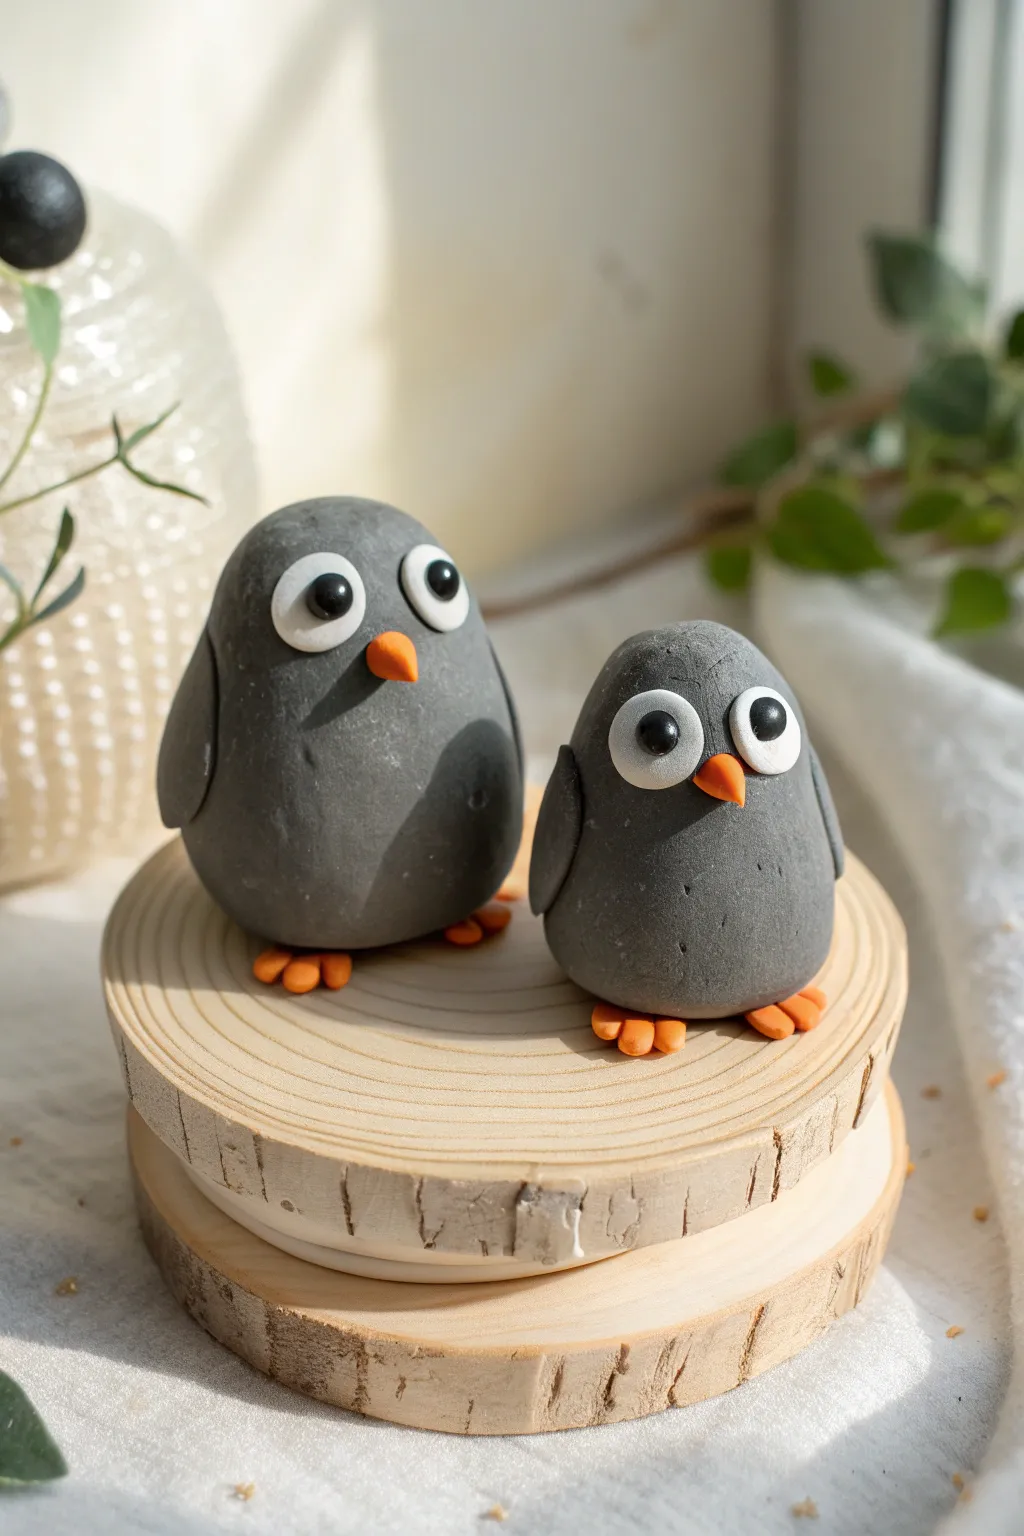
These adorable, round penguins look almost like smooth river stones brought to life with personality. Their simple, chubby shapes and exaggerated eyes make them a perfect beginner project that results in a charming, modern little sculpture.
How-To Guide
Materials
- Grey polymer clay (or air-dry clay mixed with grey acrylic)
- White polymer clay
- Orange polymer clay
- Black polymer clay
- Rolling pin or smooth jar
- Clay sculpting tools (specifically a needle tool or toothpick)
- smooth work surface or silicone mat
- Wood slices for display (optional)
Step 1: Shaping the Bodies
-
Prepare the grey clay:
Start by conditioning your grey clay until it is soft and malleable. Roll two balls of clay in your palms—make one slightly larger than the other to create a parent and child pair. -
Form the egg shape:
Take the first ball and gently roll it on your work surface to elongate it slightly. You want a distinct egg shape that is wider at the bottom and slightly tapered at the top. -
Flatten the base:
Tap the bottom of your egg shape firmly against your table. This creates a flat base so your penguin stands upright without wobbling. -
Refining the silhouette:
Smooth out any fingerprints by gently rubbing the clay with your finger. The goal is a super-smooth, stone-like finish, so take your time here.
Step 2: Adding Wings
-
Create teardrop wings:
Pinch off two small pieces of grey clay for the first penguin. Roll them into tiny balls, then flatten them into teardrop shapes with your fingers. -
Attach the wings:
Press one teardrop onto each side of the body, just below the midpoint. Ensure the pointed end of the teardrop is facing downward. -
Blend the seams:
Using a smoothing tool or your finger, gently blend the top edge of the wing into the body so it looks like it is naturally protruding from the form, rather than just stuck on. -
Repeat for the second bird:
Do the same process for the smaller bird, making the wings proportionately smaller.
Uneven Clay Surface?
If your grey clay shows too many fingerprints, lightly dust your fingertip with cornstarch (or water for air-dry clay) and buff the surface in circular motions.
Step 3: Face and Feet Details
-
Make the eye whites:
For the eyes, roll four small balls of white clay. Flatten them into little discs. I usually place them on the face first to check the size before committing—they should be large and close together for that cute look. -
Attach eye whites:
Press the white discs onto the upper third of the face. They can be touching or very close together. -
Add pupils:
Roll tiny specks of black clay into balls. Press these into the center of the white discs. Try to position them looking slightly upward or sideways to give them a curious expression. -
Sculpt the beak:
Take a tiny bit of orange clay and roll it into a cone. Attach this right between the bottom edges of the eyes, pointing outward. -
Create the feet:
Roll four small orange balls for the feet (two for each bird). Flatten them slightly into oval pads. -
Detail the toes:
Using a needle tool or toothpick, press two indentations into the front of each orange oval to create three little toes. -
Attach the feet:
Place the feet under the front edge of the body. Press the body down gently onto the feet so they stick securely.
Pro Tip: Eye Shine
After baking or drying, add a tiny dot of UV resin or glossy varnish specifically to the black pupils. This ‘wet’ look brings the character immediately to life.
Step 4: Finishing Up
-
Final texture check:
Look over your birds for any dust or lint. You can gently wipe them with a tiny bit of baby oil on your finger to smooth imperfections before baking. -
Bake or dry:
If using polymer clay, bake according to the package instructions (usually 275°F/135°C for 15-30 minutes). If using air-dry clay, let them sit undisturbed for 24-48 hours.
Place your finished penguins on a wood slice or shelf for a sweet, handmade display


Roll-And-Stack Clay Caterpillars
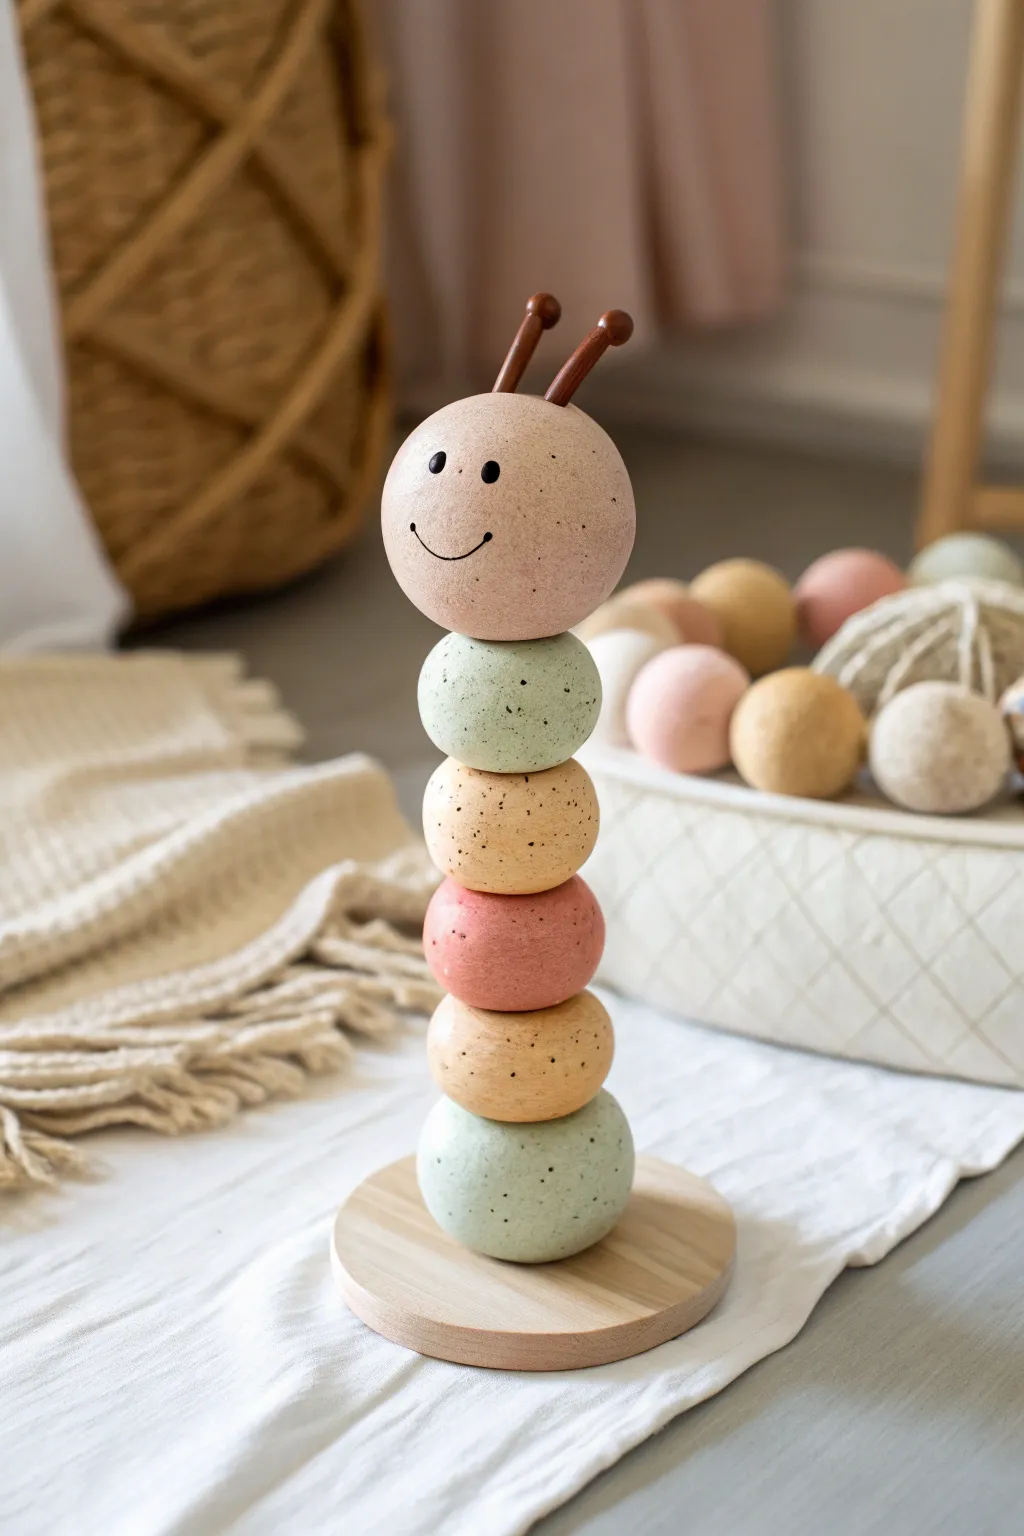
This charming little sculpture brings a soft, textured touch to your child’s shelf, featuring a friendly face and gentle pastel tones. The speckled finish gives the clay a natural, stone-like appearance that looks surprisingly professional but is simple to achieve.
Step-by-Step Tutorial
Materials
- Air-dry clay (white or natural)
- Acrylic paints (pale pink, sage green, mustard yellow, dusty rose)
- Black acrylic paint or fine-point marker
- Wooden dowel (approx. 6 inches)
- Round wooden base (coaster interaction or clay substitute)
- Old toothbrush
- Brown paint (for speckling)
- Two small wooden pegs or brow clay for antennae
- Strong craft glue
- Matte sealant spray
Step 1: Shaping the Spheres
-
Portion the clay:
Start by dividing your air-dry clay into six equal portions for the body segments. You will need one slightly larger portion for the head piece. -
Roll the body:
Take the five body portions and roll them between your palms to create perfect spheres. Aim for a smooth surface, smoothing out any cracks with a drop of water on your finger. -
Create the head:
Roll the larger portion of clay into a sphere for the head. It should be just slightly bigger than the body segments to give the caterpillar character. -
Pierce the centers:
While the clay is still soft, carefully push your wooden dowel through the center of each sphere to create a hole. I find that twisting the dowel as you push helps prevent the sphere from squashing. -
Prepare the antennae:
For the head piece, create two small indentations on the top where the antennae will go later. If you are sculpting antennae from clay, roll two tiny coils now. -
Dry thoroughly:
Let all your clay spheres dry completely. Depending on humidity, this usually takes 24-48 hours. Rotate them occasionally so they dry evenly.
Uneven Spheres?
If your spheres have flat spots after drying, use fine-grit sandpaper to gently round them out before painting. This smooths the surface perfectly.
Step 2: Painting and Assembling
-
Base coat colors:
Once dry, paint each sphere individually. Use your sage green for the bottom and chest, mustard yellow for the second and fourth segments, and dusty rose for the middle section. Paint the head a soft pale pink. -
Apply second coats:
Acrylic paint on clay often needs a second layer to look opaque. Let the first coat dry, then apply another for a solid, matte finish. -
Add the speckles:
Dilute a small amount of dark brown paint with water. Dip an old toothbrush into the mixture, aim it at your painted spheres, and run your thumb over the bristles to flick tiny specks onto the clay. -
Protect the surface:
Allow the paint to fully cure. A quick spray of matte sealant here will protect your paint job and give it that store-bought finish. -
Draw the face:
Using a fine-point black marker or a very thin brush with black paint, add two small dots for eyes and a simple U-shape smile on the pale pink head sphere. -
Prepare the base:
Take your wooden round base. If you don’t have a pre-made one, you can shape a flat disk from clay and paint it a light wood tone. Glue the wooden dowel upright into the center of the base. -
Stack the body:
Slide the spheres onto the dowel one by one. Follow the pattern: green, yellow, rose, yellow, green. -
Attach the head:
Place the head sphere on top of the stack. If the dowel is too long, trim it down before securing the head with a dab of glue. -
Fix the antennae:
Glue two small brown wooden pegs into the holes you made earlier on the head. If utilizing clay antennae, glue those dried pieces on now.
Interactive Twist
Don’t glue the spheres to the dowel! Leave them loose so kids can re-stack the caterpillar in different color patterns like a puzzle.
Now you have an adorable, speckled friend to brighten up a desk or dresser.


Easy Clay Snails With Spiral Shells
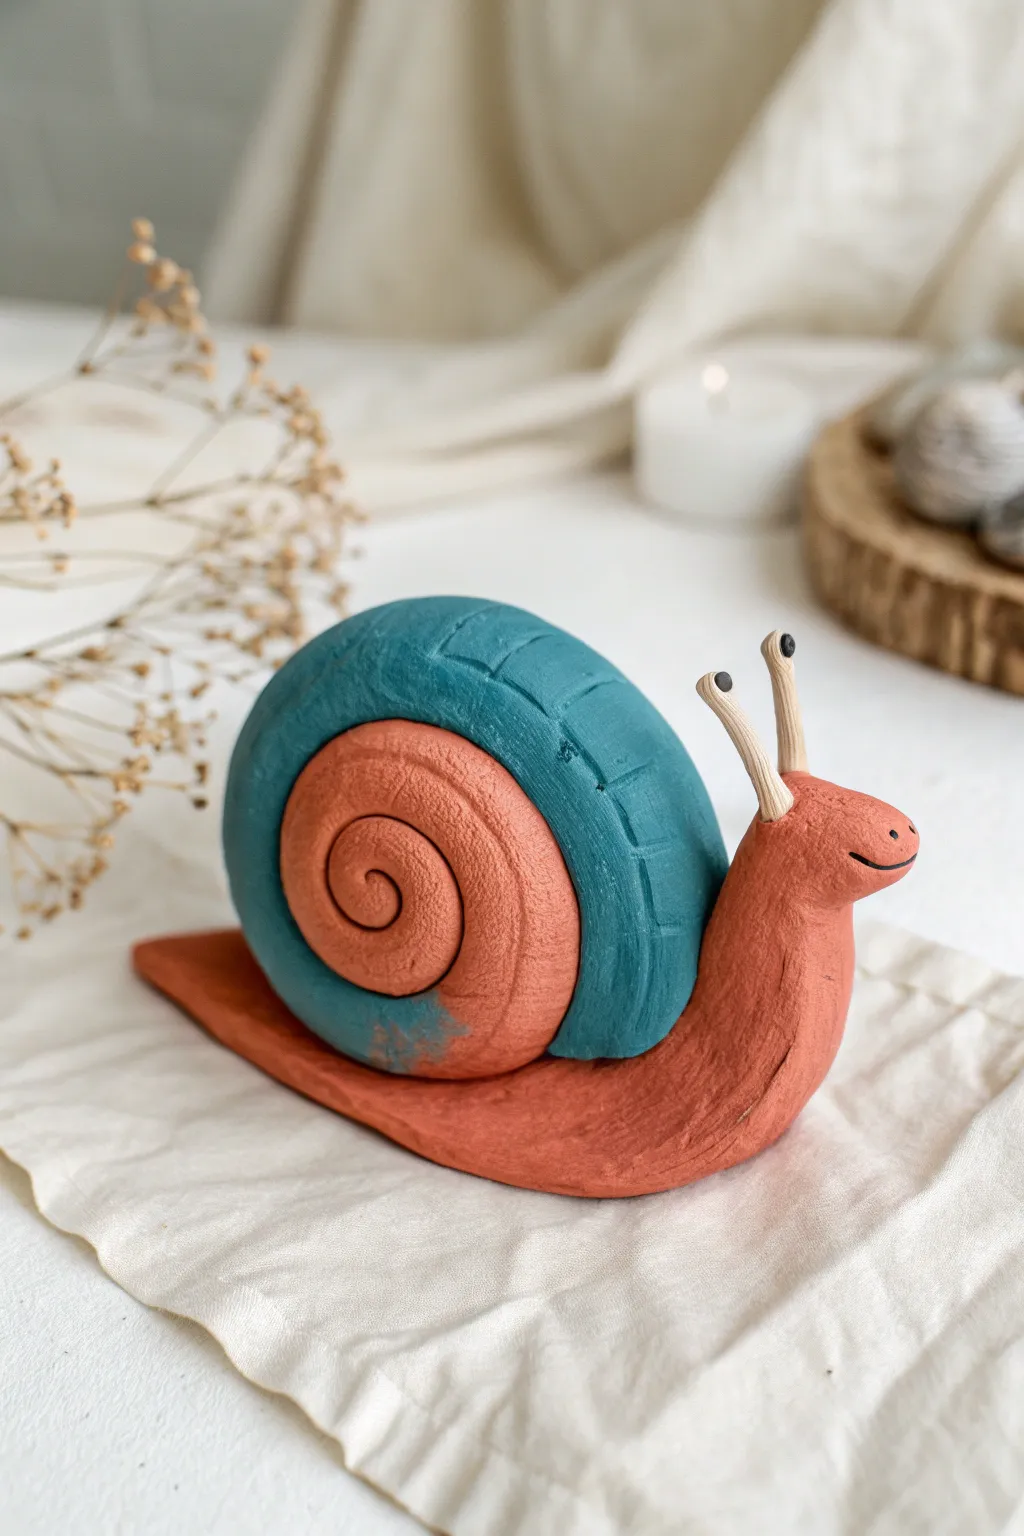
This charming little sculpture combines earthy terracotta tones with a splash of teal for a modern twist on a classic clay project. With its segmented shell and distinctive wooden antennae, it makes for a delightful desk companion or garden accent.
How-To Guide
Materials
- Terracotta-colored air-dry clay or polymer clay
- Teal or blue-green air-dry clay (or acrylic paint)
- Small wooden dowels or thick toothpicks
- Black acrylic paint
- Fine-point paintbrush or toothpick
- Clay sculpting tool (knife or needle tool)
- Small cup of water (for smoothing)
- Rolling pin
Step 1: Sculpting the Body
-
Form the base:
Start with a handful of terracotta clay, rolling it into a long, thick sausage shape. This will become the snail’s body. -
Shape the foot:
Flatten the bottom of the sausage gently against your work surface so it stands stable. Taper one end to a rounded point to create the tail. -
Create the head:
At the other end, bend the clay upwards and smooth it into a rounded, uplifted head shape. Blend the neck area so it flows naturally from the body. -
Refine the texture:
Use your fingers and a touch of water to add subtle texture to the body, creating longitudinal lines that mimic the wrinkly skin of a real snail.
Shell Slipping?
If the shell keeps rolling off the round body, flatten the connection point slightly on the snail’s back to create a ‘saddle’ for the shell to sit in.
Step 2: Creating the Spiral Shell
-
Roll the coils:
You will need two long snake shapes of clay. Roll one from the terracotta clay and a slightly thicker, flatter one from the teal clay. -
Start the center:
Take the terracotta snake and begin coiling it tightly into a flat spiral. This forms the inner core of the shell. -
Add the outer wrap:
Wrap the teal strip around the outside of your terracotta spiral. I like to press the edges together firmly to ensure they bond well. -
Create separation lines:
Using your sculpting knife, gently press indentations into the teal outer ring at regular intervals. This gives the shell a segmented, blocky appearance. -
Shape the shell profile:
If the outer ring looks too flat, round off the top edges with your fingers to make the shell look more domed and three-dimensional. -
Smooth the transition:
Where the teal clay meets the terracotta, you can gently smudge a little teal downward for an artistic, blended look, or keep the line crisp depending on your preference. -
Attach the shell:
Score the top of the snail’s back and the bottom of the shell (cross-hatch marks). Apply a dab of water or slip, then press the shell firmly onto the body.
Step 3: Adding Details and Finishing
-
Prepare the antennae:
Cut two small pieces of wooden dowel or thick toothpick, about 1 inch long. Sand the cut ends if they are rough. -
Insert antennae:
Press the wooden pieces into the top of the head slightly angled forward. Make sure they are deep enough to be secure. -
Add eye stalks:
If you want the eyes on the stalks, add tiny balls of clay to the very tips of the wooden dowels, or paint the tips black directly. -
Paint the eyes:
Using the back of a paintbrush or a fine tip, dot two small black circles onto the tips of the antennae/dowels. -
Carve the smile:
Use a needle tool or the edge of your knife to carve a simple, curved mouth line into the side of the face. -
Paint the smile (optional):
To make the expression pop, carefully trace the carved mouth line with valid thin black paint. -
Final smooth:
Check over your sculpture for any unwanted fingerprints. Smooth them away with a damp finger before setting the piece aside. -
Dry completely:
Allow the snail to air dry for 24-48 hours. If using polymer clay, bake according to the package instructions.
Make it Shine
Once fully dry, apply a coat of satin or gloss varnish just to the teal part of the shell. This creates a cool contrast between the matte body and shiny shell.
Enjoy displaying your slow-moving friend on a bookshelf or window sill

The Complete Guide to Pottery Troubleshooting
Uncover the most common ceramic mistakes—from cracking clay to failed glazes—and learn how to fix them fast.
Tiny Clay Frogs Sitting On Lily Pads
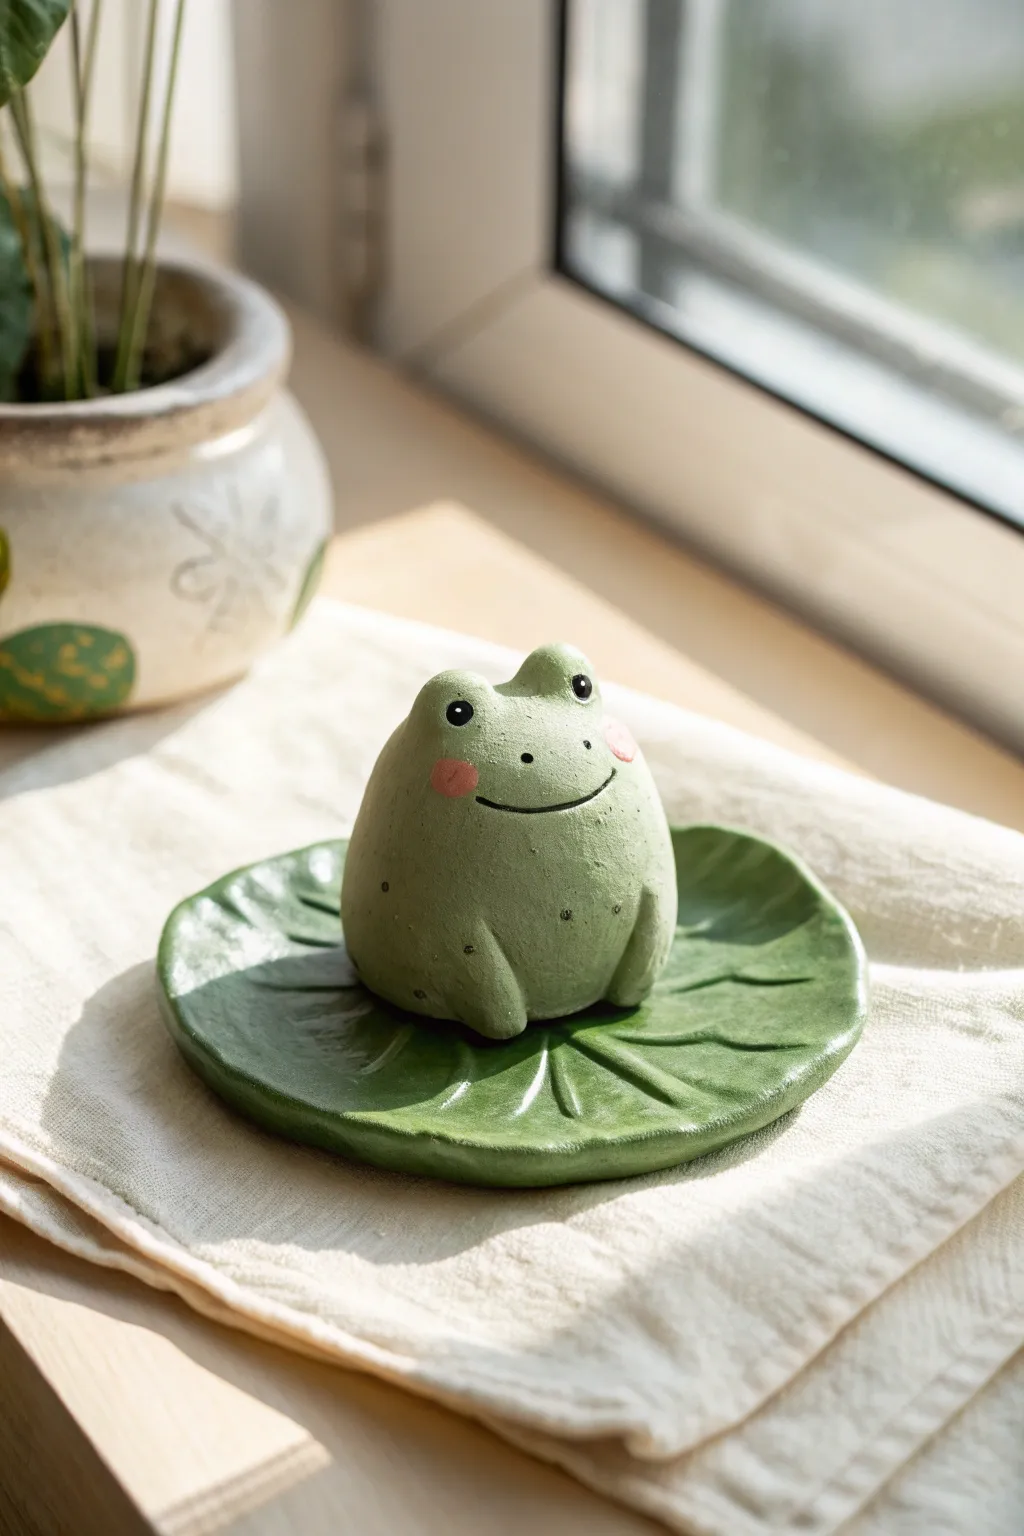
Sculpt your own adorable amphibian friend resting on a glossy lily pad leaf. This chubby little frog features a simple egg-like shape and sweet rosy cheeks, making it a perfect beginner project for clay enthusiasts.
Detailed Instructions
Materials
- Polymer clay or air-dry clay (Light Green, Dark Green, White, Black, Pink)
- Small rolling pin
- Sculpting tools (needle tool, ball tool)
- Plastic knife or clay blade
- Parchment paper or clay mat
- Gloss glaze or varnish (optional)
- Small paintbrush
Step 1: Sculpting the Lily Pad
-
Prepare the leaf color:
Start by conditioning a ball of dark green clay. You want it pliable and smooth. If you are mixing colors, blend a standard green with a tiny touch of brown or black to get that earthy, deep leaf tone. -
Create the base shape:
Flatten the dark green ball with your palm first, then use your rolling pin to roll it into a flat, circular disk about 3-4 inches in diameter and roughly 1/4 inch thick. -
Add texture:
Using a needle tool or the back of a plastic knife, gently score lines radiating from the center of the disk outwards to the edges to mimic leaf veins. Don’t cut all the way through; just indent the surface. -
Shape the edges:
Pinch the edges of the circle gently at random intervals to create a slightly wavy, uneven rim. This gives the lily pad a more natural, organic look rather than a perfect factory-made circle. -
Add the notch:
Cut a small V-shape wedge out of one side of the circle to create the classic lily pad shape. Soften the cut edges with your fingertip so they aren’t sharp.
Smooth Seams
Use a tiny drop of baby oil (polymer) or water (air-dry) on your finger to smooth out fingerprints before drying.
Step 2: Creating the Frog Body
-
Form the main body:
Take a generous lump of light green clay and roll it into a smooth ball. Then, gently shape it into a rounded egg or teardrop shape with a wide, stable base. This is your frog’s chubby body. -
Make the eyes:
Roll two small balls of the same light green clay. Press these onto the top of the head, spacing them slightly apart so they protrude upwards like bumps. -
Add the front legs:
Roll two thick, short logs of light green clay. Attach these vertically to the front of the body, blending the top of the logs into the body so they look seamless, leaving the bottom paws rounded. -
Position the frog:
Place your frog body directly onto the center of your prepared lily pad. Press down gently to ensure the two pieces adhere together.
Step 3: Facial Details & Finishing
-
Add the pupils:
Roll two tiny specks of black clay. Press them onto the front of the eye bumps. Add an even tinier speck of white clay to each black pupil for a lively ‘sparkle’ highlight. -
Sculpt the smile:
Use a needle tool or a small curved tool to impress a shallow, wide U-shape into the face for a happy smile. If you prefer, roll a very thin thread of black clay and press it into this indentation for a bolder line. -
Give him cheeks:
Take two small bits of pink clay and flatten them into thin discs. Press these onto the frog’s face just below the eyes on either side of the smile. -
Add body texture:
To mimic the speckled skin in the photo, take a stiff toothbrush or a texturing tool and very lightly tap the surface of the green clay to give it a matte, stone-like texture. You can also paint tiny darker green freckles later if you prefer. -
Bake or dry:
If using polymer clay, bake according to the package instructions (usually around 275°F/135°C for 15-30 minutes). If using air-dry clay, leave it in a dry spot for 24-48 hours. -
Glaze the leaf:
Once fully cured and cooled, use a small brush to apply a coat of gloss glaze specifically to the lily pad. This makes it look wet and waxy compared to the matte frog.
Garden Accents
Add a tiny clay lotus flower on the lily pad or place a mini fly near the frog’s mouth for extra storytelling.
Enjoy displaying your calm little frog on a windowsill where it can catch the light
Ladybugs And Bumblebees For Clay Garden Friends
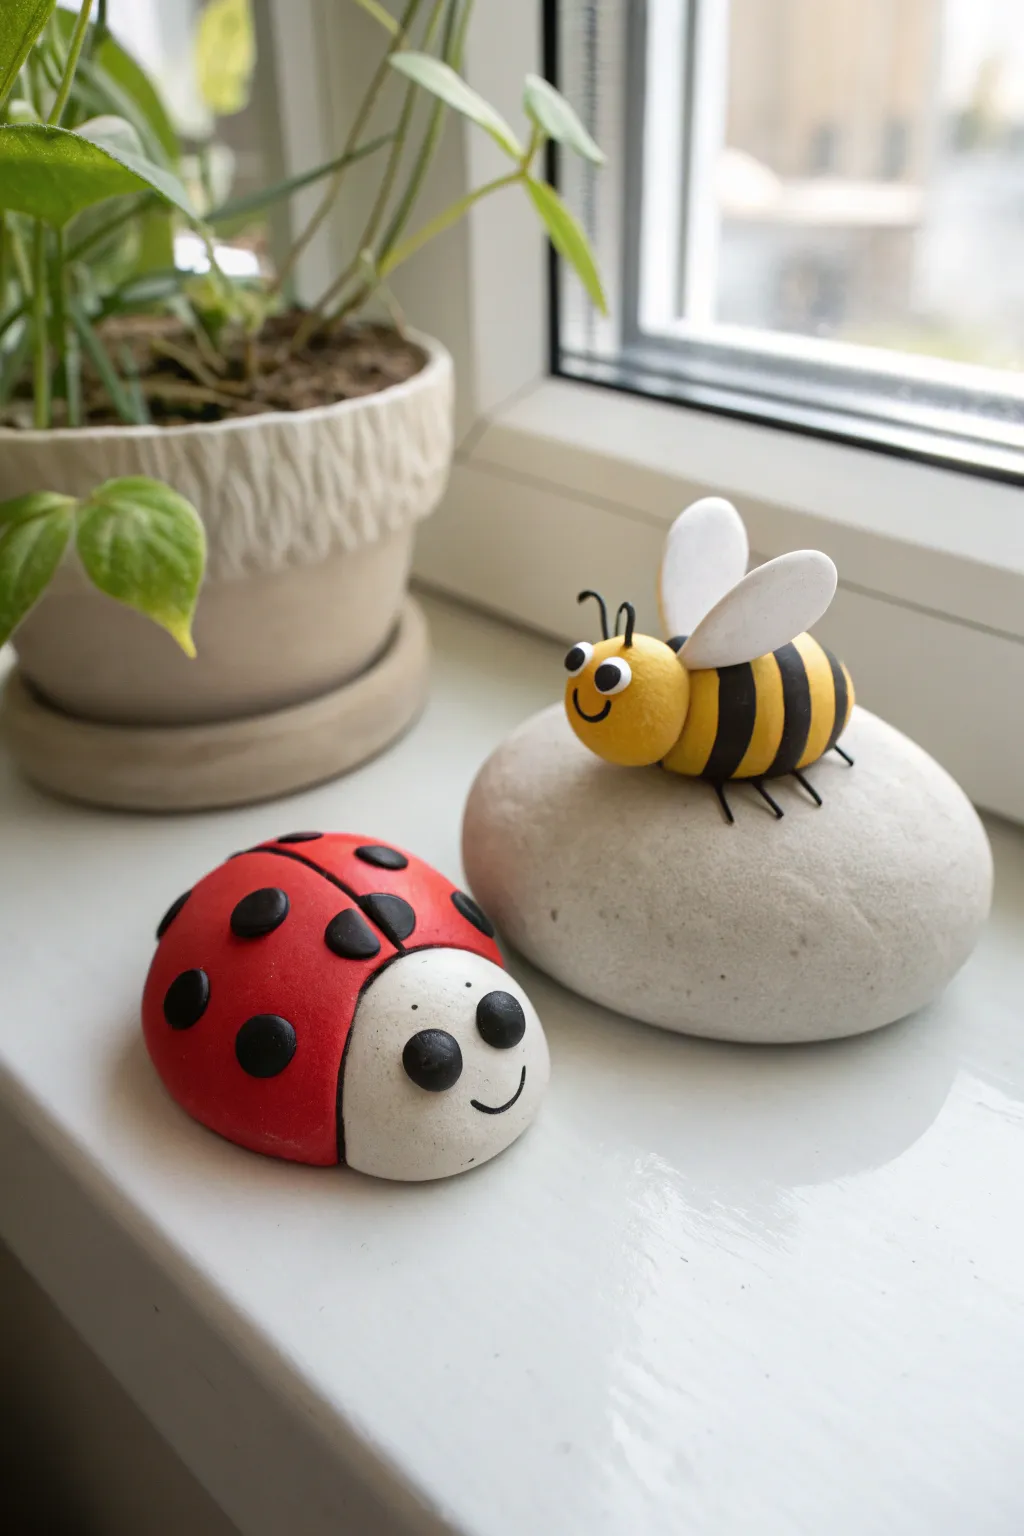
Transform simple lumps of clay and a smooth rock into charming garden companions with this cheerful project. The bright red ladybug and striped bumblebee sit perfectly together, adding a pop of personality to any windowsill or flower pot.
Step-by-Step Guide
Materials
- Polymer clay (colors: red, yellow, black, white)
- Smooth, oval river stone (for the bee’s base)
- Modeling tools (or toothpicks/plastic knife)
- Black wire or jewelry wire (thin gauge)
- Wire cutters
- Gloss glaze (optional)
- Rolling pin or acrylic roller
Step 1: Shaping the Ladybug
-
Create the base:
Start with a ball of red clay about the size of a golf ball. Flatten the bottom slightly by pressing it gently onto your work surface so it becomes a dome shape. -
Form the head:
Roll a smaller ball of white clay, roughly one-third the size of the red body. Press this white ball against the front of the red dome, blending the seam slightly underneath so they stick together firmly. -
Add the dividing line:
Roll a very thin snake of black clay. Lay it straight down the center of the red back, stopping where it meets the white head, to create the separation for the wings. -
Spot the difference:
Make several small balls of black clay and flatten them into discs. Press these randomly onto the red wings to create the classic ladybug spots. -
Make the face:
Roll two small balls of black clay for eyes and press them onto the white face. Use a modeling tool or fingernail to imprint a gentle curve below the eyes for a smile.
Step 2: Building the Bumblebee
-
Prepare the body:
Roll a medium-sized ball of yellow clay into an oval shape, slightly tapering at the back end for the bee’s abdomen. -
Create the stripes:
Roll out a long, flat strip of black clay. Cut three thin ribbons from this strip. -
Apply the stripes:
Wrap the black clay ribbons around the yellow body, spacing them out evenly. Gently roll the body on the table to smooth the stripes flush with the yellow clay. -
Add the head:
Attach a small ball of yellow clay to the front of the striped body for the head. -
Install the eyes:
Press two tiny discs of white clay onto the yellow head, then add even tinier black pupils on top to give the bee an alert expression. -
Sculpt the wings:
Form two teardrop shapes from white clay and flatten them. Press the pointed ends onto the bee’s back, just behind the head, angling them upwards. -
Antennae and legs:
Cut short lengths of black wire (about half an inch long). Insert two into the head for antennae and six into the underside for legs. -
Create the mouth:
Use a sharp tool to carve a small, happy smile onto the bee’s face.
Clean Clay Tip
Baby wipes are essential! Wipe your hands thoroughly between switching clay colors, especially before touching the white clay, to keep vibrant colors from smudging.
Step 3: Final Assembly
-
Position the friends:
Place your finished bumblebee securely on top of the smooth river stone. I like to press it down just enough so the wire legs accept the weight without bending too much. -
Bake or dry:
If using polymer clay, bake the ladybug and the bee (leaving the rock out of the oven if preferred, though most rocks are oven-safe) according to packet instructions. If using air-dry clay, let them sit undisturbed for 24 hours. -
Add a shine:
Once cool or dry, apply a coat of gloss glaze to the eyes and colored parts of the bugs to make them look wet and shiny.
Make It Sparkle
Mix a tiny pinch of iridescent glitter into the white clay before shaping the bee’s wings to give them a magical, shimmering effect in the sunlight.
Now you have a pair of adorable garden guardians ready to watch over your plants


What Really Happens Inside the Kiln
Learn how time and temperature work together inside the kiln to transform clay into durable ceramic.
Silly Clay Monsters With Mix-And-Match Faces
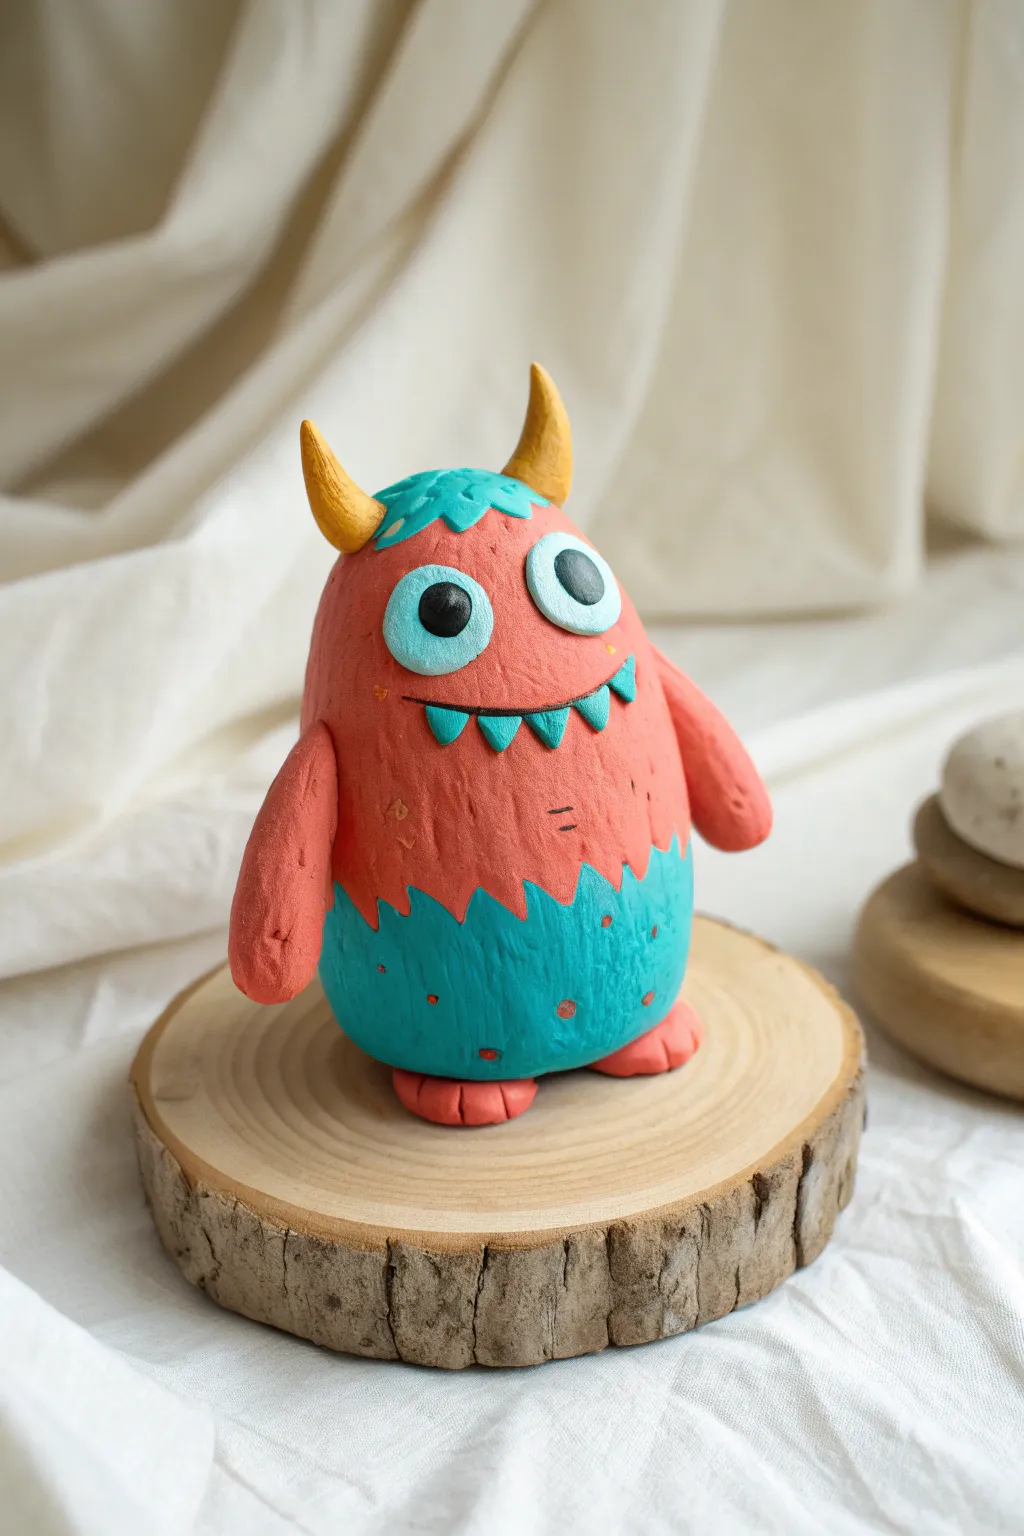
Create this adorable, two-toned monster buddy that looks ready for a hug! With its textured coral body, bright teal belly, and whimsical little horns, this clay sculpture perfectly captures a silly personality that kids will love to build.
How-To Guide
Materials
- Polymer clay or air-dry clay (Coral Pink)
- Polymer clay or air-dry clay (Teal/Turquoise)
- Polymer clay or air-dry clay (Yellow-Ochre)
- Polymer clay or air-dry clay (White & Black)
- Clay sculpting tools (needle tool, small ball stylus)
- A toothbrush or texturing sponge
- Rolling pin
- Parchment paper or craft mat
Step 1: Shaping the Main Body
-
Form the base:
Start with a large ball of coral pink clay. Roll it between your palms until smooth, then gently shape it into a rounded egg shape, slightly flatter on the bottom so it stands up on its own. -
Create the belly:
Take a smaller amount of teal clay and flatten it into a thin sheet. Using a tool or your fingers, create a jagged, zig-zag pattern along the top edge to mimic fur or separation. -
Attach the belly:
Press the teal clay onto the lower third of the egg shape, smoothing the bottom seams underneath the monster so they disappear. -
Add texture:
For that fuzzy, realistic look, lightly press a clean toothbrush or a texture sponge all over the pink and teal surfaces. Be careful not to smudge the distinct line where the colors meet.
Clay Won’t Stick?
If parts like the arms or horns aren’t sticking well, score both surfaces (scratch them up) with a needle tool and add a tiny dab of liquid clay or water as glue.
Step 2: Adding Personality
-
Make the eye sockets:
Roll two small balls of teal clay, flatten them into thick discs, and press them firmly onto the upper half of the face. -
Form the eyeballs:
Create slightly smaller white discs and place them centred on top of the teal sockets. Add tiny black balls for pupils; I like placing them slightly cross-eyed or off-center for a goofier expression. -
Create the mouth:
Use a needle tool to slice a curved smile directly into the pink clay below the eyes. -
Add teeth:
Roll tiny, rice-sized grains of teal clay. Press these little triangles onto the top of the smile line pointing downwards for a toothy grin. -
Shape the horns:
Take yellow-ochre clay and roll two cone shapes. Curve the tips slightly so they look less like spikes and more like organic horns. -
Attach horns:
Press the horns onto the top of the head. Use your needle tool to gently blend the base of the horns into the pink scalp for a secure hold.
Monster Mash-Up
Change the expression by swapping the mouth shape! Try an ‘O’ shape for surprise, or a squiggly line for confusion. You can also mix colors to marble the skin.
Step 3: Limbs and Details
-
Form the arms:
Roll two sausage shapes from the coral pink clay. Taper one end of each slightly where it will join the body. -
Attach arms:
Press the arms onto the sides of the body just above the teal belly line. Smooth the clay at the shoulder joint so they don’t fall off. -
Make the feet:
Create two flat, oval pads from coral pink clay for the feet. Use a knife tool to score two lines into the front of each foot to define the toes. -
Stand him up:
Place the monster body onto the feet, pressing down gently to secure the connection without squashing the toes. -
Top hair detail:
Add a tiny, flattened patch of teal clay to the very top of the head between the horns for a splash of extra color. -
Final spotting:
Roll microscopic balls of orange or darker pink clay and press them randomly onto the teal belly, and do the same with teal spots on the pink body for extra detail. -
Final finish:
Give the texture one last pass with your toothbrush if any spots got smoothed out during handling, then bake or dry your monster according to your clay package instructions.
Once dry, display your silly monster on a shelf or make him a few friends to start a colorful collection
Rainbow Clay Snakes Turned Into Little Sculptures
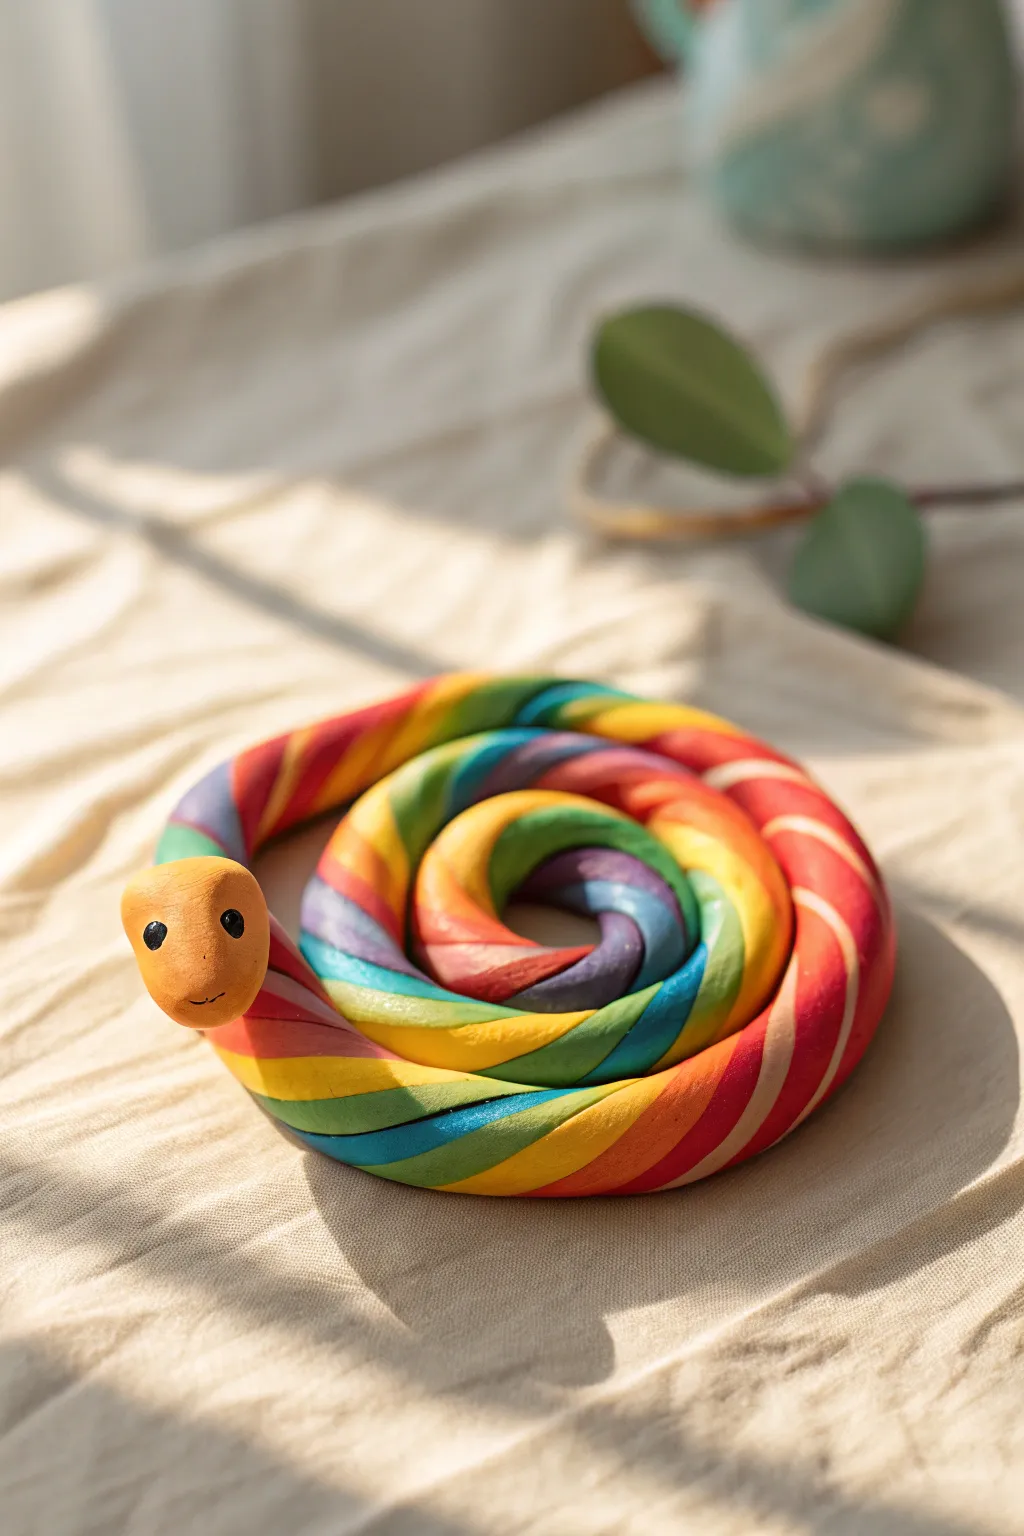
Brighten up your play dough or polymer clay collection with this vibrant, coiled serpent sculpture. The swirling colours create a mesmerizing lollipop effect all the way down its body, culminating in a friendly little face.
Step-by-Step
Materials
- Polymer clay or modelling clay (multiple rainbow colours: red, orange, yellow, green, blue, purple)
- Additional orange or yellow clay for the head
- Small amount of black clay for eyes
- Clay carving tool or toothpick (optional)
- Clean rolling surface (acrylic board or baking paper)
Step 1: Creating the Colour Strands
-
Prepare the colours:
Begin by conditioning each colour of clay separately. Knead them warm in your hands until they are soft and pliable, which prevents cracking later. -
Roll thin snakes:
Roll each colour into a very long, thin snake shape. Aim for strands that are roughly the same thickness, about the width of a piece of spaghetti or a little thicker. -
Group the strands:
Line up your coloured strands side-by-side in rainbow order: red, orange, yellow, green, blue, and purple. Pinch the ends together at one side to join them into a flat ribbon of colour. -
Twist the bundle:
This is the most fun part. Holding one end of your colour ribbon steady, gently twist the other end. Keep twisting until the colours spiral around each other tightly, looking like a barber pole or a candy cane. -
Smooth the twist:
Place your twisted rope on your work surface and gently roll it back and forth with the palm of your hand. This helps fuse the colours together into a single, smooth snake body without mashing the spiral pattern.
Fixing Breaks
If your clay rope breaks while twisting, just press the raw ends back together and give it a gentle roll on the table. The seam usually vanishes into the colorful pattern.
Step 2: Coiling and Shaping
-
Form the coil:
Take the tail end of your rainbow rope and start curling it inward on your table. -
Build the loops:
Continue wrapping the body around that center point. You want to create a flat spiral, like a cinnamon roll. -
Elevate the neck:
As you reach the last few inches of the rope, stop coiling flat. Instead, lift the clay slightly so the neck rises up and rests on top of the outer loop. -
Trim the end:
If there is excess rope or the end looks messy, trim it off cleanly where you plan to attach the head.
Go Bigger!
Try varying the thickness of your starting strands. Thicker strands create a chunky, bold pattern, while super thin threads make a complex, delicate swirl.
Step 3: Adding the Head and Details
-
Shape the head:
Take a separate piece of orange or dark yellow clay. Roll it into a smooth ball, then slightly flatten and elongate it to create an oval snake head shape. -
Attach the head:
Press the head firmly onto the raised neck of your coiled body. If using polymer clay, you can gently smooth the seam with your finger or a tool to ensure it sticks well. -
Make the eyes:
Roll two tiny specks of black clay into balls. Press them onto the sides of the face. -
Add a smile:
Using a toothpick or a small clay tool, carefully press a small curved line near the bottom of the face to give your snake a friendly grin. -
Final check:
Look over your snake. If there are any fingerprints, gently buff them out with your finger. -
Preserve or Bake:
If using air-dry clay, set it aside in a safe spot to harden. For polymer clay, bake according to the package instructions (usually 275°F/135°C for 15-30 minutes) to make your sculpture permanent.
Enjoy displaying your vibrant little reptile on a desk or shelf to add a pop of colour

TRACK YOUR CERAMIC JOURNEY
Capture glaze tests, firing details, and creative progress—all in one simple printable. Make your projects easier to repeat and improve.
Clay Cactus Sculptures With Friendly Faces

Create an adorable desk companion that never needs watering with this cheerful clay cactus project. With its smooth green body, tiny dimensional spines, and a bright smile, this approachable sculpture is perfect for adding a touch of whimsy to any room.
Detailed Instructions
Materials
- Green polymer clay (approx. 2-3 oz)
- Black polymer clay (tiny amount)
- Clay sculpting tools (needle tool, ball stylus)
- Baking sheet
- Parchment paper
- Aluminum foil
- Soft toothbrush or texture sponge (optional)
- Oven (for baking)
Step 1: Shaping the Body
-
Core Prep:
Begin by crumpling a small ball of aluminum foil, roughly the size of a golf ball, into a cylindrical shape to serve as the lightweight core of your cactus. -
Conditioning:
Take your green polymer clay and knead it thoroughly in your hands until it becomes soft, warm, and pliable to prevent cracking later. -
Covering the Core:
Flatten the green clay into a thick pancake and wrap it completely around your foil cylinder, transforming it into a smooth, standing capsule shape about 3-4 inches tall. -
Smoothing Seams:
Use your thumbs to gently rub away any seams where the clay joined, rolling the shape on your work surface to ensure it is perfectly round. -
Adding Texture:
Lightly tap a soft toothbrush or a texture sponge over the entire surface of the green clay to give it a realistic, organic plant texture instead of a perfectly plastic look. -
Vertical Detail:
Using a dull knife tool or the side of a credit card, gently press vertical indented lines running from the top center down to the base to mimic ribs on a cactus.
Clean Clay Tip
Keep baby wipes nearby! Green clay can pick up dust easily. Wipe your hands and tools before handling the clay, and execute the black eye steps last to avoid smudging.
Step 2: Arms and Features
-
Making Arms:
Roll two smaller logs of green clay for the arms; create a slight bend in each one so they curve upward like an iconic saguaro cactus. -
Attaching Arms:
Press the arms firmly onto the sides of the main body at different heights for a jaunty look, blending the seams with a modeling tool until the connection is invisible. -
Facial Indentations:
Use a medium-sized ball stylus to press two shallow divots into the upper third of the cactus body where the eyes will go. -
Creating the Smile:
With a needle tool or curved blade, carefully carve a wide U-shape smile between and slightly below the eye sockets. -
Adding Eyes:
Roll two tiny spheres of black clay and press them gently into the eye divots you created earlier, flattening them slightly so they look integrated. -
Sparkle of Life:
If you are feeling ambitious, add infinitely small specks of white clay to the black eyes as highlight reflections, though painting them later works too.
Step 3: Spines and Finishing
-
Making Spines:
Roll out a very thin snake of green clay and cut it into many tiny segments, each no larger than a grain of rice. -
Shape the bumps:
Roll each tiny segment into a small ball between your fingers. -
Applying Spines:
Gently press these small green balls all over the cactus body and arms, spacing them out randomly but keeping them generally aligned with the vertical ribs. -
Refining Spines:
I like to use a small tool to press the center of each spine bump slightly, pushing it securely into the body without flattening it completely. -
Final Check:
Look over your sculpture for any accidental fingerprints and smooth them out lightly before baking. -
Baking:
Place your cactus on parchment paper and bake according to your specific polymer clay package instructions (usually 275°F for 15-30 minutes). -
Cooling:
Allow the sculpture to cool completely in the oven with the door cracked open to ensure maximum durability.
Make It Bloom
Create a tiny pink or yellow flower by flattening five small teardrop shapes and arranging them in a circle on top of the cactus head for a pop of color.
Now you have a charming, permanent plant friend to brighten up your shelf
Mermaids With Simple Tails And Big Hair Shapes
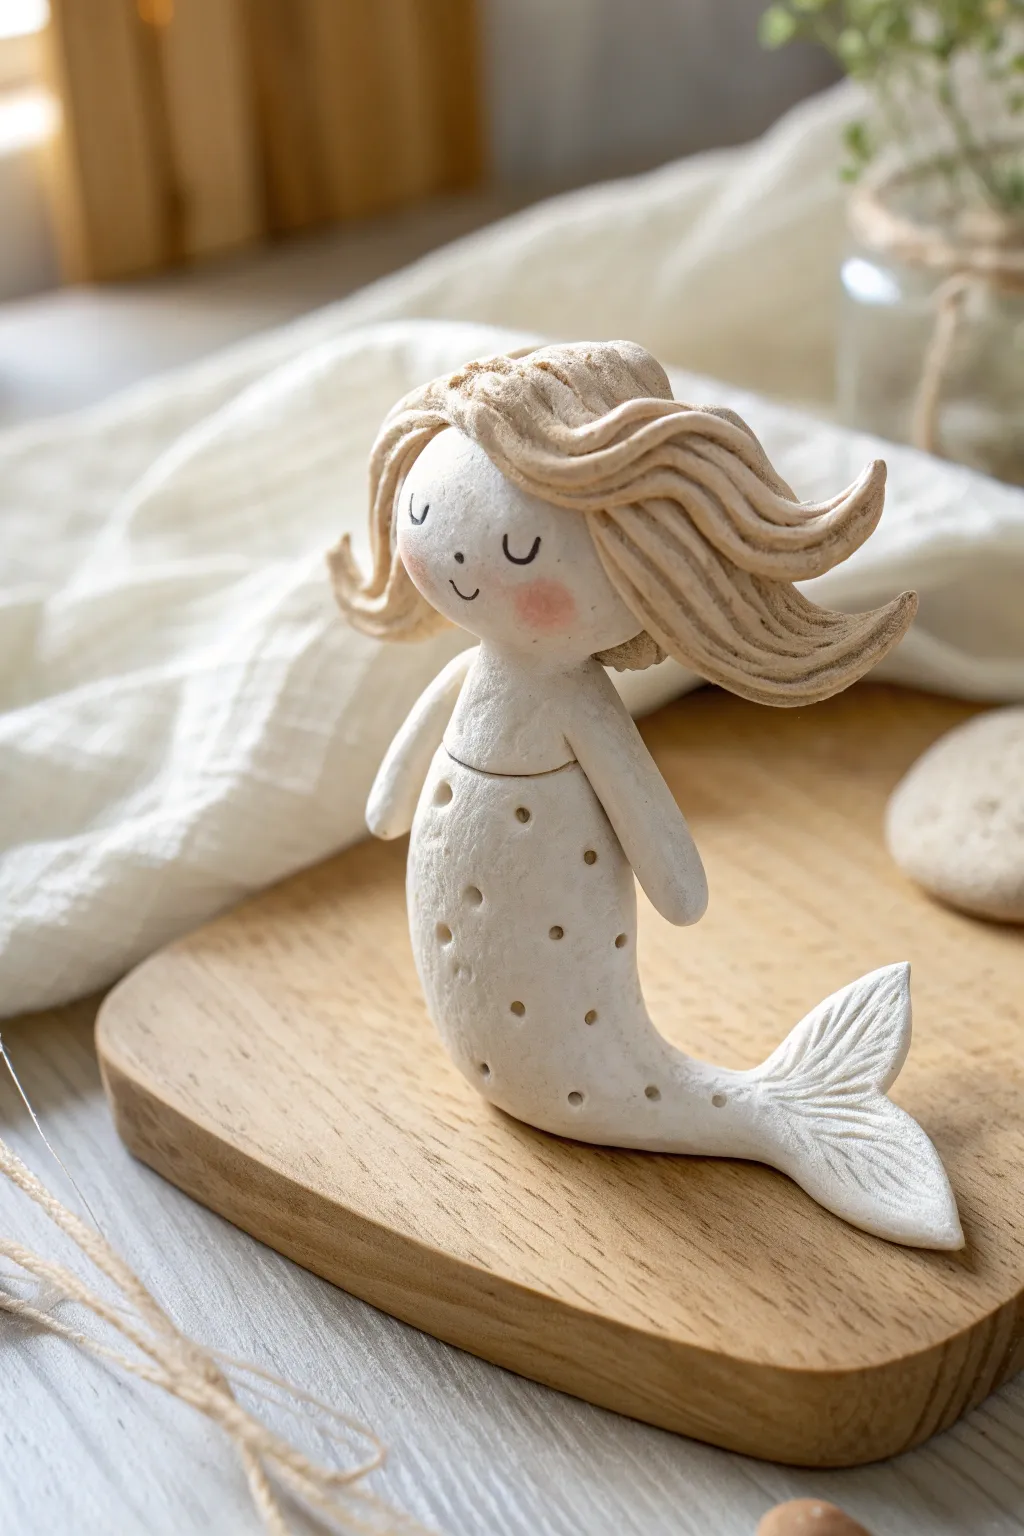
This adorable mermaid features flowing textured hair and a charmingly simple tail dotted for effect. With her serene expression and gentle pose, she makes a perfect keepsake or a sweet gift for a friend.
Step-by-Step Tutorial
Materials
- White air-dry clay or polymer clay
- Sculpting tools (needle tool, small ball tool)
- Acrylic rolling pin
- Small cup of water (for smoothing)
- Pink chalk pastel or blush
- Soft brush
- Fine-point black marker or black acrylic paint
- Toothpick (optional, for support)
Step 1: The Tail & Body
-
Form the Base:
Start by taking a medium-sized ball of white clay and rolling it into a smooth, thick log shape that tapers at one end. This will become the mermaid’s tail and lower torso. -
Curve the Pose:
Gently bend the tapered end upwards to create a seated, swimming pose. Flatten the bottom slightly so the figure can stand on its own without rolling over. -
Add Texture:
Using a small ball tool or the rounded end of a paintbrush, press small, random divots all over the lower half of the tail. These dainty indentations mimic scales in a stylized way. -
Shape the Torso:
Roll a smaller ball of clay for the upper torso. Attach this to the thicker, top end of your tail piece. I like to score and moisten the clay surfaces before joining them to ensure a strong bond. -
Smooth the Seam:
Use your finger or a smoothing tool to gently blend the clay where the torso meets the tail, creating a seamless transition. -
Create the Fin:
Flatten a small piece of clay into a fan shape. Use a needle tool to press lines radiating from the center to look like fin veins. Attach this to the very tip of the tapered tail.
Keep it Clean
White clay picks up everything! Keep a pack of baby wipes nearby to frequently clean your hands and tools to prevent dust or lint from ruining the pristine white finish.
Step 2: Head & Arms
-
Make the Head:
Roll a smooth, round ball of clay for the head. It should be proportional to the body, perhaps slightly oversized for a cute look. -
Attach the Head:
Place the head onto the torso. If your clay is heavy, you might want to insert a small piece of toothpick into the neck area for hidden structure. -
Sculpt the Arms:
Roll two small, thin logs of clay. Taper one end of each log to form simple hands without distinct fingers. -
Position the Limbs:
Attach the arms to the shoulders, smoothing the clay at the joint. Angle them slightly backward or resting by her side to match her relaxed posture.
Step 3: Hair & Details
-
Prepare the Hair Base:
Flatten a pancake of clay and place it over the back of the head. This forms the base later of hair. -
Create Strands:
Roll several long, thick snake-like strands of clay. These don’t need to be perfectly uniform; variation adds character. -
Layer the Locks:
Drape the strands over the head, allowing them to flow backwards as if they are floating underwater. Frame the face with two shorter strands. -
Texturize the Hair:
Use your needle tool to draw deep, flowing lines along the length of each hair strand to create a fibrous, sweeping texture. -
Add a Crown (Optional):
Add a subtle rim or extra volume at the top of the head to give the hair a crown-like lift, pressing in extra texture lines. -
Add Blush:
While the clay is still raw (if using polymer) or slightly damp (if air-dry), shave a tiny bit of pink chalk pastel and brush it gently onto the cheeks for a soft glow. -
Draw the Face:
Once the clay is fully dry or baked according to package directions, use a fine-tip black marker or a tiny brush with paint to draw two curved eyes and a small smile.
Glittery Scales
Mix clear glue with iridescent glitter and paint it into the small divots on the tail after drying. This makes the texture pop and adds a magical, wet-look shimmer.
Place your lovely mermaid on a shelf or windowsill where the light can catch the texture of her hair
Pocket-Size Clay Robots Built From Blocks
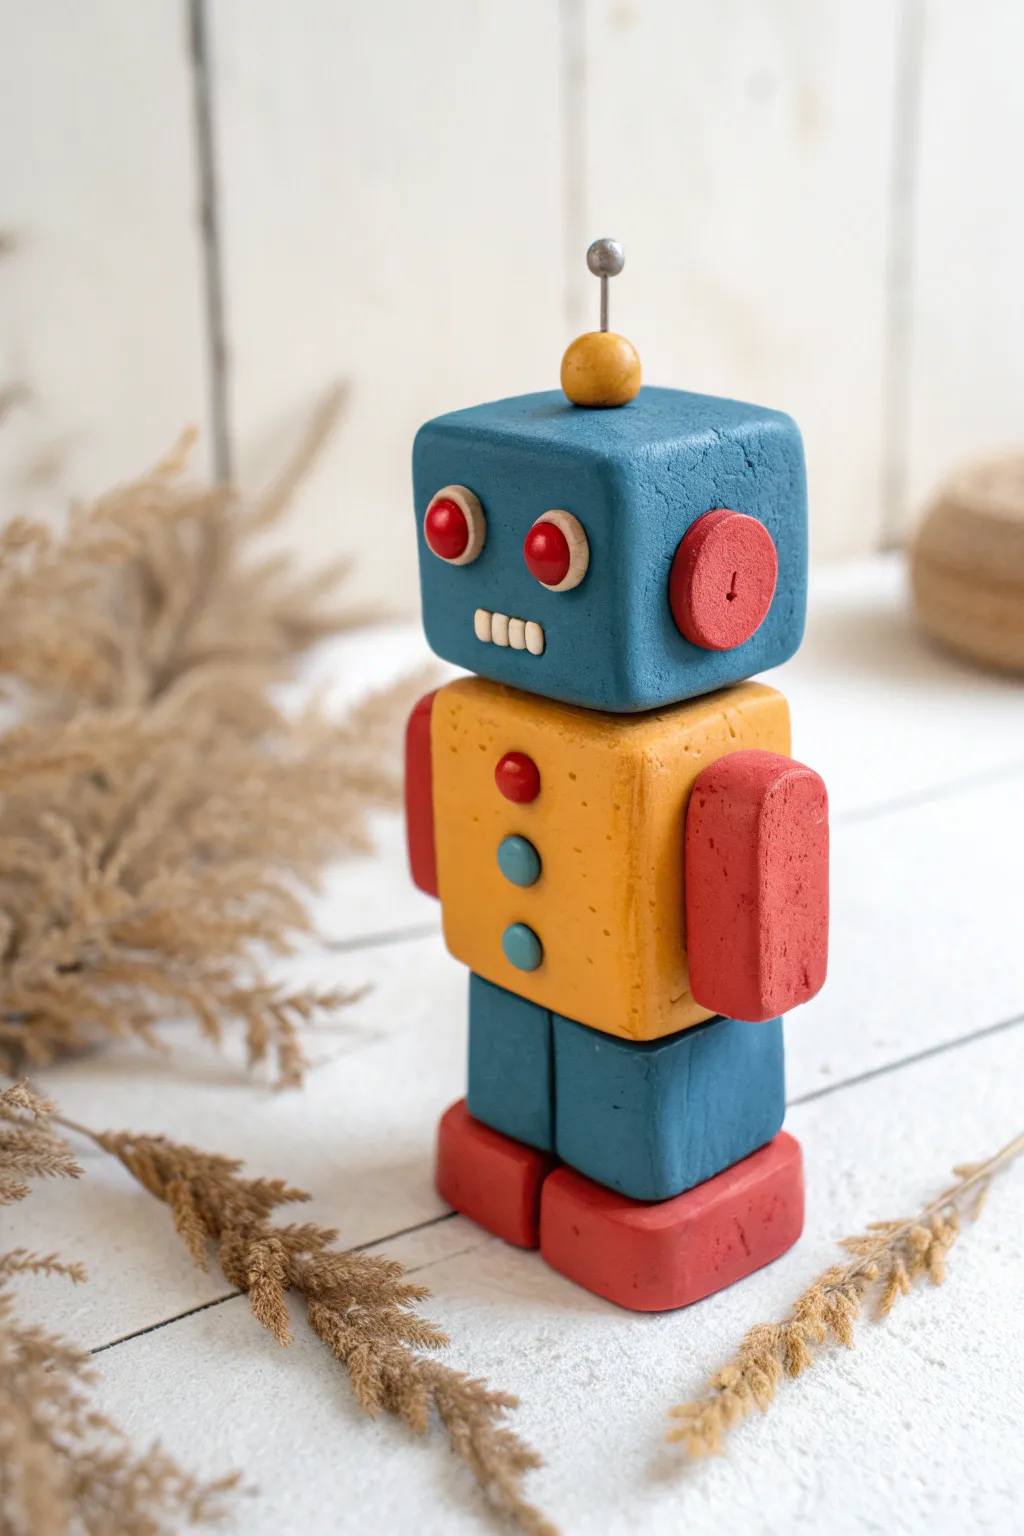
This charming little robot proves that big personality can come from simple shapes. By stacking geometric blocks of colorful polymer or air-dry clay, you’ll create a retro-futuristic figurine complete with rivet details and an antenna.
Step-by-Step Guide
Materials
- Blue polymer clay or air-dry clay
- Yellow/Ochre polymer clay or air-dry clay
- Red polymer clay or air-dry clay
- Small amount of white clay
- Small amount of silver or grey clay
- Clay knife or plastic cutting tool
- Small ball stylus or toothpick
- Short piece of stiff wire or a cut paperclip (for the antenna)
- Acrylic roller or smooth jar
Step 1: Forming the Body Blocks
-
Shape the head:
Start by conditioning a chunk of blue clay until it is soft and pliable. Roll it into a smooth ball first to remove cracks, then gently press it against your work surface to flatten the sides, forming a neat cube with slightly rounded corners. -
Texture the head:
Before attaching anything, you can lightly tap the surface with a piece of sandpaper or a textured sponge if you want that matte, stone-like finish seen in the photo. -
Create the torso:
Take a slightly larger amount of yellow or ochre clay. Repeat the cube-making process, but shape this one to be slightly rectangular—just a bit taller than the head. -
Make the legs:
Form two smaller rectangles out of the same blue clay used for the head. These should be identical in size. Place them side-by-side to ensure they match before attaching them. -
Shape the feet:
Using red clay, fashion two flat, rectangular slabs. These will act as the robot’s feet and provide a sturdy base for standing. -
Stack the body:
Assemble your stack: place the two red feet at the bottom, top them with the blue legs, then the yellow torso. I find gently pressing each layer down ensures a good bond without squishing the shapes too much. -
Attach the head:
Place the blue head cube centered on top of the yellow torso. If your clay isn’t sticking well, a tiny dab of water (for air-dry) or liquid clay (for polymer) acts as glue.
Step 2: Adding Robo-Details
-
Create the eyes:
Roll two tiny balls of white clay and flatten them into discs. Press these onto the face. Then, roll two slightly smaller red balls and press them into the center of the white discs for pupils. -
Sculpt the mouth:
Roll a very small amount of white clay into a short, thin log. Flatten it slightly into a rectangle shape and press it onto the face below the eyes. -
Detail the teeth:
Use the edge of your clay knife to vertically score lines into the white mouth rectangle, creating the look of individual teeth. -
Add ear muffs:
Flatten two balls of red clay into thick coin shapes. Attach one to each side of the blue head. -
Detail the ears:
Use a toothpick or a small tool to press a tiny indentation or vertical line into the center of each red ear piece for added mechanical texture. -
Make the arms:
Shape two oblong rectangles from red clay. Stick these securely to the sides of the yellow torso. They should be simple, blocky appendages without hands. -
Decorate the chest:
Roll three tiny balls of clay—one red and two blue. Flatten them slightly and press them in a vertical column down the front of the yellow torso to look like buttons. -
Insert the antenna wire:
push a small piece of wire or a cut paperclip into the top center of the head. Leave about half an inch sticking out. -
Finish the antenna:
Roll a small yellow ball and slide it down the wire to the base. Top the very tip of the wire with a tiny silver or grey clay ball. -
Final smooth:
Check your robot for fingerprints. You can smooth them out gently with your finger or a soft brush before letting the project dry or baking it according to your clay’s instructions.
Wobbly Robot?
If the head or limbs keep falling off while you work, insert a piece of toothpick or uncooked spaghetti between the blocks to act as an internal skeleton for support.
Pro Tip
To get that specific matte, textured look shown in the image, roll a ball of aluminum foil over the surface of the clay gently before baking or drying.
Now you have a sturdy little mechanical friend ready to guard your desk.
Build-Your-Own Clay Creature Mashups
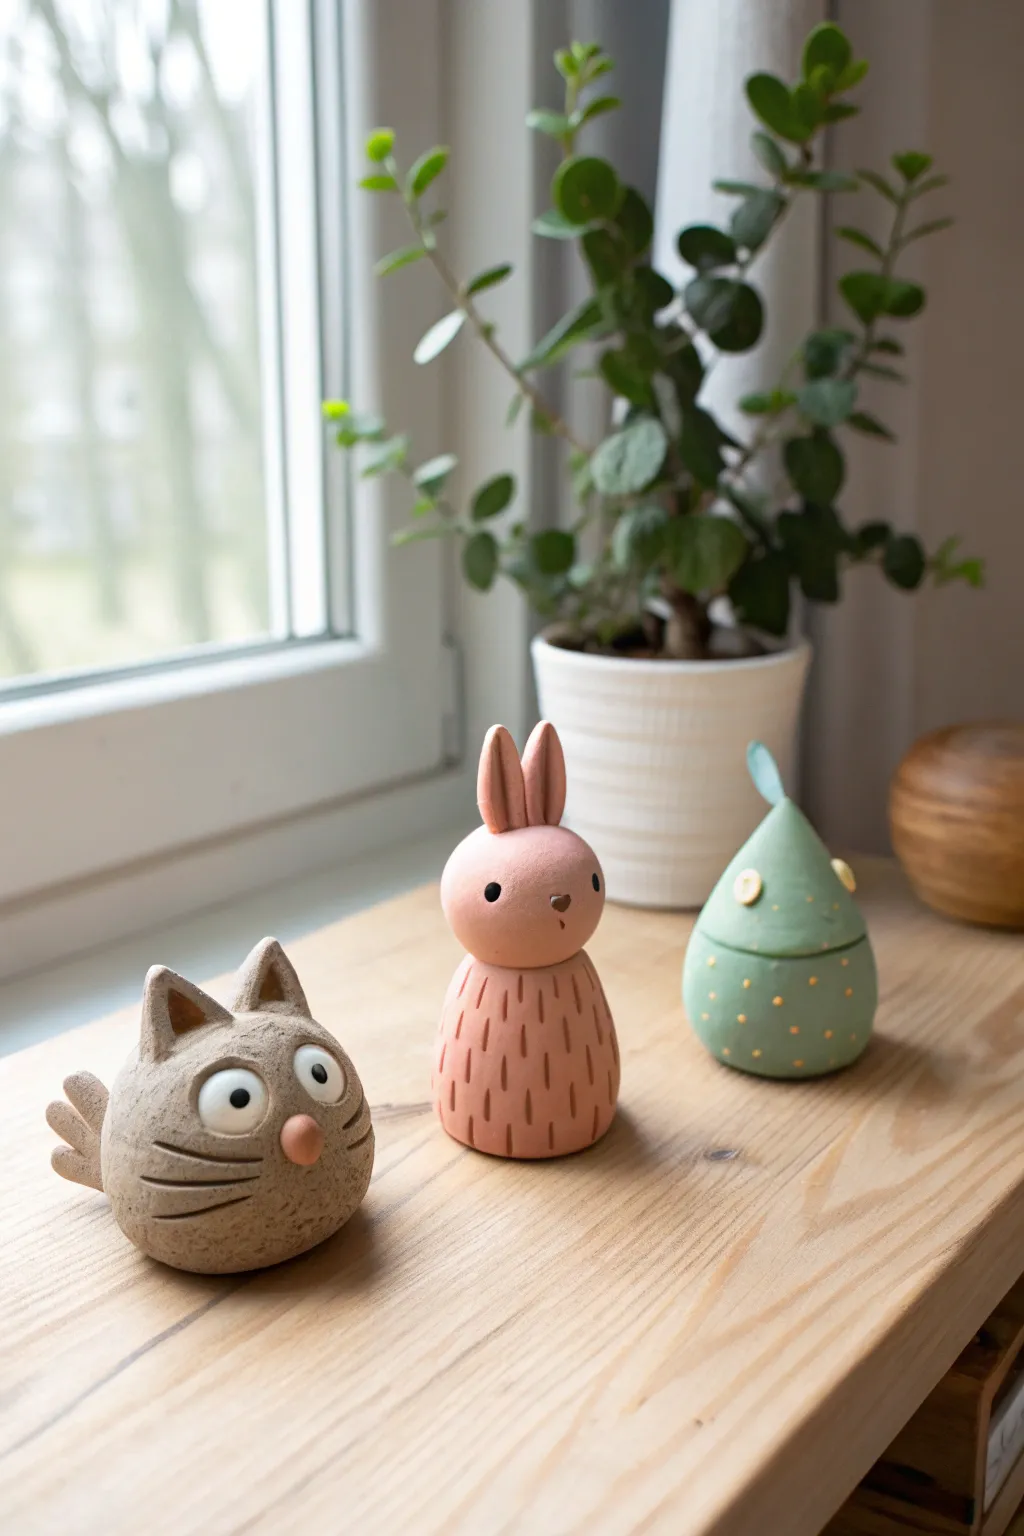
These three charming clay companions—a textured tabby, a dashing bunny, and a patterned abstract bird—bring a touch of handmade warmth to any windowsill. Their simple geometric shapes combined with minimal, expressive details make for a modern and playful display.
How-To Guide
Materials
- Air-dry clay or polymer clay (terracotta, light pink, pale green)
- Acrylic paints (white, black, bright pink, yellow)
- Small detail paintbrush
- Dotting tool or toothpick
- Clay modeling tools (specifically a needle tool)
- Fine-grit sandpaper (optional)
- Matte varnish or sealant
Step 1: Sculpting the Shapes
-
Form the base shapes:
Start by conditioning your clay. Roll three smooth spheres: one medium-sized in brown for the cat, one oval shape for the bunny’s body, and a teardrop shape for the abstract bird. -
Sculpt the bunny head:
Roll a smaller sphere of pink clay for the bunny’s head. Flatten the bottom slightly and press it firmly onto the oval body. I like to score the surfaces slightly before joining to ensure a strong bond. -
Add bunny ears:
Create two long, thin ovals of pink clay. Pinch the ends to taper them and attach them side-by-side on top of the bunny’s head. Use a blending tool to smooth the seam where the ears meet the skull. -
Create the cat’s ears:
Pinched triangular shapes work best here. Form two distinct triangles from the brown clay and press them onto the top of the cat sphere. Use your thumb to create a slight concave indentation in the front of each ear. -
Detail the cat’s tail:
On the back of the cat, attach a flattened, leaf-shaped piece of clay to act as a stylized tail. Use a knife tool to press three lines into it for texture. -
Form the bird’s peak:
For the green teardrop shape, refine the point at the top. You can gently curve it slightly to one side for a dynamic look, adding a small flattened loop or leaf shape at the very tip.
Step 2: Adding Texture & Features
-
Scribe the bunny fur:
Using a needle tool or a sharp toothpick, make small, vertical dash marks all around the bunny’s lower body. Keep the spacing somewhat random to create a stylized fur texture. -
Carve cat whiskers:
On the cat’s face, gently press your needle tool sideways into the clay to create three horizontal indentations on each cheek for whiskers. Don’t cut too deep; just displace the clay. -
Attach the cat’s nose:
Roll a tiny ball of pink clay and press it into the center of the face, right between the whisker sets. -
Make the eyes:
For the cat, roll two balls of white clay and flatten them into discs. Press these onto the face above the nose. The bunny and bird will have painted eyes later. -
Add sensory details:
Give the green bird figurine two tiny, flat discs of yellow clay near the top to resemble decorative eyes or buttons. -
Smooth and dry:
Look over all three figures. Smooth out any unwanted fingerprints with a tiny bit of water. Let them dry completely according to your clay package instructions (usually 24-48 hours).
Cracks Appearing?
If small cracks appear while drying, mix a tiny bit of fresh clay with water to make a paste (slip) and fill the cracks. Smooth over with a finger.
Step 3: Painting & Finishing
-
Sand imperfections:
Once fully dry, you can lightly sand any rough spots, especially on the bottom, to ensure they sit flat. -
Paint the cat’s eyes:
Using a dotting tool or the back of a paintbrush, place a neat black dot in the center of the white clay eyes. -
Detail the bunny’s face:
With the finest brush, paint two small black dots for eyes widely spaced apart. Add a tiny heart or triangle nose in a darker shade. -
Pattern the bird:
Dip a toothpick into yellow or orange paint and add tiny polka dots all over the lower half of the green teardrop shape. -
Seal the work:
Apply a coat of matte varnish to protect the paint and give the clay a unified, professional finish.
Make it a Set
Turn these into functional decor by hollowing out the tops before drying. They make adorable air plant holders or pencil pots for a desk.
Place your new trio on a sunny shelf so their personalities can shine together