If you’re craving clay sculpture ideas for middle school, I’ve got you—these projects are fun, doable, and built around the big three skills: pinch pot, coil construction, and slab building. Think classic student-favorite creatures first, then we’ll ramp into more creative “how did they make that?” sculptures that still feel totally achievable.
Pinch Pot Monster Heads
This whimsical monster sculpture combines basic pinch pot techniques with expressive details, resulting in a character full of personality. With its wide, toothy mouth, striped body, and raised texture, it’s a perfect introduction to hand-building with clay.
Detailed Instructions
Materials
- White or light-colored earthenware clay
- Clay sculpting tools (needle tool, loop tool)
- Slip (clay mixed with water so it’s muddy)
- Scoring tool or old fork
- Wooden spoon or paddle
- Acrylic paints (white, red, teal, orange, yellow)
- Small and medium paintbrushes
- Clear matte varnish or sealant
Step 1: Forming the Body
-
Create two pinch pots:
Start by dividing a fist-sized ball of clay into two equal halves. Form each half into a smooth ball, then push your thumb into the center to open it up. Pinch and turn the clay walls until you have two equal-sized bowls. -
Join the pots:
Score the rims of both pinch pots by scratching cross-hatch marks with a fork or needle tool. Apply a generous amount of slip to the scored areas. -
Seal the seam:
Press the two rims together firmly to create a hollow egg shape. Use your thumb or a modeling tool to smooth the clay across the seam until it disappears completely, trapping the air inside. -
Shape the base:
Gently tap the bottom of your egg shape against the table to flatten it slightly so the sculpture stands upright on its own.
Air Pressure Safety
Before the clay dries, use a needle tool to poke a tiny, hidden hole in the bottom or back. This lets expanding hot air escape in the kiln so your monster doesn’t explode.
Step 2: Sculpting the Face
-
Cut the mouth:
Where you want the mouth to be, draw a wide oval shape. Carefully cut this section out using a needle tool and remove the clay piece. -
Refine the lips:
Smooth the cut edges of the mouth opening with a damp finger or sponge to create a rounded, organic lip shape. -
Add teeth:
Roll tiny cones of clay for the teeth. Score and slip the inside of the upper and lower lips, then attach the teeth, pressing them securely so they don’t pop off later. -
Create eyes:
Roll two small spheres of clay and flatten them slightly. Attach these above the mouth. I like to use a small tool to poke a pupil hole in the center of each eye. -
Attach horns and nose:
Form two small cones for horns and a tiny triangle for the nose. Score and slip the attachment points on the head and press these features firmly into place.
Step 3: Adding Texture & Feet
-
Make the feet:
Create two thick pads of clay for feet. Attach these to the bottom of the body, blending the clay upwards so the monster looks like it has short, stubby legs. -
Create raised buttons:
Roll very small balls of clay. Score spots on the front of the body where you plan to paint stripes later, and attach these small balls as raised decorative buttons. -
Dry and fire:
Allow the clay to dry slowly under plastic for a day, then uncover to fully dry. Once bone dry, bisque fire the piece in a kiln according to your clay’s specifications.
Make it Useful
Instead of sealing the mouth closed, cut the opening high and wide to turn this sculpture into a functional pencil holder or a keeper for spare change.
Step 4: Painting
-
Base coat:
Paint the entire head section (above the mouth line) with an off-white or cream acrylic paint. This creates a clean look for the face. -
Paint the stripes:
Using a flat brush, paint vertical stripes on the lower body using alternating colors like teal, orange, and coral red. Carefully paint around the raised buttons. -
Detail the mouth:
Paint the interior of the mouth a dark red or maroon to create depth. Paint the lips a lighter coral pink, and carefully paint the teeth white. -
Highlight features:
Paint the raised buttons yellow or orange to contrast with the stripes. Add color to the horns and fill in the pupils with black paint. -
Seal the work:
Once the paint is completely dry, apply a coat of clear matte varnish to protect the finish and give the colors a slight sheen.
Place your finished monster on a shelf or desk to add a pop of color and character to your room


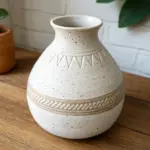
Funny Face Cup Sculpture

This charming ceramic mug features a serene, sleeping face and a decorative leafy rim that adds a touch of nature-inspired whimsy to your morning routine. With its gentle curves and warm, speckled glaze, it’s a perfect project for learning how to combine hand-building techniques with expressive surface decoration.
Step-by-Step Guide
Materials
- Light-colored stoneware clay (speckled or plain)
- Pottery wheel (optional) or rolling pin and slab mat
- Loop tool for trimming
- Needle tool
- Scoring tool (or fork)
- Slip (clay and water mixture)
- Small paintbrush
- Underglaze (terra cotta/brown)
- Clear or matte glaze
- Sponge
Step 1: Forming the Body
-
Prepare the Clay:
Wedge a grapefruit-sized ball of clay thoroughly to remove air bubbles. This ensures your cup walls will be even and strong during firing. -
Form the Base Shape:
If using a wheel, throw a rounded cylinder with a slightly narrower base and rim. If hand-building, pinch a large ball of clay into a rounded bowl shape, ensuring the floor is flat enough to sit stably. -
Refine the Belly:
Gently push the walls outward from the inside to create a pleasing, rounded ‘belly’ shape for the cup. The rim should taper in just slightly. -
Trim the Foot:
Once the cup is leather-hard, trim the bottom to create a clean foot ring. If hand-building, you can smooth the bottom with a rib tool or paddle it flat.
Steady Hands Pro-Tip
When painting the fine lines of the eyes and lashes, rest your pinky finger on the cup itself to stabilize your brush hand for smoother strokes.
Step 2: Adding Detail & Handle
-
Create the Handle Coil:
Roll out a medium-thick coil of clay. Taper one end slightly and flatten it just a bit so it’s comfortable to hold. -
Attach the Handle:
Score the side of the cup and the ends of your handle coil. Apply slip, attach the handle in a rounded ‘ear’ shape, and smooth the join seams completely with a damp tool or finger. -
Roll Snakes for the Rim:
Roll a very thin snake of clay, long enough to go around the circumference of the cup’s rim. -
Flatten the Rim Band:
Gently flatten the snake into a 1-inch wide band. Score and slip the top edge of the cup exterior and attach this band just below the lip. -
Carve the Leaves:
Using a needle tool or small carving tool, press diagonal lines into the clay band to create a leaf or braided pattern. The texture should look repeated and rhythmic. -
Add Decorative Dots:
Use the back of a small paintbrush or a detail tool to press small, vertical indented dots under the handle or around the sides for extra texture.
Smudged Underglaze?
If you smudge the face paint, don’t wipe it while wet! Let it dry completely, then gently scrape the mistake off with a craft knife.
Step 3: The Face & Finishing
-
Sketch the Face:
Lightly trace the facial features onto the leather-hard clay with a needle tool. Draw two closed semicircles for eyes, eyelashes, a simple nose line, and a small smile. -
Paint the Features:
Using a fine liner brush and terra cotta or dark brown underglaze, carefully paint over your traced lines. Consistency is key here; steady your hand against the table. -
Add Rosy Cheeks:
Paint solid circles of the terra cotta underglaze on the cheeks. I like to do a second coat here to ensure the color pops after firing. -
Highlight the Rim:
Brush the same underglaze onto the textured leaf band at the rim and the handle, wiping back slightly with a damp sponge if you want a more weathered look. -
Bisque Fire:
Let the piece dry slowly and completely before bisque firing it to cone 04 (or your clay’s specific temperature). -
Glaze Application:
Dip or brush the entire cup in a clear or translucent matte white glaze. This will seal the clay while letting the speckled body and underglaze painting show through. -
Wipe the Foot:
Use a damp sponge to meticulously wipe any glaze off the very bottom of the cup creatively so it doesn’t stick to the kiln shelf. -
Final Fire:
Glaze fire the piece to the temperature recommended for your specific clay body (usually cone 5 or 6 for stoneware).
Your finished mug is now ready to hold your favorite warm drink and bring a smile to your face


Hollow Animal Pinch Pot Buddy
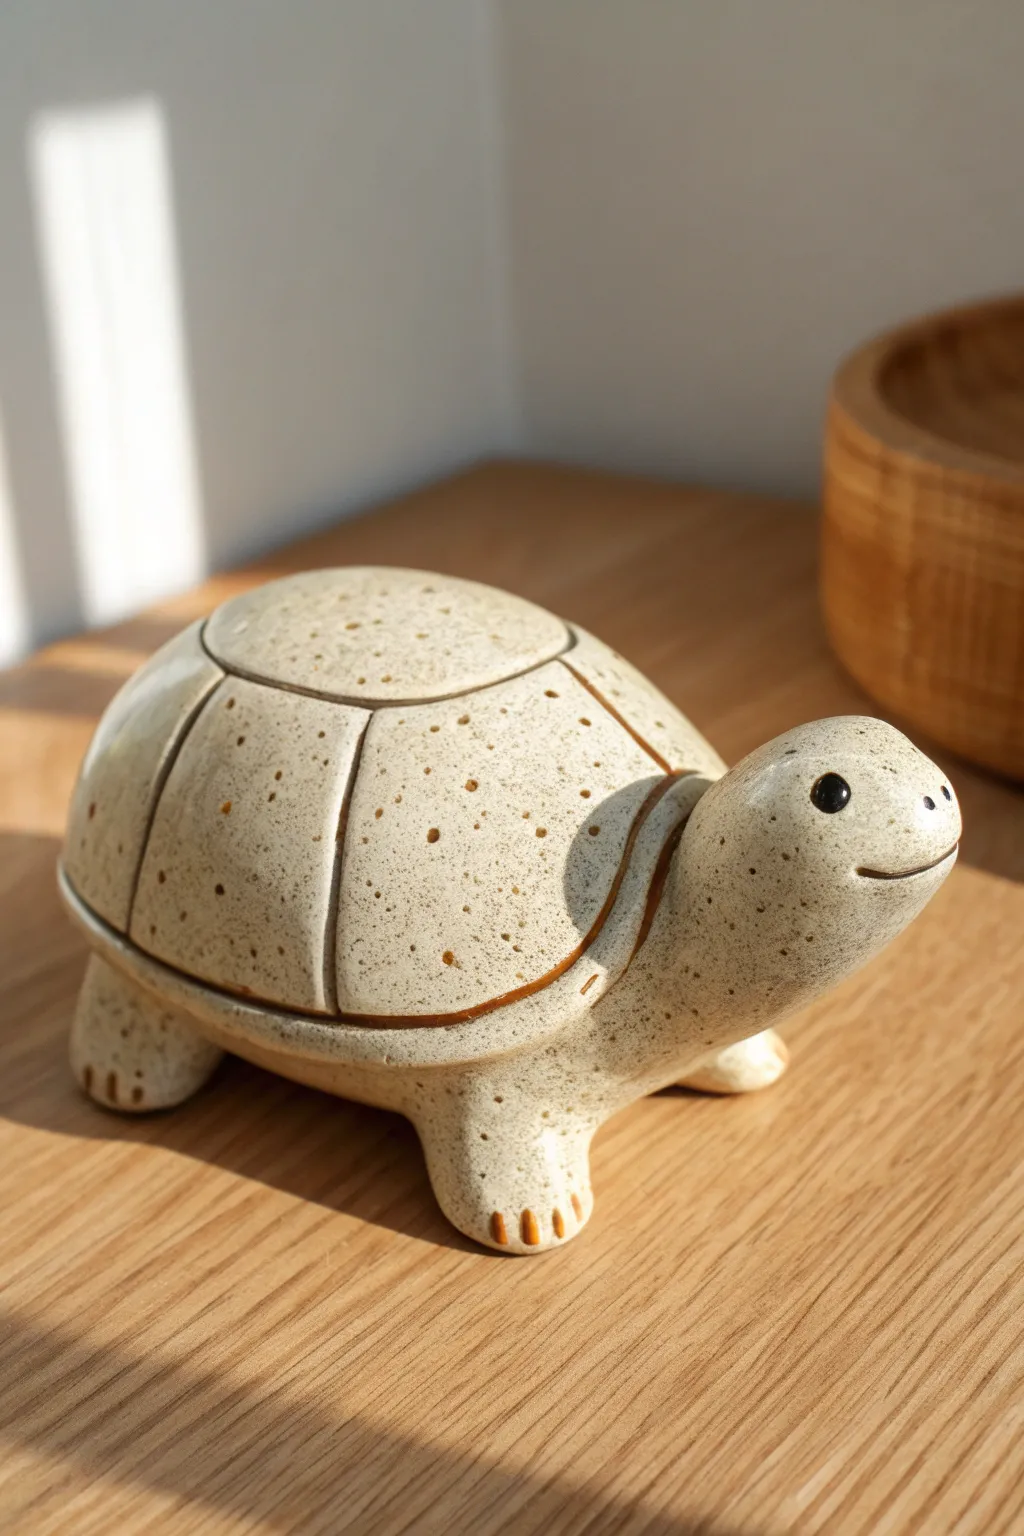
This charming ceramic turtle starts with two simple pinch pots joined together to create a hollow form with tons of personality. The finish features a lovely speckled glaze and warm brown accents that highlight the shell’s segments, making it a perfect functional jar or a standalone sculpture.
Step-by-Step
Materials
- Stoneware clay (speckled or white)
- Needle tool or toothpick
- Scoring tool (or fork)
- Slip (clay mixed with water)
- Rubber kidney rib (or spoon)
- Small sponge
- Detail brush
- Underglaze (dark brown)
- Speckled cream glaze (or clear glaze if using speckled clay)
- Black underglaze (for eyes)
Step 1: Forming the Body
-
Create two pinch pots:
Start with two balls of clay roughly the size of a tangerine. Stick your thumb in the center of each and pinch the walls evenly while rotating the clay until you have two uniform bowl shapes. -
Check the fit:
Place the two pinch pots rim-to-rim to ensure they are the same diameter. One pot will become the shell (top) and the other the belly (bottom). -
Score and slip:
Rough up the rims of both pots using your scoring tool or a fork. Apply a generous amount of slip to the scored areas to act as glue. -
Join the halves:
Press the rims firmly together. Use your thumb or a wooden tool to smudge the clay across the seam, completely sealing the two pots into a single hollow egg shape. -
Shape the shell:
On a table, gently tap the bottom to flatten it slightly so the turtle sits stable. Use a rib tool or the back of a spoon to smooth the entire surface, erasing the join line completely.
Step 2: Adding the Appendages
-
Form the head:
Roll a smaller ball of clay into a thick, elongated teardrop shape for the head and neck. Curve it slightly upwards to give the turtle an alert, happy posture. -
Attach the head:
Score and slip both the base of the neck and the front of the body. Press them firmly together, smoothing the clay from the neck onto the body to create a seamless transition. -
Make the legs:
Roll four equal-sized small cylinders of clay. Taper them slightly so they look like little stumps. -
Attach the legs:
Flip the turtle gently upside down or on its side. Score and slip the legs onto the four corners of the belly. Use a modeling tool to blend the clay so the legs look like they are growing out of the shell, not just stuck on. -
Add toes:
Using a needle tool, gently press three small vertical lines into the front of each foot to imply toes.
Air Escape Pro-Tip
Since you made a hollow sealed form, you MUST poke a tiny, hidden hole (try the belly!) with a needle tool. This lets expanding hot air escape in the kiln so your turtle doesn’t explode.
Step 3: Modeling the Shell
-
Carve the shell segments:
Using a needle tool, lightly draw the pattern of the turtle’s shell. Start with a central shape on top, then draw lines radiating down the sides. Once you like the design, go over the lines deeper with a modeling tool to create distinct grooves. -
Define the scutes:
To make the shell look puffy like the example, gently press on the center of each shell segment with your thumb to make it slightly convex, while keeping the carved lines deep. -
Add the smile and eyes:
Carve a deep, long smile line into the snout. Use the rounded end of a tool to press indentations where the eyes will go. -
Slice the lid (Optional):
If you want this to be a jar, wait until the clay is leather hard. Carefully cut along your carved shell lines to remove the top section. Add a small coil flange on the inside so the lid sits securely.
Level Up: Texture
Before glazing, gently press a piece of rough sandpaper or a dried sponge against the shell segments while the clay is soft to add a realistic, organic skin texture.
Step 4: Glazing and Finishing
-
Bisque fire:
Allow the piece to dry slowly and completely before the first firing in the kiln. -
Accent the grooves:
Paint dark brown underglaze into all the shell grooves, the toe lines, and the mouth. Wipe away the excess on the surface with a damp sponge, leaving the color only in the recesses. -
Paint the eyes:
Use a small dot of solid black underglaze for the eyes to give them a bold, shiny look. -
Apply the main glaze:
Dip or brush a speckled cream glaze over the entire body (avoiding the bottom of the feet). If you used speckled clay, a clear glaze will work perfectly to show off the clay body’s natural spots. -
Final Fire:
Fire the piece again according to your glaze instructions to achieve that glossy, durable finish.
Place your finished turtle on a shelf or desk as a friendly little guardian for your trinkets


Coil Creature Pencil Holder
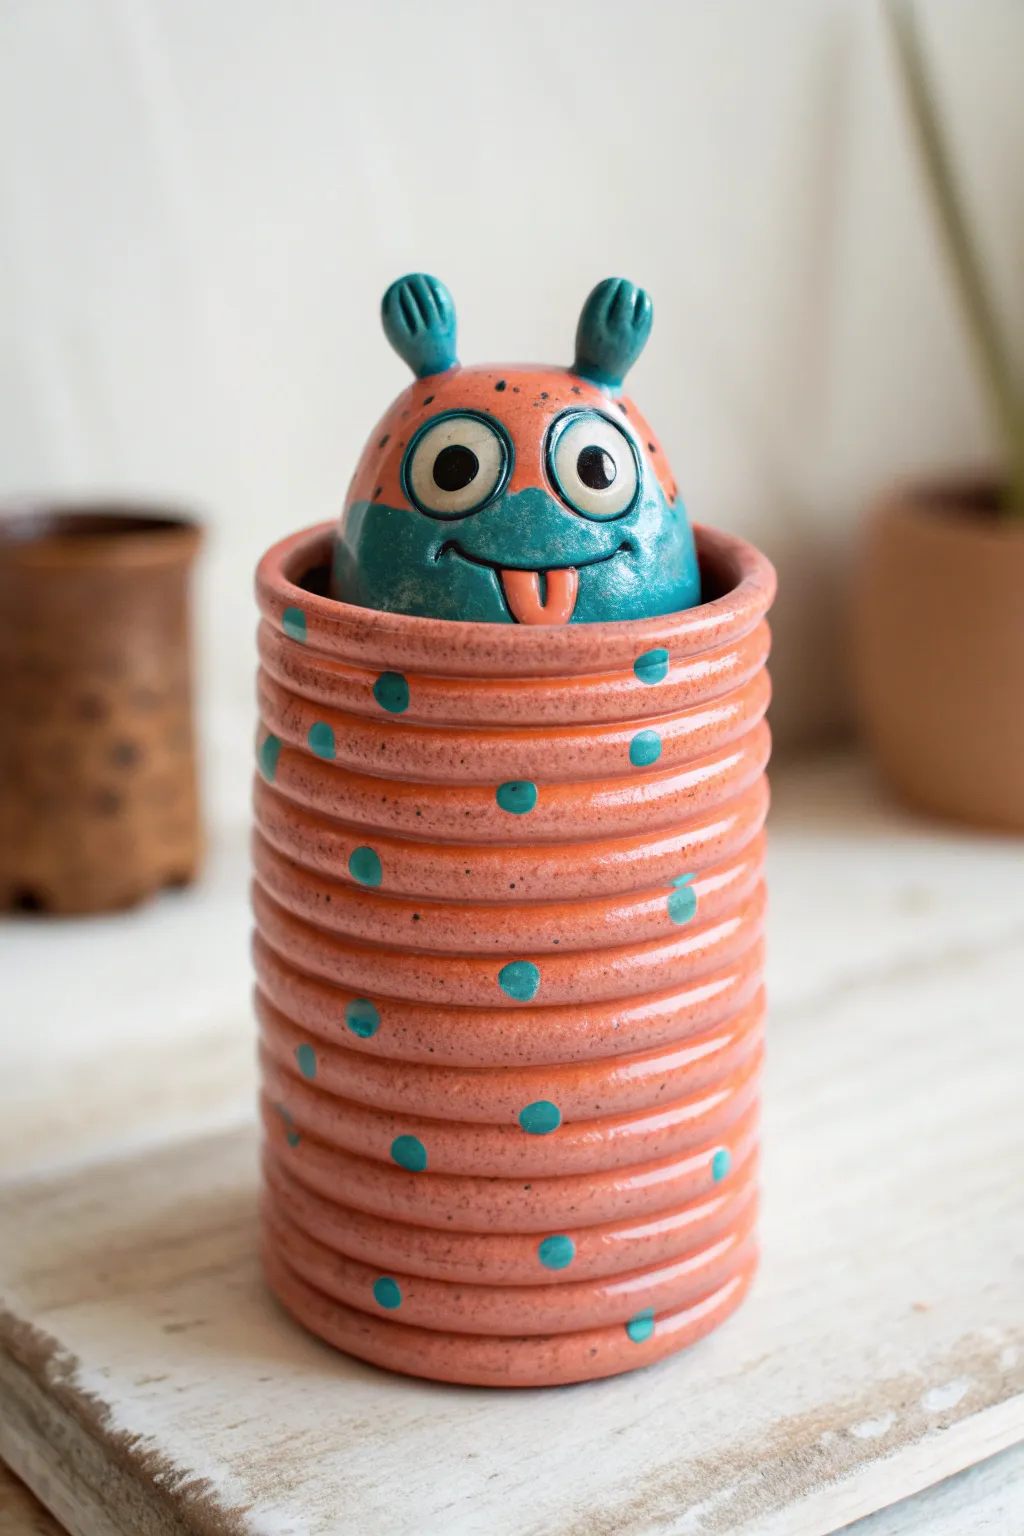
This whimsical pencil holder combines a classic coil-building technique with hand-sculpting to create a functional piece with personality. The project features a ribbed, polka-dotted cylinder that houses a goofy monster head complete with expressive eyes and a cheeky tongue.
Detailed Instructions
Materials
- Earthenware or stoneware clay (white or light-colored body)
- Clay slip (made from drying clay scraps and water)
- Scoring tool or old fork
- Wooden modeling tool
- Fettling knife
- Rolling pin (optional)
- Sponge
- Underglazes (orange/coral, teal/turquoise, black, white)
- Clear transparent glaze
- Small and medium round brushes
- Kiln
Step 1: Building the Coil Base
-
Prepare the Base:
Start by rolling a slab of clay about 1/4 inch thick. Cut out a circle approximately 3-4 inches in diameter to serve as the floor of your pencil holder. -
Roll Your Coils:
Take a chunk of clay and roll it back and forth on your table to create long, even snakes. Aim for a thickness of about a 1/2 inch, like a thick marker. Make several of these so you don’t have to stop building. -
Score and Slip:
Score (scratch) the outer edge of your base circle and the bottom of your first coil. Apply a generous amount of slip to the scored areas to act as glue. -
Attach the First Coil:
Place the first coil onto the base circle. Cut the ends at an angle where they meet to create a strong seam, and smooth the clay together on the *inside* of the pot to secure it. -
Build the Wall:
Continue stacking coils one on top of the other. For this specific look, do *not* blend the coils on the outside; leave the ribbed texture visible. Remember to score and slip between every single layer. -
Shape the Cylinder:
As you stack, ensure the walls go straight up rather than flaring out. Build until the cylinder is about 4-5 inches tall. I like to gently tap the top rim with a flat board to level it off.
Coil Collapse?
If your coil wall gets wobbly or sags while building, the clay is too wet. Stop building, stuff the inside loosely with newspaper for support, and let it firm up for an hour before adding more height.
Step 2: Sculpting the Creature
-
Form the Head:
Roll a ball of clay that is slightly narrower than the opening of your coil pot. It needs to fit inside comfortably or rest just inside the rim. Hollow it out from the bottom using a loop tool so it isn’t solid clay, which prevents explosions in the kiln. -
Create the Lid Flange:
This monster is actually a lid! To keep it from sliding off, add a small coil of clay to the underside of the head. Position it so it fits snugly *inside* the rim of the coil pot. -
Add the Antennae:
Roll two small, chubby sausage shapes for antennae. Score and slip them onto the top of the head. Use a modeling tool to press small indentations into the tips for texture. -
Make the Eyes:
Form two large flat discs for the whites of the eyes and attach them to the front of the face. Roll tiny clay snakes to create outline rims around the eyes for a cartoonish pop. -
Sculpt the Mouth:
Carve a smiling mouth line deeply into the clay. Form a small, flattened tongue shape and attach it so it looks like it’s sticking out. Smooth all seams with a damp sponge.
Monster Mash-up
Change the creature by swapping antennae for horns, ears, or crazy hair. You can also turn the mouth into a wide, toothy grin or a surprised ‘O’ shape.
Step 3: Glazing and Finishing
-
Bisque Fire:
Let both pieces dry slowly under plastic for a few days before uncovering them completely. Once bone dry, fire them in the kiln to bisque temperature. -
Apply Base Colors:
Using underglazes, paint the entire coil pot an orange-coral color. Paint the top half of the monster head matching orange, and the bottom half (the chin area) a teal blue. -
Detail the Face:
Paint the eyes white and add large black pupils. Paint the tongue the same orange-coral tone used on the body. Carefully outline the eyes and antennae details if desired. -
Add the Polka Dots:
Dip the handle end of a paintbrush into teal underglaze. Dot it randomly over the orange coil ridges to create the polka dot pattern shown in the photo. Add small teal speckles to the forehead as well. -
Clear Glaze:
Once the underglaze is dry, apply 2-3 coats of clear transparent glaze over the entire project to make it shiny and food-safe. -
Final Fire:
Stilt the lid and the pot separately in the kiln so they don’t fuse together. Fire to the maturity temperature of your clay and glaze.
Place your favorite pens in the holder and pop the lid on for a desk accessory that smiles back at you

The Complete Guide to Pottery Troubleshooting
Uncover the most common ceramic mistakes—from cracking clay to failed glazes—and learn how to fix them fast.
Coil Picture Frame With Bold Texture
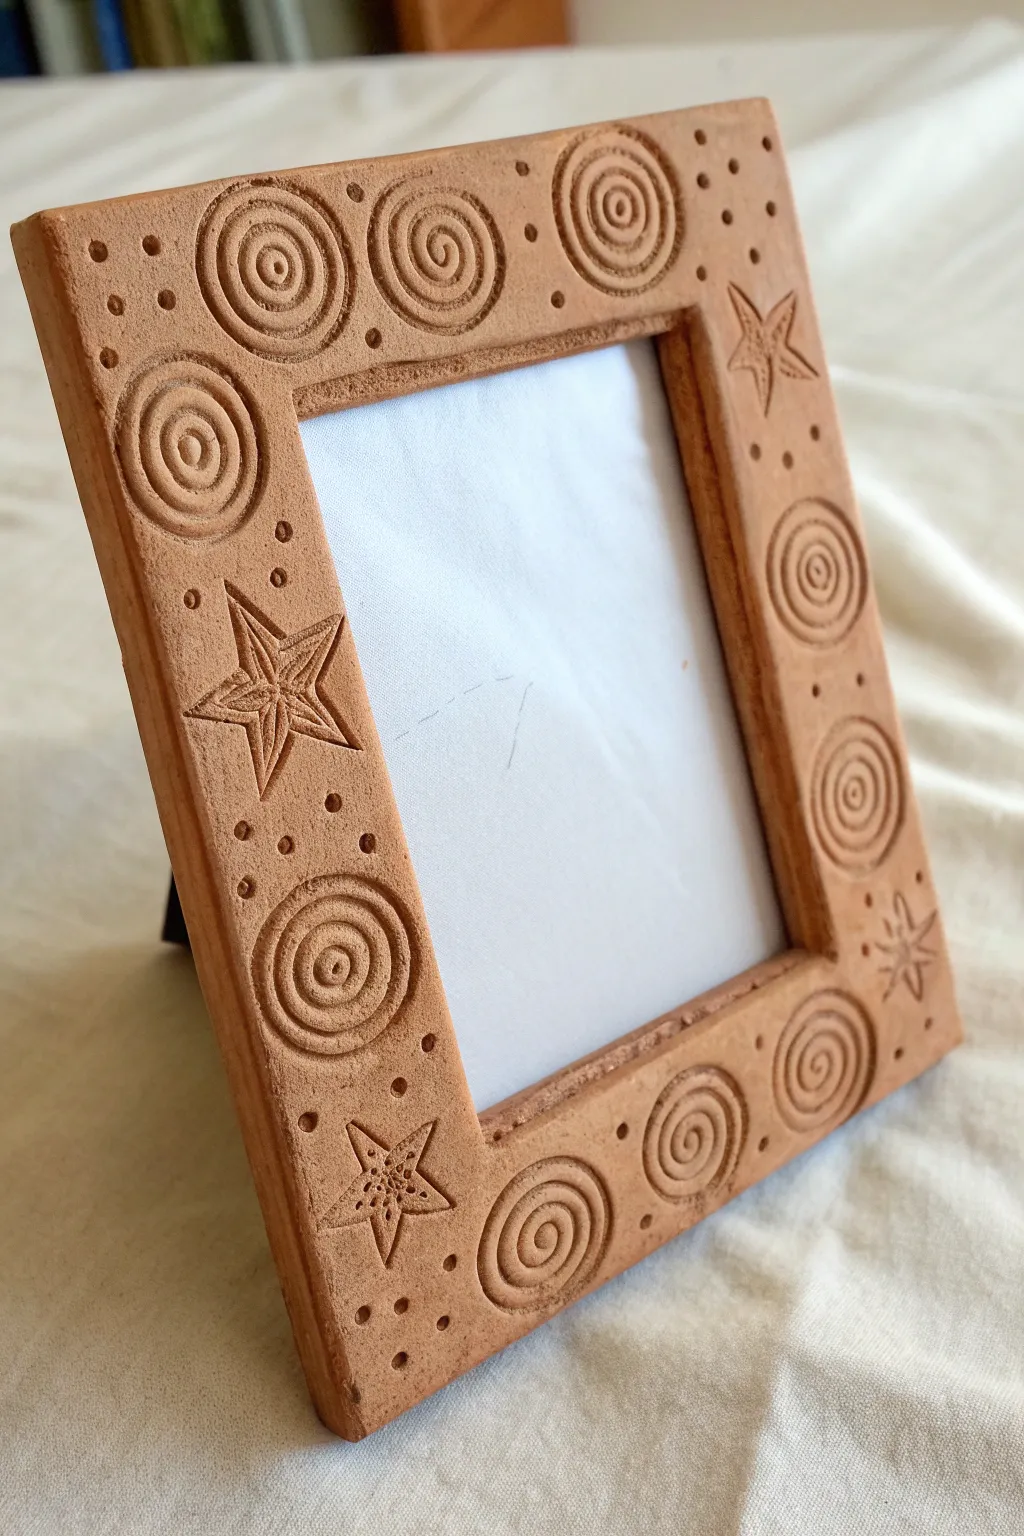
This rustic, warm-toned picture frame makes a fantastic introduction to slab construction and subtractive texture techniques. Featuring bold stamped spirals and hand-carved stars, the finished piece has a charming, rhythmic pattern perfect for showcasing your favorite memories.
Step-by-Step
Materials
- Terracotta air-dry clay or kiln-fire earthenware clay
- Rolling pin
- Two wood guiding slats (approx. 1/4 inch thick)
- Fettling knife or clay knife
- Ruler
- Cardboard template (cut to 5×7 inches or desired frame size)
- Slip and scoring tool (or a fork)
- Small circular stamps (can use marker caps, buttons, or clay tools)
- Needle tool
- Sponge and water
- Cardboard backing and glue (for finishing)
Step 1: Preparing the Base
-
Prepare your workspace:
Set up a canvas board or cloth mat to prevent the clay from sticking to the table while you work. -
Roll the slab:
Place a ball of terracotta clay between your two wooden guiding slats. Roll the clay out until the rolling pin rests on the slats, ensuring an even thickness of about 1/4 inch across the entire slab. -
Cut the outer shape:
Using a ruler and your needle tool or fettling knife, cut a large rectangle. For a standard frame, 7×9 inches is a good starting size, but you can adjust based on your needs. -
Create the window:
Center your cardboard template on the slab. Lightly trace around it, then cut out the inner rectangle to create the window for your photo. Remove the center clay piece. -
Smooth the edges:
Dip your finger or a small sponge in a little water and gently smooth the sharp cut edges of both the outer rim and the inner window to give it a professional finish.
Stamp Magic
Can’t find a spiral stamp? Roll a small coil of clay into a tight snail shape, bake or let it dry hard, and use that as your custom stamp tool.
Step 2: Adding Texture & Design
-
Plan your pattern:
Looking at the reference image, notice the alternating pattern of large spirals and stars. Prepare your layout mentally or lightly mark placement spots with your finger. -
Create the spiral stamps:
Press a circular object (like a specialized clay stamp or a found object like a button) firmly into the clay to create the raised spiral designs. Place these at the corners and midway along the sides. -
Detail the spirals:
If your stamp didn’t create the inner rings clearly, use a needle tool to re-trace and deepen the spiral grooves so they stand out clearly. -
Carve the stars:
In the spaces between the spirals, use a needle tool to freehand draw five-pointed stars. I like to practice drawing a star on a scrap piece of clay first to get the proportions right. -
Deepen the star lines:
Go over your initial star sketches with a slightly deeper cut or a small carving tool to give them a 3D effect, drawing a line from the center to each tip. -
Add detail dots:
Use the blunt end of a small paintbrush or a dedicated dotting tool to press small holes into the clay. Scatter them around the spirals and inside the star points for added texture. -
Create the inner star texture:
For the stars specifically, gently poke tiny dots inside the star shape itself to distinguish the texture from the smooth background clay.
Step 3: Construction & Finishing
-
Make the stand:
Cut a triangular wedge of clay from your leftover scraps to serve as the stand leg. -
Attach the stand:
Score the back of the frame and the long edge of the triangle stand. Apply slip (clay glue) to both scored areas and press firmly together. Alternatively, you can use a cardboard easel back after the clay is dry. -
Final smoothing:
Check the frame one last time for any unwanted clay burrs or rough spots. Use a barely damp sponge to wipe them away without erasing your texture. -
Drying:
Place the frame flat on a wire rack or between two pieces of drywall to dry slowly. This helps prevent warping. -
Finishing touches:
Once fully dry, you can leave the natural terracotta color or apply a clear matte sealer to protect the surface.
Make it Pop
After baking, wipe a dark acrylic paint wash (black or dark brown) over the texture, then wipe it off surface. The dark paint stays in the grooves!
Once your frame is dry and sturdy, slide in a favorite photo to complete this rustic masterpiece
Slab Tile Name Plaque With Relief
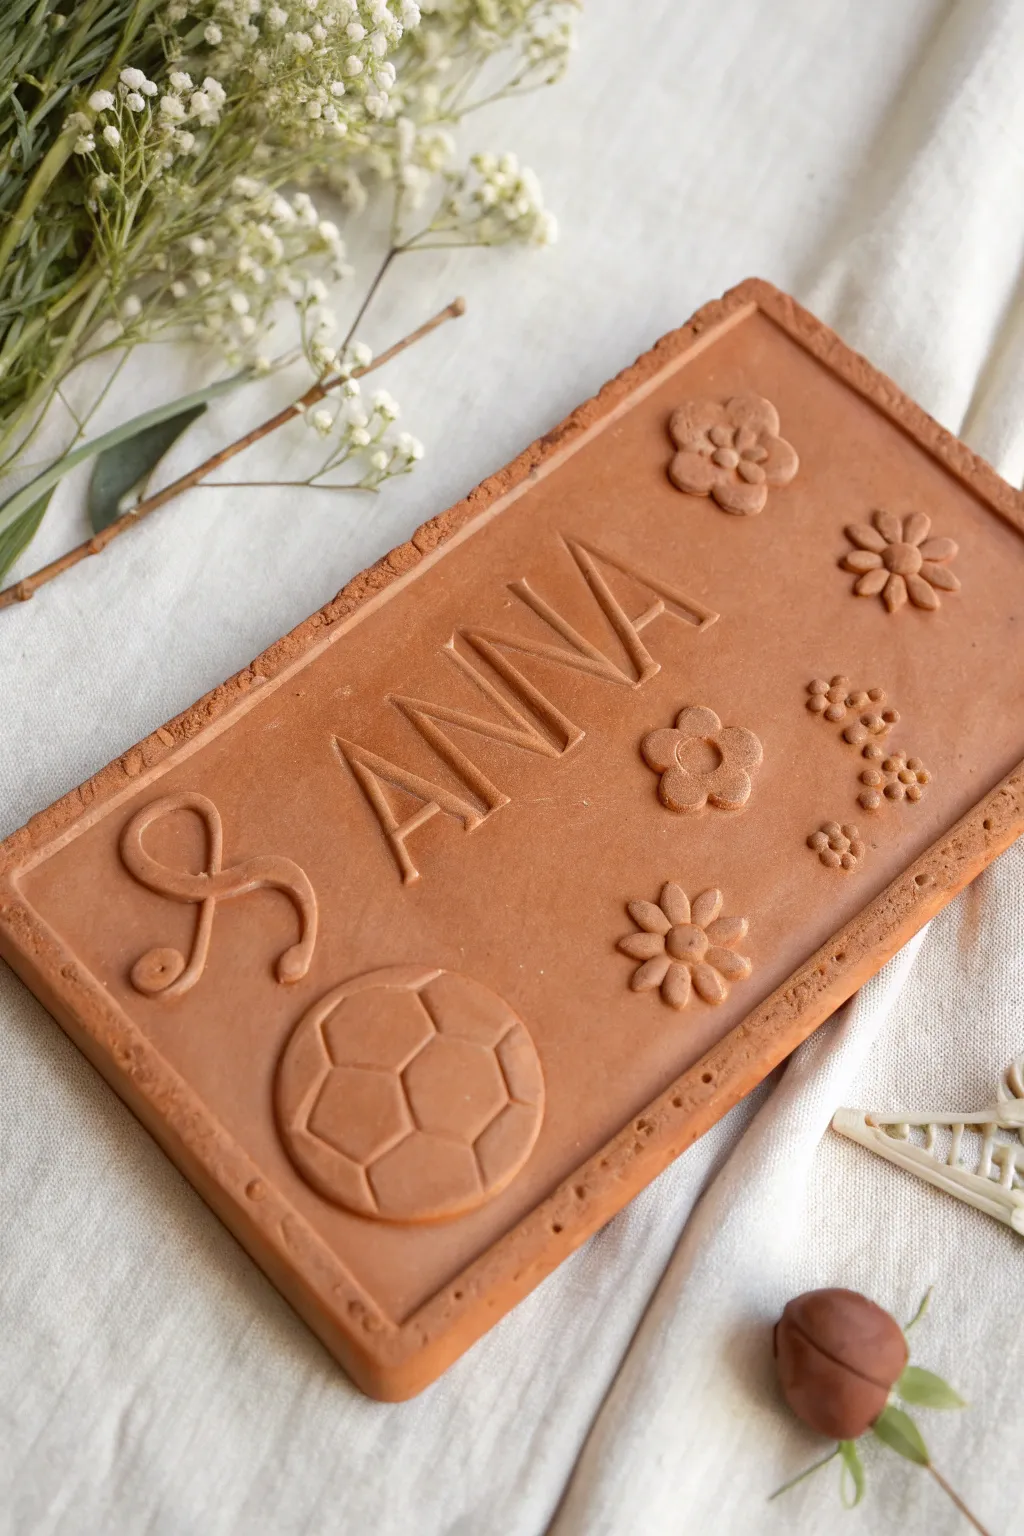
This personalized slab project combines subtractive carving techniques with additive relief elements for a dimensional, classic look. Using terracotta-colored clay gives the finished piece a warm, natural aesthetic that highlights the shadows in your carved lettering.
Step-by-Step Guide
Materials
- Terracotta air-dry clay or low-fire earthenware clay
- Rolling pin
- Two wooden guide strips (approx. 1/4 inch thick)
- Canvas mat or cloth to work on
- Needle tool or toothpick
- Fettling knife or ruler edge
- Small loop tool or ribbon tool
- Slip (clay mixed with water) or vinegar
- Scoring tool or old toothbrush
- Small sponge
Step 1: Creating the Base Slab
-
Prepare your workspace:
Lay down your canvas mat to prevent sticking. Place your two wooden guide strips parallel to each other, slightly wider than you want your final tile to be. -
Roll the slab:
Ball up a generous amount of clay and flatten it slightly with your palm between the guides. Use the rolling pin to roll the clay out until the pin rests on the guide strips, ensuring an even thickness across the entire slab. -
Cut the rectangle:
Use a ruler and a fettling knife to cut a clean, sharp rectangle. For the design shown, aim for a roughly 4-inch by 8-inch proportion. Don’t discard the trimmings; keep them moist under plastic for the decoration phase. -
Texture the edges:
Since the example has a rustic feel, tap the cut edges gently with a wooden paddle or your finger to soften the sharp corners. You can lightly press a coarse sponge against the very edge to mimic the texture seen in the photo.
Warp-Free Drying
Slabs love to warp! To keep your tile flat, dry it slowly under a loose sheet of plastic. Place a heavy board on top of the corners (with paper in between) for the first day.
Step 2: Carving the Lettering
-
Plan your spacing:
Lightly trace the name onto the clay surface using a needle tool. Do not dig in yet; just scratch the surface to ensure the letters are centered and spaced evenly. -
Carve the main strokes:
Using a needle tool, cut deeper along your traced lines. For the distinct “V” carved look shown in the ‘ANNA’ text, angle your tool inwards from one side of the line, then angle it inwards from the other side to remove a thin wedge of clay. -
Refine the letters:
Use a small ribbon tool or the flat edge of a modeling tool to clean up the bottom of your carved channels. The goal is a clean, recessed letter with sharp upper edges. -
Smooth the burrs:
Wait until the clay stiffens slightly (leather hard), then gently rub away the little crumbs or “burrs” of clay that accumulated on the edges of your carving.
Clean Lettering Hack
If your carved letters look messy, let the clay dry to ‘leather hard’ (stiff but cool) before cleaning. The crumbs will flake right off instead of smearing.
Step 3: Adding Relief Decorations
-
Create the soccer ball:
Roll a small sphere of clay and flatten it into a disc. Score the back of the disc and the spot on the slab where it will go. Apply slip to both surfaces and press the disc firmly onto the slab. -
Detail the ball:
Using your needle tool, gently impress the pentagon pattern onto the surface of the flattened disc to create the soccer ball design. -
Form the flowers:
Roll tiny balls of clay for the flower petals. Flatten them slightly and arrange them in circles. I find it easier to assemble the small flowers on the table first, then transfer them as a single unit if possible, or build them petal by petal directly on the slab. -
Attach the flowers:
Score and slip every single petal before attaching. This prevents them from popping off as the clay dries. Use the back of a needle tool or a small dowel to press a center dot into each flower, which also helps secure the clay. -
Add the swirl accent:
Roll a very thin snake or coil of clay. Form it into the stylized ‘S’ shape on your work surface first to get the curve right. -
Secure the coil:
Score the path for the coil on the slab. Apply slip, place the coil, and gently press it down so the bottom flattens slightly and bonds to the base. -
Final Cleanup:
Check the whole piece for loose crumbs. If you used slip that oozed out from under the decorations, clean it up carefully with a damp (not wet) brush.
Allow your plaque to dry completely before displaying it or adding a clear matte sealant to protect the surface


What Really Happens Inside the Kiln
Learn how time and temperature work together inside the kiln to transform clay into durable ceramic.
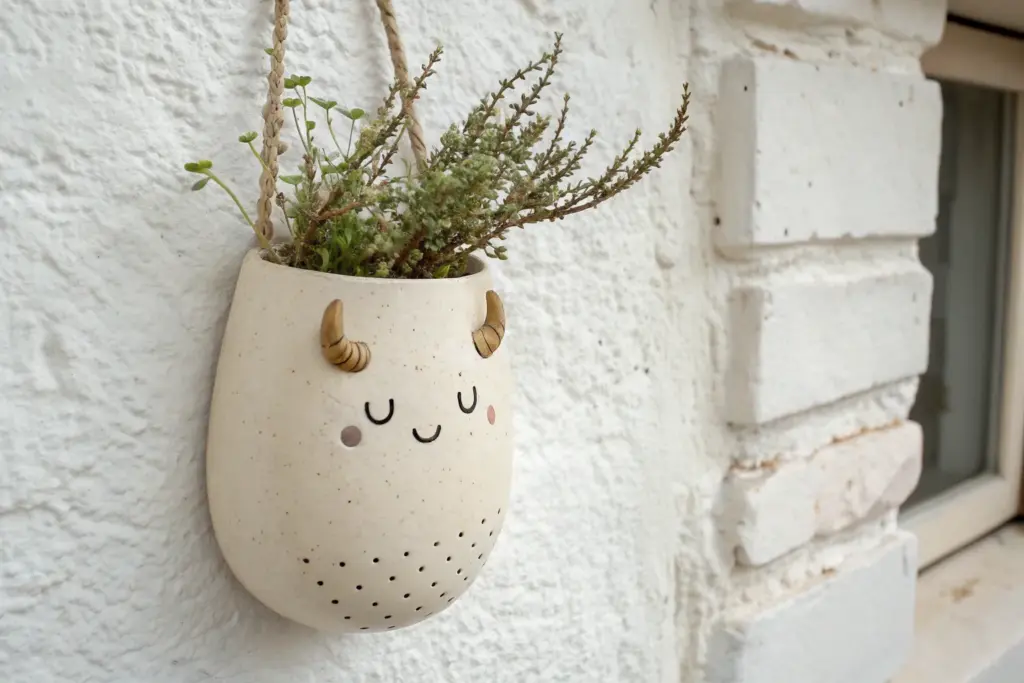
Nature-Inspired Slab Wall Pocket
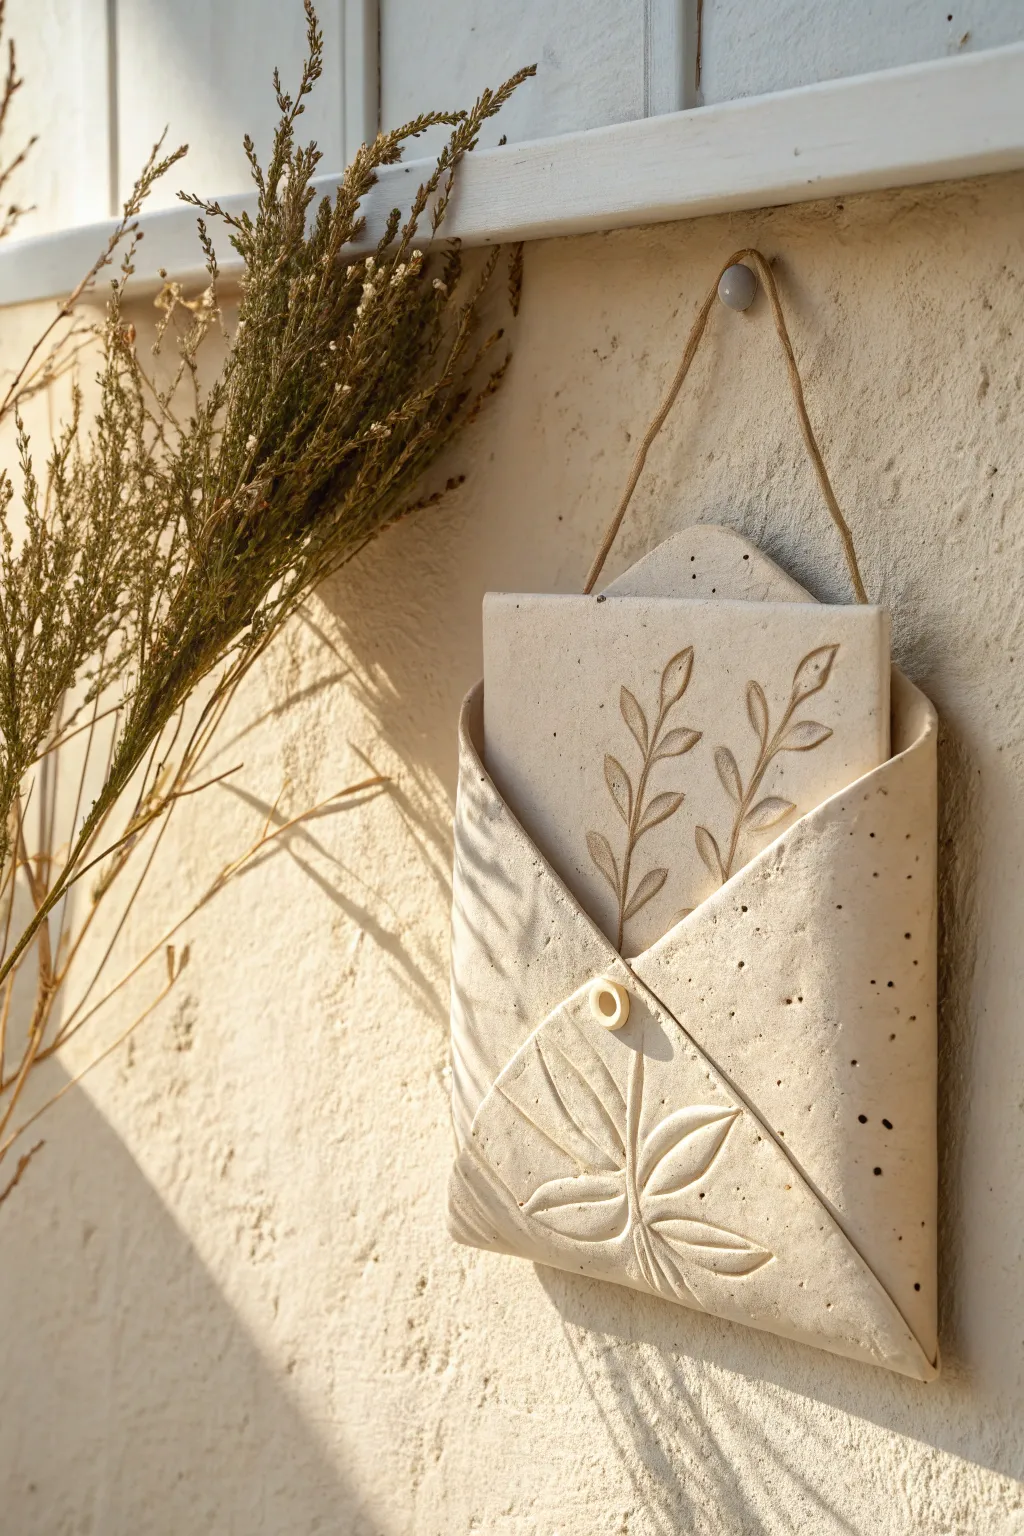
This charming wall pocket reimagines the classic envelope shape as a permanent home for dried blooms or tiny treasures. Crafted from a single slab of clay and embossed with delicate leaf patterns, it creates a warm, rustic accent for any wall.
Detailed Instructions
Materials
- Light-colored clay (stoneware or earthenware)
- Rolling pin
- Canvas or cloth work surface
- Paper template (envelope shape)
- Needle tool or fettling knife
- Leaf stamps or actual leaves for impression
- Slip (clay mixed with water)
- Scoring tool (or fork)
- Small circle cutter or straw
- Sponge
- Jute twine or leather cord
- Small wooden button or clay bead (optional)
Step 1: Preparing the Slab
-
Roll out the clay:
Begin by wedging your clay to remove air bubbles, then roll it out into a smooth, even slab about 1/4 inch thick. I find rolling on a piece of canvas prevents sticking and adds a nice subtle texture to the back. -
Smooth the surface:
Use a damp sponge or a rubber rib to compress the clay surface on both sides. This removes any canvas texture you don’t want and strengthens the slab against cracking. -
Cut the shape:
Place your paper envelope template onto the slab. The template should look like a square rotated 45 degrees (a diamond) with triangular flaps. Trace around it with a needle tool and cut away the excess clay.
Crack Prevention
Slab projects warp easily. Dry extremely slowly under plastic for at least 3-4 days, and weigh down the corners if they start to curl up.
Step 2: Texturing and Forming
-
Plan your design:
Before folding, decide where your botanical impressions will go. In the image, there are leaves on the inside back panel (visible at the top) and the front flap. -
Impress the botanicals:
Press your chosen leaves or stamps firmly into the clay. If using real leaves, roll over them gently with a pony roller or small rolling pin to get a deep, crisp impression of the veins. -
Score the connection points:
Identify the side flaps and the bottom flap that will fold inward to create the pocket. Score the edges where these pieces will overlap using a serrated rib or needle tool. -
Apply slip:
Dab a generous amount of clay slip onto the scored areas. This acts as the glue that will hold your envelope together securely. -
Fold and assemble:
Fold the side flaps in first, then bring the bottom flap up to meet them. Press the seams together firmly but gently, ensuring you don’t smudge your beautiful leaf impressions. -
Smooth the seams:
Use a modeling tool or your finger to blend the seams on the sides so they look seamless and sturdy. You want it to look like a folded paper envelope, but it needs the structural integrity of a vessel.
Level_Up: Stained Detail
After bisque firing, rub a dark oxide wash into the leaf impressions and wipe away the excess to make the veins pop with high contrast.
Step 3: Adding Details
-
Creating the button detail:
Roll a tiny ball of clay and flatten it into a small disc to mimic a button closure. Score and slip the point of the bottom flap and attach this button securely. -
Pierce the button:
Use a small tool to poke a hole in the center of your clay button for a realistic touch. -
Make the hanging holes:
At the top point of the back ‘flap’ (the part that sits against the wall), punch a small hole for hanging. Based on the photo, you should actually punch two holes near the top edges of the back panel so it hangs evenly. -
Add texture (optional):
If you want the speckled look shown in the image, you can gently flick a toothbrush dipped in iron oxide wash or watered-down dark underglaze over the surface.
Step 4: Drying and Finishing
-
Slow drying:
Place a crumpled ball of newspaper inside the pocket to keep it puffed out while drying. Cover the piece loosely with plastic to let it dry slowly, preventing warping. -
Bisque fire:
Once bone dry, fire the piece to bisque temperature (usually cone 04). -
Glazing:
Coat the piece in a clear matte glaze, or leave the raw clay bare on the outside if it’s fully vitrified. Wipe off any glaze from the foot ring or back. -
Final firing:
Fire the piece again to the maturity temperature of your clay body. -
Attach the hanger:
Thread a length of jute twine through the holes at the top and knot it securely to create the hanging loop.
Hang your finished pocket near a window to catch the light on those delicate textures
Slab Fish Relief Sculpture
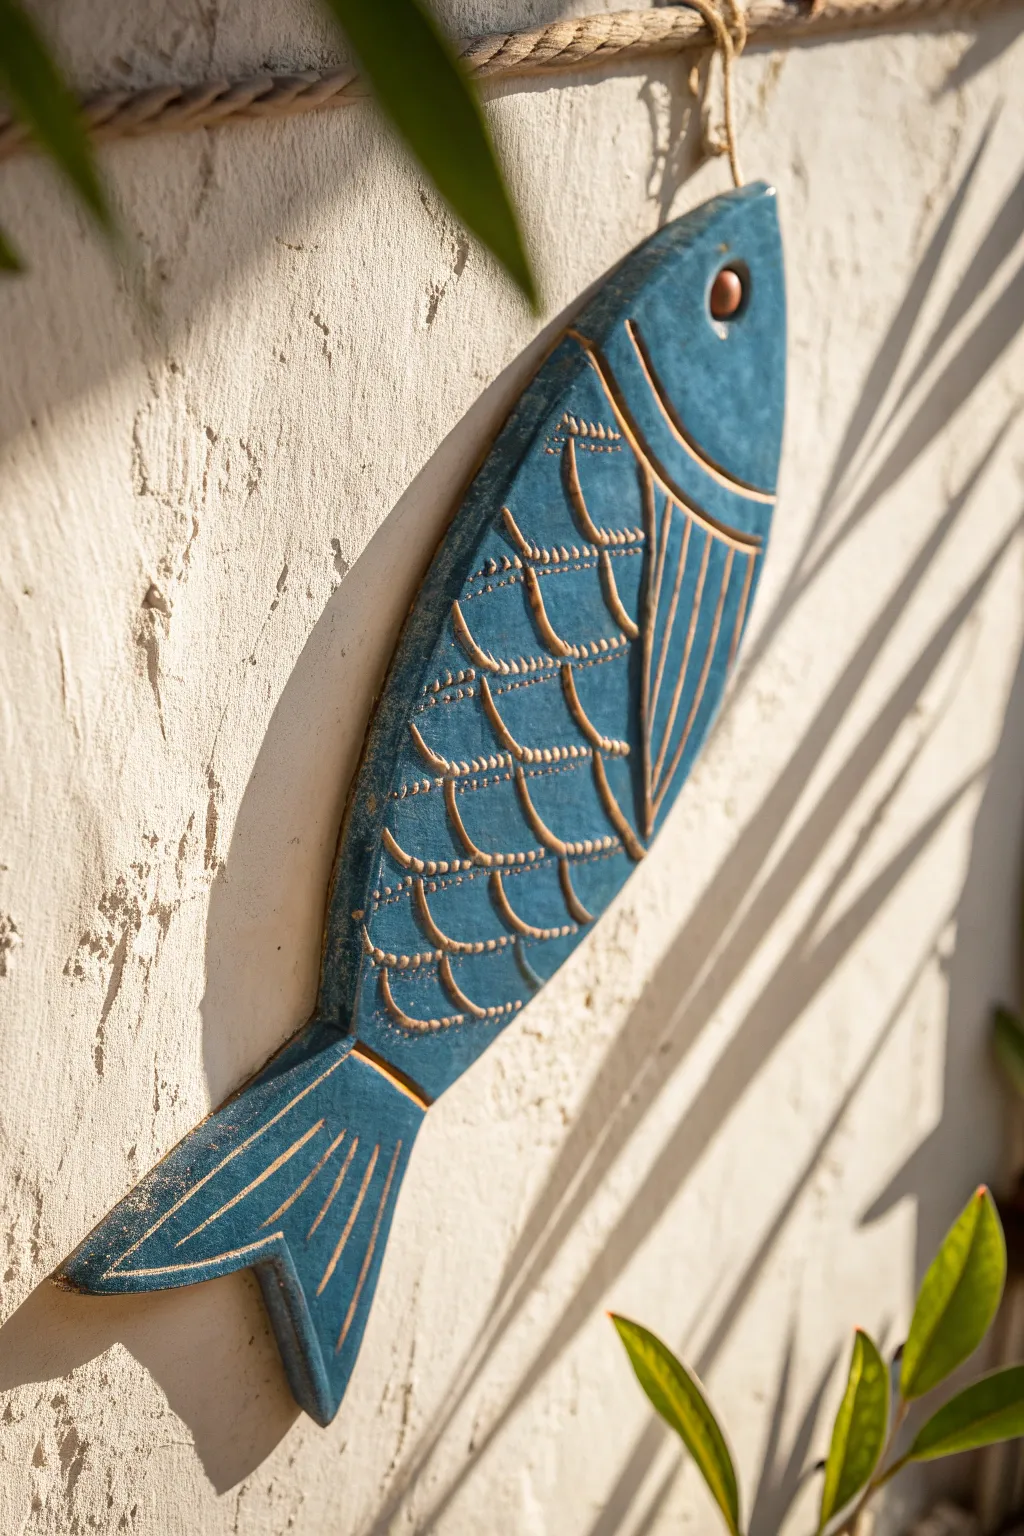
This charming ceramic fish combines simple slab building with striking surface decoration techniques. The finished piece features a rich teal-blue glaze accented by golden details in the carved lines, creating a beautiful wall hanging perfect for coastal decor.
Step-by-Step Guide
Materials
- Low-fire white earthenware clay
- Rolling pin and canvas mat
- Fettling knife or needle tool
- Loop tool (small)
- Small round sponge
- Teal or deep blue underglaze
- Clear glaze (low-fire)
- Gold or bronze acrylic paint (for post-fire finish) or metallic luster
- Small detail brush
- Jute twine for hanging
- Newspaper or paper template
Step 1: Shaping the Form
-
Prepare the template:
Begin by sketching a simple, elongated fish shape on a piece of paper or cardstock. The shape should be roughly football-shaped, tapered at the tail end, about 8-10 inches long. Cut this shape out to use as your guide. -
Roll the slab:
Roll out a portion of wedged clay on your canvas to an even thickness of about 3/8 to 1/2 inch. I find using wooden guide strips on either side of the rolling pin helps keep the thickness consistent. -
Cut the outline:
Place your paper template onto the clay slab. Using a fettling knife or needle tool, trace around the template and cut out the fish shape. Smooth the cut edges with a damp sponge to remove any sharp burrs. -
Curve the body:
To give the fish its subtle convex form (relief), gently lift the clay and place a small wad of crumpled newspaper underneath the center of the body. This supports the clay in a slightly domed shape while it firms up.
Warping Woes?
If the tail or head curls up too much while drying, place small weights (like sandbags) on the edges, or flip the piece over periodically during the drying phase.
Step 2: Carving Details
-
Define the head:
Once the clay is leather-hard (firm but still carveable), use a needle tool to lightly sketch a curved line separating the head from the body. Add a small circle for the eye. -
Map out the scales:
Lightly sketch the scale pattern. Start with rows of curved ‘U’ shapes moving from the head toward the tail. Keep the rows somewhat aligned but allow for organic variation. -
Carve the relief lines:
Using a small loop tool or a V-gouge tool, carve shallow channels over your sketched lines. You want these grooves to be deep enough to catch the gold accent later, but not so deep they pierce the slab. -
Add fin details:
Carve straight, radiating lines on the tail and the side fin area. Frame the gill area with double curved lines to emphasize the anatomy. -
Refine the eye:
Press a small ball of clay into the eye circle to create a protruding eyeball, or carve around the pupil to create depth. Use a damp sponge to soften all carved edges slightly. -
Poke hanging holes:
Before the clay dries completely, use a straw or large needle tool to create a hole through the mouth area or near the top dorsal fin for the hanging twine.
Level It Up
Before firing, press actual textures like lace, netting, or seashells into the damp clay body for hyper-realistic aquatic textures before you carve the main lines.
Step 3: Glazing and Finishing
-
Bisque fire:
Allow the clay to dry slowly and completely until bone dry. Fire the piece in the kiln to the appropriate cone (usually Cone 04) to turn it into bisque ware. -
Apply base color:
Apply 2-3 coats of a teal or deep blue underglaze over the entire front surface. Ensure the color gets into the carved grooves but isn’t pooling too heavily. -
Wipe back (Optional):
If you want a more rustic look, use a damp sponge to lightly wipe the surface. This leaves more pigment in the recesses and less on the high points, highlighting the texture. -
Glaze fire:
Apply a coat of clear glaze over the underglaze if you want a glossy finish, or leave the underglaze matte if preferred. Fire the piece again according to your glaze instructions. -
Apply gold accents:
Once the fired piece is completely cool, use a very fine brush to apply gold or bronze acrylic paint into the carved grooves of the scales, fins, and head. This ‘cold finish’ technique gives that precise metallic definition. -
Highlight the texture:
You can also ‘dry brush’ a tiny amount of the gold paint gently over the raised surfaces of the scales to catch the light. -
Add the twine:
Cut a length of jute twine. Thread it through the hole you created earlier and tie a secure knot to create a hanging loop.
Now hang your finished sculpture on a textured wall to enjoy a splash of handmade coastal charm

TRACK YOUR CERAMIC JOURNEY
Capture glaze tests, firing details, and creative progress—all in one simple printable. Make your projects easier to repeat and improve.
Mini Relief Tile for a Class Mural
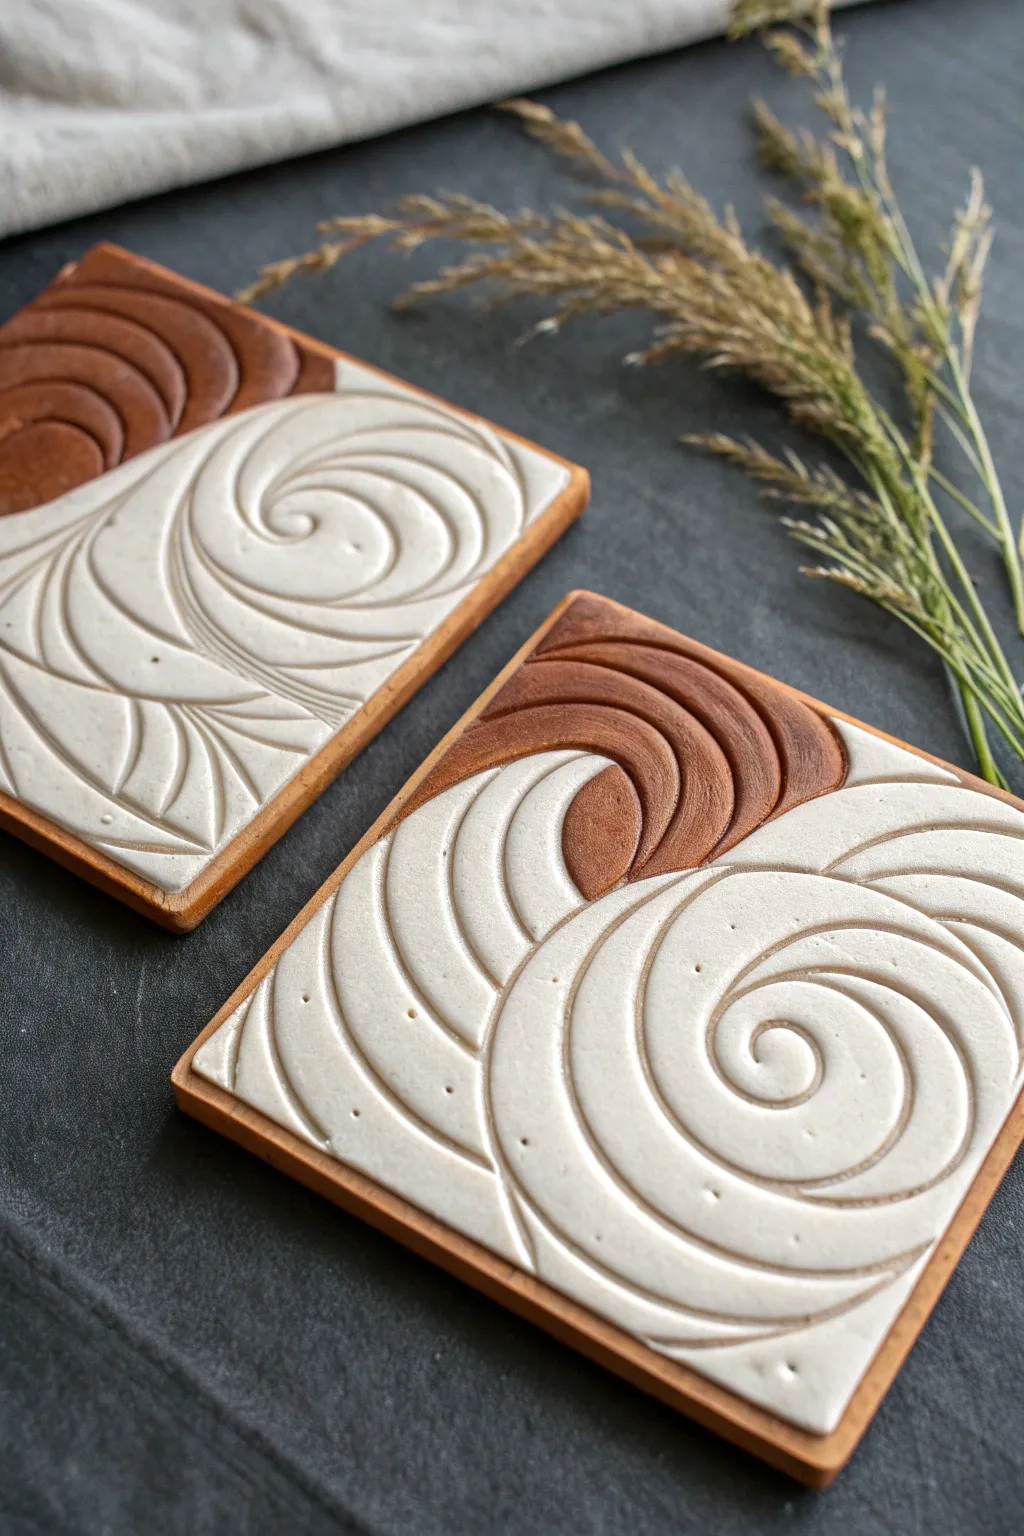
Create a mesmerizing abstract mural piece using contrasting clay bodies. These square relief tiles combine smooth curves and deep grooves to mimic stylized waves or wind, perfect for teaching students about negative space and textural contrast.
Step-by-Step Tutorial
Materials
- White stoneware or air-dry clay
- Terracotta or red earthenware clay
- Rolling pin
- Two 1/4 inch wooden guide slats
- Square tile cutter or fettling knife with a template
- Needle tool or sgraffito loop tool
- Smoothing sponge
- Slip and scoring tool (toothbrush or fork)
- Canvas mat or wooden board
Step 1: Preparing the Base
-
Roll the terracotta slab:
Begin by rolling out a medium-sized ball of the red terracotta clay on your canvas mat. Use the wooden guide slats on either side to ensure an even thickness of about 1/4 inch. -
Cut the base square:
Place your square template over the rolled clay and cut out a precise square shape. This will be the foundation of your tile. -
Create the wave section:
Using a needle tool, cut a curved, swooping line across the upper corner of the square. Remove the smaller corner section; this is where the contrasting white clay will eventually go. -
Smooth the edges:
Gently run a damp finger or sponge along the cut edges of your terracotta base to remove any sharp burrs or crumbs.
Shrinkage Rate Tip
Ensure your two clay bodies have similar shrinkage rates! If one shrinks 12% and the other 6%, your tile will crack apart while drying.
Step 2: Adding the Contrast
-
Roll the white clay:
Clean your rolling pin and workspace thoroughly to avoid color contamination, then roll out a slab of white clay to the exact same 1/4 inch thickness. -
Trace the missing shape:
Place your original square template over the white slab. You need to create a piece that fits perfectly into the gap you made on the terracotta tile. -
Cut and fit:
Cut the white clay to match the missing corner section. Test the fit dry first; it should nestle into the terracotta piece like a puzzle. -
Score and slip:
Aggressively score the touching edges of both the red and white clay pieces. Add a generous amount of slip (liquid clay) to both scored areas. -
Join the seams:
Press the pieces together firmly on a flat surface. Use a modeling tool or your thumb to drag a little clay across the back of the seam to reinforce the bond. -
Level the surface:
Flip the tile face up. Gently roll over the seam one last time with the rolling pin to ensure the two colors are perfectly flush and level with each other.
Mural Assembly Idea
Have students plan their spiral lines to connect with their neighbor’s tile. This creates one massive, flowing design across the entire wall.
Step 3: Carving the Design
-
Plan the flow:
Lightly scratch your intended design onto the surface with a needle tool. Aim for a large spiral that radiates outward, crossing over the color boundary. -
Begin the groove:
Using a small loop tool or a U-shaped carving tool, begin carving out the main spiral line. Keep your tool angle consistent to create a deep, clean channel. -
Widen the curves:
As your spiral moves outward, slightly widen the distance between the carved lines to create a dynamic sense of movement. -
Clean the channels:
Small balls of clay or ‘crumbs’ will build up in the grooves. Use a soft, dry brush to sweep these away rather than picking them out one by one. -
Refine the ridges:
Run a barely damp sponge over the raised surfaces (the ‘hills’ between your carved valleys) to soften any sharp angles left by the carving tool. -
Add detail dots:
If desired, gently poke small indents with a needle tool in the wider open spaces of the white clay to add subtle texture.
Step 4: Drying and Finishing
-
Slow drying:
Place the finished tile between two pieces of drywall ware board or loosely wrapped in plastic. Because two different clays are joined, drying slowly is critical to prevent the seam from cracking. -
Monitor the seam:
Check the tile after 24 hours. If a tiny hairline crack appears at the join, compress it gently with a smooth stone or spoon back. -
Final drying:
Once leather hard, uncover the tile and let it dry completely before firing or sealing.
Once fired or sealed, these relief tiles offer a beautiful tactile experience suitable for any hallway display
Clay Mouth Study Tiles
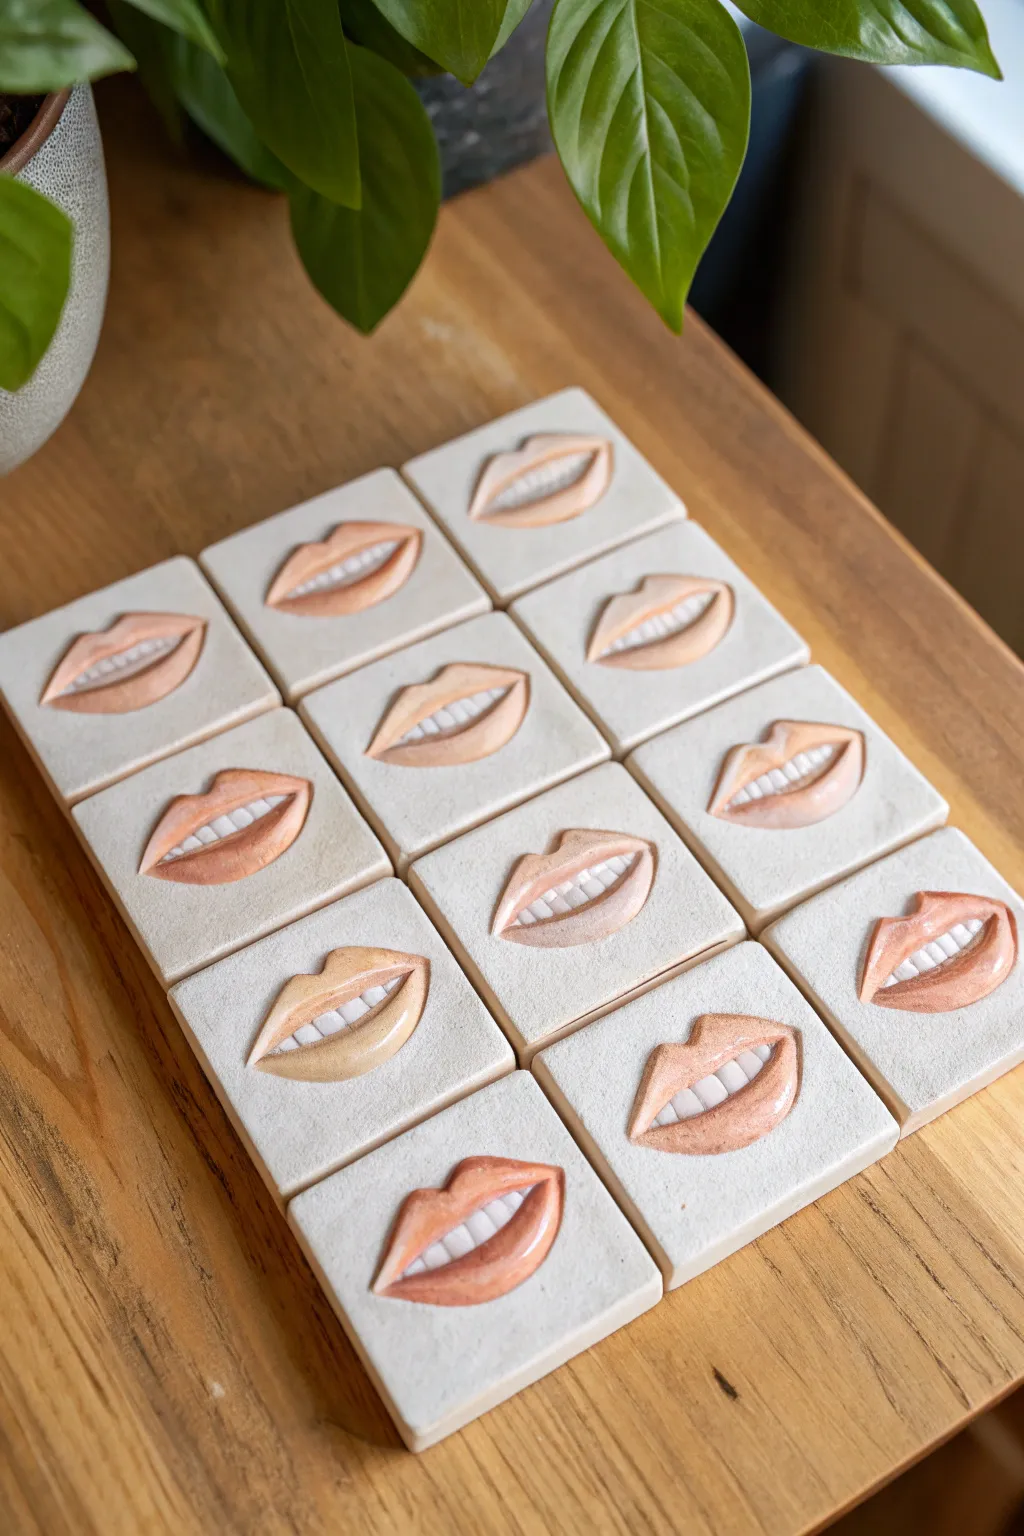
These repeating study tiles are a fantastic way to practice anatomical sculpting without the pressure of creating an entire face. The project results in a satisfying grid of uniform squares, each featuring a slightly different expression or lip structure molded in relief.
Step-by-Step Guide
Materials
- White stoneware or earthenware clay
- Rolling pin
- Two wooden guide slats (approx. 1/4 inch thick)
- Ruler and needle tool
- Square cookie cutter (optional, or cut by hand)
- Small loop tool or carving tools
- Small sponge
- Slip (clay mixed with water)
- Scoring tool or old fork
- Watercolor or watered-down acrylic paint (flesh tones/neutrals)
- White acrylic paint (for teeth)
- Matte sealant spray
Step 1: Preparation & Base
-
Prepare the slab:
Begin by wedging your white clay to remove any air bubbles. Place the clay between two wooden guide slats and roll it out until it is perfectly even and smooth. -
Cut the squares:
Using a square cookie cutter or a ruler and needle tool, cut out twelve identical squares. Aim for about 3×3 inches each. Clean up any rough edges with a damp finger. -
Smooth the surface:
Take a slightly damp sponge and gently wipe the surface of each tile to ensure a pristine, canvas-like finish before adding details.
Keep it Clean
Keep a bowl of clean water and a separate towel just for hands. Staining the white background clay with colored slip ruins the contrast.
Step 2: Sculpting the Lips
-
Outline the placement:
Lightly sketch the outline of a mouth in the center of the first tile using your needle tool. Don’t dig too deep; this is just a guide for positioning. -
Add volume for lips:
Roll two small coils of clay. Score the sketched area and the coils, add a dab of slip, and press the coils onto the tile to form the basic mass of the upper and lower lips. -
Blend the edges:
Use a modeling tool or your thumb to drag the outer edges of the coils onto the flat tile surface. The lips should rise smoothly from the background, not look like stickers stuck on top. -
Define the cupid’s bow:
Press a small indentation into the center of the top lip to define the cupid’s bow. I like to smooth the ridges downward to creating a natural slope. -
Carve the opening:
Carefully carve out the negative space between the lips. Since these are smiling mouths, ensure the opening is distinct and deep enough to eventually hold the teeth. -
Shape the corners:
Use a small ball tool or the tip of a paintbrush handle to tuck the corners of the mouth inwards, creating the depth of the cheek. -
Form the teeth:
Roll a very small, flat ribbon of clay. Insert this into the mouth opening. Use a needle tool to gently impress vertical lines to suggest individual teeth rather than carving them out individually. -
Refine the surface:
Using a slightly damp paintbrush, smooth over the lips and teeth to remove any tool marks. The transition from lip to tile should be seamless. -
Repeat with variation:
Repeat this sculpting process for the remaining tiles. Try slightly varying the arch of the smile or the thickness of the lower lip on each one to create a study of expressions.
Step 3: Finishing
-
Slow drying:
Place the tiles on a piece of drywall or canvas to dry slowly. Cover them loosely with plastic for the first day to prevent the corners from curling up. -
Bisque fire:
Once fully bone dry, fire the tiles in the kiln to bisque temperature according to your clay body’s specifications. -
Apply base color:
Mix a diluted wash of flesh-tone watercolor or watered-down acrylic. Apply this wash only to the lips, letting the natural white of the clay serve as the skin tone. -
Highlight the teeth:
Use a small detail brush and opaque white acrylic paint to carefully fill in the teeth area. This opaque white contrasts nicely with the washed-out color of the lips. -
Seal:
Finish the project by spraying all tiles with a clear matte sealant to protect the paint and give the clay a unified sheen. -
Arrange:
Lay your finished tiles out in a grid pattern to display the subtle differences in your sculpting study.
Try a Pattern
Glaze the background tiles in contrasting pastel colors (like mint or pink) while leaving the lips unglazed for a Pop Art Andy Warhol effect.
Now you have a striking grid of expressions that captures the nuances of a smile
Bobblehead Character Sculpture
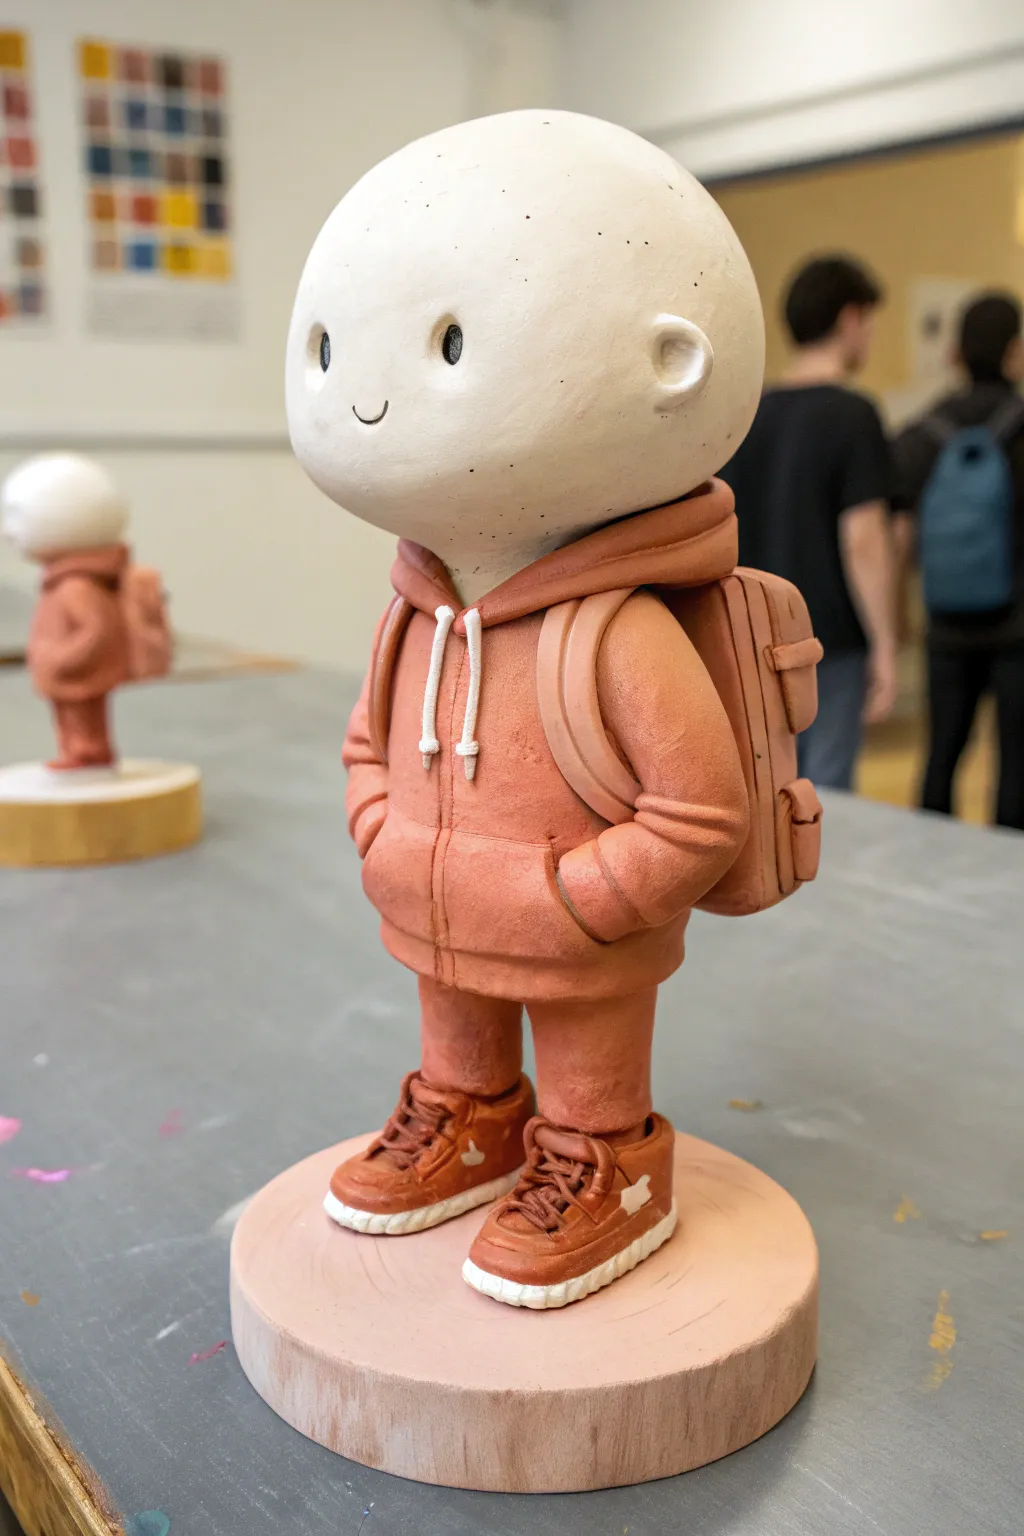
This project captures the charm of modern vinyl toys using traditional clay techniques. You’ll sculpt a character with exaggerated proportions—a large, expressive head and a detailed outfit—perfect for mastering texture and balance.
Detailed Instructions
Materials
- Polymer clay (terracotta/orange, white, and skin tone or cream)
- Aluminum foil
- Armature wire (12-14 gauge)
- Sculpting tools (needle tool, ball stylus, rubber shaper)
- Wooden circular base
- Rolling pin or pasta machine
- Liquid polymer clay (Bake and Bond)
- White acrylic paint (for details)
- Small paintbrush
- Oven for baking
Step 1: Building the Core Structure
-
Prepare the base:
Begin by drilling two small holes into your wooden base where the feet will stand. Cut two lengths of armature wire and secure them into the holes using super glue or epoxy, ensuring they stand upright. -
Form the foil core:
Crumple aluminum foil into two distinct shapes: a smaller cylinder for the body and a large, round sphere for the oversized head. Press the foil tightly so it is dense and holds its shape. -
Attach the head armature:
Push the body foil onto the wires. Twist the top of the wires together and impale the large foil sphere onto them, leaving a small gap for the neck. The head should be significantly larger than the body to achieve that ‘chibi’ style. -
Bulk out the legs:
Wrap a layer of terracotta-colored clay around the wire legs. Roll the clay smooth so the legs look like uniform cylinders, representing the pants.
Clean Clay Pro-Tip
Work on the light-colored head first! Orange or terracotta pigment stains hands easily and will ruin the pristine white head if you sculpt that part last.
Step 2: Sculpting the Outfit
-
Create the shoes:
Form two blocky shapes from terracotta clay for shoes. Press them onto the base around the wire bottoms. Use a needle tool to carve sole lines and a separate strip of white clay for the rubber siding. -
Detail the sneakers:
Add tiny clay laces and a star embellishment on the side. I find using a small ball tool helps press the laces in without squashing them. -
Dress the body:
Roll out a sheet of terracotta clay. Wrap it around the foil body to create the hoodie. Smooth the seams at the back and ensure it overhangs the pants slightly. -
Add the pockets:
Cut a semi-circle of clay and attach it to the front lower torso for the kangaroo pocket. Use a rubber shaper to blend the edges seamlessly into the main hoodie body. -
Sculpt the arms:
Roll two coils of clay for arms. Bend them slightly at the perceived elbow and attach them so the ‘hands’ (simple rounded stumps) look tucked into the front pocket. -
Why the wrinkles represent realism:
Use a modeling tool to press creases into the inner elbows and where the hoodie bunches up. These fabric folds add weight and realism to the sculpture. -
Construct the hood:
Roll a thick snake of clay and flatten it slightly. Wrap this collar-like shape around the top of the body (the neck area) to simulate the bulky hood resting on the shoulders. -
Add the drawstrings:
Roll two very thin snakes of white clay. Attach them hanging down from the hood area, adding tiny knots at the ends.
Step 3: The Head and Backpack
-
Cover the head:
Sheet out a large amount of cream or white clay (you might want to mix in a speck of black pepper or sand for that speckled texture). Cover the large foil sphere completely, smoothing out all fingerprints. -
Face features:
Use a large ball tool to press two deep indentations for eye sockets. Insert small black clay balls for eyes. Use a needle tool to carve a tiny, simple U-shape for the smile. -
Add ears:
Form two small C-shapes from the head-color clay. Attach them to the sides of the head. Keep them simple and stylized rather than anatomically perfect. -
Build the backpack:
Form a rectangular block of terracotta clay. Add a smaller pocket shape to the front and side pockets if desired. Attach this firmly to the back of the figure. -
Straps and buckles:
Roll flat strips of clay for the shoulder straps. Run them from the top of the backpack, over the shoulders, and tucked under the arms. -
Final texture check:
Before baking, use a toothbrush or a piece of texturing sponge to gently tap the hoodie and shoes. This removes the ‘plastic’ look of the clay and mimics fabric. -
Bake the sculpture:
Bake according to your clay manufacturer’s instructions (usually 275°F/130°C for 15-30 minutes per 1/4 inch thickness). Let it cool completely before painting the white soles if you didn’t use white clay.
Head Drooping?
If the heavy head tilts during baking, prop it up with a makeshift scaffolding of crumpled scrap foil or a dedicated baking rack to support the chin.
Now you have a charming character to guard your desk or bookshelf
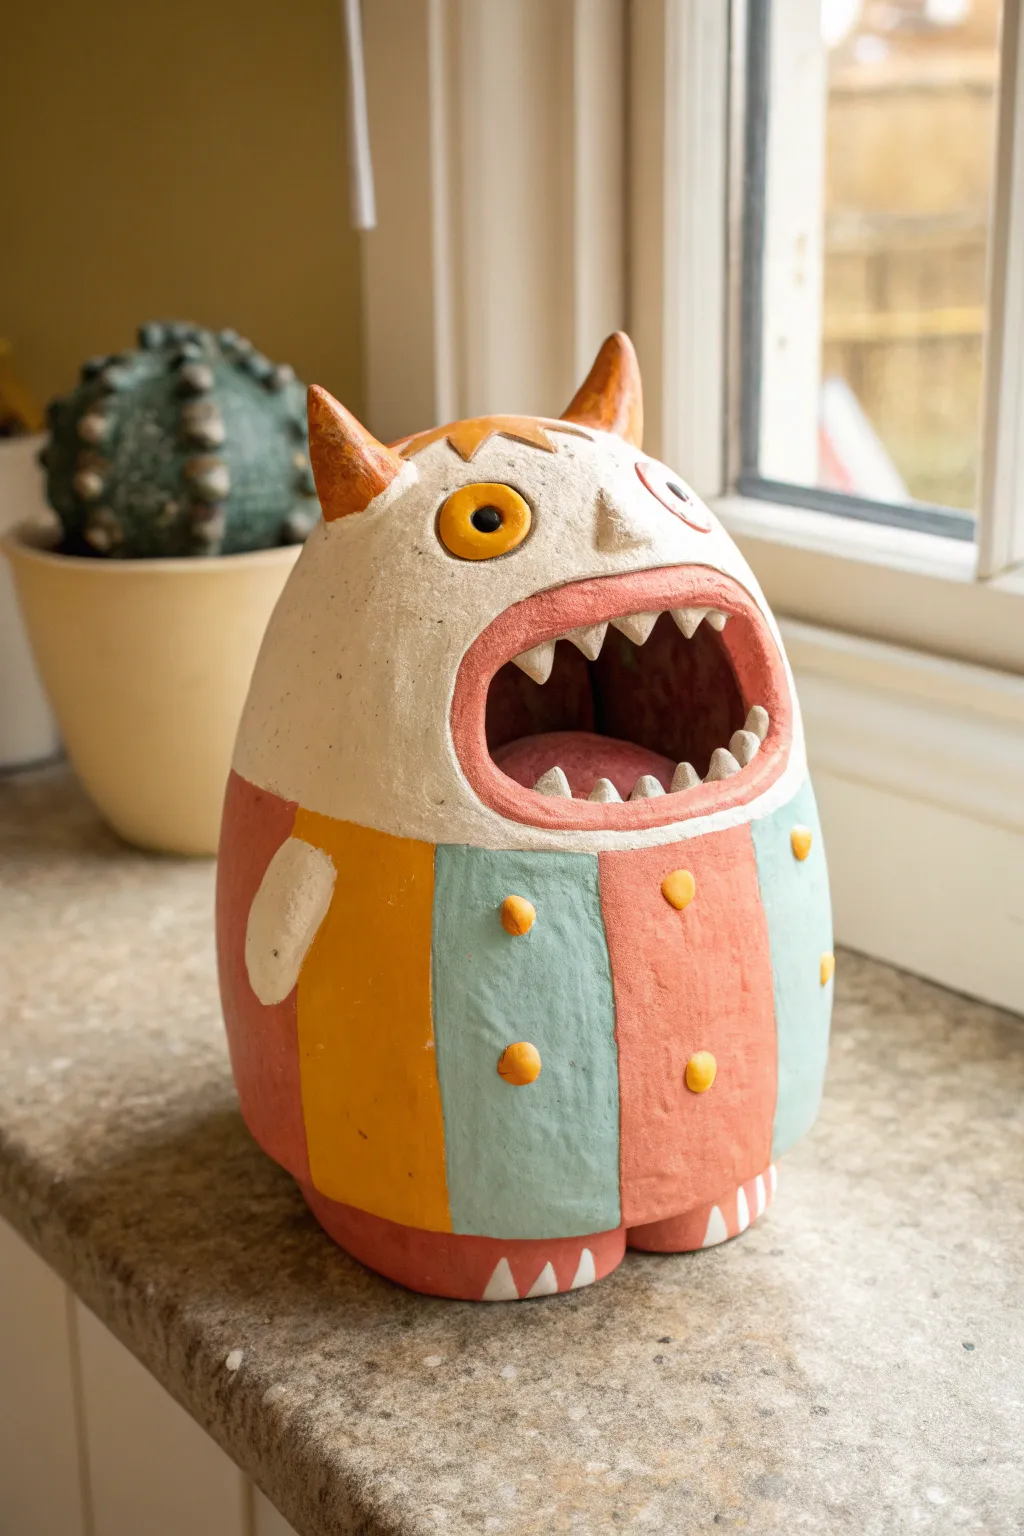
Pinch Pot Whistle Creature
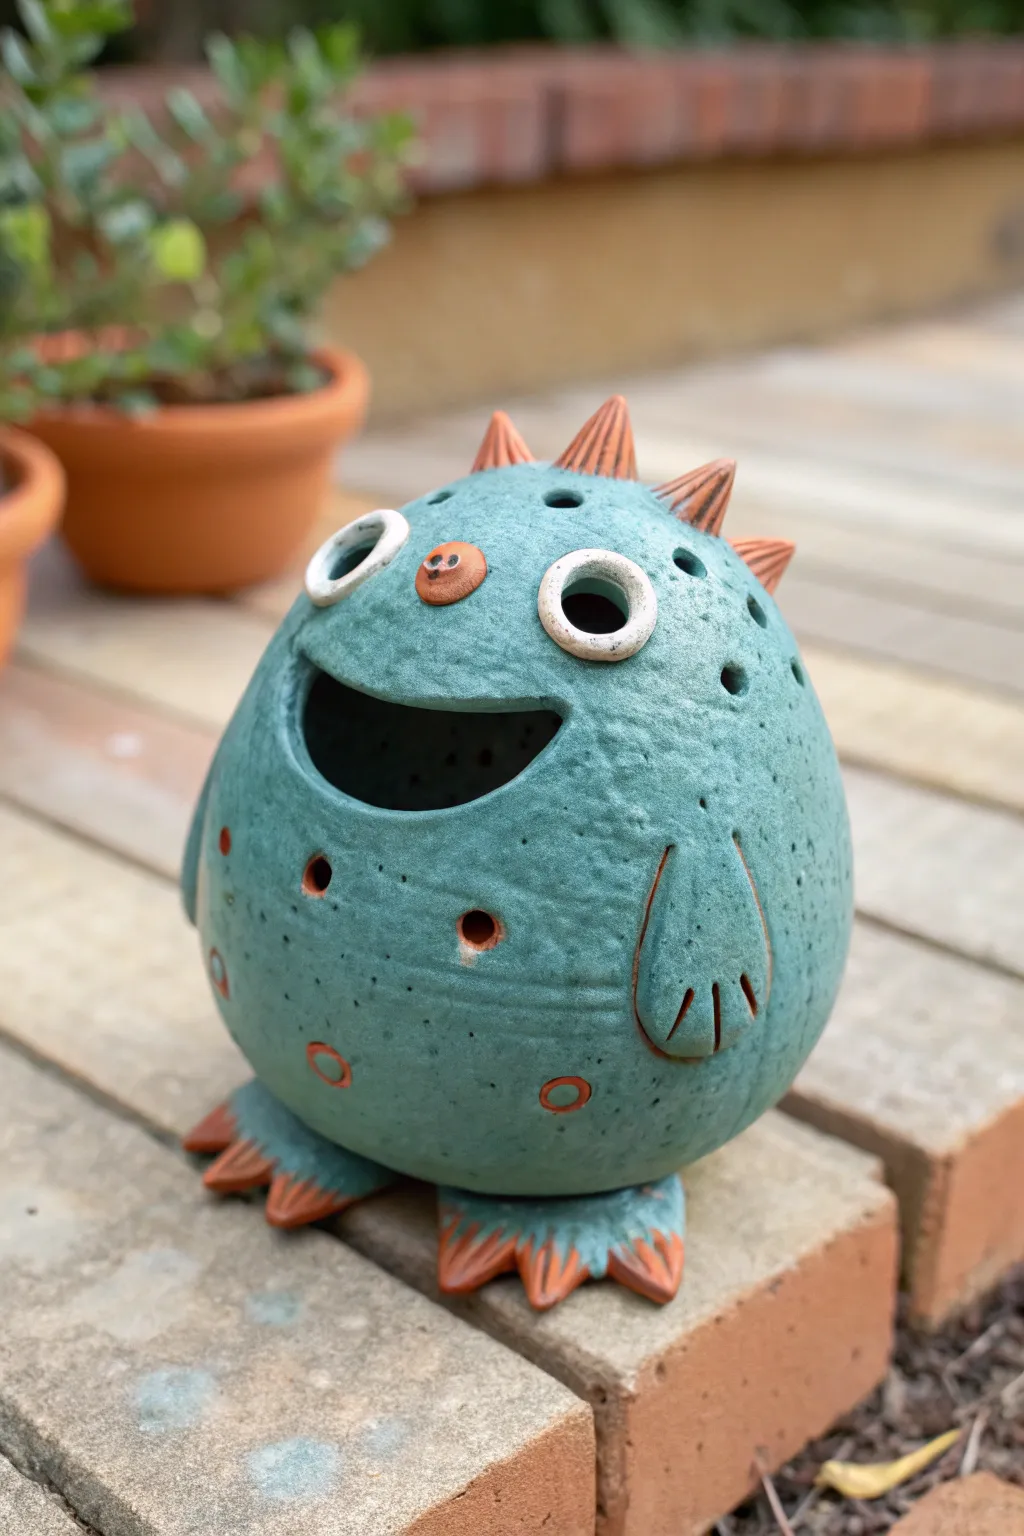
This charming, round little monster starts life as two simple pinch pots joined together. With its textured teal glaze, playful orange spikes, and wide, inviting grin, it makes a perfect first ceramic project that bursts with personality.
How-To Guide
Materials
- Earthenware or stoneware clay (low-fire white works well)
- Needle tool or toothpick
- Scoring tool (or an old fork)
- Slip (clay mixed with water)
- Small wooden modeling tool
- Sponge
- Teal/Blue-Green glaze (textured or speckled finish recommended)
- Orange underglaze or glaze
- Clear glaze (if using underglaze)
- Kiln
Step 1: Forming the Body
-
Roll two balls:
Start with two balls of clay roughly the size of tennis balls. Try to make them equal in size so your final sphere will be symmetrical. -
Pinch the pots:
Insert your thumb into the center of a ball and gently pinch the walls while rotating the clay. Aim for an even thickness of about a 1/4 inch all around. Repeat for the second ball. -
Score and slip:
Taking your needle tool or fork, rough up the rims of both pinch pots. Dab generous amounts of slip onto the scored areas to act as glue. -
Join and seal:
Press the two rims together firmly. Drag clay across the seam with a wooden tool to lock them together, then smooth the join completely with your finger until the sphere looks seamless. -
Shape the egg:
Gently paddle the hollow sphere or roll it on the table to refine the shape into a slight egg-like oval, narrower at the top.
Air Pocket Safety
Since this is a closed hollow form, make sure the mouth opening is large enough or add a small vent hole in the bottom hidden between the feet so trapped air doesn’t burst the clay in the kiln.
Step 2: Adding Features & Texture
-
Cut the mouth:
Decide where the face will be and cut a wide, crescent-shaped wedge out of the sphere for the mouth. Smooth the cut edges with a damp sponge. -
Form the feet:
Shape two flat, triangular slabs for feet. Use your needle tool to cut notches for toes. I like to curve the toes slightly upward for a cartoonish look. -
Attach the base:
Score and slip the bottom of the body and the tops of the feet, then press the body firmly onto the feet so the creature sits stable. -
Make the arm wings:
Roll two small teardrop shapes of clay. Flatten them slightly and score/slip them onto the sides of the body. Use a tool to impress three lines at the bottom of each arm to suggest fingers. -
Add the spike mohawk:
Roll four or five small cones. Attach them in a line down the top center of the head using the score-and-slip method. -
Create the nose and eyes:
Attach a small button of clay for the nose. For the eyes, attach raised rings of clay. Poke two holes in the nose for nostrils.
Make it Shine
Turn this into a functional luminary! Place a battery-operated tea light inside the wide mouth. The light will cast spooky shadows through the decorative holes you punched in the belly.
Step 3: Refining and Glazing
-
Texture the skin:
Using a stiff brush or a textured sponge, gently dab the entire surface of the teal areas to create a brilliant pitted, skin-like texture. -
Add decorative holes:
Use a specialized hole cutter or a straw to punch clean, circular holes around the belly and beside the eyes. This adds visual interest and ensures air moves freely inside. -
Dry and Bisque Fire:
Let the creature dry slowly under plastic for several days to prevent cracking. Once bone dry, fire the piece to bisque temperature (usually cone 04). -
Apply accents:
Paint the spikes, nose, feet toes, and the decorative circular indents with the orange glaze or underglaze. Keep the lines clean. -
Glaze the body:
Apply 2-3 coats of the teal/blue-green glaze to the rest of the body. Wipe back any glaze that gets on the white parts of the eyes. -
Final Fire:
Fire the project again to the temperature required by your specific glaze (often cone 05/06 for low fire glazes).
Place your finished creature in a garden nook or on a bookshelf to add a cheerful pop of color to your space
Pinch Pot Bell With Charm Details
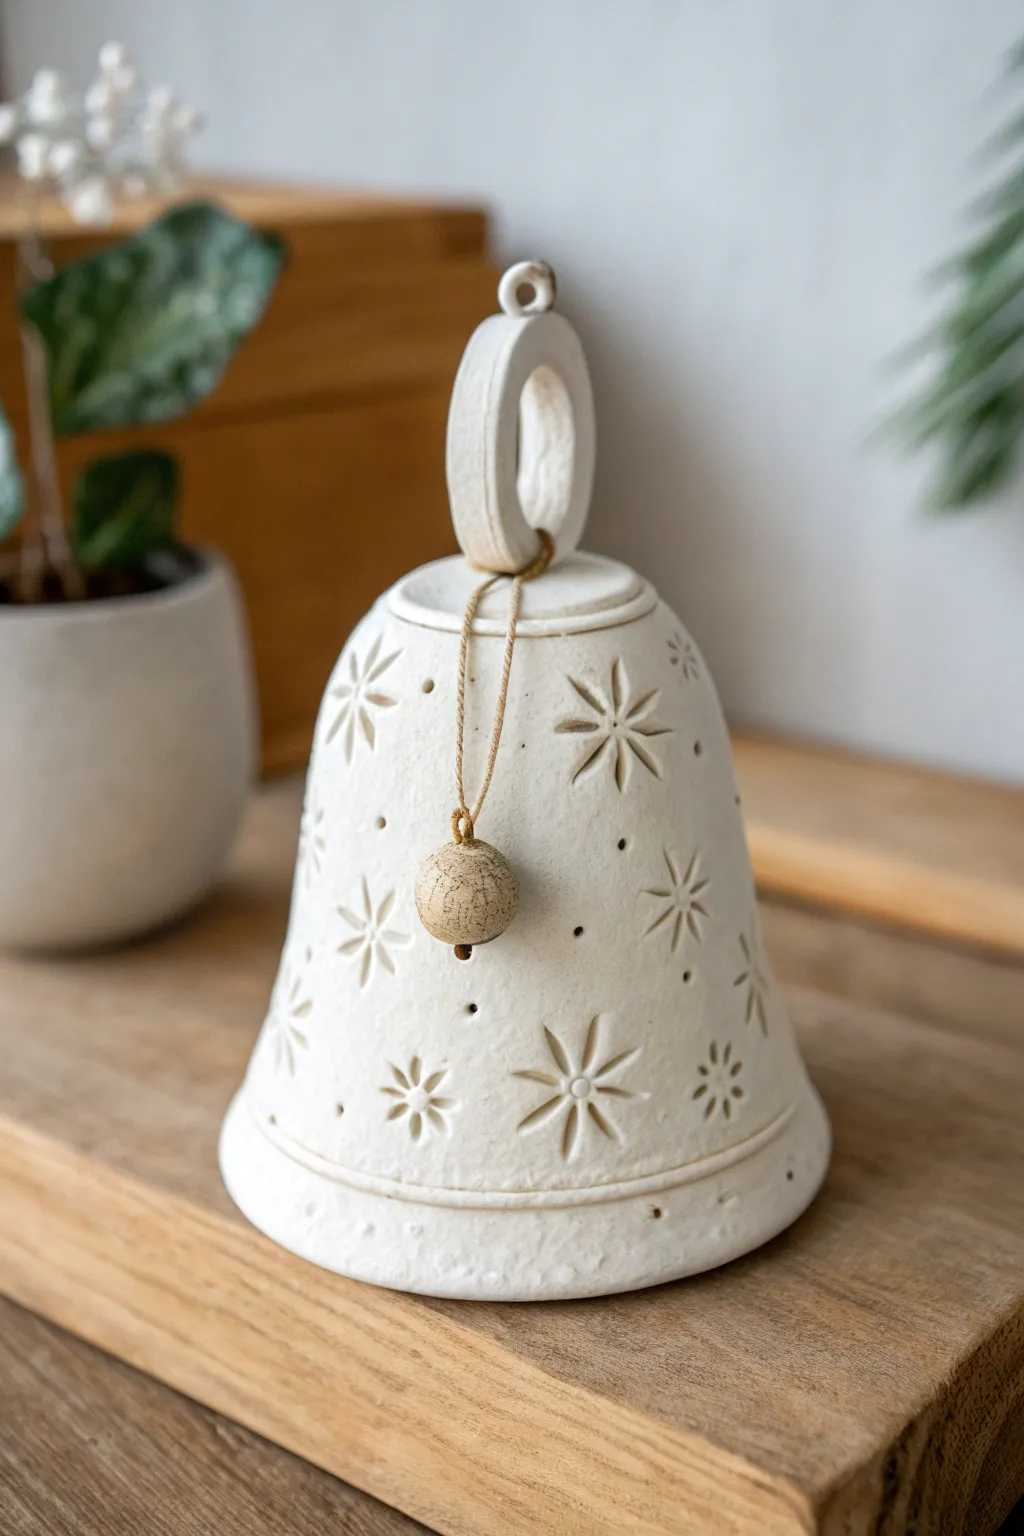
This elegant ceramic bell features a beautifully textured surface of carved starbursts and a charming dangling bead clapper. It combines simple pinch pot construction with detailed surface decoration for a finished piece that looks professionally thrown.
Step-by-Step
Materials
- White or speckled stoneware clay
- Pottery needle tool
- Small carving loop tool
- Wire clay cutter
- Wooden sculpting tool
- Hemp cord or twine
- Sponge and water
- Rolling pin (optional)
- Small wooden bead (or extra clay to make one)
Step 1: Forming the Bell Body
-
Wedge the clay:
Start with a ball of clay about the size of a large orange. Wedge it thoroughly to remove air bubbles and ensure an even consistency. -
Create the pinch pot:
Insert your thumb into the center of the ball and gently pinch the clay between your thumb and fingers. Rotate as you pinch to create an even, cup-like shape. -
Elongate the form:
Unlike a bowl, you want this form to be tall. Gently squeeze and pull the clay upward to create a bell shape that is narrower at the top and flares at the bottom. -
Flatten the base:
Turn the pot upside down onto your work surface. Gently tap the ‘bottom’ (which is now the top of the bell) to create a flat area for the handle. -
Refine the rim:
Flip the bell right-side up. If your rim is uneven, use a needle tool to slice off the excess, creating a straight edge. Smooth this cut edge with a damp sponge. -
Create the rim detail:
Roll a very thin coil of clay. Score and slip the bottom edge of the bell, then attach the coil to create a slightly thickened, decorative lip around the base. Smooth the seam so it looks integrated.
Fixing Cracks
If you see cracks forming on the rim while shaping, compress the clay by running a damp sponge firmly over the edge to bind the particles back together.
Step 2: Adding the Handle and Details
-
Make the handle:
Roll a separate coil of clay about the thickness of your finger. Form it into a loop or ring shape. -
Attach the handle:
Score the flat top of your bell and the bottom of your clay ring. Apply slip (clay glue) and firmly press the ring onto the top center. Smooth the connection points with a wooden tool. -
Pierce the hanging hole:
Use your needle tool or a small straw to punch a hole through the very top center of the bell body, directly under the handle loop. This is where the clapper string will go. -
Smooth the surface:
Before carving, use a damp sponge or a flexible rib tool to smooth the entire exterior of the bell. I like to let it dry to a ‘leather hard’ state here, which makes carving much cleaner.
Make It Ring
For a louder sound, make sure the walls of your bell are fairly thin and even. Thick clay sounds like a dull thud, but thin walls will sing.
Step 3: Carving and Finishing
-
Map out the pattern:
Lightly sketch your starburst or floral pattern onto the clay surface using the needle tool. Aim for a random but balanced distribution of large and small stars. -
Carve the petals:
For the larger stars, use a small loop tool to carve out teardrop shapes radiating from a center point. For smaller stars, simple incised lines work well. -
Add texture dots:
Use the blunt end of a small paintbrush or a needle tool strictly to poke small divots around the stars and near the rim for extra texture. -
Make the clapper bead:
Roll a small ball of clay. Poke a hole all the way through intended for the string. You can scratch the surface for texture to match the bell. -
Fire the pieces:
Allow the bell and bead to dry completely before kiln firing. Bisque fire, apply a matte white glaze (or leave raw if using nice clay), and glaze fire. -
Assemble the chime:
Cut a length of hemp cord. Tie it to the clay bead. Thread the other end up through the inside of the bell and out the top hole. -
Secure the cord:
Tie the cord securely around the base of the handle loop so the bead hangs freely inside, hitting the ceramic wall when shaken.
Hang your finished bell near a window or in the garden to enjoy the gentle clinking sound
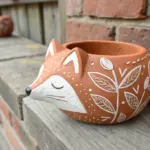
Tiny Slab Fairy House Sculpture
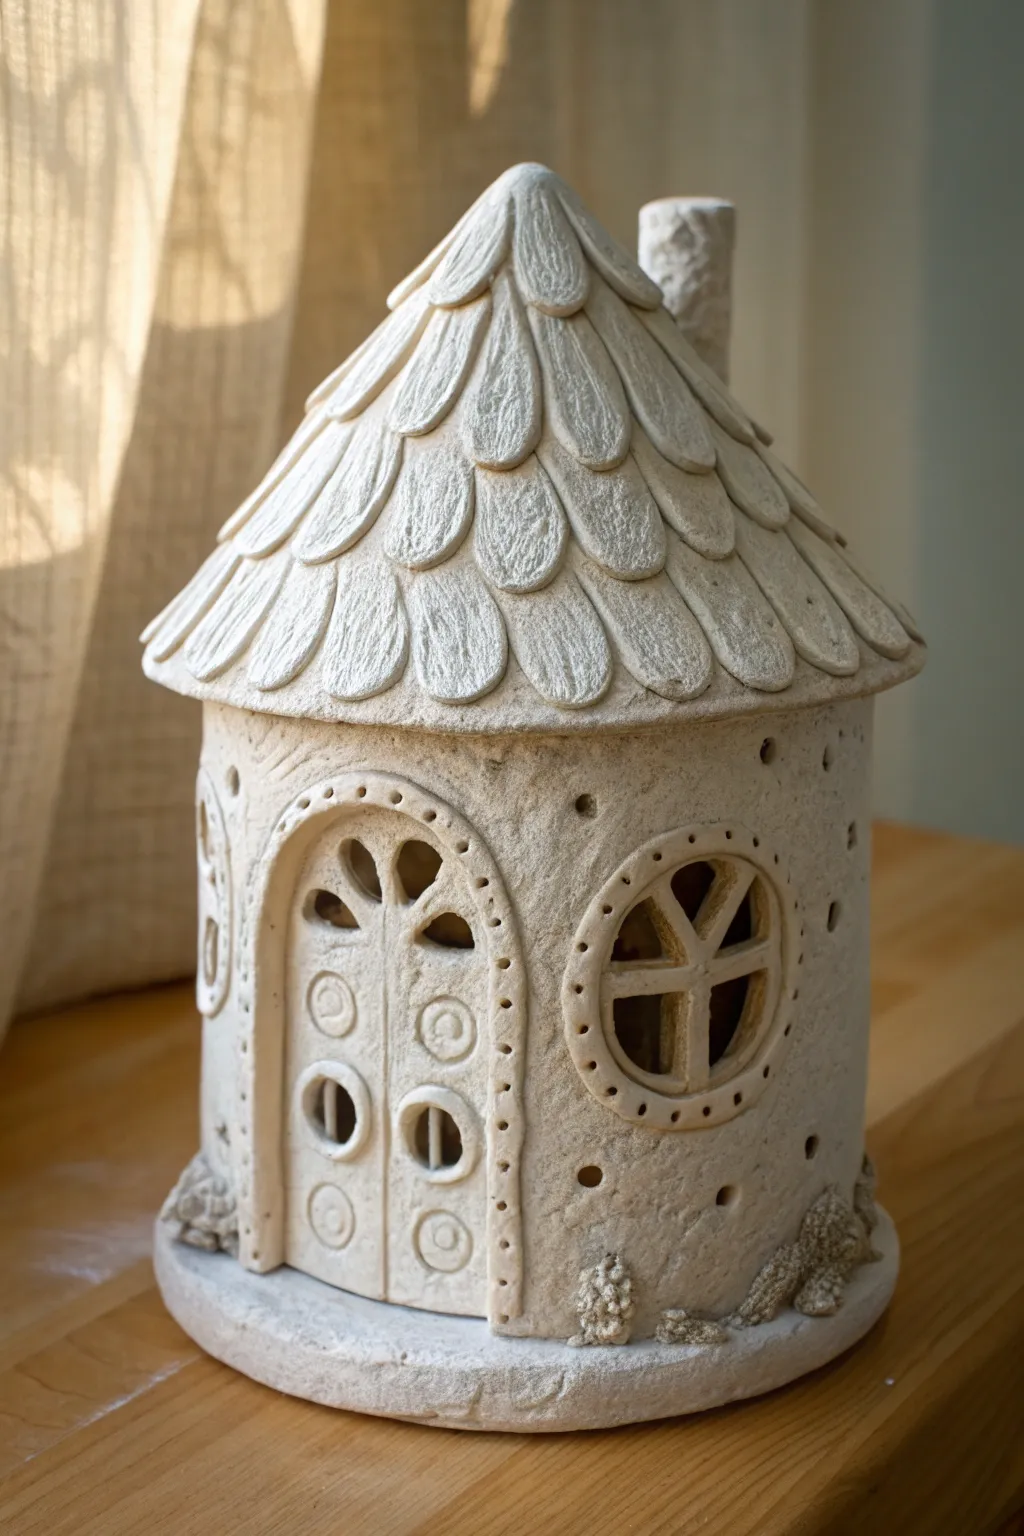
This charming project involves constructing a cylindrical dwelling topped with a shingled roof that looks like overlapping flower petals or feathers. Using white clay with a bit of grog gives it a lovely, rustic texture perfect for a garden sprite’s home.
Detailed Instructions
Materials
- White stoneware clay or air-dry clay (light color)
- Rolling pin and canvas mat
- Cylindrical form (like a sturdy cardboard tube or PVC pipe wrapped in newspaper)
- Needle tool or clay knife
- Slip and scoring tool (fork or serrated rib)
- Small circle cutters (or bottle caps)
- Wooden modeling tools
- Sponge and water
- Texturing tool (stiff brush or sandpaper)
Step 1: Building the Base Structure
-
Prepare the slab:
Roll out a slab of clay to an even thickness of about 1/4 inch on your canvas mat. Creating a long rectangle large enough to wrap around your chosen cylinder form represents the main walls. -
Form the cylinder:
Stand your paper-wrapped cylinder form upright. Wrap the clay slab around it, cutting the excess so the ends just meet. Score and slip the seam thoroughly to join the ends, blending the clay with a wooden tool until the seam disappears. -
Create the floor:
Roll a second, smaller slab and cut a circle slightly larger than the diameter of your cylinder. Score and slip the bottom edge of your cylinder walls and attach it firmly to this circular base. -
Add the base texture:
Roll a thin coil and press it around the very bottom where the wall meets the floor to reinforce the joint. Use your fingers to pinch and shape this into rough, rock-like mounds, adding small balls of clay to simulate stones or moss around the foundation. -
Let it firm up:
Allow the cylinder to stiffen to ‘leather hard’ before removing the inner support form. This prevents the walls from collapsing while you work on the roof.
Sagging Roof?
If the roof starts to slump during construction, ball up some newspaper loosely and stuff it inside the house structure immediately. This provides internal support until the clay dries enough to hold its own weight.
Step 2: Constructing the Shingled Roof
-
Make the roof cone:
Roll another slab and cut out a large circle. Cut a wedge (about 1/4 of the circle) out of it, like a slice of pie. Bring the cut edges together to form a cone shape that fits perfectly over your cylinder walls. Score, slip, and blend the seam. -
Attach the roof:
Score the top rim of your house and the underside of the roof cone. Press them together firmly and blend the clay on the inside to secure the connection. -
Create the shingles:
Roll out a thin slab of clay. Cut many teardrop or petal shapes. These don’t need to be identical; slight variations add character. -
Apply the shingles:
Starting at the bottom edge of the roof, attach a row of clay petals using a dab of slip for each. Overlap the next row slightly on top of the first, staggering them like fish scales. I prefer to work my way up to the peak slowly to ensure even coverage. -
Detail the shingles:
Once all shingles are attached, use a needle tool or small knife to scratch faint vertical lines into each petal, giving them a textured, wood-grain, or feather-like appearance. -
Add the chimney:
Form a small clay cylinder. Cut the bottom at an angle so it sits flush against the slope of the roof. Score and slip to attach it near the top.
Glow Up
Before firing, cut a hole in the bottom base large enough for an LED tea light. Once fired, placing a flickering light inside will make the windows of your fairy house glow warmly.
Step 3: Windows, Doors, and Details
-
Carve the arched doorway:
Draw an arched doorway shape on the front of the house. Use a needle tool to cut out the opening entirely, or create a recessed area by pressing the clay inwards. -
Sculpt the door frame:
Roll a thin coil of clay and attach it around the door opening to create a decorative frame. Use a needle tool to poke small holes evenly around this frame for a pattern. -
Build the double doors:
Create two flat semi-circles that fit inside your frame. Add small circles and recessed panels to mimic wood carving. Don’t forget to cut out small windows within the door itself. -
Add round windows:
Use a circle cutter to mark window locations on the side walls. Cut out the inner circle, leaving a rim. Add thin coils in a cross shape inside the window to create panes. -
Final texturing:
Use a stiff-bristled brush or a specific texturing tool to tap the exterior walls gently. This gives the surface a stucco-like or stone texture. Poke a few random small ventilation holes near the back or underneath hidden spots to prevent cracking in the kiln.
Once fired, the natural texture of the white clay creates a timeless look that needs no glaze to be beautiful.
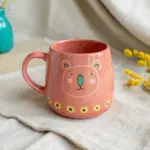
Shelf-Sitter Animal With Dangling Legs
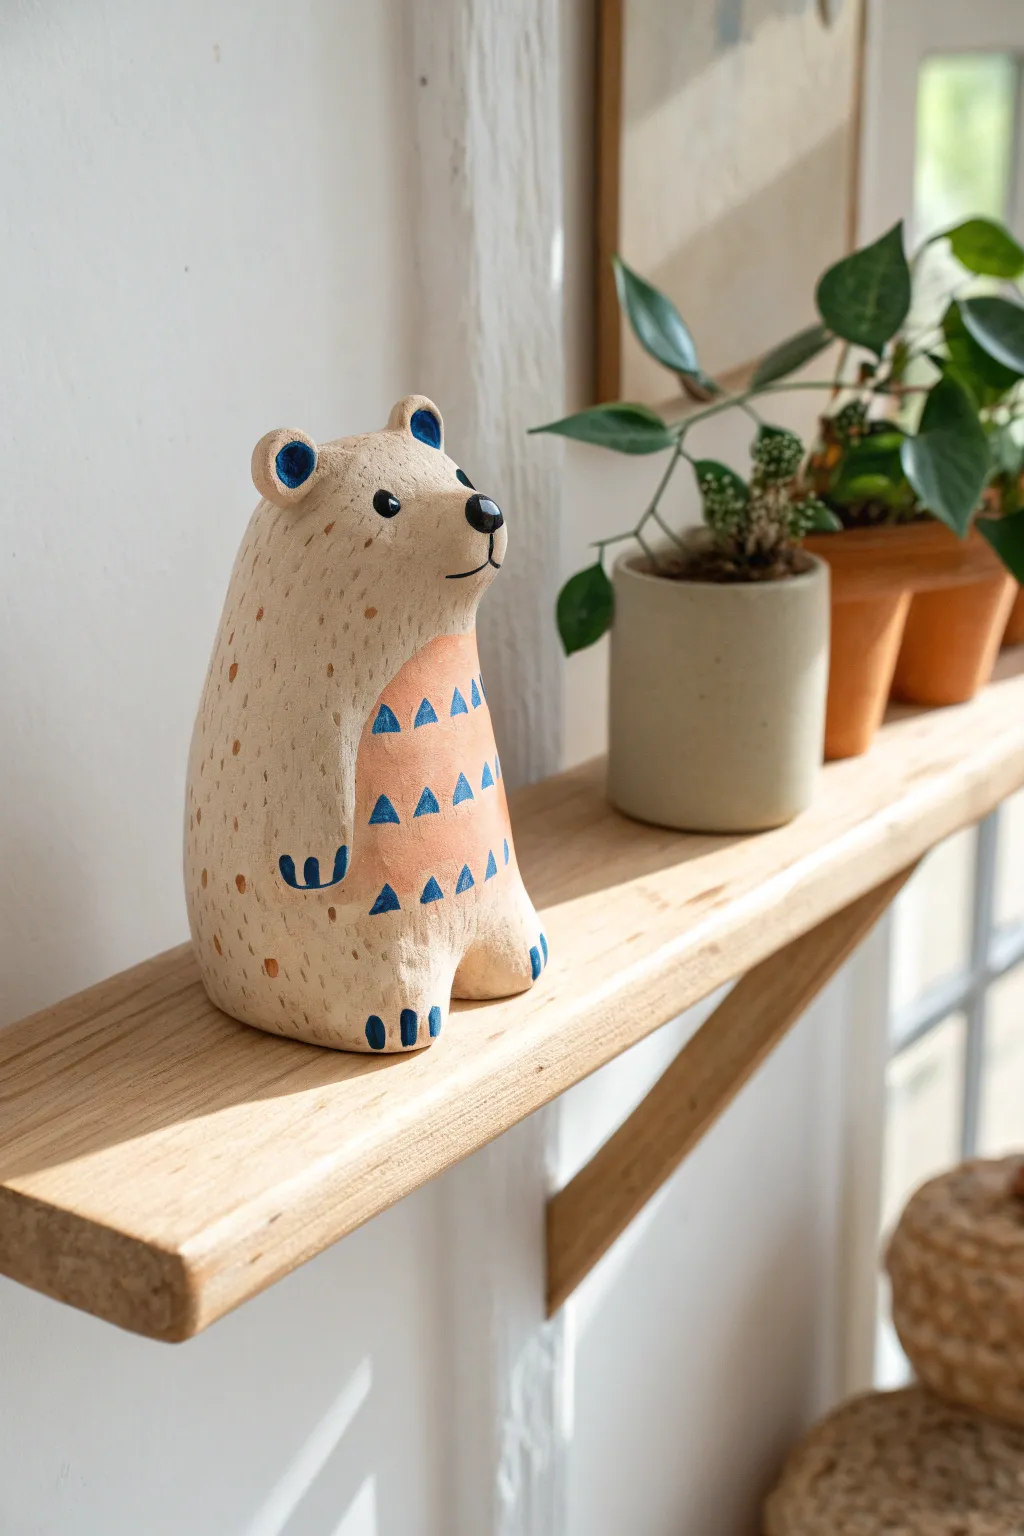
This charming ceramic bear features an elongated, stylized form with a sweet face and patterned belly that adds a modern touch. Its simple shape makes it perfect for beginners, while the painted details allow for endless personalization.
Detailed Instructions
Materials
- Air-dry clay or kiln-fire clay (white or light beige)
- Clay roller or rolling pin
- Basic clay tools (needle tool, rib tool)
- Small cup of water and slip (clay glue)
- Sponge
- Acrylic paints (peach/terracotta, dark blue, black)
- Fine detail paintbrush
- Matte sealant or varnish
Step 1: Sculpting the Form
-
Create the base cylinder:
Start with a softball-sized lump of clay. Wedging it well to remove air bubbles, roll it into a thick, elongated cone or cylinder shape with a slightly flattened bottom so it stands up straight. -
Shape the body:
Gently taper the top part of the cylinder to form the neck and head area. The transition should be smooth, creating a continuous, sloping back rather than a defined neck indentation. -
Pull the snout:
At the top front of the shape, gently pinch and pull the clay forward to create a distinctive, protruding snout. Smooth it into the face so it looks organic, not stuck on. -
Form the legs:
At the base of the cylinder, use your thumb to push an indentation into the bottom center, separating the clay into two stubby leg forms. Define the feet by slightly flattening the front of these mounds. -
Smooth the surface:
Using a slightly damp sponge or rib tool, go over the entire surface to remove fingerprints and bumps. I like to spend extra time here to get that sleek, minimalist finish. -
Add the ears:
Roll two small, pea-sized balls of clay. Flatten them slightly and attach them to the top of the head using the score-and-slip method (scratching both surfaces and applying clay water). Blend the seams completely. -
Refine the stability:
Tap the bear gently on the table to ensure the bottom is perfectly flat and the sculpture sits securely without wobbling.
Uneven Standing?
If your bear wobbles after drying, glue a small piece of felt to the base or gently sand the bottom flat with fine-grit sandpaper.
Step 2: Painting & Details
-
Initial drying:
Allow the clay to dry completely. For air-dry clay, this usually takes 24-48 hours depending on thickness. If kiln-firing, fire to bisque now. -
Base sketch:
Lightly pencil in the oval shape for the belly patch and mark where the eyes and nose will go. This helps you plan symmetry before committing with paint. -
Paint the belly patch:
Mix a soft peach or terracotta color. Paint the defined oval area on the bear’s stomach. You sit might need two coats for opaque coverage. -
Add belly patterns:
Using a fine brush and dark blue paint, add rows of small triangles across the peach belly patch. Keep them somewhat loose and hand-painted looking rather than perfectly geometric. -
Paint the paws:
With the same dark blue, paint three small vertical dashes for claws on each foot. Add three similar curved dashes on the sides of the body to suggest arm paws resting against the belly. -
Detail the face:
Using blue paint, color the inside of the ears. Switch to black paint to carefully fill in the nose tip and two small round eyes. Add a thin line for the mouth extending down from the nose. -
Add texture speckles:
Dilute a bit of light brown or dark beige paint. Dip a stiff brush or toothbrush in it and gently flick or stipple tiny speckles across the unpainted parts of the bear’s body to give it a speckled ceramic look. -
Seal the piece:
Once all paint is visibly dry, apply a coat of matte varnish or sealant to protect the finish and deepen the colors.
Pro Tip: Ear Placement
Place ears slightly lower on the side of the head curve, rather than right on top, to give the bear a softer, friendly look.
Place your finished bear on a shelf alongside a trailing plant for the perfect cozy vignette
Tic-Tac-Toe Board With Sculpted Pieces
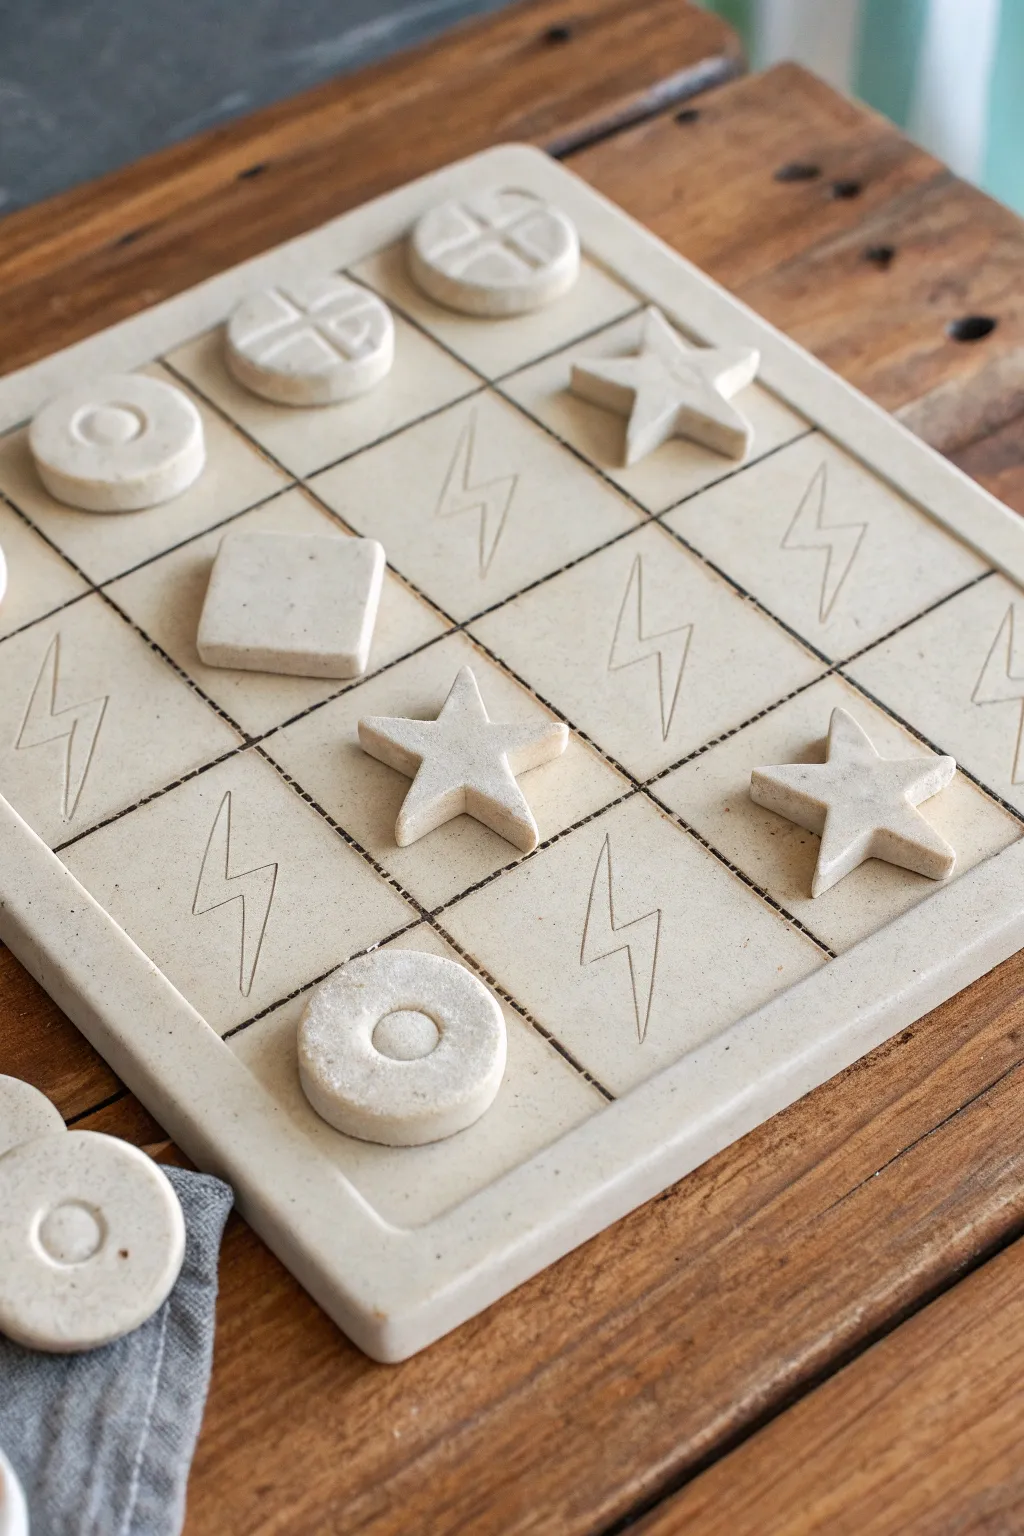
Elevate classic tic-tac-toe (or in this case, 4×4) into a functional piece of art using simple slab construction techniques. This project combines geometric precision with fun, hand-sculpted game pieces on a durable ceramic board featuring a cool lightning bolt motif.
How-To Guide
Materials
- White or speckled stoneware clay
- Rolling pin
- Canvas mat or cloth
- Two wooden guide strips (approx. 1/4 inch thick)
- Ruler or straight edge
- Needle tool
- Fettling knife
- Small geometric cookie cutters (circle, star, square)
- Slip and scoring tool
- Sponge
Step 1: Sculpting the Board
-
Roll the base slab:
Begin by wedging your clay thoroughly to remove air bubbles. Place the clay on your canvas mat between two wooden guide strips. Roll the clay out until the rolling pin rests on the guides, ensuring a perfectly even thickness. -
Cut the square:
Using a ruler and a fettling knife or needle tool, measure and cut a large, perfect square. For the 4×4 grid shown, a 10-inch or 12-inch square works well, allowing plenty of room for pieces. -
Create the border strips:
Gather your excess clay and reroll it to the same thickness. Cut four long strips that are about 1/2 inch wide. These will form the raised frame around your game board. -
Attach the frame:
Score the outer edges of your large square slab and the underside of your border strips aggressively. Apply a generous amount of slip to the scored areas. -
Secure and smooth:
Press the strips onto the edges of the board. Smooth the seams on the outside and inside edges using a modeling tool or your finger so the border looks integrated, not just stuck on top.
Warp Warning
To prevent the large flat board from warping in the kiln, dry it very slowly under plastic. Weighting the corners gently with sandbags while drying can also help keep it flat.
Step 2: Designing the Grid
-
Measure the grid:
Lightly measuring with a ruler, divide the interior space into four equal columns and four equal rows. Make tiny guide marks at the edges before committing to lines. -
Carve the lines:
Use a needle tool or a specialized carving tool to incise the grid lines. You want a groove deep enough to see clearly but not so deep it weakens the slab. A ruler helps keep these lines crisp. -
Add the motif:
In the blank squares where pieces won’t sit initially, carve a recurring symbol. The example uses a simple three-stroke lightning bolt. Sketch it lightly first, then carve it deeper for visibility. -
Clean up burrs:
Wait until the clay is leather hard, then use a semi-damp sponge to wipe away the little clay crumbs (burrs) created by your carving.
Step 3: Creating the Game Pieces
-
Roll the piece slab:
Roll out a fresh slab of clay, slightly thicker than your board if possible, to give the pieces a nice weight. -
Cut base shapes:
Using small cookie cutters or free-handing with a knife, cut out your two opposing teams. I like to make about 8-10 pieces for each shape type (like stars and circles) to ensure you have enough for a full game. -
Detail the first team:
For the circular pieces, add a smaller circle of clay in the center or press a smaller tool in to create a ‘donut’ relief impression. -
Detail the second team:
For the stars or squares, soften the sharp points slightly with your finger so they aren’t brittle after firing. You can add texture to the stars or keep them smooth. -
Create the ‘Kings’:
Make a few special pieces with distinct markings, like the cross-hatched circles shown in the back, to serve as ‘king’ pieces or simply to add variety to the set. -
Dry slowly:
Place the board and all pieces on a drying rack. Loosely cover them with plastic for the first day to prevent the corners of the board from curling up as they dry. -
Fire:
Bisque fire the completely dry set. Depending on your aesthetic, you can leave the clay raw (unglazed) for a natural stone look, or apply a clear matte glaze to protect the surface.
Level Up: Storage
Create a matching clay box or a drawstring fabric bag to store the loose pieces so they don’t get lost. You can even carve the same lightning motif onto the storage container.
Once fired, you will have a durable, heirloom-quality game set perfect for rainy days in the classroom