Whenever I need a quick project that still feels magical, I reach for clay shaker designs—because that little rattle, swish, or sprinkle never gets old. Here are my favorite clay shaker ideas, from cute shaker charms with moving bits inside to functional salt and pepper shakers you’ll actually want to keep on the table.
Classic Kawaii Animal Shaker Charm
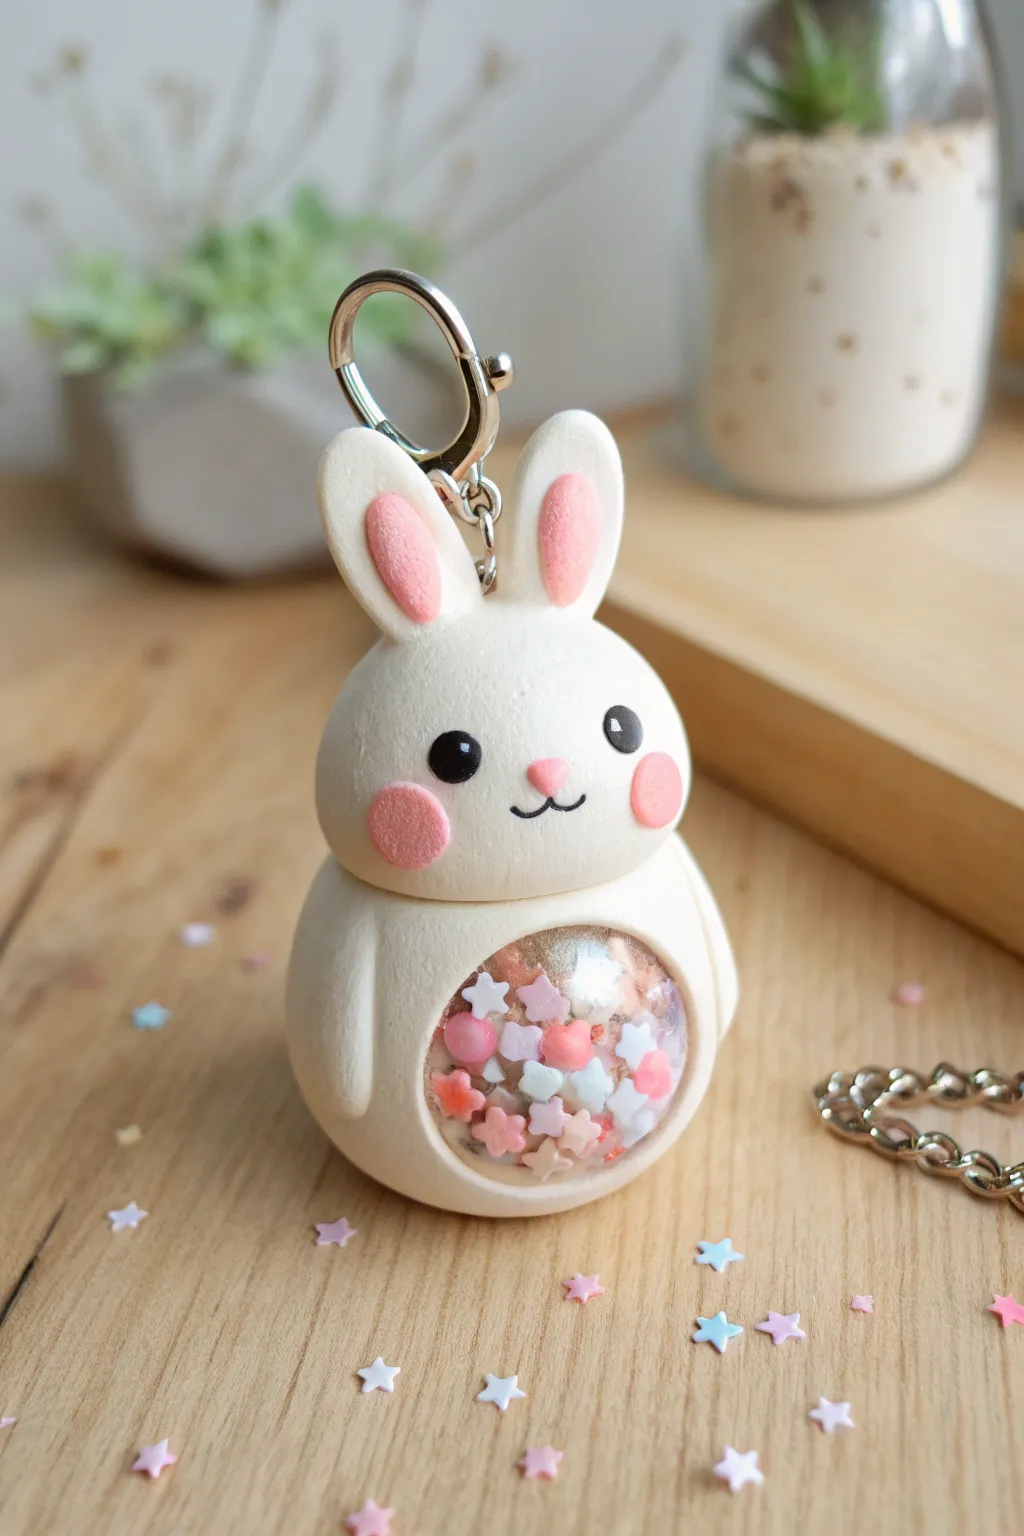
This adorable bunny charm features a clever hollow tummy filled with star confetti, combining the fun of a shaker toy with a classic kawaii character. With its smooth white finish and soft pink accents, it makes for a delightful keychain or bag accessory.
How-To Guide
Materials
- White polymer clay
- Pink polymer clay
- Clear UV resin
- UV lamp
- Clear acetate sheet or transparency film
- Star-shaped glitter or clay sprinkles
- Black acrylic paint
- Small dotting tool or toothpick
- Circle cutter (approx. 1 inch)
- Eye screw pin
- Keychain hardware
- Liquid clay (TLS)
- Sandpaper (fine grit)
- Gloss glaze (optional)
Step 1: Shaping the Base
-
Create the body:
Start by conditioning a large ball of white polymer clay until it is soft and pliable. Roll it into a smooth, slightly flattened egg shape to form the main body. -
Form the cavity:
Using a circle cutter, gently press into the lower center of the body to mark the window area. Carefully scoop out the clay inside this circle to create a shallow hollow cavity, smoothing the inner edges with a modeling tool. -
Add the head:
Roll a slightly smaller ball of white clay for the head. Flatten the bottom slightly to ensure a good connection surface. -
Attach the parts:
Apply a small dab of liquid clay to the top of the body and press the head firmly in place. Check from all angles to ensure it’s centered. -
Sculpt the ears:
Shape two elongated logs of white clay for the ears. Flatten them gently and press a smaller piece of pink clay into the center of each for the inner ear detail. -
Secure the ears:
Attach the ears to the top of the head using a bit of liquid clay, blending the seams at the back with a clay tool so they are sturdy. -
Insert hardware:
Insert the eye screw pin into the top of the head between the ears. I like to add a drop of liquid clay to the threads before inserting for extra security. -
Pre-bake:
Bake the clay structure according to your package instructions (usually 275°F/135°C for 15-30 minutes). Let it cool completely.
Step 2: Creating the Face & Shaker
-
Paint the face:
Use a dotting tool dipped in black acrylic paint to create two round eyes. Use a fine detail brush or toothpick to paint a small W-shaped mouth. -
Add pink details:
Roll tiny balls of pink clay (or use pink paint) for the cheeks and a tiny triangle used for the nose. Glue or press these onto the face. -
Fill the shaker:
Place your star sprinkles and glitter inside the hollow belly cavity. Fill it about halfway so the pieces have room to move. -
Cut the window:
Cut a piece of clear acetate sheet into a circle slightly larger than the opening of the belly cavity. -
Seal the window:
Apply a thin ring of UV resin around the rim of the cavity. Place the acetate circle on top, ensuring a tight seal, and cure under a UV lamp for 60 seconds. -
Dome the window:
Pour a layer of clear UV resin over the acetate to create a glass-like dome effect. Spread it to the edges and cure again until hard and tack-free. -
Finish body:
To hide the edges of the acetate, roll a very thin snake of white clay (or create a ‘frame’ with resin) and place it around the window border. -
Final cure:
If you added raw clay in the previous step, do a final short bake. If you used resin, give it a final full cure under the lamp. -
Assembly:
Once everything is cool and cured, attach your keychain hardware to the eye screw using jump rings.
Clean Clay Tip
White clay attracts dust like a magnet. Keep a pack of baby wipes or rubbing alcohol nearby to clean your hands and tools constantly while sculpting.
Baby Oil Magic
Add a tiny drop of baby oil inside the shaker cavity before sealing. This creates a ‘snow globe’ effect where the stars float slowly instead of rattling.
Now you have a charming little companion ready to hang on your backpack or keys


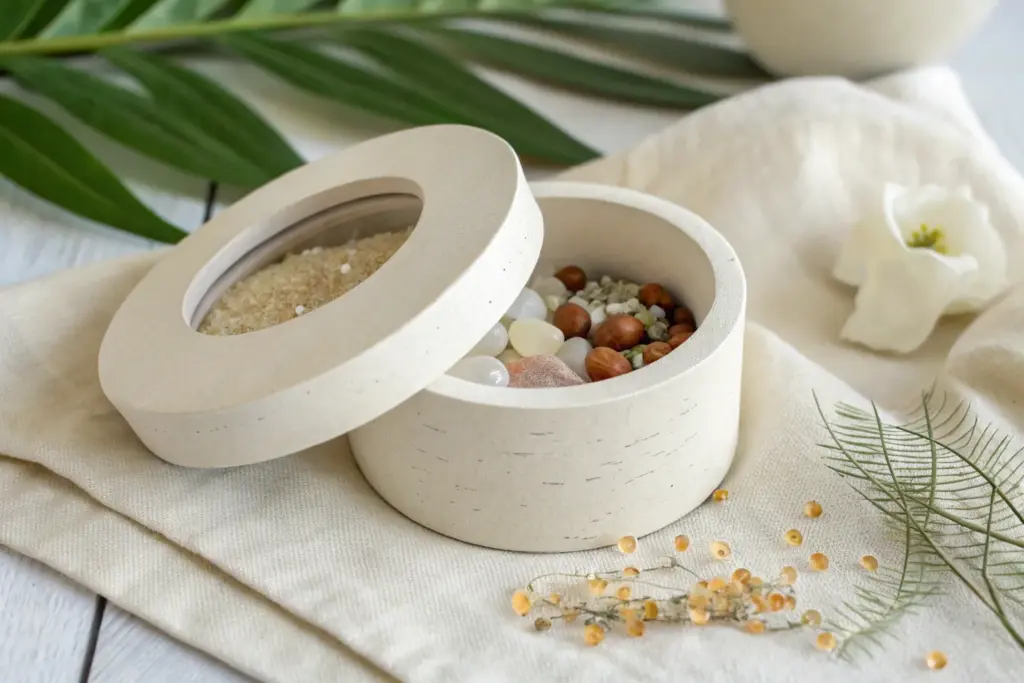
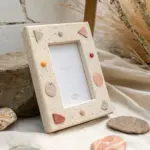
Simple Round Window Shaker Charm

Embrace simplicity with this elegant circular shaker charm, featuring a natural stone texture and soft pink accents. The clear window showcases a soothing mix of pastel chips and glitter, making it a perfect functional accessory or gift.
Step-by-Step Tutorial
Materials
- Polymer clay (white and beige/translucent blend)
- UV resin (hard type)
- Round clay cutters (two sizes to create a rim)
- Clear acetate sheet or transparency film
- Gold glitter (fine)
- Pink and white crushed shell chips or polymer clay sprinkles
- Gold keychain hardware with jump rings
- Hand drill or pin vise
- UV lamp
- Jewelry pliers
- Liquid polymer clay or strong glue
- Sandpaper or nail file
Step 1: Creating the Base and Frame
-
Mix the clay:
Start by mixing white polymer clay with a small amount of beige or translucent clay. You want a very pale, off-white stone look rather than stark white. -
Roll out the slab:
Roll your clay out to a thickness of about 4-5mm. It needs to be thick enough to hold the shaker bits inside. -
Cut the solid backing:
Use your larger circle cutter to punch out a solid circle. This serves as the back wall of your shaker. -
Create the front rim:
Cut another circle of the same size. Then, use a slightly smaller circle cutter to punch a hole directly in the center of this piece, creating a ring or rim. -
Bake the pieces:
Place the solid circle and the ring on a tile or baking sheet. Bake according to your clay package instructions (usually 275°F/135°C for 15-30 minutes) and let them cool completely.
Leaking Shaker?
If small glitter pieces are escaping through the seam, seal the side of the joined clay pieces with a thin layer of UV resin and cure again to close gaps.
Step 2: Assembling the Shaker Window
-
Cut the acetate:
Trace the size of your larger circle cutter onto a clear acetate sheet and cut it out. Trim just inside the line so the plastic doesn’t overhang the clay edge. -
Glitter the background:
This is a key detail: Mix a drop of UV resin with fine gold glitter. Spread a very thin layer of this mixture onto the *inside* face of the solid backing piece to create a shimmering backdrop. -
Cure the background:
Cure the glitter layer under your UV lamp for 60 seconds. -
Attach the rim:
Apply a thin line of liquid polymer clay or strong adhesive to one side of your baked clay ring. Press it firmly onto the glittered backing piece. -
Seal the seams:
If using liquid clay, bake the assembled piece again for 15 minutes to bond them. If using glue, ensure it is fully dry and check for gaps.
Level Up: Dried Flowers
Instead of stone chips, use tiny dried flower petals and gold leaf flakes inside the window for a botanical cottagecore aesthetic.
Step 3: Filling and Finishing
-
Add the shaker bits:
Pour your pink and white chips into the center cavity. Don’t overfill it; the pieces need room to move around. -
Secure the window:
Apply a thin ring of UV resin to the top surface of the clay rim. Carefully place your pre-cut acetate circle on top. -
Cure the window:
Cure immediately under the UV lamp for 60-90 seconds to lock the plastic in place. -
Add a final rim layer (Optional):
To hide the edge of the plastic, you can cut a very thin, flat ring of raw clay and place it over the acetate edge, then bake one last time. Alternatively, create a domed finish with resin. -
Sand the edges:
Once everything is cured and cool, use fine-grit sandpaper to smooth the outside edges of the circle so the top and bottom layers feel like one cohesive piece. -
Drill the hole:
Use a hand drill or pin vise to create a hole at the very top of the resin/clay rim. Be gentle to avoid cracking the casing. -
Attach hardware:
Insert a gold jump ring through the drilled hole. Use pliers to close it securely. -
Final assembly:
Connect your keychain clasp to the jump ring. I like to give the shaker a good shake now to make sure nothing is stuck.
Clip your new shaker onto your bag and enjoy the subtle sparkle every time you move


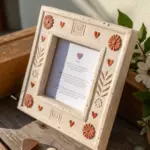
Heart Frame Shaker Charm

This sweet, soft pink heart charm features a playful shaker window filled with tiny pearls and beads. It creates a satisfying rattle and serves as a lovely handmade accessory for keys or bags.
Step-by-Step Guide
Materials
- Pink polymer clay (soft pastel shade)
- Liquid polymer clay (translucent)
- UV resin and UV lamp
- Heart-shaped clay cutter (medium size)
- Smaller heart-shaped cutter (for the center cutout)
- Thin clear acetate sheet or transparency film
- Assorted fillers: small faux pearls (white and pink), pink seed beads, clear microbeads
- Silver eye screw pin
- Silver keychain hardware with jump rings
- Jewelry pliers
- Rolling pin or pasta machine
- Craft knife or scalpel
- Sandpaper or nail buffer (fine grit)
- Glazing gloss (optional)
Step 1: Creating the Frame
-
Condition the Clay:
Begin by kneading your pink polymer clay until it is soft and pliable. If it’s too crumbly, add a drop of clay softener or baby oil. -
Roll out the Slab:
Roll the clay out into a slab that is approximately 3-4mm thick. You want it thick enough to hold the shaker bits but not too chunky. -
Cut the Outer Heart:
Use your larger heart-shaped cutter to punch out the main heart shape. Press firmly and wiggle slightly to get a clean cut. -
Create the Window:
Center the smaller heart cutter inside the clay heart you just cut. Press down to remove the center, leaving you with a heart-shaped frame. -
Smooth the Edges:
Gently rub the edges of the frame with your finger to smooth out any harsh lines or fingerprints. -
Insert the Eye Pin:
Carefully push a silver screw eye pin into the top center of the heart frame. Add a tiny dot of liquid clay on the screw threads before inserting for extra security. -
Bake the Frame:
Bake the clay frame according to the temperature and time instructions on your specific clay package. Let it cool completely before moving on.
Pro Tip: Static Control
Wipe your acetate sheets with a dryer sheet before gluing them down. This prevents static electricity from making the tiny beads stick to the window instead of shaking freely.
Step 2: Assembling the Shaker
-
Trace the Acetate:
Place your baked clay frame onto a clear acetate sheet. Trace the heart shape twice with a fine marker. -
Cut the Windows:
Cut out the two acetate hearts. Trim them slightly smaller than your traced lines so they fit comfortably on the back and front of the frame without overhanging. -
Attach the Back Window:
Apply a thin layer of UV resin or liquid clay to the *back* surface of your clay frame. Place one acetate heart on top and cure it under a UV lamp for 60 seconds. -
Seal the Back:
To ensure no beads escape, I recommend brushing a tiny bit more resin along the seam where the acetate meets the clay on the back. -
Add the Fillers:
Turn the frame over so the open side is facing you. Carefully pour in your pearl beads, pink seed beads, and microbeads. Don’t overfill it; they need room to move. -
Secure the Front Window:
Apply a thin line of UV resin around the top rim of the clay frame. Place the second acetate heart on top, sealing the beads inside. -
Cure the Seal:
Cure the top window under the UV lamp immediately to lock everything in place.
Level Up: Baby Oil Effect
For a slow-motion ‘snow globe’ effect, use baby oil! Seal the back window watertight with extra resin, create a small hole, inject oil with a syringe, and seal with resin.
Step 3: Finishing Touches
-
Doming the Top:
Pour a layer of clear UV resin over the top acetate window. Use a toothpick to drag the resin to the edges of the clay frame, creating a smooth, domed finish. -
Pop Bubbles:
Check for any air bubbles in the resin. If you see them, pop them gently with a lighter or a heat gun before curing. -
Final Cure:
Cure under the UV lamp for 2-3 minutes until the resin is hard and tack-free. -
Assemble the Keychain:
Use pliers to open the jump ring on your keychain hardware. Loop it through the eye pin on the heart and close the ring securely.
Give your new charm a little shake and enjoy the handmade sparkle.


Fruit Jam Jar Shaker Charm
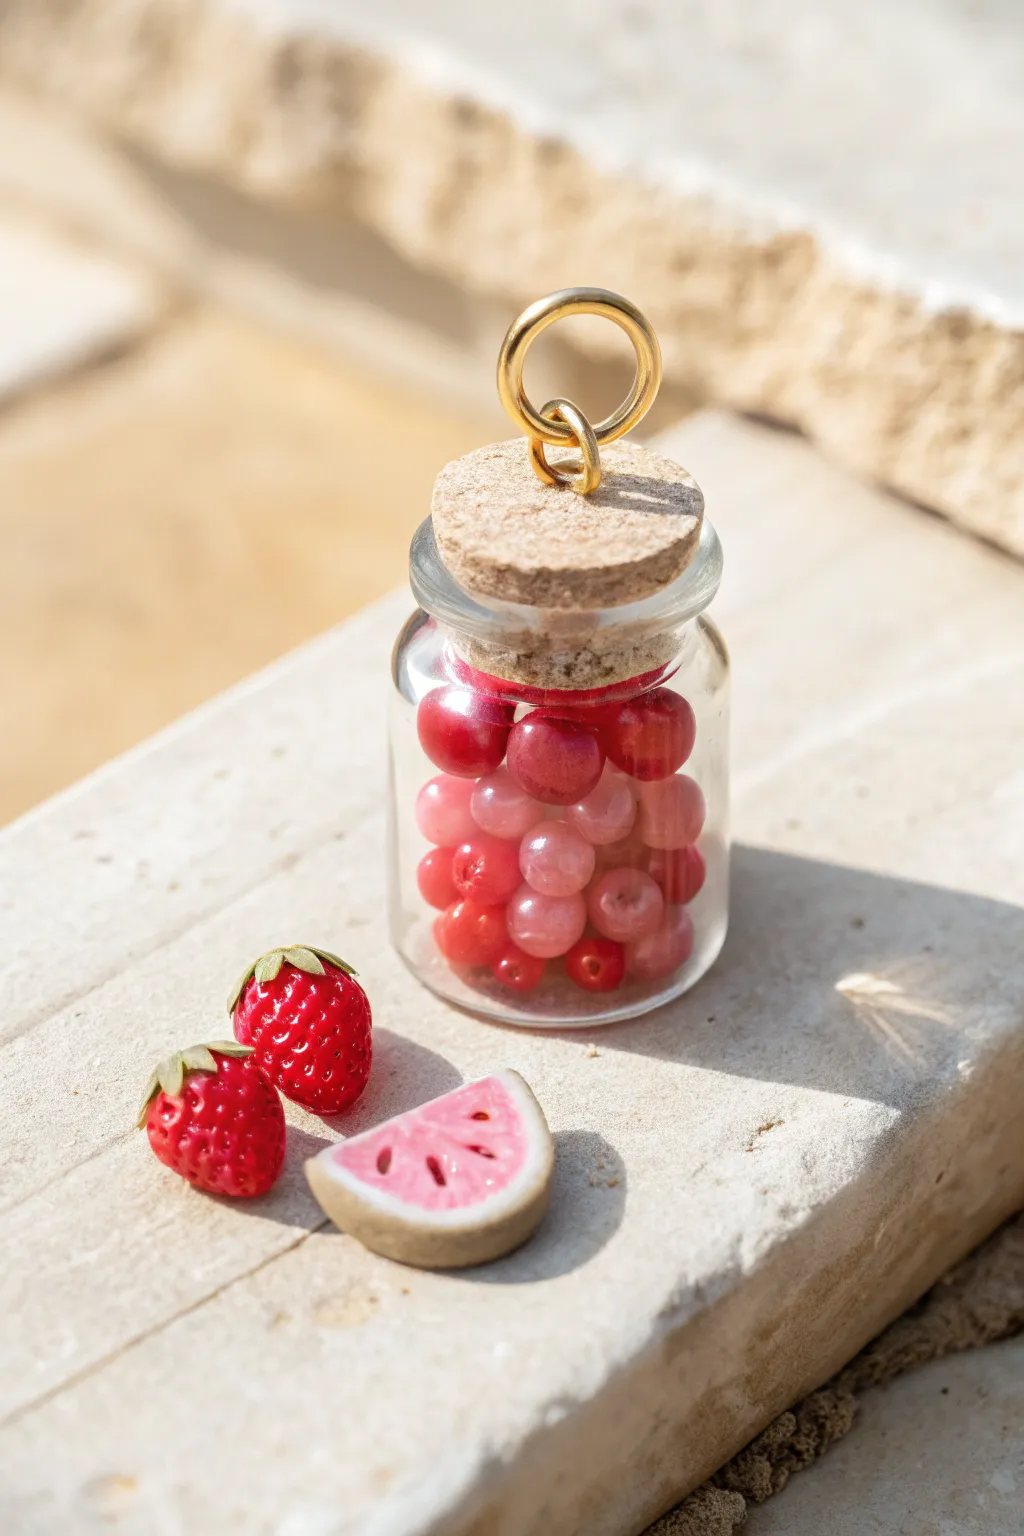
Capture the sweetness of summer in a tiny glass bottle filled with vibrant, berry-colored beads. This adorable shaker charm combines store-bought findings with handmade polymer clay miniatures for a delightful accessory perfect for necklaces or keychains.
Step-by-Step Tutorial
Materials
- Small glass vial with cork stopper
- Red and pink round glass beads (4mm – 6mm)
- Small gold eye screw
- Gold jump ring (large)
- Polymer clay (red, green, beige/translucent, pink, black)
- Liquid polymer clay (translucent)
- Needle tool or toothpick
- Gloss glaze or UV resin
- Super glue or E6000
- Pliers
Step 1: Preparing the Hardware
-
Attach the eye screw:
Begin by taking the cork stopper out of the glass vial. Locate the center of the top of the cork and gently twist your gold eye screw into it. If the cork feels crumbly, I like to pre-poke a hole with a needle tool first. -
Secure the hardware:
Unscrew the eye screw, dip the threads in a tiny amount of super glue, and screw it back in. This ensures it won’t pull out later. -
Add the jump ring:
Using your pliers, open the large gold jump ring and loop it through the eye screw. Close it securely. This will make the charm ready to hang immediately.
Juicy Realism
For ultra-realistic strawberries, rub a tiny bit of dark red pastel chalk into the seed indentations before baking to create shadows.
Step 2: Creating the Shaker Content
-
Select your beads:
Choose a mix of red, dark cherry, and soft pink glass beads. The variation in opacity—some clear, some milky—adds depth and realism to the ‘jam’ look. -
Fill the jar:
carefully drop the beads into the glass vial until it is nearly full, leaving just enough headspace for the beads to rattle slightly when shaken. -
Seal the jar:
Apply a thin rim of strong adhesive (like E6000) around the sides of the cork stopper. Press the cork firmly into the glass vial and let it set completely according to the glue’s instructions.
Step 3: Sculpting the Miniature Fruits
-
Shape the strawberry base:
Condition a small ball of red polymer clay and roll it into a teardrop shape about roughly 1cm tall. Slightly flatten the top where the leaves will go. -
Add texture:
Using a needle tool, poke tiny indentations all over the strawberry surface to mimic seeds. Don’t press too deep; just mark the surface. -
Create the leaves:
Flatten a tiny bit of green clay and cut a small star or flower shape. Press this onto the top of the strawberry. Add a tiny stem in the center. -
Sculpt the fruit slice:
Take a ball of beige clay and flatten it slightly. Add a smaller circle of pink clay on top and smooth the edges together so the pink is framed by the beige ‘rind’. -
Detail the slice:
Cut the clay circle in half to create a semi-circle slice. Use a needle tool to add seed pits and fill them with tiny specks of black clay or black paint. -
Bake the clay:
Place your miniature strawberries and fruit slice on a tile or parchment paper. Bake according to your polymer clay package directions (usually around 275°F/135°C for 15-20 minutes).
Cloudy Glass?
If super glue fumes fog up the inside of your glass while drying, leave the cork off for 20 minutes after applying glue to let vapors escape.
Step 4: Finishing Touches
-
Glaze the miniatures:
Once the clay pieces are cool, brush them with a gloss glaze or a thin layer of UV resin to make them look juicy and fresh. -
Final assembly:
Arrange the loose miniatures next to your finished shaker jar for display, or glue a small eye screw into the clay pieces if you want to hang them alongside the bottle.
Now you have a charming miniature preserve jar that captures the bright colors of freshly picked fruit

The Complete Guide to Pottery Troubleshooting
Uncover the most common ceramic mistakes—from cracking clay to failed glazes—and learn how to fix them fast.
Milk Carton Shaker Charm
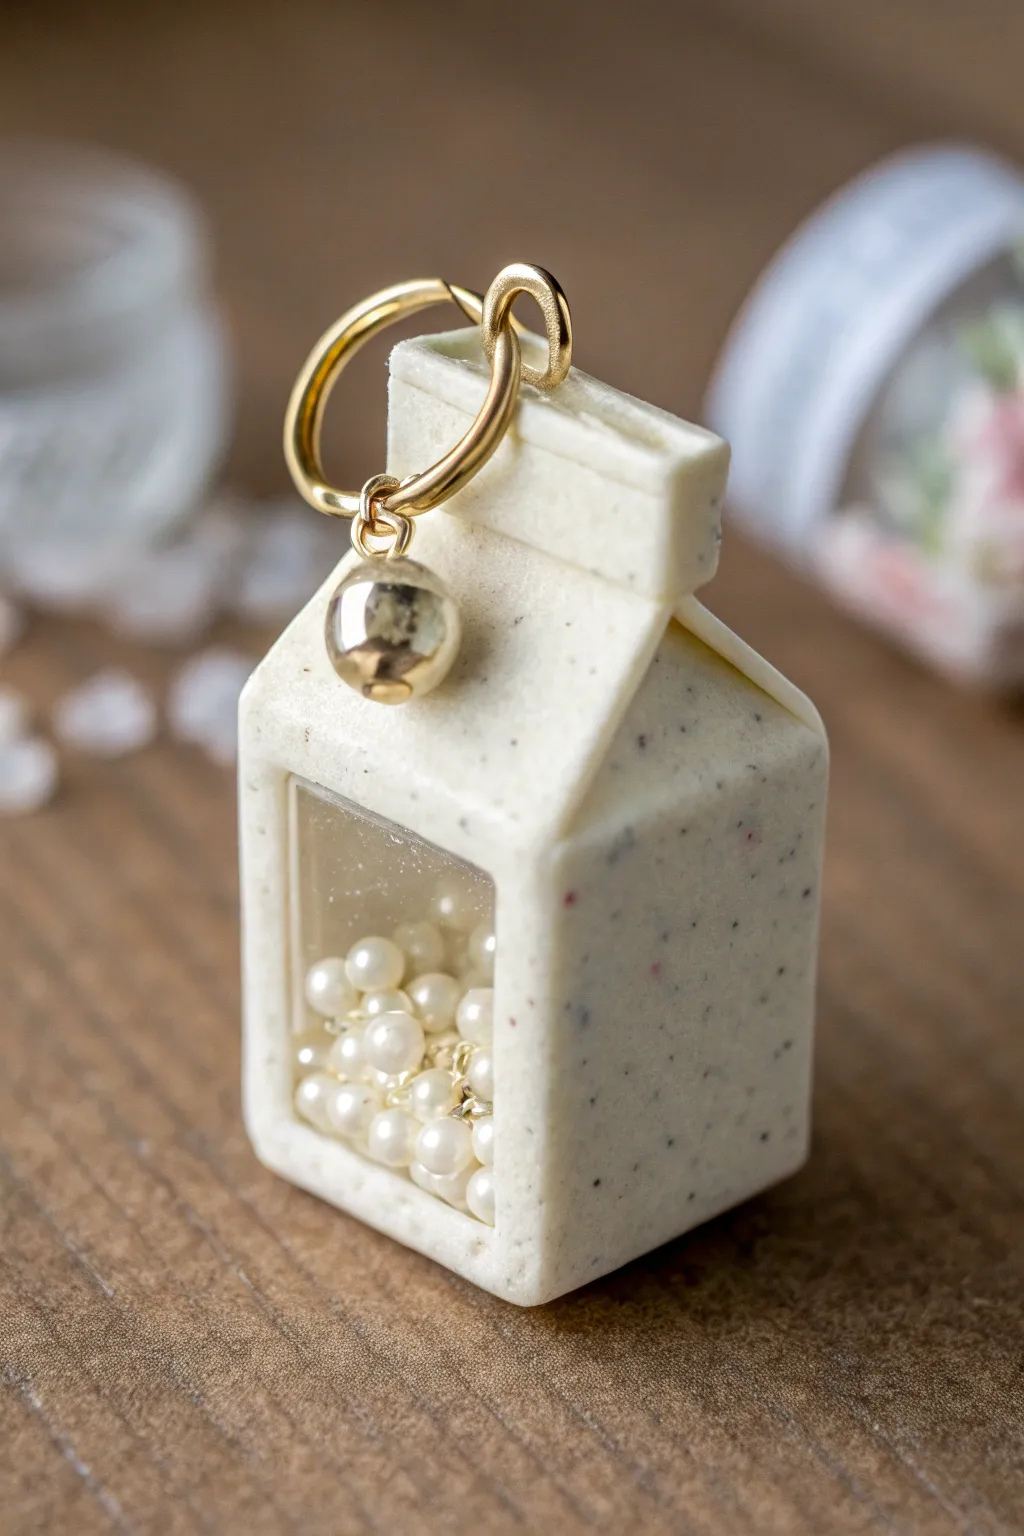
This adorable miniature milk carton brings a touch of kawaii charm to your keychain or bag. Featuring a speckled clay finish and a satisfying shaker window filled with tiny pearls, it’s a delightful project that combines structural clay work with shaker mechanics.
Step-by-Step Guide
Materials
- White polymer clay
- Speckled polymer clay (e.g., granite or cookies & cream effect) or black pepper/dried herbs
- UV resin (hard type)
- UV lamp
- Clear acetate sheet or transparency film
- Tiny white faux pearls (2-3mm)
- Liquid polymer clay (translucent)
- Craft knife
- Rolling pin or pasta machine
- Needle tool
- Small square cookie cutter (optional, for sizing)
- Gold screw eye pin
- Gold jump rings
- Small gold ball charm
- Sandpaper (various grits)
- Gloss glaze (optional)
Step 1: Preparing the Clay Base
-
Mix the clay:
If you don’t have pre-mixed speckled clay, simply condition white polymer clay and mix in a very small amount of black polymer clay chopped into dust, or even ground black pepper. Knead until the specks are evenly distributed but not blended into gray. -
Create the walls:
Roll the clay out into a thick slab, approximately 4mm thick. Using a craft knife, cut a long rectangle that will form the four walls of your carton. You want the carton to be about 1 inch tall, so size your strip accordingly. -
Cut the window:
Before assembling, identify which section will be the front. Use a small square cutter or your craft knife to carefully cut out a rectangular window opening in the center of that section. -
Assemble the box shape:
Fold the clay strip into a square tube shape. Use a little liquid clay to join the seams, smoothing them out with a silicone tool or your finger so the join is invisible. -
Add the bottom:
Place the square tube onto a thinner sheet of the same clay. Cut around the base to create a floor and seal the seams well on the inside and outside.
Cloudy Window Fix
If resin gets on the acetate window, wipe it immediately with baby wipes before curing. Once cured, you can try buffing it out or adding a thin top coat of resin.
Step 2: Forming the Carton Top
-
Shape total enclosure:
Pinch the top of the square tube gently inward to create the slanted ‘roof’ of the milk carton. You may need to trim excess clay to get that sharp, folded paper look. -
Refine the spout ridge:
Add a thin strip of clay along the very top ridge where the sides meet, mimicking the sealed edge of a real carton. Make sure the opening remains accessible if you plan to fill it from the top later, but for this method, we will bake the main body first. -
Pre-bake:
Bake the hollow clay structure according to the package instructions. Keep it slightly under-baked (about 70% of the time) if you plan to add more raw clay later, or fully bake it now.
Step 3: Creating the Shaker Mechanism
-
Prepare the window pane:
Cut a piece of clear acetate slightly larger than the window opening you cut earlier. Test the fit to ensure it covers the hole completely from the inside. -
Install the glass:
I prefer to apply a thin line of UV resin around the inner rim of the window opening. Place the acetate sheet carefully against it and cure with your UV lamp for 60 seconds. -
Seal from the inside:
For extra security, brush a thin layer of UV resin over the edges of the acetate inside the box to ensure pearls can’t get stuck in the gaps. Cure again.
Seamless Finish
Use a little baby oil on your finger to smooth clay seams before baking. It removes fingerprints and blends the clay perfectly without adding texture.
Step 4: Filling and Finishing
-
Adding the shaker bits-:
Pour your tiny white faux pearls into the carton through the top opening. Fill it about halfway so there is plenty of room for movement. -
Sealing the top:
Close off the top of the carton permanently. If your clay is already baked, use a mixture of liquid clay and raw clay to plug the top gap, sculpting it to match the folded ridge. Insert a gold screw eye pin into the top ridge before curing. -
Final cure:
Bake the entire piece again for the full recommended time to set the new clay and secure the eye pin. Let it cool completely. -
Sanding:
Once cool, use fine-grit sandpaper to buff the surface of the carton, smoothing out fingerprints and giving it that soft, matte stone-like texture. -
Attaching hardware:
Open a large gold jump ring and thread it through the eye pin. Add a small gold ball charm to the jump ring before closing it securely with pliers.
Now you have a charming little milk carton ready to shake up your accessory game
Starry Night Glitter Shaker Charm
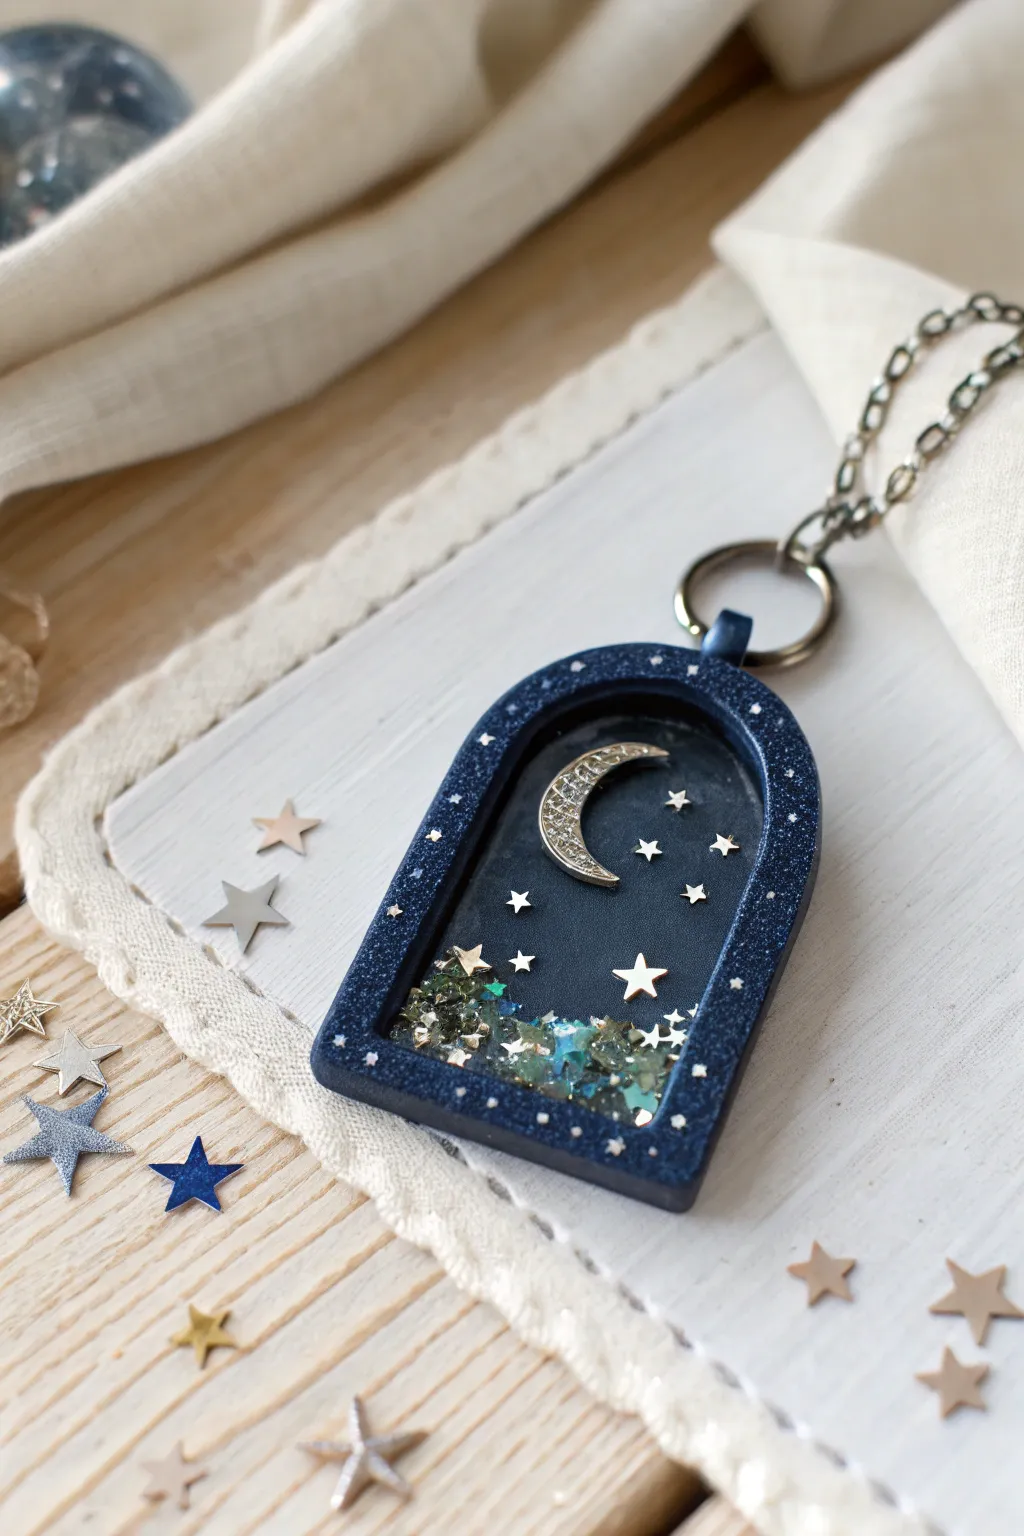
Capture the magic of a deep indigo night sky in this mesmerizing shaker charm. This window-shaped pendant features a shimmering starry background and a loose fill of gems and glitter that dances freely behind a clear film.
Step-by-Step Tutorial
Materials
- Deep blue polymer clay (e.g., navy or midnight blue)
- Fine silver glitter dust
- Silver moon charm or insert
- Tiny silver star confetti
- Chunky glitter or crushed glass (green/blue tones)
- UV resin or 2-part epoxy resin
- UV light (if using UV resin)
- Clear shaker film or heavy acetate sheet
- High-gloss varnish or polyurethane glaze
- Rolling pin or clay machine
- Arch/Window shape clay cutter
- Scalpel or craft knife
- Needle tool
- Jewelry jump ring and chain
Step 1: Creating the Clay Frame
-
Condition the Clay:
Begin by thoroughly conditioning your deep blue polymer clay until it is soft and pliable. Mix in a very small amount of fine silver glitter dust directly into the clay to give the frame itself a subtle, galaxy-like sparkle. -
Roll the Slab:
Roll the clay out to a medium thickness, approximately 3mm to 4mm. You want it thick enough to create depth for the shaker cavity but not too heavy to wear. -
Cut the Base Shape:
Use your arch-shaped cutter to punch out the main form. If you don’t have a cutter, print a template on paper and carefully trace around it with a scalpel. -
Create the Window:
Using a slightly smaller arch cutter or your scalpel, cut out the center of the shape, leaving a frame border about 4-5mm wide. Don’t discard the center piece yet; you’ll need it for sizing reference. -
Add the Bail Loop:
Form a small loop of clay or insert a tiny metal screw eye pin into the top center of the arch frame. Smooth the connection point so it looks seamless. -
Bake the Frame:
Bake the clay frame according to the manufacturer’s instructions (usually 275°F/130°C for 15-30 minutes). Let it cool completely before moving on.
Starry Depth
Mix a tiny drop of translucent liquid clay with blue mica powder and paint thin swirls on the backing before baking. This adds a nebula effect behind the stars.
Step 2: Assembling the Background
-
Prepare the Backing:
Roll out a thin sheet of the same blue clay (or black for deeper contrast) to create the back of your shaker. Place your cooled frame on top and cut around the outside so they match perfectly. -
Embed the Sky Details:
On this backing sheet, gently press your silver moon charm and several tiny star confetti pieces into the raw clay. They should be embedded enough to stick but slightly raised for texture. -
Bake the Backing:
Bake the backing piece separately. Once baked and cooled, use a strong adhesive or a thin layer of liquid clay to bond the frame to the backing piece. Bake again briefly if creating a liquid clay bond.
Step 3: Filling and Sealing
-
Seal the Cavity:
To make the cavity watertight for oil (optional) or just secure, brush a thin layer of UV resin along the inside seams where the frame meets the back. Cure under UV light. -
Add the Shaker Mix:
Pour your chunky green/blue crushed glass, loose glitter, and extra star confetti into the window cavity. Fill it about 1/4 to 1/3 full so the pieces have room to move. -
Cut the Transparency:
Trace your frame shape onto the clear shaker film or acetate. Cut it out slightly smaller than the outer edge of the frame so it fits neatly on the rim without overhang. -
Attach the Film:
Apply a thin bead of UV resin to the top face of the clay frame rim. Carefully place the clear film on top, ensuring there are no gaps. Cure under UV light immediately to lock it in place. -
Dome the Top:
To hide the film edges and create that glassy finish, pour a layer of UV resin over the entire front surface of the frame and the film window. Use a needle tool to guide the resin to the edges. -
Final Cure:
Cure the piece under your UV lamp for several minutes until it is hard and non-tacky. If the surface feels sticky, wipe it with a little rubbing alcohol. -
Assembly:
Open a large jump ring using pliers and thread it through the loop at the top of your pendant. Attach your chain and close the ring securely.
Leaking Oil?
If using baby oil inside, double-check your seal before adding liquid. Use a UV flashlight to spot-check for tiny gaps in the resin rim and patch them immediately.
Now you have a piece of the night sky you can wear close to your heart


What Really Happens Inside the Kiln
Learn how time and temperature work together inside the kiln to transform clay into durable ceramic.
Flower Confetti Shaker Charm
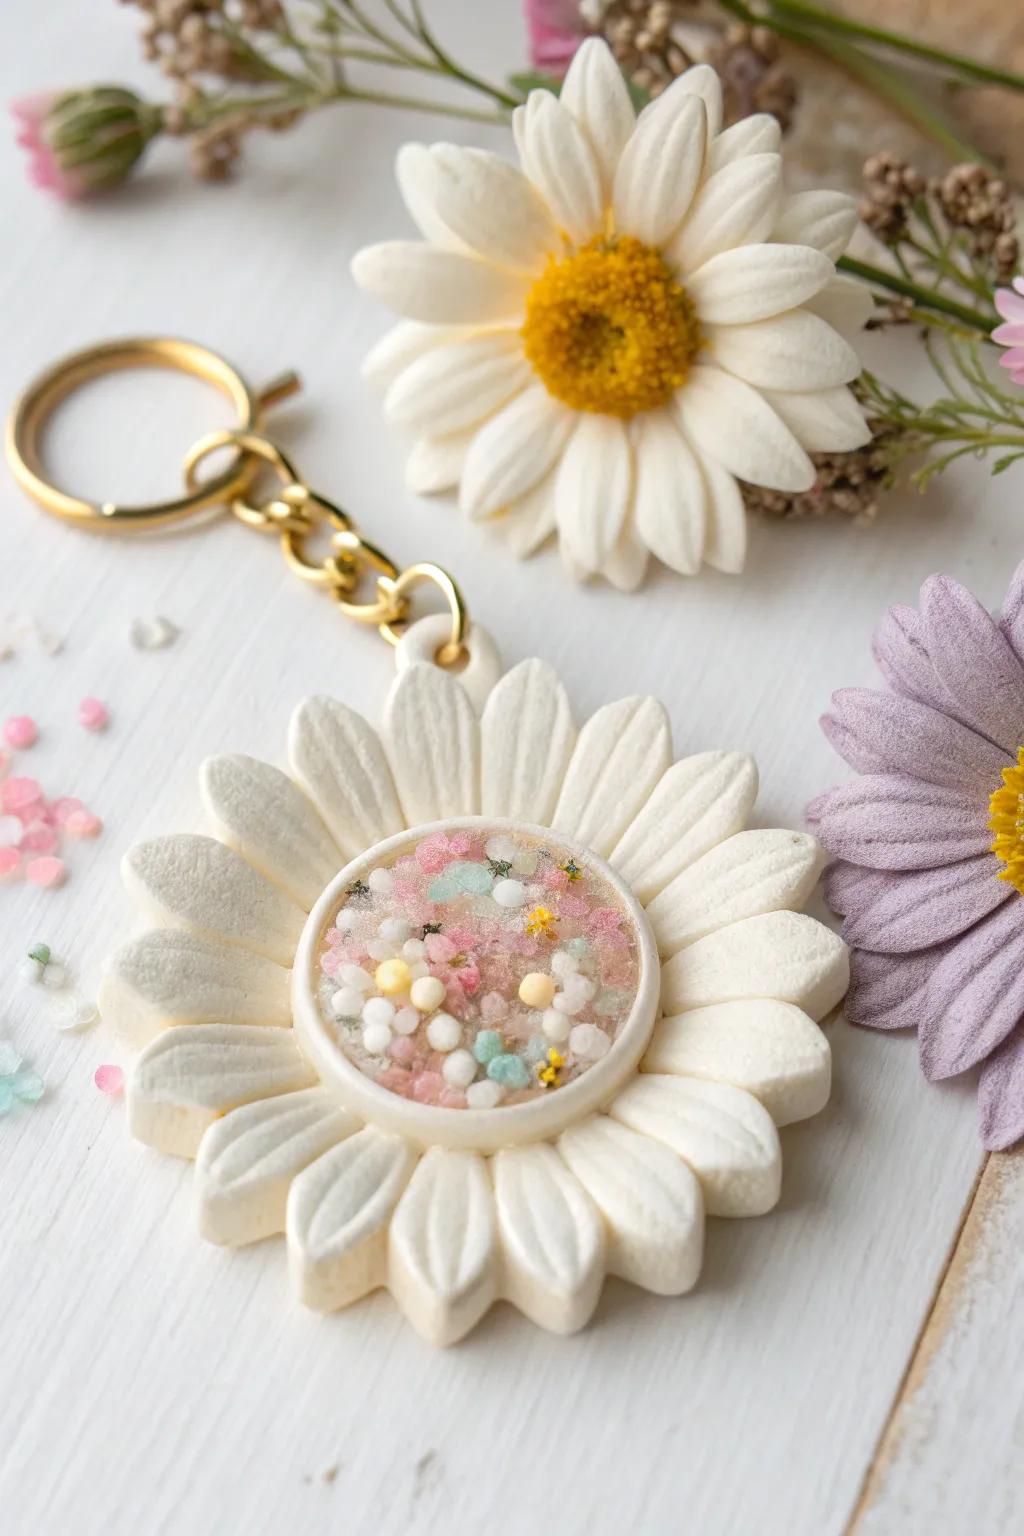
Capture the essence of spring with this elegant daisy-shaped shaker charm made from polymer clay and resin. This project features beautifully textured petals and a dreamy, confetti-filled center that rattles satisfyingly when shaken.
Step-by-Step
Materials
- White polymer clay
- Daisy flower cookie cutter (approx. 2-3 inches)
- Round cutter (smaller than the daisy center)
- UV resin (hard type)
- UV lamp
- Shaker film or transparency sheet
- Shaker inclusions (pastel wandering seeds/micro-beads, glitter, tiny stars)
- Gold tone keychain hardware with jump rings
- Clay sculpting tools (needle tool, ball tool)
- Small hand drill or pin vise
- Rolling pin or pasta machine
- Sandpaper or nail buffer
- Baby baby oil or clay softener (optional)
Step 1: Sculpting the Flower Base
-
Prepare the Clay:
Condition your white polymer clay until it is soft and pliable. Roll it out to a thickness of about 1/4 inch (approx. 6mm) making sure the surface is smooth and free of lint. -
Cut the Shape:
Press your daisy-shaped cookie cutter firmly into the clay. Before removing the cutter, gently wiggle it to ensure clean edges, then release the clay. -
Create the Cavity:
Take the smaller round cutter and press it into the absolute center of the flower, but do not cut all the way through. Press down about halfway to mark the shaker area. -
Hollow the Center:
Using a clay scoop or crafting knife, careful scoop out the clay inside the circle mark to create a well. Smooth the bottom and walls of this cavity with a ball tool or your finger. -
Refine the Petals:
This is a crucial step for realism. Use a needle tool or the back of a knife to gently score lines down the center of each petal. Soften the harsh edges of the petals with your fingertips to give them a rounded, pillowy look. -
Add Attachment Point:
Insert a screw eye pin into the top of one petal now, or wait to drill a hole after baking. I prefer drilling later for a cleaner finish, but inserting a pin now is easier.
Sticky Situation
If your resin stays tacky after curing, wipe it with rubbing alcohol or place the piece in direct sunlight for 10-15 minutes to fully harden the surface.
Step 2: Baking and Assembly
-
Bake the Clay:
Place your flower on a ceramic tile or baking sheet. Bake according to your brand of polymer clay’s instructions (usually 275°F/135°C for 15-30 minutes). Let it cool completely. -
Seal the Cavity Base:
Pour a very thin layer of UV resin into the bottom of the center well. Cure it under your UV lamp for 60 seconds to create a perfectly smooth floor for your shaker bits. -
Add Filings:
Carefully sprinkle your shaker fillers into the cavity. Use a mix of pastel micro-beads, tiny star glitter, and soft pink or yellow flakes. Don’t overfill; leave enough air space for movement. -
Cut the Window:
Trace the round cutter used earlier onto a piece of shaker film or clear transparency sheet. Cut slightly inside the line so the circle fits perfectly onto the ledge of your cavity.
Petal Perfection
Dust the raw clay petals with a tiny bit of white mica powder before baking. This adds a pearlescent shimmer that mimics the sheen of real flower petals.
Step 3: Sealing and Finishing
-
Attach the Film:
Apply a thin bead of UV resin around the top rim of the cavity wall. Place your cut film circle on top, ensuring there are no gaps. Cure immediately under the UV lamp. -
Dome the Center:
Pour clear UV resin over the film until it reaches the edges of the center circle, creating a high, glossy dome. Use a toothpick to guide the resin to the edge and pop any bubbles. Cure for 2-3 minutes. -
Detail the Rim:
To hide the seam where the film meets the clay, roll a very thin snake of white clay (or use white puffy paint). Apply it around the border of the resin dome. If using clay, you will need to re-bake briefly or cure if using liquid clay. -
Drill the Hole:
If you didn’t add an eye pin earlier, use a small hand drill to carefully bore a hole through the top petal. -
Attach Hardware:
Open a gold jump ring using two pairs of pliers. Thread it through the hole in the clay and connect it to your gold keychain clasp. Close the jump ring securely.
Your lovely daisy shaker is now ready to add a floral touch to your bag or keys
Snow Globe Liquid Shaker Charm
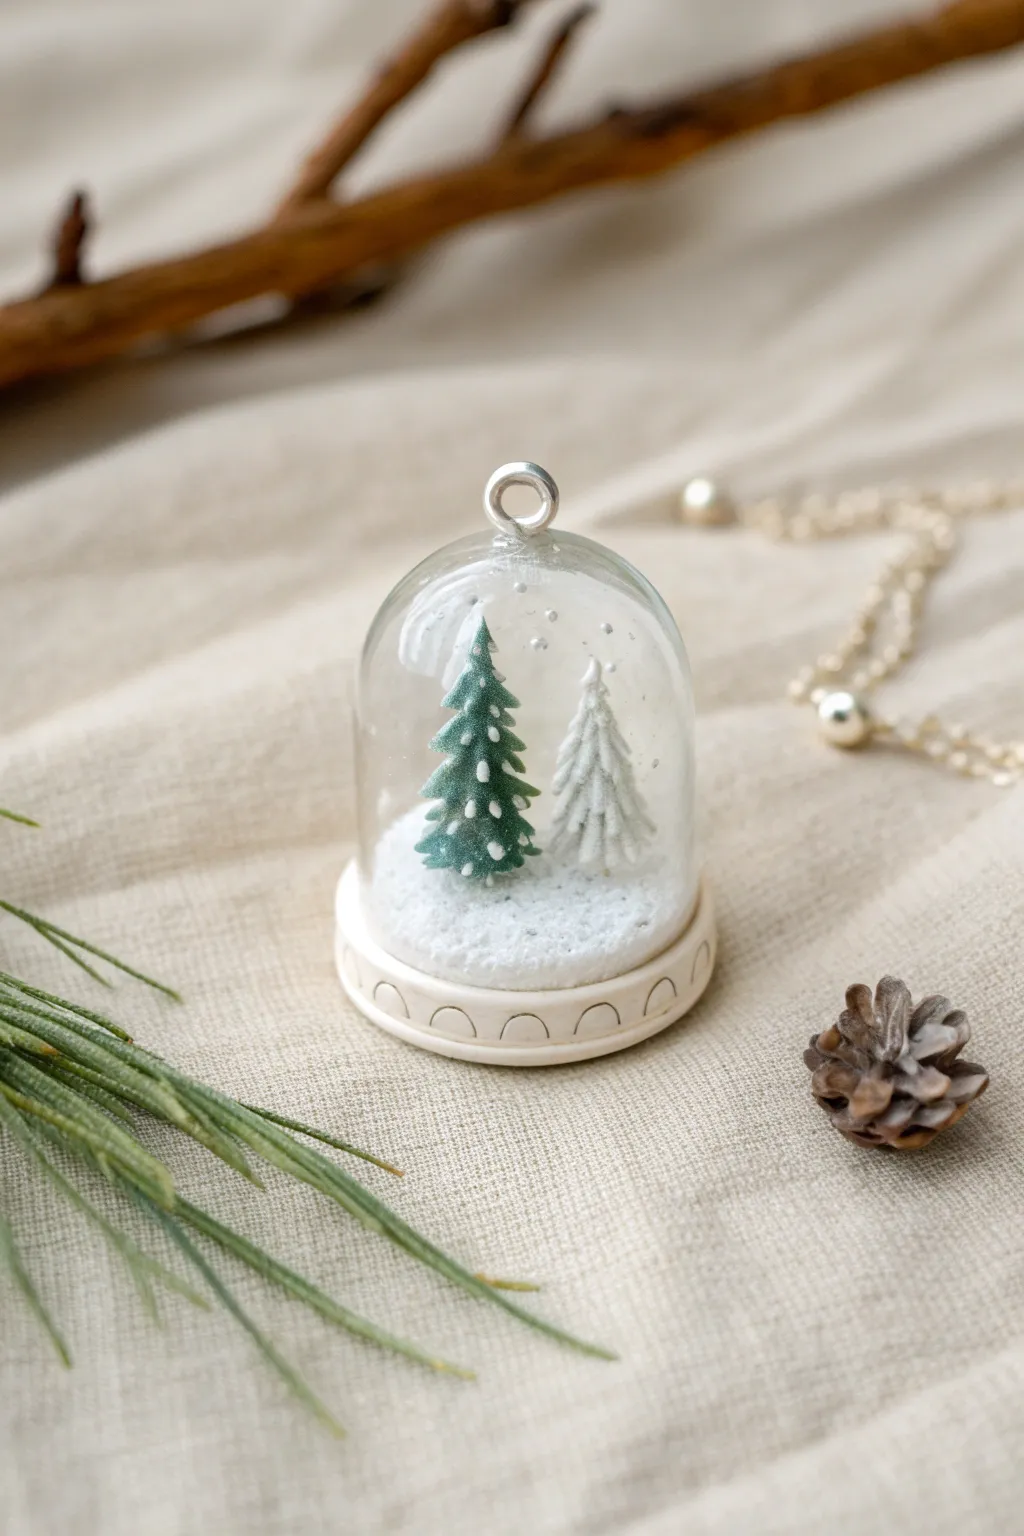
Capture the stillness of a snowy forest in this enchanting miniature snow globe shaker. This project combines delicate polymer clay sculpting with UV resin techniques to create a liquid-filled charm perfect for winter jewelry or ornaments.
Step-by-Step Guide
Materials
- Polymer clay (White, Green)
- Small glass globe bottle or clear UV resin dome mold
- UV resin (Clear)
- Baby oil or shaker oil
- White UV resin colorant or white alcohol ink
- Fine white glitter or faux snow powder
- UV lamp
- Small eye screw
- Needle tool or toothpick
- Small dotting tool
- Sculpting tools
- Strong craft glue or E6000
- Sandpaper (fine grit)
Step 1: Sculpting the Miniature Trees
-
Base Cone:
Start by rolling a tiny amount of green polymer clay into a very small, elongated cone shape. Repeat this process with white clay for the second tree. -
Wait or Bake:
If your clay is very soft, you might want to bake just these base cones for 5 minutes to make texturing easier, though working raw is faster if you have a gentle touch. -
Texturing the Branches:
Using a needle tool or small blade, gently pull down bits of clay starting from the bottom of the cone and working your way up. This creates the ‘boughs’ of the pine tree. -
Snow Details:
Take tiny flecks of white clay and carefully press them onto the tips of the green tree’s branches to mimic fresh snowfall. -
Final Bake:
Bake your miniature trees according to the manufacturer’s instructions for the brand of clay you are using. Let them cool completely.
Bubble Trouble?
Before sealing, let the oil sit for a minute so air bubbles rise to the top. Pop them with a lighter or toothpick for crystal clear results.
Step 2: Creating the Base
-
Forming the Platform:
Roll a disk of beige or white clay that is slightly wider than the opening of your glass globe or mold. This will be the distinct base shown in the photo. -
Adding Texture:
Using a needle tool or a small curved tool, press a repeating arch pattern around the side edge of the disk for a decorative touch. -
Snowy Ground:
Texture the top of the disk using a stiff brush or a crumpled ball of foil to make it look like uneven, packed snow. -
Baking the Base:
Bake the base piece and allow it to cool. Once cool, lightly sand the bottom if it isn’t perfectly flat.
Falling Trees
If trees detach inside the oil, it means the glue failed. Use E6000 for the bond and let it fully cure for 24h before adding liquid.
Step 3: Assembly and Filling
-
Mounting the Trees:
Using a dab of super glue or UV resin, secure the two tiny trees onto the center of your baked clay base. Cure briefly if using resin. -
Preparing the Dome:
If using a glass globe, clean the inside thoroughly. If using a resin mold, cast your hollow dome using clear UV resin and cure it fully. -
Adding Snow:
Place a pinch of fine white glitter or specialized shaker snow powder inside the dome. -
Filling with Oil:
Fill the dome almost to the brim with baby oil or shaker oil. The oil slows down the movement of the glitter, creating a dreamy effect. -
Sealing the Globe:
Apply a ring of UV resin around the rim of your dome. Carefully place the clay base (with trees attached) face down onto the dome. Ensure a complete seal. -
Curing the Seal:
Flip it over and cure under the UV lamp immediately. Rotate the piece to ensure the UV light reaches all sides of the seam. -
Top Loop:
Dip the threads of a small eye screw into UV resin and screw it securely into the very top center of the dome (if plastic) or glue it to the top. Cure again to lock it in place. -
Final Polish:
Inspect the seam between the dome and the base. I like to add a thin final layer of resin over the seam to ensure it is watertight and smooth.
Now you have a serene winter scene captured forever in a tiny, wearable world

TRACK YOUR CERAMIC JOURNEY
Capture glaze tests, firing details, and creative progress—all in one simple printable. Make your projects easier to repeat and improve.
Candy Sprinkle Shaker Charm
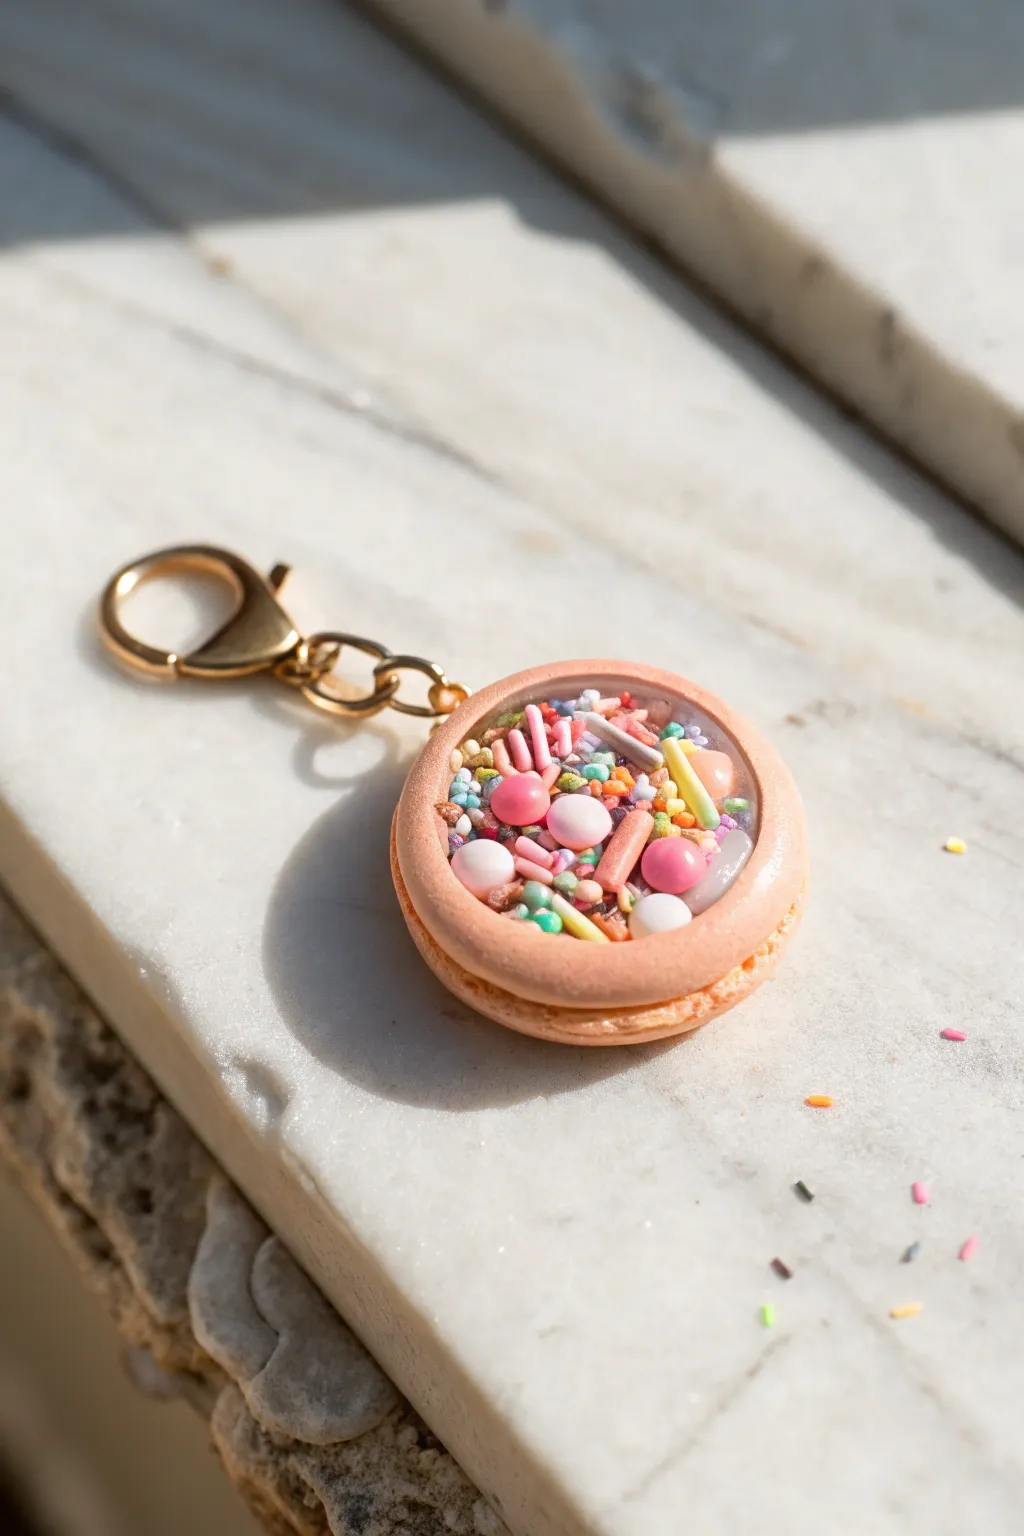
Capture the whimsy of a French patisserie with this delightful macaron shaker charm. The hollowed-out center reveals a colorful mix of faux sprinkles and beads encased in clear resin, creating a playful, interactive accessory.
Detailed Instructions
Materials
- Peach or light pink polymer clay
- Translucent liquid sculpey (TLS) or UV resin
- UV resin (hard type) and UV lamp
- Small clear acetate sheet or transparency film
- Assorted polymer clay sprinkles (can serve pre-baked or make your own)
- Small microbeads or glitter
- Circle cutters (two sizes to create the rim)
- Needle tool or toothpick
- Gold screw eye pin
- Gold lobster clasp keychain hardware
- Sandpaper (fine grit)
- Texture tool (toothbrush or needle tool)
Step 1: Crafting the Macaron Shells
-
Condition and Flatten:
Begin by conditioning your peach-colored polymer clay until it is soft and pliable. Roll it out into a thick sheet, approximately 4-5mm thick. -
Cut the Bases:
Use your larger circle cutter to punch out two identical circles. These will form the top and bottom of your macaron. -
Create the Foam Feet:
Roll out a separate, slightly thinner sheet of the same clay. Cut two more circles of the same size. Gently press one of these thinner circles onto the bottom of your thick circles. -
Texture the Edges:
Using a needle tool or an old toothbrush, texture the side edges of the thinner bottom layer to mimic the distinctive ‘feet’ of a baked macaron. Pull the clay slightly outwards and roughen it up for realism. -
Hollow the Top Shell:
Take one of your assembled macaron halves (this will be the top/shaker window). Use the smaller circle cutter to punch a hole directly in the center, leaving a sturdy rim of about 3-4mm.
Step 2: Baking and Assembly Setup
-
Pre-Bake Preparation:
Insert the gold screw eye pin into the top of the rimmed shell piece. Secure it with a tiny dab of liquid clay if needed to ensure it stays put during baking. -
Baking:
Bake both the solid bottom piece and the hollow rim piece according to your clay manufacturer’s instructions. Usually, this is around 275°F (135°C) for 15-30 minutes. -
Cool and Sand:
Allow the pieces to cool completely. If the flat surfaces aren’t perfectly level, gently sand them on a flat surface with fine-grit sandpaper to ensure a tight seal later. -
Cut the Acetate:
Trace the larger circle cutter onto your clear acetate sheet and cut it out. Trim it slightly if necessary so it fits perfectly flush on top of the hollow rim piece.
Clearer Windows
Wipe your acetate sheet with rubbing alcohol before attaching it to remove any fingerprints or dust. This ensures your shaker window is crystal clear.
Step 3: Creating the Shaker Mechanism
-
Seal the Window:
Apply a thin line of UV resin around the flat top surface of the hollow rim piece. Place your acetate circle on top and cure it under a UV lamp until hard. -
Prepare the Well:
Flip the window piece over so the acetate is face down. You now have a shallow well created by the rim. -
Fill with Sprinkles:
Place your polymer clay sprinkles, confetti, and microbeads into the center of the solid bottom piece. Pile them slightly in the middle, keeping them away from the very edge where you will glue. -
Seal the Macaron:
Apply UV resin or strong glue to the bottom rim of your top piece (the side without the acetate). I find using a toothpick helps control the flow here. -
Combine and Cure:
Carefully place the top piece over the bottom piece, aligning the edges perfectly so the sprinkles are trapped inside. Cure immediately with your UV lamp. -
Dome the Top:
To give the window a glossy, glass-like finish, apply a generous layer of UV resin over the acetate window on top. Spread it to the edges with a toothpick and cure. -
Attach Hardware:
Once fully cured and cool, open the jump ring on your gold lobster clasp keychain and attach it securely to the eye pin.
Flavor Variations
Make a trio of macarons in pastel pistachio green, lemon yellow, and violet. Fill each with color-coordinated sprinkles for a complete bakery set.
Now you have a charming, rattle-ready accessory perfect for your keys or bag
Treat Box Shaker Charm
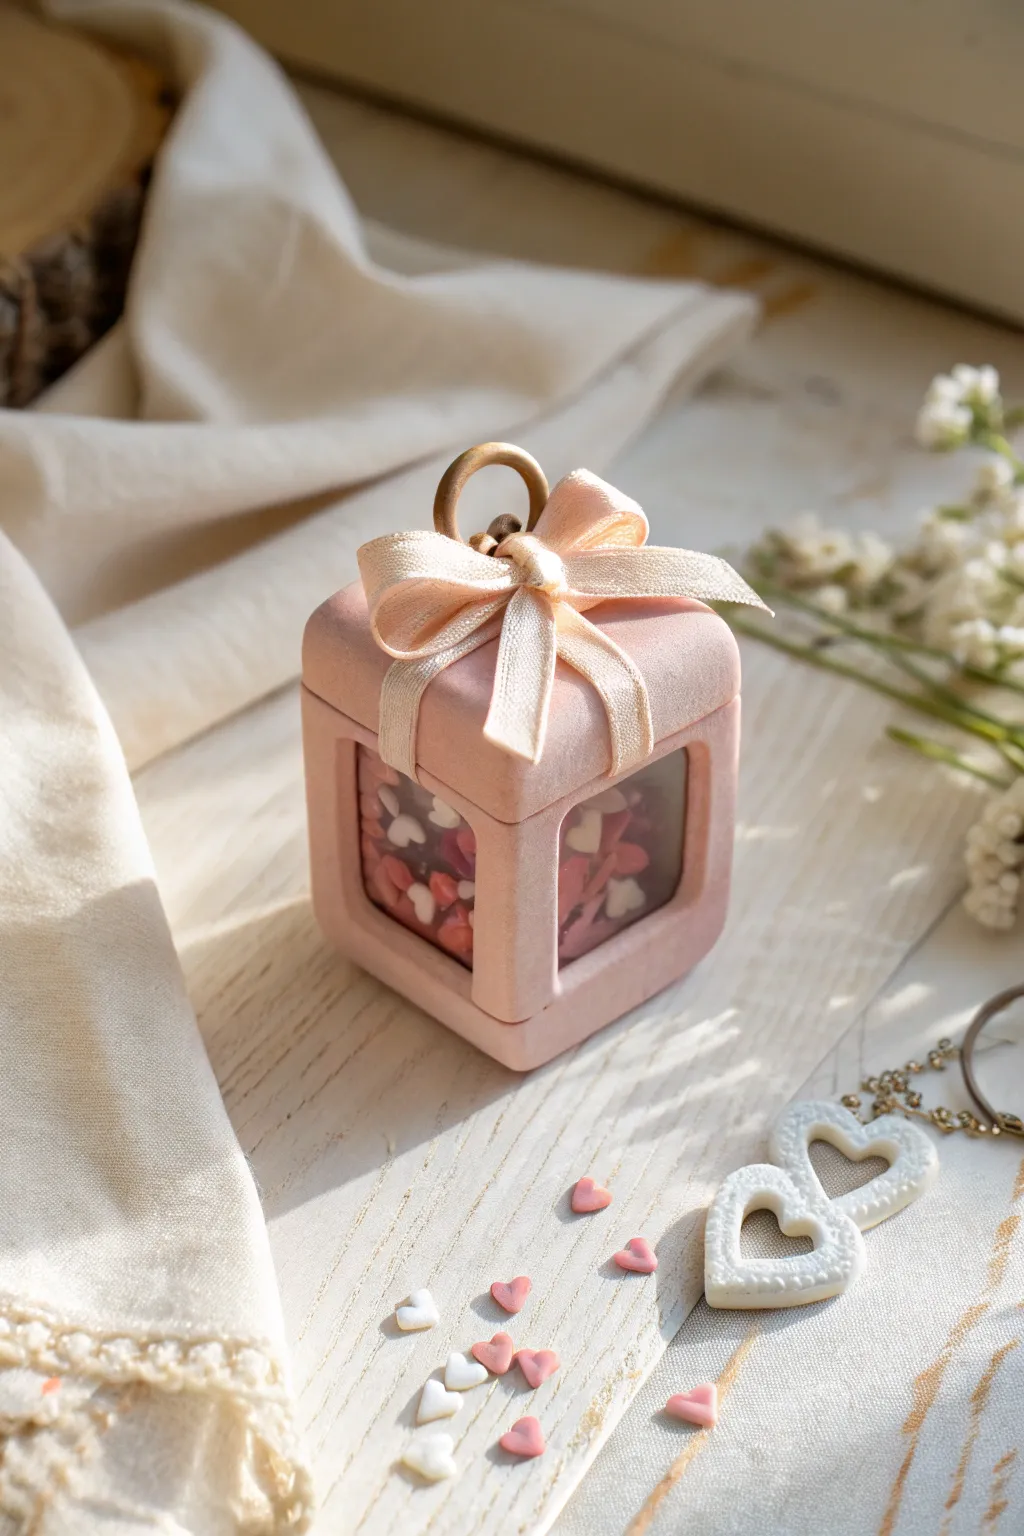
This adorable treat box shaker charm mimics the elegant look of a velvet gift box with its soft pink finish and ribbon details. It features open window sides filled with tiny heart sprinkles, creating a delightful rattling sound and visual playfulness.
Step-by-Step Guide
Materials
- Light pink polymer clay
- Liquid polymer clay (Translucent or Pink)
- Clear acetate sheet or rigid plastic packaging
- Pink flocking powder (optional, for velvet texture)
- Texturing tool (toothbrush or sandpaper)
- Square clay cutter (approx. 1 inch)
- X-Acto knife or craft blade
- Small heart sprinkles (polymer clay slices or glitter)
- Gold beading wire or small jump ring
- Thin pink satin ribbon (1/4 inch width)
- Super glue or E6000
- UV resin (optional, for sealing)
- Acrylic roller
Step 1: Constructing the Box Frame
-
Create the panels:
Roll out your light pink polymer clay to a uniform thickness of about 3mm. You will need six squares total: top, bottom, and four sides. For this specific window design, cut four identical squares for the sides and two slightly larger squares for the lid and base. -
Cut the windows:
Take the four side squares and meticulously cut out a smaller square from the center of each, leaving a sturdy frame border of about 3-4mm. Ensure your cuts are clean and straight. -
Pre-bake the frame:
Arrange your four window frames and the solid bottom square on a tile. Bake these flat pieces according to your clay package instructions (usually 275°F/130°C for 15-20 minutes). Getting them hard now makes assembly much easier later. -
Assemble the cube:
Once cooled, use a small amount of liquid polymer clay or super glue to assemble the four window frames onto the solid bottom base, forming an open-top box. Bake again for 10-15 minutes to bond the structure if using liquid clay.
Cloudy Windows?
Work cleanly! Acetate fogs up easily with super glue fumes. Use UV resin or a water-based craft glue for clear windows to keep them crystal transparent.
Step 2: Adding the Shaker Elements
-
Cut the clear windows:
Cut four pieces of clear acetate sheet slightly smaller than your outer clay walls but large enough to cover the window openings from the inside. -
Attach the acetate:
Carefully apply a thin line of glue or UV resin to the *interior* walls of your box and press the acetate squares into place. Cure or let dry completely to ensure no gaps where sprinkles could escape. -
Fill the shaker:
Pour your heart sprinkles or polymer clay slices into the box. Fill it about one-third full so there is plenty of room for the pieces to shake and move around.
Step 3: Creating the Lid and Velvet Finish
-
Form the lid:
Take your final solid square of raw clay. I like to round the edges slightly to make it look plush like a fabric box. Place it on top of your assembled cube to check the fit. -
Add the hardware:
Before baking the lid, form a small loop from gold wire or insert a jump ring into the center top of the raw clay lid. Secure it with a dab of liquid clay. -
Seal the box:
Apply liquid clay to the top edges of your box walls. Place the raw lid on top, sealing the shaker permanently. Smooth the seams where the lid meets the walls with a clay styling tool or your finger. -
Texture the surface:
To achieve that soft, non-shiny fabric look seen in the photo, gently tap the entire exterior surface of the uncured clay (lid and frames) with a toothbrush or fine sandpaper. This removes fingerprints and adds a matte texture. -
Flocking (Optional):
For a true velvet look, you can brush liquid clay over the exterior and coat it in pink flocking powder before the final bake. -
Final Bake:
Bake the entire assembled shaker one last time for the full duration recommended by your clay manufacturer.
Level Up: Scented Clay
Mix a tiny drop of vanilla or rose fragrance oil into the raw clay of the lid so your shaker charm smells as sweet as a real treat box.
Step 4: Finishing Touches
-
Tie the ribbon:
Once fully cooled, cut a length of thin pink satin ribbon. Wrap it around the box, crossing the ends at the top near the metal loop. -
Secure the bow:
Tie a neat, small bow around the gold hardware loop. Trim the tails of the ribbon so they drape nicely over the sides of the box. -
Add decorative glue:
Use a tiny dot of super glue under the knot of the bow to keep it permanently fixed in the center, ensuring it won’t slide off.
Now you have a charming little keepsake that looks soft to the touch but rattles with delight
Boba Drink Cup Shaker Charm
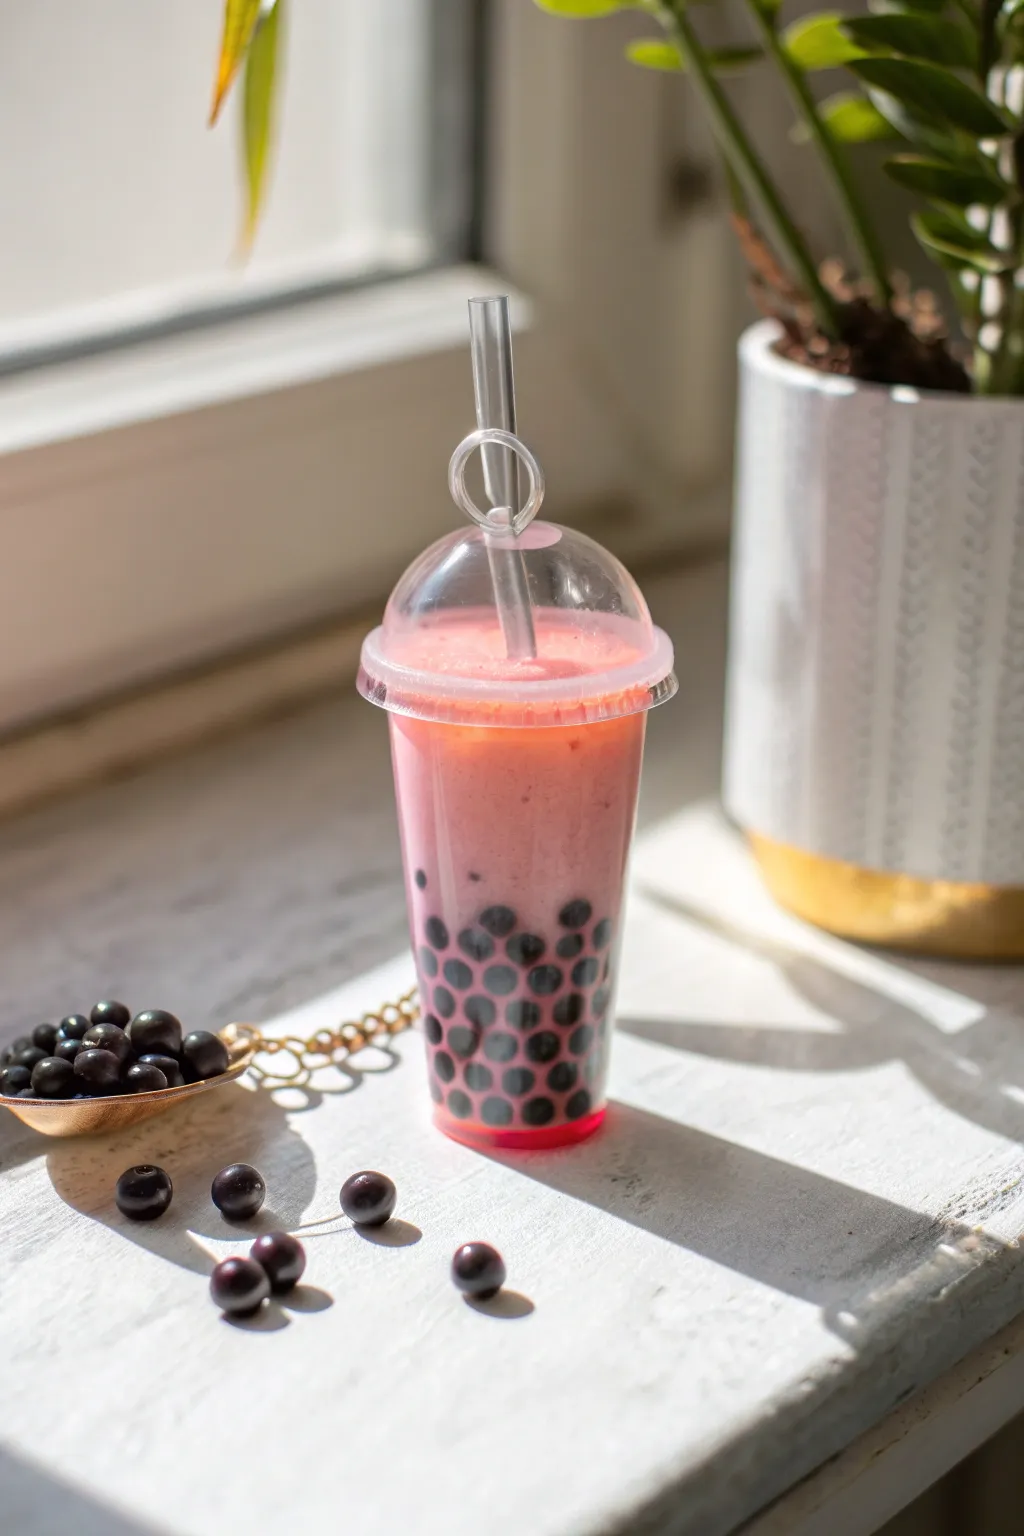
Capture the sweetness of summer with this incredibly realistic miniature boba drink shaker. With its frothy pink top, suspended tapioca pearls, and interactive shaker element, this charm is a delightful addition to any keychain or display.
Detailed Instructions
Materials
- UV resin (hard type)
- Epoxy resin (2-part)
- Boba cup silicone mold (cup and dome lid)
- Black polymer clay
- Translucent liquid polymer clay
- Pink alcohol ink or resin pigment
- White opacity pigment
- Miniature plastic straw or clear tube
- Baby oil or shaker oil
- UV lamp
- Needle tool
- Sandpaper (fine grit)
- Clear plastic film or acetate sheet
Step 1: Crafting the Boba Pearls
-
Roll the clay:
Begin by conditioning a small amount of black polymer clay until it is soft and pliable. Roll it into a thin snake, approximately 2-3mm in thickness. -
Cut and shape:
Slice the snake into tiny, equal segments. Roll each segment between your fingers to create small spheres. These will be your tapioca pearls, so aim for consistency in size. -
Pre-bake:
Place your clay pearls on a ceramic tile or baking sheet. Bake them according to your clay manufacturer’s instructions, but for a shorter duration (about 10 minutes) since they will be encased in resin later.
Leaking Shaker?
If oil leaks, wipe clean with alcohol. Apply a thicker UV resin bead around the seam where the film meets the cup rim and cure deeply.
Step 2: Casting the Cup Shell
-
Prepare the UV resin:
While the clay cools, coat the inside of your silicone cup mold with a thin layer of clear UV resin. Rotate the mold to ensure full coverage up to the rim. -
Cure the base layer:
Cure the resin under your UV lamp for 60 seconds. Repeat this process 2-3 times to build a sturdy wall for your cup. -
Create the dome lid:
Similarly, coat the dome lid mold with clear UV resin. Be careful around the hole for the straw. Cure thoroughly. I like to double-check the edges here to ensure they are thick enough to glue later.
Make it Frothy
Mix white pigment into UV resin and dab it textured onto the very top of the liquid layer before sealing. This mimics foam or blended ice.
Step 3: Creating the Drink Effect
-
Mix the ‘milk tea’ color:
Mix a small batch of UV resin with a drop of pink alcohol ink and a tiny touch of white pigment. You want a semi-translucent, milky strawberry look. -
Secure the pearls:
Pour a small amount of this pink resin into the bottom of your cured cup shell. Drop in your baked black clay pearls. Use a needle tool to arrange them so they are visible against the clear walls. -
Cure the bottom:
Cure this bottom layer to lock the pearls in place. This prevents them from floating around when you add the shaker oil. -
Add wall details:
Using a toothpick, drip tiny bits of the pink resin along the inside walls of the cup, creating a ‘coated’ look that mimics a real smoothie texture. Cure quickly to freeze the drips.
Step 4: Assembly and Shaker Mechanism
-
Fill with oil:
Fill the cup cavity with baby oil or shaker oil, leaving a small air gap at the top for movement. -
Seal the cup:
Cut a small circle of clear plastic film to fit the opening of the cup. Apply a ring of UV resin to the cup’s rim, place the film on top (ensuring no air bubbles are trapped in the rim seal), and cure immediately. -
Attach the lid:
Apply UV resin to the rim of the dome lid and place it over the sealed cup. Check for alignment and cure to bond them together. -
Insert the straw:
Cut your miniature straw to size. Insert it through the hole in the dome lid. Secure it with a tiny dab of UV resin where it meets the lid. -
Final coat:
Brush a final, thin layer of clear UV resin over the entire outside of the cup (avoiding the straw tip) to obscure any seam lines and give it a glossy, glass-like finish.
Give your tiny creation a gentle shake and enjoy the mesmerizing movement of your handmade boba drink
Mini Backpack Shaker Charm
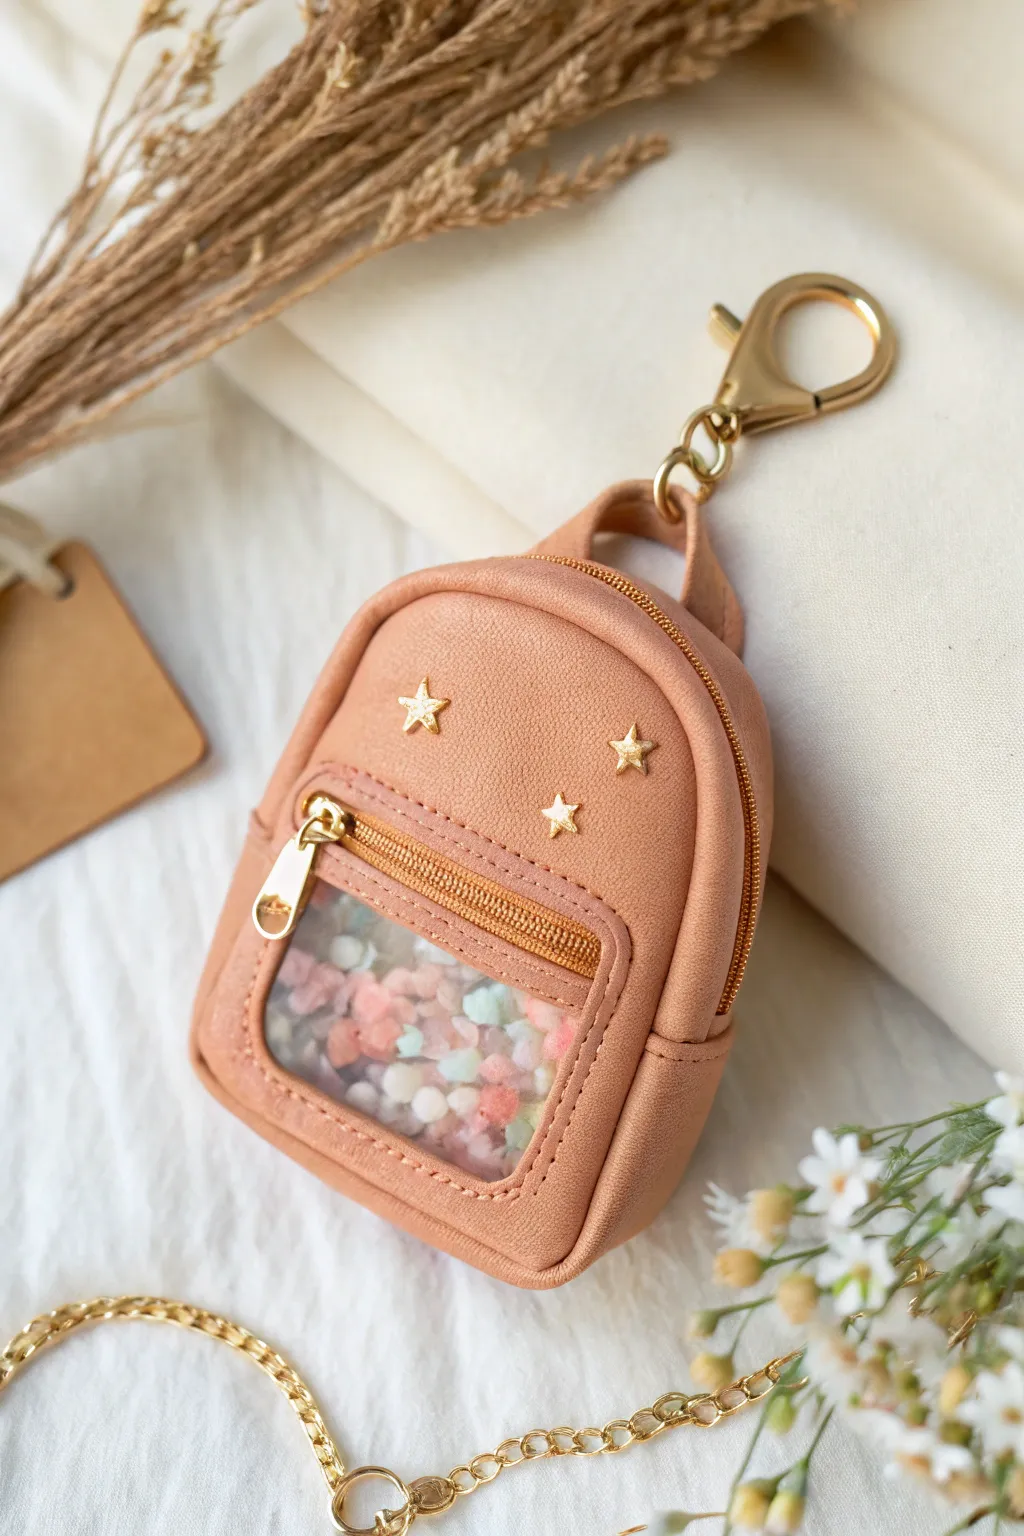
This adorable miniature backpack combines the realistic texture of leather with the fun of a shaker charm. It is crafted entirely from polymer clay to look like a tiny, high-end accessory complete with gold hardware and a window full of colorful confetti.
Step-by-Step Guide
Materials
- Peach or tan polymer clay
- Liquid polymer clay (translucent and matching color)
- UV resin and UV lamp
- Clear heavy acetate sheet
- Gold star studs or nail art charms
- Miniature zipper pull (gold)
- Gold keychain clasp and jump rings
- Texture tools: toothbrush, sandpaper, or leather texture mat
- Needle tool or sowing tracing wheel (for stitching)
- Clay shaker filler (micro beads, polymer clay sprinkles)
- X-acto knife or clay blade
- Gold acrylic paint and fine brush (optional)
- Rolling pin or pasta machine
Step 1: Creating the Backpack Structure
-
Base Preparation:
Condition your peach polymer clay until it is soft and pliable. Roll it out into a medium-thick sheet (approx 3-4mm) for stability. -
Cutting the Shape:
Cut out two identical arch shapes—one for the front and one for the back of the backpack. You can make a paper template first to ensure they match perfectly. -
Adding Leather Texture:
Gently press a leather texture mat, fine sandpaper, or even a clean toothbrush onto the surface of both clay pieces to mimic the grain of real leather. Do this before cutting the shaker window to avoid distortion. -
The Shaker Window:
On the front arch piece, use a smaller rectangular cutter or your knife to carefully remove a section from the bottom half. This will be the window for your shaker bits. -
Creating the Pocket Detail:
Roll a thin snake of clay and flatten it to create the ‘zipper’ strip. Texture it with fine vertical lines using a needle tool. Place this strip horizontally just above the window cutout to simulate a pocket zipper. -
Pre-Baking:
Bake the back piece and the front window piece separately according to your clay package instructions. This ensures the frame is rigid before we add fragile elements.
Sticky Situation?
If static cling makes your shaker bits sparkle stick to the acetate window, wipe the plastic with a dryer sheet before sealing it up.
Step 2: Assembling the Shaker Mechanism
-
Attaching the Window:
Once the front piece is cool, flip it over. Apply a thin line of UV resin around the edge of the window cutout and press a piece of clear acetate onto it. Cure under your UV lamp. -
Building the Wall:
Roll a long snake of clay to match the thickness of your shaker filler. Attach this snake to the *back* side of the front piece, outlining the window area completely to create a walled enclosure. Bake or cure again briefly to set this wall. -
Adding the Filler:
Carefully pour your choice of pastel micro-beads or sprinkles into the cavity you just created. Don’t overfill it; the pieces need room to move. -
Sealing the Shaker:
Apply liquid clay or another layer of UV resin to the top of the clay wall. Place a second piece of acetate (or the solid backing piece if you prefer a hidden mechanism) over the wall to seal the filler inside. Ensure there are no gaps.
Pro Tip: Realistic Look
After baking, lightly brush darker detailed areas (like the stitching holes) with brown acrylic paint, then wipe it off to create antique depth.
Step 3: Final Assembly and Details
-
Constructing the Sides:
Roll a long, wide strip of clay to act as the side gusset of the backpack. Texture it to match the leather grain. -
Attaching Front and Back:
Wrap this strip around the curved edge of your baked back piece, using liquid clay as glue. Then, press the front face (with the shaker window) onto the other side of the strip. Smooth the seams gently. -
Faux Stitching:
Using a needle tool or a sewing tracing wheel, gently impress small, evenly spaced holes along all the seams and around the pocket area to look like heavy-duty stitching. -
Adding the Zipper Pull:
Press a tiny gold jump ring and a miniature metal tab into the clay near the faux zipper strip to mimic a realistic slider. -
Golden Accents:
Press three small gold star studs into the upper section of the backpack for decoration. If they don’t have prongs, use a dot of liquid clay to adhere them. -
Top Loop:
Form a small loop of clay for the handle and attach it to the top center of the bag. You may want to embed a hidden jump ring here for strength. -
Final Cure:
Bake the entire assembled backpack vertically. I often prop it up against a ceramic mug to keep it from tipping over. -
Hardware Installation:
Once fully cooled, attach the large gold lobster clasp to the top loop using jump rings.
Now you have a chic, playful accessory for your keys or bag that jingles with every step
Washing Machine Shaker Charm
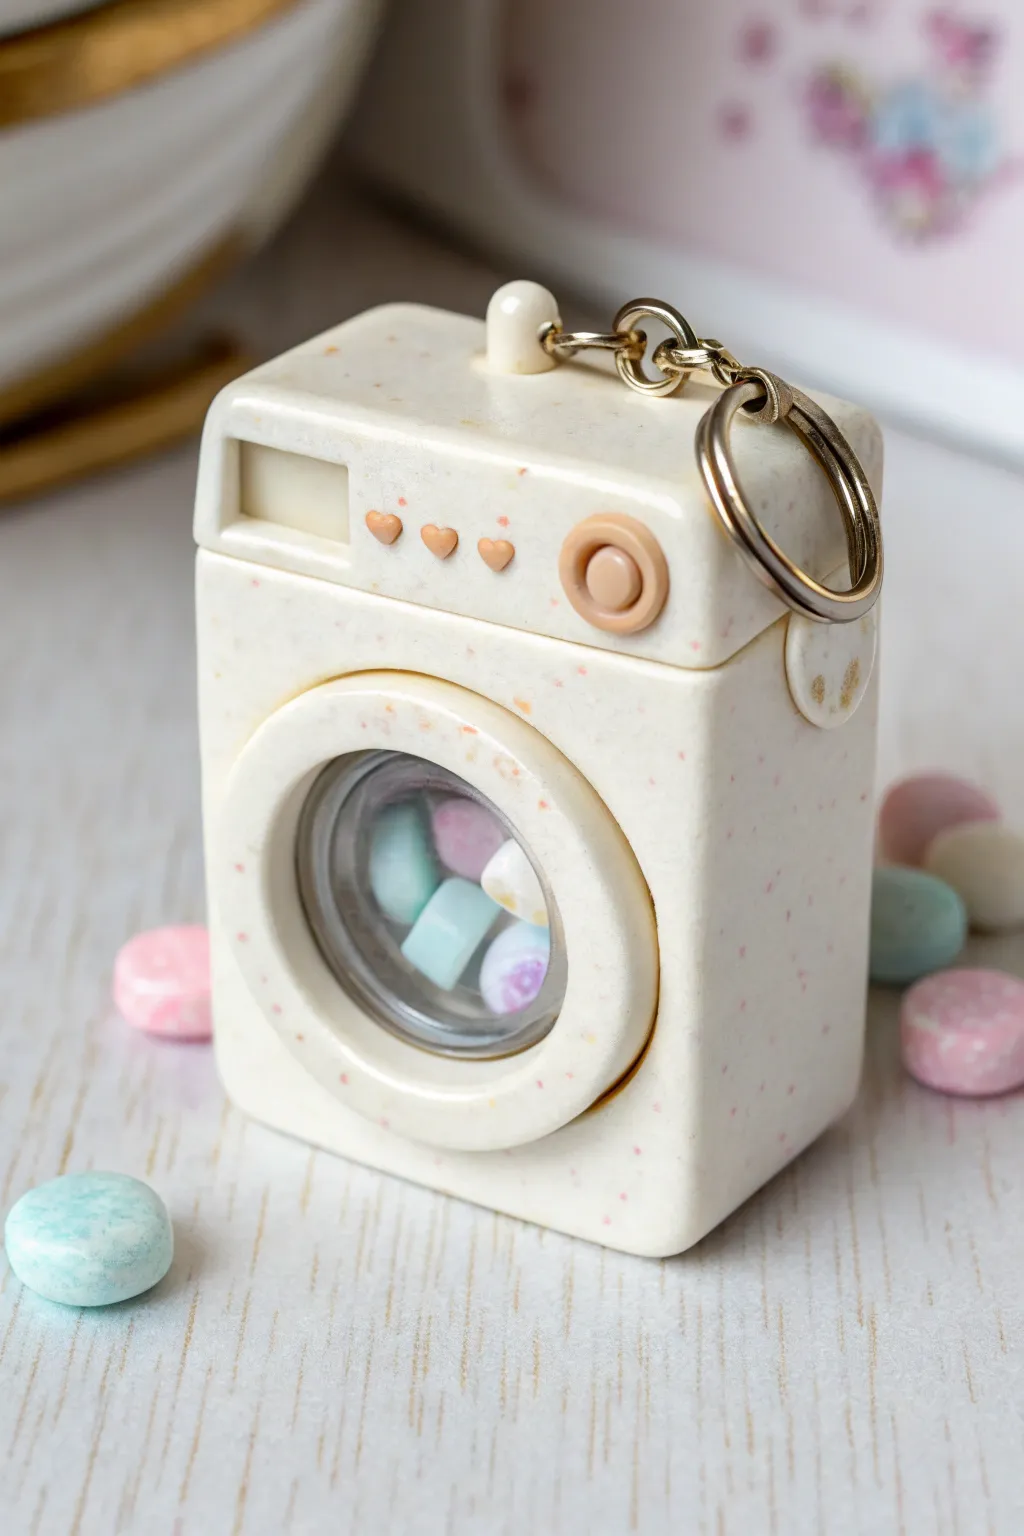
This adorable washing machine shaker charm features a trendy speckled finish and tiny floating laundry pieces inside. It’s a playful, kinetic accessory that combines detailed miniature sculpting with the fun of a shaker toy.
Step-by-Step Tutorial
Materials
- Speckled cream or granite polymer clay (e.g., Fimo or Premo)
- Pastel colored polymer clay (pink, blue, white) for the filling
- Clear UV resin
- UV lamp
- Clear acetate sheet or thick plastic packaging
- Liquid polymer clay (Translucent or White)
- Eye pin or screw eye
- Gold keyring hardware
- Circle cutters (various small sizes)
- Craft knife or scalpel
- Dotting tools
- Needle tool
- Glossy glaze or varnish (optional)
- Sandpaper (fine grit)
Step 1: Sculpting the Machine Body
-
Prepare the base clay:
Begin by conditioning your speckled cream clay until it is soft and pliable. Roll it into a thick log or block shape to ensure no air bubbles are trapped inside. -
Form the main block:
Cut a rectangular block from the clay approximately 1.5 inches tall, 1 inch wide, and 1 inch deep. Smooth the sides with your fingers to gently round the sharp corners for a softer, cartoon-like aesthetic. -
Create the door hollow:
Use a medium-sized circle cutter to gently mark the center of the front face. Carefully hollow out this circle to a depth of about 1/4 inch using a spoon tool or loop tool, creating the cavity where the shaker bits will go. -
Sculpt the door frame:
Roll a sheet of the speckled clay to about 2mm thickness. Cut out a ring shape that matches the diameter of your hollowed circle. This will be the door frame; set it aside for now. -
Define the control panel:
Use a craft knife to gently impress a horizontal line across the top quarter of the machine, separating the control panel area from the main drum area. You can also add a small rectangular indentation on the left for the detergent drawer.
Cloudy Window?
If UV resin gets on the acetate and looks foggy, wipe it immediately with rubbing alcohol before curing. Once cured, a thin top coat of resin can restore clarity.
Step 2: Creating the Shaker Mechanism
-
Make the laundry bits:
Roll tiny snakes of pastel pink, blue, and white clay. Chop them into tiny 2-3mm segments and gently squish them into rough pillow or folded-towel shapes. Bake these tiny pieces separately for 5-10 minutes so they harden. -
Bake the main body:
Insert an eye pin into the top right corner of the machine body. Bake the main scooped-out body and the separate door frame ring according to your clay package instructions. Let them cool completely. -
Cut the window:
Trace the size of your door frame ring onto a clear acetate sheet. Cut out the circle—this will be the glass window of the washing machine door. -
Assemble the shaker window:
Place your baked ‘laundry’ bits inside the hollow cavity of the machine. Apply a thin line of UV resin around the edge of the hollow and carefully place the acetate circle on top. Cure under a UV lamp for 60 seconds to seal the bits inside. -
Attach the door frame:
Apply a small amount of liquid clay or strong glue to the back of the baked clay ring. Press it firmly over the acetate edges to hide the seam. If using liquid clay, you may need a brief secondary bake or use UV resin to bond it instantly.
Step 3: Adding Details & Finishing
-
Add control buttons:
Roll three incredibly tiny balls of terracotta or orange clay. Press them into heart shapes or simple dots onto the control panel line you marked earlier. -
Create the dial:
Make a slightly larger flattened circle of orange clay. Press a smaller dot of speckled clay into the center to mimic a washing cycle dial, and attach it to the right side of the control panel. -
Secure the hardware:
If your eye pin feels loose after baking, pull it out, add a drop of superglue, and reinsert it. Attach a gold jump ring and the keychain clasp to the eye pin. -
Optional gloss finish:
For that shiny appliance look, coat the entire clay surface (avoiding the acetate window if possible) with a thin layer of UV resin or glossy glaze. Cure or dry completely.
Laundry Day Upgrade
Add tiny microbeads or white glitter inside the shaker cavity to mimic soap suds and bubbles floating around with the pastel clothes
Enjoy shaking your tiny laundry load and watching the colorful clothes tumble around inside.
Retro Handheld Screen Shaker Charm
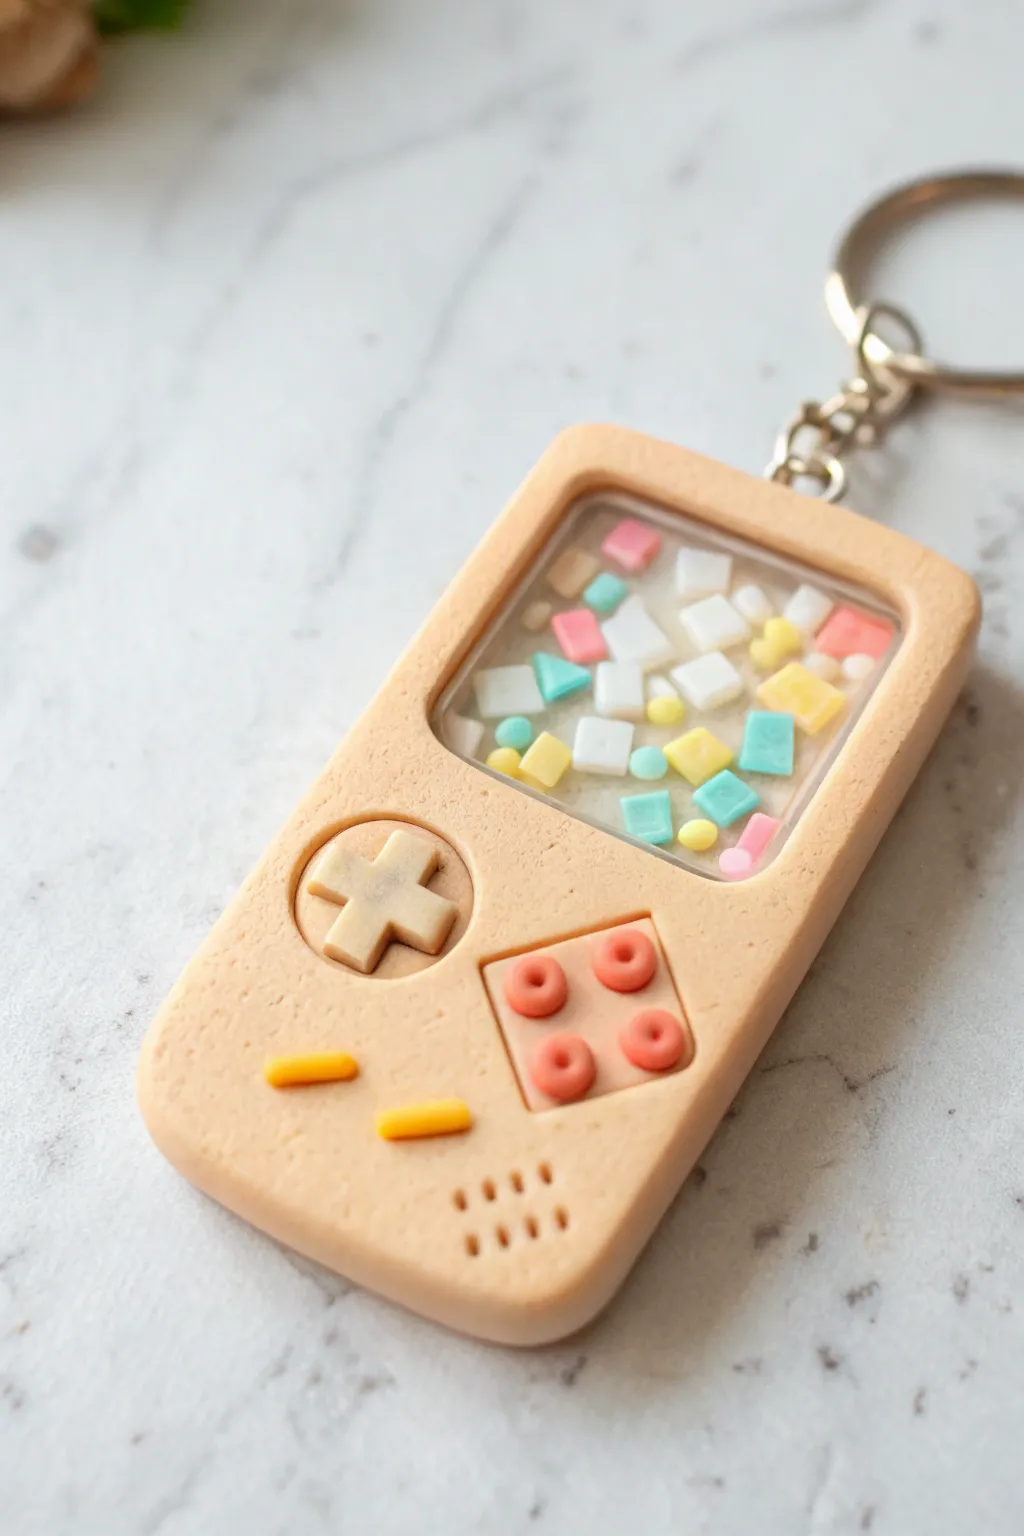
This adorable shaker charm perfectly mimics a classic handheld console but with a sweet, baked-good aesthetic. Featuring a sugary beige finish and a shaker window filled with pastel ‘sprinkles,’ it’s a playful nod to retro gaming that looks good enough to eat.
Step-by-Step Guide
Materials
- Polymer clay (light beige/tan for the body, various pastels for sprinkles)
- UV resin (hard type)
- UV lamp
- Clear acetate sheet or transparency film
- Handheld console clay cutter or scalpel
- Dotting tools or small ball stylus
- Needle tool
- Sandpaper (fine grit)
- Strong craft glue or liquid clay
- Eye screw pin and keychain hardware
- Rolling pin or pasta machine
- Gloss glaze (optional)
Step 1: Base Construction
-
Roll the dough:
Condition your light beige polymer clay until it is soft and pliable. Roll it out to a thickness of about 4-5mm using a pasta machine or rolling pin with guides to ensure an even surface. -
Cut the shape:
Use a rectangular cutter with rounded corners or a specific handheld console cutter to stamp out the main body. If cutting freehand with a scalpel, create a rectangle approximately 1.5 inches wide by 3 inches tall, rounding off the corners gently. -
Create the screen window:
Cut a square window out of the upper half of the rectangle. Leave a generous border at the top and sides for structural integrity. Smooth the inner edges of this window with your finger or a smoothing tool to remove any harsh cut marks. -
Texture the surface:
To achieve that baked cookie look, gently tap the surface of the clay with an old toothbrush or a crumpled ball of aluminum foil. This adds a realistic, porous texture. -
Add speaker vents:
At the bottom right corner, use a needle tool to poke several small holes in a diagonal grid pattern to mimic the speaker grille.
Clearer Windows
Wipe your acetate sheet with a little rubbing alcohol before using it. This removes fingerprints and static dust, ensuring your shaker window is perfectly crystal clear.
Step 2: Details & Baking
-
Form the D-pad:
Create a small ‘plus’ sign shape from the same beige clay. It should fit comfortably on the left side below the screen. Press it gently into place, ensuring the edges are rounded and soft. -
Make the A and B buttons:
Roll out a tiny amount of pinkish-tan clay. Use a small round cutter or a straw to cut two circles. Indent the centers deeply with a dotting tool to make them look like small ring donuts or fruit loops. -
Add Select/Start:
Roll very thin snakes of yellow clay. Cut two small oblong pieces and press them diagonally near the bottom center of the console. -
Hardware prep:
Insert a screw eye pin into the top center of the clay body. Add a dab of liquid clay to the screw threads before insertion to ensure it bonds permanently during baking. -
First bake:
Bake the main body according to your polygon clay manufacturer’s instructions (usually 275°F/130°C for 15-30 minutes). Let it cool completely.
Step 3: Shaker Assembly
-
Make the sprinkles:
While the body cools, take tiny scraps of pastel clay (pink, blue, yellow, white). Roll them flat and cut tiny squares, triangles, and circles. Bake these tiny pieces for about 10 minutes. -
Attach the acetate:
Cut a piece of clear acetate slightly larger than the screen window. apply a thin line of UV resin to the *back* of the window opening on the cooled clay body. Press the acetate firmly onto the resin and cure under the UV lamp. -
Build the walls:
Flip the piece over. You need to create a cavity for the sprinkles. Roll a thin snake of beige clay and outline the window area on the back side, placing it directly on top of the acetate edges. This creates a wall. -
Fill and seal:
Place your baked ‘sprinkle’ pieces inside the walled area on the back on the acetate. Then, cut a second piece of acetate to fit over the walls. Apply UV resin to the top of the clay walls, place the second acetate sheet down to seal the sprinkles inside, and cure again. -
Backing plate:
To hide the mechanism, roll a thin sheet of beige clay. Cut it to the shape of the entire console body. Apply liquid clay to the back of the console and attach this backing sheet. Smooth the edges so the seam disappears. -
Final bake:
Bake the entire piece one last time for 15-20 minutes to cure the backings and walls. Allow to cool. -
Resin finish:
I like to finish by doming the front screen window with clear UV resin. Apply a layer over the front acetate (careful not to spill over the edges) and cure firmly. This makes the glass look thick and real.
Liquid Shaker Upgrade
Instead of dry sprinkles, fill the cavity with baby oil and add glitter. Just ensure your UV resin seal is 100% gap-free before adding the liquid to prevent leaks.
Attach your keychain hardware and enjoy the satisfying rattle of your new retro accessory
Terrazzo Frame Shaker Charm
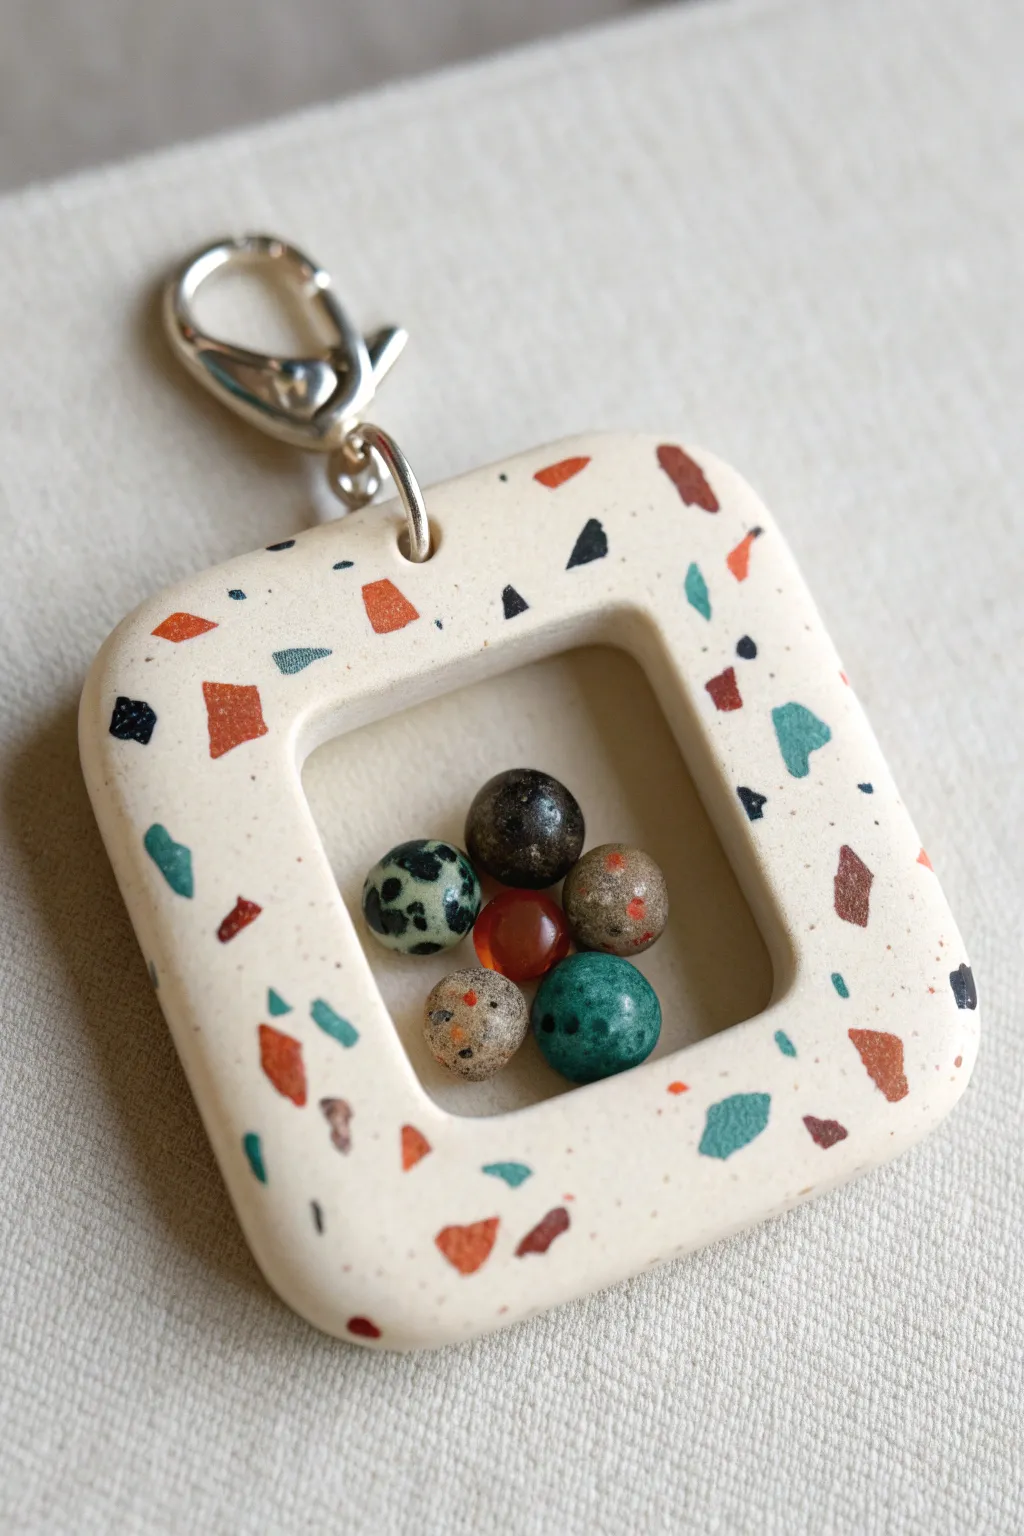
This modern, minimalist charm combines the timeless look of terrazzo stone with the tactile fun of a shaker. By embedding colorful clay fragments into a simple white frame, you’ll create a chic accessory perfect for keychains or bag pulls.
How-To Guide
Materials
- Polymer clay (white or cream for base)
- Polymer clay (various colors: rust, teal, mustard, black, brown)
- Square cookie cutters (two sizes to create a frame)
- Rolling pin or clay pasta machine
- Craft knife or tissue blade
- Small round stone beads or clay spheres (approx. 6mm)
- Liquid polymer clay (translucent)
- UV resin (optional, for sealing)
- UV lamp (if using resin)
- Sandpaper (various grits from 400 to 1000)
- Hand drill or Dremel with small bit
- Jump ring and lobster clasp hardware
Step 1: Creating the Terrazzo Chips
-
Condition the colors:
Start by conditioning small amounts of your colored clays (rust, teal, mustard, black, brown). They should be soft and pliable. -
Flatten deeply:
Roll each colored piece into a very thin sheet. The thinner the sheet, the more delicate your terrazzo chips will look. -
Bake the sheets:
Place these thin colored sheets on a tile and bake them for about 10-15 minutes at the manufacturer’s recommended temperature. We want them hard enough to chop without smearing. -
Chop into fragments:
Once cooled, use a sharp craft blade to chop the baked sheets into irregular geometric shards. Aim for variety in shapes—triangles, trapezoids, and tiny specks.
Uneven Chips?
If chips pop out during sanding, you likely didn’t roll them deep enough. Dab a tiny bit of liquid clay in the hole, replace the chip, and re-bake briefly to fix it.
Step 2: Forming the Frame
-
Prepare the base:
Condition a large block of white or cream clay. Roll it out into a thick slab, roughly 4mm to 5mm thick. This thickness is crucial for the sturdy look of the final charm. -
Apply the chips:
Scatter your chopped baked chips onto the raw white slab. Press them down gently so they stick, ensuring a random, organic distribution. -
Embed the pattern:
Cover the slab with parchment paper and roll over it firmly with your acrylic roller. You want to force the chips flush with the white clay surface. -
Cut the outer shape:
Use the larger square cutter to punch out the main shape of the charm. Don’t remove the cutter yet; it helps stabilize the clay for the next step. -
Cut the inner window:
Center the smaller square cutter inside the larger one and press down to remove the middle section, creating a hollow square frame. -
Clean the edges:
Gently remove the cutters. Use your finger or a silicone tool to smooth any rough edges or drag marks on the inner and outer cuts.
Pro Tip: Buffing
After sanding, vigorously rub the clay with a piece of denim or heavy canvas. This burnishing creates a soft, satin sheen without needing any glossy varnish.
Step 3: Assembly and Baking
-
Prepare the insert:
I usually cut a second, thinner square of white clay using the larger cutter to act as a backing, but for an open-frame look like this, we prepare the beads separately. -
Initial Bake:
Bake the terrazzo frame on a flat tile according to your clay’s instructions (usually 275°F/130°C for 30 minutes). Let it cool completely. -
Sanding:
Sand the surface of the baked frame under running water. Start with 400 grit to expose the sharp edges of the chips, then move to 1000 grit for a smooth matte finish. -
Drilling:
Carefully drill a hole in the center of the top edge of the frame for the hardware.
Step 4: Creating the Shaker Element
-
Positioning beads:
If you want the beads to be permanently fixed inside like a vignette (as seen here), arrange your stone beads or clay spheres in a clustered formation on a piece of parchment paper. -
Securing the cluster:
Use a tiny drop of liquid clay or strong glue to adhere the beads to each other in your desired shape. If you want a true rattling shaker, you would need to add acetate windows, but this style focuses on an open shadow-box effect. -
Attaching to frame:
If the beads are meant to ‘float’ in the center, you can use a small amount of liquid clay or UV resin to bridge them to the inner bottom edge of the frame, or simply glue the cluster securely to a backing sheet if you opted for a closed back. -
Attaching hardware:
Open a sturdy jump ring with pliers, loop it through the drilled hole, and attach your lobster clasp. -
Final cure:
If you used liquid clay or UV resin for assembly, give the piece a final short bake or cure under a UV lamp to set everything in place.
Clip this trendy architectural charm onto your bag and enjoy the sophisticated texture you created by hand
Faux Stained Glass Shaker Charm

Capture the ethereal beauty of a gothic cathedral window in miniature form with this sophisticated resin-based charm. The matte black framework provides a striking contrast to the muted, translucent panels that mimic the look of aged stained glass.
Detailed Instructions
Materials
- UV resin (clear)
- Black polymer clay or black UV resin (for the frame)
- Gothic window silicone mold (shaker style or frame style)
- Resin pigments or alcohol ink (pastel green, muted rose, pale yellow/cream)
- Crushed glass glitter or fine iridescent flakes (optional)
- UV lamp
- Fine-tip silicone brush or needle tool
- Mixing cups and stir sticks
- Antiqued bronze keychain hardware with jump rings
- Small jewelry pliers
- Small rhinestone or crystal embellishment (optional)
Step 1: Creating the Framework
-
Prepare the mold:
Begin by cleaning your gothic window silicone mold thoroughly with tape to remove any dust. If you are using a shaker mold vs a simple frame mold, ensure you are working on the ‘frame’ portion. -
Cast the frame:
Carefully dispense black UV resin into the intricate lines of the mold. If you don’t have black resin, you can mix a tiny amount of black mica powder into clear resin, though specialized opaque black resin cures sharper. -
Remove bubbles:
Use a needle tool or a lighter passed quickly over the surface to pop any micro-bubbles trapped in the narrow frame lines. This is crucial for structural integrity. -
Cure the frame:
Place the mold under your UV lamp for 60-90 seconds until the black frame is fully hardened. -
Demold or stay put:
I prefer to leave the frame inside the mold for the filling stage to prevent leakage, but if your mold is shallow, you can demold the frame and place it on a piece of resin tape.
Pro Tip: Matte Finish
For a realistic iron look, lightly sand the cured black frame with very fine grit sandpaper or brush on a matte varnish before adding the colored resin.
Step 2: Staining the Glass
-
Mix your colors:
In separate small mixing cups, combine clear UV resin with very small amounts of pigment. Aim for a milky, semi-translucent look rather than fully transparent. Mix a sage green, a dusty rose, and a creamy yellow. -
Add texture:
To mimic the imperfect texture of old glass, mix a tiny pinch of crushed glass glitter or fine iridescent flakes into your colored resin cups. -
Fill the top arch:
Using a fine-tip silicone brush or a toothpick, carefully drop the sage green resin into the two uppermost curved sections of the window frame. -
Fill the central design:
Fill the large central ‘lancet’ shape and the lower central panel with the creamy yellow mixture. Be careful not to overflow onto the black dividers. -
Complete the side panels:
Use the dusty rose resin for the middle side panels, and return to the sage green for the bottom corner sections to balance the color palette. -
Level and cure:
Allow the resin to self-level for a moment. If any resin has spilled onto the black lines, wipe it immediately with an alcohol-soaked wipe. Cure under the UV lamp for 3-4 minutes to ensure light penetrates the pigments.
Level Up: Backlighting
Mix glow-in-the-dark powder into the creamy yellow sections. When the lights go out, your cathedral window will look like it’s lit from within.
Step 3: Final Assembly
-
Domed finish (optional):
For a smoother feel, apply a thin layer of clear UV resin over the entire piece (frame and glass) to dome it. This creates a unified surface. -
Add the central accent:
Place a tiny drop of clear resin in the very center intersection of the window frame and set a small square rhinestone or crystal into it. Cure to secure. -
Drill or attach:
If your mold didn’t have a pre-made loop, use a small hand drill to carefully bore a hole into the top loop of the black frame. -
Attach hardware:
Using two pairs of jewelry pliers, twist open a jump ring. Thread it through the frame’s loop and the bottom of your antiqued bronze lobster clasp keychain. -
Close the ring:
Twist the jump ring closed securely, ensuring the ends meet perfectly flush so the charm doesn’t slip off.
Now you have a miniature piece of architectural art ready to clip onto your bag or keys
Minimal Salt and Pepper Shaker Pair
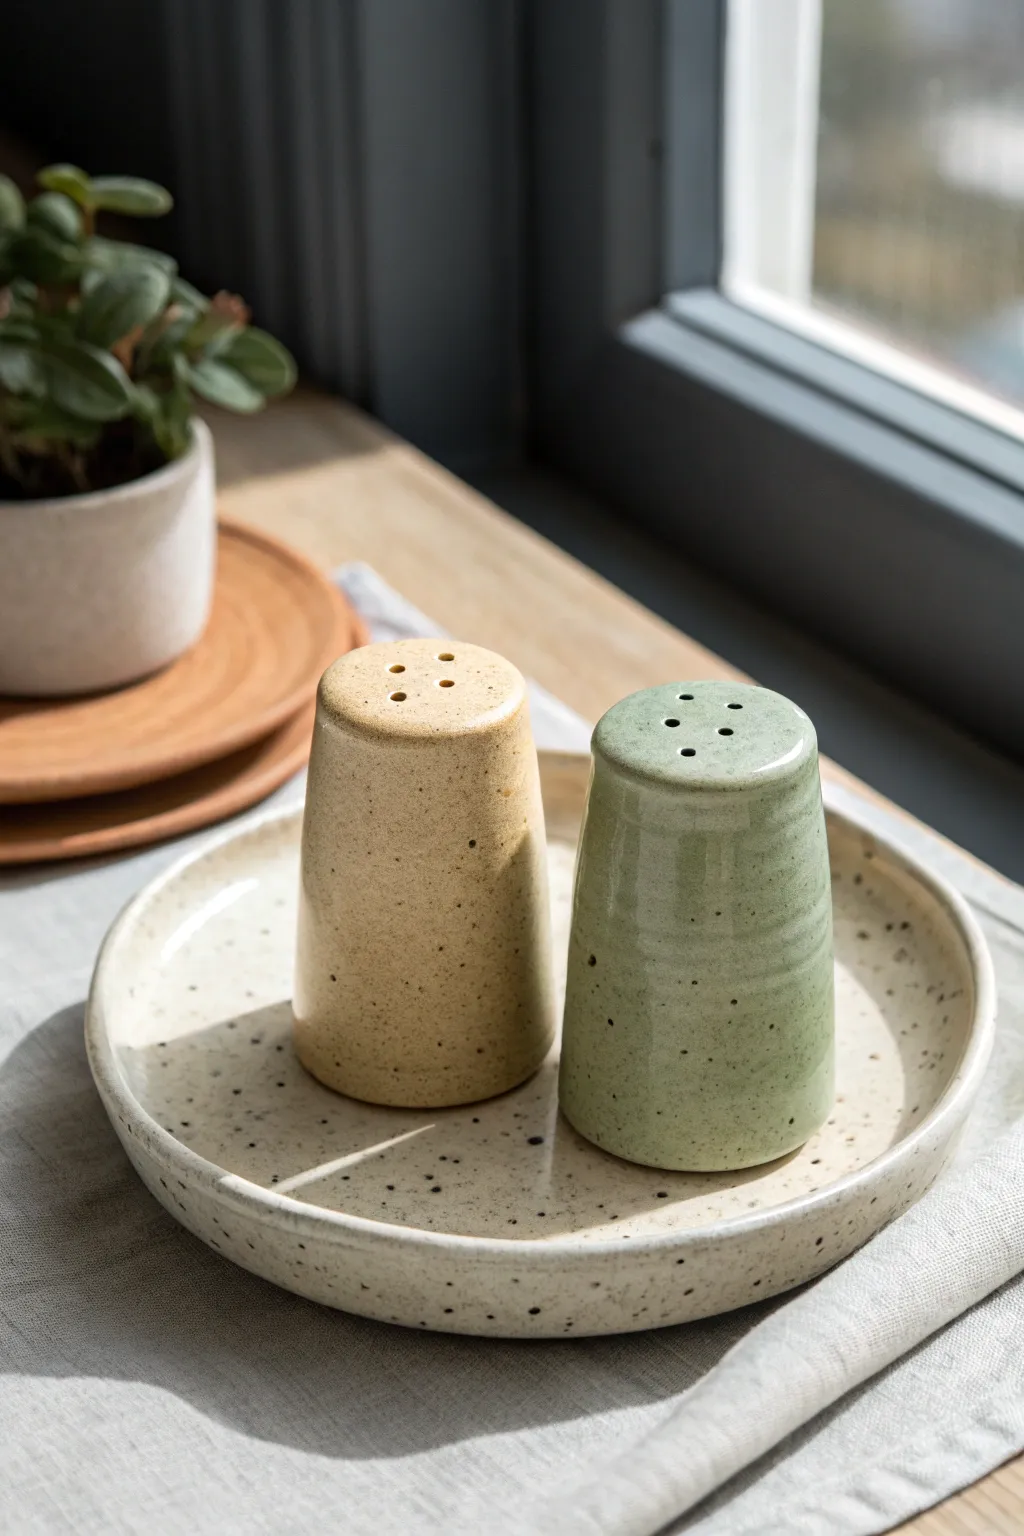
These understated, tapered salt and pepper shakers bring a soothing minimalism to the dining table with their organic curves and speckled glaze. The matching saucer unites them into a cohesive set, perfect for a modern or rustic kitchen aesthetic.
Step-by-Step
Materials
- Stoneware clay (speckled or white with grog)
- Pottery wheel (or slab roller for hand-building)
- Throwing tools (sponge, wire cutter, rib)
- Needle tool or small drill bit
- Rubber stoppers (cork or rubber) for the bottom
- Clear matte glaze
- Sage green celadon glaze
- Sandy/Beige celadon or semi-opaque glaze
- Kiln
Step 1: Throwing the Forms
-
Prepare Clay Balls:
Weigh out two equal balls of clay, roughly 1lb each, for the shakers. Prepare a slightly larger ball, about 1.5lbs, for the saucer plate. -
Center and Open:
Center the first ball on the wheel. Open up the clay but keep the floor fairly thick, as you won’t be trimming a foot ring but will need depth for the stopper hole later. -
Pull the Walls:
Pull the walls up into a tall cylinder. As you pull, gently collar the clay inward to create a tapered shape that is wider at the base and slightly narrower at the top. -
Close the Top:
Slow the wheel down significantly. Carefully collar the very top rim inward until it completely closes, creating a smooth dome. Use a rib to smooth the closure so no seam is visible. -
Refine the Shape:
Use a metal or rubber rib to compress the outside walls, removing throwing lines and ensuring a sleek, conical silhouette. -
Repeat for Second Shaker:
Cut the first shaker off the wheel and repeat the process for the second one, measuring constantly with calipers to match the height and base width. -
Throw the Saucer:
Use the larger clay ball to throw a simple, low-profile plate with a slightly raised rim to catch any stray salt grains. Keep the bottom flat.
Step 2: Trimming and Details
-
Leather Hard Stage:
Allow all pieces to dry to a leather-hard state. They should be firm enough to handle without deforming but still cool to the touch. -
Trim the Saucer:
Flip the saucer and trim a shallow foot ring to give it a finished look and help it sit flat on the table. -
Cut Fill Holes:
For the shakers, carefully cut a circular hole in the bottom center of each piece. This hole must perfectly match the size of your rubber stoppers, so measure twice. -
Smooth the Bottom:
Sponge the bottom edges of the shakers smooth. I find that spending extra time here makes the final product feel much higher quality in the hand. -
Drill Shaker Holes:
Using a needle tool or a tiny drill bit, pierce the domed tops. Create a distinct pattern for each (e.g., three holes for pepper, five for salt) to distinguish them. -
Clean Up Burrs:
Once the clay is bone dry, gently sand away any sharp burrs created by the needle tool around the top holes.
Clean Pour Tip
When drilling top holes, angle the tool slightly inward rather than straight down. This helps the salt flow freely without getting stuck in the clay wall thickness.
Step 3: Glazing and Firing
-
Bisque Fire:
Load the bone-dry pieces into the kiln and fire to Bisque temperature (usually Cone 04 or 06). -
Wax Resist:
After cooling, wipe the pieces down with a damp sponge. Apply wax resist to the bottom foot of the saucer and the bottom rim of the shakers to prevent them from sticking to the kiln shelf. -
Glaze Application:
Dip one shaker into the sandy beige glaze and the other into the sage green glaze. Dip the saucer into a clear glaze or a speckled white glaze that complements both. -
Glaze Firing:
Fire the pieces to the final maturation temperature of your clay body (likely Cone 5 or 6 for stoneware). -
Final Assembly:
Once cooled, insert the rubber stoppers into the bottom holes. Fill with salt and pepper and place them on their new tray.
Wobbly Bots?
If your shakers wobble after firing, the bottom may have warped. Use wet sandpaper or a grinding stone on a flat surface to gently level the base until it sits flush.
Enjoy the satisfaction of seasoning your meals with a set you crafted yourself from start to finish
Cork-Stopper Spice Shakers
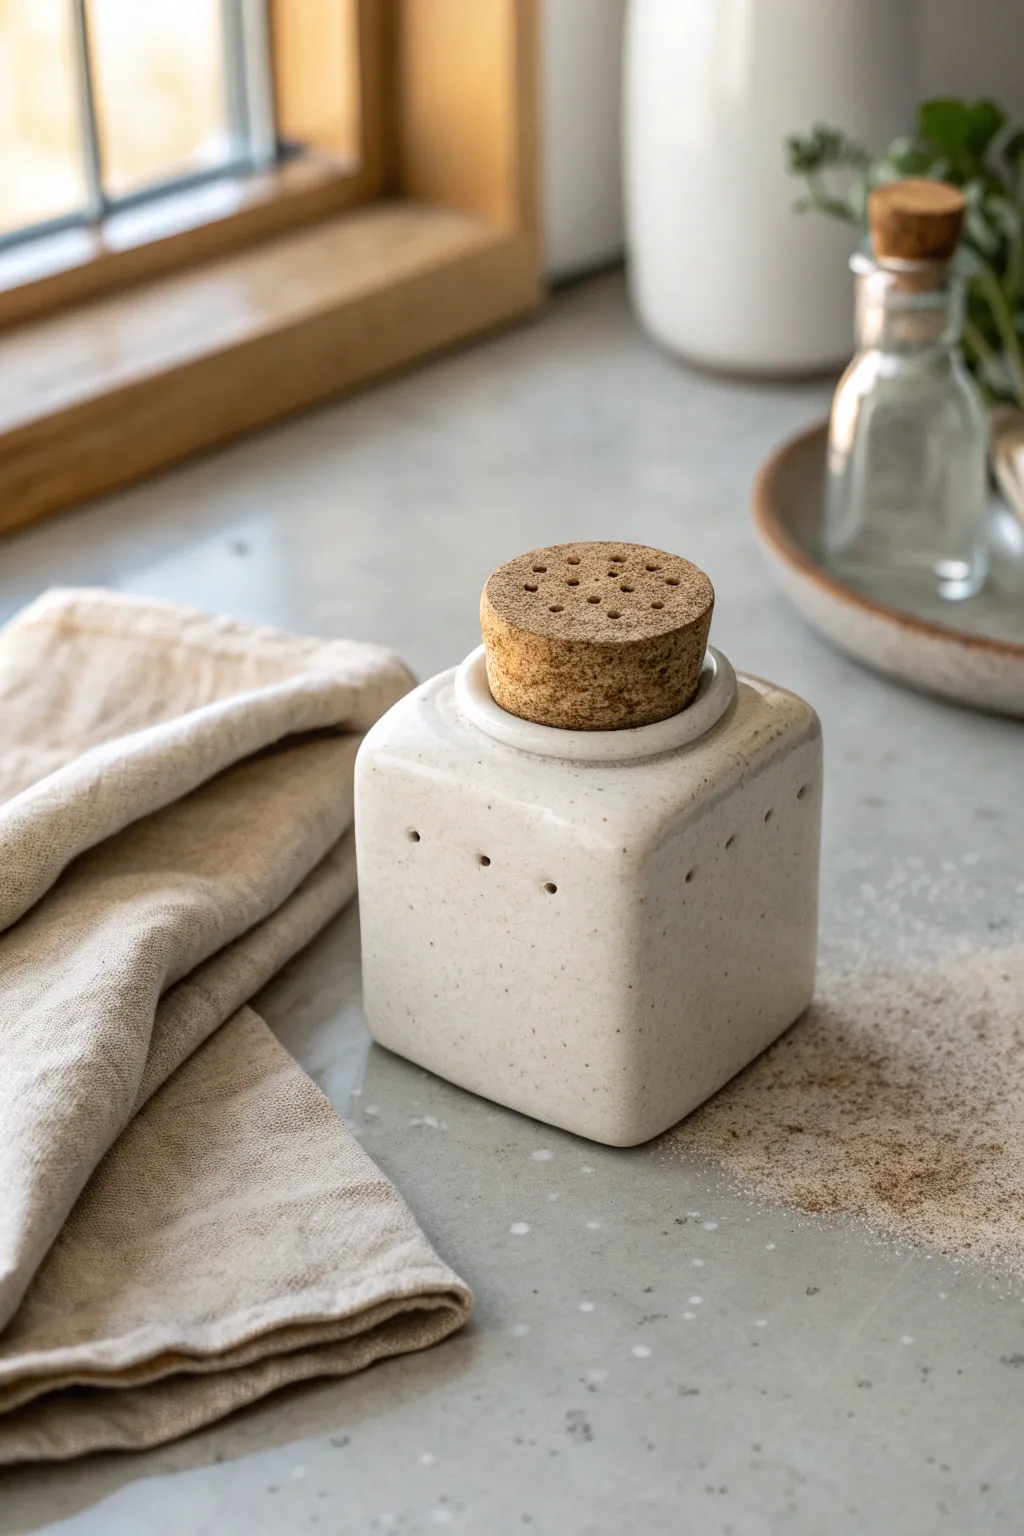
Embrace the beauty of simplicity with this handmade ceramic spice shaker, featuring a soft, speckled white glaze and a clever cork dispensing mechanism. The square form offers a modern twist on traditional shakers, while the natural cork topper adds organic warmth and functionality.
How-To Guide
Materials
- White speckle clay body (stoneware recommended)
- Square cookie cutter or template (approx. 2.5 inches)
- Rolling pin and guide sticks (1/4 inch thick)
- Slip and scoring tool
- Fettling knife or clay blade
- Small sponge
- Large tapered cork stopper
- Drill with small bit (for cork)
- Glossy white or clear glaze (food safe)
- Wooden modeling tool
- Needle tool
Step 1: Forming the Body
-
Roll out the slab:
Begin by wedging your speckled clay to remove air bubbles. Roll it out into an even slab using 1/4 inch guide sticks to ensure consistent thickness throughout the piece. -
Cut the walls:
Using a ruler or a square template, cut a long rectangular strip that will form the four walls of your shaker. The height should be about 2.5 to 3 inches. -
Create the square shape:
Measure four equal sections along your strip and lightly score vertical lines to mark where the corners will fold. Carefully fold the clay at these marks to create a box shape without snapping the clay. -
Join the seam:
At the final corner where the two ends meet, bevel the edges at a 45-degree angle. Score both sides aggressively and apply slip, then press them firmly together to seal the square. -
Reinforce the corner:
Use a thin coil of clay on the inside of the joined corner to reinforce the seam, smoothing it out completely with a wooden tool so it’s invisible. -
Attach the base:
Place your open square tube onto the remaining slab. Trace around the bottom, cut out the square base, then score and slip both contact surfaces. Press the walls onto the base firmly. -
Construct the top shoulder:
Cut a square slab slightly larger than the top opening. You’ll need to create a slightly domed or flat top with a circular hole in the center that is perfectly sized to fit your specific cork stopper. -
Create the neck rim:
I like to add a small, raised ring of clay around the central opening. This gives the cork a secure place to sit and adds a professional finish to the silhouette. -
Attach the top:
Score and slip the top edges of your box and the underside of your top piece. Join them carefully, trapping the air inside which helps hold the shape while you work.
Pro Tip: Cork Sizing
Buy your cork stopper BEFORE making the clay body. Clay shrinks 10-15% during firing, so make the neck opening about 15% larger than your cork to ensure a snug fit later.
Step 2: Refining and Detail
-
Smooth the edges:
Once the box is closed, use a paddle or flat board to gently tap the walls straight. Use a damp sponge to round over the sharp corners for that soft, stone-like look seen in the photo. -
Pierce air vents:
Using a needle tool, poke three small holes horizontally across the upper side of the shaker. This isn’t just decorative; it helps airflow so spices shake out smoothly. -
Dry slowly:
Cover the piece loosely with plastic. Because of the sharp corners, you want this to dry very slowly to prevent warping. Let it dry to bone dry over several days. -
Bisque fire:
Fire the piece to cone 04 (or your clay’s specific bisque temperature).
Troubleshooting: Crumbling Cork
If the cork crumbles while drilling, try freezing the cork for an hour first. The cold hardens the material, allowing the drill bit to cut cleaner holes without tearing.
Step 3: Glazing and Assembly
-
Apply glaze:
Dip the potential shaker into a glossy transparent or white glaze. If using clear, the natural speckles of the clay will shine through. Wipe the foot clean. -
Glaze fire:
Fire the piece to its maturity temperature (likely cone 5 or 6 for stoneware). ensure no glaze is inside the rim where the cork sits. -
Prepare the cork:
While the ceramic is in the kiln, take your cork stopper. Mark a pattern of holes on the top surface—a circular pattern or a grid works best. -
Drill the cork:
Using a small drill bit, carefully drill through the cork at your marked points. Go slowly to avoid crumbling the cork material. -
Final assembly:
Once the ceramic body is cool, fill it with fine pepper or spices. Press the drilled cork firmly into the neck. Test the shake to ensure spices flow through the cork holes.
Place your finished shaker on the table and enjoy the satisfaction of seasoning your meals with functional art.
Cute Monster Salt and Pepper Shakers
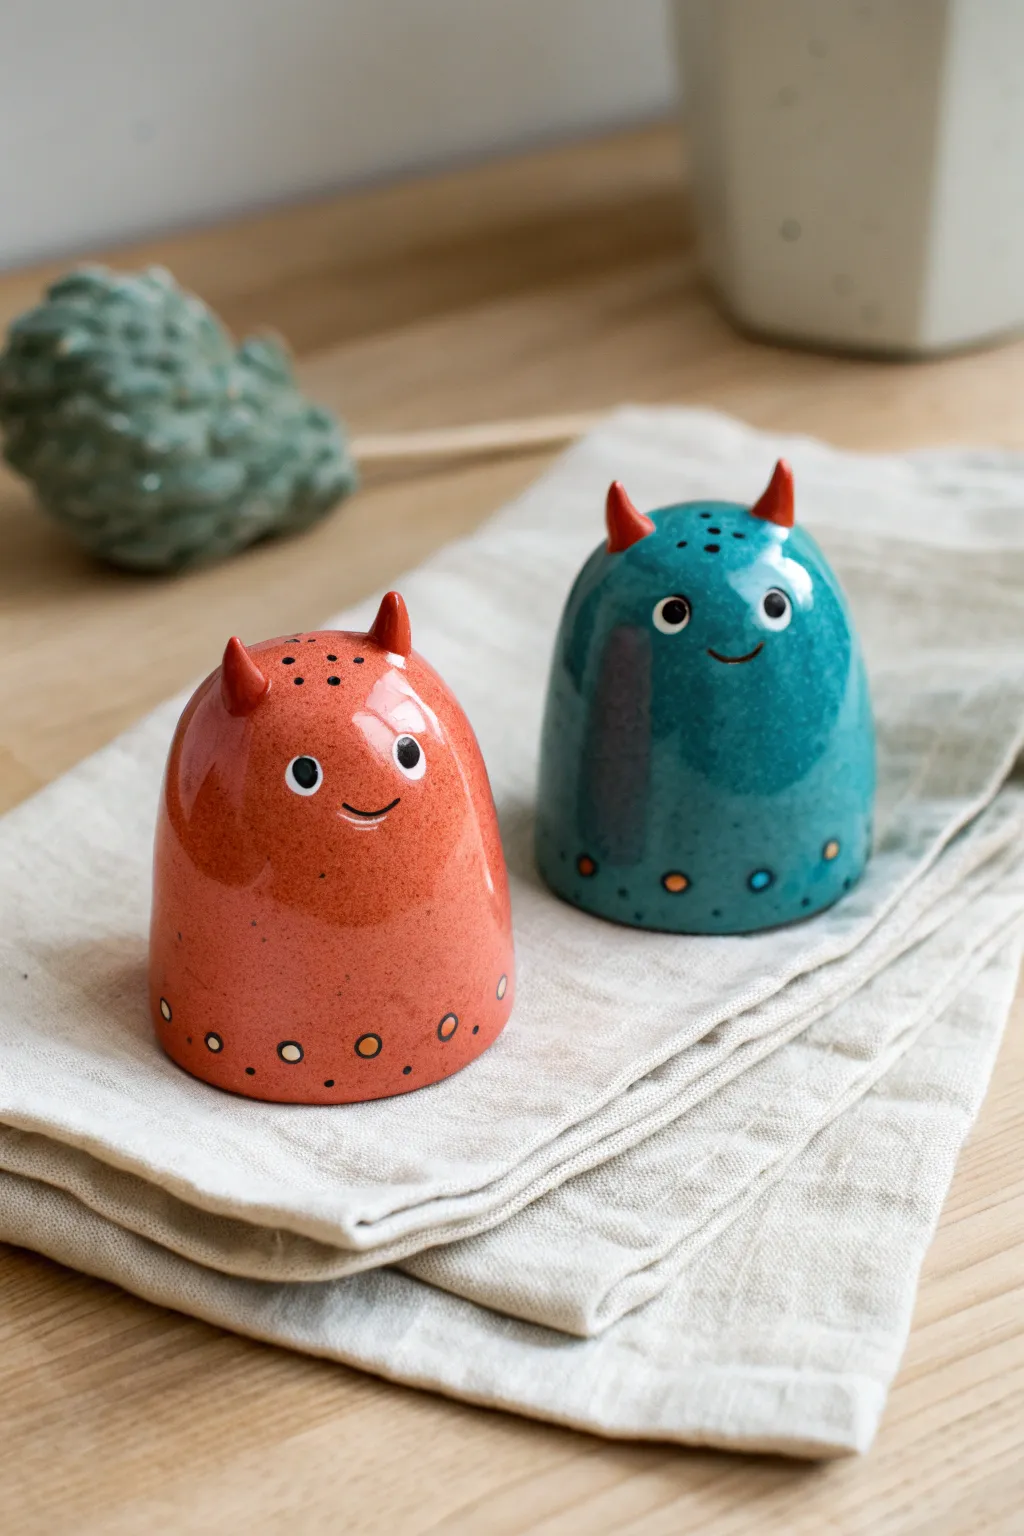
These adorable salt and pepper shakers feature charming little monster characters that bring a touch of playful personality to your dining table. With their glossy finishes, expressive faces, and tiny horns, these ceramic buddies are as functional as they are cute.
Step-by-Step Tutorial
Materials
- Earthenware or stoneware clay (white or light colored)
- Pottery wheel (optional, can be hand-built)
- Clay carving tools
- Pin tool or needle tool
- Sponge
- Underglazes (Red/Orange, Teal/Blue, Black, White, Golden Yellow)
- Clear glossy food-safe glaze
- Kiln
- Rubber stopper plugs for the bottom
Step 1: Forming the Bodies
-
Wedge the clay:
Begin by thoroughly wedging two small balls of clay, each about the size of a tangerine, to remove air bubbles and ensure consistency. -
Create the base form:
Throw two small, hollow enclosed forms on the wheel. You want a rounded, dome-like shape that tapers slightly at the top, resembling a gumdrop. -
Alternative hand-building method:
If you aren’t using a wheel, pinch two pots from balls of clay. Smooth the walls upward and gently curve them inward until you close the top completely, trapping the air inside to hold the shape. -
Refine the shape:
Once leather hard, trim away any excess clay from the bottom to create a stable, flat base. Smooth the exterior with a rib tool to get that perfect rounded curve. -
Cut the fill hole:
Flip the shakers over and carefully cut a circular hole in the bottom of each monster. This needs to be sized perfectly to fit your rubber stoppers later.
Step 2: Adding Monster Features
-
Sculpt tiny horns:
Roll four very small cones of clay for the horns. Score and slip the top of the monster heads, then attach two horns to each shaker, blending the seams down slightly for a strong bond. -
Pierce the shaker holes:
Using a pin tool or small drill bit, poke holes in the top of the head between the horns. I like to do two holes for pepper and three for salt to distinguish them. -
Clean up the surface:
Use a slightly damp sponge to smooth out any tool marks or rough edges, paying special attention to the area around the horns and the shaker holes. -
Bisque fire:
Let the monsters dry slowly and completely before firing them in the kiln to a bisque temperature (usually cone 04).
Glaze Crawling?
If your clear glaze pulls away from the underglaze spots (crawling), try thinning your underglaze slightly or ensuring the underglaze layer is totally dust-free before dipping.
Step 3: Glazing and Decorating
-
Apply base colors:
Paint one monster with a red-orange underglaze and the other with a teal-blue underglaze. Apply 2-3 coats for solid, opaque coverage, leaving the horns unpainted for now. -
Paint the horns:
Carefully paint the horns on both monsters using the red-orange underglaze. The contrast looks fantastic on the blue monster. -
Add the eyes:
Using a small detail brush, paint two white circles for eyes. Once the white is dry, add a small black pupil in the center. -
Draw the mouth:
With a very fine liner brush and black underglaze, paint a simple, small curved smile just below the eyes. -
Detail the texture:
To mimic the speckled look in the image, you can lightly flick a stiff brush loaded with thinned black underglaze over the bodies. -
Paint the bottom details:
Paint a row of small circles along the bottom edge using accent colors—yellow, blue, and white dots work well to create a decorative border. -
Clear glaze application:
Once the underglaze decorations are completely dry, dip the entire piece in a clear, food-safe glossy glaze. -
Final firing:
Fire the shakers again to your clay body’s maturity temperature (e.g., cone 5/6). Make sure the bottom rim is wiped clean of glaze so it doesn’t stick to the kiln shelf. -
Assembly:
After the kiln has cooled and you’ve removed your monsters, pop the rubber stoppers into the bottom holes.
Air Trapping Trick
When making closed forms, the trapped air supports the walls while you smooth them. Do not pierce the shaker holes until the clay has stiffened to leather hard, or the dome might collapse.
Fill them with your favorite spices and enjoy your colorful new dining companions