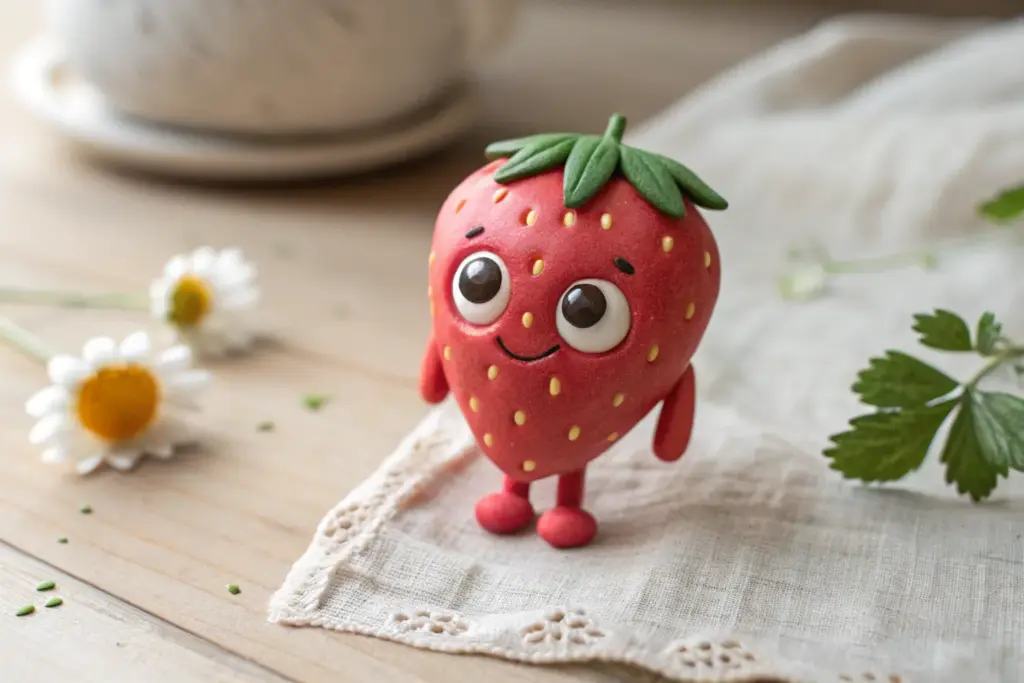
When you’re hunting for clay shapes ideas, the secret is starting with the basics—balls, logs, teardrops, and flat discs—and then giving them a tiny personality. I’m sharing my favorite beginner-friendly shapes that turn simple forms into mini clay characters and small, functional pieces you’ll actually want to keep on your desk.
Smiley Face Clay Balls
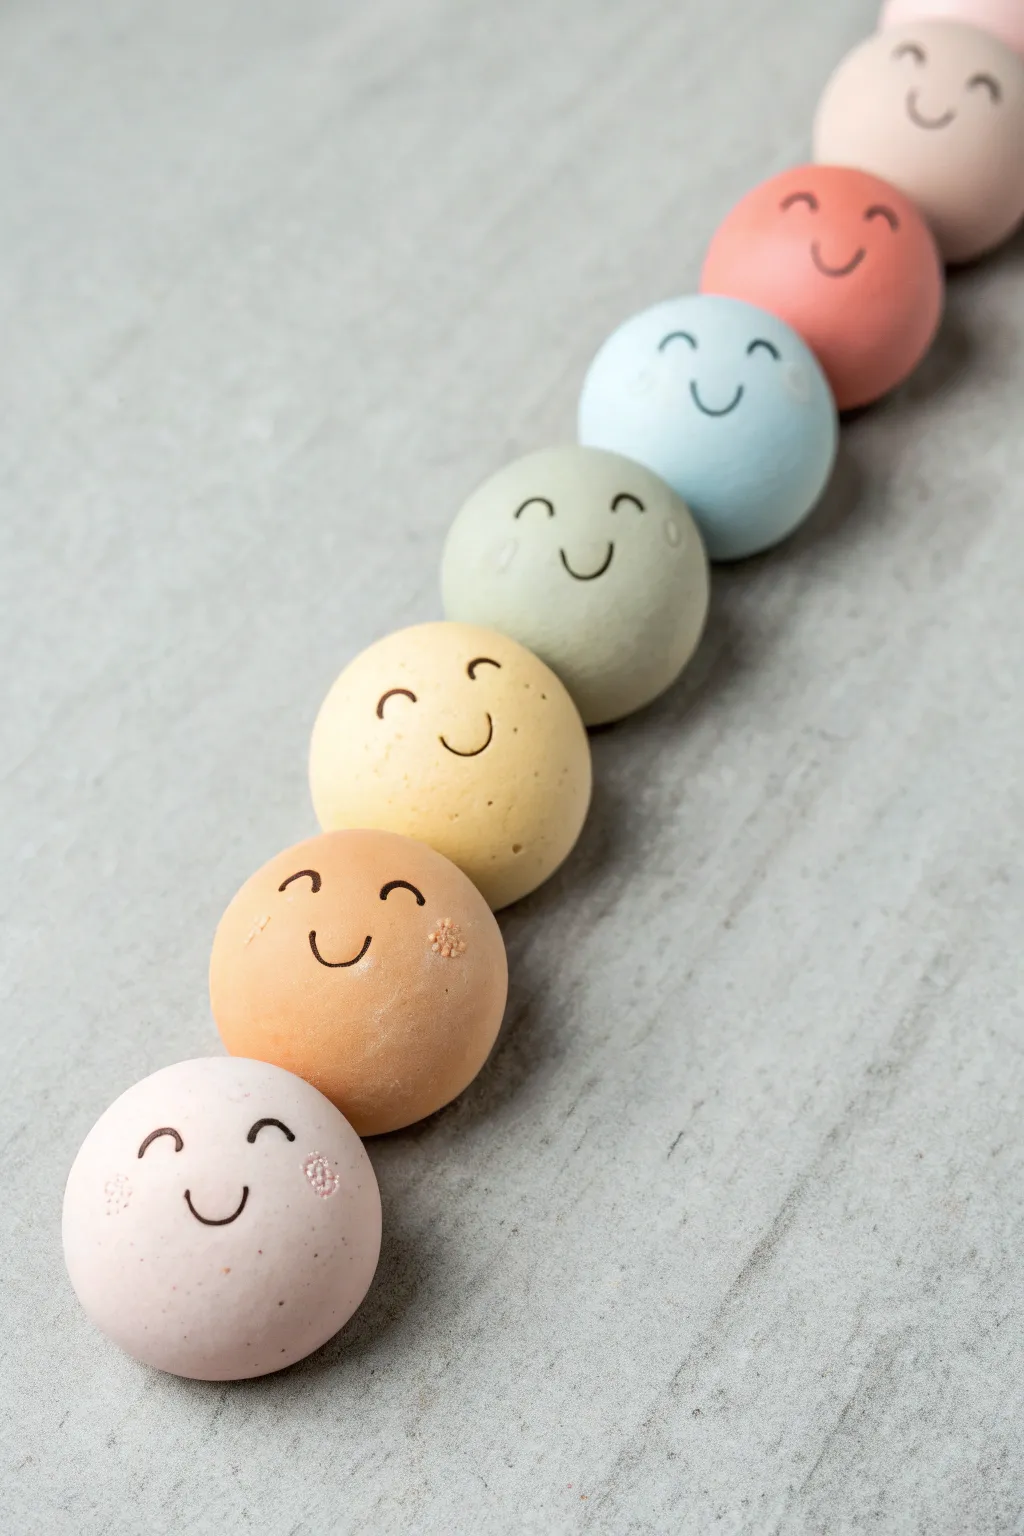
Brighten your day with this lineup of cheerful, matte clay spheres that radiate positivity. These simple shapes rely on a soft, muted color palette and charmingly minimalist carved expressions to create a modern decor piece.
Step-by-Step
Materials
- Air-dry stone clay or polymer clay (white)
- Acrylic paints (pastel pink, peach, yellow, sage green, light blue, coral, mocha)
- Small carving tool or toothpick
- Fine-grit sandpaper (400-600 grit)
- Clear matte varnish or sealant
- Small mixing palette
- Soft synthetic paintbrush
- Rolling surface (glass or tile)
Step 1: Shaping and Carving
-
Portion the clay:
Begin by grabbing even chunks of your clay. You will need seven equal portions if you want to recreate the exact lineup shown in the photo. -
Roll into spheres:
Roll each chunk of clay vigorously between your palms. Use the fleshy part of your palm to smooth out any cracks or seams until you have a perfect, seamless sphere. -
Refine the shape:
Place the ball on your work surface and roll it gently to ensure it is round, but tap the bottom lightly to create a tiny flat spot so it won’t roll away later. -
Mark the eyes:
Using a small carving tool or a toothpick, gently impress two small arcs for the eyes. I find pressing the tool in sideways creates a cleaner curve than trying to drag the point. -
Carve the smile:
Below the eyes, carve a wider U-shape for the mouth. Keep the lines clean and relatively deep, as paint layers can sometimes fill shallow grooves. -
Repeat the process:
Continue shaping and carving faces for all seven balls, trying to keep the facial features at roughly the same height on each sphere for uniformity. -
Let them dry:
Allow the clay to dry completely according to the package instructions. For air-dry clay, this usually takes 24-48 hours; for polymer clay, bake as directed.
Clean Curve Trick
Instead of carving freehand, cut a plastic straw in half lengthwise. Press the curved edge into the clay to make identical, perfect smile prints every time.
Step 2: Sanding and Painting
-
Smooth the surface:
Once fully cured or dry, inspect your spheres. Use fine-grit sandpaper to gently buff away any fingerprints or rough textures, being careful not to sand down the facial features. -
Mix pastel shades:
Prepare your palette with white paint and small amounts of your colors. Mix plenty of white into each hue to achieve that chalky, soft pastel look seen in the reference. -
Apply the base coat:
Paint each ball a different color. Start with the lightest pink, then move through peach, yellow, sage, blue, coral, and finally the darker tan tone. -
Dry and recoat:
Let the first coat dry. Apply a second or third thin coat if necessary to get an opaque, solid finish without brushstrokes showing. -
Paint the features:
Using a very fine detail brush and dark brown or black paint, carefully fill in the carved grooves of the eyes and mouth. The indentation helps guide your brush. -
Add blush details:
For the pink and peach balls, you can add tiny white dots or faint textured stippling near the cheeks to mimic ‘blush’ marks. -
Clean up lines:
If any dark paint went outside the grooves, wait for it to dry and touch it up with the original background pastel color. -
Seal the work:
Finish by applying a coat of clear matte varnish. This protects the paint while preserving the stone-like, non-glossy aesthetic.
Garden Guardians
Make these out of waterproof polymer clay and hide them in potted plants as adorable ‘pebble pets’ to surprise your guests.
Arranging these colorful friends in a gradient row creates an instant mood-lifting display on any shelf


Cute Carrot Characters
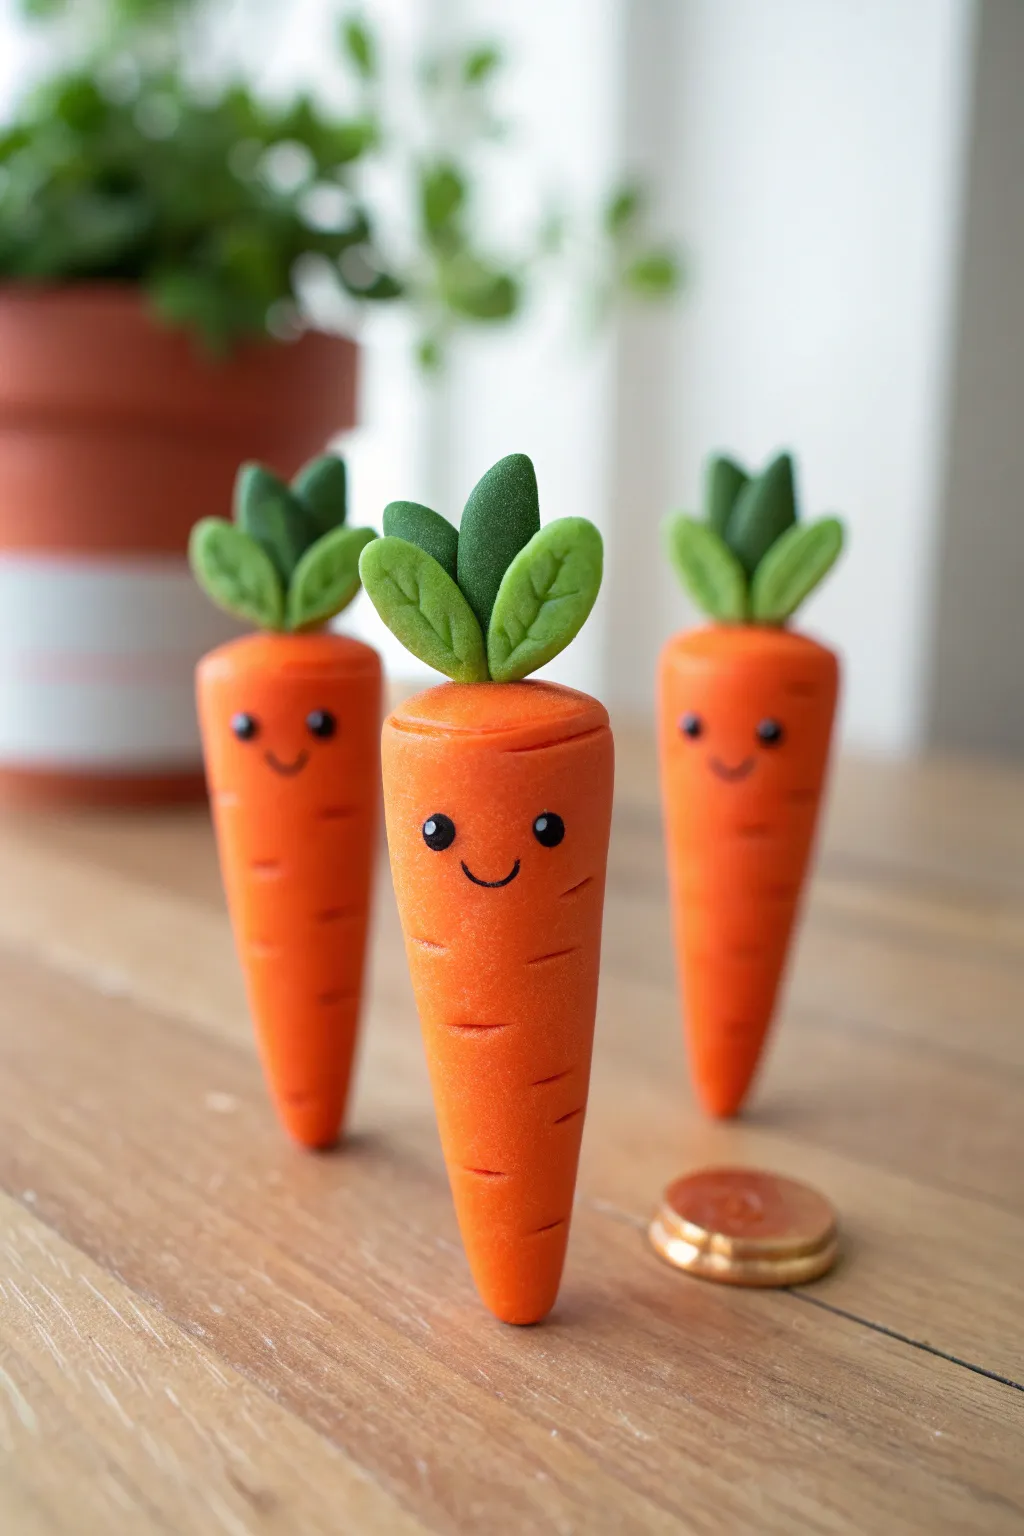
These adorable standing carrots are bursting with personality, featuring warm orange bodies, textured details, and sweet smiling faces. Perfect for beginner sculptors, this project teaches simple shapes and detailing to create a garden of cute companions.
Step-by-Step Guide
Materials
- Orange polymer clay
- Light green polymer clay
- Dark green polymer clay
- Black polymer clay
- Basic sculpting tools (needle tool, ball stylus)
- Blade or craft knife
- Oven for baking
Step 1: Shaping the Bodies
-
Prepare the orange clay:
Begin by conditioning your orange clay until it is soft and pliable. Divide it into three equal portions if you plan to make the full trio shown in the photo. -
Roll individual carrots:
Take one portion of orange clay and roll it into a smooth ball first to remove any seams or cracks. -
Form the tapered cone:
Using the palm of your hand, roll the ball against your work surface, applying more pressure on one side to create a tapered cone shape. The bottom should be rounded but narrow, and the top flatter and wider. -
Flatten the top:
Gently tap the wider end of the cone against your table to create a flat surface for the leaves to sit on. Smooth the edges of this top rim slightly with your finger. -
Add texture lines:
Use a needle tool or a dull knife blade to gently press short, horizontal indentation lines across the body of the carrot. Stagger them randomly to mimic real root vegetable textures. -
Create the top crease:
Use your needle tool to score a shallow line around the circumference of the carrot, just below the flat top edge, defining the ‘shoulder’ of the vegetable.
Clean Clay Tip
Orange clay stains easily! Clean your hands and tools with baby wipes or rubbing alcohol before switching to the green or white clay to keep colors bright.
Step 2: Sculpting the Greenery
-
Mix green tones:
Prepare your light and dark green clays. I sometimes like to mix a tiny bit of yellow into the light green to make it pop against the orange. -
Form leaf bases:
Roll small teardrop shapes—three per carrot works best. Make two from light green and one from dark green for variety. -
Flatten the leaves:
Gently flatten each green teardrop between your fingers to create a thick, leaf-like paddle shape. -
Add leaf veins:
Using a needle tool, press a central line down the middle of each leaf, then add tiny diagonal veins branching off the center line. -
Attach the greenery:
Press the three leaves together at their pointed bases, clustering them. Place this cluster onto the flat top of the orange carrot, pressing gently to secure the bond.
Turn Them Into Charms
Before baking, insert a metal eye screw into the top center of the leaves. After baking, you can attach them to keychains, earrings, or charm bracelets.
Step 3: Adding the Kawaii Face
-
Mark eye placement:
Use a small ball tool to create two shallow divots on the upper half of the carrot face where you want the eyes to go. Wide spacing makes them look cuter. -
Insert the eyes:
Roll two incredibly tiny balls of black clay. Place them into the divots and flatten them slightly so they look like buttons. -
Add eye highlights:
Take the smallest speck of white clay (or white paint after baking) and add a tiny dot to the upper corner of each black eye for life-like sparkle. -
Create the smile:
Roll a very thin, short snake of black clay. Curve it into a ‘U’ shape and gently press it onto the face between the eyes using a needle tool. -
Bake the project:
Place your carrots on a baking sheet or ceramic tile. Bake according to your specific brand of polymer clay’s instructions—usually around 275°F (130°C) for 15-30 minutes.
Once cooled, these cheerful veggies are ready to brighten up your desk or shelf


Happy Pea Pod Shapes
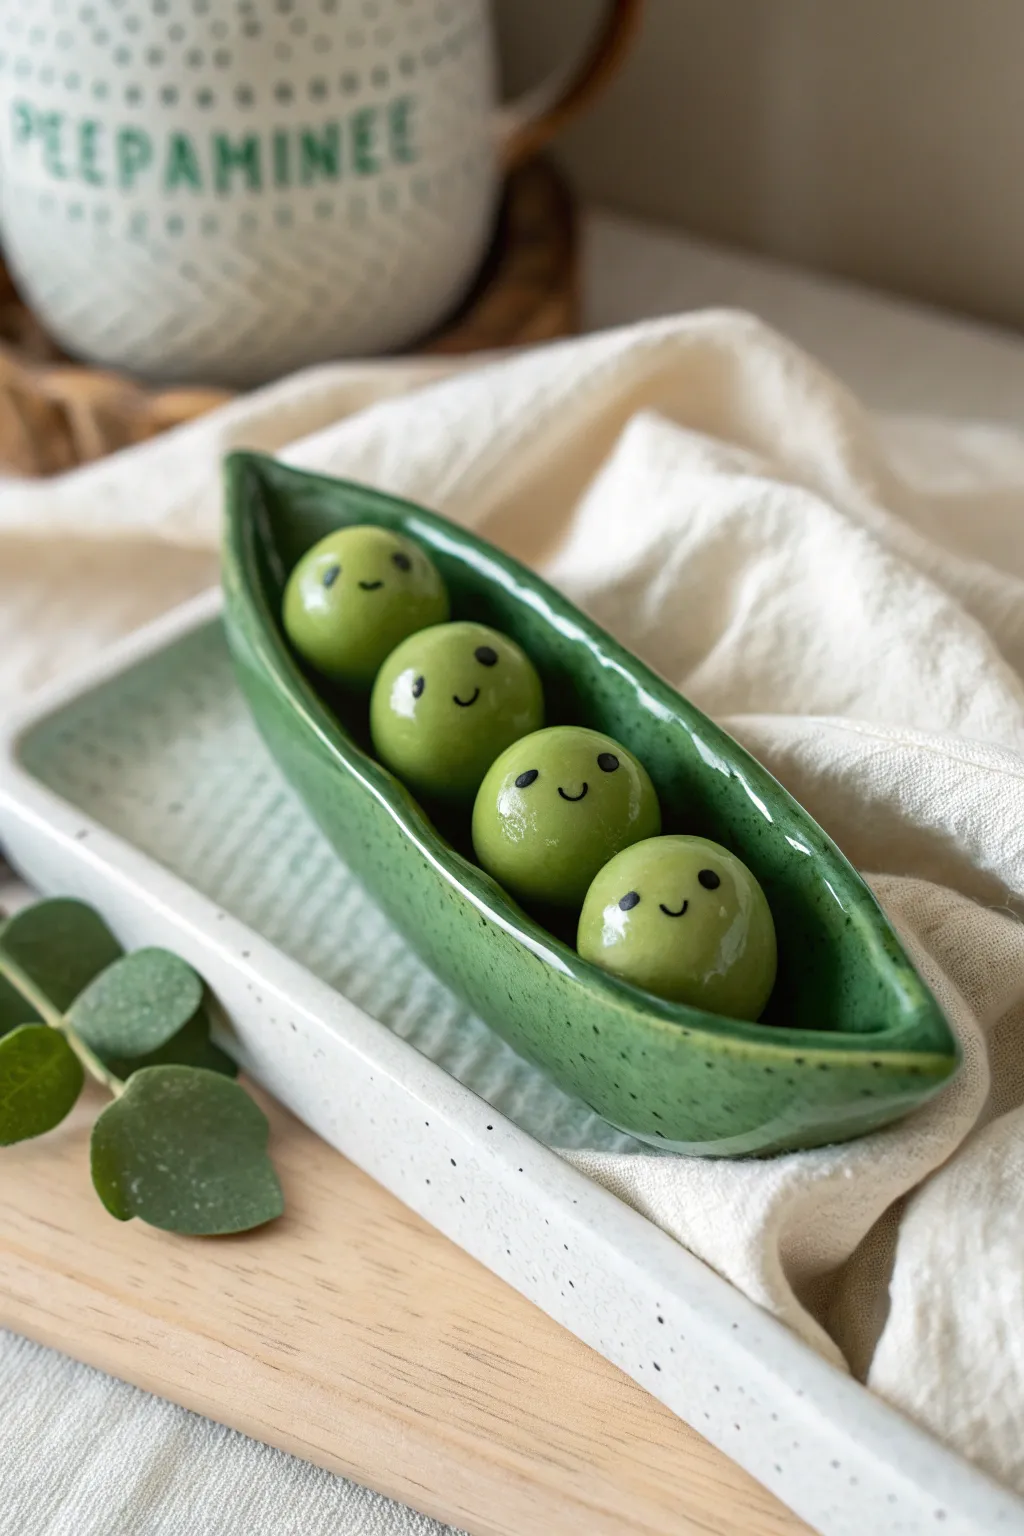
Bring a little garden charm into your home with this adorable ceramic pea pod sculpture. Featuring four cheerful peas nestled in a glossy, speckled green pod, this project is perfect as a decorative trinket dish or a friendly desk companion.
Step-by-Step
Materials
- White gloss finish polymer clay or air-dry clay (e.g., DAS)
- High-gloss ceramic glaze or acrylic gloss varnish
- Acrylic paints: leaf green, forest green, black
- Sculpting tools (ball styluses, needle tool)
- Small paintbrush (fine tip)
- Water and sponge (if using pottery clay) or clay softener
- Rolling pin
- Sandpaper (fine grit)
Step 1: Sculpting the Shapes
-
Prepare the pod base:
Start by conditioning a lump of clay roughly the size of a lemon. Roll it into a thick log, tapering both ends to create a canoe or kayak shape. -
Hollow the pod:
Using your thumbs or a sculpting loop tool, gently press into the center of the log to create a deep groove along the length. Leave the walls thick enough to support the structure, about 1/4 inch thick. -
Refine the edges:
Pinch the two ends of the pod to sharp points. Smooth the upper rims of the ‘canoe’ with a little water (or clay softener) on your finger to ensure they are rounded and organic, not sharp. -
Curve the form:
Gently bend the pod slightly into a subtle crescent shape. Flatten the bottom just enough so it sits stably on your work surface without tipping over. -
Roll the peas:
Create four balls of clay. They should be sized to fit perfectly inside your pod hollow, sitting side-by-side but not overly crowded. I prefer to make them slightly different sizes for a natural look. -
Test the fit:
Place the spheres into the pod to ensure they fit snugly. Once confirmed, remove them and set everything aside to dry or bake according to your specific clay’s instructions.
Uneven Paint?
If your acrylic paint looks streaky, mix in a tiny drop of flow improver or water. Thin, multiple layers always look smoother than one thick, goopy layer.
Step 2: Surface & Painting
-
Sand for smoothness:
Once fully cured or dried, gently sand any fingerprints or rough ridges off the pod and the four spheres using fine-grit sandpaper. Wipe away all dust with a damp cloth. -
Base coat the green:
Mix a vibrant leaf green acrylic paint. Paint the entire surface of the pod and all four peas. You may need two coats to get full opacity. -
Create the speckled effect:
To mimic the ceramic glaze look in the photo, dip an old toothbrush or stiff brush into a darker forest green paint. Fick the bristles to splatter tiny dots across the pod. Go lightly at first; you can always add more speckles. -
Paint the peas:
Paint the four spheres with a solid coat of a slightly lighter yellowish-green to differentiate them from the pod, or stick to the same green if you prefer a uniform look. -
Assemble the piece:
Glue the peas into the pod using a strong adhesive like E6000 or heavy gel medium. Arrange them in a straight line, pressing them firmly into the hollow.
Make It Functional
Before baking, use a needle tool to poke a hole through the top point of the pod. Add twine after glazing to turn this into a festive ornament.
Step 3: Bringing it to Life
-
Draft the faces:
Before painting, lightly mark the position of the eyes and mouths with a pencil to ensure they are centered and facing the same direction. -
Paint the expressions:
Using your finest detail brush and black acrylic paint, create simple faces. Paint two small dots for eyes and a tiny ‘u’ shape for the smile. Keep the features wide-set for maximum cuteness. -
Glaze application:
The secret to the ceramic look is the finish. Apply a thick coat of high-gloss varnish or resin over the entire piece. This creates that wet, fired-glaze shine. -
Second coat:
Allow the first gloss layer to dry completely, then add a second coat, paying special attention to the deep crevices between the peas where glaze would naturally pool. -
Final cure:
Let the project cure undisturbed for at least 24 hours to ensure the finish is hard, non-tacky, and durable.
Enjoy the smiles these little green friends bring to your space


Mushroom Cap and Stem Minis
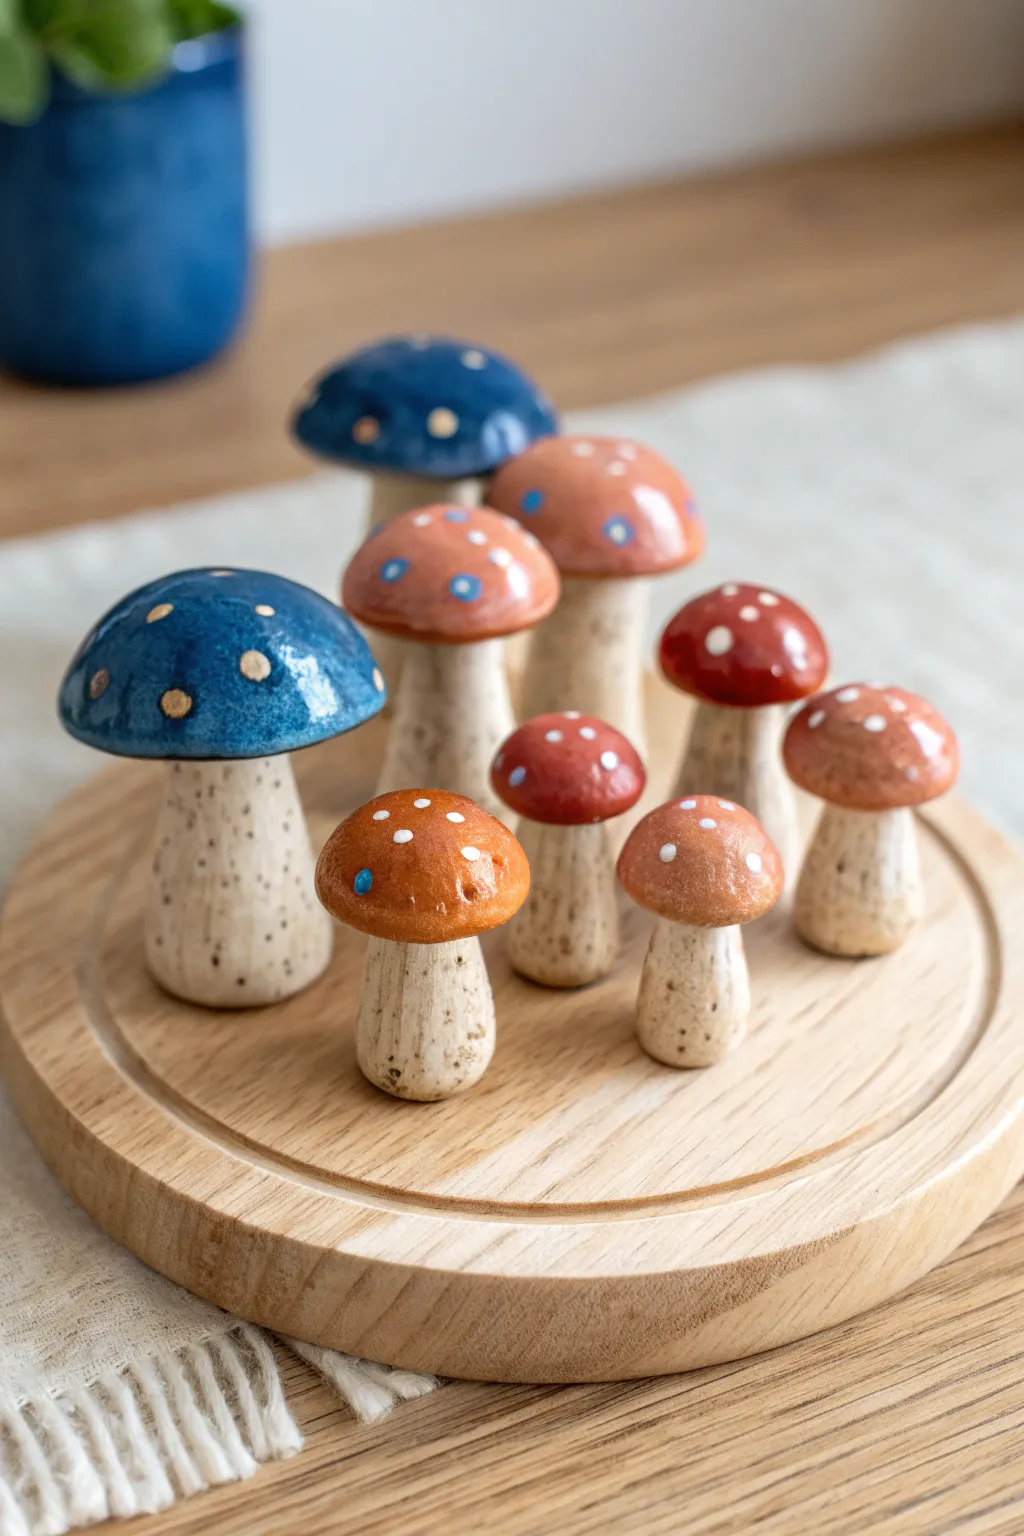
Create a charming forest floor display with these handcrafted clay mushrooms, featuring glossy, spotted caps and textured, natural-looking stems. The variety of sizes and earthy tones makes this mini-collection perfect for adding a touch of whimsy to any shelf or plant display.
Step-by-Step
Materials
- Polymer clay (white or beige) or air-dry clay
- Acrylic paints (deep blue, terracotta, rust red, warm brown, white, beige)
- Gloss varnish or resin (high gloss)
- Sculpting tools (needle tool, small ball stylus)
- Old toothbrush or stiff bristle brush
- Aluminum foil
- Sandpaper (fine grit)
- Super glue or liquid clay (for assembly)
- Paintbrushes (small detail and medium flat)
Step 1: Sculpting the Shapes
-
Condition the Caly:
Start by warming up your clay in your hands until it is pliable and smooth. If you are using white clay and want a natural base, you can mix in a tiny speck of brown or beige paint now, although we will paint the stems later. -
Establish the Stems:
Roll out several cylinders of clay in varying thicknesses and heights. Some should be short and stout, others taller and slender. Slightly taper the tops where the cap will sit and flatten the bottoms so they stand upright on your work surface. -
Create the Texture:
Before the clay hardens, take your needle tool or a stiff toothbrush and gently stipple the surface of the stems. I find this creates that organic, porous texture found in real mushrooms rather than a perfectly smooth plastic look. -
Form the Cores:
To save clay and keep the caps light, crumple small balls of aluminum foil into semi-spheres. These will act as armatures for your mushroom caps. -
Sculpt the Caps:
Roll sheets of clay and drape them over your foil cores, smoothing them down to create a dome shape. Curl the edges slightly underneath to form the lip of the mushroom cap. Make a variety of sizes to match your stems. -
Attach and Bake:
Press the tapered top of a stem into the underside of a matching cap to create an indentation for a secure fit later, then separate them for baking. Follow your clay package instructions for baking temperatures and times. Let them cool completely.
Glazing Pro Tip
For that ultra-glassy ceramic look, use UV resin instead of varnish. It builds a thicker dome that mimics kiln-fired glaze perfectly.
Step 2: Painting and Detailing
-
Base Coat the Stems:
Paint the baked stems with a creamy beige acrylic paint. While the paint is still wet, you can wipe a little off with a paper towel to let some texture show through. -
Add Stem Speckles:
Dilute a small amount of dark brown paint with water. Dip an old toothbrush into this mixture and run your thumb across the bristles to flick tiny brown specks onto the stems. This mimics soil and organic imperfections. -
Color the Caps:
Paint the mushroom caps in solid blocks of color. Use deep blue for the largest, and vary the others with terracotta, rust red, and warm brown. You may need 2-3 coats for full opacity. -
Dot the Details:
Once the base colors are dry, use a small dotting tool or the back of a paintbrush to add the signature spots. For the blue mushroom, use beige dots; for the red and brown ones, use white or light cream. -
Add Accent Dots:
For extra visual interest, add a few tiny dots of contrasting colors, like the small blue dot seen on the brown mushroom. Keep these sparse to maintain a semi-realistic look.
Step 3: Assembly and Finish
-
Glue Together:
Apply a drop of strong super glue or heavy gel medium to the top of each stem and press the corresponding cap firmly in place. Hold for a few seconds to ensure a tight bond. -
Applying the Glaze:
This is the most crucial step for the ceramic look. Apply a thick, generous coat of high-gloss varnish or UV resin specifically to the colored caps only. -
Matte the Stems:
If your stem paint looks too shiny, apply a layer of matte varnish to the beige stalks. The contrast between the matte stem and the glossy cap is what makes them look like glazed pottery. -
Final Cure:
Allow the varnish or resin to cure fully according to the manufacturer’s instructions in a dust-free area before handling or displaying your new garden.
Sticky Situation?
If fingerprints are marring your smooth caps before baking, lightly brush the raw clay with a little baby oil or cornstarch to smooth them out.
Arrange your finished mushrooms in a cluster to bring a little piece of the forest into your home

The Complete Guide to Pottery Troubleshooting
Uncover the most common ceramic mistakes—from cracking clay to failed glazes—and learn how to fix them fast.
Oval Penguin Shapes
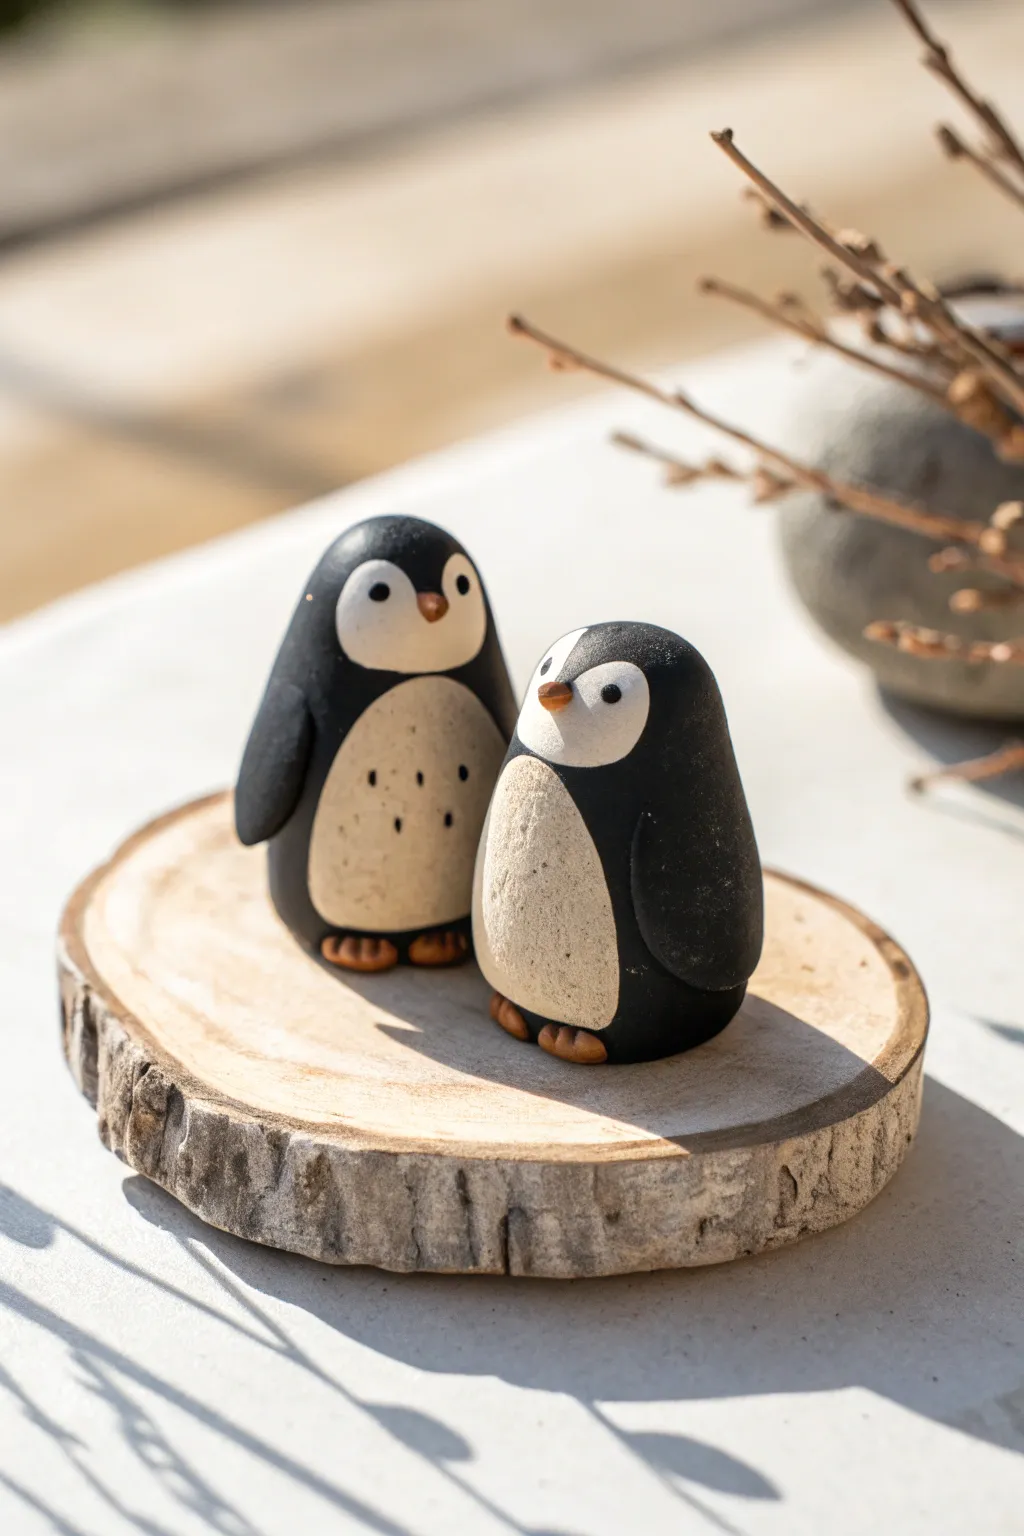
Capture the charm of the Antarctic with these wonderfully tactile, oval-shaped penguins. Using simple hand-building techniques, you’ll create a smooth, minimalist pair that balances organic textures with clean, contrasting colors.
How-To Guide
Materials
- Black polymer clay or air-dry clay (black)
- White or beige clay (for the belly)
- Small amount of terracotta or orange-brown clay (for feet and beak)
- Smooth wooden slice for display
- Clay roller or rolling pin
- Basic sculpting tools (needle tool, smoother)
- Hobby knife
- Black acrylic paint (if using white air-dry clay)
- Matte varnish (optional)
Step 1: Shaping the Bodies
-
Prepare the base:
Begin by conditioning the black clay until it is soft and malleable. Roll two separate balls of clay—one slightly larger than the other to create size variation between the penguins. -
Form the oval:
Take the larger ball and gently roll it between your palms into a smooth, egg-like oval. Flatten the bottom slightly on your work surface so it stands upright securely without wobbling. -
Refine the shape:
Repeat the process for the smaller penguin. Smooth out any fingerprints or seams using your thumb or a smoothing tool; the goal is a seamless, pebble-like finish.
Step 2: Adding Details
-
Create the belly:
Roll out a thin sheet of the white or beige clay. Use a circular cutter or freehand cut an elongated oval shape that fits the front of your penguin’s body. -
Apply the contrasting color:
Gently press the white oval onto the front of the black body. I find it helpful to blend the edges ever so slightly so it looks integrated rather than just stuck on. -
Create the face mask:
For the face, cut a small, heart-shaped piece of white clay, but with the bottom point rounded off. This will form the classic penguin face mask. -
Attach the face:
Position this face piece near the top of the body, slightly overlapping the top of the belly patch if you desire a continuous look, or keeping them separate for a different style. -
Form the wings:
Shape two small teardrops of black clay. Flatten them considerably to make the flippers. -
Attach the wings:
Press one wing onto each side of the body, blending the top curve into the shoulder area while leaving the bottom tip slightly raised for dimension.
Clean Clay Pro-Tip
White clay picks up lint easily. Always clean your hands and workspace thoroughly or use baby wipes before switching from the black clay to the white clay steps.
Step 3: Fine Features
-
Make the beak:
Using a tiny amount of the terracotta clay, roll a very small cone. Press this into the center of the white face area. -
Create the eyes:
Roll two miniscule balls of black clay. Press them gently into the white face clay on either side of the beak to give your penguin sight. -
Texture the belly (Optional):
If you want the textured look seen in the photo, lightly stipple the white belly clay with a needle tool or an old toothbrush to mimic downy feathers. -
Speckling detail:
For added character, you can add three tiny dots of black clay or paint to the belly area, arranged in a subtle triangle or vertical line.
Troubleshooting Cracks
If you see tiny cracks forming while blending seams, dab a tiny drop of baby oil (polymer) or water (air-dry) on your finger and smooth it over immediately.
Step 4: Feet and Finishing
-
Form the feet:
Create four small, flattened balls of terracotta clay. Use a knife tool to press two indentations into the front of each, creating webbed toes. -
Attach feet:
Place the feet under the front edge of the penguin’s body, ensuring they protrude enough to be visible. -
Bake or Dry:
Follow the manufacturer’s instructions for your specific clay. If baking polymer clay, ensure your oven temperature is accurate to prevent scorching the white clay. -
Final touches:
Once cool or dry, inspect your penguins. If you used air-dry clay, paint the black areas now. A matte varnish can be applied to protect the surface without making it glossy.
Set your finished pair on their wooden slice to bring a touch of cozy winter nature into your home
Teardrop Chick Shapes
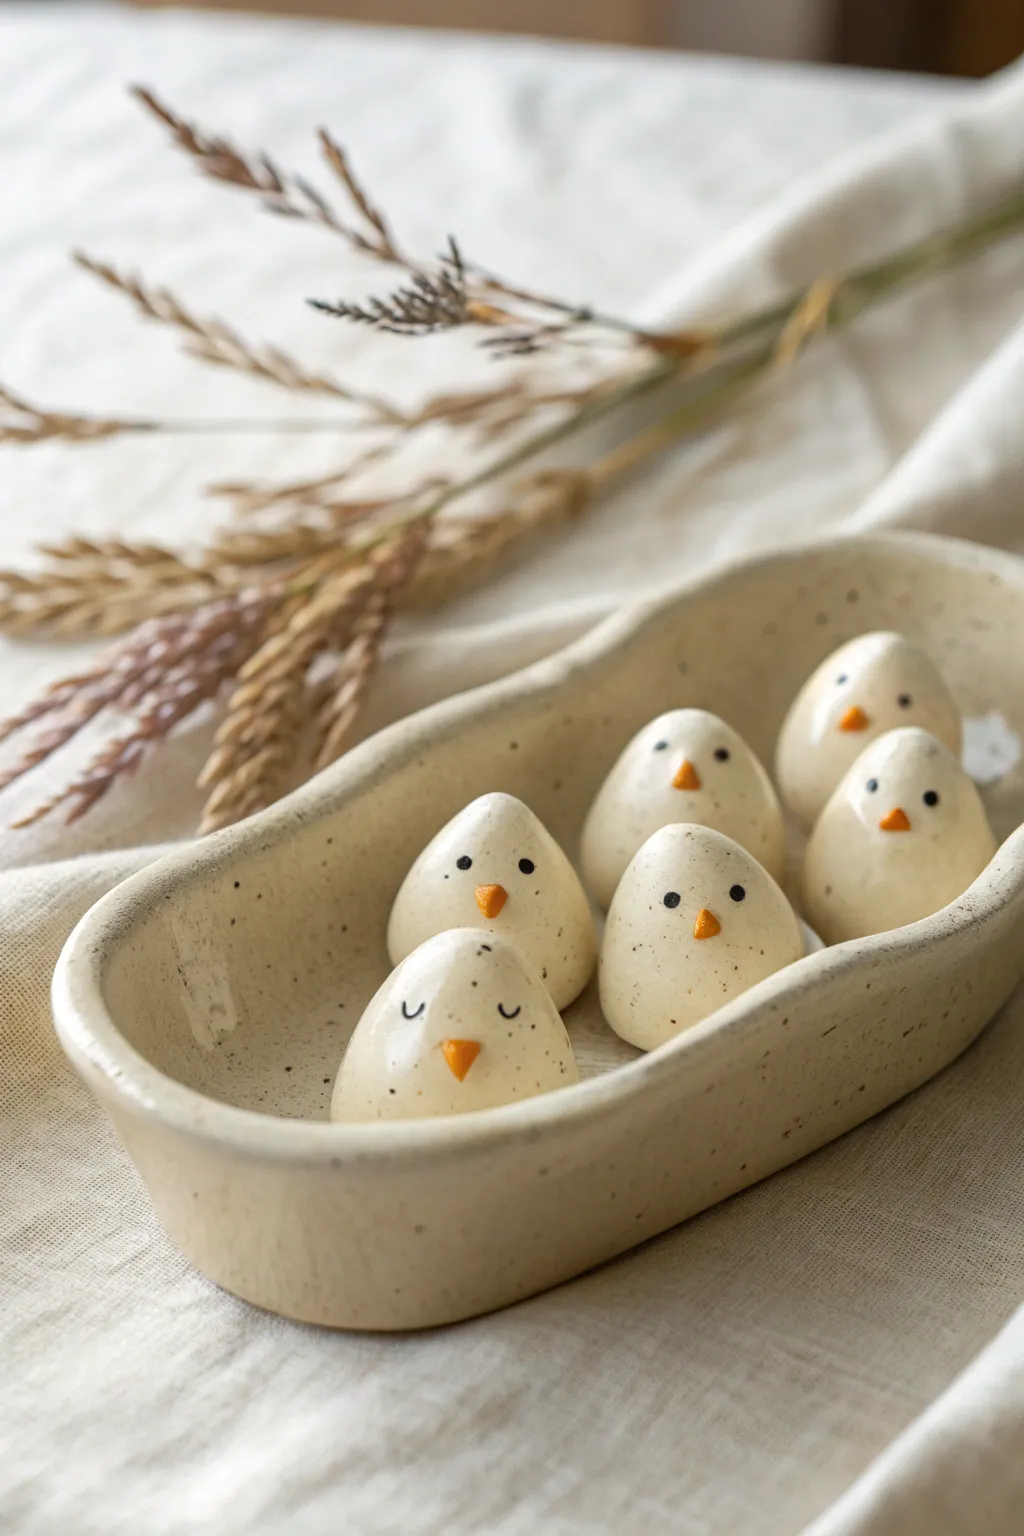
These charming little chicks are a perfect beginner clay project, reducing the complex form of a bird down to a simple, elegant teardrop shape. With their speckled cream finish and minimalist faces, they create an adorable brood that nestles perfectly into a handmade dish.
Step-by-Step
Materials
- Speckled buff stoneware clay (or white polymer clay with faux speckles)
- Orange underglaze (or acrylic paint if using polymer)
- Black underglaze (or acrylic paint)
- Clear glossy glaze
- Basic clay tools (needle tool, small sponge)
- Fine detail paintbrush
- Rolling pin (if making the dish)
- Small bowl of water
- Kiln (if using stoneware) or Oven (if using polymer)
Step 1: Sculpting the Chicks
-
Portion the clay:
Start by cutting small, uniform chunks of your speckled clay. Aim for pieces roughly the size of a walnut or a large grape, depending on how big you want your final chicks to be. -
Roll spheres:
Take one piece of clay and roll it briskly between your palms. Create a smooth, tight ball, ensuring you work out any air bubbles or cracks on the surface. -
Form the teardrop:
Place the ball on your work surface or keep it in your palm. Gently apply pressure to just the top half of the ball while rolling it back and forth. You want to taper the top into a point while keeping the bottom distinctively round and weighted. -
Refine the shape:
Stand the teardrop up on your table. Gently tap the bottom so it sits flat and stable. Smooth the tapered point slightly so it isn’t sharp—soft, rounded curves look friendlier. -
Create the flock:
Repeat this process for as many chicks as you desire. I find creating odd numbers, like five or seven, usually looks best in a grouping. -
Optional: Make the dish:
If you wish to make the matching nest bowl, roll out a slab of clay about 1/4 inch thick. Lay it over a hump mold or inside an existing shallow bowl to give it form. Smooth the rim with a damp sponge for that organic, soft edge seen in the photo.
Smooth Surfaces
Before drying, run a soft, slightly damp brush over the clay to remove fingerprints. The glaze will magnify any tiny imperfections left behind.
Step 2: Adding Details
-
Attach the beak:
Take a tiny, crumb-sized bit of clay and roll it into a minuscule cone. Score a tiny spot on the front of the chick’s face, add a dab of water or slip, and press the cone on to form the beak. Smooth the edges down slightly to secure it. -
Dry the pieces:
Let your clay shapes dry completely to the bone-dry stage. This is crucial for stoneware to prevent explosions in the kiln. If using polymer clay, follow package instructions for baking now instead. -
Bisque fire:
For ceramic clay, fire your pieces to cone 04 (or your clay’s specific bisque temperature). This hardens the clay and prepares it for glazing.
Customize the Flock
Give each chick a unique personality by changing the beak angle or eye spacing. Try stacking two chicks for a ‘piggyback’ variation.
Step 3: Glazing and Finishing
-
Paint the beaks:
Using a very fine brush, carefully apply orange underglaze just to the tiny beak area. You may need two coats for opaque coverage. -
Add the eyes:
Dip the back end of a paintbrush or a dotting tool into black underglaze. Dot two eyes above the beak. For variety, paint tiny ‘U’ shapes on one or two chicks to make them look like they are sleeping. -
Apply clear glaze:
Once the underglaze details are dry, dip the entire chick into a clear glossy glaze. Shake off the excess gently. This will make the natural speckles of the clay pop and give the piece a finished shine. -
Wipe the bottoms:
Before the final firing, meticulously wipe the bottom of each chick with a damp sponge to remove any glaze. This prevents them from sticking to your kiln shelf. -
Glaze fire:
Fire the pieces again to the maturity temperature of your clay and glaze combination (often cone 5 or 6 for speckled stoneware). -
Cool and display:
Allow the kiln to cool naturally before removing your new flock. Arrange them together in their bowl to complete the scene.
Once fired, these glossy little birds make a delightful springtime centerpiece or a sweet handmade gift


What Really Happens Inside the Kiln
Learn how time and temperature work together inside the kiln to transform clay into durable ceramic.
Coiled Snake Spiral Shapes

This elegant clay snake brings a touch of organic charm to any space, featuring a smooth, matte finish and a soothing spiral form. Its natural, stone-like appearance makes it a perfect decorative accent for shelves or tabletops.
How-To Guide
Materials
- Air-dry clay (stone, granite like, or white)
- Small cup of water
- Rolling board or clean work surface
- Needle tool or toothpick
- Fine-grit sandpaper (optional)
- Black acrylic paint
- Fine detail paintbrush
Step 1: Shaping the Base Coil
-
Prepare the Clay:
Start by taking a generous handful of air-dry clay. Knead it thoroughly in your hands to warm it up and remove any air bubbles, which helps prevent cracking later on. -
Begin Rolling:
Place the clay on your rolling board. Using the palms of your hands, begin rolling it back and forth to create a thick log shape. -
Elongate the Coil:
Gradually spread your hands apart as you roll, moving from the center of the coil outwards. Aim for a long, even snake that is roughly 18-24 inches long. -
Create the Taper:
Focus your rolling on one end of the coil to create a tapering tail. Apply slightly more pressure as you roll this section until it comes to a gentle point. -
Form the Head:
On the opposite end, leave the clay slightly thicker. Gently press and mold this section into a rounded diamond or oval shape to distinguish the head from the body. -
Smooth Imperfections:
Before coiling, inspect the entire length of the clay snake. Dip your finger in a little water and smooth out any deep cracks or unwanted bumps.
Seamless Coils
To prevent the coils from separating as they dry, lightly score (scratch) the touching sides of the clay rope and add a drop of water before pressing them together.
Step 2: Forming the Spiral
-
Start the Center:
Take the tapered tail end and begin curling it inward to form the very center of your spiral. -
Wind the Body:
Continue winding the coil around the center point. Keep the loops close together, but don’t press them so creating a solid disc; you want the definition of the coils to remain visible. -
Position the Head:
As you reach the end of the coil, position the head section so it rests on the outer edge of the spiral. I like to lift the head slightly off the surface to give it a bit of life and dimension. -
Secure the Neck:
If the head feels unstable, gently blend a tiny bit of clay underneath the ‘neck’ area to connect it securely to the coil next to it, ensuring it stays elevated while drying. -
Final Smoothing:
Run a damp finger over the entire surface one last time to unify the texture. Pay special attention to the nose area to ensure it’s smooth and rounded.
Speckled Stone Effect
Mix dried tea leaves or cracked black pepper into your white clay before rolling. Once sanded, this creates a beautiful faux-granite texture.
Step 3: Details & Finishing
-
Add Eyes:
While the clay is still soft, use a needle tool or toothpick to gently mark where the eyes will go. You don’t need deep holes, just small indentations for placement later. -
Refine the Mouth:
Use your needle tool to carefully press a horizontal line into the front of the snout to suggest a mouth. -
Allow to Dry:
Let the sculpture dry completely in a safe place away from direct sunlight. This usually takes 24-48 hours depending on the thickness of your clay. -
Sand for Texture:
Once fully dry, you can lightly sand any rough spots with fine-grit sandpaper. This enhances that smooth, matte stone look. -
Paint the Details:
Dip a fine detail brush into black acrylic paint. Carefully paint two small dots for the eyes. If you prefer a sculpted look, you can leave them unpainted, but the black adds character. -
Seal (Optional):
For durability, you can brush on a layer of matte varnish, though leaving the raw clay often looks more natural and stone-like.
Place your finished serpent on a pile of books or a sunny windowsill to enjoy its quiet, artistic presence
Frog and Lily Pad Discs
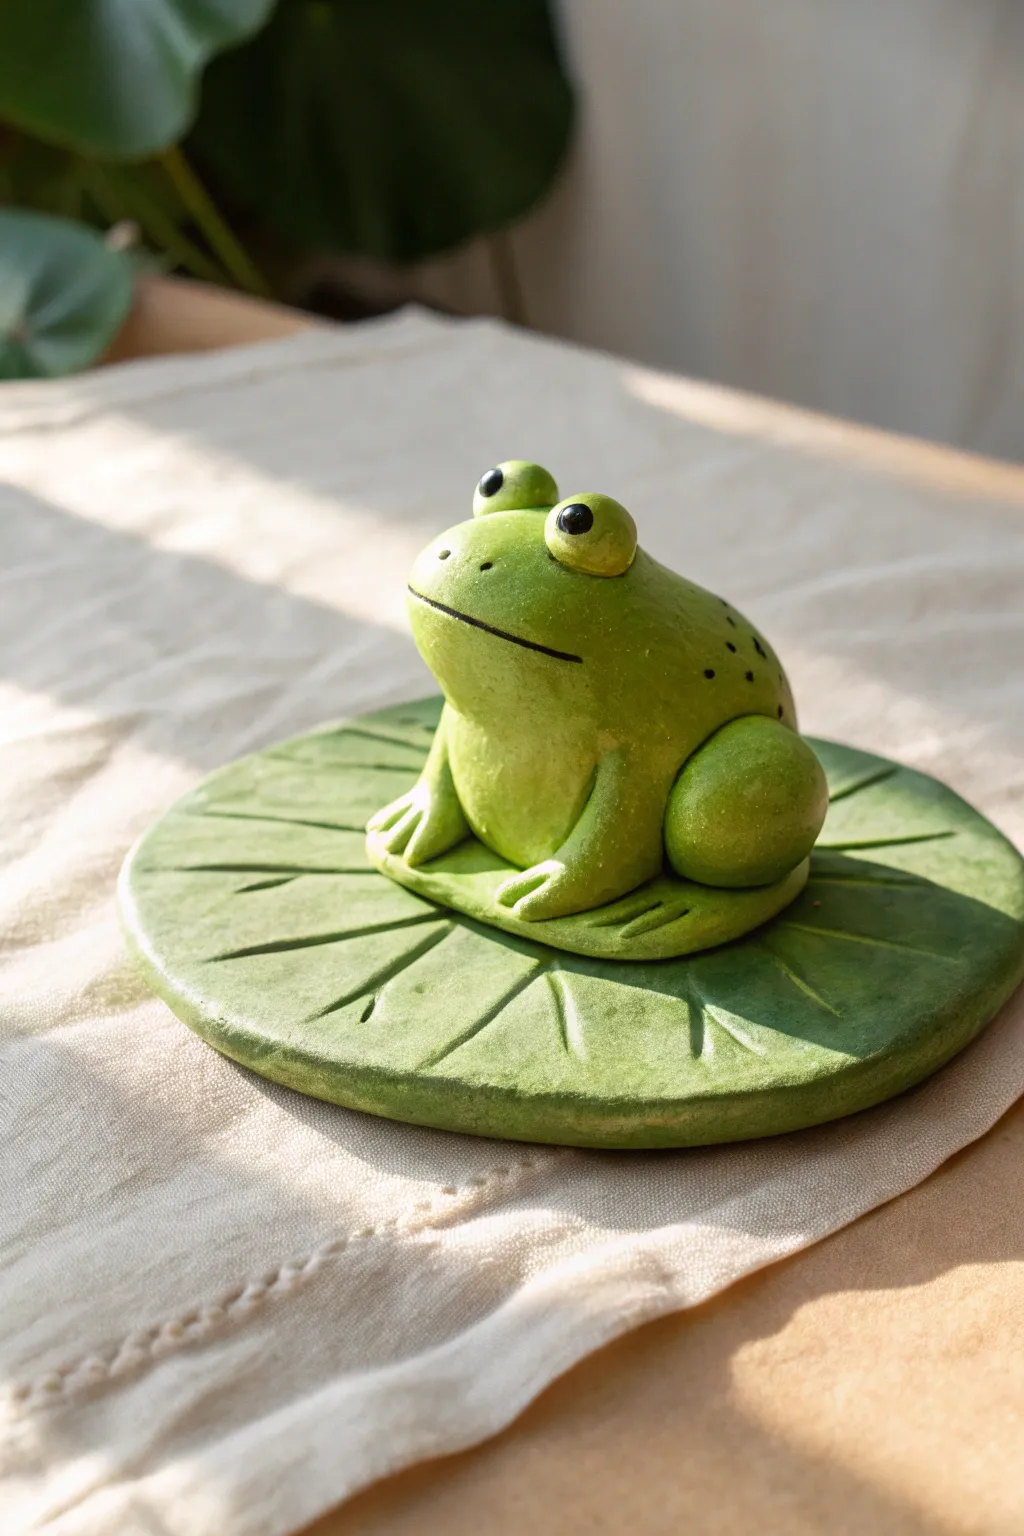
Capture the charm of a lazy afternoon pond with this adorable clay sculpture featuring a bright green frog perched atop a textured lily pad disc. The smooth, rounded forms and simple details make this a satisfying project for creating a peaceful nature-inspired accent.
Detailed Instructions
Materials
- Air-dry clay or polymer clay (white or light grey base)
- Rolling pin
- Circle cutter or bowl (approx. 4-5 inches diameter)
- Clay sculpting tools (needle tool, modeling tool)
- Acrylic paints (various greens, yellow, black, white)
- Paintbrushes (flat brush for base, fine liner for details)
- Water cup and paper towels
- Gloss varnish or sealant
Step 1: Sculpting the Lily Pad Base
-
Roll the Slab:
Begin by conditioning a large ball of clay until it is soft and pliable. Roll it out into an even slab, approximately 1/4 inch thick. Aim for a consistent thickness to prevent warping as it dries. -
Cut the Circle:
Use a circle cutter or place a small bowl upside down on the clay as a template to cut out a perfect circle. Smoothing the edges with a slightly damp finger removes any sharpness from the knife cut. -
Add Texture Details:
Using a needle tool or a dull knife, gently score lines radiating from a central point outward to the specific edges, mimicking the veins of a lily pad. Don’t press too hard; you just want surface texture, not to cut through. -
Create the Leaf Notch:
Cut a small, V-shaped wedge out of one side of the circle to create the classic heart-like shape of a lily pad leaf. Soften the cut edges with your fingertip.
Step 2: Forming the Frog
-
Shape the Body:
Roll a medium-sized ball of clay into a smooth, slightly flattened teardrop shape. This will form the main body. The wider end will be the bottom where the legs attach. -
Position on Base:
Place the body onto the center of your lily pad. If you are using air-dry clay, score and slip the bottom surface to ensure a strong bond. Press it down firmly but gently. -
Add the Hind Legs:
Roll two smaller balls of clay into ovals. Press them against the sides of the frog’s body, near the back, to form the folded thighs. Blend the clay seams slightly into the body for a unified look. -
Form the Front Legs:
Create two small snake-like rolls of clay. Attach these to the front of the chest area, tapering them down onto the lily pad. Use a tool to press distinct indentations for the toes. -
Sculpt the Head Shape:
Smooth out the top of the body teardrop to define the head. It shouldn’t be a separate ball, but rather a continuous hump rising from the back. -
Add the Eyes:
Roll two very small balls of clay and attach them to the top of the head area. Press them on securely so they bulge out slightly, giving that classic froggy silhouette. -
Carve the Mouth:
Take a thin needle tool or a piece of wire and press a wide, horizontal line across the face for the mouth. Curve the corners slightly upward for a subtle smile. -
Smoothing:
Before drying, take a slightly damp sponge or brush and smooth over the entire sculpture to remove fingerprints. Let the piece dry completely according to your clay’s instructions.
Smooth Seams
To erase seams between attached clay parts (like legs to body), use a rubber-tipped sculpting tool dipped in a tiny bit of water or clay softener to blend the edges invisibly.
Step 3: Painting and Finishing
-
Base Coat:
Mix a vibrant lime green with a touch of yellow. Paint the entire frog body with this mixture. You may need two thin coats for full opacity. -
Paint the Lily Pad:
Use a darker, deeper green for the lily pad base. I like to let this dry briefly and then dry-brush a lighter yellow-green over the raised veins to make the texture pop. -
Frog Details:
Add a lighter yellow-green wash to the frog’s belly and throat area to create dimension. Paint the eyes pure white first, let them dry, and then add large black pupils. -
Mouth and Spots:
Using your thinnest liner brush and black paint, carefully trace the indented mouth line. Add a few tiny black dots or speckles on the frog’s back for realistic patterning. -
Varnish:
Once all paint is thoroughly dry, apply a coat of gloss varnish to the frog to make it look wet and amphibious. You can use a matte or satin finish for the lily pad if you prefer a contrast in textures.
Make it a Incense Holder
Before drying, use a toothpick to poke a small, angled hole into the lily pad or the frog’s hand. Once fired or dried, it becomes a functional incense stick holder.
Place your finished frog on a desk or shelf to bring a little bit of pond-side tranquility to your space