If you love the clean, satisfying vibe of working with a flat sheet of clay, slab art is your playground. I’m sharing my favorite clay slab art ideas that start simple and classic, then get delightfully experimental as you go.
Botanical Leaf Relief Panels
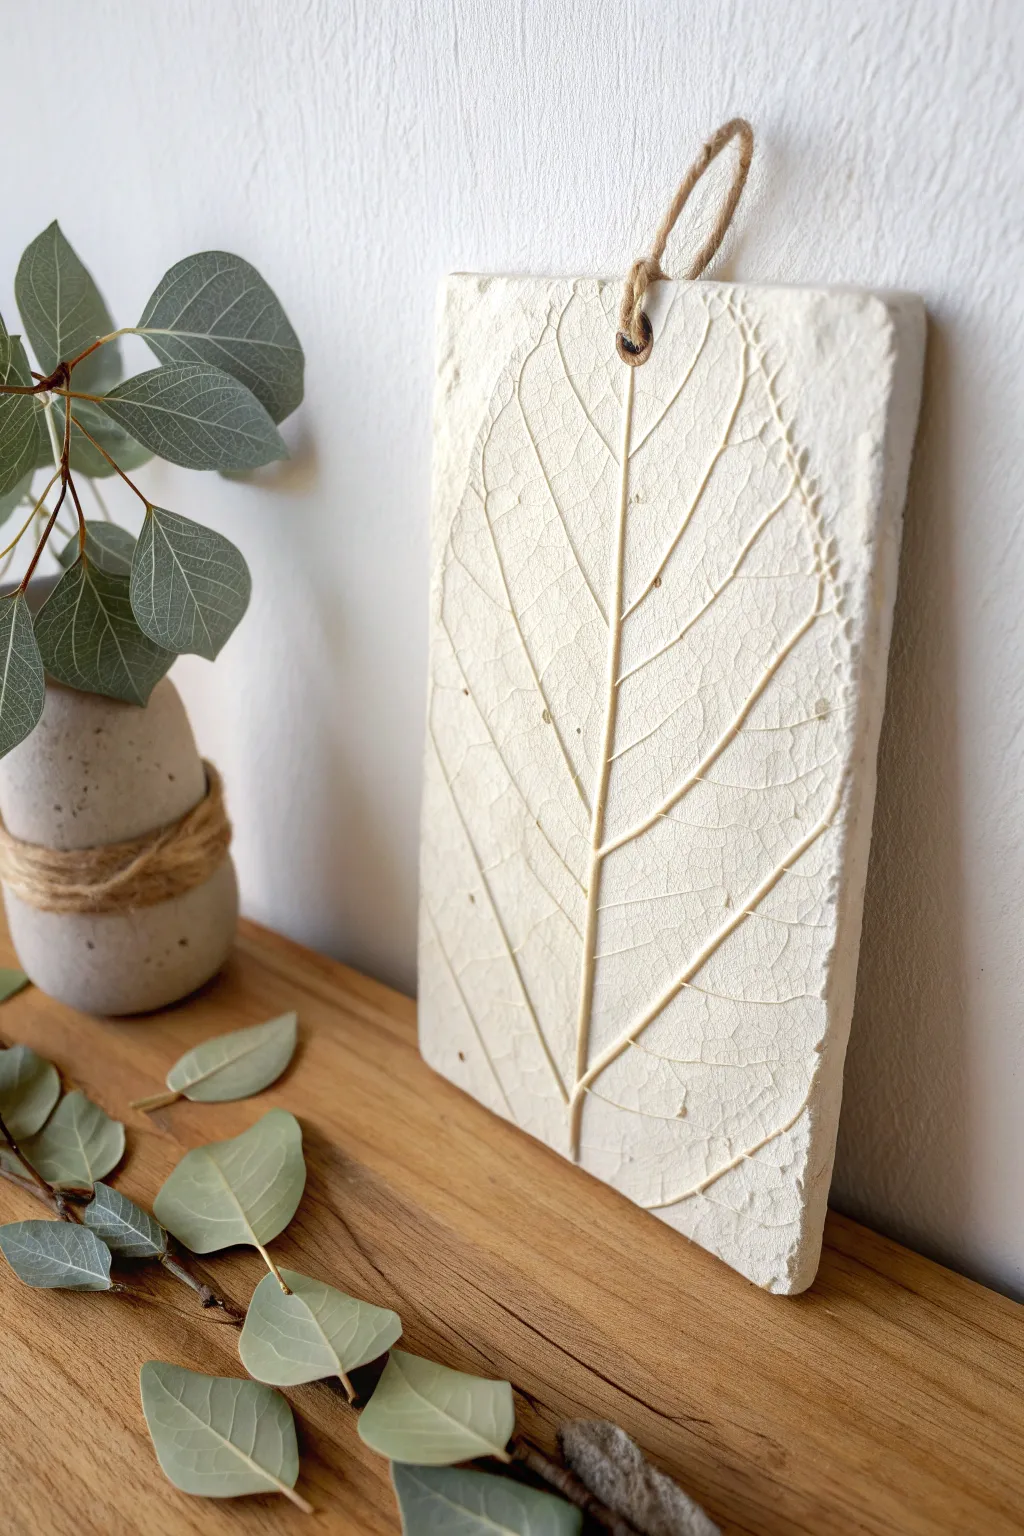
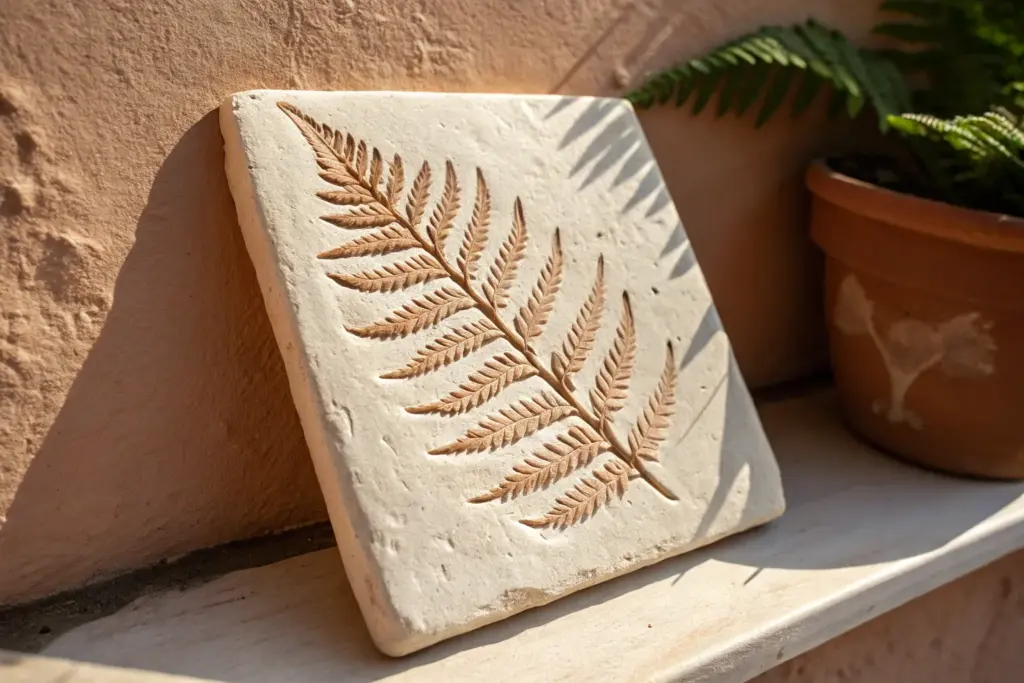
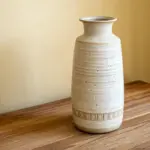
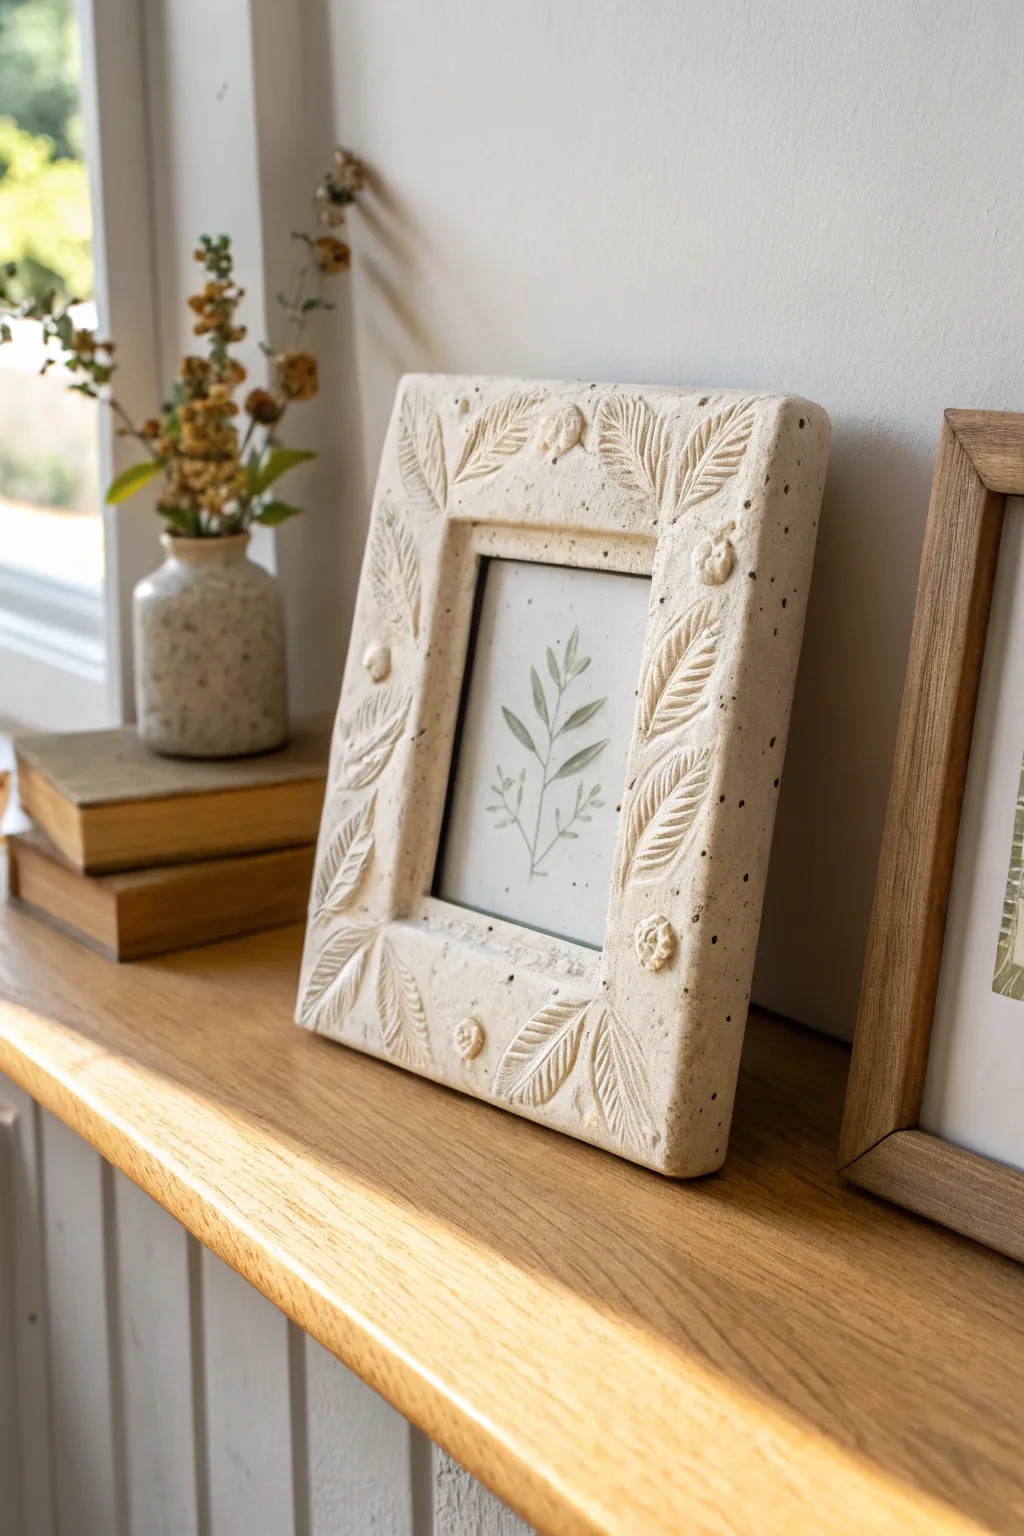
Capture the delicate vein structure of nature with this elegant clay relief panel. This monolithic white slab features a deep fossil-like impression of a large leaf, finished with a rustic hanging loop for a clean, organic wall display.
Detailed Instructions
Materials
- Air-dry clay (white) or polymer clay
- Rolling pin
- Canvas mat or parchment paper
- Large, fresh leaf with prominent veins (like Bodhi, Hosta, or Hydrangea)
- Craft knife or scalpel
- Ruler
- A straw or small circular cutter
- Sanding sponge
- Jute twine
- Clear matte varnish (optional)
Step 1: Preparing the Slab
-
Condition the clay:
Begin by kneading your white clay thoroughly to remove any air bubbles and ensure a smooth, pliable consistency. This prevents cracking later on. -
Roll out the base:
Place the clay on a canvas mat or between parchment paper sheets. Roll it out to an even thickness of about 1/4 to 1/2 inch. You want it thick enough to be sturdy but not so heavy it becomes difficult to hang. -
Measure the rectangle:
Using a ruler, lightly mark out a rectangular shape that is slightly larger than your chosen leaf. Ensure the corners are roughly squared, though a handmade look is part of the charm. -
Cut the shape:
Use your craft knife and the ruler as a guide to slice the clay into a clean rectangle. Peel away the excess clay. -
Smooth the edges:
Dip your finger in a little water and run it along the cut edges of the rectangle to soften the sharpness and smooth out any burrs.
Pro Tip: Texture
For a rougher, stone-like texture on the slab background, gently dab the surface with a crumpled ball of aluminum foil before you press the leaf into the clay.
Step 2: Creating the Impression
-
Position the leaf:
Place your fresh leaf vein-side down onto the center of the clay slab. The vein side (usually the back) provides the deepest, crispest impression. -
Roll the impression:
I prefer to gently roll over the leaf with the rolling pin once to press it firmly into the clay. Be careful not to shift the leaf or thin the clay too much. -
Secure the edges:
Go over the edges of the leaf with your fingertips, pressing them down to ensure the entire outline translates to the clay. -
Remove the botanical:
Carefully find the stem of the leaf and slowly peel it back from the clay to reveal the intricate vein structure underneath. -
Create hanging hole:
Use a straw or a small circular cutter to punch a hole at the top center of the slab. Make sure it’s not too close to the edge to prevent tearing under weight.
Troubleshooting: Warping
If your slab curls up at the edges while drying, place a lightweight book or board on top of it (sandwiching it between parchment paper) once the surface is dry to touch.
Step 3: Finishing Touches
-
Initial drying:
Allow the slab to dry flat on a wire rack or mesh screen. If using air-dry clay, turn it over carefully every few hours to ensure even drying and prevent warping. -
Inspect dry piece:
Once fully cured (this can take 24-48 hours depending on humidity), check the slab for any rough spots. -
Sand the surface:
Lightly buff the edges and flat surfaces with a fine-grit sanding sponge. Be very gentle around the leaf impression to keep the details sharp. -
Add protection:
If desired, apply a thin coat of clear matte varnish to seal the clay and protect it from dust, keeping that pristine white look. -
Attach the twine:
Cut a length of jute twine. Fold it in half, push the loop through the hole from front to back, then pull the loose ends through the loop to create a lark’s head knot, or simply tie it off securely as shown in the image.
Hang your botanical relief near a window to let the changing daylight highlight the beautiful textures of the veins


Stamped Trinket Dishes
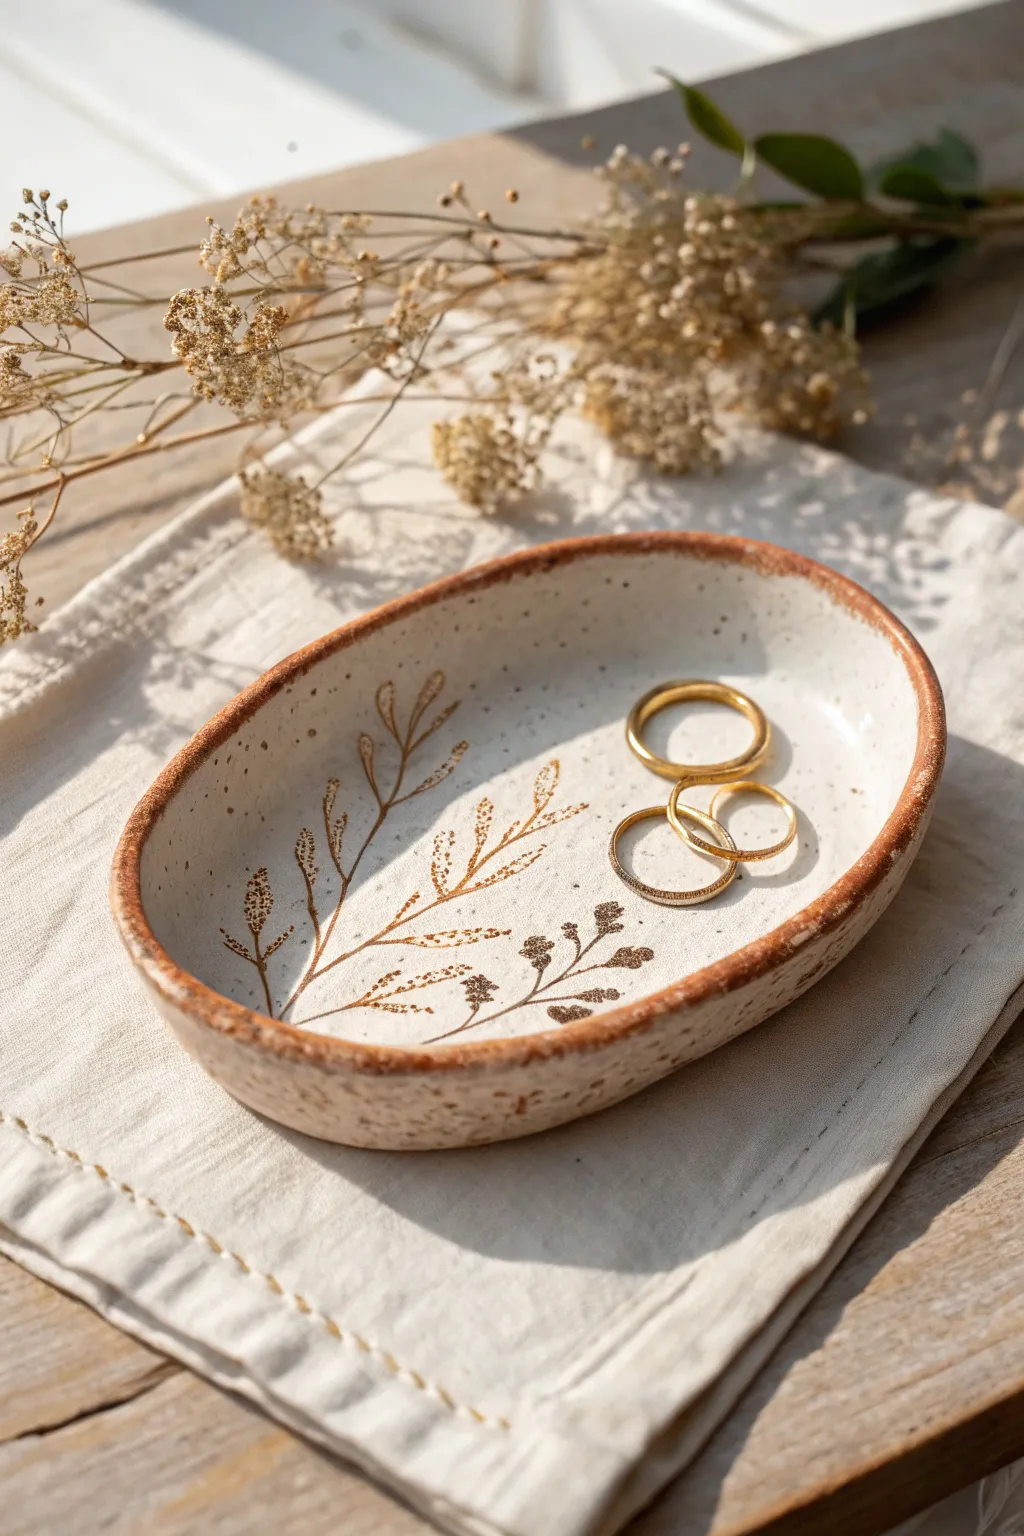
Capture the delicate beauty of nature in clay with this simple yet elegant slab-building project. This oval trinket dish features organic, speckled textures and stamped botanical motifs, finished with a warm, earthy rim that frames your favorite jewelry pieces perfectly.
Step-by-Step Guide
Materials
- Speckled clay body (stoneware or earthenware)
- Rolling pin
- Two wooden guide strips (approx. 1/4 inch thick)
- Oval paper template or cookie cutter
- Needle tool or fettling knife
- Soft rib tool (rubber or silicone)
- Small sponge
- Botanical rubber stamps or real dried plant material
- Underglaze (dark brown or black)
- Iron oxide wash or reddish-brown stain
- Clear or translucent white glossy glaze
- Small paintbrush
- Kiln
Step 1: Preparation and Shaping
-
Prepare the slab:
Begin by wedging your speckled clay to remove air bubbles. Place the clay between two wooden guide strips on a canvas surface and use your rolling pin to create an even slab about 1/4 inch thick. -
Smooth the surface:
Take a soft rib tool and gently compress the clay surface on both sides. This aligns the clay particles and removes any canvas texture, giving you a smooth canvas for your stamping. -
Cut the shape:
Place your oval paper template or cutter onto the slab. If using a template, trace around it carefully with a needle tool or fettling knife to cut out your oval base. Lift away the excess clay. -
Soften the edges:
Dip your finger or a small sponge in a little water and run it along the cut rim of the oval. You want to round off the sharp angles created by the knife for a more finished, professional look. -
Lift the walls:
Place the clay oval on a piece of foam or hold it gently in your cupped hand. Using your thumb, gently press into the center while pulling the edges upward to create a shallow curve. I find moving slowly around the perimeter helps maintain a symmetrical shape. -
Refine the curve:
Continue to shape the dish until you have a gentle, consistent concave form. The walls shouldn’t be too steep; aim for a soft slope perfect for holding rings.
Step 2: Decoration and Finishing
-
Plan your design:
Before committing to clay, lightly hover your botanical stamps over the dish to visualize placement. An asymmetrical arrangement, like the one shown, often looks more organic and pleasing. -
Stamp the motifs:
Press your chosen botanical stamps firmly into the leather-hard clay. Support the outside of the dish with your hand directly opposite where you are stamping to prevent warping the shape. -
Dry partially:
Allow the piece to dry to a bone-dry state. This is the most fragile stage, so handle with extreme care. -
Bisque fire:
Load your dish into the kiln for a bisque firing according to your clay body’s specifications (usually Cone 04). -
Apply the inlay:
Once bisque fired, water down some dark brown underglaze. Paint it into the stamped impressions, ensuring it gets into the deepest crevices. -
Wipe back:
Using a slightly damp sponge, wipe away the excess underglaze from the surface of the dish. The color should remain only inside the stamped lines, revealing the design clearly. -
Accent the rim:
Mix a small amount of iron oxide wash or use a reddish-brown stain. With a small brush or sponge, carefully apply this to the very edge of the rim to create that warm, rustic border. -
Glaze application:
Apply a coat of translucent white or clear glaze over the interior of the dish. Avoid the very edge of the rim if you want the raw oxide texture to remain matte, or glaze over it for a glossy finish. -
Final firing:
Fire the piece again to the maturation temperature of your clay and glaze (often Cone 5 or 6). Once cool, your dish is ready to hold treasures.
Uneven Rim Fix
If your rim feels wobbly after lifting the edges, use a surform tool or cheese grater tool when the clay is leather hard to gently level the top edge before sponge smoothing.
Gold Luster Accents
For a touch of luxury, apply a real gold luster overglaze to the botanical imprints or the rim after the glaze firing, then fire a third time at a much lower temperature (Cone 018).
Place this charming dish on your dresser or give it as a handmade gift that will be cherished for years


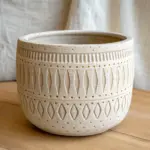
Organic Wavy Slab Bowls

Capture the laid-back elegance of hand-built ceramics with this trio of nesting slab bowls. Featuring organic, scalloped rims and a warm, speckled glaze palette, this project transforms simple flat clay into functional art perfect for serving or display.
Step-by-Step
Materials
- Stoneware clay body (speckled or smooth)
- Circular slump molds or various sized mixing bowls
- Rolling pin with thickness guides (1/4 inch)
- Canvas or slab mat
- Needle tool or fettling knife
- Flexible metal rib
- Soft sponge
- Paper templates (circles in graduated sizes)
- Scallop template or large round cookie cutter
- Pottery glazes: Terracotta/Rust, Deep Blue, and Speckled White
- Kiln
Step 1: Slab Preparation
-
Wedge the clay:
Begin by thoroughly wedging your clay to remove any air bubbles and ensure the particles are aligned, which prevents warping later. -
Roll out the slab:
On a canvas surface or slab mat, roll your clay out into a large, even sheet about 1/4 inch thick. Rotate the clay and flip it occasionally to ensure even compression. -
Compress the surface:
Take a flexible metal rib and drag it across the surface of the clay in multiple directions. I find this simple step is crucial for preventing cracks during drying and firing. -
Cut the circles:
Place your paper templates onto the slab. You will need three distinct sizes for the nesting effect. Trace and cut around them using a needle tool or fettling knife.
Rim Perfection
After cutting the scallops, wrap a piece of plastic wrap over the rim and run your finger over it. This instantly smooths the sharp edges without water.
Step 2: Forming the Scalloped Bowls
-
Create the scalloped edge:
For the top two bowls (the rust and blue ones), use a scallop template or the edge of a round cutter to remove semi-circles from the rim, creating that signature flower-like profile. -
Smooth the rims:
Dip a soft sponge or your finger in water and gently round off the sharp cut edges of your scallops. A smooth rim is essential for functional ware. -
Slump the clay:
Gently lift your clay circles and drape them *into* your slump molds (this ensures the outside texture is smooth). Alternatively, drape them *over* convex molds if you prefer that method. -
Establish the curve:
Press the clay firmly against the mold surface, starting from the center and working outward to avoid trapping air pockets. -
Enhance the wave:
Once in the mold, gently push down between the scallop points to accentuate the wavy, organic movement of the rim. -
Form the base bowl:
For the largest, bottom bowl, keep the rim straight rather than scalloped. Place it in the largest mold and compress the rim with a damp sponge for a clean, modern finish. -
Stiffen the forms:
Allow the bowls to dry in the molds until they reach a soft leather-hard stage. They should hold their shape but still be slightly flexible.
Play with Texture
Before cutting your circles, roll a lace doily or a textured fabric into the raw slab. The glaze will break beautifully over the imprinted pattern.
Step 3: Refining and Glazing
-
Trim the foot:
If desired, flip the leather-hard bowls over and carve a shallow foot rings into the base, or simply smooth the bottom flat with a rib. -
Bisque fire:
Let the bowls dry completely (bone dry) before loading them into the kiln for a bisque firing to cone 04. -
Wax the bottoms:
Apply wax resist to the bottom of each bowl to prevent glaze from adhering to the foot, which would fuse the piece to the kiln shelf. -
Glaze the interior bowl:
Dip or brush the smallest, top bowl with a matte terracotta or rust-colored glaze. Ensure the coverage is even, especially around the wavy rim. -
Glaze the middle bowl:
Apply a deep, semi-gloss blue glaze to the medium-sized bowl. Look for a glaze that breaks over texture to highlight the rim. -
Glaze the large bowl:
Finish the largest base bowl with a satin speckled white or oatmeal glaze, providing a neutral home for the colorful smaller bowls. -
Glaze fire:
Load the glazed pieces into the kiln, ensuring they aren’t touching, and fire to the maturity temperature of your clay and glaze (typically cone 5 or 6).
Stack your finished set on the counter or table to enjoy the interplay of color and organic form you have created


Minimalist Slab Plates
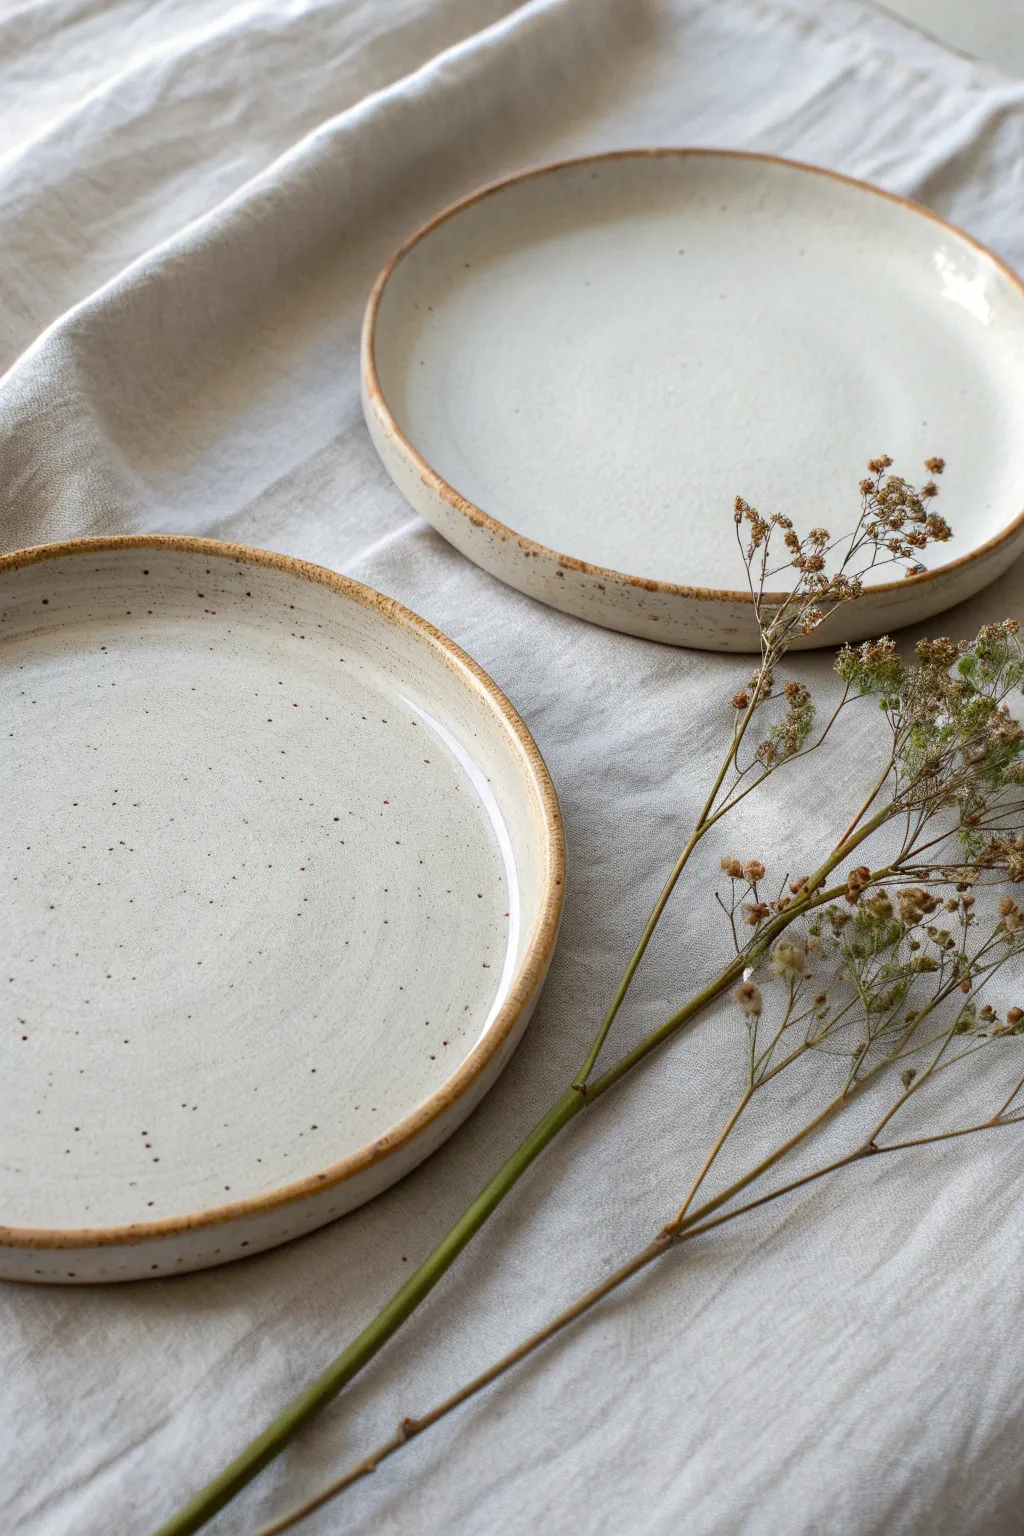
Embrace the beauty of imperfection with these minimalist stoneware plates, featuring a subtle speckled finish and an organic, exposed clay rim. They are perfect for showcasing the natural texture of the clay while maintaining a sleek, modern profile.
Step-by-Step Guide
Materials
- Speckled stoneware clay (mid-fire)
- Rolling pin
- Two thickness strips (canvas boards or wooden slats, approx. 1/4 inch)
- Circular template (paper or heavy cardstock)
- Needle tool or fettling knife
- GR Pottery Form or a simple round plaster hump mold
- Soft rib tool (silicone or rubber)
- Pottery sponge
- Serrated rib or scoring tool
- Cream or white matte glaze
- Wax resist (brush-on)
Step 1: Preparing the Slab
-
Wedge the clay:
Start by thoroughly wedging your speckled stoneware clay to remove air bubbles and ensure a uniform consistency. This is crucial for slab work to prevent warping later. -
Set up guides:
Place your thickness strips on either side of your workspace. I like to use canvas-covered boards to prevent sticking, but wooden slats work well too. -
Roll the slab:
Roll out a smooth, even slab of clay between the guides. Make sure to compress the clay by rolling in multiple directions, lifting and flipping the slab occasionally. -
Compress the surface:
Using a soft rib tool, firmly compress both sides of the slab. This aligns the clay particles, reducing the chance of cracking, and creates a beautifully smooth canvas for your glaze.
Keep it Flat
To prevent warping during drying, place a small weighted bag (filled with sand or rice) in the center of the plate once it’s off the mold.
Step 2: Shaping the Plate
-
Cut the circle:
Lay your circular template over the slab. Using a needle tool, cut vertically around the template to create a perfect circle. -
Soften the edges:
Run a damp sponge or your finger around the cut edge to smooth any sharpness. A slightly rounded edge feels more professional and is less prone to chipping. -
Position on mold:
Ideally, use a GR Pottery Form or a shallow hump mold. Carefully center your clay circle on top of the form. -
Form the rim:
Gently press the clay down around the edge of the form to create that distinct, upturned rim. Unlike a bowl, you want a flat eating surface with just a small vertical lip. -
Refine the shape:
Use a damp sponge to smooth the transition between the flat base and the rim. Ensure the rim height is consistent all the way around. -
Let it firm up:
Allow the plate to dry to a firm leather-hard stage while still on the mold. This prevents it from sagging when you flip it over.
Make a Set
Create a nesting set by using 3 different sized templates (dinner, salad, dessert) to create a cohesive stackable collection.
Step 3: Finishing and Glazing
-
Refine the foot:
Once leather-hard, remove the plate from the form. Check the bottom; you can leave it flat or crave a very shallow foot ring if you prefer a lifted look. -
Smooth the rim:
Go over the rim one last time with a slightly damp sponge to expose the rougher texture of the clay, which will contrast nicely with the smooth glaze. -
Bisque fire:
Fire the plate in your kiln to cone 04 (or your clay’s specific bisque temperature). -
Clean the bisque:
Wipe the bisque-fired plate with a damp sponge to remove any kiln dust before glazing. -
Apply wax resist:
Paint a thin line of wax resist along the very top edge of the rim and the entire outer vertical wall. This technique creates the exposed raw clay detail seen in the photo. -
Dip or brush glaze:
Dip the plate into a matte white or cream glaze, or brush on three even coats. Because of the wax, the glaze will bead off the rim, leaving that earthy brown line. -
Clean up wax:
Use a damp sponge to wipe any stray droplets of glaze off the waxed rim area to ensure a crisp line. -
Glaze fire:
Fire again to the maturity temperature of your clay and glaze (typically cone 5 or 6 for stoneware).
Enjoy using your handmade dinnerware for your next meal or styling it on open shelving.

The Complete Guide to Pottery Troubleshooting
Uncover the most common ceramic mistakes—from cracking clay to failed glazes—and learn how to fix them fast.
Slab Coasters With Carved Lines
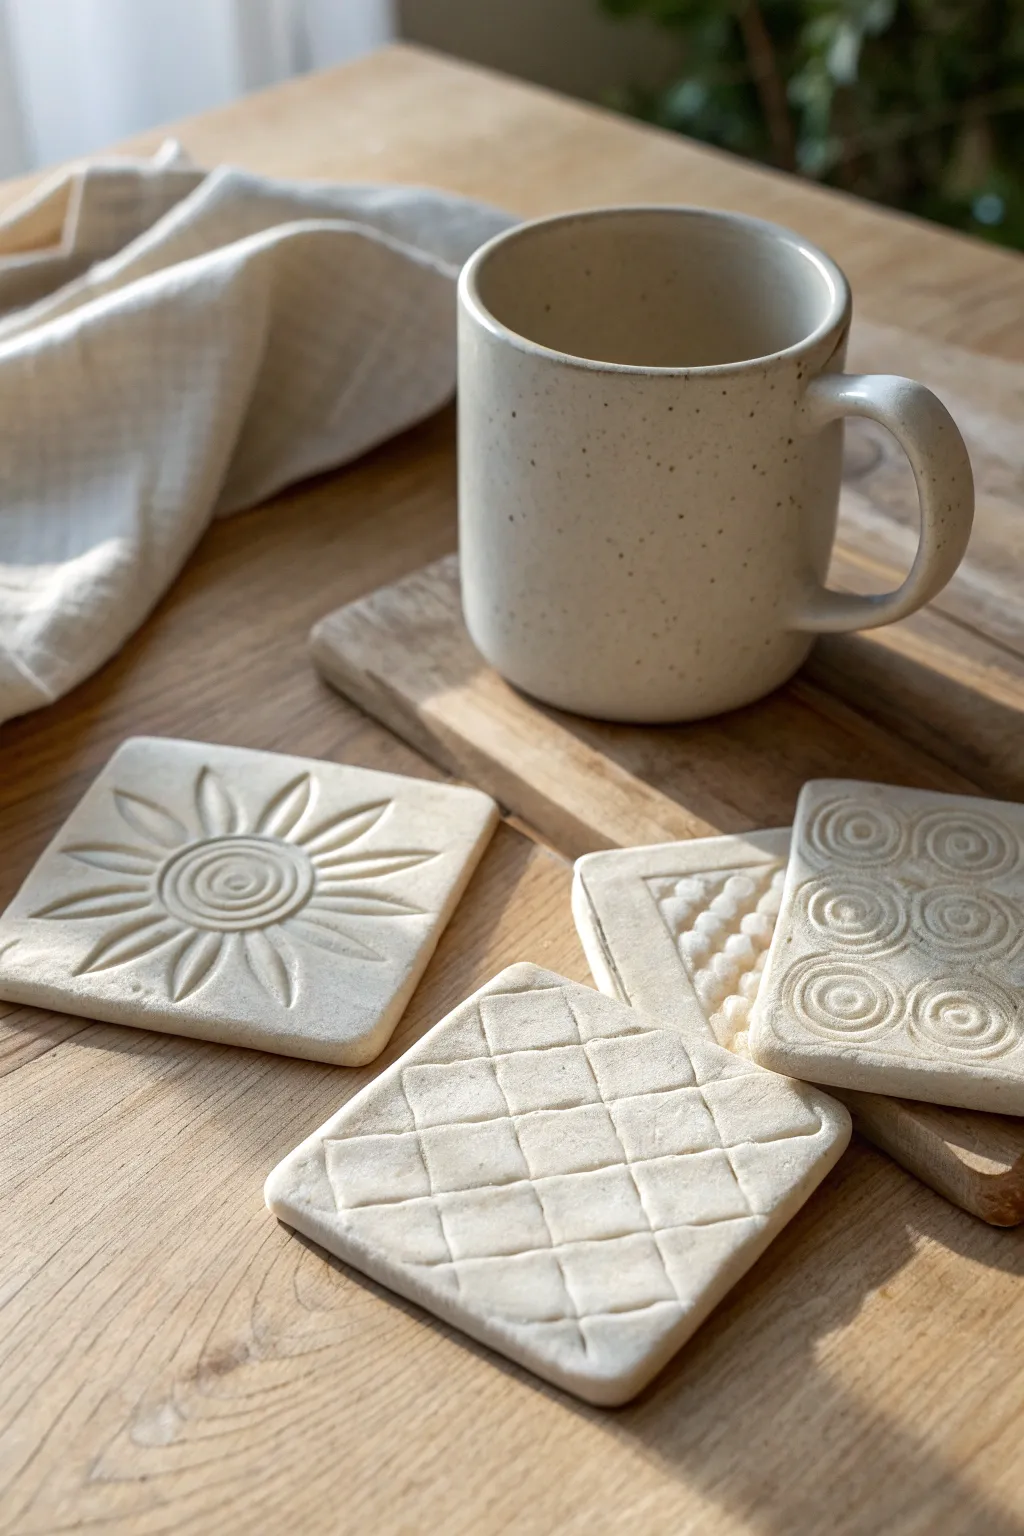
Embrace the imperfect beauty of hand-carved ceramics with this set of textured coasters. Using simple slab techniques and carving tools, you’ll create functional art featuring geometric lattices, sunbursts, and swirling spirals.
How-To Guide
Materials
- White stoneware clay or air-dry clay
- Rolling pin
- Two wooden guide strips (approx. 1/4 inch thick)
- Canvas or heavy fabric (to roll clay on)
- Square cookie cutter (approx. 4×4 inches) or ruler and knife
- Loop tool or sgraffito tool for carving
- Needle tool
- Small sponge
- Bowl of water
- Sandpaper (fine grit)
Step 1: Preparation & Rolling
-
Prepare your workspace:
Lay down your canvas or heavy fabric on a flat work surface. The fabric prevents the clay from sticking and adds a subtle texture to the bottom of your coasters. -
Wedge the clay:
Take a handful of clay and wedge it thoroughly to remove air bubbles and ensure an even consistency. This is crucial for preventing cracks later. -
Set up guides:
Place your wooden guide strips on either side of the clay ball. These will ensure your slab is a uniform thickness creating a professional finish. -
Roll the slab:
Using your rolling pin, roll the clay out until the pin rests on the wooden guides. Roll in multiple directions to compress the clay platelets. -
Smooth the surface:
Run a damp sponge lightly over the surface of the slab to remove any canvas marks from the top side or rolling pin imperfections like small ridges.
Step 2: Cutting & Shaping
-
Cut the shapes:
Press your square cutter firmly into the clay slab. If using a knife and ruler, measure 4×4 inch squares and cut straight down without dragging the blade. -
Clean the edges:
Lift the squares carefully. Gently run your finger along the cut edges to soften the harsh 90-degree angle, which prevents chipping later. -
Leather hard stage:
Let the squares sit uncovered for about an hour or two until they are ‘leather hard’—firm enough to handle without warping, but soft enough to carve easily.
Warping Woes?
If your coaster corners curl up while drying, flip them over every few hours. Weighing them down with a board during the final drying phase also keeps them perfectly flat
Step 3: Carving Designs
-
Drafting the design:
Lightly sketch your design onto the leather-hard clay using a needle tool. Don’t press deep yet; just make faint guide lines for your patterns. -
Carve the lattice:
For the diamond pattern, use a small loop tool to carve diagonal lines in one direction, then cross them solely in the other direction. Vary your pressure to make the lines slightly deeper at intersections. -
Create the sunburst:
Mark a center circle. Carve outward radiating petals that taper at the ends. I like to carve the center spiral last to anchor the design visually. -
Sculpt the spirals:
For the geometric circles, use a finer tool to carve concentric rings. Try to keep the spacing consistent between the rings for a tidy look. -
Managing clay burrs:
As you carve, small balls of clay (burrs) will form. Don’t brush them off immediately while they are wet; wait until they are dry to brush them away cleanly.
Make it Pop
After bisque firing, rub a dark oxide wash or diluted acrylic paint into the carved lines, then wipe the surface clean. The dark color stays in the crevices emphasizing the texture
Step 4: Finishing
-
Slow drying:
Place the coasters between two pieces of drywall or under a loose plastic sheet to dry very slowly. This helps prevent the corners from curling up. -
Refining:
Once bone dry, use fine-grit sandpaper to smooth any sharp edges or rough spots from the carving process. Always wear a mask when sanding clay. -
Firing:
If using ceramic clay, bisque fire the pieces. Then, fire them to maturity. For these coasters, leaving the clay raw (unglazed) provides a lovely stone-like grip for cups. -
Sealing (Optional):
If you used air-dry clay or want to protect unglazed ceramic, apply a matte sealant or a mixture of water and PVA glue to protect against moisture.
Stack your finished coasters on the coffee table to add a touch of handmade warmth to your living space
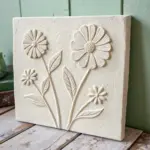
Slab Picture Frame Border Art
Bring the serene beauty of nature indoors with this textured clay slab frame featuring delicate leaf imprints and raised floral accents. The speckled finish and sculptural relief create an organic, artisanal look that transforms simple photos into cherished keepsakes.
Step-by-Step Guide
Materials
- White or cream stoneware clay with grog/speckles
- Rolling pin
- Two 1/4 inch wooden guide strips (for even thickness)
- Fettling knife or clay cutter
- Ruler
- Leaf stamps or carving tools
- Slip (clay and water mixture)
- Scoring tool or needle tool
- Sponge
- Cardboard or sturdy paper (for a template)
- Small paintbrush
- Clear matte glaze or wax finish
Step 1: Preparing the Slab Base
-
Wedge the Clay:
Begin by wedging your speckled clay body thoroughly to remove any air bubbles and ensure a consistent texture. -
Roll the Slab:
Place your wooden guide strips on either side of the clay ball. Use your rolling pin to flatten the clay until the pin rests on the guides, creating a perfectly even 1/4 inch thick slab. -
Smooth the Surface:
Take a slightly damp sponge or a rubber rib and smooth out the canvas texture left by your work surface, ensuring the face of the frame will be pristine. -
Create a Template:
Cut a rectangular template from cardboard. For a standard 4×6 photo, I recommend making the frame roughly 6×8 inches to allow for a generous border. -
Cut the Outer Shape:
Lay your template gently on the slab and trace around it with a needle tool. Use a fettling knife to cut clean, straight lines for the outer perimeter. -
Cut the Inner Window:
Measure and mark the inner window opening (leaving about a 2-inch border on all sides). Carefully cut out this center rectangle to create the space for your picture.
Warping Woes?
Flat slabs love to warp. Dry very slowly under loose plastic. Flipping the frame over once a day during the drying process helps equalize moisture loss.
Step 2: Sculpting the Design
-
Plan the Pattern:
Lightly sketch a flowing vine pattern onto the frame border with a needle tool, just barely scratching the surface so you have a guide to follow. -
Add Leaf Textures:
Using a leaf-shaped carving tool or a handmade clay stamp, press leaf impressions into the clay following your sketched vine. Angle them outwards for a dynamic look. -
Refine the Veins:
Go back into each leaf impression with a fine needle tool to deepen the central vein and add tiny details to the leaf edges for sharper definition. -
Form Flower Buds:
Roll tiny balls of clay, about the size of a pea. Flatten them slightly and score the back of each one. -
Attach the Accents:
Score the spots on the frame where you want floral accents. Apply a dab of slip, press the clay ball on, and use a tool to texture it into a small rosette or berry shape. -
Smooth the Edges:
Run a damp finger or sponge along the inner and outer cut edges of the frame to soften any sharp corners created during cutting.
Step 3: Hardware and Finishing
-
Add a Backing Ridge (Optional):
To hold glass later, you can attach thin strips of clay to the back perimeter of the window opening, creating a small recessed lip. -
Slow Drying:
Place the frame between two pieces of drywall board or weigh down the corners lightly with sandbags to prevent warping as it dries. Let it dry slowly for several days. -
Bisque Fire:
Once bone dry, fire the piece to bisque temperature (usually Cone 04) based on your specific clay body instructions. -
Applying the Finish:
Since the speckled clay is the star, skip heavy glazes. Apply a clear matte glaze to seal the piece or leave the raw clay unglazed on the outside for a stone-like feel. -
Final Firing:
Fire the frame a final time to the maturity temperature of your clay body (often Cone 5 or 6 for stoneware). -
Assembly:
Once cool, cut a piece of backing board and glass (or acetate) to fit. Secure your photo and backing using strong glue or framer’s points on the reverse side.
Make Your Own Stamps
Carve your own leaf stamps from small scraps of leather-hard clay and fire them. This creates a unique, consistent signature texture for your work.
Now you have a timeless, handcrafted frame ready to showcase your favorite botanical print or memory


What Really Happens Inside the Kiln
Learn how time and temperature work together inside the kiln to transform clay into durable ceramic.
Slab House Mini Sculptures
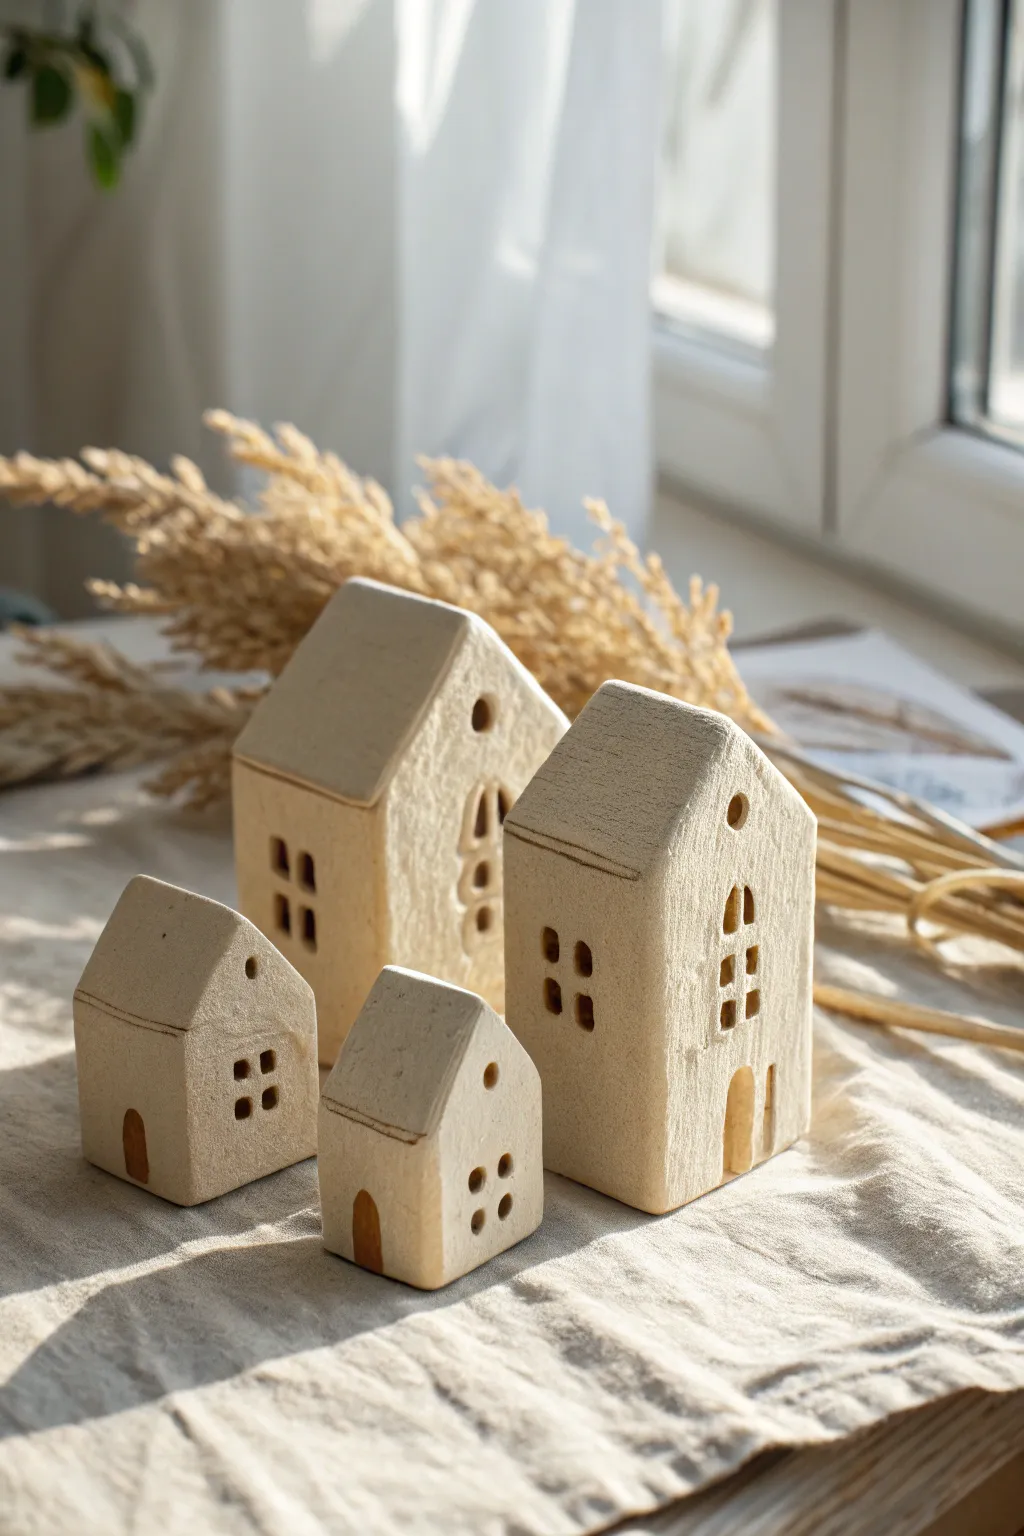
Create a charming set of minimalist slab-built houses that bring a touch of Nordic simplicity to your décor. These unglazed ceramic sculptures feature textured walls and cut-out windows, perfect for arranging on a windowsill or mantle.
Step-by-Step
Materials
- Stoneware clay (buff or white gritty)
- Rolling pin
- Two wooden guide strips (approx. 1/4 inch thick)
- Fettling knife or X-Acto knife
- Scoring tool or old toothbrush
- Slip (clay and water mixture)
- Ruler
- Canvas or mat for rolling
- Paper templates (rectangles and pentagons)
- Small square cutters (optional)
- Sponge
Step 1: Preparation and Cutting
-
Prepare your workspace:
Begin by laying down your canvas or rolling mat. Wedge your clay thoroughly to remove any air bubbles, as these can cause cracks during firing. -
Roll the slab:
Place the wooden guide strips on either side of your clay ball. Roll the clay out into a uniform slab using the rolling pin, ensuring the thickness is even across the entire surface. -
Create templates:
Sketch simple house shapes on paper or cardstock. You will need a front and back wall (pentagons with peaked roofs), two side walls (rectangles), and two roof panels (rectangles slightly longer than the side walls). -
Cut the shapes:
Place your paper templates onto the leather-hard slab. Using your fettling knife or X-Acto blade, trace around them carefully to cut out your clay pieces. Keep your knife perpendicular to the table for straight edges. -
Texture the surface (optional):
If you want that lovely rustic texture seen in the photo, gently press a piece of rough fabric or sandpaper onto the exterior faces of your cut pieces before assembling. -
Cut window and door details:
Before assembling, cut out the small square windows and arched doorways on the front and side walls. You can use small clay cutters or freehand this with your knife for a more organic look. -
Dry to leather hard:
Let your cut pieces sit for about 30-60 minutes until they are ‘leather hard’—stiff enough to stand up without flopping over, but still moist enough to join.
Clean Cuts Tip
Wait until the clay is stiff leather-hard before cutting windows. If the clay is too soft, the small frames will warp and drag as you pull the knife through.
Step 2: Assembly and Refining
-
Score the edges:
Use a scoring tool or an old fork to scratch up the edges where the walls will connect. Do this on all four wall pieces. -
Apply slip and join walls:
Dab a generous amount of slip onto the scored edges. Connect one side wall to the front wall, pressing firmly but gently. Wiggle them slightly to lock the clay particles together. -
Complete the frame:
Attach the remaining walls to form a rectangular box structure. Use a small coil of soft clay on the inside corners to reinforce the seams, smoothing it out with your finger or a modeling tool. -
Prepare the roof:
Bevel the top edges of your side walls and the underside of your roof panels at a 45-degree angle. This ensures a tight fit where the roof meets the structure. -
Attach the roof:
Score and slip the top edges of the house and the contact points on the roof panels. Based placement on the image, place the roof panels so they meet at the peak, pressing gently to seal the ridge. -
Define the separation line:
Use a needle tool or knife to gently scribe a line where the roof meets the walls on the exterior. This detail mimics the separate ‘lid’ look seen in the photo. -
Clean the edges:
Run a slightly damp sponge over any sharp corners or rough edges to soften them. Be careful not to use too much water, as it can expose the grog in the clay. -
Slow drying process:
Loosely cover your finished houses with plastic for the first day to ensure even drying. Then uncover and let them dry completely to the bone-dry stage. -
Bisque fire:
Fire the pieces in a kiln to bisque temperature (usually Cone 04). Since the look is natural, you can stop here or add a clear matte glaze before a second firing.
Illumination Upgrade
Cut a large hole in the bottom of each house before firing. This allows you to place them over battery-operated tea lights for a warm, glowing village effect.
Arrange your little village on a shelf near some dried florals for a serene, handcrafted display
Slab Sgraffito Art Plaques
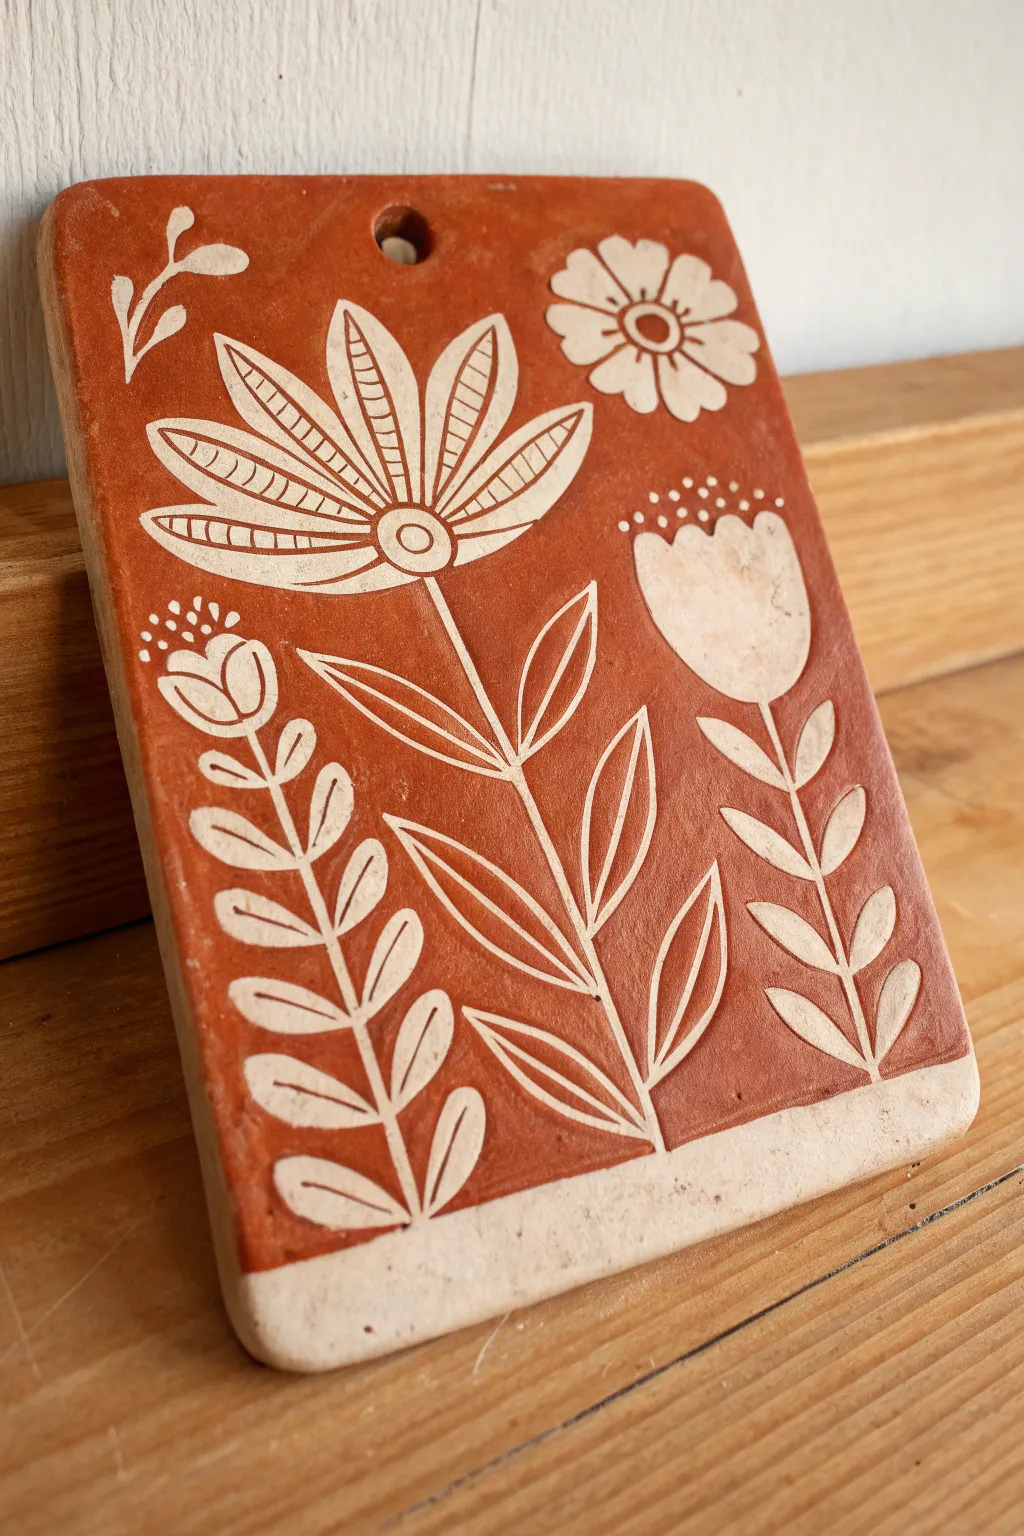
This rustic clay slab plaque features a charming folk-art floral design created with the sgraffito technique. By carving through contrasting layers, you’ll reveal striking white wildflower motifs against a warm terracotta background.
Step-by-Step Tutorial
Materials
- White or speckled stoneware clay
- Rolling pin or slab roller
- Terra sigillata or terracotta-colored underglaze
- Two 1/4-inch thick wooden guide strips
- Needle tool or sharp pencil
- Loop carving tool (small)
- Small hole punch or straw
- Canvas or cloth work surface
- Sponge
Step 1: Slab Preparation
-
Roll the clay:
Begin by wedging your white clay to remove air bubbles. Place it on your canvas work surface between two 1/4-inch wooden guide strips and roll it out until it is perfectly flat and even in thickness. -
Cut the shape:
Using a needle tool and a straight edge or template, cut a clean rectangle from the slab. Smooth the sharp edges slightly with a damp finger or sponge to prevent chipping later. -
Add the hanging hole:
While the clay is still soft, use a small circular cutter or a straw to punch a hole centered near the top edge for hanging. -
Dry to leather hard:
Allow the slab to dry slowly until it reaches the leather-hard stage. The clay should be firm and stiff, holding its shape without bending, but still cool to the touch.
Clean Lines Pro Tip
When carving, pull the tool toward you rather than pushing away. This gives you more control and helps prevent the tool from slipping and gouging the background color unexpectedly.
Step 2: Applying Color
-
Tape the bottom edge:
To create the clean white border at the bottom seen in the image, apply a strip of painter’s tape or simply carefully avoid painting the bottom 3/4-inch of the slab. -
Apply the background:
Brush 2-3 even coats of terracotta-colored underglaze or terra sigillata over the front surface (and sides if desired). Let each coat dry until matte before applying the next. -
Initial drying:
Wait until the final coat of underglaze is dry to the touch but the clay is still leather hard. You don’t want the surface to remain tacky.
Level Up: Texture Pop
Use a clear glossy glaze ONLY on the carved white areas using a tiny detail brush. This creates a beautiful contrast between the shiny white flowers and the matte terracotta background.
Step 3: Carving the Design
-
Outline the stems:
Using a needle tool, lightly scratch the skeleton of your design. Draw three main vertical lines for the stems: a central straight one, and two slightly curved ones on the sides. -
Sketch the flower heads:
At the top of the central stem, lightly outline a large, stylized daisy shape. Note the large central circle and the distinct, leaf-like petals. -
Add side blooms:
Draw a tulip shape on the right stem and a smaller, layered bud on the left stem. -
Carve the petals:
Switch to your small loop tool or a sharp sgraffito tool. Begin carving away the terracotta layer inside your flower outlines to reveal the white clay body underneath. I find short, confident strokes work best here. -
Detail the central flower:
Inside the large central petals, carve thin lines or stripes for texture. Leave thin lines of the terracotta color between the petal segments to define them. -
Carve the leaves:
Along the stems, carve out leaf shapes. Use a ‘veining’ technique where you leave a thin line of terracotta down the center of each leaf, carving out the white sections on either side. -
Add decorative accents:
Carve a small rosette flower in the upper right corner and a sprig of leaves in the upper left to balance the composition. -
Refine textures:
Add small dots (stippling) above the left and right flowers for pollen details using the tip of your tool. -
Clean up:
Gently brush away the clay crumbs with a soft, dry brush. Be careful not to smudge the underglaze if it’s still slightly damp.
Step 4: Finishing
-
Slow drying:
Place a piece of plastic loosely over the finished plaque to let it dry very slowly. This prevents the corners from warping or curling up as the moisture leaves the clay. -
Bisque fire:
Once bone dry, bisque fire the piece to Cone 04 (or according to your clay’s instructions). -
Clear glaze (optional):
Apply a clear matte or glossy glaze if you want the piece to be sealed and shiny, or leave it unglazed for that raw, earthy texture shown in the photo. -
Final firing:
Fire the piece a second time to the temperature required for your clear glaze or clay body.
Hang your finished plaque near a window to let the natural light highlight the carved textures

TRACK YOUR CERAMIC JOURNEY
Capture glaze tests, firing details, and creative progress—all in one simple printable. Make your projects easier to repeat and improve.
Carved Topography Slab Landscapes
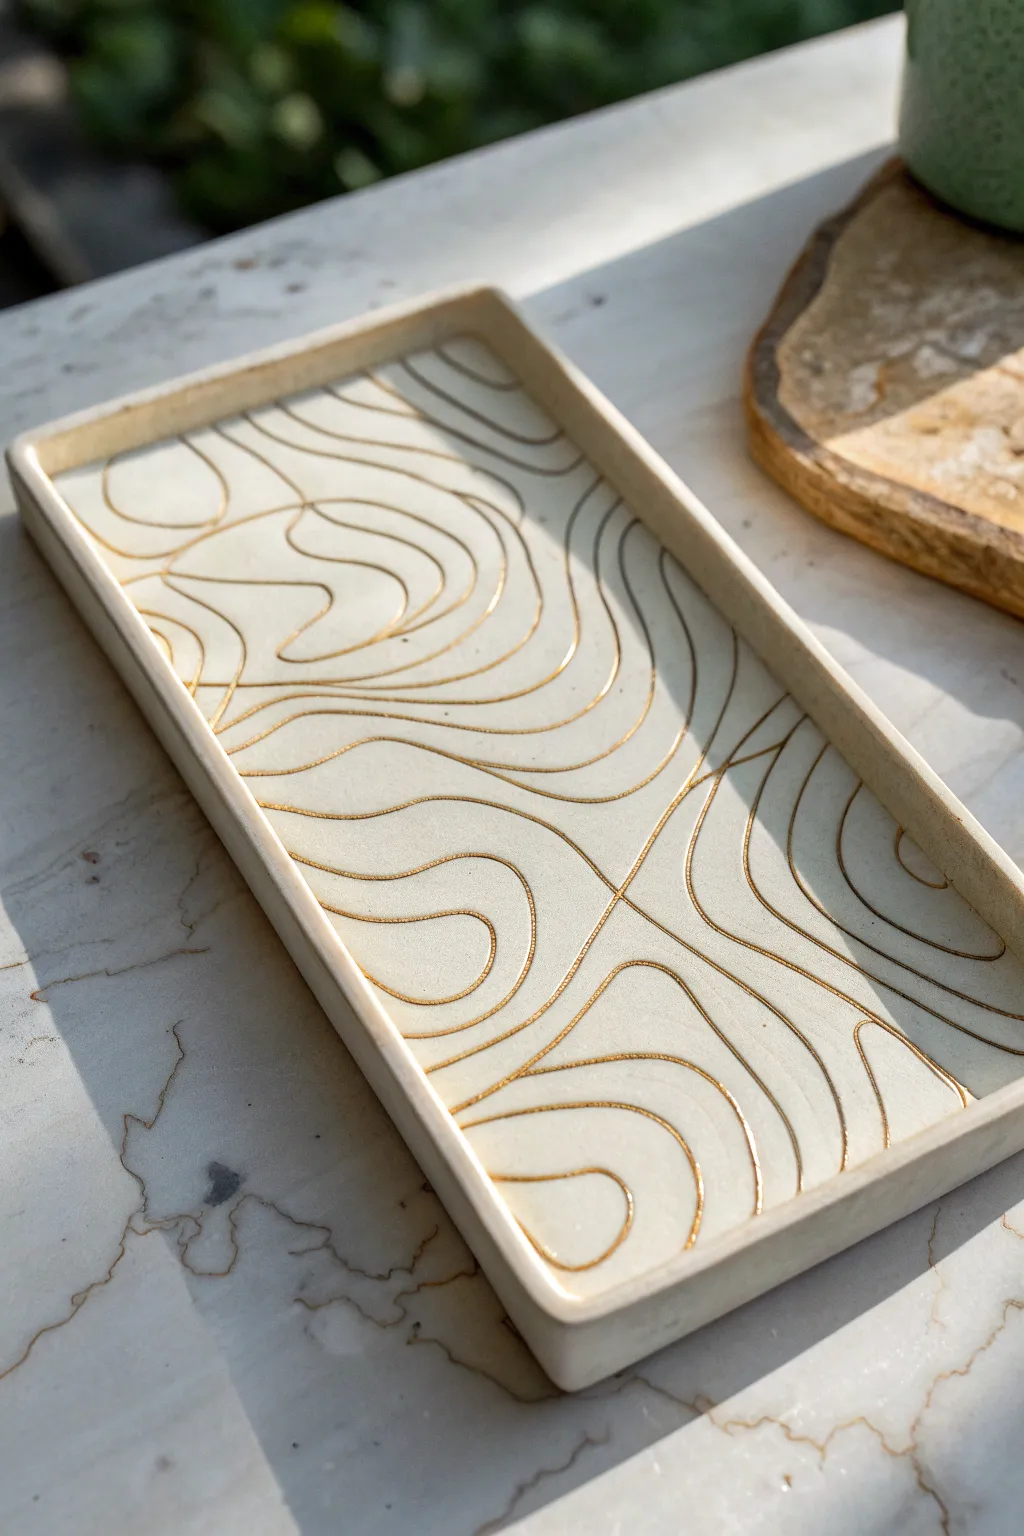
This elegant rectangular tray combines the organic flow of topographic maps with the clean lines of modern ceramics. The soft, cream-colored clay provides a perfect backdrop for the winding, gold-filled grooves that mimic rolling hills and valleys.
Detailed Instructions
Materials
- Light-colored stoneware clay (with fine grog)
- Rolling pin
- Two wooden guide strips (thickness slats, approx. 1/4 inch)
- Rectangular template (paper or cardstock)
- Fettling knife or needle tool
- Carving tool (stylus or small loop tool)
- Sponge
- Pencil (for sketching on clay)
- Gold luster or gold leaf paint
- Small fine-tipped paintbrush
- Clear glaze (optional) or matte finish
Step 1: Forming the Slab Tray
-
Prepare the Clay:
Begin by wedging your stoneware clay thoroughly to remove air bubbles. Flatten it slightly with your palms on a canvas-covered work surface to prepare for rolling. -
Roll the Slab:
Place your wooden guide strips on either side of the clay. Use the rolling pin to roll the clay out until the pin rests on the strips, ensuring a perfectly even thickness of about 1/4 inch across the entire slab. -
Cut the Shape:
Lay your rectangular paper template onto the smooth slab. Using your fettling knife, cut vertically around the template to get clean, sharp edges. Remove the excess clay. -
Create the Rim:
Score the outer 1/4 inch of the rectangle’s surface. Roll out a thin coil or cut thin strips from your excess clay slab to create the walls. Attach these strips to the scored edge using slip, pressing firmly to bond them. -
Refine the Edges:
Use a damp sponge or your finger to smooth the connection between the base and the rim. I like to focus on making the corners sharp and crisp to contrast with the organic curves we will add later. -
Stiffen the Form:
Allow the tray to dry to a ‘leather hard’ state. This is crucial; if the clay is too soft, carving will drag and warp the surface; too dry, and it will chip.
Pro Tip: Pencil Lines
Don’t worry about erasing your sketch marks! The graphite from the pencil will completely burn off in the kiln, leaving only your intentionally carved topography behind.
Step 2: Carving the Landscape
-
Sketch the Design:
Lightly draw your topographic lines directly onto the leather-hard clay with a pencil. Start with a few focal points to represent ‘peaks’ and draw concentric, wavy rings outward, letting the lines flow naturally around each other. -
Carve the Grooves:
Using a stylus or a small U-shaped loop tool, carefully carve along your pencil lines. Apply consistent pressure to create grooves of uniform depth, removing the ribbons of clay as you go. -
Clean the Burrs:
After carving, you will likely have small crumbs or burrs of clay along the edges of the lines. Wait until the clay is bone dry, then gently brush these away with a stiff brush or lightly sand them smooth. -
First Firing:
Bisque fire the piece according to your clay body’s specifications (usually Cone 04 or 06). This prepares the ceramic for glazing or finishing.
Step 3: Finishing and Gilding
-
Apply Base Finish:
If you want the base to be glazed, apply a matte white or clear glaze now and fire again. Alternatively, for a raw clay look like the photo, you can leave the stoneware unglazed if it is fully vitrified. -
Prepare the Gold:
Once the final firing is complete and the piece is cool, prepare your gold accent material. Typically, this is a liquid gold leaf paint or an overglaze luster. -
Inlay the Gold:
Dip a very fine-tipped brush into the gold. Carefully paint inside the carved grooves. Gravity will help the fluid settle into the recesses, but use a steady hand to keep the edges clean. -
Clean Up Spills:
If gold gets on the raised surface, quickly wipe it away with a specialized solvent or a clean, tight Q-tip before it sets. -
Final Cure:
If using real gold luster, fire the piece a third time to the luster’s specific low temperature (often Cone 018). If using gold leaf paint, simply allow it to cure fully according to the manufacturer’s instructions.
Troubleshooting: Burrs
If carving leaves ragged edges, your clay is likely too wet. Let it dry for another hour. If it’s chipping/flaking, it’s too dry—mist it lightly and wrap it in plastic.
Place your finished tray on a coffee table or vanity to add a touch of gilded geological beauty to your space
Pressed Fabric Texture Sampler Tiles
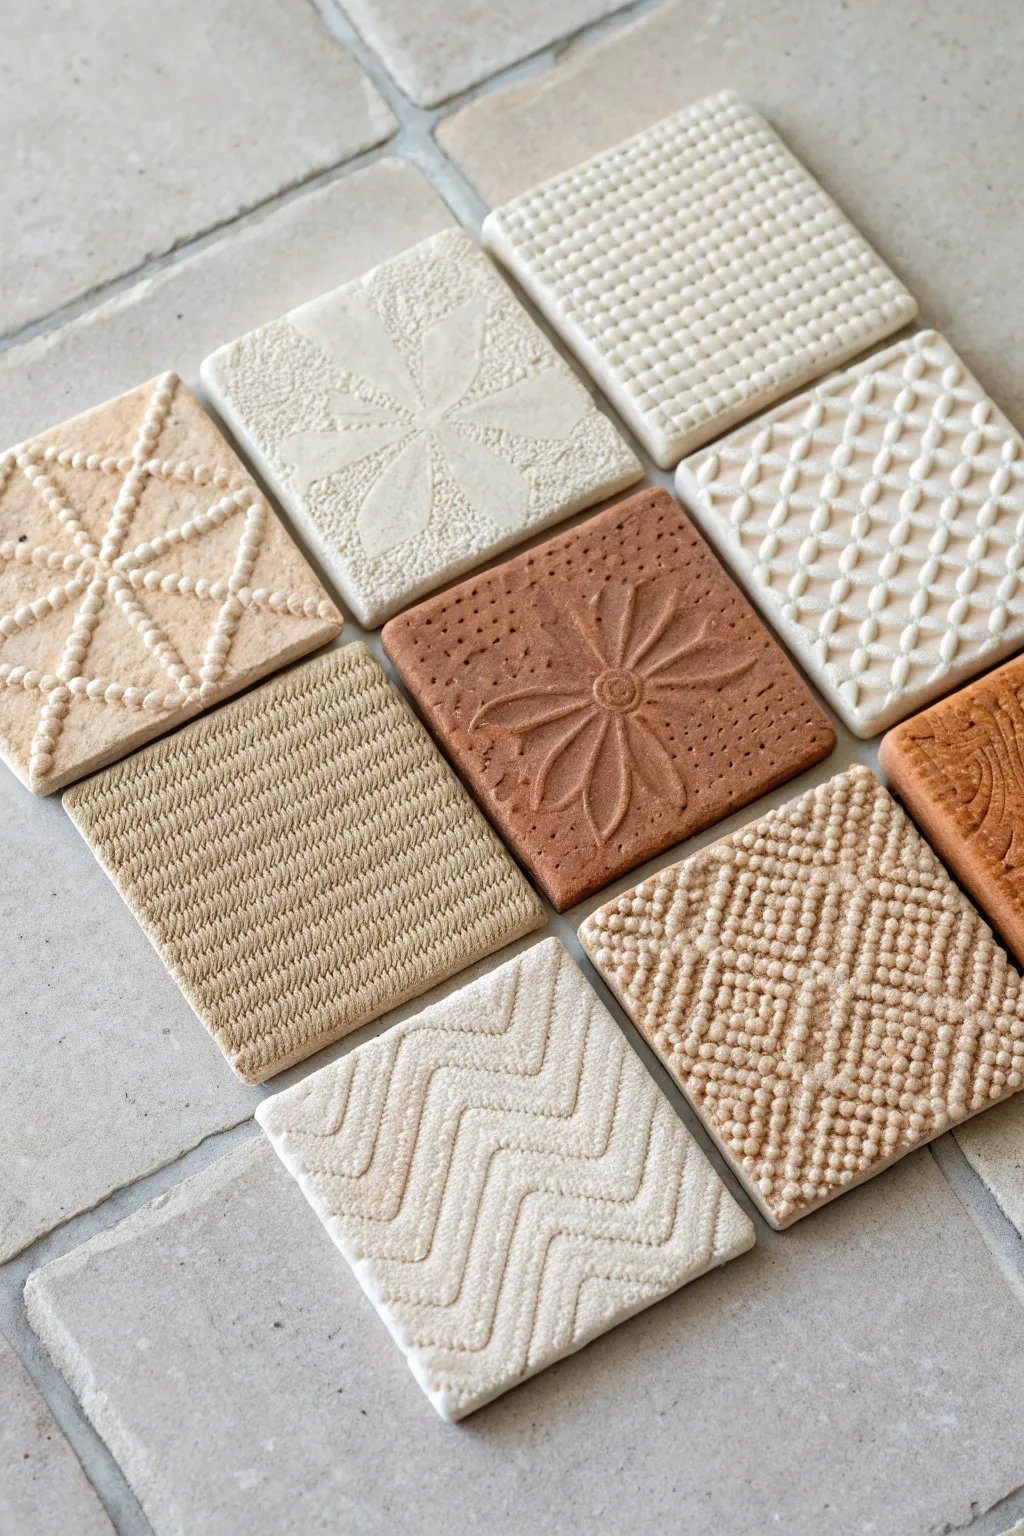
Transform simple clay slabs into a stunning sampler of tactile patterns by pressing familiar textures into the surface. These square tiles capture the delicate details of fabrics, lace, and fibers, creating a sophisticated monochromatic display that highlights the raw beauty of ceramic material.
Step-by-Step Guide
Materials
- White or light-colored polymer clay or air-dry clay (for ease)
- Terra cotta clay (for color variation)
- Ceramic clay (if you have access to a kiln)
- Rolling pin or slab roller
- Two 1/4-inch thick wooden slats (depth guides)
- Square cookie cutter (approx 3-4 inches) or ruler and craft knife
- Assorted texture materials: chunky knit fabric, lace doilies, burlap, plastic canvas, crochet patches
- Canvas or heavy cloth (to roll clay on)
- Cornstarch or baby powder (as release agent)
- Needle tool or fettling knife
- Clean sponge and water
Step 1: Preparing the Slab
-
Set up your workspace:
Lay down your canvas or heavy cloth on a flat table. This prevents the clay from sticking to your work surface. -
Condition the clay:
Take a portion of your white or cream-colored clay and knead it until it is soft, pliable, and free of air bubbles. If using terra cotta for a few accent tiles, prep that separately to avoid color contamination. -
Roll out the slab:
Place the two wooden slats on either side of your clay ball to act as depth guides. Use the rolling pin to roll the clay flat until the rolling pin rests on the slats, ensuring an even 1/4-inch thickness. -
Smoothing the canvas:
Use a damp sponge or flexible rib tool to smooth out the surface of the clay slab, removing any canvas texture or rolling marks before you begin texturing.
Clean Release Tip
If using sticky clay, place sandwich wrap between the clay and the texture material. It softens the detail slightly but guarantees zero sticking.
Step 2: Creating Impressions
-
Select your textures:
Choose a variety of textured items. For this project, look for a plastic grid (for the dimpled square), a chunky knit sweater remnant (for the chevron pattern), and a crochet doily or lace motif (for the floral bursts). -
Dust for release:
Lightly dust your chosen fabric or texture tool with cornstarch or baby powder. This is a crucial step I always double-check, as it prevents the clay from getting stuck in the intricate fibers. -
Press the grid texture:
Lay a piece of plastic canvas or a sturdy mesh grid onto the clay. Roll over it firmly once with the rolling pin to embed the grid pattern deep into the slab. -
Create the knit chevron:
On a fresh section of the slab, place the knit fabric or chevron-patterned textile face down. Press firmly and evenly to transfer the ‘v’ shapes effectively. -
Imprint the floral motif:
Arrange a lace doily or specific floral crochet patch on the clay. Carefully roll or press down with your palm to capture the delicate petal details. -
Reveal the texture:
Slowly peel back the texture materials from one corner to reveal the impression. If the impression is too faint, lay it back down in the exact same spot and press harder.
Step 3: Cutting and Refining
-
Isolate the design:
Position your square cookie cutter over the most interesting part of the texture. Frame it so the pattern is centered or artistically cropped. -
Cut the tiles:
Press the cutter straight down through the clay. If you are using a ruler and knife, measure carefully to ensure all squares are identical in size. -
Remove excess clay:
Peel away the excess clay from around your cut square before trying to move the tile itself. This prevents distortion of the square shape. -
Refine the edges:
Gently smooth the cut edges of each tile with a fingertip dipped in a little water or cornstarch to remove sharpness or crumbs.
Enhance the Depth
After baking, apply a subtle dark wash (watered-down acrylic paint) and wipe it back. This accumulates in the crevices and makes the texture pop.
Step 4: Finishing
-
Dry the tiles:
Place the cut tiles on a flat board lined with paper towels or drywall board. Let them dry slowly away from direct heat to prevent clear warping. -
Firing or curing:
If using ceramic clay, bisque fire once fully dry. If using polymer clay, bake according to the package instructions. -
Optional sanding:
Once cured or fired, you can lightly sand the edges with fine-grit sandpaper for a professional finish. -
Final arrangement:
Arrange your finished tiles in a grid, mixing the white and terra cotta textures for a balanced, gallery-worthy installation.
Display your collection of textured squares together on a wall or use them as sophisticated coasters to add an artistic touch to your home
Cutout Silhouette Slab Hangings
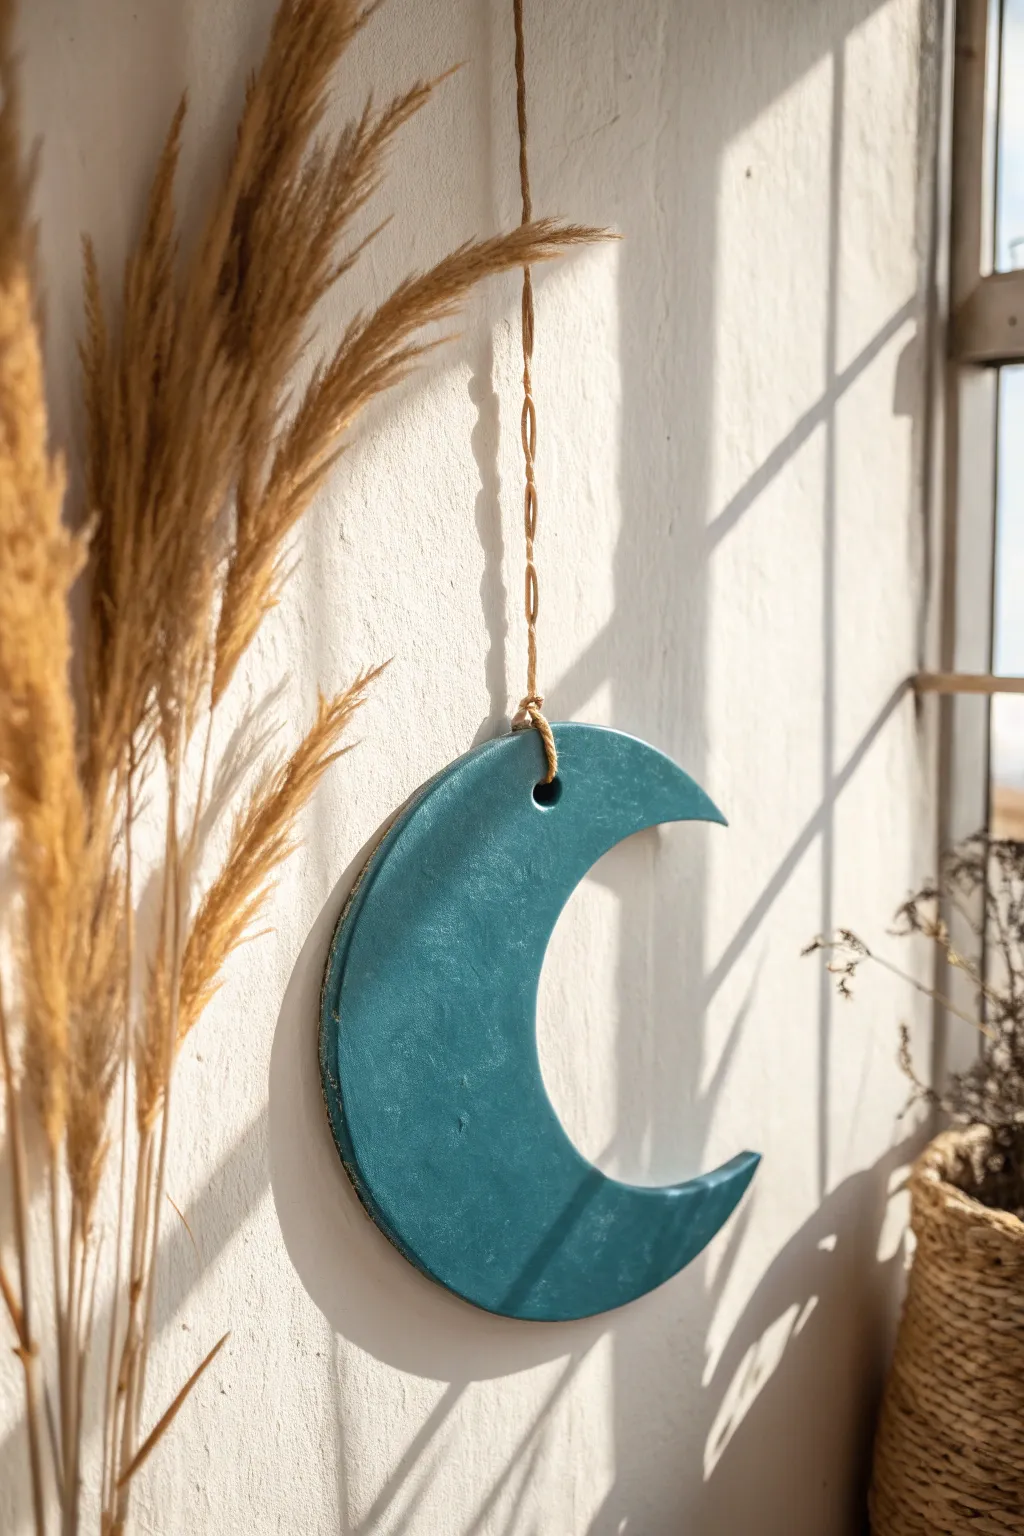
This minimalist turquoise moon brings a serene touch to any wall with its smooth, matte finish and organic silhouette. Created from a simple clay slab, it captures the interplay of light and shadow, especially when hung near a window to catch the afternoon sun.
Step-by-Step
Materials
- Air-dry clay or polymer clay (white)
- Rolling pin
- Canvas mat or parchment paper
- Crescent moon template (paper)
- Craft knife or fettling knife
- Sponge or soft paintbrush
- Acrylic paint (Deep Turquoise or Teal)
- Matte spray varnish
- Straw or round cutter (approx. 5-8mm)
- Sandpaper (fine grit)
- Jute twine or leather cord
- Water cup (for smoothing)
Step 1: Shaping the Clay
-
Prepare the workspace:
Lay down your canvas mat or parchment paper to prevent the clay from sticking to your table. Take a substantial chunk of white clay and knead it briefly to warm it up and remove air bubbles. -
Roll the slab:
Using your rolling pin, roll the clay out into an even slab. Aim for a thickness of about 1/4 inch (6mm). If you enjoy a rustic look, subtle variations in thickness are fine, but try to keep it relatively uniform for even drying. -
Position the template:
Cut out your paper moon template and place it gently onto the clay slab. Lightly tap it down so it doesn’t shift while you work. -
Cut the silhouette:
Hold your craft knife perpendicular to the mat and trace around the template. Use long, confident strokes rather than sawing motions to ensure clean edges. -
Lift the excess:
Carefully peel away the excess clay from around the moon shape first, leaving just your cutout on the mat. This prevents distortion when moving the piece. -
Create the hanging hole:
Using a straw or a small round cutter, punch a hole near the top center of the crescent. Make sure it’s at least 1cm away from the edge to ensure strength. -
Initial smoothing:
Dip your finger or a damp sponge into water and run it gently along the cut edges. This rounds off the sharp corners and gives the piece a more finished, ceramic look. -
Dry the piece:
Allow the clay to dry completely according to the package instructions. Flip the moon over halfway through the process to prevent warping.
Step 2: Finishing and Assembly
-
Sand for perfection:
Once fully cured and bone dry, use fine-grit sandpaper to buff out any remaining bumps on the surface or rough spots on the edges. -
Wipe down:
Use a slightly damp cloth or a dry soft brush to remove all sanding dust. This is crucial for a smooth paint application. -
Apply the base coat:
Brush on your first layer of deep turquoise acrylic paint. Don’t worry if it looks streaky; this is just the foundation. -
Add texture layers:
For that mottled, stone-like appearance seen in the photo, sponge on the second coat of teal paint using a dabbling motion rather than sweeping strokes. -
Detail the edges:
Paint the sides of the slab carefully. I sometimes like to add a tiny touch of darker blue to the edges to give it visual depth. -
Seal the artwork:
Once the paint is dry, spray the entire piece with a matte varnish. This protects the color from fading and gives it that professional ceramic finish. -
Prepare the cord:
Cut a length of jute twine, doubling or tripling the length depending on how low you want it to hang. -
Knot the cord:
Thread the twine through the hole. You can tie a simple decorative knot right at the base of the hole, or loop it through larks-head style. -
Create the hanging loop:
Tie a loop at the very top of the twine string for hanging. -
Final adjustment:
Hang the moon and check that it sits flat against the wall. If it tilts forward, you may need to adjust the knot placement slightly.
Warping Woes?
If your clay curls while air drying, weigh it down with a heavy book placed over parchment paper once it is partially dry (leather hard) to flatten it out.
Clean Edges Upgrade
Before painting, run a slightly wet finger continuously over the rim. This ‘burnishing’ compresses the clay particles for a smoother, high-end finish.
Hang your celestial creation in a spot where shadows can play across its surface as the day goes by
Face Features Study Slab Panels
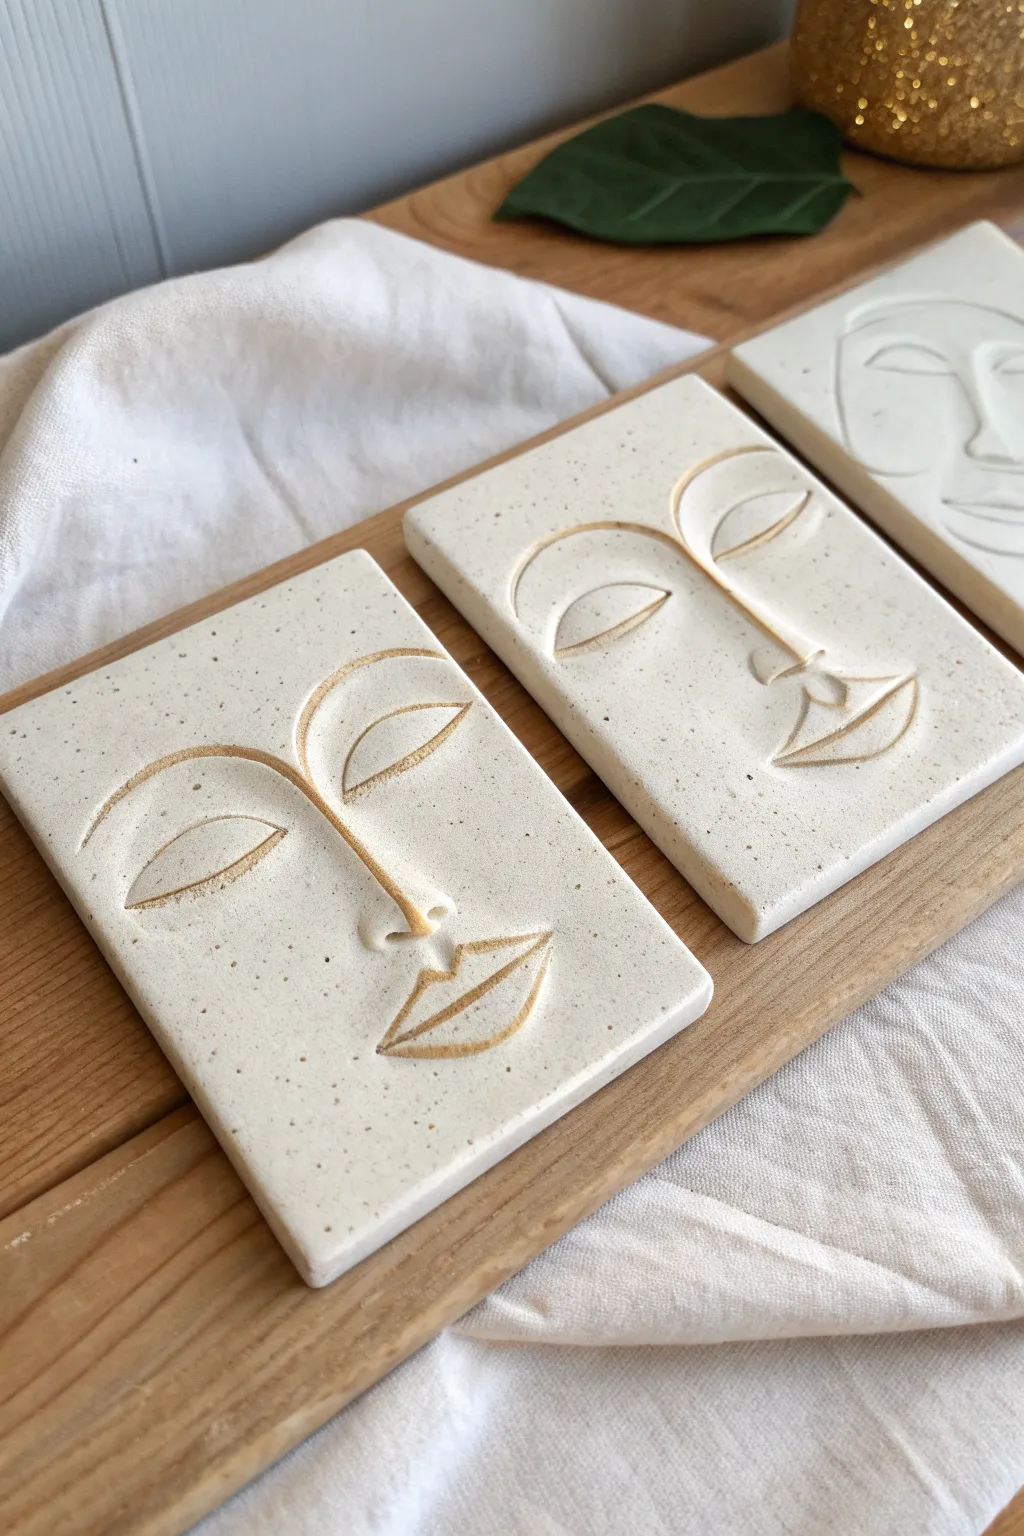
Embrace the elegance of simplicity with these stunning minimalist face study panels. Using speckled clay and a refined carving technique, you’ll create modern relief art that feels both ancient and contemporary.
Step-by-Step Guide
Materials
- Speckled cream stoneware clay (or white air-dry clay)
- Rolling pin
- Two wooden guide strips (approx. 1/4 inch thick) or slat guides
- Rectangular cookie cutter or ruler and knife
- Needle tool or sharp carving tool
- Small loop tool (optional, for wider lines)
- Reference sketch of continuous line face
- Canvas mat or slab roller surface
- Gold wax paste, brown oxide wash, or acrylic paint (for inlay)
- Small detail paintbrush
- Sponge and water
- Clear matte varnish (optional)
Step 1: Preparing the Slab Base
-
Wedge and prep:
Begin by thoroughly wedging your clay to remove any air bubbles. If using speckled stoneware, ensure the grog is evenly distributed. -
Roll the slab:
Place your clay on a canvas mat between two guide strips. Roll the clay out firmly until the rolling pin rests on the guides, ensuring a perfectly even thickness across the entire slab. -
Smooth the surface:
Take a damp sponge or a rubber rib and gently compress the surface of the clay. This aligns the clay particles and creates a pristine, smooth canvas for your carving. -
Cut the rectangles:
Using a rectangular cutter or a ruler and knife, cut out three identical rectangular panels. I find that 4×6 inches is a manageable size that looks great when displayed in a set. -
Soften the edges:
Gently run a damp finger or sponge along the sharp cut edges of each rectangle to slightly round them off, giving the piece a finished, professional look.
Clean Lines
For ultra-crisp lines, carve your design when the clay is ‘leather hard’ rather than freshly rolled. The clay will slice cleanly like cheese instead of dragging.
Step 2: Carving the Design
-
Plan your design:
Lightly trace your minimalist face design onto the clay surface using a very dull pencil or the back of a paintbrush. Don’t dig in yet; just mark where the lines will go. -
Carve the main lines:
Using a needle tool or a small loop tool, carefully carve along your traced lines. Aim for a ‘V’ or ‘U’ shaped groove. The depth should be consistent—deep enough to catch shadows but not so deep it weakens the slab. -
Create the nose bridge:
For the central nose and eyebrow connection, carve a continuous flowing line. This minimalist style relies on the connection between the brow and the nose bridge. -
Detail the eyes and lips:
Carve the closed eyelids as simple semi-circles below the brow line. Add the lips as a geometric shape with a center line. Keep your hand steady and move the tool slowly. -
Clean up crumbs:
Once the carving is done, let the clay stiffen slightly to a leather-hard state. Then, use a soft, dry brush to sweep away any clay crumbs or ‘burrs’ created during carving without smearing the design.
Step 3: Finishing and Coloring
-
Drying:
Place the slabs on a flat board covered with newsprint or drywall. Let them dry slowly and evenly to prevent warping. If using kiln clay, fire to bisque temperature now. -
Applying the inlay color:
To achieve the golden-brown definition seen in the example, dip a fine detail brush into gold wax paste (for air dry) or a diluted iron oxide wash (for ceramic). carefully paint strictly inside the carved grooves. -
Wiping the excess:
If you get pigment on the surface, wipe it away immediately with a tightly wrung-out damp sponge. You want the color to remain only in the recesses. -
Final drying or firing:
If using ceramic clay, proceed to your final glaze firing (often left unglazed for a raw stone look). For air-dry clay, let the paint dry completely. -
Sealing:
For non-fired clay, apply a thin coat of matte varnish to protect the surface while maintaining that raw, earthy texture.
Warping Woes?
If your slab corners start curling up while drying, gently weigh them down with small pieces of drywall or wood squares to keep them perfectly flat.
Display your trio of slabs together on a shelf or picture ledge to enjoy their serene, sculptural presence