
There’s something so satisfying about making a clay slab box—it’s part puzzle, part sculpture, and totally addictive once you get that first lid to fit. Here are my favorite slab-built box ideas, starting with the classic forms and moving into the fun, quirky stuff I love playing with in the studio.
Classic Square Slab Box with Gallery Lid
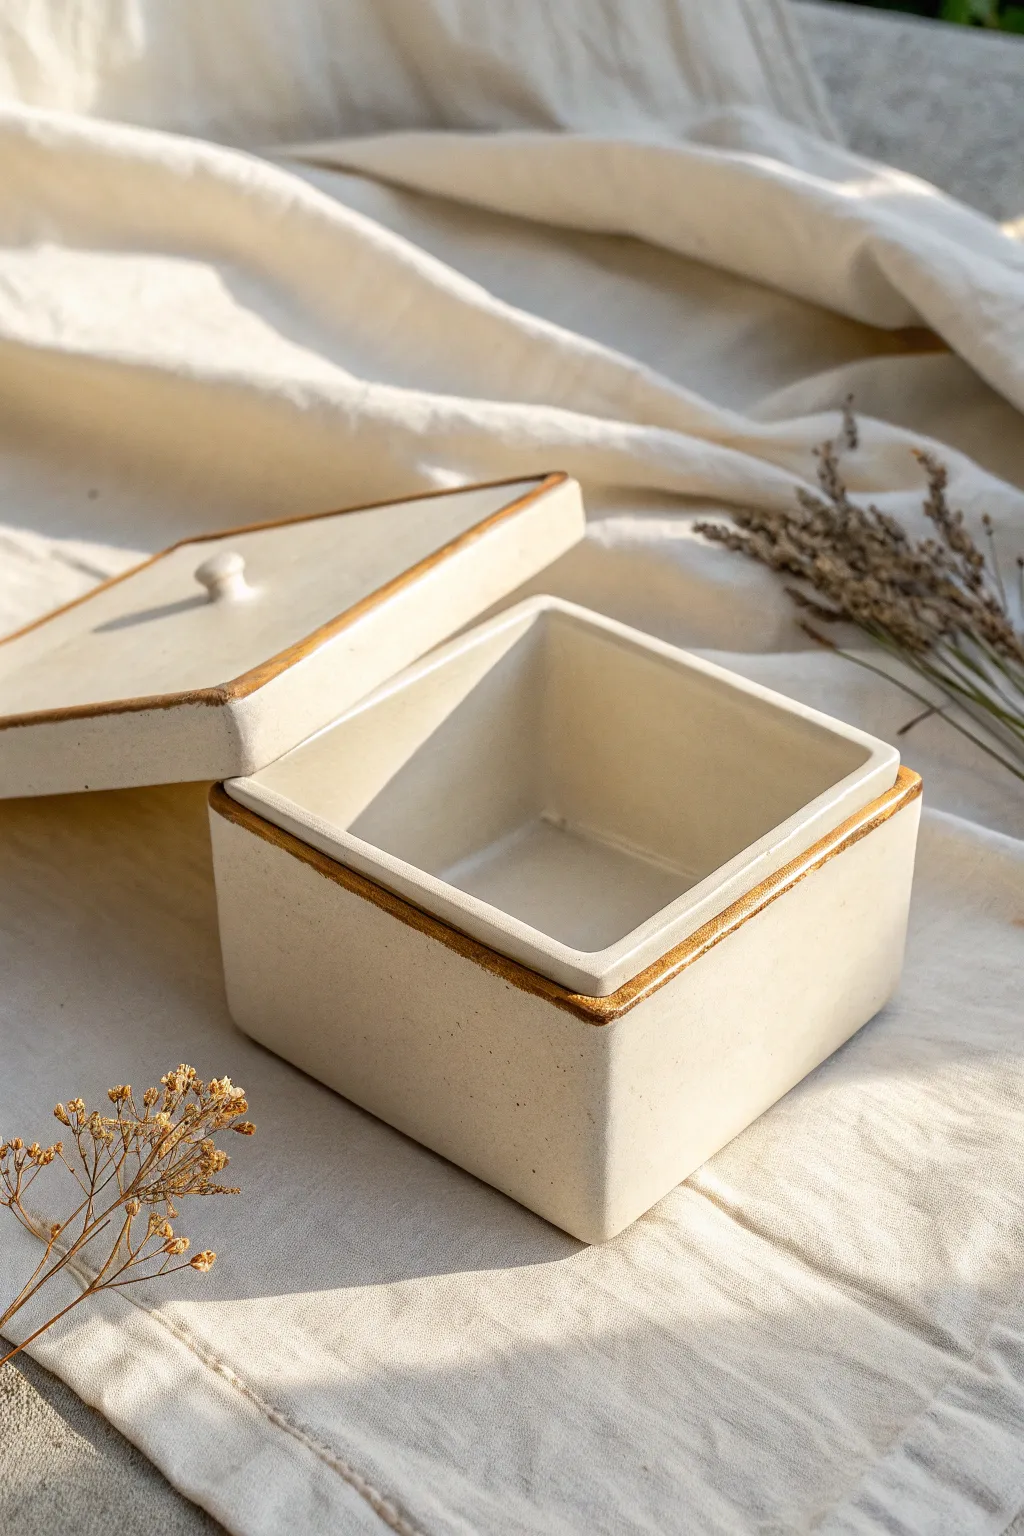
Create a sleek and functional container with this classic slab-building project. The design features a recessed gallery rim for a perfect lid fit and rustic oxide-stained edges that highlight the clean geometric form.
Detailed Instructions
Materials
- Light-colored stoneware clay (smooth)
- Rolling pin and guide strips (approx. 1/4 inch or 6mm)
- Fettling knife or X-Acto blade
- Paper or cardstock templates (4 sides, 2 squares for top/bottom)
- Slip and scoring tool (serrated rib or needle tool)
- Wooden modeling tool
- Small sponge
- Red iron oxide wash or stain
- Small paintbrush
- Clear or transparent matte glaze
Step 1: Preparing Slabs and Templates
-
Roll the clay:
Begin by rolling out a smooth, consistent slab of clay using your guide strips to ensure an even thickness of about 1/4 inch. Smooth the surface with a rib to compress the clay particles, which helps prevent future warping. -
Cut the components:
Using your cardstock templates, cut out four identical rectangular side walls and two square pieces (one for the floor, one for the lid). Let these pieces firm up to a ‘leather hard’ state; they should be stiff enough to hold their shape but still flexible enough to score. -
Bevel the edges:
For the crispest corners, cut a 45-degree bevel on the vertical edges of your four side walls. This miter joint creates a stronger bond and a cleaner visual line than a simple butt joint.
Warped Walls?
If walls bow inward while drying, place a crumpled ball of newspaper inside the box to provide gentle internal support until the clay stiffens completely.
Step 2: Assembling the Box Body
-
Score and slip the base:
Score the perimeter of your bottom square and the bottom edge of your first wall. Apply a generous amount of slip to both roughened areas. -
Attach the first walls:
Press the first wall firmly onto the base. Repeat with a second wall, scoring and slipping the vertical miter joint where they meet to create a corner. Use a small coil of clay on the interior seam for reinforcement if needed. -
Complete the box form:
Attach the remaining two walls, ensuring the box is perfectly square. I like to use a strictly right-angled object, like a wooden block, to check the interior corners before the clay sets too much. -
Refine the seams:
Smooth the exterior seams with a wooden rib or paddle to make them invisible. Gently compress the rim to ensure it is level.
Level Up: Texture
Before assembling, press a piece of linen or lace into your soft slab. The oxide wash in the final step will settle into the texture, highlighting the pattern beautifully.
Step 3: Creating the Gallery Lid
-
Measure the gallery:
To make the recessed ‘gallery’ that keeps the lid in place, roll a thin slab or a flattened coil. It needs to fit just inside the top rim of your box. -
Attach the flange:
You can either attach this strip to the underside of the lid slab (about 1/4 inch from the edge) or attach it to the interior rim of the box itself so it sticks up. In the photo, the flange is hidden on the lid’s underside. Score and slip this inner square into place. -
Test the fit:
Gently place the lid on the box. It should sit strangely high or loose at first—you want a slightly loose fit to account for shrinkage, but refrain from jamming it tight or it might get stuck. -
Add the knob:
Roll a small ball of clay and shape it into a simple mushroom or cylinder for the handle. Score the center of the lid and attach the knob securely.
Step 4: Finishing and Glazing
-
Detailed cleanup:
Once the box is bone dry, use a slightly damp sponge to soften any dangerously sharp edges, but keep the geometric integrity of the corners. -
Bisque fire:
Fire the piece in the kiln to bisque temperature (usually Cone 04 or 06) to prepare it for glazing. -
Apply oxide accent:
Mix a small amount of red iron oxide with water. Using a fine brush, carefully paint a line of oxide along the rim of the box and the edge of the lid. Wipe away any drips with a sponge, leaving the stain just on the corner. -
Glaze interior and exterior:
Pour a clear or white matte glaze inside the box and swirl to coat, pouring out the excess. Dip or brush the exterior with the same glaze. Ensure you wipe the gallery flange and the contact points clean of glaze so the lid doesn’t fuse shut during firing. -
Final firing:
Fire the piece to the maturity temperature of your clay body.
Fill your new ceramic box with treasures or keep it on display to admire the clean lines


Clean-Lined Rectangular Slab Box with Fitted Lid
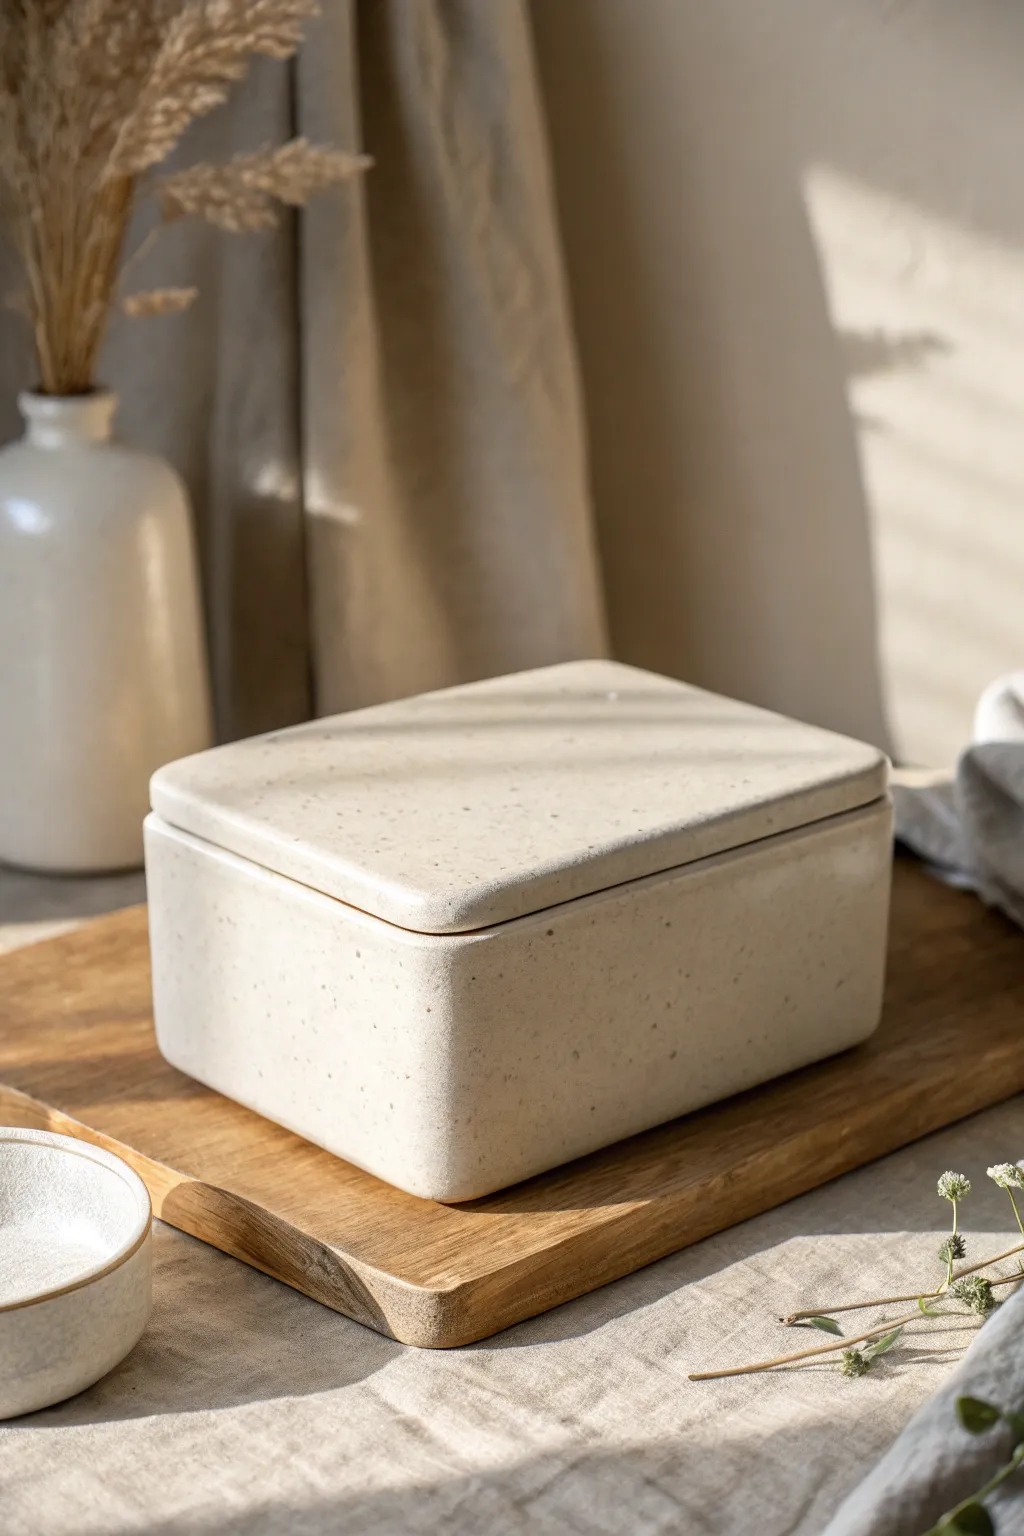
Embodying the essence of quiet luxury, this rectangular slab box features clean, softened edges and a perfectly fitted lid that sits flush with the base. Its charm lies in the simplicity of form and the subtle, organic texture of the speckled matte glaze.
Step-by-Step Guide
Materials
- Stoneware clay (speckled or buff)
- Rolling pin
- Guide sticks or slats (1/4 inch thick)
- Fettling knife or needle tool
- Ruler or square tool
- Scoring tool or serrated rib
- Slip (clay mixed with water)
- Smoothing sponge
- Wooden paddle
- Soft rib (silicone or rubber)
- Matte cream/oatmeal glaze (speckled)
Step 1: Preparing the Slabs
-
Roll out the clay:
Begin by wedging your clay to remove air bubbles, then roll it out into a large, even slab using 1/4 inch guide sticks. This consistent thickness is crucial for a box that won’t warp during firing. -
Smooth the texture:
Take a soft rib and compress the clay slab on both sides. This aligns the clay particles, strengthening the slab and removing any canvas texture from your work surface. -
Cut the templates:
Using a ruler and a fettling knife, cut out your pieces based on desired dimensions: one base, four side walls, one lid (same size as the base), and four smaller strips for the inner flange. -
Leather hard stage:
Let the cut slabs sit until they reach a ‘leather hard’ state. They should be stiff enough to hold their shape when stood up, but soft enough to be scored and joined without cracking.
Warping Woes?
If your lid rocks after firing, spread a small amount of grinding paste on the rim and gently rotate the lid back and forth against the box to grind down high spots for a flush fit.
Step 2: Assembling the Base
-
Bevel the edges:
For the cleanest corners, cut 45-degree bevels on the vertical edges of your side walls and the matching edges of the base slab. This miter joint creates a stronger bond and a shark, professional corner. -
Score and slip:
Technique matters here; score (scratch) all joining surfaces aggressively and apply a generous amount of slip. Join the long walls to the base first, pressing firmly. -
Attach short walls:
Score, slip, and attach the short walls, fitting them snugly against the long walls. Check your corners with a square tool to ensure the box is perfectly rectangular. -
Reinforce inner seams:
Roll a very thin coil of clay and press it into the interior corners of the box. Smear the coil smoothly into the walls using a modeling tool or your finger to ensure a watertight seal. -
Paddle the form:
Gently tap the exterior walls with a wooden paddle. This consolidates the joints and helps straighten any slight warping that occurred during handling.
Step 3: Creating the Fitted Lid
-
Prepare the flange strips:
Take your four smaller strip pieces. These will create the inner rim that keeps the lid from sliding off. Ensure they are cut to fit just inside the assembled box walls. -
Attach the flange:
Score and slip one side of the flange strips. Attach them to the *underside* of the lid slab, inset about 1/4 inch from the edge (or whatever the thickness of your box walls represents). -
Test the fit:
I prefer to place a piece of thin plastic or paper over the box rim, then gently set the lid on top. This prevents sticking while allowing you to check if the flange sits correctly inside the box. -
Refine the lid edges:
Once the fit is confirmed, flip the lid over and smooth the flange joints. Use a sponge to round the exterior corners of the lid slightly to match the softness of the box body.
Make it Yours
Before the clay hardens, press a textured fabric like linen or burlap into the damp clay surface. The glaze will break beautifully over the weave pattern, adding tactile interest.
Step 4: Finishing and Glazing
-
Final smoothing:
Go over the entire piece with a barely damp sponge. Focus on softening raw edges—sharp corners in ceramics are prone to chipping. The goal is a ‘soft’ look, not a sharp industrial one. -
Drying:
Dry the box slowly with the lid placed on top. Drying them together helps ensure they shrink at the same rate and warp less, maintaining that perfect fit. -
Bisque fire:
Fire the piece to bisque temperature (usually cone 04) once completely bone dry. -
Glaze application:
Wax the bottom of the box and the contact points (the rim of the box and the underside edge of the lid) to prevent fusing. Dip or brush on a matte cream glaze with heavy speckling. -
Final firing:
Fire to the maturation temperature of your clay and glaze (likely Cone 5 or 6 for stoneware). Allow the kiln to cool completely before removing your fitted box.
Enjoy the calm satisfaction of storing your treasures in this beautifully handcrafted vessel


Beveled Edge (Mitered) Slab Box for Crisp Corners
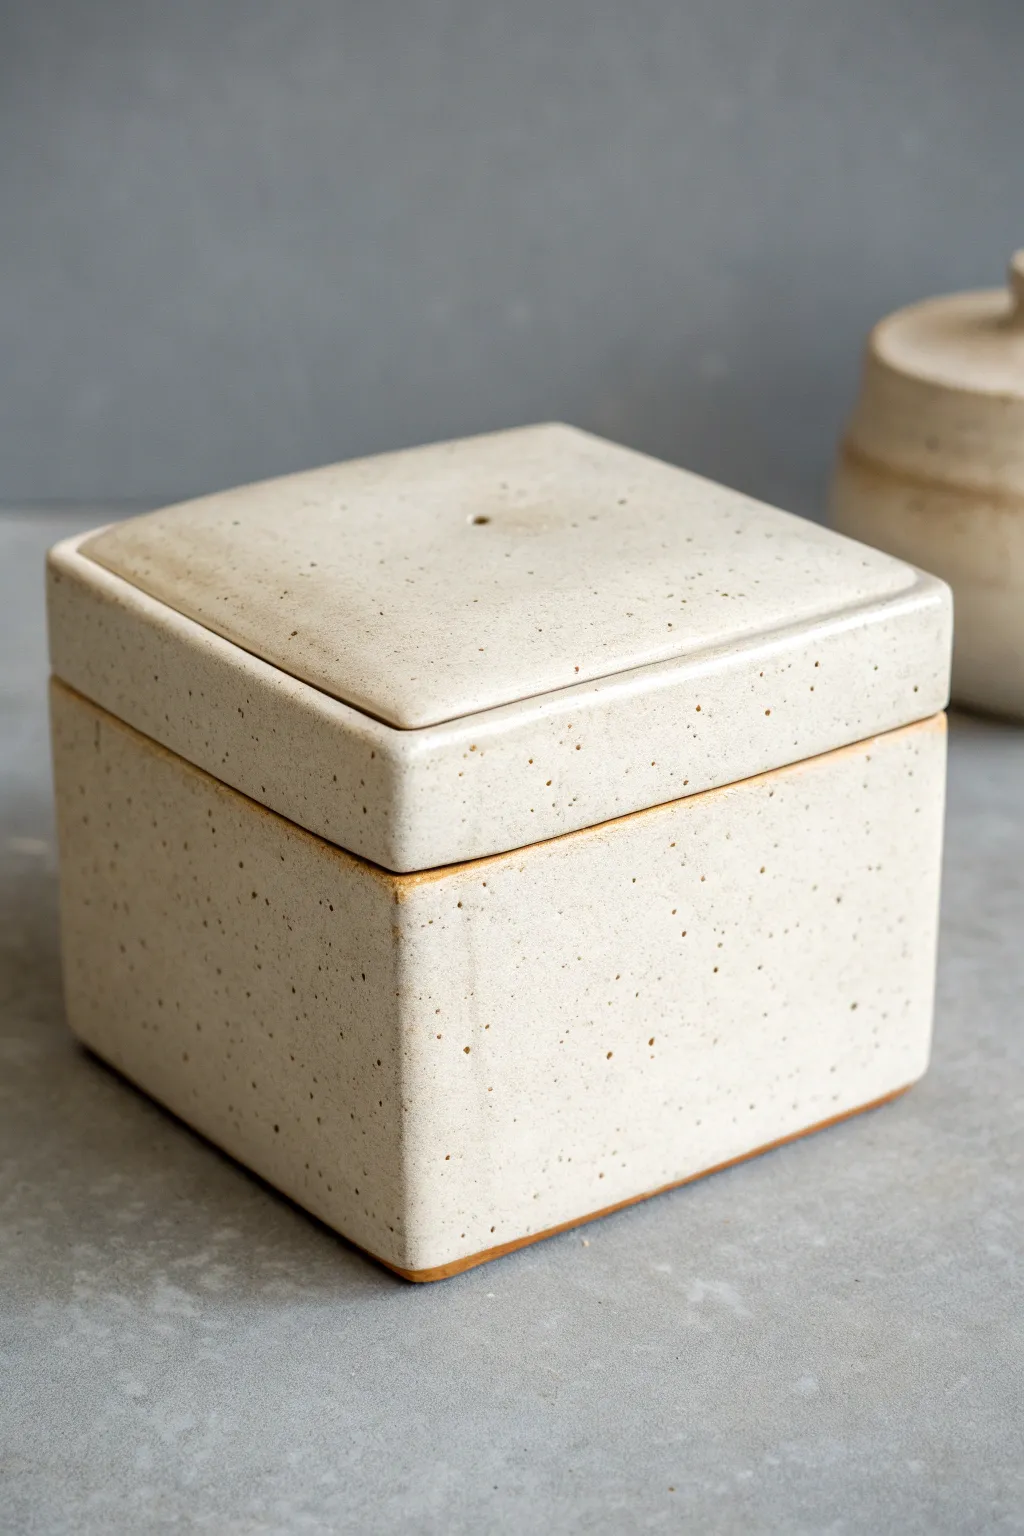
Achieve a modern, architectural look with this precise slab-built ceramic box featuring sharp 45-degree mitered corners. The speckled clay body and minimal glaze highlight the clean geometry, making it a perfect functional container for small treasures or salt cellars.
How-To Guide
Materials
- Speckled stoneware clay
- Rolling pin
- Two wooden thickness strips (3/8 inch)
- Fettling knife or potter’s knife
- Needle tool
- 45-degree bevel cutter tool (or a steady hand with a knife)
- Scoring tool (serrated rib or needle)
- Slip (clay mixed with water)
- Ruler or square
- Wooden paddle
- Sponge
- Matte white glaze
Step 1: Preparation and Cutting
-
Roll the Slabs:
Begin by wedging your speckled stoneware clay thoroughly to remove air bubbles. Roll out a large slab using your wooden thickness strips as guides to ensure an even 3/8-inch thickness throughout. -
Smooth the Surface:
Before cutting any shapes, compress the clay on both sides with a rubber rib. This aligns the clay particles, prevents warping later, and creates that smooth canvas for the glaze. -
Measure the Components:
Using a ruler and a square, map out your pieces. You will need four identical rectangular walls (e.g., 4×4 inches), a square floor (4×4 inches), and a square lid (slightly larger, around 4.25 x 4.25 inches) to account for the overhang seen in the photo. -
Cut the Basic Shapes:
Use your needle tool or fettling knife to cut out these shapes vertically (at a 90-degree angle) first. Keep the leftover clay wrapped up for making the lid’s inner flange later. -
Leather Hard Stage:
This is crucial: Let the slabs stiffen to a firm leather-hard state. I find that if you try to bevel soft clay, it just squishes and loses its precise edge. They should hold their shape without bending when picked up.
Step 2: Creating Mitered Joints
-
Bevel the Walls:
Take your bevel cutter or knife and cut a 45-degree angle on the distinct vertical edges of all four wall pieces. You are cutting the thickness of the clay away so the interior face becomes shorter than the exterior face. -
Bevel the Floor (Optional but Recommended):
For a seamless look where the walls meet the floor, you can bevel the bottom edge of the wall pieces and the four edges of the floor slab, creating a multi-directional miter. -
Score and Slip:
Rough up all the beveled surfaces aggressively with your scoring tool. Apply a generous amount of slip to these scored areas; it acts as the glue for your corners.
Pro Tip: Cutting Accuracy
Use a metal bevel cutter tool rather than a knife. It locks the angle at exactly 45 degrees, ensuring your corners meet perfectly without gaps.
Step 3: Assembly and Refining
-
Construct the Box:
Stand the walls up on the base. Press the mitered corners together firmly. Because of the angle, the contact area is larger than a butt joint, making it very strong. -
Secure the Seams:
Take a tiny coil of soft clay and press it into the interior corners for reinforcement. Smooth this coil down so it disappears into the wall. -
Paddle the Exterior:
To get those super sharp corners seen in the image, gently tap the exterior corners with a wooden paddle. This compresses the join and sharpens the 90-degree angle. -
Clean the Edges:
Wipe away excess slip on the outside with a damp sponge, being careful not to round over your crisp corners.
Troubleshooting: Cracking Seams
If corners crack as they dry, your slip wasn’t wet enough or the slabs were too dry. Cover the box with plastic to let humidity equalize, then re-compress.
Step 4: Lid Construction and Finishing
-
Create the Flange:
Roll a small coil or cut a thin strip of slab. Score and slip it onto the underside of your lid piece, indented about 1/4 inch from the edge. This flange will sit inside the box to keep the lid from sliding off. -
Refine the Lid:
Place the lid on the box. Use a rasp or surfacing tool to ensure the lid’s outer edge aligns perfectly with the box walls if you want a flush look, or smooth the slight overhang if you prefer the style in the photo. -
Add a Vent Hole:
Use a small needle tool to pierce a tiny hole in the center or side of the lid or visually hidden under the flange. This prevents trapped air from blowing the lid off during firing. -
Final smooth:
Do a final pass with a barely damp sponge to remove any sharp burrs or fingerprints. -
Bisque and Glaze:
Once bone dry, bisque fire the piece. Apply a matte white or cream glaze, wiping the bottom edge clean (about 1/4 inch up) to leave that nice raw clay contrast at the foot.
Enjoy the satisfaction of seeing those perfectly sharp corners emerge from the kiln.


One-Piece Folded Slab Box (Origami Style)

This elegant blue box captures the crisp lines and tucked corners of traditional paper folding, but with the permanence of ceramics. By using a single large slab and precise darting, you can achieve a seamless, geometric form that looks deceptively complex.
Detailed Instructions
Materials
- Stoneware clay (smooth body recommended)
- Wide rolling pin or slab roller
- Paper template (cross-shaped)
- Fettling knife or scalpel
- Ruler or straight edge
- Scoring tool or serrated rib
- Slip or magic water
- Wood paddle
- Sponge
- Matte blue underglaze or mason stain wash
Step 1: Preparation and Cutting
-
Design your template:
Draft a paper template in the shape of a cross. The center square will be your base, and the four extending arms will become the walls and lid flaps. For a box like the one pictured, ensure the arms are slightly longer than the width of the base to allow for the fold-over effect. -
Roll the slab:
Roll out a smooth, consistent slab of clay. Aim for a thickness of about 3/16 to 1/4 inch. If the slab is too thick, the folds will crack; too thin, and the walls won’t support themselves. -
Compress the clay:
Use a flexible rib to compress the clay on both sides. This aligns the clay particles, reducing the chance of warping during the drying process, and creates that smooth, leather-like surface visible in the photo. -
Cut the shape:
Lay your paper template onto the slab. Using a sharp fettling knife or scalpel, cut around the perimeter cleanly. Don’t discard your excess clay yet; you might need it for reinforcements. -
Texture stage (optional):
If you want the surface to have a specific paper-grain look, briefly pat it with a piece of canvas or smooth it further with a rubber rib. The example image has a very soft, velvety matte finish, so keep it relatively plain.
Step 2: Folding and Assembly
-
Dart the corners:
To create the triangular ‘tucked’ look seen on the sides, you need to cut darts at the inner corners of your cross shape. Measure carefully to ensure the triangular cutouts are identical on all four corners. -
Let it firm up:
Allow the slab to stiffen to a soft leather-hard stage. If you try to fold it while it’s too wet, the walls will slump. I usually wait until the clay no longer feels tacky to the touch. -
Score the seams:
Thoroughly score the edges of the darts and the areas where the walls will meet. Apply a generous amount of slip or magic water to these scored areas. -
Lift and fold:
Gently lift the four arms of the cross upwards to form the box walls. The cutout darts should now close up, creating the diagonal seam lines that run across the side faces. -
Seal the corners:
Press the scored edges together firmly. You can support the inside wall with one hand while pressing from the outside to ensure a tight bond without deforming the box shape. -
Refine the diagonal lines:
The box in the image relies on sharp, exaggerated seam lines. Instead of smoothing them away completely, use a modeling tool to define the diagonal indentation slightly, emphasizing the ‘folded paper’ aesthetic.
Cracking Corners?
If the clay hacks or cracks when you bend the walls up, the slab is too dry. Spray a fine mist of water over the fold lines and wait 10 minutes, or gently compress the fold with a damp sponge as you bend it.
Step 3: Detailed Finishing
-
Form the lid structure:
The top of this box features four triangular flaps meeting in the center. If your original template arms were long enough, fold the remaining top sections inward until their points touch in the middle. -
Paddle into shape:
Use a wooden paddle to gently tap the sides and top. This squares up the form and sharpens the 90-degree angles, moving it away from a ‘puffy’ look toward a rigid, geometric box. -
Clean the surface:
Wipe down the entire piece with a slightly damp sponge to remove any crumbs or fingerprints. Use a chamois strip on the rim or folded edges to soften them just enough so they aren’t sharp after firing. -
Apply color:
To achieve the deep, matte blue finish shown, apply three coats of a velvet underglaze or a mason stain slip while the clay is greenware. Brush in different directions to avoid streaks. -
Slow drying:
Cover the box loosely with plastic to dry very slowly. Because the seams are under tension from the folding process, rapid drying can cause the corners to split. -
Bisque fire:
Once bone dry, bisque fire the piece to the temperature appropriate for your clay body (usually Cone 04). -
Final glazing:
For the specific look in the photo, skip a glossy glaze. Instead, leave the matte underglaze raw on the outside, or apply a clear matte glaze to seal it without adding shine. Glaze the interior with a liner glaze if it will hold items.
Make it Functional
Turn this from an art object to a functional jar by cutting the ‘lid’ triangles separate from the walls. Attach them to a separate flat slab that sits inside a gallery rim for a removable lid.
Once fired, the matte finish emphasizes the sharp geometry, leaving you with a sophisticated vessel that tricks the eye

The Complete Guide to Pottery Troubleshooting
Uncover the most common ceramic mistakes—from cracking clay to failed glazes—and learn how to fix them fast.
Flanged Lid with a Simple Thumb Notch
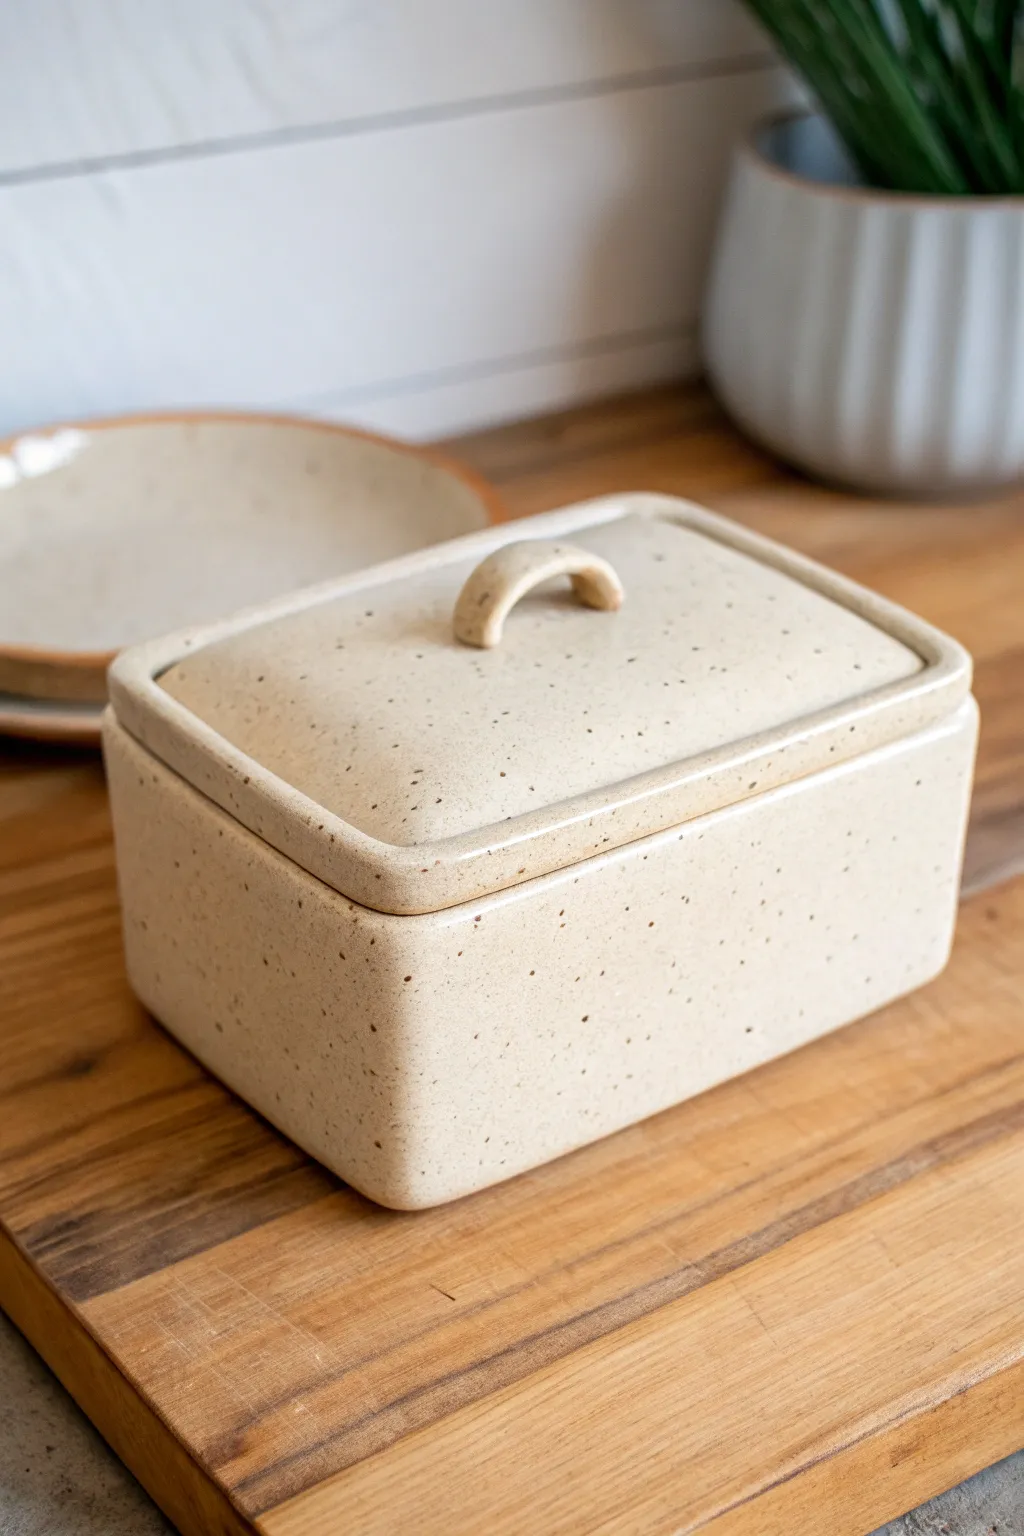
This elegant slab-built box features a clean rectangular form and a perfectly fitted flanged lid, making it ideal for storing butter or small keepsakes. The speckled clay body and soft cream glaze give it a timeless, modern farmhouse aesthetic.
Step-by-Step Guide
Materials
- Speckled Stoneware Clay
- Rolling Pin
- Guide Sticks or Slab Roller
- Fettling Knife
- Needle Tool
- Serrated Rib or Scoring Tool
- Slip (clay and water slurry)
- Ruler
- Wooden Bevel Tool (45-degree angle)
- Small Sponge
- Clear or Cream Glaze (Cone 5/6 recommended)
Step 1: Creating the Base Box
-
Roll the Slabs:
Begin by rolling out a generous amount of speckled stoneware clay to a uniform thickness, about 1/4 inch. For the best structural integrity, compress the slab on both sides with a rib to align the clay particles. -
Cut Wall Templates:
Using a ruler and fettling knife, cut four rectangular strips for the walls and one rectangle for the floor. A standard size for a butter dish might be a 6×4 inch base with 3-inch high walls, but size it according to your needs. -
Miter the Edges:
For clean corners, use your bevel tool to cut 45-degree angles on the vertical sides of your wall pieces. This miter joint creates a stronger bond and a seamless look on the outside corner. -
Score and Slip:
Aggressively score the mitered edges of your walls and the outer perimeter of your base slab. Apply a generous amount of slip to all scored areas. -
Assemble the Walls:
Stand the walls up on the base, pressing the mitered corners together firmly. I like to use a small wooden block on the inside corner to push against while I smooth the outside seam to ensure it’s square. -
Reinforce Seams:
Roll a very thin coil of soft clay and press it into the interior seams where the walls meet the floor and each other. Smooth this coil down completely until it disappears. -
Refine the Rim:
Level the top rim of the box with a cheese cutter or rasp if needed, then smooth it with a damp sponge.
Warping Walls?
If your slab walls are bowing inward while you work, stuff the inside of the box with crumpled newspaper or foam to hold the shape while the clay stiffens.
Step 2: Adding the Flange and Lid
-
Create the Flange Supports:
Cut four thin strips of clay, about 1/2 inch tall. Score and slip these to the *interior* walls of your box, placing them about 1/4 inch down from the top rim. This creates the shelf (gallery) for your lid to sit on. -
Measure the Lid:
Measure the interior opening of your box carefully. Cut a rectangle from your remaining slab that is slightly smaller than this opening so it fits comfortably without sticking. -
Test the Fit:
Gently place the lid onto the gallery you created. If it’s tight, shave down the edges of the lid with a rasp. It needs a little wiggle room to account for shrinkage. -
Form the Handle:
Roll a small, thick coil or strip of clay. Curve it into a semi-circle arch to create the handle shown in the image. -
Attach Handle:
Score the center of the lid and the feet of your handle. Attach firmly, pressing down to secure the bond, and clean up any excess slip with a brush. -
Smooth and Dry:
Go over the entire piece with a damp sponge to remove fingerprints and sharp edges. Let the piece dry slowly under plastic to prevent warping.
Level Up: Texture
Before assembling, lightly press a canvas cloth or linen fabric into your soft slabs. The subtle texture will catch the glaze and add depth to the cream surface.
Step 3: Glazing and Firing
-
Bisque Fire:
Fire the piece to cone 04 (or your clay body’s bisque temperature). -
Wax the Contact Points:
Apply wax resist to the bottom of the box, the underside edge of the lid, and the gallery shelf inside the box. This prevents the lid from fusing to the box during the glaze firing. -
Apply Glaze:
Dip or brush your cream glaze over the piece. The speckles from the clay body will naturally show through a semi-opaque cream glaze. -
Final Fire:
Fire to the glaze maturity temperature (usually Cone 5 or 6). Don’t fire the lid *on* the box unless you are absolutely certain your wax application is perfect; firing side-by-side is safer.
Once fired, you will have a beautiful, functional piece of ceramic art ready for your kitchen counter
Minimal Knob Handle with a Soft-Domed Pull
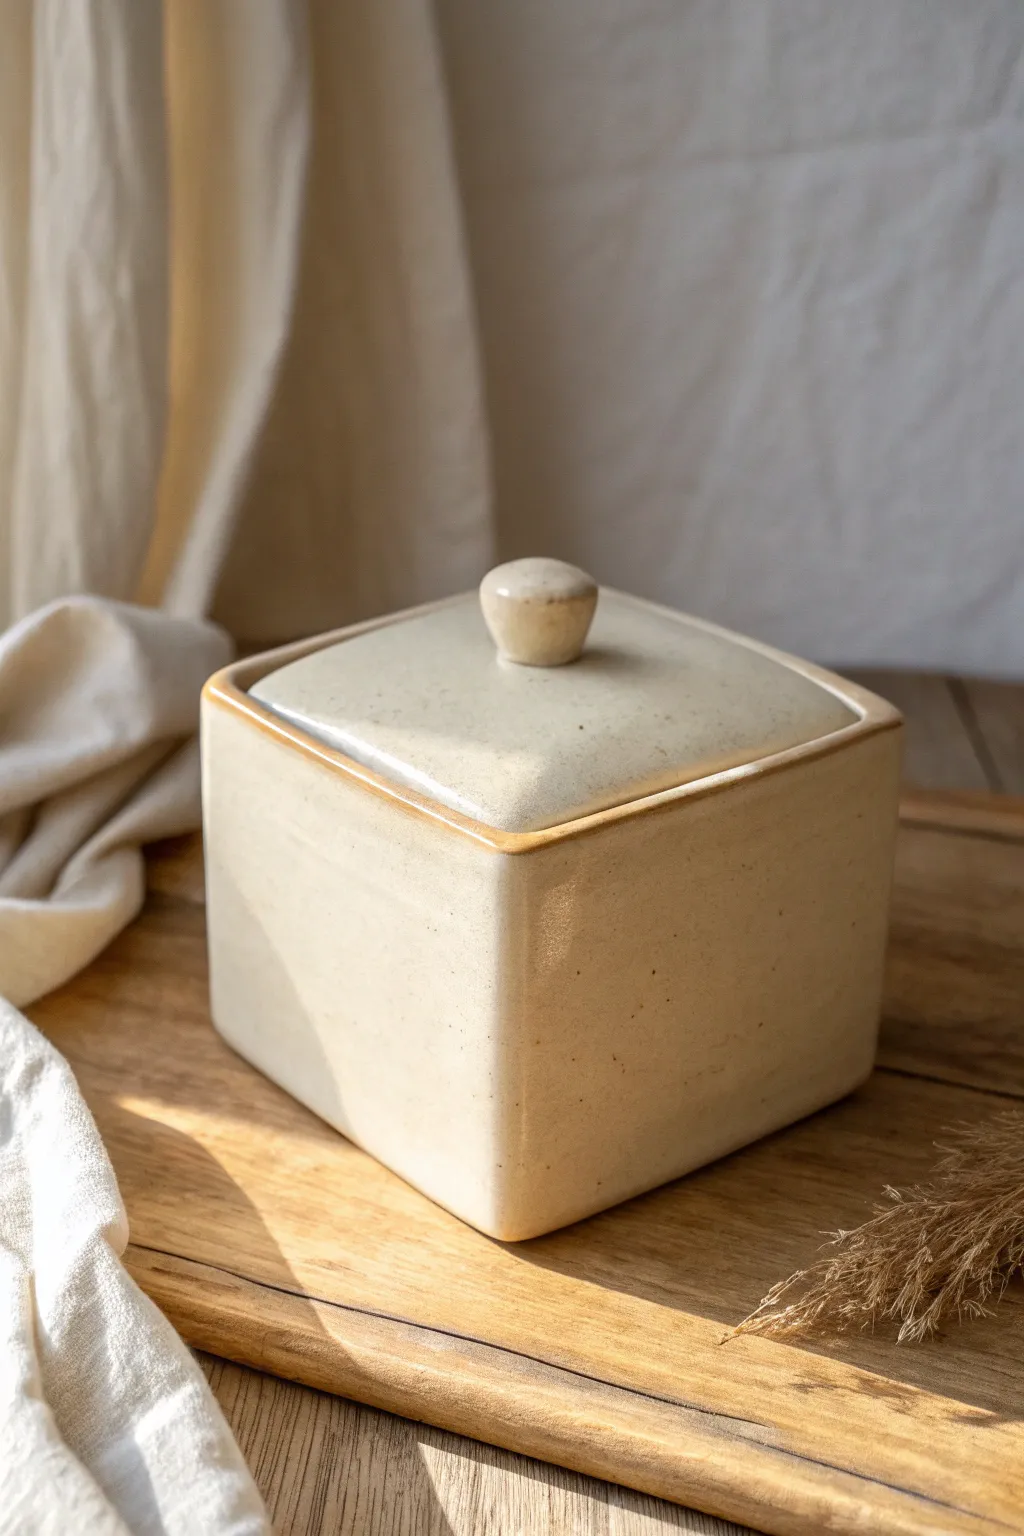
This project features a clean, minimalist square box with a gentle, inviting aesthetic. The soft-domed knob and creamy, speckled glaze give it a classic farmhouse feel that fits perfectly in any modern kitchen or vanity.
Detailed Instructions
Materials
- Stoneware clay (speckled or buff)
- Rolling pin
- Guide sticks or slab roller (approx. 1/4 inch thick)
- Fettling knife or needle tool
- Score and slip tool (serrated rib)
- Ruler/straight edge
- Sponge
- Creamy matte white glaze
- Kiln
Step 1: Creating the Box Base
-
Roll the Slabs:
Begin by wedging your clay to remove air bubbles. Roll out a large slab between guide sticks to an even 1/4 inch thickness. Compress the slab on both sides with a soft rib to align clay particles and prevent warping. -
Cut the Components:
Using a ruler and fettling knife, cut out five squares of equal size. For the box shown, 4-inch or 5-inch squares work well. Let these slabs stiffen to a soft leather-hard stage so they can stand up without slumping. -
Bevel the Edges:
For stronger, cleaner corners, cut 45-degree bevels on the edges that will join together. If you prefer a simpler method, you can use butt joints, but bevels create that seamless look. -
Score and Slip:
Thoroughly score (scratch) and apply slip to all joining edges. This ‘glue’ is crucial for structural integrity. -
Assemble the Walls:
Attach the four walls to the base square first. Press the seams firmly together. Then, bring the vertical wall edges together to form the cube. Use a small coil of soft clay on the interior seams to reinforce them. -
Smooth the Exterior:
Use a paddle or a flat piece of wood to gently tap the walls straight. Smooth the outer seams with a rib tool until the join lines disappear completely. -
Soften the Rim:
Run a damp sponge or a piece of chamois leather over the top rim of the box. We want a slightly rounded, soft edge rather than a sharp, machine-cut look.
Warped Lid Troubles?
If your lid rocks or doesn’t sit flat after drying, wait until it’s bone dry and gently sand the high spots on a piece of sandpaper tape to a flat surface.
Step 2: The Lid and Knob
-
Cut the Lid Slab:
Cut another square slab slightly larger than your box opening. Measure the box carefully, as clay shrinks; you want the lid to sit flush or slightly overhang. -
Add a Flange:
To keep the lid from sliding off, attach a smaller square of slab (or four small strips) to the *underside* of the lid. This flange should fit loosely inside the box opening. -
Shape the Knob:
Roll a small ball of clay for the knob. Pinch and shape it into a mushroom or door-knob form. I like to taper the base slightly where it meets the lid for an elegant silhouette. -
Attach the Knob:
Find the exact center of the lid top. Score and slip both the underside of the knob and the center point. Press the knob firmly into place. -
Refine the Connection:
Use a small modeling tool to blend the clay at the base of the knob into the lid, ensuring there is no gap. Smooth this transition with a damp brush. -
Dry Slowly:
Place the lid on the box to dry. This helps them shrink together and maintain a good fit. Cover loosely with plastic to ensure slow, even drying.
Smooth Operator
Use a soft red rubber rib after assembling the box walls. Compressing the clay while smoothing removes surface texture and aligns the grain for a cleaner finish.
Step 3: Glazing and Finishing
-
Bisque Fire:
Once bone dry, fire the piece to bisque temperature (usually Cone 04 or 06). Wipe off any dust with a damp sponge after firing. -
Wax the Contact Points:
Apply wax resist to the bottom of the box and the rim where the lid sits (or wax the flange). This prevents the lid from fusing to the box during the glaze firing. -
Dip Glazing:
Dip the entire box into a creamy white glaze. A satin or matte finish works best to achieve the soft look in the image. Shake gently to remove excess drips. -
Expose the Edges:
Keep the glaze application somewhat thin on the sharp corners. The ‘toasted’ look on the edges comes from the clay body showing through the semi-translucent glaze where it breaks over the edges. -
Glaze Fire:
Fire to the maturity temperature of your clay and glaze (likely Cone 5 or 6). Allow the kiln to cool completely before opening to prevent thermal shock.
Fill your new ceramic box with jewelry, cotton pads, or simply display it as a standalone sculptural piece


What Really Happens Inside the Kiln
Learn how time and temperature work together inside the kiln to transform clay into durable ceramic.
Footed Slab Box with Tiny Corner Feet
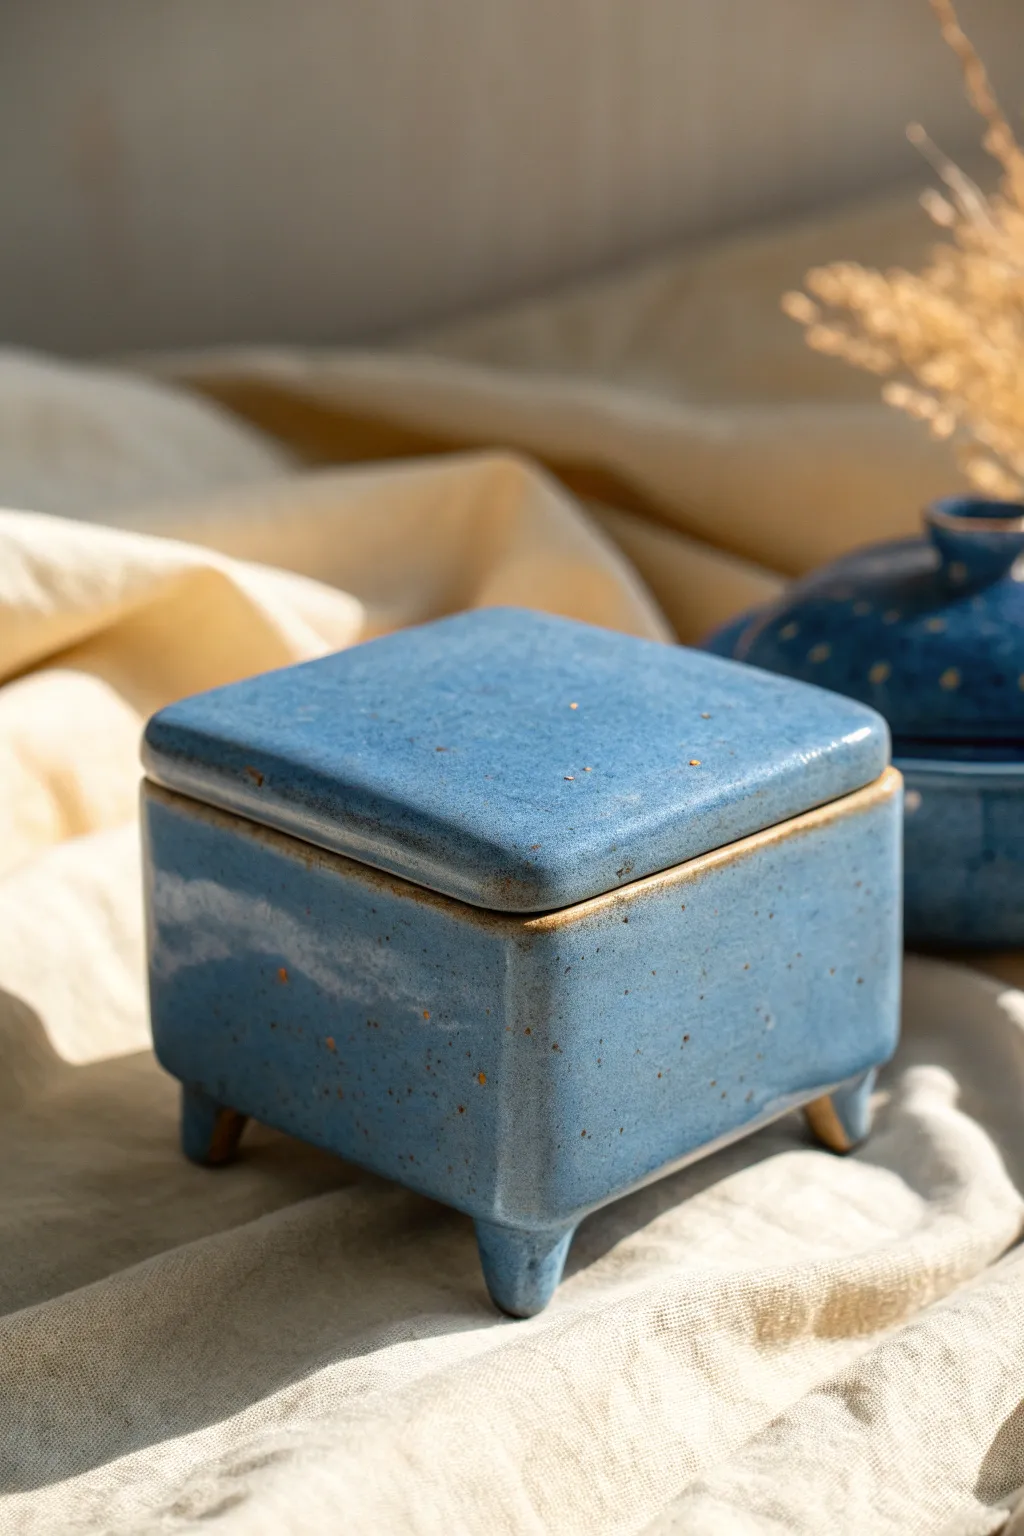
This charming ceramic box features a soft square form elevated by tiny corner feet, giving it a playful yet elegant stance. The calming blue glaze breaks beautifully over the edges, highlighting the speckled clay body underneath.
How-To Guide
Materials
- Speckled Stoneware Clay
- Rolling Pin
- Two long wooden slats (approx 1/4 inch thick) or slab roller
- Fettling Knife or Needle Tool
- Scoring Tool (serrated rib)
- Slip (clay and water mixture)
- Small sponge
- Soft rubber rib
- Square template (paper or cardstock)
- Paddle tool
- Speckled Blue Gloss Glaze
Step 1: Slab Preparation & Cutting
-
Roll the Slabs:
Begin by rolling out your speckled clay into an even slab. Use the wooden slats on either side of your clay as guides for your rolling pin to ensure a consistent thickness of about 1/4 inch. -
Smooth the Surface:
Take your soft rubber rib and compress the clay slab on both sides. This removes any canvas texture and aligns the clay particles, which helps prevent warping later. -
Cut the Base and Walls:
Using your square template, cut out two identical squares (one for the base, one for the lid). Then, measure and cut a long rectangular strip for the walls that is long enough to wrap around the perimeter of your base square. -
Leather Hard Stage:
Let the cut pieces sit until they reach a soft leather-hard stage. They should be firm enough to hold their shape when lifted, but soft enough to bend without cracking.
Step 2: Assembling the Body
-
Bevel edges:
Bevel the bottom edge of your wall strip at a 45-degree angle, and do the same for the edges of your base square. This increases surface area for a stronger join. -
Attach Walls:
Score the beveled edges aggressively and apply slip. Stand the wall strip up on the base, wrapping it around to form the square. Join the two ends of the wall strip where they meet. -
Reinforce Seams:
Use a thin coil of soft clay along the interior seams. Smooth it down into the corner join with your finger or a modeling tool to ensure a leak-proof seal. -
Shape the Box:
Gently paddle the outside walls to square up the form. I like to tap the corners slightly inward to give them that softened, rounded look seen in the photo.
Wobbly box?
If the box rocks after adding feet, lay a piece of sandpaper on a flat table. Gently rub the box (feet side down) in a figure-8 motion until all four feet are perfectly level
Step 3: The Lid & Feet
-
Create the Flange:
Roll a small coil or cut a thin strip of slab. Attach this to the underside of your second square (the lid), positioning it just inside the perimeter so it will sit snugly inside the box walls. -
Form the Feet:
Roll four small balls of clay and gently pinch them into tapered cones. These will become the corner feet. -
Attach the Feet:
Flip the box body upside down. Score and slip the four corners of the base, then firmly press the feet into place. Smooth the clay from the foot onto the base so they look integrated, not just stuck on. -
Refine the Lid Fit:
Once the body can stand on its own, test the lid. If the flange is too tight, shave it down slightly with a trimming tool. -
Round the Lid:
With the lid on the box, use a sponge or paddle to gently curve the top edges of the lid downward, creating a pillowy, slightly doomed profile rather than a flat, sharp square.
Texture twist
Before assembling, roll a piece of lace or a textured fabric into your soft slab. The glaze will break beautifully over the pattern, adding depth to the simple square shape
Step 4: Glazing & Finishing
-
Bisque Fire:
Allow the piece to dry slowly under plastic to prevent warping. Once bone dry, bisque fire the box and lid to your clay body’s recommended temperature (usually Cone 04). -
Wax the Contact Points:
Are you messy with glaze? Apply wax resist to the bottom of the feet and the rim where the lid meets the box to prevent them from fusing shut in the kiln. -
Apply Glaze:
Dip or brush your Speckled Blue Gloss glaze onto the piece. Aim for a medium thickness; too thin and it will be streaky, too thick and you lose the clay texture. -
Wipe Back Edges:
Using a damp sponge, gently wipe a tiny bit of glaze off the sharpest corners and rim. This allows the toasty clay color to peek through after firing, accentuating the form. -
Final Firing:
Glaze fire to maturity (likely around Cone 5 or 6). Ensure the lid is fired separately or heavily waxed to avoid sticking.
Now you have a perfect little vessel for trinkets or treasures that feels wonderful to hold
Texture-Stamped Slab Box with Patchwork Panels
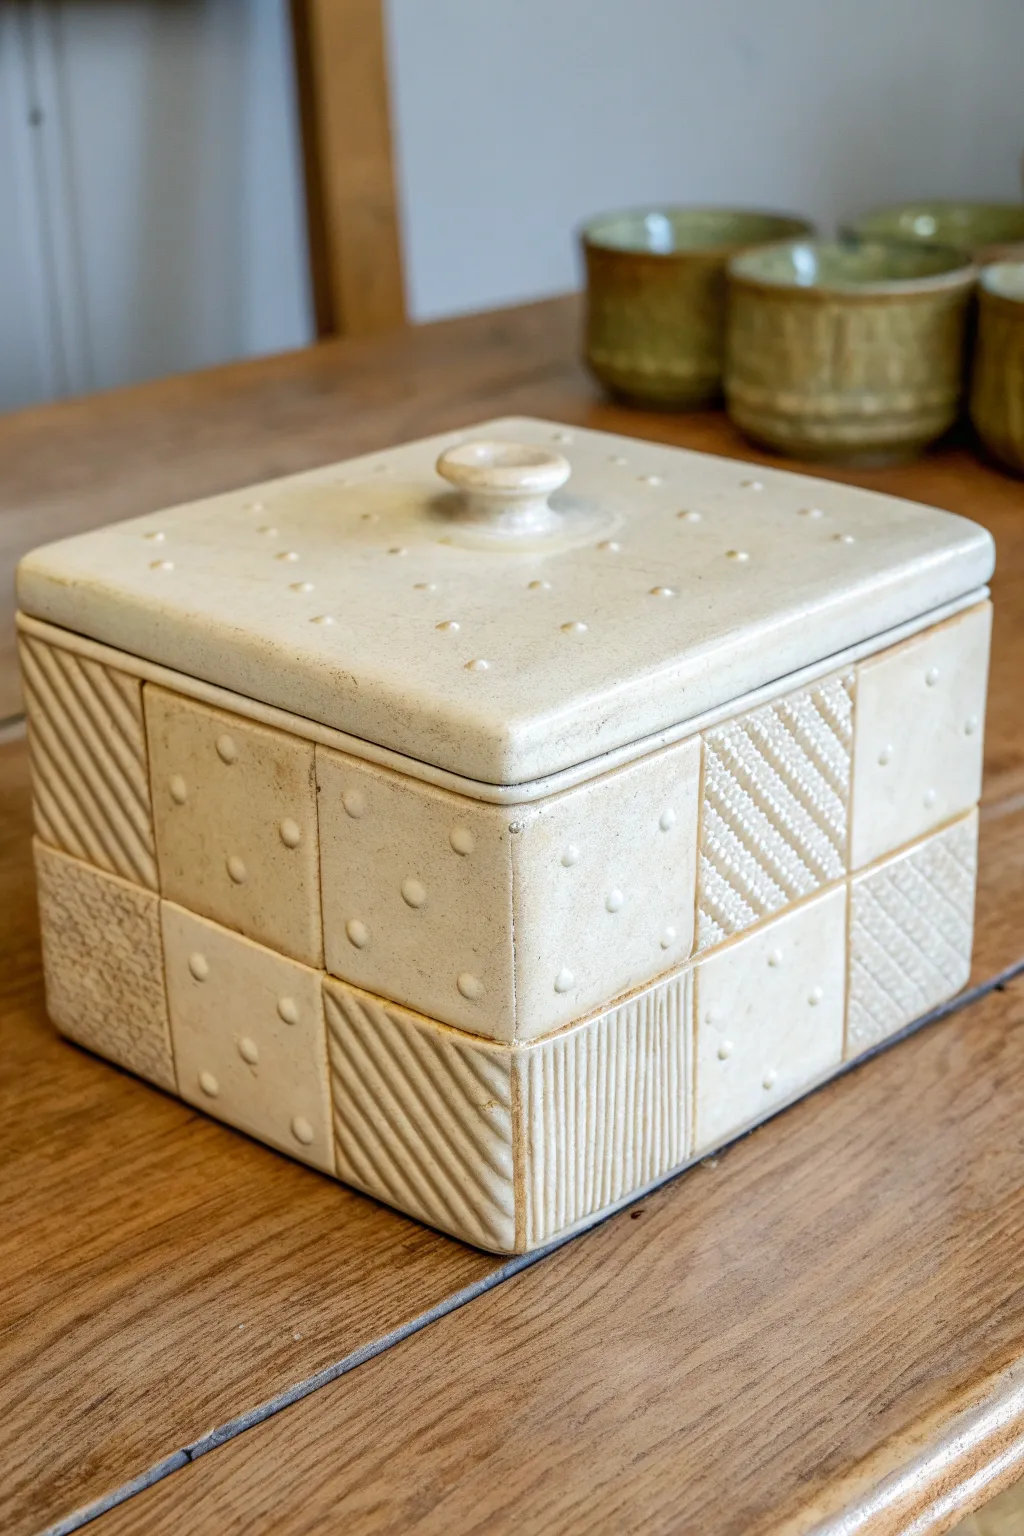
This charming ceramic lidded box mimics the cozy feel of a quilt with its distinct textured squares. By bringing together varied stamped patterns into a unified grid, you create a piece that feels both geometric and wonderfully tactile.
Detailed Instructions
Materials
- Light-colored stoneware clay body (smooth or with fine grog)
- Clay slab roller or heavy rolling pin and canvas
- Fettling knife
- Ruler
- Various texture tools (stamps, textured rolling pins, found objects like screws or fabric)
- Scoring tool (serrated rib or needle tool)
- Slip or vinegar
- Small wooden knob mold (optional) or extra clay for hand-building
- Creamy semi-translucent breaking glaze
- Kiln
Step 1: Creating the Textured Panels
-
Roll the Slabs:
Begin by rolling out a consistent slab of clay, approximately 1/4 to 3/8 inch thick. Compress the clay on both sides with a rib to align the particles and prevent warping later. -
Plan Your Patchwork:
Decide on a grid size for your box walls. For the look in the image, aim for a 3-square wide by 2-square tall ratio on each side. Lightly mark out a grid of 2-inch squares on your slab without cutting all the way through. -
Stamp the Textures:
Press different textures into each marked square. Alternate between diagonal lines, grids of dots, cross-hatching, and rougher stone-like textures. Leave a few squares smoother for visual breathing room. -
Cut the Walls:
Once textured, cut your four wall panels. If using 2-inch squares, each wall panel will be a rectangle containing six patterned squares (three wide, two high). Cut carefully along your grid lines. -
Bevel the Edges:
For clean corners, cut the vertical edges of your four wall panels at a 45-degree angle. This allows them to join seamlessly into a 90-degree corner.
Warp Watch
Slab boxes love to warp. To keep walls straight, flip your slabs frequently while rolling them out, and dry the assembled box slowly away from drafts.
Step 2: Assembling the Box
-
Join the Walls:
Score the beveled edges thoroughly and apply slip. Stand the walls up and press them together to form a square. Reinforce the inside corners with a thin coil of soft clay, smoothing it out so it’s invisible. -
Attach the Base:
Roll a plain slab for the floor of the box. Place your assembled square walls on top of this slab to trace the exact footprint. Cut the base slightly larger than the walls. -
Seal the Bottom:
Score and slip the bottom edge of your walls and the perimeter of the base slab. Join them firmly. I usually tap the walls gently with a paddle to ensure a tight seal and vertical alignment. -
Clean Up Seams:
Use a damp sponge or a soft rib to smooth the outside corners, being careful not to smudge your beautiful textures. Sharpen up any grid lines between the patchwork squares that might have softened during handling.
Step 3: Lid Construction
-
Measure the Lid:
Measure the outer dimensions of your box opening. Roll a new slab for the lid, cutting it to match the box’s outer dimensions exactly. -
Add the Flange:
To keep the lid from sliding off, you need a flange. Roll a coil or cut a strip of clay and attach it to the *underside* of the lid, inset about 1/4 inch from the edge so it fits snugly inside the box walls. -
Decorate the Lid Surface:
Texture the top of the lid to coordinate with the base. The example uses a simple, spaced-out dot pattern that radiates from the center, which prevents the design from looking too busy. -
Create the Knob:
Fashion a simple knob. You can throw a tiny form on the wheel or pinch a small amount of clay into a flared pedestal shape. Center it, score, slip, and attach it firmly to the middle of the lid. -
Dry Slowly:
Place the lid on the box with a piece of paper towel in between to prevent sticking. Wrap the whole piece loosely in plastic. Drying the lid *on* the box ensures they warp (or don’t warp) together for a perfect fit.
Stain Accent
To really pop that texture, apply an iron oxide wash or underglaze to the bisque, wipe it back with a sponge leaving color in the grooves, then apply a clear glaze.
Step 4: Glazing and Firing
-
The Bisque Fire:
Once bone dry, fire the piece to bisque temperature (usually cone 04 or 06). Sand away any sharp bits on the corners before glazing. -
Glaze Application:
Choose a glaze that ‘breaks’ over texture—meaning it gets thinner and darker on high points and pools thicker in crevices. Dip the box or brush on 2-3 even coats of a cream or oatmeal glaze. -
Wipe the Feet:
Ensure the bottom of the box and the rim where the lid sits are free of glaze. You can use wax resist before dipping or wipe it clean with a sponge. -
Final Fire:
Fire to your clay body’s maturity (likely cone 5 or 6). Allow the kiln to cool completely before removing your new treasure.
Now you have a beautifully textured container perfect for holding trinkets or simply admiring on a shelf.

TRACK YOUR CERAMIC JOURNEY
Capture glaze tests, firing details, and creative progress—all in one simple printable. Make your projects easier to repeat and improve.
Carved Sgraffito Geometric Slab Box
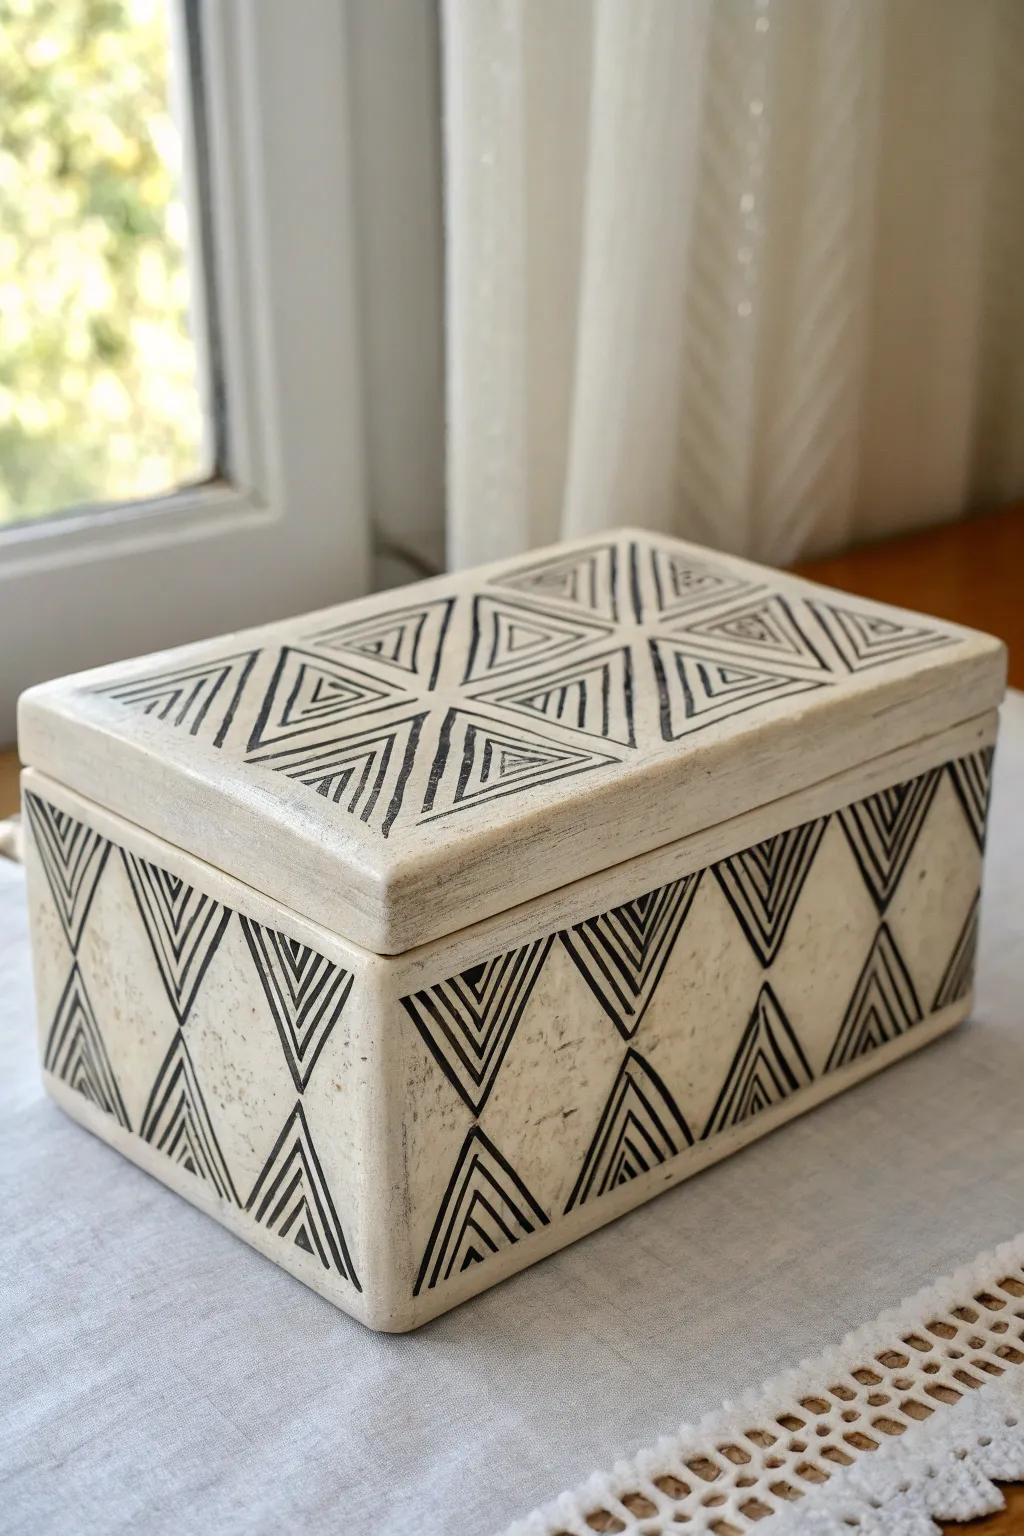
This elegant clay box combines precise slab construction with the ancient technique of sgraffito to create stunning high-contrast patterns. The creamy surface serves as a perfect canvas for the bold, black triangular motifs that give the piece a modern tribal aesthetic.
Step-by-Step Tutorial
Materials
- Light-colored stoneware clay or porcelain
- Rolling pin
- Guide strips or slab roller (approx. 1/4 inch or 6mm)
- Black underglaze
- Wide soft brush (hake or fan brush)
- Needle tool or fettling knife
- Sgraffito tool (like a small loop tool or stylus)
- Ruler or straight edge
- Slip or vinegar for joining
Step 1: Slab Construction
-
Roll the Slabs:
Begin by rolling out your clay into an even slab using a rolling pin and guide strips to ensure a uniform thickness of about 1/4 inch (6mm). Compress the clay on both sides with a rib to prevent warping later. -
Cut the Components:
Using a ruler and needle tool, cut out your rectangular pieces: a base, four walls, and a lid. For a box like the one pictured, cut the lid slightly larger than the base to account for an inner flange or simply to have a overhang. -
Bevel the Edges:
For clean, sharp corners, cut the joining edges of your walls at a 45-degree angle. This miter joint creates a stronger bond and a cleaner visual line than a butt joint. -
Score and Slip:
Ruggedly score the beveled edges and apply clay slip or vinegar. Assemble the walls onto the base, pressing firmness to ensure a tight seal without distorting the straight lines. -
Reinforce the Seams:
Roll a very thin coil of clay and press it into the bottom interior seams to reinforce the joinery. Smooth this out entirely so the inside is seamless. -
Add the Lid Flange:
To keep the lid in place, attach a smaller rectangle or strips of clay to the underside of your lid piece. This inner rim should fit snugly inside the box opening. -
Leather Hard Stage:
Allow the constructed box and lid to dry slowly under plastic until they reach a leather-hard state. The clay should be firm enough to hold its shape perfectly but soft enough to carve.
Step 2: Sgraffito Decoration
-
Clean the Surface:
Wipe the exterior surface gently with a slightly damp sponge to remove any dust or rough texture. A smooth canvas is crucial for sharp sgraffito lines. -
Apply Underglaze:
Using a soft wide brush, apply 2-3 coats of black underglaze to the exterior of the box and the top of the lid. Allow each coat to dry to the touch before applying the next to ensure solid coverage. -
Plan the Geometry:
Once the underglaze is dry but the clay is still leather-hard, lightly scratch a grid using a ruler to mark where your triangle sections will go. I find it helpful to mark the centers of each face first. -
Carve the Outlines:
Using a sgraffito tool with a fine tip, carve the main dividing lines that form the large triangles. Apply steady pressure to cut through the black layer and reveal the white clay body underneath. -
Create the Nested Triangles:
Inside each main triangle, carve a smaller triangle, leaving a band of black. Continue this pattern, creating concentric triangles getting smaller toward the center. -
Refine the Lines:
Go back over your carved lines to ensure they are clean and of consistent width. Brush away clay crumbs constantly gently with a soft, dry brush so they don’t get stuck in the wet black underglaze. -
Clean Up:
Check the corners where the patterns meet. The design should flow seamlessly from the lid to the box body if you aligned them, or simply complement each other as separate geometric fields. -
Bisque Fire:
Allow the piece to dry completely before bisque firing to cone 04 (or your clay’s specific temperature). Drying slowly is vital for slab boxes to avoid warping. -
Clear Glaze and Final Fire:
Apply a coat of clear transparent glaze over the entire piece to seal it and make the black pop against the creamy clay. Fire to maturity (likely cone 5/6) to finish your heirloom box.
Clean Lines Only
If your carving tool is dragging or chipping the black underglaze rather than cutting smoothly, your clay has gotten too dry. Lightly mist it and wrap in plastic for an hour to rehydrate before continuing.
Inverted Contrast
Try using white wax resist over the natural clay for the triangle lines, then painting black underglaze over the whole piece. After firing, the wax burns off to reveal perfectly crisp clay lines.
Place this striking box on a mantel or desk where the geometric patterns can catch the light and draw the eye
Illustrated Underglaze Story Slab Box
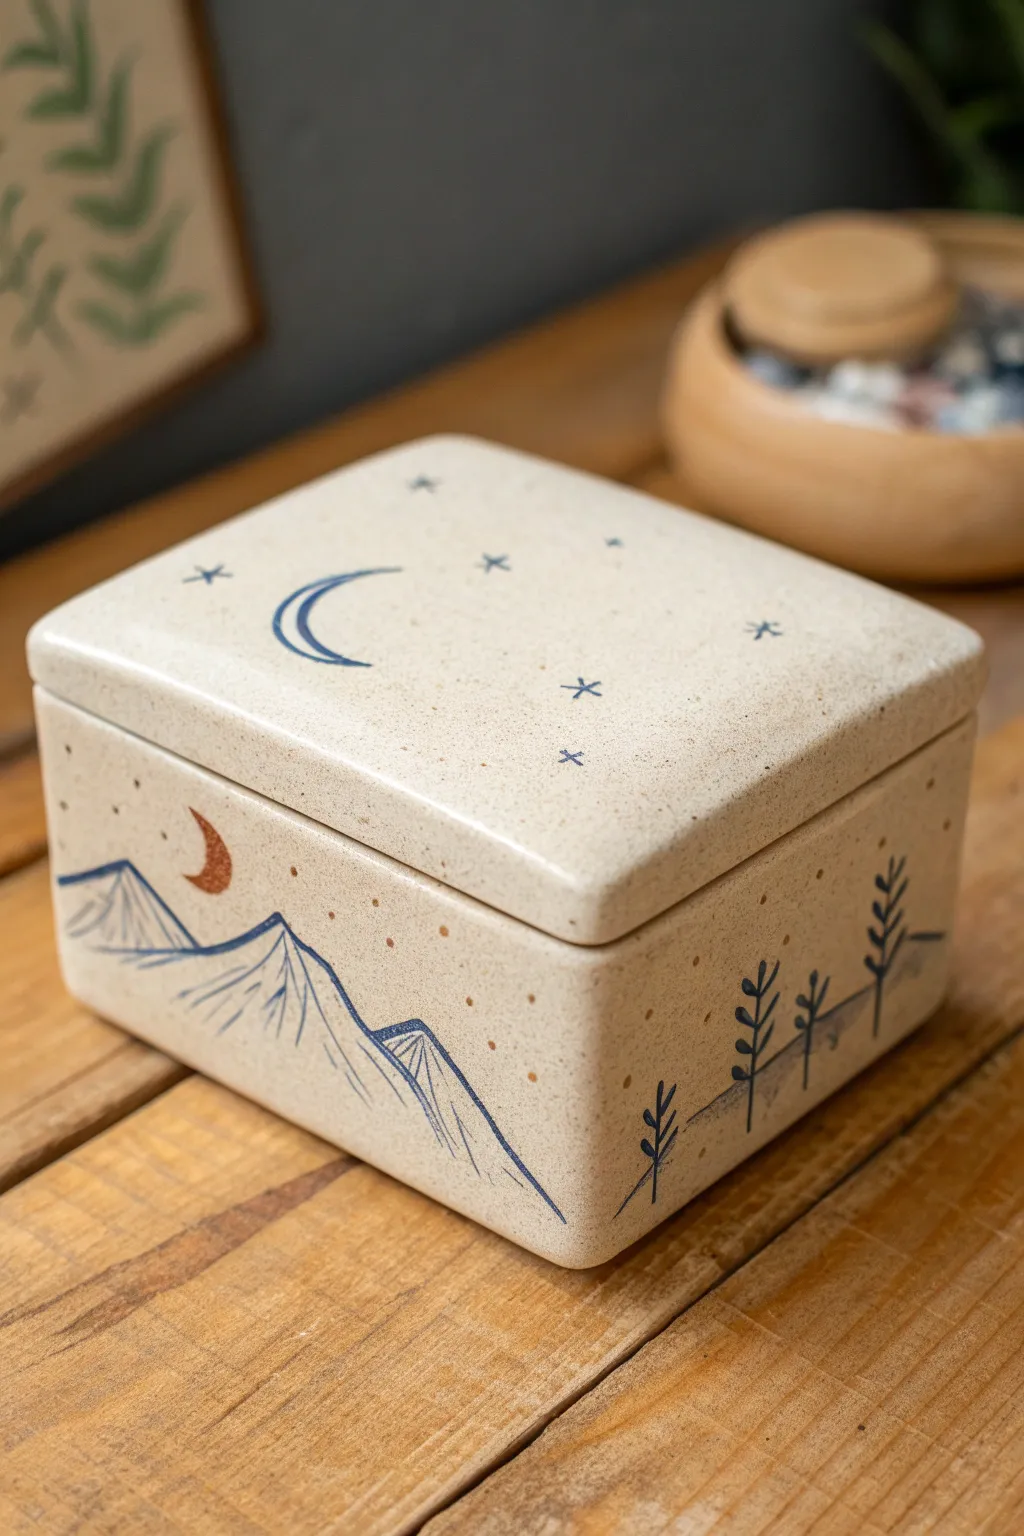
This charming rectangular lidded box combines simple slab construction with whimsical linear illustration. Featuring a serene mountain range and starry night sky in blue underglaze, it’s perfect for holding small treasures or jewelry.
Detailed Instructions
Materials
- Stoneware clay body (specs)
- Rolling pin with guide strips
- Fettling knife
- Scoring tool and slip
- Pottery sponge
- Blue underglaze (fine tip applicator or liner brush)
- Rust/Orange underglaze
- Clear transparent glaze
- Ruler and paper templates
- Small soft brush
Step 1: Slab Preparation & Cutting
-
Roll the Slabs:
Begin by rolling out your clay into an even slab, approximately 1/4 inch thick. Use guide strips or dowels on either side of your rolling pin to ensure consistent thickness throughout the entire sheet. -
Smooth the Surface:
Compress the clay on both sides using a rib tool. This step is crucial for preventing warping later and provides a nice, smooth canvas for your mountains. -
Create Templates:
Decide on your box dimensions. You’ll need a base, four walls, and a lid slightly larger than the base. I recommend a simple 4×6 inch base with 3-inch high walls for a balanced look. -
Cut the Pieces:
Using a fettling knife and a ruler, carefully cut out your base, four wall pieces, and lid. Let these pieces stiffen to a ‘soft leather-hard’ state so they can support their own weight.
Step 2: Box Assembly
-
Score and Slip:
Score the edges of your base slab and the bottom and vertical edges of your wall pieces. Apply a generous amount of slip to the scored areas. -
Attach the Walls:
Place the walls onto the base. Press them firmly together at the corners and along the bottom seam. Use a small coil of clay on the interior seams to reinforce the join, blending it smooth with a modeling tool. -
Refine the Lid:
For the lid, you want it to sit securely. Add a small flange (a strip of clay) on the underside of the lid, set in about 1/4 inch from the edge, so it fits inside the box walls. -
Smooth the Edges:
Before moving to decoration, refine all sharp edges with a damp sponge. Run your finger along the rim of the box and the lid to ensure a soft, rounded finish similar to the reference photo.
Clean Lines Pro-Tip
If your hand shakes while painting lines, rest your pinky finger on the dry clay surface to stabilize your hand. Using an underglaze pencil is also a great alternative for finer control.
Step 3: Painting the Landscape
-
Outline the Mountains:
Once the box is leather-hard, use a very fine liner brush or a needle-tip applicator bottle with blue underglaze. Draw the jagged outline of a mountain range that wraps continuously around the bottom half of the box walls. -
Add Mountain Texture:
Inside the mountain outlines, draw angled vertical lines to suggest cliffs and slopes. Vary the spacing and angle of these lines to create visual depth. -
Plant the Trees:
On the right side of the box (or wherever you prefer), draw stylized vertical branch structures. A simple central line with small curved V-shapes makes for charming, minimal pine trees. -
Add the Horizon:
Draw faint horizon lines behind the trees to ground them, adding a few stippled dots around the base of the trees to suggest texture or ground cover. -
Paint the Crescent Moon:
On the front left, above the mountains, paint a crescent moon using a rust or burnt orange underglaze. This pop of warm color contrasts beautifully with the blue linework. -
Detail the Sky:
Scatter tiny dots of the rust underglaze around the moon and mountains to represent distant stars.
Level Up: Sgraffito
For a different look, paint a solid block of blue underglaze where the mountains are, let it dry, and carve the white lines out to reveal the clay body beneath for a negative image.
Step 4: Lid Decoration & Finishing
-
Decorate the Lid:
Repeat the celestial theme on the lid. Paint a large blue crescent moon in the center and surround it with simple five-point stars and small asterisk shapes. -
Bisque Fire:
Allow the box to dry completely and slowly to prevent warping. Fire the piece to bisque temperature (usually Cone 04) to set the shape and underglaze. -
Glaze Application:
Dip the entire box and lid into a clear transparent glaze. This will seal the piece and make the speckles in your clay body pop, giving it that classic stoneware look. -
Final Firing:
Stilt the lid and box separately in the kiln and glaze fire to the maturity temperature of your clay (likely Cone 5 or 6).
Now you have a serene little keepsake box ready to hold your treasures
Mishima-Inspired Inlay Linework Slab Box
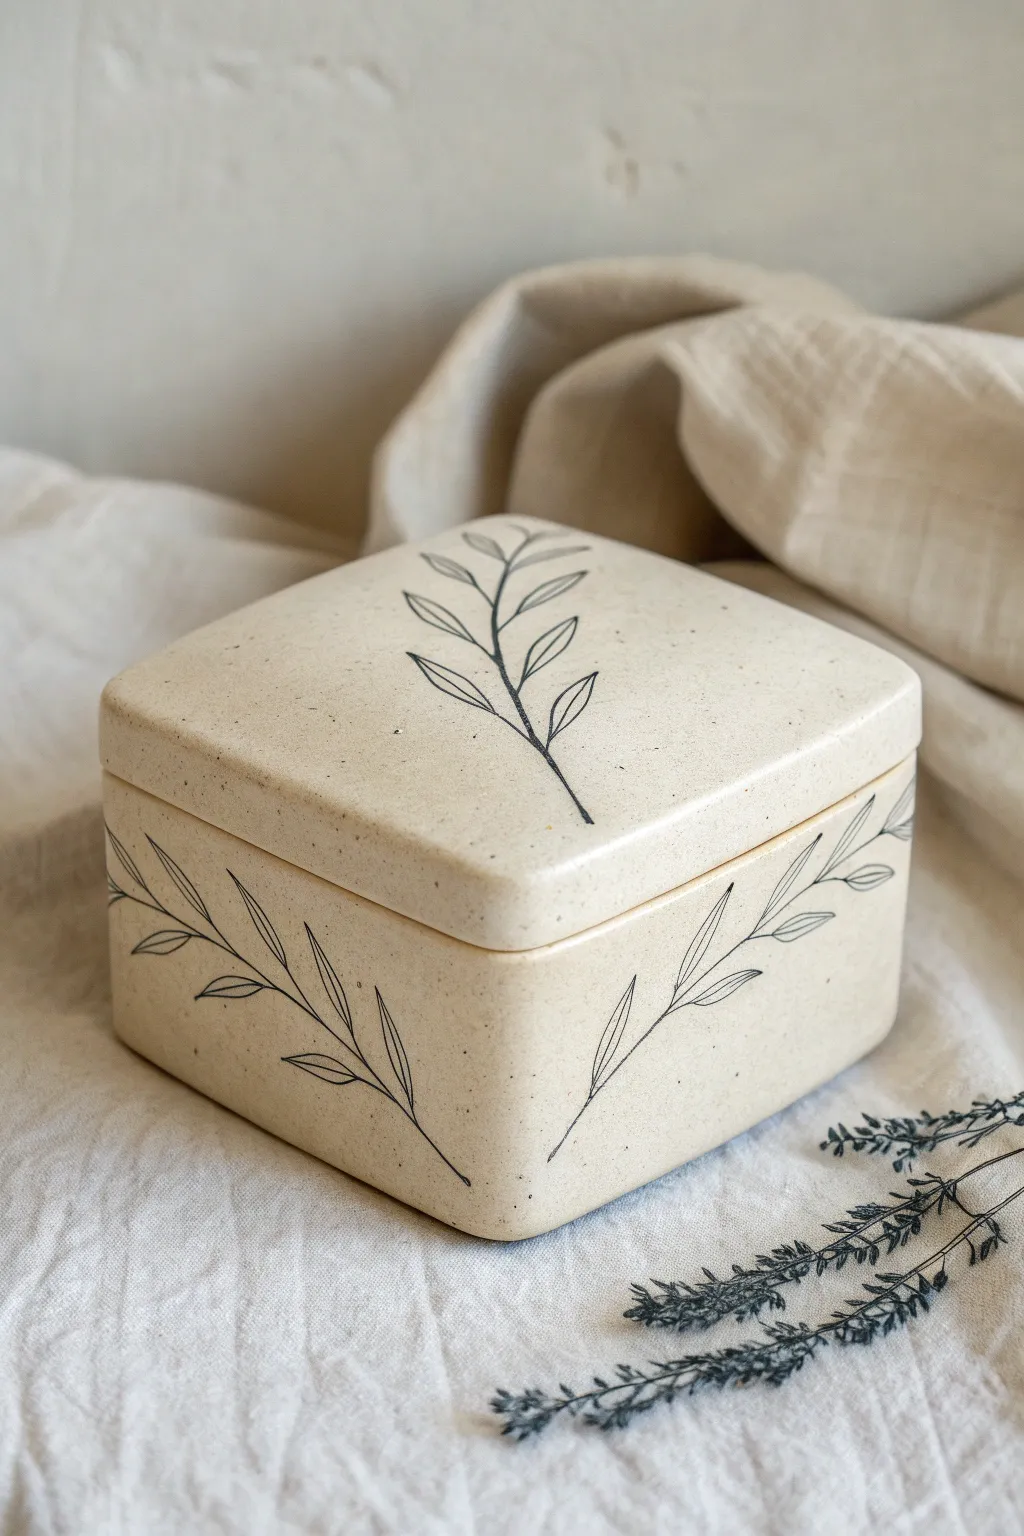
This elegant lidded box combines crisp slab construction with the ancient Korean technique of Mishima inlay. The finished piece features delicate, permanent black botanical illustrations embedded directly into a speckled cream clay body.
Detailed Instructions
Materials
- Speckled cream stoneware clay (e.g., Speckled Buff)
- Rolling pin and guide sticks (1/4 inch thick)
- Fettling knife or X-Acto blade
- Slab building templates (square)
- Scoring tool and slip
- Wax resist (liquid)
- Black underglaze or mason stain wash
- Carving tool (needle tool or very fine sgraffito tool)
- Metal rib
- Clear matte glaze
Step 1: Slab Construction
-
Roll out the clay:
Begin by wedging your clay to remove air bubbles, then roll it out into a consistent slab using 1/4 inch guide sticks. Compress the clay on both sides with a rib to align the particles and prevent warping later. -
Cut the components:
Using your paper templates, cut out a square base, four equal side walls, and a slightly larger square for the lid. For the lid flange, cut four narrow strips of clay. -
Dry to leather hard:
Let the slabs stiffen up to a sturdy leather-hard stage. They should be firm enough to hold their shape without slumping but still soft enough to score and slip. -
Assemble the box:
Score the edges of the base and the walls thoroughly. Apply slip, then press the walls onto the base and against each other. Reinforce the interior seams with shallow coils of clay, smoothing them flush. -
Construct the lid:
Flip the lid slab upside down. Attach the four flange strips about 1/4 inch inside the perimeter so they will fit snugly inside the box opening. Test the fit gently and adjust if necessary. -
Refine the form:
Once assembled, paddle the sides gently to ensure the box is perfectly square. Use a rasp/surform tool to round the sharp corners and edges for a softer, organic look similar to the reference photo.
Smudged Lines?
If your lines look blurry, you likely wiped too soon or with a sponge that was too wet. Let the underglaze dry until matte before wiping.
Step 2: Mishima Inlay Process
-
Apply wax resist:
Brush a distinct coat of wax resist over the leather-hard box and lid. I like to let this dry briefly until it’s no longer tacky; the wax protects the clay surface from staining during the next steps. -
Carve the design:
Using a needle tool, carve your botanical branch design directly through the wax and into the clay. Use light pressure to create thin, crisp channels. Plan your design to flow from the lid down onto the sides. -
Clean the burrs:
Carefully brush away any clay crumbs created by carving. Do not wipe with a wet sponge yet, as this might smear clay back into the lines. -
Fill the lines:
Paint black underglaze generously over the carved lines. Don’t worry about being neat; the goal is to get the color deep into the incisions. The wax resist will help repel the underglaze from the uncarved areas. -
Wipe away excess:
Once the underglaze has dried slightly, use a clean, slightly damp sponge to wipe the surface. The black will wipe off the waxed areas but stay trapped in the carved lines. -
Final scrape (optional):
For the crispest lines, gently scrape the surface with a metal rib to remove the wax layer and reveal the pristine clay contrast, or simply wait for the wax to burn off in the kiln.
Color Pop
Add a level of detail by painting faint watercolor-style underglaze washes inside the leaves before applying the clear glaze layer.
Step 3: Finishing
-
Bisque fire:
Allow the box to dry completely, slowly, and wrapped loosely in plastic to prevent warping. Fire to cone 04. -
Glaze application:
Dip or brush the entire piece in a clear matte glaze. This will seal the clay and heighten the contrast of the black lines without obscuring the clay’s natural speckles. -
Final firing:
Fire the piece to cone 6 (or the temperature appropriate for your clay body). Ensure the lid is fired *on* the box to keep the fit accurate, using wax on the contact points.
Enjoy using your beautifully understated box to store keepsakes or jewelry
Terrazzo Speckle Slab Box Using Colored Slip Dots
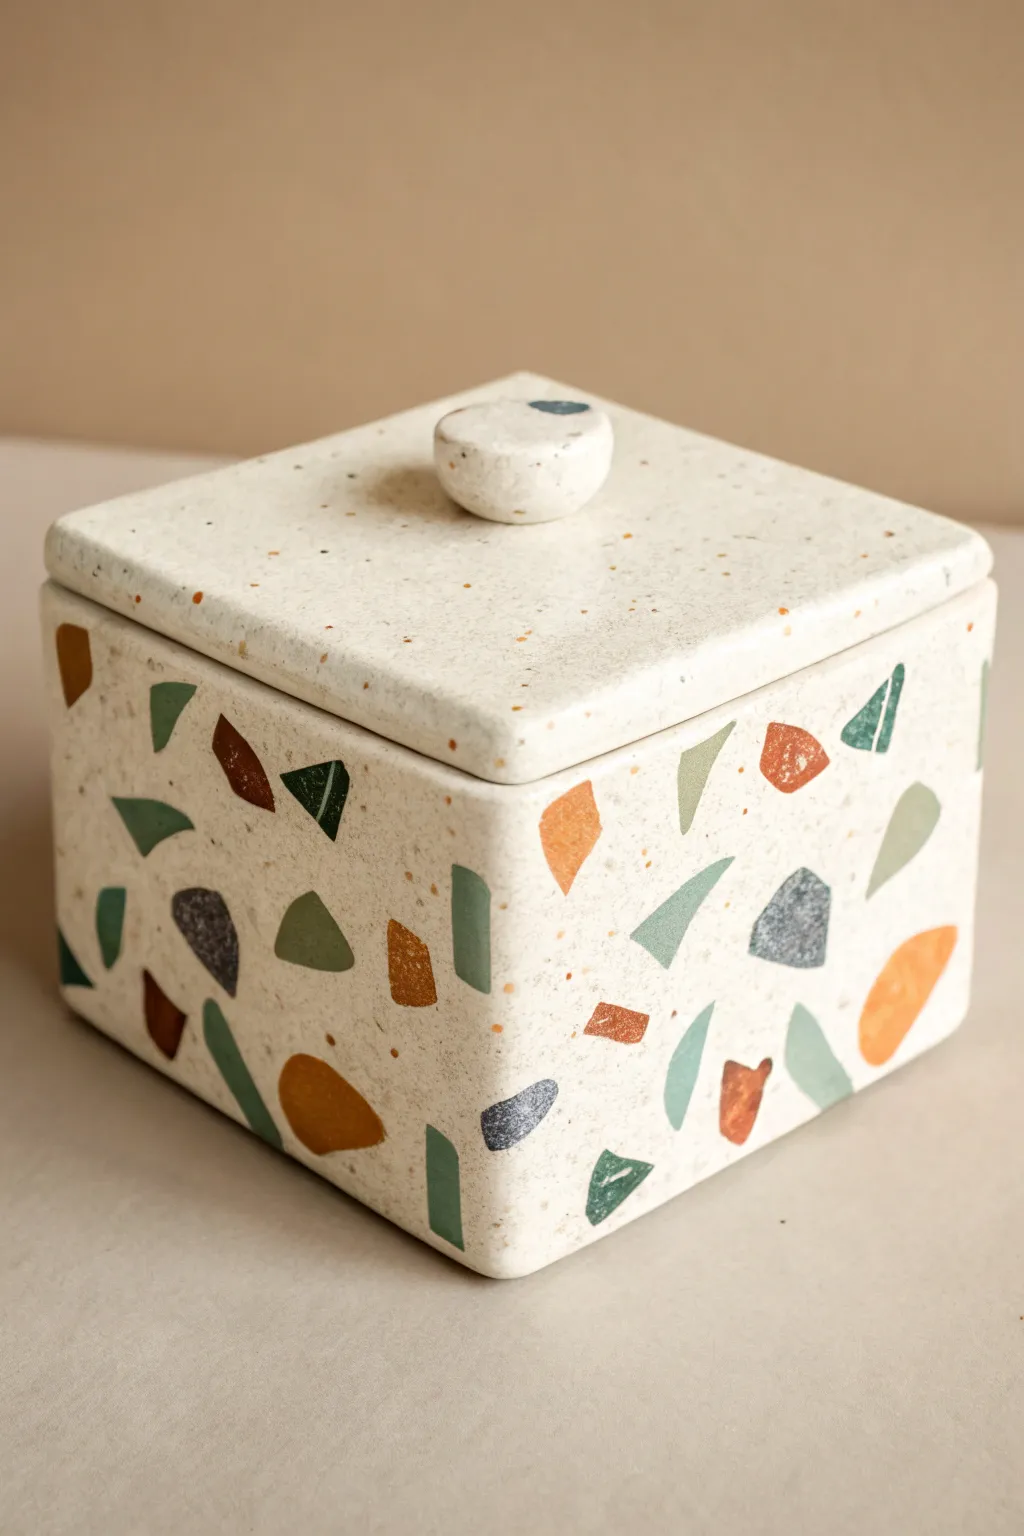
Create a sophisticated, modern storage solution with this square slab box featuring a faux-terrazzo finish. By pressing colored clay shards into your slabs, you’ll achieve a trendy speckled look with a smooth, matte surface.
Step-by-Step Guide
Materials
- White or light stoneware clay (as the base)
- Small amounts of colored clay or mason stains (green, orange, rust red, grey, black)
- Rolling pin
- Guide sticks or slats (approx. 1/4 inch thickness)
- Fettling knife or craft knife
- Rib tool (metal and rubber)
- scoring tool
- Slip (clay slurry)
- Ruler or square templates
- Sponge
Step 1: Preparing the Terrazzo Shards
-
Mix your colors:
If you don’t have pre-colored clay, knead mason stains into small balls of white clay. You’ll need an olive green, a burnt orange, a deep rust, a steel grey, and a charcoal black. -
Roll thin sheets:
Roll each colored ball into a very thin sheet, roughly the thickness of cardstock. The thinner they are, the easier they will integrate into your main slab. -
Create the shards:
Allow these thin sheets to firm up slightly to leather hard. Once firm, cut or break them into random geometric shapes—triangles, trapezoids, and jagged slivers varying from 1/4 inch to 1 inch in size.
Step 2: Forming the Main Slabs
-
Roll the base slab:
Roll out a large slab of your white base clay to a thickness slightly greater than 1/4 inch. It needs to remain thick enough to accept the inclusions without becoming too thin. -
Apply the pattern:
Scatter your prepared colored shards onto the white slab. Aim for a balanced, random distribution, leaving plenty of white space between them. Add tiny specks of the rust or orange clay for fine detail. -
Embed the design:
Cover the slab with a piece of canvas or a sheet of plastic to prevent sticking. Use your rolling pin to firmly press the colored shards into the white clay until the surface is completely flush and smooth. -
Smooth the surface:
Remove the covering and run a rib tool over the surface to compress the clay and ensure the colored pieces are fully integrated. -
Cut the components:
Using a ruler and knife, cut out your box pieces: one square for the base (e.g., 4×4 inches), four rectangular side walls, and one slightly larger square for the lid.
Clean Edges Trick
Wait until the clay is firm leather-hard before doing your final scraping with a metal kidney. This prevents smearing the colors and keeps the geometric edges sharp.
Step 3: Assembling the Box
-
Miter the edges:
For a sharp, professional corner, cut the vertical edges of your side walls at a 45-degree angle. This allows the pattern to wrap around the corner more naturally than a butt joint. -
Score and slip:
Aggressively score the mitered edges and the perimeter of the base. Apply a generous amount of slip. -
Construct the walls:
Attach the walls to the base and to each other. I like to use a square block of wood on the inside to help keep the walls perfectly upright while I press the joints together. -
Reinforce the interior:
Roll a very thin coil of white clay and press it into the interior corners of the box. Smooth it out with a modeling tool to strengthen the seams.
Warped Walls?
If your walls are bowing inward while drying, place a crumpled ball of newspaper inside the box to provide gentle support until the clay stiffens completely.
Step 4: Finishing Suggested
-
Refine the exterior:
Once the box is leather hard, use a metal rib to scrape away any excess slip or unevenness on the outside walls, revealing the sharp edges of your terrazzo shapes. -
Create the lid gallery:
Flip the lid upside down. Roll a small square slab slightly smaller than the box opening and attach it to the underside of the lid slab. This inner ‘stopper’ keeps the lid from sliding off. -
Make the knob:
Form a small, rounded pebble shape from your scrap terrazzo clay. Score and slip to attach it to the center of the lid. -
Final smoothing:
Wipe down the entire piece with a damp sponge to remove any sharp burrs or fingerprints. -
Firing:
Fire the piece according to your clay body’s instructions. A clear matte glaze is recommended to protect the surface while maintaining that authentic stone look.
Now you have a chic, custom slab box perfect for storing jewelry or trinkets on your vanity
Matchbox-Style Sliding-Lid Slab Box with Hidden Compartment
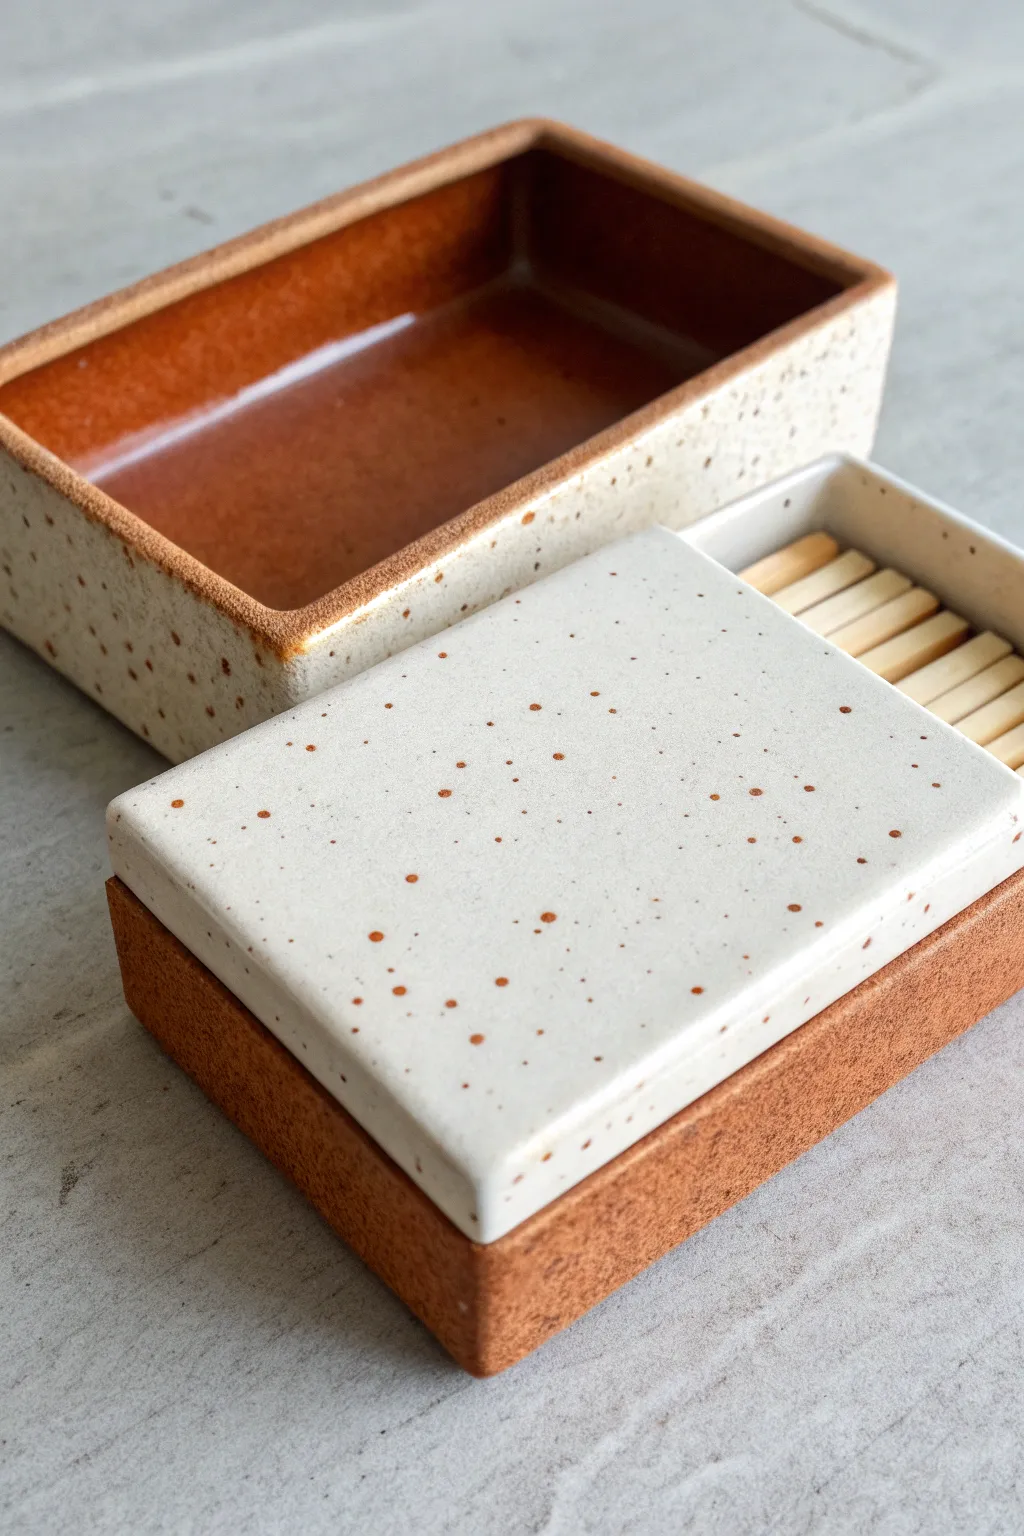
Recreate the charm of a vintage matchbox in durable ceramic form with this sliding-lid project. The design features a clever two-part construction with earthy exposed stoneware and a speckled cream glaze that feels wonderful to the touch.
Step-by-Step
Materials
- Stoneware clay (toasty brown or speckled body)
- Rolling pin with guide strips (approx. 1/4 inch)
- Fettling knife or needle tool
- Serrated rib or scoring tool
- Slip (clay mixed with water)
- Ruler
- Bisque mold or simple wooden block (optional, for shape)
- Speckled cream or ‘oatmeal’ glaze
- Glossy amber or brown glaze
- Wax resist
- Kiln
Step 1: Slab Preparation
-
Roll the clay:
Begin by wedging your dark stoneware clay thoroughly. Roll out a consistent slab approximately 1/4 inch thick. Compress the slab on both sides with a rib to prevent warping later. -
Cut the components:
Using a ruler and fettling knife, cut a long rectangular strip for the box walls, a rectangular base slightly larger than your intended box size, and a separate rectangle for the lid. -
Dry to leather hard:
Let all your slab pieces set up until they are leather hard. They need to be stiff enough to hold their shape without slumping but soft enough to join.
Shrinkage Rates
Make the lid 1-2mm smaller than the track gap. Clay shrinks, but sometimes lids warp. A slightly looser fit is safer than a lid that won’t slide at all.
Step 2: Box Construction
-
Measure and bevel:
Measure your wall strip against your base. Cut 45-degree angles at the ends where they will join to form the rectangle corners. This creates a stronger, cleaner joint. -
Score and slip the walls:
Score the edges of the base and the bottom of the wall strip. Apply slip generously. Press the walls onto the base. I like to reinforce the inside seams with a very thin coil of clay, blending it smooth. -
Create the sliding track:
This is the crucial step. You need a lip for the lid to slide on. Attach small, square strips of clay to the *interior* top edge of the two long walls, creating a recessed shelf. -
Refine the lid fit:
Test your lid slab. It should rest on those interior rails you just made. Trim it carefully so it slides smoothly but isn’t too loose. Remember, the clay will shrink, so keep tolerances tight but movable. -
Notch the opening:
On one of the short walls, cut a notch or lower the wall height slightly so the lid can slide in and out of the track without obstruction. -
Smooth everything:
Use a damp sponge to smooth all sharp edges and corners. Pay special attention to the sliding mechanism; any burrs here will cause friction later.
Step 3: Glazing and Finishing
-
Bisque fire:
Once bone dry, fire the piece to bisque temperature (usually cone 04 or 06) to prepare it for glazing. -
Wax resist application:
Apply wax resist carefully to the sliding tracks, the bottom of the lid edges, and the exterior base of the box if you want that raw clay look shown in the darker box. -
Interior glazing:
Pour the glossy amber/brown glaze into the interior of the box. Swirl it to coat the bottom and sides, then pour out the excess. Wipe any drips immediately. -
Exterior glazing:
Dip the lid and the exterior walls (if creating the light version) into the speckled cream glaze. For the darker version shown, leave the exterior raw or use a light iron wash. -
Check the mechanics:
Ensure absolutely no glaze is on the contact points where the lid slides. Even a drop will fuse the lid shut during firing. -
Glaze fire:
Fire the pieces separately in the kiln. Do not fire with the lid on the box, or they will likely stick together. -
Final assembly:
Once cool, slide the lid into the tracks. If it’s slightly tight, you can sand the clay edges slightly with wet sandpaper.
Add a Striker
Glue a sheet of strike-anywhere sandpaper or a cut strip from a matchbox to the bottom or side of your ceramic box to make it fully functional.
Enjoy using your sleek new matchbox to light your favorite candles