
Whenever I want a project that feels both relaxing and super versatile, I reach for clay slabs—flat sheets that can turn into almost anything with a few smart cuts and folds. Here are my favorite slab building ideas, starting with the classics and moving into the fun, studio-wow stuff.
Classic Round Slab Plates
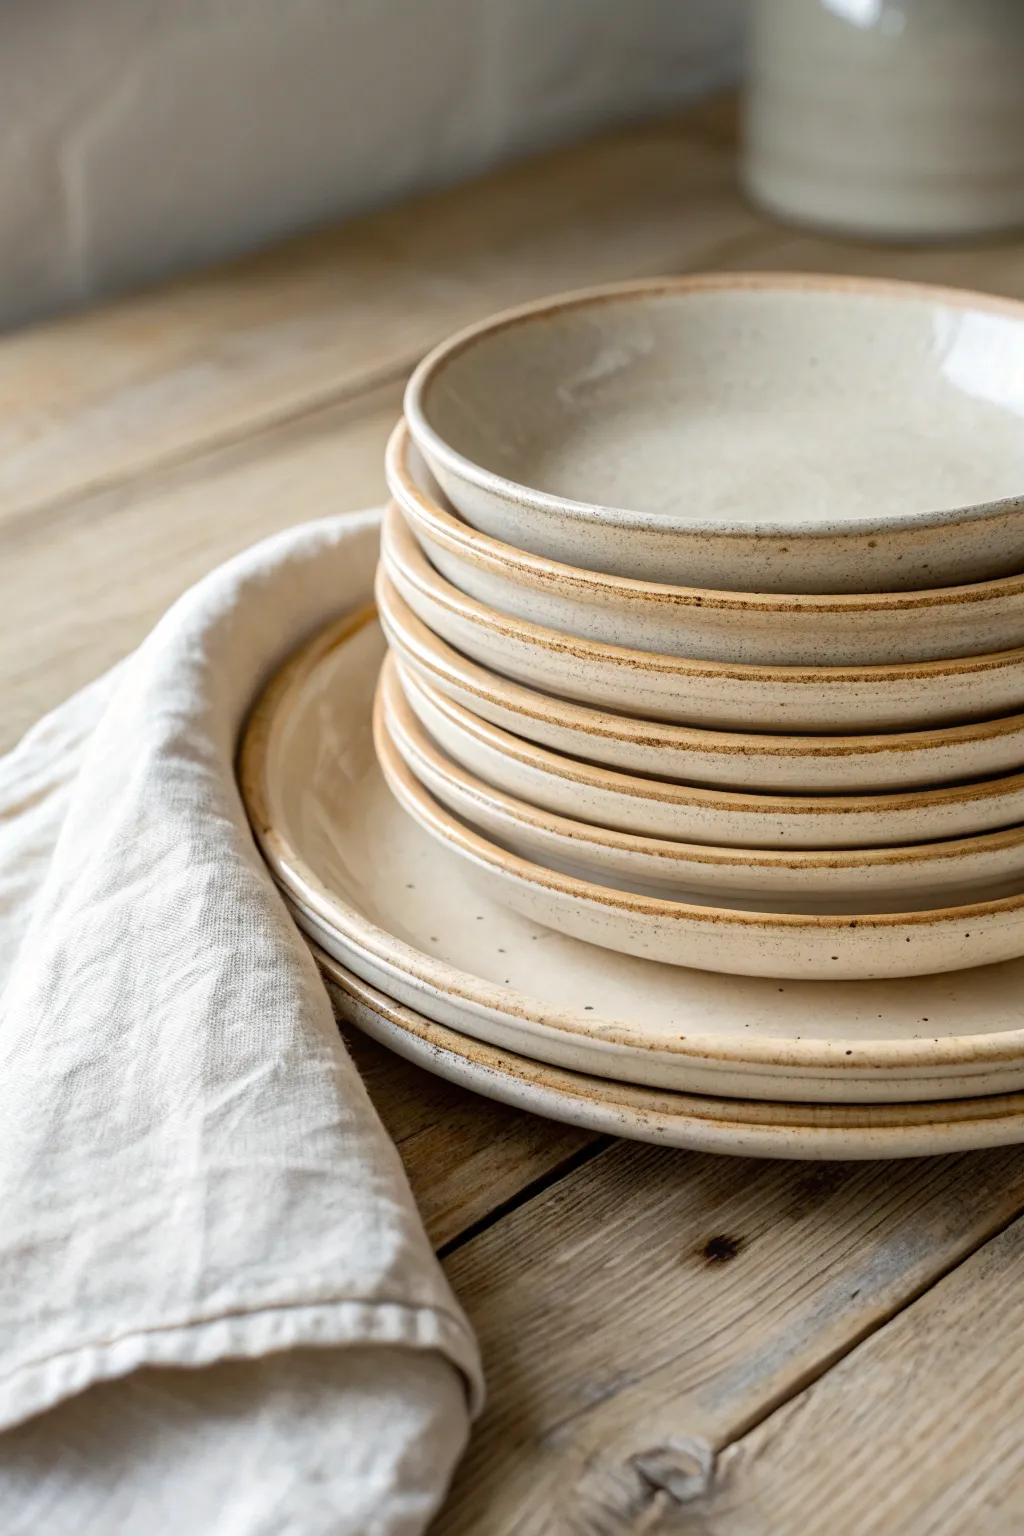
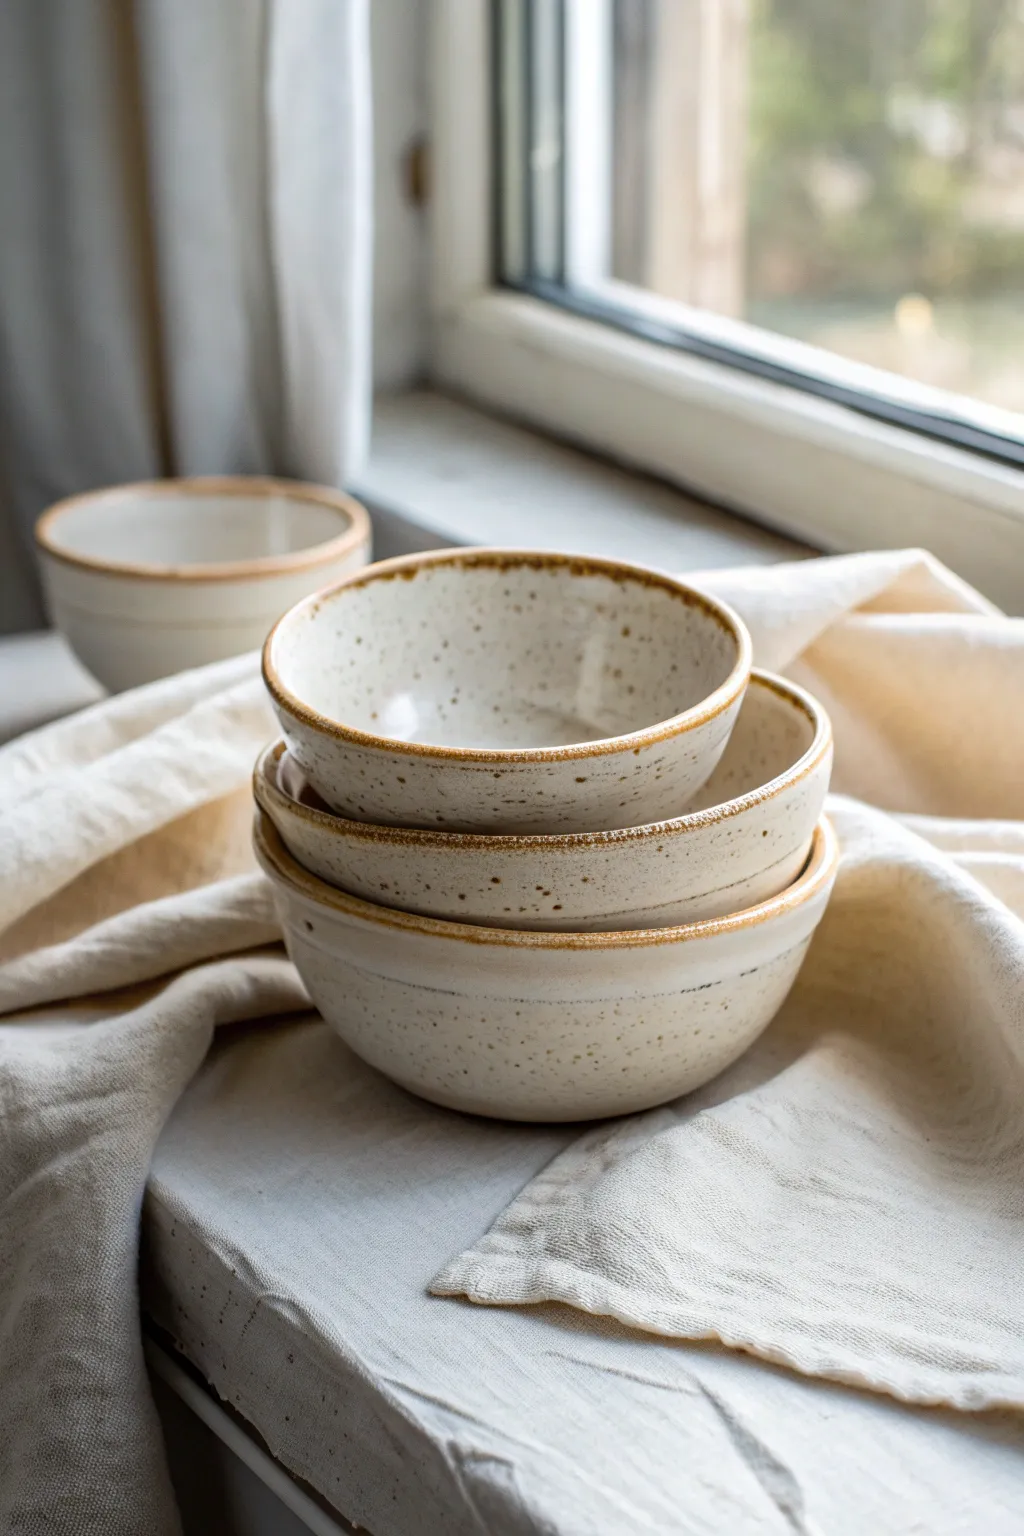
Embrace the effortless charm of organic pottery with this tutorial on creating a cohesive set of slab-built plates and shallow bowls. With their creamy speckled glaze and distinctively toasted edges, these pieces bring a warm, handcrafted aesthetic to any table setting.
How-To Guide
Materials
- Speckled stoneware clay (mid-fire)
- Wide rolling pin or slab roller
- Wooden guide strips (1/4 inch thick)
- GR Pottery Forms (round, various sizes)
- Rubber kidney rib
- Needle tool
- Fettling knife
- Surform tool (cheese grater style)
- Sponge
- Satin white or cream dipping glaze
- Weighted bag or sandbag
Step 1: Preparing the Slabs
-
Wedge the clay:
Start by thoroughly wedging your speckled stoneware clay. This removes air bubbles and ensures the clay particles are aligned, which helps prevent warping later on. -
Roll out the slab:
Place the clay between two 1/4 inch wooden guide strips. Using a rolling pin, roll the clay out smoothly. Turn the slab over occasionally to ensure even compression on both sides. -
Competiton and smoothing:
Take a rubber kidney rib and run it firmly over the entire surface of the slab on both sides. This aligns the clay platelets, creating a stronger final piece and a canvas free of canvas texture.
Warping Woes?
If plates warp in the kiln, ensure you compress the slab thoroughly on both sides before cutting. Slow, even drying away from drafts is also critical for flat wares.
Step 2: Forming the Plates
-
Cut the shape:
Place your chosen form template or GR Pottery Form onto the slab. Using a needle tool, cut a circle about 1.5 to 2 inches wider than the form itself to account for the rim height. -
Placement on the form:
Place your wooden form on a banding wheel. Gently drape the clay circle over the form. I find it helpful to start pressing from the center outward to avoid trapping air. -
Shape the rim:
Using the rubber rib or a damp sponge, gently press the clay down the sides of the form. Do not drag the tool; instead, compress the clay against the wood to define the transition from the base to the rim. -
Refine the edge:
Hold a sponge against the spinning edge (if using a wheel) or walk around the banding wheel to smooth the outer rim. Slight irregularities are okay and add to the organic look. -
Weighted drying:
To ensure flat bottoms, place a small weighted bag or sandbag in the center of the upturned plate while it stiffens on the form. This prevents the ‘memory’ of the clay from pulling the bottom up.
Step 3: Finishing and Glazing
-
Leather hard cleanup:
Once the clay is leather hard (stiff but allows a fingernail mark), remove it from the form. Use a surform tool to tidy up the bottom edge if it feels sharp or uneven. -
Sponging the rim:
Run a damp sponge firmly over the rim one last time to expose the grit of the speckled clay slightly, which enhances the toasted look after firing. -
Bisque fire:
Let the plates dry completely, covered loosely with plastic for the first day to equalize moisture, then uncovered. Bisque fire according to your clay body’s schedule (usually Cone 04). -
Wax the foot:
Apply wax resist to the bottom foot of your bisque-fired plate to prevent glaze from sticking to the kiln shelf. -
Glazing technique:
Dip the plate into a satin white or cream glaze. Shake it gently to remove excess drips. You want the glaze thin enough that the iron speckles in the clay will bleed through. -
Wiping the rim:
Here is the crucial step for this look: Immediately after dipping, use a clean, damp sponge to wipe the glaze off the very edge of the rim. This exposes the raw clay. -
Final wipe:
Do a second pass on the rim with a clean side of the sponge to ensure a crisp line where the glaze ends and the raw clay begins. -
Glaze fire:
Fire the pieces to maturity (likely Cone 5 or 6). The exposed clay rim will toast to a warm brown, contrasting beautifully with the creamy interior.
Rim Enhancement
For a darker rim, brush a very light wash of iron oxide or red iron stain onto the exposed rim edge before the final firing creates a rich, rusty contrast.
Enjoy styling your table with these beautiful, stackable handmade ceramics


Rectangular Serving Tray
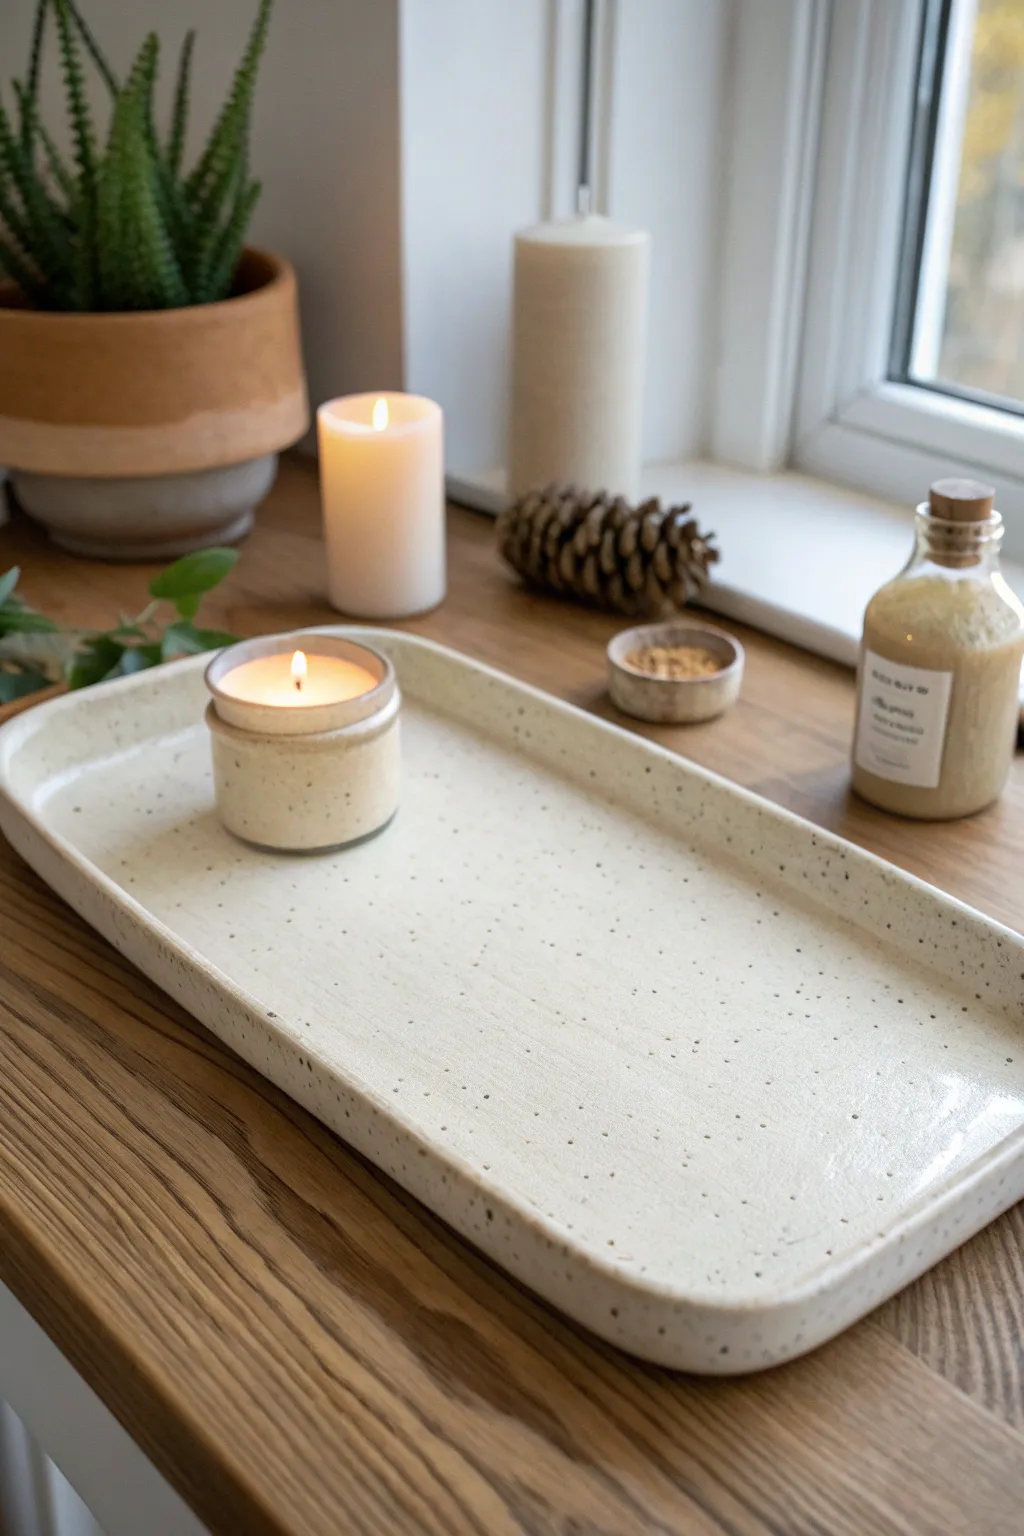
This elegant rectangular tray combines minimalist design with rustic charm, featuring a creamy white glaze over speckled stoneware clay. Its gently curved rim and generous surface area make it perfect for organizing candles or serving simple appetizers.
Step-by-Step
Materials
- Speckled stoneware clay (mid-fire)
- Rolling pin
- Two minimal thickness slats (1/4 inch)
- Rectangular paper template (approx. 14×6 inches)
- Needle tool or fettling knife
- Rib tool (rubber or kidney)
- Sponge
- Ware board
- Weighted bag or sandbag (optional)
- Creamy white glaze (glossy or satin finish)
- Kiln
Step 1: Preparing the Slab
-
Wedging:
Begin by thoroughly wedging about 3-4 pounds of speckled stoneware clay to remove any air bubbles and ensure an even consistency. -
Flattening:
Pat the clay into a rough rectangular block with your hands before you start rolling creating a shape that mimics your final goal. -
Rolling:
Place your thickness slats on either side of the clay. Roll the clay out into a long slab, rolling from the center outwards to ensure even compression. Keep rolling until the rolling pin rests on the slats. -
Smoothing:
Take a rubber rib tool and firmly compress the surface of the slab in all directions. This aligns the clay particles and prevents warping later, while also creating that smooth canvas for the speckles to shine through. -
Flipping:
Carefully flip the slab over and compress the other side with the rib tool just as you did the first.
Compression is Key
Flat trays are notorious for warping. Spend extra time compressing the slab with a rib on both sides before cutting to align particles and keep it flat.
Step 2: Shaping the Tray
-
Cutting:
Place your rectangular paper template onto the smooth slab. Using a needle tool or fettling knife, cut vertically around the template to get clean, sharp edges. -
Softening Edges:
Run a damp sponge or your finger gently along the sharp cut edges to round them off slightly. This prevents chipping after firing and gives the piece a more finished look. -
Lifting the Rim:
Carefully lift the outer 1/2 inch of the slab’s edge upward. You don’t need to add a coil; just gently coax the existing slab edge up with your fingers to create a shallow wall. -
Refining the Curve:
Support the outside of the wall with one hand while smoothing the inside curve with a damp sponge or your thumb, ensuring a seamless transition from the flat base to the raised rim. -
Corner Detail:
At the four corners, squash the excess clay slightly together and smooth it downward to create a soft, rounded corner rather than a sharp boxy angle.
Warped Bottom?
If the center pops up during drying, flip the leather-hard tray upside down onto a flat board and place a heavy book on top to flatten it back out.
Step 3: Drying and Finishing
-
Slow Drying:
Place the tray on a ware board. To prevent the long flat bottom from bowing upward, I like to place a small weighted sandbag in the center while it dries to leather hard. -
Bisque Fire:
Once the tray is bone dry, fire it in the kiln to your clay body’s bisque temperature (usually cone 04 or 06). -
Waxing:
Apply wax resist to the bottom foot of the tray to prevent glaze from adhering to the underside. -
Glazing:
Dip the tray or brush on three even coats of a creamy white semi-transparent glaze. This specific opacity is key—it covers the clay color but allows the natural iron speckles to bleed through. -
Glaze Firing:
Fire the piece again to the maturity temperature of your clay and glaze (likely cone 5 or 6 for stoneware). Allow the kiln to cool completely before removing.
Once cooled, your tray is ready to bring a touch of handmade calm to your coffee table or vanity


Slump-Mold Snack Bowls
Create a charming set of nesting bowls featuring a rustic, speckled cream glaze and warm toasted rims. These simple slab-built forms are perfect for serving snacks or organizing trinkets on a windowsill.
Detailed Instructions
Materials
- Speckled buff stoneware clay
- Bisque bowl molds (or plaster slump molds)
- Canvas or slab mat
- Rolling pin with 1/4 inch thickness strips
- Fettling knife
- Flexible metal rib
- Soft yellow sponge
- Rubber kidney tool
- Semi-matte cream or white glaze
- Small paintbrush (for rim)
- Iron oxide wash (optional)
Step 1: Preparing the Slabs
-
Wedge the clay:
Begin by thoroughly wedging your speckled buff clay to remove air bubbles and ensure particle alignment. A well-wedged ball of clay is easier to roll out evenly. -
Roll out the slab:
Place your clay on a canvas sheet or slab mat. Using thickness strips or guides set to roughly 1/4 inch, roll the clay out into a smooth, even sheet. Roll in multiple directions to compress the clay platelets. -
Smooth the surface:
Before cutting, take a flexible metal rib and compress the surface of the slab on both sides. This removing the canvas texture and prevents warping later during the firing process.
Pro Tip: Better Rims
When trimming excess clay off the mold, hold your needle tool at slight angle inward. This creates a slightly beveled edge that looks much more professional once smoothed.
Step 2: Forming the Bowls
-
Drape over the mold:
Gently lift your smooth slab and drape it over your chosen slump mold. I like to let gravity do the initial work, allowing the clay to naturally settle against the curve. -
Compress to shape:
Starting from the center bottom and working your way out in a spiral motion, press the clay firmly against the mold using a soft rubber kidney or a damp sponge. Ensure there are no air pockets trapped between the clay and the mold. -
Trim the excess:
Once the clay is snug against the mold, use a fettling knife held parallel to the table surface (or the mold’s rim) to cut away the excess clay skirt. This establishes the rough edge of your bowl. -
Refine the rim:
While the clay is still on the mold, use a damp sponge or chamois cloth to compress and round the sharp cut edge. A well-compressed rim is less likely to chip after firing. -
Stiffen the clay:
Allow the clay to dry to a leather-hard state while still on the mold. This usually takes a few hours depending on humidity; the clay should be firm enough to hold its shape but not bone dry. -
Release from mold:
Carefully remove the bowl from the mold. If it sticks, gently tap the mold upside down. Flip the bowl right-side up and check the interior for any imperfections.
Troubleshooting: Warping
If your bowls warp into ovals, you likely removed them from the mold too soon. Leave them on the mold until they are truly leather hard and can support their own weight.
Step 3: Detailing and Firing
-
Shape the foot (Optional):
If you want a defined bottom like the bowls in the image, you can gently paddle the base flat or add a small coil ring. For a simple rounded bottom, just smooth the exterior with a rib. -
Final smoothing:
Go over the entire piece with a barely damp sponge to remove any fingerprints or coarse texture, allowing the natural speckles of the clay body to remain visible. -
Bisque fire:
Let the bowls dry completely to bone dry. Fire them in a kiln to bisque temperature (usually cone 04 or 06) to prepare them for glazing.
Step 4: Glazing
-
Wax the bottom:
Apply wax resist to the foot or bottom of the bowl to prevent glaze from adhering where it touches the kiln shelf. -
Apply base glaze:
Dip the bowl into a semi-matte cream or white glaze. A dipping application ensures the smooth, uniform coat seen in the photo. Shake gently to remove drips. -
Clean the rim:
While the glaze is still powdery but dry, take a damp sponge and carefully wipe the glaze off just the very edge of the rim. This exposes the raw clay body. -
Accent the rim:
To enhance the toasted look, lightly brush a very watered-down iron oxide wash onto the exposed clay rim, or simply leave it bare if your clay body fires effectively dark. -
Glaze fire:
Fire the bowls to the maturity temperature of your clay and glaze (typically cone 5 or 6 for stoneware). This final firing brings out the iron speckles through the creamy glaze.
Stack your finished set by the window to let natural light highlight those beautiful speckled details


Straight-Sided Slab Mug
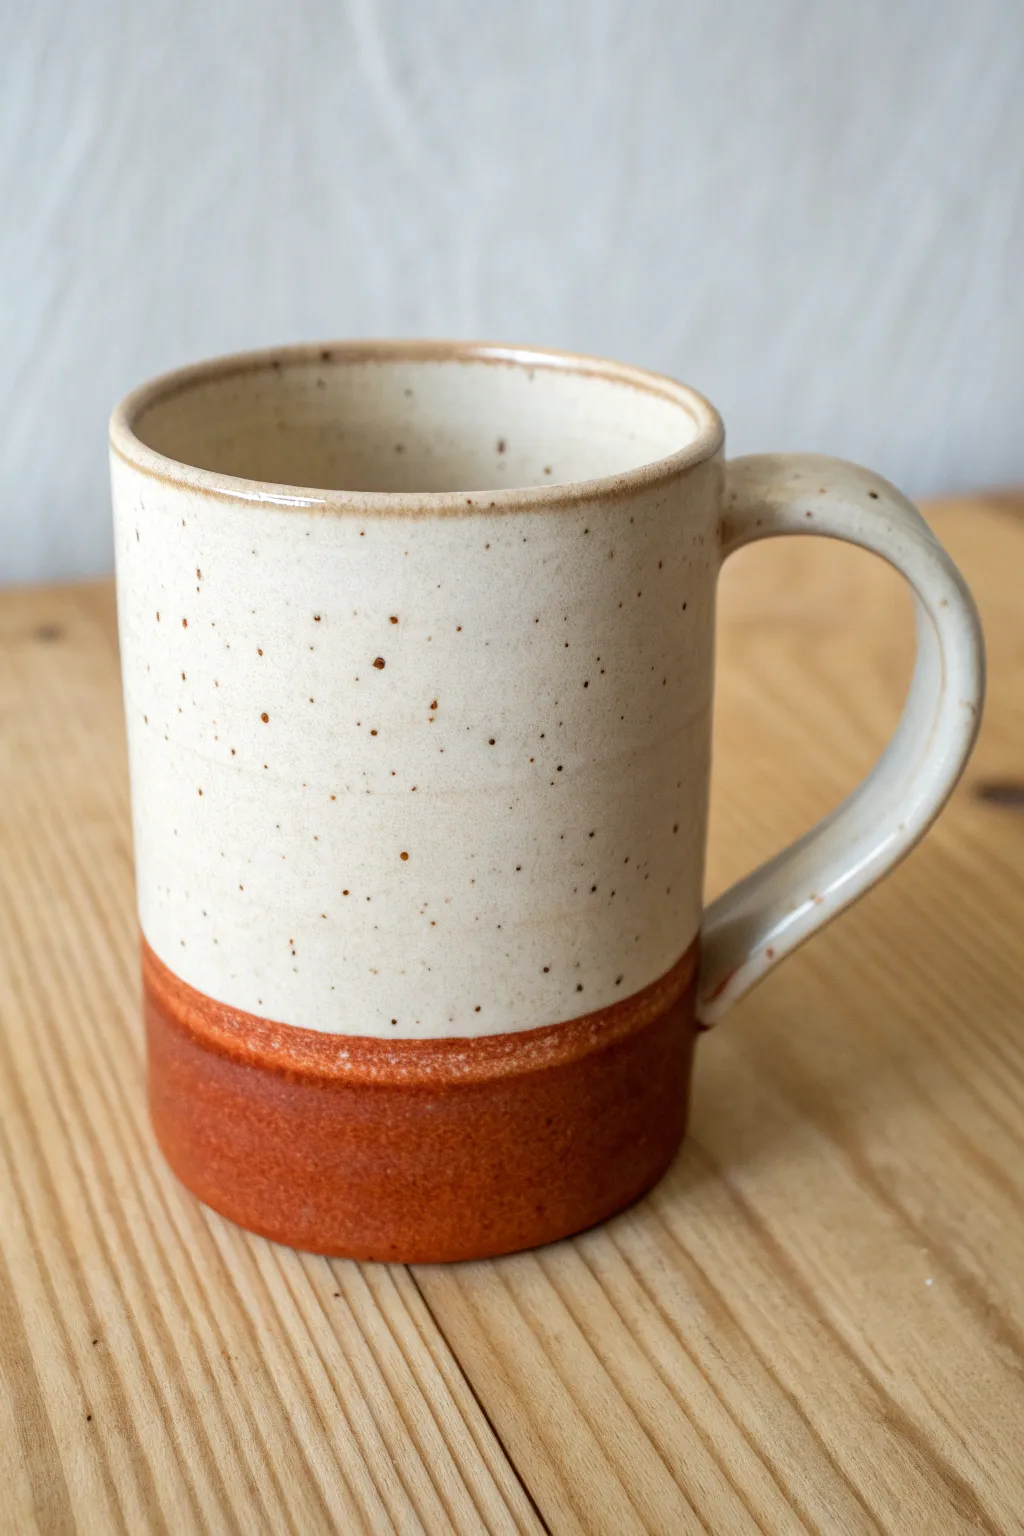
This charming, straight-sided mug features a warm, earthy aesthetic achieved by combining a speckled clay body with a contrasting dipped base. The exposed raw clay at the bottom adds a lovely textural element against the smooth, creamy glaze on the upper section.
Step-by-Step Guide
Materials
- Speckled stoneware clay (mid-fire)
- Rolling pin
- Canvas working surface or slab mat
- Two 1/4-inch wooden thickness strips
- Needle tool or fettling knife
- Flexible metal rib
- Serrated rib or scoring tool
- Slip (clay mixed with water)
- Ruler
- Cylindrical form (like a PVC pipe or rolling pin) for shaping
- Sponge
- Translucent cream or white glaze
- Deep rust or teracotta-colored underglaze (optional, if clay isn’t naturally red)
Step 1: Creating the Slab Body
-
Roll the Slab:
Begin by wedging your speckled stoneware clay to remove air bubbles. Place the clay on your canvas between the two thickness strips. Roll out an even slab using the rolling pin until the clay is perfectly flat and consistent with the guide strips. -
Smooth the Surface:
Before cutting, take your flexible metal rib and compress the slab on both sides. This aligns the clay particles to prevent warping later and erases the canvas texture for a cleaner finish. -
Measure and Cut the Rectangle:
Decide on the height and circumference of your mug. For a standard mug, a rectangle approximately 4.5 inches tall by 10-11 inches long works well. Use your ruler and needle tool to cut a precise rectangle. -
Bevel the Edges:
Cut a 45-degree angle (bevel) on the two shorter ends of the rectangle. Ensure the bevels face opposite directions so they will overlap seamlessly when wrapped into a cylinder. -
Score and Slip:
Score the beveled edges aggressively with your serrated rib. Apply a generous amount of slip to these roughed-up areas. -
Form the Cylinder:
Wrap the slab around your cylindrical form or carefully curve it by hand to bring the beveled ends together. Press the seam firmly to join. -
Reinforce the Seam:
Use a wooden modeling tool or your finger to smooth the seam on both the inside and outside. I like to run the rib over the outside seam one last time to make it completely invisible.
Straight Wall Secret
Let the slab firm up to ‘leather hard’ before joining the seam. If it’s too soft, the walls will slump and lose their straight profile.
Step 2: Attaching the Base and Handle
-
Cut the Base:
Roll out a small piece of slab for the base. Place your cylinder on top of it and trace a circle slightly larger than the cylinder’s diameter. -
Attach the Base:
Score and slip both the bottom rim of your cylinder and the outer edge of the circular base. Press them together firmly. Use a tool to blend the clay from the base up onto the wall of the mug, sealing the connection. -
Refine the Rim:
Run a damp sponge or a piece of chamois leather over the top rim to round it off. A smooth rim makes for a much more pleasant drinking experience. -
Make the Handle Strap:
Cut a strip of slab about 3/4 inch wide and 5 inches long. Smooth the sharp edges with a damp sponge. -
Shape the Handle:
While the clay is still plastic, gently curve the strap into a ‘C’ or ear shape. Hold it up to the mug to check the proportions. -
Attach the Handle:
Score and slip the attachment points on both the mug body and the handle ends. Press the handle onto the mug firmly. Reinforce the join by blending the clay with a small wooden tool; adding a tiny coil of clay around the connection points adds extra strength.
Step 3: Glazing and Finishing
-
Bisque Fire:
Allow the mug to dry slowly to the bone-dry stage, then bisque fire it according to your clay’s specifications (usually Cone 04 or 06). -
Wax the Bottom:
Apply a line of wax resist or masking tape approximately 1.5 inches up from the bottom of the mug. This will define the crisp line between the glazed upper and the raw lower section. -
Apply the Rust Color (Method A):
If your clay body is naturally grey or white and doesn’t fire to this terracotta color, paint the bottom section below your wax line with a rust-colored underglaze or iron oxide wash before the final glazing. -
Apply the Cream Glaze:
Dip the top section of the mug into a satin or glossy cream glaze. Alternatively, pour the glaze inside, swirl to coat, pour it out, and then dip the outside down to your resist line. -
Clean Up:
Wait for the glaze to dry slightly, then peel off the tape or wipe away any stray glaze drips on the bottom section with a damp sponge. -
Final Fire:
Glaze fire the mug to the maturity temperature of your clay and glaze (this look is typical of Cone 6 oxidation).
Make it Yours
Swap the cream glaze for a semi-transparent celadon blue. The iron speckles in the clay will still bleed through, creating a starry night effect.
Once fired, you will have a durable, modern mug perfect for your morning coffee routine

The Complete Guide to Pottery Troubleshooting
Uncover the most common ceramic mistakes—from cracking clay to failed glazes—and learn how to fix them fast.
Easy Cylinder Slab Vase
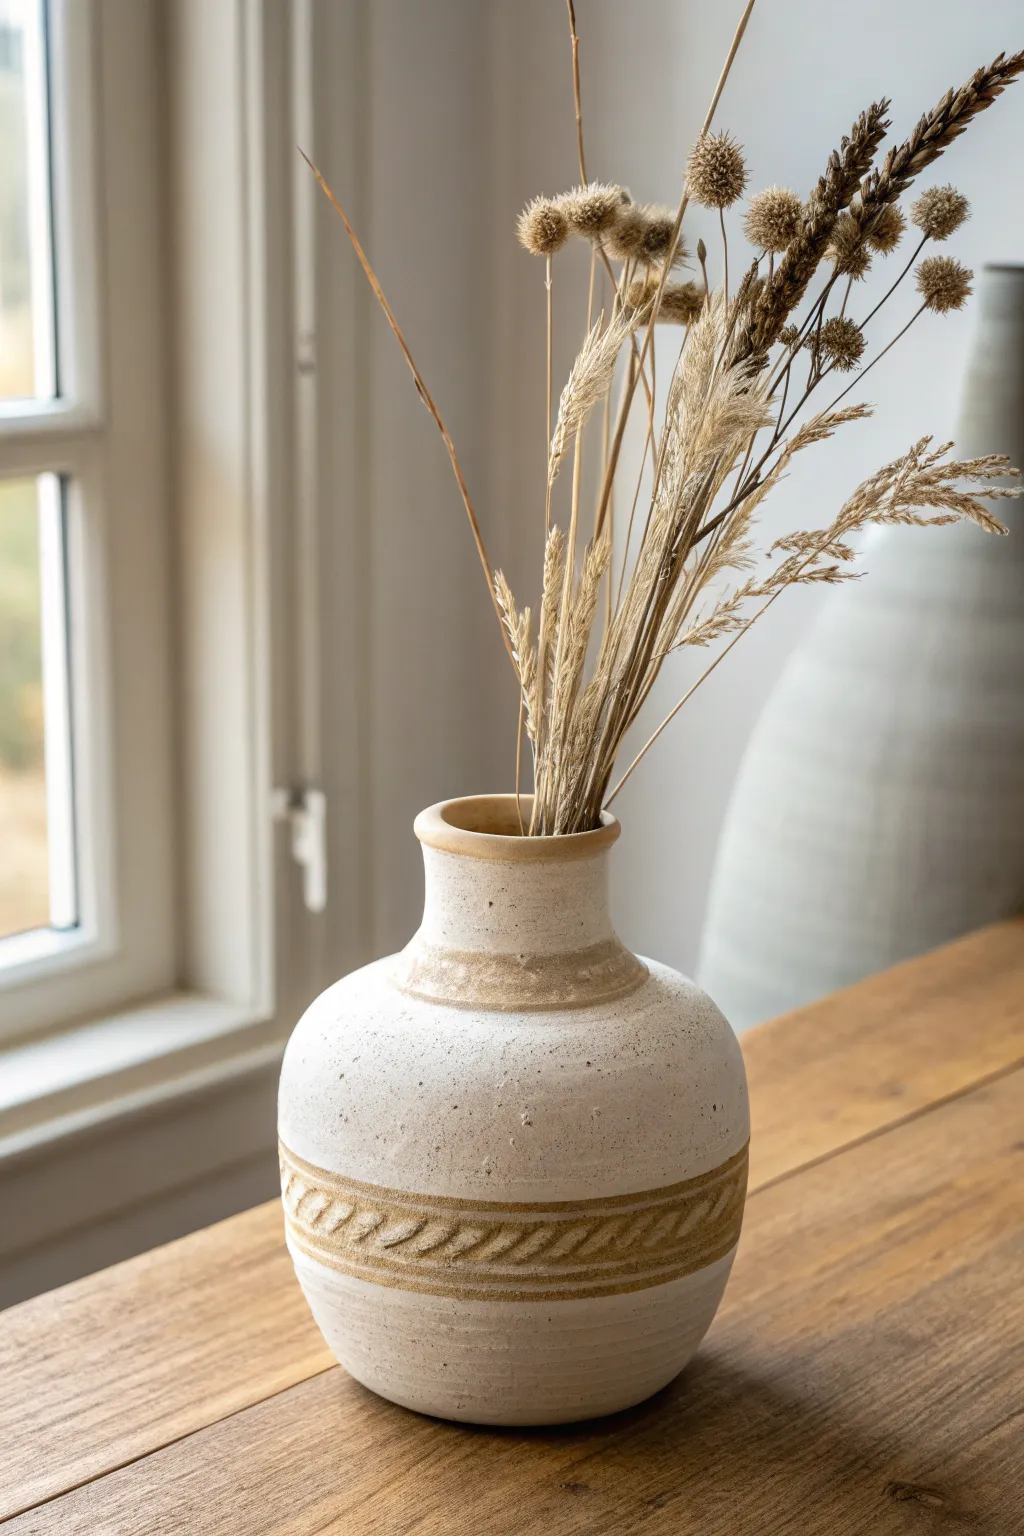
This charming, rustic vase combines simple slab building techniques with delightful textural details for an organic, handmade look. The creamy stoneware finish features a distinctive rope-pressed accent band and warm, exposed clay highlights that make it perfect for displaying dried grasses.
How-To Guide
Materials
- Speckled stoneware clay (mid-fire)
- Rolling pin
- Canvas or slab mat
- Clay knife or fettling knife
- Needle tool
- Scoring tool (serrated rib or fork)
- Slip (clay mixed with water)
- Straight edge ruler
- Paper template (approx. 12×6 inches)
- Rope or braided cord (for texture)
- Wooden sculpting tool
- Sponge
- Matte white glaze
Step 1: Preparing the Slabs
-
Roll the main body:
Begin by wedging your speckled stoneware clay to remove air bubbles. Roll out a slab to an even thickness of about 1/4 inch on your canvas working surface. -
Cut the cylinder wall:
Using your straight edge and knife, cut out a large rectangle for the main body of the vase. A size of roughly 12 inches wide by 6 inches tall works well for a medium vase like this. -
Create the base:
Roll a small separate piece of slab for the bottom. Place your rectangle temporarily into a cylinder shape on top of this slab to gauge the size, then cut a circle slightly larger than the cylinder’s diameter. -
Firming up:
Let both slab pieces sit for about 20-30 minutes until they reach leather-hard stage. This stiffness prevents the walls from slumping during assembly.
Seam Splitting?
If your vertical seam cracks during drying, score the crack deeply, fill it with soft clay, and compress it firmly. Cover tight with plastic to re-hydrate and dry very slowly.
Step 2: Assembling the Form
-
Score and slip edges:
Score the short vertical edges of your rectangle and the outer edge of your circular base. Apply a generous amount of slip to these roughened areas. -
Connect the cylinder:
Stand the rectangle up and curve it into a cylinder. Press the two slipped ends together firmly. Use a wooden tool to blend the seam on both the inside and outside so it becomes invisible. -
Attach the base:
Place the cylinder onto the scored base slab. Press down gently to secure the bond. Use your thumb or a tool to drag clay from the base up onto the wall to lock it in place, then smooth the transition. -
Shape the shoulder:
Gently dart or curve the top of the cylinder inward to create the rounded shoulder. I like to paddle the clay gently from the outside while supporting the inside with my hand to get that soft, rounded curve. -
Add the neck:
Roll a small strip of clay (about 1 inch tall) and attach it to the top opening to form the neck. Smooth the connection point thoroughly so it flows seamlessly from the shoulder. -
Refine the rim:
Roll a tiny coil and add it to the very top rim to create a slightly thickened lip. Use a damp sponge to round it off perfectly.
Step 3: Adding Texture and Glazing
-
Create the rope impression:
Roll a thin, flat strip of clay and attach it around the lower third of the vase using score and slip. While the clay is still soft, press a twisted rope or braided cord firmly into this added strip to create the diagonal texture. -
Define the borders:
Use a needle tool or wooden skewer to carve shallow horizontal lines bordering the rope texture and at the base of the neck, defining the decorative zones. -
Bisque fire:
Allow the vase to dry slowly under plastic for a few days before uncovering it completely. Once bone dry, fire the piece to bisque temperature (usually Cone 04). -
Wax resist application:
Apply wax resist to the rope textured area and the decorative band at the neck base. You want the raw, toasted clay color to show through here. -
Glazing:
Dip or brush the vase with a matte white or cream glaze. The wax will repel the glaze from your textured accents. -
Wipe back:
Use a damp sponge to wipe away any stray glaze droplets sitting on top of the waxed areas to ensure clean lines. -
Final firing:
Fire the vase to the final maturity temperature of your clay (typically Cone 5 or 6) to reveal the speckled finish and warm, exposed clay bands.
Sprinkle Some Iron
For extra speckles, sprinkle granular iron oxide or manganese into the raw clay slab before the final rolling. It creates lovely dark spots through white glaze.
Now you have a stunning, earthy vessel ready to hold your favorite dried botanicals
Faceted Geometric Vase
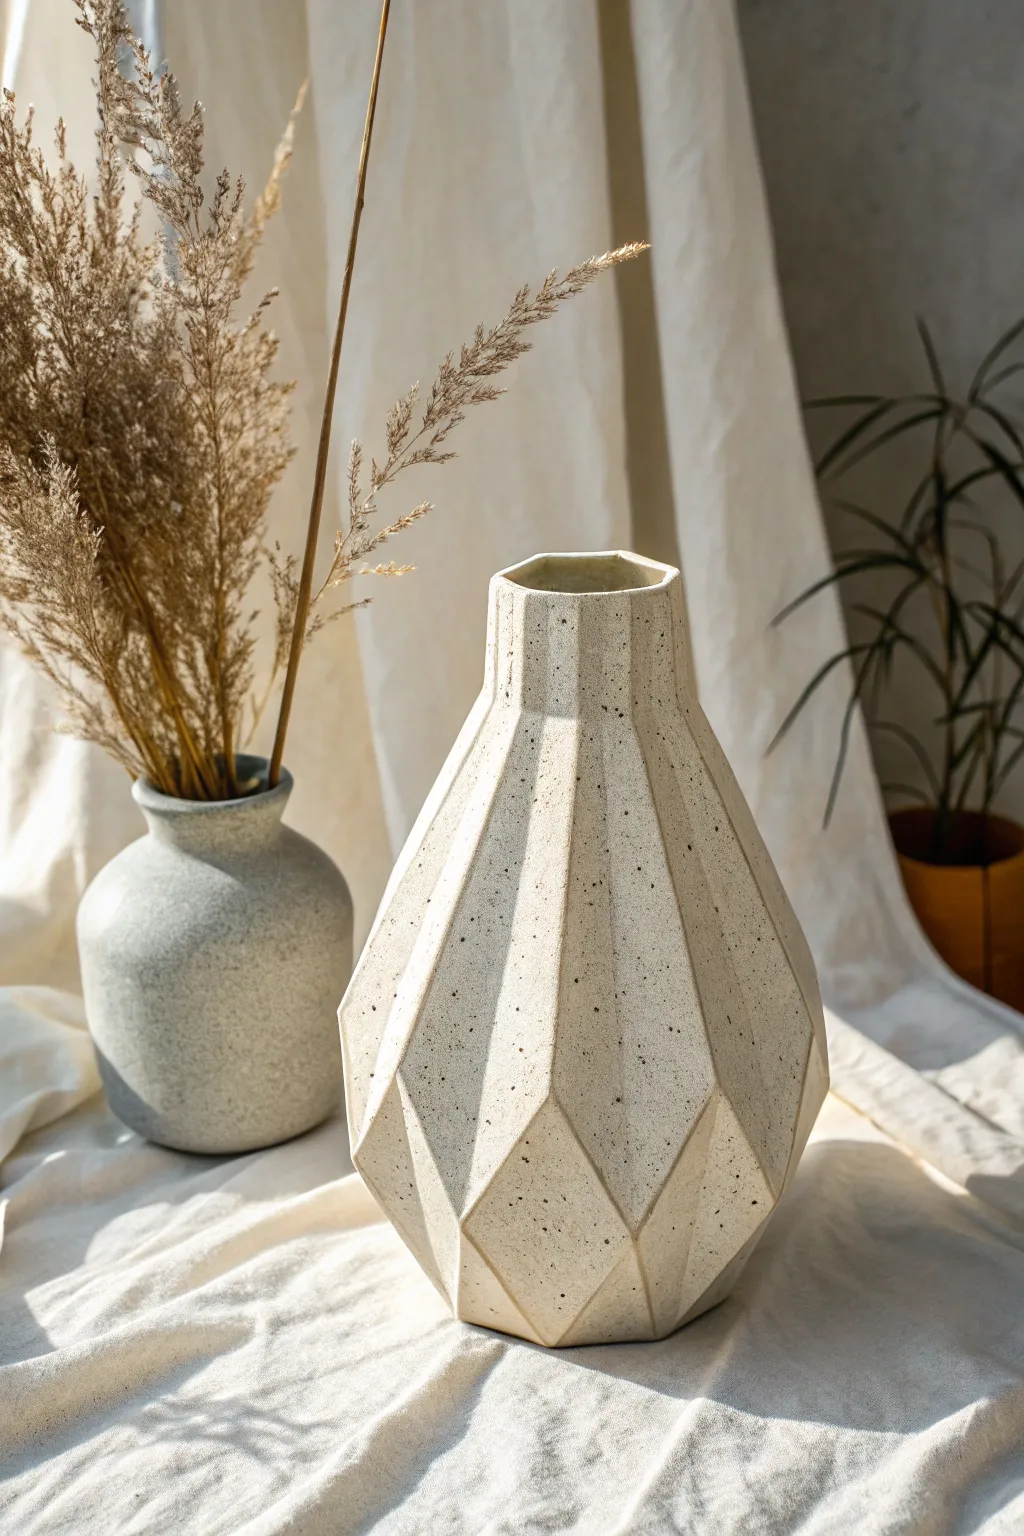
This modern vase mimics the precision of cut gemstones with its crisp, faceted planes and speckled stoneware finish. By assembling strategically cut slabs, you’ll construct a structured form that plays beautifully with light and shadow.
Step-by-Step Guide
Materials
- Speckled stoneware clay (mid-fire)
- Slab roller or rolling pin with depth guides
- Fettling knife or X-Acto blade
- Paper templates (printable or hand-drawn)
- Scoring tool (serrated rib)
- Slip or vinegar
- Wooden modeling tool
- Rubber kidney rib
- Chamois strip or sponge
- Paddle (optional)
- Clear matte glaze
Step 1: Designing and Cutting
-
Draft your template:
Begin by designing your faceted panels on cardstock. For this specific shape, you will need a repeating elongated diamond shape that tapers significantly at the top (for the neck) and bottom (for the base), with the widest point sitting low on the form. Usually, 6 to 8 identical panels work best for this geometry. -
Roll the slab:
Roll out a consistent slab of speckled stoneware clay to approximately 1/4 inch thickness. Ensure the clay is smooth and free of air bubbles by compressing it on both sides with a rib. -
Let the clay firm up:
This step is crucial for sharp angles: allow your slab to dry to a ‘soft leather-hard’ flexible state. If the clay is too wet, the walls will slump; too dry, and they won’t join. -
Cut the panels:
Lay your template onto the slab and cut out your set of panels using a sharp fettling knife or blade. You will also need to cut a hexagonal (or octagonal, depending on your panel count) base piece. -
Bevel the edges:
To create seamless, sharp corners where the panels meet, bevel the long side edges of each panel at a 45-degree angle. This increases the surface area for the join and helps the geometric shape come together naturally.
Seam Splitting?
If seams crack during drying, your clay was likely too dry when joining or you didn’t score enough. Make a paper clay paste (vinegar + clay + toilet paper) to fill cracks before bisquing.
Step 2: Assembling the Form
-
Score and slip:
Thoroughly score the beveled edges of your first two panels and apply a generous amount of slip or vinegar. I find vinegar creates a very sticky bond for leather-hard clay. -
Join the first pair:
Press the two panels together, ensuring the widest points align perfectly. Use your hand to support the back of the seam while pressing firmly from the outside. -
Reinforce the interior:
Take a tiny coil of soft clay and press it into the interior corner of the seam. Smooth this coil down with a wooden tool to reinforce the joint without disrupting the sharp exterior line. -
Continue the assembly:
Add the remaining panels one by one, working your way around the circle. As the form closes up, it will gain structural integrity and stand on its own. -
Attach the final panel:
The last panel can be tricky. Carefully score and slip both sides, then slide it into place. You may need to use a long-handled tool (like a paintbrush handle) to smooth the final interior seam if your hand doesn’t fit. -
Attach the base:
Flip the vessel gently upside down. Score the bottom edges of the faceted walls and the perimeter of your base piece. Press the base onto the walls and compress the seam well.
Step 3: Refining and Finishing
-
Refine the exterior seams:
Use a rubber rib to smooth the exterior joints. You want the planes to look continuous, so carefully blend the clay across the seams without rounding over the sharp ‘spine’ created by the facets. -
Check the geometry:
Look at the vase from above to ensure it is symmetrical. If it looks slightly warped, gently squeeze or paddle the clay to correct the angles while it is still pliable. -
Finish the rim:
Even out the top rim with your knife. Use a damp chamois or sponge to soften the very edge of the lip so it isn’t razor-sharp after firing. -
Dry slowly:
Place a loose plastic bag over the vase to let it dry slowly for the first few days. This prevents the seams from cracking due to uneven shrinkage. -
Bisque fire:
Once bone dry, fire the piece to the appropriate cone (usually Cone 04 for initial bisque) to prepare it for glazing. -
Glaze and final fire:
Apply a thin coat of clear matte glaze. This protects the piece while allowing the natural speckles of the clay to be the star of the show. Fire to the clay body’s maturation temperature (often Cone 5 or 6).
Sharpen Those Lines
To get ultra-crisp faceted edges, let the vase stiffen completely to leather hard, then run a metal rib or a rasp gently along each plane to flatten any slight warping.
Once fired, fill your architectural vessel with dried grasses or let it stand alone as a sculptural object


What Really Happens Inside the Kiln
Learn how time and temperature work together inside the kiln to transform clay into durable ceramic.
Minimal Soap Dish With Drainage
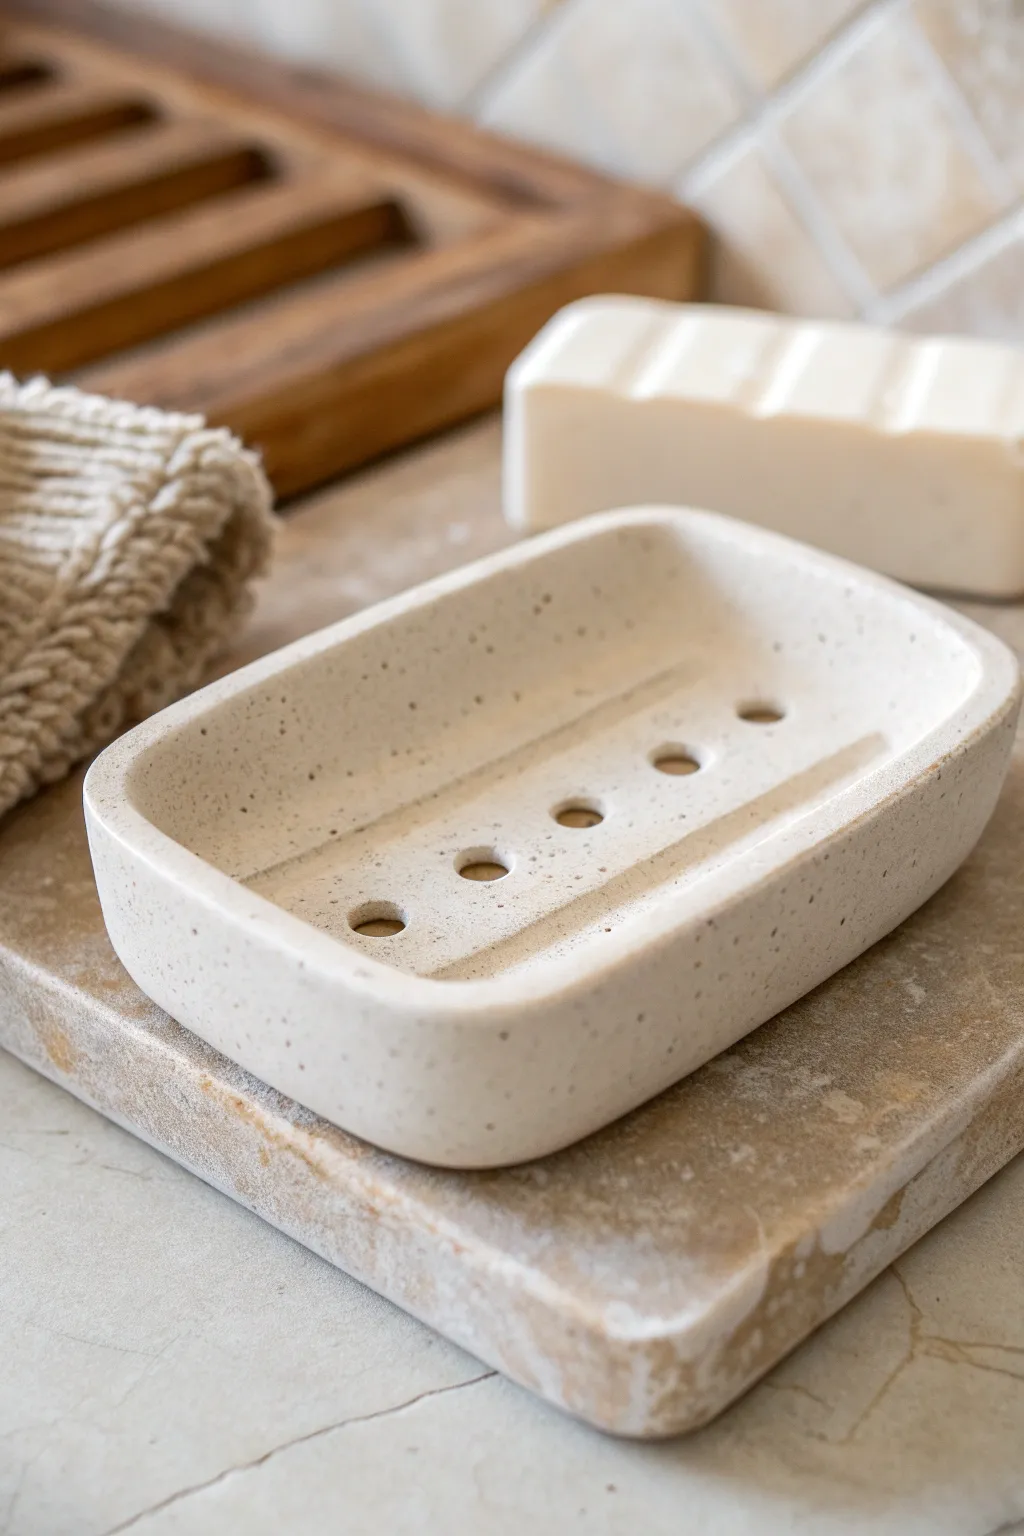
This minimalist soap dish features a softly rounded rectangular form and a natural speckled finish resembling river stone. Its practical design includes a central ridge with drainage holes to keep your soap dry and lasting longer.
Detailed Instructions
Materials
- Speckled stoneware clay (e.g., Laguma or a grogged white body)
- Rolling pin and guide sticks (approx. 1/4 inch thick)
- Rectangular paper template (approx. 4×6 inches)
- Fettling knife or needle tool
- Small circular hole punch or straw
- Ribs (soft silicone and metal)
- Sponge and water
- Scoring tool
- Slip
- Carving tool (small loop tool)
Step 1: Forming the Slab Base
-
Roll the clay:
Begin by wedging your speckled clay to remove air bubbles, then roll it out into a smooth, even slab. Use guide sticks to ensure a consistent thickness of about 1/4 inch. -
Cut the shape:
Place your rectangular paper template onto the slab. Using a fettling knife or needle tool, cut cleanly around the template to create the main body of your dish. -
Smooth the surface:
Run a soft silicone rib over the surface of the slab to compress the clay particles and remove any canvas texture from the rolling process. -
Soften the edges:
Before manipulating the form, gently round over the sharp cut edges with a damp sponge or your finger to give it that soft, stone-like appearance.
Step 2: Shaping the Dish
-
Lift the walls:
Place the slab on a small piece of foam or a folded towel. Gently press into the center with your palm while lifting the edges to create a shallow curve. -
Refine the curve:
Work your way around the perimeter, smoothing the transition from the base to the walls. Ideally, you want a continuous, fluid curve rather than a sharp 90-degree angle. -
Check the profile:
Look at the dish from the side. Ensure the walls are lifted high enough to hold a bar of soap secure, but low enough to maintain the minimal aesthetic. -
Let it stiffen:
Allow the clay to dry to a soft leather-hard stage. This is crucial for the carving step, as the clay needs to hold its shape without slumping.
Keep it clean
When punching holes, twist the tool as you push through. This creates a cleaner cut and prevents the clay from deforming around the exit point.
Step 3: Carving Details
-
Mark the drainage line:
Once leather-hard, lightly trace a straight line down the center of the interior floor where the drainage holes will go. -
Carve the channel:
Using a small loop tool, carve a shallow, rounded channel along the line you just marked. This helps guide water toward the holes. -
Smooth the channel:
Use a slightly damp finger or a very small sponge to smooth the carved area, removing any rough crumbles left by the loop tool. -
Punch the holes:
Using a hole punch tool or a sturdy straw, punch 5-6 evenly spaced holes down the center of the carved channel. -
Clean the holes:
After punching, clean up the rims of the holes on both the top and bottom of the dish so they are perfectly round and smooth.
Raised Feet
Add four small distinct clay balls to the bottom corners. This elevates the dish, allowing air to circulate so water underneath can evaporate quickly.
Step 4: Finishing Touches
-
Final smoothing:
Give the entire piece a final pass with a barely damp sponge. I find this really brings the speckles to the surface before firing. -
Slow drying:
Place the finished dish under a loose sheet of plastic to dry slowly. This prevents warping, which is common with flat slab pieces. -
Sand and fire:
Once bone dry, lightly sand any remaining rough spots (wearing a mask). Bisque fire the piece, apply a clear matte glaze to highlight the speckles, and glaze fire to cone 5/6.
Your new soap dish is now ready for duty, bringing a touch of organic calm to your bathroom counter
Curved Spoon Rest
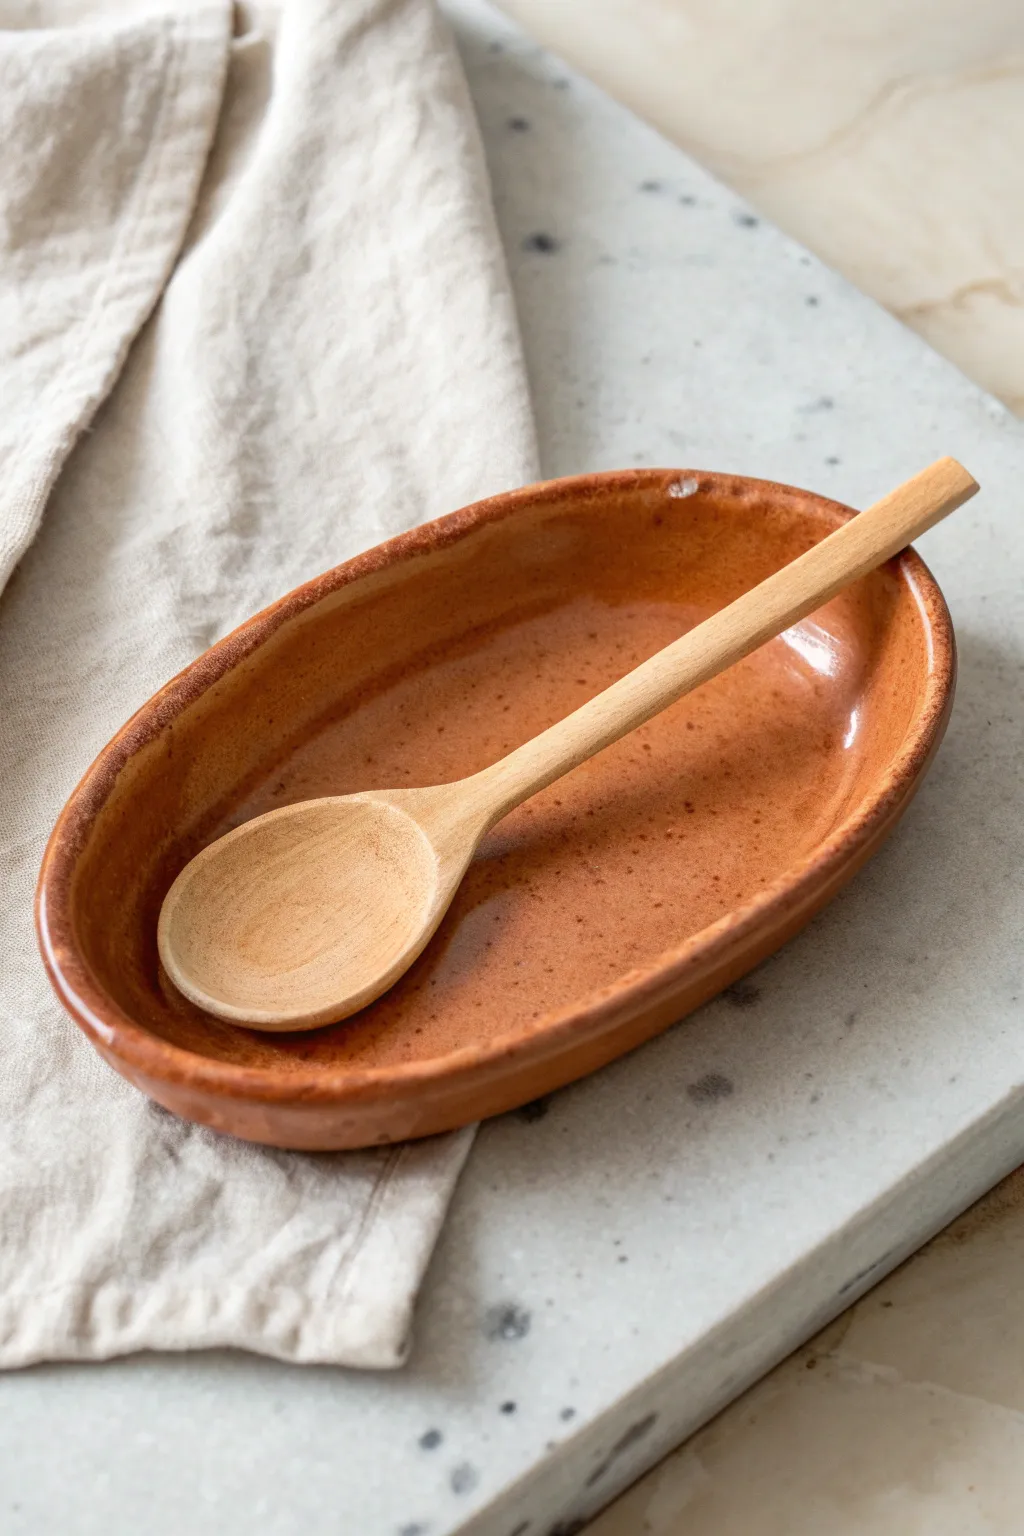
This charmingly rustic spoon rest features an organic oval shape with gently raised walls to contain drips. The warm, speckled terracotta glaze gives it an earthy, handmade feel that looks fantastic on a marble or stone countertop.
Step-by-Step Guide
Materials
- Stoneware clay (smooth or fine grog)
- Rolling pin
- Canvas or slab mat
- Oval paper template (approx. 5 x 8 inches)
- Fettling knife or needle tool
- Rib tool (wooden or silicone)
- Sponge
- Terracotta-colored glaze (e.g., Mayco Speckled Stroke & Coat or Amaco Potter’s Choice)
- Kiln
Step 1: Forming the Slab
-
Prepare your clay:
Begin by wedging a softball-sized piece of clay to remove air bubbles and ensure consistency. -
Roll the slab:
Roll your clay out onto a canvas or slab mat until it is an even 1/4-inch thickness. Rotate the slab occasionally to keep it circular and prevent sticking. -
Smooth the surface:
Use a flexible rib tool to compress the clay surface on both sides. This aligns the clay particles and creates a smooth canvas for your glaze later. -
Cut the shape:
Place your paper oval template onto the slab. Using a fettling knife, trace around the template with the blade held vertically to cut out your base shape.
Wobbly Rester?
If the bottom isn’t flat, gently tap the leather-hard piece on a flat board before drying. This realigns the bottom to ensure it won’t rock on the counter.
Step 2: Shaping the Curve
-
Soften the edges:
Dip your finger or a small sponge in water and run it along the sharp cut edge to round it over gently. I like to do this before shaping so the rim feels finished. -
Lift the walls:
Place the oval on a piece of foam or a folded towel. Gently pinch and lift the outer edge of the oval, curling it upward about half an inch to create a shallow basin. -
Curve the profile:
If you want a more pronounced curve, you can drape the slab over a slump mold or simply prop up the edges with small pieces of foam while it dries to leather hard. -
Refine the rim:
Go back around the lifted rim with a damp sponge. Smooth out any finger marks from the lifting process to ensure an organic but intentional edge. -
Dry slowly:
Cover the piece loosely with plastic to let it dry slowly to the leather-hard stage. This prevents warping, which is crucial for a spoon rest that needs to sit flat.
Make it Yours
Add a thumb notch on one side of the rim to securely hold a wooden spoon handle, stopping it from sliding into the basin.
Step 3: Glazing and Firing
-
Bisque fire:
Once fully bone dry, fire the piece to bisque temperature (usually cone 04) to prepare it for glazing. -
Clean the bisque:
Wipe the creative dust off your fired piece with a damp sponge. This ensures the glaze adheres properly without crawling. -
Apply the glaze:
Select a glossy, terracotta-colored glaze with brown speckles. Apply 2-3 even coats to the interior and rim, letting each coat dry before adding the next. -
Wipe the foot:
Carefully sponge off any glaze from the bottom of the spoon rest so it won’t fuse to your kiln shelf. -
Glaze fire:
Fire the piece again to the maturation temperature of your specific clay and glaze (typically cone 5 or 6 for stoneware).
Once cooled, your handmade spoon rest is ready to catch drips and add a warm touch to your kitchen prep area

TRACK YOUR CERAMIC JOURNEY
Capture glaze tests, firing details, and creative progress—all in one simple printable. Make your projects easier to repeat and improve.
Slab Planter With Clean Edges
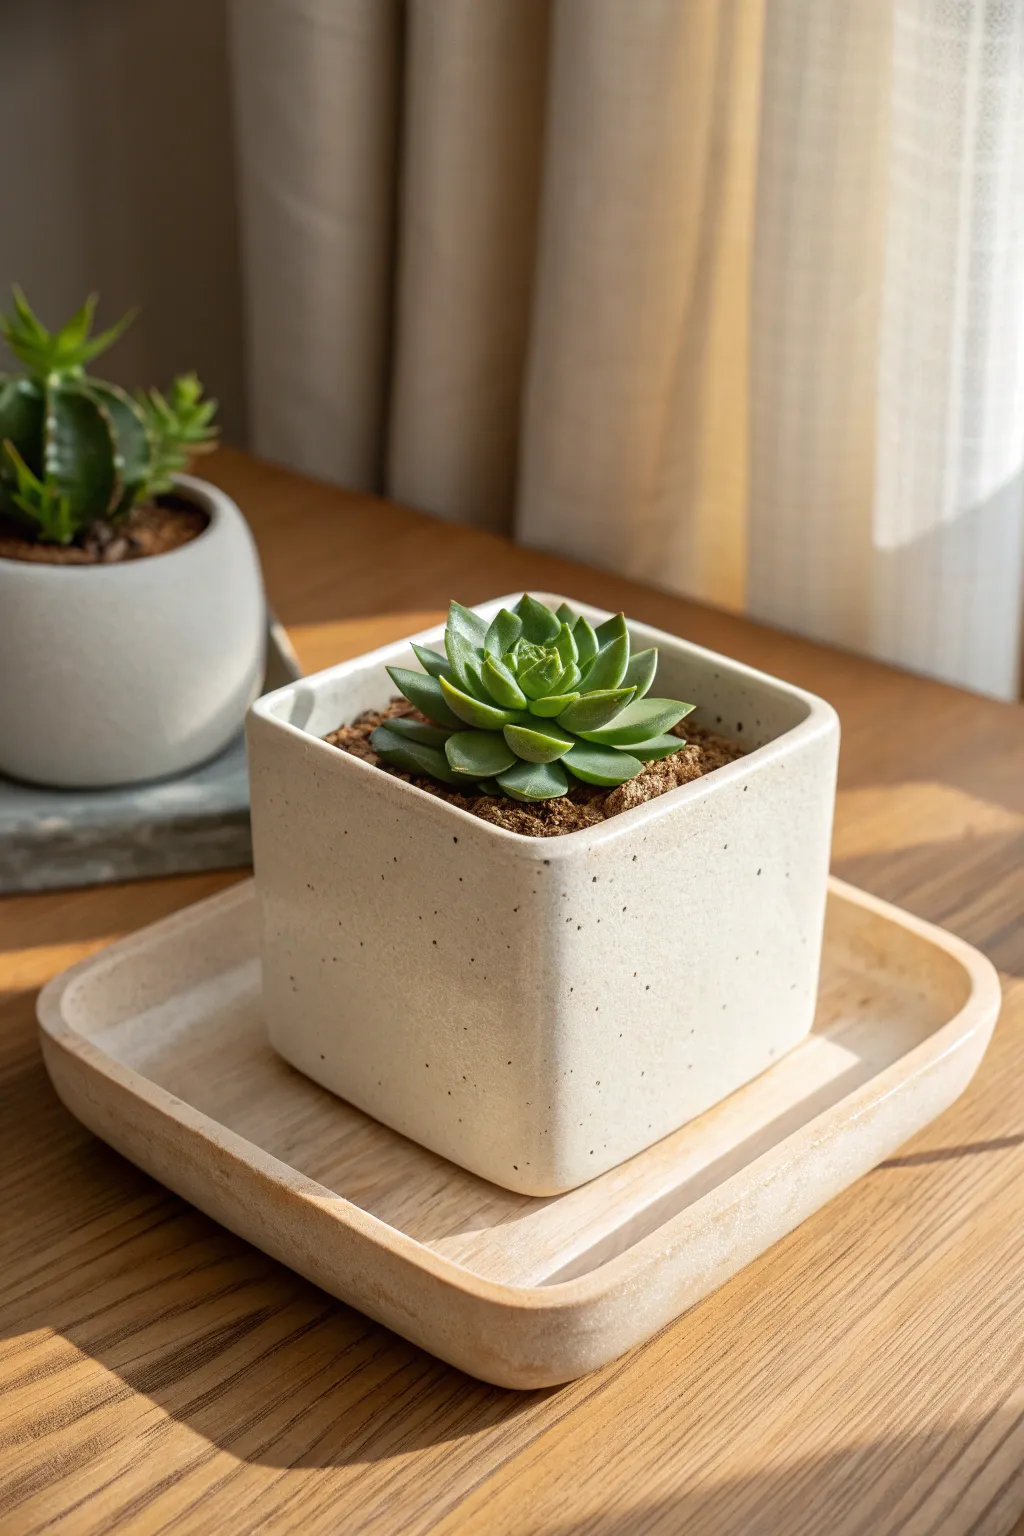
Achieve a sleek, modern aesthetic with this perfectly square slab-built planter. The charm lies in its sharp corners, subtle speckles, and that smooth, matte creamy finish that lets the succulent truly shine.
Step-by-Step Tutorial
Materials
- Stoneware clay (speckled or buff)
- Rolling pin
- Two 1/4-inch wooden thickness slats
- Fettling knife or X-Acto knife
- Ruler or carpenter’s square
- Serrated rib and smooth rubber rib
- Slip (clay and water slurry)
- Scoring tool or fork
- Matte cream/white dipping glaze
- Paintbrush for touch-ups
- Wooden tray (optional for display)
Step 1: Preparation & Cutting
-
Roll the slab:
Begin by wedging your clay to remove air bubbles, then slam it onto your work surface. Place your 1/4-inch wooden slats on either side and roll the clay out until it is uniform and smooth. -
Compress the surface:
Before cutting anything, take your smooth rubber rib and run it over both sides of the clay slab. This compresses the particles, preventing warping later, and creates that flawless canvas we need for the glaze. -
Measure your template:
You can create a paper template first or measure directly on the clay. You will need five squares total: one base and four walls. Let’s aim for 4×4 inch squares for a manageable desktop size. -
Cut the shapes:
Using your ruler and fettling knife, cut out your five squares. Hold the knife perfectly vertical to ensure the edges are 90 degrees, not beveled, as this style relies on butt joints. -
Stiffen the slabs:
This is crucial for those sharp lines. Let the cut slabs sit on a ware board until they are ‘leather hard’—stiff enough to hold their shape without slumping, but soft enough to score.
Miter for Sharpness
For invisible seams, cut your wall edges at a 45-degree angle (miter joint) instead of 90. When joined, the seam runs exactly down the corner edge, making it vanish completely.
Step 2: Assembly & Refining
-
Score the edges:
Take your scoring tool and thoroughly scratch up the four edges of your base square and the bottom edge of each wall piece. Do the same for the vertical sides where the walls will meet. -
Apply slip:
Generously dab slip onto the scored areas. It should look wet and glossy but not drippy. -
Attach the first wall:
Press one wall onto the base. Some potters place the wall *on top* of the base slab, but for this clean-edge look, attach the wall to the *side* of the base slab if you want hidden seams, or rest it on top for stability. -
Construct the box:
Attach the remaining walls, pressing them firmly against the base and each other. Use a small wooden coil in the interior corners to reinforce the joints, blending it in completely. -
Refine the corners:
With the box built, use a paddle or a flat board to gently tap the walls straight. Run your damp finger or a sponge along the sharp exterior corners to slightly soften them so the glaze doesn’t break too thinly. -
Smooth the surfaces:
Take your rubber rib again and smooth the outside walls to erase any handling marks or fingerprints. The goal is a pristine surface.
Walls Bowing In?
If the square walls start curving inward while drying, stuff the inside of the box with crumpled newspaper or foam to act as an internal support until the clay stiffens.
Step 3: Finishing & Glazing
-
Dry slowly:
Loosely cover the planter with plastic for a day to equalize moisture, then uncover to let it dry completely bone dry. Rush drying often leads to corner cracks. -
Bisque fire:
Fire the piece in the kiln to cone 04 (or your clay’s specific bisque temperature). -
Clean and wax:
Wipe the bisque ware with a damp sponge to remove dust. Wax the bottom of the pot to prevent it from sticking to the kiln shelf. -
Glaze application:
Dip the planter into a matte cream or ‘oatmeal’ glaze. If your clay doesn’t have natural speckles, choose a glaze with iron speckles included to match the photo’s texture. -
Glaze firing:
Fire again to the glaze’s maturation temperature (likely cone 5 or 6). Once cool, pot it up with a succulent and gritty soil mix.
Place your finished planter on a sunny windowsill where the light can catch the subtle texture of the glaze
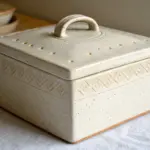
Lidded Slab Keepsake Box
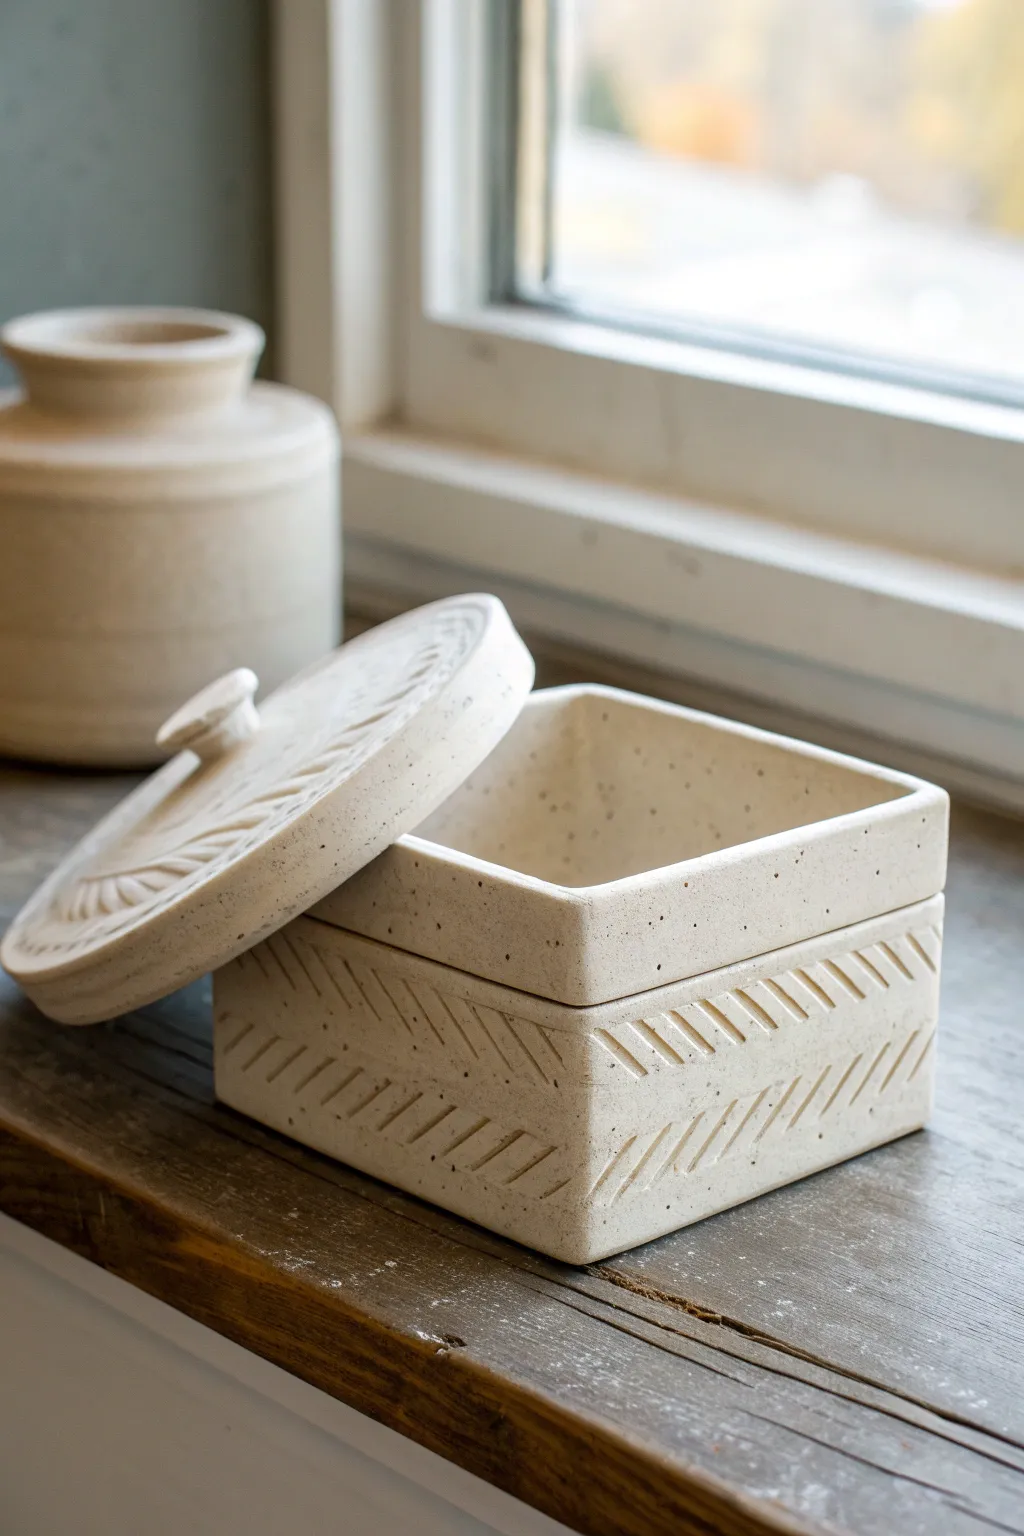
This elegant keepsake box combines crisp slab construction with soft, organic textures for a piece that feels both modern and timeless. The speckled clay body and carved chevron details create a tactile surface that begs to be touched.
Step-by-Step
Materials
- Speckled Stoneware Clay
- Rolling Pin and Thickness Strips (1/4 inch)
- Fettling Knife or X-Acto Knife
- Serrated Rib or Scoring Tool
- Slip (clay and water slurry)
- Carving Loop Tool (small)
- Ruler
- Sponge
- Wooden Modeling Tool
- Can of clear glaze (matte or satin finish)
Step 1: Creating the Box Base
-
Roll the Slabs:
Begin by wedging your speckled clay thoroughly to remove air bubbles. Roll out a large, even slab approximately 1/4 inch thick using your thickness strips as a guide. -
Cut the Components:
Using a ruler and fettling knife, measure and cut a 4×4 inch square for the base. Next, cut four rectangular strips for the walls, each measuring 4 inches long by 2.5 inches high. -
Leather Hard Stage:
Let the cut pieces sit until they reach a ‘soft leather hard’ state. They should be firm enough to stand up without slumping but still flexible enough to join easily. -
Miter the Edges:
For a seamless corner, cut the vertical edges of your wall strips at a 45-degree angle. This ensures the walls fit together perfectly squarely. -
Score and Slip:
Score the edges of the base and the bottom/side edges of your wall pieces deeply. Apply a generous amount of slip to the scored areas. -
Assemble the Walls:
Attach the walls to the base and to each other. Press firmly to ensure a strong bond, using a wooden modeling tool to smooth the seams on the inside and outside.
Clean Corner Tip
Reinforce inner corners with a tiny coil of clay blended smooth. This adds hidden strength without ruining the sharp exterior miter.
Step 2: Adding the Lid Gallery
-
Create the Gallery Strip:
Roll a thinner strip of clay, about 1 inch wide. This strip should be long enough to fit the inner perimeter of your box. -
Install the interior Rim:
Score and slip the inside top edge of your box. Attach the strip so that about 1/2 inch protrudes upward from the box rim. This creates the flange that holds the lid in place. -
Smooth the Join:
Blend the bottom edge of this gallery strip into the interior wall of the box so it looks seamless, cleaning up any excess slip with a damp sponge.
Creative Twist
Instead of a clear glaze, try rubbing a dark oxide wash into the carved lines and wiping it back to make the texture pop dramatically.
Step 3: Lid Construction & Detail
-
Cut the Lid:
Measure the outer dimensions of your box. Cut a square slab lid that is slightly larger (about 1/4 inch overhang on all sides) than the box opening. -
Make the Knob:
Roll a small coil and form it into a decorative knob or handle. Score and slip the center of the lid and attach the knob securely. -
Form the Dome:
I like to gently press the center of the lid from the underside while supporting the edges to give it a very subtle domed shape, preventing sagging during firing. -
Carve the Top Texture:
Using a small loop tool, carve a radiating pattern on the lid, starting from the knob and moving outward to the edges.
Step 4: Finishing Touches
-
Carve Body Texture:
On the exterior walls of the box, use a ruler to lightly mark diagonal guidelines. Use your carving tool to etch deep repeating diagonal lines or chevrons into the leather-hard clay. -
Refine the Edges:
Once the carving is complete, smooth any sharp burrs created by the tool with a damp sponge or your fingertip. -
Bisque Fire:
Allow the piece to dry slowly and completely under loose plastic to prevent warping. Fire to cone 04 (or your clay’s bisque temperature). -
Glaze Application:
Because the clay is speckled and beautiful on its own, apply a clear matte or satin glaze. This protects the surface while letting the natural speckles and carved shadows shine through. -
Final Fire:
Fire the piece to maturity (Cone 5/6 for most speckled stoneware) and let it cool naturally in the kiln.
Once fired, fill your new handmade box with jewelry or keepsakes to enjoy the texture daily
Jewelry Tray With Folded Corners
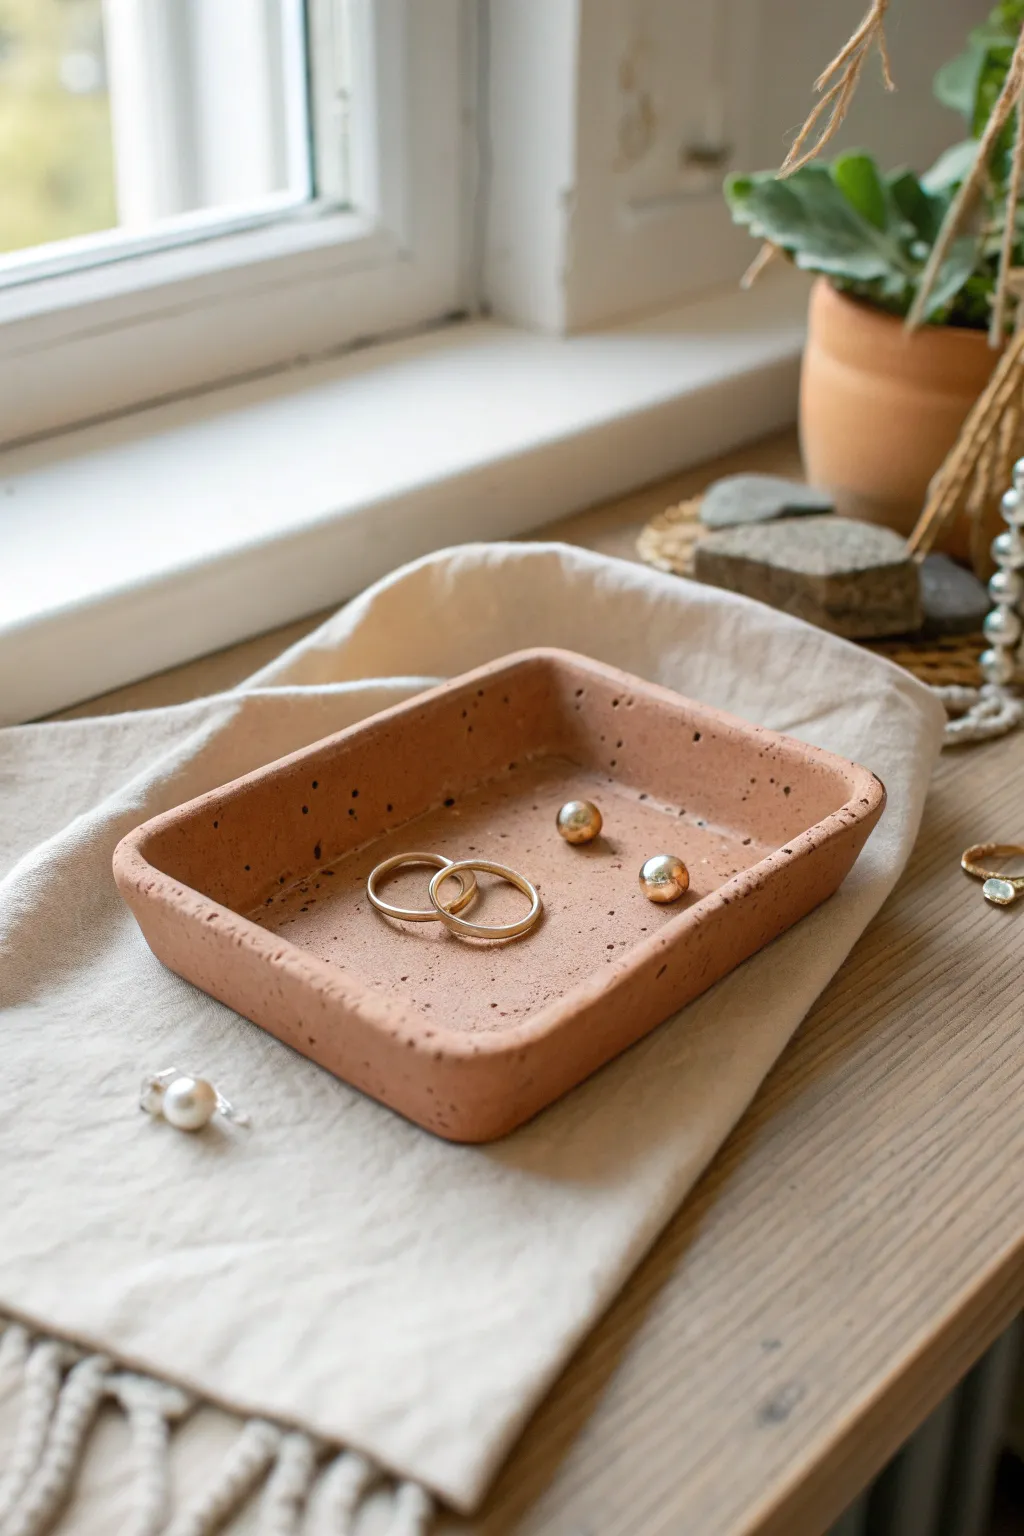
This minimalist jewelry dish showcases the natural beauty of speckled terracotta clay with a simple, functional rectangular design. The clean lines and gentle lip created by a unique folding technique make it the perfect home for your favorite rings and studs.
Step-by-Step Guide
Materials
- Speckled terracotta clay (or similar stoneware with grog)
- Rolling pin
- Two wooden depth guides (approx. 1/4 inch thick)
- Rectangular paper template (approx. 5×7 inches)
- Fettling knife or needle tool
- Sponge
- Smooth work surface or canvas cloth
- Small bowl of water
- Wooden modeling tool or rib
Step 1: Preparing the Slab
-
Roll out the clay:
Begin by wedging a ball of speckled terracotta clay to remove air bubbles. Place it on your canvas or work surface between two wooden depth guides to ensure an even thickness. -
Achieve uniform thickness:
Use your rolling pin to flatten the clay until the pin rests on both wooden guides. This ensures your final tray has a consistent wall thickness, which is crucial for even drying. -
Compress the slab:
Take a rubber rib or a damp sponge and gently drag it across the surface of the clay slab. This compresses the clay particles, preventing future warping, and smooths out the canvas texture. -
Cut the shape:
Lay your rectangular paper template onto the slab. Using a fettling knife or needle tool held vertically, cut cleanly around the perimeter of the template to create your base rectangle.
Clean Corner Trick
To keep the corners from looking bulky, slice away a tiny triangular sliver of clay from each corner tip before folding the walls up. This reduces material overlap.
Step 2: Forming the Tray
-
Initial folding prep:
Remove the excess clay. Carefully run a slightly damp finger along the cut edges to soften the sharp squareness just a bit before you start building up the sides. -
Establish the fold lines:
Lightly score a line about 3/4 of an inch in from each edge of the rectangle. Don’t cut through; just make a faint indentation to guide where the wall will verify rise. -
Score the corners:
At each corner where your scored lines intersect, you need to create a secure join. Score the clay heavily (scratch cross-hatching marks) in the corner areas that will overlap when folded. -
Add slip:
Apply a small dab of clay slip or vinegar to the scored corner areas. This acts as the glue that will hold your tray walls together. -
Lift the walls:
Gently lift all four sides of the rectangle simultaneously. It helps to have the slab on a small board or piece of paper so you can turn it easily as you work. -
Pinch the corners:
At the corners, pinch the excess material together. Unlike cutting a dart, for this look, you want to fold the corner inward or outward and compress it to create a seamless, sturdy corner joint. -
Shape the lip:
Once the walls are up, use your thumb and forefinger to gently pinch the rim all the way around, defining the wall height and ensuring it stands vertical.
Warping Walls?
If the long walls start bowing outward while wet, prop them up with small cosmetic sponges or wads of newspaper on the outside until the clay reaches leather-hard.
Step 3: Refining and Finishing
-
Smooth the interior:
Use a damp sponge or a soft rib to smooth the interior floor of the tray, erasing any fingerprints left during the lifting process. -
Perfect the rim:
Run a chamois leather or a very smooth, damp sponge along the top edge of the rim. This step is vital to ensure the finished piece is pleasant to touch and won’t scratch your jewelry. -
Slow drying:
Loosely cover the tray with plastic. I prefer to let this dry very slowly over a couple of days to prevent the corners from pulling apart or curling as the clay shrinks. -
Bisque fire:
Once bone dry, fire the piece to bisque temperature (usually Cone 04). Since the clay is naturally beautiful, you can choose to leave the outside unglazed. -
Glazing check:
If you want the speckled look to remain matte like in the photo, apply a clear matte glaze to the inside only, or simply fire high enough for the clay to vitrify if functionally isn’t a concern. -
Final firing:
Fire the tray a final time according to your clay body’s instructions (e.g., Cone 5 or 6 for stoneware) to achieve that durable finish.
Place your favorite rings inside and enjoy the earthy warmth this piece adds to your dresser
Nesting Trinket Dish Set
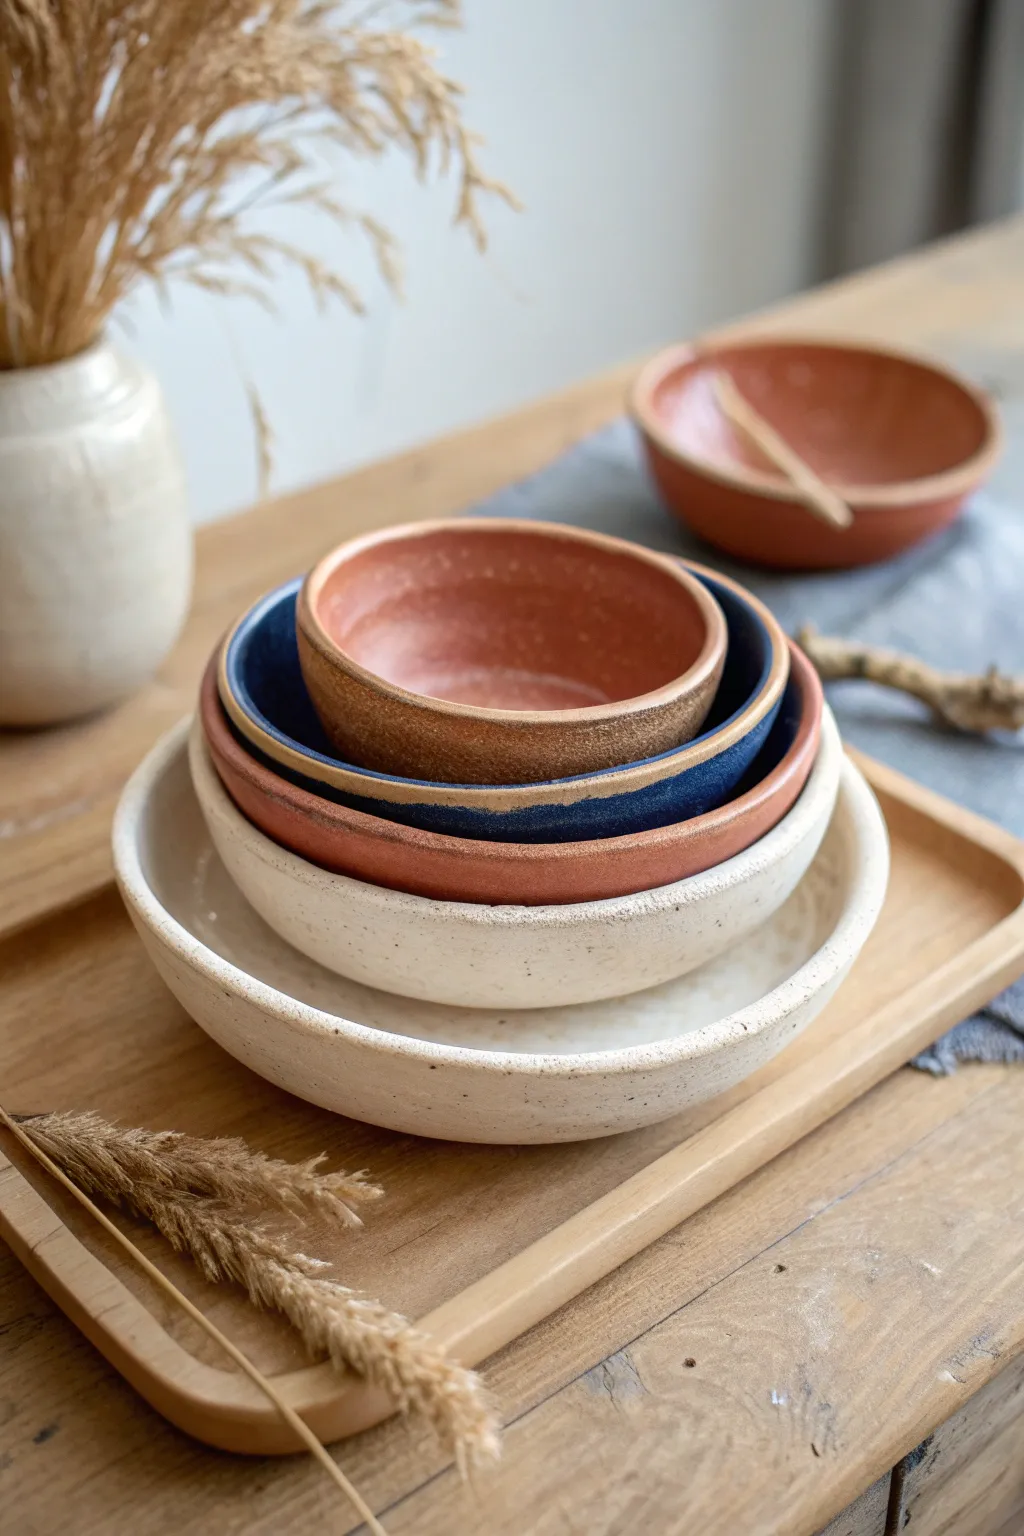
Embrace the rustic charm of handmade ceramics with this nesting trinket dish set, perfect for holding jewelry or serving dry snacks. Featuring varied earthy glazes and organic, imperfect rims, this project is an excellent introduction to slab building techniques.
Detailed Instructions
Materials
- Stoneware clay (smooth or speckled)
- Rolling pin
- Wooden guide strips or slab roller (approx. 1/4 inch thick)
- Set of nesting mixing bowls (for molds)
- Canvas or heavy fabric
- Fettling knife or needle tool
- Rib tool (smooth wood or rubber)
- Sponge
- Various glazes (terracotta orange, deep blue, matte white)
- Kiln
Step 1: Preparing the Slabs
-
Wedge the clay:
Begin by thoroughly wedging your clay to remove any air bubbles and ensure an even consistency. This is crucial for preventing cracks during firing. -
Roll out the slab:
Place your clay on a canvas surface. Using wooden guide strips on either side to ensure even thickness, roll the clay out into a large, consistent slab about 1/4 inch thick. -
Smooth the surface:
Take a rubber or smooth wooden rib and compress the clay slab on both sides. This aligns the clay particles, making it stronger and erasing the canvas texture.
Use a barrier!
Place a layer of thin plastic wrap or even newspaper between your mold and the clay slab. This prevents the clay from sticking to the mold as it shrinks during drying.
Step 2: Shaping the Dishes
-
Select your molds:
Choose a set of nesting kitchen bowls to use as hump molds. You will drape the clay over the outside (bottom) of these bowls. Ensure they are rigid enough to support the clay. -
Cut clay circles:
Place your molds upside down on the slab to estimate size. Cut circles of clay that are about 1-2 inches wider than the base of each mold using your needle tool or fettling knife. -
Drape the clay:
Gently lift a clay circle and drape it over the upturned bottom of a bowl mold. Let gravity help it settle initially. -
Form the shape:
Use your hands to gently press the clay against the mold, working from the center (bottom) outwards. Be careful not to stretch the clay too thin. -
Refine the rim:
Once the clay is conformed to the mold, use your needle tool to trim the excess clay at the bottom (which is temporarily the rim) to get a clean, even edge. You can leave it slightly wavy for an organic look. -
Smooth edges:
Take a damp—not wet—sponge and run it along the cut rim to soften the sharp edge. I find a chamois cloth works beautifully here for an ultra-smooth finish. -
Dry to leather hard:
Allow the clay to dry on the molds until it reaches a soft leather-hard stage. It should be firm enough to hold its shape but not bone dry.
Step 3: Finishing and Glazing
-
Remove from molds:
Carefully pop the clay bowls off the molds. If they stick, gently wiggle them loose. Place them right-side up on a ware board. -
Clean up the interior:
Inspect the inside of your bowls. Use a rib to smooth out any wrinkles or marks left by the mold surface. -
Bisque fire:
Let the bowls dry completely to the bone-dry stage. Load them into the kiln and bisque fire according to your clay’s specifications (usually Cone 04 or 06). -
Apply wax resist:
Once cooled, apply wax resist to the bottom foot area of each bowl to prevent glaze from sticking to the kiln shelf. -
Glaze application:
Select your glaze palette. For the look in the photo, leave the rim and exterior of the terracotta bowls unglazed or use a matte clear glaze. Glaze the interiors fully. -
Layering colors:
For the middle bowl, dip or brush a deep midnight blue glaze. For the largest base bowl, use a speckled matte white glaze. -
Final Wipe:
Use a sponge to wipe back any glaze that may have dripped onto the foot rings or areas you want to remain raw clay. -
Glaze fire:
Load the kiln carefully, ensuring bowls aren’t touching. Fire to the maturity temperature of your glaze (typically Cone 5 or 6 for stoneware).
Add Texture
Before cutting your circles, roll a piece of textured fabric or lace into the slab surface. This creates a beautiful tactile pattern on the exterior of your finished bowls.
Stack your finished set on a coffee table or shelf to show off the beautiful gradient of sizes and colors
Patterned Slab Coasters Set
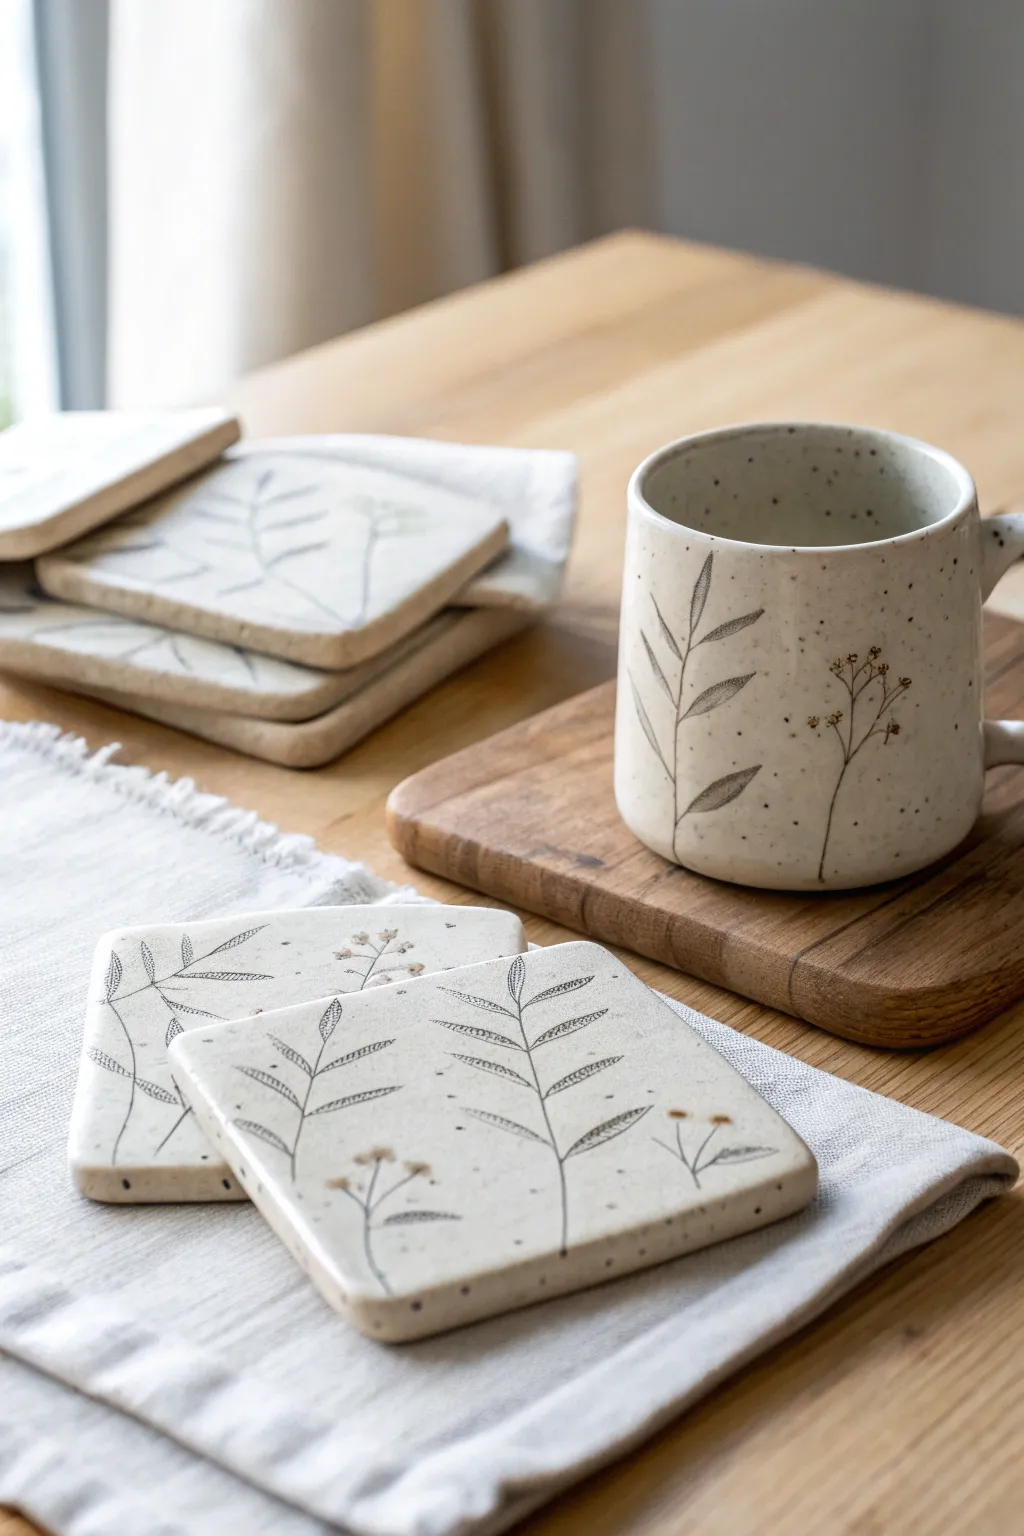
Bring a touch of nature to your coffee table with this charming set of slab-built ceramic coasters. Featuring delicate sprig designs on speckled clay, these square plates combine rustic warmth with elegant, minimalist line work.
Step-by-Step
Materials
- Speckled stoneware clay (mid-fire or high-fire)
- Rolling pin
- Two wooden guide slats (approx. 1/4 inch thick)
- Needle tool or fettling knife
- Square template or cookie cutter (approx. 4×4 inches)
- Smooth work surface (canvas or ware board)
- Soft rib tool (rubber or silicone)
- Sponge
- Black underglaze
- Fine detail brush (liner brush)
- Clear matte glaze
- Kiln
Step 1: Preparing the Slabs
-
Wedge the clay:
Start by thoroughly wedging your speckled stoneware clay to remove any air bubbles. This step is crucial for preventing cracks and explosions in the kiln later on. -
Roll out the slab:
Place your clay between two wooden guide slats. Using your rolling pin, roll the clay out until the pin rests evenly on both slats. This ensures a perfectly uniform thickness for your entire set. -
Compress the surface:
Take your soft rib tool and gently drag it across the surface of the clay in multiple directions. This aligns the clay particles, strengthens the slab, and creates a silky smooth canvas for your design. -
Cut the shapes:
Place your square template onto the slab. Using a needle tool or fettling knife, cut straight down around the edges. Repeat this for as many coasters as you wish to make, handling the wet clay carefully to avoid warping the corners.
Warping Woes?
If corners curl up while drying, flip the coasters over daily and weigh down the edges. Dry them very slowly under plastic.
Step 2: Refining and Drying
-
Smooth the edges:
Once your squares are cut, use a slightly damp sponge or your finger to soften the sharp cut edges. You want a rounded, comfortable rim that feels nice to the touch. -
Initial drying phase:
Place your coasters on a flat ware board. I like to cover them loosely with plastic for the first few hours so they dry slowly and evenly, preventing them from curling up at the corners. -
Reach leather-hard:
Allow the coasters to dry until they reach the ‘leather-hard’ stage. They should be firm enough to handle without bending, but still cool to the touch and able to accept underglaze.
Make It a Set
Use the same slab technique to build a matching mug. Wrap a clay rectangle around a cylinder form and attach a circular base.
Step 3: Decorating and Firing
-
Gather reference material:
Look at botanical illustrations or real dried sprigs for inspiration. The design relies on simple, confident lines depicting leaves and small seed heads. -
Paint the stems:
Dip a fine liner brush into black underglaze. Paint a central, slightly curved line for the main stem, starting from one edge and reaching inward. -
Add the leaves:
Using quick, light strokes, add leaves branching off the main stem. Keep the pressure light at the tip and heavier in the middle of the leaf to create a natural, tapered shape. -
Detail the accents:
For variety, paint thinner stems with tiny dots at the ends to represent seed pods or small flowers. Keep the composition airy and minimalist. -
Bisque fire:
Allow the underglaze to dry completely. Load the coasters into the kiln for a bisque firing (usually cone 04 or 06) to permanently set the shape and the decoration. -
Apply clear glaze:
Once cooled, wipe the bisque ware with a damp sponge to remove dust. Dip the coasters into a clear matte glaze, or brush it on evenly. Wipe the bottom clean or use wax resist before glazing. -
Glaze fire:
Fire the coasters again to the maturation temperature of your specific clay and glaze (often cone 5 or 6 for stoneware). This final firing will bring out the speckles in the clay and seal the surface.
Now you have a durable, custom set ready for your morning tea or to gift to a friend
Curved Slab Clock Face
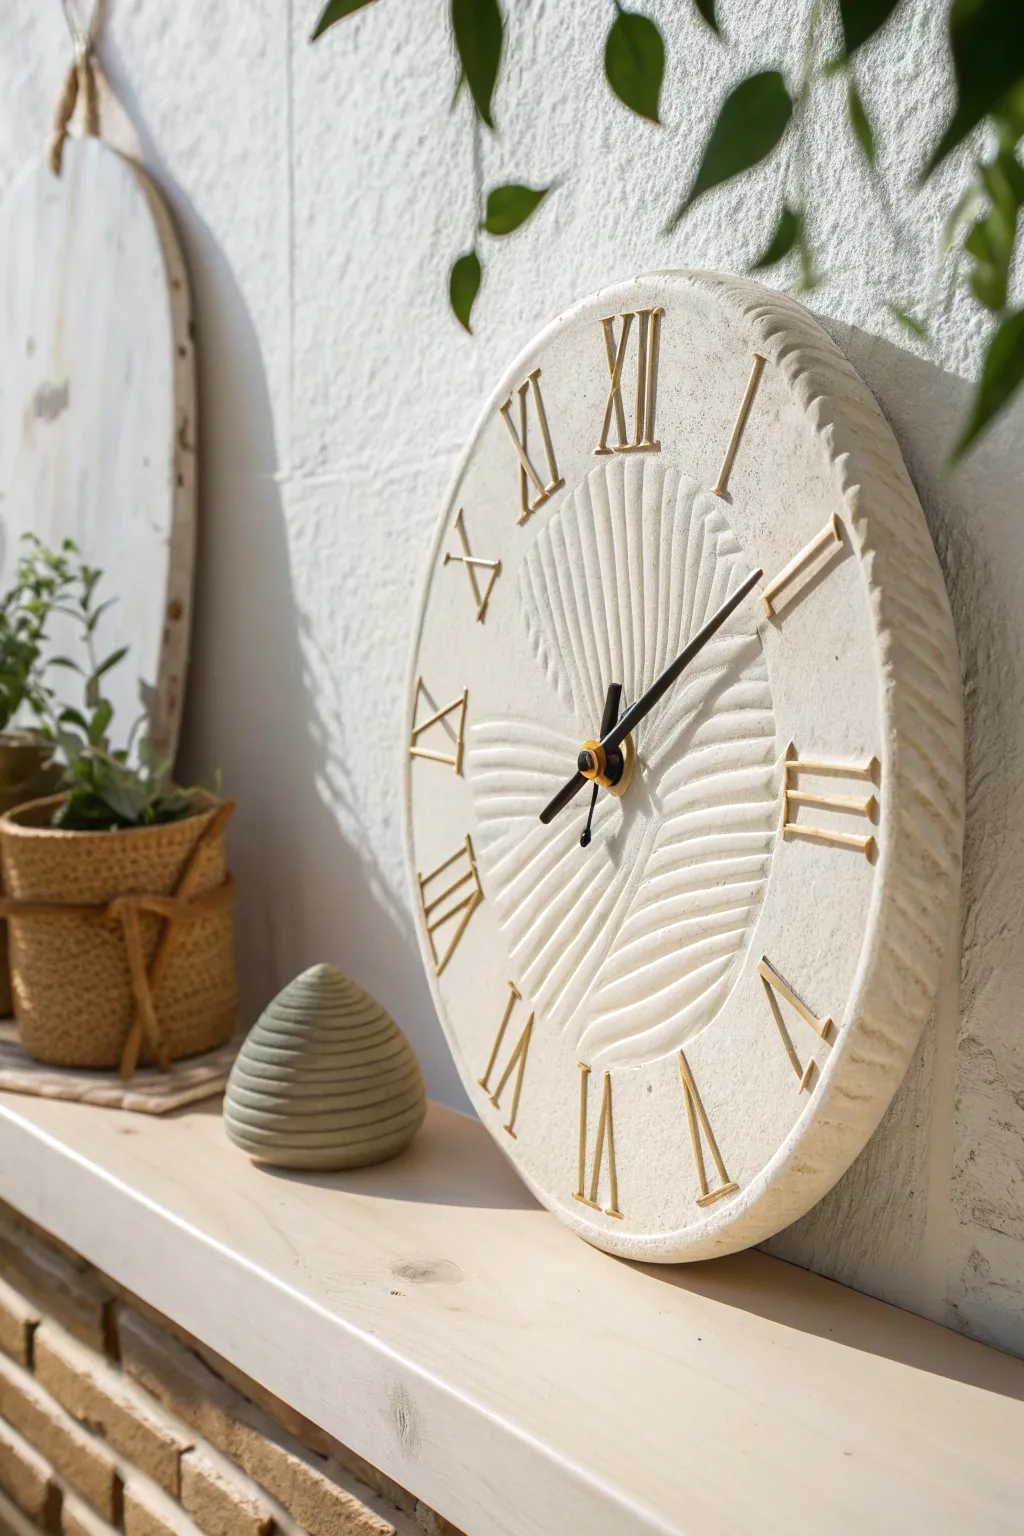
This project transforms a simple clay slab into a sophisticated timepiece featuring an elegant, fan-like relief pattern. The creamy, matte finish and gold-accented numerals give it a modern organic feel that blends perfectly with botanical decor.
Step-by-Step
Materials
- White or cream stoneware clay (or air-dry clay)
- Rolling pin and guide sticks (approx. 1/4 inch)
- Round template or large bowl (approx. 10-12 inches)
- Needle tool
- Loop tool or carving gouges
- Clock mechanism kit with hands
- Gold metallic paint or gold leaf
- Fine grit sandpaper
- Small detail paintbrush
- Sponge
Step 1: Forming the Base
-
Prepare the slab:
Begin by wedging your clay to remove air bubbles. Roll it out into a smooth, even slab about 1/4 to 1/2 inch thick, using guide sticks to ensure uniform thickness. -
Cut the circle:
Place your round template or bowl onto the slab. Using a needle tool held vertically, trace around the template to cut out a perfect circle. -
Smooth the edges:
Dip a sponge in water and gently wring it out. Run it along the cut edge of the circle to soften the sharp corners and create a refined, rounded rim. -
Create the center hole:
Find the exact center of your circle. Use a tool (like a straw or a small round cutter) to punch a hole slightly larger than the shaft of your clock mechanism, allowing for shrinkage if firing. -
Add rim texture:
Using a modeling tool or the side of a pencil, press small, diagonal indentations around the outer edge of the rim to create a rope-like border effect.
Perfect Circles
To prevent warping while drying, flip the slab over everyday. Sandwiching it between two pieces of drywall functions perfectly to suck moisture out evenly from both sides.
Step 2: Carving the Relief
-
Map the design:
Lightly sketch curved guidelines radiating from the center hole outward. Imagine a sweeping, fan-like motion that divides the face into organic sections. -
Carve the grooves:
Using a loop tool or carving gouge, carefully carve out the clay between your sketched lines. Vary the depth slightly to create shadows, but be careful not to puncture through the slab. -
Refine the ridges:
Go back over the raised areas (the ridges) with a damp finger or soft rubber rib to smooth them, ensuring the contrast between the smooth ridges and the carved valleys is distinct. -
Dry slowly:
Place the clock face on a flat board covered with canvas or newspaper. To prevent warping—a common enemy of flat clocks—place a light weight on the center or dry it very slowly under loose plastic.
Step 3: Finishing Touches
-
Sand and prep:
Once the clay is bone dry (or fully cured), sand any rough spots gently. If firing, bisque fire the piece now. If using air-dry clay, ensure it is completely hard. -
Mark numeral positions:
Use a protractor or a clock template to lightly mark the positions for the hours (12, 3, 6, 9 first, then fill in the others) to ensure accurate timekeeping. -
Paint Roman numerals:
With a fine detail brush and gold metallic paint, carefully paint the Roman numerals. I prefer to paint them directly over the texture, letting the carved ridges interrupt the lines for an integrated look. -
Seal the surface:
Apply a matte clear sealant over the entire face to protect the clay and the paint, especially if you used air-dry clay. -
Install mechanism:
Insert the clock movement shaft through the back hole. Secure it with the washer and nut provided in your kit. -
Attach hands:
Press the hour hand, then the minute hand onto the shaft. Add the second hand if included, or the cap nut to finish the assembly.
Raised Numbers
Instead of painting, cut thin strips of clay to form the Roman numerals. Score and slip them onto the face before drying for a true 3D effect that catches the light.
Hang your new handcrafted timepiece and enjoy the subtle play of light across its textured surface
Mini Slab-Built House Village
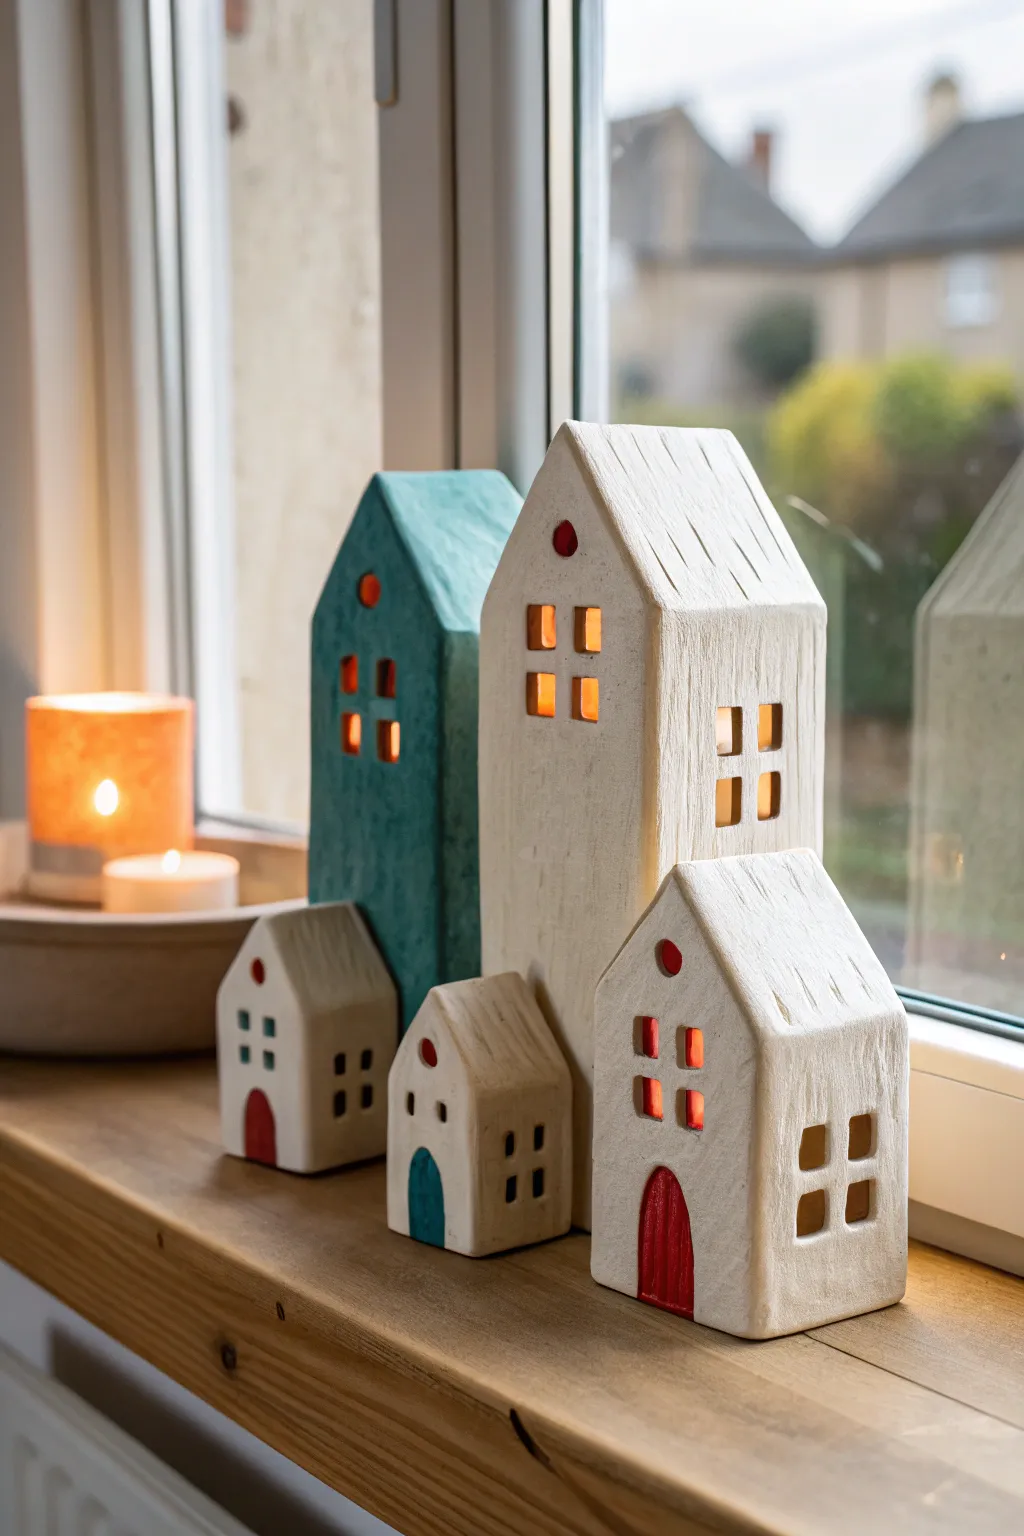
Create a charming little village of slab-built houses that glow warmly from within. With rustic textures and simple geometric cutout windows, this set brings a scandi-inspired hygge vibe to any windowsill.
Detailed Instructions
Materials
- Stoneware clay or air-dry clay
- Rolling pin
- Wooden guide strips (approx. 1/4 inch thick)
- Paper templates (cardstock recommended)
- Fettling knife or X-Acto knife
- Needle tool
- Scoring tool (or an old toothbrush)
- Slip (clay mixed with water)
- Small square cutters (optional, for windows)
- Ware board
- Underglaze (teal and red)
- White glaze (matte preferred)
- Sponge
Step 1: Planning and Slab Rolling
-
Design your templates:
Sketch out three different house sizes on cardstock. For each house, you need a front/back piece (pentagon shape with a peaked roof), two side walls (rectangles), and two roof panels (rectangles slightly wider than the house for overhang). Cut these out. -
Roll the clay:
Wedge your clay to remove air bubbles, then place it on a canvas board between two wooden guide strips. Roll the clay out until it is an even thickness, using the guides to keep it level. -
Cut the shapes:
Lay your paper templates onto the smooth slab gently. Use a needle tool to lightly trace the outline, then cut through cleanly with a fettling knife. Don’t drag the knife; slice straight down if possible to avoiding warping edges. -
Firm up:
Let the cut pieces sit on a ware board for about 30–60 minutes until they reach a ‘leather hard’ state. They should be firm enough to stand up without slumping but still flexible enough to join.
Clean Corner Pro-Tip
Cut your side walls with a 45-degree miter cut on the joining edges rather than a blunt cut. This creates a seamless corner joint that requires much less blending.
Step 2: Assembly and Detailing
-
Prepare the windows:
While flat, use a small square cutter or a steady hand with a knife to remove the window squares on the front and side panels. Create variety by making 4-pane clusters on larger houses and simpler designs on small ones. -
Carve the doors:
Cut out the arched doorways at the base of the front panels. Save the clay piece you remove if you want to test glaze colors later. -
Score the edges:
Take a serrated rib or needle tool and rough up the edges where the walls will meet (sides of the front/back panels and the long edges of the side walls). -
Join the walls:
Apply a generous amount of slip to the scored areas. Press the side walls onto the back panel first to form a ‘U’ shape, then attach the front. Use your finger or a tool to smooth the interior coil for stability. -
Add the roof:
Score and slip the top angled edges of the house walls. Place the two roof rectangular panels on top so they meet at the peak. I usually support the roof from the inside with a small coil of clay along the ridge line. -
Smooth the seams:
On the outside, use a soft rib or a slightly damp sponge to compress the seams so they disappear. The corners should look clean but soft.
Step 3: Texture and Finishing
-
Add roof texture:
Using a needle tool or a stiff bristled brush, scratch vertical lines down the roof panels to mimic wood grain or thatching texture. Be careful not to press so hard you collapse the roof. -
Refine the openings:
Take a damp paintbrush and gently run it around the inside edges of your window and door cutouts to smooth away any sharp crumbs or burrs. -
First Design Painting:
For the colorful accent house, apply a teal underglaze to the entire exterior before the first firing. For the white houses, you can paint the door interiors red now if using underglaze. -
Drying:
Loosely cover the houses with plastic for a day to let the moisture equalize, then uncover and let them dry completely to bone dry before bisque firing. -
Glazing:
After bisque firing, dip or brush the white houses with a matte white glaze. If you used underglaze on the teal house, apply a clear matte glaze over it. Wipe the bottoms clean with a sponge. -
Final Fire:
Fire the pieces again according to your clay and glaze specifications. Once cool, place LED tea lights underneath to illuminate the windows.
Roof Troubleshooting
If your roof starts sagging in the middle while drying, lightly stuff the inside of the house with crumpled newspaper or paper towels to support the weight until it hardens.
Enjoy the gentle glow of your handmade village as the evening light fades