If you love building with clay slabs, you already know it’s like crafting with a tiny sheet of earth—cut it, fold it, drape it, and suddenly you’ve got something real. These clay slab ideas are the kinds of projects I reach for in my studio when I want results that feel clean, modern, and totally doable.
Classic Slab Plates With Soft, Lifted Rims
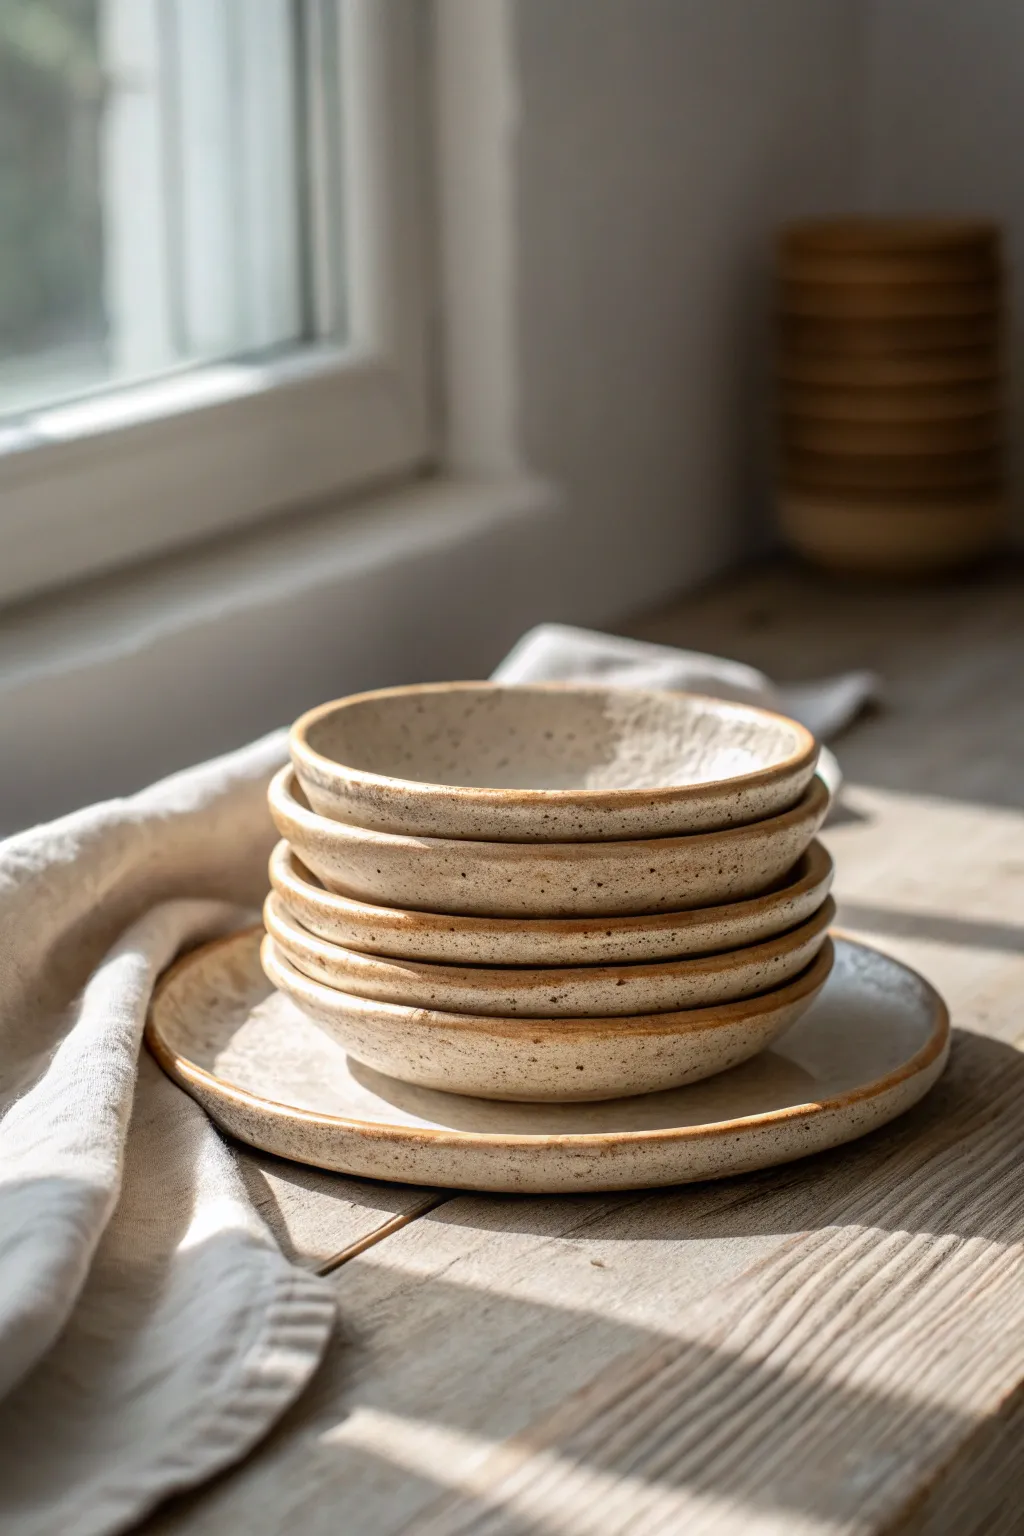
These charming, stackable dishes feature a rustic, organic aesthetic achieved through simple slab building techniques. The subtle speckling and gently toasted rims give them a timeless, handcrafted warmth perfect for everyday dining.
Step-by-Step Guide
Materials
- Speckled stoneware clay (mid-fire)
- Rolling pin
- Thickness strips or heavy canvas
- GR Pottery Forms or rounded plaster hump molds (various sizes)
- Large foam smoothers
- Ribs (soft rubber and serrated)
- Needle tool or fettling knife
- Surform tool
- Sponge
- Matte white or cream glaze
- Kiln
Step 1: Prepping the Slab
-
Wedge the clay:
Begin by thoroughly wedging your speckled stoneware clay. Since we are working with slabs, consistency is key, and wedging removes air bubbles while aligning the clay particles for a smoother roll. -
Roll out the clay:
Using a rolling pin and thickness strips (about 1/4 inch is ideal for dinnerware), roll out a large, even slab. If you don’t have strips, two magazines of equal thickness on either side of the clay work well as guides. -
Compress the surface:
Take a soft rubber rib and firmly drag it across the surface of the slab in multiple directions. This compression is crucial—it aligns the clay platelets to prevent warping during firing and creates a smooth, finished canvas for your glaze. -
Smooth the texture:
If you are using a canvas workspace, the underside of your slab will have a canvas texture. Carefully flip the slab and compress the other side with your rib until that texture is completely smoothed away.
Warping Woes?
Slab plates love to warp. To fix this, dry them excruciatingly slowly. Weight the centers down with a small sandbag while drying to keep the bottoms perfectly flat.
Step 2: Shaping and Refining
-
Cut the rough shape:
Place your chosen mold (or a circle template) lightly onto the slab. Using a needle tool, cut a circle roughly 1 inch wider than your intended finished diameter to account for the lifted rim. -
Transfer to the mold:
Carefully lift your clay circle and center it over your hump mold or pottery form. Gravity will do most of the work initially, letting the clay drape naturally over the curve. -
Press and shape:
Use a damp sponge or a soft rib to gently press the clay against the mold, starting from the center and spiraling outward. This ensures the base is flat and the curve is continuous. -
Define the rim:
I like to use a surform tool or a sharp knife at this stage to trim the excess clay at the bottom of the mold, creating a perfectly even edge. Keeping the tool steady while rotating the mold (if on a banding wheel) yields the cleanest line. -
Soften the lip:
Dip a small piece of chamois leather or a very smooth sponge in water and run it along the freshly cut rim. This rounds off the sharp edge, making it comfortable to touch and giving it that ‘soft’ look seen in the photo. -
Stiffen the form:
Allow the clay to dry to a soft leather-hard stage while still on the mold. Don’t let it dry completely, or the clay will shrink and crack against the rigid mold form.
Rim Variation
For a looser, more organic feel, gently pinch the rim at random intervals while the clay is soft. This creates a subtle undulation that catches light beautifully.
Step 3: Finishing and Glazing
-
Remove and refine:
Once the clay holds its shape, gently pop it off the mold. Flip it over and inspect the interior. If the rim feels too heavy, you can wipe it down with a damp sponge to thin it slightly. -
Bisque fire:
Let the plates dry slowly and evenly, covering them loosely with plastic if your studio is dry. Once bone dry, bisque fire them to Cone 04 (or your clay body’s recommended temperature). -
Wipe down:
After the bisque, wipe the plates with a damp sponge to remove any kiln dust. This helps prevent crawling where the glaze pulls away from the dusty surface. -
Apply the glaze:
Pour or dip your matte white or cream glaze. For the look in the image, you want a glaze that breaks over edges—meaning it thins out on high points like the rim, allowing the toasty speckled clay to show through. -
Clean the foot:
Wipe the bottom of the plate completely clean of glaze using a wax resist or a wet sponge. This prevents the plate from sticking to the kiln shelf. -
Glaze fire:
Load the kiln and fire to the maturity temperature of your clay and glaze (typically Cone 5 or 6 for speckled stoneware). The heat will interact with the iron speckles in the clay, often forcing them to bleed slightly through the white glaze.
Now you have a stunning stack of custom dinnerware ready to grace your table


Organic Slab Trinket Dishes for Jewelry Drops
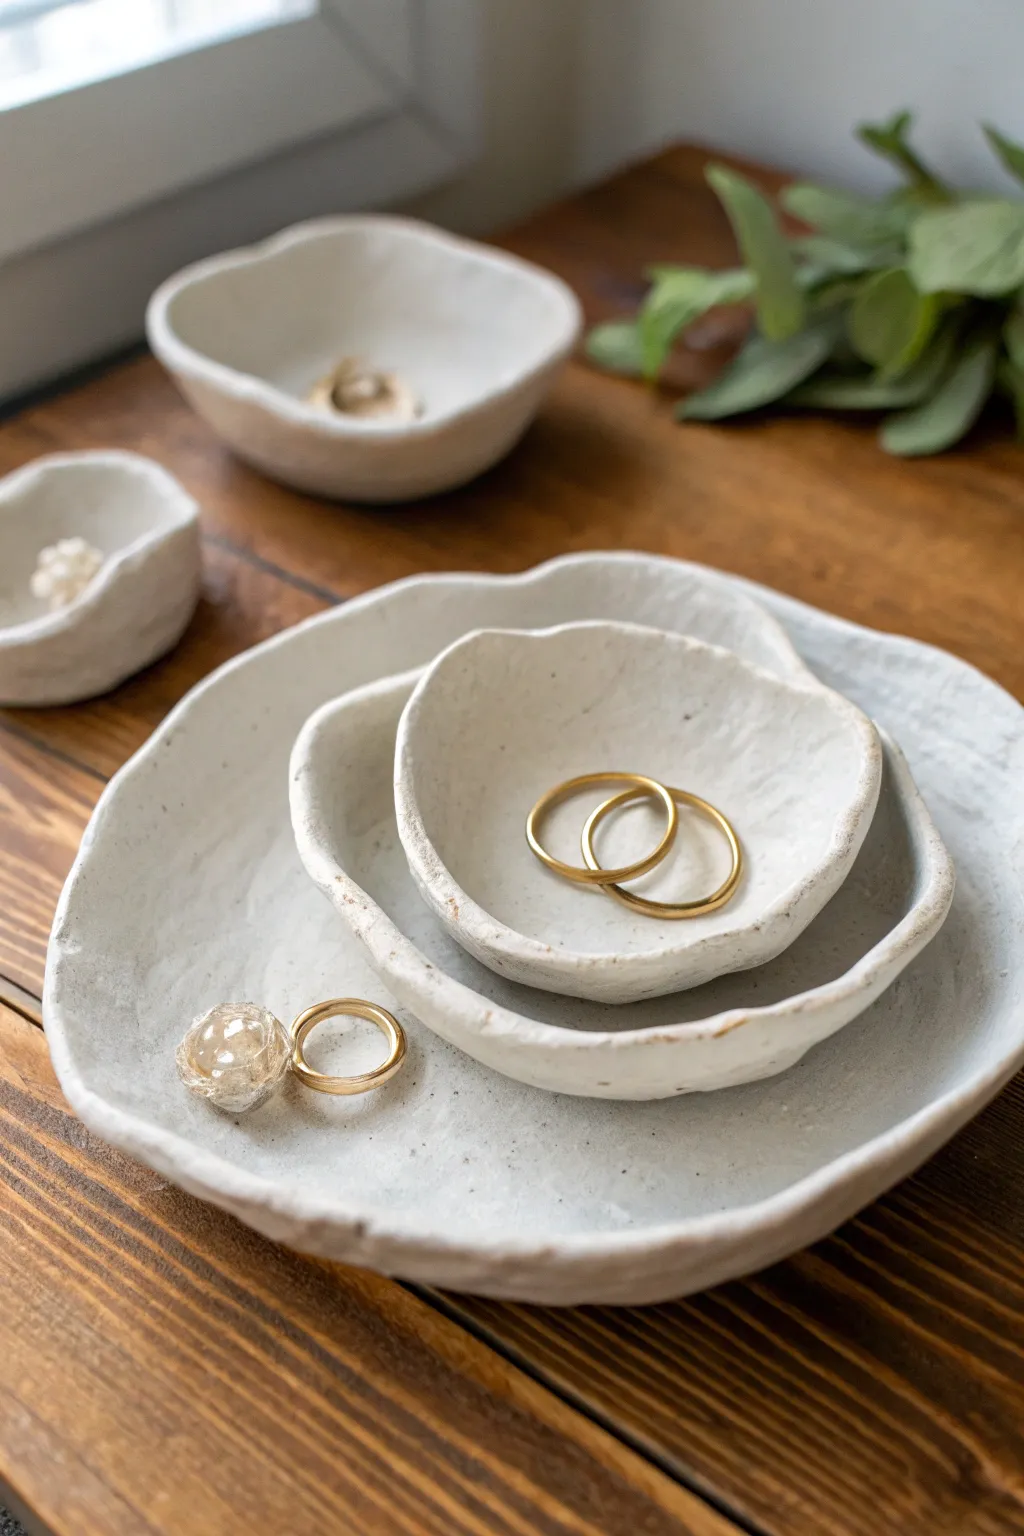
Embrace the beauty of imperfection with these charmingly uneven, textured trinket dishes. Their organic shapes and subtle, matte white finish make them the perfect minimalist home for your favorite rings and studs.
Step-by-Step Tutorial
Materials
- White polymer clay or air-dry clay (stone effect preferred)
- Acrylic rolling pin
- Rolling guides or playing cards
- Parchment paper
- Various bowl sizes for molds (nesting)
- A textured sponge or soft toothbrush
- Craft knife or needle tool
- Fine-grit sandpaper
- Matte sealant or varnish (optional)
- Water in a small cup
Step 1: Prepping and Rolling the Clay
-
Conditioning the Clay:
Begin by warming up your clay in your hands. Knead it thoroughly until it becomes pliable and soft, ensuring there are no air bubbles trapped inside, which can cause cracks later. -
Setting Up Your Workspace:
Lay down a sheet of parchment paper on your work surface. This prevents sticking and makes it easier to move your delicate slabs later without distorting their shape. -
Creating the Slab:
Place the ball of clay on the parchment. Using your acrylic roller, flatten the clay into an even sheet. Aim for a thickness of about 1/4 inch; using rolling guides on either side helps keep the thickness consistent. -
Adding Organic Texture:
Before cutting, lightly press a textured sponge or the bristles of a soft toothbrush into the surface of the clay slab. This mimics the raw, stony look seen in the photo rather than a perfectly smooth manufactured finish.
Natural Texture Hack
Gently press a crumpled ball of aluminum foil over the wet clay slab. This creates a realistic rock-like texture instantly.
Step 2: Shaping the Dishes
-
Cutting Freehand Shapes:
To achieve that natural, wobbly edge, avoid using circular cookie cutters. Instead, use a needle tool or craft knife to freehand cut rough, organic circles or ovals from your slab. -
Planning the Set:
Cut three distinct sizes—large, medium, and small—to create a nesting set. Don’t worry about symmetry; the irregularities are what give these dishes their character. -
Softening the Rims:
Dip your finger in a little water and gently run it along the cut edges of your clay shapes. Smooth out any sharp burrs or crumbs, but leave the undulating wave of the rim intact. -
Initial Shaping:
Lift one of your clay cutouts and gently drape it into a bowl that you’re using as a form. I like to dust the inside of the bowl with a little cornstarch first to ensure easy release. -
Forming the Curves:
Instead of pressing the clay hard against the bowl, gently coax it down so it slumps naturally. Allow gravity to do some of the work to create a soft, shallow curve rather than a steep wall. -
Refining the Edge:
Once in the form, use your thumb to slightly manipulate the rim. Push some sections down and pull others up slightly to exaggerate that ‘hand-formed’ aesthetic.
Gilded Edges
Once the dish is dry, paint just the very rim with liquid gold leaf or metallic paint for a luxe, high-end contrast.
Step 3: Finishing Touches
-
Drying Process:
Let the clay sit in the mold until it is leather-hard (firm but not fully dry). This helps it hold the curved shape. -
Removing from Molds:
Carefully pop the dishes out of their bowl molds. Place them right-side up on a flat surface to finish drying completely according to your clay package instructions. -
Sanding for Smoothness:
Once fully cured or dry, inspect the edges. Use fine-grit sandpaper to gently buff away any sharp points or jagged bits that might scratch your jewelry. -
Applying a Wash (Optional):
If your clay is too uniform in color, water down a tiny bit of beige or grey acrylic paint. Brush it over the textured surface and immediately wipe it off with a paper towel to highlight the pits and grooves. -
Sealing the Piece:
To protect the dishes from tarnishing jewelry or moisture, apply a thin coat of matte varnish. Avoid glossy finishes to maintain that raw, earthy stone vibration.
Arrange your finished nesting bowls on your dresser and enjoy the simple elegance they bring to your space


Slab Bowls Slumped Over a Simple Mold
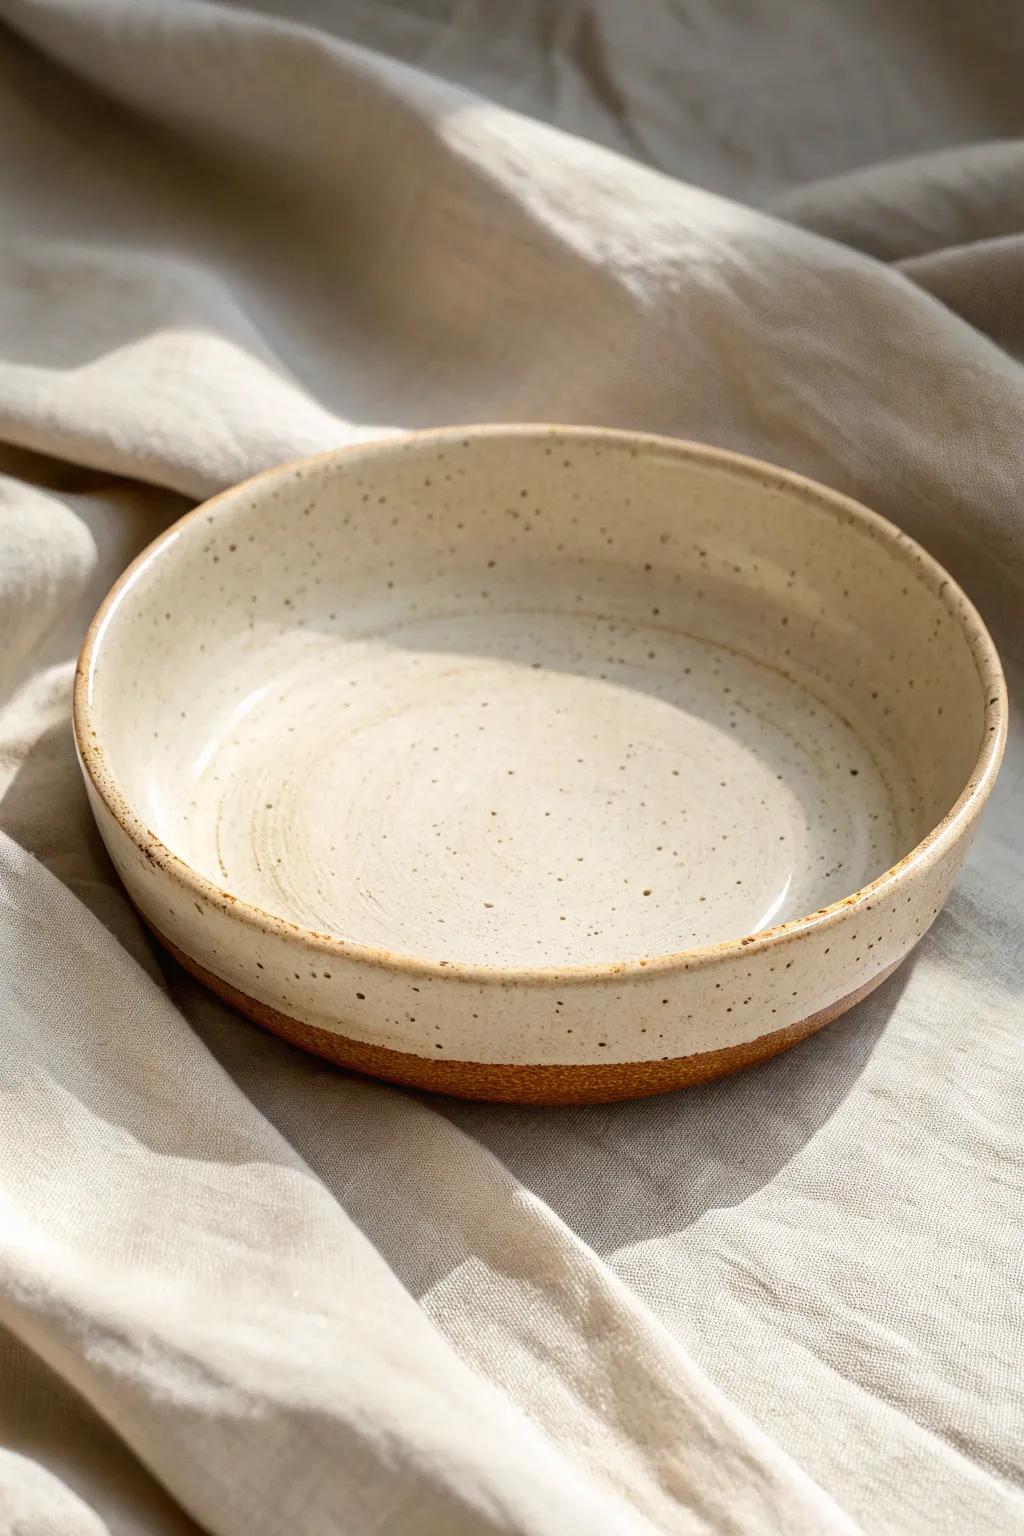
This project creates a stunningly simple bowl featuring a warm, speckled cream glaze that contrasts beautifully with a raw, toasted terracotta base. By slumping a clay slab over a basic mold, you achieve a perfectly round shape with an organic, handmade feel.
How-To Guide
Materials
- Speckled stoneware clay or Buff clay with grog
- Rolling pin
- Two wooden guide strips (approx. 1/4 inch thick)
- Circular slumping mold (or a plaster/bisque bowl)
- Canvas or slab mat
- Needle tool or fettling knife
- Soft rib (rubber or silicone)
- Sponge
- Wire cutter
- Cream or oatmeal speckled glaze
- Wax resist (optional but helpful)
Step 1: Preparing the Slab
-
Wedge the clay:
Start with a ball of speckled stoneware clay about the size of a grapefruit. Wedge it thoroughly to remove air bubbles and ensure particle alignment, which prevents warping later. -
Set up your rolling station:
Place your canvas or slab mat on a sturdy table. Position your two wooden guide strips on either side of the clay ball to ensure an even thickness throughout the slab. -
Roll out the clay:
Using the rolling pin, roll the clay out between the guides. Rotate the slab occasionally to keep it circular, rolling until the pin rests on the guide strips. -
Compress the slab:
Take a soft rubber rib and firmly drag it across the surface of the clay in multiple directions. This compression is crucial for preventing cracks and aligning the clay platelets.
Step 2: Shaping the Bowl
-
Cut the circle:
Place your circular template or bowl rim-down on the slab. Using a needle tool, cut straight down around the edge to create a perfect circle. -
Smooth the edges:
Before moving the clay, run a damp sponge or your finger along the cut edge to soften the sharp angle created by the needle tool. -
Prepare the mold:
If using a plaster mold, it’s ready to go. If using a standard bowl, cover it with a layer of thin plastic or damp newspaper to prevent the clay from sticking. -
Slump the slab:
Carefully lift your clay circle and center it over the mold. Gently lower it down, letting gravity do most of the work. -
Conform to the shape:
Starting from the center and working outward in a spiral, gently press the slab against the mold. Be careful not to stretch the clay too thin; simply encourage it to take the shape. -
Refine the rim:
Once shaped, you might notice the rim is slightly uneven. Use a sureform tool or a damp sponge to level it out while it rests on the mold.
Warping Edges?
If your rim warps drying, weigh it down. Place a small board and a light weight on the rim while it dries to leather hard to keep it flat.
Step 3: Drying and Finishing
-
Let it firm up:
Allow the clay to dry to a soft leather-hard stage while still on the mold. This usually takes a few hours depending on humidity. -
Remove and trim:
Gently remove the bowl from the mold. If desired, you can add a trimmed foot ring now by centering the bowl upside down on a wheel or banding wheel, but the example bowl sits flat. -
Smooth the exterior:
Use a damp sponge to refine the bottom curve and ensure the base is smooth. I usually stamp my maker’s mark on the bottom at this stage. -
Bisque fire:
Once bone dry, fire the piece to bisque temperature (usually cone 04 or 06) to prepare it for glazing. -
Apply wax resist:
Paint a band of wax resist along the bottom inch of the bowl’s exterior and across the entire base. This creates the clean line between the glaze and the raw clay seen in the photo. -
Glaze the bowl:
Pour a creamy, speckled glaze into the interior, coat the walls, and pour out the excess. Dip the rim just enough to meet your wax line on the exterior. -
Clean up:
Wipe away any glaze droplets that may have beaded up on the waxed areas with a damp sponge. -
Final firing:
Glaze fire the piece to the maturity temperature of your clay body (typically cone 5 or 6 for stoneware). The heat will interact with the iron specks in the clay to create that lovely texture.
Level Up: Spiral Texture
Before taking the clay off the mold, press a spiral pattern into the interior floor using a jagged rib to mimic wheel-thrown lines.
Enjoy using your new handmade bowl for salads or as a stunning centerpiece on your table


Soap Dishes With Drain Holes and Texture
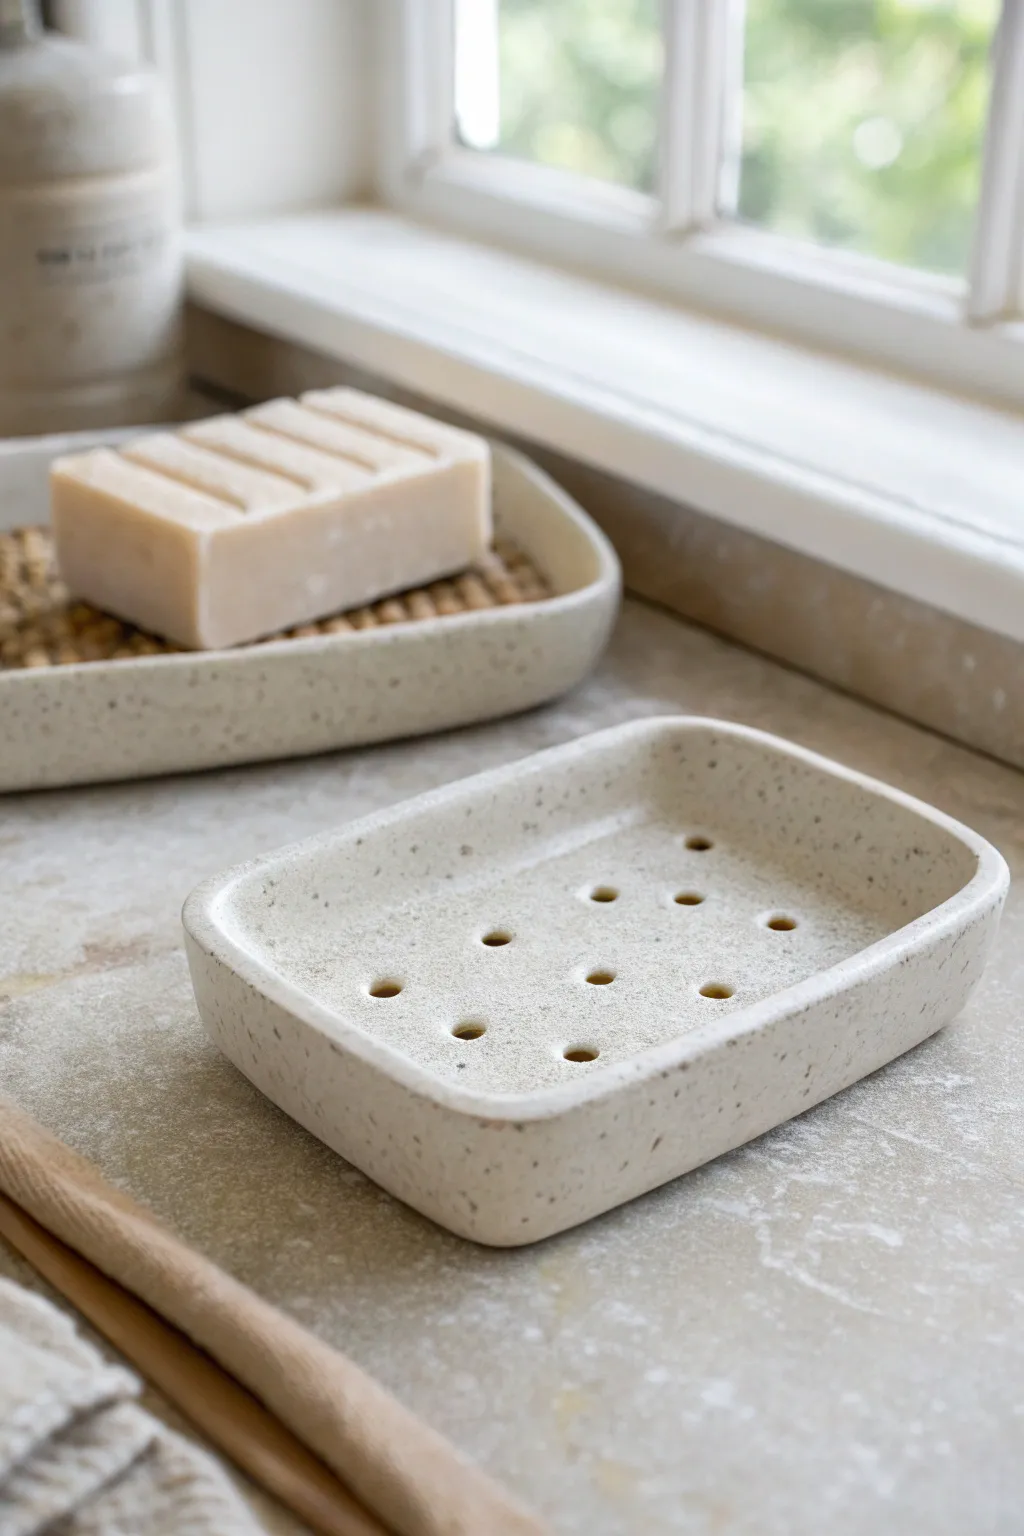
Embrace minimalist utility with this effortlessly stylish slab-built soap dish. The design features a gentle curve, functional drainage holes, and a beautiful speckled clay body that mimics the texture of natural sand.
Step-by-Step
Materials
- Speckled cream stoneware clay (e.g., Laguna Speckled Buff or similar)
- Rolling pin
- Two wooden guide slats (approx. 1/4 inch thick)
- Fettling knife or needle tool
- Paper template (rectangular with rounded corners, approx. 4×6 inches)
- Small circular clay punch or drinking straw
- Soft rib tool (rubber or silicone)
- Sponge
- Slump mold or shallow foam sheet
- Clear matte or satin glaze
Step 1: Prepping the Slab
-
Wedge the clay:
Begin by thoroughly wedging a grapefruit-sized ball of your speckled clay to remove air bubbles and ensure the particles are aligned. -
Set up guides:
Place your wooden guide slats on either side of your canvas or work surface. These will ensure your slab is a perfectly even thickness. -
Roll out the slab:
Place the clay between the slats and roll it out with your rolling pin. Roll in multiple directions to compress the clay, stopping once the pin rides smoothly on the wooden guides. -
Smooth the surface:
Before cutting, take your soft rib tool and gently compress the surface of the slab. This aligns the clay particles and removes the canvas texture, giving you that smooth, professional finish right from the start.
Step 2: Shaping the Dish
-
Cut the shape:
Lay your paper template onto the slab. Using a fettling knife or needle tool, trace around the template, keeping your tool perpendicular to the table for a clean, straight edge. -
Refine the edges:
Once cuts are made, run a damp finger or a slightly moist sponge along the sharp cut edges to round them off gently. We want a soft, hand-held feel, not sharp angles. -
Design the drainage:
Mark the placement for your drainage holes. A grid pattern works beautifully here; aim for about 9 to 12 holes depending on the size of your dish. -
Punch the holes:
Using a hole punch tool or a sturdy drinking straw, press straight down to create the drain holes. Remove the little clay plugs. -
Clean the holes:
Flip the slab over and clean up the ‘burrs’ or ragged edges around the holes on the backside using your finger or a small tool. -
Create the curve:
To give the dish its containment shape, gently lift the edges of the slab. You can press the slab into a shallow slump mold or simply prop the edges up with small bits of crumbled newspaper or foam.
Clean Hole Trick
Wait until the clay is leather hard before cleaning up the drain holes. The messy bits will flake off cleanly rather than smearing as they do when wet.
Step 3: Finishing Touches
-
Build the foot (optional):
If you want the dish elevated, roll a thin coil of clay, score and slip the bottom perimeter, and attach the coil to create a foot ring. Alternatively, you can add small clay ‘buttons’ to the corners. -
Final smoothing:
Give the entire piece one last pass with a barely damp sponge. I find this stage crucial for exposing those lovely speckles in the clay body before firing. -
Slow drying:
Cover the dish loosely with plastic. Because slabs can warp if they dry unevenly, let it dry slowly over a few days away from drafts. -
Bisque fire:
Once bone dry, fire the piece to bisque temperature (usually cone 04 or 06) according to your clay’s specifications. -
Glazing:
Dip or brush on a clear matte or satin glaze. This will seal the clay for water resistance while letting the natural speckles show through. -
Final fire:
Glaze fire the piece to the maturity temperature of your clay (likely cone 5 or 6 for stoneware).
Stamp It Up
Before curving the slab, press a piece of lace, burlap, or a custom maker’s mark into the clay surface to add subtle, tactile texture.
Place your favorite bar of handmade soap on your new dish and enjoy the simple luxury it adds to your bathroom sink

The Complete Guide to Pottery Troubleshooting
Uncover the most common ceramic mistakes—from cracking clay to failed glazes—and learn how to fix them fast.
Slab Coasters With Stamped or Carved Patterns
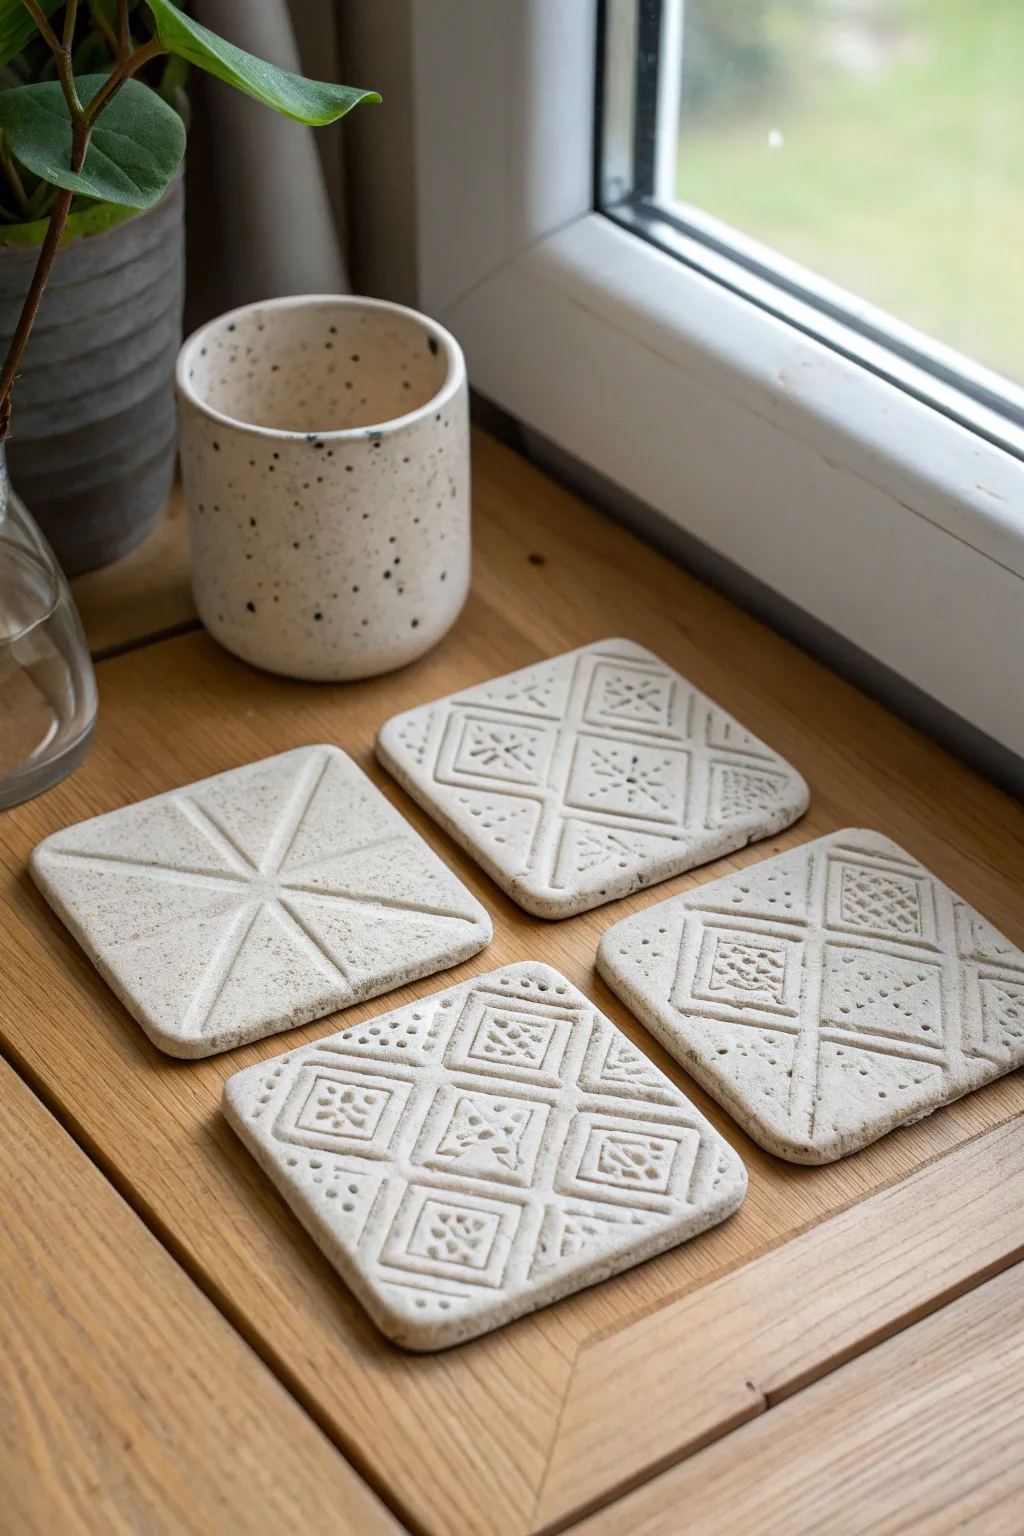
Elevate your coffee table with this set of earthy, minimalist coasters featuring intricate geometric stamped patterns. Made from speckled stoneware clay, these durable squares combine rustic charm with precise modern design.
Step-by-Step Tutorial
Materials
- Speckled Stoneware Clay (cone 5/6 recommended)
- Canvas work surface or slab mat
- Rolling pin
- Quarter-inch guide sticks
- Needle tool or fettling knife
- Geometric texture stamps (wooden or ceramic)
- Ruler
- Smoothing rib (rubber or wood)
- Plastic wrap
- Kiln (or access to a firing service)
Step 1: Preparation & Slab Rolling
-
Wedge the clay:
Begin by wedging your speckled stoneware clay thoroughly to remove any air bubbles and ensure an even consistency, which prevents warping later. -
Set up your workspace:
Lay down your canvas or slab mat. Place your quarter-inch guide sticks on either side of the area where you will roll the clay. -
Roll the slab:
Flatten the clay ball slightly with your palm, then use the rolling pin to roll it into a uniform slab, resting the pin on the guide sticks to ensure even thickness. -
Compress the slab:
Take your smoothing rib and run it firmly across the surface of the clay in multiple directions. This aligns the clay particles and creates a pristine surface for stamping.
Stamp Release Pro Tip
Dust your stamps lightly with cornstarch before pressing them into the wet clay. This acts as a release agent, preventing the clay from sticking to intricate stamp details.
Step 2: Cutting & Shaping
-
Measure the squares:
Using a ruler, lightly mark out four 4×4 inch squares on the slab. Don’t cut all the way through yet; just mark your guidelines. -
Cut the shapes:
Use a needle tool or fettling knife to cut along your ruler markings. Keep the tool vertical to ensure straight, 90-degree edges. -
Softening the corners:
Gently tap the corners of each square with your finger or a tool to round them off slightly. This prevents sharp, fragile points after firing. -
Refine the edges:
Run a damp sponge or your finger along the cut edges to smooth away any burrs or roughness left by the cutting tool.
Step 3: Stamping the Design
-
Plan the layout:
Visualize your geometric pattern. The image shows a grid-based design, so you might want to lightly score a cross in the center to guide your stamp placement. -
Apply the stamps:
Press your geometric stamps firmly into the clay. For the diamond patterns seen in the image, alignment is key, so work from the center outward. -
Create variation:
To mimic the set shown, use different stamps for different coasters. Try a simple radial mix of lines for one coaster, and complex diamond grids for the others. -
Deepen the lines:
If your stamp impression feels too shallow, I find it helpful to gently re-trace the main structural lines with a modeling tool to make the pattern pop. -
Clean up displacement:
Stamping often pushes clay up around the edges of the design. Once the clay is leather-hard, gently sand or smooth these raised ridges away.
Uneven Drying Fix
If you notice the corners starting to curl up while drying, flip the coasters over daily. Drying slowly under loose plastic is crucial for maintaining flat slabs.
Step 4: Drying & Firing
-
Slow drying:
Place the coasters between two pieces of drywall or sandwich them between plastic-covered boards. Weighted drying helps keep flat objects like coasters from curling. -
Monitor moisture:
Check the coasters daily. Once they are bone dry and room temperature to the touch, they are ready for the first firing. -
Bisque fire:
Load the coasters into the kiln for a bisque firing (usually to cone 04). This hardens the clay and prepares it for glazing. -
Clear glaze application:
Apply a thin layer of transparent matte or satin glaze. This seals the clay and makes it functional while letting the beautiful natural speckles show through. -
Glaze fire:
Fire the coasters again to the maturation temperature of your specific clay body (likely cone 5 or 6 for stoneware). -
Final sanding:
Once cool, check the bottoms of the coasters. Use wet sandpaper to smooth any rough patches so they won’t scratch your furniture.
Stack your finished coasters on the coffee table and enjoy the tactile beauty of handmade ceramics
Incense Holders That Catch Ash Cleanly
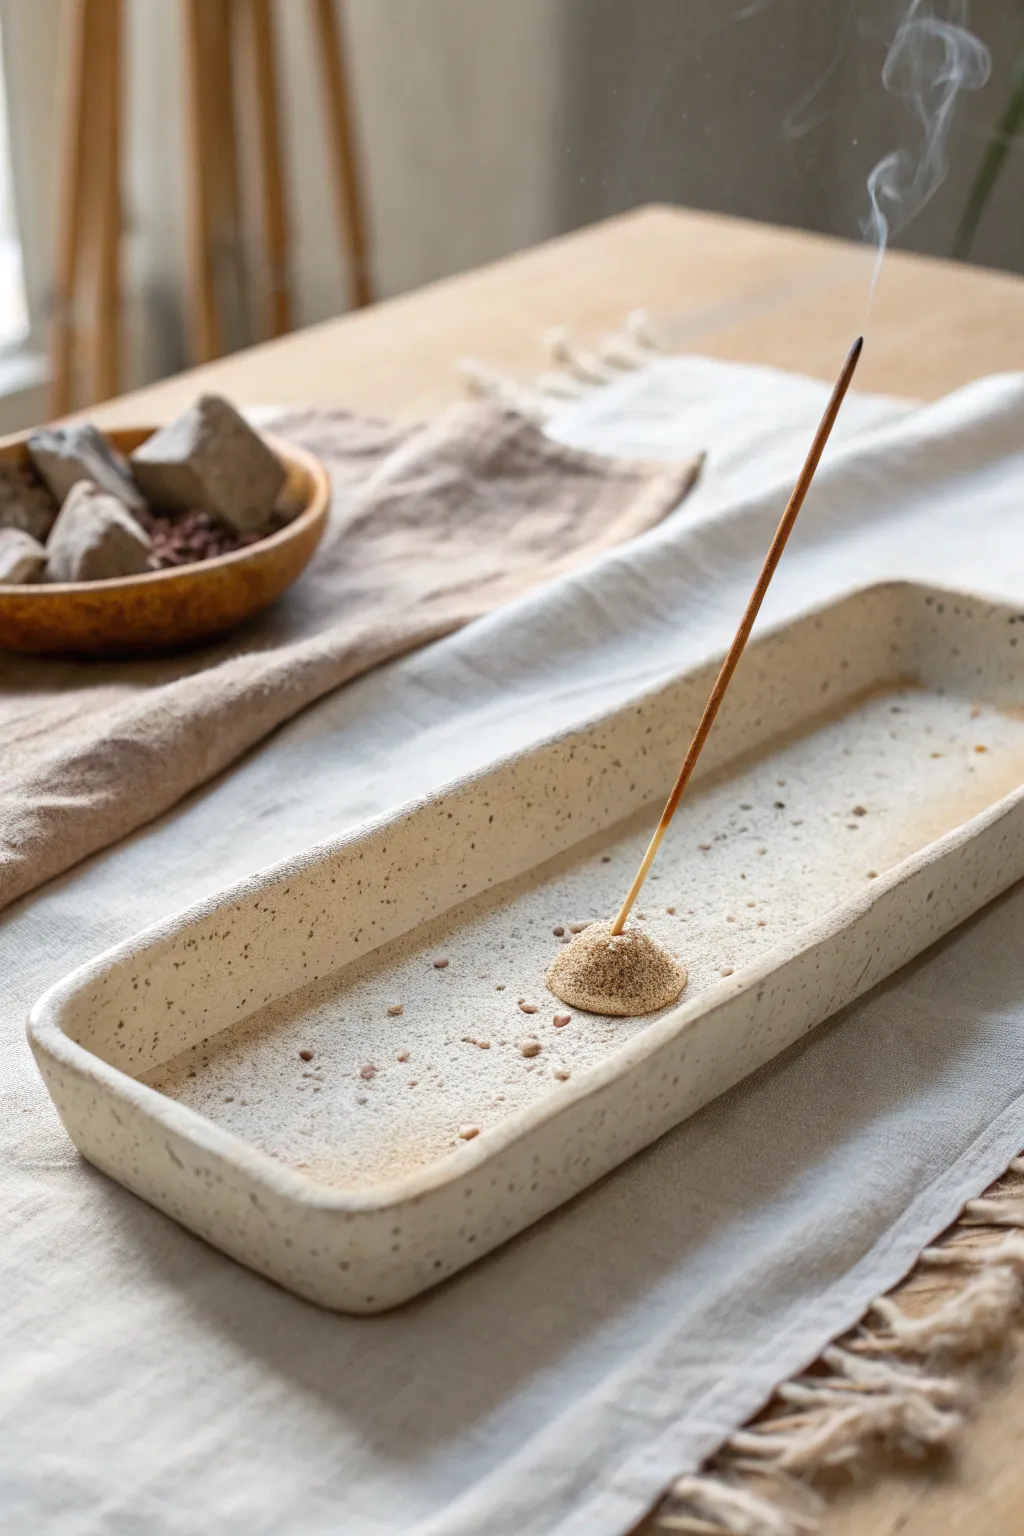
This elegant incense holder combines functionality with organic texture, featuring high walls to keep surfaces spotless and a unique pebble-style incense mount. Its speckled stoneware finish and soft rounded corners bring a calming, earthy aesthetic to any space.
Detailed Instructions
Materials
- Speckled buff stoneware clay
- Rolling pin
- Guide sticks (about 1/4 inch thick)
- Fettling knife or craft knife
- Paper template (rectangle with rounded corners)
- Score and slip tool (or needle tool + toothbrush)
- Sponge
- Rib tool (wood or rubber)
- Small drill bit or needle tool (for the hole)
- Matte white or transparent glaze
Step 1: Prepping the Slab Base
-
Roll the clay:
Begin by wedging your speckled stoneware clay to remove air bubbles. Roll it out into a uniform slab using guide sticks to ensure an even thickness, aiming for roughly 1/4 inch thick. -
Smooth the surface:
Before cutting, take a rubber rib tool and gently compress the slab on both sides. This smooths out canvas texture and aligns the clay particles to prevent warping later. -
Cut the base:
Cut a rectangular strip for the base, approximately 4 inches wide by 10 inches long. You can freehand rounded corners now or trim them after assembling the walls, but cutting them now ensures a cleaner look. -
Cut the wall strips:
From the remaining slab, cut long strips for the walls. These should be about 1 inch tall. Ensure the strips are long enough to wrap around the entire perimeter, or plan for two strips joined at the short ends.
Keep it Straight
To prevent the long walls from warping inward while drying, place a crumpled piece of newspaper or a soft foam block inside the tray to support the shape.
Step 2: Building the Walls
-
Score the edges:
Score the top perimeter of your base slab and the bottom edge of your wall strips thoroughly. Apply clay slip or vinegar to the scored areas. -
Attach the walls:
Place the wall strip onto the base. If using one long strip, wrap it gently around the curves. If using multiple strips, join them cleanly at the seams. -
Reinforce the seam:
Run a wooden modeling tool or your fingertip along the inside seam where the wall meets the floor to weld the clay together firmly. Do the same for the exterior seam. -
Smooth the connection:
Use a damp sponge to smooth out the transition lines until the wall and base look like one single unit. Pay special attention to the interior corners. -
Level the rim:
If the top edge of the wall is uneven, use a needle tool to trim it level, or gently paddle it down. Round off the sharp rim with a sponge or a piece of plastic wrap or chamois.
Step 3: Creating the Holder Mount
-
Form the pebble mount:
Roll a small ball of clay, about the size of a large marble or small walnut. Flatten the bottom slightly so it sits stable. -
Shape the mound:
Shape the top of the ball into a gentle dome or mound shape, mimicking a smooth river stone. I find keeping this shape organic contrasts nicely with the geometric tray. -
Texture the mount (optional):
To match the reference image, give the mound a slightly rougher texture by dabbing it with a stiff brush or rolling it over a textured fabric before attaching. -
Attach the mount:
Score the bottom of your clay mound and the spot in the center of the tray where it will sit. Apply slip and press the mound firmly into place. -
Create the incense hole:
Using a needle tool or a drill bit matching the size of standard incense sticks, poke a hole into the center of the mound. Angle it very slightly if you prefer the stick to lean, or go straight down. -
Check hole depth:
Ensure the hole is deep enough to hold a stick securely but doesn’t go all the way through the bottom of the tray.
Custom Clean-Up
Make the incense hole slightly larger than you think you need. Glaze often fills small holes, and clay shrinks during firing, making the final fit tight.
Step 4: Finishing and Firing
-
Final smooth:
Once the piece is leather hard, go over the entire surface with a damp sponge or rib to remove any fingerprints or sharp edges. -
Dry slowly:
Cover the piece loosely with plastic to let it dry slowly. This is crucial for slab pieces to prevent the floor from warping or cracking away from the walls. -
Bisque fire:
Fire the bone-dry piece to bisque temperature (usually cone 04). -
Glaze application:
Apply a matte, speckled glaze. A milky white or clear matte glaze works best over speckled clay bodies to let the iron spots show through. -
Glaze firing:
Fire to the maturation temperature of your clay and glaze (typically cone 5 or 6 for stoneware). Ensure the incense hole is free of thick glaze so the stick still fits.
Once fired, you will have a serene, functional piece of art ready to catch every bit of ash from your favorite scents


What Really Happens Inside the Kiln
Learn how time and temperature work together inside the kiln to transform clay into durable ceramic.
Slab Planters With Crisp Corners and Drainage
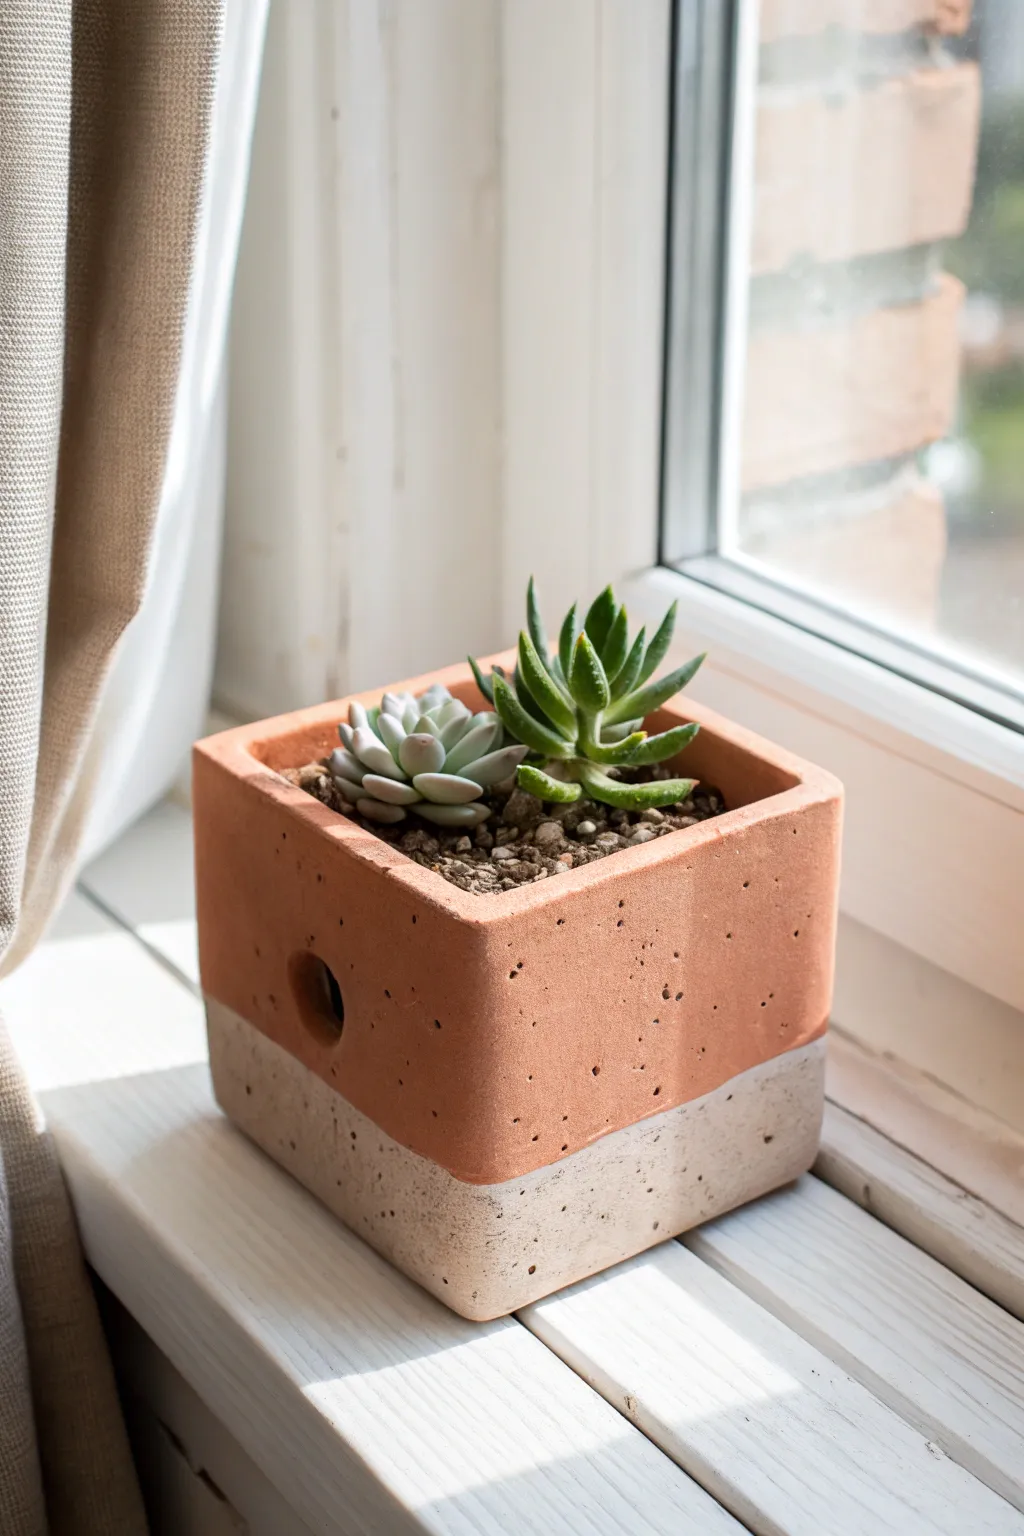
This modern, geometric planter features crisp corners and a distinctive two-tone aesthetic achieved by joining different clay bodies. Its clean lines and built-in drainage make it a functional yet stylish home for your favorite succulents.
Step-by-Step Tutorial
Materials
- Terracotta or red stoneware clay
- White or beige stoneware clay
- Rolling pin
- Wooden guide strips (approx. 1/4 inch thick)
- Ruler and square tool
- Fettling knife or needle tool
- Scoring tool (serrated rib or needle)
- Slip (made from each clay body)
- Circular clay cutter (approx. 1/2 inch)
- Sponge
- Paddle (optional)
Step 1: Preparing the Slabs
-
Roll the bottom clay:
Begin by rolling out your white/beige clay using wooden guide strips to ensure an even 1/4 inch thickness. This will form the base and the bottom accent section of the walls. -
Roll the top clay:
Repeat the rolling process with the terracotta clay. Try to keep the moisture content similar between the two clays to prevent cracking during drying. -
Measure and cut strips:
Using a ruler, cut a long strip of the white clay about 1.5 inches tall. Then, cut a strip of the terracotta clay about 3 inches tall. These dimensions will determine the color split. -
Join the strips:
Score the top edge of the white strip and the bottom edge of the terracotta strip thoroughly. Apply slip, press them together firmly, and smooth the join on both sides so it becomes one cohesive two-tone slab. Let this stiffen to leather-hard.
Shrinkage Check
Test your clays! Make small test tiles joining your two chosen clay bodies and fire them first. If they shrink at vastly different rates, the pot will crack.
Step 2: Building the Form
-
Cut the wall panels:
Once the joined slab is leather-hard, measure and cut four identical square or rectangular panels. Ensure the seam line is at the exact same height on every piece for a straight horizon line. -
Cut the base:
Measure the width of your wall panels and cut a square from the remaining white clay slab to serve as the floor of the pot. Account for the thickness of the walls in your calculation. -
Score and mitre:
For the crispest corners, cut the vertical edges of your four wall panels at a 45-degree angle (mitre joint). Score these angled edges and the edges of the base where the walls will sit. -
Assemble the walls:
Apply slip to the scored edges. Connect two walls to form a corner, ensuring the color seam aligns perfectly. Continue adding walls until the box shape is complete, pressing the joints firmly together. -
Attach the base:
Attach the floor slab to the bottom of the walls. I like to reinforce the inside seams with a very thin coil of clay blended smoothly into the corners.
Step 3: Detaling and Finishing
-
Refine the corners:
Run a barely damp sponge along the sharp exterior corners to smooth them slightly without losing their crispness. You can use a wooden paddle to gently tap the walls straight if they have warped. -
Add side drainage:
Using your circular cutter, punch a hole on one or two sides of the planter, centered in the terracotta section. This distinctive feature allows airflow and overflow drainage. -
Add bottom drainage:
Don’t forget to punch a few holes in the bottom floor of the pot as well to ensure your succulents don’t sit in standing water. -
Smooth the texture:
For the sandy, stone-like texture seen in the reference, avoid burnishing. Instead, wipe the surface with a slightly coarse sponge to expose the grog in the clay. -
Dry slowly:
Wrap the finished piece loosely in plastic for the first few days. Because you joined two different clay bodies, drying slowly is critical to prevent them from shrinking at different rates and splitting apart. -
Fire:
Bisque fire the piece, then glaze only the interior if you wish to make it watertight, or leave it unglazed (as shown) for better breathability for plants. Fire to the maturity temperature of your clay bodies.
Texture Play
Mix a small amount of sand or coffee grounds into the white clay body before rolling to create a speckled, terrazzo-like effect on the bottom section.
Once fired, fill your new architectural planter with gritty soil and a striking succulent for a perfect windowsill display
Slab Pencil Cups and Desk Organizers
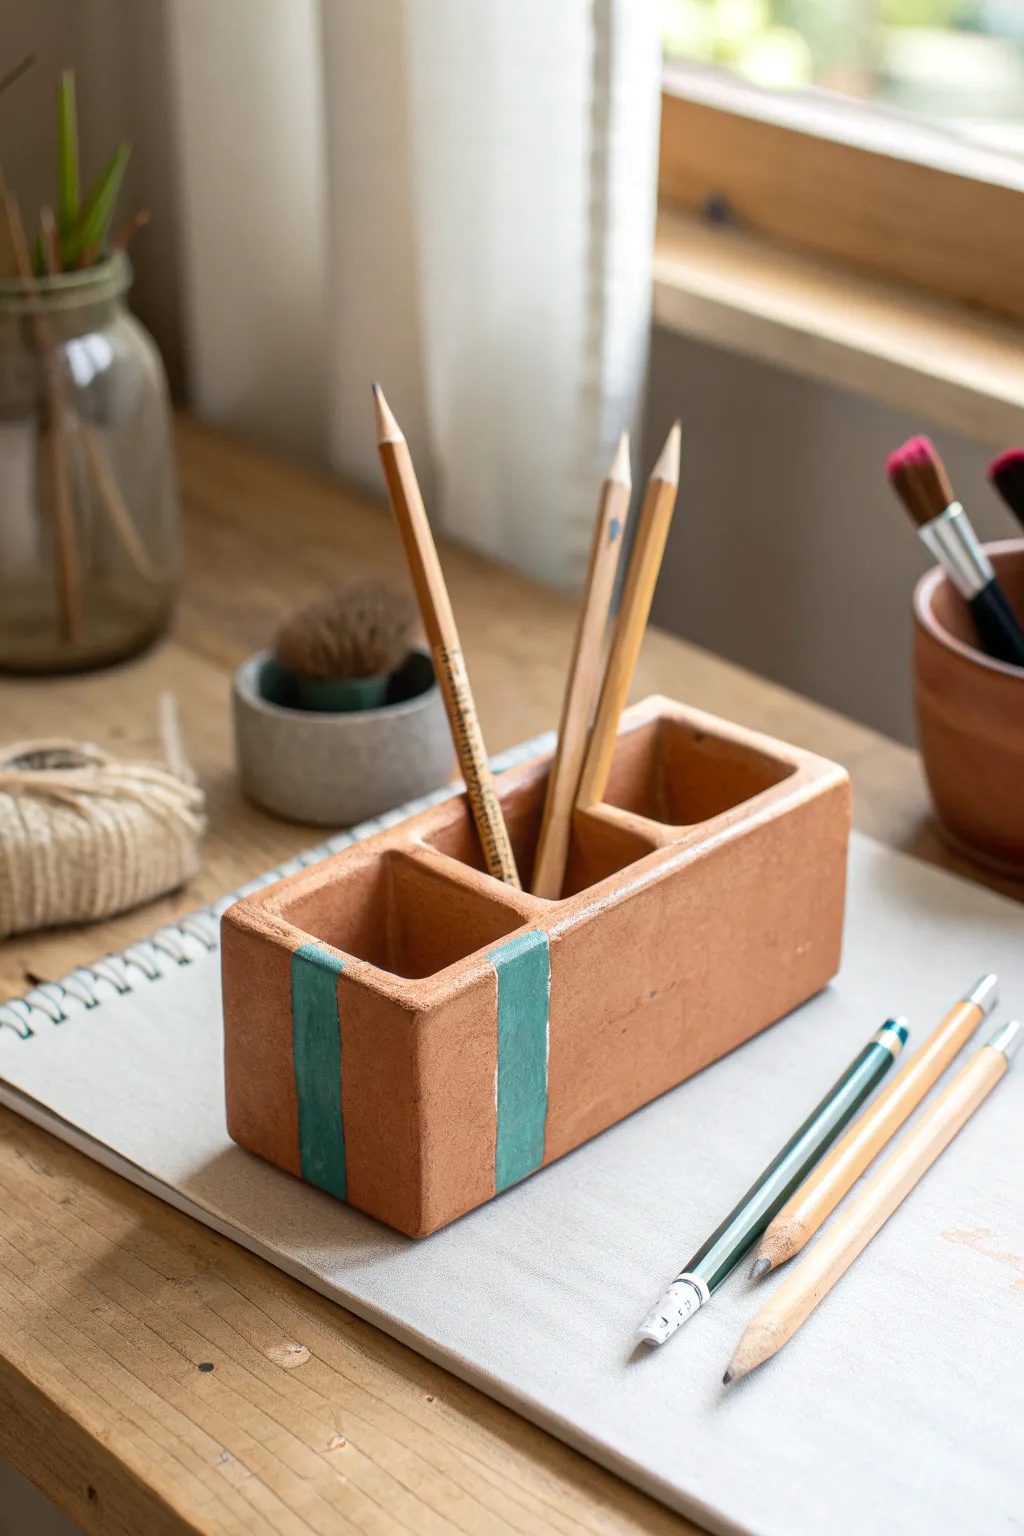
Bring earthy warmth to your workspace with this sleek, rectangular desk organizer made from terracotta clay. The structured form features distinct compartments for separating tools, while dual painted stripes add a modern pop of turquoise to the natural finish.
Step-by-Step
Materials
- Terracotta air-dry clay or kiln-fire clay
- Rolling pin
- Two 1/4-inch wooden thickness slats
- Clay knife or retractable blade
- Ruler
- Slip (clay and water mixture)
- Scoring tool (or an old toothbrush)
- Wooden sculpting tool
- Sponge
- Turquoise acrylic paint
- Painter’s tape
- Flat paintbrush
- Sandpaper (fine grit)
Step 1: Prepping the Slabs
-
Roll the main slab:
Begin by wedging your clay to remove air bubbles. Flatten it slightly with your palms, then place it between your 1/4-inch wooden slats. Roll the clay out into a long, even sheet, ensuring the rolling pin rests on the slats for uniform thickness. -
Measure the components:
Using your ruler, you’ll need to map out several rectangles. You need a base (approx. 7″ x 3″), two long side walls (7″ x 2.5″), two short end walls (3″ x 2.5″), and two interior dividers (approx. 2.75″ x 2.25″ to fit inside). -
Cut the shapes:
With a sharp clay knife, carefully cut out all your rectangular pieces. Keep the knife straight up and down to ensure perpendicular edges, which will make assembly much easier later on. -
Leather hard stage:
I like to let these slabs sit out for about 30-45 minutes until they are ‘leather hard’—stiff enough to hold their shape upright without flopping, but still moist enough to join.
Step 2: Assembling the Structure
-
Score the base:
Take your scoring tool or an old toothbrush and rough up the perimeter of the base slab where the walls will attach. Do the same to the bottom edges of your wall pieces. -
Apply slip:
Dab a generous amount of slip onto the scored areas. This acts as the glue that bonds the clay pieces together permanently. -
Attach the long walls:
Press one long wall onto the base. Use a wooden tool to blend the clay from the outside wall down onto the base to create a seamless seal. Repeat with the second long wall. -
Add short walls:
Score, slip, and attach the two short end walls. Press them firmly against the base and the edges of the long walls. Blend all exterior seams until smooth. -
Reinforce interior seams:
Roll a very thin coil of clay (like a tiny snake). Press this into the inside corners where walls meet the floor and each other, smoothing it out with your fingertip to reinforce the bond. -
Insert dividers:
Mark where you want your three compartments to be. Score and slip the vertical spots inside the box, then slide your divider rectangles in. Depending on your preference, you can space them equally or create one large and two small sections.
Wobbly Walls?
If your walls keep bowing inward during assembly, place a temporary support—like a small block of wood or a rigid sponge—inside the box to hold the shape while the seams set.
Step 3: Refining and Decoration
-
Smooth the rim:
Use a damp sponge to run along the top rim of the organizer. This softens the sharp edges and makes the piece look more finished. Check that the dividers are level with the outer walls. -
Dry completely:
Allow the piece to dry slowly away from direct sunlight to prevent warping. If using air-dry clay, this may takes 24-48 hours. If kiln-firing, follow your clay body’s specific firing schedule. -
Sand the surface:
Once fully dry (and fired, if ceramic), use fine-grit sandpaper to gently smooth out any rough fingerprints or sharp edges on the exterior. -
Tape off the design:
To create the crisp stripes shown in the photo, apply two strips of painter’s tape vertically around the left side of the box. Leave about a half-inch gap between the tapes for the paint. -
Paint the stripes:
Load a flat brush with turquoise acrylic paint. Fill in the areas defined by your tape. Because the unfinished clay is porous, you might need a second coat for opacity. -
Reveal the pattern:
Carefully peel back the painter’s tape while the paint is slightly tacky to maintain a crisp edge. Let the paint cure completely before filling your new organizer with pens and pencils.
Texture Play
Before assembly, press a piece of canvas or burlap onto the slabs. This imprints a subtle woven texture that looks amazing when glazed or painted with a wash.
This sturdy organizer is now ready to declutter your desk with simple, handmade elegance

TRACK YOUR CERAMIC JOURNEY
Capture glaze tests, firing details, and creative progress—all in one simple printable. Make your projects easier to repeat and improve.
Butter Dishes Built Like Tiny Slab Architecture
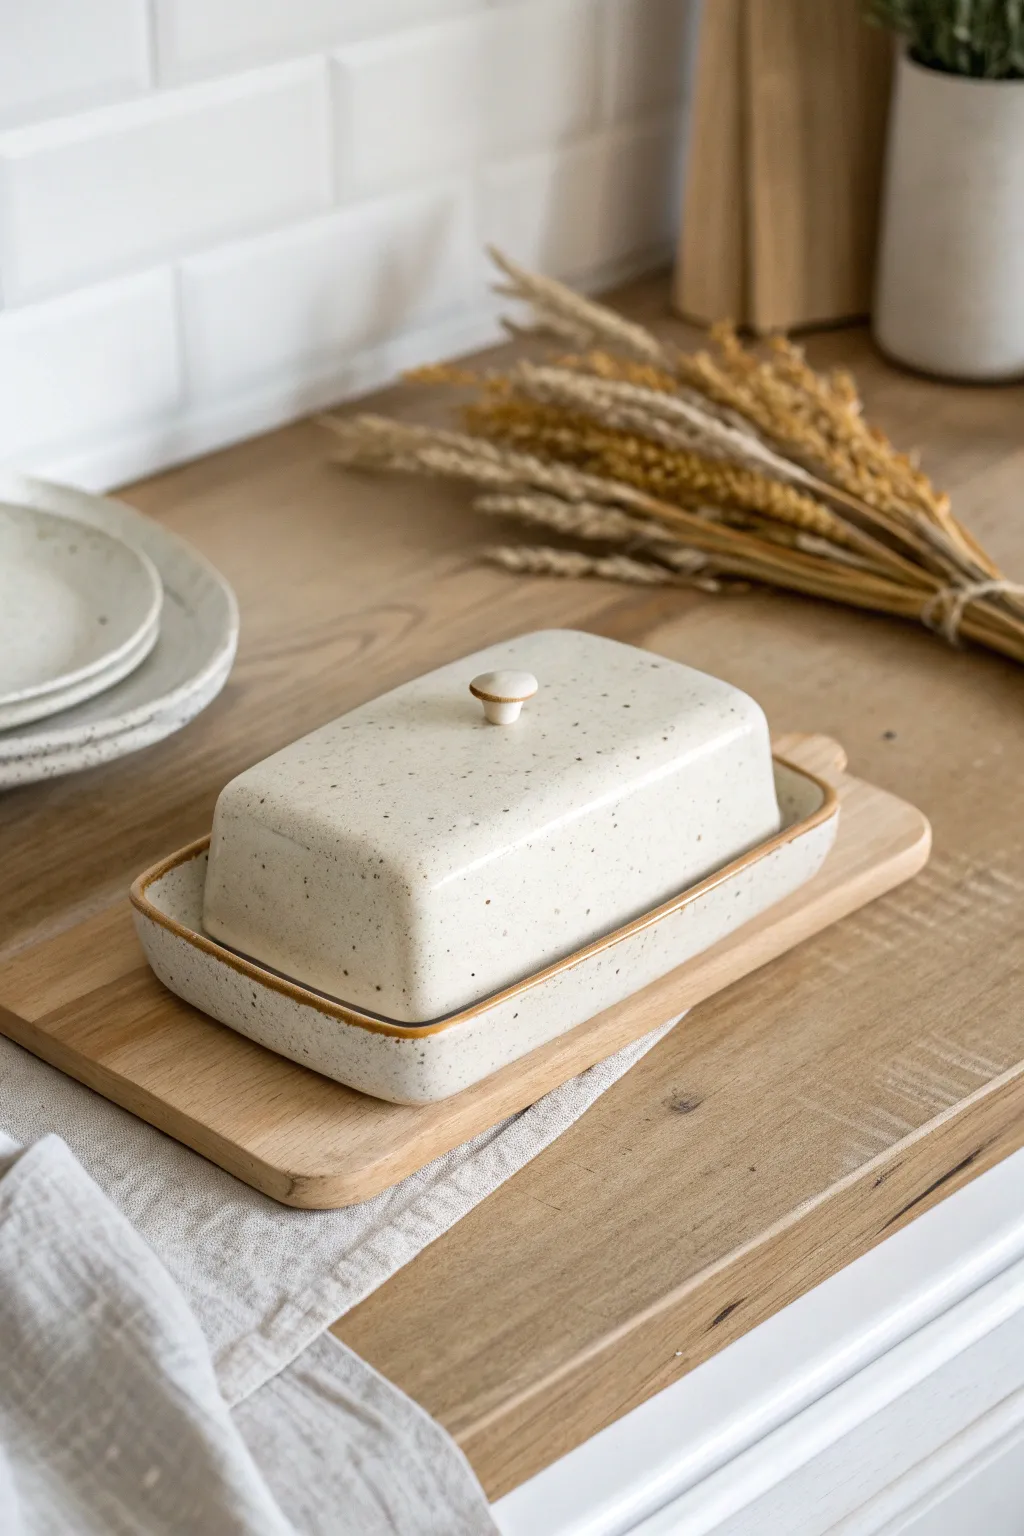
This charming, rustic butter dish elevates your morning toast routine with its architectural slab construction and warm speckled finish. Its simple, rectangular silhouette and subtle rounded corners give it a timeless, modern-farmhouse appeal.
Step-by-Step Tutorial
Materials
- Speckled buff stoneware clay
- Rolling pin
- Guide sticks (approx. 1/4 inch thick)
- Fettling knife or needle tool
- Paper templates (rectangular base and cover panels)
- Scoring tool or serrated rib
- Slip (clay slurry)
- Soft rib tool (rubber or silicone)
- Modeling tool or wooden spoon handle
- Glossy cream or white glaze (transparent enough to show speckles)
- Kiln
Step 1: Preparing the Slabs
-
Roll out the clay:
Begin by wedging your speckled buff clay to remove air bubbles. Place it between two guide sticks on a canvas board and roll it out into a smooth, even slab about 1/4 inch thick. -
Compress the surface:
Take a soft rib and gently run it over both sides of the slab. This aligns the clay particles to prevent warping later and creates a pristine canvas for that glossy glaze. -
Cut the components:
Using your paper templates, cut out the base shape (a larger rectangle with rounded corners) and the five pieces for the lid: the top rectangle and four side walls. I prefer to cut the lid’s top slightly larger than needed so I can trim it flush later. -
Firm up:
Let the cut pieces sit until they reach a ‘leather-hard’ state. They need to be stiff enough to hold their shape when standing up, but soft enough to join without cracking.
Step 2: Assembling the Lid
-
Bevel the edges:
For clean corners on the lid, cut 45-degree angles (miters) on the vertical edges of the side walls where they will meet. This creates a stronger, seamless box joint. -
Score and slip:
Rough up the mitered edges with a scoring tool and apply a generous amount of slip. Press the four walls together to form a rectangular frame. -
Reinforce the seams:
Roll a very thin coil of clay and press it into the interior corners of your frame. Smooth this coil down flat with a modeling tool to reinforce the join. -
Attach the roof:
Score and slip the top edge of your wall frame and the underside of the top slab. Press the top slab onto the walls, gently paddling it with a wooden spoon to ensure a tight seal. -
Rounding edges:
Once the lid is assembled, use a damp sponge or your finger to gently soften the sharp corners and edges. The goal isn’t a perfect box, but a soft, tactile object.
Smooth Seams Pro-Tip
Use a serrated rib to scrape across joined seams first—this blends the clay components together better than just smoothing. Follow up with a smooth rubber rib after.
Step 3: The Base and Details
-
Prepare the base plate:
Take your larger base slab and gently curve the outer rim upward just slightly using your thumb. This lipped edge creates a designated spot for the lid to sit and catches any stray butter. -
Add a flange (optional):
If you want the lid to sit more securely, you can add a small interior wall or gallery on the base, but for this simple rustic style, a flat base works well too. -
Create the knob:
Roll a small ball of clay and flatten the bottom. Shape it into a simple mushroom or tapered cylinder shape that feels comfortable between two fingers. -
Attach the knob:
Find the center of your lid, score the spot and the bottom of the knob, add slip, and press firmly. Clean up any excess slip immediately with a brush. -
Final drying:
Place the lid on the base (with a strip of newspaper in between to prevent sticking) and wrap the whole piece loosely in plastic. Let it dry very slowly to ensure the flat slabs stay true.
Level Up: Texture
Before assembling, gently press a piece of linen or canvas onto the moist clay slabs. This subtle texture adds tactile interest that glaze loves to break over.
Step 4: Glazing and Firing
-
Bisque fire:
Once bone dry, fire the piece to bisque temperature (usually cone 04 or 06) to prepare it for glazing. -
Apply wax resist:
Paint wax resist on the very bottom of the base and the bottom rim of the lid where it touches the base. This prevents the pieces from fusing together in the kiln. -
Glaze application:
Dip or brush your glossy cream glaze over the entire piece. Aim for a thickness that provides coverage but allows the dark iron speckles of the clay body to bleed through. -
Wipe the rim:
For that exposed clay detail seen in the image, carefully wipe the glaze off the very edge of the base rim and the bottom edge of the lid with a damp sponge. -
Glaze fire:
Fire to the maturation temperature of your clay (likely Cone 5 or 6) and let the kiln cool completely before opening to avoid thermal shock.
Enjoy the simple pleasure of using your handmade architectural piece during your next breakfast gathering
Wall Hanging Tiles That Treat the Slab Like a Canvas
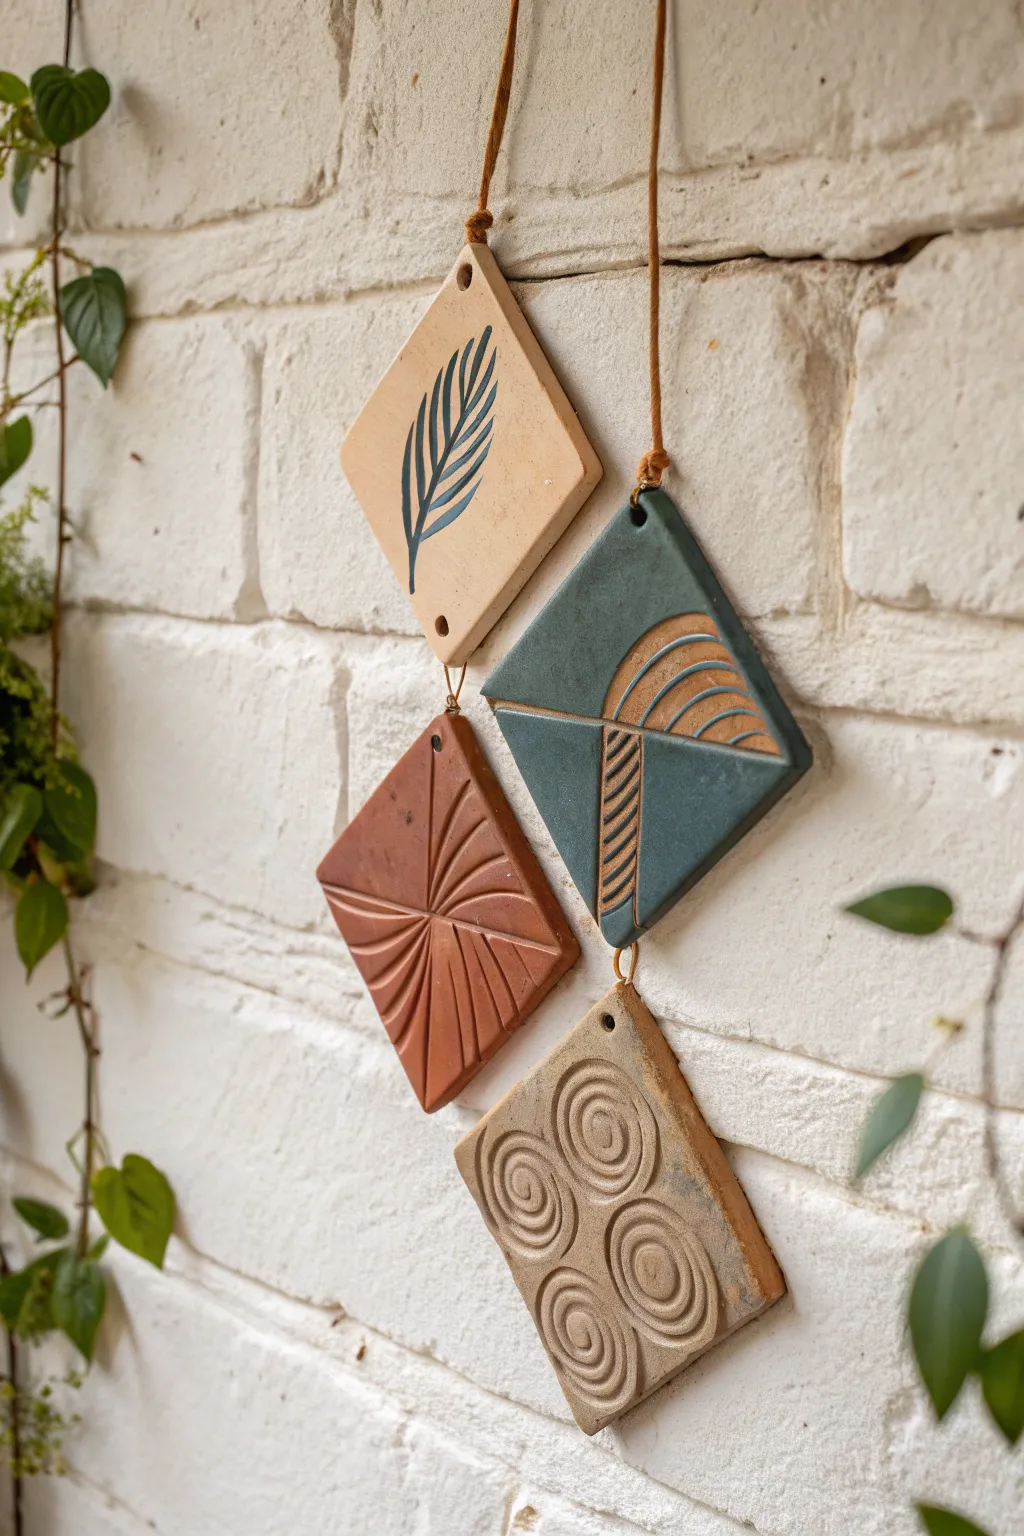
Transform simple clay slabs into a stunning vertical gallery with this four-part wall hanging. By treating the clay surface like a canvas for different techniques—from sgraffito to applique—you’ll create an interplay of texture and earthy tones that feels modern yet organic.
How-To Guide
Materials
- Stoneware clay (smooth body recommended)
- Rolling pin
- Two 1/4-inch wooden guide strips
- Square tile cutter or ruler and needle tool
- Sponge
- Underglazes (Dark blue/teal, terrcotta orange)
- Clear matte glaze
- Carving tools (loop tool and needle tool)
- Small drill bit or hole punch tool
- Jute twine or leather cord for hanging
- Kiln access
Step 1: Slab Preparation
-
Roll out the clay:
Begin by wedging your clay thoroughly to remove air bubbles. Place the clay between your two 1/4-inch wooden guide strips and roll it out into a long, even slab. -
Compress the surface:
Take a rubber rib tool and drag it firmly across the surface of the clay in multiple directions. This compression aligns the clay particles, preventing warping during drying, and creates a smooth canvas for your designs. -
Cut the tiles:
Using a square cutter or a ruler and needle tool, cut out four identical squares. Aim for about 4×4 inches each, though you can adjust the size to your preference. -
Add hanging holes:
Since these will hang diagonally, use a small hole punch or drill bit to create holes in the top and bottom corners of three tiles. The bottom-most tile only needs a top hole.
Clean Edges
Before firing, run a damp sponge or finger along the cut edges of your tiles. Sharp clay edges become razor-sharp after firing, so softening them now saves your fingers later
Step 2: Designing the Tiles
-
Tile 1: Leaf Painting:
For the top tile, keep the surface smooth. Once the clay is leather hard, paint a simple fern or palm frond design using a dark teal or navy underglaze. Use a fine liner brush to get crisp edges on the leaves. -
Tile 2: Geometric Sgraffito:
For the right-side tile (the teal one), apply a layer of teal underglaze over the entire surface. Let it dry until it’s not tacky to the touch. -
Carve the lines:
Using a carving tool, scratch through the layer of teal underglaze to reveal the raw clay body underneath. Create a composition of vertical stripes and concentric arches. -
Tile 3: Radial Incising:
For the left-side tile (terracotta color), coat it in a reddish-brown underglaze or iron oxide wash. While leather hard, use a needle tool to deeply incise ‘starburst’ lines radiating from the center to the edges. -
Tile 4: Spiral Stamps:
For the bottom tile, leave the natural clay color. Use a coil of clay or a pre-made spiral stamp tool to press four deep spiral impressions into the surface, arranging them in a neat 2×2 grid.
Step 3: Finishing and Assembly
-
Slow drying:
Place all four tiles between unfinished drywall boards or cover loosely with plastic. I find this slow drying process is crucial for preventing the corners from curling up. -
Bisque fire:
Once bone dry, fire the pieces to bisque temperature (usually Cone 04) in a kiln. -
Glazing:
Apply a thin coat of clear matte glaze over the painted leaf tile and the sgraffito tile to seal the underglaze. You can leave the textured tiles unglazed for a raw, earthy look if your clay is fully vitrified. -
Final firing:
Fire the tiles again to your clay body’s maturity temperature (e.g., Cone 5/6). -
Connect the tiles:
Cut short lengths of jute twine or leather cord. Thread a piece through the bottom hole of the top tile and the top hole of the next tile, tying secure knots on the back side to link them. -
Create the hanger:
Tie a longer loop of cord through the very top hole of the first tile to serve as the main hanger.
Add Metallics
For a luxe touch, apply gold luster overglaze into the carved grooves of the teal tile or the spirals of the bottom tile. Requires a third, lower-temp firing
Hang your new ceramic totem against a textured wall or near a window to let the light play across the different carved surfaces
Botanical Imprint Platters Using Real Leaves
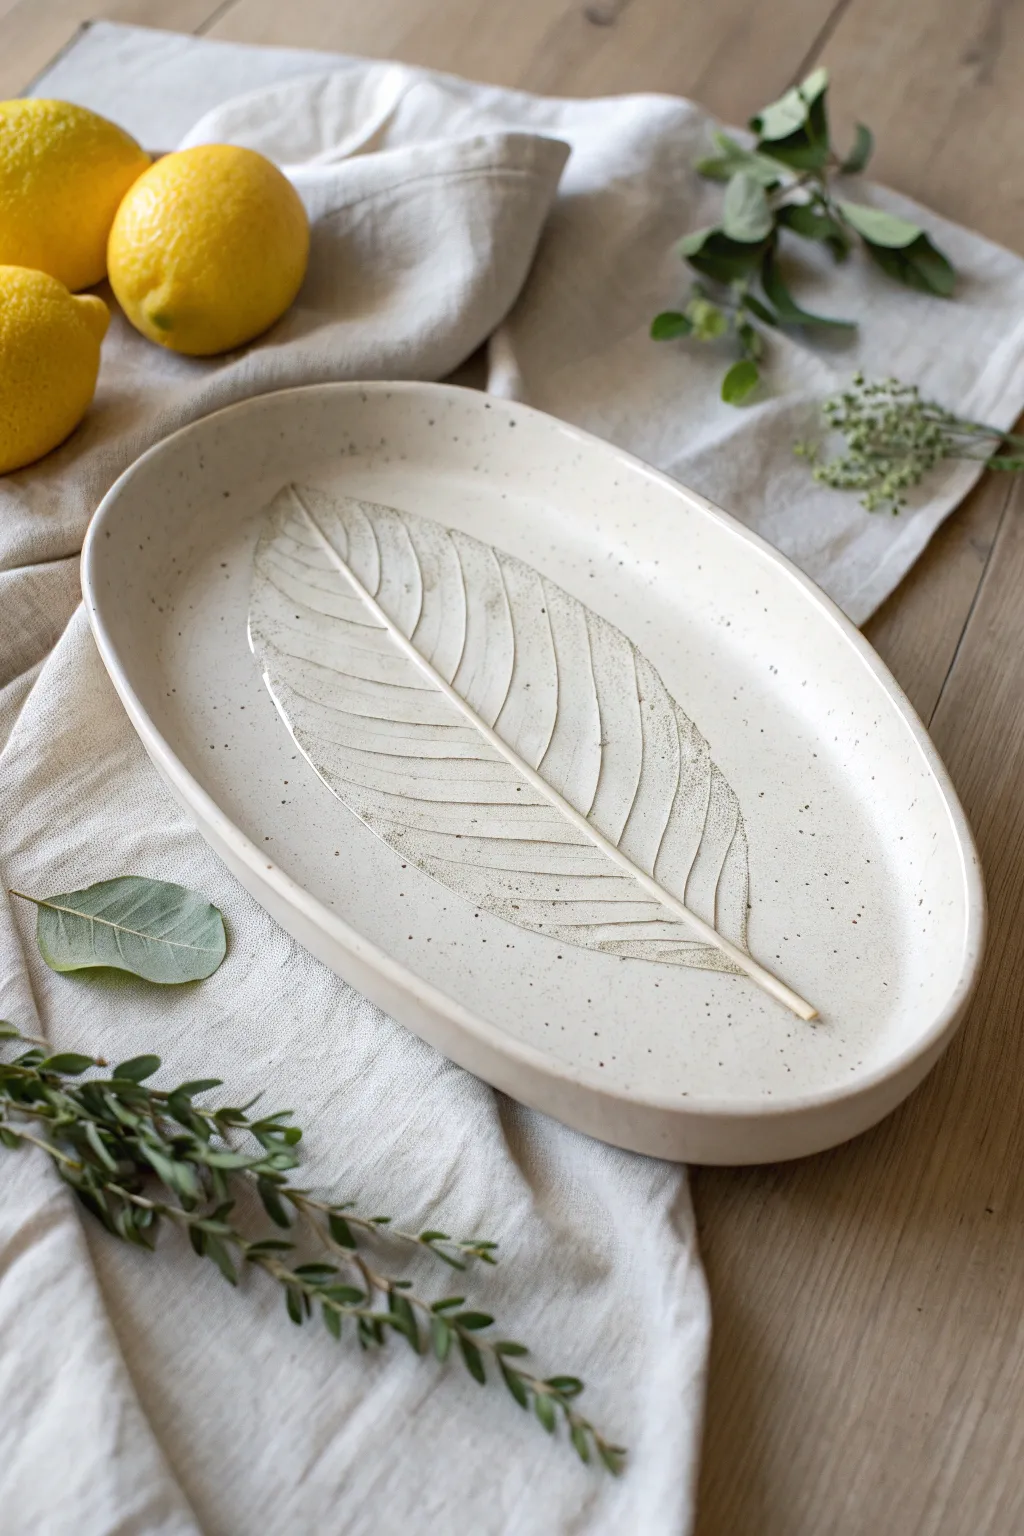
Create a stunning, organic centerpiece with this botanical imprint platter, featuring a real leaf texture permanently preserved in clay. This project combines the simplicity of slab building with the delicate details of nature to produce a functional piece with a speckled, creamy white finish.
Step-by-Step
Materials
- Cream-colored stoneware clay (with speckles/grog)
- Large, fresh leaf with prominent veins (like Ficus or Magnolia)
- Rolling pin
- Canvas sheet or slab mat
- Oval paper template or large oval cookie cutter
- Fettling knife or needle tool
- Shallow foam sheet or large sponge
- Rib tool (smooth wood or rubber)
- Rolling pin guides or slat sticks (approx. 1/4 inch)
- Small sponge
- Matte or satin white glaze (translucent)
- Kiln
Step 1: Preparing the Slab
-
Wedge the Clay:
Begin by thoroughly wedging your speckled stoneware clay to remove any air bubbles and ensure an even consistency, which is crucial for preventing warping later. -
Set Up Guides:
Place your wooden slat sticks or rolling guides on your canvas work surface. Space them slightly wider than the width of your intended platter. -
Roll the Slab:
Roll your clay out into a large, smooth slab using the rolling pin. Roll in multiple directions to compress quality platelets, until the rolling pin rests on the guides for a uniform thickness. -
Smooth the Surface:
Take your rubber or wooden rib tool and gently compress the surface of the clay slab. This removes the canvas texture and creates a pristine canvas for your botanical print.
Clean Veins
If the glaze pools too thickly in the deep leaf veins, it hides the detail. Gently wipe the indented areas with a damp sponge to thin the glaze there before firing
Step 2: Creating the Botanical Impression
-
Place the Leaf:
Select your large leaf and place it vein-side down onto the center of your smooth clay slab. Veins on the underside are usually more prominent and will leave a deeper impression. -
Roll in the Texture:
Gently glide your rolling pin over the leaf firmly once. Do not roll back and forth, as this can cause the leaf to shift and create a ghost image; just commit to one solid pass. -
Define the Shape:
Place your oval template over the imprint, centering the leaf stem nicely. Use your needle tool or fettling knife to cut vertically around the template for a clean edge. -
Remove Leaf and Smooth:
Carefully peel away the leaf to reveal the detailed impression. I find it satisfying to use the tip of a needle tool to lift the stem first. Then, run a damp sponge along the cut rim of the oval to round off any sharp edges.
Step 3: Shaping the Platter
-
Transfer to Foam:
Carefully lift your clay oval and place it onto a large piece of soft upholstery foam. -
Create the Curve:
Gently press a wooden rib or large sponge into the center of the platter while lifting the edges slightly. The foam will give way, allowing the clay to take on a gentle, organic curve without leaving finger marks. -
Refine the Rim:
While the clay is still malleable on the foam, ensure the rim curve is consistent all the way around. If you want a more distinct separation between the rim and the base, gently press a shallow groove with your thumb. -
Slow Dry:
Cover the piece loosely with plastic to let it dry slowly to the leather-hard stage. This slow drying helps prevent the flat shape from warping or curling up at the edges.
Oxide Wash Magic
Before glazing, brush iron oxide or heavy stain into the leaf veins and wipe it back. This will darken the veins dramatically under a translucent white glaze
Step 4: Finishing and Glazing
-
Bisque Fire:
Once bone dry, load the platter into the kiln for a bisque firing according to your clay body’s specifications. -
Wash the Piece:
After the kiln cools, wipe the bisque-ware down with a damp sponge to remove any dust that might resist the glaze. -
Apply Glaze:
Dip or brush, applying a coat of creamy white matte or satin glaze. Ensure the glaze isn’t too thick, as you want it to break over the leaf veins and allow the clay’s natural speckles to show through. -
Check the Rim:
Wipe the very edge of the rim slightly if you want to expose a hint of the raw clay body for contrast, though full coverage works beautifully for a modern look. -
Glaze Fire:
Fire the piece a second time to the glaze’s maturity temperature (likely Cone 5 or 6 for stoneware).
Now you have a timeless serving piece that captures the fleeting beauty of your favorite botanical finds.
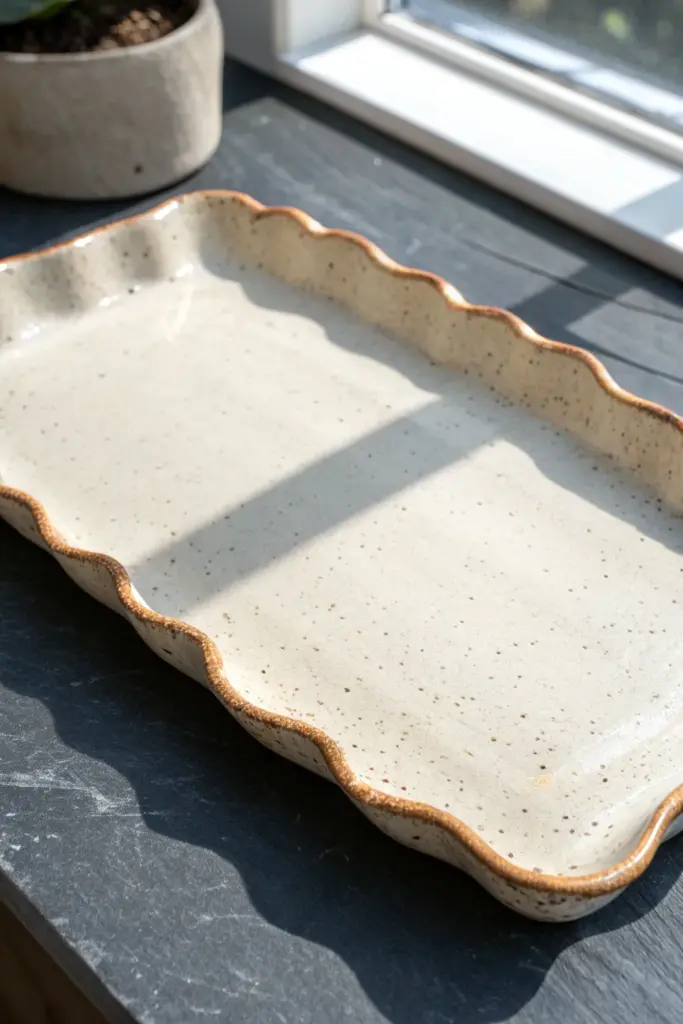
Wavy Rim Serving Trays With an Organic Edge
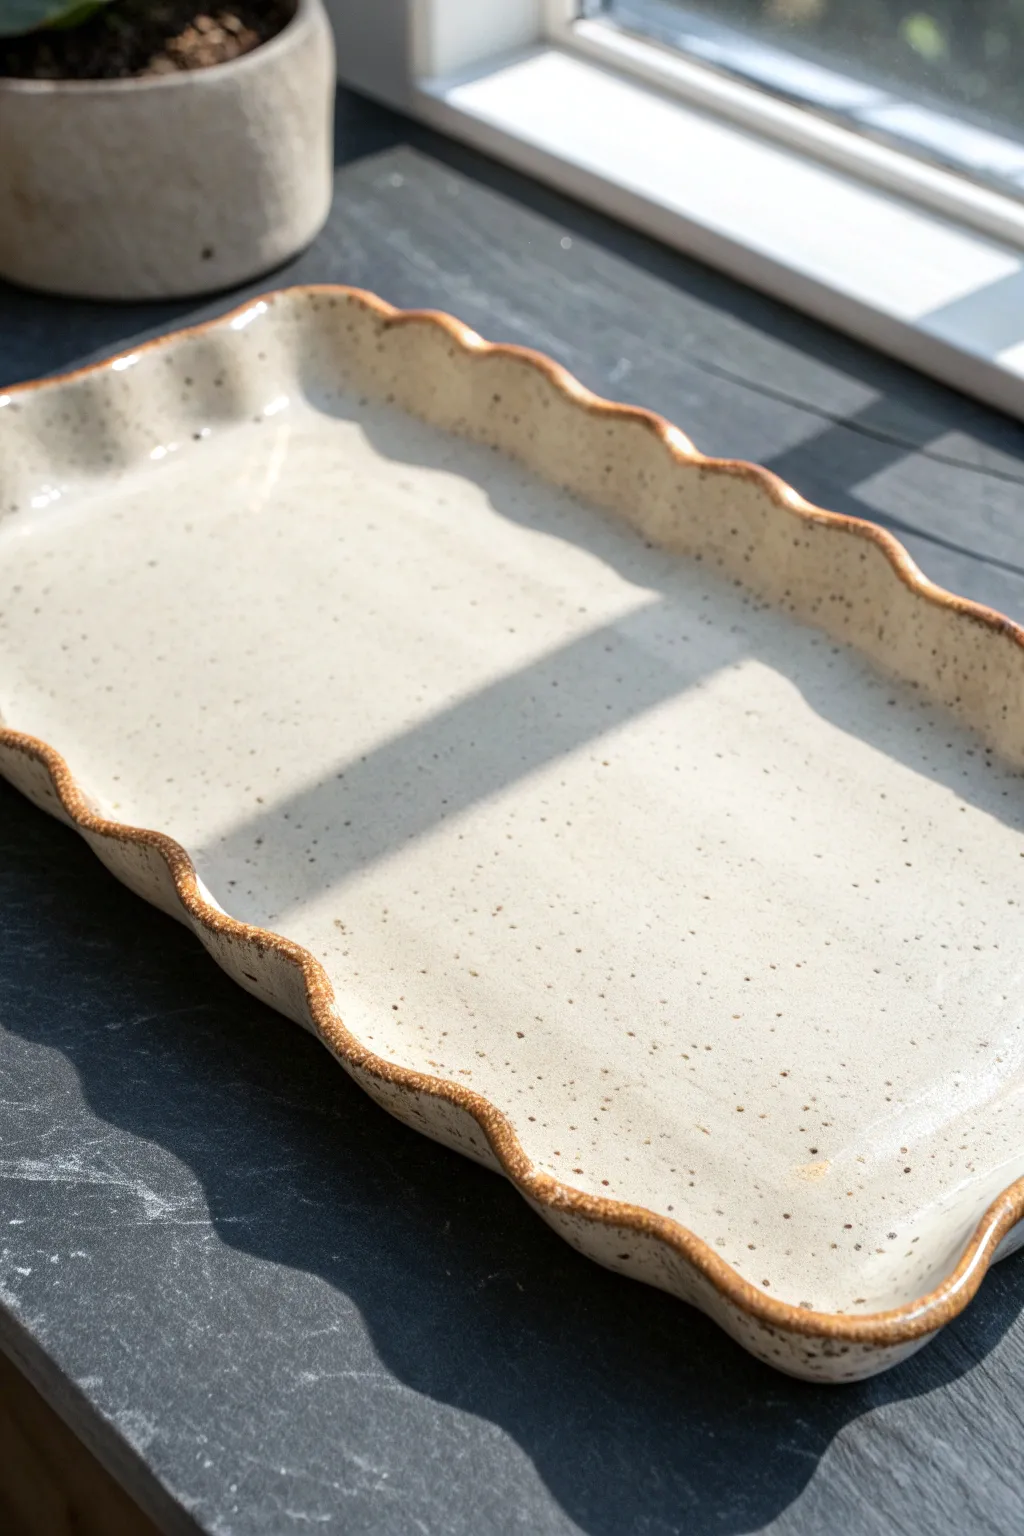
This charming serving tray combines simple slab-building techniques with an organic, wavy aesthetic that feels both modern and rustic. The finished piece features a creamy speckled glaze that breaks beautifully over the textured rim, highlighting the handmade nature of the form.
Detailed Instructions
Materials
- Speckled stoneware clay (mid-fire)
- Slab roller or rolling pin with thickness strips
- Rectangle template (paper or craft foam)
- Fettling knife
- Rib tool (soft rubber)
- Small sponge
- Wooden dowel or brush handle (approx 1-inch diameter)
- Cream/White speckled glaze
- Kiln
Step 1: Creating the Base Slab
-
Roll the clay:
Begin by rolling out a medium-sized slab of speckled stoneware clay. Aim for a thickness of about 1/4 inch to ensure the tray is sturdy but not overly heavy. If you are using a rolling pin, rotate the clay frequently to keep the compression even. -
Compress the surface:
Use a soft rubber rib to compress the slab on both sides. This step aligns the clay particles, which is crucial for preventing warping later on, and creates a pristine, smooth canvas for your glaze. -
Cut the shape:
Place your rectangular template onto the slab. Using a fettling knife, cut vertically around the template to create a clean rectangle. Don’t discard the scraps yet; you might need them for testing textures. -
Smooth the edges:
Run a damp finger or a slightly moist sponge along the freshly cut edges to soften the sharp corners. This prevents chipping and makes the form more pleasant to handle.
Step 2: Forming the Wavy Rim
-
Lift the walls:
Gently lift the edges of your slab upwards to create a shallow wall, about 1 inch high. You can prop up the sides temporarily with pieces of foam or rolled towels if the clay is too soft to stand on its own. -
Pinch the corners:
At the four corners, gently pinch and rounded the excess clay to create a continuous, flowing rim. I find it helpful to smooth the interior seams immediately so they disappear into the curve. -
Create the wave intervals:
Visualize where you want the waves to fall. Using your fingers, gently push the rim inward at regular intervals, while supporting the clay from the outside. -
Refine the scallops:
To make the waves uniform, take a wooden dowel or a thick brush handle. Place it horizontally against the outside of the rim and press the clay gently around it to form a concave curve. Repeat this around the entire perimeter. -
Adjust the rim flare:
Once the scallop pattern is established, use your thumb and forefinger to gently flare the top edge outward slightly. This enhances the organic look and catches the light beautifully.
Warp Watch
To prevent the flat bottom from bowing up or down during firing, place a “cookie” (a small scrap slab of clay) under the center of the tray during the bisque fire for support.
Step 3: Drying and Bisque Fire
-
Slow drying:
Cover the tray loosely with plastic to let it dry slowly. Uneven drying leads to warping, especially with flat slabs. Check on it after a day and uncover it once it’s leather hard. -
Final smoothing:
Before the clay is bone dry, run a slightly damp sponge over the rim one last time to remove any sharp burrs created during the shaping process. -
Bisque fire:
Load the bone-dry tray into the kiln for a bisque firing to Cone 04 (or your clay body’s recommendation). Ensure it is supported evenly on the shelf.
Layer Up
Try layering a flux-heavy glaze over the rim only. This will cause the glaze to run slightly into the valleys of the waves, creating beautiful color variation and depth.
Step 4: Glazing and Finishing
-
Clean the bisque:
Wipe the bisqueware down with a damp sponge to remove any kiln dust. This ensures the glaze adheres properly to the surface. -
Glaze application:
Pour a creamy white speckled glaze into the interior of the tray, swirl it to coat the bottom and sides evenly, and pour out the excess. This method ensures a smooth, pool-free bottom. -
Rim technique:
Brush or dip the rim carefully. The brownish edge seen in the photo often happens naturally where the glaze thins over a sharp corner, exposing the toasted clay body beneath. To encourage this, wipe the very edge slightly with a sponge if your glaze is thick. -
Clean the foot:
Flip the tray carefully and ensure the bottom is completely free of glaze. Use a wax resist if you struggle with messy lines, or simply wipe clean with a sponge. -
High fire:
Fire the piece to the glaze’s maturation temperature (typically Cone 5 or 6). Allow the kiln to cool completely before removing the tray to prevent thermal shock.
Once cooled, your tray is ready to serve appetizers or simply display its lovely organic curves on your table