If you’ve been curious about slab building, this is your sign to roll out a flat sheet of clay and make something real with it. I’m sharing my favorite beginner-friendly clay slab ideas that look charming even when they’re a little wobbly (because that’s kind of the point).
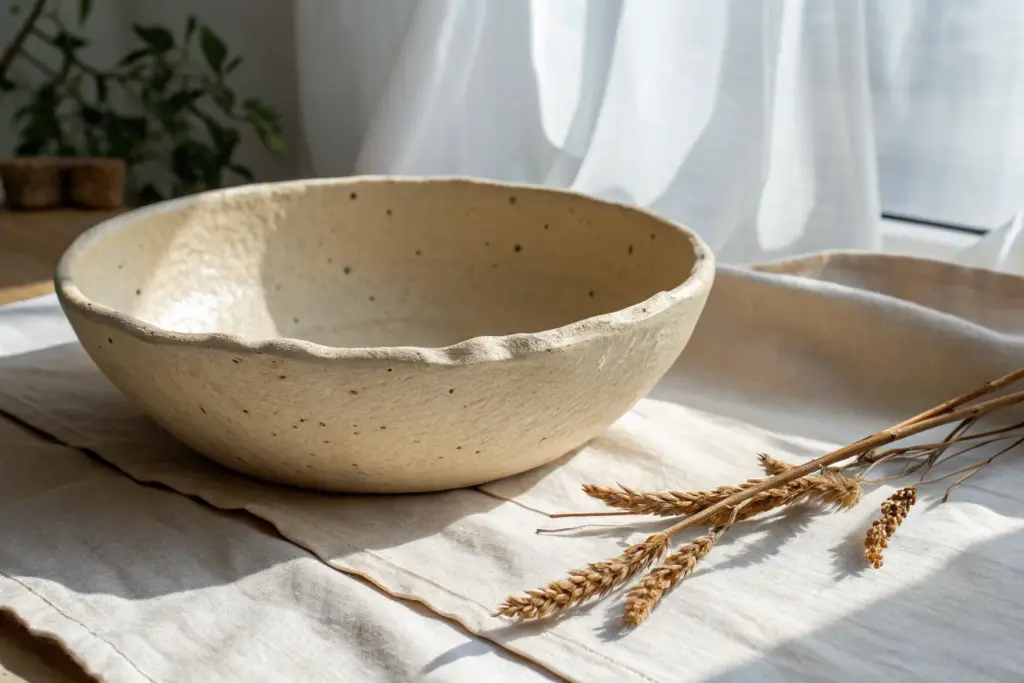
Organic Slab Plates
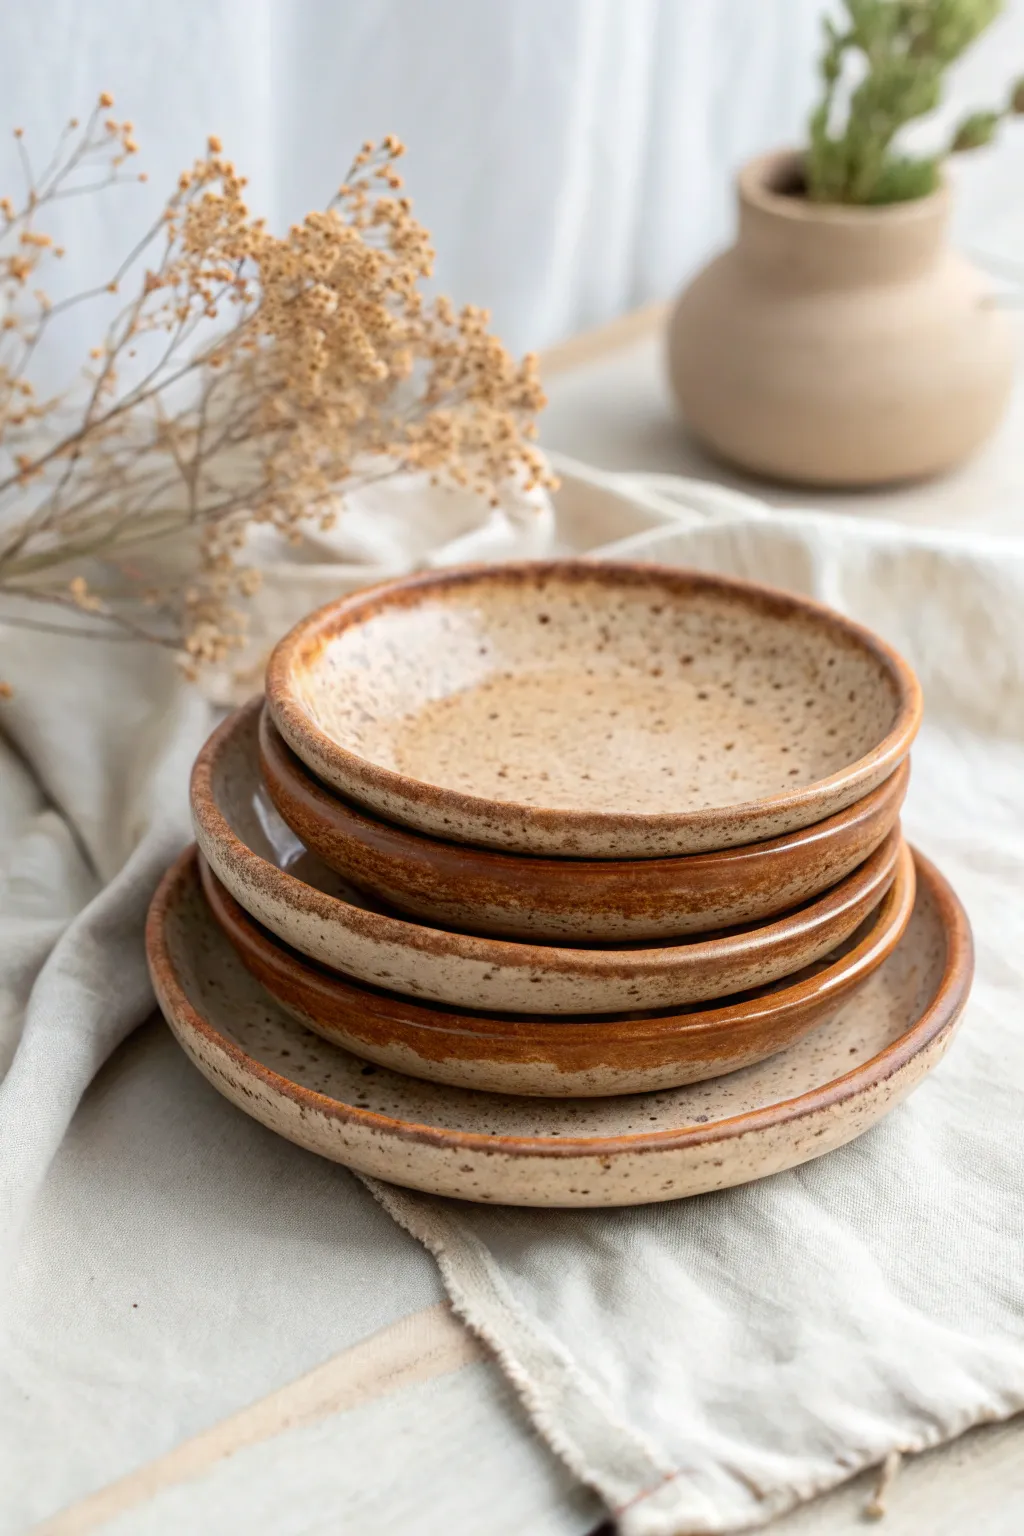
Embrace the beauty of imperfection with these charming speckled plates, featuring organic, earthy rims and a warm, inviting glaze. This project is perfect for beginners, allowing you to create a cohesive yet unique set of stackable dinnerware using simple slab-building techniques.
Step-by-Step Guide
Materials
- Speckled Stoneware Clay (cone 6 or similar)
- Rolling pin
- Two long wooden guide strips (approx. 1/4 inch thick)
- Circular templates (paper or foam sheets in graduated sizes)
- Large sponge or foam slab for shaping
- Potter’s needle tool or fettling knife
- Rubber kidney rib
- Sureform tool (cheese grater style)
- Sponge and bucket of water
- Clear glaze (dipping or brush-on)
- Iron oxide wash or dark brown underglaze
- Kiln for firing
Step 1: Preparing the Slabs
-
Wedge the clay:
Start by thoroughly wedging your speckled stoneware clay. This removes air bubbles and ensures the clay particles are aligned, which helps prevent warping later during drying and firing. -
Set up your guides:
Place your wooden guide strips parallel to each other on a canvas-covered work surface. The distance between them should be slightly wider than your intended plate size. -
Roll the slab:
Place a ball of clay between the strips. Using the rolling pin, roll the clay out until the pin rests on the wooden strips. This ensures your slab is a perfectly even 1/4 inch thickness throughout. -
Compress the clay:
Before cutting, take your rubber kidney rib and firmly smooth the surface of the slab. Drag it across the clay in multiple directions to compress the particles, which significantly strengthens the finished plate.
Warped Rims?
If your plates warp during drying, place a gentle weight (like a small bag of sand) in the center of the plate while it dries to keep the floor flat against the board.
Step 2: Cutting and Shaping
-
Trace the template:
Place your circular template onto the smooth slab. Using your needle tool, cut around the template. Hold the needle tool vertically to ensure a straight edge, or slightly angled if you prefer a beveled rim. -
Soften the edges:
Once cut, run a damp finger or a slightly moist sponge along the freshly cut rim to smooth away any sharp burrs or rough clay crumbs. -
Lift and drop:
This is a fun trick: pick up your clay circle and gently drop it onto a piece of soft foam or a thick piece of upholstery sponge. Gravity will naturally cause the center to sink slightly, creating a gentle curve. -
Refine the curve:
While it’s on the foam, use a soft rib or a damp sponge to gently press the center down further and smooth the interior curve, defining the transition from the plate floor to the rim. -
Create the foot (optional):
If you want a foot ring, score a circle on the bottom and attach a coil defined by a compass. For beginners, a simple flat bottom is fine, just make sure to compress it well.
Step 3: Drying and Bisque Firing
-
Slow drying:
Transfer the formed plates to a ware board. Loosely cover them with plastic to ensure slow, even drying. Uneven drying is the main culprit for warped rims. -
Check rim evenness:
As the clay stiffens to leather-hard, check your rims. If they look too perfect, you can gently manipulate them with your fingers to enhance that ‘organic’ wobbly look seen in the photo. -
Bone dry:
Uncover the plates and let them dry completely until they are bone dry and no longer cool to the touch. -
Bisque fire:
Load the bone-dry plates into the kiln and fire to cone 04 (or your clay body’s bisque temperature) to prepare them for glazing.
Pro Glazing Tip
Mix a tiny bit of Rutile into your clear glaze bucket. It reacts beautifully with speckled clay, creating subtle milky breaks over texture without hiding the speckles.
Step 4: Glazing and Finishing
-
Clean the bisque:
Wipe down your bisqued plates with a damp sponge to remove any kiln dust, which can cause glaze defects. -
Apply the rim oxide:
I like to dip a sponge into iron oxide wash (or dark brown underglaze) and lightly dab it along the very edge of the rim. This creates that toasted, rustic border effect. -
Wipe back excess:
If the rim color is too heavy, wipe it back slightly with a clean sponge so it naturally fades into the body of the plate. -
Glaze application:
Dip the entire plate into a clear or transparent honey glaze. A transparent glaze is crucial here to let the natural speckles of the clay body shine through. -
Clean the distinct foot:
Wipe the bottom of the plate completely clean of glaze to prevent it from sticking to the kiln shelf. -
Final firing:
Fire the glazed plates to cone 6 (oxidation). Once cool, sand the bottom if necessary to ensure it won’t scratch your table.
Stack your new set of plates proudly and serve up a meal worthy of their handmade charm


Wavy-Edge Slab Bowls
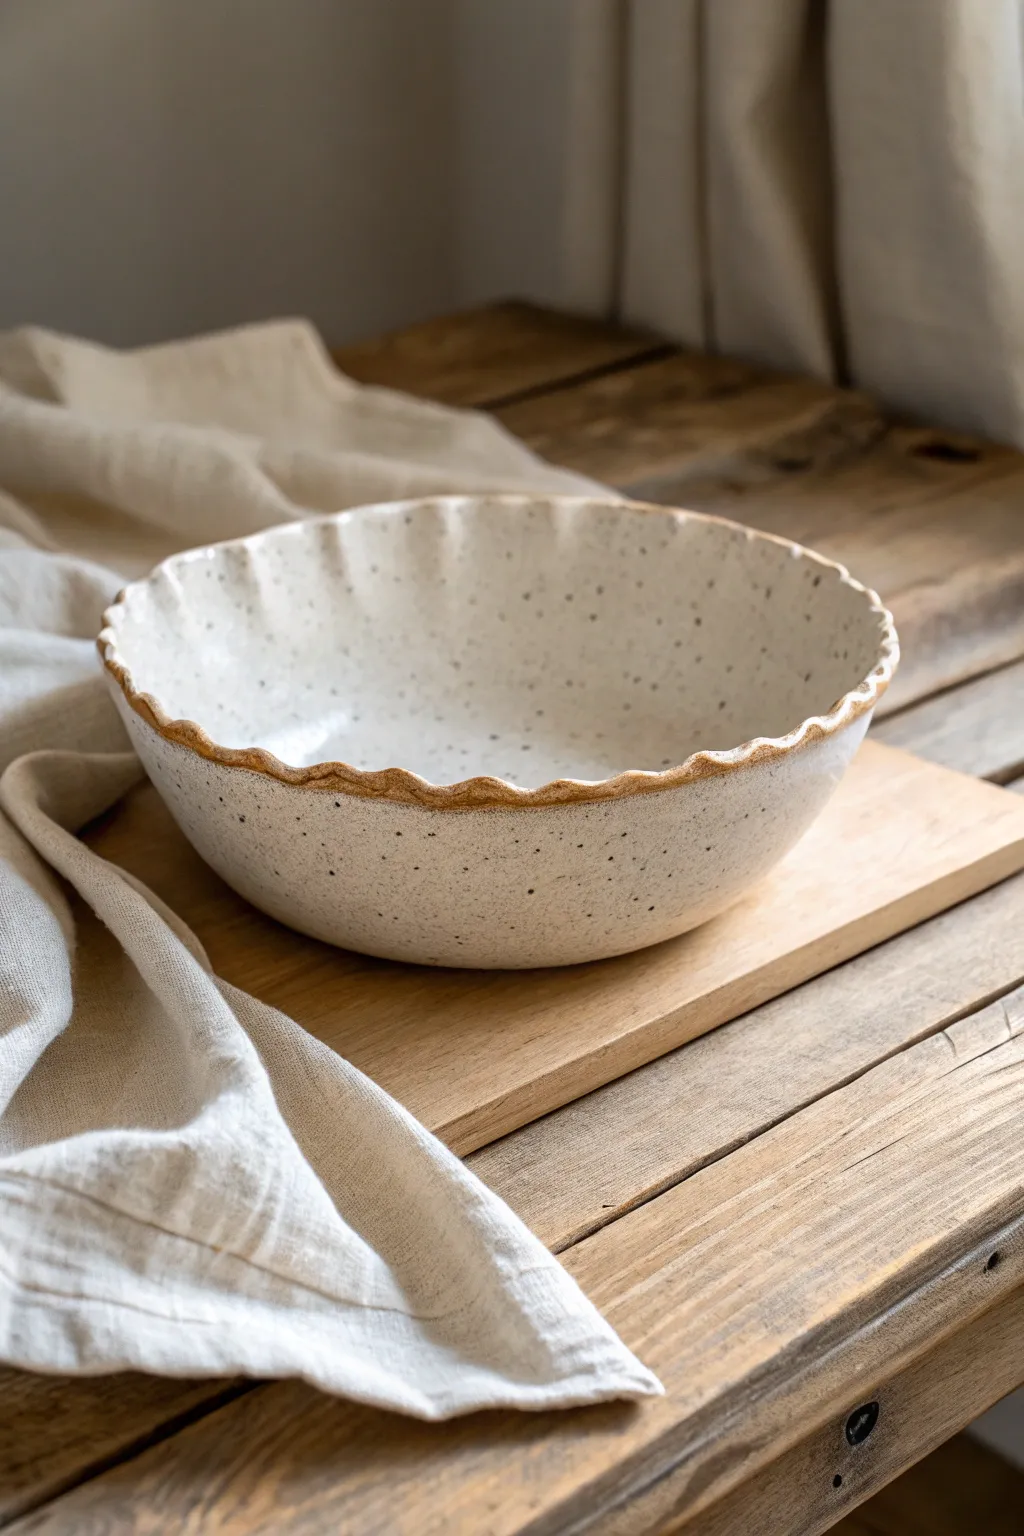
This charming bowl project combines the organic feel of slab-building with a playful, rhythmic edge. With its creamy, speckled glaze and warm, exposed clay rim, it balances rustic texture with a delicate, ruffled silhouette.
How-To Guide
Materials
- Speckled stoneware clay body (cone 5/6)
- Rolling pin
- Canvas work surface or large slab mat
- Two 1/4-inch wooden guide strips
- Large circular template (paper or cardboard)
- Fettling knife or needle tool
- Bisque mold or a simple household bowl covered in plastic
- Serrated rib tool
- Soft yellow sponge
- Glossy white glaze (semi-opaque to let speckles show)
- Wax resist
Step 1: Preparing the Slab
-
Wedge the clay:
Begin with a ball of speckled stoneware clay roughly the size of a large grapefruit. Wedge it thoroughly to remove air bubbles and ensure particle alignment, which is crucial for slab strength. -
Flatten and roll:
Pat the clay into a thick pancake with your palm. Place it between your two 1/4-inch wooden guide strips on your canvas surface. -
Roll the slab:
Use your rolling pin to flatten the clay until the pin rides smoothly on the wooden guides. I like to flip the slab over halfway through rolling to prevent it from sticking to the canvas texture. -
Compress the surface:
Run a soft rib tool lightly over both sides of the slab. This compression aligns the clay particles and helps prevent warping during the drying process.
Keep it clean
Wipe your wax resist brush with soapy water before dipping it into the wax. It protects the bristles and makes cleanup much easier later.
Step 2: Forming the Bowl
-
Cut the circle:
Place your large circular template on the slab. Using a needle tool, trace and cut around the template to create a perfect disc of clay. -
Prepare the mold:
If using a household bowl as a slump mold, cover the interior with thin plastic wrap or a piece of fabric to prevent the clay from sticking. -
Slump the clay:
Gently lift your clay circle and lower it into the mold. Let gravity do most of the work, then softly press the clay against the mold’s curve using a damp sponge, starting from the center and working outward. -
Define the rim height:
If the clay extends past the top of your mold, trim the excess with a needle tool to ensure an even height all around.
Step 3: Creating the Wavy Edge
-
Mark intervals:
Lightly mark even intervals around the rim of the leather-hard clay—about an inch apart works well for this scale. -
Form the scallops:
Use your thumb and forefinger to gently pinch and push the clay rim. Push inward with your finger at one mark, and pull outward at the next, creating a consistent sine-wave pattern. -
Refine the curve:
Smooth the transitions between the waves with a slightly damp sponge so there are no sharp creases, just flowing curves. -
Let it firm up:
Allow the bowl to dry inside the mold until it is leather hard and holds its shape without support.
Variation idea
Before slumping, roll a piece of lace or a textured doily into the slab surface. The glaze will break beautifully over the pattern.
Step 4: Finishing and Glazing
-
Remove and smoothing:
Pop the bowl out of the mold. Use a damp sponge to smooth the exterior bottom and refine the rim edge, rubbing away any canvas marks or roughness. -
Bisque fire:
Fire the piece to cone 04 (or your clay’s specific bisque temperature) once completely bone dry. -
Wax the rim:
To achieve the look in the photo, apply wax resist carefully along the very edge of the wavy rim. This will keep the raw, toasted clay color exposed after firing. -
Glaze application:
Dip the bowl into a glossy white glaze, or pour the glaze inside and roll it around to coat, then dip the exterior. The wax will protect the rim. -
Clean up:
Sponge off any glaze droplets that beaded up on the waxed rim to ensure a clean line. -
Glaze fire:
Fire the bowl to cone 5 or 6 depending on your clay body instructions to achieve the final, vitrified finish.
Enjoy using your new handmade bowl for salads or simply displaying it as a centerpiece.


Simple Slab Mug With a Strap Handle
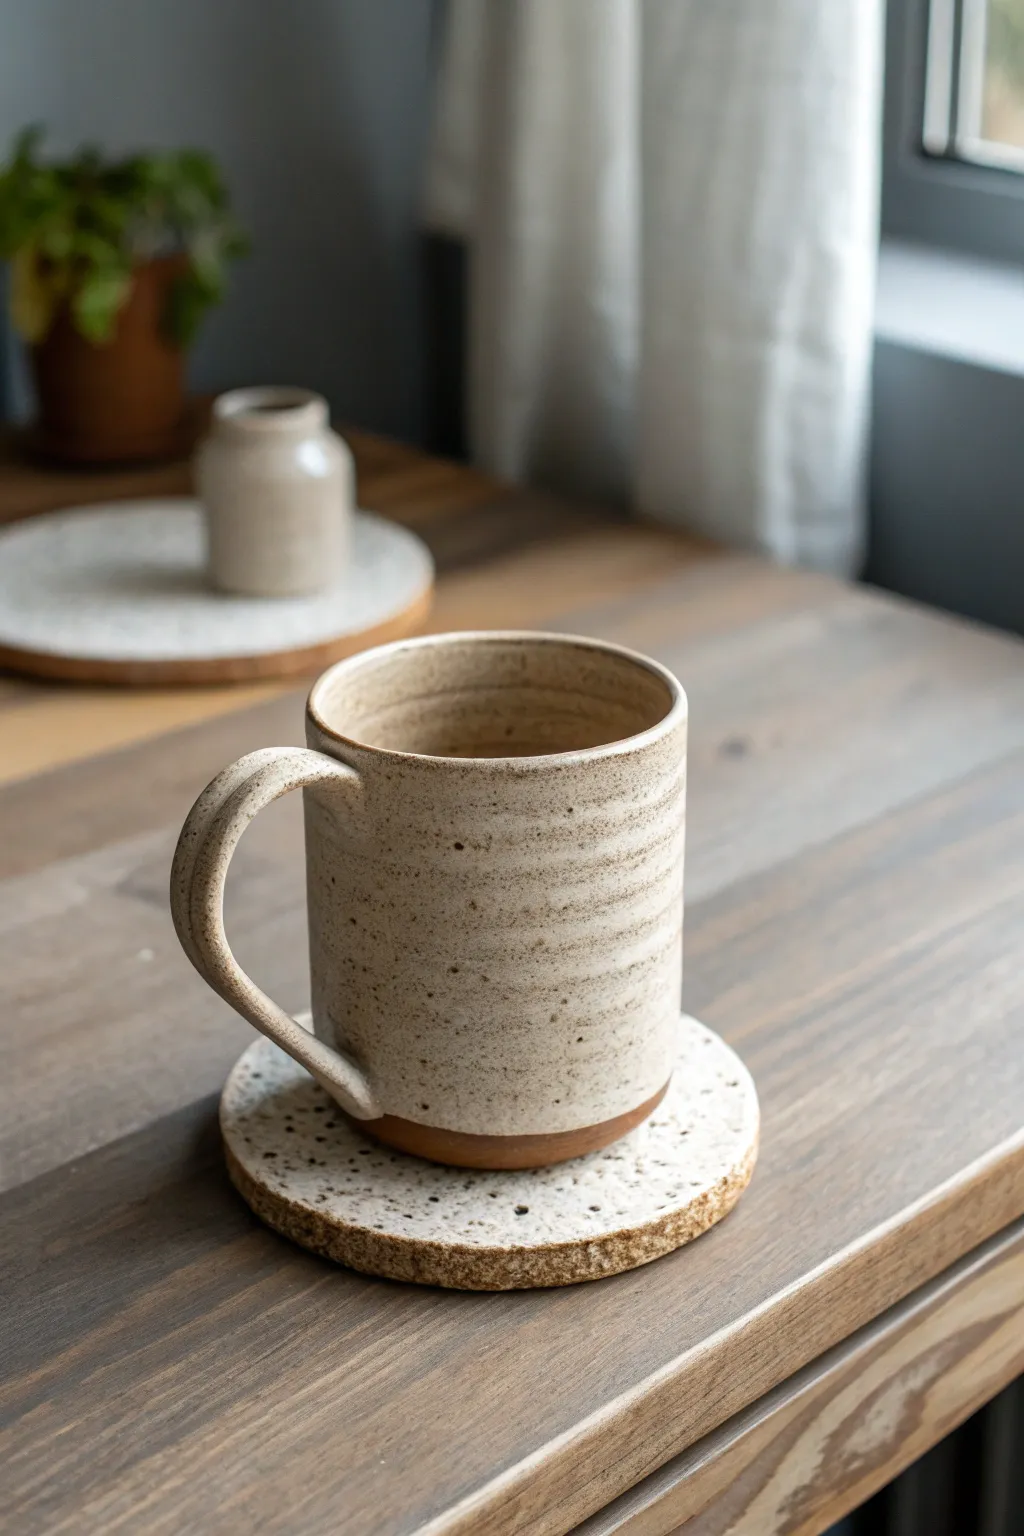
This rustic, nature-inspired mug features a beautiful speckled clay body, horizontal texture lines, and a warm bare clay base. It pairs a straightforward cylindrical form with a comfortable strap handle, making it an ideal project to master basic slab building techniques.
Detailed Instructions
Materials
- Speckled buff stoneware clay
- Rolling pin
- Canvas mat or slab roller
- Fettling knife
- Serrated rib tool or fork
- Wooden modeling tool
- Slip (clay and water mixture)
- Sponge
- Ruler
- Paper template (rectangle approx. 12×5 inches)
- Small coil of clay
- Satin white or cream glaze
Step 1: Preparing the Slab
-
Roll out clay:
Begin by rolling out a chunk of speckled stoneware clay on your canvas mat. Aim for an even thickness of about 1/4 inch. If you want a more substantial, rustic feel, you can go slightly thicker. -
Add texture:
While the slab is flat, gently drag a serrated rib tool or a fork horizontally across the surface to create subtle, organic horizontal lines. This mimics the wheel-thrown look in the inspiration image. -
Cut the body:
Place your rectangular paper template onto the clay and cut around it using a fettling knife. The length should be the circumference of your desired circle plus a little overlap, and the height defines the tallness of your mug. -
bevel the edges:
To create an invisible seam, use your knife to cut a 45-degree angle on the two short ends of your rectangle. Cut one angle on the front face and the other on the back face so they will overlap perfectly.
Seamless Texture
When smoothing the vertical seam, re-apply texture gently with your serrated tool over the joined area so the horizontal lines wrap continuously around the mug without a flat spot.
Step 2: Assembling the Cylinder
-
Score and slip:
Score (scratch) the beveled edges thoroughly and apply a generous amount of slip. This creates the glue that holds your pottery together. -
Form the cylinder:
Carefully lift the slab and curve it into a cylinder, bringing the beveled edges together. Press them firmly to join, supporting the wall from the inside with one hand. -
Smooth the seam:
Use a wooden tool or your thumb to smooth the seam on both the inside and outside. I find that rocking a wooden rib over the seam helps compress it without erasing too much of that lovely texture we added. -
Attach the base:
Roll out a small piece of clay for the floor. Set your cylinder on top of it, trace around the bottom, and cut out the circle. -
Join base to wall:
Score and slip both the bottom edge of the cylinder and the edge of the circle base. Press them together firmly. Roll a very thin coil of clay and press it into the interior seam where the floor meets the wall to ensure a watertight seal.
Step 3: Handle and Finishing
-
Cut the strap:
Cut a strip of clay for the handle, approximately 3/4 inch wide and 5 inches long. Smooth the edges with a damp sponge so they are rounded and comfortable to hold. -
Shape the handle:
Curve the strip into a ‘C’ or ear shape. Hold it up to your mug to check the proportions; trim the ends if it looks too large for the body. -
Attach the handle:
Score and slip the attachment points on both the mug body and the handle ends. Press the handle firmly onto the mug, blending the clay where it joins the body for a seamless look. -
Refine the rim:
Use a damp sponge or a piece of chamois leather to smooth the top rim of the mug. A rounded rim is much nicer to drink from than a sharp, cut edge. -
Dry slowly:
Cover the mug loosely with plastic to let it dry slowly to the leather-hard stage. This prevents the handle from cracking away from the body.
Coaster Companion
Use your leftover slab scraps to cut a simple circle coaster. Glaze it exactly like the mug for a matching set, leaving the rim raw for extra contrast.
Step 4: Glazing
-
Bisque fire:
Once bone dry, fire the piece in a kiln to bisque temperature (usually cone 04). -
Wax the base:
Apply wax resist to the bottom inch of the mug’s exterior. This creates the distinct two-tone look seen in the photo, where the raw, warm clay contrasts with the glaze. -
Glaze application:
Dip the mug into a satin white or cream glaze. The iron speckles in the clay will likely burn through the glaze during firing, creating the spotted effect. -
Final wipe:
Use a sponge to wipe away any glaze drips that might have settled on the waxed bottom section before the final firing.
Enjoy the warmth of your handmade mug and the tactile feel of the raw clay base


Folded-Edge Trinket Tray
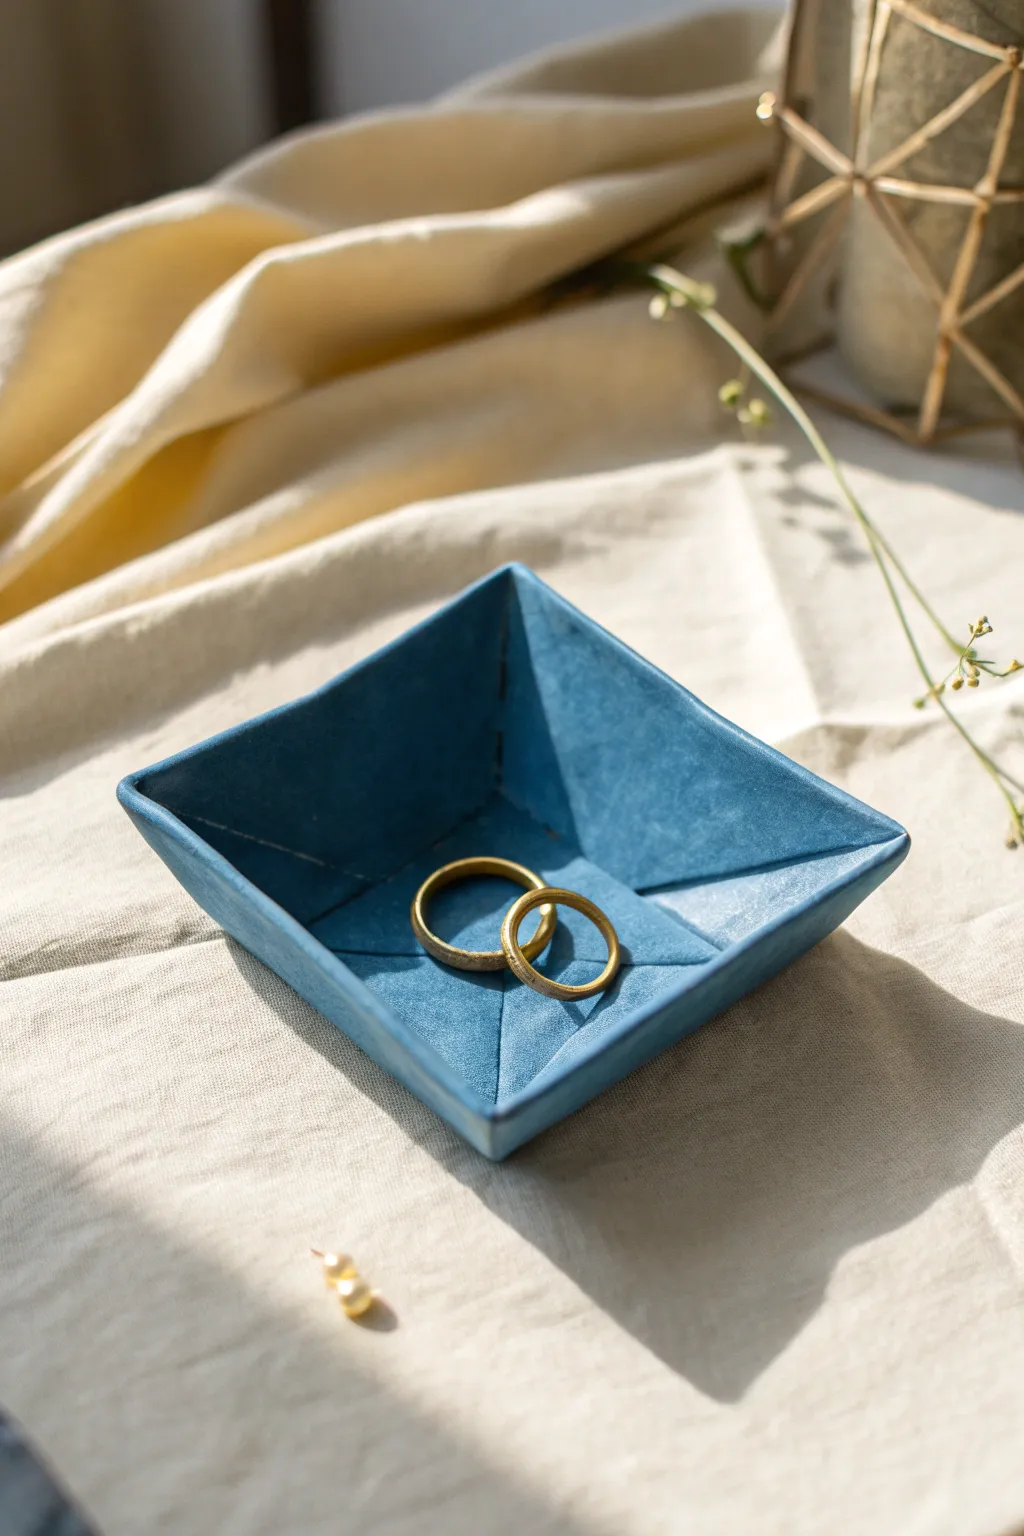
This striking blue trinket dish looks incredibly sophisticated but relies on a deceptively simple folding technique used with slab clay. Its sharp lines and deep azure color create a modern, faceted vessel perfect for holding your favorite rings.
Step-by-Step
Materials
- Polymer clay (blue, or white + blue pigment)
- Acrylic rolling pin
- Sharp craft knife or tissue blade
- Ruler or straight edge
- Paper template (square)
- Sandpaper (various grits)
- Matte or satin varnish (optional)
Step 1: Preparing the Slab
-
Condition the clay:
Begin by thoroughly conditioning your blue polymer clay until it is pliable and warm. If the clay is too stiff, it will crack when folded, so take your time here. -
Roll out the slab:
Using your acrylic rolling pin or a pasta machine, roll the clay out into an even slab about 3mm to 4mm thick. You want it sturdy enough to hold its shape. -
Check for air bubbles:
Inspect the surface for any trapped air bubbles. If you find one, gently pierce it with a needle tool and smooth the air out with your finger. -
Apply the template:
Place a square paper template onto your clay slab. A 4×4 or 5×5 inch square is a manageable size for beginners. -
Cut the square:
Using your sharp craft knife or tissue blade, cut carefully along the edges of the template to create a clean clay square.
Crack Control
If the clay cracks while folding, it wasn’t conditioned enough. Apply a drop of liquid clay or baby oil to the crack and smooth it over before baking.
Step 2: Folding and Shaping
-
Mark the center:
Lightly mark the exact center of the square with a needle tool, or place a small mark to guide your folding symmetry. -
Lift the corners:
Gently lift two opposite corners of the square towards each other, but don’t let them touch yet. -
Pinch the corners:
Pinch the very corners of the square to create a sharp point. You are effectively creating the ‘walls’ of the tray by pinching the excess clay at the corners. -
Fold the excess:
At each corner, take the pinched excess clay and fold it against either the inside or outside of the wall. For the look in the photo, create a neat interior fold. -
Secure the seam:
Press the folded clay firmly against the interior wall to seal it. You can smooth this seam with a sculpting tool if you want it invisible, or leave the folded line visible for a geometric effect. -
Repeat for all corners:
Continue this lifting and pinching process for the remaining corners until you have a four-sided bowl shape.
Marble Effect
Mix a tiny amount of white or gold clay into your blue slab but don’t fully blend it. This creates stone-like veins when you roll it out.
Step 3: Refining and Finishing
-
Straighten the walls:
Use your fingers or a flat tool to gently push the walls straight. Ensure the rim is level all the way around. -
Smooth edges:
Run your finger lightly along the top rim to soften just the sharpest cutting burrs, while keeping that crisp geometric look. -
Texture check:
If you want a specific texture like the photo, you can gently sponge the surface before baking, or leave it smooth. -
Bake the piece:
Bake according to your clay manufacturer’s instructions. Usually, this is around 275°F (130°C) for 15-30 minutes depending on thickness. -
Cool and sand:
Once fully cooled, use fine-grit sandpaper to smooth any rough spots on the rim or bottom. -
Seal:
Apply a thin coat of matte or satin varnish to protect the surface and deepen the blue color slightly.
Now you have a chic, modern spot to keep your jewelry safe and organized

The Complete Guide to Pottery Troubleshooting
Uncover the most common ceramic mistakes—from cracking clay to failed glazes—and learn how to fix them fast.
Soap Dish With Drainage Holes
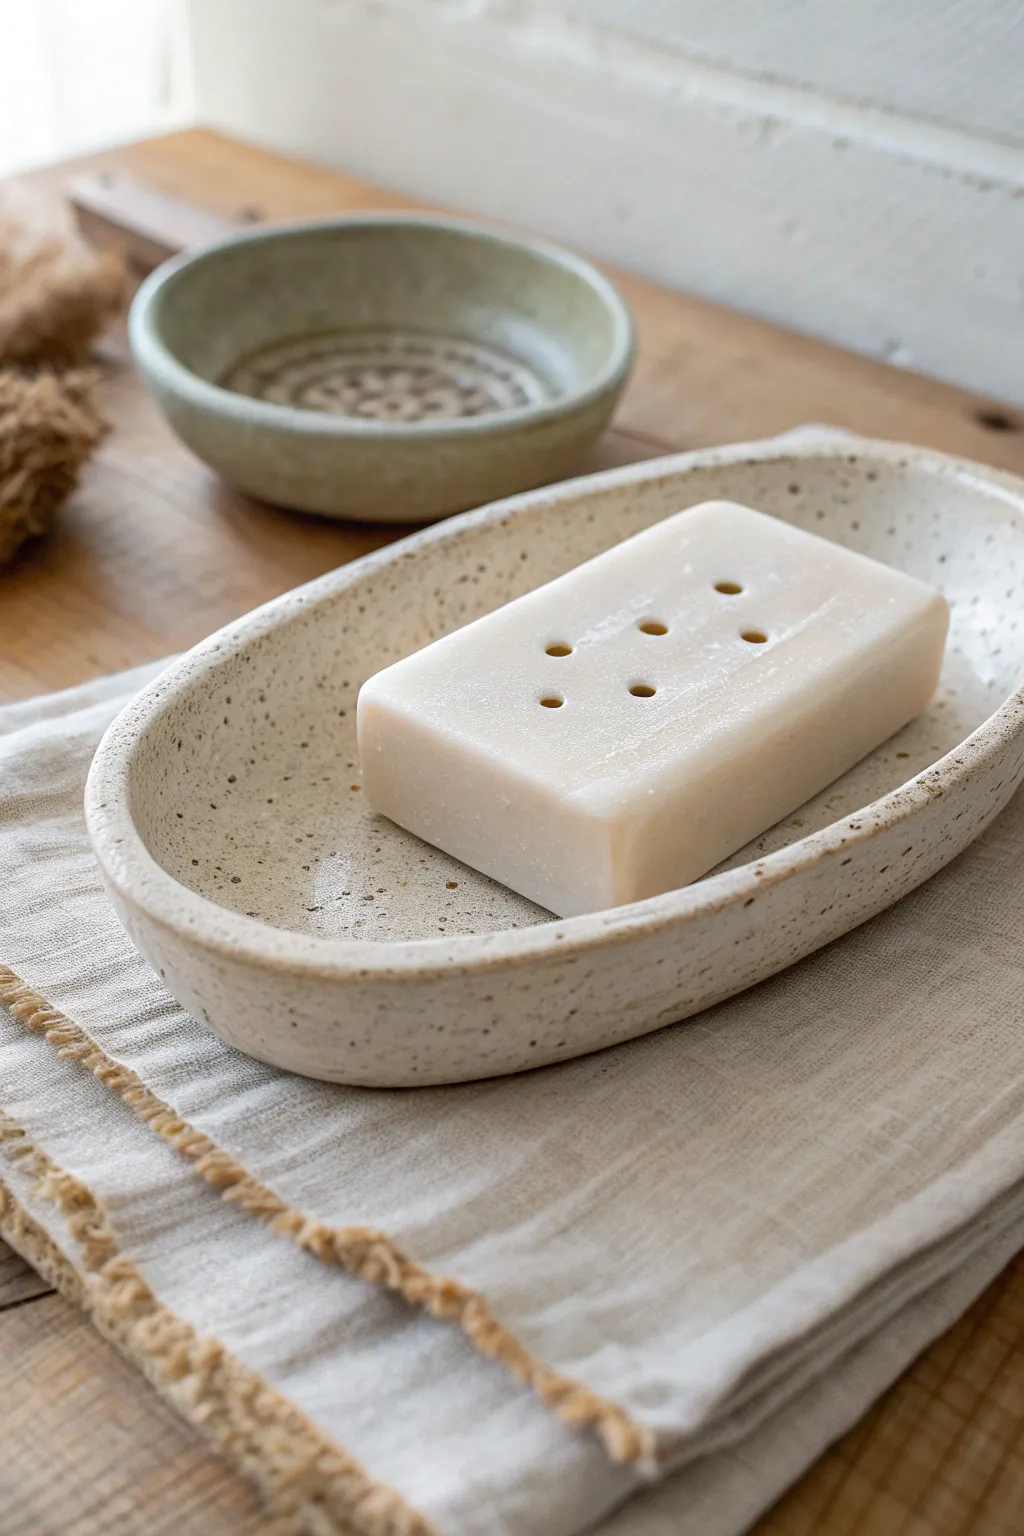
This elegant soap dish features a classic oval shape with a gently raised rim, perfect for keeping your luxury soaps dry and tidy. Its creamy, speckled glaze finish gives it a professional, handmade look that fits beautifully in any spa-like bathroom.
Step-by-Step Tutorial
Materials
- Speckled clay body (or plain stoneware with added manganese speckles)
- Rolling pin
- Wooden guide strips or slab roller (approx. 1/4 inch thickness)
- Oval paper template
- Fettling knife or needle tool
- Sponge
- Small bowl relative to your oval size (optional, for shaping)
- Clear or transparent white glaze
- Kiln
Step 1: Preparing the Slab
-
Wedge the clay:
Begin by thoroughly wedging your speckled clay. This ensures there are no air bubbles trapped inside and that the particle distribution is even. -
Set up guides:
Place your wooden guide strips on your canvas-covered work surface. I like to space them just wide enough to fit my intended oval shape. -
Roll the slab:
Using your rolling pin, roll the clay out until the pin rests flat against the guide strips. This guarantees a uniform thickness of about 1/4 inch across the entire surface. -
Smooth the surface:
Run a rubber rib tool firmly over the slab. This compresses the clay particles, which helps prevent warping later, and smooths out the canvas texture.
Pro Tip: Compression
Don’t skip compressing the rim! After cutting your oval, run a damp chamois leather strip over the edge. This prevents tiny hairline cracks from forming during firing.
Step 2: Shaping the Form
-
Cut the oval:
Place your oval paper template onto the smooth slab. Trace around it lightly with a needle tool first, then cut cleanly through with your fettling knife. -
Soften edges:
Take a slightly damp sponge and run it along the cut edge to round it off. Sharp edges can become brittle after firing, so softening them now is crucial. -
Lift the rim:
With the slab still on the canvas, gently use your thumbs to press into the center while pulling the edges upwards. You want to create a subtle, shallow bowl shape. -
Refine the curve:
If you struggle to get an even curve by hand, you can gently drape the slab over a shallow hump mold or inside a shallow foam bowl to help it hold its shape while it sets. -
Optional: Add drainage:
While the reference photo shows the soap itself having holes, many potters add three small holes in the center of the dish for drainage. Use a small hole punch tool if you desire this functionality.
Level Up: Texture
Before cutting the oval, press a piece of lace or a textured rolling pin into the slab’s underside. This adds a secret tactile element that feels great in the hand.
Step 3: Finishing and Firing
-
Slow drying:
Loosely cover the piece with plastic to let it dry slowly. Uneven drying is the enemy of flat oval shapes and can cause warping. -
Bisque fire:
Once bone dry, load the piece into the kiln for a bisque fire. This initial firing prepares the clay to accept the glaze without dissolving. -
Wax the foot:
Apply wax resist to the bottom of the dish to prevent it from sticking to the kiln shelf during the final firing. -
Apply glaze:
Dip the dish into a clear or semi-transparent white glaze. This type of glaze is essential to let the natural speckles of the clay body show through. -
Clean the rim:
Check the rim for any thick drips of glaze and gently sponge them back if necessary to maintain that crisp oval silhouette. -
Glaze fire:
Fire the piece a second time according to your clay and glaze’s specific temperature requirements.
Now you have a simple, minimalist dish ready to elevate your sink area
Spoon Rest With a Notch
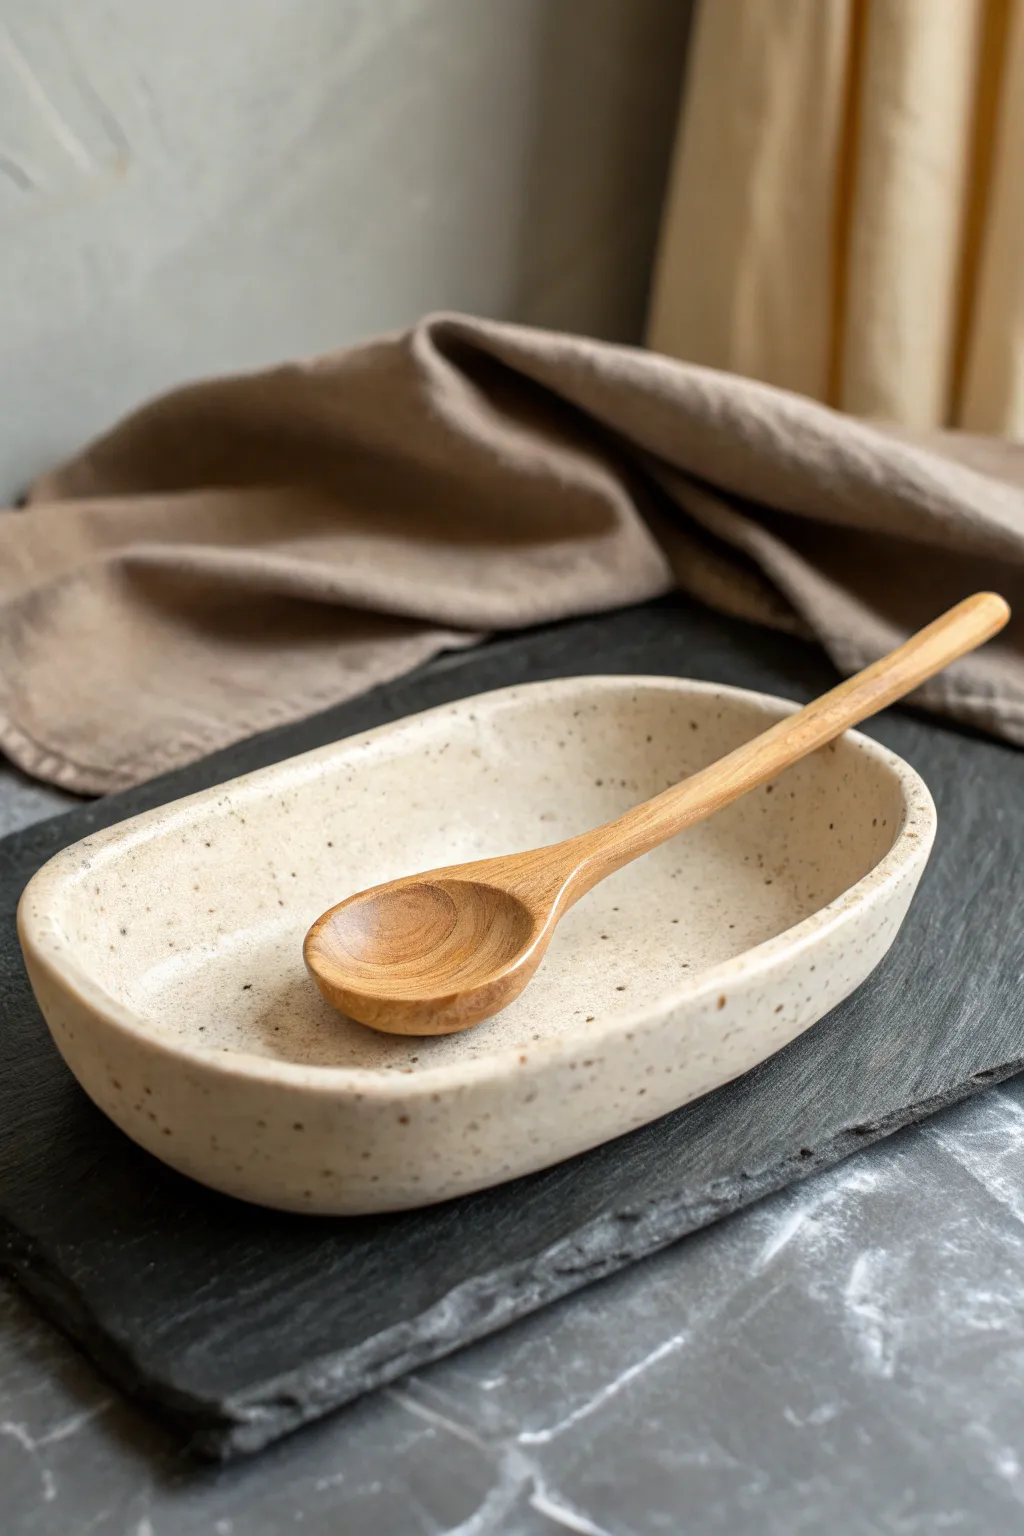
This rustic, functional piece combines a clean oval shape with an organic, speckled finish that looks perfect in any kitchen. It acts as a beautiful resting spot for your cooking utensils, keeping your counters clean while adding a touch of handmade charm.
Step-by-Step Guide
Materials
- Speckled stoneware clay body (e.g., Laguna Speckled Buff)
- Rolling pin
- Canvas or slab mat
- Oval template (paper or cardstock)
- Needle tool or fettling knife
- Sponge
- Soft rib (silicone or rubber)
- Modeling tool or finger for smoothing
- Matte white or clear glaze (depending on clay body)
Step 1: Forming the Slab
-
Prepare the Clay:
Begin by wedging a pound of speckled stoneware clay to ensure it is consistent and free of air bubbles. Pat it into a rough oval shape with your palms to get started. -
Roll the Slab:
Place the clay on your canvas or slab mat. Using your rolling pin, roll the clay out to a consistent thickness of about 1/4 inch. If you want perfectly even edges, use wooden slats on either side as depth guides. -
Smooth the Surface:
Before cutting, take your soft rib and gently compress the clay surface on both sides. This aligns the clay particles, removes canvas texture, and prevents warping later on.
Warped Bottom?
If the spoon rest rocks on the table, the bottom isn’t flat. While the clay is leather hard, gently tap the piece on a flat board to level the base before fully drying
Step 2: Shaping the Rest
-
Cut the Shape:
Lay your oval paper template onto the slab. Using a needle tool, trace around the template, holding the tool perpendicular to the table for a straight edge. Remove the excess clay. -
Soften the Rim:
Run a damp sponge or your finger along the sharp cut edge to round it off slightly. This prevents the rim from being sharp after firing. -
Create the Wall:
Since this is a shallow dish, we want to gently lift the edges. I like to place the slab on a piece of foam and press a small sandbag into the center, or simply cup the clay in my hands, gently pinching and lifting the perimeter to create a shallow curve. -
Refine the Curve:
Ensure the transition from the floor of the spoon rest to the wall is smooth. Use your rib tool on the inside curve to define the shape while supporting the outside with your hand. -
Add the Notch (Optional):
While the prompt mentions a notch, the reference image shows a smooth rim. To stay true to the photo, leave the rim continuous. If you prefer a notch for the spoon handle, gently press a thumb into one side of the rim now. -
Check Leveling:
Set the piece on a flat board. Look at it from eye level to ensure the rim is relatively even, though a bit of organic wave adds character.
Wax Resist Design
Before glazing, paint a simple pattern or rim line with wax resist. The raw, toasted clay will show through the white glaze for a striking two-tone effect
Step 3: Finishing and firing
-
Slow Dry:
Cover the piece loosely with plastic so it dries slowly. If the rim dries too fast compared to the thick bottom, it might warp. Let it reach bone dry state. -
Bisque Fire:
Fire the piece to cone 04 (or your clay body’s specifications) for the bisque firing. -
Glaze Application:
Wipe the bisque-ware with a damp sponge to remove dust. Pour a matte white glaze inside the bowl and pour it out, or dip the entire piece if you have tongs. -
Reveal the Speckles:
Because the clay body has speckles, a semi-opaque or transparent white glaze works best. As the glaze melts, the iron pyrite in the clay will bleed through, creating that lovely spotted effect seen in the photo. -
Clean the Foot:
Wipe the glaze off the very bottom of the piece with a sponge so it doesn’t stick to the kiln shelf. -
Glaze Fire:
Fire the final piece to maturity (typically Cone 5 or 6 for stoneware). Allow the kiln to cool completely before opening to prevent thermal shock.
Enjoy using your new handmade spoon rest during your next cooking session


What Really Happens Inside the Kiln
Learn how time and temperature work together inside the kiln to transform clay into durable ceramic.
Coasters With Pressed Texture
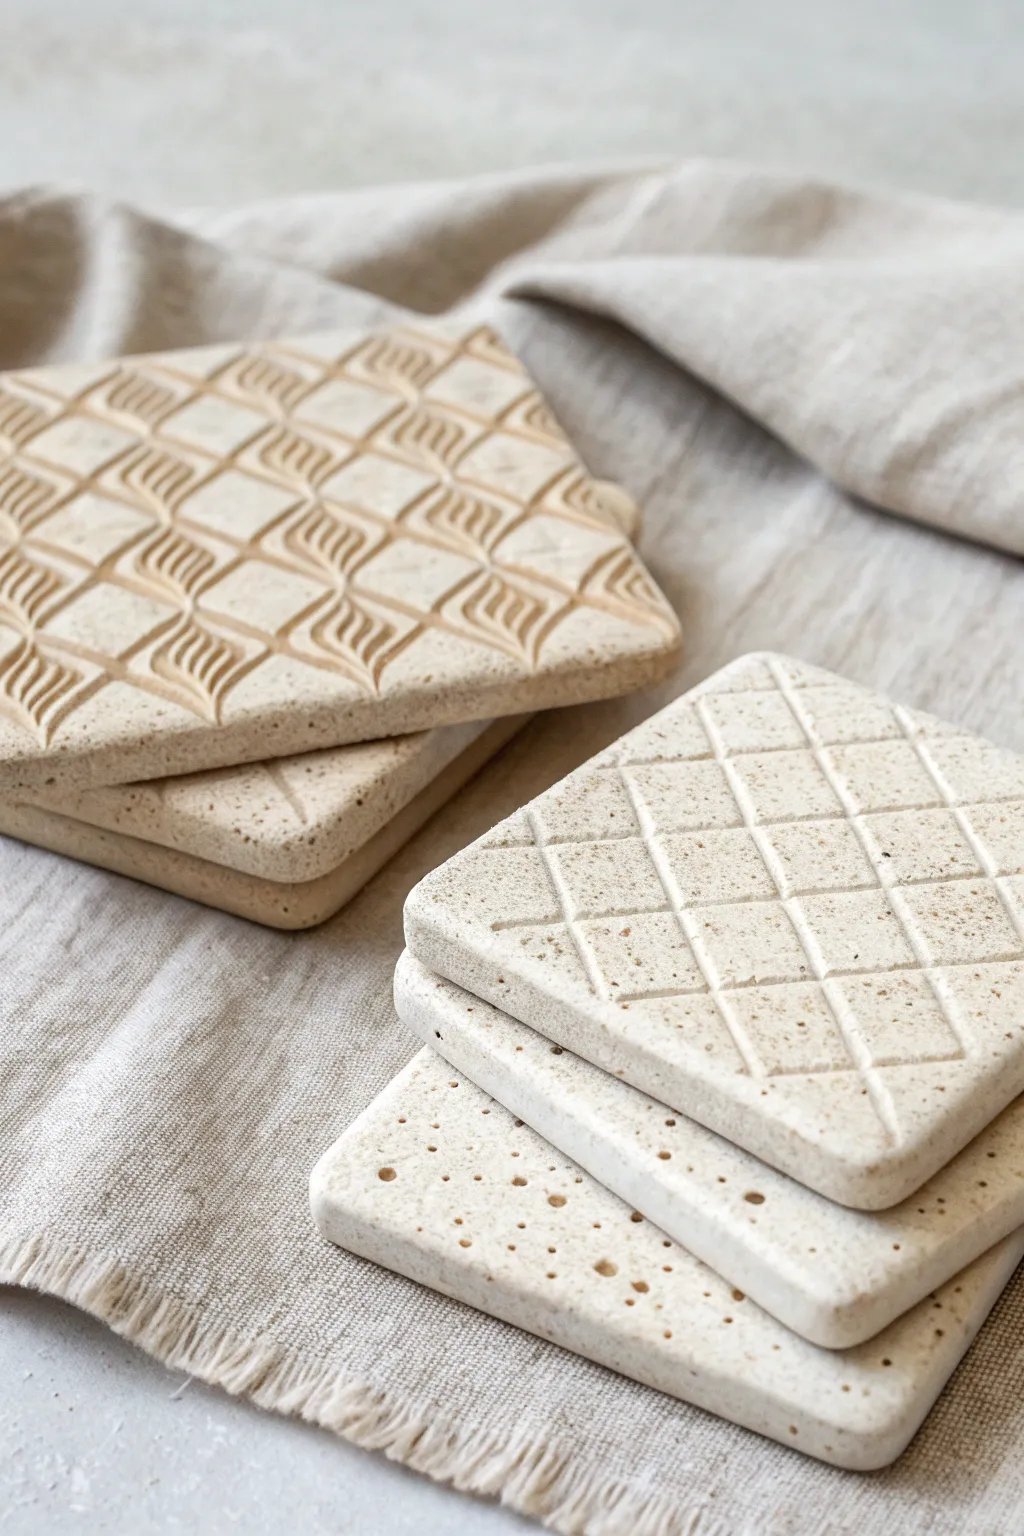
These elegant, earthy coasters bring a touch of artisanal charm to your coffee table using nothing more than slab-rolled clay and simple texture tools. The natural speckled finish and consistent geometric patterns make them look professionally thrown, yet they are surprisingly approachable for beginners.
Detailed Instructions
Materials
- Speckled stoneware clay or air-dry clay (if not kiln firing)
- Rolling pin
- Two wooden guide strips (approx. 1/4 inch thick)
- Square cookie cutter (approx. 4×4 inches) or a ruler and needle tool
- Texture mats or rollers (diamond pattern and swirling motif)
- Clean canvas or heavy fabric for working surface
- Sponge and water
- Cornstarch (for release)
- Sandpaper (fine grit)
- Clear matte glaze (optional, for fired clay)
Step 1: Preparation and Rolling
-
Prepare your workspace:
Lay down your canvas or heavy fabric on a flat table. This prevents the clay from sticking and absorbs excess moisture as you work. Place your wooden guide strips on either side of your working area to ensure an even thickness. -
Wedge the clay:
Take a ball of your speckled stoneware clay and wedge it thoroughly to remove any air bubbles. This is crucial to prevent cracking later during the drying or firing process. -
Roll the slab:
Place the clay ball between the guide strips. Using your rolling pin, roll the clay out until the pin rests flat on the wooden guides. You want a smooth, consistent slab that is roughly 1/4 inch thick. -
Smooth the surface:
Take a slightly damp sponge or a silicone rib and gently wipe the surface of the clay slab. This compresses the clay particles and creates a pristine canvas for your texture.
Step 2: Adding Texture
-
Apply a release agent:
Lightly dust the surface of the clay or your texture tool with cornstarch. This simple trick prevents the tool from sticking and pulling up the clay, ensuring a crisp impression. -
Press the diamond grid:
For the simple grid design, press a diamond-patterned texture mat or roller firmly into the slab. Apply even pressure as you roll or press to ensure the lines are deep enough to catch glaze later but not so deep they cut through. -
Create the swirling motif:
For the more intricate patterned coasters, use a decorative stamp or carved rolling pin. Position it carefully to align the repeating pattern and press down firmly to transfer the detailed swirling diamond design. -
Create the dotted texture:
For the bottom variation shown in the image, use the end of a paintbrush or a small dowel to gently press random indentations into the surface, creating a porous, organic look. -
Re-compress gently:
Sometimes pressing texture can distort the slab slightly. If necessary, gently tap the slab with a flat board to level it out without ruining your design.
Warp-Free Tip
To prevent curling corners, dry your coasters sandwiched between two pieces of drywall or wooden boards. The weight keeps them perfectly flat as moisture evaporates.
Step 3: Cutting and Refining
-
Cut the shapes:
Position your square cookie cutter over the textured areas to capture the best part of the design. Press straight down and lift up. If using a ruler and needle tool, measure 4-inch squares and cut cleanly. -
Soften the edges:
I always find that sharp edges chip easily. Run a damp finger or sponge lightly along the cut edges of each coaster to round them off slightly. -
Dry slowly:
Place your coasters on a ware board or piece of drywall. Cover them loosely with plastic sheeting to allow them to dry slowly over 2-3 days. This slow drying prevents warping. -
Flip occasionally:
Flip the coasters over once a day during the drying process to ensure both sides dry at the same rate, keeping them perfectly flat.
Texture Trouble?
If your texture looks shallow or washed out, the clay might be too dry. Spray a fine mist of water over the slab and wait 5 minutes before trying to press the texture again.
Step 4: Finishing
-
Sanding:
Once bone dry (or fully cured if using air-dry clay), use fine-grit sandpaper to gently smooth out any rough spots on the rim or bottom. Wear a dust mask for this step. -
Bisque fire:
If using ceramic clay, fire the pieces to cone 04 (or your clay’s specific bisque temperature) in a kiln. -
Glazing:
For the natural look in the photo, dip the coasters in a clear matte glaze, or leave the raw clay unglazed if it is fully vitrified stoneware. If using air-dry clay, seal with a matte acrylic varish. -
Final firing:
Fire the glazed pieces to the final maturity temperature for your clay body (e.g., cone 6 for stoneware). Once cooled, attach small felt or cork pads to the bottom to protect your furniture.
Enjoy using your new set of custom-textured coasters for your morning coffee or gifting them to a lucky friend
Mini Pinch Bowls From Slab Scraps
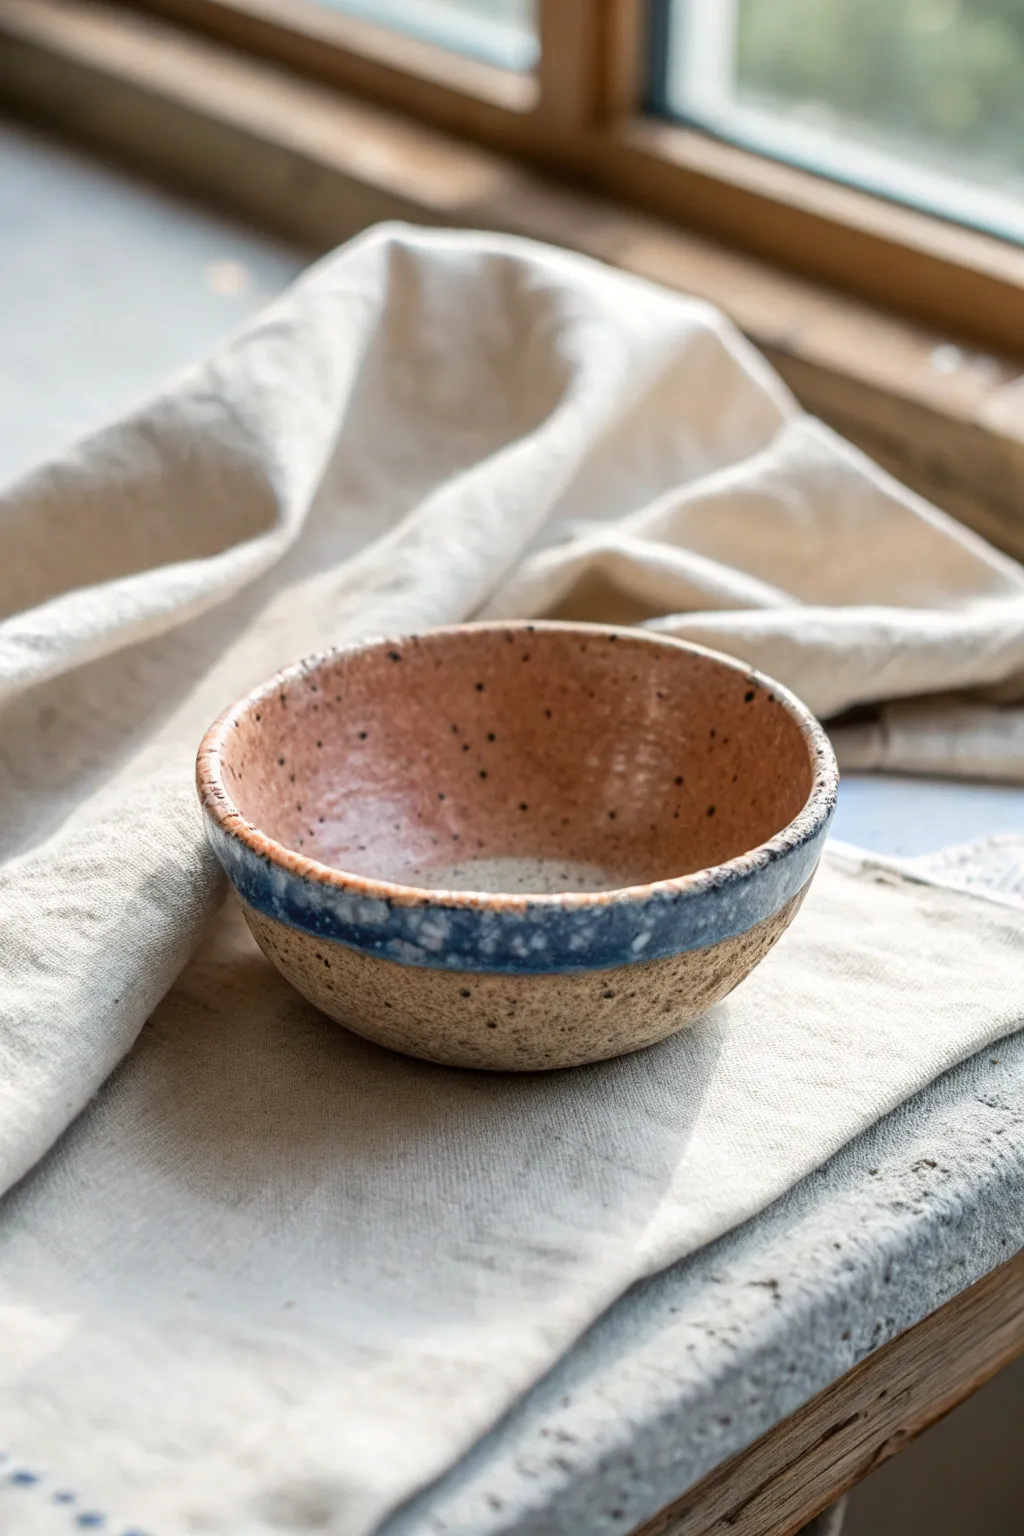
Transform your leftover clay trimmings into this charming, rustic bowl that highlights the natural beauty of speckled clay. With a warm blush interior and a distinctive navy rim accent, this piece proves that scrap clay can become your favorite pottery project.
Step-by-Step Tutorial
Materials
- Leftover speckled stoneware clay scraps
- Rolling pin
- Circular template (cookie cutter or jar lid, approx. 4-5 inches)
- Fettling knife or needle tool
- Clean sponge
- Wooden modeling tool or rib
- Small bowl or hump mold (optional)
- Speckled blush pink glaze (cone 5/6)
- Navy blue glaze (cone 5/6)
- Clear glaze (optional for exterior)
- Kiln access
Step 1: Preparing the Slab
-
Reclaim scraps:
Gather your clay scraps and wedge them thoroughly to remove air bubbles and ensure the moisture consistency is even throughout the ball. -
Roll it out:
Using your rolling pin, flatten the wedged ball into a small slab. Aim for a thickness of about 1/4 inch, trying to keep it consistent so the walls dry evenly. -
Smooth the surface:
Before cutting, take a damp sponge or a soft rib tool and gently compress the surface of the slab to remove canvas texture or rolling marks. -
Cut the circle:
Place your circular template onto the slab and cut around it using a needle tool or fettling knife to get a clean, round base.
Rim Cracks?
If the rim creates tiny fissures while you bend the slab, compress the clay rim immediately with a damp sponge. Keeping the clay slightly wetter during forming helps prevent this.
Step 2: Forming the Bowl
-
Pinch the edges:
Pick up the clay circle. Gently pinch the edges upward while rotating the clay in your hand, starting to curve it from a flat disc into a shallow bowl shape. -
Deepen the curve:
Continue working your way around the rim, pressing your thumb into the center and pulling the walls up slightly to deepen the curve. I find this organic pinching method gives it more character than a perfect mold. -
Refine the rim:
Run a damp sponge or piece of chamois leather over the rim to smooth out any sharp edges or cracks that formed during the shaping process. -
Optional mold assistance:
If you are struggling to get a round shape, gently press your clay disc into a small bisque bowl or over a hump mold to guide the form, then remove it once it holds its shape. -
Dry slowly:
Set the finished greenware bowl aside to dry slowly. Cover loosely with plastic for the first day to prevent the rim from drying too fast and warping. -
Bisque fire:
Once bone dry, fire the piece to bisque temperature (usually cone 04) according to your clay body’s instructions.
Step 3: Glazing and Finishing
-
Wax the bottom:
Apply wax resist to the foot or bottom surface of the bisque bowl to prevent glaze from running onto the kiln shelf. -
Glaze the interior:
Pour the speckled blush pink glaze into the bowl, swirl it to coat the entire interior, and pour out the excess. Wipe any drips off the rim immediately. -
Exterior texture:
Leave the lower half of the exterior unglazed (raw clay) to show off the beautiful speckles and grainy texture of the stoneware. -
Apply the accent band:
Dip a brush into the navy blue glaze and carefully paint a band around the exterior rim, about half an inch thick. Let it overlap slightly with the pink interior at the very lip. -
Final wipe:
Check the bottom one more time to ensure no glaze droplets have traveled entirely to the foot. -
Glaze fire:
Load the kiln and fire to the maturity temperature of your glaze and clay (typically cone 5 or 6 for stoneware).
Stamp It
Before the clay dries to leather-hard, press a small personalized maker’s mark or a textured nature stamp into the unglazed lower exterior for a custom touch.
Enjoy using your new scrap bowl for holding rings, spices, or just admiring the beautiful interaction of glaze and raw clay

TRACK YOUR CERAMIC JOURNEY
Capture glaze tests, firing details, and creative progress—all in one simple printable. Make your projects easier to repeat and improve.
Slab-Built Tumblers
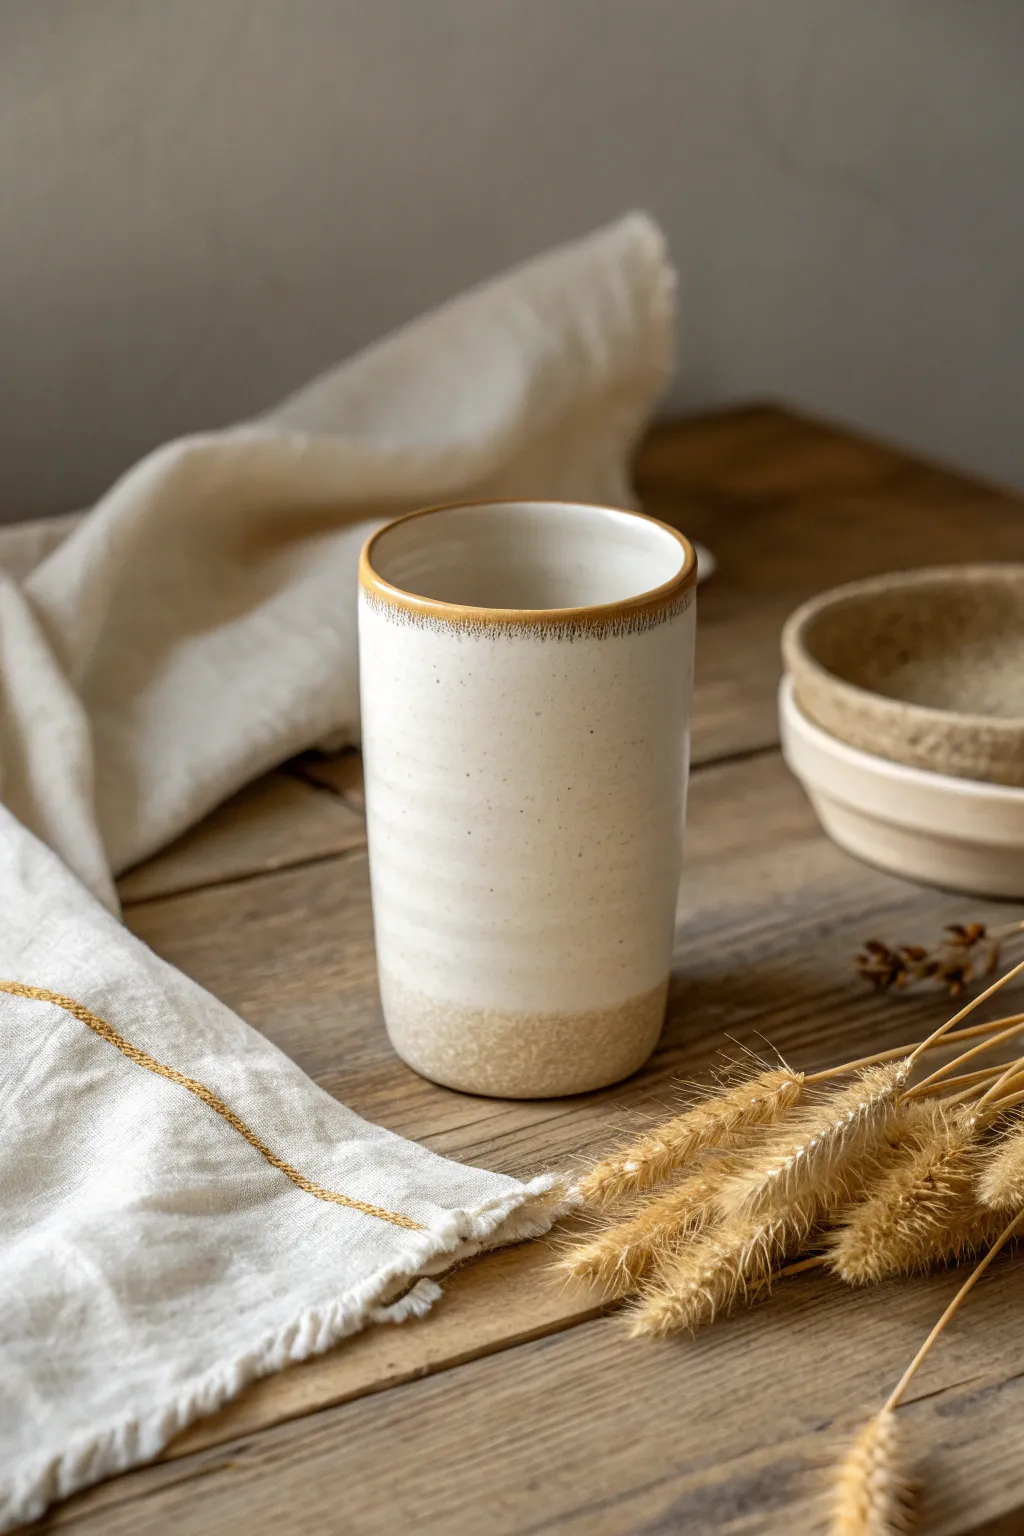
This elegant yet grounded slab-built tumbler features a beautiful contrast between smooth, creamy glaze and raw, speckled clay. Its simple cylindrical form is elevated by a distinct brown-oxide rim that beautifully frames the piece.
Detailed Instructions
Materials
- Speckled stoneware clay (mid-fire)
- Canvas working surface
- Rolling pin
- Two wooden guide slats (approx. 1/4 inch thick)
- Fettling knife or needle tool
- Rib tool (flexible metal or rubber)
- Serrated rib or scoring tool
- Slip (clay mixed with water)
- Cylindrical mold/form (like a PVC pipe or heavy cardboard tube) approx 3 inches diameter
- Newspaper
- Damp sponge
- Creamy white matte glaze
- Iron oxide wash or brown underglaze
- Small paintbrush
Step 1: Preparing the Slab
-
Roll the clay:
Begin by wedging your speckled stoneware clay to remove air bubbles. Place it on your canvas between the two wooden guide slats. Roll the clay out until the rolling pin rests flat on the guides, ensuring an even thickness across the entire slab. -
Smooth the surface:
Before cutting, take your flexible rib tool and compress the slab on both sides. This aligns the clay particles to prevent warping later and provides a nice, smooth canvas for your glaze. -
Measure and cut:
Determine the circumference of your chosen form (C = diameter × 3.14). Add about 1/4 inch for overlap or beveling. Cut a rectangular strip based on this length and your desired height (around 5–6 inches for a tall tumbler). -
Cut the base:
Use your cylindrical form or a generic circle cutter to trace and cut out a circular base from the remaining slab scrap.
Wobbly Walls?
If your slab slumps when you stand it up, the clay is too wet. Let the cut slab sit on the canvas for 20-30 minutes until it’s ‘cheese hard’—firm enough to hold shape but soft enough to bend.
Step 2: Assembling the Cylinder
-
Prepare the form:
Wrap your cylindrical mold (PVC pipe or similar) in a single sheet of newspaper. This critical step prevents the wet clay from sticking to the mold and allows you to slide it out easily later. -
Bevel the edges:
On the short ends of your rectangular strip, cut 45-degree angles in opposite directions. This allows the seam to overlap flush rather than creating a thick lump. -
Score and slip:
Roughen the beveled edges with a serrated tool and apply a generous amount of slip. -
Form the wall:
Wrap the clay rectangle around your newspaper-covered mold. Press the beveled ends together firmly to create the cylinder. Use a wooden modeling tool or your thumb to blend the seam inside and out until it is invisible. -
Attach the base:
Score and slip the bottom edge of the cylinder and the outer edge of the circular base. Place the cylinder on top of the base. -
Seal the bottom:
Use a wooden tool to drag clay from the base up onto the wall to seal the joint. Smooth this connection with a rib so it is seamless. -
Refine the shape:
While the mold is still inside, use a rib to smooth the outside walls again. Gently slide the mold out once the cylinder holds its shape.
Pro Tip: Texture
For the subtle horizontal ribs seen on the white section, gently drag a serrated kidney rib horizontally around the pot while it’s still on the mold, before you smooth it out fully.
Step 3: Finishing and Glazing
-
Refine the rim:
The rim in the photo is slightly rounded. Use a damp chamois strip or a sponge to gently compress and round the top lip of the tumbler. -
Bisque fire:
Allow the tumbler to dry slowly under loose plastic for a few days before bisque firing it to cone 04 (or your clay’s specific bisque temperature). -
Wax the bottom:
To achieve the look in the image, apply wax resist to the bottom 1.5 inches of the fired tumbler. This will keep the glaze off the lower section, revealing the raw speckled clay. -
Dip glaze:
Dip the tumbler quickly into a bucket of creamy white matte glaze. Hold it upside down for a few seconds to let drips fall off, then turn upright. I find wiping any stray glaze spots off the waxed area immediately keeps the line crisp. -
Apply the rim detail:
Once the main glaze is dry to the touch, use a small brush to apply a thin line of iron oxide wash or brown underglaze directly onto the very edge of the rim. It should naturally bleed slightly into the white glaze during firing. -
Glaze fire:
Fire the piece to cone 5 or 6 (depending on your clay body) to fully mature the glaze and vitrify the stoneware.
Enjoy the tactile pleasure of using a cup where the raw earth meets a smooth finish
Leaf-Shaped Slab Dish
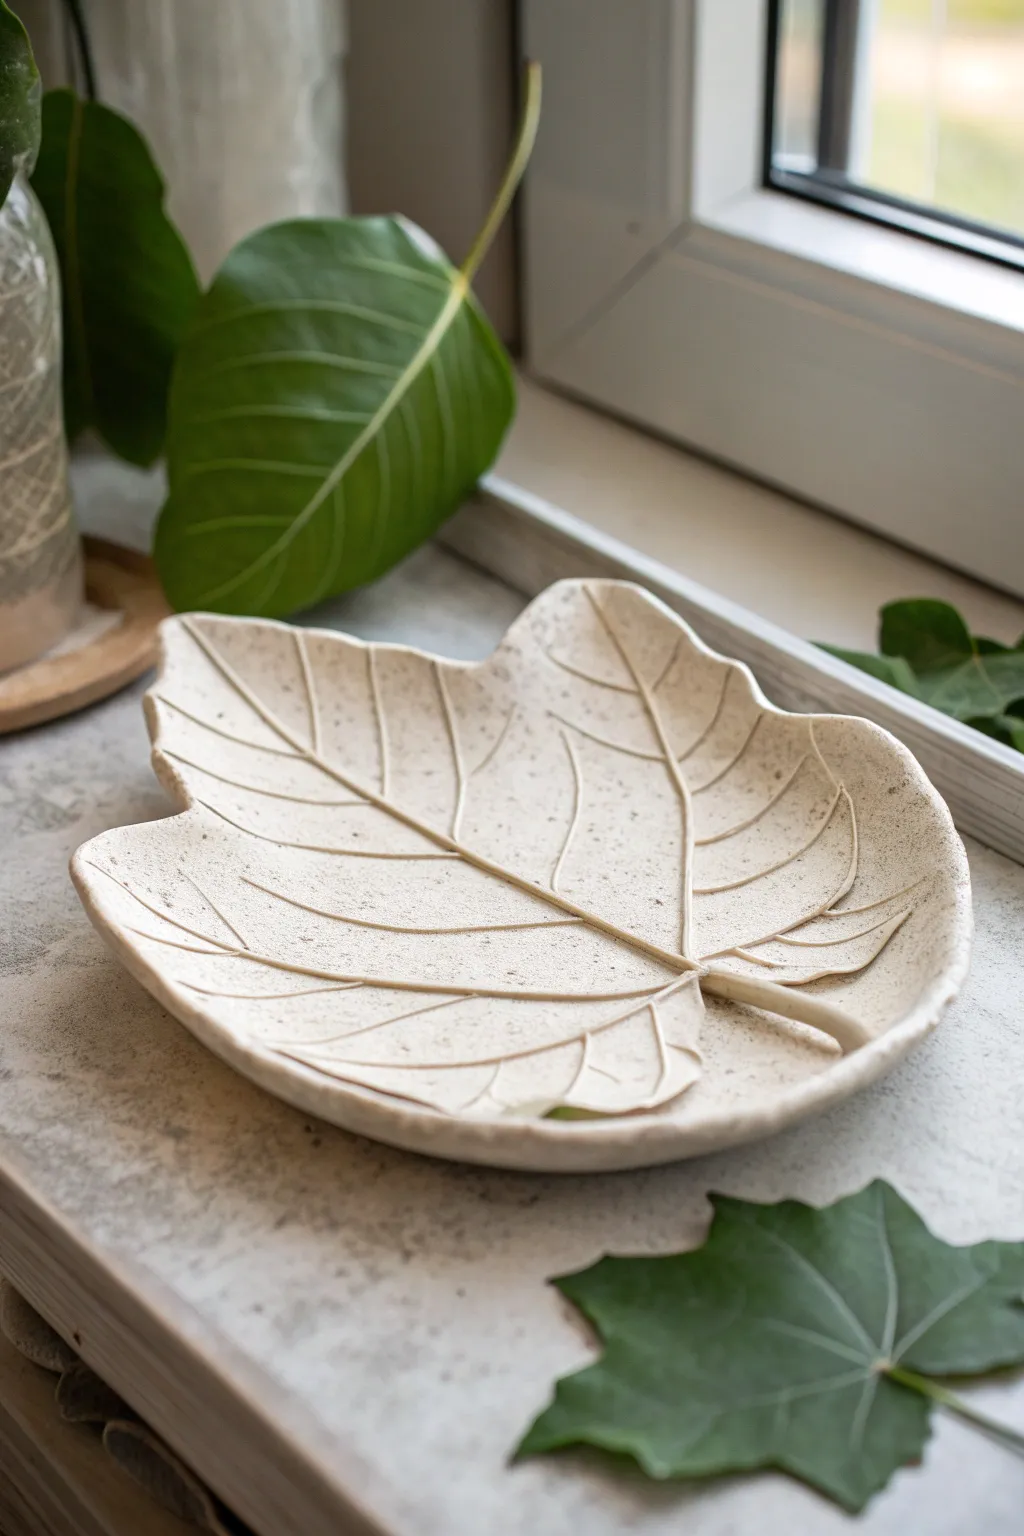
Bring the outdoors in with this elegant leaf-shaped dish, perfect for holding keys or jewelry. With its organic speckled finish and distinctive vein structure, this project is an excellent introduction to working with clay slabs and texture.
Step-by-Step
Materials
- Speckled stoneware clay (light beige or buff)
- Large, fresh leaf with prominent veins (e.g., maple, sycamore, or fig)
- Rolling pin
- Two guide slats (approx. 1/4 inch thick)
- Canvas or heavy fabric mat
- Needle tool or fettling knife
- Small loop tool or carving tool
- Sponge
- Small bowl or curved mold (for shaping)
- Sandpaper (fine grit)
- Matte clear glaze
Step 1: Preparation & Rolling
-
Prep your workspace:
Lay down your canvas or heavy fabric mat on a flat surface. This prevents the clay from sticking to your table and absorbing too much moisture. -
Wedge the clay:
Take a manageable chunk of speckled stoneware clay and wedge it thoroughly to remove air bubbles and ensure consistency. -
Roll the slab:
Place the clay between your two guide slats. Using the rolling pin, roll the clay out until it is an even thickness, aligning with the height of your slats. -
Smooth the surface:
Take a damp rib or a slightly moist sponge and gently compress the clay surface to remove any canvas texture or rolling marks.
Vein Definition
If your leaf doesn’t have thick veins, use a loop tool to gently carve out material *beside* the impressed line to make the veins pop.
Step 2: Shaping the Leaf
-
Position the leaf:
Place your fresh leaf vein-side down onto the clay slab. I like to gently run my fingers over it first to ensure full contact before rolling. -
Press the texture:
Use your rolling pin to firmly roll over the leaf once. This embeds the veins into the clay surface without making the slab too thin. -
Cut the outline:
Holding your needle tool or fettling knife vertically, carefully cut around the perimeter of the leaf. Remove the excess clay. -
Refine the edges:
Gently lift the clay leaf. Use a damp sponge or your fingertip to smooth the sharp cut edges, rounding them slightly for a finished look. -
Enhance the veins:
If the natural leaf didn’t leave a deep enough impression, use a carving tool or a modeling tool to carefully deepen the central stem and main veins, mimicking the clear lines seen in the example.
Step 3: Forming & Drying
-
Create the curve:
Transfer your clay leaf into a shallow bowl or drape it over a curved mold. This will give it the gentle, cupped shape suitable for holding items. -
Slow drying:
Cover the dish loosely with plastic. Allow it to dry slowly for a day or two to prevent warping, then uncover it to reach bone dry stage. -
Bisque fire:
Fire the piece in a kiln to bisque temperature (usually Cone 04) to prepare it for glazing.
Level Up: Oxide Wash
Before the final glaze, wipe a dark iron oxide wash into the veins and sponge off the high points to create dramatic contrast.
Step 4: Finishing Touches
-
Sand for smoothness:
Once fired and cooled, gently sand any rough spots on the rim or bottom. Always wear a mask when sanding bisque. -
Clean the surface:
Wipe the dish down with a damp sponge to remove all ceramic dust, or the glaze might not adhere properly. -
Apply clear glaze:
Dip or brush a matte clear glaze over the entire piece. A matte finish preserves the natural, earthy look of the speckled clay. -
Wipe the foot:
Use a sponge to wipe the glaze off the very bottom of the dish where it will touch the kiln shelf. -
Final firing:
Fire the piece again to the maturity temperature of your clay body (likely Cone 5 or 6 for stoneware).
Now you have a stunning, nature-inspired dish ready to grace your windowsill or coffee table
Botanical Impression Serving Board
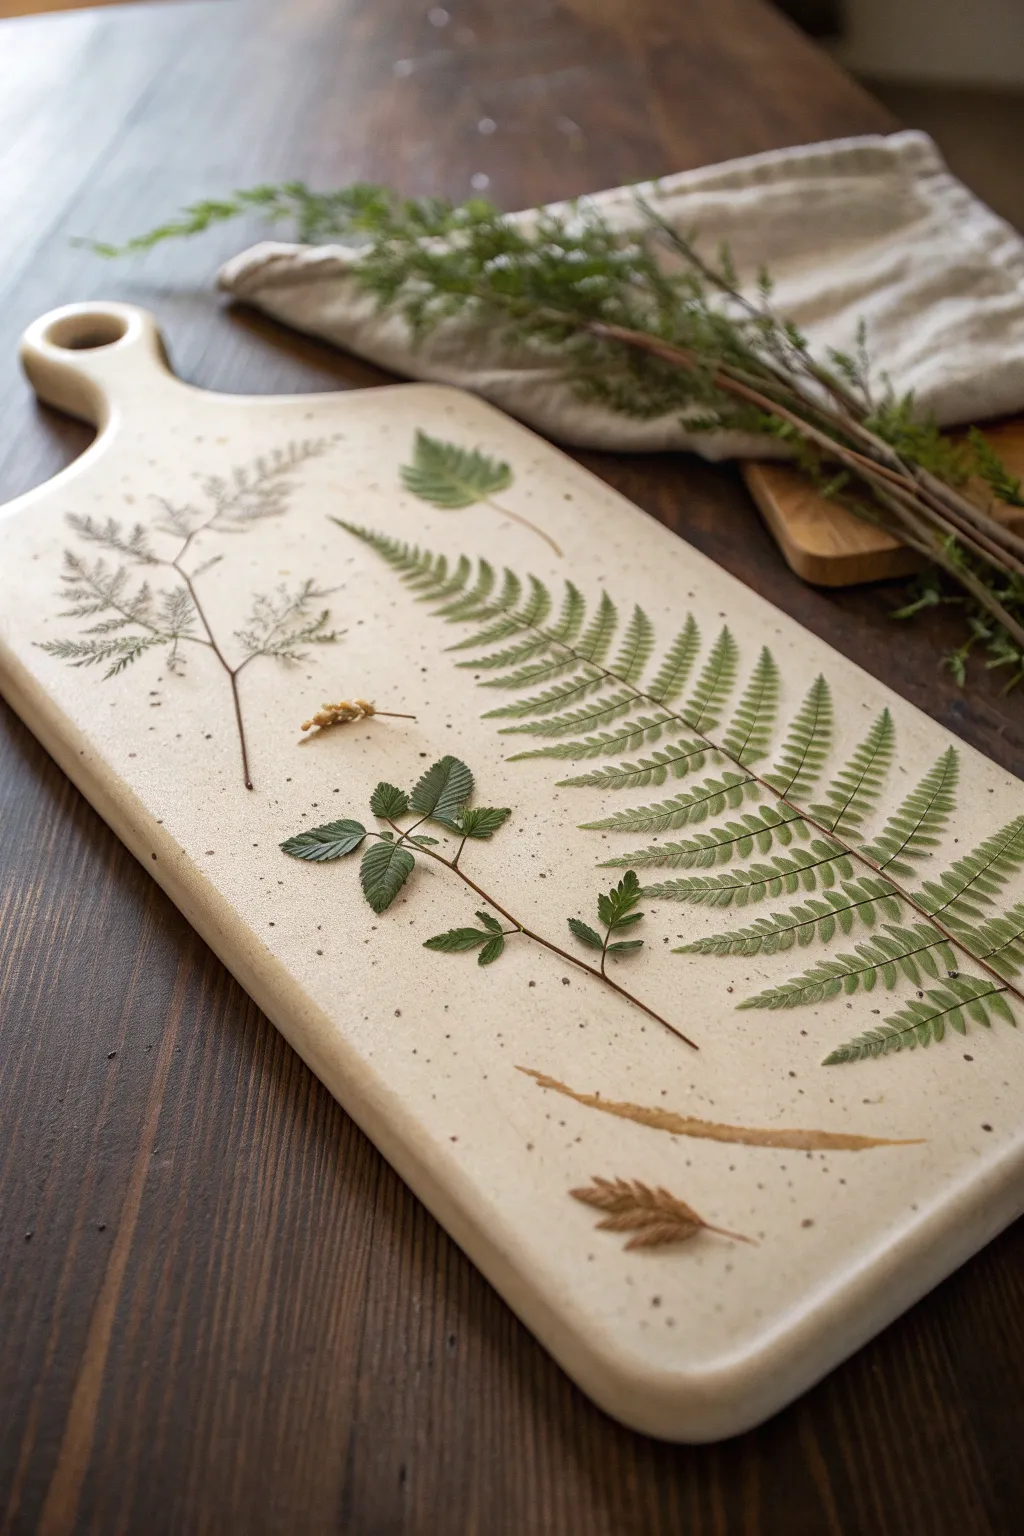
Capture the delicate details of nature with this elegant ceramic serving board. Using real foliage pressed directly into soft clay creates stunning, fossil-like textures that are highlighted with a simple wash, making it a perfect beginner-friendly slab project.
Step-by-Step Tutorial
Materials
- White stoneware clay (preferably with grog or speckles)
- Rolling pin
- Two wooden guide slats (approx. 1/4 inch thick)
- Canvas or heavy fabric mat
- Assorted fresh leaves and ferns (flat varieties work best)
- Fettling knife or needle tool
- Rib tool (smooth metal or rubber)
- Sponge
- Underglaze (dark brown or green) or Iron Oxide wash
- Clear matte food-safe glaze
- Small paintbrush
- Sandpaper (for bisque stage)
Step 1: Preparing the Slab
-
Wedge the clay:
Begin by thoroughly wedging your clay to remove air bubbles and ensure a uniform consistency. -
Set up your workspace:
Lay down your canvas mat to prevent sticking. Place your wooden guide slats on either side of the clay ball to ensure an even thickness. -
Roll the slab:
Use your rolling pin to flatten the clay, rolling over the guide slats until the pin rests on them. This guarantees your board will be perfectly flat and uniform. -
Smooth the surface:
Take your rib tool and firmly compress the clay surface. Drag it across the slab in multiple directions to align the clay particles, which helps prevent warping later.
Sticky Situation?
If leaves stick to the clay and tear when peeling, wait 10 minutes. As the clay absorbs moisture from the leaf, it often releases easier.
Step 2: Creating the Design
-
Arrange the botanicals:
Place your selected leaves and ferns onto the clay slab. -
Plan composition:
Experiment with the layout before committing; try a large central fern balanced by smaller sprigs on the sides, similar to the photo. -
Pressing the plants:
Once satisfied with the arrangement, gently roll your rolling pin over the leaves. Apply firm, even pressure to embed them flush with the clay surface without distorting the slab’s shape. -
Revealing the texture:
Carefully snag the stem of each leaf with a needle tool or your fingernail and peel them away to reveal the crisp impression left behind. -
Adding subtle texture:
I like to flick a stiff toothbrush dipped in a little watered-down clay or oxide across the surface to add those tiny speckles seen in the reference image.
Vein Definition
Place leaves vein-side down! The back of the leaf always has more raised texture than the front, giving you a much crisper impression.
Step 3: Shaping and Finishing
-
Cut the shape:
Using a needle tool or fettling knife, cut out a large rectangular shape, rounding the top corners. -
Form the handle:
At the top of the rectangle, carve out a protruding handle shape with a round hole in the center for hanging. -
Refine the edges:
Once the clay is leather-hard, use a damp sponge to smooth down the cut edges and the inside of the handle hole to remove any sharpness. -
Bisque fire:
Allow the piece to dry slowly between two pieces of drywall or wood to prevent warping, then bisque fire according to your clay body’s instructions. -
Applying color:
Mix a small amount of dark green or brown underglaze with water. Paint this wash into the impressed textures. -
Wiping back:
immediately wipe the surface with a damp sponge. The color will stay in the deep veins of the leaves but wipe clean from the high points. -
Glazing:
Apply a coat of clear matte glaze over the entire board to seal the clay while keeping the natural look. -
Final firing:
Fire the piece a final time to the glaze temperature recommended for your specific clay.
Once fired, this durable board is ready to bring a touch of the outdoors to your next dinner party
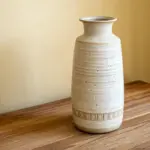
Slab Vase Made From a Cylinder
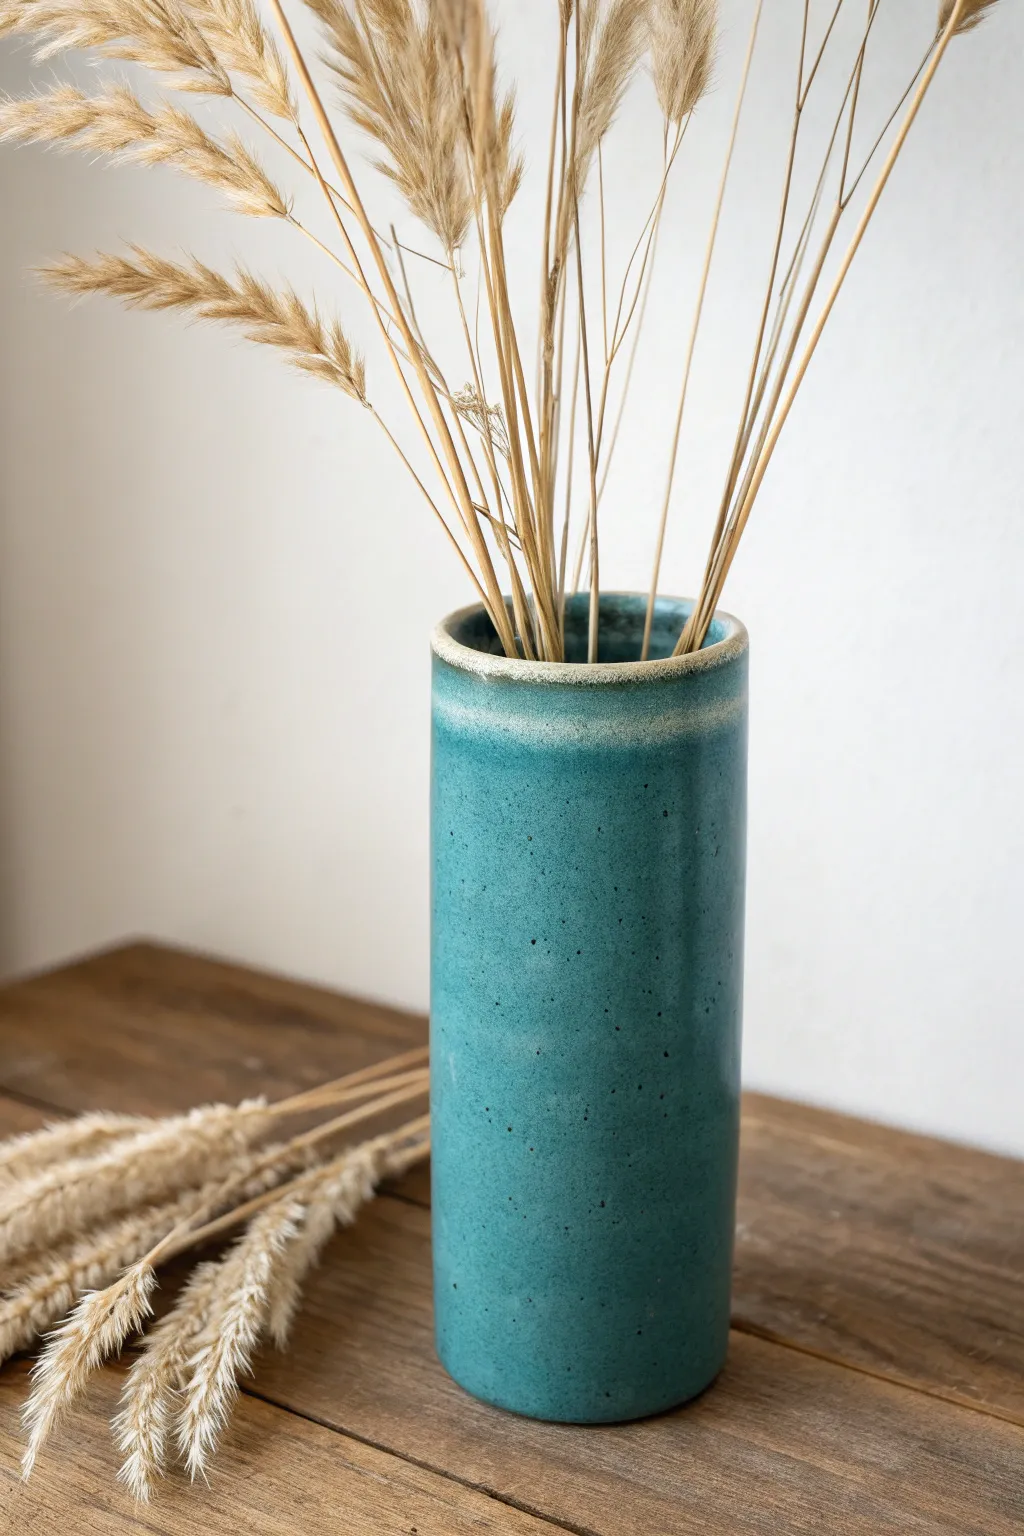
This classic cylinder vase is the perfect entry point into slab building, proving that simple shapes often have the most elegance. Using a straightforward rolling technique, you’ll create a perfectly round form finished for a stunning, speckled teal glaze that brings a pop of color to any room.
How-To Guide
Materials
- Stoneware clay (smooth or lightly grogged)
- Rolling pin
- Two wooden guide slats (approx 1/4 inch thick)
- Cardboard mailing tube or PVC pipe (for the form)
- Newspaper or paper towel
- Needle tool
- Serrated rib or scoring tool
- Slip (clay and water slurry)
- Fettling knife
- Sponge
- Speckled teal cone 6 glaze
- Paintbrush or glaze dipping tongs
Step 1: Creating the Slab
-
Prepare the Clay:
Begin by wedging your clay thoroughly to remove any air bubbles, as these can cause cracks later on. Form the clay into a workable rectangular block with your hands before you start rolling. -
Roll the Slab:
Place your wooden guide slats on either side of the clay block on a canvas-covered surface. Use your rolling pin to flatten the clay until the rolling pin rests on the guides, ensuring an even thickness of about 1/4 inch across the entire slab. -
Smooth the Surface:
Before rigorous cutting, take a soft rubber rib or a slightly damp sponge to compress the clay surface. This not only smooths out canvas texture but aligns the clay particles to prevent warping. -
Cut the Rectangle:
Measure the height you want your vase to be—the one in the photo is roughly 8-10 inches tall. Use a ruler and needle tool to cut a clean rectangle. The width needs to be the circumference of your tube form plus a small overlap for the seam.
Clean Seams
To erase the vertical seam completely, paddle the join lightly with a wooden spoon or paddle while the tube is still inside. The resistance helps flatten the bump.
Step 2: Forming the Cylinder
-
Prepare the Form:
Wrap your cardboard tube or PVC pipe in a single layer of newspaper. I like to tape the paper lightly so it stays in place; this crucial step prevents the wet clay from sticking to the mold. -
Wrap the Clay:
Gently lift your clay slab and wrap it around the paper-covered tube. Bring the two vertical edges together until they just touch or slightly overlap, depending on your preferred join method. -
Score and Slip:
Using a serrated tool, aggressively score (scratch) the two edges that will meet. Apply a generous amount of slip to the scored areas. -
Join the Seam:
Press the slipped edges firmly together. You can pinch them to ensure a bond, then use a wooden modeling tool to smooth the clay over the seam line on the outside so it becomes invisible. -
Compress the Seam:
Roll the tube gently on the table to compress the seam further and ensure the cylinder is perfectly round.
Step 3: Adding the Base and Rim
-
Cut the Base:
Roll out a small separate piece of slab for the floor. Place your cylinder (still on the tube) vertically onto this slab and trace around it with a needle tool, then cut the circle out. -
Attach the Bottom:
Score and slip the bottom edge of your cylinder and the outer edge of the circular base. Press them together firmly. Use a tool to blend the clay from the base up into the wall of the vase for a watertight seal. -
Remove the Tube:
Once the clay has stiffened slightly (usually after 15-30 minutes), carefully slide the interior tube out. Leave the newspaper inside for now if the clay feels too soft; you can peel it out later. -
Refine the Rim:
Use a damp chamois or sponge to round off the top rim. The vase in the example has a soft, rounded lip that allows the glaze to break beautifully, showing a lighter color at the very top. -
Dry and Bisque:
Let the vase dry slowly under loose plastic to prevent uneven shrinkage. Once bone dry, fire it to bisque temperature (usually Cone 04).
Textured Twist
Before rolling the slab into a cylinder, press dried flowers or lace into the soft clay. The glaze will pool in the impressions, highlighting the texture dark teal.
Step 4: Glazing
-
Wax the Bottom:
Apply wax resist to the bottom of the vase and about 1/4 inch up the side to prevent glaze from running onto your kiln shelf. -
Choose the Glaze:
Select a semi-opaque teal glaze. The example specifically uses a glaze that breaks over edges (turning white/tan) and has black speckles, often called ‘Robin’s Egg’ or similar. -
Dip or Paint:
For the most even coverage like the photo, dip the bisque ware into a bucket of glaze for 3 seconds. Alternatively, brush on 3 even coats, letting each dry in between. -
Rim Detail:
Ensure the glaze is not too thick on the very rim; a slightly thinner application here encourages that lighter ‘breaking’ effect seen in the reference image. -
Final Fire:
Fire the piece to the maturity temperature of your clay and glaze (likely Cone 6 for stoneware) and let the kiln cool completely before opening.
Fill your finished cylinder with dried grasses or fresh blooms to complete the modern, rustic aesthetic
Folded Slab Vase With Overlap Seams
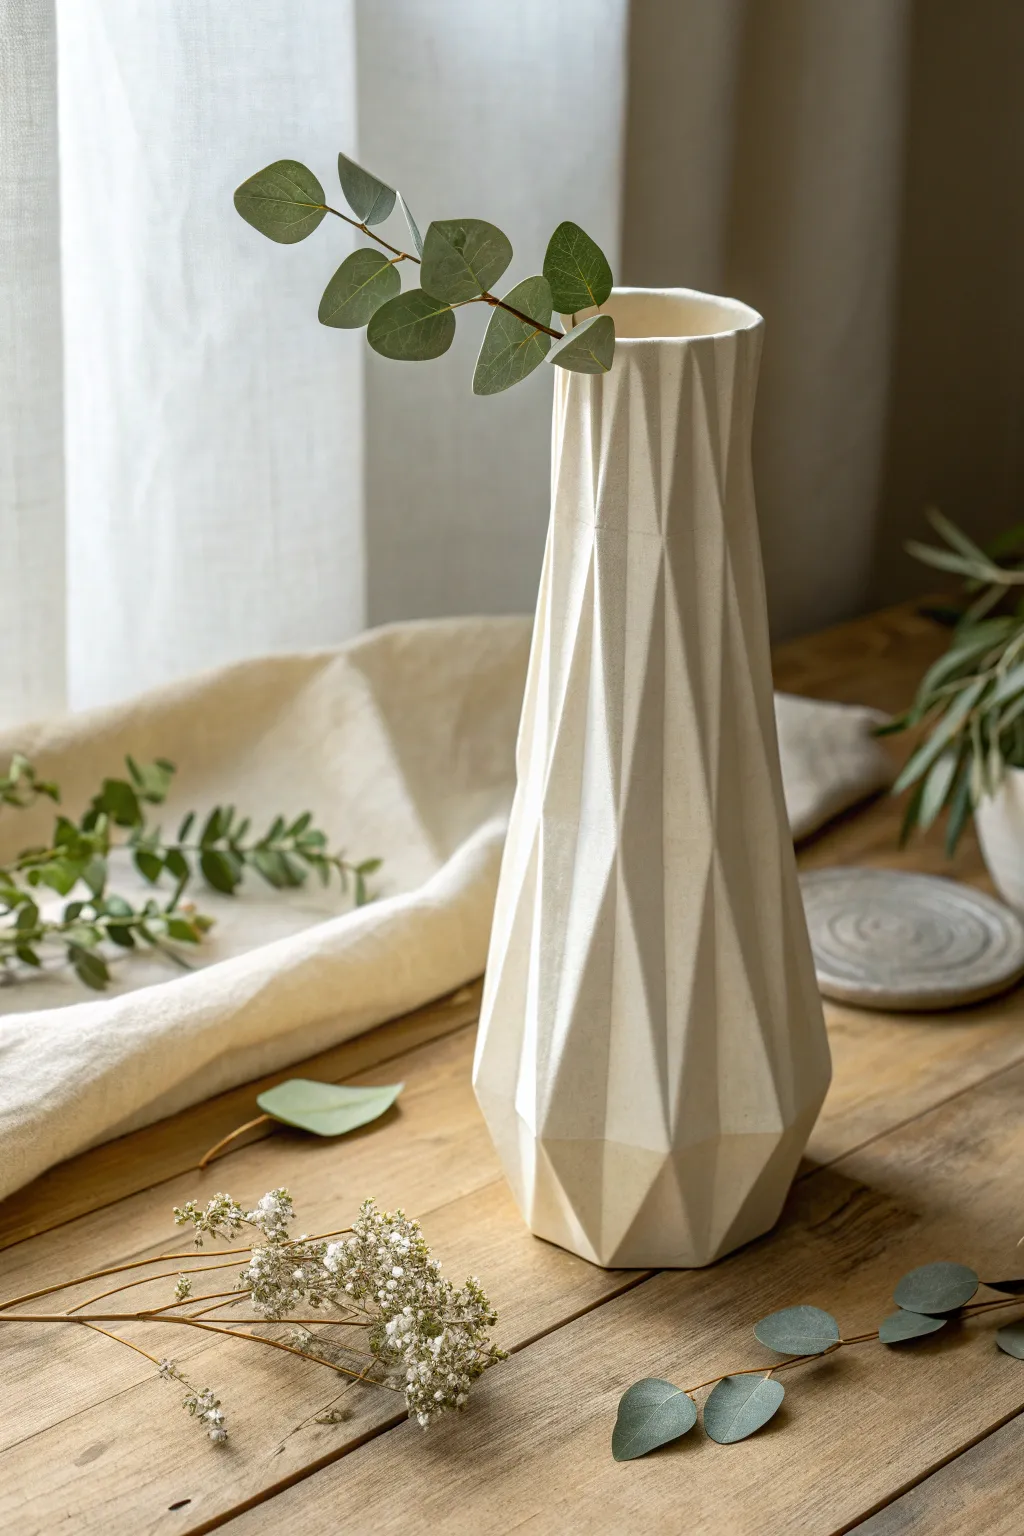
This elegant vase mimics the crisp lines of folded paper but offers the permanence of ceramic, featuring a striking geometric surface created through careful slab construction. The elongated diamond facets catch the light beautifully, making simple white clay look sophisticated and complex.
Step-by-Step Guide
Materials
- White stoneware or porcelain clay body (smooth)
- Rolling pin with 1/4 inch thickness strips
- Paper template (diamond grid pattern)
- Fettling knife or X-Acto blade
- Metal ruler or straight edge
- Scoring tool or serrated rib
- Slip (clay mixed with water)
- Soft rib (silicone or rubber)
- Banding wheel (optional)
- Sponge
Step 1: Preparing the Slab and Texture
-
Roll the Slab:
Begin by rolling out a smooth, consistent slab of white clay approximately 1/4 inch thick. Make sure the slab is wide and tall enough to accommodate your full vase circumference and height. -
Compress the Clay:
Use a soft rubber rib to compress both sides of the slab. This aligns the clay particles, prevents warping later, and creates that pristine, smooth surface finish seen in the photo. -
Template Transfer:
Place your paper template—a grid of tall, interconnected triangles and diamonds—lightly onto the clay. You don’t want to cut all the way through yet; you are just marking the fold lines. -
Score the Fold Lines:
Using a dull tool or back of a knife against a ruler, gently press into the clay along the vertical and diagonal grid lines of your template. These impressions will act as hinges for the ‘folding’ process.
Crisp Fold Trick
Before folding your slab, lightly sponge the ‘fold’ lines with a tiny amount of water. This softens the clay just at the hinge point, preventing unsightly surface cracking as you bend the angles.
Step 2: Forming the Geometry
-
Cut the Perimeter:
Once your faceted pattern is impressed, use your fettling knife and ruler to cut the outer perimeter of the vase shape. Cut the vertical seam edges at a 45-degree bevel angle to ensure a stronger join. -
Initial Firming:
Let the slab set up slightly until it reaches a ‘soft leather-hard’ state. This is crucial; if it’s too wet, the facets will slouch, but if it’s too dry, they will crack when folded. -
Induce the Folds:
From the back side of the slab, gently push outward at the center of each diamond shape while supporting the impressed lines from the front. You want the vertical lines to protrude outward (peaks) and the diagonals to recess (valleys), or vice versa depending on your preferred pattern. -
Enhance the Creases:
Go over the front of the slab and gently pinch or sharpen the creases to make the geometric planes distinct. The sharper these lines are now, the more dramatic the light and shadow will be on the finished piece.
Go Translucent
Try swapping stoneware for porcelain clay. If you roll the slab slightly thinner and fire to high temperatures, the light from a window will glow through the walls, highlighting the overlapping geometric seams.
Step 3: Assembling the Cylinder
-
Prepare the Vertical Seam:
Score the beveled vertical edges of your slab thoroughly and apply a generous amount of slip. -
Stand and Join:
Carefully stand the slab up to form a cylinder. Bring the scored edges together, pressing firmly to interlock the clay particles. -
Secure the Seam:
Reach inside the cylinder and run a tool or your finger up the seam to seal it completely. On the outside, careful smoothing is needed to make the seam disappear into one of the vertical folds. -
Adjust the Shape:
With the cylinder standing, gently gently manipulate the neck to be slightly narrower than the base if desired, reinforcing the ‘waist’ of the vase by pressing the facets inward slightly at the top third.
Step 4: Base and Finishing
-
Create the Floor:
Roll a small separate slab for the base. Place your faceted cylinder on top of it and trace around the perimeter. -
Attach the Base:
Score and slip both the bottom edge of the cylinder walls and the perimeter of the base slab. Press them together firmly. -
Trim Excess:
Trim away any excess clay from the base slab so it is flush with the vase walls. Use a modeling tool to blend the clay upward, sealing the bottom seam fully. -
Refine the Rim:
Use a damp sponge (or a strip of chamois) to soften the top rim. It should look deliberate and finished, but keep the geometric corners of the rim distinct rather than rounding them off completely. -
Final Smoothing:
Do a final pass over the flat planes with a barely damp sponge to remove fingerprints, being careful not to wash away the crispness of your folded edges. -
Dry Slowly:
I prefer to tent this loosely with plastic for the first day of drying. This slow drying prevents the tension in the folds from pulling the seams apart. -
Bisque and Glaze:
Fire the piece to bisque temperature. For the final finish, choose a matte or satin white glaze that breaks over edges—this highlights the geometry without concealing the form with high gloss reflections.
Once fired, fill your architectural vase with a simple branch or eucalyptus stem to complement its modern lines
Easy Slab Planter With a Box Shape
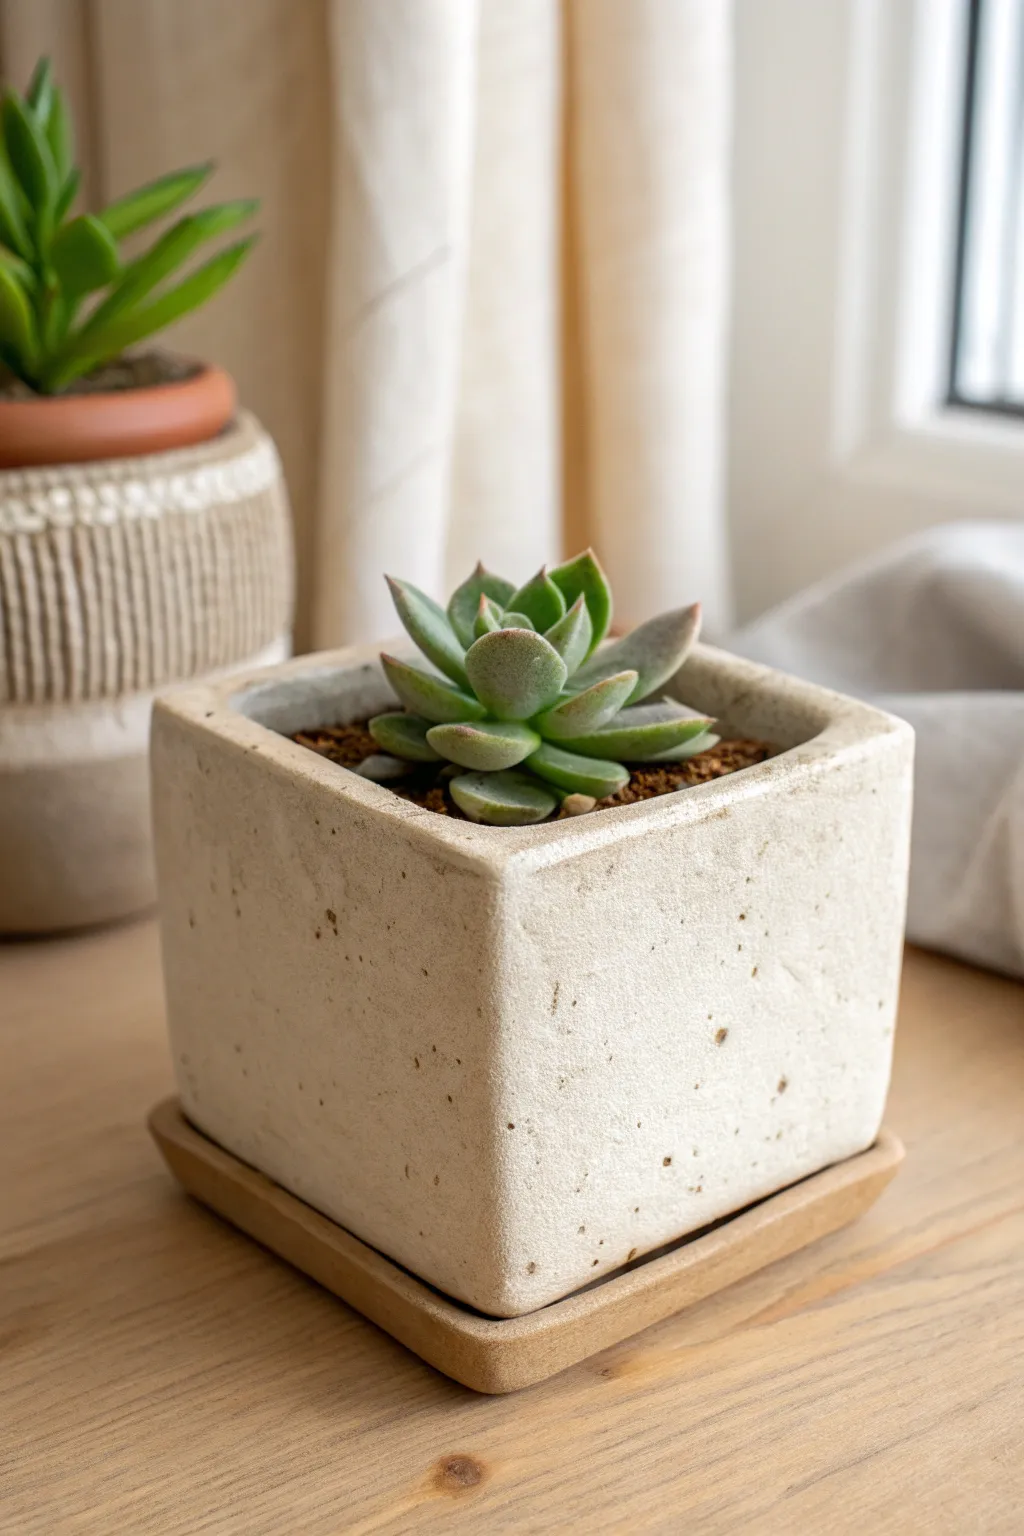
This project transforms simple clay slabs into a sophisticated, stone-effect cube planter perfect for small succulents. Its thick walls and rough, speckled texture give it a timeless, organic look that mimics carved limestone.
Detailed Instructions
Materials
- Light-colored stoneware clay (with grog/speckles preferred)
- Rolling pin
- Two wooden guide strips (thickness approx. 1/4 to 3/8 inch)
- Ruler
- Fettling knife or sharp craft blade
- Scoring tool (or serrated rib)
- Slip (clay mixed with water)
- Sponge
- Wooden sculpting tool or paddle
- Square template (cardboard or paper)
- Coarse sandpaper (optional, for post-firing texture)
Step 1: Preparing the Slabs
-
Roll out the clay:
Wedge your clay thoroughly to remove air bubbles. Place the wooden guide strips on either side of your clay lump and use the rolling pin to roll it out into a consistent slab. For this chunky look, aim for a thickness of at least 1/4 inch, perhaps slightly thicker. -
Smooth the surface:
Before cutting, take a moment to compress the clay slab with a rib tool or a damp sponge. This aligns the clay particles and prevents warping later on. -
Measure and cut sides:
Using a ruler and knife (or a 4×4 inch cardboard template), cut out five identical squares for the box—four walls and one base. For the saucer, cut a slightly larger square, perhaps 4.5 or 5 inches. -
Let them firm up:
Allow the cut squares to dry until they are leather-hard. They should be stiff enough to hold their shape when stood up but still dark with moisture. I find waiting about an hour or two usually does the trick depending on humidity.
Clean Corner Trick
Use a straight 2×4 piece of wood held against the inside of the wall while you paddle the outside. This creates perfectly sharp, crisp corners.
Step 2: Assembling the Box
-
Bevel the edges (optional):
For a seamless 90-degree corner, cut the vertical edges of your four wall pieces at a 45-degree angle. If you prefer a simpler method, you can use butt joints, where one slab sits against the face of another. -
Score the connection points:
Take your scoring tool and roughen up every edge that will be joined. Score the perimeter of the base slab and the bottom/side edges of the wall slabs. Be aggressive; texture is key for a strong bond. -
Apply slip:
Generously dab slip onto all scored areas. It acts as the glue. -
Attach the first wall:
Press one wall firmly onto the base. Use a small clay coil on the interior seam to reinforce the connection, blending it smooth with your thumb. -
Construct the rest:
Attach the remaining walls one by one, scoring and slipping the vertical seams as you go. Always reinforce interior corners with thin coils. -
Paddle the shape:
Once assembled, gently tap the outside walls with a wooden paddle. This compresses the joints, sharpens the corners, and helps unify the shape.
Step 3: Creating the Saucer & Texture
-
Form the saucer lip:
Take your larger square slab for the saucer. Roll a thin coil of clay and attach it to the top perimeter edge to create a low rim, blending it downwards so it looks like one solid piece. -
Refine the edges:
Use a damp sponge to soften sharp edges on both the pot and saucer lips. We want it to look geometric but not razor-sharp. -
Add surface texture:
To achieve that weathered stone look, lightly tap the exterior surfaces with the rough side of a scouring pad or a wire brush. Don’t smooth it out perfectly—embrace the imperfections. -
Drainage hole:
Don’t forget to cut a hole in the center of the pot’s bottom for water drainage. A simple circular tool or a knife works fine. -
Slow drying:
Cover the pot lightly with plastic for day or two to let the moisture even out, then uncover to dry completely. This prevents corner cracks. -
Finishing:
Fire the piece according to your clay body’s instructions. If you want that exact matte, speckled look, skip the glaze on the outside and apply a clear matte glaze only to the inside for waterproofing.
Color Wash Finish
After bisque firing, apply a black iron oxide wash and wipe it back with a sponge. The dark color stays in the pits, highlighting the stone texture.
Once fired, pop in your favorite succulent for a modern, architectural addition to your windowsill.
Tea Light Lantern With Cutouts
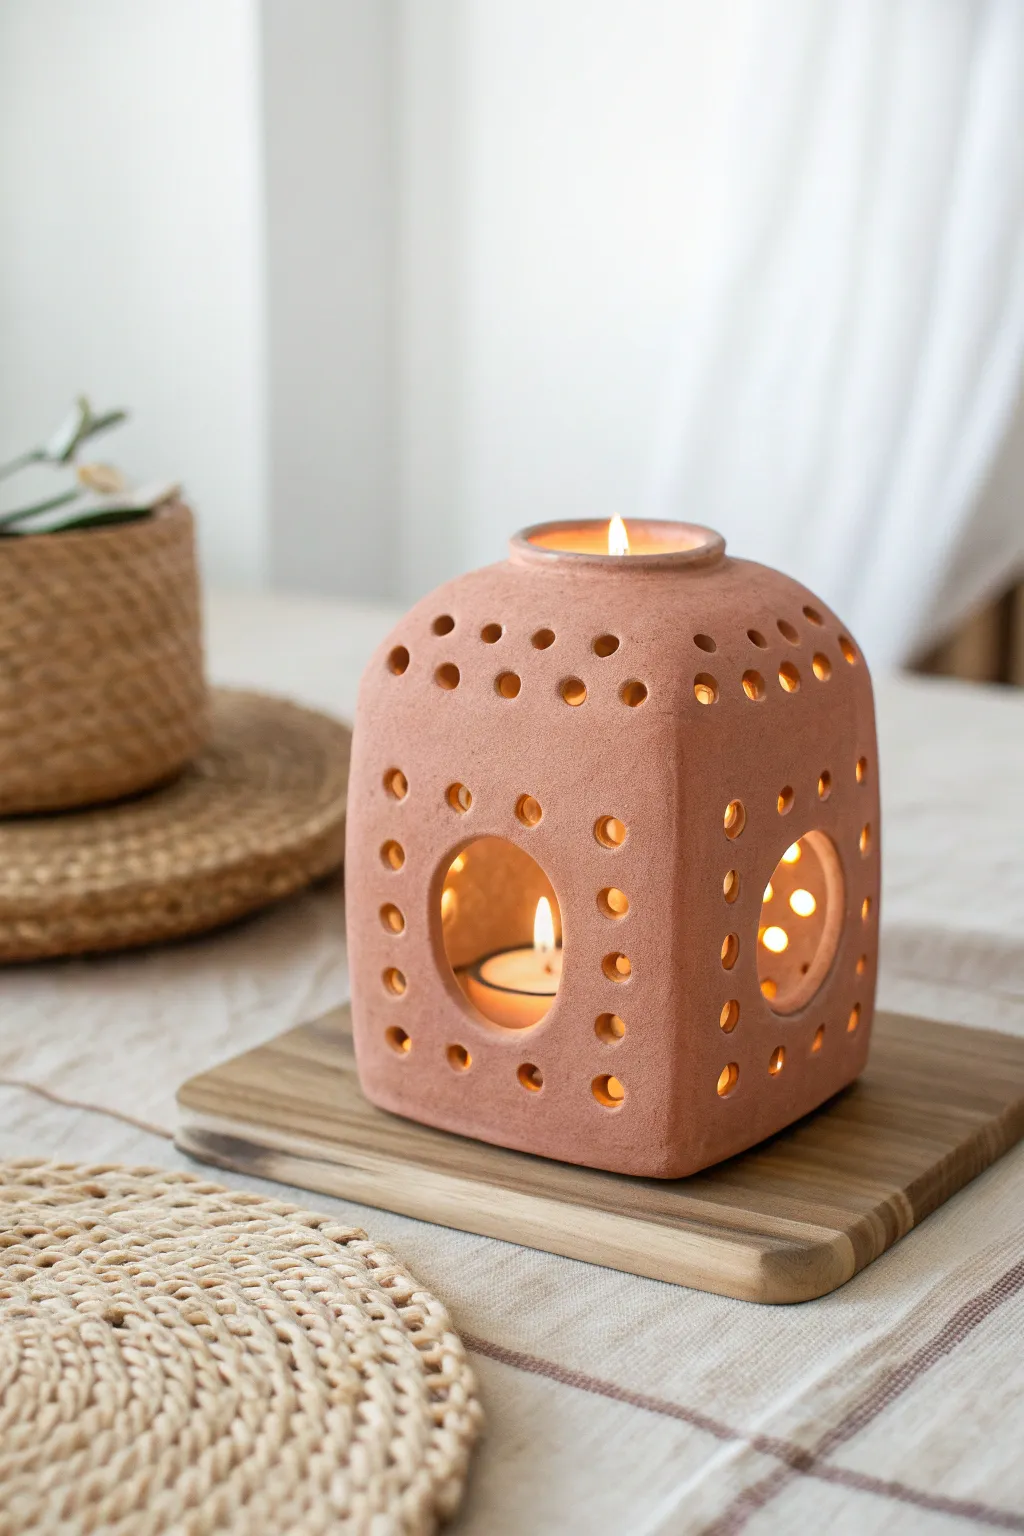
This rustic terracotta lantern brings a warm, cozy atmosphere to any space with its soft curves and speckled light patterns. By using simple slab-building techniques and strategic cutouts, creating this charming luminaria is surprisingly accessible for beginners.
Step-by-Step Tutorial
Materials
- Terracotta colored stoneware or earthenware clay
- Rolling pin
- Two wooden guide strips (approx. 1/4 inch thick)
- Ruler
- Fettling knife or clay cutter
- Circular cookie cutters (one medium-large, one very small)
- Serrated rib or scoring tool
- Slip (clay mixed with water)
- Smoothing sponge
- Wooden paddle (optional)
Step 1: Preparing the Slabs
-
Roll out the clay:
Begin by wedging your terracotta clay to remove air bubbles. Place it between your two wooden guide strips and roll it out into a long, even slab. The guides ensure your walls will have a consistent thickness, which is crucial for even drying. -
smooth the texture:
Before cutting, take a rubber rib or a damp sponge and compress the clay surface on both sides. This aligns the clay particles and removes any canvas texture from your rolling surface. -
Measure and cut walls:
You will need four rectangular panels for the sides. Measure and cut four identical rectangles, roughly 4 inches wide by 5 inches tall. I like to cut a slightly larger square for the base to allow for trimming later. -
Leather hard stage:
Let these slabs sit until they are ‘leather hard’—stiff enough to hold their shape but still flexible enough to bend slightly without cracking. This usually takes a few hours depending on humidity.
Clean Cuts Every Time
When punching holes, twist the cutter slightly as you pull it out. If the clay plug gets stuck inside the lantern, leave it until the clay is bone dry—it will rattle around but break up easily for removal.
Step 2: Assembling the Form
-
Bevel the edges:
For a cleaner corner joint, cut the vertical edges of your four wall panels at a 45-degree angle. This allows them to fit together snugly like a picture frame. -
Score and slip:
Rough up the beveled edges with your scoring tool and apply a generous amount of slip. Do the same to the edges of the base slab where the walls will sit. -
Construct the box:
Stand the walls up on the base, pressing the scored corners together firmly. Wiggle them slightly to lock the joints. You should now have a tall, open box shape. -
Reinforce the seams:
Roll thin coils of soft clay and press them into the interior corners of the box. Smooth these coils down with a modeling tool or your finger to reinforce the structure. -
Shape the volume:
To get that slightly puffed, rounded look seen in the photo, gently paddle the outside walls with a wooden paddle or your hand. Support the wall from the inside with your other hand to create a soft convex curve. -
Round the corners:
Use a damp sponge to round over the sharp vertical corners of the box. You want a soft, organic transition rather than a sharp geometric edge. -
Add the top:
Create a top slab with a hole cut in the center for the candle. Attaching a slightly doomed top can be tricky, so you may prefer to ease the tops of the walls inward before attaching a flat slab, then smoothing everything to look seamless.
Step 3: Design and Cutouts
-
Mark the centers:
Lightly mark the center of each side panel where your main window will go. Visual symmetry helps the final piece feel balanced. -
Cut the main windows:
Use your medium-sized circular cutter to punch a hole in the center of each of the four walls. Support the wall from the inside with your hand so the pressure doesn’t deform the box. -
Add decorative perforations:
Using a very small circular cutter or the end of a straw, punch a series of small holes around the perimeter of the main circle. Also add rows of these small holes along the top and corners of the lantern. -
Clean the edges:
Once the clay has stiffened a bit more, go back with a sponge or a small brush and clean up any crumbs or sharp edges around your cutouts. Sharp edges can become very brittle after firing. -
Create the rim:
Roll a small coil and attach it around the top opening to create a finished rim. Smooth it onto the body so it looks integrated. -
Final smooth:
Give the entire piece a final wipe with a damp fine-pore sponge to ensure the surface is uniform and ready for drying. -
Slow drying:
Cover the lantern loosely with plastic to let it dry slowly. Uneven drying in a box shape can lead to warping or corner cracks.
Make it Shine
After the bisque fire, apply a clear matte glaze or a light wax finish. This deepens the natural terracotta color without making it look glossy or plastic, preserving that earthy, primitive vibe.
Light a tea light inside your new creation and enjoy the beautiful, dappled shadows it casts on your walls
Simple House Sculpture From Slabs
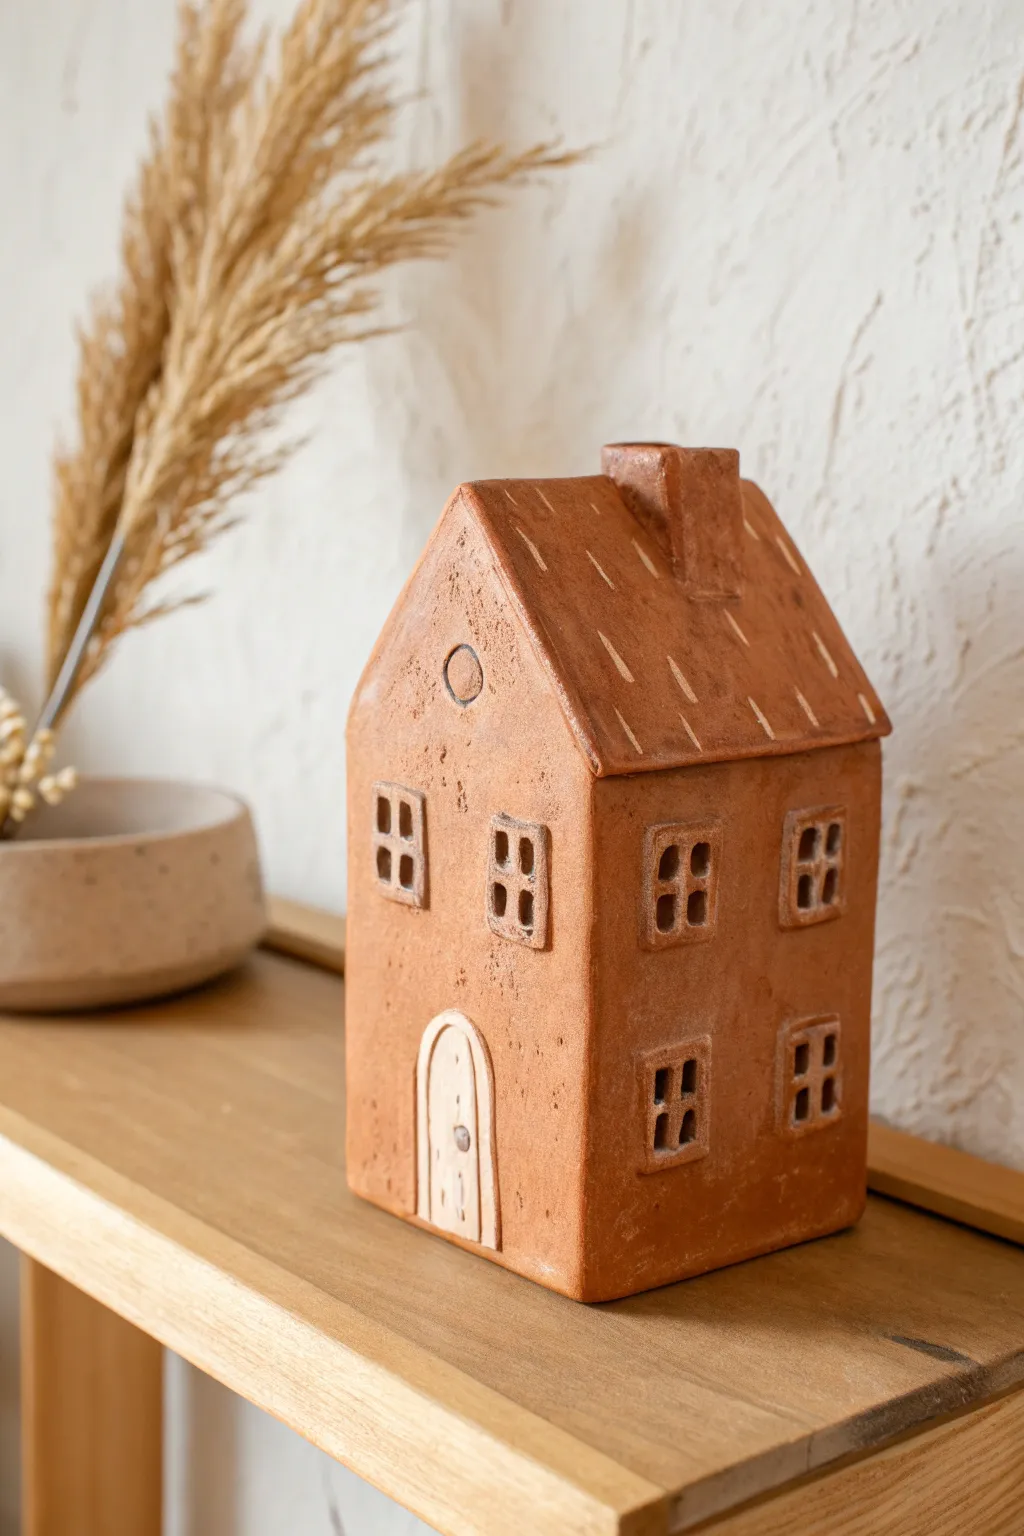
This charming, rustic house sculpture captures the warmth of traditional terracotta with simple slab construction. Its unglazed, textured finish and whimsical hand-carved details make it a perfect project to practice your precise cutting and joining skills.
How-To Guide
Materials
- Terracotta-colored stoneware clay
- Rolling pin
- Two wooden guide strips (approx. 1/4 inch thick)
- Fettling knife or X-Acto knife
- Needle tool
- Slip (clay and water slurry)
- Scoring tool or serrated kidney
- Ruler
- Paper templates (walls, roof, floor)
- Wooden modeling tool
- Small sponge
Step 1: Preparation and Cutting the Slabs
-
Roll the Slabs:
Begin by wedging your terracotta clay thoroughly to remove air bubbles. Place the clay between your two wooden guide strips on a canvas surface and roll it out with the rolling pin. This ensures an even thickness for all your walls. -
Let the Clay Stiffen:
Once rolled, let the slab sit for about 30-45 minutes until it reaches a ‘leather-hard’ state. This is crucial; if the clay is too soft, the house will slump during assembly. -
Create Templates:
While waiting, cut paper templates: two rectangles for side walls (approx. 4×6 inches), two pentagons for the front/back gable walls (4 inches wide, 6 inches to eaves, peaking at 8 inches), and two roof rectangles (slightly wider than the house depth). -
Cut the Shapes:
Lay your templates onto the leather-hard slab. Using a sharp fettling or X-Acto knife, cut around the templates. Keep the knife vertical to ensure square edges for better joining later. -
Bevel the Edges:
For a cleaner 90-degree corner joint, carefully slice a 45-degree angle along the vertical edges where the walls will meet. This miter cut helps the corners fit snugly.
Slumping Saga?
If walls start bowing or sagging during assembly, the clay is too wet. Stop! Prop walls with crumpled newspaper or foam blocks and wait 30 minutes before continuing.
Step 2: Assembling the Structure
-
Score and Slip:
Take your scoring tool and rough up the edges you just beveled. Apply a generous amount of slip to these scored areas. -
Build the Base Walls:
Attach one side wall to the front gable wall. Press them firmly together, smoothing the clay on the inside seam to reinforce it. I find adding a thin coil of clay into the interior corner adds extra strength. -
Complete the Box:
Add the remaining side and back walls using the same score-and-slip method. Check that your corners are square before the clay sets too firmly. -
Attach the Roof:
Score the top edges of your gable walls and side walls. Place the roof slabs on top. You may want to miter the top ridge where the two roof pieces meet for a sharp peak. -
Add the Chimney:
Construct a small hollow box or solid block for the chimney. Cut the bottom at an angle to match the slope of the roof, score, slip, and attach it near the peak.
Seamless Seams
After joining corners, roll a wooden spoon handle or brayer over the seam on the outside. This compresses the clay layers together better than just finger smoothing.
Step 3: Adding Details and Texture
-
Carve the Windows:
Using a needle tool, lightly sketch the placement of the windows. Carve out four rectangular windows on the front and side walls, leaving the center mullions intact. -
Decorate the Gable:
Carve a small circular window near the peak of the front gable. Just below that, create a slightly recessed circle or decorative element. -
Sculpt the Door:
Instead of cutting a hole, add a thin slab of clay in an arch shape to the bottom front for the door. Use a needle tool to scribe vertical wood-grain lines and press a tiny ball of clay on for a doorknob. -
Refine the Windows:
Use a small, flat wooden tool to smooth the inside frames of your window cutouts. You can add extra squares of clay around the windows for raised frames if desired. -
Detail the Roof:
Use a sharp tool to scratch short, dashed lines vertically down the roof slope. This mimics thatch or simple shingles and adds great visual interest to the plain surface. -
Create Texture:
Gently pat the entire exterior surface with a stiff brush or a coarse sponge. This removes fingerprints and gives the piece that weathered, stone-like texture seen in the reference. -
Final Smoothing:
Check all seams one last time. Run a slightly damp finger over any sharp edges on the roof or chimney to soften them slightly before letting the piece dry slowly under loose plastic.
Allow your sculpture to dry completely before firing to enjoy your miniature architectural masterpiece
Wall Tile Art With Carved Lines
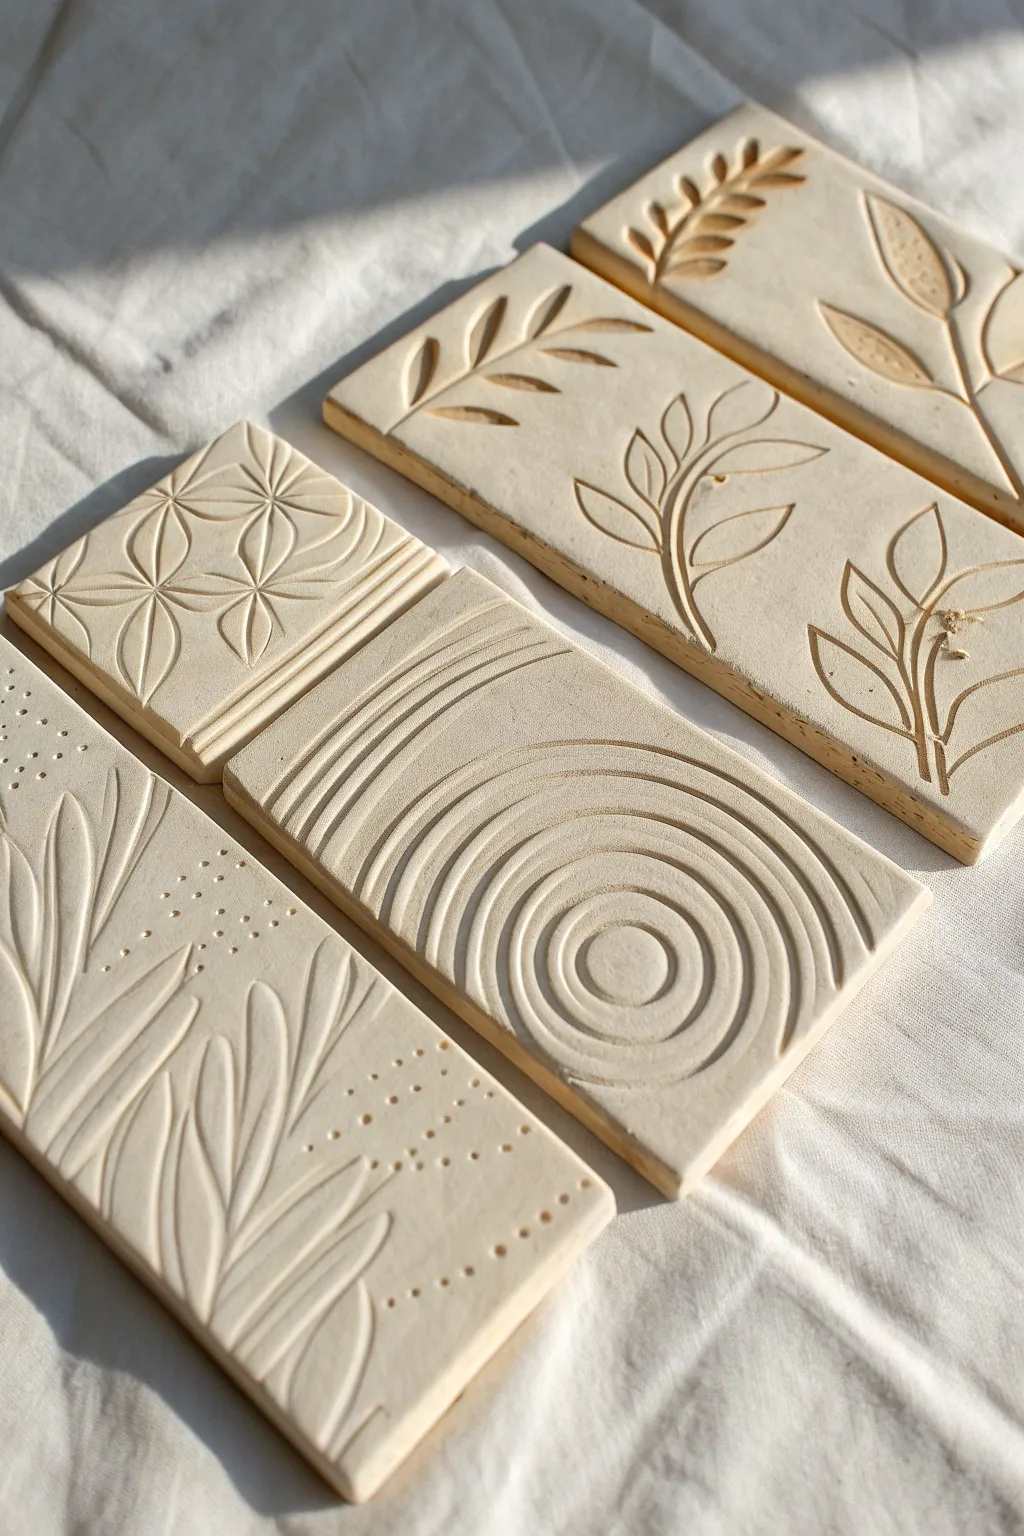
These elegant clay tiles showcase the beauty of simple line work, featuring botanical motifs and geometric concentric circles carved directly into fresh slabs. The natural, unglazed finish highlights the texture and depth of the incisions, making them perfect for minimalist wall decor.
Step-by-Step Tutorial
Materials
- Light-colored clay (earthenware or stoneware)
- Rolling pin
- Two wooden guide strips (approx. 1/4 inch thick)
- Needle tool or sharp carving tool
- Loop tool (small)
- Ruler or straight edge
- Fettling knife
- Canvas working mat or slab mat
- Smooth sponge
- Small bowl of water
Step 1: Preparing the Slabs
-
Wedge the clay:
Begin by thoroughly wedging your clay to remove any air bubbles. This is crucial for flat tiles to prevent explosions in the kiln and ensure a smooth carving surface. -
Set up guides:
Place your canvas mat on a sturdy table. Position your two wooden guide strips parallel to each other, slightly wider than the width of the clay you intend to roll. -
Roll the slab:
Place the ball of clay between the guides. Using the rolling pin, roll the clay out until the pin rests flat on the wooden strips, ensuring an even thickness across the entire slab. -
Smooth the surface:
The rolling pin might leave a canvas texture. Take a damp sponge or a flexible rib tool and gently compress the surface of the clay to make it perfectly smooth and erase the canvas weave. -
Cut the rectangles:
Using a ruler and a fettling knife, cut the slab into uniform rectangles. For the set shown, you’ll need at least four or five tiles, roughly 3 inches by 6 inches, though you can adjust the size to your preference. -
Leather hard transition:
Let the tiles sit for a bit until they reach a ‘soft leather hard’ stage. If the clay is too sticky, your carving lines will be messy; if it’s too dry, they will chip. The perfect stage creates clean burrs that brush away easily.
Warping Woes?
If corners curl up while drying, place a lightweight board on top of the tiles (sandwiching them) during the leather-hard stage to force flatness.
Step 2: Carving the Designs
-
Outline the geometric patterns:
For the circular design, use a needle tool to faintly sketch the center point. You can use a compass or circular objects to lightly mark the concentric rings before committing to the deep cuts. -
Carve the circles:
Using a small loop tool or a U-shaped carving tool, carve out the concentric circles. Vary the depth slightly—deepest in the center channel—to create nice shadow lines. Start from the center and work your way outward to the corners. -
Sketch the botanicals:
For the leaf tiles, lightly scratch a flowing central stem line diagonally or vertically across the tile surface. Sketch the positions of the leaves branching off this main stem. -
Carve the leaves:
Switch to a sharp carving tool. Press firmly to create the outline of each leaf, tapering your pressure at the tips to create a sharp point. I find that pulling the tool toward the stem creates a more natural leaf connection. -
Add texture dots:
For the mixed pattern tile, use the back end of a drill bit or a small round tool to press indentations into the clay. Scatter them organically around your carved leaves to add contrast. -
Clean the burrs:
Once carved, you will see little crumbs of clay (burrs) along the edges. Wait until the clay is fully leather hard, then gently brush these away with a soft dry brush. Don’t wipe them while wet or you’ll smear the design.
Step 3: Finishing Touches
-
Smooth the edges:
With a slightly damp finger, run along the cut outer edges of each rectangle to soften the sharpness. This gives the tile a finished, professional look. -
Dry slowly:
This is the most critical step for flat tiles. Place the tiles on a piece of drywall or between two pieces of drywall to ensure they dry evenly from both sides. This prevents warping. -
Final drying:
Allow them to dry completely for several days until they are bone dry and no longer cool to the touch. -
Firing:
Bisque fire the tiles in a kiln. If you love the raw look in the photo, you can leave them unglazed or simply apply a clear matte glaze to protect them without altering the color.
Pro Tip: Clean Lines
For ultra-crisp carvings, wrap your finger in a piece of thin plastic wrap and gently rub over the carved lines. This smooths sharp edges instantly.
Once fired, these beautiful tiles can be framed, mounted directly on a wall, or used as sophisticated coasters