If you love the look of a handmade mug but want something totally doable on a table (no wheel required), slab mugs are where the magic happens. I’m sharing my favorite clay slab mug ideas—from classic shapes and comfy handles to bold textures and “how did you do that?” details.
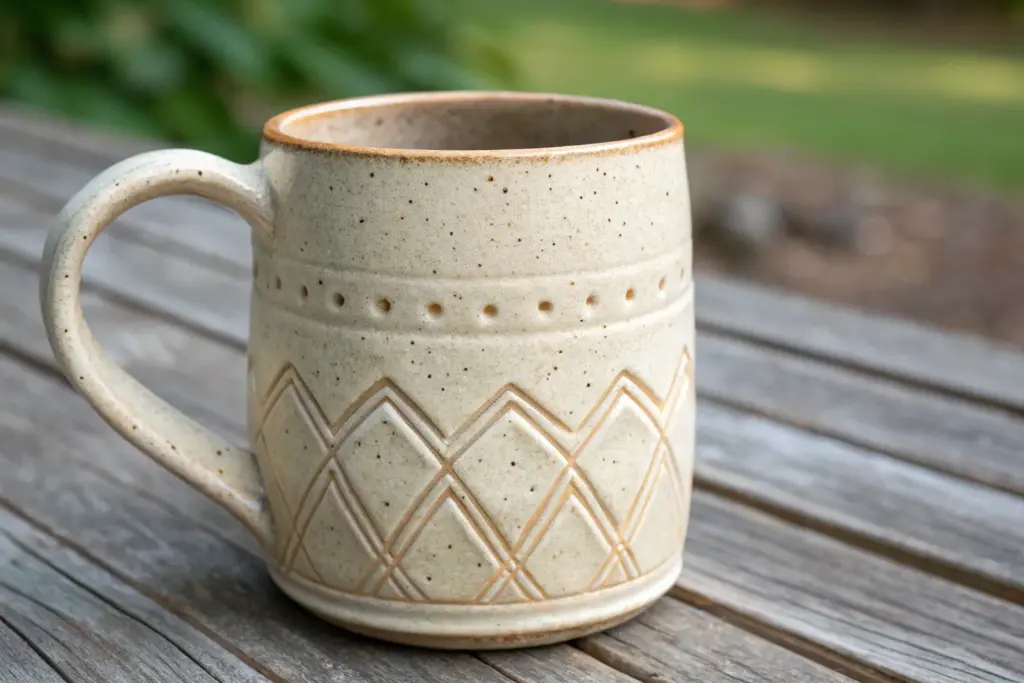
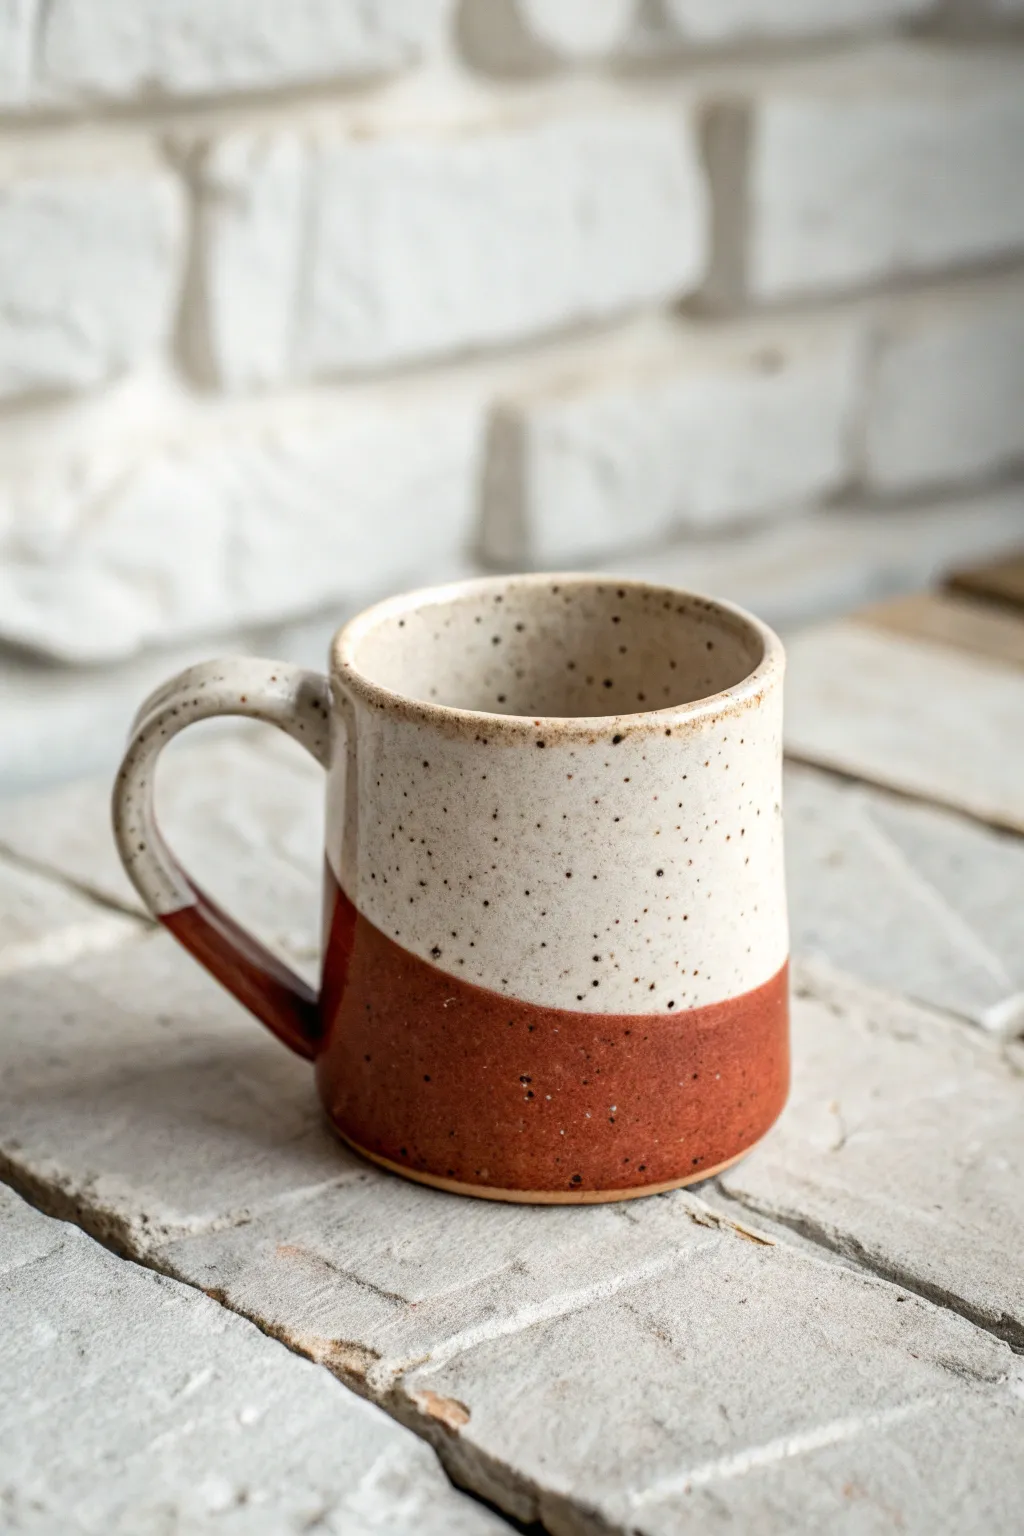
Classic Straight-Sided Slab Mug With a Clean Vertical Seam

This timeless project relies on a simple slab-building technique to create a perfectly cylindrical mug with a rustic, professional finish. The combination of toasted clay poking through a creamy white glaze highlights the natural warmth of the ceramic material.
Step-by-Step Tutorial
Materials
- Speckled stoneware clay (mid-fire)
- Templates (rectangle for body, circle for base)
- Heavy canvas or slab roller
- Rolling pin and guide strips (about 1/4 inch thickness)
- Fettling knife
- Scoring tool (serrated rib or needle tool)
- Slip (clay slurry)
- Wooden modeling tool
- Soft synthetic rib
- Sponge
- Oatmeal or Satin White glaze
- Wax resist (optional)
Step 1: Creating the Slab Components
-
Roll the clay:
Begin by wedging your speckled stoneware clay to remove air bubbles. Roll it out into a consistent slab on your canvas, using guide strips to ensure an even thickness of approximately 1/4 inch. -
Smooth the texture:
Before cutting, take a soft rib and compress the slab on both sides. This aligns the clay particles to prevent warping and erases the canvas texture for a smoother finish. -
Cut the body rectangle:
Place your rectangular template (roughly 10-12 inches long by 4-5 inches high) onto the slab. Cut around it cleanly with your fettling knife. Save the excess clay for the handle and base. -
Bevel the edges:
On the short sides of your rectangle, cut a 45-degree angle (bevel) on opposite faces. This allows the seam to overlap cleanly without creating a thick lump in the wall. -
Cut the base:
Use your circular template or a cookie cutter to create the floor of the mug. I find it helpful to make the base slightly wider than the cylinder initially, then trim it back later.
Seamless Seams
Use a wooden spoon handle inside the cylinder while pressing on the seam from the outside. This opposing pressure seals the join without denting the perfectly round wall.
Step 2: Assembling the Cylinder
-
Score and slip the seam:
Roughen the beveled edges of your rectangle with a serrated tool and apply a generic amount of slip. This acts as the glue for your joint. -
Form the tube:
Carefully lift the rectangle and curve it into a cylinder, pressing the slipping beveled edges together. Apply firm pressure along the seam from both the inside and outside. -
Join the base:
Score and slip the bottom edge of your cylinder and the outer rim of your circular base. Place the cylinder on top of the base. -
Seal the connections:
Use a wooden modeling tool to blend the clay from the base up onto the cylinder wall. Smooth this area with your finger or a sponge so the transition is seamless. -
Refine the shape:
Run a rib up the interior and exterior walls. This straightens the cylinder and compresses the connection seam so it disappears completely.
Step 3: Adding the Handle and Finishing
-
Pull a strap handle:
Cut a strip from your remaining slab or pull a thick strap of clay. Smooth the edges so they are rounded, not sharp. -
Shape the curve:
Bend the strap into a ‘C’ or ear shape and let it stiffen slightly until it holds its form without flopping. -
Attach the handle:
Score and slip two attachment points on the mug body. Press the handle firmly onto the mug, blending the clay at the joints for a secure hold. -
Wait for leather hard:
Let the mug dry slowly to the leather-hard stage under loose plastic. This prevents the handle from cracking away from the body. -
Rim and foot cleanup:
Use a damp sponge to round off the drinking rim so it feels comfortable on the lips. Clean up the bottom edge to create a sharp, distinct foot ring. -
Bisque fire:
Once bone dry, fire the mug in a kiln to cone 04 (or your clay’s specific bisque temperature). -
Apply wax resist:
Paint a band of wax resist along the bottom 1/4 inch of the exterior and the entire underside. This creates the exposed raw clay band seen in the photo. -
Glaze dipping:
Dip the mug into an oatmeal or satin white glaze for 3-5 seconds. Shake off excess drips and let it dry. -
Glaze firing:
Fire the piece to maturity (likely Cone 5 or 6). The heat will interact with the iron speckles in the clay, causing them to bleed slightly through the white glaze.
Make it Cozy
Before the clay dries, gently press your thumb into the top of the handle attachment point. This creates a natural ‘thumb rest’ that makes the mug incredibly comfortable to hold.
Enjoy your morning coffee in a vessel that celebrates simplicity and the natural texture of clay


Softly Tapered Slab Mug for a Comfy Hand Feel
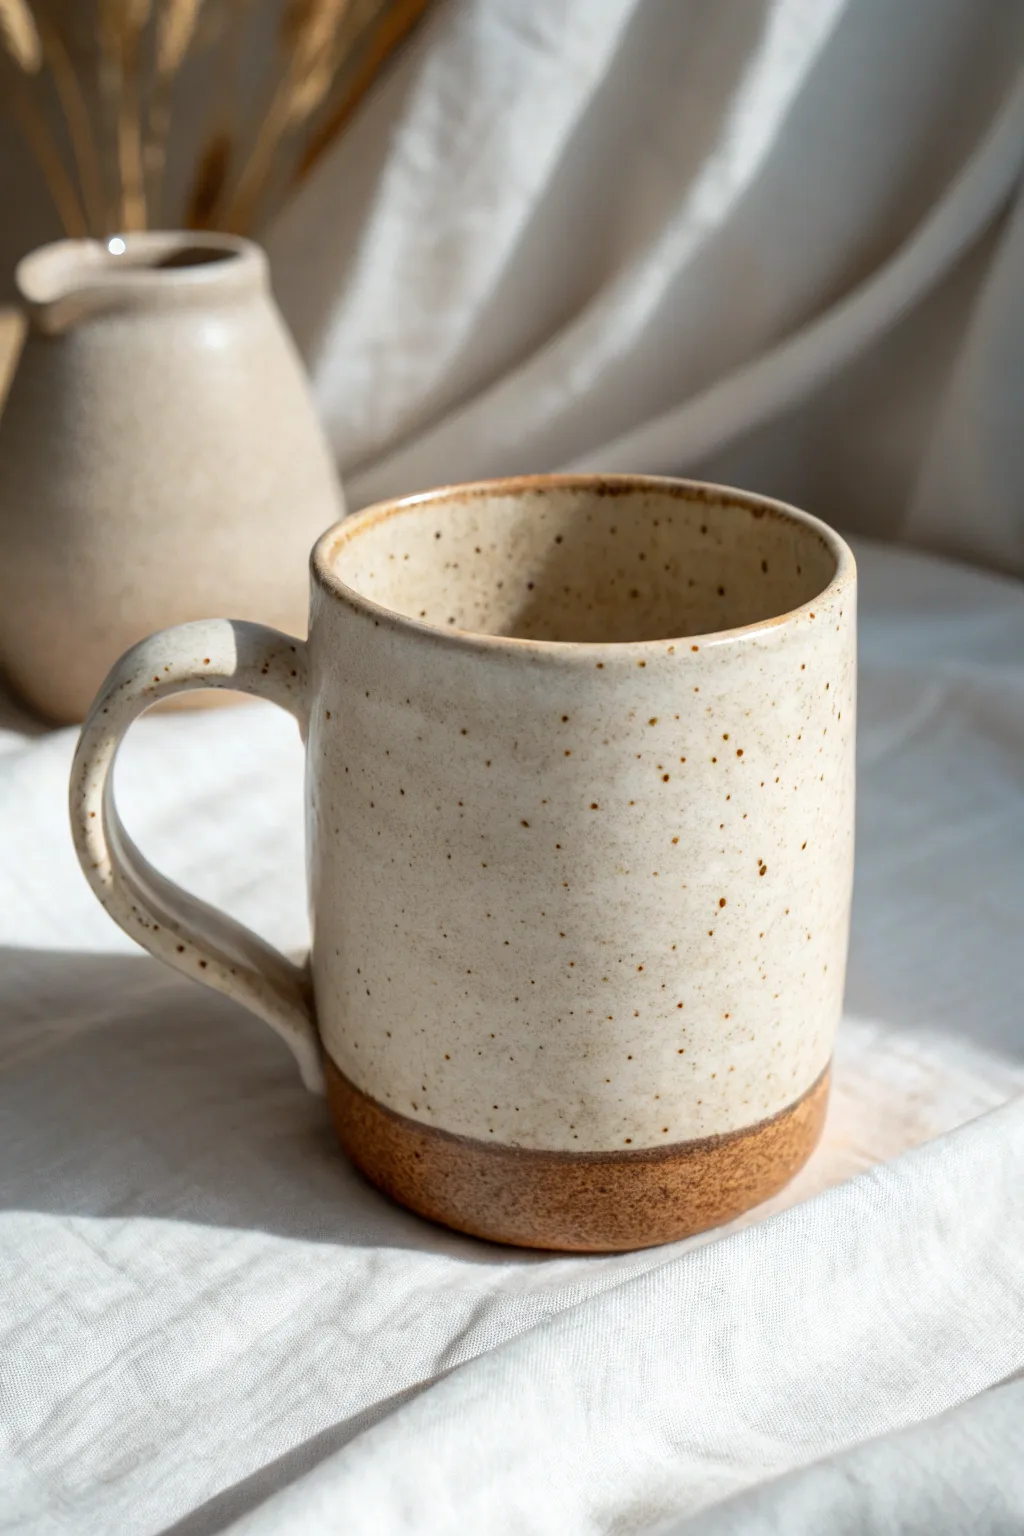
This project achieves a beautiful balance of rustic warmth and refined form, featuring a softly speckled cream glaze over a raw stoneware base. The distinctive unglazed foot provides a lovely textural contrast while the gentle taper makes it a joy to hold.
How-To Guide
Materials
- Speckled stoneware clay (mid-range cone 5/6)
- Rolling pin with thickness guides
- Slab roller (optional)
- Fettling knife
- Metal rib
- Serrated rib or scoring tool
- Slip (clay mixed with water)
- Wooden modeling tool
- Sponge
- Canvas board or ware board
- Plastic wrap for slow drying
- Glossy cream or white speckled glaze
- Wax resist (optional)
Step 1: Forming the Slab Body
-
Roll the primary slab:
Begin by rolling out your speckled stoneware clay into a consistent slab. For a mug of this weight, aim for about 3/8-inch thickness, ensuring it’s even throughout to prevent warping. -
Compress the clay:
Using a metal rib, firmly compress the slab on both sides. This aligns the clay particles, strengthening the wall and creating a smoother canvas for your glaze later. -
Cut the template:
Cut a rectangular strip from your slab. For a standard mug size, try dimensions around 11 inches long by 4.5 inches high. Cut the short ends at a 45-degree angle (beveling) in opposite directions to create a seamless overlap joint. -
Form the cylinder:
Stand the slab up and curve it into a cylinder. deeply score both beveled edges and apply a generous amount of slip. Press the ends together firmly. -
Refine the seam:
Use a wooden tool to blend the clay across the seam on both the inside and outside. I like to run a metal rib over the exterior seam to make it completely invisible.
Clean Seams
If your seam is stubborn, use a pony roller or a small rolling pin vertically inside the cylinder against the seam to compress it without distorting the round shape.
Step 2: Base and Shaping
-
Attach the base:
Roll a smaller piece of clay for the floor. Place your cylinder on top of it, trace around the bottom edge, and cut out the circle. Score and slip both the bottom of the cylinder and the edge of the base disc before pressing them together. -
Create the tapered profile:
While supporting the wall from the inside with one hand, gently paddle or smooth the outside with a rib to create a very subtle inward taper towards the rim. This shouldn’t be drastic, just enough to soften the silhouette. -
Detail the rim:
Using a damp sponge or piece of chamois, compress the rim to round it off. A smooth drinking edge is crucial for comfort.
Step 3: Handle and Finishing
-
Pull the handle strap:
Roll or pull a strip of clay for the handle. It should be roughly 1 inch wide and slightly thicker than the rim. Shape it into a ‘?’ curve and let it stiffen slightly. -
Attach the handle:
Score and slip the attachment points on both the mug body and the handle ends. Press the handle firmly onto the mug, blending the clay with a wooden tool until the connection is seamless. -
Clean the foot:
Use a sponge to wipe away any excess slip. Define the bottom inch of the mug—this will be left unglazed later, so ensure the transition line is purposeful and clean. -
Drying:
Cover the mug loosely with plastic to let it dry slowly over a few days. This prevents the handle from cracking away from the body as the clay shrinks. -
Bisque firing:
Once bone dry, fire the piece to bisque temperature (usually Cone 06 or 04 depending on your clay body).
Thumb Rest
Before the handle dries completely, press your thumb firmly into the top curve where it meets the mug body. This creates a custom ergonomic spot for gripping.
Step 4: Glazing
-
Wax the foot:
Apply wax resist to the bottom inch of the mug’s exterior and the entire underside. This reserves the raw clay look shown in the photo. -
Apply glaze:
Dip the mug into your prepared cream speckled glaze. Hold it upside down for a few seconds to let excess glaze drip off, ensuring an even coat. -
Clean and fire:
Check the wax line and wipe away any rogue glaze beads with a damp sponge. Fire to maturity (Cone 5 or 6) according to your clay and glaze specifications.
Once fired, the interplay between the smooth glaze and the gritty raw clay creates a tactile experience perfect for morning coffee


Rounded Rectangle Slab Mug for a Modern Minimal Look
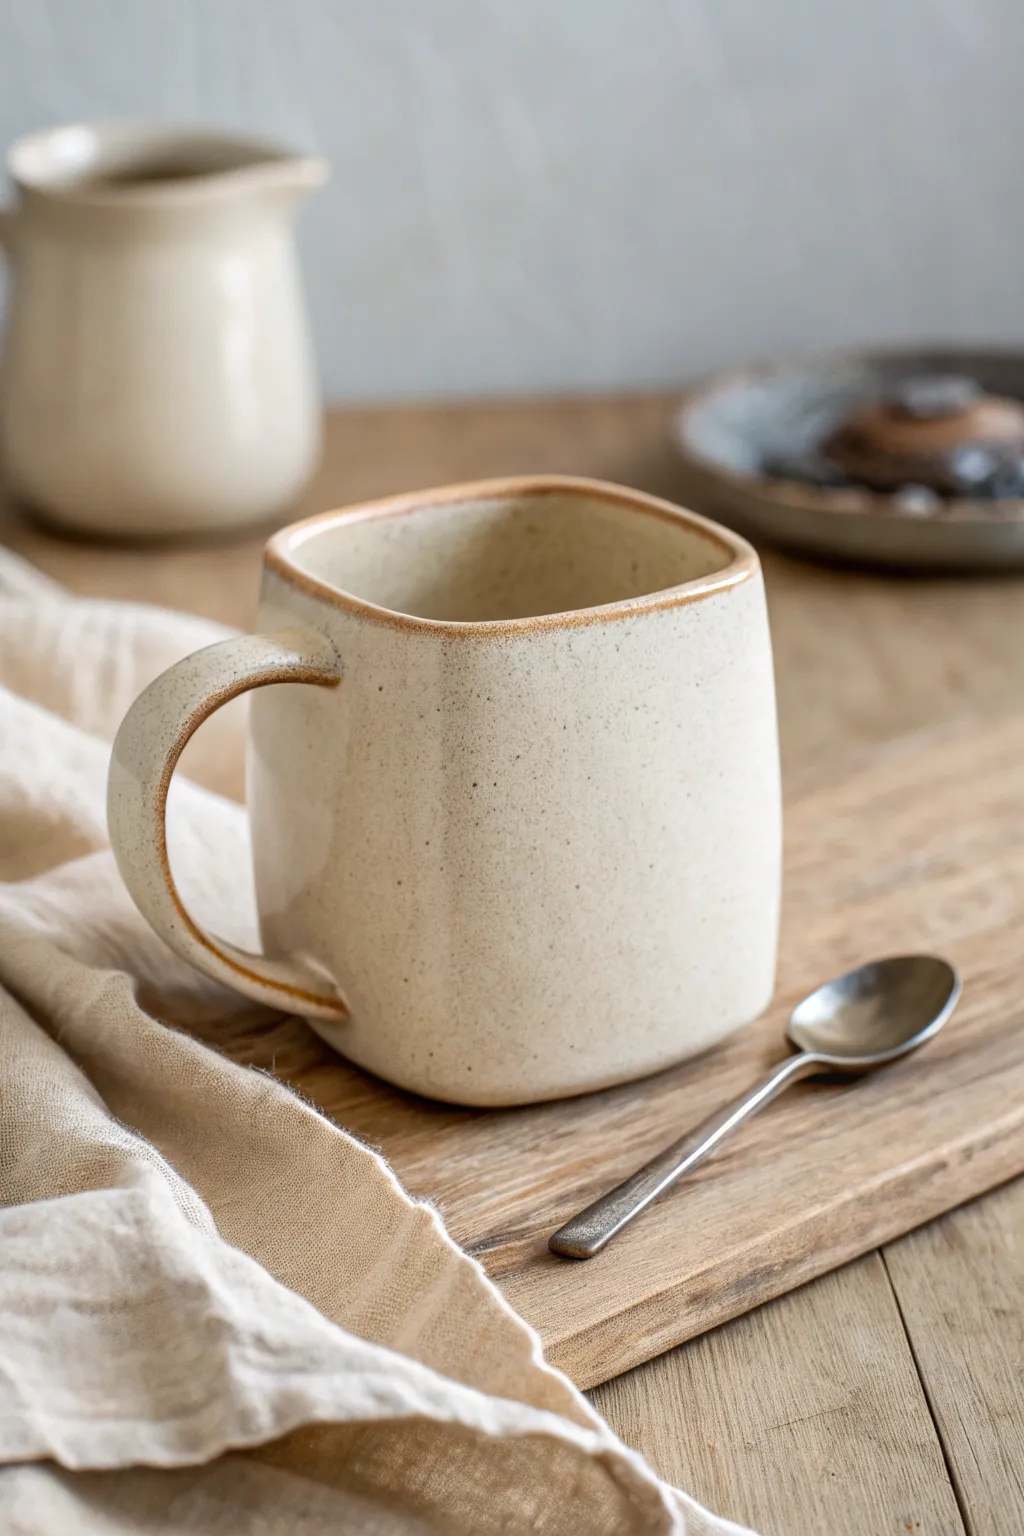
Embrace the beauty of subtle geometry with this rounded rectangle slab mug, featuring a speckled cream clay body and warm brown accents. Its modern, minimal silhouette feels incredibly comfortable in the hands, making it perfect for your morning coffee rituals.
Step-by-Step
Materials
- Speckled cream stoneware clay (e.g., Laguna Speckled Buff)
- Rolling pin with thickness guides/slats (1/4 inch)
- Canvas work surface
- Fettling knife or needle tool
- Paper template (rectangle 13″ x 4.5″ and a 4″ rounded square)
- Serrated rib and smooth rubber rib
- Slip and scoring tool
- Soft sponge
- Iron oxide wash or dark brown stain
- Clear or transparent matte glaze
- Kiln
Step 1: Preparing the Slabs
-
Roll out the clay:
Begin by wedging your speckled clay to remove air bubbles. Roll it out onto your canvas using thickness guides to create an even slab that is approximately 1/4 inch thick. -
Smooth the surface:
Before cutting, use a soft rubber rib to compress the clay on both sides. This aligns the clay particles to prevent warping and erases the canvas texture for a sleek, modern finish. -
Cut the shapes:
Place your paper templates on the slab. You will need one long rectangle for the wall (approx. 13 inches long by 4.5 inches tall) and one rounded square for the base. Cut cleanly around them with your fettling knife. -
Bevel the edges:
On the short ends of your long rectangle, cut 45-degree angles in opposite directions. This allows the seam to overlap cleanly without creating a thick lump in the wall. -
Stiffen the clay:
Let the pieces sit until they reach a ‘soft leather hard’ state. They should hold their shape when lifted but still be flexible enough to bend without cracking.
Pro Tip: Consistent Corners
To keep the ‘squircle’ shape uniform while working, place a jar or object with a similar rounded-square footprint inside the mug as a temporary mold while the clay stiffens.
Step 2: Assembling the Body
-
Form the cylinder:
Score the beveled edges of your wall piece and apply slip. Bring the ends together to form a cylinder, pressing the beveled seam firmly to join. -
Shape the squircle:
Gently manipulate the cylinder into a rounded square shape to match your base template. I find looking at the mug from directly above helps ensure the corners are symmetrical. -
Attach the base:
Score and slip the bottom edge of your shaped wall and the perimeter of your base piece. Place the wall onto the base and press down firmly. -
Reinforce the seal:
Use a thin coil of soft clay inside the bottom seam to reinforce the joint. Smooth this coil up into the wall and down into the floor until it disappears completely. -
Refine the exterior:
On the outside, use a wooden modeling tool or rib to drag clay across the bottom seam, blending the wall and base into one continuous surface. Smooth away any marks with a damp sponge.
Level Up: Texture Play
Before rolling the slab, scatter dry grog or heavy sand on your canvas. This embeds texture into the surface for an even rustier, more tactile finish under the matte glaze.
Step 3: Adding the Handle and Details
-
Pull a handle strap:
Roll or pull a strap of clay about 3/4 inch wide. Cut it to your desired length and curve it into a ‘C’ shape. Let it stiffen slightly. -
Attach the handle:
Score and slip the attachment points on both the mug and the handle. Press the handle firmly onto the side of the mug, ensuring it is vertically aligned. -
Smooth the transition:
Use a small modeling tool to blend the clay at the attachment points, making the handle look like it grew out of the mug naturally. Wipe with a damp sponge for a seamless look. -
Soften the rim:
Run a piece of chamois or a wet finger over the top rim to ensure it is perfectly rounded and comfortable for drinking. -
Dry slowly:
Cover the mug loosely with plastic to let it dry very slowly. This equalization helps prevent the square corners from warping or cracking.
Step 4: Glazing and Firing
-
Bisque fire:
Once bone dry, fire the mug to cone 04 (or your clay body’s bisque temperature). -
Apply the oxide rim:
Dip a small brush into iron oxide wash. Carefully paint a thin line along the rim and the edges of the handle. Wipe it back with a sponge so only a stain remains, emphasizing the form. -
Glaze dip:
Dip the entire mug into a transparent or semi-transparent matte glaze. This will seal the clay while allowing the natural speckles and the oxide rim to show through. -
Final wipe:
Clean the bottom of the mug (and up the side slightly if you prefer a ‘foot’ line) with a wax resist or damp sponge to prevent it sticking to the kiln shelf. -
Glaze fire:
Fire to the maturity temperature of your clay and glaze (typically cone 5 or 6 for stoneware).
Now you have a beautifully understated mug that proves simple shapes are often the most sophisticated.


Wavy Rim Slab Mug That Celebrates the Handmade Vibe
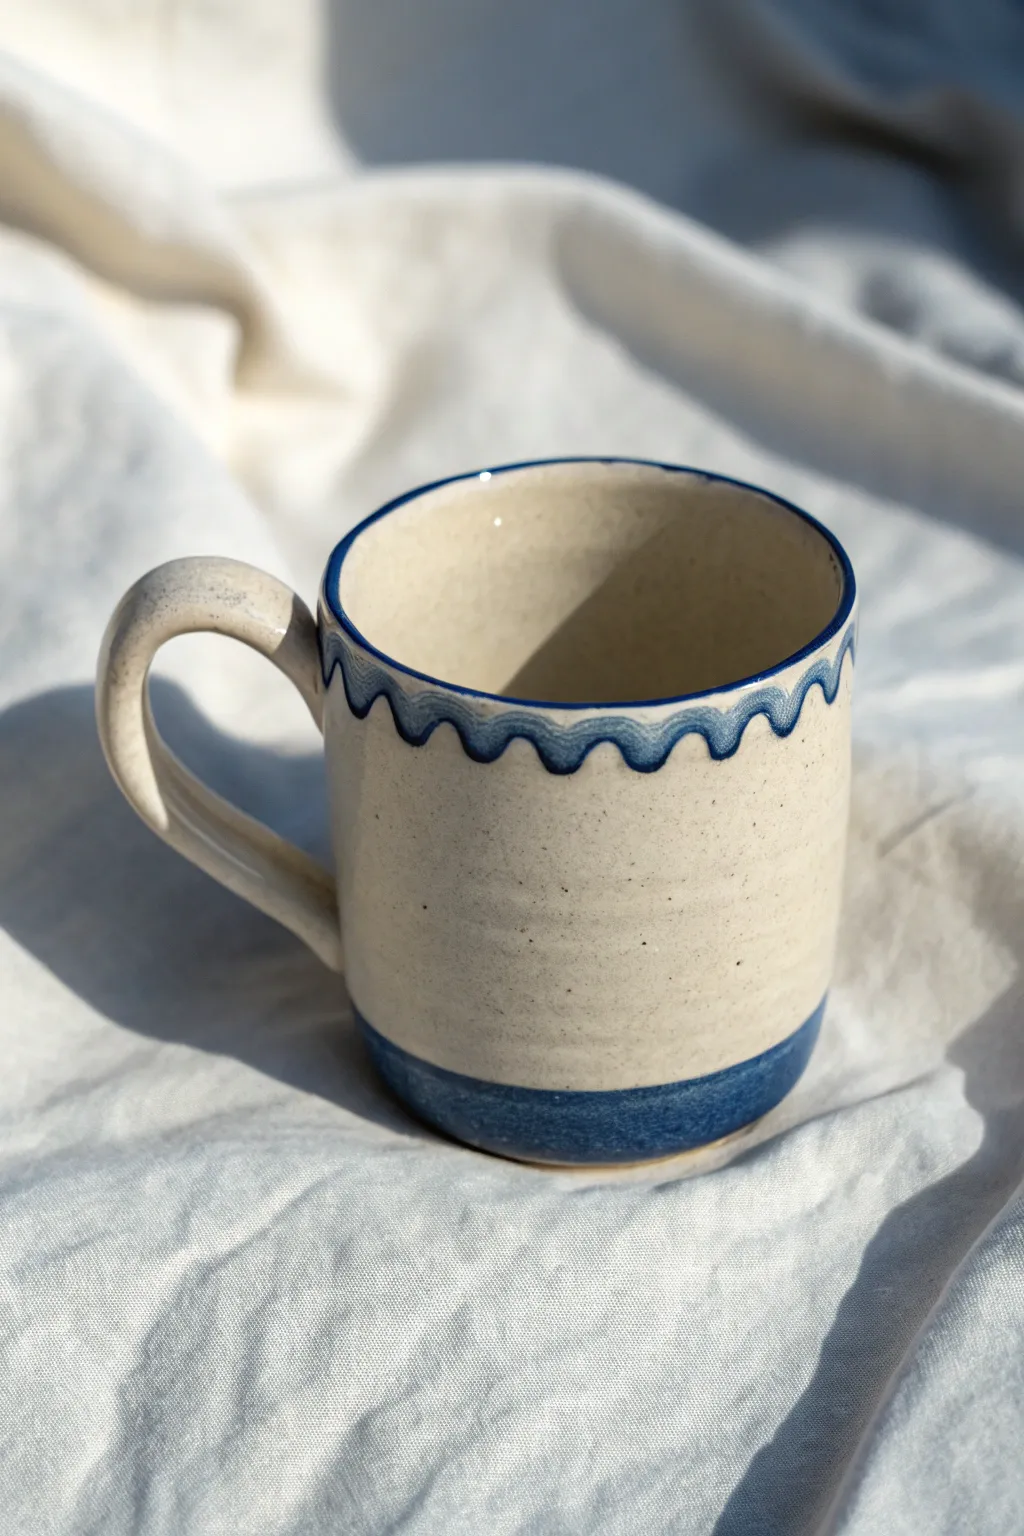
Embrace the perfectly imperfect nature of handbuilding with this charming slab mug, featuring a creamy speckled clay body and touches of ocean blue. This project highlights a simple cylinder form accented by a playful wavy decorative line and a distinct dipped base.
Step-by-Step Tutorial
Materials
- Speckled stoneware clay (mid-fire)
- Rolling pin and guide strips (approx. 1/4 inch thickness)
- Fettling knife or craft knife
- Ruler
- Scoring tool and slip
- Cylindrical form for template (e.g., a quart paint can or large bottle)
- Modeling tool or wooden spoon handle
- Sponge
- Creamy matte white glaze (speckled)
- Cobalt blue underglaze or glaze
- Small round detail brush
- Wax resist
Step 1: Forming the Body
-
Rolling the slab:
Begin by rolling out your speckled stoneware clay into a slab. Use guide strips to ensure an even thickness of about 1/4 inch, which provides a sturdy but not overly heavy wall for your mug. -
Cutting the rectangle:
Using a ruler and fettling knife, cut a clean rectangle from the slab. A size of roughly 4 inches by 10-11 inches works well for a standard mug, but feel free to adjust based on your desired height. -
Forming the cylinder:
Wrap your slab rectangle around your chosen cylindrical template. Where the ends overlap, cut through both layers at an angle (bevel cut) to create a seamless joint surface. -
Joining the seam:
Score the beveled edges aggressively and apply slip. Press the ends together firmly and compress the seam inside and out using a wooden tool or your thumb to make the join invisible. -
Adding the base:
Roll a small piece of clay for the base. Place your cylinder on top, trace around it, and cut out the circle. Score and slip both the bottom of the cylinder and the edge of the base circle, then join them, smoothing the clay upward to seal.
Rim Smoothing Secret
Use a piece of plastic wrap over the clay when cutting the initial rim. Pressing the cutter through the plastic creates a naturally rounded, soft edge.
Step 2: Handle & Detailing
-
Pulling the handle strap:
Cut a strip of clay for the handle. I like to smooth the edges with a damp sponge to curve them slightly so it feels comfortable in the hand later. -
Attaching the handle:
Shape the strip into a ‘C’ or ear shape. Score and slip the attachment points on both the mug body and the handle ends. Press firmly to attach, blending the clay onto the body for a strong bond. -
Refining the rim:
Before the clay dries too much, use a soft, damp sponge or a chamois cloth to compress and round the rim of the mug. This ensures it will be comfortable to drink from. -
Bisque firing:
Allow the mug to dry slowly to the bone-dry stage, then fire it in a bisque peep to prepare it for glazing.
Step 3: Glazing the Design
-
Waxing the foot:
Apply wax resist to the very bottom of the mug to prevent glaze from sticking to the kiln shelf. -
Painting the wave:
Using a small round detail brush and cobalt blue underglaze (or a stable blue glaze), paint a scalloped, wavy line about an inch below the rim. Focus on keeping the curves consistent. -
Dipping the base:
Pour a small amount of the blue glaze into a shallow container. Dip the bottom half-inch of the mug directly into it to create the solid blue band at the base. Let this dry completely. -
Applying the main glaze:
Dip the entire mug into your creamy matte white glaze. If you used underglaze for the blue wave, a transparent or semi-transparent white works best to let the design show through. -
Rim detail:
Take your detail brush again and carefully paint a thin line of blue right along the very edge of the rim to frame the piece. -
Final wipe:
Use a sponge to wipe away any glaze that may have dripped onto the waxed bottom before loading it into the kiln. -
Glaze firing:
Fire the mug to the temperature recommended for your specific clay and glaze combination (likely Cone 5 or 6 for stoneware).
Warped Walls?
If your cylinder warps while working, stuff the inside lightly with newspaper or foam to help it hold its shape while the handle stiffens.
Enjoy your morning coffee in a vessel that feels uniquely yours

The Complete Guide to Pottery Troubleshooting
Uncover the most common ceramic mistakes—from cracking clay to failed glazes—and learn how to fix them fast.
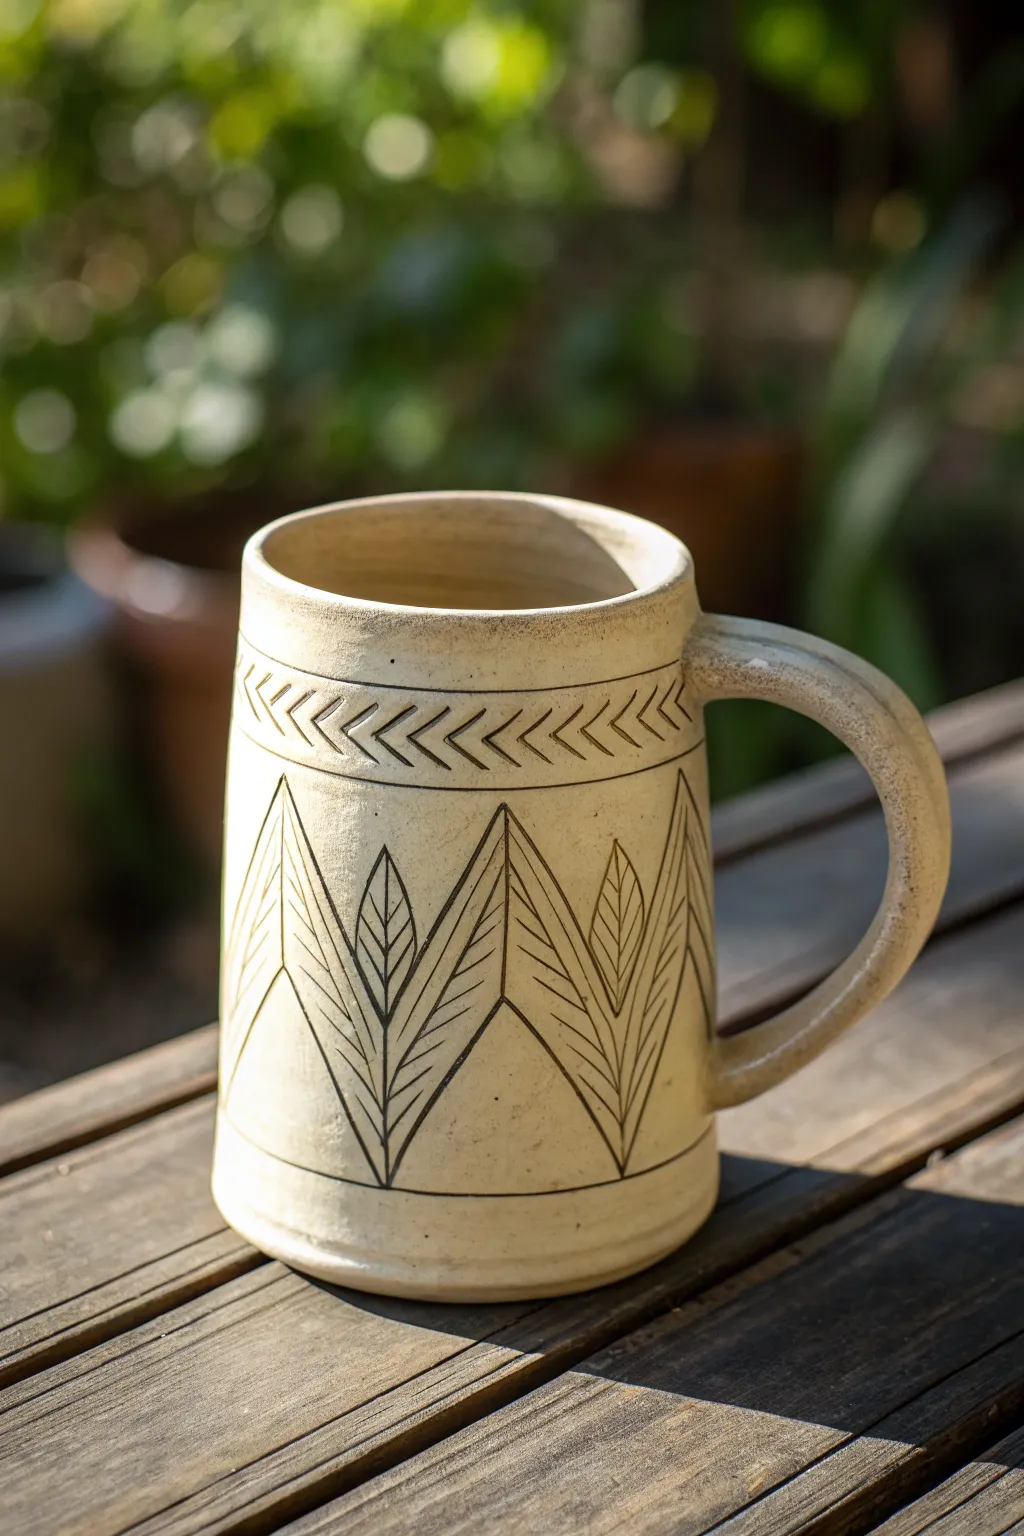
Texture-Rolled Slab Mug With an All-Over Pattern
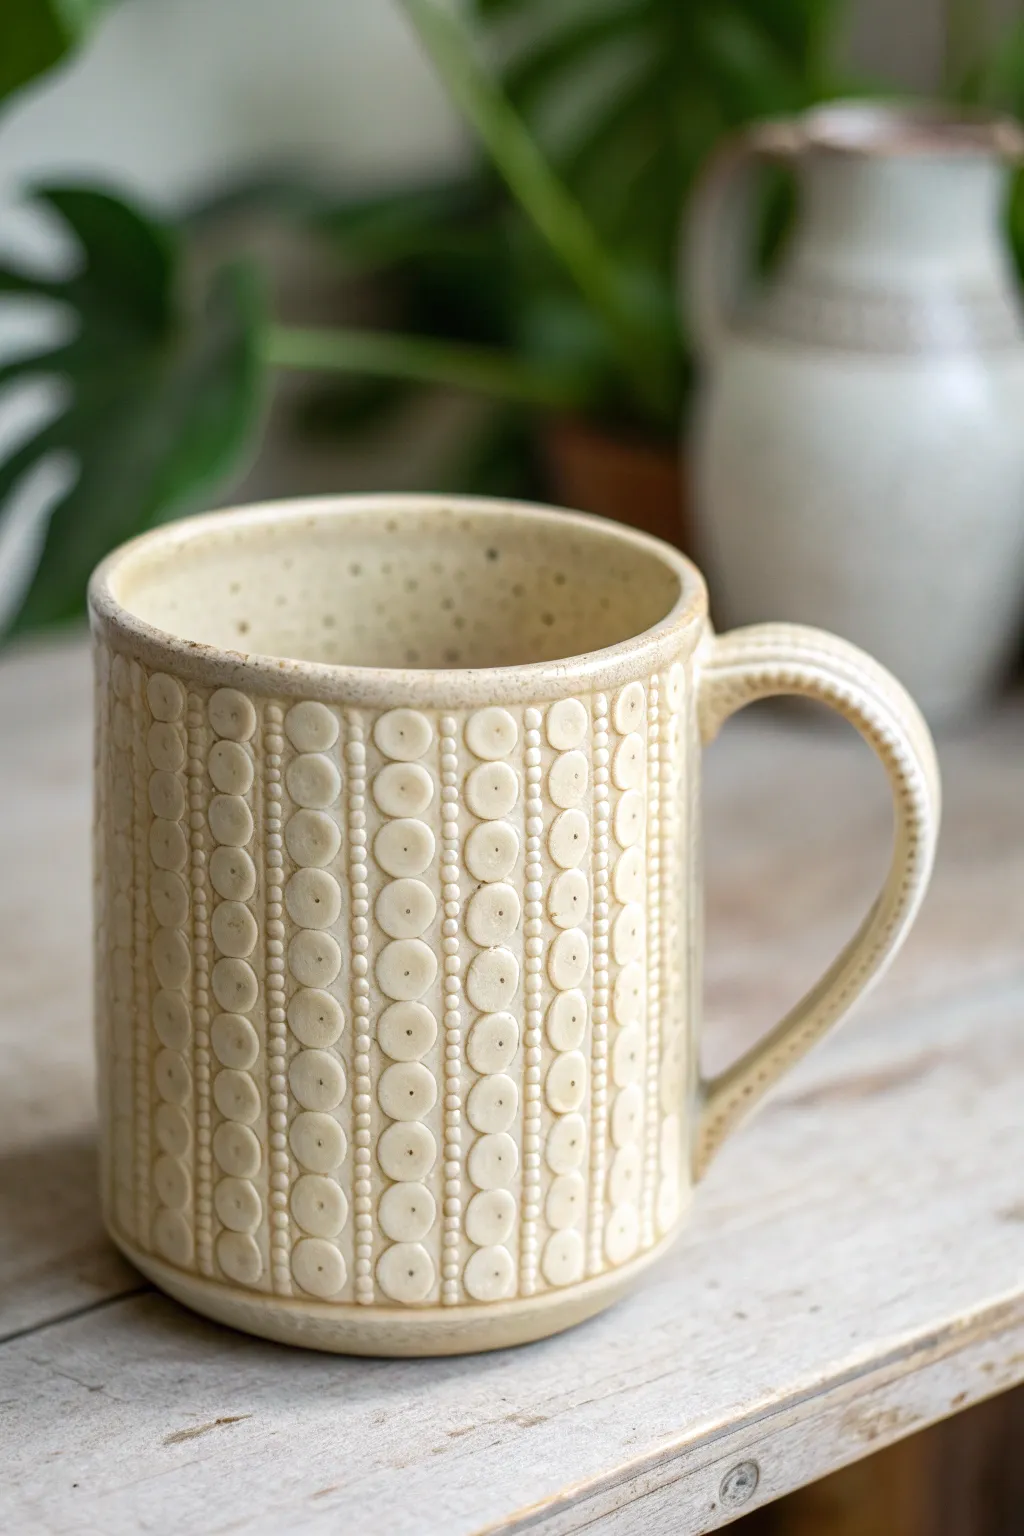
This elegant slab-built mug features a soothing, rhythmic pattern of alternating impressed circles and delicate beaded lines. The creamy speckled glaze highlights the texture beautifully, collecting in the deeper recesses to create a subtle vintage aesthetic.
Step-by-Step
Materials
- Stoneware clay (speckled or buff)
- Texture roller or stamp (vertical dot/bead pattern)
- Alternatively: Wooden dowel and small beading tool
- Rolling pin
- Canvas work surface
- Fettling knife or needle tool
- Rib tool (flexible metal and soft rubber)
- Scoring tool (serrated rib)
- Slip (clay and water slurry)
- Cylindrical form or bisque mold (for shaping)
- Mug handle extruder (optional) or clay coil
- Sponge
- Transparent or semi-opaque cream glaze
Step 1: Creating the Textured Slab
-
Roll the foundation:
Begin by rolling out a chunk of speckled stoneware clay on your canvas. Aim for an even thickness of about 1/4 inch throughout the slab to ensure the mug walls are substantial but not heavy. -
Compress the clay:
Use a flexible rubber rib to compress the clay surface on both sides. This aligns the clay particles, preventing future warping, and creates a smooth canvas for your texture. -
Apply the texture:
This pattern is best achieved with a custom texture roller. Roll the tool firmly across the slab in one continuous motion to create deep, consistent impressions of the vertical dot-and-bead columns. -
Alternative texturing method:
If you don’t have a roller, press the end of a small wooden dowel into the clay to make the larger circles, and use a small, rounded modeling tool to poke the ‘bead’ lines between them. -
Cut the rectangle:
Measure and cut a rectangular strip from your textured slab. A standard size is roughly 4 inches high by 10-11 inches long, but adjust based on your desired mug size. -
Bevel the edges:
Cut 45-degree bevels on the two shorter ends of your rectangle. Bevel one side facing up and the opposite side facing down so they will overlap seamlessly when rolled.
Step 2: Assembling the cylinder
-
Score and slip:
Rough up the beveled edges with your scoring tool and apply a generous amount of slip. This ‘glue’ is crucial for a watertight seal. -
Form the cylinder:
Gently lift the slab and curve it into a cylinder, bringing the beveled edges together. I find it easiest to stand the cylinder up to check vertical alignment before pressing the seam closed. -
Reinforce the seam:
Reach inside with a wooden tool or your finger to smooth the seam together firmly. On the outside, carefully compress the join without obliterating your beautiful texture. -
Cut the base:
Roll a small separate piece of slab for the floor. Place your cylinder on top of it, trace around the bottom edge with a needle tool, and cut out the circle. -
Attach the base:
Score and slip the bottom edge of the cylinder and the outer edge of the base circle. Press them together firmly. -
Seal the bottom:
Use a small wooden modeling tool to blend the clay from the base up into the wall on the outside. This creates the slightly flared foot seen in the image.
Compression is Key
Don’t skip compressing the rim after assembling! A compressed rim helps keep the cylinder round during firing and prevents warping.
Step 3: Handle and finishing
-
Create the handle strap:
Pull a handle or extrude a strap of clay. To match the body, add a strip of texture down the center of the handle, perhaps using just the beaded line element of your pattern. -
Shape the ear:
Curve the strap into an ‘ear’ shape and let it stiffen slightly on a board until it holds its form without collapsing. -
Attach the handle:
Score and slip the attachment points on both the mug body and handle. Press firmly to join, ensuring the handle is straight and comfortable for gripping. -
Refine the rim:
Run a damp sponge or a piece of chamois leather over the rim of the mug. It should be perfectly smooth and rounded for a comfortable drinking experience. -
Control drying:
Cover the mug loosely with plastic to let it dry showly. This ensures the handle and body shrink at the same rate, preventing cracks. -
Underglaze details (optional):
For extra definition, you can wipe a dark oxide into the texture and sponge it off the high points before the final glaze firing. -
Glaze application:
Dip or brush on a semi-opaque cream or oatmeal glaze. This type of glaze breaks over edges, effectively highlighting the relief pattern.
Smooth Seams
If the vertical seam disrupts the pattern too much, use a small stamp or tool to re-impress the texture directly over the joined area while the clay is soft.
Once fired, fill your new favorite mug with coffee or tea and enjoy the tactile experience of your handmade creation
Stitched Seam Slab Mug Using Simple Score Marks
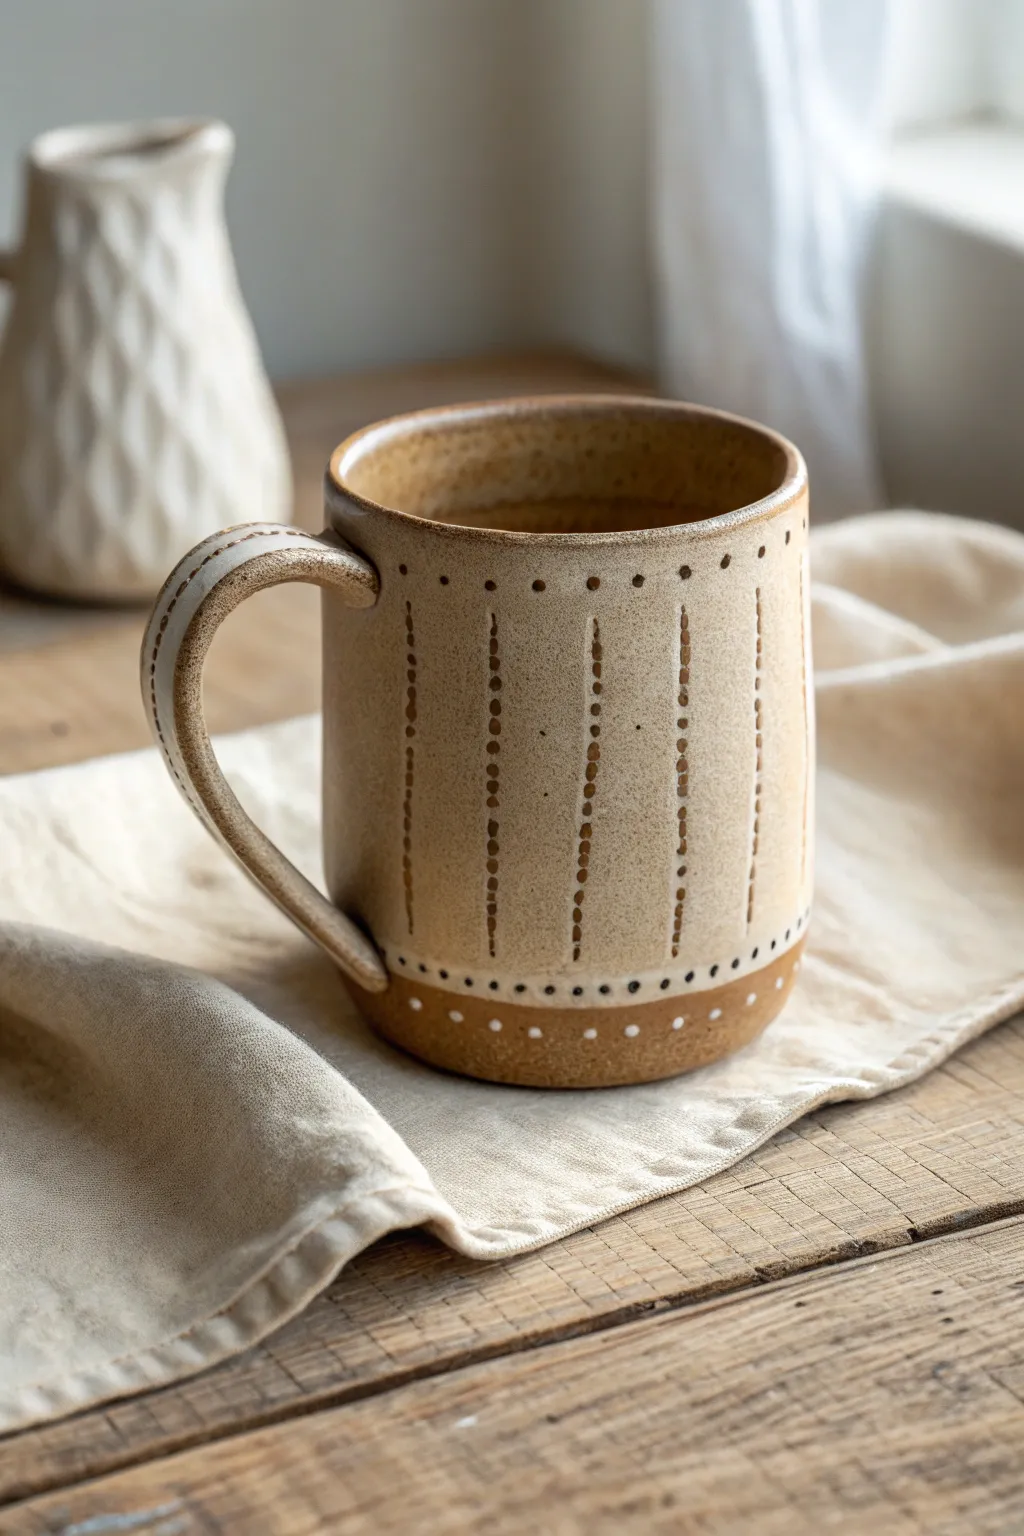
Capture the charm of hand-sewn leather in ceramic form with this inviting slab-built mug. The design features vertical dashed lines resembling heavy stitching, accented by a warm, speckled glaze and a beautifully contrasting bare clay base.
Step-by-Step Tutorial
Materials
- Speckled stoneware clay (mid-fire)
- Contrasting dark brown clay (small amount for base)
- Rolling pin
- Canvas or slab mat
- Dowel or slab sticks (for thickness)
- Needle tool or sharp knife
- Scoring rib or serrated tool
- Slip (clay glue)
- Small semi-circle loop tool (for carving)
- Fine-point round carving tool
- Sponge
- Transparent matte or satin glaze
- Paintbrush
Step 1: Forming the Slab Body
-
Roll the Main Slab:
Begin by wedging your speckled stoneware clay to remove air bubbles. Roll it out into a uniform slab about 1/4 inch thick using guide sticks or a slab roller to ensure consistency. -
Cut the Body Template:
Wrap a paper template around a cylindrical form to check size, then lay it on your slab. Use a needle tool to cut a clean rectangle, roughly 4 inches by 10 inches, depending on your desired mug size. -
Bevel the Edges:
To create a seamless join, cut the short ends of your rectangle at a 45-degree angle. bevel the ends in opposite directions so they will overlap perfectly when formed into a cylinder. -
Form the Cylinder:
Score the beveled edges aggressively and apply a generous amount of slip. Bring the ends together to form a standing cylinder, pressing the seam firmly from both the inside and outside.
Wobbly Walls?
If your slab cylinder slumps while working, let the slab firm up on the canvas for 20 minutes before forming. Only build when the clay can hold its own weight.
Step 2: Adding the Base and Handle
-
Create the Contrast Base:
Roll out a small amount of the darker brown clay to the same thickness. Cut a circle slightly larger than the diameter of your cylinder. -
Attach the Base:
Score and slip the bottom rim of your cylinder and the outer edge of the dark clay circle. Press the cylinder onto the base. -
Trim and Smooth:
Once attached, use a knife to trim the excess dark clay flush with the cylinder walls. Use a rib tool to smooth the transition where the two clay bodies meet, blending them for a strong bond. -
Pull a Strap Handle:
Pull a strap of the speckled clay or roll a coil and flatten it slightly. Cut it to length and shape it into a comfortable ‘C’ or ear shape. -
Attach the Handle:
Score and slip the attachment points on both the mug body and the handle. Press firmly to attach, reinforcing the join with small coils of clay if needed, and smooth away any excess slip.
Step 3: Carving and Detailing
-
Mark Vertical Guidelines:
Lightly sketch vertical lines around the humid body using a dull pencil or tool to space out your stitching pattern evenly. -
Carve the Stitches:
Using a small loop tool or carving tool, carefully gouge out short, vertical dashes along your guidelines. The goal feels rhythmic, mimicking heavy thread passing through fabric. -
Add Decorative Dots:
Use the rounded end of a paintbrush handle or a small ball tool to impress a row of dots near the top rim. Repeat this process near the bottom join, overlapping onto the darker clay base for continuity. -
Carve Handle Detail:
Don’t forget the handle—carve a central groove or a line of dashed stitches running down the center of the strap to tie it visually to the main body. -
Clean Up Burrs:
Let the mug dry to leather-hard. Gently run a damp sponge or a soft finger over the carvings to remove sharp clay crumbs or ‘burrs’ without washing away the texture.
Stitch It Up
For a hyper-realistic textile look, gently run a serrated tracing wheel (used in sewing) over the clay instead of carving individual dashes.
Step 4: Glazing and Finishing
-
Bisque Fire:
Fire the mug to bisque temperature (usually cone 04) to prepare it for glazing. -
Wax the Base:
Apply wax resist to the bottom ¼ inch of the mug, covering the dark clay section and the dots near the base. You want the raw texture of the dark clay to remain unglazed. -
Apply Glaze:
Dip or brush a transparent matte or satin glaze over the entire interior and the exterior down to the wax line. The transparency allows the speckles and the stitching details to show through clearly. -
Final Fire:
Fire the piece to maturity (Cone 5 or 6 depending on your clay). Once cool, sand the bottom lightly if rough.
Enjoy your morning coffee in a mug that feels as cozy and handcrafted as a favorite wool sweater


What Really Happens Inside the Kiln
Learn how time and temperature work together inside the kiln to transform clay into durable ceramic.
Buttoned Seam Slab Mug With Tiny Clay Dots
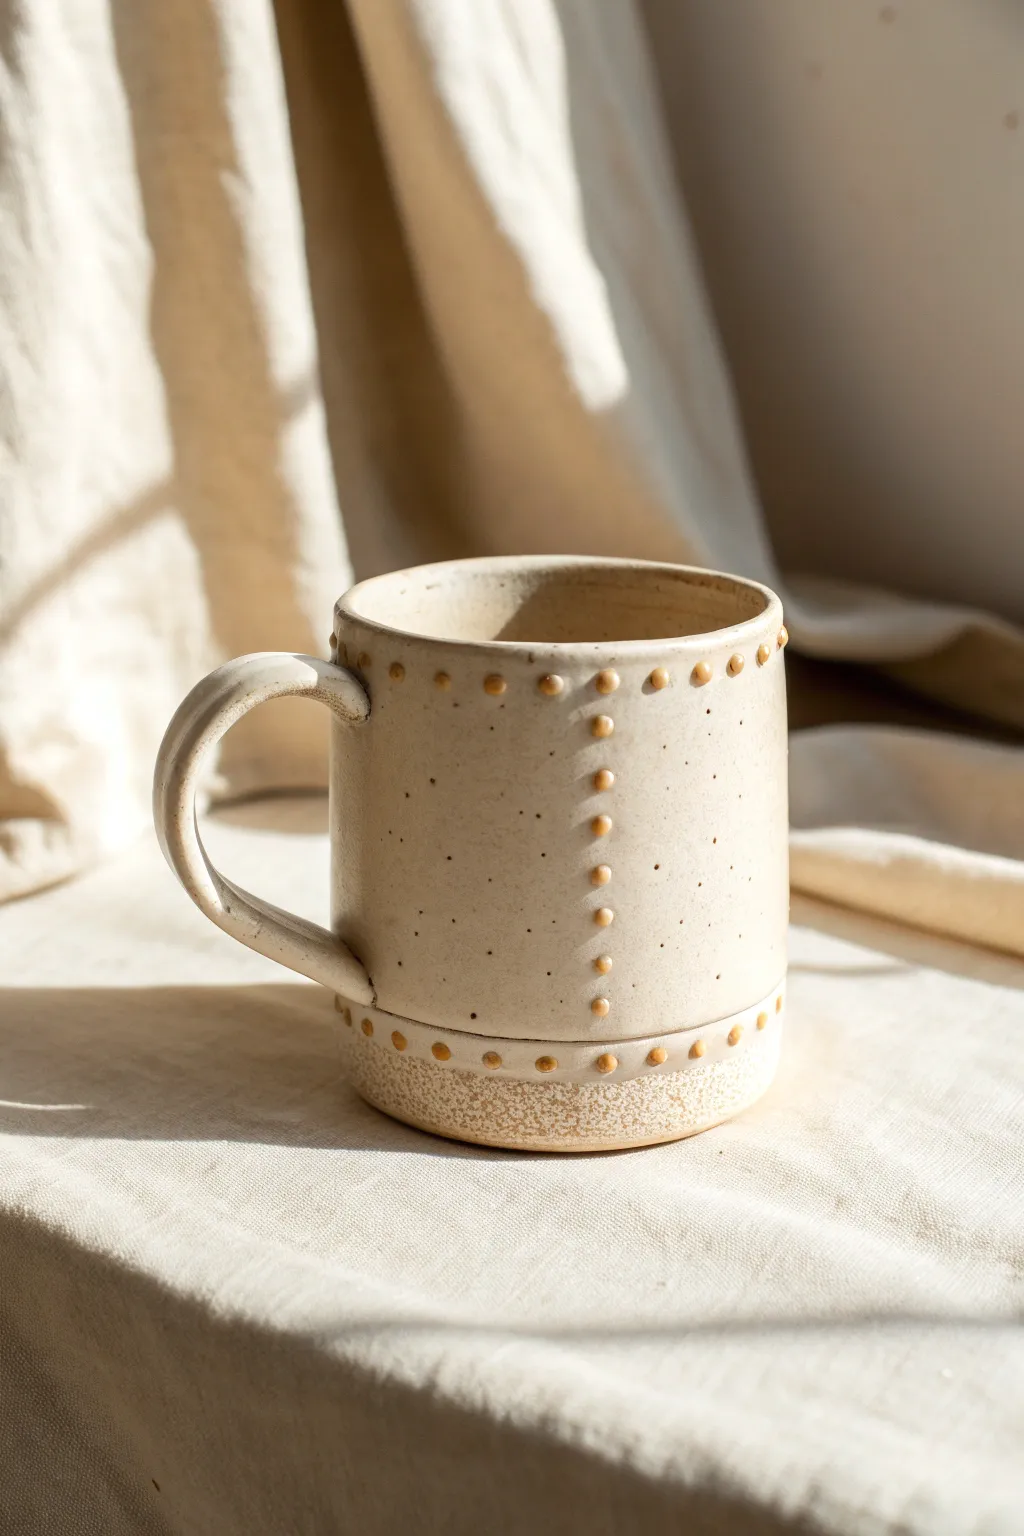
This charming handmade mug features a distinct construction style where the seam isn’t hidden but celebrated with a vertical row of clay buttons. The speckled clay body and exposed raw texture at the base give it a warm, rustic appeal that feels great in the hands.
Step-by-Step
Materials
- Speckled stoneware clay
- Rolling pin
- Guide sticks (1/4 inch thickness)
- Fettling knife or needle tool
- Serrated rib or flexible metal rib
- Slip (clay styling glue)
- Scoring tool or fork
- Small circle cutter (or a straw)
- Sponge
- Template (rectangle for body, circle for base)
- Wooden modeling tool
Step 1: Preparing the Slab Body
-
Roll out the clay:
Begin by wedging your speckled stoneware clay to remove air bubbles. Place it between two 1/4 inch guide sticks and roll it out into a smooth, even slab. Smooth the surface with a flexible rib to compress the clay particles. -
Cut the forms:
Using your templates, cut out a large rectangle for the mug body and a circle for the base. Don’t discard the scraps yet; you will need them for the handle and the decorative buttons. -
Texture the base (optional):
If you want the gritty texture shown at the bottom of the mug in the photo, lightly press a coarse sponge or sand into the bottom half-inch of the rectangular slab before assembling. -
Bevel the bottom edge:
On the long bottom edge of your rectangular slab, cut a 45-degree angle. Do the same on the edge of the circular base. This helps create a stronger join. -
Score and slip the base:
Score the beveled edges of the base and the bottom of the wall thoroughly. Apply a generous amount of slip to these rough areas. -
Form the cylinder:
Wrap the rectangular slab around the circular base. Unlike traditional mugs where you blend the seam invisible, here you want the vertical ends of the wall to just touch or slightly overlap without blending them completely yet.
Step 2: Creating the Button Seam
-
Secure the vertical seam:
Score and slip the vertical edges where the cylinder meets. Press them firmly together. You can run a finger up the inside to smooth it, but leave the outside seam visible as a vertical line. -
Make the clay buttons:
Take a small balls of fresh clay (about the size of peppercorns) and roll them between your fingers. You’ll need about 8-10 for the vertical seam and another 10-12 for the rim and base decoration. -
Apply the vertical buttons:
Score small dots along the vertical seam line. Place a clay ball on each scored spot. Using your thumb or a flat tool, gently press the ball down to flatten it into a ‘button’ that straddles the seam, effectively stitching the pot together visually. -
Add rim and base details:
Repeat this process around the very top rim and the join where the wall meets the floor. Space these dots out evenly—about an inch apart—to create a rhythmic pattern.
Pro Tip: Consistent Buttons
Use a small drinking straw to punch out tiny circles from a thin slab of clay. This ensures every single button is exactly the same size before you press them onto the mug.
Step 3: Handle & Finishing Touches
-
Pull or roll a handle:
Roll a coil for the handle, slightly tapering it. Flatten it slightly so it matches the aesthetic of the slab body. Curve it into an ear shape and let it stiffen slightly so it holds its form. -
Attach the handle:
Score and slip the contact points on both the mug body and the handle ends. Press the handle firmly onto the opposite side of the mug from your button seam. Use a small wooden tool to reinforce the connection points. -
Clean up the surface:
I always take a moment here to wipe down any excess slip with a slightly damp sponge, being careful not to smear the little buttons you added. -
Bisque fire:
Allow the mug to dry slowly under loose plastic to prevent the handle from cracking. Once bone dry, bisque fire the piece to Cone 04 (or your clay’s specification). -
Glazing strategy:
To achieve the look in the image, use a satin white or cream glaze. Pour the glaze inside the mug and swirl to coat. For the outside, dip the mug but leave the bottom half-inch unglazed to show off the raw, sandy clay texture. -
Final wipe:
Gently wipe the glaze off the raised buttons with a damp sponge. This technique, called ‘wax resist’ or simply wiping back, allows the toasty color of the clay circles to pop through the white glaze. -
Glaze fire:
Fire the mug to maturity (likely Cone 5 or 6 depending on your stoneware). This will melt the glaze and turn those exposed raw spots a beautiful toasty brown.
Troubleshooting: Cracking Seams
If the vertical button seam pulls apart during drying, your slip wasn’t wet enough. Wrap the mug tightly in plastic for 2 days to re-hyrdate, then compress the seam again from the inside.
Enjoy your morning coffee in a mug that highlights the beauty of hand-built construction.
Stamped Lettering Slab Mug for Names, Initials, or Short Words
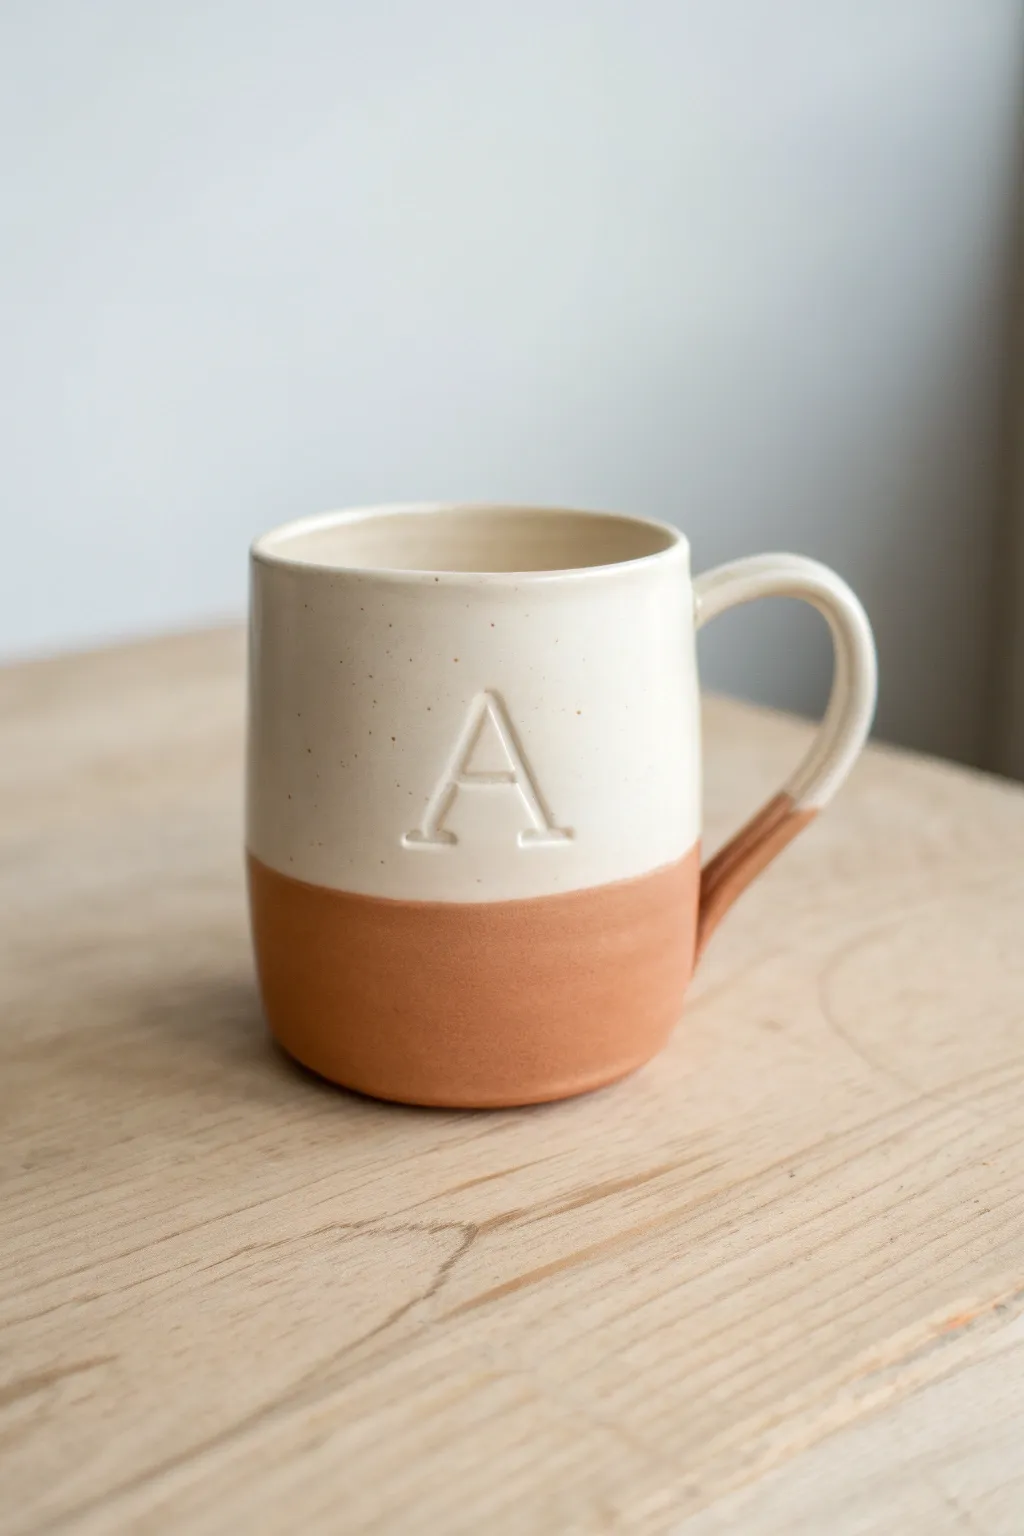
Embrace the beauty of raw clay with this elegant slab-built mug that features a creamy glazed top and an exposed terracotta base. The sharp relief of a single stamped initial adds a personal touch, making it a perfect gift or a special addition to your own morning routine.
Detailed Instructions
Materials
- Terracotta stoneware clay (or speckle clay)
- White or cream dipping glaze (glossy)
- Letter stamp set (large serif font)
- Rolling pin and guide sticks (1/4 inch)
- Rectangle template (approx. 11″ x 4″)
- Circle template for base (approx. 3.5″)
- Fettling knife
- Scoring tool (serrated rib)
- Slip (clay slurry)
- Sponge and bucket of water
- Loop tool for trimming
- Modeling tool or wooden stick
Step 1: Forming the Body
-
Roll the slab:
Start by rolling out your terracotta clay to an even ¼-inch thickness. Using guide sticks on either side of your rolling pin ensures the wall thickness remains consistent, which is crucial for even drying later. -
Cut the shapes:
Place your rectangular template onto the slab and cut around it using your fettling knife. From the remaining clay, cut out a circle for the base of the mug. -
Compress the clay:
Gently run a rubber rib over both sides of your slab pieces. This compresses the clay particles, reducing the chance of warping in the kiln and smoothing out any canvas texture. -
Bevel the edges:
On the short ends of your rectangular slab, cut 45-degree bevels in opposite directions. This allows the seam to overlap seamlessly without creating a thick lump on the side of the mug. -
Stamp the initial:
Before assembling, position your letter stamp in the center of the rectangular slab. Press firmly but evenly to create a deep, clean impression, supporting the clay from underneath so you don’t distort the thickness. -
Score and slip:
Rough up the beveled edges and the outer edge of your circular base with your scoring tool. Apply a generous amount of slip to these textured areas to act as glue. -
Construct the cylinder:
Stand the rectangle up and wrap it into a cylinder, pressing the beveled ends together. Place this cylinder onto the scored base and gently press down to seal the connection.
Step 2: Handle and Refinement
-
Smooth the seams:
Using a wooden modeling tool or your finger, smooth the vertical seam inside and out. Then, work on the bottom seam where the wall meets the floor, ensuring it feels like one solid piece. -
Pull a handle strap:
Roll a small coil and flatten it slightly to form a strap. Wet your hand and stroke the clay downwards to ‘pull’ a handle, tapering it slightly. Curve it into an ear shape and set it aside until it’s leather-hard. -
Attach the handle:
Score the attachment points on the mug and handle. Press the handle firmly onto the mug—aligning the top attachment near the rim and the bottom curve about halfway down the body. -
Clean connection points:
Use a small wet sponge, or ‘chamois,’ to wipe away excess slip around the handle joints. I like to run my thumb over the join to create a smooth transition that feels comfortable to hold. -
Refine the rim:
Gently sponge the drinking rim to round it off. A sharp edge is unpleasant to drink from, so take time to make this smooth and rounded. -
Slow drying:
Loosely cover the mug with plastic to let it dry showly to the bone-dry stage. This prevents handles from cracking away from the body. -
Bisque fire:
Fire the piece in a kiln to cone 04 (or your clay’s specific bisque temperature) to prepare it for glazing.
Stamp Clean-Up
If your stamp leaves rough edges or ‘crumbs’ of clay, don’t pick them off while wet! Wait until the clay is bone dry, then gently brush them away with a soft brush.
Step 3: Glazing the Two-Tone Look
-
Wax the letter (Optional):
If you want the letter to remain raw clay, carefully paint wax resist into the stamped groove. For the look in the photo, skip this step so the glaze pools inside the letter. -
Dip the top section:
Hold the mug by the foot and dip it upside down into your white glaze. Only submerge it about two-thirds of the way down, leaving the bottom section raw. -
Check the interior:
Ensure the interior is fully coated. If dipping didn’t cover the inside bottom, pour glaze inside, swirl it around, and pour it out before dipping the exterior. -
Clean the transition line:
While the glaze is still powdery, use a damp sponge to tidy up the glaze line on the outside, making it straight and horizontal. -
Glaze fire:
Fire the mug to maturity (usually Cone 5 or 6 for stoneware). The glaze will melt into the stamped letter, highlighting the relief.
Custom Glaze Line
Instead of a straight dip, try dipping the mug at an angle for a modern, geometric look. You can also dip the handle separately to create contrast.
Enjoy your morning coffee knowing your hands made every curve of this beautiful mug

TRACK YOUR CERAMIC JOURNEY
Capture glaze tests, firing details, and creative progress—all in one simple printable. Make your projects easier to repeat and improve.
Sgraffito Slab Mug With a Simple Line Drawing
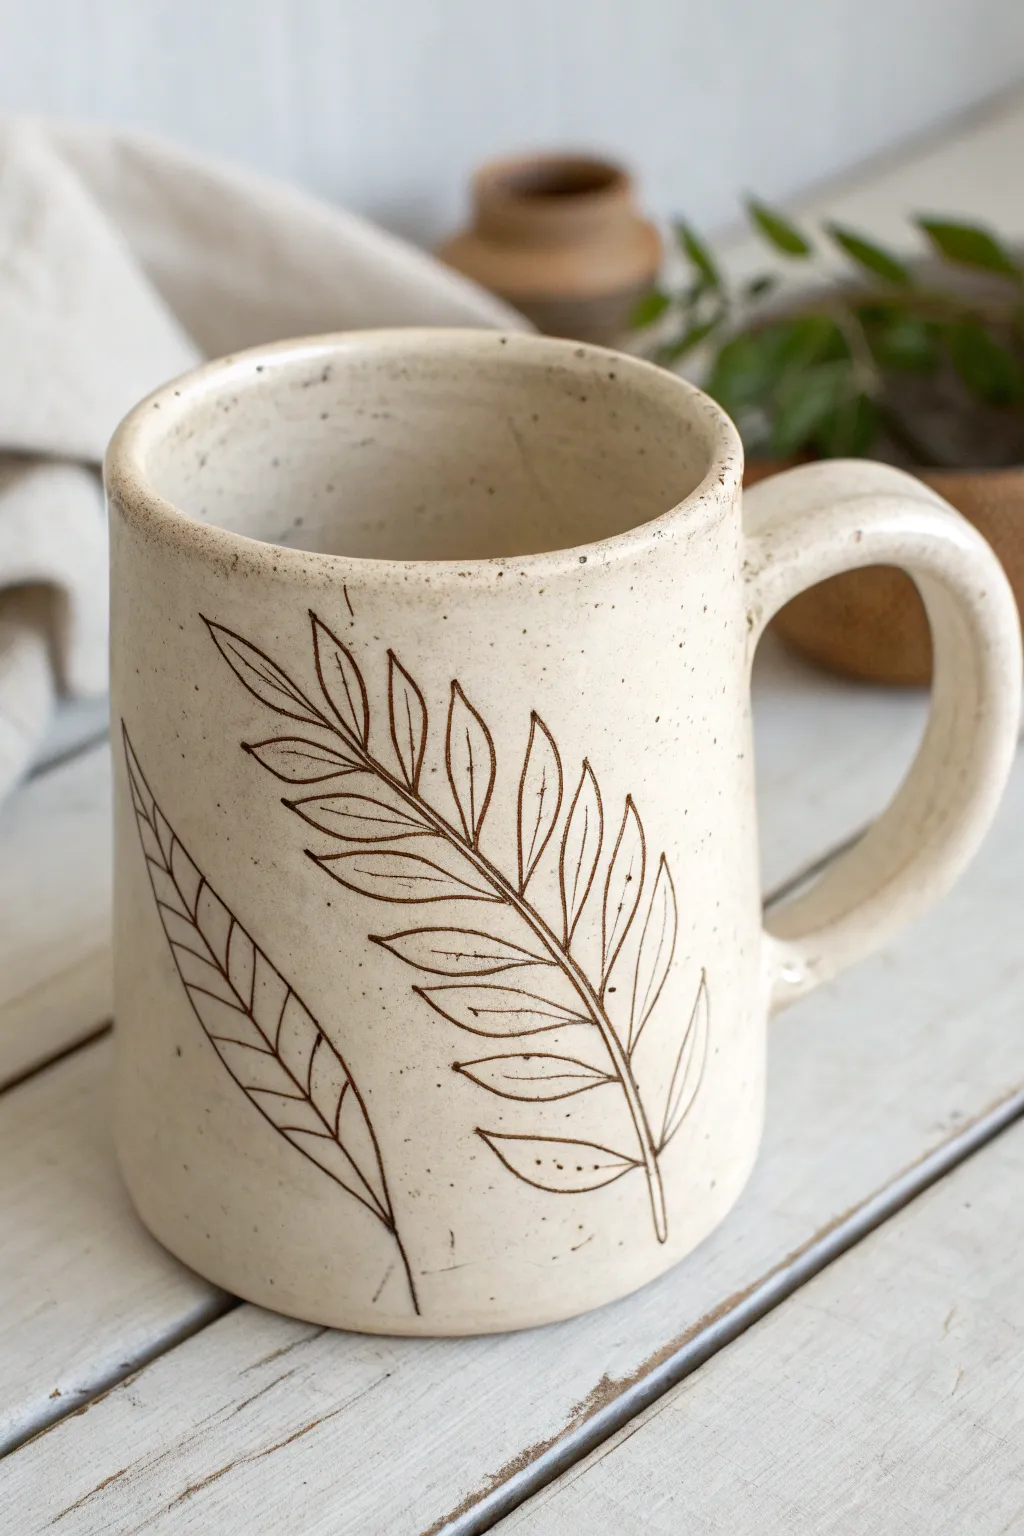
Capture the elegance of nature with this charming slab-built mug featuring a delicate fern design. By combining a creamy, speckled clay body with simple line work, you achieve a piece that feels both rustic and modern.
Step-by-Step
Materials
- Speckled stoneware clay slab (approx. 1/4 inch thick)
- Fettling knife
- Score and slip tool (or serrated rib)
- Clay slip
- Rolling pin and guide sticks
- Cylindrical form or template (like a PVC pipe or oatmeal container)
- Needle tool
- Dark underglaze (dark brown or black)
- Fine-point sgraffito tool or specialized carving needle
- Small paintbrush
- Clear or translucent white glaze
- Sponge
Step 1: Forming the Mug Body
-
Prepare the slab:
Roll out your speckled stoneware clay into an even slab, using guide sticks to ensure a consistent thickness of about 1/4 inch. Smooth both sides with a soft rib to compress the particles. -
Cut the rectangle:
Using a ruler and fettling knife, cut a rectangle large enough to wrap around your chosen form. A standard size is roughly 10-11 inches long and 4-5 inches high, but adjust to your preference. -
Bevel the edges:
Cut 45-degree bevels on the two shorter ends of your rectangle. Remember to bevel them in opposite directions so they will overlap seamlessly when the cylinder is formed. -
Shape the cylinder:
Wait until the clay is soft leather-hard—flexible but not sticky. Wrap the slab around your form or simply curve it by hand to create a cylinder. Score the beveled edges thoroughly and apply slip. -
Seal the seam:
Press the beveled edges together firmly. Use a wooden modeling tool or your thumb to smooth the seam inside and out until it is invisible. I like to run a rib over the join to ensure the wall thickness is even. -
Add the bottom:
Place your cylinder on a fresh piece of slab. Trace around the base with a needle tool, cut out the circle, score and slip the contact points, and attach the floor. Smooth the connection with a tool or your finger.
Clean Lines Pro-Tip
When wiping back the underglaze for the inlay, wipe perpendicular to your carved lines. This prevents the sponge from scooping the color out of the grooves you just filled.
Step 2: Designing and Firing
-
Attach the handle:
Pull or cut a strap of clay for the handle. Bend it into a pleasing curve—ear-shaped handles work beautifully here. Score and slip the attachment points on the mug body and handle, press firmly to join, and clean up excess slip. -
Refine the rim:
Use a damp sponge or a piece of chamois leather to smooth the rim of the mug. This is crucial for a comfortable drinking experience. -
Outline the design:
Once the mug is leather-hard to bone-dry, lightly sketch your fern design using a regular pencil. The graphite will burn off in the kiln, leaving only your intended lines. -
Inlay the lines (Mishima-style):
Using a needle tool or sharp carving tool, incise the fern lines into the clay. You want a groove deep enough to hold color but not so deep it weakens the wall. -
Apply underglaze:
Paint your dark brown or black underglaze directly over the incised lines. Ensure the grooves are completely filled with color. -
Clean the surface:
Let the underglaze dry slightly until it’s no longer shiny. Gently wipe the surface with a barely damp sponge. This removes the excess underglaze from the high points but leaves the pigment trapped inside the carved lines. -
Sgraffito alternative:
Alternatively, you can paint a defined shape of underglaze first and scratch through it (sgraffito), but the inlay method yields the clean, specific lines seen in this project best. -
Bisque fire:
Allow the mug to dry completely. Fire it to a bisque temperature (usually Cone 04 or 06) to permanentize the form and the underglaze design. -
Glaze application:
Dip or pour a clear or semi-transparent creamy glaze over the entire mug. A glaze that breaks over texture will highlight the speckles in the clay. -
Final wipe:
Wipe the bottom of the mug clean with a sponge to prevent it from sticking to the kiln shelf. -
Glaze fire:
Fire the mug to the maturity temperature of your clay and glaze (typically Cone 5 or 6 for stoneware). Let the kiln cool naturally before unloading.
Level Up: Texture
Before rolling your slab, lightly sprinkle dried coffee grounds or heavy grog onto your canvas. This adds extra earthy texture to the clay surface that pops under the clear glaze.
Enjoy your morning coffee knowing you crafted this serene, botanical vessel yourself
Mishima-Inspired Slab Mug With Inlaid Lines
This elegant slab-built mug features sharp, geometric leaf designs created using the traditional Mishima inlay technique. The contrast between the stark black underglaze and the creamy clay body gives it a clean, modern aesthetic perfect for your morning coffee.
Step-by-Step Guide
Materials
- Light-colored stoneware clay slab (approx. 1/4 inch thick)
- Black underglaze or black slip
- Wax resist (optional)
- Needle tool or X-Acto knife
- Metal rib and rubber rib
- Slab roller or rolling pin with thickness strips
- Specific templates (rectangle for body, circle for base)
- Scoring tool and slip
- Loop tool or carving tool (fine point)
- Sponge and water
- Matte or clear transparent glaze
Step 1: Forming the Mug Body
-
Roll the Slab:
Begin by rolling out a consistent slab of light stoneware clay to about 1/4 inch thickness. Use a rubber rib to compress both sides of the slab, which aligns the clay particles and creates a smooth canvas for your future carving. -
Cut the Components:
Using your templates, cut a long rectangle for the mug walls and a circle for the base. Be sure to cut the short edges of the rectangle at a 45-degree angle (beveling) to create a seamless overlap joint. -
Assemble the Cylinder:
Score and slip the beveled edges of your rectangle. Curl the slab into a cylinder, pressing the joined edges firmly together. Use a wooden modeling tool to smooth the seam inside and out until it disappears. -
Attach the Base:
Score and slip the bottom edge of your cylinder and the perimeter of your circular base. Press the cylinder onto the base, using a tool to blend the clay upward from the base into the wall for a strong connection. -
Refine the Form:
I like to slightly flare the bottom of the mug outward with my fingers for stability, just like the reference photo. Smooth the rim with a damp sponge or chamois strip for a comfortable drinking edge. -
Attach the Handle:
Pull or roll a coil for the handle. Shape it into a large ‘D’ or ear shape, flatten it slightly, and attach it to the leather-hard cylinder using the score and slip method. Clean up any excess slip immediately.
Step 2: Mishima Design & Inlay
-
Draft the Grid:
Once the mug is leather hard—stiff enough to hold its shape but soft enough to carve—lightly sketch two horizontal parallel lines near the top rim to frame the upper band. -
Carve the Upper Band:
Using a sharp needle tool or fine carving tool, carve a repeating chevron or ‘arrowhead’ pattern between your two upper guide lines. The lines should be deep enough to hold underglaze but not so deep they cut through the wall. -
Sketch the Leaves:
For the main body, lightly sketch large triangle shapes that mimic stylized leaves. Inside these triangles, draw a central vertical vein and upward-angled side veins. -
Deepen the Lines:
Go over your sketch lines with your carving tool to create clean channels. Remove any clay burrs (little crumbs of clay) from the edges of your lines now, as they can cause smearing later. -
Prioritize Wax (Optional):
For a cleaner result, you can paint a thin layer of wax resist over the entire outside surface. This prevents the black underglaze from staining the uncarved areas, though it requires a steady hand to fill the lines afterward. -
Apply Underglaze:
Generously paint black underglaze or slip over all your carved lines. Don’t worry about being neat; the goal is to ensure the recessed lines are completely filled with pigment. -
Let it Set:
Allow the underglaze to dry until it is no longer shiny. This usually takes 10 to 20 minutes depending on humidity. -
Scrape Attempt One:
Using a sharp metal rib, gently scrape away the excess underglaze from the surface. Hold the rib at a steep angle to avoid gouging the clay. -
Wipe Clean:
Follow up with a slightly damp (not soaking) sponge to wipe away the remaining haze of black from the surface, revealing the crisp black lines inlaid into the light clay.
Smudged Lines?
If your black underglaze smears onto the white clay while wiping, your sponge is too wet. Squeeze it out thoroughly and rinse it often to keep the background bright.
Step 3: Finishing Touches
-
Bisque Fire:
Allow the mug to dry slowly and completely before bisque firing it to the appropriate cone (usually Cone 04 or 06) to set the shape and underglaze. -
Glaze Application:
Dip or brush a clear or lightly matte transparent glaze over the entire piece. This will seal the clay and make the black inlay pop without obscuring the design. -
Final Firing:
Fire the mug to maturity (Cone 5, 6, or 10 depending on your clay body) to finish the piece.
Inlay Variation
Try using colored slip instead of black underglaze for a softer look. Navy blue or deep forest green create a beautiful, earthy contrast.
Enjoy the satisfaction of sipping from a mug that balances modern geometry with ancient techniques
Appliqué Slab Mug With Raised Leaves or Petals
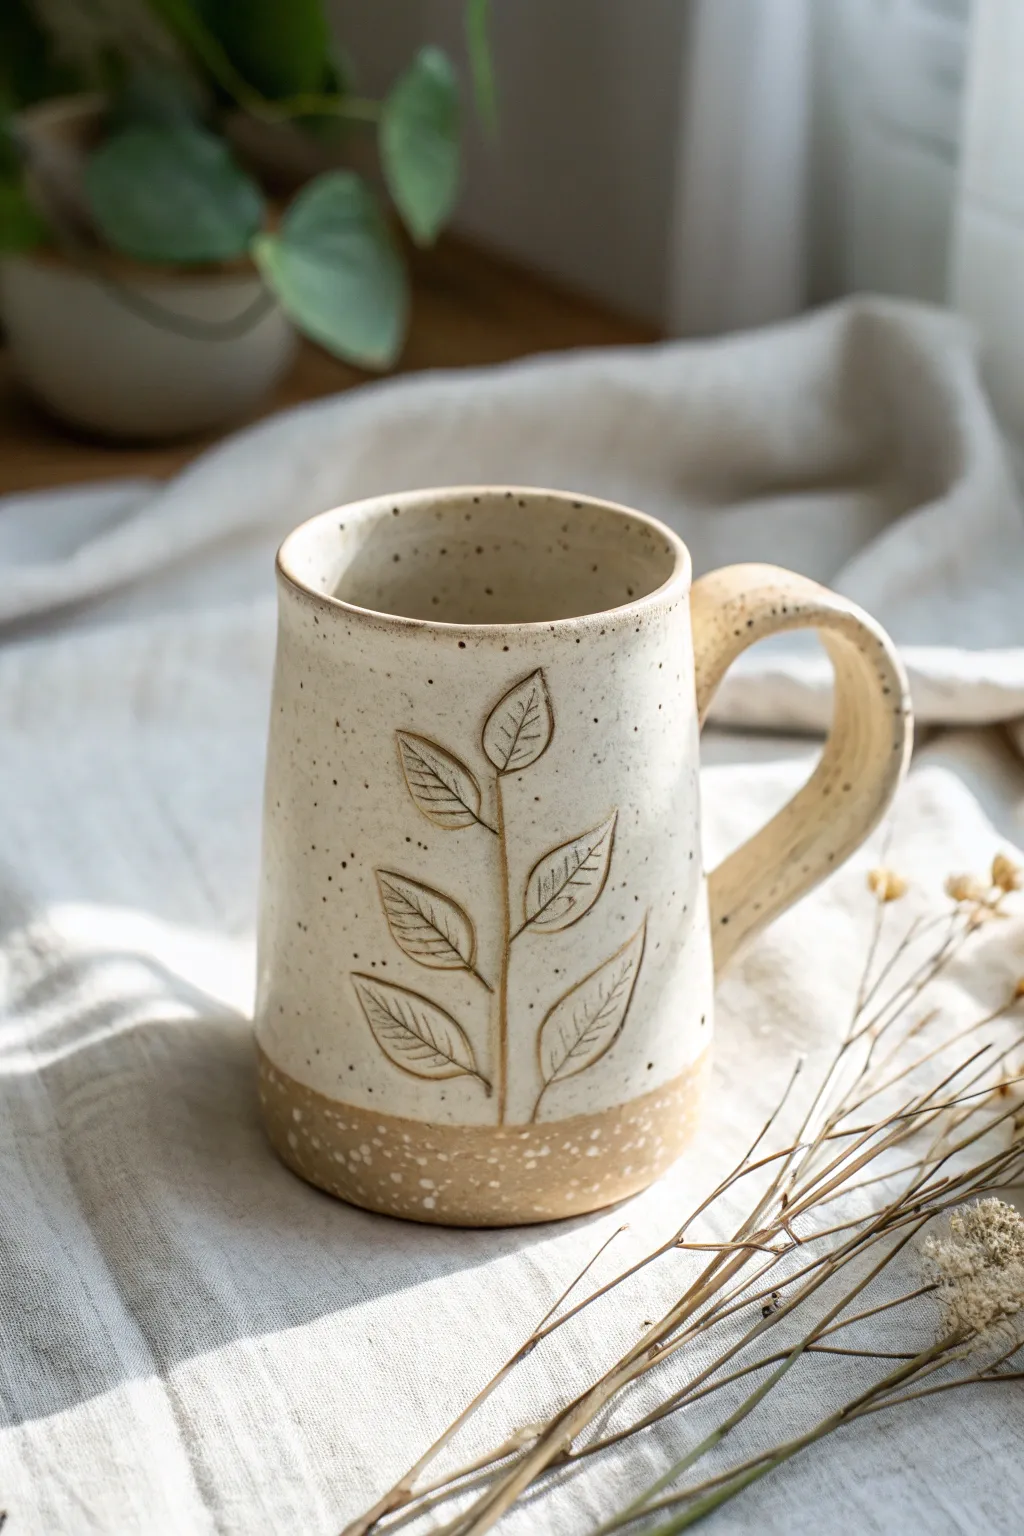
Embrace the natural beauty of clay with this rustic slab-built mug, featuring delicate leaf motifs and a warm, toasted base. The exposed raw clay bottom contrasts beautifully with the creamy, speckled glaze, creating a piece that feels as cozy as the coffee it holds.
Step-by-Step
Materials
- Speckled stoneware clay (mid-fire)
- Rolling pin
- Canvas or slab mat
- Mug template (rectangular slab body + circular base)
- Clay knife or fettling knife
- Serrated rib or scoring tool
- Slip (clay mixed with water)
- Small carving tool or needle tool
- Sponge
- Matte white or cream glaze
- Wax resist (optional)
Step 1: Forming the Mug Body
-
Roll the Slab:
Begin by wedging your speckled stoneware clay to remove air bubbles. Roll it out into a consistent slab about 1/4 inch thick using your rolling pin and guide sticks if available. -
Cut the Shapes:
Place your templates onto the slab. You will need one rectangular strip for the wall and one circle for the base. Cut clearly around them with your fettling knife. -
Texture the Clay (Optional):
If you want a smoother finish, compress the clay on both sides with a damp sponge or rib. This aligns the clay particles and prevents warping later. -
Score and Slip:
Score the short ends of your rectangle and the outer edge of your circular base. Apply a generous amount of slip to these scored areas. -
Assemble the Cylinder:
Stand the rectangular slab up and curve it around the circular base. Join the two short ends together to form a cylinder, pressing firmly to create a seam. -
Secure the Base:
Place the cylinder onto the scored circular base. Use a modeling tool handle or your finger to smooth the clay from the wall down onto the base on the outside, and vice versa on the inside, ensuring a watertight seal.
Seam Splitting?
If the vertical seam of your mug cracks during drying, score it deeply, add slip (thickened with vinegar helps!), and compress it again. Dry slowly under plastic.
Step 2: Adding the Handle and Design
-
Pull a Handle:
Roll a thick coil or cut a narrow strip from your leftover slab. Smooth the edges and curve it into a ‘C’ or ear shape. Let it stiffen slightly until it holds its shape. -
Attach the Handle:
Score and slip the attachment points on both the mug body and the handle. Press the handle firmly onto the mug, smoothing the joints with a small tool or wet finger. -
Sketch the Leaf:
Lightly trace a vertical stem and leaf shapes onto the center of the mug using a needle tool. Keep the pressure light so you can erase mistakes with a sponge. -
Carve the Outline:
Using a small carving tool or a sharp needle tool, incise the lines deeper into the clay to define the stem and leaf outlines. Unlike appliqué where you add clay, here we are carving into the surface to create relief. -
Add Leaf Veins:
carefully carve small, diagonal lines inside each leaf shape to represent veins. This adds texture that the glaze will break over later. -
Smooth the Burrs:
Once the carving is totally dry (bone dry), use a slightly damp sponge or a soft brush to gently wipe away any sharp clay crumbs or burrs created during carving.
Make it Pop
Rub a dark underglaze or iron oxide wash into the carved leaf lines and wipe away the excess before glazing. This emphasizes the botanical drawing.
Step 3: Glazing and Finishing
-
Bisque Fire:
Load your bone-dry mug into the kiln and bisque fire it according to your clay body’s specifications (usually Cone 04 or 06). -
Wax the Base:
Paint a line of wax resist around the bottom third of the mug, covering the foot and the lower section of the wall. This ensures the raw speckled clay remains visible after firing. -
Apply Glaze:
Is pour a creamy white matte glaze into the inside of the mug, pour it out, and then dip the outside down to the wax line. The wax will repel the glaze. -
Wipe the Decoration:
While the glaze is powdery but not fired, I like to gently rub the carved leaf area. If the glaze is too thick, it might obscure the carving; wiping it slightly allows the texture to pop. -
Clean the Foot:
Use a damp sponge to wipe any stray droplets of glaze off the waxed bottom section and the very bottom of the foot ring so it doesn’t stick to the kiln shelf. -
Final Fire:
Glaze fire the mug to the temperature recommended for your stoneware clay (typically Cone 5 or 6). Let the kiln cool completely before unloading.
Your finished mug is ready to bring a touch of earthy elegance to your morning routine
Medallion Accent Slab Mug With a Framed Front Detail

This charming farmhouse-style mug features a speckled clay body accented by clean blue banding and a central medallion relief. The framing detail around the medallion gives it a classic, stamped-seal appearance that elevates a simple cylinder form.
Step-by-Step Tutorial
Materials
- Speckled stoneware clay (mid-fire)
- Rolling pin and guide strips (approx. 1/4 inch thick)
- Canvas or slab mat
- Fettling knife or needle tool
- Pottery rib (smooth, firm)
- Scoring tool or serrated rib
- Slip (clay slurry)
- A small oval cutter (or cardboard template)
- A slightly larger oval cutter (for the frame)
- Detail carving tool or small stamps
- Cobalt oxide wash or blue underglaze
- Clear or transparent matte glaze
- Sponge
- Paintbrush (small liner brush)
Step 1: Forming the Cylinder
-
Roll the Slab:
Begin by wedging your speckled stoneware clay thoroughly to remove air bubbles. Roll it out into a large, even slab using your guide strips to maintain a consistent thickness of about 1/4 inch. -
Cut the Templates:
Using a ruler or template, cut a long rectangle for the wall of the mug (typically 10-12 inches long and 4-5 inches high) and a circle for the base. -
Texture and Compress:
Before assembling, run a smooth rib over both sides of the slab to compress the clay particles, which helps prevent future cracking. This is also the time to ensure the surface is speckle-ready and smooth. -
Bevel the Edges:
Use your fettling knife to cut 45-degree bevels on the short ends of your rectangle slab. Bevel them in opposite directions so they will overlap seamlessly when rolled into a cylinder. -
Assemble the Body:
Score the beveled edges and the perimeter of the circular base. Apply slip, then wrap the rectangle slab around the base, joining the side seam first. Press the join firmly together. -
Attach the Base:
Flip the cylinder onto the scored base. Use a modeling tool handle or your finger to smooth the interior bottom seam. Use a rib on the outside to blend the clay so the seam disappears.
Step 2: Creating the Medallion Accent
-
Prepare the Medallion:
Roll a small, separate piece of clay (slightly thinner than the mug wall). Use your larger oval cutter to create the background shape for the accent. -
Add the Frame:
Cut a smaller oval from the center of another piece of slab to create a thin ‘frame’ or ring, or simply press a smaller oval cutter gently into your existing oval to define a border. The goal is to have a raised rim or a defined separation. -
Attach to Mug:
Score and slip the back of your oval medallion and the chosen spot on the mug front. Press the medallion gently onto the curve of the mug, ensuring no air is trapped behind it. -
Stamp Details:
Using a very small stamp or the tip of a detailing tool, impress a repeating pattern—like tiny squares or dots—into the border area of the medallion. This texture will catch the glaze later. -
Create the Handle:
Pull a strap handle or cut a strip from your remaining slab. Smooth the edges so they are rounded and comfortable to hold. Bend it into an ear shape and allow it to stiffen slightly. -
Attach Handle:
Score and slip the attachment points on both the mug and the handle. Press firmly to join, then smooth the connections with a damp sponge or modeling tool.
Clean Lines Pro-Tip
To get crisp blue bands on the rim and foot without shaky hands, place the mug on a banding wheel. Hold your brush steady in one spot and spin the wheel rather than moving your hand.
Step 3: Glazing and Finishing
-
Bisque Fire:
Allow the mug to dry slowly under plastic to even out moisture, then bisque fire it to the temperature appropriate for your clay body. -
Apply Wax Resist:
If you want the raw speckled clay to show through perfectly, apply wax resist to the main body of the mug, leaving only the medallion, rim, and foot exposed for coloring. -
Paint Blue Details:
Using a liner brush, apply cobalt oxide wash or blue underglaze. Paint a clean line around the top rim, the bottom foot, and fill in the center of the medallion and its textured border. -
Wipe Back:
Use a damp sponge to gently wipe across the textured border of the medallion. This removes the blue from the high points but leaves it in the stamped recesses, highlighting the pattern. -
Di-electric Glazing:
Dip the entire mug into a clear or transparent matte glaze. The glaze will seal the bare clay and make the cobalt decoration pop without obscuring the clay’s natural speckles. -
Final Fire:
Glaze fire the piece according to your clay’s instructions to achieve the final, vitrified finish.
Level Up: Custom Shield
Make the center medallion customizable! Instead of a plain blue oval, carve an initial, a tiny landscape, or a flower inside the frame before firing for a personalized gift.
Enjoy your morning coffee with a touch of farmhouse elegance using your new handmade mug
Faceted Slab Mug Made From Angled Panels
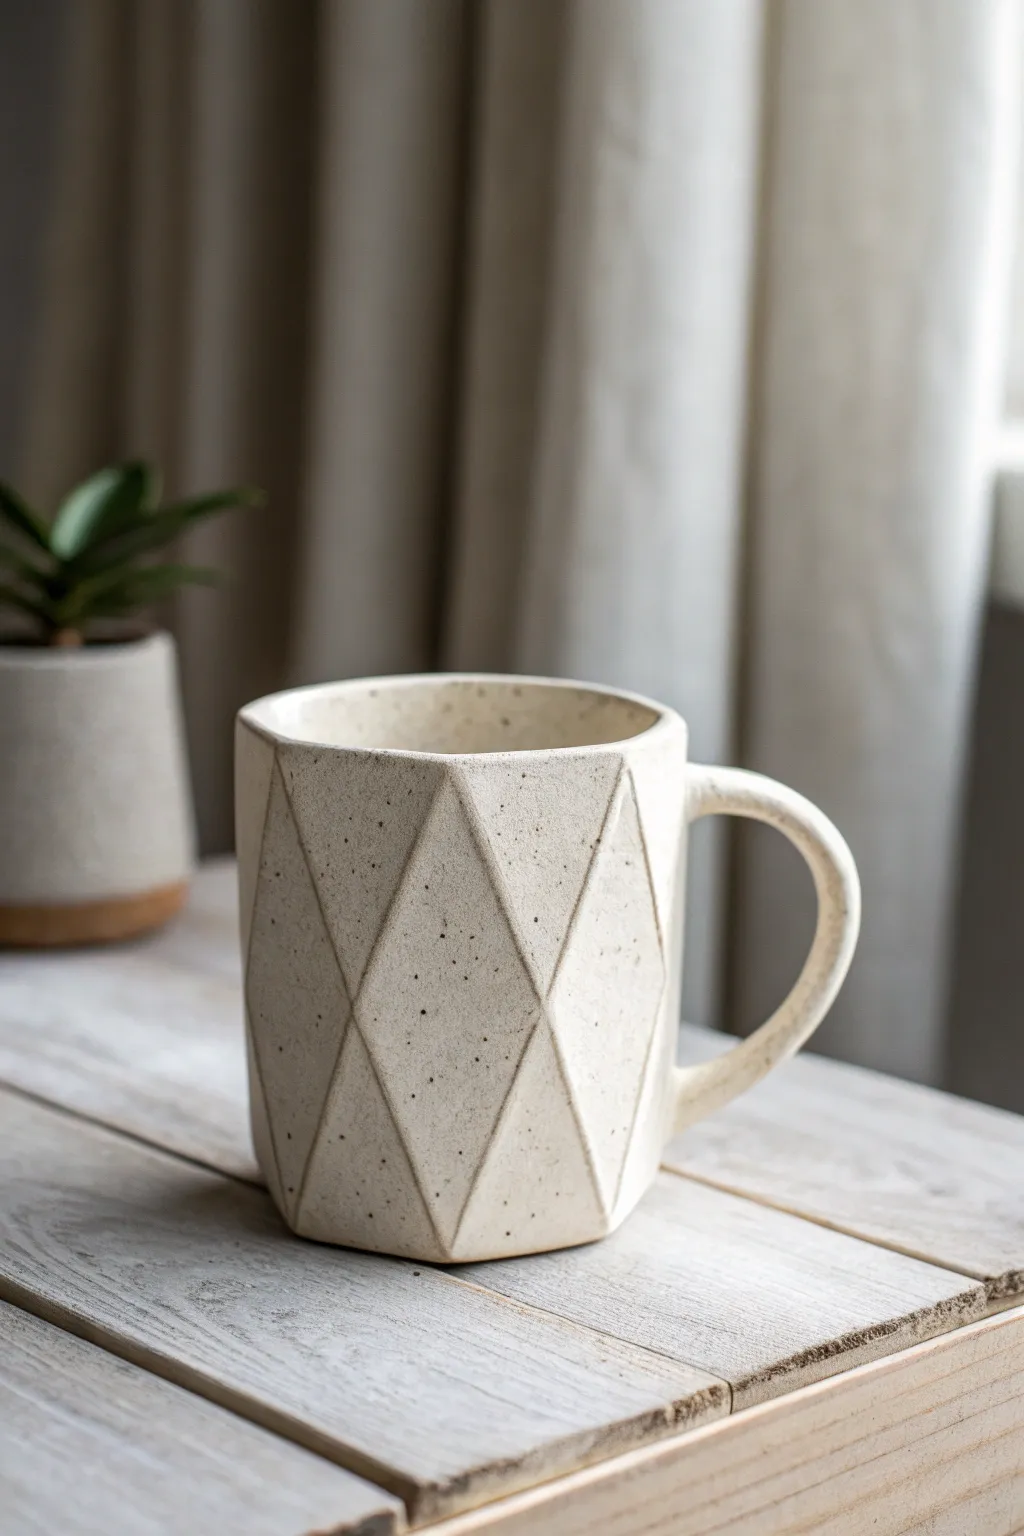
This chic ceramic mug features a geometric, diamond-patterned relief that feels wonderful in the hand and catches the light beautifully. The natural speckled clay body combined with a soft matte glaze gives it a sophisticated, minimalist aesthetic suitable for any modern kitchen.
Step-by-Step Guide
Materials
- Speckled stoneware clay (mid-fire)
- Rolling pin
- Thickness strips or slab roller (approx. 1/4 inch)
- Fettling knife or X-Acto knife
- Paper template (rectangle for body, circle for base)
- Ruler
- Scoring tool (serrated rib or needle tool)
- Slip (clay and water mixture)
- Modeling tool or wooden rib
- Sponge
- Matte white or cream glaze
- Kiln
Step 1: Preparing the Slabs
-
Roll out the clay:
Begin by rolling out your speckled stoneware clay into a smooth, even slab. Aim for a thickness of about 1/4 inch (approx. 6mm). Use thickness strips on either side of your rolling pin to ensure the slab is perfectly uniform, which is crucial for geometric work. -
Compress the slab:
Use a rubber or metal rib to compress the clay on both sides. This aligns the clay particles to prevent warping later and creates a smooth canvas for your geometric design. -
Cut the main body:
Place your rectangular paper template onto the slab. This rectangle determines the height and circumference of your mug. Cut around the template using a fettling knife, keeping the edges crisp and vertical. -
Create the base:
Cut a circle for the base of the mug from the remaining slab. The size should match the intended diameter of your cylinder once rolled.
Clean Grooves
After forming the cylinder, run your tool through the diamond grooves one last time. Bending the slab can soften the lines, and re-defining them ensures they pop after glazing.
Step 2: Creating the Facets
-
Mark the grid:
Before assembling the cylinder, lay your rectangular slab flat. Lightly score a grid pattern or guide lines where the points of your diamonds will meet. You aren’t cutting through; just making faint reference marks. -
Score the diamond pattern:
Using a ruler and a dull modeling tool (or the back of a knife), press distinct diagonal lines into the slab to create the diamond motif. Press firmly enough to create deep grooves that simulate separate panels, but be careful not to slice all the way through the clay. -
Bevel the edges:
Cut a 45-degree bevel on the two short ends of your rectangular slab. Bevel one side facing up and the opposite end facing down, so they will overlap seamlessly when rolled into a cylinder.
Step 3: Assembly
-
Form the cylinder:
Carefully lift the slab and curve it into a cylinder shape. Score and slip the beveled edges thoroughly, then press them together firmly to create the wall of the mug. -
Smooth the seam:
Reinforce the vertical seam on the inside with a wooden tool. On the outside, blend the seam into the geometric pattern. I usually try to hide the join within one of the diagonal groove lines for a cleaner look. -
Attach the base:
Score and slip the bottom edge of the cylinder and the outer edge of your circular base. Press the cylinder onto the base. Use a modeling tool to blend the clay from the base up into the wall, ensuring a watertight seal. -
Refine the shape:
Use a straight edge or paddle to gently tap the flat planes of the diamonds. This enhances the faceted look, making the ‘panels’ appear flatter and the ridges sharper.
Angled Rim
Instead of a flat rim, cut the top edge of the slab to follow the zigzag pattern of the top diamonds before rolling. This creates a striking, crown-like geometric rim.
Step 4: Handle and Finish
-
Pull the handle:
Pull a strap of clay for the handle, keeping it simple and slightly rounded to contrast with the angular body. Let it stiffen slightly into a curve on your worktable until it holds its shape. -
Attach the handle:
Score and slip the attachment points on the mug and the handle ends.Press the handle firmly onto the mug body, blending the clay at the joints for strength. Check that the handle is perfectly vertical. -
Smooth rim and edges:
Run a damp sponge or piece of chamois leather around the rim of the mug to make it soft and comfortable for drinking. Check the bottom edge to ensure it won’t scratch a table. -
Bisque fire:
Allow the mug to dry slowly to prevent uneven shrinkage. Once bone dry, fire the piece to bisque temperature (usually Cone 04). -
Glazing:
Dip or brush your mug with a matte cream or white glaze. A matte finish is essential here, as glossy glazes often reflect too much light and obscure the subtle geometric relief lines. -
Final firing:
Fire the mug to the final temperature required by your clay and glaze (typically Cone 5 or 6 for stoneware). The heat will bond the glaze and bring out the natural speckles in the clay.
Once cooled, your geometric mug is ready to add a touch of modern elegance to your morning coffee routine
Half-Dipped Glaze Slab Mug That Shows Off the Slab Texture
This project emphasizes the natural beauty of the clay body itself by leaving the bottom third unglazed, creating a striking contrast with a creamy, speckled glaze. The clean cylindrical form highlights the simple slab-building technique while the two-tone finish adds a modern, rustic aesthetic.
Detailed Instructions
Materials
- Speckled buff stoneware clay (or similar cone 6 clay)
- Rolling pin and guide sticks (1/4 inch thick)
- Ruler and fettling knife
- Mug template (approximately 4×10 inches rectangle)
- Serrated rib and scoring tool
- Slip (clay mixed with water)
- Sponge and bucket of water
- Wooden modeling tool
- Creamy white speckled glaze
- Wax resist (optional)
Step 1: Forming the Cylinder
-
Roll the Slab:
Begin by rolling out your clay on a canvas board. Use your wooden guide sticks to ensure an even 1/4-inch thickness throughout the entire slab. -
Cut the Body:
Place your rectangular template onto the slab. Using the fettling knife, cut a clean rectangle for the body of the mug. Save the excess clay for the base and handle. -
Bevel the Edges:
To create a seamless join, cut the short ends of your rectangle at a 45-degree angle. Ensure the angles are cut in opposite directions so they will overlap perfectly when formed into a cylinder. -
Roll and Attach:
Carefully stand the rectangle up and curve it into a cylinder. Score and slip the beveled edges generously, then press them firmly together. -
Smooth the Seam:
Support the wall from the inside with one hand while using a wooden tool or rib on the outside to compress and smooth the seam until it disappears.
Clean Lines
Use electrical tape to mark your dip line before glazing. Dip just past the tape, let dry slightly, then peel it off for a perfect crisp edge without wax.
Step 2: Adding the Base and Handle
-
Cut the Base:
Place your cylinder onto the remaining slab of clay. Trace lightly around the bottom, remove the cylinder, and cut out the circle slightly larger than your trace line. -
Attach the Bottom:
Score and slip both the bottom edge of the cylinder and the outer edge of the circular base. Press the cylinder onto the base. -
Clean Up the Join:
Using a wooden tool, smooth the excess clay from the base up onto the wall of the mug to seal it. Check the interior seam as well, using a long brush or tool to smooth the inside corner. -
Create the Handle Strip:
Cut a strip of clay for the handle, approximately 3/4 inch wide. Gently pull or smooth the edges with a wet sponge to round them off so they are comfortable to hold. -
Form the Curve:
Shape the strip into a ‘C’ or ear shape. Hold it up to the cylinder to check proportions; trim the ends if the handle feels too large. -
Attach Handle:
Score and slip the attachment points on both the mug and the handle ends. Press firmly to attach, ensuring the top attachment is near the rim and the bottom aligns comfortably below. -
Slow Drying:
Cover the mug loosely with plastic to let it dry slowly to the leather-hard stage, then uncover to let it reach bone dry. Bisque fire the piece according to your clay’s specifications.
Step 3: Glazing
-
Prep for Glazing:
Wipe the bisqued mug with a damp sponge to remove any kiln dust. If you prefer a razor-sharp glaze line, apply wax resist to the bottom third of the mug and the corresponding lower section of the handle. -
Interior Glaze:
Pour your creamy speckled glaze inside the mug, roll it around to coat the entire interior, and pour out the excess. Wipe the rim immediately with a sponge. -
The Dip:
Hold the mug by the foot or base. Invert it seamlessly into the glaze bucket, submerging it until the glaze level hits your desired line (about two-thirds down). I find a quick, confident dip prevents drip marks. -
Clean the Handle:
If you didn’t use wax resist, check the handle. The glaze usually naturally coats the top curve, but you may need to wipe glaze off the lower attachment point to match the body’s design. -
Final Cleanup:
Use a damp sponge to clean any stray droplets from the unglazed clay section perfectly. The contrast relies on this clay being completely bare. -
Final Fire:
Glaze fire the mug to the temperature recommended for your specific clay and glaze combination (usually Cone 6 for this look).
Stamp Accent
Before the clay dries, press a small, personalized stamp or maker’s mark into the unglazed lower section for a professional, branded finish.
Enjoy your morning coffee with the satisfaction of holding a piece of art you built from scratch
Carved Grid Slab Mug With Clean, Graphic Lines
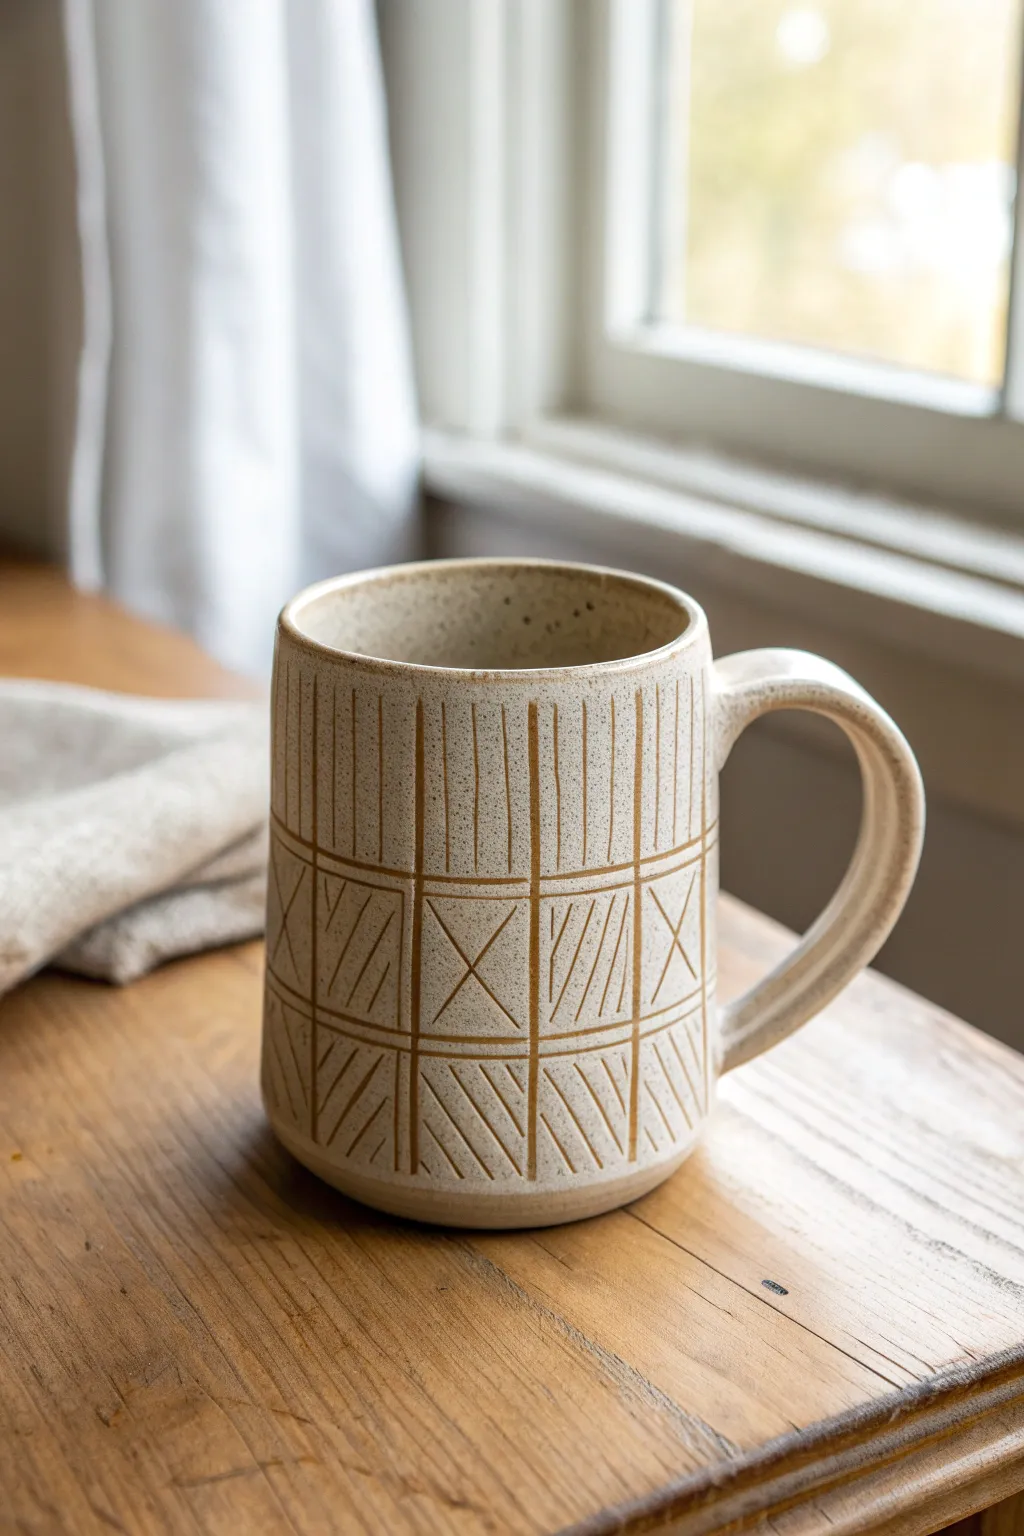
Achieve a modern, tactile aesthetic with this hand-built slab mug featuring crisp, carved geometric patterns. The contrast between the speckled glaze and the raw clay lines gives this piece a wonderful earthy warmth perfect for your morning coffee.
How-To Guide
Materials
- Stoneware clay (speckled or buff)
- Rolling pin
- Canvas or slab mat
- Paper template (rectangle approx. 12×5 inches, circle for base)
- Fettling knife or needle tool
- Serrated rib or scoring tool
- Slip (clay mixed with water)
- Wooden sculpting tool or bevel tool
- Carving tool (small loop or sgraffito tool)
- Soft sponge
- Ruler
- White or Oatmeal matte glaze
Step 1: Forming the Slab Body
-
Roll the slab:
Begin by rolling out a consistent slab of stoneware clay on your canvas to about 1/4 inch thickness. Compress the clay on both sides with a rib to align the particles and prevent warping later. -
Cut the shapes:
Place your paper templates onto the slab. You will need one large rectangle for the body and a circle for the base. Cut around them precisely using a fettling knife. -
Bevel the edges:
On the short sides of your rectangular slab, cut 45-degree bevels in opposite directions. This allows the seam to overlap seamlessly without creating a thick lump. -
Wait for leather hard:
Let the slab stiffen slightly until it can stand up on its own but is still flexible (soft leather hard). This makes construction much easier. -
Form the cylinder:
Score the beveled edges and apply slip generously. Bend the slab into a cylinder, pressing the beveled ends together firmly to create a bond. -
Attach the base:
Score and slip the bottom edge of the cylinder and the outer edge of your circular base. Press the cylinder onto the base, smoothing the clay connection with a wooden tool.
Step 2: Adding the Handle
-
Pull or roll a handle:
Create a strap for the handle by pulling a carrot-shaped piece of clay with wet hands or rolling a strip from the remaining slab to match the mug’s thickness. -
Shape the ear:
Curve the clay strip into a large ‘ear’ shape, ensuring it has a generous loop for comfortable gripping. I usually hold it up to the cylinder to check proportions before cutting. -
Attach the handle:
Score and slip the attachment points on both the mug body and the handle ends. Press firmly to attach, blending the clay significantly to ensure it won’t crack during drying.
Uneven Carving Lines?
If your tool drags or creates jagged edges, your clay is likely too dry. Mist it lightly and wrap it in plastic for an hour to rehydrate the surface before trying again.
Step 3: Carving the Design
-
Plan the grid:
Once the mug is truly leather hard (stiff enough not to deform when pressed), lightly sketch a grid pattern around the exterior using a ruler and a needle tool. Create three horizontal bands and divide them vertically. -
Carve the main lines:
Using a small loop tool or a sharp carving tool, carve out the main grid lines first. Use the ruler as a guide to keep your lines graphically straight and clean. -
Fill the top row:
In the top row of squares, carve vertical pinstripes. Keep the spacing tight and consistent for that textile-like appearance. -
Carve the middle row:
For the middle band, alternate your patterns. Create ‘X’ shapes in some squares and diagonal hatching in others to create visual rhythm. -
Finish the bottom row:
Mirror the patterns from the middle or top row in the bottom section. The example uses angled hatching and vertical lines to ground the design. -
Clean the burrs:
After carving, small crumbs of clay (burrs) will remain. Let the mug dry a bit more, then gently rub the surface with a soft scour pad or your finger to knock them off without smoothing down your crisp lines.
Wax Resist Trick
Can’t get a steady hand with wax? Use an inlay technique instead: glaze the whole pot, let it dry, then gently carve through the dry powdery glaze to reveal the lines.
Step 4: Glazing and Finishing
-
Bisque fire:
Slowly dry the mug completely before loading it into the kiln for a bisque firing (usually Cone 04 or 06). -
Apply wax resist:
Crucial step: Paint liquid wax resist carefully into all the carved lines. This prevents glaze from filling them, ensuring the raw clay shows through in the final piece. -
Dip into glaze:
Dip the entire mug into a matte white or oatmeal glaze. The wax will repel the glaze from the lines. -
Wipe away excess:
Use a damp sponge to wipe any beads of glaze off the waxed lines to ensure they are perfectly clean clay. -
Glaze fire:
Fire the mug to maturity (Cone 5 or 6 depending on your clay body). The heat will burn off the wax, leaving deeply recessed raw clay lines against the smooth glaze.
Enjoy the satisfying texture and unique geometry of your new handmade mug every morning
Coil-Handle Slab Mug for a Chunky, Cozy Grip
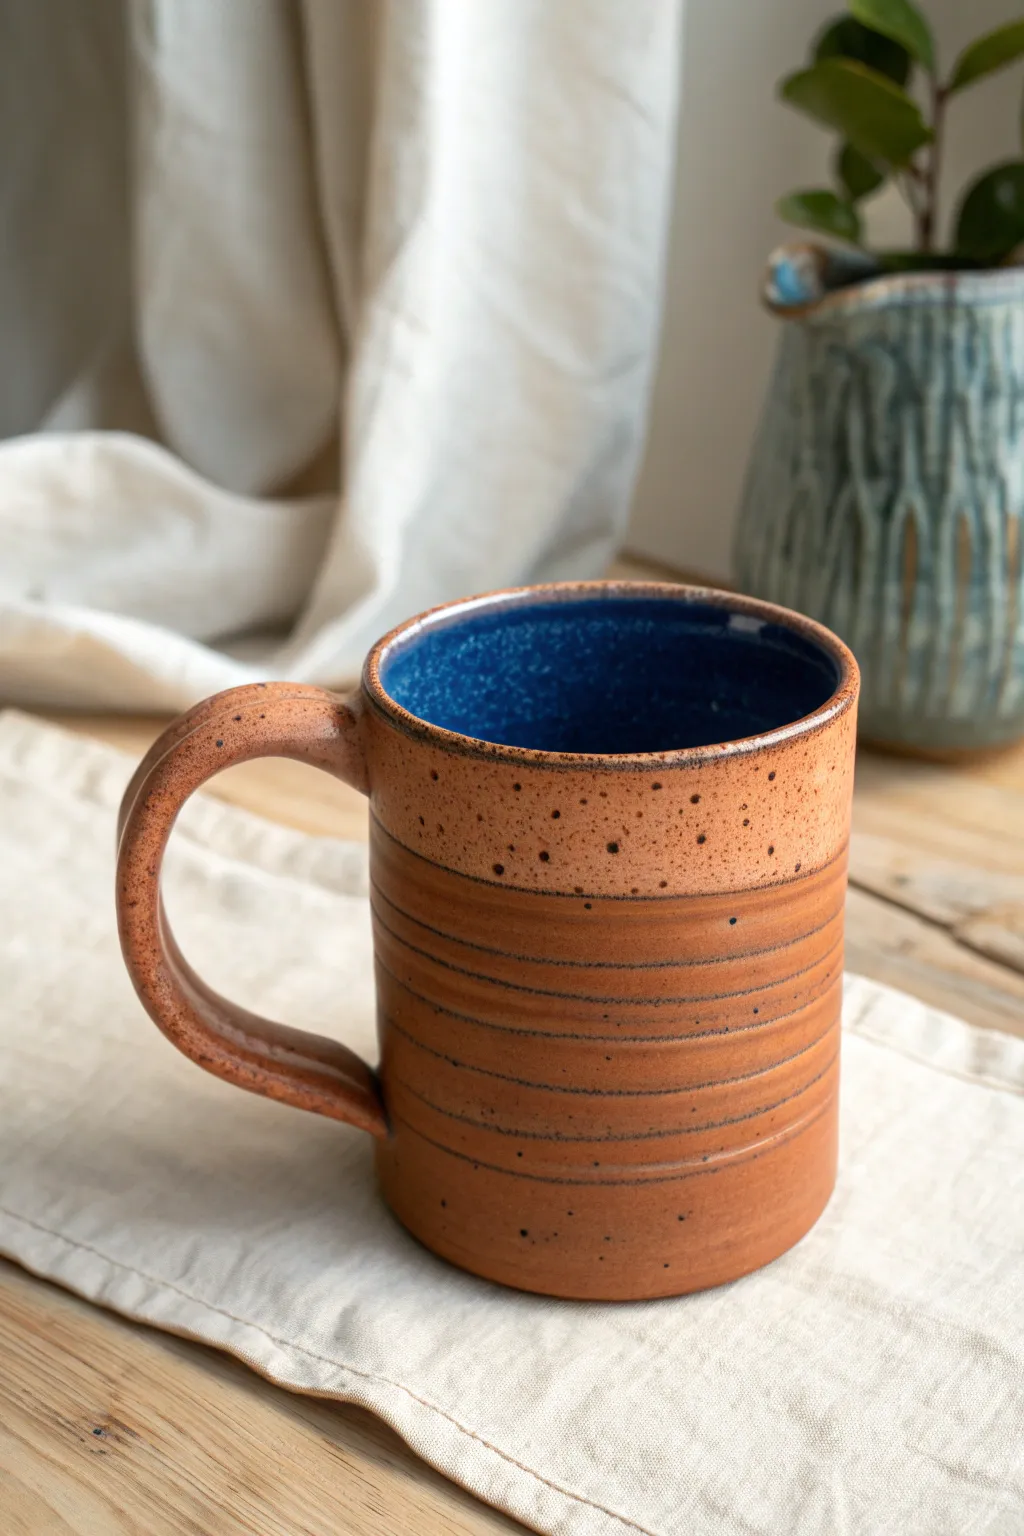
This project combines the clean lines of slab construction with rustic, hand-carved textures for a mug that feels grounded and substantial. The deep blue interior glaze creates a stunning contrast against the warm, speckled clay body, making it a perfect vessel for your morning coffee.
Step-by-Step
Materials
- Speckled stoneware clay (mid-fire)
- Deep indigo blue glaze (cone 5/6)
- Clear matte or transparent glaze (optional)
- Rolling pin and guide sticks (1/4 inch)
- Slab roller (optional)
- Fettling knife
- Serrated rib or scoring tool
- Slip
- Cylindrical form or bisque mold (for shaping)
- Loop tool or carving tool (for lines)
- Sponge
- Wooden modeling tool
Step 1: Creating the Cylinder
-
Roll the slab:
Begin by rolling out your speckled stoneware clay into a consistent slab. Use guide sticks to ensure an even thickness of about 1/4 inch, which provides a sturdy wall without being too heavy. -
Cut the rectangle:
Measure and cut a rectangle approximately 11 to 12 inches long and 4.5 inches high. These dimensions will shrink during firing, but this serves as a good starting size for a standard mug. -
Bevel the edges:
Cut 45-degree angles on the short vertical ends of your clay rectangle. Bevel one side facing up and the opposite side facing down so they will overlap seamlessly when rolled into a cylinder. -
Form the body:
Wrap the slab around your cylindrical form or simply guide it into a circle by hand. Score the beveled edges aggressively and apply slip. -
Join the seam:
Press the scored edges together firmly. Use a wooden modeling tool to blend the clay across the seam on both the inside and outside, ensuring the join is invisible and strong. -
Attach the base:
Roll a small separate piece of slab for the floor. Place your cylinder on top, trace around it, and cut out the circle. Score and slip both the bottom of the cylinder walls and the edge of the base, then compress them together firmly.
Step 2: Adding Texture and Handle
-
Smooth the lip:
Run a damp chamois or sponge over the rim of the mug to round it off. A smooth drinking edge is crucial for comfort. -
Carve the lines:
Using a loop tool or a specialized carving tool, crave horizontal parallel lines around the lower two-thirds of the mug. I like to do this while the clay is leather hard so it carves cleanly without dragging. -
Leave the rim plain:
Stop your carving about an inch and a half from the top rim. This negative space highlights the natural speckling of the clay. -
Pull the handle:
Traditionally pull a thick strap handle or roll a coil and flatten it slightly. This mug features a sturdy C-shape, so aim for a handle that feels substantial in the hand. -
Attach the handle:
Score and slip the attachment points on the mug body and the handle ends. Press the handle firmly onto the mug, blending the clay at the joints for a seamless transition. -
Dry slowly:
Cover the mug loosely with plastic to let it dry slowly. This prevents the handle from pulling away from the body as the clay shrinks.
Straight Line Secret
For perfectly parallel horizontal lines, place your mug on a banding wheel. Hold your carving tool steady in one spot and slowly spin the wheel.
Step 3: Glazing and Firing
-
Bisque fire:
Once bone dry, fire the mug to bisque temperature (usually cone 04) to prepare it for glazing. -
Wax the exterior:
If you want to keep the raw clay look on the outside, apply wax resist to the entire exterior surface, including the handle and the carved lines. Alternatively, you can just be very careful when pouring. -
Glaze the interior:
Pour a glossy deep indigo blue glaze inside the mug. Swirl it around to coat every surface evenly and pour out the excess quickly. -
Clean the rim:
Wipe away any blue glaze that dripped onto the exterior rim with a damp sponge. The transition between the blue interior and raw exterior should be crisp. -
Glaze fire:
Fire the mug to maturity (cone 5 or 6 depending on your clay body). The heat will darken the raw clay to a warm toast color and melt the blue glaze into a glossy pool.
Warped Rim Fix
If your cylinder goes oval during handling, gently gently squeeze it back into round immediately after attaching the base, while the clay is still plastic.
Now you have a beautifully tactile mug ready for your favorite warm beverage
Strap-Handle Slab Mug With a Wide Thumb Rest

This project features a beautifully simple cylindrical mug crafted from speckled clay, highlighting the natural texture of the earth. With its comfortable strap handle and reserved glazing technique that leaves a raw clay ‘foot,’ it balances modern minimalism with rustic charm.
Step-by-Step Tutorial
Materials
- Speckled stoneware clay (mid-fire recommended)
- Rolling pin
- Canvas or slab mat
- Clay knife or fettling knife
- Ruler
- Scoring tool (serrated rib or needle tool)
- Slip (clay and water mixture)
- Wooden modeling tool
- Sponge
- Creamy white matte glaze
- Kiln
Step 1: Forming the Body
-
Roll the slab:
Begin by rolling out a prominent slab of speckled clay to an even thickness of about 1/4 inch. Using guide strips or depth rings on your rolling pin helps ensure consistency. -
Cut the rectangle:
Measure and cut a rectangular strip approximately 4 inches high and 10-12 inches long, depending on your desired mug circumference. I often use a cardboard template to keep my sizes uniform. -
Bevel the edges:
On the short ends of your rectangle, cut 45-degree bevels in opposite directions. This allows the seam to overlap cleanly without adding bulk to the wall. -
Score and slip:
Rough up the beveled edges with your scoring tool and apply a generic amount of slip. Bring the ends together to form a cylinder. -
Secure the seam:
Gently compress the seam from both the inside and outside using a wooden tool or your thumb, smoothing it until the line virtually disappears. -
Add the base:
Roll a smaller slab for the bottom. Place your cylinder on top, trace around it, and cut out the circle. Score and slip both the bottom edge of the cylinder and the base. -
Attach the bottom:
Press the cylinder firmly onto the base. Use a modeling tool to blend the clay upward from the base onto the wall to create a tight seal.
Step 2: Adding the Handle
-
Cut the strap:
Cut a strip of clay regarding 3/4 inch wide and 5 inches long. This will be your strap handle. -
Shape the curve:
Gently curve the strip into a ‘C’ shape. Let it sit for about 15-20 minutes until it stiffens slightly; this prevents it from flopping when attached. -
Prepare attachment points:
Hold the handle up to the mug to find the most comfortable placement. Mark the spots, then deeply score both the mug wall and the handle ends. -
Attach firmly:
Apply slip and press the handle ends firmly onto the mug body. Use a small coil of clay around the attachment points to reinforce the bond creates a seamless transition. -
Create the thumb rest:
At the top attachment point, press your thumb gently into the curve of the strap to flatten it slightly, creating a subtle, ergonomic rest.
Seam Splitting?
If the vertical seam cracks during drying, score it deeper next time and compress longer. You can fix minor greenware cracks with vinegar and slip.
Step 3: Finishing and Glazing
-
Bisque fire:
Allow the mug to dry slowly under plastic to prevent warping. Once bone dry, bisque fire it according to your clay body’s specifications. -
Apply wax resist:
Paint a band of wax resist heavily along the bottom 1/4 inch of the mug, including the underside. This ensures the raw speckled clay remains visible and unglazed at the foot. -
Glaze the interior:
Pour your creamy white glaze inside the mug, roll it around to coat the entire interior, and pour out the excess. -
Dip the exterior:
Using glazing tongs or your hand, dip the mug into the glaze bucket, stopping exactly where the wax line begins. Hold it for 3 seconds for even coverage. -
Clean up:
Once the glaze is dry on the surface, use a damp sponge to wipe any stray droplets off the waxed bottom area to satisfy a clean firing. -
Glaze fire:
Fire the mug to maturity (typically Cone 5 or 6). The heat will interact with the iron specks in the clay, causing them to bleed slightly through the white glaze.
Make it Cozy
Before the clay dries, press a piece of coarse linen or burlap into the outer slab to give the unglazed bottom section a tactile, woven texture.
Now you have a sturdy, comforting vessel ready for your morning coffee routine
Capped Rim Slab Mug With a Contrasting Lip Band
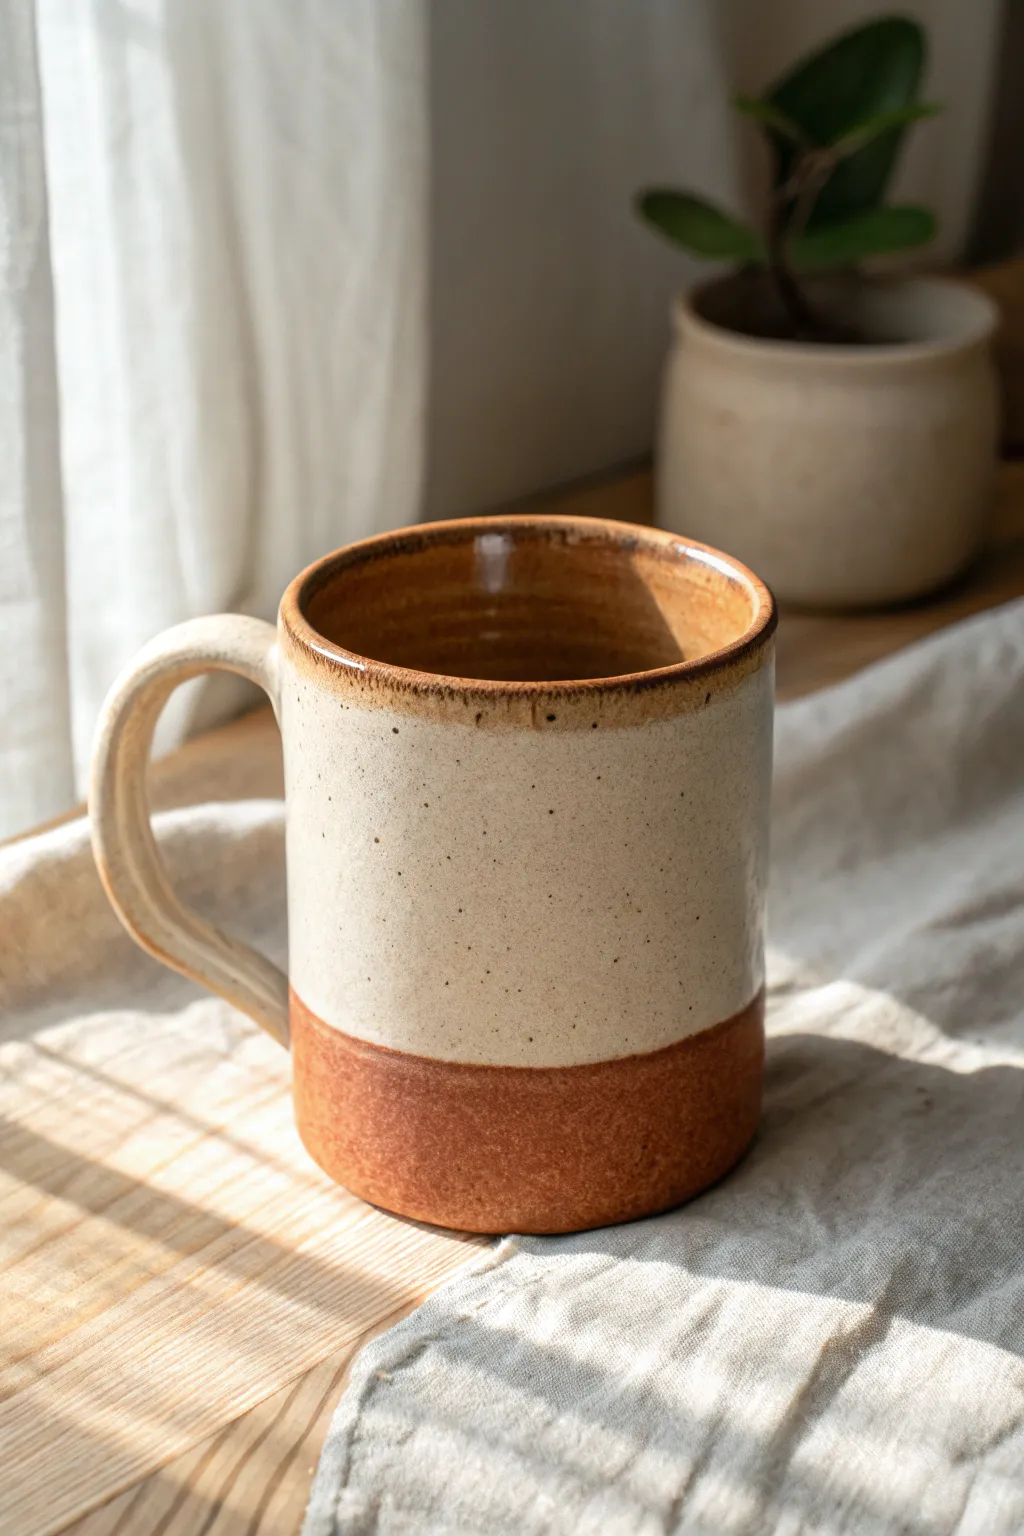
Embrace the warmth of raw clay with this sturdy slab-built mug, featuring a creamy speckled glaze that contrasts beautifully against a toasted terracotta base. The defining capped rim adds professional polish and a cozy aesthetic perfect for your morning brew.
How-To Guide
Materials
- Stoneware clay (speckled or buff)
- Rolling pin and guide sticks (approx. 1/4 inch)
- Rectangular paper template (approx. 10×4 inches)
- Circular cookie cutter (approx. 3.5 inches)
- Fettling knife
- Serrated rib or scoring tool
- Slip (clay mixed with water)
- Wooden modeling tool
- Sponge
- Cream matte glaze (speckled)
- Amber or honey celadon glaze
Step 1: Preparing the Slab Body
-
Roll the clay:
Begin by wedging your clay to remove air bubbles, then roll out a smooth slab using 1/4 inch guide sticks for consistent thickness. Take your time to compress the slab on both sides with a rib to prevent warping later. -
Cut the components:
Lay your rectangular template on the slab and cut around it with your fettling knife. Then, use your circle cutter to create the base of the mug. -
Bevel the edges:
On the short ends of your rectangular slab, cut a 45-degree angle. This bevel will create a stronger, seamless join when you form the cylinder. -
Form the cylinder:
Score the beveled edges aggressively and apply a generous amount of slip. Bring the ends together to form a cylinder, pressing the seam firmly. -
Secure the seam:
Use a wooden tool to blend the clay across the seam on both the inside and outside, then smooth over it with a damp sponge so the join becomes invisible.
Step 2: Attaching Base and Handle
-
Attach the base:
Score and slip the bottom edge of your cylinder and the outer rim of your circular base. Press the cylinder onto the base firmly. -
Seal the bottom:
Use your wooden tool to drag a little clay from the base up onto the wall to seal the connection, then smooth it out. I prefer to use a soft rubber kidney here to get a nice curve where the wall meets the floor. -
Pull a strap handle:
Create a strap for your handle by pulling a lug of clay with wet hands until it’s the desired thickness. Let it stiffen slightly on a board into a curved shape. -
Attach the handle:
Score and slip attachment points on the mug body and the handle ends. Press the handle firmly onto the mug, blending the clay where it meets the body for a strong hold.
Warping Woes?
If your cylinder creates an oval shape instead of a circle, your slab might have been too wet. Let the slab stiffen to soft leather-hard before forming.
Step 3: Creating the Capped Rim
-
Prepare a clay coil:
Roll a thin, even coil of clay, slightly thicker than the mug’s wall. -
Apply the coil:
Score the top rim of your mug. Place the coil on top, circling the entire rim. -
Blend downward:
Gently pinch the coil onto the rim and blend the clay downward on the outside only, leaving a slightly rounded, distinct lip at the very top. -
Refine the shape:
Use a damp sponge to smooth the capped rim, ensuring it feels comfortable for drinking.
Level Up: Texture
Before rolling the cylinder, press a coarse fabric or canvas into the clay surface. The glaze will break beautifully over the subtle texture.
Step 4: Glazing the Two-Tone Look
-
Bisque fire:
Once bone dry, fire the mug to bisque temperature (usually Cone 06/04). -
Wax the exterior base:
Apply wax resist to the bottom third of the mug’s exterior. This will keep the raw clay exposed, creating that earthy two-tone effect. -
Glaze the interior:
Pour the amber glaze inside the mug, swirl to coat, and pour out the excess. Wipe the rim clean. -
Glaze the exterior upper:
Dip the top two-thirds of the mug (up to your wax line) into the cream speckled glaze. The wax will repel the glaze from the bottom. -
Accent the rim:
Carefully dip just the very lip of the rim into the amber glaze to create a toasted, contrasting band, or paint it on with a brush. -
Final fire:
Fire the mug to maturity (Cone 5/6 or 10 depending on your clay body).
Enjoy your morning coffee in a mug that feels as grounded and natural as the earth it came from
Cutout Window Slab Mug With a Recessed Inset Panel
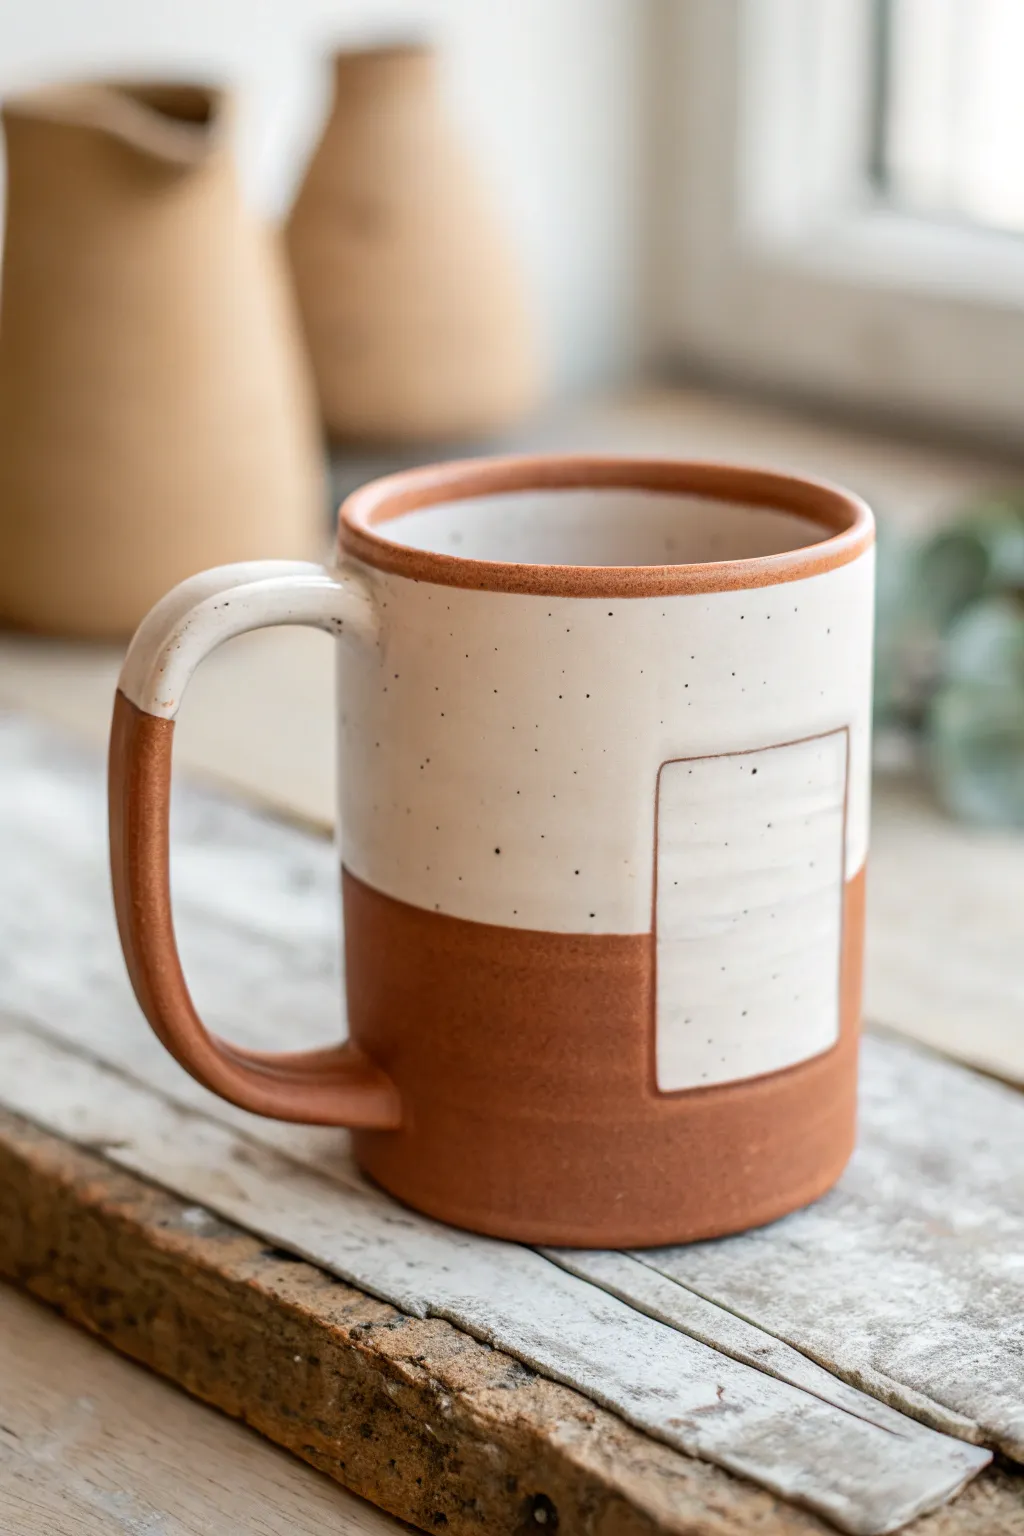
This project combines subtle texture with bold contrast, featuring a crisp rectangular inlay that adds depth to a classic cylindrical form. The look is achieved by layering two distinct clay bodies or using a masking technique with slip to create that striking white-on-terracotta finish.
Step-by-Step
Materials
- Terracotta stoneware clay (or red clay body)
- White slip or white underglaze (specifically designed for your firing range)
- Mug template (cardstock or paper)
- Rolling pin
- Canvas work surface or slab mat
- Fettling knife or X-Acto blade
- Scoring tool (serrated rib or needle tool)
- Slip for joining
- Banding wheel (optional but helpful)
- Modelling tool or wooden rib
- Sponge
Step 1: Preparing the Slab
-
Roll the main slab:
Start by wedging your terracotta clay thoroughly to remove air bubbles. Roll it out into a smooth, even slab about 1/4 inch thick. I find flipping the slab halfway through rolling helps keep the thickness consistent. -
Compress the clay:
Using a soft rib, compress the surface of the clay on both sides. This aligns the clay particles and creates a smooth canvas for the slip application later. -
Cut the body:
Place your rectangular mug template onto the slab. Cut around the template using your fettling knife to create the main body wall. Don’t discard your clay scraps just yet; you’ll need them for the handle and base. -
Cut the base:
Use a circular cookie cutter or a spare cup to cut a circular base from the remaining slab that matches the diameter of your intended cylinder.
Clean Lines
If your slip lines look messy, wait until the clay is bone dry. Then, gently scratch off the excess slip with an X-Acto knife or specialized cleanup tool for a crisp edge.
Step 2: Creating the Window Detail
-
Mark the window:
Lay your rectangular wall flat. Decide where you want your ‘window’ feature to sit. Lightly trace a rectangle onto the surface—don’t cut through, just mark the perimeter. -
Apply wax or paper resist:
To keep the red clay visible at the bottom and the rim, you can apply wax resist or simply use masking tape to block off the bottom third and the very top rim of the slab. Mask off the inside of your ‘window’ rectangle as well if you want that specific texture to remain raw, or plan to paint around it. -
Apply the white slip:
Brush distinctive coats of white slip or underglaze over the top two-thirds of the slab (avoiding your masked areas). I like to apply 2-3 coats for opaque coverage, letting it dry slightly between layers so it doesn’t streak. -
Create the recessed line:
Once the slip is leather hard, carefully peel away any tape. Use a specialized carving tool or a sharp blade to incise a deep square border around your window panel. This physical channel creates the ‘inset’ look seen in the photo. -
Refine the inset:
Smooth the edges of your incised lines with a slightly damp brush to remove sharp burrs. This definition separates the white panel from the surrounding white wall.
Texture Play
Before applying slip to the ‘window’ area, gently press a textured wood plank or fabric into that specific spot. The slip will break over the texture for added depth.
Step 3: Assembly
-
Bevel the edges:
Cut the short ends of your rectangular wall at a 45-degree angle. This ensures a strong, seamless vertical joint when rolled into a cylinder. -
Score and slip the cylinder:
Score the beveled edges heavily and apply joining slip. Carefully roll the wall into a cylinder, pressing the beveled ends together firmly. -
Attach the base:
Score and slip the bottom edge of the cylinder and the outer rim of your circular base. Press the cylinder onto the base. Use a wooden tool to blend the clay on the inside for a watertight seal. -
Smooth the seam:
On the outside, gently paddle the vertical seam so it disappears. Be careful not to smudge your white slip design; work slowly and keep your hands clean.
Step 4: Handle and Final Touches
-
Pull a strap handle:
Roll a small coil or cut a strip from your leftover slab. Pull or shape it into a comfortable C-shape handle. Ensure the handle is half white (top) and half red (bottom) if you want to mimic the photo exactingly, or simply glaze it later. -
Attach the handle:
Score and slip the attachment points on the mug body opposite your window design. Press the handle on firmly. Use a small coil to reinforce the joins if necessary, blending until seamless. -
Clean the rim:
Wipe the rim with a damp sponge to expose the red clay line, creating that nice framing effect seen in the image. -
Bisque fire:
Allow the mug to dry slowly under plastic to prevent warping. Once bone dry, bisque fire it to your clay body’s specifications (usually Cone 04). -
Glaze and final fire:
Dip the entire piece in a clear gloss glaze to seal the clay and make the colors pop. Fire again to your final glaze temperature.
Enjoy your morning coffee knowing you built this architectural beauty from scratch