If you love the look of handmade ceramics but don’t feel like wrestling a wheel, clay slab pottery is your best friend. I’m sharing my favorite slab pottery ideas that start with a flat sheet of clay and turn into pieces you’ll genuinely want to keep around the house.
Easy Slab Plates with Organic Edges
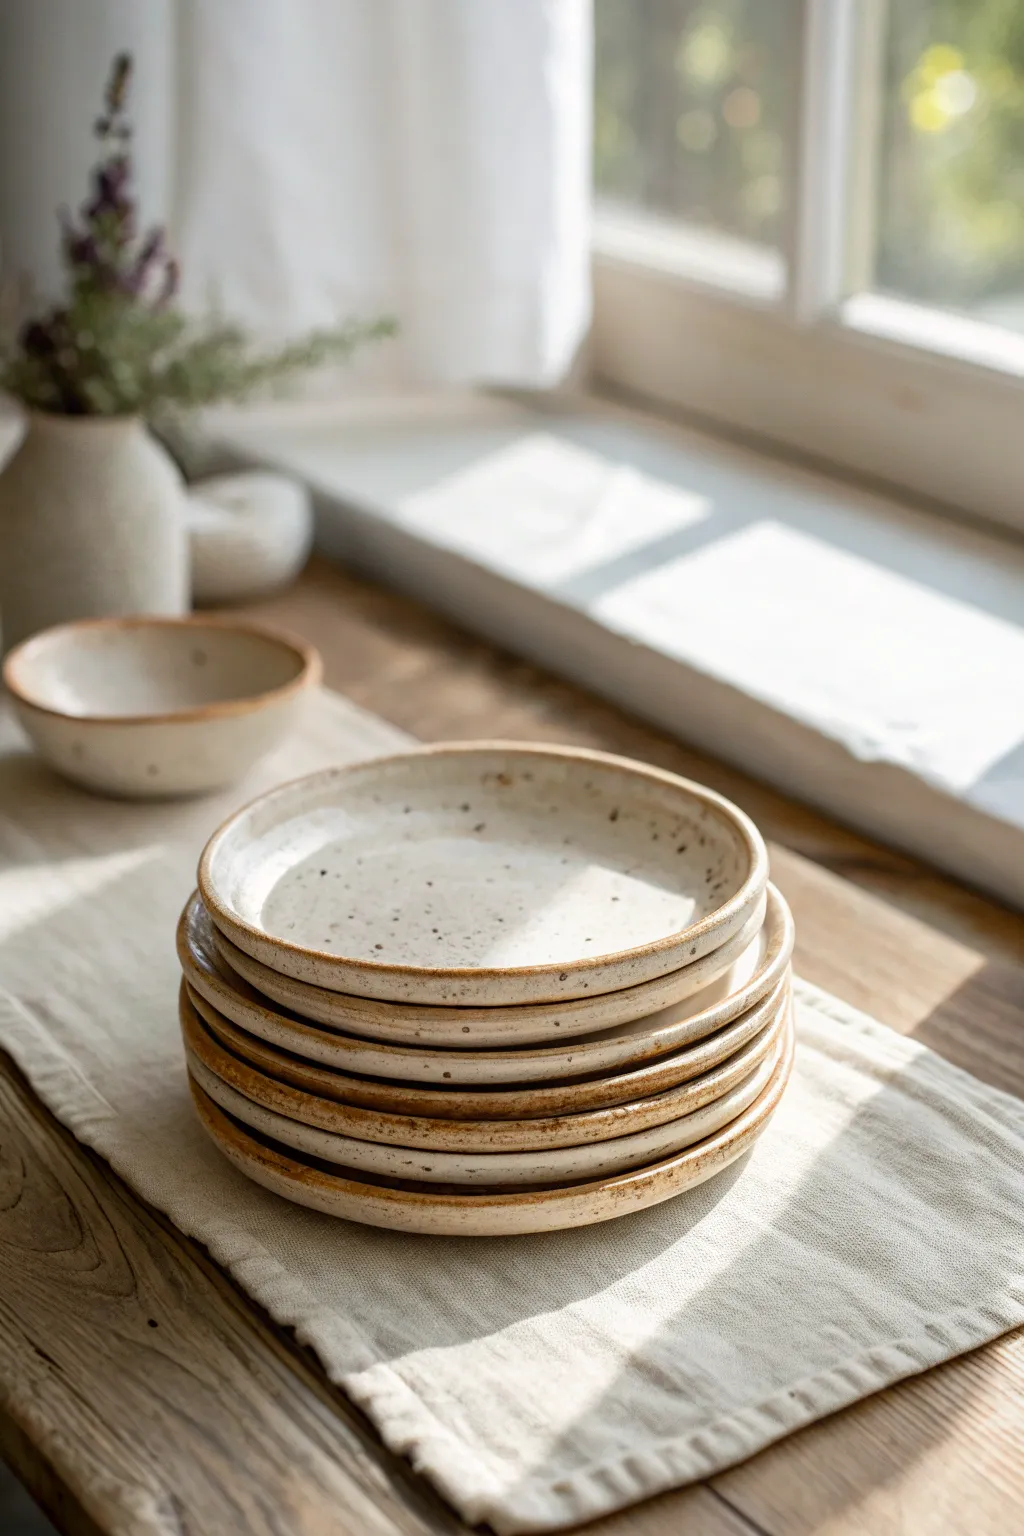
Create a stunning set of dinnerware that embodies wabi-sabi charm with these organic, slab-built plates. The speckled clay body and exposed, toasted rims give them an earthy warmth perfect for cozy meals.
Step-by-Step
Materials
- Speckled stoneware clay (e.g., Cone 5/6)
- Rolling pin
- Canvas mat or slab roller
- Two wooden thickness strips (approx. 1/4 inch)
- Round template (paper, wood, or a plastic plate)
- Needle tool or fettling knife
- GR Pottery Form (or a simple bisque mold for the curve)
- Rib tool (yellow or red)
- Sponge
- Clear or white satin glaze
- Kiln
Step 1: Prepping the Slab
-
Wedge the clay:
Begin by wedging your speckled stoneware clay thoroughly to remove air bubbles and ensure particle alignment, which reduces warping later. -
Set up your workspace:
Lay down your canvas mat to prevent sticking. Place your wooden thickness strips on either side of the clay ball to act as guides for an even slab. -
Roll out the slab:
Use your rolling pin to flatten the clay. Roll from the center outwards, flipping the slab and rotating it occasionally to compress the clay particles in all directions. -
Compress with a rib:
Once rolled to the thickness of your guide strips, take a smooth rib tool and firmly compress the surface of the slab on both sides to align the clay platelets and smooth out canvas textures.
Warping Prevention
Dry your plates slowly! Cover them loosely with plastic while they are on the molds to ensure the rim doesn’t dry faster than the center, which causes warping.
Step 2: Shaping the Plate
-
Cut the circle:
Place your round template onto the smooth slab. Using a needle tool, cut straight down around the template to create your plate’s circular base. -
Soften the edge:
Before shaping, run a damp sponge or your finger along the sharp cut edge to round it over slightly. This prevents chipping later. -
Form the rim:
Place your clay circle onto a shallow slump mold or a GR Pottery Form. Gently press the clay down to conform to the shape. I prefer to use a soft bouncer bag or a sponge to press evenly without leaving finger marks. -
Define the lip:
While on the form, use a damp sponge to slightly compress and lift the very edge of the plate, creating that distinct thick rim seen in the photo. This creates a frame for your food. -
Dry to leather hard:
Let the plates sit on the forms until they are leather hard. This usually takes a few hours depending on humidity. They should hold their shape but still be cool to the touch.
Step 3: Refining and Glazing
-
Clean up the foot:
Remove the plate from the form. Flip it over and use a rib to smooth the bottom. If you want a foot ring, you can trim one now, but these rustic plates often sit flat with a smoothed bottom. -
Bisque fire:
Allow the plates to dry completely (bone dry) before loading them into the kiln for a bisque fire. -
Wax the rim (optional style):
The plates in the image have a beautiful exposed clay rim. To achieve this, carefully apply wax resist to the very edge of the rim before glazing. -
Apply glaze:
Dip or brush a satin white or clear glaze onto the plate. If you didn’t wax the rim, simply use a damp sponge to wipe the glaze off the edge to reveal the speckled clay beneath. -
Glaze fire:
Check that the bottom is free of glaze, then fire the plates to the maturity temperature of your clay body (likely Cone 5 or 6). -
Sand the bottom:
Once fired and cooled, sand the unglazed bottom of the plate lightly with wet sandpaper to ensure it won’t scratch your table.
Rustic Iron Rim
For a darker rim contrast, sponge a little iron oxide wash onto the exposed clay edge before the final glaze firing to enhance the toasted look.
Stack your finished plates on a shelf and admire how the natural speckles shine through the glaze


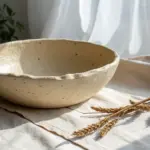
Slab Bowls Draped over Simple Molds
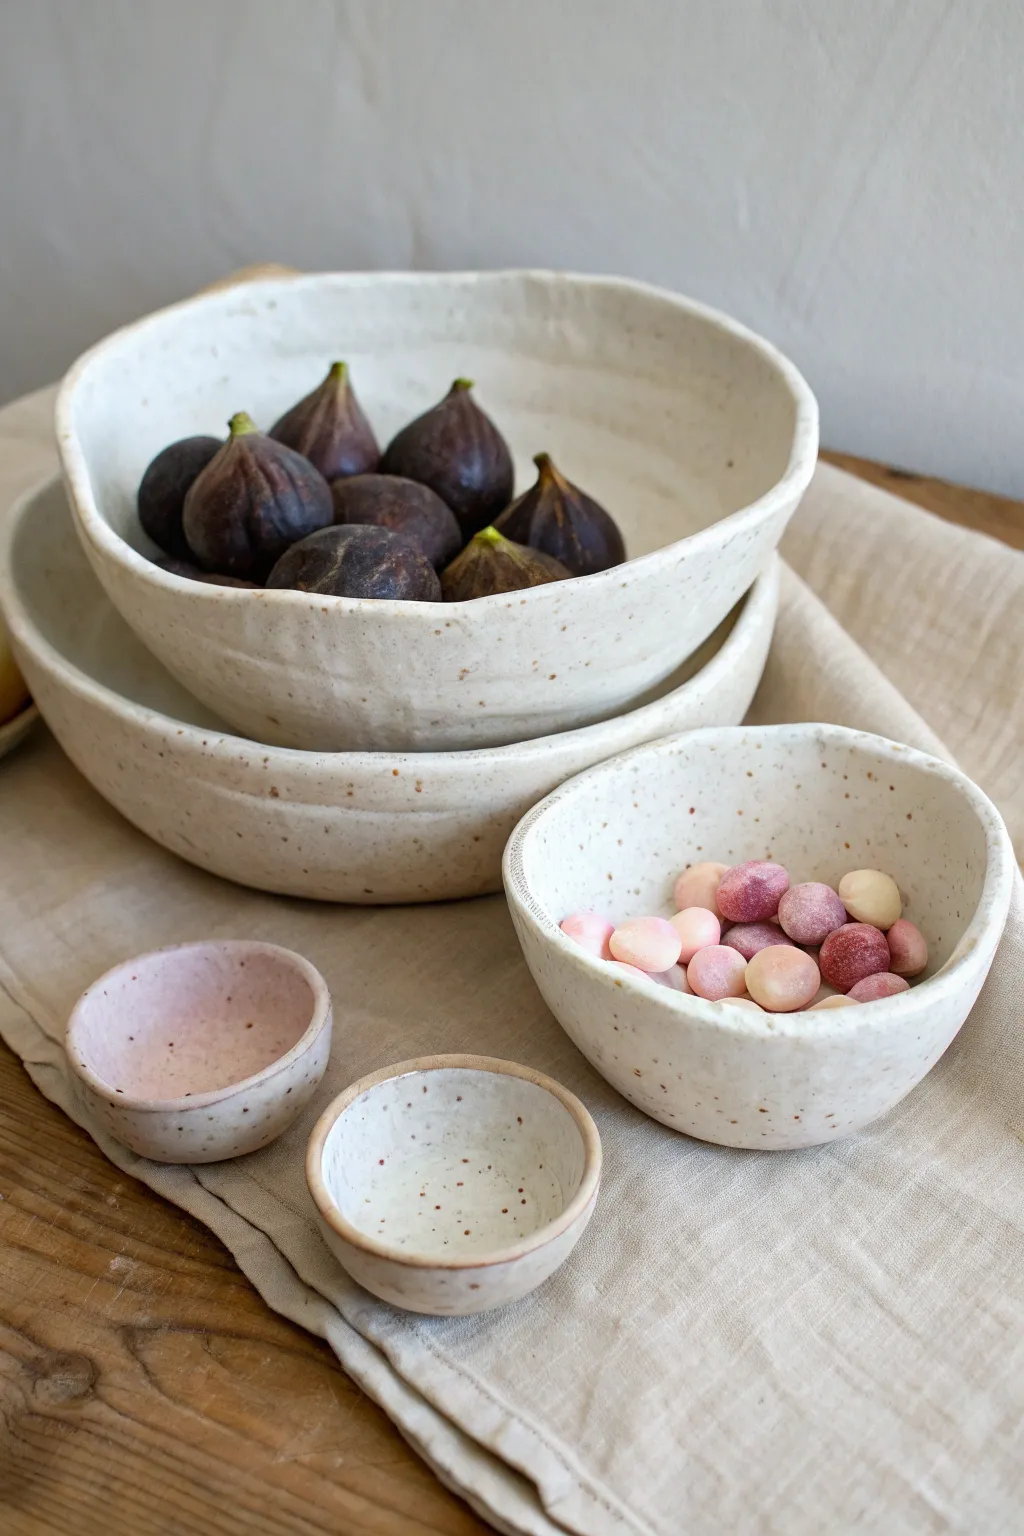
Create a charming nesting set of ceramic bowls with a perfectly imperfect, organic aesthetic. By draping clay slabs over simple molds, you’ll achieve these gentle curves and rustic rims that highlight the beauty of speckled stoneware.
Step-by-Step Tutorial
Materials
- Speckled buff stoneware clay
- Rolling pin
- Canvas or slab mat
- Wooden guide strips (1/4 inch thick)
- Various bowls to use as hump molds (plastic, blown glass, or plaster)
- Cornstarch or thin fabric (for mold release)
- Needle tool
- Rib tool (soft kidney)
- Sponge
- Surform tool (cheese grater style)
- Creamy matte white glaze
Step 1: Preparing the Slabs
-
Wedge the clay:
Begin by thoroughly wedging your speckled stoneware clay to remove air bubbles and ensure an even consistency. -
Set up your workspace:
Place your canvas or slab mat on a flat surface. Lay down your 1/4 inch wooden guide strips on either side of where you plan to roll. -
Roll the slab:
Place a ball of clay between the guides and roll it out with firm, even pressure until the rolling pin rests on the wooden strips, ensuring a uniform thickness. -
compress the slab:
Take a soft rib tool and gently compress the surface of the clay in both directions. This aligns particle structure and helps prevent cracking later, a step I find crucial for durability.
Step 2: Forming the Bowls
-
Prepare your molds:
Select a variety of bowl sizes to use as hump molds. Lightly dust the outside of your chosen molds with cornstarch or drape a thin piece of fabric over them to prevent sticking. -
Cut the shapes:
Using a needle tool, cut rough circles from your slab that are slightly larger than the diameter of your molds. -
Drape the clay:
Gently lift a clay circle and center it over the upside-down mold. Let gravity do the initial work, then softly press the clay down to fit the form. -
Shape the rim:
Instead of trimming perfectly evenly, use your fingers or a wire tool to create a slightly undulating, organic edge. This gives the bowl its handmade character. -
Smooth the exterior:
While the clay is on the mold, use a damp sponge or a soft rib to smooth out any canvas textures or fingerprints. -
Add a foot (optional):
If you want a foot ring, score and slip a small coil of clay onto the bottom center while the bowl is still on the mold, leveling it gently with a flat board. -
Stiffen:
Allow the clay to dry to a firm leather-hard stage while still on the mold. Don’t leave it too long, or the clay might crack as it shrinks against the rigid mold.
Use Gravity
Drop your slab onto the mold from a height of 2-3 inches. This naturally stretches the clay for a relaxed shape that hand-pressing can’t mimic.
Step 3: Finishing and Glazing
-
Remove and refine:
Carefully pop the bowl off the mold. Use a surform tool to clean up any sharp or heavy edges around the rim. -
Sponge smooth:
Use a barely damp sponge to soften the rim and any rough spots on the interior creating a ‘soft’ visual look. -
Bisque fire:
Once bone dry, load your bowls into the kiln for a bisque firing (usually cone 04 or 06). -
Wax the foot:
Apply wax resist to the bottom of the bowl (and the foot ring if you added one) to prevent glaze from sticking to the kiln shelf. -
Apply glaze:
Dip or pour a creamy matte white glaze over the entire piece. The key is a glaze that is slighty translucent or breaks over edges to reveal the iron speckles in the clay body. -
Clean up:
Sponge off any glaze drips on the foot or rim if required. -
Glaze fire:
Fire the pieces to maturity (likely cone 5 or 6 depending on your clay body). The heat will draw the dark speckles through the white glaze.
Texture Play
Before cutting your circles, gently roll a textured fabric (like linen or lace) into the top surface of the slab for a subtle tactile interior.
Stack your finished set on a rustic wooden table to admire how the organic rims nest together beautifully


Everyday Slab Trays for Catch-All Storage
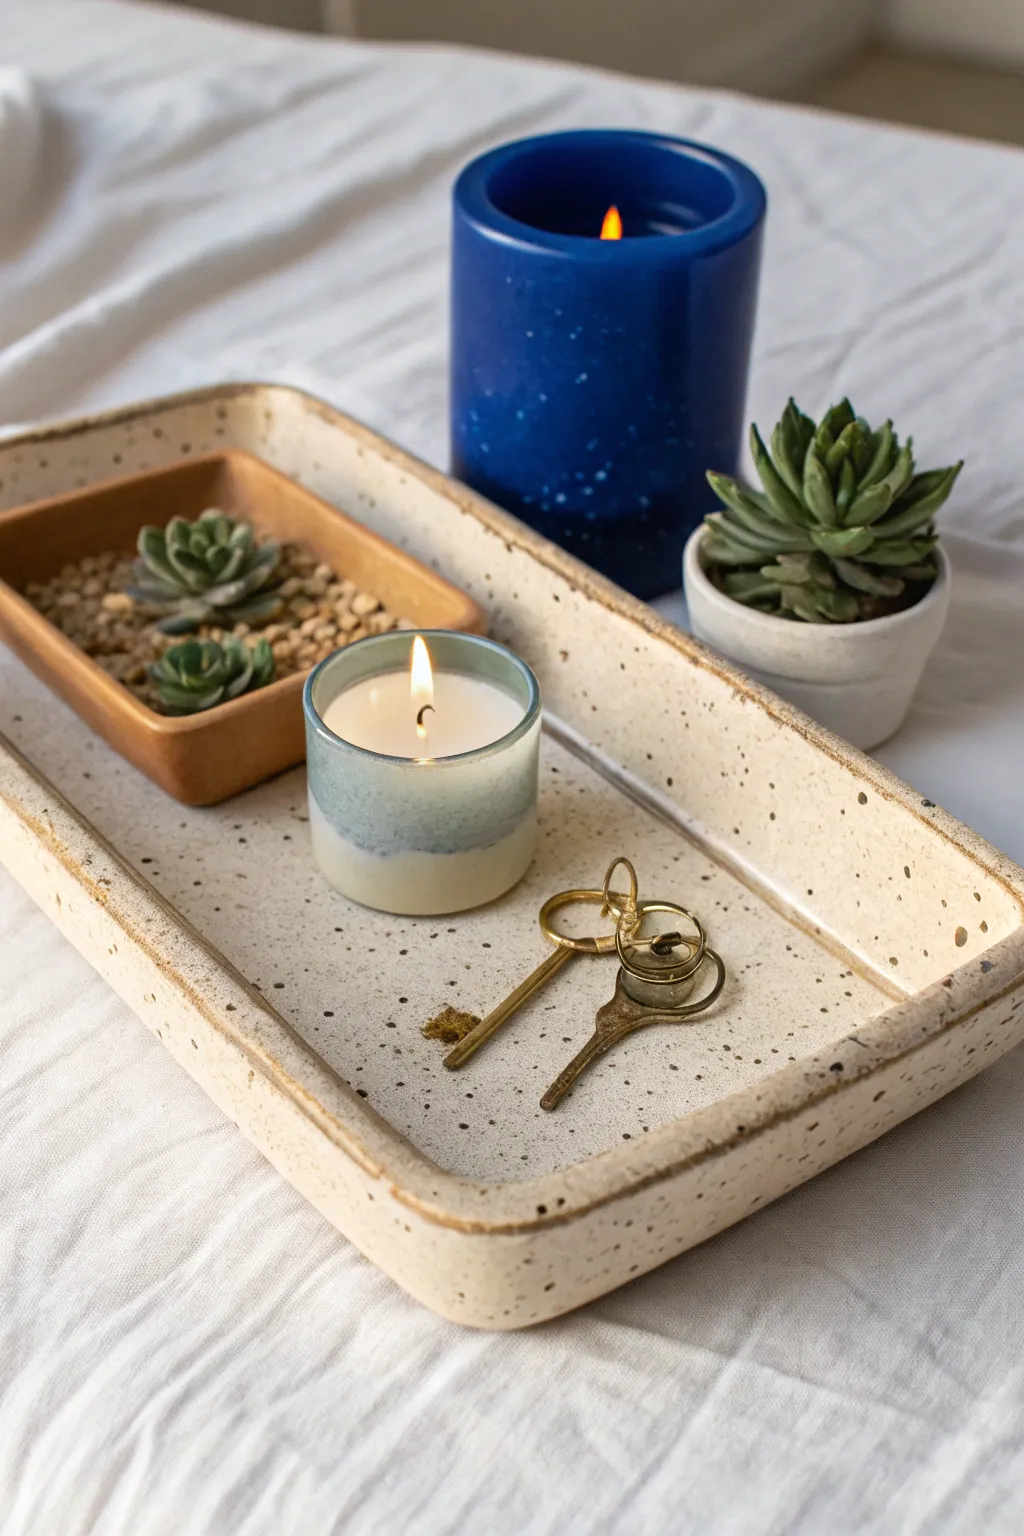
This elegant tray combines functionality with the earthy charm of slab-built pottery. Its creamy speckled glaze and soft, rounded edges create a perfect resting place for your daily essentials like keys and candles.
Detailed Instructions
Materials
- Speckled cream stoneware clay (cone 5/6)
- Clean smooth work surface or canvas cloth
- Rolling pin
- Guide sticks or slats (approx. 1/4 inch thick)
- Rectangular paper template (approx. 6×10 inches)
- Fettling knife or needle tool
- Rib tool (flexible metal or rubber)
- Sponge
- Clear or transparent gloss glaze
- Scoring tool or serrated rib
- Slip (clay mixed with water)
Step 1: Creating the Slab Base
-
Prepare the clay:
Begin by wedging your speckled stoneware clay thoroughly to remove air bubbles. Flatten it into a thick pancake shape with your palms to prepare for rolling. -
Roll the slab:
Place your guide sticks on either side of the clay. Using your rolling pin, roll the clay out until the pin rests on the sticks, ensuring an even thickness of about 1/4 inch across the entire surface. -
Smooth the texture:
Take a rubber or metal rib and gently compress the surface of the clay. This aligns the clay particles, preventing cracking later, and smooths out any canvas textures from your work surface. -
Cut the shape:
Place your rectangular paper template onto the smoothed slab. Using a fettling knife held vertically, cut around the template to create your base rectangle. -
Create the walls:
From the remaining clay slab, cut long strips that are approximately 1 inch wide. These will become the raised walls of your tray.
Step 2: Assembling the Form
-
Score the edges:
Use a serrated rib or needle tool to scratch up the outer edges of your rectangular base where the walls will sit. Do the same to the bottom edge of your wall strips. -
Apply slip:
Dab a generous amount of slip onto the scored areas of the base. This acts as the glue that bonds your pieces together. -
Attach the walls:
Press the clay strips firmly onto the base. I like to cut the strips at a 45-degree angle where they meet at the corners for a cleaner join, though butt joints work too if blended well. -
Secure the seam:
Use a wooden modeling tool or your finger to smooth the clay from the wall down onto the base on the inside, and from the base up onto the wall on the outside, completely erasing the seam. -
Shape the rim:
Once the walls are secure, gently pinch and smooth the rim to round it off. Create a slight outward flare to the walls to match the relaxed look of the tray in the photo. -
Soften the corners:
Use a damp sponge to gently round over the sharp corners of the rectangle. This gives the piece that soft, organic feel rather than a rigid, industrial look.
Clean Edges Trick
Wait until the clay is leather-hard before doing your final sponge wipe. It removes fewer clay particles and leaves a crisper, more professional finish.
Step 3: Refining and Glazing
-
Slow drying:
Place the tray on a board and cover it loosely with plastic. Allow it to dry slowly to the leather-hard stage, then uncover to let it become bone dry before bisque firing. -
Bisque fire:
Fire the bone-dry piece in a kiln to cone 04 (or your clay body’s specific bisque temperature). -
Prepare for glazing:
Wipe the bisque-fired tray with a damp sponge to remove any kiln dust. This ensures the glaze adheres properly without crawling. -
Apply the glaze:
Dip the tray or brush on a transparent or semi-transparent gloss glaze. This type of glaze is crucial as it allows the natural speckles of the clay body to show through. -
Wipe the foot:
Carefully sponge off any glaze from the very bottom of the tray so it doesn’t fuse to the kiln shelf. -
Final firing:
Glaze fire the piece to the maturity temperature of your clay, typically cone 5 or 6 for stoneware, to achieve that durable, glassy finish.
Warping Worries?
If the bottom lifts while drying, place a small sandbag or weighted bat on the center of the tray to keep it perfectly flat.
Place your finished tray on a bedside table or entryway console to beautifully organize your daily items


Slab Soap Dishes with Drainage Details
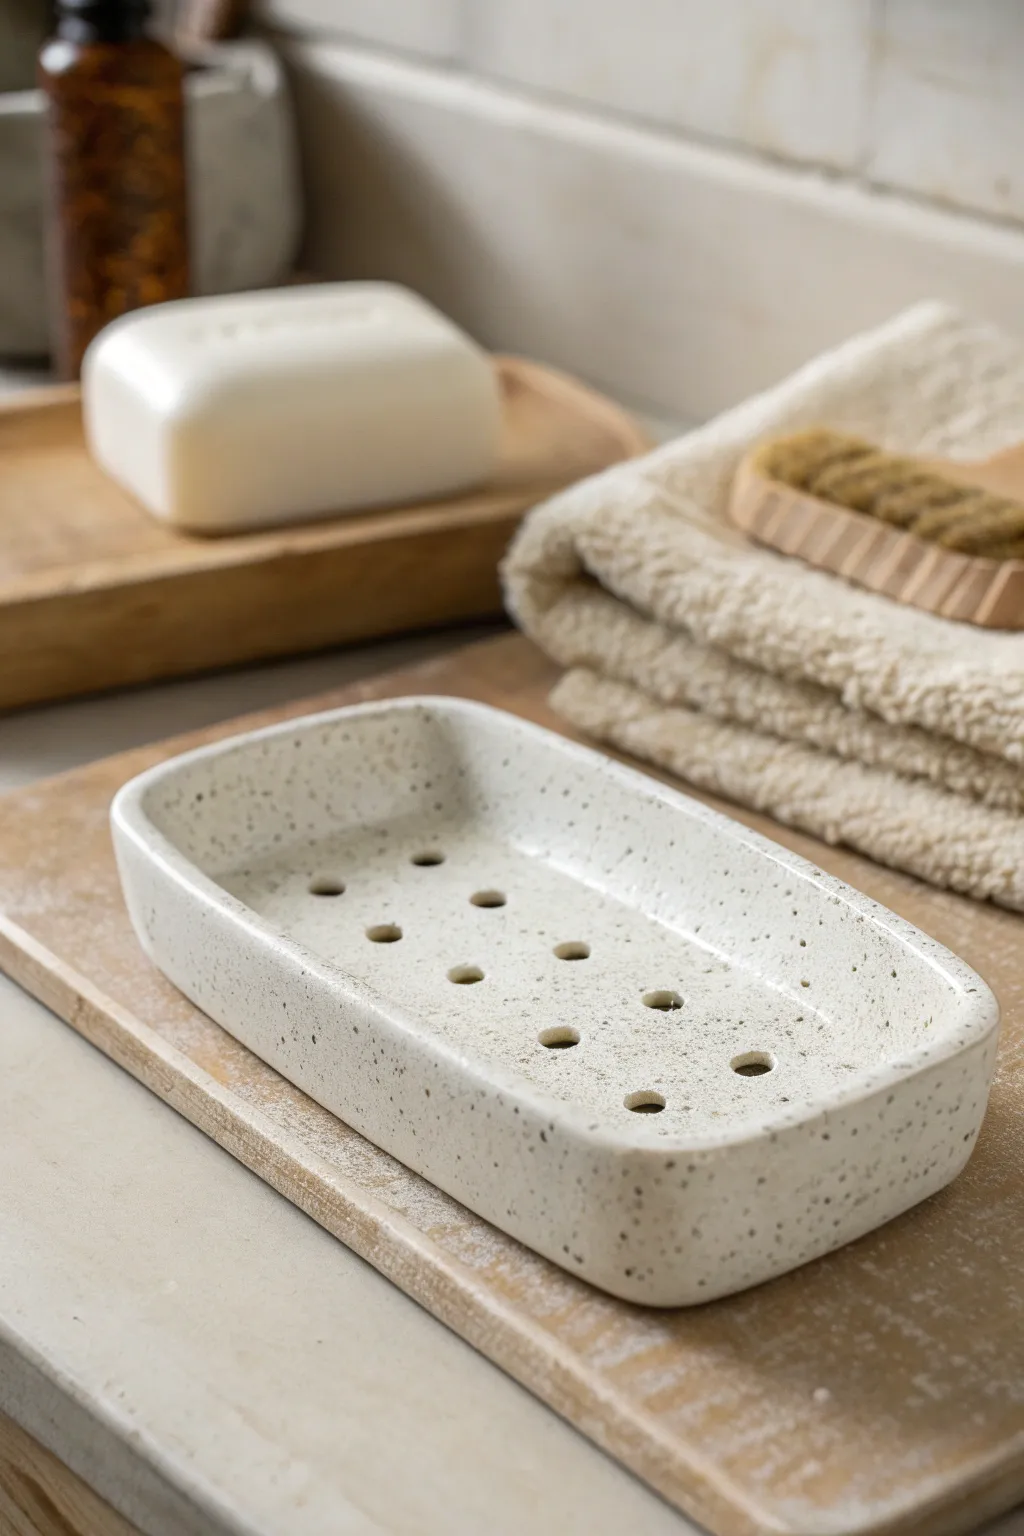
This project features a clean, rectangular form with soft rounded corners and precise drainage holes, finished in a creamy, speckled glaze. It’s an elegant yet functional addition to any bathroom that showcases the beauty of simple slab construction.
How-To Guide
Materials
- Speckled Stoneware Clay
- Rolling pin
- Canvas work surface or mat
- Rectangular template (cardstock or paper)
- Needle tool or fettling knife
- Hole punch tool or straw
- Sponge
- Rib tool (soft rubber)
- White or cream matte glaze
- Kiln
- Slip and scoring tool
Step 1: Creating the Base Slab
-
Prepare the Clay:
Wedge a ball of speckled stoneware clay thoroughly to remove air bubbles. This ensures your final dish won’t crack during firing. -
Roll the Slab:
On your canvas surface, roll the clay out into an even slab. Aim for a consistent thickness of about 1/4 inch (6mm). Using guide sticks on either side of your rolling pin can help keep it perfectly level. -
Compress the Clay:
Take your soft rubber rib and gently compress the surface of the slab on both sides. This aligns the clay particles, smooths out the canvas texture, and strengthens the slab just a bit. -
Cut the Shape:
Place your rectangular template (approx. 4×6 inches) onto the clay. Using a needle tool, cut cleanly around the template. I like to keep the knife vertical to ensure square edges.
Step 2: Forming the Walls and Drainage
-
Soften the Edges:
While the slab is flat, use a damp sponge or your finger to gently round over the sharp cut edges. This creates that soft, finished look seen in the photo. -
Punch Drainage Holes:
Using a hole punch tool or a clean straw, create a grid of drainage holes in the center of the slab. Space them evenly—about an inch apart—creating three rows. -
Clean the Holes:
Flip the slab over and remove any little clay burrs pushed through by the hole punch. A quick swipe with a sponge handles this perfectly. -
Lift the Edges:
Rather than attaching separate walls, we will gently curve the edges of this single slab upwards. Support the clay from underneath and lift the outer perimeter to create a shallow rim. -
Pinch Corners:
To manage the excess clay at the corners as you lift, gently pinch and smooth the clay to create a rounded, seamless corner. You want a flowing curve, not a sharp fold. -
Refine the Basin:
Establish a distinct transition between the flat bottom and the rising walls. Press gently with your thumb along the inside perimeter to define the bottom basin area. -
Smooth Everything:
Use a barely damp sponge to run along the rim and the interior. Ensure the transition from the wall to the floor is smooth and free of cracking.
Warping Woes?
Does your soap dish rock? If the bottom bows up during drying, place a small sandbag or weight in the center while it dries to keep the floor flat.
Step 3: Drying and Glazing
-
Control Drying:
Place the dish on a ware board. Because the rim is raised, it can dry faster than the center. Loosely drape a piece of plastic over it for the first day to equalize the moisture. -
Bisque Fire:
Once the piece is bone dry, fire it to cone 04 (or your clay body’s bisque recommendation). The speckled clay will serve as the base for the final look. -
Apply Wax Resist:
Apply wax resist to the very bottom foot area of the dish so it won’t stick to the kiln shelf. You generally don’t need to wax the drainage holes if your glaze isn’t too runny. -
Glaze Application:
Dip or brush on a semi-opaque white or cream matte glaze. The goal is a milky finish that allows the dark speckles of the clay body to bleed through slightly. -
Clear Drainage Holes:
Check the drainage holes one last time. If glaze has filled them, poke a needle tool through or twist a small drill bit by hand to clear the opening. -
Glaze Fire:
Fire the piece to cone 5 or 6 (mid-range oxidation), or whatever temperature your clay and glaze combination requires. This preserves those lovely speckles.
Add Raised Feet
Attach four small clay balls to the corners of the underside. This lifts the dish off the counter, improving airflow and drainage.
Once fired, you will have a durable, spa-like soap dish ready to elevate your sink area

What Really Happens Inside the Kiln
Learn how time and temperature work together inside the kiln to transform clay into durable ceramic.
Textured Slab Coasters as a Matching Set
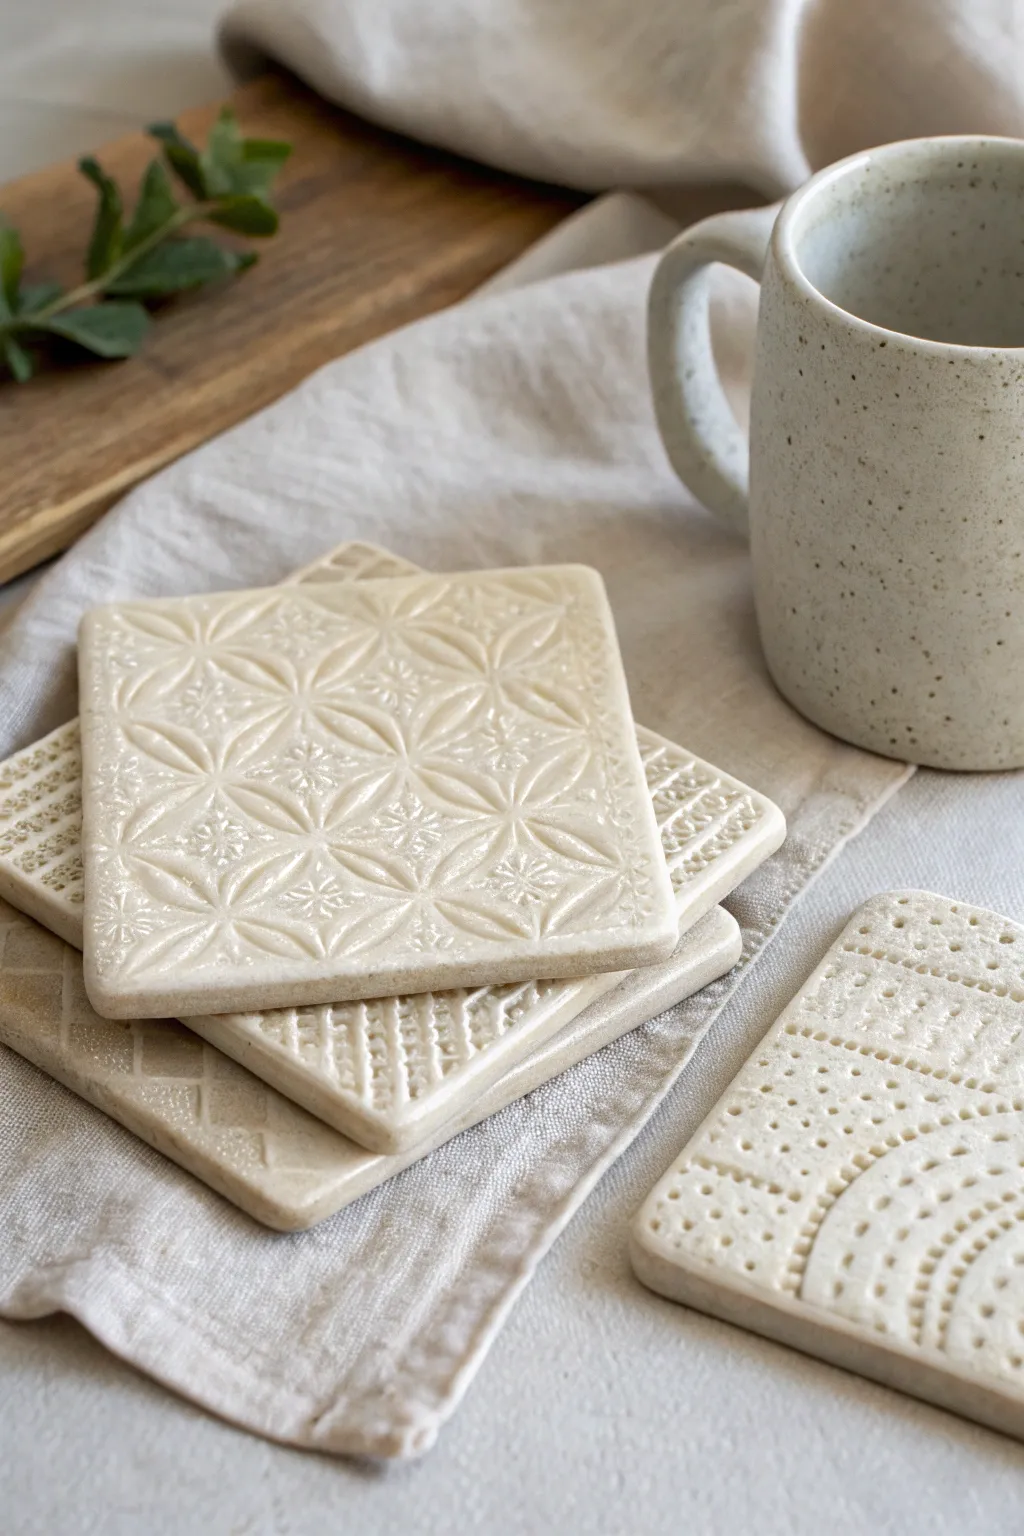
These sophisticated slab-built coasters feature delicate geometric patterns impressed into creamy stoneware clay. They make for a lovely, functional addition to any coffee table or a heartfelt handmade gift for a housewarming.
Step-by-Step Guide
Materials
- Light-colored stoneware clay
- Rolling pin
- Two wooden thickness strips (quarter-inch)
- Texture rollers, stamps, or lace doilies
- Square cookie cutter (approx. 4 inches) or ruler and knife
- Ware board or drywall piece for drying
- Fettling knife or needle tool
- Smooth river stone or rib tool
- Sponge
- Creamy white or transparent glaze
- Kiln
Step 1: Preparing the Slab
-
Wedge the Clay:
Begin by thoroughly wedging your clay to remove any air bubbles. This ensures a consistent structure that won’t warp or crack during firing. -
Set Up Guides:
Place your wooden thickness strips on either side of your work surface. These guides are crucial for keeping the coaster thickness perfectly uniform. -
Roll the Slab:
Roll your clay out between the guides. Start from the center and push outwards, flipping the clay occasionally to prevent it from sticking to the canvas or table. -
Smoothing the Canvas:
If you are rolling on canvas, use a flexible rib tool to smooth away the canvas texture from the surface of the clay slab before you begin texturing.
Step 2: Texturing and Cutting
-
Select Your Texture:
Decide on your patterns. You can use specialized pottery texture rollers, wooden stamps, or even found objects like vintage lace or fabric. -
Apply the Texture:
Press your chosen texture tool firmly into the clay slab. If using a roller, do this in a single, confident pass to avoid ‘ghosting’ or double images. -
Cut the Shape:
Using your square cutter or a ruler and needle tool, cut out your coaster shapes. Try to capture the most interesting part of the pattern within the square. -
Release the Clay:
Carefully lift the excess clay away from your squares, leaving the coasters on the work surface for a moment so they don’t distort while lifting.
Warping Woes?
If coasters curl up at the corners while drying, dry them slower! Cover gently with plastic or dry them sandwiched between two pieces of drywall to keep them perfectly flat.
Step 3: Refining and Drying
-
Clean the Edges:
Once the clay is leather-hard (stiff but still cool to the touch), use a slightly damp sponge to soften the sharp cut edges. I prefer to gently run my finger along the rim to round it off comfortably. -
Addressing the Back:
Flip the coasters over and smooth the back with a rib. You can also lightly stamp your maker’s mark or initials at this stage. -
Weighted Drying:
To prevent curling corners, place the coasters between two pieces of drywall or sandwich them between wooden boards with a light weight on top while they dry slowly. -
Bisque Fire:
Load the bone-dry coasters into the kiln for a bisque firing (typically Cone 04 or 06) to prepare them for glazing.
Mix & Match Sets
Make a set of four where each coaster uses a different texture tool but shares the same glaze color. This creates a cohesive collection that isn’t overly repetitive.
Step 4: Glazing and Finishing
-
Wax the Bottom:
Apply wax resist to the bottom of each coaster. This prevents glaze from fusing your work to the kiln shelf. -
Dip Glazing:
Using dipping tongs, submerge the coaster into a creamy white or semi-transparent glaze. A transparent glaze works best to highlight the intricate textures. -
Shake Off Excess:
Give the coaster a quick, gentle shake as you pull it out of the bucket to remove excess glaze, ensuring the texture doesn’t get filled in completely. -
Clean the Foot:
Sponge off any stray drops of glaze from the waxed bottom or the very edge of the foot. -
Glaze Fire:
Fire the coasters to the temperature recommended for your specific clay and glaze combination (e.g., Cone 5 or 6). allow the kiln to cool completely before unloading.
Stack your finished coasters and tie them with twine for a beautiful presentation
Small Slab Planters with Clean Corners
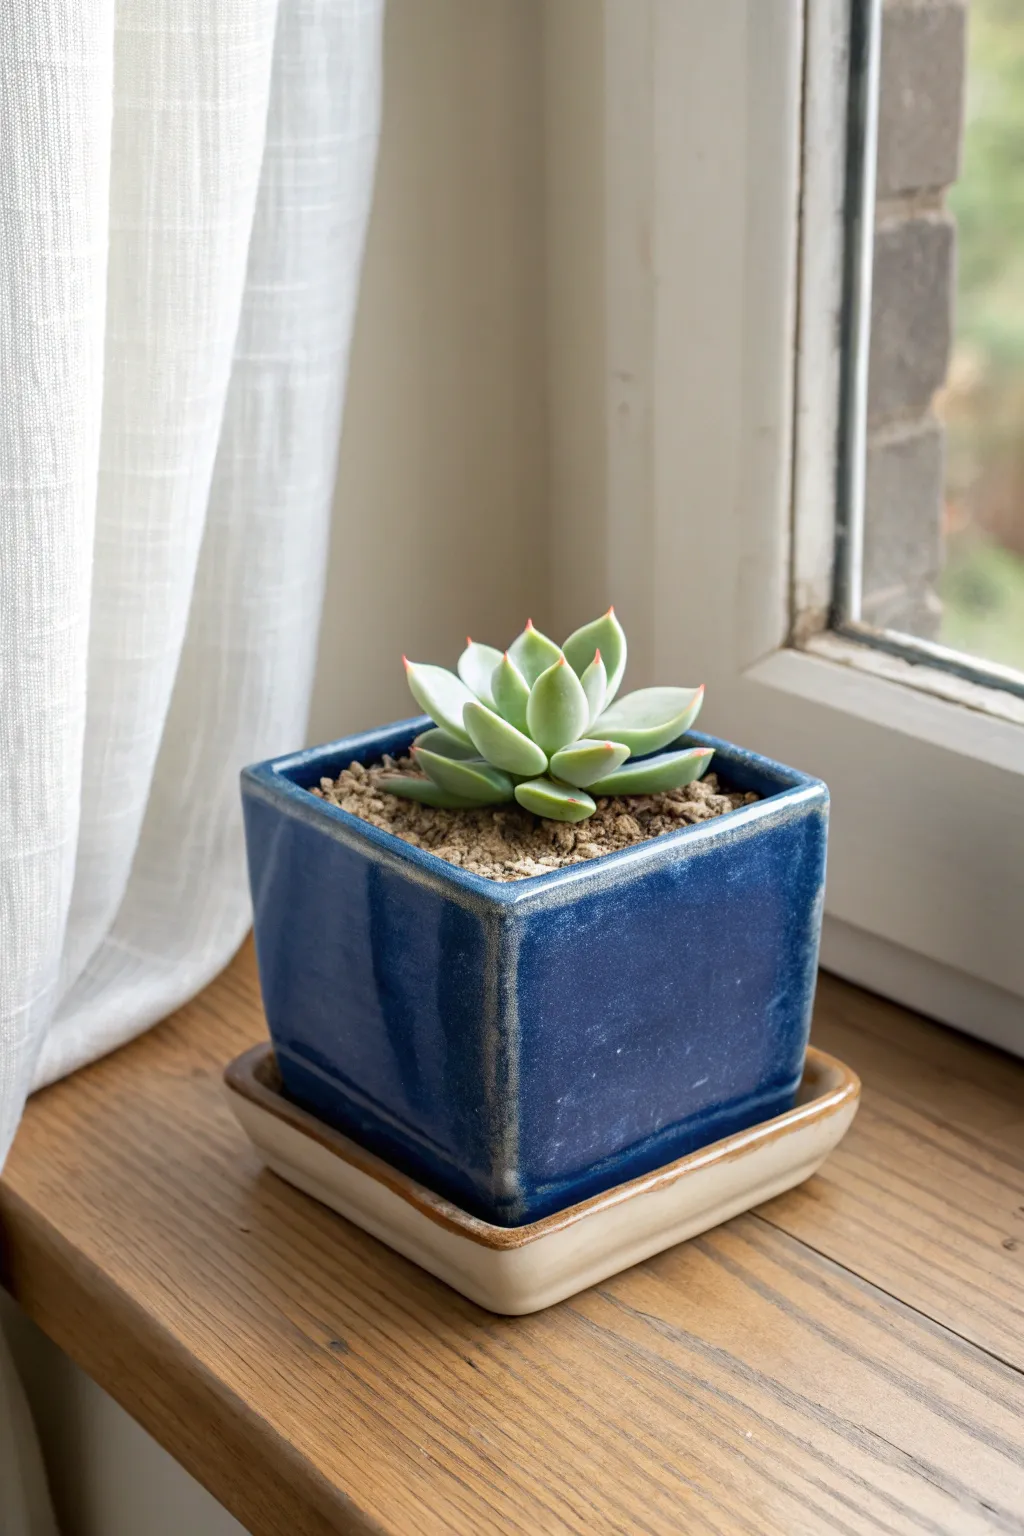
This tutorial guides you through crafting a crisp, square planter with a charming matching saucer, perfect for small succulents. The glossy, deep blue glaze breaks beautifully over the sharp corners, highlighting the clean geometry of your slab construction.
Detailed Instructions
Materials
- Stone stoneware clay (mid-fire)
- Slab roller or rolling pin with thickness strips
- Fettling knife or X-Acto blade
- Ruler and square tool
- Scoring tool (serrated rib or needle tool)
- Slip (clay mixed with water)
- Small wooden blending tool
- Paintbrush for glazing
- Deep cobalt blue glossy glaze
- Clear or light tan glaze (for saucer)
- Wax resist
Step 1: Creating the Slabs
-
Roll out clay:
Begin by wedging your clay to remove air bubbles, then roll out a consistent slab about 1/4 inch thick. Ensuring even thickness is crucial for a geometric pot like this. -
Smooth the surface:
Compress both sides of the slab using a rubber rib. This aligns the clay particles, preventing warping later, and creates that smooth canvas for our glossy glaze. -
Let it stiffen:
Allow the slab to dry to a ‘leather-hard’ state. You want it firm enough to hold its shape when standing up, but not so dry that it cracks when joined. I usually wait until it holds up without bending when I lift a corner.
Step 2: Cutting and Assembly
-
Measure the walls:
Using your ruler and square, cut four identical squares for the walls (e.g., 3.5 x 3.5 inches). Accuracy here ensures those perfect corners shown in the photo. -
Cut the base:
Cut a base square that matches the inner dimensions of your assembled walls, or slightly larger if you prefer to attach walls on top of the base. -
Bevel the edges:
For the sharpest 90-degree corners, cut the vertical edges of your wall pieces at a 45-degree angle. This mitering technique hides the seams effectively. -
Score and slip:
Aggressively score the beveled edges and apply a generous amount of slip. -
Join the walls:
Press the walls together to form a box. Use a square tool to check the inside corners are perfectly perpendicular. -
Reinforce the interior:
Roll a very thin coil of soft clay and press it into the interior corners. Smooth it down with a round wooden tool to seal the joint completely. -
Refine the exterior:
Clean up the outside seams with a rib or sponge, but try to maintain that sharp edge definition rather than rounding it over too much. -
Create drainage:
Flip the pot over and use a hole cutter to create a drainage hole in the center of the bottom slab.
Uneven Walls?
If your walls are slightly different heights after assembly, don’t panic. Gently slide the upside-down pot on a piece of sandpaper on a flat surface to level the rim perfectly.
Step 3: Making the Saucer
-
Shape the saucer base:
Cut a square slab slightly larger than your pot (about 1 inch wider). Gently curl up the edges or attach a very low rim strip to catch water. -
Softening the rim:
Unlike the sharp pot, the saucer in the image has slightly softer, rolled edges. Run a damp sponge along the rim to round it off.
Add Texture
Before assembling, roll a textured fabric or lace over your slab. The deep blue glaze will pool in the recesses, creating incredible depth.
Step 4: Glazing and Firing
-
Bisque fire:
Once bone dry, fire both pieces to bisque temperature (usually cone 04). -
Wax resist:
Apply wax resist to the bottom of the pot and the saucer to prevent them directly sticking to kiln shelves. -
Glaze the pot:
Dip or brush the main pot in a deep cobalt blue glaze. The glaze naturally thins at the sharp corners during firing, revealing the lighter clay body beneath, which creates that beautiful framing effect. -
Glaze the saucer:
Glaze the saucer in a contrasting light tan or clear glaze to match the image aesthetics. -
Final fire:
Glaze fire to maturity (likely cone 5/6 depending on your clay). Ensure the pot doesn’t touch the saucer during firing.
Once fired, pot your favorite Echeveria to complete this classic, clean look


The Complete Guide to Pottery Troubleshooting
Uncover the most common ceramic mistakes—from cracking clay to failed glazes—and learn how to fix them fast.
Jewelry Dishes Made from Curved Slabs
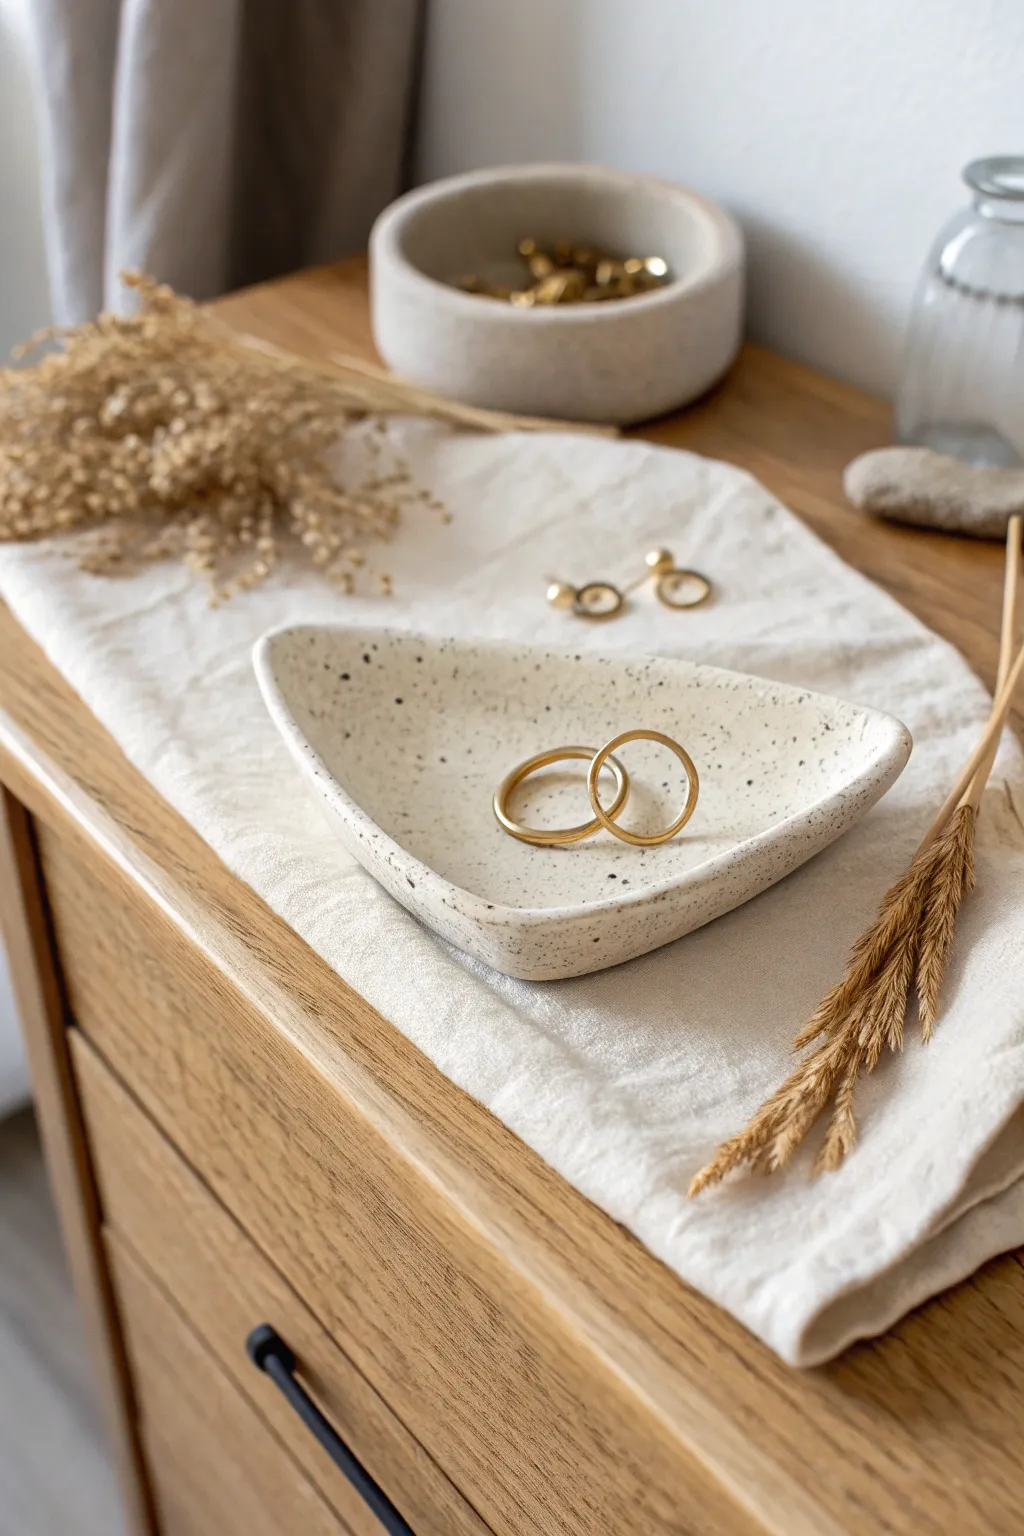
This elegant triangular dish features a soft, organic curve and a minimalist speckled finish that mimics the look of natural stone. It is the perfect beginner-friendly slab project for holding rings, earrings, or small keepsakes on your bedside table.
Step-by-Step Guide
Materials
- Speckled stoneware clay (white or cream)
- Rolling pin
- Canvas mat or slab roller
- Needle tool or fettling knife
- Paper template (triangle with rounded corners)
- Small sponge
- Smooth river stone or rib tool
- Shallow bowl or foam cushion (for shaping)
- Clear or matte white glaze
- Kiln
Step 1: Preparing the Slab
-
Wedge the Clay:
Begin by wedging a small ball of speckled stoneware clay to remove any air bubbles and ensure an even consistency. -
Roll the Slab:
Place the clay on your canvas mat and use a rolling pin to flatten it into a slab. Aim for a thickness of about 1/4 inch (approx. 6mm) throughout. -
Check for Texture:
If you want the natural canvas texture on the bottom, leave it as is. If you prefer a smooth finish, run a rubber rib over the surface to compress the clay particles.
Step 2: Cutting and Formatting
-
Create a Template:
Draw a soft triangle with rounded corners on a piece of paper or cardstock and cut it out. The size should be slightly larger than your desired finished dish to account for shrinkage. -
Trace and Cut:
Lay the template gently on your clay slab. Using a needle tool, trace around the shape, holding the tool perpendicular to the table for a clean edge. -
Remove Excess:
Peel away the extra clay around your shape and set it aside for recycling later. -
Smooth the Edges:
Dip your finger or a small sponge in water and gently run it along the cut rim to round off the sharp angles left by the knife. This is crucial for a professional look.
Rim Perfection
For that ultra-smooth edge seen in the photo, burnish the rim with a piece of plastic wrap stretched over your finger before the clay dries completely.
Step 3: Shaping the Curve
-
Lift the Slab:
Carefully lift your clay triangle off the mat. If it sticks, slide a wire cutter underneath. -
Apply the Curve:
Place the slab into a shallow bowl or onto a piece of foam. Gently press the center down so the corners flare upward naturally. -
Refine the Form:
Use your fingers to smooth out the transition from the base to the rim. It should be a gentle slope, not a sharp fold. -
Dry Slowly:
Let the dish dry to a leather-hard state while resting in the mold to ensure it keeps its curved shape.
Gold Accents
After the final firing, apply gold luster to the very edge of the rim and do a third, low-temperature firing for a touch of true luxury.
Step 4: Finishing and firing
-
Final Smoothing:
Once leather hard, remove the dish from the mold. Use a damp sponge to wipe away any imperfections or rough spots on the rim and surface. -
Bisque Fire:
Load the bone-dry dish into the kiln for a bisque firing (usually around Cone 04). -
Prepare for Glazing:
Wipe the bisque-fired piece with a damp sponge to remove dust. Wax the foot (the bottom area that will touch the kiln shelf) if you plan to dip it fully. -
Apply Glaze:
Dip or brush on a clear or semi-opaque matte white glaze. The transparency allows the gorgeous natural speckles of the clay body to shine through. -
Glaze Fire:
Fire the piece again to the maturation temperature of your specific clay and glaze, likely Cone 5 or 6 for stoneware. -
Cool and Inspect:
Allow the kiln to cool completely before removing your new jewelry dish. Check the bottom for any sharp bits of glaze to sand down.
Place your finished dish on your dresser and enjoy the minimalist charm it adds to your space
Slab Wall Tiles as Mini Art Panels
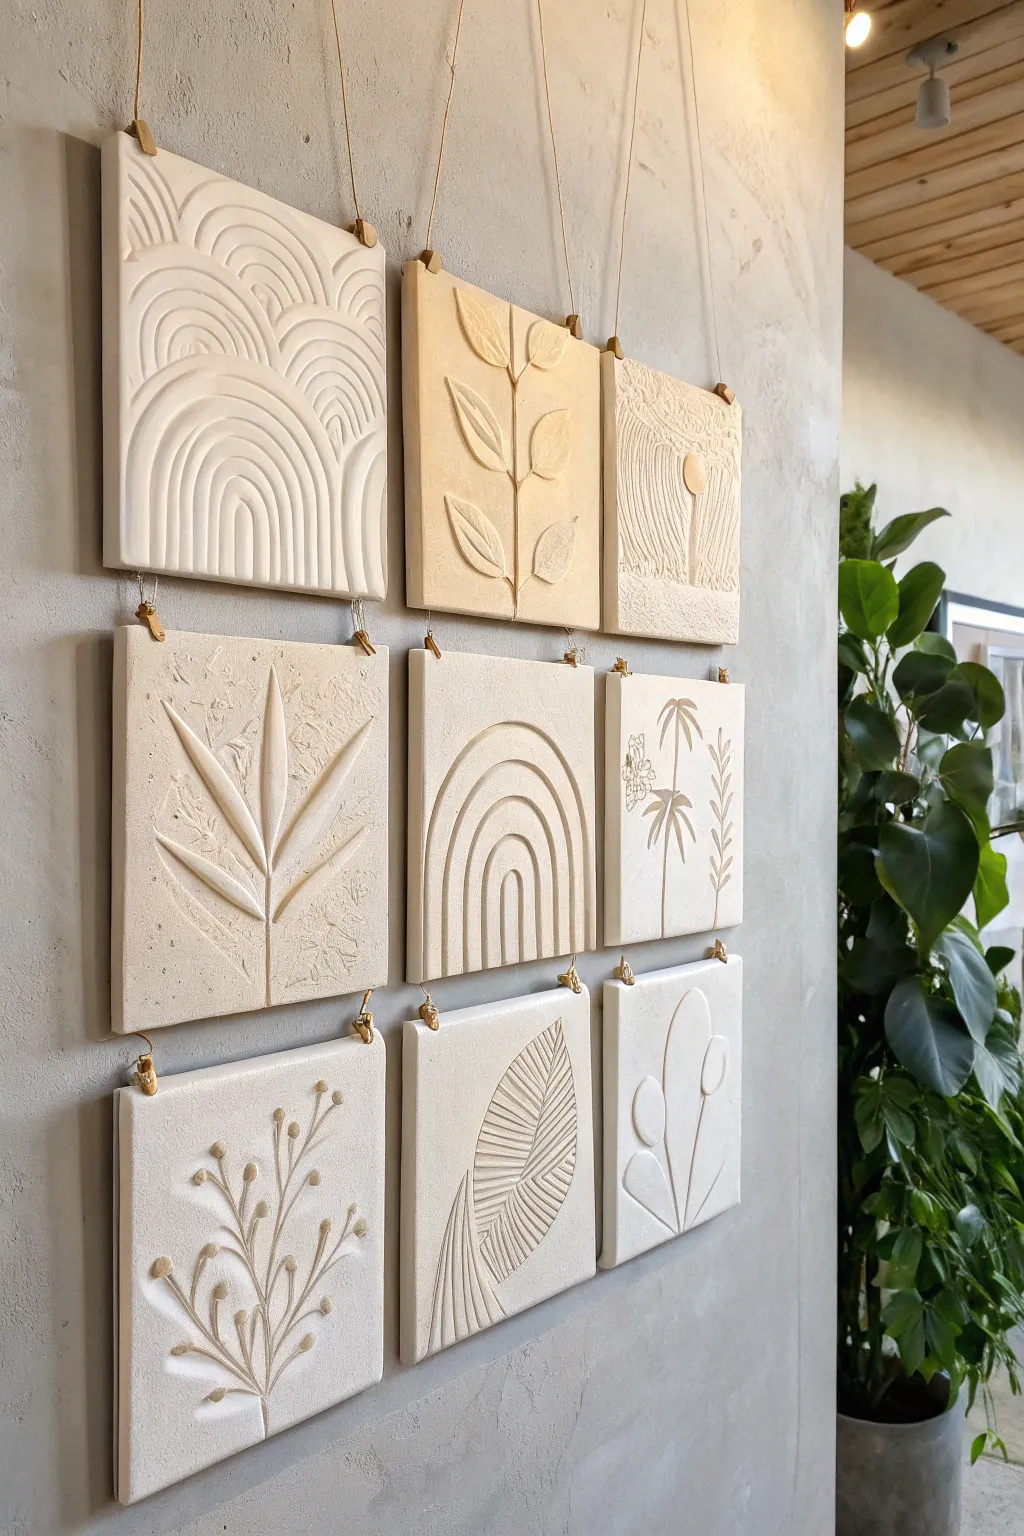
Transform simple clay slabs into a gallery-worthy installation with this cohesive set of nine textured tiles. Featuring a mix of botanical imprints, geometric arches, and abstract reliefs, this project explores the beauty of raw, unfinished ceramic textures.
How-To Guide
Materials
- White or light-colored stoneware clay (smooth body)
- Rolling pin
- Two wooden guide strips (approx. 1/4 inch or 6mm thick)
- Square template (cardboard or plastic, approx. 6×6 inches)
- Fettling knife or clay cutter
- Carving tools (loop tools, needle tool)
- Modeling tools (wooden or rubber ribs)
- Sponge
- Small metal clips (bulldog style) or wire for hanging
- Natural twine or jute string
- Wooden dowel or nails for wall mounting
Step 1: Slab Preparation
-
Roll the Slabs:
Begin by wedging your clay to remove air bubbles. Place the clay between your two wooden guide strips on a canvas-covered surface. Roll the clay out until it is perfectly even with the guides, ensuring a consistent thickness for all nine tiles. -
Cut the Squares:
Place your square template onto the slab. Using a fettling knife held vertically, carefully cut around the template. Repeat this until you have nine identical squares. I like to cut one or two extras just in case a design doesn’t work out. -
Smooth the Edges:
Run a slightly damp sponge or your finger along the sharp cut edges of each tile to soften them. This prevents the clay from becoming sharp and brittle after firing.
Fixing Warp
If corners start lifting while drying, flip the tile over onto a flat board and weigh down the corners with small sandbags or heavy books for a day.
Step 2: Designing the Reliefs
-
Plan Your Grid:
Before carving, sketch out your nine designs on paper. Aim for a balance: three geometric (arches), three botanical (leaves/branches), and three abstract or mixed textures to match the photo’s aesthetic. -
Sculpt the Arches:
For the rainbow-style tiles, use a small loop tool to carve deep, concentric U-shapes. Vary the width of the lines—some thick, some thin. Use a rubber rib to smooth the raised areas between the carved lines for a clean, graphical look. -
Create Botanical Reliefs:
For the leaf designs, you have two options. You can use a needle tool to incise the outline and veins of a branch. Alternatively, roll small coils of fresh clay, place them onto the slab in a leaf pattern, and smear the edges down to blend them seamlessly into the background, creating a raised effect. -
Add Texture and Detail:
For the more abstract tiles, experiment with different tools. Press the iconic ‘sun’ shape into one tile using a small stamp or coin, and use the back of a paintbrush to create the surrounding landscape texture. Keep the pressure consistent so the tile doesn’t warp. -
Refine the Surfaces:
Once all designs are carved or modeled, let the tiles stiffen slightly to a leather-hard state. Go back over your lines with a clean, dry brush to sweep away any clay crumbs or ‘burrs’ created during carving.
Go for Color
For a subtle pop, rub a tinted mason stain wash into the carved grooves before firing. Wipe the surface clean so the color only remains in the recess.
Step 3: Finishing and Mounting
-
Drying Process:
Sandwich your tiles between two pieces of drywall or place them on a wire rack covered lightly with plastic. They need to dry very slowly and evenly to prevent the corners from curling up. Check them daily. -
Bisque Fire:
Once bone dry, fire the tiles to bisque temperature (usually cone 04). Since the goal is a raw, matte finish, you may choose not to glaze them at all, or simply apply a clear matte glaze to seal the surface. -
Attach the Clips:
If you aren’t firing holes directly into the clay, you’ll use the clip method shown. Attach a small, gold-toned metal clip to the top center of each fired tile. Ensure the grip is tight enough to hold the weight of the ceramic. -
Prepare the String:
Cut lengths of natural twine. The length will depend on how high you want the tile to hang. Tie one end firmly to the metal clip. -
Hang the Installation:
Measure a 3×3 grid on your wall. Install small nails or hooks at the top of where each column of tiles will go. Tie the strings to these anchors, adjusting the lengths so the tiles hang evenly spaced as shown in the inspiration photo.
Step back and admire how the light catches the different textures of your modern wall grid

TRACK YOUR CERAMIC JOURNEY
Capture glaze tests, firing details, and creative progress—all in one simple printable. Make your projects easier to repeat and improve.
Lidded Slab Boxes for Trinkets
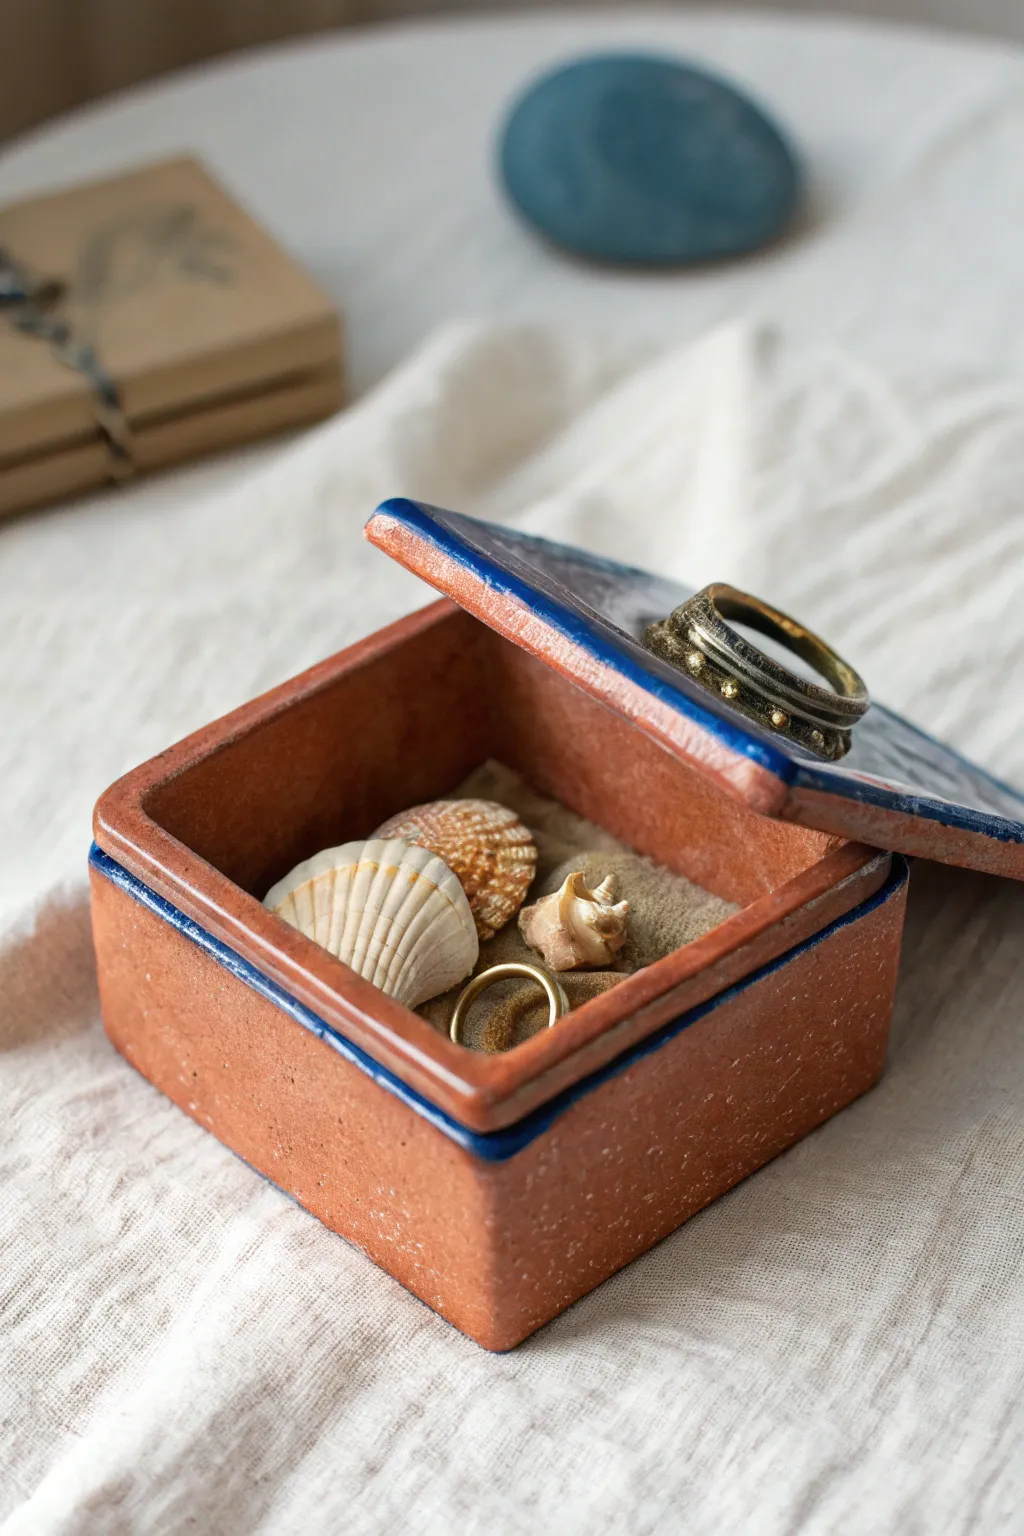
Capture the warmth of the beach with this charming terracotta trinket box, accented by rustic blue rims and a textured finish. Perfect for holding small treasures like sea glass or rings, its simple slab construction makes it an excellent project for refining your hand-building skills.
Step-by-Step Guide
Materials
- Terracotta or red stoneware clay
- Rolling pin and guide sticks (1/4 inch)
- Fettling knife or creative cutter
- Ruler
- Score and slip tool (needle tool or serrated rib)
- Clay slip
- Wooden paddle
- Sponge
- Cobalt blue underglaze
- Clear matte or satin glaze
- Small paintbrush
- Kiln
Step 1: Preparing the Slabs
-
Roll out the clay:
Begin by wedging your terracotta clay to remove air bubbles. Roll it out into an even slab using 1/4 inch guide sticks to ensure consistent thickness throughout the piece. -
Cut the templates:
Using a ruler and fettling knife, cut out your pieces: one 4×4 inch square for the base, one 4.5×4.5 inch square for the lid, and four rectangular walls measuring 4 inches long by 2.5 inches high. -
Leather hard stage:
Allow your cut slabs to stiffen up slightly to the leather-hard stage. This makes them strong enough to stand up without sagging but soft enough to join securely. -
Miter the edges:
For a clean corner joint, cut the vertical edges of your wall pieces at a 45-degree angle. You can also do this for the bottom edge of the walls and the perimeter of the base, though a simple butt joint works too if you blend well.
Warping Walls?
If walls bow inward, stuff the leather-hard box with crumpled newspaper or foam while drying. This internal support keeps the straight lines crisp until the clay is rigid.
Step 2: Assembling the Box
-
Score and slip:
Aggressively score the contact points on the base and the bottom of your first wall. Apply a generous amount of slip to both scored areas. -
Attach the walls:
Press the first wall onto the base. Repeat the scoring and slipping process for the subsequent walls, joining them to the base and to each other at the corners. -
Reinforce corners:
Roll a very thin coil of clay and press it into the interior seams of the box. Smooth this coil down with a modeling tool or your finger to ensure a watertight bond. -
Refine the shape:
Once all four walls are attached, use a wooden paddle to gently tap the outside walls. This helps square up the shape and compresses the joints. -
Smooth the exterior:
Use a damp sponge to smooth away rough texture or canvas marks, but leave a little natural clay texture if you prefer that rustic look.
Rustic Texture Tip
Don’t over-smooth the clay surface. I like to lightly tap the exterior with a textured fabric or a stiff bristle brush before drying to enhance that earthy, ancient feel.
Step 3: Creating the Lid
-
Form the lid flange:
Flip your lid slab over. Roll a small coil or cut thin strips of clay and attach them to the underside of the lid, inset about 1/4 inch from the edge. This ‘flange’ sits inside the box walls to keep the lid from sliding off. -
Check the fit:
Carefully test the lid on the box. It should sit flush, with the flange fitting snugly inside the walls. Adjust the flange if necessary. -
Add a handle:
Form a small ring or loop from a scrap of clay. Score and slip the center of the lid top and attach this ring firmly to act as a handle. -
Final drying:
Place the lid on the box with a piece of paper towel in between to prevent sticking. Let the entire piece dry slowly under loose plastic to prevent warping.
Step 4: Glazing and Firing
-
Bisque fire:
Fire the piece to cone 04 (or your clay’s specific bisque temperature). -
Apply underglaze:
Using a small brush, apply cobalt blue underglaze specifically to the rim of the box lid and the top edge of the box walls. You can let the brush drag slightly for a weathered look. -
Clear glaze:
Dip or brush a clear matte glaze over the entire piece (or just the interior if you want the outside to remain raw clay). Ensure the footing is wiped clean. -
Final fire:
Glaze fire the piece to the maturity temperature of your clay body.
Now you have a timeless little vessel ready to hold your most precious coastal finds
Slab Lanterns with Cutout Patterns
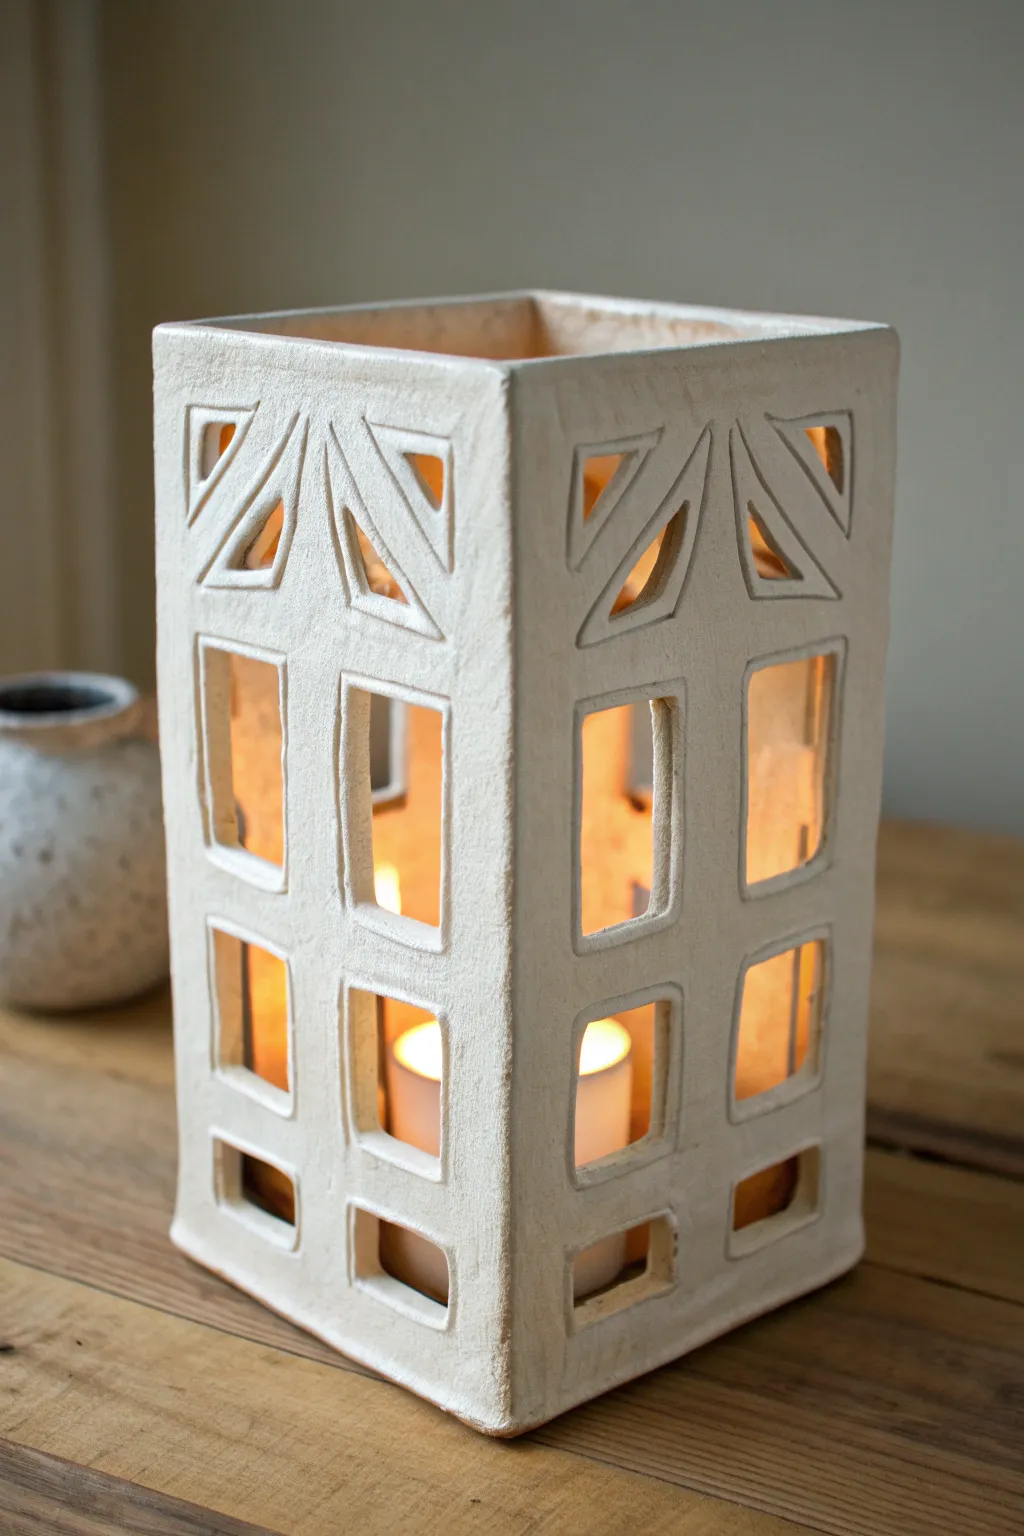
Illuminate your space with this architectural slab lantern, featuring bold geometric cutouts reminiscent of Art Deco design. The raw, textured finish highlights the natural beauty of the clay while casting warm, patterned shadows.
Step-by-Step
Materials
- Stoneware clay with grog (for texture and stability)
- Pin tool or X-Acto knife
- Fettling knife
- Rolling pin
- Two wooden guide strips (thickness of desired wall, approx. 1/4 inch)
- Ruler or straight edge
- Serrated rib or scoring tool
- Slip (clay mixed with water)
- Paper templates (rectangular)
- Wooden paddle
- Sponge
Step 1: Planning and Slabs
-
Design and measure:
Sketch your lantern design on paper first. For this square tower look, you will need four identical rectangular walls. A good starting size is 4 inches wide by 8 inches tall. -
Roll out the clay:
Place your wooden guide strips on either side of your clay wedge. Roll the clay out into a long, even slab, ensuring the rolling pin rests on the guides to maintain a consistent thickness of about 1/4 inch. -
Cut the walls:
Using your paper template or a ruler, cut four identical rectangles from the slab using a fettling knife or pin tool. Save the excess clay for the base. -
Create the base:
Cut a square slab for the floor of the lantern. It should be slightly smaller than the outer dimensions of your assembled walls, or exactly the size of the inner opening depending on how you plan to attach them. -
Leather hard stage:
This is crucial: Let your slabs dry to a ‘leather hard’ state. They should be stiff enough to stand up without slumping but still soft enough to cut and join. I like to sandwich them between drywall boards for even drying.
Slumping Slabs?
If walls buckle while standing, the clay is too wet. Lay them flat again for 30-60 mins. If assembled, use cardboard supports inside until stiff.
Step 2: Carving the Patterns
-
Mark the grid:
Lightly trace your geometric pattern onto the leather-hard slabs using a pin tool. Create a layout of triangles near the top rim and rows of rectangular windows below. -
Cut the triangles:
Carefully slice out the triangular shapes at the top. Keep your knife perpendicular to the slab surface for clean, sharp edges. -
Cut the windows:
Move down to the rectangular sections. Remove the clay for the windows. If you want a beveled look, angle your knife slightly, or simply smooth the sharp 90-degree edges later with a damp sponge. -
Refine the edges:
Once all cutouts are removed, use a slightly damp sponge or your finger to smooth the interior cuts. It’s much easier to do this now while the slabs are flat than after assembly.
Step 3: Assembly
-
Miter the vertical edges:
For a seamless corner joint, bevel the long vertical edges of your four wall slabs at a 45-degree angle. This creates a stronger connection and a cleaner 90-degree corner. -
Score and slip:
Aggressively score (scratch) all the mitered edges and resultantly apply a generous amount of clay slip. Do the same to the edges of the base slab. -
Join the first corner:
Stand two walls up and press the mitered edges together. Ensure they are perpendicular to the table. -
Complete the box:
Attach the remaining two walls, pressing all corners firmly together. Use a wooden coil or thin ‘snake’ of clay on the inside corners to reinforce the joint, blending it smooth with a modeling tool. -
Attach the base:
Place the assembled tower onto the square base slab (scored and slipped). Press down firmly from the inside to secure the walls to the floor. -
Paddle the corners:
Gently tap the outside corners with a wooden paddle. This compresses the joint and helps sharpen the square shape of the lantern.
Pro Tip: Sharp Shadows
Keep the edges of your cutouts sharp and un-rounded. Crisp edges cast more distinct, dramatic shadows when the candle is lit inside.
Step 4: Finishing Touches
-
Clean up:
Go over the entire piece with a barely damp sponge. Remove any slip that squeezed out of the joints and smooth any sharp burrs on the cutouts. -
Slow drying:
Cover the lantern loosely with plastic to let it dry very slowly. Because of the cutouts, uneven drying can cause warping or cracking. Once bone dry, bisque fire the piece. -
Glazing choice:
To match the reference image, leave the exterior unglazed or apply a matte white oxide wash. Alternatively, glaze only the interior to maximize light reflection.
Place a tea light or LED candle inside your finished lantern to see your geometric patterns dance on the walls
Slab Clocks with Botanical Impressions
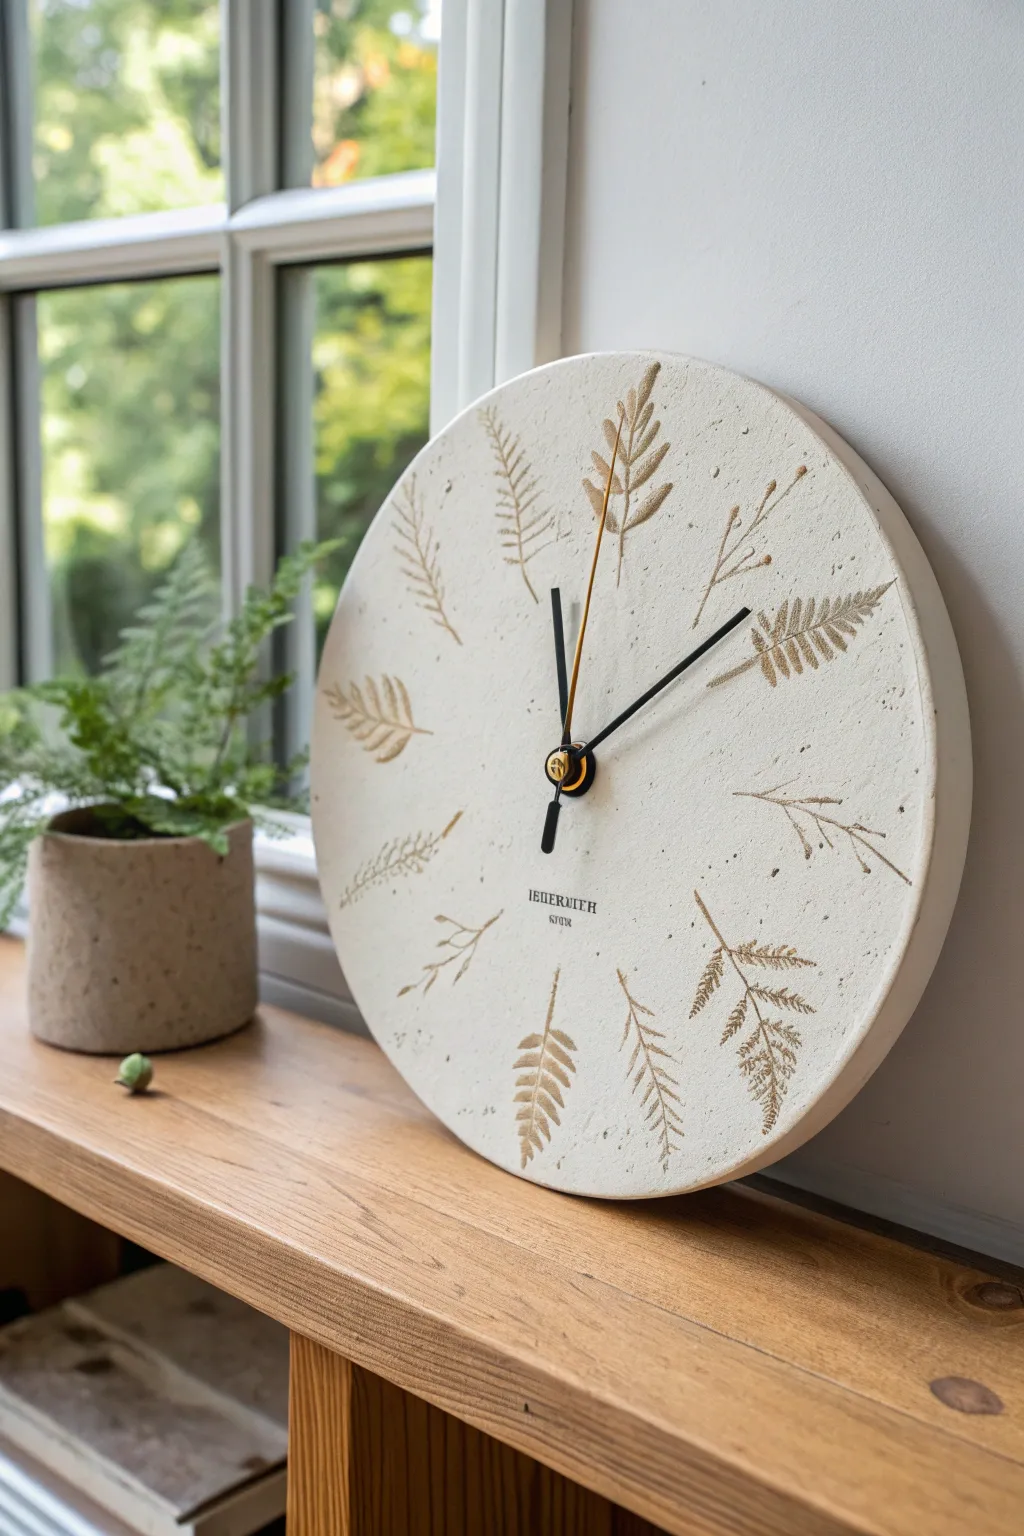
This project combines the clean, modern look of white pottery with the organic beauty of foraged botanicals. By impressing fern leaves into a soft clay slab, you’ll create a functional timepiece that brings a quiet, natural elegance to any room.
Detailed Instructions
Materials
- White stoneware or porcelain clay
- Rolling pin with thickness guides (approx. 1/4 inch or 6-8mm)
- Canvas mat or slab roller
- Round template or plate (approx. 10-12 inches diameter)
- Needle tool or fettling knife
- Fresh ferns or sturdy leaves
- Small pony roller or rib tool
- Sponge
- Iron oxide wash or brown underglaze
- Clean rags or paper towels
- Clear matte glaze (optional)
- Quartz clock mechanism kit (spindle, gold/black hands, battery pack)
- Drill bit (sized for your clock shaft)
Step 1: Creating the Slab Base
-
Prepare the workspace:
Begin by setting up a canvas-covered work surface to prevent your clay from sticking. Wedging your white stoneware clay thoroughly is crucial here to remove any air bubbles. -
Roll the slab:
Roll out a smooth, consistent slab of clay. Use thickness guides to ensure the entire piece is an even thickness, generally around 1/4 inch (6-8mm). Too thin and it might warp; too thick and the clock mechanism shaft won’t poke through. -
Smooth the surface:
Before cutting, take a rubber or metal rib and compress the clay surface. Run it gently over the slab in multiple directions to align the clay particles, which helps prevent warping later. -
Cut the circle:
Place your round template or dinner plate onto the slab. Using your needle tool held vertically, trace around the template to cut out a perfect circle. -
Refine the edges:
Once the circle is cut, use a slightly damp sponge to smooth the sharp cut edges. Rounding them over now gives the finished piece a more professional, tailored look.
Step 2: Adding Botanical Textures
-
Arrange the composition:
Lay out your fresh fern fronds on top of the clay circle in a radial pattern, pointing inward like the numbers on a clock face. Play with the spacing until it feels balanced. -
Press the leaves:
Using a small pony roller or your fingertips, gently press the leaves into the clay. You want them flush with the surface but not buried too deep. Make sure to press the stems and distinct veins firmly. -
Roll for definition:
Pass your rolling pin gently over the leaves one final time to ensure a deep, uniform impression across the entire face. -
Reveal the pattern:
Carefully peel the leaves away by lifting the stem end first. I love this part—wiggling the stem slightly helps release the leaf without tearing the clay. -
Create the center hole:
Find the exact center of your circle. Use a hole cutter or drill bit (by hand) to create a hole slightly larger than your clock movement’s shaft, accounting for clay shrinkage. -
Stamp your mark:
If you have a maker’s mark or want to add a small text stamp like the one in the photo, press it into the lower half of the clock face now.
Warping Worries?
To fix minor warping after the bisque fire, place the slab on a flat kiln shelf with a small weight on the high spot during the final glaze firing.
Step 3: Finishing and Assembly
-
Slow drying:
Sandwich the slab between two pieces of drywall board or place it on a wire rack covered lightly with plastic. Dry very slowly to keep it perfectly flat. -
Bisque fire:
Once bone dry, fire the piece to bisque temperature (usually cone 04) according to your clay body’s specifications. -
Apply oxide wash:
Mix iron oxide with water (or use a watered-down brown underglaze). Brush this dark mixture liberally into all the leaf impressions. -
Wipe back:
Using a damp sponge, wipe the surface of the clock clean. The dark color should remain only in the recessed veins of the leaves, highlighting the texture against the white clay. -
Glaze fire:
You can leave the clay unglazed for a raw stone look, or apply a thin matte clear glaze. Fire the piece to its final maturity temperature (e.g., cone 6). -
Install mechanism:
Insert the clock movement from the back. Secure it with the washer and nut on the front side. -
Attach hands:
Press the hour hand, then the minute hand, and finally the second hand (if using) onto the shaft. Ensure they are parallel so they don’t catch on each other as they rotate.
Add Color Depth
Use two different oxide washes—like iron and a touch of cobalt—in different areas of the leaves to create subtle, lifelike color variation.
Hang your new handcrafted timepiece and enjoy the tranquil, natural vibe it brings to your space.
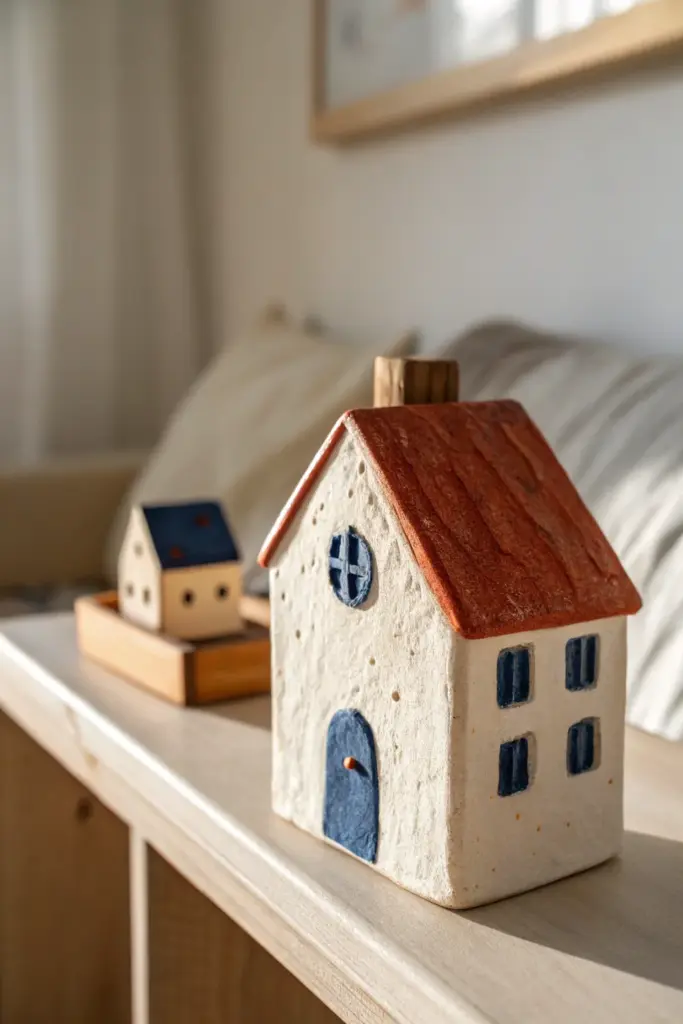
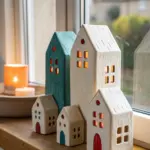
Template-Built Mini Ceramic House Village
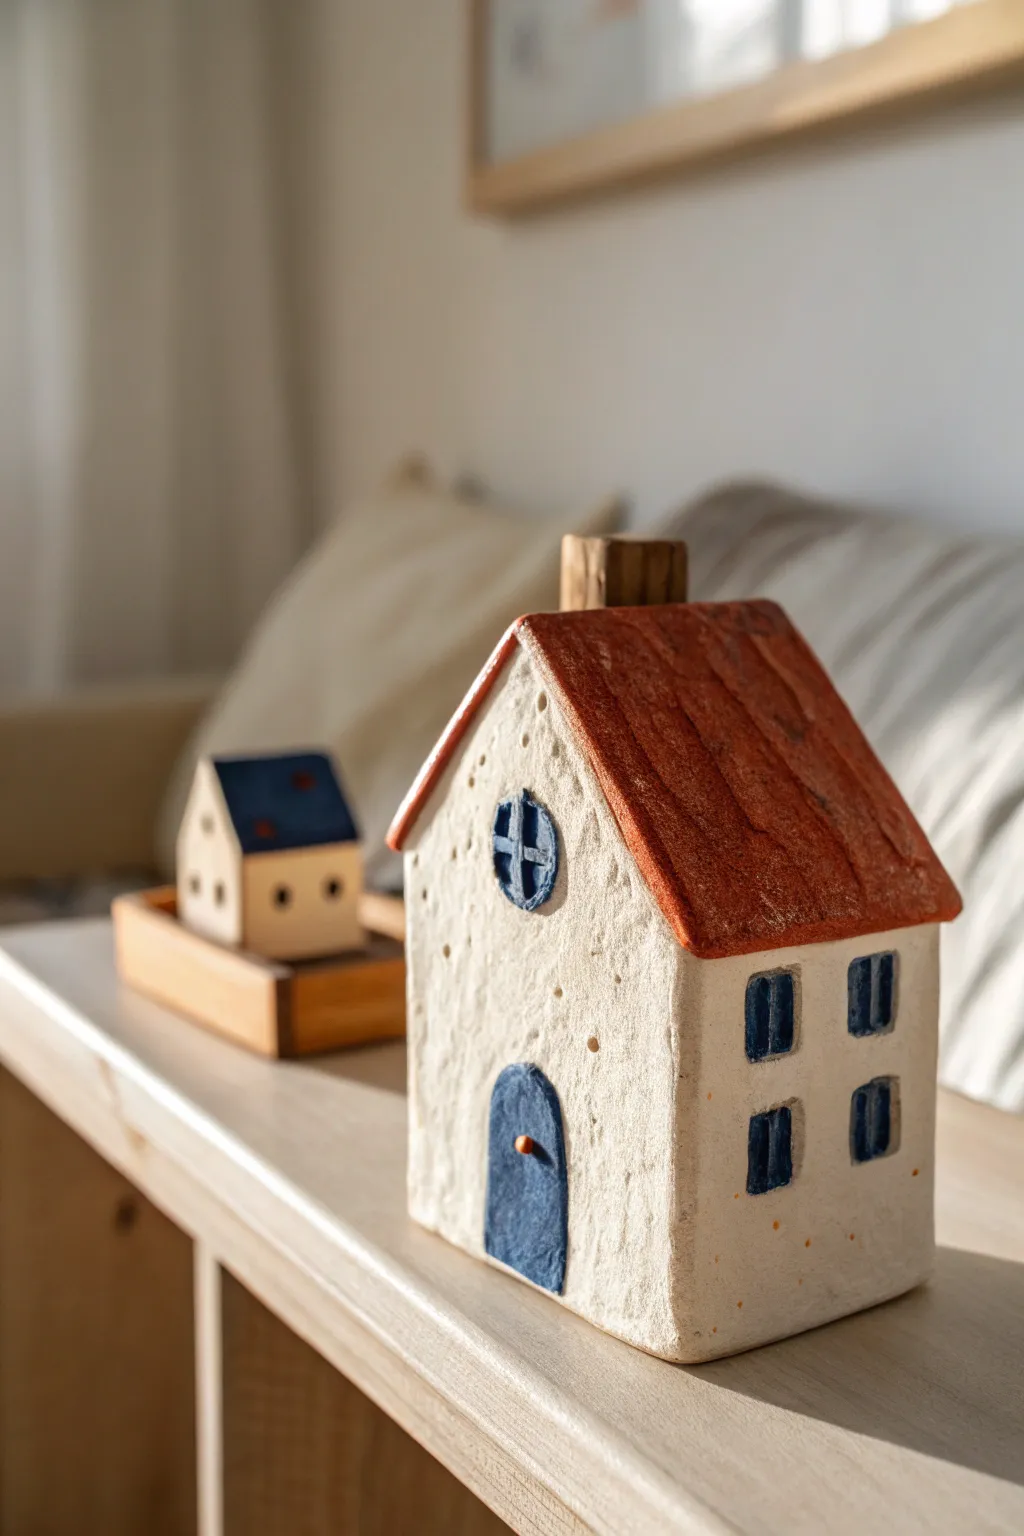
Create a cozy village atmosphere with this slab-built ceramic house, featuring a distinctively rough, rustic texture and charming hand-painted blue accents. The combination of creamy white clay walls and a warm, terracotta-toned roof gives this piece a timeless, folk-art appeal.
Step-by-Step
Materials
- Stoneware clay (one light/buff body, one terracotta or use oxides)
- Rolling pin
- Two wooden guide strips (approx. 1/4 inch thick)
- Fettling knife or craft knife
- Ruler
- Paper templates (walls, roof panels)
- Slip and scoring tool (or serrated rib)
- Small wooden paddle or spoon
- Underglaze (Navy Blue)
- Small detail paintbrush
- Clear matte or satin glaze
- Sponge
Step 1: Preparing the Slabs and Templates
-
Drafting the structure:
Begin by sketching your house templates on cardstock or stiffness paper. You will need two pentagonal shapes for the front and back walls (approx. 4 inches wide by 6 inches tall at the peak) and two rectangular side walls (4×4 inches). -
Rolling the clay:
Roll out your light-colored stoneware clay between the wooden guide strips to ensure an even 1/4-inch thickness. This uniform thickness is crucial for preventing warping during the firing process. -
Cutting the components:
Place your paper templates onto the slab and carefully cut around them using a fettling knife. Don’t discard the scraps just yet; you’ll need them for the chimney. -
Texturing the walls:
Before assembly, use a rough sponge or a crumpled ball of aluminum foil to press a subtle, stucco-like texture into the surface of all four wall pieces. This mimics the rustic plaster look seen in the reference.
Fixing Warped Walls
If your walls start bowing inward while plastic, crumple up newspaper and stuff the inside of the house gently. This acts as internal support while the clay stiffens to leather-hard.
Step 2: Assembling the House Body
-
Drying to leather-hard:
Let your cut slabs sit until they reach a leather-hard state. They should be firm enough to stand up without slumping but still soft enough to join. -
Beveling the edges:
Cut the vertical edges of your walls at a 45-degree angle. This creates a miter joint that is stronger and hides the seam better than a simple butt joint. -
Scoring and slipping:
Aggressively score the beveled edges and apply a generous amount of clay slip. This ‘glue’ is vital for a bond that survives the kiln. -
joining the walls:
Press the walls together to form the rectangular base. Use a small wooden paddle to gently tap the corners, ensuring the seams are tight and the shape is squared. -
Reinforcing the interior:
Roll a very thin coil of clay and press it into the interior corners of the house. Smooth this coil down to mechanically lock the walls together.
Step 3: Roofing and Architectural Details
-
Creating the roof slabs:
Roll out a slab for the roof. You can either use a terracotta clay body here for natural color contrast or stick with the light clay and paint it later. Cut two rectangles slightly larger than the footprint of the house to allow for an overhang. -
Adding roof texture:
Using a modeling tool or the handle of a paintbrush, drag deep, vertical grooves down the roof panels to simulate wooden shingles or tiles. The rougher, the better. -
Attaching the roof:
Score the top peaks of your front and back walls. Apply slip and place the roof panels on, ensuring they meet perfectly at the apex. Use a small coil to reinforce the underside of the peak inside. -
Building the chimney:
Use a small scrap block of clay to form a rectangular chimney. Score and slip it onto the roof ridge. I like to leave the top rough and unrefined for character. -
Carving the windows:
With a loop tool, lightly carve out shallow recesses for the windows—two squarish ones on the right, and a circular attic window on the peak. Don’t cut all the way through; just create a depression. -
Sculpting the door:
Identify where the door goes and layer a thin arched slab of clay over the wall, or carve the surrounding area down to make the door stand out in relief. Add a tiny ball of clay for the doorknob.
Clean Lines Hack
For crisp window painting, apply liquid wax resist over the wall areas surrounding the windows before painting the blue underglaze. Any stray paint will wipe right off the waxed sections.
Step 4: Finishing and Decoration
-
Bisque firing:
Allow the house to dry completely (slowly, under loose plastic) before bisque firing it to Cone 04. -
Painting the details:
Apply Navy Blue underglaze to the recessed window panes and the door. Use a steady hand to paint the window mullions (the crossed lines) over the blue, or wipe back the blue carefully to reveal the clay lines. -
Roof treatment:
If you didn’t use terracotta clay, apply a reddish-brown iron oxide wash or underglaze to the roof. Wipe it back with a damp sponge so the color stays darker in the texture grooves. -
Glazing:
Dip the entire piece in a clear matte glaze, or leave the exterior unglazed for a truly raw, stony texture, only glazing the interior for strength. -
Final firing:
Fire the piece to the maturity temperature of your clay body (likely Cone 5 or 6 for stoneware).
Place your finished cottage on a shelf or windowsill where it can catch the light and add a touch of handmade warmth to your room