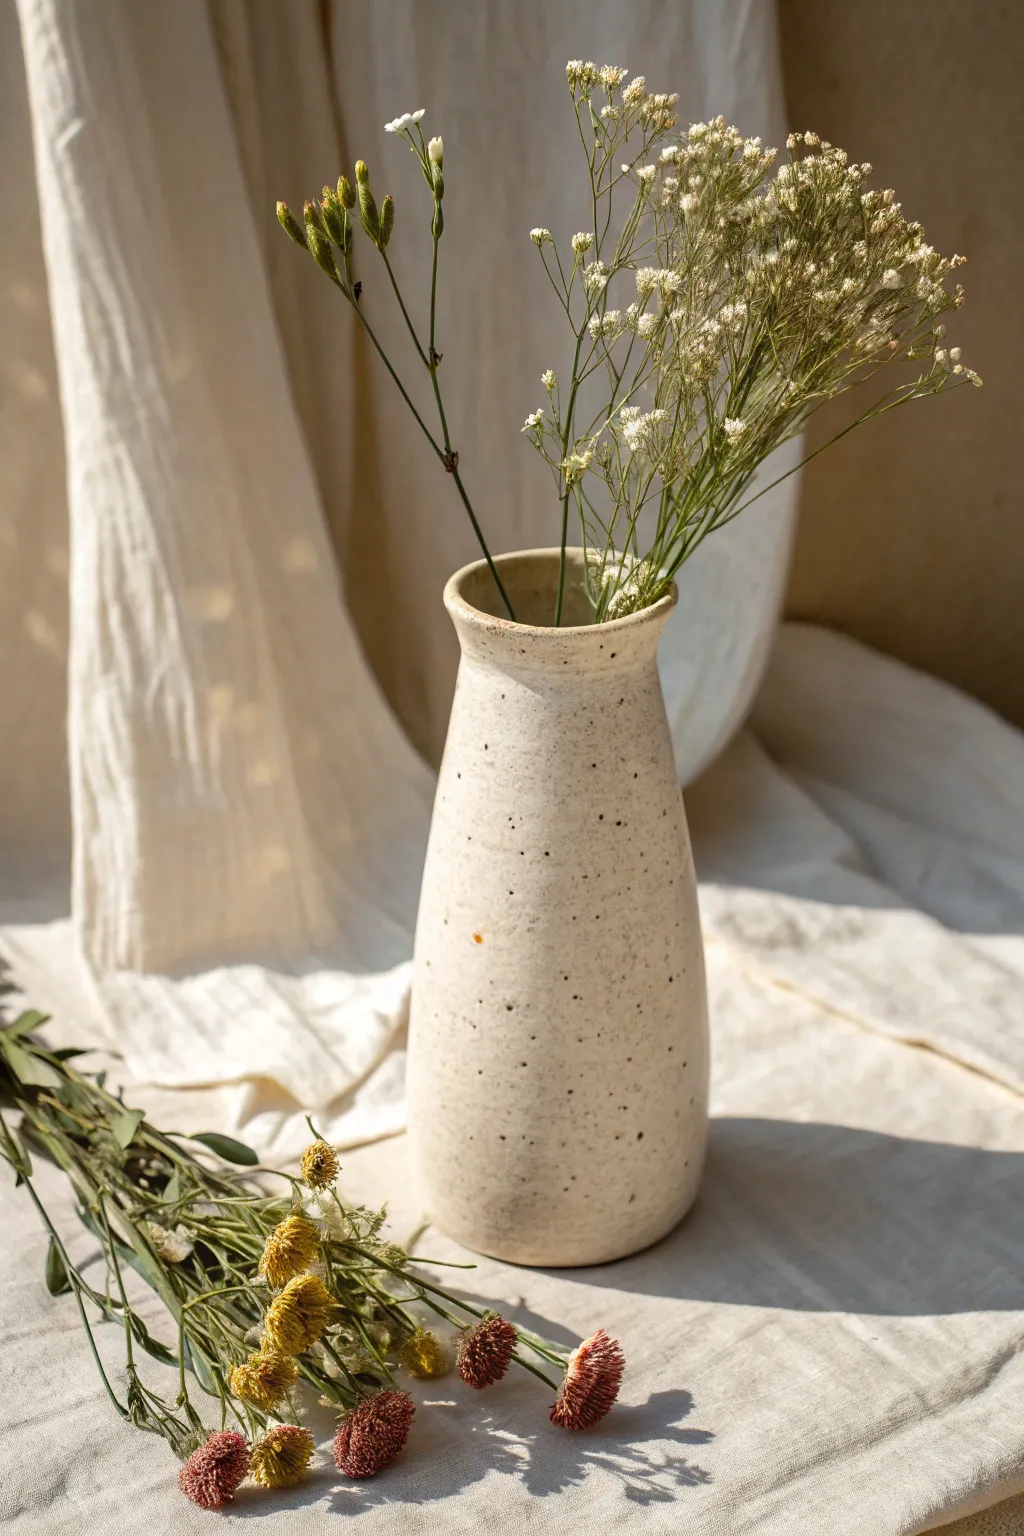
There’s something magical about turning a flat clay slab into a vase that actually holds its shape and feels totally “you.” Here are my favorite clay slab vase ideas—starting with the classic go-to forms and drifting into the fun, experimental stuff once you’ve got momentum.
Classic Wrapped Cylinder Vase
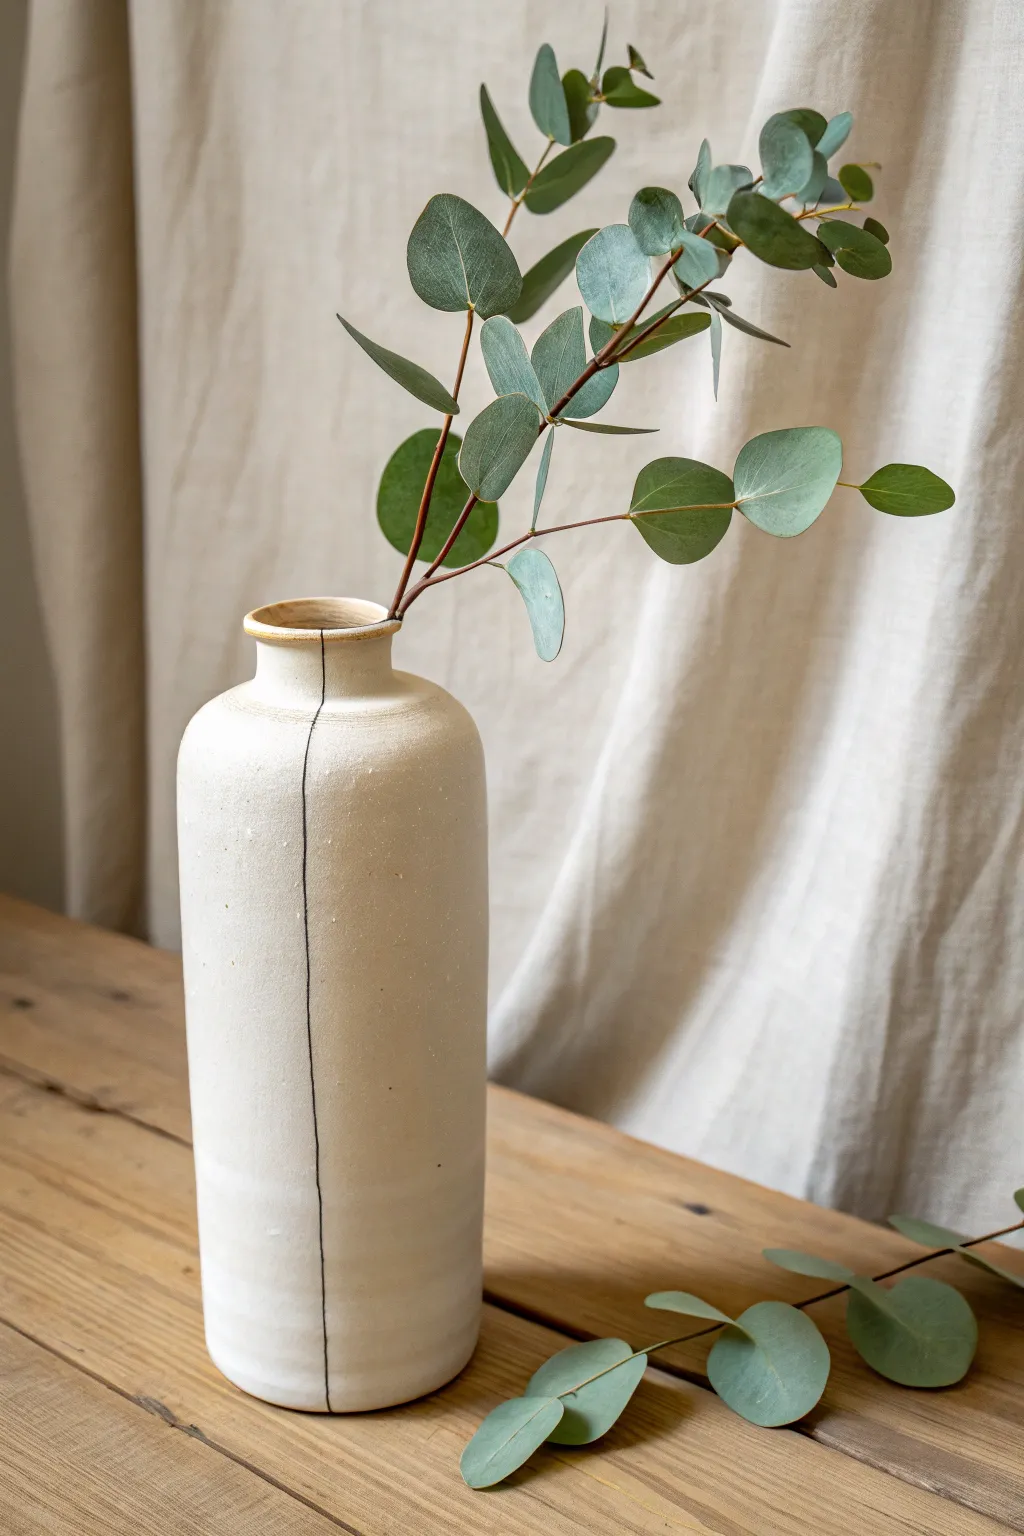
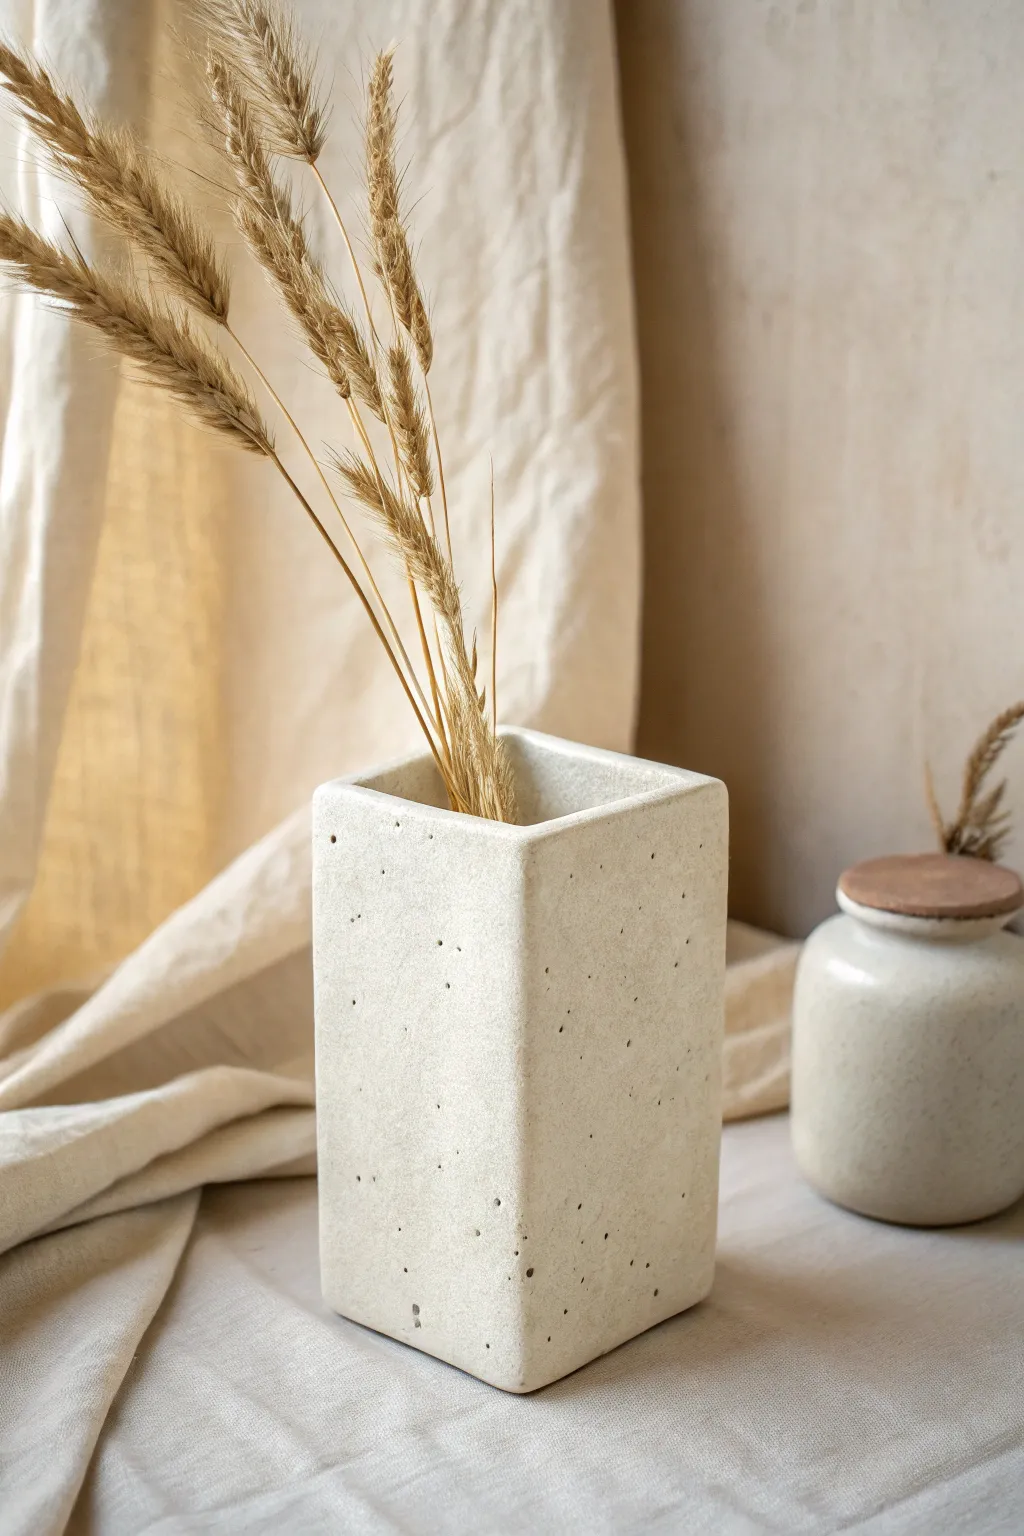
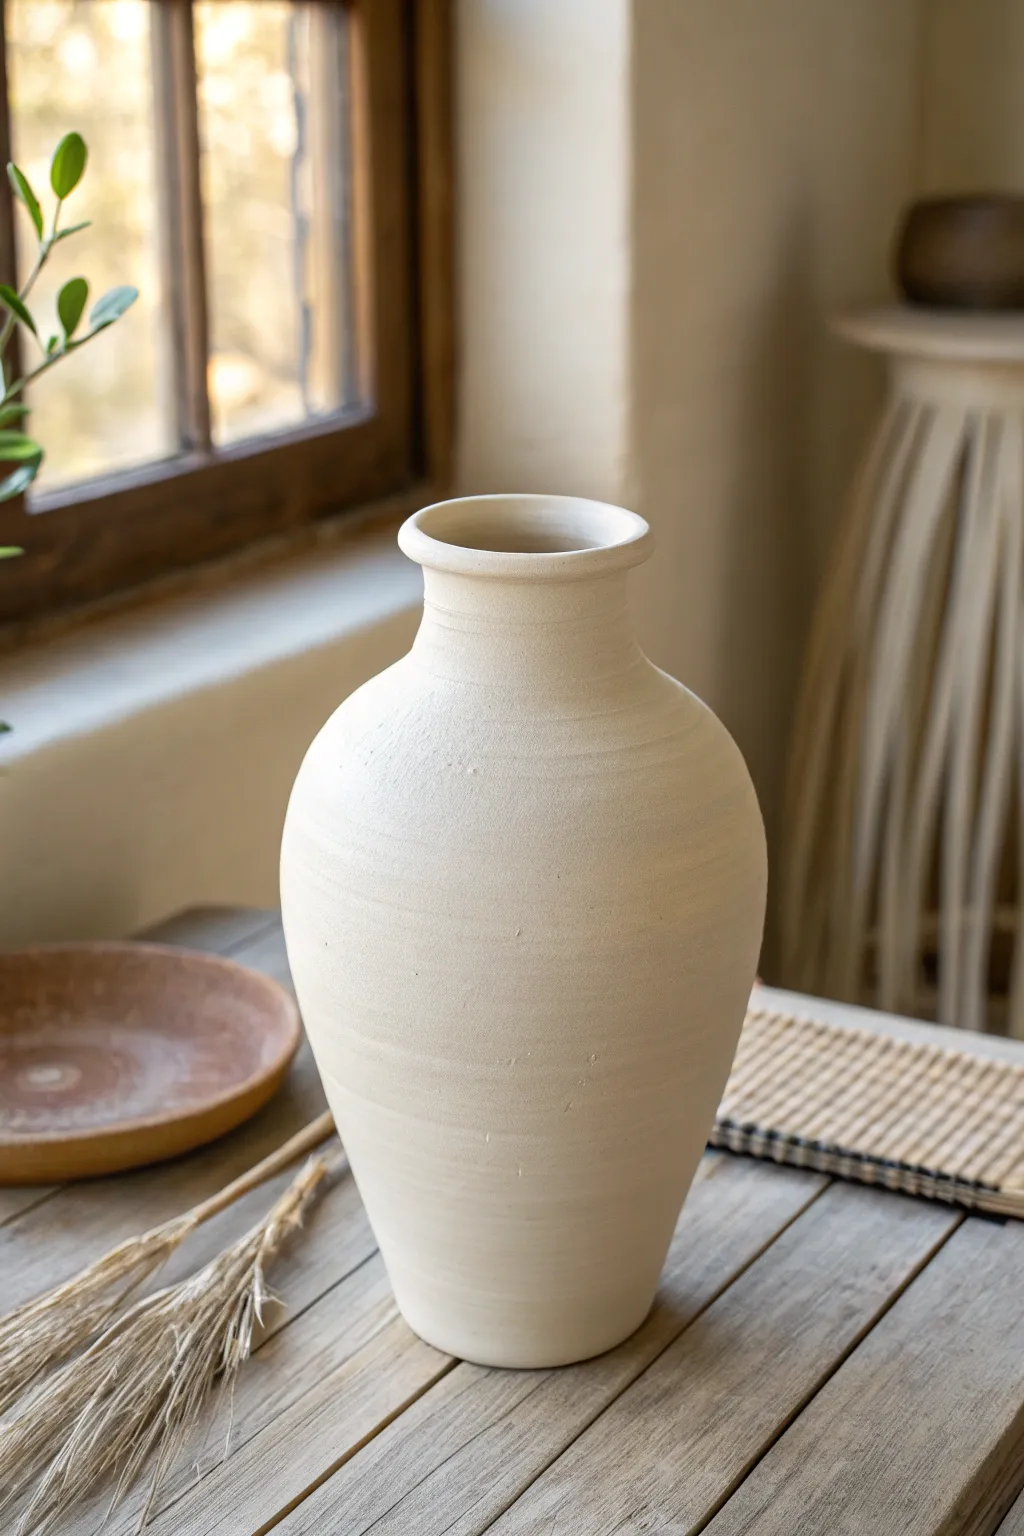
This elegant vase celebrates the process of construction with a prominent, artistic seam line running down a sleek white form. Its tall, cylindrical body and narrowed neck create a modern silhouette perfect for displaying simple eucalyptus branches or dried florals.
Detailed Instructions
Materials
- Light-colored stoneware clay (white or cream)
- Rolling pin
- Canvas or slab mat
- Ruler
- Fettling knife or needle tool
- PVC pipe or cardboard tube (approx. 4-inch diameter) for a mold
- Newspaper
- Scoring tool (serrated rib)
- Slip (clay slurry)
- Black underglaze or black slip
- Fine sponge
- Clear matte glaze (optional) or leave unglazed on the outside
Step 1: Planning and Slab Preparation
-
Prepare your mold:
Begin by selecting your cylinder mold—a PVC pipe works perfectly. Wrap the pipe entirely in a sheet of newspaper, taping it secure. This paper barrier prevents the clay from sticking to the plastic and allows for easy removal later. -
Roll the slab:
Wedging your clay well, roll out a large, even slab. Aim for a thickness of about 1/4 to 3/8 of an inch. Ensure the slab is wide enough to wrap around your pipe with a little overlap, and tall enough for your desired vase height (around 12-14 inches). -
Compress the clay:
Using a rubber rib, smooth the surface of the slab on both sides. This compression not only removes canvas texture but also aligns the clay particles to prevent warping during firing. -
Trim to size:
Measure the circumference of your tube. Cut a clean rectangle from your slab that is the height you want and the width of the circumference plus just a tiny bit of extra allowance.
Slumping Neck?
If the neck collapses while collaring, the clay is too wet. Use a heat gun or hair dryer to stiffen the top 3 inches slightly before attempting to narrow it further.
Step 2: Forming the Cylinder Body
-
Wrap the form:
Carefully lift your slab and wrap it around the newspaper-covered tube. Bring the two vertical edges together. -
Create the seam connection:
Instead of blending the seam invisible immediately, score the edges thoroughly where they meet. Apply a generous amount of slip. Press the edges firmly together to ensure a strong bond. -
Enhance the seam line:
For the look in the photo, we want to accentuate the join rather than hide it. Use a wooden tool to gently press a groove along the join line. This groove will later hold the black detail. -
Attach the base:
Roll a small separate piece of slab for the floor of the vase. Place your cylinder on top of this piece, trace around it, and cut it out. Score and slip the bottom edge of the cylinder and the disk, then attach them firmly. -
Initial drying:
Let the cylinder stiffen up slightly while still on the tube—just until it can support its own weight without slumping. I find about 30-60 minutes is usually enough depending on humidity. -
Remove the support:
Carefully slide the PVC pipe out, leaving the newspaper inside if it’s stuck (it will burn out in the kiln, or you can peel it out later). Now your cylinder is standing on its own.
Pro Tip: Sharp Lines
For the crispest black seam line, lay a piece of string dipped in wax resist into the groove before applying black slip. It acts as a mask and keeps the edges super defined.
Step 3: Shaping the Neck
-
Collar the rim:
With the cylinder standing, gently cup your hands around the top rim. Slowly squeeze inward while rotating the vase (if you have a banding wheel) or moving your hands around it. This is called ‘collaring’ and it narrows the opening. -
Refine the shoulder:
Continue collaring until you have a distinct shoulder and a narrower neck, mimicking the bottle shape in the image. Keep the clay moist with a sponge if it starts to crack. -
Finish the lip:
Smooth the very top edge with a chamois or wet sponge or finger to create a soft, rounded rim.
Step 4: Surface Detail and Finishing
-
Create the black inlay:
Once the pot is leather hard, take your black underglaze or slip. Paint it directly into that vertical seam groove you created earlier. Don’t worry if it gets messy on the surrounding clay. -
Clean the seam:
Wait for the underglaze to dry to the touch. Then, using a clean, slightly damp sponge or a metal rib, scrape or wipe away the excess black material from the surface, leaving the black pigment trapped only inside the deep crack/line. -
Smooth the body:
Give the entire exterior a final wipe with a sponge to ensure a smooth, stone-like texture. If you want the subtle horizontal texture at the bottom shown in the photo, you can lightly drag a serrated rib around the base. -
Bisque fire:
Let the vase dry completely (slowly, to avoid warping) before bisque firing it to your clay body’s specifications. -
Glazing:
For the inside, pour in a liner glaze to make it waterproof. For the outside, the image suggests a raw clay look or a very thin matte white glaze. If glazing the exterior, dip or spray a satin matte glaze, but ensure the black line remains visible. -
Final fire:
Fire the piece to maturity (likely Cone 5/6 or Cone 10 depending on your clay). Start enjoying your new vase once cool.
Fill your finished vase with a few simple stems and admire the organic, modern touch it adds to your space


Simple Boxy Slab Vase
This minimalist vase project focuses on clean lines and subtle texture, resulting in a timeless piece perfect for dried botanicals. The simple boxy silhouette is achieved through careful slab construction, while the speckled finish mimics the look of natural stone.
Step-by-Step Guide
Materials
- Speckled buff stoneware clay (or plain clay with added grog/sand)
- Rolling pin
- Two wooden guide strips (approx. 1/4 inch thick)
- Canvas or slab mat
- Fettling knife or sharp craft blade
- Ruler or set square
- Scoring tool (serrated rib or needle tool)
- Slip (clay and water slurry)
- Small paintbrush
- Wooden modeling tool or paddle
- Sponge
- Matte white or clear glaze (optional)
- Paper template (optional for consistency)
Step 1: Slab Preparation
-
Wedge the Clay:
Begin by thoroughly wedging your speckled clay to remove air bubbles and ensure an even consistency. Wedging is crucial for slab work to prevent warping later. -
Roll the Slab:
Place your clay on a canvas surface between two wooden guide strips. Roll the clay out until the rolling pin rests on the guides, ensuring a perfectly uniform 1/4-inch thickness. -
Smooth the Surface:
Before cutting, take a rubber rib or a slightly damp sponge and compress the surface of the slab on both sides. -
Let it firm up:
Wait until the slab is leather-hard before cutting. If you cut while it’s too soft, the walls will slump.
Step 2: Cutting and Assembly
-
Measure and Mark:
Using a ruler and a set square, mark out four identical rectangles for the walls (e.g., 3 inches wide by 6 inches tall) and one square for the base (e.g., 3×3 inches). -
Cut the Pieces:
Use your fettling knife or blade to cut along your guide lines. Keep the blade perpendicular to the table for straight edges, or bevel the edges at 45 degrees for a miter joint if you prefer a seamless corner. -
Score the Edges:
Rough up the contact points on the base and the bottom of the first wall using your scoring tool. Be generous with the texture to ensure a strong bond. -
Apply Slip:
Brush a layer of clay slip onto the scored areas. It should be the consistency of heavy cream. -
Attach First Wall:
Press the first wall firmly onto the base. Use a square block or object on the inside to help keep it perfectly upright while the slip grabs. -
Build the Box:
Repeat the score-and-slip process for the remaining three walls, attaching them to the base and to each other. Work opposite sides first for better stability. -
Reinforce Seams:
Roll a very thin coil of soft clay. Press this coil into the interior corners where the walls meet the base and each other to reinforce the joints.
Warped Walls?
If your walls are bowing inward or outward during drying, fill the vase with rice or dry beans while it’s in the leather-hard stage. This acts as internal support.
Step 3: Refining and Finishing
-
Paddle the Shape:
Once assembled, gently tap the outside walls with a wooden paddle. This compresses the joints further and sharpens the boxy silhouette. -
Clean the Corners:
I like to run a slightly damp sponge along the sharp exterior corners to slightly soften them, preventing chipping after firing. -
Smooth the Rim:
Pay special attention to the top rim. Use a chamois or sponge to ensure it is level and smooth to the touch. -
Dry Slowly:
Loosely cover the vase with plastic to let it dry slowly. Uneven drying is the enemy of box forms and can cause warping. -
The Bisque Fire:
Once bone dry, bisque fire the piece to the appropriate cone for your clay body (usually Cone 04 or 06). -
Glazing:
To achieve the look in the photo, apply a matte, semi-opaque white glaze, or leave the exterior unglazed if your clay body is naturally speckled and vitrified. If glazing, pour glaze inside, swirl to coat, and pour out. -
Fettle the Finish:
Wipe the vase bottom clean of any glaze with a sponge to prevent it from sticking to the kiln shelf. -
Final Firing:
Fire the piece a final time to the clay’s maturity temperature (often Cone 5 or 6 for stoneware).
Texture Play
Before assembling, gently press a piece of rough linen or canvas into the soft slab. This adds a subtle fabric texture that complements the speckled clay perfectly.
Now you have a structured, minimalist vessel ready to display your favorite dried grasses


Teardrop Cone-Joined Vase
Embrace the beauty of organic forms with this textured teardrop vase, characterized by its wide, grounding base and elegantly tapered neck. The finish mimics the raw appeal of sandstone, bringing a serene and natural touch to your living space.
Detailed Instructions
Materials
- Stoneware clay (groggy or sandy texture preferred)
- Rolling pin
- Canvas mat or slab roller
- Paper templates (cone shape for neck, wide curved rectangles for body)
- Serrated metal rib
- Rubber kidney rib
- Needle tool
- Slip and scoring tool
- Wooden paddle
- Sponge
Step 1: Preparing the Slab Components
-
Roll the clay:
Begin by wedging your clay to remove air bubbles. Roll out a consistent slab approximately 1/4 inch thick on your canvas mat. Avoid rolling it too thin, as the walls need support the vase’s height. -
Cut the templates:
You will need to design two paper templates: a large, curved rectangle that forms a cylinder for the body (tapering slightly at the top) and a cone-shaped template for the narrow neck. Lay these on your slab and cut around them using a needle tool. -
Cut the base:
Cut a simple circle corresponding to the bottom width of your body template. This will serve as the floor of your vase. -
Texture the surface:
Before assembling, lightly drag a serrated metal rib horizontally across the flat slabs. This creates the subtle, stone-like striations seen in the finished piece. -
Set to leather hard:
Allow the cut slabs to firm up slightly until they can hold their shape but are still flexible enough to bend without cracking. Creating a rigid vase starts with patience here.
Slumping Walls?
If the belly sags, stuff the inside with crumpled newspaper or plastic bags. This supports the weight of the clay while the shape stiffens up.
Step 2: Construction
-
Form the body:
Take the large body slab and curve it into a cylinder that bulges slightly. Score and slip the vertical edges, then press them firmly together to create a seam. Smooth the seam inside and out. -
Attach the base:
Score the bottom edge of your cylinder and the outer rim of your circular base. Apply slip and join them. Use a wooden modeling tool to blend the clay upwards from the base to the wall, ensuring a watertight seal. -
Shape the belly:
With one hand inside the cylinder support the wall, use a wooden paddle on the outside to gently beat the clay into a rounder, teardrop shape. Work slowly around the circumference to expand the belly. -
Form the neck cone:
Roll your second template into a tall, narrow cone. Join the seam securely just like you did with the body. The opening at the top should be small and refined. -
Join neck to body:
Score the top rim of the teardrop body and the bottom rim of the cone neck. Apply slip and place the cone on top. This is a critical joint; blend the clay thoroughly on the outside so the transition looks seamless. -
Refine the curve:
I like to use a flexible metal rib to scrape away the excess clay at the join line, creating a smooth, continuous curve from the wide body up into the neck.
Make it Ancient
Mix grog or heavy sand into your clay body before rolling. After firing, leave the outside unglazed for a raw, archaeological artifact texture.
Step 3: Finishing Touches
-
Smooth the rim:
Use a damp chamois or your finger to compress and smooth the top lip of the vase. It should look polished but retain a handmade feel. -
Enhance texture:
If the joining process smoothed away your texture, lightly drag the serrated rib around the vase again, following the form horizontally. This emphasizes the turned look. -
Dry slowly:
Cover the vase loosely with plastic to ensure slow, even drying. The neck dries faster than the thick base, so slow drying prevents cracking. -
Bisque fire:
Once bone dry, fire the piece to bisque temperature (usually Cone 04 or 06) in a kiln. -
Glazing:
Apply a matte, stone-colored glaze. Alternatively, if your clay body is naturally sandy, a simple wash of iron oxide wiped back can highlight the texture without covering the clay’s character. -
Final firing:
Glaze fire to the maturity temperature of your clay body (likely Cone 5/6 or Cone 10 for stoneware).
Place your finished vase near a window where natural light can graze the textured surface and highlight your craftsmanship

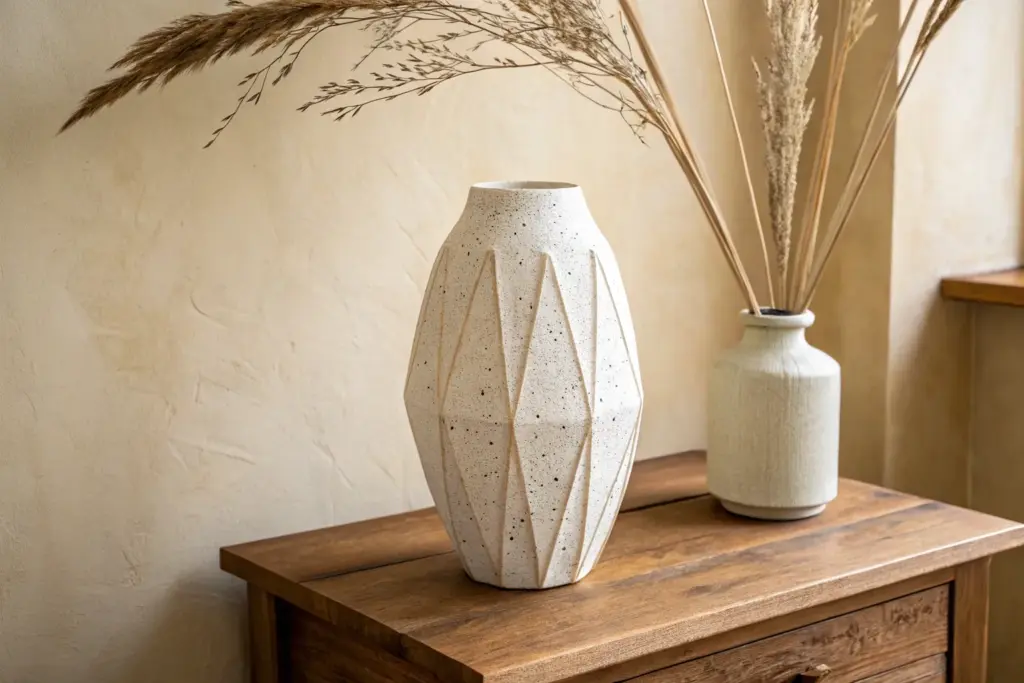
Faceted Angular Prism Vase
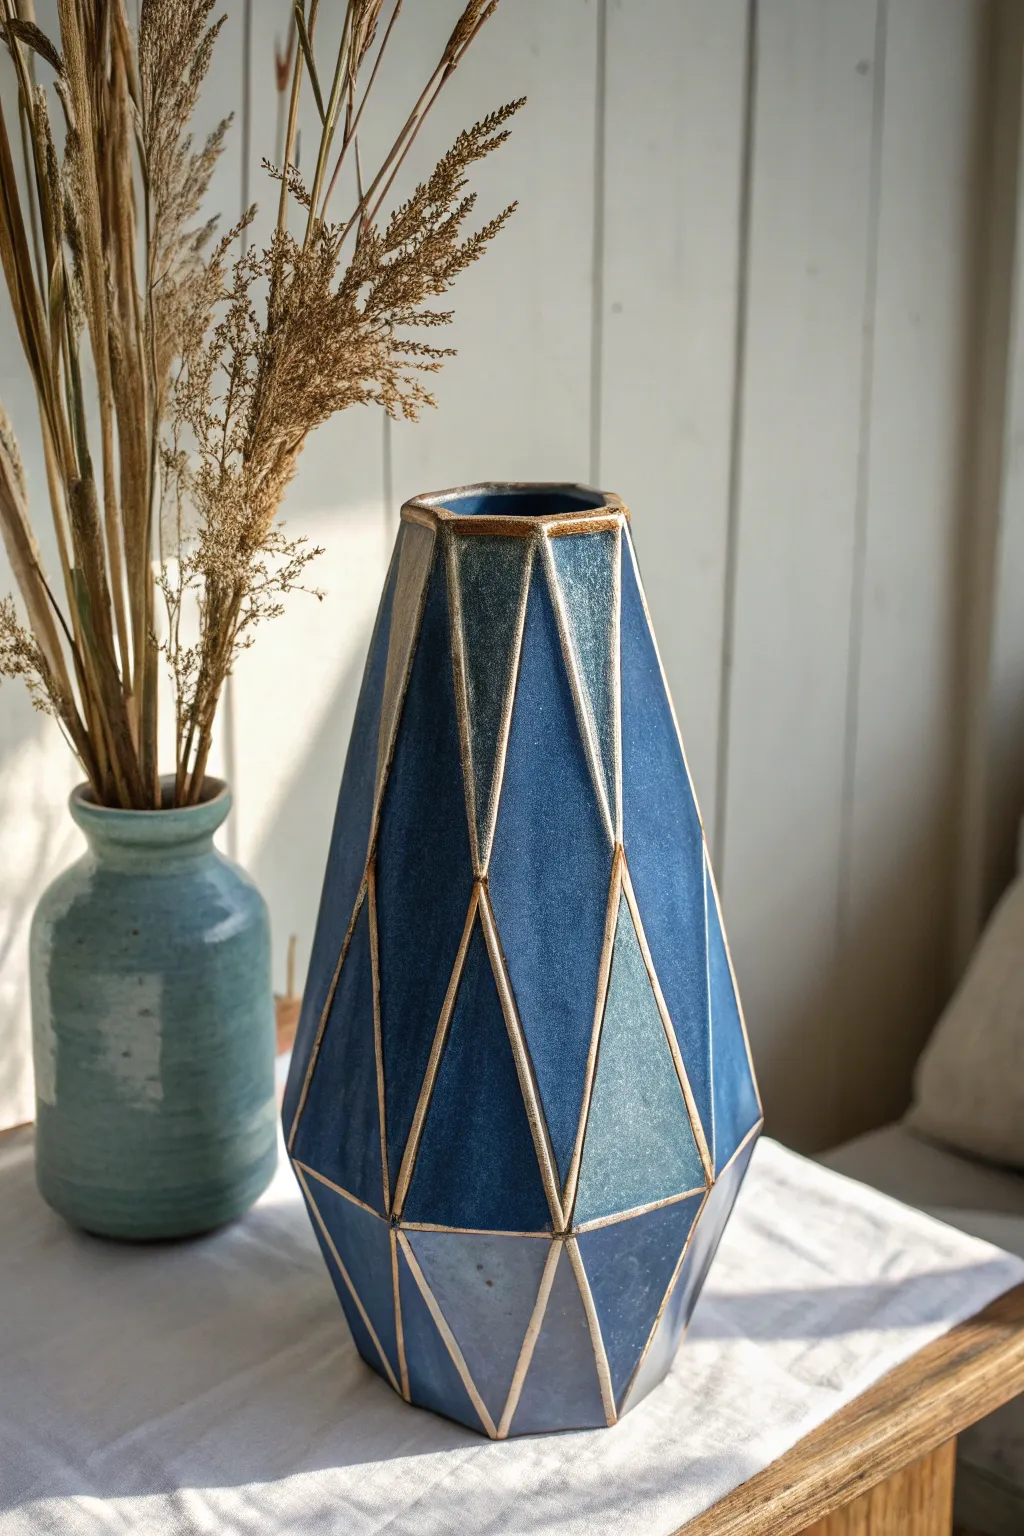
This striking vase combines the structure of modern architecture with the warmth of handmade ceramics. By assembling cut triangular slabs into a columnar prism and accentuating the seams with gold luster, you achieve a sophisticated, multi-dimensional centerpiece.
Step-by-Step Guide
Materials
- Mid-fire stoneware clay body (smooth)
- Rolling pin and ½-inch guide strips
- Paper templates (scalene and isosceles triangles)
- Fettling knife or X-Acto blade
- Slip and scoring tool
- Pony roller or rib
- Deep sapphire blue glossy glaze
- Slate blue satin matte glaze
- Gold wax luster (overglaze)
- Small liner brush
- Kiln
Step 1: Slab Preparation & Cutting
-
Design your templates:
Sketch the faceted structure on paper first. You will need a series of elongated, alternating triangles to create the vertical rise, plus a hexagonal base. Cut these shapes out of cardstock to serve as your templates. -
Roll the clay:
Roll your clay out into a large, even slab. I find that using ½-inch guide strips ensures the walls are thick enough to support the height of this vessel without buckling. -
Smooth the surface:
Run a flexible rib over the clay surface on both sides. This compresses the clay particles, preventing future warping, and creates a pristine canvas for that glossy glaze. -
Cut the facets:
Lay your cardstock templates onto the slab. Using a fettling knife held at a 45-degree angle (bevel cut), carefully cut out each triangular panel. The beveled edges provide more surface area for strong joints. -
Let them firm up:
Leave the cut pieces on a ware board until they reach a ‘leather hard’ state. They need to be stiff enough to stand upright without slumping but still retain some moisture for attachment.
Slumping Walls?
If walls sag during assembly, use crumpled newspaper inside the vase as temporary interior support. Leave it in until the clay stiffens, then remove before the shape closes up too much.
Step 2: Assembly
-
Score the edges:
Take your scoring tool and thoroughly scratch up the beveled edges of all your clay triangles. -
Construct the base ring:
Start with the bottom row of triangles pointing upward. Apply slip to the scored edges and press them together, attaching them to your hexagonal base slab. It helps to work in a ring to establish stability immediately. -
Build upward:
Begin attaching the inverted triangles that slot between the upright ones. Ensure the seams are completely sealed on the *inside* of the vase using a small coil or a wooden tool, but leave the outside seams clearly defined. -
Refine the seams:
Instead of smoothing the exterior joints away, use a damp sponge to slightly soften the sharp corners, but keep the ‘channel’ between slabs distinct. This groove is crucial for the gold detailing later. -
Clean the rim:
Once the full height is achieved, verify the rim is level. Use a surform tool if necessary to even it out, then sponge it smooth. -
Bisque fire:
Allow the vase to dry very slowly under loose plastic to prevent cracking at the many seams. Once bone dry, bisque fire it to Cone 04.
Step 3: Glazing & Luster
-
Wax the lines:
Apply thin lines of wax resist directly over the recessed seams where the panels meet. This prevents glaze from adhering to the lines, leaving raw clay exposed for the gold later. -
Apply the glazes:
To mimic the image, alternate your glaze application. Brush a deep sapphire blue gloss onto the larger central facets and a slate blue satin matte onto the side or lower facets for contrast. Avoid getting glaze in the waxed seams. -
Glaze fire:
Fire the piece to the maturation temperature of your clay and glaze (typically Cone 5 or 6). Let it cool completely. -
Apply gold luster:
Using a dedicated brush and a well-ventilated area, carefully paint the gold overglaze luster into the unglazed seam channels and along the rim. A steady hand is key here. -
Final firing:
Place the vase back in the kiln for a third firing, usually a low-fire luster cycle (around Cone 018), to set the gold.
Level Up: Texture
Before assembly, lightly press a linen cloth or canvas onto just a few of the slab triangles. This subtle texture variation will catch the glaze differently than the smooth panels.
This geometric beauty is now ready to hold dried botanicals or stand alone as a sculptural statement piece

The Complete Guide to Pottery Troubleshooting
Uncover the most common ceramic mistakes—from cracking clay to failed glazes—and learn how to fix them fast.
Soft-Slab Calla Lily Wrap Vase
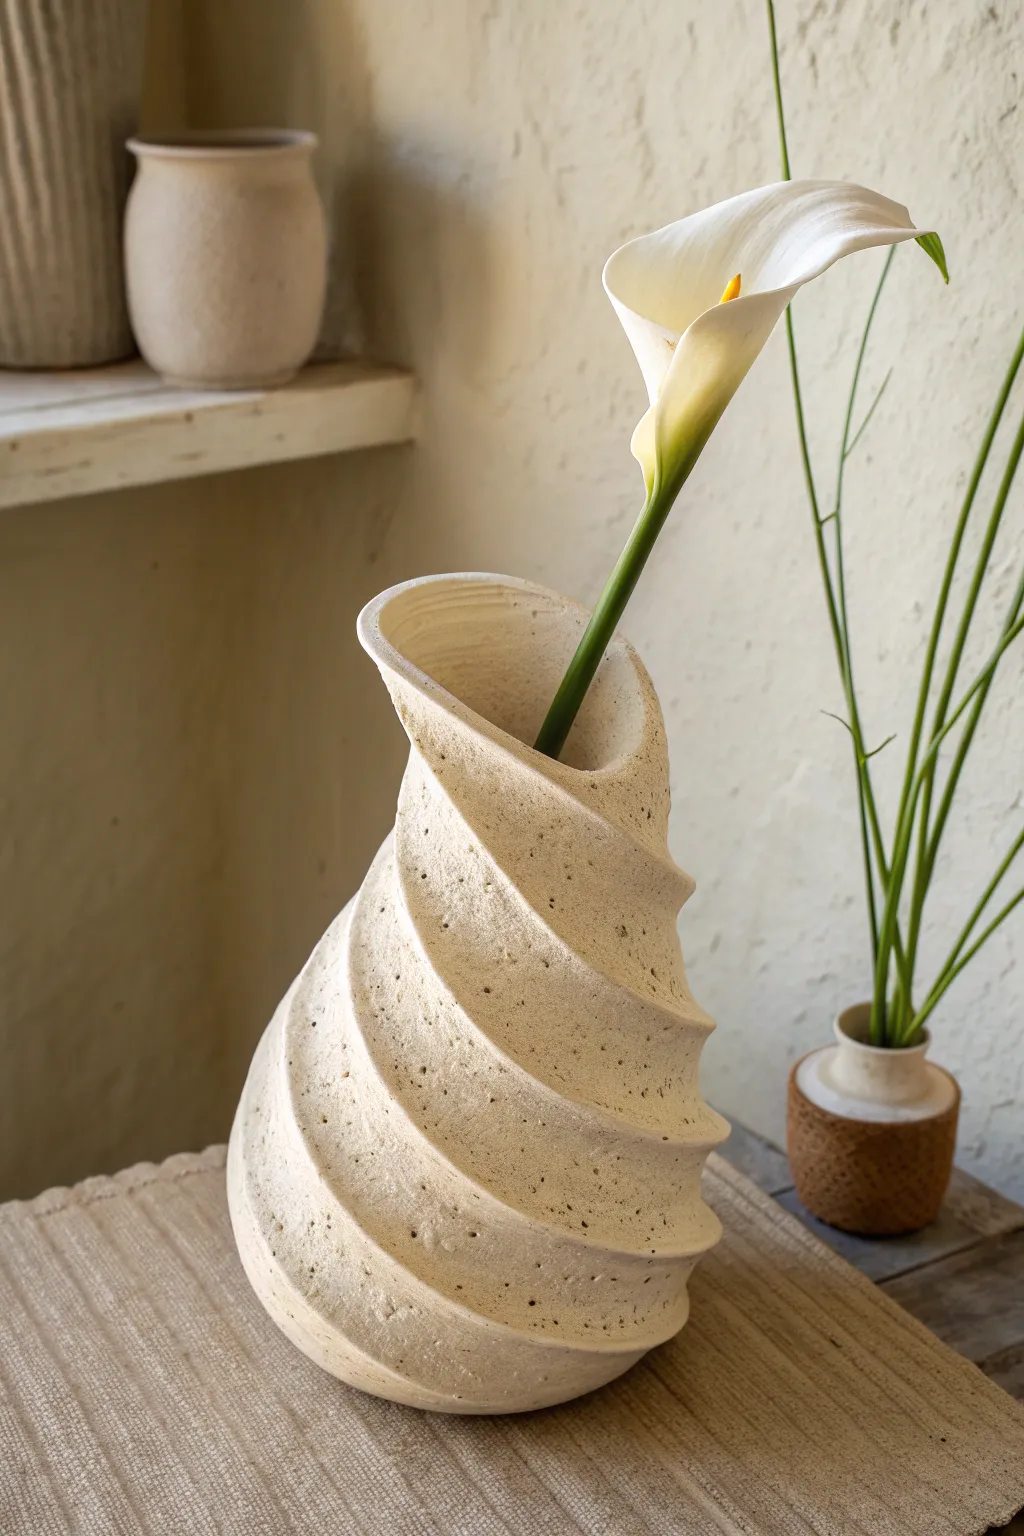
Mimicking the elegant, rolled form of a calla lily flower, this vase features a continuous spiral wrap that creates stunning visual movement. The textured, speckled clay body gives it an organic feel, while the flared opening is perfectly shaped to cradle a single, long-stemmed bloom.
Step-by-Step Tutorial
Materials
- Speckled stoneware clay (mid-fire)
- Rolling pin with thickness guides (approx. 1/4 inch)
- Canvas mat or slab roller
- Fettling knife or needle tool
- Serrated rib and scoring tool
- Slip or vinegar
- Smoothing sponge
- Conical form or temporary paper cone support
- Wooden modeling tool
- Lazy Susan or banding wheel
Step 1: Slab Preparation
-
Roll the slab:
Begin by rolling out a generous slab of speckled stoneware clay on your canvas mat. Aim for an even thickness of about 1/4 inch throughout. If you want the subtle surface texture seen in the photo, you can lightly roll over the slab with a piece of coarse fabric before cutting. -
Cut the triangular form:
To achieve the spiral shape, you aren’t cutting a simple rectangle. Instead, cut a very long, elongated right-angled triangle. The wide end will become the base, and the tapering point will wrap around the top. -
Soften the edges:
Before assembling, run a damp sponge or your finger along the cut edges to compress them. This prevents sharp, brittle edges after firing and gives that soft, organic look. -
Create a temporary support:
Roll a piece of stiff poster board or roofing felt into a cone shape that matches your desired interior volume. Tape it securely. This will act as the internal armature while the clay is soft.
Slumping Spiral?
If the clay wall sags as you wrap, your slab is too wet. Let the slab sit on the canvas for 20-30 minutes to stiffen up before attempting to build vertical height.
Step 2: Forming the Spiral
-
Prepare the base:
Cut a circular disc for the floor of the vase, slightly larger than the wide end of your cone support. Score and slip the outer perimeter of this disc. -
Begin the wrap:
Place your cone support on the base. Take the widest end of your triangular slab and stand it up against the form. Score and slip the bottom edge of the slab where it meets the floor. -
Wind the clay:
Slowly wrap the long clay tail around the cone form, moving upward as you go. Allow the clay to overlap the layer beneath it by about half an inch to an inch. This overlap is crucial for the structural integrity. -
Secure the overlap:
As you wrap, apply slip to the point where the new layer touches the previous one. Reaching inside the cone might be tricky, so I often use a long wooden tool to gently press the inner seam together as I wind upwards. -
Refine the lip:
Let the final tapered point of the clay flare slightly outward at the top, mimicking the opening of a flower. Smooth this edge carefully so it looks intentional and fluid.
Rim Variation
Before the clay dries, gently pinch and pull the very top edge of the rim outward and downward to create an exaggerated, drooping ‘petal’ effect similar to a wilting lily.
Step 3: Finishing and Drying
-
Blend the base seam:
Return to the bottom of the vase. Use a modeling tool to firmly blend the wall of the vase into the floor disc so no seam is visible on the outside. You can roll a tiny coil and press it into this joint for extra strength. -
Enhance the texture:
With the vase still on the support, use a barely damp sponge to wipe away excess slip. If you lost some of the speckled texture during handling, lightly pat the surface with a coarse sponge. -
Slow drying phase:
Cover the piece loosely with plastic. Because it is drying around a form, you must check it frequently. Once the clay is leather hard—stiff but not dry—carefully remove the inner paper cone. -
Interior clean-up:
Now that the support is gone, check the interior seams. If they feel rough or weak, smooth them out with a long-handled tool or a sponge on a stick. -
Final drying:
Allow the vase to dry completely, uncovered, away from drafts. The spiral structure is strong, but uneven drying can cause the overlapping seams to crack. -
Bisque fire:
Fire the bone-dry piece to bisque temperature (usually Cone 04 or 06, depending on your clay body). -
Glazing:
For the look in the photo, leave the exterior unglazed (raw clay) to show off the speckles and texture. Apply a clear or white liner glaze to the interior only to make it watertight. -
Final firing:
Glaze fire to maturity (Cone 5 or 6 for most stoneware). This will seal the interior and vitrify the stone-like exterior.
Place this vase near a window where natural light can trace the beautiful spiral shadows across the surface
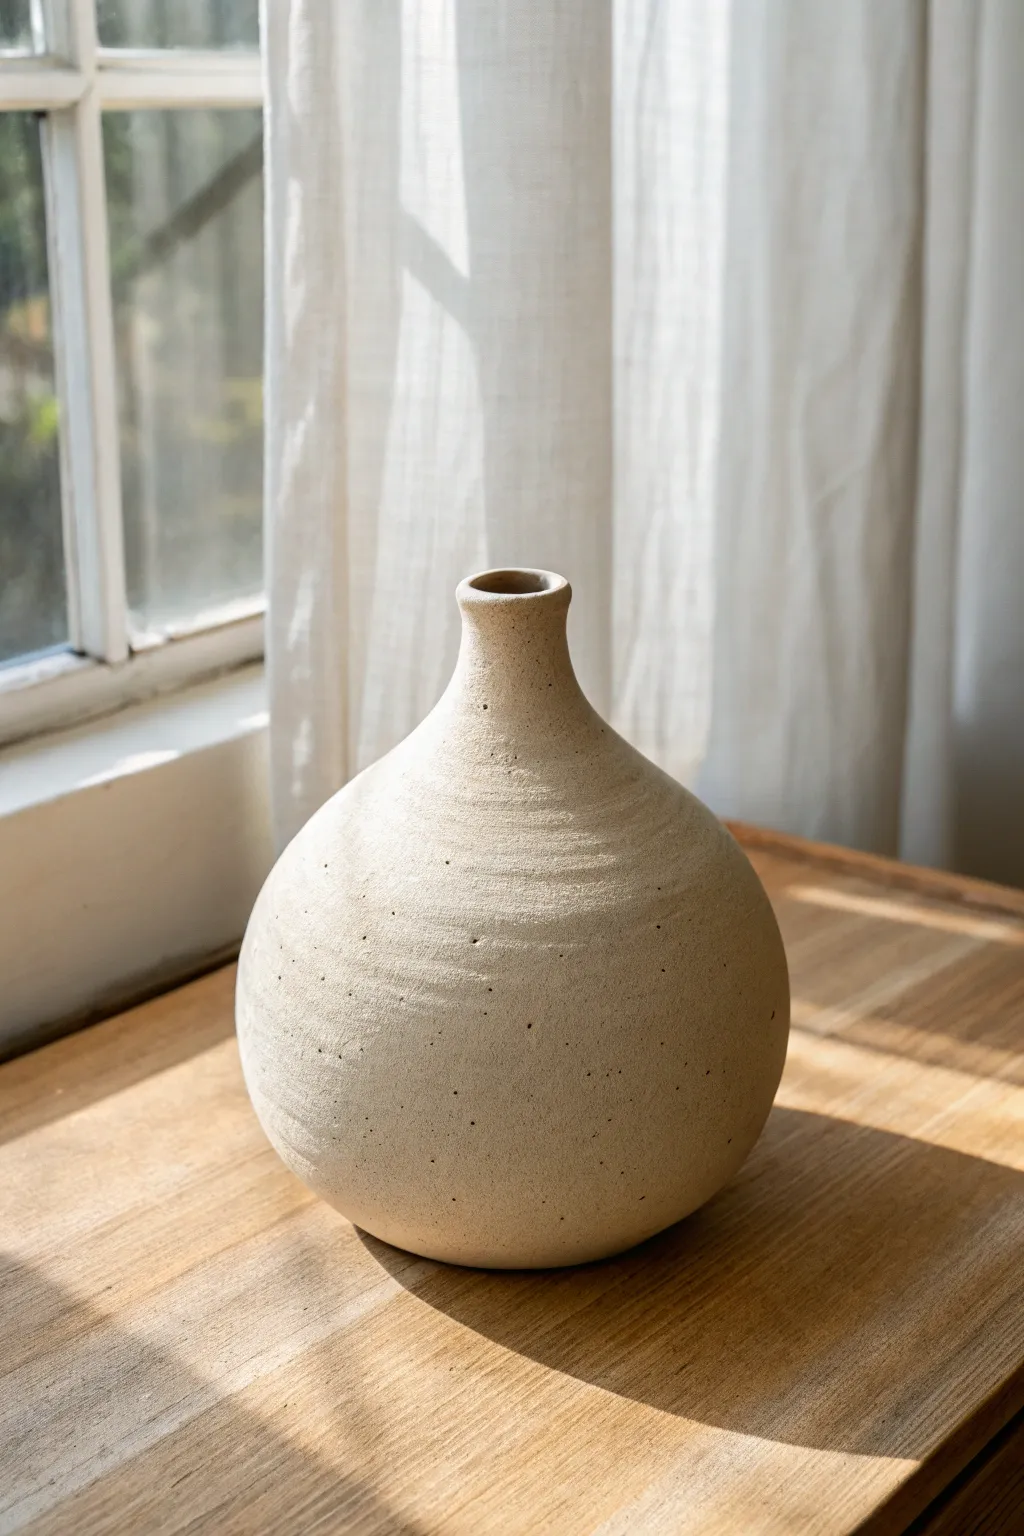
Belly-Out Cylinder With Gentle Curve
This classic vessel features a graceful, swelling belly and a smooth, unglazed finish that celebrates the raw beauty of natural clay. While it has the symmetrical look of a wheel-thrown piece, you can achieve this soft, gently curved form using precise slab-building techniques and careful smoothing.
Step-by-Step Guide
Materials
- Stoneware clay (smooth, light-bodied)
- Rolling pin
- Canvas or slab mat
- Fettling knife
- Flexible metal rib
- Serrated rib
- Scoring tool or needle tool
- Slip
- Banding wheel (optional but recommended)
- Wooden paddle
- Sponge
Step 1: Preparing the Slabs
-
Roll the main body:
Begin by rolling out a medium-sized slab of stoneware clay to a thickness of approximately 3/8 inch. You want enough width to wrap around your desired diameter, so measure roughly 18-20 inches long for a vase of this scale. -
Cut the template:
To achieve the tapered belly shape without a wheel, cut your slab into a long trapezoid. The bottom edge should be shorter than the middle, and the top edge should be shorter than the middle, essentially creating a subtle barrel shape when joined later. -
Create the base:
Roll a smaller second slab for the base. Use a circular cookie cutter or trace a circle about 4 inches in diameter and cut it out with your needle tool. -
Stiffen the clay:
Let both the body slab and the base circle sit until they are soft leather-hard. This sturdiness is crucial so the belly doesn’t collapse under its own weight during construction.
Step 2: Constructing the Form
-
Score and slip the base:
Thoroughly score the perimeter of your circular base and apply a generous amount of slip. -
Form the cylinder:
Stand your trapezoid slab up on its long edge. Carefully curve it into a cylinder, overlapping the short ends. Because of the trapezoid cut, the cylinder will naturally lean or bow slightly. -
Join the seam:
Bevel the vertical edges where the slab ends meet to create a stronger overlapping joint. Score, slip, and press these edges firmly together. -
Attach to the base:
Place the clay cylinder onto the prepared base. Press down firmly on the inside seam to seal the wall to the floor of the vase. -
Reinforce the interior:
Roll a thin coil of soft clay and press it into the interior bottom seam where the wall meets the floor. Smooth it out with a wooden tool to ensure there are no leaks.
Seam Invisible Trick
Use a serrated rib to cross-hatch over the vertical seam after joining. It blends the clay particles better than just smoothing, making the joint disappear completely.
Step 3: Shaping and Refining
-
Paddle the shape:
This is where the magic happens. With one hand inside the pot supporting the wall, gently use a wooden paddle on the outside to round out the belly. Start from the bottom and work your way up, pushing the clay outward from the inside while paddling against it. -
Refine the neck:
As you move toward the top, gently collar the clay in by squeezing slightly with both hands to narrow the neck. I like to keep the wheel spinning slowly if using a banding wheel to keep this symmetrical. -
Add the rim coil:
Roll a thick coil for the rim. Score the top edge of your vessel and attach the coil, smoothing it downwards to integrate it with the neck. -
Profile the rim:
Use a damp sponge or a chamois strip to smooth the added coil into a rounded, flared lip. This gives the vase a finished, professional look akin to a thrown pot. -
Smooth the exterior:
Take your flexible metal rib and drag it up the sides of the vase. This compresses the clay and removes the paddle marks, leaving the faint horizontal texture lines seen in the image. -
Final texture check:
If you want that slightly raw, gritty texture, lightly wipe the surface with a damp sponge to expose a bit of the grog in the clay body. -
Slow drying:
Cover the vase loosely with plastic to let it dry very slowly. This prevents the seams from cracking as the distinctive belly shape settles.
Level Up: Surface Detail
Before the clay dries, gently press a piece of coarse linen or burlap against the belly to add a subtle textile texture that catches glaze beautifully.
Once fired, the subtle belly curve will cast soft shadows that look stunning on any shelf


What Really Happens Inside the Kiln
Learn how time and temperature work together inside the kiln to transform clay into durable ceramic.
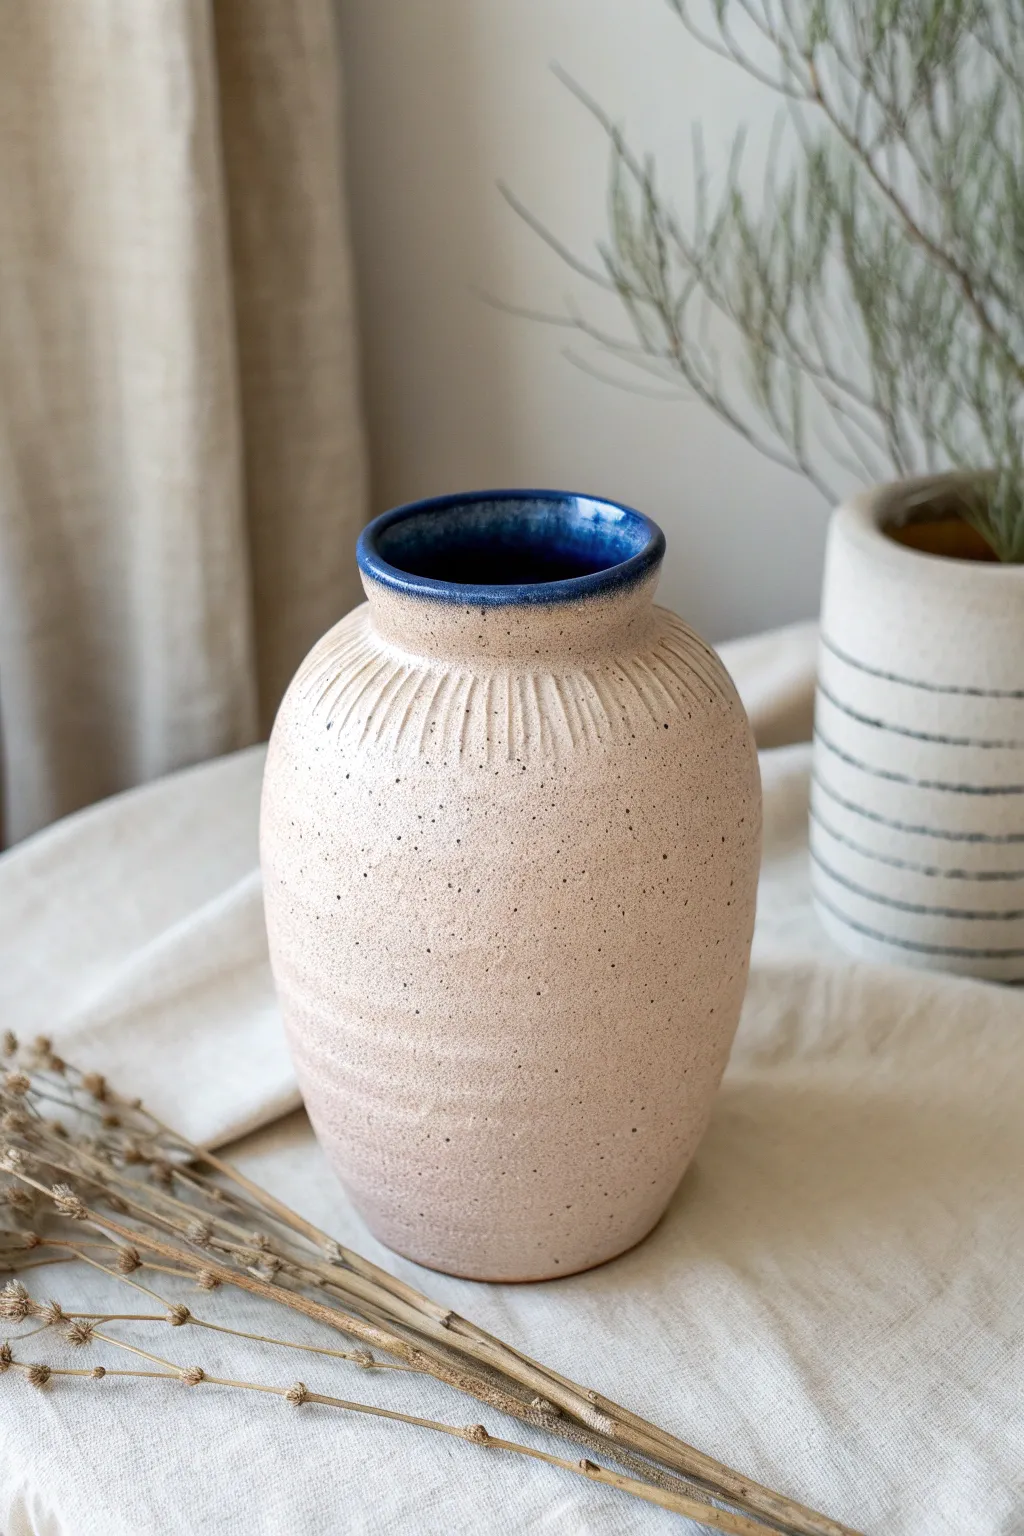
Tall Narrow Bottle-Neck Slab Vase
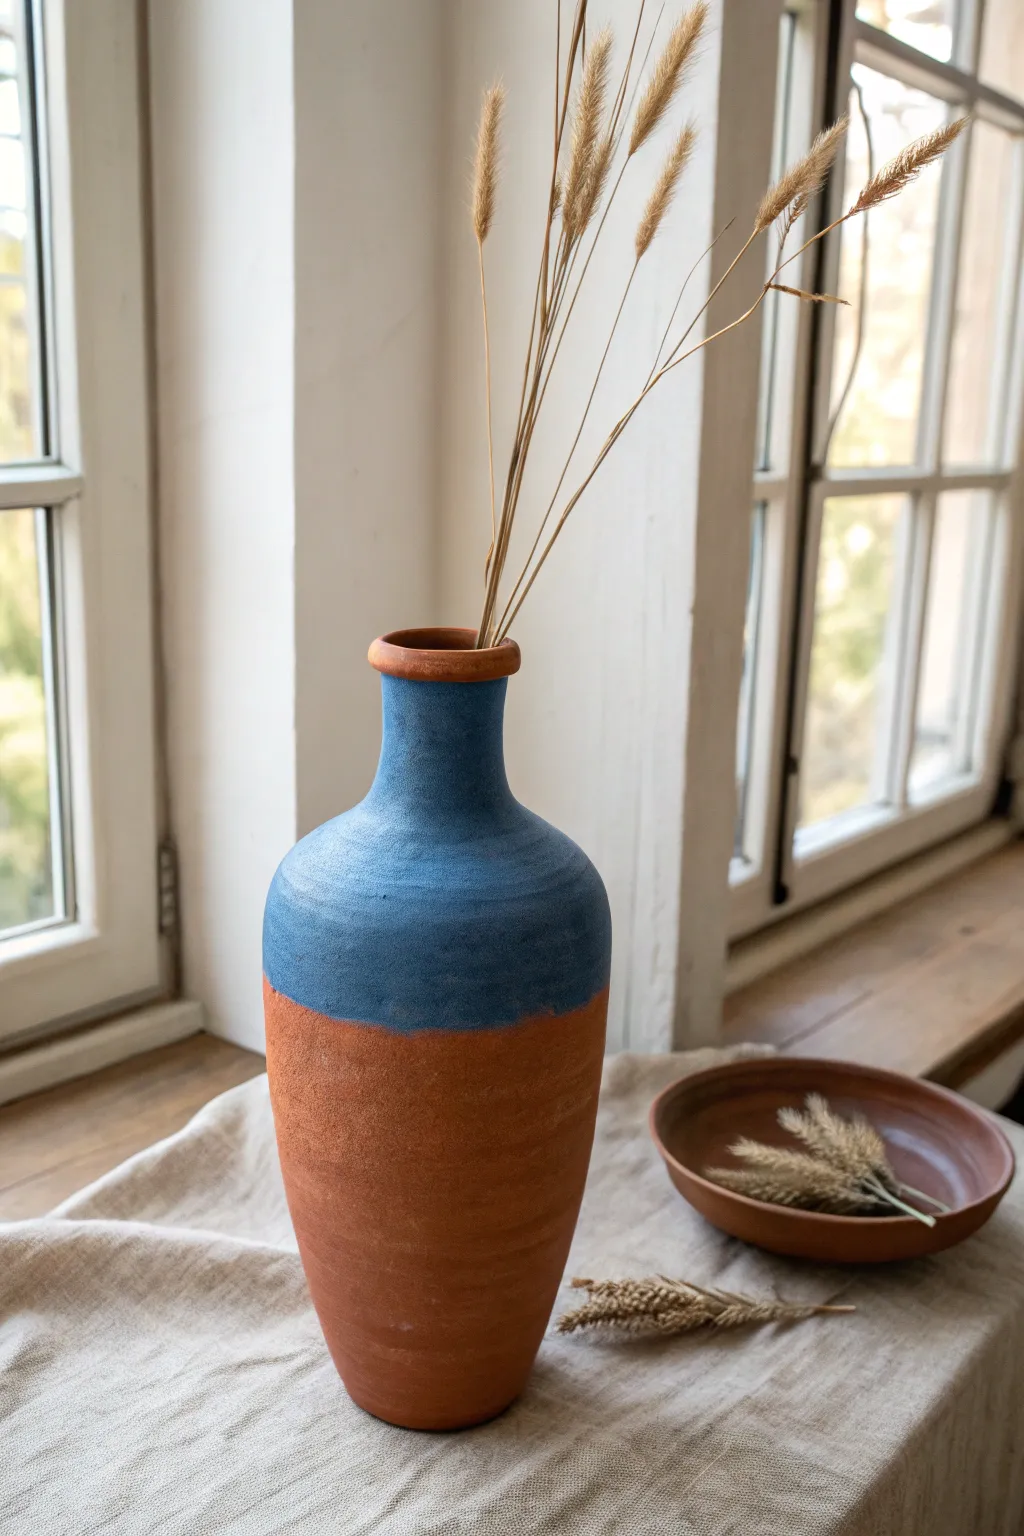
This elegant vessel combines the raw, earthy warmth of terracotta with a striking cool blue upper section. Its tall, narrow silhouette and visible surface texture give it an organic, hand-built charm that feels both ancient and modern.
Step-by-Step Tutorial
Materials
- Terracotta clay (low fire or earthenware)
- Rolling pin
- Canvas mat or slab roller
- Cardboard or poster board (for templates)
- Fettling knife
- Serrated rib tool
- Smooth rubber rib
- Scoring tool or fork
- Slip (clay slurry)
- Paddles (wooden)
- Blue underglaze or matte blue glaze
- Wax resist
- Soft fan brush
- Sponge
Step 1: Planning and Slab Preparation
-
Create your templates:
Design a template for the body and the neck. For a bottle shape like this, you’ll need a large rectangular section for the main body cylinder, a tapered curved piece for the shoulder, and a smaller rectangle for the neck. Cut a circle for the base. -
Roll out the clay:
Roll your terracotta clay out on a canvas mat to a thickness of about 1/4 inch. Keep the thickness consistent to prevent cracking later. -
Texture the slabs:
Before cutting, you can lightly compress the clay with a rib. For this specific rustic look, don’t smooth it perfectly; leaving a little natural clay texture is desirable. -
Cut the shapes:
Lay your templates over the clay slabs. Using your fettling knife, cut out the base, the body cylinder, the shoulder piece, and the neck rectangle. Keep the excess clay wrapped up to stay moist.
Step 2: Building the Form
-
Form the main cylinder:
Stand the large rectangular slab up and curve it into a cylinder. Bevel the vertical edges at a 45-degree angle so they join flush. -
Score and slip the seam:
Rough up the beveled edges with a scoring tool and apply a generous amount of slip. Press the edges together firmly from the inside and outside to seal the seam. -
Attach the base:
Score and slip the bottom edge of your cylinder and the outer rim of your circular base. Press the cylinder onto the base. Use a modeling tool to blend the clay across the join until it’s seamless. -
Construct the shoulder:
Form your shoulder piece into a truncated cone shape. Score and slip the bottom of this cone and attach it to the top of your cylinder. This is a delicate step, so take your time blending the clay together. -
Add the neck:
Create a small cylinder from your neck template. Attach this to the top opening of the shoulder section using the same score-and-slip method. -
Paddle for shape:
Once the basic structure is assembled, use a wooden paddle to gently tap the exterior. This helps remove angularity from the slab construction and gives it that rounded, wheel-thrown appearance.
Seamless Shoulders
When attaching the shoulder slab, support the wall from the inside with a long wooden spoon handle or dowel. This counter-pressure prevents the wall from collapsing while you blend.
Step 3: Refining and Finishing
-
Add surface texture:
While the clay is leather hard, use a serrated rib to lightly scrape horizontally around the body. This mimics the subtle turning lines seen in the reference image. -
Create the rim:
Roll a small coil of clay and attach it to the very top rim of the neck. Smooth it down to create a slightly thickened, rounded lip. -
Bisque fire:
Allow the vase to dry slowly under plastic to prevent warping. Once bone dry, bisque fire the piece according to your clay body’s instructions. -
Apply wax resist:
To achieve the clean line between the colors, precise application is key. Paint a band of wax resist exactly where you want the terracotta section to end. -
Glaze the top section:
Using a soft fan brush, apply 2-3 coats of matte blue glaze or underglaze to the upper section and the interior. The wax resist will protect the bottom area, keeping it raw and earthy. -
Clean up splashes:
Use a damp sponge to wipe away any stray droplets of blue glaze that might have landed on the terracotta bottom. -
Final firing:
Fire the vase a second time to the temperature required for your specific glaze.
Driftwood Detail
Before firing, press dried grasses or textural fabrics into the wet clay of the bottom section to enhance the organic feel, then stain with iron oxide wash after bisque firing.
Place your dried grasses in the finished vessel to complete the serene aesthetic
Pinch-and-Fold Asymmetrical Rim Vase
This rustic, elegant vase features a gently tapered cylindrical form and a distinctive speckled glaze that mimics the look of natural stone. Its subtle, hand-formed rim and warm cream finish make it a perfect vessel for displaying dried botanicals or airy wildflowers.
Detailed Instructions
Materials
- Stoneware clay (preferably a speckled clay body or white clay with grog)
- Rolling pin
- Canvas mat or slab roller
- Fettling knife
- Needle tool
- Scoring tool or serrated rib
- Slip (clay and water mixture)
- Wooden spoon or paddle tool
- Sponge
- Cardboard shipping tube (for support)
- Newspaper
- Cream or oatmeal matte glaze (preferably with speckles if using plain clay)
Step 1: Creating the Slab
-
Prepare the clay:
Begin by wedging your stoneware clay thoroughly to remove air bubbles. This is crucial for structural integrity during firing. -
Roll the slab:
Roll out a large slab of clay on your canvas mat to an even thickness of approximately 1/4 inch. Try to keep the slab consistent so the walls of your vase dry evenly. -
Measure and cut:
Using a ruler and fettling knife, cut a rectangle from the slab. For a vase of this proportion, a rectangle about 10 inches wide by 12 inches tall works well. -
Cut the base:
From the remaining clay scraps, use a circular cookie cutter or trace a circle that is slightly larger than the planned diameter of your cylinder to serve as the base.
Clean Seams
When joining the vertical seam, run a rib tool vertically up the inside and outside of the join. This compresses the clay particles and prevents the seam from splitting open during the drying phase.
Step 2: Forming the Cylinder
-
Prepare the support form:
Wrap a cardboard shipping tube in newspaper. This prevents the wet clay from sticking to the cardboard and makes removal easier later. -
Bevel the edges:
On your rectangular slab, cut a 45-degree angle on the two vertical edges that will meet. Beveling ensures a stronger seam that is less likely to crack. -
Score and slip:
Rough up the beveled edges with a scoring tool and apply a generous amount of slip to both sides. -
Assemble the wall:
Wrap the clay rectangle around your newspaper-covered tube. Press the scored edges together firmly to create a cylinder. -
Refine the seam:
Use a wooden modeling tool or your thumb to smooth the seam both inside and out, blending the clay until the join is invisible.
Add Rustic Texture
Before rolling your slab completely flat, sprinkle coarse sand or grog onto your canvas. Roll the clay over it to embed the grit, creating an authentic stone-like texture that shows through the glaze.
Step 3: Shaping and Finishing
-
Attach the base:
Score the bottom edge of the cylinder and the outer rim of your circular base. Apply slip, then press the cylinder firmly onto the base. -
Trim the base:
Once attached, trim away any excess clay from the base slab so it fits flush with the cylinder wall. Use a modeling tool to blend the seam upward. -
Create the taper:
Gently paddle the top third of the vase with a wooden spoon while supporting the inside with your hand. This narrows the neck slightly to create that elegant tapered silhouette. -
Flare the rim:
At the very top, use your wet fingers to gently pinch and flare the rim outwards just a tiny bit, giving it a soft, organic lip. -
Smooth the surface:
Once the clay is leather hard, use a damp sponge to wipe down the entire piece, removing any harsh fingerprints but leaving the natural texture of the clay.
Step 4: Glazing and Firing
-
Bisque fire:
Slowly dry the vase completely to avoid warping, then bisque fire it according to your clay body’s specifications (usually Cone 04). -
Clean the bisque:
Wipe the fired piece with a damp sponge to remove any kiln dust before glazing. -
Apply glaze:
Dip or brush your cream-colored glaze onto the vase. If your clay isn’t naturally speckled, choose a glaze formulation that includes heavy iron speckling to mimic the photo. -
Glaze fire:
Fire the vase a second time to the maturation temperature of your glaze (typically Cone 5 or 6 for stoneware) to achieve the durable, semi-matte finish.
Once cooled, fill your new vase with dried lunaria or baby’s breath to complete the serene aesthetic

TRACK YOUR CERAMIC JOURNEY
Capture glaze tests, firing details, and creative progress—all in one simple printable. Make your projects easier to repeat and improve.
Scalloped or Wave-Cut Rim Vase

This elegant cylinder vase features a distinctive double-scalloped rim that adds a playful rhythm to its minimal form. The speckled clay body and soft matte glaze create a natural, organic finish perfect for displaying fresh cut flowers.
Step-by-Step Tutorial
Materials
- Speckled stoneware clay (mid-fire)
- Rolling pin or slab roller
- Canvas work surface
- Fettling knife or needle tool
- Scoring tool (serrated rib)
- Slip or vinegar
- Cylindrical form for template (PVC pipe or large rolling pin)
- Ruler
- Bevel cutter (45-degree angle)
- Sureform or rasp
- Sponge
- Transparent matte glaze
Step 1: Preparing the Slab
-
Wedge the clay:
Start by thoroughly wedging your speckled stoneware clay to remove air bubbles and align the particles for a smoother roll. -
Roll out the slab:
Roll your clay out into a long rectangular slab. Aim for a consistent thickness of about 1/4 to 3/8 of an inch, ensuring it’s robust enough to stand tall. -
Smooth the surface:
Before cutting, compress the slab on both sides using a rib tool. This strengthens the clay and removes canvas texture, which is crucial for that clean, modern look. -
Measure and cut:
Determine the desired height and circumference of your vase. Use a ruler and needle tool to cut a clean rectangle, leaving a little excess length for the seam.
Use a Template
Make a paper template of your wave pattern first. Wrap it around the raw clay rim and trace it. This ensures your scallops meet perfectly at the back without an awkward overlap.
Step 2: Creating the Cylinder
-
Bevel the edges:
Cut 45-degree bevels on the two short ends of your rectangle. Bevel them in opposite directions so they will overlap seamlessly when rolled. -
Score the bevels:
Rough up the beveled surfaces with a serrated rib or scoring tool. Apply a generous amount of slip or vinegar to these areas. -
Form the cylinder:
Carefully lift the slab and wrap it around your cylindrical form or simply curl it by hand to join the beveled edges. I find standing the slab up and letting it curve naturally helps prevent cracking. -
Compress the seam:
Press the seam firmly together from both the inside and outside. Use a wooden modeling tool or rib to smooth the join until it is completely invisible.
Step 3: Looking at the Bottom
-
Cut the base:
Roll a small separate slab for the floor of the vase. Place your cylinder on top of it and trace around the perimeter with a needle tool. -
Attach the base:
Score and slip the bottom edge of the cylinder and the outer edge of the circular base. Press them firmly together. -
Seal the interior:
Roll a tiny coil of clay and press it into the interior seam where the wall meets the floor to ensure a watertight seal.
Add Visible Texture
Before rolling the cylinder, gently roll the slab over a textured fabric or canvas. This subtle surface noise interacts beautifully with the matte glaze and speckles.
Step 4: Sculpting the Scalloped Rim
-
Add the rim coil:
Roll a thick coil or cut a narrow strip of slab. Attach this to the top exterior of the cylinder to create a thickened band, blending the bottom edge of the strip smoothly into the vase wall. -
Mark the waves:
Lightly draw a wavy pattern along the top edge of this new thickened rim using a needle tool. Try to keep the spacing consistent. -
Carve the scallops:
Using a sharp fettling knife, carefully cut along your wavy guide line. Remove the excess clay to reveal the undulating top edge. -
Refine the wave:
Use a damp sponge or your fingers to round off the sharp cut edges of the wave. The goal is a soft, biscuit-like appearance rather than a sharp, mechanical cut. -
Re-define the overhang:
Use a small loop tool or wooden stick to gently undercut the scalloped band slightly, emphasizing that it sits on top of the main cylinder like a crown.
Step 5: Finishing and Glazing
-
Bisque fire:
Once bone dry, fire the piece to a bisque temperature (usually cone 04 or 06). -
Apply glaze:
Dip or brush on a transparent matte glaze. The transparency is key here—it allows the beautiful speckles of the clay body to shine through. -
Wipe the foot:
Clean off any glaze from the bottom 1/4 inch of the vase to prevent it from sticking to the kiln shelf. -
Final firing:
Fire the vase to the maturity temperature of your clay (likely cone 5 or 6). Let it cool completely before removing from the kiln.
Fill your new vase with tall grasses or wildflowers to complement its organic style
Exposed Seam Detail Slab Vase

This project explores the beauty of geometric forms softened by organic texture. You’ll build a tall, sturdy vase using slab construction techniques, finishing it with a creamy, speckled glaze that highlights the natural character of the clay.
Step-by-Step
Materials
- Speckled stoneware clay (mid-fire)
- Rolling pin
- Two wooden thickness strips (approx. 1/4 inch)
- Fettling knife or needle tool
- Paper templates (4 side panels, 1 base)
- Serrated rib or scoring tool
- Slip (clay mixed with water)
- Wooden paddle
- Soft sponge
- Matte cream or white glaze
Step 1: Slab Preparation
-
Roll out the clay:
Begin by wedging your speckled stoneware clay to remove air bubbles. Place the clay between two wooden thickness strips and roll it out into a large, consistent slab. Aim for about 1/4 inch thickness to ensure the walls can support the height. -
Compress the slab:
Before cutting, take a rubber rib and firmly compress the clay on both sides. This aligns the clay particles, preventing future warping and creating a smoother canvas for texture later. -
Cut the components:
Lay your paper templates onto the leather-hard slab. You will need four identical tall rectangles for the walls and one square for the base. Use your fettling knife to cut cleanly around the templates. -
Bevel the edges:
For a strong corner joint, cut the long sides of your wall panels at a 45-degree angle. This miter joint increases the surface area for connection and helps keep the corners sharp. -
Dry to leather hard:
Let the slabs sit until they are ‘leather hard’—stiff enough to stand up on their own without slumping, but soft enough to be scored and joined. This is crucial for a tall form.
Warping Walls?
If your tall walls start bowing inward or outward during construction, stuff the inside of the vase lightly with crumpled newspaper. This offers internal support while the clay stiffens up.
Step 2: Assembly & Shaping
-
Score and slip:
Rough up the beveled edges of your side panels and the edges of the base using a serrated rib or needle tool. Apply a generous amount of slip to all scored areas. -
Connect the walls:
Attach two side walls to the base first, pressing them firmly together at the corner. Add the remaining walls one by one to form a tall box. I like to reach inside and run my finger along the interior seams to ensure a tight seal. -
Reinforce the seams:
Roll tiny coils of soft clay and press them into the interior corners. Smooth these coils down to reinforce the structural integrity of the box. -
Paddle the form:
Once the box is assembled, gently beat the outside walls with a wooden paddle. This bonds the joints further and creates that slightly softened, pillow-like square shape seen in the photo. -
Form the shoulder:
To create the tapered neck, gently pinch and gather the clay at the top opening inward. You can cut small darts (V-shaped notches) at the top corners, slip and score them, and fold the clay in to reduce the diameter.
Step 3: Refining & Glazing
-
Add the rim:
Roll a small coil or cut a thick strip of clay for the rim. Attach it to the narrowed opening at the top. Smooth it carefully, leaving a slightly rounded, substantial lip. -
Smooth and sponge:
Use a damp sponge to wipe down the entire piece, softening any sharp edges created by the paddle. This reveals the grit in the clay body, enhancing the texture. -
Bisque fire:
Allow the vase to dry slowly and completely to prevent cracking. Fire it in the kiln to a bisque temperature (usually cone 04). -
Apply the glaze:
Dip or brush on a matte cream glaze. The glaze should be thick enough to provide coverage but thin enough to let the iron speckles from the clay body bleed through. -
Detail the rim:
Wipe the glaze off the very top edge of the rim with a damp sponge. This exposes the raw clay body, creating a warm, brown contrast line similar to the finished piece. -
Final firing:
Fire the piece to the maturity temperature of your clay and glaze (typically cone 5 or 6). Let the kiln cool completely before removing your new vase.
Textural Depth
For more surface character, mix a small amount of sand or grog into your slip before joining. When sponged back later, this creates a beautiful, tactile gritty surface.
Fill your architectural vase with dried grasses or wildflowers to complete the modern, rustic aesthetic
Pressed Texture All-Over Slab Vase
This elegant vessel combines the organic warmth of speckled clay with a striking pop of deep cobalt blue. The gently rounded form features subtle fluting around the shoulder, creating a timeless piece perfect for showcasing dried stems.
Step-by-Step Guide
Materials
- Speckled stoneware clay body (cone 5/6 recommended)
- Rolling pin
- Guide sticks or slab roller (approx. 1/4 inch thick)
- Paper template (vase profile shape)
- Fettling knife
- Scoring tool or serrated rib
- Slip (clay mixed with water)
- Wooden modeling tool or chopstick (for fluting)
- Large sponge
- Paddle tool
- Banding wheel (optional)
- Cobalt blue glaze suitable for your firing range
- Clear matte glaze (optional for exterior)
Step 1: Preparing the Slabs
-
Wedge the clay:
Begin by thoroughly wedging your speckled stoneware clay to remove air bubbles and ensure an even consistency. -
Roll out the slab:
Roll the clay into a large, consistent slab about 1/4 inch thick. If you want the speckles to be prominent, avoid smoothing the surface too aggressively, as this can push the textural grog down. -
Compress the slab:
Use a rib tool to gently compress the clay on both sides. This strengthens the slab and prevents warping during the drying process. -
Cut the body:
Cut a large rectangular piece for the main body of the vase. The length should equal the desired circumference of your vase plus a little overlap. -
Cut the base:
Cut a circular disc for the base. This should be slightly smaller than the cylinder you are about to create, as we will paddle it into a curve later.
Step 2: Forming the Vessel
-
Create a cylinder:
Stand the rectangular slab up and curve it into a cylinder. Bevell the connecting edges at 45-degree angles to create a seamless join. -
Score and slip:
Aggressively score the beveled edges and apply a generous amount of slip. Press the edges together firmly. -
Reinforce the seam:
Smooth the seam inside and out. I like to run a thin coil of soft clay vertically up the interior seam and blend it in for extra security. -
Attach the base:
Score and slip the bottom edge of the cylinder and the edge of your circular base. Join them together, smoothing the clay so the transition is invisible.
Use a Dart
To get a dramatic curve without excessive paddling, cut V-shaped darts out of the bottom and top of your rectangle slab before rolling it into a cylinder.
Step 3: Shaping and Texturing
-
Belly out the form:
With one hand inside the cylinder for support and the other holding a wooden paddle outside, gently tap the clay to expand the middle section. Rotate constantly on a banding wheel to ensure even roundness. -
Collar the neck:
As you move toward the top, gently ‘collar’ or squeeze the clay inward to narrow the neck opening. Do this gradually to avoid pleating the clay. -
Refine the rim:
Depending on your preference, you can add a small coil to the rim to thicken it, or simply smooth and round off the existing edge. -
Create the shoulder fluting:
Using a wooden modeling tool or the side of a chopstick, press vertical indentations around the shoulder of the vase. Space them evenly, radiating from the neck down towards the belly. -
Smooth the exterior:
Use a damp sponge to wipe down any sharp burrs created by the fluting tool, softening the texture slightly.
Dual-Tone Exterior
Try dipping just the bottom third of the exterior in a translucent white glaze. It creates a beautiful layer over the speckles without hiding them.
Step 4: Glazing and Finishing
-
Bisque fire:
Allow the vase to dry slowly under loose plastic to prevent uneven shrinkage. Once bone dry, bisque fire it according to your clay body’s specifications. -
Glaze the interior:
Pour a deep cobalt blue glaze into the interior of the vase. Swirl it around quickly to coat the entire inside surface and pour out the excess. -
Detail the rim:
Carefully apply the blue glaze to the very top rim of the vase, letting it barely overlap onto the outer edge for that distinct ‘dipped’ look. -
Finish exterior:
Leave the exterior unglazed to show off the raw speckled clay, or apply a very thin coat of clear matte glaze if you prefer a sealed surface. -
Final firing:
Glaze fire the piece to the temperature required for your clay and glaze (typically cone 5 or 6).
Once fired, the contrast between the rough, sandy exterior and the deep, glossy blue interior makes for a truly sophisticated display piece
Botanical Appliqué Relief Slab Vase
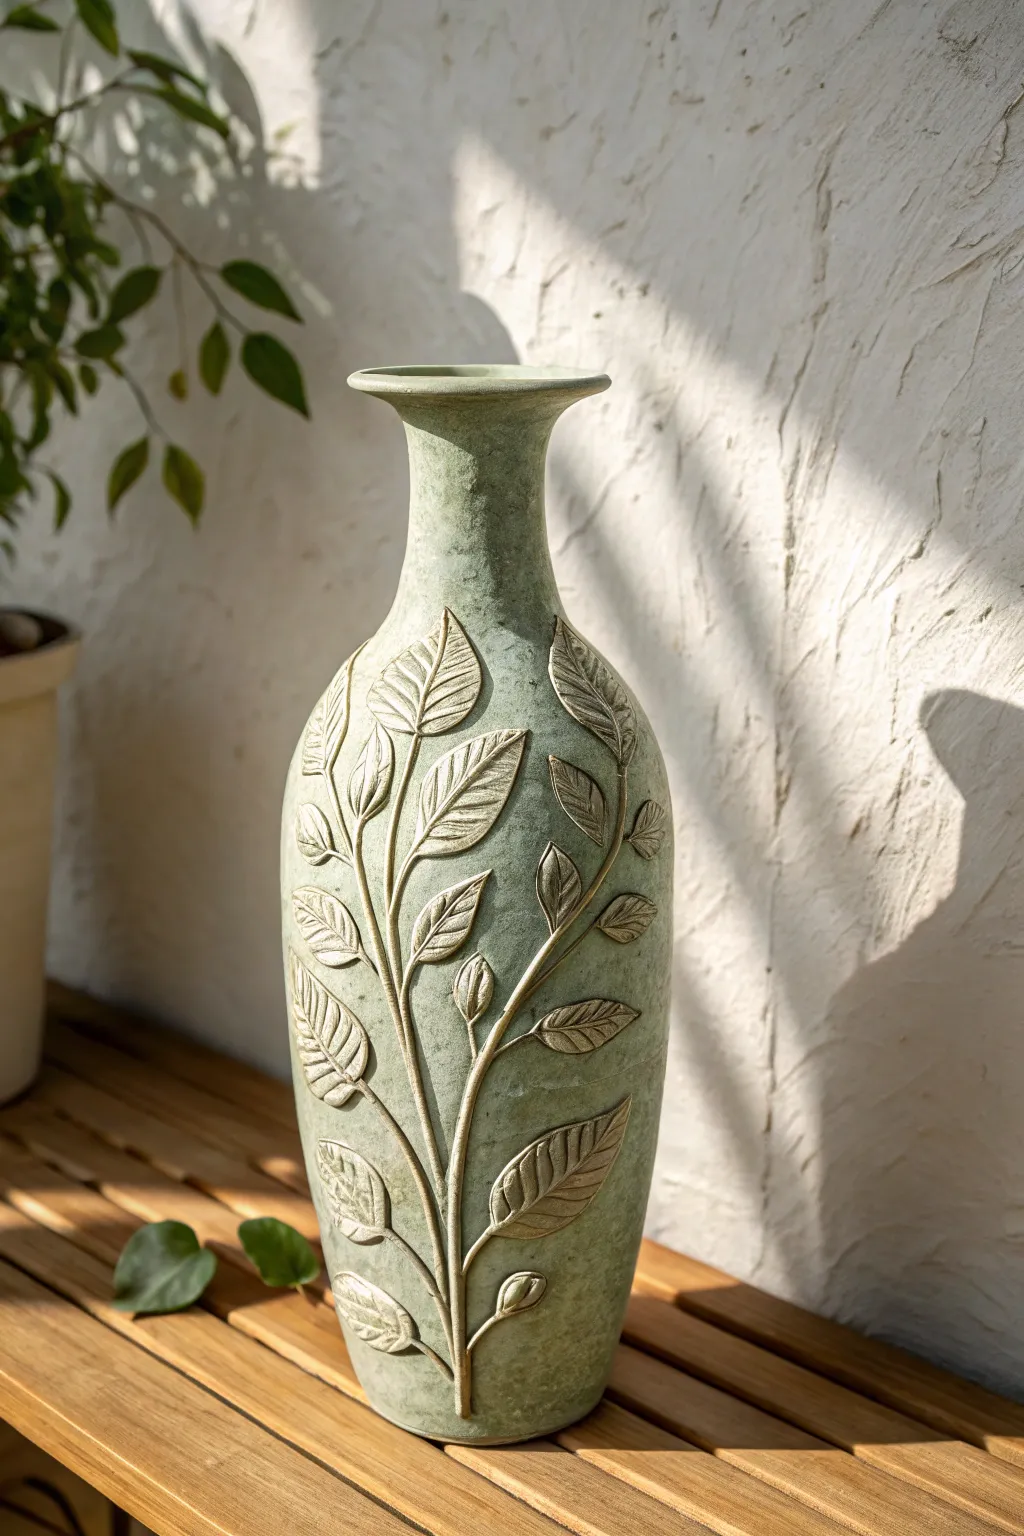
Embrace organic elegance with this slab-built vase, featuring stunning botanical relief work that seems to grow directly from the clay surface. The muted sage green finish and tactile leaf textures create a sophisticated, nature-inspired centerpiece.
How-To Guide
Materials
- Stoneware clay (smooth or light texture)
- Rolling pin and guide sticks (about 6mm thickness)
- Leaf templates or real sturdy leaves
- Fettling knife or X-Acto tool
- Scoring tool and slip
- Large cylindrical form (like a PVC pipe or strong mailing tube) for support
- Sponge and bucket of water
- Modeling tools (wooden and metal ribs)
- Matte sage green glaze or underglaze with a matte clear coat
- Soft bristle brush
Step 1: Constructing the form
-
Roll the main slab:
Begin by rolling out a medium-sized slab of clay to a consistent 6mm thickness using your guide sticks. You will need enough width to wrap around your chosen cylindrical support form plus a little extra for the seam. -
Cut the body shape:
Instead of a simple rectangle, cut a shape that tapers slightly towards the top to create the vase’s shoulder. The bottom should be wider to form the belly of the vase. -
Form the cylinder:
Carefully lift your slab and wrap it around your support mold. If you don’t have a mold, loosely form it by hand into a tall cylinder that tapers inward near the top third. -
Join the seam:
Score the overlapping edges thoroughly and apply slip. Compress the seam firmly from both the inside and outside using a wooden rib to ensure it won’t split during firing. -
Shape the belly:
With the cylinder standing upright, gently push from the inside out with your hand or a rib to expand the lower section, creating the rounded, bulbous shape seen in the reference. -
Refine the neck:
Collar the upper portion of the vase by gently squeezing with wet hands while rotating the piece (or walking around it), narrowing the clay to form the slender neck. -
Add the rim:
Roll a small coil or cut a thin strip of clay and attach it to the very top opening. Flare this outwards gently with your fingers to create the distinct lip. -
Attach the base:
Place the vase on a fresh piece of slab. Trace around the bottom, cut out the circle, and score and slip it into place. Smooth the connection so the base is seamless.
Cracking Appliqués?
If leaves peel off during drying, you likely didn’t score deep enough. Re-attach broken pieces with vinegar-soaked clay slip (magic mud) before firing.
Step 2: Creating the botanical relief
-
Prepare leaf slabs:
Roll out a much thinner slab of clay, approximately 3mm thick. This will be used for your appliqués. -
Cut leaf shapes:
Using a needle tool or fettling knife, cut out various leaf shapes freehand. Aim for a mix of sizes to create a natural, growing composition. -
Add vein texture:
While the leaves are flat on the table, use a dull pencil or a modeling tool to firmly press in the central vein and branching side veins. The texture needs to be deep enough to hold glaze later. -
Make the stems:
Roll very thin, long coils of clay for the stems. I find it helpful to slightly flatten these so they adhere better to the vase surface. -
Plan the composition:
Lightly sketch a flowing line on your leather-hard vase to guide where the main stem will travel. A meandering ‘S’ curve often looks most organic. -
Attach the stems:
Score along your sketched line and apply slip. Press your thin stem coils onto the vase, blending the edges slightly so they look integrated rather than just stuck on. -
Attach the leaves:
Score and slip the back of each leaf and place them branching off the main stem. Press firmly in the center but leave some edges slightly lifted to enhance the 3D relief effect. -
Refine the connections:
Use a small modeling tool to clean up any excess slip around the leaves and stems. Re-define any vein textures that might have been smudged during attachment.
Step 3: Finishing and glazing
-
Slow drying:
Cover the vase loosely with plastic to let it dry very slowly. This is crucial because the appliqués dry faster than the main body and can pop off if rushed. -
Bisque fire:
Once bone dry, fire the piece to bisque temperature (usually Cone 04 or 06, depending on your clay body). -
Apply the finish:
Brush on a matte sage green glaze. As you apply it, ensure the glaze gets into the deep vein textures but isn’t so thick that it obscures the relief detail. -
Highlighting (Optional):
For extra depth, you can gently wipe away a tiny bit of glaze from the highest points of the leaves with a damp sponge before firing, exposing the clay body slightly.
Natural Variation
Vary the pressure when carving veins. Deeper lines catch more glaze, creating darker shadows that make the botanical design pop visually.
Enjoy the rhythmic process of building your own botanical sculpture
Cutout Window Slab Vase With Inner Liner
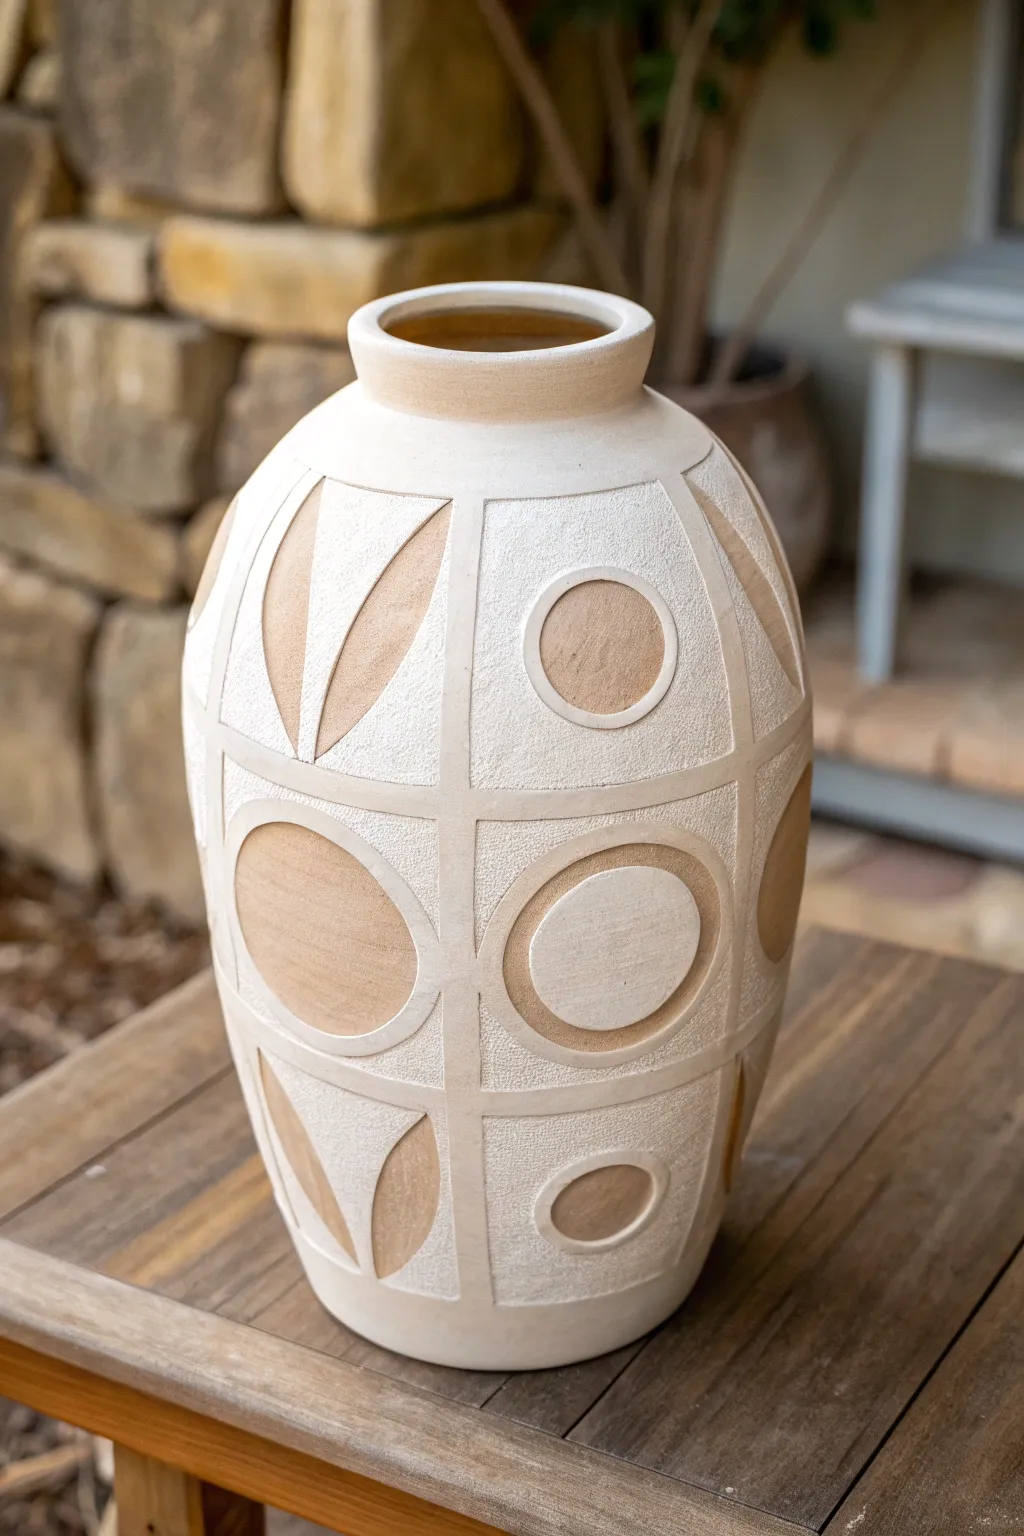
This striking vase combines the structured beauty of slab building with organic, earthy textures. The design features a clever double-walled or appliqué effect where geometric shapes reveal a contrasting raw clay body underneath a textured cream surface.
Step-by-Step
Materials
- High-grog stoneware clay (buff or speckled)
- Contrasting slip or underglaze (white/cream)
- Slab roller or rolling pin with thickness strips
- Large cylindrical slump mold or PVC pipe (approx. 6-8 inch diameter)
- Pottery knife or scalpel (X-Acto)
- Scoring tool and slip
- Flexible metal kidney rib
- Wooden paddle
- Sponge
- Templates for geometric shapes (circles, leaves)
Step 1: Preparing the Base Form
-
Roll the Primary Slabs:
Begin by rolling out substantial slabs of your clay body to a uniform thickness, roughly 3/8 of an inch. You will need enough to cover the circumference of your mold plus a base. -
Form the Main Cylinder:
Wrap your slab around your chosen cylindrical mold or PVC pipe. Be sure to place newsprint or plastic between the clay and the mold to prevent sticking. -
Seam the Cylinder:
Score and slip the meeting edges of the slab thoroughly. Press them together firmly and blend the seam inside and out until it is invisible, then attach a circular slab for the floor. -
Shape the Belly:
Once the clay is leather hard and can support itself, remove the inner mold. Gently paddle the walls from the outside while supporting from the inside to create a slight curve or ‘belly’ in the form, narrowing slightly at the top. -
Add the Neck:
Roll a thick coil or cut a smaller strip of slab to form the neck. Attach this ring to the top opening, blending the clay downward to create a seamless transition. -
Smooth the Rim:
Refine the rim of the vase, giving it a sturdy, slightly thickened edge that looks finished and intentional.
Clean Lines Pro-Tip
When peeling away the outer textured layer, wait until the clay is stiff leather-hard. If it’s too wet, the distinct ‘window’ edges will smear and lose crispness.
Step 2: Creating the Relief Design
-
Apply the Texture Layer:
You have two options here: either apply a thick, textured white slip (engobe) over the entire exterior, or attach thin ‘veneer’ slabs of white clay over the buff body. The image suggests a thick, sandy slip application is easiest. -
Texture the Surface:
While the white surface is still damp, stipple it with a stiff-bristled brush or a sponge to create that rough, stone-like stucco texture shown in the reference. -
Draft the Grid:
Using a soft pencil or a needle tool, lightly sketch a grid system onto the surface of the vase to guide your geometric placement. -
Place the Templates:
Cut paper templates for your circles and leaf-like shapes. Position them within your grid squares to ensure balanced spacing. -
Carve the Outlines:
Using a sharp needle tool, trace deeply around your templates. You want to cut through the white textured layer but just barely into the base clay. -
Excavate the Windows:
Carefully peel away the white textured layer inside your traced shapes to reveal the smooth, raw clay body underneath. This creates the ‘window’ effect. -
Refine the Edges:
Use a small loop tool or a straight-edged modeling tool to clean up the borders of your cutouts. The transition between the rough white surface and the smooth inner clay should be sharp and crisp. -
Add Geometric Detail:
For the circular designs, consider adding a thin ring of white clay back onto the raw circle to create a bullseye effect, or carve a relief ring if your walls are thick enough.
Step 3: Finishing and Firing
-
Slow Drying:
Cover the vase loosely with plastic to allow it to dry very slowly. This is crucial for slab pieces to prevent warping or cracking at the seams. -
Bisque Fire:
Once bone dry, bisque fire the piece to the appropriate temperature for your clay body (usually cone 04 or 06). -
Glazing Strategy:
To maintain the matte, stone look, leave the exterior unglazed or apply a very dry matte wash. Glaze the interior with a liner glaze to make it waterproof. -
Final Firing:
Fire the piece to maturity. If you utilized contrasting clay bodies, ensure they have the same shrinkage rate to avoid cracking during this final stage.
Level Up: Depth
Instead of just revealing the smooth base clay, try burnishing the exposed ‘window’ areas with a smooth stone. The contrast between rough texture and polished clay is stunning.
Place your finished vase in a spot with good natural light to highlight the beautiful relief shadows
Twisted Column Slab Vase
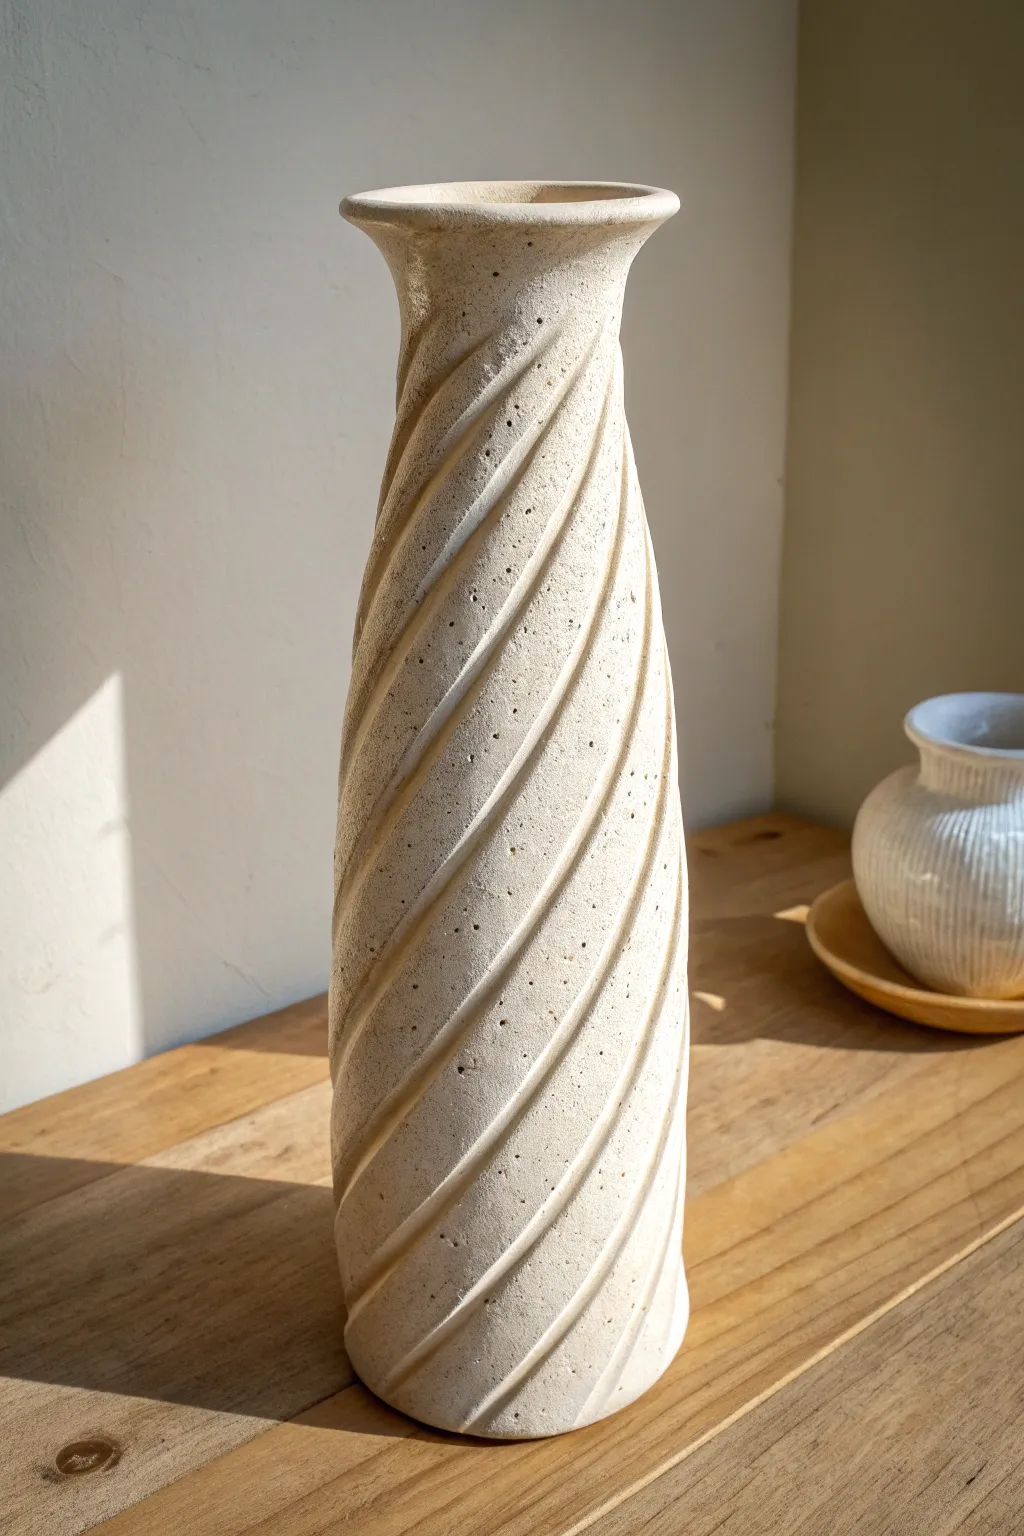
This project transforms a simple clay cylinder into a stunning architectural piece featuring deep, spiraling grooves that catch the light beautifully. The natural, matte finish emphasizes the sculptural quality of the twisting lines, making it a perfect modern accent for any shelf.
Step-by-Step Guide
Materials
- Stoneware clay (groggy/speckled body recommended)
- Rolling pin
- Canvas work surface
- Ware board
- Fettling knife
- Needle tool
- Slip and scoring tool
- Large wooden rib or paddle
- Carving loop tool (medium width)
- Sponge
- Serrated rib
- Clear matte glaze (for liner only)
Step 1: Forming the Base Cylinder
-
Roll the slab:
Begin by rolling out a consistent slab of clay, approximately 3/8 inch thick. Ensure the slab is large enough to form a tall cylinder; a rectangle roughly 12 inches wide by 14 inches tall is a good starting point. -
Cut the rectangle:
Using a ruler and your fettling knife, cut a precise rectangle. Bevel the two side edges (the vertical sides) at complementary 45-degree angles to create a seamless overlap join later. -
Texture and prep:
Smooth both sides of the slab with a rib to compress the clay particles. If you want a speckled look like the example, now is the time to ensure your clay body’s texture is highlighted by wiping gently with a damp sponge. -
Form the cylinder:
Carefully stand the slab up and curve it into a cylinder. Apply slip to the beveled edges, score them aggressively, and press them together firmly to create a strong vertical seam. -
Add the base:
Roll a small separate piece of clay for the floor. Place your cylinder on top, trace around it, and then cut a circle slightly larger than the tracing. Score and slip the bottom of the cylinder and the disk, then join them. -
Reinforce seams:
Use a long wooden tool or your fingers to smooth the interior seam. On the exterior, smooth the join until it is invisible, using a serrated rib followed by a smooth rib.
Keep it Straight
When carving spirals, the clay wall gets thin. Stuff the vase interior with newspaper or soft foam to provide counter-pressure and prevent the walls from collapsing inward.
Step 2: Shaping and Twisting
-
Taper the neck:
Working from the bottom up, gently collar the cylinder in with your hands to narrow the form towards the top 1/3, creating a slender bottleneck shape. -
Flare the rim:
Once the neck is narrowed, gently pinch and flare the very top edge outward to create the distinctive lip shown in the image. Keep this rim relatively thick to match the hefty aesthetic. -
Draft the spirals:
Before carving, lightly trace spiral lines onto the leather-hard clay with a needle tool. Start at the bottom and curve upwards to the right to guide your carving tools. -
Carve the grooves:
Using a medium-width loop tool, carve out the clay between your traced lines. Maintain steady pressure to ensure the grooves are deep and consistent. I find it easiest to pull the tool towards me while rotating the banding wheel. -
Refine the ridges:
After carving the initial grooves, you’ll have sharp ridges remaining. Use a damp sponge or a soft rib to gently round off the sharpest peaks, giving the twist a softer, more organic flow.
Step 3: Refinement and Surface
-
Clean the texture:
Once the clay is bone dry, carefully inspect the fluting. Use a stiff brush to sweep away any clay crumbs or sharp burrs left from the carving process. -
Bisque fire:
Fire the piece to bisque temperature (usually cone 04) to prepare it for glazing. -
Interior glazing:
Pour a clear or white liner glaze into the interior of the vase, swirl it to coat fully, and pour out the excess. This makes the vase functional/water-tight. -
Exterior treatment:
To achieve the matte, stone-like finish in the photo, leave the exterior unglazed if your clay body is vitrified, or apply a very thin wash of matte transparent glaze. Wipe back any glaze that pools too thickly in the grooves. -
Final firing:
Fire the vase to the maturity temperature of your clay body (likely cone 5/6 or cone 10). -
Sand the bottom:
After firing, sand the bottom of the vase with wet-dry sandpaper to ensure it sits perfectly flat and won’t scratch your furniture.
Color Wash
Enhance the twist by applying a black iron oxide wash over the bisque, then sponge it off. The oxide will stay in the deep grooves, emphasizing the spiral movement.
Fill your new twisted vase with dried grasses or a simple branch to complement its earthy texture
Darted Slab Sphere-Inspired Vase
Embrace the imperfect beauty of hand-built ceramics with this wonderfully round, darted slab vessel. The texture of groggy stoneware shines through in this project, featuring a swelling spherical body that tapers gracefully into a narrow, classic neck.
Step-by-Step Guide
Materials
- Stoneware clay with grog (speckled buff or similar)
- Rolling pin
- Two long wooden dowels (1/4 inch thickness guides)
- Canvas work surface
- Fettling knife
- Paper template (football/eye shape)
- Serrated rib tool
- Rubber kidney rib
- Slip (clay and water mixture)
- Scoring tool or fork
- Paddle (wooden kitchen spoon works)
- Sponge
Step 1: Prepping the Canvas
-
Design your template:
Before touching clay, sketch a ‘football’ or ‘eye’ shape on paper. This will be your dart. A wider shape creates a rounder belly; a narrower shape makes a taller, thinner vase. Cut this out to use as your master guide. -
Roll the slab:
Wedge your clay thoroughly to remove air bubbles. Place it on your canvas between the two wooden dowels. Roll the clay out until the rolling pin rides on the dowels, ensuring a perfectly even 1/4 inch thickness throughout. -
Cut the body:
You will need a long rectangular strip for the body. Measure the desired circumference of your vase (e.g., 20 inches) and cut a rectangle that long and about 8-10 inches high. Smooth the edges with a damp finger. -
Texture stage:
If you want that lovely, gritty surface shown in the photo, now is the time to lightly drag a serrated rib across the surface or press in organic textures. I sometimes skip this if using a very groggy clay that provides natural character.
Dart Perfection Tip
Cut your darts slightly curved (concave) rather than straight triangles. Curved cuts create a fuller, rounder ‘puffed’ volume when joined, whereas straight cuts can result in a boxier, angular shape.
Step 2: Forming the Sphere
-
Measure and cut darts:
Mark vertical intervals along the top and bottom edges of your rectangle. Place your paper template at these marks and carefully cut out triangular ‘V’ notches (darts) from the top and bottom edges. Keep the middle solid. -
Bevel the edges:
With your fettling knife held at a 45-degree angle, bevel the vertical ends of your rectangle where they will join to form a cylinder. This creates a stronger overlap joint. -
Form the cylinder:
Stand the slab up and curve it into a cylinder. Score the beveled edges aggressively, apply slip, and press them firmly together. Smooth the seam inside and out with your rubber rib until it disappears. -
Close the darts:
Gently curve the top of the cylinder inward. Score and slip the ‘V’ shaped cuts you made earlier. Press the cut edges together to close the gaps; this will force the clay into a rounded, spherical shape. -
Repeat for bottom:
Flip the form over carefully and repeat the dart-closing process for the bottom. You should now have a rounded, voluminous shape that is open at both the top and very bottom. -
Add a base:
Roll a small circular slab for the foot. Score and slip the bottom opening of your sphere and attach it to this disc. Trim away excess clay and smooth the join so it looks seamless.
Cracking Seams?
If seams pop open during drying, your clay was likely too dry when joining. Score deeper, use more slip, and compress the seam firmly again. A tiny coil of soft clay added to the crack can act as filler.
Step 3: Refining and Necking
-
Paddle into shape:
With the vase standing on its new base, use a wooden paddle to gently tap around the curve of the body. This smooths out angular spots from the darts and creates that perfect, continuous curve. -
Form the neck:
Roll a smaller rectangular strip of clay. Join it into a small cylinder sized to fit the top opening of your sphere. Bevel, score, and slip to attach this neck to the main body. -
Blend the transition:
Use your thumb or a modeling tool to drag clay across the seam between body and neck, blending them into one continuous piece. The transition should be a fluid curve, not a sharp angle. -
Shape the rim:
Use a damp sponge to smooth the lip of the vase. You can flare it outward slightly for a traditional look or keep it blunt and modern. -
Surface finishing:
Take a serrated rib and lightly scratch horizontal lines around the neck and shoulders to mimic wheel-thrown marks. Wipe away sharp burrs with a sponge. -
Slow drying:
Loosely cover the vase with plastic to let it dry very slowly. This equalization helps prevent the darts from cracking open as the clay shrinks.
Enjoy the organic, earthy presence this vessel brings to your windowsill display