If you’re in the mood for a cozy winter make, a little clay snowman is basically the perfect project. I’m sharing my favorite clay snowman ideas—from classic ornaments to a few playful twists you can totally pull off at your kitchen table.
Top Hat Snowman Ornament
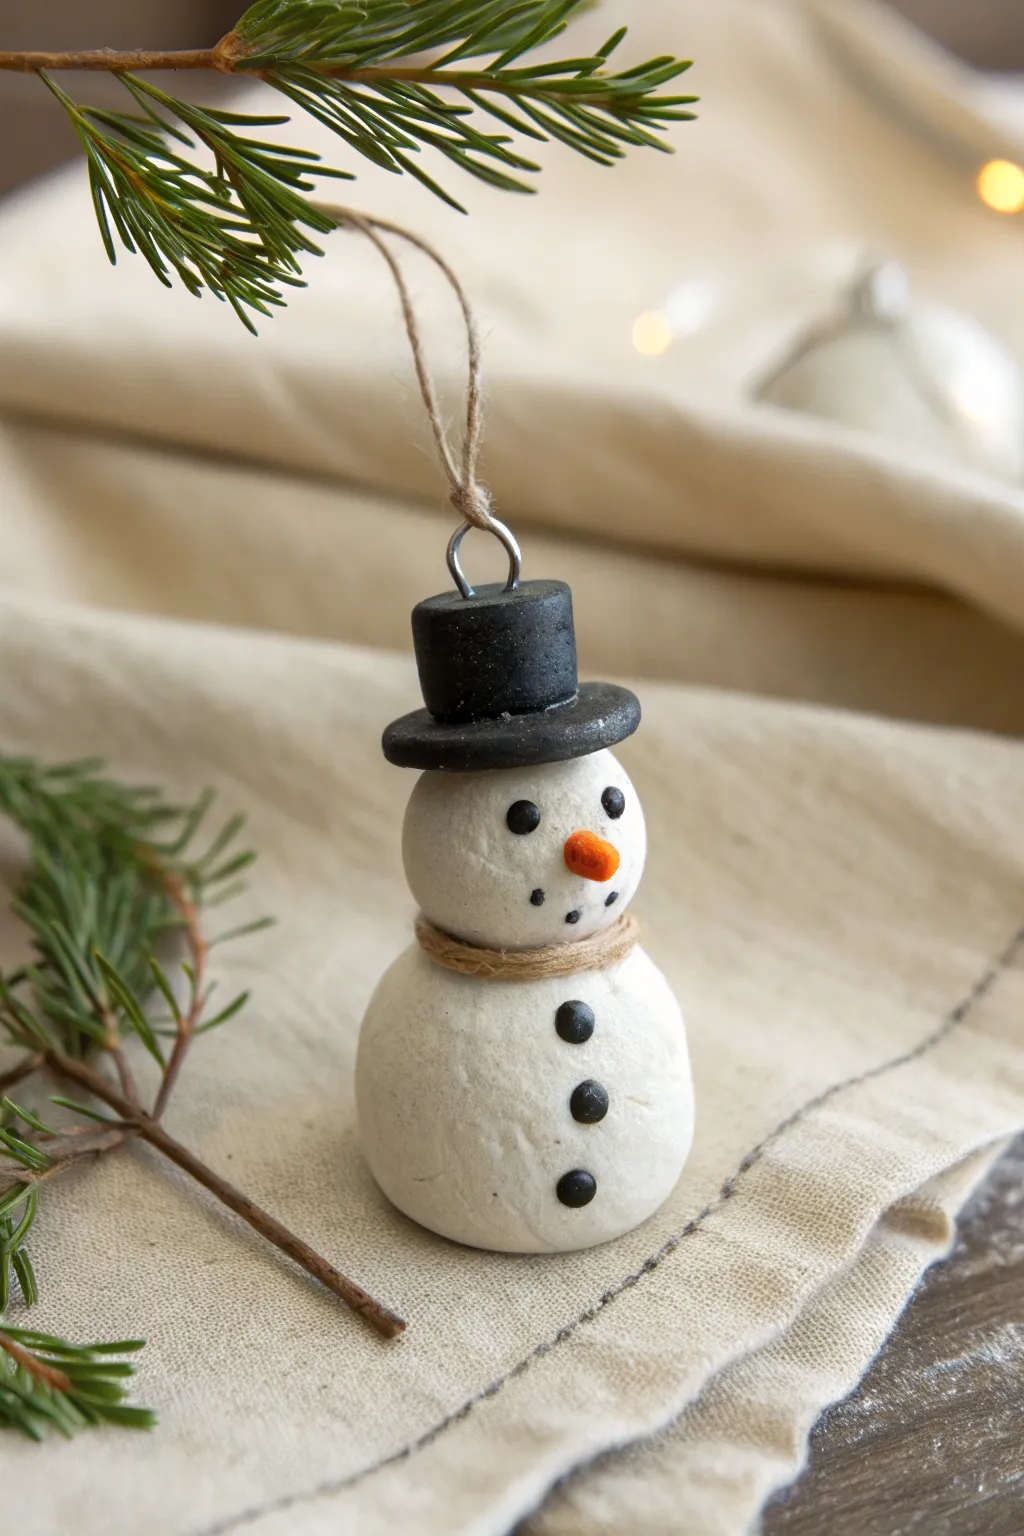
Bring a touch of vintage charm to your holiday tree with this sophisticated snowman ornament. Featuring a dapper black top hat and rustic twine detailing, this simple clay project creates a timeless winter keepsake.
Step-by-Step Tutorial
Materials
- White polymer clay or air-dry clay
- Black polymer clay (or black acrylic paint)
- Orange polymer clay (or orange acrylic paint)
- Eye pin or small wire loop
- Jute twine or thin hemp cord
- Black acrylic paint
- Small detail paintbrush or dotting tool
- Toothpick or sculpting needle tool
- Strong craft glue (e.g., E6000)
- Matte varnish (optional)
Step 1: Sculpting the Body
-
Form the base:
Start by taking a chunk of white clay about the size of a walnut. Roll it between your palms until it forms a smooth, even sphere for the snowman’s body. -
Flatten the bottom:
Gently press the sphere onto your work surface to create a flat bottom. This helps the ornament sit upright if you choose to display it on a mantel instead of hanging it. -
Create the head:
Take a slightly smaller piece of white clay, roughly two-thirds the size of the body. Roll this into a second smooth sphere for the head. -
Connect the parts:
If using polymer clay, press the head firmly onto the body. For air-dry clay, score the touching surfaces with a toothpick and add a dab of water or slip before joining them. -
Texture the surface:
To mimic the look of packed snow, lightly tap the surface of both spheres with a stiff-bristled toothbrush or a crumpled ball of aluminum foil. This adds a lovely, organic texture.
Hat trouble?
If the clay hat keeps sliding off during assembly, insert a toothpick through the hat and down into the head to act as an internal support spine.
Step 2: Creating the Accessories
-
Make the hat brim:
Using black clay, roll a small ball and flatten it into a disk about the width of the snowman’s head. Smooth the edges so they are rounded, not sharp. -
Form the hat crown:
Roll a cylinder of black clay slightly narrower than the brim. Attach this cylinder to the center of the brim disk to complete the top hat shape. -
Secure the hanger:
Insert an eye pin or a small loop of wire directly into the top center of the hat while the clay is still soft. Make sure it goes deep enough to be secure. -
Attach the hat:
Place the completed hat onto the snowman’s head. I like to tilt it just slightly to the side to give him a bit of personality. Press down gently to adhere. -
Add the nose:
Roll a tiny speck of orange clay into a cone shape. Press this into the center of the face for the carrot nose.
Sparkle finish
Before baking or drying, brush the white clay sections with a little pearlescent mica powder or white glitter to give your snowman a frosty shimmer.
Step 3: Finishing Details
-
Bake or dry:
If using polymer clay, bake the figure according to the package instructions (usually 275°F for 15-30 minutes). If using air-dry clay, let it sit undisturbed for 24-48 hours until fully hard. -
Paint the face:
Once hardened and cool, use a dotting tool or the wrong end of a paintbrush dipped in black acrylic paint to make two eyes above the nose. -
Paint the buttons:
Continue with the black paint to create three vertically aligned dots on the lower body sphere for coal buttons. -
Add the smile:
Use a very fine toothpick or needle tool dipped in black paint to create a dotted smile made of ‘coal’ bits beneath the nose. -
Tie the scarf:
Cut a short length of jute twine. Wrap it around the snowman’s neck where the two spheres meet. -
Secure the scarf:
Apply a tiny dot of strong craft glue to the back of the neck to hold the twine in place, wrapping it twice to look cozy. -
Add the hanger:
Thread a length of twine through the eye pin on the hat, tie a knot, and trim the excess to create a rustic hanging loop.
Now your charming little snowman is ready to hang on the tree or be gifted to a friend


Cozy Beanie Snowman With Long Scarf
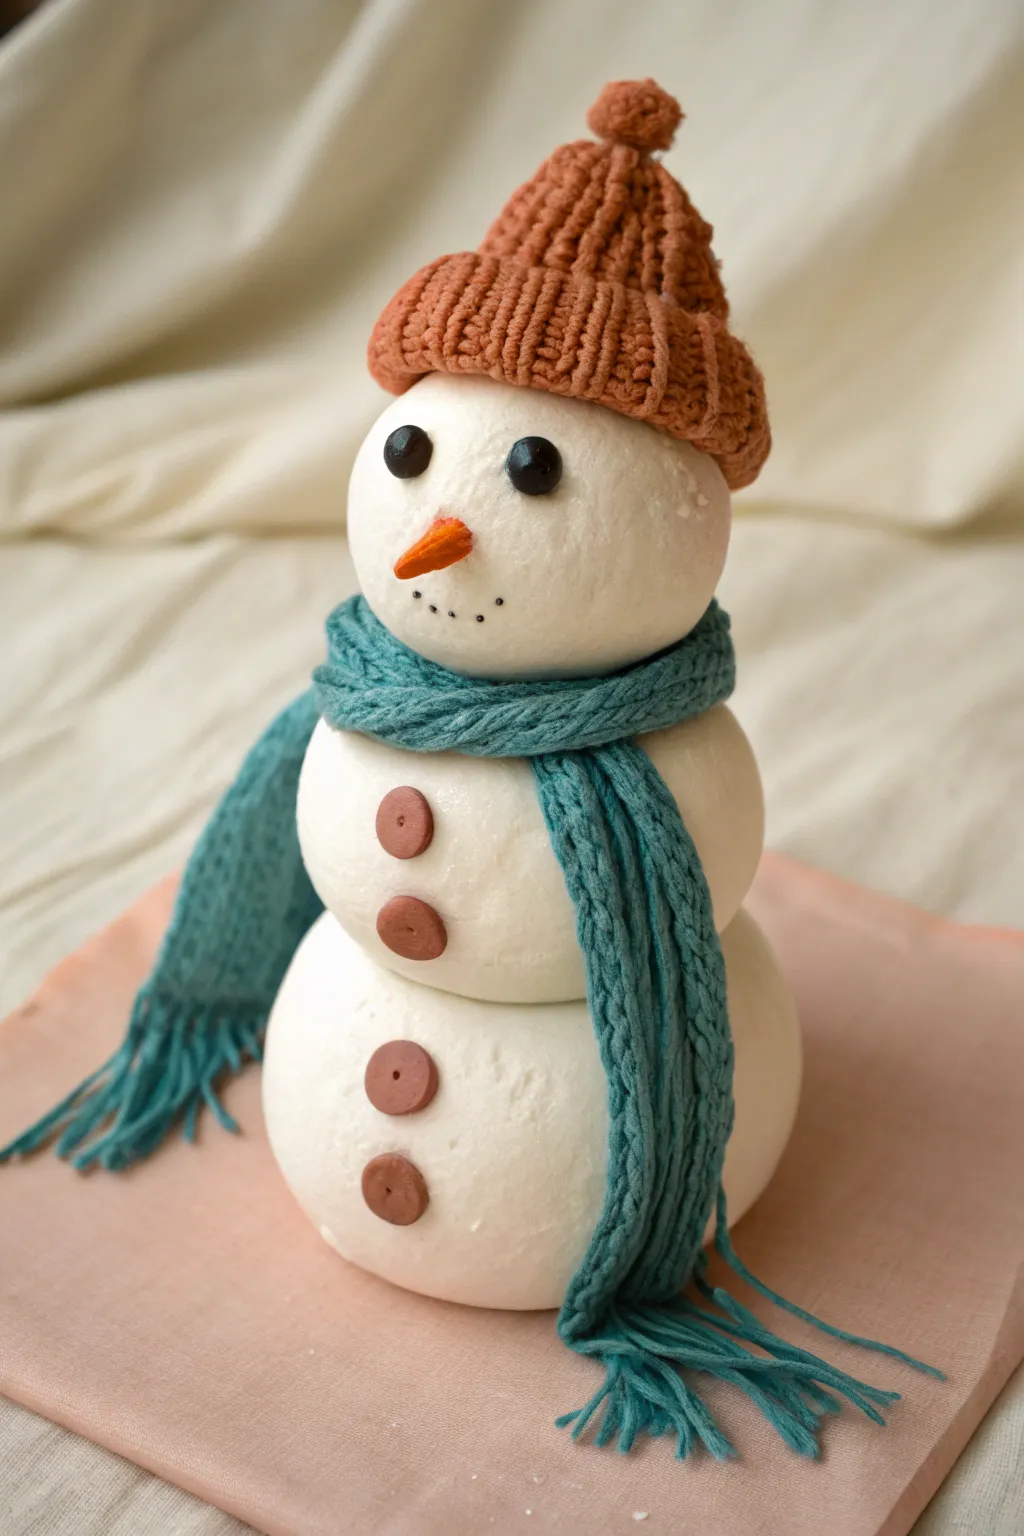
This adorable winter figurine combines the smooth, minimalist look of snowballs with incredibly realistic knitted textures made entirely from clay. The cozy orange beanie and long teal scarf add a pop of warmth to this frosty friend.
Step-by-Step Guide
Materials
- White polymer clay (approx. 3-4 oz)
- Rust/burnt orange polymer clay
- Teal/blue-green polymer clay
- Black polymer clay (small amount)
- Brown polymer clay (small amount)
- Needle tool or toothpick
- Ball tool (various sizes)
- Texture tool or clean toothbrush (optional)
- Rolling pin or acrylic roller
- Craft knife
- Baking sheet and oven (per clay instructions)
Step 1: Forming the Body
-
Roll the Base:
Start by conditioning your white clay until it is soft and pliable. Roll a large ball for the base, approximately 1.5 to 2 inches in diameter. Gently flatten the bottom just enough so it sits stably on your work surface without rolling away. -
Add the Middle Section:
Roll a second ball of white clay, slightly smaller than the base. Press this firmly onto the top of the base ball. You can blend the seam slightly with a smoothing tool if you want a fused look, or leave it distinct for a stacked snowball effect. -
Create the Bead:
Roll the smallest white ball for the head. Place it on top of the middle section. Check the proportions to ensure your snowman has a classic tapered silhouette. -
Add Texture (Optional):
To give the white clay a more realistic ‘snow’ appearance, lightly tap a clean toothbrush or crumpled foil over the surface of the three balls. This removes fingerprints and adds a frosty matte finish.
Realistic Knits
For the most realistic knit texture, twist two very thin strands of clay together, then place another twisted pair next to it (twisted in the opposite direction). Press these onto the hat surface.
Step 2: Knitting the Winter Gear
-
Prepare the Scarf Clay:
Condition the teal clay and roll it into a long, thin snake. Flatten this snake with your roller until it is a long, flat ribbon about 1/4 inch thick. -
Texture the Scarf:
Using a needle tool, gently score parallel lines lengthwise down the entire ribbon to mimic yarn strands. I like to make these grooves fairly deep so the texture remains visible after baking. -
Wrap the Scarf:
Drape the scarf around the snowman’s neck area (between the head and middle body). Overlap the ends so one hangs down longer than the other. Use your needle tool to separate the very ends of the scarf to create loose fringe. -
Texture the Fringe:
Refine the fringe strands by twisting them slightly or separating them further to make them look soft and distinct. -
Shape the Beanie Base:
Roll a ball of rust-colored clay and flatten it into a thick disc. Place this on top of the snowman’s head and shape it down into a dome, ensuring it covers the ‘forehead’ slightly. -
Create the Ribbed Brim:
Roll a small snake of rust clay, flatten it, and wrap it around the bottom edge of the hat to form a brim. Use your needle tool to press vertical indentations all around this band to create a ribbed knit texture. -
Texture the Hat Body:
On the main dome of the hat, use the needle tool to press small ‘V’ shapes in rows, stacking them upward toward the peak. This mimics the classic stockinette stitch of knitting. -
Top with a Pom-Pom:
Roll a small ball of rust clay for the pom-pom. Texture it aggressively with a needle tool by poking it repeatedly until it looks fuzzy. Press this securely onto the very top of the beanie.
Drooping Scarf?
If the long scarf ends are too heavy and droop incorrectly before baking, support them with a small wad of crumpled aluminum foil or tissue paper until the clay hardens in the oven.
Step 3: Adding Personality
-
Make the Eyes:
Roll two tiny spheres of black clay. Press them gently into the face area. You can use a small ball tool to make divots first so the eyes sit flush rather than bulging out. -
Sculpt the Carrot Nose:
Mix a tiny bit of orange clay (or use the rust color mixed with a speck of yellow). Roll a small cone shape. Press horizontal lines into it with a knife to create carrot ridges, then attach it to the center of the face. -
Create the Smile:
Use a needle tool or a very fine dotting tool to poke five or six tiny holes in a curved shape beneath the nose to form a coal-dotted mouth. -
Add Buttons:
Roll four small balls of brown clay and flatten them into discs. Press two onto the middle body section and two onto the bottom section. -
Detail the Buttons:
Use a needle tool to poke two or four tiny holes in the center of each brown disc to make them look like real sewn-on buttons. -
Bake:
Place your finished snowman on a baking sheet lined with parchment paper. Bake according to your specific brand of polymer clay instructions (usually 275°F for about 15-30 minutes depending on thickness). -
Cool and Finish:
Let the snowman cool completely before handling. If desired, you can glaze the eyes and nose with a gloss varnish for a wet look.
This charming, textured figure makes a perfect holiday gift or a festive addition to your mantle display


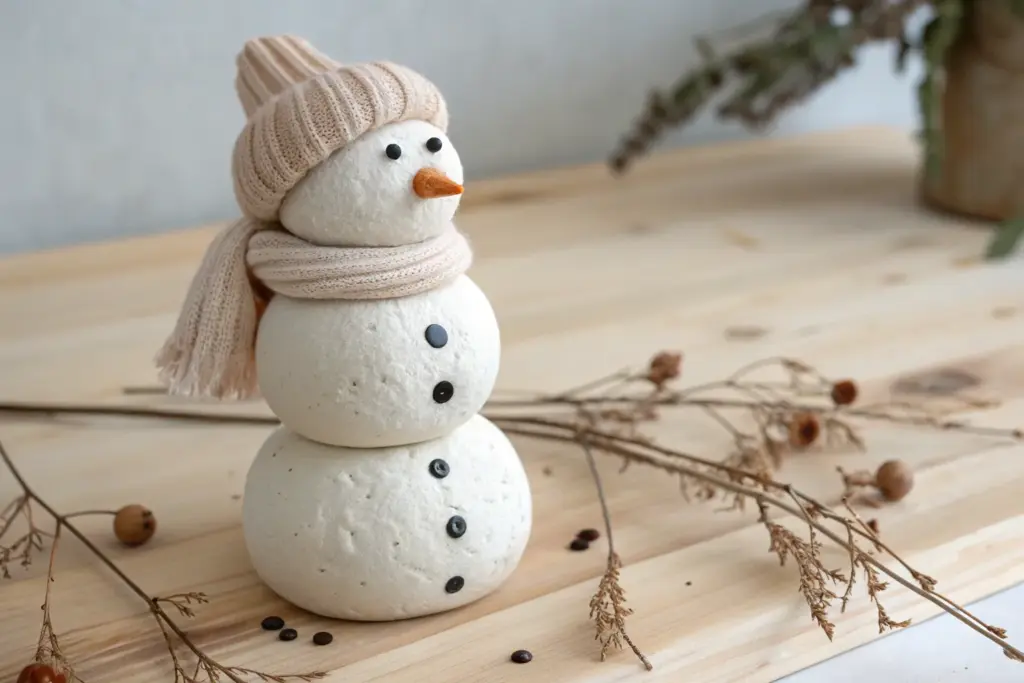
Twig-Arm Rustic Snowman
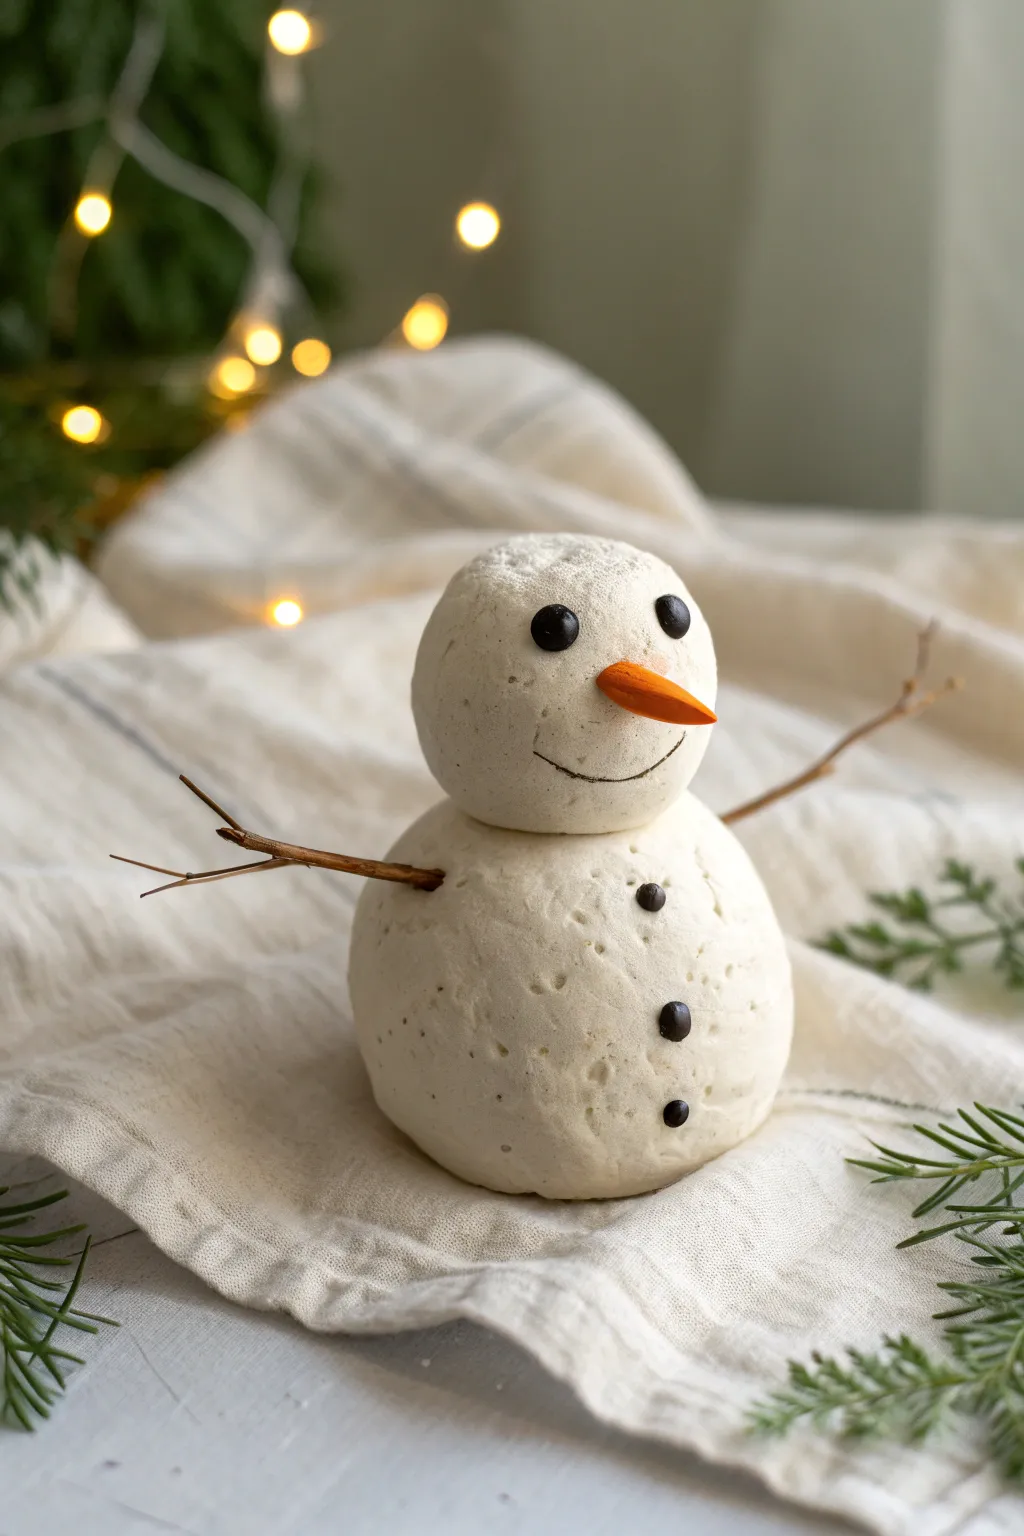
Embrace the beauty of imperfection with this delightful rustic snowman made from air-dry clay. Its textured finish and natural twig arms give it a cozy, handcrafted personality perfect for winter displays.
Step-by-Step
Materials
- White air-dry clay (or salt dough)
- Clean, dry twigs (thin)
- Small black beads or peppercorns
- Orange acrylic paint
- Small piece of clay (for nose)
- Toothpick or sculpting needle
- Fine-point black permanent marker or black paint
- Parchment paper (work surface)
- Water
Step 1: Farming the Body
-
Prepare the workspace:
Lay down a sheet of parchment paper to prevent the clay from sticking to your table. Condition your white air-dry clay by kneading it in your hands until it becomes soft and pliable. -
Form the base:
Take a generous handful of clay and roll it between your palms to form a sphere. This will be the body, so aim for something slightly larger than a golf ball. Don’t worry about making it perfectly smooth; those little dents add texture. -
Create the texture:
Gently tap the ball on the table to flatten the bottom so it sits securely without rolling. I like to lightly dab the surface with a crumpled piece of foil or a stiff brush to create a subtle pitted texture. -
Insert the buttons:
While the clay is still wet, take three black beads or peppercorns. Press them vertically down the front of the body sphere, spacing them evenly to resemble buttons. -
Form the head:
Roll a second, smaller ball of clay for the head. It should be roughly two-thirds the size of the body. Texture it lightly to match the base. -
Connect the pieces:
Use a toothpick to score the top of the body and the bottom of the head. Dab a little water or slip (clay mixed with water) on the scored areas. -
Secure the head:
Press the head firmly onto the body. For extra stability, you can insert a toothpick halfway into the body and slide the head onto the protruding end.
Step 2: Adding Personality
-
Make the eyes:
Press two black beads into the upper third of the face sphere. Push them in deep enough that they won’t fall out as the clay shrinks during drying. -
Craft the nose:
Take a tiny pinch of clay and roll it into a small cone shape to mimic a carrot. -
Attach the nose:
Score the center of the face and add a drop of water. Press the base of the carrot nose firmly onto the face. -
Paint the nose:
If your clay isn’t already orange, carefully paint the nose with orange acrylic paint once the clay has set slightly, or paint it before attaching if you have a steady hand. -
Draw the smile:
Use a needle tool or toothpick to lightly etch a curved smile line under the nose. Start small; you can always deepen the line later. -
Prepare the arms:
Select two thin twigs that branch out at the ends. Break them to a length that looks proportional to your snowman’s body. -
Insert the arms:
While the clay body is still soft, gently push the non-branched end of a twig into the left side of the body. Repeat on the right side. -
Enhance the details:
Using a needle tool, add tiny pricks or holes randomly around the body to enhance the porous snow-like look shown in the inspiration photo. -
Final drying:
Let the snowman sit undisturbed in a warm, dry area for at least 24-48 hours until completely hard. -
Define the mouth:
Once fully dry, trace over your etched smile line with a fine-point black marker or a very thin brush with diluted black paint to make the expression pop.
Texturing Tip
To get that specific porous look seen in the photo, gently press a clean, coarse sponge or a stiff toothbrush against the wet clay instead of smoothing it out perfectly.
Sparkle Upgrade
Before the clay dries, lightly brush the snowman with white glue and sprinkle fine iridescent glitter over it to mimic the shimmer of fresh morning snow.
Now you have a charming little winter friend to keep you company on your desk or mantelpiece


Air-Dry Clay Snowman Lantern
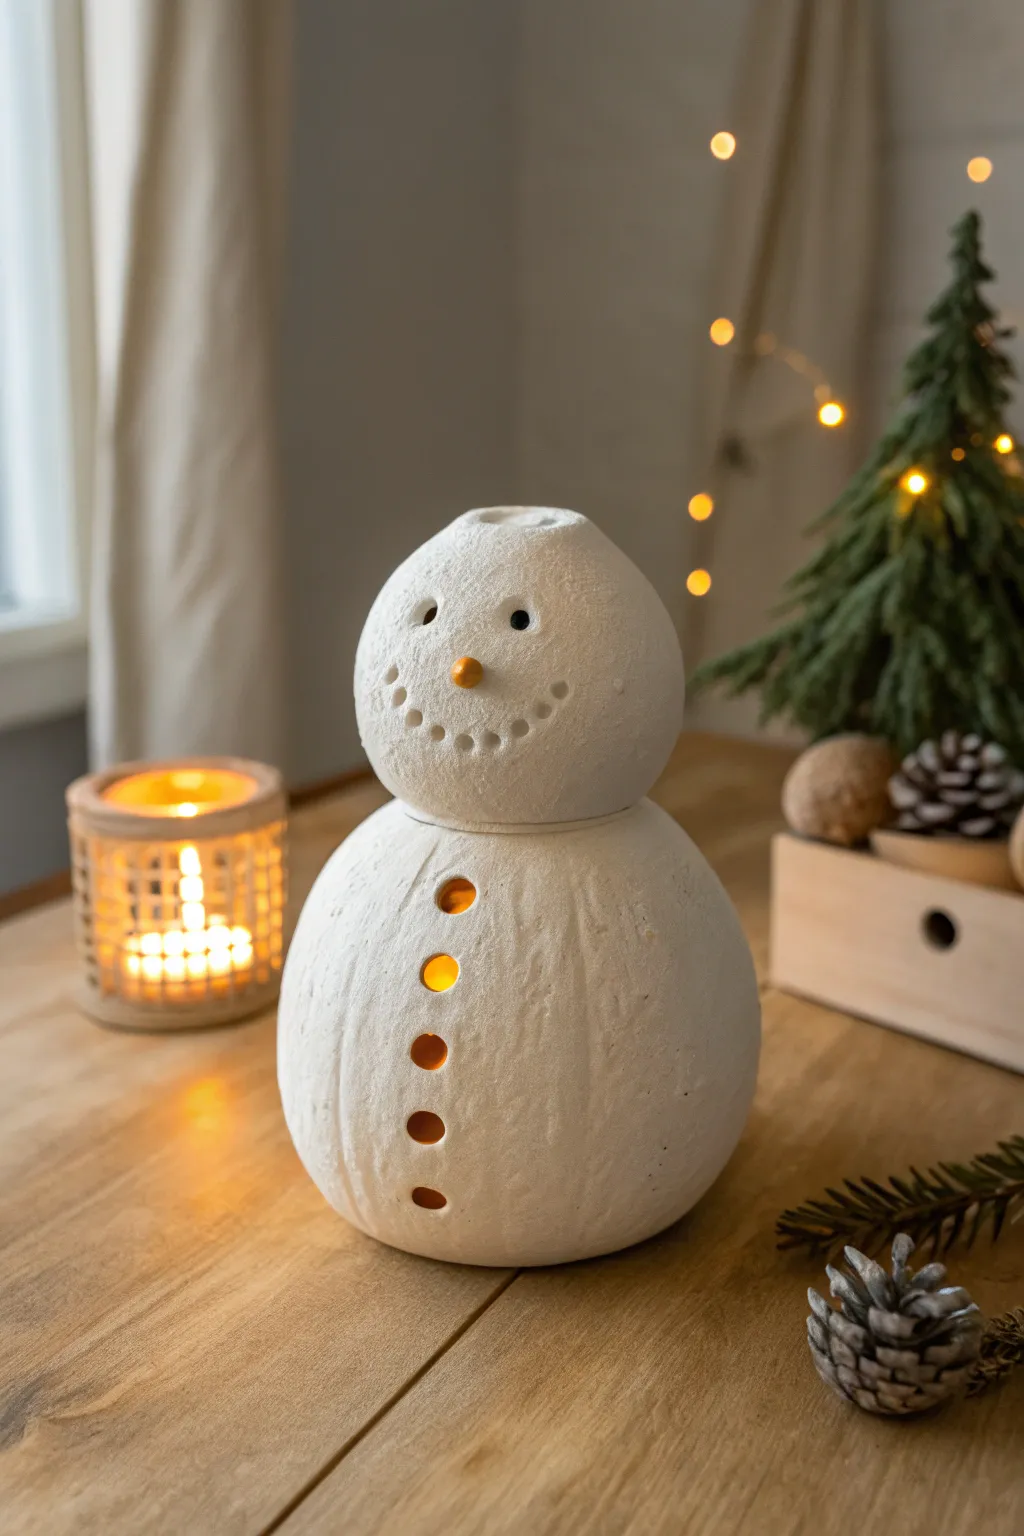
Transform simple air-dry clay into a charming, rustic snowman lantern that casts a warm holiday glow. This project features a textured, stone-like finish and perforated details that let candlelight shine through his jolly smile and buttons.
Detailed Instructions
Materials
- White stone-effect air-dry clay (or standard white clay)
- Small LED tealight candle
- Two foil balls (one large, one medium)
- Rolling pin
- Small circular cutters (straws work well)
- Clay sculpting tools or a toothpick
- Small piece of orange clay or orange acrylic paint
- Black acrylic paint
- Fine-grit sandpaper
- Sponge or texture brush
Step 1: Forming the Body Base
-
Prepare the foil armature:
Begin by scrunching aluminum foil into two distinct tight balls. Make the bottom ball larger (about the size of a grapefruit) and the top ball slightly smaller (like a large orange) to form the snowman’s head and body structure. -
Roll out the clay:
Take a large chunk of your stone-effect or white air-dry clay. Roll it out on a flat surface to a thickness of about 1/4 inch. You want it sturdy enough to stand but thin enough not to be too heavy. -
Cover the bottom sphere:
Drape the rolled clay over the larger foil ball. Gently press and smooth the clay down around the foil until it is completely covered, leaving an open hole at the very bottom for removing the foil later. -
Create the base opening:
Ensure the opening at the bottom is wide enough to fit your LED tealight comfortably. Flatten the rim of this opening so the sphere can sit level on a table without wobbling. -
Texture the surface:
While the clay is still soft, dab the surface with a textured sponge or crumpled foil. This mimics the compacted snow look seen in the photo rather than a perfectly smooth ceramic finish. -
Add vertical ridges:
I like to use a modeling tool to gently press faint vertical lines around current sphere, giving it a subtle pumpkin-like volume or the look of rolled snow.
Pro Tip: Glowing Diffusion
Line the inside of the button holes with a tiny scrap of tracing paper or thin tissue paper. It diffuses the harsh LED bulb light, creating a softer, magical glow.
Step 2: Sculpting the Head and Details
-
Cover the top sphere:
Repeat the covering process with the smaller foil ball for the head. However, leave the bottom of this sphere open so light can eventually travel up from the body. -
Stack and join:
Place the head on top of the body. Score (scratch) the contact points and add a dab of water or clay slip to bind them together securely. -
Create the nose:
Roll a very small cone of clay for the carrot nose. Attach it to the center of the face, pressing the base firmly to blend it. -
Punch the smile:
Using a small straw or a circular hole punch tool, press a curved line of small dots into the face to form the mouth. Push deep enough to create shadows, though you don’t necessarily need to pierce all the way through for the smile. -
Carve the eyes:
Use a larger tool to create two distinct indents for the eyes. These should be deep recesses. -
Punch the light holes:
For the buttons, use a medium-sized circular cutter to punch a vertical row of holes down the belly. Remove the clay plugs entirely so the candlelight can shine through brightly. -
Hollow the top:
Create a small opening at the very top of the head (the chimney hole). This allows heat to escape if you use real candles, though LED is safer, and it helps the light circulate.
Step 3: Refining and Finishing
-
Remove the core:
Let the clay dry until it is leather-hard—firm but still slightly flexible. Carefully reach through the bottom hole with tweezers or pliers and pull out the scrunched foil from inside. This leaves a hollow shell. -
Open the passage:
Ensure there is a clear passage between the body and head inside so the light from the base reaches the face. -
Full dry time:
Allow the snowman to dry completely (24-48 hours depending on humidity). The color will lighten significantly as moisture leaves deeply. -
Sand edges:
Once bone dry, use fine-grit sandpaper to smooth any sharp edges around the button holes and the bottom rim. -
Paint the nose and eyes:
Use a tiny brush to paint the carrot nose a vibrant orange. Dab a small dot of black paint into the eye recesses for contrast. -
Final texture check:
If you missed texturing the ‘seam’ where the head meets the body, dab a little white paint with baking soda mixed in to mimic fresh snow.
Troubleshooting: Cracks?
If hairline cracks appear while drying, mix a small amount of fresh clay with water to make a paste (slip). Fill the cracks, smooth it over with your finger, and let it dry again.
Simply slide a battery-operated tealight underneath your new creation and watch him bring warmth to your winter decor.

The Complete Guide to Pottery Troubleshooting
Uncover the most common ceramic mistakes—from cracking clay to failed glazes—and learn how to fix them fast.
Pinch Pot Snowman For Beginners

Create a rustic, charming snowman using simple pinch pot techniques for a hollow, lightweight sculpture. This project features a textured, stone-like finish and minimalistic details that give it a timeless winter feel.
Step-by-Step Guide
Materials
- White modeling clay (air-dry or polymer)
- Small wooden craft stick or toothpick
- Orange clay (tiny amount for nose)
- Black peppercorns or small black beads
- Texturing tool (old toothbrush or stiff bristle brush)
- Water and small sponge
- Clay scoring tool or knife
Step 1: Forming the Body Segments
-
Prepare the clay:
Begin by wedging your white clay to remove air bubbles. Divide the clay into three portions of graduating sizes: one large for the base, a medium piece for the torso, and a small piece for the head. -
Create the base pinch pots:
Take the largest ball of clay and press your thumb into the center about halfway down. Gently pinch and rotate the clay between your thumb and fingers to open up a pot shape. -
Close the sphere:
Once you have a bowl shape, gently curve the rim inward until the opening closes up completely. Smooth the seam with your finger to create a hollow sphere. This keeps the snowman lighter than a solid ball. -
Repeat for upper sections:
Repeat the pinch pot process for the medium and small clay portions. Ensure each sphere is fairly round, though slight imperfections add to the organic, snowy look. -
Initial texturing:
Before assembly, gently roll each sphere on a canvas cloth or tap it all over with a stiff bristle brush. This creates a subtle pitted texture resembling packed snow.
Step 2: Assembly and Structure
-
Flatten the contact points:
Identify the top of your large base sphere and the bottom of the medium sphere. Gently tap them against the table to create small flat spots where they will connect. -
Score and slip:
Use a scoring tool or toothpick to scratch up the flat spots on both spheres. Dab a little water (slip) onto the scratched areas to act as glue. -
Connect the torso:
Press the medium sphere firmly onto the base sphere. Wiggle it slightly to lock the clay together. -
Add support (optional):
If the clay feels soft, I like to insert a toothpick vertically through the center of the bottom two spheres to act as a hidden spine. -
Attach the head:
Repeat the flattening, scoring, and slipping process for the head. Press the smallest sphere onto the medium one securely.
Seamless Merges
When stacking the spheres, blend a tiny bit of clay from the upper ball down onto the lower ball at the back to prevent it from toppling over.
Step 3: Adding Details
-
Create the carrot nose:
Roll a very tiny cone shape from orange clay. Score the center of the face and press the wide end of the cone onto the clay. -
Place the eyes:
Press two black peppercorns or small beads deep into the clay for eyes. Pushing them in slightly creates a shadowed socket effect. -
Add buttons:
Select three peppercorns or beads for the buttons. Press them into the torso and base spheres in a vertical line. -
Final surfacing:
Check the surface texture again. If your fingerprints smoothed out the ‘snow’ texture during assembly, re-tap those areas with your bristle brush. -
Refining the shape:
Look at the silhouette. If the spheres look too separated, take a small coil of white clay, wrap it around the neck seam, and blend it smooth to integrate the shapes.
Cozy Accessories
Twist two thin snakes of clay together to make a scarf, or shape a tiny flat disc and cylinder to create a top hat for extra character.
Let your frosty new friend dry completely before displaying him on a wooden board or shelf for the winter season
Mini Snowman Place Card Holders
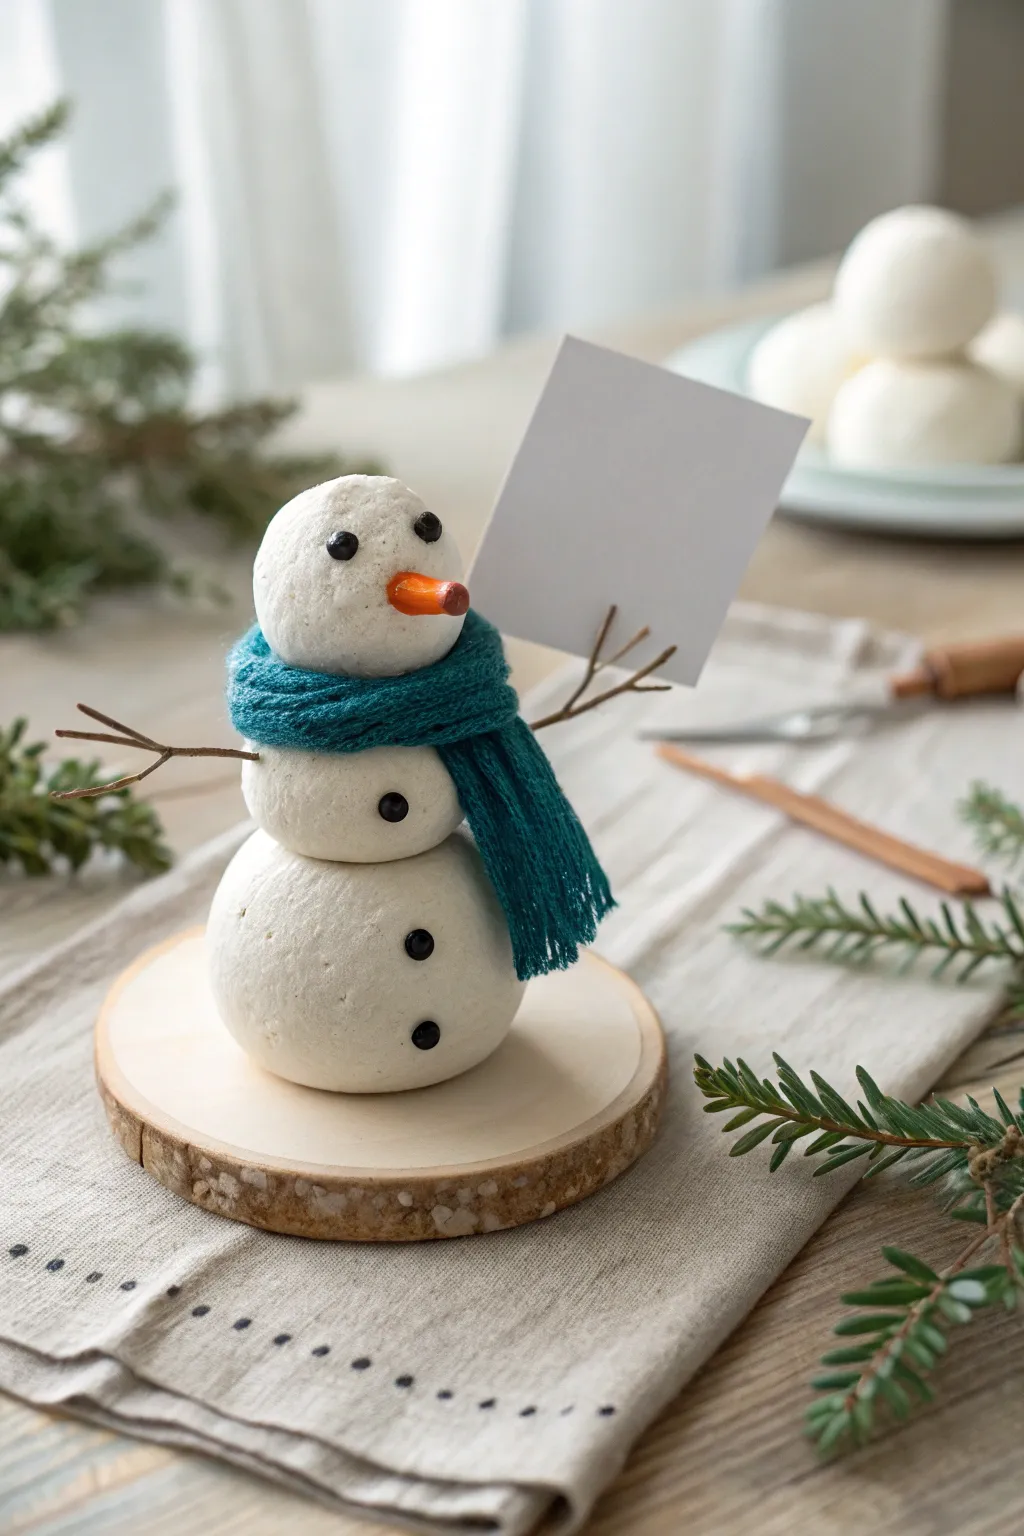
This adorable mini snowman combines rustic charm with practical function, featuring a textured clay body and a tiny knitted scarf. Perched on a wood slice, he’s ready to greet your guests by holding a place card in his natural twig hand.
Step-by-Step
Materials
- White air-dry clay (or polymer clay)
- Small wooden slice coaster (approx. 3-4 inches)
- Small twigs (natural or wire-reinforced)
- Teal yarn or a strip of knit fabric
- Orange acrylic paint or orange clay
- Small black beads or black clay
- Cardstock for the place card
- Texture tool (toothbrush or stiff bristle brush)
- Craft glue or strong adhesive
- Sculpting tools
- Clear matte sealer (optional)
Step 1: Sculpting the Body
-
Form the Base:
Start by rolling a ball of white clay approximately 2 inches in diameter for the bottom section. Flatten the bottom slightly by pressing it gently against your work surface so it sits stable without rolling. -
Add Texture:
Before assembling, use a toothbrush or a stiff-bristle brush to tap all over the surface of the ball. This stippling technique mimics the granular texture of real packed snow. -
Create the Middle Section:
Roll a second ball, slightly smaller than the first (about 1.5 inches). Flatten the top of the base ball slightly and the bottom of this new ball to increase the contact area. -
Stack and Bond:
Apply a dab of water (for air-dry clay) or liquid clay (for polymer) between the two balls and press them firmly together. Texture this middle section just like the first one to keep the look consistent. -
Form the Head:
Roll the smallest ball for the head, roughly 1 inch in size. Attach it to the top of the middle section using your adhesive agent, ensuring the stack looks balanced but whimsical. -
Final Texturing:
Go over the seams and the new head section with your texturing tool. I like to gently blend the seams a tiny bit before re-texturing to make the snowman look like one cohesive figure.
Drooping Snowman?
If the clay balls are too heavy and squashing the lower sections, insert a toothpick or crumpled foil core through the center of the body for internal structural support.
Step 2: Adding Details
-
Insert the Arms:
While the clay is still soft, select two small, forked twigs. Push one twig deep into the left side of the middle section. -
Position the Card Holder Arm:
Insert the second twig on the right side. Angle this one slightly upward or forward so the ‘fingers’ of the twig can securely cradle a small piece of cardstock later. -
Make the Carrot Nose:
Shape a tiny cone from clay. If using white clay, you will paint it orange later; if using polymer, use orange clay. Press it firmly into the center of the face. -
Add Facia Features:
Press two small black beads into the face for eyes. If you don’t have beads, roll tiny balls of black clay or create indentations to fill with black paint later. -
Button It Up:
Press three larger black beads (or clay balls) into the front of the body: one on the middle section and two on the bottom base section.
Frosty Effect
Brush a thin layer of white glue over the dried clay body and sprinkle with fine iridescent glitter or mica powder to give the snowman a sparkling, fresh-snow finish.
Step 3: Finishing Touches
-
Drying or Baking:
If using air-dry clay, let the figure sit undisturbed for 24-48 hours. If using polymer clay, bake according to the package instructions (usually 275°F for 15-30 mins) and let cool completely. -
Painting the Nose:
If you used white clay for the nose, carefully paint it a bright carrot orange now. Let the paint dry. -
Create the Scarf:
Cut a strip of teal knit fabric or braid three strands of teal yarn together to create a chunky miniature scarf. -
Dress the Snowman:
Wrap the scarf snugly around the snowman’s neck area (between the head and middle ball). Tie a simple knot or cross the ends, cutting fringe into the ends for a realistic textile look. -
Mounting the Figure:
Apply a strong craft glue to the bottom of your snowman and press it firmly onto the center of the wood slice coaster. Hold it in place for a minute to ensure a good bond. -
Insert the Card:
Cut a small rectangle of white cardstock. Gently wedge it into the forked twig arm to complete the place holder function.
Now your charming little frozen friend is ready to guide guests to their seats with a smile


What Really Happens Inside the Kiln
Learn how time and temperature work together inside the kiln to transform clay into durable ceramic.
Snowman Gift Tag Charms
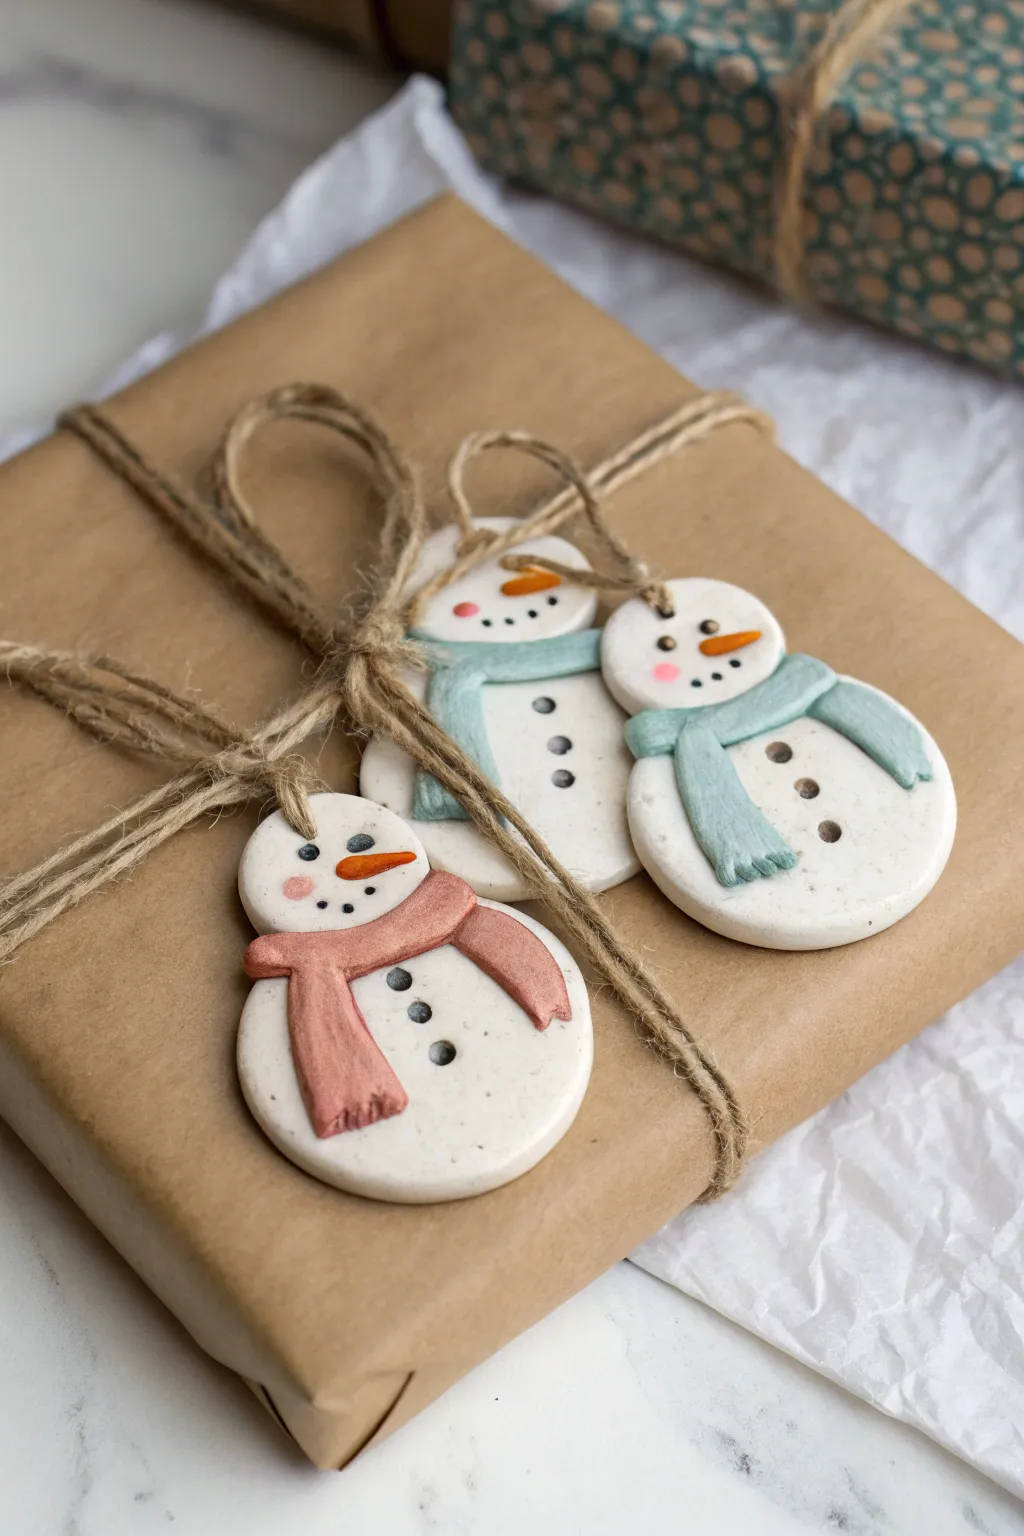
Add a handmade touch to your holiday wrapping with these adorable clay snowman tags. These sturdy, flat charms feature textured scarves and sweet painted faces, perfect for tying onto packages or hanging on the tree.
Step-by-Step Guide
Materials
- White air-dry clay or polymer clay
- Rolling pin
- Circle cutters (two sizes: approx. 1.5″ and 1″)
- Modeling tool or butter knife
- Texturing tool (old toothbrush or sandpaper)
- Acrylic paints (teal, dusty pink, orange, black, pink)
- Small detail paintbrushes
- Straw or cocktail stick
- Matte varnish or sealant
- Jute twine
Step 1: Shaping the Base
-
Condition the Clay:
Begin by kneading your white clay until it is soft, pliable, and free of cracks. If you are using polymer clay, warm it up in your hands first. -
Roll it Out:
Roll the clay out on a smooth surface to a uniform thickness of about 1/4 inch. You want them thick enough to be durable but thin enough to lie flat on a gift. -
Cut the Circles:
Use your two sizes of circle cutters to punch out shapes. You need one large and one small circle for each snowman. -
Join the Body:
Gently press the smaller circle onto the top of the larger circle. Smooth the seam ever so slightly on the back to ensure they stick together, reshaping the edges if they get slightly squished. -
Add a Hanging Hole:
Use a straw or a cocktail stick to poke a hole through the very top of the head. Make sure the hole is wide enough for your twine to pass through later. -
Texture the Body:
To give the snowmen a less manufactured look, I like to gently tap the surface with an old toothbrush or sandpaper to add a subtle grainy texture.
Fixing Cracks
If air-dry clay cracks while drying, mix a tiny bit of fresh clay with water to make a paste. Fill the cracks, smooth with a wet finger, and let dry again.
Step 2: Adding Details
-
Form the Scarves:
Roll out a small snake of fresh clay and flatten it into a ribbon shape. Cut a long strip for the main scarf and two shorter pieces for the tails. -
Attach the Scarf:
Drape the long strip across the ‘neck’ seam where the two circles meet. Press the two shorter tails underneath one side to look like a knot. -
Add Scarf Texture:
Use a needle tool or knife to gently press ribbing lines into the ends of the scarf tails, mimicking fringe or knit fabric. -
Make the Carrot Nose:
Roll a tiny, tiny cone of clay for the nose. Attach it to the center of the face, pressing gently so it adheres but keeps its pointy shape. -
Button Indentations:
Use a small ball tool or the end of a paintbrush to press three small indentations down the chest for the buttons. This helps guide your painting later. -
Let it Dry:
Allow the clay to dry completely according to the package instructions. Air-dry clay usually takes 24-48 hours; polymer clay will need baking.
Step 3: Painting & Finishing
-
Paint the Scarves:
Once dry and hard, paint the scarves carefully. Use a soft teal for some and a dusty warm pink for others to match the reference look. -
Color the Nose:
Paint the tiny carrot nose a bright, cheerful orange. -
Add Black Details:
Using your finest brush or a toothpick, dab black paint into the button indentations. Add two small dots for eyes and a curved line of dots for a coal smile. -
Rosy Cheeks:
Dilute a tiny drop of pink paint with water or use a dry-brush technique to gently dab faint rosy cheeks right under the eyes. -
Seal the Charm:
Coat the entire front of the snowman with a matte varnish to protect the paint and give it a finished, ceramic-like feel. -
String it Up:
Cut a length of jute twine, thread it through the hole in the head, and tie it onto your package or create a loop for hanging.
Sparkle Finish
Before the varnish dries, sprinkle very fine iridescent glitter over the white parts of the body to make the snowman look like glistening fresh snow.
Now you have a set of charming, reusable gift toppers ready for the season
Snowman Family Mini Set
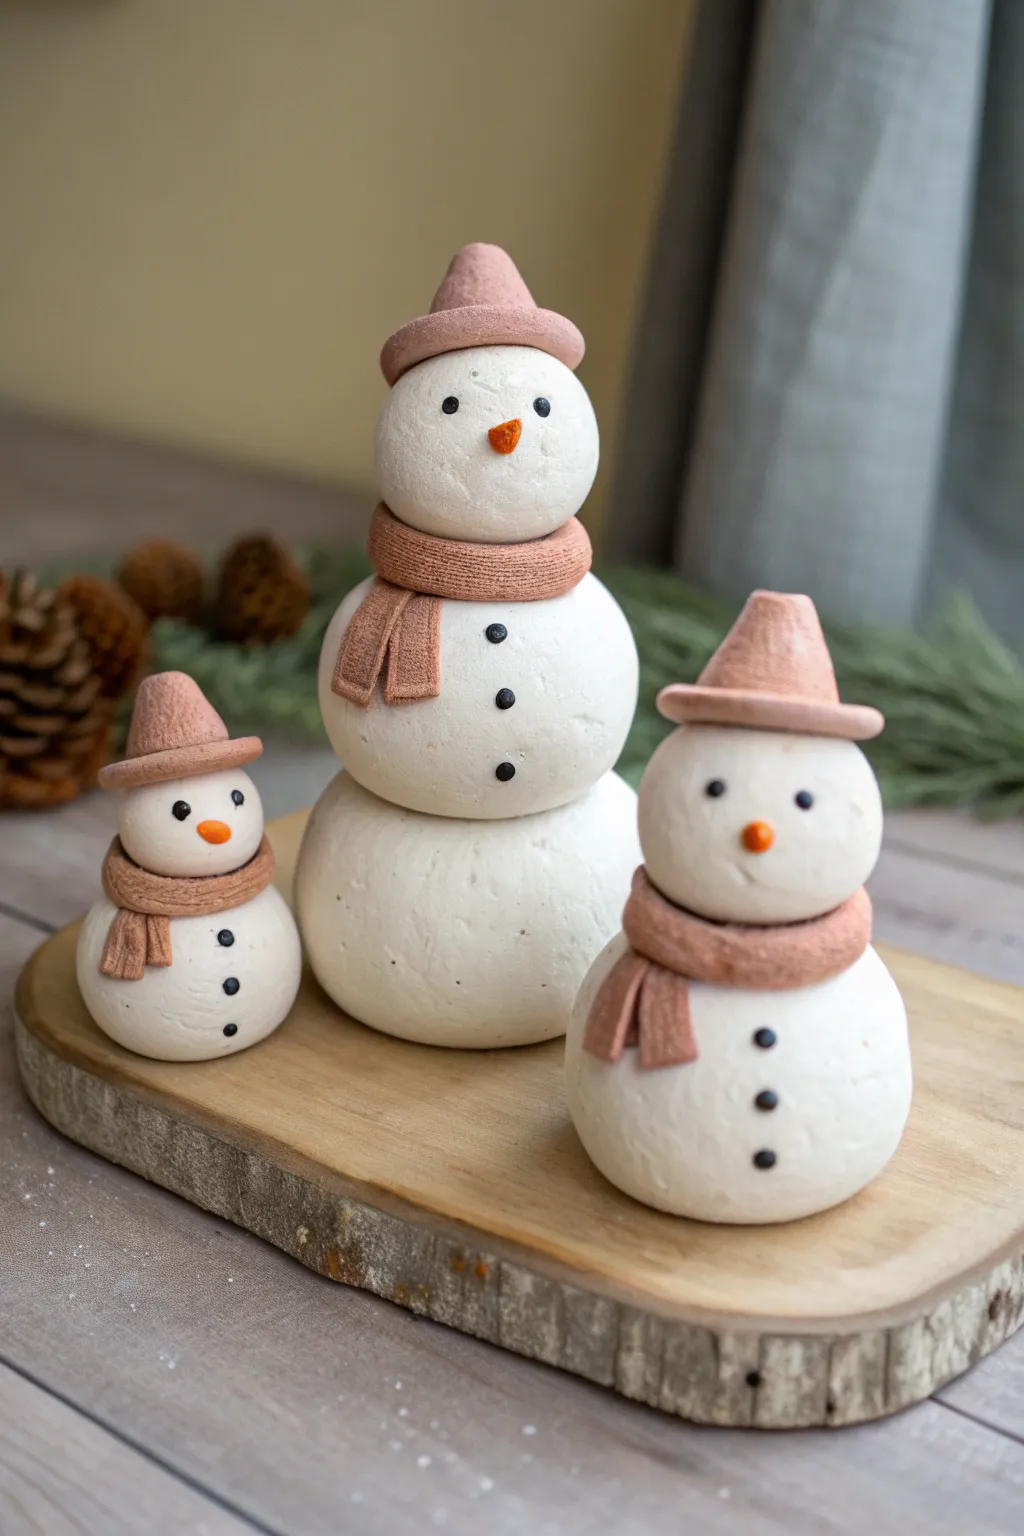
This adorable mini set features a classic trio of clay snowmen, including a tall three-tiered figure and two smaller companions. Their minimalist charm comes from the textured, stone-like white clay and matching dusty rose accessories.
How-To Guide
Materials
- Air-dry clay (stone white or natural white)
- Polymer clay (terracotta or dusty rose color)
- Small amount of orange clay
- Small amount of black clay
- Basic sculpting tools
- Texture sponge or toothbrush
- Rolling pin
- Craft knife
- Toothpicks (for internal structure)
- Super glue or liquid clay (optional)
Step 1: Sculpting the Bodies
-
Prepare the large base:
Start with the tallest snowman. Roll a large ball of white clay about the size of a golf ball for the bottom tier, ensuring it is smooth. -
Flatten the bottom:
Gently press the large ball onto your work surface to create a flat base so the snowman stands securely without wobbling. -
Create the middle tier:
Roll a slightly smaller ball of white clay. If you are using heavy clay, you can insert a toothpick into the center of the base to help anchor this second piece on top. -
Add the head:
Roll a third, even smaller sphere for the head. Press it gently onto the middle section to complete the three-tiered stack. -
Form the smaller snowmen:
For the two smaller figures, they only need two tiers. Roll a medium-sized ball for the body and a slightly smaller one for the head for each figure. -
Assemble the small figures:
Stack the heads onto the bodies, pressing firmly enough to bond them but gently enough to maintain the spherical shape. -
Add surface texture:
Take a texture sponge or an old toothbrush and dab it lightly all over the white surfaces to create a packed-snow effect rather than leaving it perfectly smooth.
Texturing Tip
To get that realistic ‘snowy’ look, dab the white clay with a ball of crumpled aluminum foil before the clay dries. It creates deeper, more organic pockmarks than a sponge.
Step 2: Adding Accessories
-
Mix the accessory color:
If you don’t have a pre-mixed dusty rose clay, blend a small amount of terracotta with white until you achieve a soft, muted pink shade. -
Make the scarves:
Roll out a thin snake of the pink clay and flatten it with a rolling pin to create a long, ribbon-like strip. -
Detail the scarf texture:
Before attaching, use a craft knife or needle tool to gently score vertical lines along the strip to mimic a knitted rib pattern. -
Attach the scarves:
Wrap a strip around the neck of each snowman where the head meets the body. Overlap the ends slightly to look like a tied scarf. -
Add fringe:
Cut small rectangular pieces for the hanging ends of the scarf, score them with lines, and attach them hanging down the front. -
Form the hat brims:
Roll three small balls of pink clay and flatten them into discs. Place these on top of each snowman’s head to form the brim. -
Shape the hat cones:
Roll three small cones of pink clay. I find it easiest to shape these on the table first before transferring them. -
Attach the hats:
Place the cones onto the center of the brims and blend the connection point slightly if needed so it looks like one solid piece.
Fixing Strange Seams
If the clay scarves or hats aren’t sticking to the bodies, use a tiny dab of water (for air-dry) or liquid clay (for polymer) as a bonding agent between the pieces.
Step 3: Finishing the Faces
-
Create carrot noses:
Roll tiny amounts of orange clay into very small, pointy cones. Gently press these into the center of each face. -
Make the eyes:
Roll extremely tiny specks of black clay into balls. Press two into each face above the nose for the eyes. -
Add buttons:
Using the same black clay, create slightly larger balls for the buttons. Place three down the front of the tall snowman and two or three on the smaller ones. -
Final cure:
Let your project dry completely according to your clay manufacturer’s instructions, usually 24-48 hours for air-dry clay.
Display your charming snowman family on a wooden slice or shelf for instant winter cheer

TRACK YOUR CERAMIC JOURNEY
Capture glaze tests, firing details, and creative progress—all in one simple printable. Make your projects easier to repeat and improve.
Textured Snow Look With “Bumpy” Clay
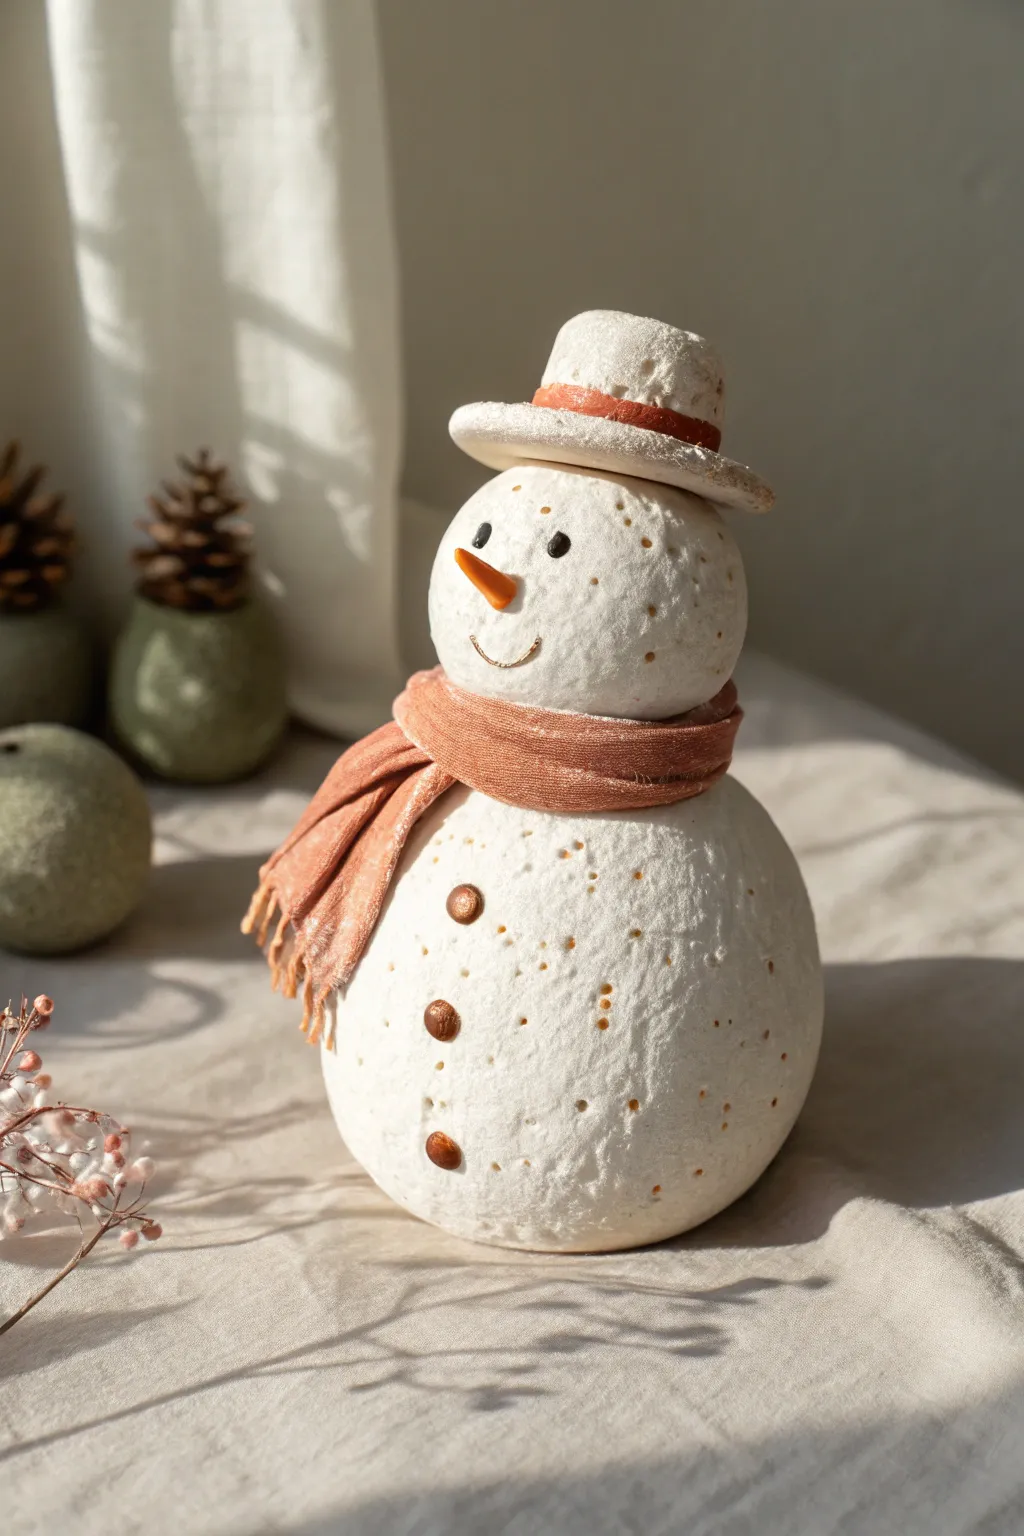
Recreate the charm of freshly packed snow with this delightfully bumpy snowman figurine. By utilizing a unique texturing technique, you can elevate simple white clay into a rustic winter character full of personality and tactile appeal.
Step-by-Step
Materials
- Air-dry clay (white)
- Small stiff-bristled toothbrush or texturing sponge
- Terra cotta or soft orange fabric strip (for scarf)
- Small amount of orange clay (for nose)
- Brown paint (acrylic)
- Fine detail paintbrush
- Rolling pin
- Basic sculpting tools (needle tool, modeling tool)
- Matte sealant spray
Step 1: Forming the Body
-
Roll the base:
Begin by taking a large handful of white air-dry clay and rolling it into a smooth, round ball for the body. Tap the bottom gently on your work surface to create a flat base so it stands securely. -
Create the head:
Roll a second, slightly smaller ball for the head. Gently press it onto the top of the body piece. You can lightly score the connection points and add a dab of water to ensure a strong bond between the two spheres. -
Texture the surface:
This is the signature step. Using a stiff toothbrush or a coarse texturing sponge, firmly stash and press all over the surface of both clay balls. Don’t be afraid to press deep; you want a visible, pitted surface that mimics porous snow.
Secret Texturing Tool
If a toothbrush isn’t creating deep enough pits, try rolling a ball of crumpled aluminum foil over the wet clay surface for a more craggy, rocky snow texture.
Step 2: Character Details
-
Shape the nose:
Take a tiny pinch of orange clay and roll it into a small cone. Attach this to the center of the face, pressing the wider end into the clay so it integrates well. -
Add the smile:
Use a needle tool or a thin piece of wire to gently press a curved line for the smile directly into the textured clay. -
Sculpt the hat base:
Roll a small flat disc of white clay for the hat brim and place it on the head. -
Add the hat top:
Form a short cylinder or rounded mound for the crown of the hat and attach it to the center of the brim. -
Texture the hat:
Repeat the texturing process on the hat components with your brush or sponge, ensuring it matches the rough ‘snowy’ finish of the body. -
Poke button holes:
Using a small rounded tool or the back of a paintbrush, create shallow indentations where the eyes and buttons will go. This pre-placement helps when painting later. -
Dry completely:
Set the figure aside in a dry, room-temperature area. Depending on the brand of clay and humidity, this could take 24 to 48 hours to fully harden.
Step 3: Painting & Finishing
-
Paint the buttons and eyes:
Once dry, use a fine brush and brown acrylic paint to fill in the eyes and the three buttons down the chest. The brown tone offers a softer, more rustic look than harsh black. -
Highlight the smile:
Very lightly trace the indented smile line with a diluted wash of brown paint to make it pop without looking too drawn-on. -
Paint the hat band:
Paint a thin strip of terracotta or rust-colored paint around the base of the hat’s crown to mimic a ribbon. -
Simulate speckling:
For added depth, you can dilute a tiny bit of light brown or beige paint and flick fine speckles over the body, or gently dab it into some of the deeper texture pits. This creates an antique, weathered effect. -
Seal the piece:
Spray the entire snowman with a matte sealant. This protects the porous texture from gathering dust and seals the paint.
Add Sparkle
Coat the finished, dry snowman with a layer of spray adhesive and dust with super-fine clear glitter to mimic the glint of fresh frost in sunlight.
Step 4: Dressing Up
-
Prepare the scarf:
Cut a thin strip of soft fabric, preferably in a muted orange or terracotta shade to match the nose or hat band. Fray the ends slightly by pulling out a few horizontal threads. -
Wrap the scarf:
Wrap the fabric strip comfortably around the snowman’s neck. I prefer to secure it with a small dab of clear craft glue at the overlap so it doesn’t slide off over time. -
Final adjustment:
Arrange the scarf fringe so it drapes naturally over the shoulder, completing the cozy winter look.
Now you have a charmingly rustic decoration that captures the magic of a snowy day without the cold
Sweater-Knit Texture Scarf Snowman
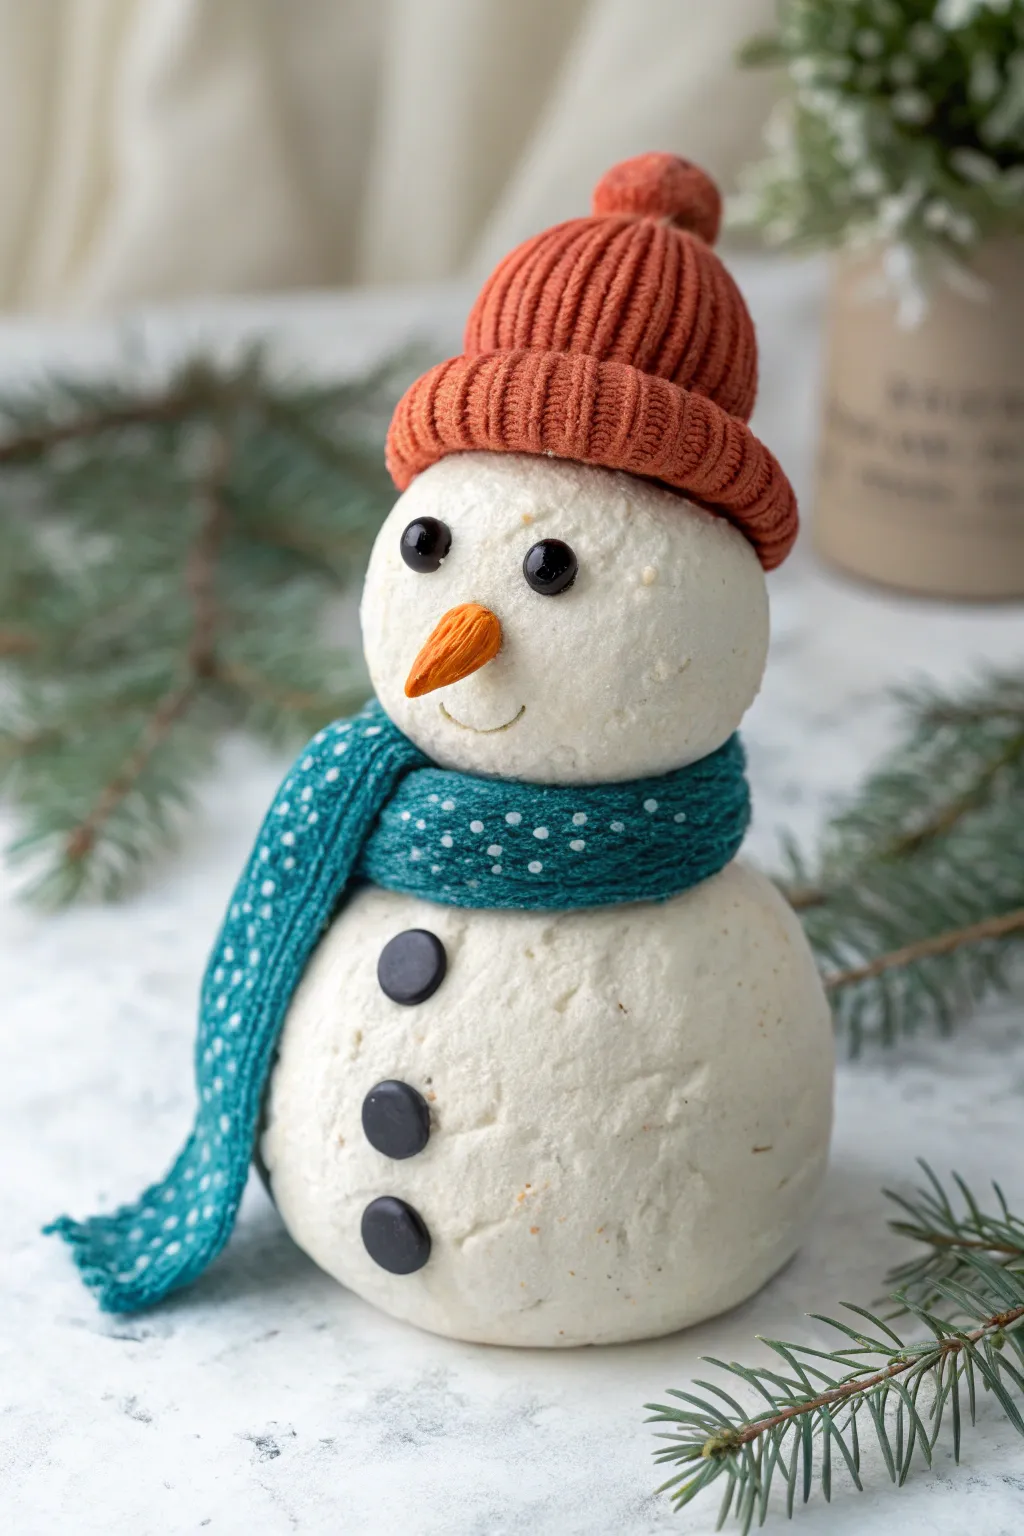
This charming snowman project features a distinctive sweater-knit texture on the scarf and hat, achieved entirely with clay modeling techniques. The finished piece has a rustic, handcrafted feel with a bright teal scarf and cozy orange beanie that perfectly captures the spirit of winter.
How-To Guide
Materials
- White air-dry clay (or polymer clay)
- Orange clay (or white clay + orange acrylic paint)
- Teal/Turquoise clay (or white clay + teal paint)
- Black clay (or small black beads/buttons)
- Needle tool or toothpick
- Rolling pin
- Small ball tool
- Texture tool (or a scrap of actual coarse fabric)
- White acrylic paint (for the scarf dots)
- Fine detail paintbrush
- Strong craft glue
Step 1: Forming the Base
-
Roll the body:
Start by taking a generous amount of white clay and rolling it into a smooth, large ball for the base of the snowman. Gently press the bottom onto your work surface so it stands flat without rolling away. -
Texture the surface:
Instead of leaving the clay perfectly smooth, gently dab a stiff-bristled brush or a crumpled ball of foil over the surface to create a slightly pitted, snowball-like texture. -
Create the head:
Roll a second, slightly smaller ball for the head. Add the same snowball texture to this sphere before attaching it. -
Connect the parts:
Press the head firmly onto the body. If you’re using air-dry clay, scoring the connection points and adding a dab of water or slip will create a stronger bond.
Cracking Issues?
If using air-dry clay, cracks can happen as moisture evaporates. Smooth wet mixture (slip) into fissures or patch with fresh clay immediately.
Step 2: Sculpting the Accessories
-
Prepare the hat clay:
Condition your orange clay until it is soft and pliable. Roll a portion into a thick, flattened hamburger shape that corresponds to the size of the snowman’s head. -
Shape the beanie:
Mold the orange clay onto the top of the head, pulling it down slightly to cover the forehead area. Create a folded brim by adding a separate flattened snake of clay around the bottom edge of the hat. -
Texture the beanie:
Using a needle tool or toothpick, score vertical lines closely together all the way around the hat brim and the main dome to mimic a ribbed knit pattern. -
Add the pom-pom:
Roll a small ball of orange clay and attach it to the very top. Texture it by poking it repeatedly with a needle tool to make it look fluffy. -
Roll the scarf:
For the scarf, roll out a strip of teal clay into a long, flat ribbon. It needs to be long enough to wrap around the neck with excess draping down. -
Wrap the scarf:
Wrap the teal strip around the snowman’s neck where the head meets the body. Overlap the ends on the left side, letting a long tail drape down the front of the body. -
Create fringe:
Use your knife tool to cut small slits into the very end of the scarf tail to create a fringed look.
Sparkle Up
Mix ultrafine translucent glitter into matte mod podge and brush over the white body parts for a glistening, freshly-fallen snow effect.
Step 3: Adding Details
-
Make the nose:
Roll a tiny piece of orange clay into a cone shape. Press texture lines into it horizontally to resemble a carrot, then attach it to the center of the face. -
Add eyes:
Take two small balls of black clay (or small black beads) and press them firmly into the face above the nose to create the eyes. If using clay, add a tiny white dot of paint later for a highlight. -
Form the buttons:
Roll three small, flat discs of black clay. Press these vertically down the center of the snowman’s lower body. -
Carve the smile:
Use a curved tool or just the edge of your thumbnail to gently impress a small, curved smile under the carrot nose.
Step 4: Finishing Touches
-
Paint the scarf pattern:
Once the teal clay is set or dry, dip a fine-tip paintbrush or a toothpick into white acrylic paint. -
Dot the design:
Carefully add varied sizes of white dots all over the teal scarf to mimic a winter snowfall pattern. I find clustering tiny dots near bigger ones makes it look more natural. -
Final drying:
Allow the entire project to dry completely according to your clay package instructions before handling.
Place your finished snowman on a mantle or holiday table for a cozy winter decoration
Modern Minimal Snowman In Neutral Tones
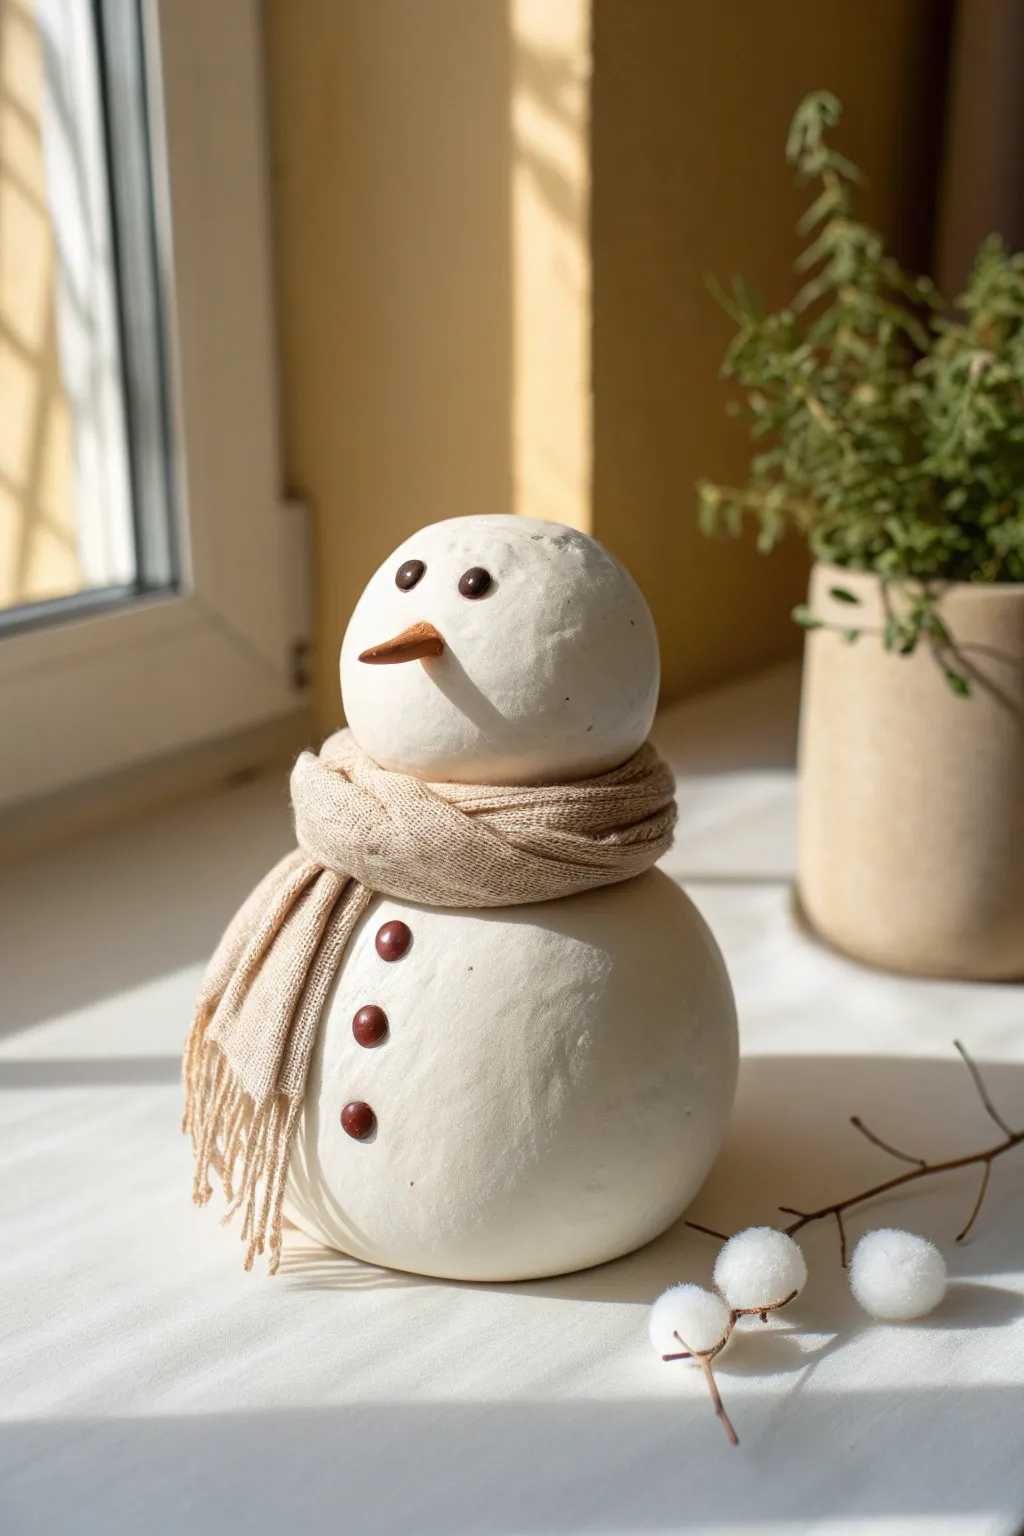
Embrace the quiet beauty of winter with this sleek, Scandinavian-inspired snowman. Its soft, matte finish and neutral palette make it a perfect understated accent that pairs beautifully with modern holiday decor.
Step-by-Step Guide
Materials
- White stone air-dry clay (fine grain, not terracotta)
- Aluminum foil
- Water bowl and sponge
- Sandpaper (fine and medium grit)
- Small twig or piece of wood for nose
- Brown polymer clay or small wooden beads (for buttons/eyes)
- Matte white acrylic paint (optional, for finish)
- Off-white or beige knit fabric scrap (old sock or sweater sleeve)
- Strong craft glue (e.g., E6000 or Tacky Glue)
- Clay carving tools or a butter knife
Step 1: Forming the Base Structure
-
Create the armatures:
Begin by crumpling aluminum foil into two tight balls. Make one slightly larger for the body (about the size of a large orange) and one smaller for the head (size of a clementine). This saves clay and reduces drying time. -
Roll out the clay:
Take a large chunk of air-dry clay and knead it until soft and pliable. Use a rolling pin to create a slab about 1/4 inch thick. -
Cover the body:
Wrap the clay slab around the larger foil ball. Smooth the seams together with your fingers, using a little water if cracks appear. -
Shape the sphere:
Roll the clay-covered ball gently on your work surface to ensure it is perfectly round. If gravity flattens the bottom slightly, that’s actually helpful for stability. -
Cover the head:
Repeat the process for the smaller foil ball, wrapping it in clay and smoothing it until it looks seamless.
Smooth Operator
Keep a small bowl of water nearby while sculpting. Dipping your finger in water and rubbing the clay instantly erases fingerprints and smooths out cracks.
Step 2: Assembly and Detailing
-
Join the pieces:
Score the bottom of the head and the top of the body with a tool to rough up the surfaces. Add a dab of wet clay ‘slip’ (clay mixed with water) and press the head firmly onto the body. -
Blend the neck:
Use a modeling tool or your finger to smooth a small amount of clay across the seam where the head meets the body to bond them securely. -
Create the carrot nose:
You have two options here: form a small cone from the clay itself, or insert a real sharpened twig for a rustic look. If using clay, attach it now with slip. If using wood, poke a hole now but glue it in after painting. -
Make the buttons and eyes:
Roll tiny balls of clay for the eyes and body buttons. I like to gently press them into position while the body is still damp to ensure they adhere well. -
Initial drying:
Allow the snowman to dry completely in a safe place. This usually takes 24-48 hours depending on humidity. Rotate it occasionally so the bottom dries too.
Step 3: Finishing Touches
-
Sand for smoothness:
Once bone dry, use fine-grit sandpaper to buff away any fingerprints or uneven texture. The goal is a smooth, satiny surface. -
Paint application:
Apply 1-2 thin coats of matte white or off-white acrylic paint to the body. This gives it that uniform, clean ceramic look. -
Detail the features:
Paint the button and eye nibs a dark chocolate brown. If you used a clay nose, paint it a muted terra cotta or orange-brown tone. -
Prepare the scarf:
Cut a strip from an old beige sweater or knit fabric, roughly 1 inch wide and 10 inches long. Pull at the short ends to create frayed ‘tassels’ on the edges. -
Attach the scarf:
Wrap the fabric strip around the snowman’s neck. Secure the overlap with a dot of strong craft glue so it stays perfectly draped without slipping. -
Display:
Place your creation on a windowsill or shelf, adding a few dried twigs or cotton stems nearby to complete the vignette.
Texture Twist
Before the clay dries, gently press a textured cloth or linen napkin against the surface to give the ‘snow’ a subtle, organic fabric-like texture.
Now you have a timeless winter decoration that brings warmth without the slush
Marbled Clay Snowman With Color Swirls
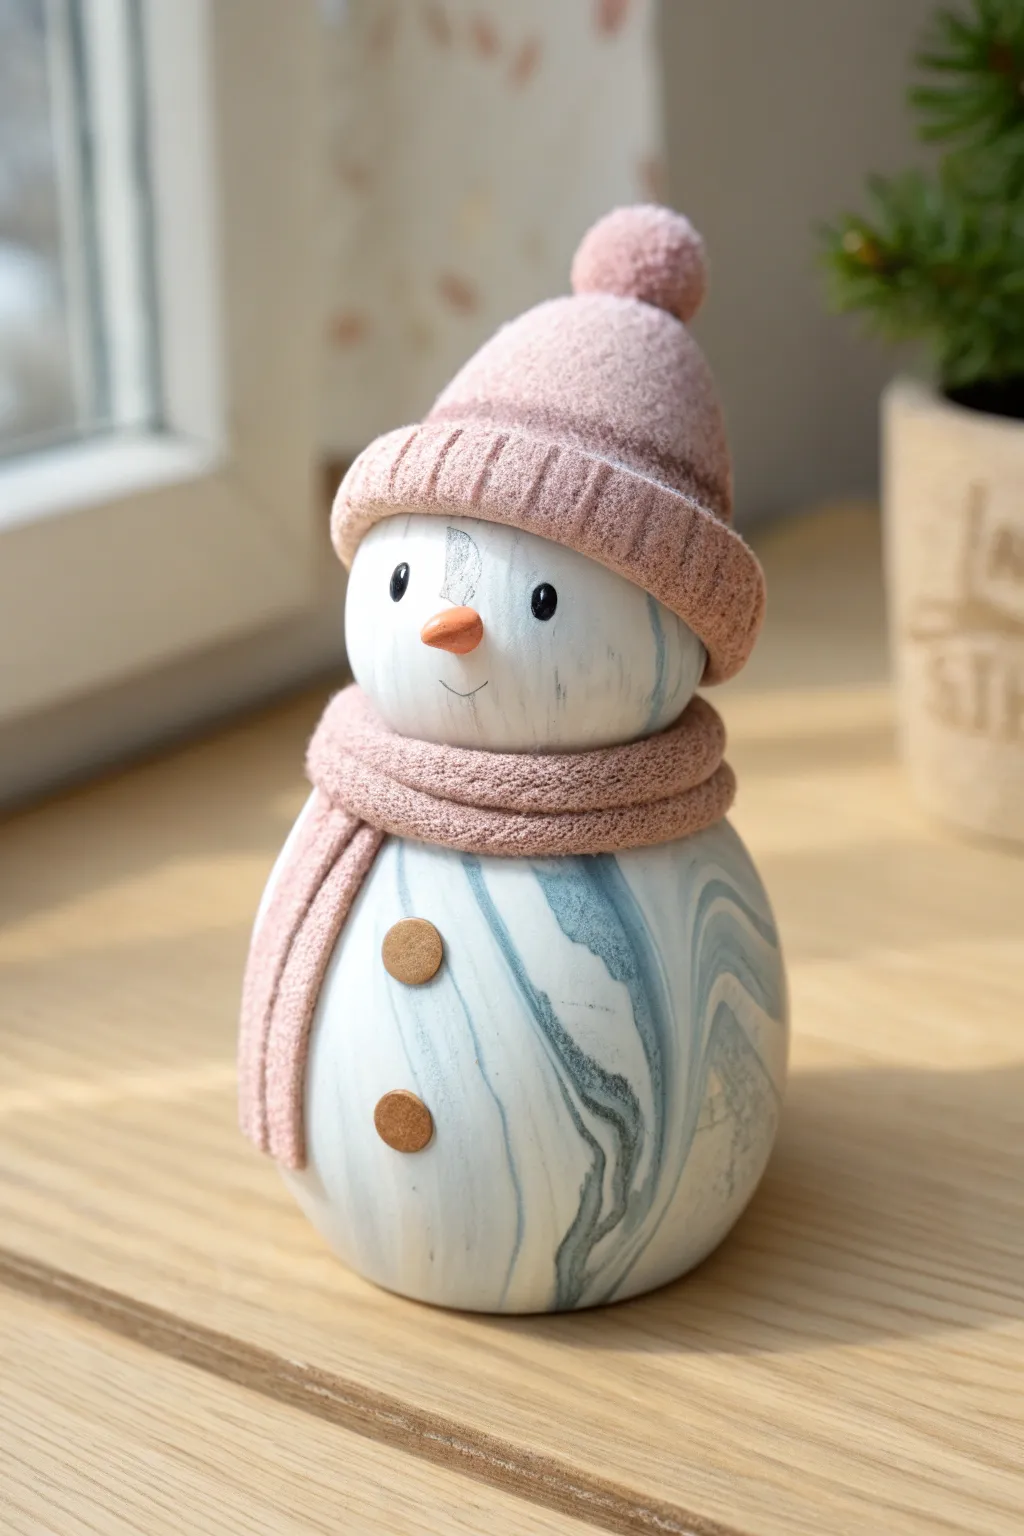
This elegant take on a classic holiday figure features a sophisticated blue-grey marbled body paired with a cozy, textured knit-effect hat and scarf. The smooth, porcelain-like finish of the clay contrasts beautifully with the realistic fabric detailing for a truly unique winter decoration.
Step-by-Step
Materials
- White polymer clay
- Blue-grey (or slate blue) polymer clay
- Dusty pink or mauve polymer clay
- Orange polymer clay
- Black polymer clay
- Brown polymer clay
- Needle tool or toothpick
- Old toothbrush or stiff bristle brush
- Texture sheet (knit pattern) or fabric scrap
- Acrylic roller
- Blade or craft knife
- Oven (for baking)
- Gloss glaze (optional)
Step 1: Creating the Marbled Body
-
Prepare the base colors:
Begin by conditioning a large block of white clay until it is soft and pliable. Condition a much smaller amount of the blue-grey clay—you want a ratio of about 10:1 white to blue for a subtle effect. -
Create the marble blend:
Roll the white clay into a thick log. Roll the blue clay into thin snakes and drape them randomly over the white log. -
Twist and fold:
Twist the log like a candy cane, then fold it in half. Repeat this twisting and folding process 3-4 times. Stop before the colors blend completely; you want distinct streaks. -
Form the spheres:
Divide your marbled clay into two uneven portions. Roll the larger portion into a smooth ball for the body and the smaller portion into a slightly flattened sphere for the head. -
Connect the parts:
Gently press the head onto the body. Insert a small piece of toothpick or wire between them for internal support if the clay feels soft.
Marbling Pro-Tip
Stop mixing sooner than you think! Distinct streaks look better than a muddy grey blend. If the outside gets messy, slice a thin layer off the surface to reveal the crisp swirls inside.
Step 2: Adding the Knit Accessories
-
Prepare the pink clay:
Condition the dusty pink clay. Roll it out into a flat, even sheet, approximately 3mm thick. -
Texture the clay:
Press a knit-pattern texture sheet firmly into the clay. If you don’t have a texture sheet, I press a piece of coarse fabric or an actual sweater onto the clay to imprint the weave. -
Cut the scarf strip:
Use your blade to cut a long, narrow strip from the textured clay. The edges should be clean and straight. -
Apply the scarf:
Wrap the strip around the snowman’s neck where the two spheres meet. Overlap the ends slightly at the front to look like a tied scarf. -
Form the hat brim:
Cut a slightly wider strip of textured pink clay. Wrap this around the top of the head to form the brim of the beanie. -
Shape the hat dome:
Form a smooth dome of pink clay that fits inside the brim. Texture it using an old toothbrush to give it a fuzzy, felted wool appearance, then place a small textured ball on top for the pom-pom.
Step 3: Facial Features and Details
-
Make the eyes:
Roll two tiny specks of black clay into balls. Press them gently into the face using a ball tool or your fingertip to flatten them slightly. -
Sculpt the carrot nose:
Shape a small piece of orange clay into a cone. Press it into the center of the face. -
Add the smile:
Use a needle tool or sharp blade to gently impress a small, curved smile line under the nose. Add tiny ticks at the corners for character. -
Create the buttons:
Roll out a small amount of brown clay. Cut two small circles using a mini cutter or a straw. -
Texture the buttons:
Use a toothbrush to tap the surface of the brown circles, giving them a wood-grain or cork texture. Press them onto the body. -
Final check and bake:
Inspect the snowman for fingerprints and smooth them out with a drop of baby oil if needed. Bake according to your polymer clay package instructions.
Level Up: Frosty Finish
After baking, lightly brush white acrylic paint over the pink textured areas (scarf and hat) and wipe it off immediately. The paint will stay in the crevices, highlighting the knit pattern.
Place your finished snowman on a windowsill or mantle where the light can catch the lovely marble swirls
Snowman On A Tiny Sled
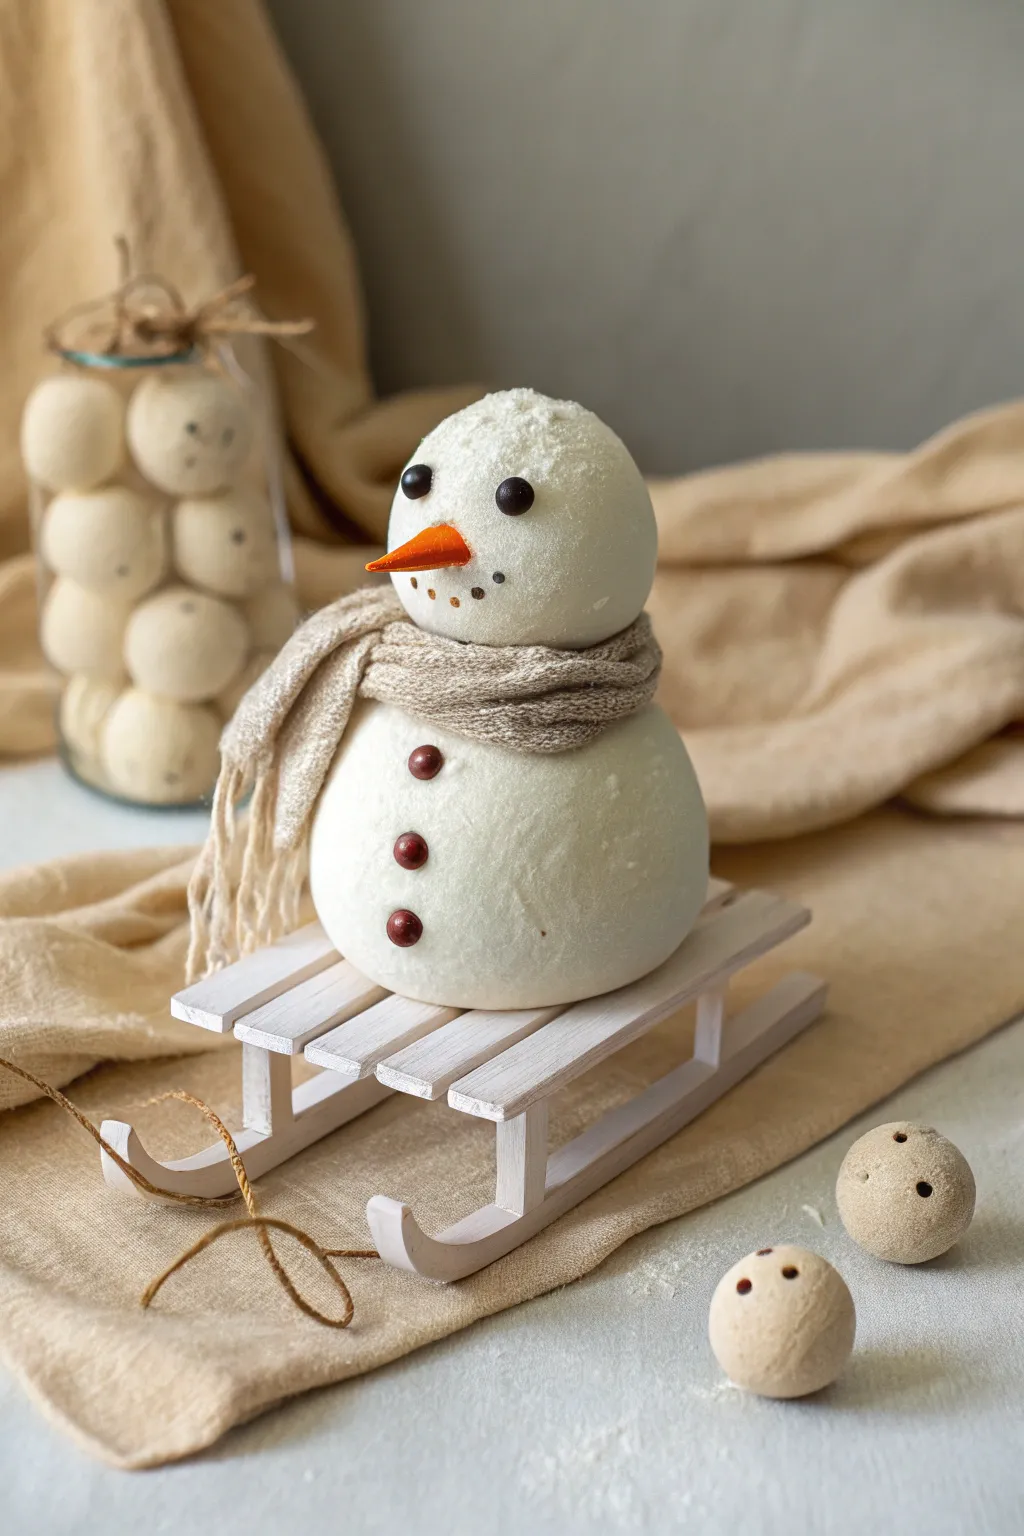
This adorable clay project captures the whimsy of winter with a smooth, bright white snowman perched ready for a ride. The textured finish and tiny knitted scarf add a cozy, handmade charm perfect for holiday decor.
Detailed Instructions
Materials
- White air-dry clay (smooth finish)
- Small amount of orange clay (or orange acrylic paint)
- Small amount of dark brown or black clay (or acrylic paint)
- Tiny wooden sled (pre-made craft supply)
- Beige or oatmeal-colored yarn (fine weight)
- Knitting needles (size US 0–2) or a wider strip of scrap fabric
- Texturing tool (old toothbrush or stiff bristle brush)
- Craft glue or tacky glue
- Gloss varnish or Mod Podge (optional for eyes/buttons)
- White acrylic paint (optional for highlights)
- Translucent dusting powder or white chalk pastel (for the frosty look)
Step 1: Forming the Body
-
Shape the base:
Begin by conditioning a handful of white air-dry clay until it is pliable. Roll it into a smooth, solid ball approximately the size of a tangerine for the snowman’s lower body. -
Flatten the bottom:
Gently tap the ball on your work surface to create a slightly flat bottom so it sits securely without rolling away. -
Create the head:
Roll a second, slightly smaller ball of white clay for the head. It should be proportional to the body, roughly two-thirds the size of the base. -
Attach the pieces:
Score the top of the body and the bottom of the head with a needle tool or toothpick. Add a dab of water or slip to the scored areas and press them firmly together to join the head and body. -
Add texture:
To mimic the look of packed snow, take an old toothbrush or a stiff-bristled brush and gently tap it all over the surface of the clay. This creates a realistic, non-uniform texture.
Step 2: Adding Details
-
Make the nose:
Take a tiny amount of orange clay and roll it into a small cone shape. If you don’t have colored clay, you can paint a white clay cone orange later. -
Attach the nose:
Press the wide end of the carrot nose into the center of the face. I find using a tiny dot of glue here ensures it stays put permanently. -
Create the eyes:
Roll two minuscule balls of black or dark brown clay. Press them gently into the head above the nose to create the eyes. They should protrude slightly, like pieces of coal. -
Form the mouth:
Using a needle tool, poke five or six small, shallow holes in a curved smile shape beneath the nose. You can fill these with tiny bits of dark clay or simply leave them as indented shadows for a subtle look. -
Add the buttons:
Roll three small balls of brown clay, slightly larger than the eyes. Press these vertically down the front of the body section. -
Frosting effect:
While the clay is still slightly tacky (or after applying a very thin layer of matte varnish), dust the very top of the head with white chalk pastel powder or a craft ‘snow’ powder to enhance the snowy feel.
Stay Textured
Don’t over-smooth the clay! The charm of this snowman lies in the slight bumps and toothbrush stippling that make it look like real, packed snow rather than plastic.
Step 3: Accessorizing & Assembly
-
Knit the scarf:
Using fine yarn and small needles, knit a tiny strip about 4-5 inches long (garter stitch works well). If you don’t knit, braid three strands of yarn together or cut a strip from an old beige sweater. -
Secure the scarf:
Wrap the scarf snugly around the snowman’s neck, covering the seam between the head and body. Tie a simple knot and let the fringed ends drape down the side. -
Prepare the sled:
Take your pre-made wooden craft sled. If desired, give it a whitewash with watered-down white acrylic paint for a weathered, vintage look. -
Mount the snowman:
Place a generous amount of tacky glue or strong craft adhesive on the slats of the sled. -
Final placement:
Carefully set the dried snowman onto the sled, ensuring it is centered and balanced. Hold it in place for a few moments to let the bond tackle.
Winter Wonderland
Create a whole scene by making smaller clay balls (snowballs) with little holes in them, as seen in the photo, and scatter them around the base of the sled.
Now you have a charming winter companion ready to slide into your seasonal display
Melted Snowman Puddle Sculpture
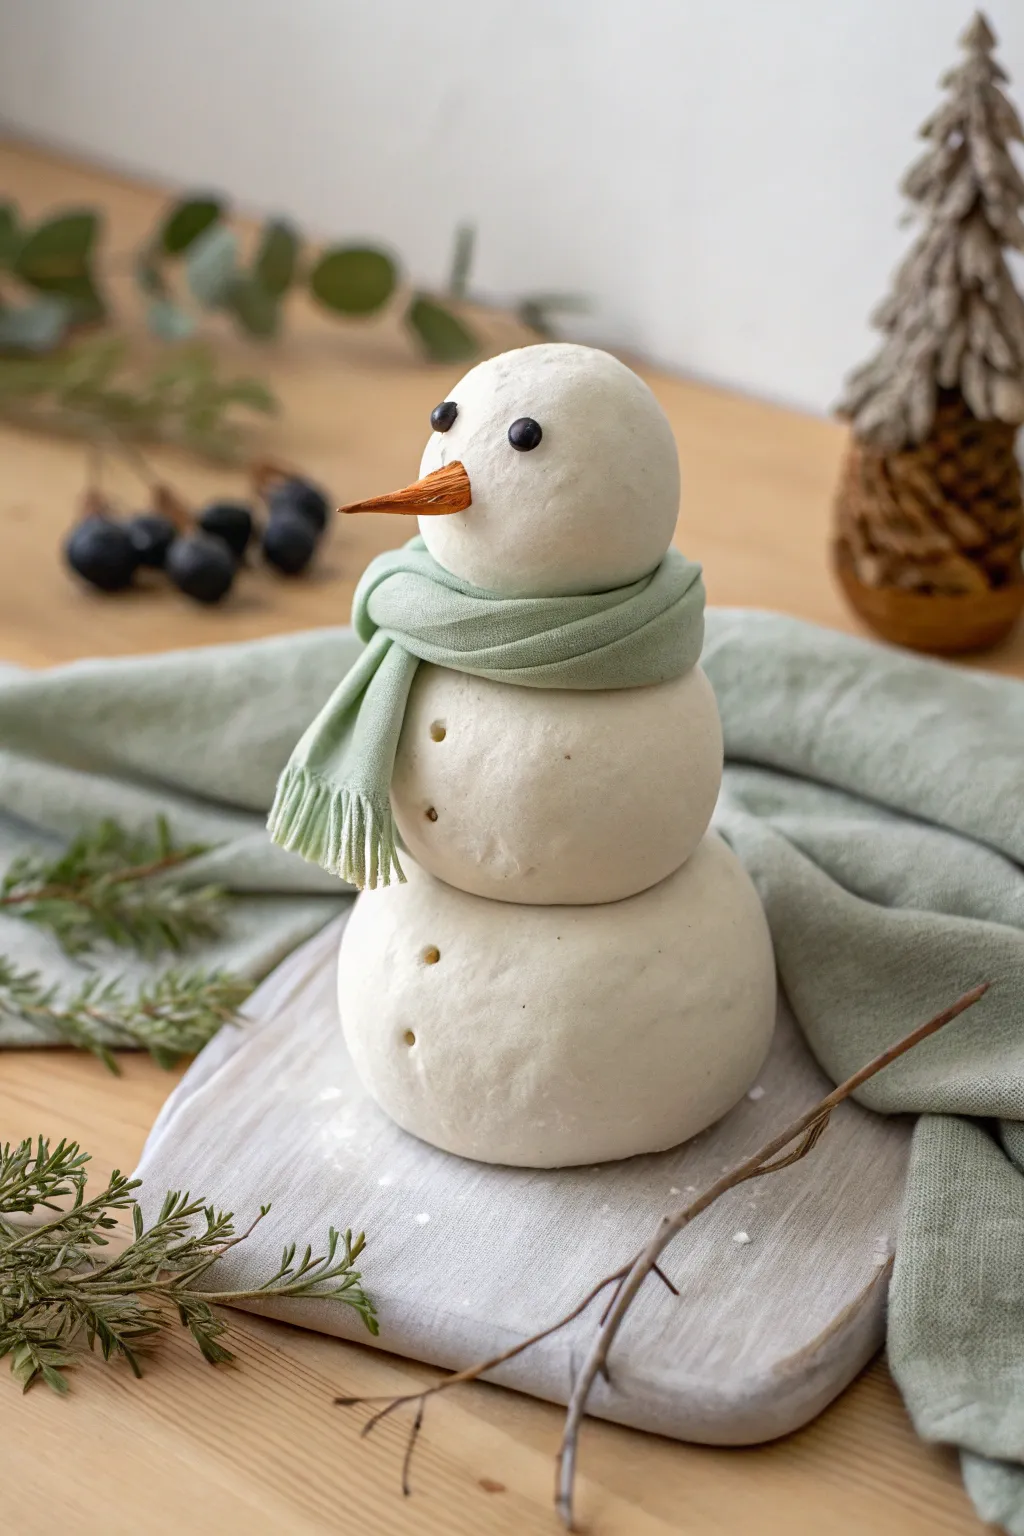
Capture the stillness of winter with this charming, minimalist sculpture made from smooth white clay. The soft fabric scarf and natural textures give it a cozy, rustic appeal perfect for understated holiday decor.
Step-by-Step Tutorial
Materials
- White air-dry clay (or salt dough)
- Small piece of sage green fabric or felt
- Dried orange peel or small twig (for the nose)
- Two black peppercorns or small beads (for eyes)
- Wooden skewer or toothpick
- Water in a small cup
- Rolling pin (optional)
- Scissors
Step 1: Shaping the Body
-
Prepare the clay:
Start by kneading your white air-dry clay until it is warm, pliable, and free of cracks. If it feels too dry, dip your fingers in a tiny bit of water and work it in. -
Form the base:
Pull off a large chunk of clay and roll it between your palms to create a smooth sphere. This will be the bottom section of the snowman, so gentling press it onto your work surface to create a flat bottom for stability. -
Create the middle section:
Take a slightly smaller piece of clay and roll a second sphere. Check the proportions by holding it over the base; it should be visibly smaller but sturdy. -
Make the head:
Roll a third, even smaller sphere for the head. Before assembling, I like to smooth out any fingerprints with a slightly damp finger to get that pristine snow look. -
Stack and secure:
To join the pieces securely, scratch the contact points (top of base, bottom of middle) with your toothpick to roughen them up. Dab a drop of water or liquid clay slip on the scratches and press the middle ball firmly onto the base. -
Attach the head:
Repeat the roughening and wetting process to attach the head to the middle section. Press down gently to ensure a good bond without squashing the shapes.
Seamless Snow
To erase fingerprints, lightly brush the raw clay with a damp soft watercolor brush. This smooths the surface without adding too much water.
Step 2: Adding Details
-
Form the nose:
For a natural look, cut a tiny sliver of dried orange peel or whittle a small, pointy piece of wood. Alternatively, shape a tiny cone of orange clay. -
Insert the nose:
Use your toothpick to pre-poke a small hole in the center of the face. Press your nose material into the hole comfortably so it stays put. -
Add the eyes:
Press two black peppercorns deeply into the clay above the nose. Push them in far enough that they are flush with the surface, which prevents them from popping out as the clay shrinks during drying. -
Create the buttons:
Instead of adding pieces, create ‘buttons’ by sculpting negative space. Use the blunt end of a skewer or a small round tool to press two indentations into the middle body section. -
Detail the base:
Repeat the button indentation process on the bottom sphere, adding two more indented dots.
Cracks Appearing?
If small cracks appear while drying, mix a tiny amount of fresh clay with water to make a paste and fill them in immediately with your finger.
Step 3: Dressing the Snowman
-
Initial Drying:
Let the sculpture dry for about an hour so the surface isn’t tacky before adding the fabric, though full drying will take 24-48 hours. -
Cut the scarf:
Cut a long, thin strip of sage green fabric or felt, approximately 0.5 inches wide and 6-8 inches long. -
Fringe the ends:
Use sharp scissors to make tiny vertical cuts at both ends of the fabric strip to create a realistic fringed tassel effect. -
Tie the scarf:
Wrap the fabric strip around the snowman’s neck area (between the head and middle sphere). Tie a simple knot on the left side, letting the fringed ends drape naturally. -
Adjust the drape:
Gently manipulate the fabric folds so they look heavy and soft, covering the seam where the head joins the body. -
Final cure:
Set the finished snowman in a cool, dry place away from direct heat to dry completely. This slow drying prevents cracks from forming.
Enjoy displaying your quiet little winter friend on a mantle or holiday table setting