Whenever I’m stuck or just craving a low-pressure project, I reach for a lump of air-dry clay or polymer clay and make something small that I can actually use. Here are my favorite clay stuff ideas—classic first, then a few weirder studio treats once you’re warmed up.
Stamped Trinket Dish
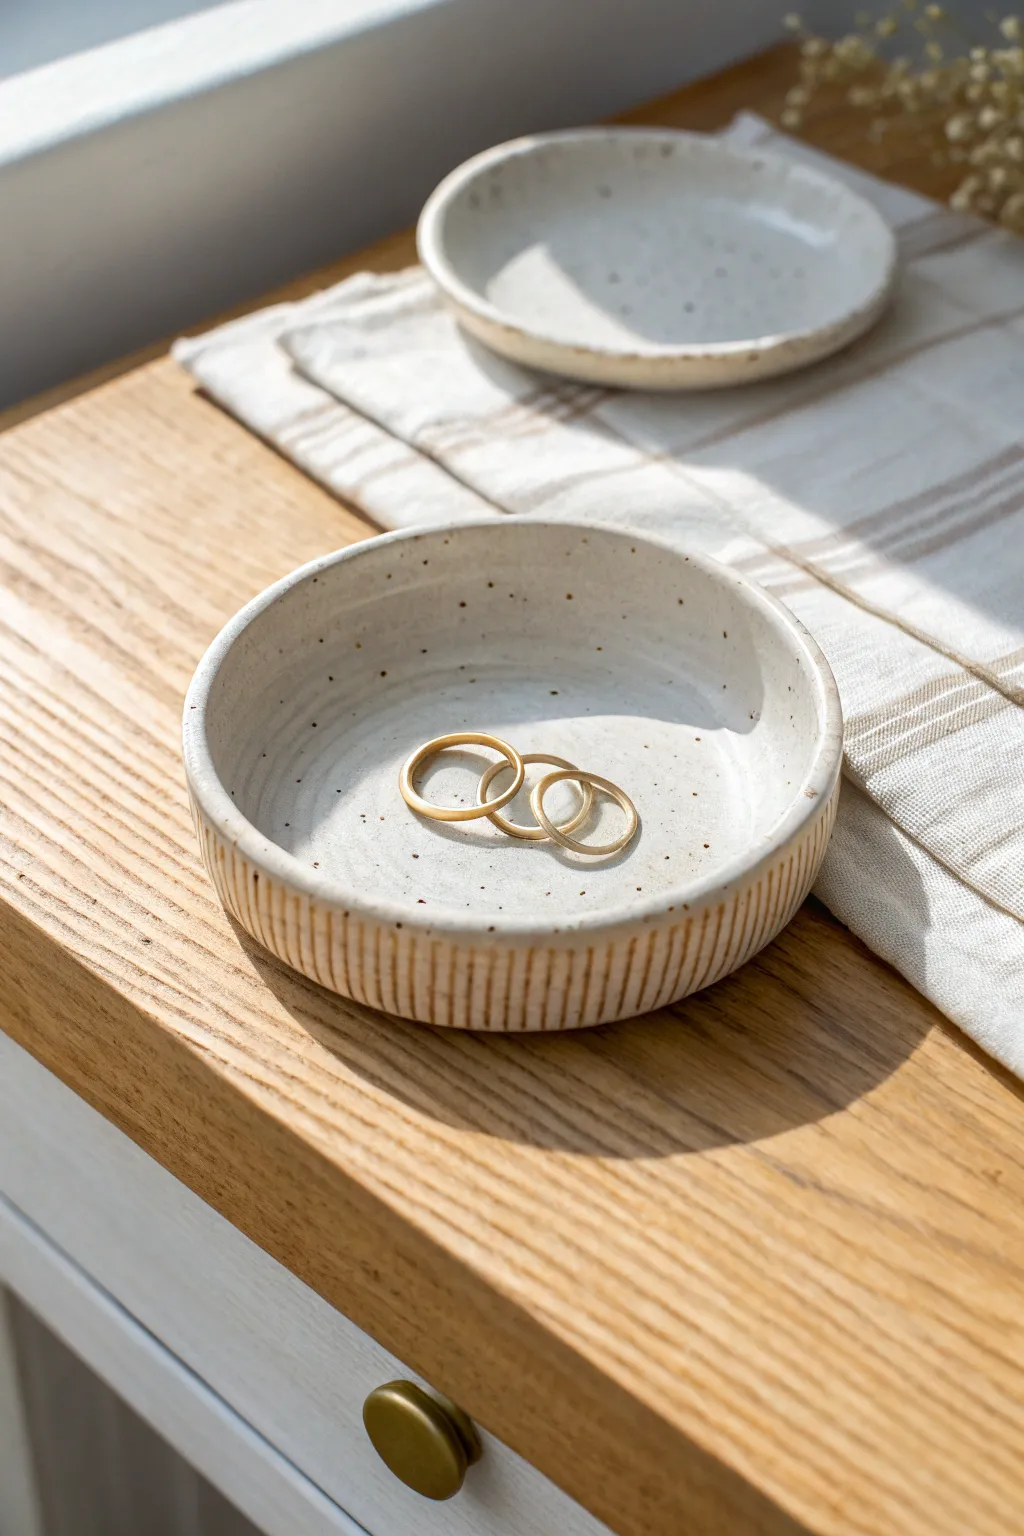
This minimalist stoneware ring dish combines functional simplicity with earthy texture. Featuring a gentle speckled glaze and a hand-carved ribbed exterior, it is the perfect spot to keep your dainty jewelry safe.
Step-by-Step Guide
Materials
- Speckled stoneware clay (approx. 1 lb)
- Potter’s wheel
- Small sponge
- Wooden rib tool
- Wire cutter
- Needle tool
- Trimming loop tool
- Carving tool (or small loop tool)
- Transparent or white glossy glaze
- Glaze brush
- Kiln
Step 1: Throwing the Form
-
Prepare the clay:
Begin by wedging your speckled stoneware clay thoroughly to remove any air bubbles. Form it into a uniform ball, roughly the size of a large orange. -
Center specifically:
Slam the ball onto the wheel head and center it. Since this is a small dish, ensure your centering is precise, keeping the mound low and wide rather than tall. -
Open the clay:
Create an opening in the center, pressing down until you leave about a quarter-inch of clay for the floor. -
Establish the floor:
Pull the opening outward to create a flat, wide interior floor. Compress the floor with your fingers or a sponge to prevent cracking later. -
Pull the walls:
Gently pull up the walls. Aim for a low profile—about an inch high. Keep the walls relatively thick (about 1/4 inch) to allow depth for the carving step later. -
Refine the rim:
Use a small piece of chamois or your sponge to smooth and round the rim. A sharp rim is prone to chipping, so keep it soft. -
Cut form loose:
Run your wire cutter under the pot to separate it from the wheel head, then carefully set it aside on a ware board until it reaches a leather-hard state.
Uneven Carving Lines?
If your vertical lines are wobbling, rest your pinky finger against the pot or the wheel deck to anchor your hand while carving.
Step 2: Trimming and Carving
-
Center for trimming:
Once leather-hard, place the dish upside down on the wheel. Secure it with small clay lugs. Tap it into the center so the spin is even. -
Trim the foot:
Use a loop tool to trim away excess clay from the bottom, defining a clean, flat foot ring. Smooth the surface with a rib tool. -
Mark vertical guides:
While the wheel is stationary, use a needle tool to lightly mark vertical lines on the exterior wall if you need a guide, or trust your eye for freehand carving. -
Carve the ribbing:
Using a small carving loop tool, carve vertical channels from the rim down to the base of the wall. Move slowly and maintain consistent pressure to create uniform grooves. -
Refine the texture:
I like to gently run a damp finger over the carved ridges to soften any sharp burrs created during carving, giving it a weathered feel. -
Bisque fire:
Allow the piece to dry completely until bone dry. Load it into the kiln for a bisque firing (usually to Cone 04 or 06, depending on your clay).
Pop Those Speckles
Choose a transparent glaze over an opaque white one. This allows the natural iron speckles in the clay body to show through clearly.
Step 3: Glazing and Finishing
-
Clean the bisque:
Wipe the bisque-fired dish with a damp sponge to remove any dust, which can prevent glaze from adhering properly. -
Apply the glaze:
pour a transparent or milky white glaze into the interior, swirl to coat, and pour out the excess. For the outside, brush the glaze on carefully. -
Reveal the texture:
While the exterior glaze is still damp, gently wipe the raised ribs with a sponge. This leaves glaze in the grooves but exposes the raw clay on the high points. -
Clean the foot:
Ensure the bottom foot ring is completely free of glaze. Use a wax resist if helpful, or wipe thoroughly with a clean sponge. -
Glaze fire:
Fire the piece again to the maturation temperature of your clay and glaze (typically Cone 5 or 6 for stoneware).
Place your finished dish on a bedside table or vanity to add a touch of handcrafted elegance to your daily routine.


Ring Cone Holder
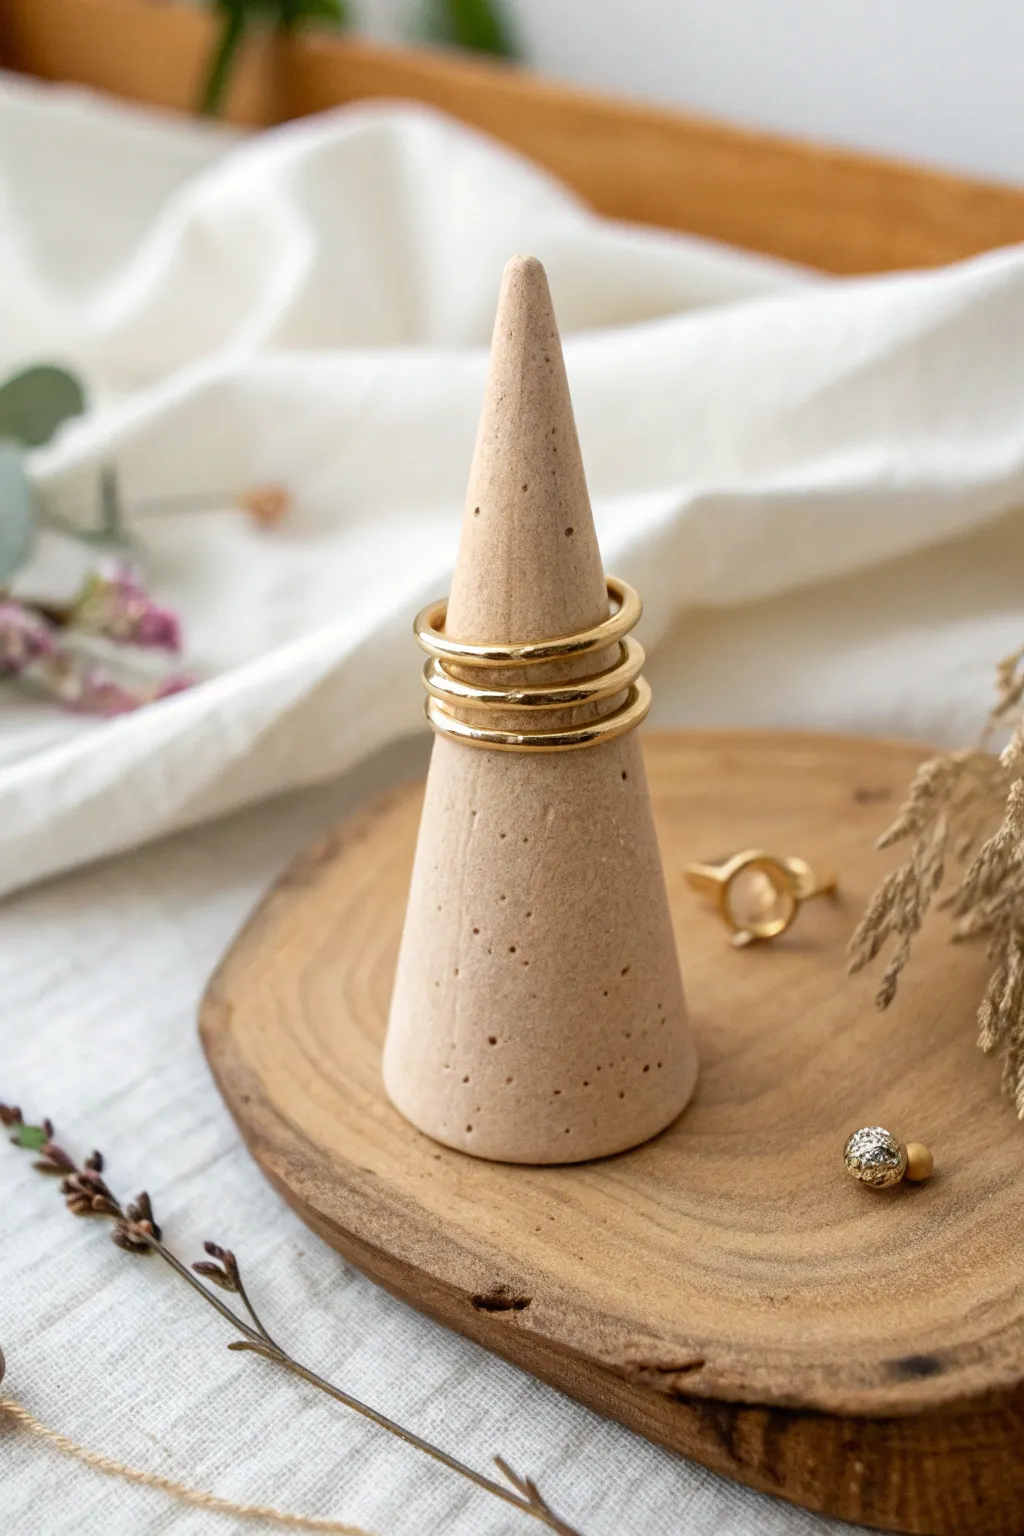
This elegant ring holder combines simple geometry with a natural, organic finish. Its sturdy cone shape and subtle speckling make it the perfect modern display for your favorite gold bands.
Detailed Instructions
Materials
- Beige polymer clay (or white mixed with a tiny bit of brown)
- Black pepper or dried coffee grounds
- Rolling pin or acrylic roller
- Flexible clay blade or exacto knife
- Smooth work surface (ceramic tile or glass)
- Fine-grit sandpaper (400 and 800 grit)
- Baking sheet/oven (if using polymer clay)
- Matte varnish (optional)
Step 1: Preparing the Clay
-
Condition the clay:
Start by warming your beige clay in your hands, kneading it until it is soft and pliable. If the clay feels too stiff, keep working it to prevent cracks later. -
Create the speckled effect:
If you aren’t using pre-speckled clay, flatten your conditioned clay into a pancake. Sprinkle a pinch of ground black pepper or dried coffee grounds onto the surface. -
incorporate the texture:
Fold the clay over the speckles and knead it thoroughly. I like to fold and roll repeatedly until the little dark spots are distributed evenly throughout the entire lump. -
Form a ball:
Roll the clay into a smooth, tight sphere between your palms, aiming for a size roughly slightly larger than a golf ball. Ensure there are no visible seams or air pockets.
Step 2: Shaping the Cone
-
Begin the cone shape:
Place the ball on your work surface. Using the flat of your palm, apply pressure to one side of the ball while rolling it back and forth. -
Elongate the form:
Continue rolling, focusing pressure on the top end to taper it into a point, while keeping the base wider. You want a gradual, smooth slope. -
Check the height:
Stand the cone up occasionally to check proportions. Aim for a height of about 3 to 4 inches, which is ideal for stacking multiple rings. -
Flatten the base:
Once you are happy with the cone shape, pick it up and gently tap the wide bottom against your table to create a perfectly flat base so it stands stable. -
Refine the surface:
Inspect the cone for fingerprints. Lightly stroke the surface with your finger or roll it very gently against the table to smooth out any imperfections.
Leaning Tower?
If your cone leans while baking, stick a raw toothpick into the bottom center before baking. Stick the other end into a foil ball to hold it upright.
Step 3: Finishing Touches
-
Baking:
Preheat your oven according to the clay manufacturer’s instructions (usually around 275°F or 130°C). Place the cone upright on a baking sheet. -
Curing time:
Bake the cone for at least 30 minutes. Since the base is thick, I prefer to add an extra 10-15 minutes to ensure the core cures completely. -
Cooling down:
Turn off the oven and let the cone cool down slowly inside the oven or on the counter until it reaches room temperature. -
Sanding for texture:
Once cool, use a fine-grit sandpaper to lightly buff the surface. This removes any shiny spots and enhances that stone-like matte finish seen in the photo. -
Cleaning up:
Wipe the cone with a slightly damp cloth to remove any sanding dust. -
Optional sealing:
If you want extra protection, apply a very thin layer of matte varnish, though leaving it raw preserves the natural stone look best.
Seamless Rolling
Use a clear acrylic block to roll the cone against your surface instead of your hand. This prevents finger indentations and creates a perfectly geometric slope.
Now you have a chic, functional sculpture to keep your jewelry safe and accessible


Simple Clay Coasters

These minimalist coasters combine the warmth of raw terracotta with a creamy, speckled glaze for a modern rustic look. The slight raised rim isn’t just stylish; it’s functional, keeping condensation from rolling onto your table.
Step-by-Step Tutorial
Materials
- Light terracotta or stoneware clay (wedge well)
- Creamy white speckled glaze (food safe)
- Circle cutter (approx. 4 inches) or a bowl to trace
- Rolling pin with 1/4 inch guide sticks
- Fettling knife or needle tool
- Small sponge
- Wooden modeling tool or rib
- Clean canvas or heavy cloth for rolling
- Kiln (or access to a firing service)
Step 1: Shaping the Base
-
Prepare your clay:
Start by wedging your terracotta clay thoroughly to remove any air bubbles. I find that spending an extra minute here prevents cracks later on. -
Roll the slab:
Lay down your canvas and use your rolling pin and guide sticks to roll out a smooth, even slab that is about 1/4 inch thick. Ensure the thickness is consistent so the coasters dry flat. -
Cut the circles:
Using your 4-inch circle cutter or a bowl as a template, press firmly into the clay to cut out your coaster shapes. Create a few extras just in case one warps during drying. -
Smooth the edges:
Run a damp sponge or your finger around the cut edge of each circle to soften the sharpness. This makes the finished piece much more pleasant to hold.
Keep it Flat
Flat objects love to warp. Dry them slowly under plastic, and flip them over every few hours during the first day of drying to ensure even air exposure.
Step 2: Creating the Rim
-
Score the perimeter:
Using a needle tool, gently score (scratch) a ring around the top surface of the coaster, about 1/8 inch in from the edge. This is where the rim will attach. -
Make the coil:
Roll out a very thin, consistent coil of fresh clay. It should be barely thicker than a piece of spaghetti. -
Attach the coil:
Apply a tiny amount of slip (or water) to the scored area. Place the coil onto the ring. -
Blend the coil:
Using a wooden modeling tool, gently blend the inside edge of the coil down onto the coaster surface until the seam disappears. Leave the outside edge of the coil distinct to create that nice visual lip. -
Refine the shape:
Run your damp sponge over the new rim to smooth it out. It should feel like a subtle, raised borders rather than a sharp ridge.
Step 3: Drying and Firing
-
Controlled drying:
Sandwich the coasters between two pieces of drywall board or place them under lightweight plastic. They need to dry slowly to prevent the edges from curling up. -
Check flatness:
Once leather hard, flip them over and check the bottoms. If they are bowing, gently press them flat against a table. -
Bisque fire:
Once bone dry (completely moisture-free), load them into the kiln for a bisque firing to cone 04 (or as per your clay body’s instructions).
Mix & Match Sets
Instead of identical coasters, try using slightly different clay bodies for the rims, or vary the speckle density in your glaze for a curated, organic set.
Step 4: Glazing
-
Wax the rim:
Brush a steady line of wax resist along the top edge and distinct outer side of the rim. This ensures the raw clay color remains visible. -
Wax the bottom:
Apply wax resist to the entire bottom of the coaster to prevent it from sticking to the kiln shelf. -
Pour the glaze:
Stir your speckled cream glaze well. Pour a small amount into the center of the coaster. -
Swirl and dump:
Tilt the coaster to let the glaze swirl and coat the interior surface, stopping right at the waxed rim. Pour out any excess quickly. -
Clean up:
If any glaze dripped onto the waxed rim or the outside wall, wipe it away immediately with a clean, damp sponge. -
Final fire:
Fire the coasters again to the maturity temperature of your glaze and clay (typically cone 5 or 6 for stoneware).
Stack your fresh set on the coffee table and enjoy that handmade touch with your morning brew


Geometric Clay Earrings
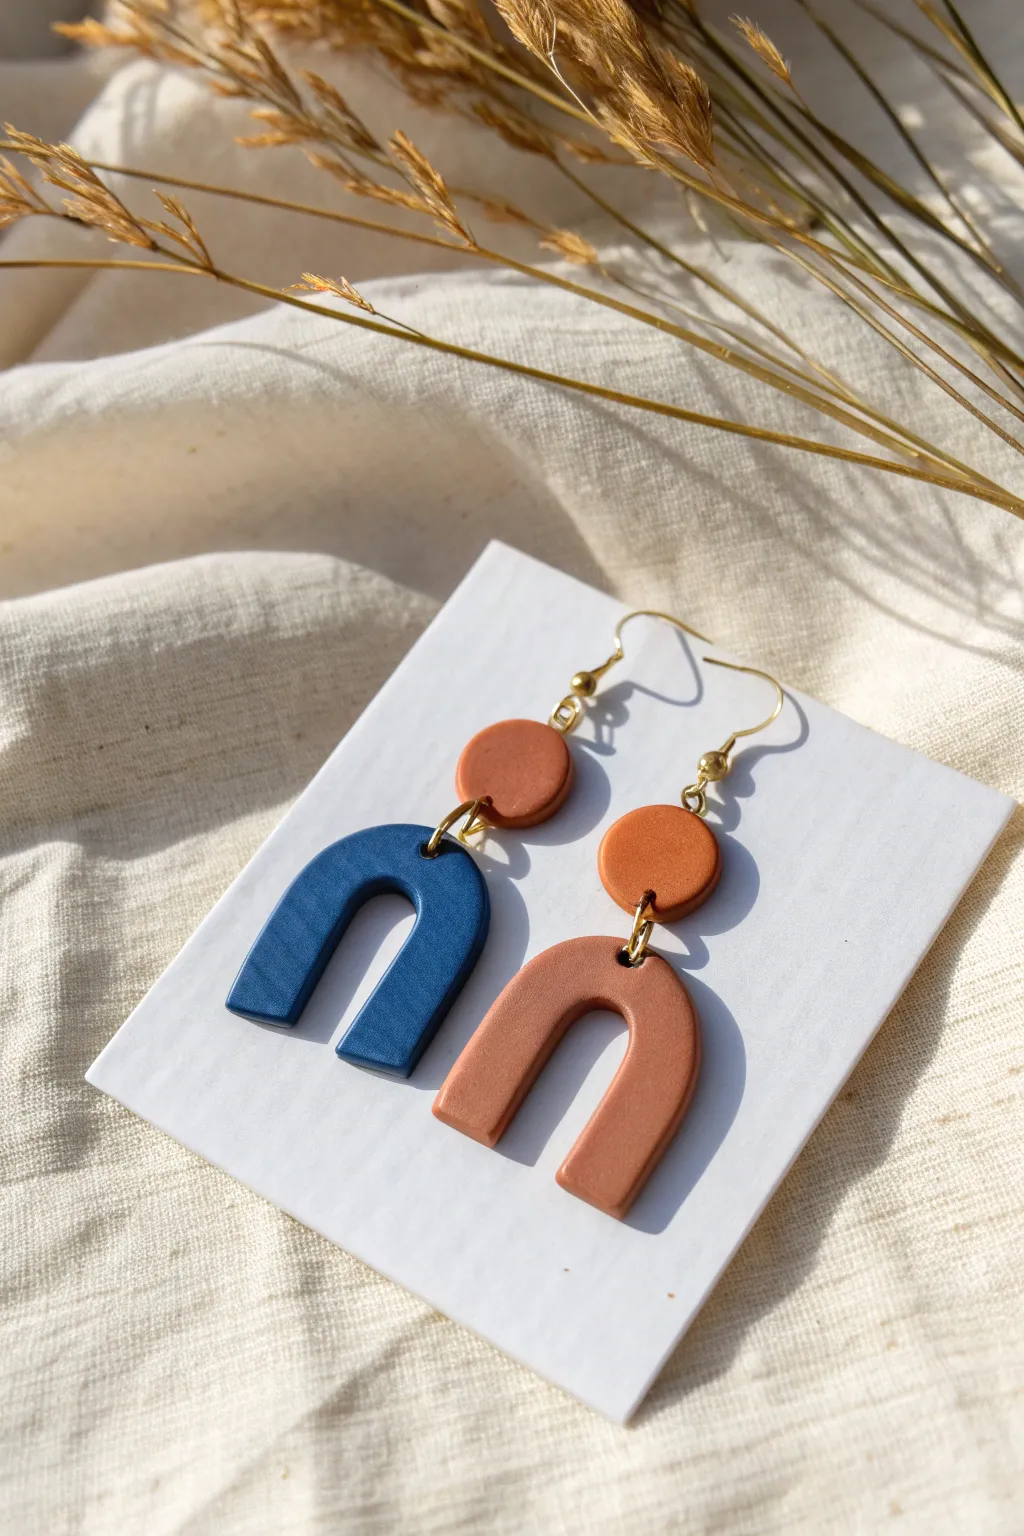
Embrace the earthy elegance of these geometric polymer clay earrings, which combine warm terracotta tones with deep navy blue. With their modern arch shape and simple construction, they are a perfect project for beginners looking to create professional-quality jewelry.
Detailed Instructions
Materials
- Polymer clay (Terracotta/Rust color)
- Polymer clay (Deep Navy Blue color)
- Acrylic rolling pin or pasta machine
- U-shaped clay cutter (medium size)
- Small circular clay cutter (approx. 1cm)
- Jump rings (gold finish)
- Earring hooks or ball posts (gold finish)
- Jewelry pliers (flat nose and round nose)
- Hand drill or pin vibe with small bit
- Smooth ceramic tile or baking sheet
- Parchment paper
- Fine-grit sandpaper (optional)
Step 1: Preparing the Clay
-
Condition the clay:
Start by warming the polymer clay in your hands. Knead the terracotta and navy blocks separately until they are soft, pliable, and free of any cracks. -
Roll out the sheets:
Using your acrylic roller or a pasta machine on a medium setting (approx 3mm thick), roll out both the navy and terracotta clay into smooth, even slabs. -
Check for bubbles:
Inspect the surface of your rolled clay. I like to gently pierce any air bubbles with a needle and smooth them over with my finger to ensure a flawless finish.
Step 2: Cutting and Shaping
-
Cut the circles:
Using the small circular cutter, punch out two circles from the terracotta clay slab. These will form the top stud or connector piece. -
Cut the navy arch:
Press your U-shaped cutter firmly into the navy clay slab to create one arch. Wiggle the cutter slightly before lifting to ensure clean edges. -
Cut the terracotta arch:
Repeat the process with the U-shaped cutter on the terracotta slab to create the second arch. -
Smooth the edges:
Before baking, gently run your finger along the cut edges of all pieces to soften any sharpness or remove stray bits of clay.
Uneven Surfaces?
If fingerprints are visible after baking, use a cotton swab dipped in a tiny amount of acetone (nail polish remover) to gently buff the surface smooth.
Step 3: Baking and Assembly
-
Drill holes (Pre-bake method):
If you prefer pre-drilling, use a needle tool to create a hole at the top center of each arch and at the bottom and top of each circle. Ensure the holes are large enough for your jump rings. -
Bake carefully:
Place your pieces on a parchment-lined baking sheet or ceramic tile. Bake according to your specific clay brand’s instructions (usually 275°F/135°C for 15-30 minutes). -
Cool down:
Allow the pieces to cool completely in the oven or on a wire rack. The clay is strongest when fully cooled. -
Drill holes (Post-bake method):
If you didn’t pierce them earlier, use a hand drill or pin vise to drill holes at the top of the arches and double holes (top and bottom) on the circles now. -
Open the jump rings:
Use two pairs of pliers to twist a jump ring open sideways—never pull them apart outward, as this weakens the metal. -
Connect the pieces:
Thread an open jump ring through the top of the navy arch and the bottom of one terracotta circle. Close the ring securely. -
Assemble the second pair:
Repeat the connection process with the terracotta arch and the second terracotta circle. -
Attach the hardware:
Open the loop on your earring hooks. Thread one onto the top hole of each terracotta circle connector. -
Final check:
Ensure all jump rings and loops are fully closed so the pieces don’t slip apart while wearing.
Clean Cuts Every Time
Dip your metal cutters into a small pile of cornstarch or flour before pressing into the clay. This prevents sticking and ensures the clay releases easily.
Wear your mismatched geometric masterpieces with pride or gift them to a friend who loves modern style

The Complete Guide to Pottery Troubleshooting
Uncover the most common ceramic mistakes—from cracking clay to failed glazes—and learn how to fix them fast.
Pinch Pot Tea Light Holder
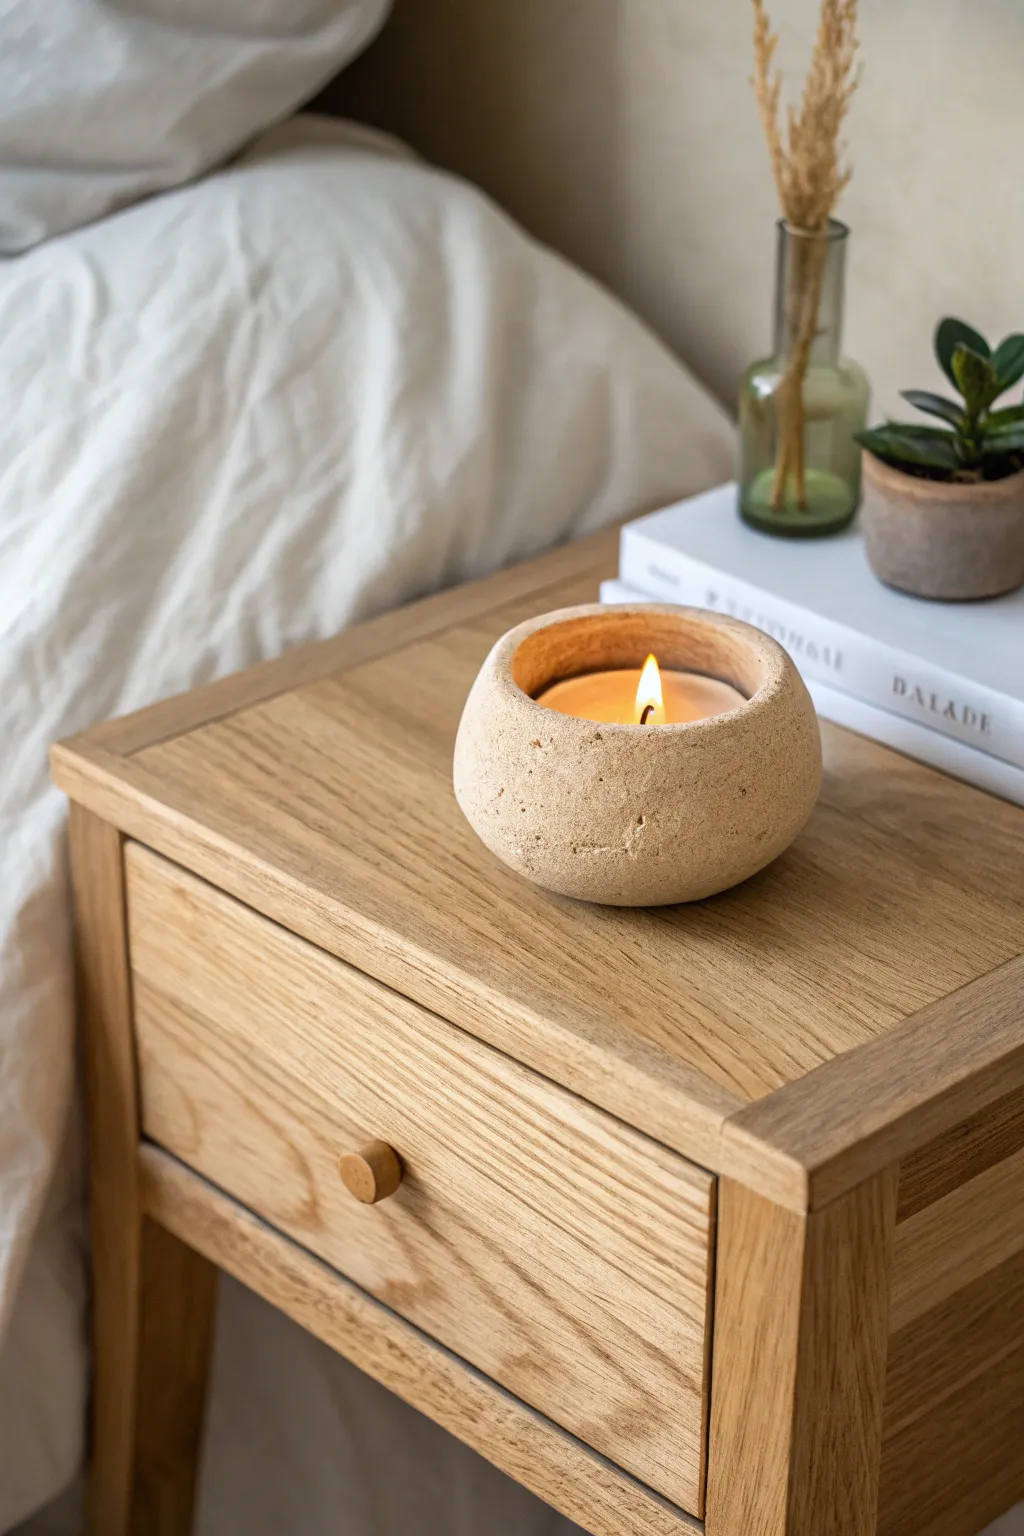
Bring a touch of nature indoors with this rustic, stone-effect candle holder that looks like it was carved directly from rock. This simple pinch pot project emphasizes natural textures and imperfections, creating a serene and grounded focal point for any bedside table.
Step-by-Step Guide
Materials
- Air-dry clay (stone, granite effect, or white)
- Small bowl of water
- Paring knife or needle tool
- Old toothbrush or stiff bristle brush
- Real stone or rock (for texturing)
- Fine-grit sandpaper (optional)
- Matte sealant or varnish
- Tealight candle (for sizing)
- Sponge
Step 1: Forming the Base
-
Prepare your clay:
Start by taking a chunk of air-dry clay roughly the size of a tennis ball. Knead it in your hands for a minute to warm it up and ensure it’s pliable without any internal air bubbles. -
Create a sphere:
Roll the clay between your palms or on a flat surface until you have a smooth, round ball. Don’t worry if it isn’t perfect; organic shapes work best for this look. -
Begin the pinch:
Hold the ball in one hand and gently press your thumb into the center of the sphere. Push down until you are about a half-inch from the bottom, being careful not to push all the way through. -
Shape the walls:
Using a pinching motion with your thumb on the inside and fingers on the outside, slowly rotate the ball while gently squeezing the clay walls. Work your way from the bottom up to thin them out evenly. -
Open the form:
Continue pinching until the opening is wide enough to comfortably fit your tealight candle. Periodically place the tealight inside to check the fit—you want a small gap around the edge, not a tight squeeze. -
Flatten the bottom:
To ensure the holder sits safely on your table, gently tap the bottom of the pot against your work surface to create a flat, stable base. -
Curve the rim:
Instead of flaring the rim outward like a typical bowl, gently curve the top edge slightly inward. This creates an enclosed, cozy feeling for the flame and matches the stone shape.
Step 2: Adding Stone Texture
-
Rough initial texture:
Take your old toothbrush or a stiff bristle brush and stipple the entire exterior surface. Press the bristles into the clay to remove smooth fingerprints and create a porous look. -
Deepen the details:
Find a real rock with a rough surface from your garden. press this rock into the clay at random intervals to transfer authentic geological patterns and pits. -
Refine the rim:
The rim shouldn’t look perfectly sliced. I like to lightly tap the rim with the flat side of a knife or tool to level it while keeping a slightly irregular, ‘chipped’ stone edge. -
Create surface imperfections:
Use a needle tool or toothpick to add a few tiny cracks or deeper pits, masquerading as natural weathering found in old stones. -
Smooth the interior:
While the outside is rough, use a damp sponge or your finger with a little water to smooth the inside floor of the pot so the candle sits perfectly level.
Natural Texture
Mix dried coffee grounds or sand directly into your clay block before shaping. This adds authentic speckling and grit throughout the entire piece.
Step 3: Finishing Touches
-
Slow drying:
Place your finished pot in a cool, dry place away from direct sunlight. Let it dry slowly for 24-48 hours. If it dries too fast, the thick walls might crack. -
Check for sharp spots:
Once fully dry and hard, run your hand over the surface. If any textured peaks are uncomfortably sharp, gently knock them back with a quick pass of fine-grit sandpaper. -
Enhancing the color (Optional):
If you used plain white clay, you can now sponge on a watered-down wash of beige, taupe, or grey acrylic paint. Wipe most of it off immediately so it only stays in the textures. -
Seal the piece:
Apply a coat of matte varnish or sealant to the entire piece. This protects the clay from soot and wax drips while maintaining that natural, unpolished look. -
Insert candle:
Once the varnish is cured, place your tealight or votive in the center and enjoy the warm glow.
Make it a Set
Create a trio of these “stones” in different sizes. Vary the openings slightly—one for a tall taper, one for a wide pillar, and this one for a tealight.
Light your candle and watch how the flickering flame casts shadows across the rough, stone-like texture you created
Cute Pen Cup Organizer
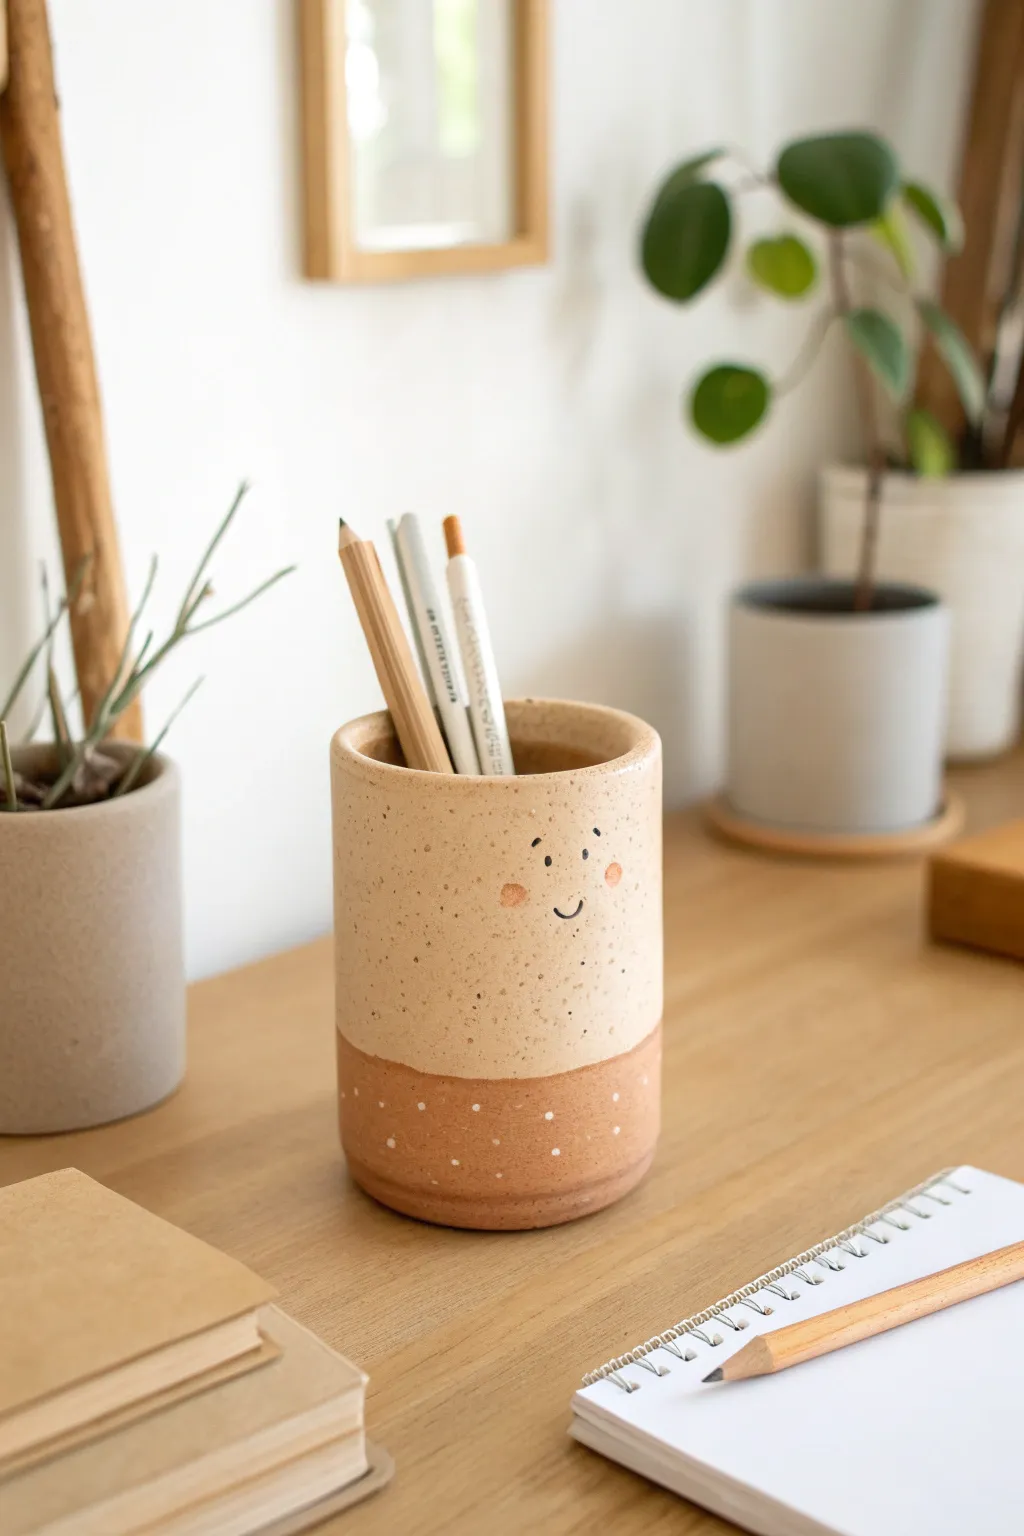
Bring a touch of charm to your workspace with this adorable two-tone clay pen organizer. Featuring a natural speckled finish and a sweet, blushing face, this project combines minimalist design with handmade warmth.
Step-by-Step Tutorial
Materials
- Beige polymer clay (e.g., Fimo or Sculpey)
- Terracotta or brown polymer clay
- Coarse black pepper or dark sand (for speckling)
- Acrylic rolling pin
- Flexible clay blade or craft knife
- Circular cookie cutter (approx. 3-inch diameter)
- Cylindrical object (like a glass jar or aluminum can) for forming
- Needle tool
- Black acrylic paint
- Pink or coral soft pastel chalk
- Fine detail paintbrush
- White acrylic paint
- Liquid clay or Bake & Bond
- Matte varnish (optional)
Step 1: Preparing the Speckled Clay
-
Condition the beige clay:
Start by thoroughly kneading your beige polymer clay until it is soft and pliable. You’ll need a substantial amount, roughly the size of a large lemon. -
Add texture:
To achieve that organic, stoneware look, knead in a pinch of coarse black pepper or very dark sand. Fold the clay over itself repeatedly until the speckles are evenly distributed throughout the block. -
Roll out the main slab:
Using your acrylic rolling pin, roll the beige clay into a long, rectangular slab about 1/4 inch thick. Aim for a height of approximately 4 inches and a length sufficient to wrap around your forming cylinder. -
Prepare the terracotta base:
Condition the terracotta clay and mix in speckles just like you did for the beige clay. Roll this into a long strip that is also 1/4 inch thick but only about 1.5 inches tall. -
Join the clays:
Trim the bottom edge of the beige slab and the top edge of the terracotta strip so they are perfectly straight. Place them side-by-side on your work surface and gently press the edges together. -
Secure the seam:
Flip the joined slab over. To really lock them together, I like to gently smear a thin layer of clay across the back of the seam, smoothing it down so the two colors become one cohesive sheet.
Seamless Finishes
To erase fingerprints before baking, lightly brush the raw clay with a little baby oil or clay softener. It smooths the texture perfectly.
Step 2: Forming the Cup
-
Cut to size:
Trim your two-tone slab into a clean rectangle. Ensure the terracotta section is at the bottom. The length should match the circumference of your forming cylinder plus a tiny bit for overlap. -
Create the base:
Roll out a separate piece of terracotta clay to 1/4 inch thickness. Use your circular cutter to stamp out a disk that will serve as the bottom of the cup. -
Wrap the cylinder:
Wrap your rectangular slab around your glass jar or metal form. Use a little cornstarch on the form if you’re worried about sticking. -
Seal the side seam:
Slice through the overlapping clay ends with your blade to create a perfect butt joint. Apply a tiny amount of liquid clay to the raw edges and press them together, smoothing the seam with your finger or a clay tool until it disappears. -
Attach the base:
Place the cylinder (still on the form) onto the terracotta disk. Blend the clay from the bottom of the cylinder down onto the disk ensuring a watertight seal. Smooth the outer rim so the transition is seamless.
Step 3: Details and Finishing
-
Smooth the rim:
Use your finger to gently round over the top lip of the cup. It should look soft and finished, not sharp. -
Bake the structure:
Bake the clay according to the manufacturer’s instructions (usually around 230°F-275°F for 15-30 minutes). Let it cool completely before sliding it off the forming cylinder. -
Add the face:
Using a very fine paintbrush and black acrylic paint, dab two tiny dots for eyes on the upper beige section. Paint a small, shallow ‘U’ shape between them for the smile. -
Blush the cheeks:
Scrape a little powder from a pink pastel chalk. Use your finger or a dry soft brush to gently rub two round circles of pink powder onto the clay cheeks. -
Paint the dots:
Using a needle tool or toothpick dipped in white paint, add random tiny white dots solely to the terracotta bottom section to create a cute geometric contrast. -
Seal the work:
Once the paint is dry, apply a coat of matte varnish over the painted areas to protect the face and white dots from rubbing off over time.
Level Up: Texture Play
Before baking, gently press a piece of coarse sandpaper or a stiff toothbrush against the clay surface to give it a realistic, grainy ceramic texture.
Now you have a charming new home for your favorite pens and pencils that looks just like expensive pottery


What Really Happens Inside the Kiln
Learn how time and temperature work together inside the kiln to transform clay into durable ceramic.
Creature Toothbrush Stand
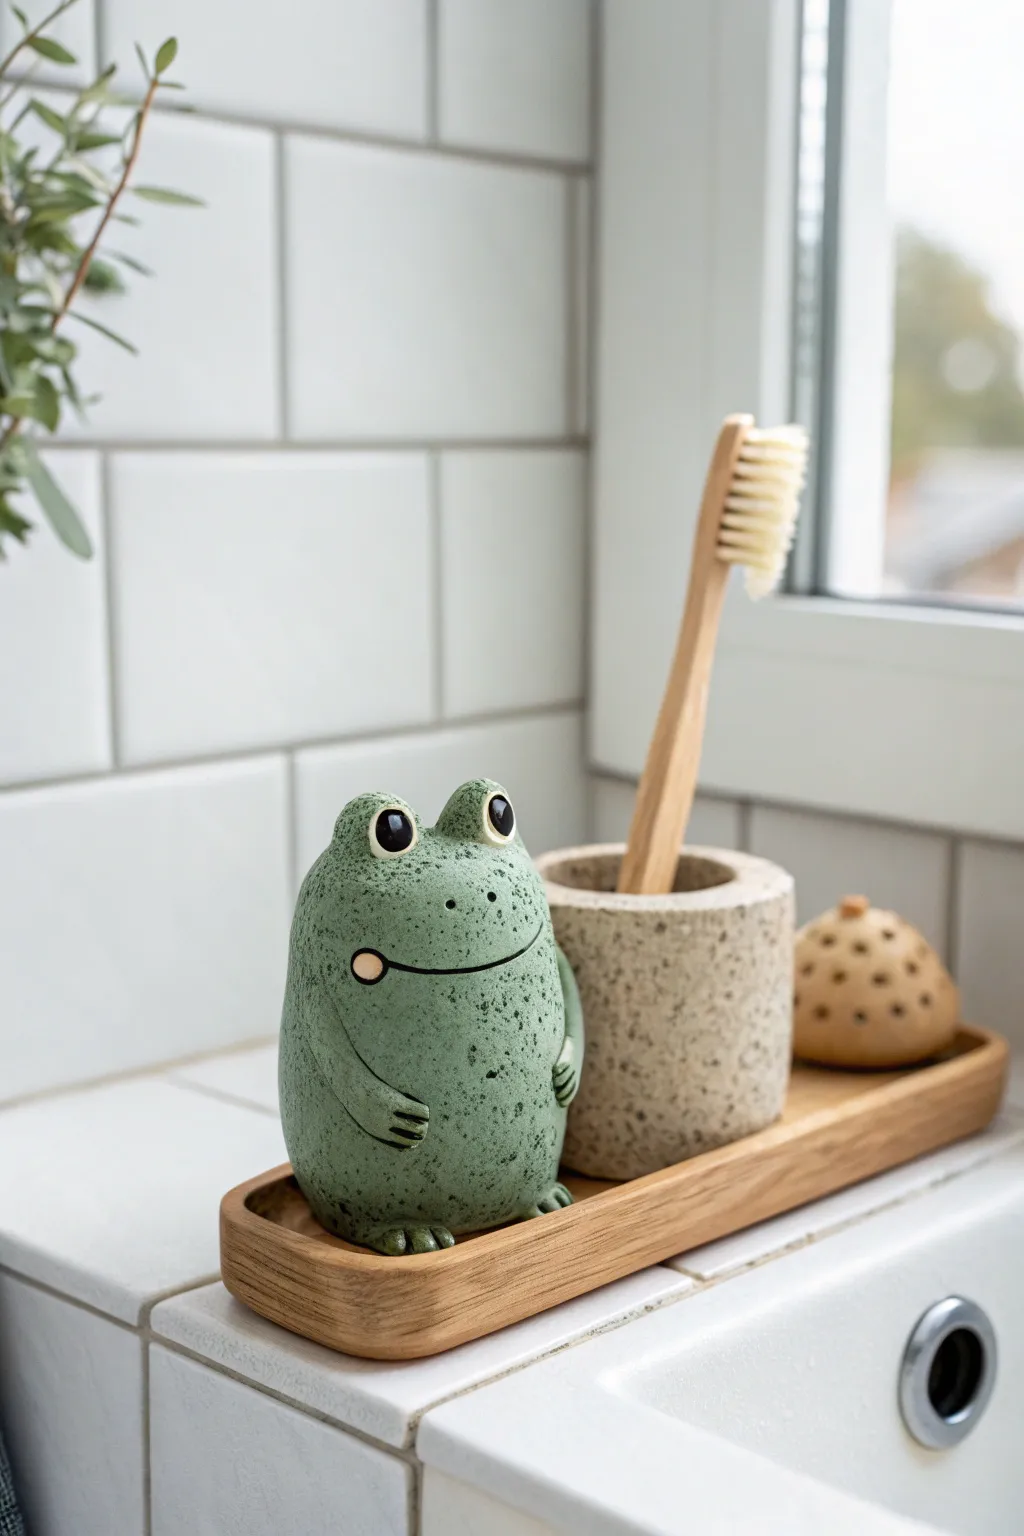
Bring a touch of whimsical charm to your bathroom counter with this delightful clay frog figurine. With its speckled green finish and friendly smile, this sturdy little creature serves as a comforting presence during your morning routine.
Step-by-Step Guide
Materials
- Polymer clay or air-dry clay (white or light grey base)
- Acrylic paints (sage green, dark green, black, white, pink)
- Speckle medium or old toothbrush for spattering
- Clay sculpting tools (needle tool, smoothing tool)
- Aluminum foil (for armature)
- Matte or satin varnish
- Fine grit sandpaper
- Paintbrushes (flat brush and fine detail liner)
Step 1: Forming the Body
-
Prepare the core:
Start by crumpling a piece of aluminum foil into a dense, rounded egg shape. This saves clay and keeps the figurine lighter. Aim for a shape that is wider at the bottom for stability. -
Cover with clay:
Roll out a thick sheet of your chosen clay. Wrap it completely around the foil core, smoothing out any seams with your fingers or a smoothing tool until the surface is uniform. -
Shape the silhouette:
Gently gently press the clay to refine the shape. You want a distinct pear-like form—narrower at the top for the head and wider at the base where the frog sits. -
Add the eye mounds:
Roll two small balls of clay. Place them on top of the head, spaced slightly apart, and blend the bottom edges downward into the main body so they look like natural protrusions rather than stuck-on spheres.
Weight It Down
Add a few metal washers or a clean stone inside the bottom of the foil core before wrapping it. This lowers the center of gravity so it won’t tip over.
Step 2: Adding Character Details
-
Sculpt the arms:
Create two small snakes of clay for the arms. Attach them to the sides of the body, curving them inward as if the frog is holding its belly. -
Detail the hands:
Using a needle tool or knife, gently press three indentations into the ends of the arms to suggest fingers. -
Form the feet:
Make two small, flat ovals for the feet. Attach them to the very bottom front of the body, pressing them firmly so the frog sits flat. Mark gentle toes on these as well. -
Carve the smile:
Use a needle tool to incise a long, sweeping smile line across the face. Curve it up slightly at the ends to give him a happy expression. -
Create the cheek dimple:
Press a small, circular tool (or the end of a paintbrush) into the left corner of the mouth to create a distinct identifying circle. -
Final smoothing:
Before curing, dip your finger in a little water (or clay softener) and run it over the entire surface to remove fingerprints. Let the clay dry or bake according to the manufacturer’s package instructions.
Step 3: Painting and Finishing
-
Base coat:
Once fully cured and cooled, paint the entire frog with a solid coat of sage green acrylic paint. You may need two coats for full opacity. -
Apply the speckles:
To achieve the stone-like texture, dip an old toothbrush into dark green paint (slightly watered down). Run your thumb over the bristles to flick tiny specks all over the frog’s body. -
Paint the eyes:
Using a fine detail brush, paint the interior of the eye mounds black. Add a tiny white dot in the upper corner of each eye for a reflective highlight. -
Highlight the cheek:
Paint the small circular dimple near the mouth with a soft pale pink or cream color. -
Enhance the mouth:
I like to run a very thin line of black or dark grey into the carved smile line to make the expression pop. -
Seal the piece:
Finish by applying a coat of matte or satin varnish. This protects the paint from bathroom humidity and gives the frog a finished, ceramic look.
Functional Upgrade
Rather than a figurine, make it a holder! Before baking, press the handle of a toothbrush into the side or back to create a custom resting groove.
Now you have a charming amphibian buddy to greet you every morning
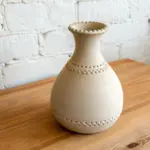
Tiny Bud Vase
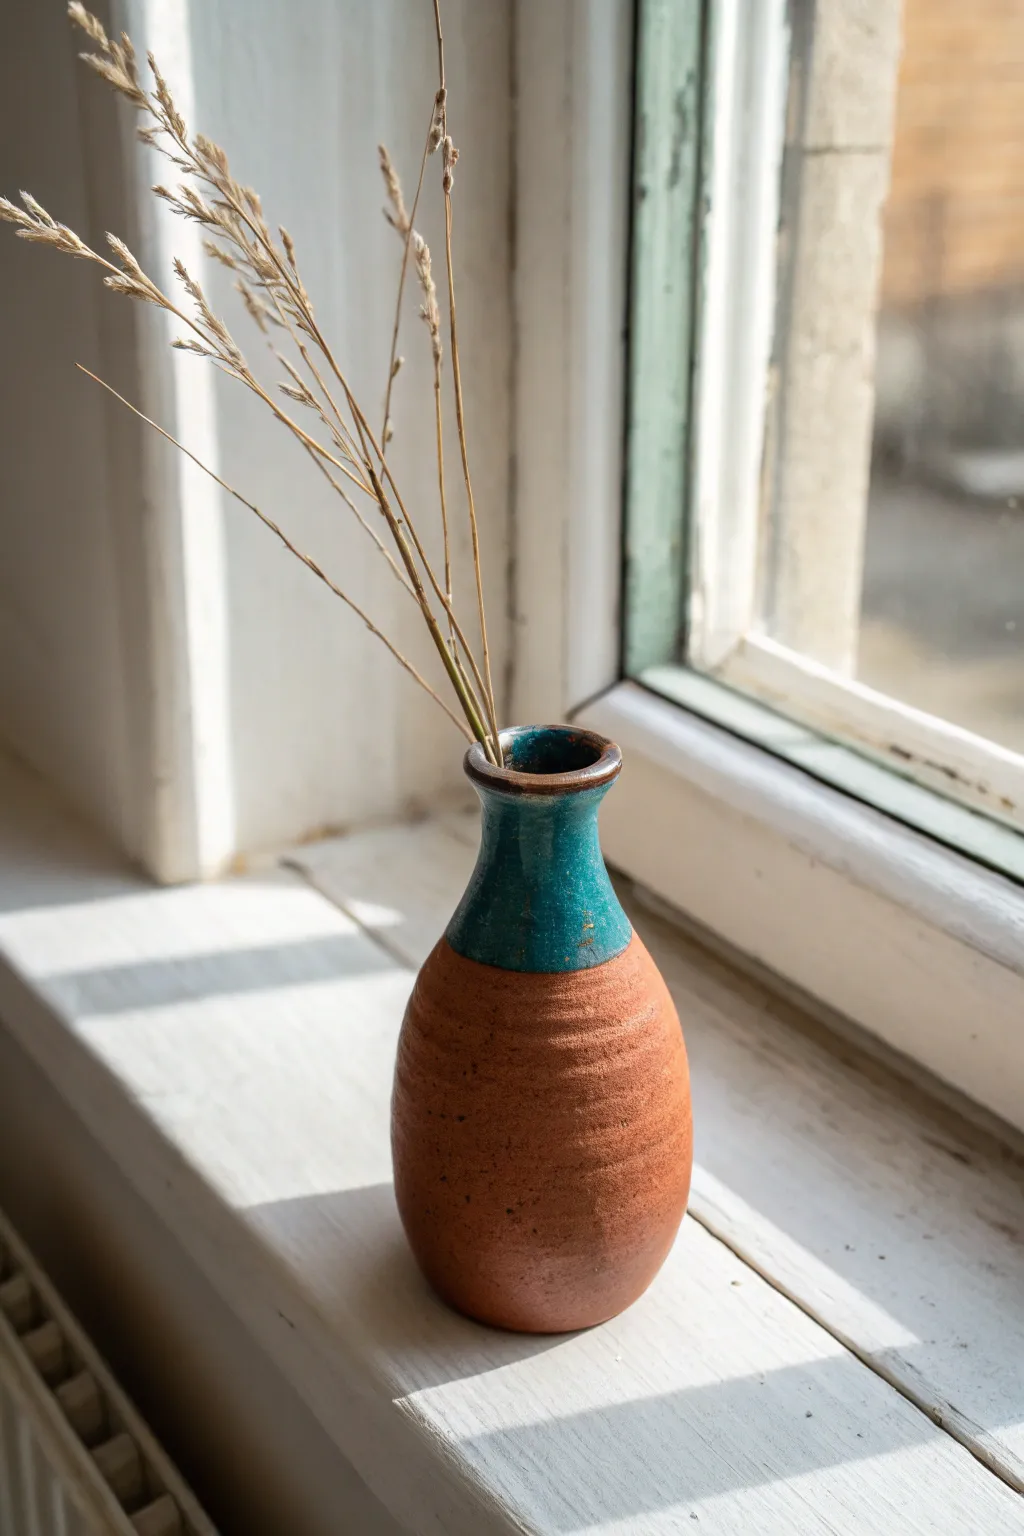
This charming little bud vase celebrates the raw beauty of red clay by leaving the base unglazed while contrasting it with a striking glossy teal neck. Its small stature makes it perfect for displaying dried grasses or a solitary wildflower on your windowsill.
Step-by-Step
Materials
- Red stoneware or terracotta clay (low to mid-fire)
- Pottery wheel (or hand-building tools if pinching/coiling)
- Throwing sponge
- Pin tool
- Wire cutter
- Rib tool (wooden or metal)
- Loop tool for trimming
- Teal or turquoise reactive glaze (glossy)
- Wax resist (liquid)
- Paintbrush (for wax)
- Kiln access
Step 1: Forming the Body
-
Prepare the clay:
Start by thoroughly wedging a small ball of red clay, about the size of a tennis ball or slightly smaller. Ensure there are no air bubbles. -
Center specifically for height:
Secure the clay to the wheel head and center it. Since this is a tall, narrow form, focus on centering it into a taller cone shape rather than a flat puck. -
Open the vessel:
Open the hole in the center, leaving about a half-inch of thickness for the floor. Compress the floor with your finger or a tool to prevent cracks. -
Pull the cylinder:
Begin pulling the walls upward. Keep your hand movements steady and slow. Aim for a narrow cylinder shape initially, tapering slightly inward as you go up. -
Shape the belly:
Once you have some height, gently push from the inside out to create a rounded belly at the bottom two-thirds of the form. I find using a flexible rib on the outside helps smooth the curve while I push. -
Texture the surface:
As the wheel spins slowly, use the edge of a wooden rib or your fingertip to lightly impress a spiral groove from the bottom up to the shoulder. This creates the subtle ridges seen on the unglazed portion.
Step 2: Refining the Neck
-
Collar the neck:
Using both hands effectively as a choke, gently squeeze the top third of the clay inward to form a narrow neck. Do this in stages, compressing the clay to keep the wall thickness even. -
Flare the rim:
At the very top, use your thumb and forefinger to gently flare the rim outward slightly, creating a distinct lip. -
Define the transition:
Use a modeling tool to crisp up the transition point where the belly meets the neck. This indent will act as a natural stopping point for your glaze later. -
Cut and dry:
Wire the pot off the wheel. Allow it to dry to a leather-hard state, usually overnight depending on humidity.
Clean Lines
For a razor-sharp line between the raw clay and the glaze, use narrow masking tape instead of free-handing the wax resist. Peel tape off before firing.
Step 3: Trimming and Glazing
-
Trim the foot:
Place the vase upside down on the wheel (centered) and use a sharp loop tool to trim the bottom. Create a slight undercut to give the vase a lifted appearance. -
Bisque fire:
Allow the piece to bone dry completely, then load it into the kiln for a bisque firing (typically Cone 04 or 06). -
Clean the bisque:
Wipe the fired pot down with a damp sponge to remove any kiln dust before glazing. -
Apply wax resist:
Using a brush dedicated to wax, carefully paint liquid wax resist over the entire bottom section of the vase, stopping exactly where the neck begins. This ensures the glaze won’t stick to the textured body. -
Dip the neck:
Whisk your teal glaze thoroughly. Holding the vase by the foot, dip the top section quickly and smoothly into the glaze bucket, submerging just past the wax line. -
Clean up drips:
Let the glaze dry. Any droplets that formed on the waxed area can now be easily wiped away with a damp sponge. -
Glaze fire:
Fire the piece again to the maturation temperature of your specific clay and glaze combination (e.g., Cone 5/6).
Mineral Pop
Add iron oxide wash to the unglazed section and wipe it back before firing. This emphasizes the throwing rings and adds an aged, rustic depth.
Once cooled, arrange a few stems of dried grass in your new vase to complete the earthy aesthetic.

TRACK YOUR CERAMIC JOURNEY
Capture glaze tests, firing details, and creative progress—all in one simple printable. Make your projects easier to repeat and improve.
Mini Magnet Set
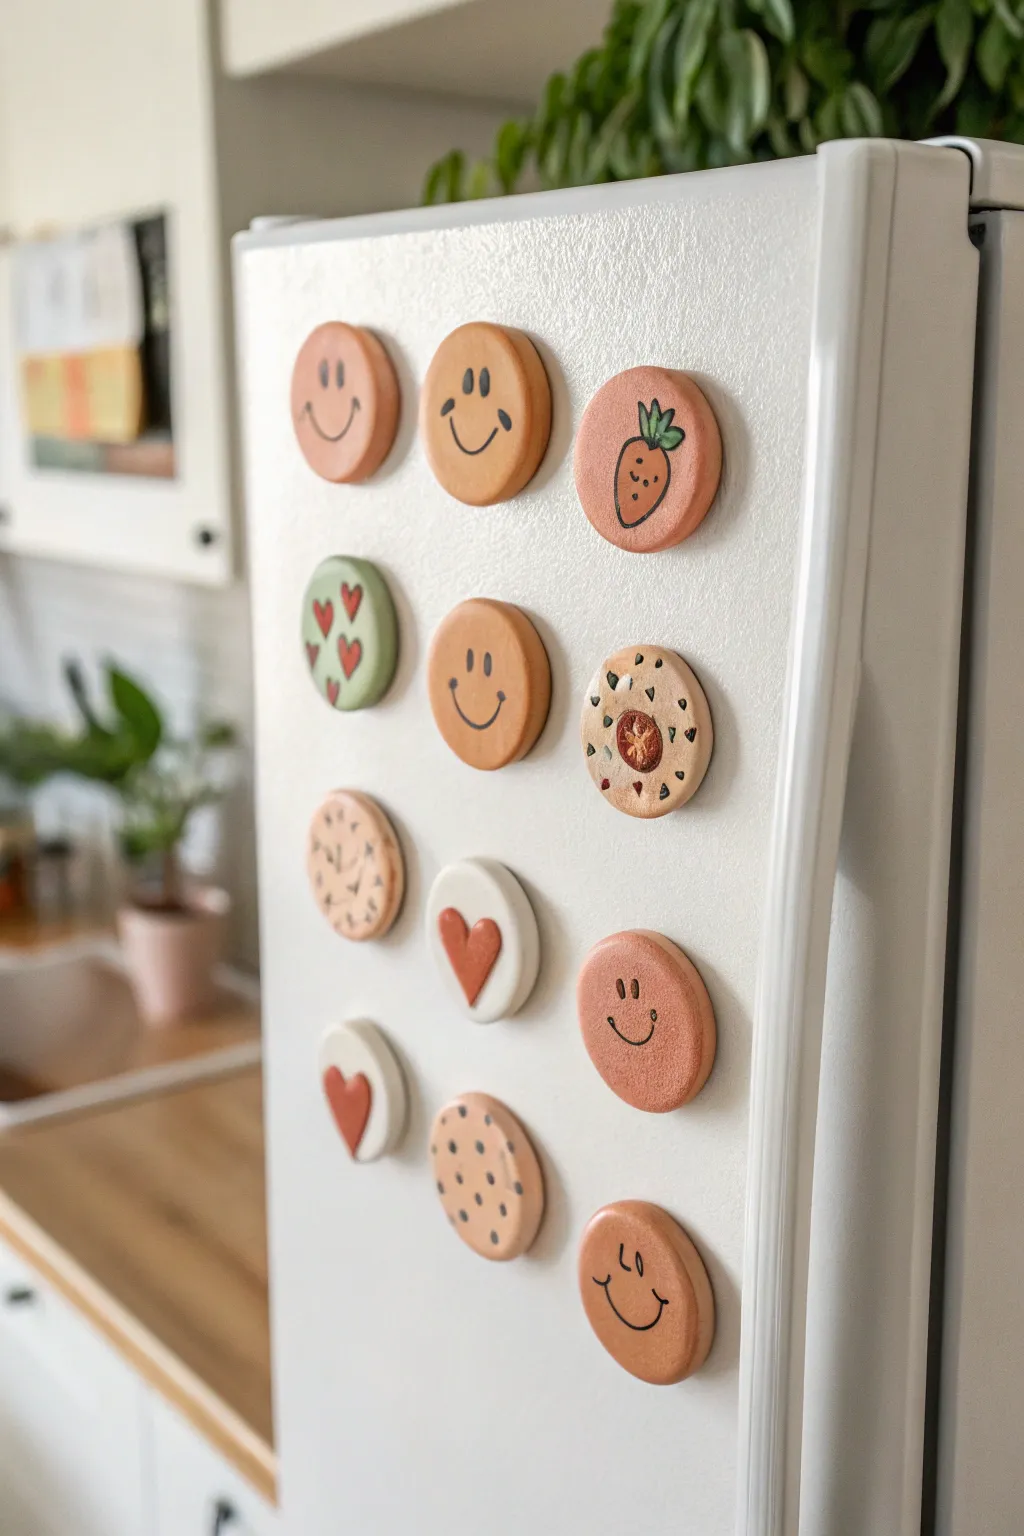
Brighten up your kitchen space with this charming set of handmade clay magnets. Featuring earthy terracotta tones, sweet smiley faces, hearts, and tiny fruit illustrations, these round ceramic-style pieces add a personal, artisanal touch to holding up your grocery lists.
Detailed Instructions
Materials
- Polymer clay (terracotta, white, peach, and sage green colors)
- Small round circle cutter (approx. 1-1.5 inches)
- Acrylic rolling pin
- Parchment paper or ceramic tile (for working)
- Fimo gloss glaze or matte varnish (optional)
- Black fine-point permanent marker or acrylic paint pen
- Strong round craft magnets (ceramic or neodymium)
- Superglue or E6000 adhesive
- Small detail paintbrush (if painting instead of drawing)
- Toothpick or needle tool
- Sandpaper (fine grit)
Step 1: Shaping the Base
-
Condition the clay:
Start by warming up your terracotta, peach, white, and sage green polymer clays in your hands. Knead each color separately until it is soft and pliable to prevent cracking later. -
Roll the slabs:
Using an acrylic rolling pin, roll each color into a slab. Aim for a distinct thickness—about 1/4 inch thick looks best for these sturdy, coin-like magnets. -
Cut the shapes:
Press your small round cutter firmly into the slabs to punch out perfect circles. For the set shown, you’ll need several terracotta/peach rounds, a few white ones, and one green one. -
Smooth the edges:
Gently rub your finger along the cut edge of each circle to soften the sharp ridge left by the cutter. This gives them that handmade, ceramic ‘biscuit’ look. -
Pre-bake prep:
Place your clay rounds on a parchment-lined baking sheet or a ceramic tile. Make sure they aren’t touching each other.
Step 2: Adding Details & Baking
-
Create the heart details:
For the white magnets with relief hearts, pinch off a tiny amount of terracotta clay. Roll it into a ball, flatten slightly, and notch the top to form a heart shape. -
Attach the hearts:
Gently press this terracotta heart onto the center of a white clay round. I find using the back of a paintbrush helps press it down securely without leaving fingerprints. -
Bake the clay:
Bake the pieces according to your specific polymer clay package instructions (usually around 275°F/135°C for 15-30 minutes). Do not overbake. -
Cool down:
Allow the clay pieces to cool completely inside the oven or on a cooling rack before handling. They need to be hard before we draw on them. -
Sand for finish:
Once cool, lightly sand the edges or surfaces if there are any fingerprints or rough spots, then wipe away the dust with a damp cloth.
Smooth Surface Secret
Before baking, wipe your raw clay circles with a little rubbing alcohol on a brush or finger. This melts away fingerprints and dust instantly.
Step 3: Decorating & Assembly
-
Draw the smiles:
Using a fine-point black marker or paint pen, draw the smiley faces. Keep lines simple—two vertical dashes for eyes and a wide, U-shaped curve create that classic, friendly expression. -
Sketch the fruit:
On a peach or terracotta round, draw the carrot or strawberry outline. Add small dots for texture and a little green tuft at the top using a green paint pen or marker. -
Add pattern details:
For the green magnet, draw tiny red hearts. For the beige cookie-style magnet, add varying dots and speckles to mimic texture or chocolate chips. -
Seal the surface:
This step is optional, but applying a thin coat of matte fluid medium or glaze will protect your marker drawings from smudging over time. -
Prepare the magnets:
Flip all your clay pieces so the backs are facing up. Apply a small dot of strong adhesive (like E6000) to the center of each back. -
Attach hardware:
Press a round magnet firmly into the glue. Let the adhesive cure fully (often 24 hours) to ensure the weight of the clay doesn’t pull the magnet off.
Make Them 3D
Instead of drawing fruit, use tiny scraps of colored clay to sculpt miniature carrots or strawberries and press them onto the flat discs before baking.
Once the glue is fully dry, your cheerful new collection is ready to organize your fridge photos and notes
Key and Coin Catchall
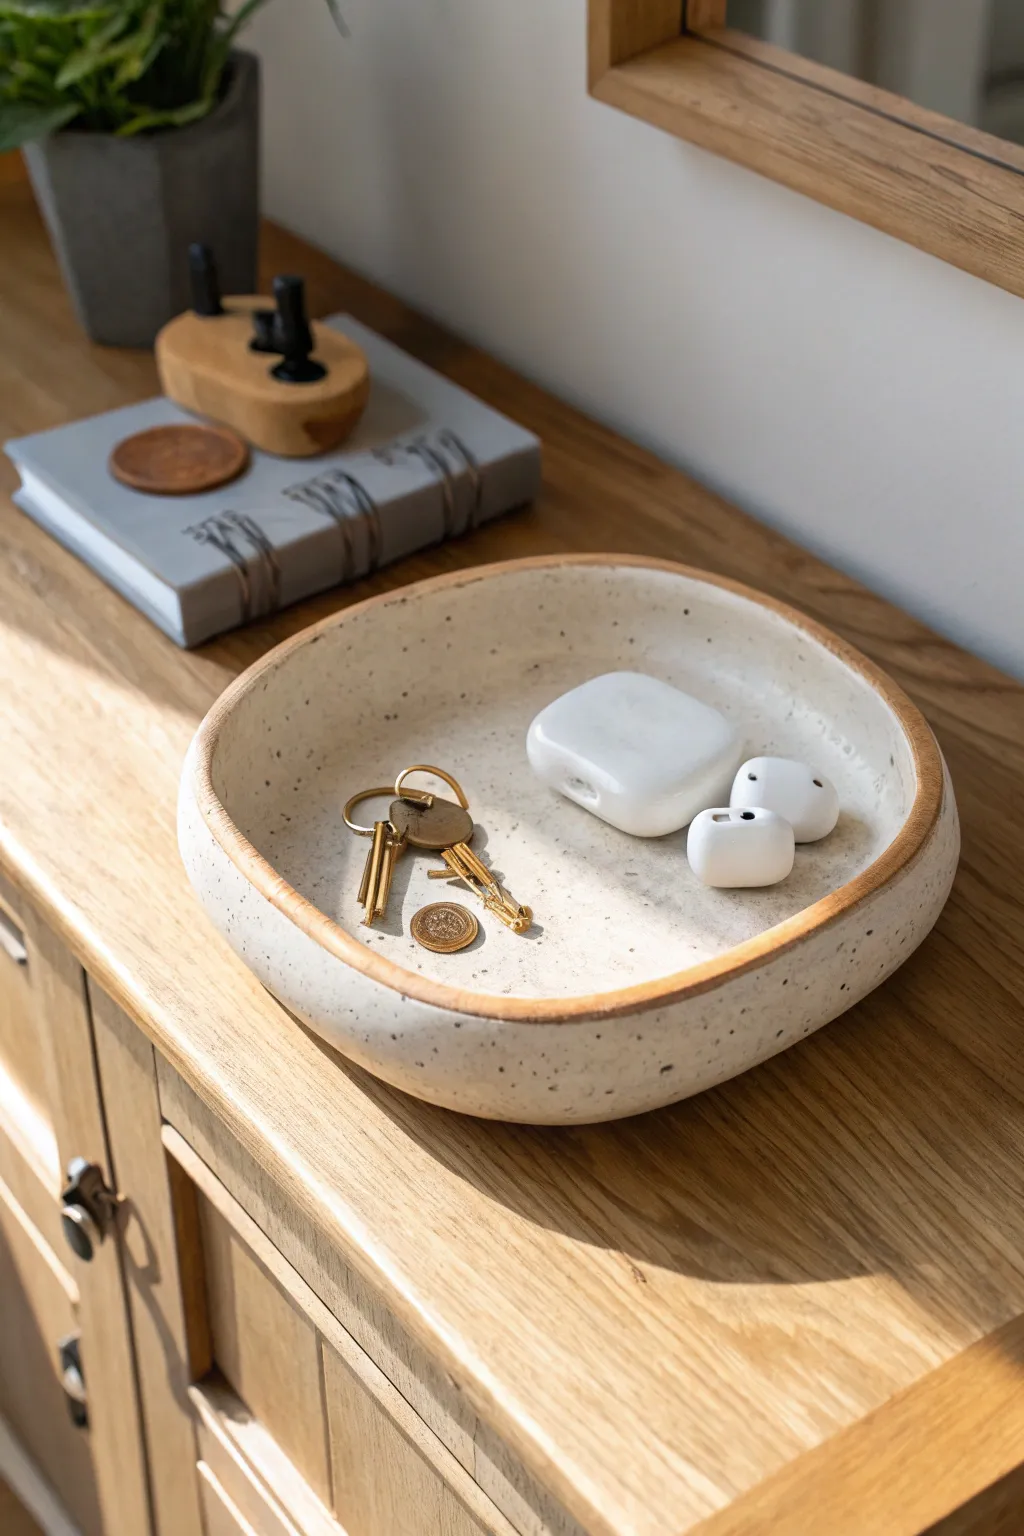
This minimal catchall features a charmingly organic rim and a speckled glaze finish that looks right at home on any entryway console. It’s the perfect beginner project to practice handling clay slabs and achieving a pro-level glazed look.
Step-by-Step Guide
Materials
- Speckled Stoneware Clay (white or cream body)
- Rolling pin
- Canvas mat or wooden board
- Needle tool or fettling knife
- Wooden modeling rib
- Shallow bowl or plaster hump mold (approx. 8-inch diameter)
- Sponge
- Clear or Satin White Glaze
- Iron Oxide wash or Amaco Shino Glaze (for the rim)
- Small paintbrush
- Kiln (or access to a firing service)
Step 1: Creating the Form
-
Prepare the slab:
Begin by wedging a ball of speckled stoneware clay to remove air bubbles. Flatten it slightly with your palm. -
Roll it out:
Roll the clay into a slab approximately 1/4 inch thick. For this project, I prefer to roll in alternating directions to ensure the clay particles align strongly. -
Smooth the surface:
Take a rubber or wooden rib and compress the slab on both sides. This smoothing step is crucial as it removes canvas textures and strengthens the eventual bottom of your dish. -
Cut the shape:
Using a needle tool, cut a rough circle or organic oval shape. Don’t worry about being perfectly geometric; the charm lies in a slightly irregular, handmade silhouette. -
Shape on the mold:
Gently drape your clay slab over a hump mold or press it into a shallow bowl mold. If using a standard kitchen bowl as a mold, line it with plastic wrap first to prevent sticking. -
Refine the curve:
Use a damp sponge to gently press the clay against the mold, ensuring the curve is consistent. Pay attention to the transition between the base and the walls.
Uneven Rim Fix
If your rim cracks while drying, blend a tiny bit of vinegar with clay dust to make a paste (slip). Score the crack, apply the paste, and compress firmly.
Step 2: Refining and Drying
-
Define the rim:
While the clay is still leather hard on the mold, use your fingers or a finishing sponge to round over the sharp cut edge of the rim. -
Add texture (optional):
If you want the rim to look slightly thickened or rolled like the example, gently tap the edge with a wooden paddle or spoon to compress and slightly widen it. -
Slow drying:
Allow the piece to dry slowly to the leather-hard stage. Once firm enough to hold its shape without warping, remove it from the mold. -
Final smoothing:
Check the bottom for any rough spots. You can burnish the bottom with the back of a spoon for a silky finish. -
Bisque fire:
Let the piece dry completely (bone dry) before loading it into the kiln for a bisque firing (usually Cone 04).
Speckle Magic
If you can’t find pre-speckled clay, you can wedge granular manganese into plain white clay. Wear a mask, as raw oxides can be hazardous to inhale!
Step 3: Glazing and Firing
-
Wax the bottom:
Apply a coat of wax resist to the foot or bottom surface of your bisque-fired bowl to prevent glaze from sticking to the kiln shelf. -
Apply the main glaze:
Pour a satin white or clear glaze into the interior of the bowl, swirl it around to coat, and pour out the excess. Dip the exterior if desired, or leave the outside unglazed for a raw clay texture. -
Clean the rim:
Use a damp sponge to wipe any white glaze off the very top edge of the rim. You want this area exposed for the next step. -
Accent the edge:
Paint the exposed rim with a thin line of Iron Oxide wash or a caramel-colored glaze. This recreates that beautiful toasted distinctive border seen in the photo. -
Final fire:
Fire the piece to the maturation temperature of your specific clay and glaze (typically Cone 5 or 6 for stoneware).
Once cooled, your catchall is ready to elegantly organize your daily essentials.
Wavy Rim Jewelry Bowl
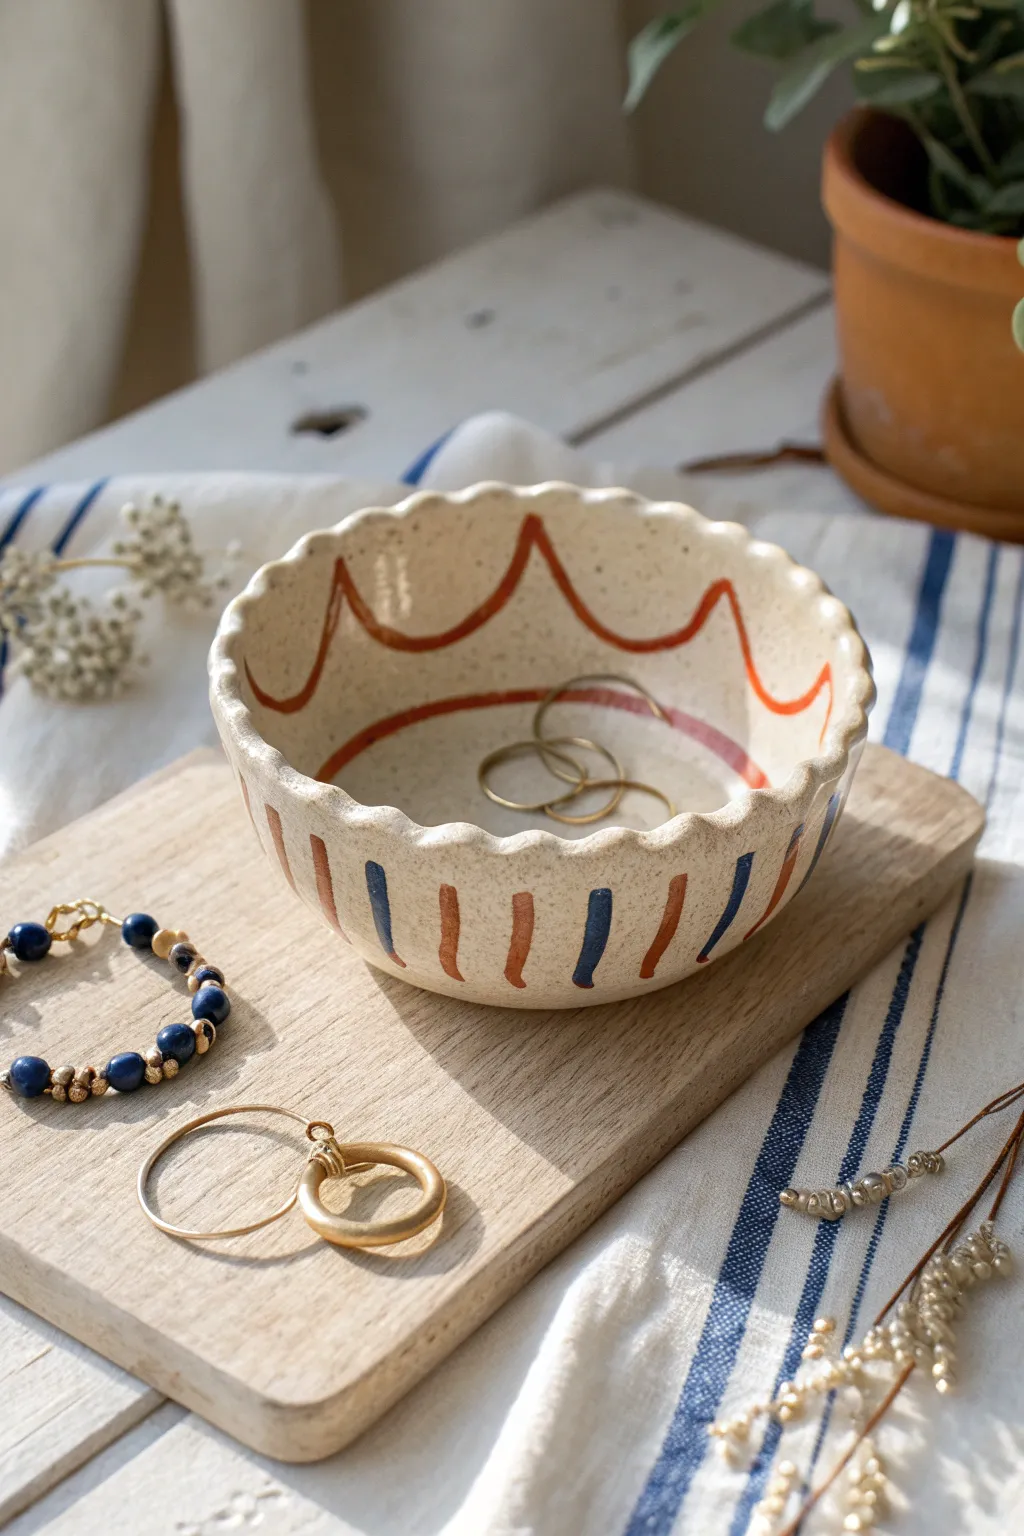
This charming, shallow bowl features a playful scalloped rim and simple hand-painted details that give it a warm, folk-art feel. The speckled clay body shines through the transparent glaze, creating a perfect earthy home for your favorite rings and bracelets.
Step-by-Step Tutorial
Materials
- Speckled clay body (stoneware or earthenware)
- Rolling pin
- Canvas mat or cloth
- Circular template or bowl (approx. 5-6 inches)
- Needle tool or fettling knife
- Small slump mold (or a rounded bowl covered in plastic)
- Modeling tool or finger for shaping
- Underglazes: Rust Orange, Navy Blue
- Small round detail brush
- Clear transparent glaze
- Pottery sponge
- Kiln access
Step 1: Forming the Bowl
-
Roll the slab:
Begin by wedging your speckled clay to remove air bubbles. Roll it out into a smooth, even slab about 1/4 inch thick on your canvas mat to prevent sticking. -
Cut the circle:
Place your circular template onto the slab. Using a needle tool, cut straight down around the template to create a perfect clay disc. -
Smooth the edges:
Dip your finger in a tiny bit of water or use a damp sponge to compress and round the cut edge of the disc. This prevents sharp edges later and prepares the rim for shaping. -
Create the scallop:
With the disc flat on the table, use your thumb and forefinger to gently pinch the rim at regular intervals. Push down slightly with your thumb while supporting underneath to create the scalloped ‘wave’ pattern all around the edge. -
Shape the form:
Carefully lift your clay disc and place it into your slump mold. Gently press the center down so it takes the curve of the mold. Don’t press too hard on the rim, as you want to preserve those waves you just made. -
Dry to leather hard:
Let the bowl sit in the mold until it is leather hard—firm enough to hold its shape but still cool to the touch. This usually takes a few hours or overnight depending on humidity.
Uneven Rim?
If your scallops look uneven, try marking the rim lightly with a needle tool at 12, 3, 6, and 9 o’clock first, then subdivide sections for evenly spaced waves
Step 2: Decorating and Glazing
-
Clean the surface:
Once leather hard, remove the bowl from the mold. Gently wipe it with a barely damp sponge to smooth out any imperfections or finger marks. -
Paint interior waves:
Using a small detail brush and rust orange underglaze, paint a wavy line completely around the upper interior wall of the bowl. The peaks of your painted line should align with the valleys of your scalloped rim. -
Add an interior ring:
Paint a second, straight ring of rust orange further down inside the bowl, roughly halfway to the center. -
Paint exterior stripes:
Flip the bowl over or hold it sideways. Paint vertical dashes all around the exterior wall. Alternate between the rust orange and the navy blue underglaze for a rhythmic pattern. -
Bisque fire:
Let the bowl dry completely to the bone-dry stage. Fire it in the kiln to a bisque temperature (usually Cone 04) to set the shape and underglaze. -
Apply clear glaze:
Wipe the bisque ware with a damp sponge to remove dust. Dip the entire bowl into a clear transparent glaze, or brush on three even coats if using brush-on glaze. -
Wipe the foot:
I always make sure to thoroughly wipe the bottom (foot) of the bowl with a wet sponge to remove all glaze, ensuring it won’t fuse to the kiln shelf. -
Glaze fire:
Load the kiln again and fire to the maturity temperature of your clay and glaze (for example, Cone 5/6 for mid-range stoneware).
Make it yours
Try using a dark clay body with white underglaze for a high-contrast modern look, or carve the exterior stripes instead of painting them for texture
Enjoy styling this sweet little dish with your daily jewelry pieces
Clay Bead Jewelry
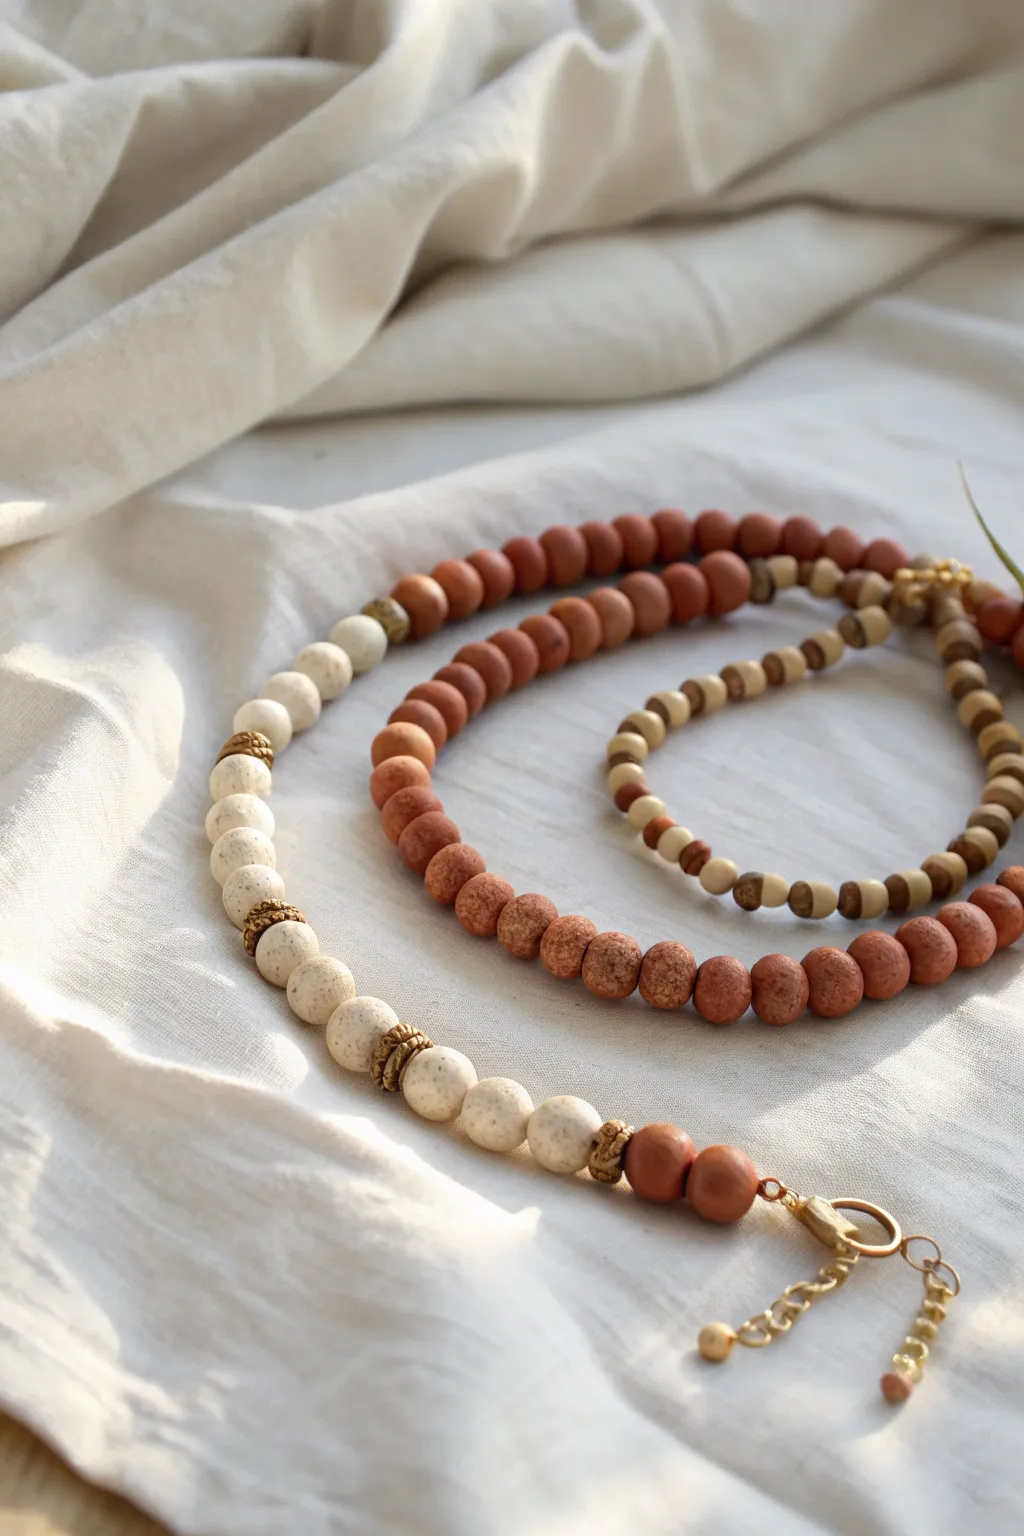
Embrace earthy textures and warm tones with this stunning multi-strand beaded necklace project. By hand-rolling polymer clay beads and pairing them with golden accents, you’ll create a statement piece that feels both organic and refined.
How-To Guide
Materials
- Polymer clay in ‘Granite/Speckled Cream’ and ‘Terracotta/Rust’
- Leather hard clay or light brown polymer clay (for inner strand)
- Small gold spacer beads (heishi or textured discs)
- Gold beading wire or strong nylon cord
- Gold crimp beads
- Gold necklace clasp (lobster claw) and extender chain
- Gold jump rings
- Toothpicks or a bead piercing tool
- Baking sheet and parchment paper
- Jewelry pliers (flat nose and cutting)
Step 1: Crafting the Clay Beads
-
Condition the Clay:
Begin by kneading your speckled cream and terracotta polymer clay separately until they are soft and pliable. This conditioning step prevents cracks during baking. -
Roll the Cream Base:
Pinch off small amounts of the speckled cream clay and roll them between your palms to form spheres. Aim for a size of about 8-10mm for these main beads. -
Texture the Cream Beads:
To achieve that organic, stone-like look, gently roll the cream beads over a piece of coarse sandpaper or dab them with a stiff toothbrush. This adds distinct surface character. -
Form the Terracotta Beads:
Repeat the rolling process with the terracotta clay. Create a mix of sizes: some matching the cream beads and a larger batch of slightly smaller (6-8mm) beads for the contrasting sections. -
Create Inner Strand Beads:
For the inner loop, roll much smaller beads (4-5mm) using a light brown or tan clay. Keep these varying slightly in color to mimic natural wood grain. -
Pierce the Holes:
Using a toothpick or a dedicated piercing tool, carefully poke a hole through the center of each bead. I find twisting the tool as you push through helps maintain the bead’s round shape. -
Bake:
Arrange all your beads on a baking sheet lined with parchment paper. Bake according to your customized clay package instructions (usually 275°F for 15-30 minutes). -
Cool Down:
Allow the beads to cool completely before handling them. They harden fully as they return to room temperature.
Step 2: Assembling the Necklace
-
Cut the Wire:
Cut two lengths of beading wire. One should be shorter for the inner loop (choker style) and one longer for the outer draping strand. -
Start the Outer Strand:
Secure one end of the longer wire to a jump ring using a crimp bead. Thread on two terracotta beads followed by a gold spacer. -
Create the Cream Section:
Thread approximately 5-6 speckled cream beads, placing a textured gold spacer between every third or fourth bead to break up the pattern visually. -
Transition Colors:
Switch back to the terracotta beads for the central drape of the necklace. Use about 20-30 beads here to create the main reddish-brown curve. -
Finish the Pattern:
Mirror the design on the other side: a section of speckled cream beads with spacers, finishing with a few terracotta beads near the clasp. -
String the Inner Loop:
On the shorter wire, string the small tan and light brown beads in a random, organic pattern until the strand sits comfortably at the base of the neck. -
Join the Strands:
Bring the ends of both the inner and outer strands together. Feed them both through a single crimp bead on each side. -
Attach Hardware:
Loop the wire ends through the clasp components (jump ring on one side, clasp on the other), thread back through the crimp bead, and flatten the crimp tightly with pliers. -
Add the Extender:
Attach a gold chain extender to the jump ring side using a small connecting ring. This allows you to adjust the drop length when wearing it. -
Final Trim:
Snip off any excess wire tail sticking out from the crimp beads for a clean, professional finish.
Fixing Fingerprints
If you notice fingerprints on your raw clay beads, lightly smooth them with a drop of baby oil or cornstarch before baking to ensure a flawless matte finish.
Scent Diffuser Upgrade
Use unglazed terracotta clay for the red beads. This porous material can hold drops of essential oils, turning your necklace into a wearable aromatherapy diffuser.
Now you have a beautifully textured, handmade accessory ready to elevate any casual outfit
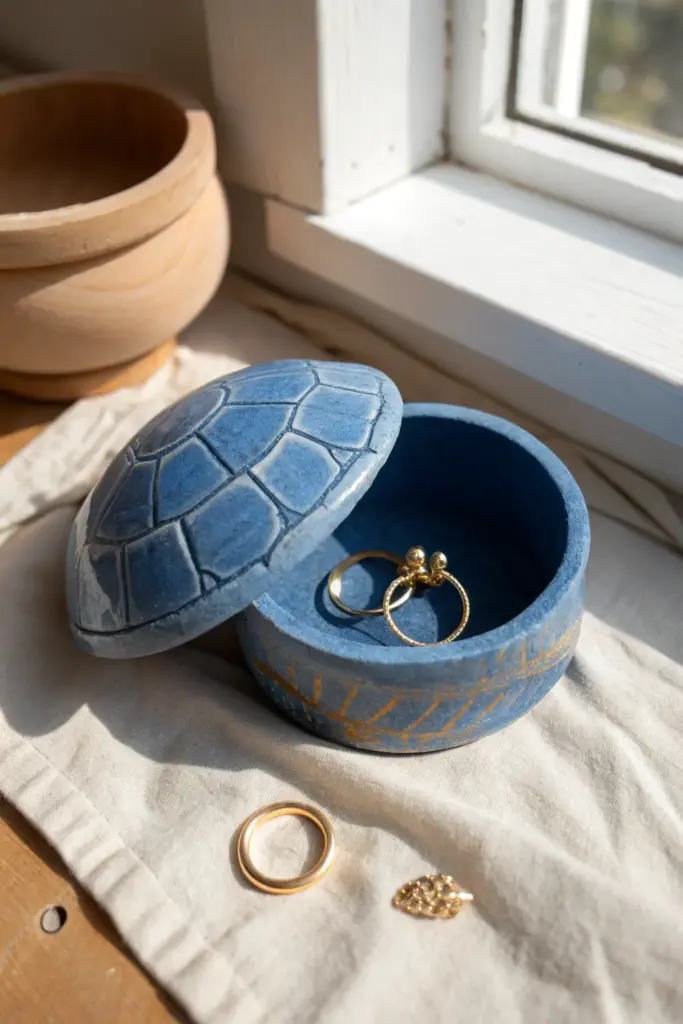
Lidded Trinket Box

Keep your favorite rings safe in this charming sea-inspired lidded box featuring a stylized turtle shell texture on top. The deep ocean blue finish is accented with subtle gold details, giving it the look of a discovered treasure.
How-To Guide
Materials
- Air-dry clay (white or terracotta)
- Clay rolling pin
- Circle cutter or a round bowl (approx. 3-4 inches)
- Fettling knife or clay sculpting tool
- Small bowl of water
- Fine-grit sandpaper
- Acrylic paint (Deep Ocean Blue, Navy)
- Gold leaf or metallic gold paint pen
- Matte varnish or sealant
- Paintbrushes (flat and fine tip)
Step 1: Forming the Base
-
Roll the clay:
Begin by conditioning your clay with your hands until it’s pliable and smooth. Roll out a slab to an even thickness of about 1/4 inch. -
Cut the base and walls:
Cut out a circle for the floor of your box. Then, cut a long rectangular strip that is long enough to wrap around the circumference of your circle and about 1.5 inches tall. -
Construct the box:
Score the edge of the circle base and one long edge of your rectangular strip. Apply a little water or slip to the scored areas. -
Attach and smooth:
Wrap the strip around the base, pressing the scored edges together firmly. Use your finger or a modeling tool to blend the seam where the wall meets the floor on both the inside and outside, ensuring a strong bond. -
Close the loop:
Where the two ends of the wall meet, score and slip them, then smooth the vertical seam until it disappears. Refine the rim to be level.
Uneven Lid?
If the lid wobbles, place a sheet of sandpaper on a table and gently rub the lid’s bottom rim in circles against it until perfectly flat.
Step 2: Sculpting the Lid
-
Create the dome shape:
Form a ball of clay slightly larger than a golf ball. Flatten it gently into a thick disc that is just slightly larger than the diameter of your box base. -
Shape the curve:
Cup the disc in your palm to create a gentle dome shape. Test the fit on your base frequently; you want it to sit neatly on top without sliding off. -
Add the inner lip:
Roll a thin snake of clay and attach it to the underside of the lid, creating a ring that fits *inside* the box walls. This keeps the lid secure. -
Carve the pattern:
Using a needle tool or knife, lightly sketch a ‘turtle shell’ pattern on the dome. Start with a central shape and draw radiating lines outward to the edge. -
Deepen the lines:
Go back over your sketch lines with a carving tool, pressing deeper to create distinct grooves that will catch paint later. Smooth any clay crumbs with a damp finger. -
Dry completely:
Allow both pieces to dry fully for 24-48 hours. I usually flip the lid upside down halfway through so the inside dries evenly.
Step 3: Finishing Touches
-
Sand until smooth:
Once bone dry, use fine-grit sandpaper to smooth out any rough edges on the rim and the exterior walls. Wipe away dust with a slightly damp cloth. -
Base coat:
Paint the entire exterior and interior with a layer of deep navy blue acrylic paint. You may need two coats for full opacity. -
Create texture:
Mix a slightly lighter blue shade and dry-brush it over the top of the lid. This highlights the raised areas of the shell pattern while keeping the carved grooves dark. -
Gold accents:
Using a gold paint pen or thin brush, add faint, scratchy line details around the bottom edge of the box base to mimic sea grass or abstract botanical shapes. -
Seal the work:
Protect your paint job with a coat of matte varnish. This gives the piece a professional, finished stone-like appearance.
Go glam
Instead of paint for the gold details, apply gold leaf sizing and real gold leaf into the carved grooves of the lid for a luxe, inlaid effect.
Place this little guardian on your bedside table to watch over your jewelry while you sleep