If you’re craving fresh clay texture ideas, texture is the fastest way to make even a simple shape feel special. I like to think of surface texture as the part where you get to play—press it, carve it, build it up, and let the light show off every little detail.
Clay Stamps and Repeat Patterns
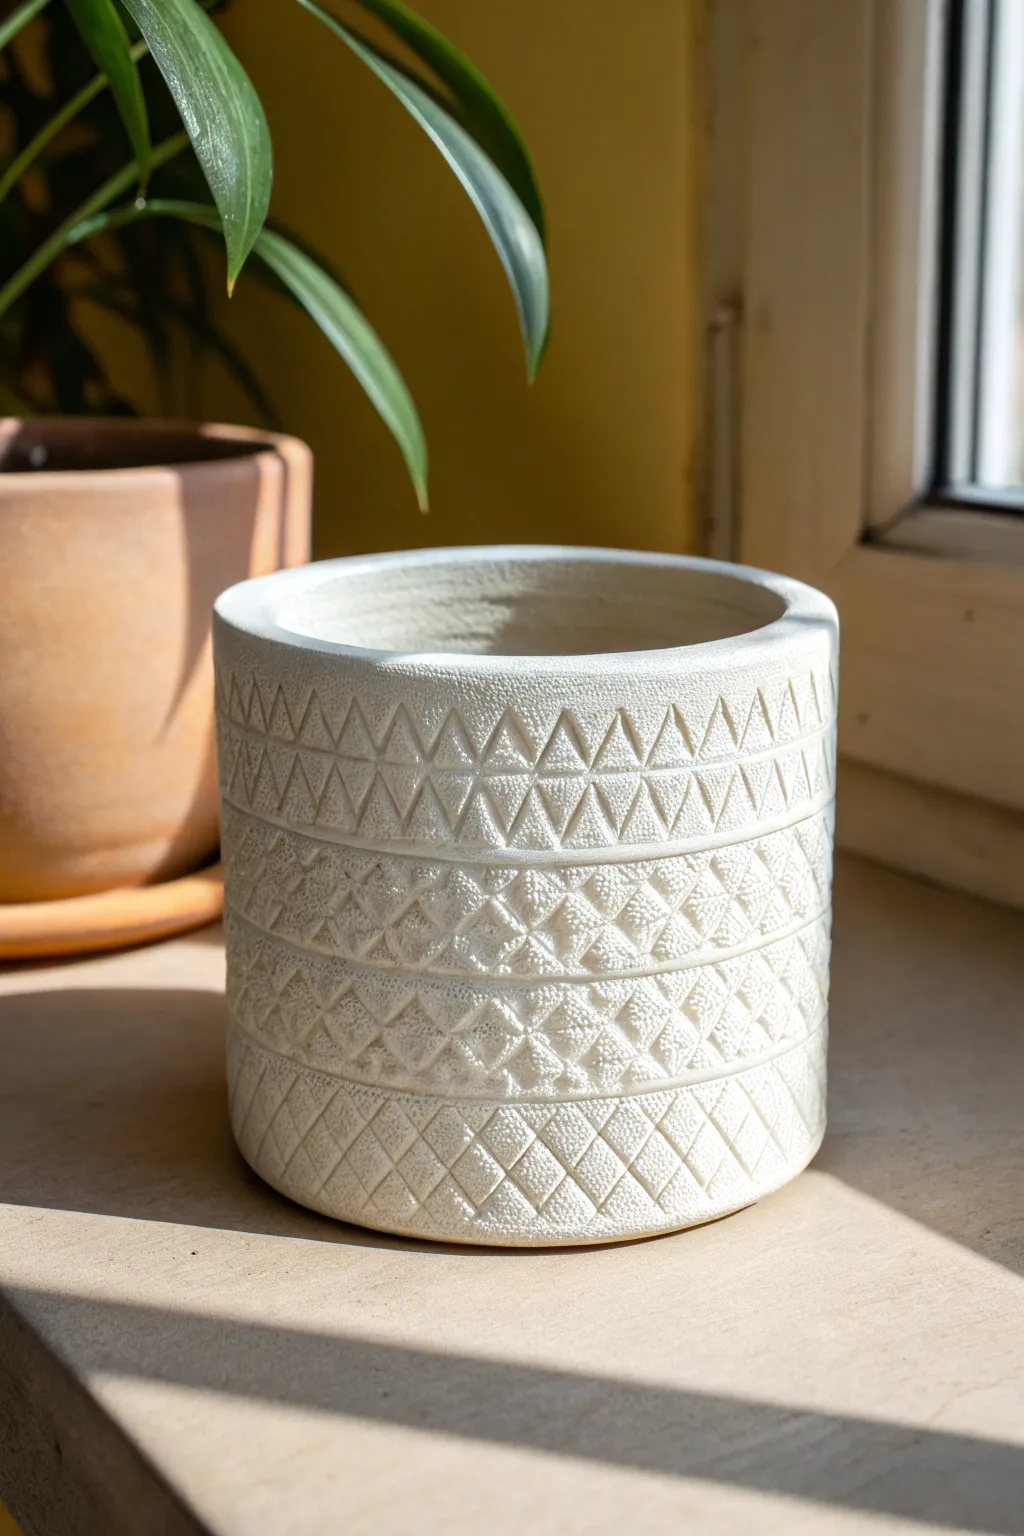
This project explores the satisfying rhythm of repeating patterns on a simple cylindrical form. The resulting planter features crisp bands of triangles and diamonds that catch the light beautifully, especially when finished with a matte, stony glaze.
Step-by-Step Tutorial
Materials
- White stoneware clay (preferably with grog for texture)
- Rolling pin
- Canvas work surface or slab mat
- Clay knife or fettling knife
- Pottery rib (metal or wood)
- Ruler
- Scoring tool and slip
- Geometric clay stamps (triangles and diamonds)
- Cylindrical mold or PVC pipe (optional, for shape support)
- Sponge
Step 1: Preparing the Slab
-
Roll out the clay:
Begin by wedging your white stoneware clay to remove air bubbles. Roll it out into a long, rectangular slab. Aim for a consistent thickness of about 3/8 of an inch to ensure the walls are sturdy enough to stand but not too heavy. -
Smooth the surface:
Using a rib tool, compress the clay on both sides. This aligns the clay particles, preventing warping later, and creates a pristine, smooth canvas for your stamping work. -
Cut to size:
Measure the circumference and height you want for your planter. Using a ruler and clay knife, cut a clean rectangle. Don’t forget to add a little extra length for the overlap or bevel joint.
Step 2: Stamping the Pattern
-
Plan your zones:
Before stamping, lightly mark horizontal guidelines with your ruler to define where each band of pattern will go. I find it helpful to visualize three distinct sections: top triangles, middle diamonds, and bottom cross-hatching. -
Stamp the top border:
Start with your triangle stamp near the top edge. Press the stamp firmly into the clay, ensuring even pressure. Repeat this horizontally to create a continuous band of upward-pointing triangles. -
Invert the pattern:
For the row immediately below, use the same triangle stamp but invert it so the point faces down. Nest these triangles between the top ones to create a classic zigzag or mountains-and-valleys effect. -
Create the middle band:
Move to the center section. Use a diamond-shaped stamp or a textured tool to create a band of intricate, diamond-like impressions. Press deeply enough to create shadow, but be careful not to puncture the slab. -
Add separation lines:
Between your major pattern bands, you can use a straight edge or a fine tool to impress subtle horizontal lines. This acts like a frame, separating the geometric zones and making the design look intentional and tidy. -
Finish the bottom texture:
For the bottom third, switch to a larger diamond or cross-hatch stamp. Create a dense grid pattern here to visually anchor the pot. The variety in texture size adds visual interest from top to bottom.
Warped Patterns?
If your slab stretches while lifting it, the pattern will distort. Let the clay stiffen more before moving it, or roll the slab on a piece of canvas you can use to lift it without touching the clay.
Step 3: Assembling the Form
-
Wait for leather hard:
Let the stamped slab stiffen slightly until it is ‘soft leather hard.’ If you try to lift it while it’s too wet, you risk distorting your beautiful stamped impressions. -
Bevel the edges:
Cut the short ends of your rectangle at 45-degree angles (bevels). This ensures a strong, seamless joint where the cylinder connects without adding bulky thickness. -
Score and slip:
Rough up the beveled edges with your scoring tool and apply a generous amount of clay slip (liquid clay) to act as glue. -
Form the cylinder:
Carefully stand the slab up and curve it into a cylinder, bringing the scored edges together. Press the seam firmly from the inside and outside to bond them. Be gentle on the outside to preserve the texture. -
Add the base:
Roll a small separate slab for the base. Place your cylinder on top of it and trace around the bottom. Cut out this circle, then score and slip both the cylinder bottom and the base edge to attach them. -
Smooth the rim:
Run a damp sponge or your finger along the top rim to round it off. A sharp or jagged rim is uncomfortable to handle, so take time to make it smooth and level.
Cornstarch Release
Dust your clay stamps lightly with cornstarch before pressing them into the clay. This acts as a release agent, preventing the stamp from sticking and ensuring crisp, clean impressions every time.
Step 4: Finishing Touches
-
Dry slowly:
Cover the pot loosely with plastic to let it dry slowly. Uneven drying can cause the seam to crack. -
Bisque fire:
Once bone dry, fire the piece to bisque temperature (usually centered around Cone 04 depending on your clay body). -
Glaze application:
Apply a matte white or satin glaze. I prefer dipping suitable for texture; avoid thick, runny glazes that might fill in the stamped details and obscure your hard work. -
Final smooth:
Wipe the foot (bottom) of the pot clean with a sponge to prevent it from sticking to the kiln shelf during the final firing. -
Glaze fire:
Fire the piece to the final temperature recommended for your specific clay and glaze combination.
Once fired, the interplay of light and shadow on the texture will make this a standout piece for any windowsill


Pressed Lace and Textile Texture
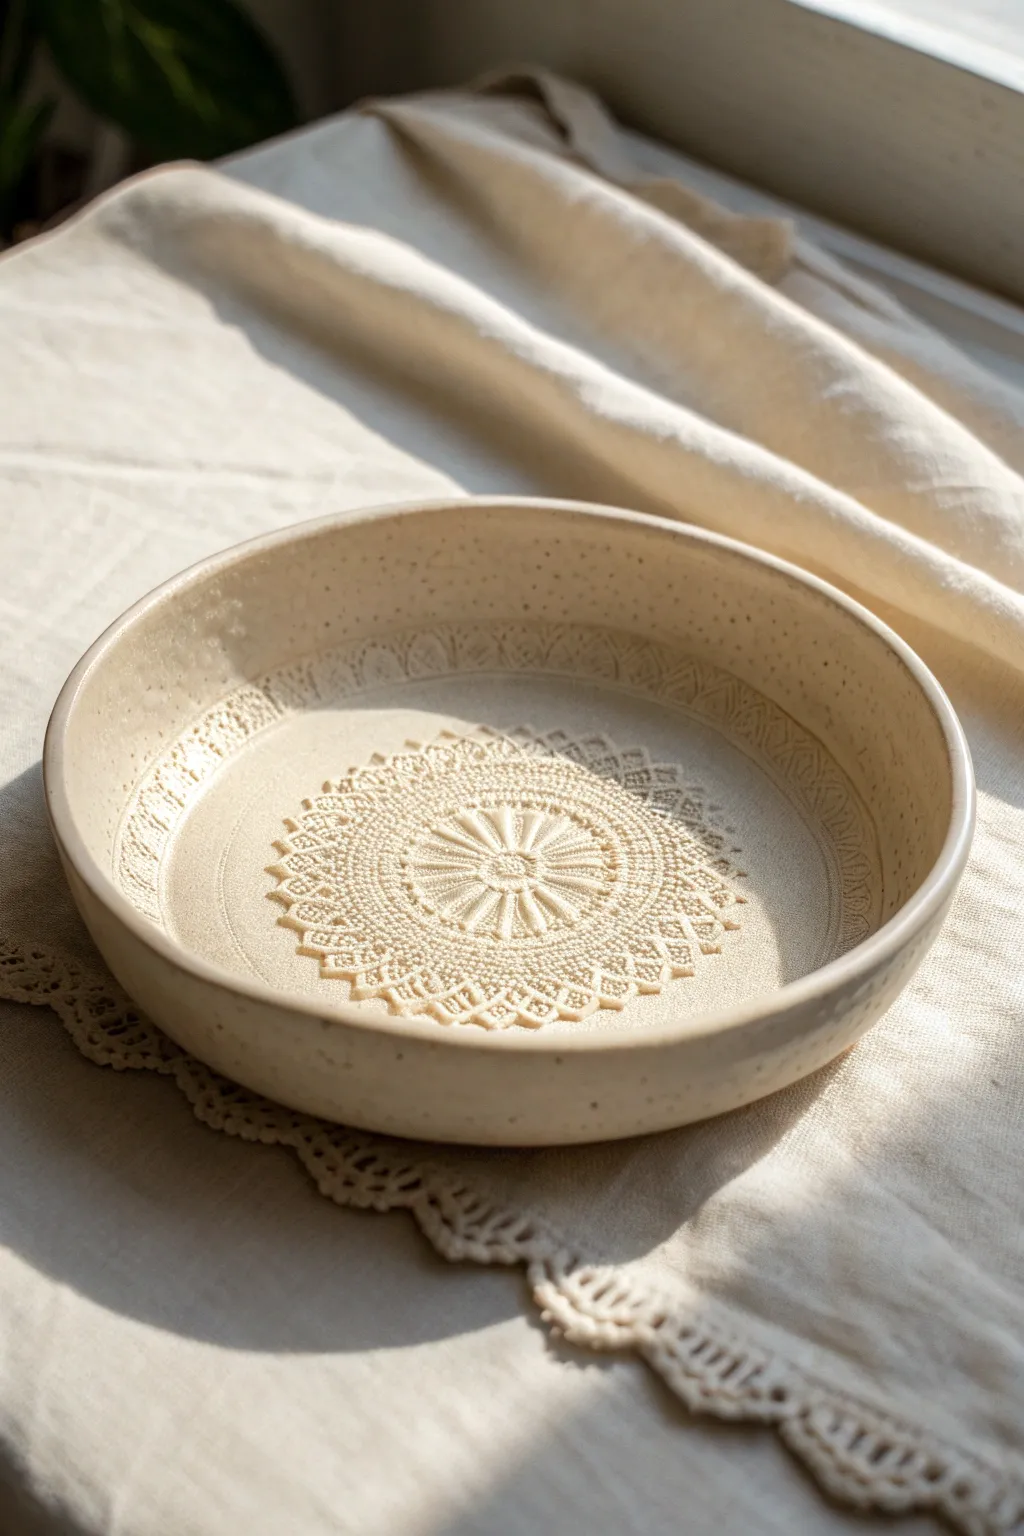
Capture the delicate beauty of vintage textiles forever in clay with this simple yet stunning project. By pressing intricate lace or doilies into a speckled stoneware slab, you can create a functional bowl that carries the ghost of a beautiful pattern.
Detailed Instructions
Materials
- Speckled stoneware clay (mid-fire)
- Canvas work surface or ware board
- Rolling pin
- Guide sticks or slats (approx. 1/4 inch thick)
- Vintage lace doily (circular) and lace ribbon
- GR Pottery Form (or a large bowl/plaster mold for draping)
- Rib tool (soft kidney)
- Needle tool or fettling knife
- Sponge
- Clear or transparent matte glaze
Step 1: Preparing the Slab
-
Wedge the Clay:
Begin by thoroughly wedging your speckled stoneware clay. This removes air bubbles and ensures the clay particles are aligned, which is crucial for preventing warping later. -
Set Up Guides:
Place your canvas cloth on a sturdy table. Position your wooden guide sticks on either side of the clay ball. These will ensure your slab is a perfectly even thickness. -
Roll the Slab:
Using your rolling pin, flatten the clay ball into a large, even slab. Roll from the center outwards, turning the clay occasionally to keep it circular, until the rolling pin rests on the guide sticks. -
Smooth the Surface:
Take your flexible rib tool and gently compress the surface of the slab. I like to do this in multiple directions to align the clay particles and remove any canvas texture before adding the lace.
Sticky Lace?
If the lace sticks to the wet clay, lightly dust the fabric with cornstarch before placing it down. This acts as a release agent and burns off in the kiln without a trace.
Step 2: Impressing the Texture
-
Position the Center Doily:
Carefully place your circular lace doily in the exact center of the slab. Take your time to align it well, as this will be the focal point of the finished bowl. -
Roll the Center Pattern:
Firmly roll over the doily with your rolling pin. Do not roll back and forth; make one single, decisive pass with firm pressure to drive the textile deep into the clay. -
Add Border Texture:
If you want the rim texture shown in the photo, place a strip of lace ribbon around the perimeter of the central design, leaving a smooth gap in between. Roll this firmly into the clay just as you did with the center. -
Reveal the Design:
Carefully peel back the lace to reveal the raised impression. Use a needle tool to pick up the edge of the fabric if it’s stuck.
Step 3: Forming the Bowl
-
Cut the Circle:
Place your form or a large circular template over the design to determine the bowl’s size. Use a needle tool to cut a clean circle around the perimeter. -
Lift the Slab:
Gently lift the clay slab. If it feels too floppy, let it stiffen up for about 15-20 minutes so it holds its shape better during forming. -
Drape Over Mold:
Invert the slab and drape it over your bowl mold or specific pottery form. The textured side should be facing the mold surface if you are pressing *into* a concave mold, or facing out if draping *over* a convex form. The example image suggests a drape mold where the texture remains on the inside. -
Shape the Curve:
Gently press the slab to conform to the mold’s curve. Use a damp sponge to smooth the rim, ensuring there are no sharp edges. -
Dry Slowly:
Cover the bowl loosely with plastic and allow it to dry to leather-hard on the mold. This slow drying prevents the rim from warping.
Pro Tip: Depth Check
Don’t be afraid to press hard. The glaze will soften the texture slightly, so a deeper impression now ensures the pattern remains crisp and visible after firing.
Step 4: Finishing and Firing
-
Bisque Fire:
Once the piece is bone dry, bisque fire it according to your clay body’s specifications (usually cone 04 or 06). -
Glaze Application:
Dip, brush, or spray a clear or transparent matte glaze over the piece. A transparent glaze is essential here to let the speckles and the intricate lace texture shine through. -
Wipe the Foot:
Use a damp sponge to wipe any glaze off the bottom foot of the bowl to prevent it from sticking to the kiln shelf. -
Glaze Fire:
Fire the bowl to the final temperature required by your clay and glaze combination (typically cone 5 or 6 for mid-fire stoneware).
Now you have a permanently preserved piece of textile history ready for your table


Stencil-Embossed Slab Patterns
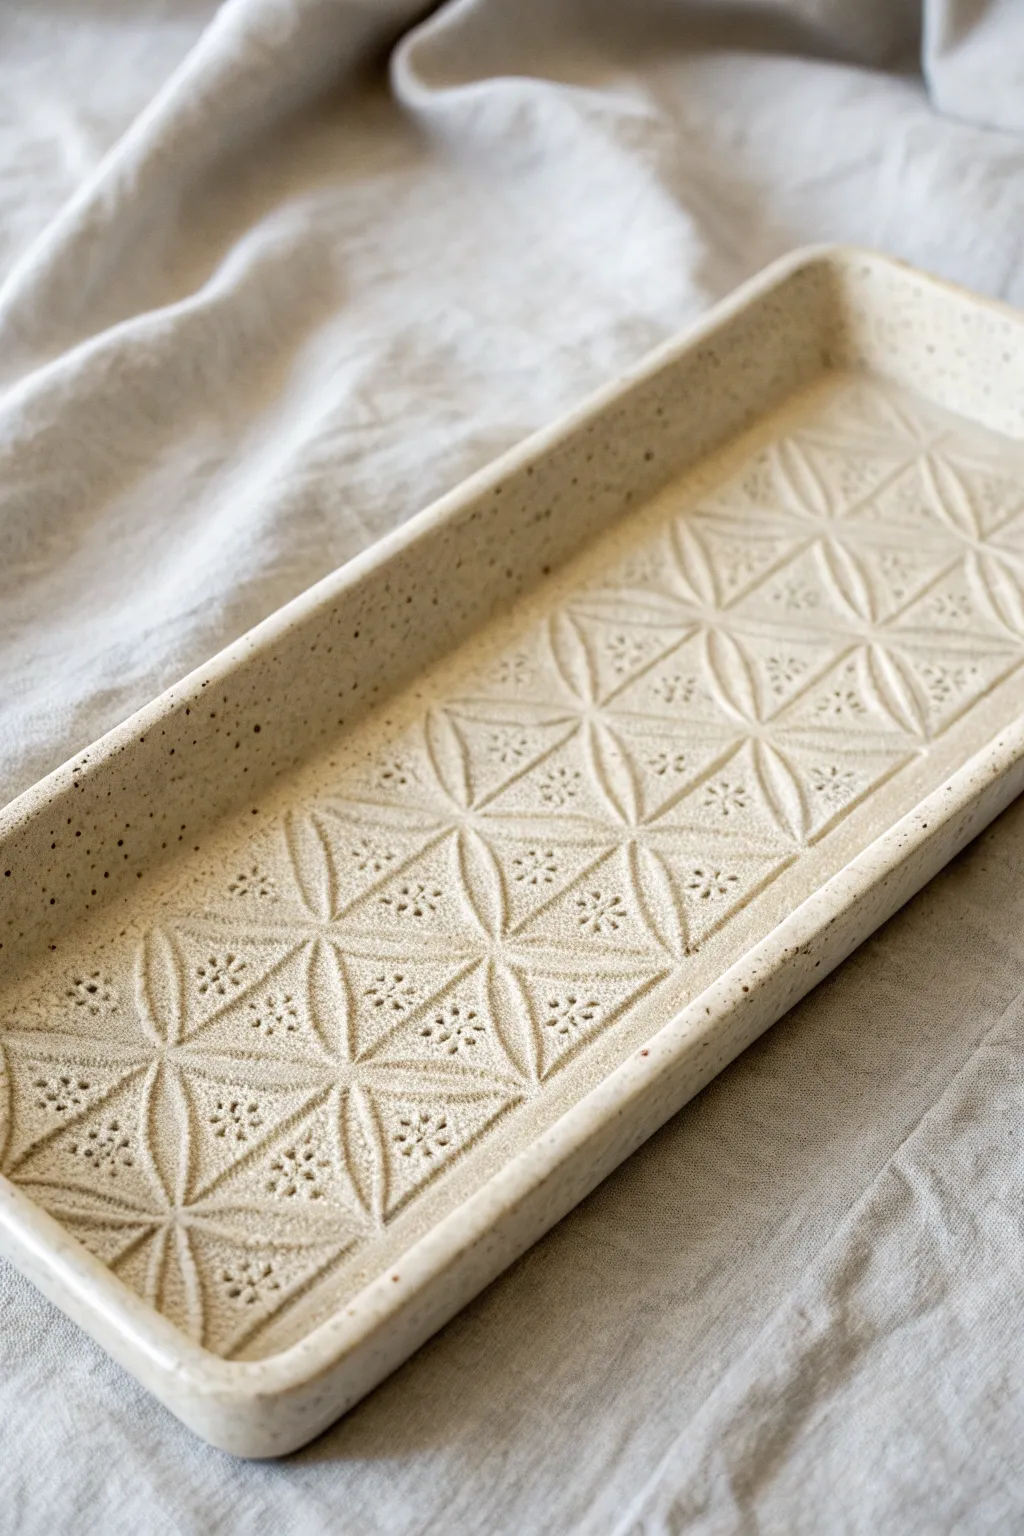
Learn to transform a simple slab of clay into an elegant organizational tray featuring a mesmerizing geometric relief. The flower-of-life inspired grid combined with delicate internal textures creates a sophisticated surface that begs to be touched.
How-To Guide
Materials
- Speckled Stoneware Clay (e.g., Speckled Buff)
- Rolling pin
- Canvas work surface
- Two long wooden guide strips (thickness slats, approx. 1/4 inch)
- Geometric stencil (flexible plastic or heavy cardstock)
- Small foam roller or pony roller
- Small circular texture stamp (or found object like a pen cap)
- Fettling knife or needle tool
- Ruler
- Cornstarch (for release)
- Sponge
- Clear or Satin Matte Glaze
Step 1: Preparing the Slab
-
Roll the foundation:
Begin by wedging your speckled stoneware clay thoroughly to remove air pockets. Place the clay on your canvas work surface between two wooden guide strips. -
Create the slab:
Roll the clay out using a rolling pin until the pin rests on the guide strips, ensuring an even thickness across the entire slab. Smooth both sides with a kidney rib to compress the clay particles. -
Measure the base:
Using a ruler and needle tool, lightly mark the dimensions of your finished tray base on the slab, but do not cut yet. Leave ample extra clay around the edges for the walls.
Step 2: Embossing the Pattern
-
Position the stencil:
Dust the surface of your clay very lightly with cornstarch to prevent sticking. Lay your geometric stencil over the central area where the tray floor will be. -
Roll the relief:
Using a pony roller or a small brayer, firmly roll over the stencil. Apply consistent pressure to push the clay into the open areas of the stencil, creating a raised pattern. -
Check depth:
Lift a corner of the stencil gently to peek at the texture. If the pattern isn’t distinct enough, lay it back down carefully and roll again with slightly more force. -
Remove the stencil:
Peel the stencil away slowly to reveal the raised geometric grid. If any rough edges appear where the stencil lifted, smooth them very gently with a soft finger or brush. -
Add detail stamping:
Select a small circular stamp or a found object like a patterned pen cap. Press this tool gently into the center of the triangular negative spaces created by the main grid pattern to add the intricate secondary texture.
Stamp Clarity
If your stencil sticks, dust it with cornstarch before rolling. The cornstarch burns out in the kiln, leaving a clean impression without altering the clay surface.
Step 3: Constructing the Tray
-
Cut the template:
Now, use your ruler and fettling knife to cut the final rectangle shape. For this specific folded-corner style, you want a simple large rectangle. -
Create the rim:
Measure about 3/4 of an inch in from each edge. This outer border will become the vertical wall of the tray. -
Score and fold:
Instead of cutting separate walls, we will fold up the edges. Lightly score a line where the floor meets the wall, but don’t cut through. This helps the clay fold cleanly. -
Form the corners:
Lift the four sides up to a 90-degree angle. At the corners, pinch the excess clay together on the inside or butt the edges together if you cut distinct notches. I prefer to smooth the corner seams firmly ensuring no cracks remain. -
Refine the lip:
Run a damp sponge along the top rim of the tray to round it off and soften any sharp angles created by the knife.
Level Up: Colored Slip
Before removing the stencil, brush a contrasting colored slip over the exposed clay. When you peel the stencil away, the pattern will be both embossed and colored.
Step 4: Finishing Touches
-
Slow drying:
Loosely cover the tray with plastic to let it dry slowly. Uneven drying can cause rectangular trays to warp. Once leather hard, tidy up the bottom and edges with a damp sponge. -
Bisque fire:
Fire the piece to cone 04 (or your clay body’s bisque temperature) once fully bone dry. -
Glaze application:
Since the texture and clay body are the stars here, apply a clear or satin matte glaze. Dip or brush the glaze evenly, ensuring it doesn’t pool too thickly in the textured crevices, which would obscure the pattern. -
Final wipe:
If the glaze looks too thick in the deep stamped spots, gently dab them with a clean, slightly damp brush to remove excess material before the final firing.
Once fired, place this sophisticated tray on a coffee table or vanity to organize your small treasures with style


Texture Rollers and Patterned Pins
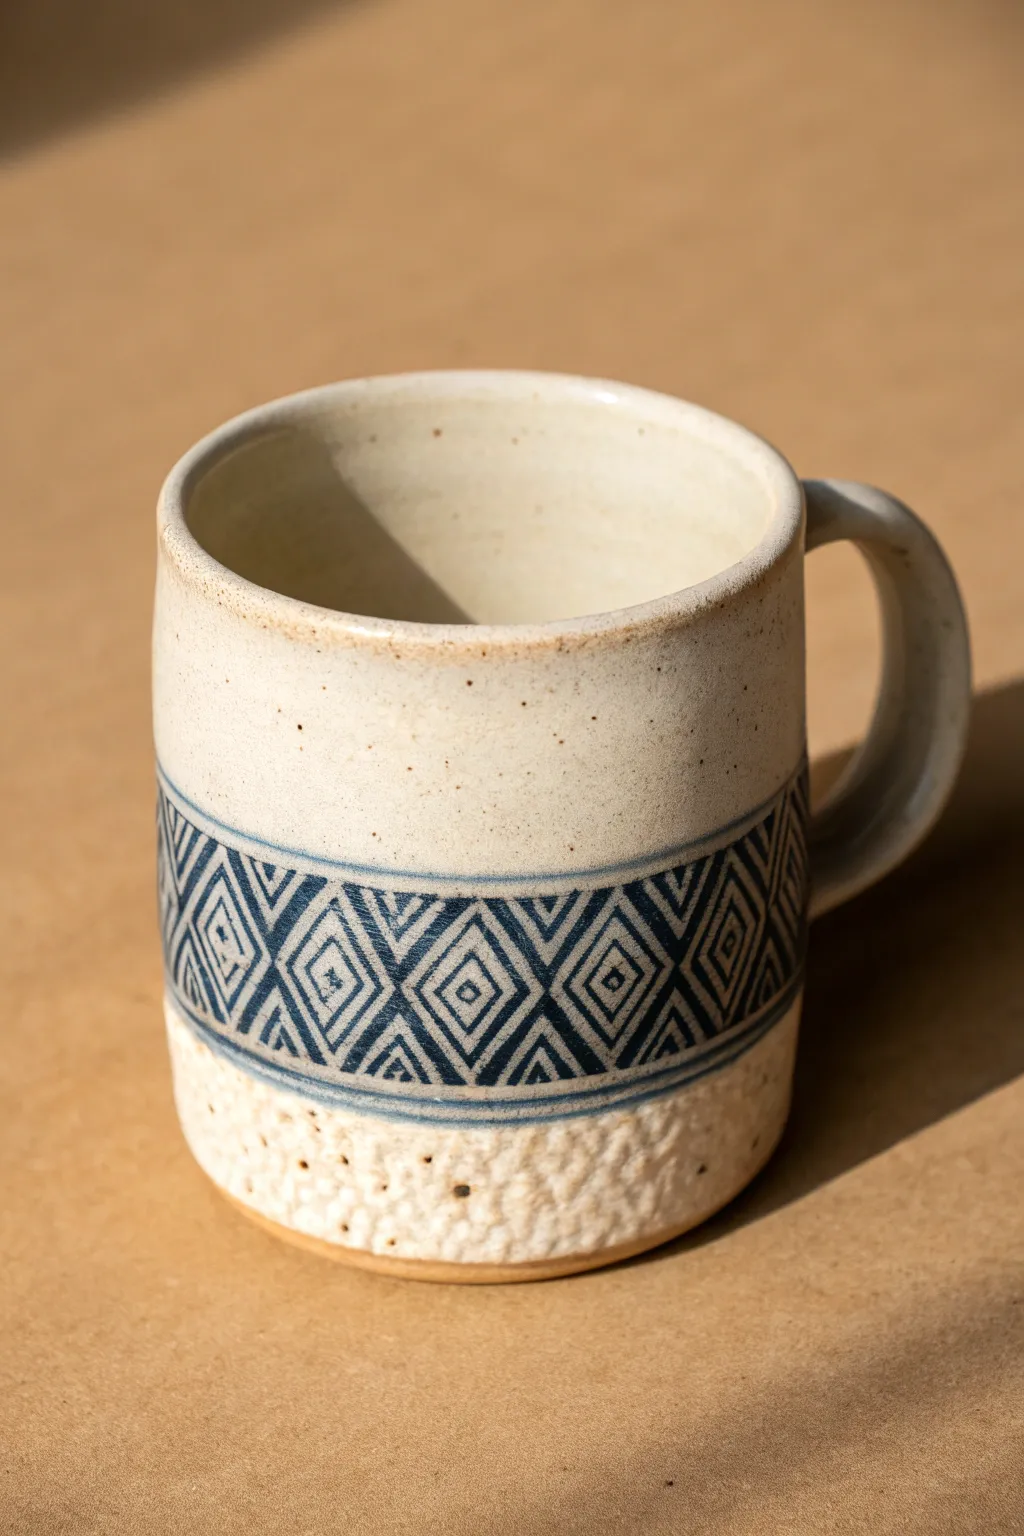
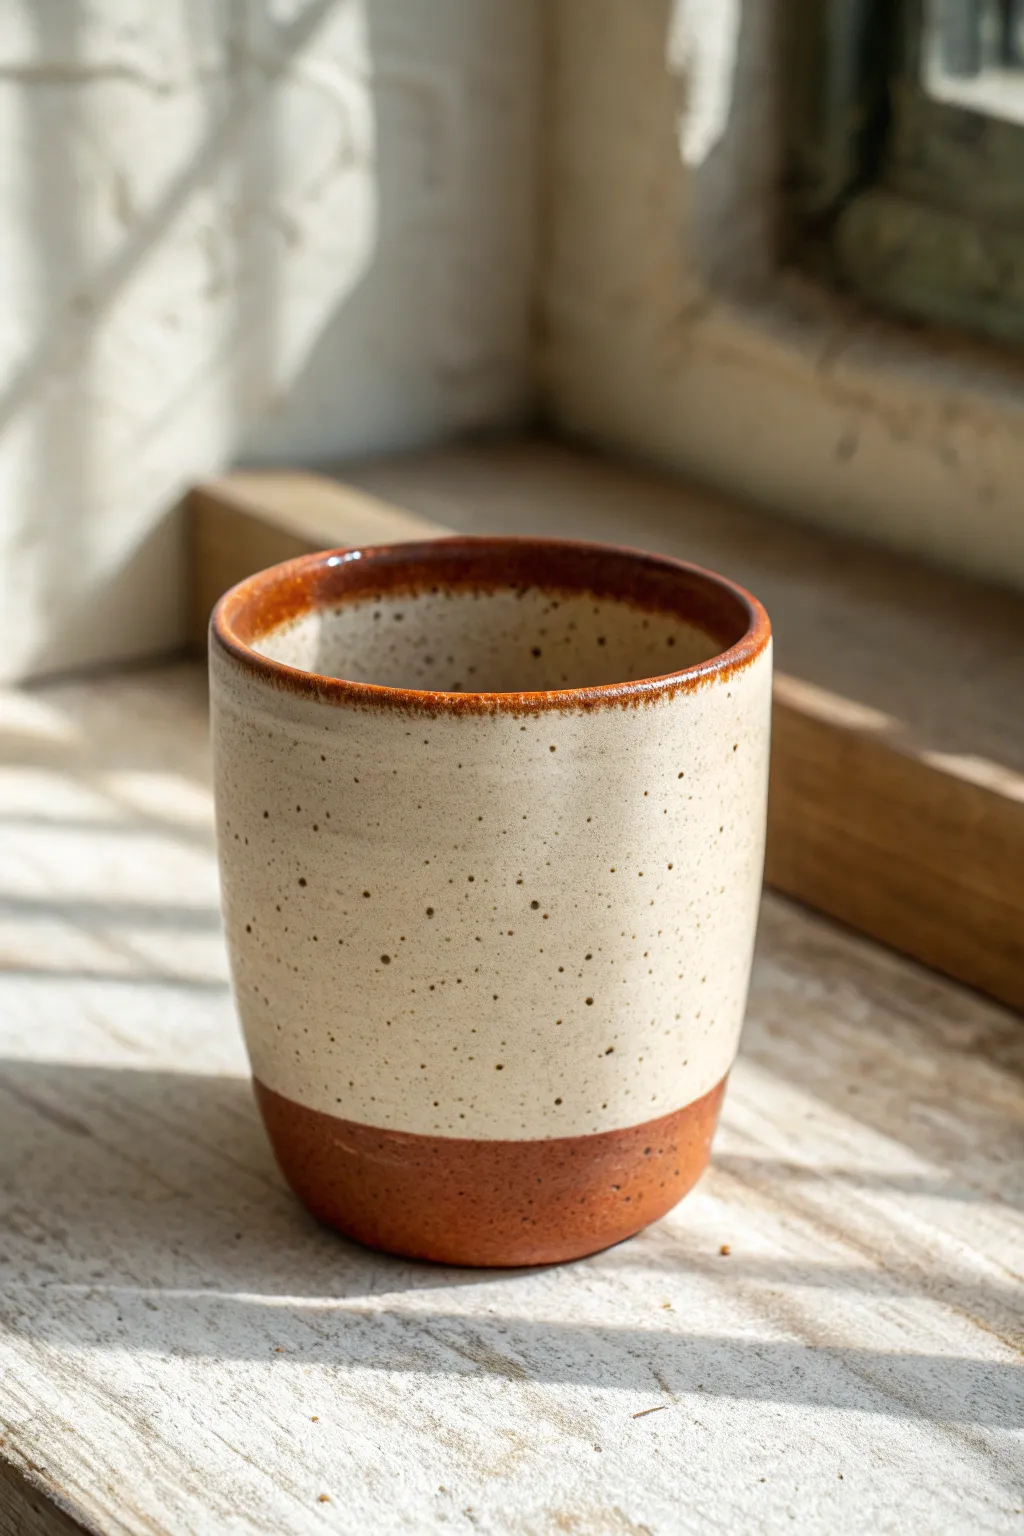
This handmade ceramic mug features a stunning combination of surfaces, blending a smooth speckled upper body with a tactile, stony base. The highlight is a striking geometric diamond band created with a texture roller and enhanced with blue underglaze inlay.
Step-by-Step
Materials
- Stoneware clay (speckled or buff)
- Geometric diamond pattern texture roller
- Rolling pin
- Canvas or slab mat
- Dark blue underglaze (e.g., cobalt or navy)
- Sponge
- Needle tool
- Scoring tool (serrated rib)
- Slip or vinegar
- Cylinder mold or bisqued form (optional)
- Clear or translucent matte glaze
- Soft texture tool (for the base, like a rasp or stiff brush)
Step 1: Preparing the Slab
-
Roll out the clay:
Begin by rolling out a medium-sized slab of stoneware clay on your canvas to a consistent thickness, roughly 1/4 inch. Ensure the slab is large enough to cut a rectangle that will form the body of your mug. -
Compress the slab:
Use a soft rib to smooth and compress the clay surface on both sides. This aligns the clay particles, preventing warping later, and creates a nice canvas for your texture. -
Apply the texture band:
Position your geometric diamond texture roller horizontally across the middle of your slab. Roll it firmly and evenly across the clay in a single pass to emboss the pattern deeply without making the clay too thin. -
Texture the base:
For the bottom section of the mug (below the geometric band), use a rougher tool like a rasp, the side of a uneven stone, or a stiff bristle brush to tap and drag against the clay. This creates the ‘pitted’ organic look seen at the base.
Step 2: Forming the Mug Body
-
Cut to size:
Measure and cut a precise rectangle from your textured slab. The length should match the circumference of your desired mug size plus a small overlap for the seam. -
Bevel the edges:
On the short ends of your rectangle, cut 45-degree bevels in opposite directions. This allows for a clean, secure overlap joint without adding bulk. -
Form the cylinder:
Carefully lift the slab and wrap it into a cylinder shape. I like to wrap it around a bisque mold or PVC pipe to keep it perfectly round, but you can also do this freehand. -
Join the seam:
Score the beveled edges aggressively and apply slip or vinegar. Press the edges together firmly to seal the join. Carefully maneuver your fingers inside the cylinder to support the wall while pressing from the outside. -
Blend the surface:
Smooth the vertical seam on the inside of the mug completely. On the outside, be gentle to avoid erasing your geometric texture; try to minimize the seam’s visibility by strictly blending the cut line.
Clean Lines
When sponging back the underglaze, use a firm sponge and wipe diagonally across the texture. Following the lines can deeply scoop out the color you want to keep.
Step 3: Adding the Base and Handle
-
Attach the floor:
Roll a small separate slab for the floor. Place your cylinder on top, trace around it, and cut out the circle. Score and slip both the bottom edge of the cylinder and the edge of the circle, then join them. -
Pull a handle:
Pull a strap of clay for the handle, tapering it slightly. Curve it into a ‘C’ or ear shape and let it stiffen slightly until it holds its form. -
Attach the handle:
Attach the handle to the smooth upper portion of the mug, ensuring the top attachment is just below the rim and the bottom attachment sits above the geometric band. Score, slip, and smooth the connection points. -
Dry slowly:
Cover the mug loosely with plastic and let it dry slowly to the bone-dry stage. Uneven drying can cause the handle to crack away from the body.
Distorted Patterns?
If the diamond pattern stretches or warps when you curve the slab into a cylinder, let the slab stiffen to soft leather-hard before rolling it into a tube.
Step 4: Decoration and Glazing
-
Bisque fire:
Fire the mug in a kiln to bisque temperature (usually cone 04 or 06) to prepare it for glazing. -
Inlay the pattern:
Brush a thick coat of dark blue underglaze over the geometric texture band, ensuring it gets deep into the impressed grooves. -
Wipe back:
Using a clean, damp sponge, wipe away the excess underglaze from the high points of the texture. Rinse your sponge frequently. You want the blue to remain only in the recessed lines. -
Glaze application:
Dip or brush the entire mug (inside and out) with a translucent or semi-opaque creamy matte glaze. This will seal the clay while allowing the speckles and the blue inlay pattern to show through. -
Final wipe:
Wipe the very bottom foot of the mug clean of any glaze to prevent it from sticking to the kiln shelf. -
Glaze fire:
Fire the mug to maturity (typically cone 5/6 for stoneware). The glaze should melt to a satin finish, revealing the intricate diamond pattern beneath.
Enjoy your morning coffee knowing you crafted this textured geometric vessel by hand.

The Complete Guide to Pottery Troubleshooting
Uncover the most common ceramic mistakes—from cracking clay to failed glazes—and learn how to fix them fast.
Found-Object Impressions from Around the House
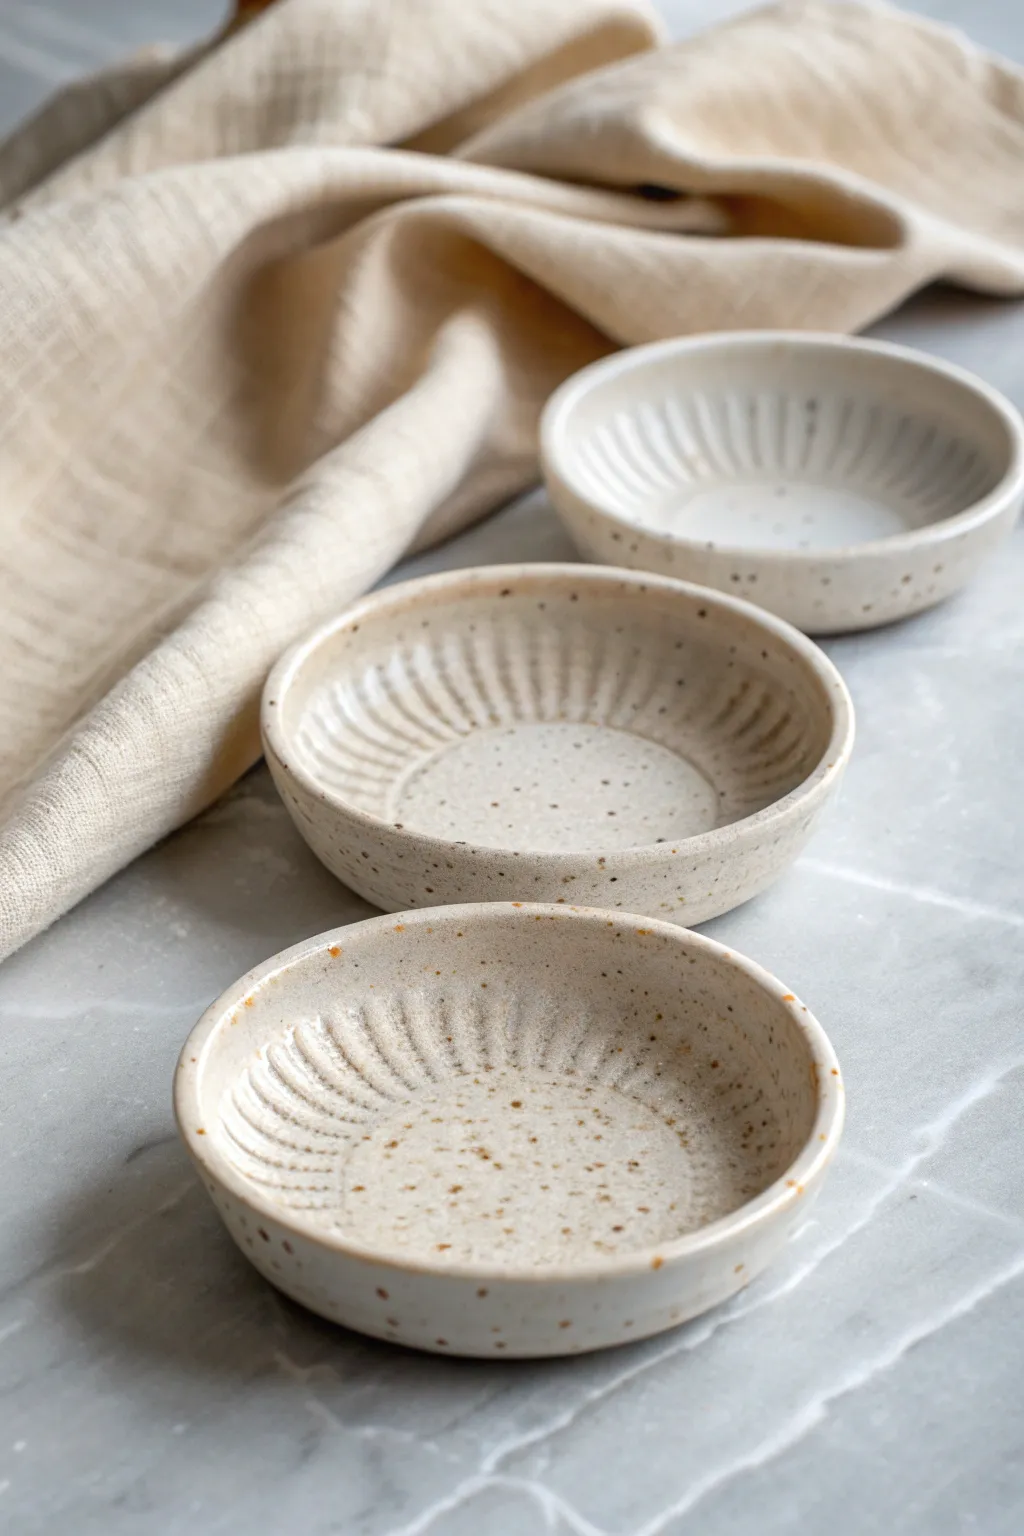
Transform simple clay slabs into elegant trinket dishes by using a humble kitchen staple for texture. These shallow bowls feature a stunning fluted pattern created by pressing standard cupcake liners into the surface, finished with a creamy, speckled glaze for a classic pottery look.
Step-by-Step Guide
Materials
- White stoneware clay with speckles (or plain white clay)
- Standard paper cupcake liners (stiff varieties work best)
- Rolling pin
- Two wooden guide strips (approx. 1/4 inch thick)
- Circular cookie cutter or bowl template (approx. 4-5 inches diameter)
- Small sponge
- Rib tool (rubber or metal)
- Shallow slump mold (or a small bowl covered in plastic)
- Creamy semi-matte glaze
- Kiln (for firing)
Step 1: Preparing the Slab
-
Wedge the clay:
Begin by thoroughly wedging your clay to remove any air bubbles and ensure an even consistency, which is crucial for slab work. -
Set up your guides:
Place your wooden guide strips on either side of your clay ball on a canvas or mat. These will help you roll a perfectly even slab. -
Roll the slab:
Using the rolling pin, roll the clay out until the pin rests on the guide strips. Flip the clay occasionally to prevent sticking. -
Smooth the surface:
Run a rib tool gently across the surface of the clay to compress the particles and remove any canvas texture or rolling pin marks.
Step 2: Creating the Texture
-
Prepare the liner:
Take a standard paper cupcake liner and flatten it out. To get the distinct ridges shown in the photo, you might need to cut a slit in the liner so it lies perfectly flat against the clay. -
Position the texture:
Place your flattened cupcake liner ridge-side down onto the smooth clay slab. -
Impress the pattern:
Gently roll over the paper liner with your rolling pin. Use firm, even pressure to ensure the pleats imprint deeply, but don’t thin the clay too much. -
Peel and reveal:
Carefully peel back the paper liner to reveal the sunburst-style radiating ridges left behind in the clay. -
Cut the shape:
Center your circular cookie cutter or template over the textured area. Press down to cut out your bowl shape, keeping the texture pattern centered.
Pro Tip: Release Agent
If the paper liner sticks to the clay, lightly dust the clay surface with cornstarch before placing the paper down. It acts as a release and burns off in the kiln.
Step 3: Forming and Finishing
-
Soften the rim:
After lifting the circle from the scrap clay, run a damp finger or small sponge lightly around the cut edge to round it off and remove sharpness. -
Shape the bowl:
Gently lift your clay circle and place it into a shallow slump mold or a plastic-covered bowl. Press gently so it takes on a slight curve. -
Refine the curve:
Ensure the rim lifts slightly but the bottom remains somewhat flat for stability. I find gently tapping the mold on the table helps settle the clay. -
Dry slowly:
Allow the bowls to dry slowly to the leather-hard stage before removing them from the molds to prevent warping. -
Bisque fire:
Once fully bone dry, fire the pieces in a kiln to bisque temperature (usually Cone 04).
Level Up: Rim Accent
After glazing the main body, carefully brush a thin line of iron oxide or a contrasting dark glaze along just the very rim to frame the texture beautifully.
Step 4: Glazing
-
Wipe down:
Use a damp sponge to wipe any dust off the bisque-fired bowls. -
Dip or brush glaze:
Apply a creamy, semi-opaque white glaze. If dipping, hold the bowl with tongs and submerge quickly. If brushing, apply 2-3 even coats. -
Reveal the texture:
The glaze will naturally pool slightly in the imprinted ridges and break over the high points, accentuating the cupcake liner pattern. -
Clean the distinct foot:
Wipe the bottom of the bowl completely clean of glaze to prevent it from sticking to the kiln shelf. -
Glaze fire:
Fire the bowls again to the maturation temperature of your specific clay and glaze combination (often Cone 5 or 6 for stoneware).
These charming textured bowls make perfect ring dishes or condiment servers for your next dinner party
Nature Prints (Leaves, Pinecones, Seed Pods)
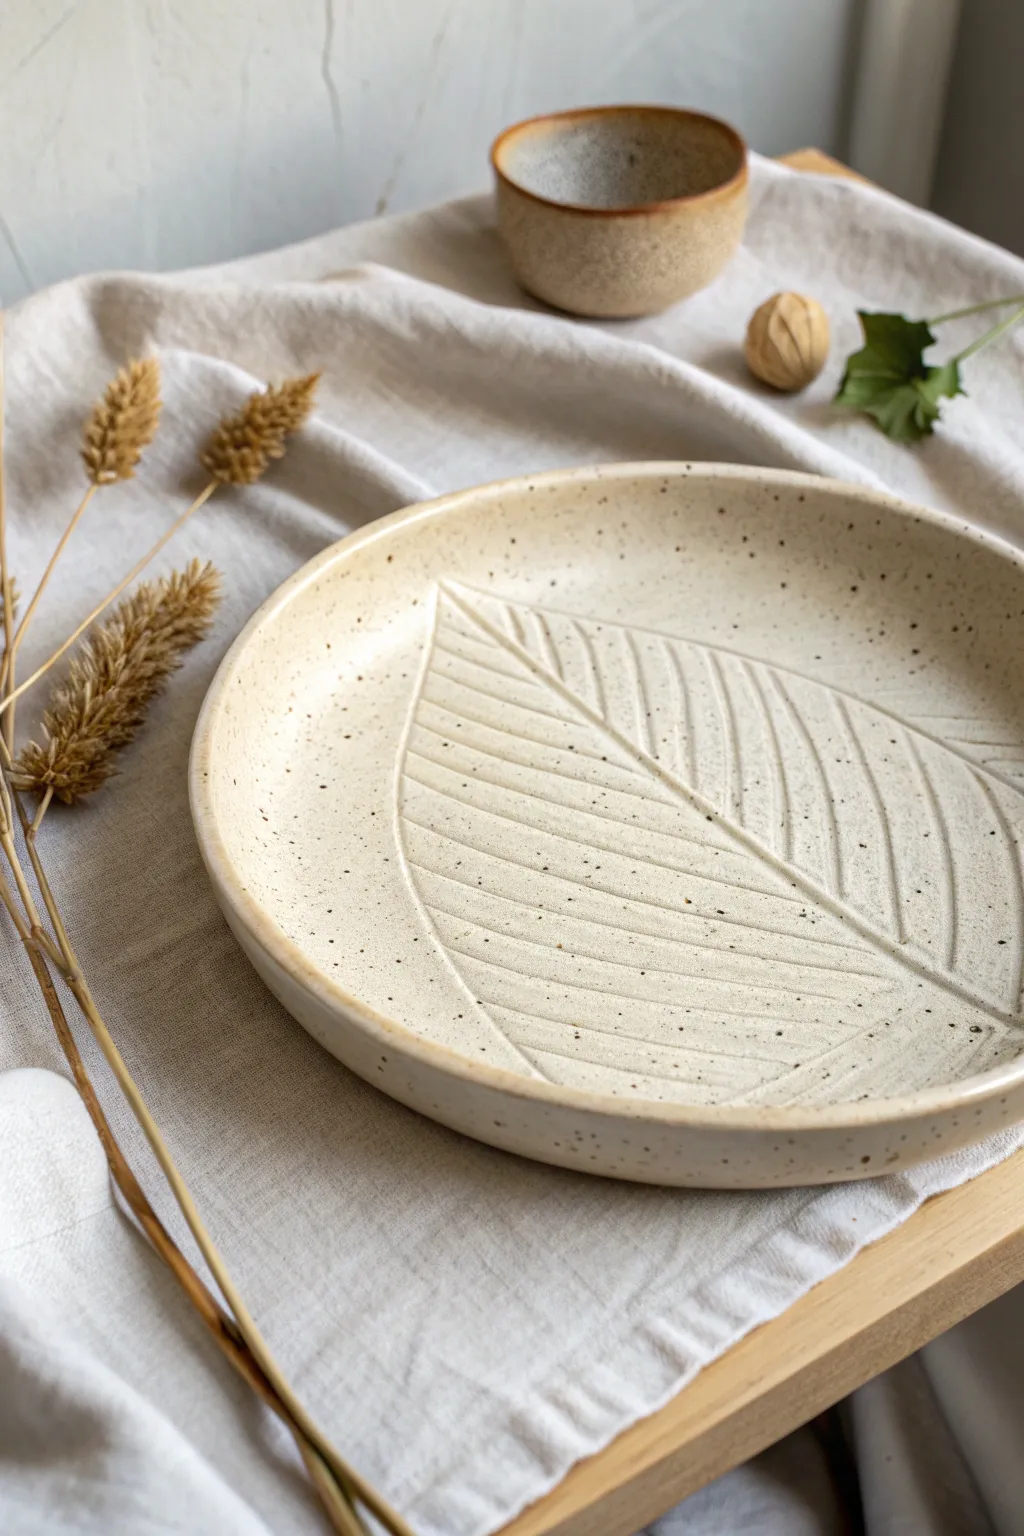
Capture the essence of fossilized nature with this minimalist ceramic plate, featuring a stylized leaf motif carved directly into the clay body. The finished piece combines the warmth of speckled stoneware with clean, geometric lines for a truly modern botanical feel.
How-To Guide
Materials
- Speckled buff stoneware clay
- Rolling pin
- Wooden guide strips (approx. 1/4 inch thick)
- Circle template or large bowl (for cutting shape)
- Fettling knife or needle tool
- Large foam block or soft cushion (for shaping)
- Loop carving tool (u-shaped tip)
- Standard needle tool
- Rubber kidney rib
- Sponge
- Clear or satin matte glaze
Step 1: Preparing the Slab
-
Wedge the clay:
Begin by thoroughly wedging your speckled stoneware clay to remove any air bubbles. This is crucial for a smooth carving surface later. -
Set up guides:
Place your wooden guide strips on either side of your clay ball on a canvas-covered work surface. This ensures your plate has an even thickness. -
Roll the slab:
Roll the clay out using the rolling pin until the pin rests flat on the wooden guides. Keep the pressure even as you roll back and forth. -
Compress the surface:
Take a rubber kidney rib and firmly drag it across the surface of the clay in multiple directions. This compresses the clay particles, preventing warping and creating a silky canvas for your design.
Step 2: Shaping and Designing
-
Cut the circle:
Lay your circle template or a large overturned bowl onto the slab. Cut around the edge cleanly with a fettling knife or needle tool. -
Smooth the edges:
Run a damp sponge or your finger along the cut rim of the circle to soften the sharp angle. This makes the finished plate much more pleasant to hold. -
Form the curve:
Gently lift the clay circle and place it onto a large foam block. Press a smaller plate or sandbag gently into the center to lift the edges naturally, creating a shallow bowl or plate shape. -
Draft the spine:
Allow the clay to stiffen slightly to a soft leather-hard stage. Using a needle tool with very light pressure, sketch a diagonal line across the center to serve as the leaf’s central vein. -
Draft the outline:
Lightly sketch the outer perimeter of your leaf shape. It can extend all the way to the rim or sit comfortably in the center.
Clean Lines Pro Tip
Don’t sponge the carving immediately! Let the clay crumbs dry to bone-dry, then brush them off. Sponging wet clay muddies the sharp lines.
Step 3: Carving the Texture
-
Carve the spine:
Using a U-shaped loop tool, carve out the central vein line you drafted. Use a confident, steady stroke to remove a long ribbon of clay. -
Carve the outline:
Carve the exterior outline of the leaf. I find it helpful to pull the tool towards myself for better control over the depth. -
Add veins:
Using the needle tool again, press deeply to draw the diagonal veins branching from the center spine to the leaf edge. Keep the spacing consistent. -
Detailing:
For extra dimension, go back over the needle lines with a slightly thicker tool or the edge of a modeling stick to widen the grooves. -
Clean up burrs:
Once the carving is complete, let the clay dry just a bit more. Then, gently brush away the little clay crumbs (burrs) with a stiff brush or a lightly damp sponge.
Level Up: Oxide Wash
Apply an iron oxide wash into the carved grooves and wipe it back before glazing. This darkens the veins for higher contrast.
Step 4: Finishing
-
Dry slowly:
Cover the plate loosely with plastic to let it dry very slowly. This prevents the rim from warping as the clay shrinks. -
Bisque fire:
Once bone dry, fire the piece to bisque temperature (usually Cone 04) in a kiln. -
Glaze application:
Dip or brush a clear or translucent satin matte glaze over the entire piece. Avoid thick opaque glazes, as they will fill in your carving work and hide the speckles. -
Final wipe:
Wipe the foot of the plate clean with a sponge to prevent it from sticking to the kiln shelf. -
Glaze fire:
Fire for the final time to the temperature appropriate for your clay body (likely Cone 5 or 6 for stoneware).
Enjoy using your beautifully textured plate for serving or simply as a striking piece of decor.


What Really Happens Inside the Kiln
Learn how time and temperature work together inside the kiln to transform clay into durable ceramic.
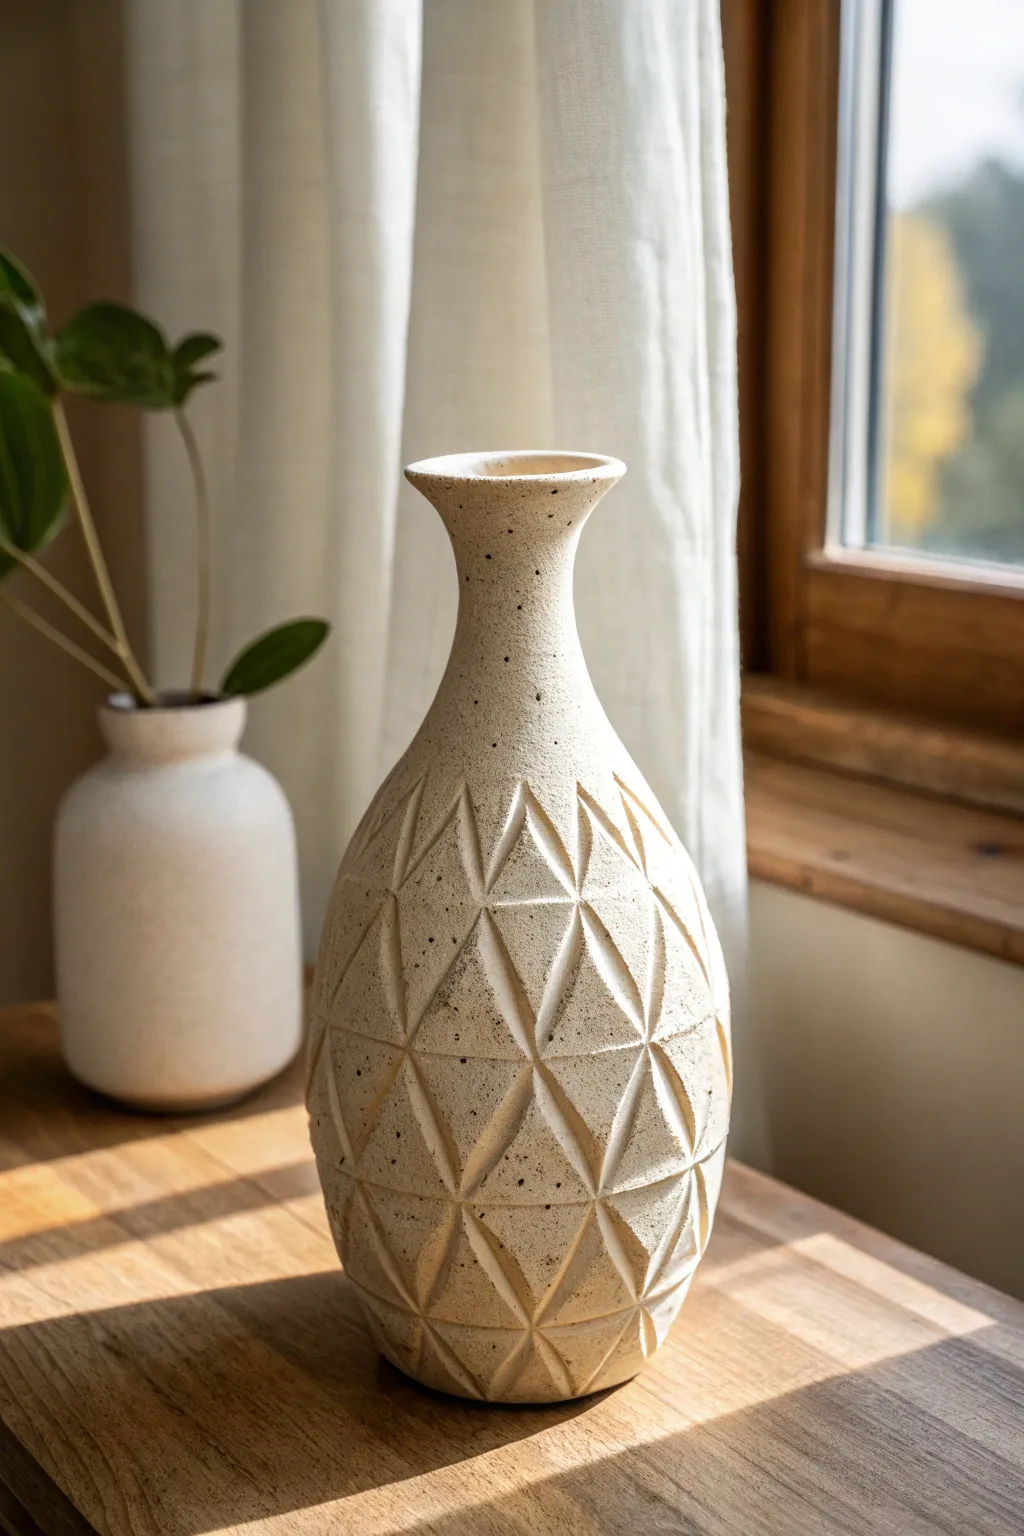
Carved Lines and Simple Sgraffito
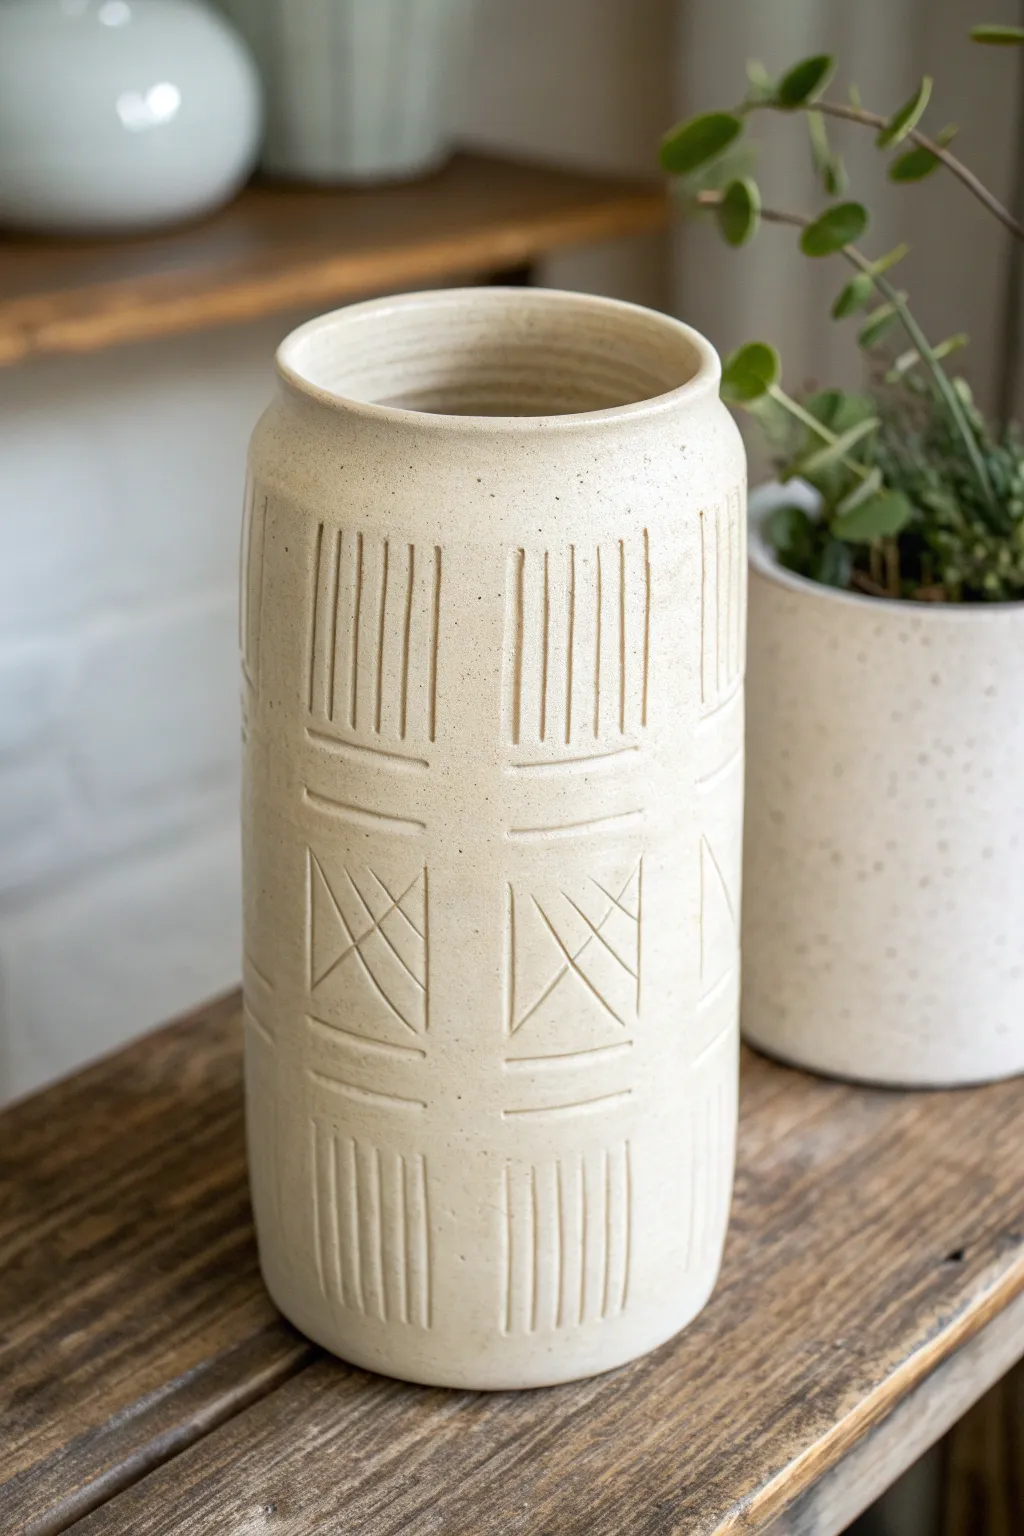
This elegant stoneware vase relies on the magic of simple, repetitive carving to create depth and interest. The matte, speckled finish highlights the interplay of shadow and light within the geometric patterns, making it a perfect exercise in precision and patience.
Step-by-Step Guide
Materials
- Stoneware clay (speckled or buff)
- Pottery wheel
- Throwing tools (sponge, rib, wire cutter)
- Loop tool or carving tool (small U-tip)
- Ruler or flexible measuring tape
- Needle tool
- Sponge for smoothing
- Matte white or clear glaze (dipping or brushing)
Step 1: Forming the Cylinder
-
Prepare the Clay:
Begin by thoroughly wedging about 3-4 pounds of speckled stoneware clay to remove air bubbles. -
Center and Open:
Center your clay on the wheel and open it up, aiming for a flat interior bottom. -
Pull the Walls:
Pull the clay upward into a tall, straight cylinder. Aim for a height of roughly 8-10 inches and a width of 4-5 inches. Keep the walls even, as variations will make carving difficult later. -
Shape the Shoulder:
Collar the neck in slightly to create a gentle shoulder. The rim should be distinct and slightly thickened for durability. -
Refine the Surface:
Use a metal or firm rubber rib to compress the outside wall, removing all throwing lines and slip. A smooth canvas is essential for clean carving. -
Drying Stage:
Set the vase aside to dry to a ‘leather hard’ state. The clay should be firm enough to handle without deforming but soft enough to carve easily.
Uneven Lines?
If your carving tool is dragging or stuttering, the clay is too dry. Lightly mist it and wrap in plastic for an hour to restore moisture.
Step 2: Carving the Pattern
-
Plan the Grid:
Using a needle tool and a flexible ruler, lightly scratch a grid onto the surface. Divide the circumference into four or six even vertical sections. -
Mark Horizontal Bands:
Mark three main horizontal zones: a top band, a middle band, and a bottom band, separated by narrow spacer areas. -
Carve Vertical Accents:
Start with the top and bottom bands. Using a small U-tip loop tool, carve straight, vertical parallel lines within the grid squares. Keep the spacing consistent. -
Create the Separators:
I find it helpful to carve horizontal double lines between each main section to frame the distinct patterns. -
Carve the Central Pattern:
In the middle band, carve a square ‘X’ shape. Inside the triangles formed by the X, create perpendicular hatch lines. This creates the dynamic geometric center seen in the reference. -
Clean Up Burrs:
Once all carving is complete, let the pot dry a bit more until the burrs (little clay crumbs) are brittle. -
Smooth the Edges:
Gently brush off the crumbs with a soft brush, then lightly wipe the surface with a damp sponge to soften any sharp carved edges without erasing the texture.
Add Color Depth
Before glazing, apply a dark underglaze or iron oxide wash into the carved lines and wipe it back to make the pattern pop.
Step 3: Finishing
-
Bisque Fire:
Slowly dry the piece completely, then bisque fire it to Cone 04 (or your clay body’s recommendation). -
Glazing:
Apply a matte white or semi-transparent glaze. A partial wipe-back technique can be used here: apply glaze, then sponge it off the high points so it stays mostly in the carved recesses. -
Final Fire:
Glaze fire to the maturity temperature of your clay (likely Cone 5 or 6 for stoneware).
Now you have a stunning, tactile vessel ready to hold your favorite dried stems or fresh flowers
Slip Trailing for Raised Doodles
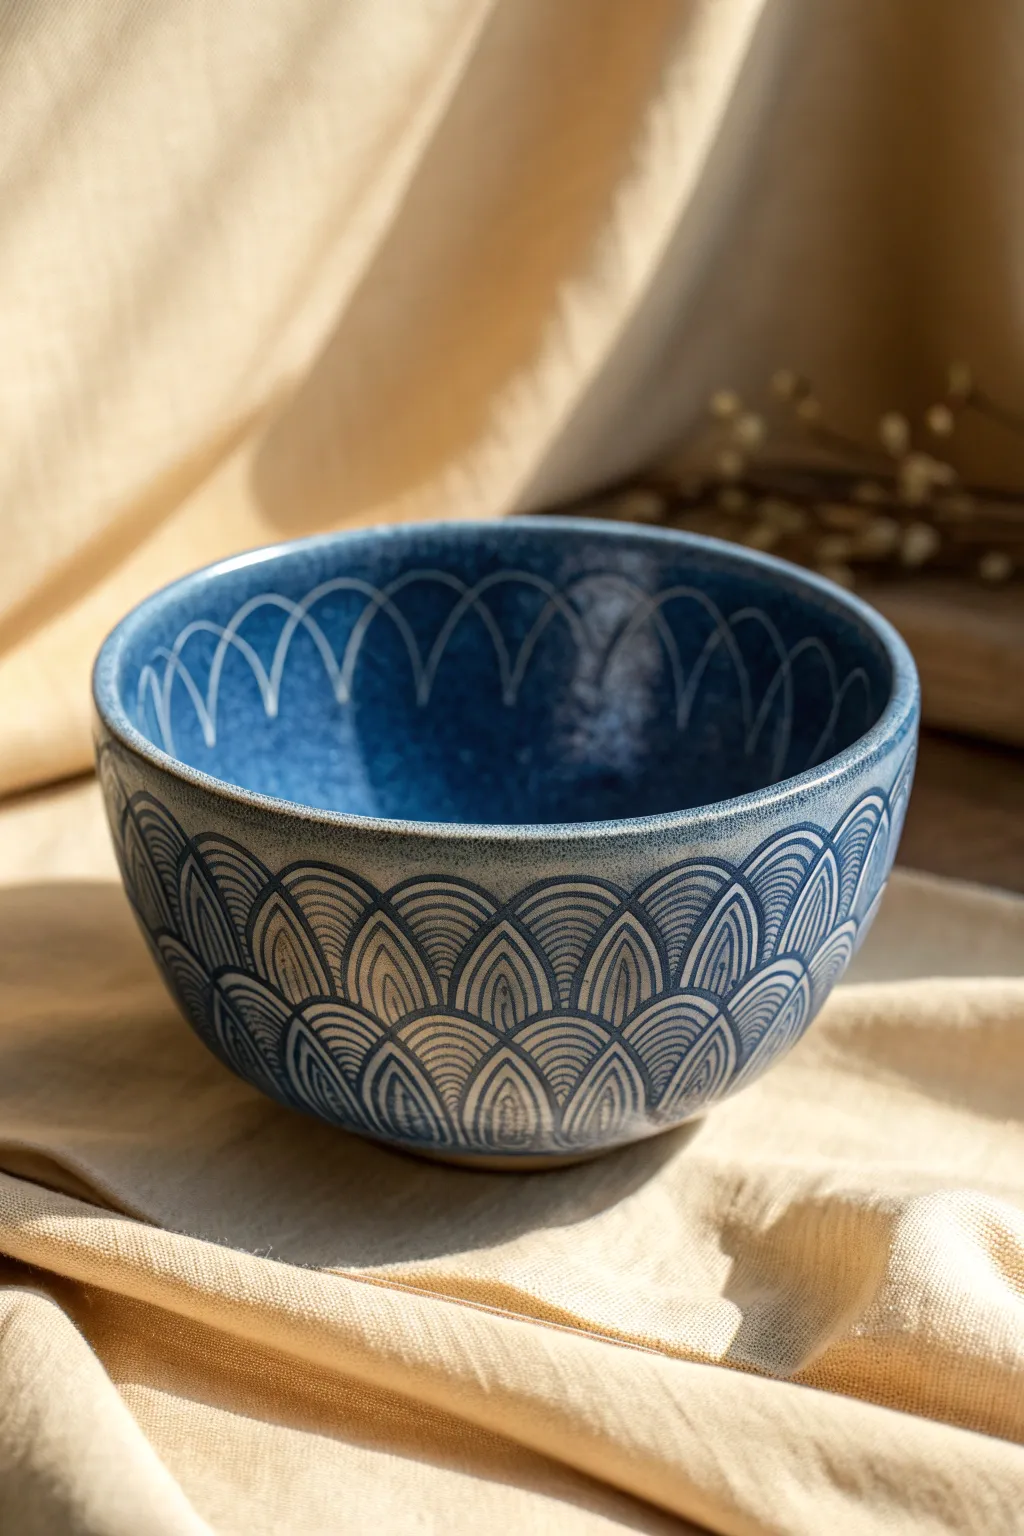
This project combines the soothing, repetitive rhythm of traditional ocean wave patterns with the tactile delight of slip trailing. The result is a stunning blue bowl where raised, cream-colored arches add literal depth to the surface, creating a piece that feels as good as it looks.
Step-by-Step
Materials
- Leather-hard clay bowl (wheel-thrown or hand-built)
- White or cream-colored slip (trailing consistency)
- Slip trailer bulb or bottle with a fine metal tip (around 16-18 gauge)
- Surform tool or metal rib
- Soft sponge
- Pencil or needle tool (optional for guidelines)
- Translucent cobalt blue glaze
- Clear glaze (optional, depending on your blue glaze stability)
- Pottery wheel or banding wheel
Step 1: Preparation and Planning
-
Refine the surface:
Begin with a leather-hard bowl. The surface needs to be smooth and free of grog or imperfections for the slip to adhere cleanly. Run a metal rib over the exterior to compress the clay particles and create a pristine canvas. -
Check slip consistency:
Test your slip before applying it to the bowl. Squeeze a line onto a spare slab or your work table; it should hold its round shape without slumping flat, similar to the consistency of thick yogurt or cake icing. If it’s too runny, let it sit open to air; if too thick, add drops of water. -
Mark lightweight guidelines:
To keep the wave pattern even, place your bowl on a banding wheel. While spinning slowly, lightly hold a pencil or needle tool against the clay to scribe faint horizontal rings around the exterior. Space them about 3/4 of an inch apart. These will act as the baseline for each row of arches.
Smooth Operator Tip
Sieve your slip through a fine mesh (60-80 mesh) before putting it in the bulb. Even tiny clumps can clog the fine metal tip and ruin your line flow instantly.
Step 2: Applying the Relief Pattern
-
Start the bottom row:
Begin at the foot of the bowl. Squeeze the slip bulb gently to establish flow, then drag the tip to create small, inverted ‘V’ or arch shapes. The key is to keep the tip slightly above the clay surface, letting the slip lay down rather than scratching it in. -
Fill the first arches:
Inside each primary arch, trail smaller concentric arches. Usually, three to four inner lines create a dense, rich texture. Try to maintain consistent pressure on the bulb so the line width remains uniform. -
Offset the second row:
Move up to your next guideline. Position the center of your new arches directly above the valley between the two arches below it (like laying bricks). This varying placement creates the overlapping scale effect known as the Seigaiha pattern. -
Continue upward:
Repeat this process, row by row, working your way toward the rim. Rotate the banding wheel steadily as you work to keep a smooth rhythm. -
Adjust near the rim:
As the bowl widens, your arches may naturally need to become slightly wider to fit the circumference. Just be careful not to stretch them too far, or the pattern will look distorted. -
Decorate the interior:
For the interior, lighter touch is best. Roughly an inch below the rim, trail a simple, continuous scalloped line—a series of connected semi-circles. Add a second, larger scalloped line directly beneath it that mirrors the peaks of the first. -
Clean up stray marks:
Let the slip set until it reaches a leather-hard state. If you made any mistakes or have jagged start/stop points, now is the time to gently smooth them with a slightly damp brush or finger.
Step 3: Firing and Glazing
-
Bisque fire:
Once the slip decoration is completely bone dry, load the bowl into the kiln for a bisque fire (typically cone 04 or 06). This permanently fuses the raised texture to the body. -
Sand imperfections:
After bisque firing, run your hand over the textured areas. If any slip trails spiked up into sharp points, gently sand them down with 220-grit sandpaper so the finished bowl is comfortable to hold. -
Apply the base glaze:
Pour or dip your bowl into a translucent cobalt blue glaze. The translucency is crucial; an opaque glaze would hide the beautiful white clay of the slip trails. I find that dipping gives a more even coat than brushing for textured surfaces. -
Check the thickness:
Ensure the glaze isn’t too thick in the recesses of the pattern. If it pools too deeply between the raised lines, it might bubble or obscure the texture detail. Briefly shake the piece after dipping to remove excess. -
Reveal the peaks (optional):
For a higher contrast look (like the photo), you can take a damp sponge and very lightly wipe the top of the raised slip trails. This thins the blue glaze on the high points, allowing the cream color of the slip to break through more brightly. -
Rim clean up:
Wipe the foot ring clean with a sponge. Check the rim to ensure no drips are forming that might run during the firing. -
Glaze fire:
Fire the piece to your clay body’s maturity temperature (e.g., cone 5/6 or cone 10). The blue glaze should melt and ‘break’ over the texture, pooling darker in the valleys and lighter on the ridges.
Clogged Tip Rescue
If the trailing tip clogs, do NOT squeeze harder—the bulb will pop off and explode slip everywhere. Use a thin needle tool or wire to clear the obstruction from the outside in.
Once cooled, you will have a strikingly textured vessel that invites touch and showcases the classic beauty of slip trailing

TRACK YOUR CERAMIC JOURNEY
Capture glaze tests, firing details, and creative progress—all in one simple printable. Make your projects easier to repeat and improve.
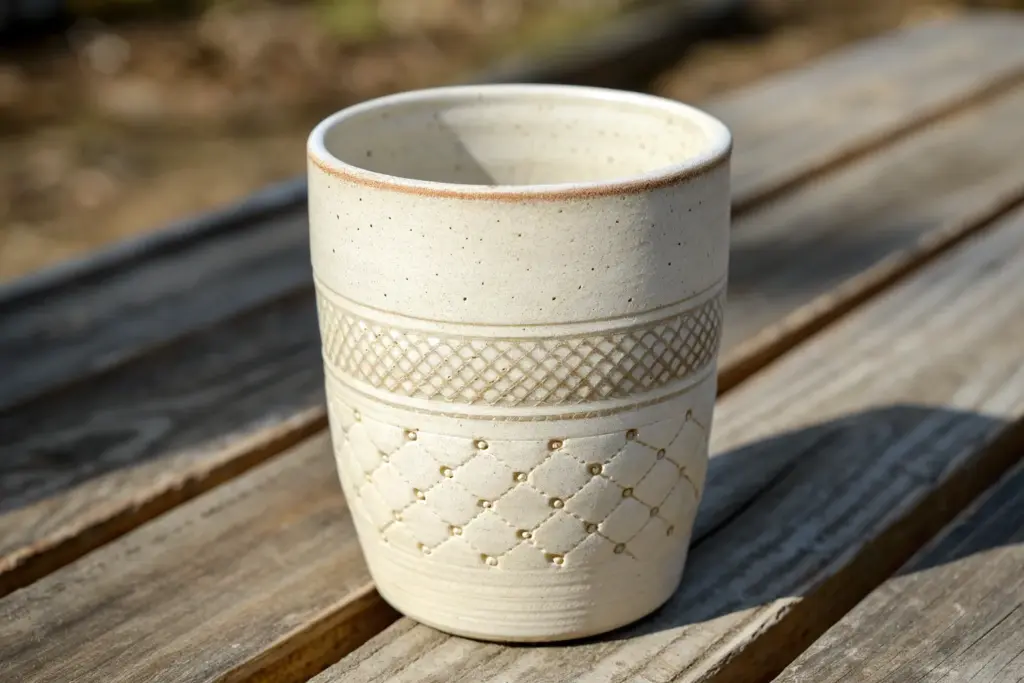
Appliqué Sprigs and Little Relief Bits
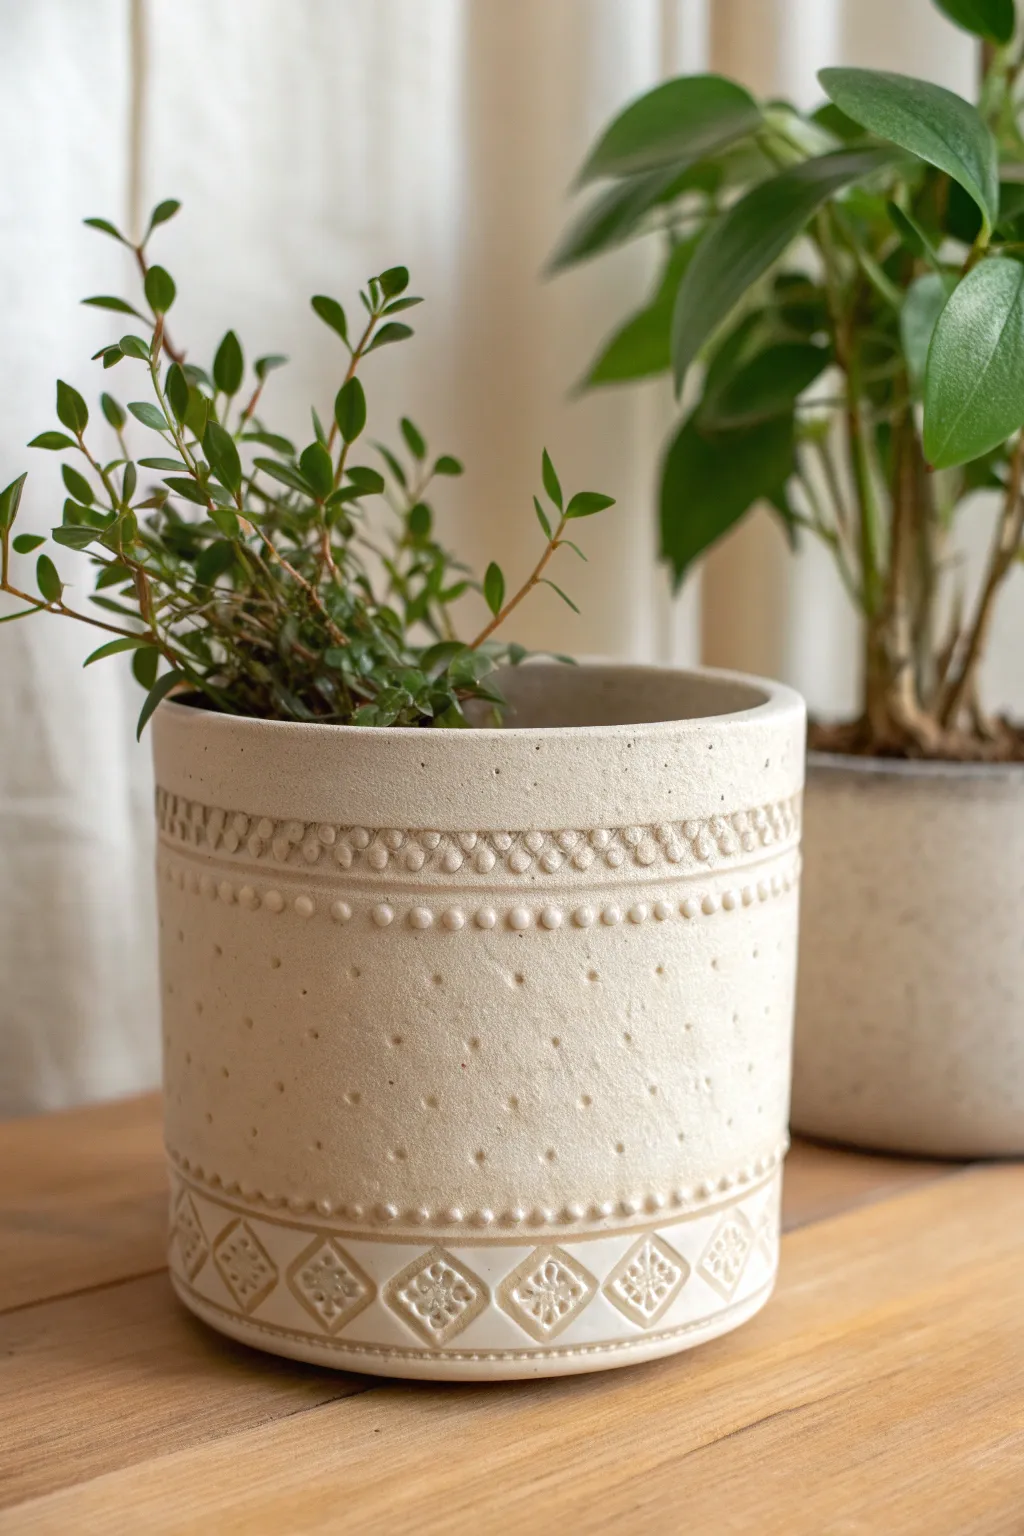
This elegant cylindrical planter combines refined appliqué techniques with subtle relief work for a textured, tactile finish. The creamy beige stoneware creates a warm, neutral canvas that lets the beaded details and geometric sprig patterns truly shine.
How-To Guide
Materials
- Light stone-colored stoneware clay (smooth body)
- Slab roller or rolling pin with thickness guides
- Cylindrical mold or slump form (approx. 6-inch diameter)
- Rib tool (flexible metal or rubber)
- Slip and scoring tool (serrated rib or needle tool)
- Small wooden sculpting tool or rounded chopstick
- Sprig mold (diamond/floral geometric pattern)
- Cornstarch (for mold release)
- Small round bead mold or hand-rolling surface
- Sponge
- Matte white or transparent glaze
Step 1: Building the Base Form
-
Roll the Slab:
Start by rolling out a generous slab of clay to a uniform thickness of about 3/8-inch. Ensure the slab is long enough to wrap around your cylindrical form with a little overlap. -
Cut to Size:
Using a straight edge and a needle tool or fettling knife, cut a clean rectangle for the walls and a circle for the base that matches the diameter of your mold. -
Form the Cylinder:
Wrap the rectangular slab around your cylinder form. Score and slip the seam thoroughly, blending the clay together inside and out until the join is invisible. -
Attach the Base:
Score and slip the bottom edge of the cylinder and the edge of the circular base. Press them together firmly and smooth the outer seam with a rib tool to create a crisp 90-degree angle. -
Refine the Surface:
Use a flexible rib tool to smooth the entire exterior surface while the pot is still on the form. This erases canvas marks and prepares the ‘blank canvas’ for your appliqué work.
Sprigs Won’t Stick?
If sprigs peel off as they dry, your pot was likely too dry when you attached them. Wrap the whole piece in damp plastic for 24 hours to rehydrate and equalize moisture.
Step 2: Creating the Relief Textures
-
Mark Guidelines:
Lightly etch horizontal guidelines around the pot while it creates a subtle indentation. I find placing the pot on a banding wheel helps facilitate perfectly straight lines. -
Create the Bead Sprigs:
Roll tiny, consistent balls of clay by hand, or press clay into a small beaded mold to create a long string of relief dots. Make enough to encircle the pot twice. -
Apply the Top Borders:
Score the area about an inch below the rim. Apply slip, then gently press your beaded clay strings onto the pot in two parallel rows, ensuring they are level. -
Add Decorative Filler:
Between the two rows of beads, you can add a small coil of clay and stamp it with a repetitive tool to create the textured band seen in the image, or use a pre-made texture strip. -
Stipple the Body:
For the main body texture, take a blunt, rounded tool and gently press small indentations into the leather-hard clay in a loose, scattered pattern. Keep the pressure light for subtle shadows.
Step 3: Adding the Geometric Base
-
Prepare the Sprig Molds:
Dust your geometric diamond or floral sprig mold lightly with cornstarch. This prevents the moist clay from sticking inside the detailed crevices. -
Press the Sprigs:
Press a small ball of clay firmly into the mold, scrape the back flat with a rib, and then gently pop the clay element out. Repeat until you have enough diamonds to encircle the base. -
Pattern Arrangement:
Arrange the diamond sprigs along the bottom edge of the pot to check spacing. Adjust the gaps slightly if necessary so they fit perfectly around the circumference. -
Attach the Base Appliqués:
Score the back of each diamond sprig and the corresponding spot on the pot. Apply slip and press the sprig firmly onto the surface, being careful not to crush the raised floral design. -
Add Borders:
Roll two very thin coils of clay. Place one above and one below the row of diamond sprigs to frame the geometric pattern, creating a finished border. -
Clean Up:
Once the clay is leather hard, use a slightly damp sponge to clean up any excess slip or rough edges around your appliqué work.
Level Up: Color Wash
After bisque firing, brush an iron oxide wash over the textured areas and wipe it back with a sponge. This deepens the recesses and makes the relief pop.
Step 4: Finishing
-
Bisque Fire:
Allow the pot to dry slowly and evenly, covering it loosely with plastic for the first day, before bisque firing it to cone 04. -
Glazing:
Apply a thin coat of matte white or transparent glaze. A thinner application is key here; you want the glaze to break over the high points of the relief to highlight the texture. -
Final Firing:
Fire the piece to the maturity temperature of your clay body (likely cone 5 or 6). Once cool, the texture will stand out beautifully against the smooth background.
Plant your favorite fern or succulent inside and enjoy the handmade warmth this piece brings to your shelf.
Pierced Dot Grids and Cutwork
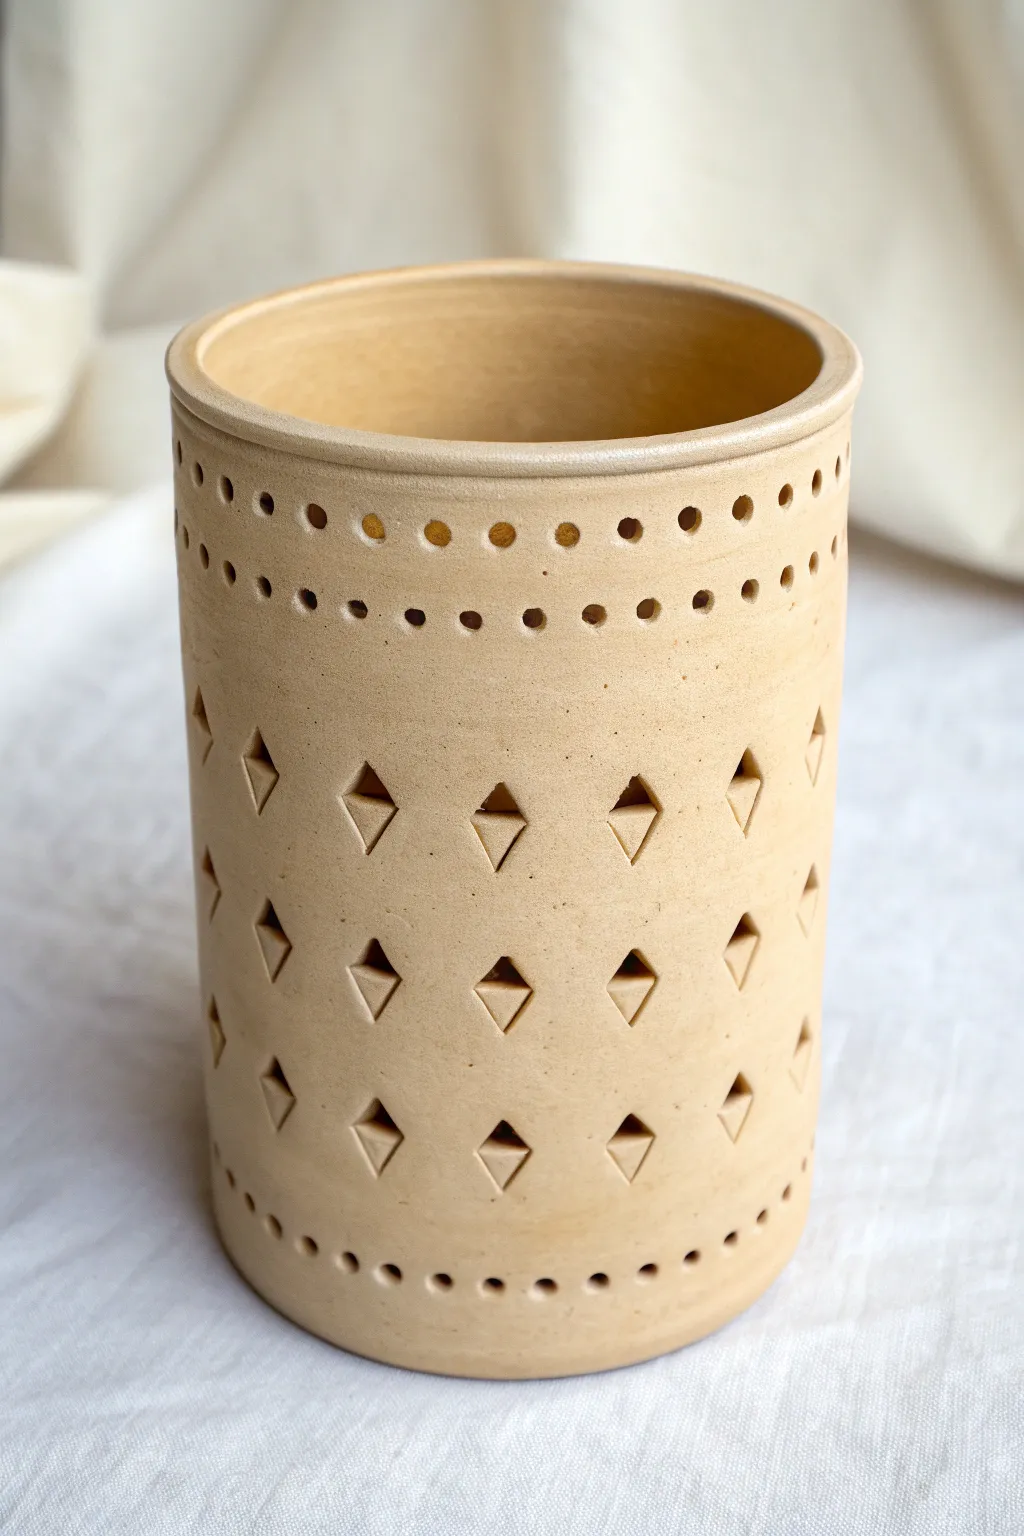
This elegant cylindrical vessel showcases the beauty of negative space, using precise cutouts to transform a simple form into a light-filtering masterpiece. The warm, matte finish of the clay combined with a rhythmic pattern of diamonds and dots creates a modern yet earthy texture perfect for a luminary or utensil holder.
Step-by-Step
Materials
- Stoneware clay (buff or light tan)
- Rolling pin
- Canvas work surface or slab mat
- Cylindrical form or mandrel (PVC pipe or large can)
- Needle tool
- Fettling knife
- Diamond-shaped cutter (small)
- Hole punch tool or drill bit (circular)
- Slip and scoring tool
- Flexible rib (metal or rubber)
- Sponge
Step 1: Creating the Cylinder
-
Roll the slab:
Begin by rolling out a slab of stoneware clay to an even thickness of about 1/4 inch. Ensure the slab is large enough to wrap around your chosen form with a little overlap. -
Smooth the surface:
Use a flexible rib to compress the clay on both sides. This aligns the clay particles to prevent warping and creates that smooth, stone-like canvas we need for the piercing work later. -
Cut to size:
Measure the circumference of your cylindrical mold. Cut a rectangle from your slab that matches the height you visualize (about 6-7 inches) and the circumference plus a half-inch for the detailed seam. -
Form the cylinder:
Wrap the clay rectangle around your form. Sometimes I like to wrap a layer of newsprint around the form first to prevent sticking. Bevel the vertical edges of the clay at a 45-degree angle where they will meet. -
Join the seam:
Score the beveled edges aggressively and apply slip. Press the edges together firmly to create a seamless cylinder. Use the rib to smooth the join so it becomes invisible.
Step 2: Planning the Grid
-
Define the rim:
While the clay is still on the form but leather hard, use a needle tool to lightly scribe a horizontal line about 1/2 inch below the top rim, and another 1 inch below that. -
Mark vertical guides:
To keep your diamond pattern straight, lightly mark vertical guide lines around the cylinder. Space these evenly based on how many diamonds you want in each row. -
Refine the lip:
Use a damp sponge or chamois to round over the top rim of the cylinder. A slightly rounded, compressed rim looks more professional and is chip-resistant.
Warped Walls?
If the cylinder slumps while cutting, your clay is too wet. Let it stiffen to a ‘leather hard’ state before piercing. The clay should be firm enough to hold its shape but soft enough to cut easily.
Step 3: Piercing the Design
-
Punch the top holes:
Using a small circular hole cutter or a drill bit, punch the first row of dots just below the rim. Twist the tool gently as you push through to keep the hole clean. -
Add the secondary row:
Create the second row of dots below the first one. Ensure these align vertically with the gaps between the top holes for an offset look, or align them directly underneath depending on your preference. -
Cut the diamonds:
For the main body, use your diamond cutter. Press firmly into the leather-hard clay at the intersection of your guide lines. Support the wall from the inside with your hand if you’ve removed the form. -
Create offset rows:
Continue the diamond pattern downward. Create three distinct rows of diamonds, offsetting each row so the point of one diamond aligns with the center of the gap in the row above it. -
Punch the base holes:
Finish the piercing work by adding a final row of circular holes near the bottom edge of the cylinder, mirroring the pattern at the top rim.
Pro Tip: Bevel Cut
When cutting the diamonds, hold your knife or cutter at a slight inward angle. This beveled edge catches light better and makes the clay wall look thicker and more substantial.
Step 4: Finishing Touches
-
Clean up burrs:
Allow the piece to dry until it is stiff leather hard. Gently brush away any crumbs or ‘burrs’ of clay from the cutouts using a stiff paintbrush or your finger. -
Smooth the interior:
Check the inside of the vessel. Sometimes punching through creates jagged edges on the interior; smooth these down with a damp sponge tool on a stick or your fingers. -
Final drying:
Let the piece dry slowly under loose plastic to ensure even shrinkage, especially around the delicate cutwork areas which dry faster. -
Bisque fire:
Fire the piece to bisque temperature (usually Cone 04). Since this project relies on raw texture, ensure your kiln is clean to avoid debris settling on the clay. -
Glazing choice:
To replicate the image, skip a glossy glaze. Apply a clear matte glaze or leave the exterior bare (if the clay is fully vitrified) to highlight the natural stony texture. -
Final firing:
Fire to the final temperature required by your specific clay body (e.g., Cone 6). Ensure no glaze clogs the small holes before loading the kiln.
Now you have a stunning piece of intersected geometry ready to cast beautiful shadows
Faceted Paddle Marks and Geometric Planes
Capture the organic warmth of stoneware with this intricately carved vase, featuring a mesmerizing grid of geometric facets. The finished piece boasts a raw, speckled surface that plays beautifully with light and shadow, making it a stunning centerpiece for any modern home.
Step-by-Step Guide
Materials
- Speckled stoneware clay (approx. 3-4 lbs)
- Pottery wheel
- Throwing tools (sponge, wire cutter, ribs)
- Sharp carving tool (loop tool or fettling knife)
- Ruler or measuring tape
- Needle tool
- Tracing paper (optional)
- Sanding sponge
- Clear matte glaze (optional)
- Kiln
Step 1: Throwing the Form
-
Center and open:
Begin by wedging your speckled stoneware clay thoroughly to remove air bubbles. Center the clay on the wheel head, ensuring a stable base before opening up the interior. -
Pull the cylinder:
Pull the walls up into a tall, even cylinder. Keep the walls slightly thicker than usual (about 1/2 inch) to allow depth for the upcoming carving work without piercing through. -
Shape the belly:
Gently balloon the clay outwards to create a rounded belly at the bottom while simultaneously collaring the neck inward to create a graceful, tapered throat. -
Refine the rim:
Flare the rim slightly outward for a classic vase profile. Use a chamois or a soft sponge to compress and smooth the lip for a professional finish. -
Dry to leather hard:
Cut the piece from the wheel and let it dry slowly under loose plastic. Wait until it reaches a sturdy ‘leather hard’ stage—firm enough to hold its shape but soft enough to carve easily.
Uneven Carving?
If your facets look messy, your clay might be too soft. Let it dry 30 more minutes. If it crumbles, it’s too dry—spritz lightly with water and wrap in plastic.
Step 2: Mapping the Grid
-
Measure the circumference:
Using a measuring tape, determine the circumference of the vase at its widest point. Divide this number by how many diamond columns you want (e.g., 6 or 8) to find your spacing. -
Mark vertical guides:
Lightly scratch vertical lines down the vase with a needle tool at your determined intervals. These lines will guide the peaks of your geometric pattern. -
Mark horizontal bands:
Decide on the height of your diamonds. While rotating the vase on a banding wheel, lightly scribe horizontal rings around the vessel to create a grid system. -
Connect the diagonals:
Within your grid boxes, use the needle tool or a ruler to lightly sketch flexible ‘X’ shapes or connecting diagonals, forming the diamond/triangle outline.
Texture Pop
Apply a black or dark brown wash over the bisque, then sponge it off the high points. This leaves darkness in the crevices, dramatically enhancing the carved depth.
Step 3: Carving the Facets
-
Start the first cut:
Using a sharp loop tool or a straight-edged carving tool, make an angled cut from the center of a diamond outline towards the edge. The goal is to create a triangular plane that slopes inward. -
Carve the opposing facet:
Flip your angle and carve the adjacent section, meeting the first cut at a sharp ridge. This creates the ‘peak’ and ‘valley’ effect characteristic of this style. -
Establish the rhythm:
Continue this alternating carving pattern around the belly of the vase. I find it helpful to complete one horizontal row at a time to maintain consistent depth and pressure. -
Clean the edges:
As you carve, small burrs of clay will form. Wait until the clay is bone dry to brush these away, or carefully smooth them now with a barely damp sponge if they are distracting. -
Refine the transition:
Fade the carving pattern gently as you reach the neck and the very bottom of the vase, allowing the texture to merge smoothly into the uncarved surfaces.
Step 4: Finishing and Firing
-
Dry completely:
Allow the vase to dry slowly and evenly to the bone-dry stage. Uneven drying forces on carved ware can sometimes lead to cracking. -
Bisque fire:
Load the vase into the kiln for a bisque firing (usually to Cone 04 or 06). This prepares the clay for glazing. -
Create the matte look:
To match the reference image, leave the exterior unglazed to show off the raw clay texture, or apply a very thin wash of matte clear glaze to seal it without hiding the speckles. Glaze the interior fully for functionality. -
Final smooth:
Once fired to maturity (Cone 5, 6, or 10 depending on your clay body), use a fine sanding sponge on the bottom and any sharp exterior ridges to ensure it feels pleasant to the touch.
Place your vase near a window to watch the changing light dance across your hand-carved facets throughout the day
Finger-Pressed Dimples and Pinch Texture
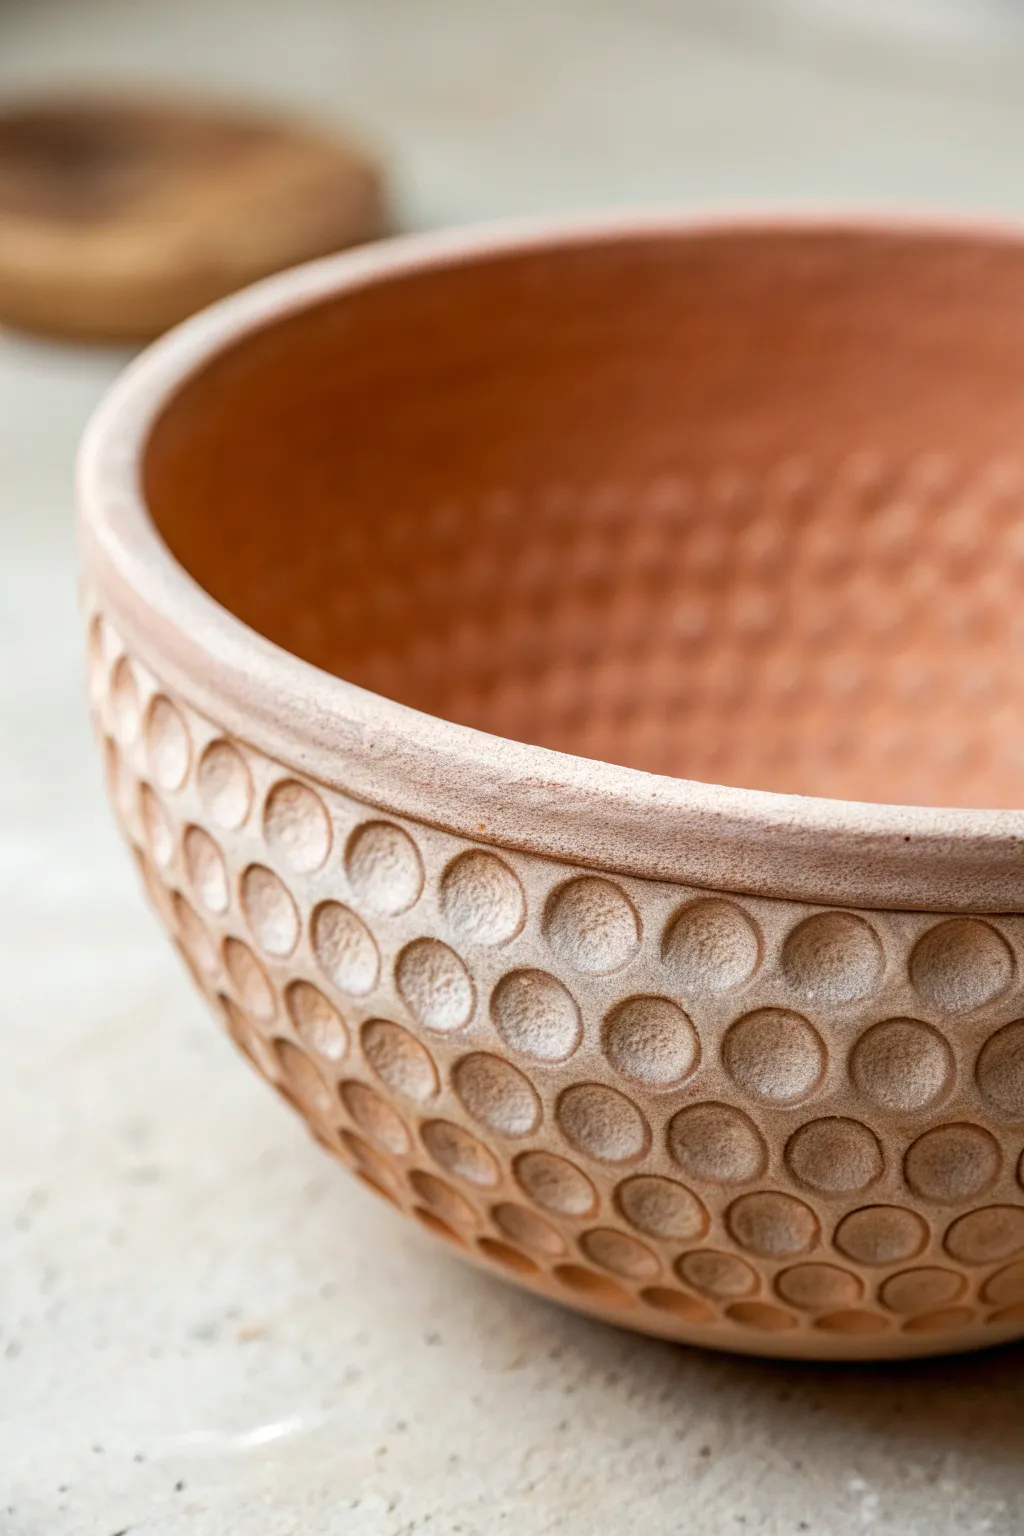
Transform a simple wheel-thrown or coil-built bowl into a tactile masterpiece with this satisfying pressed texture technique. The uniform rows of concave dimples create a mesmerizing geometric pattern that feels wonderful to hold and catches glaze beautifully.
Detailed Instructions
Materials
- Terra cotta or cone 6 stoneware clay
- Pottery wheel (or coil/pinch equipment)
- Wooden spoon or rounded stick (dowel)
- Soft rubber rib
- Sponge
- Metal kidney scraper
- Chamois strip
Step 1: Shaping the Base Vessel
-
Prepare the Clay:
Wedge your clay thoroughly to remove air pockets. For a bowl this size, start with approximately 2-3 lbs of clay. -
Throw the Cylinder:
Center your clay on the wheel and pull the walls up into a basic cylinder shape first, ensuring even wall thickness. -
Shape the Bowl:
Gently gently belly out the clay to form a deep, rounded bowl curve, keeping the rim slightly thicker for structural integrity. -
Refine the Surface:
While the wheel is spinning slowly, run a metal kidney scraper up the exterior to remove throwing lines and create a smooth canvas for your texture. -
Define the Rim:
Compress the rim using a small piece of chamois. Create a gentle overhang or bead just below the lip to frame the textured area we are about to create. -
Dry to Leather Hard:
This is crucial: allow the bowl to dry until it is firm leather hard. If it’s too soft, the bowl will warp when you press; too hard, and the texture won’t impress cleanly.
Even Depth Tip
Wrap a rubber band around your pressing tool to act as a depth gauge. Stop pressing when the rubber band touches the clay surface.
Step 2: Applying the Dimples
-
Select Your Tool:
Find a tool with a rounded, convex end. The back of a wooden spoon handle, a specialized dimple tool, or a 1/2-inch rounded dowel works perfectly. -
Support the Wall:
Place the bowl in your lap or on a banding wheel. Position your non-dominant hand inside the bowl to support the wall directly opposite where you will press. -
Start the Top Row:
Begin your first row of impressions right below the rim bead. Press the tool firmly into the clay while providing resistance from the inside hand. -
Maintain Spacing:
Move horizontally around the bowl, leaving a tiny sliver of un-pressed clay between each circle. Try to keep consistent pressure for equal depth. -
Stagger the Second Row:
For the second row, offset your dimples. Press the new circle into the space between the two circles above it, creating a honeycomb or ‘brick-lay’ pattern. -
Continue Downward:
Work your way down the bowl, row by row. As the bowl curves inward toward the base, you may need to cheat the spacing slightly to accommodate the shrinking circumference. -
Check Internal Texture:
Notice that your interior hand may have created a subtle bump on the inside wall corresponding to each dimple. You can smooth this or leave it for a double-sided texture effect.
Step 3: Finishing Touches
-
Clean the Edges:
Let the piece dry a bit more. Once bone dry or very stiff leather hard, use a dry sponge or soft brush to gently knock off any sharp burrs created by the pressing tool. -
Trim the Foot:
Flip the bowl over and trim a neat foot ring, being careful not to cut into your lowest row of texture. -
Final Smoothing:
Run a barely damp sponge over the textured surface one last time to soften any harsh edges before the bisque firing. -
Fire:
Bisque fire the piece, then glaze. Translucent celadons or breaking glazes work best here, as they pool in the dimples to highlight the relief.
Level Up: Color Inlay
Coat the dimples in white slip before bisque firing. After firing, sand the surface back to reveal the red clay body with white inlaid circles.
Once fired, the rhythmic pattern creates a surface that begs to be touched
Sponge-Dabbed Stoneware-Look Surfaces
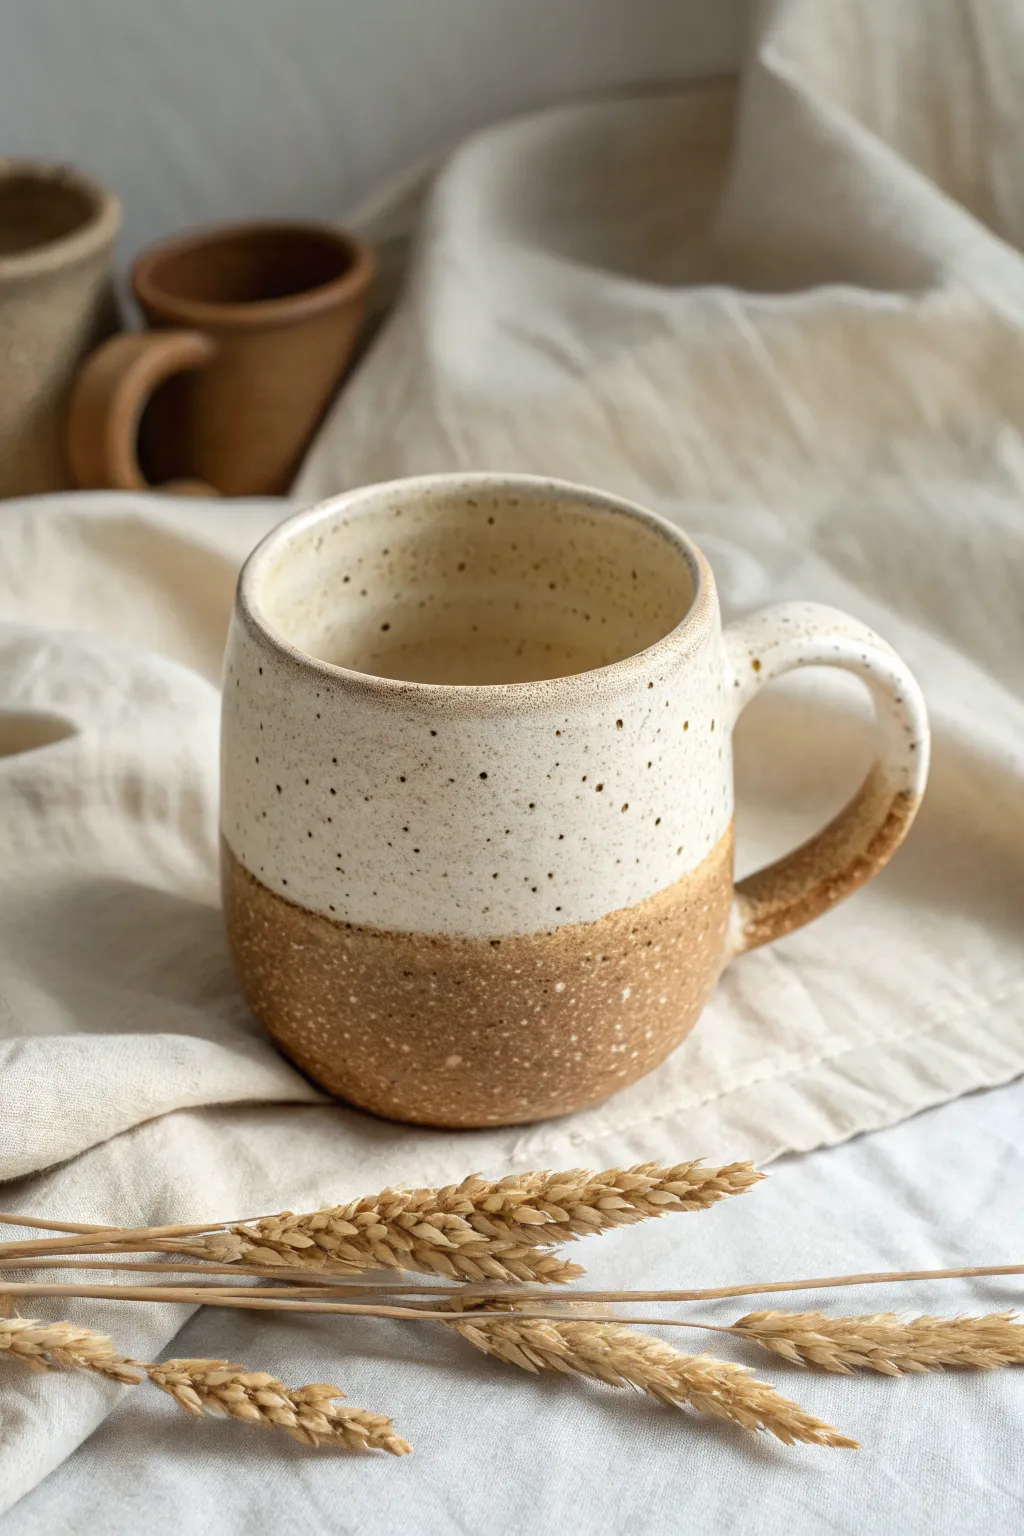
Replicate the rustic charm of wheel-thrown pottery using accessible air-dry clay and a clever sponge technique. This project creates a convincing two-tone speckled finish that mimics high-fire stoneware without requiring a kiln.
How-To Guide
Materials
- Air-dry clay (terra cotta or brown colored)
- Acrylic paints (Cream/Oatmeal, dark brown, black)
- Sea sponge or coarse kitchen sponge
- Old toothbrush
- Rolling pin
- Clay sculpting tools (knife, rib/smoother)
- Cup of water
- High-gloss varnish or sealant
- Rolling guides or slat sticks (approx. 5mm thick)
- Slip (clay mixed with water)
Step 1: Forming the Mug Body
-
Prepare the slab:
Begin by kneading your brown air-dry clay to warm it up. Place your rolling guides on either side of the clay and roll it out into a long, even rectangle about 5mm thick. This thickness ensures sturdy walls. -
Cut the rectangle:
Using a ruler and a clay knife, cut a clean rectangle. For a standard mug size, aim for approximately 4 inches high by 10-11 inches long. -
Form the cylinder:
Score the two short ends of your rectangle with a needle tool or fork. Apply a dab of slip (clay + water slurry) to the scored areas. Gently bend the slab into a cylinder, overlapping the ends slightly. -
Weld the seam:
Press the seam together firmly inside and out. Use your thumb or a modeling tool to smooth the clay across the join until the seam is invisible. I like to support the inside wall with my other hand during this step to keep the shape round. -
Create the base:
Roll out a separate, smaller piece of clay. Place your cylinder on top of it and trace around the bottom edge. Cut out this circle. -
Attach the bottom:
Score and slip both the bottom edge of the cylinder and the outer edge of the circle base. Press them together firmly and blend the clay upwards from the base onto the walls to create a seamless seal.
Step 2: Handle & Refinement
-
Pull the handle:
Roll a coil of clay and flatten it slightly to form a strap. Shape it into a ‘C’ or ear shape that fits comfortably in your hand. Let it stiffen for about 20 minutes before attaching. -
Attach the handle:
Score and slip the attachment points on both the mug body and the handle ends. Press firmly to attach. Reinforce the join by adding tiny coils of clay around the connection points and smoothing them out. -
Smooth the surface:
Dip a sponge in water and wring it out almost completely. Gently wipe the entire mug to remove fingerprints and crate a smooth, uniform surface canvas for our texture later. -
Full drying time:
Allow the mug to dry completely. For air-dry clay, this usually takes 24-48 hours depending on humidity. It must be bone dry before painting.
Cracking Seams?
If hairline cracks appear at the seams during drying, fill them immediately with a loose paste of clay and water (slip), then smooth over. Don’t wait until fully dry.
Step 3: The Sponge-Dabbed Glaze Effect
-
Base coat primer:
Paint the entire mug with a clear sealant or watered-down PVA glue to seal the raw clay. This prevents the clay from sucking the moisture out of your acrylics too quickly. -
Simulate the raw clay texture:
If your clay dried too smoothly, mix a little sand or baking soda into a brown acrylic paint that matches the dried clay tone. Sponge this onto the bottom third of the mug to create that gritty, stoneware look. -
Create the ‘dipped’ line:
Mix a creamy oatmeal-colored acrylic paint. Using a flat brush, paint the top two-thirds of the mug, creating a deliberate horizontal line where it meets the brown bottom. It doesn’t need to be ruler-straight; a slight wave looks more organic. -
Sponge texture on the glaze:
While the cream paint is still tacky, take a damp sea sponge with a tiny bit of the cream paint on it and lightly dab over the painted area. This removes brushstrokes and creates the pitted look of ceramic glaze. -
Light speckling:
Dilute a small amount of dark brown paint with water. Dip an old toothbrush into this mixture and run your thumb across the bristles to flick tiny specks onto the cream section. -
Heavy speckling:
Repeat the splatter technique with black paint, focusing a bit more near the transition line and the rim. This mimics the iron spots found in real reduction-fired pottery. -
Rim definition:
Run a very slightly darkened version of your cream paint heavily along the very top rim of the mug to highlight the lip. -
Final gloss:
Once all paint is totally dry, apply two coats of high-gloss varnish. This brings the ‘glaze’ to life and makes the faux-stoneware finish look wet and fired.
Level Up: Drip Effect
Mix your oatmeal paint with a pouring medium or extra thick gel. Apply it heavily at the transition line so it physically forms a raised drip over the raw textured section.
Place your warm, rustic mug on a linen cloth to admire your handiwork, remembering that this decorative piece is perfect for holding dried blooms or pencils
Mesh and Netting Imprints (Fruit Netting, Screen)
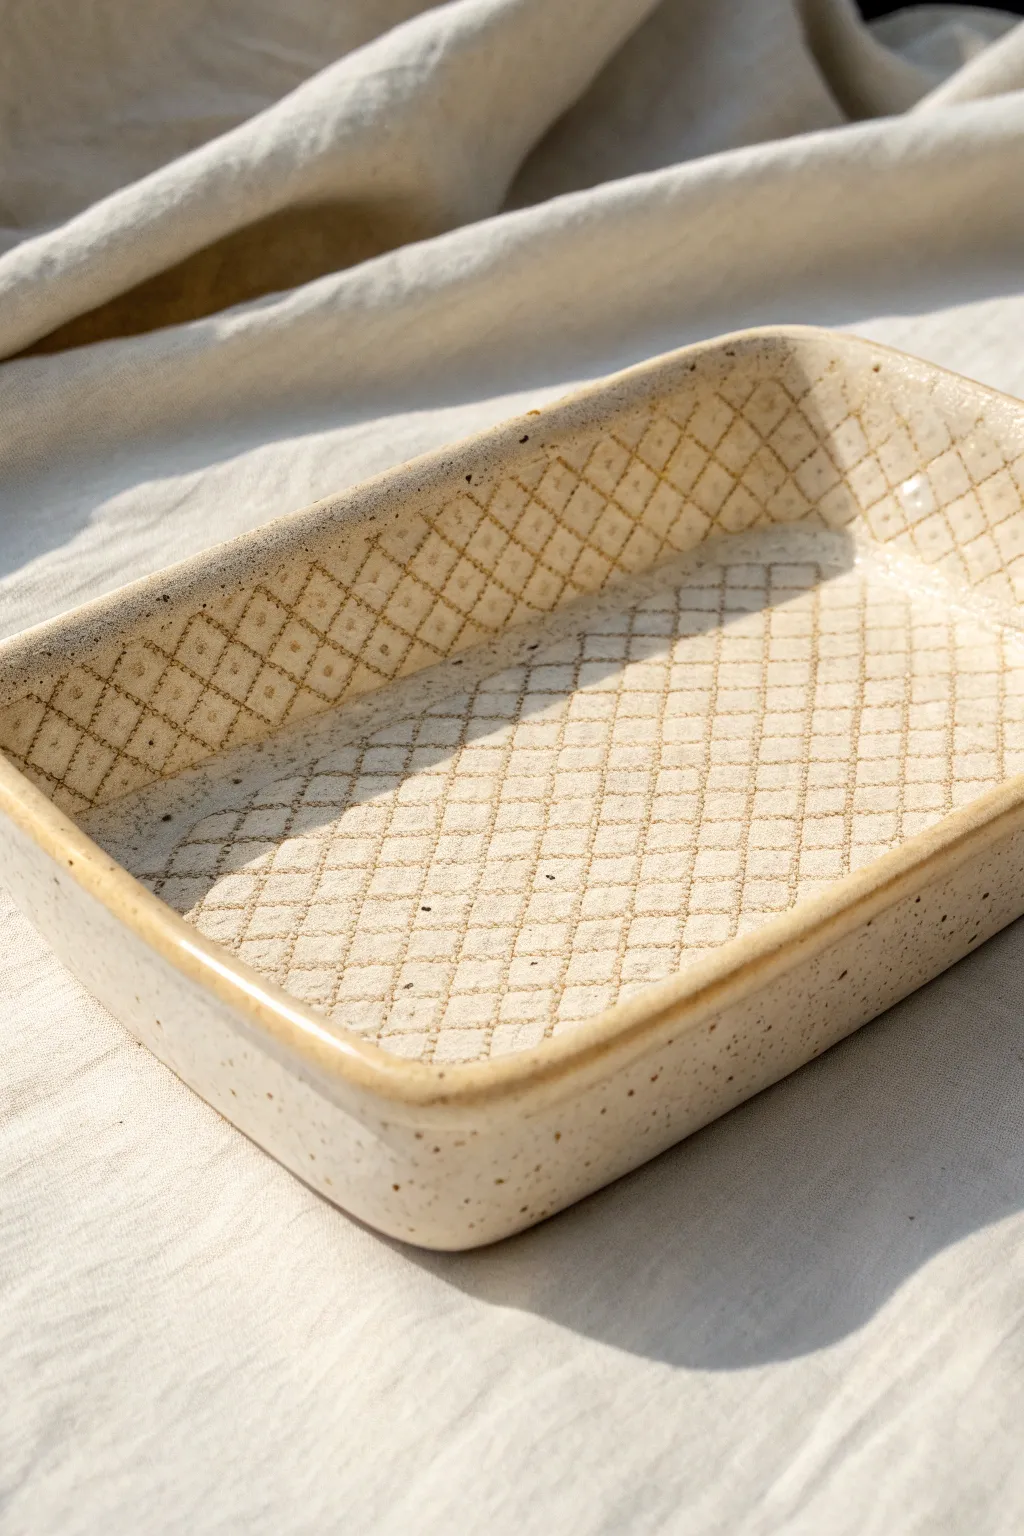
Transform a simple slab of clay into an elegant catch-all tray featuring a tactile, grid-like pattern. This project uses common household netting to create a sophisticated texture that captures glaze beautifully, highlighting the peaks and valleys of the imprint.
Step-by-Step Guide
Materials
- Stoneware clay (speckled or buff)
- Plastic mesh produce sculpting netting or heavy screen
- Rolling pin
- Wooden guide strips (approx. 1/4 inch thick)
- Rectangular slump mold or wooden form
- Fettling knife or needle tool
- Soft rib tool (rubber or silicone)
- Sponge
- Scoring tool
- Slip
- Cream or transparent matte glaze
Step 1: Preparing the Slab
-
Wedge the Clay:
Begin by wedging your clay thoroughly to remove air bubbles and ensure particle alignment, which is crucial for preventing warping in flat pieces like this one. -
Roll the Base:
Place your wooden guide strips on either side of the clay. flatten the clay slightly with your palm, then roll it out into a smooth, even slab that is slightly larger than your intended mold. -
Compress the Surface:
Use a soft rubber rib to compress the clay surface on both sides. This aligns the clay platelets and creates a pristine canvas for your texture. -
Apply the Texture:
Lay your mesh netting or screen directly onto the slab. You want clean, crisp lines, so ensure the mesh is pulled taut and isn’t bunched up anywhere. -
Imprint the Pattern:
Roll your rolling pin firmly over the netting one single time. Avoid rolling back and forth, as the mesh might shift and create a ‘ghost’ image. Press hard enough to leave a deep impression. -
Reveal the Design:
Carefully peel back the netting to reveal the diamond grid pattern. Check closely to ensure the texture is consistent across the entire surface area you plan to use.
Step 2: Forming the Tray
-
Cut to Size:
Using your slump mold as a visual guide, cut a large rectangle from the textured slab. Leave enough excess material to account for the depth of the tray’s walls. -
Drape the Clay:
Carefully lift the slab and drape it into your slump mold or over your wooden form. Be gentle to avoid stretching the pattern you just created. -
Define the Corners:
Press the clay into the corners of the mold. If you have excess clay bunching in the corners, you can cut a small dart (a V-shape), score and slip the edges, and press them together to create a seamless corner. -
Shape the Base:
Use a lightly damp sponge to press the clay firmly against the bottom of the mold, ensuring the base is perfectly flat. I prefer to work from the center outward to push out any trapped air. -
Refine the Rim:
Trim the excess clay from the top edge using a needle tool or fettling knife to create an even height all around the tray. -
Smooth the Edges:
Run a damp sponge or a piece of chamois leather over the cut rim to round it off. A sharp edge will be fragile after firing and unpleasant to touch.
Clean Texture
Dust the clay surface lightly with cornstarch before laying down the netting. This acts as a release agent and prevents the mesh from sticking to sticky, wet clay.
Step 3: Finishing and Glazing
-
Slow Drying:
Cover the piece with plastic sheet, leaving it loosely draped. Allow it to dry slowly to leather hard before removing it from the mold to prevent warping. -
Bisque Firing:
Once bone dry, fire the piece to bisque temperature (usually cone 04 or 06). This prepares the clay to accept the glaze without dissolving. -
Glaze Application:
Dip or brush your creamy white glaze over the piece. The magic happens here: the glaze will naturally pool in the indentations of the mesh pattern and break (thin out) over the raised ridges. -
Clean the Foot:
Wipe away any glaze from the bottom of the tray so it doesn’t fuse to your kiln shelves during the final firing. -
Final Firing:
Fire to the maturity temperature of your clay body (likely cone 5/6 for stoneware). The heat will melt the glaze, highlighting the beautiful grid texture and any speckles in the clay body.
Accentuate Depth
Apply a dark oxide wash (like iron oxide) to the texture and wipe it back with a sponge before glazing. The dark color will stay in the grooves, making the pattern pop.
Your finished tray is now ready to hold keys, jewelry, or simply sit as a beautiful textured accent on your table
Embedded Grog and Sand for Grit
This rustic, hand-thrown tumbler features a creamy white glaze that breaks beautifully over speckled stoneware clay, leaving the warm, gritty base exposed for tactile contrast. The embedded grog creates visible texture that feels grounded and substantial in your hand.
Step-by-Step
Materials
- Speckled Stoneware Clay with Grog (e.g., Laguna Speckled Buff or similar)
- Pottery Wheel
- Throwing Tools (sponge, rib, needle tool, wire)
- Trimming Tools
- Creamy White/Oatmeal Satin Glaze (stoneware cone 5/6)
- Wax Resist (optional)
- Kiln
Step 1: Throwing the Form
-
Prepare the Clay:
Begin by wedging about 1-1.5 lbs of speckled stoneware clay. Ensure it is fully de-aired, as groggy clay can hide air pockets. -
Center on the Wheel:
Throw the ball of clay onto the wheel head and center it. You’ll feel the grit of the grog against your palms; keep your hands wet to minimize abrasion. -
Open the Clay:
Open the centered mound, establishing a flat interior floor. Compress the floor well with your fingers or a flat tool to prevent S-cracks later. -
Pull the Walls:
Slowly pull up the walls of the cylinder. Aim for a straight-sided profile with a very subtle curve towards the base. -
Refine the Shape:
Use a metal or wooden rib on the exterior to smooth the throwing lines and compress the grog into the surface slightly, ensuring a clean silhouette. -
Finish the Rim:
Compress the rim specifically with a chamois or sponge. I like to slightly thicken the rim here for better durability and mouthfeel.
Grog Drag
When trimming groggy clay, use a very sharp tool and trim quickly. Dull tools will drag the grog particles across the surface, creating deep scratches.
Step 2: Trimming and Texture
-
Leather Hard Stage:
Allow the piece to dry to a leather-hard state where it is firm enough to handle without deforming but still cool to the touch. -
Trimming the Foot:
Invert the cup on the wheel and trim the excess clay from the bottom. Define the transition line where the glaze will eventually stop. -
Smooth the Texture:
After trimming, run a damp sponge or a soft rib over the trimmed area to smooth out drag marks caused by the grog. -
Slow Drying:
Loosely cover the tumbler with plastic and let it dry slowly to the bone-dry stage to prevent warping. -
Bisque Fire:
Load the bone-dry piece into the kiln and bisque fire to approximately Cone 04 to prepare it for glazing.
Step 3: Glazing and Firing
-
Clean the Bisqueware:
Wipe the fired cup with a damp sponge to remove any kiln dust, which helps the glaze adhere properly. -
Wax the Base:
Apply a band of wax resist to the bottom 1/4 of the cup’s exterior and the entire foot ring. This creates the sharp line between the raw clay and the glaze. -
Prepare the Glaze:
Mix your creamy oatmeal glaze thoroughly. If the glaze is too thick, it may hide the iron speckles; aim for the consistency of heavy cream. -
Dip the Cup:
Holding the cup by the foot (or using tongs), dip it fully into the glaze bucket for about 3 seconds, then lift and shake off excess. -
Clean the Rim:
Check the rim; if the glaze is too thick, gently wipe it back slightly so the brown iron of the clay will ‘break’ through the white glaze during firing. -
Wipe the Foot:
Use a damp sponge to wipe any stray glaze droplets off the wax-resisted bottom area to ensure a clean band of raw clay. -
Glaze Fire:
Load the glazed tumbler into the kiln and fire to Cone 5 or 6 (depending on your clay/glaze rating) in an oxidation atmosphere.
Burnishing the Base
Before the first firing, rub the unglazed bottom section with the back of a spoon. This compresses the clay for a smoother, stone-like feel after firing.
Once cooled, your tumbler is ready to add a touch of earthiness to your morning routine
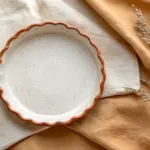
Crackle Slip and Intentional Dry Cracks
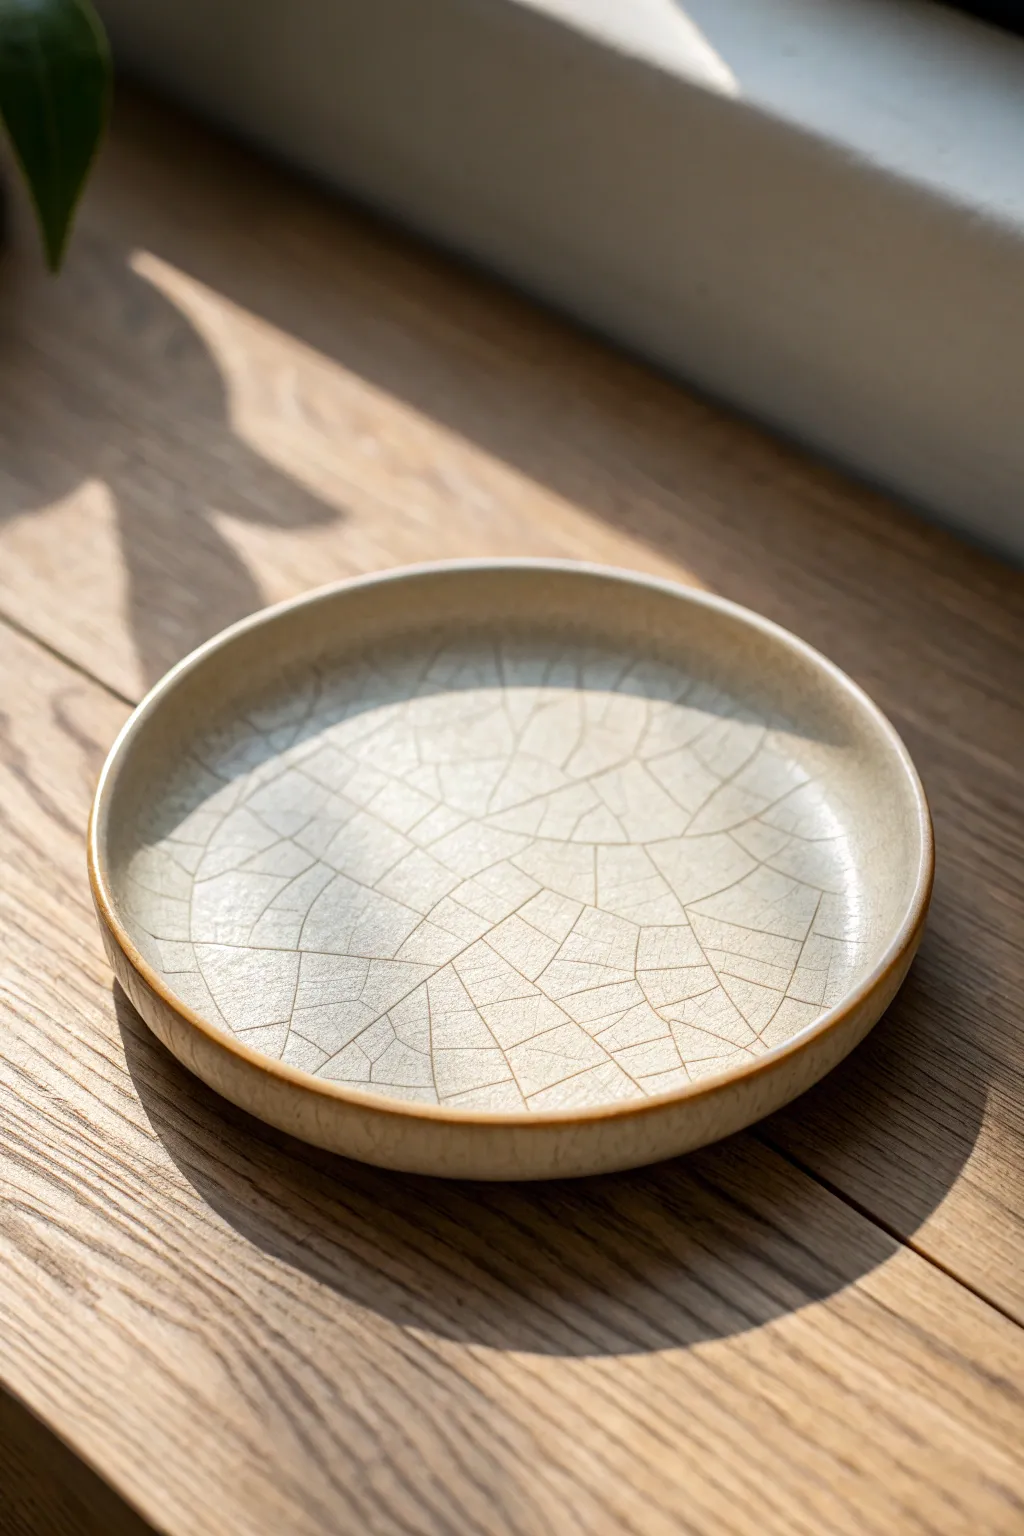
This project explores the beautiful, timeless aesthetic of intentional crackle patterns on pottery. By layering a specialized slip over a clay body and manipulating the drying process, you can achieve a stunning network of fissures that give this simple plate a sophisticated, aged character.
Step-by-Step Tutorial
Materials
- Stoneware clay body (buff or dark brown recommended)
- Sodium Silicate
- White decorative slip or underglaze
- Sponge
- Rib tool (metal or rubber)
- Pottery wheel (or slab roller for hand-building)
- Wire cutter
- Heat gun or blow dryer
- Clear transparent glaze
- Black stain or dark wash (optional, to highlight cracks)
Step 1: Forming the Base
-
Prepare your clay:
Wedge your stoneware clay thoroughly to remove air bubbles. For this project, a clay body that fires to a darker color (like buff or brown) works best as it creates high contrast with the white slip that will be applied later. -
Center and open:
Center your clay on the pottery wheel. Open the clay up into a wide, shallow bowl or plate form. Keep the floor relatively flat and the walls low, aiming for a classic saucer shape. -
Refine the rim:
Use a chamois or a damp sponge to compress the rim. This is crucial because forming the crackle later involves stretching the clay, so a strong rim prevents unwanted structural tearing at the edge. -
Smooth the interior:
Run a rib tool across the interior floor of the plate to ensure it is perfectly smooth and level. Remove any throwing rings if you want a clean canvas for the crackle effect.
Slip Flaking Off?
If slip flakes off completely rather than cracking, it was likely too thick or dried too fast. Try a thinner application or less heat next time.
Step 2: Creating the Crackle Effect
-
Apply Sodium Silicate:
While the pot is still on the wheel and plastic (wet), brush a generous layer of sodium silicate over the interior surface of the plate. Be careful not to let it drip excessively down the outside. -
Dry the surface:
Use a heat gun or blow dryer to dry the surface. You want the sodium silicate to form a ‘skin’ on top. Touch it lightly; it should feel tacky but not wet, and it shouldn’t stick to your finger. -
Apply the white slip:
Brush a thick, even layer of white slip (or thinned underglaze) directly over the dried sodium silicate layer. I prefer a slightly thicker application here, as it tends to create chunkier, more defined islands of texture. -
Dry the slip layer:
Use your heat gun again to dry this slip layer until the surface sheen is gone. It needs to be dry enough to crack when expanded, but the clay underneath must remain soft. -
Expand the form:
This is the magic moment. With the wheel spinning slowly, reach inside the plate with your fingers or a rib. Gently push outward and downward to stretch the clay form. As the clay expands, the dried slip on top cannot stretch, forcing it to crack and separate. -
Refine the shape:
Continue stretching until you have reached your final desired width and the crackle pattern is evenly distributed. Be gentle near the rim to maintain the circular shape.
Step 3: Finishing and Firing
-
Allow to stiffen:
Let the plate dry to a leather-hard state. Because you introduced moisture and heat, handle it carefully to avoid warping. -
Trim the foot:
Turn the plate over and trim a foot ring. This elevates the piece and gives it a professional profile. Smooth the bottom surface with a rib. -
Bisque fire:
Once fully bone dry, bisque fire the plate to your clay body’s recommended temperature (usually Cone 06/04). -
Highlight the cracks (Optional):
If you want the cracks to really pop, wash a black stain or dark underglaze over the surface, then wipe it back with a damp sponge. The dark pigement will remain settled deep in the crevices. -
Glaze application:
Dip or spray a clear transparent glaze over the entire piece. A clear glaze seals the textured surface, making it food safe while preserving the visual depth of the crackle. -
Final fining:
Fire the plate to its final maturity temperature (e.g., Cone 6 or 10). The glaze will melt, encasing the cracked slip pattern in a smooth, glassy surface.
Try Colored Clay
Swap the white slip for a colored slip (like blue or sage green) over a dark clay body to create a vibrant, reversed-color crackle effect.
The contrast between the smooth glaze and the rugged, earthy fissures creates a piece that feels both modern and ancient