
A clay tic tac toe board is one of those projects that’s simple enough to finish in a weekend, but still feels totally special when it’s done. The real fun is swapping plain X’s and O’s for tiny themed pieces that look like a little collectible set.
Classic Minimalist Xs and Os With a Raised Grid
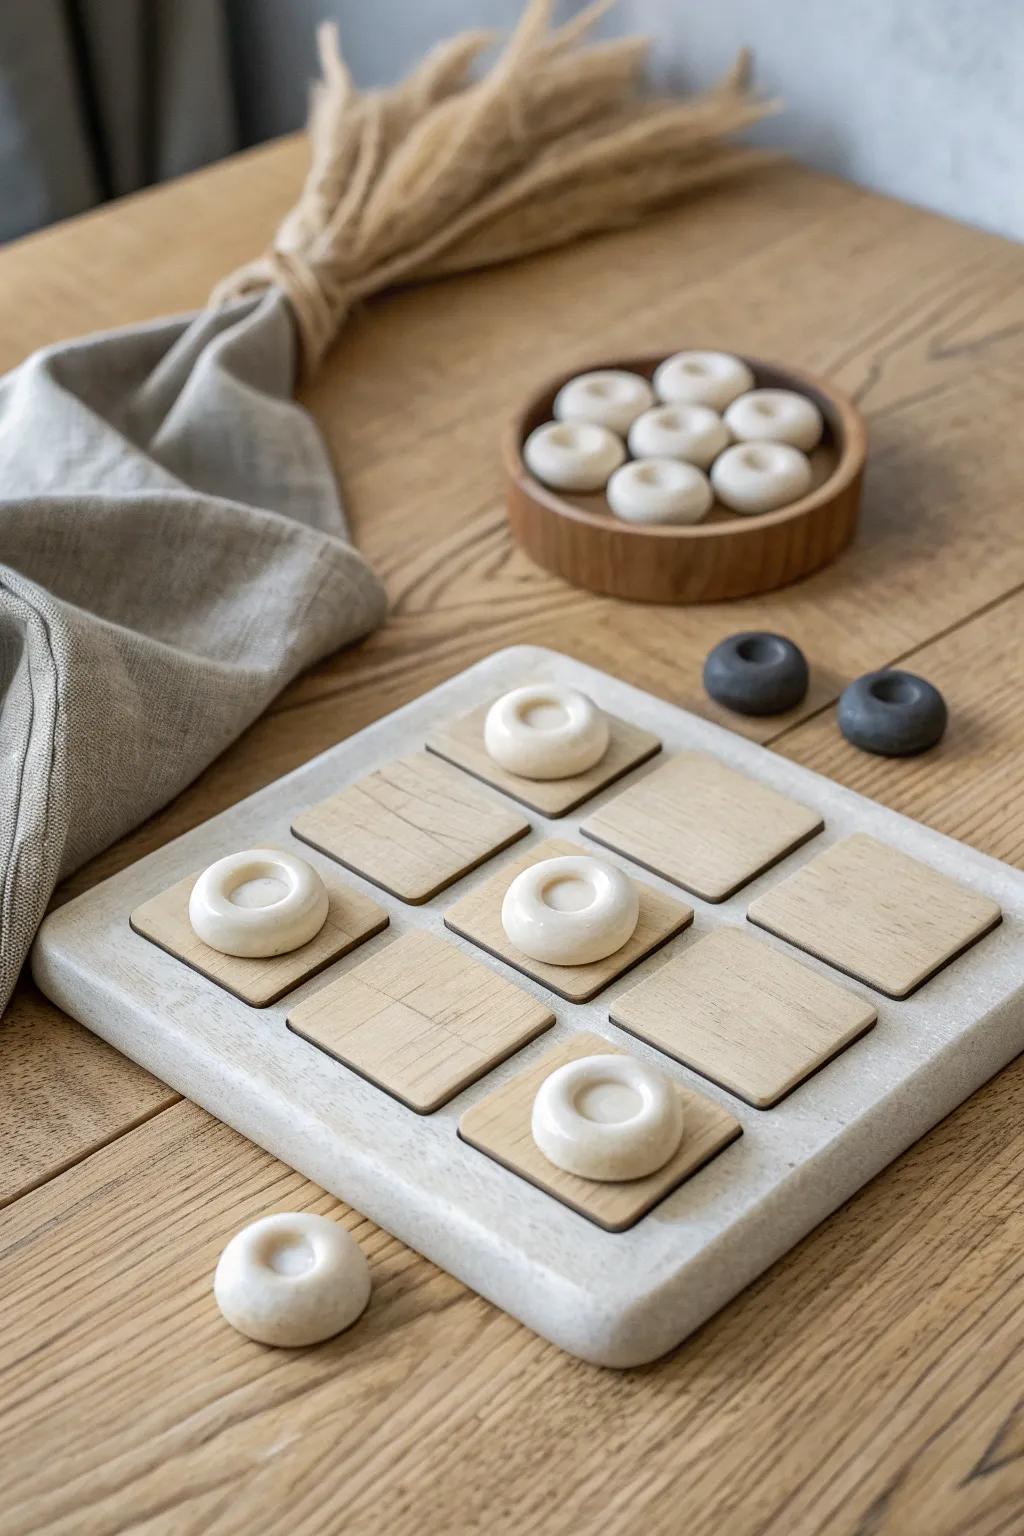
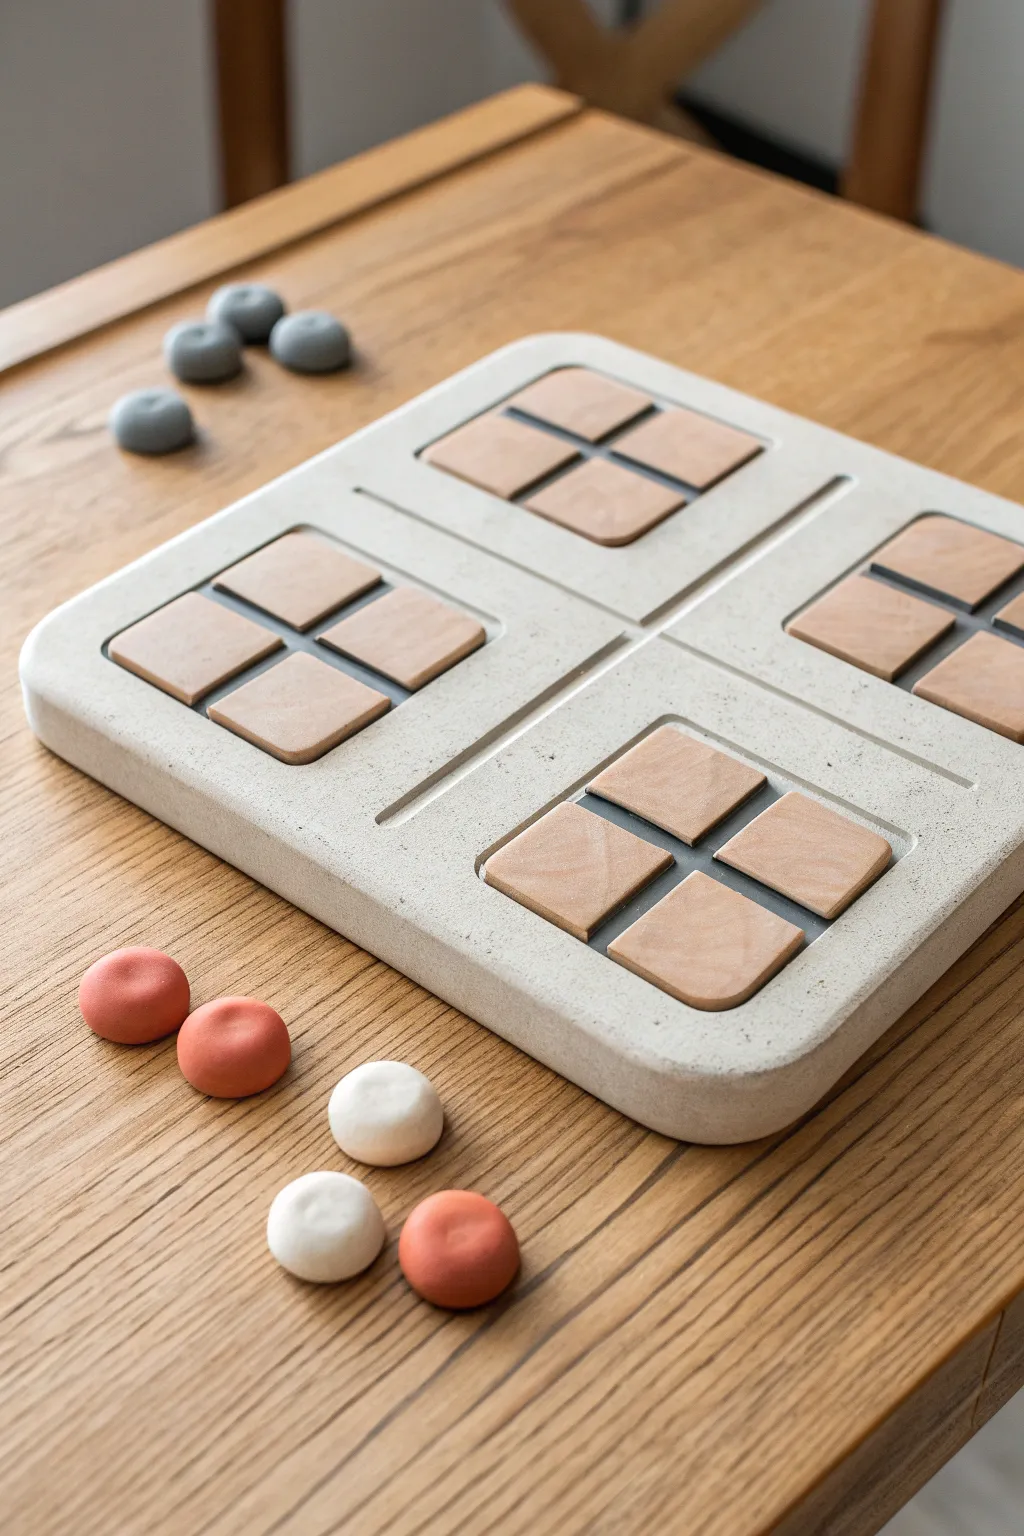
Elevate your game night with a sophisticated tic tac toe set that mimics the look of carved stone and wood. This project combines a chunky, speckled faux-granite base with smooth, minimalist playing pieces for a timeless and tactile decor piece.
How-To Guide
Materials
- White or light grey granite-effect polymer clay (approx. 1 lb)
- Beige or tan polymer clay (for wood effect)
- Translucent liquid clay
- Square clay cutter (approx. 2 inches)
- Large acrylic rolling pin
- Depth guides or playing cards
- Small round cutter or bottle cap (approx. 1 inch)
- Modeling tool with small ball end
- Sandpaper (400 to 1000 grit)
- Matte spray varnish
- Oven functionality (if using polymer clay)
Step 1: Crafting the Stone Base
-
Condition the stone clay:
Begin by thoroughly conditioning your granite-effect polymer clay until it is soft and pliable. This ensures the stone inclusions are evenly distributed and prevents cracking during baking. -
Roll out a slab:
Roll the conditioned clay into a smooth, thick sheet. Aim for a thickness of roughly 1/2 inch to give the board substantial weight. Using depth guides will help keep the surface perfectly level. -
Cut the base shape:
Cut a large square, approximately 7×7 inches, from your slab. You can use a dedicated large cutter or simply measure and cut with a sharp craft blade against a metal ruler. -
Soften the edges:
Use your fingers to gently round over the sharp cut edges and corners. The goal is a soft, tumbled stone look rather than sharp, manufactured angles. -
Pre-bake the base:
Place your stone base on a ceramic tile or index card and bake it according to the manufacturer’s instructions for about 20 minutes. Pre-baking creates a rigid surface for attaching the tiles later.
Stone Texture Secret
Mix black pepper or used dried coffee grounds into white clay to create your own realistic granite speckles if you can’t find pre-mixed effect clay.
Step 2: Creating the Wood-Look Tiles
-
Prepare the tan clay:
Condition the beige or tan polymer clay. To create a faux wood grain, you can twist in a tiny sliver of darker brown clay, but keep the mixing minimal so streaks remain visible. -
Roll the tile sheet:
Roll this clay out much thinner than the base, aiming for about 1/8 inch thickness. Ensure the surface is free of fingerprints or lint. -
Cut the grid squares:
Using your 2-inch square cutter, punch out nine identical squares. These will form the 3×3 grid on top of your stone base. -
Texture the tiles:
Before baking, deeply score random, thin straight lines across the surface of each square using a needle tool to simulate natural wood cracks and grain. -
Attach tiles to base:
Once the base is cool from its pre-bake, apply a thin layer of liquid clay to the back of each square tile. Arrange them in a 3×3 grid on the base, leaving consistent gaps between them.
Step 3: Sculpting the Playing Pieces
-
Form the O pieces:
Roll leftover stone-effect clay into a log and cut five equal segments. Roll each segment into a smooth ball, then flatten slightly into a thick disc. -
Indent the centers:
Use a large ball tool or your thumb to press a deep, rounded indentation into the center of each disc, creating a distinctive donut or ring shape. -
Form the opposing pieces:
For the opposing team, create five similar discs using a contrasting color, such as dark grey or black clay. Repeat the indentation process so they match the style of the first set. -
Final curing:
Place the entire board (with attached tiles) and all playing pieces into the oven. Bake for the full recommended duration, usually 30-45 minutes at 275°F (130°C), to fully cure the thick layers.
Uneven Grid Alignment?
Work from the center outward. Place the middle tile first, centered perfectly, and align the remaining eight tiles around it for symmetry.
Step 4: Finishing Touches
-
Cool down:
Allow all pieces to cool completely in the oven with the door cracked open. This slow cooling helps prevent thermal shock cracks in thick clay projects. -
Sand the edges:
Once cool, use wet/dry sandpaper starting at 400 grit to smooth any rough edges on the playing pieces and the main board. -
Seal the work:
Finish by spraying a light coat of matte varnish over the board and pieces. This protects the faux wood grain and gives the stone clay a unified, professional sheen.
Place your beautiful new board on a coffee table and enjoy a stylish game with friends


Stamped Grid Slab Board With Recessed Squares
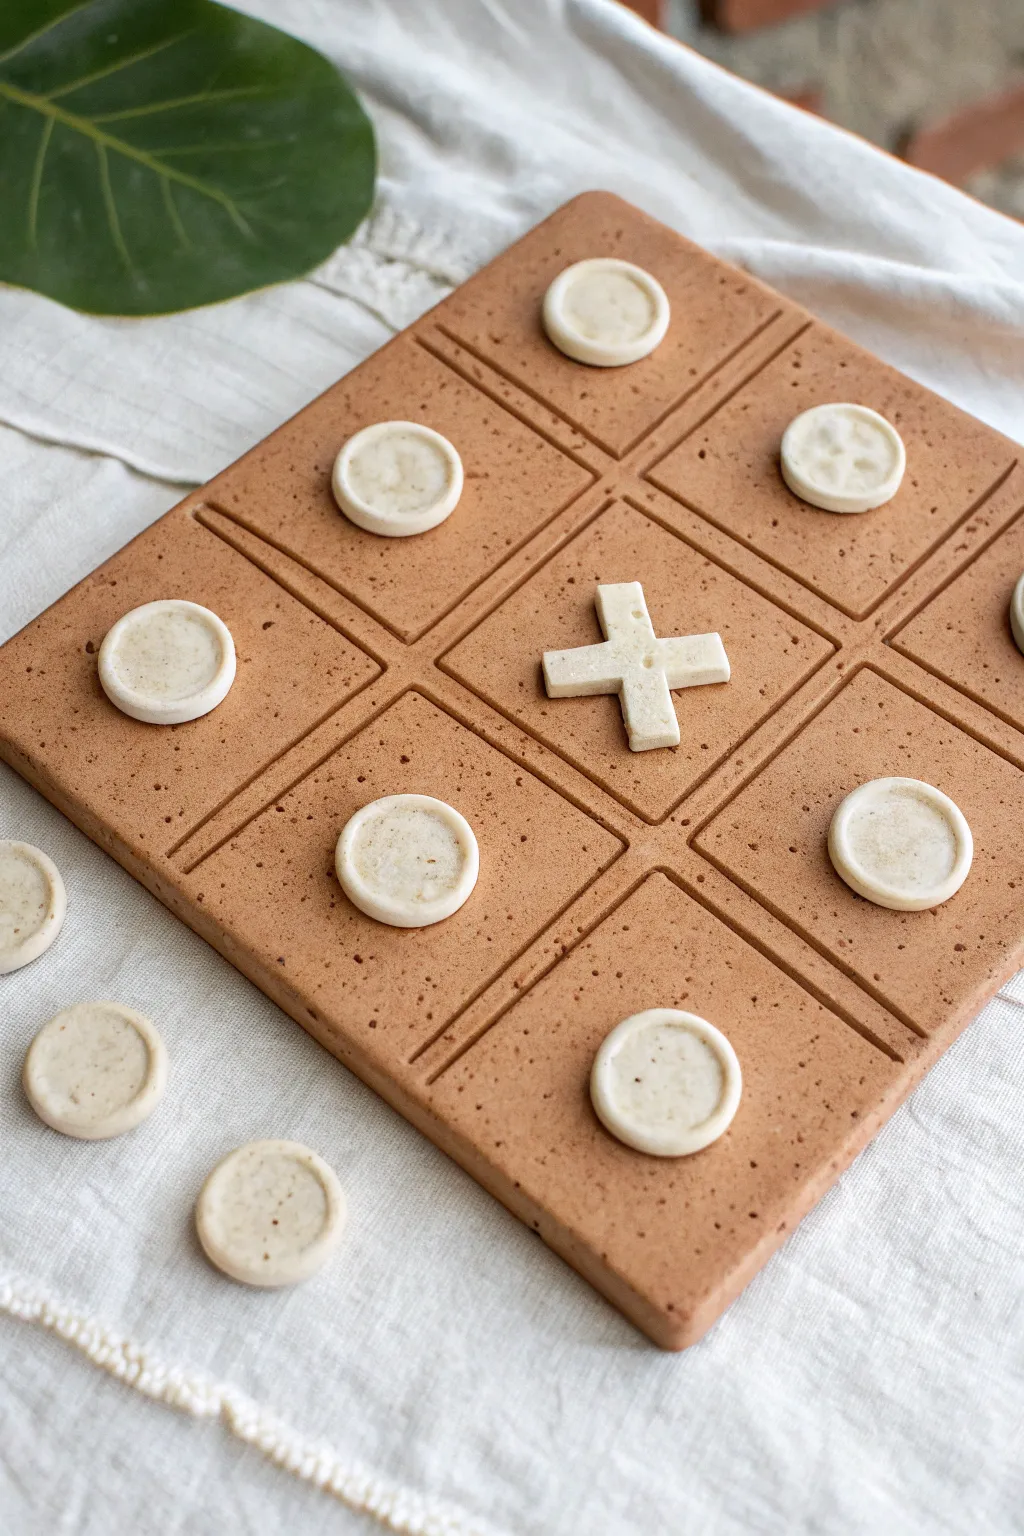
This project combines the rustic charm of speckled clay with sleek geometric lines for a playable piece of decor. By creating a thick slab base with recessed grid lines and simple geometric playing pieces, you get a game that feels substantial and looks beautiful on any coffee table.
Step-by-Step Guide
Materials
- Speckled stoneware clay (approx. 2-3 lbs)
- Rolling pin
- Two wooden guide strips (approx. 1/2 inch thick)
- Fettling knife or clay cutter
- Ruler or straight edge
- Needle tool
- Modelling tool with a rounded or beveled edge
- Round cookie cutter (small, approx. 1-1.5 inch)
- Small plus-sign cutter (optional) or knife
- Sponge and water
- Matte transparent glaze (optional)
Step 1: Creating the Board Base
-
Prep the workspace:
Begin by setting up a canvas board or piece of heavy fabric to work on so your clay doesn’t stick to the table. -
Roll the slab:
Take a large chunk of speckled clay and wedge it briefly to remove air bubbles. Place your wooden guide strips on either side and roll the clay out into a thick, even slab. -
Cut the square:
Using a ruler and a fettling knife, measure and cut a perfect square. Aim for about 8×8 inches or 10×10 inches depending on your preference. -
Smooth the edges:
Run a damp sponge or your finger along the cut edges of the square to soften the sharp corners and remove any crumbs. -
Measure the grid:
Lightly mark nine equal squares on the surface using your ruler. Don’t cut yet; just make tiny guide marks with a needle tool. -
Create the channels:
Using a modeling tool with a wide, blunt edge (or the backside of a butter knife), press firmly along your guide marks to create deep, recessed channels rather than cuts. This creates the ‘grid’ look. -
Refine the intersections:
Where the lines cross, use your finger or a small tool to smooth the clay down so the intersection is clean and tidy. -
Texture the surface:
If your clay surface got too smooth during rolling, I like to gently pat it with a stiff brush or a coarse sponge to bring back that earthy, stone-like texture.
Step 2: Scoring the Playing Pieces
-
Roll thinner slab:
Roll out a second, smaller slab of clay. This one can be slightly thinner than the board, perhaps 1/4 inch thick. -
Cut the circles:
Use your small round cookie cutter to punch out at least 5 circles (it’s wise to make an extra or two just in case). These will be the ‘O’ pieces. -
Detail the circles:
To mimic the board’s style, gently press a smaller circular object or a modeling tool into the center of each circle to create a raised rim effect. -
Cut the crosses:
Cut out 5 cross shapes for the ‘X’ pieces. You can use a specific cutter for this, or simply cut small strips and join them, or carve them freehand from the slab. -
Smooth the pieces:
Take time to smooth the edges of every single game piece with a damp fingertip. Sharp edges become very sharp once fired. -
Check fit:
Place one of your finished pieces onto the board’s grid squares to ensure the sizing looks proportional. They should fit comfortably within the lines.
Warping Worries
Slab boards love to warp. Flip your board over every few hours during the drying process, or sandwich it between two pieces of drywall to keep it perfectly flat.
Step 3: Drying and Finishing
-
Dry slowly:
Place the board and pieces on a wire rack or leave them on the canvas board. Cover loosely with plastic for the first day to prevent the corners of the board from curling up. -
Bisque fire:
Once bone dry, fire the pieces to bisque temperature (usually cone 04) based on your clay body’s instructions. -
Glaze option:
For the look in the photo, leave the clay bare creates a wonderful tactile feel. However, a very thin coat of matte transparent glaze can protect it from stains. -
Final fire:
Fire the pieces a second time to maturity (often cone 5 or 6 for stoneware). Check your clay specifications.
Level Up: Contrast
For better game visibility, use a different colored clay (like white porcelain) for the X and O pieces, or glaze them a creamy white while leaving the board raw.
Now you have a timeless game set that doubles as a piece of handcrafted art for your home


Kawaii Faces on X and O Game Pieces
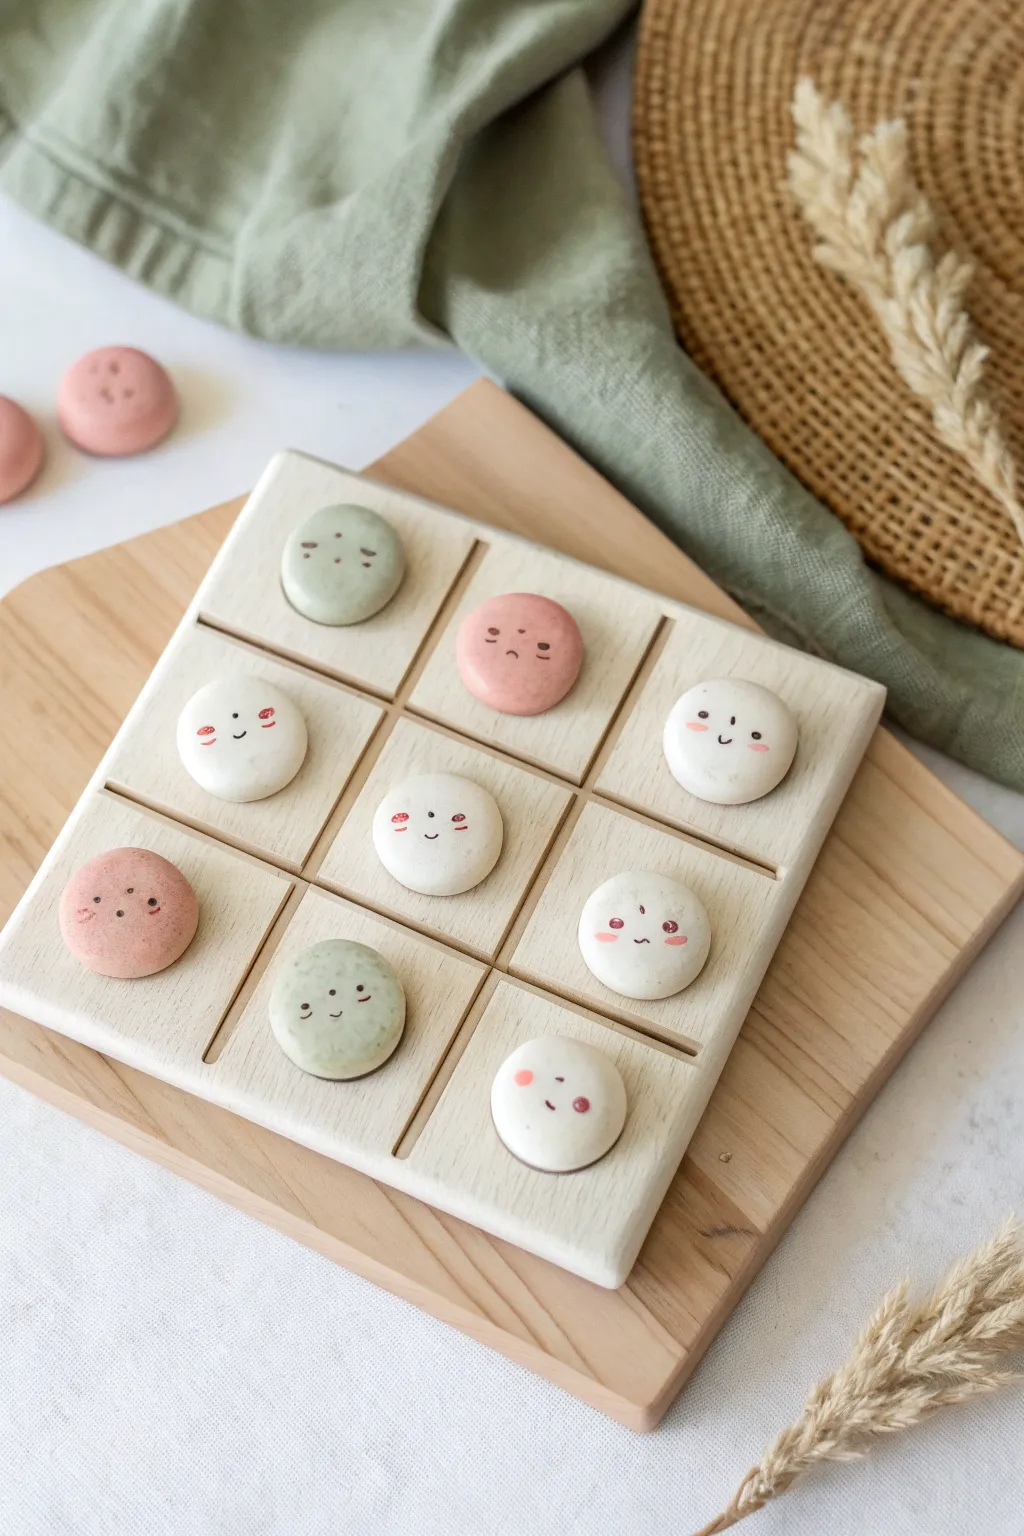
Transform a simple wooden board and clay into a charming game night centerpiece. With soft pastel tones and adorable hand-painted faces, this kawaii-inspired set brings a smile to every move.
How-To Guide
Materials
- White air-dry clay or polymer clay
- Square wooden board (approx. 6×6 or 8×8 inches)
- Wooden dowels (thin, square or round)
- Acrylic paints (white, pastel pink, sage green, black)
- Fine detail paintbrush (00 or 000 size)
- Dotting tool or toothpick
- Wood glue
- Sandpaper (fine grit)
- Clear matte varnish or sealant
- Rolling pin
- Small round cookie cutter or bottle cap
Step 1: Crafting the Board
-
Prepare the base:
Start with your square wooden board. If the wood is rough, gently sand the surface and edges with fine-grit sandpaper until it feels smooth to the touch. Wipe away any dust with a slightly damp cloth. -
Paint the foundation:
Apply a coat of creamy white or very light beige acrylic paint to the top of the board. You want a matte, natural look, so one or two thin coats should suffice, allowing the wood grain to peek through slightly if desired. -
Create the grid lines:
Measure and cut your wooden dowels to fit the length and width of the board. You will need four pieces total creates the classic tic-tac-toe grid. Sand the cut ends to remove any splinters. -
Attach the grid:
Arrange the dowels on the painted board to form a 3×3 grid. Once you are happy with the spacing, use a small amount of wood glue to secure them in place. Wipe away excess glue immediately and let the board dry completely.
Uneven Clay?
If your clay circles warp while drying, gently sand the bottom flat against a piece of sandpaper taped to your table. This ensures they sit perfectly stable on the board.
Step 2: Sculpting the Pieces
-
Condition the clay:
Take your air-dry or polymer clay and knead it until it’s soft and pliable. This prevents cracks from forming later. -
Roll out the slab:
Using a rolling pin, flatten the clay to a uniform thickness, roughly 1/4 inch thick. Aim for an even surface. -
Cut the shapes:
Use a small round cutter or a clean bottle cap to punch out at least 10 circles (5 for each player, plus a spare or two). Smooth the edges of each circle with your finger and a drop of water to remove any sharp ridges. -
Create the dome shape:
Gently press the center of each circle while cupping it in your palm to give it a slight, soft dome shape, rather than being perfectly flat. This makes them nicer to hold. -
Dry or bake:
If using air-dry clay, let the pieces sit for 24-48 hours until fully hardened. If using polymer clay, bake according to the package instructions.
Step 3: Painting the Kawaii Faces
-
Base colors:
Once the clay is solid, sort your pieces into two groups. Paint one group a soft sage green and the other a dusty rose pink. Keep a few plain white if you prefer a mix. Apply 2-3 coats for opaque coverage. -
Add rosy cheeks:
Dip a dotting tool or the end of a toothpick into a slightly darker pink paint. create small oval blushes on the cheeks of your character pieces. I like to place these wider apart to enhance the cute factor. -
Paint the eyes:
Using your finest detail brush and black paint, add the eyes. Varied expressions give personality—try simple dots, widely spaced wide-set eyes, or little sleepy curves. -
Draw the mouth:
Between the blush marks, paint a tiny, simple mouth. A small ‘u’ shape or a flat line situated high up (inline with the eyes) creates that classic kawaii proportion. -
Seal the deal:
Allow the paint to cure fully for several hours. Finally, brush a coat of clear matte varnish over each piece and the game board to protect your handiwork from scratches during play.
Magnetic Magic
Make the set travel-friendly by embedding small, strong magnets into the underside of the clay pieces and sinking flat washers into the wood board before painting.
Now you have a delightful handmade game ready for display on your coffee table or your next family gathering


Garden Theme: Ladybugs vs. Daisies
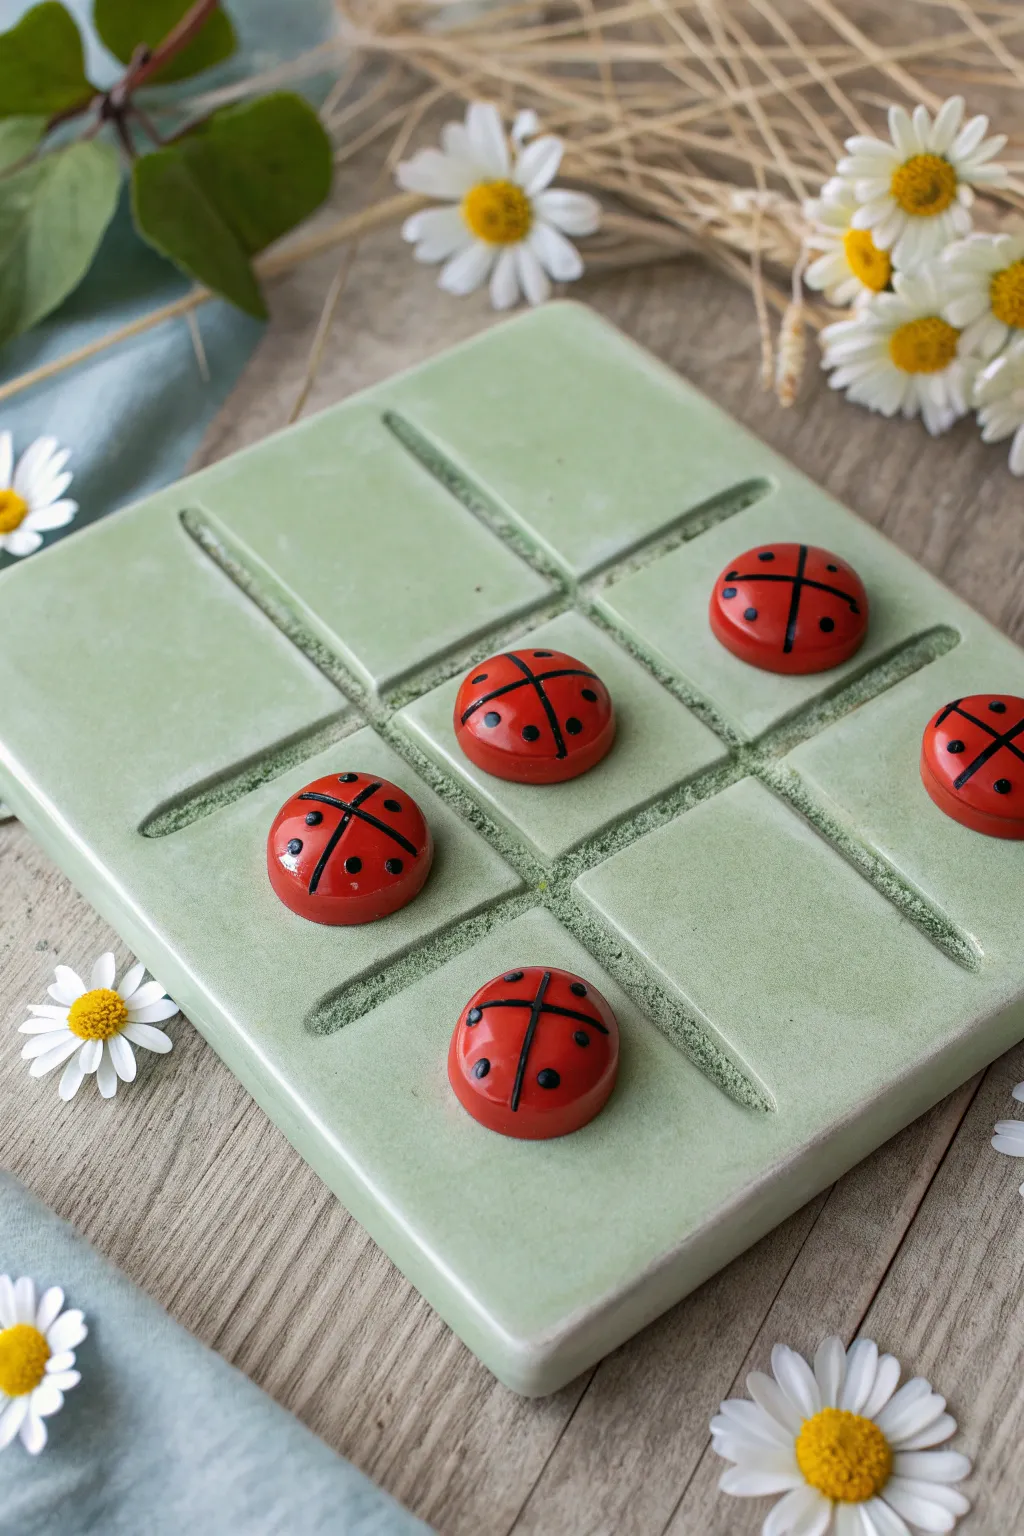
Bring the charm of a spring garden to your game nights with this delightful clay project. This soft sage-green board features deep, clean grid lines and pairs perfectly with hand-sculpted ladybug playing pieces for a whimsical touch.
Detailed Instructions
Materials
- Polymer clay (white and green, or pre-mixed sage)
- Red polymer clay
- Black acrylic paint
- Glaze or varnish (glossy finish)
- Rolling pin or clay machine
- Square clay cutter or ruler and craft knife
- Modeling tool with a rounded edge (for grid lines)
- Fine-point detail brush
- Sandpaper (fine grit)
- Oven (for baking)
- Parchment paper
Step 1: Sculpting the Board
-
Prepare the Clay Base:
Begin by conditioning your green clay until it is soft and pliable. If you don’t have a pre-mixed sage green, try mixing a large amount of white with a small amount of dark green and a tiny dot of brown to achieve that earthy, pastel tone shown in the image. -
Roll it Out:
Roll the clay out into an even slab, approximately 1/4 to 1/2 inch thick. I like to use depth guides or playing cards on either side of the rolling pin to ensure the thickness is perfectly uniform across the whole square. -
Cut the Square:
Using a large square cutter or a ruler and craft knife, cut a precise square shape. Smooth the outer edges with your finger to soften any sharp cuts, giving the board a finished, ceramic-like look. -
Mark the Grid:
Lightly measure and mark where your tic-tac-toe grid lines will go. You want to divide the square into nine equal sections, so you’ll need two vertical lines and two horizontal lines. -
Create the Grooves:
Take a modeling tool with a rounded or blunt edge. Press firmly into the clay along your marked lines to create deep, recessed grooves. Don’t just scratch the surface; you want a visible channel that mimics carved stone. -
Refine the Channels:
Go back over the grooves to smooth out any displaced clay. If the clay pushed up on the sides of the lines, gently tap it back down with a flat tool or your finger so the board remains flat. -
Texture the Grooves (Optional):
For the slightly textured look inside the grooves seen in the photo, tap a stiff brush or a crumpled piece of foil gently into the bottom of the channels before baking.
Uneven Lines?
If your grid lines wiggle while carving, let the clay firm up in the fridge for 15 minutes first. Cooler clay drags less and holds sharp detail better.
Step 2: Creating the Ladybugs
-
Form the Bodies:
Condition the red polymer clay. Roll five small balls of equal size, roughly 1 inch in diameter. Flatten the bottom of each ball against your work surface to create a semi-circle dome shape. -
Bake the Pieces:
Place your green board and the five red domes on a baking sheet lined with parchment paper. Bake according to your specific clay manufacturer’s instructions (usually 275°F for 15-30 minutes). -
Cool and Sand:
Allow all pieces to cool completely. If there are any rough fingerprints on the board or ladybugs, wet-sand them gently with fine-grit sandpaper for a professional finish.
Opponent Pieces
To complete the set, sculpt five simple white daisies with yellow centers using the same dome technique, flattening them slightly more than the bugs.
Step 3: Painting and Finishing
-
Paint the Ladybug Details:
Using black acrylic paint and a fine detail brush, paint a straight line down the center of each red dome. At the front, paint a semi-circle for the head. -
Add the Spots:
Dip the non-brush end of your paintbrush or a dotting tool into the black paint. Carefully apply symmetrical dots on the red wings. The example uses roughly six spots per ladybug. -
Enhance the Grid:
To make the grid pop, you can lightly brush a darker green pastel dust or diluted acrylic paint into the grooves of the board, wiping away the excess from the surface. -
Seal the Board:
Apply a coat of semi-gloss or matte varnish to the green board to protect it. This gives it that smooth, polished stone appearance. -
Glaze the Ladybugs:
Once the black paint is fully dry, coat the ladybugs with a high-gloss glaze. This step is crucial as it gives them the wet, shiny look of a real beetle shell.
Set up your board on a patio table and enjoy a quick game surrounded by nature

The Complete Guide to Pottery Troubleshooting
Uncover the most common ceramic mistakes—from cracking clay to failed glazes—and learn how to fix them fast.
Ocean Theme: Starfish vs. Shells
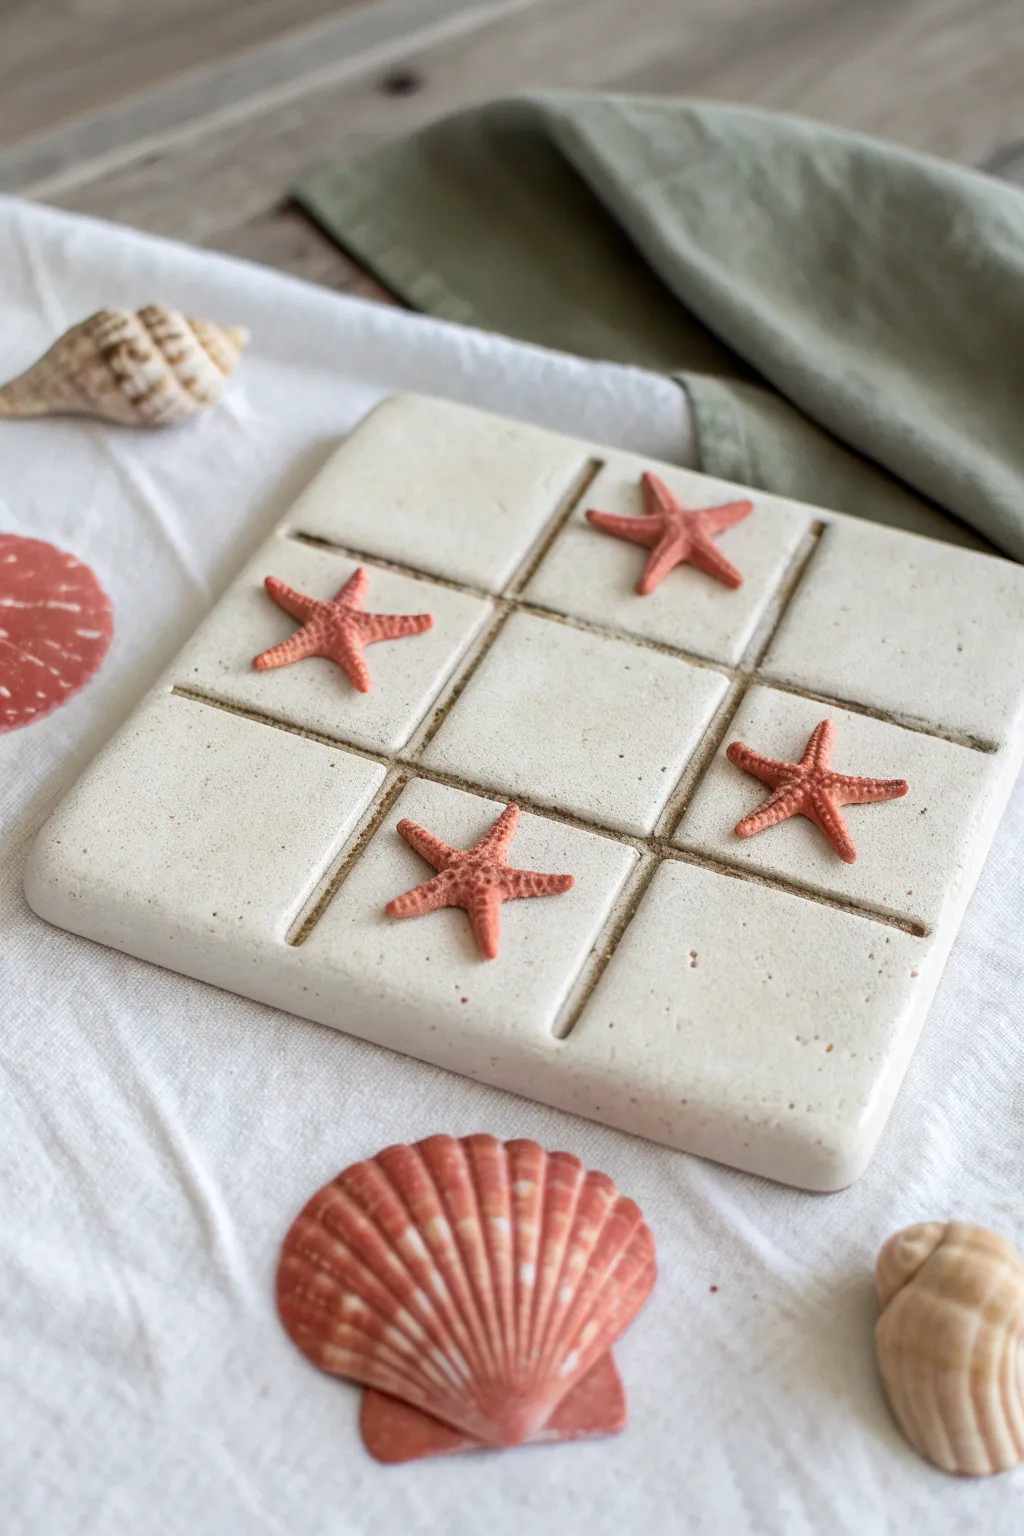
Bring the beach home with this charming clay tic-tac-toe set, featuring a textured sandy base and vibrant starfish game pieces. It’s a functional piece of decor that captures the relaxed, sun-bleached vibes of a coastal cottage.
Step-by-Step Guide
Materials
- White or cream-colored air-dry clay (approx. 1 lb)
- Red-orange polymer clay (small block)
- Rolling pin
- Square cookie cutter or ruler and knife
- Sculpting tool or dull butter knife
- Sandpaper (medium and fine grit)
- Clean toothbrush or stiff bristle brush
- Acrylic paint (tan, cream, speckled brown)
- Matte spray sealant
Step 1: Sculpting the Board
-
Condition the Clay:
Start by kneading your white air-dry clay until it is soft, pliable, and free of cracks. This ensures a smooth base for your board. -
Roll the Slab:
Roll the clay out onto a clean surface to an even thickness of about 1/2 inch. You want it substantial enough to feel like a stone tablet. -
Cut the Square:
Using a ruler and knife, or a large square cutter if you have one, cut a perfect 5×5 inch or 6×6 inch square. Remove the excess clay. -
Round the Corners:
Gently tap the corners with your finger or a smoothing tool to round them off slightly. This prevents sharp edges and mimics the look of eroded stone. -
Score the Grid:
Use a ruler to lightly mark the board into nine equal squares. Once measured, use a dull sculpting tool or the back of a knife to press deep grooves into the clay. Don’t cut all the way through; just create distinct channels. -
Add Texture:
Take a clean toothbrush and gently tap the entire surface of the board. This stippling effect creates a realistic, porous stone or sand texture. -
Dry the Board:
Place the board on a wire rack to dry completely. This usually takes 24-48 hours depending on humidity. Flip it halfway through to prevent warping.
Warping Woes?
If the board corners curl up while drying, simply dampen the concave side slightly and place a heavy book on top for a few hours to flatten it back out.
Step 2: Creating the Starfish
-
Form the Base:
While the board dries, take small balls of red-orange polymer clay and flatten them slightly. -
Pinch the Arms:
Pinch out five points from each ball to form the arms of the starfish. Keep them relatively thin and elongated. -
Texture the Starfish:
Use a needle tool or toothpick to prick tiny holes along the center of each arm for texture. Gently curve the arms so they look organic, not perfectly flat. -
Bake the Pieces:
Bake your starfish pieces according to the polymer clay package instructions (usually around 275°F for 15 minutes). Let them cool completely.
Level Up: Shell Pieces
For the opposing team pieces, try using real found seashells or sculpt simple scallop shells from white clay to contrast perfectly with the red starfish.
Step 3: Finishing Touches
-
Sand the Board:
Once the air-dry clay board is rock hard, lightly sand the edges and surface to remove any harsh burs, while preserving the toothbrush texture. -
Base Coat Paint:
Mix a small amount of tan paint with cream to create a warm, sandy hue. Apply a wash of this color over the entire board. -
Highlight the Grid:
I like to take a slightly darker brown wash and run it specifically into the grid grooves to make the tic-tac-toe lines pop visually. -
Speckle Effect:
Dip a stiff brush into watery brown paint and flick it over the board to create tiny speckles, mimicking real beach sand. -
Seal Everything:
Spray the board and the starfish with a matte sealant. This protects the clay from moisture and gives the set a finished, professional look.
Now you have a durable, beach-ready game set perfect for coffee table decor or porch gaming sessions
Playful Rivalry: Cats vs. Fish
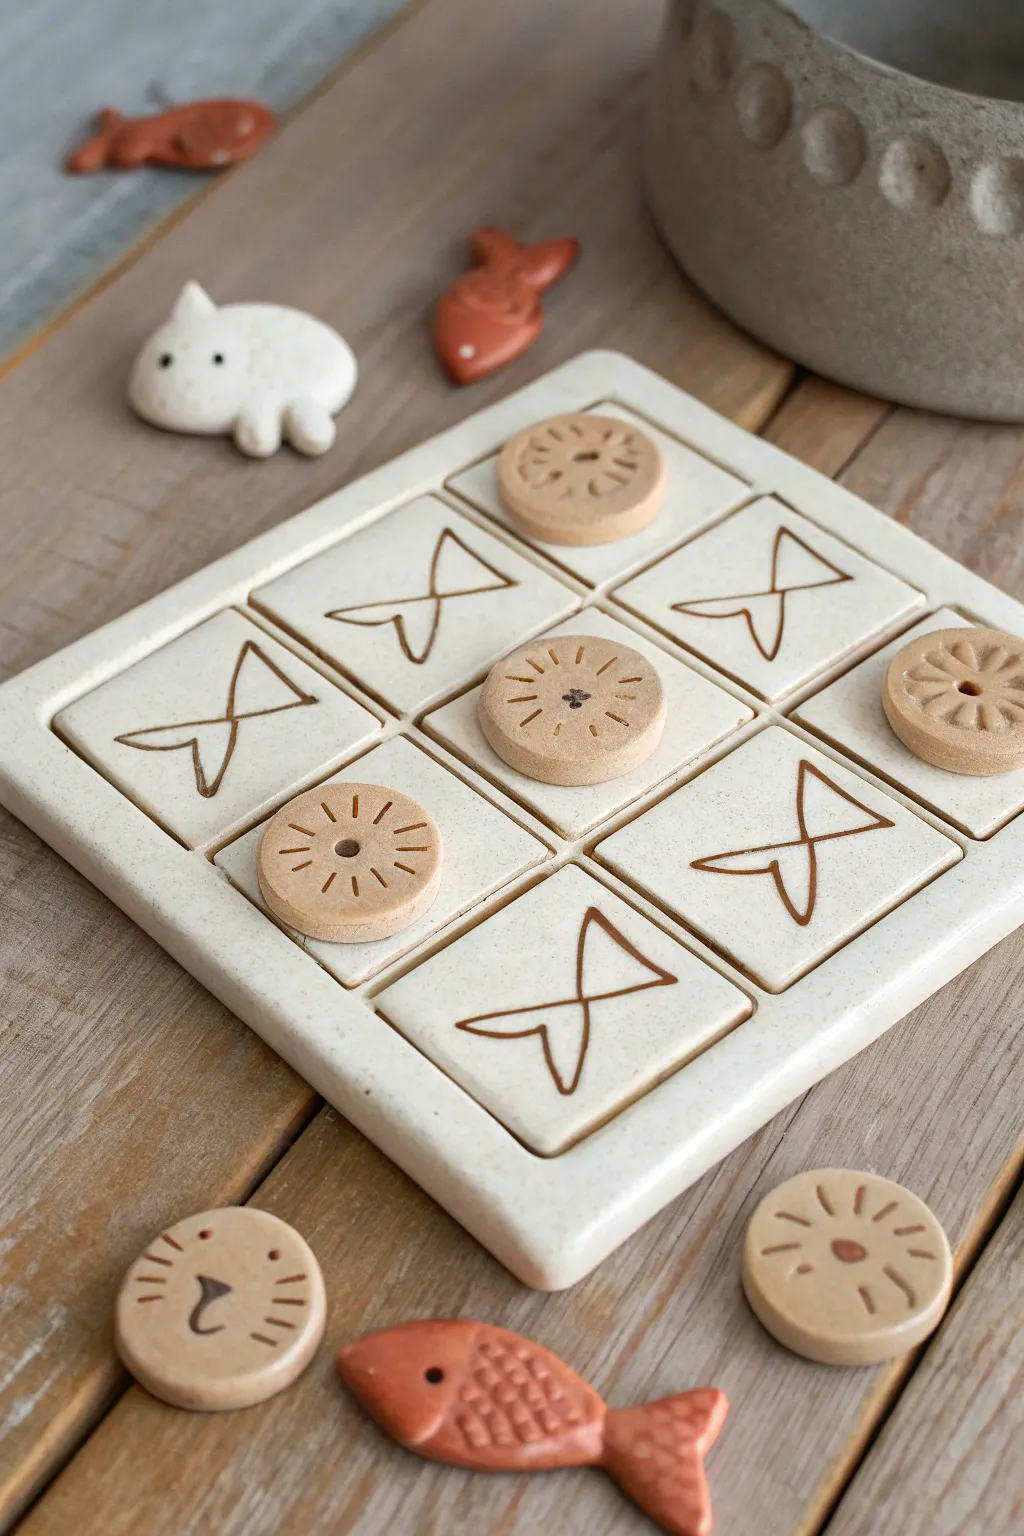
Bring a charming rivalry to life with this handmade polymer clay tic-tac-toe set. Featuring a clean white grid board engraved with minimalist fish bones, this project pairs fish-themed playing tokens against adorable cat faces for endless entertainment.
How-To Guide
Materials
- White polymer clay (approx. 8 oz)
- Terracotta or light brown polymer clay (approx. 2 oz)
- Square clay cutter (approx. 4×4 inches)
- Small circle cutter (approx. 1 inch)
- Clay rolling pin
- Acrylic crafting roller or pasta machine
- Brown acrylic paint
- Fine detail paintbrush
- Needle tool or toothpick
- Sandpaper (fine grit)
- Glaze or varnish (optional)
Step 1: Creating the Board Base
-
Prepare the White Clay:
Condition the white polymer clay by kneading it until it is soft and pliable. Use your rolling pin or a pasta machine to roll out a thick slab, approximately 1/4 inch thick, to ensure the board is sturdy. -
Cut the Base:
Use the square clay cutter or a sharp blade and ruler to cut out a perfect square for the main game board. Smooth the edges with your finger to remove any sharp cuts. -
Create the Grid Lines:
Before sculpting the grid, lightly score a 3×3 grid onto the surface using a ruler. Roll out thin snakes of white clay and place them along these scored lines to create raised dividers. -
Blend the Grid:
Gently press the thin snakes onto the base. Use a modeling tool or your finger to smooth and blend the seams so the grid looks like one cohesive piece with the base, rather than just attached on top. -
Inscribe the X Spaces:
In traditional tic-tac-toe, squares are blank, but this design features stylized fish bones (acting as the ‘X’) engraved directly into the board. Use a needle tool to carve a simple bowtie shape with a vertical line through it into five of the squares, creating a playful fish bone motif.
Uneven Grid Lines?
If your grid snakes look wobbly, use the side of a rigid ruler to gently push them straight before blending them into the base clay.
Step 2: Sculpting the Playing Pieces
-
Cut the Tokens:
Roll out the terracotta or light brown clay to a 1/8 inch thickness. Use the small circle cutter to punch out five round tokens. These will be the ‘O’ pieces for the opposing player. -
Detail the Fish Tokens:
For the tokens shown on the board, press a sunburst or wheel pattern into the clay using a texture tool or by pressing the tip of a needle tool repeatedly around a center point. -
Sculpt the Cat Pieces:
Using the remaining light brown clay, shape small, flattened rounds. Gently pinch two small triangles at the top of each round for ears to create the cat heads. -
Add Cat Details:
Use the needle tool to gently impress whisker lines and a small nose onto the cat faces. Keep the details simple to match the minimalist aesthetic. -
Sculpt the Fish Pieces:
For extra decorative flair (like the loose pieces in the photo), shape small fish silhouettes from the terracotta clay. Add scale textures by pressing the rounded end of a small tool into the clay.
Antiquing Pro-Tip
For a deeper, more rustic look, use dark brown or burnt umber paint for the wash. It mimics the look of fired ceramic glaze perfectly.
Step 3: Finishing Touches
-
Bake the Clay:
Place the board and all game pieces on a baking sheet lined with parchment paper. Bake according to your brand of polymer clay instructions (usually 275°F for 15-30 minutes). -
Cool and Sand:
Allow all pieces to cool completely. Once hard, use fine-grit sandpaper to smooth any rough edges on the board or tokens, ensuring they slide easily. -
Apply the Paint Wash:
Dilute brown acrylic paint with a little water. Brush this wash into the engraved fish bones on the board and the crevices of the tokens. -
Wipe Away Excess:
Immediately wipe the surface with a damp paper towel or cloth. The paint will remain in the recessed lines, highlighting the designs, while leaving the raised surfaces clean. -
Seal the Project:
If desired, apply a thin coat of matte varnish to protect the paint and give the clay a finished, ceramic-like quality.
Set up your new game board on a coffee table and enjoy a quick match of strategy.


What Really Happens Inside the Kiln
Learn how time and temperature work together inside the kiln to transform clay into durable ceramic.
Woodland Rivalry: Foxes vs. Rabbits
Blend the warmth of terracotta with cool, modern lines in this sophisticated take on classic tic-tac-toe. This project creates a sturdy, heavy-weight game board that serves as elegant coffee table decor when playtime is over.
Step-by-Step
Materials
- Terracotta air-dry clay (or polymer clay)
- White or light beige air-dry clay (for the rabbit)
- Balsa wood strips (approx. 1/4 inch wide)
- Craft knife
- Rolling pin
- Square cookie cutter or ruler
- Circle cutters (two sizes: small for playing pieces, slightly larger for base indentations)
- Sandpaper (fine grit)
- Matte sealant or varnish
- Small dotting tool or toothpick
- Acrylic paint (black for eyes/details, optional)
- Wood glue
Step 1: Shaping the Board Base
-
Prepare the clay slab:
Begin by conditioning your terracotta clay until it is smooth and pliable. Roll it out into a thick, even square slab, aiming for a thickness of at least 3/4 of an inch to give the board substantial weight. -
Cut the square:
Use a ruler and a sharp craft knife to trim the edges, creating a perfect square. Use a little water on your finger to smooth out any rough edges immediately. -
Create the raised rim:
Roll four coils of clay and attach them to the outer top perimeter of your square to create a raised border. Blend the seams seamlessly using your fingers or a clay tool so it looks like one solid piece. -
Form the divider channels:
Before the clay hardens, take your balsa wood strips and gently press them into the soft clay in a cross formations to create the channels where the wood will eventually sit. Remove the wood carefully; you just want the impression for now.
Clean Cuts Pro Tip
Does your clay drag when cutting? place a piece of plastic wrap over the clay before using your cookie cutter. This creates beautifully rounded, professional edges without sharp burrs.
Step 2: Creating the Playing Pieces
-
Cut the playing discs:
Roll out a thinner slab of terracotta clay (about 1/4 inch thick). Use your smaller circle cutter to punch out at least six discs (extras are always good). -
Detail the pieces:
For one set of pieces, leave them smooth and domed. For the opposing set, I like to use a dotting tool or toothpick to create small texture patterns or holes on the top surface to distinguish them. -
Sculpt the rabbit marker:
Using the white clay, sculpt a small, simple rabbit figure for a special marker or decorative element. Keep the shape rounded and abstract to match the modern aesthetic. -
Create base plates (optional):
Roll out a bit more clay and use the larger circle cutter to create shallow, dish-like bases that can hold the playing pieces when not in play. -
Dry completely:
Allow all clay components—the board, discs, and rabbit—to dry for at least 24-48 hours. Turn them occasionally to ensure even drying and prevent warping.
Level Up: Magnetic Play
Embed small magnets into the base of the board and the bottom of each playing piece before the clay dries. This makes the game travel-friendly and satisfying to play.
Step 3: Assembly and Finishing
-
Sand the surfaces:
Once bone dry, use fine-grit sandpaper to smooth out any fingerprints or rough edges on the board and the playing pieces. Pay special attention to the corners of the board. -
Cut the wood inlays:
Measure the channels you created in the board earlier. Cut your balsa wood strips to fit perfectly inside the cross shape. You may need to sand the ends of the wood for a snug fit. -
Glue the inlay:
Apply a thin line of wood glue into the recessed channels and press the wood strips into place. Wipe away any excess glue instantly with a damp cloth. -
Speckle effect:
To mimic the natural speckling seen in the photo, dilute a tiny amount of brown or black paint. Dip an old toothbrush in it and flick the bristles to spray a very fine mist of speckles over the terracotta board. -
Paint details:
Use a fine liner brush and black paint to add tiny eyes and a nose to your white rabbit sculpture. -
Seal the project:
Apply a coat of matte varnish or sealant over the entire clay surface. This protects the clay from moisture and gives it a finished, professional look without making it too shiny.
Place your finished board on a side table to enjoy an impromptu game whenever the mood strikes
Celestial Theme: Moons vs. Stars
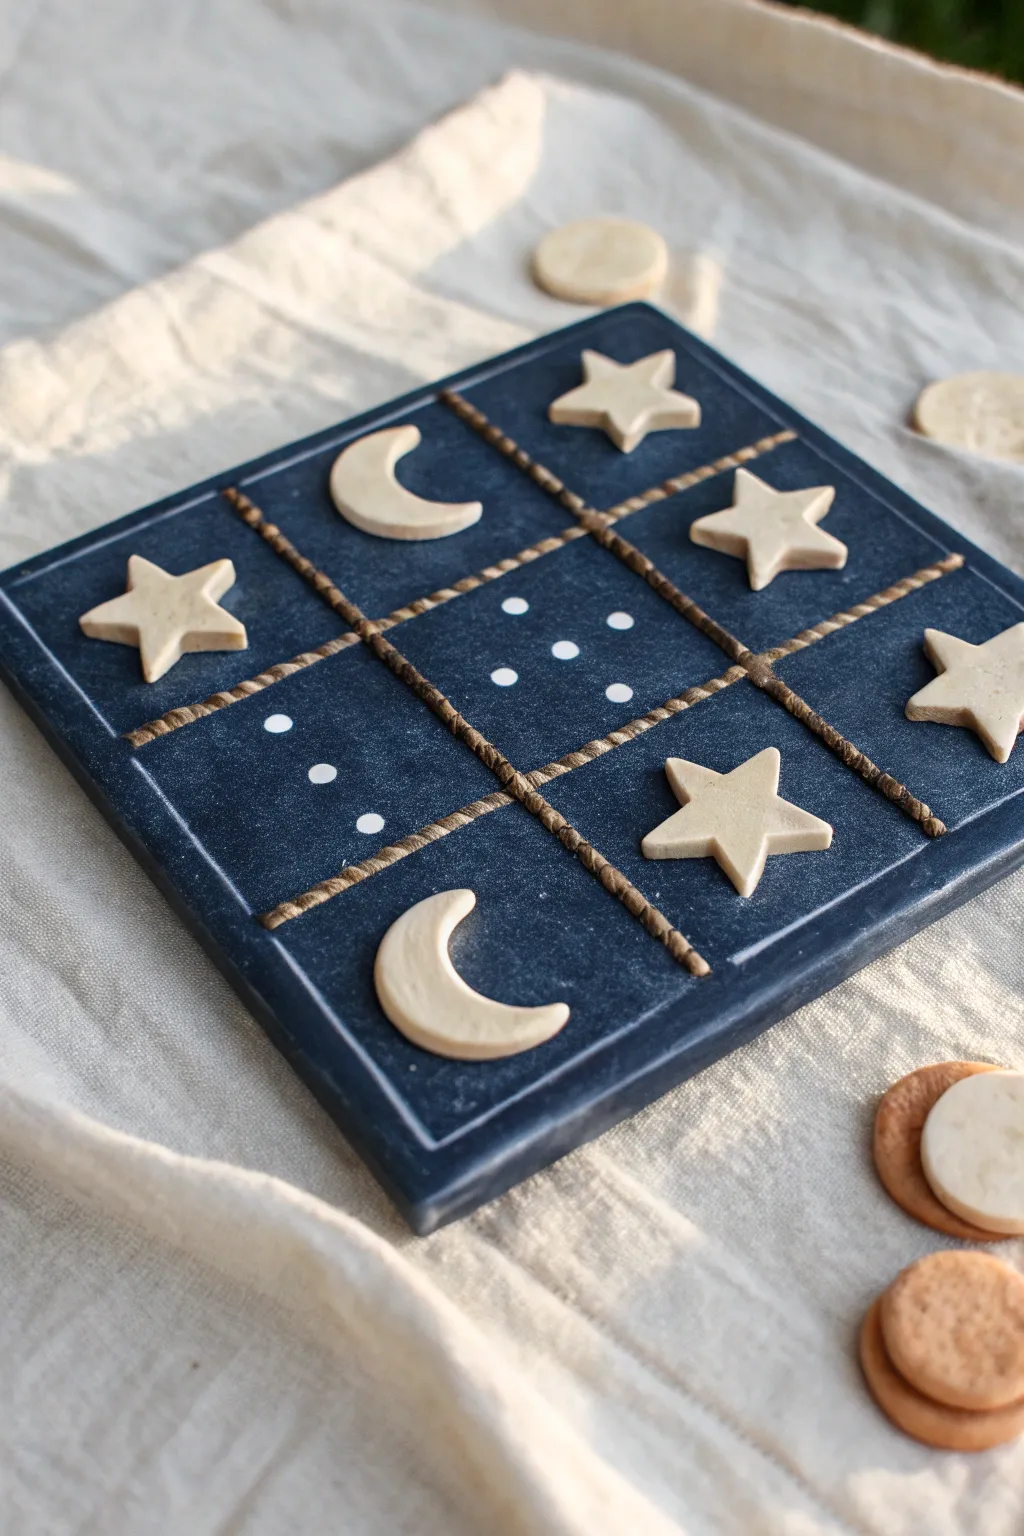
Transform a classic game into a dreamy celestial experience with this starry night-themed set. Using deep indigo hues and simple clay shapes, you’ll create a beautiful board featuring rustic twine lines and delicate moon and star playing pieces.
Step-by-Step Tutorial
Materials
- Polymer clay (white or beige)
- Square ceramic tile or wooden board (approx. 6×6 inches)
- Acrylic paint (dark indigo/navy blue, white, gold)
- Natural jute twine
- Small star-shaped cookie cutter
- Circular cookie cutter (or bottle cap)
- Sculpting tools or craft knife
- Paintbrushes (flat shader and fine detail)
- Strong craft glue (E6000 or tacky glue)
- Rolling pin
- Parchment paper
- Matte or satin sealant spray
Step 1: Crafting the Celestial Pieces
-
Condition the clay:
Begin by warming the polymer clay in your hands until it becomes soft and pliable. Roll it out on parchment paper to a uniform thickness of about 1/4 inch. -
Cut the stars:
Use your small star cutter to punch out five shapes. If you don’t have a cutter, you can hand-cut these with a craft knife, smoothing the edges with your finger. -
Shape the moons:
Cut five circles using your round cutter. To turn these into crescent moons, use the same circular cutter to take a bite’ out of each circle, leaving perfectly shaped crescents behind. -
Smooth edges:
Gently tap the edges of all ten pieces to remove any sharpness from the cutting process, giving them a soft, handmade feel. -
Bake the pieces:
Arrange your moons and stars on a baking sheet lined with parchment paper. Bake according to your specific clay package instructions (usually 275°F for 15-30 minutes) and let them cool completely.
Sticky Situation?
If twine ends keep fraying or lifting, apply a tiny dot of superglue specifically to the cut ends, holding them down with a toothpick until set.
Step 2: Preparing the Night Sky Board
-
Base coat application:
While the clay pieces cool, paint your square board with a rich dark indigo or navy blue acrylic paint. I find that applying two thin coats provides better coverage than one thick coat. -
Create texture:
To mimic the stone-like texture seen in the photo, lightly sponge a slightly lighter shade of blue or grey over the dark base while it’s still tacky, then let it dry thoroughly. -
Measure the grid:
Measure your board and make small tick marks to divide the square into three equal vertical columns and three equal horizontal rows. -
Lay the twine:
Cut four pieces of jute twine to fit the length and width of your board. Glue them down along your measured lines to form the tic-tac-toe grid, pressing them firmly into the surface.
Step 3: Adding Starry Details
-
Paint the dots:
Using the handle end of a paintbrush or a dotting tool, dip it into white paint and stamp three distinct dots in the center of the empty squares (or wherever you prefer decoration). -
Detail the pieces:
Once the clay pieces are cool, you can leave them natural for a rustic look or give them a light wash of cream paint if your clay isn’t the right shade. -
Seal the board:
Protect your painted board from scratches by spraying it with a matte or satin sealant. This ensures the dark paint won’t chip during intense gaming sessions. -
Seal the pieces:
While sealing the board, give your moons and stars a quick coat as well to keep them looking pristine.
Cosmic Shimmer
Mix a tiny amount of fine glitter into your dark blue base paint to give the board a subtle galaxy effect that sparkles under light.
Now gather a friend and enjoy a game under the stars you created yourself

TRACK YOUR CERAMIC JOURNEY
Capture glaze tests, firing details, and creative progress—all in one simple printable. Make your projects easier to repeat and improve.
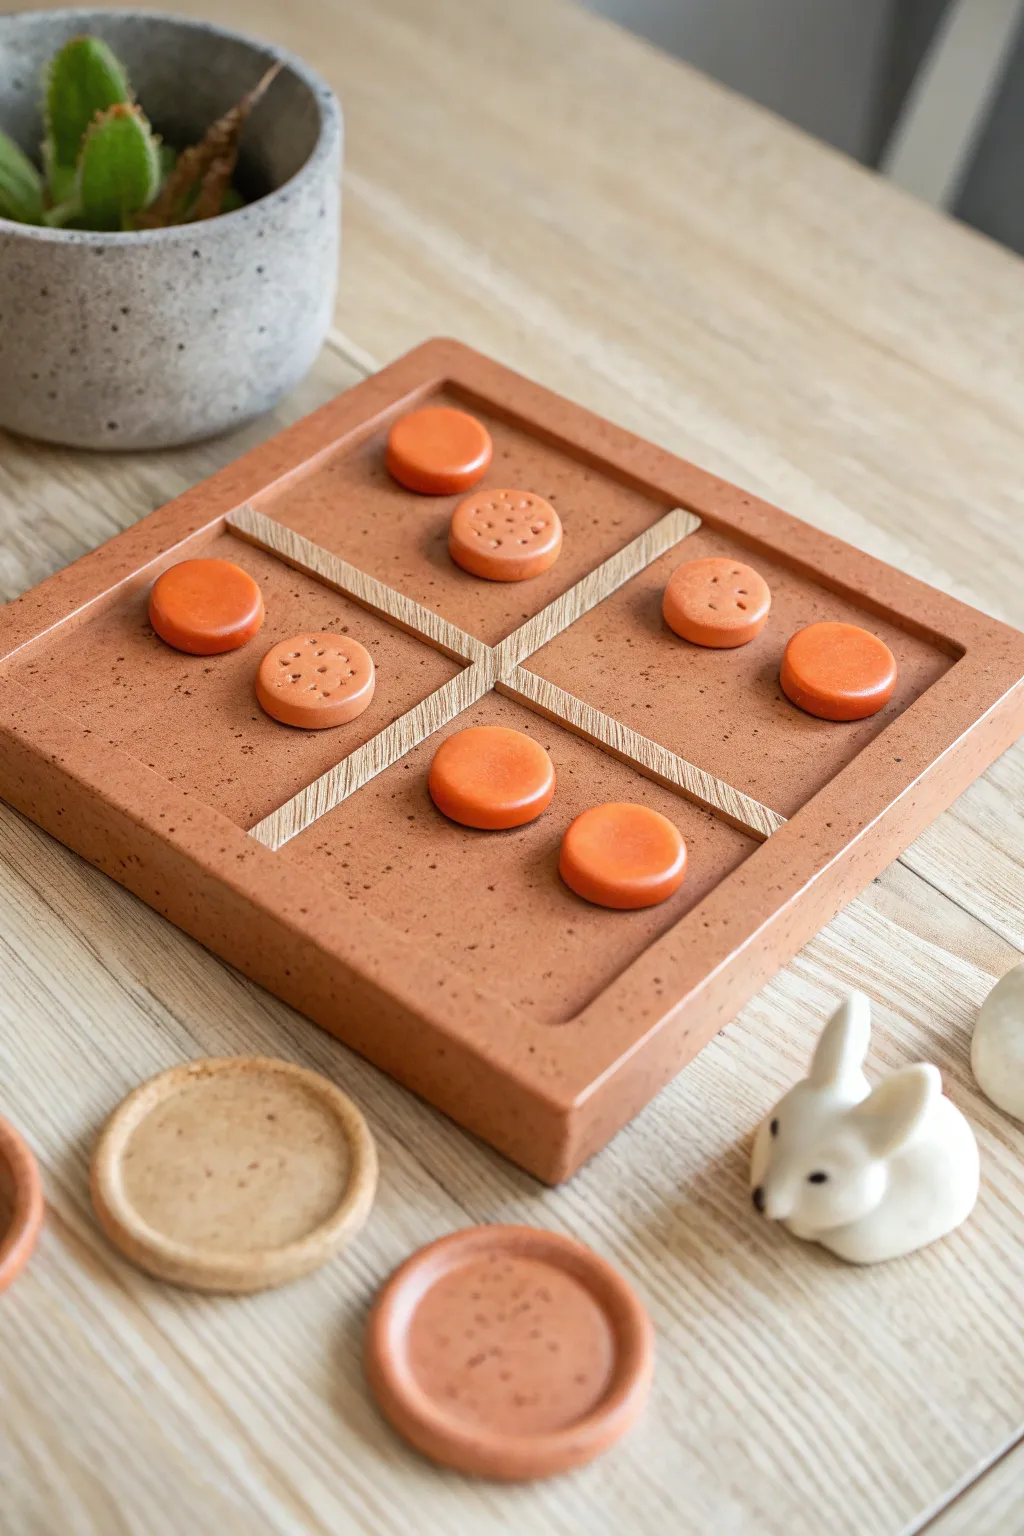
Modern Abstract: Blobs vs. Cubes in Two Colorways
Elevate your game night with a sleek, sculptural take on the classic tic-tac-toe. This project combines smooth, concrete-like textures with warm terracotta tones for a statement piece that doubles as modern decor.
Step-by-Step Guide
Materials
- White or grey air-dry clay (stone effect optional)
- Terracotta colored polymer clay
- Rolling pin
- Square cookie cutter (approx. 1 inch)
- X-Acto knife or clay blade
- Ruler
- Fine grit sandpaper (320-400 grit)
- Matte acrylic sealant spray
- Acrylic paint (charcoal grey or black)
- Small flat paintbrush
- Sculpting tool with rounded end
Step 1: Designing the Base
-
Prepare the slab:
Start by conditioning your white or grey air-dry clay until it’s pliable. Roll it out into a large, even square slab, approximately 3/4-inch thick. You want a substantial weight for the base to mimic real stone. -
Shape the board:
Cut the slab into a perfect square, roughly 8×8 inches, or whatever size accommodates four of your 2×2 grid squares. Smooth the cut edges with a little water on your finger to round them off gently. -
Mark the grid lines:
Using a ruler, lightly press a long cross into the center of the board to divide it into four large quadrants. Don’t cut all the way through; just create a distinct channel about 1/8-inch deep. -
Create the play zones:
Within each of the four quadrants, you need to create the recessed areas where the tiles will sit. Press a smaller square object or template into the clay to create indentation guides, leaving a raised border around the edge of each quadrant. -
Refine the recesses:
Carefully carve out or compress the clay within these four square zones to make them slightly lower than the main surface level. -
Detail the inner grids:
Inside each of the four recessed zones, use your knife to score a smaller cross. This visual detail mimics the separation of the tiles we will make later. -
Initial drying:
Set the base aside on a wire rack to dry. Since it is thick, I recommend letting this dry for at least 48 to 72 hours, flipping it occasionally to prevent warping.
Stone effect simplified
Mix dried used coffee grounds or black pepper into your white clay before rolling. This adds instant speckles and texture for a convincing faux-granite look without painting.
Step 2: Crafting the Tiles
-
Roll the terracotta clay:
While the base dries, switch to your terracotta polymer clay. Condition it well and roll it out to a uniform thickness, about 1/4-inch. -
Cut the squares:
Using your square cutter, punch out 16 identical squares. These will form the ‘cube’ aspect of the board design. -
Soften the edges:
Gently tap the sharp edges of each square against your work surface or smooth them with a finger to create that soft, tumbled stone look seen in the photo. -
Make the blobs:
For the playing pieces, take remaining clay (or use contrasting white and terracotta colors as shown) to form small spheres. Flatten them slightly with your thumb to create organic ‘blob’ markers. -
Bake the components:
Bake the polymer clay squares and the round playing pieces according to the package instructions (usually 275°F for 15-30 minutes). Let them cool completely.
Dual-purpose design
Add small felt pads to the bottom of the board. This protects your table and makes the heavy piece easier to slide or rotate during intense matches.
Step 3: Assembly and Finish
-
Sand the base:
Once the air-dry base is bone dry, use fine-grit sandpaper to smooth out any rough texture on the surface and edges. Wipe away the dust with a barely damp cloth. -
Paint the divider lines:
Take your charcoal grey paint and a very fine brush. Carefully paint the deep grooves of the main central cross and the inner crosses within the quadrants to add depth and definition. -
Place the tiles:
Test fit your baked terracotta squares into the four recessed zones on the base. They should sit neatly in 2×2 formations. -
Glue the tiles:
Apply a strong adhesive or super glue to the back of each terracotta square and press them permanently into place on the board. Ensure the painted grid lines remain visible between them. -
Seal the artwork:
Finish the entire piece, including the loose round playing markers, with a coat of matte acrylic spray sealant. This protects the clay and unifies the sheen of the different materials.
Display your new architectural game board on a coffee table where its geometric shadows can shine
Textured Board: Carved Patterns Inside Each Grid Square
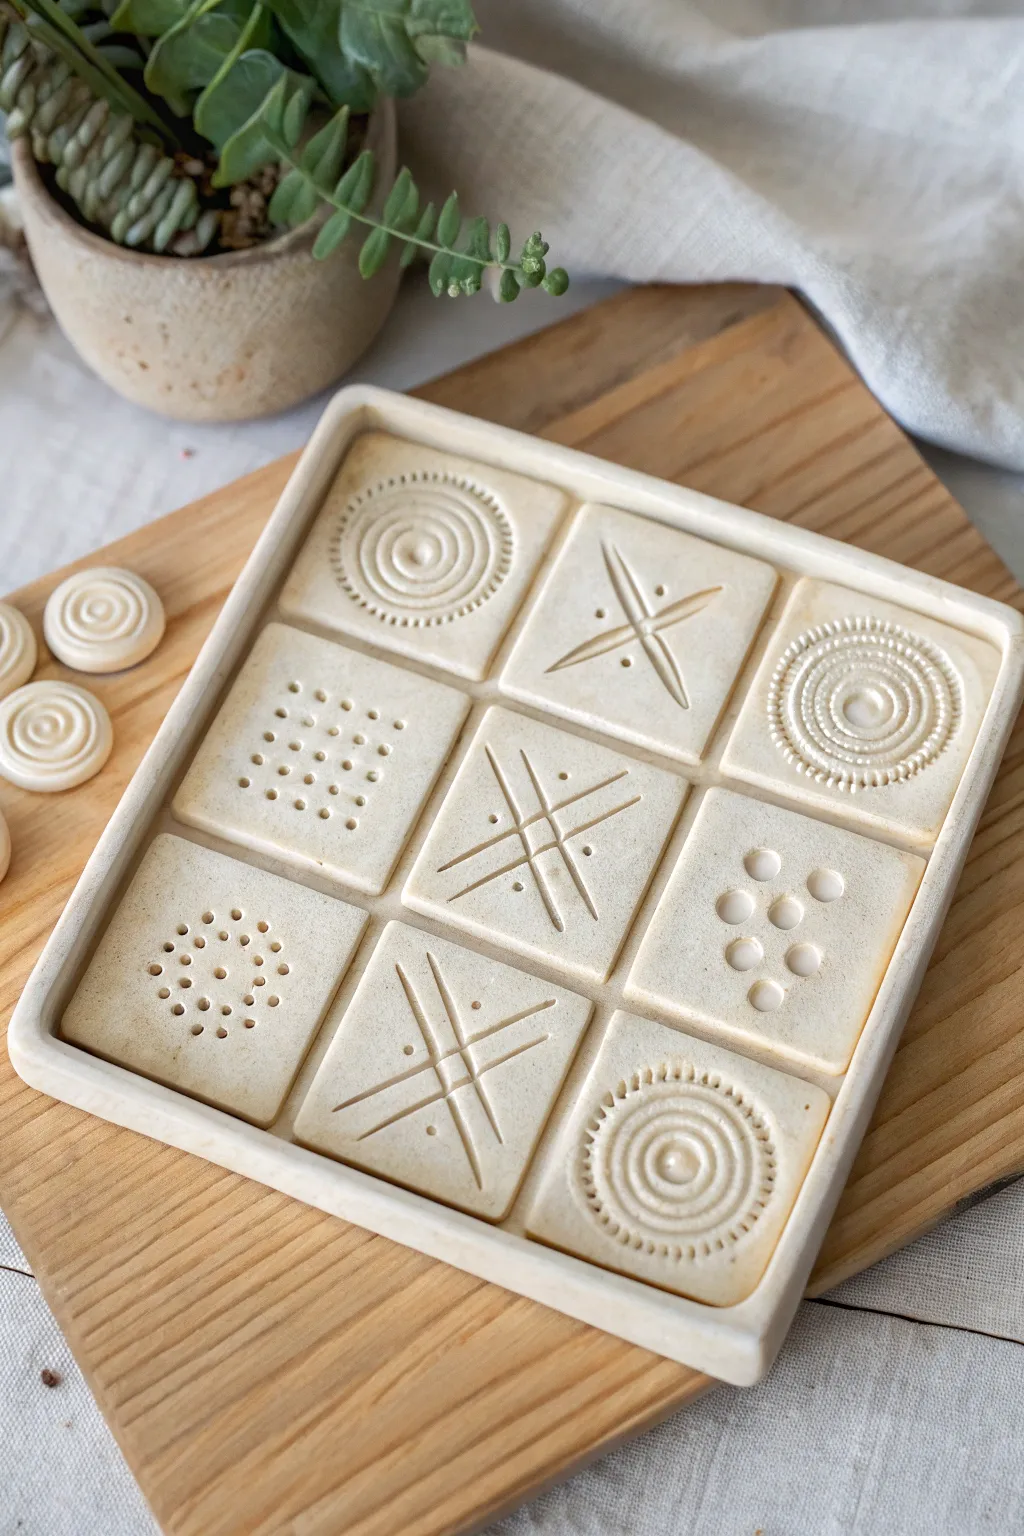
This elegant take on the classic game elevates a simple pastime into a modern decor piece, featuring a nine-grid tray filled with beautifully textured square tiles. The monochromatic cream finish highlights the intricate geometric carvings, creating a tactile and visual delight for players of all ages.
How-To Guide
Materials
- Light-colored polymer clay or air-dry clay (approx. 1 lb)
- Square cookie cutter (approx. 2 inches)
- Rolling pin with depth guides (1/4 inch)
- Small circular texture tool or straw tip
- Detail needle tool or craft knife
- Ceramic tile or glass sheet (for a flat work surface)
- Ruler
- Fine-grit sandpaper
- Matte spray varnish (optional)
Step 1: Creating the Board Base
-
Prepare the Clay Slab:
Begin by conditioning your clay until it is soft and pliable, ensuring there are no air bubbles trapped inside. Roll it out on your work surface using depth guides to create a uniform slab that is roughly 1/4 inch thick. -
Cut the Base Shape:
Using a ruler and a craft knife, cut a large square plain slab that will serve as the bottom of your tray. It needs to be large enough to hold a 3×3 grid of your smaller squares, plus a rim, so calculate roughly 7×7 inches depending on your cookie cutter size. -
Form the Rim:
Roll a long snake of clay and flatten it slightly to create the side walls. Score and slip (if using air-dry clay) or use liquid clay (if using polymer) to attach this strip around the perimeter of your base square, smoothing the seams so the transition is seamless. -
Refine the Edges:
Use your fingers or a smoothing tool to round over the top edges of the rim slightly for a softer, more finished look.
Step 2: Sculpting the Tiles
-
Cut the Playing Squares:
Roll out a fresh slab of clay to the same 1/4 inch thickness. Use your square cookie cutter to punch out nine identical tiles. Place them gently on your work surface so they don’t warp. -
Design the Spiral Pattern (O’s):
For the first set of patterns (representing the O’s), take five of the squares. Press a small circular object into the center to make a central dot. -
Add Spiral Details:
Use a needle tool or small stylus to gently carve concentric circles expanding outward from that center dot. Finish the outer edge by stamping a ring of tiny dots using the tip of a toothpick or a small hollow tool to create a ‘stitched’ look. -
Design the Geometric Cross Pattern (X’s):
For the remaining four squares, use a straight edge to lightly impress a large X shape that spans from corner to corner. -
Enhance the X Design:
Parallel to your initial X lines, carve deeper grooves to define the cross shape more boldly. I find that adding a small dot in the empty triangular spaces between the arms of the X adds a nice sophisticated touch. -
Create the Dot Grid Pattern (Alternate):
If you prefer variety like in the photo, replace a few X squares with a dot grid. Simply use a blunt tool to press a 4×4 or 5×5 grid of indentations evenly across the tile surface. -
Make the Playing Pieces:
Roll small balls of leftover clay and flatten them into discs about the size of a quarter. Stamp them with a simple spiral pattern to use as the moveable game pieces.
Clean Lines Tip
Place a piece of plastic wrap over the clay before cutting with cookie cutters. This creates a soft, beveled edge instantly and saves you time on sanding later.
Step 3: Finishing Touches
-
Initial Drying/Baking:
Follow the instructions for your specific clay type. If baking polymer clay, place the tiles and board on a ceramic tile to ensure they stay perfectly flat in the oven. -
Sand for Smoothness:
Once fully cured or dry, inspect the edges. Use fine-grit sandpaper to gently buff away any sharp corners or rough spots on the rim of the tray and the sides of the tiles. -
Clean Up Dust:
Wipe all pieces down with a slightly damp cloth to remove any sanding residue, ensuring the carved crevices are clean. -
Seal the Project:
To protect the white surface from fingerprints and playing wear, apply a light coat of matte spray varnish. Let it dry completely in a well-ventilated area before assembling the game.
Make It Magnetic
Embed small neodymium magnets into the back of the tiles and the base board before drying. This makes the game travel-friendly and holds pieces in place securely.
Place the textured tiles into the tray grid and enjoy a timeless game that looks beautiful even when no one is playing
Self-Contained Travel Set With Built-In Piece Storage
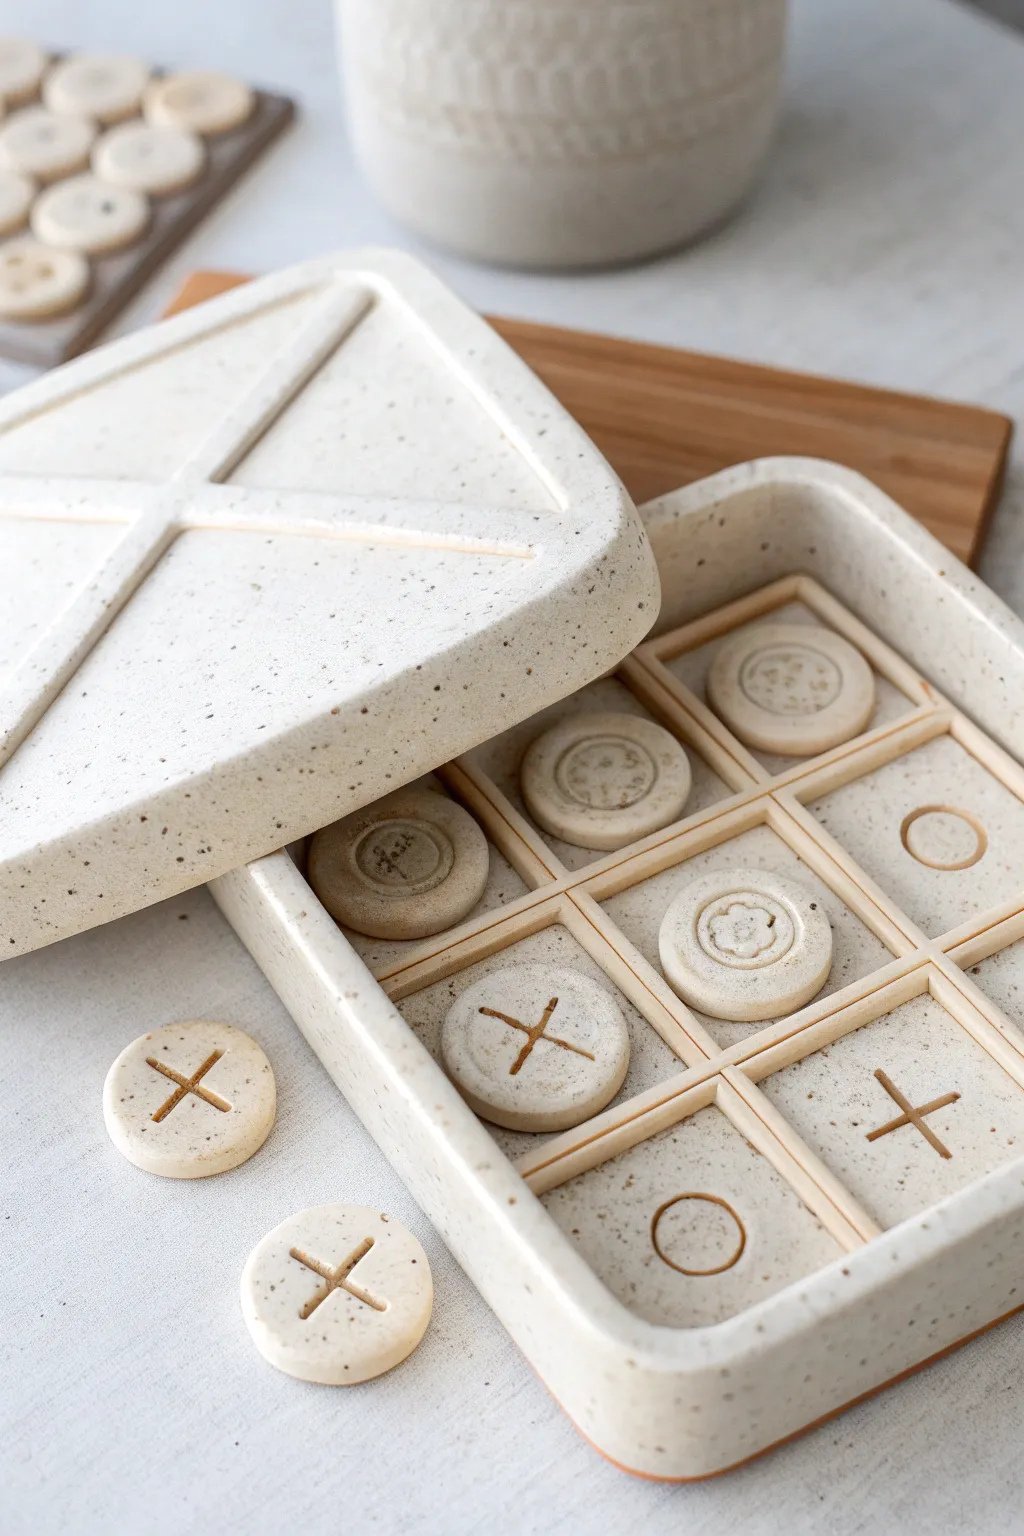
This elegant, travel-ready game set features a clever lid that doubles as a minimalist sculpture and a base with built-in storage. The beautiful speckled clay finish mimics natural stone, making this handmade piece sturdy enough for road trips yet stylish enough for your coffee table.
Step-by-Step
Materials
- Speckled polymer clay (e.g., ‘Granite’ or ‘Stone’ effect)
- Acrylic rolling pin
- Square clay cutters (two sizes) or a craft knife and ruler
- Balsa wood strips or thin dowels (approx. 1/8 inch thick)
- Round cookie cutter (approx. 1 inch diameter)
- Clay sculpting tools (needle tool, ball tool)
- Sandpaper (various grits)
- Strong craft glue or E6000
- Ruler
- Cornstarch (for release)
- Oven (if using polymer clay)
Step 1: Creating the Box Base
-
Roll the base slab:
Start by conditioning your speckled clay until it is pliable. Roll out a thick, even slab about 1/4 inch thick to ensure the box is sturdy. Cut a 5×5 inch square (or your desired size) to serve as the floor of the box. -
Form the walls:
Roll out long strips of clay, keeping them slightly thicker than the base for stability. Cut four strips that match the length of your base sides and stand about 1.5 inches tall. -
Assemble the box:
Attach the wall strips to the top of the base slab, not the sides, to create a strong seam. Score the clay surfaces and use a little liquid clay or water (depending on your clay type) as ‘slip’ to bond them. Smooth the seams inside and out with a modeling tool so they are invisible. -
Refine the shape:
Gently press the corners to round them off slightly, giving the piece a softer, organic stone look. Use your finger dipped in cornstarch to smooth the top rim of the walls until it’s perfectly flat.
Seamless Smoothness
Use baby oil on your fingertips while smoothing the clay seams. It melts the clay slightly, erasing fingerprints and blending joints perfectly.
Step 2: Sculpting the Geometric Lid
-
Cut the lid slab:
Roll another slab of clay, slightly larger than your box base to account for a small overhang. Cut it into a square with rounded corners that matches the footprint of your box. -
Add the lip:
Flip the lid upside down. Roll a thin snake of clay and attach it in a square shape slightly smaller than the perimeter of the lid. This lip will sit inside the box walls to keep the lid secure during travel. -
Create the X relief:
Flip the lid right-side up. Roll two long, thick snakes of clay. Lay them diagonally across the lid to form a large ‘X’ that spans from corner to corner. Press them down firmly to adhere. -
Shape the relief:
Use your fingers to pinch and flatten the ‘X’ snakes, blending the edges smoothly into the lid surface so it looks like a raised relief rather than an added piece. I like to keep the center of the X slightly higher for visual interest.
Wall Stability
If your box walls sag while you work, support the inside with a square of cardstock or crumpled foil until the clay is firm enough to bake or dry.
Step 3: Making the Playing Pieces
-
Cut the tokens:
Roll a slab of clay to 1/4 inch thickness. Use your small round cutter to punch out at least 10 circles (5 for X, 5 for O). -
Detail the X pieces:
For the X team, use a needle tool or a small knife to carve strictly straight, intersecting lines deep into the clay surface. Widen the cut slightly so the design is visible from a distance. -
Detail the O pieces:
For the O team, press a smaller circle cutter or a cap gently into the center of the token to create an indented ring. Alternatively, you can stamp flower or swirl patterns for a unique twist. -
Bake or dry:
Follow manufacturer instructions to bake (for polymer) or dry the box, lid, and pieces. If baking, tent with foil to prevent scorching the stone effect.
Step 4: Assembly and Finishing
-
Sand for stone texture:
Once fully cured and cooled, sand the outside of the box and lid with medium-grit sandpaper. This removes fingerprints and enhances the matte, stone-like texture. -
Cut the wooden grid:
Measure the interior width of your box. Cut two strips of balsa wood to span perfectly across the width. Then, cut roughly four shorter pieces to fit perpendicularly between the long strips and walls. -
Install the grid:
Arrange the wood strips inside the box to form a 3×3 grid. Use a small dab of strong craft glue at each intersection and where the wood meets the clay walls to secure the layout permanently. -
Final test:
Place your clay tokens into the grid compartments to ensure they fit comfortably. Close the lid to verify the inner lip fits snugly.
Now you have a chic, durable game set ready to entertain you on your next adventure
Magnetic-Style Concept: Peg-In Pieces for No-Slip Play
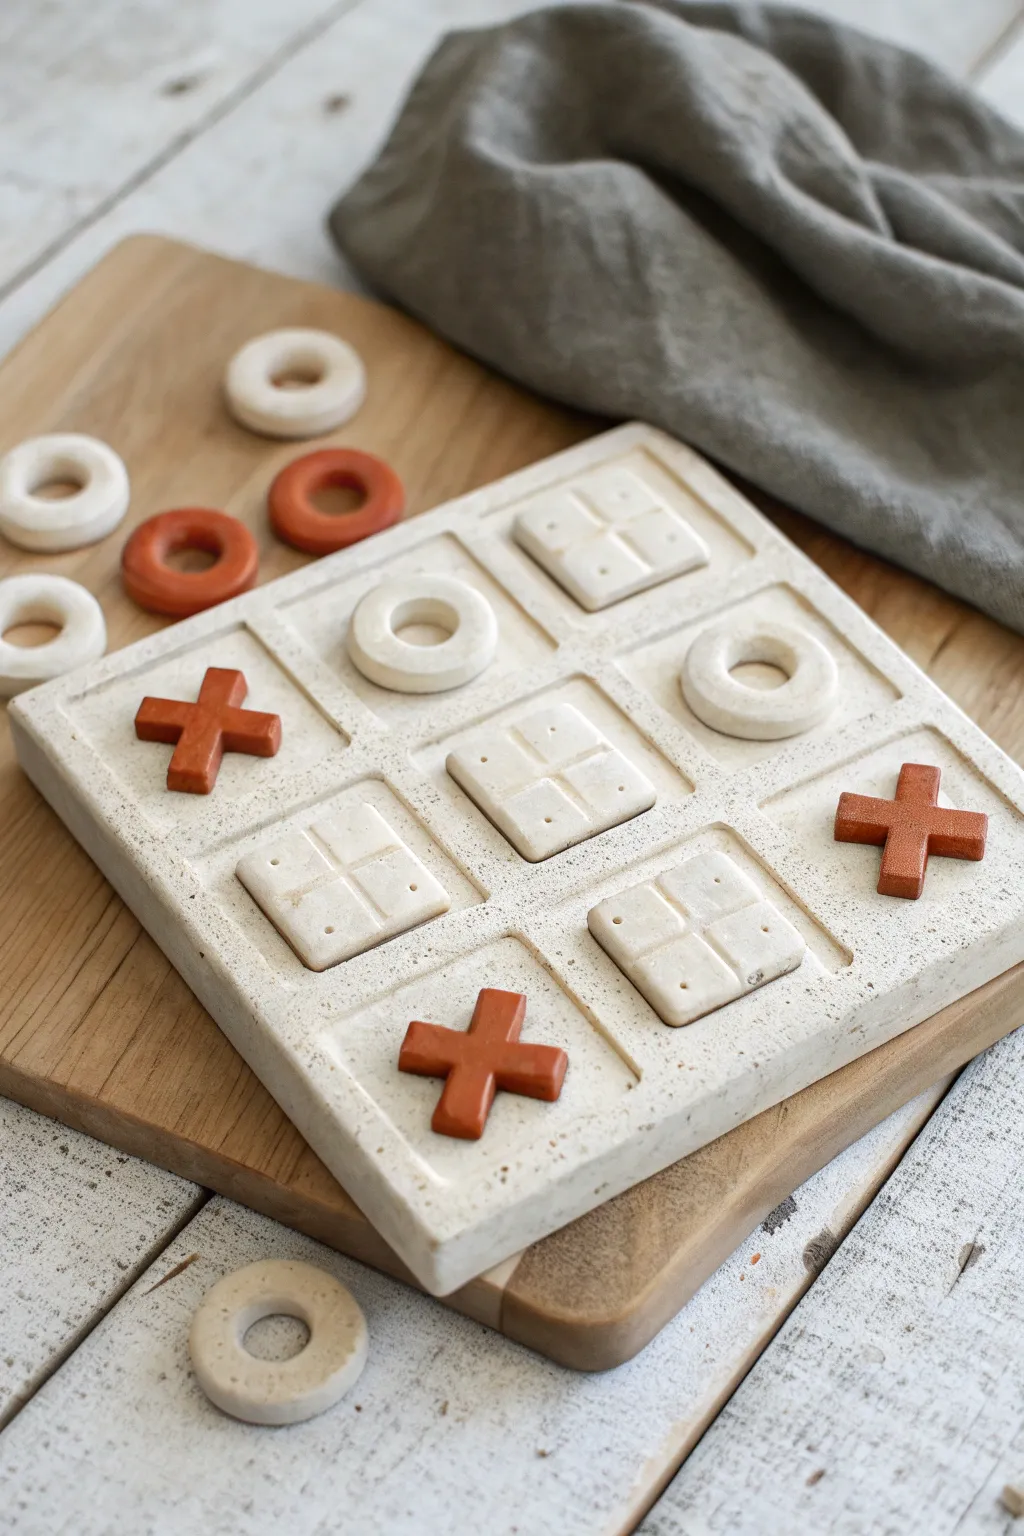
Create a stunning, tactile game board that mimics the look of speckled limestone with warm terracotta accents. This project uses no-slip recessed squares and chunky clay pieces for a set that feels as good to hold as it does to play.
How-To Guide
Materials
- Air-dry clay (white or cream)
- Speckled clay additive or coarse sand/coffee grounds
- Rolling pin
- Square cookie cutter (approx. 2 inches)
- Small circle cutter (approx. 1.5 inches)
- Ruler
- Craft knife or clay blade
- Acrylic paints (terracotta/burnt sienna, sealant)
- Sandpaper (fine grit)
- Modeling tool or dull pencil
- Water in a small cup
Step 1: Preparing the Faux-Stone Clay
-
Mix the texture:
Start by conditioning your white air-dry clay. To achieve that organic, speckled stone look seen in the photo, knead in a small amount of coarse sand or dried coffee grounds. Fold the clay repeatedly until the speckles are evenly distributed throughout the batch. -
Create the base slab:
Roll out a large slab of your textured clay to a thickness of about 3/4 inch. You want this base to be substantial and heavy. Cut a perfect square, approximately 8×8 inches, using a ruler and craft knife to ensure sharp, clean edges.
Natural Speckling
For the most realistic stone look, use coarse black pepper instead of sand. It mimics granite flecks perfectly and won’t affect the clay’s structural integrity.
Step 2: Sculpting the Grid
-
Mark the grid lines:
Lightly score the surface of your square slab to divide it into nine equal sections. Don’t cut all the way through; these are just guidelines for where your playing spaces will go. -
Form the raised platforms:
For this unique ‘peg-in’ style, you need to create the raised squares inside the grid. Roll out a thinner slab (about 1/4 inch) and cut nine identical squares that are slightly smaller than your grid sections. -
Detail the platforms:
Take your nine small squares and use a ruler or blade to impress a cross-hatch or window-pane pattern onto the surface of each one. Deeply press a small dot or hole into the center of each quadrant for added texture. -
Attach the platforms:
Score the back of each textured square and the center of each grid space on the main board. Apply a little water or slip (liquid clay) and press the squares firmly into the center of each grid space. Secure the edges with a modeling tool so they look integrated. -
Build the dividers:
Roll thin ‘snakes’ of clay and place them along the original grid lines you scored earlier. Flatten them slightly to create raised dividers between the square platforms, creating a recessed feel for the playing spots. Smooth these dividers into the main slab.
Step 3: Creating the Game Pieces
-
Cut the O pieces:
Roll out fresh clay to about 1/2 inch thick of thickness. Use your medium circle cutter to punch out five circle shapes. Use a much smaller cutter to remove the centers, creating thick ring shapes. -
Shape the X pieces:
Roll another slab of the same thickness. Cut strips of clay and form them into five ‘X’ shapes. Join the cross-sections by scoring and adding a drop of water, smoothing the seams so they don’t crack during drying. -
Smooth the edges:
Dip your finger in water and run it along the edges of all your X and O pieces to round them off. This soft, tumbled look is key to the aesthetic.
Warping Woes
If the corners of your main board curl up while drying, gently weigh them down with books placed on top of parchment paper during the first day of drying.
Step 4: Finishing and Assembly
-
Slow drying phase:
Place the board and pieces on a wire rack or mesh screen. Cover them loosely with plastic wrap for the first 24 hours to prevent warping, then uncover and let them dry completely for another 24-48 hours. -
Sand for stone effect:
Once bone dry, lightly sand the surface of the board and the O pieces. This will expose more of the mixed-in speckles and enhance the limestone texture. -
Paint the X pieces:
Mix a terracotta or burnt sienna acrylic paint with a tiny bit of water. Paint only the X pieces, giving them a warm, earthen clay look that contrasts with the pale board. -
Seal the set:
Apply a matte varnish or sealant over the entire board and all pieces. This protects the clay from moisture and dirt while maintaining that natural, non-glossy stone appearance.
Now you have a beautiful, sculptural game set ready for display on your coffee table
Statement Board: Sculpted Frame That Matches the Piece Theme

Elevate your coffee table décor with this sophisticated take on a classic game, featuring a hand-sculpted clay board with delicate botanical carvings. The creamy, stone-like finish and raised frame give it the appearance of an heirloom architectural tile.
Step-by-Step
Materials
- White or cream-colored air-dry clay (approx. 1kg)
- Non-stick rolling pin
- Square template (cardboard or sturdy paper)
- Ruler
- Needle tool or X-Acto knife
- Carving tools (small U-gouge and V-gouge)
- Sponge and water
- Fine-grit sandpaper (220 and 400 grit)
- Matte sealant or water-based polyurethane
- Clay cutting wire
Step 1: Forming the Base
-
Prepare the slab:
Begin by conditioning your clay and rolling out a thick, even slab. Aim for a thickness of about 3/4 inch to 1 inch to give the board a substantial, stone-like weight. -
Cut the square:
Place your square template over the slab and cut around it using a sharp blade or needle tool to ensure straight, crisp edges. A 7×7 or 8×8 inch square works well for a standard game. -
Smooth the foundation:
Dip a sponge lightly in water and run it over the surface and cut edges to remove any loose clay bits or texture from the rolling pin.
Warping Woes?
If the board edges curl up while drying, flip the board over and weigh it down gently with a heavy book placed on a towel for a day.
Step 2: Sculpting the Grid and Frame
-
Mark the frame:
Use a ruler to lightly impress a square border about 1 inch inward from the outer edge. This area will become your decorative frame. -
Define the grid:
Inside the frame, measure and mark a 3×3 grid. Using a U-gouge tool or a flat modeling tool, press or carve down the lines between the grid squares to create recessed channels. -
Refine the grid channels:
Deepen the grid lines until the nine playing squares appear raised. Smooth the bottom of these channels with a slightly damp brush or your finger. -
Add the ‘X’ detail:
At the top center of the frame, use a knife or small sculpting tool to carve a simple, deep ‘X’ mark as a focal point. -
Sketch leaf guides:
Very lightly scratch a curved line running along the center of the frame borders. This will serve as the stem for your leaf pattern.
Step 3: Carving the Botanical Details
-
Carve the leaves:
Using a V-gouge or a needle tool held at an angle, carve small almond shapes branching off your guide line. Press deeper at the base of the leaf and lift as you move outward. -
Mirror the pattern:
Ensure the leaves on opposite sides of the frame mirror each other for symmetry. I find it helpful to rotate the board frequently so my hand angle stays consistent. -
Create the veins:
Inside each carved leaf shape, make a tiny, shallow incision down the center to suggest a vein, adding realistic texture. -
Softening the edges:
Once the carving is complete, gently tap down any sharp clay burrs with a soft, dry brush. Don’t use water here, or you might wash away the crisp details.
Luxurious Texture
Mix a tiny amount of speckled sand or dried tea leaves into your clay before rolling for a faux-granite or limestone appearance.
Step 4: Creating the Game Pieces
-
Roll small coils:
Roll out a long, thin snake of clay. Cut it into equal segments to form the rings for the ‘O’ pieces. -
Form the rings:
Loop the segments into circles, blending the seam smoothly. Gently press them flat precisely so they don’t roll away. -
Make the centers:
Create small, flat discs of clay that fit inside the rings but are slightly thinner, creating a two-tone depth effect when assembled.
Step 5: Finishing Touches
-
Slow drying:
Place the board on a wire rack away from direct heat. Cover it loosely with plastic wrap for the first 24 hours to prevent warping, then let it air dry completely for 2-3 days. -
Sanding:
Once bone dry, sand the flat surfaces of the playing squares and the outer edges with 220-grit sandpaper, finishing with 400-grit for a silky touch. -
Sealing:
Apply two thin coats of matte sealant to protect the clay from oils and dirt while maintaining that natural, unglazed stone aesthetic.
Place your finished board on a linen cloth to highlight its natural elegance and enjoy a stylish game night