If you’ve got a simple slab of clay, you’ve already got the start of a seriously satisfying little art piece: a tile. These clay tile design ideas are the kinds of projects I love because you can keep them beginner-simple or layer on detail until they feel like tiny wall-worthy sculptures.
Classic Sunflower Relief Tile
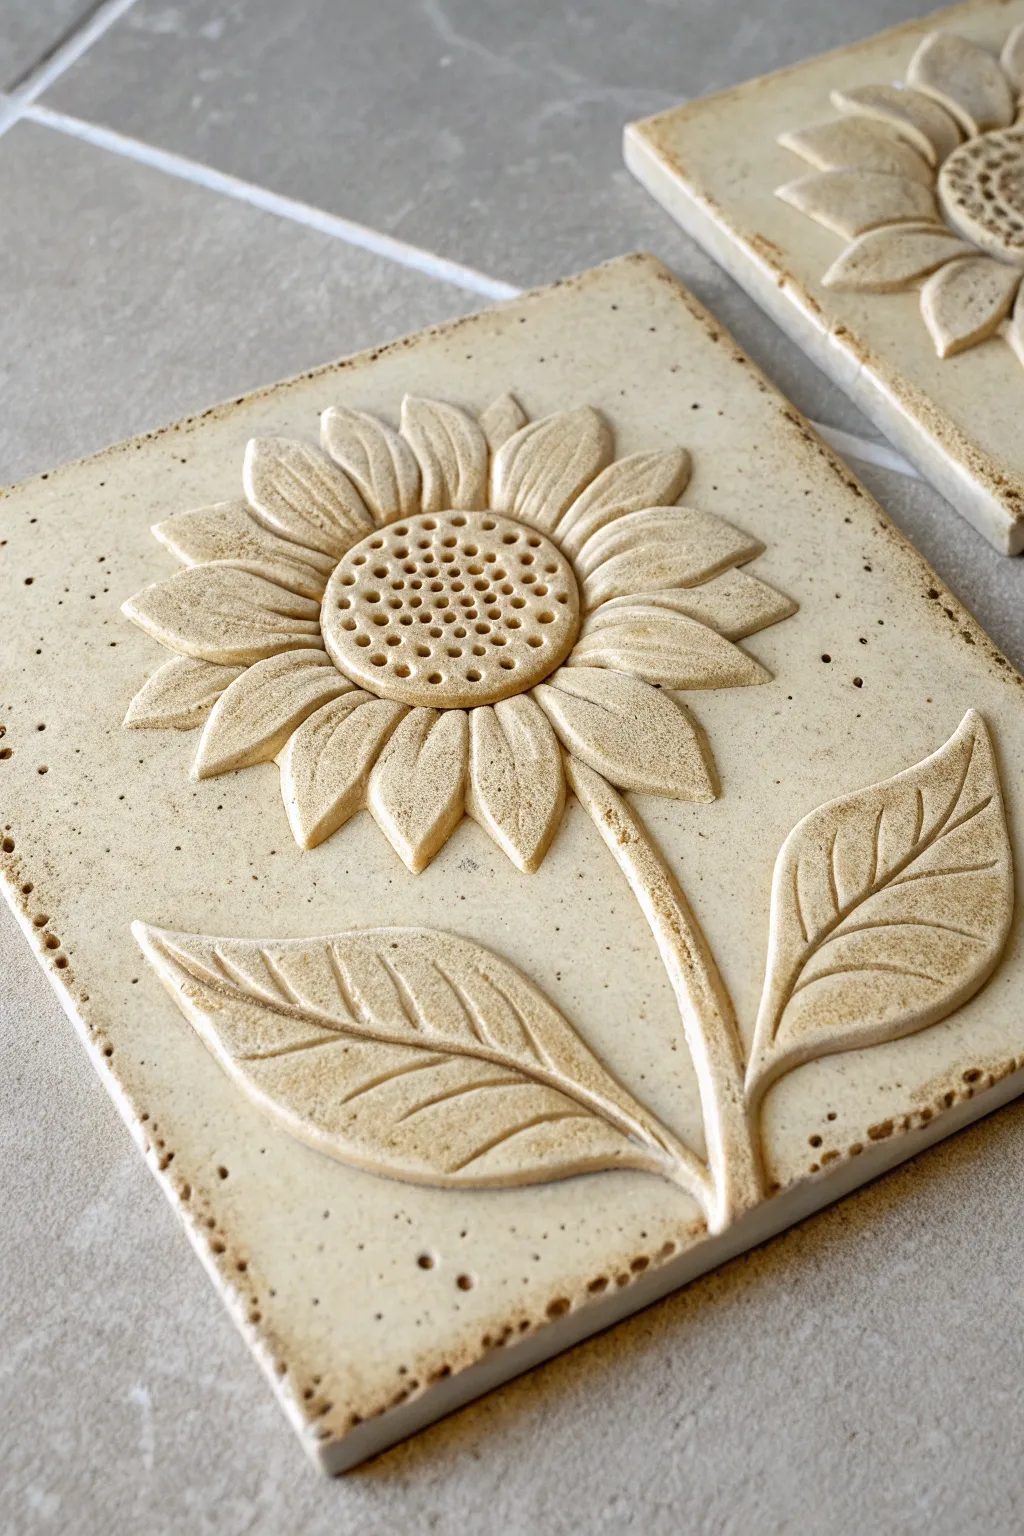
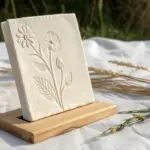
Capture the warmth of late summer with this charming ceramic relief tile, featuring a prominent sunflower design that rises from the surface. The piece uses a lightly speckled clay body and a textured carving technique to create a timeless, earthy aesthetic perfect for kitchen backsplashes or garden accents.
Step-by-Step Guide
Materials
- Speckled buff stoneware clay (or polymer clay for non-kiln version)
- Square tile cutter or ruler and knife
- Rolling pin
- Two wooden slats (approx. 1/4 inch thick) for thickness guides
- Needle tool
- Loop carving tools (small and medium)
- Small sponge
- Scoring tool or serrated rib
- Slip (liquid clay)
- Canvas work surface
- Brown oxide wash or watered-down brown acrylic paint (for finishing)
Step 1: Preparing the Base
-
Roll the slab:
Begin by wedging your clay to remove air bubbles. Place the clay between your two wooden slats on the canvas surface. Roll the clay out until the rolling pin rides along the slats, ensuring an even quarter-inch thickness across the entire slab. -
Cut the square:
Using a square tile cutter or a ruler and knife, cut out a perfect square. A standard 6×6 inch size works well for this design. Smooth the sharp edges of the square gently with a damp finger to prevent chipping later. -
Smooth the surface:
Take your serrated rib or a smooth kidney tool and compress the surface of the tile. This aligns the clay particles and creates a pristine canvas for your relief work.
Crack Prevention
Tiles warp if they dry unevenly. Flip the tile carefully onto a drywall board or wooden bat and dry it slowly under plastic for at least 3-4 days before firing.
Step 2: Sculpting the Sunflower
-
Sketch the outline:
Very lightly trace the basic shape of the sunflower onto the clay using a needle tool. Draw a central circle for the seed head and mark out where the petals will radiate, leaving room at the bottom for the stem and leaves. -
Add the center:
Roll a small ball of clay and flatten it into a disc slightly smaller than your sketched center circle. Score the back of the disc and the center of the tile, apply a dab of slip, and press the disc firmly into place. -
Texture the seeds:
Using the tip of a small round tool or a blunt needle, press distinct holes into the center disc. Start from the outer edge of the disc and spiral inward to mimic the natural growth pattern of sunflower seeds. -
Form petal shapes:
Roll small coils of clay and flatten them into teardrop shapes for the petals. You will need roughly 12-15 petals for the main layer. Vary their sizes slightly for a more organic look. -
Attach the petals:
Score and slip the area surrounding the center disc. Attach the petals in a radial pattern, overlapping them slightly. Press down firmly at the base of each petal where it meets the center to ensure a strong bond. -
Define petal details:
Use a modeling tool to press a central vein or groove down the length of each petal. Gently curl the tips of a few petals upward or downward to give the flower movement and life. -
Create the stem:
Roll a long, thin coil for the stem. Score a path from the flower head to the bottom edge of the tile. Attach the coil using slip, smoothing the edges down so it looks integrated rather than just stuck on.
Go Bigger
Make a set of four tiles where the stem and leaves continue across the edges, creating a larger mural image when the four tiles are installed together.
Step 3: Refining and Leaves
-
shape the leaves:
Hand-shape two large leaves from flat slabs of clay. They should be roughly diamond-shaped with tapered points. I find it helpful to curve these slightly in my hand before attaching them to give them volume. -
Attach leaves:
Score and slip the spots on either side of the stem where the leaves will sit. Press the leaves onto the tile, blending the stem connection point smoothly into the main stalk. -
Carve leaf veins:
Using a needle tool or a small carving tool, incise the vein patterns into the leaves. Draw a central line and angular veins branching off, pressing deep enough to catch the glaze later. -
Refine the edges:
Go around the entire design with a small, damp sponge or brush. Smooth out any rough fingerprints or sharp bits of clay that might have been created during the attachment process. -
Dry slowly:
Place a piece of plastic loosely over the tile to let it dry slowly. This prevents the added relief pieces from pulling away from the base tile as they shrink.
Step 4: Finishing the Look
-
Bisque fire:
Once bone dry, fire the tile in a kiln to bisque temperature (usually cone 04). If using polymer clay, bake according to the package instructions. -
Apply wash:
Mix a brown oxide wash or watered-down brown acrylic paint. Brush it liberally over the entire textured surface, ensuring it gets into all the seed holes and vein crevices. -
Wipe back:
Using a clean, damp sponge, wipe the surface of the tile. This removes the color from the high points while leaving the dark brown pigment in the recessed areas, highlighting the relief. -
Final fire or seal:
If using ceramic clay, apply a clear matte glaze if desired and fire to maturity. For polymer clay, seal with a matte varnish to protect the surface.
Once fired or sealed, your sunflower tile creates a permanent piece of sunshine ready to brighten any wall


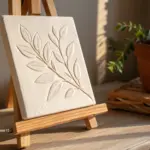
Fern and Leaf Impression Tiles
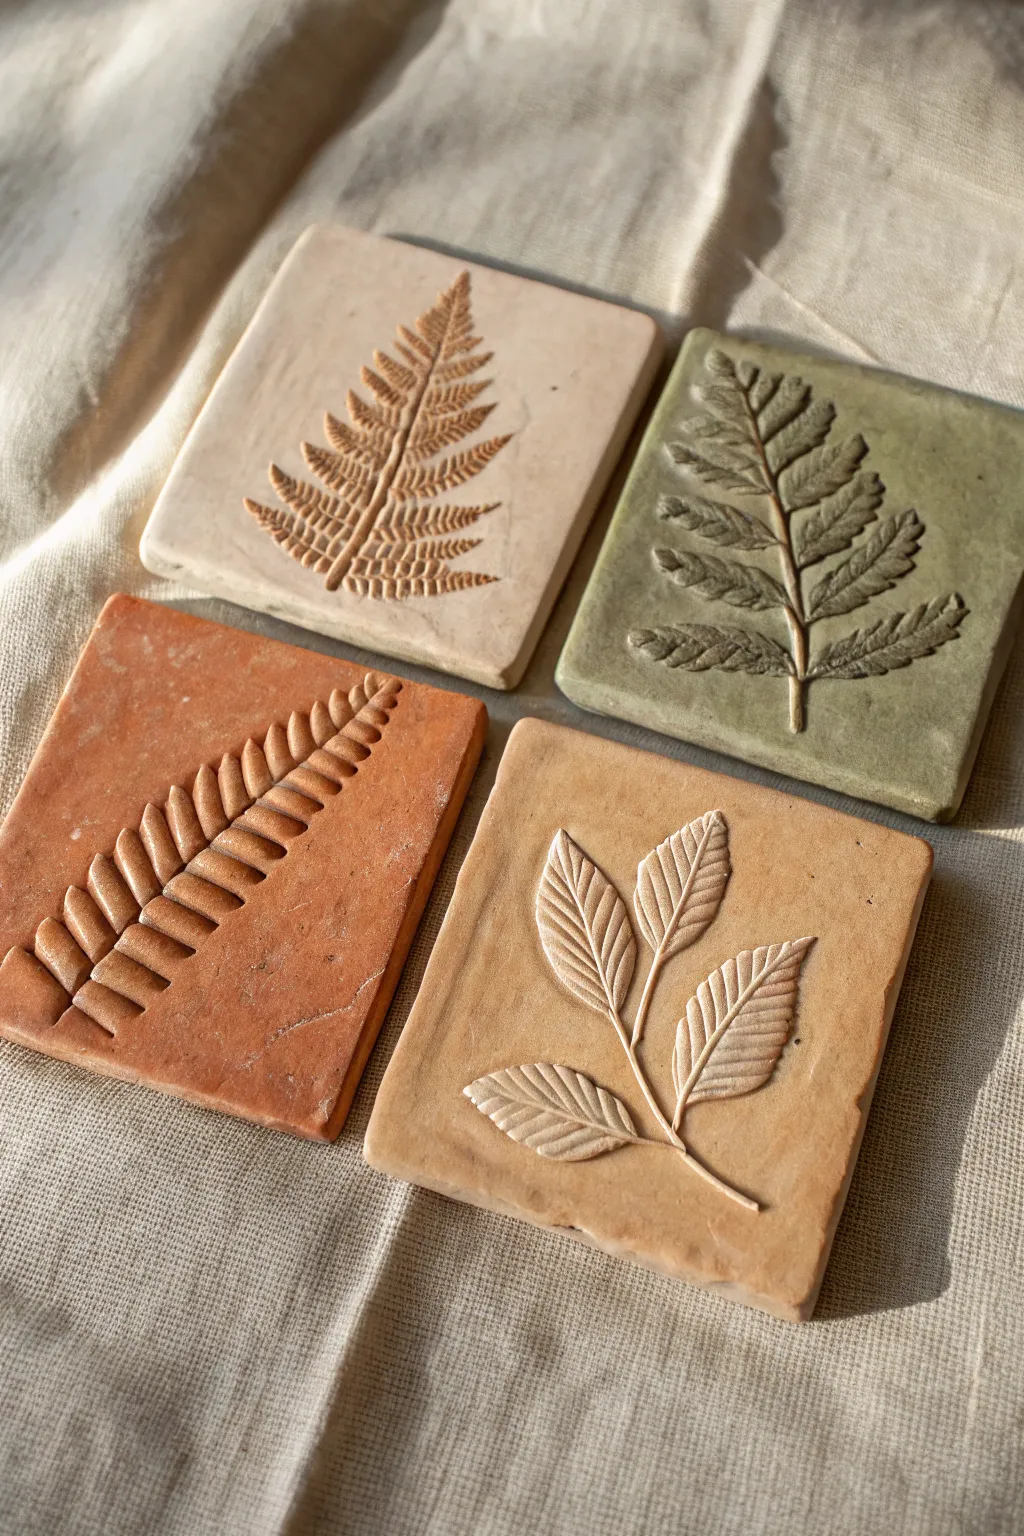
Capture the delicate details of nature with these rustic clay tiles featuring deep botanical impressions. The natural variation in clay bodies—from terracotta to sage green—creates an earthy, organic set perfect for use as coasters or decorative wall accents.
Step-by-Step Tutorial
Materials
- Various colored clays (e.g., stoneware, terracotta, porcelain, or tinted air-dry clay)
- Fresh fern fronds and sturdy leaves with prominent veins
- Rolling pin
- Two wooden guide strips (approx. 1/4 inch thick) or dowels
- Square cookie cutter (approx. 4×4 inches) or a knife and ruler
- Canvas mat or heavy cloth for rolling
- Clean sponge and water
- Pottery rib tool or an old credit card
- Small rolling pin or brayer (optional)
Step 1: Preparation and Rolling
-
Prep the workspace:
Set up your canvas mat on a flat, sturdy surface. This texture prevents the clay from sticking and adds a subtle woven texture to the back of your tiles. -
Wedge the clay:
Take a handful of your chosen clay and wedge it thoroughly to remove air bubbles and ensure a consistent texture. Repeat this for each different clay color you plan to use. -
Set up guides:
Place your wooden guide strips on either side of the clay ball. These will ensure your rolling pin flattens the clay to a perfectly even thickness. -
Roll the slab:
Using the rolling pin, roll the clay out until it rests flat against your guide strips. Make sure the slab is large enough to accommodate your square cutter. -
Smooth the surface:
Take your pottery rib or a damp sponge and gently smooth the surface of the clay slab to remove any canvas marks or imperfections from the rolling process.
Step 2: Creating the Impression
-
Select your botanicals:
Choose leaves that are fresh but sturdy. Ferns work beautifully because of their intricate patterns, but any leaf with thick veins will create a strong impression. -
Position the leaf:
Place the leaf vein-side down onto the smooth slab. I find that pressing the veins down creates a sharper, more defined relief than the top smoothness of the leaf. -
Press gently:
Use your fingers to lightly tack the leaf into place so it doesn’t shift during the main impression step. -
Roll the impression:
Using a small roller or brayer, firmly roll over the leaf. If you don’t have a brayer, the large rolling pin works too—just apply even, firm pressure to embed the plant material flush with the clay surface. -
Peel and reveal:
Use a needle tool or tweezers to carefully lift the stem of the leaf. Slowly peel it back to reveal the intricate impression left behind.
Sticky Leaf Syndrome?
If the leaf sticks to the clay and tears when peeling, the clay is likely too wet. Let the slab sit for 10-15 minutes to firm up slightly before pressing the botanicals into the surface.
Step 3: Cutting and Refining
-
Frame the design:
Position your square cutter over the impression, centering the leaf or angling it diagonally for a dynamic composition. -
Cut the shape:
Press the cutter straight down firmly. Avoid wiggling it, as this can distort the square shape. -
Release the tile:
Remove the excess clay from around the cutter first, then gently release the tile from the cutter. -
Soften the edges:
Dip your finger in a little water and run it along the cut edges of the tile. This smooths out sharpness/burrs and gives it a professional, finished look. -
Check for warping:
Look at the tile from eye level. If the corners have lifted during cutting, gently press them back flat against the board.
Ancient Artifact Look
After the initial firing or drying, rub a dark iron oxide wash or diluted acrylic paint into the grooves of the leaf print, then wipe back the surface to make the veins pop with contrast.
Step 4: Drying and Finishing
-
Slow drying:
Place the tiles on a piece of drywall or a wooden board to dry slowly. Cover them loosely with plastic for the first day to prevent the corners from curling up. -
Monitor moisture:
Flip the tiles over once a day so both sides dry evenly. This is the secret to keeping them perfectly flat. -
Final touches:
Once bone dry, you can lightly sand any rough edges. If using ceramic clay, fire them according to the clay body’s instructions, or seal with varnish if using air-dry clay.
Arrange your finished tiles as a seasonal set or gift them to a nature-loving friend

Vine Border Frame Tile
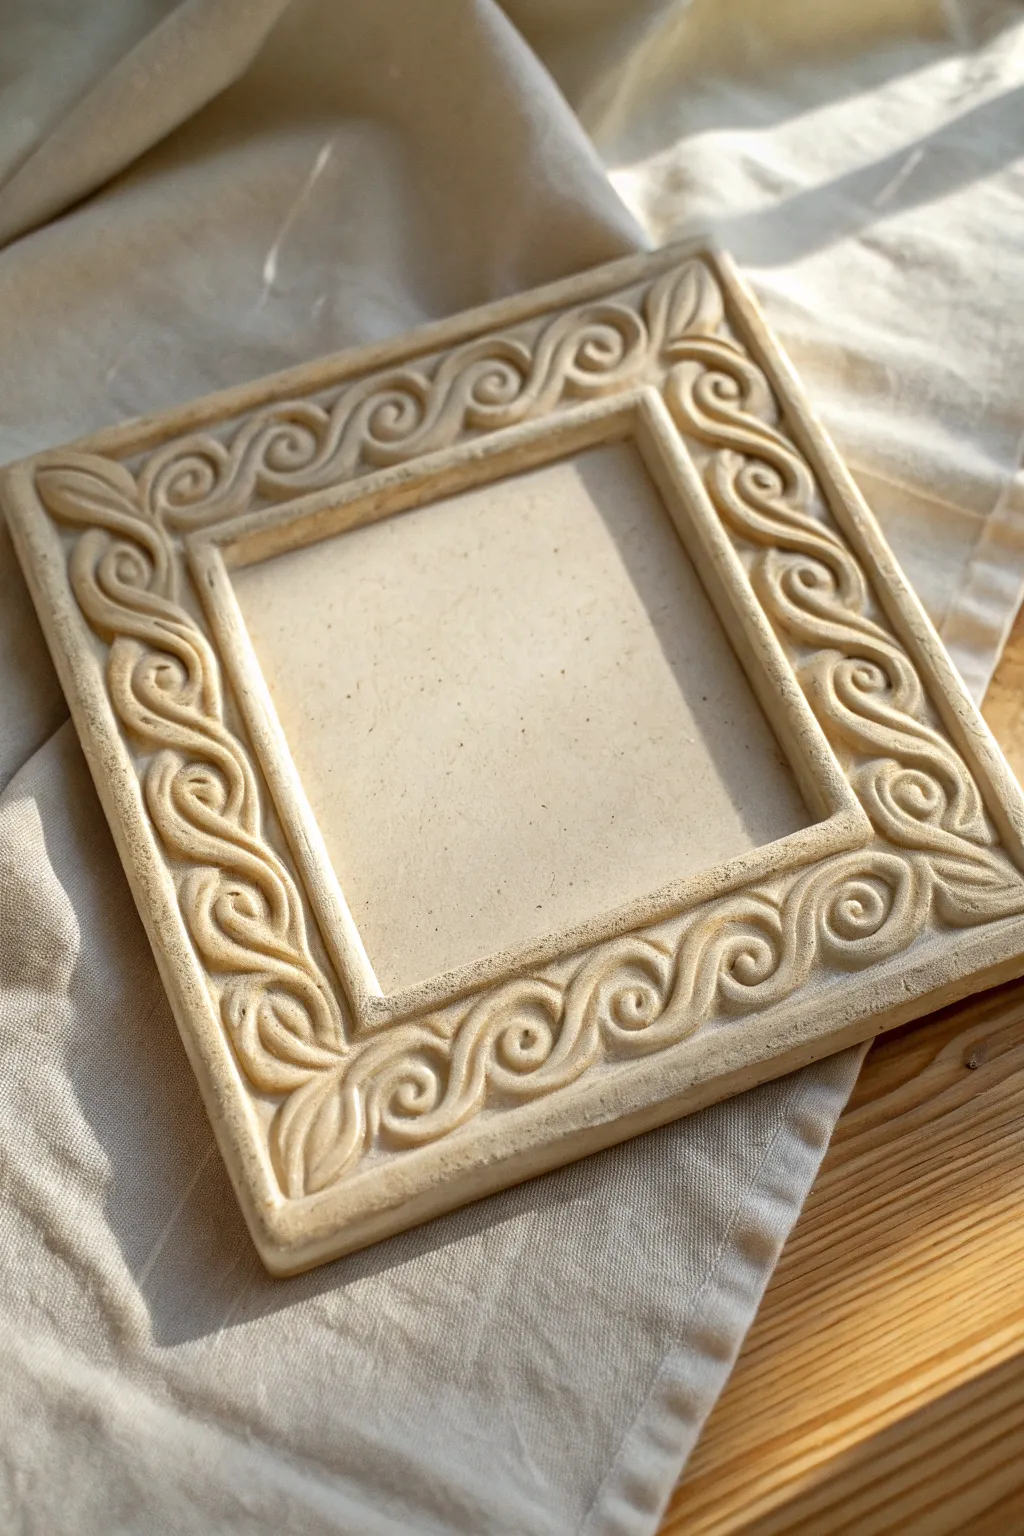
This elegant square tile features a timeless running scroll pattern bordered by delicate corner leaves, evoking ancient architectural friezes. The finished piece has a soft, matte stone-like texture that makes it perfect as a standalone décor object or a sophisticated photo frame component.
Detailed Instructions
Materials
- White or cream-colored air-dry clay (or polymer clay)
- Square tile cutter or template (approx. 6×6 inches)
- Smaller square cutter for the center (approx. 4×4 inches)
- Rolling pin with depth guides
- Sculpting tools (needle tool, small ball stylus)
- Rubber clay shaper or soft brush
- Water or slip (for joining)
- Fine-grit sandpaper
- Canvas or heavy cloth (for working surface)
Step 1: Base Construction
-
Prepare the slab:
Begin by wedging your clay to remove air bubbles, then roll it out on a canvas surface to a uniform thickness of about 1/4 inch. Using depth guides ensures the frame will be perfectly level. -
Cut the outer square:
Use your large square cutter or a ruler and knife to cut the outer dimensions of the tile. Keep the edges clean and vertical. -
Define the frame border:
Lightly mark the inner square area where the picture or central void will be. You can cut this center out now for a true frame, or leave it as a solid backing if you just want the relief border effect. -
Add the raised border capability:
Roll four thin coils of clay and flatten them slightly. Attach these strips to the perimeter of your square using a bit of water and scoring to create a raised platform for the carving work, blending the seams seamlessly into the base.
Step 2: Sculpting the Design
-
Draft the pattern:
With a needle tool, very lightly sketch the S-curve scroll pattern around the border. The spirals should flow into each other like heavy waves breaking. -
Rough out the relief:
Add small snakes of clay along your sketched lines to build up volume. I find it easiest to place all the S-shapes first before refining them. -
Refine the spirals:
Use a ball stylus tool to press into the center of each spiral, creating that classic rolled fern look. Smooth the clay from the tip of the spiral back down into the connecting stem. -
Carve the negative space:
Using a small loop tool or spoon-shaped tool, gently press down the areas between the scrolls. This makes the wave pattern pop out from the background. -
Add corner details:
At each of the four corners, sculpt a simple pointed leaf shape that bridges the gap where the scroll patterns meet. Use a knife tool to indent a central vein in each leaf. -
Smooth the surfaces:
Dip a soft brush in a tiny amount of water and gently sweep over the relief work. This melts away fingerprint ridges and tool marks without erasing your sharp details. -
Define edges:
Re-trace the inner and outer perimeter lines of the relief border with a sharp tool to ensure separation between the sculpted frame and the flat central area.
Cracks appearing?
If small cracks form during drying, make a paste of clay and vinegar (called ‘slurry’) and fill them in with a brush, then sand smooth once dry.
Step 3: Finishing Touches
-
Initial drying phase:
Let the piece dry slowly under a loose plastic sheet for the first 24 hours. This prevents the corners from curling up as the moisture evaporates. -
Full cure:
Remove the plastic and allow the clay to dry completely until it’s room temperature to the touch and chalky white. -
Sanding:
Take your fine-grit sandpaper and very gently buff the high points of the scrolls. This creates that worn, ancient stone look seen in the reference image. -
Dusting off:
Use a dry, fluffy brush to remove all sanding dust from the deep crevices of the carving. -
Sealing (optional):
For durability, apply a clear matte varnish. Avoid glossy finishes if you want to maintain the natural, raw plaster aesthetic.
Instant Antiquity
For an aged look, mix watered-down brown acrylic paint, wash it over the texture, and immediately wipe the surface clean, leaving dark pigment in the crevices.
Place your finished tile on a sunny shelf where the changing light will dance across your beautiful relief work


Daisy Medallion Center Tile

Bring a touch of Mediterranean warmth to your home with this handcrafted terracotta coaster featuring a classic daisy medallion. The earthy ochre tones combined with crisp cobalt dots create a timeless design perfect for accent tiles or standalone coasters.
Step-by-Step Guide
Materials
- Ready-made bisque terracotta tile (4×4 or 6×6 inch)
- Underglazes: Dark Cobalt Blue, Ochre/Mustard Yellow, Creamy White
- Fine liner brush (size 0 or 00)
- Small round brush (size 2)
- Pencil
- Compass or round stencils/tracing objects
- Ruler
- Clear dipping glaze (optional, for firing)
- Needle tool or fine dotting tool
Step 1: Planning and Sketching
-
Mark the center:
Begin by finding the exact center of your bisque tile. Use a ruler to lightly draw diagonal lines from corner to corner with a pencil; where they intersect is your center point. -
Draw the medallion boundaries:
Using a compass anchored at the center point, draw a large circle that fills most of the tile’s face, leaving about a half-inch margin from the edges. -
Define the flower center:
Draw a small inner circle in the very middle, about the size of a dime, to serve as the daisy’s pollen center. -
Sketch the petals:
Sketch twelve elongated, teardrop-shaped petals radiating from the center circle. I find it easiest to sketch the top, bottom, left, and right petals first to ensure symmetry, then fill in the gaps between them. -
Add perimeter details:
Lightly sketch a circle of small dots just outside the main medallion circle, and place four larger circles in the extreme corners of the tile.
Wobbly Lines?
If your hand shakes while lining, rest your pinky finger on the dry surface of the tile as an anchor. This stabilizes your hand for smoother strokes.
Step 2: Painting the Base Colors
-
Fill the background:
Using your size 2 brush and Ochre/Mustard underglaze, carefully paint the negative space between the petals and the outer circle line. You may need two coats for opaque coverage. -
Paint the center:
Fill in the small central circle with the same Ochre shade. -
Whiten the petals:
Using the Creamy White underglaze, fill inside each petal shape. Be careful not to overlap the yellow background too much. Let this dry completely before moving on. -
Brighten the corners:
Paint the outer margin of the tile (outside the main circle) with the Creamy White underglaze as well, creating a crisp square frame.
Go Geometric
Swap the floral petals for sharp triangles or diamonds in a radial pattern to create a Moroccan-inspired zellige look using the same color palette.
Step 3: Detailing and Outlining
-
Outline the petals:
Switch to your fine liner brush and the Dark Cobalt Blue. Carefully paint a thin outline around each white petal and the central yellow circle. -
Define the medallion ring:
Paint a precise blue ring around the outer edge of the yellow background circle, separating it from the white border. -
Add the petal veins:
Inside each white petal, paint a very fine, straight blue line down the center. Add tiny specks or dots inside the petals for texture if desired. -
Create the dotted border:
Dip the handle end of a brush or a dotting tool into the Blue underglaze. Stamp a ring of small, evenly spaced dots around the outside of the blue medallion ring. -
Finish the corners:
Paint the four large circles in the corners with solid Blue. Add a decorative ring of tiny brown or ochre dots around the very edge of the tile to frame the entire piece. -
Clean up edges:
Wipe away any stray smudges on the side of the tile with a damp sponge.
Step 4: Firing
-
Bisque fire (if using greenware):
If you started with raw clay, fire to cone 04. If you used a store-bought bisque tile, skip this. -
Glaze and final fire:
Dip the tile into a clear transparent glaze and fire it according to your clay body’s specifications (usually cone 06 or cone 5/6) to seal the design and make it food safe.
Once fired, place cork pads on the back to protect your furniture and enjoy your custom artisan coaster

The Complete Guide to Pottery Troubleshooting
Uncover the most common ceramic mistakes—from cracking clay to failed glazes—and learn how to fix them fast.
Honeycomb Stamp Texture Tile
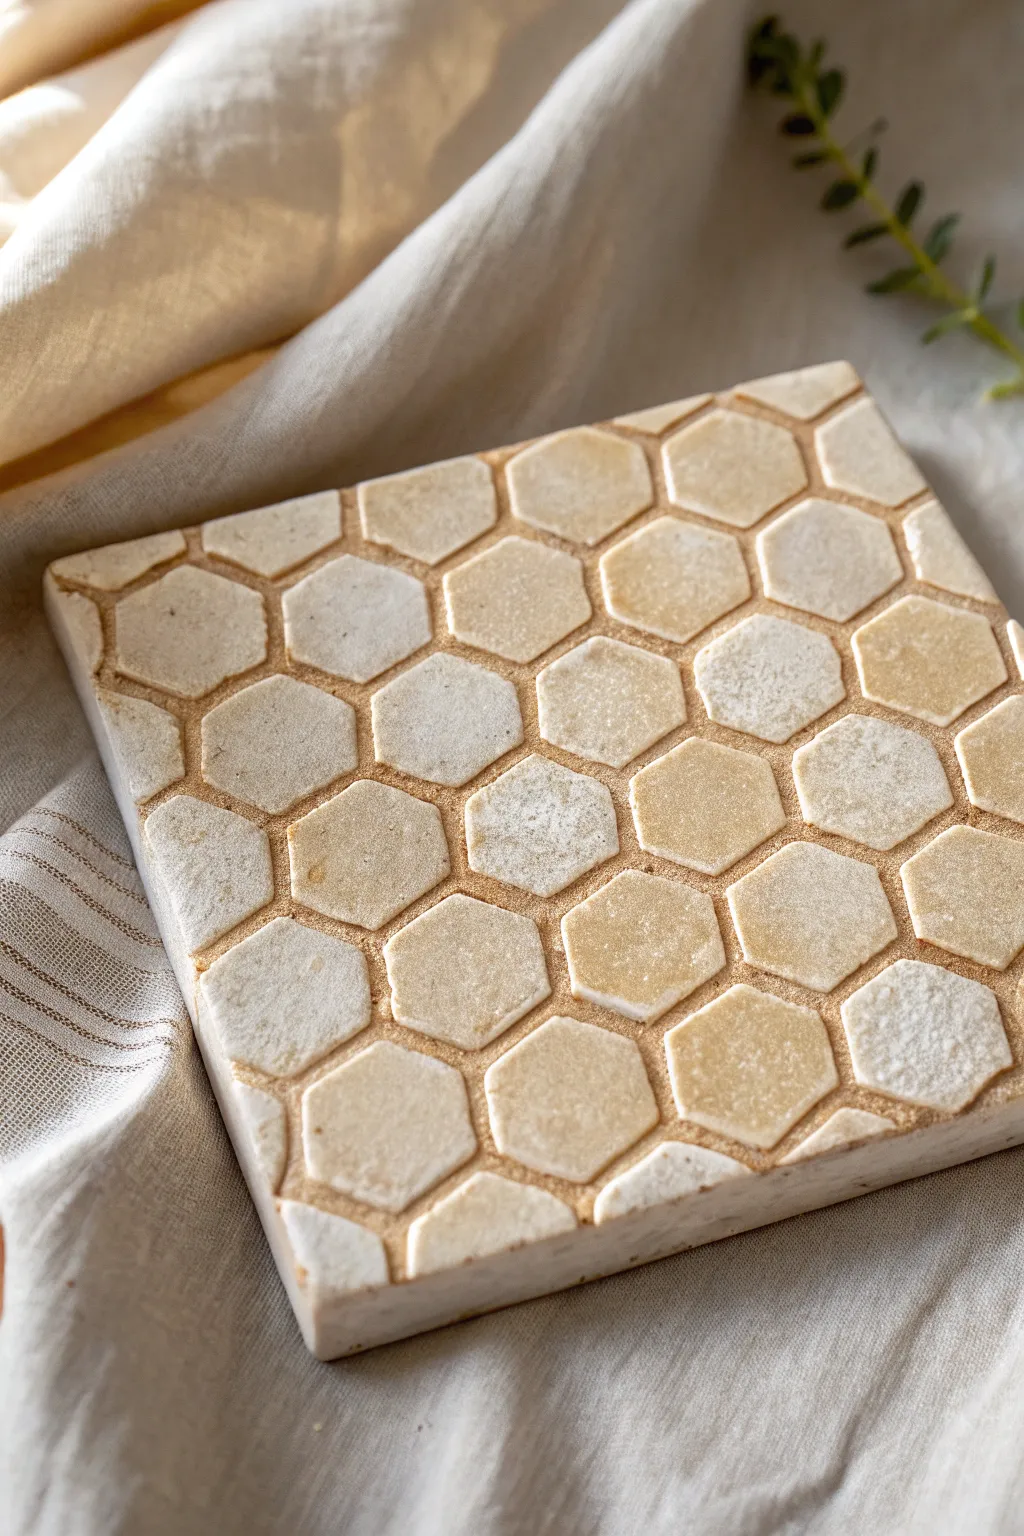
This project captures the organic warmth of natural stone with a satisfyingly tactile honeycomb pattern. The result is a substantial, earthy coaster or decorative tile that features raised hexagonal reliefs with a beautifully weathered finish.
How-To Guide
Materials
- White or light buff stoneware clay (or air-dry clay)
- Small hexagon cookie cutter or clay stamp (approx. 0.75 inch)
- Square tile cutter (4×4 inch) or ruler and needle tool
- Rolling pin
- Old texture cloth or canvas board
- Two 1/4 inch wooden guide strips
- Iron oxide wash or watered-down brown acrylic paint
- Sponge
- Clear matte varnish or glaze (optional)
- Modeling tool or dull pencil
Step 1: Forming the Base Tile
-
Prepare the workspace:
Lay down your texture cloth or canvas board on a flat surface. This prevents the clay from sticking and adds a subtle texture to the back of your tile. -
Roll out the slab:
Place your wooden guide strips on either side of your clay ball. Roll the clay out until the rolling pin rests on the strips, ensuring a perfectly even 1/4 inch thickness across the entire slab. -
Cut the square shape:
Using your square cutter or a ruler and needle tool, cut a clean 4×4 inch square from the clay slab. Remove the excess clay and smooth the cut edges gently with a damp fingertip to remove any sharp burrs.
Stamp Release Trick
Dust your hexagon cutter with cornstarch or baby powder before stamping. This acts as a release agent so the cutter doesn’t pull up the clay when you lift it.
Step 2: Creating the Honeycomb Texture
-
Establish the first impression:
Take your small hexagon cutter. Instead of cutting all the way through, you will use it as a stamp. Position it near one corner, leaving a small border, and press down gently about halfway into the clay depth. -
Build the pattern row:
Align the flat side of the cutter with the flat side of your first impression. Leave a tiny gap (about 1-2mm) between them to create the ‘grout line’ effect. Press the second hexagon. -
Complete the grid:
Continue stamping rows across the tile. The honeycomb pattern naturally nests, so fit the next row into the V-shaped gaps of the previous row. Don’t worry if edge shapes get cut off; simply let the stamp overhang the edge of the tile to create a partial hexagon impression. -
Refine the grout lines:
Once the grid is stamped, use a modeling tool or a dull pencil to gently press down the spaces between the hexagons. This defining step ensures the ’tiles’ look raised and distinct, rather than just outlined. -
Add surface texture:
To mimic the stone look in the photo, lightly tap the surface of the raised hexagons with a stiff bristle brush or a crumpled ball of aluminum foil. This breaks up the perfect smoothness of the clay.
Warped Edges?
If your tile curls up while drying, flip it over and place a heavy book on top of it (sandwich it between paper towels) once it’s mostly dry but still slightly flexible.
Step 3: Finishing and Coloring
-
Dry the tile:
Allow the clay to dry slowly to the leather-hard stage (firm but cold to the touch). If you are using stoneware, fire it to bisque now. If using air-dry clay, wait until it is fully bone dry. -
Apply the wash:
Mix your iron oxide with water (for ceramic) or dilute brown acrylic paint extensively (for air-dry). Brush this dark liquid over the entire surface, ensuring it pools into the recessed lines between the hexagons. -
Wipe back the surface:
Before the wash dries completely, take a damp, clean sponge and wipe the surface of the raised hexagons. I like to do this in circular motions. You want to remove most of the color from the high points, leaving the dark pigment trapped in the grout lines and the texture indentations. -
Final drying or firing:
If using ceramic clay, fire to the clay body’s maturation temperature. For air-dry clay, let the paint dry completely. -
Seal the piece:
For a functional coaster using air-dry clay, apply two coats of a matte varnish to protect it from moisture. For ceramics, you might leave it unglazed for a raw stone feel or apply a clear matte glaze before the final firing.
Place your finished tile on a table and enjoy the play of light across the textured geometric surface
Carved Geometric Linework Tile
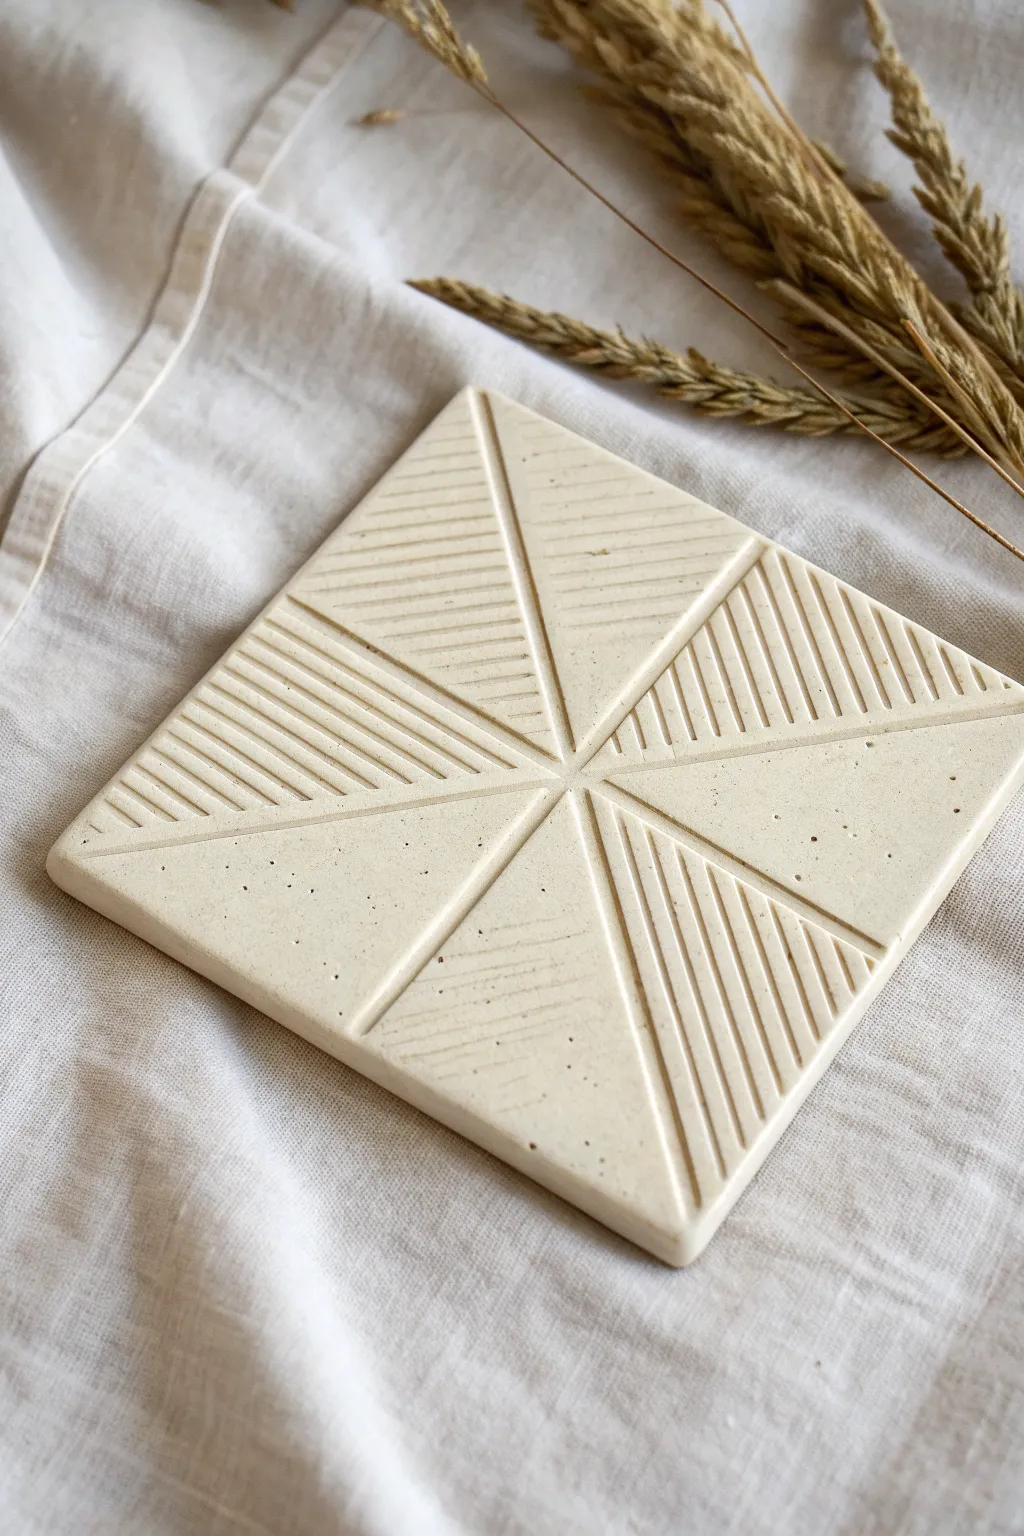
This elegant clay tile project combines minimalist aesthetics with satisfying tactile texture. By dividing a simple square into distinct triangular zones of smooth and etched finishes, you’ll create a striking relief pattern that feels both modern and timeless.
Step-by-Step Tutorial
Materials
- White stoneware clay (w/ grog or speckles)
- Rolling pin
- Two 1/4 inch wooden guide strips
- Canvas work surface or cloth
- Needle tool
- Metal ruler or straight edge
- Carving tool (small loop or sgraffito tool)
- Fettling knife
- Smoother rib (soft rubber)
- Damp sponge
- Square template (paper or metal, approx 4×4 inches)
Step 1: Preparing the Slab
-
Prepare your workspace:
Lay down your canvas or cloth on a flat table to prevent the clay from sticking. Place your wooden guide strips on either side of the workspace, positioned slightly wider than your desired tile width. -
Wedge the clay:
Take a handful of your speckled white stoneware clay and wedge it thoroughly to remove any air bubbles. This ensures a uniform consistency and prevents cracking later. -
Roll out the slab:
Place the clay between the guide strips. Using the rolling pin, roll the clay out until the pin rides smoothly on the wooden guides, creating a perfectly even 1/4 inch thickness. -
Compress the surface:
Before cutting, use a soft rubber rib to gently compress the clay surface. Stroke in multiple directions to align the clay particles, which helps prevent warping during drying. -
Cut the square:
Place your square template onto the slab. Using a fettling knife held vertically, carefully cut around the template to create your base tile shape.
Clean Lines Tip
When carving geometric lines, don’t drag the tool. Instead, place the ruler down and pull the tool along it with swift, confident strokes to avoid wobbly edges.
Step 2: Drafting the Design
-
Mark the center:
Use your ruler to lightly find the exact center of the square. Make a tiny prick with your needle tool to mark this central convergence point. -
Draw the main diagonals:
Lay your ruler from corner to corner. Very lightly score an ‘X’ across the tile with the needle tool, connecting opposite corners through the center point. -
Bisect the sides:
Draw a distinct line from the center point to the midpoint of each of the four sides. This will divide your square into eight triangular sections resembling a starburst. -
Deepen the lines:
Go back over these eight dividing lines with slightly more pressure to create clear boundaries between the sections. Be careful not to cut all the way through.
Step 3: Carving the Texture
-
Select your texture zones:
Decide which triangles will be textured. In the reference image, the textured sections alternate with smooth ones, creating a balanced visual rhythm. -
Plan line direction:
Observe the pattern: the carved lines run parallel to the outer edge of the tile within their specific triangle. I find it helpful to lightly scratch a guide line first before committing to the deep cut. -
Carve the first section:
Using your small carving tool and ruler, press into the clay to create straight, parallel grooves. Space them evenly, about 3-4mm apart. -
Clean the edges:
As you carve, small burrs of clay will form. Wait until the clay stiffens slightly to leather hard, then gently brush these crumbs away with a soft brush. -
Complete the pattern:
Rotate the tile and continue carving the parallel lines in the alternating triangles. Ensure the depth of your carving is consistent across all sections. -
Smooth the plain sections:
For the uncarved triangles, use your finger or a slightly damp sponge to smooth out any accidental marks, highlighting the contrast with the textured areas.
Level Up: Contrast
Try inlaying a contrasting colored slip into the carved grooves before the clay dries. Once stiff, scrape the surface flush to reveal crisp, colorful lines.
Step 4: Finishing Touches
-
Refine the perimeter:
Use your slightly damp sponge to gently round over the sharp cut edges of the square tile. This gives it a professional, finished look and prevents chipping. -
Slow drying:
Place the tile on a piece of drywall or between two boards to dry slowly. Tiles are prone to warping, so slow, even drying away from drafts is crucial. -
Bisque fire:
Once bone dry, fire the piece to bisque temperature (usually Cone 04) in a kiln. -
Final Surface:
Since the beauty lies in the raw clay texture, you may choose to leave it unglazed or apply a clear matte glaze to seal it without hiding the speckles.
Your finished tile will serve as a beautiful minimalist coaster or a component of a larger wall installation


What Really Happens Inside the Kiln
Learn how time and temperature work together inside the kiln to transform clay into durable ceramic.
Radial Mandala Starburst Tile
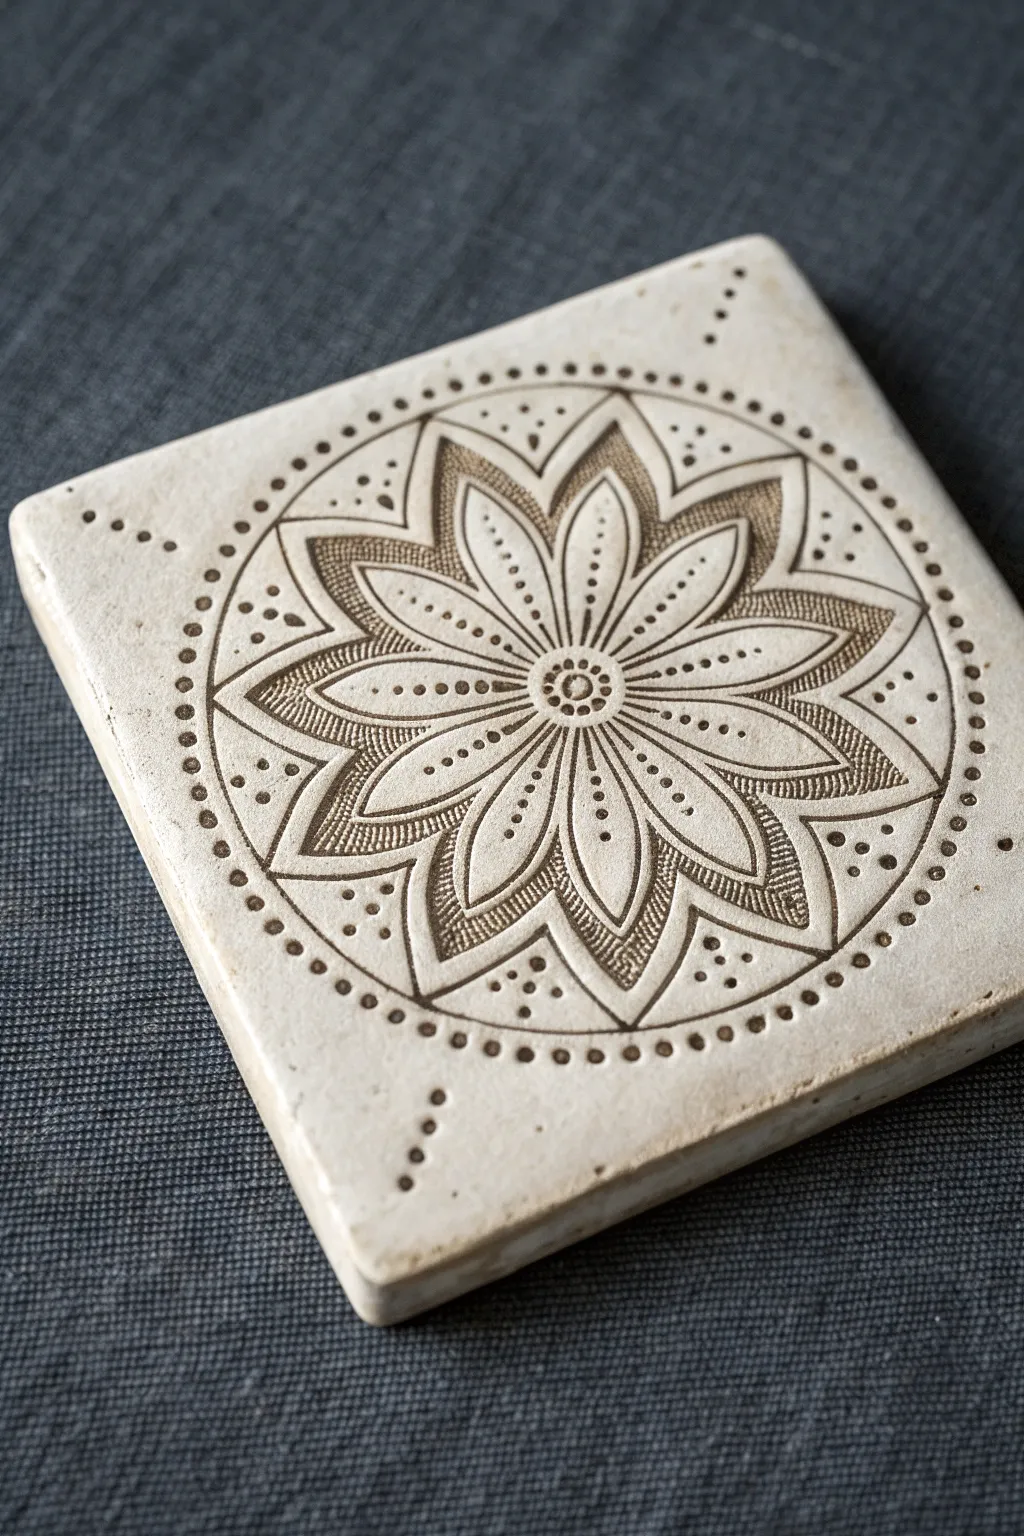
This elegant square tile features a radial starburst design that combines geometric precision with organic flow. The deep engraving and subtle antique finish give it a timeless look, perfect for use as a coaster or decorative accent.
How-To Guide
Materials
- White air-dry clay or low-fire ceramic clay
- Rolling pin
- Square cookie cutter (4×4 inch) or craft knife and ruler
- Clean canvas or smooth wooden board (work surface)
- Needle tool or sharp skewer
- Loop tool (small)
- Small round stylus tool or ballpoint pen
- Sandpaper (fine grit)
- Brown acrylic paint or oxide wash
- Paper towels or sponge
- Clear matte varnish (optional)
Step 1: Preparing the Base
-
Roll the slab:
Begin by wedging your white clay to remove air bubbles, then roll it out into an even slab approximately 1/4 to 1/3 inch thick. I like to use guide sticks on either side of the rolling pin to ensure the thickness is perfectly uniform. -
Cut the square:
Using a 4×4 inch square cutter or a sharp craft knife with a ruler, cut a clean square shape from the slab. -
Smooth the edges:
Dip your finger in a little water and gently run it along the cut edges to soften the sharpness and smooth away any cutting debris.
Clean Lines Tip
Wait for the clay to reach a ‘leather hard’ state before carving the finest hatched lines. If the clay is too wet, the lines will be mushy; leather hard yields crisp shavings.
Step 2: Establishing the Guide
-
Find the center:
Use a ruler to lightly mark the exact center of the tile with a tiny pinprick. -
Draft the outer circle:
Use a compass or a circular template centered on your mark to lightly trace a large circle that nearly touches the edges of the square. This defines the boundary of your mandala. -
Mark the star points:
Divide your circle into twelve equal sections using very faint lines radiating from the center, like a clock face.
Step 3: Carving the Design
-
Create the center cluster:
Press a small circle in the very center, then use your smallest stylus tool to surround it with a ring of tiny dots. -
Outline the petals:
Draw twelve petals radiating from the center. These should be pointed shapes, with the tips landing on your radial guide lines. Ensure there is a small gap of negative space between each petal. -
Detail the petals:
Inside each large petal, draw a smaller, inner petal shape. Use a needle tool for a crisp, thin line. -
Add texture:
Using a fine point tool, etch horizontal hatching lines into the space between the inner and outer petal outlines. This creates a shaded effect and adds depth to the design. -
Create the central vein:
Draw a line of graduating dots down the center of each petal, starting with larger dots near the center and getting smaller toward the tips. -
Carve the border seeds:
In the negative space between the petal tips, carve a small teardrop or seed shape. -
Texture the background:
Fill these background seed shapes with the same fine cross-hatching or straight lines used on the petal borders.
Stamp Variation
Instead of hand-carving every petal, create a single petal stamp from baked polymer clay. Press it twelve times around the center for perfect symmetry in half the time.
Step 4: Finishing Touches
-
Add the dotted perimeter:
Along the main circular guide line you traced earlier, press a continuous ring of distinct dots using a medium-sized stylus tool. -
Corner details:
In the four corners of the square, outside the main circle, press a simple line of three or four graduating dots pointing toward the corner. -
Dry the tile:
Place the tile between two pieces of drywall or under a weighted board with newspaper to prevent warping while it dries. Allow it to bone dry completely (24-48 hours). -
Sand and refine:
Once fully dry, lightly sand the surface to remove any burrs or sharp crumbs of clay created during carving. Wipe away the dust. -
Apply the wash:
To achieve the aged look in the photo, brush watered-down brown acrylic paint over the entire surface. While it’s still wet, wipe the surface with a damp sponge. The dark paint will remain in the carved grooves. -
Seal (Optional):
If using as a coaster, apply a matte varnish to protect the clay from moisture.
This meditative carving process results in a beautiful, tactile piece of art you can proudly display
Sgraffito Sketch Tile
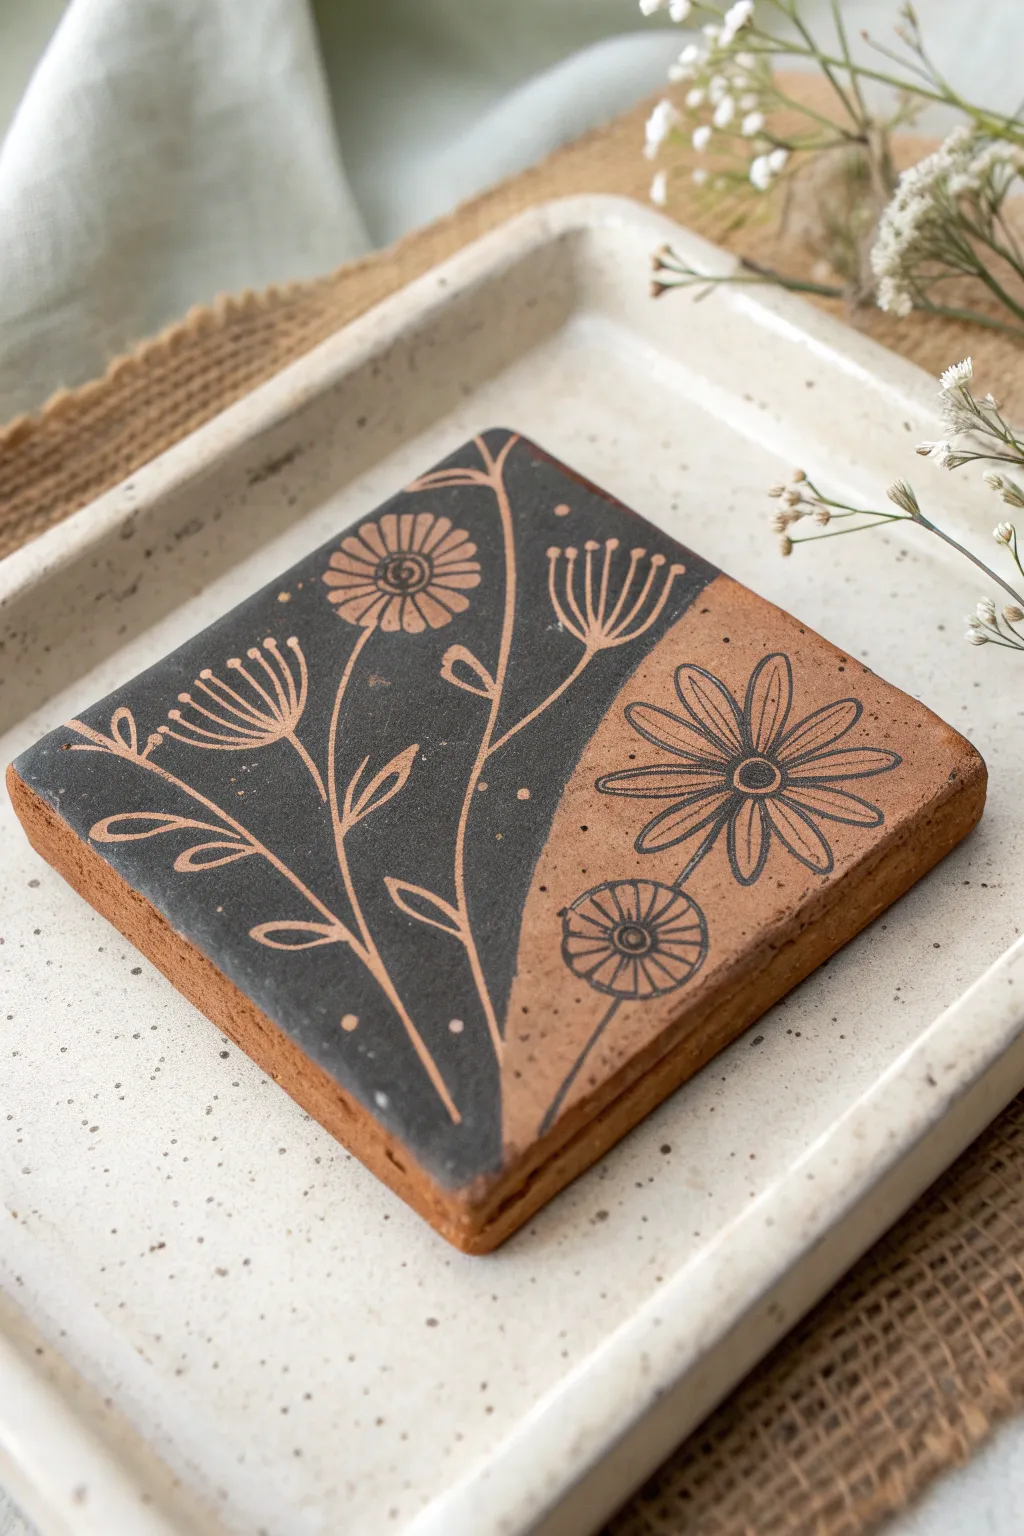
This elegant clay tile project combines the striking contrast of sgraffito with delicate mishima-style inlay work. By splitting the composition diagonally between dark underglaze and raw clay, you create a balanced, modern botanical piece perfect for coasters or wall art.
Step-by-Step
Materials
- Red stoneware or earthenware clay slab (approx. 1/4 inch thick)
- Black underglaze
- Soft fan brush or hake brush
- Needle tool or fine loop tool
- Carving tool (sgraffito tool) with a small loop
- Ruler or straight edge
- Sponge
- Pencil and sketching paper
- Rolling pin and guide strips (optional but helpful)
Step 1: Preparation & Application
-
Roll your slab:
Begin by rolling out your clay to an even thickness of about 1/4 inch. For a uniform surface, I find using wooden guide strips on either side of the clay works best to keep the rolling pin level. -
Cut the tile shape:
Using a ruler and a needle tool or fettling knife, cut a precise square from your slab. Smooth the edges with a slightly damp sponge or your finger to express the water and compress the particles, preventing future cracks. -
Dry to leather hard:
Allow the clay to dry slowly until it reaches a ‘leather hard’ state. It should be firm enough to handle without bending but still contain moisture. This is the crucial texture for clean carving. -
Establish the division:
Using a pencil, lightly mark a wavy, diagonal line across the tile. This will serve as the organic border between the black background section and the natural clay section. -
Apply the underglaze:
On the left side of your wavy line, apply 2-3 even coats of black underglaze using a soft fan brush. Let each coat dry until it’s matte before applying the next to ensure solid, opaque coverage.
Step 2: Carving the Design
-
Sketch the layout:
While the underglaze dries completely, sketch your floral design on paper. For this look, plan for long, sweeping stems of Queen Anne’s Lace and coneflowers that cross the divider line. -
Transfer or freehand:
You can lightly rest your sketch on the tile and trace over lines with a pencil to leave a faint impression, or simply freehand the design directly onto the clay surface using a very light touch. -
Start sgraffito carving:
On the black painted side, use a small loop tool to carve away the black underglaze. You are removing the dark layer to reveal the red clay beneath. Follow the outlines of your stems and flower heads. -
Detail the flowers:
Inside the flower heads on the black side, carve out small lines for petals and dots for pollen. Keep your strokes consistent and confident to avoid jagged edges. -
Carve the stems:
Carve the long stems leading downwards. Vary the line thickness slightly where the leaves ‘attach’ to create a more organic feel. -
Add background texture:
Scatter small dot marks around the flowers on the black background using the point of your needle tool. These little ‘stars’ add depth and break up the solid black space.
Clean Lines Only
If your sgraffito lines look jagged or chipped, your clay is likely too dry. Mist it lightly with water and cover with plastic for an hour to rehydrate the surface before carving again.
Step 3: Inlay & Finishing
-
Inlay the right side:
On the unpainted right side, the process reverses. Use a needle tool to scratch the design lines deeply into the raw clay. -
Fill the lines:
Paint black underglaze heavily over these scratched lines, ensuring the liquid gets deep into the grooves. It will look messy at this stage, but don’t worry. -
Wipe back:
once the underglaze in the grooves has stiffened slightly, use a clean, damp sponge to wipe the surface. Wipe gently across the lines (not parallel to them) to remove the excess surface paint, leaving distinct sharp black lines inside the clay. -
Clean up borders:
Check the wavy border where the two styles meet. You may need to do a little touch-up carving to ensure the transition is sharp and clean. -
Slow drying:
Place a loose sheet of plastic over the tile to let it dry very slowly. This prevents warping, which is common with flat tiles. -
Bisque fire:
Once bone dry, bisque fire the piece according to your clay body’s specifications. -
Clear glaze (optional):
For a functional coaster, apply a clear matte glaze and fire again. If it is purely decorative, you can leave the matte finish of the naked clay and underglaze as is.
Add Subtle Color
For a softer look, water down a second color of underglaze (like teal or sage) and use it as a wash on the ‘raw’ side before carving, creating a three-tone effect.
Once fired, you’ll have a stunning piece of ceramic art that perfectly balances negative and positive space

TRACK YOUR CERAMIC JOURNEY
Capture glaze tests, firing details, and creative progress—all in one simple printable. Make your projects easier to repeat and improve.
Texture Sampler Grid Tile Set
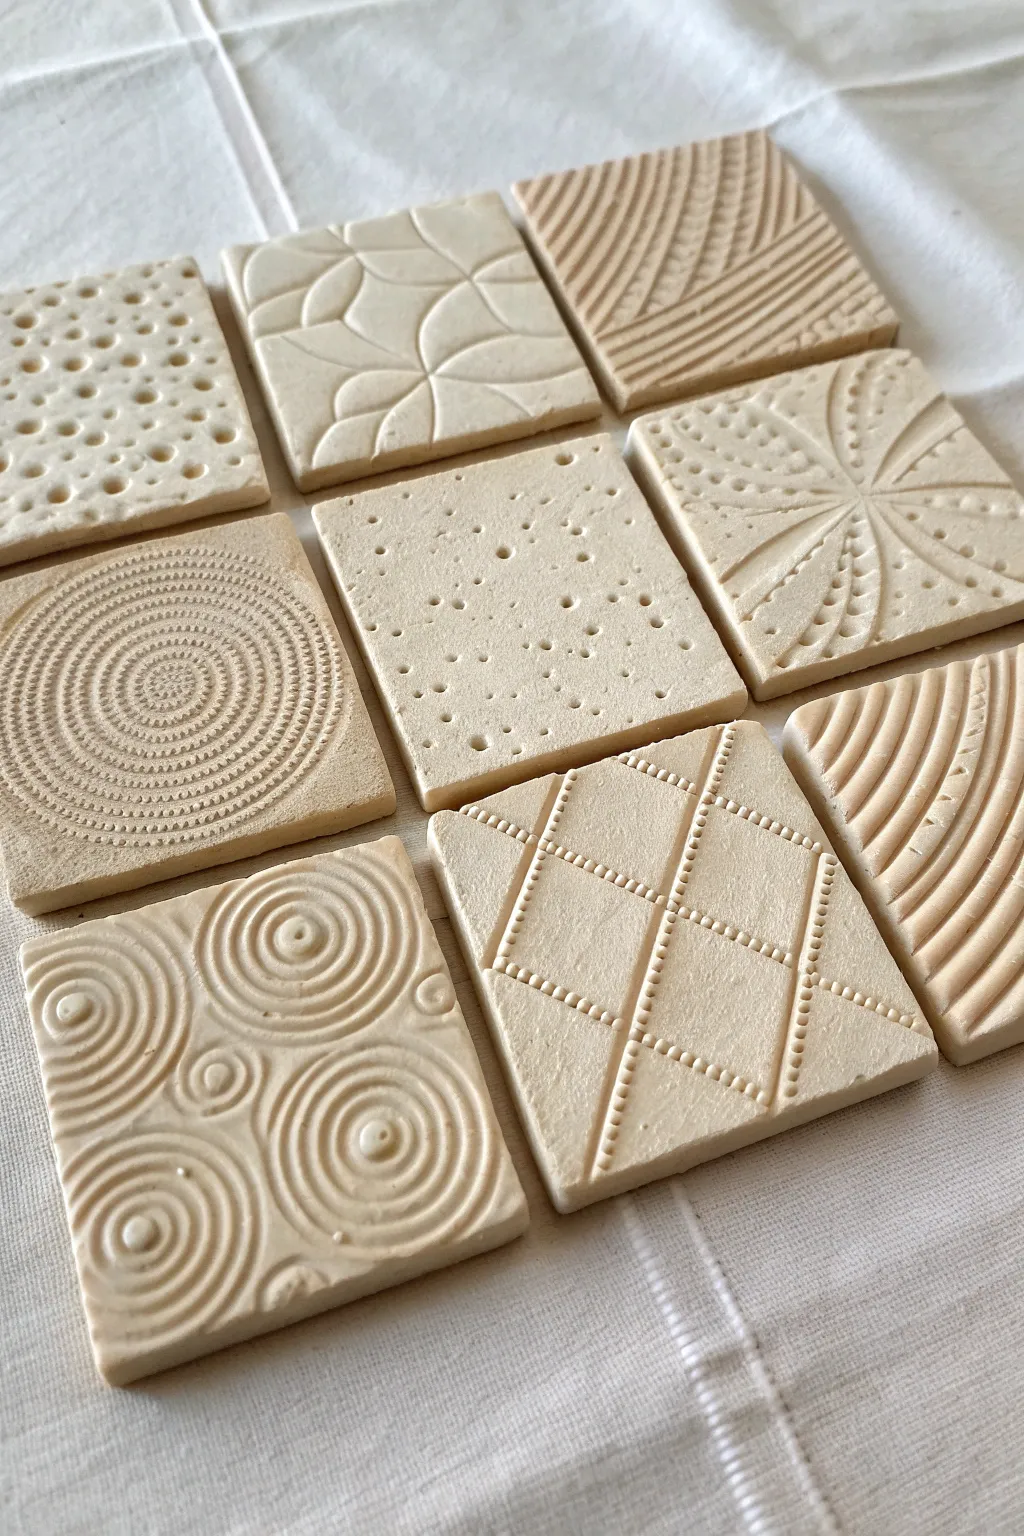
This project explores the endless possibilities of surface design by creating a cohesive set of nine monochromatic clay tiles. The beauty lies in the subtle play of light and shadow created by various carving, stamping, and impression techniques on a unified cream-colored canvas.
Step-by-Step Tutorial
Materials
- Polymer clay (white or cream) or air-dry clay
- Rolling pin or clay machine
- Square cookie cutter (approx. 2-3 inches)
- Ruler
- Parchment paper or ceramic tile work surface
- Needle tool
- Ball stylus tools (various sizes)
- Modeling tools or old credit card
- Texture tools (combs, stamps, household items)
- Sandpaper (fine grit)
- Matte varnish (optional)
Step 1: Preparation & Base Creation
-
Condition the clay:
Begin by thoroughly conditioning your clay until it is soft, pliable, and free of air bubbles. If using polymer clay, warm it in your hands first. -
Roll out a slab:
Roll your clay into a consistent slab. Aim for a thickness of about 1/4 inch (6mm) to ensure the tiles are sturdy enough to handle deep impressions without warping. -
Cut the squares:
Using your square cookie cutter or a ruler and craft knife, cut out nine identical squares. Clean up any ragged edges with your finger or a smoothing tool. -
Arrange your workspace:
Place the squares on a sheet of parchment paper or a designated baking tile. This allows you to work on them without having to move the soft clay later, which could distort their shape.
Clean Impressions
To prevent tools from sticking to the clay while stamping, dust your clay surface lightly with cornstarch or dip your tools in water before pressing.
Step 2: Texturing Techniques
-
Dot Gradient Tile:
For the first tile, use a medium ball stylus or the back of a paintbrush. Press indentations randomly but densely on one side, gradually spacing them out as you move across the tile to create a fading effect. -
Geometric Flower Tile:
Use a curved modeling tool or the edge of a spoon to press petal shapes. Start from the center and press outward four times to make a central flower, then add corner petal details for a geometric floral look. -
Linear Stripes Tile:
Take a texture comb or drag a needle tool across the surface to create parallel, diagonal lines. Vary the pressure slightly to give the lines an organic, hand-carved feel. -
Concentric Circles Tile:
This detailed tile requires a steady hand. Using a fine needle tool, imprint a series of tight concentric circles. Add tiny dot impressions within the rings using a very small stylus for extra detail. -
Scattered Pores Tile:
Create a porous, stone-like texture by using needle tools and styluses of three different sizes. Poke holes of varying depths randomly across the entire surface. -
Radial Burst Tile:
From a central point, use a straight edge to press lines radiating outward like a starburst. Between these rays, add rows of small dots using a stylus to enhance the explosive pattern. -
Diamond Lattice Tile:
Lightly score a grid of diamonds onto the tile. Over these lines, press a small ball stylus repeatedly to create ‘beaded’ lines that form a raised diamond pattern. -
Circular Ripples Tile:
Press a small circular object (like a pen cap) into the clay to make rings. Create four main focal points of concentric rings, allowing the outer rings to overlap slightly like ripples in a pond. -
Curved Ridges Tile:
Use a wide, curved modeling tool or a loop tool to carve out deep, sweeping grooves. Create an alternating pattern where the curves flow against each other for high movement.
Make it a Wall Hanging
Poke holes in the top corners of each tile before baking. Afterward, link them together with jump rings or drift wood to create a mobile.
Step 3: Finishing
-
Refine edges:
Before curing or drying, give the edges of each tile one last check. Smooth down any burrs created during the texturing process. -
Cure or dry:
Bake your polymer clay according to the manufacturer’s instructions, or let air-dry clay set for at least 24-48 hours until fully hard. -
Sand for finish:
Once fully cured, use fine-grit sandpaper to lightly buff the surface. This highlights the high points and ensures the tiles are smooth to the touch. -
Seal (Optional):
If you want to protect the finish, apply a thin coat of matte varnish. A matte finish works best here to preserve the natural, stone-like aesthetic.
Group your finished tiles together on a table or mount them in a shadow box to display your beautiful texture library
Two-Tone Checkerboard Tile Series
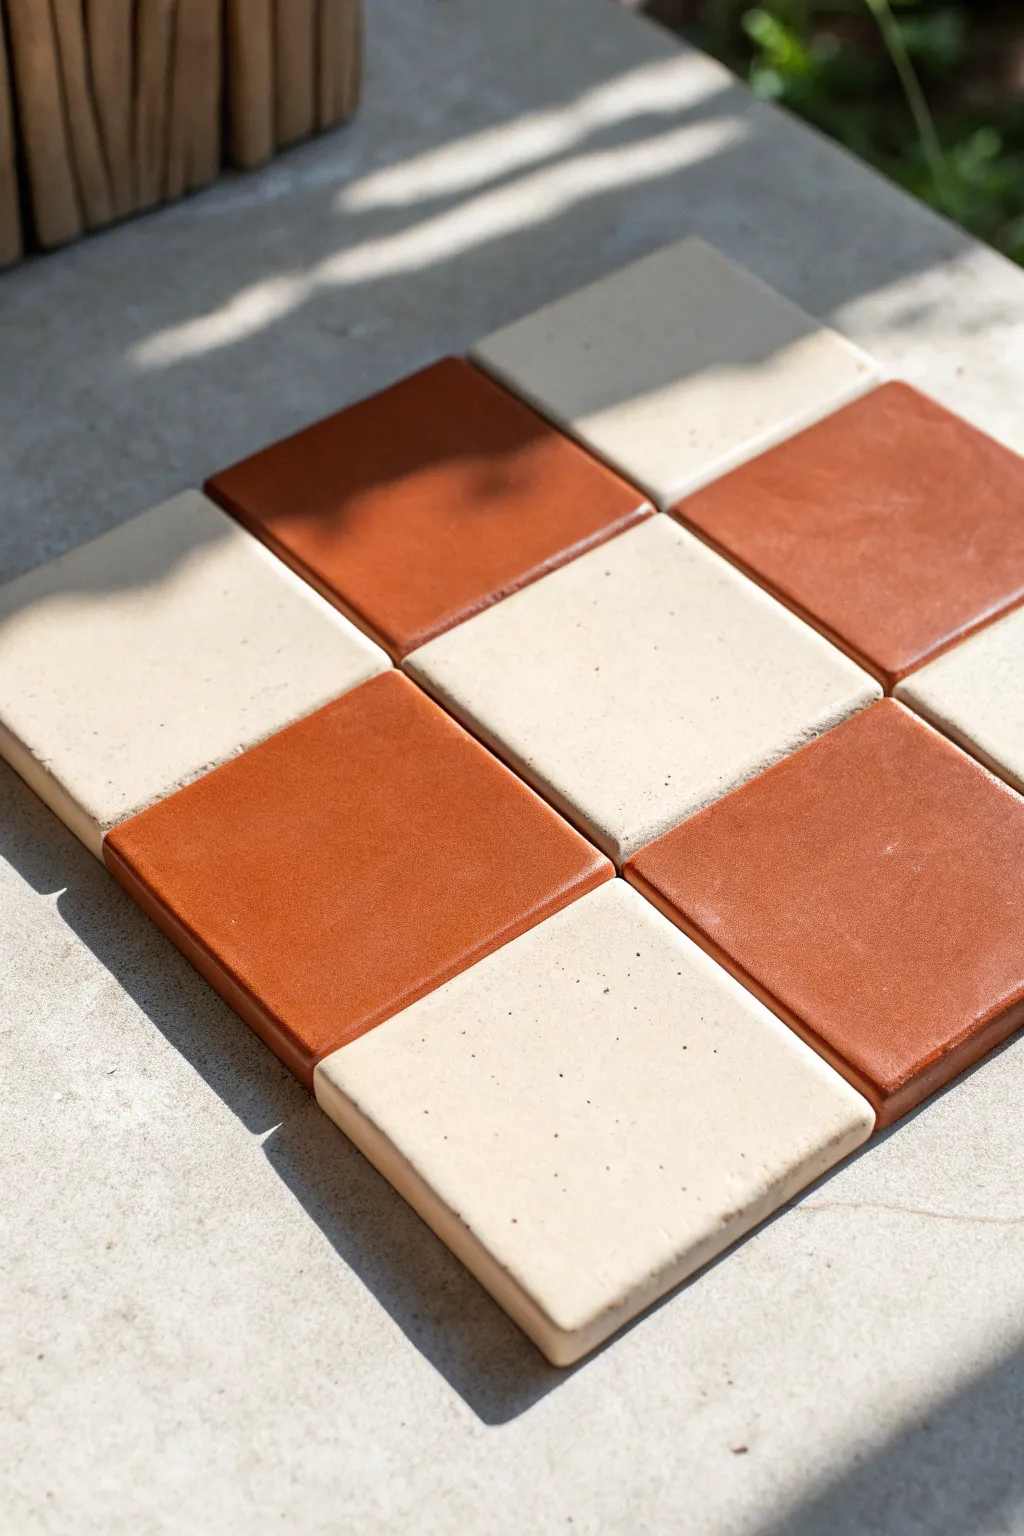
Bring a touch of timeless warmth to your tabletop with this simple yet striking clay tile project. By arranging classic terracotta and cream squares into a checkerboard pattern, you’ll create a durable and stylish surface perfect for use as a large trivet or decorative accent.
Step-by-Step
Materials
- Polymer clay or air-dry clay (Terracotta color)
- Polymer clay or air-dry clay (Cream or White color)
- Rolling pin or pasta machine
- Square clay cutter (2-inch width)
- Ruler
- Parchment paper or ceramic tile (for working surface)
- Cyanoacrylate glue (Super glue) or strong craft adhesive
- Craft knife
- Optional: Cork backing sheet
Step 1: Preparing the Clay
-
Condition the clay:
Begin by working the terracotta clay in your hands until it is soft, pliable, and free of cracks. -
Roll it out:
Roll the terracotta clay into a flat slab. Aim for a thickness of about 1/4 inch (6mm) to ensure the final tiles feel substantial. -
Repeat for cream color:
Clean your hands and rolling tools thoroughly to avoid color transfer, then condition and roll out the cream-colored clay to the exact same thickness.
Step 2: Cutting the Squares
-
Cut terracotta squares:
Using your square cutter, press firmly into the terracotta slab to cut out five individual squares. -
Refine the edges:
Gently smooth the sides of each square with your fingertip to remove any sharp ridges left by the cutter, softening the look slightly. -
Cut cream squares:
Cut out four squares from the cream clay slab using the same cutter. -
Check consistency:
Line up a cream square next to a terracotta one to ensure they are the same height; adjust if necessary by gently pressing or re-rolling. -
Add texture (optional):
If you want that authentic stone look seen in the photo, gently tap the surface of the unbaked clay with a toothbrush or piece of sandpaper. -
Bake or dry:
Follow the manufacturer’s instructions for your specific clay. If using polymer, bake on a parchment-lined tray. If using air-dry, let them sit undisturbed for 24-48 hours.
Clean Cuts
Use a piece of plastic wrap over the clay before pressing your cutter down. This creates a beautifully rounded, ‘pillowed’ edge on the tile rather than a sharp, harsh angle.
Step 3: Assembly and Finishing
-
Sand the edges:
Once fully cured and cooled, lightly sand the sides of each tile with fine-grit sandpaper to ensure they fit together snugly. -
Perform a dry fit:
Arrange the tiles on your work surface in a 3×3 grid, alternating colors. Start with corners of terracotta for the classic look shown in the image. -
Glue grid rows:
Apply a small bead of strong adhesive to the side of a corner tile and press perfectly flat against its neighbor. I like to glue them into three separate rows of three first. -
Connect the rows:
Apply adhesive along the long edges of your three rows and press them together to form the final square block. -
Clean up excess glue:
Immediately wipe away any glue that squeezes out from the seams before it dries. -
Cut the backing:
Cut a piece of cork sheet slightly smaller than the total dimension of your tiled square. -
Attach backing:
Glue the assembled tile block onto the cork sheet; this reinforces the joints and protects your table surfaces.
Antique Finish
After baking, dilute brown acrylic paint with water and wash it over the tiles, wiping it off immediately. The paint will settle into the tiny pits, creating an aged, vintage pottery look.
Now you have a beautifully geometric piece that brings earthy texture to your home decor
Mini Landscape Horizon Tile
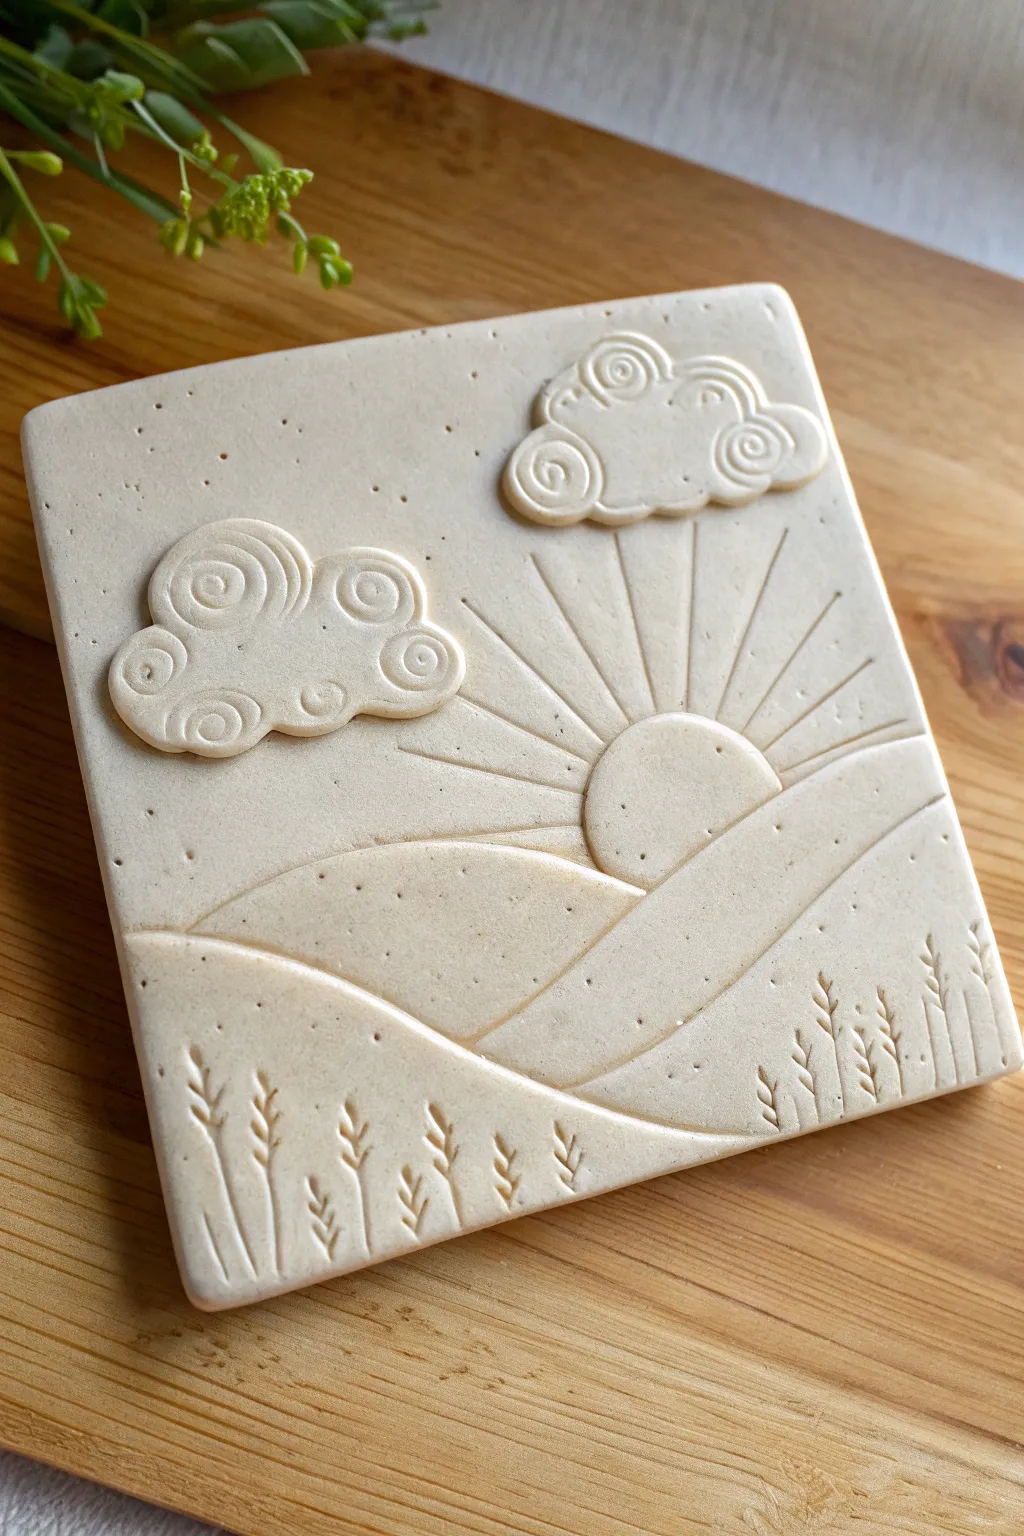
Capture the serenity of a quiet morning with this charming relief tile featuring rolling hills, a rising sun, and stylized spiral clouds. The speckled clay texture adds a lovely organic grit to the clean lines of the design.
Detailed Instructions
Materials
- Polymer clay (white granite, beige granite, or stone effect)
- Square clay cutter (approx. 4×4 or 5×5 inches)
- Acrylic roller or pasta machine
- Ball stylus tool (medium and large sizes)
- Needle tool or clay knife
- Rubber-tipped clay shaper (optional)
- Small circle cutter (approx. 1 inch)
- Parchment paper or ceramic tile for baking
Step 1: Base Preparation
-
Condition the Clay:
Start by thoroughly conditioning your speckled clay until it is soft and pliable. Avoid trapping air bubbles as you fold and knead. -
Roll the Slab:
Roll out a slab of clay to a uniform thickness of about 1/4 inch (6mm). Using depth guides or the thickest setting on a pasta machine ensures it’s perfectly level. -
Cut the Shape:
Place your square cutter onto the slab and press down firmly to create the main tile base. Remove the excess clay from the edges but keep it nearby for the appliqué details. -
Smooth the Edges:
Run your finger or a little water (if using air-dry clay) or baby oil (if using polymer) along the cut edges to soften the harsh sharpness left by the cutter.
Clean Cuts Pro-Tip
Place a sheet of plastic wrap over the clay before using your cutters. This creates a beautifully rounded, ‘pillowed’ edge on your cut pieces rather than a sharp, harsh angle.
Step 2: Sculpting the Landscape
-
Outline the Horizon:
Using a needle tool, lightly sketch the curved lines for the hills directly onto the base. Don’t cut deep; just mark where your clay layers will go. -
Add the Hills:
Roll a slightly thinner sheet of clay. Cut curved shapes to match your hill sketches and lay them onto the base tile. Gently press the edges down to bond them without smashing the clay flat. -
Create the Sun:
Cut a circle of clay and trim the bottom third off to create a ‘rising’ sun shape. Place this partially behind the front hill layer, pressing it gently into the background. -
Define the Sunrays:
Use a needle tool or a dull knife to press radiating lines into the sky area, extending outward from the sun. Vary the lengths slightly for a dynamic look. -
Add Wheat Stalks:
In the foreground hills, use a small needle tool to impress vertical lines representing plant stalks. Add tiny ‘v’ shapes on either side of the stalks to create the grain kernels.
Step 3: Cloud Details & Finish
-
Form Cloud Shapes:
Hand-shape two irregular, puffy cloud forms from leftover clay. Flatten them slightly, but keep them thicker than the hills for dimension. -
Attach Clouds:
Press the clouds firmly into the upper sky corners. Use a drop of liquid clay or water (depending on clay type) if they aren’t sticking well. -
Impress Spirals:
This is my favorite part: Take a small ball stylus and press it into the center of the cloud bumps. Drag the tool outward in a spiral motion to create the swirly texture. -
Refine Edges:
Go over the borders of your hills and sun with a rubber shaping tool to clean up any messy seams and ensure everything looks integrated. -
Final Texture Check:
Inspect the surface for fingerprints. You can gently buff them away with a little cornstarch or baby oil before baking. -
Bake or Dry:
Follow the manufacturer’s instructions for your specific clay. If baking polymer clay, tent it with foil to prevent scorching the white surface.
Level Up: Color Wash
Once baked and cooled, apply a diluted brown or grey acrylic paint wash. Wipe it off immediately so the dark paint stays only in the recesses, highlighting the spirals and sunrays.
Now you have a serene piece of landscape art ready to display on a shelf or mount in a frame
Bird Silhouette Branch Tile
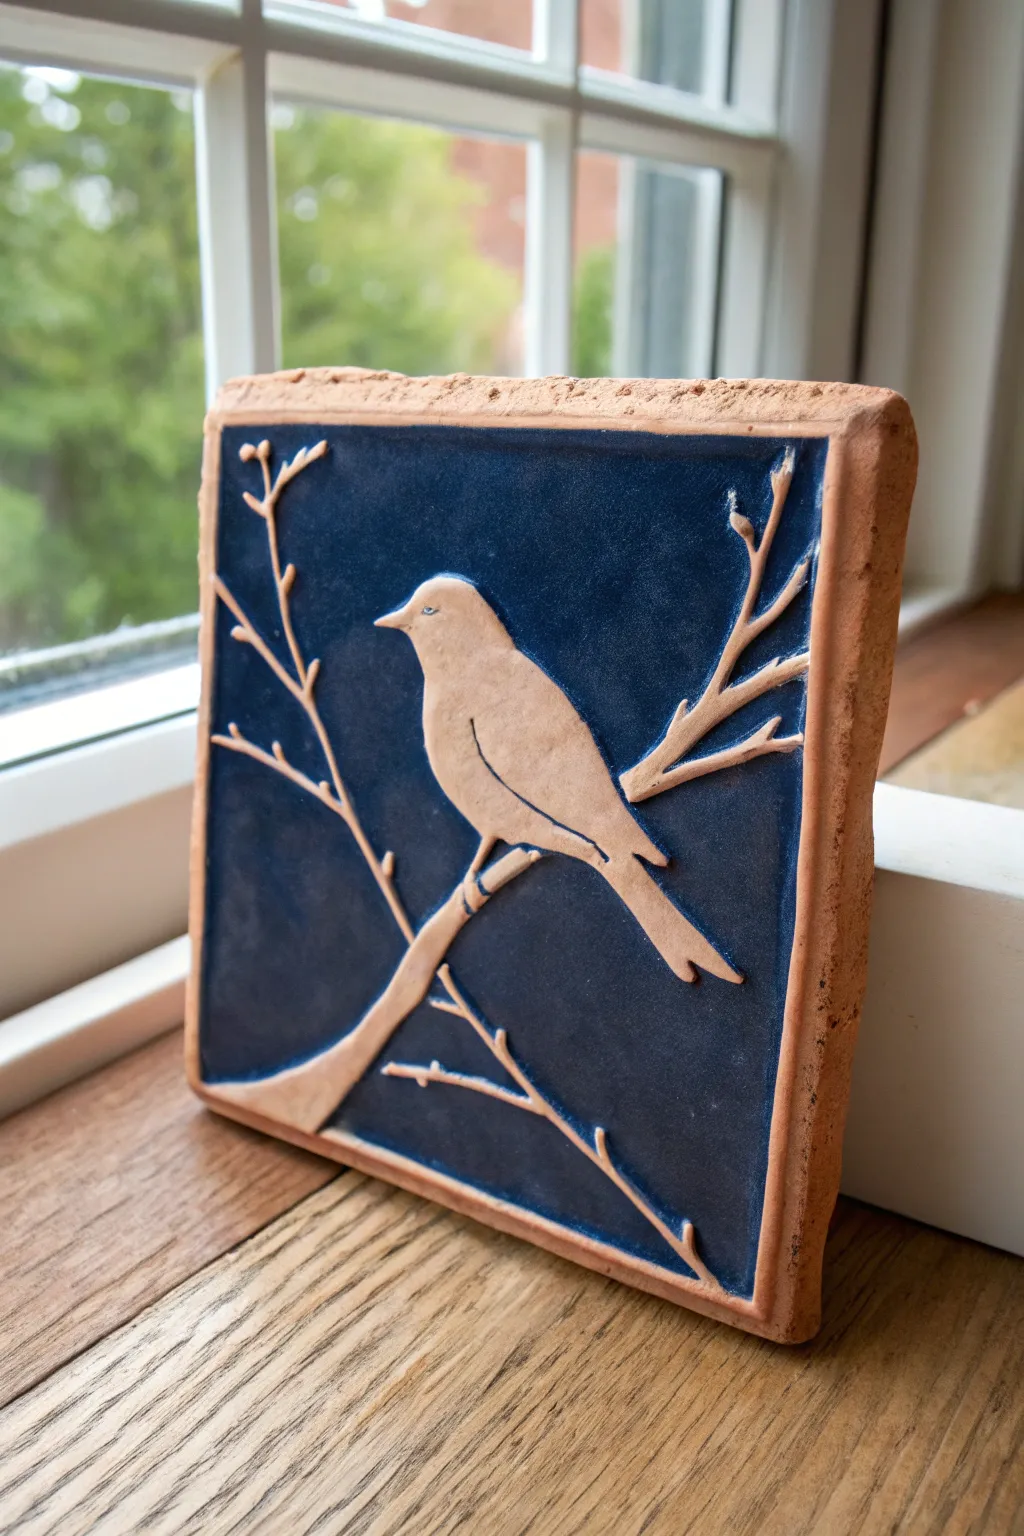
This rustic yet elegant tile features a stylized bird perched on a branch, created using a wax resist or carving technique to keep the raw clay exposed against a deep glossy blue background. The contrast between the matte, warm terracotta and the cool, shiny glaze makes for a striking decorative piece.
Step-by-Step Guide
Materials
- Terracotta or red earthenware clay slab (approx. 1/2 inch thick)
- Square tile cutter or ruler and needle tool
- Bird on branch template (paper printout)
- Pencil or dull stylus
- Carving tools (loop tool and needle tool)
- Small sponge
- Deep blue gloss glaze (low-fire or mid-fire depending on clay body)
- Glaze brushes (small detail brush and medium soft brush)
- Wax resist (liquid emulsion)
- Kiln access
Step 1: Shaping the Tile Base
-
Roll out the slab:
Begin by rolling out your terracotta clay to a consistent thickness of about 1/2 inch. Use guide sticks or a slab roller to ensure the surface is perfectly flat, which prevents warping later. -
Cut the square:
Measure and cut a precise square, approximately 6×6 inches. Clean up the edges with a damp sponge or your finger to smooth away any sharp burrs created by the cutting tool. -
Create the rough edge:
To mimic the handmade look in the photo, gently tap the edges of the slab on your work surface or use a paddle to give them a slightly irregular, organic texture rather than a perfect machine-cut look.
Glaze Beading Up?
If glaze beads remain on the waxed bird, wipe them immediately with a damp sponge tip. Once fired, stray glaze spots are permanent and hard to remove.
Step 2: Creating the Design
-
Transfer the image:
Place your paper bird template gently onto the leather-hard clay. Trace over the lines of the bird and branches with a pencil or dull stylus, pressing just hard enough to leave a faint impression in the clay surface. -
Define the outline:
Caringfully remove the paper. Using a needle tool, deepen the outline of the bird, the twiggy branches, and the small leaf buds to ensure the design is clearly visible. -
Carve the background (Optional):
If you want a true relief (where the bird is higher than the blue sky), use a loop tool to gently shave away a thin layer of clay from the background area, leaving the bird and branch slightly raised. Alternatively, you can rely purely on the wax resist for a flat design. -
Add details:
Use a needle tool to scratch in the bird’s eye, the definition of the wing, and segments of the branch. Keep lines simple and fluid to match the stylized aesthetic.
Add Texture
Before the bisque fire, gently press a real texture, like linen or canvas, into the bird’s body to give the raw clay a distinct tactile feel against the smooth glass-like background.
Step 3: Glazing and Finishing
-
Bisque fire:
Allow the tile to dry slowly and completely to avoid cracking. Once bone dry, fire it in the kiln to the bisque temperature recommended for your specific clay body. -
Apply wax resist:
This is the critical step. Using a steady hand and a detail brush, paint liquid wax resist carefully over the bird, the branches, and the edges of the tile. Any area covered in wax will repel the glaze and remain raw clay. -
Check the wax:
Let the wax dry completely. I usually hold it up to the light to check for missed spots on the bird’s body or the delicate tips of the branches. -
Apply the glaze:
Dip a medium soft brush into the deep blue gloss glaze. Apply a generous coat to the background areas. The glaze will bead up and roll off the waxed bird, but you may need to wipe stray droplets off the wax with a damp sponge or finger. -
Clean the edges:
Ensure the sides and back of the tile are clean of glaze to prevent it from sticking to the kiln shelf. -
Second firing:
Load the tile into the kiln for the glaze firing. Ensure the temperature matches the glaze specifications to achieve that rich, glossy melt seen in the photo. -
Final inspection:
Once cool, check the unglazed clay areas. If the wax residue left any roughness, you can lightly sand the bird with fine-grit sandpaper to smooth the terracotta.
Display your finished tile on a stand or framed in a shadow box to catch the light beautifully
Turtle Shell Pattern Relief Tile
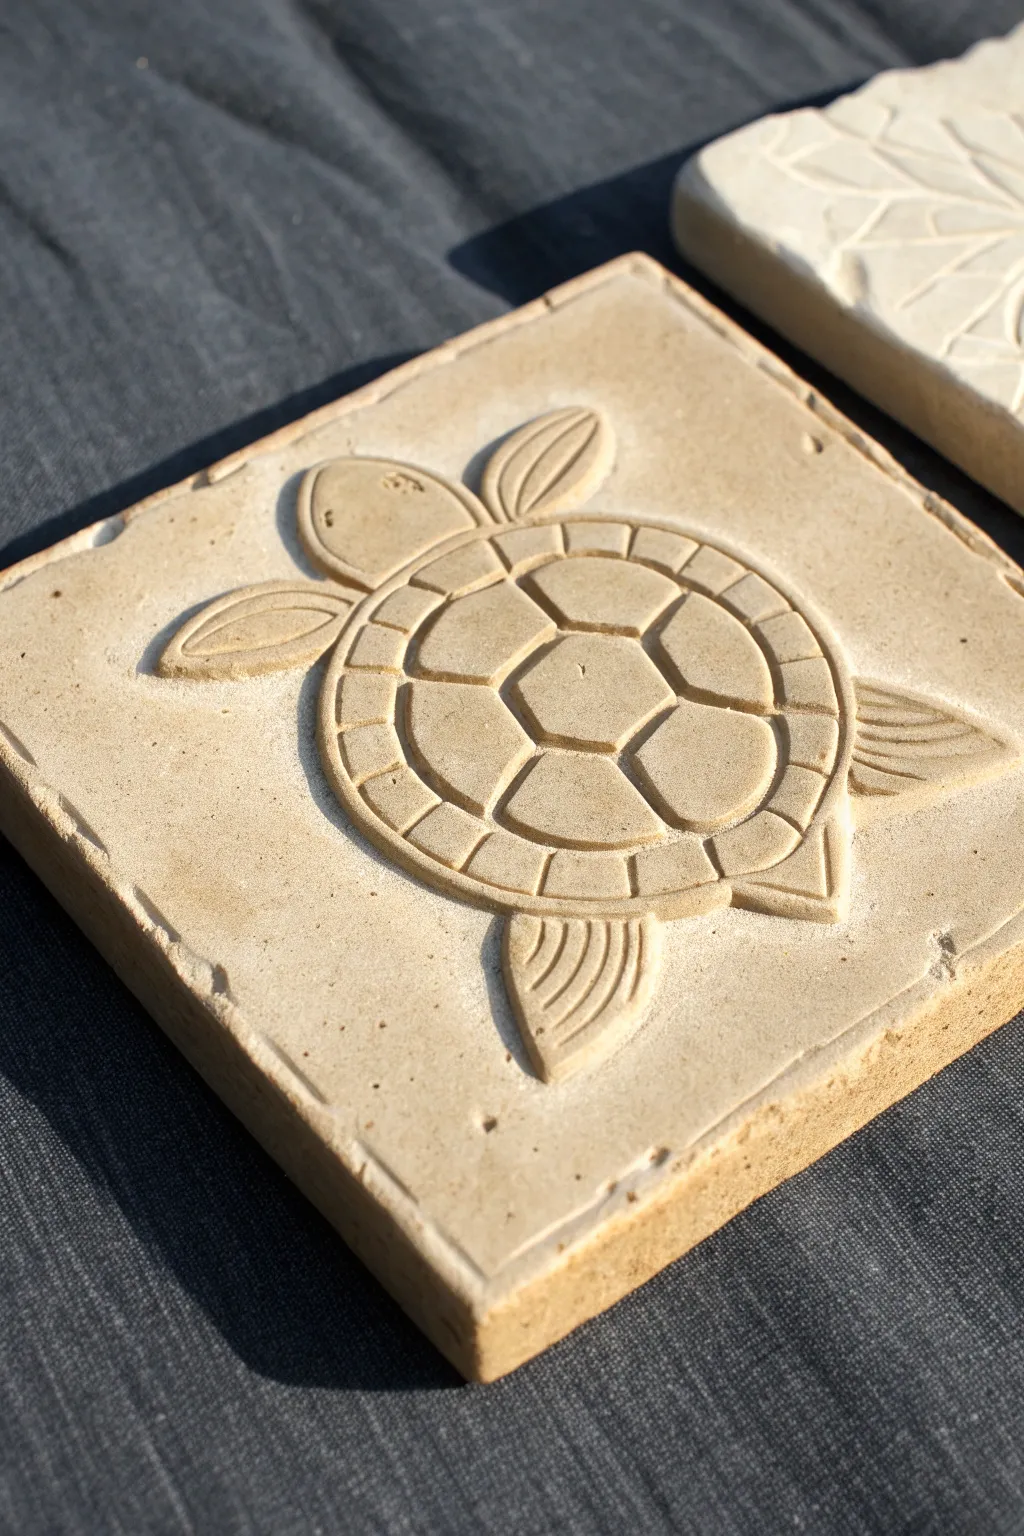
This project captures the enduring grace of a sea turtle in a classic square relief tile that feels like a discovery from a seaside ruin. The piece features a beautifully stylized turtle with defined shell segments and flowing flippers, rendered in a warm, sandy-beige clay that mimics natural stone.
Detailed Instructions
Materials
- Stoneware clay (buff or sand colored)
- Rolling pin
- Two 1/2-inch thickness strips (or wooden slats)
- Heavy canvas or ware board
- Potter’s needle tool
- Loop tool (small)
- Rubber kidney rib
- Modeling tool (wooden or plastic)
- Ruler
- Drafting compass (optional)
- Sea sponge
- Square tile cutter or fettling knife
Step 1: Base Preparation
-
Prepare the slab:
Begin by wedging your clay thoroughly to remove air pockets. Place the clay on a canvas-covered surface between your two 1/2-inch thickness strips. Roll the clay out until the rolling pin rides smoothly on the strips, ensuring an even thickness across the entire slab. -
Cut the square:
Using a ruler and a fettling knife (or a square tile cutter if available), measure and cut a perfect 6×6 inch square. Keep your knife vertical to ensure straight, clean edges. -
Smooth the surface:
Take your rubber kidney rib and gently compress the surface of the tile. This aligns the clay particles and creates a smooth canvas for your carving. I find that doing this in multiple directions helps prevent warping later. -
Refine the edges:
Run a damp finger or slightly moist sponge along the sharp cut edges of the square to soften them slightly, giving the tile a finished, professional look.
Step 2: Designing the Turtle
-
Outline the shell:
Lightly sketch a large oval in the center of your tile using the needle tool. Don’t dig deep; you just want a faint guideline. Inside this oval, sketch a slightly smaller concentric oval about 1/4 inch inward to create the shell rim. -
Add head and limbs:
Sketch a rounded, teardrop shape at the top for the head. Add two large, sweeping flippers extending from the upper sides of the shell, and two smaller, triangular fins at the bottom. -
Draft the shell pattern:
In the center of the inner oval, draw a hexagon. From the points of that hexagon, draw lines extending outward to the inner oval border, creating the classic segmented scute pattern of a turtle shell. -
Carve the negative space:
Using a small loop tool, begin carving away the clay *outside* the turtle shape. Remove about 1/8 to 1/4 inch of clay from the background. This will make the turtle appear raised (bas-relief). -
Smooth the background:
Once the bulk of the background clay is removed, use a modeling tool or your fingertip to smooth the lower surface, getting tight into the corners where the background meets the turtle outline.
Clean Lines Pro-Tip
When carving lines for the shell segments, drag a small piece of plastic wrap over the clay before pressing your tool down. This softens the edges instantly and prevents crumbled burrs.
Step 3: Detailing and Texture
-
Define the shell segments:
Use a needle tool or a fine point modeling tool to deeply score the lines separating the shell segments. Press down firmly to create distinct channels between the center hexagon and the surrounding plates. -
Bevel the segments:
Gently press down the edges of each individual shell segment with a modeling tool. This rounds them slightly, giving the shell a realistic, convex armored look rather than a flat surface. -
Carve flipper details:
On the front flippers, use the needle tool to press in three or four long, curved lines that follow the sweep of the limb. Repeat this on the rear flippers with shorter strokes to mimic fin texture. -
Add the eye and border:
Press a small, hollow circle into the head for the eye using the back of a small paintbrush or a detail tool. Then, use your needle tool to create vertical tick marks around the outer rim of the shell. -
Texture the stone:
To achieve the aged stone look seen in the photo, take a dry, coarse sea sponge and gently dab the background areas. You can also lightly press it onto the turtle’s shell for a weathered effect. -
Dry slowly:
Place a piece of plastic loosely over the tile to let it dry very slowly. Rapid drying causes warping, especially with flat tiles. Check it daily until it reaches bone dry. -
Bisque fire:
Fire the tile to bisque temperature (usually Component 04). Once fired, the piece can be left as bare ceramic for a matte stone look or glazed.
Level Up: Oxide Wash
After bisque firing, apply an iron oxide wash and wipe away the excess with a sponge. The dark oxide will settle into the carved recesses, making the shell pattern pop with ancient contrast.
Once kiln-fired, your relief tile will be ready to serve as a stunning coaster or a permanent installation in a garden wall.
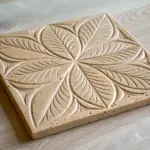
Tree of Life Fill-the-Square Tile
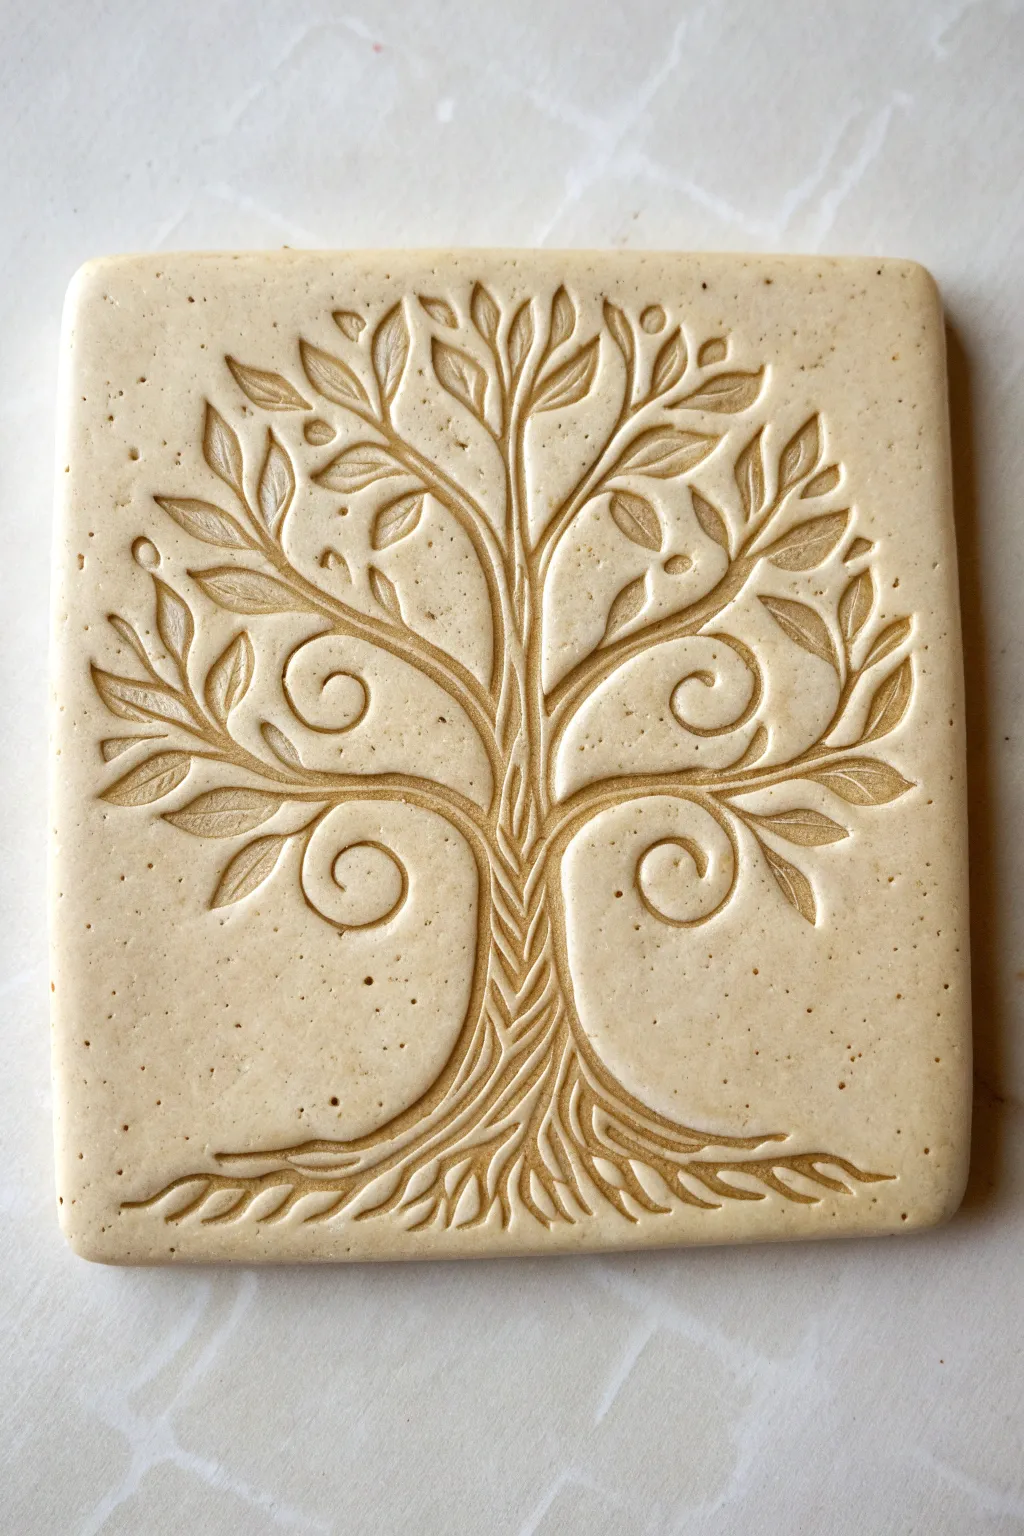
Capture the enduring beauty of nature with this elegant Tree of Life relief tile. Using a blend of carving and impressing techniques, you’ll create a monochromatic masterpiece that works perfectly as a coaster, trivet, or wall hanging.
Step-by-Step Tutorial
Materials
- Light-colored stoneware clay or air-dry clay (smooth body)
- Square cookie cutter or tile cutter (approx. 4×4 or 6×6 inches)
- Rolling pin
- Canvas or wooden board for working
- Two wooden guide strips (approx. 1/4 or 3/8 inch thick)
- Needle tool
- Small loop tool or carving stylus
- Soft rubber rib
- Small sponge
- Thin plastic sheet (optional, for smoothing)
- Pencil and paper (for sketching)
Step 1: Preparation & Base
-
Design your tree:
Begin by sketching your Tree of Life design on a piece of paper cut to the exact size of your intended tile. Focus on the symmetrical flow of the branches and the swirling roots at the base. -
Roll the slab:
Place your clay between the two wooden guide strips on your canvas. Roll the clay out until the rolling pin rides on the strips, ensuring a perfectly even thickness across the entire slab. -
Compress the clay:
Take your soft rubber rib and firmly drag it across the surface of the clay in multiple directions. This compression aligns the clay particles, preventing warping during drying and creating a silky smooth surface for carving. -
Cut the square:
Place your square cutter or template onto the clay and cut your tile shape. Be careful not to distort the edges as you remove the excess clay.
Clean Lines Hack
Place a piece of cling film over the clay before using your stylus. Drawing through the plastic softens the edges instantly, meaning less cleanup work later.
Step 2: Tracing & Layout
-
Transfer the design:
Lay your paper sketch gently onto the damp clay. Using a dull pencil or a stylus, trace over your lines with light pressure to leave a faint impression on the clay surface without tearing the paper. -
Establish the trunk:
Using a needle tool, lightly define the central trunk lines first. This anchors your composition and helps ensure the branches radiate correctly from the center. -
Map the main swirls:
Lightly mark the dominant spirals—specifically the two large curls at the base of the branches and the two inward curls near the roots. These spirals are the key movement lines of this specific design.
Step 3: Carving & Detailing
-
Carve the negative space:
Using a small loop tool or a carving stylus, gently depress the clay around the trunk and main branches. You aren’t removing much clay here; rather, you are compressing the background to make the tree appear raised. -
Define the branches:
Go back over the branch outlines with your needle tool or a fine stylus to sharpen the edges. I find that holding the tool at a slight angle helps create a clean, beveled edge that catches the light. -
Creating the leaves:
For each leaf, press a small, pointed modeling tool or the tip of a spoon-shaped tool into the clay. Press deeper at the center and lift up as you move toward the tip to create a tapered leaf shape. -
Leaf detailing:
Use a very fine needle tool to draw a singular vein down the center of each impressed leaf. Keep the pressure light so the line looks organic. -
Texture the trunk:
Carve interwoven lines up the center of the trunk to mimic a braided or twisted bark texture. These lines should flow seamlessly into the roots below. -
Sculpt the roots:
Carve the roots spreading outward at the bottom. Mirror the technique used on the branches, ensuring the roots taper off towards the edges of the tile.
Preveting Warped Corners
If edges start lifting while drying, lightly mist the center (not edges) and place a weighted board on top to force it flat as it cures.
Step 4: Refining & Finishing
-
Smooth the edges:
Run your finger or a slightly damp sponge along the outer rim of the tile to soften the sharp cut edge. This prevents chipping later and gives the piece a professional finish. -
Clean up burrs:
Inspect your carving for any ‘clay crumbs’ or sharp burrs around the incisions. Use a soft brush or a barely damp fingertip to gently smooth these away without erasing your details. -
Adding texture (optional):
If you want a speckled look like the example image, you can gently stipple the background area with a stiff-bristled brush, or use a clay body with grog or speckles for natural texture. -
Slow drying:
Place a piece of plastic loosely over the tile or sandwich it between two pieces of drywall/plasterboard. Tiles love to warp, so slowing down the drying process is absolutely minimal for a flat result.
Once fired or fully cured, your relief tile will serve as a permanent reminder of growth and balance
Multi-Tile Puzzle Mural Panel
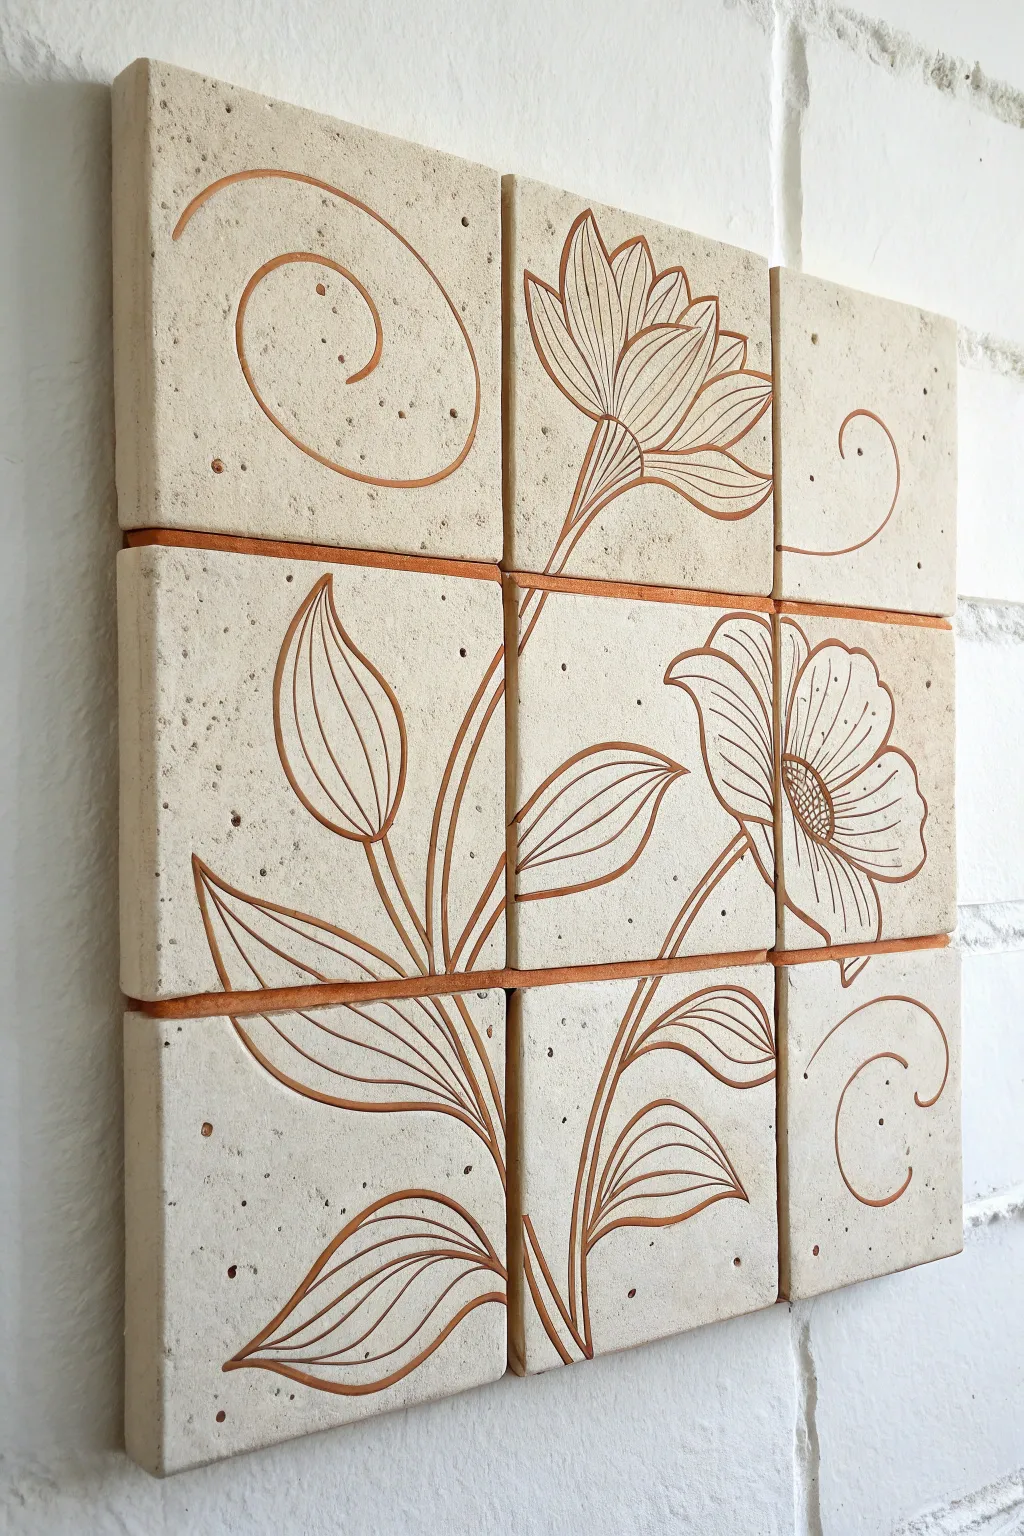
Transform simple stone coasters or tiles into a stunning, fragmented floral mural with this elegant carving technique. The creamy, pitted texture of tumbled stone provides an ancient canvas for the warm, terracotta-toned linework that flows seamlessly across nine individual pieces.
Step-by-Step
Materials
- 9 Tumbled limestone or travertine tiles (4×4 inches)
- Pencil
- Carbon transfer paper
- Masking tape
- Dremel rotary tool with flex shaft attachment
- Diamond burr engraving bits (various sizes)
- Small stiff-bristle brush
- Terracotta or rust-colored acrylic paint
- Small detail paintbrush
- Damp lint-free cloth
- Clear matte stone sealer
- Mounting adhesive or tile grout (for installation)
Step 1: Planning and Transferring
-
Arrange the canvas:
Lay your nine tiles out on a flat workspace in a 3×3 grid pattern. Ensure the edges are touching but not grinding against each other. It helps to number the back of each tile (1-9) so you don’t lose the order later. -
Draft the design:
Draw your floral design on a large sheet of paper cut to the exact size of your 3×3 grid (approx. 12×12 inches). Sketch flowing stems that cross over tile boundaries, large open blooms, and decorative spirals for the outer corners. -
Prepare for transfer:
Tape the tiles together temporarily from the back to keep them stable. Flip them over and place a sheet of carbon paper over the entire face, followed by your sketched design. -
Trace the lines:
Using a firm hand and a pencil or stylus, trace over every line of your drawing. Check a corner periodically to ensure the carbon is transferring darker enough to see on the stone surface.
Clean Lines Tip
Keep a spray bottle of water handy while carving. A light mist keeps dust down and helps the diamond bit cut smoother lines without overheating.
Step 2: Carving the Stone
-
Safety check:
Put on safety glasses and a dust mask. Carving stone produces fine silica dust that you definitely don’t want to inhale. -
Outline the design:
Using a Dremel with a fine diamond point bit, begin etching the main outlines of your design. Hold the tool like a pen and let the speed of the rotation do the work—don’t press too hard. -
Deepen the grooves:
Go over your initial lines a second time to deepen the channels. Aim for a depth of about 1-2mm so the paint has a nice reservoir to sit in later. -
Widen selected areas:
Switch to a slightly rounder or wider burr bit to vary the line weight. Thicken the curves of the leaves and the base of the flower stems to give the artwork more dynamic visual weight. -
Details and texture:
Add fine details like the center stamen of the flowers or the veins within the leaves. Keep these lines thinner than the main structural outlines. -
Clean the channels:
Use a stiff-bristle brush or compressed air to thoroughly remove all stone dust from the carved grooves. Any leftover dust will prevent the paint from adhering properly.
Step 3: Inking and Finishing
-
Mix the color:
To mimic the look of inlaid terracotta, mix a rust-colored acrylic paint with a tiny drop of water to improve flow. You want a consistency closer to heavy cream than paste. -
Fill the grooves:
Load a fine detail brush and carefully paint inside the carved channels. It’s okay if you get a little paint on the surface—we’ll clean that up—but try to keep the majority inside the groove. -
Wipe away excess:
Allow the paint to set for just a minute or two until it’s tacky but not fully dry. Take a damp, tightly wrung cloth and wipe flat across the surface of the tile to remove overpainting, leaving the color only in the carved recesses. -
Refine the lines:
If wiping removed too much pigment, go back in with your small brush and touch up the lines. I find doing a second pass often makes the color much richer. -
Seal the stone:
Once the paint is completely dry (give it a few hours), apply a matte stone sealer over the entire face of the tiles. This protects the stone from staining and locks in your paint work without adding an unnatural shine. -
Mount display:
Install your finished tiles on the wall using heavy-duty construction adhesive or tile mastic. Leave a very small gap (about 1/16 inch) between tiles to mimic the look of a traditional mosaic installation.
Level Up: Gold Leaf
For a luxurious twist, apply gold leaf sizing into the carved grooves instead of paint, then lay in gold leaf for a shimmering, illuminated manuscript effect.
Step back and admire how the continuous lines unite the separate tiles into one cohesive, organic masterpiece