Clay totem poles are my favorite kind of vertical sculpture because they’re basically storytelling in stackable form. If you can make a few simple hollow shapes and a couple of cute characters, you can build a totem that looks totally custom and surprisingly sturdy.
Classic Whimsical Animal Stack
Bring a touch of whimsical storytelling to your garden with this adorable stacked totem featuring a friendly fox, a sleeping critter, and a watchful bird. The matte finish and soft color palette give these clay pieces a charming, modern folk-art feel perfect for outdoor decor.
Detailed Instructions
Materials
- Polymer clay (white or terracotta) or low-fire ceramic clay
- Rolling pin
- Aluminum foil (for armatures)
- Clay sculpting tools (knife, needle tool, smoothing rib)
- Thick galvanized wire or metal rod (for the internal structure)
- Acrylic paints (matte finish) or ceramic underglazes
- Fine-grit sandpaper
- Clear matte sealer (outdoor rated)
- Paintbrushes (various sizes)
- Wooden skewer or knitting needle
Step 1: Forming the Base Components
-
Prepare the core structure:
Since this is a stack, you need consistent vertical holes. If using polymer clay, scrunch clean aluminum foil into cylindrical shapes for the core of each thick piece to save clay and reduce weight. If using ceramic clay, these must be hollowed out later. -
Shape the bottom cylinder:
Roll a thick slab of clay and form a wide cylinder, approximately 3-4 inches in diameter and 2 inches tall. This is the peach-colored base. Smooth the seams perfectly using a little water or clay softener. -
Create the leafy base texture:
While the clay is soft, use a small loop tool or a knife tip to gently carve stylized vine and leaf patterns around the circumference of the bottom cylinder. Don’t cut too deep; you just want relief texture. -
Form the bear face block:
Ideally, shape a slightly taller cylinder for the teal bear section (about 3 inches tall). Smooth the surface until it resembles a perfect marshmallow shape.
Wobbly Tower?
If your pieces don’t sit flush, use a small washer or a hidden disk of uncured clay (if gluing permanently) between layers to level them out invisibly.
Step 2: Sculpting the Animal Segments
-
Sculpt the snout detail:
For the bear/teal block, attach a small flattened circle of clay near the bottom center for the snout. Poke a hole in the center with a large tool to create the mouth opening. -
Create the sleeping fox section:
Form a rounded, squat shape for the orange ‘sleeping’ fox layer. It should be slightly wider than it is tall. Pull the clay subtly at the top corners to suggest ears. -
Stacking test:
Before sculpting further, gently stack your wet pieces to check proportions. The teal body section (blue with triangles) should be narrower at the top to nestle under the head. -
Sculpt the main fox head:
Create a rounded sphere for the head. Pinch the top corners dramatically to form pointed ears. This piece needs to be smooth and distinctive. -
Create the topper bird:
Sculpt a small bird shape with a teardrop body. Add a separate tail feather piece and a tiny three-pointed crest on the head. Insert a toothpick or wire into the feet area so it can mount securely to the fox head later. -
Hollow the centers:
Using your main metal rod as a gauge, carefully pierce a vertical hole through the absolute center of every single piece. This ensures they will stack straight.
Level Up
Create a ‘seasonally interchangeable’ totem by not gluing the pieces; sculpt a winter-themed scarf or a holiday hat segment to swap in later.
Step 3: Baking & Painting
-
Bake or fire the pieces:
Follow the instructions for your specific clay type. For polymer clay, bake on a tile at the recommended temperature. If using ceramic clay, fire to bisque. I like to let polymer clay cool inside the oven to prevent cracking. -
Sand for smoothness:
Once cool, use fine-grit sandpaper to buff away any fingerprints or sharp edges. The finish should feel like smooth stone. -
Apply base coats:
Paint each section its dominant color: peach for the base, teal for the bear, terra-cotta for the middle spacer, orange for the fox face, and soft blue for the upper body. -
Add the white details:
Using a creamy white paint, block in the face shapes on the fox and the tummy patch on the middle section. You may need two coats for opacity. -
Paint fine details:
Using a fine liner brush and black paint, add the sleepy eyes, the nose tips, and the tiny triangle patterns on the blue body section. Don’t forget the rosy cheeks on the teal bear. -
Color the leaf relief:
Carefully paint the carved leaves on the bottom base with a muted sage green.
Step 4: Assembly
-
Seal the artwork:
Apply two thin coats of matte outdoor sealer to every piece. This is crucial if the totem will live in the garden. -
Final assembly:
Feed the support rod into the ground or a heavy display base. Slide each clay segment onto the rod in order: base, bear, spacer, sleeping fox, blue body, fox head, and finally the bird. -
Secure the stack:
If you want the stack permanent, use a strong epoxy glue between the layers as you slide them onto the rod.
Place your charming critter stack on a patio stone or nestled among ground cover to welcome visitors to your garden


Bird Finial on Top

This charming garden sculpture features a stacked array of handcrafted ceramic blocks topped with a stylized bird finial. Its rustic, beige clay body is accented with incised geometric patterns and earthy red underglaze, creating a playful yet modern vertical accent for any outdoor space.
Step-by-Step
Materials
- Light-colored stoneware clay (cone 5-6 recommended)
- Pottery wire cutter
- Rolling pin and guide strips (approx. 1/4 inch)
- Needle tool
- Fettling knife
- Scoring tool or serrated rib
- Slip (clay mixed with water)
- Wooden sculpting tools
- Red and brown underglaze
- Fine detail paintbrush
- Metal or wooden rod for stacking (optional post-firing)
- Clear matte glaze (optional)
Step 1: Forming the Base Blocks
-
Prepare the slabs:
Begin by rolling out your clay into a consistent slab, using guide strips to ensure an even thickness of about 1/4 inch. You will need enough clay to construct six main body blocks. -
Cut the walls:
Measure and cut rectangular strips for the walls of your blocks. For the shape shown, create rounded squares; cut strips approximately 3 inches tall and long enough to form a tube with a 3-inch diameter. -
Assembling cylinders:
Form each strip into a cylinder or rounded square shape. Score the edges thoroughly, apply slip, and press the ends together firmly to create a seam. Smooth the seam inside and out so it disappears. -
Capping the blocks:
Cut squares of clay slightly larger than your cylinders for the tops and bottoms. Score and slip the rim of the cylinder and the edge of the cap, then attach. This creates a hollow, enclosed form. -
Refining the shape:
Once the hollow forms are leather hard, gently paddle them with a wooden spatula to flatten the sides slightly, giving them that soft, rounded-cube aesthetic shown in the middle blocks. -
Creating the stacking holes:
This is crucial: Using a hole cutter or a fettling knife, cut a centered hole through the top and bottom of every single block. This allows you to run a rod through them later for stability.
Step 2: Sculpting the Top Elements
-
Forming the sphere:
Hand-build a hollow sphere using two pinch pots joined together. Ensure it is sized proportionally to sit atop your base blocks. Don’t forget to cut the vertical hole through this piece as well. -
Sculpting the bird body:
Model the bird using a solid piece of clay or a hollow pinched form if it’s large. Shape a smooth, curved body that tapers into a head. -
Adding details:
Pinch out a small beak and attach slab-cut wings and tail feathers. Score and slip all distinctive additions securely. Note how the tail feathers in the image are stylized slabs with incised lines. -
Final assembly construction:
Create a vertical hole through the bottom of the bird, but not all the way through the top, so it can cap the rod. Check that the bird sits level on top of the sphere.
Wobbly Stack?
If pieces don’t sit flush, use a rasp or sandpaper on the bisque-fired ware to flatten the tops and bottoms before the final glaze firing.
Step 3: Decoration and Finishing
-
Incising patterns:
Once the clay is leather hard, use a needle tool or carving tool to scratch in the geometric designs. Replicate the triangles, diamonds, and vertical lines seen in the reference image. -
Applying color:
Paint the incised designs with red and brown underglaze. I like to let this dry briefly and then wipe the surface with a damp sponge, which leaves the color crisp inside the recessed lines while cleaning up the high points. -
Adding bold accents:
Paint solid shapes, like the red triangles on the lower block and the circular ‘eyes’ on the middle block, using a steady hand and saturated underglaze. -
Drying and firing:
Allow all pieces to dry very slowly to prevent cracking, especially the hollow blocks. Bisque fire the pieces according to your clay’s specifications. -
Glazing:
For the matte, stone-like finish seen here, you can leave the clay unglazed on the outside or apply a very thin coat of matte clear glaze. Fire the pieces a second time to the glaze temperature. -
Final installation:
Once cool, thread all pieces onto a rebar or metal garden stake securely planted in the ground, stacking them in your preferred order.
Geometric Precision
Use a flexible ruler or a strip of paper wrapped around the cylinder to mark even spacing for your geometric patterns before carving.
Enjoy watching your new ceramic friend survey the garden from its geometric perch


Bead-Style Totem With Donuts and Discs
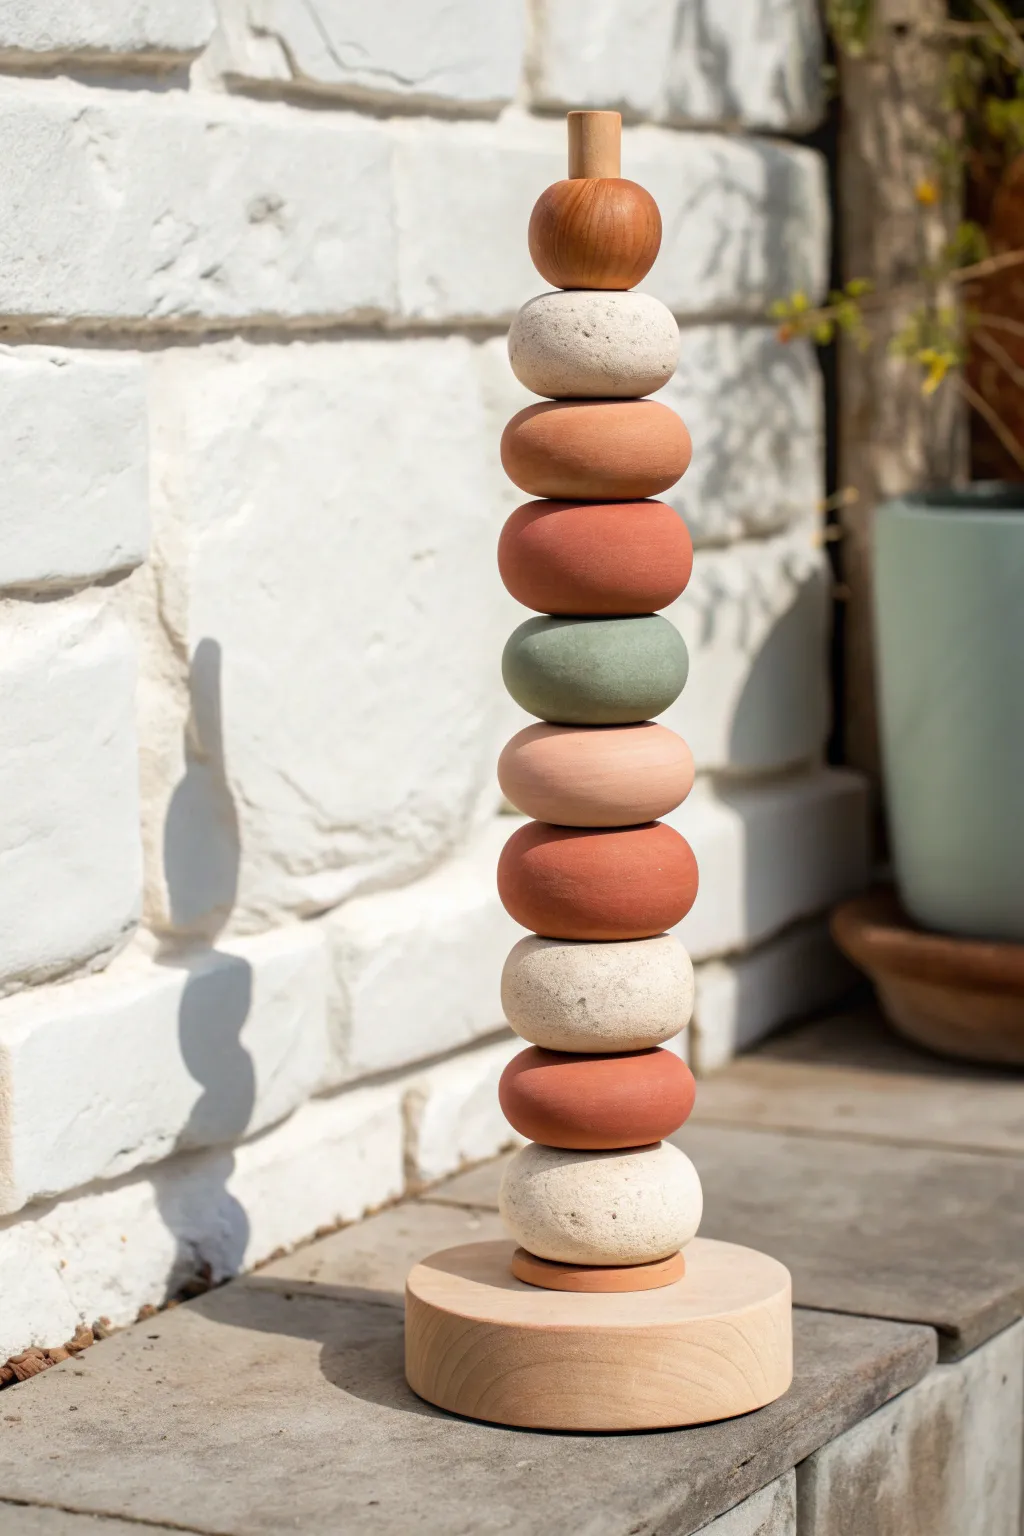
This serene, Zen-inspired sculpture combines natural textures and muted clay tones into a vertical accent perfect for a patio or garden shelf. The design mimics the look of balanced river stones but with the stability of a central dowel system.
Step-by-Step Tutorial
Materials
- Air-dry clay (white and terracotta colors)
- Wooden dowel (approx. 1/2 inch diameter)
- Thick wooden base disc (pre-drilled or drill needed)
- Wooden sphere/finial for the top
- Acrylic paints (sage green, pale peach, warm terracotta)
- Course sandpaper or texturing tool (for stone effect)
- Clear matte varnish or sealant
- Strong wood glue
- Drill with bit matching dowel size
- Rolling pin or flat surface for shaping
Step 1: Preparing the Base Structure
-
Select your foundation:
Begin with a sturdy wooden base. A thick circular slice of wood works best to obtain that organic feel, but a square block can also work. -
Drill the center hole:
Find the exact center of your wooden base and drill a hole about halfway through the thickness of the wood. Ensure the drill bit size matches your dowel diameter perfectly for a snug fit. -
Secure the vertical support:
Apply a generous amount of wood glue into the hole and insert your wooden dowel. Wipe away any excess glue immediately and ensure the dowel stands perfectly straight while drying.
Step 2: Sculpting the Clay Beads
-
Portioning the clay:
Divide your clay into roughly equal portions. For the specific look in the photo, you will need about 10-12 large distinct pieces. Vary the sizes slightly to create a natural, non-uniform rhythm. -
Rolling the basic shapes:
Roll each portion into a smooth ball between your palms. Once round, gently press them down on a flat surface to create a flattened, disc-like ‘donut’ or ‘stone’ shape. -
Creating the channel:
Use a tool slightly larger than your dowel (like a marker cap or a separate piece of dowel) to punch a clean hole through the center of each flattened sphere. Always test the fit on a spare dowel piece if you have one. -
Adding stone texture:
For the white/grey beads, I like to gently press a piece of coarse sandpaper or a real rock against the wet clay surface to imprint a realistic, pitted stone texture. -
Smoothing the terracotta:
For the warmth-toned beads, keep the surface smoother. Use a bit of water on your finger to buff out any fingerprints or cracks before they dry. -
Drying the components:
Let all your clay beads dry completely. This can take 24-48 hours depending on humidity. Flip them occasionally to ensure even drying on both sides.
Wobbly Tower?
If beads fit too loosely on the dowel, wrap a small band of masking tape around the dowel at the position of that specific bead to create a snug, shim-like fit.
Step 3: Painting and Finishing
-
Mixing custom colors:
Mix a muted sage green and a soft peach tone using your acrylic paints. The goal is an earthy palette, so avoid overly bright or neon colors. -
Applying the color:
Paint specific beads to break up the pattern. Leave some beads in their raw clay state (especially the textured white ones) and paint select smooth ones in your sage, peach, and deep terracotta hues. -
Distressing the finish:
Once the paint is dry, lightly sand the edges of the painted beads to reveal a bit of the underlying clay texture. This gives them a weathered, aged appearance. -
Sealing the work:
Apply a coat of clear matte varnish to all separate beads. This protects the clay from moisture and gives the colors a unified finish without adding artificial gloss.
Go Geometric
Instead of organic rounded stones, sculpt your clay into cubes, pyramids, or flat hexagonal discs for a modern, architectural take on the classic totem.
Step 4: Assembly
-
Stacking the stones:
Slide your dried and sealed clay beads onto the wooden dowel. Experiment with the order—alternating textures and colors creates the most visual interest. -
Adding the wooden topper:
Top the stack with a wooden sphere. If your sphere doesn’t have a hole, you may need to drill a partial hole into it so it caps the dowel comfortably. -
The final detail:
Finish the very top with a small cylindrical wooden peg if desired, gluing it securely to the wooden sphere for a totem-like silhouette. -
Securing the stack:
If you want the arrangement permanent, add a dab of glue between each bead. However, leaving them loose allows you to rearrange your sculpture whenever the mood strikes.
Place your finished sculpture in a spot with natural light to highlight the lovely textures you created


Tapered Stack for Easy Balance
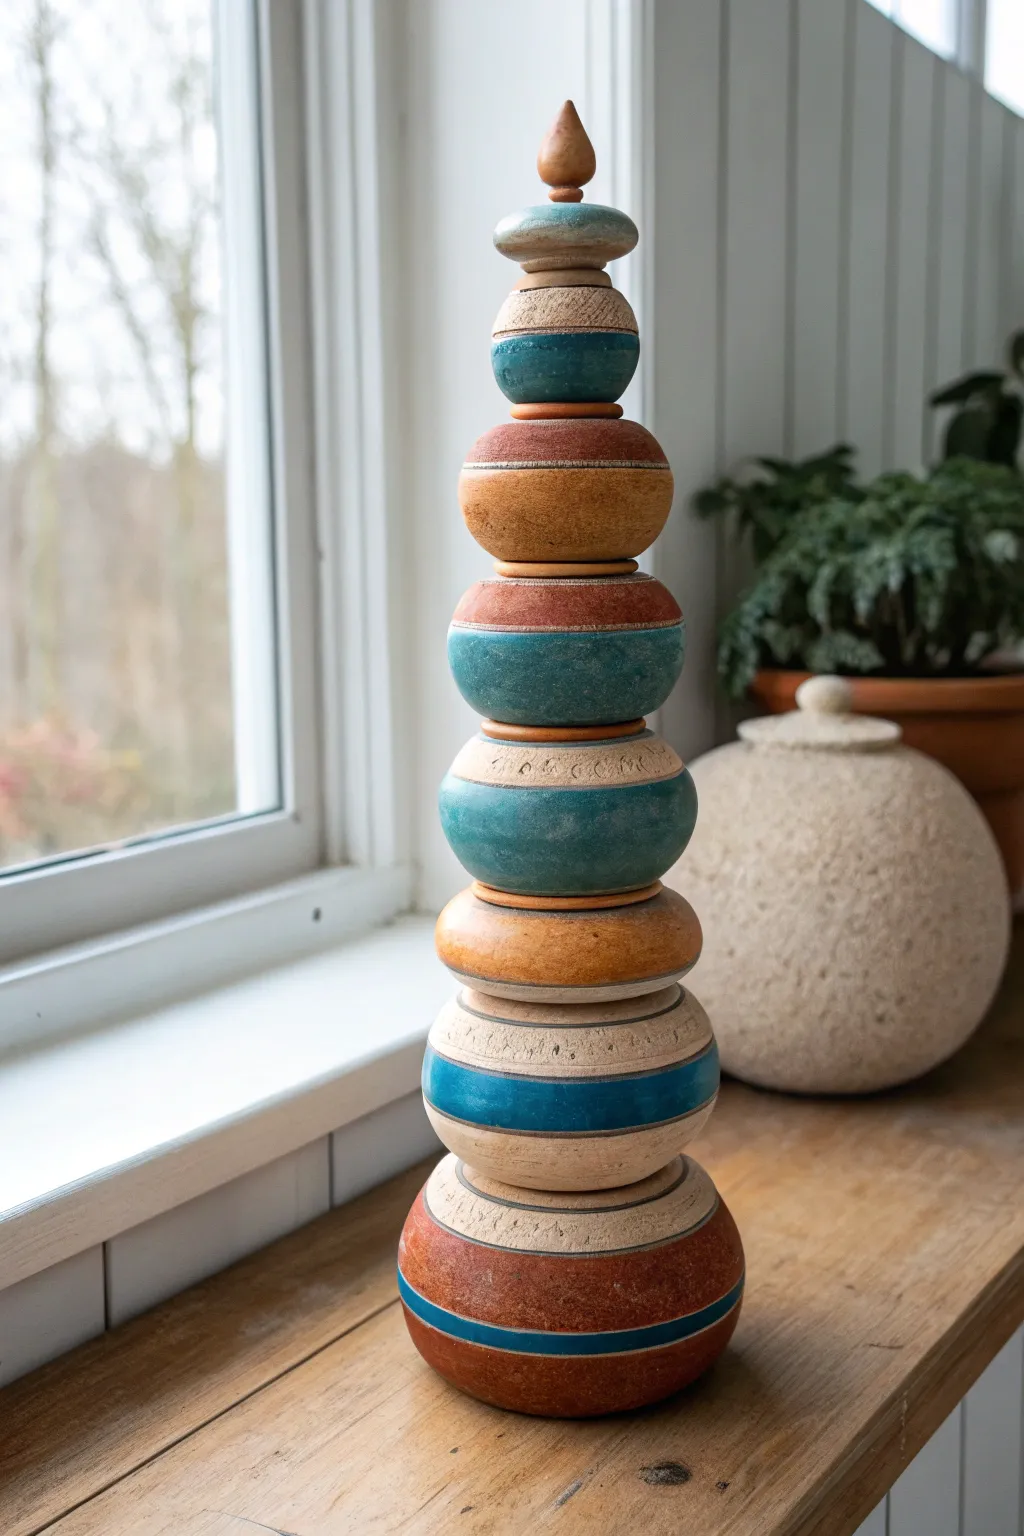
This striking clay totem combines the stability of flattened spheres with a sense of upward movement, perfect for a windowsill or shelf display. Its tapered design creates natural balance, while layers of earthy terracotta, deep teal, and stone-cream glazes give it a timeless, excavated feel.
Step-by-Step Guide
Materials
- Stoneware clay (buff or white grogged works best)
- Pottery wheel (or coil/slab building tools)
- Wooden throwing ribs / kidney tool
- Wire cutter
- Metal or wooden rod for structure (optional but recommended)
- Hole cutter or apple corer
- Underglazes: Terracotta, Deep Teal, Cream/Beige
- Sponge and bucket of water
- Clear matte glaze
- Kiln
Step 1: Shaping the Tapered Beads
-
Plan your sizes:
Sketch out the stack first. You will need roughly 8-9 main spherical sections that graduate in size from a wide base (approx. 5-6 inches) to a small finial top. -
Prepare clay balls:
Weigh out your clay balls in decreasing increments. For example, start with 2 lbs for the base, reducing by a few ounces for each subsequent tier. -
Throw or form the base:
Throw the largest ball on the wheel into a thick, closed form. Instead of a perfect sphere, gently compress it with a wooden rib to create a ‘squat’ bun shape with flattened top and bottom surfaces for stacking stability. -
Create the mid-sections:
Repeat the throwing process for the middle sections. Focus on varying the heights slightly—some can be flatter discs, while others are rounder, but maintain the graduating width diameter. -
Fashion the spacers:
Create small, flat separating discs (like thick washers) to go between the main featured shapes. These should be narrower than the spheres they separate, acting as a ‘neck’ to give the totem visual breathing room. -
Sculpt the finial:
For the very top piece, throw or hand-build a teardrop or flame shape. This won’t overlap anything, so it can have a pointed tip. -
Create the central channel:
allow the pieces to dry to leather-hard. Once firm enough to handle without deforming, use a hole cutter to core a vertical hole through the center of every piece *except* the top finial.
Stability Secret
Make the bottom-most bead slightly concave on its underside. This creates two points of contact rather than one spinning center, preventing the totem from wobbling on the shelf.
Step 2: Texturing and Surface Decoration
-
Scribe detailing:
While leather hard, place selected pieces back on a banding wheel. Use a needle tool to incise horizontal bands or rings around the circumference. These shallow grooves will catch the glaze later. -
Add texture:
I like to gently press a coarse stone or texturing sponge against the clay surface to remove the smooth ‘plastic’ look and mimic natural stone. -
Dry and bisque:
Allow all components to bone dry completely. Slow drying is essential here to prevent warping, which would ruin the balance. Bisque fire according to your clay body’s specifications.
Garden Adaptation
To make this suitable for outdoors, swap the inner rod for copper pipe and skip the gluing. The copper will patina nicely and the pieces can rattle gently in the wind.
Step 3: Glazing and Assembly
-
Apply base colors:
Using a sponge or wide brush, apply your underglazes in bands. Alternate between the terracotta (rust), teal, and cream colors. Don’t worry about perfect lines; a little irregularity adds to the rustic charm. -
Highlight the grooves:
Where you carved horizontal lines, wipe back the glaze slightly with a damp sponge so the raw clay body peeks through, creating contrast. -
Glaze and fire:
Apply a thin coat of clear matte glaze to seal the piece without making it too shiny. Fire the pieces separately in the kiln, ensuring they don’t touch. -
Final assembly:
Once cool, thread your ceramic beads onto a metal or sturdy wooden rod anchored into the base piece. Use epoxy putty between layers if you want a permanent bond, or leave them loose to rearrange later.
Step back and admire how the tapered silhouette brings a sense of calm structure to your space

The Complete Guide to Pottery Troubleshooting
Uncover the most common ceramic mistakes—from cracking clay to failed glazes—and learn how to fix them fast.
Leaf Layers as Natural Spacers
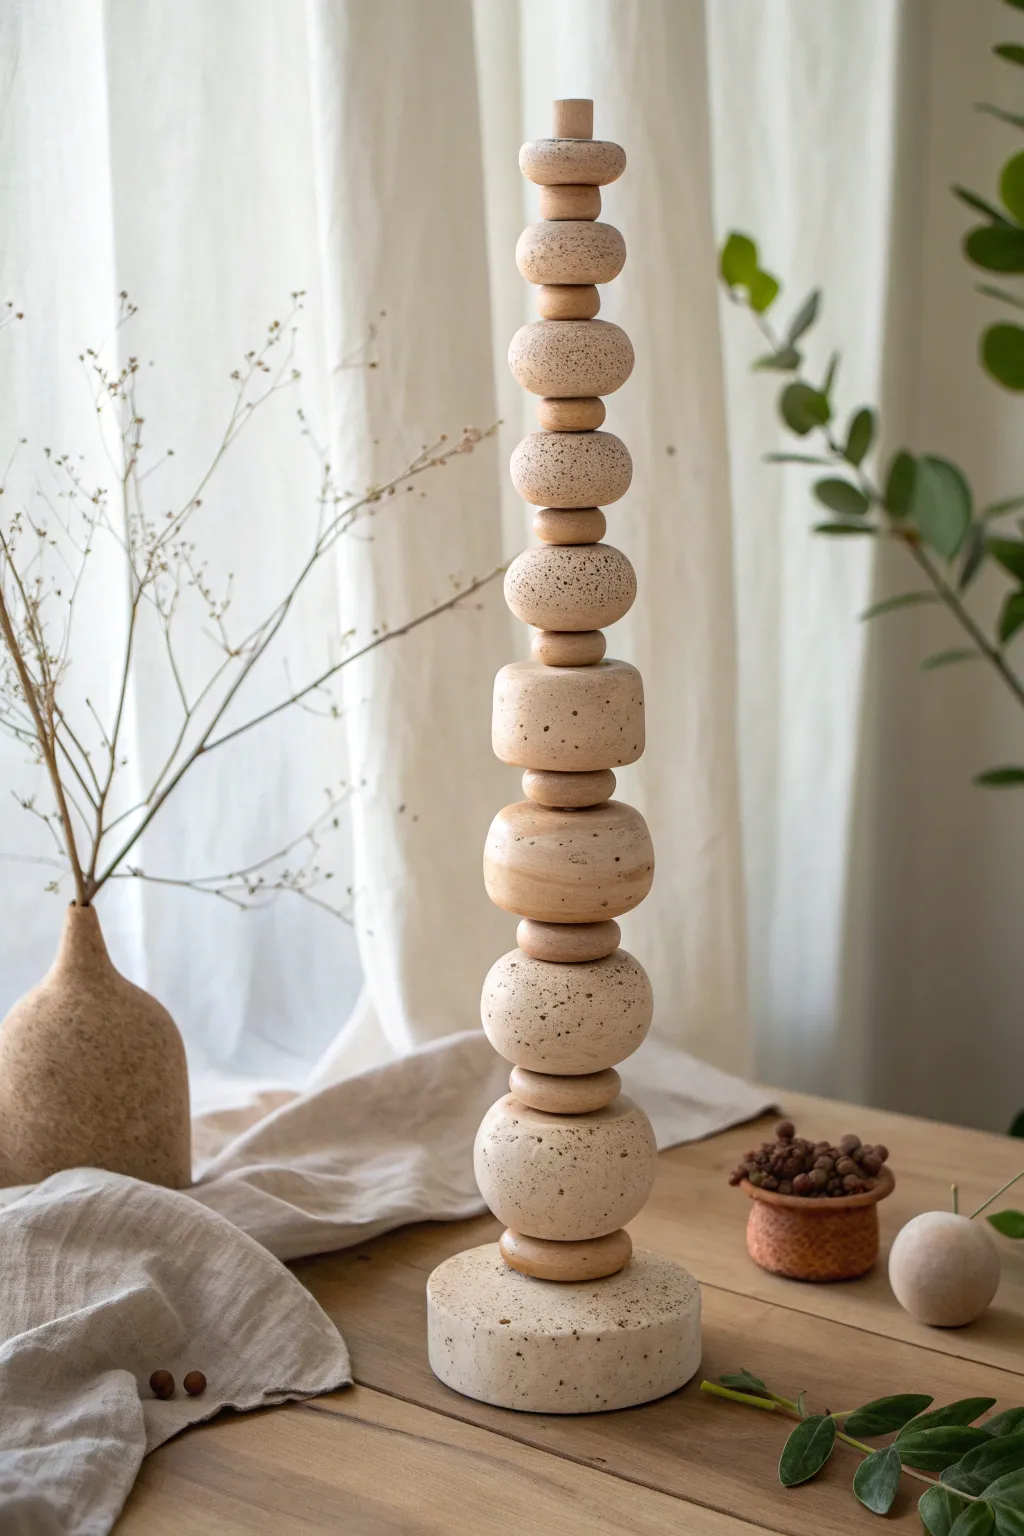
Standing tall with the quiet elegance of natural stone, this ceramic totem pole balances organic, speckled clay spheres with warm wooden accents. It serves as a calming architectural centerpiece, bringing a structured yet earthy rhythm to any interior space.
How-To Guide
Materials
- Stoneware clay (smooth or lightly grogged)
- Speckled clay body (or dried coffee grounds/granular manganese to add texture)
- Wooden beads/disks (approx. 1-2 inch diameter, pre-drilled)
- Wooden dowel rod (height of desired totem, approx. 1/2 inch diameter)
- Heavy circular base (wood or cast concrete)
- Pottery wire cutter
- Rib tool
- Large sponge
- Needle tool
- Calipers (optional but helpful for sizing)
- Clear matte glaze or beeswax finish
- Sandpaper (medium and fine grit)
Step 1: Preparing the Clay Forms
-
Prepare the speckled clay:
Start by wedging your clay thoroughly. If you aren’t using a pre-speckled clay body, knead in granular manganese or even dried used coffee grounds at this stage to achieve that organic, stone-like texture seen in the reference. -
Portion the clay:
Divide your clay into roughly 8-10 chunks. These shouldn’t be identical; you want a graduation in size. Create two larger portions for the base sections, three or four medium chunks, and smaller ones for the top. -
Shape the base cylinder:
Take your largest portion of clay for the heavy bottom anchor. Roll it into a thick slab or compress it into a puck shape about 6-8 inches in diameter and 2 inches tall. Smooth the sides with a rib tool to keep them vertical. -
Form the organic spheres:
Roll the remaining portions into balls. Unlike a perfect sphere, gently flatten them slightly between your palms to create ‘bun’ shapes or rounded disks. This prevents the stack from looking too unstable or rigid. -
Refine the surface:
Use a damp sponge to smooth out any finger marks, but don’t overwork it. The beauty of this piece lies in the slight irregularities that mimic river stones. I find that leaving a few minor dents adds character. -
Create the central channel:
Once the shapes are leather-hard (firm but still cool to the touch), use a hole cutter or a needle tool to create a vertical channel through the center of every clay piece. Make the hole slightly larger than your wooden dowel to account for clay shrinkage during firing.
Wobbly Stack?
If the clay pieces rock on the wooden spacers, add small felt or rubber washers hidden between the layers. This fills gaps and adds grip for stability.
Step 2: Firing and Finishing
-
Bisque fire:
Let the clay pieces dry completely. This might take a week for the thicker pieces. Fire them to bisque temperature according to your clay’s specifications. -
Apply finish:
For the raw, stone look, you might skip a heavy glaze. Instead, apply a thin wash of iron oxide for warmth, or simply fire to maturity if using a speckled clay. If glazing, choose a matte clear glaze to let the speckles show through without adding high gloss. -
Glaze fire:
Fire the pieces a final time to the clay’s maturity temperature. -
Prep the wooden spacers:
While the ceramics are firing, gather your wooden spacers. These should be smooth, wheel-like beads or custom-cut wooden disks. They act as the ‘neck’ between each clay ‘head’. Sand them smooth and stain them a light, warm oak tone if desired.
Step 3: Assembly structure
-
Secure the dowel:
Insert your main wooden dowel into the heavy base. If your base is wood, drill a tight hole and glue it in. If your base is the large ceramic cylinder, you may need to use epoxy to secure the dowel upright within that first clay piece. -
The stacking rhythm:
Begin threading your pieces onto the dowel. The pattern is crucial: one large ceramic organic form, followed by one small wooden spacer. Repeat this process. -
Graduate the sizes:
As you stack upwards, use the slightly smaller ceramic forms. This visual taper draws the eye upward and prevents the sculpture from looking top-heavy. -
Cap the top:
Finish the stack with your smallest ceramic form, and finally, a small wooden finial or cap to hide the top of the dowel rod. -
Final adjustments:
Rotate the ceramic ‘stones’ until they sit in a way that feels balanced. Since they are organic shapes, some sides might look better facing forward than others.
Use Nature
Swap the turned wooden spacers for slices of dried birch branches or large, sturdy tropical seed pods to create an even more rustic, forest-floor aesthetic.
Place your sculpture near a window where natural light can highlight the tactile difference between the speckled clay and smooth wood
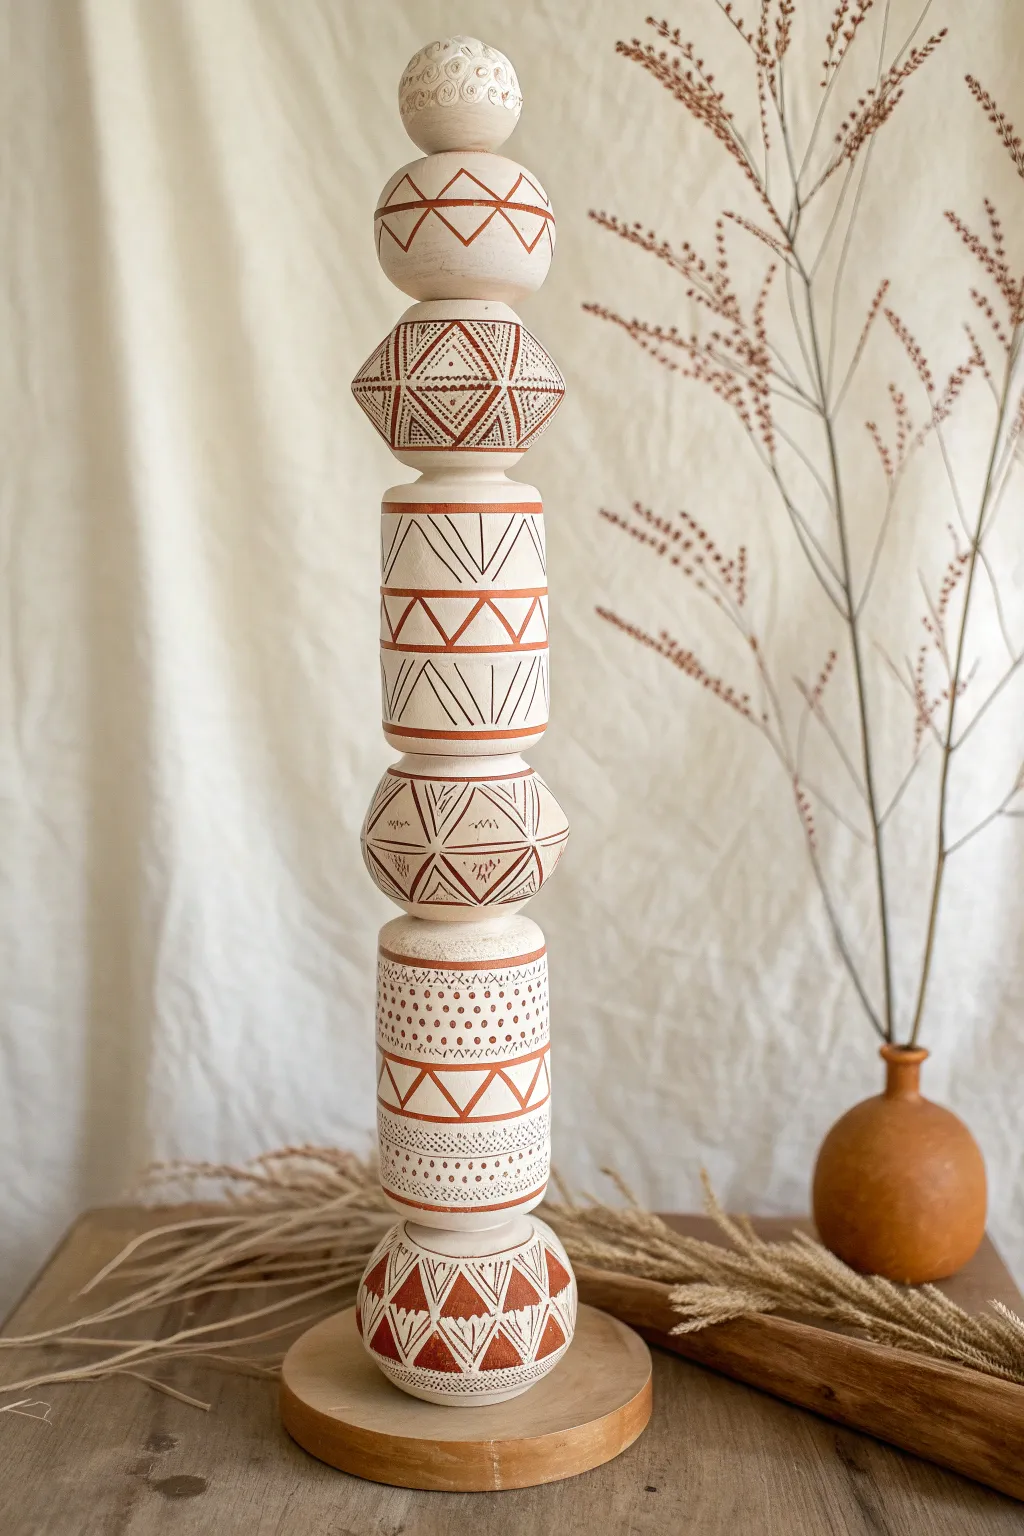
Textured vs. Smooth Contrast Stack
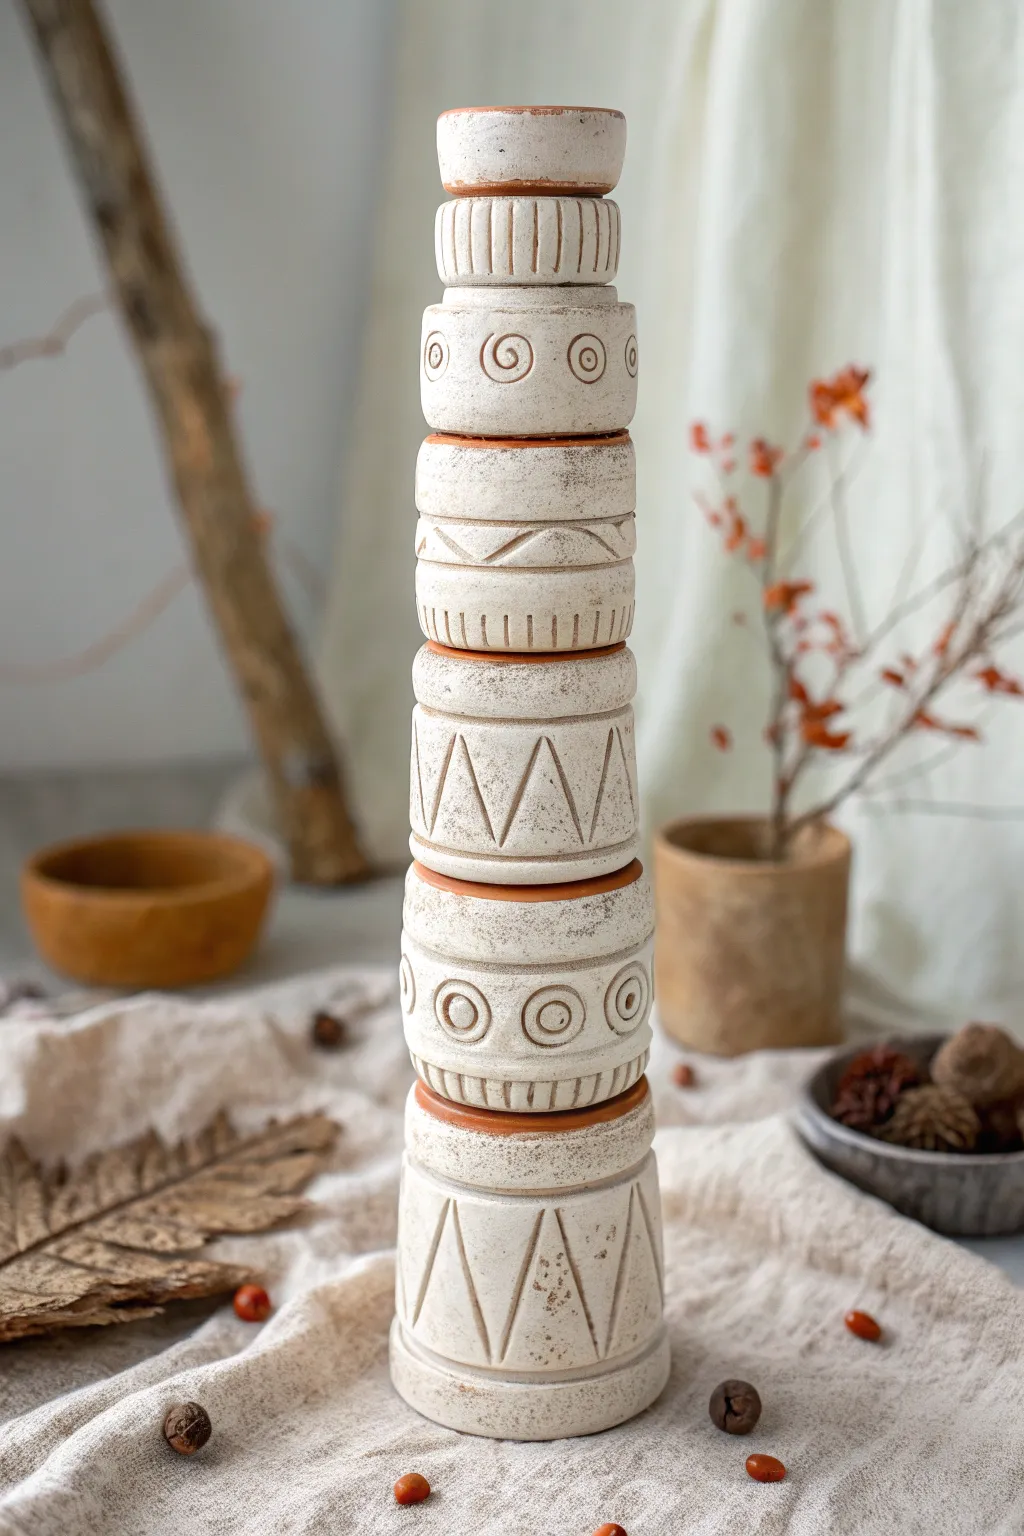
This rustic, bohemian-inspired totem pole relies on the beauty of repetition and simple geometric carving. By stacking distinct cylindrical segments with varying textures, you create a sculptural piece that feels ancient yet modern.
Step-by-Step Guide
Materials
- White or speckled stoneware clay (or air-dry clay)
- Terra cotta clay (for the spacer rings)
- Rolling pin
- Canvas or cloth work surface
- Carving tools (needle tool, loop tool)
- Cylindrical forms for draping (pvc pipe or cardboard tubes of varying widths)
- Slip and scoring tool
- Sponge
- Matte white glaze (if kiln firing) or white acrylic paint & matte sealer
- Kiln (optional, depending on clay type)
Step 1: Forming the Cylinders
-
Roll your slabs:
Begin by rolling out your primary white clay into a consistent slab, approximately 1/4 inch thick. Compress the clay on both sides with a rib to prevent warping later. -
Cut the rectangles:
Measure and cut rectangular strips. To achieve the tapered look shown in the image, you will need slightly different lengths for different sections. The bottom cylinder is the widest base, while the very top cap is the smallest. -
Form the cylinders:
Wrap your clay strips around your cylindrical forms (like PVC pipe or sturdy cardboard tubes). Be sure to overlap the ends slightly. -
Join the seams:
Score the overlapping areas thoroughly, apply a bit of slip (liquid clay), and press firmly to seal. Blend the seam with a modeling tool or your finger so it becomes invisible. -
Close the forms:
For the very top piece and the very bottom base piece, cut circular discs of clay to cap the ends so they aren’t open tubes. This gives the totem structural integrity.
Wobbly Tower?
If the pieces rock when stacked, sanding is key. Place a sheet of sandpaper on a flat table and rub the top/bottom of each dry cylinder in a figure-8 motion until perfectly flat.
Step 2: Creating Texture and Pattern
-
Initial smoothing:
Once the cylinders are leather-hard (stiff but still cold to the touch), smooth out any finger marks with a slightly damp sponge. -
Carving the zig-zag base:
On the largest bottom cylinder and the large middle cylinder, use a needle tool to lightly sketch a zig-zag arrow pattern. Once satisfied, use a small loop tool to carve these lines deeper, creating a relief effect. -
Adding concentric circles:
For the segments with circular motifs, press a small round object or use a loop tool to carve a central circle, then careful carve a larger ring around it. Repeat this pattern around the circumference. -
Carving linear details:
On the smaller, thinner rings, use a straight edge to press or carve vertical tick marks. Vary the spacing—some can be dense like a coin edge, others simpler like the horizontal band shown in the middle. -
Distressing the surface:
To mimic the stone-like texture in the photo, gently tap the surface with a rough stone or a crumpled ball of aluminum foil. This breaks up the perfect smoothness of the clay.
Pro Tip: Hidden Support
For a taller tower (over 12 inches), insert a wooden dowel or metal rod through the center of the hollow cylinders during assembly to prevent accidental tipping.
Step 3: The Terracotta Spacers
-
Roll thin coils:
Using your terra cotta clay, roll out thin, even coils. These will act as the visual separators between your white patterned sections. -
Flatten and shape:
Slightly flatten the coils into thick rings. Ensure their diameter matches the top edge of the cylinder they will sit upon. -
Dry fit the stack:
Carefully stack your leather-hard pieces to check alignment. You aren’t joining them permanently yet; just ensuring the diameters transition smoothly from bottom to top.
Step 4: Finishing and Assembly
-
Drying:
Allow all pieces to dry very slowly under loose plastic to prevent uneven shrinkage. The different clay bodies might shrink at different rates, so keep them separate until bone dry. -
Firing or sealing:
If using ceramic clay, bisque fire, then apply a matte white glaze that breaks over texture (wiping it back slightly to reveal the gritty clay body) and glaze fire. If using air-dry clay, paint with a wash of watered-down white acrylic. -
Highlighting the texture:
I prefer to use a brown antique wax or a diluted dark paint wash over the carved lines. Wipe it away immediately with a rag so the dark color only remains in the deep recesses, emphasizing the pattern. -
Final assembly:
Once everything is finished and cured, stack your pieces. You can use a strong epoxy glue for a permanent bond, or simply let gravity hold them if you want to rearrange the order later.
Place your finished totem on a shelf or mantle where the light can catch the subtle carvings and enjoy the handmade warmth it adds to the room


What Really Happens Inside the Kiln
Learn how time and temperature work together inside the kiln to transform clay into durable ceramic.
Ocean-Themed Totem With Waves and Dolphins
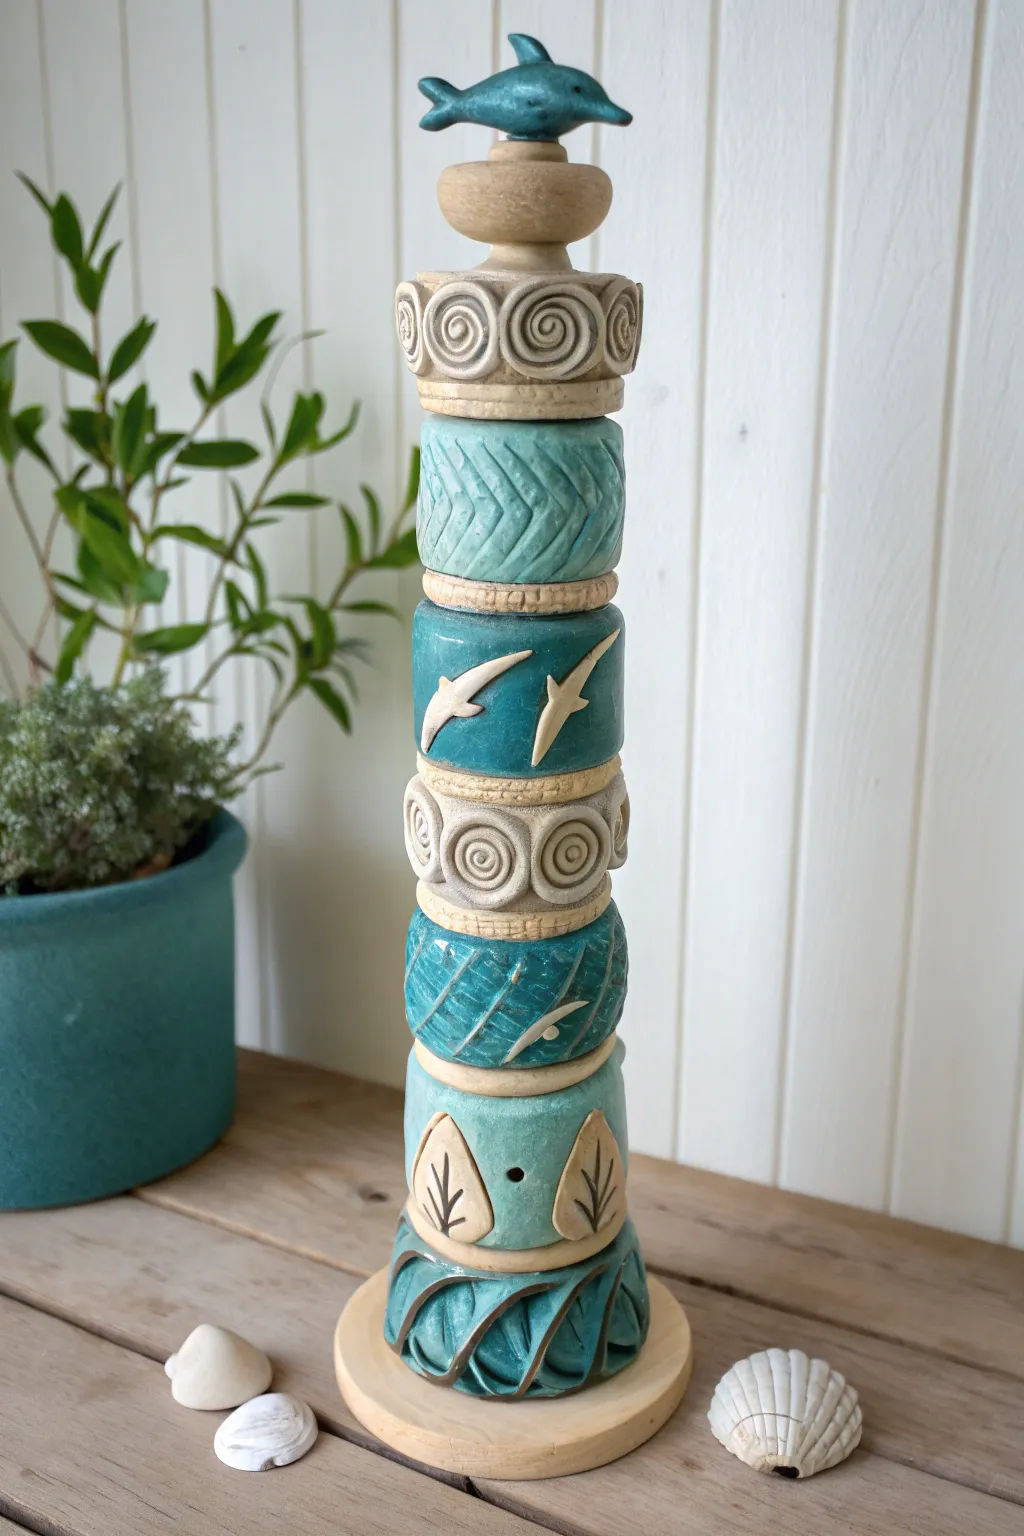
Capture the calm of the coast with this handcrafted ceramic totem pole, featuring stacked segments inspired by ocean waves, dolphins, and spiraling shells. The soothing turquoise glazes contrast beautifully with natural clay textures, creating a striking vertical centerpiece for your garden or sunroom.
Step-by-Step
Materials
- Stoneware clay (white or buff)
- Wooden dowel or metal rod (for stacking)
- Wooden base plinth
- Rolling pin
- Clay carving tools (needle tool, loop tool)
- Texture stamps or mats (spiral/swirl patterns)
- Turquoise and teal ceramic glazes
- White underglaze (optional)
- Clear matte or satin glaze
- Kiln access
- Epoxy or strong adhesive
- Sponge and water bucket
Step 1: Forming the Base Components
-
Prepare the clay:
Begin by wedging your stoneware clay thoroughly to remove air bubbles. Divide the clay into roughly equal-sized balls, enough for 6-8 main beads and several spacer discs. -
Create the cylinders:
Roll the larger balls into thick cylinders. You can do this by hand or by rolling out a slab and wrapping it around a tube form for uniformity. Ensure they are roughly the same diameter (about 3-4 inches). -
Make the center holes:
While the clay is still plastic but firm, create a vertical hole through the center of every piece using a hole cutter or a dowel slightly larger than your final display rod to account for shrinkage. -
Sculpt the dolphin topper:
Model a small, arched dolphin figure by hand. Attach it securely to a small cap-shaped piece of clay that will sit on the very top of the rod. Smooth the seams carefully.
Step 2: Carving and Texturing
-
Carve the wave patterns:
On two of your cylinders, use a loop tool to carve chevron or diagonal line patterns that mimic the movement of water. Vary the depth of the lines to catch the glaze later. -
Shape the dolphin segment:
For the focal dolphin bead, use a needle tool to outline two dolphin silhouettes swimming in opposite directions. Gently crave away the background clay slightly so the dolphins appear raised. -
Create spiral spacers:
Flatten clay into thick discs for the spacer beads. Use spiral stamps or hand-carve swirling shell motifs around the outer edge. I find that pressing deeply here helps the glaze break beautifully over the texture. -
Sculpt the leaf/fish scale base:
On the bottom-most cylinder, carve large, leaf-like or fish-scale shapes. Use a tool to impress veins or lines inside these shapes for added detail. -
Smooth and refine:
Once all carving is done, use a damp sponge to smooth any sharp burrs or rough edges on all pieces. Let the clay dry slowly to the bone-dry stage.
Wobbly Wonder?
If pieces wobble on the rod, wrap a little masking tape around the rod at the level of each bead to create a snugger, custom fit for each section.
Step 3: Glazing and Assembly
-
Bisque fire:
Load the bone-dry pieces into the kiln and bisque fire them according to your clay body’s specifications (usually Cone 04 or 06). -
Apply wax resist:
Wax the bottom of every piece and the interior of the holes to prevent glaze from sticking them to the kiln shelf or the mounting rod. -
Glaze the textured areas:
Apply your turquoise and teal glazes to the carved cylinders. Wipe back the glaze with a damp sponge on the raised areas (like the dolphins and spiral tops) to reveal the raw clay color, highlighting the texture. -
Glaze the dolphin topper:
Dip or brush the dolphin topper in a solid teal glaze. You might want to leave its belly slightly lighter or unglazed for contrast. -
Glaze fire:
Fire the pieces again to the glaze maturity temperature (e.g., Cone 5 or 6). Allow the kiln to cool completely before unloading. -
Prepare the stand:
Secure a sturdy wooden dowel or metal rod into the center of your wooden base plinth. Ensure it stands perfectly vertical. -
Stack the totem:
Slide the ceramic pieces onto the rod one by one. I suggest alternating the tall turquoise cylinders with the shorter, unglazed spiral spacers for visual rhythm. -
Secure the topper:
Place the dolphin cap on the very top. If the fit is loose, use a small amount of silicone or epoxy to keep it permanently oriented in the right direction.
Coastal Charms
Intersperse real driftwood discs or large seashells with holes drilled in them between your ceramic beads for an authentic mixed-media beach look.
Place your finished totem in a sunny spot where the light can play off the glazed textures
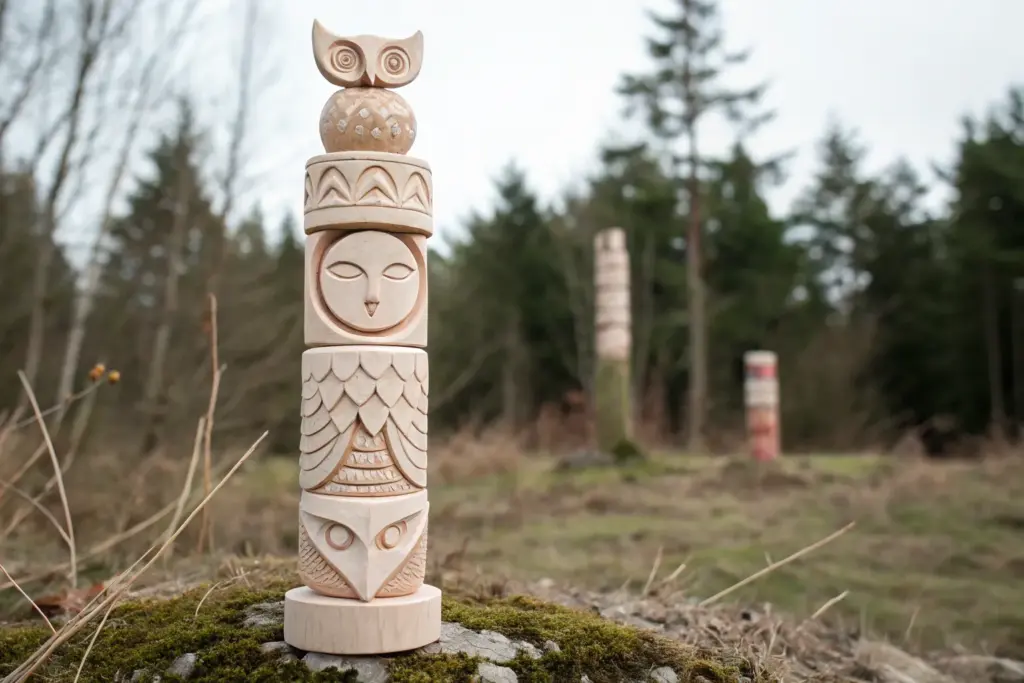
Owl Totem With Big Eyes
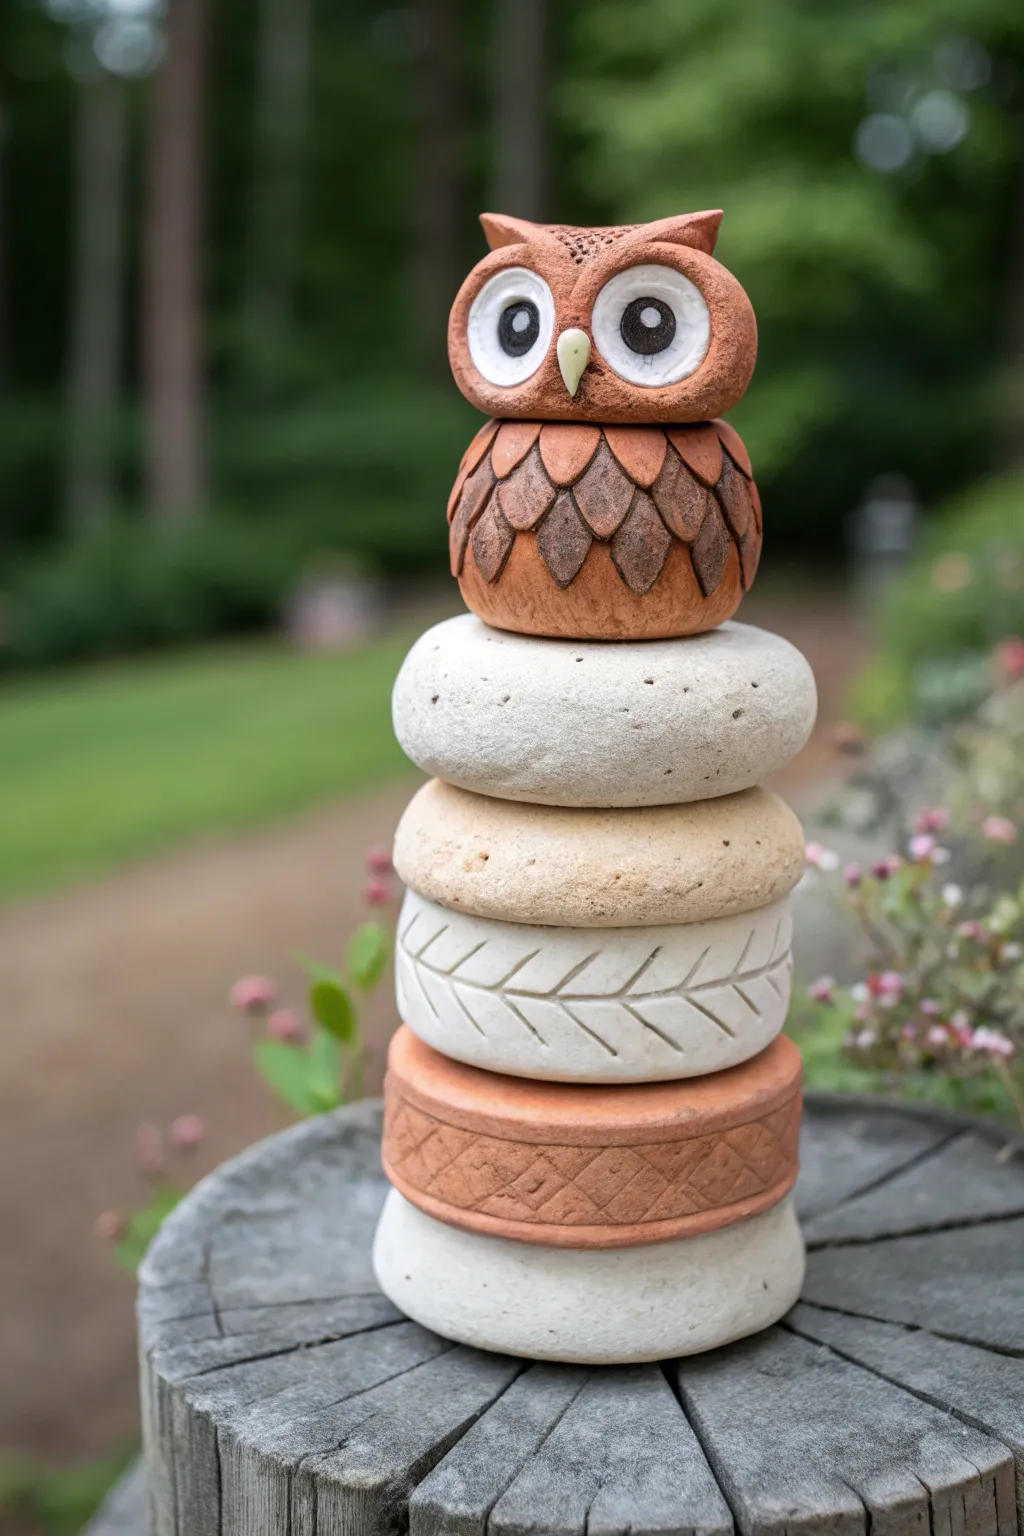
This charming garden totem combines earthy tones with playful textures, capped by a darling owl with oversized eyes. By stacking distinct ceramic discs beneath the character, you create height and visual interest that makes a perfect focal point for a tree stump or flowerbed.
How-To Guide
Materials
- Earthenware clay (terracotta or reddish-brown)
- White stoneware or light-colored clay
- Pottery wheel (optional, hand-building works too)
- Poring rod or metal totem pole stand
- Loop carving tools
- Needle tool
- White and black underglaze
- Clear matte outdoor glaze
- Sponge and water
- Kiln
Step 1: Forming the Base Discs
-
Shape the bottom disc base:
Start with white clay to form the lowest tier. Create a thick, rounded disc shape about 6-7 inches in diameter with slightly concave sides. -
Create the hole:
Use a hole cutter or needle tool to create a central channel vertically through the disc. This must be wide enough to fit your metal garden stake later. -
Build the cross-hatched tier:
Using terracotta clay, form a similarly sized disc but flatten the sides to create a vertical band. Use a needle tool to scribe a diagonal cross-hatch pattern around the entire circumference. -
Form the leaf-patterned tier:
Create the next disc from white clay. While the clay is leather-hard, use a carving tool to incise a mesmerizing vine or leaf vein pattern horizontally around the edge. -
Shape the plain stone tiers:
Form two smaller, rounded discs—one in tan/light clay and one in white stoneware. Texture these gently with a rock or sponge to give them a natural, porous stone appearance. -
Dry fit the stack:
Carefully stack your leather-hard pieces to ensure the holes align perfectly and the proportions look balanced before firing.
Shrinkage Check
Make the center holes 15-20% larger than your metal rod. Clay shrinks during both drying and firing, and you don’t want the pieces getting stuck.
Step 2: Sculpting the Owl
-
Construct the body:
Using terracotta clay, form a rounded, bulbous shape for the owl’s body. Ensure the bottom is flat enough to sit securely on the top stone disc. -
Add the feather texture:
Roll small, flat teardrop shapes of clay. Attach them in overlapping rows starting from the bottom of the body and working upward to create a layered plumage effect. -
Sculpt the head:
Form a second, slightly flattened sphere for the head. Pinch the corners gently to suggest ear tufts. -
Create the eyes:
Roll two large balls of white clay and flatten them onto the face. I find using a slight thumb impression in the center helps the pupil sit naturally. -
Detail the face:
Add a small, sharp triangular beak between the eyes using light clay or white slip. Add texture to the forehead with a stippling tool or stiff brush. -
Attach head to body:
Score and slip the neck joint thoroughly to connect the head to the feathered body. Don’t forget to create a vertical channel through the entire owl for the pole.
Step 3: Glazing and Assembly
-
Bisque fire:
Load all fully dried pieces into the kiln and bisque fire them according to your clay body’s specifications (usually Cone 04). -
Apply underglaze details:
Paint the large eye discs white. Use black underglaze for the pupils, adding a tiny white reflection dot to bring them to life. -
Enhance textures:
Wipe a diluted dark oxide or stain over the cross-hatched tier and the feather textures, then sponge it back. This remains in the crevices to highlight the carving. -
Final glaze firing:
Apply a clear matte glaze to seal the pieces for outdoor use, then fire again to the appropriate temperature for your clay. -
Garden installation:
Drive your metal rod into a stump or the ground. Thread the finished ceramic pieces onto the rod one by one, finishing with the owl.
Wobbly Stack?
If discs don’t sit flat, insert rubber washers or small varying lengths of PVC pipe between the ceramic layers on the rod to act as invisible spacers.
Once assembled, your wise little guardian is ready to watch over your garden through every season

TRACK YOUR CERAMIC JOURNEY
Capture glaze tests, firing details, and creative progress—all in one simple printable. Make your projects easier to repeat and improve.
Mushroom Woodland Totem Pole
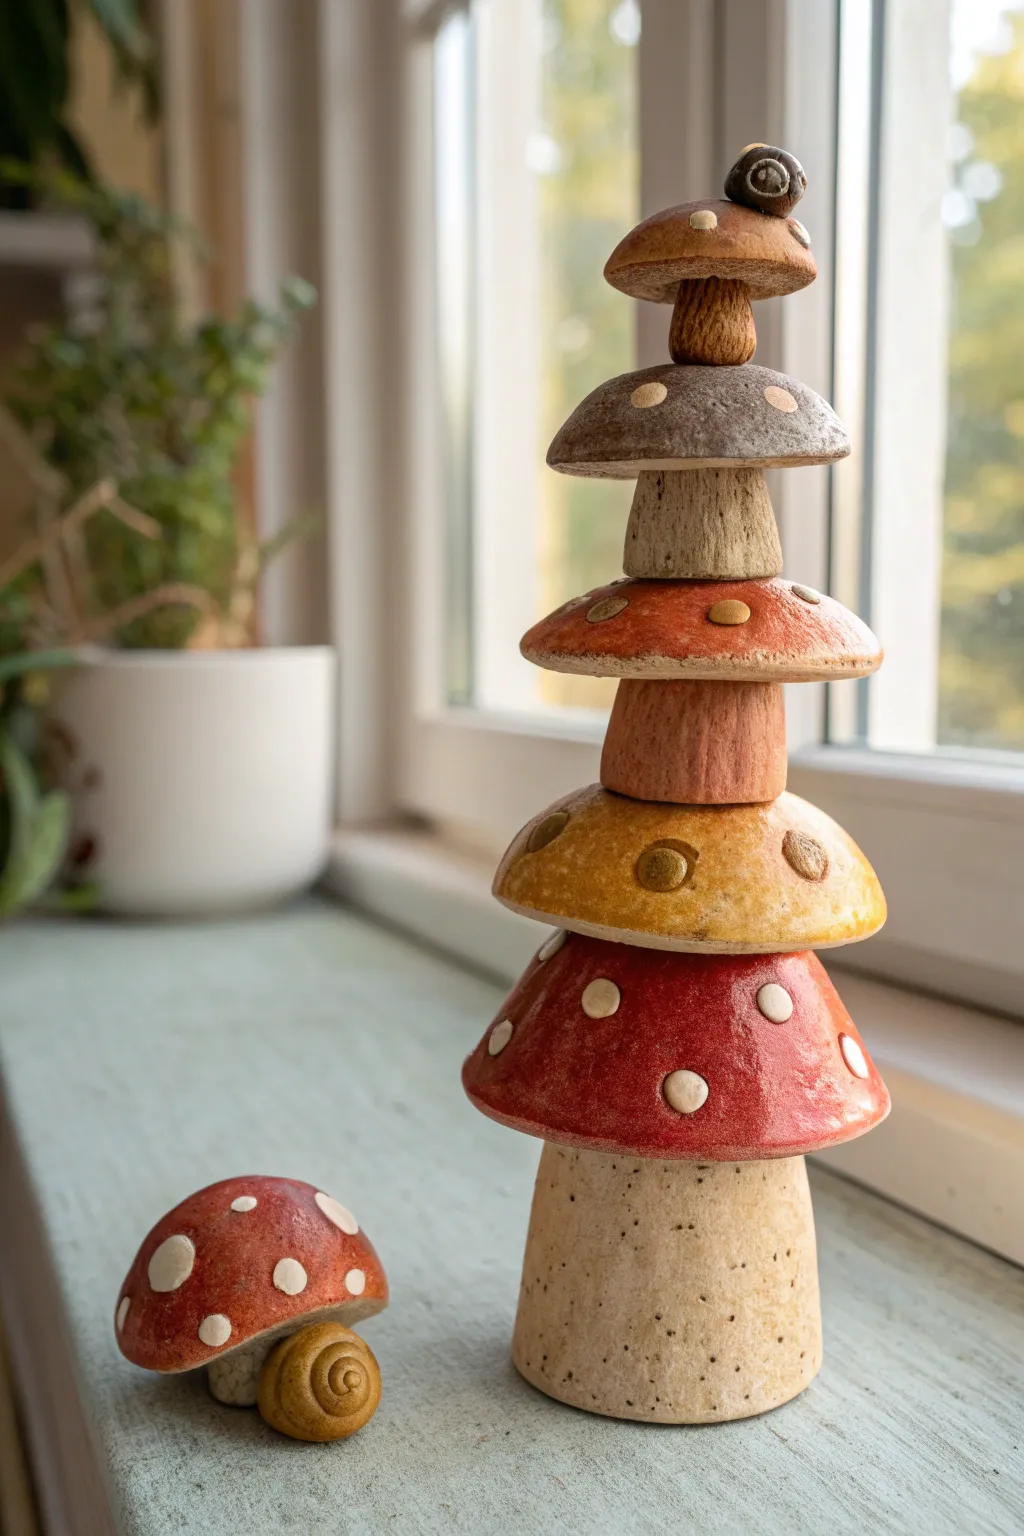
This charming woodland totem pole features a graduated stack of rustic clay mushrooms, topped with a tiny snail guardian. With its warm, earthy glazes and speckled clay texture, this project brings a touch of fairytale magic to any windowsill or garden shelf.
Step-by-Step Guide
Materials
- Speckled stoneware clay (mid-fire)
- Pottery wheel (optional, can be hand-built)
- Wooden modeling tools
- Pin tool
- Sponge
- Scoring tool or serrated rib
- Slip (clay mixed with water)
- Underglazes (Red, Orange, Yellow, Brown, White)
- Clear glaze
- Kiln
Step 1: Forming the Stems
-
Prepare the clay:
Begin by wedging your speckled stoneware clay thoroughly to remove air bubbles. Divide the clay into five balls of decreasing size for the totem stems. -
Throw or coil the base stem:
Using the largest ball of clay, form a sturdy cylinder. I like to throw this on the wheel for symmetry, but you can build a thick coil cylinder. It should be wide at the base and slightly tapered at the top, roughly 3-4 inches tall. -
Create the middle stems:
Form the next three stems. These should be progressively shorter and narrower than the base. Keep the walls thick enough to support weight, but hollow them out to prevent exploding in the kiln. -
Form the top stem:
Shape the smallest, final stem. This one can be quite short, just enough to lift the final cap. -
Add texture:
While the clay is leather hard, use a sponge to gently wipe away fine clay particles, exposing more of the grog or speckles for a rustic texture.
Step 2: Sculpting the Caps
-
Shape the caps:
Create five mushroom caps corresponding to the sizes of your stems. You can pinch these into bowls and flip them over, or throw shallow domes on the wheel. -
Refine the shapes:
Vary the shapes slightly—make the bottom one wide and rounded, and the upper ones slightly flatter or more conical for visual interest. -
Create the separate mushroom:
Use leftover clay to form a small, single mushroom cap and a short, stout stem for the companion piece. -
Hollow out the connection points:
Ensure the underside of each cap has a slight indentation or rough area where it will sit on its corresponding stem.
Wobble Worries?
If the stack feels unstable, create a vertical hole through the center of every piece and thread them onto a metal garden stake or dowel rod.
Step 3: Assembly & Details
-
Stack check:
Before attaching anything permanent, stack your leather-hard pieces to check balance. The totem relies on gravity and good fit, so ensure the stems sit flush against the caps below them. -
Join the pieces:
Score and slip the top of each stem to the underside of its matching cap. You are making five individual mushrooms that will be stacked later (or you can fuse them now for a permanent structure, though firing separate pieces is safer). -
Sculpt the snails:
Roll a tiny coil for a shell and a small body. Attach one snail to the very top mushroom cap and another peeking out from under the separate small mushroom. -
Impress the spots:
Use a small loop tool or the back of a paintbrush to gently press circular indentations into the mushroom caps where the white spots will go. This makes glazing easier later.
Mossy Magic
Make small pinched moss textures near the base of the stems using a needle tool, and glaze these areas green for a forest floor effect.
Step 4: Glazing & Firing
-
Bisque fire:
Let all pieces dry very slowly to prevent warping. Fire to cone 04 (or your clay’s bisque temperature). -
Apply verify red:
Paint the largest bottom cap and the separate mushroom cap with a deep red underglaze. Apply 2-3 coats for opacity. -
Paint the gradient layer:
For the middle mushrooms, mix yellow and orange underglazes. Paint the second cap yellow-ochre, the third orange-red, and the fourth a muted grey-brown. -
Detail the spots:
Fill the indented spots on the caps with white underglaze. Be careful to keep the edges crisp. -
Glaze the stems:
Leave the stems unglazed to show off the raw speckled clay, or apply a very thin wash of clear matte glaze to seal them without adding shine. -
Final glaze fire:
Apply clear glaze over the colored caps to make the colors pop. Fire to cone 5/6 (stoneware temperature). -
Final assembly:
Once cool, stack your ceramic pieces. If you kept them separate, you can use a strong epoxy or a central metal rod (if you made holes) to secure them permanently.
Place your finished totem in a sunny spot and enjoy the rustic charm of your handmade woodland sculpture
Sun, Moon, and Stars Stack
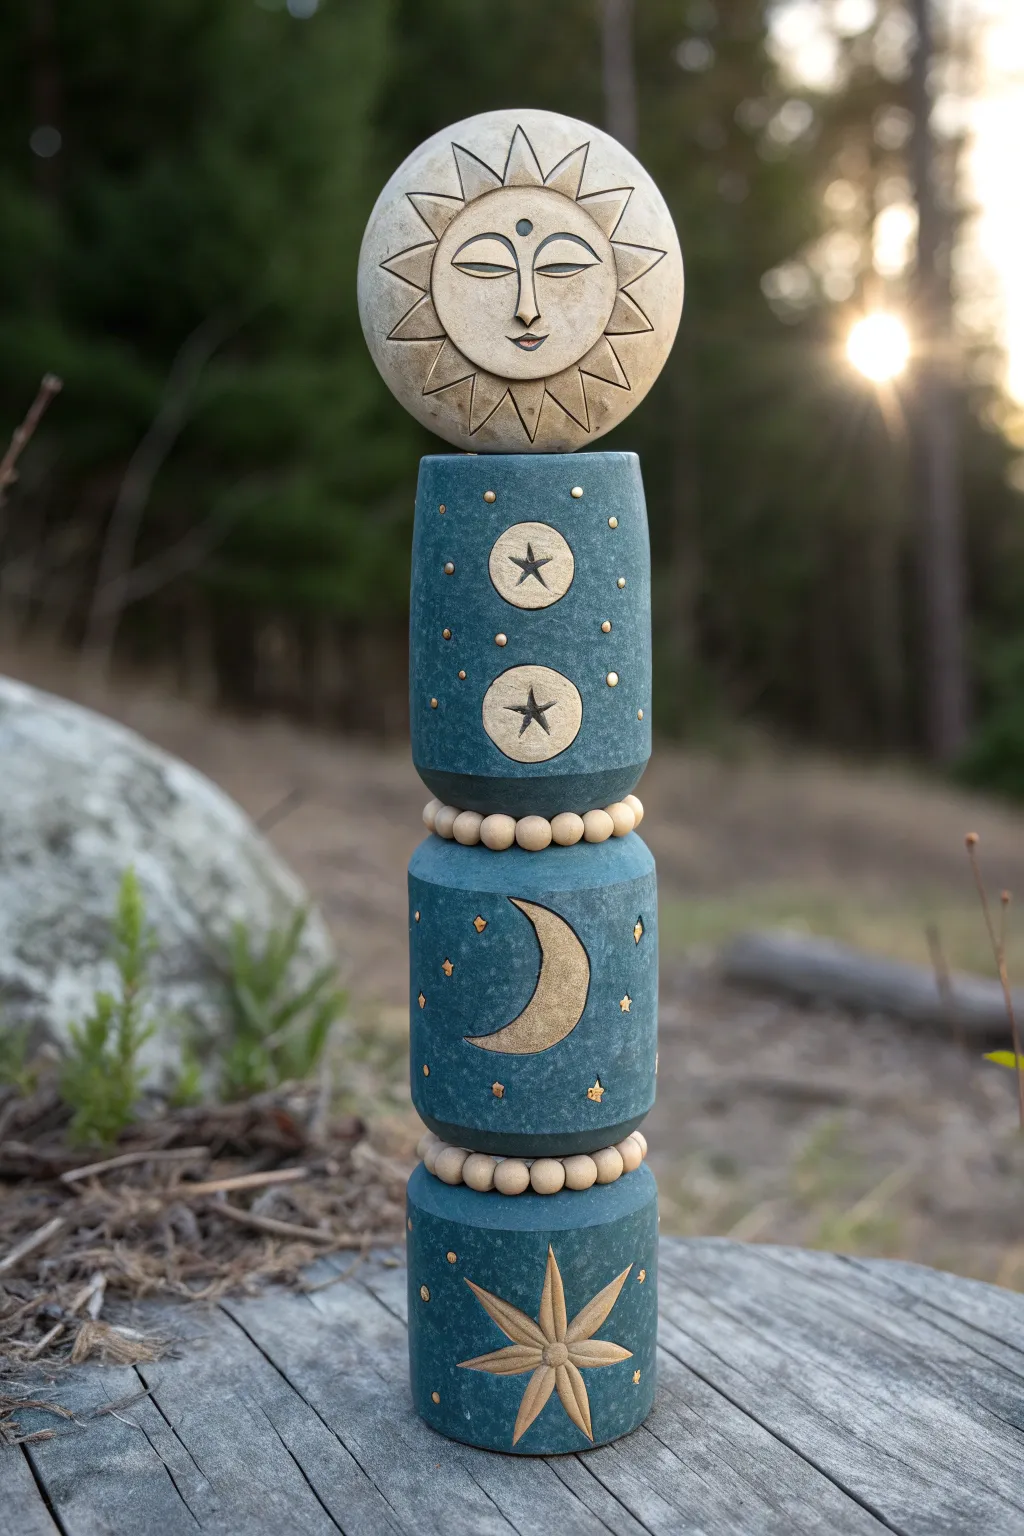
Bring a touch of cosmic wonder to your garden with this hand-built ceramic totem pole. Featuring a serene sun face, moon phases, and scattered stars, this stacked sculpture uses etched details and contrasting glazes to create a timeless, weathered stone effect.
Step-by-Step Tutorial
Materials
- Stoneware clay (buff or white firing)
- Rolling pin and guide strips (3/8 inch)
- Circular templates (or cookie cutters)
- PVC pipe or cardboard tube (for forming cylinders)
- Needle tool and fettling knife
- Carving loop tools (small)
- Slip and scoring tool
- Wooden sculpting tools
- Wooden beads (pre-made or handmade clay beads)
- Matt glaze (deep teal/blue-green)
- Wax resist
- Gold acrylic paint or gold luster (optional post-fire accent)
- Clear matte acrylic sealer (if not firing to vitrification)
Step 1: Sculpting the Sun Topper
-
Form the Sphere:
Begin by forming two equal pinch pots from your clay. Score and slip the rims, then join them together to create a hollow sphere. Paddle it gently to ensure it is perfectly round. -
Add the Anchor Hole:
Cut a hole in the bottom of the sphere large enough for your garden stake or rebar to pass through. This is crucial for stability later. -
Define the Face:
Flatten the front face slightly. Using a needle tool, lightly sketch the sun’s features: almond-shaped eyes, a long nose bridge, and a small mouth. Add a small clay ball for the ‘bindi’ dot on the forehead. -
Carve the Rays:
Around the perimeter of the face, sketch triangles for sun rays. Use a small carving tool to incise these lines deeply, creating separation between the face and the rays. -
Refine Details:
Smooth the area within the face with a damp sponge. Use a small loop tool to carve out the eyes so they look closed and peaceful.
Step 2: Creating the Sky Cylinders
-
Roll the Slabs:
Roll out a large slab of clay to an even 3/8-inch thickness. You will need enough for three distinct cylinders. -
Cut to Size:
Measure your forming tube (PVC pipe works wonderfully). Cut three rectangles of clay that will wrap around the tube with a slight overlap. -
Form the Cylinders:
Wrap the clay slabs around your tube. Score and slip the seam thoroughly, blending the clay inside and out until the join is invisible. Slide the clay off the tube immediately so it doesn’t shrink and crack. -
Cap the Ends:
Cut circular slabs to fit the top and bottom of each cylinder. Attach these with score and slip. Once attached, cut a central hole in the top and bottom of every cylinder for the stacking rod.
Clean Lines
When carving designs, wait until the clay is ‘leather hard.’ If it’s too wet, the clay will tear and look messy. Use a stiff brush to sweep away crumbs.
Step 3: Decorating and Carving
-
Sketch the Designs:
Once the cylinders are leather-hard, lightly sketch your motifs. Use circles with stars inside for the top tier, a crescent moon for the middle, and a large multi-point star flower for the base. -
Sgraffito Carving:
If you plan to glaze the whole piece, carve your designs deep enough to hold glaze or resist. I like to carve the outline first, then gently scrape away the background inside the shapes to lower the relief. -
Add Texture:
Use a small, blunt tool to press tiny ‘stars’ or divots into the background space around your main motifs. This adds a lovely starry night texture. -
Create Spacer Beads:
Roll small balls of clay to act as spacers between the cylinders. Pierce a hole through each one. Alternatively, you can use pre-made wooden beads after firing if the rod allows.
Glow Up
Paint the carved recessed areas (like the stars) with glow-in-the-dark acrylic paint after the final firing for a magical nighttime surprise.
Step 4: Glazing and Finishing
-
The Bisque Fire:
Allow all pieces to dry very slowly to prevent cracking or warping. Fire to cone 04 (bisque). -
Wax Resist Method:
Apply wax resist carefully to the sun face features and the carved motifs on the cylinders (the stars and moons). This will keep the raw clay color visible. -
Apply Glaze:
Brush or dip the cylinders in a matte teal or deep blue-green glaze. The wax will repel the glaze, leaving your designs uncoloured. -
Glaze the Sun:
For the sun topper, you might leave most of it raw clay or use a very light wash of oxide to highlight the textures, keeping it distinct from the blue cylinders. -
Final Fire and Accent:
Fire to the maturity temperature of your clay and glaze. Once cool, you can tap a tiny bit of gold acrylic into the small star divots for extra sparkle before stacking them in the garden.
Assemble your totem on a sturdy rebar rod in a featured spot in your garden and enjoy the peaceful energy it radiates
Abstract Totem With Bold Geometrics
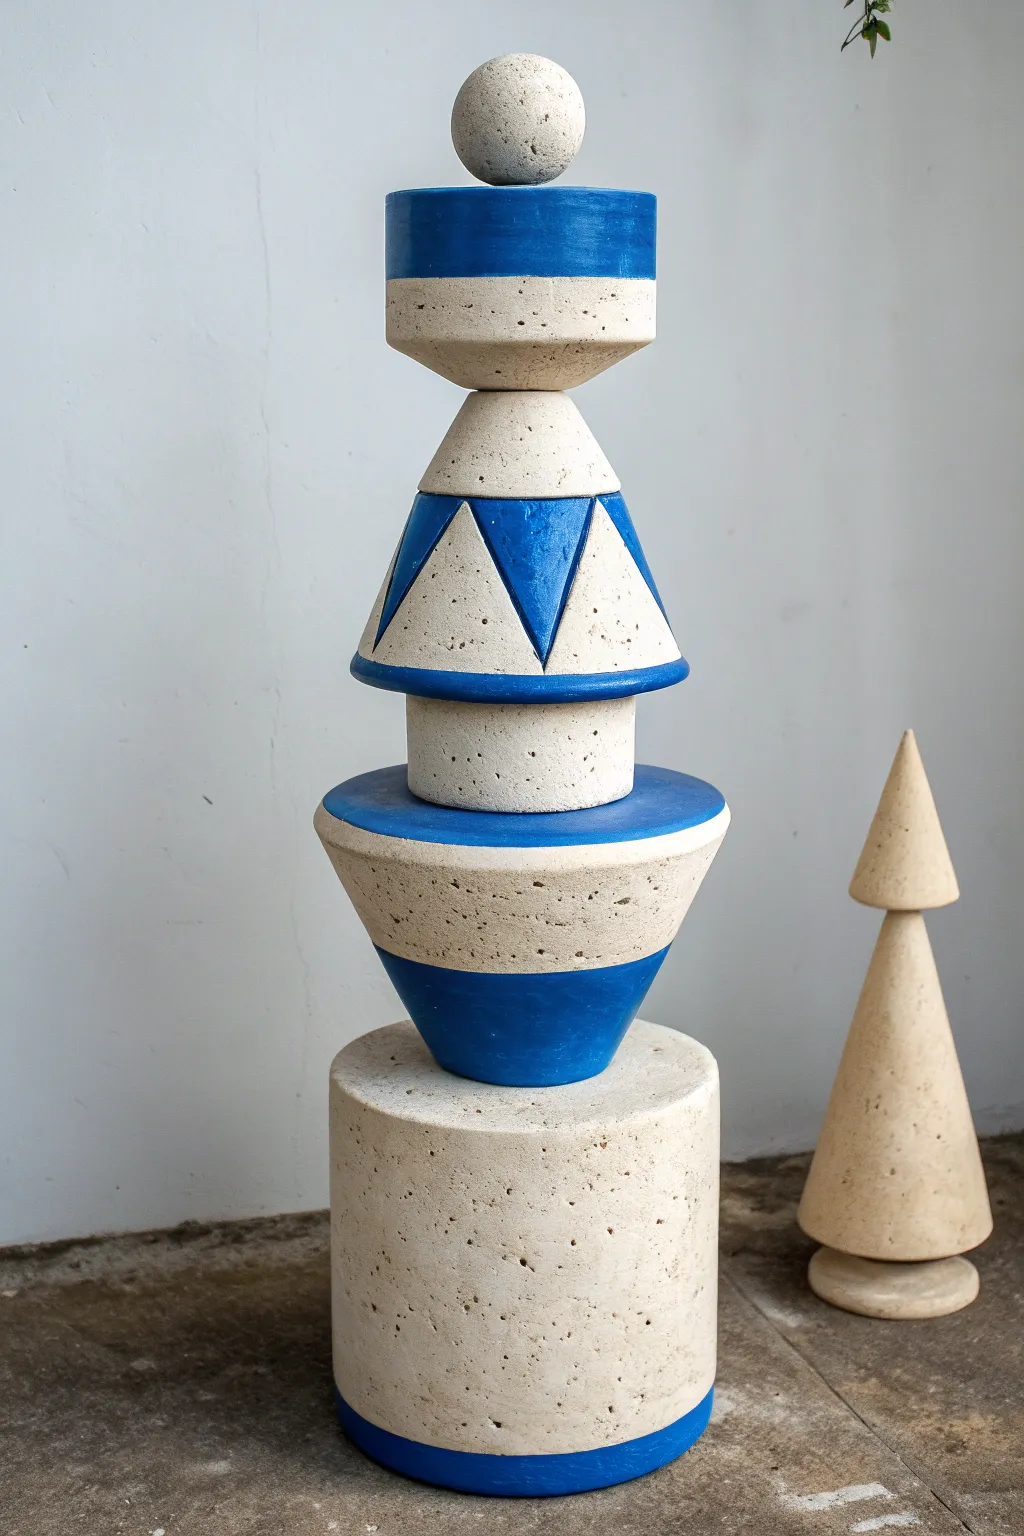
This striking vertical sculpture combines the raw, porous texture of travertine-like stone with crisp, electric blue geometric accents. By stacking distinct shapes—cylinders, cones, and spheres—you create a modern architectural piece perfect for a garden feature or an indoor statement corner.
Step-by-Step Guide
Materials
- White stoneware clay or grogged clay body
- Pottery wheel (optional, can be hand-built)
- Wooden modeling tools
- Wire clay cutter
- Slip and scoring tool
- Electric kiln
- Royal blue underglaze (or acrylic paint if non-functional)
- Small flat brush
- Painter’s tape
- Clear matte glaze (optional)
- Internal support rod (metal or wood) for assembly
- Epoxy adhesive
Step 1: Shaping the Base Components
-
Form the main cylinder:
Start with the large bottom base. Throw or hand-build a tall, wide cylinder with thick walls to support the weight above. Keep the top and bottom perfectly flat. -
Create the inverted cone:
For the second tier, shape a bowl-like form that tapers sharply downwards. The rim should be wide and flat to support the next piece. -
Make the connector piece:
Fashion a smaller, stout cylinder. This acts as the ‘neck’ between the middle tiers, adding visual breathing room. -
Construct the triangle tier:
Shape a wide cone structure. Unlike a perfect cone, flatten the sides slightly if you want a more angular look, or keep it rounded but create a distinct overhanging lip at the bottom edge. -
Sculpt the top elements:
Create an inverted trapezoid shape (wider at the top) and a final perfect sphere for the finial. Check their proportions by stacking them gently while the clay is leather hard.
Stone Effect Tip
Mix a small amount of coarse grog or sand into your smooth clay body before sculpting. When you sponge it down later, the gritty texture will naturally appear.
Step 2: Refining and Assembly Prep
-
Create the central channel:
While the clay is leather hard, carefully bore a vertical hole through the exact center of every piece except the top sphere. This channel must be wide enough for your support rod. -
Texture the surface:
To mimic the porous stone look in the photo, gently press a coarse sponge or a stiff brush into the clay surfaces. Random tiny punctures with a needle tool help simulate natural travertine pits. -
Dry fitting:
Stack the leather-hard pieces briefly to ensure they sit flush against one another. Sand or trim any wobbles now before firing. -
Bisque fire:
Let all components bone dry completely. I like to dry them slowly under plastic to prevent warping. Fire to cone 04 (or your clay’s bisque temperature).
Garden Stability
If placing this outdoors, extend the internal metal rod out the bottom by 12 inches. You can drive this spike directly into the ground so it won’t tip over.
Step 3: Decoration and Installation
-
Tape the geometric patterns:
Using high-quality painter’s tape, mask off the areas you want to remain raw ‘stone.’ Look closely at the reference: tape a band at the base, triangular wedges on the middle cone, and the top block. -
Apply the blue:
Paint the exposed areas with three coats of royal blue underglaze (for fired results) or high-pigment heavy body acrylics (for a non-fired finish). Ensure crisp lines by sealing the tape edges first. -
Remove tape and touch up:
Peel the tape away while the paint is slightly tacky to avoid chipping. Clean up any bleed-through with a damp brush or a craft knife. -
Glaze or seal:
If firing, apply a clear matte glaze only over the blue areas to heighten the contrast, or leave it raw for a matte finish. Fire to maturity. If using acrylics, apply a matte spray sealer. -
Final assembly:
Insert your metal or wooden support rod into the base. Thread the pieces onto the rod in order, using a strong two-part epoxy between each layer for permanent stability. -
Attach the finial:
Glue the top sphere onto the final block, capping off the rod (which should end inside the block below the sphere).
Step back and admire the interplay of modern color and ancient texture in your new sculpture
Patchwork Totem With Stamped Patterns
Standing tall with an earthy elegance, this totem pole combines varied geometric forms into a cohesive sculptural piece. The rhythmic interplay of raw clay tones and stark white glaze creates a striking, modern artifact perfect for a mantel or shelf display.
Detailed Instructions
Materials
- Air-dry clay or polymer clay (white or terracotta)
- Wooden dowel rod (approx. 1/2 inch diameter)
- Round wooden base
- Acrylic paints (terracotta/rust color and warm white)
- Fine-point paintbrushes (size 0 and 2)
- Detail carving tools or a needle tool
- Rolling pin
- Sandpaper (fine grit)
- Strong craft glue or epoxy
- Clear matte varnish (optional)
Step 1: Forming the Beads
-
Prepare the core:
Before sculpting, determine the height of your finished totem and cut your wooden dowel to match. Drill a hole in the center of your wooden base that fits the dowel snugly, and glue the dowel into the base so it stands vertical and secure. -
Plan your shapes:
Sketch out the stack of shapes you want to create. The example features a mix of spheres, flattened discs, elongated cylinders, and bicone (diamond-like) beads. Aim for about 7-8 distinct beads of varying sizes. -
Sculpt the base bead:
Start with a large ball of clay for the bottom-most bead. Form a round, slightly flattened sphere. Use a tool or the dowel itself to create a vertical hole through the center. Make the hole slightly larger than the dowel to account for shrinkage. -
Create cylindrical segments:
For the straight sections, roll clay into a thick log and trim the ends to be perfectly flat. Ensure the walls act as straight columns. Pierce the center hole carefully to keep the cylinder symmetrical. -
Sculpt angled forms:
Fashion the bicone shapes by rolling a ball and then pinching or rolling just the top and bottom edges against your work surface to create a sharp, central equator line. -
Form the spherical topper:
Create one final, smaller sphere for the very top. This one only needs a hole halfway through the bottom, not all the way through, so it caps the dowel invisibly. -
Smooth and dry:
Use a little water on your fingers to smooth out any fingerprints. Let all clay pieces dry completely according to the package instructions. I usually rotate them every few hours to ensure even drying.
Stamp trick
Make DIY stamps from scrap clay! Carve cross-hatching or dots into a small, baked clay scrap. Press this into wet clay beads for instant, uniform texture before painting.
Step 2: Decorating and Assembly
-
Base coat application:
Once dry, lightly sand any rough spots. Paint the entire surface of each bead with a warm white acrylic paint. You may need two coats for opaque coverage. Let this dry fully. -
Pencil guidelines:
Using a very light pencil touch, draw horizontal bands around the varying shapes to section off your design areas. This helps keep your geometric patterns level as they wrap around the curve. -
Paint the bottom bead:
On the lowest sphere, paint bold terracotta triangles pointing upward. Fill the space between them with lighter, scratchy vertical lines to create a textural contrast. -
Detail the main cylinder:
For the large cylinder, create horizontal bands of rust-colored triangles. Between these main bands, create sections of tiny stippled dots using the very tip of your smallest brush. -
Add line work:
On the bicone shape, focus on the ‘equator.’ Paint framing lines above and below the center ridge, filling the central band with a dense cross-hatch or diamond pattern using the fine liner brush. -
Vary the patterns:
Continue painting the remaining beads. Mix up the density: leave some areas mostly white with thin chevron lines, while others can be heavily patterned with solid triangles or zig-zags. -
Assemble the stack:
Once all paint is cured, slide your beads onto the wooden dowel. Apply a small ring of strong glue between each segment to prevent them from spinning. -
Final touches:
Place the topper bead on the summit. If desired, seal the entire sculpture with a matte varnish to protect the paint and give it a finished, ceramic look.
Uneven beads?
If your beads wobble on the dowel, wrap a little masking tape around the dowel at the height of that specific bead. This creates a tighter fit and keeps the stack straight.
Now you have a stunning, custom-patterned sculpture that brings a touch of global artistry to your home decor
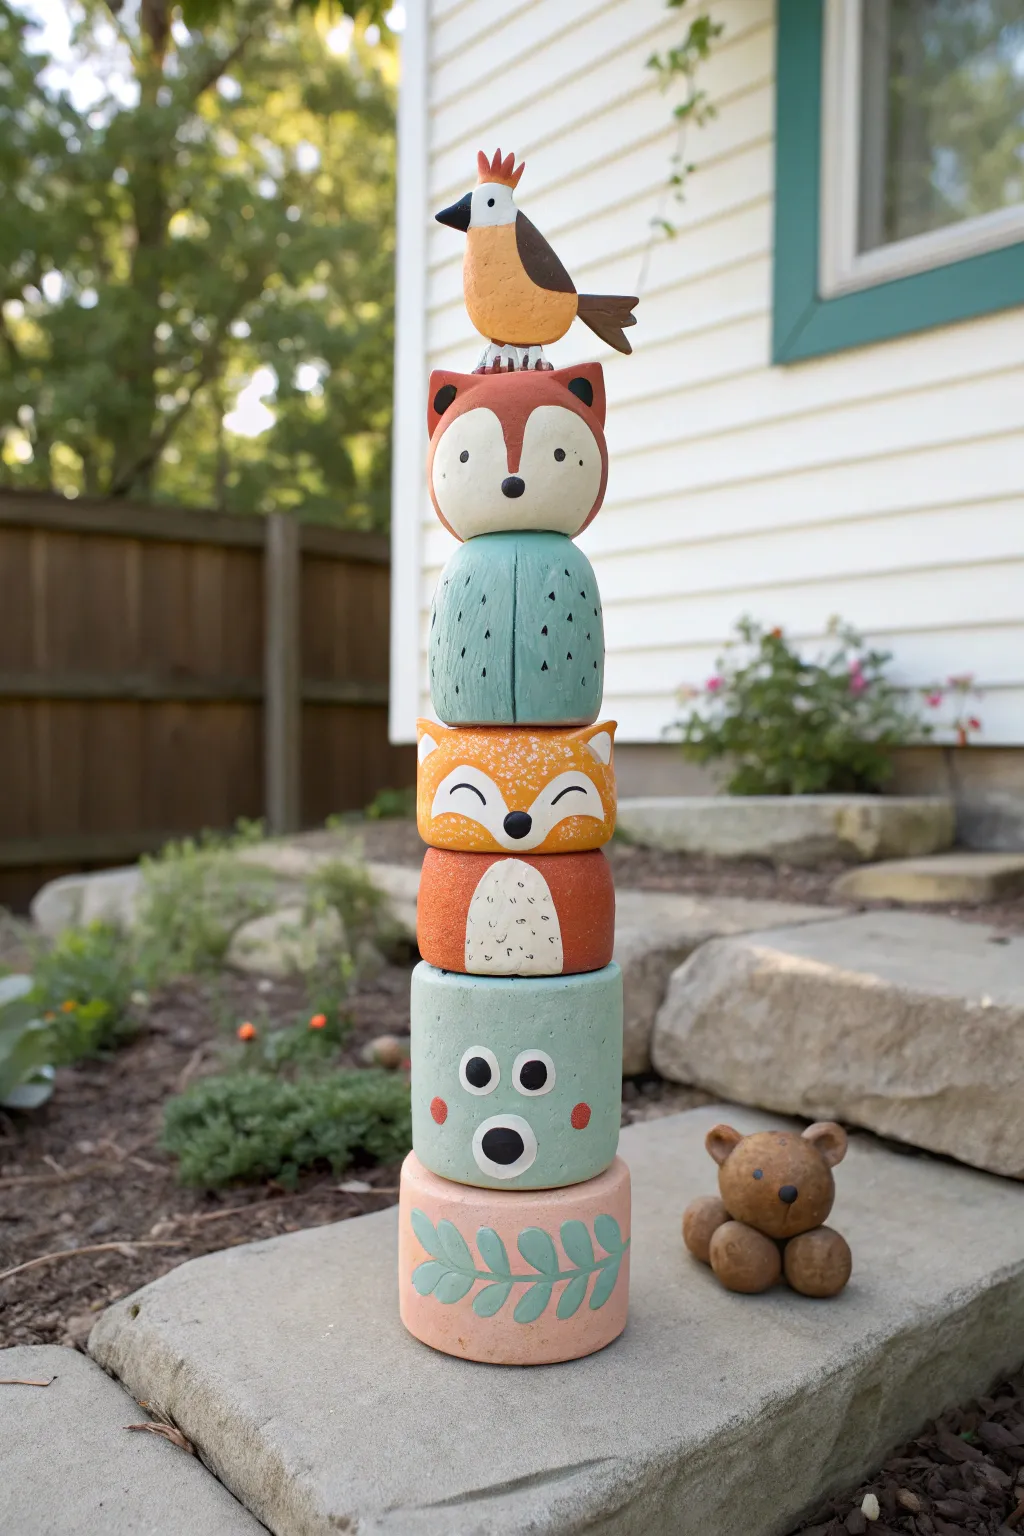
Family Symbol Totem With Personal Animals
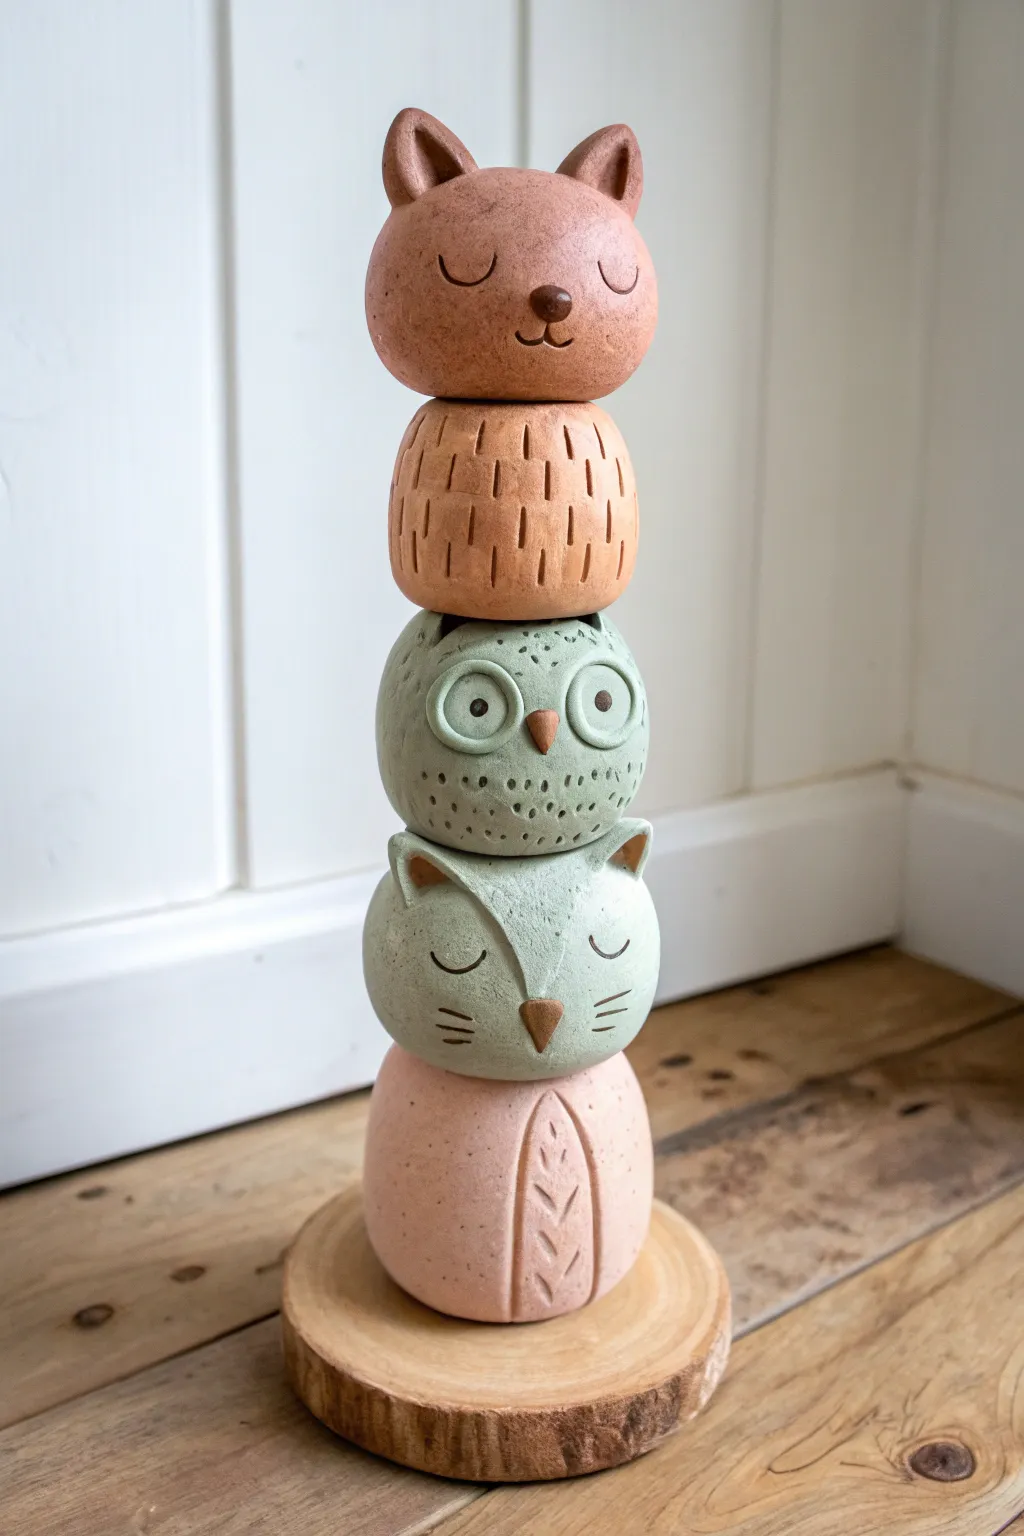
Create a charming, personalized family totem by stacking adorable clay animal components on a simple wooden base. This project features soft pastel glazes and a mix of smooth and textured segments, resulting in a sweet, rustic decoration perfect for a nursery or living room shelf.
Step-by-Step
Materials
- Polymer clay (terracotta/brown, muted green, pale pink colors) or air-dry clay + acrylic paints
- Aluminum foil (for armatures)
- Wooden dowel (approx. 1/4 inch diameter)
- Circular wooden slice base (approx. 4-5 inches wide)
- Clay sculpting tools (needle tool, ball stylus)
- Texture tools (or a simple toothpick)
- Strong craft glue or E6000
- Sandpaper (fine grit)
- Drill with bit matching the dowel size
- Matte varnish or sealant
Step 1: Planning and Base Preparation
-
Design your stack:
Note the order of the pieces in the reference: a pink feathered base, a grey cat head, a grey speckled owl, a textured brown spacer, and a brown fox head on top. Determine the size of each component to ensure they balance well vertically. -
Prepare the wooden base:
Take your wooden slice and drill a hole directly in the center. The hole should be snug enough to hold the dowel firmly. -
Insert the dowel:
Apply a dab of strong glue into the drilled hole and insert the wooden dowel. Ensure it stands perfectly straight and let the glue cure completely before adding clay.
Core Stability
Work directly on the dowel! Sliding raw clay pieces onto the dowel while sculpting ensures the holes line up perfectly later.
Step 2: Sculpting the Components
-
Form the foil cores:
To save clay and reduce weight, crumple aluminum foil into five tight balls/ovals roughly the size of tennis balls or slightly smaller. Poke a hole vertically through the center of each foil ball so they can slide onto a temporary working dowel or the final armature. -
Sculpt the base piece (pink body):
Cover the first foil ball with pale pink clay, smoothing it into a rounded egg shape. Using a needle tool, carve a centered oval on the front and add ‘V’ shaped notches inside it to simulate feathers or fur patterns. -
Sculpt the cat head (muted green):
Cover a foil ball with muted green clay. Pinch the top corners gently to form pointed ears. Use a needle tool to impress closed, curved eyes and whiskers on the cheeks. -
Add cat details:
Attach a small triangle of brown clay for the nose. Use a sculpting tool to define the snout area slightly, giving the face dimension. -
Sculpt the owl (muted green):
Cover the next ball with the same green clay. Create two large circular indentations for the eyes. Add small balls of clay inside these circles, then impress a tiny dot in the center for pupils. -
Detail the owl:
Attach a small brown beak between the eyes. Use a needle tool to poke rows of small dots across the lower half of the face for a speckled feather texture. -
Create the spacer (terracotta):
Cover a smaller foil ball with terracotta-colored clay. This piece acts as a decorative spacer. Use a blade or needle tool to make vertical dashes all around the circumference to mimic wood grain or fur. -
Sculpt the fox topper (terracotta):
For the top piece, cover the last foil ball with terracotta clay. Pinch prominent ears at the top. Use a ball tool to create smooth indentations for closed, happy eyes. -
Final fox features:
Add a small ball of dark brown clay for the nose and use a tool to press a small smile line underneath it. Ensure the top of the head is smooth and rounded.
Clay Cracking?
If using air-dry clay and cracks appear while drying, fill them with a ‘slip’ made of water and fresh clay, then sand smooth.
Step 3: Assembly and Finishing
-
Make the channel holes:
Before baking or drying, ensure every clay piece has a vertical hole running through the center that is wide enough to slide over your wooden dowel. -
Bake or dry:
If using polymer clay, bake the pieces strictly according to package instructions. I find creating a foil ‘nest’ on the baking sheet helps them keep their round shape. If using air-dry clay, allow 24-48 hours for full drying. -
Check fit and sand:
Once hard, test fit the pieces on the dowel. If they don’t sit flush against each other, lightly sand the tops and bottoms of the spheres to create flatter contact points. -
Glue the stack:
Apply glue to the dowel and between each clay segment as you slide them on: Base Body, Cat Head, Owl, Spacer, Fox Head. Align the faces forward. -
Seal the work:
Apply a coat of matte varnish to protect the clay and give it a unified, professional finish. Avoid glossy finishes to maintain the natural, earthy look shown in the photo.
Place your finished totem on a shelf where its cheerful faces can overlook the room
Mini Totem Trio for a Shelf or Windowsill
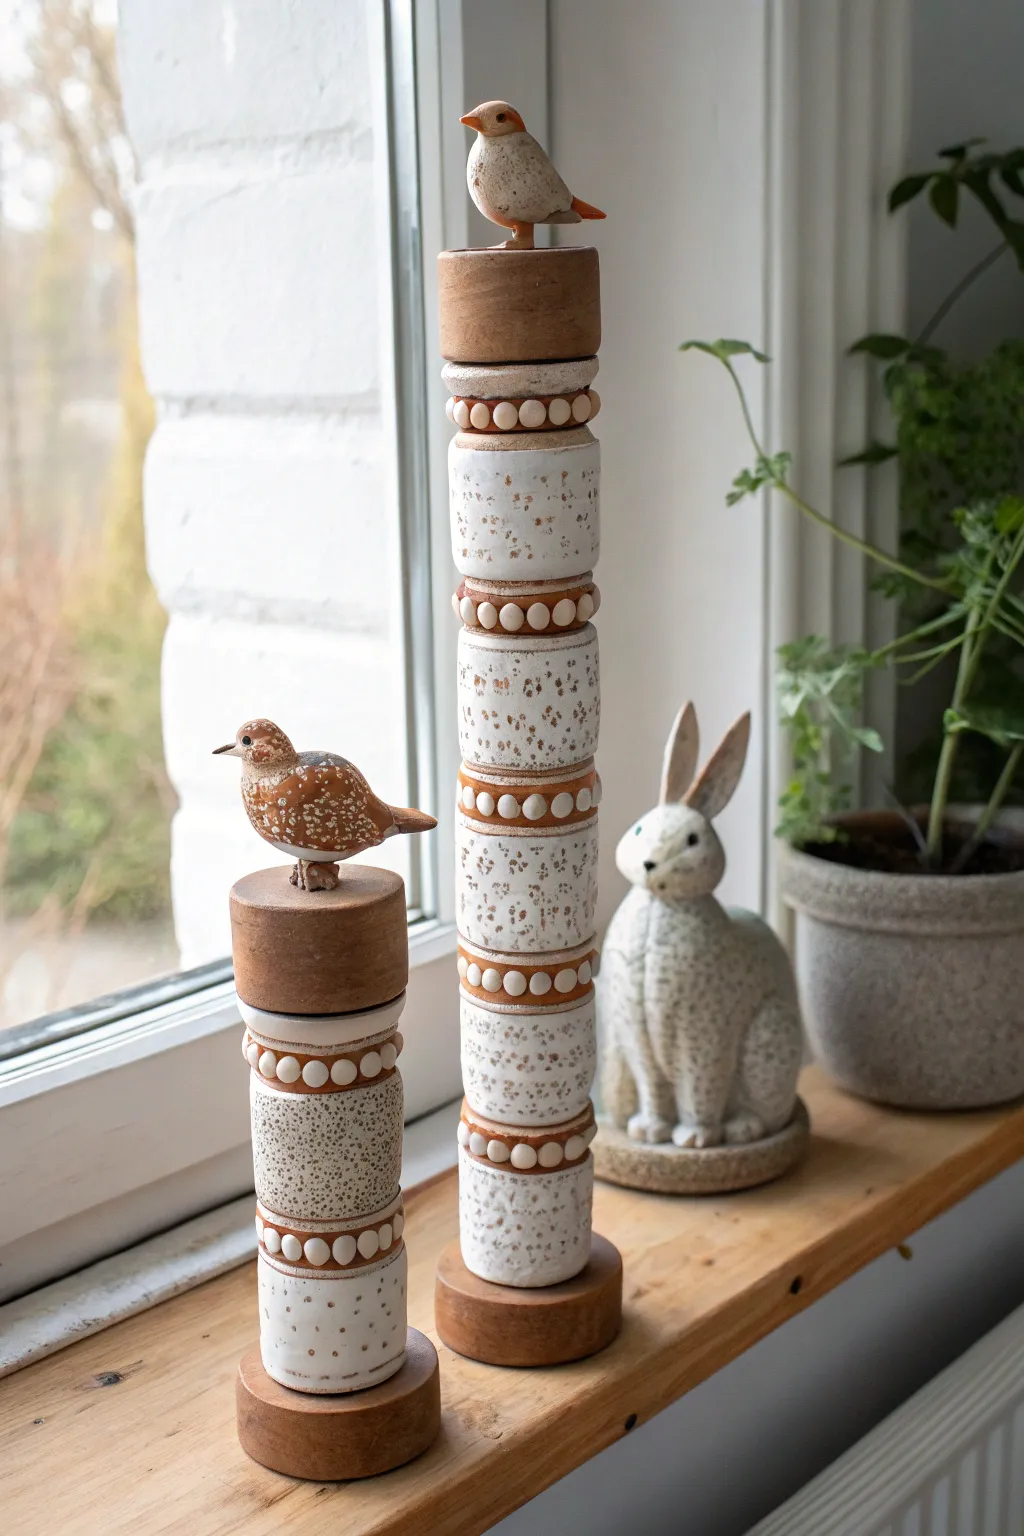
Bring a touch of playful elegance to your home with these mini ceramic totem poles, featuring stacked cylindrical segments and charming bird toppers. The speckled glaze and earthy terracotta accents create a cozy, handmade feel that looks perfect catching the morning light on a windowsill.
Step-by-Step Guide
Materials
- White stoneware or polymer clay (oven-bake)
- Wooden dowel (1/4 inch or similar, sized to your desired height)
- Small bird figurine mold or sculpting tools
- Rolling pin
- Circle cutters (various sizes)
- Speckled ceramic glaze (white/cream) or acrylic paints for faux finish
- Terracotta colored paint or clay (for the bead accents)
- Wood blocks or round bases
- Strong craft glue or epoxy
- Sandpaper
- Clear sealant (matte or satin)
- Toothbrush (for speckling if painting)
Step 1: Creating the Stacked Segments
-
Form the cylinders:
Begin by rolling out your clay into thick slabs. Cut rectangular strips and wrap them around a form (like a cardboard tube or just free-hand) to create hollow cylinders of uniform width but slightly varying heights. Smooth the seams well. -
Add texture:
While the clay is still soft, gently tap the surface with a textured sponge or crumpled foil to give it a natural, organic feel similar to the reference photo. If using real ceramic clay, create a center hole in the top and bottom caps of each cylinder for the dowel. -
Sculpt the spacer beads:
For the decorative rings between the main segments, roll small balls of clay. These will act as the ‘beaded’ details. You can press these onto a flat clay ring to keep them organized. -
Create the toppers:
Sculpt two small, rounded birds. Keep the shapes simple—smooth bodies, small beaks, and wings tucked in. Ensure the base of the bird is flat and wide enough to sit securely on the top wooden block. -
Bake or Fire:
Follow the instructions for your specific material. If using polymer clay, bake at the recommended temperature. If using stoneware, let the pieces dry slowly before bisque firing.
Step 2: painting and Glazing
-
Base coat application:
Apply a creamy white base coat to the main cylinder segments. If you are using real ceramic glaze, choose a ‘speckled white’ variety. -
Faux speckling technique:
If using acrylics on polymer clay, mimic the stoneware look by dipping an old toothbrush into diluted brown or grey paint. Run your thumb over the bristles to flick tiny specks onto the white cylinders. I find less is more here, so start light. -
Detail the spacers:
Paint the small beaded rings and the flat divider discs in a warm terracotta or rust color. This contrast defines the sections of your totem. -
Decorate the birds:
Paint the birds to match the theme. Use the speckled white for the belly and a warm brown or rust for the wings and beak. Let all paint dry completely.
Keep it Straight
Use a plumb line or a simple square tool when gluing the dowel to the base to ensure your totem stands perfectly vertical and doesn’t lean.
Step 3: Assembly and Finishing
-
Prepare the wood accents:
While paint dries, cut your wooden blocks. You’ll need solid blocks for the very top (under the bird) and the very bottom base. Sand them smooth and stain them a medium walnut color. -
Seal the wood:
Apply a light coat of varnish to the wood pieces to protect them and deepen the color, matching the rustic aesthetic. -
Stack the core:
Secure your wooden dowel into the center of the bottom wooden base using strong wood glue. This dowel will act as the spine for your totem. -
Thread the pieces:
Slide your components onto the dowel in order: a cylinder, a terracotta spacer ring, a cylinder, and so on. Apply a dab of epoxy between each layer to prevent spinning. -
Attach the top block:
Place the final wooden block on top of the last ceramic cylinder. Ensure it sits level. -
Crown the totem:
Glue the bird figurine securely to the center of the top wooden block using epoxy. -
Final protection:
Once fully assembled and the glue has cured, spray the entire piece with a matte or satin clear coat to unify the finish and protect the paint.
Mix & Match Heights
Create a visual rhythm by varying the height of the white cylinder segments—try a pattern of tall-short-tall or gradually getting smaller toward the top.
Now you have a charming set of sculptural totems ready to add character to your favorite nook
Mixed-Media Look With Embedded Stone Impressions
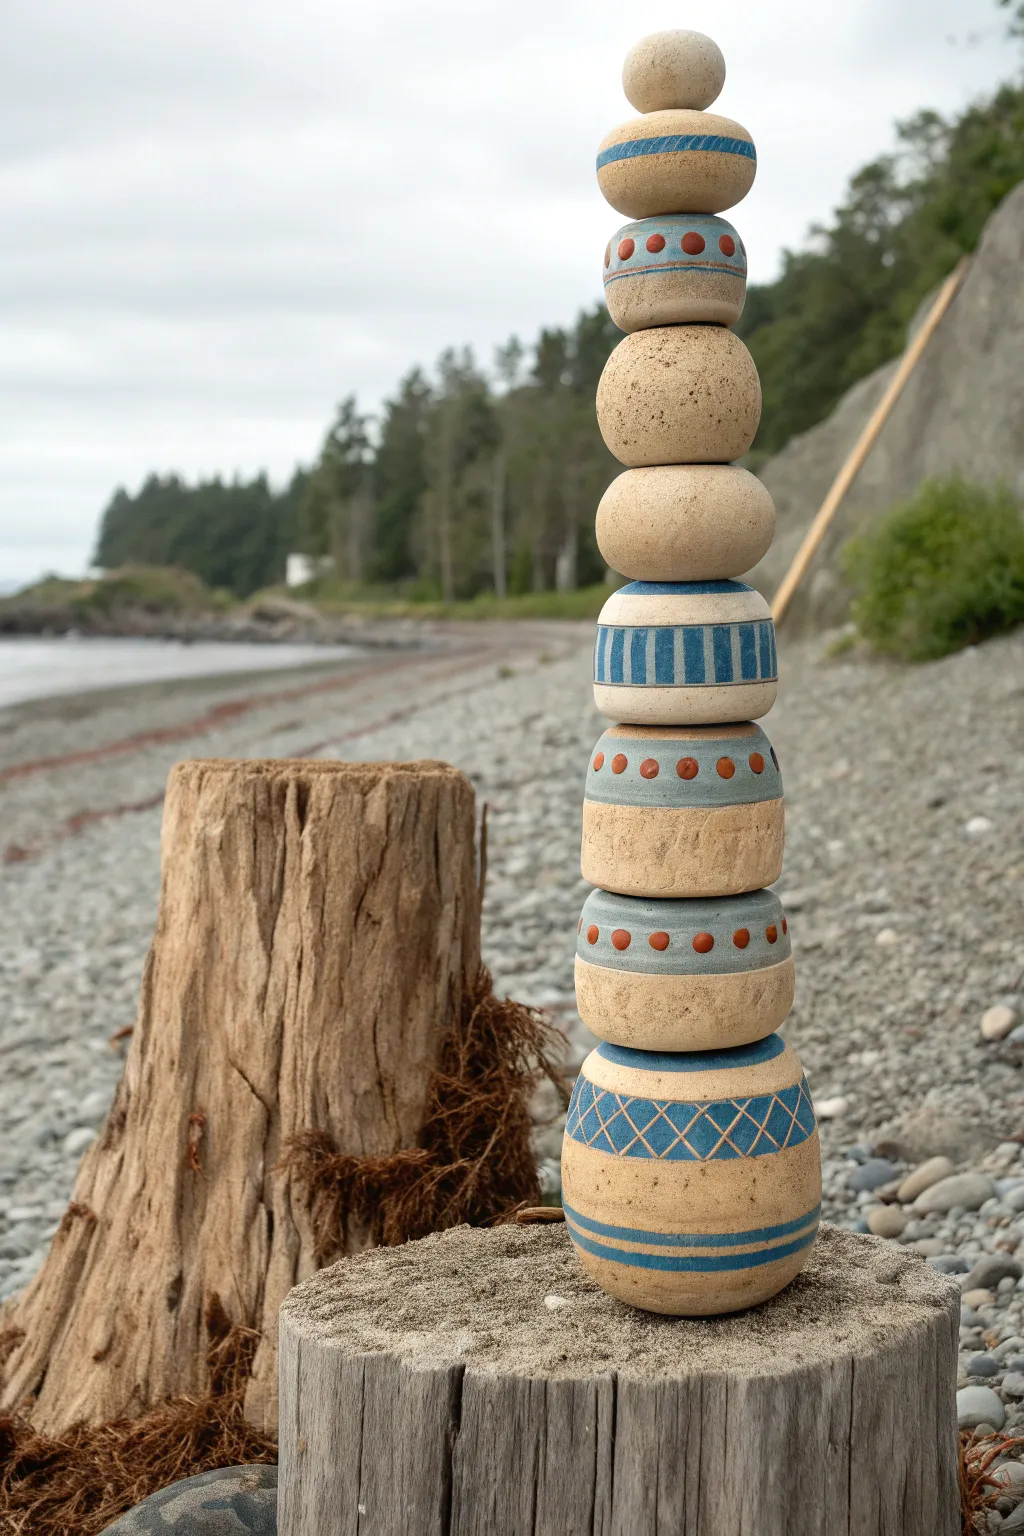
Recreate the serene balance of a beachside cairn with this stacked ceramic sculpture, featuring earthy clay tones and crisp geometric patterns. This project combines wheel-throwing or hand-building techniques with precise underglaze decoration to achieve a modern, coastal aesthetic.
Step-by-Step
Materials
- Stoneware clay (smooth, light-colored body)
- Pottery wheel (optional, hand-building alternative provided)
- Blue underglaze (cobalt blue)
- Rust/terracotta orange underglaze
- Clear matte glaze
- Carving tools (sgraffito tool or needle tool)
- Sponge and bucket of water
- Paintbrushes (fine liner and small flat brush)
- Kiln
- Internal support rod (metal or sturdy wood) for assembly
- Epoxy or strong ceramic adhesive (optional)
Step 1: Forming the Orb Components
-
Prepare the clay:
Begin by wedging your stoneware clay thoroughly to remove air bubbles. Divide the clay into roughly nine portions of varying sizes to create a tapered look for your stack. -
Throw or pinch the shapes:
If using a wheel, throw closed forms or ‘donuts’ that are hollow inside. For hand-building, pinch two bowl shapes and score-and-slip them together to form hollow orbs. Aim for slightly flattened, organic river-stone shapes rather than perfect spheres. -
Pierce the connection holes:
While the clay is leather hard, use a hole punch or cutting tool to create a vertical hole through the center of each ‘stone.’ Ensure the hole is wide enough to accommodate your final support rod, accounting for clay shrinkage. -
Refine the surfaces:
Smooth out the exterior of each shape with a rib or damp sponge. I find that burnishing the surface slightly with a smooth stone or spoon at this stage gives that nice, weathered rock texture later on. -
Arrange the stack:
Dry-stack your leather-hard pieces to check the balance and silhouette. The largest, distinctly patterned orb should be at the bottom, graduating to smaller, simpler stones at the top.
Wobbly Stack?
If stones don’t sit flush, use sanding paper (wet sanding is best for safety) on the contact points of the fired pieces to flatten them out before final assembly.
Step 2: Decorating and Glazing
-
Apply base bands:
Select the stones that will feature stripes. Using a banding wheel, apply smooth, even bands of cobalt blue underglaze. Vary the thickness—thin pinstripes on some, bold wide bands on others. -
Add geometric details:
On the bottom-most stone, paint a wide band of blue, then carefully carve a cross-hatch or diamond pattern through the underglaze using a sgraffito tool to reveal the raw clay body underneath. -
Paint dot accents:
For the stones with rust-colored details, use a small round brush to dab perfectly spaced circles of orange underglaze. You can lightly sketch the spacing with a pencil first to ensure symmetry. -
Create vertical dashes:
On the middle ‘belt’ stone, paint vertical blue dashes within a horizontal band. Keep the lines crisp to contrast with the organic roundness of the form. -
Bisque fire:
Once all decoration is bone dry, load the pieces into the kiln and bisque fire them according to your clay body’s specifications (usually Cone 04 or 06). -
Apply clear glaze:
Dip or brush a thin coat of clear matte glaze over the pieces. A matte finish is crucial here to maintain the natural, stone-like appearance rather than a high-gloss synthetic look. -
Glaze fire:
Fire the kiln again to the maturity temperature of your clay and glaze (often Cone 5 or 6 for stoneware).
Clean Lines
Use automotive detailing tape or thin washis tape to mask off your areas before painting the blue bands. This guarantees crisp, sharp edges for your geometric patterns.
Step 3: Final Assembly
-
Prepare the base:
Select a sturdy wooden post or drift-wood stump as your base. Drill a vertical hole into the top center to secure your metal support rod. -
Stack the totem:
Thread your finished ceramic stones onto the rod in your predetermined order. If you want a permanent bond, apply a dab of epoxy between each stone; otherwise, let gravity hold them for a re-arrangeable sculpture. -
Secure the capstone:
Place the smallest, undecorated sphere at the very top to cap off the rod. If the rod is visible, you may need to plug the top hole with a bit of filler or adhesive.
Step back and admire how the clean geometric lines complement the organic clay textures in your new garden sculpture