A clay trinket dish is one of those feel-good projects that’s quick to make, easy to personalize, and actually useful the second it’s done. I love how a tiny dish can hold your everyday jewelry while showing off your style through shape, texture, and finish.
Classic Round Trinket Dish With a Soft Rim
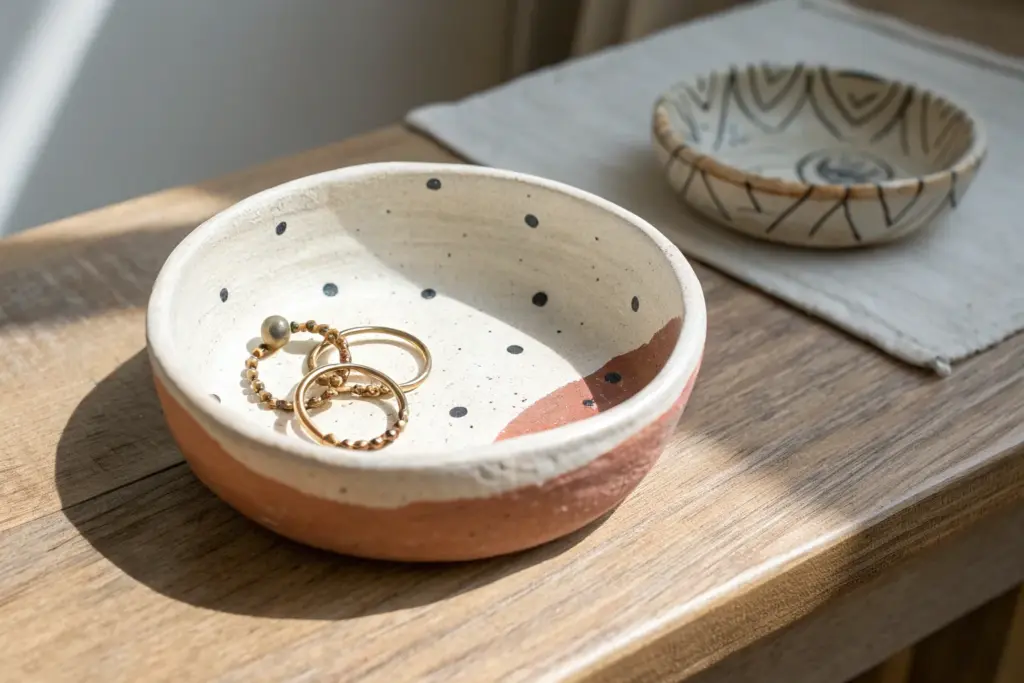
This charming, understated trinket dish features a classic round shape with gently lifted edges and a beautiful raw, toasted rim. The creamy speckled glaze contrasts perfectly with the exposed clay edge, creating a warm, organic home for your favorite rings.
Step-by-Step Guide
Materials
- Speckled Stoneware or Earthenware clay (cone 5-6)
- Cream or White Glossy Glaze (food safe recommended)
- Rolling pin
- Canvas mat or slab roller
- Round cookie cutter or bowl (approx. 4-5 inches diameter)
- Fettling knife or needle tool
- Small sponge
- Soft rib tool (rubber or silicone)
- Stylus tool or small texture tool (optional for rim)
- Kiln access
Step 1: Shaping the Clay Body
-
Roll out the slab:
Begin by wedging a softball-sized amount of speckled clay to remove air bubbles. Flatten it onto your canvas mat and roll it out into an even slab, aiming for a consistent thickness of about 1/4 inch. -
Cut the circle:
Place your round cookie cutter or an upside-down bowl onto the slab. Using the cutter or tracing around the bowl with a needle tool, cut out a perfect circle. -
Smooth the surface:
Before lifting the clay, gently run a soft rubber rib over the surface of the circle. This compresses the clay particles and removes any canvas texture left by the mat. -
Soften the edges:
Take a slightly damp sponge and run it around the cut edge of the circle. You want to round off that sharp 90-degree angle so the rim feels soft to the touch later. -
Create the curvature:
To get that gentle, shallow bowl shape, transfer your clay circle onto a piece of foam or cup it in your hand. I like to gently press my thumbs into the center while pulling the edges slightly upward. -
Refine the rim:
Pinch the very edge of the rim lightly between your thumb and forefinger to slightly thin it out and give it that delicate, handmade look shown in the photo. -
Dry to leather hard:
Set the dish aside to dry slowly. Cover it loosely with plastic if your room is dry, allowing it to reach a leather-hard state where it is firm but still cold to the touch.
Warped Edges?
If your dish isn’t drying flat, dry it slowly under plastic with a small weighted bag of rice in the center to hold the shape.
Step 2: Bisque and Glazing
-
Sponge cleaning:
Once bone dry, take a barely damp sponge and do a final pass over the piece, smoothing out any tiny imperfections or sharp bits on the rim. -
First firing:
Fire the piece in the kiln to a bisque temperature (usually Cone 04). This hardens the clay and prepares it for glazing. -
Wipe down:
After the bisque firing, wipe the dish with a damp sponge to remove any kiln dust, which can prevent the glaze from sticking properly. -
Apply the glaze:
Pour a small amount of creamy white glaze into the center of the dish. Swirl it around to coat the interior bottom and sides evenly. -
Dip or Pour the exterior (optional):
If you want the outside glazed, you can dip the exterior, but be careful not to let the glaze touch the very top rim yet. -
Clean the rim:
This is the most crucial step for this specific look. Using a damp sponge or a green scrubby pad, aggressively wipe the glaze off the very top edge of the rim. -
Review the rim line:
Ensure you have exposed a consistent line of raw clay all around the circumference. This exposed clay will toast in the kiln to create that beautiful orange-brown definition. -
Clean the foot:
Make sure the bottom of the dish (the foot) is completely free of glaze so it doesn’t fuse to the kiln shelf. -
Final firing:
Fire the piece again to the maturation temperature of your specific clay and glaze (likely Cone 5 or 6). This higher temperature creates the speckles and sets the final color.
Iron Oxide Boost
To darken the raw rim further, wipe a tiny diluted wash of red iron oxide onto the exposed edge before the final firing.
Now you have a perfectly sized spot to keep your daily jewelry safe and sound nearby


Organic Wavy-Edge Trinket Dish
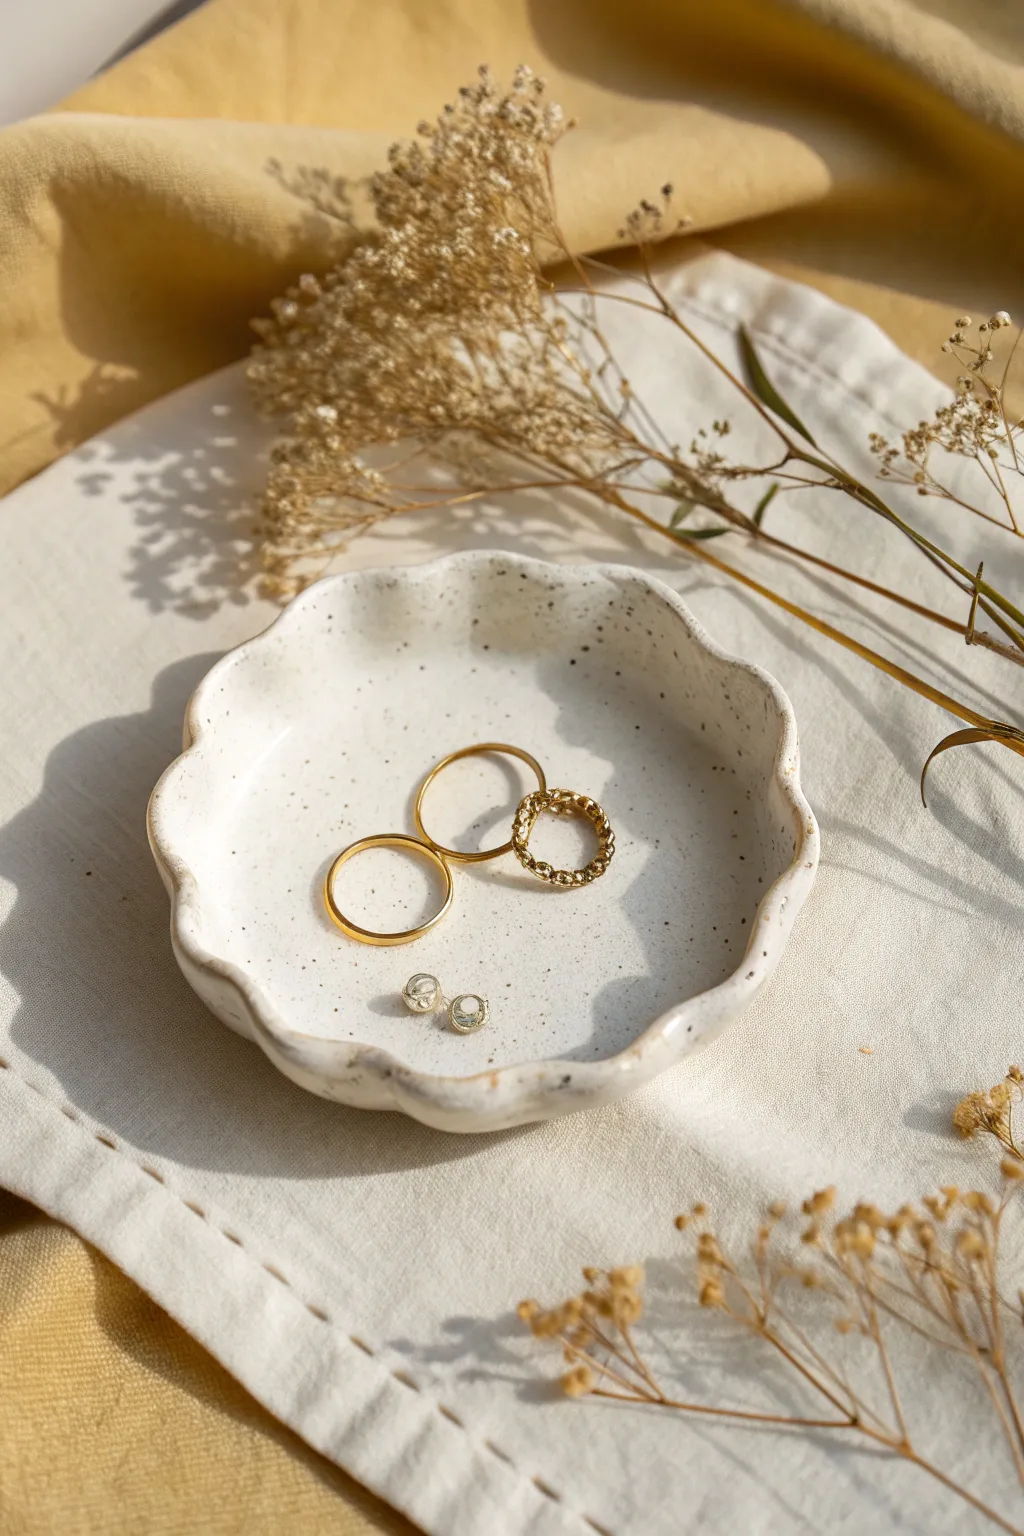
Embrace the beauty of imperfection with this lovely organic trinket dish, featuring gentle wavy edges and a charming speckled finish. It’s the perfect minimalist holder for your favorite gold rings or delicate studs.
Step-by-Step Tutorial
Materials
- White air-dry clay (or polymer clay)
- Acrylic rolling pin
- Circle cutter or a small bowl (approx. 4-5 inches)
- Craft knife
- Small bowl for shaping (drying form)
- Fine grit sandpaper
- White acrylic paint (matte)
- Black or brown acrylic paint
- Old toothbrush
- Gloss or satin varnish/sealer
- Canvas mat or parchment paper
Step 1: Shaping the Clay
-
Condition the clay:
Begin by taking a handful of white air-dry clay and kneading it in your hands until it becomes soft, pliable, and free of cracks. -
Roll it out:
Place the clay on your canvas mat or parchment paper. Using your rolling pin, roll the clay out to an even thickness of about 1/4 inch. Try to keep the pressure consistent so one side isn’t thinner than the other. -
Cut the circle:
Place your circle cutter or an inverted small bowl onto the clay slab to use as a template. Press down or trace around it with a craft knife to cut out a perfect circle. -
Smooth the edges:
Dip your finger in a tiny bit of water and run it along the cut edge of the circle. This softens the sharp cut angle and makes the finished rim look more polished and ceramic-like. -
Create the waves:
Gently lift the clay circle. Using your thumb and forefinger, pinch the edge gently at regular intervals to create a subtle scalloped or wavy pattern. Don’t worry about symmetry; the organic look is key here. -
Form the shallow bowl:
Place your clay circle inside a slightly larger bowl to help it hold a curved shape while drying. Gently press the center down so it conforms to the curve, but ensure the wavy edges remain distinct.
Step 2: Refining and Painting
-
Allow to dry:
Let the dish dry completely in the mold. Depending on your humidity and clay type, this usually takes 24 to 48 hours. It must be bone dry before sanding. -
Sand for smoothness:
Once dry, pop the dish out of the mold. Use fine-grit sandpaper to gently smooth out any fingerprints, rough spots, or sharp points on the scallops. Wipe away the dust with a barely damp cloth. -
Apply the base coat:
Paint the entire dish, front and back, with a coat of matte white acrylic paint. This provides a fresh, clean canvas and covers any slight discoloration in the raw clay. Let it dry. -
Prepare the speckle mix:
Squeeze a tiny dot of black or dark brown acrylic paint onto a palette and water it down significantly until it has an inky, fluid consistency. -
Splatter texture:
Dip an old toothbrush into the watered-down paint. Hold the brush over the dish and run your thumb across the bristles to flick tiny specks of paint onto the surface. I like to practice on a piece of paper first to get the force right. -
Spot check:
Add more speckles to areas that look too empty, aiming for a random, natural stone appearance. Allow the paint flecks to dry completely.
Uneven Drying?
If the clay starts warping while drying, weigh the center down gently with a small bag of rice or beans to keep the base flat.
Step 3: Finishing Touches
-
Seal the piece:
Apply a coat of gloss or satin varnish over the entire dish. This seals the porous clay, protects the paint, and gives it that fired-ceramic sheen seen in the photo. -
Dry and cure:
Let the varnish dry according to the manufacturer’s instructions, usually leaving it overnight to fully cure before placing any jewelry inside.
Go for Gloss
Apply two or three thin coats of high-gloss polyurethane varnish instead of one thick coat. This creates a deeply glazed look that mimics kiln-fired pottery.
Enjoy styling this delicate piece on your dresser or nightstand


Minimal Oval Catchall Trinket Dish
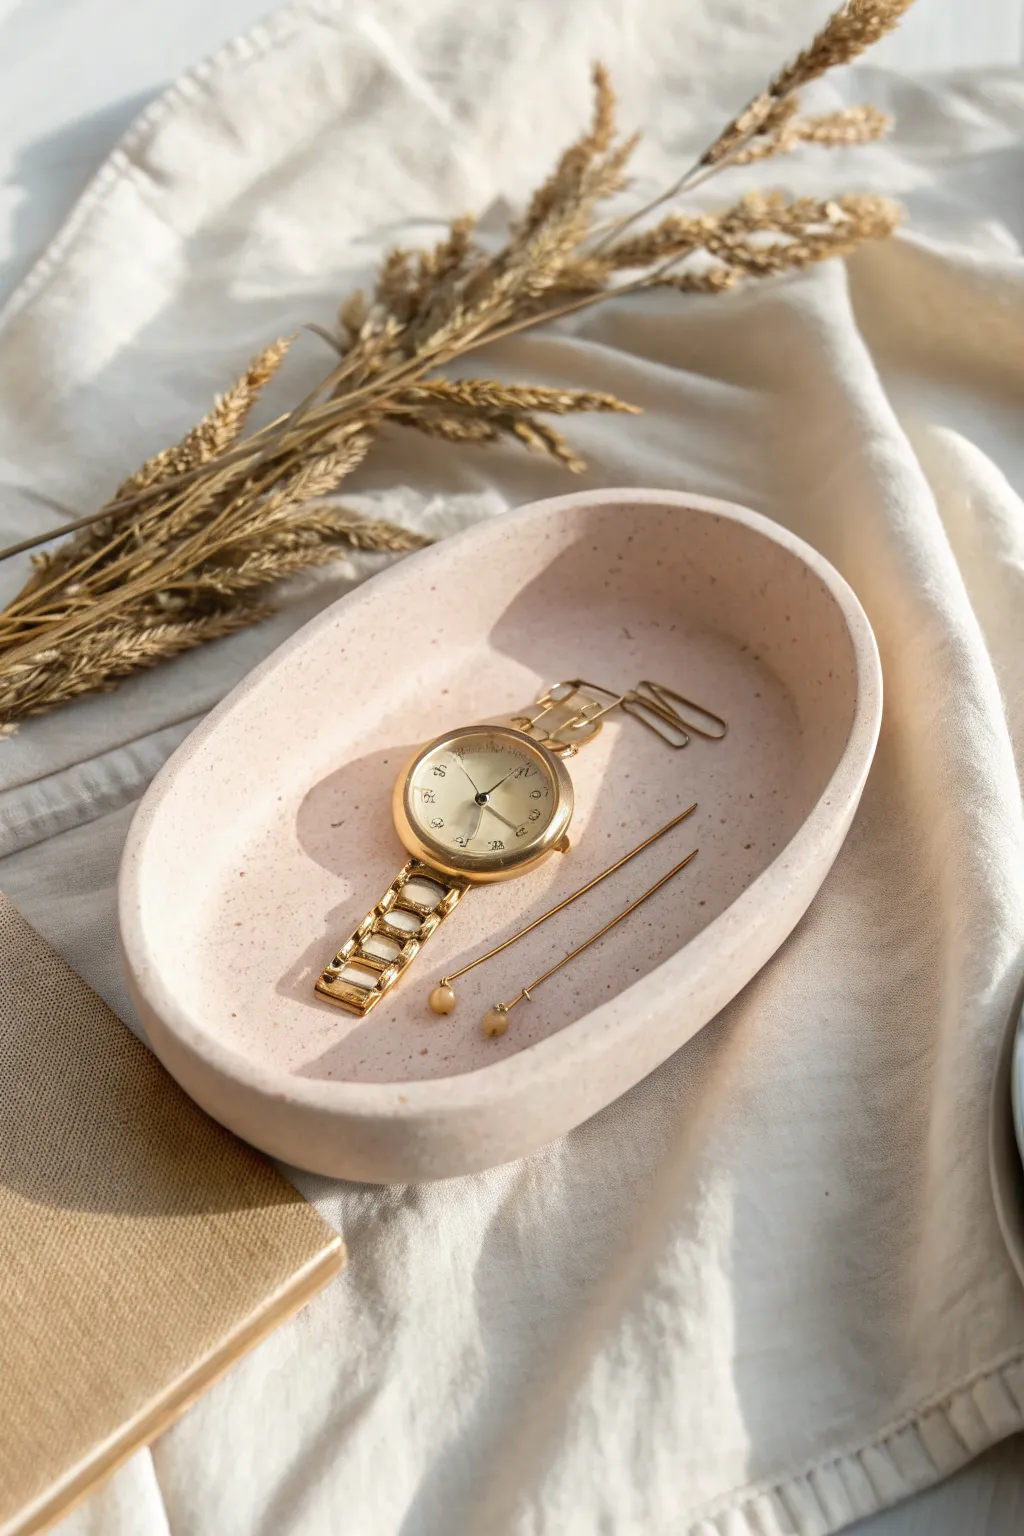
Embrace the understated elegance of this minimalist oval catchall, perfect for organizing your everyday jewelry in style. Crafted with a soft blush tone and a subtle speckled texture, this modern clay dish adds a serene, functional sculpture to your bedside table.
How-To Guide
Materials
- Polymer clay (white and translucent)
- Acrylic paint (burnt orange or terracotta)
- Ground black pepper or dried coffee grounds (for speckling)
- Rolling pin or acrylic roller
- Oval template (paper or cardstock)
- Craft knife or clay blade
- Fine-grit sandpaper (400 to 1000 grit)
- Matte varnish or sealant
- Gloss glaze (optional, for interior only)
- Parchment paper or baking mat
- Oven
Step 1: Preparing the Speckled Clay
-
Mix the Base Color:
Begin by conditioning a large block of white polymer clay until it is soft and pliable. To achieve that soft blush hue, mix in a very small amount of burnt orange or terracotta acrylic paint or colored clay. Knead thoroughly until the color is completely uniform and streak-free. -
Add Translucency:
Incorporate a small amount of translucent clay (about 20% of the total volume) into your blush mixture. This helps mimic the look of natural stoneware rather than opaque plastic. -
Create the Speckles:
Sprinkle a pinch of ground black pepper or very finely dried coffee grounds onto your flattened clay. Fold the clay over and knead it repeatedly to distribute the particles evenly. This adds that trendy, organic terrazzo effect shown in the photo. -
Roll the Slab:
Place the clay on a piece of parchment paper to prevent sticking. Using your rolling pin, roll the clay out into an even slab, aiming for a thickness of about 1/4 inch. I find that using depth guides or stack of playing cards on either side helps keep the thickness consistent.
Uneven Rims?
If the top edge of your wall looks wavy after attaching it, don’t overwork it while wet. wait until after baking, then simply sand the rim down on a flat sheet of sandpaper to get it perfectly level.
Step 2: Shaping the Dish
-
Cut the Oval Base:
Place your paper oval template onto the clay slab. Using a sharp craft knife or dedicated clay blade, carefully trace around the template to cut out your base shape. -
Prepare the Wall Strip:
Gather the excess clay and re-roll it into a long, rectangular strip. This needs to be long enough to wrap around the entire circumference of your oval base. Cut the strip to be about 3/4 inch tall. -
Attach the Walls:
Gently lift the strip and place it on top of the oval base, aligning it with the very edge. You want the wall to sit *on* the base, not wrap around the side of it. -
Join the Seams:
Where the two ends of the wall strip meet, slice through both layers at a diagonal angle and press them together. Use a modeling tool or your finger to smooth this vertical seam until it disappears. -
Blend the Bottom Seam:
This is the most crucial step for durability. On the inside of the dish, use a rounded tool to drag a bit of clay from the wall down onto the base, blurring the line where they connect. Repeat this on the outside, dragging clay from the base up onto the wall. -
Smooth the Surfaces:
Dip your finger in a tiny bit of water (or baby oil if the clay is sticky) and run it over all the joins. Smooth out any fingerprints and ensure the transition between the wall and floor is a gentle curve rather than a sharp angle.
Stone Texture Trick
Before baking, lightly press a piece of coarse sandpaper or a crumpled ball of aluminum foil against the exterior walls. This imitates the tactile feel of real raw ceramic or stone.
Step 3: Baking and Finishing
-
Bake the Piece:
Preheat your oven according to the clay manufacturer’s instructions (usually around 275°F/135°C). Place the dish on a parchment-lined baking sheet and bake for 30–45 minutes. Longer baking times generally result in stronger clay. -
Cool Down:
Turn the oven off and open the door slightly, letting the dish cool down slowly inside. This prevents thermal shock that could cause cracking. -
Sand for Perfection:
Once fully cool, use fine-grit sandpaper under running water (wet sanding prevents dust) to smooth the top rim and any rough patches on the outside walls. The rim should feel soft to the touch. -
Seal the Dish:
Apply a thin layer of matte varnish over the entire piece to protect the surface and the organic speckles. If you want a slight contrast, you can use a semi-gloss glaze just on the inside basin. -
Final Cure:
Let the varnish dry completely in a dust-free area for at least 24 hours before placing your jewelry inside.
Now you have a chic, custom-made spot to keep your favorite timepiece and earrings safe and sound


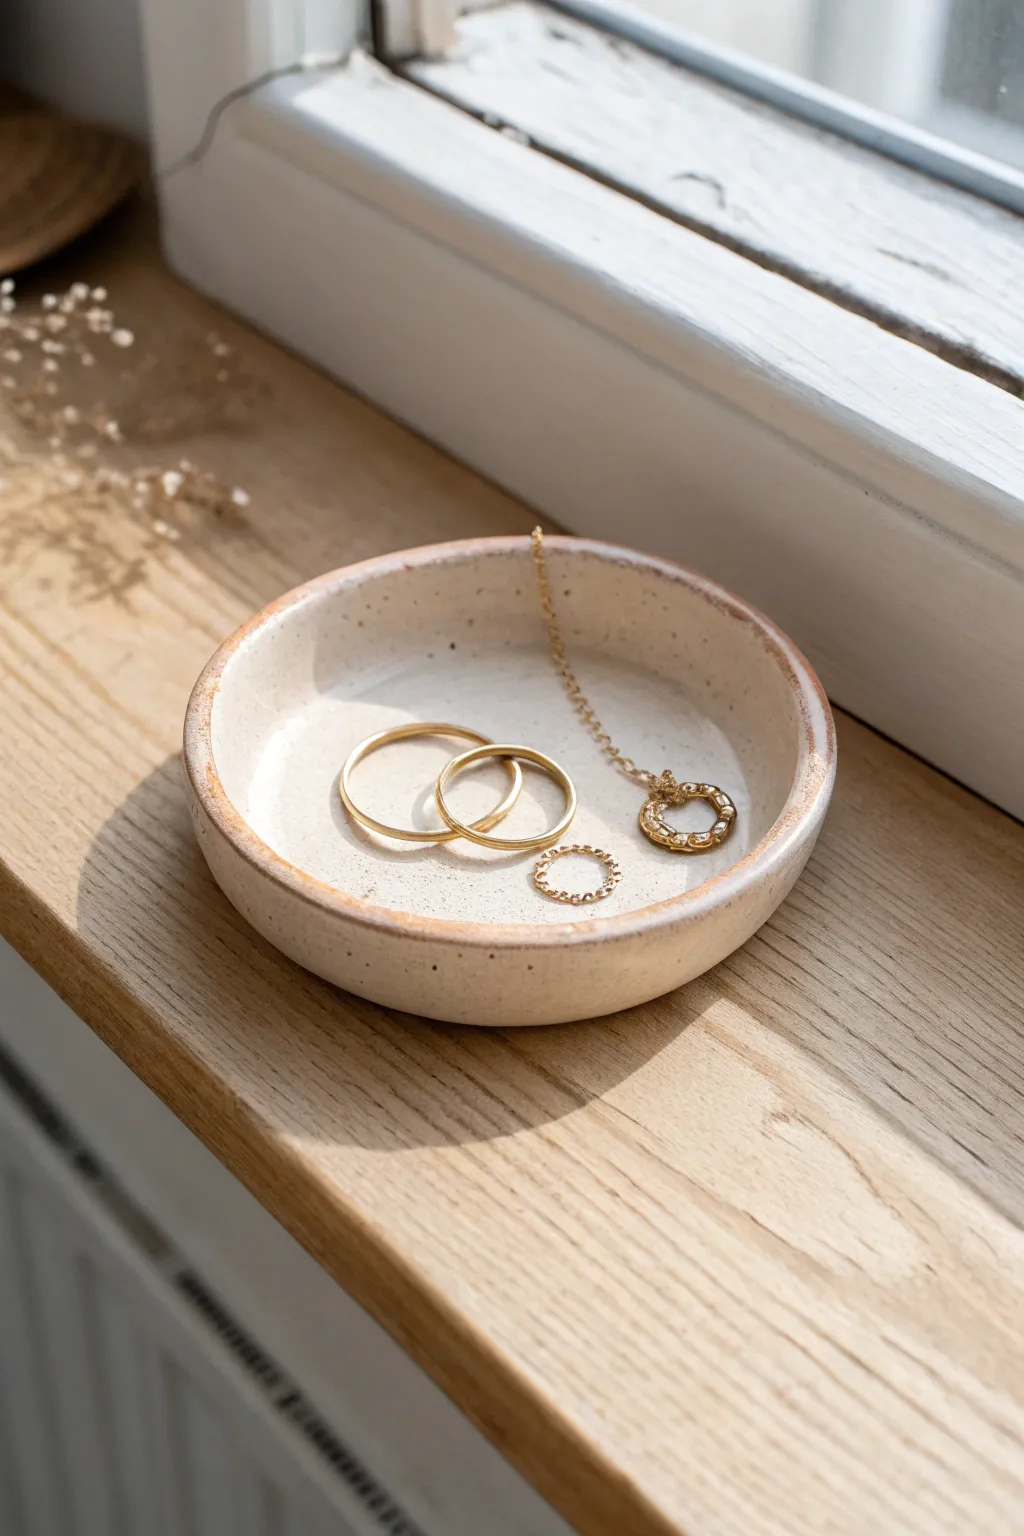
Gold-Accented Rim Trinket Dish

Elevate a simple handmade clay dish with a touch of elegance by adding a glimmering metallic border. The intentional unevenness of the bowl combined with the rustic gold rim creates a beautiful wabi-sabi aesthetic perfect for holding your favorite rings.
Step-by-Step Tutorial
Materials
- White styling clay (air-dry or oven-bake)
- Rolling pin
- Small bowl or round cookie cutter (approx. 4 inches)
- Small sponge or foam brush
- Sandpaper (fine grit)
- Liquid gilding paint or gold leaf pen
- Fine detail paintbrush
- Water for smoothing
- Gloss varnish or sealant (optional)
Step 1: Shaping the Clay
-
Prepare the clay:
Begin by taking a handful of white clay and kneading it in your hands until it becomes soft, pliable, and free of air bubbles. -
Roll it out:
On a clean, flat surface, roll the clay out to a thickness of about 1/4 inch. Try to keep the thickness consistent, though slight variations add to the handmade charm. -
Cut the circle:
Use a round cookie cutter or place a small bowl upside down on the clay as a template. Cut around it with a knife to create your base circle. -
Soften the edges:
Dip your finger in a little water and run it along the cut edge of the clay circle to smooth out any sharp ridges or crumbs left by the knife. -
Form the curve:
Gently lift the edges of the circle upwards with your thumbs to create a shallow bowl shape. You aren’t looking for a deep cup, but rather a gentle saucer curve. -
Texturize the surface:
Instead of smoothing the inside perfectly, leave some fingerprints or lightly press a textured fabric into the clay to achieve that organic, handmade surface seen in the photo. -
Refine the rim:
Pinch the rim slightly between your thumb and forefinger to give it an irregular, organic wave. This uneven surface is what will catch the light once we apply the gold.
Smooth Moves
To shape the bowl easier, drape your clay over a melon or a small upside-down bowl covered in saran wrap. This lets gravity do the work for a consistent curve.
Step 2: Drying and Finishing
-
Let it dry:
Allow the piece to dry completely according to your clay’s instructions. If using air-dry clay, I prefer to let it sit for at least 24-48 hours; if oven-bake, follow the temperature guide on the package. -
Sand for imperfections:
Once fully cured, gently sand any unpleasantly sharp snagging points, particularly on the bottom, but leave the rim’s texture intact. -
Wipe clean:
Use a slightly damp cloth or a dry brush to remove all sanding dust. The surface must be dust-free for the paint to adhere properly. -
Seal the clay:
If you are using porous air-dry clay, apply a coat of white acrylic paint or a clear sealant first to prevent the gold paint from soaking in too deeply.
Make It Marble
Before rolling, twist grey and white clay together but don’t fully blend them. This creates a stunning marble effect that looks incredible with the gold rim.
Step 3: The Golden Touch
-
Prepare the gold:
Shake your liquid gilding paint well. Pour a tiny amount onto a palette or scrap piece of paper. -
Apply the first pass:
Using a fine detail brush, paint the very top edge of the rim. Use a stippling or dabbing motion rather than long strokes to get into the crevices. -
Extend the border:
Allow the paint to bleed slightly over the edge onto the inner and outer lip of the bowl. The line shouldn’t be perfect; irregular thickness looks more artistic here. -
Add texture highlights:
If there are high points on the rim’s texture, lightly brush over them to catch the ‘peaks’ with gold, leaving the ‘valleys’ white for depth. -
Dry and seal:
Let the gilding dry completely. Finally, seal the entire dish with a clear gloss varnish to protect the finish and give it a ceramic-like sheen.
Place your creation on your vanity to keep your daily jewelry safe and stylish

The Complete Guide to Pottery Troubleshooting
Uncover the most common ceramic mistakes—from cracking clay to failed glazes—and learn how to fix them fast.
Marbled Clay Trinket Dish in Neutral Swirls
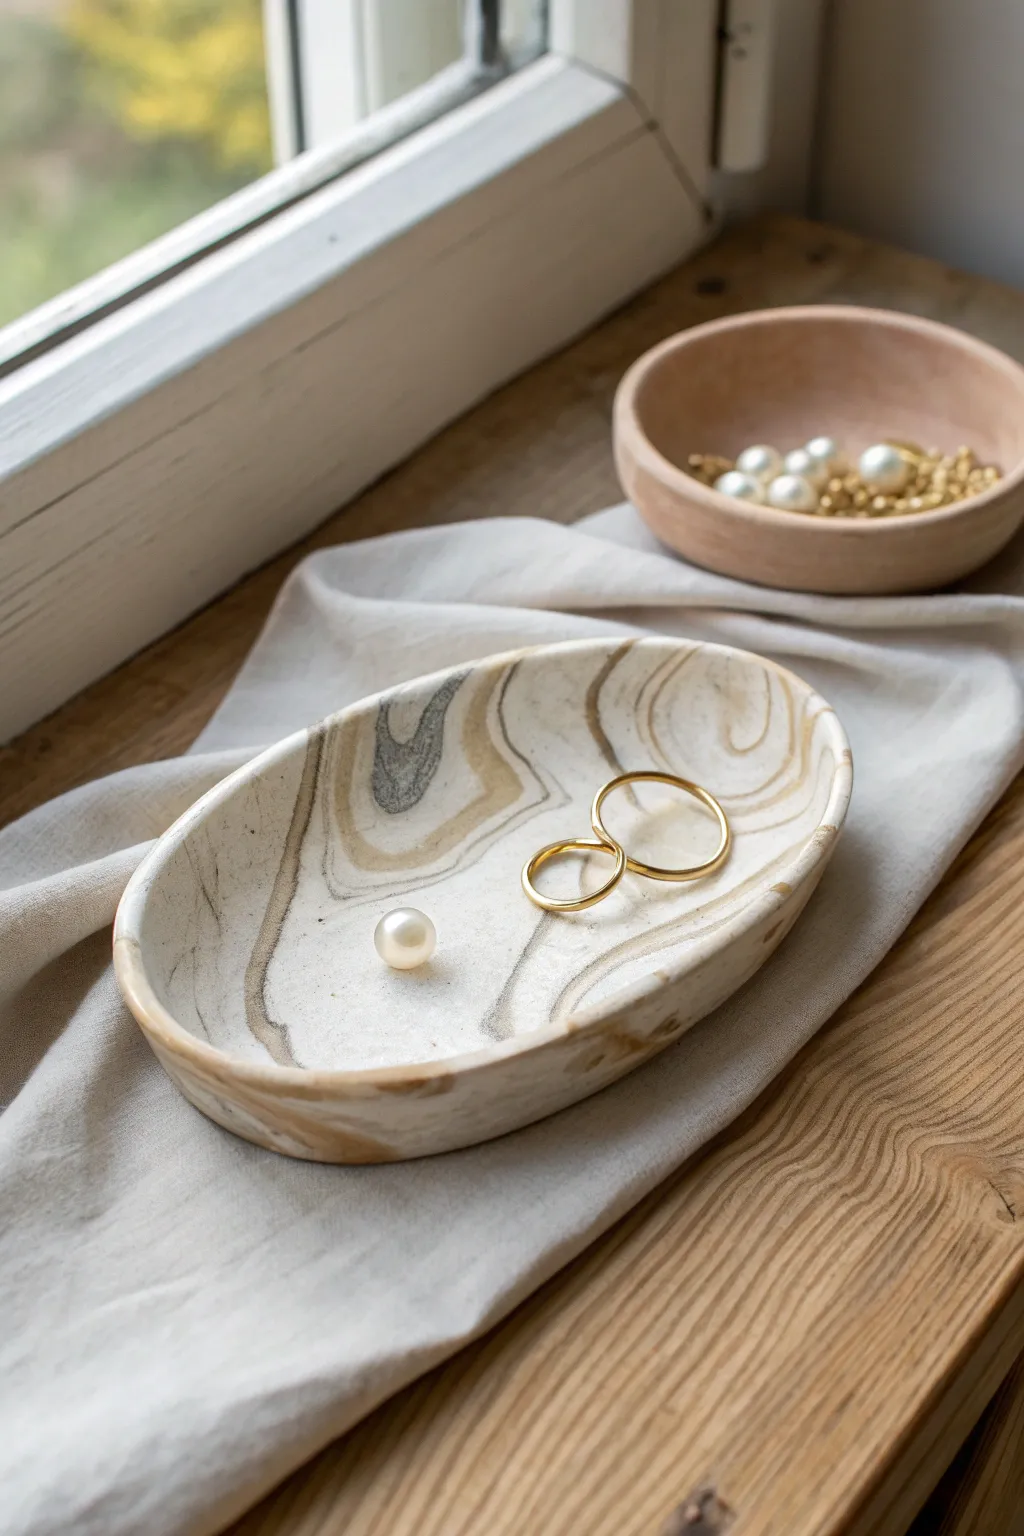
Bring the calming elegance of stone into your home with this faux-marble jewelry tray. Using a simple blend of polymer clay in white, taupe, and deep charcoal, this project mimics the organic flow of nature to create a sophisticated spot for your daily treasures.
Detailed Instructions
Materials
- White or translucent white polymer clay
- Beige or champagne colored polymer clay
- Dark grey or granite colored polymer clay
- Rolling pin (acrylic preferred)
- Oval template or cookie cutter (approx. 4-5 inches wide)
- Craft knife or clay slicer
- Glass paperweight or small round bowl (for shaping)
- Sandpaper (fine grit)
- Water-based gloss varnish (optional for a polished stone look)
Step 1: Prepping the Clay
-
Condition the Clay:
Begin by ‘conditioning’ your polymer clay, which simply means kneading it in your hands until it is warm, soft, and pliable. Do this separately for your white, beige, and dark grey blocks. -
Create the Base:
Since the dish is primarily light-colored, roll a large log of the white clay. This will be the main body of your marble mix. -
Prepare the Veins:
Roll very thin ‘snakes’ of the beige and dark grey clay. These should be much smaller in volume compared to the white clay.
Step 2: Marbling Technique
-
Combine the Colors:
Lay the thin colored snakes lengthwise along your thick white log. Twist the entire bundle together like a candy cane. -
Fold and Twist:
Fold the twisted log in half and twist it again. Be careful not to over-twist, or the colors will blend into a muddy brown rather than distinct marble veins. -
Form a Ball:
Once you have a nice striped pattern, roll the log into a smooth ball. You should see streaks of color swirling through the white. -
Roll Out the Slab:
Place the ball on your work surface and use your acrylic rolling pin to flatten it into an oval shape. Aim for a consistent thickness of about 1/4 inch. -
Check the Pattern:
Look at your slab. If the marbling isn’t organic enough for your taste, I sometimes fold it once more and re-roll, but remember that less is often more with this technique.
Stone Effect Tip
Mix a pinch of ground black pepper or dried tea leaves into the white clay base before marbling. It adds tiny speckles that look just like real granite inclusions.
Step 3: Shaping and Curing
-
Cut the Shape:
Place your oval template or cookie cutter onto the clay slab. If using a template, trace around it carefully with your craft knife to get a clean edge. -
Smooth the Edges:
Dip your finger in a little water (or cornstarch) and gently run it along the cut edge of the oval to smooth out any roughness or sharp corners. -
Create the Lip:
To give the dish its curved form, gently lift the edges of the oval upwards. You can pinch the rim slightly to define it, ensuring it looks like the dish in the photo. -
Support the Shape:
Place the clay oval into a shallow oven-safe bowl or curve it over the back of a measuring cup to help it hold that gentle concave shape while baking. -
Bake:
Bake the clay according to the manufacturer’s instructions on the package. Usually, this is around 275°F (135°C) for 15-30 minutes. -
Cool Down:
Allow the dish to cool completely inside the oven or on a wire rack before handling it. The clay hardens fully as it cools.
Make it Luxe
Paint the very rim of the dish with liquid gold leaf after baking. The metallic edge creates a stunning contrast against the neutral matte clay swirls.
Step 4: Finishing Touches
-
Sand the Rim:
Once cool, use a piece of fine-grit sandpaper to lightly buff the rim of the dish. This mimics the smooth, worn feel of real stone. -
Clean Up:
Wipe away any sanding dust with a damp cloth or baby wipe. -
Seal (Optional):
For a glossy, wet-stone look, apply a thin layer of water-based gloss varnish. If you prefer the matte, raw clay look shown in the image, you can skip this step entirely.
Place your rings in their new home and enjoy the chic, organizational beauty you’ve created
Terrazzo-Speckled Trinket Dish
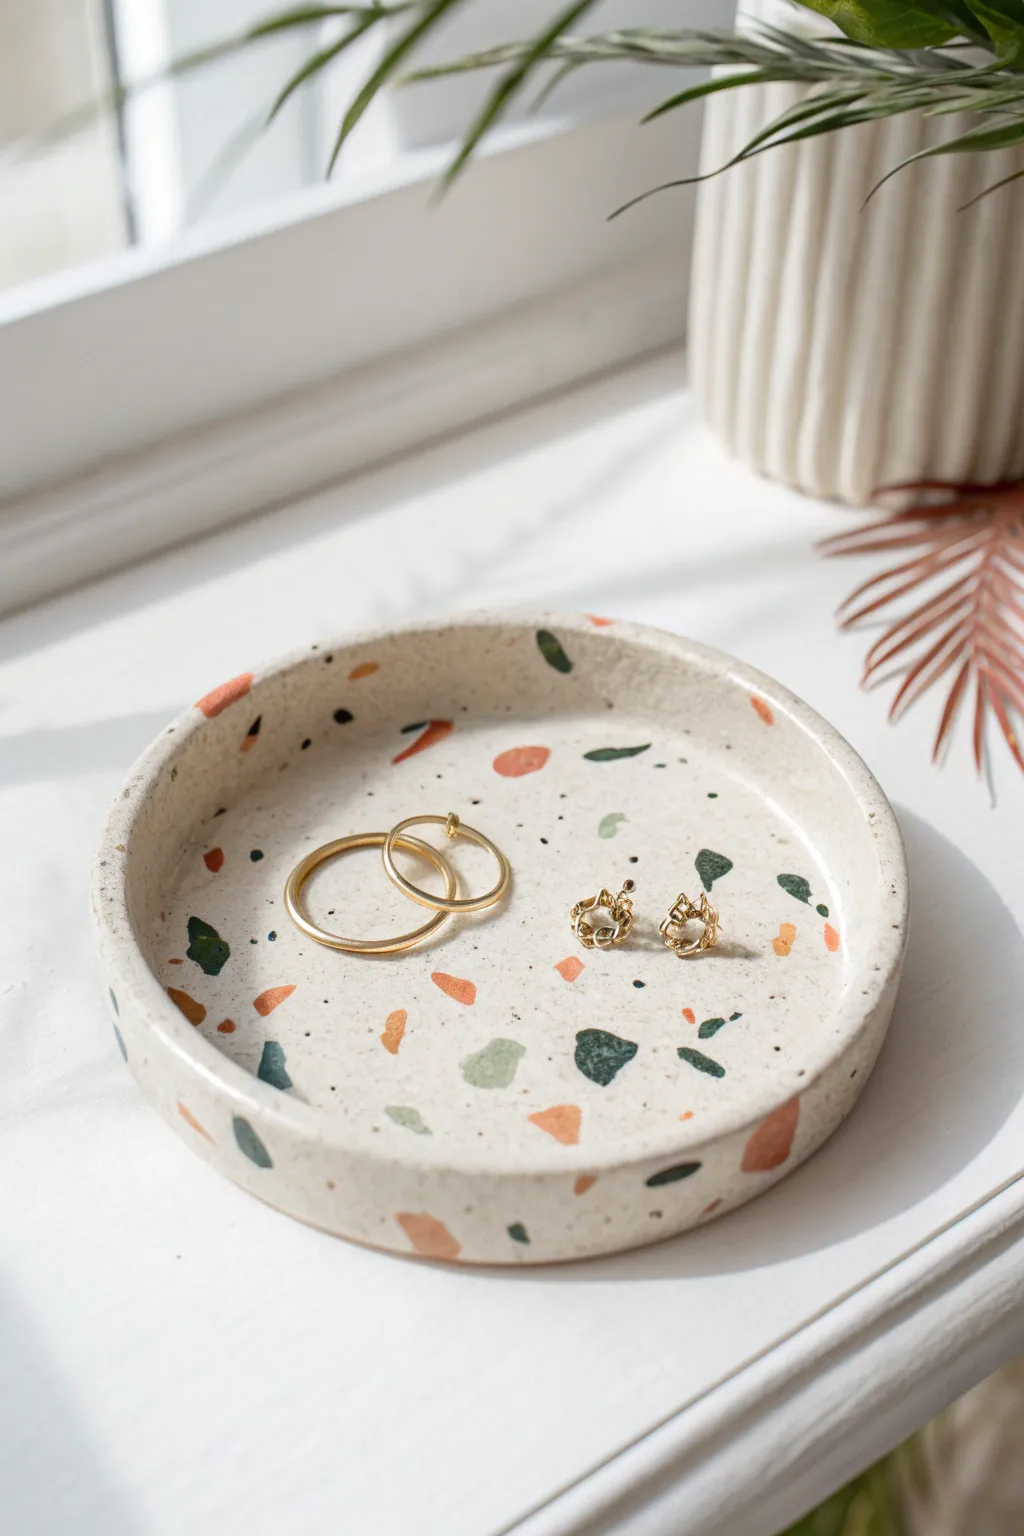
Bring a stylish, modern touch to your dresser with this easy-to-make faux terrazzo trinket dish. Using polymer clay, you’ll create a chic cream-colored base speckled with vibrant chips of terracotta and forest green, perfect for holding your favorite rings and studs.
Step-by-Step Guide
Materials
- Polymer clay (White or Beige/Cream)
- Polymer clay (Terracotta/Burnt Orange)
- Polymer clay (Dark Green/Teal)
- Polymer clay (Sage Green)
- Acrylic rolling pin
- Circle clay cutter (approx. 4-5 inches)
- Craft knife or scalpel
- Baking sheet
- Parchment paper
- Oven
- Fine grit sandpaper or sanding block
- Matte water-based varnish (optional)
Step 1: Preparing the Terrazzo Chips
-
Condition the colored clay:
Start by taking small amounts of your terracotta, dark green, and sage green polymer clay. Knead them individually until they are soft and pilable. -
Flatten the colored sheets:
Roll each color out into a very thin, organic sheet. It doesn’t need to be perfect; irregular shapes are actually better here. -
Bake the chips (Part 1):
Place these thin colored sheets on a baking tray lined with parchment paper. Bake them for about 10-15 minutes according to package instructions—just enough to harden them slightly so they can be chopped. -
Chop the confetti:
Once cool, use your craft knife to chop the hardened clay sheets into small, irregular shards. Aim for a mix of sizes for a realistic terrazzo look, keeping most pieces under 5mm.
Clean Color Tip
Wipe your hands with a baby wipe when switching between clay colors. Dark pigments like green can smudge onto the cream base and muddy the crisp terrazzo effect.
Step 2: Forming the Dish Base
-
Condition the base clay:
Take a large block of your white or cream clay and knead it thoroughly until soft. I find mixing a tiny dot of translucent clay helps mimic stone texture better. -
Roll the slab:
Roll the base clay out into a thick slab, approximately 1/4 inch thick. Make sure it’s wide enough to fit your circle cutter. -
Apply the chips:
Scatter your chopped colored chips onto the surface of the white slab. Spread them out randomly, leaving some white space between pieces. -
Embed the texture:
Gently roll over the slab again with your acrylic roller. Apply firm pressure to press the colored chips flat into the white base until the surface is completely smooth and level. -
Cut the circles:
Press your circle cutter into the patterned slab to cut out the base of your dish. If you have enough excess clay, cut a long strip about 1/2 inch wide to serve as the rim.
Step 3: Assembling and Finishing
-
Attach the rim:
Take the long strip of clay and carefully wrap it around the edge of your circle base, sitting it on top of the outer edge like a wall. -
Blend the seams:
Using a modeling tool or your finger, blend the clay on the inside and outside seams where the rim meets the base ensuring a seamless transition. -
Shape the rim:
Smooth the top edge of the rim with your finger to round it off slightly, removing any sharp angles. -
Embed side chips:
If the rim looks too plain after blending, press a few extra colored chips into the side walls and roll gently to flatten them in. -
Final Bake:
Place your assembled dish on the parchment-lined baking sheet. Bake for the full duration and temperature recommended by the clay manufacturer (usually around 30 minutes at 275°F/130°C). -
Cool down:
Allow the dish to cool completely in the oven with the door cracked open to prevent cracking from thermal shock. -
Sanding:
Once fully cool, wet sand the dish under running water using fine-grit sandpaper. This reveals the crisp edges of the terrazzo chips and creates a silky smooth stone-like finish. -
Sealing:
Apply a thin coat of matte varnish to protect the surface from oils and dust, giving it a professional finished look.
Level Up: Gold Leaf
For a luxe touch, press small flakes of gold leaf into the clay alongside the colored chips before the final rolling step to add metallic sparkle.
Now you have a stunning, bespoke vessel ready to show off your jewelry collection


What Really Happens Inside the Kiln
Learn how time and temperature work together inside the kiln to transform clay into durable ceramic.
Botanical Leaf-Imprint Trinket Dish
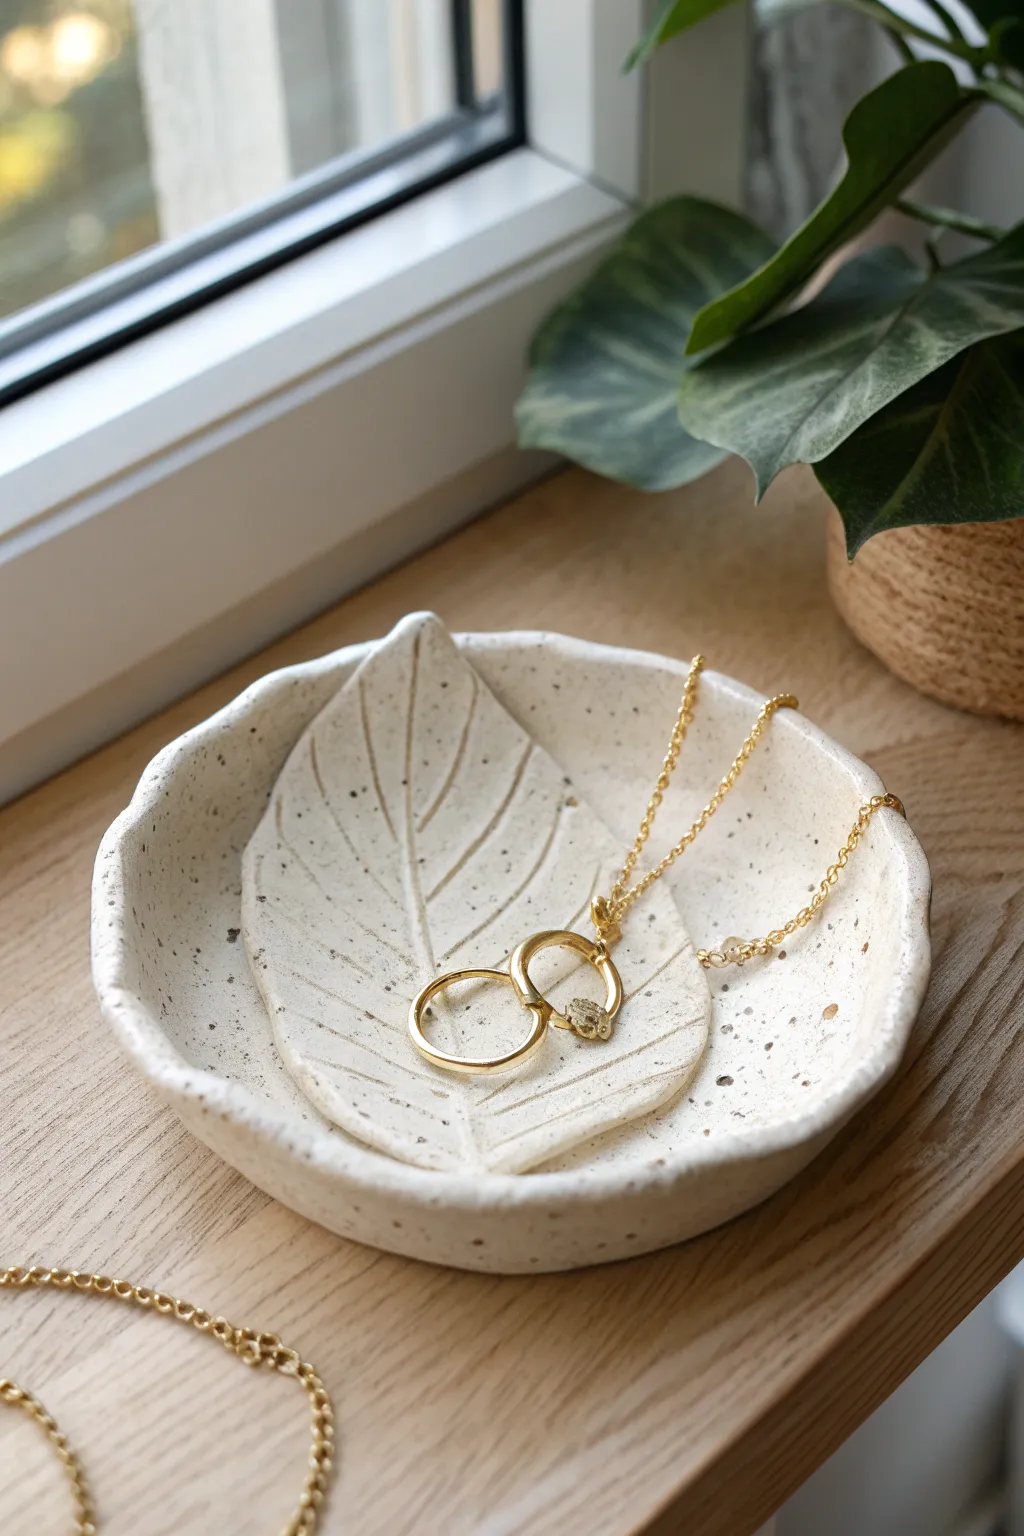
Capture the delicate veins of nature in this minimalist trinket dish, featuring a subtle leaf relief set against stone-effect clay. The speckled finish gives it a professional, ceramic look using accessible air-dry or polymer clay.
How-To Guide
Materials
- White clay (polymer clay with granite effect or air-dry clay)
- Faux granite speckle additive (e.g., black pepper or dried coffee grounds if using plain clay)
- Fresh leaf with prominent veins (like a hydrangea or hosta leaf)
- Rolling pin or smooth glass jar
- Sharp craft knife or scalpel
- Small bowl for shaping (mold)
- Fine grit sandpaper
- Clear matte varnish or sealant
- Small paintbrush
Step 1: Preparation and Rolling
-
Prepare the Clay:
Begin by conditioning your clay. If you are using plain white clay and want the speckled look shown in the image, knead in a pinch of coarse black pepper or dried coffee grounds until evenly distributed. -
Initial flattening:
Place the ball of clay on a smooth, clean surface. Flatten it slightly with the palm of your hand to create a thick disc. -
Roll to thickness:
Use your rolling pin to roll the clay out evenly. Aim for a thickness of about 1/4 inch (6mm) to ensure the dish is sturdy enough to hold the imprint without cracking. -
Check for bubbles:
Examine the surface for any trapped air bubbles. If you find one, gently pierce it with a needle and smooth over the area with your finger.
Step 2: Creating the Leaf Impression
-
Select and position leaf:
Choose a fresh leaf with a strong vein structure on the back. Place the leaf vein-side down onto the center of your rolled clay slab. -
Embed the leaf:
Gently roll over the leaf with the rolling pin. Apply firm, even pressure to push the veins into the clay, but be careful not to make the clay too thin. -
Check the impression:
Carefully lift one edge of the leaf to peek at the impression. If it’s too faint, lay it back down and roll again with slightly more pressure. -
Remove the leaf:
Slowly peel the leaf away from the clay using the stem as a handle. Do this slowly to ensure you don’t tear the clay surface.
Pro Tip: Release Agent
Before rolling over your leaf, lightly dust it with cornstarch or baby powder. This prevents the leaf from sticking to the clay and ruining the fine details when you peel it off.
Step 3: Cutting and Shaping
-
Cut the leaf shape:
Using a sharp craft knife or scalpel, carefully cut around the outline of the leaf impression. Leave a small border of smooth clay around the vein pattern if you prefer a wider dish. -
Prepare the outer bowl:
To recreate the specific double-layered look in the photo, roll a second, larger circle of clay. This will form the main bowl that holds the leaf shape. -
Form the organic rim:
Hand-shape the rim of the larger circle to be slightly uneven and wavy, giving it that handmade, organic pottery aesthetic. -
Join the pieces:
Score the back of your leaf shape and the center of the bowl shape. Add a dab of water (for air-dry) or liquid clay (for polymer) and press the leaf shape firmly into the center of the bowl. -
Shape the curvature:
Lift the entire assembled piece and drape it gently inside a small bowl. This will support the sides as they curve upward while drying.
Level Up: Gold Accent
After the sealant dries, use a fine detail brush and gold liquid leaf paint to carefully trace the rim of the dish or the main vein of the leaf for a luxurious, gilded edge.
Step 4: Finishing Touches
-
Drying or baking:
If using air-dry clay, let it sit in a cool, dry place for 24-48 hours. I find flipping it halfway through helps the bottom dry evenly. If using polymer clay, bake according to the package instructions. -
Sand the edges:
Once fully cured and hard, take fine-grit sandpaper and gently smooth any rough edges on the rim to give it a refined finish. -
Dust and clean:
Wipe the dish down with a very slightly damp cloth to remove any sanding dust before sealing. -
Seal the dish:
Apply a thin coat of clear matte varnish to protect the clay from moisture and oils from your jewelry. Let it dry completely.
Now you have a stunning, nature-inspired dish ready to cradle your favorite rings and necklaces
Flower Petal Trinket Dish
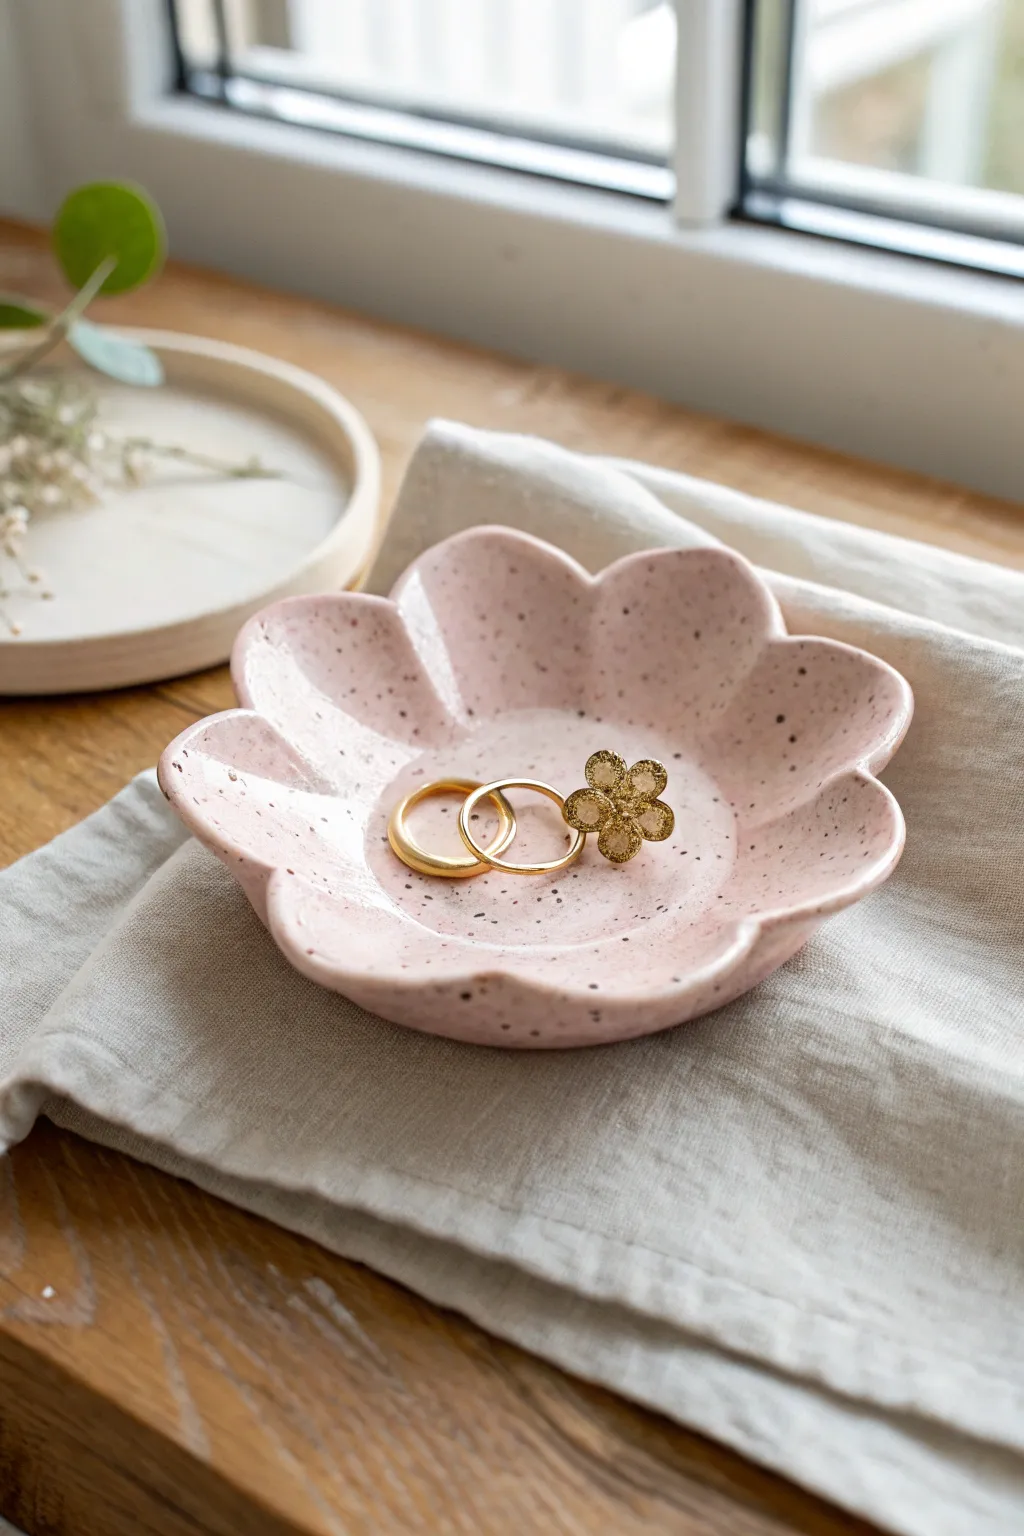
This charming, flower-shaped dish features a soft pink glaze speckled with dark clay flecks, making it a perfect spot to rest your favorite jewelry. With its gently upturned petals and organic handmade feel, this project adds a touch of blooming elegance to any bedside table.
Step-by-Step Tutorial
Materials
- White air-dry clay or polymer clay
- Rolling pin
- Flower-shaped cookie cutter (large, approx. 4-5 inches)
- Small bowl or curved surface (for drying)
- Sandpaper (fine grit)
- Acrylic paint (soft pink)
- Acrylic paint (dark brown or black)
- Old toothbrush (for splattering)
- Gloss varnish or clear sealant
- Paintbrushes
- Water cup
Step 1: Shaping the Flower
-
Prepare the Clay:
Begin by conditioning your clay. If using polymer clay, knead it until soft and pliable. If using air-dry clay, take a clump roughly the size of a tennis ball and work it briefly to remove large air bubbles. -
Roll it Out:
Use your rolling pin to flatten the clay into an even slab. Aim for a thickness of about 1/4 inch (6mm). You want it substantial enough to be sturdy, but delicate enough to look like a flower. -
Cut the Shape:
Press your large flower-shaped cookie cutter firmly into the rolled clay. If you don’t have a cutter, you can sketch a scalloped flower shape on paper, cut it out, place it on the clay, and trace around it with a craft knife. -
Smooth the Edges:
Carefully remove the excess clay. There may be rough edges where the cutter lifted the clay. Dip your finger in a little water (for air-dry clay) or baby oil (for polymer) and gently run it along the rim of the petals to round them off. -
Form the Curve:
Lift the clay flower and gently place it inside a small shallow bowl or on a curved drying form. I like to press the center down slightly while ensuring the petals curve upward naturally to create the dish shape.
Step 2: Drying and Refining
-
Let it Set:
Allow the clay to dry or bake according to the manufacturer’s instructions. For air-dry clay, this usually takes 24-48 hours; for polymer clay, bake at the recommended temperature. -
Check for Imperfections:
Once fully cured and cooled, inspect the dish. Use fine-grit sandpaper to buff away any remaining sharp edges or fingerprints, focusing on the rim of the petals for a professional finish. -
Clean the Surface:
Wipe the dish down with a slightly damp cloth or paper towel to remove any sanding dust before you begin painting.
Pro Tip: Gravity Assist
To prevent the petals from curling too much or flopping over while drying, place a small piece of crumpled plastic wrap under any petals that need extra support.
Step 3: Decoration and Finishing
-
Apply the Base Color:
Paint the entire dish, top and bottom, with your soft pink acrylic paint. You may need two to three thin coats to get full, opaque coverage. Let each coat dry completely before adding the next. -
Prepare the Speckle:
Dilute a small mount of dark brown or black acrylic paint with water. You want a very fluid consistency, almost like ink, so it flies easily off a brush bristles. -
Create the Speckled Effect:
Dip an old toothbrush into the watered-down dark paint. Hold the brush over the dish and run your thumb across the bristles to flick tiny droplets onto the pink surface. Test on a scrap paper first to control the droplet size. -
Dry the Details:
Allow the speckles to dry completely. Since the paint was watered down, this might take a little longer than the base coat. -
Seal the Dish:
Apply a coat of high-gloss varnish or clear sealant. This mimics the look of glazed ceramic shown in the photo and protects the paint from chipping. -
Final Coat:
For extra durability and shine, add a second coat of varnish once the first is dry. This gives it that wet, glossy look characteristic of fired pottery.
Troubleshooting: Cracks
If tiny cracks appear in air-dry clay while drying, mix a small amount of fresh clay with water to make a paste and fill the cracks, then sand smooth once dry.
Now you have a delicate, custom-made vessel ready to hold your treasured rings and trinkets

TRACK YOUR CERAMIC JOURNEY
Capture glaze tests, firing details, and creative progress—all in one simple printable. Make your projects easier to repeat and improve.
Scallop Shell Trinket Dish
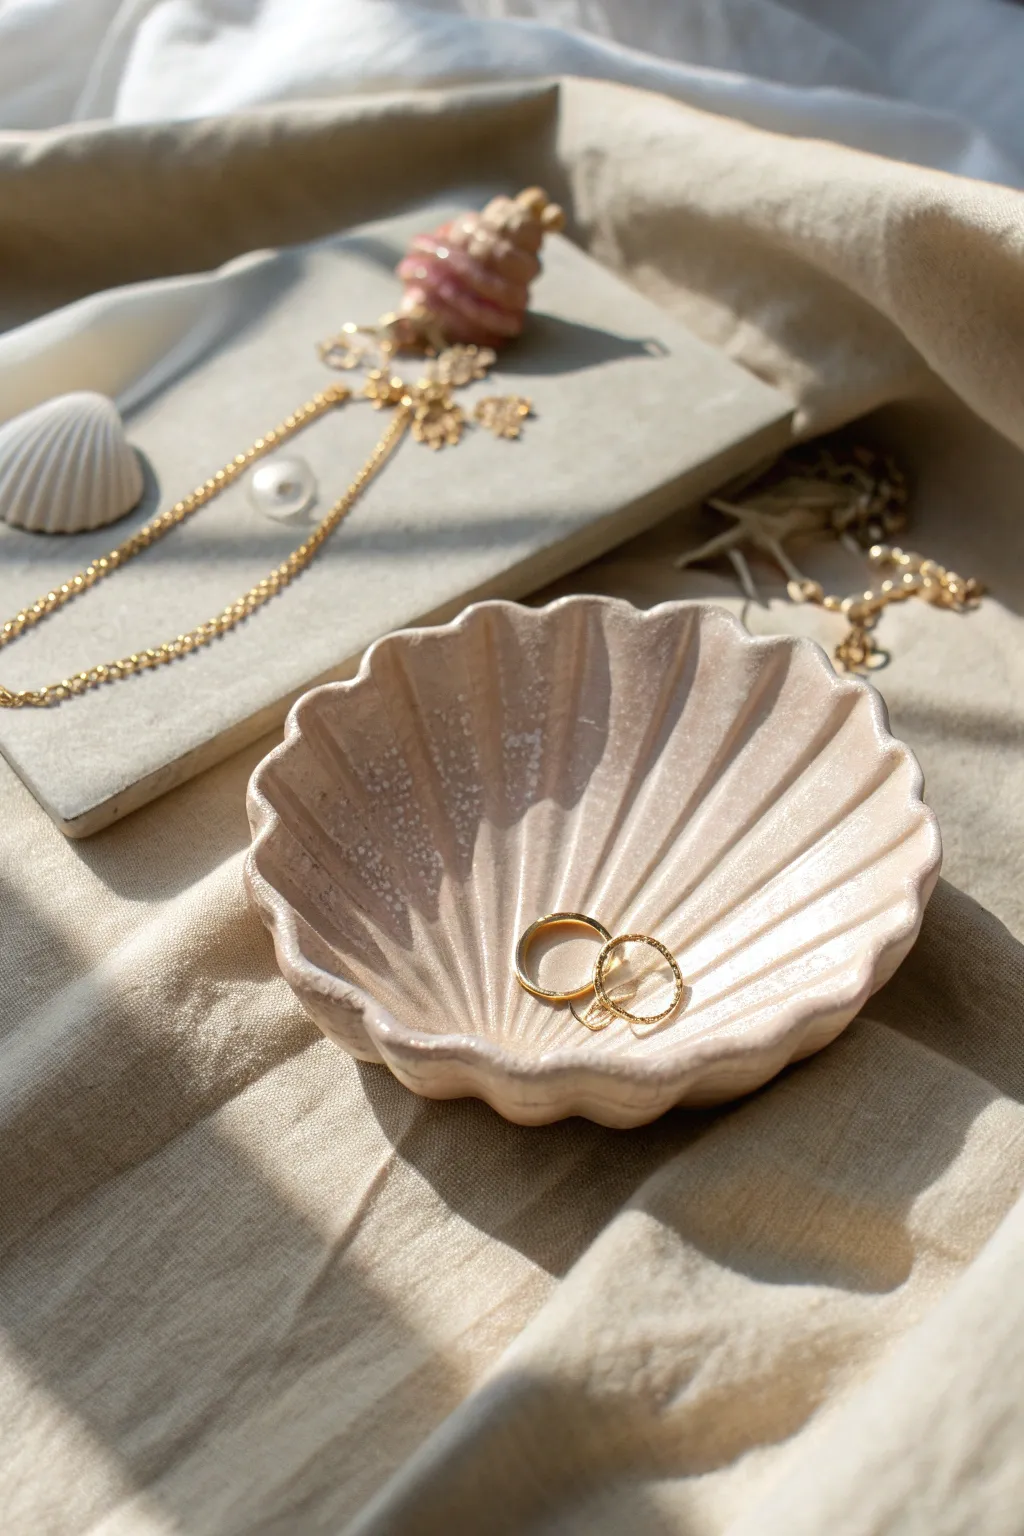
Capture the delicate beauty of the ocean with this handmade scallop shell trinket dish. Its soft ridges and glossy, iridescent finish make it the perfect resting place for your favorite gold rings or delicate chains.
How-To Guide
Materials
- White air-dry clay or polymer clay
- Rolling pin or acrylic roller
- Large natural scallop shell (as a mold) or a printed template
- Craft knife or clay needle tool
- Small bowl of water
- Sponge or smoothing tool
- Fine-grit sandpaper
- Acrylic paint (pale blush pink and white)
- Glossy varnish or glaze
- Soft paintbrush
- Old toothbrush (optional for texture)
- Small curved bowl (for drying form)
Step 1: Shaping the Shell
-
Condition the clay:
Begin by taking a handful of clay and kneading it thoroughly in your hands until it becomes warm, soft, and pliable. This prevents cracks later on. -
Roll it out:
Place the clay on a clean, flat surface and use your rolling pin to create a smooth slab about 1/4 inch thick. Aim for an even thickness throughout. -
Create the outline:
If you have a large real scallop shell, press it gently into the clay to make an impression. Alternatively, place a paper template of a scallop shell on top of the slab. -
Cut the shape:
Using your craft knife or needle tool, carefully trace around the shell impression or template. Remove the excess clay and set it aside for future projects. -
Refine the edges:
Dip your finger or a small sponge into a little water and run it along the cut edges of the clay to smooth out any sharpness or roughness. -
Add the ridges:
To create that classic scallop texture, use a modeling tool or the back of a paintbrush to press linear indentations radiating from the bottom narrowed hinge point up to the fluted edges. -
Deepen the flutes:
At the top curved edge of the shell, gently pinch the clay between your fingers at each ridge point to emphasize the wavy, fluted shape.
Smooth Moves
Use a little bit of baby oil on your fingertips when smoothing polymer clay. It helps erase fingerprints much better than water.
Step 2: Drying and Refining
-
Form the curve:
Carefully lift your clay shell and place it inside a small curved bowl. This will ensure it dries in a cupped shape suitable for holding jewelry rather than drying flat. -
Let it dry:
Allow the clay to dry completely according to the package instructions. For air-dry clay, this usually takes 24-48 hours. I stick it in a sunny spot to help it along. -
Sand the surface:
Once fully cured and hard, remove the dish from the drying bowl. Use fine-grit sandpaper to gently buff away any remaining bumps or rough patches on the rim. -
Clean off dust:
Wipe the entire piece down with a slightly damp cloth or sponge to remove all sanding dust before painting.
Step 3: Painting and Glazing
-
Mix the base color:
Mix a small amount of blush pink acrylic paint with plenty of white to create a very pale, milky pink tone similar to the inside of a seashell. -
Apply the first coat:
Paint the entire interior of the dish with your pale pink mixture. Use long, sweeping strokes that follow the direction of the ridges. -
Add subtle texture:
To mimic the speckled look of the original, dip an old toothbrush into slightly watered-down white paint and lightly flick it over the dish for a gentle splattered effect. -
Seal with gloss:
Once the paint is completely dry, apply a thick, even coat of high-gloss varnish or glaze. This gives the dish that wet, ceramic-like sheen. -
Protect the underside:
Don’t forget to flip the dish over and varnish the bottom as well, sealing the clay completely against moisture.
Gilded Edges
For a luxe upgrade, paint just the very rim of the scallop shell with liquid gold leaf or metallic gold paint after the glaze dries.
Place your new shell dish on your vanity to catch the light and your favorite ring
Oyster-Style Trinket Dish With Ruffled Edges
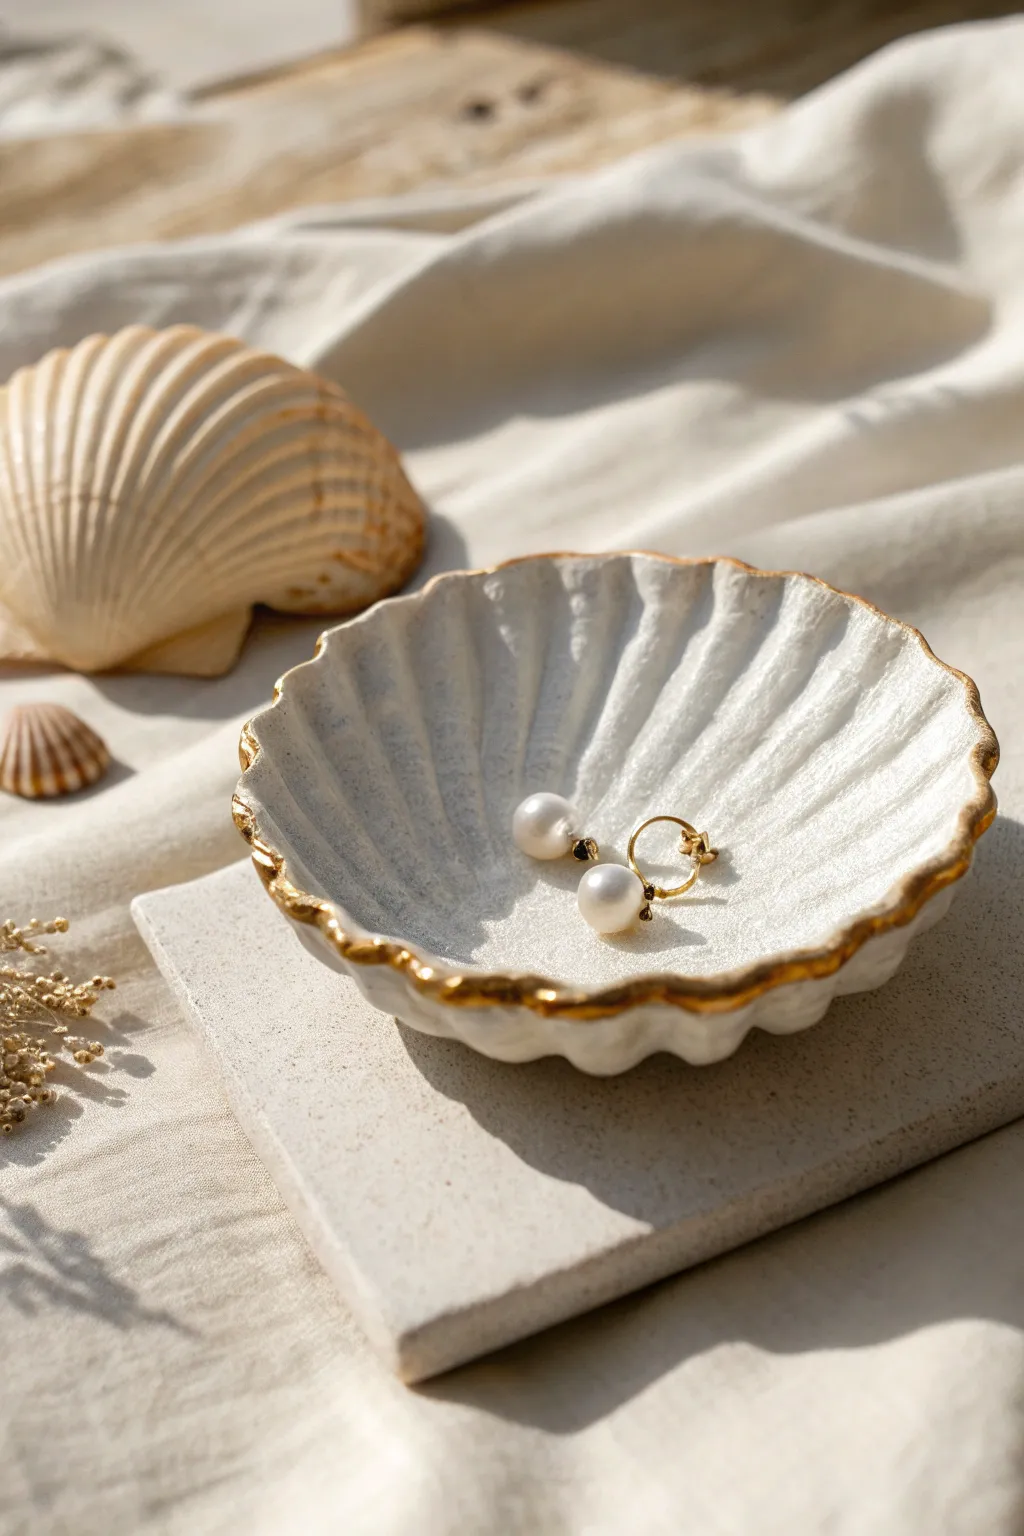
Capture the elegance of the seaside with this handmade clay dish, molded to look like a delicate scallop shell. With its textured ridges, organic ruffled edge, and a luxe touch of gold leaf paint, it is the perfect resting place for your favorite pearl earrings.
Step-by-Step
Materials
- Air-dry clay (white or porcelain finish)
- Real scallop shell (for texture) or a clay sculpting tool
- Rolling pin
- Parchment paper or canvas mat
- Craft knife or needle tool
- Small bowl or curved form (for drying)
- Fine-grit sandpaper (220-400 grit)
- White acrylic paint (glossy or pearlescent)
- Liquid gold leaf or metallic gold enamel paint
- Fine detail paintbrush
- Soft glazing brush
- Gloss varnish or sealant
Step 1: Shaping the Clay
-
Prepare your workspace:
Lay down a piece of parchment paper or a canvas mat to prevent sticking. Take a handful of air-dry clay, about the size of a lemon, and knead it until it’s soft and conditioned. -
Roll the slab:
Roll out the clay evenly until it is approximately ¼ inch thick. Try to keep the thickness consistent so it dries without cracking. -
Create the rough shape:
Using a needle tool or craft knife, cut a circle or oval shape from your slab. It doesn’t need to be perfect, as organic shapes often look more natural. -
Add the scallop texture:
If you have a large, clean scallop shell, press it firmly into the clay to imprint the ridges. If shaping by hand, use a modeling tool to press lines radiating from the bottom center point out toward the edges. -
Form the ridges:
I like to go back over the imprinted lines with a damp finger or a round tool to soften them, ensuring the ridges look like natural shell fluting rather than sharp cuts. -
Ruffle the edges:
Gently pinch and pull the outer rim of the clay between your thumb and forefinger. Create small waves to mimic the uneven, ruffled edge of a real shell. -
Curve the dish:
Carefully lift your clay circle and place it inside a small bowl or onto a curved form. This creates the concave ‘dish’ shape as it dries. -
Dry thoroughly:
Allow the clay to dry completely. This usually takes 24-48 hours depending on humidity. Don’t rush this step, or the clay will be cool to the touch if it’s still wet inside.
Step 2: Finishing and Gilding
-
Sand the surface:
Once fully dry, use fine-grit sandpaper to gently smooth any rough spots on the rim or underside. Wipe away the dust with a slightly damp cloth. -
Apply base coat:
Paint the entire dish with a glossy or pearlescent white acrylic paint. This gives it that ceramic look and seals the raw clay slightly. -
Add a second coat:
Let the first layer dry, then apply a second coat of white paint to ensure opaque, solid coverage. Let this dry completely. -
Prepare the gold:
Shake your liquid gold leaf or metallic enamel paint well. Pour a tiny amount onto a palette or piece of scrap paper. -
Paint the rim:
Using a fine detail brush, carefully paint the very edge of the ruffled rim. Let the brush naturally follow the bumps and waves you created earlier. -
Add organic details:
Allow the gold line to vary slightly in thickness, dipping just a tiny bit into the inner ridges occasionally to enhance the natural, handmade feel. -
Seal the piece:
Once the gold is completely dry, apply a high-gloss varnish over the entire piece (avoiding the gold if your specific gold medium reacts to varnish—check the bottle first). This gives it a glazed ceramic shine.
Smoother Ridges
Dip your finger in water while sculpting the ridges. The water acts as a lubricant, letting you smooth out cracks instantly for a polished, porcelain-like finish.
Jewelry Stand Base
Before drying, create a small textured square of clay to act as a plinth. Once both pieces are dry and painted, glue the shell on top for an elevated display stand.
Now you have a stunning, seaside-inspired catchall ready to hold your treasures
Mushroom Motif Trinket Dish With Raised Details
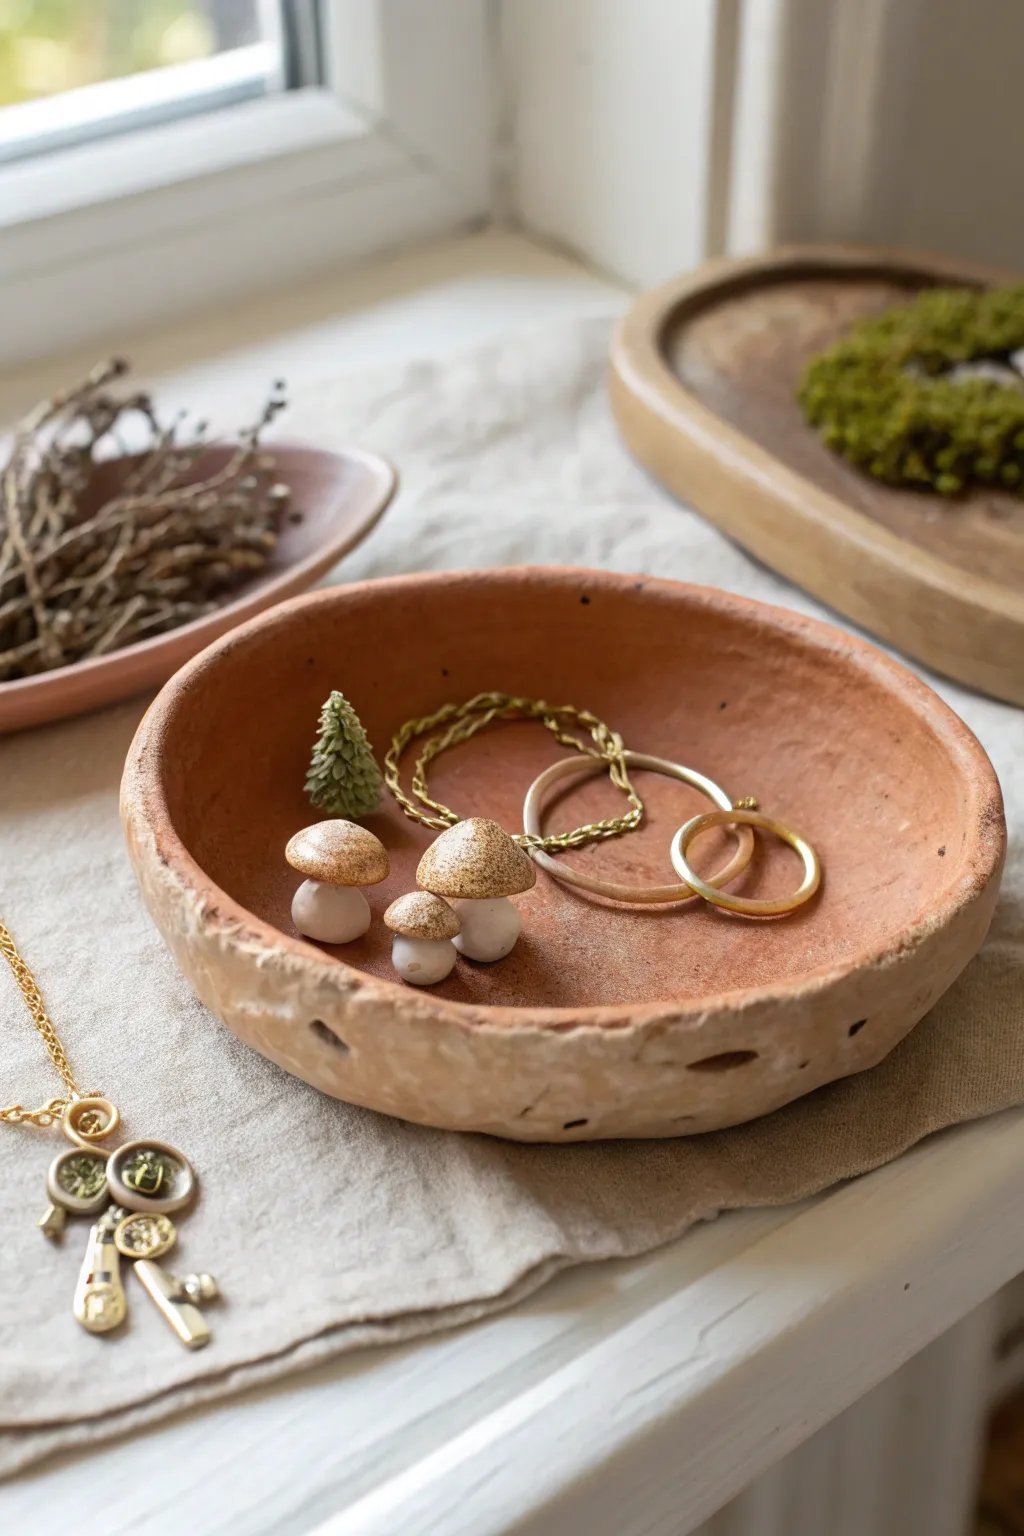
Bring a touch of the woodlands indoors with this rustic, terracotta-toned clay dish featuring adorable handmade mushrooms. The textured, raw edge and miniature forest details make it the perfect resting spot for your delicate gold jewelry or daily keepsakes.
Detailed Instructions
Materials
- Terracotta-colored air-dry clay (or polymer clay)
- White or cream air-dry clay
- Rolling pin
- Small bowl (approx. 5-6 inches diameter) to use as a slump mold
- Clear acrylic rolling pin or glass jar
- Modeling tools (or toothpicks/skewers)
- Sandpaper (fine grit)
- Brown acrylic paint (burnt umber)
- Green acrylic paint (olive or moss tone)
- Matte sealant or varnish
- Small stiff paintbrush
- Old toothbrush (for texturing)
Step 1: Shaping the Dish
-
Prepare the base:
Begin by taking a large handful of the terracotta-colored clay. Knead it in your hands until it is pliable and warm to prevent cracking during the rolling process. -
Roll the slab:
Roll the clay out on a smooth surface until it’s about ¼ inch thick. A consistent thickness ensures even drying. -
Form the circle:
Place your bowl upside down on the clay slab and trace around it with a knife to cut out a perfect circle. Remove the excess clay. -
Initial shaping:
Lift your clay circle and gently press it into the *inside* of your bowl mold. Because we want a rustic look, don’t worry about smoothing it perfectly against the sides yet. -
Create the rustic rim:
Use your fingers to pinch and slightly fold the top edge of the clay inward. Instead of smoothing it, leave the fingerprints and slight ridges to mimic the organic feel seen in the photo. -
Add rim details:
Using the end of a paintbrush or a small modeling tool, poke small, shallow holes horizontally around the outside of the thickened rim you just created. Space them randomly for a natural look. -
Texture the surface:
Take an old toothbrush or a stiff brush and tap it gently all over the inside and outside of the dish. This creates a pitted, stone-like texture rather than a smooth, manufactured finish.
Step 2: Sculpting the Forest Elements
-
Form mushroom stems:
Take tiny pinched amounts of white clay and roll them into short, squat cylinder shapes. You’ll need three sizes—one small, one medium, and one slightly larger. Press these gently onto the floor of the dish, slightly off-center. -
Shape the mushroom caps:
Using the terracotta clay again, roll three small balls. Flatten them slightly into domes and press them firmly onto the white stems. I find a little dab of water helps them adhere securely. -
Create the mini tree:
Roll a small cone shape from the white clay (we will paint it green later). Using fine scissors or a needle tool, snip into the clay starting from the bottom and working up to create the texture of pine boughs. -
Attach the tree:
Place the textured pine tree next to the mushroom cluster. Press the base firmly into the dish floor to bond the clays together. -
Let it dry:
Allow the entire piece to dry completely in the mold for at least 24-48 hours. Remove it from the mold halfway through if possible to let the bottom breathe.
Cracks happen!
If small cracks appear as the clay dries, don’t panic. Mix a tiny bit of fresh clay with water to make a paste (slip) and fill in the cracks, then smooth over with a damp finger.
Step 3: Painting and Finishing
-
Sand edges:
Once fully dry, lightly sand any extremely sharp peaks on the rim, but leave the majority of the texture intact. -
Paint the tree:
Mix a muted olive green paint and carefully brush it onto the pine tree. Dry-brushing slightly lighter green on the tips adds lovely dimension. -
Detail the mushroom caps:
Dilute some brown acrylic paint with water to create a wash. Dab this irregularly over the terracotta mushroom caps to create a speckled, toasted look. -
Mist the white stems:
If the white stems look too stark, dirty them slightly with a very watered-down wash of the brown paint, wiping most of it off immediately. -
Seal the piece:
Apply a coat of matte varnish over the entire dish. This protects the clay from moisture and seals the paint without adding an unnatural glossy shine.
Add some sparkle
For a magical touch, paint the very edges of the mushroom caps with metallic gold paint. It catches the light beautifully when hold your rings.
Place this charming dish on your bedside table or vanity to keep your treasures safe in their own little forest
Pressed-Floral Look Trinket Dish With Paper Decoupage
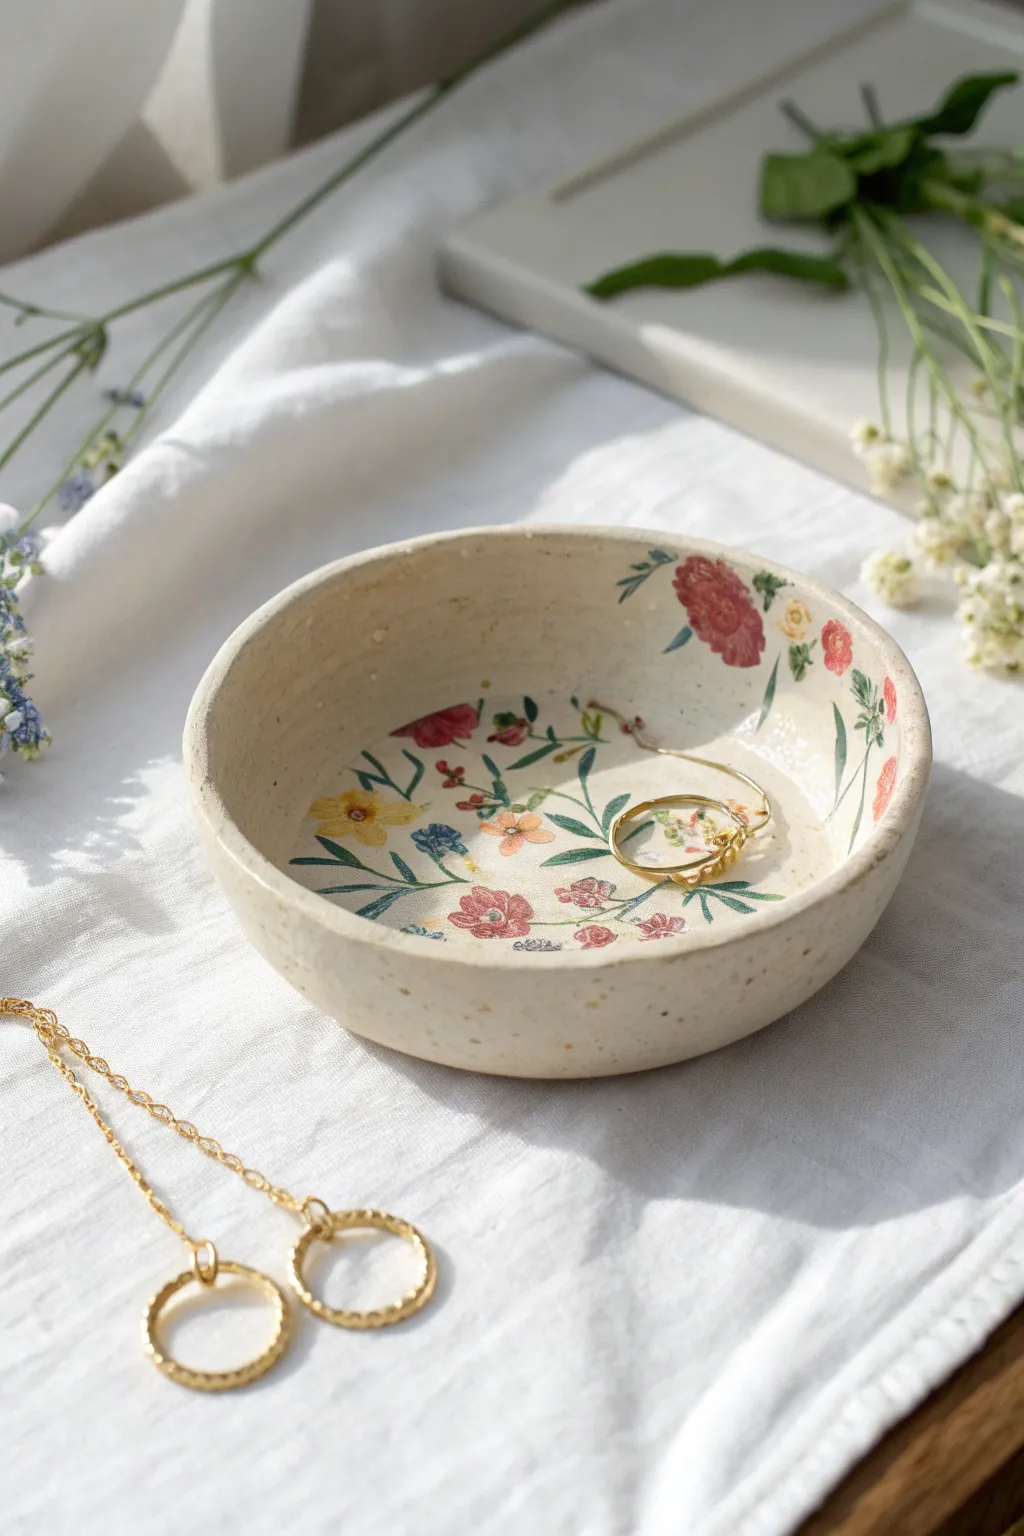
Bring the delicate beauty of a cottage garden indoors with this lovely trinket dish project. By combining simple air-dry clay shaping with the art of paper decoupage, you can achieve a sophisticated, painted-on floral look without needing a single paintbrush.
Step-by-Step Tutorial
Materials
- Air-dry clay (white or stone effect)
- Rolling pin
- Small bowl (to use as a mold)
- Sandpaper (fine grit)
- Floral napkins or tissue paper with small motifs
- Decoupage glue (like Mod Podge)
- Small scissors
- Soft bristle brush
- Clear matte varnish or sealant
- Water and sponge
- Plastic wrap
Step 1: Shaping the Dish
-
Prepare the clay:
Begin with a ball of air-dry clay about the size of a tennis ball. Knead it briefly to ensure it is pliable and free of air bubbles. -
Roll it out:
On a clean, flat surface, roll the clay out to an even thickness of approximately 1/4 inch. Lift and rotate the clay occasionally to prevent sticking. -
Cut the circle:
Place a round bowl or circular template upside down on your rolled clay. Use a craft knife or needle tool to trace and cut out a perfect circle. -
Smooth the edges:
Dip your finger in a little water and run it along the cut edge of the circle to smooth out any harsh angles or roughness. -
Form the shape:
Take your small bowl mold and cover the exterior with plastic wrap to prevent sticking. Gently drape your clay circle over the bottom of the upside-down bowl. -
refine the form:
Press the clay gently against the bowl to shape it, being careful not to stretch it too thin. Allow the walls to curve naturally. -
Dry partially:
Let the clay sit on the mold for about 24 hours until it’s firm enough to hold its shape but not fully bone dry. -
Remove and fully dry:
Carefully pop the clay dish off the mold. Place it right-side up on a drying rack for another 24-48 hours to dry completely on the inside. -
Sand for perfection:
Once fully cured, use fine-grit sandpaper to smooth the rim and any bumps on the interior surface. Wipe away dust with a slightly damp sponge.
Tear, Don’t Cut
For a softer, more painterly edge that blends seamlessly into the clay, gently tear the paper around the floral motifs instead of cutting them with scissors.
Step 2: Applying the Design
-
Prepare the motifs:
Identify the floral designs you want to use from your decorative napkins. Carefully cut around the flowers and leaves using small, sharp scissors. -
Separate the layers:
This is crucial: peel away the bottom white layers of the napkin pieces so you are left with only the single, ultra-thin printed top layer. -
Draft your layout:
Ideally, place the dry paper cutouts inside the bowl first to plan your arrangement without glue. Try scattering small blooms up the sides for an organic look. -
Apply base glue:
Using a soft brush, apply a thin, even layer of decoupage glue to a small section of the dish’s interior where your first flower will go. -
Place the motif:
Gently lay the thin paper cutout onto the wet glue. Start from the center of the paper and lightly tap it down. -
Smooth it out:
Dip your brush in a tiny bit more glue and gently brush over the top of the paper, working from the center outward to push out air bubbles and wrinkles. -
Repeat the process:
Continue gluing your floral pieces one by one. Overlapping stems and leaves slightly can create a lovely, dense garden effect in the center. -
Clean the edges:
If any glue has strayed onto the plain clay where there are no flowers, wipe it carefully with a damp cloth or cotton swab before it dries clear to avoid shiny spots. -
Seal the piece:
Once the decoupage layer is fully dry, apply a coat of clear matte varnish or sealer over the entire interior to protect your jewelry dish from moisture and wear.
Speckled Finish
Before sealing, flick a toothbrush dipped in diluted brown acrylic paint over the dish to create scattered speckles for a trendy ceramic pottery look.
This charming dish is now ready to hold your favorite rings and bring a touch of botanical joy to your dresser
Sticker-Style Illustration Trinket Dish
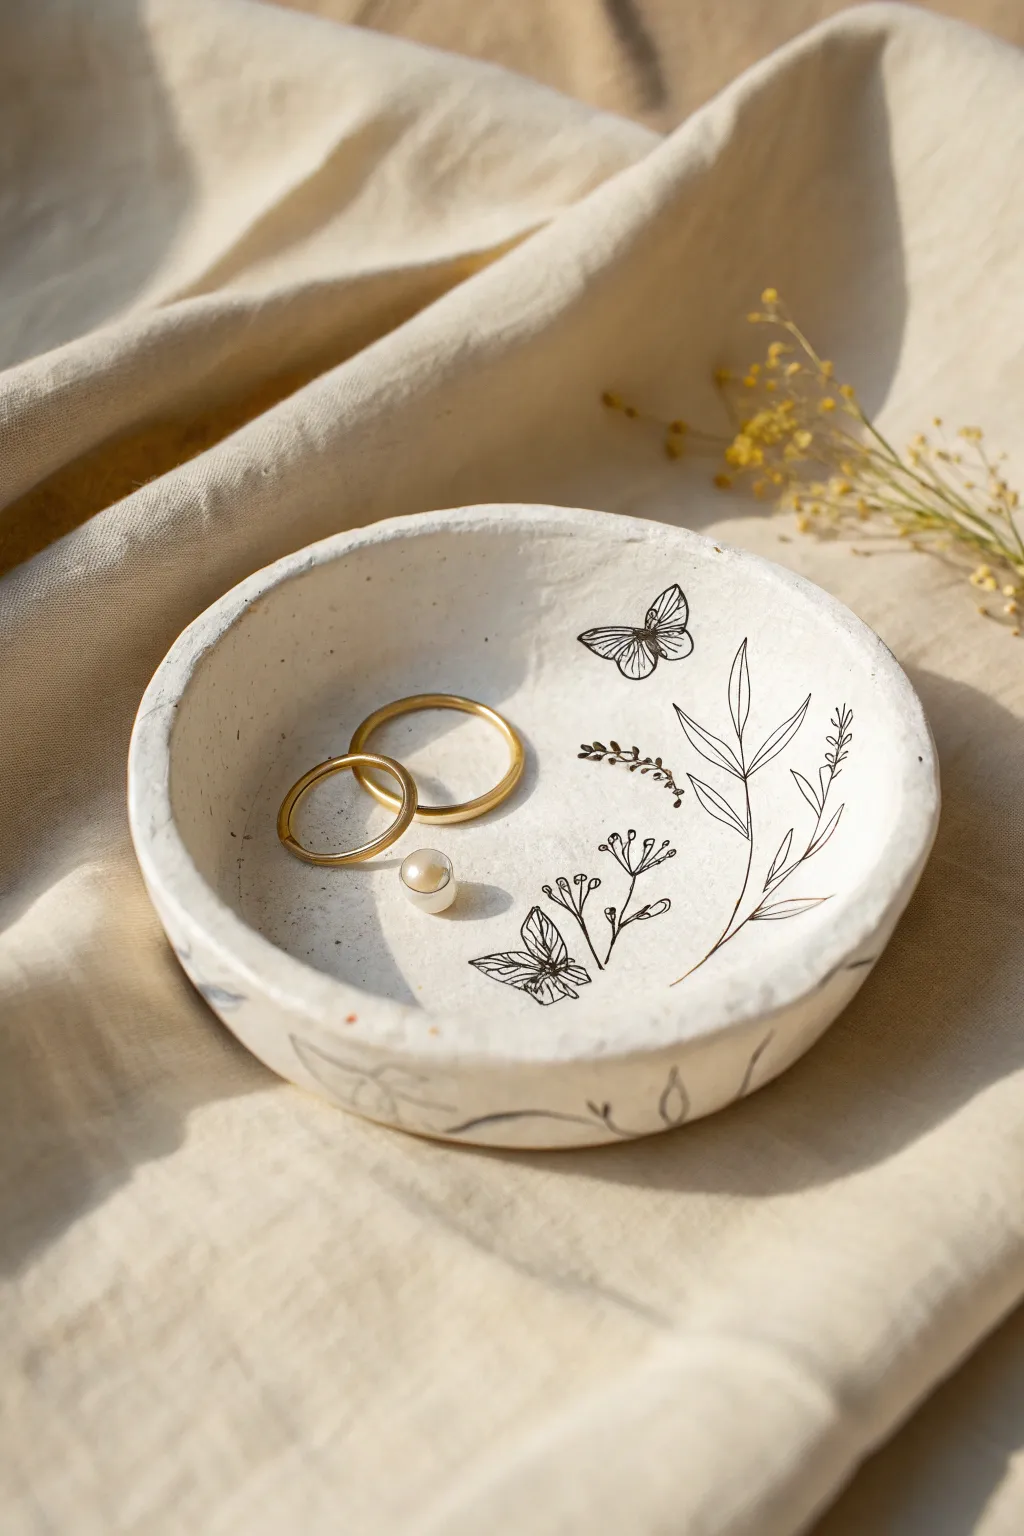
Capture the delicate beauty of nature with this charming trinket dish featuring crisp, sticker-style illustrations. The contrast between the organic, handmade clay surface and the fine black ink drawings creates a modern heirloom perfect for holding your favorite rings.
How-To Guide
Materials
- White air-dry clay (or polymer clay)
- Small rolling pin
- Round cookie cutter or bowl (approx. 4-5 inches diameter)
- Fine grit sandpaper
- Small bowl for molding
- Water and sponge
- Fine-tip black permanent marker or waterproof archival ink pen
- Clear matte varnish or sealant
- Pencil (optional)
Step 1: Shaping the Dish
-
Condition the clay:
Begin by taking a handful of white air-dry clay and kneading it in your hands until it becomes soft, pliable, and free of cracks. -
Roll it out:
Place the clay on a smooth surface or craft mat. Use your rolling pin to flatten it to an even thickness of about 1/4 inch. If you notice air bubbles, pierce them gently and smooth over. -
Cut the circle:
Position your round cookie cutter or an upside-down bowl over the clay and press down firmly to cut a clean circle. Remove the excess clay from around the edges. -
Create the form:
Gently lift your clay circle and drape it into a slightly larger bowl to give it a curved shape. Gently press it down so it takes the form of the bowl without thinning the clay too much. -
Smooth the edges:
Dip your finger or a small sponge into a little water and run it along the rim of the dish to smooth out any sharp cuts or roughness. I like to spend extra time here to get a professional finish. -
Dry completely:
Allow the clay to dry according to the package instructions. This usually takes 24-48 hours. Ensure it is bone dry and hard before moving to the next phase. -
Sand for smoothness:
Once fully dry, take fine-grit sandpaper and gently buff the surface of the dish. Focus on the rim and the interior bottom where you will be drawing to ensure a smooth canvas.
Ink Success
Test your pen on a scrap piece of dried clay first. Some markers might bleed into the porous surface, so use archival ink pens for crisp lines.
Step 2: Drawing the Illustrations
-
Plan your layout:
Before committing to ink, you can lightly sketch your placement with a pencil. Aim for an asymmetrical arrangement—perhaps a butterfly near the top right and some botanicals sweeping up from the bottom right. -
Start the main botanical:
Using your fine-tip black pen, draw a long, thin stem curving up the side of the dish. Add simplistic, pointed leaves extending from the stem in pairs. -
Add detail sprigs:
Draw smaller botanical elements, such as the tiny sprig with small buds or berries next to the main stem. Keep your lines confident and clean to mimic that ‘sticker’ aesthetic. -
Draw the main butterfly:
Near the upper rim, draw a butterfly in profile or with open wings. Start with the body, then add the wings, filling them with simple line details rather than heavy shading. -
Add secondary elements:
Fill in empty spaces with smaller motifs, like the second butterfly near the bottom or the wildflower sprig growing upwards. Balance is key, so leave some white space on the left side for your jewelry to rest. -
Extend to the rim:
Don’t forget the outside! Continue a few simple leaves or lines wrapping over the edge and onto the exterior of the dish for a cohesive look. -
Let the ink set:
Allow the ink to dry completely to prevent any smudging during the sealing process. An hour is usually sufficient.
Step 3: Finishing Touches
-
Apply sealant:
Using a soft brush, apply a thin coat of clear matte varnish over the entire dish. This protects the clay from moisture and prevents the ink from fading. -
Dry and cure:
Let the varnish dry fully. If you plan to use this for jewelry like rings or earrings, a second coat of varnish adds extra durability.
Add a Golden Touch
Paint the very rim of the dish with metallic gold liquid leaf or acrylic paint to frame your illustrations and add a hint of luxury.
Now you have a quiet, elegant resting place for your daily treasures
Heart-Shaped Trinket Dish With a Tiny Lip
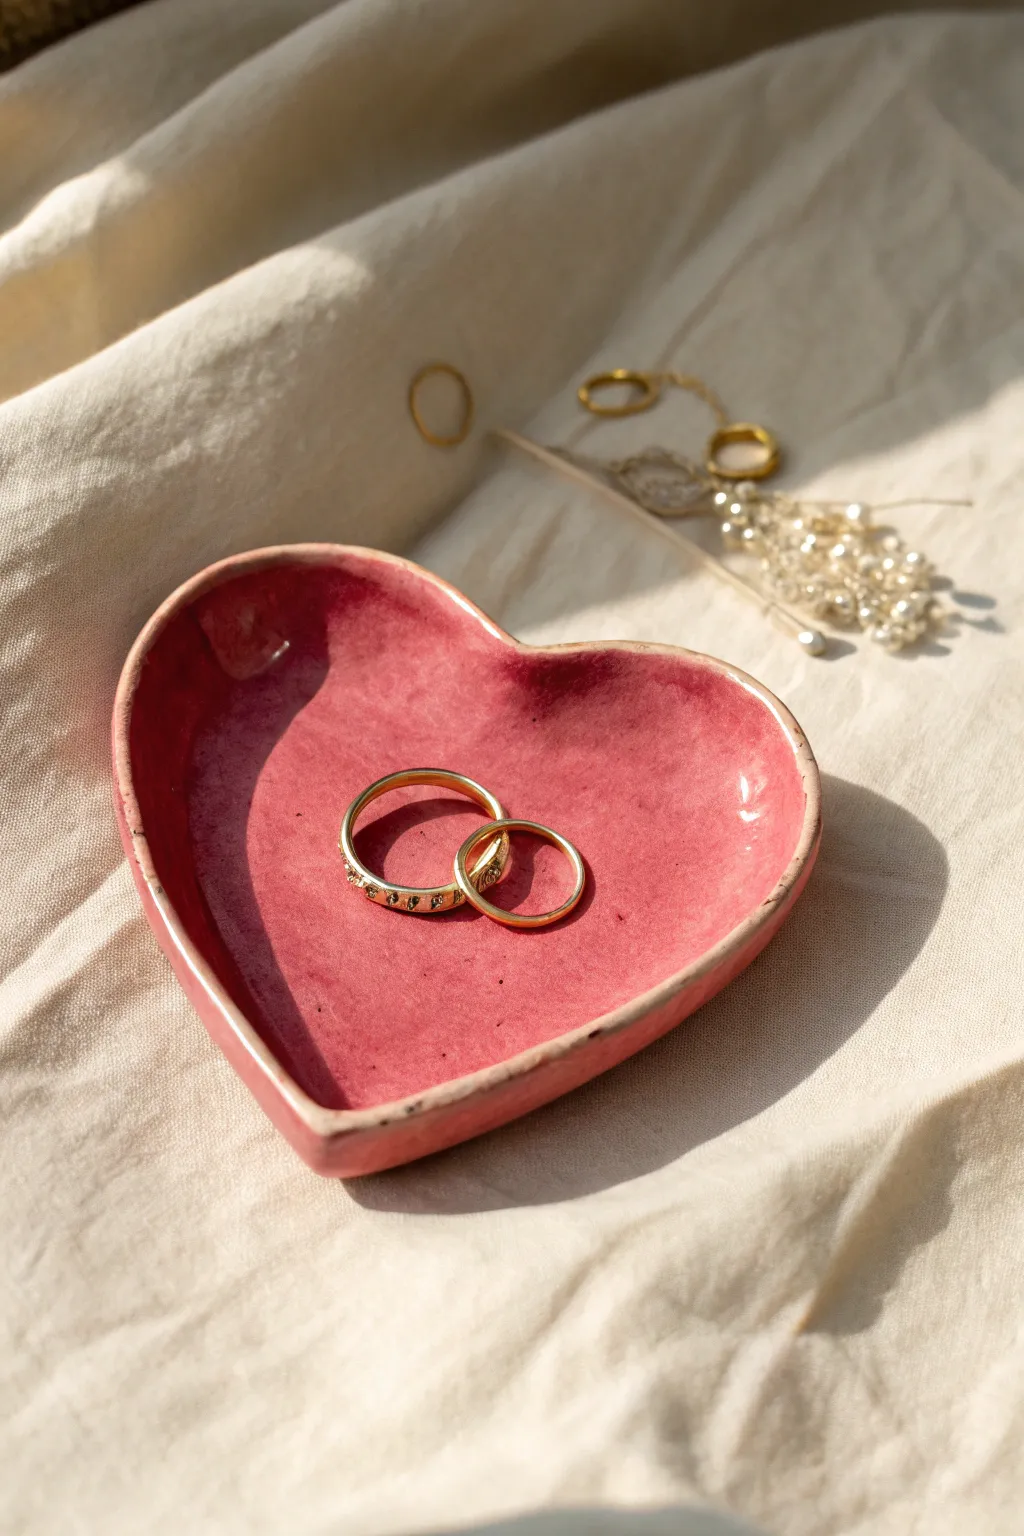
This charming, petite trinket dish captures attention with its rich, rose-pink glaze and organic, handmade silhouette. It features a slightly lifted, irregular rim and a glossy finish that beautifully mimics fired ceramic ware.
Step-by-Step Tutorial
Materials
- Air-dry clay (white)
- Rolling pin
- Heart-shaped cookie cutter (medium to large)
- Bowl of water
- Sponge or soft paintbrush
- Fine-grit sandpaper
- Acrylic paint (Deep rose or berry pink)
- Acrylic paint (Antique brown or dark bronze for the rim)
- High-gloss varnish or glaze medium
- Small flat synthetic brush
- Detail brush
Step 1: Shaping the Base
-
Condition the clay:
Begin by taking a handful of white air-dry clay. Knead it in your hands for a minute or two until it feels warm and pliable, eliminating any potential internal air bubbles. -
Roll out the slab:
Roll the clay out on a smooth, flat surface to a thickness of about 1/4 inch. Aim for a consistent thickness, but don’t worry if it’s perfectly uniform—a little variation adds character. -
Cut the shape:
Press your heart-shaped cookie cutter firmly into the clay slab. If you don’t have a cutter, you can sketch a heart lightly with a needle tool and cut it out manually with a craft knife. -
Smooth the edges:
Dip your finger in a little water and run it along the cut edge of the heart to soften the sharp angles left by the cutter. This makes the finished piece feel more finished and professional.
Rim Cracking?
If the clay cracks while you lift the rim, dip your finger in water and create a ‘slip’ (muddy paste) to fill and smooth the crack immediately before it dries.
Step 2: Forming and Refining
-
Lift the edges:
Gently pinch and lift the outer perimeter of the heart upwards to create a lip. I like to use my thumb on the inside and forefinger on the outside to curve the clay up rather than just folding it. -
Create the organic rim:
Don’t aim for a perfectly straight wall. Use your fingertips to gently undulate the rim height slightly, giving it that handmade, organic pottery feel visible in the photo. -
Smooth the interior:
Use a slightly damp sponge to wipe the inside surface of the dish. This erases fingerprints and ensures a smooth base for the glossy paint later. -
Dry thoroughly:
Place your dish in a safe, dry spot. Let it cure completely according to your clay package instructions—usually 24 to 48 hours depending on humidity. -
Sand imperfections:
Once fully dry and hard, lightly sand any rough spots on the rim or the back of the dish with fine-grit sandpaper. Wipe away all dust with a dry cloth.
Faux-Ceramic Texture
Instead of painting flat color, mix a tiny pinch of baking soda into your pink paint. It adds a subtle texture that mimics stone or earthenware clay.
Step 3: Painting and Glazing
-
Base coat color:
Mix a deep rose or berry pink acrylic paint. Apply the first coat to the entire top surface and rim. The color might look streaky at first, but subsequent layers will fix that. -
Build the color depth:
Apply a second and possibly third coat of pink, allowing drying time in between. To mimic the ceramic look, you can dab the wet paint slightly with a sponge to give it texture rather than smooth brushstrokes. -
Add the vintage rim:
Using a fine detail brush and your antique brown or dark bronze paint, carefully paint a very thin, slightly uneven line along the very top edge of the lip. -
Add speckling (optional):
If you want that speckled pottery look, dilute a tiny bit of brown paint and flick it sparingly onto the pink surface using an old toothbrush or stiff brush. -
Seal for shine:
Once the paint is bone dry, apply a generous coat of high-gloss varnish. This step is crucial as it transforms the matte paint into a finish that looks like kiln-fired glaze. -
Final cure:
Let the varnish cure completely in a dust-free environment for at least 24 hours before placing any jewelry inside.
Now you have a lovely spot to keep your favorite rings safe
Sun and Moon Trinket Dish Set
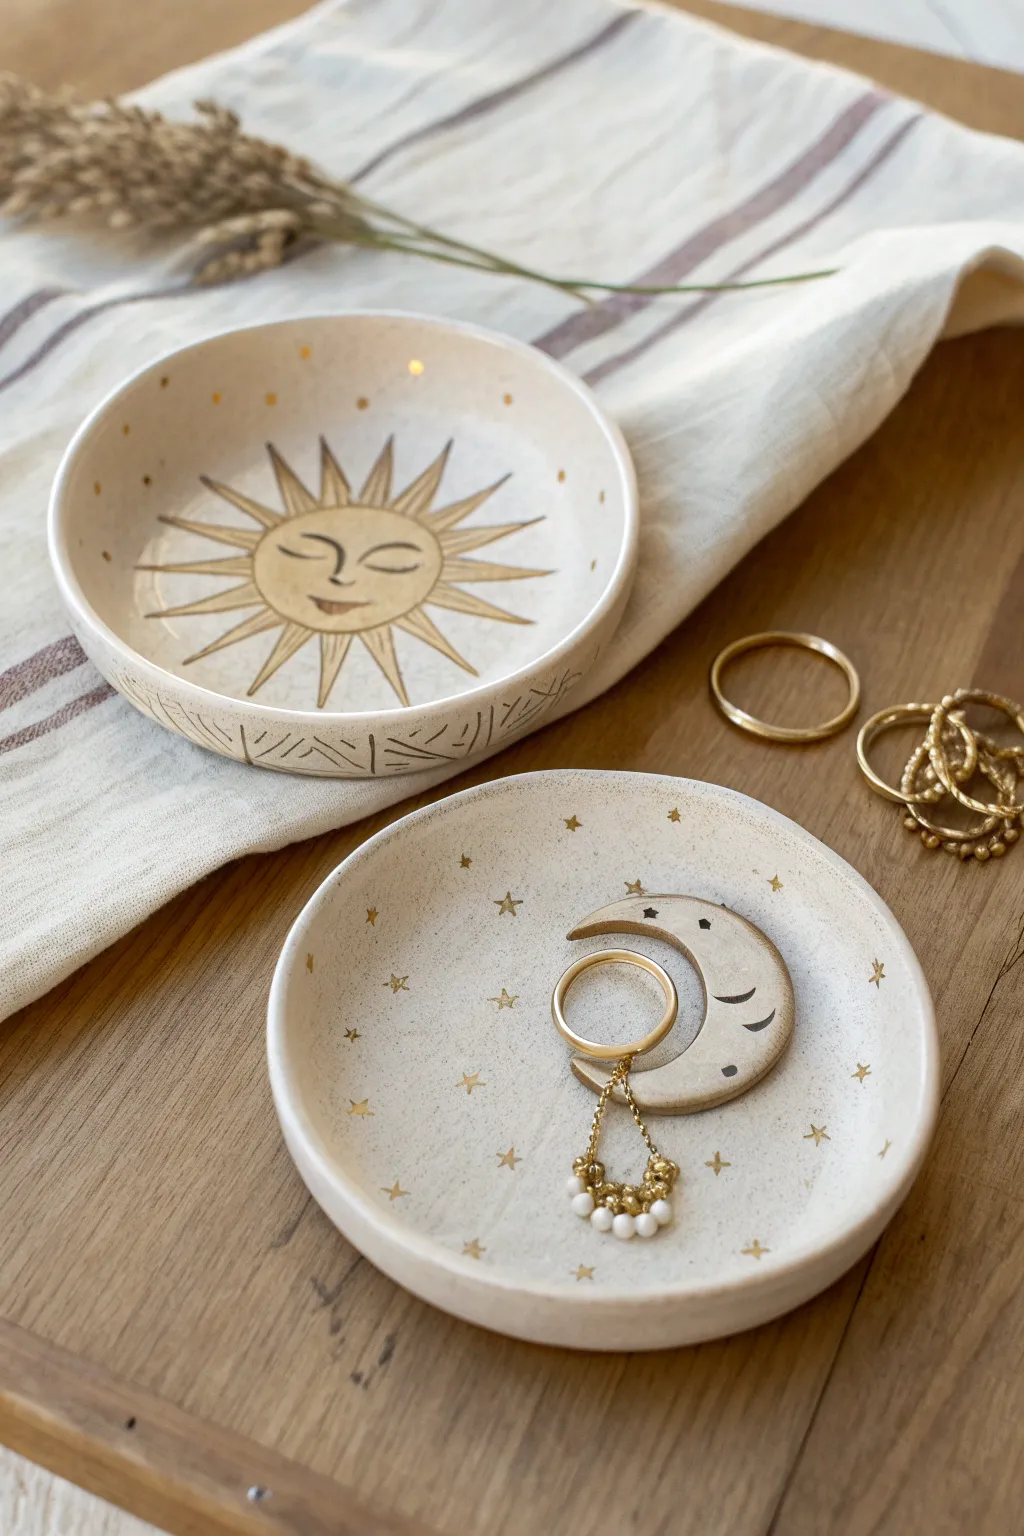
Bring a touch of cosmic magic to your dresser with this handcrafted duo of trinket dishes featuring a serene sun and a minimalist moon. The creamy stoneware finish combined with delicate gold accents creates an ethereal, modern bohemian vibe perfect for holding your favorite rings.
Detailed Instructions
Materials
- Air-dry clay (white or cream)
- Rolling pin
- Two circular cookie cutters (one large for dishes, one small for moon)
- Pottery sponge
- Small bowl of water
- Modeling tool or toothpick
- Sandpaper (fine grit)
- Acrylic paints (pale beige, dark brown, black)
- Liquid gold leaf or metallic gold paint
- Fine detail paintbrush
- Gloss varnish or sealant
Step 1: Shaping the Clay Base
-
Roll the clay:
Begin by conditioning the air-dry clay in your hands until it’s pliable. Roll it out on a flat surface to an even thickness of about 1/4 inch. -
Cut the circles:
Use your larger circular cutter or trace around a bowl to cut out two identical circles. These will be the bases for your sun and moon dishes. -
Form the rim:
Gently curve the edges of both circles upward to create a lip. Use your fingers to smooth the transition from the base to the rim so there are no sharp creases. -
Smooth the surface:
Dip your sponge lightly in water and run it over the entire surface of the dishes to remove fingerprints and tiny imperfections. I find this step crucial for getting that professional ceramic look. -
Create the crescent moon:
Roll a small piece of excess clay and use the smaller cutters to punch out a crescent moon shape. This will be the 3D element inside the moon dish. -
Attach the moon:
Score the back of the crescent moon and the spot on the dish where it will sit. Add a dab of water to create ‘slip’ and press the moon firmly into the center of one dish.
Cracked Clay Fix
If you see hairline cracks while drying, mix a tiny bit of fresh clay with water to make a paste. Fill the crack, smooth it over, and let it dry again.
Step 2: Adding Details & Drying
-
Carve the sun’s edge:
On the rim of the sun dish, use a modeling tool to carve angled geometric lines all the way around the exterior, mimicking the pattern seen in the photo. -
Dry completely:
Let both dishes dry for 24-48 hours. Flip them occasionally to ensure the bottom dries evenly and to prevent warping. -
Sand for smoothness:
Once fully cured, use fine-grit sandpaper to gently buff the edges and surface until they feel silky smooth.
Pro Tip: Metallic Magic
When painting the gold stars, vary the pressure. Press harder for larger stars and barely touch the surface for tiny, distant twinkle lights.
Step 3: Painting the Design
-
Base coat:
Apply a wash of pale beige or cream paint if your clay isn’t already the desired shade. The goal is a natural, earthy background. -
Sketch the sun face:
Lightly pencil the sun’s face in the center of the first dish. Draw a serene expression with closed eyes, surrounded by alternating long and short triangular rays. -
Paint the sun details:
Using a fine brush and watered-down brown paint, outline the sun’s face and rays. Fill the rays with a very sheer wash of the beige paint to differentiate them slightly from the background. -
Add gold accents:
Dip the tip of a toothpick or a tiny brush into gold leaf paint. Add small golden dots around the inner rim of the sun dish for a celestial sparkle. -
Detail the moon dish:
On the moon dish, paint tiny gold stars scattered across the surface. Use black paint to add a simple sleeping face on the raised crescent moon shape. -
Highlight the carving:
Run a very thin wash of dark brown paint into the carved geometric lines on the sun dish’s rim, then wipe the surface immediately to leave the dark color only in the grooves. -
Seal the work:
Apply 1-2 coats of gloss varnish to protect your artwork and give it a glazed, ceramic finish.
Place your finished celestial set on your bedside table to keep your treasures safe while you dream
Couch-Shaped Trinket Dish
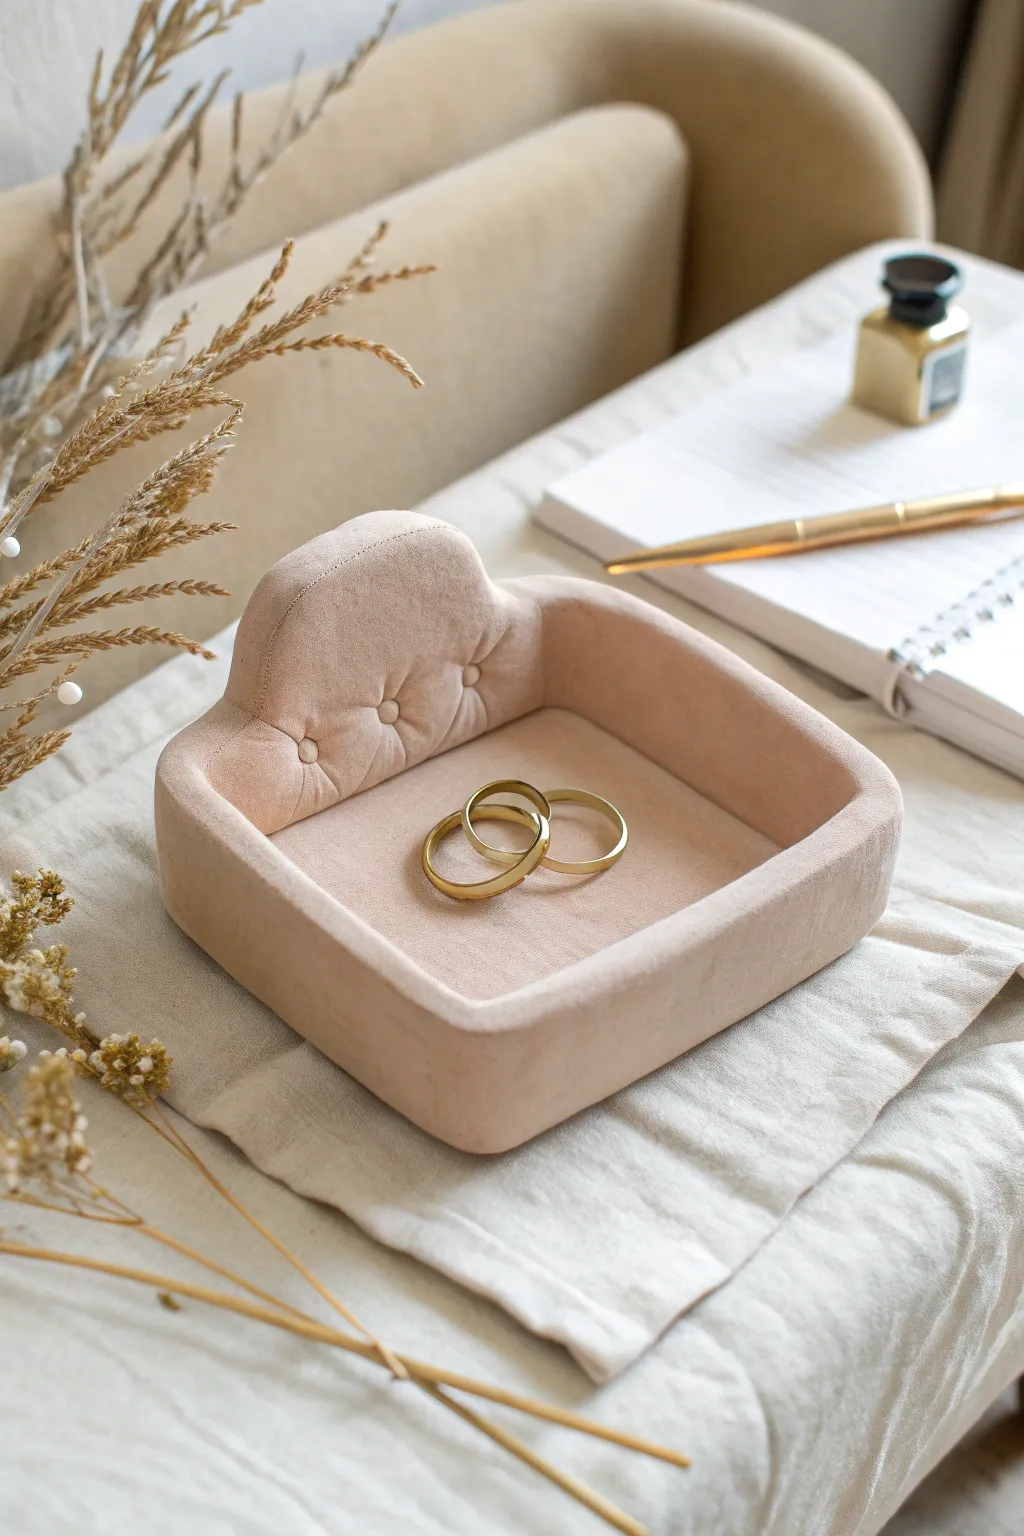
This charming project reimagines a miniature Chesterfield sofa as a functional jewelry holder with an incredibly sophisticated look. By sculpting air-dry clay into a soft, tufted form and finishing it with a velvety matte paint, you create a luxe piece of décor perfect for holding dainty rings.
How-To Guide
Materials
- High-quality white air-dry clay (e.g., DAS or Crayola)
- Acrylic rolling pin
- Clay knife or craft blade
- Smoothing sponge and water
- Ball stylus tool (medium size)
- Fine-grit sandpaper (400-600 grit)
- Baking soda (for paint texture)
- Matte acrylic paint (dusty blush or beige)
- Soft synthetic paintbrush
- Cardboard or ruler (for straight edges)
Step 1: Forming the Base Structure
-
Roll the base slab:
Start by conditioning your clay until it’s pliable. Roll out a smooth slab regarding 1/4 inch thick. Cut out a square roughly 4×4 inches to serve as the seat of the couch. -
Cut the walls:
Roll out a second slab of equal thickness. Cut three long strips: two for the side arms and one slightly taller piece for the backrest. The backrest should have a gentle curve at the top center to mimic a classic sofa silhouette. -
Attach the backrest:
Score the back edge of your base square and the bottom edge of your backrest piece. Apply a little water or slip (clay mixed with water) and press them firmly together. Use a tool to blend the seam on the inside and outside so it becomes one solid piece. -
Attach the arms:
Repeat the scoring and slipping process for the two side arms. Attach them to the sides of the base, blending them into both the base and the sides of the backrest. The corners should be rounded and seamless. -
Soften the edges:
Dip your finger or a sponge in water and run it over every sharp edge. You want the entire form to look soft and upholstered, so round over the tops of the arms and the backrest significantly.
Step 2: Detailing the Upholstery
-
Add the tufting buttons:
Using a ruler, lightly mark a symmetrical grid on the inside of the backrest where you want your buttons. I like to use a medium ball stylus to press deep indentations at these points. Make sure they are deep enough to remain visible after painting. -
Create the crease lines:
To simulate the fabric pulling towards the buttons, use the back of a knife or a sculpting tool to gently press subtle diagonal lines connecting the button indentations. This creates that classic diamond-tufted effect. -
Add miniature buttons:
Roll tiny spheres of clay—no bigger than a peppercorn. Place a tiny drop of slip into each indentation you made, then gently press a sphere into it. This mimics the upholstered buttons perfectly. -
Dry efficiently:
Set the dish aside to dry completely. This usually takes 24-48 hours depending on humidity. Rotate it occasionally so the bottom dries evenly. -
Refine the surface:
Once fully dry, use fine-grit sandpaper to gently buff away any fingerprints or rough textures. Wipe away all dust with a slightly damp cloth.
Cracks appearing?
If small cracks form while drying, mix a paste of fresh clay and vinegar. Smear it into the cracks, let dry, then sand smooth before painting.
Step 3: Velvet Finish Painting
-
Mix the textured paint:
To achieve that velvety, stoneware look seen in the photo, mix your matte acrylic paint with a teaspoon of baking soda. This creates a fluffy, chalky texture. -
Apply the first coat:
Paint the entire dish, ensuring you get into the crevices of the tufting. The baking soda mix might look thick, but that helps hide clay imperfections. -
Check for drips:
Watch out for paint pooling around the tiny buttons. Use a dry brush to wick away excess paint in those deep spots so you don’t lose the detail. -
Final coat:
Once the first layer is dry, add a second coat for full opacity. The baking soda will dry to a beautiful, soft matte finish that resembles suede or velvet.
Adding luxury
Paint the tiny ‘buttons’ with a fine-tip gold leaf pen after the base coat dries for a glamorous, mixed-material jewelry look.
Place your favorite rings in the center and enjoy this impossibly cute addition to your vanity
Mini Serving Tray Trinket Dish With Handles

This minimalist rectangular tray features a clean, white-speckled finish and subtle, curved handles that give it the look of a miniature serving platter. It’s the perfect size for organizing your daily essentials like watches and rings on a nightstand.
Step-by-Step Tutorial
Materials
- White airflow-dry clay or polymer clay
- Rolling pin
- Sharp crafting knife or clay blade
- Ruler
- 400-grit sandpaper
- Small bowl of water
- Glossy acrylic varnish or glaze
- Black acrylic paint (optional for speckling)
- Old toothbrush (optional for speckling)
- Flat synthetic paintbrush
Step 1: Forming the Base
-
Condition the clay:
Start by kneading a large handful of white clay until it is warm, soft, and pliable. This prevents cracks from forming later during the drying process. -
Roll out a slab:
Using your rolling pin, flatten the clay into an even slab. Aim for a thickness of about 1/4 inch (approx. 6mm) to ensure the tray feels substantial but elegant. -
Cut the rectangle:
Place your ruler on the clay and use the sharp crafting knife to cut a clean rectangle. A size of approximately 4×8 inches works well for watches and jewelry. -
Round the corners:
Instead of leaving sharp 90-degree angles, gently use your finger or a specialized clay tool to smooth and round off the four corners of your rectangle.
Smooth Surface Secret
Use a baby wipe instead of just water when smoothing raw air-dry clay. Examples have fewer fibers than paper towels and help create a porcelain-like finish.
Step 2: Building the Rim and Handles
-
Create a coil:
Roll out a separate long, thin snake of clay. This coil should be consistent in thickness, roughly the width of a pencil. -
Attach the rim:
Score the outer edge of your rectangular base and brush on a little water. Place the coil on top of the scored edge, tracing the entire perimeter of the rectangle. -
Blend the seams:
Using a modeling tool or your fingertip, drag the clay from the coil down onto the base, both on the inside and outside. Smooth it until the transition is seamless and the separate coil is no longer visible. -
Shape the handles:
To create the ‘serving tray’ look, gently pinch the rim upwards and outwards slightly at the two shorter ends of the rectangle. This creates subtle, curved lip extensions. -
Smooth with water:
Dip your finger in a tiny bit of water and run it over the entire piece. Focus on the rim to ensure it is perfectly smooth and level. -
Let it dry:
Allow the clay to dry completely according to the package instructions. Air-dry clay usually takes 24-48 hours. I recommend flipping it halfway through to ensure the bottom dries evenly.
Warping Fix
If the tray edges curl up while drying, place a lightweight book on top of it (with parchment paper in between) once the clay is leather-hard but not fully dry.
Step 3: Finishing Touches
-
Sand imperfections:
Once fully dry and hard, take your 400-grit sandpaper and gently sand away any fingerprints, bumps, or sharp edges. Wipe away the dust with a damp cloth. -
Create the speckled effect:
Mix a tiny drop of black acrylic paint with water until it’s fluid. Load an old toothbrush with the mixture, hold it over the tray, and run your thumb across the bristles to flick tiny specks onto the white surface. -
Seal the tray:
After the speckles are dry, apply a generous coat of glossy acrylic varnish. This gives the tray that ceramic-like shine shown in the photo. -
Second coat:
Wait for the first layer of varnish to dry tack-free, then apply a second coat for extra durability and a deeper gloss. -
Final cure:
Let the varnish cure completely before placing any jewelry or watches inside to prevent sticking.
Now you have a chic, speckled catch-all that looks like professionally fired ceramic
Split Compartment Trinket Dish for Rings and Studs
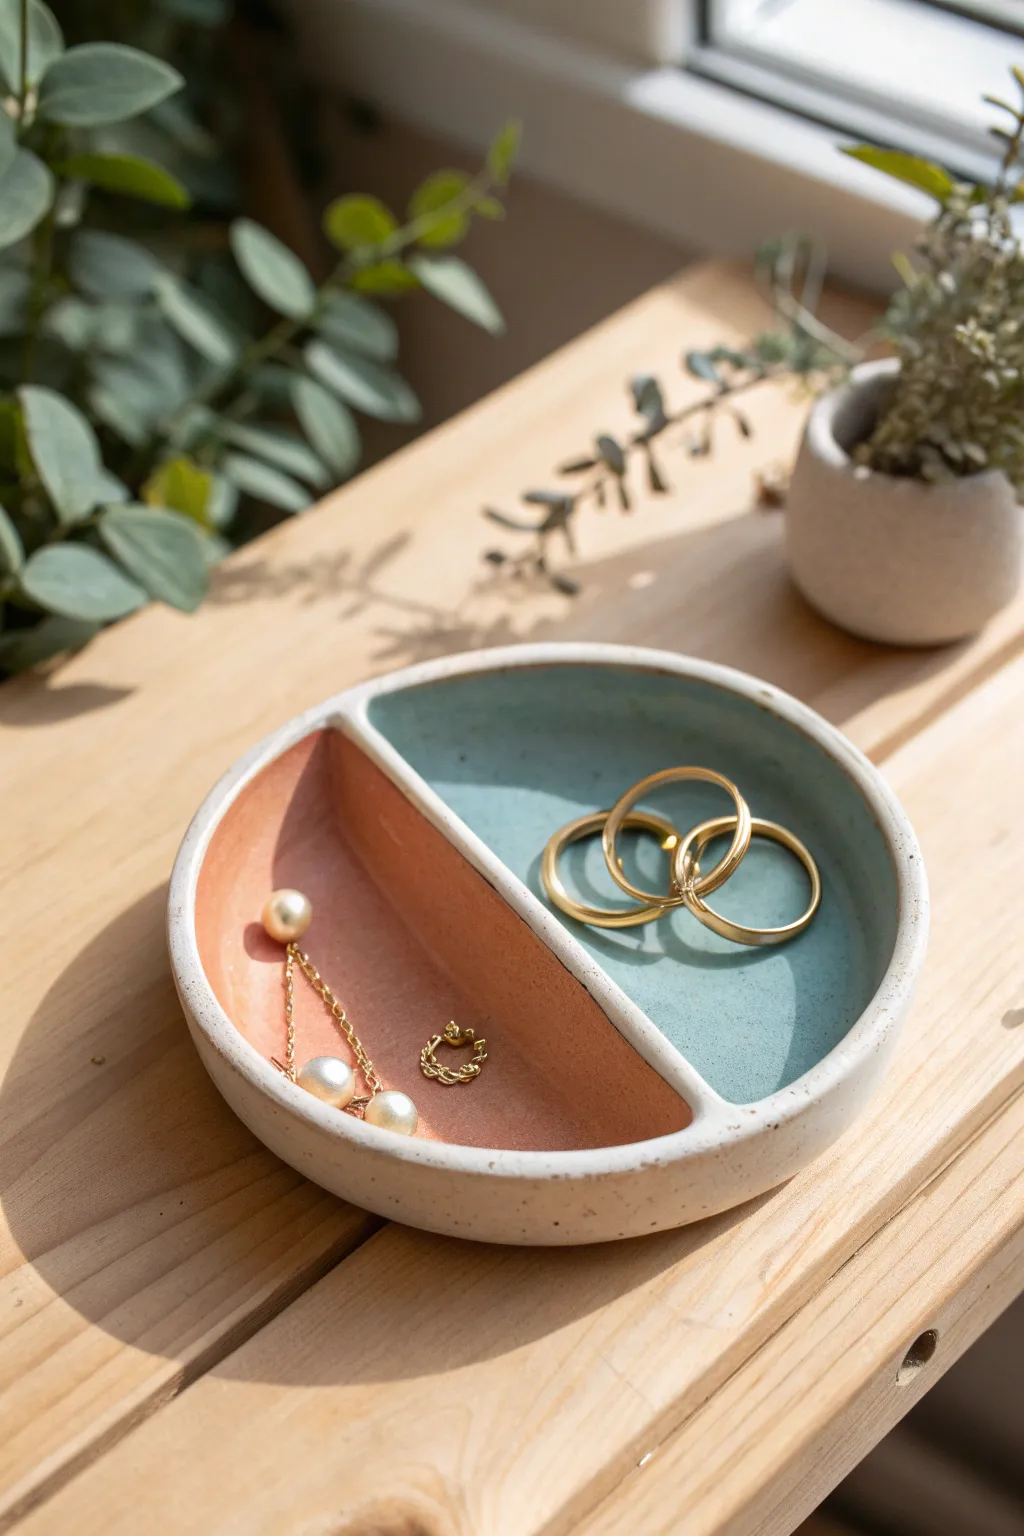
This elegant split compartment dish combines functional organization with minimal, modern aesthetics. The natural speckled clay body is contrasted beautifully by two soft, complementary glaze colors, perfect for keeping your rings and studs separate but accessible.
How-To Guide
Materials
- Speckled stoneware clay (or white air-dry clay mixed with dark sand)
- Rolling pin
- Circle template or bowl (approx. 5-6 inches diameter)
- Needle tool or craft knife
- Sponge
- Rib tool or old credit card
- Slip (clay mixed with water) for joining
- Scoring tool or fork
- Peach/Terracotta underglaze or acrylic paint
- Seafoam blue/Teal underglaze or acrylic paint
- Clear sealant or transparent glaze
- Small flat paintbrush
- Canvas or cloth work surface
Step 1: Shaping the Base
-
Roll the slab:
Begin by rolling out your clay on a canvas surface to a consistent thickness of about 1/4 inch. If you want that lovely speckled look and only have plain clay, knead in a pinch of dark sand or dried coffee grounds before rolling. -
Cut the circle:
Place your circle template or bowl onto the slab and trace around it with a needle tool to cut out your base. -
Smooth the surface:
Use a damp sponge to gently wipe the surface of your circle, removing any canvas texture or imperfections.
Clean Lines
For a super crisp paint line near the divider, use a tiny bit of painter’s tape or washi tape on the top edge of the divider while you paint the bottom reservoirs.
Step 2: Building the Walls
-
Create the coil:
Roll a long snake or coil of clay, keeping it evenly thick—roughly the width of a pencil or slighty thicker. -
Score and slip the edge:
Using a scoring tool or fork, scratch up the outer perimeter of your clay circle base. Apply a small amount of clay slip or water to the roughed-up area. -
Attach the outer rim:
Place the coil onto the scored edge, pressing down gently to adhere it. Cut off any excess coil and smooth the joined ends together. -
Blend the seams:
Using your thumb or a wooden tool, drag the clay from the coil down onto the base on the inside, and from the coil down on the outside, until the seam disappears. This is crucial for strength. -
Refine the rim:
With a damp sponge, smooth the top lip of the rim to make it even and rounded.
Texture Play
Before the clay dries, gently press a piece of coarse linen or dried flowers into the exterior walls to create subtle, organic fossil-like impressions.
Step 3: Adding the Divider
-
Shape the partition:
Roll another coil, slightly shorter than the diameter of your dish. flatten it slightly so it matches the height of your outer wall. -
Position and mark:
Lay the coil across the center of the dish to check the fit. Mark lightly where it touches the base and side walls. -
Score and attach:
Remove the coil, score the marked lines on the base and the ends of the coil. Apply slip, then press the divider firmly into place. -
Blend the divider:
Just like the outer wall, use a small tool to smooth the clay from the divider into the floor of the dish and the side walls, creating a seamless, unified piece. -
Final smoothing:
Give the entire piece one last pass with a damp sponge to remove fingerprints and soften any sharp edges. Let the piece dry completely (24-48 hours for air-dry clay, or until bone dry for firing).
Step 4: Painting and Finishing
-
Sand imperfections:
Once fully dry, you can lightly sand any rough spots. Wipe away dust with a barely damp cloth. -
Paint the first section:
Paint the left interior half with a peach or terracotta color. I find using a small flat brush helps get a clean line right up against the divider without smudging. -
Paint the second section:
Paint the right interior half with a muted seafoam blue or teal. Apply 2-3 coats for opaque, even coverage. -
Leave the rim natural:
Leave the top rim, the divider top, and the exterior unpainted to show off the natural speckled clay texture. -
Seal the piece:
Finish by applying a clear gloss varnish or glaze over the painted sections to make them shine. You can leave the raw clay matte for a nice textural contrast.
Once sealed and dried, pop this on your dresser for an instant organization upgrade that looks effortlessly chic