
If you’ve ever needed a cute little spot for rings, coins, or hair pins, clay trinkets are the most satisfying quick win. I’m sharing my favorite clay trinket ideas that feel super doable but still look polished enough to gift (or keep on your nightstand forever).
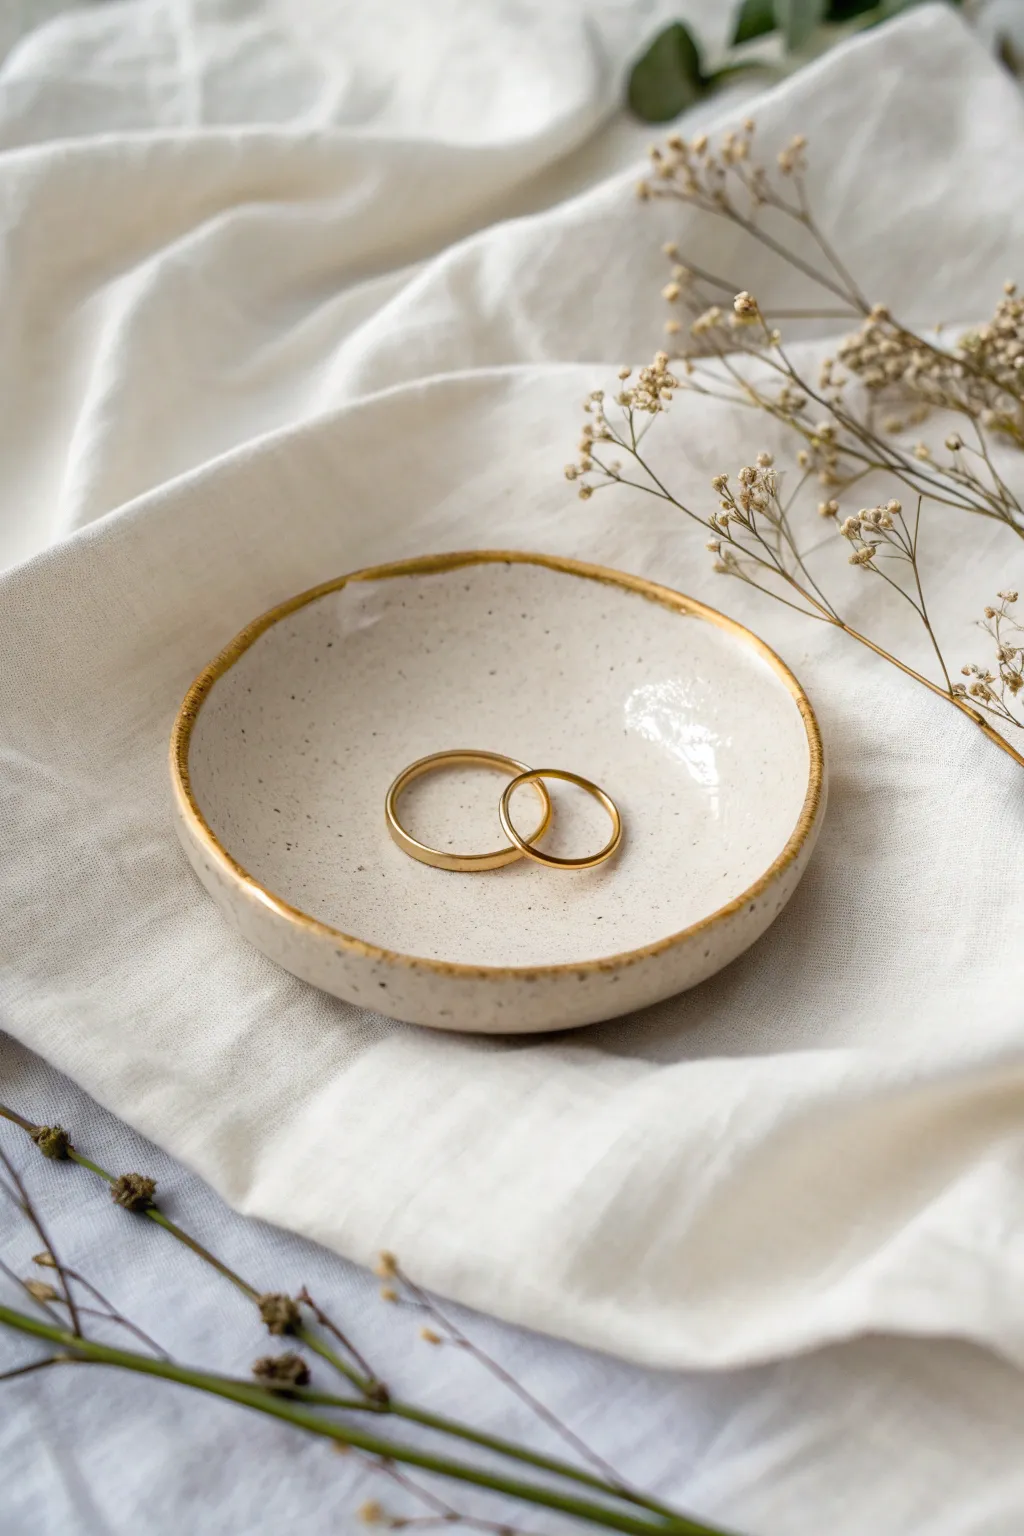
Classic Round Trinket Dish
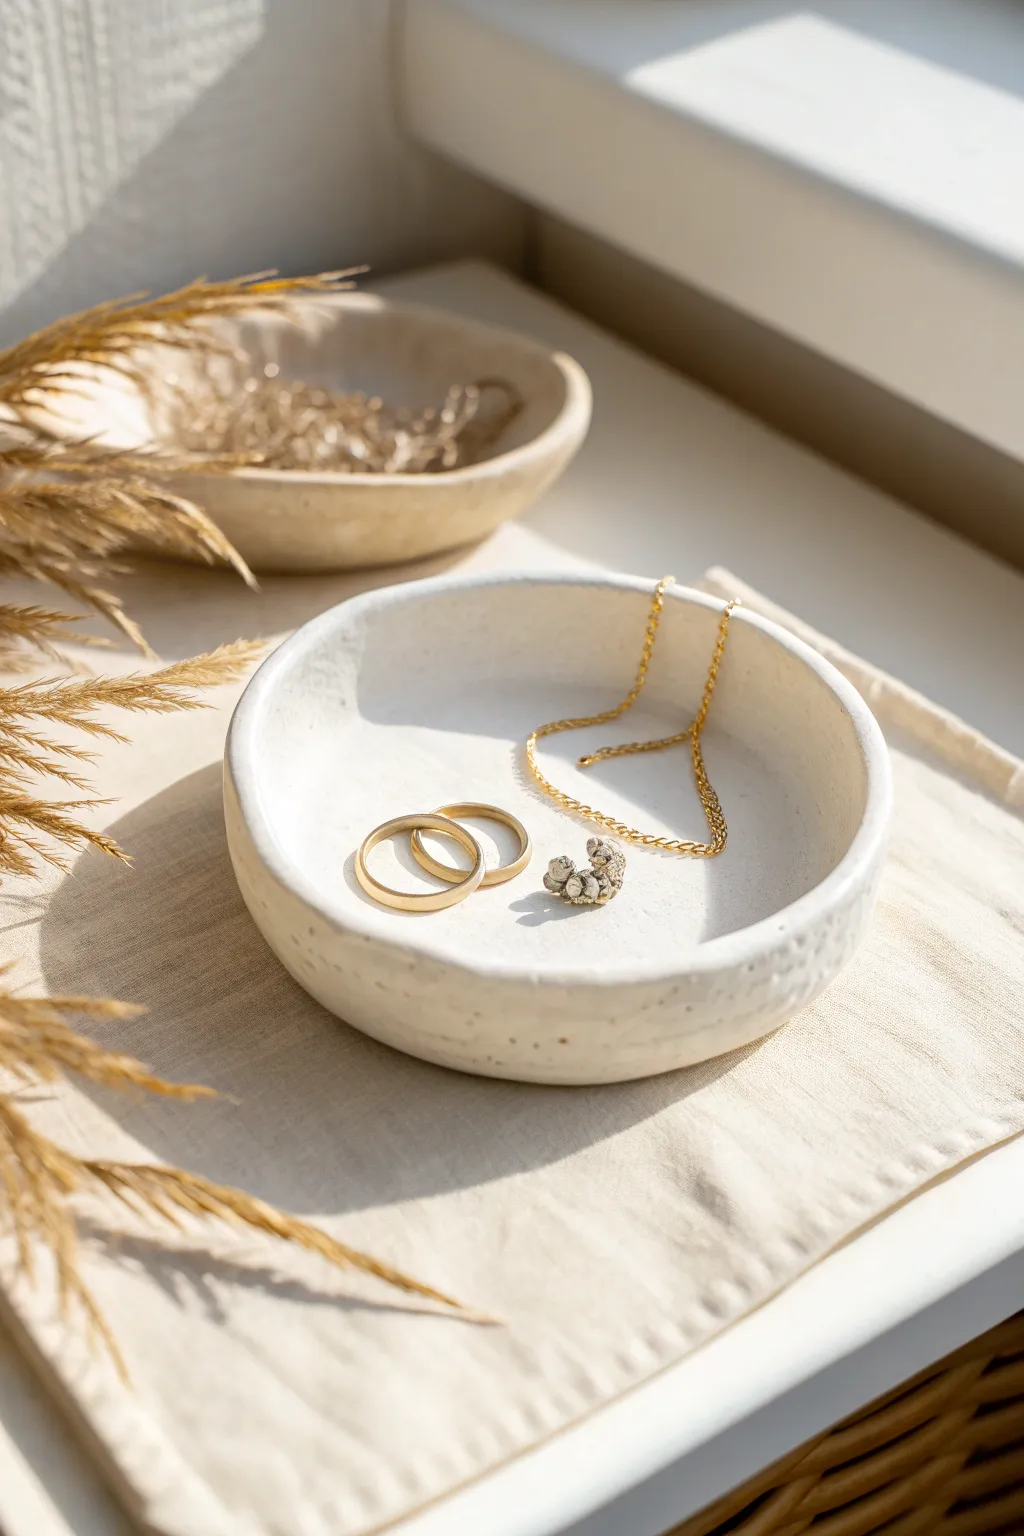
Embrace the beauty of imperfection with this lovely, hand-formed trinket dish that exudes organic charm. Its matte white finish and subtle texture make it the perfect minimalist home for your gold jewelry and daily treasures.
How-To Guide
Materials
- White air-dry clay (or polymer clay)
- Rolling pin
- Circle cutter or a small bowl (approx. 4-5 inches)
- Small sponge
- Water cup
- Fine-grit sandpaper (400 grit)
- Matte acrylic sealant or matte varnish
- Soft synthetic brush
- Canvas mat or parchment paper
Step 1: Shaping the Clay
-
Condition the clay:
Begin by taking a handful of white clay and kneading it in your hands until it becomes soft, pliable, and free of cracks. Warming it up makes it much easier to work with. -
Roll out the slab:
Place your clay on a canvas mat or parchment paper. Using your rolling pin, roll the clay out evenly until it is about 1/4 inch thick. Try to keep the thickness consistent across the entire surface. -
Cut the circle:
Place your circle cutter or an upside-down bowl onto the clay slab. Press down firmly to cut out a perfect circle, then peel away the excess clay from the edges. -
Soften the edges:
Dip your finger slightly in water and run it gently along the cut edge of the circle. This smooths out any sharpness or ragged bits left by the cutter. -
Form the rim:
Gently lift the edges of the clay circle upward. Use your thumbs on the inside and fingers on the outside to pinch creates a vertical wall. I like to keep this looking organic rather than perfectly machine-made. -
Level the bottom:
Once the rim is raised, press the center of the dish down gently against your work surface to ensure the bottom is flat. This ensures your bowl won’t wobble later. -
Create texture:
To achieve that stony, natural look seen in the photo, dampen a small sponge and lightly dab the exterior walls and the rim. Do not smooth it perfectly; let the sponge leave tiny distinctive marks.
Cracks while rolling?
If the edges crack while rolling out the slab, your clay is likely too dry. Dip your fingers in water and knead the moisture back into the clay for a few minutes before rolling again.
Step 2: Refining and Finishing
-
Initial drying:
Let the dish sit undisturbed in a dry area. If you are using air-dry clay, loosely cover it with plastic wrap for the first 12 hours to prevent cracking, then uncover it. -
Full cure time:
Allow the piece to dry completely for 24 to 48 hours. It should turn a chalky white and feel hard to the touch with no cold spots. -
Inspect for flaws:
Check the rim for any sharp peaks or uncomfortable rough spots that formed during drying. -
Sand the surface:
Take your fine-grit sandpaper and very gently buff the rim and the exterior. You want to keep the texture, but remove anything that feels scratchy. -
Dust off:
Use a dry, soft brush or a tack cloth to remove all the clay dust from the sanding process. Any leftover dust will create lumps in your sealant. -
Apply sealant:
Dip a soft synthetic brush into your matte varnish. Apply a thin, even coat to the inside of the bowl first, working from the center outwards. -
Coat the exterior:
Once the inside is touch-dry, flip the bowl and coat the exterior walls and bottom. The matte finish is key to replicating the stone-like appearance in the image. -
Second coat:
For durability, apply a second thin layer of sealant after the first has fully dried. This protects the clay from oils in your jewelry.
Natural Speckles
To get the speckled look seen in the photo, mix a pinch of used coffee grounds or cracked pepper into the clay while kneading. It creates a beautiful faux-stone texture.
Place your new dish on a sunny windowsill and fill it with your favorite rings for an instant decor upgrade


Wavy Edge Trinket Dish
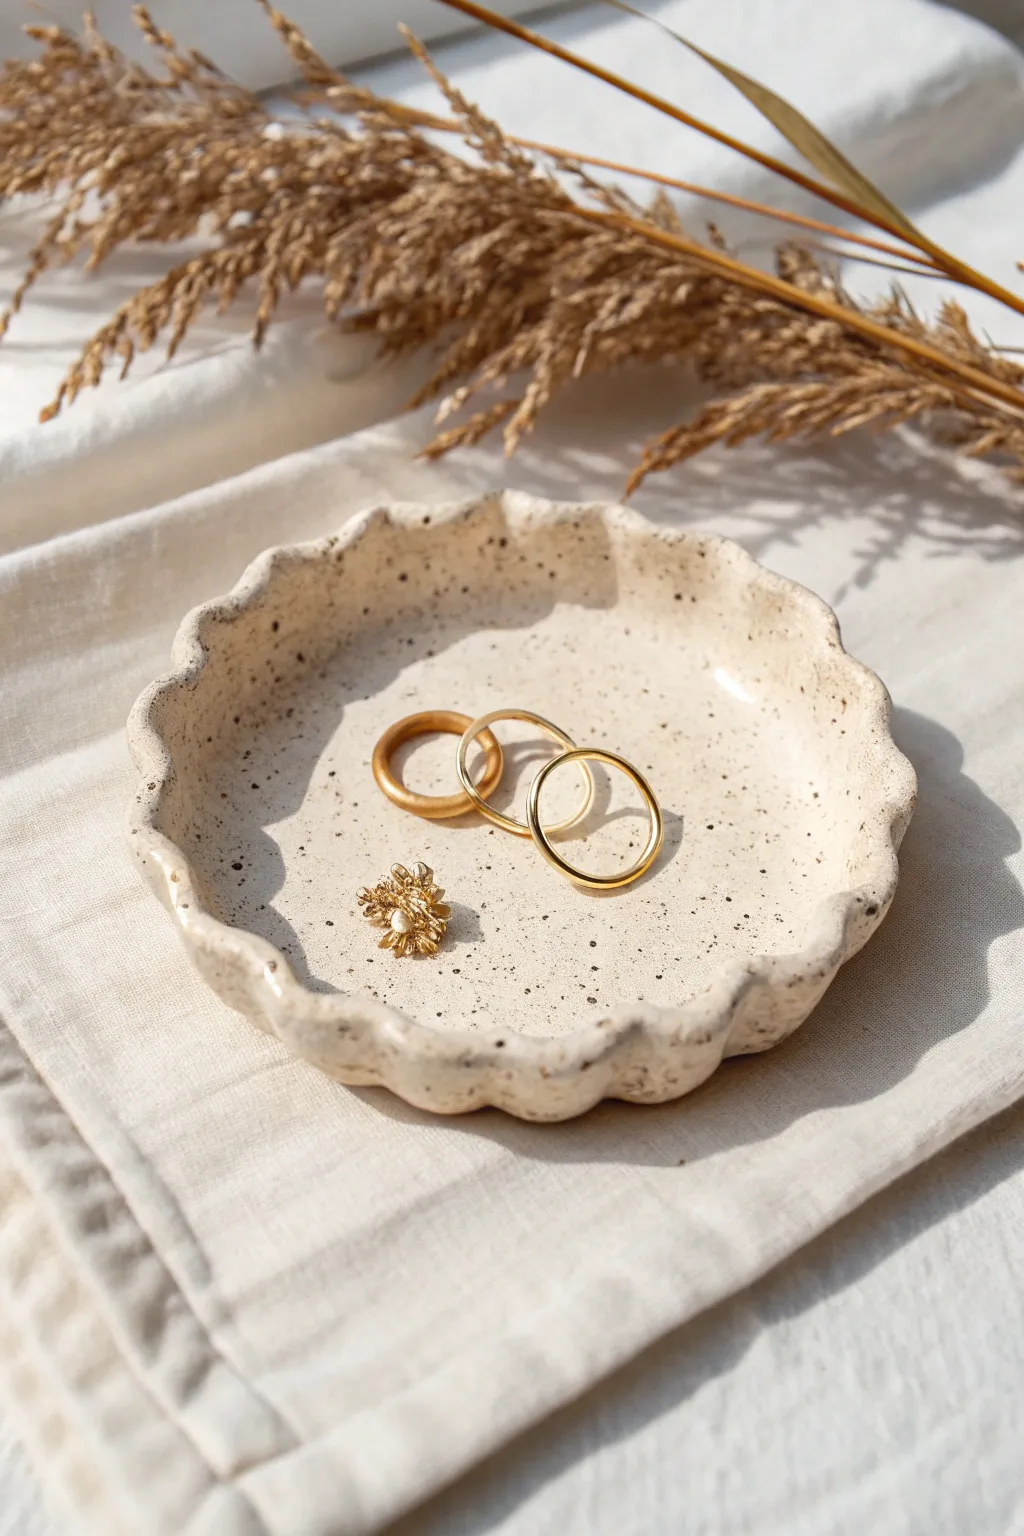
Capture a laid-back, organic aesthetic with this charming trinket dish featuring gently rippled edges and a natural speckled finish. It’s the perfect minimalist catch-all for your favorite rings and small treasures.
Step-by-Step
Materials
- Air-dry clay (white or cream)
- Acrylic roller or rolling pin
- Circle cutter or a small bowl (approx. 4-5 inches diameter)
- Craft knife
- Small bowl for shaping (to drape the clay inside)
- Sponge or soft paintbrush
- Speckled pottery paint or brown and black acrylic paint
- Old toothbrush (if creating custom speckles)
- Gloss varnish or sealant
- Fine-grit sandpaper
- Cup of water
Step 1: Shaping the Base
-
Condition the clay:
Begin by taking a handful of air-dry clay and kneading it in your hands until it becomes warm, soft, and pliable. This removes air bubbles and prevents cracking later. -
Roll it out:
Place the clay on a smooth surface or canvas mat. Use your acrylic roller to flatten the clay to an even thickness of about 1/4 inch (6mm). -
Cut the circle:
Place your circle cutter or an overturned bowl onto the clay slab. -
Refine the edge:
Use a craft knife to trace around the bowl if you aren’t using a cutter. Lift away the excess clay. -
Smooth the perimeter:
Dip your finger in a little water and run it along the cut edge of the circle. This smooths out any harsh cut marks or dragging from the knife.
Natural Speckle Hack
Mix dried coffee grounds or crushed peppercorns directly into the wet clay before rolling. It creates texture deeply embedded in the material.
Step 2: Creating the Ruffles
-
Prepare the mold:
Take a small bowl that creates the depth you want. Lightly dust the inside with cornstarch or line it with plastic wrap to prevent sticking. -
Place the clay:
Gently lift your clay circle and lay it inside the bowl. Press the center down delicately so it takes the concave shape. -
Form the first wave:
Using your thumb and forefinger, gently pinch a section of the rim to create a soft peak. I usually push the clay slightly upward from the underside. -
Continue the pattern:
Move about an inch along the rim and create the next wave. Repeat this around the entire circumference. -
Adjust the symmetry:
Once you generally have the waves in place, go back around and manipulate them until they look organic but relatively evenly spaced. -
Smoothing:
Use a slightly damp sponge to gently wipe the interior and rim again, erasing any fingerprints left from the pinching process.
Cracks Appearing?
If small hairline cracks appear while drying, make a ‘slip’ paste of clay and water. Fill the cracks, smooth it out, and let it dry again slowly.
Step 3: Finishing and Decorating
-
Let it dry:
Allow the dish to dry completely in the bowl for at least 24-48 hours. Keep it away from direct heat to prevent warping. -
Sand imperfections:
Once bone dry, remove the dish from the bowl. Use fine-grit sandpaper to buff away any rough spots on the rim or underside. -
Base coat:
If your clay isn’t already the desired cream color, paint the entire dish with a coat of warm white or cream acrylic paint and let it dry. -
Create the speckles:
Dilute a small amount of dark brown or black paint with water. Dip an old toothbrush into the mixture. -
Apply the texture:
Hold the toothbrush over the dish and run your thumb across the bristles to flick tiny droplets of paint onto the clay. Go lightly for a subtle effect. -
Seal the piece:
Once the paint is fully set, verify that the speckles are dry. Apply a coat or two of gloss varnish to give it that ceramic-glaze look. -
Final cure:
Let the varnish cure according to the bottle instructions before placing any jewelry inside.
Now you have a beautiful, handmade vessel ready to display your daily jewelry pieces


Scalloped Flower Trinket Dish
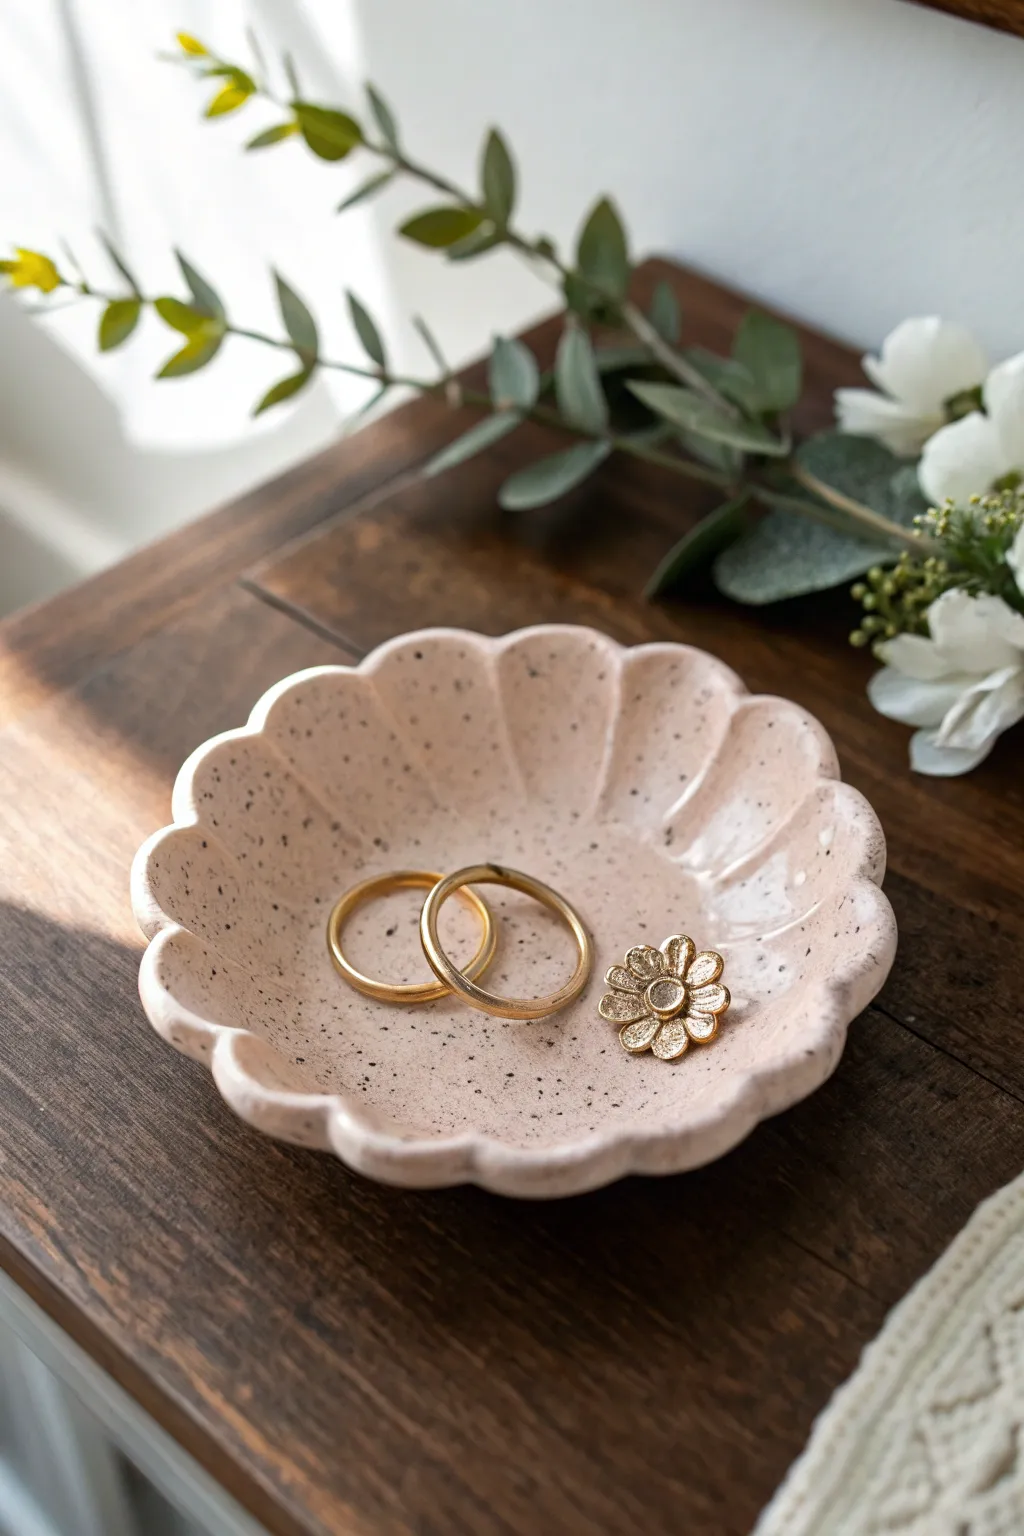
Create a delicate resting place for your favorite rings with this charming flower-shaped trinket dish. The soft pink tone and speckled finish give it an organic, pottery-studio look without needing a kiln
Step-by-Step Tutorial
Materials
- Polymer clay (light pink or peach)
- Speckled clay effects medium or black pepper (alternative)
- Rolling pin or acrylic roller
- Circle cutter (approx. 4 inches) or a bowl to trace
- Small round cutter or bottle cap (approx. 1 inch)
- Modeling tools (ball tool or rounded knitting needle)
- Sandpaper (fine grit)
- High-gloss varnish or glaze
- Soft paintbrush
- Oven-safe bowl (for forming)
Step 1: Preparing the Clay
-
Condition the base:
Begin by warming up your light pink polymer clay in your hands. Knead it thoroughly until it is soft, pliable, and free of any air bubbles. -
Create the speckled effect:
If your clay isn’t pre-speckled, sprinkle in a tiny pinch of faux granite granules or even coarsely ground black pepper. Fold the clay over itself repeatedly to distribute the specks evenly throughout the slab. -
Roll out the slab:
Place the clay on a clean, smooth work surface. Use your acrylic roller to flatten it into an even sheet, aiming for a thickness of about 1/4 inch to ensure durability. -
Cut the base circle:
Use your large 4-inch circle cutter to punch out a perfect round shape. If you don’t have a cutter that size, simply trace around a small bowl with a craft knife.
Pro Tip: Pepper Power
If using black pepper for speckles, seal the clay well with varnish! Unsealed organic material can degrade over time or attract moisture.
Step 2: Scalloping the Edges
-
Mark the center:
Lightly press a smaller circle cutter or bottle cap into the very center of your clay disk. don’t cut through; just leave a faint impression to guide your petal placement. -
Divide the circle:
Using a blade, mark faint lines to divide the outer ring into 8 or 10 equal sections, radiating from that center circle impression to the edge. -
Indent the scallops:
At each mark on the outer edge, use a rounded tool or your finger to gently push the clay inward slightly, creating the divot between petals. -
Curve the petals:
Use your thumb to gently press and round out the clay sections between the divots. Smooth the edges so they look like soft, organic flower petals rather than sharp cuts. -
Add dimension:
Take a ball tool or the end of a paintbrush and drag it from the outer divot toward the center circle. This creates those gentle fluted grooves you see in the finished dish. -
Refine the shape:
Go around the perimeter one last time, smoothing any fingerprints with a drop of baby oil on your finger if needed.
Step 3: Forming and Baking
-
Shape the bowl:
Lift your clay flower carefully and place it inside a small, oven-safe bowl. Gently press the center down so the petals curve upward naturally, taking the shape of the bowl. -
Bake the piece:
Place the bowl with the clay inside into your oven. Bake according to the specific manufacturer’s instructions on your chosen brand of clay (usually around 275°F or 135°C). -
Cool down completely:
Once bakes, remove from the oven and let the clay cool completely inside the bowl. Removing it while hot might cause warping. -
Sand the edges:
Check the rim of your petals for any rough spots. I usually take a piece of fine-grit sandpaper and wet-sand the edges under running water for a silky smooth finish.
Level Up: Gilded Edge
After baking but before glazing, paint just the very rim of the scalloped petals with liquid gold leaf for a luxurious, high-end finish.
Step 4: The Glossy Finish
-
Clean surface:
Wipe the dish down with a damp cloth or alcohol wipe to remove any sanding dust or oils. -
Apply first coat:
Using a soft brush, apply a thin layer of high-gloss glaze or varnish. Brush in the direction of the petals to minimize visible strokes. -
Dry and repeat:
Allow the first coat to dry fully. Apply a second or third coat until the dish looks wet and ceramic-like. -
Final cure:
Let the final coat of glaze cure for 24 hours to ensure it is hard and scratch-resistant before placing jewelry inside.
Now you have a beautiful, bespoke catch-all perfect for your bedside table.


Heart-Shaped Trinket Dish
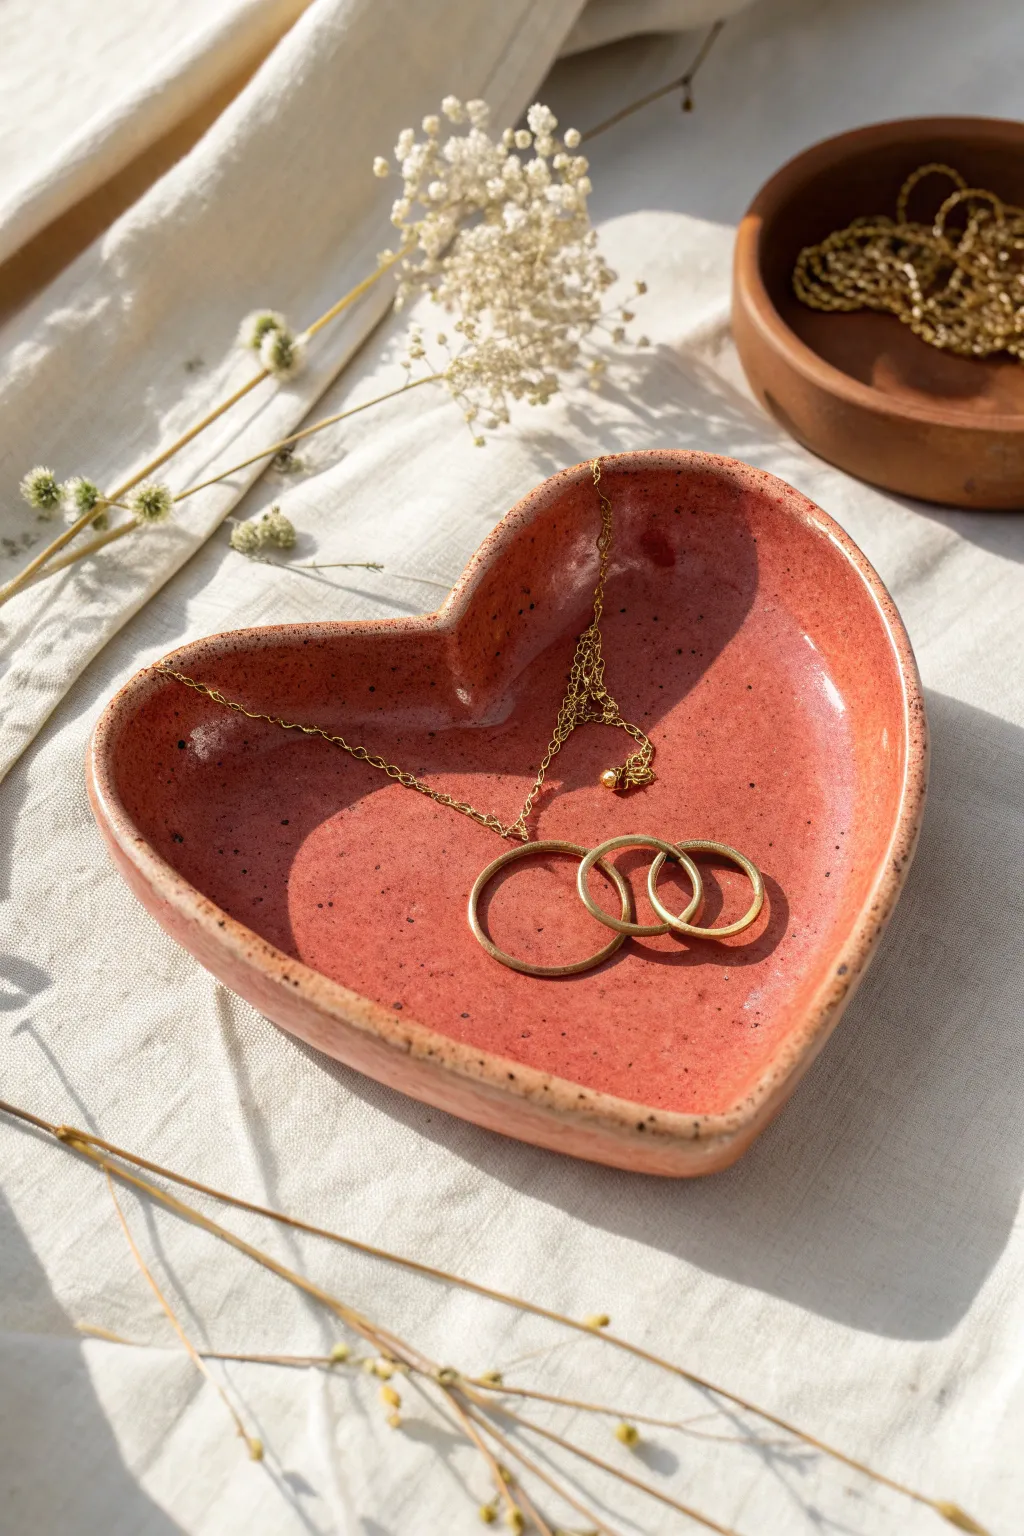
Capture the warmth of romance with this rustic, hand-shaped heart dish featuring a unique speckled glaze effect. Its shallow curves are perfect for cradling your favorite delicate chain necklaces or everyday ring stack.
How-To Guide
Materials
- Air-dry clay (white or terracotta)
- Rolling pin
- Heart-shaped paper template (hand-drawn)
- Craft knife or needle tool
- Small sponge
- Cup of water
- Sandpaper (fine grit)
- Acrylic paints (coral pink/terracotta)
- Brown fluid acrylic or ink
- Old toothbrush
- Gloss varnish or sealant
Step 1: Shaping the Clay
-
Prepare your template:
Draw a freehand heart on a piece of cardstock or paper and cut it out. Aim for a slightly wider, softer heart shape about 4-5 inches across to match the organic look of the photo. -
Condition the clay:
Take a handful of air-dry clay and knead it in your hands until it becomes warm, pliable, and free of cracks. -
Roll the slab:
Roll the clay out on a smooth surface to an even thickness of about 1/4 inch. If the clay sticks, you can lay down a piece of parchment paper first. -
Cut the shape:
Place your paper template onto the clay slab. Use a craft knife or needle tool to trace around the edge, cutting out the heart shape cleanly. -
Soften the edges:
Dip your finger in a little water and run it along the cut edges to smooth out any sharpness or roughness left by the knife. -
Create the curve:
Pick up the clay heart and gently pinch the edges upward to create a rim. I like to cup the clay in my palm while pressing the center down with my thumb to create a shallow bowl shape. -
Refine the form:
Work around the perimeter, smoothing the elevated rim so it flows naturally. Ensure the tip of the heart and the center cleave are defined but soft. -
Dry completely:
Place the dish on a wire rack to air dry. This typically takes 24-48 hours depending on humidity. Rotate it occasionally so the bottom dries evenly.
Rim Shaping Hack
To get a perfectly even curve while drying, let the clay heart rest inside a slightly larger bowl lined with plastic wrap.
Step 2: Decorating & Finishing
-
Sand for smoothness:
Once fully dry and hard, use fine-grit sandpaper to gently buff away any remaining fingerprints or bumps on the surface and rim. -
Mix the base color:
Mix a terracotta-pink shade using acrylic paints. Combine red, a touch of yellow ochre, and plenty of white to achieve that warm, earthy coral tone. -
Apply base coats:
Paint the entire dish, front and back. You will likely need two or three thin coats for opaque coverage, letting each layer dry in between. -
Prepare the speckles:
Dilute a small amount of dark brown acrylic paint or ink with water until it is very fluid. -
Splatter effect:
Dip an old toothbrush into the brown mixture. Hold it over the dish and run your thumb across the bristles to flick tiny speckles onto the pink surface. Test on paper first to control the spray. -
Add rim detail:
Optionally, use a very dry brush with a tiny bit of the brown paint to gently distress the very top edge of the rim, giving it a ‘burnt’ pottery look. -
Seal the piece:
Finish with two coats of high-gloss varnish. This mimics the glazed look of kiln-fired ceramics and protects the paint from scratches.
Gilded Touch
Paint the very rim of the heart with metallic gold leaf paint instead of the brown distress for a more luxurious, modern finish.
Now you have a charming spot to keep your daily treasures organized and safe

The Complete Guide to Pottery Troubleshooting
Uncover the most common ceramic mistakes—from cracking clay to failed glazes—and learn how to fix them fast.
Marbled Clay Trinket Dish
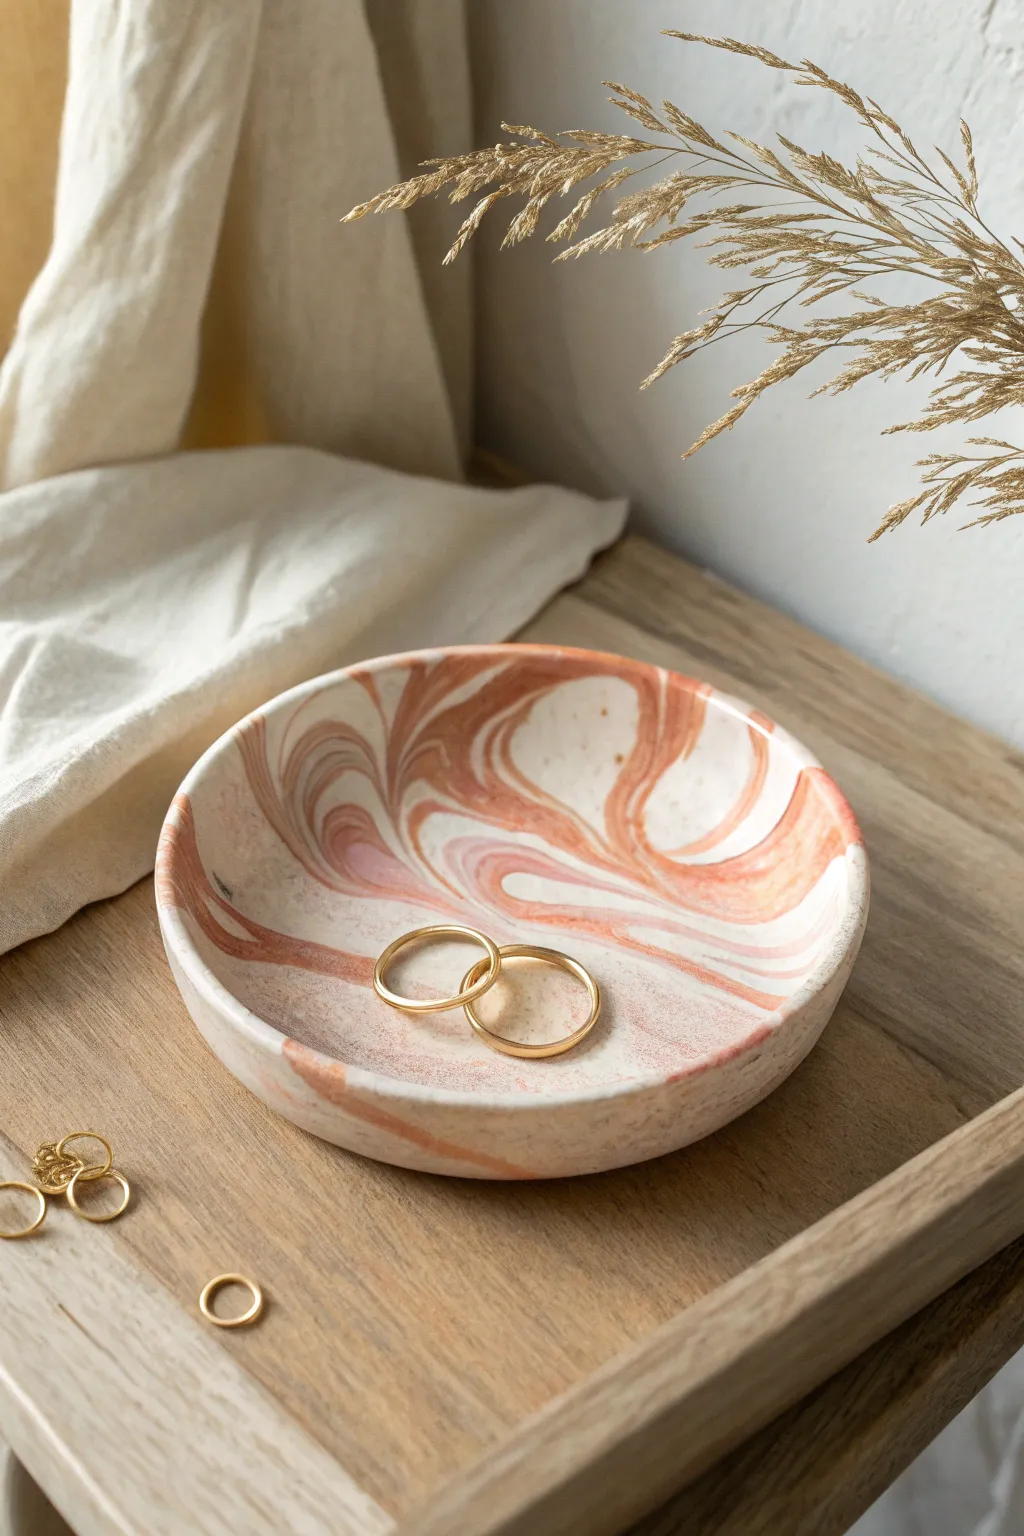
Capture the organic beauty of flowing stone with this marbled trinket dish, featuring soft terracotta and cream swirls. It’s the perfect minimalist catch-all for your favorite rings and small treasures.
Step-by-Step Tutorial
Materials
- White polymer clay (approx. 2 oz)
- Terracotta or rust-colored polymer clay (approx. 1 oz)
- Translucent polymer clay (optional, for depth)
- Acrylic rolling pin or glass bottle
- Round cookie cutter or bowl (approx. 4-5 inches diameter)
- Oven-safe bowl (for shaping)
- Craft knife or clay blade
- Fine-grit sandpaper (400 and 800 grit)
- Matte or satin polymer clay varnish (optional)
- Soft paintbrush
Step 1: Preparing the Clay
-
Condition the Clay:
Begin by warming up your clay. Knead the white and terracotta clays separately until they are soft, pliable, and free of cracks. If you are using a bit of translucent clay, condition that as well. -
Create Snakes:
Roll each color into long, thin snakes or logs. Since the dish is predominantly white/cream, make the white log significantly thicker or make two white logs for every one colored log. -
Combine the Colors:
Twist the different colored snakes together into one large rope. This is the start of your marbling journey.
Step 2: Marbling Technique
-
Fold and Twist:
Fold the twisted rope in half and twist it again. Roll it on your work surface to smooth it out into a single log again. -
Repeat for Complexity:
Repeat the twisting, folding, and rolling process. Be careful not to over-mix; you want distinct streaks of color, not a blended murky orange. Stop when you see a pleasing pattern of stripes. -
Form a Ball:
Squash the marbled log into a solid ball. Check all sides to ensure the colors are visible and swirled nicely.
Clean Cuts Matter
Wipe your clay blade with a baby wipe or a bit of rubbing alcohol before cutting. This prevents dragging and keeps the edges of your circle crisp.
Step 3: Shaping the Dish
-
Roll out the Slab:
Using your acrylic roller, flatten the ball into a smooth slab about 1/4 inch thick. Roll in different directions to keep the shape relatively circular and to stretch the pattern organically. -
Cut the Circle:
Place your round cutter or a bowl template onto the most attractive part of your swirled slab. Press down firmly or trace around it with your craft knife to cut a perfect circle. -
Smooth the Edges:
Lift the clay circle gently. Use your clean fingertip to lightly smooth the cut edge, rounding it off so it isn’t sharp or jagged. -
Add Curvature:
Place your clay circle inside an oven-safe bowl or draped over the bottom of an overturned bowl. Gently press it to conform to the curve, creating the dish shape.
Gilded Edge
Use a small brush and liquid gold leaf paint to add a metallic rim to your dish after baking. It adds a luxurious contrast to the matte, earthy clay.
Step 4: Baking and Finishing
-
Bake:
Place the bowl with the clay onto a baking sheet. Bake according to the manufacturer’s instructions for your specific brand of clay (usually 275°F/135°C for 15-30 minutes). -
Cool Down:
Once baked, turn the oven off and let the clay cool completely inside the oven or on a wire rack before popping it out of the shaping bowl. -
Sanding:
Dip your fine-grit sandpaper in water and gently sand the rim and any rough spots on the surface. Wet sanding prevents dust and creates a silky smooth finish. -
Seal (Optional):
If you prefer a sheen or want extra protection, apply a thin layer of matte or satin varnish with a soft brush. Let it dry completely.
Now you have a chic, modern spot to rest your daily jewelry
Terrazzo Speckle Trinket Tray

Embrace the modern charm of terrazzo with this sleek oval tray, perfect for holding keys, coins, or jewelry. By mixing custom color chips into a neutral base, you create a high-end stone look that feels completely personalized and sophisticated.
Detailed Instructions
Materials
- White or cream polymer clay (1 block)
- Small amounts of colored polymer clay (terracotta, hunter green, grey, mustard)
- Acrylic rolling pin or glass jar
- Parchment paper or baking mat
- Oval cutter or paper template with craft knife
- Sandpaper (various grits from 400 to 1200)
- Black acrylic paint
- Stiff bristle toothbrush
- Gloss or matte polyurethane varnish (optional)
Step 1: Creating the Chips
-
Condition the colors:
Start by conditioning your small amounts of colored clay—terracotta, green, grey, and mustard. Knead each piece until soft and pliable. -
Roll thin sheets:
Roll each colored piece into a very thin sheet, roughly 1-2mm thick. The thinner the sheet, the more delicate your final chips will be. -
Bake the sheets:
Place these thin colored sheets on a baking tray lined with parchment paper. Bake them for about 10-15 minutes at the manufacturer’s recommended temperature (usually 275°F/130°C) to semi-harden them. This makes chopping them easier. -
Chop into terrazzo shapes:
Once cooled, use your craft knife to chop the baked sheets into irregular, jagged fragments. Aim for a variety of sizes, from tiny specks to slightly larger chunks.
Sticky Situation?
If your clay gets too soft and sticky while rolling, pop it in the fridge for 10 minutes. This firms it up, making it much easier to cut clean edges without distortion.
Step 2: Forming the Base
-
Prepare the base clay:
Condition the main block of white or cream clay thoroughly. It needs to be soft enough to accept the inclusions. -
Incorporate the chips:
Sprinkle your chopped colored fragments onto the white clay. Fold the white clay over the chips and roll it out, then fold again. Repeat this process until the chips are evenly distributed throughout the block. -
Roll the slab:
Roll the clay out into a final slab about 1/4 inch thick. Make sure the surface is level and smooth. -
Reveal the pattern:
At this stage, many chips might be buried. I like to gently pass a rolling pin over the surface to press everything flat, ensuring the chips form a cohesive surface with the base.
Metallic Accent
Mix gold leaf flakes in with your colored chips before rolling out the slab. When you sand the final piece, you’ll reveal subtle metallic glimmers alongside the matte colors.
Step 3: Shaping and Sprinkling
-
Cut the oval shape:
Place your oval template onto the clay slab and carefully cut around it with a sharp craft knife. Remove the excess clay. -
Create the rim:
Take the long strip of excess clay and roll it into a long snake. Flatten it slightly to create a ribbon. -
Attach the rim:
Wrap this flattened ribbon around the edge of your oval base. Press the seams together firmly on the inside and outside edges to bond them. Use a modeling tool to smooth the seam so it disappears. -
Smooth the edges:
Dip your finger in a little bit of water (or baby oil) and run it along the rim to smooth out any fingerprints or rough joints.
Step 4: Final Details and Baking
-
Add the speckles:
For the tiny black dots seen in the reference, dilute a drop of black acrylic paint with a tiny bit of water. Dip a stiff toothbrush into the paint. -
Splatter technique:
Hold the toothbrush over the raw clay tray and run your thumb across the bristles to flick tiny specks of paint onto the surface. Let the paint dry completely. -
Final Bake:
Place your finished tray on a parchment-lined baking sheet. Bake for 30 minutes at the temperature recommended on your clay package. -
Cool and Sand:
Allow the tray to cool completely. Once hard, wet-sand the tray under running water using high-grit sandpaper to reveal the sharp edges of the terrazzo chips and create a buttery smooth finish. -
Seal (Optional):
If you want extra durability or a glossy look, apply a thin coat of polyurethane varnish to the finished piece.
Now you have a chic catch-all that brings order to your entryway with effortless style


What Really Happens Inside the Kiln
Learn how time and temperature work together inside the kiln to transform clay into durable ceramic.
Gold-Rimmed Trinket Dish
Simple yet undeniably elegant, this handcrafted trinket dish features a subtle speckled texture and a luxurious gold edge perfect for holding your most precious rings. It makes for a beautiful addition to a bedside table or a thoughtful handmade gift.
Step-by-Step Guide
Materials
- White air-dry clay or polymer clay
- Rolling pin
- Circle cutter or small bowl (approx. 4 inches)
- Small sponge or foam brush
- Sandpaper (fine grit)
- Gold leaf paint or liquid gilding
- Small detail paintbrush
- Brown acrylic paint (optional for speckles)
- Old toothbrush (optional for speckles)
- Gloss varnish or sealant
- Small bowl for shaping (drying form)
Step 1: Shaping the Clay
-
Condition the clay:
Start by taking a handful of white clay and working it in your hands to warm and soften it. This conditioning process prevents cracks from forming later when you roll it out. -
Roll out the slab:
Place the clay on a smooth surface or canvas mat. Use your rolling pin to flatten it into an even sheet. Aim for a thickness of about 1/4 inch—too thin and it will break; too thick and it looks chunky. -
Cut the circle:
Press your circle cutter or place an inverted bowl onto the clay slab to trace a perfect circle. Use a craft knife to cut around the guide if you aren’t using a cutter, then remove the excess clay. -
Smooth the edges:
Dip your finger in a tiny bit of water and run it gently along the cut edge of the clay circle. This smooths out any harsh cutting lines or loose bits of clay. -
Form the curve:
Pick up your clay circle and gently place it inside a slightly larger bowl to give it a curved shape. Gently press the center down so it conforms to the bottom of the bowl form without leaving fingerprints. -
Let it dry:
Allow the clay to dry completely while sitting in the bowl form. Depending on your clay type and humidity, this could take 24 to 48 hours. Don’t rush this step.
Natural Speckles
Mix dried coffee grounds or black pepper directly into the white clay before rolling. This creates authentic texture and speckling from within the clay itself.
Step 2: Refining and Decorating
-
Sand for smoothness:
Once fully dry, pop the dish out of the mold. Use fine-grit sandpaper to gently buff the rim and any bumps on the surface until it feels like smooth stone. -
Clean the dust:
Wipe the entire dish down with a slightly damp cloth or sponge to remove all the sanding dust. A clean surface ensures your varnish and paint adhere properly. -
Create the speckles (Optional):
If your clay isn’t naturally speckled, dilute a small amount of dark brown acrylic paint with water. Dip an old toothbrush into the mixture and run your thumb across the bristles to flick tiny droplets onto the dish for that organic, stoneware look. -
Seal the surface:
Apply a coat of gloss varnish or sealant over the entire dish, top and bottom. This protects the clay and gives it a finished ceramic sheen. Let this coat dry completely. -
Prepare the gold:
Shake your bottle of liquid gilding or gold leaf paint thoroughly. You want the metallic pigments to be well-mixed for the brightest finish. -
Paint the rim:
Using a fine detail brush, carefully paint the very edge of the rim with gold. I find it helps to rest my pinky finger on the table to steady my hand while turning the dish slowly. -
Add slight imperfections:
Don’t worry about a perfectly straight line. Allow the gold to dip slightly onto the inner or outer edge in a few spots to mimic the organic feel of a hand-dipped glaze. -
Initial drying:
Let the gold rim dry undisturbed. Liquid gilding usually dries faster than acrylics, but check the manufacturer’s instructions. -
Final clear coat:
Once the gold is fully set, verify if your specific gold paint requires a sealant (some liquid gilding dulls with varnish). If compatible, add a final thin layer of gloss over the gold to prevent tarnishing.
Warping While Drying
If the clay starts to curl away from the bowl mold as it dries, place a small, light beanbag or bag of rice in the center to gently weigh it down.
Place your finished dish on a vanity to hold your favorite jewelry pieces safely and stylishly
Leaf-Shaped Trinket Dish
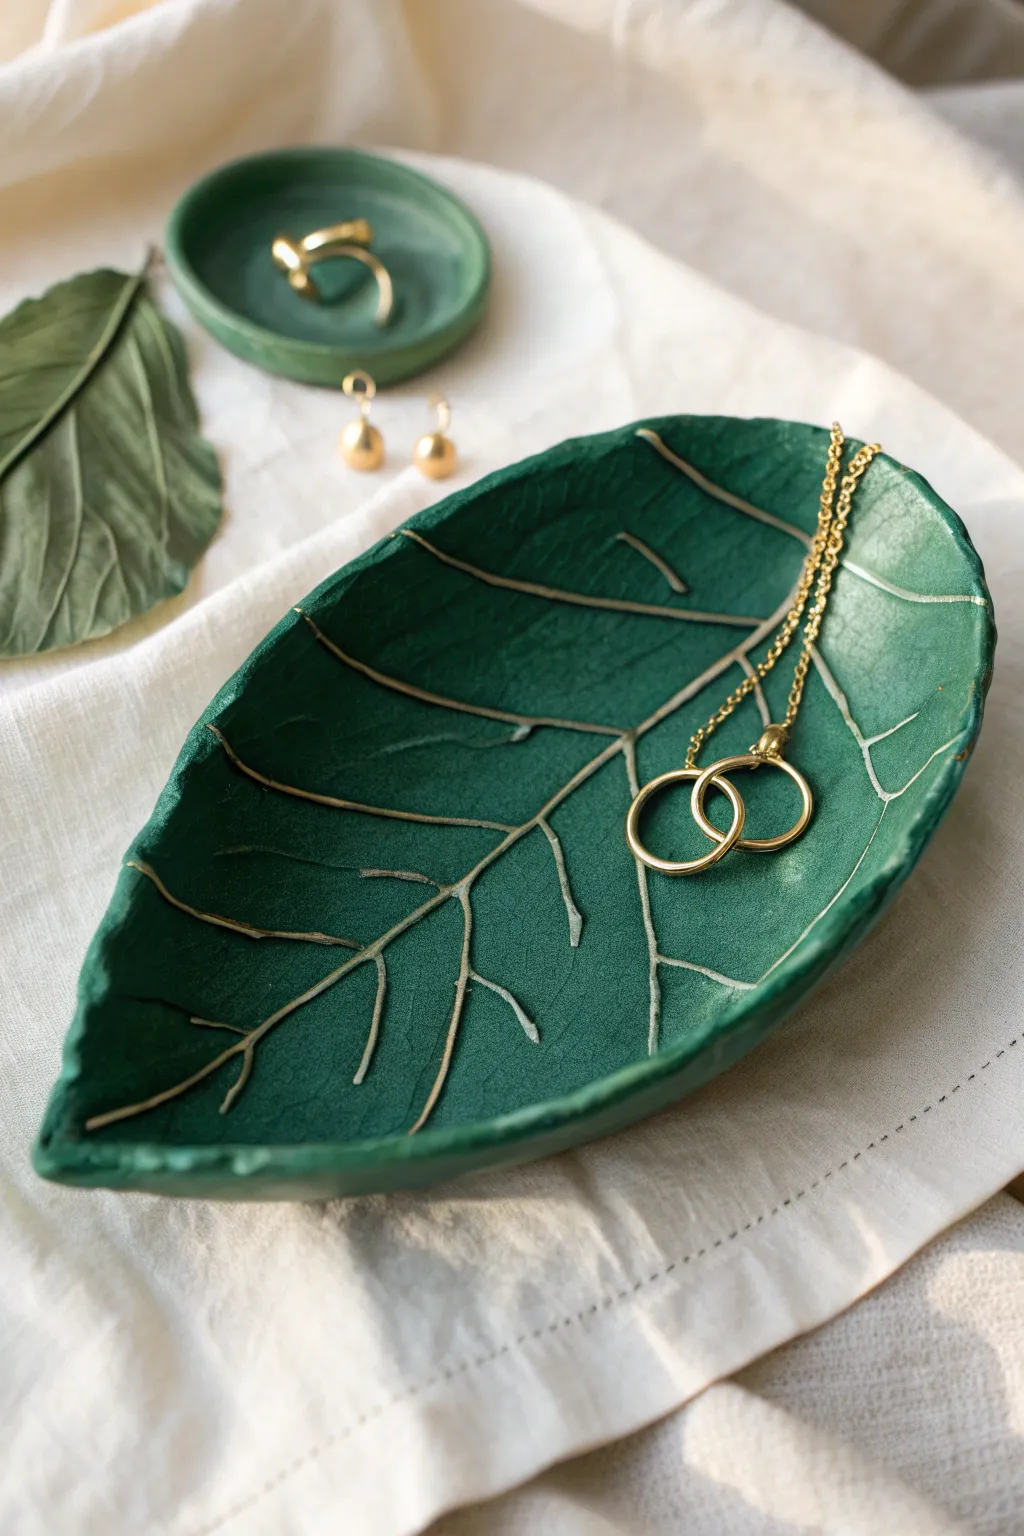
Bring a touch of nature to your dresser with this sophisticated trinket dish shaped like a deeply textured leaf. The deep forest green clay is accentuated by delicate gold-painted veins, creating an elegant resting place for your favorite rings and necklaces.
Step-by-Step
Materials
- Air-dry clay (white or terracotta)
- Acrylic paint (deep forest green)
- Acrylic paint (metallic gold)
- Real leaf with prominent veins (like a hydrangea or hosta leaf)
- Rolling pin
- Sharp craft knife or scalpel
- Fine detail paintbrush
- Medium flat paintbrush
- Small bowl or curved surface (for drying)
- glossy varnish or sealant
- Sandpaper (fine grit)
- Wax paper or parchment paper
Step 1: Shaping the Clay
-
Prepare your workspace:
Lay down a sheet of wax or parchment paper to prevent sticking. Take a handful of air-dry clay and knead it until it’s pliable and smooth, working out any air bubbles. -
Roll out the slab:
Use your rolling pin to flatten the clay into an even slab. You want a thickness of about 1/4 inch—thick enough to be durable but thin enough to look delicate. -
Select your leaf:
Choose a fresh leaf from the garden that has distinct, raised veins on the underside. The leaf in the photo has a broad, oval shape, similar to a magnolia or hydrangea leaf. -
Make the impression:
Place the leaf vein-side down onto your clay slab. Gently roll over the leaf with the rolling pin initially to set it, then press firmly with your fingers to ensure every vein transfers its texture. -
Cut the shape:
Leaving the leaf in place as a guide, use your sharp craft knife specifically to trace around the perimeter of the leaf. Peel away the excess clay. -
Reveal the texture:
Carefully lift the real leaf off the clay by the stem to reveal the imprinted pattern underneath. If any edges look rough, gently smooth them with a bit of water on your fingertip. -
Create the curve:
To give the dish its cupped shape, lift the clay leaf and drape it inside a small bowl or over a curved object. Gently press the center down so the edges curve upward naturally. -
Allow to dry:
Let the clay dry completely in this position. Depending on your climate and clay brand, this usually takes 24 to 48 hours. It must be bone dry before painting.
Vein Definition Tip
If your leaf’s veins are shallow, try ‘dry brushing’ the gold over the raised surfaces instead of painting the recessed lines for a reversed, equally stunning effect.
Step 2: Painting and Finishing
-
Smooth the edges:
Once fully dry, remove the dish from the bowl. Use fine-grit sandpaper to lightly sand any sharp or jagged edges on the rim to ensure a professional finish. -
Base coat application:
Using a medium flat brush, apply the deep forest green acrylic paint to the entire surface of the dish, front and back. Work the paint into the textured crevices. -
Add a second coat:
Let the first layer dry to the touch, then apply a second coat if needed to achieve that rich, opaque green color seen in the example. -
Dry the base:
Allow the green paint to dry completely. If the paint is tacky, the gold detailing step will be messy. -
Highlight the veins:
Dip a fine detail brush into your metallic gold paint. Very carefully paint inside the impressed lines of the main veins. I find it easiest to start from the center stem and work outward. -
Define the rim:
For a cohesive look, run a thin line of gold paint along the very edge of the dish’s rim, framing the green interior. -
Clean up details:
If you get gold outside the lines, quickly wipe it with a damp cotton bud or touch it up with a bit of green paint after the gold dries. -
Seal the piece:
Once all paint is perfectly dry, apply a coat of glossy varnish or sealant. This protects the clay from moisture and gives the dish a finished, ceramic-like sheen.
Cracked While Drying?
Mix a tiny amount of fresh clay with water to create a paste (slip). Fill the crack, smooth it over with a wet finger, and let it dry again before painting.
Place your new jewelry dish on your nightstand and enjoy the elegant organic vibes

TRACK YOUR CERAMIC JOURNEY
Capture glaze tests, firing details, and creative progress—all in one simple printable. Make your projects easier to repeat and improve.
Pinch Pot Mini Trinket Bowl
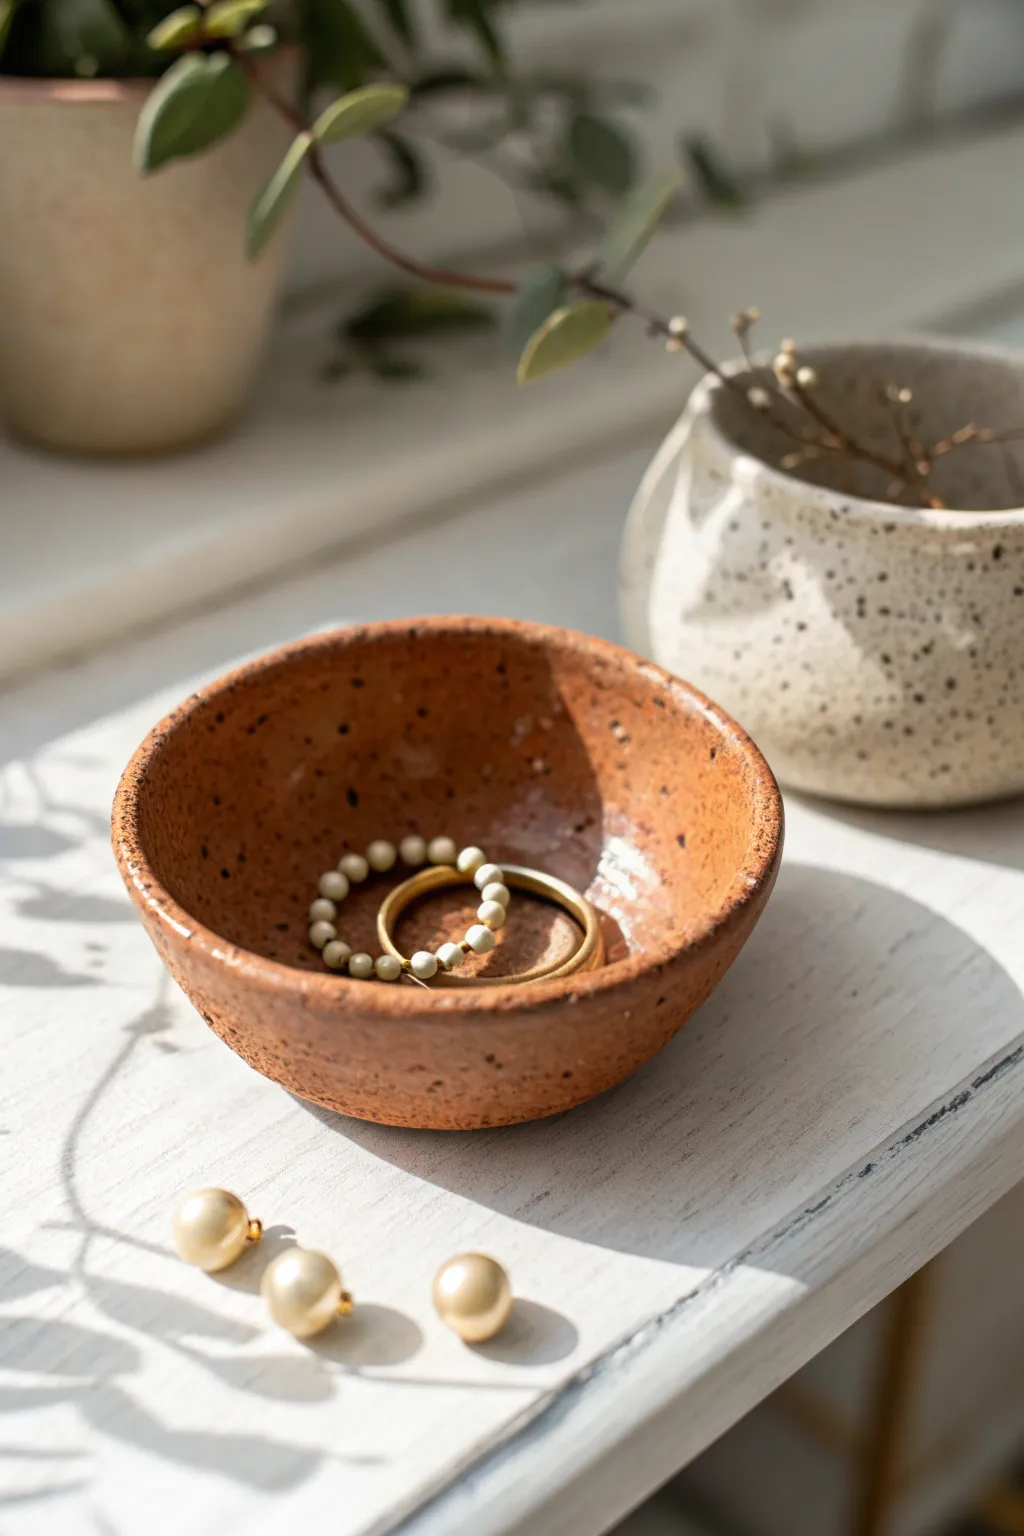
Embrace the imperfect beauty of hand-built pottery with this charming little trinket bowl. Its warm terracotta tones and delicate speckled finish make it the perfect resting spot for your favorite rings and small treasures.
Step-by-Step Tutorial
Materials
- Red stoneware or terracotta clay (ideally grogged or speckled)
- Clear glossy glaze (food safe recommended)
- Black iron oxide wash or manganese wash (optional for speckling)
- Sponge
- Small container of water
- Wooden modeling tool or old spoon
- Needle tool or toothpick
- Sandpaper (fine grit)
- Kiln access (or air-dry clay alternatives if not firing)
Step 1: Shaping the Base
-
Prepare the Clay:
Start with a ball of clay roughly the size of a golf ball or a small tangerine. Wedge it well in your hands to remove air bubbles and ensure it feels consistent and pliable. -
Create the Opening:
Hold the clay ball in your non-dominant hand. With your dominant thumb, press gently into the center of the ball, stopping about a quarter-inch from the bottom to leave enough thickness for the base. -
Begin Pinching:
With your thumb inside the hole and your fingers on the outside, gently pinch and rotate the clay. Work your way from the bottom up in a spiral motion. -
Even the Walls:
Continue rotating and pinching to thin the walls. Aim for an even thickness of about 1/4 inch throughout. Don’t worry if it’s not perfectly symmetrical; the slight wobble adds to the rustic charm seen in the photo. -
Shape the Rim:
As you reach the top, you can gently flare the rim outward slightly. If the edge cracks, smooth it over with a slightly damp finger, but avoid using too much water which can weaken the structure.
Step 2: Refining and Drying
-
Smooth the Surface:
Using a slightly damp sponge or your thumb, smooth out any deep fingerprints or harsh ridges on both the interior and exterior. -
Refine the Foot:
Tap the bottom of the bowl gently on your work surface to create a flat, stable base so it won’t tip over once filled with jewelry. -
Slow Drying:
Loosely cover your bowl with plastic and let it dry slowly for a day or two until it reaches a ‘leather hard’ state. This prevents warping. -
Final Smoothing:
Once bone dry, take fine-grit sandpaper and gently gently rub away any sharp bits on the rim or base. Be sure to wear a dust mask for this step. -
Bisque Fire:
Fire the piece in a kiln to cone 04 (or according to your clay’s instructions) to prepare it for glazing.
Natural Texture
Don’t over-smooth the exterior walls. Leaving subtle finger ridges or ‘chatter’ marks catches the light and emphasizes the handmade quality.
Step 3: Glazing and Finishing
-
Clean the Bisque:
Wipe the fired bowl with a clean, damp sponge to remove any kiln dust. This ensures the glaze adheres properly. -
Apply Speckles (Optional):
If your clay body doesn’t have natural speckles, you can flick a toothbrush dipped in iron oxide wash over the surface to create that dotted effect. -
Glaze the Interior:
Pour a small amount of clear glossy glaze into the bowl. Swirl it around to coat the entire interior and pour out the excess. I usually wipe the rim clean to keep that nice contrast between the glazed inside and matte edge. -
Clean the Bottom:
Ensure the bottom of the pot is completely free of glaze. Use a sponge to wipe back the exterior if you want the raw clay texture to remain visible like the reference image. -
Final Fire:
Place the bowl back in the kiln for the glaze firing (temperature depends on your specific glaze and clay combo, usually Cone 5/6 for stoneware).
Jewelry Protection
Once finished, glue a small circle of felt or cork to the very bottom of the bowl. This prevents scratches on your nightstand or dresser surface.
Place your new creation on a windowsill to catch the light and fill it with your favorite daily gems
Stamped Texture Trinket Dish
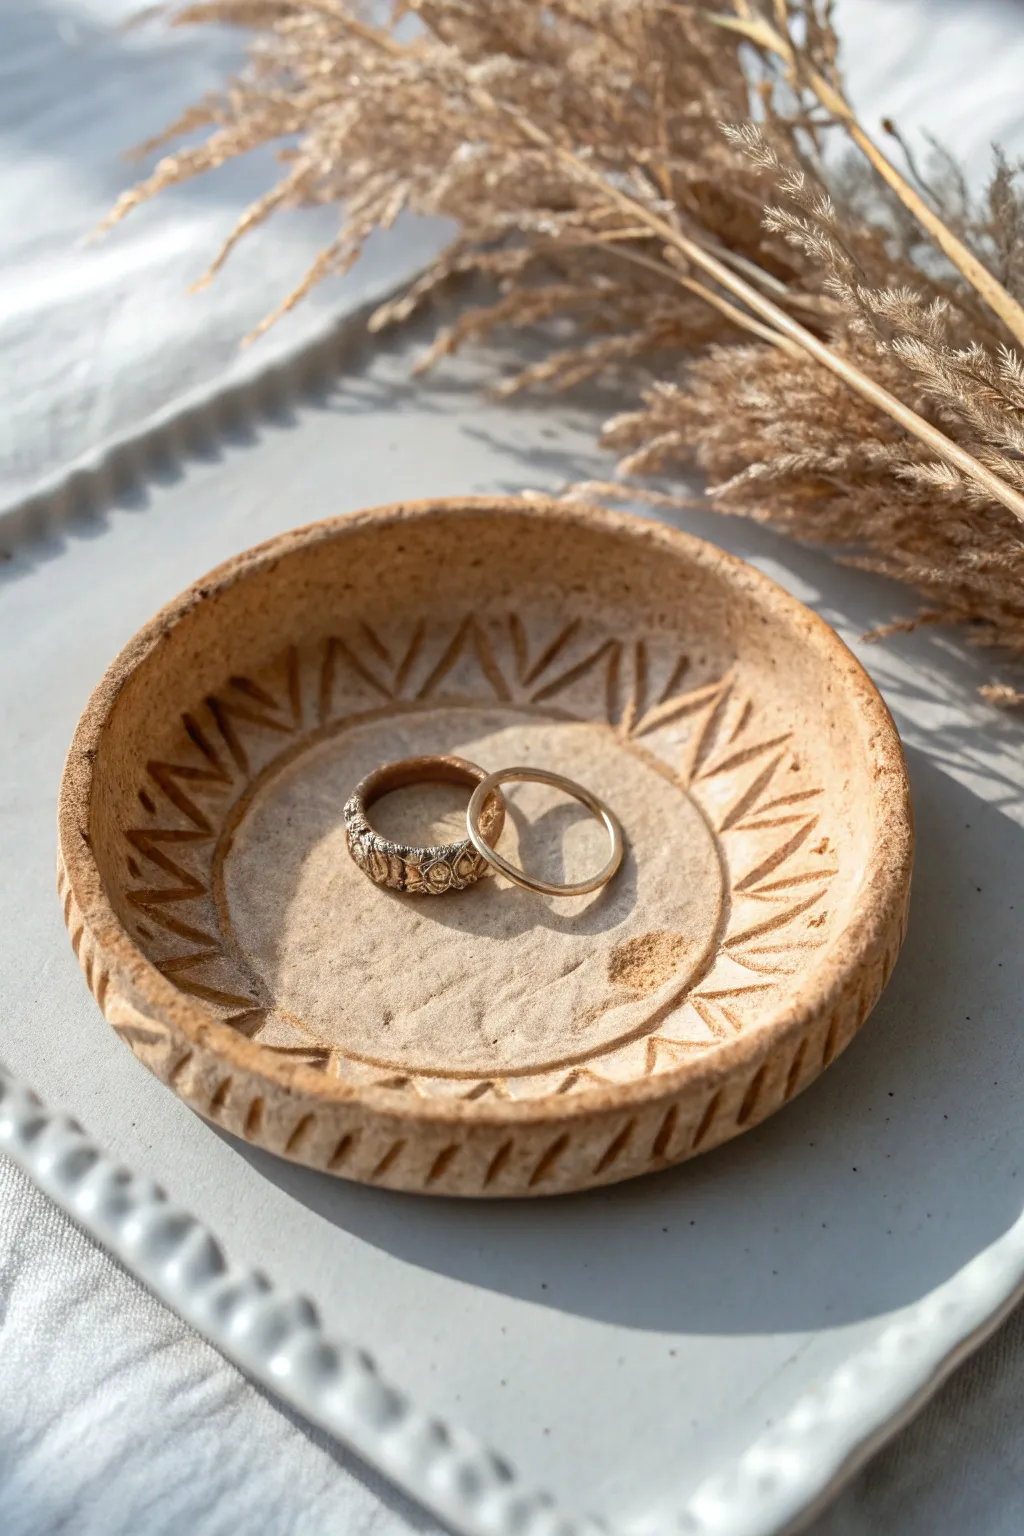
This earthy, minimalist trinket dish captures the warmth of natural clay with a tactile sunburst pattern. It’s the perfect size for keeping your favorite rings safe and adds a touch of bohemian charm to any dresser or bedside table.
Step-by-Step
Materials
- Air-dry clay (terra cotta or white)
- Rolling pin
- Circle cutter or small bowl (approx. 4 inches diameter)
- Flat, straight-edged sculpting tool or a small flathead screwdriver
- Small sponge
- Fine-grit sandpaper
- Clear matte varnish or sealant
- Small paintbrush
- Bowl of water
Step 1: Preparing the Clay Base
-
Condition the Clay:
Begin by taking a handful of air-dry clay and kneading it in your hands to warm it up. Continue kneading until it feels pliable and smooth, removing any potential air bubbles. -
Roll the Slab:
Place the clay on a clean, flat surface or a craft mat. Use your rolling pin to flatten the clay into a slab that is roughly 1/4 inch thick. Try to keep the thickness consistent across the entire piece. -
Cut the Circle:
Position your circle cutter or a small bowl upside down on the clay slab. Press down firmly to cut out a perfect circle. -
Smooth the Edges:
Dip your finger into a little water and run it gently along the cut edge of the circle. This softens the sharp cut line and prevents cracking later on.
Cracks appeared?
Mix a tiny amount of fresh clay with water to create a paste (slip). Fill the cracks with this paste, smooth it over with your finger, and let it dry again.
Step 2: Creating the Form
-
Lift the Edges:
Gently peel the clay circle off your work surface. Cupping the clay in one hand, use your other hand to slowly and gently pinch the edges upward. -
Shape the Curve:
Rotate the disk as you pinch, aiming for a consistent, shallow rim. You aren’t building a tall wall, just a gentle curve to keep jewelry contained. -
Refine the Shape:
Place the dish back on the table and lightly press the center down to ensure the bottom is flat. Go around the rim again with a damp sponge to smooth out any fingerprints or uneven spots.
Pro Tip: Uniform Depth
For consistent stamping, wrap a piece of tape around your tool to mark how deep to press. This acts as a depth stop so all your ‘V’ shapes look identical.
Step 3: Adding the Stamped Texture
-
Plan the Pattern:
Visualize a repeating V-shaped or chevron pattern radiating from the center of the dish toward the rim, like sun rays. You can mark light guide points if you are worried about spacing. -
Stamp the Inner Ray:
Take your flat-edged tool. Press the edge into the clay floor, starting about an inch from the rim, angling it diagonally. Press firmly enough to leave a growing indentation but not cut through. -
Stamp the Outer Ray:
Create the second part of the ‘V’ shape. Press the tool edge into the rim itself, angling it to meet or mirror the first line you made. -
Continue the Pattern:
Repeat this process, moving around the circumference of the dish. I find it helpful to rotate the dish itself rather than moving my hand position too much. -
Detail the Rim:
Extend the texture over the lip of the dish. Press your tool into the outer vertical edge of the rim to continue the lines, giving the piece a rustic, carved look from all angles. -
Texture the Center:
If you want that grainy, stone-like texture seen in the photo, gently dab the center flat area with a dry sponge or a crumpled ball of aluminum foil.
Step 4: Finishing Touches
-
Initial Drying:
Let the dish sit undisturbed in a cool, dry place for at least 24 hours. Flip it over halfway through the drying process to ensure the bottom dries evenly. -
Sanding:
Once the clay is bone dry and hard (it should be lighter in color), use fine-grit sandpaper to gently buff away any rough burrs on the rim. -
Dusting Off:
Wipe the dish down with a slightly damp cloth or a dry brush to remove all the clay dust from the sanding process. -
Adding the Wash:
To enhance the texture, mix a tiny bit of brown acrylic paint with water. Brush it over the textured areas and immediately wipe the surface with a paper towel, leaving pigment only in the deep grooves. -
Sealing:
Apply a thin coat of matte varnish or sealant to the entire dish. This protects the clay from moisture and gives it a finished feel.
Place your new dish on your vanity and enjoy the handmade warmth it brings to your space
Monogram Letter Trinket Dish
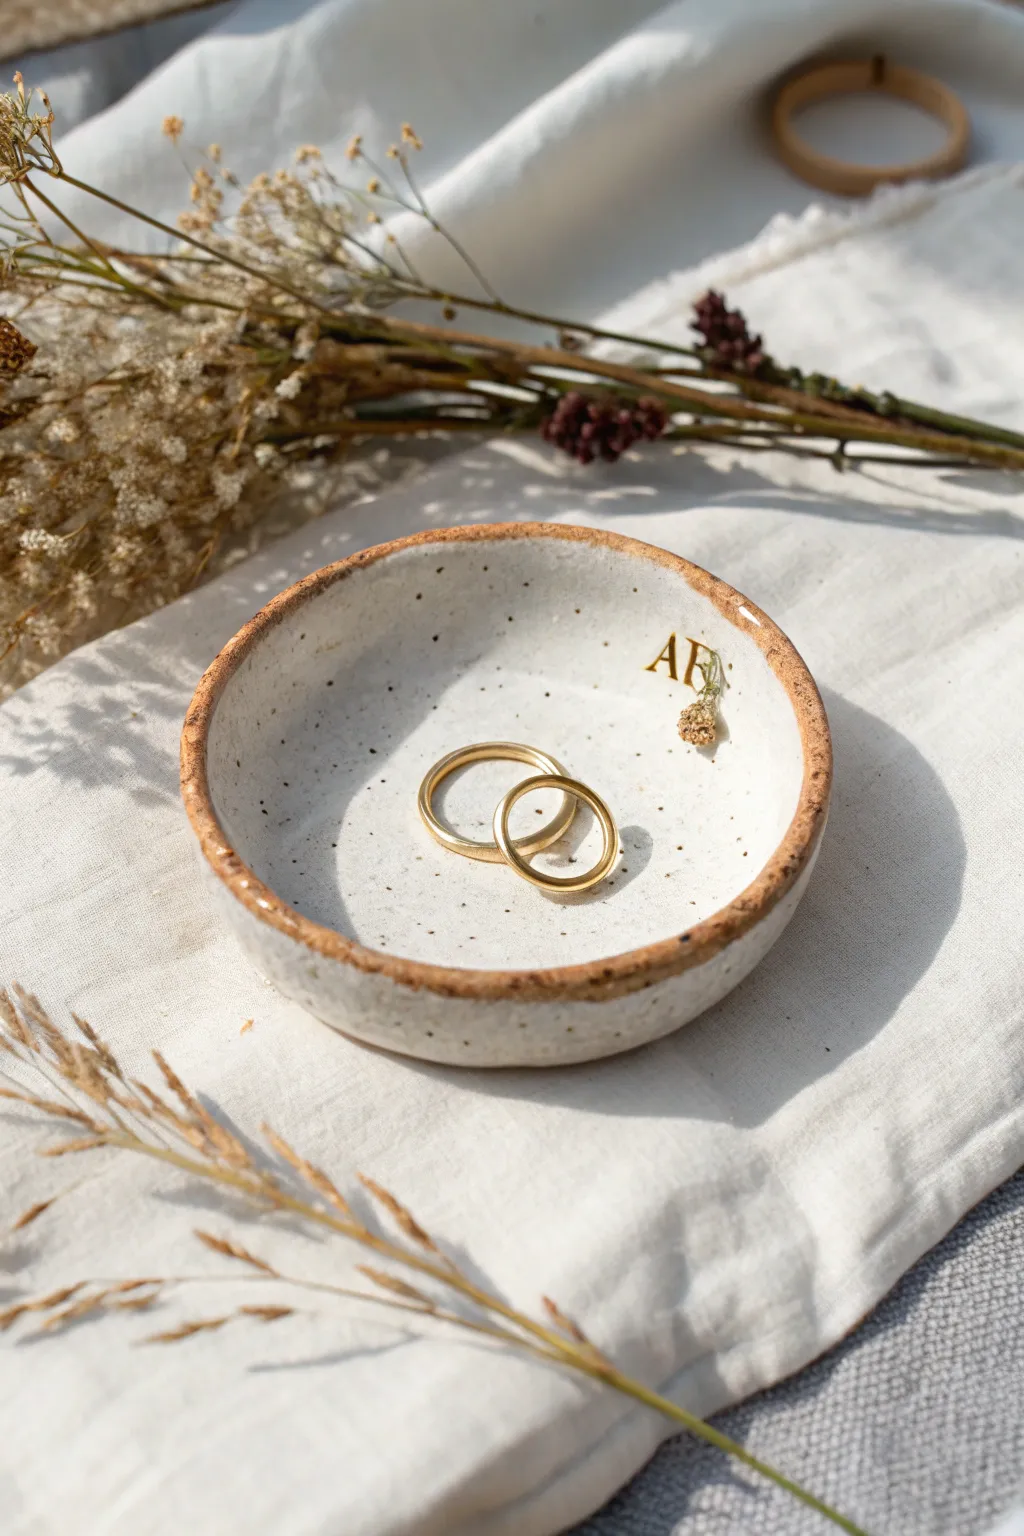
This delicate, speckled trinket dish is the perfect resting place for your most precious rings. Featuring a rustic toasted clay rim and a personalized gold monogram, it combines modern elegance with handmade warmth.
Step-by-Step Tutorial
Materials
- White polymer clay (cernit or fimo)
- Black pepper or dried vanilla specks (for faux speckle effect)
- Gold acrylic paint or liquid gold leaf
- Fine detail paintbrush
- Small letter stamps (serif font)
- Small bowl or round cutter (approx. 3-4 inches)
- Rolling pin
- Sandpaper (fine grit)
- Gloss glaze or varnish
- Burnt umber or bronze acrylic paint (for the rim)
Step 1: Shaping the Clay
-
Prepare the Clay:
Begin by conditioning your white polymer clay until it is soft and pliable. If your clay doesn’t come pre-speckled, I like to knead in a tiny pinch of cracked black pepper or vanilla bean specks to achieve that organic, pottery-like texture. -
Roll it Out:
Roll the clay into a smooth ball, then flatten it with your rolling pin. Aim for an even thickness of about 1/4 inch so the dish feels substantial but not chunky. -
Cut the Circle:
Use a round cookie cutter or trace around a small bowl to cut a perfect circle from your rolled slab. Smooth the edges with your finger to remove any sharp cut marks. -
Form the Curve:
Gently lift the clay circle and place it into a slightly larger, oven-safe bowl to give it a curved shape. Press it down lightly so it takes the form of the bowl without thinning the bottom too much. -
Stamp the Initials:
While the clay is still inside the shaping bowl, position your letter stamps off-center on the right side. Press firmly but carefully to create a clean impression of your chosen monogram.
Uneven Stamping?
If your stamp impression looks too shallow, don’t re-stamp directly over it. Flip the clay circle over, smooth it out, and try again on the fresh side to avoid ghost images.
Step 2: Baking and Finishing
-
Bake the Dish:
Bake the clay according to the manufacturer’s instructions on the package (usually around 230°F to 265°F for 15-30 minutes). Keep the clay in the oven-safe bowl during baking to maintain its shape. -
Cool Down:
Allow the dish to cool completely before removing it from the form. This prevents warping and ensures the clay has fully hardened. -
Sand the Edges:
Take a piece of fine-grit sandpaper and gently sand the rim of the dish. You want to create a slightly uneven, organic edge rather than a perfectly sharp factory finish. -
Clean the Surface:
Wipe the entire dish with a slightly damp cloth to remove any clay dust or sanding residue before painting.
Add a Dried Floral
Before baking, press a tiny dried flower head into the clay next to the letters. Remove it after baking and fill the impression with a soft pastel paint for a botanical touch.
Step 3: Decoration and Glazing
-
Paint the Monogram:
Dip a very fine detail brush into your gold paint or liquid gold leaf. Carefully fill in the impressed letters. Don’t worry if you go slightly outside the lines; you can scrape away excess once dry. -
Create the Rustic Rim:
Mix a small amount of burnt umber paint with a touch of bronze. Using a dry brush technique or a sponge, dab this color along the very top edge of the rim. -
Feather the Rim Color:
While the rim paint is wet, gently pull a tiny amount of the color downward onto the inner and outer walls to create that toasted, earthy pottery look shown in the photo. -
Let Paint Dry:
Allow all paint layers to dry completely. Liquid gold leaf dries quickly, but acrylics might need 20 minutes. -
Apply Glaze:
Seal the entire dish with a coat of high-gloss varnish. This mimics the look of ceramic glaze and protects the gold paint from tarnishing over time.
Enjoy your sophisticated custom dish as a beautiful spot to keep your everyday jewelry safe
Botanical Painted Trinket Dish
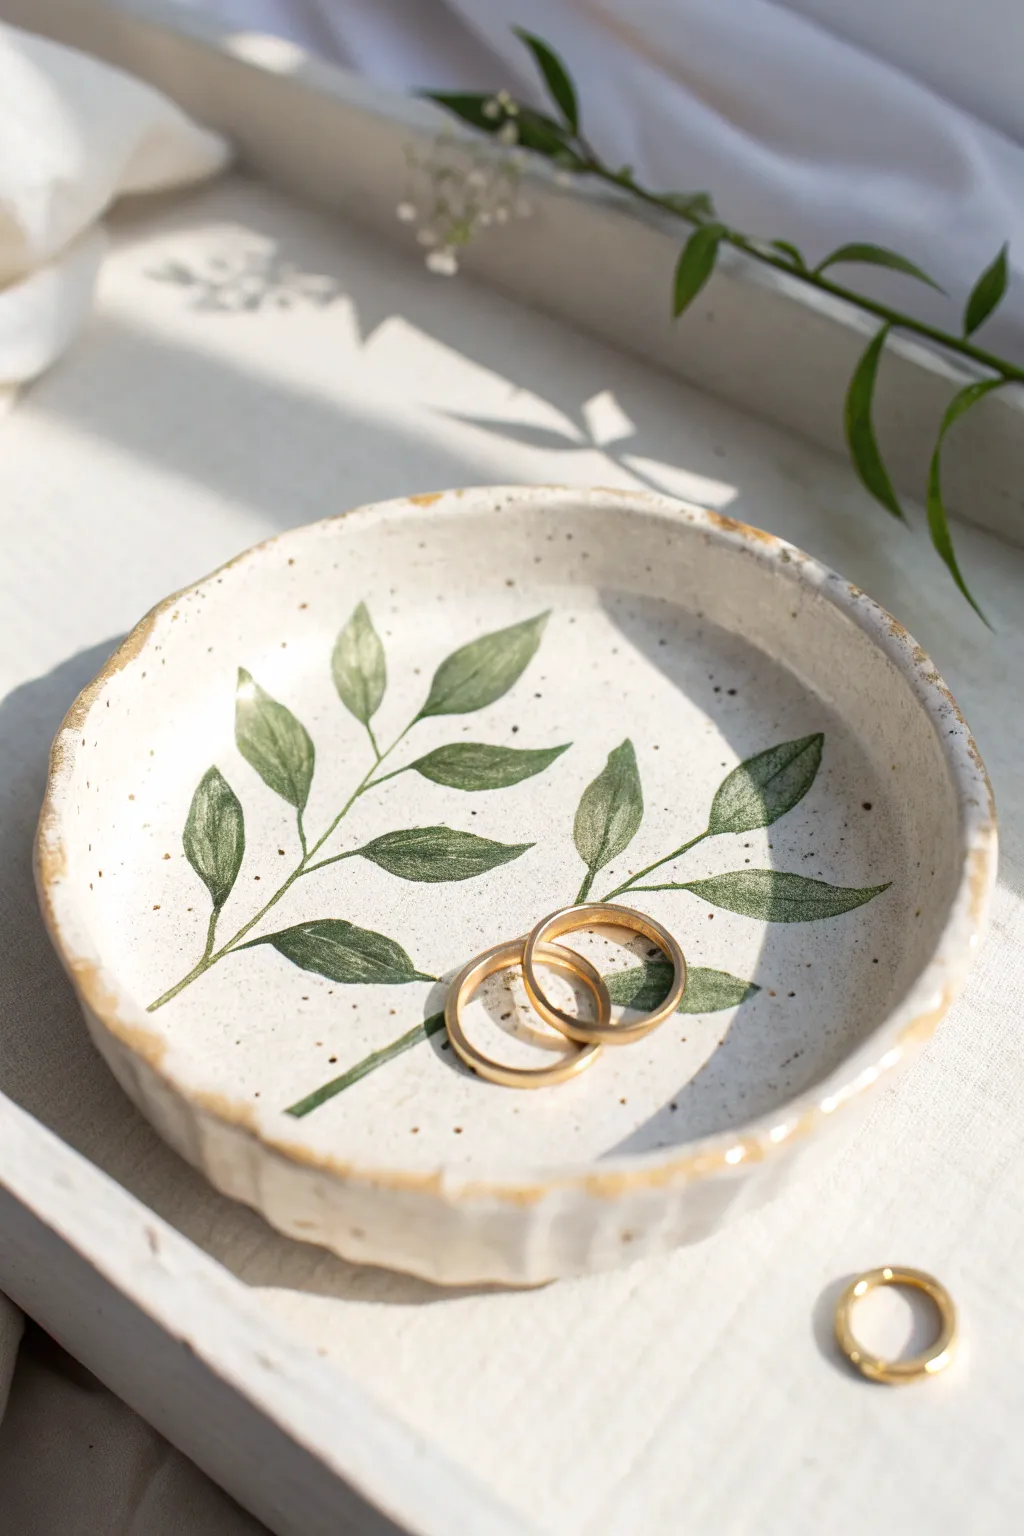
Capture the serenity of nature with this elegant little dish, featuring delicate hand-painted leaves on a speckled stoneware-style background. It’s the perfect size for holding your most precious rings or serving as a decorative accent on a bedside table.
Step-by-Step
Materials
- White specialized air-dry clay (or stoneware clay if you have kiln access)
- Acrylic rolling pin
- Small bowl (approx. 4-5 inches diameter) for use as a mold
- Craft knife or needle tool
- Sanding sponge (fine grit)
- Acrylic paints: Sage green, forest green, warm white, beige/cream, metallic gold
- Fine detail paintbrushes (size 0 and 00)
- Small flat shader brush
- Old toothbrush
- High-gloss varnish or resin for sealing
- Palette or small plate for mixing
- Water cup and paper towels
Step 1: Shaping the Clay Body
-
Condition and roll:
Begin by working a handful of white clay in your hands until it’s pliable and warm. Roll it out on a smooth surface to an even thickness of about 1/4 inch, ensuring there are no air bubbles trapped inside. -
Cut the circle:
Place your selected bowl upside down on the rolled clay to use as a template. Trace around the rim with a craft knife or needle tool to cut out a perfect circle. -
Add texture to the rim:
Before shaping, use your fingertips to gently pinch and irregularize the cut edge. We want an organic, handmade feel rather than a sharp, factory-cut look, so slight waves are perfect. -
Form the dish shape:
Gently lift your clay circle and lay it inside your bowl mold. Press it down lightly so it takes on the curved shape. Don’t press too hard, or the clay might stick. -
Dry completely:
Let the clay dry in the mold for about 24 hours until it’s rigid enough to hold its shape, then remove it and let it air dry fully for another 24-48 hours. I find flipping it occasionally helps it dry evenly. -
Smooth the surface:
Once bone dry, use a fine-grit sanding sponge to gently smooth the rim and the interior surface. Wipe away all dust with a slightly damp tack cloth or paper towel.
Uneven Speckles?
If your paint speckles are coming out too large or blotchy, blot the toothbrush on a paper towel first to remove excess moisture before flicking.
Step 2: Painting the Botanical Design
-
Create the base coat:
Mix a warm white acrylic with a tiny drop of beige. Paint two thin coats over the entire dish to create a creamy ceramic look, letting each coat dry fully. -
Sketch the branches:
Lightly sketch your leaf placement with a pencil directly on the painted clay. Draw two main stems crossing near the bottom and curving upwards to fill the space. -
Paint the stems:
Load a fine liner brush with watered-down forest green paint. Carefully trace your pencil stem lines, keeping the pressure light so the stems remain thin and delicate. -
Block in the leaves:
Using sage green, paint the basic leaf shapes extending from your stems. Aim for an elongated almond shape for each leaf. -
Add leafy details:
Once the sage base is dry, use your smallest detail brush and the darker forest green to add a central vein to each leaf. You can also lightly outline one side of the leaves for depth. -
Create the speckled effect:
Dilute a small amount of dark brown or black paint with water until it’s very runny. Dip an old toothbrush into it, then run your thumb across the bristles to flick tiny speckles over the entire dish. -
Gild the rim:
With a flat brush or your finger, dab metallic gold paint along the irregular rim of the bowl. Allow the gold to smudge slightly down into the crevices for a vintage, uneven finish.
Pro Tip: Translucency
Mix a tiny bit of glazing medium into your leaf colors. This makes the acrylic paint slightly transparent, mimicking real watercolor or underglaze.
Step 3: Sealing and Finishing
-
Apply the gloss:
To mimic the look of glazed ceramic, apply a coat of high-gloss varnish over the entire interior. Ensure you get into the textures of the painted leaves. -
Final cure:
Let the varnish cure according to the bottle instructions. If you want an extra glass-like finish, a second coat of varnish or a thin layer of UV resin works wonders.
Now you have a stunning, nature-inspired dish ready to organize your jewelry collection in style
Simple Floral Trinket Dish
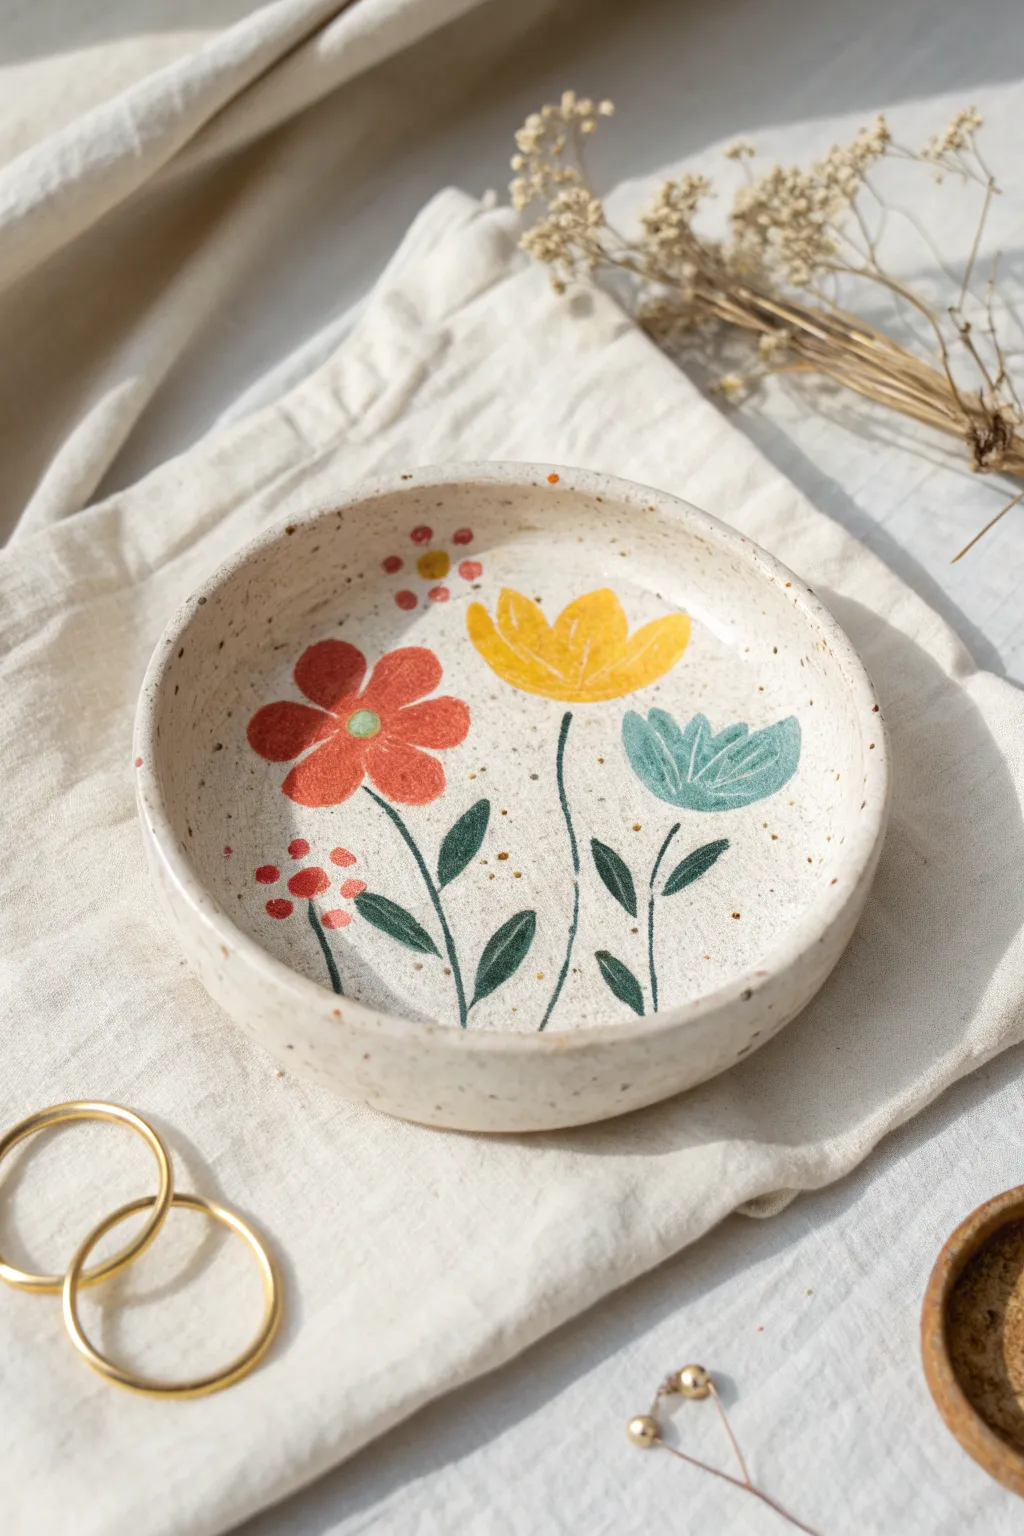
Bring a touch of cottagecore charm to your nightstand with this creamy, speckled trinket dish adorned with hand-painted wildflowers. Its shallow rim prevents jewelry from sliding off while showcasing a naive, folk-art floral design.
How-To Guide
Materials
- White stoneware clay (preferably speckled)
- Rolling pin
- Wooden guide strips (1/4 inch thickness)
- Circular clay cutter or bowl template (approx. 4-5 inches)
- Sponge
- Underglazes: Terra cotta red, sunny yellow, sage green, deep forest green
- Fine detail paintbrush
- Needle tool
- Clear glaze
- Kiln access
Step 1: Forming the Dish
-
Prepare your clay slab:
Begin by wedging a ball of speckled stoneware clay to remove air bubbles. Lay down your wooden guide strips and roll the clay out until you have a smooth, even slab about 1/4 inch thick. -
Cut the base shape:
Place your circular cutter or a small bowl template onto the slab. Press down firmly or trace around the template with a needle tool to create a perfect circle. -
Lift and smooth:
Gently lift the clay circle from your work surface. Use a damp sponge to smooth down the sharp edges where you cut, ensuring a soft feel for the finished rim. -
Create the rim:
To form the lip, gently pinch the edges of the circle upward. Work your way around the circumference multiple times, raising the wall just slightly—about half an inch—to create a shallow basin. -
Refine the shape:
Tap the dish gently on your work surface to flatten the bottom. Use your damp sponge again to ensure the interior transition between the floor and the wall is smooth and seamless.
Uneven drying?
If your rim warps while drying, place a lightweight board or small beanbag on top of the rim (with a paper barrier) during the leather-hard stage to gently weigh it down evenly.
Step 2: Painting the Design
-
Dry to leather hard:
Let the dish dry slowly for a few hours until it reaches a ‘leather hard’ stage. The clay should be firm enough to hold its shape but soft enough to absorb the underglaze. -
Start with the red flower:
Load a small brush with terra cotta red underglaze. Paint a five-petal flower on the left side of the dish. Keep the strokes somewhat organic and loose rather than geometrically perfect. -
Add the yellow tulip:
Using a sunny yellow underglaze, paint a tulip or bell-shaped flower head in the upper center, positioning it slightly higher than the red flower. -
Paint the blue-green bloom:
Mix a touch of sage green with a tiny bit of blue (or use a pre-mixed teal) to paint the third flower head on the right. This one should look like a ruffled fan shape. -
Add decorative berries:
Dip a small round tool or the back of a brush into the red underglaze. Dot a small cluster of berries near the bottom left, and add a few floating dots near the top left rim for balance. -
Paint the stems and leaves:
Switch to your finest detail brush and deep forest green underglaze. Paint thin, curving stems connecting each flower head to the bottom of the dish. -
Add leaf details:
Along the stems, paint simple, almond-shaped leaves. Add two longer leaves specifically framing the bottom of the stems to ground the composition. -
Detail the flower centers:
Once the base colors are dry to the touch, add a small green dot in the center of the red flower. -
Carve fine lines (Sgraffito):
Before the underglaze is bone dry, take your needle tool and gently scratch fine lines into the yellow and teal flowers to mimic petals and texture. I prefer doing this while the underglaze is slightly damp for cleaner lines.
Air dry alternative
No kiln? Use air-dry clay and acrylic paints instead. Seal it with a glossy Mod Podge or varnish for a similar look, though note it won’t be food or water safe.
Step 3: Firing and Finishing
-
Bisque fire:
Allow the piece to dry completely (bone dry). Fire it in the kiln to a bisque temperature (usually cone 04) to harden the clay. -
Apply clear glaze:
Wipe the bisqued piece with a damp sponge to remove dust. Dip the entire dish into a clear, glossy glaze, ensuring an even coat. -
Wipe the foot:
thoroughly wipe the glaze off the bottom of the dish with a sponge so it won’t stick to the kiln shelf during the final firing. -
Final firing:
Fire the piece again to the maturation temperature of your specific clay and glaze (often cone 5 or 6 for stoneware).
Once cooled, your charming floral dish is ready to hold your favorite rings or simply brighten up a tabletop
Butterfly Decal Trinket Dish

This elegant little catch-all combines the organic feel of speckled clay with a structured ripple effect that draws the eye toward a delicate butterfly center. It’s perfect for holding daily jewelry or simply sitting prettily on a sunny windowsill to catch the light.
Step-by-Step Guide
Materials
- Speckled stoneware clay (or white polymer clay with faux speckles)
- Butterfly rubber stamp or clay stamp
- Rolling pin
- Circle cutter (approx. 4-5 inches) or a bowl to trace
- Pottery wheel (optional, for throwing) or a round slump mold/bowl for hand-building
- Needle tool or fettling knife
- Small loop tool (for carving ripples)
- Sponge
- Matte white or clear glaze (if firing)
- Kiln (if using stoneware)
Step 1: Preparation and Forming
-
Prepare the Clay:
Begin with a ball of speckled stoneware clay. Wedge it thoroughly to remove air bubbles and ensure an even consistency, which is crucial for preventing cracks later. -
Form the Base:
You have two main paths here: throwing or hand-building. If throwing on a wheel, center your clay and open it up into a low, wide cylinder with thick walls. -
Pull the Walls:
Gently pull up the walls of your dish. You want them to be approximately 1 to 1.5 inches high. Keep the rim distinct and slightly rounded rather than sharp. -
Alternative Hand-Building Method:
If hand-building, roll a slab to about 1/4 inch thickness. Cut a circle, then gently press it into a shallow bowl or slump mold to create the cupped shape. Smooth the edges with a damp sponge. -
Let it Firm Up:
Whether thrown or hand-built, let the piece dry to a ‘leather hard’ stage. This is critical—the clay needs to be firm enough to carve into without warping, but soft enough to take an impression.
Clean Grooves
Glaze loves to fill texture. Before firing but after glazing, run a clean finger lightly over the ripples to thin the glaze there, highlighting the ridges.
Step 2: Creating the Design
-
Locate the Center:
Identify the exact center of the interior floor of your dish. This needs to be precise so the ripples radiate evenly. -
Stamp the Butterfly:
Take your butterfly stamp and press it firmly into the center. Apply even pressure so the wings impress clearly without pushing all the way through the bottom. -
Clean the edges:
If the stamp raised any sharp ridges of clay around the outline, gently smooth them down with your finger or a soft brush. -
Start the Inner Ripple:
Using a small loop tool, begin carving a shallow groove just outside the stamped area. I find creating a light guide line first helps minimize mistakes. -
Carve Concentric Circles:
Continue carving concentric circles moving outward toward the walls. Aim for a pattern that mimics water rippling. The ridges should be rounded, not sharp V-grooves. -
Smooth the Texture:
Once carved, run a barely damp sponge over the ridges to soften them. You want them to feel pleasant to the touch, not scratchy. -
Refine the Rim:
Turn your attention to the outer rim. Use your sponge or a piece of chamois leather to ensure it creates a smooth, finished lip.
Gold Luster
For extra luxury, paint liquid gold luster into just the stamped butterfly wings after the final firing, then re-fire at a very low temperature (Cone 018).
Step 3: Finishing
-
Dry Completely:
Allow the dish to dry slowly under loose plastic for a day, then uncovered until bone dry. Slow drying prevents the bottom from cracking. -
Bisque Fire:
Load the bone-dry piece into the kiln for a bisque firing (usually Cone 04). This prepares the clay to accept glaze. -
Select the Glaze:
Choose a milky white or translucent matte glaze. Since the clay has natural speckles, you don’t want an opaque glaze that will hide them. -
Apply Glaze:
Dip or brush the glaze onto the piece. Be careful not to let the glaze pool too thickly in the carved grooves or the stamp impression, as this will obscure the details. -
Wipe the Foot:
Using a wet sponge, clean any glaze off the very bottom of the dish so it doesn’t fuse to your kiln shelf. -
High Fire:
Fire the piece again to the maturity temperature of your specific clay body (often Cone 5 or 6 for stoneware).
Once cooled, your dish is ready to bring a touch of serene nature to your bedside table
Mushroom Sticker Trinket Dish
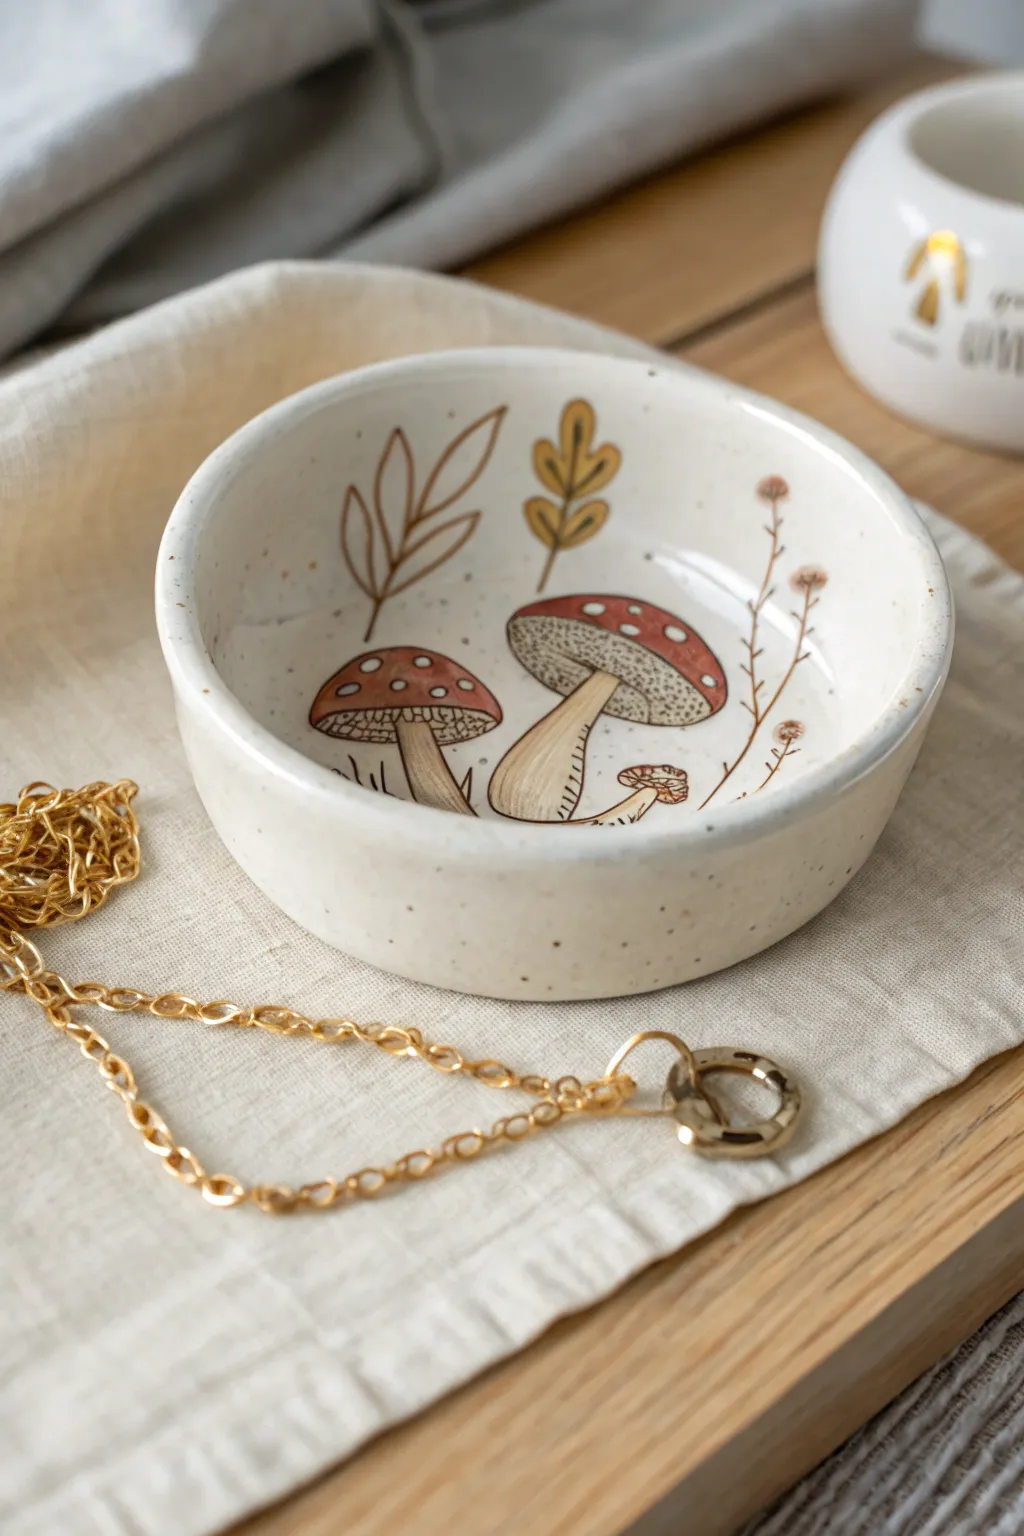
Embrace cottage-core aesthetics with this speckled clay bowl featuring delicate mushroom illustrations. It’s the perfect bedside catch-all for dainty jewelry, combining rustic warmth with detailed line art.
Step-by-Step
Materials
- White polymer clay or air-dry clay
- Rolling pin
- Small bowl (for a mold)
- Sandpaper (fine grit)
- White acrylic paint (if using colored clay)
- Acrylic paints (rust red, mustard yellow, beige, brown)
- Fine liner brush (size 00 or 000)
- Brown fine-tip permanent marker or micron pen
- Glossy varnish or glaze
- Toothbrush (for speckling)
- Craft knife
Step 1: Shaping the Clay Base
-
Condition the Clay:
Begin by kneading your white clay until it is soft, pliable, and free of air bubbles. If you are using polymer clay, the warmth of your hands is essential here. -
Roll it Out:
Roll the clay into a smooth slab about 1/4 inch thick. Aim for an even surface, as lumps will show in the final bowl. -
Cut the Circle:
Use a round cookie cutter or trace around a small bowl (about 4 inches in diameter) with your craft knife to cut out a perfect circle. -
Create the Wall:
Roll a long snake of clay and flatten it into a strip about 3/4 inch high. Attach this strip to the edge of your circle base to create the vertical sides of the dish. -
Smooth the Seams:
Use your finger or a clay tool to blend the seam where the wall meets the base, both inside and outside. I find a little water helps smooth air-dry clay seams perfectly. -
Refine the Shape:
Gently press the clay into a small bowl to help it hold a perfectly round shape while it cures, or simply shape it by hand if you prefer a more organic look. -
Dry or Bake:
Follow your clay package instructions to either bake (for polymer) or air dry completely (usually 24-48 hours). -
Sand and Prep:
Once solid, lightly sand any rough edges or fingerprints with fine-grit sandpaper until the surface is buttery smooth. Wipe away dust with a damp cloth.
Step 2: Painting the Illustrations
-
Speckle the Base:
Dilute some brown paint with water. Dip a toothbrush in, point it at the bowl, and run your thumb across the bristles to flick tiny speckles all over the white surface. Let this dry completely. -
Sketch the Outline:
Lightly sketch the mushroom positions with a pencil. Place a large mushroom cap on the left, a taller one in the center, and a tiny sprout on the right. -
Block in Base Colors:
Paint the mushroom caps with a muted rust red. For the stems, mix beige with a tiny drop of brown for a creamy off-white shade. -
Add Leaf Accents:
Using mustard yellow and light brown, paint simple leaf shapes floating above the mushrooms. Don’t worry about details yet; just get the solid shapes down. -
Detail the Caps:
Once the red paint is dry, use your smallest brush to dab white spots onto the mushroom caps. -
Add Line Work:
This is where the magic happens. Use a brown fine-tip pen or very thin paint to outline the mushrooms and leaves. Add gills under the caps and veins to the leaves. -
Create Floral Sprigs:
Draw delicate, thin stems rising on the right side with tiny seed pod shapes at the ends to balance the composition. -
Seal the Dish:
Apply two coats of glossy varnish to the entire piece. This protects your painting and gives the dish that finished ceramic shine.
Smooth Seams Trick
If you struggle with invisible seams on polymer clay, try using a tiny amount of baby oil or clay softener on your fingertip while blending.
Make it Functional
Before baking, press a real leaf into the clay bottom to create a textured underside, or add a small clay ring holder in the center.
Place your new dish on a dresser to hold your favorite rings and necklaces securely
Napkin-Decoupage Trinket Dish
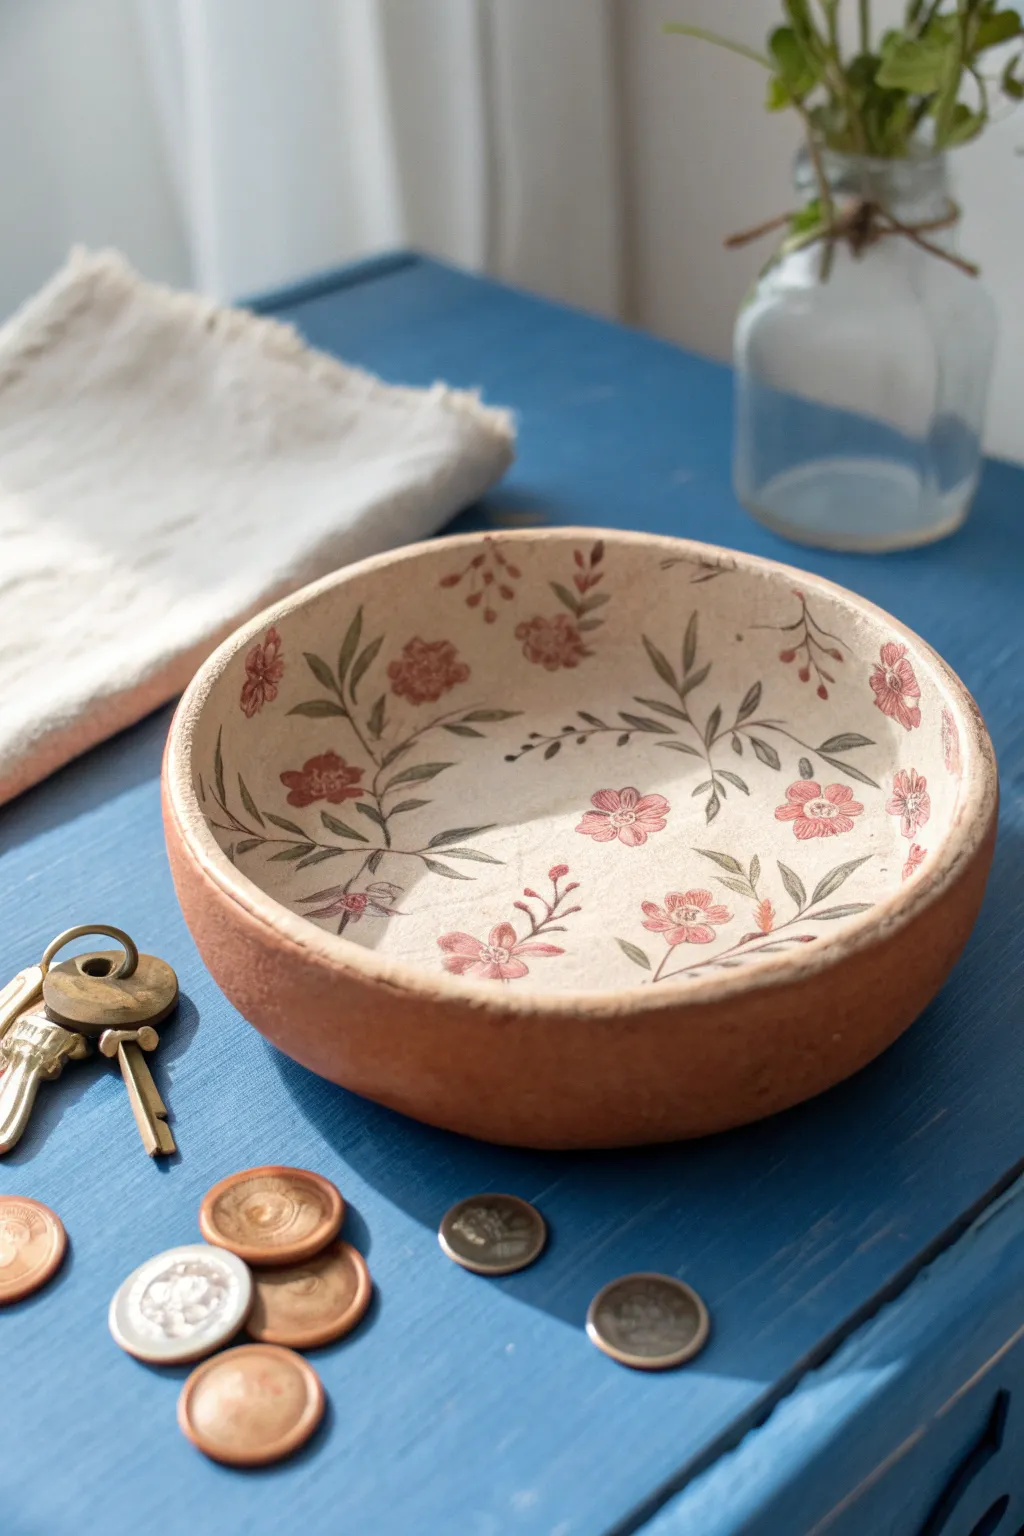
Transform simple air-dry clay into a stunning, vintage-inspired catchall using the magic of napkin decoupage. This project combines the rustic warmth of terracotta tones with delicate floral motifs for a piece that looks like a ceramic heirloom.
Step-by-Step Guide
Materials
- Air-dry clay (terracotta color)
- Floral paper napkin with a white background
- Rolling pin
- Medium-sized bowl (to use as a mold)
- Plastic wrap
- Sandpaper (fine grit)
- Mod Podge (matte finish)
- Soft synthetic brushes
- White acrylic paint
- Scissors
- Gloss or satin varnish (optional for durability)
Step 1: Shaping the Base
-
Prepare the Clay:
Begin by kneading a large handful of terracotta air-dry clay until it is soft, pliable, and free of air bubbles. If the clay feels dry, wet your hands slightly to add moisture. -
Roll it Out:
Roll the clay onto a smooth surface to an even thickness of about 1/4 inch. Lift and rotate the clay occasionally so it doesn’t stick to your work surface. -
Cut the Circle:
Place your guide bowl upside down on the clay and trace around the rim with a knife or clay tool. Remove the excess clay and smooth the cut edge with a damp finger to get rid of any stray bits. -
Prepare the Mold:
Take your guide bowl and cover the inside tightly with plastic wrap. This step is crucial so you can easily remove the clay later. -
Form the Dish:
Lift your clay circle and gently drape it inside the plastic-lined bowl. Press it lightly against the bottom and up the sides to take the shape of the mold. -
Refine the Edges:
Use a little water on your fingertip to smooth the rim of the bowl. You can leave it slightly uneven for a rustic handmade look or smooth it perfectly flat. -
First Drying Phase:
Let the clay dry inside the mold for at least 12–24 hours until it holds its shape firmly but isn’t bone dry. -
Demolding:
Carefully lift the clay form out of the bowl using the plastic wrap. Peel away the plastic and place the clay dish on a wire rack to finish drying completely (another 24 hours).
Step 2: Applying the Design
-
Surface Prep:
Once bone dry, lightly sand any rough spots or sharp edges on the rim. Wipe away the dust with a barely damp cloth. -
Priming the Interior:
Paint the *inside* of the bowl with white acrylic paint. This is essential because napkins become translucent when glued; the white base ensures the floral colors pop rather than disappearing into the brown clay. -
Prepare the Napkin:
While the paint dries, separate the layers of your paper napkin. You strictly need only the single, top printed ply. -
Cut the Motifs:
Roughly cut out the floral pattern. For a full coverage look like the photo, cut a circle slightly larger than your bowl’s interior. You can also cut individual flowers to arrange manually. -
Apply Glue:
Brush a thin, even layer of Mod Podge over the white painted interior of the bowl. -
Position the Napkin:
Gently lay the napkin ply into the bowl. Start from the center and lightly tap it down, working your way outward. Don’t pull or stretch the paper. -
Smooth the Wrinkles:
Here I like to use a piece of plastic wrap over my finger to gently smooth out bubbles. The plastic prevents the delicate wet paper from tearing under friction. -
Seal to Finish:
Once the decoupage layer is dry to the touch, apply a top coat of Mod Podge over the napkin to seal it. Let this dry completely clear. -
Rim Cleanup:
If napkin edges overhang the rim, wait until completely dry, then use a sanding block in a downward motion to shear off the excess paper cleanly. -
Final Varnish:
For extra protection against keys and coins, add a layer of satin or matte varnish over the entire piece.
Wrinkle Rescue
If the napkin wrinkles badly, don’t panic. The texture often disappears into the matte finish. For big creases, sand them very lightly after the glue dries.
Aged Effect
Dilute a drop of brown paint with water and dabb lightly around the rim or over the flowers to give the bright white napkin an antique, tea-stained look.
Enjoy using your beautiful new dish to organize your small daily treasures
Geometric Faceted Trinket Tray
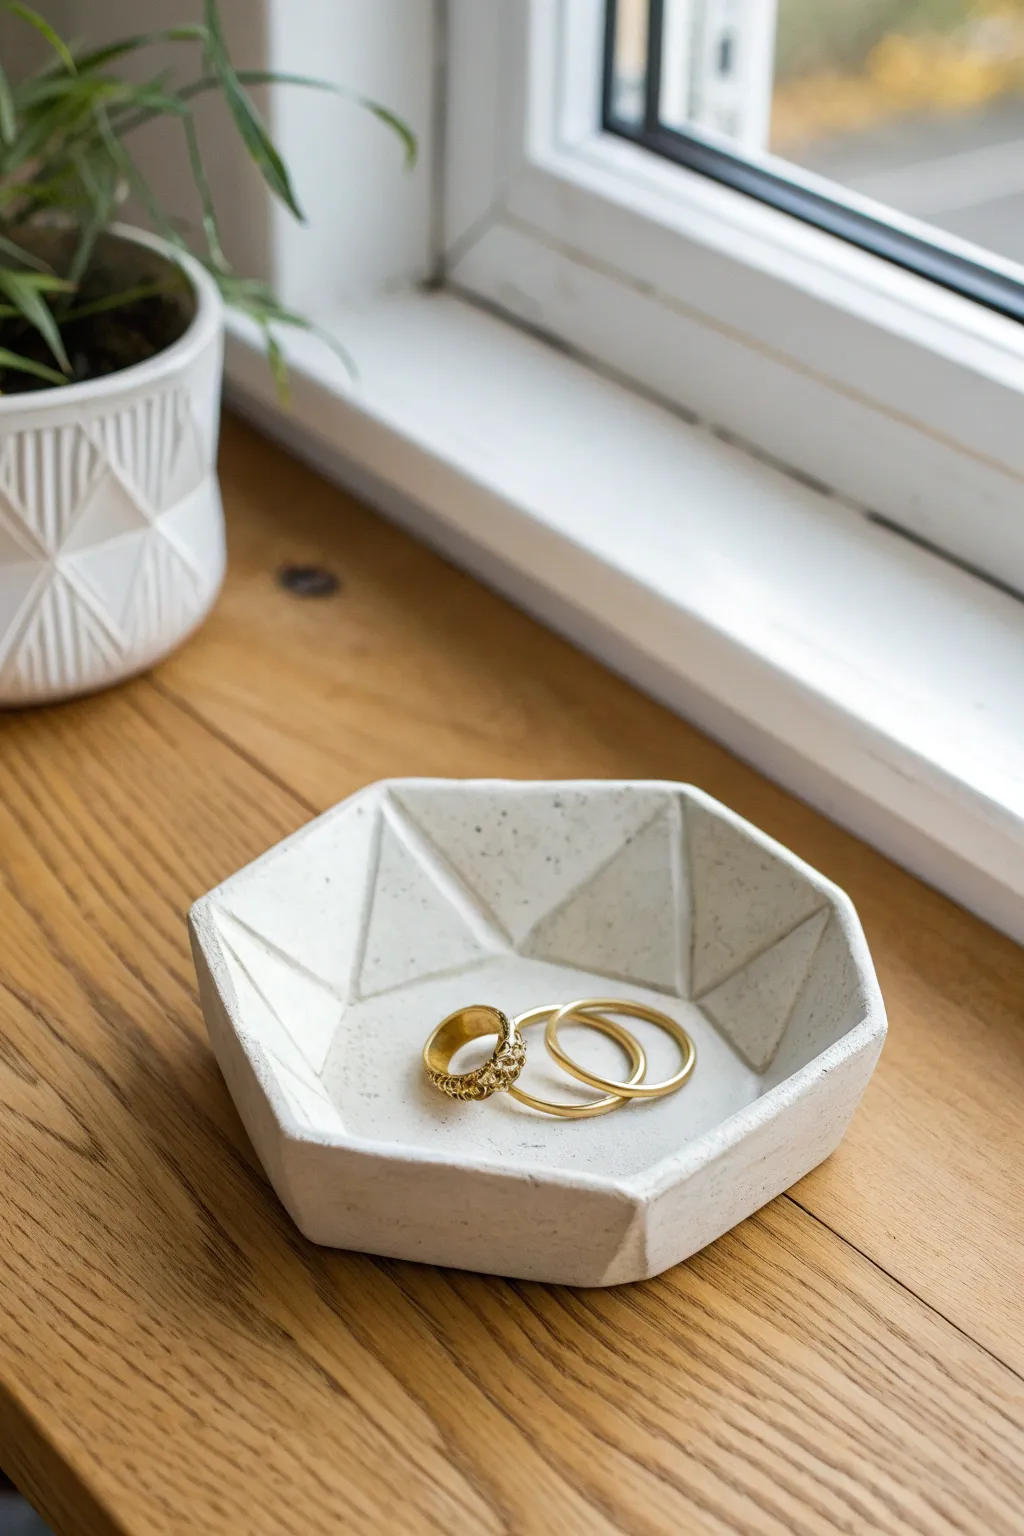
Achieve a high-end minimalist look with this geometric trinket dish featuring clean lines and architectural facets. The crisp white finish and angled interior create a sculptural home for your favorite rings and jewelry.
Step-by-Step Tutorial
Materials
- White air-dry clay or polymer clay (approx. 200g)
- Rolling pin with guides (or two skewers for even thickness)
- Utility knife or clay blade
- Paper template (hexagon base)
- Ruler
- Smooth work surface or silicone mat
- Small sponge and water cup
- Fine-grit sandpaper (400-600 grit)
Step 1: Creating the Base
-
Prepare your template:
Start by drawing or printing a regular hexagon shape on a piece of cardstock to serve as your template. A 4-inch width is a good standard size for a ring dish. -
Condition the clay:
Warm up your white clay in your hands until it is pliable and smooth. If using air-dry clay, keep a damp cloth nearby to prevent it from drying out while you work. -
Roll the slab:
Roll the clay out into an even slab, aiming for about 1/4 inch thickness. Use rolling guides or skewers on either side of your clay to ensure the thickness is perfectly uniform. -
Cut the hexagon:
Place your paper template onto the clay slab. Using a sharp utility knife or blade, steady your hand and cut vertically around the template to create your hexagonal base.
Uneven Walls?
If walls sag while building, let the clay sit for 15 minutes to firm up (leach out moisture on cardboard if it’s too wet) before attaching.
Step 2: Building the Facets
-
Cut the wall strips:
From the remaining clay, cut a long strip approximately 1 inch wide. This will form the angled walls of the tray. -
Create triangle segments:
To achieve the faceted look shown in the image, you need to cut the strip into triangles. Cut them so they fit the length of each hexagon side. -
Score and slip:
If using air-dry clay, score (scratch) the edges of your hexagon base and dampen them slightly. If using polymer clay, apply a tiny amount of liquid clay adhesive to the edges. -
Attach the first wall:
Place a clay segment onto one side of the hexagon base, leaning it outward slightly. Smooth the seam where the wall touches the base on the inside. -
Add adjacent walls:
Continue adding wall segments around the hexagon. Instead of joining them flush, pinch the clay where two wall segments meet to create a sharp internal ridge or ‘facet’ line. -
Define the interior geometry:
Using your thumb or a sculpting tool, gently press into the center of each triangular wall segment while sharpening the seams between them. This creates that concave, gem-like interior appearance.
Step 3: Refining and Finishing
-
Level the rim:
Once all walls are up, check the top rim. I like to use a long blade to gently slice across the top to ensure the rim is visually level all the way around. -
Smooth the surfaces:
Dip your finger or a sponge in a tiny bit of water (or baby oil for polymer) and smooth out any fingerprints, paying special attention to the sharp geometric ridges. -
Let it dry or bake:
Follow the manufacturer’s instructions for your specific clay. If baking polymer clay, support the angled walls with paper scraps so they don’t slump in the oven. -
Sand for perfection:
Once fully cured or dry, use fine-grit sandpaper to buff the surface. This step is crucial for achieving the matte, stone-like finish seen in the photo. -
Wipe clean:
Remove any sanding dust with a slightly damp cloth. Leave the clay unvarnished to maintain the natural, raw texture.
Faux Stone Effect
Knead in some black pepper or dried tea leaves before rolling to give the white clay a speckled, granite-like organic appearance.
Place your new geometric tray on a sunny windowsill and enjoy organizing your jewelry in style
Folded Corner Trinket Catchall
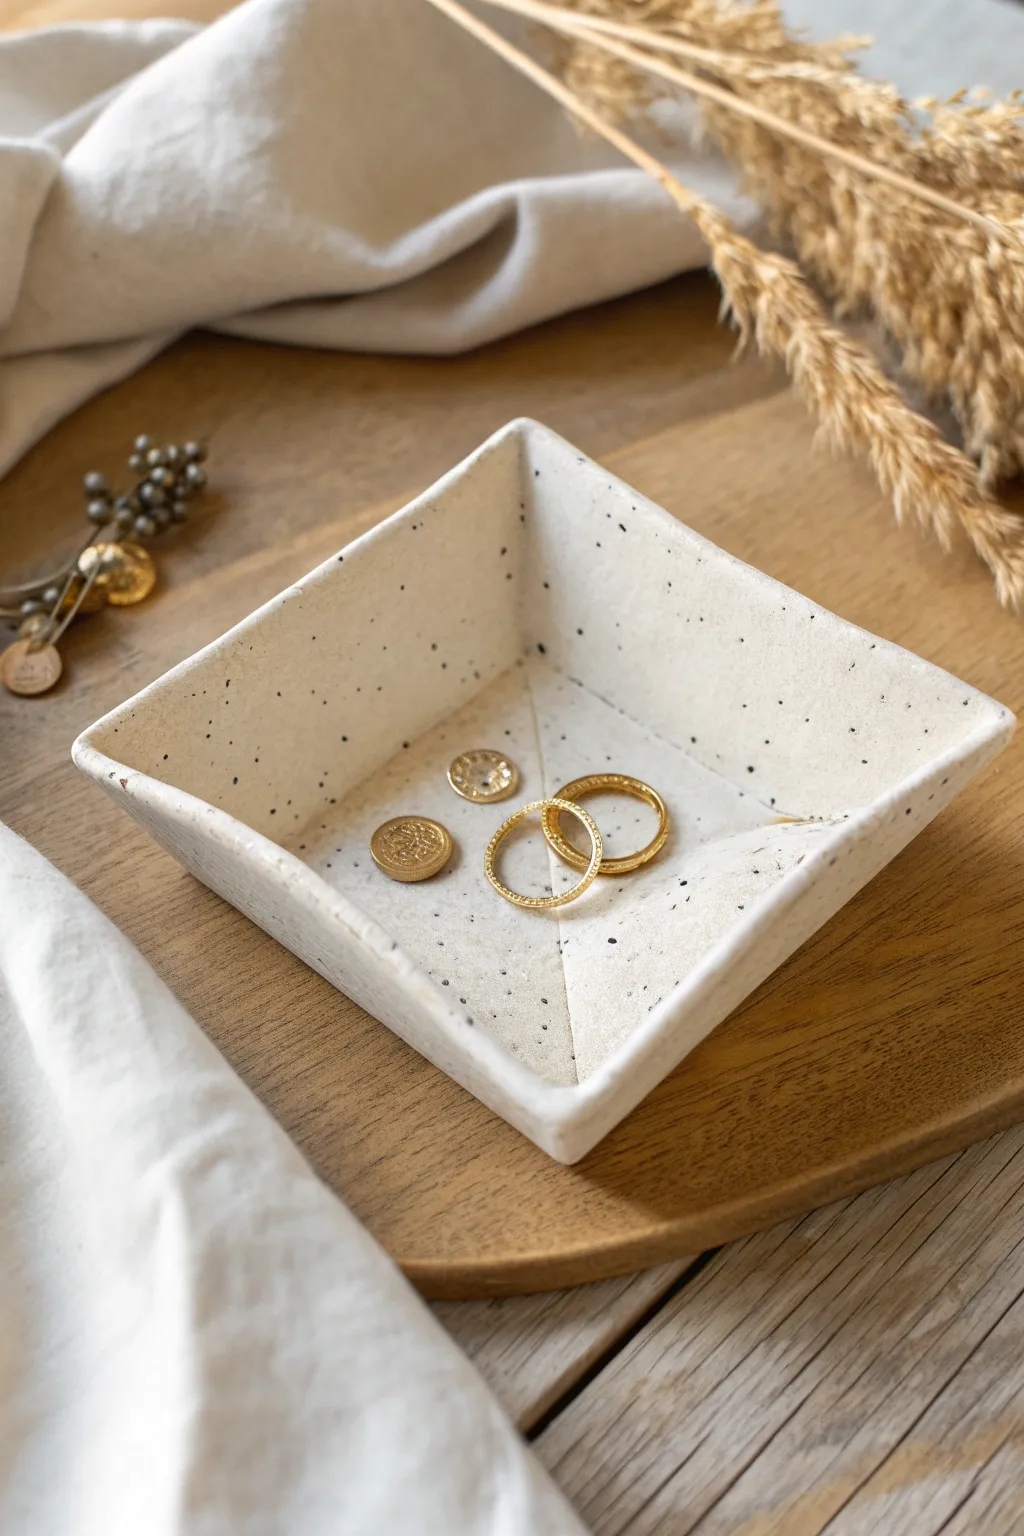
This minimalist catchall combines rustic charm with modern geometry, featuring a lovely speckled finish and crisp folded corners. It’s the perfect size for holding dainty rings, stud earrings, or small desk treasures.
Step-by-Step Guide
Materials
- White air-dry clay or polymer clay
- Rolling pin
- Smooth work surface or clay mat
- Craft knife or scalpel
- Ruler
- Square template (paper or cardstock)
- Black coarse pepper or dried coffee grounds (for speckling)
- Small sponge
- Clear matte varnish or sealant
- Fine-grit sandpaper
Step 1: Preparing the Clay
-
Condition the clay:
Begin by kneading a ball of white clay in your hands until it becomes warm, soft, and pliable. This prevents cracks from forming later. -
Add texture:
To achieve the speckled look seen in the photo without painting later, sprinkle a small pinch of coarse black pepper or dried coffee grounds onto the clay ball. -
Integrate the speckles:
Fold the clay over the speckles and knead thoroughly again. Continue folding and pressing until the black flecks are evenly distributed throughout the white clay. -
Roll it out:
Place the clay on your mat. Roll it out into an even slab, aiming for a thickness of about 1/4 inch (4-5mm). Try to keep the thickness consistent for a sturdy base.
Natural Texture Hack
Don’t have pepper? You can flick a toothbrush dipped in diluted black acrylic paint onto the wet clay before sealing for a similar effect.
Step 2: Shaping the Base
-
Cut the square:
Place your square template (approx. 4×4 inches works well) onto the clay slab. Use your ruler and craft knife to cut a clean, perfect square around the template. -
Smooth the edges:
Dip your finger in a little water and gently run it along the cut edges of the square to smooth out any sharpness or drag marks from the knife. -
Mark the center:
Lightly press the ruler diagonally from corner to corner to make a very faint ‘X’ impression in the center. This helps guide your folds, though you don’t want to cut into the clay.
Fixing Cracks
If tiny cracks appear at the folded corners while drying, mix a tiny bit of fresh clay with water to make a paste and fill them in.
Step 3: Creating the Folded Form
-
Pinch the first corner:
Gently lift one corner of the square. Pinch the neighboring sides together to create a 90-degree angle, folding the excess clay inward toward the center. -
Secure the seam:
Press the folded seam firmly. You can use a modeling tool or your fingertip to smooth the clay where it overlaps, ensuring the walls stand up securely. -
Repeat the folds:
Rotate the square and repeat the pinching and folding process on the remaining three corners. The dish should now look like a pyramid that has been inverted. -
Adjust the shape:
Look at the dish from above. Gently push or pull the walls to ensure the square shape is symmetrical and the rim height is even all around. -
Refine the interior:
If the interior folds look messy, take a damp sponge and gently wipe the inside corners to soften the transition lines while keeping the geometric look. -
Final smooth:
Run your wet finger along the top rim one last time to ensure it feels organic and soft significantly improving the final tactile quality.
Step 4: Finishing Touches
-
Let it dry:
Allow the clay to dry completely according to the package instructions. Air-dry clay usually takes 24-48 hours; turn it over halfway through to let the bottom dry evenly. -
Sand the surface:
Once fully cured, use fine-grit sandpaper to buff away any minor imperfections or fingerprints. Be gentle to preserve the matte texture. -
Seal the piece:
Apply a thin coat of clear matte varnish to protect the dish and the organic inclusions (pepper/coffee) from moisture. Let this coat dry fully.
Place your finished dish on a wooden surface to admire its clean lines and organic texture
Sectioned Trinket Dish With Compartments
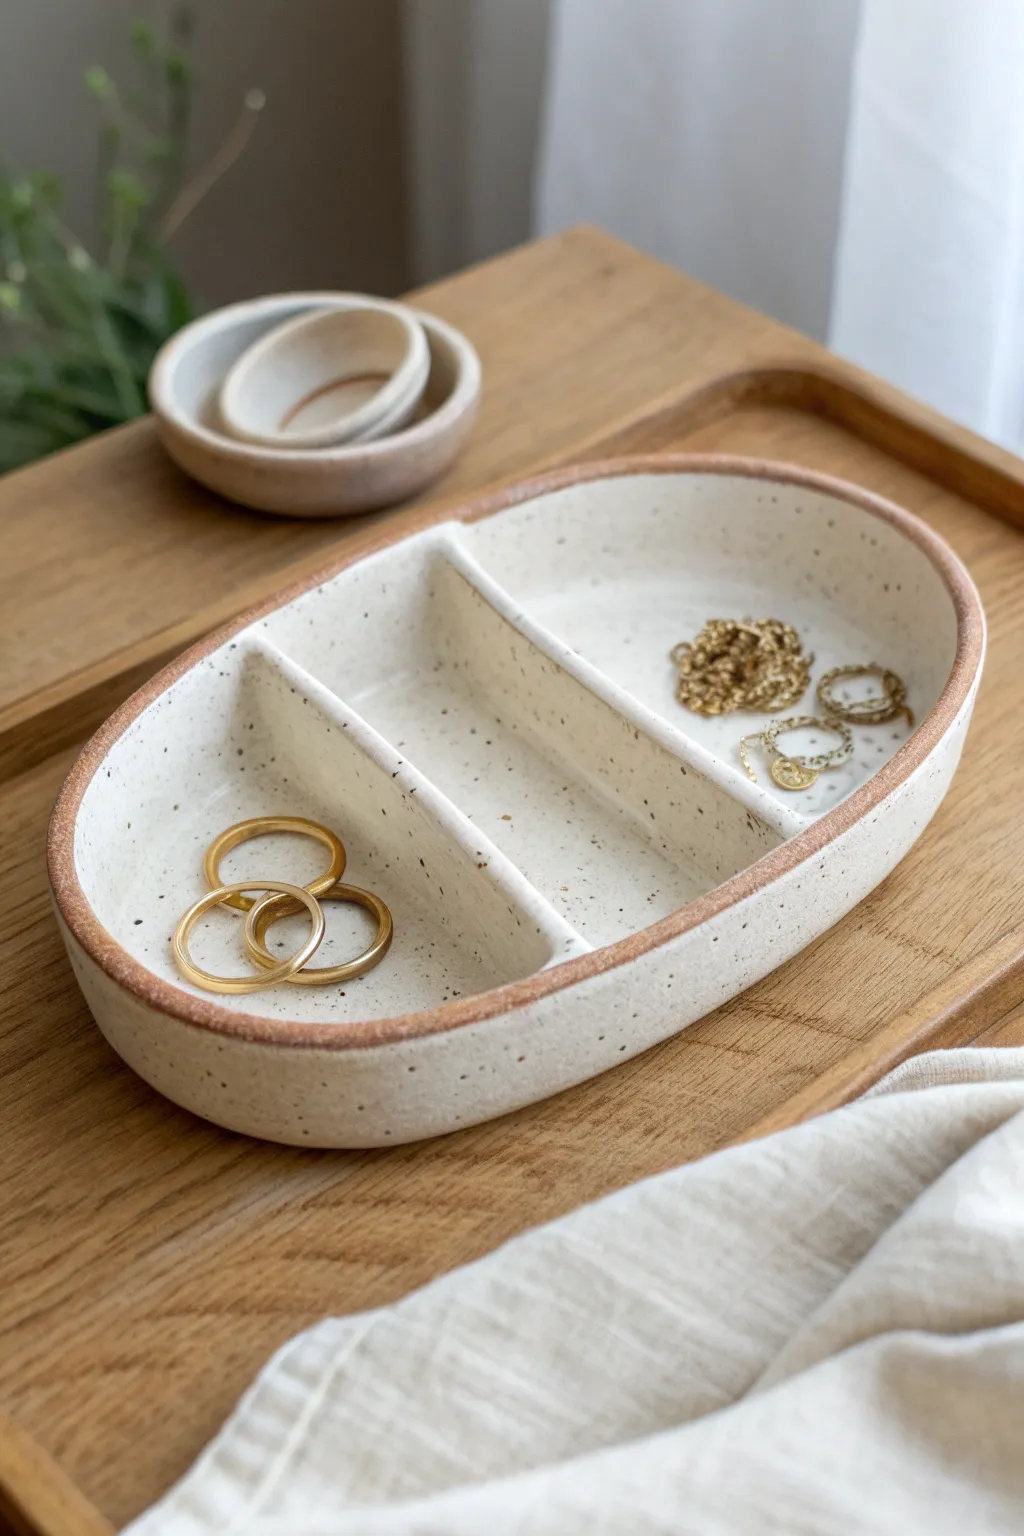
This elegant oval trinket dish features three distinct compartments to keep your rings and necklaces tangle-free. The speckled creamy glaze contrasts beautifully with the exposed raw clay rim, giving it a modern, organic aesthetic perfect for any dresser.
How-To Guide
Materials
- Speckled stoneware clay (or white polymer clay with pepper included)
- Rolling pin
- Oval template (paper or cardstock)
- Clay knife or needle tool
- Sponge
- Slip (liquid clay) and scoring tool
- Clear or white glossy glaze
- Paintbrush
- Sandpaper (optional)
Step 1: Base Construction
-
Roll the slab:
Begin by wedging your clay to remove air bubbles, then roll it out into an even slab about 1/4 inch thick. A consistent thickness ensures the dish won’t warp during drying. -
Cut the shape:
Place your oval paper template onto the slab. Using your needle tool or knife, trace carefully around the edge to cut out the base shape. -
Prepare the walls:
Roll a long coil of clay or cut a long strip from your remaining slab to serve as the outer wall. It should be approximately 3/4 inch to 1 inch tall. -
Attach the walls:
Score the outer edge of your oval base and the bottom edge of your wall strip. Apply a generous amount of slip to the scored areas. -
Secure the seam:
Press the wall firmly onto the base, working your way around the oval. Smooth the seam on both the inside and outside using a modeling tool or your finger to ensure a strong bond.
Step 2: Creating Compartments
-
Measure dividers:
Cut two rectangular strips of clay for the inner dividers. Measure the width of your oval at the points where you want the sections to verify the length needed. -
Angle the fit:
The dividers need to sit flush against the curved outer wall, so use your knife to bevel or angle the ends of the strips slightly to match the curve of the dish. -
Install dividers:
Score and slip the contact points inside the dish and sticking points on the dividers. Press them into place, creating three distinct sections. -
Reinforce corners:
Take a very small, thin coil of clay and press it into the bottom corners where the dividers meet the base and walls. Smooth this out to reinforce the structure.
Cracking Dividers?
If dividers pull away from the walls while drying, dampen the cracks with vinegar (for earthen clay) or slip, fill with soft clay, and compress well. Cover tightly to equalize moisture.
Step 3: Refining and Finishing
-
Smooth the rim:
Use a slightly damp sponge to round over the top edges of the outer wall and the dividers. You want a soft, organic look rather than sharp, machine-cut edges. -
Dry slowly:
Loosely cover the piece with plastic and let it dry slowly to the leather-hard stage, then uncover to let it dry completely bone dry. Rushing this can cause cracks at the dividers. -
Bisque fire:
Fire the piece in a kiln to bisque temperature according to your clay’s instructions. If using oven-bake clay, bake according to the package directions now. -
Wax resist application:
To recreate the look in the photo, apply wax resist (or painter’s tape if not firing) carefully along the very top rim and the tops of the dividers. This keeps these areas raw and unglazed. -
Apply glaze:
Brush or pour a milky white or clear speckle glaze over the entire interior and exterior, avoiding the waxed rims. -
Clean edges:
Wait for the glaze to dry slightly, then use a damp sponge to wipe away any glaze droplets that might have snuck onto the waxed rims to ensure a crisp line. -
Final fire:
Fire the piece for a final time to melt the glaze. The result will be a glossy, speckled dish with beautiful raw clay accents.
Scallop Upgrade
Transform the look by gently pushing the handle of a paintbrush into the exterior walls at regular intervals while the clay is soft, creating a subtle scalloped texture.
Once cooled, your sectioned dish is ready to organize your favorite jewelry pieces
Lidded Trinket Box for Tiny Treasures
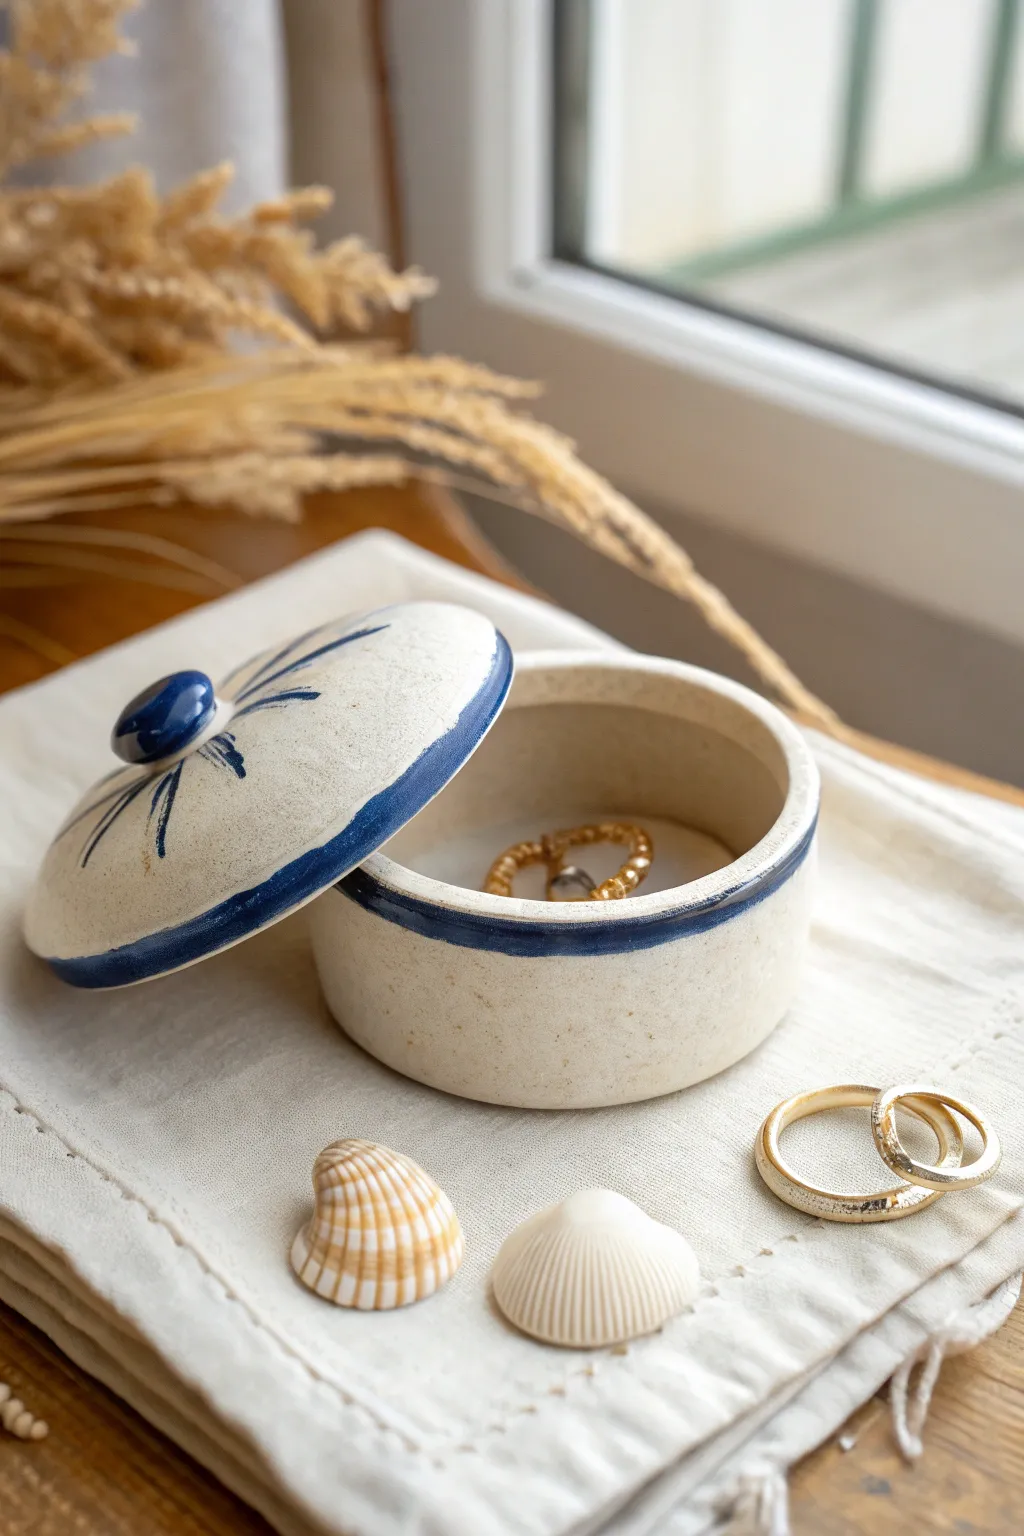
This charming, rustic trinket box features a simple cylindrical form and a gently domed lid, perfect for storing rings or small treasures. With its creamy natural clay body and deep cobalt blue accents, it captures a relaxed coastal vibe that feels both handcrafted and timeless.
Detailed Instructions
Materials
- White or speckled stoneware clay
- Rolling pin
- Canvas mat or slab roller
- Circle cutters (approx. 3-inch diameter)
- Fettling knife (or clay knife)
- Needle tool
- Scoring tool (or serrated rib)
- Slip (clay slurry)
- Sponge
- Potter’s wheel (optional, can be hand-built)
- Cobalt blue underglaze
- Fine detail paintbrush
- Clear transparent glaze
- Kiln
Step 1: Forming the Base
-
Prepare the clay:
Begin by wedging your stoneware clay thoroughly to remove any air bubbles. If you are hand-building, roll out a slab to an even thickness of about 1/4 inch. -
Cut the base:
Use your circle cutter or a needle tool guided by a template to cut out a perfect circle for the floor of your box. -
Create the wall strip:
Measure the circumference of your base circle. Cut a long rectangular strip of clay from your slab that matches this length plus a tiny bit of overlap, approximately 1.5 inches tall. -
Attach the wall:
Score the outer edge of the base circle and the bottom edge of your rectangular strip. Apply slip generously to both scored areas. -
Join and smooth:
Wrap the strip around the base, pressing the scored edges together firmly. Where the ends of the strip meet, score and slip them, then smooth the vertical seam inside and out until it disappears. -
Refine the rim:
Use a damp sponge to smooth the top rim of the box, ensuring it is level so the lid will sit flat later.
Step 2: Creating the Lid
-
Cut the lid slab:
Cut another circle from your clay slab, making it slightly larger than your box base to account for the slight dome shape we will create. -
Form the dome:
Gently cup the clay circle in your palm, pressing from the center outward to create a subtle curve. I find using a small foam pillow helps support the shape without leaving finger marks. -
Make the flange:
Roll a small coil of clay. Score and slip a circle on the *underside* of the lid that will fit just inside the box’s rim. This flange keeps the lid from sliding off. -
Add the knob:
Roll a small ball of clay and slightly flatten it into a button shape. Score and slip the center of the lid’s top, then attach the knob firmly. -
Dry generally:
Place the lid on the box with a piece of paper towel in between to prevent sticking. Let them dry slowly to leather-hard stage together to ensure they warp or shrink in unison.
Lid Logic
If your lid wobbles after firing, apply a tiny amount of grinding paste to the rim and twist the lid back and forth to sand it into a perfect fit.
Step 3: Decoration & Glazing
-
Clean up surfaces:
Once bone dry, use a slightly damp sponge to wipe away any sharp edges or rough texture on the clay body. -
Bisque fire:
Fire the piece in the kiln to cone 04 (or your clay’s specific bisque temperature). -
Outline the rim:
Using a fine brush and cobalt blue underglaze, paint a distinct band around the vertical rim of the lid. Allow the brush to naturally vary in pressure for a hand-painted look. -
Paint the lid stripe:
Paint a matching horizontal stripe around the exterior wall of the box, about a half-inch from the top edge. -
Detail the knob:
Coat the button knob entirely in the blue underglaze. -
Add radial lines:
Paint thin, radiating strokes extending from the knob outward. These don’t need to be perfectly symmetrical; their organic spacing adds charm. -
Apply clear glaze:
Once the underglaze is dry, dip the entire piece (lid and box separately) into a clear transparent glaze. Wipe the foot of the box and the flange of the lid clean. -
Final firing:
Glaze fire the piece to the temperature recommended for your stoneware clay (typically cone 5 or 6) to vitrify the clay and melt the glaze.
Brushwork Tip
Don’t overload your brush with underglaze. A slightly drier brush near the ends of the radiating lines creates that lovely tapered, feathery effect shown.
Place your favorite rings inside your new creation or gift it to a friend who loves the ocean