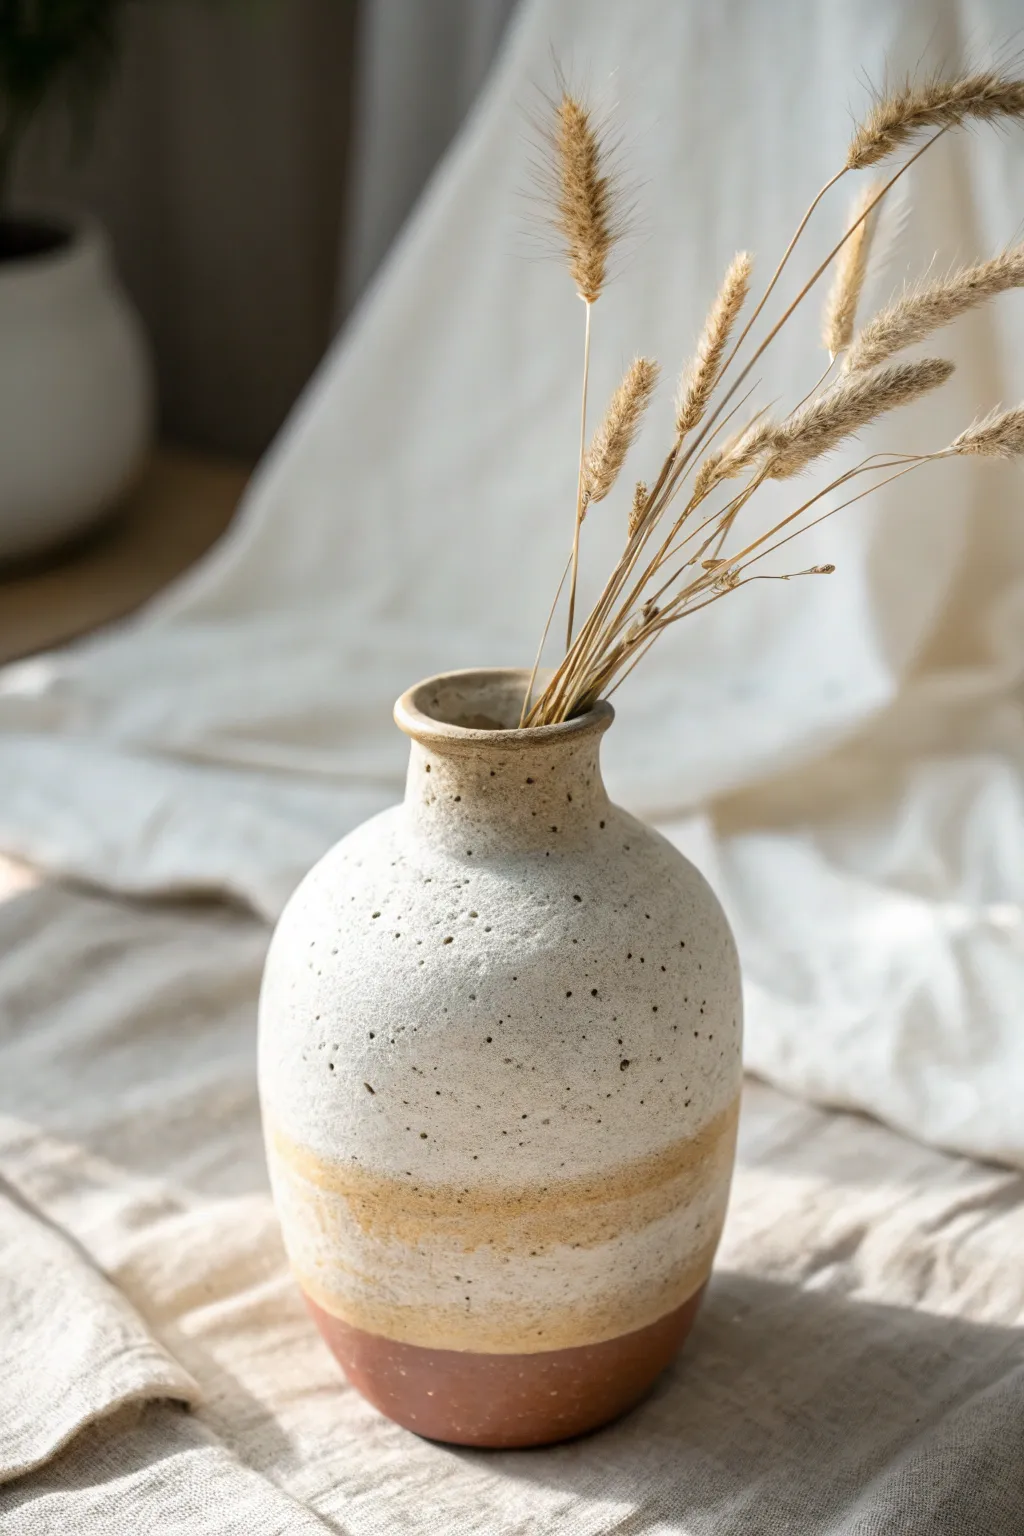
A plain vase is basically a blank canvas, and clay vase decoration is where the fun really starts. Here are my go-to ideas for adding texture, pattern, and personality—without needing anything fussy or intimidating.
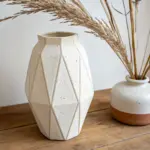
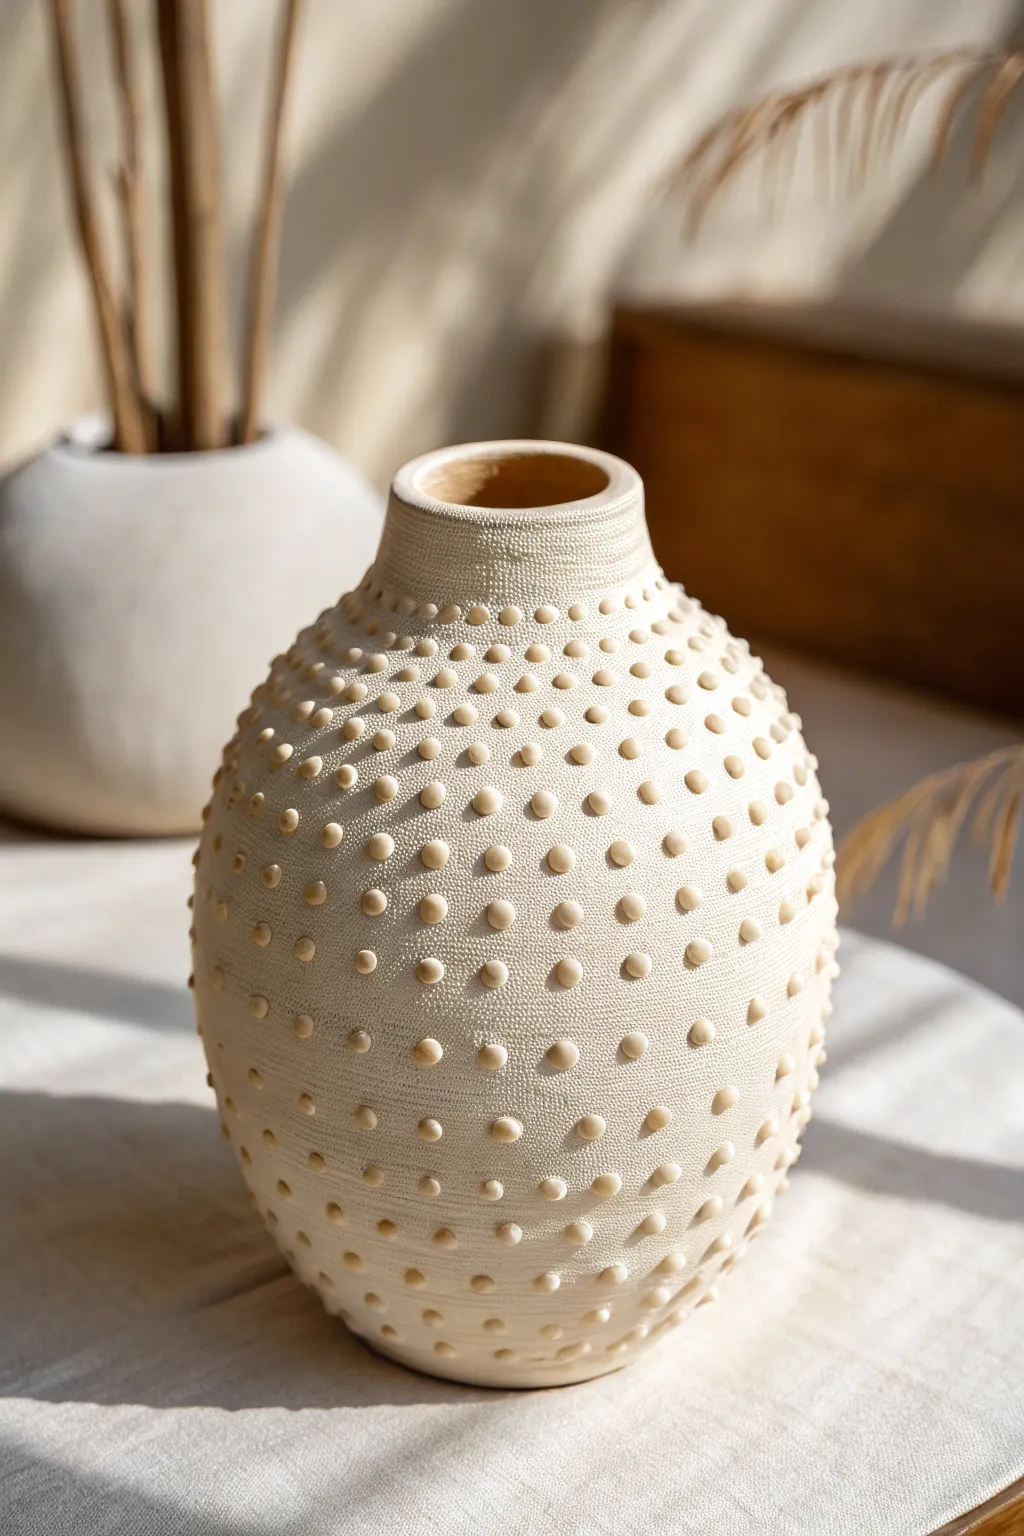
Carved Geometric Lines
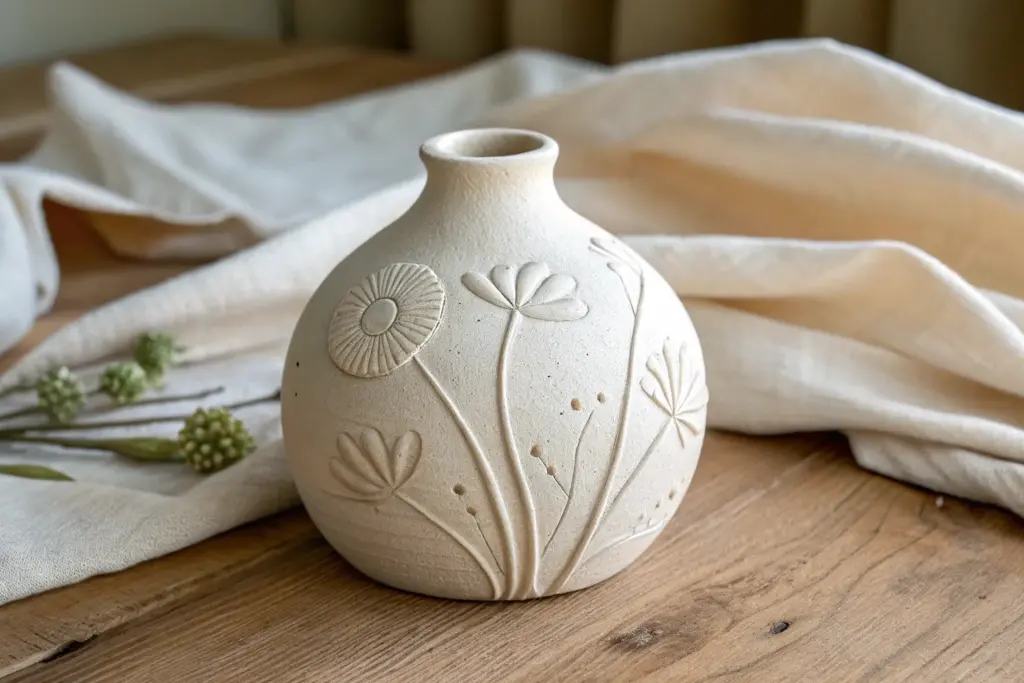
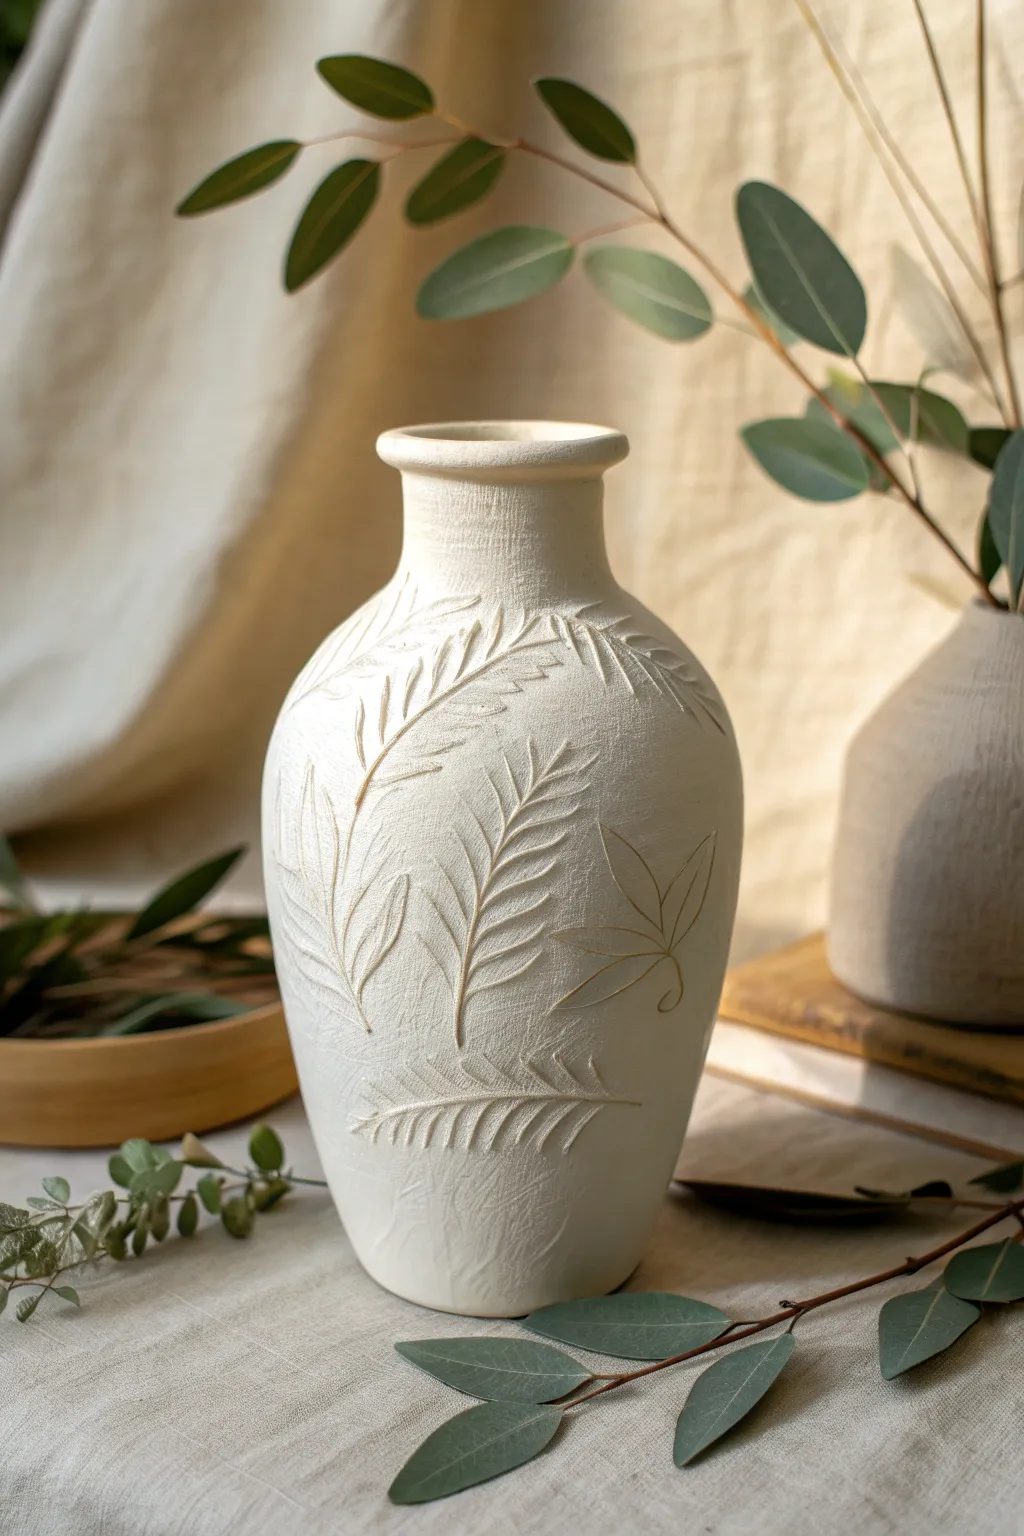
Transform a plain clay or ceramic vessel into a high-end decor piece with this surprisingly simple carving technique. The finished look combines organic textures with precise geometric lines for a timeless, artisanal aesthetic.
How-To Guide
Materials
- Unfinished bisque ceramic vase or standard clay pot
- Pencil
- Flexible measuring tape
- Carving tool (V-gouge or needle tool)
- Medium-grit sandpaper sponge
- Warm beige or cream matte acrylic paint
- Terra cotta or brown acrylic paint
- Flat paintbrush
- Small round detail brush
- Matte spray sealer (optional)
- Baking soda (optional, for texture)
- Paper towel or rag
Step 1: Preparation & Base Coat
-
Clean surface:
Begin by wiping down your vase with a damp cloth to remove any dust or oils that might interfere with paint adhesion. -
Mix base color:
If your vase isn’t already the desired creamy beige, mix your base acrylic paint. I like to add a teaspoon of baking soda to the paint to give it a rougher, more stone-like texture. -
Apply base paint:
Apply an even coat of your beige paint over the entire exterior. Let this dry completely before adding a second coat if needed for full opacity. -
Smooth the finish:
Once fully dry, lightly gently sand any overly rough patches with your sanding sponge to create a surface that mimics honed stone.
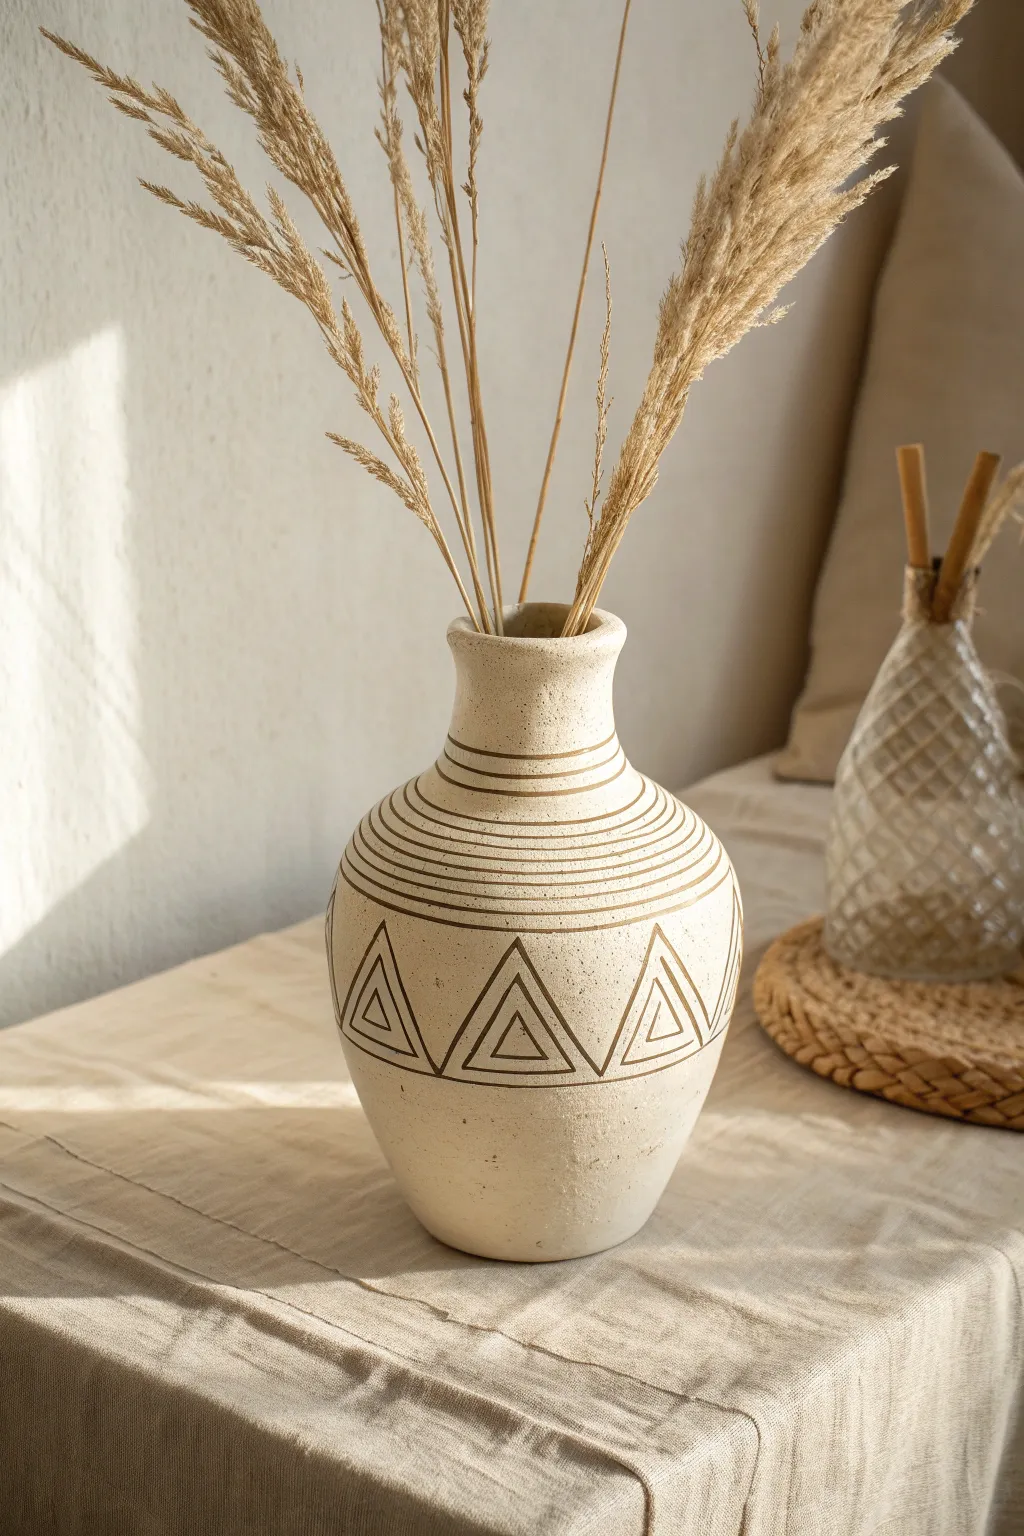
Clean Lines Hack
For the neck rings, place the vase on a banding wheel or lazy Susan. Hold your hand steady against a stack of books and spin the vase for perfect circles.
Step 2: Mapping the Design
-
Mark horizontal bands:
Use a flexible measuring tape to find the center point of the vase’s neck. -
Sketch neck rings:
Lightly sketch five to seven parallel horizontal rings around the neck and shoulder of the vase with a pencil. Vary the spacing slightly: group three close together near the top, then leave a small gap before the lower ones. -
Define the triangle zone:
Draw two parallel horizontal lines around the widest part of the vase body to create a ‘belt’ about 3-4 inches wide where your triangles will sit. -
Draft the triangles:
Sketch a zigzag line between your top and bottom belt lines to create the main triangles. Aim for equilateral shapes. -
Add nested details:
Inside each large upward-pointing triangle, sketch two smaller, nested triangles sharing the same center point.
Make it Ancient
After the final paint dries, rub a tiny bit of dark wax or diluted brown paint over random sections and wipe it off to create an aged, antique effect.
Step 3: Carving & Defining
-
Carve the lines:
Using your V-gouge or needle tool, carefully trace over your pencil lines, applying firm pressure to etch slightly into the surface. If you are using a standard glazed vase, you are scratching the paint layer; if using raw clay, carve slightly deeper. -
Dust off debris:
Use a dry, soft brush to sweep away any paint crumbs or clay dust created by the carving process. -
Prepare accent color:
Load your small detail brush with the terra cotta or brown paint. Thin it slightly with a drop of water so it flows easily. -
Inlay the color:
Paint directly into the carved grooves. Don’t worry about being perfectly neat; the goal is to fill the etched lines with dark color. -
Wipe excess paint:
Before the dark paint dries completely, take a slightly damp paper towel and wipe strictly across the surface. This removes paint from the high points but leaves it trapped in the carved grooves. -
Touch up base:
If the wiping process muddied your cream background too much, use a small flat brush to touch up the negative space between the lines with your original beige color.
Step 4: Finishing Touches
-
Dry completely:
Allow the vase to sit for at least an hour to ensure all layers of paint are fully cured. -
Protect the work:
Spray the entire vase with a matte clear coat if you plan to handle it often, though leaving it unsealed keeps the raw texture more authentic. -
Style properly:
Clean the rim one last time and insert your dried florals or pampas grass to complete the organic look.
Now you have a stunning, artisanal centerpiece that brings warmth to any room


Soft Color-Block Bands

Bring the desert sunset indoors with this beautifully textured clay vase decoration project. By layering soft, sandy tones with a warm terra cotta base, you can transform a plain ceramic vessel into a stunning piece of modern decor.
Step-by-Step Guide
Materials
- Bisque fired clay vase or plain unglazed ceramic vase
- Terra cotta colored acrylic paint or ceramic stain
- Sand beige or cream acrylic paint
- Dark brown or black acrylic paint (for speckling)
- Wide flat paintbrush (approx 1 inch)
- Old toothbrush or stiff bristle brush
- Painters tape (optional for crisp lines)
- Matte clear sealant spray
- Mixing palette or paper plate
- Paper towels
- Water cup
Step 1: Base Preparation
-
Clean surface:
Begin by wiping down your vase with a slightly damp paper towel to remove any dust or oils that might prevent the paint from adhering properly. -
Mix base tone:
Squeeze out a generous amount of your terra cotta paint. If it looks too bright, mix in a tiny drop of brown to muddy it slightly for a more natural clay look. -
Paint bottom section:
Using the wide flat brush, paint the bottom third of the vase with the terra cotta color. Don’t worry about perfect coverage yet; a little texture is good. -
Create soft edge:
As you reach the top of this bottom band, feather your brush strokes upward slightly so the line isn’t too harsh, unless you prefer a very graphic look. -
Dry partially:
Let this bottom section dry for about 10-15 minutes until it is tacky but not wet.
Uneven Lines?
Don’t stress if your bands aren’t perfectly straight due to the vase’s curve. Put the vase on a banding wheel or lazy susan and spin it while holding your brush steady for straighter lines.
Step 2: Layering Bands
-
Mix cream tone:
Prepare your sand beige or cream paint. I find adding a touch of water helps it flow into the natural texture of the vase better. -
Paint middle band:
Paint a wide band right above the terra cotta section, roughly covering the middle belly of the vase. You can leave a tiny gap of raw clay showing between colors if you like that rustic vibe. -
Paint neck area:
Continue with the same cream color to paint the neck and rim of the vase. Ensure you get inside the rim just a bit for a finished look. -
Add the accent stripe:
Mix a lighter version of the terra cotta paint (add some cream to your original mix). Paint a narrower band that overlaps the upper part of the cream belly section. -
Blend transitions:
Use a slightly damp brush to gently run over the horizontal meetings of the colors. This softens the transition and mimics natural clay striations. -
Apply second coat:
Once the first layers are dry to the touch, go back over any areas that look too sheer, but keep your brush strokes horizontal to maintain the turned-clay appearance.
Step 3: Texture and Finishing
-
Prepare speckle mix:
Dilute a small amount of dark brown or black paint with water until it is very runny, like ink. -
Test splatter:
Dip an old toothbrush into this watery mix and run your thumb across the bristles over a piece of scrap paper to test the splatter size. -
Apply speckles:
Gently flick the toothbrush bristles to spray fine speckles across the entire vase. Focus slightly more on the lighter cream sections where they will show up best. -
Full dry:
Allow the vase to dry completely for at least 2-3 hours. The paint must be fully cured before sealing. -
Seal:
Take the vase to a well-ventilated area and apply a light coat of matte clear sealant spray to protect the finish without adding unwanted shine.
Texture Tip
For that authentic rough ceramic feel, mix a teaspoon of baking soda into your acrylic paint before applying. It dries with a gritty, stony texture.
Place your new vase near a window where the light can highlight the subtle textures and warm earthy tones


Speckled Terrazzo Finish
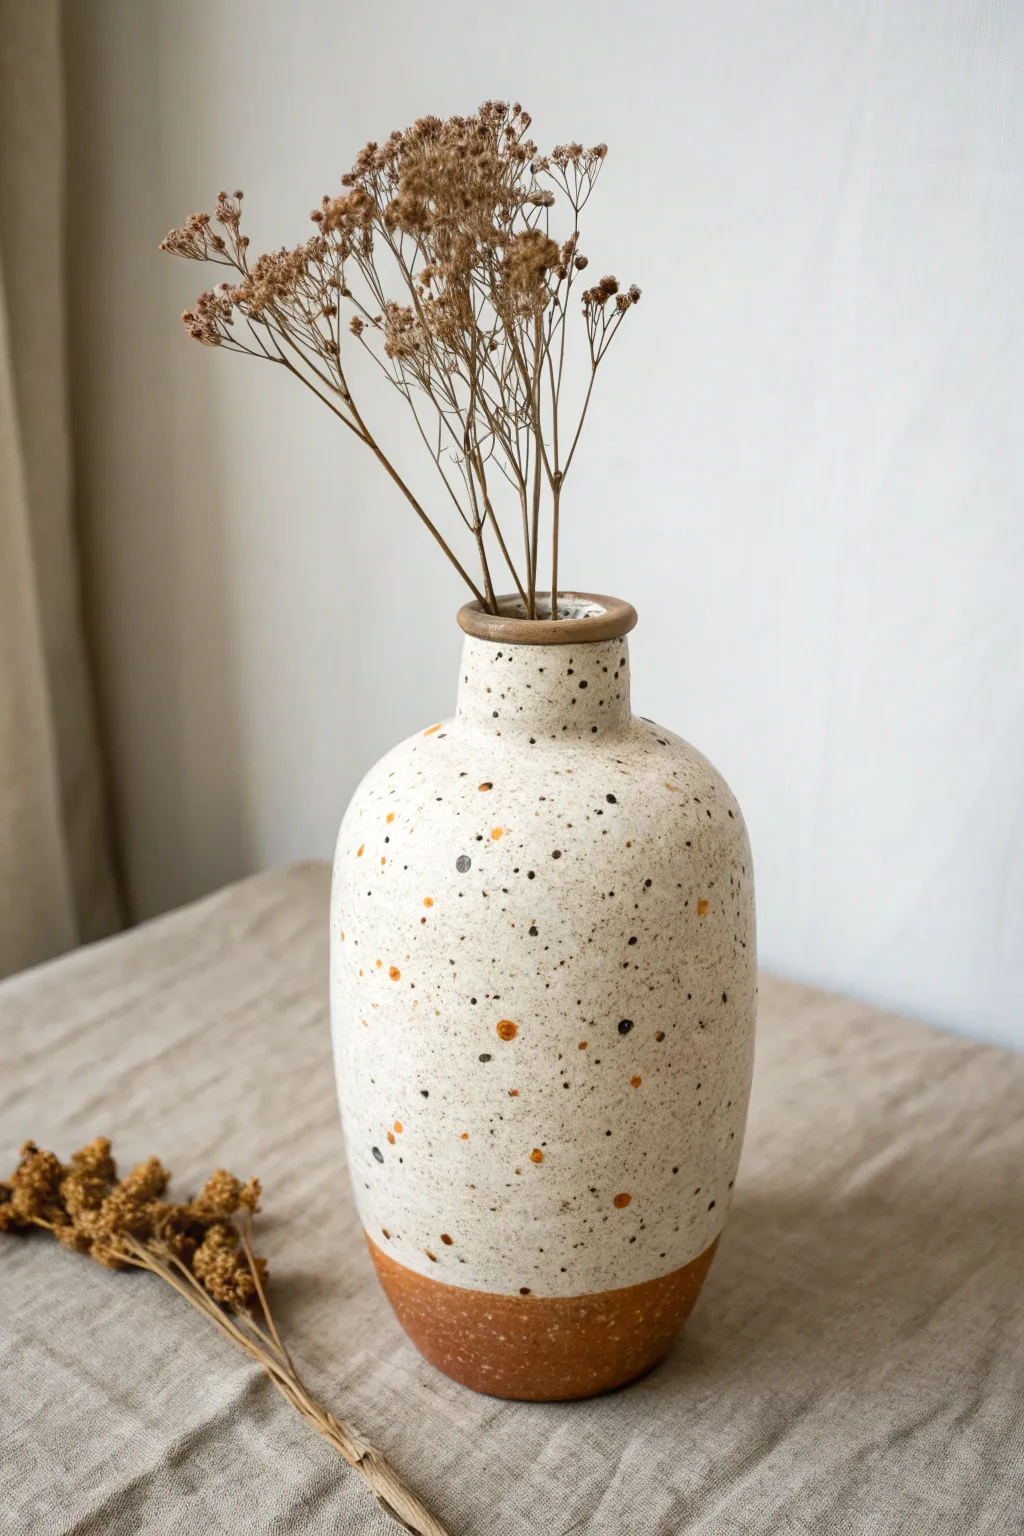
Transform a plain clay vessel into a high-end designer piece with this simple speckled terrazzo technique. This project mimics the organic look of stoneware pottery using easily accessible paints to create a warm, textured finish that highlights the raw clay base.
Step-by-Step
Materials
- Bisque-fired clay vase or terracotta vase (unglazed outer surface)
- White or cream matte acrylic paint
- Burnt sienna acrylic paint (orange-brown)
- Black acrylic paint
- Dark brown acrylic paint
- Painter’s tape (1-inch width)
- Small stiff-bristle toothbrush (an old one works great)
- Medium soft flat paintbrush
- Fine detail paintbrush (size 0 or 1)
- Matte spray sealer or varnish
- Palette or paper plate
- Cup of water and paper towels
Step 1: Preparation & Base Coat
-
Clean the surface:
Wipe down your clay vase with a slightly damp cloth to remove any pottery dust or oils. Let it dry completely before starting. -
Define the raw clay zones:
Decide how much of the raw clay base you want to show. Use painter’s tape to mask off the bottom 2-3 inches of the vase. Press the tape edges firmly to ensure a crisp line. -
Protect the rim:
If you want the rim to match the base, tear small strips of painter’s tape and carefully mask around the very top lip of the vase opening. -
Apply the main color:
Using the medium flat brush, paint the exposed middle section of the vase with your white or cream matte acrylic. Apply thin, even strokes. -
Layer for opacity:
Let the first coat dry for about 15-20 minutes. If the clay color shows through too much, apply a second coat for solid, opaque coverage. -
Remove the tape:
While the second coat is still slightly tacky (not fully cured), gently peel away the painter’s tape at the base and rim. Pulling while wet helps prevent the paint from chipping at the line.
Splatter Control Tips
If you get paint splatters on the raw clay base, wipe them immediately with a damp Q-tip. If they dry, gently scrape them off with a craft knife.
Step 2: Creating the Speckle Effect
-
Prepare the splatter station:
Set up a cardboard box or lay down plenty of newspaper to protect your workspace, as the next steps can get messy. -
Mix the splatter paint:
On your palette, water down a small amount of black acrylic paint. You want a consistency similar to heavy cream or melted ice cream—fluid enough to fly off a brush, but pigmented enough to show up. -
Apply the fine mist:
Dip the toothbrush into the watered-down black paint. hold it near the vase and run your thumb across the bristles to flick a fine mist of tiny black dots onto the white section. -
Add dimension with brown:
Clean the toothbrush and repeat the flicking process with diluted dark brown paint. This adds subtle depth and prevents the pattern from looking too flat. -
Control the density:
Rotate the vase frequently as you splatter. I like to step back occasionally to check that the density is even all the way around.
Step 3: Hand-Painting Terrazzo Details
-
Paint larger inclusions:
Switch to your fine detail brush. Dip it into the burnt sienna (orange-brown) paint to create the larger ‘terrazzo’ chips. -
Place irregular shapes:
Dab small, irregular organic shapes onto the white surface. Don’t make them perfect circles; vary the sizes and keep them somewhat spaced out. -
Add dark accents:
Clean your detail brush and add a few larger, irregular spots using undiluted black paint. These anchor the design and contrast nicely with the orange tones. -
Layering specks:
For a hyper-realistic stone look, you can carefully paint a tiny orange dot partially over a black splatter, or vice versa, to make the ‘stones’ look embedded. -
Dry thoroughly:
Allow the entire vase to dry for at least 2-3 hours. The thicker hand-painted dots will take longer to cure than the thin base coat. -
Seal the finish:
In a well-ventilated area, apply a coat of matte spray sealer over the entire vase (including the raw clay parts if you want them protected). This unifies the sheen and protects the paint from scratching.
Level Up: Texture
Mix baking soda into your white base paint (1:1 ratio) before applying. This creates a gritty, ceramic-like texture that makes the piece feel like real stone.
Now you have a stunning faux-ceramic piece that brings earthy warmth to any corner of your home

Botanical Stamp Impressions
Bring the serene beauty of the forest floor into your home with this understated, textured vase project. By pressing botanical elements into clay, you’ll create a tactile, fossil-like relic that feels both ancient and refreshingly modern.
Detailed Instructions
Materials
- Bisque-fired ceramic vase or air-dry clay vessel (smooth shape)
- White or cream textured acrylic paint (or paint mixed with baking soda)
- Soft-bristle brush (1-inch width)
- Small palette knife
- Air-dry modeling clay or pliable polymer clay
- Rolling pin
- Fresh or faux fern leaves (stiff, distinct veins work best)
- Simple leaf sprigs (for variety)
- Strong craft glue or heavy gel medium
- Fine-grit sandpaper (220-grit)
- Matte spray sealant
Step 1: Creating the Botanical Appliqués
-
Prepare the Clay:
Begin by conditioning a small handful of air-dry modeling clay. Knead it until it’s soft, pliable, and free of cracks. I generally aim for a consistency that feels like soft dough but isn’t sticky. -
Roll It Out Thin:
Using a rolling pin, flatten the clay into a very thin sheet, approximately 2-3mm thick. If you don’t have a rolling pin, a smooth glass jar works essentially the same way. -
Select Your Botanicals:
Choose fern fronds or leaves that have strong, raised veins on the back. These structural details are what will transfer the best texture into your clay. -
Press the Impressions:
Place your leaves vein-side down onto the clay sheet. Use the rolling pin to firmly roll over the leaves once, pressing them deeply into the clay surface without cutting all the way through. -
Reveal the Texture:
Carefully peel back the real leaves to reveal the detailed impression left behind in the clay. Use a craft knife or a needle tool to cut around the outline of the stamped leaf shape, leaving a clean clay replica. -
Refine the Edges:
Dip your finger in a tiny bit of water and run it along the cut edges of your clay leaves to smooth out any ragged bits or sharp corners.
Sharper Impressions
For ultra-crisp veins, lightly mist the back of your leaf with cooking spray before rolling it into the clay. This prevents sticking and tearing.
Step 2: Decorating the Vessel
-
Plan the Composition:
Hold your clay cutouts against the vase to test the arrangement. Aim for a flowing, organic look where some ferns curve upwards and others drape naturally across the surface. -
Adhere the Botanicals:
Apply a layer of strong craft glue or heavy gel medium to the back of a clay leaf. Press it firmly onto the vase surface. If the vase is curved, gently bend the clay to conform to the shape without squashing the texture. -
Blend the Seams:
Using a slightly damp finger or a sculpting tool, gently smooth the very edges of the clay leaf onto the vase so there is no harsh ridge where the clay meets the vessel wall. -
Add Variety:
Continue adding leaves, varying the size and orientation. Leave plenty of negative space between them to keep the design elegant rather than cluttered. -
Dry Completely:
Allow the appliqués to dry fully according to the package instructions. This usually takes 24 hours for air-dry clay, during which the pieces will harden and turn white or grey.
Step 3: Applying the Stone Finish
-
Mix Texture Medium:
Mix white acrylic paint with baking soda (roughly a 1:1 ratio) to create a fluffy, textured paste. Alternatively, use a pre-mixed stone effect paint. -
First Coat:
Using a soft brush, dab—don’t drag—the paint mixture over the entire vase, including the raised clay leaves. Stippling the paint into the crevices ensures the botanical details don’t get filled in too thickly. -
Enhance the Details:
While the paint is still wet on the leaves, use a dry, clean brush to lightly lift excess paint out of the deepest vein impressions, ensuring the pattern remains visible and crisp. -
Layering:
Once the first coat is dry, apply a second, lighter coat if needed to achieve full opacity and that desirable matte, stony finish. -
Gentle Sanding:
For a worn, antiqued look, very lightly sand the highest points of the leaves with 220-grit sandpaper once the paint is bone dry. This reveals the texture underneath. -
Seal the Work:
Finish by spraying the entire piece with a matte sealant to protect the texture and lock the paint in place without adding unwanted shine.
Rustic Wash Effect
Mix a drop of brown paint into 2 tbsp of water. Brush this wash over the dry texture paint and wipe it off immediately to darken just the deep crevices.
Now you have a stunning, tactile centerpiece that captures the quiet elegance of nature in stone

The Complete Guide to Pottery Troubleshooting
Uncover the most common ceramic mistakes—from cracking clay to failed glazes—and learn how to fix them fast.
Raised Coil Wraps
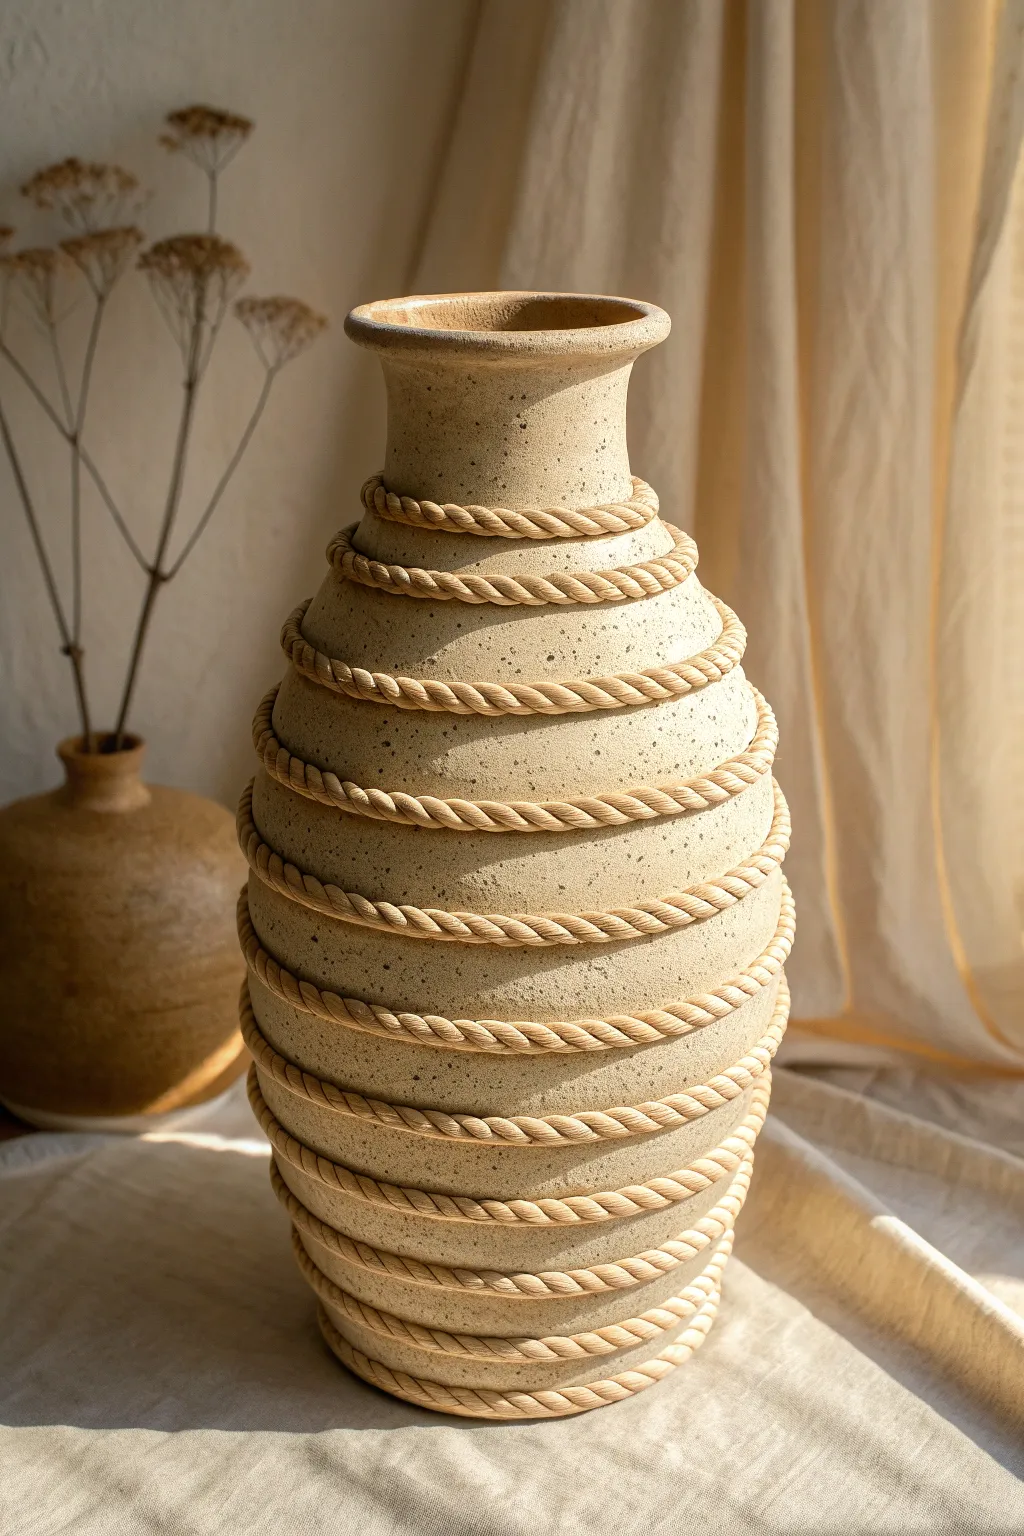
Transform a plain clay vessel into a tactile masterpiece by integrating raised, twisted-rope elements directly onto the form. Ideally suited for speckled stoneware clay, this project combines the rustic charm of woven textures with the sleek silhouette of a classic vase.
How-To Guide
Materials
- Speckled stoneware clay (mid-fire)
- Pottery wheel (or coil building supplies)
- Needle tool
- Scoring tool (serrated rib)
- Slip (clay mixed with water)
- Wooden modeling tool
- Sponge
- Soft rib tool
- Wire cutter
- Small paintbrush
Step 1: Shaping the Base Vessel
-
Prepare your clay:
Begin by thoroughly wedging your speckled stoneware clay to remove air bubbles. Center a substantial amount of clay on the wheel, aiming for a tall, narrow cylinder shape as your starting point. -
Throw the cylinder:
Pull the walls up evenly. Since you will be adding heavy coils later, keep the walls slightly thicker than usual to support the added weight without buckling. A thickness of about 3/8 inch is a safe target. -
Shape the belly:
Using a rib on the inside and your hand on the outside, gently push form outward to create a rounded belly, tapering back in toward the neck. Refine the profile until you have a smooth, continuous curve. -
Form the rim:
Create a distinct, flared rim at the top. This heavy lip will balance the visual weight of the rope textures you’ll be adding later. -
Smooth the surface:
Run a soft rib over the exterior to remove throwing lines. You want a relatively blank canvas so the rope texture stands out clearly. -
Let it firm up:
Allow the vase to dry to a sturdy leather-hard state. It needs to be firm enough to handle pressure without warping, as applying the coils requires some force.
Step 2: Creating the Rope Coils
-
Roll primary coils:
Roll out several long, even coils of clay. They should be roughly the thickness of a pencil. Try to keep them consistent so your ‘rope’ looks uniform. -
Twist the rope:
Take two clay coils and gently twist them around each other to simulate a rope texture. Alternatively, you can take a single thicker coil and impress diagonal lines with a modeling tool, but twisting two strands creates a more authentic depth. -
Measure the circumference:
Hold your clay rope against the vase to estimate the length needed for one ring. Make several of these twisted ropes, keeping them under plastic so they don’t dry out.
Cracking Coils?
If the rope coils start pulling away or cracking as they dry, wrapped the specifically affected area with damp paper towels under the plastic to rehydrate the join and slow the drying process even further.
Step 3: Attaching the Texture
-
Mark placement lines:
Using a needle tool, lightly score horizontal lines around the vase where you want your ropes to sit. Space them evenly—about 1.5 to 2 inches apart works well for this scale. -
Score and slip:
Thoroughly score the marked lines on the vase and the back of your twisted clay ropes. Apply a generous amount of slip to the vase surface. -
Apply the first rope:
Starting from the bottom ring, press the twisted clay rope firmly onto the scored area. Join the ends by cutting them at an angle and blending the clay together seamlessly. -
Secure the edges:
Use a small wooden modeling tool to gently blend the very underside of the rope into the vase body. This ensures a strong bond without ruining the twisted texture on the front. -
Clean up slip:
Use a damp paintbrush to wipe away any excess slip that squeezed out during attachment. This keeps the intersection between the ‘rope’ and the vase crisp. -
Repeat the process:
Work your way up the vase, attaching each ring. I find it helpful to stand back occasionally to check that the rings remain parallel to the base. -
Refine the texture:
Once all ropes are attached, go back over the twists with a dull tool to sharpen any details that got smushed during handling.
Add Oxide Depth
Before the final glaze firing, wipe a black or dark brown oxide wash over the rope texture and sponge it off. This will leave dark color in the crevices of the twist, making the texture pop.
Step 4: Finishing
-
Slow drying:
Cover the vase loosely with plastic. Because the coils are wetter than the vase body, you must dry the piece very slowly to prevent cracking where they join. -
Bisque fire:
Once bone dry, bisque fire the piece according to your clay body’s specifications. -
Glazing:
Apply a clear matte glaze to highlight the speckles, or leave the exterior unglazed (if the clay is vitrified) for a raw, stone-like texture. If glazing, ensure the glaze isn’t too thick, or it will obscure the rope detail.
Once fired, fill your new vessel with dried botanicals to complement the earthy, organic aesthetic.
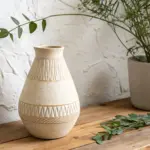
Abstract Squiggle Appliqué
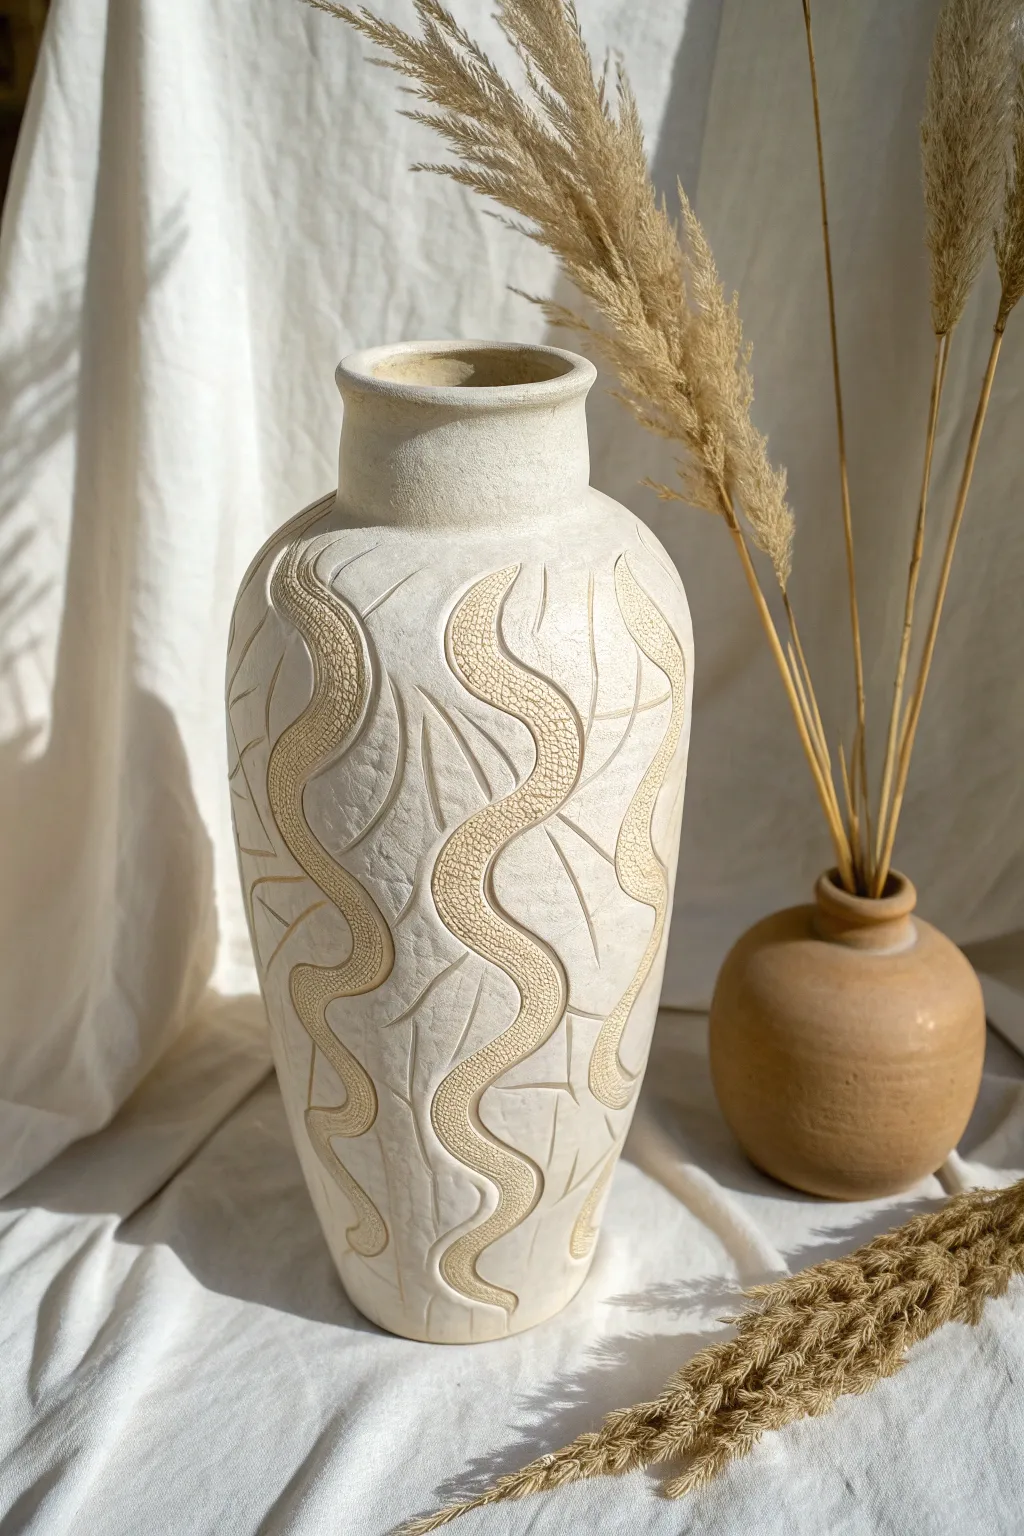
Transform a plain ceramic form into a tactile masterpiece using slip-trailing and carving techniques. This project combines organic, flowing lines with intricate micro-textures to create a sophisticated sculptural vessel perfect for dried grasses.
Step-by-Step
Materials
- Bisque-fired or leather-hard ceramic vase (tall, cylindrical shape)
- Thick ceramic slip (trailing consistency) or air-dry clay paste
- Slip trailer bottle with medium tip
- Needle tool or fine-point carving tool
- Loop tool (small)
- Sponge
- Soft paintbrush
- Matte white or cream glaze (or acrylic paint for non-fired version)
- Clear sealant (optional, for non-fired)
Step 1: Planning and Mapping
-
Prepare the surface:
Ensure your vase is clean and dust-free. If working with leather-hard clay, sponge it lightly to remove any grog. If upcycling a finished vase, sand the surface gently to help the new clay adhere. -
Map the flow:
Using a pencil or a needle tool, lightly sketch vertical wavy lines from the top rim down to the base. Create roughly three or four main ‘pathways’ that undulate gently, ensuring they don’t cross each other. -
Define spacing:
Step back and look at your composition. You want the negative space between the squiggles to feel balanced, wide enough to allow the eye to rest but close enough to create rhythm.
Slip Consistency
Your slip should be like thick Greek yogurt. If it’s too runny, the squiggles will spread and flatten; too dry, and they will crack.
Step 2: Creating the Relief
-
Apply the raised lines:
Fill your slip trailer with thick slip. Carefully trace over your penciled guidelines, applying steady pressure to create a raised, snake-like strip about half an inch wide. -
Build height:
If the line feels too flat, I prefer to let the first layer stiffen for about 10 minutes before applying a second, thinner bead of slip directly on top to build volume. -
Flatten and bind:
Once the applied slip is firm but not dry, gently press it down with a slightly damp finger or modeling tool to flatten the top slightly, ensuring the edges bond securely to the vase body. -
Clean the edges:
Use a damp paintbrush or a small sponge to wipe away any slip smears along the borders of your raised squiggles, keeping the lines crisp.
Step 3: Texturing and Carving
-
Texture the squiggles:
This is the meditative part. Take your needle tool and gently press a grid or scale pattern into the raised clay strips. Start with horizontal lines, then cross them vertically or diagonally to create a ‘reptilian’ texture. -
Detail the edges:
Ensure the texture goes all the way to the edge of the raised strip, which highlights the difference in depth between the appliqué and the base vase. -
Carve the background:
In the smooth spaces between the textured squiggles, use a fine carving tool to encise large, sweeping leaf outlines. These lines should be thin and subtle, contrasting with the heavy raised texture. -
Connect the elements:
Allow some of these incised leaf lines to touch or disappear behind the raised squiggle forms, creating a sense of depth and layering. -
Final smoothing:
Run a soft, dry brush over the entire piece to sweep away any clay crumbs created during the scratching process.
Two-Tone Effect
Use a dark colored clay for the appliqué squiggles and a light clay for the vase body to create striking, high-contrast graphic patterns.
Step 4: Finishing
-
Dry thoroughly:
Allow the vase to dry slowly, especially if the slip was applied thickly, to prevent the applied decoration from cracking or peeling away. -
Glaze application:
Brush or dip the vase in a matte white or cream glaze. Avoid glossy glazes, as the reflection can hide your beautiful carved details. -
Wipe back (optional):
For more contrast, you can gently wipe the glaze off the high points of the texture with a damp sponge before firing, exposing the raw clay beneath. -
Fire or seal:
Fire the kiln according to your clay body’s specifications. If using air-dry clay, seal the finished piece with a matte varnish to protect the texture.
Now you have a stunning, tactile vessel ready to display your favorite dried botanicals


What Really Happens Inside the Kiln
Learn how time and temperature work together inside the kiln to transform clay into durable ceramic.
Fluted Ribbed Texture
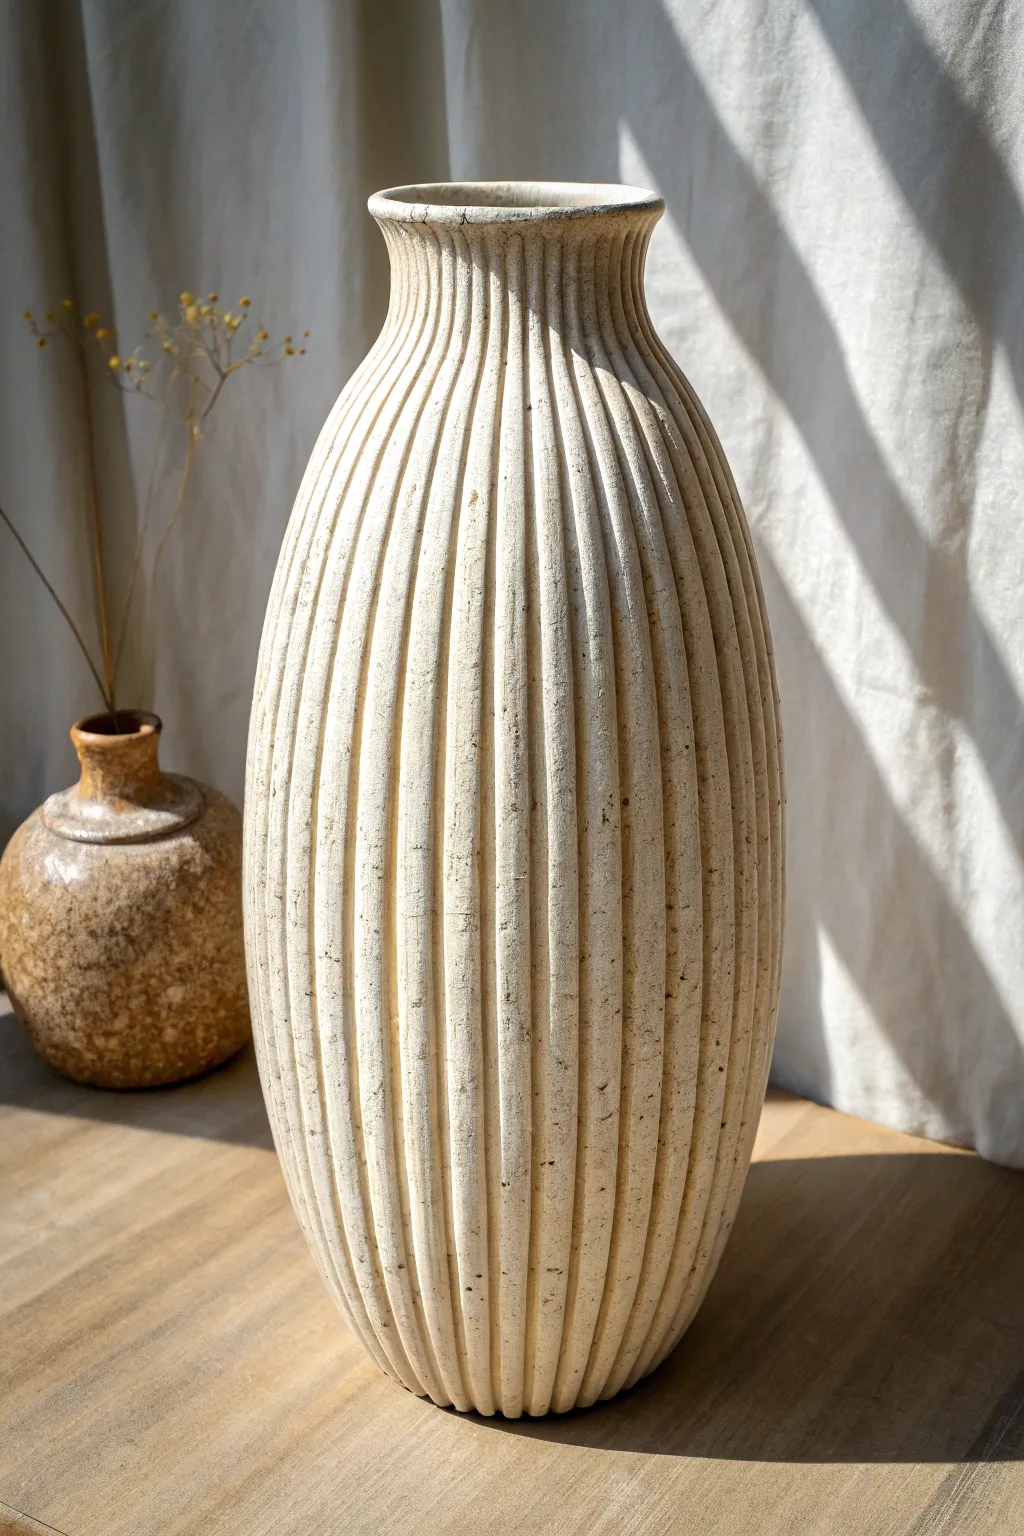
Embrace the beauty of repetition with this stunning fluted vase project, characterized by its organic vertical ribs and naturally speckled finish. This piece balances structural precision with raw, earthy textures for a timeless addition to your home decor.
Step-by-Step Guide
Materials
- Speckled stoneware clay (approx. 5-7 lbs)
- Tall cylindrical mold or PVC pipe (approx. 4-5 inches diameter)
- Newspaper or heavy paper
- Rolling pin
- Canvas work surface
- Ribbon tool or loop tool (medium U-shape)
- Flexible metal rib
- Serrated rib (scoring tool)
- Slip (clay mixed with water)
- Sponge
- Pottery knife or fettling knife
- Ruler or straight edge
- Cutting wire
Step 1: Forming the Base Structure
-
Prepare the Clay:
Begin by wedging your speckled stoneware clay thoroughly to remove air bubbles and ensure an even consistency. -
Roll the Slab:
Roll out a large, rectangular slab of clay on your canvas. Aim for a thickness of about 3/8 inch to ensure stability for a tall vessel. -
Prepare the Form:
Take your PVC pipe or tall cylindrical mold and wrap it loosely with newspaper or heavy paper. This barrier prevents the clay from sticking to the mold later. -
Cut to Size:
Using your ruler and knife, cut the clay slab into a precise rectangle that is tall enough for your desired vase height and wide enough to wrap fully around your mold with a little overlap. -
Construct the Cylinder:
Lift the slab and wrap it around the paper-covered mold. Score and slip the overlapping edges, then press them firmly together to create a seamless vertical join. -
Add a Bottom:
Roll a smaller slab and cut a circle slightly larger than the cylinder’s diameter. Place the cylinder on top, score and slip the contact points, and seal the bottom from the outside. -
Initial Shaping:
While the mold is still inside, use a flexible rib to smooth the exterior. Once stable, carefully slide the mold out, leaving the paper inside temporarily.
Warped Walls?
If the cylinder slumps during construction, stuff the interior with crumbled newspaper or plastic bags to support the shape while it stiffens up.
Step 2: Refining the Silhouette
-
Collar the Neck:
Gently squeeze inwards around the top rim to narrow the opening. Use water sparingly on your hands to keep the clay moving without getting sticky. -
Curve the Body:
From the inside, gently push the belly of the vase outward to create a slight curve, tapering back in towards the bottom for that elegant ovate shape. -
Dry to Leather Hard:
Allow the vase to dry slowly under loose plastic until it reaches a leather-hard state. It must be firm enough to carve without warping.
Step 3: Carving the Flutes
-
Mark Vertical Guides:
Lightly sketch vertical lines from top to bottom using a ruler to ensure your fluting stays straight, spacing them about an inch apart. -
Carve the First Ribs:
Using a loop tool or ribbon tool, carve vertical channels along your guide lines. Start just below the rim and drag the tool all the way to the base in one smooth motion. -
Deepen the Texture:
Make a second pass in each channel if you want deeper ribs. I prefer to vary pressure slightly to give it a more hand-hewn look rather than perfect machine lines. -
Round the Ridges:
Use a damp sponge to gently soften the sharp edges created between the carved channels, rounding them over into soft ribs. -
Refine the Rim:
Smooth the top rim with a chamois or damp sponge, ensuring it is level and comfortable to the touch.
Pro Tip: Consistent Depth
Rest your hand against the vase or table while carving to act as a stabilizer. This keeps your loop tool at a consistent depth for every single vertical stroke.
Step 4: Finishing and Firing
-
Enhance the Texture:
Before the clay is bone dry, lightly rub the surface with a scour pad to expose more of the grainy, speckled grog in the clay body. -
Bisque Fire:
Once fully bone dry, fire the piece to bisque temperature (usually cone 04 or 06) in a kiln. -
Glaze Application:
Apply a matte, transparent, or white wash glaze. The goal is to highlight the texture, not hide it, so wipe back the glaze with a sponge so it remains mostly in the crevices. -
Final Firing:
Fire again to the maturity temperature of your clay (usually cone 5/6 or cone 10) to vitrify the stoneware.
Place your finished vase near a window where sunlight will catch the deep grooves and highlight the beautiful, rhythmic shadows.
Lace-Imprint Collar
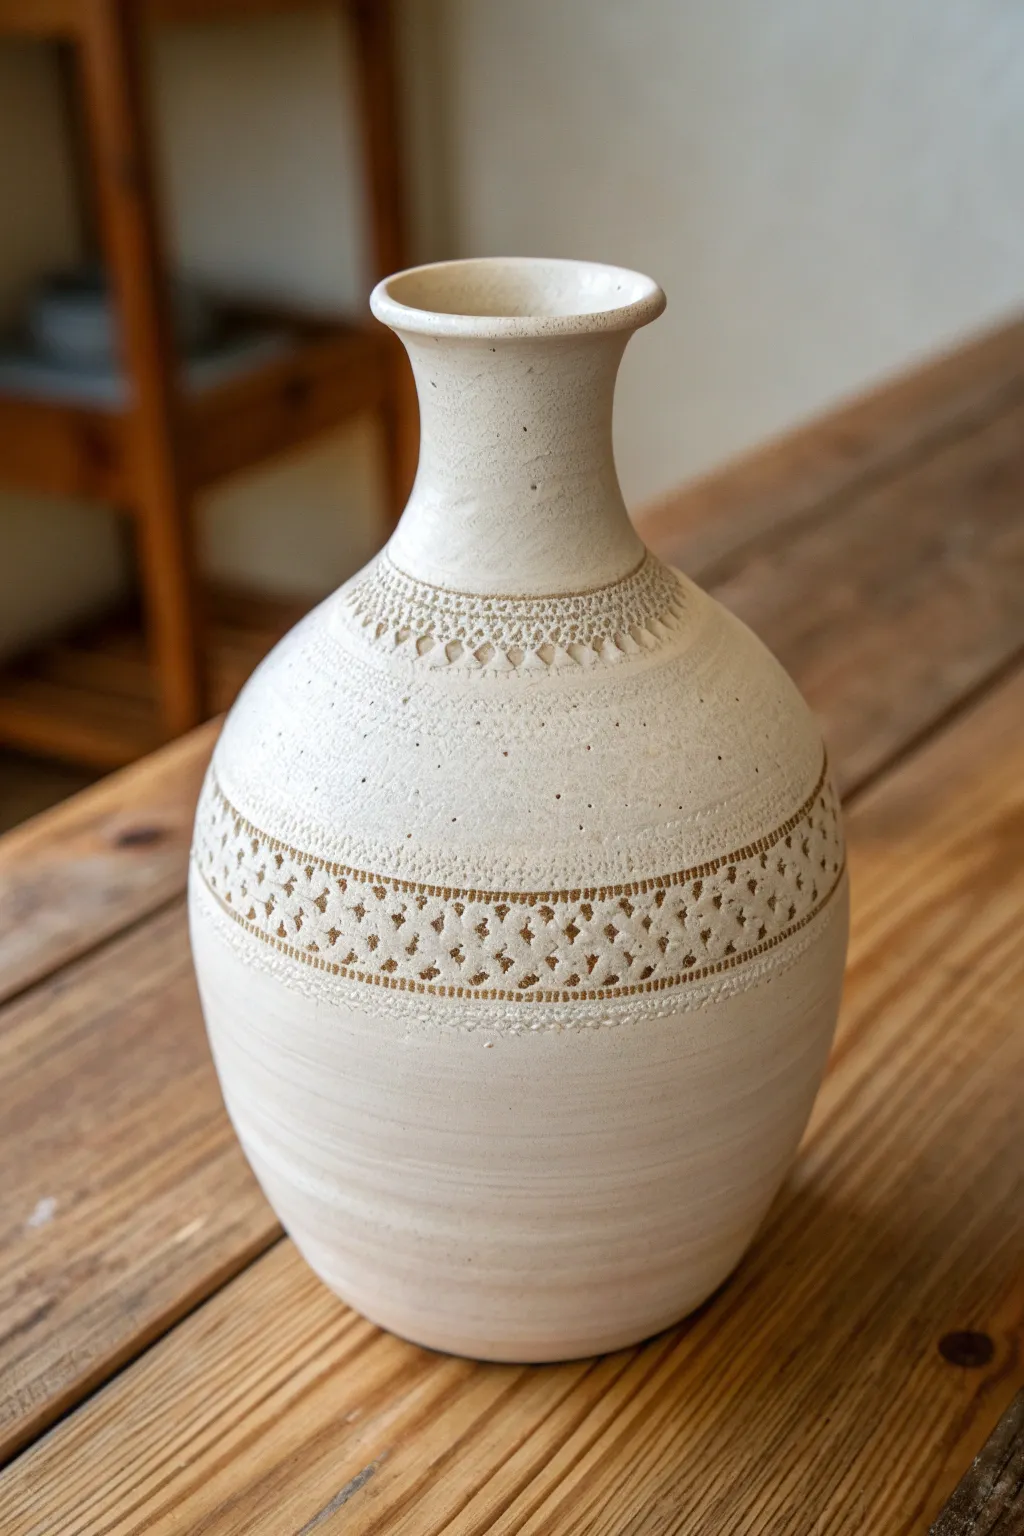
This project combines the clean lines of wheel-thrown pottery with the delicate, vintage texture of lace. The result is a stunning cream-colored vase featuring intricate bands of imprinted patterns that add depth and tactile interest to the smooth clay surface.
Detailed Instructions
Materials
- White or speckled stoneware clay
- Potter’s wheel
- Throwing tools (sponge, rib, wire cutter)
- Strips of heavy-textured cotton lace or crochet trim
- Rolling pin or pony roller
- Needle tool
- Clear or translucent matte glaze
- Kiln
Step 1: Throwing the Form
-
Prepare the clay:
Begin with a well-wedged ball of white stoneware clay. Center it firmly on the potter’s wheel to ensure an even foundation for your vase. -
Open and pull:
Open the centered clay and begin pulling the walls upward. Aim for a cylinder initially, keeping the walls consistent in thickness. -
Shape the belly:
From the inside, gently push the clay outward to form a bulbous, rounded belly. Use a rib on the outside to smooth the curve and compress the clay particles. -
Leaving throwing lines:
For the lower half of the vase, I like to leave the subtle spiral ridges created by my fingers during the pull untouched. This adds a nice contrast to the lace texture later. -
Collar the neck:
Gently collar the clay inward at the top to create a narrow neck. Move slowly to prevent the clay from buckling. -
Finish the rim:
Flare the very top edge outward slightly to create a graceful rim. Smooth the lip with a piece of chamois or a sponge. -
Dry to leather hard:
Cut the pot from the wheel but leave it on the bat if possible. Allow it to dry slowly until it reaches a sturdy leather-hard stage—firm enough to handle without deforming, but soft enough to take an impression.
Step 2: Applying the Lace Texture
-
Select your lace:
Choose a thick cotton lace or crocheted trim. Synthetic lace can be too thin; you want something with distinct, raised stitching for a deep impression. -
Position the neck band:
Cut a strip of lace to fit around the base of the neck where it meets the shoulder. Wrap it snugly around the form. -
Roll the impression:
Using a small pony roller or simply pressing firmly with your thumb, roll over the lace strip. Support the wall from the inside of the vase with your other hand to prevent collapsing. -
Check the depth:
Peel back a small corner to ensure the pattern is transferring clearly. If it’s too faint, press harder or dampen the lace slightly. -
Position the belly band:
Place a wider strip of lace around the widest part of the vase’s belly. Ensure it runs straight and horizontal. -
Imprint the belly:
Repeat the rolling process on this lower band. Be extra gentle here, as the belly is the widest and structurally weakest point. -
Clean up borders:
Carefully peel away the lace strips. If the edges of the impression are rough, smooth them very lightly with a damp sponge or a rubber rib, taking care not to erase the pattern.
Uneven Impressions?
If the lace isn’t leaving a deep mark, the clay might be too dry. Mist the area lightly with water, wait 5 minutes for it to absorb, and try pressing again.
Step 3: Firing and Glazing
-
Bisque fire:
Allow the vase to dry completely to the bone-dry stage. Fire it in the kiln to a bisque temperature (usually cone 04 or 06). -
Wash the textured areas:
To highlight the texture, apply a red iron oxide wash or a darker underglaze specifically into the lace impressions, then wipe away the excess with a damp sponge so color remains only in the recesses. -
Apply main glaze:
Dip or brush the entire vase with a translucent matte or satin white glaze. A glossy glaze might obscure the fine details, so matte is often better. -
High fire:
Fire the vase a final time to the maturity temperature of your clay and glaze (typically cone 5, 6, or 10).
Adding Contrast
Use an oxide wash (like manganese or iron oxide) rubbed into the texture before glazing. This darkens the deep spots and makes the lace pattern pop.
Place your finished vase near a window where natural light can dance across the textured surface.

TRACK YOUR CERAMIC JOURNEY
Capture glaze tests, firing details, and creative progress—all in one simple printable. Make your projects easier to repeat and improve.
Textured Matte Paint Finish
Transform a plain glass or ceramic vase into an earthy, high-end decor piece that looks like handmade stoneware. This textured matte finish uses baking soda and acrylics to create a convincing grainy surface with lovely color blocking.
Step-by-Step Guide
Materials
- Smooth glass or ceramic vase (thrifted is perfect)
- Primer (spray or brush-on)
- Acrylic paint: Cream/Off-white
- Acrylic paint: Ochre/Mustard Yellow
- Acrylic paint: Terracotta/Rust Brown
- Acrylic paint: Dark Umber or Black (for speckling)
- Baking soda or baking powder
- Matte finish clear sealant spray
- Medium flat paintbrush
- Stiff bristle toothbrush
- Paper plate or mixing palette
- Small cup or bowl for mixing
- Sandpaper (optional)
Step 1: Preparation and Base Texture
-
Clean surface:
Begin by thoroughly cleaning your vase with soap and warm water to remove any grease or dust. Dry it completely with a lint-free cloth. -
Rough it up:
If your vase is very glossy, lightly scuff it with fine-grit sandpaper. This helps the primer adhere better. -
Prime the vase:
Apply a coat of primer to the entire exterior. This ensures your textured paint won’t peel off later. Let this dry fully according to the bottle instructions. -
Mix texture medium:
Pour a generous amount of your Cream/Off-white acrylic paint into a mixing cup. Slowly stir in baking soda until you reach a consistency like fluffy cupcake frosting—thick but spreadable. -
Apply base texture:
Paint the entire vase with this thick cream mixture. Use dabbing motions with your brush rather than long strokes to create a rough, stone-like surface. -
Dry and Assess:
Let this first thick coat dry for at least an hour. If you can still see the original vase color peeking through, mix a fresh batch of texture paint and apply a second coat.
Pro Tip: Rub it dirtier
Before sealing, lightly rub a tiny bit of watered-down brown paint into the crevices of the texture with a rag, then wipe it off. This ages the ‘stone’ deeply.
Step 2: Color Blocking
-
Prepare lower colors:
Mix a small amount of baking soda into your Ochre/Mustard paint, and a separate batch into your Terracotta paint. You want the texture to remain consistent across all colors. -
Paint the middle band:
Apply the textured Ochre paint to the lower third of the vase. Don’t worry about a crisp straight line; a slightly organic, uneven edge blends better with the pottery look. -
Blend the transition:
While the ochre paint is still slightly wet, use a clean, dry brush to lightly feather the top edge where it meets the cream color, creating a soft, hazy transition. -
Paint the base:
Apply the textured Terracotta paint to the very bottom of the vase, covering the lowest inch or so. I like to curve this line slightly to follow the shape of the pot. -
Feather the bottom edge:
Gently blend the top edge of the Terracotta into the Ochre section using dabbing motions to marry the two earthy tones together.
Step 3: Speckling and Sealing
-
Dilute dark paint:
Mix a tiny drop of Dark Umber or Black paint with water until it has an inky, thin consistency. -
Load the toothbrush:
Dip the tips of your stiff bristle toothbrush into the watery dark paint. Test the spray on a piece of paper first to ensure you don’t have large drips. -
Flick the paint:
Hold the toothbrush near the vase and run your thumb across the bristles to flick tiny specks of paint onto the surface. Rotate the vase to cover all sides evenly. -
Control the density:
Focus slightly heavier speckles near the neck of the vase for visual interest, keeping the bottom section slightly cleaner. -
Let it cure:
Allow the vase to dry completely overnight. The baking soda mixture is thick and needs time to harden fully. -
Protect the finish:
Spray the entire vase with a matte clear coat. This is crucial as it prevents the baking soda texture from crumbling or yellowing over time.
Level Up: Handle Hack
Use air-dry clay to fashion small loop handles on the neck before priming. Once painted with the baking soda mix, they’ll look like part of original ceramic cast.
Style your new vase with dried bunny tails or wheat grass for a warm, minimalist display
Minimal Line-Art Face
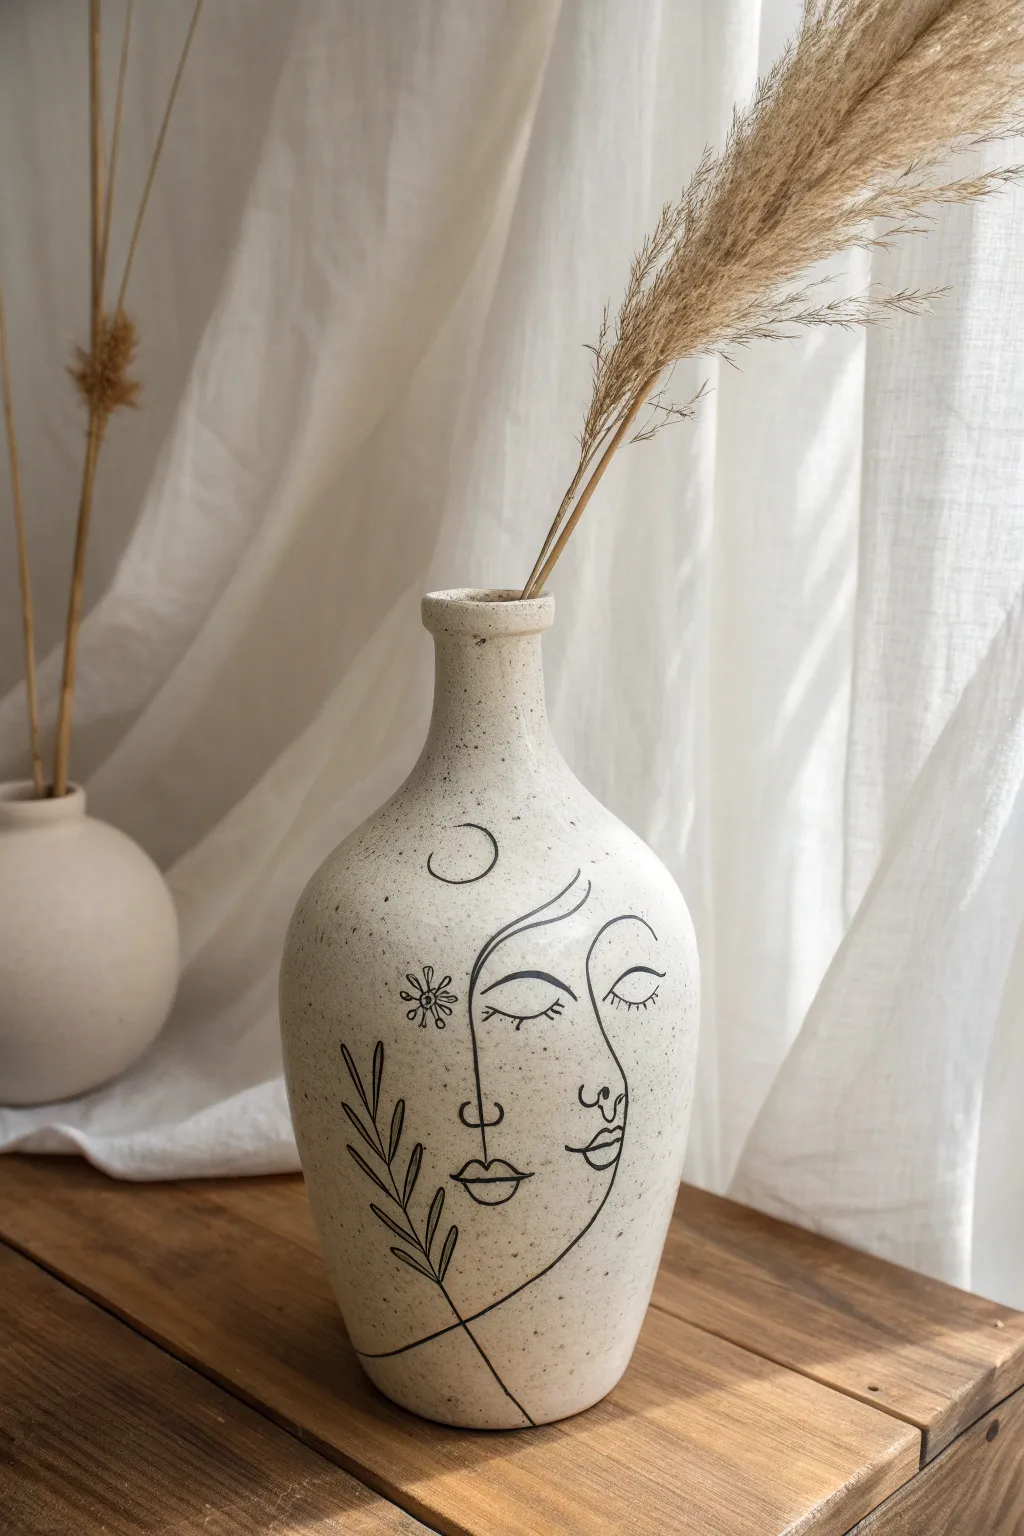
Transform a plain ceramic vase into a stunning piece of modern art with this simple yet impactful line-art technique. The speckled beige finish combined with delicate facial contours creates a sophisticated bohemian aesthetic perfect for displaying dried pampas grass.
Step-by-Step
Materials
- White or beige ceramic vase (smooth surface preferred)
- Beige/Sand colored acrylic paint
- Speckle medium or brown and black acrylic paint
- Matte finish spray sealant
- Fine tip black acrylic paint marker (0.7mm or 1mm)
- Pencil (HB or lighter)
- Eraser
- Tracing paper (optional)
- Old toothbrush (for speckling technique)
- Medium flat paintbrush
- Paper towels
- Water cup
Step 1: Base Preparation
-
Clean the Surface:
Begin by thoroughly cleaning your vase with warm soapy water to remove any oils or dust. Dry it completely with a lint-free cloth to ensure the paint adheres properly. -
Apply Base Color:
Using your flat paintbrush, apply a coat of beige or sand-colored acrylic paint over the entire exterior of the vase. Smooth out your brushstrokes as you go. -
Dry and Repeat:
Allow the first coat to dry for about 20-30 minutes. If the original color of the vase is still showing through, apply a second or third coat until you have opaque, solid coverage. -
Create the Speckled Effect:
Mix a small amount of brown paint with a drop of water to thin it slightly. Dip an old toothbrush into this mixture. -
Flick the Speckles:
Hold the toothbrush near the vase and run your thumb across the bristles to flick tiny droplets of paint onto the surface. I like to practice on a piece of cardboard first to gauge the spray pattern. -
Vary the Speckles:
Repeat the previous step with a tiny amount of black paint for depth. Aim for a random, organic distribution rather than perfect uniformity. -
Seal the Base:
Once the paint and speckles are fully dry (give it at least an hour), spray a light coat of matte sealant over the vase. This provides a non-porous surface that is easier to draw on without clogging your marker.
Step 2: Designing the Face
-
Plan Your Sketch:
Lightly sketch your design onto the vase using a pencil. Start with the central nose line that divides the two faces. -
Outline Features:
Draw the closed eye (a simple U-shape with lashes) on the left side, then mirror a similar eye on the right side. Keep the lines fluid and connected where possible. -
Add Lips and Curves:
Sketch the lips below the nose line. Add a sweeping curve for the jawline on the right and the hair outline on the left. -
Incorporate Details:
Add the botanical branch on the bottom left and the small sun/flower motif near the left eye. Don’t worry about perfection; the charm is in the hand-drawn look.
Marker Problems?
If the marker skips, the surface might be too rough. Lightly sand the area with fine-grit sandpaper, wipe clean, and try again for smoother lines.
Step 3: Inking the Art
-
Prime the Marker:
Shake your black acrylic paint marker well and press the nib on a scrap paper until the ink flows smoothly. -
Trace the Main Lines:
Starting from the top of the design, carefully trace over your pencil lines. Use a steady, slow hand to maintain a consistent line width. -
Work in Sections:
To avoid smudging, work from the top down or left to right (if you are right-handed). Let one section dry for a minute before your hand rests near it. -
Refine the Details:
Go back in to add the delicate eyelashes and the small circles in the floral motif. Press very lightly for these fine details. -
Clean Up:
Once the black ink is completely dry (wait at least 30 minutes to be safe), gently erase any visible pencil marks. Be gentle so you don’t scratch the base paint. -
Final Seal:
Apply one final coat of clear matte spray sealant over the entire vase to protect your artwork from scratches and fading.
Add Texture
Mix baking soda into your beige base paint before applying (1 part soda to 2 parts paint) to create a trendy terracotta-like texture.
Place your finished vase on a sunny sill filled with dried grasses for an instant decor upgrade
Sculpted Facial Features
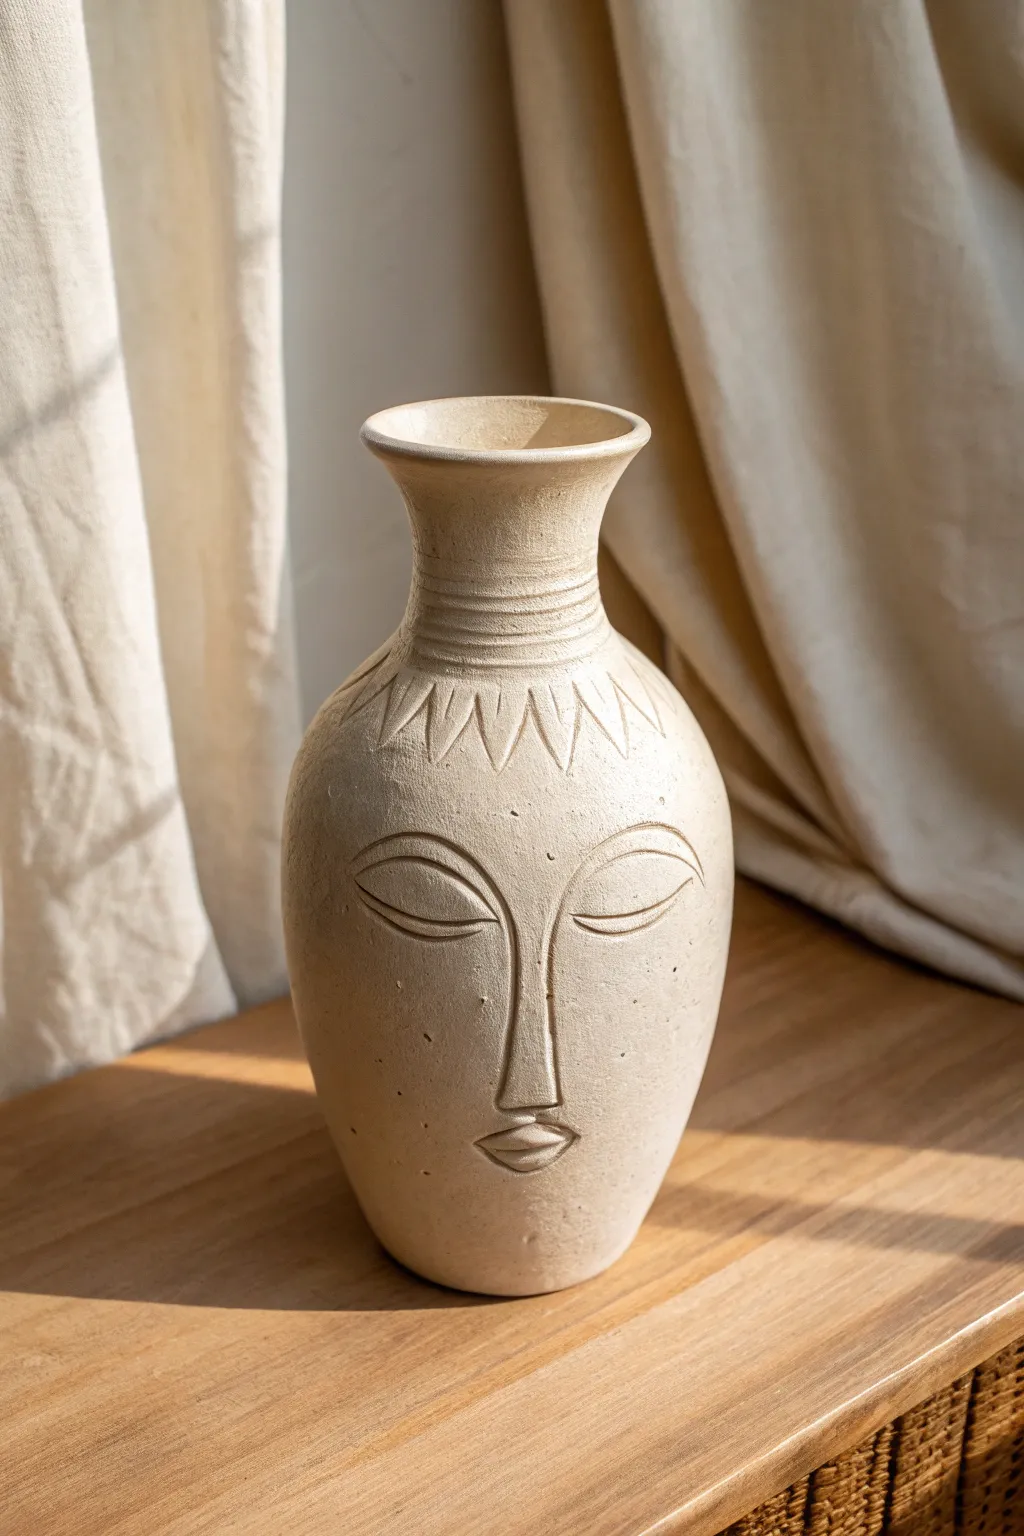
Transform a simple pottery form into a serene work of art with this sculpted face vase tutorial. Featuring gentle curves, etched details, and a natural matte finish, this piece brings a calming, modern aesthetic to any shelf.
Step-by-Step Tutorial
Materials
- Air-dry clay or stoneware clay (cream/beige)
- Pottery wheel (optional, or coil build)
- Kidney scraper (smooth)
- Needle tool
- Loop tool (small)
- Sponge
- Water slip
- Wooden modeling tool
- Clear matte sealant (if using air-dry clay)
Step 1: Forming the Base
-
Prepare the clay:
Begin by wedging your clay thoroughly to remove air bubbles. You want a consistent, smooth texture before you start shaping. -
Construct the main body:
Whether throwing on a wheel or building with coils, aim for a classic urn shape. Create a bulbous bottom that tapers gently inward toward the neck. -
Shape the neck and rim:
Pull the clay upwards to form a cylindrical neck, flaring it out slightly at the very top to create a distinct, rolled rim. -
Smooth the surface:
Use a kidney scraper and a damp sponge to smooth the entire exterior. I find that taking extra time here to remove fingerprints makes the carving stage much satisfying. -
Leather hard stage:
Allow the vase to dry until it reaches a ‘leather hard’ state. firm enough to handle without deforming, but soft enough to carve into.
Uneven Features?
If facial symmetry is tricky, sketch the face on paper first. Cut it out as a stencil, wrap it gently around the curved surface, and trace lightly with a needle tool.
Step 2: Sculpting the Features
-
Draft the face:
Using the tip of a needle tool, very lightly sketch the placement of the eyes, nose, and mouth. The nose should be long and connect directly to the brow line. -
Carve the nose bridge:
Use a small loop tool to carve away a shallow layer of clay on either side of the nose bridge, making the nose appear raised. -
Define the nose tip:
Sculpt the bottom of the nose into a simple triangle shape, blending the edges smoothly into the cheek area. -
Incise the eyelids:
For the sleeping eyes, cut two deep, sweeping distinct curves. Add a second, slightly lighter curve above each to represent the eyelid crease. -
Shape the lips:
Press a small amount of clay outward or attach a tiny coil to form the lips, then define the separation line and the cupid’s bow with a wooden modeling tool. -
Create the hair motif:
Around the shoulder of the vase, just below the neck, carve a series of V-shapes or leaf-like triangles pointing downward to simulate a stylized hairline or collar. -
Add neck rings:
Using a needle tool or wire loop, etch three or four horizontal parallel lines around the center of the neck involving consistent pressure.
Create Depth
For deeper shadows in the eyes and nose, gently rub a diluted darker wash (watered-down paint or underglaze) into the carvings, then wipe the surface clean.
Step 3: Finishing Touches
-
Refine the carvings:
Go back over your incised lines with a damp brush or fingertip to soften any sharp burrs or jagged edges left by the tools. -
Add texture:
If you want that speckled, stone-like look, gently press coarse sand or grog into the surface, or prick random tiny texture holes with a needle. -
Final drying:
Let the piece dry completely. If using stoneware, fire it according to clay specifications. If using air-dry clay, allow 24-48 hours to cure. -
Seal or glaze:
Apply a clear matte sealant to protect the surface while aiming to keep that raw, earthy appearance visible in the reference.
Now you have a tranquil, handmade vessel ready to hold dry flowers or stand alone as a statement piece
Tiny Floral Appliqué Garland
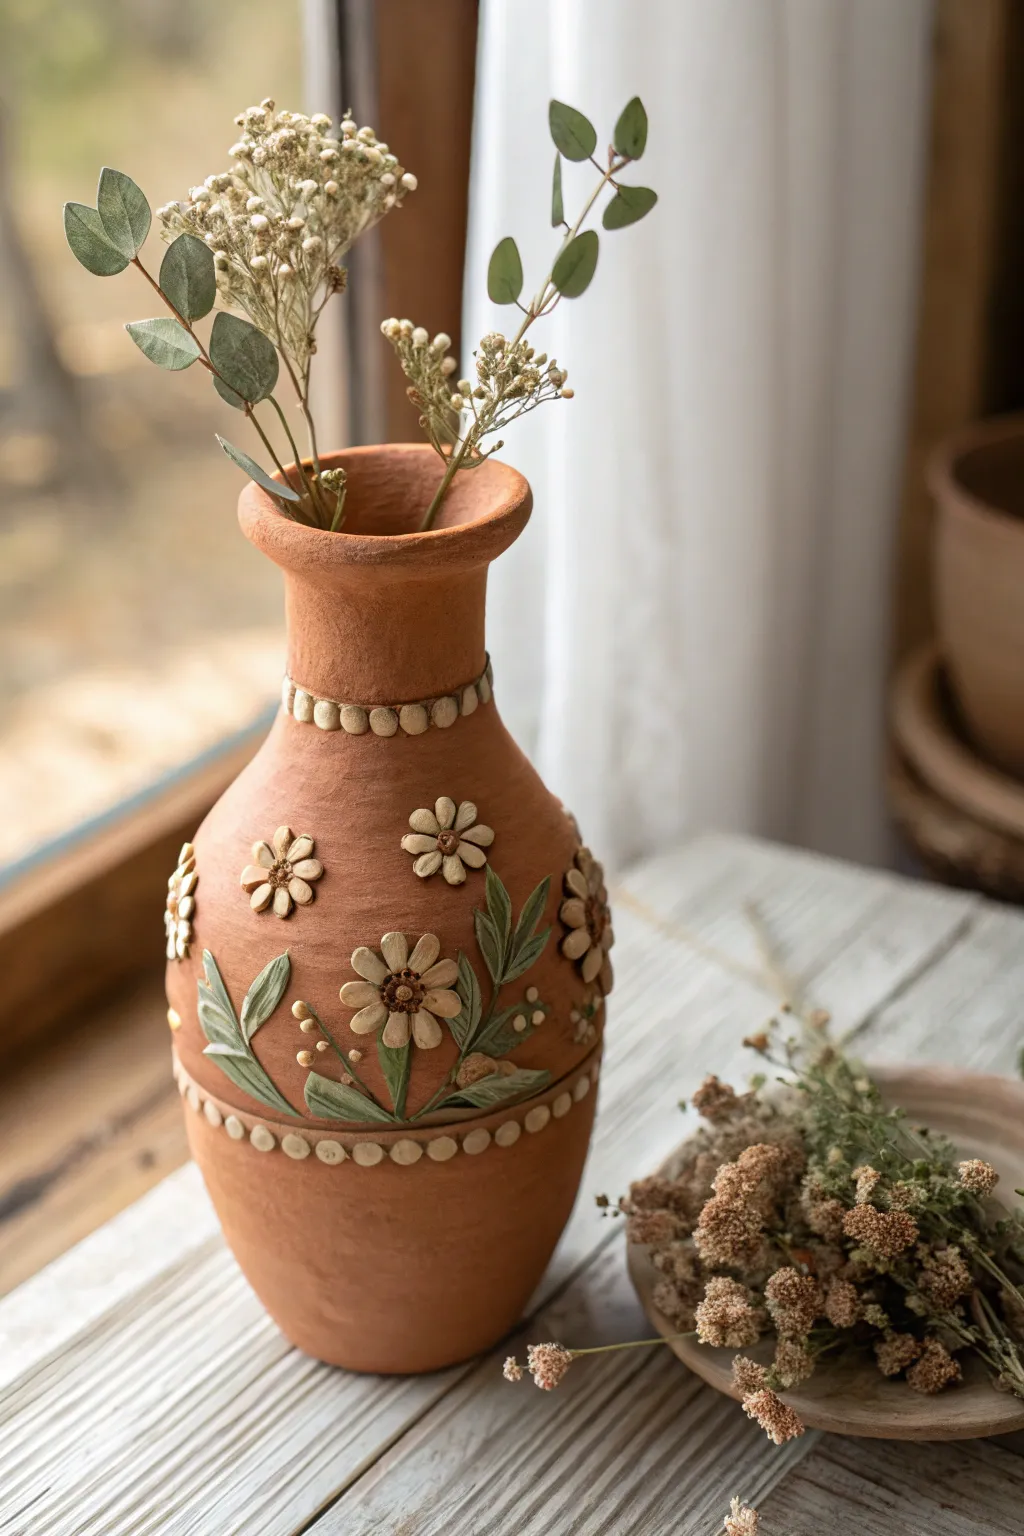
Transform a plain terracotta vessel into a charming heirloom piece using simple relief techniques. This project, which features delicate daisy-like blooms and leafy vines bordered by pearl-like accents, brings a touch of organic warmth to any windowsill.
How-To Guide
Materials
- Unfinished terracotta vase (medium size)
- Air-dry clay or polymer clay (cream/beige color and soft sage green)
- Clay sculpting tools (needle tool, small ball stylus)
- Strong craft glue or slip (if using raw ceramic clay)
- Acrylic matte varnish or sealant
- Small paintbrush
- Rolling pin
- Wax paper (work surface)
- Wet sponge or cloth
Step 1: Preparation & Bead Borders
-
Clean surface:
Begin by wiping down your terracotta vase with a slightly damp cloth to remove any dust or oils that might prevent adhesion. -
Create clay beads:
Roll small, pea-sized balls of the cream-colored clay. You will need enough to encircle the neck and the belly of the vase. Try to keep them relatively uniform in size. -
Flatten the beads:
Gently press each ball flat with your thumb or a flat tool to create small discs rather than perfect spheres. -
Attach the neck border:
Apply a tiny dot of glue to the back of each disc and press them in a row around the neck of the vase, just where it begins to flare out. Ensure they touch side-by-side for a continuous garland effect. -
Attach the lower border:
Repeat this process around the widest part of the vase’s belly, creating a second horizontal border that will frame your central floral design.
Adhesion Issues?
If clay pieces pop off the terracotta after drying, the clay shrank too much. Use super glue to reattach them firmly to the porous surface.
Step 2: Sculpting the Flowers
-
Form flower centers:
Roll slightly larger balls of cream clay for the flower centers. Press them onto the vase in a scattered pattern between your two borders. -
Texture the centers:
Use a needle tool or the tip of a toothpick to poke tiny holes repeatedly into the center discs, creating a seeded texture. -
Create petals:
Roll small tear-drop shapes from the cream clay. Flatten them slightly and use your needle tool to impress a single line down the center of each petal. -
Assemble blooms:
Arrange five or six petals around each textured center. I find it easiest to attach opposite petals first to keep the spacing even. -
Add side profiles:
For variety, create a few ‘side view’ flowers by layering three petals in a fan shape and placing a textured half-circle at the base.
Step 3: Adding Greenery & Finishing
-
Shape the leaves:
Switch to your sage green clay (or paint cream clay later). Roll elongated teardrop shapes and flatten them. Use a knife or needle tool to carve intricate vein patterns. -
Position the foliage:
Tuck these leaves under and around the flowers. Aim for an upward-sweeping motion to mimic natural growth habits. -
Create vines:
Roll very thin snakes of green clay for stems. Connect your leaves and flowers, allowing the stems to curve gracefully across the terracotta surface. -
Add filler buds:
Roll tiny balls of cream clay and place them near the ends of the vines to represent unopened buds. -
Dry completely:
Allow the clay to dry fully according to the package instructions. Air-dry clay typically takes 24 hours. -
Seal the work:
Once bone dry, brush a coat of matte varnish over the clay appliqués to protect them from moisture and dust.
Go Anthropomorphic
Mix coffee grounds into your clay for a speckled, stone-like texture before sculpting your flowers for an even earthier look.
Now fill your new vessel with dried baby’s breath or eucalyptus to complete the cottagecore aesthetic
Bubble Dot Texture
Transform a plain vase into a high-end sculptural piece featuring a tactile, sandy finish and a mesmerizing array of raised bubble dots. This project mimics the look of expensive stoneware using simple materials to create a modern, minimalist statement piece.
Step-by-Step Tutorial
Materials
- Old glass or ceramic vase (clean and dry)
- Air-dry clay (white or light beige)
- Baking soda
- Acrylic paint (creamy beige or off-white)
- Paintbrush (medium flat brush)
- Strong craft glue (optional, for extra adhesion)
- Small bowl for mixing
- Water
- Rolling pin (optional)
- Small circular cutter or straw (optional)
Step 1: Creating the Base Texture
-
Prepare the paint mix:
In a small bowl, mix your acrylic paint with baking soda. Aim for a 1:1 ratio, but adjust until you have a thick, fluffy consistency that resembles mousse or heavy batter. -
Apply the first coat:
Using your paintbrush, dush the mixture onto the vase in random, multidirectional strokes. You want to create a visibly rough, grainy surface, so don’t smooth it out too much. -
Add dimension:
While the first coat is still tacky, dab the brush vertically against the surface to create tiny peaks and valleys, enhancing the stone-like effect. -
Let it dry:
Allow this base layer to dry completely. Since the mixture is thick, give it at least an hour or two until it is hard to the touch.
Step 2: Forming the Hobnails
-
Condition the clay:
Take a chunk of air-dry clay and knead it in your hands until it is warm, soft, and pliable. If it feels dry, add a tiny drop of water. -
Make the dot spheres:
Pinch off small pieces of clay and roll them into small spheres between your palms. Aim for balls about the size of a large pea or a chickpea. -
Check for consistency:
Line up your clay spheres as you make them to ensure they are relatively uniform in size. You’ll need quite a few to cover the vase, likely between 50 and 100 depending on your vessel size. -
Plan the spacing:
Visualize a grid pattern on your vase. The dots in the reference image are staggered (offset), meaning each row sits in the gaps of the row above it. -
Begin attaching dots:
Start at the top of the vase just under the rim. Press a clay ball firmly onto the textured surface. The fresh clay should stick to the textured paint, but if it feels loose, add a tiny dot of glue. -
Flatten the dots:
Once placed, gently press the center of the sphere with your thumb or a flat tool to flatten it slightly into a dome shape rather than a full ball. -
Create the first row:
Continue placing dots around the circumference of the vase neck, keeping even spacing roughly a finger-width apart. -
Start the second row:
Move down to the next level. Place your first dot directly underneath the empty space between two dots from the row above to create that diamond or honeycomb pattern. -
Finish the pattern:
Continue this alternating pattern all the way down the body of the vase. Don’t worry if the spacing isn’t mathematically perfect; the handmade irregularity adds charm.
Sticky Situation
If your clay dots keep falling off the painted surface while you work, score the back of the clay slightly with a needle tool and use a dab of PVA glue for a permanent hold.
Step 3: Unifying the Finish
-
Dry the clay:
Let the applied clay dots dry completely according to the package instructions, usually overnight. They will turn a lighter shade of white when fully dry. -
Mix finish paint:
Whip up another batch of the paint and baking soda mixture. You might want slightly less baking soda this time for a smoother application over the dots. -
Paint the dots:
Carefully paint over each clay dot. Dab the paint into the crevices where the dot meets the vase to ensure a seamless transition. -
Blend the surface:
Apply a final coat of the textured paint to the spaces between the dots. This unifies the color of the clay and the vase so it looks like one solid ceramic piece. -
Add final texture:
I prefer to do a final ‘stipple’ over the dots with a nearly dry brush to give them that sandy texture consistent with the rest of the vessel. -
Final dry:
Let the entire project cure for 24 hours to ensure the paint and clay are fully hardened and bonded.
Two-Tone Effect
For added depth, paint the vase a darker earthy brown first, and then dry-brush a lighter cream color over the raised dots to make them pop visually.
Place your dried florals inside and find the perfect sunlit spot to show off those beautiful shadows
Cut-Out Lantern Pattern
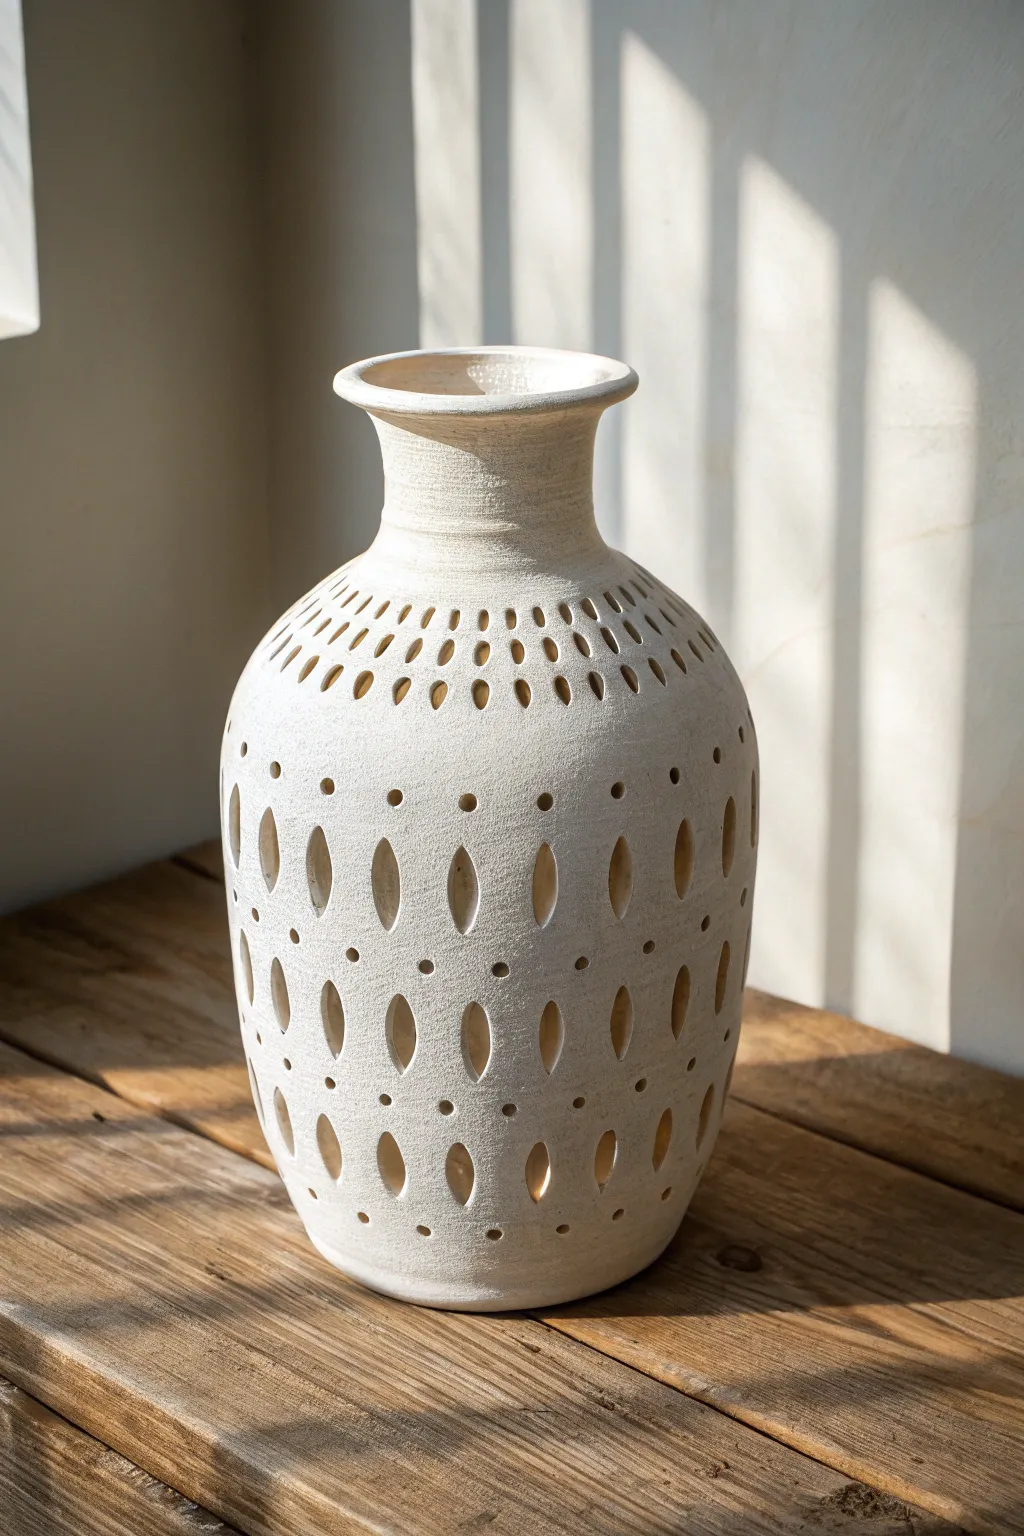
Transform a simple clay form into an architectural statement piece with this intricate cut-out lantern project. The repeating pattern of oval slots and pinholes creates a mesmerizing play of light and shadow, mimicking the effect of sunlight filtering through leaves.
Step-by-Step Guide
Materials
- White stoneware or earthenware clay (approx. 3-5 lbs)
- Pottery wheel (or coil building supplies)
- Metal kidney rib
- Kemper hole cutter (various small circle sizes)
- Fettling knife or X-Acto blade
- Loop tool (small oval profile)
- Sponge
- Measuring tape or ruler
- Needle tool
- Wooden paddle (optional)
Step 1: Forming the Vessel
-
Throw the Cylinder:
Begin by centering your clay on the wheel and opening it up. Pull the walls up to create a tall, even cylinder, aiming for a consistent thickness of about 1/4 inch throughout to support the future cutouts. -
Shape the Belly:
Gently push the walls outward from the inside to create a bulbous, rounded belly shape. Be careful not to stretch the clay too thin in the widest section. -
Collar the Neck:
Gradually collar the clay inward at the top to form a narrower neck. Use both hands to compress the clay as you narrow it, preventing buckling. -
Flare the Rim:
Pull the very top edge outward to create a distinct, flared rim. This adds a classic silhouette and balances the visual weight of the base. -
Smooth the Surface:
While the wheel is spinning slowly, run a metal kidney rib up the exterior. This removes throwing lines and creates the smooth canvas needed for your carving. -
Leather Hard Stage:
Allow the vase to dry slowly under plastic until it reaches a sturdy ‘leather hard’ state. The clay should be firm enough to handle without warping but soft enough to cut cleanly.
Slumping Walls?
If the belly sags while cutting, the clay is too wet. Stop immediately, cover the top rim with plastic, and let the body dry exposed to air for 2-3 hours before resuming.
Step 2: Drafting the Design
-
Mark Vertical Guides:
Using a needle tool, lightly scratch vertical lines down the vase at regular intervals. These will serve as center lines for your oval cutouts to ensure they align perfectly. -
Establish Horizontal Bands:
Place the vase on a banding wheel. Hold your needle tool steady at specific heights and spin the wheel to create light horizontal guide rings where your pattern bands will sit.
Step 3: Carving the Pattern
-
Cut the Neck Details:
Start at the top shoulder near the neck. Use a small oval loop tool or a sharp blade to cut angled, tear-drop shapes that radiate outward from the neck. -
Begin the Main Body:
Moving to the main body, carve the first row of large oval slots. I find it easiest to punch a pilot hole at the top and bottom of the oval, then connect them with a blade for a clean shape. -
Add Decorative Punctuation:
Between the larger oval slots or in bands above them, use a small circular hole cutter to punch clean, round dots. This adds variety to the lattice effect. -
Create the Central Band:
About halfway down the vase, carve a dense row of alternating ovals. Ensure these are spaced evenly, using your vertical guide lines to keep the rhythm consistent. -
Mirror the Pattern:
Repeat the bands of ovals and dots on the lower half of the vase. The pattern doesn’t need to be identical to the top, but maintaining the same spacing creates visual harmony. -
Clean the Edges:
Once all cuts are made, wait for the clay to stiffen slightly more. Then, use a damp sponge or a soft brush to smooth the sharp edges of every cutout, removing any clay burrs.
Light From Within
Since this vase won’t hold water due to the holes, turn it into a lamp! Before firing, cut a small notch in the bottom foot ring to allow an electrical cord to pass through flat.
Step 4: Finishing and Firing
-
Slow Drying:
Cover the finished piece loosely with plastic. Because the cutouts create weak points and varying surface area, slow drying is crucial to prevent cracking. -
Bisque Fire:
Fire the piece to cone 04 (or your clay body’s bisque temperature). Handle the vase gently when loading the kiln, as the lattice structure is fragile. -
Glaze Application:
Apply a matte white glaze. Using a spray gun is ideal here to get coverage inside the cutouts without clogging them. If dipping, be ready to blow air through the holes immediately to clear them. -
Final Firing:
Fire to the final temperature for your stoneware (e.g., cone 6). Ensure no glaze dripped onto the foot during application, as the intricate base is hard to grind clean.
Place your finished vessel near a window or insert an LED candle to watch the shadows dance across your room
Patchwork Slab Mosaic
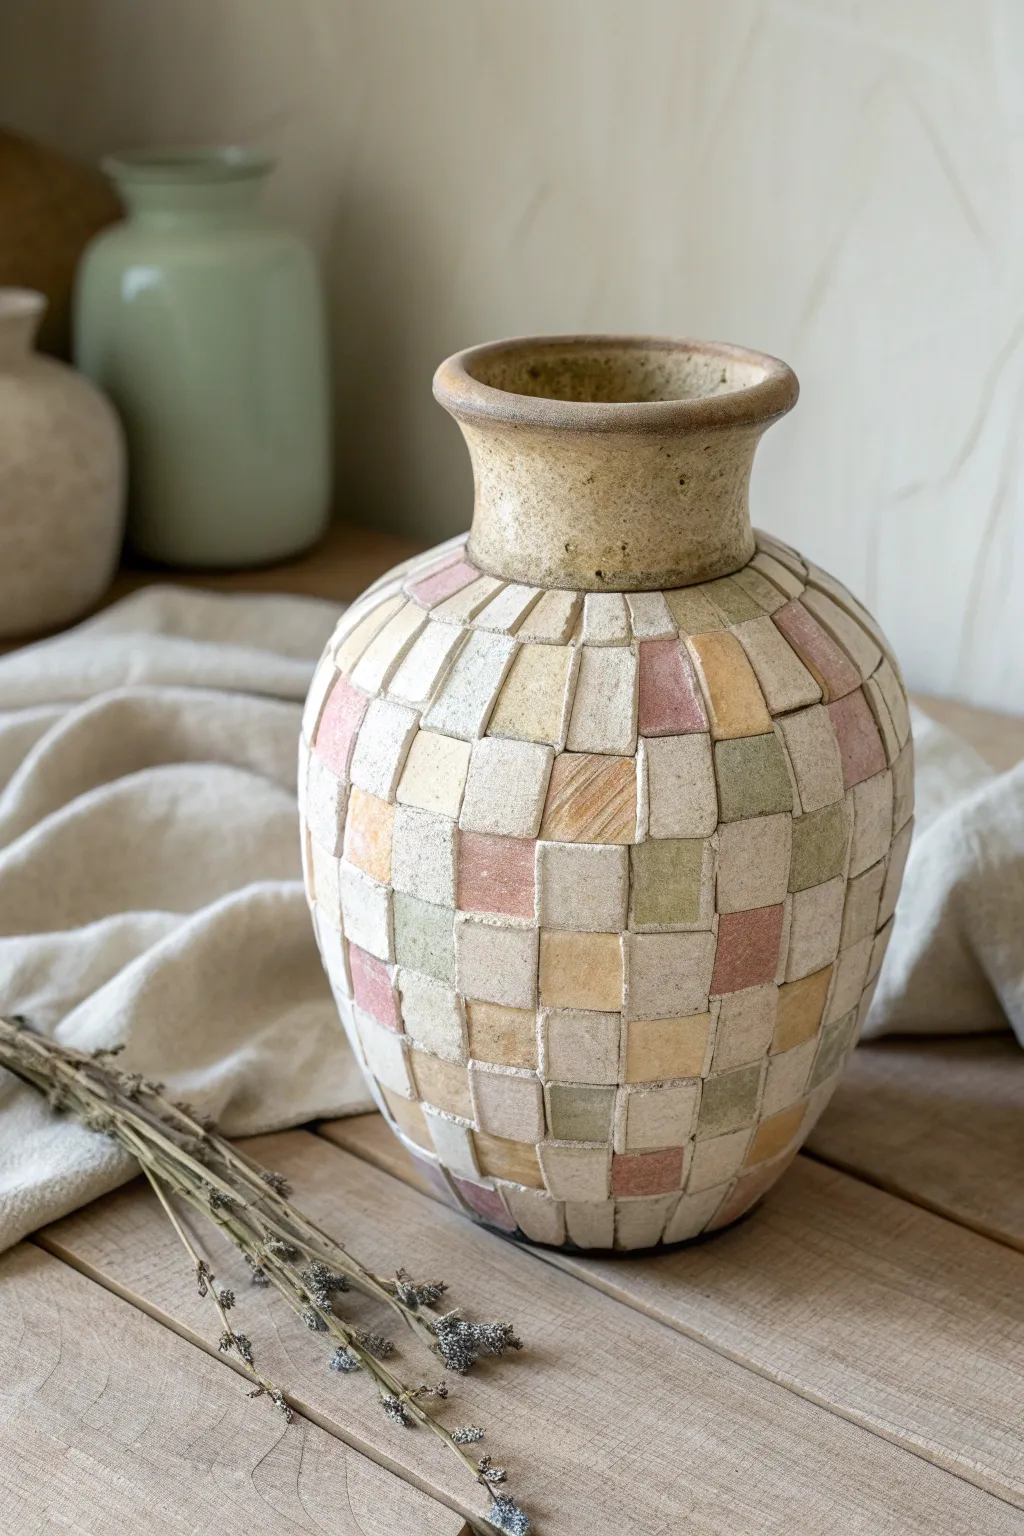
Transform a plain vase into a stunning, textured centerpiece using a patchwork slab mosaic technique. This project combines the rustic charm of stoneware with a soft, muted color palette of hand-cut tiles for an artisanal finish.
How-To Guide
Materials
- Base ceramic vase (bisque or glazed)
- Small ceramic tiles or tesserae (matte finish preferred)
- Adhesive (tile mastic or heavy-duty craft glue)
- Grout (sanded, light beige or off-white)
- Tile nippers or wheeled glass cutters
- Sponge and bucket of water
- Grout float or rubber spatula
- Soft cloth for polishing
- Protective sealer (optional)
Step 1: Preparation & Planning
-
Surface Preparation:
Begin by cleaning your base vase thoroughly. If you are using a glazed vase, lightly sand the surface with medium-grit sandpaper to give the adhesive more grip, then wipe away all dust. -
Tile Selection:
Sort your tiles into color groups. For this specific look, aim for a palette of soft pastels: dusty pink, sage green, wheat yellow, creamy white, and terracotta. -
Cutting Tiles:
Using your tile nippers, cut the tiles into rough squares and rectangles. Don’t worry about perfect geometric precision; the slight irregularities add to the handmade aesthetic shown in the photo. -
Dry Fitting:
Lay out a small section of your pattern on a flat surface first to visualize the color distribution. Try to avoid clustering too many of the same color together.
Natural Texture
To mimic the stone-like texture in the image, tumble your cut ceramic pieces in a rock tumbler with grit for an hour to soften sharp edges before gluing.
Step 2: Adhering the Mosaic
-
Apply Adhesive:
Start just below the neck of the vase. Apply a small amount of adhesive directly to the back of a tile or a small patch on the vase itself. -
Starting the Top Row:
Place your first row of tiles horizontally around the top curve of the vase base, just under where the neck flares out. Keep the gap between tiles minimal but consistent. -
Working Downward:
Continue adding rows moving downward. As the curvature of the vase changes, you may need to slightly adjust the shape of your tiles with the nippers to keep the lines relatively straight. -
Handling the Curves:
When you reach the widest part of the vase, you might notice larger gaps appearing. I find it helpful to cut slightly wider rectangular pieces for this section to maintain the grid pattern without large grout lines. -
Closing the Bottom:
Finish tiling all the way to the bottom edge. Ensure the bottom row is flush so the vase sits flat and stable. -
Curing Time:
Let the adhesive cure completely according to the manufacturer’s instructions, usually for at least 24 hours, before moving on to grouting.
Step 3: Grouting & Finishing
-
Mix the Grout:
Mix your sanded grout with water until it reaches a peanut butter consistency. A light beige or oatmeal color works best to complement the earthy tones of the tiles. -
Apply Grout:
Using a grout float or rubber spatula, spread the grout over the tiles, pressing firmly to ensure it fills all the crevices and gaps fully. -
Initial Wipe:
Let the grout set for about 15-20 minutes until it looks hazy. Dampen a sponge (wring it out well so it’s not dripping) and gently wipe across the tiles to remove excess grout. -
Detail Cleaning:
Rinse your sponge frequently. Keep wiping until the tile surfaces are clean and the grout lines look smooth and recessed just slightly below the tile surface. -
Final Polish:
Once the grout is fully dry (usually another 24 hours), use a soft, dry cloth to buff the tiles and remove any remaining haze.
Slipping Tiles?
If tiles slide down while the glue dries, wrap a large rubber band or masking tape around the row you just finished to hold everything in place.
Place your newly decorated vessel on a wooden table with some dried botanicals to complete the rustic look
Metallic-Highlighted Crackle Lines
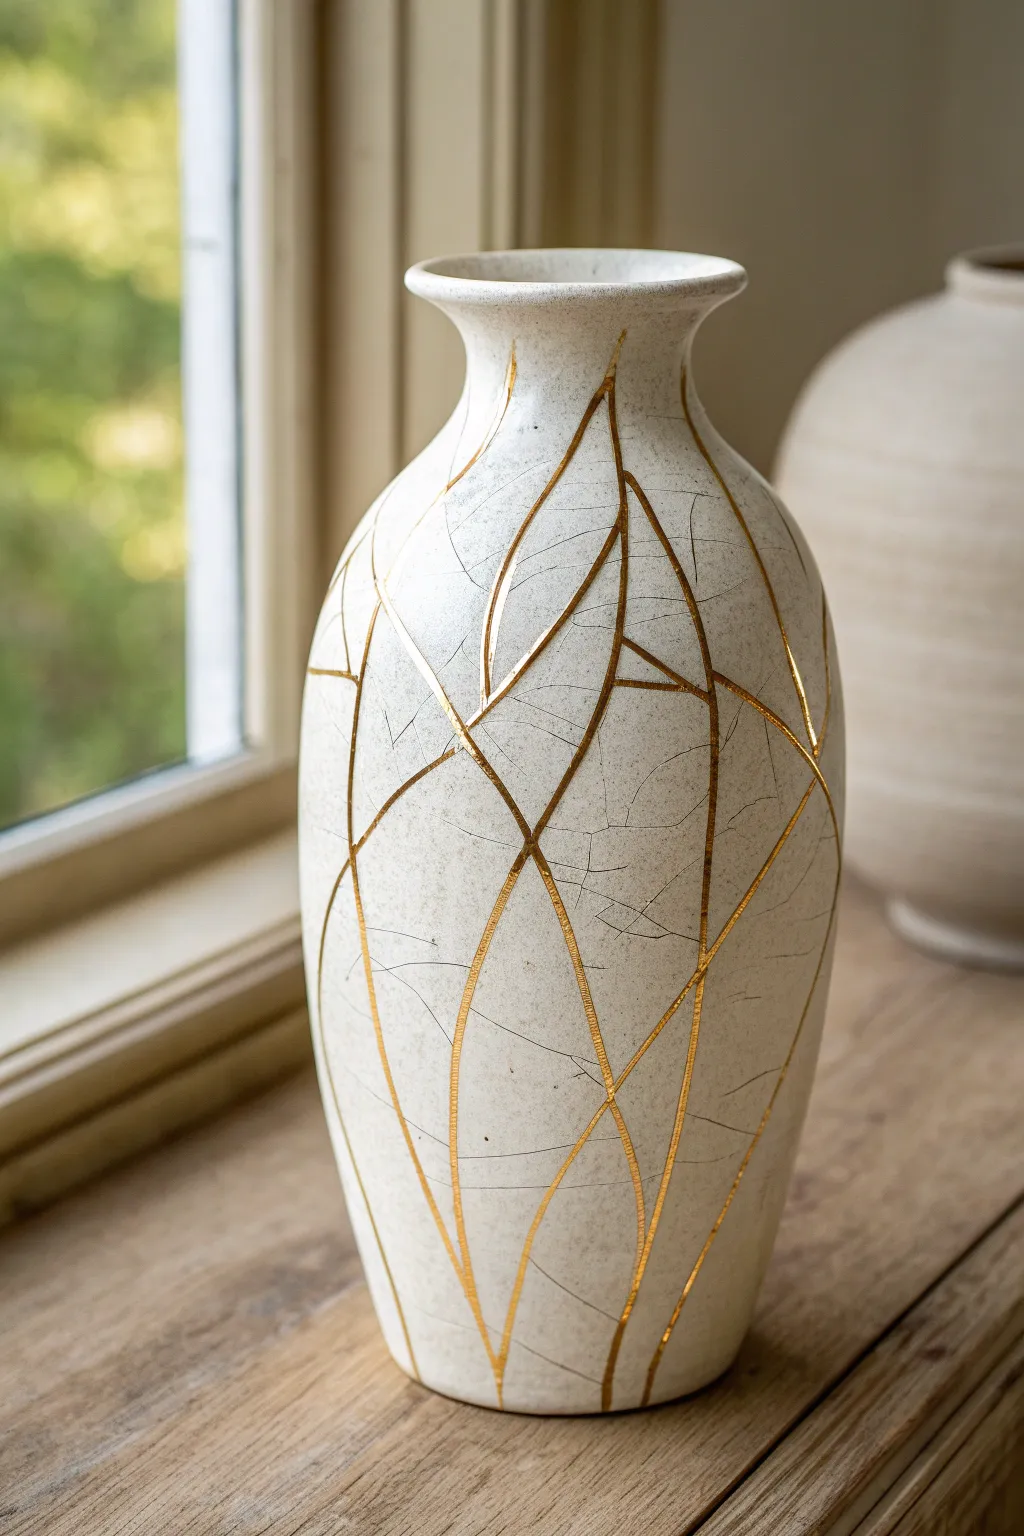
Elevate a simple clay vase into a stunning sculptural piece featuring an elegant network of gold lines reminiscent of organic leaf veins. This Kintsugi-inspired design marries a weathered crackle finish with luxurious metallic accents for a sophisticated, modern-rustic look.
Step-by-Step Tutorial
Materials
- Bisque-fired clay vase or plain matte white ceramic vase
- Crackle medium (clear or white)
- Matte white acrylic paint or chalk paint
- Gold leafing pen or liquid gold leaf
- Fine-point liner brush (if using liquid leaf)
- Pencil or disappearing ink fabric marker
- Clear matte spray sealer
Step 1: Preparation & Base Design
-
Clean surface:
Begin by wiping down your vase with a damp cloth to remove any dust or oils. Let it dry completely. -
Apply finish base:
If your vase is unfinished bisque, apply two coats of matte white chalk paint as a primer. If it is already glazed, lightly sand the surface to help the new layers adhere. -
Plan the pattern:
Visualize the large, sweeping curves that define the design. These shapes resemble oversized leaf structures or stained glass segments. -
Sketch guidelines:
Using a pencil, very lightly sketch these intersecting, curved lines onto the vase. Start from the bottom and sweep upward toward the neck. -
Refine the shapes:
Review your sketched lines. Ensure they intersect naturally and create pleasing geometric spaces between them. Erase and adjust as needed until the composition feels balanced.
Crackle not cracking?
If cracks don’t appear, your top coat layer was likely too thick or applied after the medium was too dry. Apply paint when medium is still sticky.
Step 2: Creating the Crackle Texture
-
Apply crackle medium:
Brush a generous, even layer of crackle medium over the entire vase, painting right over your pencil lines. The thickness of this layer often dictates crack size. -
Let it tack:
Allow the medium to dry until it feels tacky but not wet. Consult the specific instructions on your bottle, but usually, this takes about 30-60 minutes. -
Apply top coat:
Apply a contrasting top coat of matte white paint over the tacky medium. Brush in one direction only; overworking the paint will ruin the crackle effect. -
Watch it crack:
As the top coat dries, you will see fine fissures appearing on the surface, giving the vase that aged, weathered pottery look. -
Dry completely:
Let the vase sit undisturbed for at least 24 hours to ensure the crackle finish is fully cured and hard.
Add depth
Before sealing, lightly rub a diluted brown or grey antiquing glaze over the white sections to highlight the tiny craze lines.
Step 3: Applying the Gold Detail
-
Retrace guidelines:
Once dry, your original pencil lines might be faint beneath the paint. Lightly re-sketch your planned pattern over the crackled surface. -
Prepare the gold:
Shake your liquid gold leaf well or prime your gold leafing pen on a piece of scrap paper until the ink flows smoothly. -
Start lining:
Begin tracing your sketched lines with the gold. I prefer starting from the narrow neck area and working downward to avoid smudging wet gold with my hand. -
Vary line width:
Keep the lines naturally imperfect. Allow them to be slightly thicker at intersection points to mimic organic veins or welded joints. -
Fill the gaps:
If the crackle texture created a deep groove where your line is, press the gold pen or brush tip gently into the crack to ensure full coverage. -
Double check:
Rotate the vase and inspect your work. Add small connecting lines if a space feels too empty or disconnected. -
Dry the gold:
Allow the gold application to dry for several hours. Liquid leaf is oil-based and needs plenty of time to set properly.
Step 4: Finishing Touches
-
Seal the work:
To protect the delicate crackle and prevent the gold from tarnishing, spray the entire vase with a clear matte sealer. -
Final cure:
Let the sealer cure according to the can’s instructions before placing the vase on display or filling it with dry florals.
Now you have a striking vessel that looks like a high-end artifact restored with gold